Embed Size (px)
Citation preview

Citrix XenServer Workload Balancing 6.0 Administrator'sGuide
Published September 20111.0 Edition
Citrix XenServer Workload Balancing 6.0 Administrator's Guide
Copyright © 2011 Citrix All Rights Reserved.Version: Citrix Workload Balancing 6.0
Citrix, Inc.851 West Cypress Creek RoadFort Lauderdale, FL 33309United States of America
DisclaimersThis document is furnished "AS IS." Citrix, Inc. disclaims all warranties regarding the contents of this document,including, but not limited to, implied warranties of merchantability and fitness for any particular purpose. Thisdocument may contain technical or other inaccuracies or typographical errors. Citrix, Inc. reserves the right torevise the information in this document at any time without notice. This document and the software describedin this document constitute confidential information of Citrix, Inc. and its licensors, and are furnished under alicense from Citrix, Inc.
Citrix Systems, Inc., the Citrix logo, Citrix XenServer and Citrix XenCenter, are trademarks of Citrix Systems, Inc. inthe United States and other countries. All other products or services mentioned in this document are trademarksor registered trademarks of their respective companies.
TrademarksCitrix ®XenServer ®XenCenter ®
iii
Contents
About ................................................................................................................. 1
What's New? ...................................................................................................................... 1
New Features ............................................................................................................. 1
Changes ..................................................................................................................... 1
Finding Workload Balancing Documentation ........................................................................ 2
Introducing Workload Balancing ....................................................................... 3
Workload Balancing Overview ............................................................................................. 3
Reports on Workloads ................................................................................................ 4
Workload Balancing Basic Concepts ............................................................................. 4
Pool Requirements ..................................................................................................... 4
Using Workload Balancing ................................................................................. 5
Introduction to Basic Tasks ................................................................................................. 5
Choosing the Best Host for a VM ........................................................................................ 5
To start a virtual machine on the optimal server .......................................................... 6
To resume a virtual machine on the optimal server .............................................. 7
Accepting Optimization Recommendations .......................................................................... 8
To accept an optimization recommendation ................................................................. 8
Understanding WLB Recommendations under High Availability ..................................... 8
Generating Workload Reports ......................................................................... 10
Overview of Workload Reports .......................................................................................... 10
Generating and Managing Workload Balancing Reports .............................................. 10
To generate a Workload Balancing report ........................................................... 10
To navigate in a Workload Balancing report ........................................................ 10
To print a Workload Balancing report ................................................................ 11
To export a Workload Balancing report ...................................................... 11
Workload Balancing Report Glossary ......................................................................... 12
Chargeback Utilization Analysis .......................................................................... 12
Host Health History .......................................................................................... 14
iv
Pool Optimization Performance History .............................................................. 14
Pool Audit Trail ................................................................................................. 15
Audit Log Event Names ............................................................................. 15
Pool Health ...................................................................................................... 16
Pool Health History ........................................................................................... 16
Pool Optimization History ................................................................................. 17
Virtual Machine Motion History ........................................................................ 17
Virtual Machine Performance History ................................................................ 18
Managing Workload Balancing Features and Settings .................................... 19
Changing Workload Balancing Settings ............................................................................... 19
Adjusting the Optimization Mode .............................................................................. 20
Optimizing and Managing Power Automatically .................................................. 21
Applying Recommendations Automatically ................................................. 22
Enabling Workload Balancing Power Management ...................................... 22
Designing Environments for Power Management and VM Consolidation ....... 23
To apply optimization recommendations automatically ............................... 24
To select hosts for power management ...................................................... 24
Understanding When Workload Balancing Makes Recommendations ................... 25
Optimization and Consolidation Process ..................................................... 26
Changing the Critical Thresholds ................................................................ 28
Tuning Metric Weightings .......................................................................... 29
Excluding Hosts from Recommendations ............................................................ 30
To exclude hosts from Workload Balancing ................................................. 31
Controlling Automated Recommendations ......................................................... 31
Setting Conservative or Aggressive Automated Recommendations ............... 31
Administering Workload Balancing ................................................................. 37
Administering and Maintaining Workload Balancing ........................................................... 37
Connecting to the Workload Balancing Virtual Appliance ............................................ 37
To connect your pool to the Workload Balancing virtual appliance ....................... 38
To obtain the IP address for the WLB virtual appliance ........................................ 40
Workload Balancing Access Control Permissions ................................................. 40

v
Determining the Status of the Workload Balancing Virtual Appliance ........................... 40
Reconfiguring a Pool to Use Another WLB Appliance .................................................. 41
Updating Workload Balancing Credentials .................................................................. 41
Stopping Workload Balancing .................................................................................... 42
Entering Maintenance Mode with Workload Balancing Enabled ................................... 43
To enter maintenance mode with Workload Balancing enabled ........................... 43
Increasing the Workload Balancing Disk Size .............................................................. 43
Removing the Workload Balancing Virtual Appliance ................................................. 44
Managing the Workload Balancing Database .............................................................. 44
Controlling Database Grooming ......................................................................... 45
Database Grooming Parameters ................................................................ 45
Changing the Database Password ...................................................................... 45
Archiving Database Data ................................................................................... 46
Enabling client authentication to the database ........................................... 46
Modifying the Database Configuration Files ............................................... 46
Changing the Database Maintenance Window .................................................... 47
Customizing Workload Balancing ............................................................................... 48
Appendix A: XenServer Workload Balancing Troubleshooting ........................ 49
Troubleshooting Workload Balancing ................................................................................. 49
General Troubleshooting Tips .................................................................................... 49
Error Messages ......................................................................................................... 49
Issues Entering Workload Balancing Credentials ......................................................... 49
Issues with Firewalls ................................................................................................. 49
Losing the Connection to Workload Balancing ............................................................ 50
Workload Balancing Connection Errors ...................................................................... 50
Workload Balancing Stops Working ........................................................................... 50
Issues Changing Workload Balancing Servers .............................................................. 51
Appendix B: Workload Balancing Commands ................................................. 52
Service Commands ........................................................................................................... 52
Logging in to the Workload Balancing Virtual Appliance .............................................. 52
service workloadbalancing restart ............................................................................. 52
vi
service workloadbalancing start ................................................................................ 52
service workloadbalancing stop ................................................................................. 52
service workloadbalancing status .............................................................................. 52
Modifying the Workload Balancing configuration options ............................................ 53
Editing the Workload Balancing configuration file ....................................................... 53
Increasing the Detail in the Workload Balancing Log ................................................... 54
Workload Balancing XE Commands .................................................................................... 55
pool-initialize-wlb ..................................................................................................... 55
pool-param-set other-config ...................................................................................... 55
pool-retrieve-wlb-diagnostics .................................................................................... 56
host-retrieve-wlb-evacuate-recommendations ............................................................ 56
vm-retrieve-wlb-recommendations ............................................................................ 56
pool-certificate-list .................................................................................................... 56
pool-certificate-install ............................................................................................... 56
pool-certificate-sync .................................................................................................. 56
pool-param-set ......................................................................................................... 56
pool-deconfigure-wlb ................................................................................................ 57
pool-retrieve-wlb-configuration ................................................................................. 57
pool-retrieve-wlb-recommendations ......................................................................... 57
pool-retrieve-wlb-report .......................................................................................... 57
pool-send-wlb-configuration ..................................................................................... 58
Appendix C: Configuring Certificates for Workload Balancing ......................... 60
Overview .......................................................................................................................... 60
Configuring XenServer to Verify the Self-Signed Certificate .................................................. 60
Task 1: Exporting the Self-Signed Certificate ............................................................... 61
Task 2: Importing the Self-Signed Certificate .............................................................. 62
Configuring XenServer to Verify a Certificate-authority Certificate ....................................... 63
Task 1: Obtaining a Certificate-authority Certificate .................................................... 63
Task 2: Specifying the New Certificate ....................................................................... 64
Task 3: Exporting the Certificate Chain for XenServer .................................................. 65
Task 4: Importing the Certificate Chain into the Pool .................................................. 66

vii
Index ................................................................................................................ 68
1
AboutThis document explains how to run the Citrix® XenServer®Workload Balancing virtual appliance. To get startedand import the Workload Balancing virtual appliance, see the Citrix XenServer Workload Balancing 6.0 Quick Start.
What's New?This topic describes new features for Workload Balancing 6.0 and changes since the Workload Balancing 2.1release. (Workload Balancing 2.1 was included with XenServer 5.6 Feature Pack 1.)
Workload Balancing is now distributed as a Linux-based virtual appliance with all components integrated. Thispackaging eliminates installing the Workload Balancing component and only requires you to configure it. To usethe new appliance, you must download it from My Citrix.com and import it into a pool. Instructions for thesetasks are provided in the Citrix XenServer Workload Balancing 6.0 Quick Start.
New Features
Workload Balancing 6.0 includes the following new features and enhancements:
• Configurable audit logging. Workload Balancing now stores less extraneous detail on administrative changes.This reduces the amount of disk space the audit log consumes. You can customize the audit log data gatheredby following instructions in CTX130830—Monitoring Additional XenServer Audit Log Events.
• Simplified installation. You no longer need to install Workload Balancing. Likewise, you do not need to install aSQL Server database for Workload Balancing. A PostgreSQL database is now included in the virtual appliance.To get the virtual appliance up and running, you only need to import and configure it.
• Improved usability. Some user-interface controls, such as the Advanced page, have been reorganized to beeasier to find. A few controls, such as Initialization, have been renamed to be more understandable, suchas Connect. Likewise, the button that launches the Workload Balancing Configuration dialog is now namedSettings.
• Historical data kept longer. Workload Balancing attempts to save as much historical data as possible and it nolonger purges data simply because it exceeds a certain age.
Changes
This release of Workload Balancing also contains the following changes:
• Installation and configuration changes.
• To obtain the Workload Balancing virtual appliance, you now download it from My Citrix.com. It is no longeravailable from the XenServer installation media.
• After you download Workload Balancing, you import it into your pool as described in the Citrix WorkloadBalancing 6.0 Quick Start.
• Upgrading to the Workload Balancing virtual appliance from any previous releases of Workload Balancing,including Workload Balancing 2.1, is not supported.
• Workload Balancing Administration Tool is no longer available. Instead, you can perform many of thesefunctions using the Workload Balancing service commands. For more information, see the the section called“Service Commands”.
• Report subscriptions removed. Due to the fact that report-subscription functionality relied on MicrosoftReporting Services and Workload Balancing now uses Linux as its operating system, subscribing to reports byemail is not possible during the current release.
• Changes to certificate configuration. The certificate process has changed due to the Linux migration. For moreinformation, see Appendix C: Configuring Certificates for Workload Balancing.
• Other changes.
2
• Audit logging is now enabled by default. In addition, the Pool Audit Trail report no longer has the Verboseoption since the audit-log data is now streamlined and configurable.
• Changes to paths. Because Workload Balancing now runs on Linux, some paths changed. For example, thepath for the Workload Balancing log is now /var/log/wlb/LogFile.log.
• Disable feature renamed and moved. The Disable feature is now named Disconnect Workload BalancingServer. You can find this feature under the Pool menu in XenCenter.
Finding Workload Balancing DocumentationThe Workload Balancing documentation also includes:
• Citrix XenServer Workload Balancing 6.0 Quick Start provides information about downloading and importingthe Workload Balancing virtual appliance.
• Citrix XenServer Workload Balancing 6.0 Release Notes provides a list of known issues that affect this release.
3
Introducing Workload BalancingThis chapter provides introductions to the following topics:
• Workload Balancing at a high level
• Workload Reports
• Basic concepts of Workload Balancing
Workload Balancing OverviewWorkload Balancing is a XenServer component, packaged as a virtual appliance, that:
• Creates reports about VM performance in your XenServer environment
• Evaluates resource utilization and locates virtual machines on the best possible hosts in the pool for theirworkload's needs
Even if you do not want to use Workload Balancing to balance your virtual machines, you may want to runit anyway for the workload reporting functionality. When deployed to manage virtual machine workloads,Workload Balancing can:
• Balance virtual-machine workloads across hosts in a XenServer resource pool
• Determine the best host on which to start a virtual machine
• Determine the best host on which to resume a virtual machine that you powered off
• Determine the best host to move a virtual machine to when a host fails
• Determine the optimal server for each of the host's virtual machines when you put a host into or take a hostout of Maintenance Mode
Depending on your preference, Workload Balancing can accomplish these tasks automatically or prompt you toaccept its rebalancing and placement recommendations. You can also configure Workload Balancing to poweroff hosts automatically at specific times of day (for example, to save power at night).
Workload Balancing functions by evaluating the utilization of virtual machines across a pool and, when a hostexceeds a performance threshold, relocating the VM to a less-taxed host in the pool. To rebalance workloads,Workload Balancing moves VMs to balance the resource utilization on hosts.
To ensure the rebalancing and placement recommendations align with your environment's needs, you canconfigure Workload Balancing to optimize workloads for either resource performance or to maximize the numberof virtual machines that fit on hosts. These optimization modes can be configured to change automatically atpredefined times or stay the same at all times. For additional granularity, you can fine-tune the weighting ofindividual resource metrics (CPU, network, memory, and disk).
To help you perform capacity planning, Workload Balancing provides historical reports about host and poolhealth, optimization and virtual-machine performance, and virtual-machine motion history.
4
Reports on Workloads
Because Workload Balancing captures performance data, you can also use this component to generate reports,known as Workload Reports, about your virtualized environment.
Workload Reports provide data for a pool or host's health, for auditing, optimizations, and placement (or motion)history. Also, you can run a chargeback report that shows virtual machine usage and can help you measure andassign costs.
To run reports, you do not need to configure for Workload Balancing to make placement recommendations ormove virtual machines. However, you do need to configure the Workload Balancing component and, ideally, setCritical thresholds to values that reflect the point at which the performance of the hosts in your pool degrades.
For more information, see Generating Workload Reports.
Workload Balancing Basic Concepts
When virtual machines are running, they consume computing resources on the physical host, such as CPU,Memory, Network Reads, Network Writes, Disk Reads, and Disk Writes. For example, some virtual machines,depending on their workload (that is, the applications running on a virtual machine and their user transactions),might consume more CPU resources than other virtual machines on the same host. Naturally, the combinedresource consumption of all virtual machines on a host reduces the host's available resources.
Workload Balancing captures data for resource performance on virtual machines and physical hosts and stores itin a database. Workload Balancing uses this data, combined with the preferences you set, to provide optimizationand placement recommendations.
Optimizations are a way in which hosts are "improved" to align with your goals: Workload Balancing makesrecommendations to redistribute the virtual machines across hosts in the pool to increase either performanceor density. When Workload Balancing is making recommendations, it makes them in light of its ultimategoal: to create balance or harmony across the hosts in the pool. When Workload Balancing acts on theserecommendations, the action is known as an optimization.
Within a Workload Balancing context:
• Performance refers to the usage of physical resources on a host (for example, the CPU, memory, network, anddisk utilization on a host). When you set Workload Balancing to maximize performance, it recommends placingvirtual machines to ensure the maximum amount of resources are available for each virtual machine.
• Density refers to the number of virtual machines on a host. When you set Workload Balancing to maximizedensity, it recommends placing virtual machines to ensure they have adequate computing power so you canreduce the number of hosts powered on in a pool.
Workload Balancing does not conflict with settings you already specified for High Availability: Citrix designedthese features to work together.
Pool Requirements
To balance a pool with Workload Balancing, the hosts in the pool must meet the requirements for XenMotion(live migration), including:
• Shared remote storage
• Similar processor configurations
• Gigabit Ethernet
If the hosts do not meet these requirements, Workload Balancing cannot migrate the virtual machines in the pool.
5
Using Workload BalancingThis chapter provides information about the following topics:
• Using Workload Balancing to start virtual machines on the best possible host
• Accepting the recommendations Workload Balancing issues to move virtual machines to different hosts
Introduction to Basic Tasks
Workload Balancing is a powerful XenServer component that includes many features designed to optimize theworkloads in your environment, such as host power management, the ability to schedule optimization-modechanges, and running reports. In addition, you can fine-tune the criteria Workload Balancing uses to makeoptimization recommendations.
However, when you first begin using Workload Balancing, there are two main tasks you will probably useWorkload Balancing for on a daily (or regular) basis:
• Determining the best host on which to run a virtual machine
• Accepting Workload Balancing optimization recommendations
Running reports about the workloads in your environment, which is described in Generating Workload Reports,is another frequently used task.
Determining the best host on which to run a virtual machine
Determining the host on which to start and run a virtual machine, which is known as virtual-machine placement,is handy when you want to restart a powered off virtual machine and when you want to migrate a virtual machineto a different host. Placement recommendations may also be useful in XenDesktop environments.
Accepting Workload Balancing recommendations
After Workload Balancing is running for a while, it begins to make recommendations about ways in which youcan improve your environment. For example, if your goal is to improve virtual-machine density on hosts, at somepoint, Workload Balancing may issue a recommendation to consolidate virtual machines on a host. Assumingyou are not running in automated mode, you can choose to either accept this recommendation (and apply it)or just simply ignore it.
Both of these tasks, and the way in which you perform them in XenCenter, are explained in more depth in thesections that follow.
Important:
After Workload Balancing is running for a period of time, if you do not receive optimalplacement recommendations, Citrix strongly recommends you evaluate your performancethresholds as described in the section called “Understanding When Workload BalancingMakes Recommendations”. It is critical to set Workload Balancing to the correct thresholdsfor your environment or its recommendations might not be appropriate.
Choosing the Best Host for a VM
When Workload Balancing is enabled and you restart a virtual machine that is offline, XenCenter providesrecommendations to help you determine the optimal physical host in the resource pool on which to start a virtualmachine. The recommendations are also known as star ratings since stars are used to indicate the best host.
6
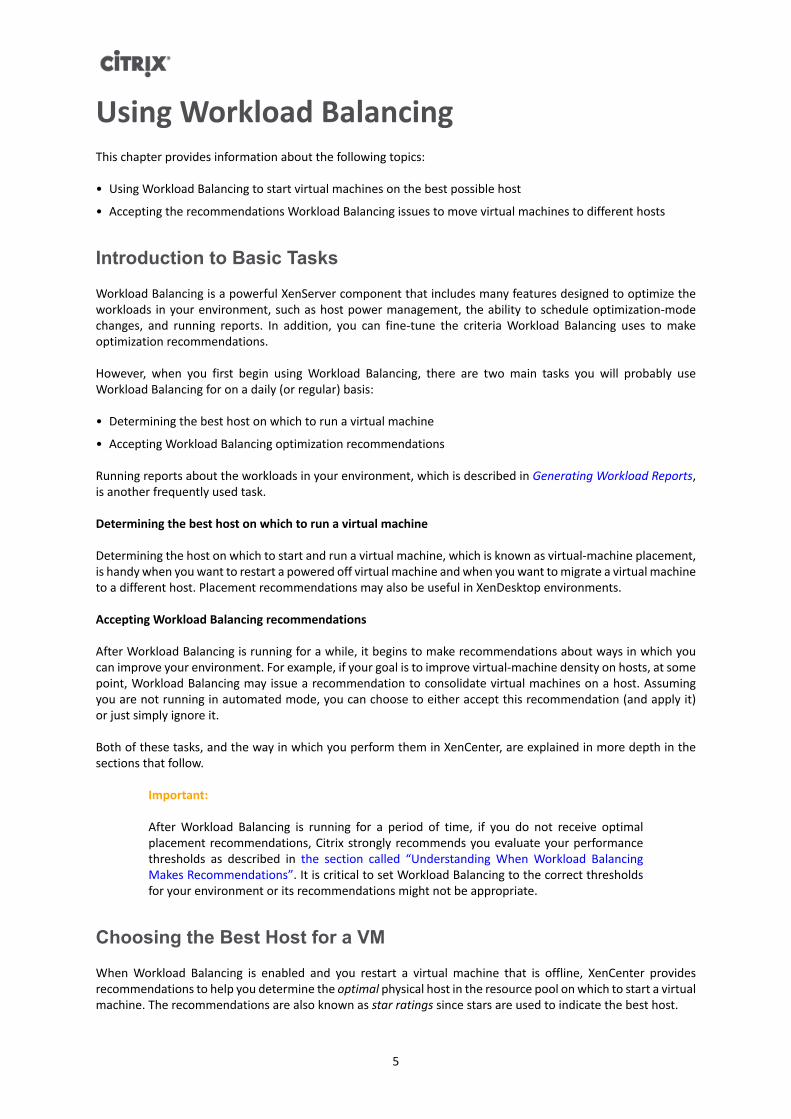
This illustration shows a screen capture of the Start On Server feature. More stars appear besidehost17 since this is the optimal host on which to start the VM. host16 does not have any starsbeside it, which indicates that host is not recommended. However, since host16 is enabled theuser can select it. host18 is greyed out due to insufficient memory, so the user cannot select it.
The term optimal refers to the physical server best suited to hosting your workload. There are several factorsWorkload Balancing uses when determining which host is optimal for a workload:
• The amount of resources available on each host in the pool. When a pool is running in Maximum Performancemode, Workload Balancing tries to balance the virtual machines across the hosts in the pool so that all virtualmachines have good performance. When a pool is running in Maximum Density mode, Workload Balancingtries to place virtual machines onto hosts as densely as possible while ensuring the virtual machines havesufficient resources.
• The optimization mode in which the pool is running (Maximum Performance or Maximum Density). When apool is running in Maximum Performance mode, Workload Balancing tries to place virtual machines on hostswith the most resources available of the type the VM requires. When a pool is running in Maximum Densitymode, Workload Balancing tries to place virtual machines on hosts that already have virtual machines runningso that virtual machines are running on as few hosts as possible.
• The amount and type of resources the VM requires. After Workload Balancing has monitored a virtual machinefor a while, it uses the VM metrics it gathered to make placement recommendations according to the type ofresources the virtual machine requires. For example, Workload Balancing may select a host with less availableCPU but more available memory if it is what the VM requires (based on its past performance history).
When Workload Balancing is enabled, XenCenter provides ratings to indicate the optimal hosts for starting avirtual machine, including when you want to start the virtual machine when it is powered off or suspended andwhen you want to migrate the virtual machine to a different host (Migrate and Maintenance Mode).
When you use these features with Workload Balancing enabled, host recommendations appear as star ratingsbeside the name of the physical host. Five empty stars indicates the lowest-rated (least optimal) server. When itis not possible to start or migrate a virtual machine to a host, when you use the menu command for one of theplacement features, the host name is greyed out and the reason it cannot accept the VM appears beside it.
In general, Workload Balancing functions more effectively and makes better, less frequent optimizationrecommendations if you start virtual machines on the hosts it recommends (that is, by using one of the placementfeatures to select the host with the most stars beside it).
To start a virtual machine on the optimal server
1. In the Resources pane of XenCenter, select the virtual machine you want to start.
2. From the VM menu, select Start on Server and then select one of the following:
• Optimal Server. The optimal server is the physical host that is best suited to the resource demands of thevirtual machine you are starting. Workload Balancing determines the optimal server based on its historicalrecords of performance metrics and your placement strategy. The optimal server is the server with the moststars.
7
• One of the servers with star ratings listed under the Optimal Server command. Five stars indicates themost-recommended (optimal) server and five empty stars indicates the least-recommended server.
Tip:
You can also select Start on Server by right-clicking the virtual machine you want to start inthe Resources pane.
To resume a virtual machine on the optimal server
1. In the Resources pane of XenCenter, select the suspended virtual machine you want to resume.
2. From the VM menu, select Resume on Server and then select one of the following:
• Optimal Server. The optimal server is the physical host that is best suited to the resource demands of thevirtual machine you are starting. Workload Balancing determines the optimal server based on its historicalrecords of performance metrics and your placement strategy. The optimal server is the server with the moststars.
• One of the servers with star ratings listed under the Optimal Server command. Five stars indicates themost-recommended (optimal) server and five empty stars indicates the least-recommended server.
Tip:
You can also select Resume on Server by right-clicking the suspended virtual machine in theResources pane.
8
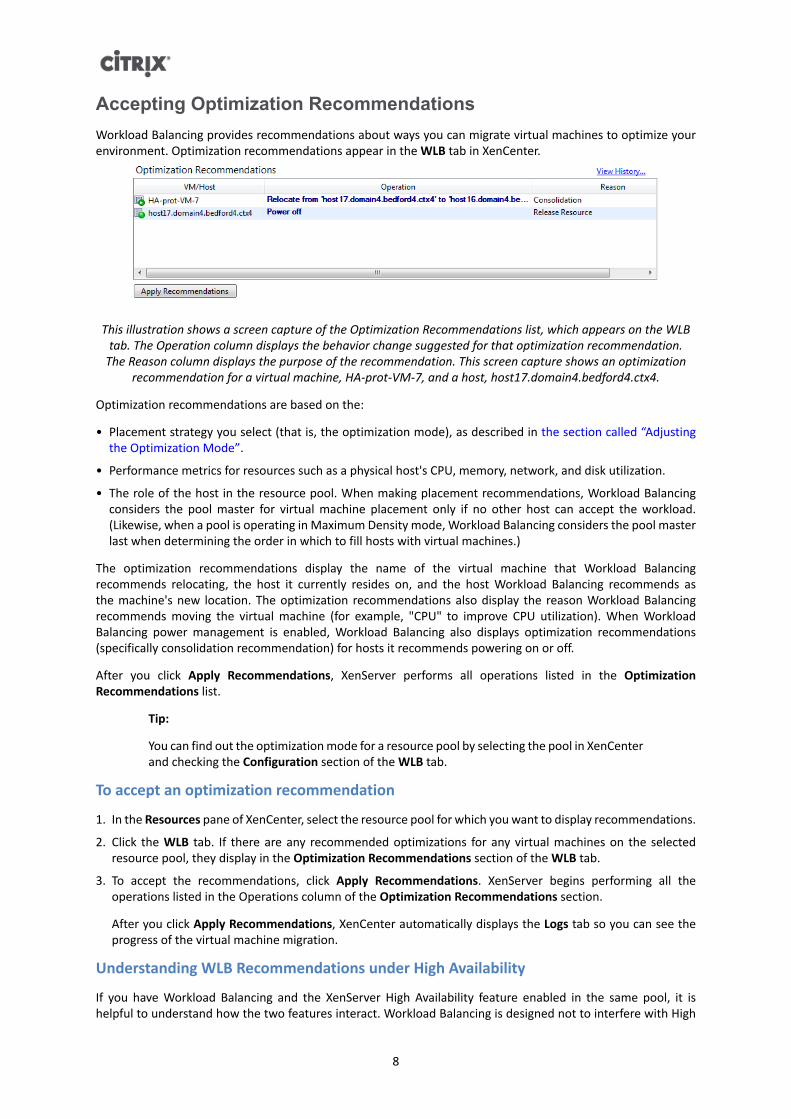
Accepting Optimization RecommendationsWorkload Balancing provides recommendations about ways you can migrate virtual machines to optimize yourenvironment. Optimization recommendations appear in the WLB tab in XenCenter.
This illustration shows a screen capture of the Optimization Recommendations list, which appears on the WLBtab. The Operation column displays the behavior change suggested for that optimization recommendation.
The Reason column displays the purpose of the recommendation. This screen capture shows an optimizationrecommendation for a virtual machine, HA-prot-VM-7, and a host, host17.domain4.bedford4.ctx4.
Optimization recommendations are based on the:
• Placement strategy you select (that is, the optimization mode), as described in the section called “Adjustingthe Optimization Mode”.
• Performance metrics for resources such as a physical host's CPU, memory, network, and disk utilization.
• The role of the host in the resource pool. When making placement recommendations, Workload Balancingconsiders the pool master for virtual machine placement only if no other host can accept the workload.(Likewise, when a pool is operating in Maximum Density mode, Workload Balancing considers the pool masterlast when determining the order in which to fill hosts with virtual machines.)
The optimization recommendations display the name of the virtual machine that Workload Balancingrecommends relocating, the host it currently resides on, and the host Workload Balancing recommends asthe machine's new location. The optimization recommendations also display the reason Workload Balancingrecommends moving the virtual machine (for example, "CPU" to improve CPU utilization). When WorkloadBalancing power management is enabled, Workload Balancing also displays optimization recommendations(specifically consolidation recommendation) for hosts it recommends powering on or off.
After you click Apply Recommendations, XenServer performs all operations listed in the OptimizationRecommendations list.
Tip:
You can find out the optimization mode for a resource pool by selecting the pool in XenCenterand checking the Configuration section of the WLB tab.
To accept an optimization recommendation
1. In the Resources pane of XenCenter, select the resource pool for which you want to display recommendations.
2. Click the WLB tab. If there are any recommended optimizations for any virtual machines on the selectedresource pool, they display in the Optimization Recommendations section of the WLB tab.
3. To accept the recommendations, click Apply Recommendations. XenServer begins performing all theoperations listed in the Operations column of the Optimization Recommendations section.
After you click Apply Recommendations, XenCenter automatically displays the Logs tab so you can see theprogress of the virtual machine migration.
Understanding WLB Recommendations under High Availability
If you have Workload Balancing and the XenServer High Availability feature enabled in the same pool, it ishelpful to understand how the two features interact. Workload Balancing is designed not to interfere with High
9
Availability. If there is a conflict between a Workload Balancing recommendation and a High Availability setting,the High Availability setting always takes precedence. In practice, this means:
• When you attempt to start a virtual machine on a host, Workload Balancing will not give you star ratings if thevirtual machine cannot be migrated to a host without violating the High Availability plan.
• Workload Balancing will not automatically power off any hosts beyond the number specified in the Failuresallowed box in the Configure HA dialog.
• However, Workload Balancing may still make recommendations to power off more hosts than the numberof host failures to tolerate. (For example, Workload Balancing will still make a recommendation to power offtwo hosts when High Availability is only configured to tolerate one host failure.) However, when you attemptto apply the recommendation, XenCenter may display an error message stating that High Availability willno longer be guaranteed.
• When Workload Balancing is running in automated mode and has power management enabled, anyrecommendations that exceed the number of host failures to tolerate are ignored. In this situation, if youlook in the Workload Balancing log, you will see a message that says a power-management recommendationwas not applied because High Availability is enabled.
10
Generating Workload ReportsThis chapter provides information about using the Workload Balancing component to generate reports aboutyour virtualized environment, including reports about hosts and virtual machines. Specifically, this chapterprovides information about the following:
• How to generate reports
• What workload reports are available
Overview of Workload ReportsThe Workload Balancing reports can help you perform capacity planning, determine virtual server health, andevaluate the effectiveness of your configured threshold levels.
Workload Balancing lets you generate reports on three types of objects: physical hosts, resource pools, and virtualmachines. At a high level, Workload Balancing provides two types of reports:
• Historical reports that display information by date
• "Roll up" style reports, which provide a summarizing overview of an area
Workload Balancing provides some reports for auditing purposes, so you can determine, for example, the numberof times a virtual machine moved.
You can use the Pool Health report to evaluate the effectiveness of your optimization thresholds. While WorkloadBalancing provides default threshold settings, you might need to adjust these defaults for them to providevalue in your environment. If you do not have the optimization thresholds adjusted to the correct level for yourenvironment, Workload Balancing recommendations might not be appropriate for your environment.
To generate a Workload Balancing report, the pool must be running Workload Balancing. Ideally, the pool shouldhave been running Workload Balancing for a couple of hours or long enough to generate the type of data youwant to display in the reports.
Generating and Managing Workload Balancing Reports
This topic explains how to generate, navigate, print, and export Workload Balancing reports.
To generate a Workload Balancing report
1. In XenCenter, from the Pool menu, select View Workload Reports.
Tip:
You can also display the Workload Reports screen from the WLB tab by clicking the Reportsbutton.
2. From the Workload Reports screen, select a report from the Reports pane.
3. Select the Start Date and the End Date for the reporting period. Depending on the report you select, youmight need to specify a host in the Host list box.
4. Click Run Report. The report displays in the report window. For information about the meaning of the reports,see the section called “Workload Balancing Report Glossary”.
To navigate in a Workload Balancing report
After generating a report, you can use the toolbar buttons in the report to navigate and perform certain tasks. Todisplay the name of a toolbar button, pause your mouse over toolbar icon.
11
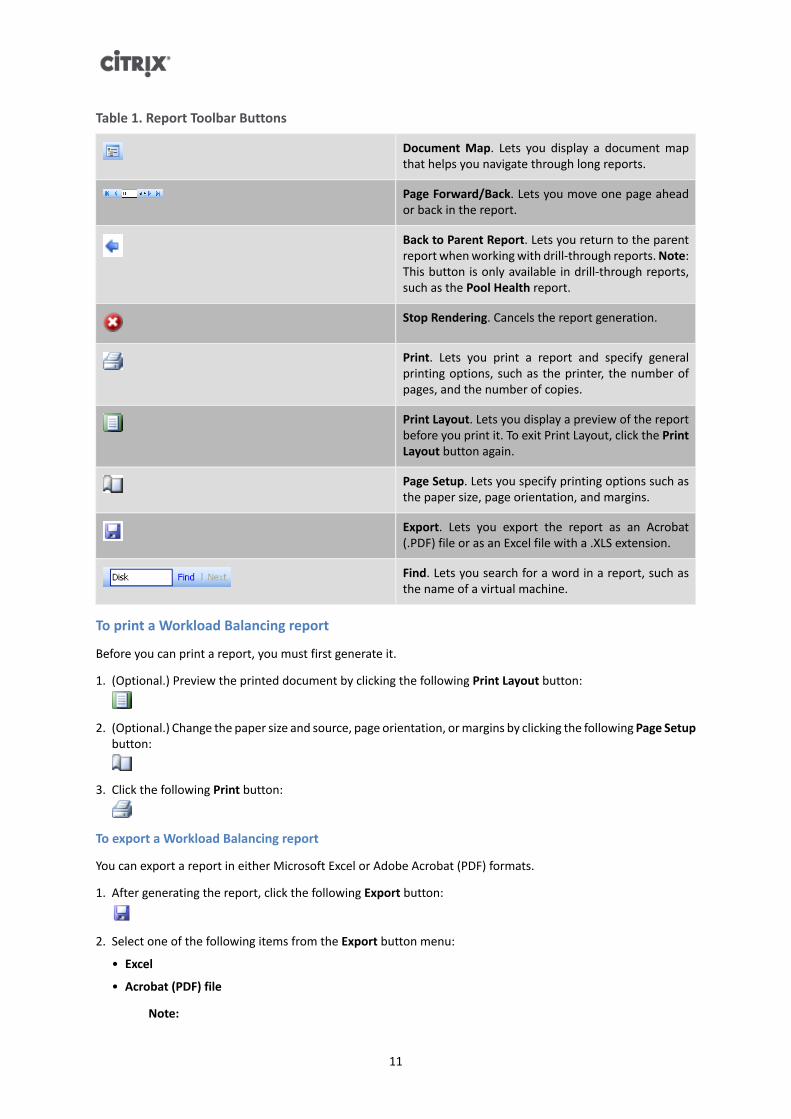
Table 1. Report Toolbar Buttons
Document Map. Lets you display a document mapthat helps you navigate through long reports.
Page Forward/Back. Lets you move one page aheador back in the report.
Back to Parent Report. Lets you return to the parentreport when working with drill-through reports. Note:This button is only available in drill-through reports,such as the Pool Health report.
Stop Rendering. Cancels the report generation.
Print. Lets you print a report and specify generalprinting options, such as the printer, the number ofpages, and the number of copies.
Print Layout. Lets you display a preview of the reportbefore you print it. To exit Print Layout, click the PrintLayout button again.
Page Setup. Lets you specify printing options such asthe paper size, page orientation, and margins.
Export. Lets you export the report as an Acrobat(.PDF) file or as an Excel file with a .XLS extension.
Find. Lets you search for a word in a report, such asthe name of a virtual machine.
To print a Workload Balancing report
Before you can print a report, you must first generate it.
1. (Optional.) Preview the printed document by clicking the following Print Layout button:
2. (Optional.) Change the paper size and source, page orientation, or margins by clicking the following Page Setupbutton:
3. Click the following Print button:
To export a Workload Balancing report
You can export a report in either Microsoft Excel or Adobe Acrobat (PDF) formats.
1. After generating the report, click the following Export button:
2. Select one of the following items from the Export button menu:
• Excel
• Acrobat (PDF) file
Note:
12
The data that appears between report export formats may be inconsistent, depending on theexport format you select. Reports exported to Excel include all the data available for reports,including "drilldown" data, whereas reports exported to PDF and displayed in XenCenter onlycontain the data that you selected when you generated the report.
Workload Balancing Report Glossary
This topic provides information about the following Workload Balancing reports:
Chargeback Utilization Analysis
You can use the Chargeback Utilization Analysis report ("chargeback report") to determine how much of aresource (such as a physical server) a specific department in your organization used. Specifically, the report showsinformation about all the virtual machines in your pool, including their availability and resource utilization. Sincethis report shows virtual machine availability ("up time"), it can help you demonstrate Service Level Agreementscompliance and availability.
The chargeback report can help you implement a simple chargeback solution and facilitate billing. To billcustomers for usage of a specific resource, generate the report, save it as Excel, and then customize thespreadsheet data to include your price per unit. Alternatively, you can import the Excel data into your billingsystem.
If you know that you will want to bill internal or external customers for virtual machine usage, considerincorporating department or customer names in your virtual-machine naming conventions. This will make readingchargeback reports easier.
The resource reporting in the chargeback report is, in some cases, based on the allocation of physical resourcesto individual virtual machines.
Likewise, because XenServer lets you allocate fixed or automatic allocations of memory, the average memorydata in this report is based on the amount of memory currently allocated to the virtual machine, whether it isthrough a fixed memory allocation or an automatically adjusting memory allocation (Dynamic Memory Control).
The chargeback report contains the following columns of data:
• VM Name. The name of the virtual machine to which the data in the columns in that row applies.
• VM Uptime. The number of minutes the virtual machine was powered on (or, more specifically, appears witha green icon beside it in XenCenter).
• VCPU Allocation. The number of virtual CPUs configured on the virtual machine. Each virtual CPU receives anequal share of the physical CPU(s) on the host. For example, if you configured eight virtual CPUs on a host thatcontains two physical CPUs and this column had "1" in it, then this value is equal to 2/16 of the total processingpower on the host.
• Minimum CPU Usage (%). The lowest recorded value for virtual CPU utilization in the reporting period. Thisvalue is expressed as a percentage of the VM's virtual CPU capacity, and the capacity is based on the numberof virtual CPUs allocated to the VM. For example, if, when you created the VM, you allocated one virtual CPUto it, Minimum CPU Usage represents the lowest percentage of virtual CPU usage XenServer recorded, evenif it was only for a second. If you allocated two virtual CPUs to the VM, the value in this column represents thelowest usage of the combined capacity of both virtual CPUs, expressed as a percentage.
Ultimately, the percentage of CPU usage represents the lowest recorded workload that virtual CPU handled. Forexample, if you allocate one virtual CPU to a VM and the physical CPU on the host is 2.4 GHz, you are allocatingone-eighth of 2.4 GHz to the VM. This means that if the VM's allocated capacity is 0.3GHz, or 300MHz, andthe Minimum CPU Usage for the VM was 20%, the VM's lowest usage of the physical host's CPU during thereporting period was 60MHz.
• Maximum CPU Usage (%). The highest percentage of the VM's virtual CPU capacity that the VM consumedduring the reporting period. The CPU capacity consumed is a percentage of the virtual CPU capacity youallocated to the VM. For example, if, when you created the VM, you allocated one virtual CPU to it, the
13
Maximum CPU Usage represents the highest recorded percentage of virtual CPU usage during the timereported. If you allocated two virtual CPUs to the VM, the value in this column represents the highest utilizationfrom the combined capacity of both virtual CPUs.
• Average CPU Usage (%). The average amount, expressed as a percentage, of the VM's virtual CPU capacity thatwas in use during the reporting period. The CPU capacity is the virtual CPU capacity you allocated to the VM.If you allocated two virtual CPUs to the VM, the value in this column represents the average utilization fromthe combined capacity of both virtual CPUs.
• Total Storage Allocation (GB). The amount of disk space that is currently allocated to the VM at the time thereport was run. Frequently, unless you modified it, this disk space is the amount of disk space you allocatedto the VM when you created it.
• Virtual NIC Allocation. The number of virtual interfaces (VIFs) allocated to the VM.
• Current Minimum Dynamic Memory (MB).
• Fixed memory allocation. If you assigned a VM a fixed amount of memory (for example, 1024MB), the sameamount of memory appears in the following columns: Current Minimum Dynamic Memory (MB), CurrentMaximum Dynamic Memory (MB), Current Assigned Memory (MB), and Average Assigned Memory (MB).
• Dynamic memory allocation. If you configured XenServer to adjust a VM's memory automatically based ona range (that is, you enabled Dynamic Memory Control), the minimum amount of memory specified in therange appears in this column. For example, if in the Memory Settings dialog box in XenCenter, you selectedthe Automatically allocate memory within this range option for this VM and then specified the range valuesas 1024MB as the minimum memory and 2048MB as the maximum memory, then 1024MB will appear inthe Current Minimum Dynamic Memory (MB) column.
• Current Maximum Dynamic Memory (MB).
• Dynamic memory allocation. If XenServer is set to adjust a VM's memory automatically based on a range,the maximum amount of memory specified in the range appears in this column. For example, if the memoryrange you provided was 1024MB minimum and 2048MB maximum, then 2048MB will appear in the CurrentMaximum Dynamic Memory (MB) column.
• Fixed memory allocation. If you assign a VM a fixed amount of memory (for example, 1024MB), the sameamount of memory appears in the following columns: Current Minimum Dynamic Memory (MB), CurrentMaximum Dynamic Memory (MB), Current Assigned Memory (MB), and Average Assigned Memory (MB).
• Current Assigned Memory (MB).
• Dynamic memory allocation. When Dynamic Memory Control is configured, this value indicates the amountof memory XenServer is currently allocating to the VM at the time at which the report was run.
• Fixed memory allocation. If you assign a VM a fixed amount of memory (for example, 1024MB), the sameamount of memory appears in the following columns: Current Minimum Dynamic Memory (MB), CurrentMaximum Dynamic Memory (MB), Current Assigned Memory (MB), and Average Assigned Memory (MB).
Note:
If you change the VM's memory allocation immediately before running this report, the valuereflected in this column reflects the new memory allocation you configured.
• Average Assigned Memory (MB).
• Dynamic memory allocation. When Dynamic Memory Control is configured, this value indicates the averageamount of memory XenServer allocated to the VM over the reporting period.
• Fixed memory allocation. If you assign a VM a fixed amount of memory (for example, 1024MB), the sameamount of memory appears in the following columns: Current Minimum Dynamic Memory (MB), CurrentMaximum Dynamic Memory (MB), Current Assigned Memory (MB), and Average Assigned Memory (MB).
Note:
If you change the VM's memory allocation immediately before running this report, the valuedisplayed in this column may not change from what it would have previously displayed. Thevalue in this column reflects the average over the time period.
14
• Average Network Reads (BPS). The average amount of data (in bits per second) the VM received during thereporting period.
• Average Network Writes (BPS). The average amount of data (in bits per second) the VM sent during thereporting period.
• Average Network Usage (BPS). The combined total (in bits per second) of the Average Network Reads andAverage Network Writes. For example, if a VM sent, on average, 1,027 bits per second and received, on average,23,831 bits per second over the reporting period, then the Average Network Usage would be the combinedtotal of these two values: 24,858 bits per second.
• Total Network Usage (BPS). The total of all network read and write transactions in bits per second over thereporting period.
Host Health History
This report displays the performance of resources (CPU, memory, network reads, and network writes) on specifichost in relation to threshold values.
The colored lines (red, green, yellow) represent your threshold values. You can use this report with the PoolHealth report for a host to determine how a particular host's performance might be affecting overall pool health.When you are editing the performance thresholds, you can use this report for insight into host performance.
You can display resource utilization as a daily or hourly average. The hourly average lets you see the busiest hoursof the day, averaged, for the time period.
To view report data grouped by hour, expand + Click to view report data grouped by house for the time periodunder the Host Health History title bar.
Workload Balancing displays the average for each hour for the time period you set. The data point is based on autilization average for that hour for all days in the time period. For example, in a report for May 1, 2009 to May15, 2009, the Average CPU Usage data point represents the resource utilization of all fifteen days at 12:00 hourscombined together as an average. That is, if CPU utilization was 82% at 12PM on May 1st, 88% at 12PM on May2nd, and 75% on all other days, the average displayed for 12PM is 76.3%.
Note:
Workload Balancing smooths spikes and peaks so data does not appear artificially high.
Pool Optimization Performance History
The optimization performance report displays optimization events (that is, when you optimized a resource pool)against that pool's average resource usage. Specifically, it displays resource usage for CPU, memory, networkreads, and network writes.
The dotted line represents the average usage across the pool over the period of days you select. A blue barindicates the day on which you optimized the pool.
This report can help you determine if Workload Balancing is working successfully in your environment. You canuse this report to see what led up to optimization events (that is, the resource usage before Workload Balancingrecommended optimizing).
This report displays average resource usage for the day; it does not display the peak utilization, such as when thesystem is stressed. You can also use this report to see how a resource pool is performing if Workload Balancingis not making optimization recommendations.
In general, resource usage should decline or be steady after an optimization event. If you do not see improvedresource usage after optimization, consider readjusting threshold values. Also, consider whether or not theresource pool has too many virtual machines and whether or not new virtual machines were added or removedduring the time frame you specified.
15
Pool Audit Trail
This report displays the contents of the XenServer Audit Log, a XenServer feature designed to log attempts toperform unauthorized actions and select authorized actions, including import/export, host and pool backups,and guest and host console access. For information about the Audit Log feature, see the audit log documentationin the XenCenter Help or the XenServer Administrator's Guide.
Important:
To run the Pool Audit Trail report, the Audit Logging feature must be enabled. By default, AuditLogging is always enabled in the Workload Balancing virtual appliance. However, the auditlog only captures limited amounts of data for specific objects and actions. You can increasethe detail by following the instructions in CTX130830—Monitoring Additional XenServer AuditLog Events.
The Pool Audit Trail report displays the following data:
• Time. The time XenServer recorded the user's action.
• Event Action. The action that occurred. For definitions of these actions, see the section called “Audit Log EventNames”.
• User Name. The name of the person who created the session in which the action was performed. In somecases, this may be the User ID.
• Access. Whether or not the user had permission to perform the action.
• Event Object. The object that was the subject of the action (for example, a virtual machine).
• Object Name. The name of the object (for example, the name of the virtual machine).
• Succeeded. This provides that status of the action (that is, whether or not it was successful).
Audit Log Event Names
The following table defines some events that appear frequently in the audit-log data and the Pool Audit Trailreport. For additional event definitions, see the events section of the Citrix XenServer Management API.
Event Name Definition
SR.destroy Destroyed the storage repository.
VM.start Started a virtual machine.
http/get_audit_log Retrieved Audit Log.
reboot Restarted a XenServer host.
disable Put the host into a state in which no new virtualmachines can be started.
migrate Migrated all virtual machines off of this host, providedit was possible.
suspend VM state was saved to disk and is no longer running.
hard_shutdown Stopped executing the specified VM withoutattempting a clean shutdown.
hard_reboot Stopped executing the specified VM withoutattempting a clean shutdown and immediatelyrestarted the VM.
16
Event Name Definition
start_on Started the specified VM on a particular host.
snapshot_with_quiesce Took a snapshot of the specified VM with quiesce,making a new VM.
enable_ha Turn on High Availability mode.
copy Copied the specified VM, making a new VM.
disable_ha Turn off High Availability mode.
join_force Instructed (forced) host to join a new pool.
join Instructed host to join a new pool.
shutdown Shutdown the specified VM.
pool_migrate Migrated a VM to another host.
pool.retrieve_wlb_recommendations Retrieved Workload Balancing recommendations forthis pool.
Pool Health
The pool health report displays the percentage of time a resource pool and its hosts spent in four differentthreshold ranges: Critical, High, Medium, and Low. You can use the Pool Health report to evaluate theeffectiveness of your performance thresholds.
A few points about interpreting this report:
• Resource utilization in the Average Medium Threshold (blue) is the optimum resource utilization regardless ofthe placement strategy you selected. Likewise, the blue section on the pie chart indicates the amount of timethat host used resources optimally.
• Resource utilization in the Average Low Threshold Percent (green) is not necessarily positive. Whether Lowresource utilization is positive depends on your placement strategy. For example, if your placement strategyis Maximum Density and most of the time your resource usage was green, Workload Balancing might not befitting the maximum number of virtual machines possible on that host or pool. If this is the case, you shouldadjust your performance threshold values until the majority of your resource utilization falls into the AverageMedium (blue) threshold range.
• Resource utilization in the Average Critical Threshold Percent (red) indicates the amount of time averageresource utilization met or exceeded the Critical threshold value.
If you double-click on a pie chart for a host's resource usage, XenCenter displays the Host Health History reportfor that resource (for example, CPU) on that host. Clicking the Back to Parent Report toolbar button returns youto the Pool Health history report.
If you find the majority of your report results are not in the Average Medium Threshold range, you probablyneed to adjust the Critical threshold for this pool. While Workload Balancing provides default threshold settings,these defaults are not effective in all environments. If you do not have the thresholds adjusted to the correctlevel for your environment, the Workload Balancing optimization and placement recommendations might not beappropriate. For more information, see the section called “Changing the Critical Thresholds”.
Pool Health History
This report provides a line graph of resource utilization on all physical hosts in a pool over time. It lets you see thetrend of resource utilization—if it tends to be increasing in relation to your thresholds (Critical, High, Medium,
17
and Low). You can evaluate the effectiveness of your performance thresholds by monitoring trends of the datapoints in this report.
Workload Balancing extrapolates the threshold ranges from the values you set for the Critical thresholds whenyou connected the pool to Workload Balancing. Although similar to the Pool Health report, the Pool Health Historyreport displays the average utilization for a resource on a specific date rather than the amount of time overallthe resource spent in a threshold.
With the exception of the Average Free Memory graph, the data points should never average above the Criticalthreshold line (red). For the Average Free Memory graph, the data points should never average below the Criticalthreshold line (which is at the bottom of the graph). Because this graph displays free memory, the Criticalthreshold is a low value, unlike the other resources.
A few points about interpreting this report:
• When the Average Usage line in the chart approaches the Average Medium Threshold (blue) line, it indicatesthe pool's resource utilization is optimum regardless of the placement strategy configured.
• Resource utilization approaching the Average Low Threshold (green) is not necessarily positive. Whether Lowresource utilization is positive depends on your placement strategy. For example, if your placement strategyis Maximum Density and most days the Average Usage line is at or below the green line, Workload Balancingmight not be placing virtual machines as densely as possible on that pool. If this is the case, you should adjustthe pool's Critical threshold values until the majority of its resource utilization falls into the Average Medium(blue) threshold range.
• When the Average Usage line intersects with the Average Critical Threshold Percent (red), this indicates thedays when the average resource utilization met or exceeded the Critical threshold value for that resource.
If you find the data points in the majority of your graphs are not in the Average Medium Threshold range, butyou are satisfied with the performance of this pool, you might need to adjust the Critical threshold for this pool.For more information, see the section called “Changing the Critical Thresholds”.
Pool Optimization History
The Pool Optimization History report provides chronological visibility into Workload Balancing optimizationactivity.
Optimization activity is summarized graphically and in a table. Drilling into a date field within the table displaysdetailed information for each pool optimization performed for that day.
This report lets you see the following information:
• VM Name. The name of the virtual machine that Workload Balancing optimized.
• Reason. The reason for the optimization.
• Status. If the optimization was successful.
• From Host. The physical server where the virtual machine was originally hosted.
• To Host. The physical server where the virtual machine was migrated.
• Time. The time when the optimization occurred.
Tip:
You can also generate a Pool Optimization History report from the WLB tab by clicking theView History link.
Virtual Machine Motion History
This line graph displays the number of times virtual machines migrated on a resource pool over a period of time.It indicates if a migration resulted from an optimization recommendation and to which host the virtual machine
18
moved. This report also indicates the reason for the optimization. You can use this report to audit the numberof migrations on a pool.
Some points about interpreting this report:
• The numbers on the left side of the chart correspond with the number of migrations possible, which is basedon how many virtual machines are in a resource pool.
• You can look at details of the migrations on a specific date by expanding the + sign in the Date section of thereport.
Virtual Machine Performance History
This report displays performance data for each virtual machine on a specific host for a time period you specify.Workload Balancing bases the performance data on the amount of virtual resources allocated for the virtualmachine. For example, if the Average CPU Usage for your virtual machine is 67%, this means that your virtualmachine was using, on average, 67% of its virtual CPU for the period you specified.
The initial view of the report displays an average value for resource utilization over the period you specified.
Expanding the + sign displays line graphs for individual resources. You can use these graphs to see trends inresource utilization over time.
This report displays data for CPU Usage, Free Memory, Network Reads/Writes, and Disk Reads/Writes.
19
Managing Workload Balancing Featuresand SettingsThis chapter provides information about how to perform optional changes to Workload Balancing settings,including how to:
• Adjust the optimization mode
• Optimize and manage power automatically
• Change the critical thresholds
• Tune metric weightings
• Exclude hosts from recommendations
• Configure advanced automation settings, report subscriptions, and data storage
This chapter assumes that you already connected your pool to a Workload Balancing virtual appliance. Forinformation about downloading, importing, and configuring a Workload Balancing virtual appliance, see the CitrixWorkload Balancing 6.0 Quick Start. To connect to the virtual appliance, see the section called “Connecting tothe Workload Balancing Virtual Appliance”.
Changing Workload Balancing SettingsAfter connecting to the Workload Balancing virtual appliance, you can, if desired, edit the settings WorkloadBalancing uses to calculate placement and recommendations.
Placement and optimization settings you can modify include changing the placement strategy, configuringautomatic optimizations and power management, editing performance thresholds and metric weightings, andexcluding hosts.
Workload Balancing settings apply collectively to all virtual machines and hosts in the pool.
Provided the network and disk thresholds align with the hardware in your environment, you might want toconsider using most of the defaults in Workload Balancing initially.
After Workload Balancing is enabled for a while, Citrix recommends evaluating your performance thresholds anddetermining if you need to edit them. For example, consider if you are:
• Getting recommendations when they are not yet required. If this is the case, try adjusting the thresholds untilWorkload Balancing begins providing suitable recommendations.
• Not getting recommendations when you think you should receive them. For example, if your network hasinsufficient bandwidth and you do not receive recommendations, you might need to tweak your settings.If this is the case, try lowering the network critical thresholds until Workload Balancing begins providingrecommendations.
Before you edit your thresholds, you might find it handy to generate a Pool Health report and the Pool HealthHistory report for each physical host in the pool.
You can use the Workload Balancing Configuration properties in XenCenter to modify the configuration settings.
To update the credentials XenServer and the Workload Balancing server use to communicate, see the sectioncalled “Editing the Workload Balancing configuration file”.
To display the Workload Balancing Settings dialog box
1. In the Resources pane of XenCenter, select XenCenter > your-pool.
20
2. In the Properties pane, click the WLB tab.
3. In the WLB tab, click Settings.
Adjusting the Optimization Mode
Workload Balancing makes recommendations to rebalance, or optimize, the virtual-machine workload in yourenvironment based on a strategy for placement you select known as the optimization mode.
Workload Balancing lets you chose from two optimization modes:
• Maximize Performance. (Default.) Workload Balancing attempts to spread workload evenly across all physicalhosts in a resource pool. The goal is to minimize CPU, memory, and network pressure for all hosts. WhenMaximize Performance is your placement strategy, Workload Balancing recommends optimization when a hostreaches the High threshold.
• Maximize Density. Workload Balancing attempts to minimize the number of physical hosts that must be onlineby consolidating the active virtual machines.
When you select Maximize Density as your placement strategy, you can specify parameters similar to theones in Maximize Performance. However, Workload Balancing uses these parameters to determine how it canpack virtual machines onto a host. When Maximize Density is your placement strategy, Workload Balancingrecommends consolidation optimizations when a virtual machine reaches the Low threshold.
Workload Balancing also lets you apply these optimization modes all of the time, Fixed, or switch between modesfor specified time periods, Scheduled:
• Fixed optimization modes set Workload Balancing to a specific optimization behavior—either to try to createthe best performance or the highest density—at all times.
• Scheduled optimization modes let you schedule for Workload Balancing to apply different optimization modesdepending on the time of day. For example, you might want to configure Workload Balancing to optimize forperformance during the day when you have users connected and then, to save energy, specify for WorkloadBalancing to optimize for Maximum Density at night.
When you configure Scheduled optimization modes, Workload Balancing automatically changes to theoptimization mode at the beginning of the time period you specified. You can configure Everyday, Weekdays,Weekends, or individual days. For the hour, you select a time of day.
To set an optimization mode for all time periods
1. In the Resources pane of XenCenter, select XenCenter > your-pool.
2. In the Properties pane, click the WLB tab.
3. On the WLB tab, click Settings.
4. In the left pane, click Optimization Mode.
5. In the Fixed section of the Optimization Mode page, select one of these optimization modes:
• Maximize Performance. (Default.) Attempts to spread workload evenly across all physical hosts in aresource pool. The goal is to minimize CPU, memory, and network pressure for all hosts.
• Maximize Density. Attempts to fit as many virtual machines as possible onto a physical host. The goal is tominimize the number of physical hosts that must be online. (Note that Workload Balancing considers theperformance of consolidated VMs and issues a recommendation to improve performance if a resourceon a host reaches a Critical threshold.)
To specify times when the optimization mode will change automatically
1. In the Resources pane of XenCenter, select XenCenter > your-pool.
2. In the Properties pane, click the WLB tab.
21
3. On the WLB tab, click Settings.
4. In the left pane, click Optimization Mode
5. In the Optimization Mode pane, select Scheduled. The Scheduled section becomes available.
6. Click Add New.
7. In the Change to box, select one of the following modes:
• Maximize Performance. Attempts to spread workload evenly across all physical hosts in a resource pool.The goal is to minimize CPU, memory, and network pressure for all hosts.
• Maximize Density. Attempts to fit as many virtual machines as possible onto a physical host. The goal isto minimize the number of physical hosts that must be online.
8. Select the day of the week and the time when you want Workload Balancing to begin operating in this mode.
9. Create more scheduled mode changes (that is, "tasks") until you have the number you need. If you onlyschedule one task, Workload Balancing will switch to that mode as scheduled, but then it will never switchback.
10. Click OK.
To delete or pause a scheduled optimization mode task
1. Display the Optimization Mode dialog box by following steps 1 to 4 in the previous procedure.
2. Select the task you want to delete or disable from the Scheduled Mode Changes list.
3. Do one of the following:
• Delete the task permanently. Click the Delete button.
• Stop the task from running temporarily. Right-click the task and click Disable.
Tip:
You can also disable or enable tasks by selecting the task, clicking Edit, and selecting theEnable Task check box in the Optimization Mode Scheduler dialog.
Note:
To re-enable a task, right click the task in the Scheduled Mode Changes list and click Enable..
To edit a scheduled optimization mode task
1. Do one of the following:
• Double-click the task you want to edit.
• Select the task you want to edit, and click Edit.
2. In the Change to box, select a different mode or make other changes as desired.
Note:
Clicking Cancel, before clicking OK, will undo any changes you made in the Optimization tab,including deleting a task.
Optimizing and Managing Power Automatically
You can configure Workload Balancing to apply recommendations automatically (Automation) and turn hosts onor off automatically (Power Management). In order to power down hosts automatically (for example, during low-usage periods), you must configure Workload Balancing to apply recommendations automatically and enablepower management. Both power management and automation are described in the sections that follow.
22
Applying Recommendations Automatically
Workload Balancing lets you configure for it to apply recommendations on your behalf and perform theoptimization actions it recommends automatically. You can use this feature, which is known as Automation,to apply any recommendations automatically, including ones to improve performance or power down hosts.However, to power down hosts as virtual-machines usage drops, you must configure automation, powermanagement, and Maximum Density mode.
By default, Workload Balancing does not apply recommendations automatically. You must enable Automationif you want Workload Balancing to apply recommendations automatically. If you do not, you must applyrecommendations manually by clicking Apply Recommendations.
Workload Balancing will not automatically apply recommendations to hosts or virtual machines if therecommendations conflict with High Availability settings. If a pool will become overcommitted by applyingWorkload Balancing optimization recommendations, XenCenter will prompt you whether or not you want tocontinue applying the recommendation. When Automation is enabled, Workload Balancing will not apply anypower-management recommendations that exceed the number of host failures to tolerate in the High Availabilityplan.
When Workload Balancing is running with the Automation feature enabled, this is sometimes referred to asrunning in automated mode.
It is possible to tune how Workload Balancing applies recommendations in automated mode. For information,see the section called “Setting Conservative or Aggressive Automated Recommendations”
Enabling Workload Balancing Power Management
The term power management refers to the ability to the turn the power on or off for physical hosts. In a WorkloadBalancing context, this term refers to powering hosts in a pool on or off based on the pool's total workload.
Configuring Workload Balancing power management on a host requires that:
• The hardware for the host has remote power on/off capabilities
• The Host Power On feature is configured for the host
• The host has been explicitly selected as a host to participate in (Workload Balancing) Power Management
In addition, if you want Workload Balancing to power off hosts automatically, you also need to configure WorkloadBalancing to:
• Apply recommendations automatically
• Apply Power Management recommendations automatically
When enabled and the pool is in Maximum Density mode, if Workload Balancing detects unused resources, itrecommends powering off hosts until it eliminates all excess capacity in the pool. If Workload Balancing detectsthere is not sufficient host capacity in the pool to turn off hosts, it recommends leaving the hosts on until thepool's workload decreases enough to power off hosts. When you configure Workload Balancing to power offextra hosts automatically, it applies these recommendations automatically and, consequently, behaves in thesame way.
When a host is set to participate in Power Management, Workload Balancing makes power-on/offrecommendations as needed. If you configure Workload Balancing so that it can automatically power on hostswhen you are running in Maximum Performance mode, Workload Balancing will power on one or more hosts ifa resource's utilization on a host exceeds the High threshold. However, when running in Maximum Performancemode, Workload Balancing never powers off hosts after it has powered them on.
If you turn on the option to apply Power Management recommendations automatically, you do so at the poollevel. However, you can specify which hosts from the pool you want to participate in Power Management.
Understanding Power Management Behavior
23
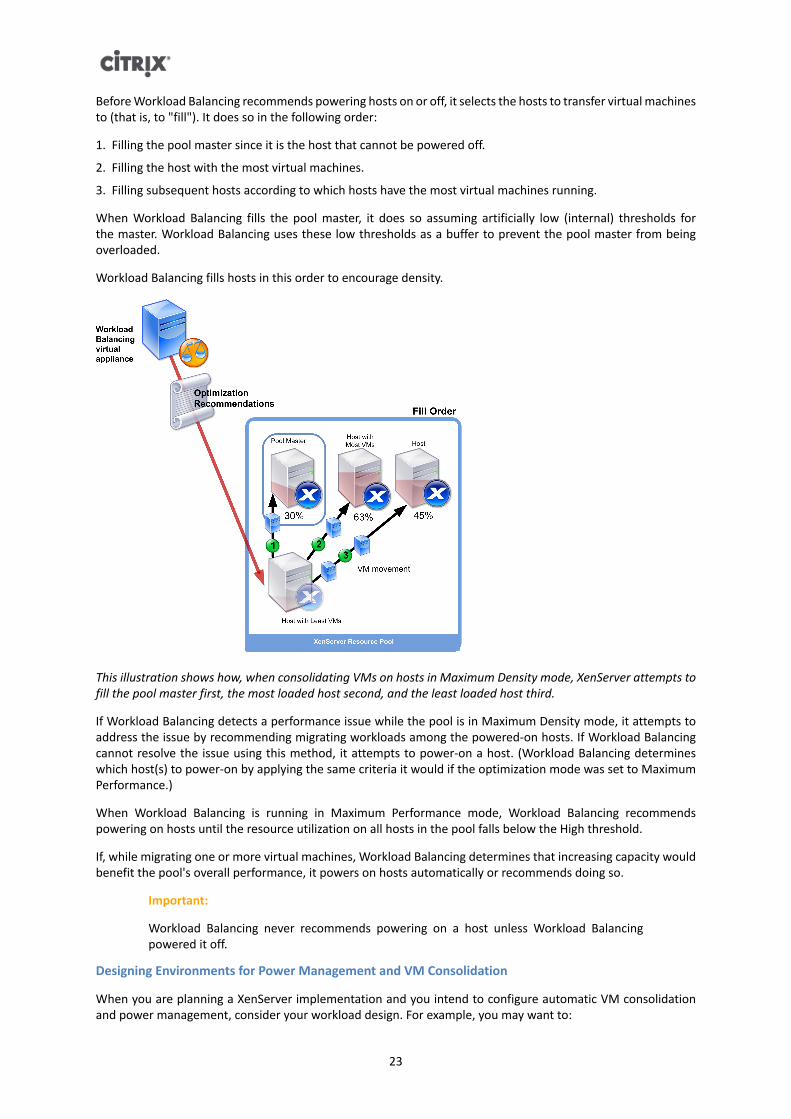
Before Workload Balancing recommends powering hosts on or off, it selects the hosts to transfer virtual machinesto (that is, to "fill"). It does so in the following order:
1. Filling the pool master since it is the host that cannot be powered off.
2. Filling the host with the most virtual machines.
3. Filling subsequent hosts according to which hosts have the most virtual machines running.
When Workload Balancing fills the pool master, it does so assuming artificially low (internal) thresholds forthe master. Workload Balancing uses these low thresholds as a buffer to prevent the pool master from beingoverloaded.
Workload Balancing fills hosts in this order to encourage density.
This illustration shows how, when consolidating VMs on hosts in Maximum Density mode, XenServer attempts tofill the pool master first, the most loaded host second, and the least loaded host third.
If Workload Balancing detects a performance issue while the pool is in Maximum Density mode, it attempts toaddress the issue by recommending migrating workloads among the powered-on hosts. If Workload Balancingcannot resolve the issue using this method, it attempts to power-on a host. (Workload Balancing determineswhich host(s) to power-on by applying the same criteria it would if the optimization mode was set to MaximumPerformance.)
When Workload Balancing is running in Maximum Performance mode, Workload Balancing recommendspowering on hosts until the resource utilization on all hosts in the pool falls below the High threshold.
If, while migrating one or more virtual machines, Workload Balancing determines that increasing capacity wouldbenefit the pool's overall performance, it powers on hosts automatically or recommends doing so.
Important:
Workload Balancing never recommends powering on a host unless Workload Balancingpowered it off.
Designing Environments for Power Management and VM Consolidation
When you are planning a XenServer implementation and you intend to configure automatic VM consolidationand power management, consider your workload design. For example, you may want to:
24
• Place Different Types of Workloads in Separate Pools. If you have an environment with distinct types ofworkloads (for example, user applications versus domain controllers) or types of applications that performbetter with certain types of hardware, consider if you need to locate the virtual machines hosting theseworkloads in different pools.
Because power management and VM consolidation are managed at the pool level, you should design pools sothey contain workloads that you want consolidated at the same rate, factoring in considerations such as thosediscussed in the section called “Controlling Automated Recommendations”.
• Exclude Hosts from Workload Balancing. Some hosts may need to be on at all times. See the section called“Excluding Hosts from Recommendations” for more information.
To apply optimization recommendations automatically
1. In the Resources pane of XenCenter, select XenCenter > your-pool.
2. In the Properties pane, click the WLB tab.
3. In the WLB tab, click Settings.
4. In the left pane, click Automation.
5. Select one or more of the following check boxes:
• Automatically apply Optimization recommendations. When you select this option, you do not need toaccept optimization recommendations manually. Workload Balancing automatically accepts optimizationand placement recommendations it makes.
• Automatically apply Power Management recommendations. The behavior of this option varies accordingto the pool's optimization mode:
• Maximum Performance Mode. When Automatically apply Power Management recommendations isenabled, Workload Balancing automatically powers on hosts when doing so improves host performance.
• Maximum Density Mode. When Automatically apply Power Management recommendations isenabled, Workload Balancing automatically powers off hosts when resource utilization drops below theLow threshold (that is, Workload Balancing powers hosts off automatically during low usage periods).
6. (Optional.) Fine-tune optimization recommendations by clicking Advanced in the left pane of the Settingsdialog and doing one or more of the following:
• Specifying the number of times Workload Balancing must make an optimization recommendation beforethe recommendation is applied automatically. The default is three times, which means the recommendationis applied on the third time it is made.
• Selecting the lowest level of optimization recommendation that you want Workload Balancing to applyautomatically. The default is High.
• Changing the aggressiveness with which Workload Balancing applies its optimization recommendations.
You may also want to specify the number of minutes Workload Balancing has to wait before applying anoptimization recommendation to a recently moved VM.
All of these settings are explained in more depth in the section called “Setting Conservative or AggressiveAutomated Recommendations”.
7. Do one of the following:
• If you want to configure power management, click Automation/Power Management and proceed to thethe section called “To select hosts for power management”.
• If you do not want to configure power management and you are finished configuring automation, click OK.
To select hosts for power management
1. In the Power Management section, select the hosts that you want Workload Balancing to recommendpowering on and off.
Note:

25
Selecting hosts for power management recommendations without selecting theAutomatically apply Power Management recommendations check box results in WorkloadBalancing suggesting power-management recommendations but not applying themautomatically for you.
2. Click OK. If none of the hosts in the resource pool support remote power management, Workload Balancingdisplays the message, "No hosts support Power Management."
Understanding When Workload Balancing Makes Recommendations
Workload Balancing continuously evaluates the resource metrics of physical hosts and VMs across the pool(s)it is managing against thresholds. Thresholds are preset values that function like boundaries that a host mustexceed before Workload Balancing can make an optimization recommendation. At a very high level. the WorkloadBalancing process is as follows:
1. Workload Balancing detects that the threshold for a resource was violated.
2. Workload Balancing evaluates if it will make an optimization recommendation.
3. Workload Balancing determines which host(s) it will recommend function as the destination host(s), which isthe host where Workload Balancing will recommend relocating one or more VMs.
4. Workload Balancing makes the recommendation.
After Workload Balancing determines that a host could benefit from optimization, before it makes therecommendation, it evaluates other hosts on the pool to decide (a) the order in which it should make theoptimization (what hosts, what VMs) and (b) where it should recommend placing a virtual machine when it doesmake a recommendation. To accomplish these two tasks, Workload Balancing uses thresholds and weightingsas follows:
• Thresholds, which are the boundary values Workload Balancing compares your pool's resource metrics against,are used to determine whether or not to make a recommendation and what hosts are a suitable candidate forhosting relocated virtual machines.
• Weightings, which are a way of ranking resources according to how much you want them to be considered,are used to determine the processing order. That is, after Workload Balancing determines it needs to makea recommendation, it uses your specifications of what resources are important to determine which hosts'performance to address first and which virtual machines to recommend migrating first.
For each resource Workload Balancing monitors, it has four levels of thresholds (Critical, High, Medium, andLow), which are discussed in the sections that follow. Workload Balancing evaluates whether to make arecommendation when a resource metric on a host:
• Exceeds the High threshold when the pool is running in Maximum Performance mode (improve performance)
• Drops below the Low threshold when the pool is running in Maximum Density mode (consolidate VMs on hosts)
• Exceeds the Critical threshold when the pool is running in Maximum Density mode (improve performance)
For example, if the High threshold for a pool running in Maximum Performance mode is set to 80%, when the CPUutilization on a host reaches 80.1%, Workload Balancing will evaluate whether or not to issue a recommendation.
When a resource violates its threshold, Workload Balancing evaluates the resource's metric against its historicalperformance to prevent issuing an optimization recommendation based on a temporary resource spike. To doso, Workload Balancing creates an historically averaged utilization metric by evaluating the data for resourceutilization captured at the following times:
Data Captured Weight
Immediately, at the time threshold was exceeded (that is, real-time data) 70%
Thirty minutes before the threshold was exceeded 25%
26
Data Captured Weight
Twenty-four hours before the threshold was exceeded 5%
For example, if the CPU utilization on the host exceeds the High threshold at 12:02 PM on Thursday, WorkloadBalancing checks the data utilization at 11:32 AM on Thursday, and at 12:02PM on Wednesday (the previousday). If the CPU utilization is 80.1% at 12:02 PM, but only 50% at 11:32AM, and 78% at 12:32 PM on Wednesday,Workload Balancing does not make a recommendation. This is because the historically averaged utilization is72.47%, so Workload Balancing assumes the utilization is a temporary spike. However, if the CPU utilization was78% at 11:32AM, Workload Balancing would make a recommendation since the historically averaged utilizationis 80.1%.
Optimization and Consolidation Process
The Workload Balancing process for determining potential optimizations varies according to the optimizationmode (Maximum Performance or Maximum Density). However, regardless of the optimization mode,optimization and placement recommendations are made using a two-stage process:
1. Determine potential optimizations. (That is, what VMs to migrate off hosts.)
2. Determine placement recommendations. (That is, what hosts would be suitable candidates for new hosts.)
Note:
Workload Balancing only recommends migrating VMs that meet the XenServer criteria for livemigration, including the destination host must have the storage the VM requires. Likewise,the destination host must have sufficient resources to accommodate adding the VM withoutexceeding the thresholds of the optimization mode configured on the pool (for example,the High threshold in Maximum Performance mode and the Critical threshold for MaximumDensity mode).
When Workload Balancing is running in automated mode, you can tune the way it applies recommendations. Seethe section called “Setting Conservative or Aggressive Automated Recommendations” for more information.
Optimization Recommendation Process in Maximum Performance Mode
When running in Maximum Performance mode, Workload Balancing uses the following process to determinepotential optimizations:
1. Every two minutes Workload Balancing evaluates the resource utilization for each host in the pool. It does soby monitoring on each host and determining if each resource's utilization exceeds its High threshold. See thesection called “Changing the Critical Thresholds” for more information about the High threshold.
If, in Maximum Performance mode, a resource's utilization exceeds its High threshold, then WorkloadBalancing starts the process to determine if it wants to make an optimization recommendation. WorkloadBalancing determines if it should make an optimization recommendation based on whether or not doing socan ease performance constraints, such as ones revealed by the High threshold.
For example, if Workload Balancing sees that the performance of the virtual machines on Host A is beingnegatively affected by insufficient CPU resources, if Workload Balancing can find another host with less CPUutilization, it will recommend moving one or more virtual machines to another host.
2. If a resource's utilization on a host exceeds the relevant threshold, Workload Balancing combines theresource's current utilization with the historical data from thirty minutes ago and twenty-four hours agoto form the historically averaged utilization. If the historically averaged utilization exceeds the resource'sthreshold, Workload Balancing determines it will make an optimization recommendation.
3. Workload Balancing uses metric weightings to determine what hosts it should optimize first. The resource towhich you have assigned the most weight is the one that Workload Balancing attempts to address first. Seethe section called “Tuning Metric Weightings” for information about metric weightings.
4. Workload Balancing determines which hosts can support the VM(s) it wants to migrate off of host(s).
27
Workload Balancing makes this determination by calculating the projected effect on resource utilization ofplacing different combinations of VMs on hosts. (Workload Balancing uses a method of performing thesecalculations that in mathematics is known as permutation.)
To do so, Workload Balancing creates a single metric or score to forecast the impact of migrating a VM to thehost. The score indicates the suitability of a host as a home for additional VMs.
To score the host's performance, Workload Balancing combines the host's current metrics, the host's metricsfrom the last thirty minutes, the host's metrics from 24 hours ago, and the VM's metrics.
5. After scoring the hosts and VMs, Workload Balancing attempts to build (in essence) virtual models of whatthe hosts would look like with different combinations of VMs so that it can determine the best host to placethe VM.
In Maximum Performance mode, Workload Balancing uses metric weightings to determine what hosts itshould optimize first and what VMs on those hosts it should migrate first. Workload Balancing bases itsmodels on the metric weightings. For example, if CPU utilization is assigned the highest importance, WorkloadBalancing sorts hosts and VMs to optimize first according to what hosts are most affected by CPU utilization(that is, are running closest to the High threshold for CPU utilization) and what VMs have the highest CPUutilization (or are running the closest to its High threshold).
6. Workload Balancing continues calculating optimizations. It perceives hosts as potential candidates foroptimization and views VMs as candidates for migration until the predicted resource utilization on the VM'shost drops below the configured High threshold. The term predicted resource utilization refers to the resourceutilization Workload Balancing forecasts a host will have after Workload Balancing has added or removed aVM from the host.
Consolidation Process in Maximum Density Mode
Workload Balancing determines if it should make a recommendation (for consolidation) based on whether it canmigrate a virtual machine off a host and still run the destination host below the Critical threshold.
1. When a resource's utilization drops below its Low threshold, Workload Balancing begins calculating potentialconsolidation scenarios.
2. When Workload Balancing discovers a potential way in which it can consolidate VMs on a host, it evaluateswhether or not the destination host is a suitable home for the VM.
3. Like in Maximum Performance mode, Workload Balancing scores the host to determine the suitability of ahost as a home for new VMs.
For example, if Workload Balancing determines that it can consolidate virtual machines on fewer hosts,before it makes an optimization recommendation, Workload Balancing checks to make sure that the resourceutilization on the destination hosts will not exceed the Critical thresholds after the VMs are relocated to them.
Note:
Workload Balancing does not consider metric weightings when it makes a consolidationrecommendation; it only considers metric weightings to ensure performance on hosts.
4. After scoring the hosts and VMs, Workload Balancing attempts to build (in essence) virtual models of whatthe hosts would look like with different combinations of VMs so that it can determine the best host to placethe VM.
5. Workload Balancing calculates the effect of adding more VMs to a host until it forecasts that adding anotherVM to the host would cause one of its resources to exceed the Critical threshold.
6. Workload Balancing recommendations always suggest filling the pool master first since it is the host thatcannot be powered off. However, Workload Balancing applies a buffer to the pool master so that it cannotbe over-allocated.
7. Workload Balancing continues to recommend migrating VMs on to hosts until no hosts remain that will notexceed a Critical threshold if a VM is migrated on to them.
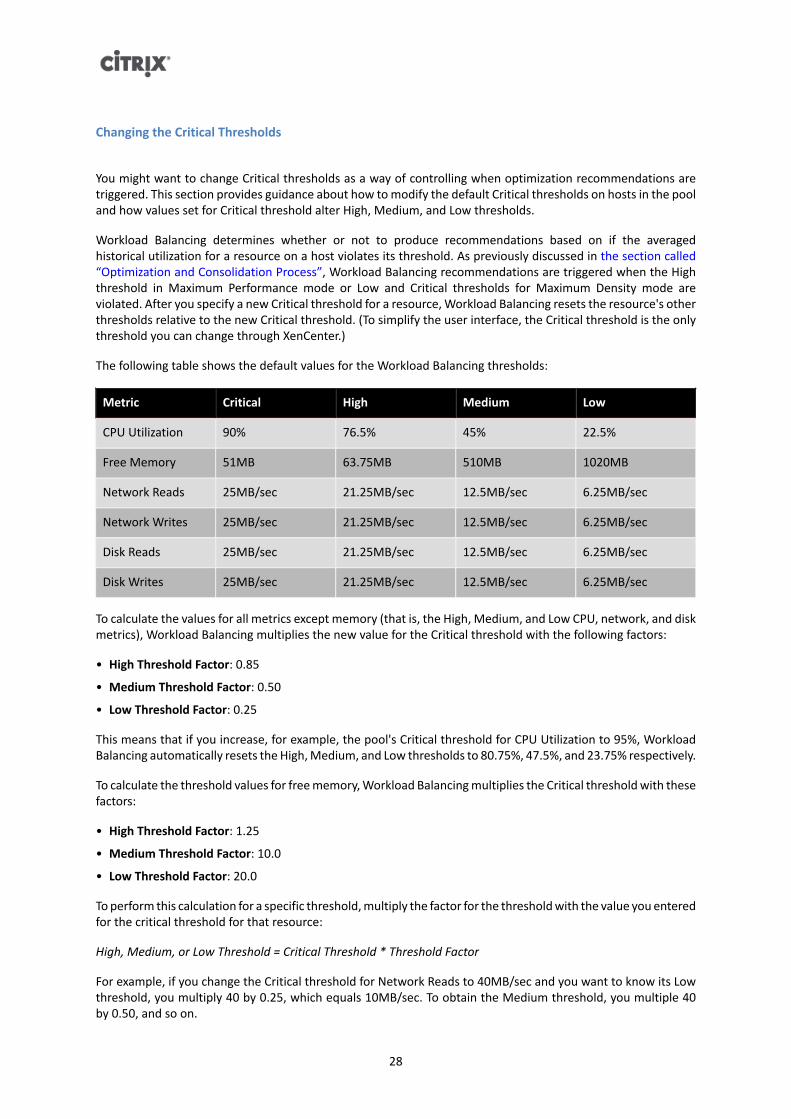
28
Changing the Critical Thresholds
You might want to change Critical thresholds as a way of controlling when optimization recommendations aretriggered. This section provides guidance about how to modify the default Critical thresholds on hosts in the pooland how values set for Critical threshold alter High, Medium, and Low thresholds.
Workload Balancing determines whether or not to produce recommendations based on if the averagedhistorical utilization for a resource on a host violates its threshold. As previously discussed in the section called“Optimization and Consolidation Process”, Workload Balancing recommendations are triggered when the Highthreshold in Maximum Performance mode or Low and Critical thresholds for Maximum Density mode areviolated. After you specify a new Critical threshold for a resource, Workload Balancing resets the resource's otherthresholds relative to the new Critical threshold. (To simplify the user interface, the Critical threshold is the onlythreshold you can change through XenCenter.)
The following table shows the default values for the Workload Balancing thresholds:
Metric Critical High Medium Low
CPU Utilization 90% 76.5% 45% 22.5%
Free Memory 51MB 63.75MB 510MB 1020MB
Network Reads 25MB/sec 21.25MB/sec 12.5MB/sec 6.25MB/sec
Network Writes 25MB/sec 21.25MB/sec 12.5MB/sec 6.25MB/sec
Disk Reads 25MB/sec 21.25MB/sec 12.5MB/sec 6.25MB/sec
Disk Writes 25MB/sec 21.25MB/sec 12.5MB/sec 6.25MB/sec
To calculate the values for all metrics except memory (that is, the High, Medium, and Low CPU, network, and diskmetrics), Workload Balancing multiplies the new value for the Critical threshold with the following factors:
• High Threshold Factor: 0.85
• Medium Threshold Factor: 0.50
• Low Threshold Factor: 0.25
This means that if you increase, for example, the pool's Critical threshold for CPU Utilization to 95%, WorkloadBalancing automatically resets the High, Medium, and Low thresholds to 80.75%, 47.5%, and 23.75% respectively.
To calculate the threshold values for free memory, Workload Balancing multiplies the Critical threshold with thesefactors:
• High Threshold Factor: 1.25
• Medium Threshold Factor: 10.0
• Low Threshold Factor: 20.0
To perform this calculation for a specific threshold, multiply the factor for the threshold with the value you enteredfor the critical threshold for that resource:
High, Medium, or Low Threshold = Critical Threshold * Threshold Factor
For example, if you change the Critical threshold for Network Reads to 40MB/sec and you want to know its Lowthreshold, you multiply 40 by 0.25, which equals 10MB/sec. To obtain the Medium threshold, you multiple 40by 0.50, and so on.
29
While the Critical threshold triggers many optimization recommendations, other thresholds can also triggeroptimization recommendations, as follows:
• High threshold.
• Maximum Performance. Exceeding the High threshold triggers optimization recommendations to relocatea VM to a host with lower resource utilization.
• Maximum Density. Workload Balancing will not recommend placing a virtual machine on host if moving thatVM to the host will cause the utilization of any of the host's resources to exceed the High threshold value.
• Low threshold.
• Maximum Performance. Workload Balancing does not trigger recommendations from the Low threshold.
• Maximum Density. When a metric value drops below the Low threshold, it signals Workload Balancing thathosts are being underutilized and triggers an optimization recommendation to consolidate virtual machineson fewer hosts. Workload Balancing continues to recommend moving VMs onto a host until the metricvalues for one of the host's resource reaches its High threshold.
However, if after a VM is relocated, a resource's utilization on the VM's new host exceeds its Criticalthreshold, Workload Balancing will temporarily use an algorithm similar to the Maximum Performance load-balancing algorithm to find a new host for the virtual machines. Workload Balancing continues to use thisalgorithm to recommend moving virtual machines until resource utilization on hosts across the pool fallsbelow the High threshold.
To change the critical thresholds
1. In the Resources pane of XenCenter, select XenCenter > your-resource-pool.
2. In the Properties pane, click the WLB tab.
3. In the WLB tab, click Settings.
4. In the left pane, select Critical Thresholds. These critical thresholds are used to evaluate host resourceutilization.
5. In Critical Thresholds page, type one or more new values in the Critical Thresholds boxes. The values representresource utilization on the host.
Workload Balancing uses these thresholds when making virtual-machine placement and pool-optimizationrecommendations. Workload Balancing strives to keep resource utilization on a host below the critical valuesset.
Tuning Metric Weightings
The way in which Workload Balancing uses metric weightings when determining which hosts and VMs to processfirst varies according to the optimization mode, Maximum Density or Maximum Performance.
When Workload Balancing is processing optimization recommendations, it creates an optimization order. Todetermine this, Workload Balancing ranks the hosts to address first according to which hosts have the highestmetric values for whatever resource is ranked as the most important in the metric weightings page.
In general, metric weightings are mainly used when a pool is in Maximum Performance mode. However, whenWorkload Balancing is in Maximum Density mode, it does use metric weightings if a resource exceeds its Criticalthreshold.
Maximum Performance mode
In Maximum Performance mode, Workload Balancing uses metric weightings to determine (a) which hosts'performance to address first and (b) which VMs to recommend migrating first.
For example, if you rank Network Writes as the most important resource for Workload Balancing to consider—that is, you move the Metric Weighting slider all the way to the right (More Important) and you move all theother sliders to the middle—then Workload Balancing will begin addressing performance issues (that is, makingoptimization recommendations) on the host with the highest number of Network Writes per second first.
30
If you configure all resources to be equally important (that is, the Metric Weighting slider is in the same placefor all resources), Workload Balancing addresses CPU utilization first and memory second, as these are typicallythe most constrained resources.
Maximum Density mode
In Maximum Density mode, Workload Balancing only uses metric weightings when a host reaches theCritical threshold—then Workload Balancing applies a Maximum Performance-like algorithm until no Hosts areexceeding the Critical thresholds. When using the Maximum Performance-like algorithm, Workload Balancinguses metric weightings to determine the optimization order in the same way as it does for Maximum Performancemode.
If two or more hosts have resource(s) exceeding their Critical thresholds, Workload Balancing verifies theimportance you set for each resource before determining which host to optimize first and which VMs on thathost to relocate first.
For example, your pool contains Host A and Host B, which are in the following state:
• The CPU utilization on Host A exceeds the Critical threshold for CPU, and the metric weighting for CPU utilizationis set to the far right of the slider (More Important).
• The memory utilization on Host B exceeds the Critical threshold for memory, and the metric weighting formemory utilization is set to the far left of the slider (Less Important).
Workload Balancing will recommend optimizing Host A first because the resource on it that reached the Criticalthreshold is the resource assigned the highest weight. After Workload Balancing determines that it needs toaddress the performance on Host A, Workload Balancing then begins recommending placements for VMs on thathost beginning with the VM that has the highest CPU utilization, since that CPU utilization is the resource withthe highest weight.
After Workload Balancing has recommended optimizing Host A, it makes optimization recommendations for HostB. When it recommends placements for the VMs on Host B, it does so by addressing CPU utilization first, sinceCPU utilization was assigned the highest weight.
If there are additional hosts that need optimization, Workload Balancing addresses the performance on thosehosts according to what host has the third highest CPU utilization.
By default, all metric weightings are set to the farthest point on the slider (More Important).
Note:
The weighting of metrics is relative. This means that if all of the metrics are set to the samelevel, even if that level is Less Important, they will all be weighted the same. The relation ofthe metrics to each other is more important than the actual weight at which you set eachmetric.
To edit metric weighting factors
1. In the Resources pane of XenCenter, select XenCenter > your-resource-pool.
2. Click the WLB tab, and then click Settings.
3. In the left pane, select Metric Weighting.
4. In Metric Weighting page, as desired, adjust the sliders beside the individual resources.
Moving the slider towards Less Important indicates that ensuring virtual machines always have the highestamount of this resource available is not as vital on this resource pool.
Excluding Hosts from Recommendations
When configuring Workload Balancing, you can specify that specific physical hosts are excluded from WorkloadBalancing optimization and placement recommendations, including Start On placement recommendations.
Situations when you may want to exclude hosts from recommendations include when:
31
• You want to run the pool in Maximum Density mode and consolidate and shut down hosts, but there arespecific hosts you want to exclude from this behavior.
• When two virtual-machine workloads always need to run on the same host (for example, if they havecomplementary applications or workloads).
• You have workloads that you do not want moved (for example, a domain controller or database server).
• You want to perform maintenance on a host and you do not want VMs placed on the host.
• The performance of the workload is so critical that the cost of dedicated hardware is irrelevant.
• Specific hosts are running high-priority workloads (virtual machines), and you do not want to use the HighAvailability feature to prioritize these virtual machines.
• The hardware in the host is not the optimum for the other workloads in the pool.
Regardless of whether you specify a fixed or scheduled optimization mode, hosts excluded remain excludedeven when the optimization mode changes. Therefore, if you only want to prevent Workload Balancing fromshutting off a host automatically, consider not enabling (or deselecting) Power Management for that host insteadas described in the section called “Optimizing and Managing Power Automatically ”.
When you exclude a host from recommendations, you are specifying for Workload Balancing not to manage thathost at all. This means that Workload Balancing will not make any optimization recommendations for an excludedhost. In contrast, when you do not select a host to participate in Power Management, Workload Balancing stillmanages the host, but it will not issue power-management recommendations for that host.
To exclude hosts from Workload Balancing
Use this procedure to exclude a host in a pool that Workload Balancing is managing from power management,host evacuation, placement, and optimization recommendations.
1. In the Resources pane of XenCenter, select XenCenter > your-resource-pool.
2. In the Properties pane, click the WLB tab.
3. In the WLB tab, click Settings.
4. In the left pane, select Excluded Hosts.
5. In Excluded Hosts page, select the hosts for which you do not want WLB to recommend alternate placementsand optimizations.
Controlling Automated Recommendations
Workload Balancing supplies some advanced settings that let you to control how Workload Balancing appliesautomated recommendations. These settings appear on the Advanced page of the Workload BalancingConfiguration dialog.
To display the Advanced page of the Workload Balancing Configuration dialog
1. In the Resources pane of XenCenter, select XenCenter > your-resource-pool.
2. In the Properties pane, click the WLB tab.
3. In the WLB tab, click Settings.
4. In the left pane, select Advanced.
Setting Conservative or Aggressive Automated Recommendations
When running in automated mode, the frequency of optimization and consolidation recommendations and howsoon they are automatically applied is a product of multiple factors, including:
• How long you specify Workload Balancing waits after moving a VM before making another recommendation
• The number of recommendations Workload Balancing must make before applying a recommendationautomatically
32
• The severity level a recommendation must achieve before the optimization is applied automatically
• The level of consistency in recommendations (recommended VMs to move, destination hosts) WorkloadBalancing requires before applying recommendations automatically
Important:
In general, Citrix recommends that you do not adjust the settings for factors without eitherguidance from Citrix Technical Support or significant observation and testing of your pool'sbehavior with Workload Balancing enabled. Incorrectly configuring these settings can resultin Workload Balancing not making any recommendations.
VM Migration Interval
You can specify the number of minutes Workload Balancing must wait after the last time a particular virtualmachine was moved, regardless of the cause, before Workload Balancing can generate another recommendationthat includes that particular recently moved virtual machine.
The recommendation interval is designed to prevent Workload Balancing from generating recommendations forartificial reasons (for example, if there was a temporary utilization spike).
When Automation is configured, it is especially important to be careful when modifying the recommendationinterval. If an issue occurs that leads to continuous, recurring spikes, increasing the frequency (that is, setting alower number) can generate many recommendations and, consequently, relocations.
Note:
Setting a recommendation interval does not affect how long Workload Balancing waits tofactor recently rebalanced hosts into recommendations for Start-On Placement, Resume, andMaintenance Mode.
Recommendation Count
Every two minutes, Workload Balancing checks to see if it can generate recommendations for the pool it ismonitoring. When you enable Automation, you can specify the number of times a consistent recommendationmust be made before Workload Balancing can automatically apply the recommendation. To do so, you configure asetting known as the Recommendation Count. The Recommendation Count and the Optimization Aggressivenesssetting let you fine-tune the automated application of recommendations in your environment.
As described in the aggressiveness section, Workload Balancing uses the similarity of recommendations to a) vetif the recommendation is truly needed and b) determine if the destination host has stable enough performanceover a prolonged period of time to accept a relocated VM (without needing to move it off the host again shortly).Workload Balancing uses the Recommendation Count value to determine a recommendation must be repeatedbefore Workload Balancing automatically applies the recommendation.
Workload Balancing uses this setting as follows:
1. Every time Workload Balancing generates a recommendation that meets its consistency requirements, asindicated by the Optimization Aggressiveness setting, Workload Balancing increments the RecommendationCount. If the recommendation does not meet the consistency requirements, Workload Balancing may resetthe Recommendation Count to zero, depending on the factors described in the section called “OptimizationAggressiveness”.
2. When Workload Balancing generates enough consistent recommendations to meet the value for theRecommendation Count, as specified in the Recommendations text box, it automatically applies therecommendation.
If you choose to modify this setting, the value you should set varies according to your environment. Considerthese scenarios:
• If host loads and activity increase extremely quickly in your environment, you may want to increase valuefor the Recommendation Count. Workload Balancing generates recommendations every two minutes. For
33
example, if you set this interval to "3", then six minutes later Workload Balancing applies the recommendationautomatically.
• If host loads and activity increase gradually in your environment, you may want to decrease the value for theRecommendation Count.
Accepting recommendations uses system resources and affects performance when Workload Balancing isrelocating the virtual machines. Increasing the Recommendation Count increases the number of matchingrecommendations that must occur before Workload Balancing applies the recommendation, which encouragesWorkload Balancing to apply more conservative, stable recommendations and may decrease the potential forspurious VM moves. It should be noted, however, that the Recommendation Count is set to a conservative valueby default.
Because of the potential impact adjusting this setting may have on your environment, Citrix only recommendschanging it with extreme caution, preferably by testing and iteratively changing the value or under the guidanceof Citrix Technical Support.
Recommendation Severity
All optimization recommendations include a severity rating (Critical, High, Medium, Low) that indicates theimportance of the recommendation. Workload Balancing bases this rating on a combination of factors includingconfiguration options you set, such as thresholds and metric tunings, resources available for the workload, andresource-usage history. (The severity rating for a recommendation appears in the Optimization Recommendationspane on the WLB tab.)
When you configure Workload Balancing to apply recommendations automatically, you can set the minimumseverity level that should be associated with a recommendation before Workload Balancing automatically appliesit.
Optimization Aggressiveness
To provide additional assurance when running in automated mode, Workload Balancing has consistency criteriafor accepting optimizations automatically so as to prevent moving VMs due to spikes and anomalies. Inautomated mode, Workload Balancing does not accept the first recommendation it produces. Instead, WorkloadBalancing waits to automatically apply a recommendation until a host or VM exhibits consistent behavior overtime. The phrase consistent behavior over time refers to factors such as whether a host continues to triggerrecommendations and whether the same VMs on that host continue to trigger recommendations.
Workload Balancing determines if behavior is consistent by using criteria for consistency and by having criteria forthe number of times the same recommendation is made (that is, the Recommendation Count). You can configurehow strictly you want Workload Balancing to apply the consistency criteria using the Optimization Aggressivenesssetting.
While Citrix primarily designed the Optimization Aggressiveness setting for demonstration purposes, you can usethis setting to control the amount of stability you want in your environment before Workload Balancing appliesan optimization recommendation. The most stable setting (Low aggressiveness) is configured by default. In thiscontext, the term stable refers to the similarity of the recommended changes over time, as explained throughoutthis section. In most environments, aggressiveness is not desirable. Consequently, Low is the default setting.
Workload Balancing uses up to four criteria to ascertain consistency. The number of criteria that must be metvaries according to the level you set in the Optimization Aggressiveness setting. The lower the level (for example,Low or Medium) the less aggressively Workload Balancing is in accepting a recommendation. In other words,Workload Balancing is stricter about requiring criteria to match (or less cavalier or aggressive) about consistencywhen aggressiveness is set to Low.
For example, if the aggressiveness level is set to Low, Workload Balancing requires that each criterion for Low ismet the number of times specified in the Recommendations box (where you specify the Recommendation Countvalue) before automatically applying the recommendation.
For example, if you set the Recommendation Count in the Recommendations box to "3", you are makingWorkload Balancing wait until it sees all the criteria listed below for Low met and repeated in three consecutiverecommendations. This helps ensure that the VM actually needs to be moved and that the destination host
34
Workload Balancing is recommending has consistently stable resource utilization over a longer period of time. Itreduces the potential for a recently moved VM to be moved off a host due to host performance changes afterthe move. By default, this setting is set to a conservative setting (Low) to encourage stability.
Citrix does not recommend increasing the Optimization Aggressiveness setting to increase the frequency withwhich your hosts are being optimized. If you feel that your hosts are not being optimized quickly or frequentlyenough, try adjusting the Critical thresholds and comparing them against the Pool Health report.
The consistency criteria associated with the different levels of aggressiveness is the following:
Low
• All VMs in subsequent recommendations must be the same (as demonstrated by matching UUIDs in eachrecommendation).
• All destination hosts must be the same in subsequent recommendations
• The recommendation that immediately follows the initial recommendation must match or else theRecommendation Count reverts to 1
Medium
• All VMs in subsequent recommendations must be from the same host same; however, they can be differentVMs from the ones in the first recommendation.
• All destination hosts must be the same in subsequent recommendations
• One of the next two recommendation that immediately follows the first recommendation must match or elsethe Recommendation Count reverts to 1
High
• All VMs in the recommendations must be from the same host same; however, the recommendations do nothave to immediately follow each other.
• The host from which Workload Balancing recommended the VM move must be the same in eachrecommendation
• The Recommendation Count does not revert to 1 if the two recommendations that follow the firstrecommendation do not match
Example
The following example illustrates the way in which Workload Balancing uses the Optimization Aggressivenesssetting and the Recommendation Count to determine whether or not to automatically accept a recommendation.
The first column represents the recommendation number. The second column, "Placement Recommendations,"represents the placement recommendations made when Workload Balancing issued the optimizationrecommendation: each recommendation proposes three VM placements (moves). The third, fourth, andfifth columns represent the effect of the Optimization Aggressiveness setting on a group of placementrecommendations (the group is denoted by the row, for example "Recommendation #1"). The number inthe aggressiveness columns is the number of times there have been consecutive recommendation at thatOptimization Aggressiveness setting. For example, 1 in the medium column for Recommendation #2 indicatesthat the recommendation was not consistent enough at that Optimization Aggressiveness setting and the counterwas reset to 1.
For example, in the table below, when the Optimization Aggressiveness setting is set to High, theRecommendation Count continues to increase after Recommendation #1, #2, and #3—even though the sameVMs are not recommended for new placements in each recommendation. Workload Balancing applies theplacement recommendation with Recommendation #3 because it has seen the same behavior from that host forthree consecutive recommendations.
In contrast, when set to Low aggressiveness, the consecutive recommendations count does not increase for thefirst four recommendations. In fact, the Recommendation Count resets to 1 with each recommendation because
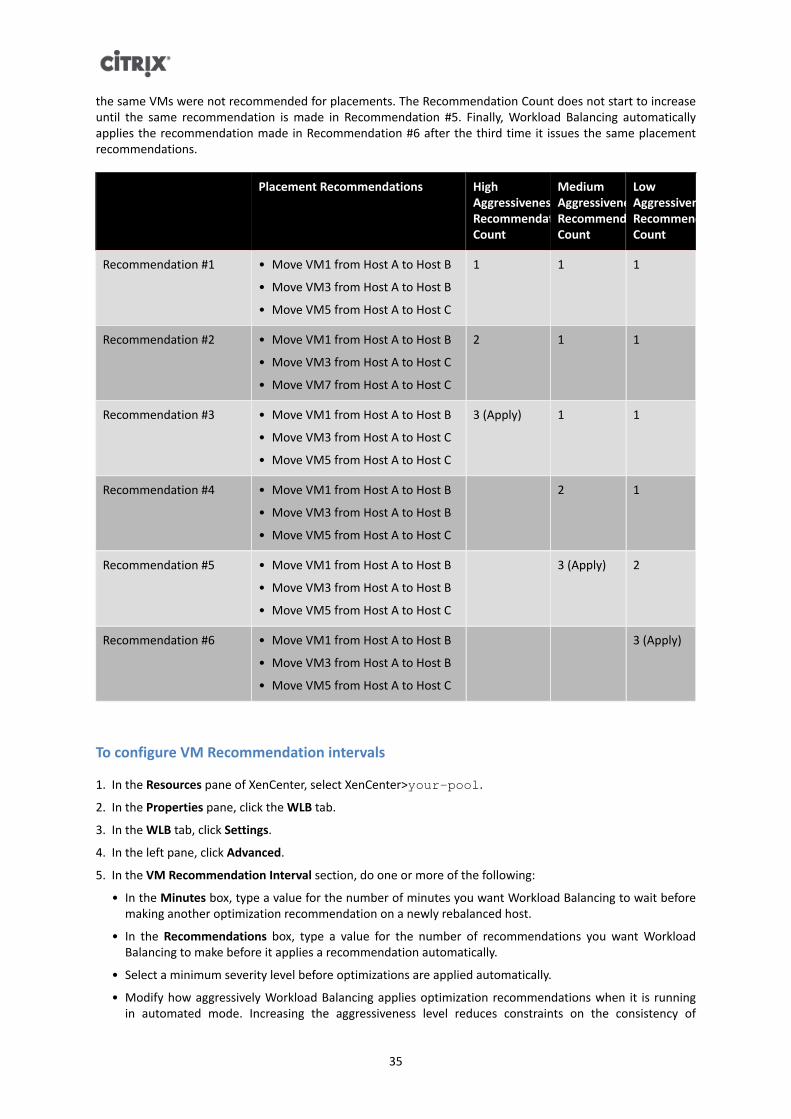
35
the same VMs were not recommended for placements. The Recommendation Count does not start to increaseuntil the same recommendation is made in Recommendation #5. Finally, Workload Balancing automaticallyapplies the recommendation made in Recommendation #6 after the third time it issues the same placementrecommendations.
Placement Recommendations HighAggressiveness,RecommendationCount
MediumAggressiveness,RecommendationCount
LowAggressiveness,RecommendationCount
Recommendation #1 • Move VM1 from Host A to Host B
• Move VM3 from Host A to Host B
• Move VM5 from Host A to Host C
1 1 1
Recommendation #2 • Move VM1 from Host A to Host B
• Move VM3 from Host A to Host C
• Move VM7 from Host A to Host C
2 1 1
Recommendation #3 • Move VM1 from Host A to Host B
• Move VM3 from Host A to Host C
• Move VM5 from Host A to Host C
3 (Apply) 1 1
Recommendation #4 • Move VM1 from Host A to Host B
• Move VM3 from Host A to Host B
• Move VM5 from Host A to Host C
2 1
Recommendation #5 • Move VM1 from Host A to Host B
• Move VM3 from Host A to Host B
• Move VM5 from Host A to Host C
3 (Apply) 2
Recommendation #6 • Move VM1 from Host A to Host B
• Move VM3 from Host A to Host B
• Move VM5 from Host A to Host C
3 (Apply)
To configure VM Recommendation intervals
1. In the Resources pane of XenCenter, select XenCenter>your-pool.
2. In the Properties pane, click the WLB tab.
3. In the WLB tab, click Settings.
4. In the left pane, click Advanced.
5. In the VM Recommendation Interval section, do one or more of the following:
• In the Minutes box, type a value for the number of minutes you want Workload Balancing to wait beforemaking another optimization recommendation on a newly rebalanced host.
• In the Recommendations box, type a value for the number of recommendations you want WorkloadBalancing to make before it applies a recommendation automatically.
• Select a minimum severity level before optimizations are applied automatically.
• Modify how aggressively Workload Balancing applies optimization recommendations when it is runningin automated mode. Increasing the aggressiveness level reduces constraints on the consistency of

36
recommendations before automatically applying them. The Optimization Aggressiveness setting directlycomplements the Recommendation Count setting (that is, the Recommendations box).
Note:
If you type "1" for the value in the Recommendations setting, the OptimizationAggressiveness setting is not relevant.
37
Administering Workload BalancingThis chapter provides information about the following topics:
• How to reconfigure a pool to use a different Workload Balancing virtual appliance
• How to disconnect a pool from Workload Balancing or temporarily stop Workload Balancing
• Database grooming
• How to change configuration options
Administering and Maintaining Workload Balancing
After Workload Balancing has been up and running for a while, there are routine tasks that you may need toperform in order to keep Workload Balancing running optimally. These tasks may arise either as the result ofchanges to your environment (such as different IP addresses or credentials), hardware upgrades, or routinemaintenance.
Some administrative tasks you may want to perform on Workload Balancing include:
• Connecting or reconnecting a pool to a Workload Balancing virtual appliance
• Reconfiguring a pool to use another Workload Balancing virtual appliance
• Renaming the Workload Balancing user account
• Disconnecting the Workload Balancing virtual appliance from a pool
• Removing the Workload Balancing virtual appliance
• Understanding the Role Based Access Control permissions Workload Balancing requires
Workload Balancing lets you fine-tune some aspects of its behavior through a configuration file known as thewlb.conf file.
This section also discusses some database administration tasks for those interested in additional ways to managethe Workload Balancing database.
Connecting to the Workload Balancing Virtual Appliance
After Workload Balancing configuration, you must connect the pool you want managed to the Workload Balancingvirtual appliance using either the XE commands or the Connect to WLB Server dialog box in XenCenter. Likewise,you might need to reconnect to the same virtual appliance at some point.
To complete the XenCenter procedure that follows, you need the:
• Host name (or IP address) and port of the Workload Balancing virtual appliance.
• Credentials for the resource pool you want Workload Balancing to monitor.
• Credentials for the account you created on the Workload Balancing virtual appliance. This is often known as theWorkload Balancing user account. XenServer uses this account to communicates with Workload Balancing. Youcreated this account on the Workload Balancing virtual appliance during Workload Balancing Configuration.
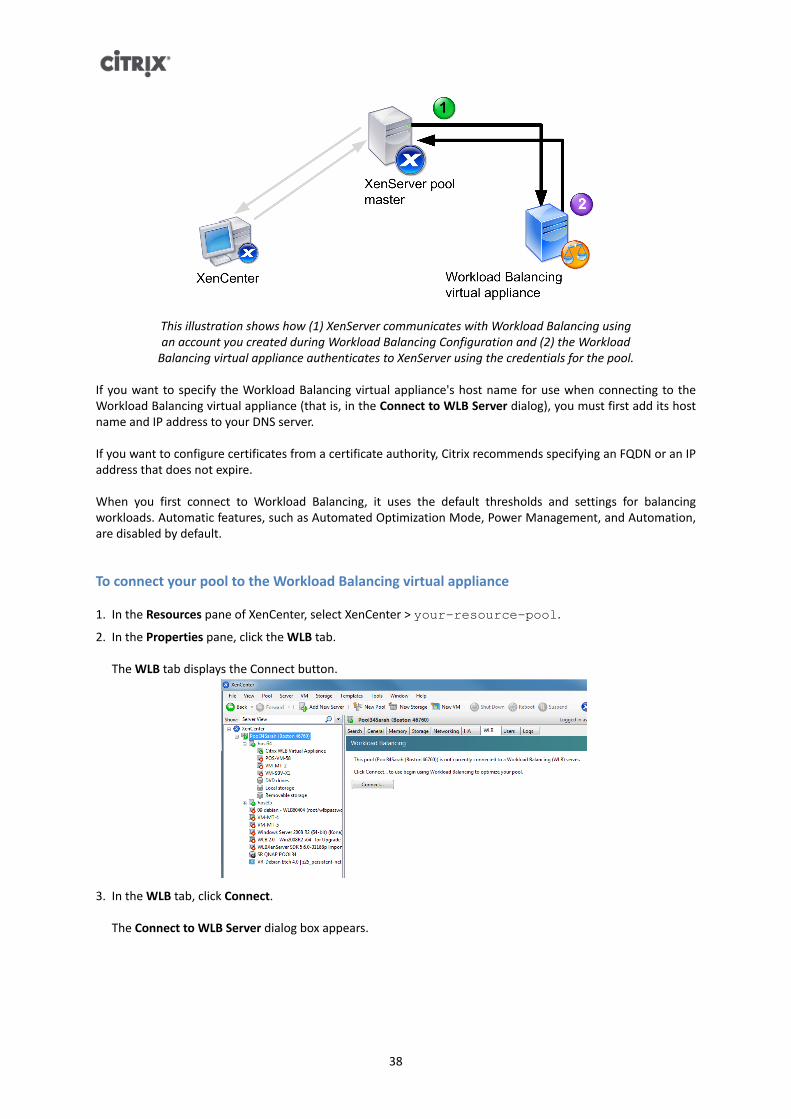
38
This illustration shows how (1) XenServer communicates with Workload Balancing usingan account you created during Workload Balancing Configuration and (2) the Workload
Balancing virtual appliance authenticates to XenServer using the credentials for the pool.
If you want to specify the Workload Balancing virtual appliance's host name for use when connecting to theWorkload Balancing virtual appliance (that is, in the Connect to WLB Server dialog), you must first add its hostname and IP address to your DNS server.
If you want to configure certificates from a certificate authority, Citrix recommends specifying an FQDN or an IPaddress that does not expire.
When you first connect to Workload Balancing, it uses the default thresholds and settings for balancingworkloads. Automatic features, such as Automated Optimization Mode, Power Management, and Automation,are disabled by default.
To connect your pool to the Workload Balancing virtual appliance
1. In the Resources pane of XenCenter, select XenCenter > your-resource-pool.
2. In the Properties pane, click the WLB tab.
The WLB tab displays the Connect button.
3. In the WLB tab, click Connect.
The Connect to WLB Server dialog box appears.
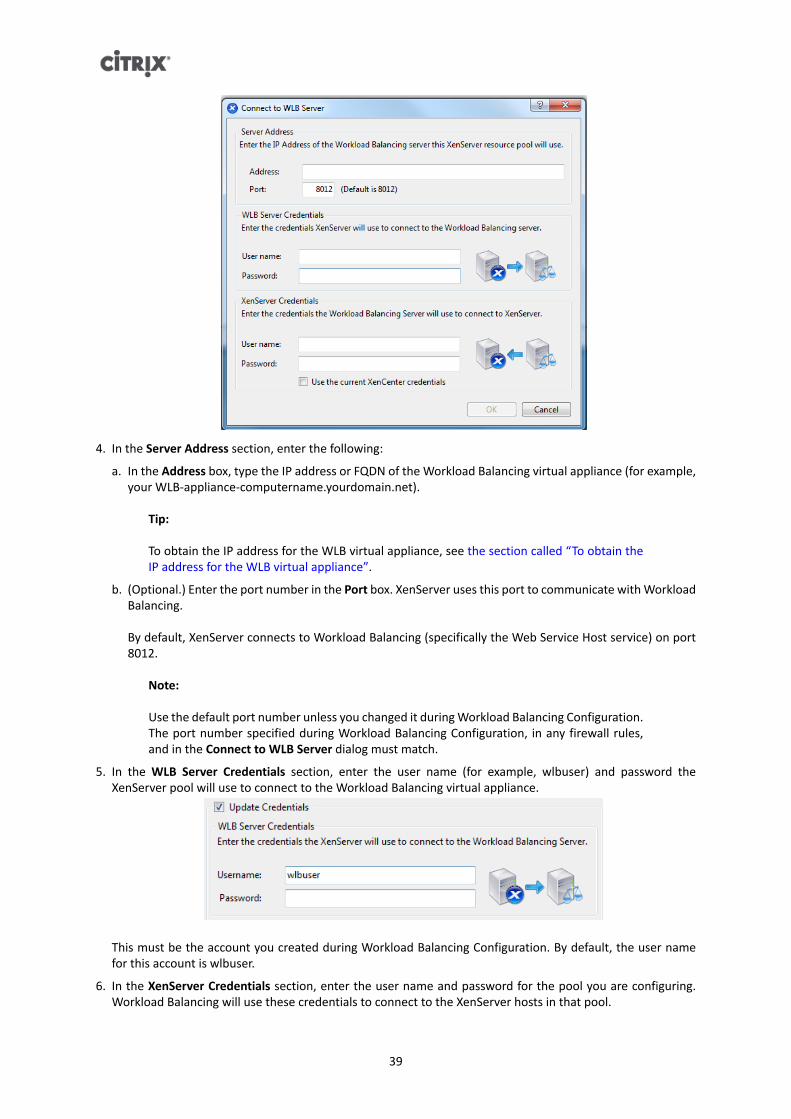
39
4. In the Server Address section, enter the following:
a. In the Address box, type the IP address or FQDN of the Workload Balancing virtual appliance (for example,your WLB-appliance-computername.yourdomain.net).
Tip:
To obtain the IP address for the WLB virtual appliance, see the section called “To obtain theIP address for the WLB virtual appliance”.
b. (Optional.) Enter the port number in the Port box. XenServer uses this port to communicate with WorkloadBalancing.
By default, XenServer connects to Workload Balancing (specifically the Web Service Host service) on port8012.
Note:
Use the default port number unless you changed it during Workload Balancing Configuration.The port number specified during Workload Balancing Configuration, in any firewall rules,and in the Connect to WLB Server dialog must match.
5. In the WLB Server Credentials section, enter the user name (for example, wlbuser) and password theXenServer pool will use to connect to the Workload Balancing virtual appliance.
This must be the account you created during Workload Balancing Configuration. By default, the user namefor this account is wlbuser.
6. In the XenServer Credentials section, enter the user name and password for the pool you are configuring.Workload Balancing will use these credentials to connect to the XenServer hosts in that pool.
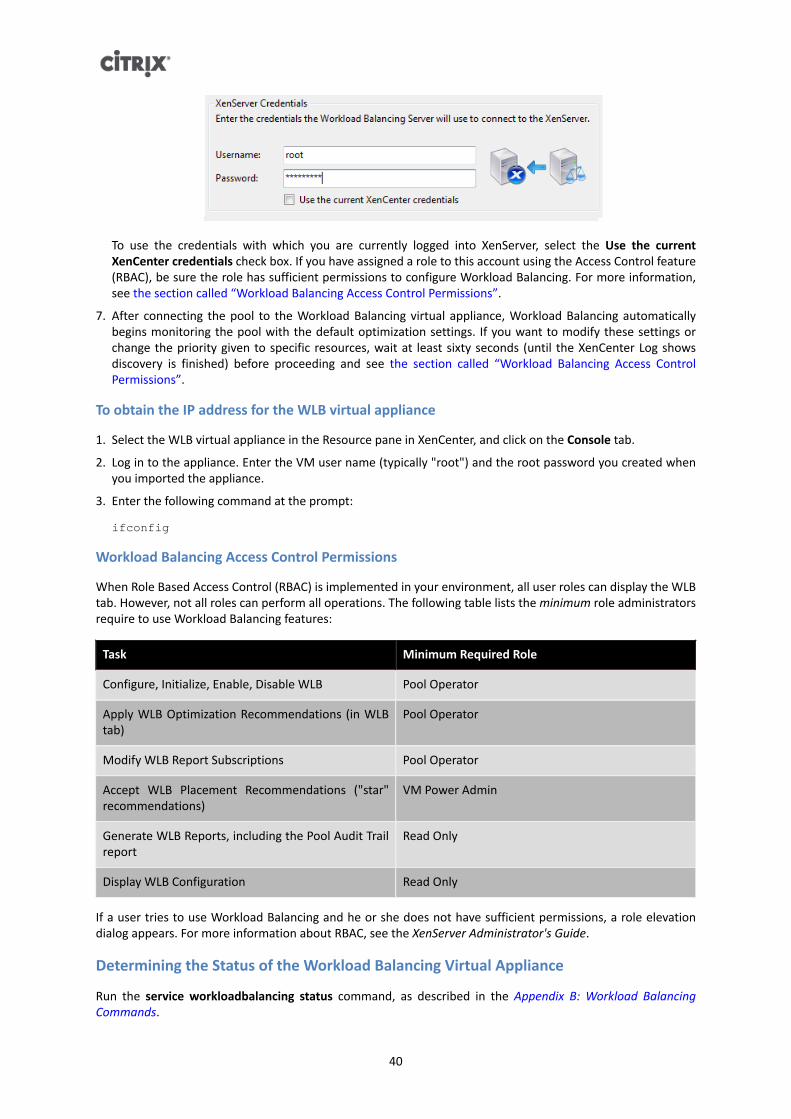
40
To use the credentials with which you are currently logged into XenServer, select the Use the currentXenCenter credentials check box. If you have assigned a role to this account using the Access Control feature(RBAC), be sure the role has sufficient permissions to configure Workload Balancing. For more information,see the section called “Workload Balancing Access Control Permissions”.
7. After connecting the pool to the Workload Balancing virtual appliance, Workload Balancing automaticallybegins monitoring the pool with the default optimization settings. If you want to modify these settings orchange the priority given to specific resources, wait at least sixty seconds (until the XenCenter Log showsdiscovery is finished) before proceeding and see the section called “Workload Balancing Access ControlPermissions”.
To obtain the IP address for the WLB virtual appliance
1. Select the WLB virtual appliance in the Resource pane in XenCenter, and click on the Console tab.
2. Log in to the appliance. Enter the VM user name (typically "root") and the root password you created whenyou imported the appliance.
3. Enter the following command at the prompt:
ifconfig
Workload Balancing Access Control Permissions
When Role Based Access Control (RBAC) is implemented in your environment, all user roles can display the WLBtab. However, not all roles can perform all operations. The following table lists the minimum role administratorsrequire to use Workload Balancing features:
Task Minimum Required Role
Configure, Initialize, Enable, Disable WLB Pool Operator
Apply WLB Optimization Recommendations (in WLBtab)
Pool Operator
Modify WLB Report Subscriptions Pool Operator
Accept WLB Placement Recommendations ("star"recommendations)
VM Power Admin
Generate WLB Reports, including the Pool Audit Trailreport
Read Only
Display WLB Configuration Read Only
If a user tries to use Workload Balancing and he or she does not have sufficient permissions, a role elevationdialog appears. For more information about RBAC, see the XenServer Administrator's Guide.
Determining the Status of the Workload Balancing Virtual Appliance
Run the service workloadbalancing status command, as described in the Appendix B: Workload BalancingCommands.
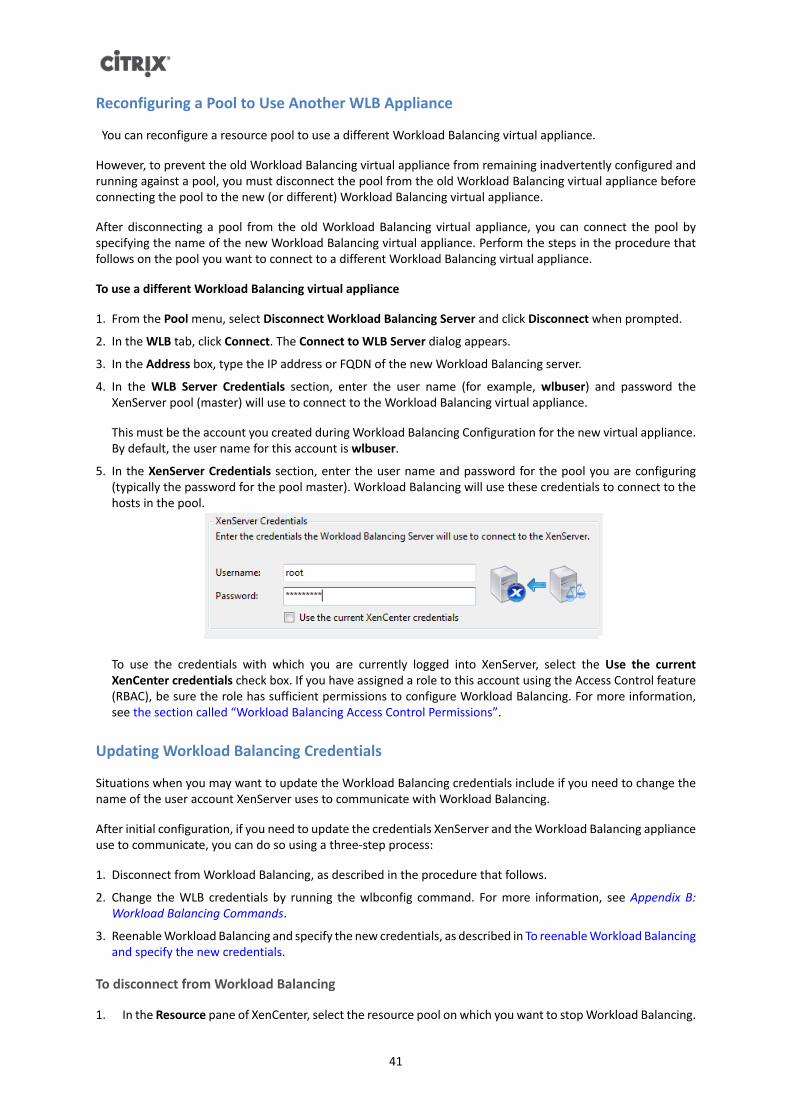
41
Reconfiguring a Pool to Use Another WLB Appliance
You can reconfigure a resource pool to use a different Workload Balancing virtual appliance.
However, to prevent the old Workload Balancing virtual appliance from remaining inadvertently configured andrunning against a pool, you must disconnect the pool from the old Workload Balancing virtual appliance beforeconnecting the pool to the new (or different) Workload Balancing virtual appliance.
After disconnecting a pool from the old Workload Balancing virtual appliance, you can connect the pool byspecifying the name of the new Workload Balancing virtual appliance. Perform the steps in the procedure thatfollows on the pool you want to connect to a different Workload Balancing virtual appliance.
To use a different Workload Balancing virtual appliance
1. From the Pool menu, select Disconnect Workload Balancing Server and click Disconnect when prompted.
2. In the WLB tab, click Connect. The Connect to WLB Server dialog appears.
3. In the Address box, type the IP address or FQDN of the new Workload Balancing server.
4. In the WLB Server Credentials section, enter the user name (for example, wlbuser) and password theXenServer pool (master) will use to connect to the Workload Balancing virtual appliance.
This must be the account you created during Workload Balancing Configuration for the new virtual appliance.By default, the user name for this account is wlbuser.
5. In the XenServer Credentials section, enter the user name and password for the pool you are configuring(typically the password for the pool master). Workload Balancing will use these credentials to connect to thehosts in the pool.
To use the credentials with which you are currently logged into XenServer, select the Use the currentXenCenter credentials check box. If you have assigned a role to this account using the Access Control feature(RBAC), be sure the role has sufficient permissions to configure Workload Balancing. For more information,see the section called “Workload Balancing Access Control Permissions”.
Updating Workload Balancing Credentials
Situations when you may want to update the Workload Balancing credentials include if you need to change thename of the user account XenServer uses to communicate with Workload Balancing.
After initial configuration, if you need to update the credentials XenServer and the Workload Balancing applianceuse to communicate, you can do so using a three-step process:
1. Disconnect from Workload Balancing, as described in the procedure that follows.
2. Change the WLB credentials by running the wlbconfig command. For more information, see Appendix B:Workload Balancing Commands.
3. Reenable Workload Balancing and specify the new credentials, as described in To reenable Workload Balancingand specify the new credentials.
To disconnect from Workload Balancing
1. In the Resource pane of XenCenter, select the resource pool on which you want to stop Workload Balancing.
42
2. From the Pool menu, select Disconnect Workload Balancing Server. The Disconnect Workload Balancingdialog box appears.
3. Click Disconnect to permanently stop Workload Balancing to stop Workload Balancing from monitoring thepool.
To reenable Workload Balancing and specify the new credentials
1. After the progress bar completes, click Connect.
The Connect to WLB Server dialog box appears.
2. Click Update Credentials.
3. In the Server Address section, modify the following as desired:
• In the Address box, type the IP address or FQDN of the Workload Balancing appliance.
• (Optional.) If you changed the port number during Workload Balancing Configuration, enter that portnumber. The port number you specify in this box and during Workload Balancing Configuration is the portnumber XenServer uses to connect to Workload Balancing.
By default, XenServer connects to Workload Balancing on port 8012.
Note:
Do not edit this port number unless you have changed it during Workload Balancing Setup.The port number value specified during Setup and in the Workload Balancing Configurationdialog must match.
4. In the WLB Server Credentials section, enter the user name (for example, wlbuser) and password thecomputers running XenServer will use to connect to the Workload Balancing server.
5. In the XenServer Credentials section, enter the user name and password for the pool you are configuring(typically the password for the pool master). Workload Balancing will use these credentials to connect tothe computers running XenServer in that pool.
6. In the XenServer Credentials section, enter the user name and password for the pool you are configuring.Workload Balancing will use these credentials to connect to the computers running XenServer in that pool.
To use the credentials with which you are currently logged into XenServer, select the Use the currentXenCenter credentials check box.
Stopping Workload Balancing
Because Workload Balancing is configured at the pool level, when you want it to stop managing a pool, you mustdo one of the following:
• Pause Workload Balancing. Pausing Workload Balancing stops XenCenter from displaying recommendationsfor the specified resource pool and managing the pool. Pausing is designed for a short period of time and letsyou resume monitoring without having to reconfigure. When you pause Workload Balancing, data collectionstops for that resource pool until you enable Workload Balancing again.
• Disconnect the pool from Workload Balancing. Disconnecting from the Workload Balancing virtual appliancebreaks the connection between the pool and the deletes the pool data from the Workload Balancing database.When you disconnect from Workload Balancing, Workload Balancing stops collecting data on the pool.
To pause Workload Balancing temporarily
1. In the Resource pane of XenCenter, select the resource pool for which you want to disable WorkloadBalancing.
2. In the WLB tab, click Pause. A message appears on the WLB tab indicating that Workload Balancing iscurrently paused.
43
Tip:
To resume monitoring, click the Resume button in the WLB tab.
To disconnect a pool from Workload Balancing
1. In the Resource pane of XenCenter, select the resource pool on which you want to stop Workload Balancing.
2. From the Pool menu, select Disconnect Workload Balancing Server. The Disconnect Workload Balancingdialog box appears.
3. Click Disconnect to permanently stop Workload Balancing from monitoring the pool.
Tip:
If you disconnected the pool from the Workload Balancing virtual appliance, to re-enableWorkload Balancing on that pool, you must reconnect to a Workload Balancing appliance.For information, see the the section called “Connecting to the Workload Balancing VirtualAppliance”.
Entering Maintenance Mode with Workload Balancing Enabled
When Workload Balancing is enabled, if you take a physical host offline for maintenance (that is, suspend a hostby entering Maintenance Mode), XenServer automatically migrates the virtual machines running on that host totheir optimal hosts when available. XenServer migrates them based on Workload Balancing recommendations(performance data, your placement strategy, and performance thresholds).
If an optimal host is not available, the words Click here to suspend the VM appear in the Enter MaintenanceMode dialog box. In this case, because there is not a host with sufficient resources to run the virtual machine,Workload Balancing does not recommend a placement. You can either suspend this virtual machine or exitMaintenance Mode and suspend a virtual machine on another host in the same pool. Then, if you reenter theEnter Maintenance Mode dialog box, Workload Balancing might be able to list a host that is a suitable candidatefor migration.
Note:
When you take a host offline for maintenance and Workload Balancing is enabled, the words"Workload Balancing" appear in the upper-right corner of the Enter Maintenance Modedialog box.
To enter maintenance mode with Workload Balancing enabled
1. In the Resources pane of XenCenter, select the physical host that you want to take offline. From the Servermenu, select Enter Maintenance Mode.
2. In the Enter Maintenance Mode dialog box, click Enter maintenance mode. The virtual machines running onthe host are automatically migrated to the optimal host based on the Workload Balancing performance data,your placement strategy, and performance thresholds.
To take the host out of maintenance mode, right-click the host and select Exit Maintenance Mode. When youremove a host from maintenance mode, XenServer automatically restores that host's original virtual machinesto that host.
Increasing the Workload Balancing Disk Size
This procedure explains how to resize the virtual disk of the Workload Balancing virtual appliance. You must shutdown the virtual appliance before performing these steps. Consequently, Workload Balancing will be unavailablefor approximately five minutes.
44
Warning:
Citrix recommends taking a snapshot of your data before performing this procedure.Incorrectly performing these steps can result in corrupting the Workload Balancing virtualappliance.
To extend the size of the Workload Balancing virtual-appliance disk
1. Shut down the Workload Balancing virtual appliance.
2. In the XenCenter resource pane, select the Workload Balancing virtual appliance (typically “Citrix WLB VirtualAppliance”).
3. Click the Storage tab.
4. Select the “vdi_xvda” disk, and click the Properties button.
5. In the “vdi_xvda” Properties dialog, select Size and Location.
6. Increase the disk size as needed, and click OK.
7. Start the Workload Balancing virtual appliance and log in to it.
8. Run the following command on the Workload Balancing virtual appliance:
resize2fs /dev/xvda
9. Run the df –h command to confirm the new disk size.
Removing the Workload Balancing Virtual Appliance
Citrix recommends removing the Workload Balancing virtual appliance by using the standard procedure to deletevirtual machines from XenCenter.
When you delete the Workload Balancing virtual appliance, the PostgreSQL database containing the WorkloadBalancing is deleted. To save this data, you must migrate it from the database before deleting the WorkloadBalancing virtual appliance.
Managing the Workload Balancing Database
The Workload Balancing database is a PostgreSQL database. PostgreSQL is an open-source enterprise-classrelational database. You can find documentation for PostgreSQL by searching the web.
The following information is intended for database administrators and advanced users of PostgreSQL who arecomfortable with database administration tasks. If you are not experienced with PostgreSQL, Citrix recommendsthat you become familiar with it before you attempt the database tasks in the sections that follow.
By default, the PostgreSQL user name is postgres. You set the password for this account during WorkloadBalancing Configuration.
The amount of historical data you can store is based on the size of the virtual disk allocated to Workload Balancing(by default 8GB) and the minimum required space, which is discussed in the section called “Database GroomingParameters”.
If you want to store a lot of historical data, you can do either of the following:
• Make the virtual disk size assigned to the Workload Balancing virtual appliance larger. To do so, import thevirtual appliance, and increase the size of the virtual disk by following the steps in the section called “Increasingthe Workload Balancing Disk Size”.
• Create periodic duplicate back-up copies of the data by enabling remote client access to the database andusing a third-party database administration tool, such as pgAdmin.
In terms of managing the database, you can control the space that database data consumes by configuringdatabase grooming.
45
Controlling Database Grooming
The Workload Balancing database is set up to automatically delete the oldest data whenever the VPX reachesthe minimum amount of disk space Workload Balancing requires to run. By default, the minimum amount ofrequired disk space is set to 1024MB.
The Workload Balancing database grooming options are controlled through the wlb.conf file.
When there is not enough disk space left on the Workload Balancing virtual appliance, Workload Balancingautomatically starts grooming historical data. The process is as follows:
1. At a predefined grooming interval, the Workload Balancing data collector checks if grooming is required.Grooming is required if the database data has grown to the point where the only space that remains unusedis the minimum required disk space. (You can change the grooming interval if desired. However, by defaultWorkload Balancing checks to see if grooming is required once per hour.)
2. If grooming is required, Workload Balancing begins by grooming the data from the oldest day. WorkloadBalancing then checks to see if there is now enough disk space for it to meet the minimum disk-spacerequirement.
3. If deleting the oldest day of data did not free enough disk space, then Workload Balancing does another roundof grooming.
4. If this round of grooming does not meet the required disk space, (by default) Workload Balancing performstwo more round of grooming.
5. If the remaining data still does not meet the required minimum disk size, Workload Balancing repeats thisprocess until it does.
Database Grooming Parameters
There are five parameters in the wlb.conf file that control various aspects of database grooming. They are asfollows:
• GroomingIntervalInHour. Controls how many times in an hour Workload Balancing checks to see if grooming isrequired (that is, if the unused disk space exceeds the required minimum amount of disk space). For example,if you enter "1", Workload Balancing checks the disk space hourly. If you enter "2", Workload Balancing checksdisk space every two hours to determine if grooming needs to occur.
• GroomingRetryCounter. Controls the number of times Workload balancing tries rerunning the groomingdatabase query.
• GroomingDBDataTrimDays. Controls the number of days worth of data Workload Balancing will delete fromthe database each time it tries to groom data. The default value is one day.
• GroomingDBTimeoutInMinute. Controls the number of minutes that the database grooming will take beforeit times out and is canceled. If the grooming query takes longer than is expected and does not finish runningwithin the timeout period, the grooming task is canceled. The default value is 0 minutes, which means thatdatabase grooming never times out.
• GroomingRequiredMinimumDiskSizeInMB. Controls the minimum amount of free space left in the virtual diskassigned to the Workload Balancing virtual appliance. When the data in the virtual disk grows to the pointwhere there is only minimum disk size left on the virtual disk, Workload Balancing begins to trigger databasegrooming. The default value is 1024MB.
To edit these values, see the the section called “Editing the Workload Balancing configuration file”.
Changing the Database Password
While it is possible to change the database password by using the wlb.conf file, Citrix recommends running thewlbconfig command instead, as described in the section called “Modifying the Workload Balancing configurationoptions”.
46
Archiving Database Data
To avoid having older historical data deleted, you can, optionally, copy data from the database for archiving. Todo so, you must perform the following tasks:
1. Enable client authentication on the database.
2. Set up archiving using the PostgreSQL database administration tool of your choice.
Enabling client authentication to the database
While you can connect directly to the database through the Workload Balancing console, you can also use aPostgreSQL database management tool, such as the free utility pgAdmin, which is available on the web. Afterdownloading a database management tool, install it on the computer from which you want to connect to thedatabase (for example, the same laptop where you run XenCenter).
Before you can enable remote client authentication to the database, you must:
1. Modify the database configuration files, including pg_hba.conf file and the postgresql.conf, to allowconnections.
2. Stop the Workload Balancing services, restart the database, and then restart the Workload Balancing services.
3. In the database-management tool, configure the IP address of the database (that is, the IP address of theWorkload Balancing VPX) and the database password.
Modifying the Database Configuration Files
To enable client authentication on the database, you must modify two files on the Workload Balancing virtualappliance: the pg_hba.conf file and the postgresql.conf file.
To edit the pg_hba.conf file
1. Modify the pg_hba.conf file. From the Workload Balancing virtual appliance console, open the pg_hba.conffile with an editor, such as VI. For example:
vi /var/lib/pgsql/9.0/data/pg_hba.conf
2. If your network uses IPv4, add the IP address from the connecting computer to this file. For example:
In the configuration section, enter the following under #IPv4 local connections:
TYPE DATABASE USER CIDR-ADDRESS METHOD
host all all 0.0.0.0/0 trust
Enter your IP address in the CIDR-ADDRESS field.
Note:
Instead of entering 0.0.0.0/0, you can enter your IP address and replace the last three digitswith 0/24. The trailing "24" after the / defines the subnet mask and only allows connectionsfrom IP addresses within that subnet mask.
When you enter trust for the Method field, it enables the connection to authenticate without requiring apassword. If you enter password for the Method field, you must supply a password when connecting tothe database.
3. If your network uses IPv6, add the IP address from the connecting computer to this file. For example:
Enter the following under #IPv6 local connections:
47
TYPE DATABASE USER CIDR-ADDRESS METHOD
host all all ::0/0 trust
Enter the IPv6 addresses in the CIDR-ADDRESS field. In this example, the ::0/0 opens the database up toconnections from any IPv6 addresses.
4. Save the file and quit the editor.
5. After changing any database configurations, you must restart the database to apply the changes. Run thefollowing command:
service postgresql-9.0 restart
To edit the postgresql.conf file
1. Modify the postgresql.conf file. From the Workload Balancing virtual appliance console, open thepostgresql.conf file with an editor, such as VI. For example:
vi /var/lib/pgsql/9.0/data/postgresql.conf
2. Edit the file so that it listens on any port and not just the local host. For example:
a. Find the following line:
# listen_addresses='localhost'
b. Remove the comment symbol (#) and edit the line to read as follows:
listen_addresses='*'
3. Save the file and quit the editor.
4. After changing any database configurations, you must restart the database to apply the changes. Run thefollowing command:
service postgresql-9.0 restart
Changing the Database Maintenance Window
Workload Balancing automatically performs routine database maintenance every night at 12:05AM GMT (00:05),by default. During this maintenance window, data collection occurs but the recording of data may be delayed.However, the Workload Balancing user interface controls are available during this period and Workload Balancingstill makes optimization recommendations.
Database maintenance includes releasing allocated unused disk space and re-indexing the database.Maintenance lasts for approximately 6 to 8 minutes. In larger pools, maintenance may last longer.
Depending on your time zone, you may want to change the time when maintenance occurs. For example, in theJapan Standard Time (JST) time zone, Workload Balancing maintenance will occur at 9:05 AM (09:05), which mayconflict with peak usage in some organizations. If you want to specify a seasonal time change, such as DaylightSaving Time or summer time, you must build the change into value you enter.
Tip:
You can find more information about crontab and its syntax by searching the web.
To change the maintenance time
1. In the Workload Balancing console, run the following command from any directory:
crontab -e
Workload Balancing displays the following:
48
05 0 * * * /opt/citrix/wlb/wlbmaintenance.sh
05 0 represents the default time for Workload Balancing to perform maintenance in minutes (05) and thenhours (0). (The asterisks represent the day, month, and year the job will run: do not edit these fields.) 05 0indicates database maintenance occurs at 12:05 AM, or 00:05, Greenwich Mean Time (GMT) every night.This means, for example, that if you live in New York city in the United States, by default, the maintenancewould run at 7:05 PM (19:05) during winter months and 8:05 PM in summer months.
Important:
Do not edit the day, month, and year the job will run (as represented by asterisks). Databasemaintenance must run daily.
2. Enter the time at which you want maintenance to occur in GMT. For example, assuming that you want themaintenance to run at midnight:
If your time zone is... UTC Offset Value for Maintenanceto Run at 12:05 AMLocal Time
Value in DaylightSaving Time
Pacific Time Zone (PST)in the United States (forexample, California)
UTC-08 05 8 05 7
Japan Standard Time(JST)
UTC+09 05 15 N/A
3. Save the file and quit the editor.
Customizing Workload Balancing
Workload Balancing provides several methods of customization:
• Command lines for scripting. See the commands in Appendix B: Workload Balancing Commands.
• Host Power On scripting support. You can also customize Workload Balancing (indirectly) through the HostPower On scripting. How to create a custom script for Host Power On is documented in the XenServerAdministrator's Guide.
49
Appendix A: XenServer Workload BalancingTroubleshootingTroubleshooting Workload BalancingWhile Workload Balancing usually runs smoothly, this series of topics provides guidance in case you encounterissues.
General Troubleshooting Tips
• Start troubleshooting by reviewing the Workload Balancing log files (LogFile.log and wlb_install_log.log). Youcan find these logs in Workload Balancing virtual appliance in this location (by default):
• /var/log/wlb
• Check the logs in the XenCenter Logs tab for more (different) information.
• To check the Workload Balancing virtual appliance build number, run the following command on a XenServerhost in a pool being monitored by that VPX:
xe pool-retrieve-wlb-diagnostics | more
The Workload Balancing version number appears at the top of the output.
Error Messages
Workload Balancing displays errors on screen as dialog boxes and as error messages in the Logs tab in XenCenter.
If an error message appears, review the XenCenter event log for additional information. For information aboutthe location of this log, see the XenCenter Help.
Issues Entering Workload Balancing Credentials
If you cannot successfully enter the virtual appliance user account and password while configuring the Connectto WLB Server dialog, try the following:
• Make sure that Workload Balancing virtual appliance imported and was configured correctly and all of itsservices are running. See the section called “service workloadbalancing start”.
• Check to make sure you are entering the correct credentials. The default credentials appear in the WorkloadBalancing Quick Start.
• You can enter a host name in the Address box, but it must be the fully qualified domain name (FQDN) of theWorkload Balancing virtual appliance (and not the host name of the physical server hosting the appliance). Forexample, yourcomputername.yourdomain.net. If you are having trouble entering a computer name,try using the Workload Balancing appliance's IP address instead.
• Verify that the host is using the correct DNS server and the XenServer host can contact Workload Balancingserver using its FQDN. To do this, ping the Workload Balancing appliance using its FQDN from the XenServerhost. For example, enter the following in the XenServer host console:
ping wlb-vpx-1.mydomain.net
Issues with Firewalls
The following error appears if the Workload Balancing virtual appliance is behind a (hardware) firewall, and youdid not configure the appropriate firewall settings: "There was an error connecting to the Workload Balancingserver: <pool name> Click Initialize WLB to reinitialize the connection settings." This error may also appear if theWorkload Balancing appliance is otherwise unreachable.
50
Resolution
If the Workload Balancing virtual appliance is behind a firewall, you must open port 8012.
Likewise, the port XenServer uses to contact Workload Balancing (8012 by default), must match the port numberspecified when you ran the Workload Balancing Configuration wizard.
Losing the Connection to Workload Balancing
If, after configuring and connecting to Workload Balancing, you receive a connection error, the credentials mayno longer be valid. To isolate this issue, try:
• Verifying the credentials you entered in the Connect to WLB Server dialog box match the credentials:
• You created during Workload Balancing Configuration
• On XenServer (that is, the pool master credentials)
• Verifying the IP address or FQDN for the Workload Balancing virtual appliance that you entered in the Connectto WLB Server dialog box is correct.
• Verifying the user name you created during Workload Balancing Configuration matches the credentials youentered in the Connect to WLB Server dialog box.
Workload Balancing Connection Errors
If you receive a connection error in the Workload Balancing Status line on the WLB tab, you might need toreconfigure Workload Balancing on that resource pool.
Click the Connect button on the WLB tab and reenter the server credentials.
Workload Balancing Stops Working
If Workload Balancing does not work (for example, it does not let you save any changes to settings, or star ratingsand/or optimization recommendations do not appear), check the Workload Balancing log file for the followingerror message:
"dwmdatacolsvc.exe: Don't have a valid pool. Trying again in 10 minutes."
Cause
This typically occurs in pools that have one or more problematic VMs. When VMs are problematic, this maybecome evident as follows:
• Windows. The Windows VM crashes due to a stop error ("blue screen").
• Linux. The Linux VM may be unresponsive in the console and typically does not shut down.
Workaround
1. Force the VM to shut down. To do so, you can do one of the following on the host with the problematic VM:
• In XenCenter, select the VM, and then from the VM menu, click Force Shutdown.
• Run the vm-shutdown XE command with the <force> parameter set to true as described in the XenServerAdministrator's Guide. For example:
xe vm-shutdown \vm-selector=<vm_selector_value> \force=<true> \on=XenServer <host UUID>
51
You can find the host UUID on the General tab for that host (in XenCenter) or by running the host-list xecommand. The options for the <vm-selector> parameter are described in the XenServer Administrator'sGuide .
2. In the xsconsole of the XenServer hosting the crashed VM or in XenCenter, migrate all of the VMs to anotherhost, then run the xe-toolstack-restart command.
Issues Changing Workload Balancing Servers
If you connect a resource pool to a different Workload Balancing server without disconnecting from WorkloadBalancing, both the old and new Workload Balancing server will monitor the pool.
To solve this problem, you can either shutdown and delete the old Workload Balancing virtual appliance ormanually stop the Workload Balancing services (analysis, data collector and Web service) so that it will no longermonitor the pool.
Note:
Citrix does not recommend using the pool-deconfigure-wlb xe command to disconnect a poolfrom the Workload Balancing virtual appliance or using the pool-initialize-wlb xe commandto specify a different appliance.
52
Appendix B: Workload BalancingCommandsThis appendix provides a reference for the Workload Balancing commands that you can perform from a XenServerhost or console to control Workload Balancing or configure Workload Balancing settings on the XenServer host.This appendix includes xe commands and service commands.
Service CommandsRun the following service commands on the Workload Balancing appliance. To do so, you must log in to theWorkload Balancing virtual appliance.
Logging in to the Workload Balancing Virtual Appliance
Before you can run any service commands or edit the wlb.conf file, you must log in to the Workload Balancingvirtual appliance. To do so, you must enter a user name and password. Unless you created additional useraccounts on the virtual appliance, log in using the root user account. You specified this account when you ranWorkload Balancing Configuration wizard (before you connected your pool to Workload Balancing). You can,optionally, use the Console tab in XenCenter to log in to the appliance.
To log in to the Workload Balancing virtual appliance
1. At the <name-of-your-WLB-VPX> login prompt, enter the account user name. For example, where wlb-vpx-pos-pool is the name of your Workload Balancing appliance:
wlb-vpx-pos-pool login: root
2. At the Password prompt, enter the password for the account:
wlb-vpx-pos-pool login: root
Note:
To log off the Workload Balancing virtual appliance, simply type logout at the commandprompt.
service workloadbalancing restart
Run the service workloadbalancing start command from anywhere in the Workload Balancing appliance to stopand then restart the Workload Balancing Data Collection, Web Service, and Data Analysis services.
service workloadbalancing start
Run the service workloadbalancing start command from anywhere in the Workload Balancing appliance to startthe Workload Balancing Data Collection, Web Service, and Data Analysis services.
service workloadbalancing stop
Run the service workloadbalancing stop command from anywhere in the Workload Balancing appliance to stopthe Workload Balancing Data Collection, Web Service, and Data Analysis services.
service workloadbalancing status
Run the service workloadbalancing status command from anywhere in the Workload Balancing appliance todetermine the status of the Workload Balancing server. After you execute this command, the status of the threeWorkload Balancing services (the Web Service, Data Collection Service, and Data Analysis Service) is displayed.
53
Modifying the Workload Balancing configuration options
Many Workload Balancing configurations, such as the database and web-service configuration options, arestored in the wlb.conf file, a configuration file on the Workload Balancing virtual appliance.
To make it easier to modify the most commonly used options, Citrix provides a command, wlbconfig. Runningthe wlbconfig command on the Workload Balancing virtual appliance lets you rename the Workload Balancinguser account, change its password, or change the PostgreSQL password. After you execute this command, theWorkload Balancing services are restarted.
To run the wlbconfig command
• Run the following from the command prompt:
wlbconfig
The screen displays a series of questions guiding you through changing your Workload Balancing user nameand password and the PostgreSQL password. Follow the questions on the screen to change these items.
Important:
Double-check any values you enter in the wlb.conf file: Workload Balancing does not validatevalues in the wlb.conf file. Consequently, if the configuration parameters you specify are notwithin the required range, Workload Balancing does not generate an error log.
Editing the Workload Balancing configuration file
You can modify Workload Balancing configuration options by editing the wlb.conf file, which is stored in /opt/citrix/wlb directory on the Workload Balancing virtual appliance. In general, Citrix does not recommend changingthe settings in this file without guidance from Citrix; however, there are three categories of settings you canchange if desired:
• Workload Balancing account name and password. It is easier to modify these by running the wlbconfigcommand.
• Database password. This can be modified using the wlb.conf file. However, Citrix recommends modifying itthrough the wlbconfig command since this command modifies the wlb.conf file and automatically updates thepassword in the database. If you choose to modify the wlb.conf file instead, you must run a query to updatethe database with the new password.
• Database grooming parameters. You can modify database grooming parameters, such as the databasegrooming interval, using this file by following the instructions in the database-management section of theWorkload Balancing Administrator's Guide. However, Citrix recommends using caution if you do so.
For all other settings in the wlb.conf file, Citrix currently recommends leaving them at their default, unless Citrixinstructed you to modify them.
To edit the wlb.conf file
1. Run the following from the command prompt on the Workload Balancing virtual appliance (using VI as anexample):
vi /opt/citrix/wlb/wlb.conf
The screen displays several different sections of configuration options.
2. Modify the configuration options, and exit the editor.
You do not need to restart Workload Balancing services after editing the wlb.conf file. The changes go intoeffect immediately after exiting the editor.
Important:
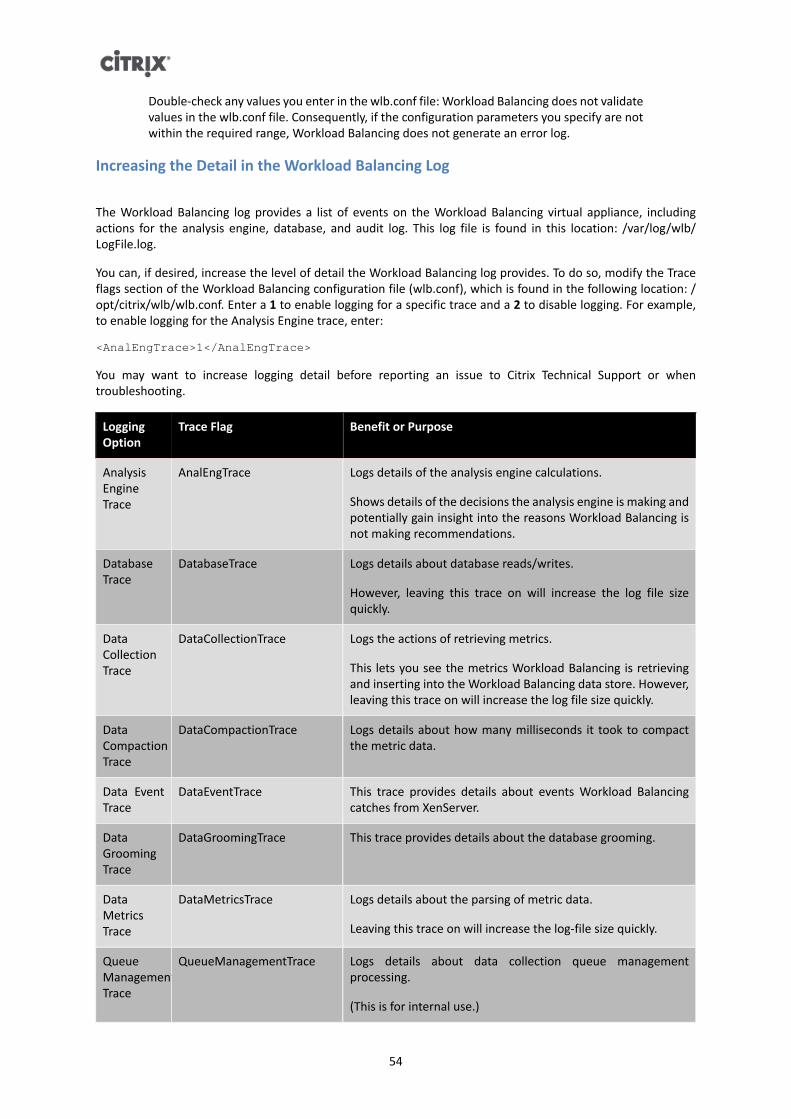
54
Double-check any values you enter in the wlb.conf file: Workload Balancing does not validatevalues in the wlb.conf file. Consequently, if the configuration parameters you specify are notwithin the required range, Workload Balancing does not generate an error log.
Increasing the Detail in the Workload Balancing Log
The Workload Balancing log provides a list of events on the Workload Balancing virtual appliance, includingactions for the analysis engine, database, and audit log. This log file is found in this location: /var/log/wlb/LogFile.log.
You can, if desired, increase the level of detail the Workload Balancing log provides. To do so, modify the Traceflags section of the Workload Balancing configuration file (wlb.conf), which is found in the following location: /opt/citrix/wlb/wlb.conf. Enter a 1 to enable logging for a specific trace and a 2 to disable logging. For example,to enable logging for the Analysis Engine trace, enter:
<AnalEngTrace>1</AnalEngTrace>
You may want to increase logging detail before reporting an issue to Citrix Technical Support or whentroubleshooting.
LoggingOption
Trace Flag Benefit or Purpose
AnalysisEngineTrace
AnalEngTrace Logs details of the analysis engine calculations.
Shows details of the decisions the analysis engine is making andpotentially gain insight into the reasons Workload Balancing isnot making recommendations.
DatabaseTrace
DatabaseTrace Logs details about database reads/writes.
However, leaving this trace on will increase the log file sizequickly.
DataCollectionTrace
DataCollectionTrace Logs the actions of retrieving metrics.
This lets you see the metrics Workload Balancing is retrievingand inserting into the Workload Balancing data store. However,leaving this trace on will increase the log file size quickly.
DataCompactionTrace
DataCompactionTrace Logs details about how many milliseconds it took to compactthe metric data.
Data EventTrace
DataEventTrace This trace provides details about events Workload Balancingcatches from XenServer.
DataGroomingTrace
DataGroomingTrace This trace provides details about the database grooming.
DataMetricsTrace
DataMetricsTrace Logs details about the parsing of metric data.
Leaving this trace on will increase the log-file size quickly.
QueueManagementTrace
QueueManagementTrace Logs details about data collection queue managementprocessing.
(This is for internal use.)
55
LoggingOption
Trace Flag Benefit or Purpose
Data SaveTrace
DataSaveTrace Logs details about the pool being saved to the database.
Score HostTrace
ScoreHostTrace Logs details about how Workload Balancing is arriving at a scorefor a host.
This trace shows the detailed scores generated by WorkloadBalancing when it calculates the star ratings for selectingoptimal servers for VM placement.
Audit LogTrace
AuditLogTrace Shows the action of the audit log data being captured andwritten.
(This is generally only for internal use and does not provideinformation that is captured in the audit log.)
However, leaving this trace on will increase the log file sizequickly.
ScheduledTask Trace
ScheduledTaskTrace Logs details about scheduled tasks.
For example, if your scheduled mode changes or reportsubscriptions are not working, you might want to enable thistrace to investigate the cause.
WebServiceTrace
WlbWebServiceTrace Logs details about the communication with the web-serviceinterface.
Workload Balancing XE CommandsCommands for controlling the Workload Balancing feature.
pool-initialize-wlb
pool-initialize-wlb wlb_url=<wlb_server_address> \wlb_username=<wlb_server_username> \wlb_password=<wlb_server_password> \xenserver_username=<pool_master_username> \xenserver_password=<pool_master_password>
Initializes the connection between the Workload Balancing server and the XenServer pool.
Note:
Initializing a pool requires running two commands. After executing the pool-initialize-wlbcommand, execute xe pool-param-set wlb-enabled=true uuid=<pool-uuid>[].
pool-param-set other-config
Use the pool-param-set other-config command to specify the timeout when communicating with the WorkloadBalancing server. All requests are serialized, and the timeout covers the time from a request being queued to itsresponse being completed. In other words, slow calls cause subsequent ones to be slow. Defaults to 30 secondsif unspecified or if the setting cannot be parsed.
xe pool-param-set other-config:wlb_timeout=<0.01> \uuid=<315688af-5741-cc4d-9046-3b9cea716f69>
56
pool-retrieve-wlb-diagnostics
Use the pool-retrieve-wlb-diagnostics command to return the full contents of the Workload Balancing Log filefor the Workload Balancing server that the pool is currently using. This command also returns some versioninformation.
xe pool-retrieve-wlb-diagnostics \
host-retrieve-wlb-evacuate-recommendations
host-retrieve-wlb-evacuate-recommendations uuid=<host_uuid>
Returns the evacuation recommendations for a host, and a reference to the UUID of the recommendations object.
vm-retrieve-wlb-recommendations
Returns the workload balancing recommendations for the selected VM. The simplest way to select the VM onwhich the operation is to be performed is by supplying the argument vm=<name_or_uuid>. VMs can also bespecified by filtering the full list of VMs on the values of fields. For example, specifying power-state=haltedselects all VMs whose power-state is halted. Where multiple VMs are matching, specify the option --multipleto perform the operation. The full list of fields that can be matched can be obtained by the command xe vm-listparams=all. If no parameters to select VMs are given, the operation will be performed on all VMs.
pool-certificate-list
XenServer Workload Balancing component lets you use certificates to secure communication between XenServerpools and the Workload Balancing server. You can either use the default test certificate, which is createdautomatically during Workload Balancing configuration, or you can specify a certificate from a Trusted Authority.
To use a Trusted Authority certificate, the certificate must be in X.509 format and comply with the guidelinesprovided earlier in the Workload Balancing Administrator's Guide. If you want to verify the presence of acertificate from a Trusted Authority, you must:
pool-certificate-list
Lists all installed SSL certificates.
pool-certificate-install
pool-certificate-install filename=<certificatefilename>
Run this command on the pool to install the certificate on the Workload Balancing virtual appliance on the poolmaster.
pool-certificate-sync
pool-certificate-sync
Run this command on the pool, after running the pool-certificate-install command, to make sure the certificateand certificate revocation lists are synchronized from the pool master to all slaves on the pool.
pool-param-set
pool-param-set wlb-verify-cert=<true> uuid=<uuid_of_pool>
Run this command on the pool, after running the pool-certificate-sync command, to make XenServer alwaysverify the certificate when communicating with the Workload Balancing server.
57
Tip:
Pressing the Tab key automatically populates the UUID of the pool.
pool-deconfigure-wlb
Permanently deletes all workload balancing configuration.
pool-retrieve-wlb-configuration
Prints all Workload Balancing configuration information to standard out.
pool-retrieve-wlb-recommendations
Prints all Workload Balancing recommendations to standard out.
pool-retrieve-wlb-report
Gets a Workload Balancing report of the specified type and saves it to the specified file. XenCenter uses thiscommand when executing Workload Balancing reports. However, running this command from the CLI does notoutput report data in a graphical format. Outputting reports requires using the XenCenter Pool > View WorkloadReports menu command. The available reports are:
• pool_health
• host_health_history
• optimization_performance_history
• pool_optimization_history
• pool_health_history
• vm_chargeback_history
• pool_audit_history
• vm_movement_history
• vm_performance_history
Example usage for each report type is shown below. The utcoffset parameter specifies the number of hoursthe pool's time zone is ahead or behind Coordinated Universal Time (UTC). For example, <-5> represents theEastern Standard Time zone in North America, which is five hours behind UTC. The start parameter and endparameters specify the number of hours to report. For example specifying start=-3 and end=0 will causeWorkload Balancing to report on the last three hours of activity. LocaleCode represents the language for thereport output. You can enter either <en> for English or <ja> for Japanese.
xe pool-retrieve-wlb-report report=pool_health \LocaleCode=<en> \Start=<-3> \End=<0> \PoolID=<c75f9ee9-422f-9cde-4781-24f6cbd9279c> \UTCOffset=<-5> \filename=/<pool_health>.txt \
xe pool-retrieve-wlb-report report=host_health_history \Start=<-3> \End=<0> \PoolID=<c75f9ee9-422f-9cde-4781-24f6cbd9279c> \HostID=<471626e5-8e8b-429b-9990-6013726d7e86> \UTCOffset=<-5> \filename=/<host_health_history.txt> \
58
xe pool-retrieve-wlb-report report=optimization_performance_history \LocaleCode=<en> \Start=-3 \End=0 \PoolID=c75f9ee9-422f-9cde-4781-24f6cbd9279c \UTCOffset=-5 \filename=</optimization_performance_history>.txt \
xe pool-retrieve-wlb-report report=pool_health_history \LocaleCode=<en> \Start=<-3> \End=<0> \PoolID=<c75f9ee9-422f-9cde-4781-24f6cbd9279c> \UTCOffset=<-5> \filename=</pool_health_history>.txt \
xe pool-retrieve-wlb-report report=vm_movement_history \LocaleCode=<en> \Start=<-3> \End=<0> \PoolID=<c75f9ee9-422f-9cde-4781-24f6cbd9279c> \UTCOffset=<-5> \filename=</vm_movement_history>.txt \
xe pool-retrieve-wlb-report report=vm_performance_history \LocaleCode=<en> \Start=<-3> \End=<0> \PoolID=<c75f9ee9-422f-9cde-4781-24f6cbd9279c> \HostID=<471626e5-8e8b-429b-9990-6013726d7e86> \UTCOffset=<-5> \filename=</vm_performance_history>.txt \
xe pool-retrieve-wlb-report report=pool_audit_history \LocaleCode=<en> \Start=<-3> \End=<0> \PoolID=<c75f9ee9-422f-9cde-4781-24f6cbd9279c> \UTCOffset=<-5> \filename=</pool_audit_history>.txt \
xe pool-retrieve-wlb-report report=pool_optimization_historyLocaleCode=<en>Start=<-3>End=<0>PoolID=<c75f9ee9-422f-9cde-4781-24f6cbd9279c>UTCOffset=<-5>filename=</pool_optimization_history>.txt
xe pool-retrieve-wlb-report report=vm_chargeback_historyLocaleCode=<en>Start=<-3>End=<0>PoolID=<c75f9ee9-422f-9cde-4781-24f6cbd9279c>UTCOffset=<-5>filename=</vm_chargeback_history>.txt
pool-send-wlb-configuration
Modifies Workload Balancing configuration settings, including thresholds, Workload Balancing power-management settings, and weightings. It is not mandatory to configure all settings with the command. You canconfigure only some parameters, but not all, if desired.
Before using the pool-send-wlb-configuration command, learn about the default values on your system byrunning pool-retrieve-wlb-configuration.
59
When you run the pool-retrieve-wlb-configuration command, additional parameters appear that are notdocumented in this section. Citrix does not recommend editing these parameters.
pool-send-wlb-configuration[config:HostMemoryThresholdCritical=<HostCpuThresholdCritical=value>\config:HostMemoryThresholdHigh=<HostMemoryThresholdHigh=value>\config:HostPifReadThresholdCritical=<HostPifReadThresholdCritical=value>\config:HostPifReadThresholdHigh=<HostPifReadThresholdHigh=value>\ config:set_host_configuration=<true |false> ...\ ]
Use the pool-send-wlb-configuration command with the arguments <ParticipatesInPowerManagement> and<set_host_configuration> to configure Workload Balancing's Host Power Management feature.
xe pool-send-wlb-configuration \config:<host_21_> \ParticipatesInPowerManagement=<true> \config:set_host_configuration=<true>
60
Appendix C: Configuring Certificates forWorkload BalancingThis chapter provides information about two optional tasks for securing certificates:
• Configuring XenServer to verify a certificate from a Trusted Authority
• Configuring XenServer to verify the default Citrix WLB self-signed certificate
Overview
XenServer and Workload Balancing communicate over HTTPS. Consequently during Workload BalancingConfiguration, the wizard automatically creates a self-signed test certificate. This self-signed test certificate letsWorkload Balancing establish an SSL connection to XenServer.
Note:
The self-signed certificate is a placeholder to facilitate HTTPS communication and is not from atrusted certificate authority. For added security, Citrix recommends using a certificate signedfrom a trusted certificate authority.
By default, Workload Balancing creates this SSL connection with XenServer automatically. You do not needto perform any certificate configurations during or after configuration for Workload Balancing to create thisSSL connection. However, to use a certificate from another certificate authority, such as a signed one from acommercial authority, you must configure Workload Balancing and XenServer to use it.
Regardless of what certificate Workload Balancing uses, by default, XenServer does not validate the identity of thecertificate before it establishes connection to Workload Balancing. To configure XenServer to check for a specificcertificate, you must export the root certificate that was used to sign the certificate, copy it to XenServer, andconfigure XenServer to check for it when a connection to Workload Balancing is made. In this scenario, XenServeracts as the client and Workload Balancing acts as the server.
This illustration shows how XenServer verifies that a specific certificate is present before it lets the WorkloadBalancing virtual appliance establish a connection to it over SSL. In this case, the real certificate (the certificatewith the private key) is on the Workload Balancing server and the certificate that was used to sign it, is on theXenServer pool master.
Depending on your security goals, you can either:
• Configure XenServer to verify the self-signed test certificate. See the section called “Configuring XenServer toVerify the Self-Signed Certificate”.
• Configure XenServer to verify a certificate from a trusted certificate authority. See the section called“Configuring XenServer to Verify a Certificate-authority Certificate ”.
Configuring XenServer to Verify the Self-Signed CertificateYou can configure XenServer to verify that the Citrix WLB self-signed certificate is authentic before XenServerpermits Workload Balancing to connect.
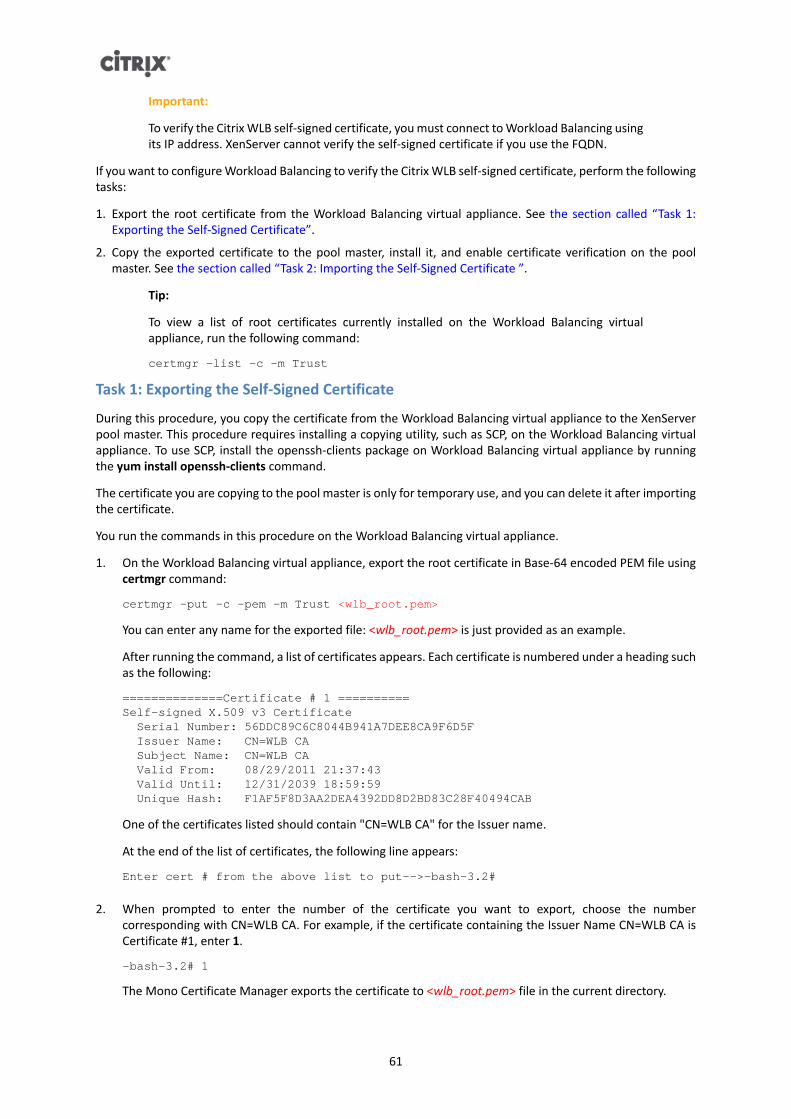
61
Important:
To verify the Citrix WLB self-signed certificate, you must connect to Workload Balancing usingits IP address. XenServer cannot verify the self-signed certificate if you use the FQDN.
If you want to configure Workload Balancing to verify the Citrix WLB self-signed certificate, perform the followingtasks:
1. Export the root certificate from the Workload Balancing virtual appliance. See the section called “Task 1:Exporting the Self-Signed Certificate”.
2. Copy the exported certificate to the pool master, install it, and enable certificate verification on the poolmaster. See the section called “Task 2: Importing the Self-Signed Certificate ”.
Tip:
To view a list of root certificates currently installed on the Workload Balancing virtualappliance, run the following command:
certmgr -list -c -m Trust
Task 1: Exporting the Self-Signed Certificate
During this procedure, you copy the certificate from the Workload Balancing virtual appliance to the XenServerpool master. This procedure requires installing a copying utility, such as SCP, on the Workload Balancing virtualappliance. To use SCP, install the openssh-clients package on Workload Balancing virtual appliance by runningthe yum install openssh-clients command.
The certificate you are copying to the pool master is only for temporary use, and you can delete it after importingthe certificate.
You run the commands in this procedure on the Workload Balancing virtual appliance.
1. On the Workload Balancing virtual appliance, export the root certificate in Base-64 encoded PEM file usingcertmgr command:
certmgr -put -c -pem -m Trust <wlb_root.pem>
You can enter any name for the exported file: <wlb_root.pem> is just provided as an example.
After running the command, a list of certificates appears. Each certificate is numbered under a heading suchas the following:
==============Certificate # 1 ==========Self-signed X.509 v3 Certificate Serial Number: 56DDC89C6C8044B941A7DEE8CA9F6D5F Issuer Name: CN=WLB CA Subject Name: CN=WLB CA Valid From: 08/29/2011 21:37:43 Valid Until: 12/31/2039 18:59:59 Unique Hash: F1AF5F8D3AA2DEA4392DD8D2BD83C28F40494CAB
One of the certificates listed should contain "CN=WLB CA" for the Issuer name.
At the end of the list of certificates, the following line appears:
Enter cert # from the above list to put-->-bash-3.2#
2. When prompted to enter the number of the certificate you want to export, choose the numbercorresponding with CN=WLB CA. For example, if the certificate containing the Issuer Name CN=WLB CA isCertificate #1, enter 1.
-bash-3.2# 1
The Mono Certificate Manager exports the certificate to <wlb_root.pem> file in the current directory.
62
3. Using a copying utility, copy the certificate (wlb_root.pem) to a temporary directory on the pool master. Forexample, run the following command on the Workload Balancing appliance:
scp <wlb_root.pem> root@<pool-master-ip>:/tmp
Because this certificate copy is only for temporary use, you can store the certificate anywhere on the poolmaster, such as, for example, the /tmp directory.
4. If you receive a message stating that the authenticity of the master (<pool-master-ip>) cannot be established,type yes to continue.
5. Enter the pool master's password. After the screen indicates the .pem file is 100% copied, continue on tothe next procedure.
Task 2: Importing the Self-Signed Certificate
After copying the certificate to the pool master, you must install the certificate onto the pool master andsynchronize the certificate to all member hosts in the pool. Then, you can configure XenServer to check thecertificate’s identity and validity each time Workload Balancing attempts to connect to a XenServer host. All ofthe examples in the following procedure use <wlb_root>.pem as the file name for the exported certificate.
1. On the pool master, install the exported certificate. Run the pool-certificate-install command from thedirectory where you copied the certificate. For example:
xe pool-certificate-install filename=<wlb_root>.pem
2. Verify the certificate was installed correctly by running the pool-certificate-list command on the poolmaster:
xe pool-certificate-list
If you installed the certificate correctly, the output of this command will include the exported rootcertificate (for example, wlb_root.pem). Running this command lists all installed SSL certificates, includingthe certificate you just installed.
3. Synchronize the certificate from the master to all hosts in the pool by running the pool-certificate-synccommand on the pool master:
xe pool-certificate-sync
Running the pool-certificate-sync command on the master synchronizes the certificate and certificaterevocation lists on all the pool servers with the master. This ensures all hosts in the pool use the samecertificate(s).
There is no output from this command. However, the next step does not work if this one did not worksuccessfully.
4. Instruct XenServer to verify the certificate before connecting to the Workload Balancing virtual appliance.Run the following command on the pool master:
xe pool-param-set wlb-verify-cert=<true> uuid=<uuid_of_pool>
Tip:
Pressing the Tab key automatically populates the UUID of the pool.
5. (Optional.) To verify this procedure worked successfully, perform the following steps:
a. To test if the certificate synchronized to the other hosts in pool, run the pool-certificate-list commandon those hosts.
b. To test if XenServer was set to verify the certificate, run the pool-param-get command with theparam-name=<wlb-verify-cert> parameter. For example:
xe pool-param-get param-name=<wlb-verify-cert> uuid=<uuid_of_pool>
63
Configuring XenServer to Verify a Certificate-authority CertificateYou can configure XenServer to verify a certificate signed by a trusted certificate authority.
For trusted authority certificates, XenServer requires an exported certificate or certificate chain (the intermediateand root certificates) in .pem format that contains the public key.
If you want Workload Balancing to use a trusted authority certificate, do the following:
1. Obtain a signed certificate from the certificate authority. See the section called “Task 1: Obtaining a Certificate-authority Certificate”.
2. Follow the instructions in the section called “Task 2: Specifying the New Certificate” to specify and apply thenew certificate.
3. Export the root and intermediate certificates as PEM files and copy them to the pool master. See the sectioncalled “Task 3: Exporting the Certificate Chain for XenServer”.
4. Install the copied certificates and enable certificate verification on the pool master. See the section called“Task 4: Importing the Certificate Chain into the Pool”.
Before beginning these tasks, make sure:
• You know the IP address for the XenServer pool master.
• XenServer can resolve the Workload Balancing host name. (For example, you can try pinging the WorkloadBalancing FQDN from the XenServer console for the pool master.)
• You know the port you set during Workload Balancing Configuration for Workload Balancing communications.This port is displayed in the Connect to WLB dialog, which is displayed from the WLB tab by clicking Connect.
Important:
If you want to use an IP address to connect to Workload Balancing, you must specify that IPaddress as the Subject Alternative Name (SAN) when you create the certificate.
Task 1: Obtaining a Certificate-authority Certificate
To obtain a certificate from a certificate authority, you must generate a Certificate Signing Request (CSR).Generating a CSR for the Workload Balancing virtual appliance is two-task process. You must (1) create a privatekey and (2) use that private key to generate the CSR. You must perform both of these procedures on the WorkloadBalancing virtual appliance.
Guidelines for Specifying the Common Name
The Common Name (CN) you specify when creating a CSR must exactly match the FQDN of your WorkloadBalancing virtual appliance and the FQDN or IP address you specified in the Address box in the Connect to WLBServer dialog box.
To ensure the name matches, specify the Common Name using one of these guidelines:
• Specify the same information for the certificate's Common Name as you specified in the Connect to WLB Serverdialog. For example, if your Workload Balancing virtual appliance is named “wlb-vpx.yourdomain,” specify“wlb-vpx.yourdomain” in the Connect to WLB Server and provide “wlb-vpx.yourdomain” as the Common Namewhen creating the CSR.
• If you connected your pool to Workload Balancing using an IP address, use the FQDN as the Common Nameand specify the IP address as a Subject Alternative Name (SAN). However, this may not work in all situations.
Note:
Certificate verification is a security measure designed to prevent unwanted connections. Asa result, Workload Balancing certificates must meet strict requirements or the certificateverification will not succeed and XenServer will not allow the connection. Likewise, for
64
certificate verification to succeed, you must store the certificates in the specific locations inwhich XenServer expects to find the certificates.
To create a private key file
1. Create a private key file:
openssl genrsa -des3 -out <privatekey.pem> 2048
2. Remove the password (optional):
openssl rsa -in <privatekey.pem> -out <privatekey.nop.pem>
Note:
If you enter the password incorrectly or inconsistently, you may receive some messagesindicating the there is a user interface error. Simply rerun the commands to create the privatekey file.
To generate the CSR
1. Generate the CSR:
a. Create the CSR using the private key:
openssl req -new -key <privatekey.nop.pem> -out <csr>
b. Follow the prompts to provide the information necessary to generate the CSR:
Country Name. Enter the SSL Certificate country codes for your country. For example, CA for Canadaor JM for Jamaica. You can find a list of SSL Certificate country codes on the web.
State or Province Name (full name). Enter the state or province where the pool is located. For example,Massachusetts or Ontario.
Locality Name. The name of the city where the pool is located.
Organization Name. The name of your company or organization.
Organizational Unit Name. Enter the department name. This field is optional.
Common Name. Enter the FQDN of your Workload Balancing server. This must match the name thepool uses to connect to Workload Balancing.
Email Address. This email address is included in the certificate when you generate it.
c. Provide optional attributes or click Enter to skip providing this information.
The CSR request is saved at the root level and is named csr.
2. Display the CSR in the console window by running the following commands in the Workload Balancingappliance console:
cat csr
3. Copy the entire Certificate Request and use the CSR to request the certificate from the certificate authority.
Task 2: Specifying the New Certificate
Use this procedure to specify Workload Balancing use a certificate from a certificate authority. This procedureinstalls the root and (if available) intermediate certificates and applies the certificate-authority certificate to theWorkload Balancing port.
Each port can have only one certificate/key associated with it. By default, unless you specified a different portduring Workload Balancing Configuration, the self-signed certificate is bound to port 8012. You must delete this
65
binding before you can bind your new certificate-authority certificate to the Workload Balancing port. Becausehttpcfg does not accept Base-64 encoded private keys, you must convert your key to Microsoft format (.pvk). Allof these tasks are explained in the procedure that follows.
To specify a new certificate
1. Download the signed certificate, root certificate and, if the certificate authority has one, the intermediatecertificate from the certificate authority.
2. If you did not download the certificates to the Workload Balancing virtual appliance. Do one of the following:
a. If you are copying the certificates from a Windows computer to the Workload Balancing appliance, useWinSCP or another copying utility, to copy the files.
For the host name, you can enter the IP address and leave the port at the default. The user name andpassword are typically root and whatever password you set during configuration.
b. If you are copying the certificates from a Linux computer to the Workload Balancing appliance, use SCPor another copying utility, to copy the files to the directory of your choice on the Workload Balancingappliance. For example:
scp <ca_root.pem> root@<linux-computer>:/<path_on_your_WLB>
3. Install the root (and intermediate) certificate to the certificate store on the Workload Balancing virtualappliance. For example:
certmgr -add -c -m CA <root_ca.cer>certmgr -add -c -m CA <intermediate_ca.cer>
4. Apply the new certificate-authority certificate to the Workload Balancing port. This requires removing theold binding for the self-signed certificate, which was set to port 8012 by default.
1. Stop the Workload Balancing services by running the following command:
service workloadbalancing stop
2. Remove the old port binding for the original self-signed certificate:
httpcfg -del -port 8012
Note:
If you specified a different port, enter that port number instead of 8012.
3. Run the pvk command to convert the key to .pvk format:
pvk -in <privatekey.nop.pem> -topvk -nocrypt -out <private.pvk>
4. Bind your new certificate to the Workload Balancing port:
httpcfg -add -port 8012 -pvk private.pvk -cert <signed_cert.cer>
Tip:
You can view the list of current port bindings by running the following command:
httpcfg -list
5. Start the services on the Workload Balancing virtual appliance:
service workloadbalancing start
Task 3: Exporting the Certificate Chain for XenServer
For XenServer to verify a certificate, you must export the certificate chain from the Workload Balancing virtualappliance (before adding it to the pool master).
66
To export the certificate chain
1. Export the root certificate you installed in Section the section called “Task 2: Specifying the New Certificate”in Base-64 encoded PEM file using certmgr tool:
certmgr -put -c -pem -m CA <ca_root.pem>
When prompted, choose the certificate-authority root certificate from the list.
Tip:
You can view the list of currently installed certificate-authority certificates on the server usingthe following command:
certmgr -list -c -m CA
2. If applicable, export the intermediate certificate you installed in the section called “Task 2: Specifying theNew Certificate” in Base-64 encoded PEM file using certmgr tool:
certmgr -put -c -pem -m CA <ca_intermediate.pem>
When prompted, choose the certificate-authority intermediate certificate from the list.
3. Using a copying utility, copy the exported certificates (root and intermediate) to the directory of your choiceon the pool master. For example, to copy the root certificate to the /tmp directory, enter:
scp <ca_root.pem> root@<pool-master-ip>:/tmp
Tip:
To use SCP on Workload Balancing virtual appliance, install the openssh-clients package byrunning the following:
yum install openssh-clients
Task 4: Importing the Certificate Chain into the Pool
After exporting the certificate chain from the Workload Balancing, you must import (install) the certificates ontothe XenServer pool master and synchronize the hosts in the pool to use those certificates. Then, you can configureXenServer to check the certificate's identity and validity each time Workload Balancing connects to a XenServerhost.
1. Install the root certificate on the pool master:
xe pool-certificate-install filename=<ca_root>.pem
2. If applicable, install the intermediate certificate on the pool master:
xe pool-certificate-install filename=<ca_intermediate>.pem
3. Verify both the certificates installed correctly by running this command on the pool master:
xe pool-certificate-list
Running this command lists all installed SSL certificates. If the certificates installed successfully, they appearin this list.
4. Synchronize the certificate on the pool master to all hosts in the pool:
xe pool-certificate-sync
Running the pool-certificate-sync command on the master synchronizes the certificates and certificaterevocation lists on all the pool servers with the pool master. This ensures all hosts in the pool use the samecertificates.
5. Instruct XenServer to verify a certificate before connecting to the Workload Balancing virtual appliance. Runthe following command on the pool master:
67
xe pool-param-set wlb-verify-cert=<true> uuid=<uuid_of_pool>
Tip:
Pressing the Tab key automatically populates the UUID of the pool.
6. If, before you enabled certificate verification, you specified an IP address in the Connect to WLB dialog, youmay be prompted to reconnect the pool to Workload Balancing.
In this case, specify the FQDN for the Workload Balancing appliance in the Address box in the Connect toWLB dialog—exactly as it appears in the certificate's Common Name (CN). (You must enter the FQDN sincethe Common Name and the name XenServer uses to connect must match.)
Troubleshooting Tips
• If, after configuring certificate verification, the pool cannot connect to Workload Balancing, check to see if thepool can connect if you turn certificate verification off (by running xe pool-param-set wlb-verify-cert=<true>uuid=<uuid_of_pool>). If it can connect with verification off, the issue is in your certificate configuration. If itcannot connect, the issue is in either your Workload Balancing credentials or your network connection.
• Some commercial certificate authorities, such as Verisign, provide tools to verify the certificate installedcorrectly. Consider running these tools if these procedures fail to help isolate the issue. If these tools requirespecifying an SSL port, specify port 8012 or whatever port you set during Workload Balancing Configuration.
• If, after following these procedures, an error message appears on the WLB tab stating, “There was an errorconnecting to the WLB server,” there may be a conflict between the Common Name in the certificate and thename of the Workload Balancing virtual appliance. The Workload Balancing virtual-appliance name and theCommon Name of the certificate must match exactly.
68
IndexAadjusting
optimization mode, 20aggressiveness
configuring, 33automated recommendations
advanced settings, 31controlling, 31overview, 22
automaticoptimization acceptance, 22
Ccertificates
certificate authority certificate, verifying, 63certificate chain, exporting, 65certificate chain, importing, 66Certificate Signing Request, generating, 63configuring, 60new, specifying, 64self-signed, exporting, 61self-signed, importing, 62self-signed, verifying, 60
changingPostgreSQL account, 53WLB server, 41Workload Balancing account, 53
commandsWorkload Balancing, 52
configuringcritical thresholds, 28power management, 21
connectingpool to WLB, 37
consolidation processMaximum Density Mode, 27
critical thresholdsconfiguring, 28default settings, 28
customizingWorkload Balancing, 48
Ddatabase
archiving, 46changing account, 53changing maintenance time, 47client authentication, 46configuration files, 46grooming, 45, 53grooming parameters, 45managing, 44password, 45pg_hba.conf file, 46
postgresql.conf file, 47disconnecting
Workload Balancing, 43disk size
increasing, 44displaying
settings dialog, 19
Eenabling
power management, 22excluding
hosts from recommendations, 30
Ffixed optimization mode
configuring, 20
HHigh Availability
interaction with WLB, 8
IIP address
obtaining for WLB, 40
Llogging in
Workload Balancing appliance, 52logs
enabling traces, 53increasing detail in logs, 54
MMaximum Density Mode
consolidation process, 27Maximum Performance Mode
recommendation process, 26metric weightings
configuring, 29
Ooptimal server
resuming VM on, 7starting, 6
optimization modefixed mode, 20scheduled mode, 20scheduling, 20settings, 20
optimization recommendationsaccepting, 8how WLB makes, 25
optionsconfiguring, 19

69
Ppausing
Workload Balancing, 42PostgreSQL
changing password, 53power management
configuring, 21enabling, 22
RRBAC
Workload Balancing, 40recommendation count
setting, 32recommendation process
Maximum Performance Mode, 26recommendation severity
setting, 33recommendations
accepting, 8accepting, optimization, 8excluding hosts from, 30
reconfiguringpool to use different WLB server, 41
renamingWLB user account, 53
reportsChargeback, 12generating, 10glossary, 12Host Health History, 14introduction, 4overview, 10Pool Audit Trail, 15Pool Health, 16Pool Health History, 16Pool Optimization History, 17Pool Optimization Performance History, 14Virtual Machine Motion History, 17Virtual Machine Performance History, 18
requirementsWorkload Balancing, 4
resource utilizationprocess for evaluating, 25
Sscheduled optimization mode
configuring, 20scheduling
optimization mode, 20securing
Workload Balancing, 60settings
configuring, 19, 19displaying dialog, 19
star ratings, 5stopping
Workload Balancing, 42
Ttrace flags
increasing detail in logs, 54troubleshooting
connection to WLB, 50error messages, 49firewalls, 49issues changing servers, 51overview, 49recommendations, stop, 50WLB credentials, 49
Trusted Authority certificatesconfiguring, 60
Uuninstalling
Workload Balancing, 44updating credentials
Workload Balancing, 41user accounts
setting permissions, 40
Vvirtual disk size
increasing, 44VM migration interval
setting, 32VM placement
how to start VM, 6overview, 5
Wwlb.conf
changing, 53editing (proc.), 53
wlbconfediting (proc.), 53
wlbconfigrunning (proc.), 53running command, 53
Workload Balancingadministering, 37administering, overview, 37commands, 52configuring, 19, 19customizing, 48disconnecting, 43IP address, 40Maintenance Mode, 43overview, 3pausing, 42reports, 10requirements, 4settings, 19, 19stopping, 42
70
uninstalling, 44using, 5
Workload Balancing accountchanging, 53
Workload Balancing commandsservice workloadbalancing restart, 52service workloadbalancing start, 52service workloadbalancing status, 52service workloadbalancing stop, 52
workload reportsChargeback, 12generating, 10glossary, 12, 12Host Health History, 14introduction, 4overview, 10Pool Audit Trail, 15Pool Health, 16Pool Health History, 16Pool Optimization History, 17Pool Optimization Performance History, 14Virtual Machine Motion History, 17Virtual Machine Performance History, 18