Embed Size (px)
Citation preview
CLC Bioinformatics Database
Manual forCLC Bioinformatics Database 2.0Windows, Mac OS X and Linux
September 5, 2008
CLC bioFinlandsgade 10-12DK-8200 Aarhus NDenmark
Contents
1 Introduction 5
1.1 System requirements . . . . . . . . . . . . . . . . . . . . . . . . . . . . . . . . 6
2 Installation and database set-up 7
2.1 Database set-up . . . . . . . . . . . . . . . . . . . . . . . . . . . . . . . . . . . 7
2.1.1 Integrating with existing user authentication and group management systems 8
Authentication/group settings . . . . . . . . . . . . . . . . . . . . . . . . 8
Active Directory Example . . . . . . . . . . . . . . . . . . . . . . . . . . . 8
2.2 Client set-up . . . . . . . . . . . . . . . . . . . . . . . . . . . . . . . . . . . . . 9
2.2.1 Installing the database plug-in . . . . . . . . . . . . . . . . . . . . . . . . 9
2.2.2 Installing the administration plug-in . . . . . . . . . . . . . . . . . . . . . . 9
3 In the Workbench 10
3.1 Adding a database location . . . . . . . . . . . . . . . . . . . . . . . . . . . . . 10
3.1.1 Connecting to the database . . . . . . . . . . . . . . . . . . . . . . . . . . 10
3.1.2 Logging in . . . . . . . . . . . . . . . . . . . . . . . . . . . . . . . . . . . 11
3.2 Using the database . . . . . . . . . . . . . . . . . . . . . . . . . . . . . . . . . 12
3.3 From the system administrator’s perspective . . . . . . . . . . . . . . . . . . . 13
4 User administration and access control 14
4.1 Users and groups . . . . . . . . . . . . . . . . . . . . . . . . . . . . . . . . . . 14
4.1.1 Managing users . . . . . . . . . . . . . . . . . . . . . . . . . . . . . . . . 14
4.1.2 Managing groups . . . . . . . . . . . . . . . . . . . . . . . . . . . . . . . 14
4.1.3 Adding users to a group . . . . . . . . . . . . . . . . . . . . . . . . . . . . 15
4.2 Access privileges . . . . . . . . . . . . . . . . . . . . . . . . . . . . . . . . . . 16
4.2.1 Setting access permissions on a folder . . . . . . . . . . . . . . . . . . . 16
3
CONTENTS 4
4.2.2 Permissions on the recycle bin . . . . . . . . . . . . . . . . . . . . . . . . 17
5 Database-specific attributes 18
5.1 Configuring which fields should be available . . . . . . . . . . . . . . . . . . . . 18
5.1.1 Editing lists . . . . . . . . . . . . . . . . . . . . . . . . . . . . . . . . . . 19
5.1.2 Removing attributes . . . . . . . . . . . . . . . . . . . . . . . . . . . . . . 19
5.2 Filling in values . . . . . . . . . . . . . . . . . . . . . . . . . . . . . . . . . . . . 20
5.2.1 What happens when the sequence gets outside the database? . . . . . . 22
5.3 Searching . . . . . . . . . . . . . . . . . . . . . . . . . . . . . . . . . . . . . . 22
Index 22
Chapter 1
Introduction
CLC Bioinformatics Database is designed to enable an organization to easily store and sharebioinformatics data in a central database, tightly integrated with the CLC Workbenches.
The base components of a database set-up are:
• A relational database. Either Microsoft SQL Server, Oracle, PostgreSQL, or MySQL.
• CLC Workbenches (clients). The Workbenches are the primary clients for the database.
• Plug-ins to the CLC Workbench to make it possible to interact with the database:
– CLC Bioinformatics Database Plug-in. Enables communication with the database.This is needed for all who users to get access to the database.
– CLC Database Administration Plug-in. Administration of access privileges, customfields etc. This plug-in provides a graphical user interface for administrating thedatabase. This plug-in is only needed for people in charge of administrating thedatabase.
• Web interface. Browse, search, download and upload data using a web interface. Thismakes it possible to access data in the database without a Workbench. Viewing data isrestricted to a simple text and history view.
Some of the benefits from using CLC Bioinformatics Database are:
• Easy data sharing
• Data searching
• Data security using flexible read/write access privileges
• User-friendly data structure and data handling
• Support for virtually all data types
• Cross platform environment on the client side (Windows, Mac OS X, and Linux)
5
CHAPTER 1. INTRODUCTION 6
The database includes an Application Programming Interface (API) that makes it possible tointegrate other applications with the CLC Bioinformatics Database. In this user manual, itis assumed that the clients are CLC Workbenches. Read more about the Database API athttp://www.clcbio.com/database
This first chapter in this manual deals with the installation and set-up of the database on theserver side. The next chapter moves to the client side and explains how to connect to thedatabase, and how to use it. Next follows a description of how to administer user access andaccess privileges. Finally you can see how to set up custom fields to be used for searching.
1.1 System requirementsThe system requirements of the client workbenches are these:
• Windows 2000, Windows XP or Windows Vista
• Mac OS X 10.4 or newer
• Linux: Redhat or SuSE
• 32 or 64 bit
• 256 MB RAM required
• 512 MB RAM recommended
• 1024 x 768 display recommended
For the database, the system requirements are these:
• Microsoft SQL Server, Oracle, PostgreSQL, or MySQL
• See the database documentation for information on system requirements for the database.There are no additional requirements for the CLC Bioinformatics Database.
Chapter 2
Installation and database set-up
2.1 Database set-upFirst step is to install a database. We refer to the documentation of the database providers for astandard installation:
• MySQL: http://dev.mysql.com/downloads/
• PostgreSQL: http://www.postgresql.org/
• Microsoft SQL Server: http://www.microsoft.com/SQL/
• Oracle: http://www.oracle.com/
If you have further questions about the installation of the database, please contact [email protected].
Once the database has been installed, perform the following steps (they are described in generalterms - the specific steps to follow varies from database to database):
• Create a "clcdb" database
• Create a "clcdb" user and grant SELECT, INSERT, DELETE and UPDATE on the database
• Add the hostname and database name to the init script provided by CLC bio.
• Run the init script on the database
The init script creates one user which can be used to log in to the database from the Workbenchand create additional user accounts:
• Username: root
• Password: default
7
CHAPTER 2. INSTALLATION AND DATABASE SET-UP 8
2.1.1 Integrating with existing user authentication and group management systems
The CLC Bioinformatics Database comes with a built-in user authentication and management sys-tem, but it can also be configured to use an existing user authentication and group managementsystem via LDAP (Lightweight Directory Access Protocol), such as Microsoft Active Directory.
The configuration is done in the settings table in the database and must be done manually byediting the following values:
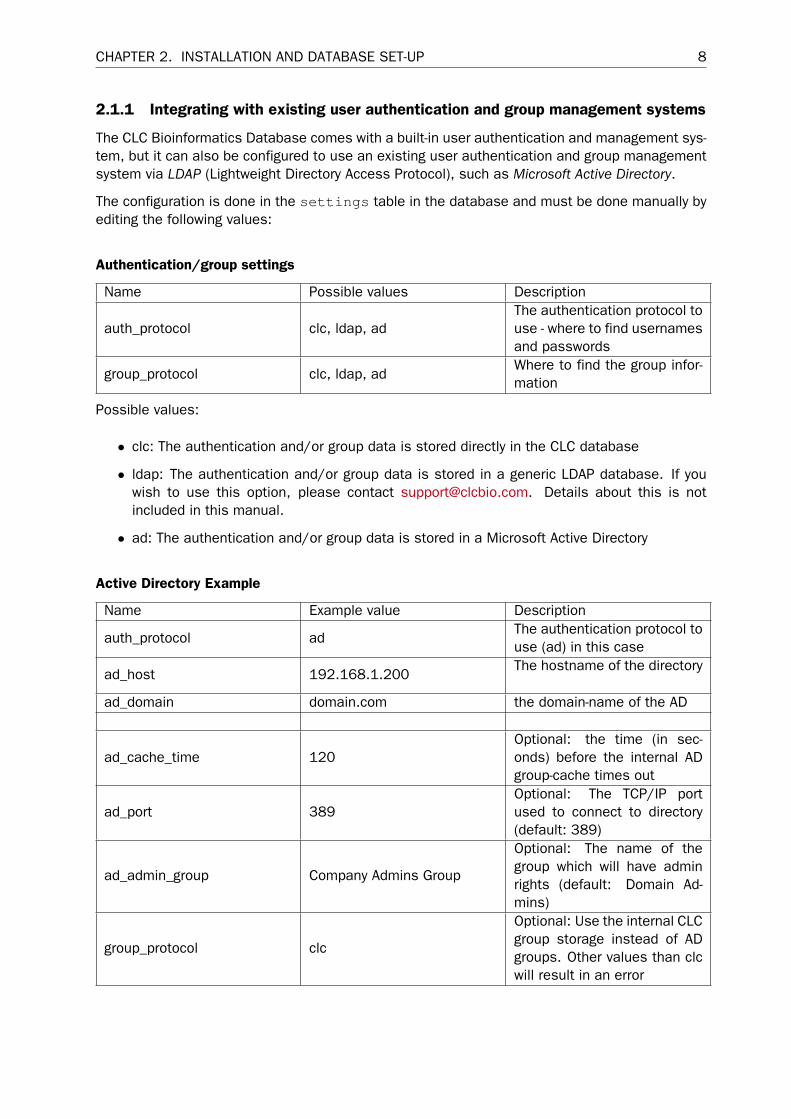
Authentication/group settings
Name Possible values Description
auth_protocol clc, ldap, adThe authentication protocol touse - where to find usernamesand passwords
group_protocol clc, ldap, adWhere to find the group infor-mation
Possible values:
• clc: The authentication and/or group data is stored directly in the CLC database
• ldap: The authentication and/or group data is stored in a generic LDAP database. If youwish to use this option, please contact [email protected]. Details about this is notincluded in this manual.
• ad: The authentication and/or group data is stored in a Microsoft Active Directory
Active Directory Example
Name Example value Description
auth_protocol adThe authentication protocol touse (ad) in this case
ad_host 192.168.1.200The hostname of the directory
ad_domain domain.com the domain-name of the AD
ad_cache_time 120Optional: the time (in sec-onds) before the internal ADgroup-cache times out
ad_port 389Optional: The TCP/IP portused to connect to directory(default: 389)
ad_admin_group Company Admins Group
Optional: The name of thegroup which will have adminrights (default: Domain Ad-mins)
group_protocol clc
Optional: Use the internal CLCgroup storage instead of ADgroups. Other values than clcwill result in an error
CHAPTER 2. INSTALLATION AND DATABASE SET-UP 9
2.2 Client set-up
2.2.1 Installing the database plug-in
For the Workbench to be able to connect to a database, the CLC Bioinformatics Database Plug-inmust be installed:
Plug-ins are installed using the plug-in manager1:
Help in the Menu Bar | Install Plug-ins ( )
or Plug-ins ( ) in the Toolbar
Install the plug-in by clicking the Install from File button at the bottom of the dialog. This willopen a dialog where you can browse for the plug-in. The plug-in file is provided by CLC bio alongwith licenses and installation files for the database. The plug-in file is of the type ".cpa".
Next you will be prompted for a license. The license for the plug-in is based on the same conceptas for the CLC Workbench. This means that you can use a CLC license server to host the licensesfor the plug-in. We refer to the user manual of the Workbench (press F1 and look for Licenses,forth item from the top).
When you close the dialog, you will be asked whether you wish to restart the workbench. Theplug-in will not be ready for use before the workbench is restarted.
See section 3.3 for more information about deployment of the plug-in.
2.2.2 Installing the administration plug-in
Plug-ins are installed using the plug-in manager2:
or Plug-ins ( ) in the Toolbar
Install the plug-in by clicking the Install from File button at the bottom of the dialog. This willopen a dialog where you can browse for the plug-in. The plug-in file is provided by CLC bio alongwith licenses and installation files for the database. The plug-in file is of the type ".cpa".
Next you will be prompted for a license. The license for the plug-in is based on the same conceptas for the CLC Workbench. This means that you can use a CLC license server to host the licensesfor the plug-in. We refer to the user manual of the Workbench (press F1 and look for Licenses,forth item from the top).
When you close the dialog, you will be asked whether you wish to restart the workbench. Theplug-in will not be ready for use before the workbench is restarted.
See section 3.3 for more information about deployment of the plug-in.
1In order to install plug-ins on Windows Vista, the Workbench must be run in administrator mode: Right-click theprogram shortcut and choose "Run as Administrator". Then follow the procedure described below. When you start theWorkbench after installing the plug-in, it should also be run in administrator mode.
2In order to install plug-ins on Windows Vista, the Workbench must be run in administrator mode: Right-click theprogram shortcut and choose "Run as Administrator". Then follow the procedure described below. When you start theWorkbench after installing the plug-in, it should also be run in administrator mode.
Chapter 3
In the Workbench
With many bioinformatics databases, retrieval of data is based on querying or searching. WithCLC Bioinformatics Database it is also possible to search for data, but in addition it is designedto support browsing a hierarchical tree-like structure. There are three main reasons why this isdesired:
• Usability. Users are familiar with browsing the filesystem on their computer. When usingthe CLC Workbench with a filesystem location, the hierarchical browsing is also used, sothe same concept of user interaction applies to both the database and the filesystem.
• Organizing data. With a hierarchical structure, it is much easier to organize data both interms of the contents of the data, but also in terms of the organizational structure. Onepart of the database could be devoted to one research group, which in turn could be dividedinto specific projects.
• User access control. Administrating user access is much easier when data is hierarchicallystructured. This means that access can be granted at both overall and more fine-grainedlevels.
The hierarchical structure does not preclude powerful search capabilities. Searches can beconducted across the hierarchical structure providing the same powerful possibilities for datamining as traditional "flat" databases.
3.1 Adding a database locationFor a CLC Workbench to be able to use the CLC Bioinformatics Database, the CLC BioinformaticsDatabase Plug-in has to be installed (see section 2.2.1).
3.1.1 Connecting to the database
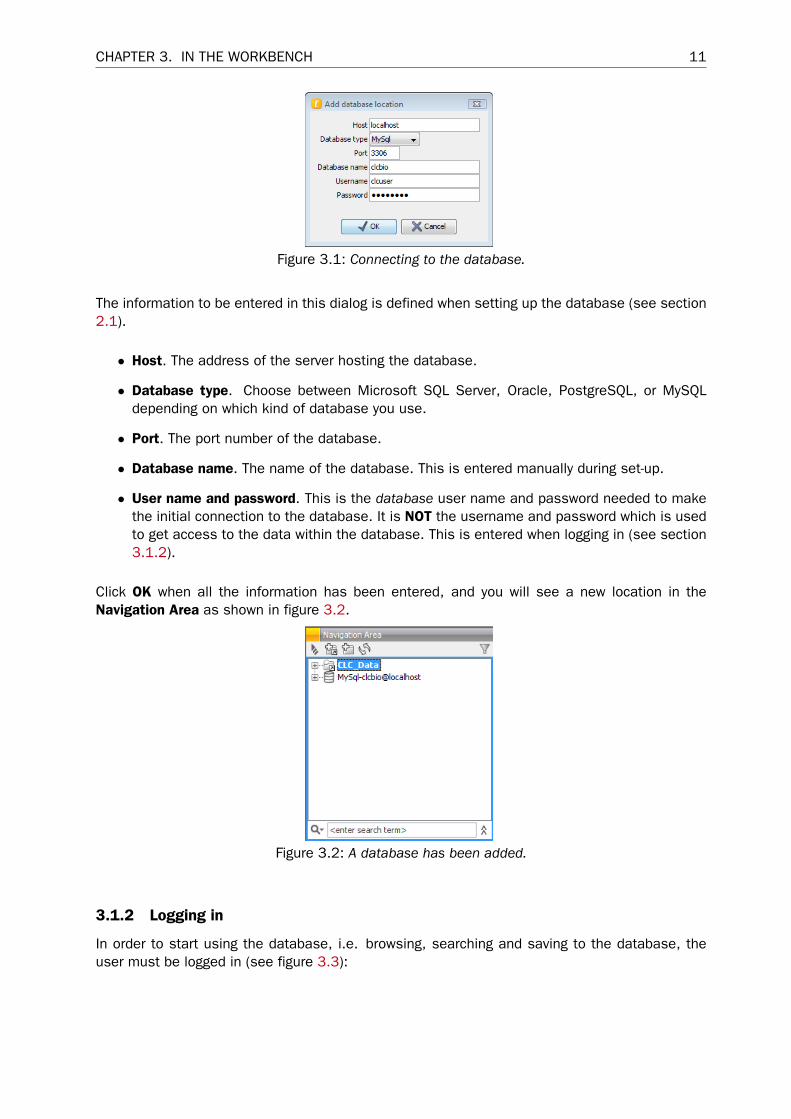
When the Workbench has been restarted, click the Add Location ( ) icon at the top of theNavigation Area, and choose Database Location.
This will display the dialog shown in figure 3.1.
10
CHAPTER 3. IN THE WORKBENCH 11
Figure 3.1: Connecting to the database.
The information to be entered in this dialog is defined when setting up the database (see section2.1).
• Host. The address of the server hosting the database.
• Database type. Choose between Microsoft SQL Server, Oracle, PostgreSQL, or MySQLdepending on which kind of database you use.
• Port. The port number of the database.
• Database name. The name of the database. This is entered manually during set-up.
• User name and password. This is the database user name and password needed to makethe initial connection to the database. It is NOT the username and password which is usedto get access to the data within the database. This is entered when logging in (see section3.1.2).
Click OK when all the information has been entered, and you will see a new location in theNavigation Area as shown in figure 3.2.
Figure 3.2: A database has been added.
3.1.2 Logging in
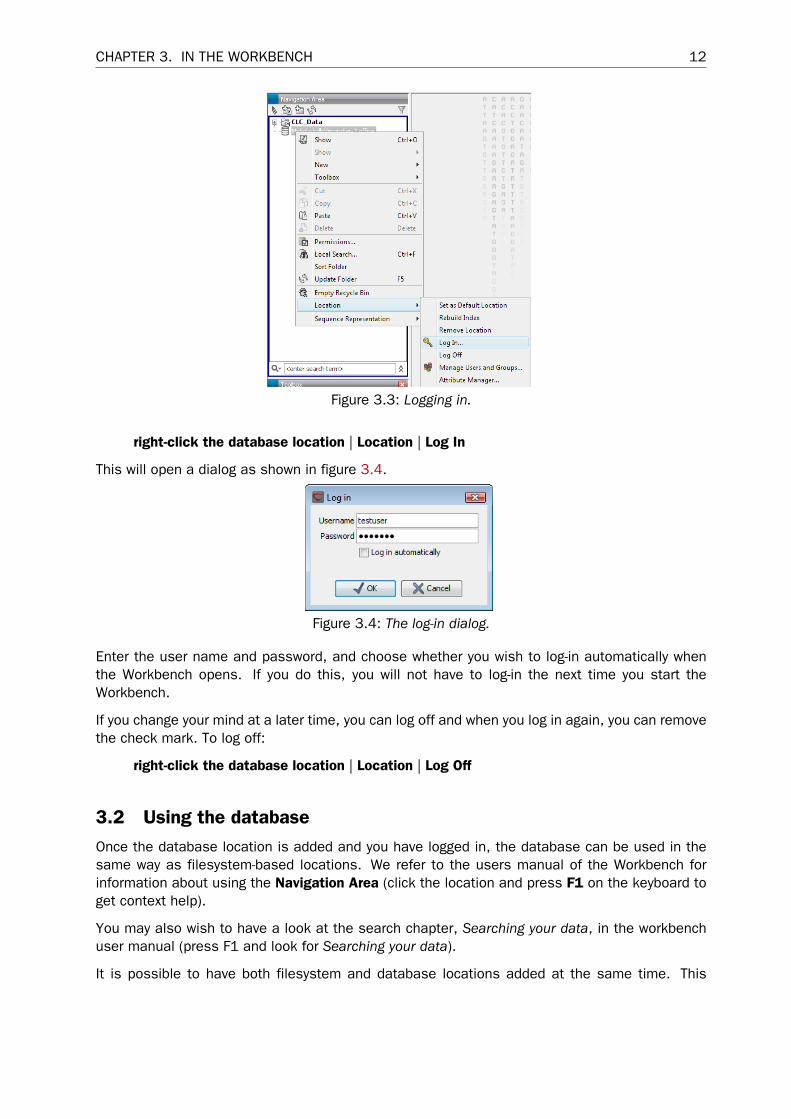
In order to start using the database, i.e. browsing, searching and saving to the database, theuser must be logged in (see figure 3.3):
CHAPTER 3. IN THE WORKBENCH 12
Figure 3.3: Logging in.
right-click the database location | Location | Log In
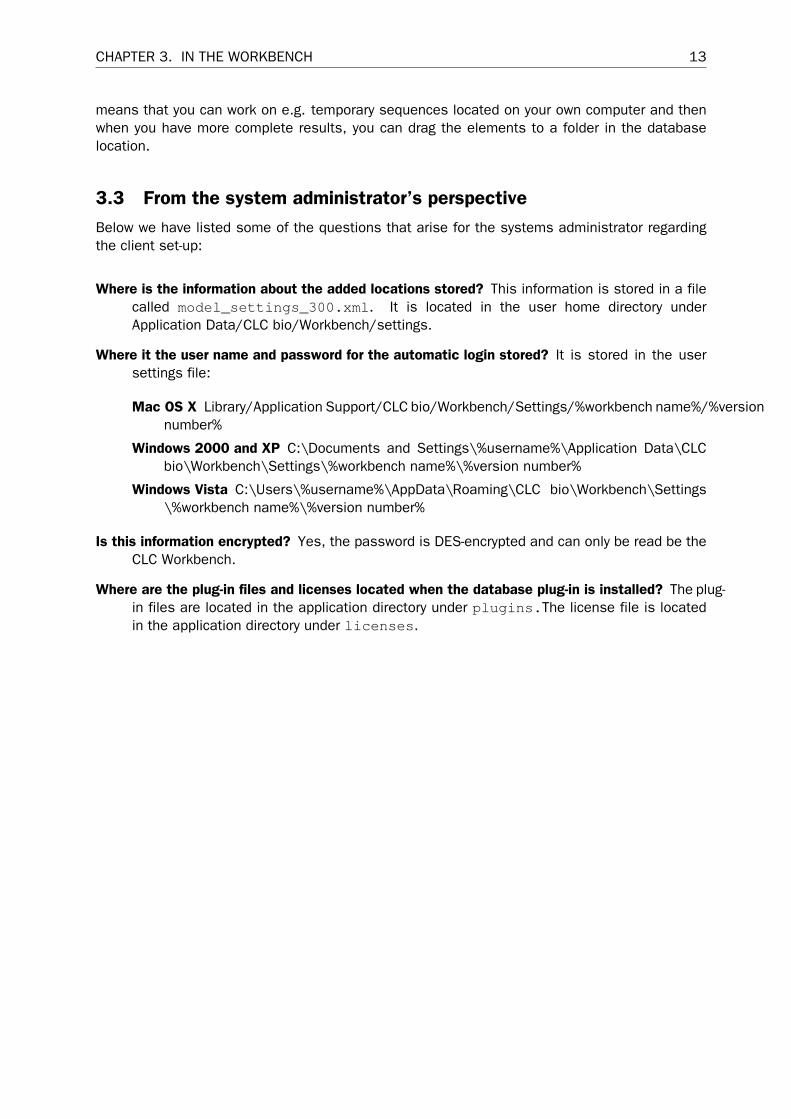
This will open a dialog as shown in figure 3.4.
Figure 3.4: The log-in dialog.
Enter the user name and password, and choose whether you wish to log-in automatically whenthe Workbench opens. If you do this, you will not have to log-in the next time you start theWorkbench.
If you change your mind at a later time, you can log off and when you log in again, you can removethe check mark. To log off:
right-click the database location | Location | Log Off
3.2 Using the databaseOnce the database location is added and you have logged in, the database can be used in thesame way as filesystem-based locations. We refer to the users manual of the Workbench forinformation about using the Navigation Area (click the location and press F1 on the keyboard toget context help).
You may also wish to have a look at the search chapter, Searching your data, in the workbenchuser manual (press F1 and look for Searching your data).
It is possible to have both filesystem and database locations added at the same time. This
CHAPTER 3. IN THE WORKBENCH 13
means that you can work on e.g. temporary sequences located on your own computer and thenwhen you have more complete results, you can drag the elements to a folder in the databaselocation.
3.3 From the system administrator’s perspectiveBelow we have listed some of the questions that arise for the systems administrator regardingthe client set-up:
Where is the information about the added locations stored? This information is stored in a filecalled model_settings_300.xml. It is located in the user home directory underApplication Data/CLC bio/Workbench/settings.
Where it the user name and password for the automatic login stored? It is stored in the usersettings file:
Mac OS X Library/Application Support/CLC bio/Workbench/Settings/%workbench name%/%versionnumber%
Windows 2000 and XP C:\Documents and Settings\%username%\Application Data\CLCbio\Workbench\Settings\%workbench name%\%version number%
Windows Vista C:\Users\%username%\AppData\Roaming\CLC bio\Workbench\Settings\%workbench name%\%version number%
Is this information encrypted? Yes, the password is DES-encrypted and can only be read be theCLC Workbench.
Where are the plug-in files and licenses located when the database plug-in is installed? The plug-in files are located in the application directory under plugins.The license file is locatedin the application directory under licenses.

Chapter 4
User administration and access control
The CLC Bioinformatics Database comes with a built-in user authentication and managementsystem, but it can also be configured to use an existing user authentication and group manage-ment system via LDAP (Lightweight Directory Access Protocol), such as Microsoft Active Directory.Please go to section 2.1.1 for more information on how to configure this.
The database solution is born with traditional support for access permissions. The accessprivilege model is based on user groups and privileges attached to "folders" in the database.
4.1 Users and groupsTo administer users and groups, the CLC Database Administration Plug-in has to be installed(see section 2.2.2).
The functionality of this plug-in depends on the user authentication and management system: ifthe built-in system is used, all the functionality described below is relevant; if an external systemis used for managing users and groups, the menus below will be disabled. In this case, you canskip to section 4.2 which describes how to set permissions on folders.
4.1.1 Managing users
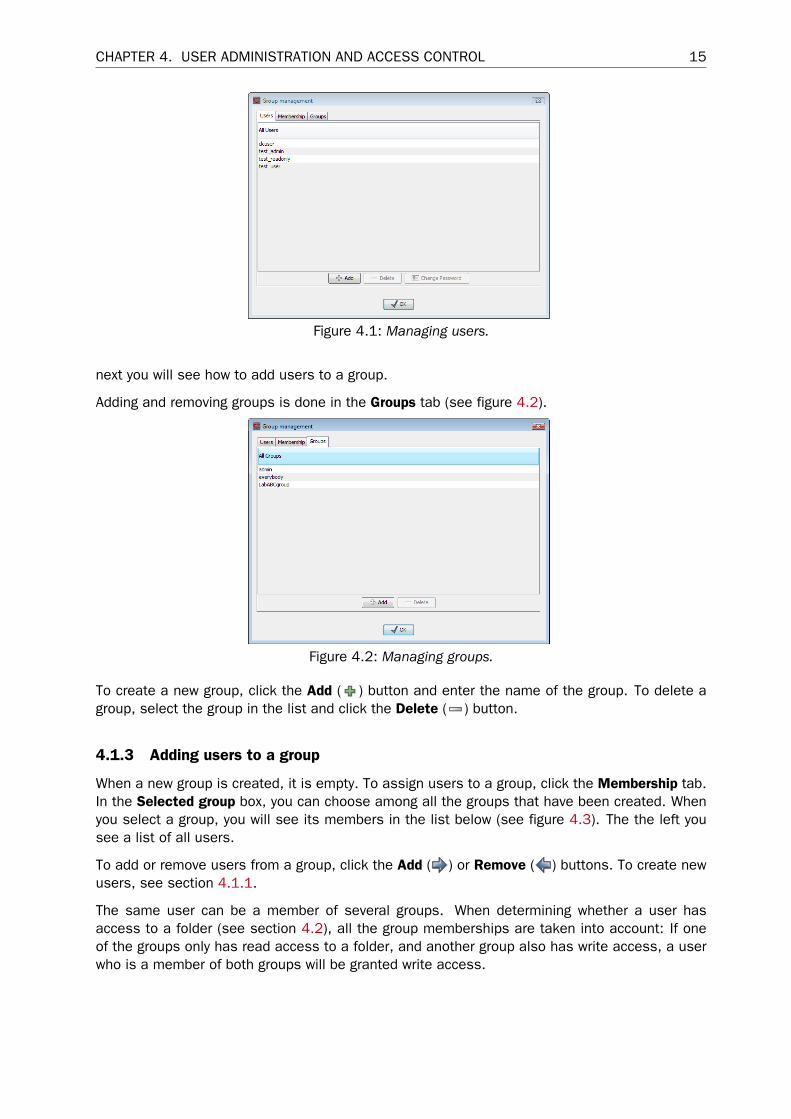
To create or delete users:
right-click the database location ( ) | Location | Manage Users and Groups
This will display the dialog shown in figure 4.1.
Click the Add ( ) button to create a new user. Enter the name of the user and enter a password.You will be asked to re-type the password. If you wish to change the password at a later time,select the user in the list and click Change password ( ).
To delete a user, select the user in the list and click Delete ( ).
4.1.2 Managing groups
Access rights are granted to groups, not users, so a user has to be member of one or moregroups to get access to the database. Here you can see how to add and remove groups, and
14
CHAPTER 4. USER ADMINISTRATION AND ACCESS CONTROL 15
Figure 4.1: Managing users.
next you will see how to add users to a group.
Adding and removing groups is done in the Groups tab (see figure 4.2).
Figure 4.2: Managing groups.
To create a new group, click the Add ( ) button and enter the name of the group. To delete agroup, select the group in the list and click the Delete ( ) button.
4.1.3 Adding users to a group
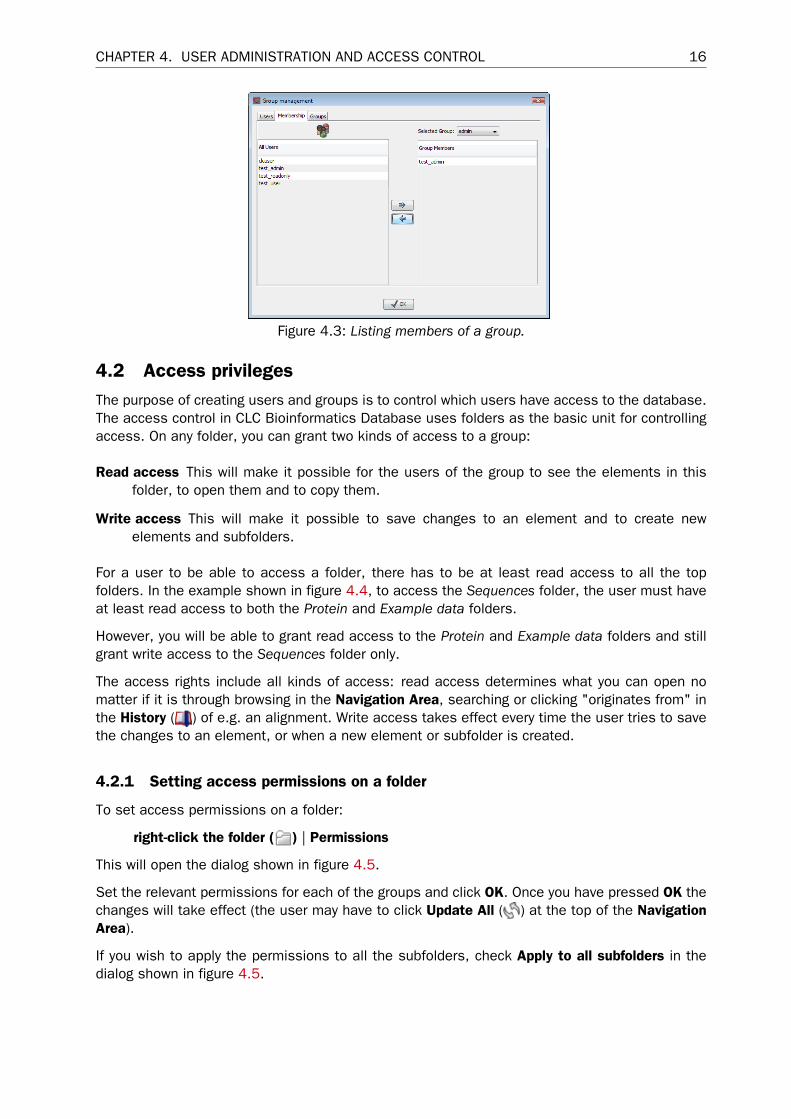
When a new group is created, it is empty. To assign users to a group, click the Membership tab.In the Selected group box, you can choose among all the groups that have been created. Whenyou select a group, you will see its members in the list below (see figure 4.3). The the left yousee a list of all users.
To add or remove users from a group, click the Add ( ) or Remove ( ) buttons. To create newusers, see section 4.1.1.
The same user can be a member of several groups. When determining whether a user hasaccess to a folder (see section 4.2), all the group memberships are taken into account: If oneof the groups only has read access to a folder, and another group also has write access, a userwho is a member of both groups will be granted write access.
CHAPTER 4. USER ADMINISTRATION AND ACCESS CONTROL 16
Figure 4.3: Listing members of a group.
4.2 Access privilegesThe purpose of creating users and groups is to control which users have access to the database.The access control in CLC Bioinformatics Database uses folders as the basic unit for controllingaccess. On any folder, you can grant two kinds of access to a group:
Read access This will make it possible for the users of the group to see the elements in thisfolder, to open them and to copy them.
Write access This will make it possible to save changes to an element and to create newelements and subfolders.
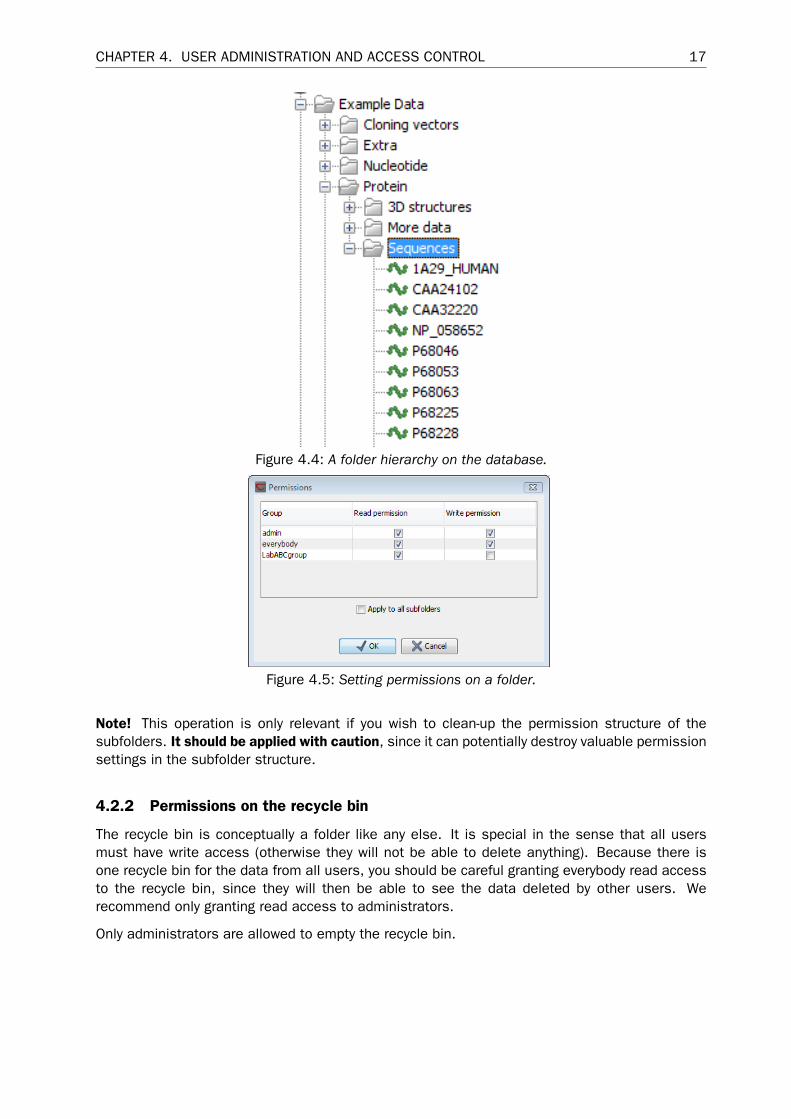
For a user to be able to access a folder, there has to be at least read access to all the topfolders. In the example shown in figure 4.4, to access the Sequences folder, the user must haveat least read access to both the Protein and Example data folders.
However, you will be able to grant read access to the Protein and Example data folders and stillgrant write access to the Sequences folder only.
The access rights include all kinds of access: read access determines what you can open nomatter if it is through browsing in the Navigation Area, searching or clicking "originates from" inthe History ( ) of e.g. an alignment. Write access takes effect every time the user tries to savethe changes to an element, or when a new element or subfolder is created.
4.2.1 Setting access permissions on a folder
To set access permissions on a folder:
right-click the folder ( ) | Permissions
This will open the dialog shown in figure 4.5.
Set the relevant permissions for each of the groups and click OK. Once you have pressed OK thechanges will take effect (the user may have to click Update All ( ) at the top of the NavigationArea).
If you wish to apply the permissions to all the subfolders, check Apply to all subfolders in thedialog shown in figure 4.5.
CHAPTER 4. USER ADMINISTRATION AND ACCESS CONTROL 17
Figure 4.4: A folder hierarchy on the database.
Figure 4.5: Setting permissions on a folder.
Note! This operation is only relevant if you wish to clean-up the permission structure of thesubfolders. It should be applied with caution, since it can potentially destroy valuable permissionsettings in the subfolder structure.
4.2.2 Permissions on the recycle bin
The recycle bin is conceptually a folder like any else. It is special in the sense that all usersmust have write access (otherwise they will not be able to delete anything). Because there isone recycle bin for the data from all users, you should be careful granting everybody read accessto the recycle bin, since they will then be able to see the data deleted by other users. Werecommend only granting read access to administrators.
Only administrators are allowed to empty the recycle bin.
Chapter 5
Database-specific attributes
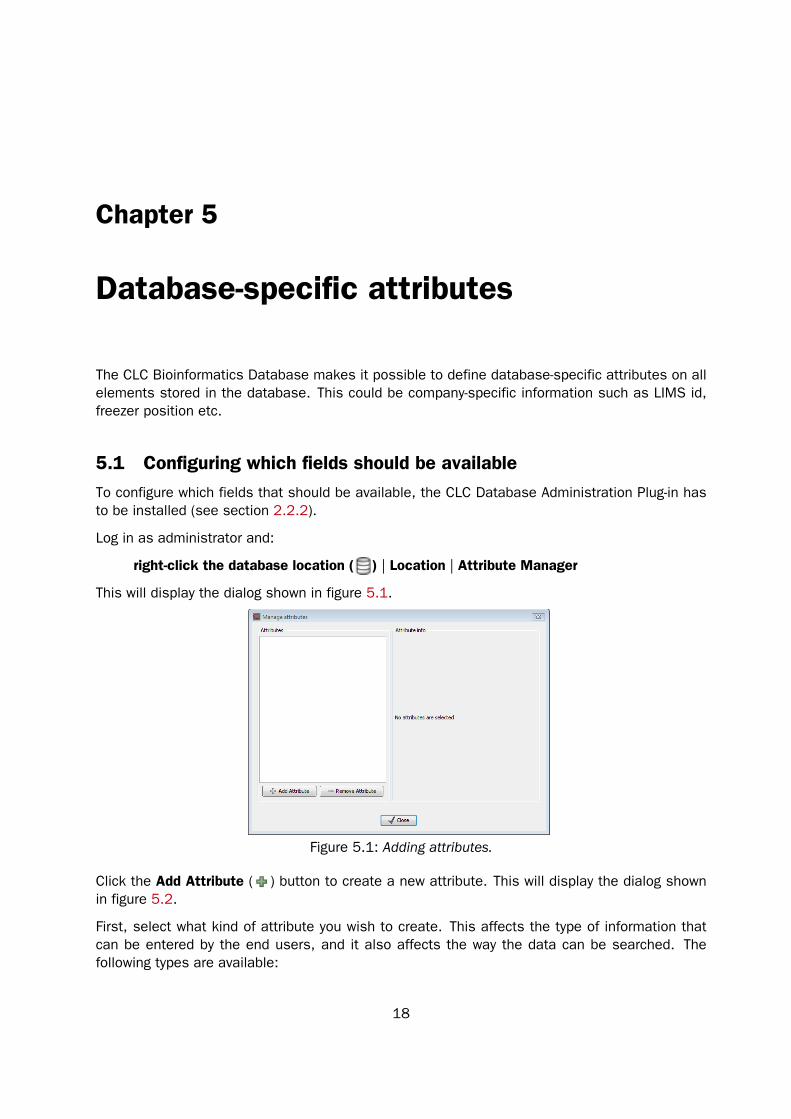
The CLC Bioinformatics Database makes it possible to define database-specific attributes on allelements stored in the database. This could be company-specific information such as LIMS id,freezer position etc.
5.1 Configuring which fields should be availableTo configure which fields that should be available, the CLC Database Administration Plug-in hasto be installed (see section 2.2.2).
Log in as administrator and:
right-click the database location ( ) | Location | Attribute Manager
This will display the dialog shown in figure 5.1.
Figure 5.1: Adding attributes.
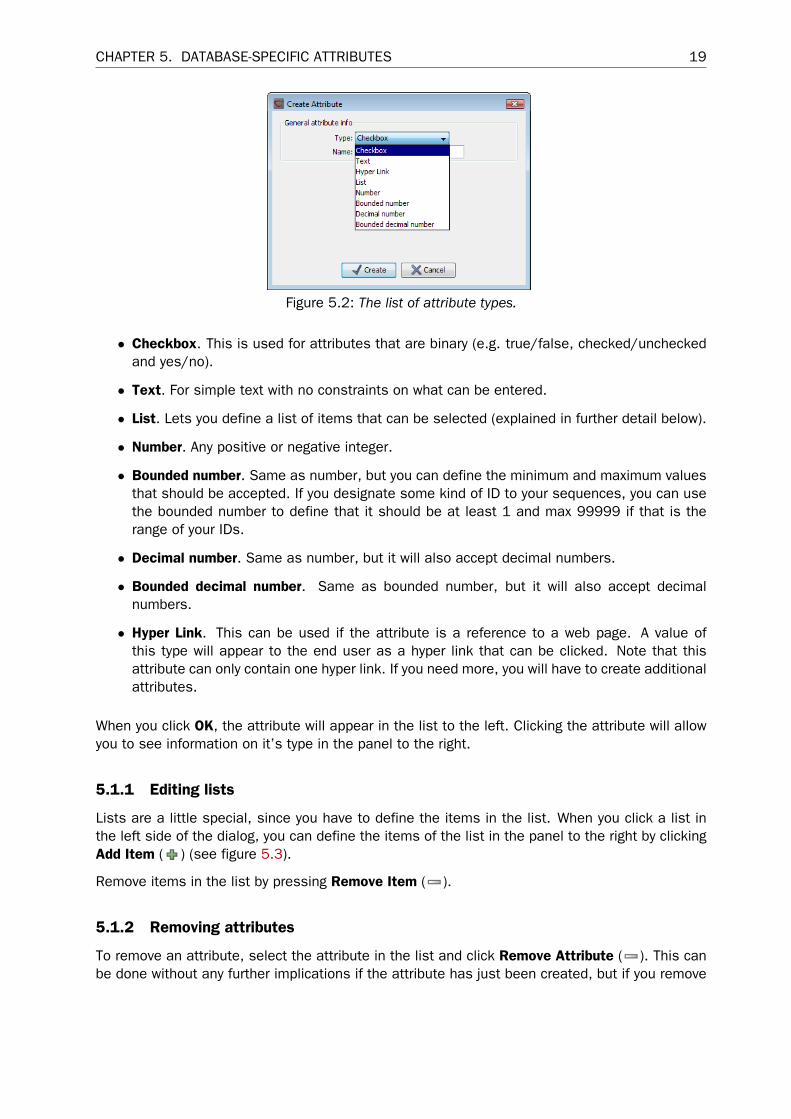
Click the Add Attribute ( ) button to create a new attribute. This will display the dialog shownin figure 5.2.
First, select what kind of attribute you wish to create. This affects the type of information thatcan be entered by the end users, and it also affects the way the data can be searched. Thefollowing types are available:
18
CHAPTER 5. DATABASE-SPECIFIC ATTRIBUTES 19
Figure 5.2: The list of attribute types.
• Checkbox. This is used for attributes that are binary (e.g. true/false, checked/uncheckedand yes/no).
• Text. For simple text with no constraints on what can be entered.
• List. Lets you define a list of items that can be selected (explained in further detail below).
• Number. Any positive or negative integer.
• Bounded number. Same as number, but you can define the minimum and maximum valuesthat should be accepted. If you designate some kind of ID to your sequences, you can usethe bounded number to define that it should be at least 1 and max 99999 if that is therange of your IDs.
• Decimal number. Same as number, but it will also accept decimal numbers.
• Bounded decimal number. Same as bounded number, but it will also accept decimalnumbers.
• Hyper Link. This can be used if the attribute is a reference to a web page. A value ofthis type will appear to the end user as a hyper link that can be clicked. Note that thisattribute can only contain one hyper link. If you need more, you will have to create additionalattributes.
When you click OK, the attribute will appear in the list to the left. Clicking the attribute will allowyou to see information on it’s type in the panel to the right.
5.1.1 Editing lists
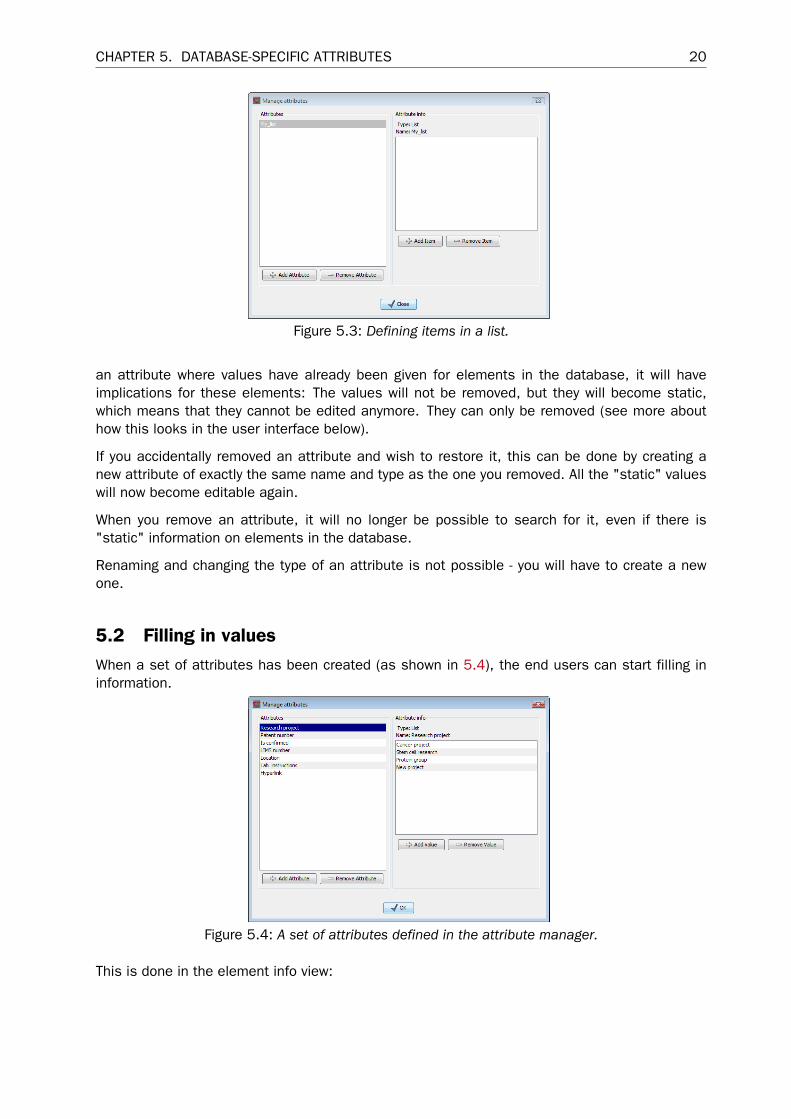
Lists are a little special, since you have to define the items in the list. When you click a list inthe left side of the dialog, you can define the items of the list in the panel to the right by clickingAdd Item ( ) (see figure 5.3).
Remove items in the list by pressing Remove Item ( ).
5.1.2 Removing attributes
To remove an attribute, select the attribute in the list and click Remove Attribute ( ). This canbe done without any further implications if the attribute has just been created, but if you remove
CHAPTER 5. DATABASE-SPECIFIC ATTRIBUTES 20
Figure 5.3: Defining items in a list.
an attribute where values have already been given for elements in the database, it will haveimplications for these elements: The values will not be removed, but they will become static,which means that they cannot be edited anymore. They can only be removed (see more abouthow this looks in the user interface below).
If you accidentally removed an attribute and wish to restore it, this can be done by creating anew attribute of exactly the same name and type as the one you removed. All the "static" valueswill now become editable again.
When you remove an attribute, it will no longer be possible to search for it, even if there is"static" information on elements in the database.
Renaming and changing the type of an attribute is not possible - you will have to create a newone.
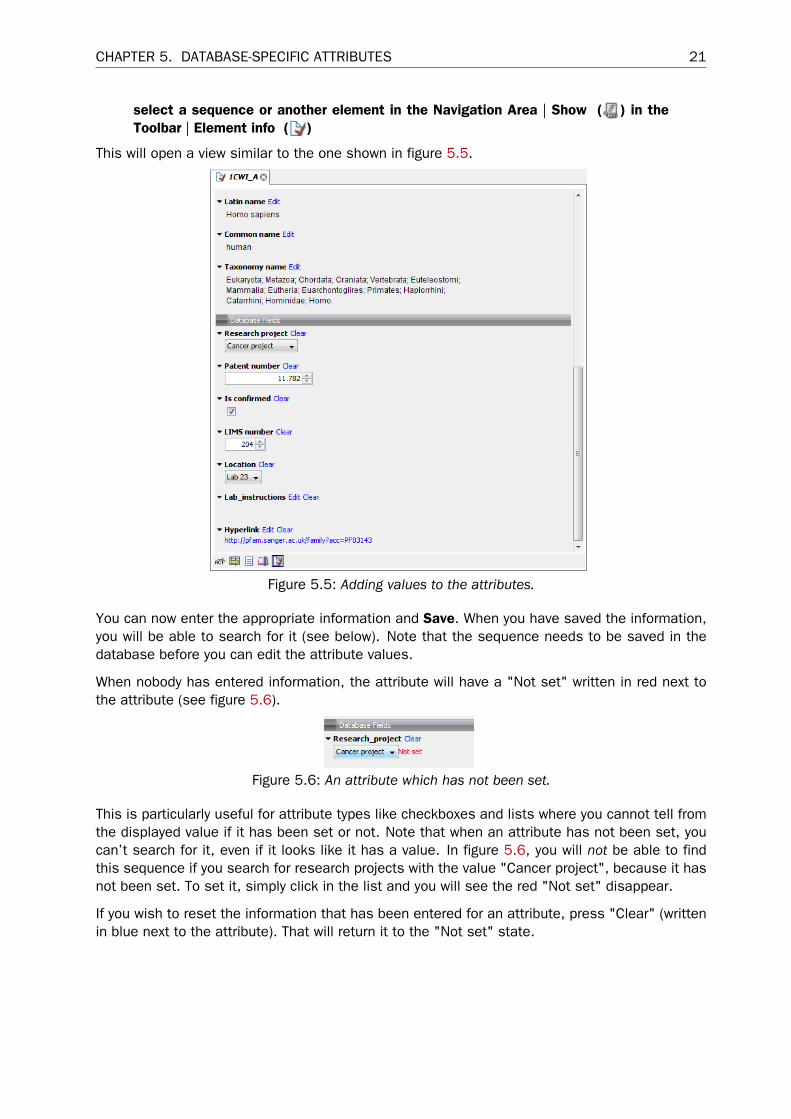
5.2 Filling in valuesWhen a set of attributes has been created (as shown in 5.4), the end users can start filling ininformation.
Figure 5.4: A set of attributes defined in the attribute manager.
This is done in the element info view:
CHAPTER 5. DATABASE-SPECIFIC ATTRIBUTES 21
select a sequence or another element in the Navigation Area | Show ( ) in theToolbar | Element info ( )
This will open a view similar to the one shown in figure 5.5.
Figure 5.5: Adding values to the attributes.
You can now enter the appropriate information and Save. When you have saved the information,you will be able to search for it (see below). Note that the sequence needs to be saved in thedatabase before you can edit the attribute values.
When nobody has entered information, the attribute will have a "Not set" written in red next tothe attribute (see figure 5.6).
Figure 5.6: An attribute which has not been set.
This is particularly useful for attribute types like checkboxes and lists where you cannot tell fromthe displayed value if it has been set or not. Note that when an attribute has not been set, youcan’t search for it, even if it looks like it has a value. In figure 5.6, you will not be able to findthis sequence if you search for research projects with the value "Cancer project", because it hasnot been set. To set it, simply click in the list and you will see the red "Not set" disappear.
If you wish to reset the information that has been entered for an attribute, press "Clear" (writtenin blue next to the attribute). That will return it to the "Not set" state.
CHAPTER 5. DATABASE-SPECIFIC ATTRIBUTES 22
5.2.1 What happens when the sequence gets outside the database?
Since the information entered in the Element info is very tightly connected to the attributes setin the database, they will appear in a different way when it is stored in another location. Whenyou save the sequence in another database with a different attribute set, or on the file system,the information will become "static" which means that it can’t be changed and searched for. Itcan only be deleted. Note that attributes that were "Not set" will disappear when you go outsidethe database.
If the sequence is moved back into the database, the information will be available for editing andsearching again.
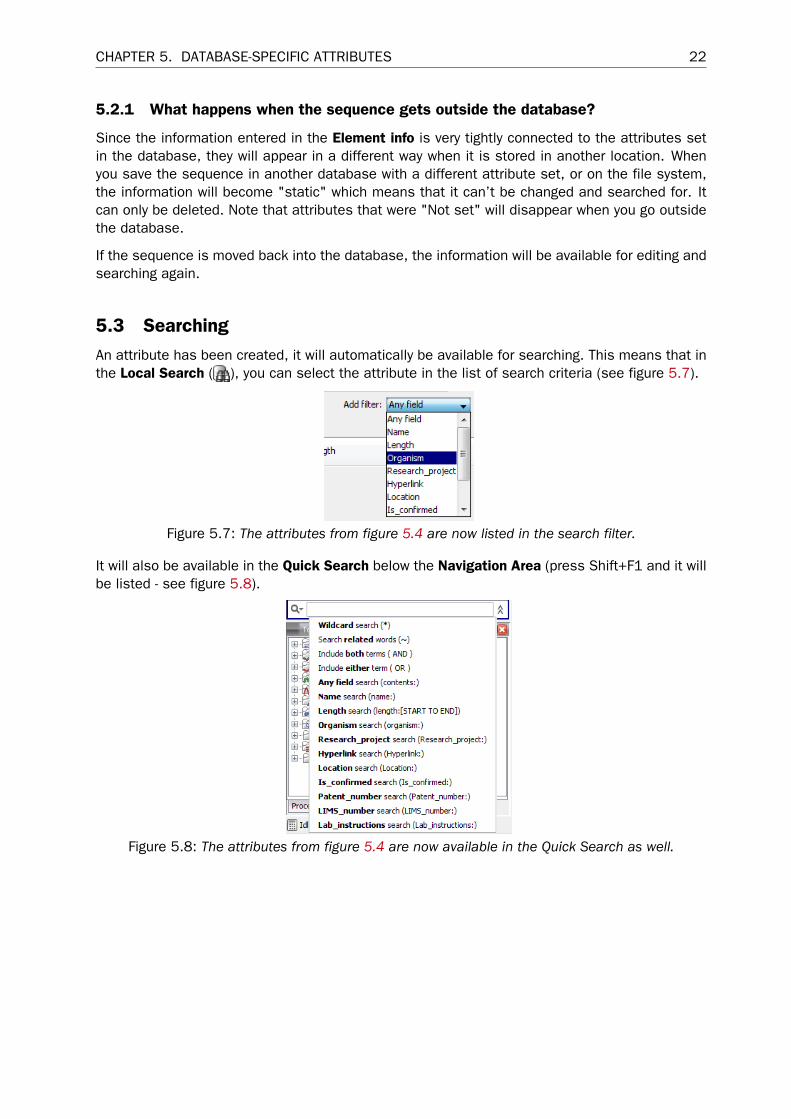
5.3 SearchingAn attribute has been created, it will automatically be available for searching. This means that inthe Local Search ( ), you can select the attribute in the list of search criteria (see figure 5.7).
Figure 5.7: The attributes from figure 5.4 are now listed in the search filter.
It will also be available in the Quick Search below the Navigation Area (press Shift+F1 and it willbe listed - see figure 5.8).
Figure 5.8: The attributes from figure 5.4 are now available in the Quick Search as well.
Index
Active Directory, 8AD, see active directoryAttributes, 18
Back-up, attribute, 20
Custom fields, 18
Freezer position, 18
LDAP, 8
Meta data, 18
Recover removed attribute, 20Recycle bin, 17
System requirements, 6
User authentication, 8User management, 8
23


![Building a Semantic Graph Database for Bioinformatics · In this work, we illustrate how to build BioGrakn, a semantic graph database for bioinformatics [3] based on GRAKN.AI [4],](https://img.pdfslide.net/doc/110x75/5ecd612feaac6c5f67389c31/building-a-semantic-graph-database-for-bioinformatics-in-this-work-we-illustrate.jpg)