Embed Size (px)
Citation preview

Client Access & TCP/IP
MaddenCo Inc. Revised August 2006
Copyright © 2006 by MaddenCo, Inc All rights reserved.

2
Please understand that MaddenCo has expended substantial sums in developing and maintaining its software, systems and related materials, and as a result, it has and will continue to have substantial proprietary interest and valuable trade secrets therein. Also understand that MaddenCo's software, systems, related materials and the "ideas" represented by software, as well as the physical materials, are valuable trade secrets and are strictly confidential material, and important, and that its confidentiality gravely affects the successful conduct of the business of MaddenCo.
3
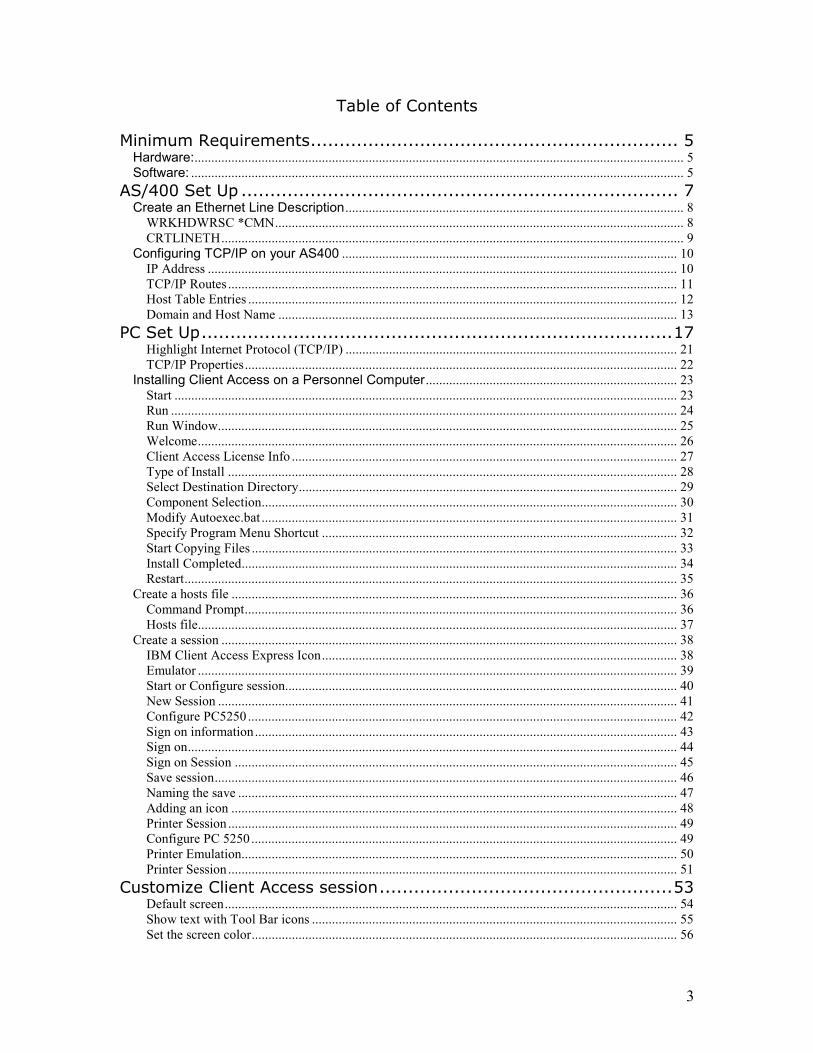
Table of Contents Minimum Requirements................................................................ 5
Hardware:.................................................................................................................................................. 5 Software: ................................................................................................................................................... 5
AS/400 Set Up ............................................................................ 7 Create an Ethernet Line Description..................................................................................................... 8
WRKHDWRSC *CMN.......................................................................................................................... 8 CRTLINETH.......................................................................................................................................... 9
Configuring TCP/IP on your AS400 .................................................................................................... 10 IP Address ............................................................................................................................................ 10 TCP/IP Routes ...................................................................................................................................... 11 Host Table Entries ................................................................................................................................ 12 Domain and Host Name ....................................................................................................................... 13
PC Set Up..................................................................................17 Highlight Internet Protocol (TCP/IP) ................................................................................................... 21 TCP/IP Properties................................................................................................................................. 22
Installing Client Access on a Personnel Computer........................................................................... 23 Start ...................................................................................................................................................... 23 Run ....................................................................................................................................................... 24 Run Window......................................................................................................................................... 25 Welcome............................................................................................................................................... 26 Client Access License Info ................................................................................................................... 27 Type of Install ...................................................................................................................................... 28 Select Destination Directory................................................................................................................. 29 Component Selection............................................................................................................................ 30 Modify Autoexec.bat ............................................................................................................................ 31 Specify Program Menu Shortcut .......................................................................................................... 32 Start Copying Files ............................................................................................................................... 33 Install Completed.................................................................................................................................. 34 Restart................................................................................................................................................... 35
Create a hosts file ..................................................................................................................................... 36 Command Prompt................................................................................................................................. 36 Hosts file............................................................................................................................................... 37
Create a session ........................................................................................................................................ 38 IBM Client Access Express Icon.......................................................................................................... 38 Emulator ............................................................................................................................................... 39 Start or Configure session..................................................................................................................... 40 New Session ......................................................................................................................................... 41 Configure PC5250 ................................................................................................................................ 42 Sign on information.............................................................................................................................. 43 Sign on.................................................................................................................................................. 44 Sign on Session .................................................................................................................................... 45 Save session.......................................................................................................................................... 46 Naming the save ................................................................................................................................... 47 Adding an icon ..................................................................................................................................... 48 Printer Session ...................................................................................................................................... 49 Configure PC 5250 ............................................................................................................................... 49 Printer Emulation.................................................................................................................................. 50 Printer Session ...................................................................................................................................... 51
Customize Client Access session...................................................53 Default screen....................................................................................................................................... 54 Show text with Tool Bar icons ............................................................................................................. 55 Set the screen color............................................................................................................................... 56

4
New screen color .................................................................................................................................. 57 Map keyboard....................................................................................................................................... 58 View 132 wide reports on full screen. .................................................................................................. 62 24x80 report format example ............................................................................................................... 63 27x132 format report example ............................................................................................................. 63 Session name ........................................................................................................................................ 64 Blinking Curser .................................................................................................................................... 65
5
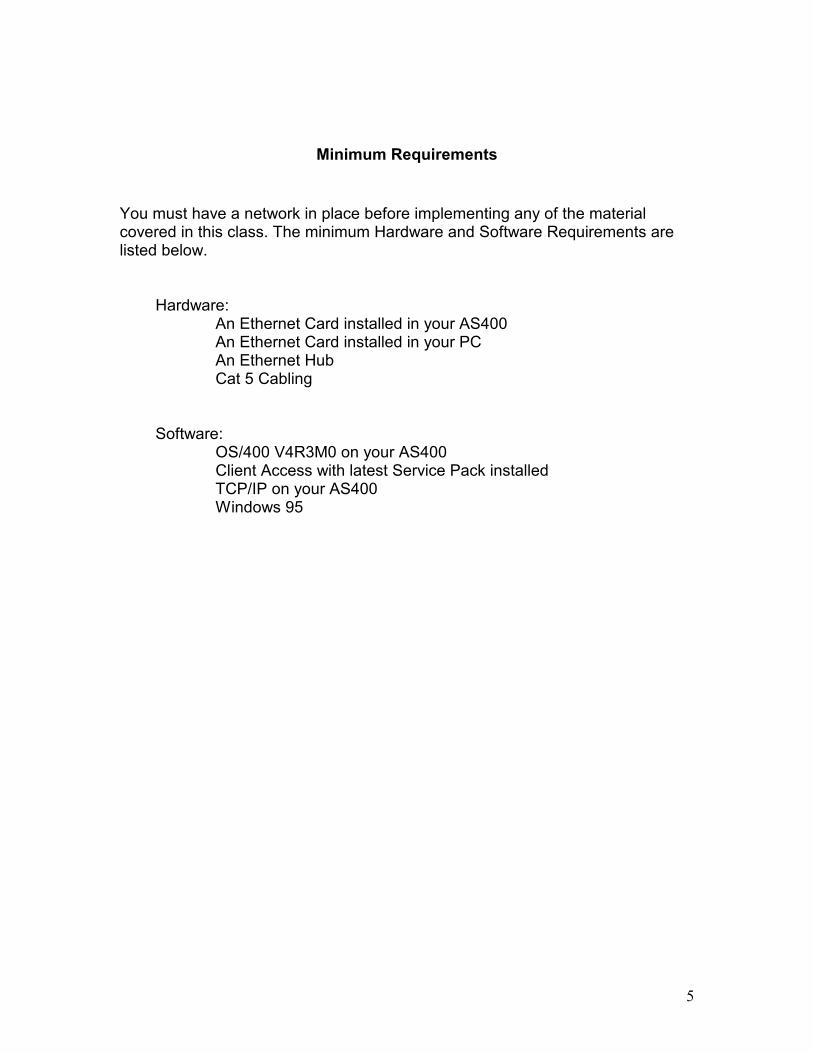
Minimum Requirements
You must have a network in place before implementing any of the material covered in this class. The minimum Hardware and Software Requirements are listed below. Hardware: An Ethernet Card installed in your AS400 An Ethernet Card installed in your PC An Ethernet Hub Cat 5 Cabling Software: OS/400 V4R3M0 on your AS400 Client Access with latest Service Pack installed TCP/IP on your AS400 Windows 95

6
7
AS/400 Set Up
8
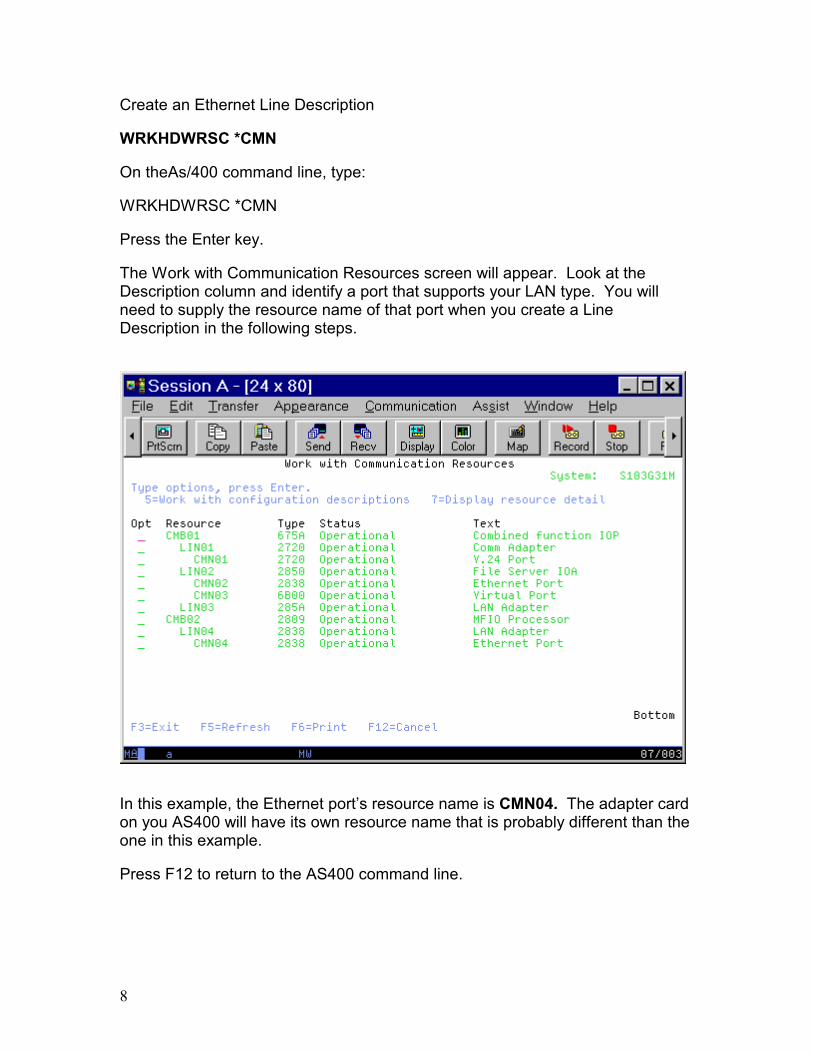
Create an Ethernet Line Description WRKHDWRSC *CMN On theAs/400 command line, type: WRKHDWRSC *CMN Press the Enter key. The Work with Communication Resources screen will appear. Look at the Description column and identify a port that supports your LAN type. You will need to supply the resource name of that port when you create a Line Description in the following steps.
In this example, the Ethernet port’s resource name is CMN04. The adapter card on you AS400 will have its own resource name that is probably different than the one in this example. Press F12 to return to the AS400 command line.
9
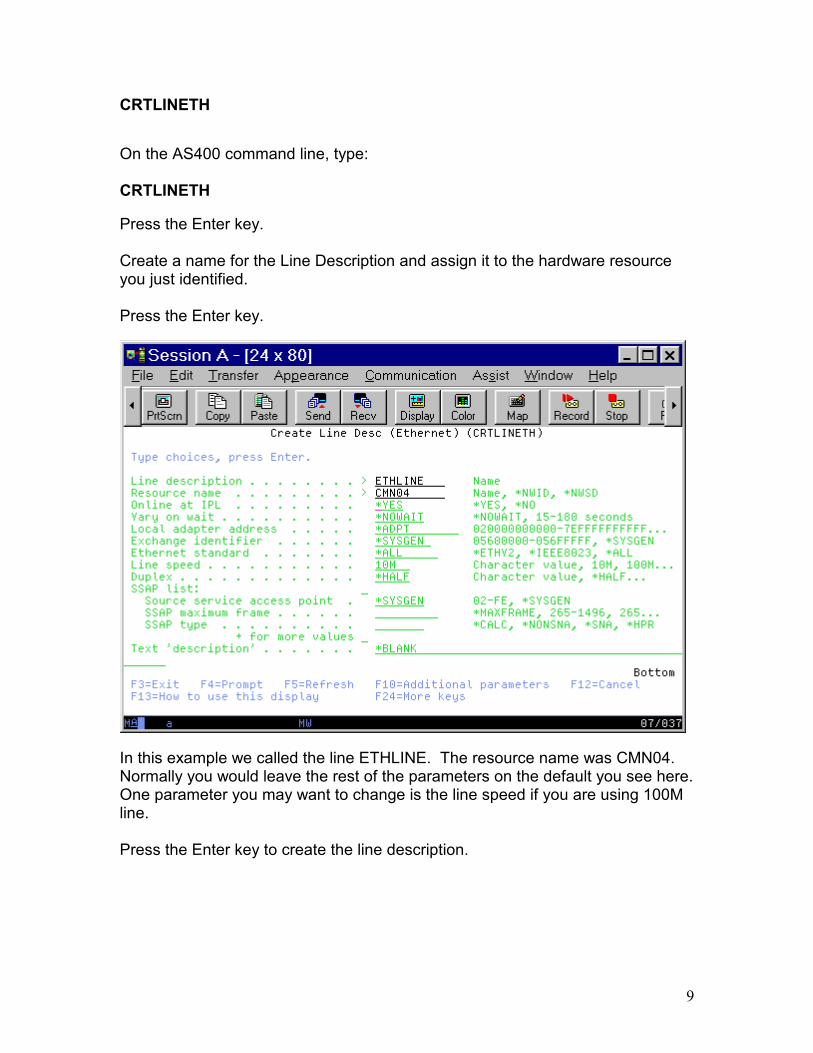
CRTLINETH On the AS400 command line, type: CRTLINETH Press the Enter key. Create a name for the Line Description and assign it to the hardware resource you just identified. Press the Enter key.
In this example we called the line ETHLINE. The resource name was CMN04. Normally you would leave the rest of the parameters on the default you see here. One parameter you may want to change is the line speed if you are using 100M line. Press the Enter key to create the line description.
10
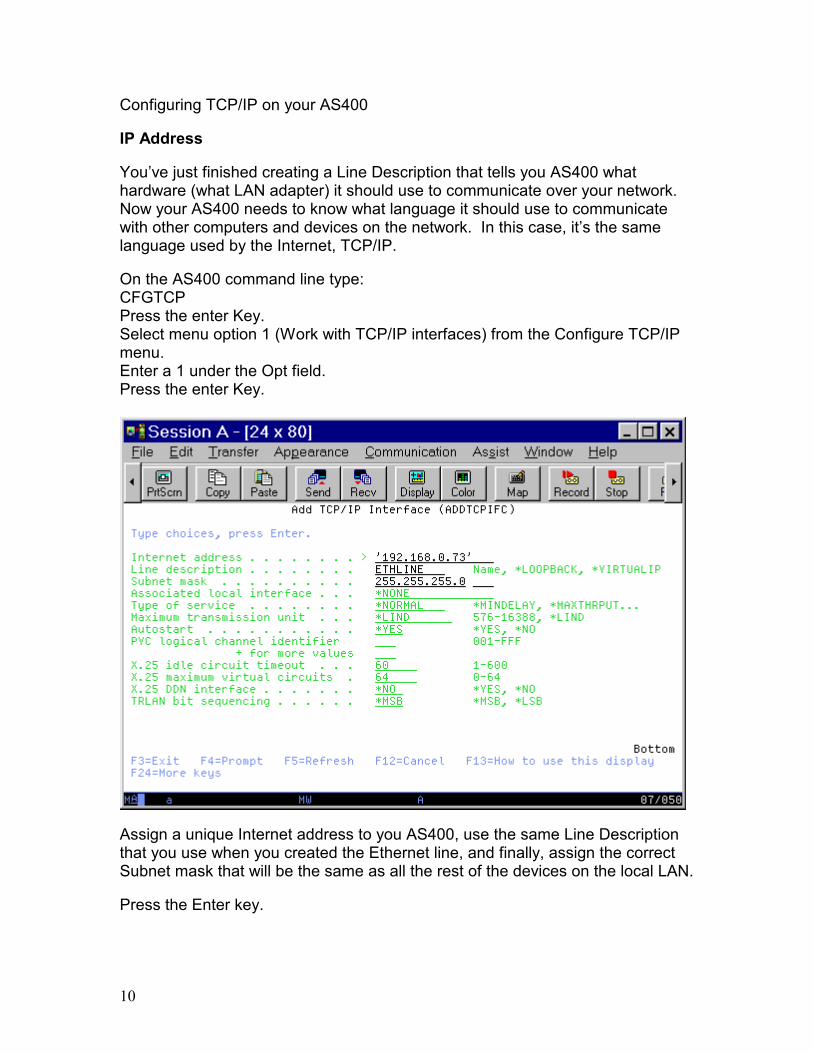
Configuring TCP/IP on your AS400 IP Address You’ve just finished creating a Line Description that tells you AS400 what hardware (what LAN adapter) it should use to communicate over your network. Now your AS400 needs to know what language it should use to communicate with other computers and devices on the network. In this case, it’s the same language used by the Internet, TCP/IP. On the AS400 command line type: CFGTCP Press the enter Key. Select menu option 1 (Work with TCP/IP interfaces) from the Configure TCP/IP menu. Enter a 1 under the Opt field. Press the enter Key.
Assign a unique Internet address to you AS400, use the same Line Description that you use when you created the Ethernet line, and finally, assign the correct Subnet mask that will be the same as all the rest of the devices on the local LAN. Press the Enter key.
11
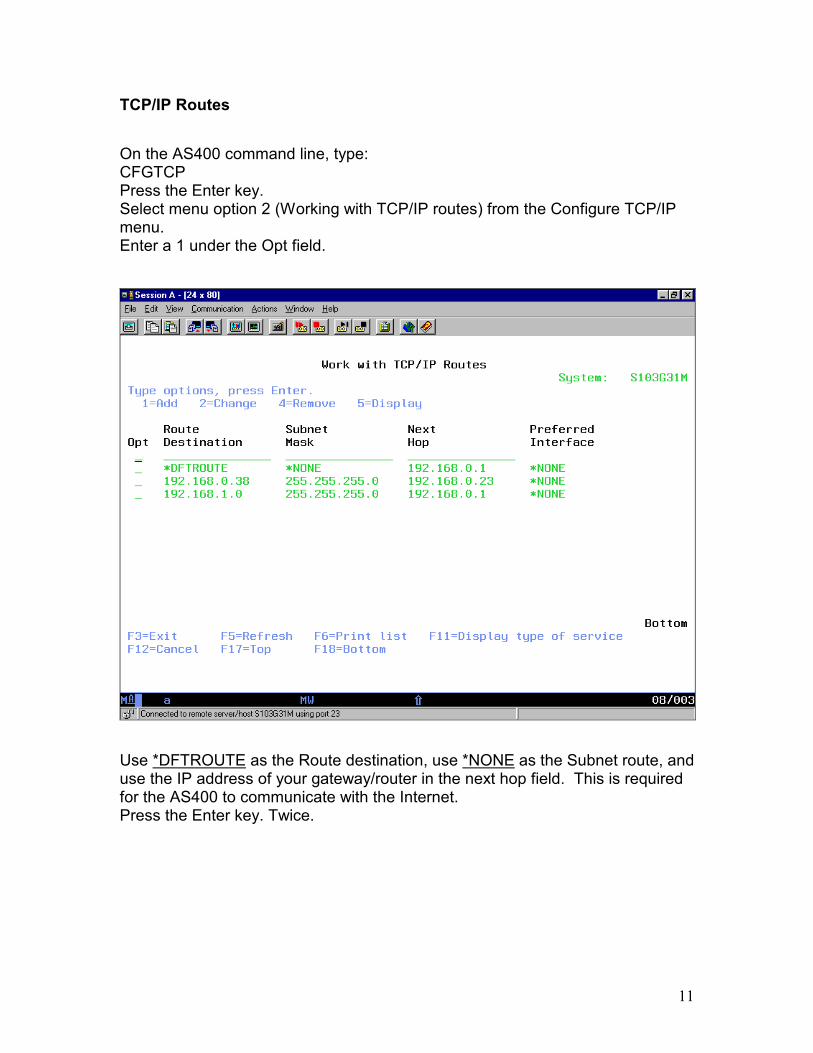
TCP/IP Routes On the AS400 command line, type: CFGTCP Press the Enter key. Select menu option 2 (Working with TCP/IP routes) from the Configure TCP/IP menu. Enter a 1 under the Opt field.
Use *DFTROUTE as the Route destination, use *NONE as the Subnet route, and use the IP address of your gateway/router in the next hop field. This is required for the AS400 to communicate with the Internet. Press the Enter key. Twice.
12
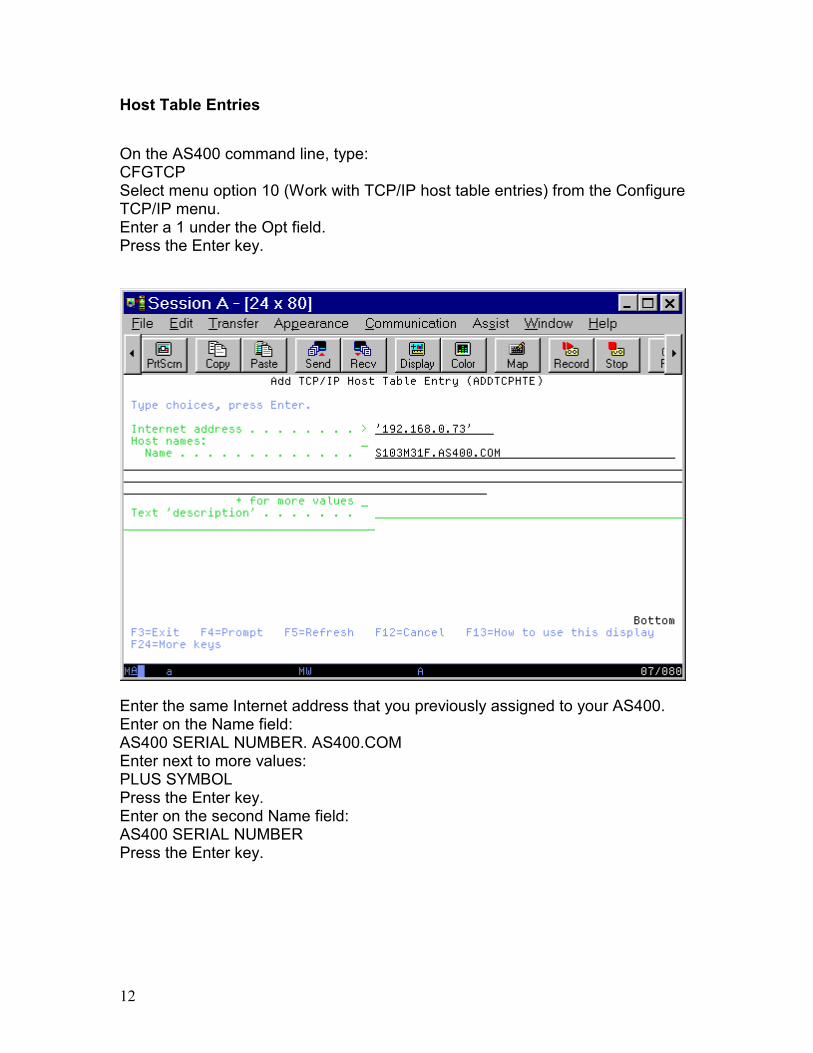
Host Table Entries On the AS400 command line, type: CFGTCP Select menu option 10 (Work with TCP/IP host table entries) from the Configure TCP/IP menu. Enter a 1 under the Opt field. Press the Enter key.
Enter the same Internet address that you previously assigned to your AS400. Enter on the Name field: AS400 SERIAL NUMBER. AS400.COM Enter next to more values: PLUS SYMBOL Press the Enter key. Enter on the second Name field: AS400 SERIAL NUMBER Press the Enter key.

13
Domain and Host Name On the AS400 command line, type: CFGTCP Press the Enter key. Select menu option 12(Change TCP/IP domain information) from the Configure TCP/IP menu. Press the Enter key.
Enter next to Host name: AS400 SERIAL NUMBER Enter next to Domain name: AS400400.COM (The domain and host name should match what was entered on the Host Table Entry screen.) Enter next to Internet address Primary DNS address (Provided by your ISP if this AS400 is to attach to the internet.) Enter next to Internet address Secondary DNS address Press the enter key.

14

15
Starting TCP Make sure your Ethernet line is “varied on.” On the AS400 command line, type: VRYCFG ETHLINE *LIN *ON (Ethline is the name of the previously created Ethernet line). On the AS400 command line, type: STRTCP On the AS400 command line type: STRHOSTSVR *ALL To automate the above procedure you will need to add the commands STRTCP and STRHOSTSVR *ALL to the Job Scheduler or the IPL startup program. If using IBM OS/400 V5R1 or above this step is not necessary since the modification has already been made to the IPL startup program.

16

17
PC Set Up
18
Setting up TCP on a Windows WP Personnel Computer Start
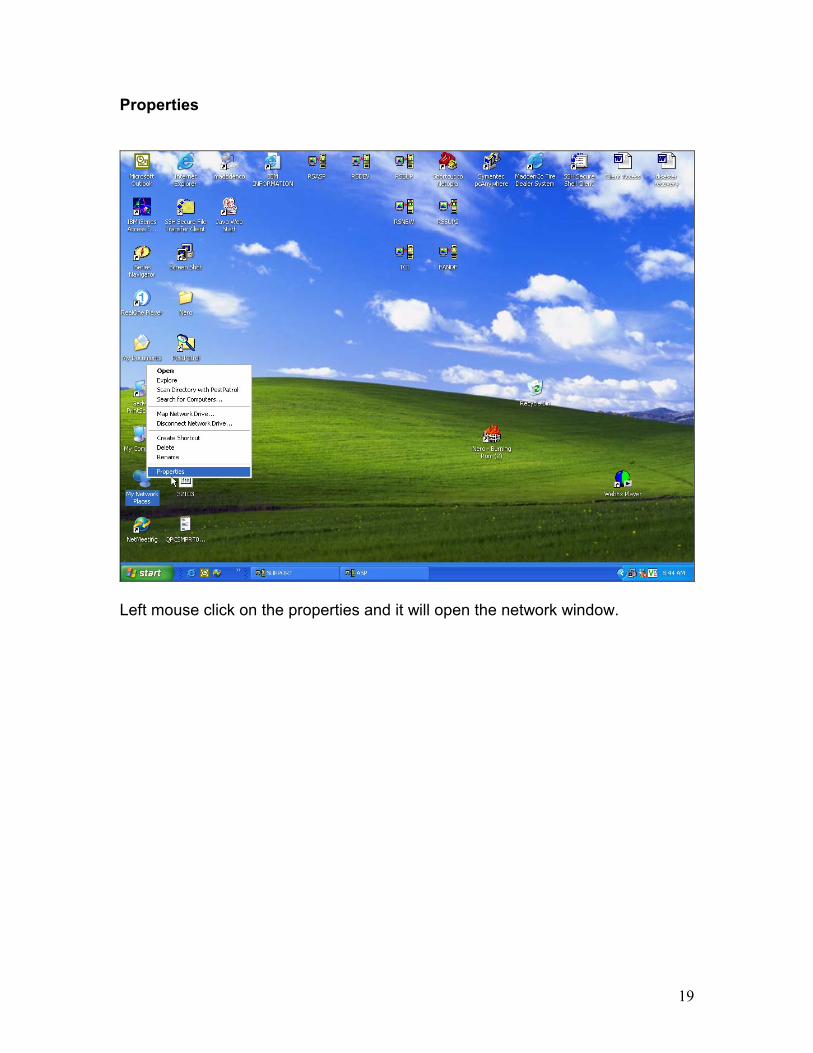
Right mouse click on the My Network Places icon on the Windows desktop and it will drop down a menu .
19
Properties
Left mouse click on the properties and it will open the network window.

20
Local Area Connection Properties
Right click on Local Area Connection and click properties in the pull down menu.
21
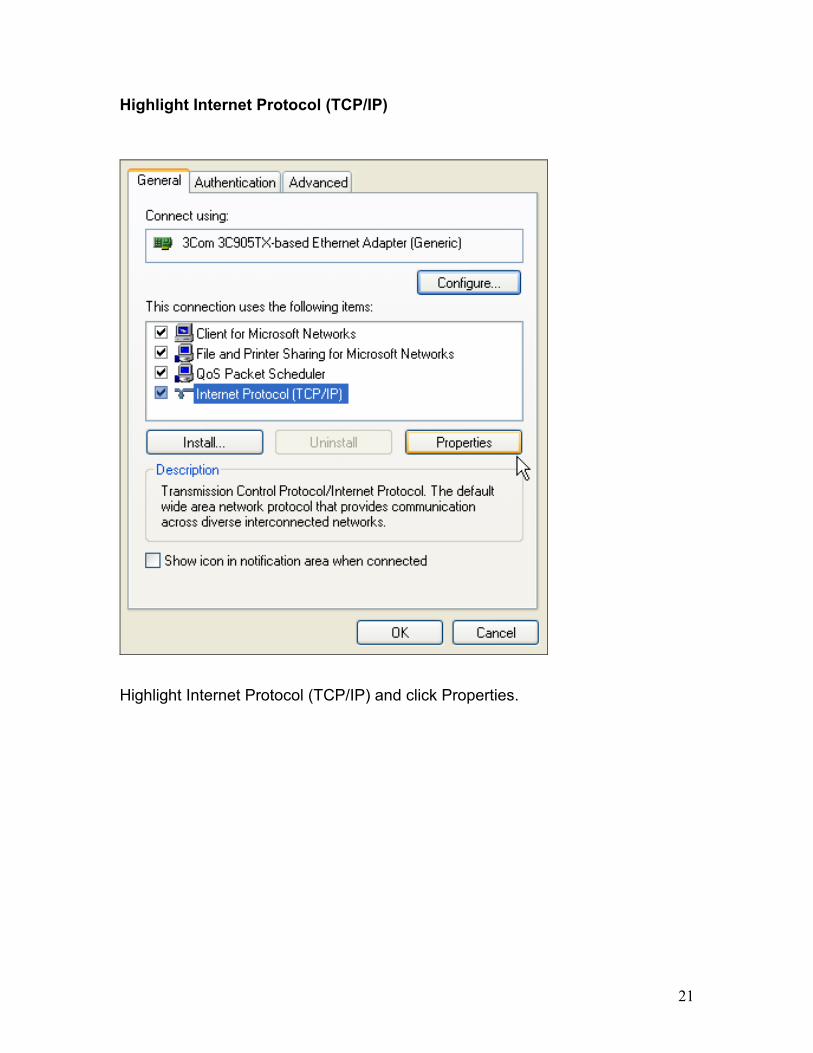
Highlight Internet Protocol (TCP/IP)
Highlight Internet Protocol (TCP/IP) and click Properties.
22
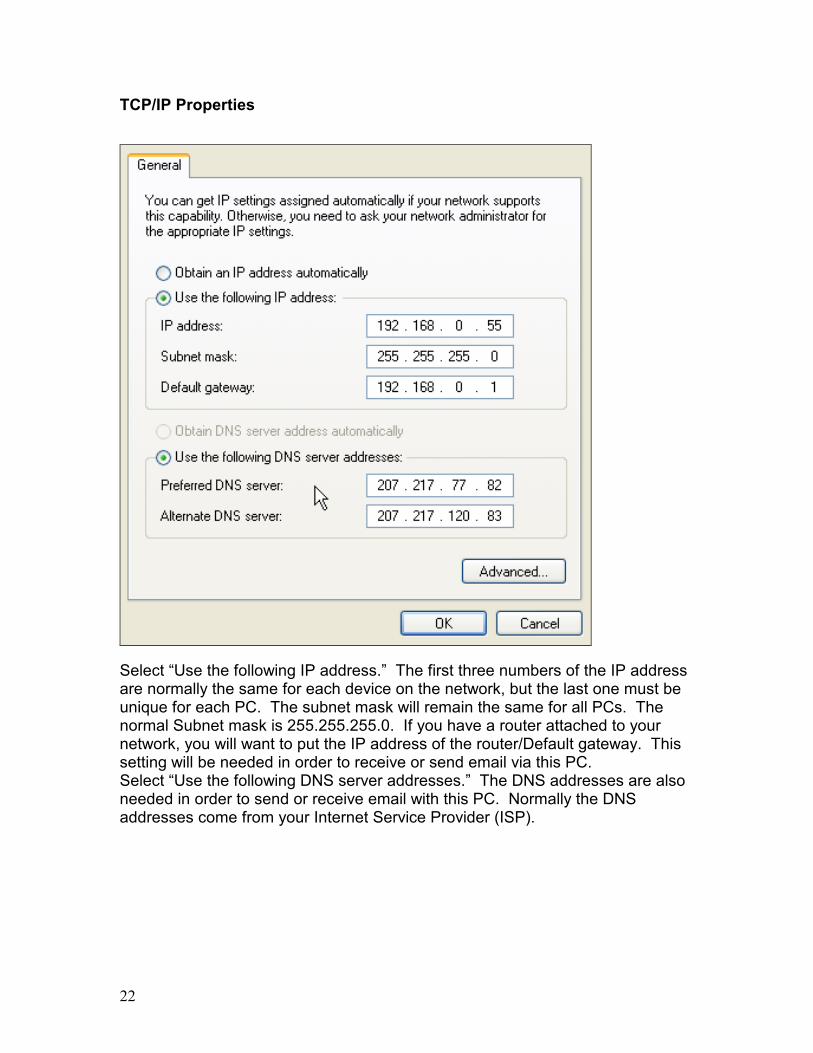
TCP/IP Properties
Select “Use the following IP address.” The first three numbers of the IP address are normally the same for each device on the network, but the last one must be unique for each PC. The subnet mask will remain the same for all PCs. The normal Subnet mask is 255.255.255.0. If you have a router attached to your network, you will want to put the IP address of the router/Default gateway. This setting will be needed in order to receive or send email via this PC. Select “Use the following DNS server addresses.” The DNS addresses are also needed in order to send or receive email with this PC. Normally the DNS addresses come from your Internet Service Provider (ISP).

23
Installing Client Access on a Personnel Computer Start
Place the CD for AS400 Client Access Family for Windows into the CD drive. Click on Start.
24
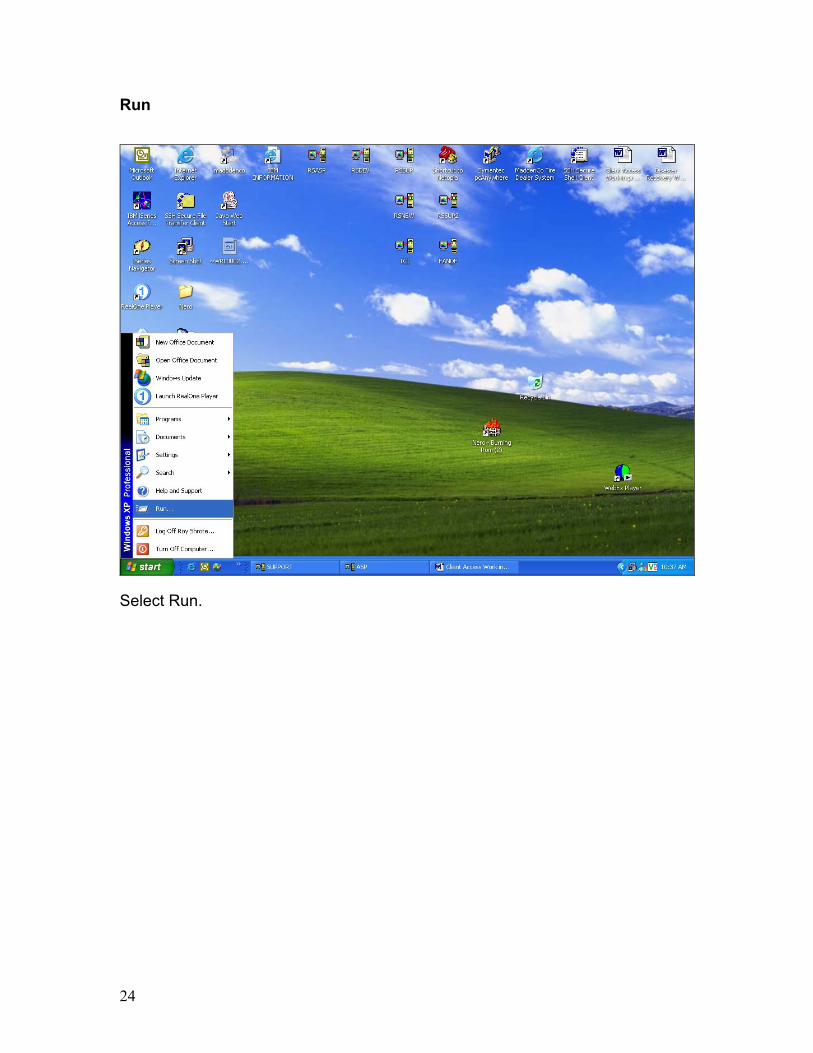
Run
Select Run.
25
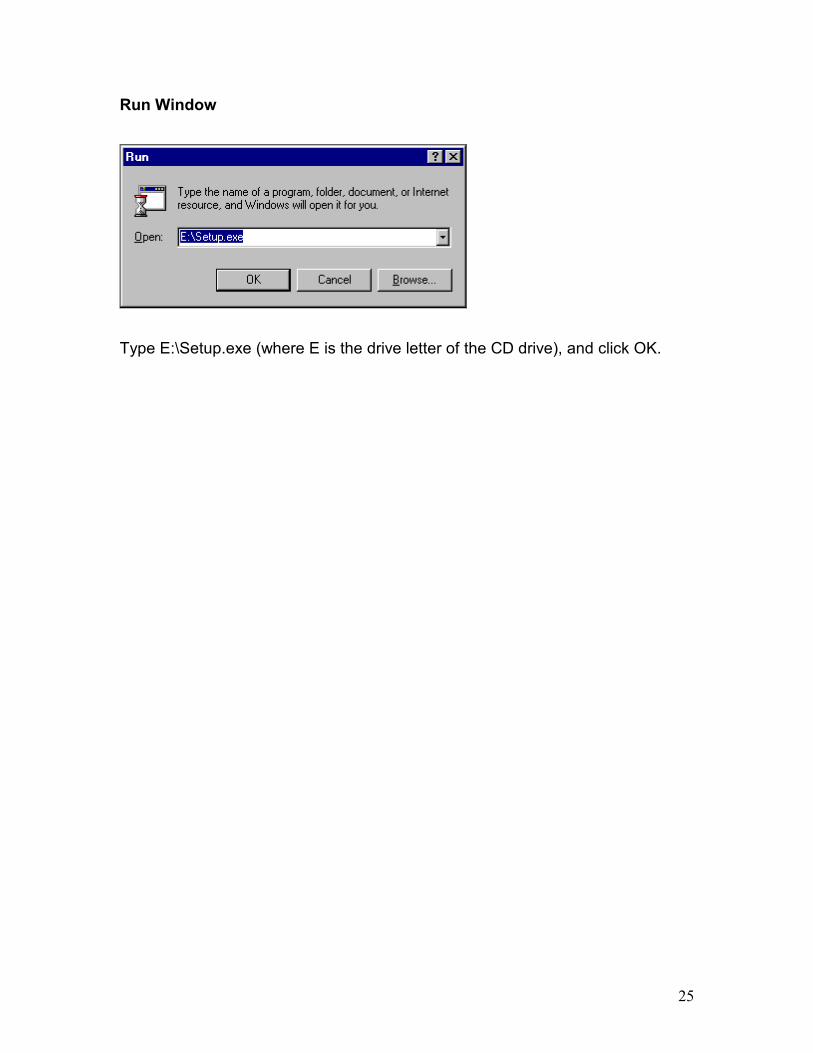
Run Window
Type E:\Setup.exe (where E is the drive letter of the CD drive), and click OK.
26
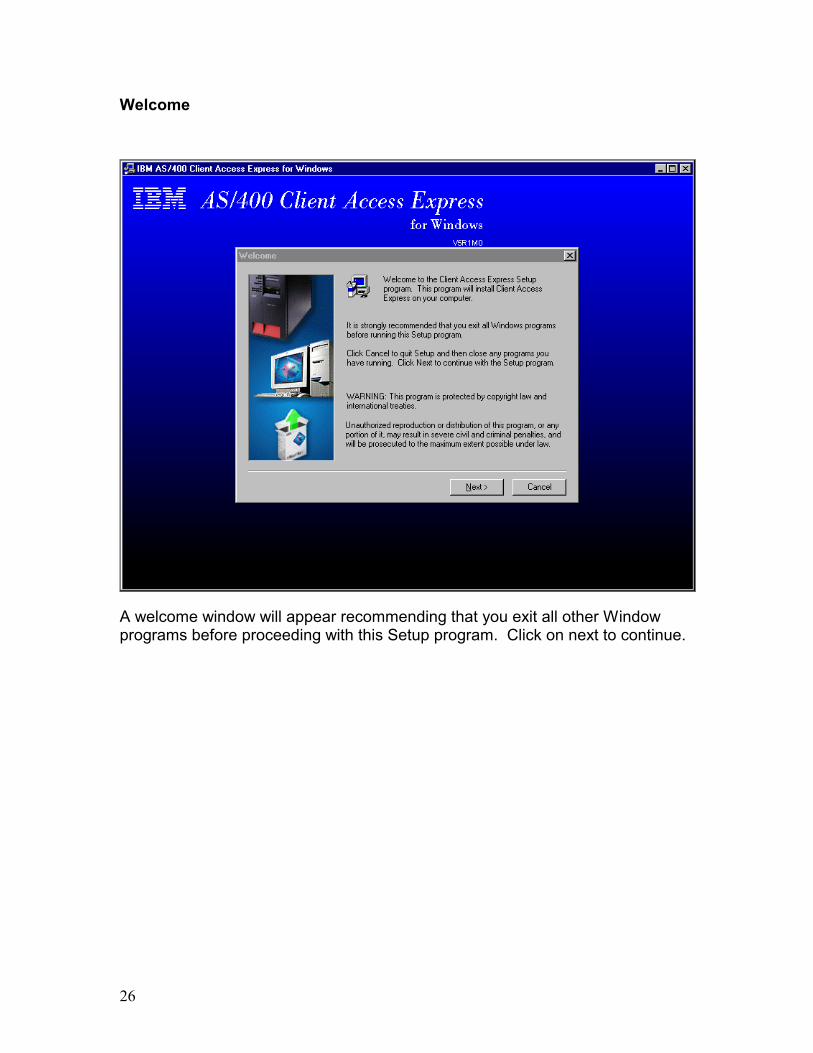
Welcome
A welcome window will appear recommending that you exit all other Window programs before proceeding with this Setup program. Click on next to continue.
27
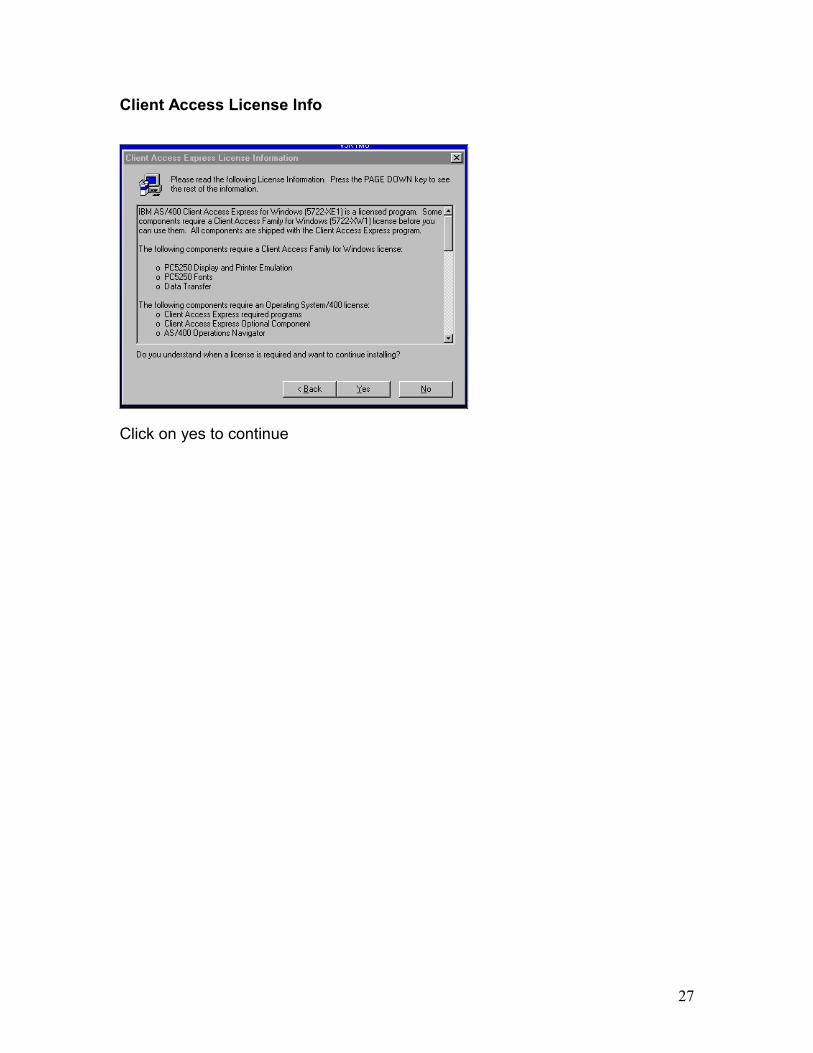
Client Access License Info
Click on yes to continue
28
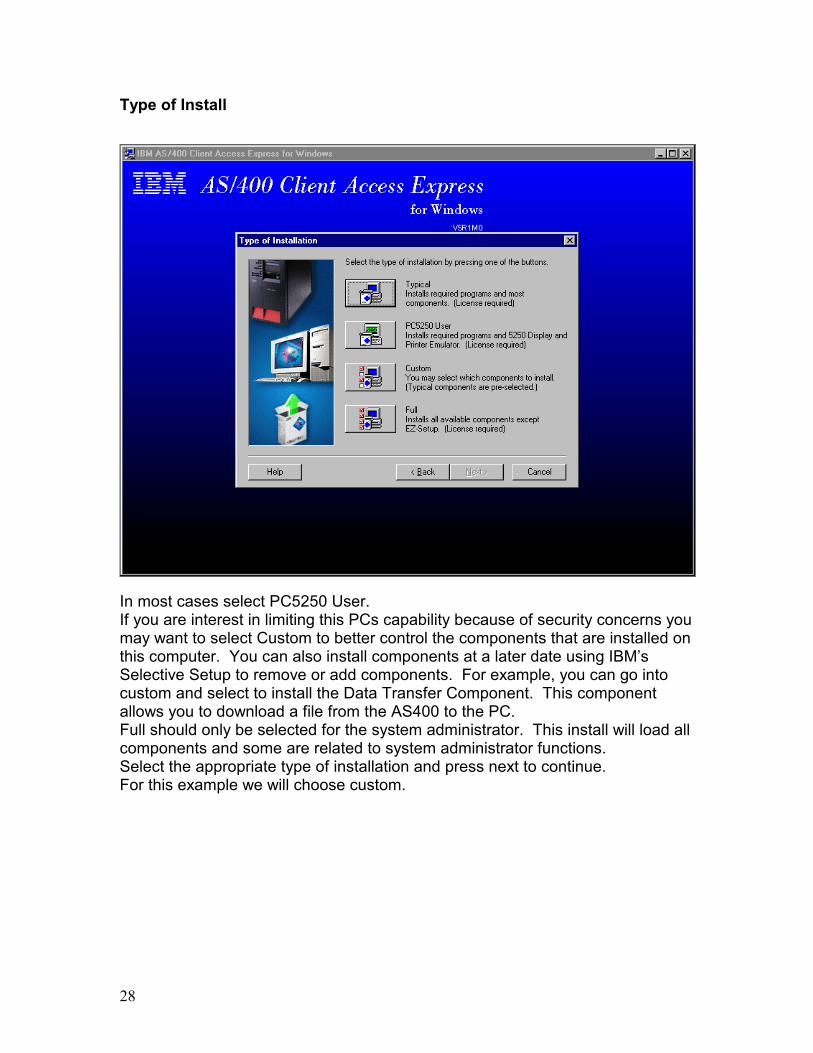
Type of Install
In most cases select PC5250 User. If you are interest in limiting this PCs capability because of security concerns you may want to select Custom to better control the components that are installed on this computer. You can also install components at a later date using IBM’s Selective Setup to remove or add components. For example, you can go into custom and select to install the Data Transfer Component. This component allows you to download a file from the AS400 to the PC. Full should only be selected for the system administrator. This install will load all components and some are related to system administrator functions. Select the appropriate type of installation and press next to continue. For this example we will choose custom.
29
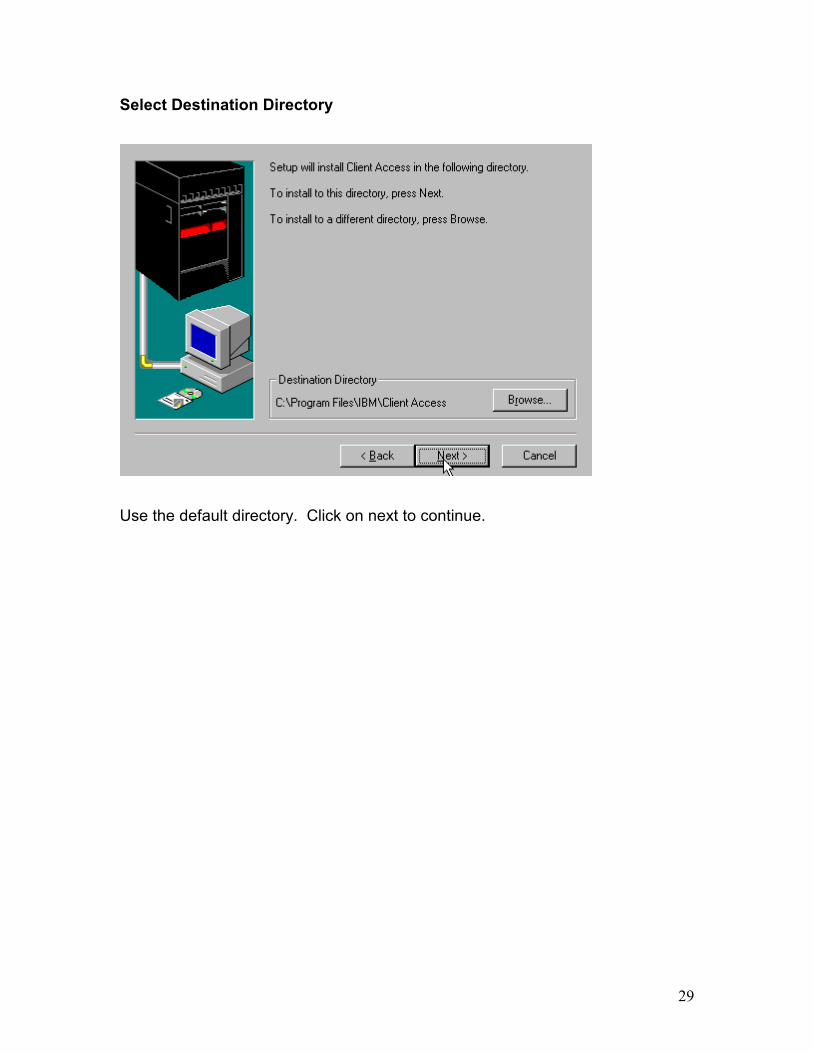
Select Destination Directory
Use the default directory. Click on next to continue.
30
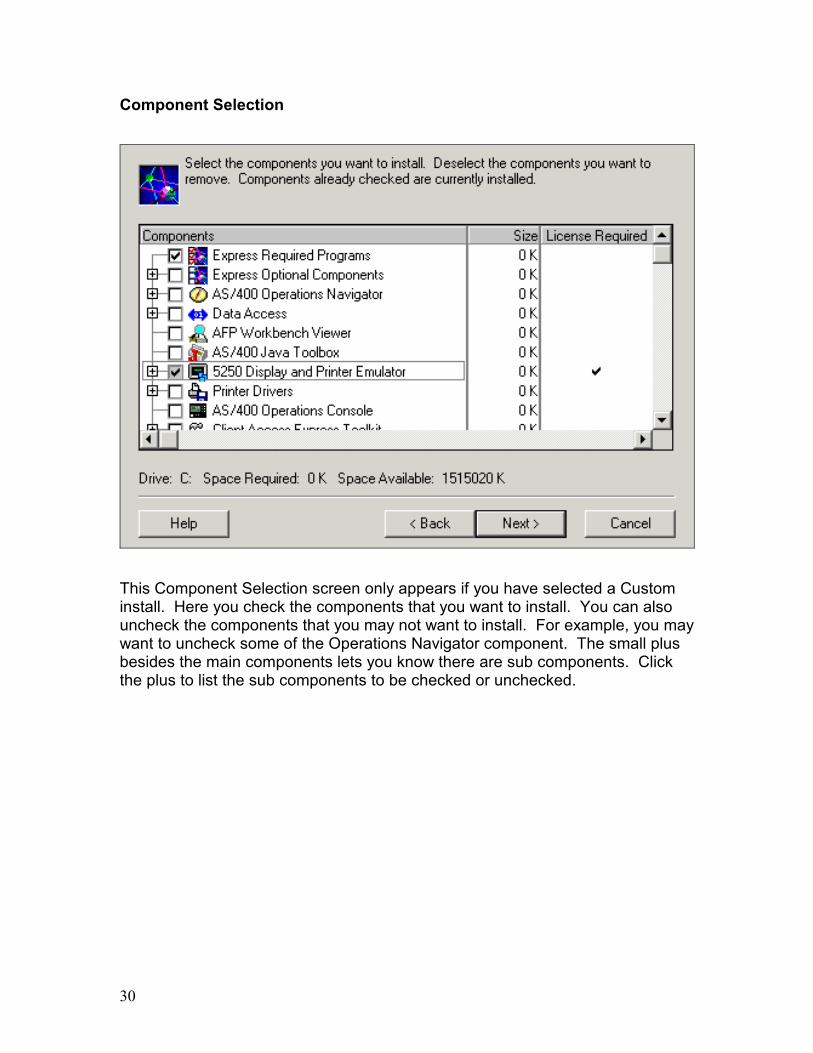
Component Selection
This Component Selection screen only appears if you have selected a Custom install. Here you check the components that you want to install. You can also uncheck the components that you may not want to install. For example, you may want to uncheck some of the Operations Navigator component. The small plus besides the main components lets you know there are sub components. Click the plus to list the sub components to be checked or unchecked.
31
Modify Autoexec.bat
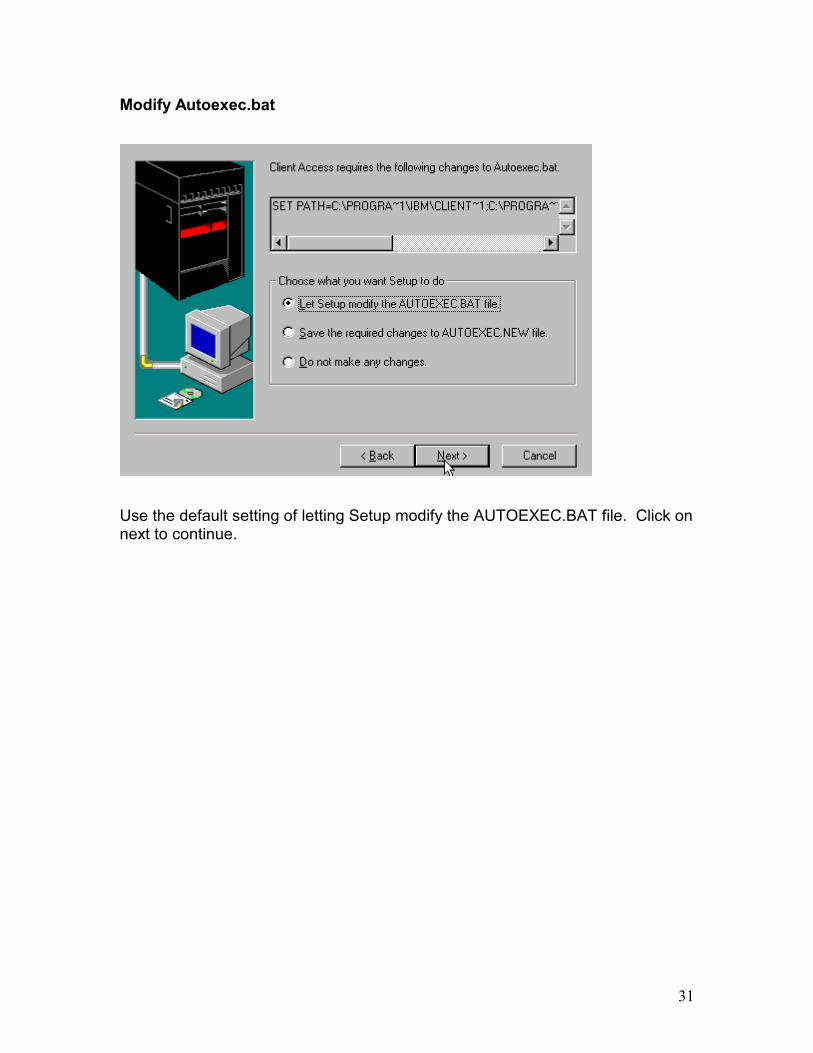
Use the default setting of letting Setup modify the AUTOEXEC.BAT file. Click on next to continue.
32
Specify Program Menu Shortcut
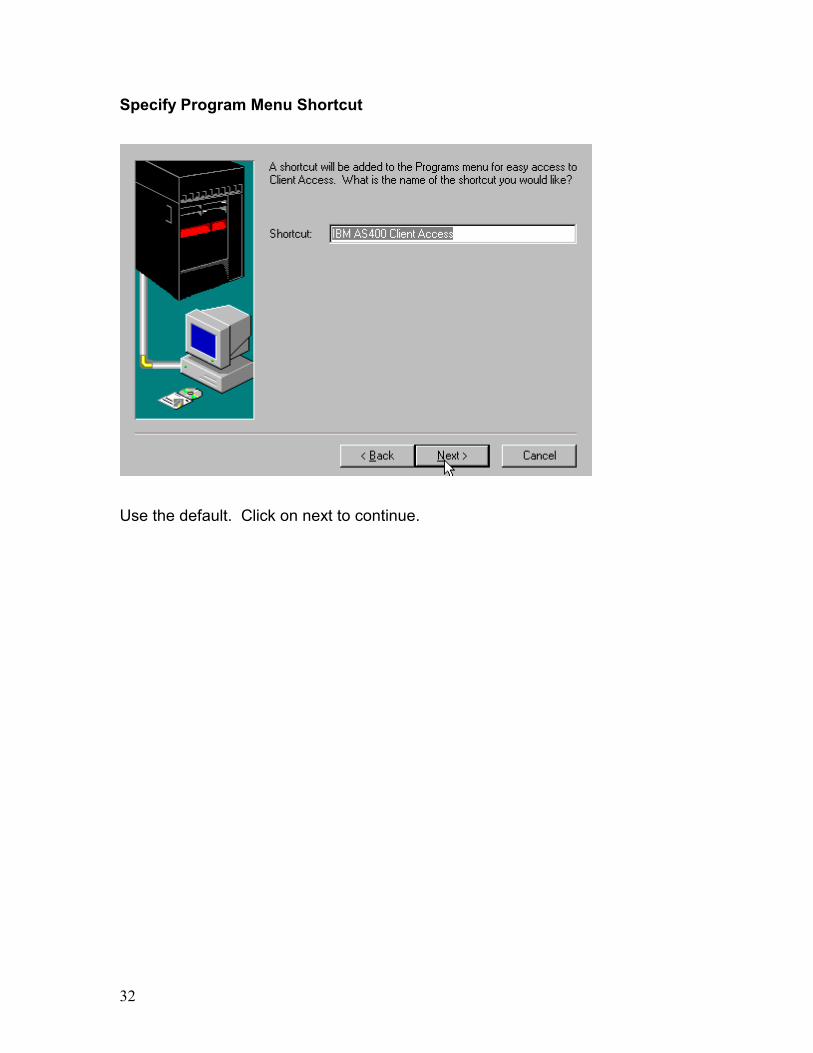
Use the default. Click on next to continue.
33
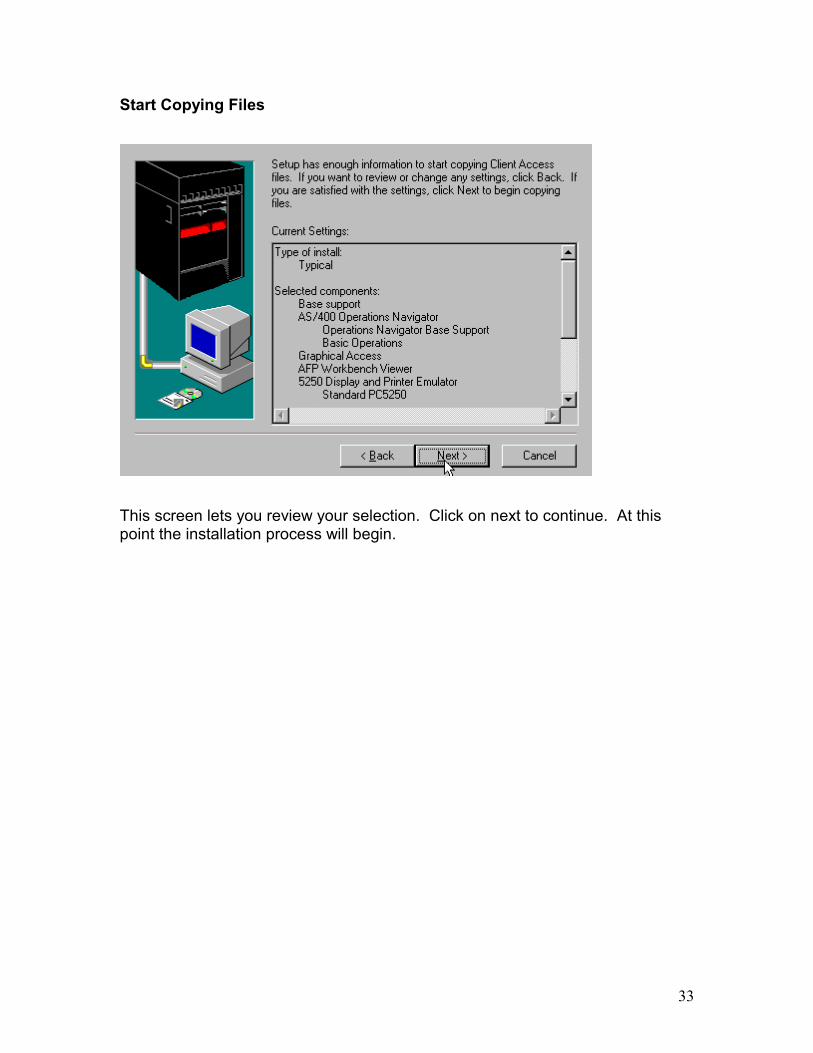
Start Copying Files
This screen lets you review your selection. Click on next to continue. At this point the installation process will begin.
34
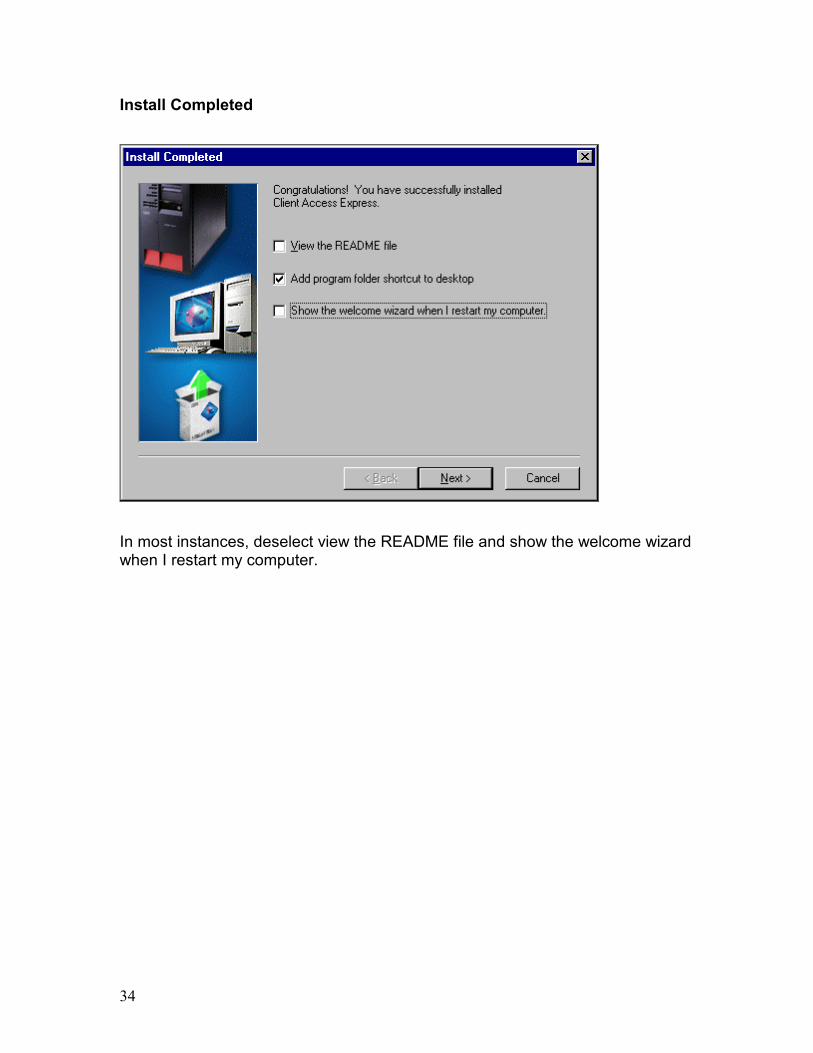
Install Completed
In most instances, deselect view the README file and show the welcome wizard when I restart my computer.
35
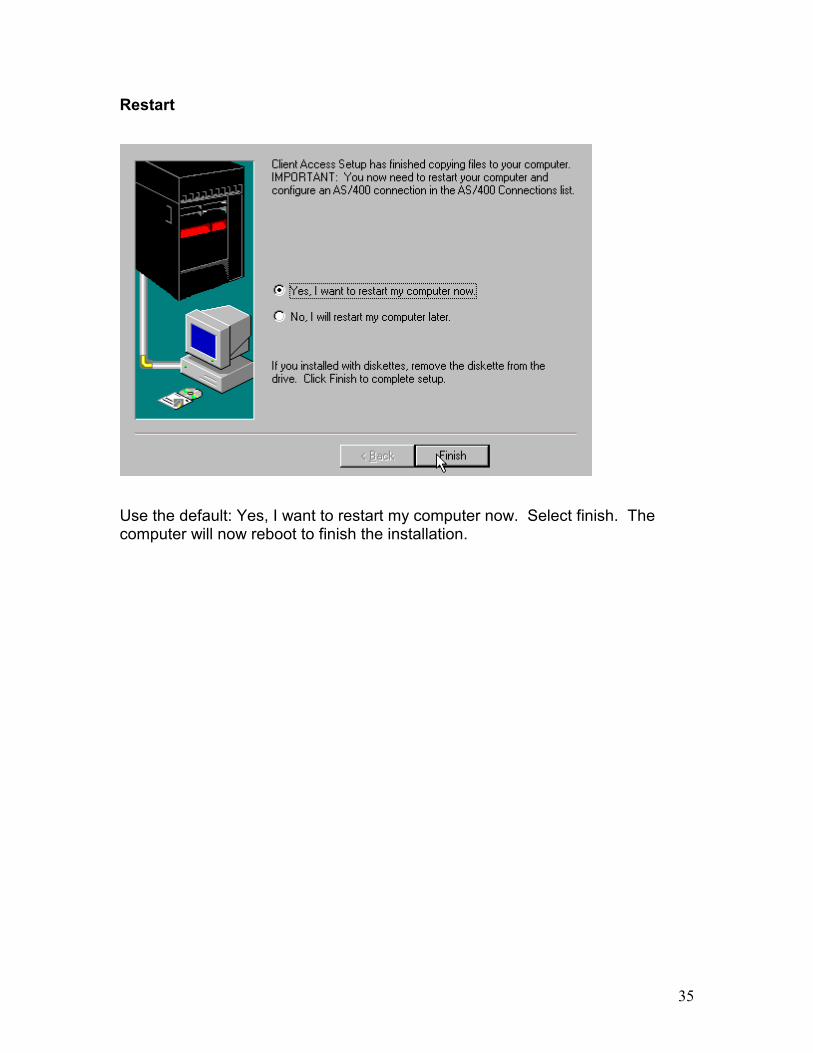
Restart
Use the default: Yes, I want to restart my computer now. Select finish. The computer will now reboot to finish the installation.
36
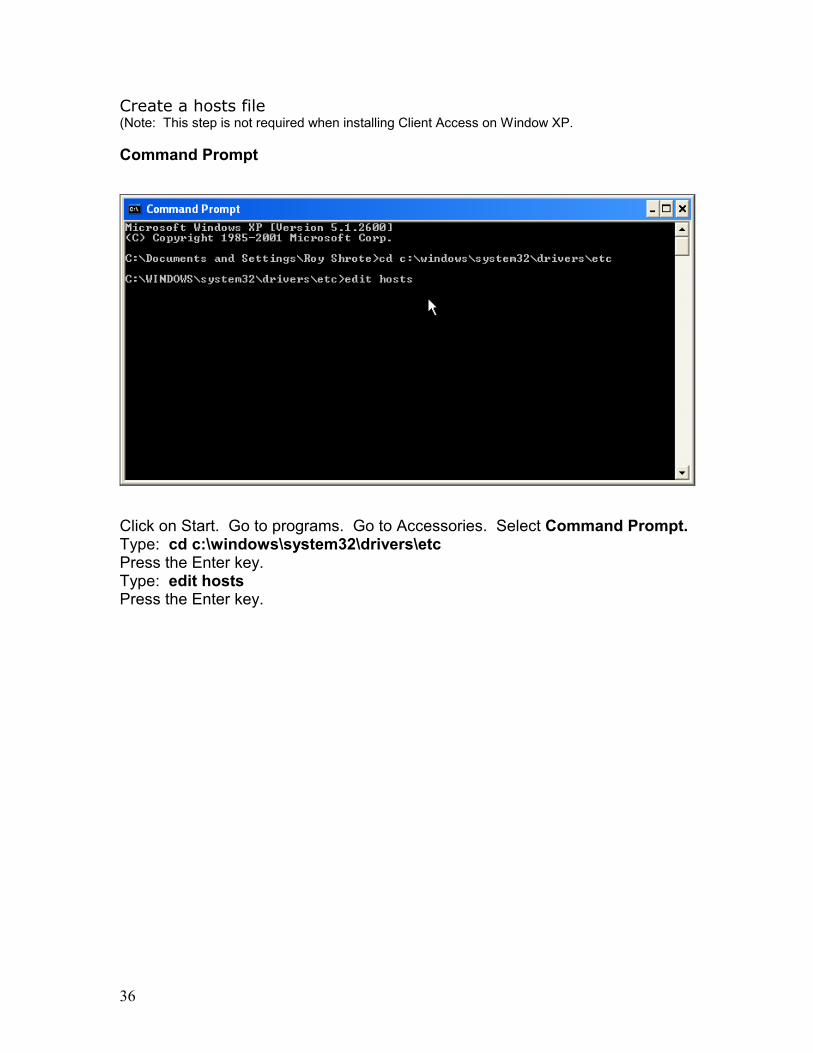
Create a hosts file (Note: This step is not required when installing Client Access on Window XP. Command Prompt
Click on Start. Go to programs. Go to Accessories. Select Command Prompt. Type: cd c:\windows\system32\drivers\etc Press the Enter key. Type: edit hosts Press the Enter key.
37
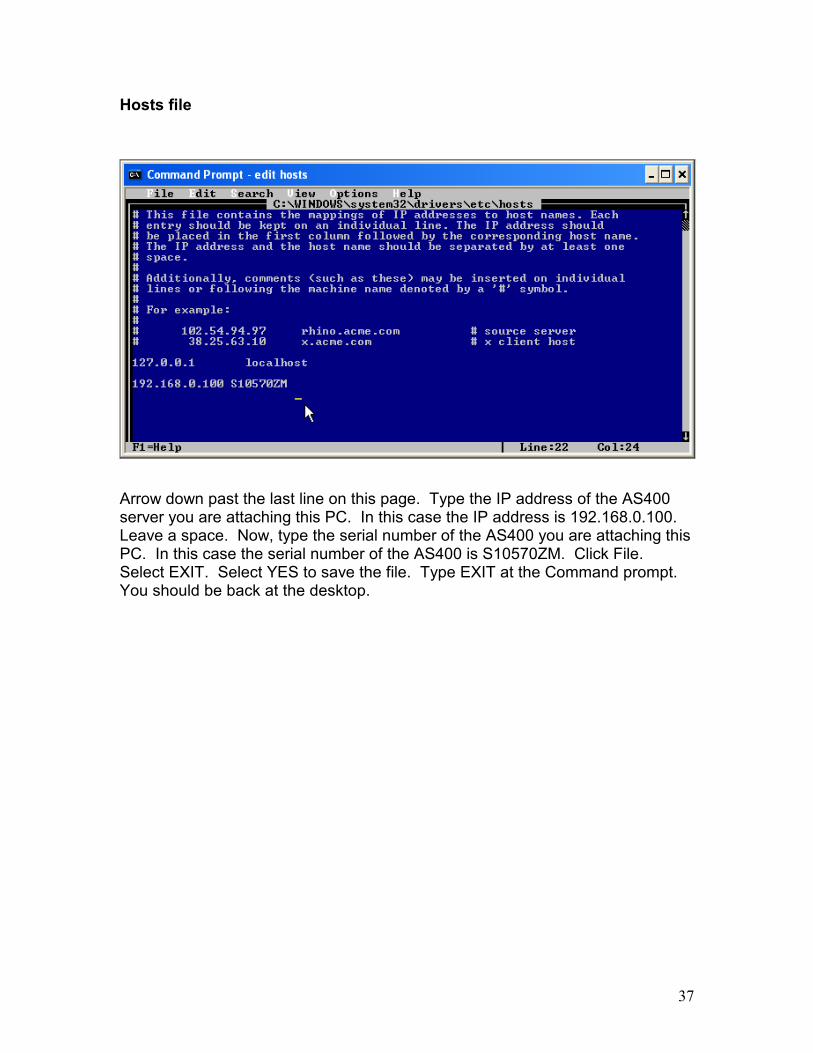
Hosts file
Arrow down past the last line on this page. Type the IP address of the AS400 server you are attaching this PC. In this case the IP address is 192.168.0.100. Leave a space. Now, type the serial number of the AS400 you are attaching this PC. In this case the serial number of the AS400 is S10570ZM. Click File. Select EXIT. Select YES to save the file. Type EXIT at the Command prompt. You should be back at the desktop.

38
Create a session IBM Client Access Express Icon
Double click on the Client Access Icon. This will open the Client Access Express folder.
39
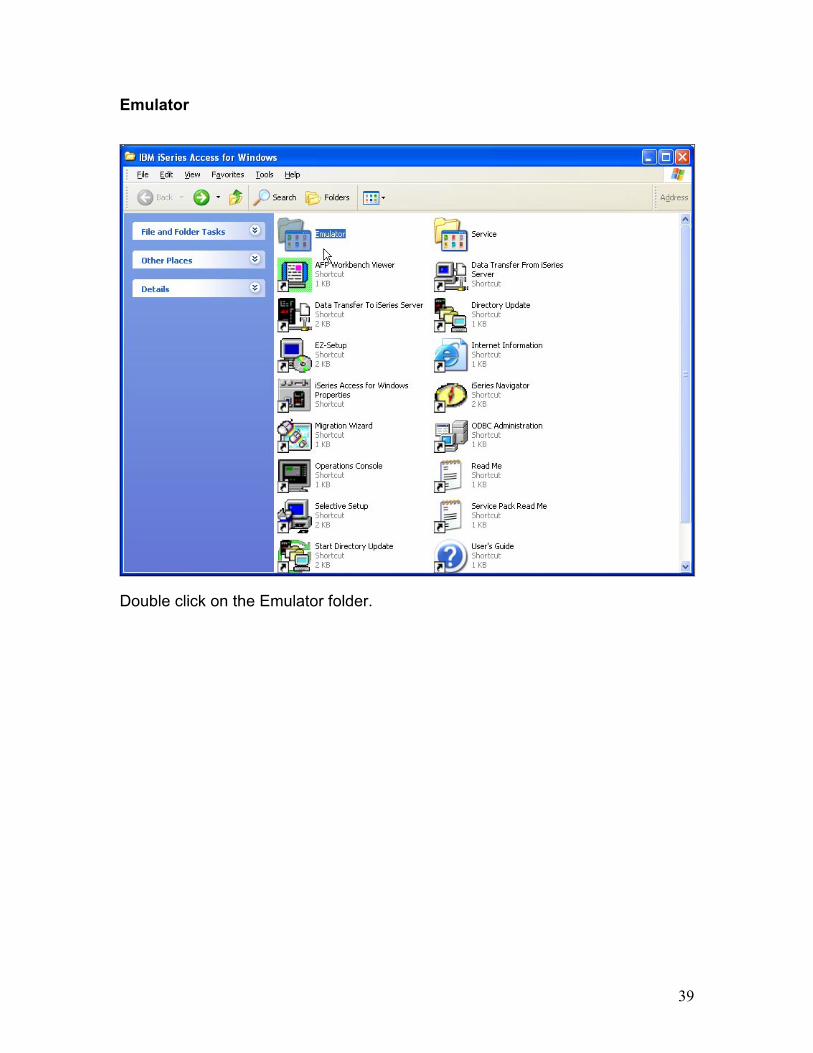
Emulator
Double click on the Emulator folder.
40
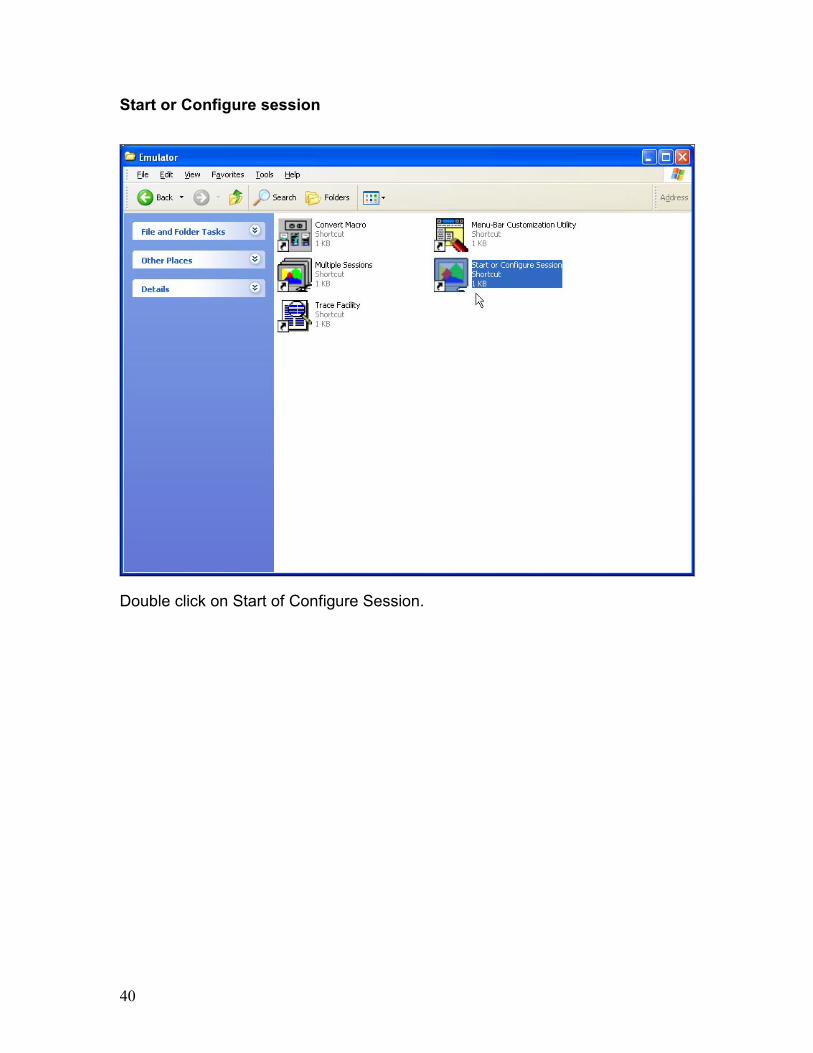
Start or Configure session
Double click on Start of Configure Session.
41
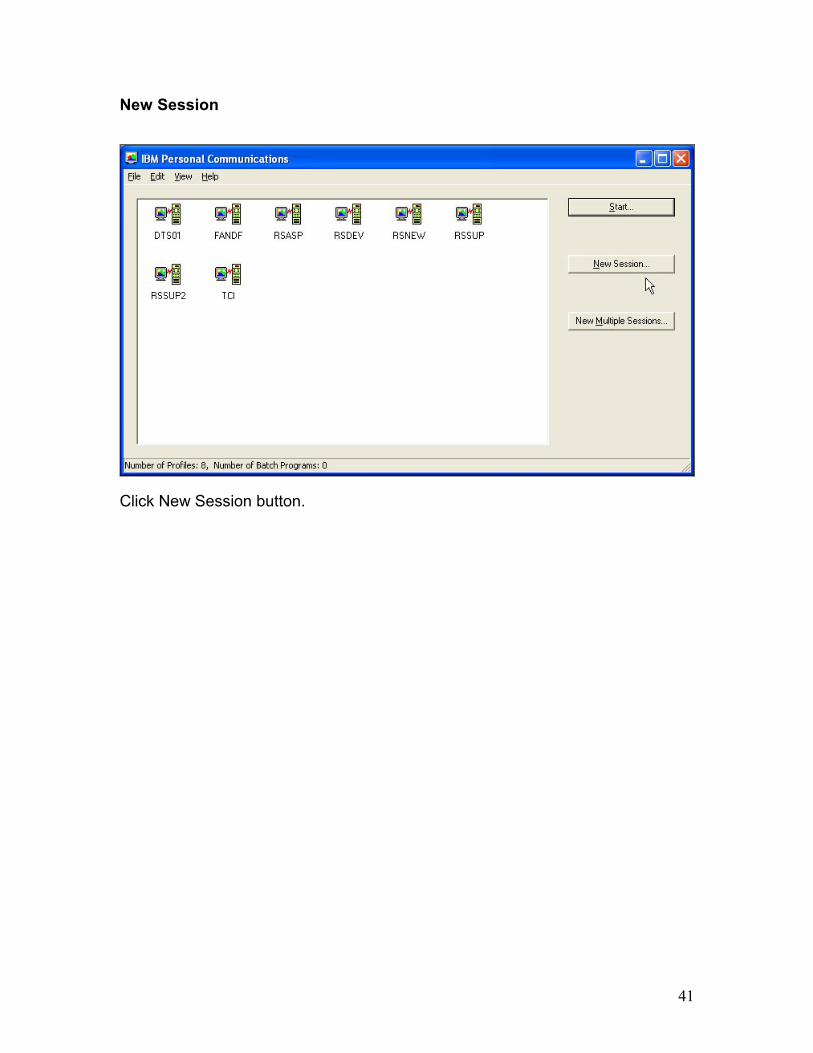
New Session
Click New Session button.
42
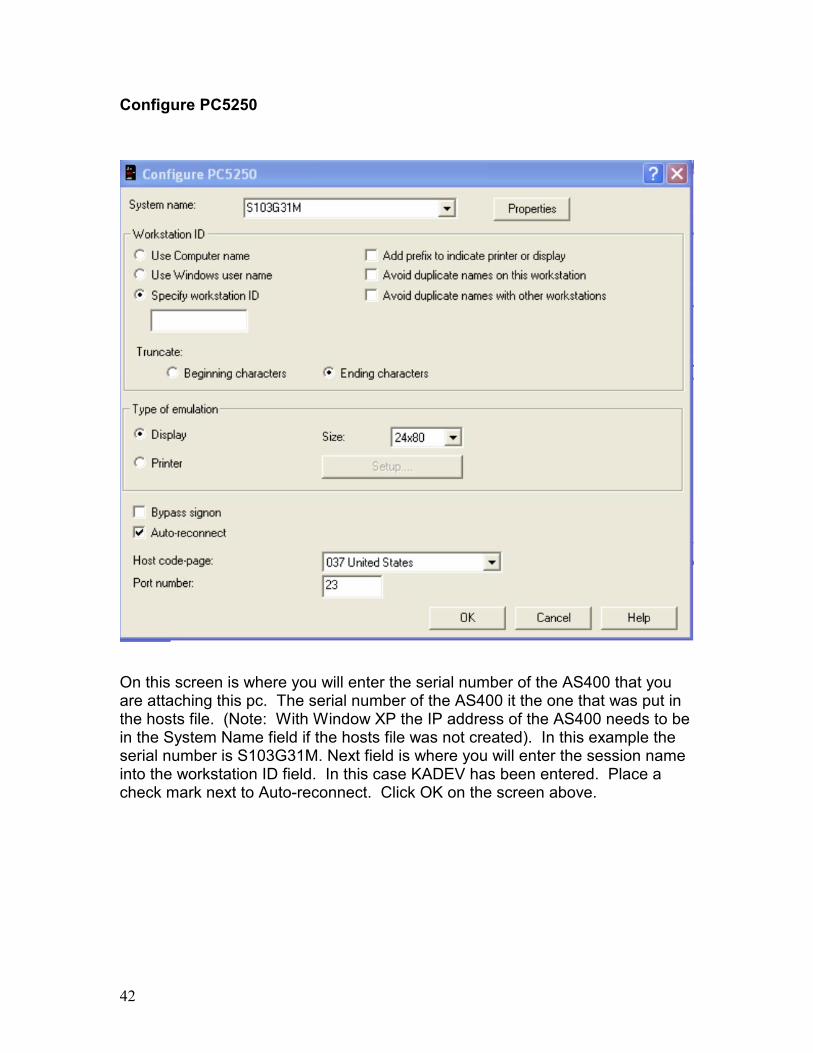
Configure PC5250
On this screen is where you will enter the serial number of the AS400 that you are attaching this pc. The serial number of the AS400 it the one that was put in the hosts file. (Note: With Window XP the IP address of the AS400 needs to be in the System Name field if the hosts file was not created). In this example the serial number is S103G31M. Next field is where you will enter the session name into the workstation ID field. In this case KADEV has been entered. Place a check mark next to Auto-reconnect. Click OK on the screen above.
43
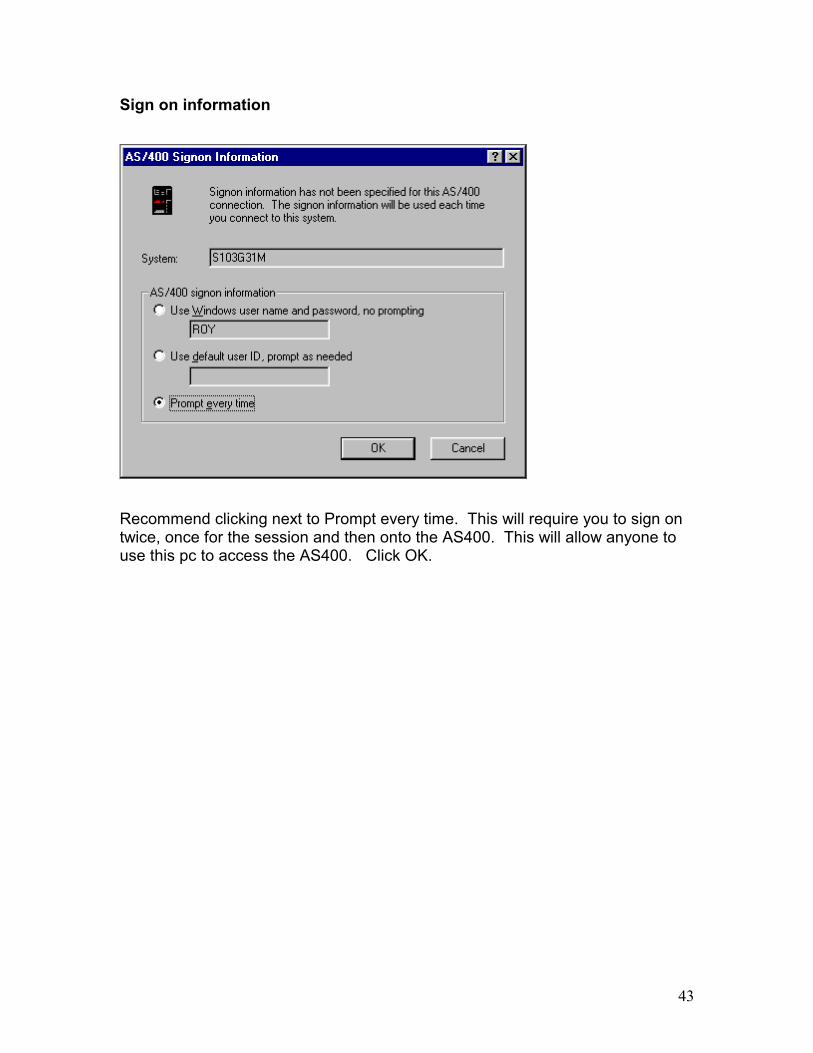
Sign on information
Recommend clicking next to Prompt every time. This will require you to sign on twice, once for the session and then onto the AS400. This will allow anyone to use this pc to access the AS400. Click OK.
44
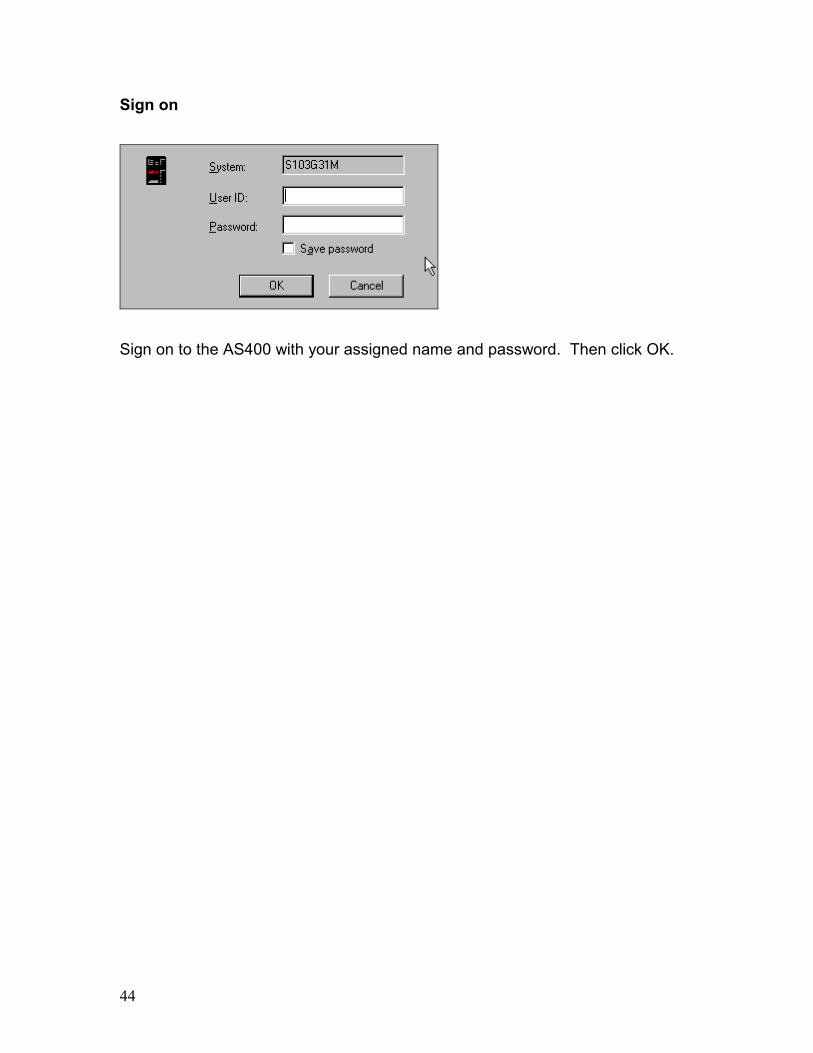
Sign on
Sign on to the AS400 with your assigned name and password. Then click OK.
45
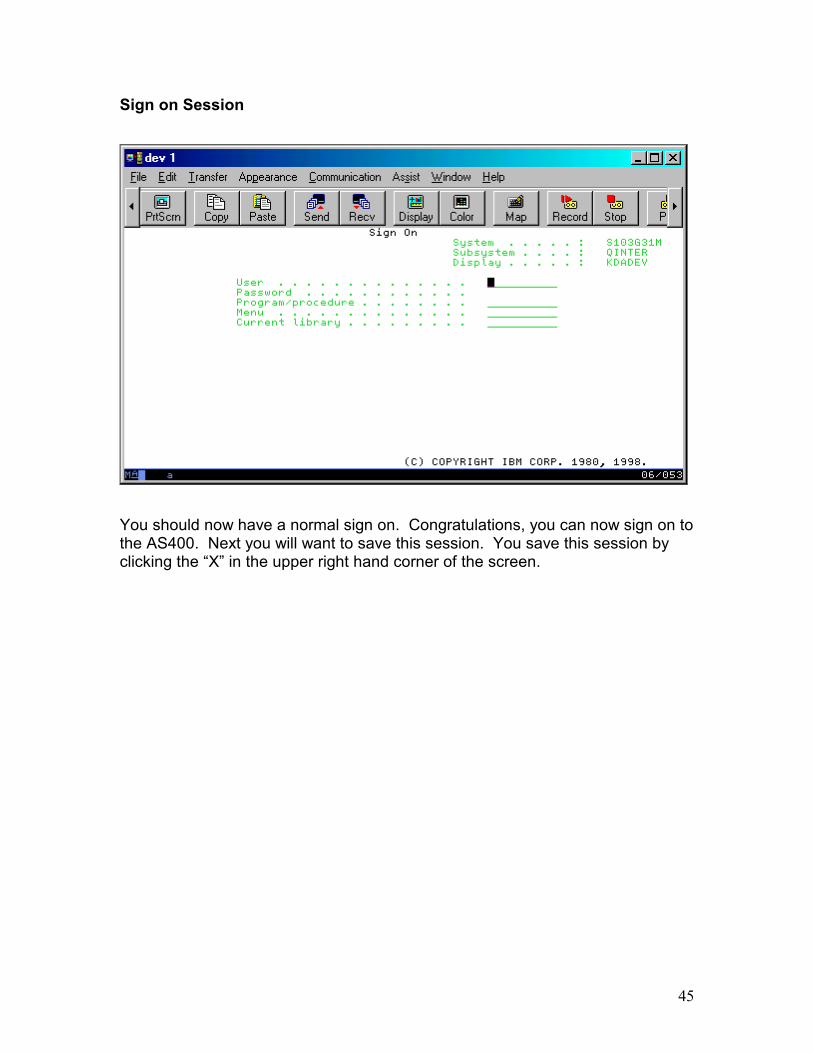
Sign on Session
You should now have a normal sign on. Congratulations, you can now sign on to the AS400. Next you will want to save this session. You save this session by clicking the “X” in the upper right hand corner of the screen.

46
Save session
Click YES to save the new session that you just created.
47
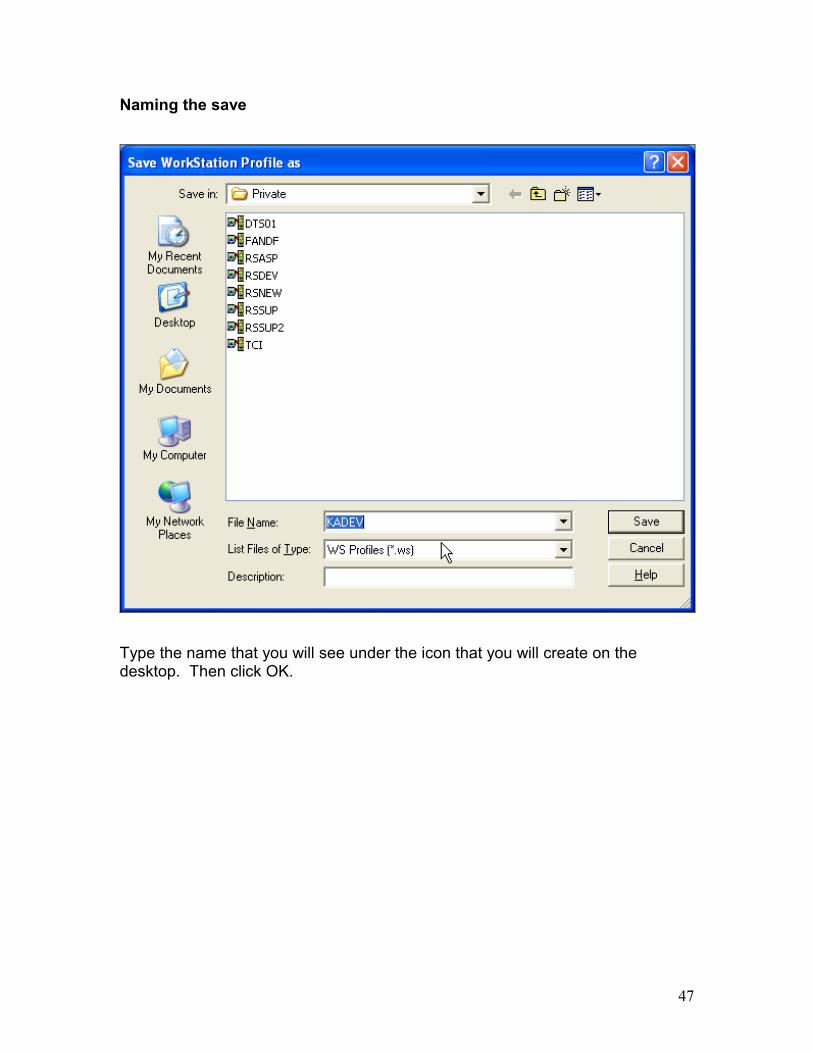
Naming the save
Type the name that you will see under the icon that you will create on the desktop. Then click OK.
48
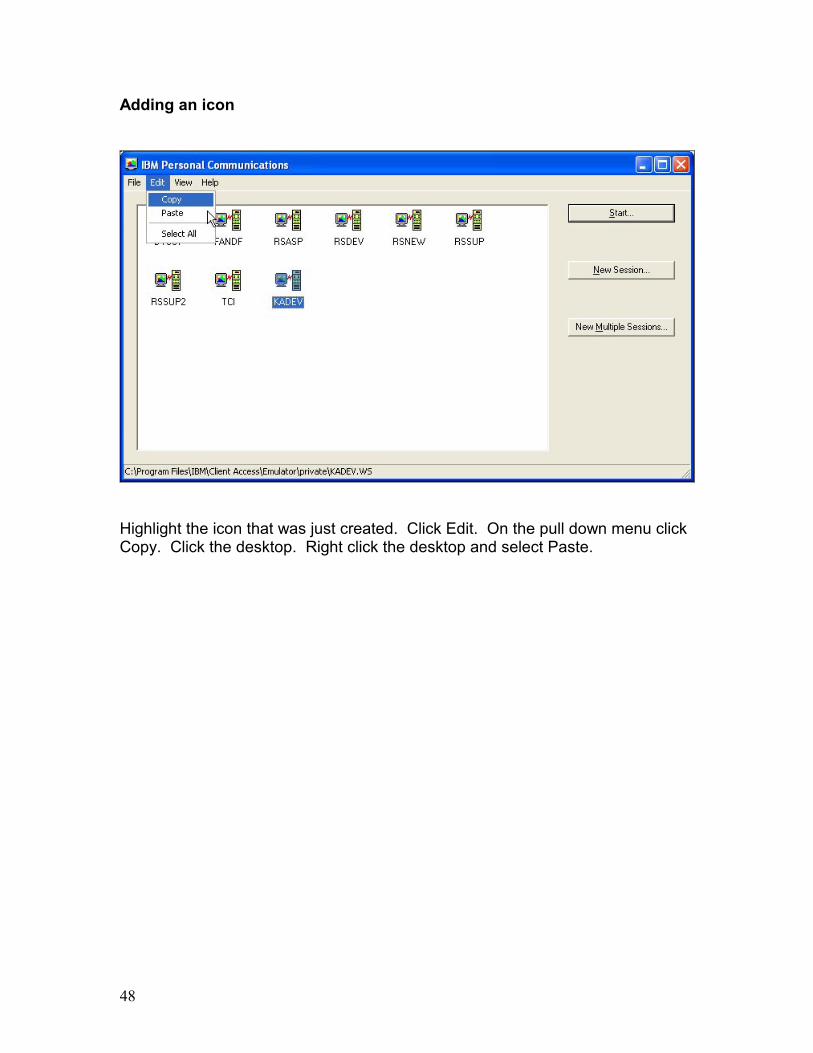
Adding an icon
Highlight the icon that was just created. Click Edit. On the pull down menu click Copy. Click the desktop. Right click the desktop and select Paste.
49
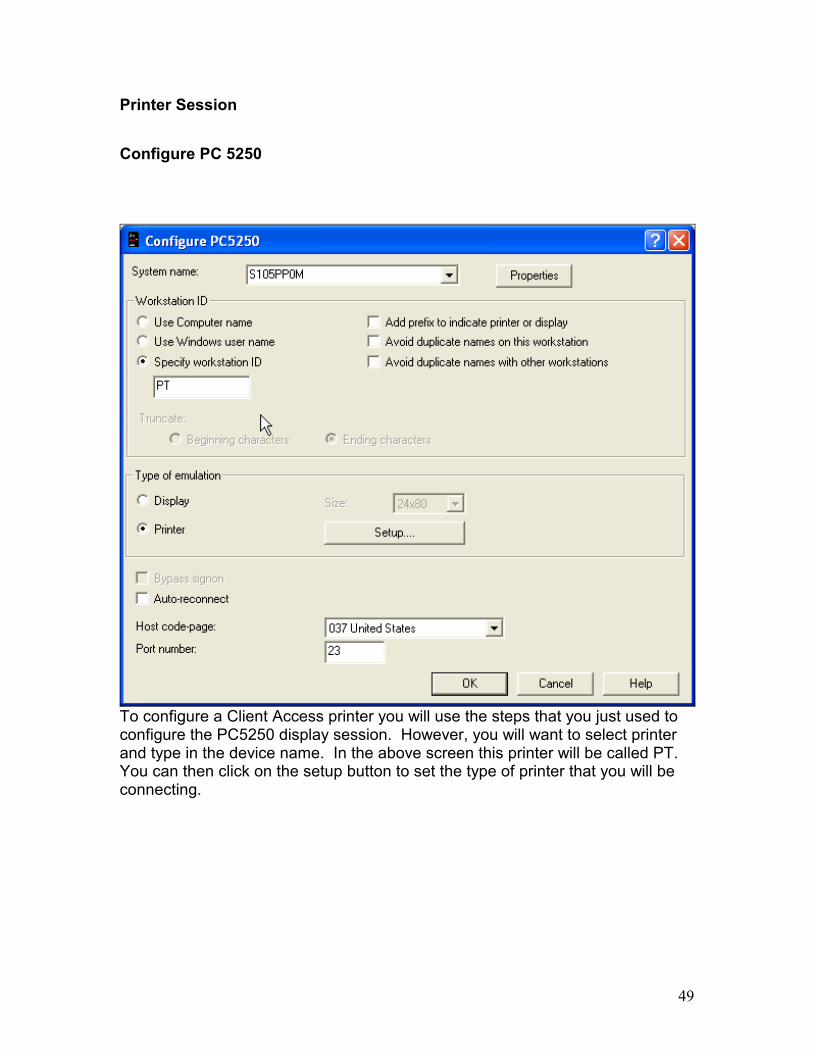
Printer Session Configure PC 5250
To configure a Client Access printer you will use the steps that you just used to configure the PC5250 display session. However, you will want to select printer and type in the device name. In the above screen this printer will be called PT. You can then click on the setup button to set the type of printer that you will be connecting.
50
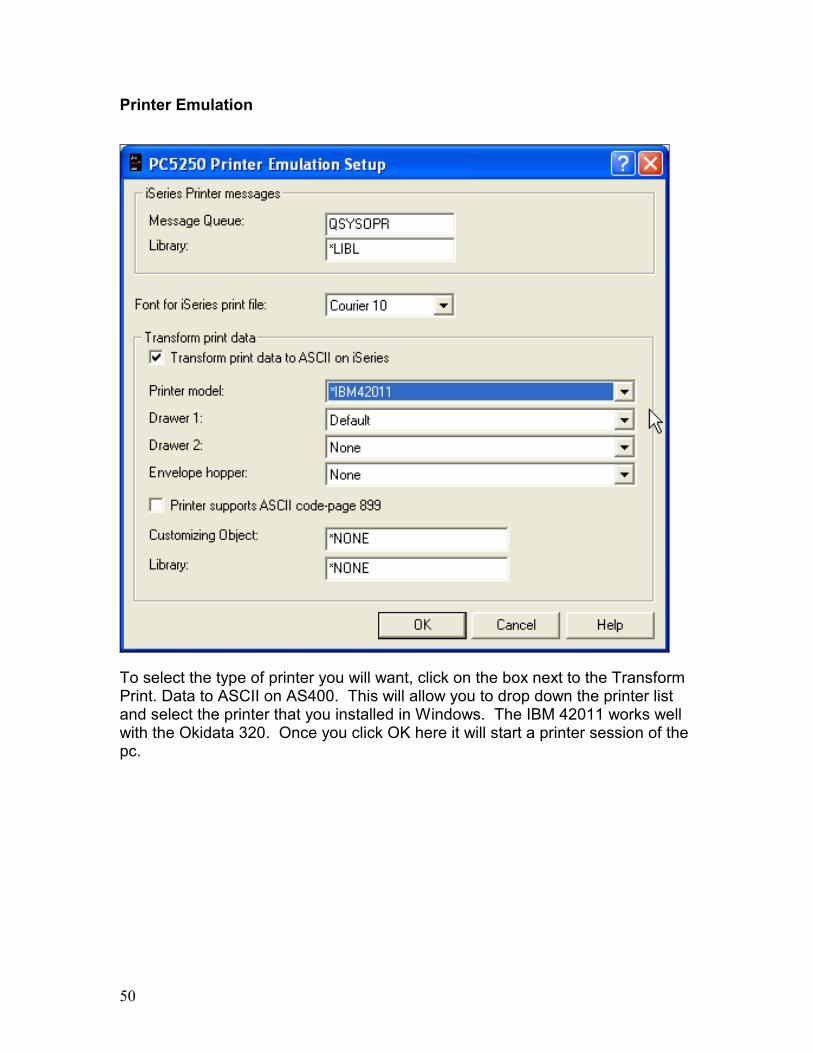
Printer Emulation
To select the type of printer you will want, click on the box next to the Transform Print. Data to ASCII on AS400. This will allow you to drop down the printer list and select the printer that you installed in Windows. The IBM 42011 works well with the Okidata 320. Once you click OK here it will start a printer session of the pc.
Printer Session
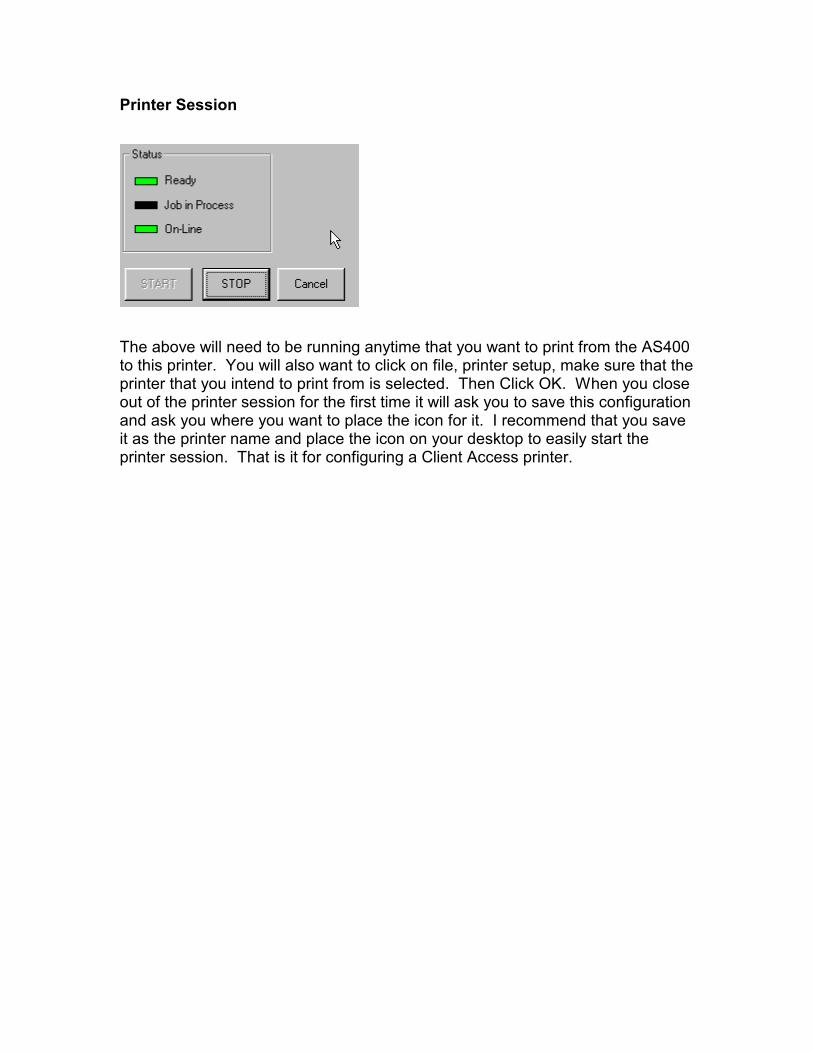
The above will need to be running anytime that you want to print from the AS400 to this printer. You will also want to click on file, printer setup, make sure that the printer that you intend to print from is selected. Then Click OK. When you close out of the printer session for the first time it will ask you to save this configuration and ask you where you want to place the icon for it. I recommend that you save it as the printer name and place the icon on your desktop to easily start the printer session. That is it for configuring a Client Access printer.

52

53
Customize Client Access session
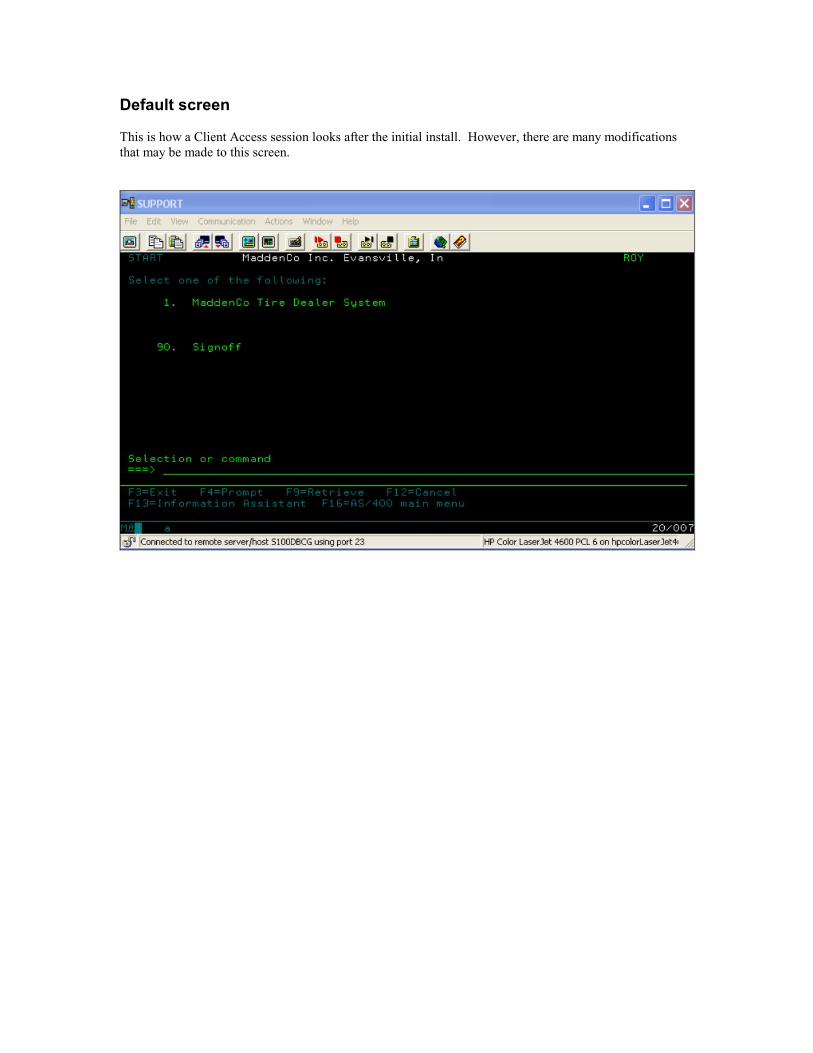
Default screen This is how a Client Access session looks after the initial install. However, there are many modifications that may be made to this screen.
55
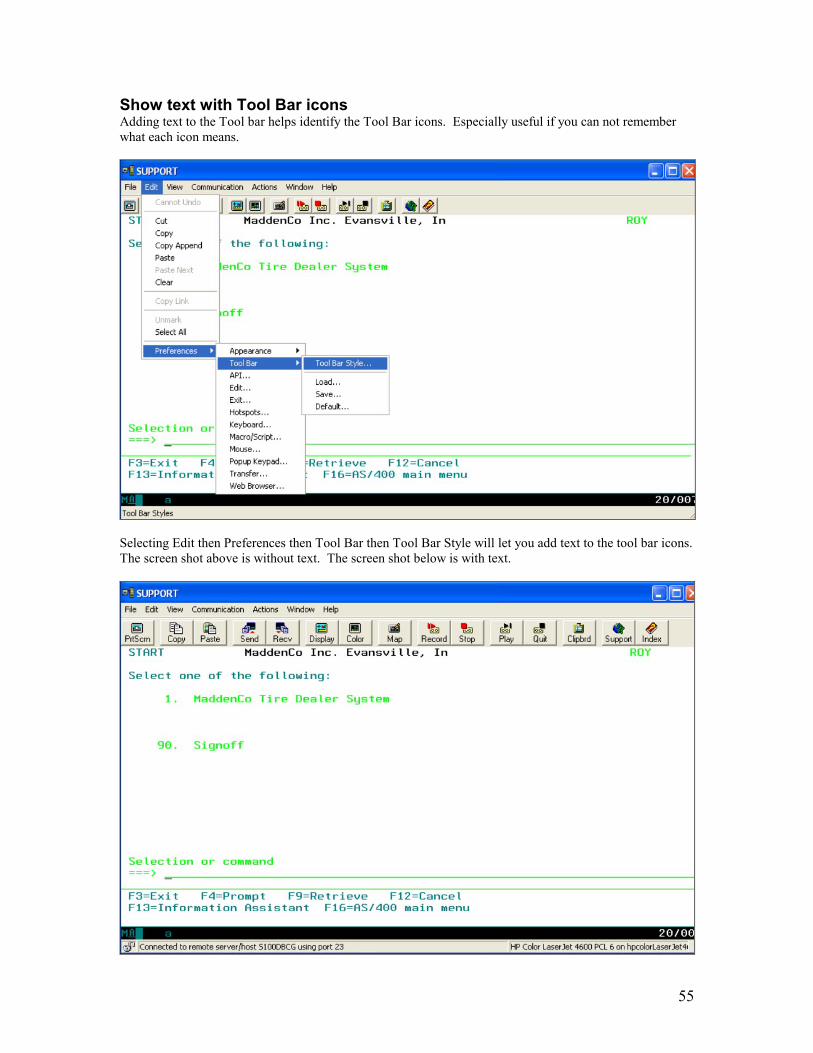
Show text with Tool Bar icons Adding text to the Tool bar helps identify the Tool Bar icons. Especially useful if you can not remember what each icon means.
Selecting Edit then Preferences then Tool Bar then Tool Bar Style will let you add text to the tool bar icons. The screen shot above is without text. The screen shot below is with text.
56
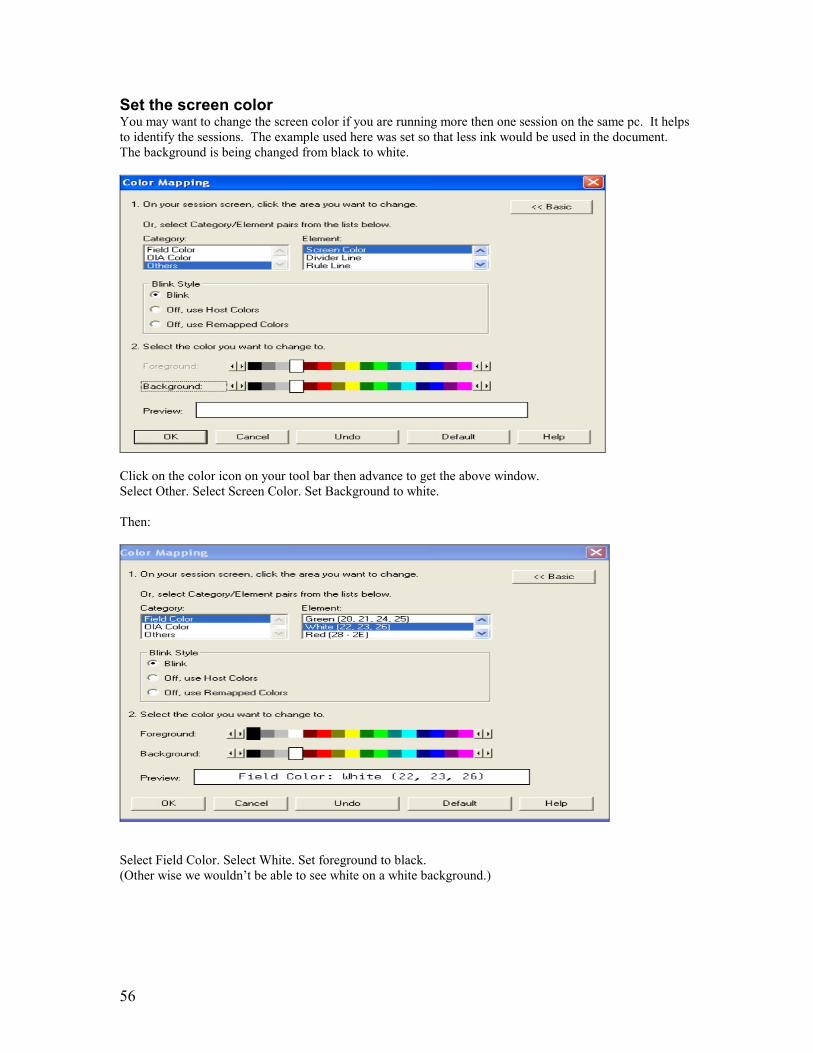
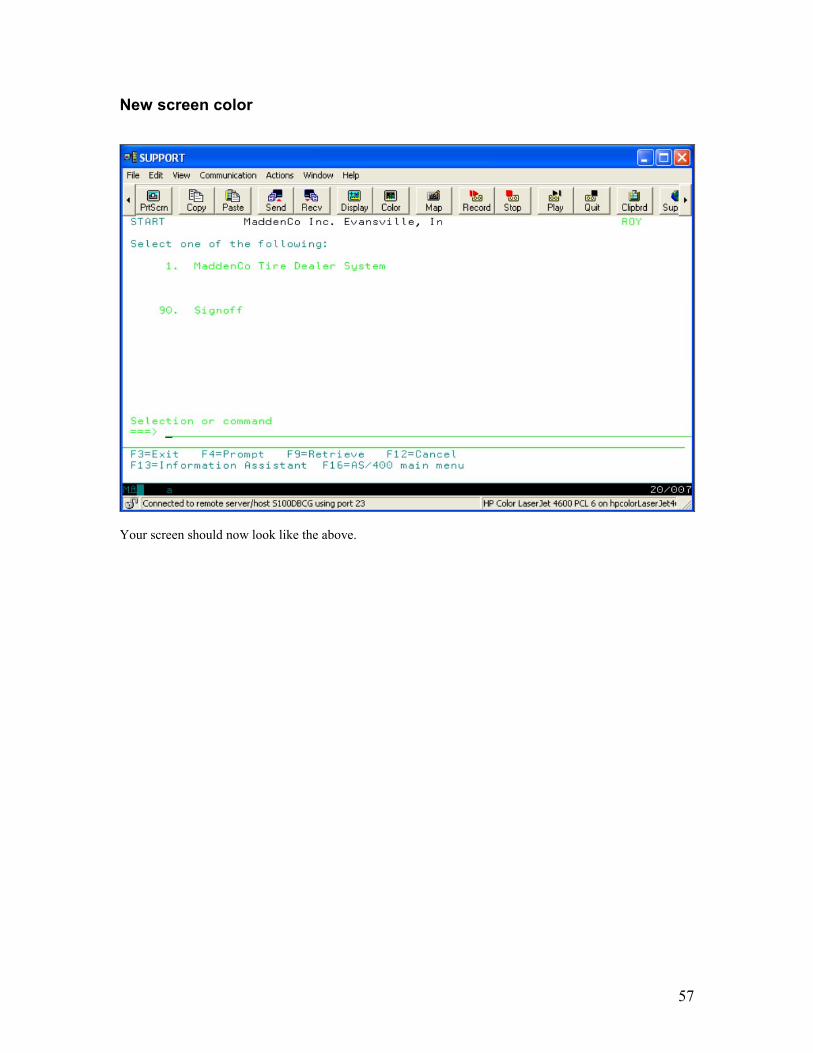
Set the screen color You may want to change the screen color if you are running more then one session on the same pc. It helps to identify the sessions. The example used here was set so that less ink would be used in the document. The background is being changed from black to white.
Click on the color icon on your tool bar then advance to get the above window. Select Other. Select Screen Color. Set Background to white. Then:
Select Field Color. Select White. Set foreground to black. (Other wise we wouldn’t be able to see white on a white background.)
57
New screen color
Your screen should now look like the above.
58
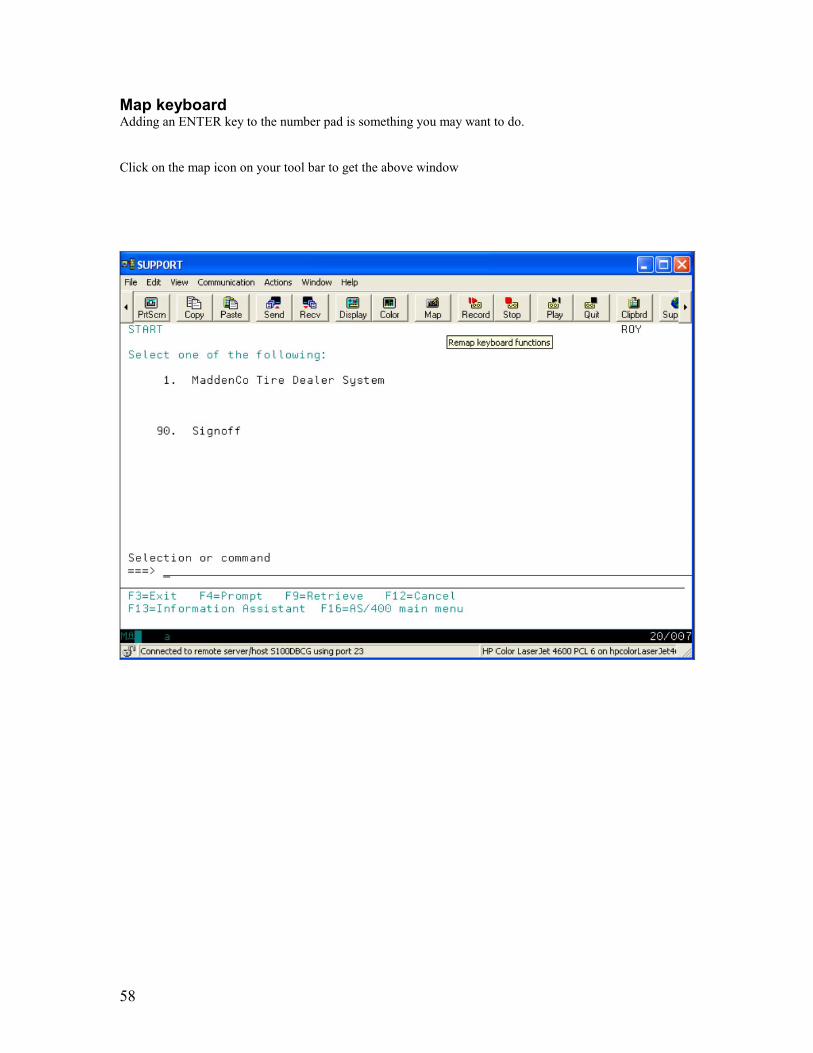
Map keyboard Adding an ENTER key to the number pad is something you may want to do. Click on the map icon on your tool bar to get the above window
59
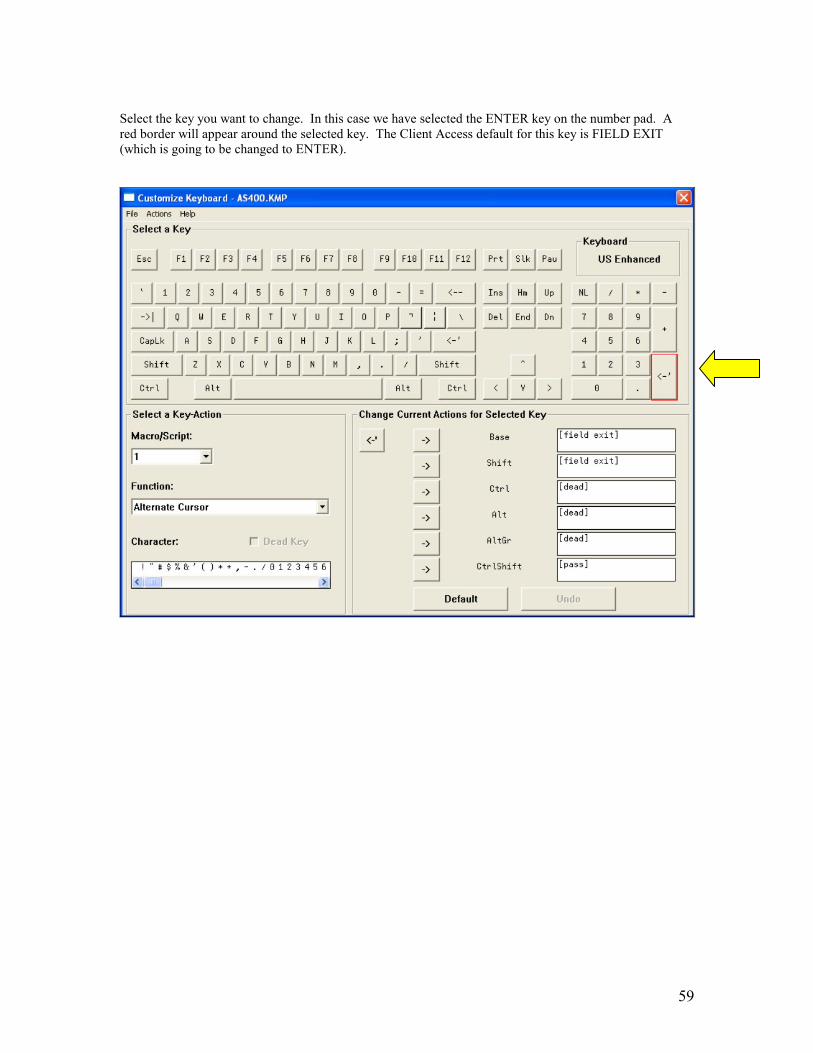
Select the key you want to change. In this case we have selected the ENTER key on the number pad. A red border will appear around the selected key. The Client Access default for this key is FIELD EXIT (which is going to be changed to ENTER).
60
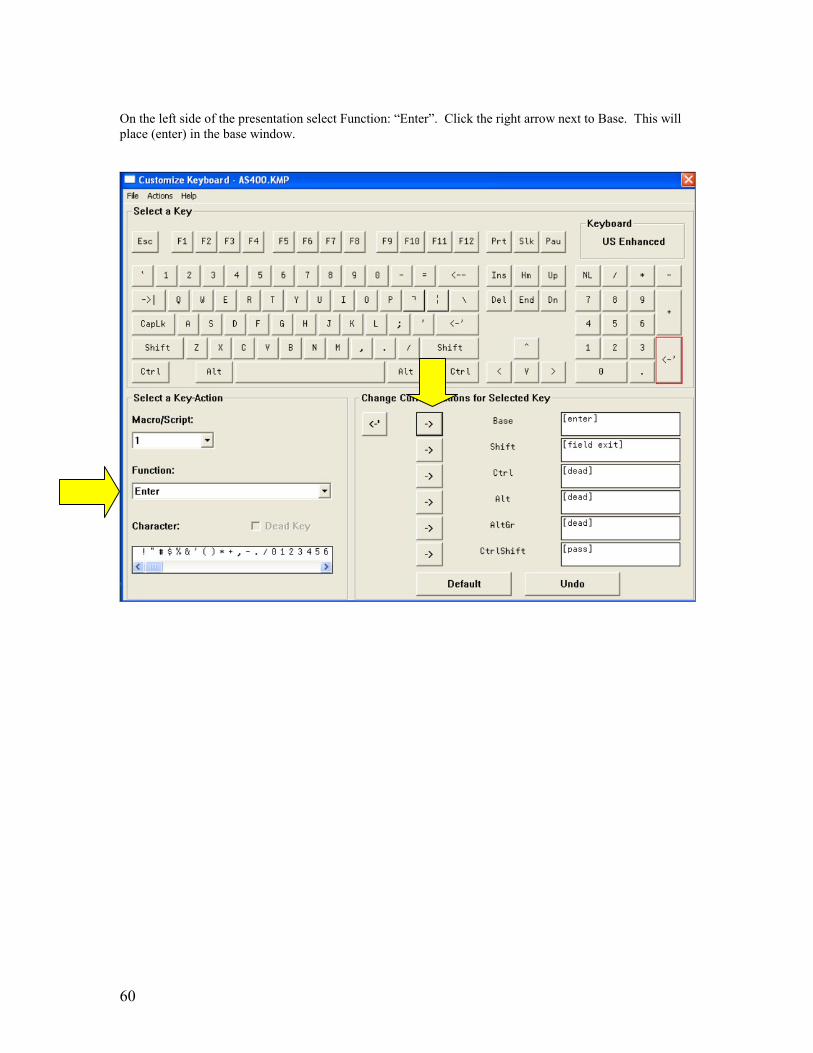
On the left side of the presentation select Function: “Enter”. Click the right arrow next to Base. This will place (enter) in the base window.
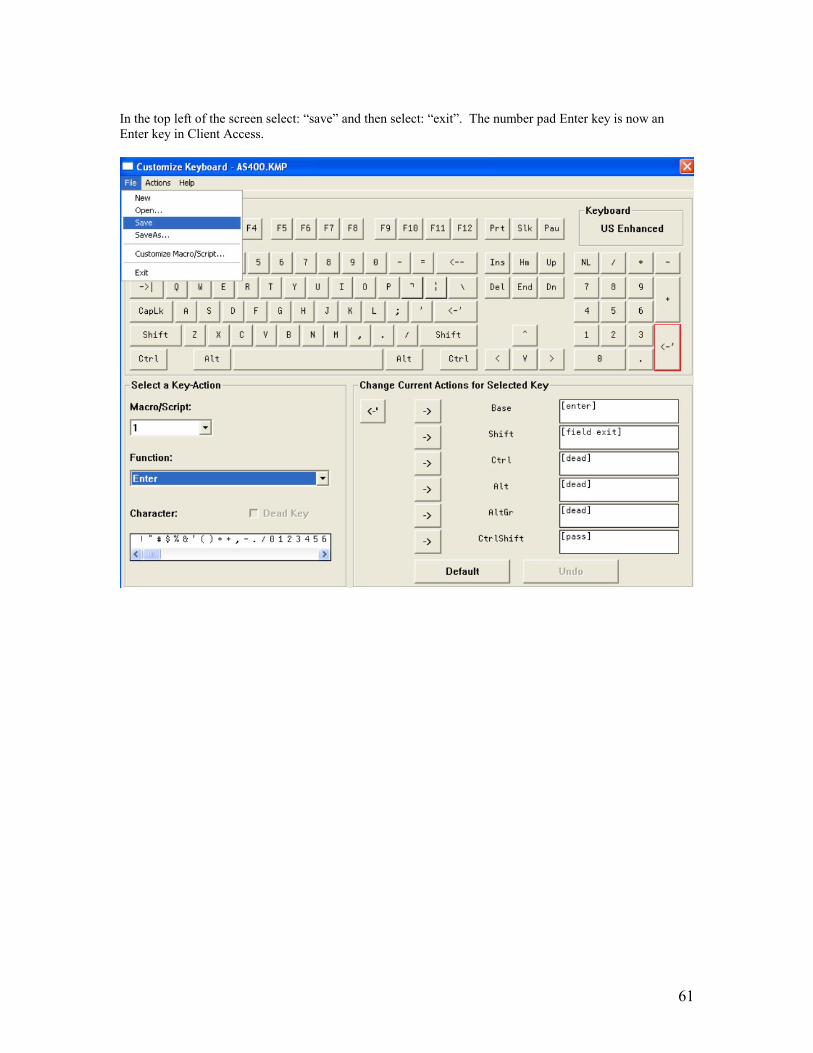
61
In the top left of the screen select: “save” and then select: “exit”. The number pad Enter key is now an Enter key in Client Access.
62
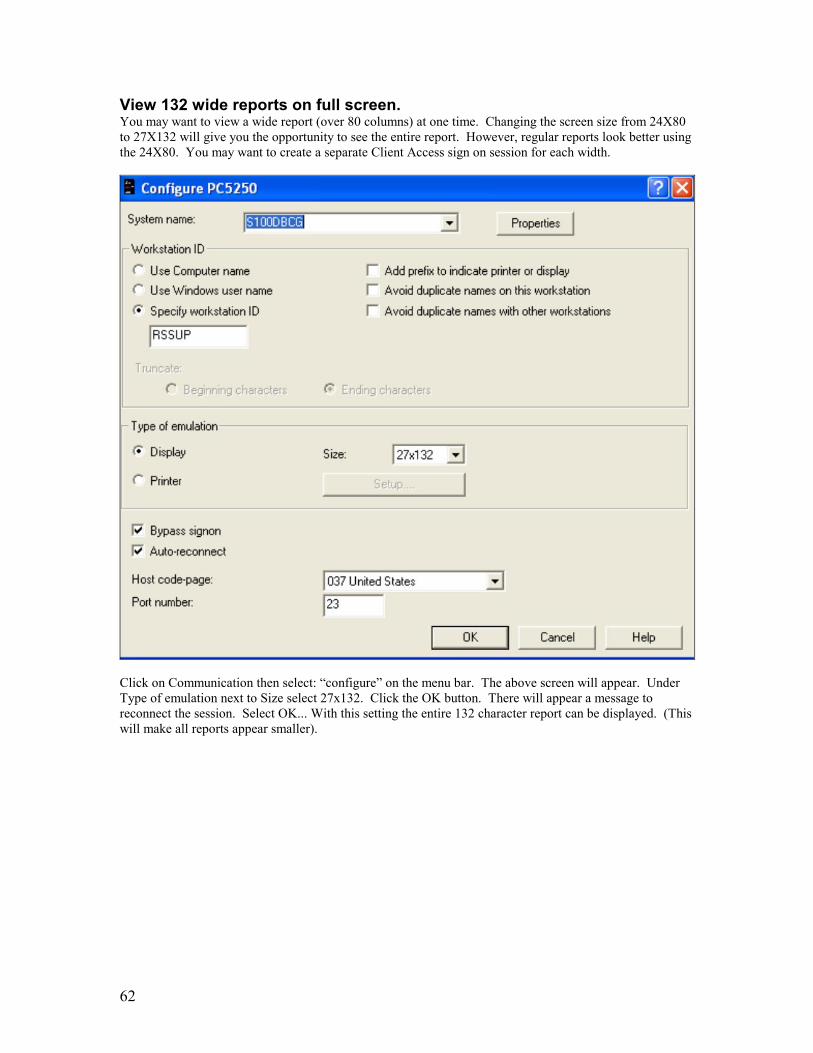
View 132 wide reports on full screen. You may want to view a wide report (over 80 columns) at one time. Changing the screen size from 24X80 to 27X132 will give you the opportunity to see the entire report. However, regular reports look better using the 24X80. You may want to create a separate Client Access sign on session for each width.
Click on Communication then select: “configure” on the menu bar. The above screen will appear. Under Type of emulation next to Size select 27x132. Click the OK button. There will appear a message to reconnect the session. Select OK... With this setting the entire 132 character report can be displayed. (This will make all reports appear smaller).
63
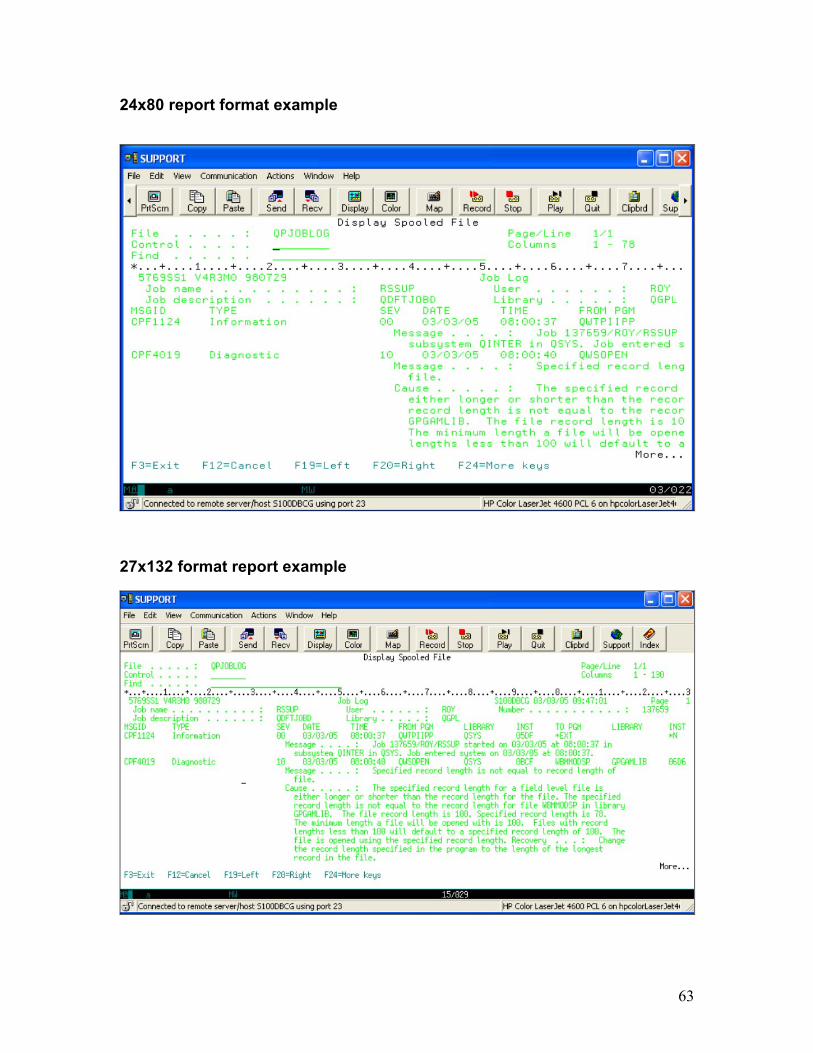
24x80 report format example
27x132 format report example
64
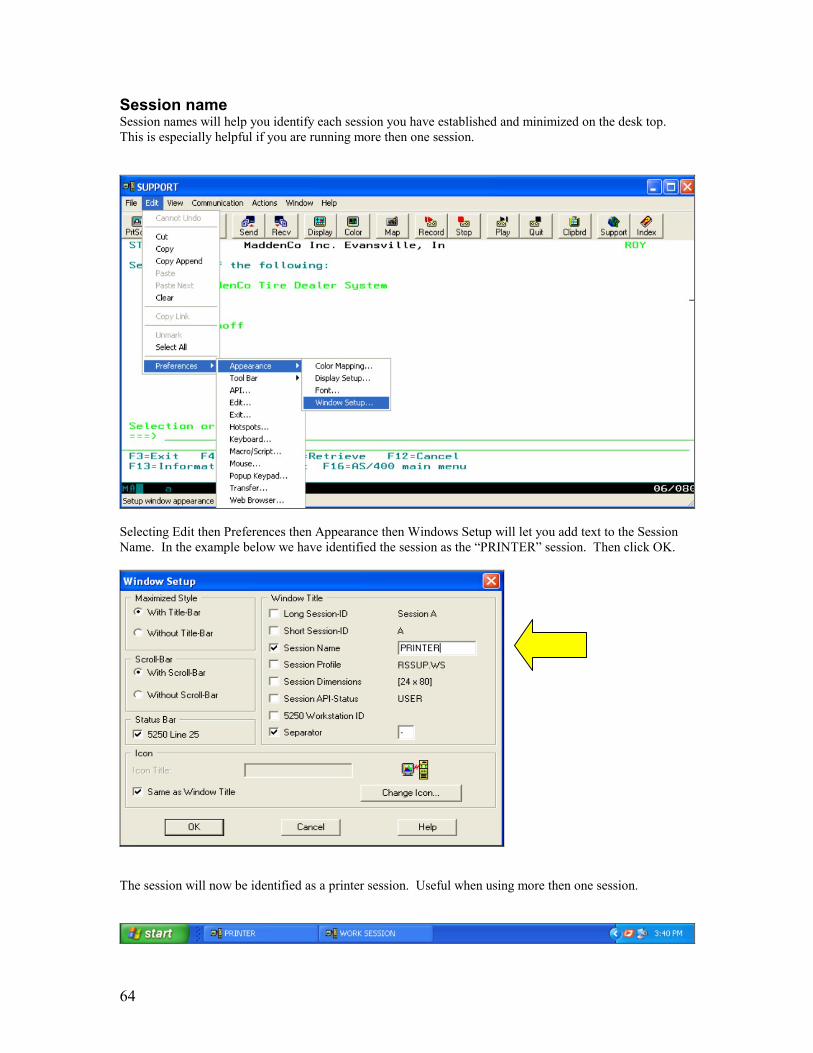
Session name Session names will help you identify each session you have established and minimized on the desk top. This is especially helpful if you are running more then one session.
Selecting Edit then Preferences then Appearance then Windows Setup will let you add text to the Session Name. In the example below we have identified the session as the “PRINTER” session. Then click OK.
The session will now be identified as a printer session. Useful when using more then one session.
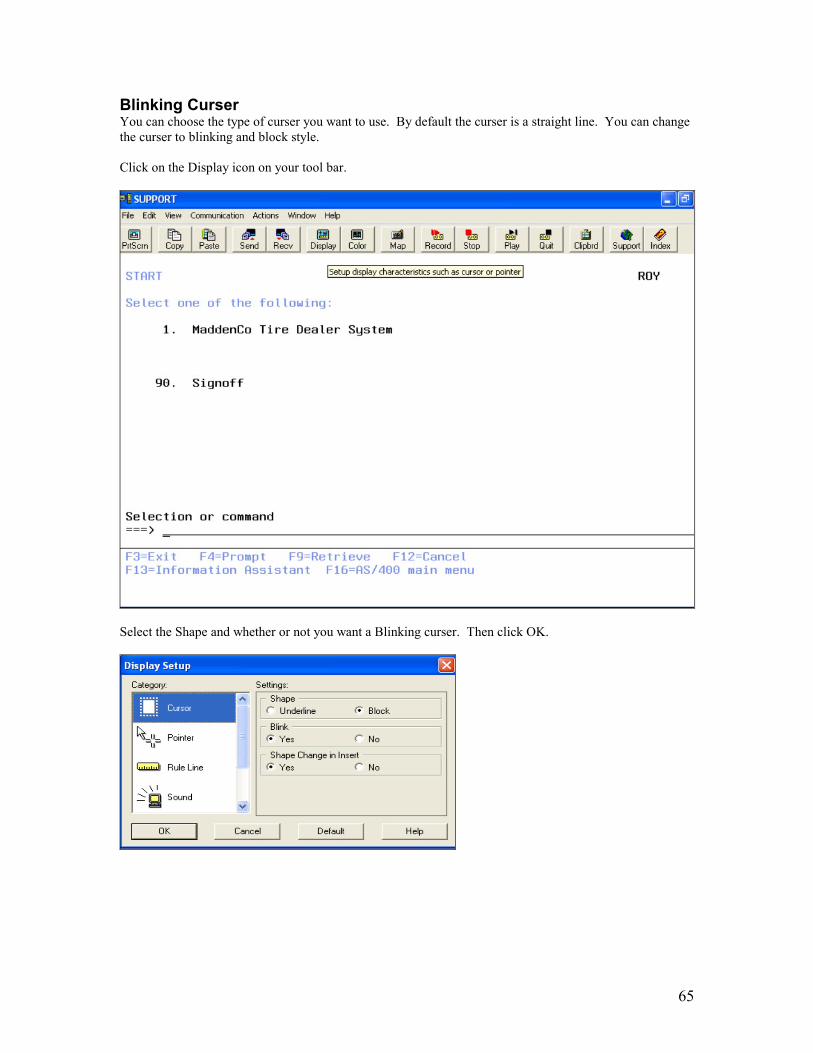
65
Blinking Curser You can choose the type of curser you want to use. By default the curser is a straight line. You can change the curser to blinking and block style. Click on the Display icon on your tool bar.
Select the Shape and whether or not you want a Blinking curser. Then click OK.