Embed Size (px)
Citation preview
Cloud GMS
Quick Start Guide
SonicWall Inc. May 12, 2017
SonicWall Cloud GMS 1
Quick Start Guide
Copyright © 2017 SonicWall Inc. All rights reserved.
This product is protected by U.S. and international copyright and intellectual property laws. SonicWall is a trademark or registered trademark of SonicWall Inc. and/or its affiliates in the U.S.A. and/or other countries. All other trademarks and registered trademarks are property of their respective owners.
The information in this document is provided in connection with SonicWall Inc. and/or its affiliates’ products. No license, express or implied, by estoppel or otherwise, to any intellectual property right is granted by this document or in connection with the sale of SonicWall products. EXCEPT AS SET FORTH IN THE TERMS AND CONDITIONS AS SPECIFIED IN THE LICENSE AGREEMENT FOR THIS PRODUCT, SONICWALL AND/OR ITS AFFILIATES ASSUME NO LIABILITY WHATSOEVER AND DISCLAIMS ANY EXPRESS, IMPLIED OR STATUTORY WARRANTY RELATING TO ITS PRODUCTS INCLUDING, BUT NOT LIMITED TO, THE IMPLIED WARRANTY OF MERCHANTABILITY, FITNESS FOR A PARTICULAR PURPOSE, OR NON- INFRINGEMENT. IN NO EVENT SHALL SONICWALL AND/OR ITS AFFILIATES BE LIABLE FOR ANY DIRECT, INDIRECT, CONSEQUENTIAL, PUNITIVE, SPECIAL OR INCIDENTAL DAMAGES (INCLUDING, WITHOUT LIMITATION, DAMAGES FOR LOSS OF PROFITS, BUSINESS INTERRUPTION OR LOSS OF INFORMATION) ARISING OUT OF THE USE OR INABILITY TO USE THIS DOCUMENT, EVEN IF SONICWALL AND/OR ITS AFFILIATES HAVE BEEN ADVISED OF THE POSSIBILITY OF SUCH DAMAGES. SonicWall and/or its affiliates make no representations or warranties with respect to the accuracy or completeness of the contents of this document and reserve the right to make changes to specifications and product descriptions at any time without notice. SonicWall Inc. and/or its affiliates do not make any commitment to update the information contained in this document.
For more information, visit https://www.sonicwall.com/legal/.
Legend
WARNING: A WARNING icon indicates a potential for property damage, personal injury, or death.
CAUTION: A CAUTION icon indicates potential damage to hardware or loss of data if instructions are not followed.
IMPORTANT, NOTE, TIP, MOBILE, or VIDEO: An information icon indicates supporting information.
SonicWall Cloud GMS 2
Quick Start Guide
Table of Contents
Overview ................................................................................................................................................................. 3
Supported Firmware Versions ................................................................................................................................ 3
Summary of Steps to Add Unit to Cloud GMS ........................................................................................................ 3
MySonicWall Setup ............................................................................................................................................. 4
Steps to activate Cloud GMS .......................................................................................................................... 4
Adding new SonicWall appliances to Cloud GMS ............................................................................................... 6
Step 1: Adding Unit to Cloud GMS .................................................................................................................. 6
Step 2: Configuring the firewall for management by “Cloud GMS” ............................................................... 7
Step 3: Configuring perimeter routers, gateways, etc. for allowing Cloud GMS to access firewall ............. 10
Advanced Firewall Configuration.......................................................................................................................... 10
Introduction to Policy Management and UI layout .......................................................................................... 10
Multi-Firewall Management ......................................................................................................................... 11
Navigation Tabs ............................................................................................................................................ 11
Left Pane or Tree Control ............................................................................................................................. 11
Middle Pane .................................................................................................................................................. 12
Right Pane ..................................................................................................................................................... 12
Introduction to Reporting ................................................................................................................................. 13
Real-Time > Monitor ..................................................................................................................................... 13
Real-Time > Report ....................................................................................................................................... 14
Dashboard > Applications ............................................................................................................................. 14
Reports > Applications .................................................................................................................................. 15
SWARM Report ............................................................................................................................................. 16
SonicWall Cloud GMS 3
Quick Start Guide
Overview Cloud GMS is a web based management and reporting application that provides centralized management and high performance reporting for SonicWall family of firewalls. With the introduction of a cloud-based solution, the customer can now focus on their core business and not worry about installation and maintenance of the software.
This Quick Start Guide helps to rapidly deploy one or more firewalls and configure the policies quickly, schedule firmware upgrades for execution during maintenance windows, monitor the capacity and activity of the firewalls using industry standard encrypted IPFix based logs in highly pleasing reports. In addition to the reporting, the Real Time reports can be used to view the active traffic passing through the firewall instantaneously.
This document will cover the basic functionality on how to:
1. Log into MySonicWall.com 2. How to log into Cloud GMS and Add Unit for Management and Reporting 3. Introduction to Policy Management 4. Introduction to Reporting
Please refer to the steps below and the GMS Online Help for detailed steps and in-depth description on the features of the product.
Supported Firmware Versions • Management and Reporting
o All Gen 6 firewalls with the exception of the following: ▪ SOHO ▪ Super Massives
• Management Only o All Gen 5 Firewalls running 5.9.1.7 and above o Gen 6 SOHO
Summary of Steps to Add Unit to Cloud GMS These are the steps for an advanced user who is already familiar with MySonicWall, GMS, Firewall UI and i to add a unit to Cloud GMS.
1. Log into MySonicWall.com 2. Enroll to Cloud GMS tenancy 3. Activate Cloud GMS license for each firewall in MySonicWall.com 4. Log into firewall and configure the GMS Management settings to point to Cloud GMS 5. Log into Cloud GMS cloudgms.sonicwall.com 6. Add Unit to Cloud GMS using the “Add Unit” and follow the prompts 7. Monitor the Status page for unit acquisition
Note: Cloud GMS makes changes to the following configuration for the firewall to be managed and generate reports correctly.
• Firewall > System > Administration > Enable Management Using GMS > Configure
• Firewall > AppFlow > Flow Reporting > GMS Flow Server
• Firewall > AppFlow > GMSFlow Server
Any changes to the settings will disrupt the management and report generation capability.

SonicWall Cloud GMS 4
Quick Start Guide
In addition to the above settings, Cloud GMS creates a Reporting tunnel between Firewall and Cloud GMS to upload the reporting data securely with a prefix “SGMS-<fw serial number>”. Please do not make any changes to this tunnel.
MySonicWall Setup Prerequisites You need a MySonicWall account: Sign up at https://www.mysonicwall.com/user/registration.aspx
Steps to activate Cloud GMS 1. Log into https://cloud.mysonicwall.com and follow the login instructions
2. Activate your “Cloud GMS” by clicking on “Enroll”. Note: The initial login will show that “You do not have any products registered” which is expected.
The status of registration is now “In Progress”
SonicWall Cloud GMS 5
Quick Start Guide
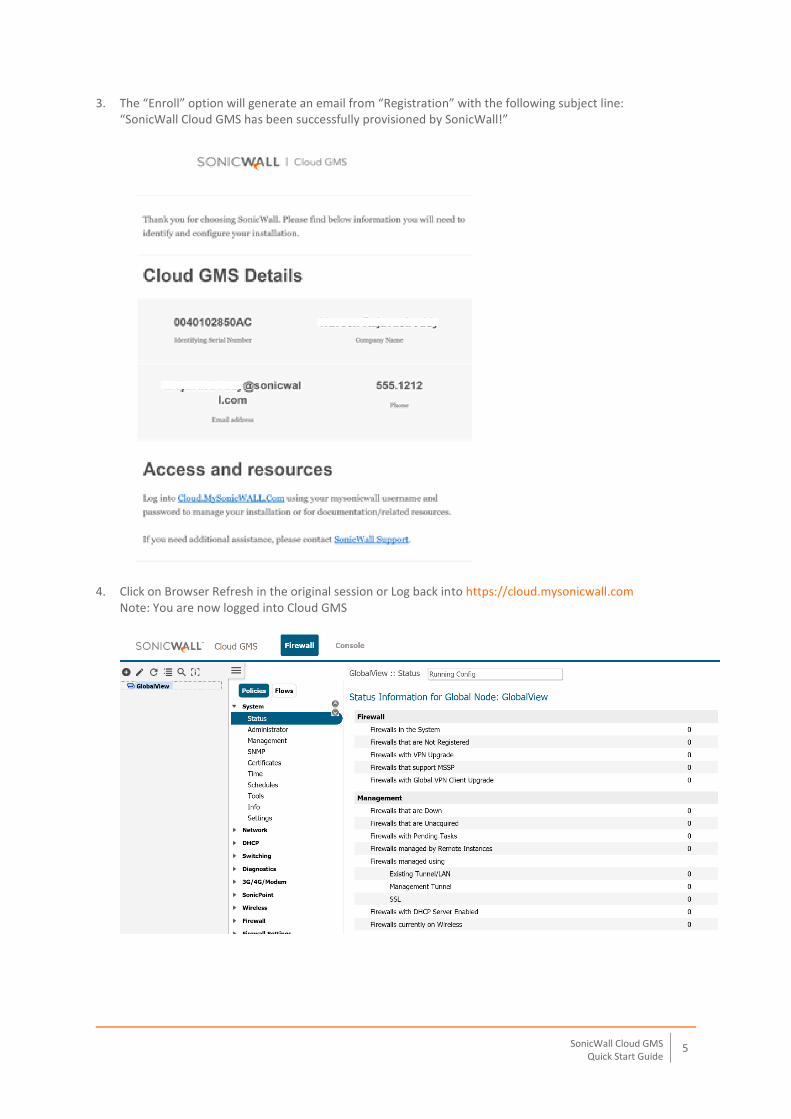
3. The “Enroll” option will generate an email from “Registration” with the following subject line: “SonicWall Cloud GMS has been successfully provisioned by SonicWall!”
4. Click on Browser Refresh in the original session or Log back into https://cloud.mysonicwall.com
Note: You are now logged into Cloud GMS
SonicWall Cloud GMS 6
Quick Start Guide
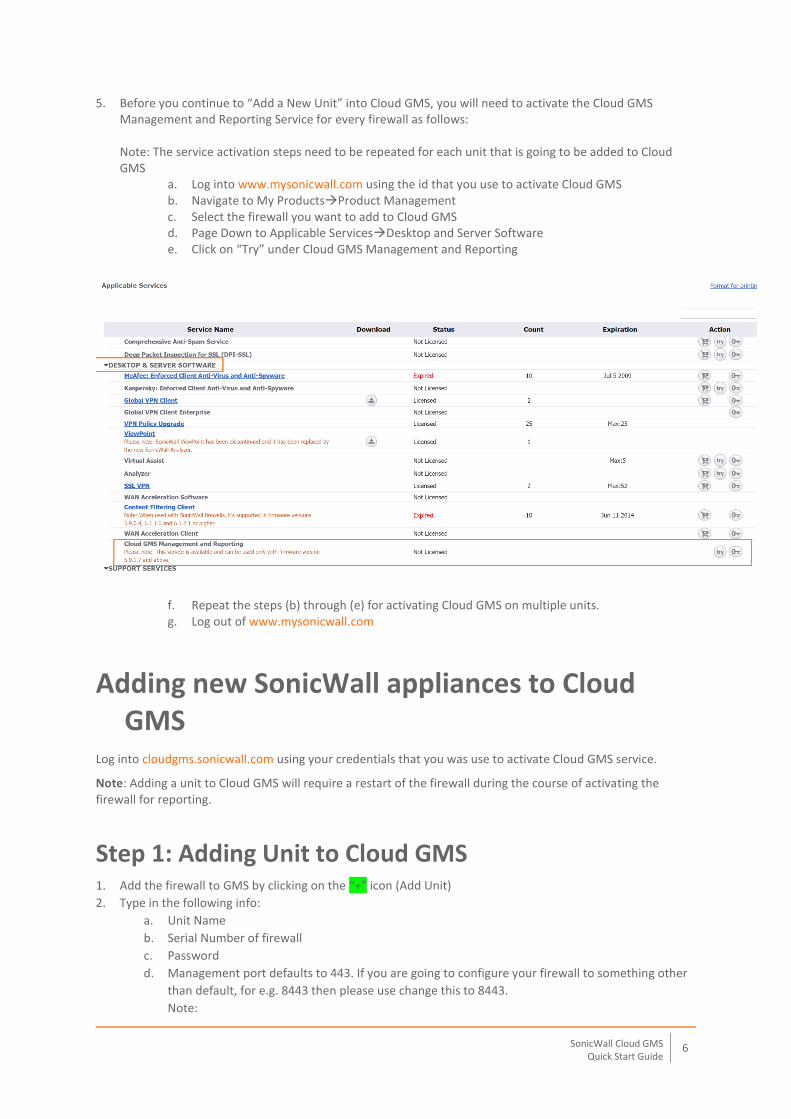
5. Before you continue to “Add a New Unit” into Cloud GMS, you will need to activate the Cloud GMS Management and Reporting Service for every firewall as follows: Note: The service activation steps need to be repeated for each unit that is going to be added to Cloud GMS
a. Log into www.mysonicwall.com using the id that you use to activate Cloud GMS b. Navigate to My ProductsProduct Management c. Select the firewall you want to add to Cloud GMS d. Page Down to Applicable ServicesDesktop and Server Software e. Click on “Try” under Cloud GMS Management and Reporting
f. Repeat the steps (b) through (e) for activating Cloud GMS on multiple units. g. Log out of www.mysonicwall.com
Adding new SonicWall appliances to Cloud GMS
Log into cloudgms.sonicwall.com using your credentials that you was use to activate Cloud GMS service.
Note: Adding a unit to Cloud GMS will require a restart of the firewall during the course of activating the firewall for reporting.
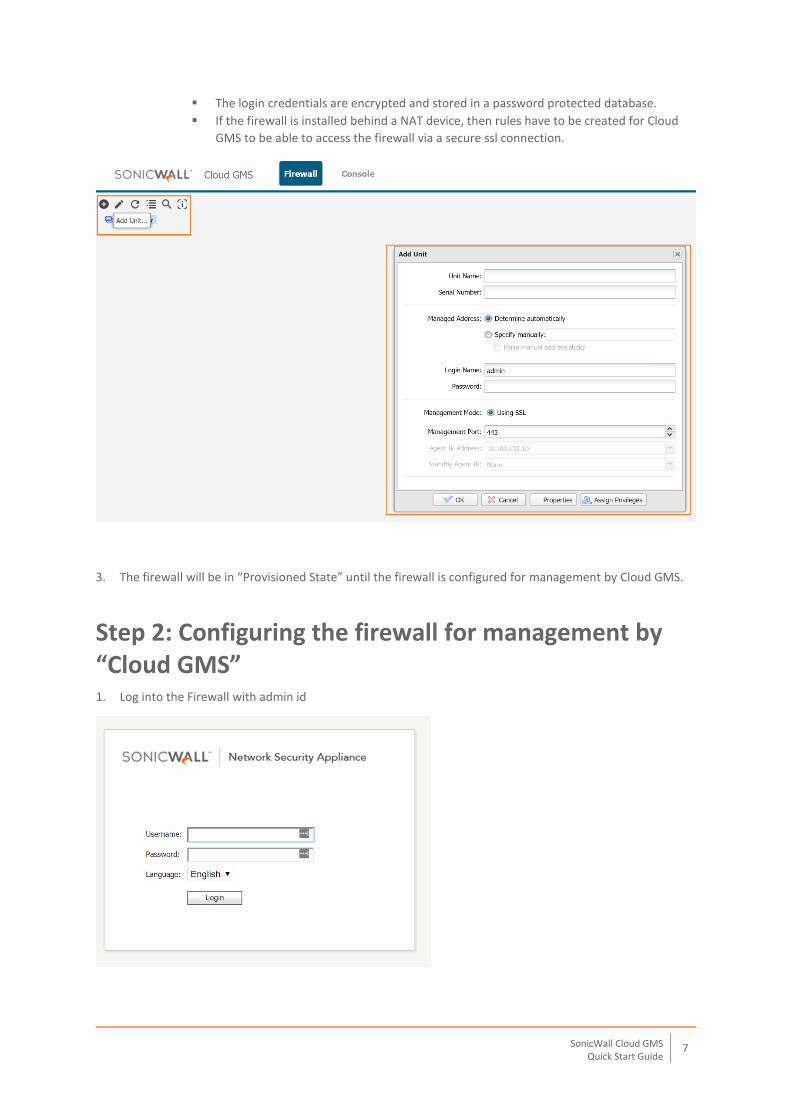
Step 1: Adding Unit to Cloud GMS 1. Add the firewall to GMS by clicking on the “+” icon (Add Unit)
2. Type in the following info:
a. Unit Name
b. Serial Number of firewall
c. Password
d. Management port defaults to 443. If you are going to configure your firewall to something other
than default, for e.g. 8443 then please use change this to 8443.
Note:
SonicWall Cloud GMS 7
Quick Start Guide
▪ The login credentials are encrypted and stored in a password protected database.
▪ If the firewall is installed behind a NAT device, then rules have to be created for Cloud
GMS to be able to access the firewall via a secure ssl connection.
3. The firewall will be in “Provisioned State” until the firewall is configured for management by Cloud GMS.
Step 2: Configuring the firewall for management by “Cloud GMS” 1. Log into the Firewall with admin id
SonicWall Cloud GMS 8
Quick Start Guide
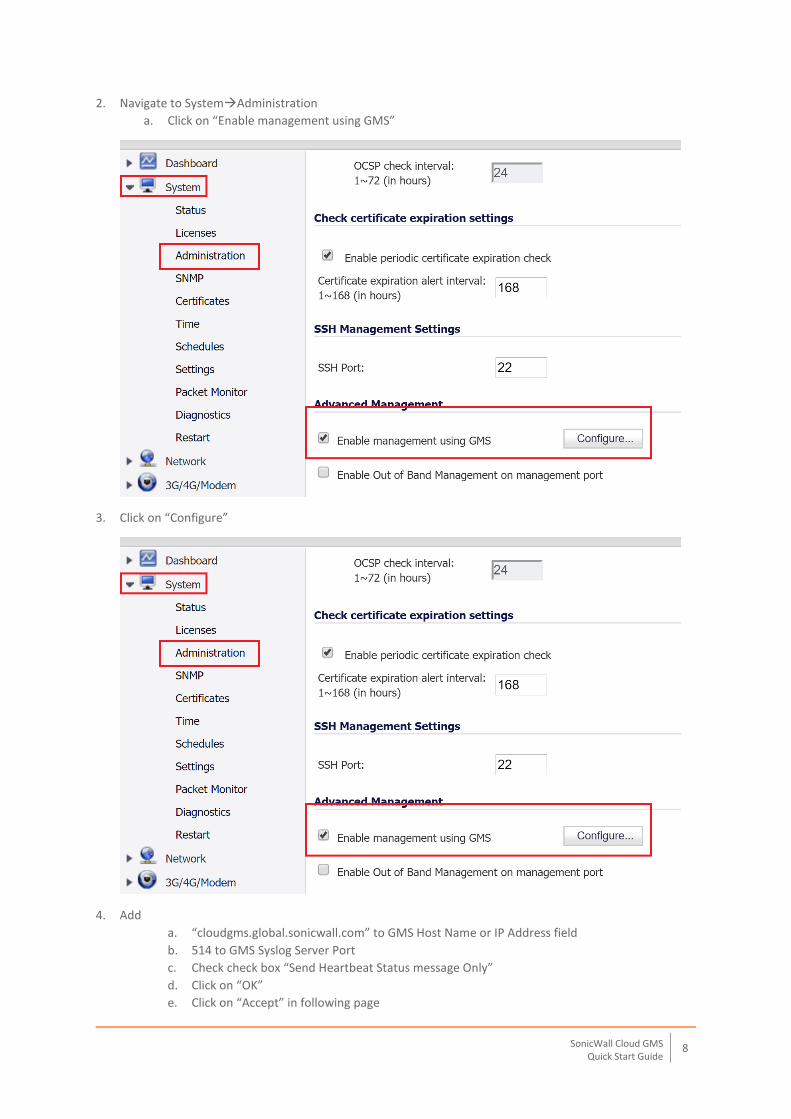
2. Navigate to SystemAdministration
a. Click on “Enable management using GMS”
3. Click on “Configure”
4. Add
a. “cloudgms.global.sonicwall.com” to GMS Host Name or IP Address field
b. 514 to GMS Syslog Server Port
c. Check check box “Send Heartbeat Status message Only”
d. Click on “OK”
e. Click on “Accept” in following page

SonicWall Cloud GMS 9
Quick Start Guide
f. Log out from the firewall UI.
Note: After you log into Cloud GMS application and find that the Middle Pane shows a button instead of the
Policies and Flows pages links then, click on the button to sync the license information from the backend. This
will then clear the issue with the missing links in middle pane.
SonicWall Cloud GMS 10
Quick Start Guide
Step 3: Configuring perimeter routers, gateways, etc. for allowing Cloud GMS to access firewall Add a Rule to Allow Inbound HTTPS traffic on your NAT Device to allow access from Cloud GMS to the WAN interface of your managed appliance.
Note: This is critical to manage the appliance from the Cloud GMS application. Without this, the appliance will not be acquired, it will appear Un-provisioned (yellow icon) and the following error will be displayed in the Status screen of the GMS UI at unit level.
Advanced Firewall Configuration
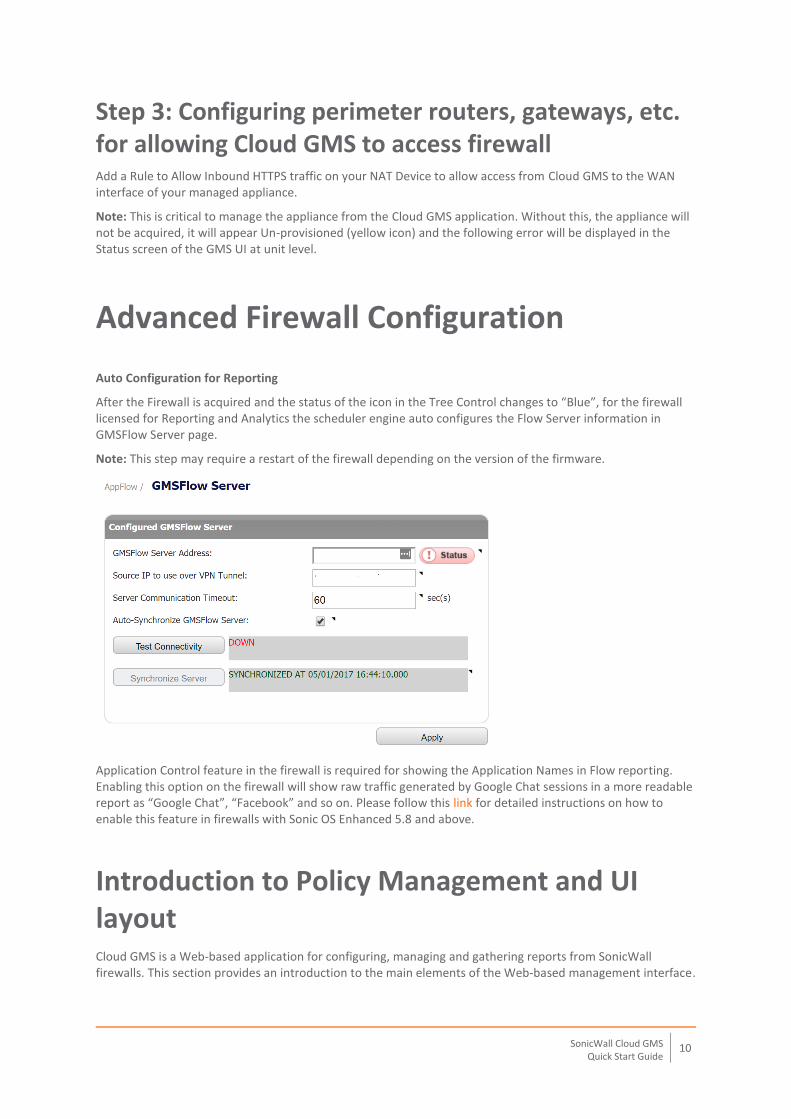
Auto Configuration for Reporting
After the Firewall is acquired and the status of the icon in the Tree Control changes to “Blue”, for the firewall licensed for Reporting and Analytics the scheduler engine auto configures the Flow Server information in GMSFlow Server page.
Note: This step may require a restart of the firewall depending on the version of the firmware.
Application Control feature in the firewall is required for showing the Application Names in Flow reporting. Enabling this option on the firewall will show raw traffic generated by Google Chat sessions in a more readable report as “Google Chat”, “Facebook” and so on. Please follow this link for detailed instructions on how to enable this feature in firewalls with Sonic OS Enhanced 5.8 and above.
Introduction to Policy Management and UI layout Cloud GMS is a Web‐based application for configuring, managing and gathering reports from SonicWall firewalls. This section provides an introduction to the main elements of the Web‐based management interface.
SonicWall Cloud GMS 11
Quick Start Guide
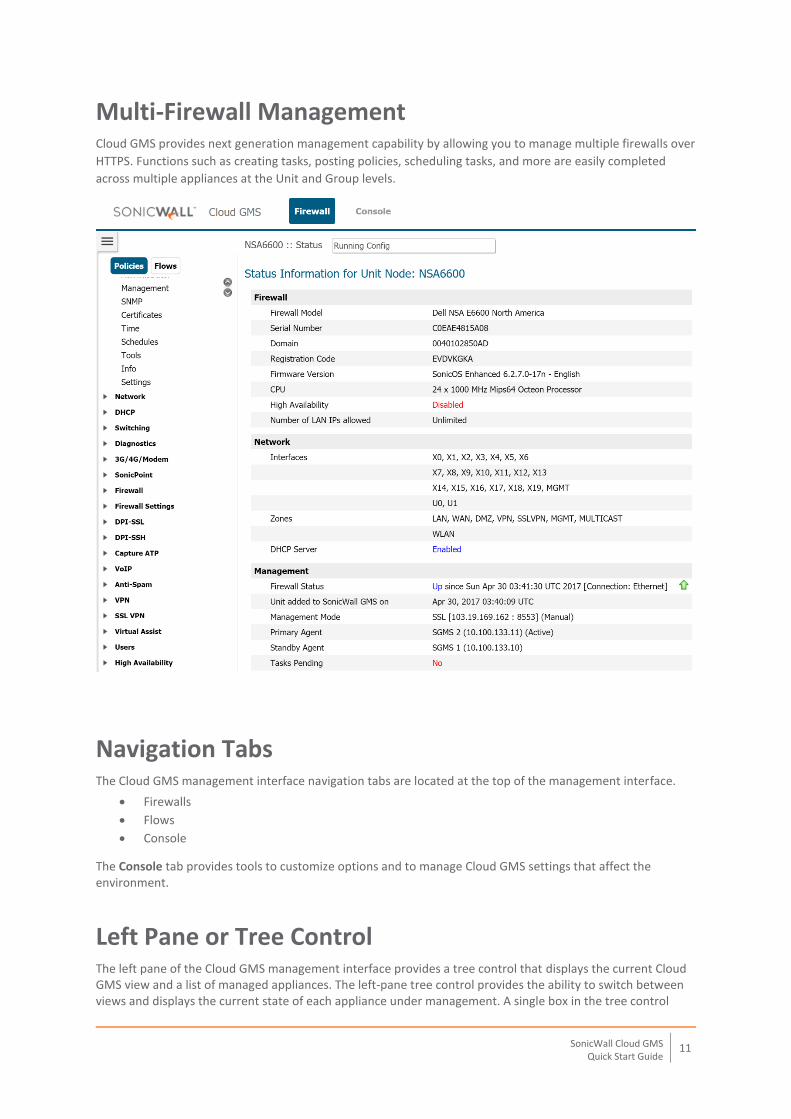
Multi-Firewall Management Cloud GMS provides next generation management capability by allowing you to manage multiple firewalls over
HTTPS. Functions such as creating tasks, posting policies, scheduling tasks, and more are easily completed
across multiple appliances at the Unit and Group levels.
Navigation Tabs The Cloud GMS management interface navigation tabs are located at the top of the management interface.
• Firewalls
• Flows
• Console
The Console tab provides tools to customize options and to manage Cloud GMS settings that affect the environment.
Left Pane or Tree Control The left pane of the Cloud GMS management interface provides a tree control that displays the current Cloud GMS view and a list of managed appliances. The left‐pane tree control provides the ability to switch between views and displays the current state of each appliance under management. A single box in the tree control
SonicWall Cloud GMS 12
Quick Start Guide
indicates a node at appliance or unit level. Two boxes in the tree control indicates a node at a group level. A global node at the top of the tree control is indicated by a three‐box icon. The color and additional images superimposed on these icons provide useful status information
Middle Pane At the top of the Center Pane there are two sub‐tabs:
• Policies – Provides policy configuration options for managed appliances.
• Flows – Provides IPFIX‐based Flow Reporting on the global, group, or appliance level. The current selection in the center pane is indicated by the highlighted item.
The center Pane options change based on the navigational tab and left‐pane selections, and selections in the center pane modify the display in the right Pane.
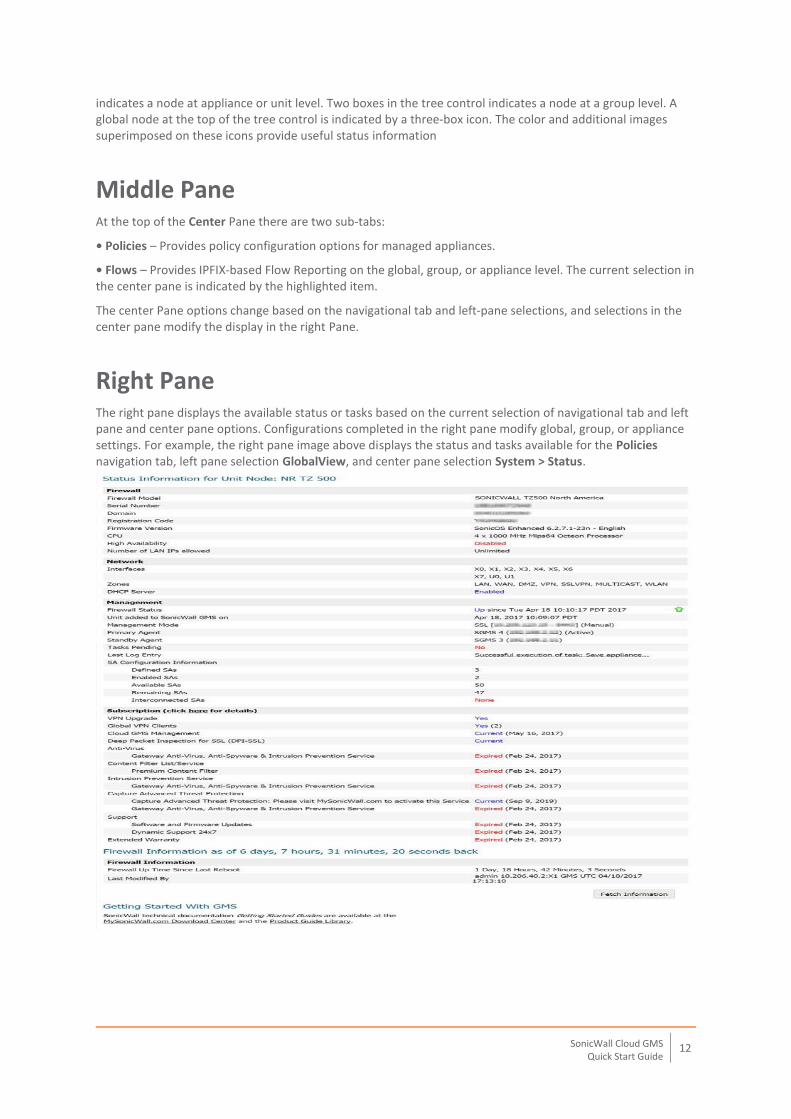
Right Pane The right pane displays the available status or tasks based on the current selection of navigational tab and left pane and center pane options. Configurations completed in the right pane modify global, group, or appliance settings. For example, the right pane image above displays the status and tasks available for the Policies navigation tab, left pane selection GlobalView, and center pane selection System > Status.
SonicWall Cloud GMS 13
Quick Start Guide
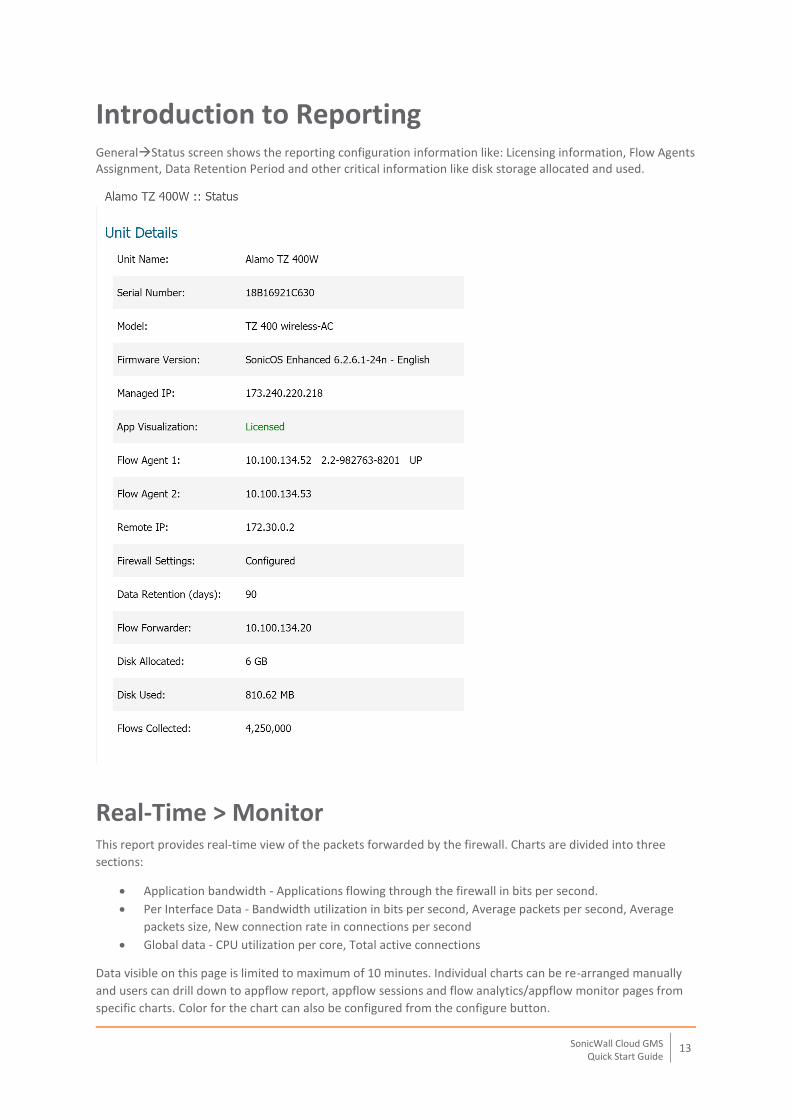
Introduction to Reporting GeneralStatus screen shows the reporting configuration information like: Licensing information, Flow Agents Assignment, Data Retention Period and other critical information like disk storage allocated and used.
Real-Time > Monitor This report provides real-time view of the packets forwarded by the firewall. Charts are divided into three
sections:
• Application bandwidth - Applications flowing through the firewall in bits per second.
• Per Interface Data - Bandwidth utilization in bits per second, Average packets per second, Average
packets size, New connection rate in connections per second
• Global data - CPU utilization per core, Total active connections
Data visible on this page is limited to maximum of 10 minutes. Individual charts can be re-arranged manually
and users can drill down to appflow report, appflow sessions and flow analytics/appflow monitor pages from
specific charts. Color for the chart can also be configured from the configure button.
SonicWall Cloud GMS 14
Quick Start Guide
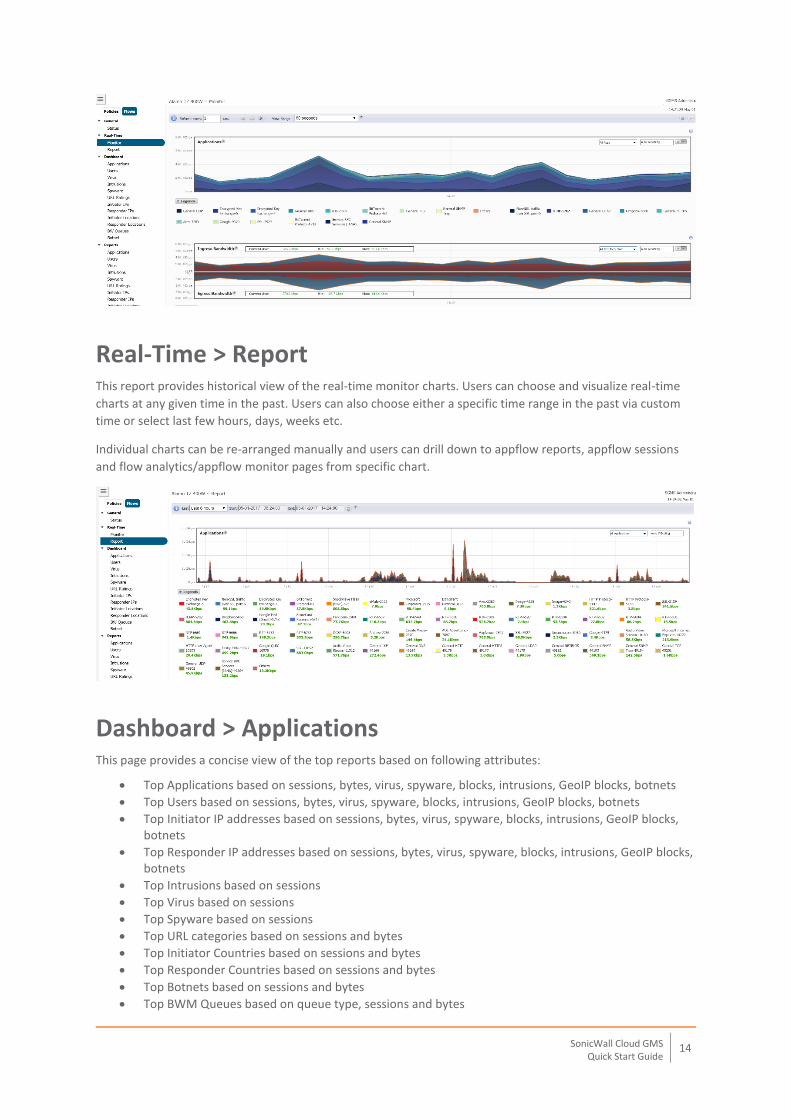
Real-Time > Report This report provides historical view of the real-time monitor charts. Users can choose and visualize real-time
charts at any given time in the past. Users can also choose either a specific time range in the past via custom
time or select last few hours, days, weeks etc.
Individual charts can be re-arranged manually and users can drill down to appflow reports, appflow sessions
and flow analytics/appflow monitor pages from specific chart.
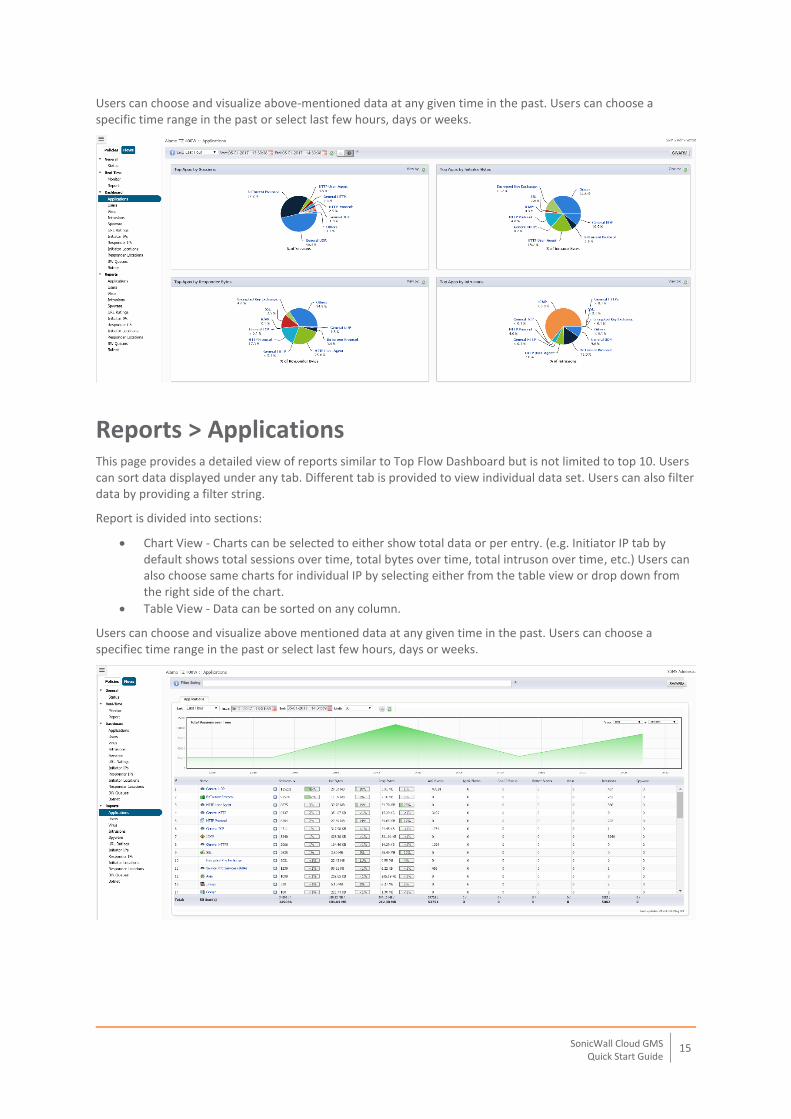
Dashboard > Applications This page provides a concise view of the top reports based on following attributes:
• Top Applications based on sessions, bytes, virus, spyware, blocks, intrusions, GeoIP blocks, botnets
• Top Users based on sessions, bytes, virus, spyware, blocks, intrusions, GeoIP blocks, botnets
• Top Initiator IP addresses based on sessions, bytes, virus, spyware, blocks, intrusions, GeoIP blocks, botnets
• Top Responder IP addresses based on sessions, bytes, virus, spyware, blocks, intrusions, GeoIP blocks, botnets
• Top Intrusions based on sessions
• Top Virus based on sessions
• Top Spyware based on sessions
• Top URL categories based on sessions and bytes
• Top Initiator Countries based on sessions and bytes
• Top Responder Countries based on sessions and bytes
• Top Botnets based on sessions and bytes
• Top BWM Queues based on queue type, sessions and bytes
SonicWall Cloud GMS 15
Quick Start Guide
Users can choose and visualize above-mentioned data at any given time in the past. Users can choose a specific time range in the past or select last few hours, days or weeks.
Reports > Applications This page provides a detailed view of reports similar to Top Flow Dashboard but is not limited to top 10. Users can sort data displayed under any tab. Different tab is provided to view individual data set. Users can also filter data by providing a filter string.
Report is divided into sections:
• Chart View - Charts can be selected to either show total data or per entry. (e.g. Initiator IP tab by default shows total sessions over time, total bytes over time, total intruson over time, etc.) Users can also choose same charts for individual IP by selecting either from the table view or drop down from the right side of the chart.
• Table View - Data can be sorted on any column.
Users can choose and visualize above mentioned data at any given time in the past. Users can choose a specifiec time range in the past or select last few hours, days or weeks.
SonicWall Cloud GMS 16
Quick Start Guide
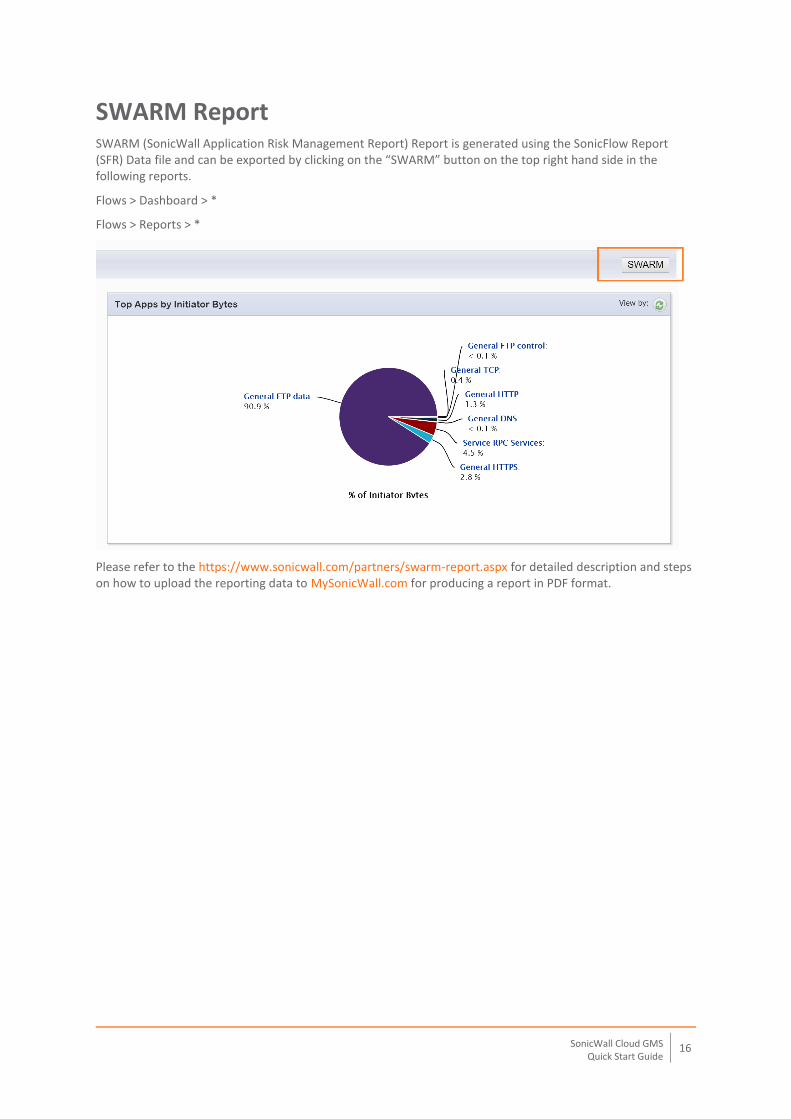
SWARM Report SWARM (SonicWall Application Risk Management Report) Report is generated using the SonicFlow Report (SFR) Data file and can be exported by clicking on the “SWARM” button on the top right hand side in the following reports.
Flows > Dashboard > *
Flows > Reports > *
Please refer to the https://www.sonicwall.com/partners/swarm-report.aspx for detailed description and steps on how to upload the reporting data to MySonicWall.com for producing a report in PDF format.