Embed Size (px)
Citation preview
Combination Lensatic / Map
Compass
Instruction for Use
Foreword
A compass in its simplest form is a tool that point to magnetic north (in the Northern Hemisphere) The addition of various features makes this tool easier to use in specific circumstances For example, the Map Compass has features that make it easier to measure angles and determine direction from a topographical map. And the Lensatlc Compass allows for more accurate determination of a azimuths or lines of direction when In the field Both function fine but have their limitations The Combination Lensatic / Map Compass combines the features of both and will make your compass work easier and more precise
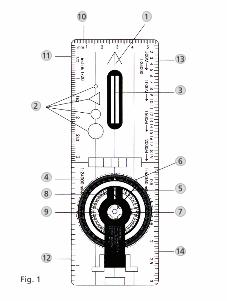
1. Index line
2. Holes for Drawing Map Symbols
3. Aim Slot A
4. Scale Ring
5. Bezel Arrow
6. Rotating Plate
7. Magnifier
8. Aim Slot B
9. Floating Magnetic Dial
10. Scale A -mm
11. Scale B -Inch and 1/20
12. Scale C –1:24000
13. Scale D -1:25000
14. Scale E –1:63360
1
13
10
11
2
4
8
9
1214
7
5
6
3
Fig. 1
General Knowledge about Maps and Compass
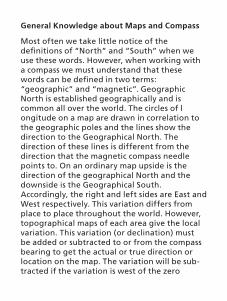
Most often we take little notice of the definitions of “North” and “South” when we use these words. However, when working with a compass we must understand that these words can be defined in two terms: “geographic” and “magnetic”. Geographic North is established geographically and is common all over the world. The circles of l ongitude on a map are drawn in correlation to the geographic poles and the lines show the direction to the Geographical North. The direction of these lines is different from the direction that the magnetic compass needle points to. On an ordinary map upside is the direction of the geographical North and the downside is the Geographical South. Accordingly, the right and left sides are East and West respectively. This variation differs from place to place throughout the world. However, topographical maps of each area give the local variation. This variation (or declination) must be added or subtracted to or from the compass bearing to get the actual or true direction or location on the map. The variation will be sub-tracted if the variation is west of the zero
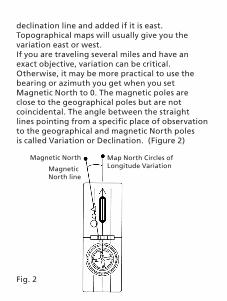
declination line and added if it is east. Topographical maps will usually give you the variation east or west. If you are traveling several miles and have an exact objective, variation can be critical. Otherwise, it may be more practical to use the bearing or azimuth you get when you set Magnetic North to 0. The magnetic poles are close to the geographical poles but are not coincidental. The angle between the straight lines pointing from a specific place of observation to the geographical and magnetic North poles is called Variation or Declination. (Figure 2)
Magnetic North line
Magnetic North Map North Circles of Longitude Variation
Fig. 2
Finding the direction to a destination
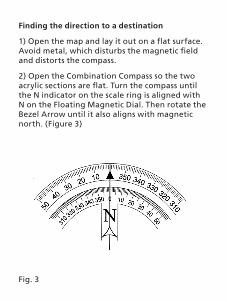
1) Open the map and lay it out on a flat surface. Avoid metal, which disturbs the magnetic field and distorts the compass.
2) Open the Combination Compass so the two acrylic sections are flat. Turn the compass until the N indicator on the scale ring is aligned with N on the Floating Magnetic Dial. Then rotate the Bezel Arrow until it also aligns with magnetic north. (Figure 3)
Fig. 3
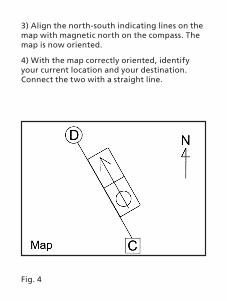
3) Align the north-south indicating lines on the map with magnetic north on the compass. The map is now oriented.
4) With the map correctly oriented, identify your current location and your destination. Connect the two with a straight line.
Fig. 4
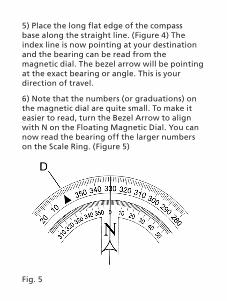
5) Place the long flat edge of the compass base along the straight line. (Figure 4) The index line is now pointing at your destination and the bearing can be read from the magnetic dial. The bezel arrow will be pointing at the exact bearing or angle. This is your direction of travel.
6) Note that the numbers (or graduations) on the magnetic dial are quite small. To make it easier to read, turn the Bezel Arrow to align with N on the Floating Magnetic Dial. You can now read the bearing off the larger numbers on the Scale Ring. (Figure 5)
Fig. 5
Maintaining your direction of travel
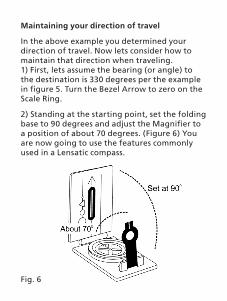
In the above example you determined your direction of travel. Now lets consider how to maintain that direction when traveling. 1) First, lets assume the bearing (or angle) to the destination is 330 degrees per the example in figure 5. Turn the Bezel Arrow to zero on the Scale Ring.
2) Standing at the starting point, set the folding base to 90 degrees and adjust the Magnifier to a position of about 70 degrees. (Figure 6) You are now going to use the features commonly used in a Lensatic compass.
Fig. 6
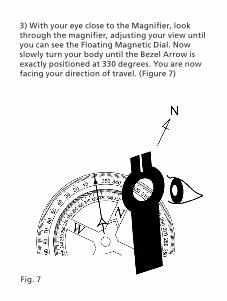
3) With your eye close to the Magnifier, look through the magnifier, adjusting your view until you can see the Floating Magnetic Dial. Now slowly turn your body until the Bezel Arrow is exactly positioned at 330 degrees. You are now facing your direction of travel. (Figure 7)
Fig. 7
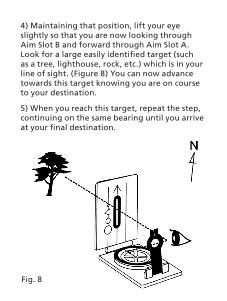
4) Maintaining that position, lift your eye slightly so that you are now looking through Aim Slot B and forward through Aim Slot A. Look for a large easily identified target (such as a tree, lighthouse, rock, etc.) which is in your line of sight. (Figure 8) You can now advance towards this target knowing you are on course to your destination.
5) When you reach this target, repeat the step, continuing on the same bearing until you arrive at your final destination.
Fig. 8
Finding your location on a map
You are lost! But you have a topographical map of the area and your Combination Lensatic /Map Compass.
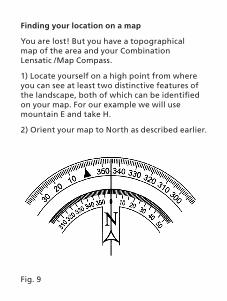
1) Locate yourself on a high point from where you can see at least two distinctive features of the landscape, both of which can be identified on your map. For our example we will use mountain E and take H.
2) Orient your map to North as described earlier.
Fig. 9
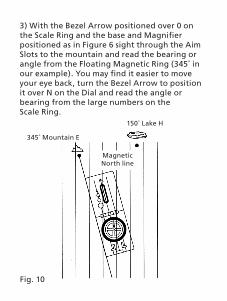
3) With the Bezel Arrow positioned over 0 on the Scale Ring and the base and Magnifier positioned as in Figure 6 sight through the Aim Slots to the mountain and read the bearing or angle from the Floating Magnetic Ring (345˚ in our example). You may find it easier to move your eye back, turn the Bezel Arrow to position it over N on the Dial and read the angle or bearing from the large numbers on the Scale Ring.
Magnetic North line
345˚ Mountain E
150˚ Lake H
Fig. 10
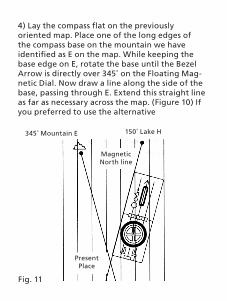
4) Lay the compass flat on the previously oriented map. Place one of the long edges of the compass base on the mountain we have identified as E on the map. While keeping the base edge on E, rotate the base until the Bezel Arrow is directly over 345˚ on the Floating Mag-netic Dial. Now draw a line along the side of the base, passing through E. Extend this straight line as far as necessary across the map. (Figure 10) If you preferred to use the alternative
Magnetic North line
Present Place
345˚ Mountain E 150˚ Lake H
Fig. 11
escribed in 3) above and read the angle from the Scale Ring, leave the Bezel Arrow where it was positioned. Line up your straight edge on E and move the base in an arc until N on the Magnetic Dial is positioned directly under the Bezel Arrow. Then draw your line along the base through E.
5) Repeat steps 3 and 4 using lake H as the target. Our example shows the lake at 15˚. Your line from the lake at 15 degrees will intersect with the previously drawn line from the mountain. Where the lines intersect is your current location. (Figure 11)