Embed Size (px)
Citation preview
Disclaimer
The information furnished herein by Comdata is proprietary and confidential and is intended for Comdata customers and/or Comdata internal use. It should not be duplicated, published, or disclosed in whole or in part without the prior written permission of Comdata.
COMDATA EXPORT SYNC TOOL USER GUIDE

Table of Contents
Overview ....................................................................................................................................................... 5
Technical and System Requirements ........................................................................................................ 5
Install the Comdata Export Sync Tool ........................................................................................................... 6
Navigate Dashboard ...................................................................................................................................... 8
Configure Expense Track ............................................................................................................................. 10
Expense Track Overview ......................................................................................................................... 10
Expense Track Configuration .................................................................................................................. 10
Perform an Expense Track Export ............................................................................................................... 21
Configure Spend Escalator™ ....................................................................................................................... 24
Spend Escalator Overview ...................................................................................................................... 24
Spend Escalator Configuration ................................................................................................................ 25
Perform a Spend Escalator Export .............................................................................................................. 30
Set up a Task Schedule ................................................................................................................................ 33
Troubleshooting .......................................................................................................................................... 37
Comdata Export Sync Tool User Guide
Comdata Confidential and Proprietary 4
Revision Table
Date Version Author Notes
01/05/2017 Ver 1.0 Steven Harris Initial draft created 02/09/2018 Ver 2.0 Steven Harris Finalized document published
Comdata Export Sync Tool User Guide
Comdata Confidential and Proprietary 5
Overview The Comdata Export Sync Tool allows you to export data directly from your local Enterprise Resource Planning (ERP) system into Comdata’s databases. The export sync tool can pull a wide variety of data related to your Comdata solutions, such as general ledger coding structure, job codes, vendors, transaction spending, payment methods, etc.
Use the Comdata Export Sync Tool to alleviate many of your manual accounting processes, such as updating new vendors, new jobs, phases, equipment, GL structures and more. A Comdata Technical Services Specialist (TSS) will assist you with many of the set up processes outlined in this guide.
Technical and System Requirements
See the following requirements needed to use the Comdata Export Sync Tool:
• Operating system: Windows 7 or higher
• Space: 900 MB
• Access: Administrator access on your computer to install the software and an Administrative user for the ERP with read privileges to the database.
• 64-bit or 32-bit processor on your computer; Sage 300 ERPs require a 32-bit ODBC driver.
Comdata Export Sync Tool User Guide
Comdata Confidential and Proprietary 6
Install the Comdata Export Sync Tool Follow these steps to download and begin using the export sync tool. If you run into a problem during installation, configuration, or usage of the export sync tool, contact your Technical Services Specialist (TSS).
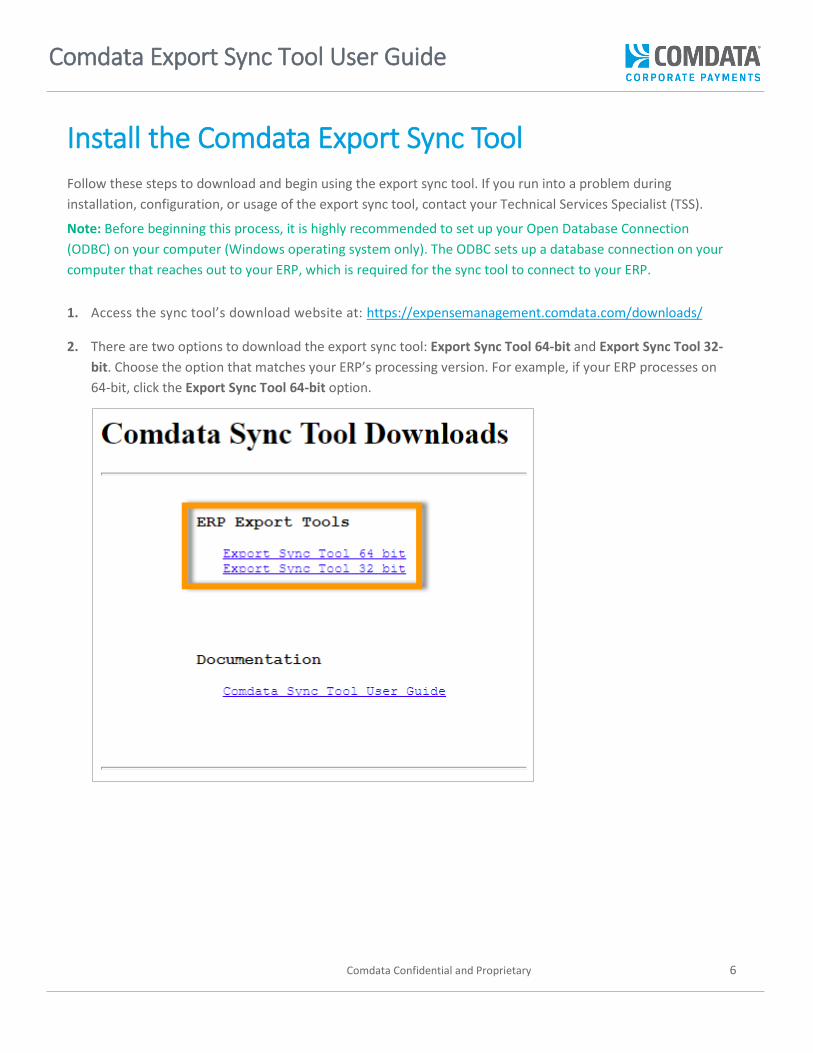
Note: Before beginning this process, it is highly recommended to set up your Open Database Connection (ODBC) on your computer (Windows operating system only). The ODBC sets up a database connection on your computer that reaches out to your ERP, which is required for the sync tool to connect to your ERP. 1. Access the sync tool’s download website at: https://expensemanagement.comdata.com/downloads/
2. There are two options to download the export sync tool: Export Sync Tool 64-bit and Export Sync Tool 32-bit. Choose the option that matches your ERP’s processing version. For example, if your ERP processes on 64-bit, click the Export Sync Tool 64-bit option.
Comdata Export Sync Tool User Guide
Comdata Confidential and Proprietary 7
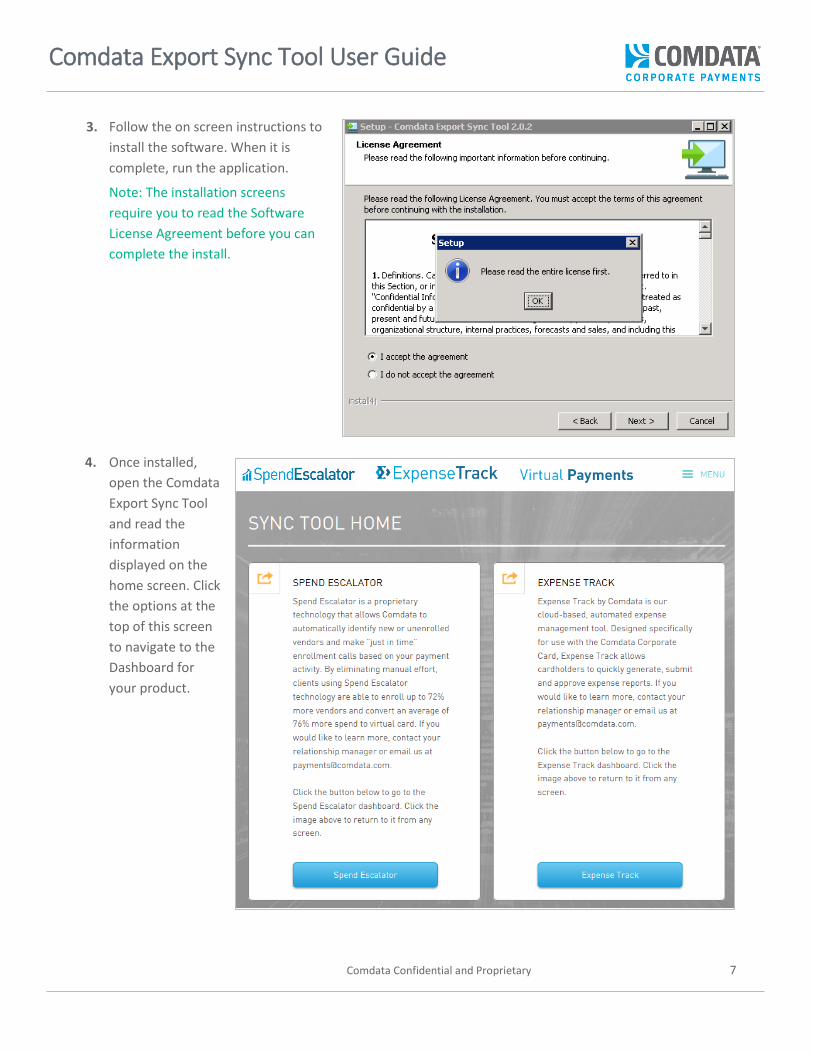
3. Follow the on screen instructions to install the software. When it is complete, run the application.
Note: The installation screens require you to read the Software License Agreement before you can complete the install.
4. Once installed,
open the Comdata Export Sync Tool and read the information displayed on the home screen. Click the options at the top of this screen to navigate to the Dashboard for your product.
Comdata Export Sync Tool User Guide
Comdata Confidential and Proprietary 8
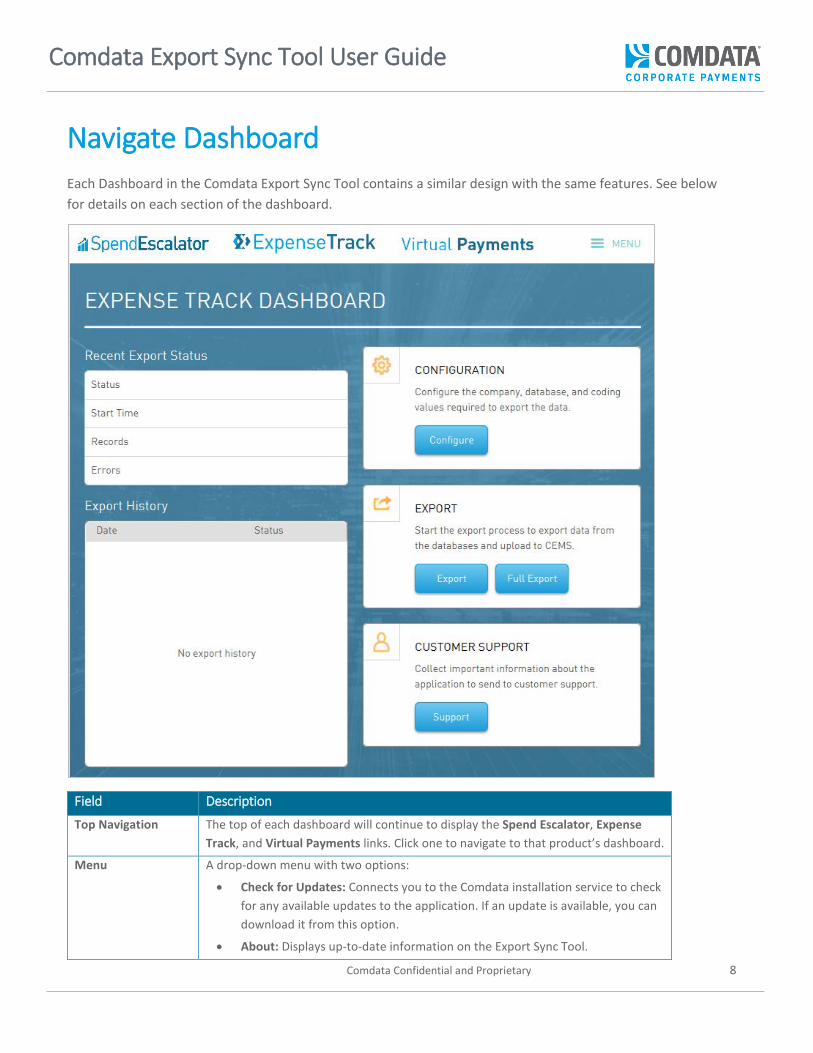
Navigate Dashboard Each Dashboard in the Comdata Export Sync Tool contains a similar design with the same features. See below for details on each section of the dashboard.
Field Description
Top Navigation The top of each dashboard will continue to display the Spend Escalator, Expense Track, and Virtual Payments links. Click one to navigate to that product’s dashboard.
Menu A drop-down menu with two options:
• Check for Updates: Connects you to the Comdata installation service to check for any available updates to the application. If an update is available, you can download it from this option.
• About: Displays up-to-date information on the Export Sync Tool.
Comdata Export Sync Tool User Guide
Comdata Confidential and Proprietary 9
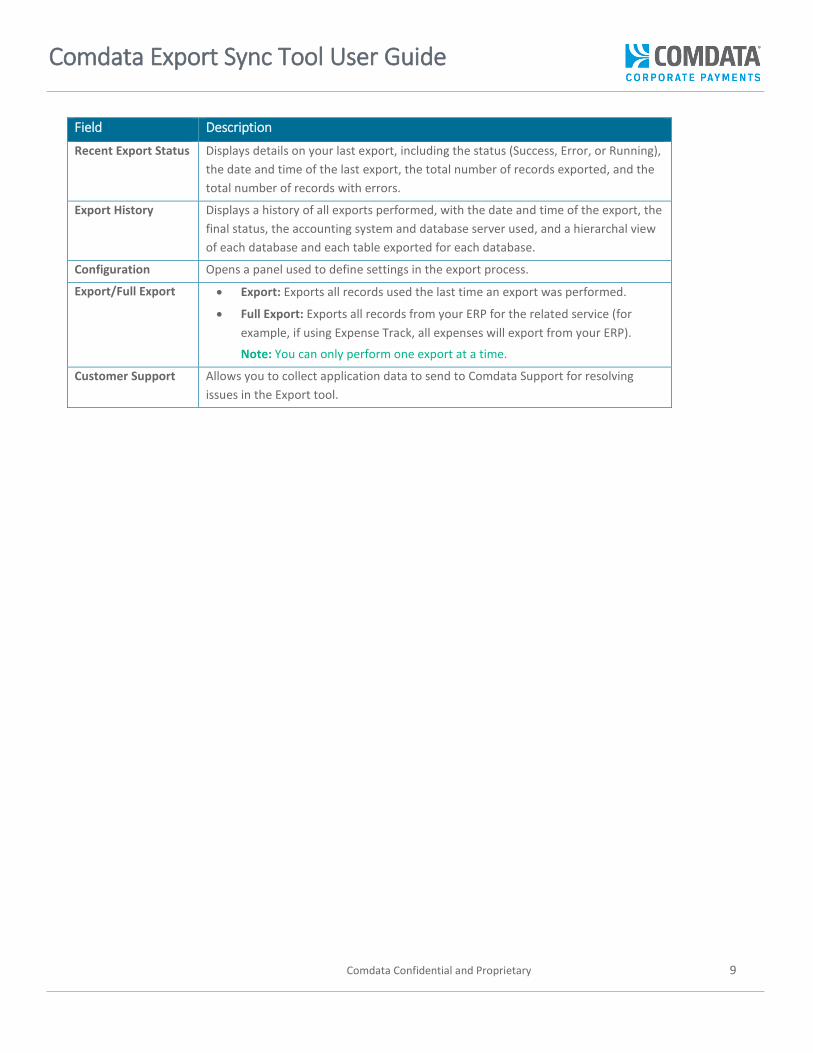
Field Description
Recent Export Status Displays details on your last export, including the status (Success, Error, or Running), the date and time of the last export, the total number of records exported, and the total number of records with errors.
Export History Displays a history of all exports performed, with the date and time of the export, the final status, the accounting system and database server used, and a hierarchal view of each database and each table exported for each database.
Configuration Opens a panel used to define settings in the export process.
Export/Full Export • Export: Exports all records used the last time an export was performed.
• Full Export: Exports all records from your ERP for the related service (for example, if using Expense Track, all expenses will export from your ERP).
Note: You can only perform one export at a time.
Customer Support Allows you to collect application data to send to Comdata Support for resolving issues in the Export tool.

Comdata Export Sync Tool User Guide
Comdata Confidential and Proprietary 10
Configure Expense Track
Expense Track Overview
If your company uses Comdata’s expense management solution, Expense Track, you must configure the Sync Tool to export coding values from your ERP. Completing the configuration process allows the sync tool to connect to and to populate the Expense Track database, so your employees can code their expense reports.
Note: No matter the service you use in the Comdata Export Sync Tool (Expense Track, Spend Escalator, and/or Virtual Payments), you must complete the Account Information tab (Expense Track > Configure > Account Information). Completing this process sets up your Tenant ID, which is needed for the sync tool to recognize your account with Comdata.
Expense Track Configuration
Follow the steps below to configure Expense Track.
1. On the Expense Track Dashboard, click Configure.
Comdata Export Sync Tool User Guide
Comdata Confidential and Proprietary 11
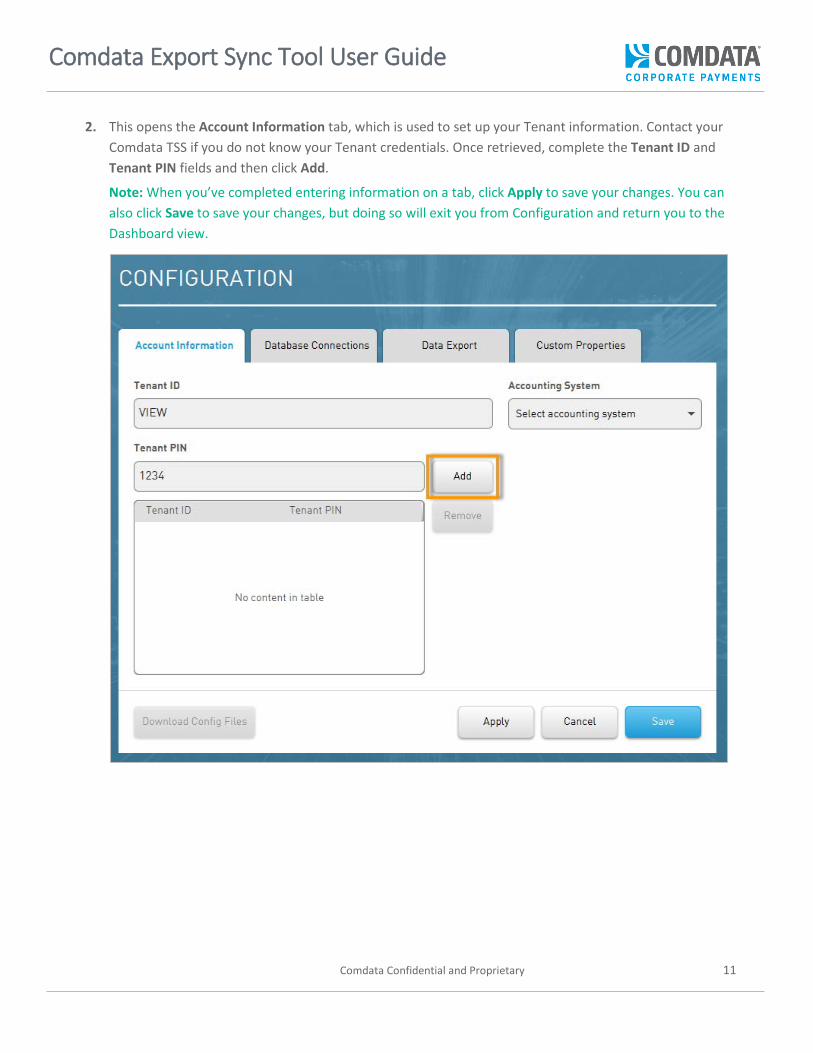
2. This opens the Account Information tab, which is used to set up your Tenant information. Contact your Comdata TSS if you do not know your Tenant credentials. Once retrieved, complete the Tenant ID and Tenant PIN fields and then click Add.
Note: When you’ve completed entering information on a tab, click Apply to save your changes. You can also click Save to save your changes, but doing so will exit you from Configuration and return you to the Dashboard view.
Comdata Export Sync Tool User Guide
Comdata Confidential and Proprietary 12
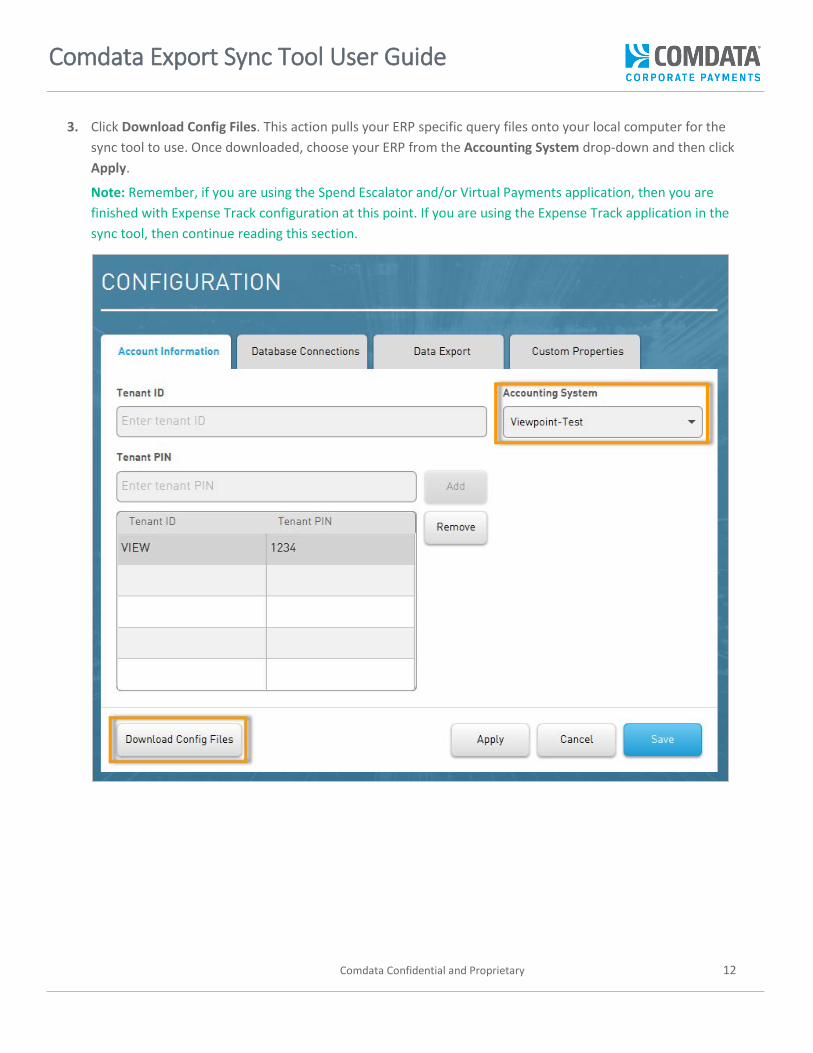
3. Click Download Config Files. This action pulls your ERP specific query files onto your local computer for the sync tool to use. Once downloaded, choose your ERP from the Accounting System drop-down and then click Apply.
Note: Remember, if you are using the Spend Escalator and/or Virtual Payments application, then you are finished with Expense Track configuration at this point. If you are using the Expense Track application in the sync tool, then continue reading this section.
Comdata Export Sync Tool User Guide
Comdata Confidential and Proprietary 13
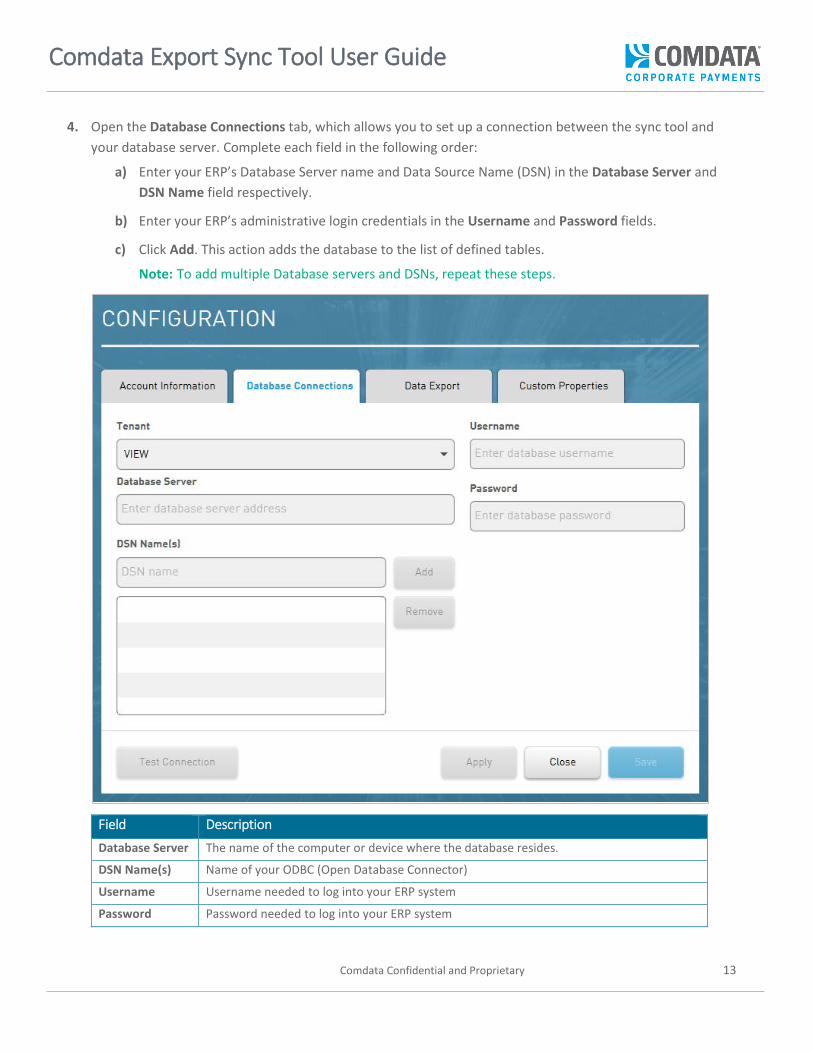
4. Open the Database Connections tab, which allows you to set up a connection between the sync tool and your database server. Complete each field in the following order:
a) Enter your ERP’s Database Server name and Data Source Name (DSN) in the Database Server and DSN Name field respectively.
b) Enter your ERP’s administrative login credentials in the Username and Password fields.
c) Click Add. This action adds the database to the list of defined tables.
Note: To add multiple Database servers and DSNs, repeat these steps.
Field Description
Database Server The name of the computer or device where the database resides.
DSN Name(s) Name of your ODBC (Open Database Connector)
Username Username needed to log into your ERP system
Password Password needed to log into your ERP system
Comdata Export Sync Tool User Guide
Comdata Confidential and Proprietary 14
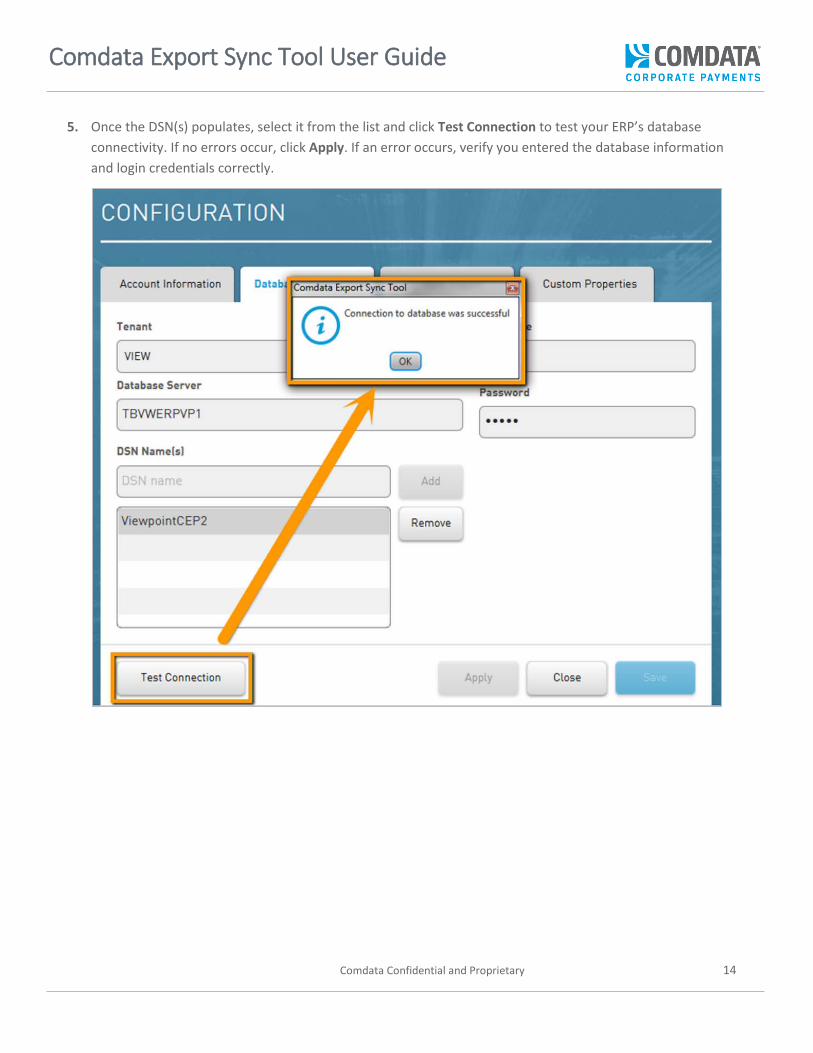
5. Once the DSN(s) populates, select it from the list and click Test Connection to test your ERP’s database connectivity. If no errors occur, click Apply. If an error occurs, verify you entered the database information and login credentials correctly.
Comdata Export Sync Tool User Guide
Comdata Confidential and Proprietary 15
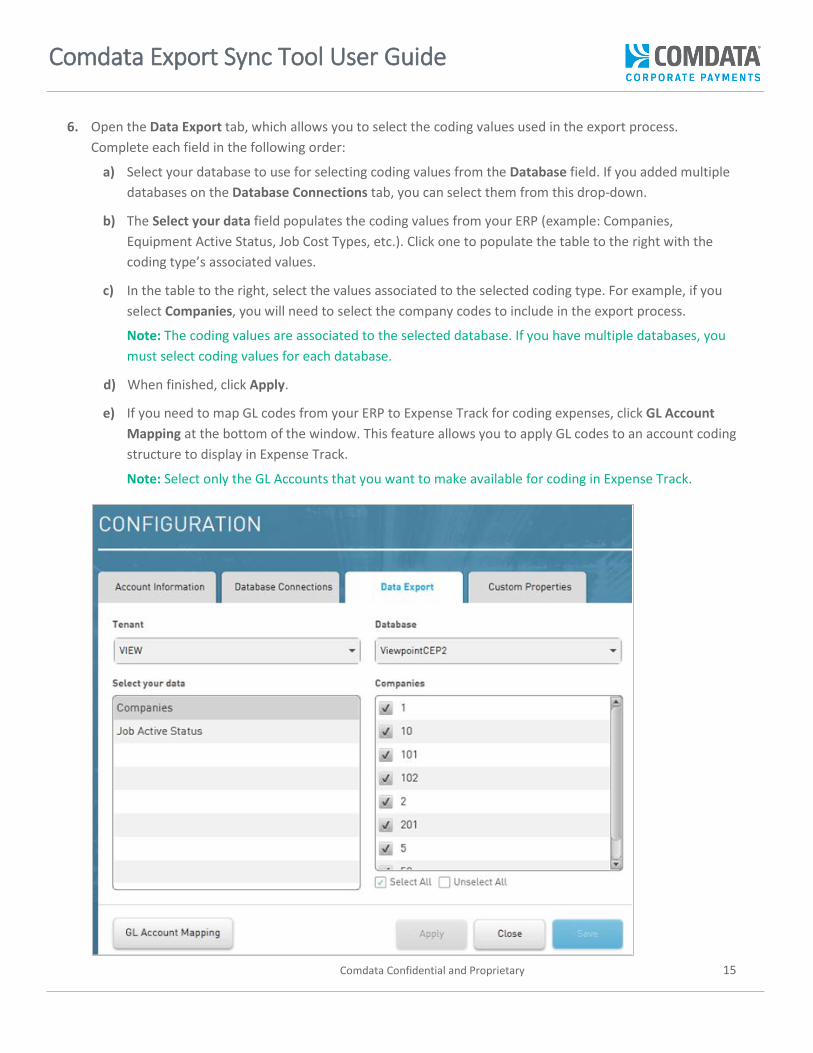
6. Open the Data Export tab, which allows you to select the coding values used in the export process. Complete each field in the following order:
a) Select your database to use for selecting coding values from the Database field. If you added multiple databases on the Database Connections tab, you can select them from this drop-down.
b) The Select your data field populates the coding values from your ERP (example: Companies, Equipment Active Status, Job Cost Types, etc.). Click one to populate the table to the right with the coding type’s associated values.
c) In the table to the right, select the values associated to the selected coding type. For example, if you select Companies, you will need to select the company codes to include in the export process.
Note: The coding values are associated to the selected database. If you have multiple databases, you must select coding values for each database.
d) When finished, click Apply.
e) If you need to map GL codes from your ERP to Expense Track for coding expenses, click GL Account Mapping at the bottom of the window. This feature allows you to apply GL codes to an account coding structure to display in Expense Track.
Note: Select only the GL Accounts that you want to make available for coding in Expense Track.
Comdata Export Sync Tool User Guide
Comdata Confidential and Proprietary 16
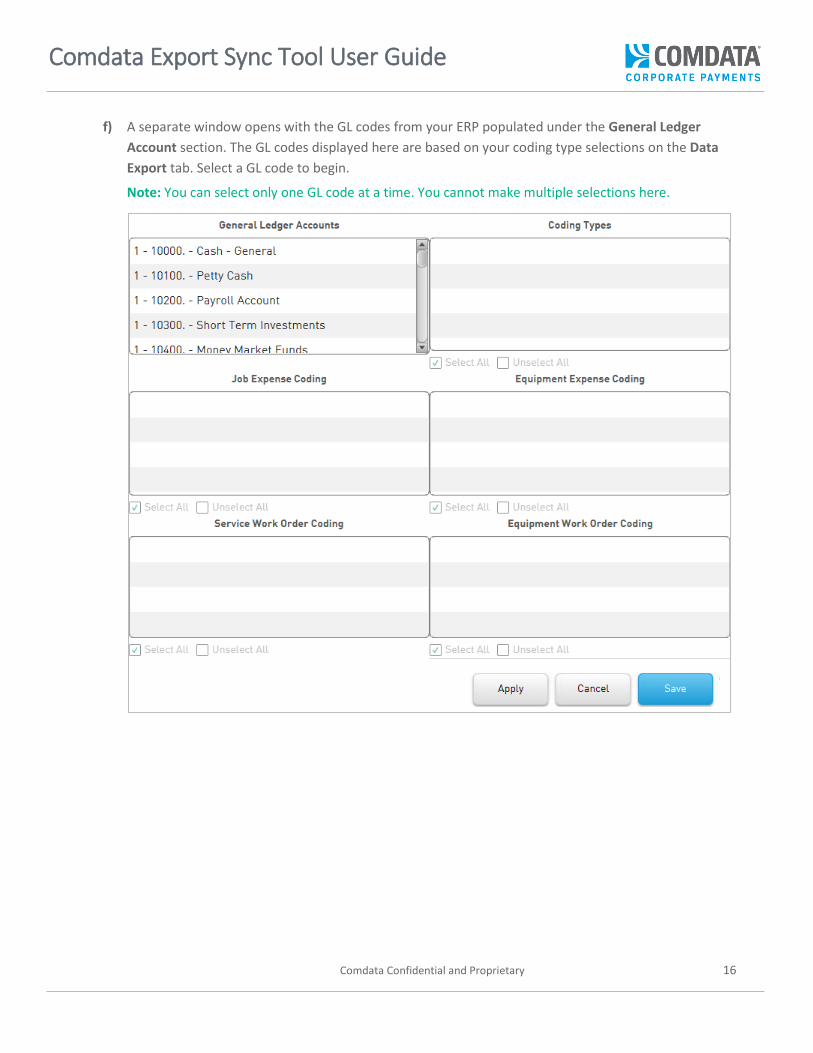
f) A separate window opens with the GL codes from your ERP populated under the General Ledger Account section. The GL codes displayed here are based on your coding type selections on the Data Export tab. Select a GL code to begin.
Note: You can select only one GL code at a time. You cannot make multiple selections here.
Comdata Export Sync Tool User Guide
Comdata Confidential and Proprietary 17
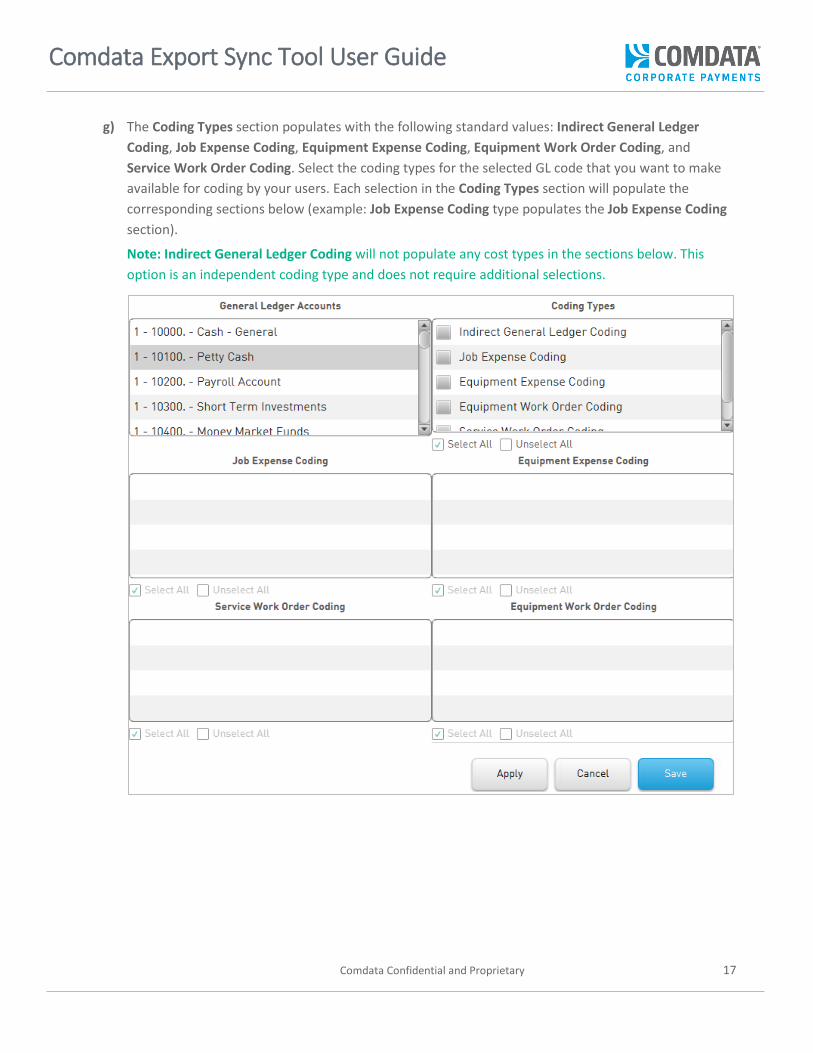
g) The Coding Types section populates with the following standard values: Indirect General Ledger Coding, Job Expense Coding, Equipment Expense Coding, Equipment Work Order Coding, and Service Work Order Coding. Select the coding types for the selected GL code that you want to make available for coding by your users. Each selection in the Coding Types section will populate the corresponding sections below (example: Job Expense Coding type populates the Job Expense Coding section).
Note: Indirect General Ledger Coding will not populate any cost types in the sections below. This option is an independent coding type and does not require additional selections.
Comdata Export Sync Tool User Guide
Comdata Confidential and Proprietary 18
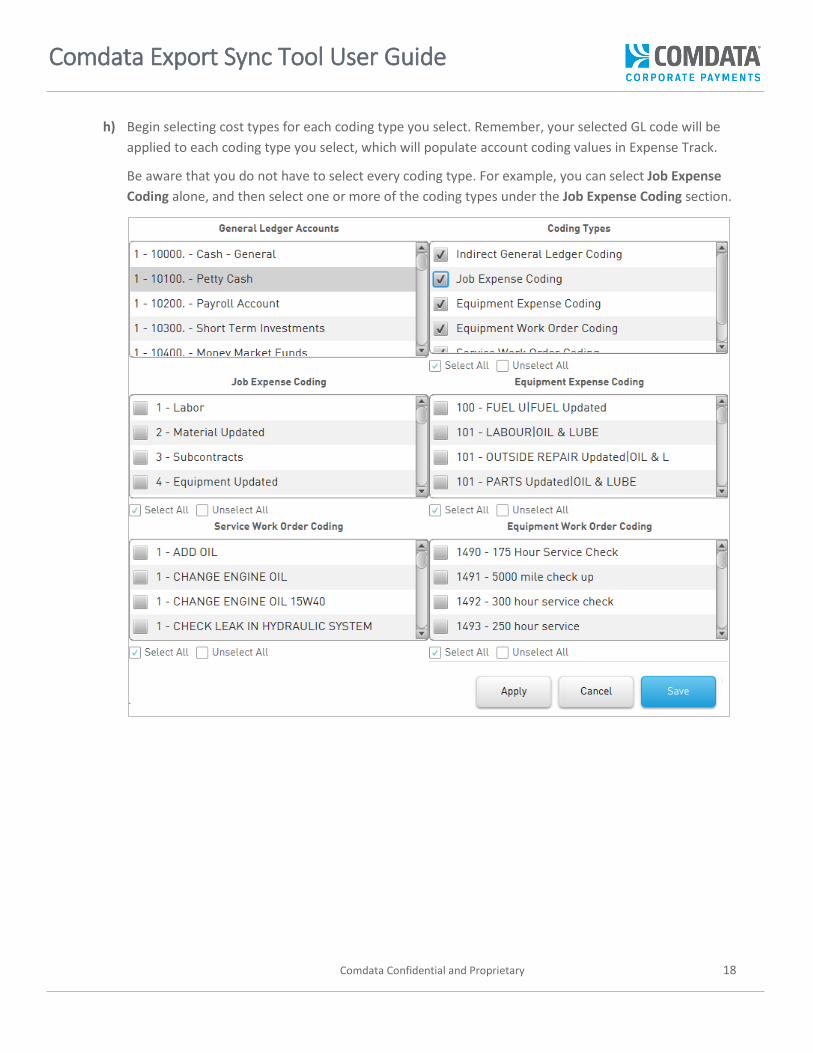
h) Begin selecting cost types for each coding type you select. Remember, your selected GL code will be applied to each coding type you select, which will populate account coding values in Expense Track.
Be aware that you do not have to select every coding type. For example, you can select Job Expense Coding alone, and then select one or more of the coding types under the Job Expense Coding section.
Comdata Export Sync Tool User Guide
Comdata Confidential and Proprietary 19
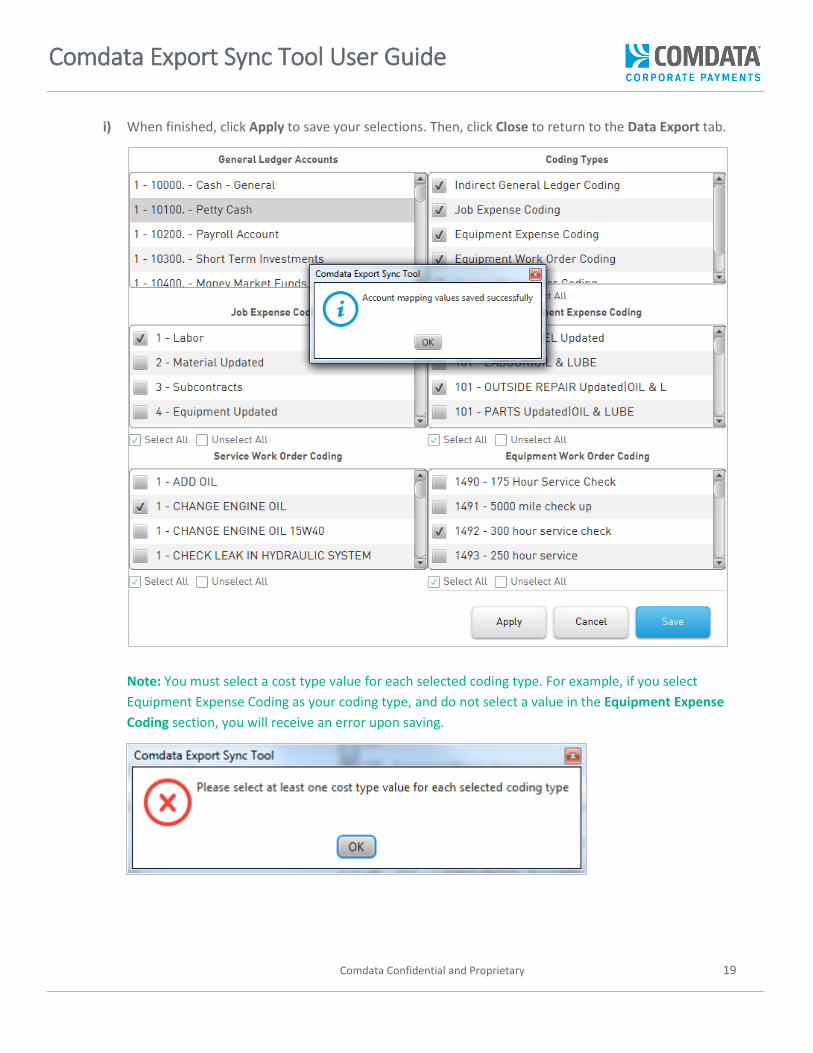
i) When finished, click Apply to save your selections. Then, click Close to return to the Data Export tab.
Note: You must select a cost type value for each selected coding type. For example, if you select Equipment Expense Coding as your coding type, and do not select a value in the Equipment Expense Coding section, you will receive an error upon saving.
Comdata Export Sync Tool User Guide
Comdata Confidential and Proprietary 20
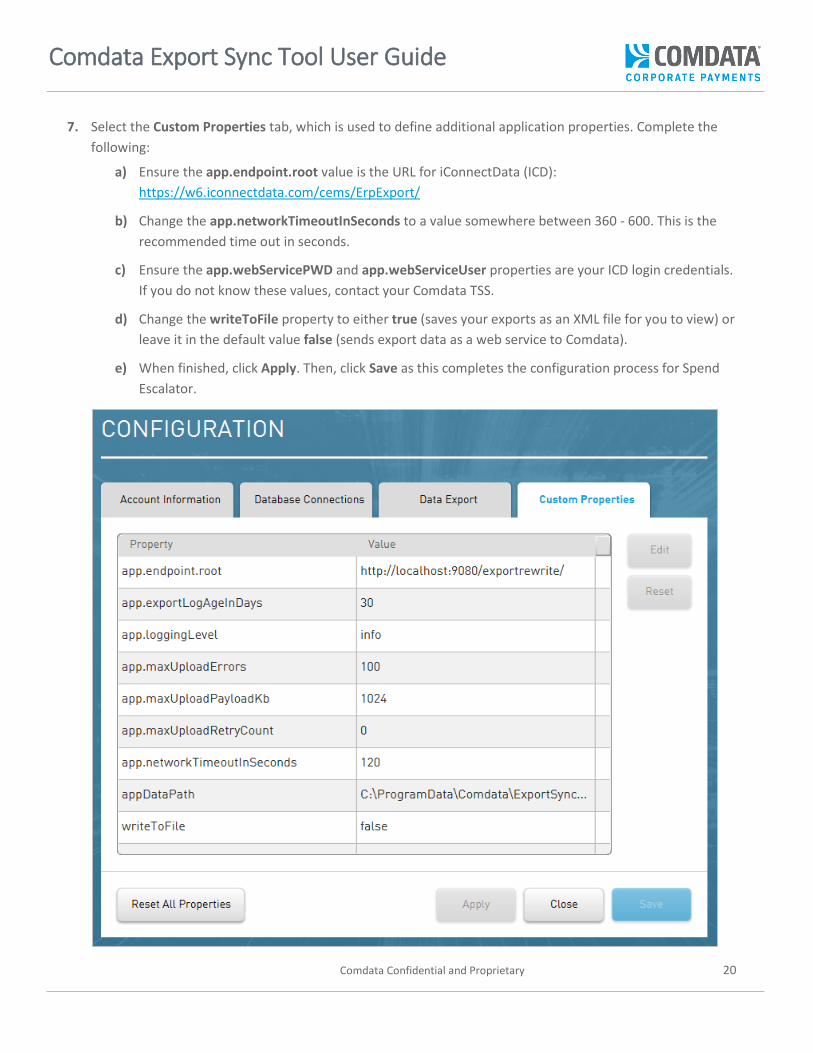
7. Select the Custom Properties tab, which is used to define additional application properties. Complete the following:
a) Ensure the app.endpoint.root value is the URL for iConnectData (ICD): https://w6.iconnectdata.com/cems/ErpExport/
b) Change the app.networkTimeoutInSeconds to a value somewhere between 360 - 600. This is the recommended time out in seconds.
c) Ensure the app.webServicePWD and app.webServiceUser properties are your ICD login credentials. If you do not know these values, contact your Comdata TSS.
d) Change the writeToFile property to either true (saves your exports as an XML file for you to view) or leave it in the default value false (sends export data as a web service to Comdata).
e) When finished, click Apply. Then, click Save as this completes the configuration process for Spend Escalator.
Comdata Export Sync Tool User Guide
Comdata Confidential and Proprietary 21
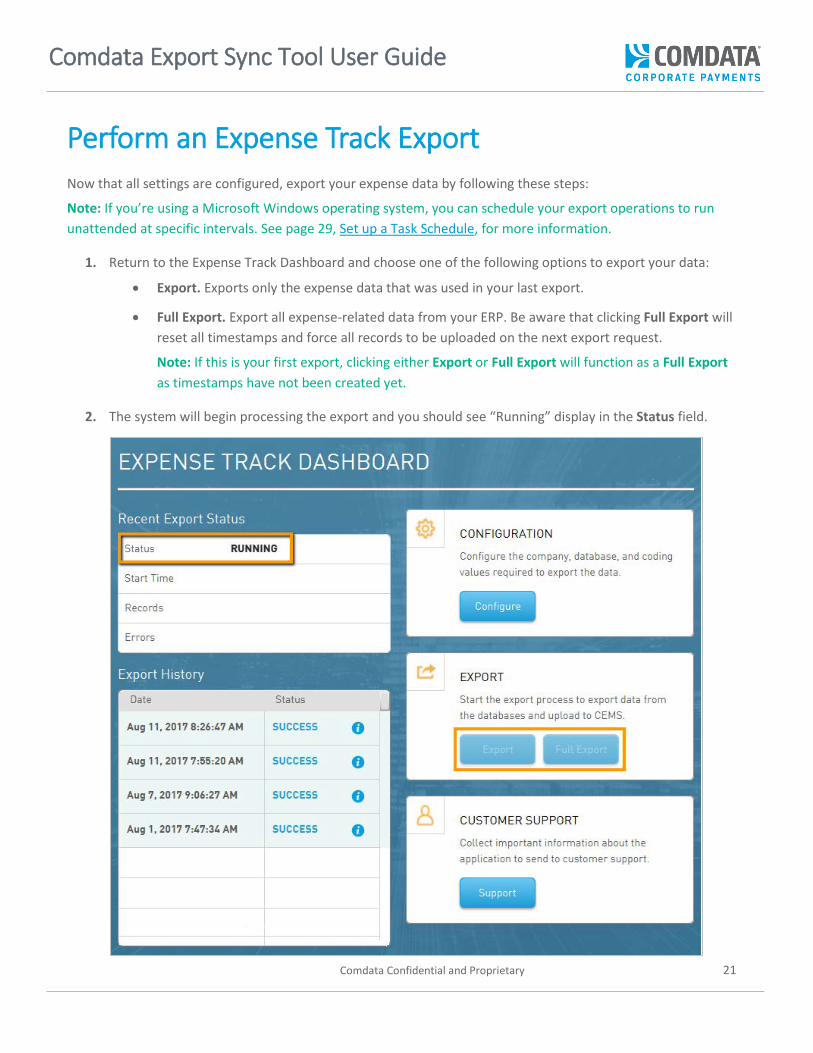
Perform an Expense Track Export Now that all settings are configured, export your expense data by following these steps:
Note: If you’re using a Microsoft Windows operating system, you can schedule your export operations to run unattended at specific intervals. See page 29, Set up a Task Schedule, for more information.
1. Return to the Expense Track Dashboard and choose one of the following options to export your data:
• Export. Exports only the expense data that was used in your last export.
• Full Export. Export all expense-related data from your ERP. Be aware that clicking Full Export will reset all timestamps and force all records to be uploaded on the next export request.
Note: If this is your first export, clicking either Export or Full Export will function as a Full Export as timestamps have not been created yet.
2. The system will begin processing the export and you should see “Running” display in the Status field.
Comdata Export Sync Tool User Guide
Comdata Confidential and Proprietary 22
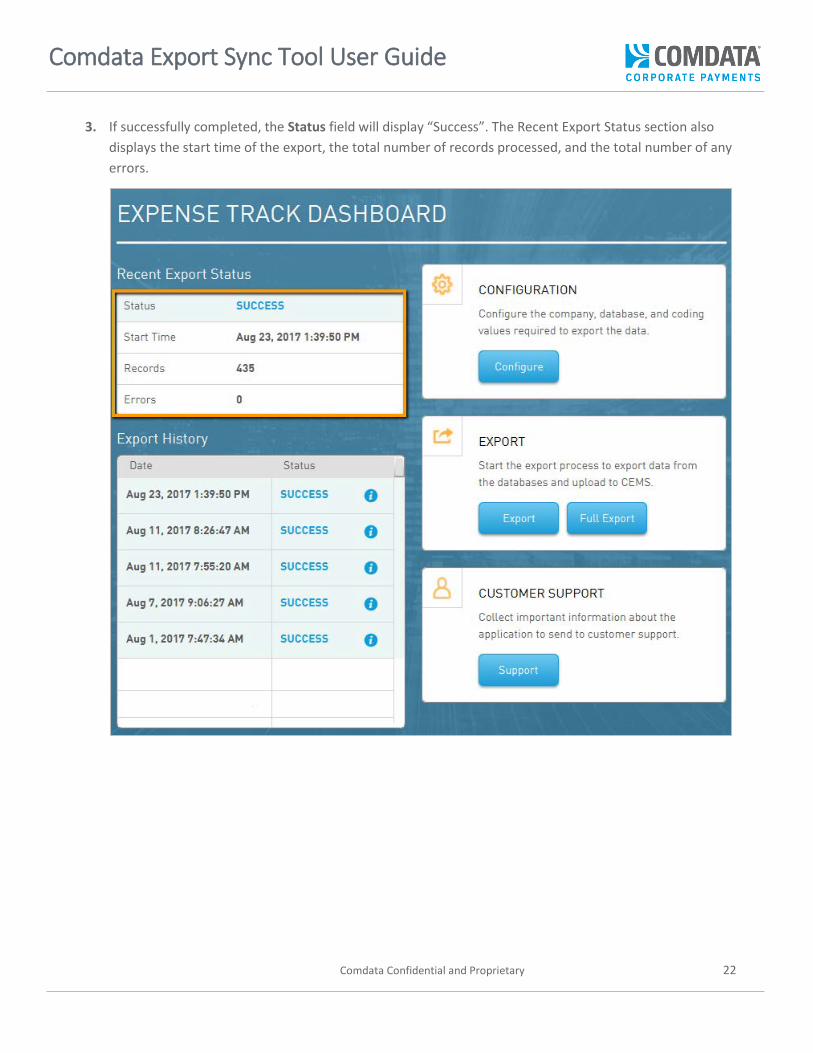
3. If successfully completed, the Status field will display “Success”. The Recent Export Status section also displays the start time of the export, the total number of records processed, and the total number of any errors.
Comdata Export Sync Tool User Guide
Comdata Confidential and Proprietary 23
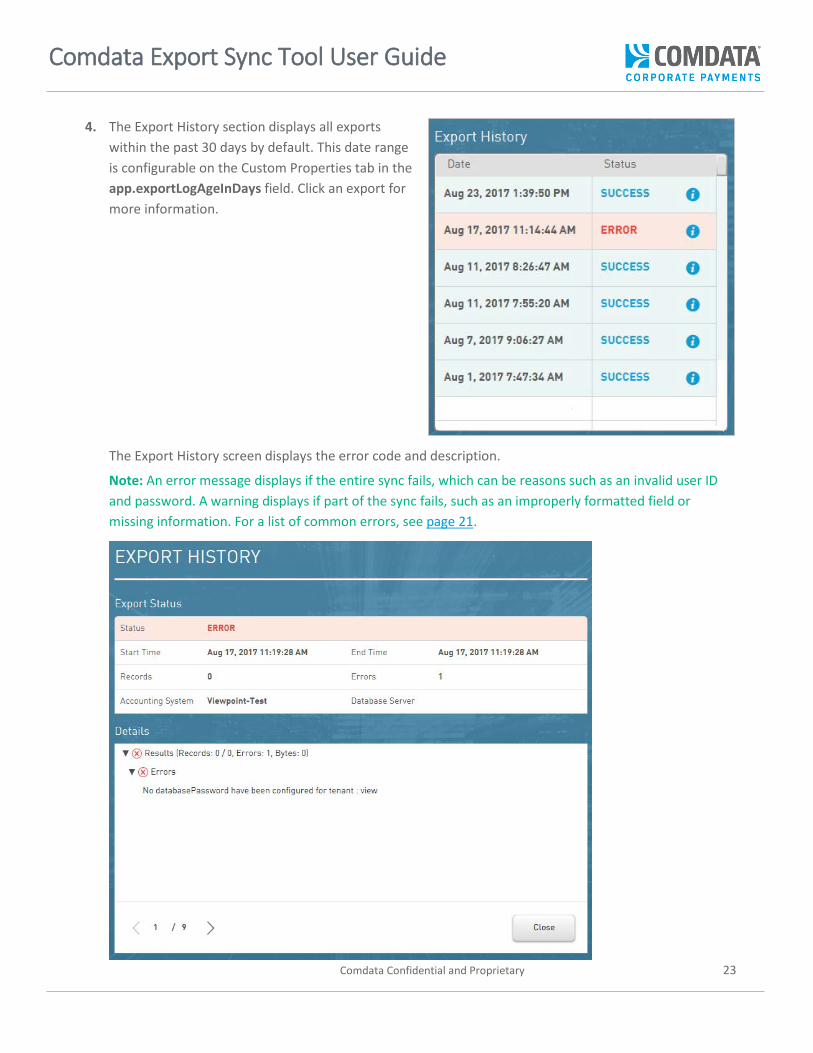
4. The Export History section displays all exports within the past 30 days by default. This date range is configurable on the Custom Properties tab in the app.exportLogAgeInDays field. Click an export for more information.
The Export History screen displays the error code and description.
Note: An error message displays if the entire sync fails, which can be reasons such as an invalid user ID and password. A warning displays if part of the sync fails, such as an improperly formatted field or missing information. For a list of common errors, see page 21.
Comdata Export Sync Tool User Guide
Comdata Confidential and Proprietary 24
Configure Spend Escalator™
Spend Escalator Overview
Spend Escalator™ aims to help you simplify and automate your continuous vendor enrollment with Comdata. With Spend Escalator™, Comdata’s systems can automatically pull your vendor data directly from your Enterprise Resource Planning (ERP) system and populate it within our systems. Comdata’s Vendor Enrollment team will then campaign to any vendor who is actively receiving payments other than virtual cards, such as checks. The Vendor Enrollment team will use the pending payment as leverage and offer immediate payment via virtual card if the vendor agrees to enroll.
This feature removes the need for heavy IT intervention in ERP integration and to send us your vendor information. Furthermore, if you use a Windows operating system, you can set the export sync tool to perform exports on a schedule of your choosing through the windows task scheduler.
Additional benefits include:
• Sustained, constant flow of vendor data directly from your ERP system
• Automated continuous vendor enrollment which will increase your spend and revenue
• Added ability for Comdata to focus vendor enrollment on only vendors that are currently being paid, which prevents us from campaigning to vendors you no longer do business with
• Removed need to constantly send in updated vendor master records
• Added opportunity to enroll up 72% more vendors and convert an average of 76% more spend to virtual cards
Your Comdata Technical Services Specialist (TSS) will help you complete many of the steps listed in this section, but use this information as a reference or to complete steps on your own. Also, note that TSSs can set the Export Sync Tool to pull your vendor data by a start date of your choosing.
Note: You can set up two types of filter rules to help our systems properly scan your data: Exclusion and Transformation.
• Exclusion rules allow you to exclude any vendors with a specific value. For example, if you want to exclude vendors that have a vendor type of employee, you can set the tool to remove those vendors.
• Transformation rules allow you to replace a value in a vendor record with another value. For example, if Joe’s Flowers is entered as the Vendor Name, you can set the system to replace that text with Joseph’s Flowers.
Contact your Comdata TSS to set up filter rules.

Comdata Export Sync Tool User Guide
Comdata Confidential and Proprietary 25
Spend Escalator Configuration
Follow these steps to configure your export parameters for the Spend Escalator.
1. Navigate to the Spend Escalator Dashboard and click Configure.
Note: When you’ve completed entering information on a tab, click Apply to save your changes. You can also click Save to save your changes, but doing so will exit you from Configuration and return you to the Dashboard view.

Comdata Export Sync Tool User Guide
Comdata Confidential and Proprietary 26
2. The Database Connections tab displays, which allows you to set up a connection between the sync tool and your database server. Complete each field in the following order:
a) Enter your ERP’s Database Server name and Data Source Name (DSN) in the Database Server and DSN Name field respectively.
b) Enter your ERP’s login credentials in the Username and Password fields.
c) Click Add.
d) Once the DSN populates under the Current Databases list, click Apply. If you enter multiple databases, select one from the Current Database list and then click Load to use that database for the export.
Note: To add multiple Database servers and DSNs, repeat these steps.
Field Description
Database Server The name of the computer or device where the database resides.
DSN Name(s) Name of the database as listed in your ODBC (Open Database Connector)
Username Username needed to log into your ERP system
Password Password needed to log into your ERP system
Comdata Export Sync Tool User Guide
Comdata Confidential and Proprietary 27
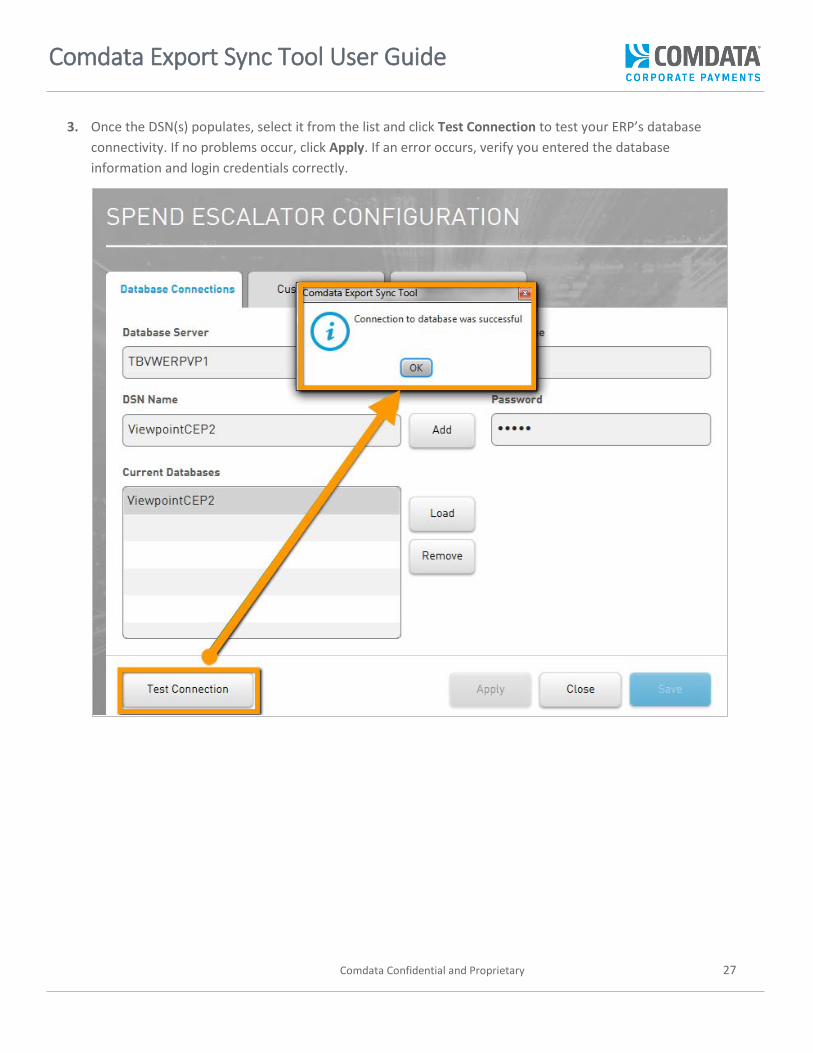
3. Once the DSN(s) populates, select it from the list and click Test Connection to test your ERP’s database connectivity. If no problems occur, click Apply. If an error occurs, verify you entered the database information and login credentials correctly.
Comdata Export Sync Tool User Guide
Comdata Confidential and Proprietary 28
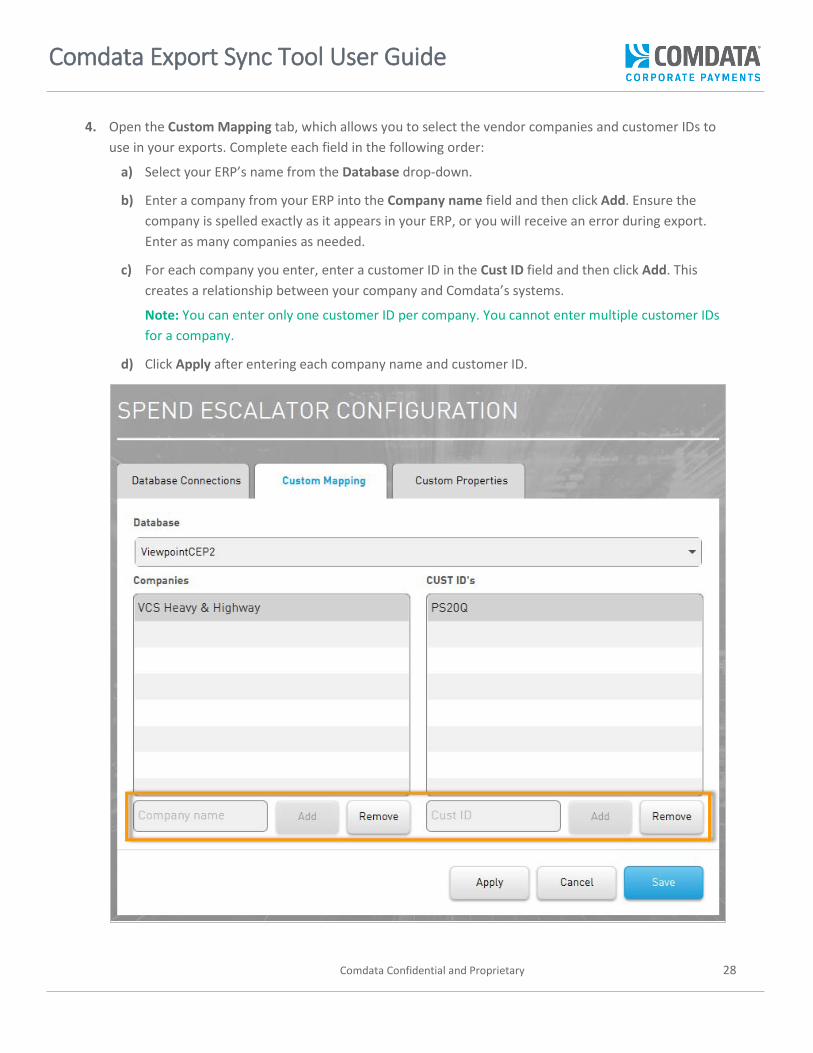
4. Open the Custom Mapping tab, which allows you to select the vendor companies and customer IDs to use in your exports. Complete each field in the following order:
a) Select your ERP’s name from the Database drop-down.
b) Enter a company from your ERP into the Company name field and then click Add. Ensure the company is spelled exactly as it appears in your ERP, or you will receive an error during export. Enter as many companies as needed.
c) For each company you enter, enter a customer ID in the Cust ID field and then click Add. This creates a relationship between your company and Comdata’s systems.
Note: You can enter only one customer ID per company. You cannot enter multiple customer IDs for a company.
d) Click Apply after entering each company name and customer ID.
Comdata Export Sync Tool User Guide
Comdata Confidential and Proprietary 29
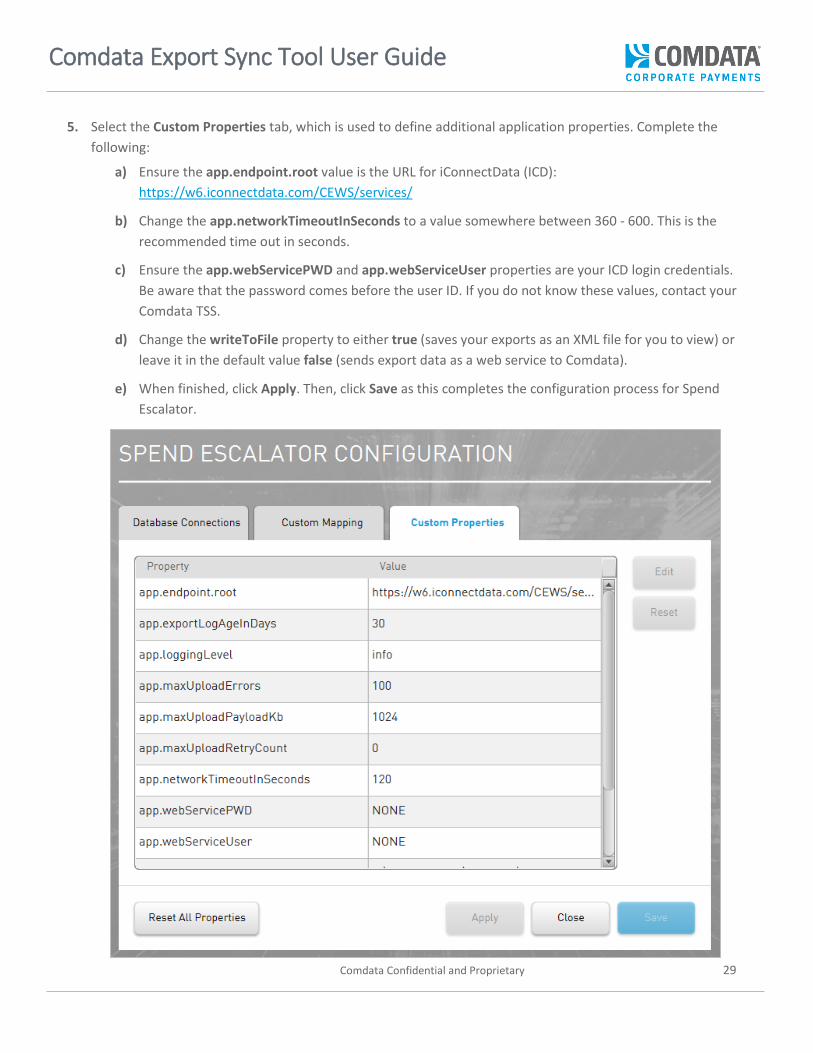
5. Select the Custom Properties tab, which is used to define additional application properties. Complete the following:
a) Ensure the app.endpoint.root value is the URL for iConnectData (ICD): https://w6.iconnectdata.com/CEWS/services/
b) Change the app.networkTimeoutInSeconds to a value somewhere between 360 - 600. This is the recommended time out in seconds.
c) Ensure the app.webServicePWD and app.webServiceUser properties are your ICD login credentials. Be aware that the password comes before the user ID. If you do not know these values, contact your Comdata TSS.
d) Change the writeToFile property to either true (saves your exports as an XML file for you to view) or leave it in the default value false (sends export data as a web service to Comdata).
e) When finished, click Apply. Then, click Save as this completes the configuration process for Spend Escalator.
Comdata Export Sync Tool User Guide
Comdata Confidential and Proprietary 30
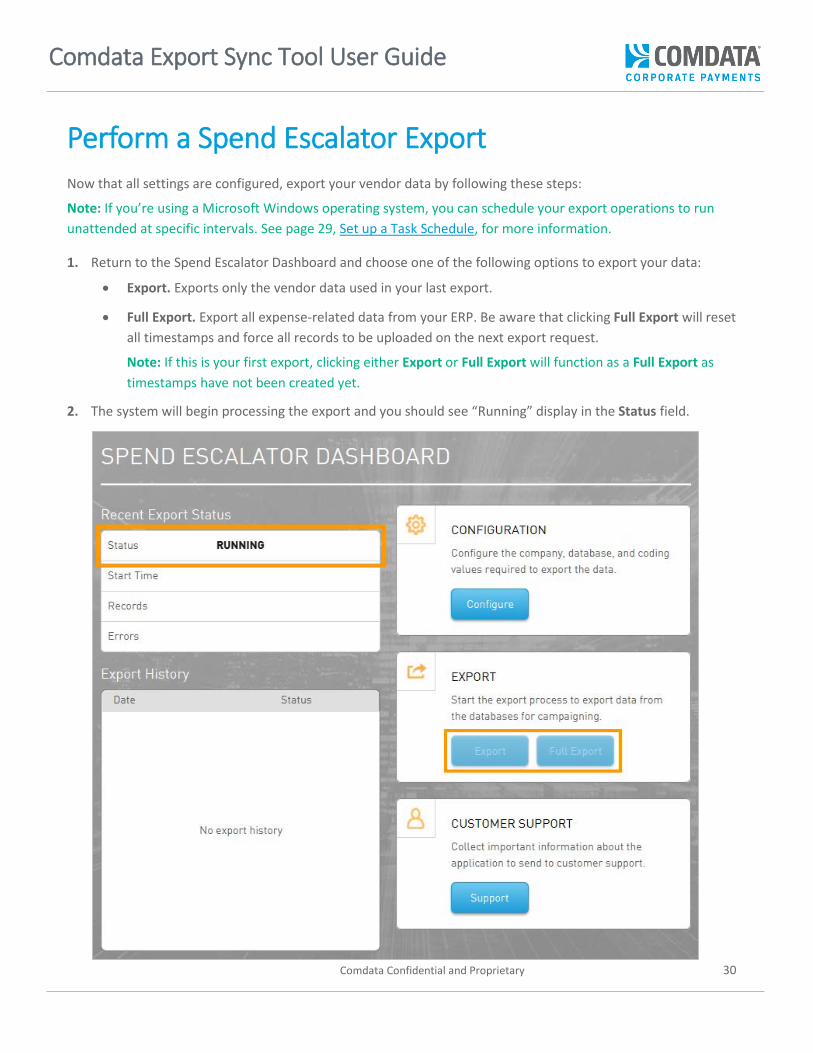
Perform a Spend Escalator Export Now that all settings are configured, export your vendor data by following these steps:
Note: If you’re using a Microsoft Windows operating system, you can schedule your export operations to run unattended at specific intervals. See page 29, Set up a Task Schedule, for more information.
1. Return to the Spend Escalator Dashboard and choose one of the following options to export your data:
• Export. Exports only the vendor data used in your last export.
• Full Export. Export all expense-related data from your ERP. Be aware that clicking Full Export will reset all timestamps and force all records to be uploaded on the next export request.
Note: If this is your first export, clicking either Export or Full Export will function as a Full Export as timestamps have not been created yet.
2. The system will begin processing the export and you should see “Running” display in the Status field.
Comdata Export Sync Tool User Guide
Comdata Confidential and Proprietary 31
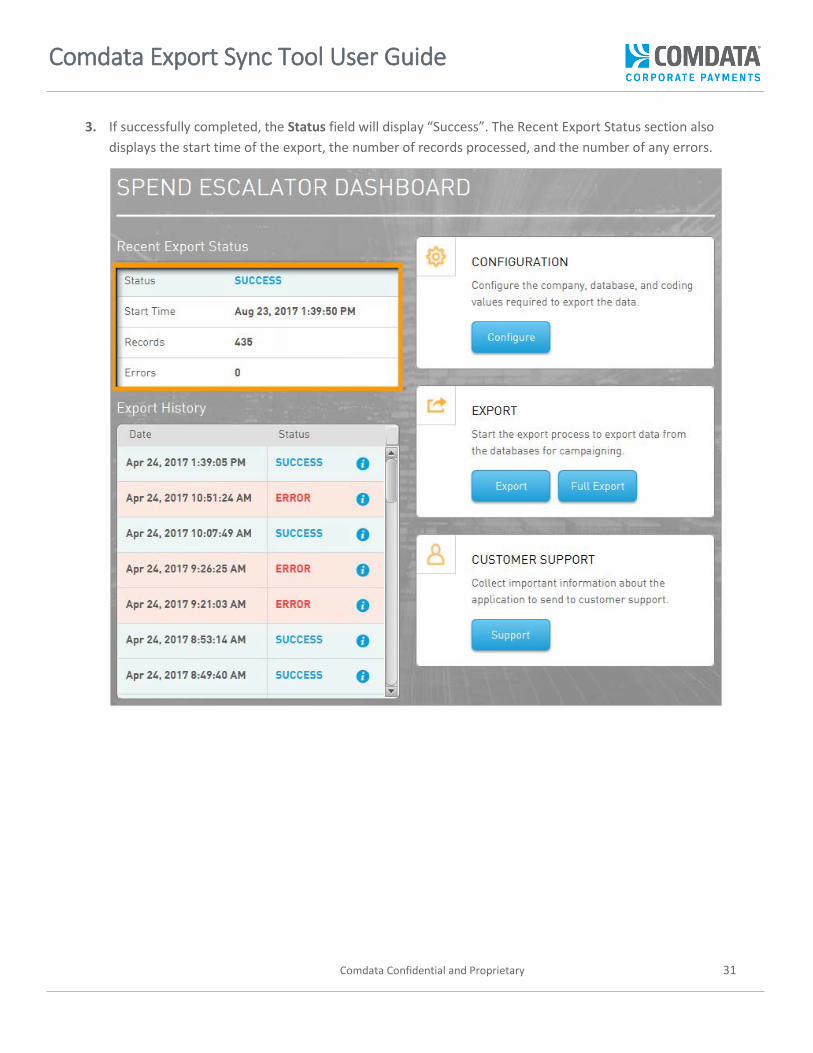
3. If successfully completed, the Status field will display “Success”. The Recent Export Status section also displays the start time of the export, the number of records processed, and the number of any errors.
Comdata Export Sync Tool User Guide
Comdata Confidential and Proprietary 32
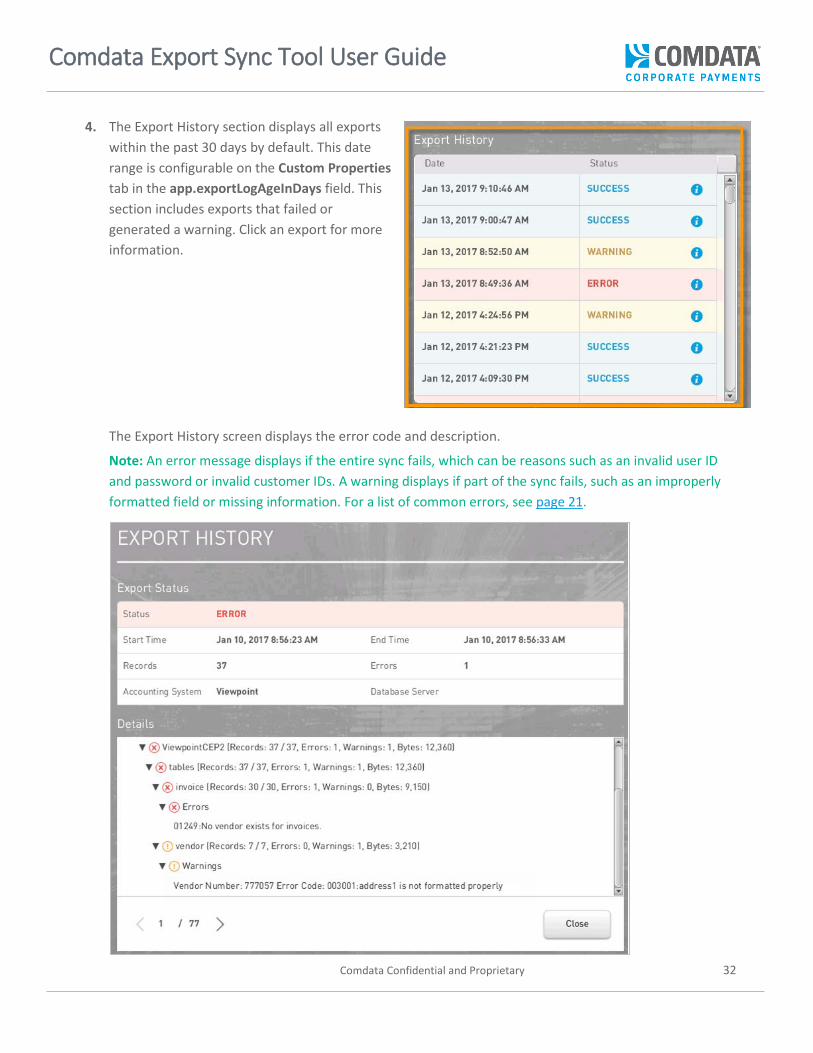
4. The Export History section displays all exports within the past 30 days by default. This date range is configurable on the Custom Properties tab in the app.exportLogAgeInDays field. This section includes exports that failed or generated a warning. Click an export for more information.
The Export History screen displays the error code and description.
Note: An error message displays if the entire sync fails, which can be reasons such as an invalid user ID and password or invalid customer IDs. A warning displays if part of the sync fails, such as an improperly formatted field or missing information. For a list of common errors, see page 21.
Comdata Export Sync Tool User Guide
Comdata Confidential and Proprietary 33
Set up a Task Schedule If you’re using a Microsoft Windows operating system, you can schedule your export operations to run unattended at specific intervals. Follow these steps to create a scheduled task:
Note: These steps are for written from a Windows 7 perspective. Your screens and steps may be different depending on your version of Windows.
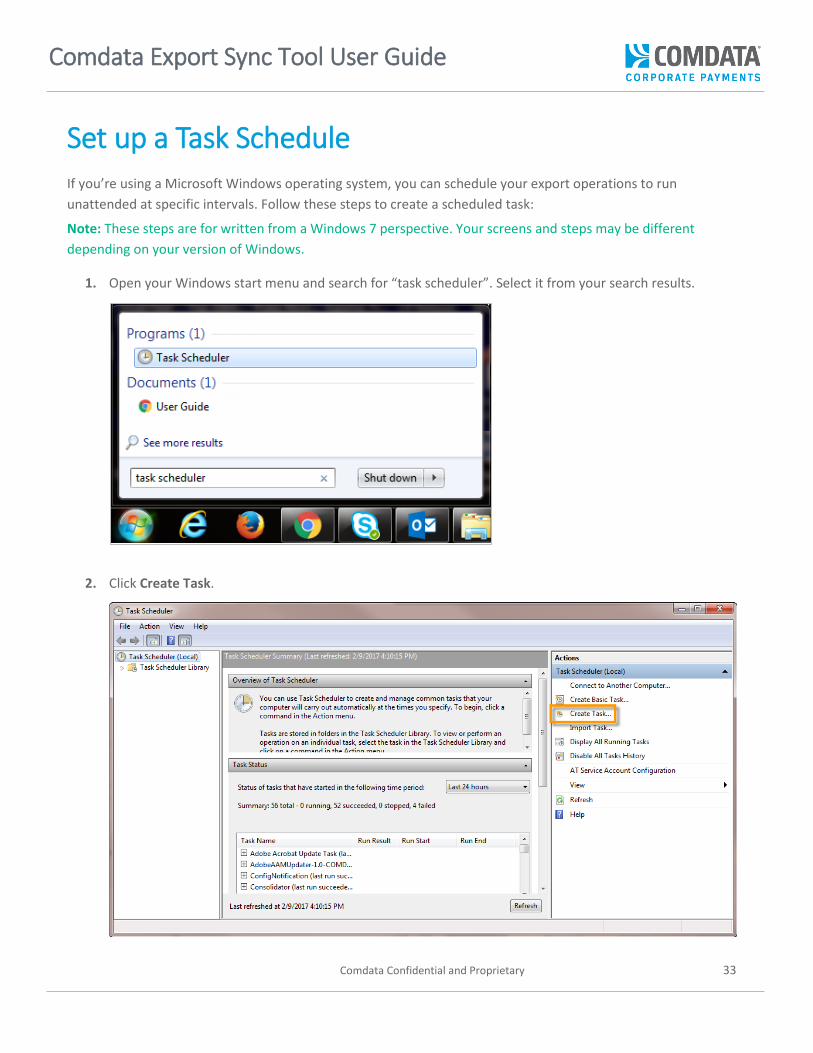
1. Open your Windows start menu and search for “task scheduler”. Select it from your search results.
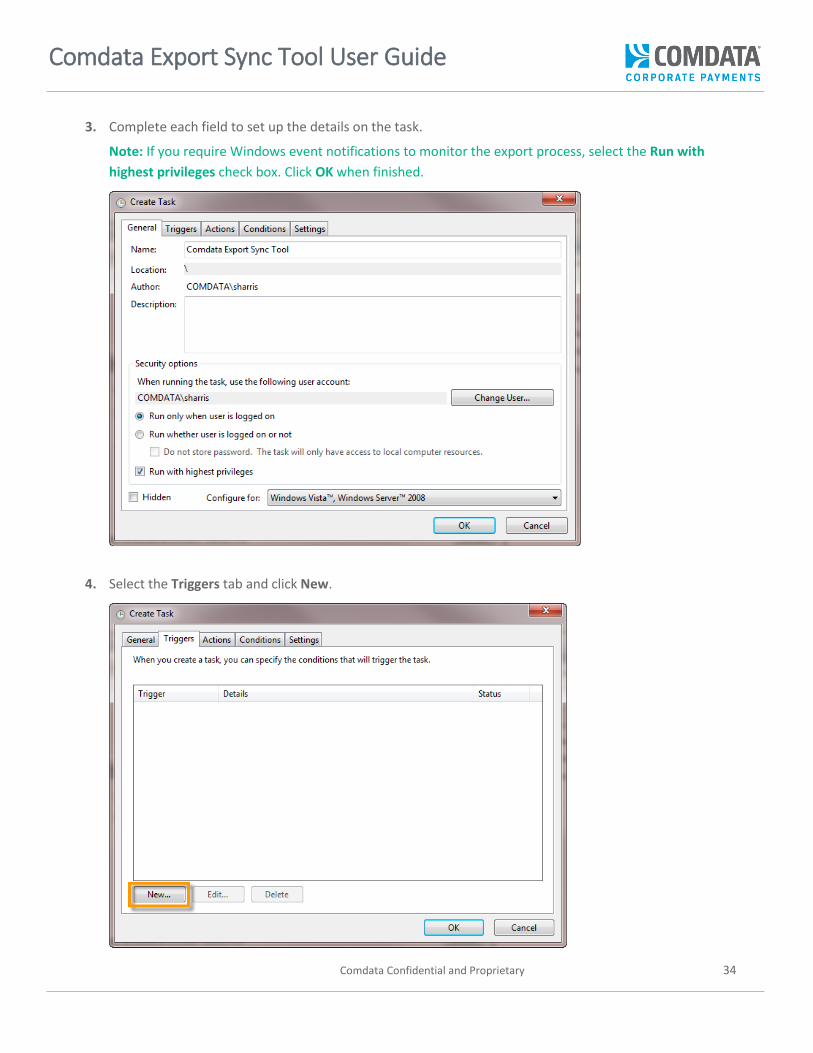
2. Click Create Task.
Comdata Export Sync Tool User Guide
Comdata Confidential and Proprietary 34
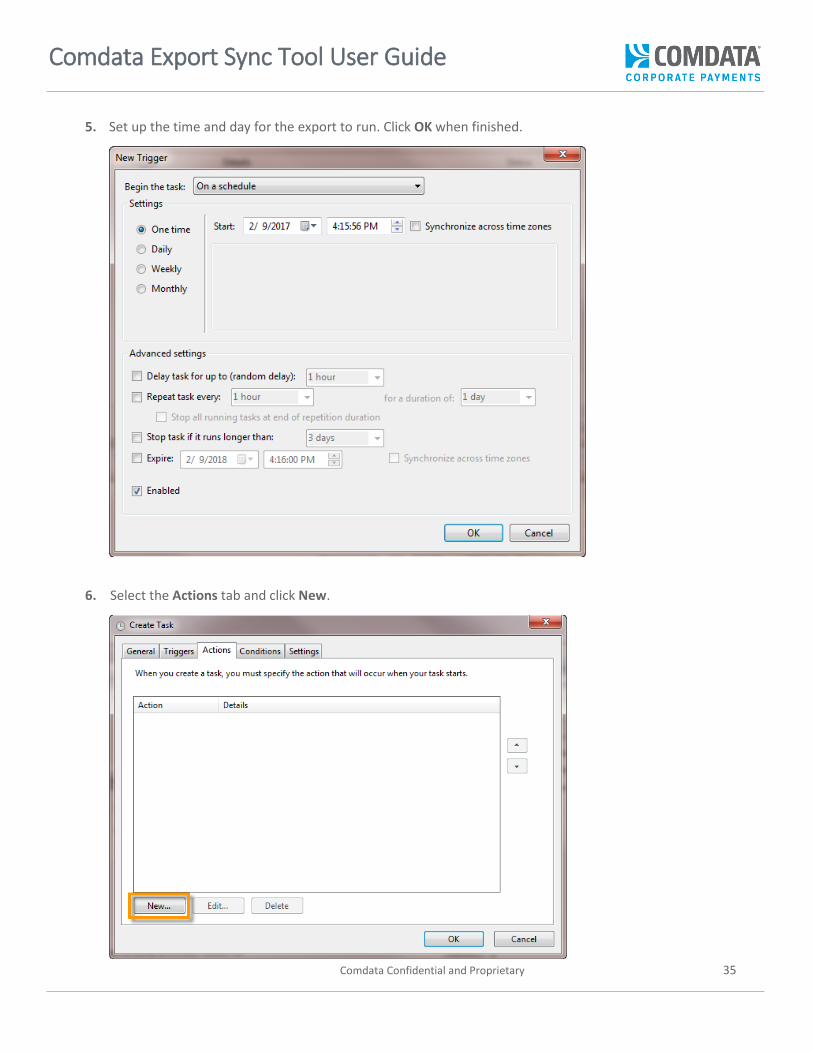
3. Complete each field to set up the details on the task.
Note: If you require Windows event notifications to monitor the export process, select the Run with highest privileges check box. Click OK when finished.
4. Select the Triggers tab and click New.
Comdata Export Sync Tool User Guide
Comdata Confidential and Proprietary 35
5. Set up the time and day for the export to run. Click OK when finished.
6. Select the Actions tab and click New.
Comdata Export Sync Tool User Guide
Comdata Confidential and Proprietary 36
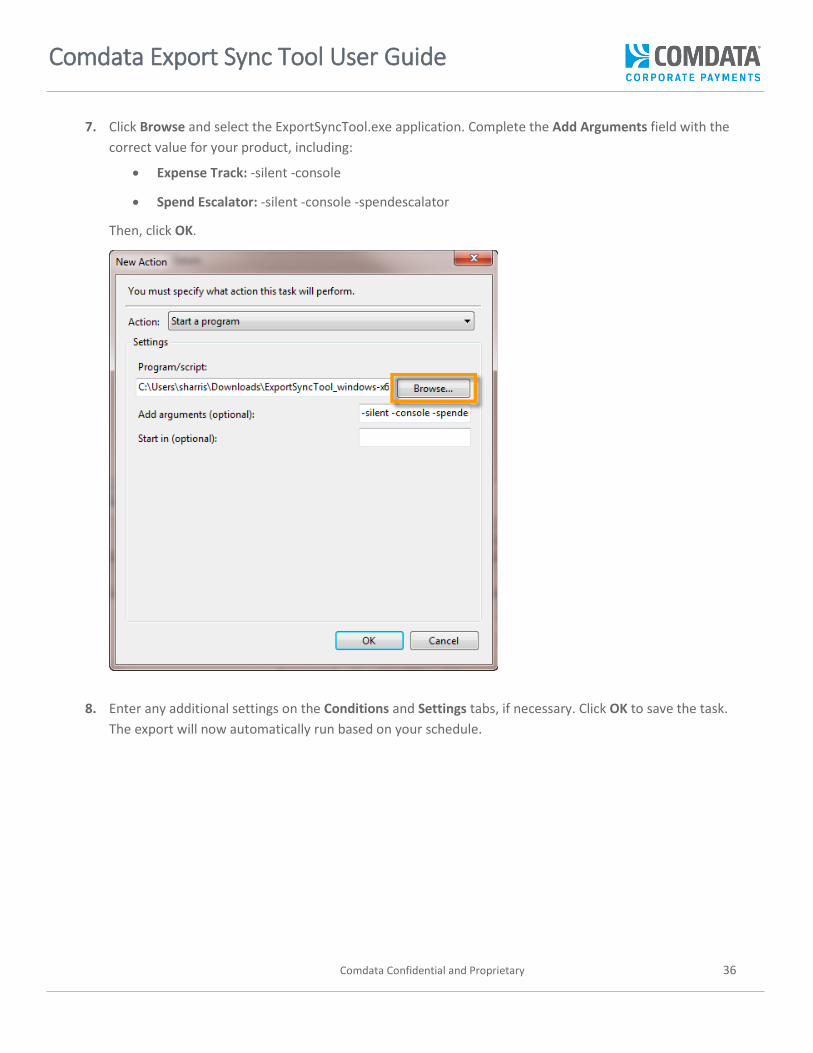
7. Click Browse and select the ExportSyncTool.exe application. Complete the Add Arguments field with the correct value for your product, including:
• Expense Track: -silent -console
• Spend Escalator: -silent -console -spendescalator
Then, click OK.
8. Enter any additional settings on the Conditions and Settings tabs, if necessary. Click OK to save the task. The export will now automatically run based on your schedule.

Comdata Export Sync Tool User Guide
Comdata Confidential and Proprietary 37
Troubleshooting See below for a list of common errors you may encounter using the export sync tool:
Note: Additional errors will be added in the future.
• Clicking Remove on the Database Connections tab for Spend Escalator will delete the Database server name (DSN) from the sync tool. If you do this in error, add it back using the DSN Name field.
• No databasePassword have been configured for tenant: “tenant name”. This error displays if you have not entered the correct password to test your database connectivity.


![Sync Client Export Page Troubleshooting Tips€¦ · Correct Job Name format example 20-0510-F [Fire] Example 1 - screenshot . Sync Client – Export Page Troubleshooting Tips Revised](https://img.pdfslide.net/doc/110x75/603116290169dc57f2270e48/sync-client-export-page-troubleshooting-tips-correct-job-name-format-example-20-0510-f.jpg)