Embed Size (px)
Citation preview


COMPUTER BASED
PROBLEM SOLVING
COMPUTER BASED PROBLEM SOLVING
This book is licensed under a Creative Commons Attribution-Noncommercial-Share Alike 3.0
Unported.
(http://creativecommons.org/licenses/by-nc-sa/3.0/)
Printed in USA by: Lulu.com
Written by: Patrick Coxall
Last Update: November 28, 2009
Cartoons by: Geek and Poke (http://geekandpoke.typepad.com/)
ISBN: 978-0-9784251-0-4
Microsoft ®, Visual Basic ® and C# ® are either registered trademarks or trademarks of the
Microsoft Corporation in the United States and/or other countries.
Names of all other products mentioned herein are used for identification purposes only and may be
trademarks of their respective owners.
For more information on ordering a hardcopy of this book or to get the code examples see:
http://www.vector3studios.com
_Preface i_
PREFACE
The goal of the book is to take students from the point of never having
done any formal programming and lead them first through a structured
method of problem solving (Input-Process-Output and Top-Down design)
and then into the early basics of Object Oriented Programming (or OOP).
If this book is used to teach a high school course in computer
programming, there are likely many other learning outcomes that students
are required to do that are not presented in this book. The focus of this
book is strictly on solving problems with computer programming.
This book will use Visual Basic and C# as the example languages.
Although there are hundreds of different programming languages and
many good ones that can be used to teach someone that has never
programmed before, these languages have many advantages. The first and
probable most important is that they are completely free. This is a huge
advantage, since schools and students do not have to worry about the cost.
Students can have the exact same IDE at home as they do at school, which
up until now has not happened often. Although they are free, both are still
first class development environments with everything a student and most
professional developers would ever need.
Visual Basic is an excellent language for first time programmers.
They can get visual GUIs on the screen fast, which builds confidence. It is
also very ―forgiving‖, so that students do not get bogged down in syntax
problems. C#, although not as forgiving as Visual Basic, is very close to
Java and is therefore a great second language for students to learn
especially if they will be doing programming after high school. In addition
to these reasons, there is a huge amount of online resources for these
languages, which will help students and teachers alike.
It should be remembered that the focus of this book is to teach
students how to program, not to just teach them a programming language.
To do this the focus is on ―Problem Solving‖, using a computer program
as a problem solving aid. Programming languages change over time and
come and go but a good foundation of programming concepts and how to
solve a problem will allow anyone to get over the syntax of a new
programming language.
_Preface ii_
This book does not include any instructions on how to load, use,
create GUIs or any other housekeeping of the VB or C # IDE. There are
many other resources that can aid both students and teachers alike for this.
Many of them are available from Microsoft online.
The following are links to the programming languages as well as to
the above mentioned resources that might be useful:
Visual Studio Express editions o http://msdn.microsoft.com/vstudio/express/downloads/
Coding 4 Fun o http://blogs.msdn.com/coding4fun/
Kids Corner o http://msdn.microsoft.com/vstudio/express/beginner/kids/default.aspx
Beginner Developer Learning Center o http://msdn.microsoft.com/vstudio/express/beginner/windows/tier1
Within the text you will see words or groups of words that are
hyperlinked (blue text and underlined). If the full URL is included, then
type that into your web browser to see the page. If the link directs you to
the Wikipedia webpage (http://en.wikipedia.org) for a topic, then just the
word that is underlined and you can place that word in the previous URL
to find it definition. The point of linking to Wikipedia is to give additional
information about a topic if the reader is unsure about the concept. Please
note that I do not have control over what is placed on the Wikipedia
webpages and although it seemed useful and correct when I looked at the
link, these pages are changing all the time. Despite this, the information is
usually correct and can be very helpful.
When coding examples are included, they are colour coded so that
they can be easily distinguished. VB code is in light blue and C# is in light
green. There are also two tables of contents for code examples so that you
can easily find what you are looking for, in the appropriate language. The
coding examples are usually just snippets and do not include the complete
source code you would need to recreate the program. Also as mentioned
above, there is none or very little reference to the underlying GUI that
exists in the program.
Key words and concepts that are being described are placed on the
left-hand side of the page in the margin in blue. These are the words that
you will see in the index and there so that they are easily referenced when
looking up some topic.
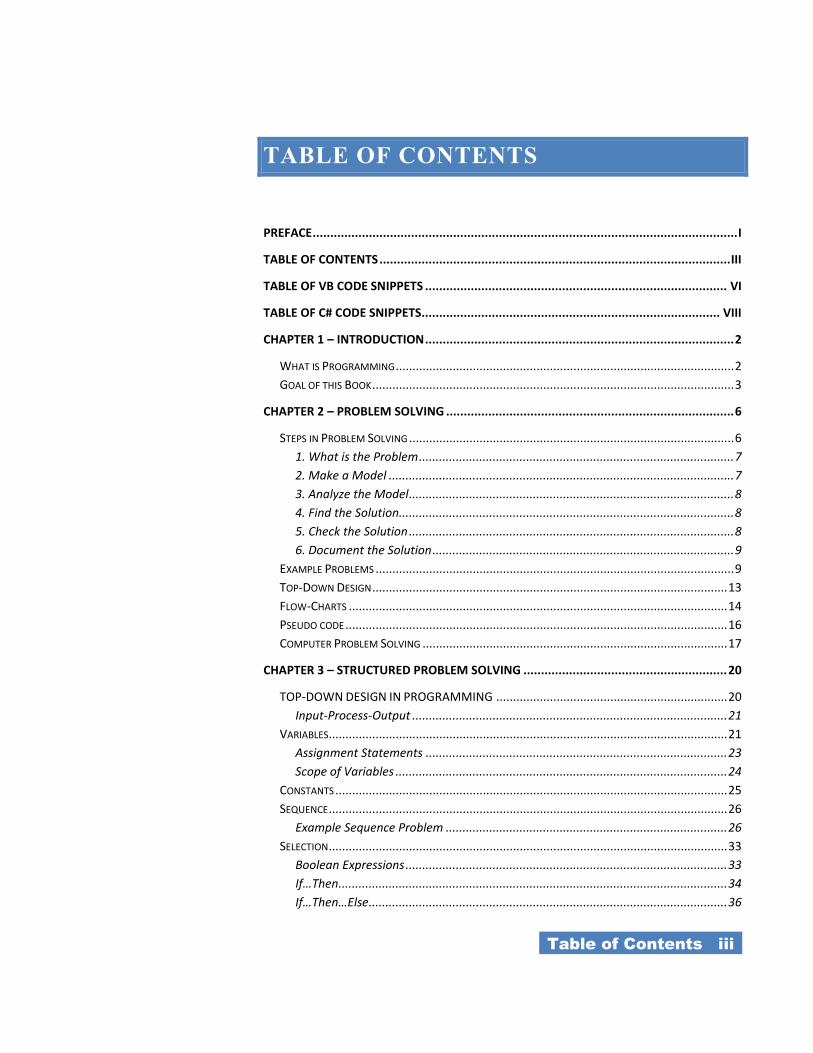
_Table of Contents iii_
TABLE OF CONTENTS
PREFACE ......................................................................................................................... I
TABLE OF CONTENTS .................................................................................................... III
TABLE OF VB CODE SNIPPETS ...................................................................................... VI
TABLE OF C# CODE SNIPPETS..................................................................................... VIII
CHAPTER 1 – INTRODUCTION ........................................................................................ 2
WHAT IS PROGRAMMING ..................................................................................................... 2
GOAL OF THIS BOOK ............................................................................................................ 3
CHAPTER 2 – PROBLEM SOLVING .................................................................................. 6
STEPS IN PROBLEM SOLVING ................................................................................................. 6
1. What is the Problem .............................................................................................. 7
2. Make a Model ....................................................................................................... 7
3. Analyze the Model ................................................................................................. 8
4. Find the Solution.................................................................................................... 8
5. Check the Solution ................................................................................................. 8
6. Document the Solution .......................................................................................... 9
EXAMPLE PROBLEMS ........................................................................................................... 9
TOP-DOWN DESIGN .......................................................................................................... 13
FLOW-CHARTS ................................................................................................................. 14
PSEUDO CODE .................................................................................................................. 16
COMPUTER PROBLEM SOLVING ........................................................................................... 17
CHAPTER 3 – STRUCTURED PROBLEM SOLVING .......................................................... 20
TOP-DOWN DESIGN IN PROGRAMMING ..................................................................... 20
Input-Process-Output .............................................................................................. 21
VARIABLES ....................................................................................................................... 21
Assignment Statements .......................................................................................... 23
Scope of Variables ................................................................................................... 24
CONSTANTS ..................................................................................................................... 25
SEQUENCE ....................................................................................................................... 26
Example Sequence Problem .................................................................................... 26
SELECTION ....................................................................................................................... 33
Boolean Expressions ................................................................................................ 33
If…Then .................................................................................................................... 34
If…Then…Else........................................................................................................... 36
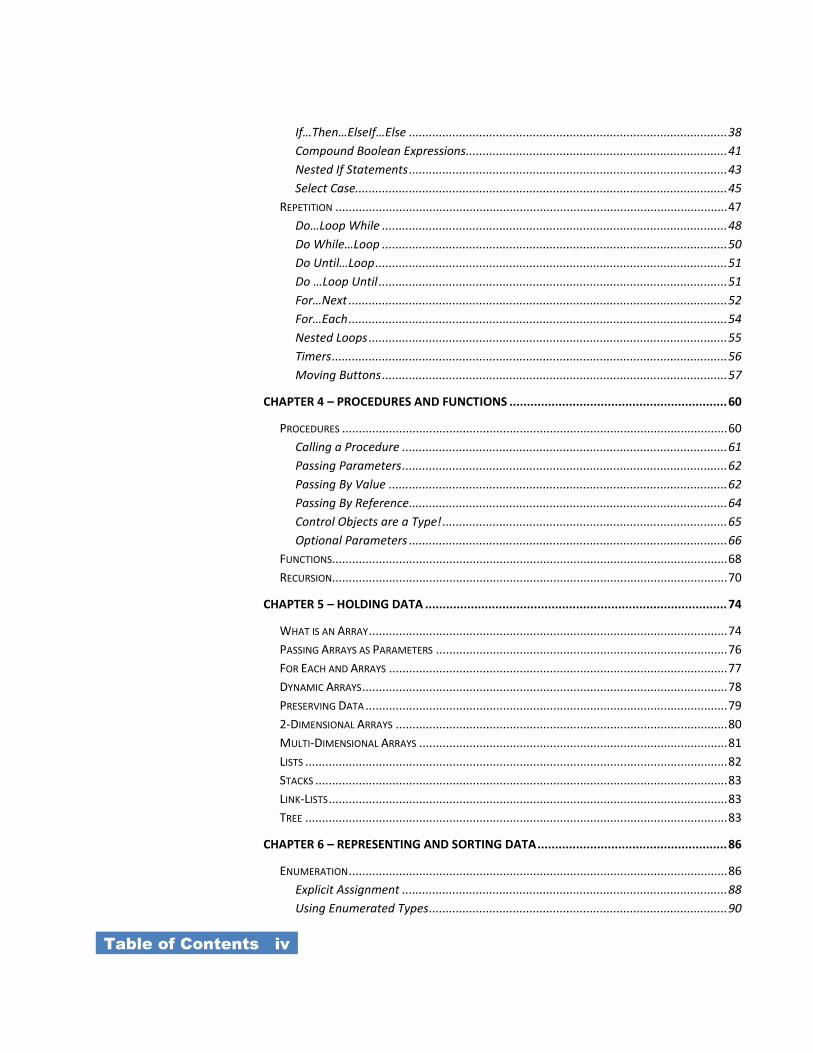
_Table of Contents iv_
If…Then…ElseIf…Else ............................................................................................... 38
Compound Boolean Expressions.............................................................................. 41
Nested If Statements ............................................................................................... 43
Select Case............................................................................................................... 45
REPETITION ..................................................................................................................... 47
Do…Loop While ....................................................................................................... 48
Do While…Loop ....................................................................................................... 50
Do Until…Loop ......................................................................................................... 51
Do …Loop Until ........................................................................................................ 51
For…Next ................................................................................................................. 52
For…Each ................................................................................................................. 54
Nested Loops ........................................................................................................... 55
Timers ...................................................................................................................... 56
Moving Buttons ....................................................................................................... 57
CHAPTER 4 – PROCEDURES AND FUNCTIONS .............................................................. 60
PROCEDURES ................................................................................................................... 60
Calling a Procedure ................................................................................................. 61
Passing Parameters ................................................................................................. 62
Passing By Value ..................................................................................................... 62
Passing By Reference............................................................................................... 64
Control Objects are a Type! ..................................................................................... 65
Optional Parameters ............................................................................................... 66
FUNCTIONS...................................................................................................................... 68
RECURSION...................................................................................................................... 70
CHAPTER 5 – HOLDING DATA ...................................................................................... 74
WHAT IS AN ARRAY ........................................................................................................... 74
PASSING ARRAYS AS PARAMETERS ....................................................................................... 76
FOR EACH AND ARRAYS ..................................................................................................... 77
DYNAMIC ARRAYS ............................................................................................................. 78
PRESERVING DATA ............................................................................................................ 79
2-DIMENSIONAL ARRAYS ................................................................................................... 80
MULTI-DIMENSIONAL ARRAYS ............................................................................................ 81
LISTS .............................................................................................................................. 82
STACKS ........................................................................................................................... 83
LINK-LISTS ....................................................................................................................... 83
TREE .............................................................................................................................. 83
CHAPTER 6 – REPRESENTING AND SORTING DATA ...................................................... 86
ENUMERATION ................................................................................................................. 86
Explicit Assignment ................................................................................................. 88
Using Enumerated Types ......................................................................................... 90
_Table of Contents v_
ABSTRACT DATA TYPES ...................................................................................................... 91
Using an Enum in an ADT ........................................................................................ 94
An array (or List) of ADT .......................................................................................... 95
A Function inside an ADT ......................................................................................... 96
SEARCHING ...................................................................................................................... 98
Linear....................................................................................................................... 98
Binary ...................................................................................................................... 98
SORTING ......................................................................................................................... 98
Bubble Sort .............................................................................................................. 98
Selection Sort........................................................................................................... 98
Insertion Sort ........................................................................................................... 98
Quick Sort ................................................................................................................ 98
CHAPTER 7 – READING AND WRITING FILES .............................................................. 100
FILE STREAM .................................................................................................................. 100
STREAM READER ............................................................................................................ 101
STREAM WRITER ............................................................................................................ 101
CHAPTER 8 – USING OOP .......................................................................................... 104
WHAT IS AN OBJECT? ...................................................................................................... 104
WHAT IS A CLASS? .......................................................................................................... 106
FIELDS .......................................................................................................................... 108
PROPERTY MEMBERS ...................................................................................................... 109
READONLY PROPERTY ..................................................................................................... 111
METHODS ..................................................................................................................... 112
UML ........................................................................................................................... 114
CLASS DIAGRAMS ........................................................................................................... 115
CHAPTER 9 – CREATING OBJECTS .............................................................................. 117
ENCAPSULATION ............................................................................................................. 117
CONSTRUCTORS.............................................................................................................. 117
OVERLOADING METHODS ................................................................................................. 119
INHERITANCE ................................................................................................................. 122
CLASS DIAGRAMS AGAIN! ................................................................................................ 124
POLYMORPHISM ............................................................................................................. 125
ABSTRACT METHODS & CLASSES ....................................................................................... 128
UML ONCE MORE!! ....................................................................................................... 129
MULTIPLE CLASS INTERACTIONS ........................................................................................ 130
ARRAYS OF OBJECTS ........................................................................................................ 130
INDEX ........................................................................................................................ 131
_Table of VB Code Snippets vi_
TABLE OF VB CODE SNIPPETS
VB Code 1: Declaration Statements ..................................................23
VB Code 2: Assignment Statements ..................................................24
VB Code 3: Constant Declaration......................................................26
VB Code 4: Tax Problem Solution ....................................................30
VB Code 5: VB Example Comment Section .....................................33
VB Code 6: If...Then Statement in VB ..............................................35
VB Code 7: If...Then...Else Statement in VB ....................................37
VB Code 8: If...Then...ElseIf...Else Statement in VB .......................39
VB Code 9: Compound Boolean Expression in VB ..........................42
VB Code 10: NOT Logical Operator in VB ......................................43
VB Code 11: Nested If Statement in VB ...........................................45
VB Code 12: Select Case in VB .......................................................46
VB Code 13: Do...Loop While example in VB .................................49
VB Code 14: Do While ... Loop example in VB ...............................50
VB Code 14: Creating a procedure in VB .........................................61
VB Code 15: Calling a procedure in VB ...........................................62
VB Code 16: Calling a procedure with parameters in VB.................63
VB Code 17: Passing parameters in VB ............................................63
VB Code 18: Passing parameters By Reference in VB .....................64
VB Code 19: Call a procedure with passing By Reference in VB ....65
VB Code 20: Optional parameters in VB ..........................................66
VB Code 21: Function declaration in VB ..........................................69
VB Code 22: Function declaration in VB ..........................................70
VB Code 24: Declaring an array in VB .............................................75
VB Code 25: Traversing an array in VB ...........................................75
VB Code 26: Arrays as a parameter in a function in VB...................77
VB Code 26: Arrays as a parameter in a function in VB...................77
VB Code 28: For … Each and arrays in VB ......................................77
VB Code 26: Re-dimensioning an array in VB .................................78
VB Code 25: List in VB.....................................................................82
VB Code 31: Defining an Enumerated type in VB............................87
VB Code 32: Declaring a variable that is an Enum type in VB ........88
VB Code 33: Defining an Enum with a value in VB .........................89
VB Code 34: Retrieving an Enum’s value in VB ..............................89
_Table of Contents vii_
VB Code 35: Placing Enum values in a Listbox in VB .....................90
VB Code 36: Convert String to Enum to Number in VB ..................91
VB Code 37: Declaration of an ADT in VB ......................................93
VB Code 38: Declaring a variable that is a Structure type in VB .....93
_Table of VB Code Snippets viii_
TABLE OF C# CODE SNIPPETS
C# Code 1: Declaration Statements ................................................... 23
C# Code 2: Assignment Statements .................................................. 24
C# Code 3: Constant Declaration ...................................................... 26
C# Code 4: Tax Problem Solution .................................................... 31
C# Code 5: Tax Problem Solution Fixed .......................................... 32
C# Code 6: If...Then Statement in C# ............................................... 35
C# Code 7: If...Then...Else Statement in C# ..................................... 37
C# Code 8: If...Then...ElseIf...Else Statement in C# ......................... 40
C# Code 9: Compound Boolean Expression in C# ........................... 43
C# Code 10: NOT Logical Operator in C# ....................................... 43
C# Code 11: Nested If Statement in C# ............................................ 45
C# Code 12: Switch Structure in C# ................................................ 47
C# Code 13: Do...Loop While example in C# .................................. 49
C# Code 14: Nested Looping in C# .................................................. 56
C# Code 15: Creating a procedure in C# .......................................... 61
C# Code 16: Calling a procedure in C# ............................................ 62
C# Code 17: Calling a procedure with parameters in C# .................. 63
C# Code 18: Passing parameters in C# ............................................. 63
C# Code 19: Passing parameters By Reference in C# ...................... 64
C# Code 20: Call a procedure with passing By Reference in C# ...... 65
C# Code 21: Optional parameters in C# ........................................... 66
C# Code 22: Call a procedure with passing By Reference in C# ...... 68
C# Code 20: Call a procedure with passing By Reference in C# ...... 68
C# Code 24: Function declaration in C# ........................................... 69
C# Code 25: Function declaration in C# ........................................... 70
C# Code 26: Declaring an array in C# .............................................. 75
C# Code 27: Traversing an array in C# ............................................. 75
C# Code 28: Arrays as a parameter in a function in C# .................... 77
C# Code 28: Arrays as a parameter in a function in C# .................... 77
C# Code 30: For … Each and arrays in C# ....................................... 78
C# Code 27: List in C# ...................................................................... 82
C# Code 32: Defining an Enumerated type in C# ............................. 87
C# Code 33: Declaring a variable that is an Enum type in C# .......... 88
C# Code 34: Defining an Enum with a value in C# .......................... 89
C# Code 35: Retrieving an Enum’s value in C# ............................... 89
_Table of C# Code Snippets ix_
C# Code 36: Placing Enum values in a Listbox in C# ...................... 90
C# Code 37: Convert String to Enum to Number in C# ................... 91
C# Code 38: Declaration of an ADT in C# ....................................... 93
C# Code 39: Declaring a variable that is a Structure type in C# ....... 93
C# Code 40: Declaration of a List of ADTs in C# ............................ 94
C# Code 41: Declaration of a List of ADTs in C# ............................ 95
C# Code 42: Declaration of a List of ADTs in C# ............................ 97
C# Code 43: Class definition in C# ................................................... 107
C# Code 44: Property Definition in C# ............................................. 110
C# Code 45: Read-only Property in C# ............................................. 111
C# Code 46: Protected Function inside a Class in C# ....................... 113

CHAPTER 1 –
INTRODUCTION
_Chapter 1 – Introduction 2_
CHAPTER 1 – INTRODUCTION
Problems have been around for as long as people have been
around. The process of solving a problem is not something new. Using a
computer to aid in solving a problem is new. Modern electronic computers
have only been around since the end of the Second World War (1945),
which might seem like a long time to you but in the history of the human
race it is a very short time. The purpose of this book is to help you learn to
structure your problem solving method, so that you can consistently
develop a verifiable solution that will solve a problem and in the process,
use the computer to help you more easily and quickly solve that problem.
WHAT IS PROGRAMMING
Before you can actually start to write programs on a computer to
help you solve problems, it would be nice to know what programming
really is! We all use and see computers every day and hear people say
how smart they are. Actually, computers are not very smart at all! A
computer, broken down into its most basic form, is nothing more than a
bunch of tiny electronic switches that can be set to either a 1 or 0 (on or
off, also known as binary). By getting the computer to set these tiny
switches on or off in a certain pattern, you can get the computer to actually
do something useful, like show a picture on the screen that you have
taken. The computer does not know how to do this by itself though. A
person has to instruct it to do this.
To communicate with your friends, one way for them to
understand what you mean is for you to talk to them. To keep things
simple, you usually talk in the same language. Since a computer is just a
bunch of switches, it does not understand English, so you have to talk to it
in a language that it does understand. Computers use a language called
machine language, made up of just the 1’s and 0’s mentioned above.
Trying to talk in machine language is quiet difficult, easy to make
mistakes in and tedious. To help people talk to a computer an intermediate
language is used, that is translated into machine language so that the
computer can understand what to do. This intermediate language is called
a programming language and you have probably already heard of some of
Machine
Language
Programming
Language
Binary
_Chapter 1 – Introduction 3_
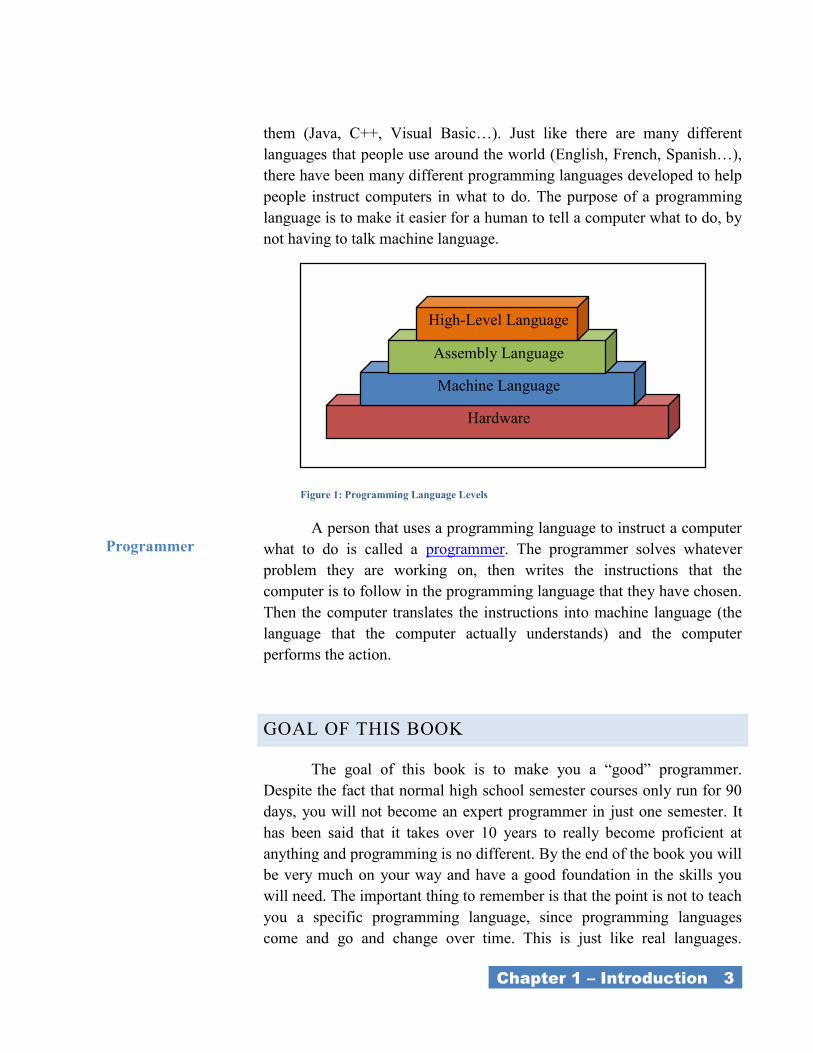
them (Java, C++, Visual Basic…). Just like there are many different
languages that people use around the world (English, French, Spanish…),
there have been many different programming languages developed to help
people instruct computers in what to do. The purpose of a programming
language is to make it easier for a human to tell a computer what to do, by
not having to talk machine language.
A person that uses a programming language to instruct a computer
what to do is called a programmer. The programmer solves whatever
problem they are working on, then writes the instructions that the
computer is to follow in the programming language that they have chosen.
Then the computer translates the instructions into machine language (the
language that the computer actually understands) and the computer
performs the action.
GOAL OF THIS BOOK
The goal of this book is to make you a ―good‖ programmer.
Despite the fact that normal high school semester courses only run for 90
days, you will not become an expert programmer in just one semester. It
has been said that it takes over 10 years to really become proficient at
anything and programming is no different. By the end of the book you will
be very much on your way and have a good foundation in the skills you
will need. The important thing to remember is that the point is not to teach
you a specific programming language, since programming languages
come and go and change over time. This is just like real languages.
Hardware
Machine Language
Assembly Language
High-Level Language
Figure 1: Programming Language Levels
Programmer
_Chapter 1 – Introduction 4_
Although it is the official language of the Catholic Church, not too many
people go around on the streets and speak Latin to their friends. Many
years ago, it might have been common but not today. The tools you will
learn from this book are good programming techniques. These tools will
be useful no matter what programming language you are using. Just like in
the real world, you cannot be called a ―linguist‖ if you only know one
language. The same thing is true for a programmer; knowing more than
one language is essential. The fortunate thing is that if you know one
programming language, picking up a second one is much easier. The
cornerstone of being a good programmer is to be able to solve problems in
a logical and systematic way and hopefully have fun in the process.
CHAPTER 2 –
PROBLEM SOLVING
_Chapter 2 – Problem Solving 6_
CHAPTER 2 – PROBLEM SOLVING
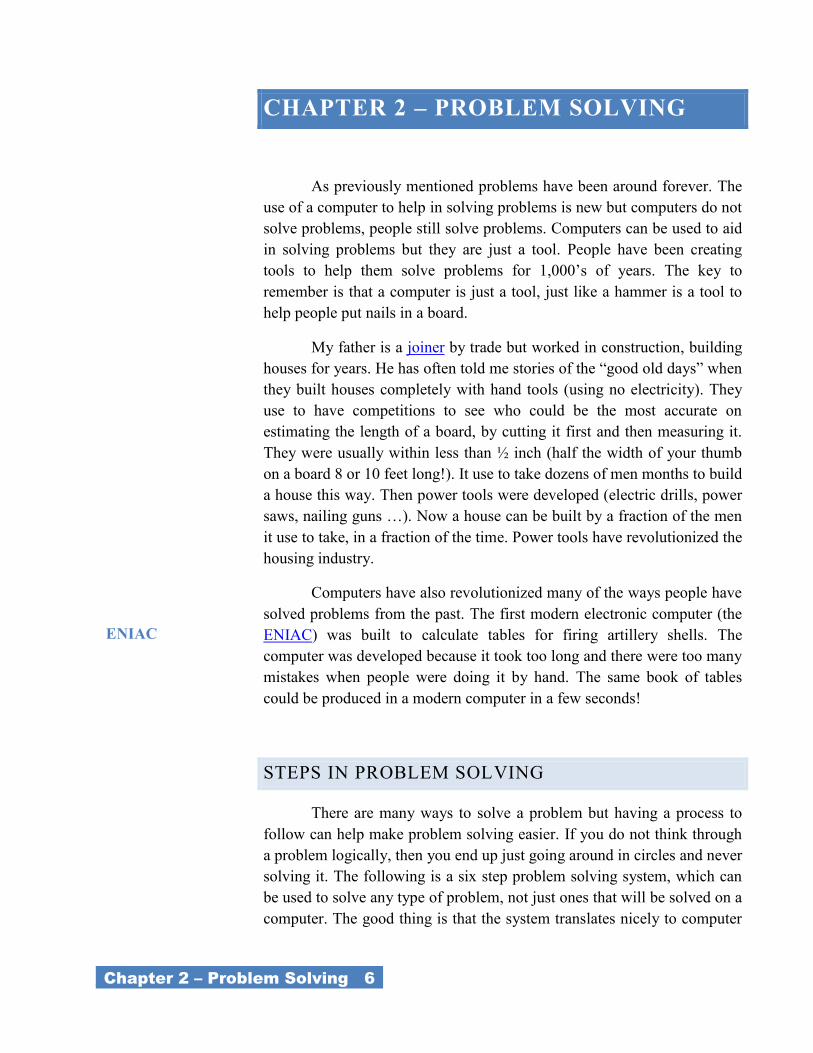
As previously mentioned problems have been around forever. The
use of a computer to help in solving problems is new but computers do not
solve problems, people still solve problems. Computers can be used to aid
in solving problems but they are just a tool. People have been creating
tools to help them solve problems for 1,000’s of years. The key to
remember is that a computer is just a tool, just like a hammer is a tool to
help people put nails in a board.
My father is a joiner by trade but worked in construction, building
houses for years. He has often told me stories of the ―good old days‖ when
they built houses completely with hand tools (using no electricity). They
use to have competitions to see who could be the most accurate on
estimating the length of a board, by cutting it first and then measuring it.
They were usually within less than ½ inch (half the width of your thumb
on a board 8 or 10 feet long!). It use to take dozens of men months to build
a house this way. Then power tools were developed (electric drills, power
saws, nailing guns …). Now a house can be built by a fraction of the men
it use to take, in a fraction of the time. Power tools have revolutionized the
housing industry.
Computers have also revolutionized many of the ways people have
solved problems from the past. The first modern electronic computer (the
ENIAC) was built to calculate tables for firing artillery shells. The
computer was developed because it took too long and there were too many
mistakes when people were doing it by hand. The same book of tables
could be produced in a modern computer in a few seconds!
STEPS IN PROBLEM SOLVING
There are many ways to solve a problem but having a process to
follow can help make problem solving easier. If you do not think through
a problem logically, then you end up just going around in circles and never
solving it. The following is a six step problem solving system, which can
be used to solve any type of problem, not just ones that will be solved on a
computer. The good thing is that the system translates nicely to computer
ENIAC

_Chapter 2 – Problem Solving 7_
problems, which is very useful, since the focus of the book is to solve
problems on a computer. The six steps in this system are:
1. What is the problem
2. Make a model
3. Analyze the model
4. Find the solution
5. Check the solution
6. Document the solution
1. WHAT IS THE PROBLEM
Before you can solve a problem correctly, you have to ensure that
you understand the problem thoroughly. Many times you will have to go
back to the source of the problem and confirm information or ask
additional questions. You might have to have them restate the problem so
that it is very clear what they are asking. Here are things to remember:
o What am I trying to find?
o What do I know / don’t know?
o State the problem in your own words.
o Get them to restate the problem.
2. MAKE A MODEL
Making a model of a problem is a great way to see what is really
going on and to lead you to a solution. It can show you patterns or you
might recognize the problem from before. The model might be a drawing,
picture, chart, a physical 3D scale model, or something else. Most ―good‖
problems are too complex to be solved simply, they need to be broken
down into smaller pieces, solve each of the smaller pieces and then bring
all the small solutions back together to solve the original problem. Here
are things to remember:
o Draw or create a model.
o Break the problem down into pieces.
o Is there a pattern?
_Chapter 2 – Problem Solving 8_
o Have you seen something similar?
3. ANALYZE THE MODEL
Once you have broken the problem down into more manageable
pieces and made a model of the problem or the pieces of the problem, the
next step is to understand what is really going on. If you do not become an
expert at the problem, you might miss an important aspect. It is always a
good idea to go back, not to the person that asked the question but the
person that will be using the solution, to get information from them. Each
piece might have a pattern that can be followed. You might have seen a
solution for one of the pieces before. Here are things to remember:
o Ensure the model does what you think it does.
o Look for patterns you have seen before.
o Go back to the user to get more information.
4. FIND THE SOLUTION
The hard part is now to find a solution. Hopefully you are well on
your way by doing the above three steps. Can you find a pattern? Do you
know the solution to one of the pieces? Can you find the solution
somewhere (internet!)? In the world of programming there are book call,
―Patterns and Practices‖, that are full of common problems and their
solutions. Once you have all your solutions, the next step is to bring them
all together to a final overall solution to the original problem. Here are
things to remember:
o Find a solution to each piece of the problem.
o Find other people’s solutions to similar problems.
o Make sure all the pieces fit back together.
5. CHECK THE SOLUTION
You now (hopefully) have a solution to the original problem that
you are pretty sure works. The next step is to ensure it actually solves
exactly what the problem was. You might need to go through, step by step,
_Chapter 2 – Problem Solving 9_
to ensure it works. You might need to work through the solution and
confirm the answer you get is correct. You might have to work through the
solution several times and ensure you always get the same (or similar)
answer. Here are things to remember:
o Is the answer reasonable?
o Work through the solution and check for errors.
o Go through the solution several times and compare results.
6. DOCUMENT THE SOLUTION
So you have come up with a brilliant solution to a problem. If you
do not share the solution with anyone, what was the point? You have to
ensure that you answer is verifiable and reproducible, so anyone can use it.
Here are things to remember:
o Document what the problem and solution is.
o Ensure anyone can follow your steps.
EXAMPLE PROBLEMS
Here are some examples of problems and a possible solution using
the six step method. Note that these problems are not necessarily problems
that you would use a computer to help you solve. Latter on these six steps
will be translated into six step used to solve problems that a computer
program will be used to help solve.
PROBLEM: FOLDING PAPER
How small can a piece of paper be made?
1. What is the problem?
The wording in the problem is a little vague and could be confusing. What
is meant by ―made‖? Is it cutting, burning, shredding or cutting? You
should go back to the source of the question to find out.
_Chapter 2 – Problem Solving 10_
You might find out that the real question is, ―How many times can a piece
of paper be folded?‖
2. Make a model.
For this problem our model will just be our actual physical piece of paper.
It is not always possible to make a model using that ―real‖ item. What
would happen if the question was to fold paper made of gold, can you
afford gold leaf paper? You might have to use a suitable substitute.
3. Analyze the model.
You should check to make sure that your model will be correct. What is
your size of paper? Would that not make a difference in how many times
you can fold it? Maybe not? Once again you might have to go back to the
source of the question and get more information. Maybe the real question
is, ―How many times can a piece of 8 ½ ―x 11‖ paper be folded?‖
4. Find the solution
In this case to find the solution we will take our piece of 8 ½ ―x 11‖ piece
of paper and keep folding it until we cannot longer do it. Should we try
more than once?
5. Check the solution
It is always important to check your solution to see if it can be reproduced
with accuracy. Maybe you could get someone else to fold a piece of paper
and see how many times they can do it. Is it different from your answer?
Maybe they have some special technique?
6. Document the solution
Now that you have proven that a piece of 8 ½ ―x 11‖ can only be folded X
number of times (where X is your answer), the next step is to document
the solution so that other people can benefit from your analysis and can
reproduce your experiment.
So what did you get as your answer? When you got someone else to do the
experiment, did they get a higher number than you? Here are a few web
links to also look at.
• Amazing paper folding facts
_Chapter 2 – Problem Solving 11_
o http://educ.queensu.ca/~fmc/june2002/PaperFact.htm
• Folding paper
o http://mathworld.wolfram.com/Folding.html
PROBLEM: THE SALMON SWIM
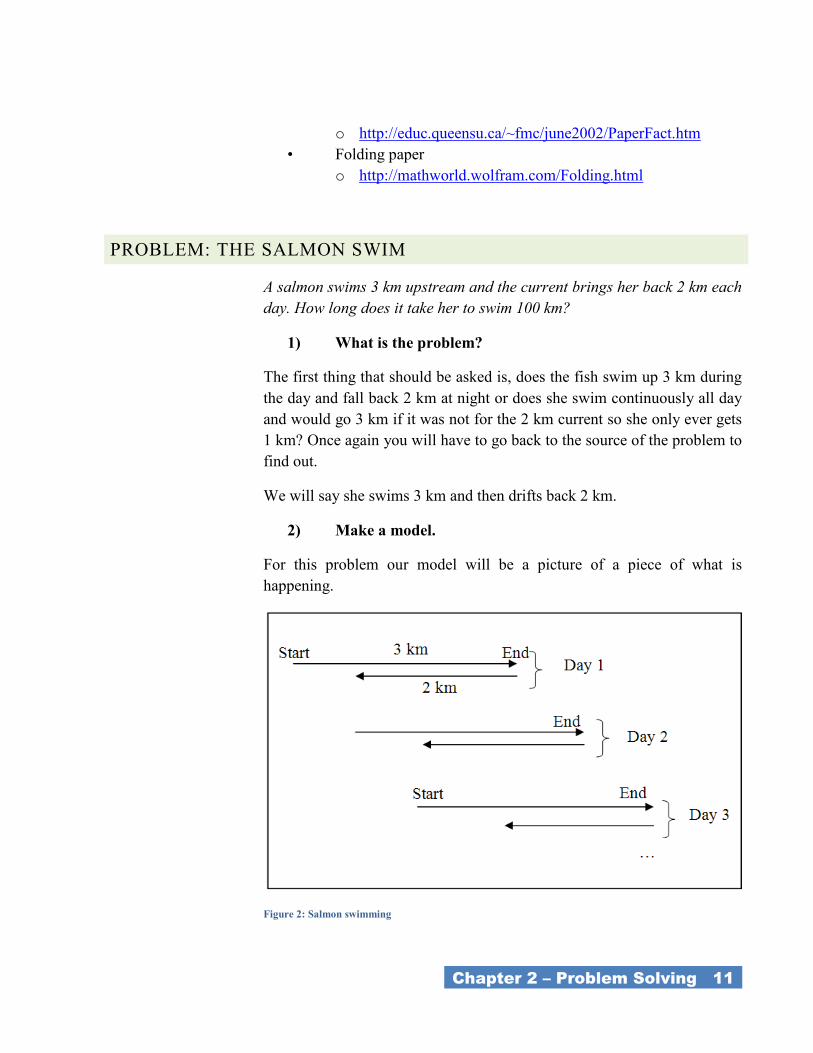
A salmon swims 3 km upstream and the current brings her back 2 km each
day. How long does it take her to swim 100 km?
1) What is the problem?
The first thing that should be asked is, does the fish swim up 3 km during
the day and fall back 2 km at night or does she swim continuously all day
and would go 3 km if it was not for the 2 km current so she only ever gets
1 km? Once again you will have to go back to the source of the problem to
find out.
We will say she swims 3 km and then drifts back 2 km.
2) Make a model.
For this problem our model will be a picture of a piece of what is
happening.
Figure 2: Salmon swimming
_Chapter 2 – Problem Solving 12_
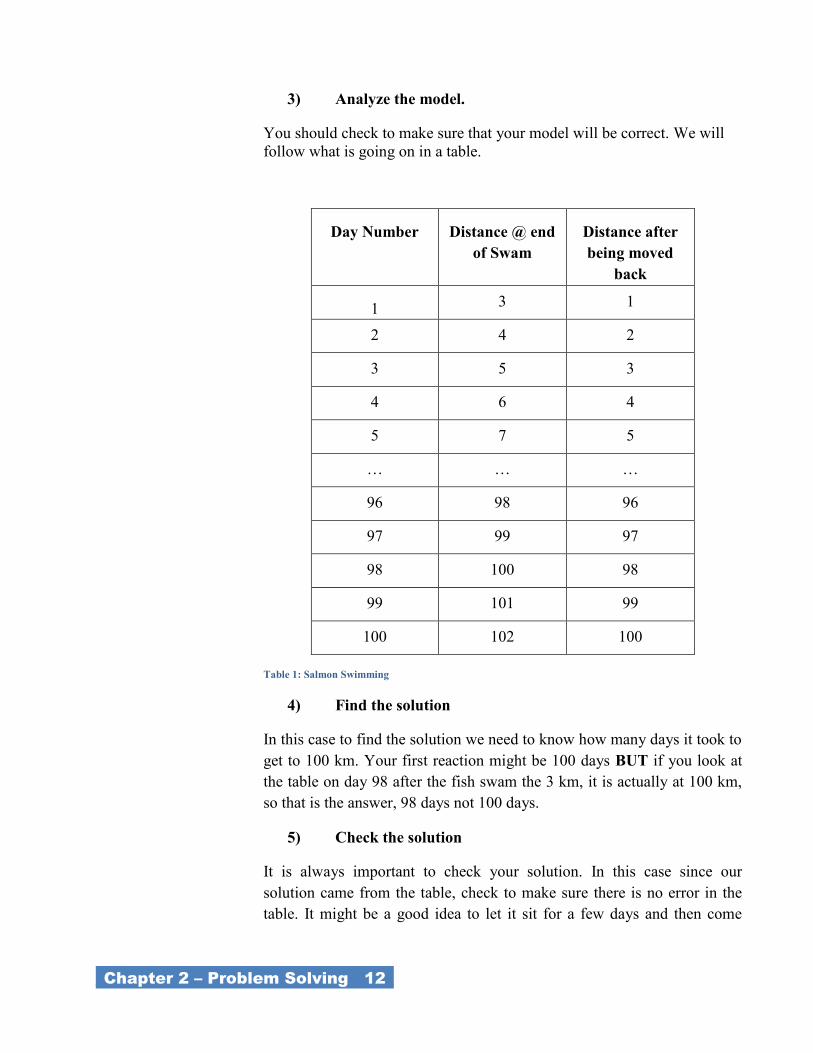
3) Analyze the model.
You should check to make sure that your model will be correct. We will
follow what is going on in a table.
Day Number Distance @ end
of Swam
Distance after
being moved
back
1 3 1
2 4 2
3 5 3
4 6 4
5 7 5
… … …
96 98 96
97 99 97
98 100 98
99 101 99
100 102 100
Table 1: Salmon Swimming
4) Find the solution
In this case to find the solution we need to know how many days it took to
get to 100 km. Your first reaction might be 100 days BUT if you look at
the table on day 98 after the fish swam the 3 km, it is actually at 100 km,
so that is the answer, 98 days not 100 days.
5) Check the solution
It is always important to check your solution. In this case since our
solution came from the table, check to make sure there is no error in the
table. It might be a good idea to let it sit for a few days and then come
_Chapter 2 – Problem Solving 13_
back to look at it or get somebody else to look at your solution and see if it
is correct.
6) Document the solution
Now that you have proven that the answer is 98 days, make sure you
document it, so that someone else does not have to figure it out but can
just refer to your answer and check your solution.
Remember not to always go with your gut instinct and thing
because it is following a patter you know the answer instantly without
following through with the steps. Do all six steps and always check your
answer.
TOP-DOWN DESIGN
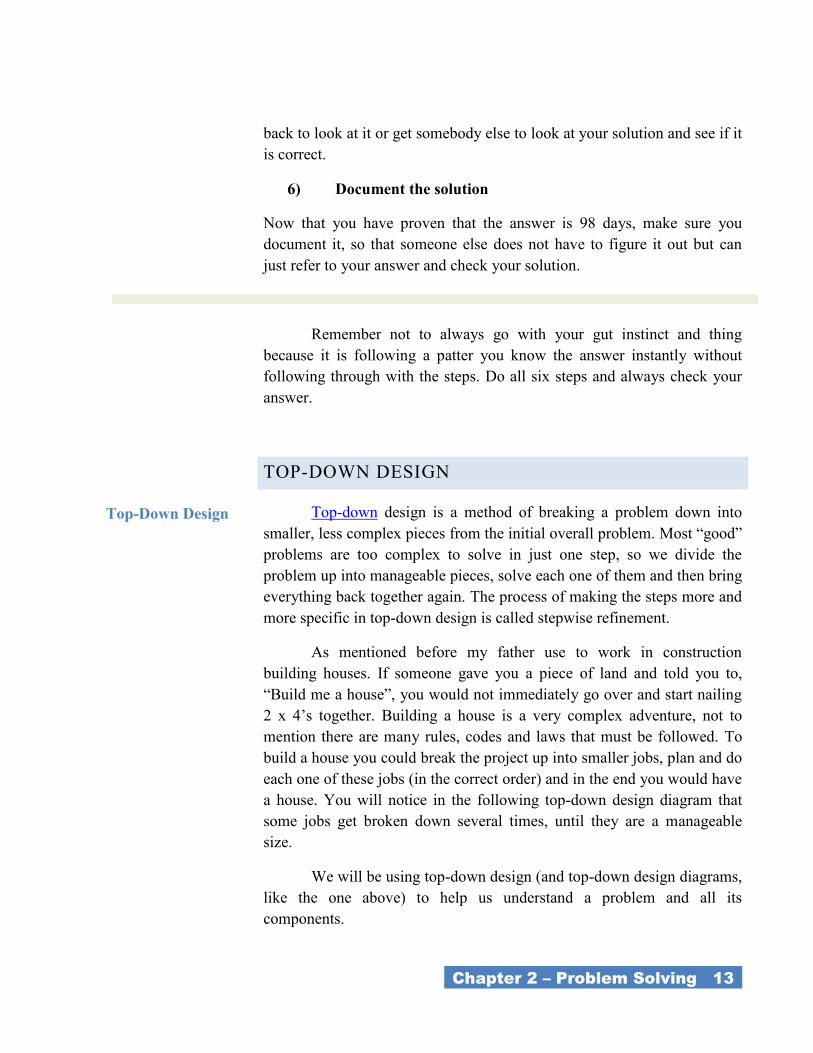
Top-down design is a method of breaking a problem down into
smaller, less complex pieces from the initial overall problem. Most ―good‖
problems are too complex to solve in just one step, so we divide the
problem up into manageable pieces, solve each one of them and then bring
everything back together again. The process of making the steps more and
more specific in top-down design is called stepwise refinement.
As mentioned before my father use to work in construction
building houses. If someone gave you a piece of land and told you to,
―Build me a house‖, you would not immediately go over and start nailing
2 x 4’s together. Building a house is a very complex adventure, not to
mention there are many rules, codes and laws that must be followed. To
build a house you could break the project up into smaller jobs, plan and do
each one of these jobs (in the correct order) and in the end you would have
a house. You will notice in the following top-down design diagram that
some jobs get broken down several times, until they are a manageable
size.
We will be using top-down design (and top-down design diagrams,
like the one above) to help us understand a problem and all its
components.
Top-Down Design
_Chapter 2 – Problem Solving 14_
FLOW-CHARTS
Some people think that there is no need to do flow-charts before
writing a program; that you can just go to the computer and start writing
code. Any ―interesting‖ computer problem is so complex though, that
without planning, you would just end up spinning your wheels and have to
throw out most of your code. In our six step problem solving model, the
second step was to create a model and flow-charts are an excellent tool to
make a model of what happens in most computer problems. Remember
that a computer program is just a set of steps that the computer follows to
solve a problem. A flow-chart is just a pictorial representation of a
sequence of steps.
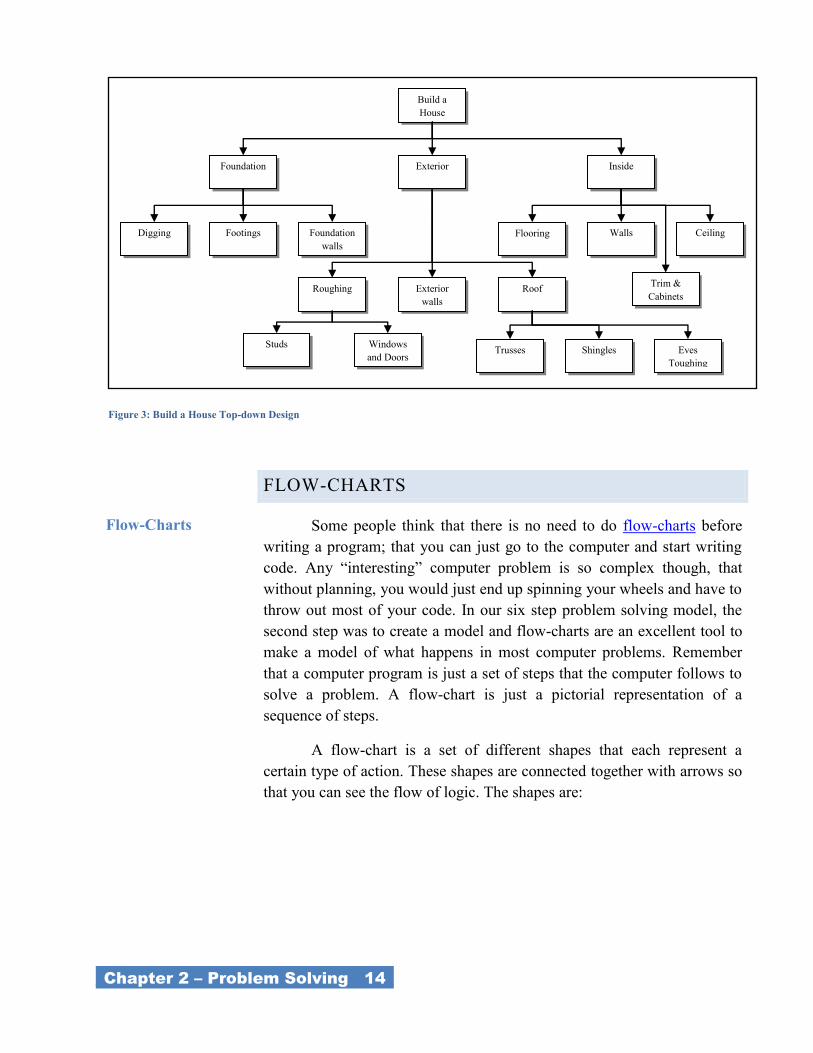
A flow-chart is a set of different shapes that each represent a
certain type of action. These shapes are connected together with arrows so
that you can see the flow of logic. The shapes are:
Build a
House
Exterior Foundation Inside
Footings Digging Foundation
walls
Walls Flooring Ceiling
Exterior
walls
Roughing Roof
Studs Windows
and Doors Shingles Trusses Eves
Toughing
Trim &
Cabinets
Figure 3: Build a House Top-down Design
Flow-Charts
_Chapter 2 – Problem Solving 15_
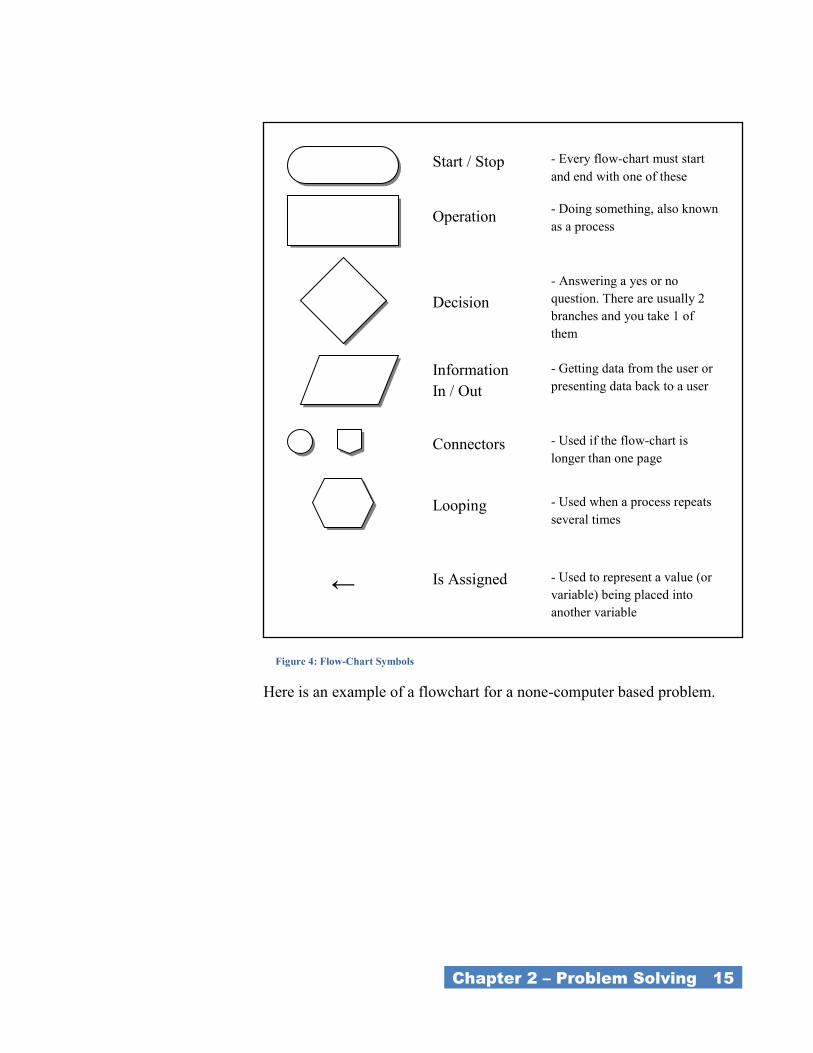
Here is an example of a flowchart for a none-computer based problem.
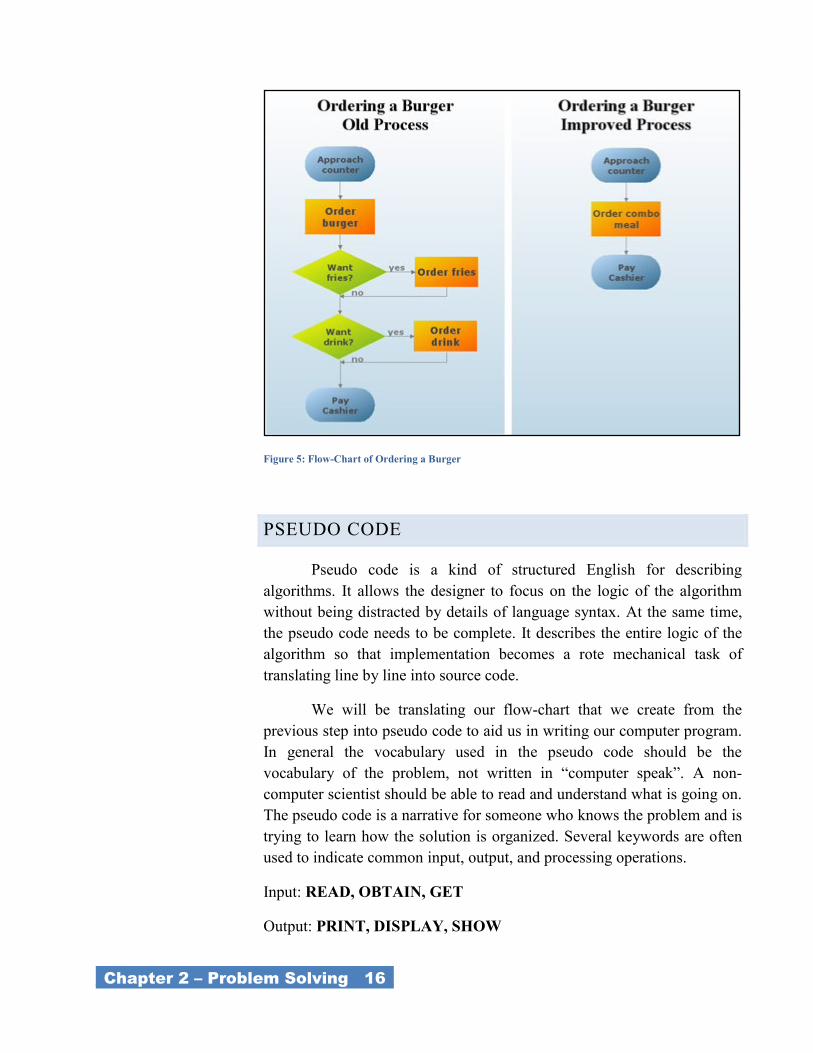
Start / Stop - Every flow-chart must start
and end with one of these
Operation - Doing something, also known
as a process
Decision
- Answering a yes or no
question. There are usually 2
branches and you take 1 of
them
Information
In / Out
- Getting data from the user or
presenting data back to a user
Connectors - Used if the flow-chart is
longer than one page
Looping - Used when a process repeats
several times
Is Assigned - Used to represent a value (or
variable) being placed into
another variable
←
Figure 4: Flow-Chart Symbols
_Chapter 2 – Problem Solving 16_
Figure 5: Flow-Chart of Ordering a Burger
PSEUDO CODE
Pseudo code is a kind of structured English for describing
algorithms. It allows the designer to focus on the logic of the algorithm
without being distracted by details of language syntax. At the same time,
the pseudo code needs to be complete. It describes the entire logic of the
algorithm so that implementation becomes a rote mechanical task of
translating line by line into source code.
We will be translating our flow-chart that we create from the
previous step into pseudo code to aid us in writing our computer program.
In general the vocabulary used in the pseudo code should be the
vocabulary of the problem, not written in ―computer speak‖. A non-
computer scientist should be able to read and understand what is going on.
The pseudo code is a narrative for someone who knows the problem and is
trying to learn how the solution is organized. Several keywords are often
used to indicate common input, output, and processing operations.
Input: READ, OBTAIN, GET
Output: PRINT, DISPLAY, SHOW
_Chapter 2 – Problem Solving 17_
Compute: COMPUTE, CALCULATE, DETERMINE
Initialize: SET, INIT
Add one: INCREMENT, BUMP
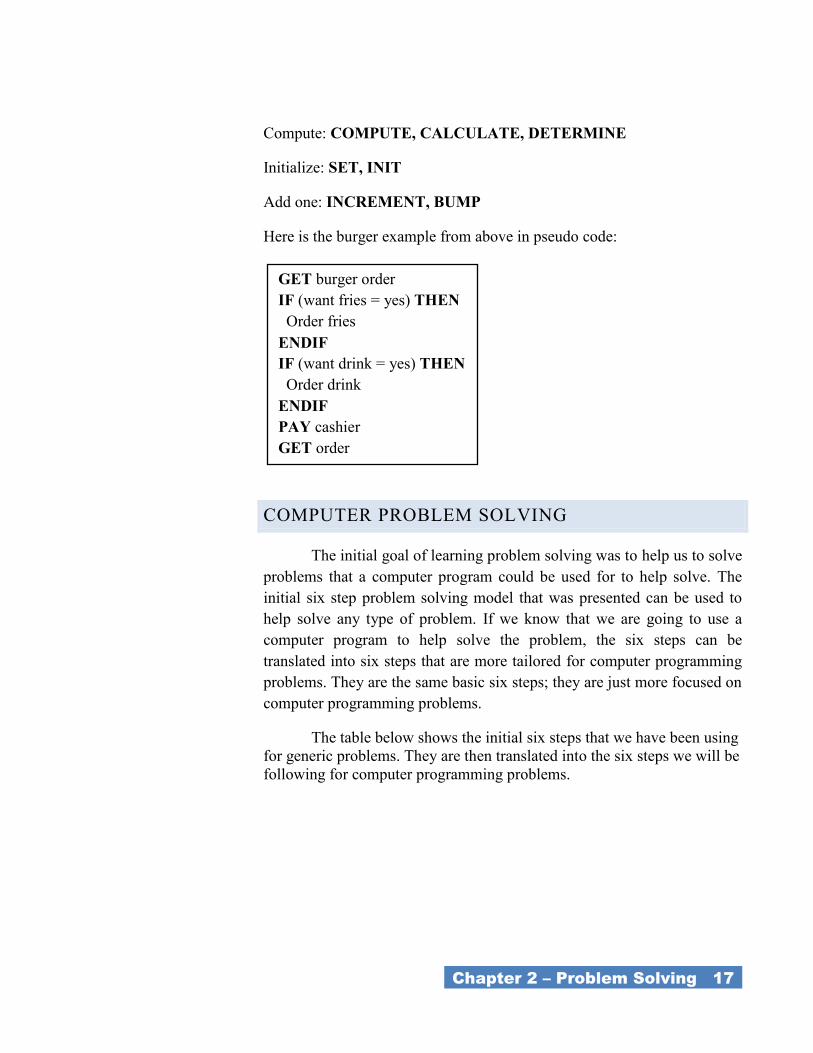
Here is the burger example from above in pseudo code:
COMPUTER PROBLEM SOLVING
The initial goal of learning problem solving was to help us to solve
problems that a computer program could be used for to help solve. The
initial six step problem solving model that was presented can be used to
help solve any type of problem. If we know that we are going to use a
computer program to help solve the problem, the six steps can be
translated into six steps that are more tailored for computer programming
problems. They are the same basic six steps; they are just more focused on
computer programming problems.
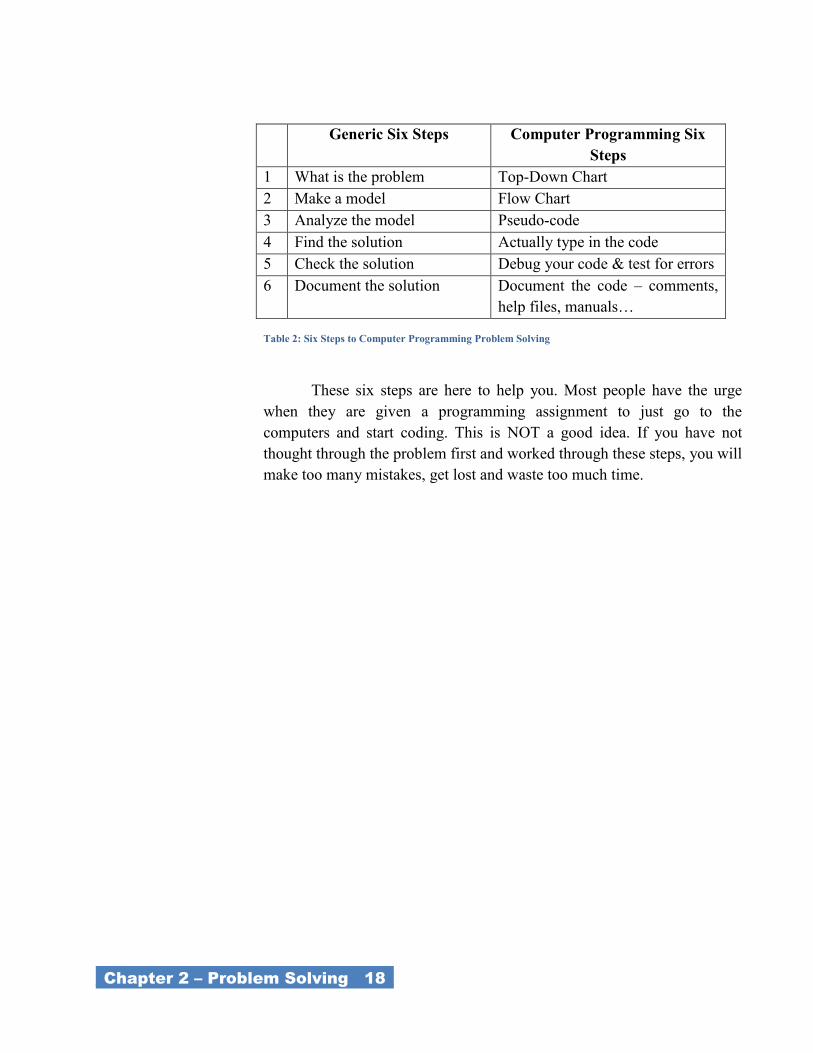
The table below shows the initial six steps that we have been using
for generic problems. They are then translated into the six steps we will be
following for computer programming problems.
GET burger order
IF (want fries = yes) THEN
Order fries
ENDIF
IF (want drink = yes) THEN
Order drink
ENDIF
PAY cashier
GET order
_Chapter 2 – Problem Solving 18_
Generic Six Steps Computer Programming Six
Steps
1 What is the problem Top-Down Chart
2 Make a model Flow Chart
3 Analyze the model Pseudo-code
4 Find the solution Actually type in the code
5 Check the solution Debug your code & test for errors
6 Document the solution Document the code – comments,
help files, manuals…
Table 2: Six Steps to Computer Programming Problem Solving
These six steps are here to help you. Most people have the urge
when they are given a programming assignment to just go to the
computers and start coding. This is NOT a good idea. If you have not
thought through the problem first and worked through these steps, you will
make too many mistakes, get lost and waste too much time.
CHAPTER 3 –
STRUCTURED PROBLEM
SOLVING
_Chapter 3 – Structured Problem Solving 20_
CHAPTER 3 – STRUCTURED
PROBLEM SOLVING
Teachers often hear students complain that they "…don't know
where to begin." when they are expected to solve what seem to be
straightforward problems. Obviously they are not straightforward to the
students for reasons that we are now beginning to understand, knowing
where to begin is usually the hardest part. Structured problem solving is a
set of tools to help you guide yourself though the process of solving
computer related problems that seem to be impossible to solve.
TOP-DOWN DESIGN IN PROGRAMMING
As we have seen above, top-down design is a process of breaking a
complicated problem down into simpler steps that actually can be solved.
In programming one of the easiest models to follow for beginner
programmers is the ―Input-Process-Output‖ model. You are most likely
already familiar with this model, even if you do not realize you are using
it. In life there are many examples of getting information, doing something
with it and then returning the result. The most common example is
probable the problems you do in math class every day. You get
information, do calculations and then return the answer. We are going to
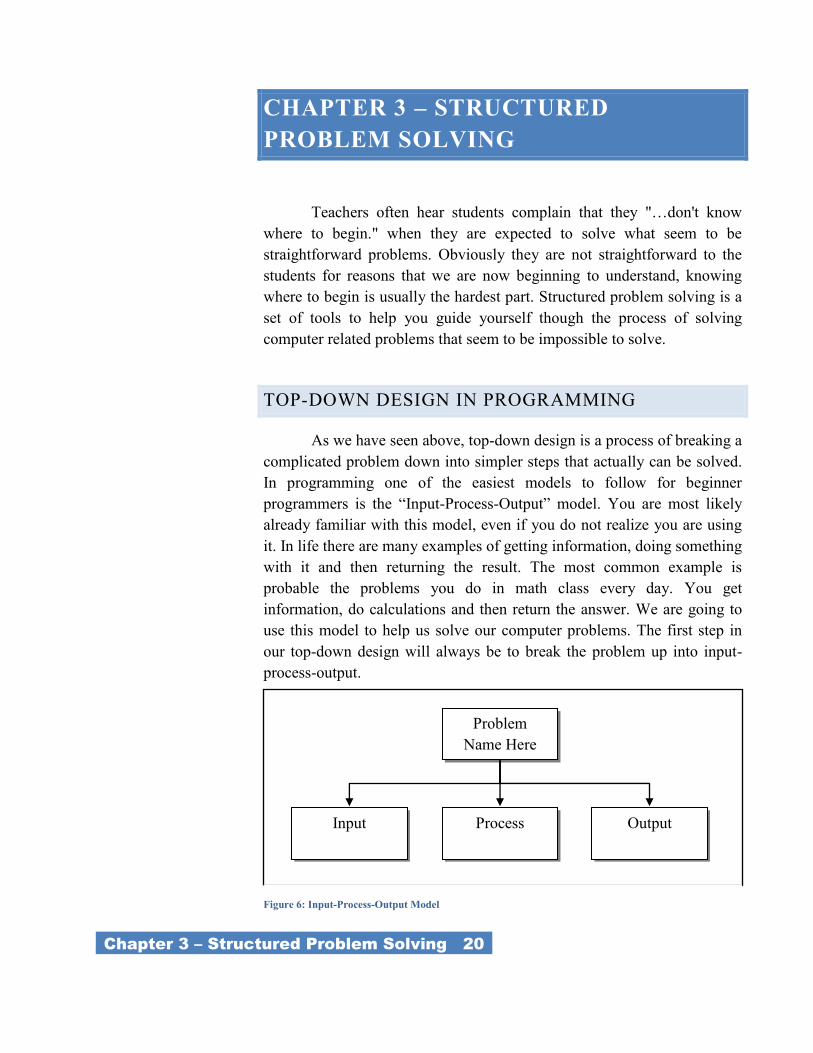
use this model to help us solve our computer problems. The first step in
our top-down design will always be to break the problem up into input-
process-output.
Problem
Name Here
Process Input Output
Figure 6: Input-Process-Output Model
_Chapter 3 – Structured Problem Solving 21_
INPUT-PROCESS-OUTPUT
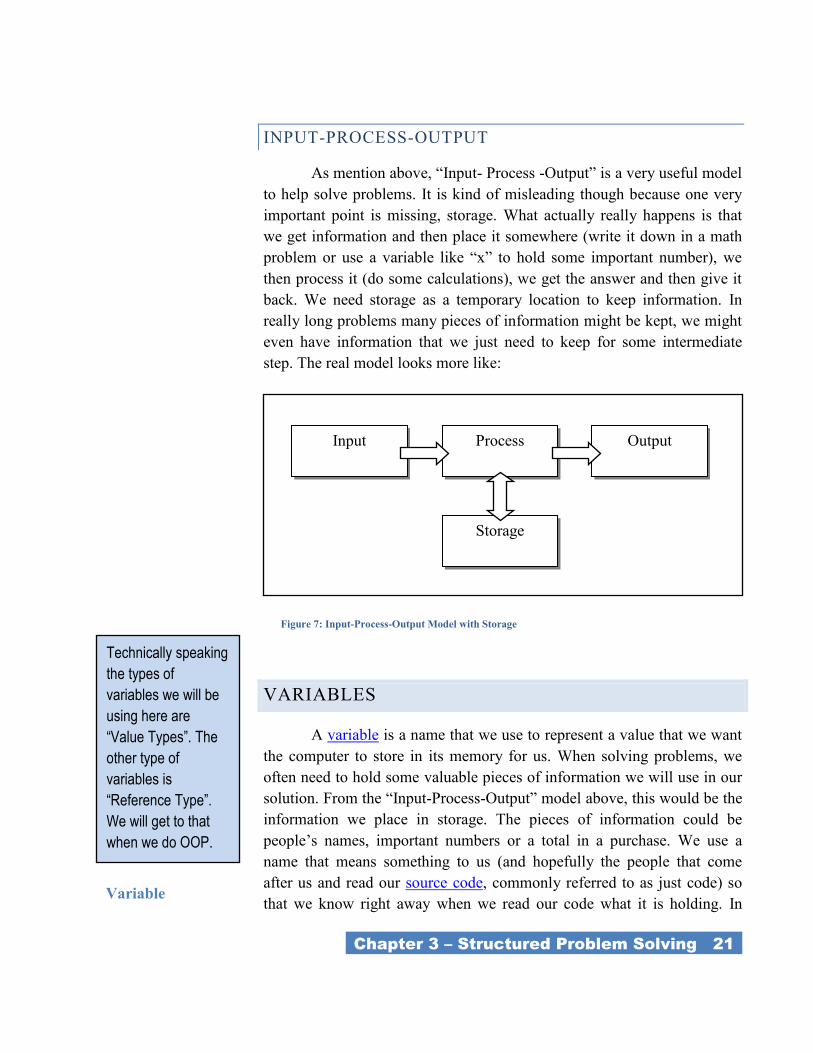
As mention above, ―Input- Process -Output‖ is a very useful model
to help solve problems. It is kind of misleading though because one very
important point is missing, storage. What actually really happens is that
we get information and then place it somewhere (write it down in a math
problem or use a variable like ―x‖ to hold some important number), we
then process it (do some calculations), we get the answer and then give it
back. We need storage as a temporary location to keep information. In
really long problems many pieces of information might be kept, we might
even have information that we just need to keep for some intermediate
step. The real model looks more like:
VARIABLES
A variable is a name that we use to represent a value that we want
the computer to store in its memory for us. When solving problems, we
often need to hold some valuable pieces of information we will use in our
solution. From the ―Input-Process-Output‖ model above, this would be the
information we place in storage. The pieces of information could be
people’s names, important numbers or a total in a purchase. We use a
name that means something to us (and hopefully the people that come
after us and read our source code, commonly referred to as just code) so
that we know right away when we read our code what it is holding. In
Storage
Process Input Output
Technically speaking
the types of
variables we will be
using here are
“Value Types”. The
other type of
variables is
“Reference Type”.
We will get to that
when we do OOP.
Variable
Figure 7: Input-Process-Output Model with Storage
_Chapter 3 – Structured Problem Solving 22_
math class you might be familiar with equations that involve variables like
―x or y‖. We would not name a variable x, if it is holding the number of
students in class, we might call it numberOfStudents. This has much more
meaning to us and other people that also look at our code.
A variable should always be declared (warn the computer we will
be using a variable before we use it) before we use it in a program. Some
programming languages do not enforce this rule, other do. Since you are
new to programming, it is really good programming style to always
declare a variable before using it. The process of declaring a variable is
called a declaration statement.
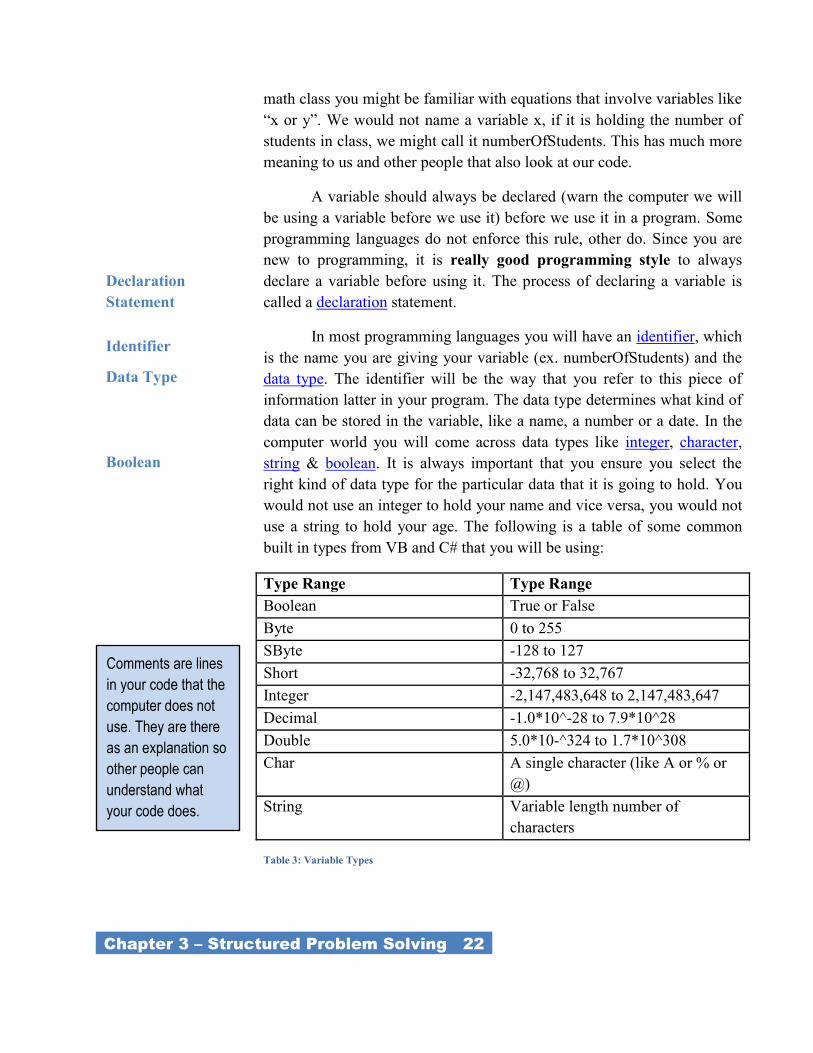
In most programming languages you will have an identifier, which
is the name you are giving your variable (ex. numberOfStudents) and the
data type. The identifier will be the way that you refer to this piece of
information latter in your program. The data type determines what kind of
data can be stored in the variable, like a name, a number or a date. In the
computer world you will come across data types like integer, character,
string & boolean. It is always important that you ensure you select the
right kind of data type for the particular data that it is going to hold. You
would not use an integer to hold your name and vice versa, you would not
use a string to hold your age. The following is a table of some common
built in types from VB and C# that you will be using:
Type Range Type Range
Boolean True or False
Byte 0 to 255
SByte -128 to 127
Short -32,768 to 32,767
Integer -2,147,483,648 to 2,147,483,647
Decimal -1.0*10^-28 to 7.9*10^28
Double 5.0*10-^324 to 1.7*10^308
Char A single character (like A or % or
@)
String Variable length number of
characters
Table 3: Variable Types
Boolean
Declaration
Statement
Identifier
Data Type
Comments are lines
in your code that the
computer does not
use. They are there
as an explanation so
other people can
understand what
your code does.
_Chapter 3 – Structured Problem Solving 23_
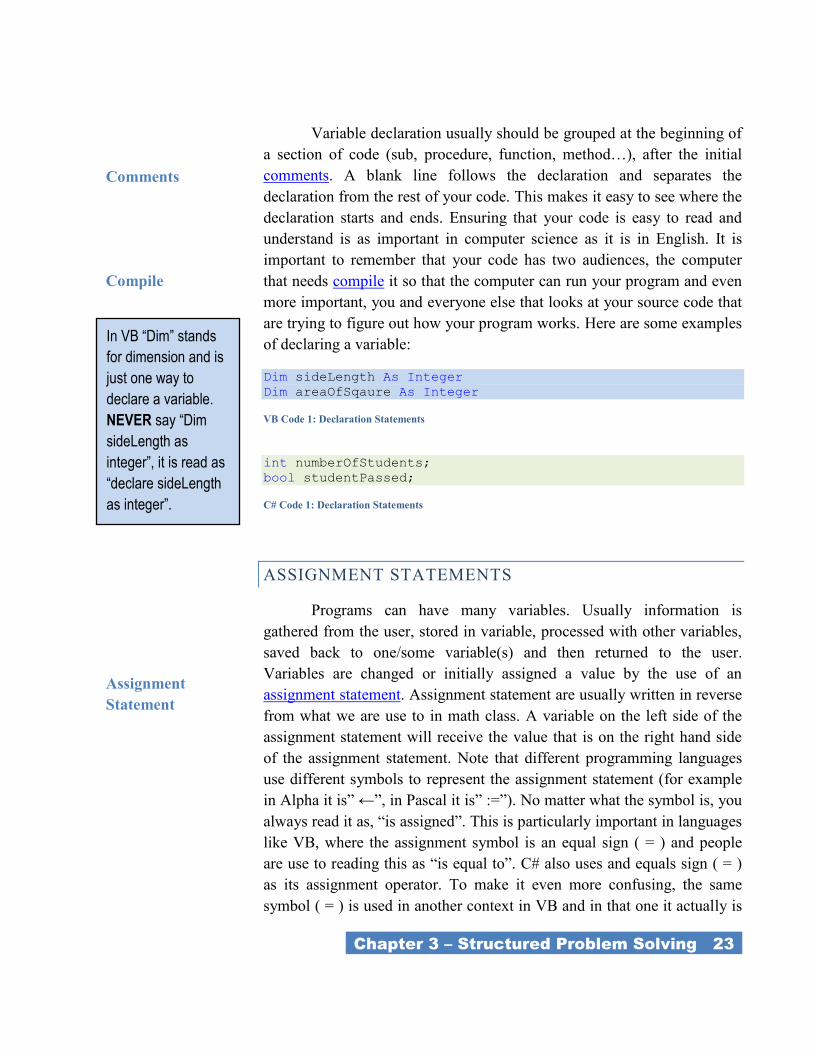
Variable declaration usually should be grouped at the beginning of
a section of code (sub, procedure, function, method…), after the initial
comments. A blank line follows the declaration and separates the
declaration from the rest of your code. This makes it easy to see where the
declaration starts and ends. Ensuring that your code is easy to read and
understand is as important in computer science as it is in English. It is
important to remember that your code has two audiences, the computer
that needs compile it so that the computer can run your program and even
more important, you and everyone else that looks at your source code that
are trying to figure out how your program works. Here are some examples
of declaring a variable:
Dim sideLength As Integer
Dim areaOfSqaure As Integer
VB Code 1: Declaration Statements
int numberOfStudents;
bool studentPassed;
C# Code 1: Declaration Statements
ASSIGNMENT STATEMENTS
Programs can have many variables. Usually information is
gathered from the user, stored in variable, processed with other variables,
saved back to one/some variable(s) and then returned to the user.
Variables are changed or initially assigned a value by the use of an
assignment statement. Assignment statement are usually written in reverse
from what we are use to in math class. A variable on the left side of the
assignment statement will receive the value that is on the right hand side
of the assignment statement. Note that different programming languages
use different symbols to represent the assignment statement (for example
in Alpha it is‖ ←‖, in Pascal it is‖ :=‖). No matter what the symbol is, you
always read it as, ―is assigned‖. This is particularly important in languages
like VB, where the assignment symbol is an equal sign ( = ) and people
are use to reading this as ―is equal to‖. C# also uses and equals sign ( = )
as its assignment operator. To make it even more confusing, the same
symbol ( = ) is used in another context in VB and in that one it actually is
Assignment
Statement
Comments
In VB “Dim” stands
for dimension and is
just one way to
declare a variable.
NEVER say “Dim
sideLength as
integer”, it is read as
“declare sideLength
as integer”.
Compile
_Chapter 3 – Structured Problem Solving 24_
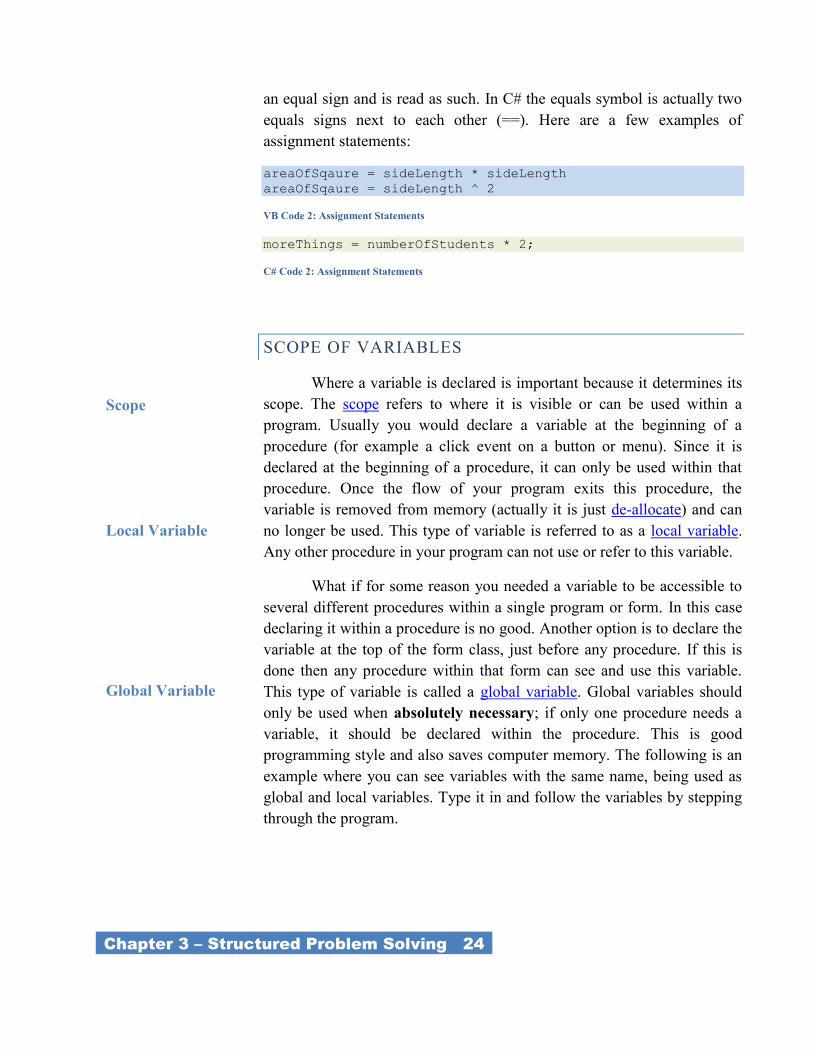
an equal sign and is read as such. In C# the equals symbol is actually two
equals signs next to each other (==). Here are a few examples of
assignment statements:
areaOfSqaure = sideLength * sideLength
areaOfSqaure = sideLength ^ 2
VB Code 2: Assignment Statements
moreThings = numberOfStudents * 2;
C# Code 2: Assignment Statements
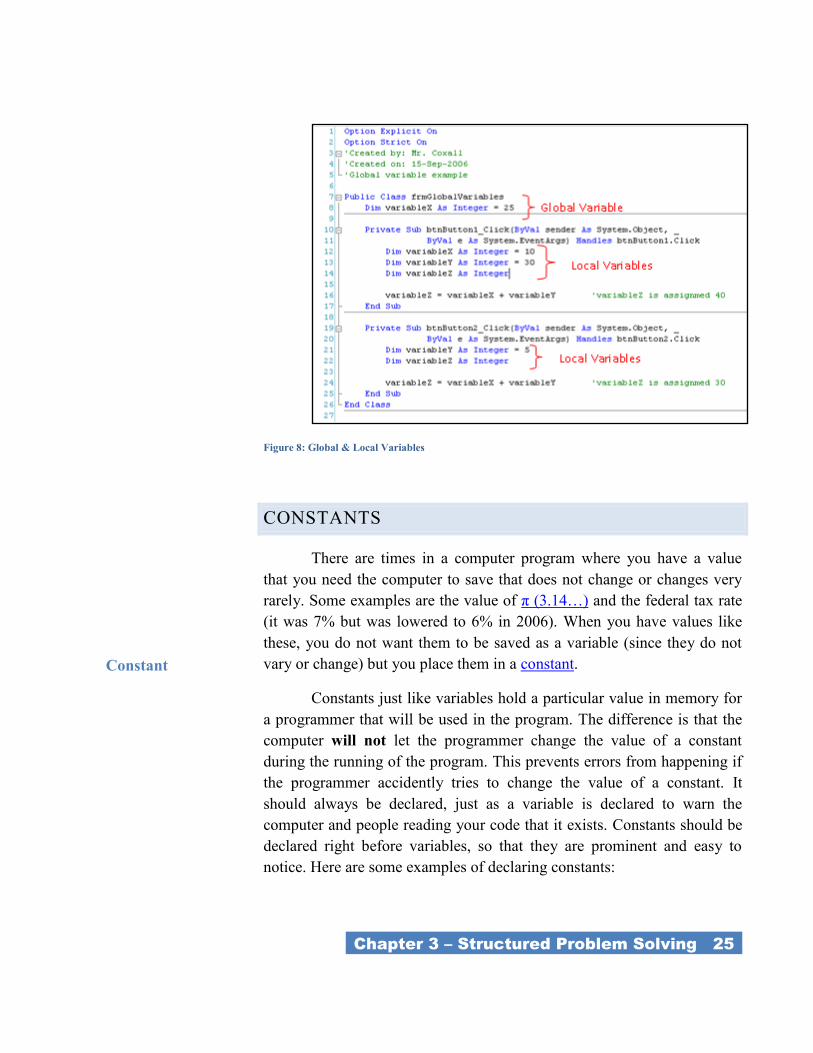
SCOPE OF VARIABLES
Where a variable is declared is important because it determines its
scope. The scope refers to where it is visible or can be used within a
program. Usually you would declare a variable at the beginning of a
procedure (for example a click event on a button or menu). Since it is
declared at the beginning of a procedure, it can only be used within that
procedure. Once the flow of your program exits this procedure, the
variable is removed from memory (actually it is just de-allocate) and can
no longer be used. This type of variable is referred to as a local variable.
Any other procedure in your program can not use or refer to this variable.
What if for some reason you needed a variable to be accessible to
several different procedures within a single program or form. In this case
declaring it within a procedure is no good. Another option is to declare the
variable at the top of the form class, just before any procedure. If this is
done then any procedure within that form can see and use this variable.
This type of variable is called a global variable. Global variables should
only be used when absolutely necessary; if only one procedure needs a
variable, it should be declared within the procedure. This is good
programming style and also saves computer memory. The following is an
example where you can see variables with the same name, being used as
global and local variables. Type it in and follow the variables by stepping
through the program.
Scope
Local Variable
Global Variable
_Chapter 3 – Structured Problem Solving 25_
Figure 8: Global & Local Variables
CONSTANTS
There are times in a computer program where you have a value
that you need the computer to save that does not change or changes very
rarely. Some examples are the value of π (3.14…) and the federal tax rate
(it was 7% but was lowered to 6% in 2006). When you have values like
these, you do not want them to be saved as a variable (since they do not
vary or change) but you place them in a constant.
Constants just like variables hold a particular value in memory for
a programmer that will be used in the program. The difference is that the
computer will not let the programmer change the value of a constant
during the running of the program. This prevents errors from happening if
the programmer accidently tries to change the value of a constant. It
should always be declared, just as a variable is declared to warn the
computer and people reading your code that it exists. Constants should be
declared right before variables, so that they are prominent and easy to
notice. Here are some examples of declaring constants:
Constant
_Chapter 3 – Structured Problem Solving 26_
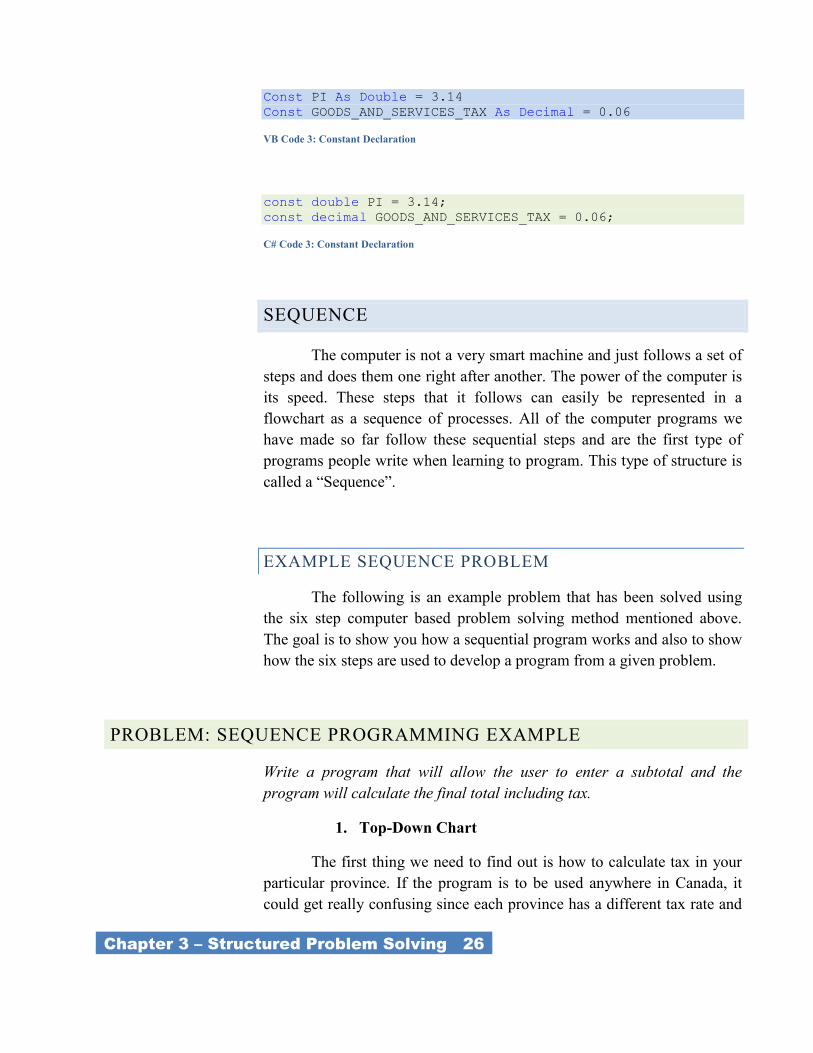
Const PI As Double = 3.14
Const GOODS_AND_SERVICES_TAX As Decimal = 0.06
VB Code 3: Constant Declaration
const double PI = 3.14;
const decimal GOODS_AND_SERVICES_TAX = 0.06;
C# Code 3: Constant Declaration
SEQUENCE
The computer is not a very smart machine and just follows a set of
steps and does them one right after another. The power of the computer is
its speed. These steps that it follows can easily be represented in a
flowchart as a sequence of processes. All of the computer programs we
have made so far follow these sequential steps and are the first type of
programs people write when learning to program. This type of structure is
called a ―Sequence‖.
EXAMPLE SEQUENCE PROBLEM
The following is an example problem that has been solved using
the six step computer based problem solving method mentioned above.
The goal is to show you how a sequential program works and also to show
how the six steps are used to develop a program from a given problem.
PROBLEM: SEQUENCE PROGRAMMING EXAMPLE
Write a program that will allow the user to enter a subtotal and the
program will calculate the final total including tax.
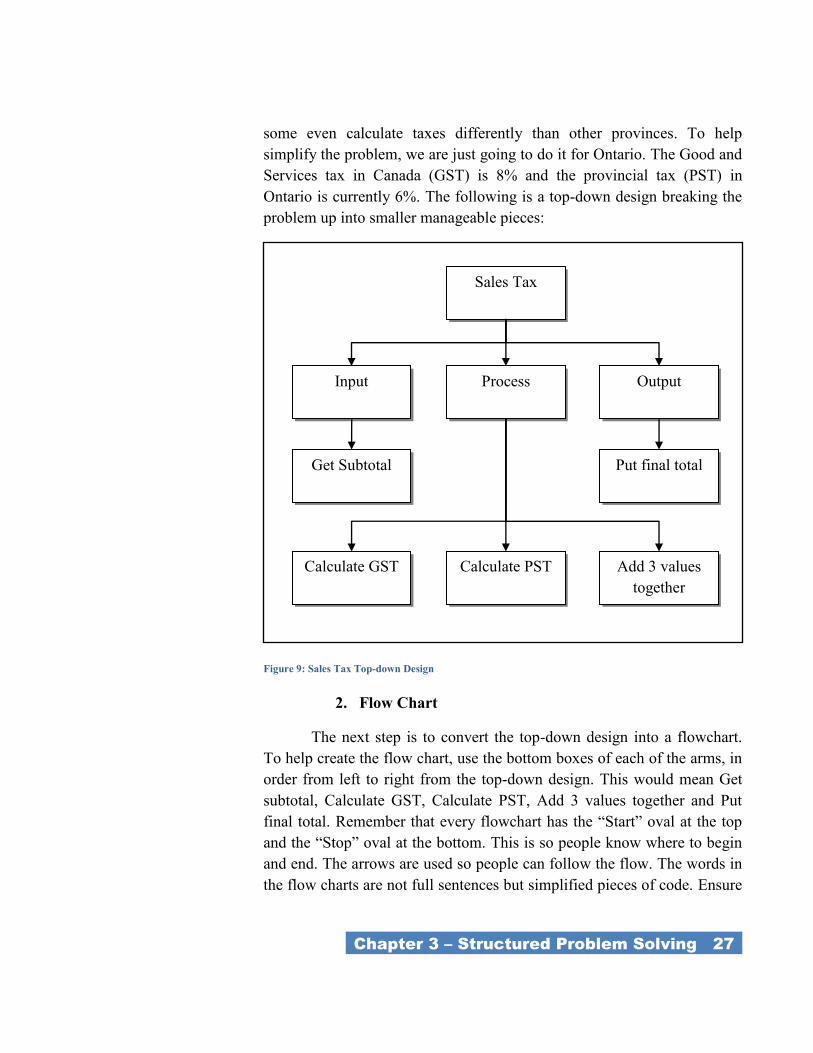
1. Top-Down Chart
The first thing we need to find out is how to calculate tax in your
particular province. If the program is to be used anywhere in Canada, it
could get really confusing since each province has a different tax rate and
_Chapter 3 – Structured Problem Solving 27_
some even calculate taxes differently than other provinces. To help
simplify the problem, we are just going to do it for Ontario. The Good and
Services tax in Canada (GST) is 8% and the provincial tax (PST) in
Ontario is currently 6%. The following is a top-down design breaking the
problem up into smaller manageable pieces:
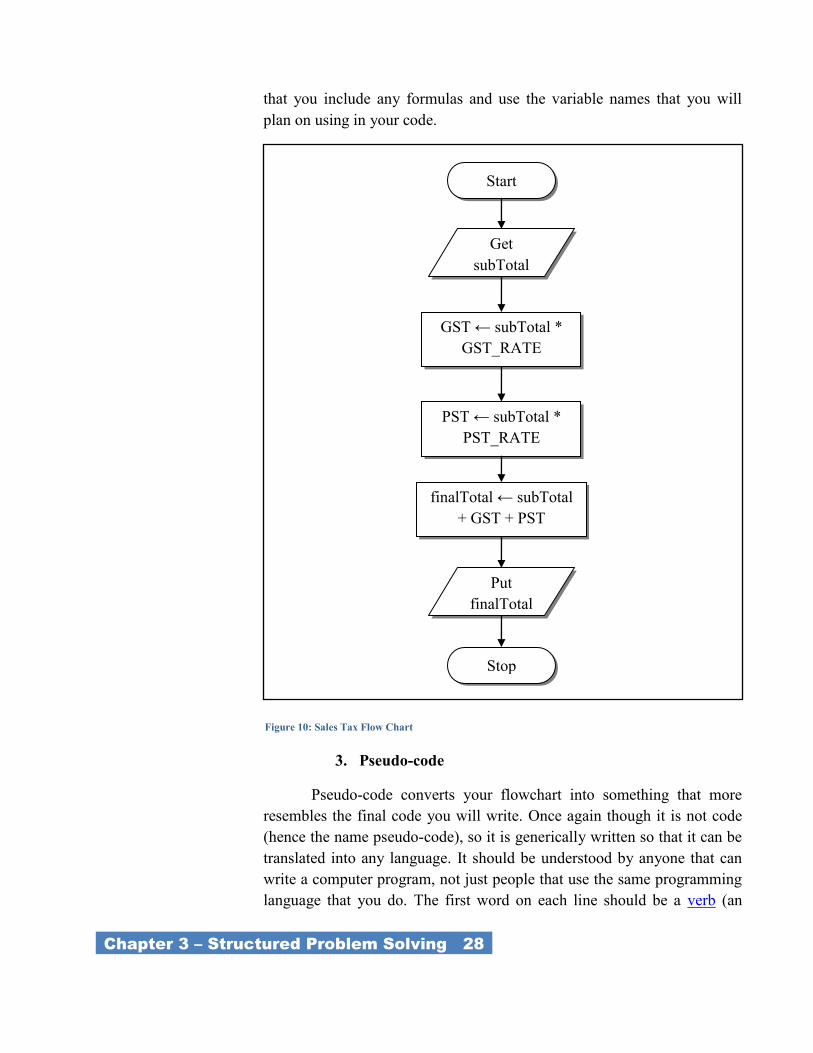
2. Flow Chart
The next step is to convert the top-down design into a flowchart.
To help create the flow chart, use the bottom boxes of each of the arms, in
order from left to right from the top-down design. This would mean Get
subtotal, Calculate GST, Calculate PST, Add 3 values together and Put
final total. Remember that every flowchart has the ―Start‖ oval at the top
and the ―Stop‖ oval at the bottom. This is so people know where to begin
and end. The arrows are used so people can follow the flow. The words in
the flow charts are not full sentences but simplified pieces of code. Ensure
Sales Tax
Process Input Output
Get Subtotal Put final total
Calculate PST
Calculate GST
Add 3 values
together
Figure 9: Sales Tax Top-down Design
_Chapter 3 – Structured Problem Solving 28_
that you include any formulas and use the variable names that you will
plan on using in your code.
3. Pseudo-code
Pseudo-code converts your flowchart into something that more
resembles the final code you will write. Once again though it is not code
(hence the name pseudo-code), so it is generically written so that it can be
translated into any language. It should be understood by anyone that can
write a computer program, not just people that use the same programming
language that you do. The first word on each line should be a verb (an
GST ← subTotal *
GST_RATE
Get
subTotal
Start
PST ← subTotal *
PST_RATE
finalTotal ← subTotal
+ GST + PST
Put
finalTotal
Stop
Figure 10: Sales Tax Flow Chart
_Chapter 3 – Structured Problem Solving 29_
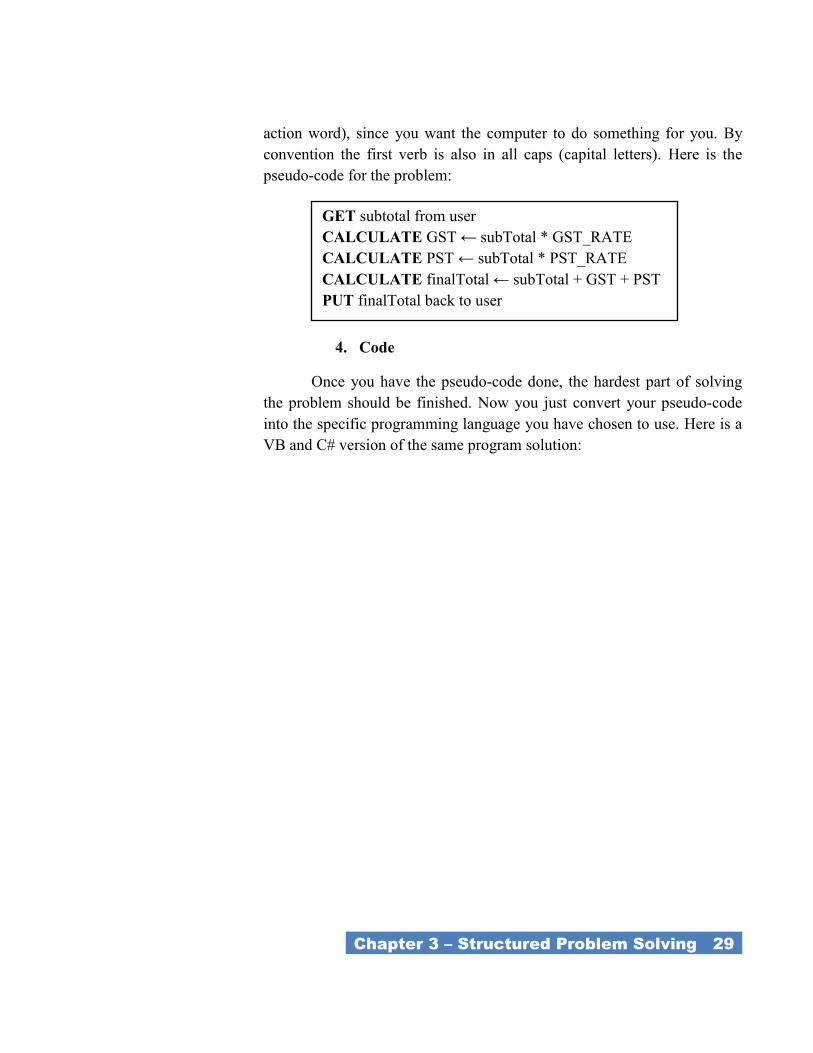
action word), since you want the computer to do something for you. By
convention the first verb is also in all caps (capital letters). Here is the
pseudo-code for the problem:
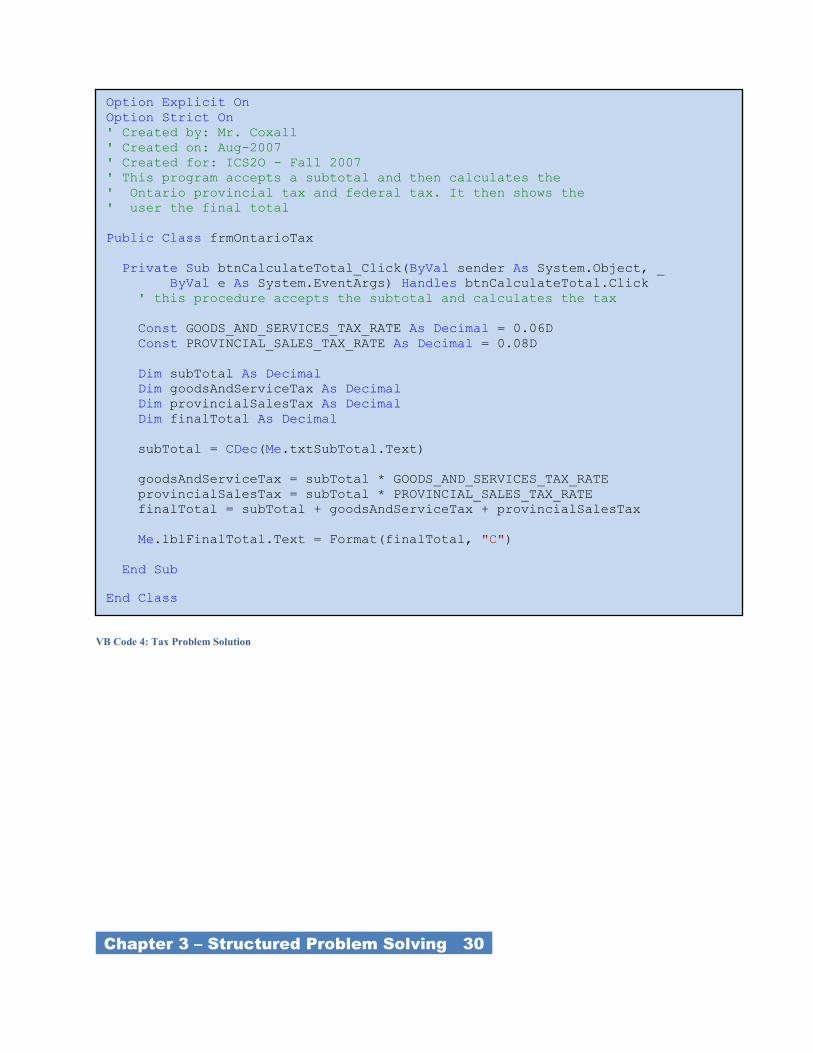
4. Code
Once you have the pseudo-code done, the hardest part of solving
the problem should be finished. Now you just convert your pseudo-code
into the specific programming language you have chosen to use. Here is a
VB and C# version of the same program solution:
GET subtotal from user
CALCULATE GST ← subTotal * GST_RATE
CALCULATE PST ← subTotal * PST_RATE
CALCULATE finalTotal ← subTotal + GST + PST
PUT finalTotal back to user
_Chapter 3 – Structured Problem Solving 30_
Option Explicit On
Option Strict On
' Created by: Mr. Coxall
' Created on: Aug-2007
' Created for: ICS2O - Fall 2007
' This program accepts a subtotal and then calculates the
' Ontario provincial tax and federal tax. It then shows the
' user the final total
Public Class frmOntarioTax
Private Sub btnCalculateTotal_Click(ByVal sender As System.Object, _
ByVal e As System.EventArgs) Handles btnCalculateTotal.Click
' this procedure accepts the subtotal and calculates the tax
Const GOODS_AND_SERVICES_TAX_RATE As Decimal = 0.06D
Const PROVINCIAL_SALES_TAX_RATE As Decimal = 0.08D
Dim subTotal As Decimal
Dim goodsAndServiceTax As Decimal
Dim provincialSalesTax As Decimal
Dim finalTotal As Decimal
subTotal = CDec(Me.txtSubTotal.Text)
goodsAndServiceTax = subTotal * GOODS_AND_SERVICES_TAX_RATE
provincialSalesTax = subTotal * PROVINCIAL_SALES_TAX_RATE
finalTotal = subTotal + goodsAndServiceTax + provincialSalesTax
Me.lblFinalTotal.Text = Format(finalTotal, "C")
End Sub
End Class
VB Code 4: Tax Problem Solution
_Chapter 3 – Structured Problem Solving 31_
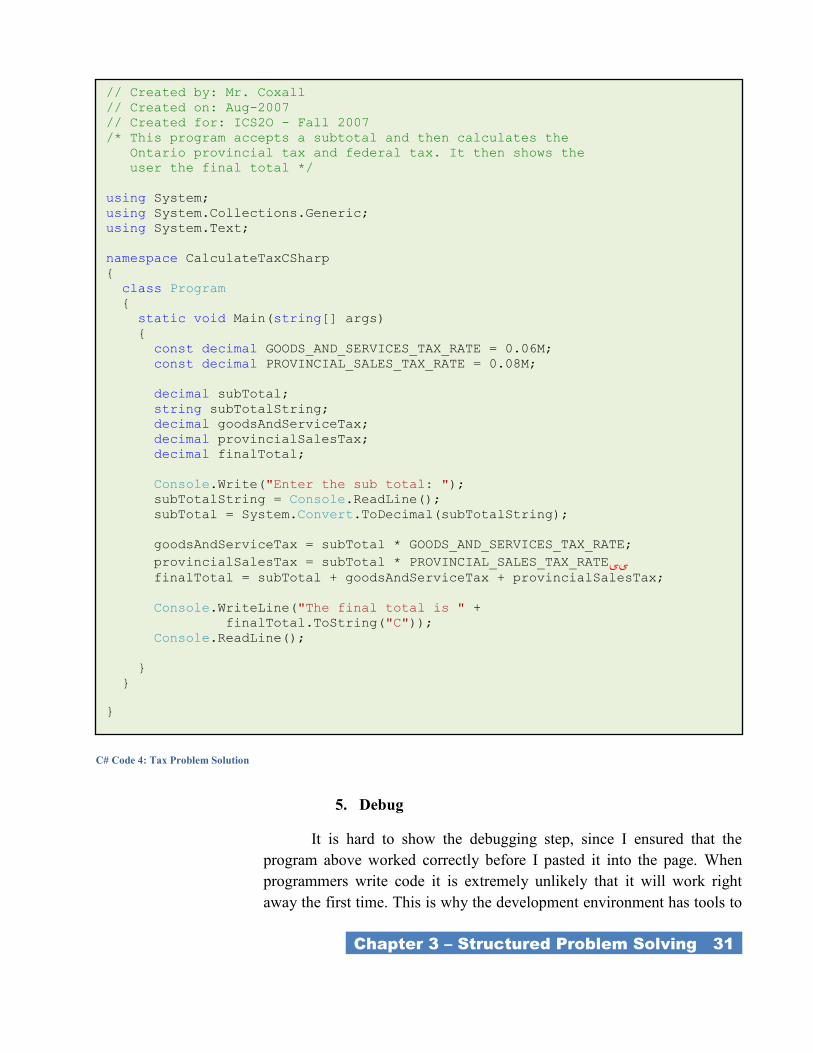
5. Debug
It is hard to show the debugging step, since I ensured that the
program above worked correctly before I pasted it into the page. When
programmers write code it is extremely unlikely that it will work right
away the first time. This is why the development environment has tools to
// Created by: Mr. Coxall
// Created on: Aug-2007
// Created for: ICS2O - Fall 2007
/* This program accepts a subtotal and then calculates the
Ontario provincial tax and federal tax. It then shows the
user the final total */
using System;
using System.Collections.Generic;
using System.Text;
namespace CalculateTaxCSharp
{
class Program
{
static void Main(string[] args)
{
const decimal GOODS_AND_SERVICES_TAX_RATE = 0.06M;
const decimal PROVINCIAL_SALES_TAX_RATE = 0.08M;
decimal subTotal;
string subTotalString;
decimal goodsAndServiceTax;
decimal provincialSalesTax;
decimal finalTotal;
Console.Write("Enter the sub total: ");
subTotalString = Console.ReadLine();
subTotal = System.Convert.ToDecimal(subTotalString);
goodsAndServiceTax = subTotal * GOODS_AND_SERVICES_TAX_RATE;
provincialSalesTax = subTotal * PROVINCIAL_SALES_TAX_RATEىى finalTotal = subTotal + goodsAndServiceTax + provincialSalesTax;
Console.WriteLine("The final total is " +
finalTotal.ToString("C"));
Console.ReadLine();
}
}
}
C# Code 4: Tax Problem Solution
_Chapter 3 – Structured Problem Solving 32_
help the programmer fix simple mistakes. The two main kinds of mistakes
are syntax errors and logical errors.
In modern languages like VB and C#, syntax errors are usually
easy to see and fix. A syntax error is a piece of code that the computer
does not understand. It would be like speaking to you and one of the
sentences did not make any sense to you. The in VB and C# the IDE will
nicely place a squiggly line under the code it does not understand, so that
you can fix the problem. A logical error is a lot harder to find. This is a
problem with the way you solved the problem. The code will still compile
and run but the program will give you the wrong answer (or maybe just
the wrong answer some times!). There is not easy way to solve these
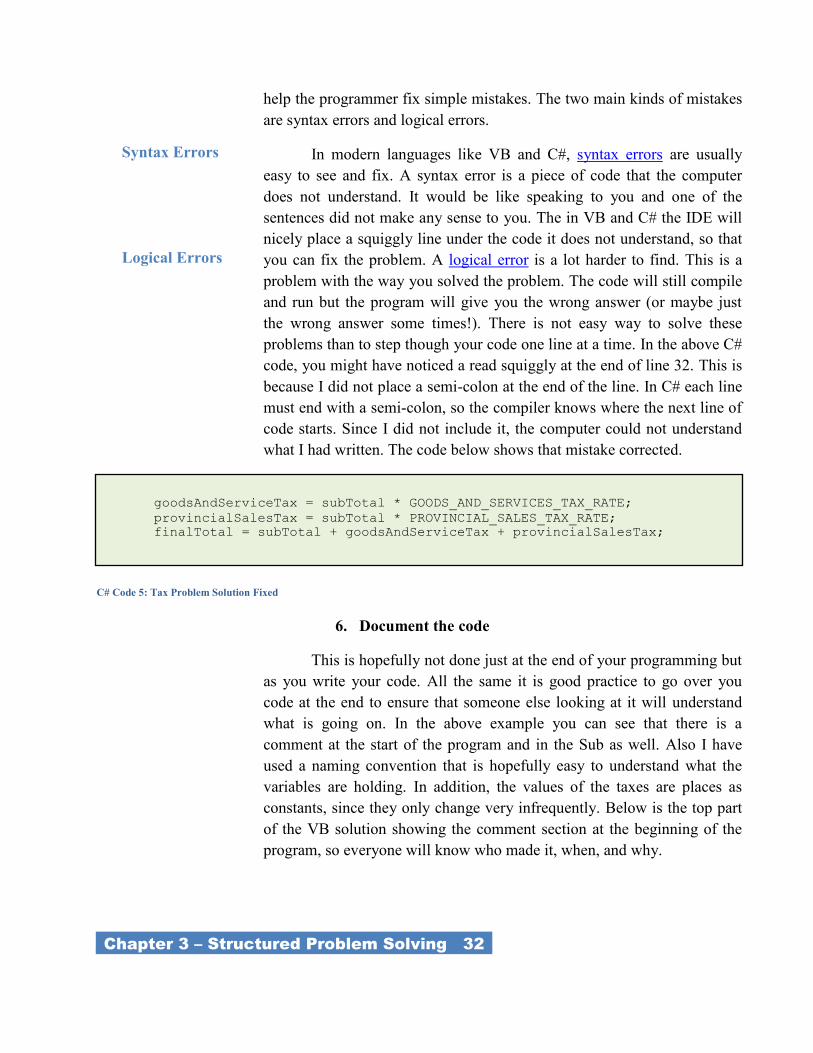
problems than to step though your code one line at a time. In the above C#
code, you might have noticed a read squiggly at the end of line 32. This is
because I did not place a semi-colon at the end of the line. In C# each line
must end with a semi-colon, so the compiler knows where the next line of
code starts. Since I did not include it, the computer could not understand
what I had written. The code below shows that mistake corrected.
6. Document the code
This is hopefully not done just at the end of your programming but
as you write your code. All the same it is good practice to go over you
code at the end to ensure that someone else looking at it will understand
what is going on. In the above example you can see that there is a
comment at the start of the program and in the Sub as well. Also I have
used a naming convention that is hopefully easy to understand what the
variables are holding. In addition, the values of the taxes are places as
constants, since they only change very infrequently. Below is the top part
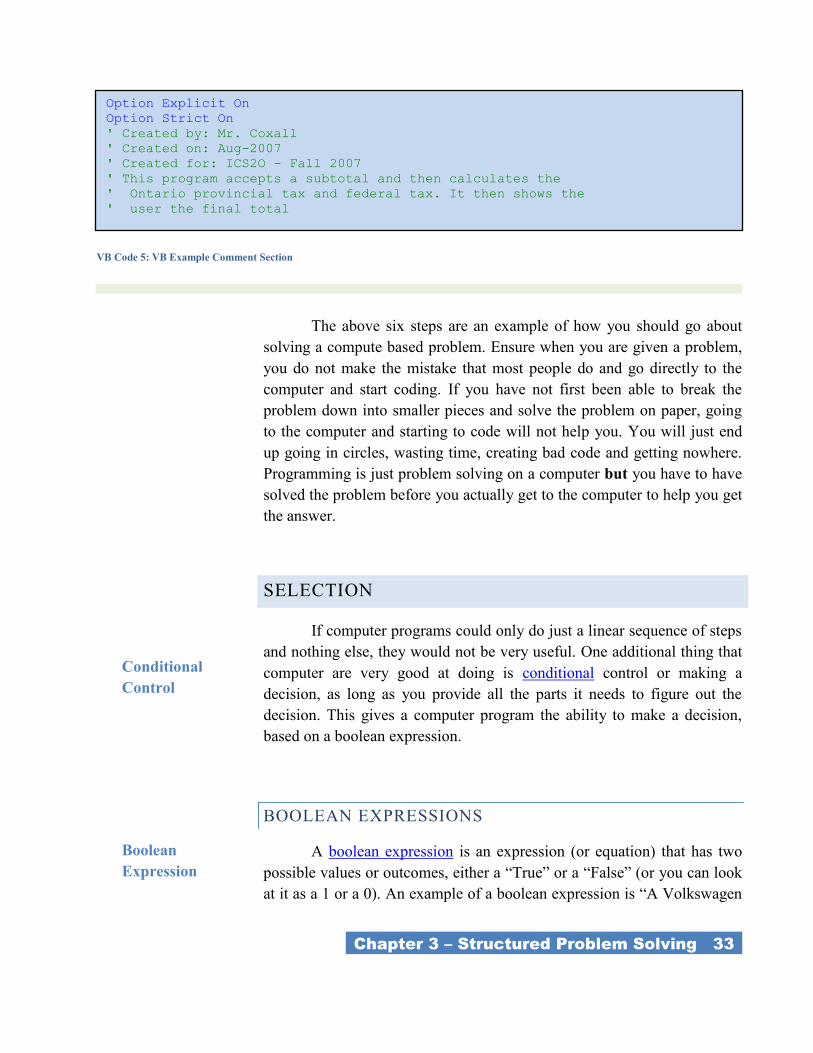
of the VB solution showing the comment section at the beginning of the
program, so everyone will know who made it, when, and why.
goodsAndServiceTax = subTotal * GOODS_AND_SERVICES_TAX_RATE;
provincialSalesTax = subTotal * PROVINCIAL_SALES_TAX_RATE;
finalTotal = subTotal + goodsAndServiceTax + provincialSalesTax;
Syntax Errors
Logical Errors
C# Code 5: Tax Problem Solution Fixed
_Chapter 3 – Structured Problem Solving 33_
The above six steps are an example of how you should go about
solving a compute based problem. Ensure when you are given a problem,
you do not make the mistake that most people do and go directly to the
computer and start coding. If you have not first been able to break the
problem down into smaller pieces and solve the problem on paper, going
to the computer and starting to code will not help you. You will just end
up going in circles, wasting time, creating bad code and getting nowhere.
Programming is just problem solving on a computer but you have to have
solved the problem before you actually get to the computer to help you get
the answer.
SELECTION
If computer programs could only do just a linear sequence of steps
and nothing else, they would not be very useful. One additional thing that
computer are very good at doing is conditional control or making a
decision, as long as you provide all the parts it needs to figure out the
decision. This gives a computer program the ability to make a decision,
based on a boolean expression.
BOOLEAN EXPRESSIONS
A boolean expression is an expression (or equation) that has two
possible values or outcomes, either a ―True‖ or a ―False‖ (or you can look
at it as a 1 or a 0). An example of a boolean expression is ―A Volkswagen
Option Explicit On
Option Strict On
' Created by: Mr. Coxall
' Created on: Aug-2007
' Created for: ICS2O - Fall 2007
' This program accepts a subtotal and then calculates the
' Ontario provincial tax and federal tax. It then shows the
' user the final total
Boolean
Expression
VB Code 5: VB Example Comment Section
Conditional
Control
_Chapter 3 – Structured Problem Solving 34_
beetle is a car.‖ Clearly this statement is true, so that is how it is evaluated.
You could also have ―a frog is a mammal‖. This statement is not correct,
so it evaluates to false. You could also have mathematical expression,
―3+2 = 6‖. This equation (and yes it is an equations so you read the ―=‖ as
―is equal‖) is not correct, so it is also evaluated to false. There are many
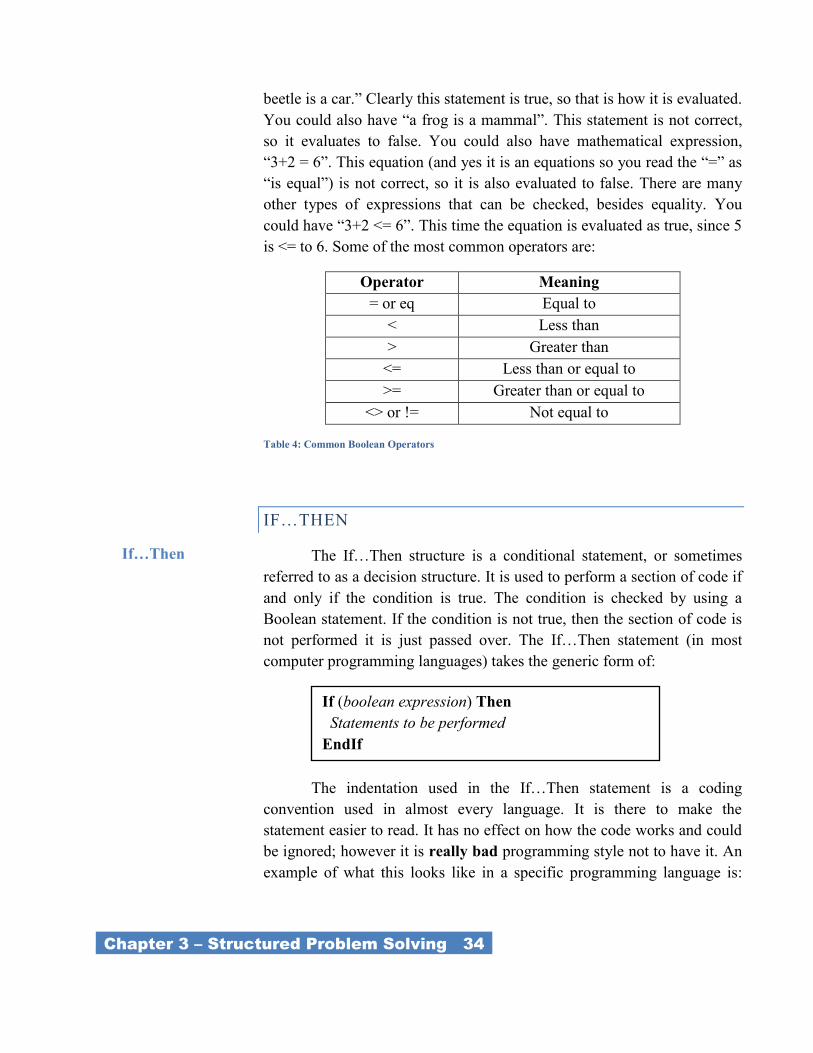
other types of expressions that can be checked, besides equality. You
could have ―3+2 <= 6‖. This time the equation is evaluated as true, since 5
is <= to 6. Some of the most common operators are:
Operator Meaning
= or eq Equal to
< Less than
> Greater than
<= Less than or equal to
>= Greater than or equal to
<> or != Not equal to
Table 4: Common Boolean Operators
IF…THEN
The If…Then structure is a conditional statement, or sometimes
referred to as a decision structure. It is used to perform a section of code if
and only if the condition is true. The condition is checked by using a
Boolean statement. If the condition is not true, then the section of code is
not performed it is just passed over. The If…Then statement (in most
computer programming languages) takes the generic form of:
The indentation used in the If…Then statement is a coding
convention used in almost every language. It is there to make the
statement easier to read. It has no effect on how the code works and could
be ignored; however it is really bad programming style not to have it. An
example of what this looks like in a specific programming language is:
If (boolean expression) Then
Statements to be performed
EndIf
If…Then
_Chapter 3 – Structured Problem Solving 35_
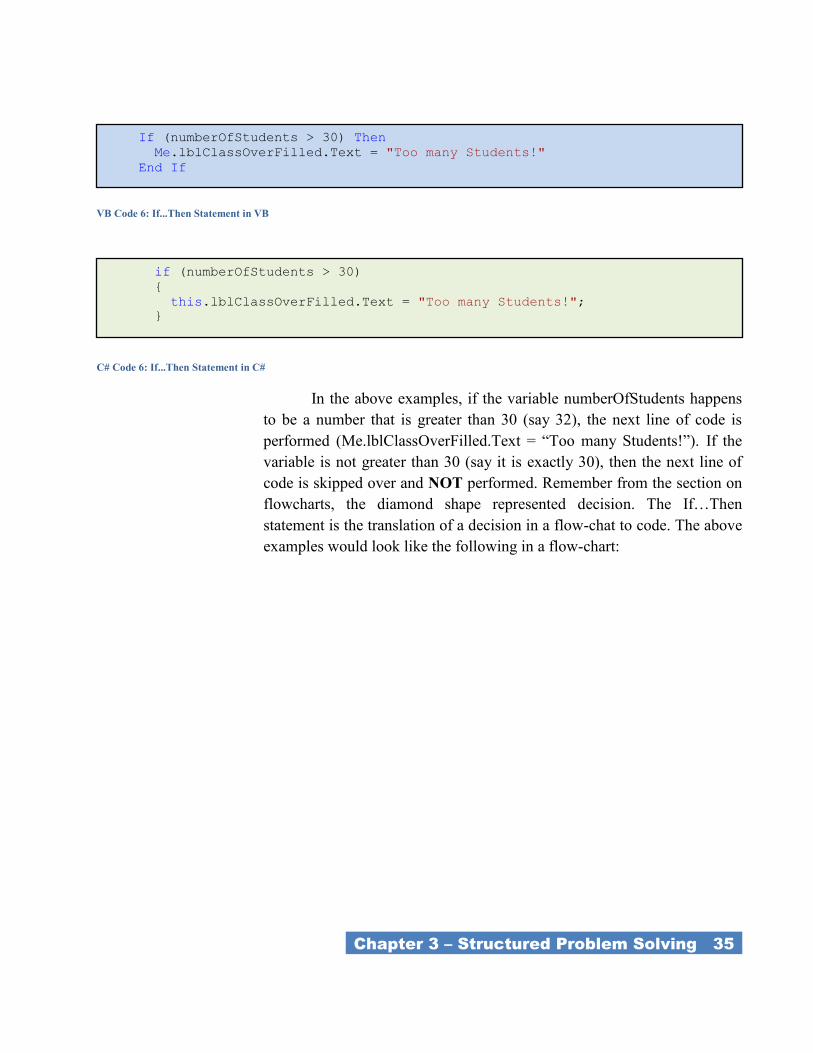
In the above examples, if the variable numberOfStudents happens
to be a number that is greater than 30 (say 32), the next line of code is
performed (Me.lblClassOverFilled.Text = ―Too many Students!‖). If the
variable is not greater than 30 (say it is exactly 30), then the next line of
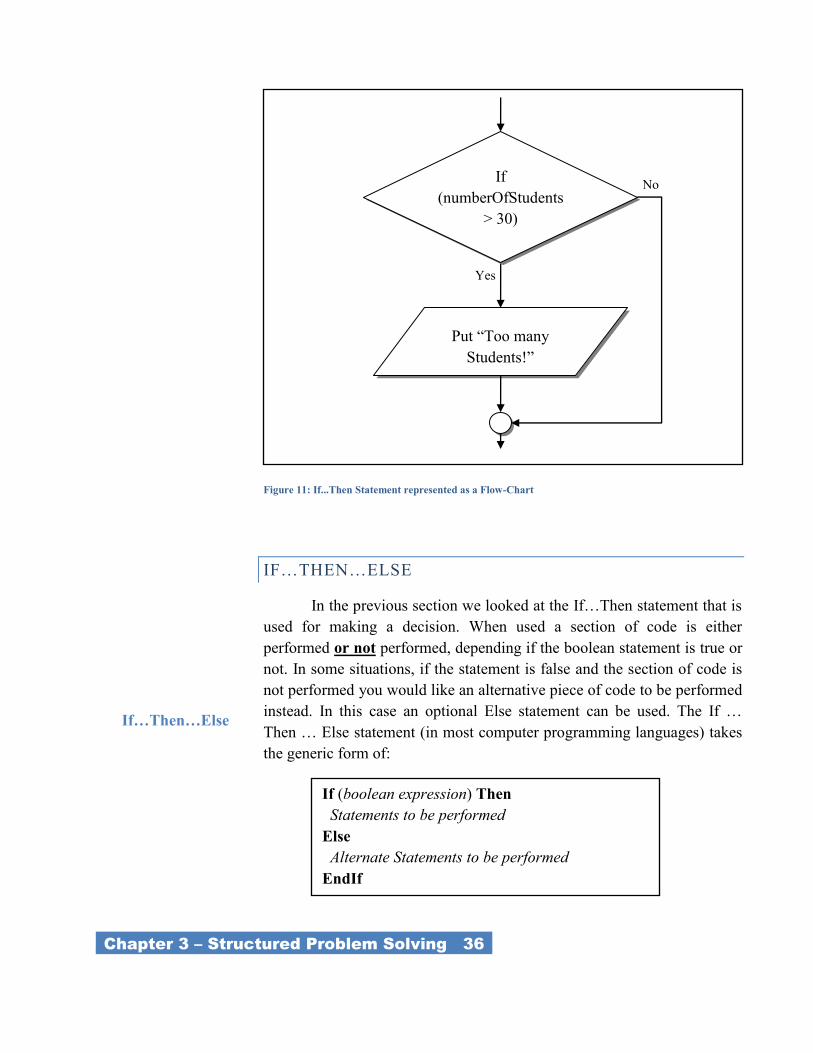
code is skipped over and NOT performed. Remember from the section on
flowcharts, the diamond shape represented decision. The If…Then
statement is the translation of a decision in a flow-chat to code. The above
examples would look like the following in a flow-chart:
if (numberOfStudents > 30)
{
this.lblClassOverFilled.Text = "Too many Students!";
}
If (numberOfStudents > 30) Then
Me.lblClassOverFilled.Text = "Too many Students!"
End If
VB Code 6: If...Then Statement in VB
C# Code 6: If...Then Statement in C#
_Chapter 3 – Structured Problem Solving 36_
IF…THEN…ELSE
In the previous section we looked at the If…Then statement that is
used for making a decision. When used a section of code is either
performed or not performed, depending if the boolean statement is true or
not. In some situations, if the statement is false and the section of code is
not performed you would like an alternative piece of code to be performed
instead. In this case an optional Else statement can be used. The If …
Then … Else statement (in most computer programming languages) takes
the generic form of:
If (boolean expression) Then
Statements to be performed
Else
Alternate Statements to be performed
EndIf
If
(numberOfStudents
> 30)
Put ―Too many
Students!‖
Yes
No
Figure 11: If...Then Statement represented as a Flow-Chart
If…Then…Else
_Chapter 3 – Structured Problem Solving 37_
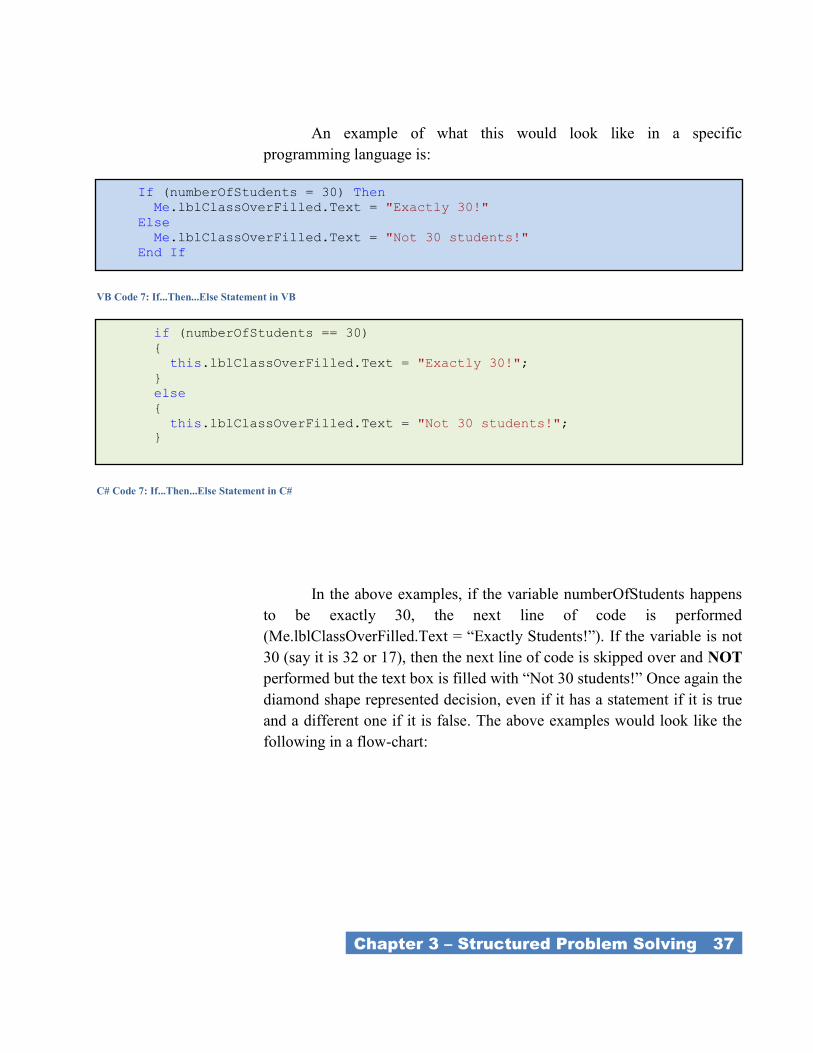
An example of what this would look like in a specific
programming language is:
In the above examples, if the variable numberOfStudents happens
to be exactly 30, the next line of code is performed
(Me.lblClassOverFilled.Text = ―Exactly Students!‖). If the variable is not
30 (say it is 32 or 17), then the next line of code is skipped over and NOT
performed but the text box is filled with ―Not 30 students!‖ Once again the
diamond shape represented decision, even if it has a statement if it is true
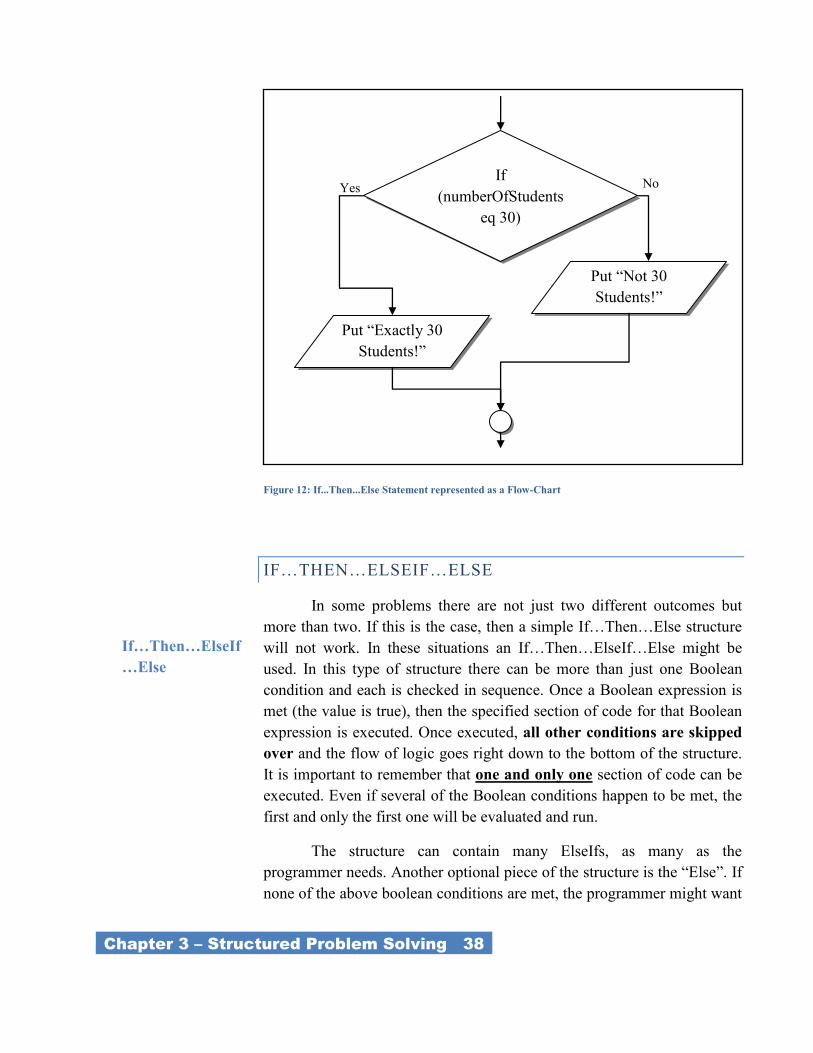
and a different one if it is false. The above examples would look like the
following in a flow-chart:
if (numberOfStudents == 30)
{
this.lblClassOverFilled.Text = "Exactly 30!";
}
else
{
this.lblClassOverFilled.Text = "Not 30 students!";
}
If (numberOfStudents = 30) Then
Me.lblClassOverFilled.Text = "Exactly 30!"
Else
Me.lblClassOverFilled.Text = "Not 30 students!"
End If
C# Code 7: If...Then...Else Statement in C#
VB Code 7: If...Then...Else Statement in VB
_Chapter 3 – Structured Problem Solving 38_
IF…THEN…ELSEIF…ELSE
In some problems there are not just two different outcomes but
more than two. If this is the case, then a simple If…Then…Else structure
will not work. In these situations an If…Then…ElseIf…Else might be
used. In this type of structure there can be more than just one Boolean
condition and each is checked in sequence. Once a Boolean expression is
met (the value is true), then the specified section of code for that Boolean
expression is executed. Once executed, all other conditions are skipped
over and the flow of logic goes right down to the bottom of the structure.
It is important to remember that one and only one section of code can be
executed. Even if several of the Boolean conditions happen to be met, the
first and only the first one will be evaluated and run.
The structure can contain many ElseIfs, as many as the
programmer needs. Another optional piece of the structure is the ―Else‖. If
none of the above boolean conditions are met, the programmer might want
If
(numberOfStudents
eq 30)
Put ―Exactly 30
Students!‖
Yes No
Put ―Not 30
Students!‖
If…Then…ElseIf
…Else
Figure 12: If...Then...Else Statement represented as a Flow-Chart

_Chapter 3 – Structured Problem Solving 39_
a section of code to be executed. If this is the case, then the code is placed
in the else section. Any code in the else section is run if and only if, none
of the Boolean expressions were met. It should also be noted that there is
no Boolean condition associated with the else. That is because it is run
only if all the above boolean conditions are not met. The
If…Then…ElseIf…Else statement (in most computer programming
languages) takes the generic form of:
An example of what this would look like in a specific
programming language is:
If (boolean expression #1) Then
First potential statement to be performed
ElseIf (boolean expression #2) Then
Second potential statement to be performed
…
ElseIf (boolean expression #n) Then
Nth potential statement to be performed
Else
Alternate statement to be performed
EndIf
If (colourOfLight = “red”) Then
Me.txtWhatCarAreToDo.Text = "Stop!"
ElseIf (colourOfLight = “yellow”) Then
Me.txtWhatCarAreToDo.Text = "Slow Down."
ElseIf (colourOfLight = “green”) Then
Me.txtWhatCarAreToDo.Text = "Go, if all clear"
Else
Me.txtWhatCarAreToDo.Text = "No idea!"
End If
VB Code 8: If...Then...ElseIf...Else Statement in VB
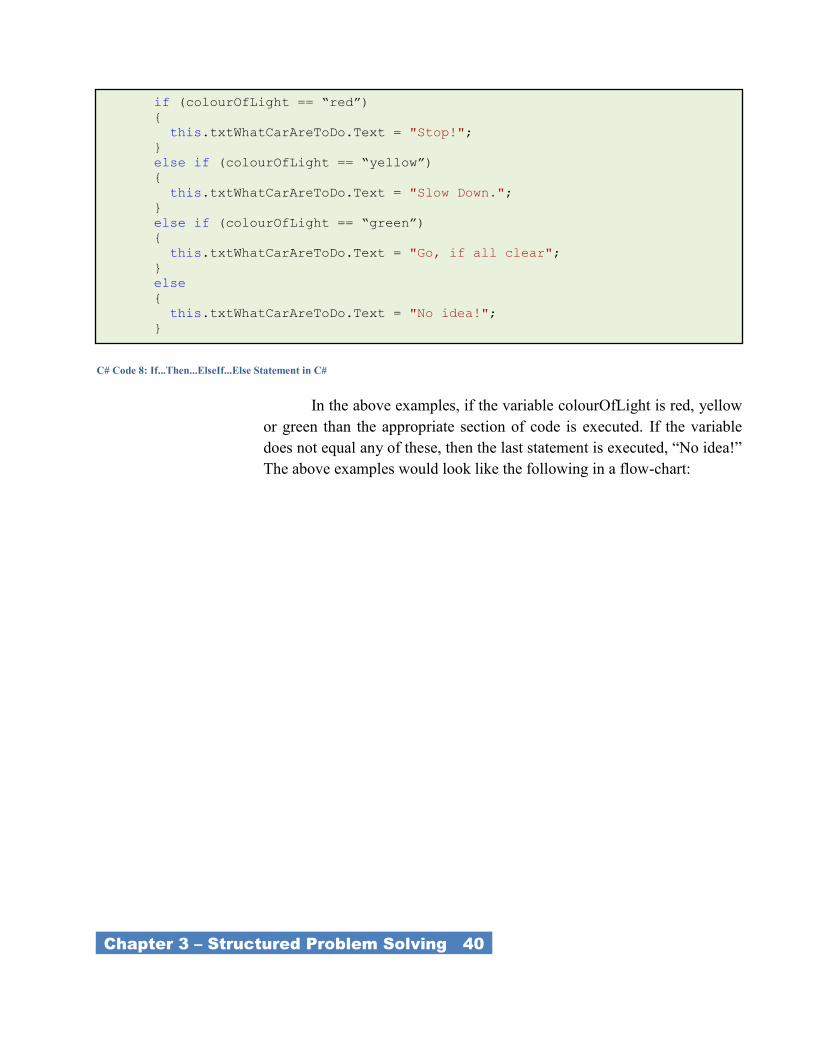
_Chapter 3 – Structured Problem Solving 40_
In the above examples, if the variable colourOfLight is red, yellow
or green than the appropriate section of code is executed. If the variable
does not equal any of these, then the last statement is executed, ―No idea!‖
The above examples would look like the following in a flow-chart:
if (colourOfLight == “red”)
{
this.txtWhatCarAreToDo.Text = "Stop!";
}
else if (colourOfLight == “yellow”)
{
this.txtWhatCarAreToDo.Text = "Slow Down.";
}
else if (colourOfLight == “green”)
{
this.txtWhatCarAreToDo.Text = "Go, if all clear";
}
else
{
this.txtWhatCarAreToDo.Text = "No idea!";
}
C# Code 8: If...Then...ElseIf...Else Statement in C#
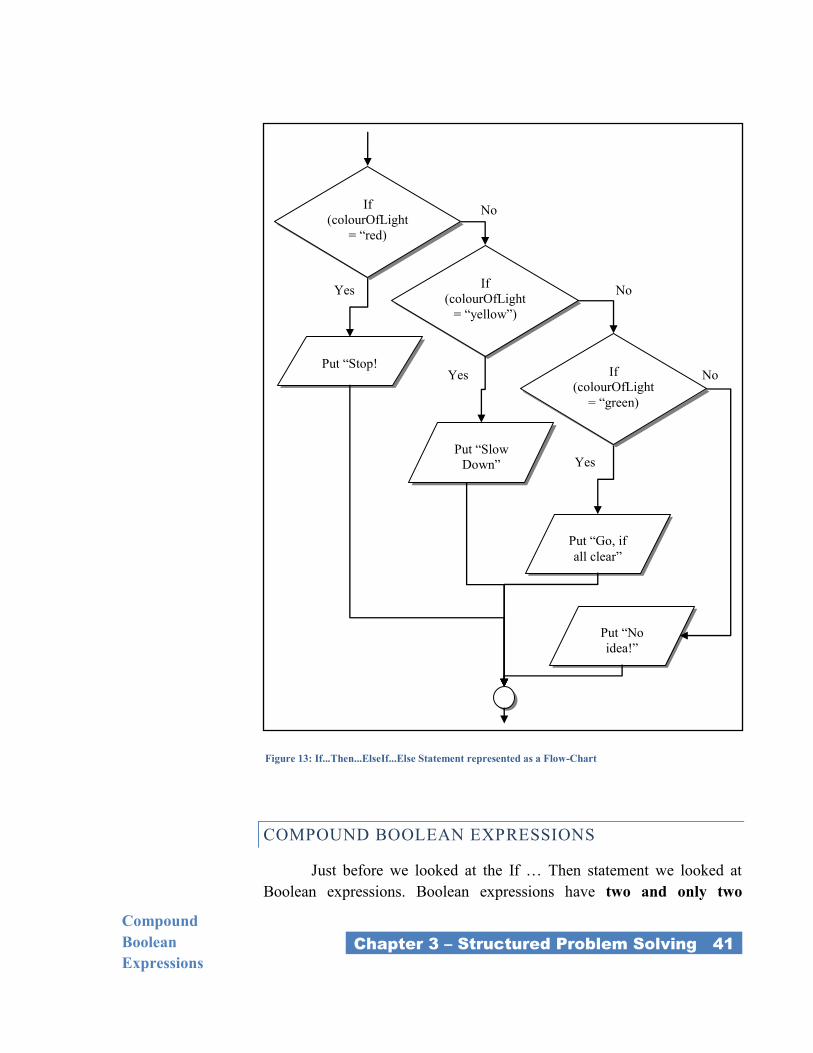
_Chapter 3 – Structured Problem Solving 41_
COMPOUND BOOLEAN EXPRESSIONS
Just before we looked at the If … Then statement we looked at
Boolean expressions. Boolean expressions have two and only two
If
(colourOfLight
= ―red)
Put ―Stop!
Yes
No
If
(colourOfLight
= ―yellow‖)
Put ―Slow
Down‖
Yes
No
If
(colourOfLight
= ―green)
Put ―Go, if
all clear‖
Yes
No
Put ―No
idea!‖
Figure 13: If...Then...ElseIf...Else Statement represented as a Flow-Chart
Compound
Boolean
Expressions
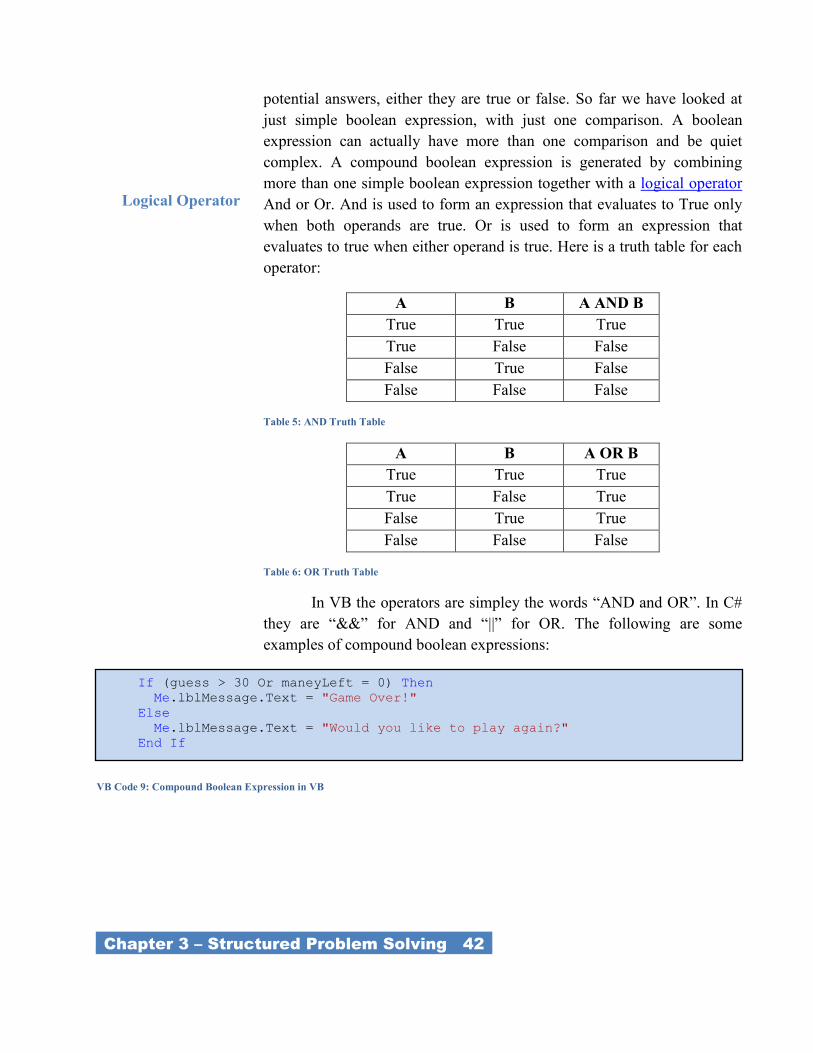
_Chapter 3 – Structured Problem Solving 42_
potential answers, either they are true or false. So far we have looked at
just simple boolean expression, with just one comparison. A boolean
expression can actually have more than one comparison and be quiet
complex. A compound boolean expression is generated by combining
more than one simple boolean expression together with a logical operator
And or Or. And is used to form an expression that evaluates to True only
when both operands are true. Or is used to form an expression that
evaluates to true when either operand is true. Here is a truth table for each
operator:
A B A AND B
True True True
True False False
False True False
False False False
Table 5: AND Truth Table
A B A OR B
True True True
True False True
False True True
False False False
Table 6: OR Truth Table
In VB the operators are simpley the words ―AND and OR‖. In C#
they are ―&&‖ for AND and ―||‖ for OR. The following are some
examples of compound boolean expressions:
If (guess > 30 Or maneyLeft = 0) Then
Me.lblMessage.Text = "Game Over!"
Else
Me.lblMessage.Text = "Would you like to play again?"
End If
Logical Operator
VB Code 9: Compound Boolean Expression in VB
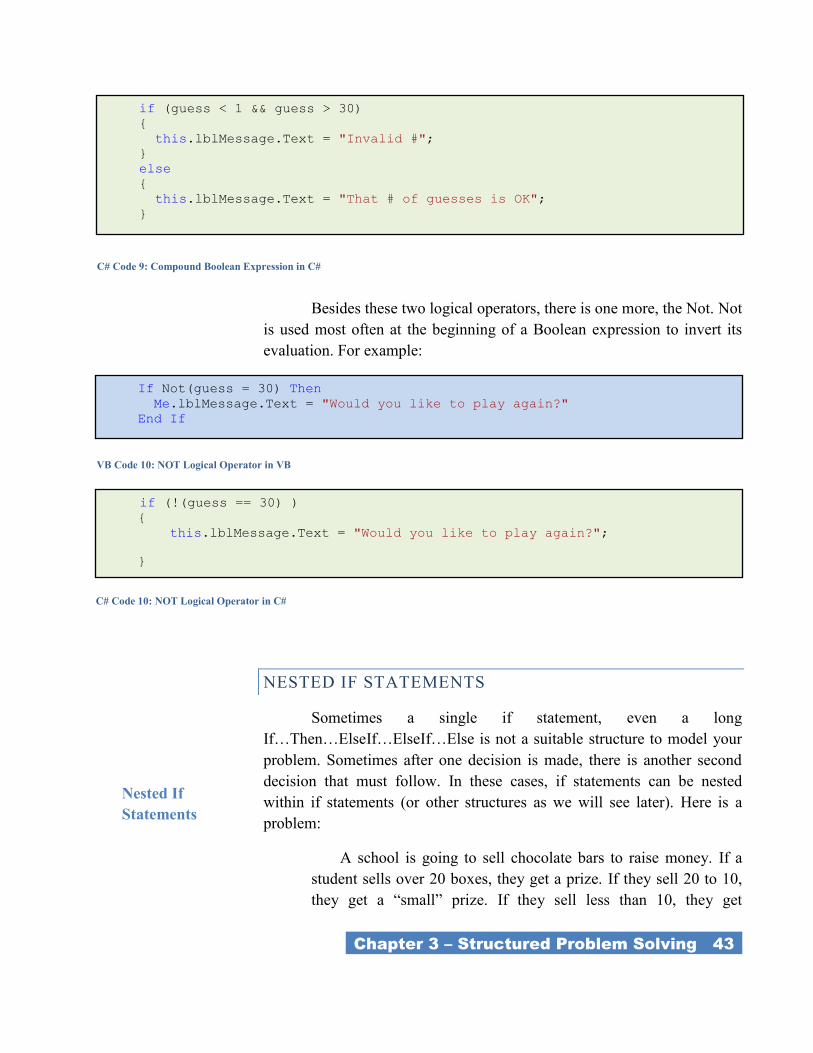
_Chapter 3 – Structured Problem Solving 43_
Besides these two logical operators, there is one more, the Not. Not
is used most often at the beginning of a Boolean expression to invert its
evaluation. For example:
NESTED IF STATEMENTS
Sometimes a single if statement, even a long
If…Then…ElseIf…ElseIf…Else is not a suitable structure to model your
problem. Sometimes after one decision is made, there is another second
decision that must follow. In these cases, if statements can be nested
within if statements (or other structures as we will see later). Here is a
problem:
A school is going to sell chocolate bars to raise money. If a
student sells over 20 boxes, they get a prize. If they sell 20 to 10,
they get a ―small‖ prize. If they sell less than 10, they get
if (guess < 1 && guess > 30)
{
this.lblMessage.Text = "Invalid #";
}
else
{
this.lblMessage.Text = "That # of guesses is OK";
}
If Not(guess = 30) Then
Me.lblMessage.Text = "Would you like to play again?"
End If
VB Code 10: NOT Logical Operator in VB
Nested If
Statements
C# Code 9: Compound Boolean Expression in C#
if (!(guess == 30) ) {
this.lblMessage.Text = "Would you like to play again?";
}
C# Code 10: NOT Logical Operator in C#
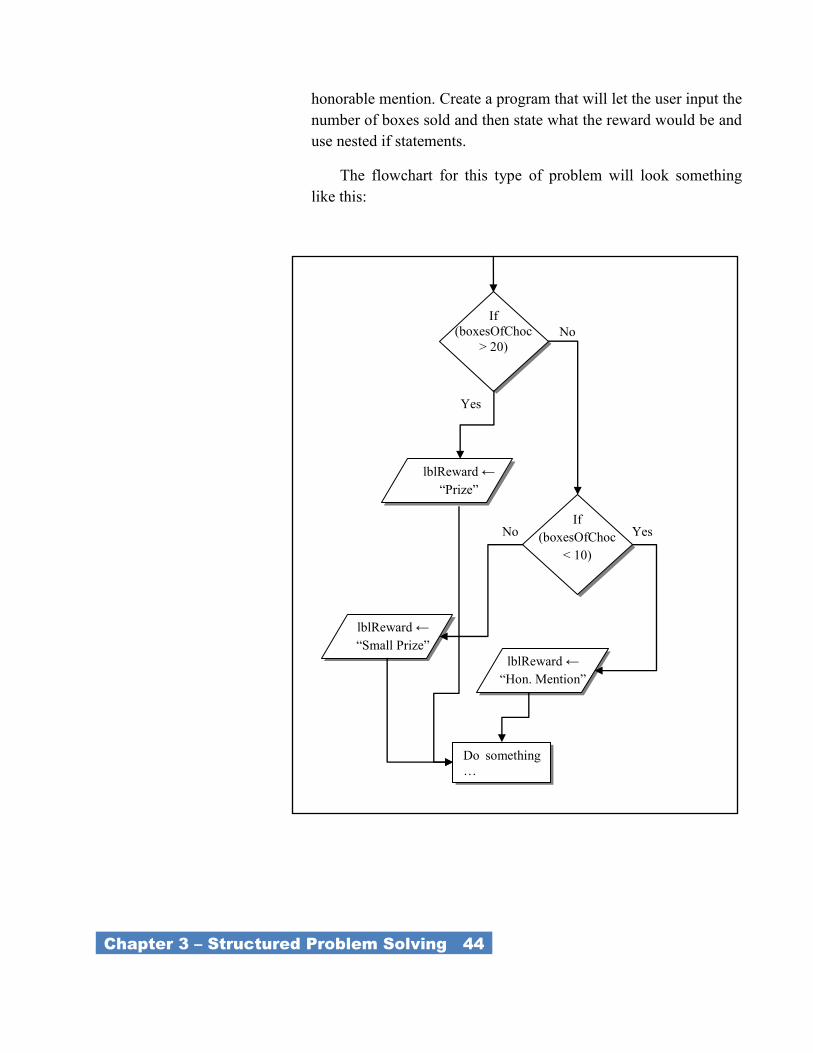
_Chapter 3 – Structured Problem Solving 44_
honorable mention. Create a program that will let the user input the
number of boxes sold and then state what the reward would be and
use nested if statements.
The flowchart for this type of problem will look something
like this:
Do something
…
If
(boxesOfChoc
> 20)
lblReward ←
―Prize‖
Yes
No
If
(boxesOfChoc
< 10) Yes
lblReward ←
―Small Prize‖
lblReward ←
―Hon. Mention‖
No
Yes
No
Yes No
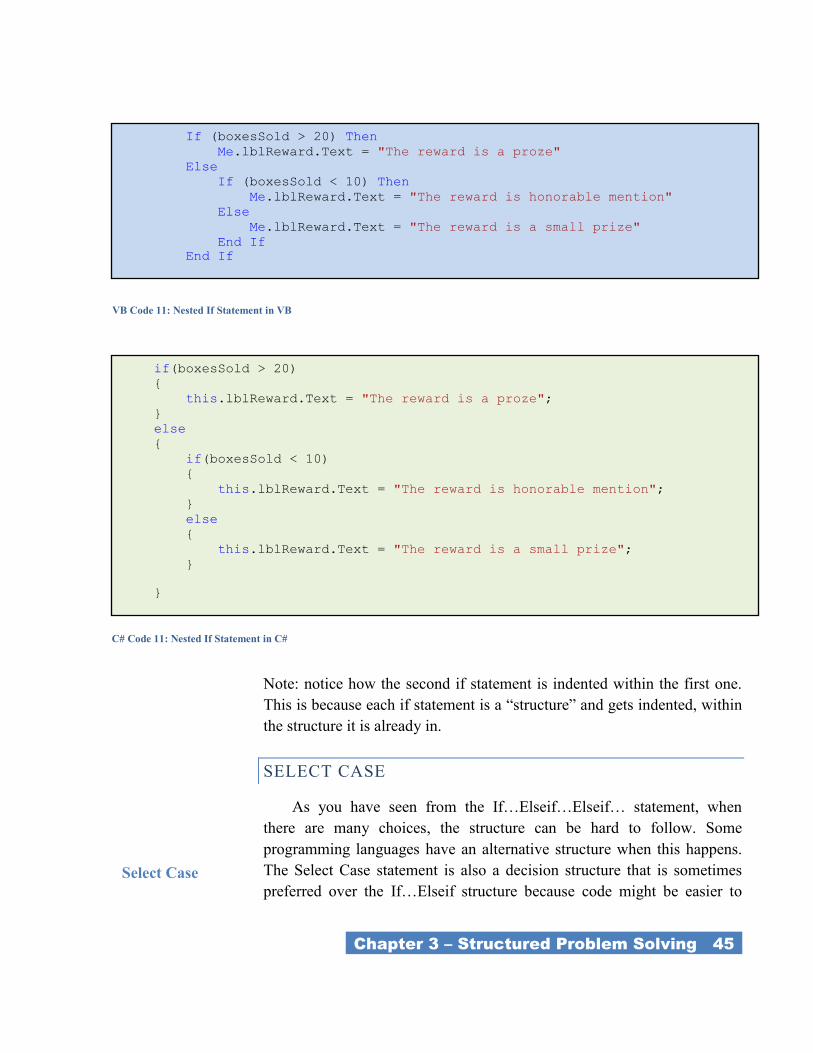
_Chapter 3 – Structured Problem Solving 45_
Note: notice how the second if statement is indented within the first one.
This is because each if statement is a ―structure‖ and gets indented, within
the structure it is already in.
SELECT CASE
As you have seen from the If…Elseif…Elseif… statement, when
there are many choices, the structure can be hard to follow. Some
programming languages have an alternative structure when this happens.
The Select Case statement is also a decision structure that is sometimes
preferred over the If…Elseif structure because code might be easier to
Select Case
If (boxesSold > 20) Then
Me.lblReward.Text = "The reward is a proze"
Else
If (boxesSold < 10) Then
Me.lblReward.Text = "The reward is honorable mention"
Else
Me.lblReward.Text = "The reward is a small prize"
End If
End If
if(boxesSold > 20)
{
this.lblReward.Text = "The reward is a proze";
}
else
{
if(boxesSold < 10)
{
this.lblReward.Text = "The reward is honorable mention";
}
else
{
this.lblReward.Text = "The reward is a small prize";
}
}
C# Code 11: Nested If Statement in C#
VB Code 11: Nested If Statement in VB
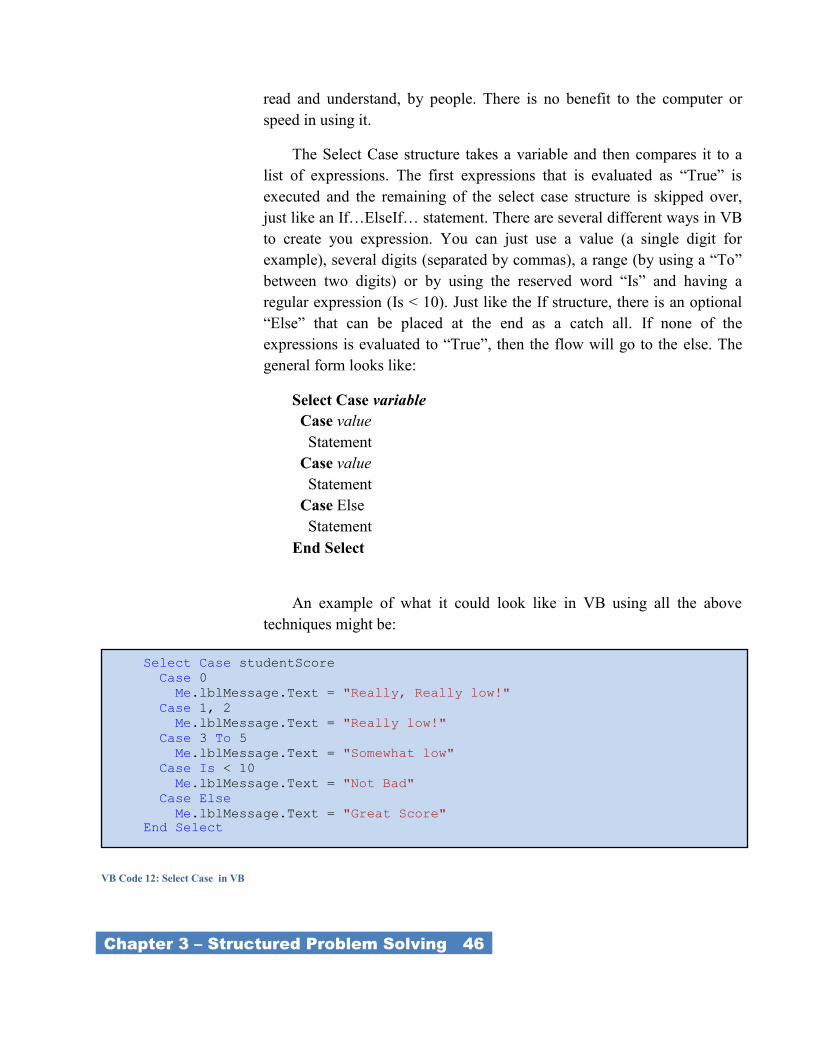
_Chapter 3 – Structured Problem Solving 46_
read and understand, by people. There is no benefit to the computer or
speed in using it.
The Select Case structure takes a variable and then compares it to a
list of expressions. The first expressions that is evaluated as ―True‖ is
executed and the remaining of the select case structure is skipped over,
just like an If…ElseIf… statement. There are several different ways in VB
to create you expression. You can just use a value (a single digit for
example), several digits (separated by commas), a range (by using a ―To‖
between two digits) or by using the reserved word ―Is‖ and having a
regular expression (Is < 10). Just like the If structure, there is an optional
―Else‖ that can be placed at the end as a catch all. If none of the
expressions is evaluated to ―True‖, then the flow will go to the else. The
general form looks like:
Select Case variable
Case value
Statement
Case value
Statement
Case Else
Statement
End Select
An example of what it could look like in VB using all the above
techniques might be:
Select Case studentScore
Case 0
Me.lblMessage.Text = "Really, Really low!"
Case 1, 2
Me.lblMessage.Text = "Really low!"
Case 3 To 5
Me.lblMessage.Text = "Somewhat low"
Case Is < 10
Me.lblMessage.Text = "Not Bad"
Case Else
Me.lblMessage.Text = "Great Score"
End Select
VB Code 12: Select Case in VB
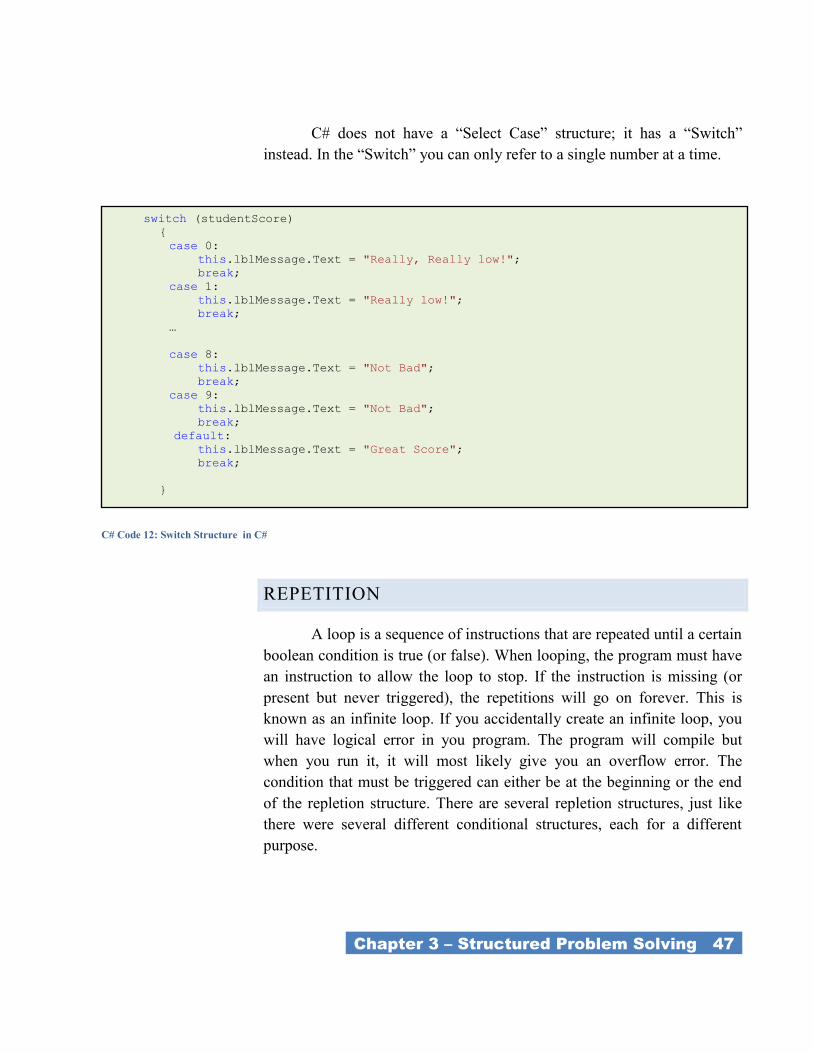
_Chapter 3 – Structured Problem Solving 47_
C# does not have a ―Select Case‖ structure; it has a ―Switch‖
instead. In the ―Switch‖ you can only refer to a single number at a time.
REPETITION
A loop is a sequence of instructions that are repeated until a certain
boolean condition is true (or false). When looping, the program must have
an instruction to allow the loop to stop. If the instruction is missing (or
present but never triggered), the repetitions will go on forever. This is
known as an infinite loop. If you accidentally create an infinite loop, you
will have logical error in you program. The program will compile but
when you run it, it will most likely give you an overflow error. The
condition that must be triggered can either be at the beginning or the end
of the repletion structure. There are several repletion structures, just like
there were several different conditional structures, each for a different
purpose.
switch (studentScore)
{
case 0:
this.lblMessage.Text = "Really, Really low!";
break;
case 1:
this.lblMessage.Text = "Really low!";
break;
…
case 8:
this.lblMessage.Text = "Not Bad";
break;
case 9:
this.lblMessage.Text = "Not Bad";
break;
default:
this.lblMessage.Text = "Great Score";
break;
}
C# Code 12: Switch Structure in C#

_Chapter 3 – Structured Problem Solving 48_
DO…LOOP WHILE
The do…loop while is a repetition structure where the statements in
the structure are repeated as long as the boolean expression is true. It can
be represented in a flow-chart like the one below:
Notice that the looping action continues while the condition is true. It is
for this reason that the repetition structure is called the do…while
structure. The boolean condition is also not checked before the looping
statements are executes the first times. This mean if the condition is not
true the first time, the statements will still happen once. It has the
following general looking structure in most programming languages:
Do
Statements
Loop While (boolean condition)
It is a common occurrence to have an accumulator or counter
within a looping structure. The counter is incremented (1 is added) or
decremented (1 is subtracted) each time the condition is meet and the
statements inside the loop are performed. When the counter reaches a
certain number that is expressed inside the boolean statement, then the
loop is exited. Ensure you use proper style and do not do what is very
common in programming, just declare the variable as i, j or x. Always
name a variable for what it is actually doing and holding.
Looping
statements
No Boolean
Condition
No
Yes
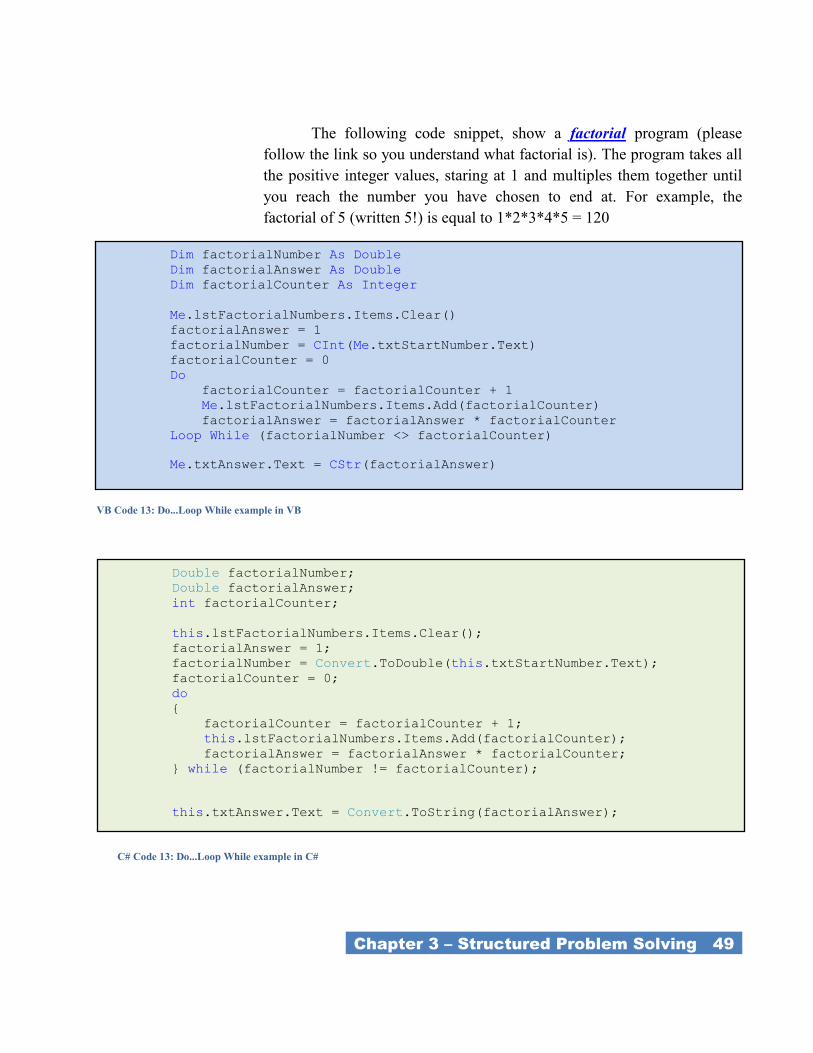
_Chapter 3 – Structured Problem Solving 49_
The following code snippet, show a factorial program (please
follow the link so you understand what factorial is). The program takes all
the positive integer values, staring at 1 and multiples them together until
you reach the number you have chosen to end at. For example, the
factorial of 5 (written 5!) is equal to 1*2*3*4*5 = 120
Dim factorialNumber As Double
Dim factorialAnswer As Double
Dim factorialCounter As Integer
Me.lstFactorialNumbers.Items.Clear()
factorialAnswer = 1
factorialNumber = CInt(Me.txtStartNumber.Text)
factorialCounter = 0
Do
factorialCounter = factorialCounter + 1
Me.lstFactorialNumbers.Items.Add(factorialCounter)
factorialAnswer = factorialAnswer * factorialCounter
Loop While (factorialNumber <> factorialCounter)
Me.txtAnswer.Text = CStr(factorialAnswer)
VB Code 13: Do...Loop While example in VB
Double factorialNumber;
Double factorialAnswer;
int factorialCounter;
this.lstFactorialNumbers.Items.Clear();
factorialAnswer = 1;
factorialNumber = Convert.ToDouble(this.txtStartNumber.Text);
factorialCounter = 0;
do
{
factorialCounter = factorialCounter + 1;
this.lstFactorialNumbers.Items.Add(factorialCounter);
factorialAnswer = factorialAnswer * factorialCounter;
} while (factorialNumber != factorialCounter);
this.txtAnswer.Text = Convert.ToString(factorialAnswer);
C# Code 13: Do...Loop While example in C#
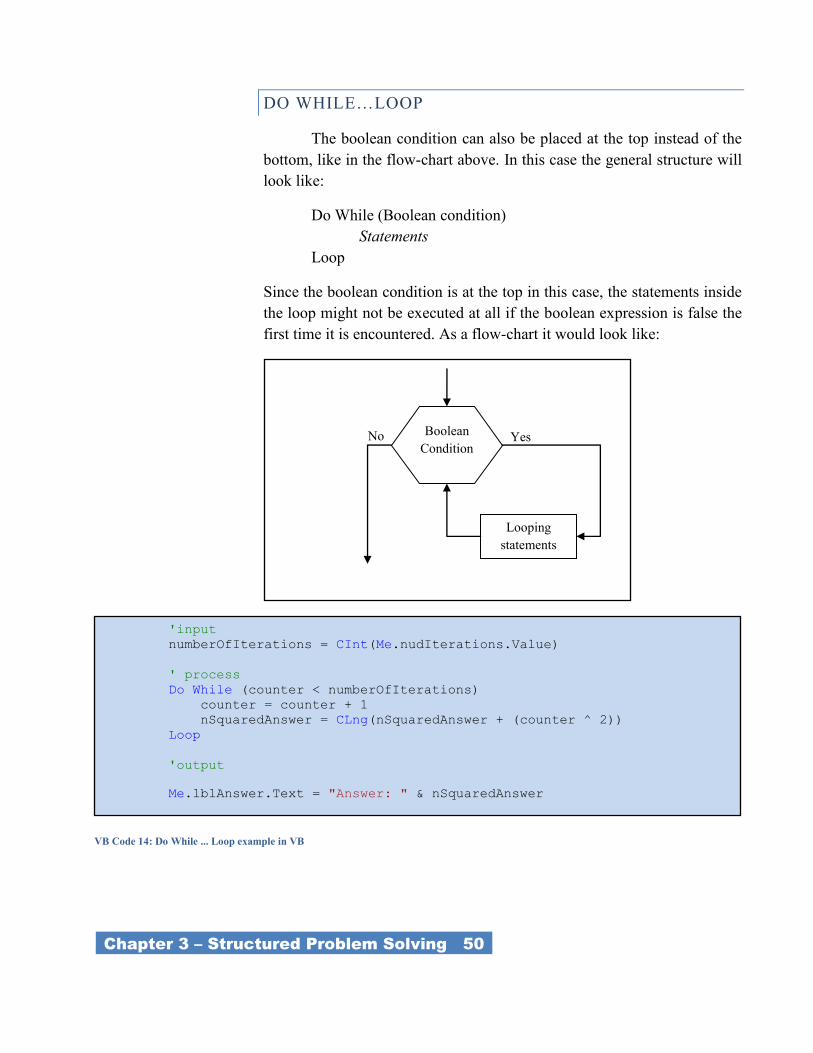
_Chapter 3 – Structured Problem Solving 50_
DO WHILE…LOOP
The boolean condition can also be placed at the top instead of the
bottom, like in the flow-chart above. In this case the general structure will
look like:
Do While (Boolean condition)
Statements
Loop
Since the boolean condition is at the top in this case, the statements inside
the loop might not be executed at all if the boolean expression is false the
first time it is encountered. As a flow-chart it would look like:
Looping
statements No
Boolean
Condition
No Yes
'input
numberOfIterations = CInt(Me.nudIterations.Value)
' process
Do While (counter < numberOfIterations)
counter = counter + 1
nSquaredAnswer = CLng(nSquaredAnswer + (counter ^ 2))
Loop
'output
Me.lblAnswer.Text = "Answer: " & nSquaredAnswer
VB Code 14: Do While ... Loop example in VB
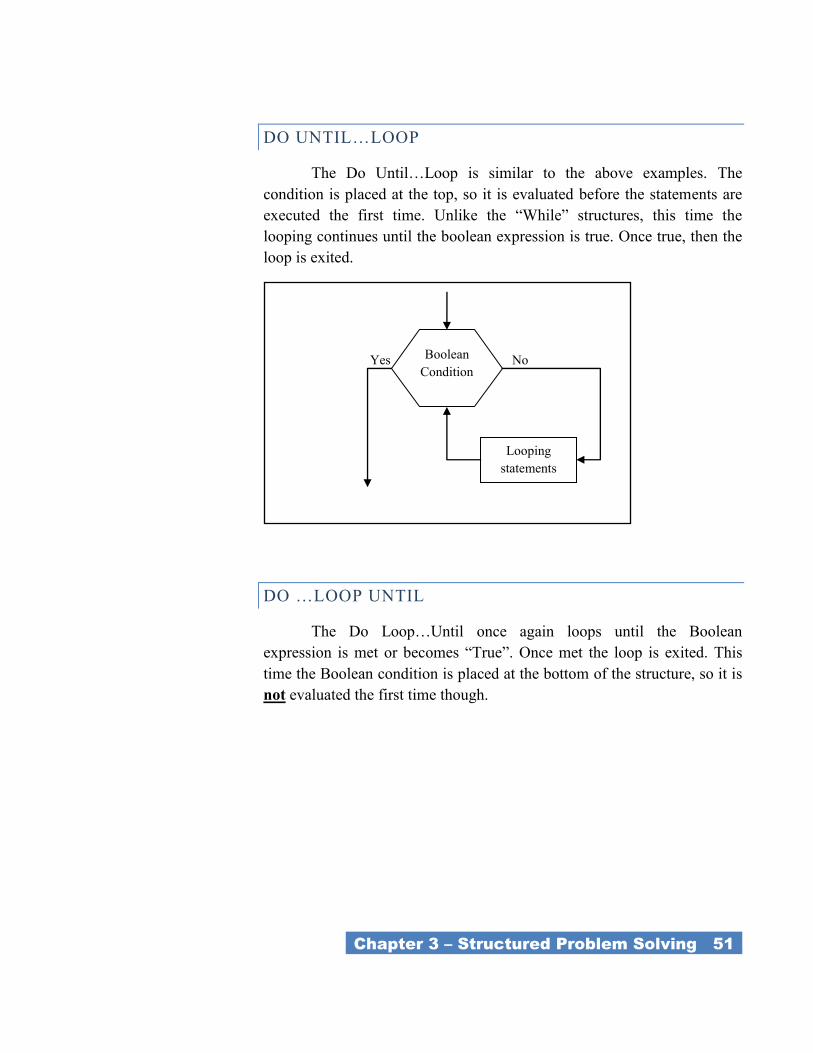
_Chapter 3 – Structured Problem Solving 51_
DO UNTIL…LOOP
The Do Until…Loop is similar to the above examples. The
condition is placed at the top, so it is evaluated before the statements are
executed the first time. Unlike the ―While‖ structures, this time the
looping continues until the boolean expression is true. Once true, then the
loop is exited.
DO …LOOP UNTIL
The Do Loop…Until once again loops until the Boolean
expression is met or becomes ―True‖. Once met the loop is exited. This
time the Boolean condition is placed at the bottom of the structure, so it is
not evaluated the first time though.
Looping
statements No
Boolean
Condition
No Yes
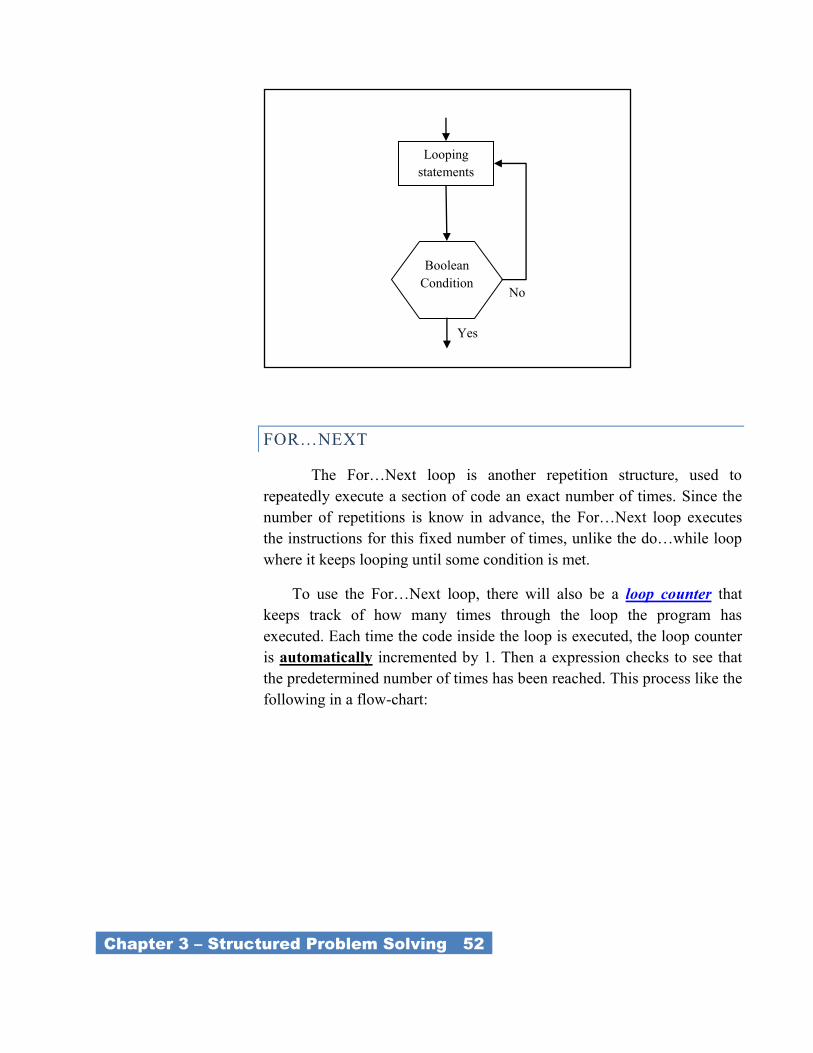
_Chapter 3 – Structured Problem Solving 52_
FOR…NEXT
The For…Next loop is another repetition structure, used to
repeatedly execute a section of code an exact number of times. Since the
number of repetitions is know in advance, the For…Next loop executes
the instructions for this fixed number of times, unlike the do…while loop
where it keeps looping until some condition is met.
To use the For…Next loop, there will also be a loop counter that
keeps track of how many times through the loop the program has
executed. Each time the code inside the loop is executed, the loop counter
is automatically incremented by 1. Then a expression checks to see that
the predetermined number of times has been reached. This process like the
following in a flow-chart:
Looping
statements
No Boolean
Condition
No
Yes
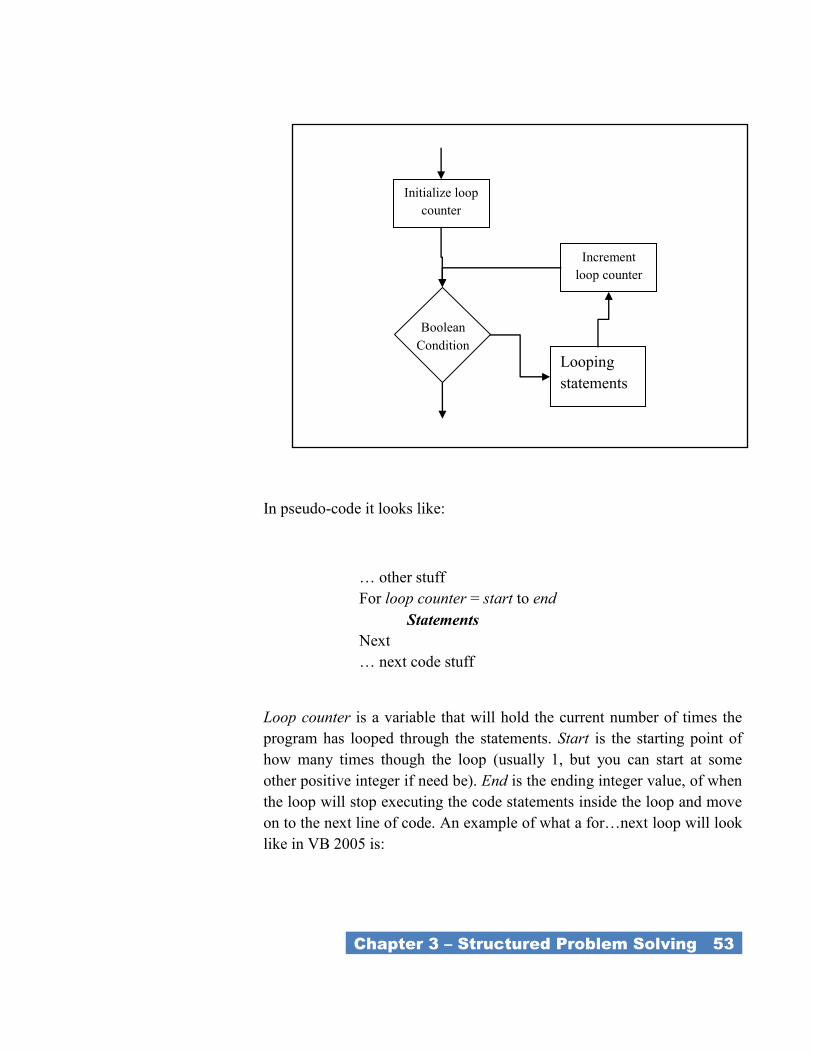
_Chapter 3 – Structured Problem Solving 53_
In pseudo-code it looks like:
… other stuff
For loop counter = start to end
Statements
Next
… next code stuff
Loop counter is a variable that will hold the current number of times the
program has looped through the statements. Start is the starting point of
how many times though the loop (usually 1, but you can start at some
other positive integer if need be). End is the ending integer value, of when
the loop will stop executing the code statements inside the loop and move
on to the next line of code. An example of what a for…next loop will look
like in VB 2005 is:
Boolean
Condition
Looping
statements
No
Yes
Initialize loop
counter
Increment
loop counter
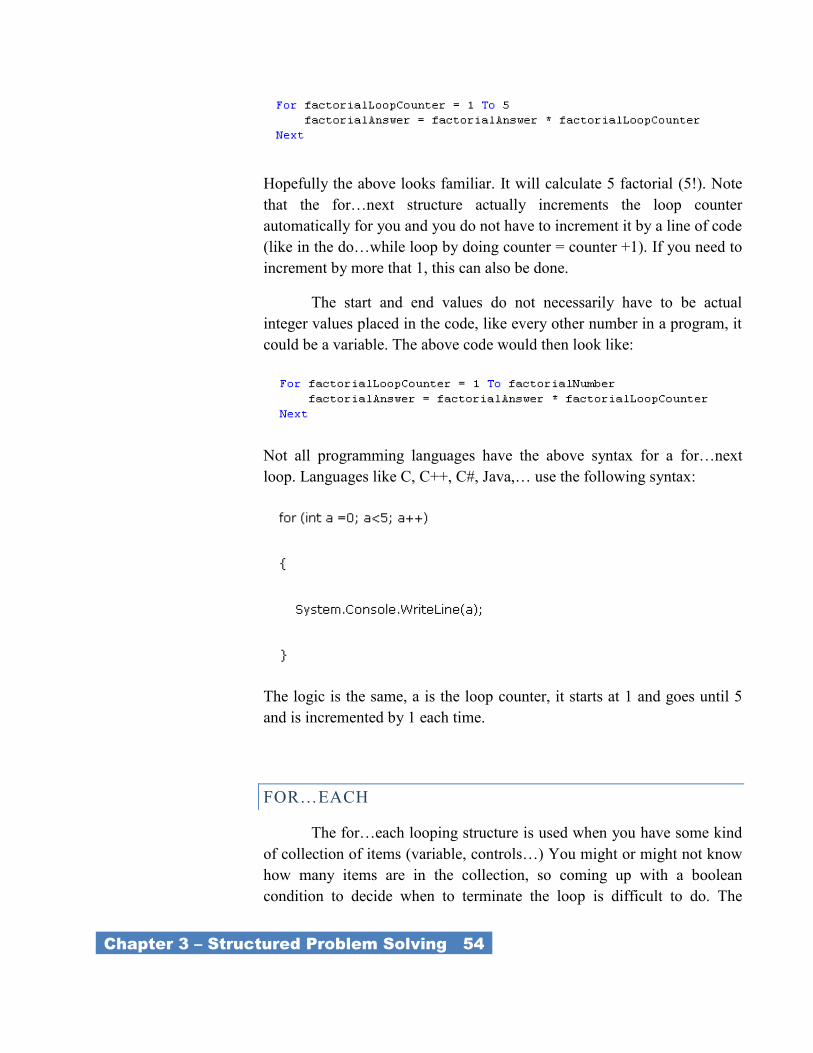
_Chapter 3 – Structured Problem Solving 54_
Hopefully the above looks familiar. It will calculate 5 factorial (5!). Note
that the for…next structure actually increments the loop counter
automatically for you and you do not have to increment it by a line of code
(like in the do…while loop by doing counter = counter +1). If you need to
increment by more that 1, this can also be done.
The start and end values do not necessarily have to be actual
integer values placed in the code, like every other number in a program, it
could be a variable. The above code would then look like:
Not all programming languages have the above syntax for a for…next
loop. Languages like C, C++, C#, Java,… use the following syntax:
The logic is the same, a is the loop counter, it starts at 1 and goes until 5
and is incremented by 1 each time.
FOR…EACH
The for…each looping structure is used when you have some kind
of collection of items (variable, controls…) You might or might not know
how many items are in the collection, so coming up with a boolean
condition to decide when to terminate the loop is difficult to do. The

_Chapter 3 – Structured Problem Solving 55_
for…each loop gathers together all the items that you are interested in and
then presents each item one at a time, just like the counter in a do…loop is
used to keep track of where you are.
Just like I the last few lessons, we used a new type that was not like
the regular integer or string. In today’s example we will use a new type
called ―control‖. The control type holds not a number but the reference
any kind of control, like buttons or text boxes. As you iterate through the
list of control, you can do interesting things like changing the colour of the
buttons (just like the example below).
NESTED LOOPS
We have seen the advantages of using various methods of iteration,
or looping. Now let's take a look at what happens when we combine
looping procedures.
The placing of one loop inside the body of another loop is called
nesting. When you "nest" two loops, the outer loop takes control of the
number of complete repetitions of the inner loop. While all types of loops
may be nested, the most commonly nested loops are for loops. How this
works is that the first pass of the outer loop triggers the inner loop, which
executes to completion. Then the second pass of the outer loop triggers the
inner loop again. This repeats until the outer loop finishes. In a flow chart
it looks like:
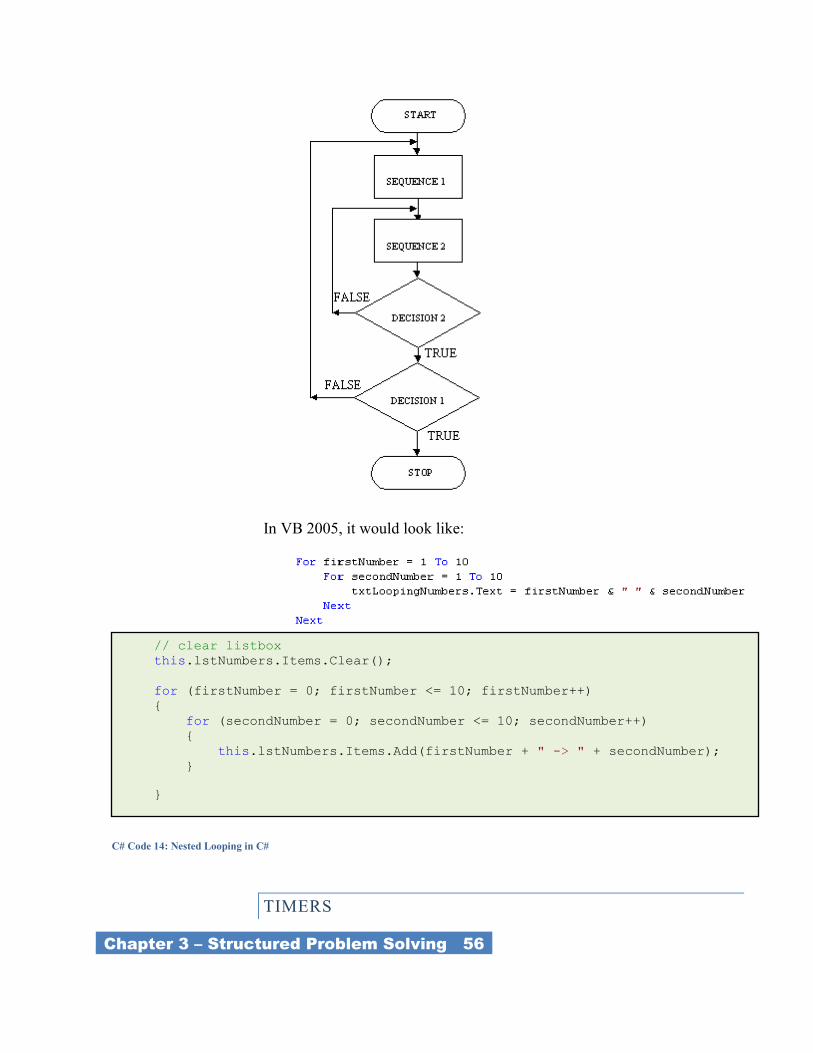
_Chapter 3 – Structured Problem Solving 56_
In VB 2005, it would look like:
TIMERS
// clear listbox
this.lstNumbers.Items.Clear();
for (firstNumber = 0; firstNumber <= 10; firstNumber++)
{
for (secondNumber = 0; secondNumber <= 10; secondNumber++)
{
this.lstNumbers.Items.Add(firstNumber + " -> " + secondNumber);
}
}
C# Code 14: Nested Looping in C#
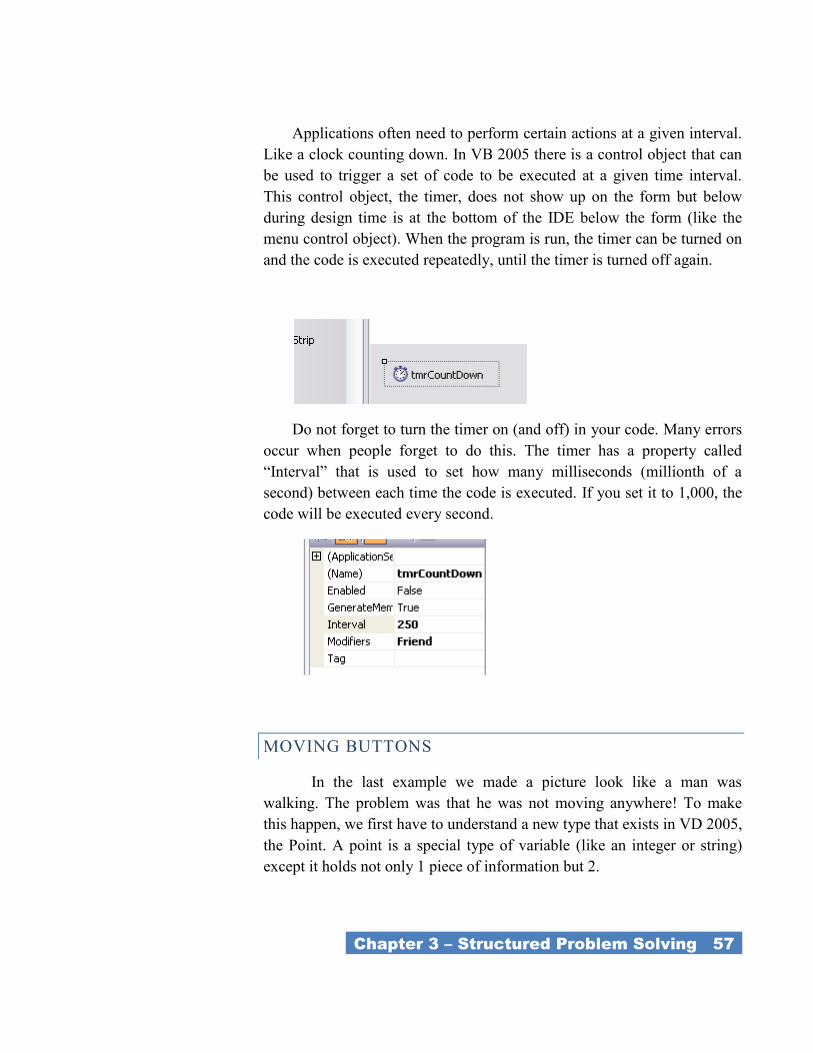
_Chapter 3 – Structured Problem Solving 57_
Applications often need to perform certain actions at a given interval.
Like a clock counting down. In VB 2005 there is a control object that can
be used to trigger a set of code to be executed at a given time interval.
This control object, the timer, does not show up on the form but below
during design time is at the bottom of the IDE below the form (like the
menu control object). When the program is run, the timer can be turned on
and the code is executed repeatedly, until the timer is turned off again.
Do not forget to turn the timer on (and off) in your code. Many errors
occur when people forget to do this. The timer has a property called
―Interval‖ that is used to set how many milliseconds (millionth of a
second) between each time the code is executed. If you set it to 1,000, the
code will be executed every second.
MOVING BUTTONS
In the last example we made a picture look like a man was
walking. The problem was that he was not moving anywhere! To make
this happen, we first have to understand a new type that exists in VD 2005,
the Point. A point is a special type of variable (like an integer or string)
except it holds not only 1 piece of information but 2.
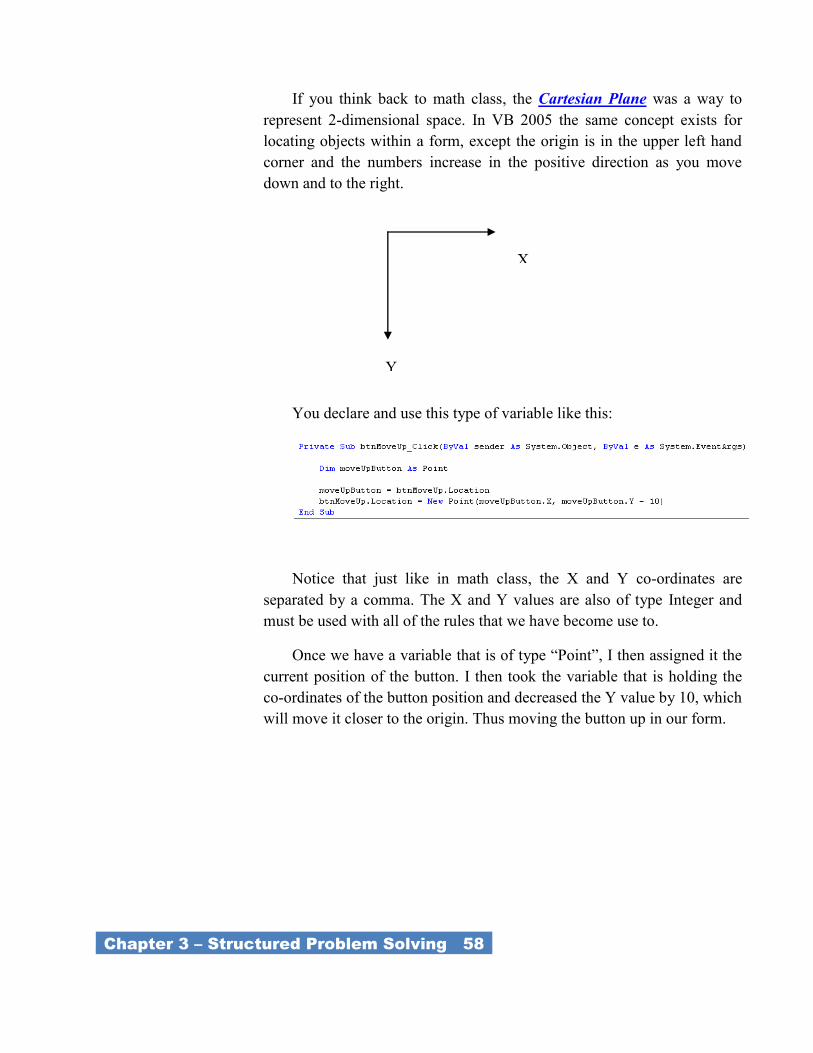
_Chapter 3 – Structured Problem Solving 58_
If you think back to math class, the Cartesian Plane was a way to
represent 2-dimensional space. In VB 2005 the same concept exists for
locating objects within a form, except the origin is in the upper left hand
corner and the numbers increase in the positive direction as you move
down and to the right.
You declare and use this type of variable like this:
Notice that just like in math class, the X and Y co-ordinates are
separated by a comma. The X and Y values are also of type Integer and
must be used with all of the rules that we have become use to.
Once we have a variable that is of type ―Point‖, I then assigned it the
current position of the button. I then took the variable that is holding the
co-ordinates of the button position and decreased the Y value by 10, which
will move it closer to the origin. Thus moving the button up in our form.
X
Y
CHAPTER 4 – FUNCTIONS
AND PROCEDURES
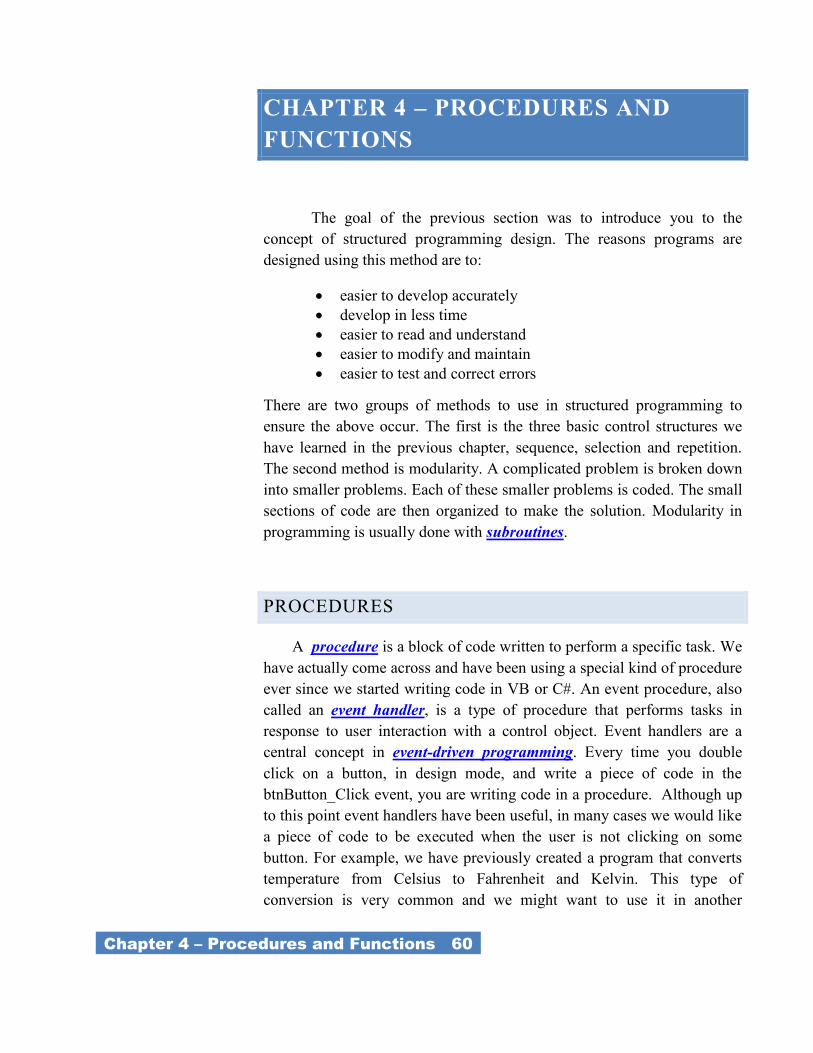
_Chapter 4 – Procedures and Functions 60_
CHAPTER 4 – PROCEDURES AND
FUNCTIONS
The goal of the previous section was to introduce you to the
concept of structured programming design. The reasons programs are
designed using this method are to:
easier to develop accurately
develop in less time
easier to read and understand
easier to modify and maintain
easier to test and correct errors
There are two groups of methods to use in structured programming to
ensure the above occur. The first is the three basic control structures we
have learned in the previous chapter, sequence, selection and repetition.
The second method is modularity. A complicated problem is broken down
into smaller problems. Each of these smaller problems is coded. The small
sections of code are then organized to make the solution. Modularity in
programming is usually done with subroutines.
PROCEDURES
A procedure is a block of code written to perform a specific task. We
have actually come across and have been using a special kind of procedure
ever since we started writing code in VB or C#. An event procedure, also
called an event handler, is a type of procedure that performs tasks in
response to user interaction with a control object. Event handlers are a
central concept in event-driven programming. Every time you double
click on a button, in design mode, and write a piece of code in the
btnButton_Click event, you are writing code in a procedure. Although up
to this point event handlers have been useful, in many cases we would like
a piece of code to be executed when the user is not clicking on some
button. For example, we have previously created a program that converts
temperature from Celsius to Fahrenheit and Kelvin. This type of
conversion is very common and we might want to use it in another
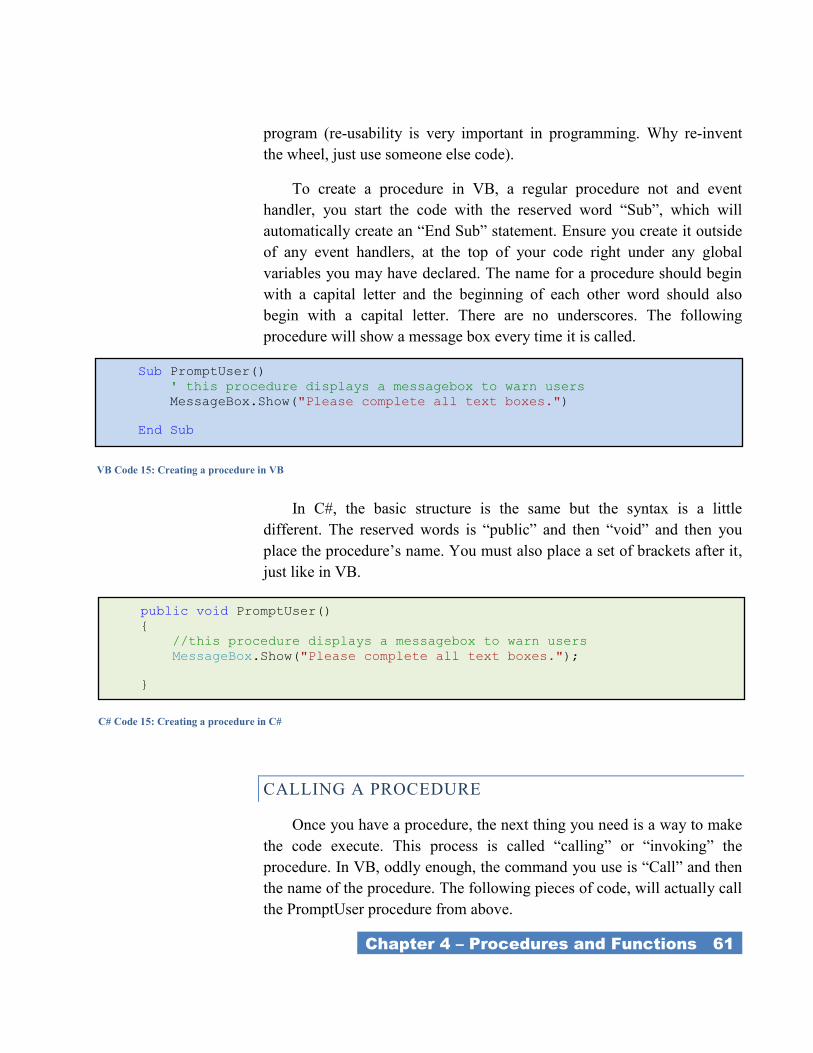
_Chapter 4 – Procedures and Functions 61_
program (re-usability is very important in programming. Why re-invent
the wheel, just use someone else code).
To create a procedure in VB, a regular procedure not and event
handler, you start the code with the reserved word ―Sub‖, which will
automatically create an ―End Sub‖ statement. Ensure you create it outside
of any event handlers, at the top of your code right under any global
variables you may have declared. The name for a procedure should begin
with a capital letter and the beginning of each other word should also
begin with a capital letter. There are no underscores. The following
procedure will show a message box every time it is called.
In C#, the basic structure is the same but the syntax is a little
different. The reserved words is ―public‖ and then ―void‖ and then you
place the procedure’s name. You must also place a set of brackets after it,
just like in VB.
CALLING A PROCEDURE
Once you have a procedure, the next thing you need is a way to make
the code execute. This process is called ―calling‖ or ―invoking‖ the
procedure. In VB, oddly enough, the command you use is ―Call‖ and then
the name of the procedure. The following pieces of code, will actually call
the PromptUser procedure from above.
Sub PromptUser()
' this procedure displays a messagebox to warn users
MessageBox.Show("Please complete all text boxes.")
End Sub
VB Code 15: Creating a procedure in VB
public void PromptUser()
{
//this procedure displays a messagebox to warn users
MessageBox.Show("Please complete all text boxes.");
}
C# Code 15: Creating a procedure in C#
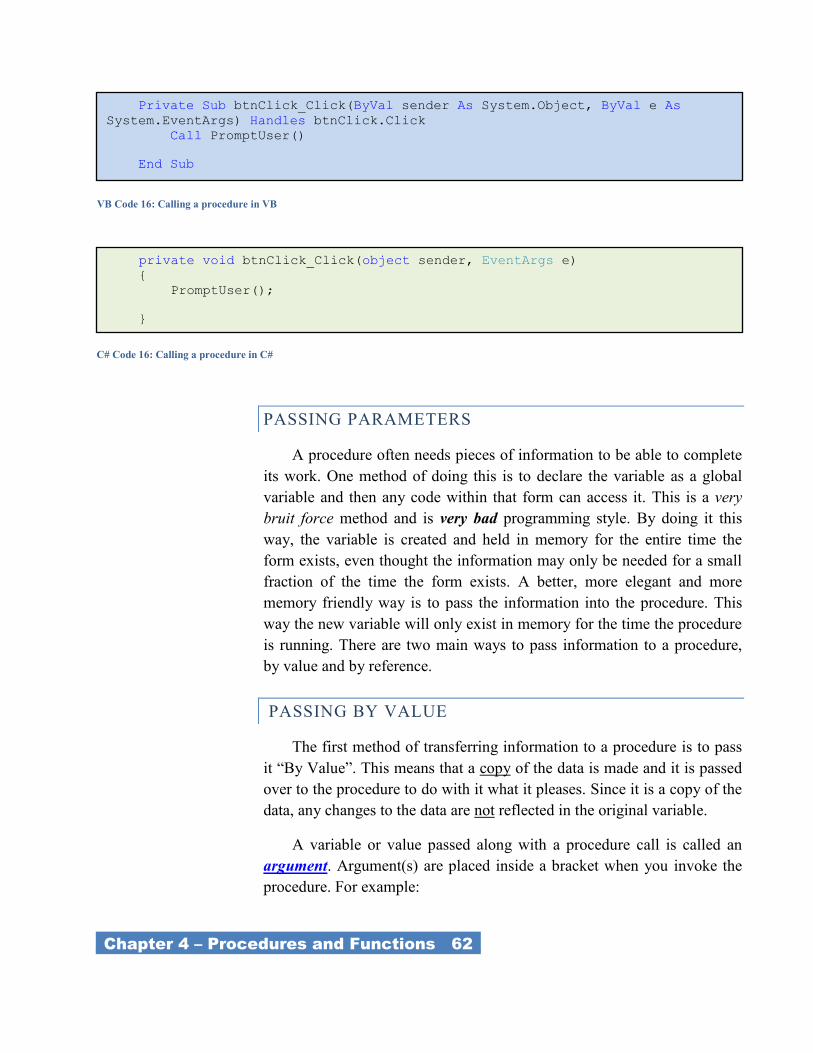
_Chapter 4 – Procedures and Functions 62_
PASSING PARAMETERS
A procedure often needs pieces of information to be able to complete
its work. One method of doing this is to declare the variable as a global
variable and then any code within that form can access it. This is a very
bruit force method and is very bad programming style. By doing it this
way, the variable is created and held in memory for the entire time the
form exists, even thought the information may only be needed for a small
fraction of the time the form exists. A better, more elegant and more
memory friendly way is to pass the information into the procedure. This
way the new variable will only exist in memory for the time the procedure
is running. There are two main ways to pass information to a procedure,
by value and by reference.
PASSING BY VALUE
The first method of transferring information to a procedure is to pass
it ―By Value‖. This means that a copy of the data is made and it is passed
over to the procedure to do with it what it pleases. Since it is a copy of the
data, any changes to the data are not reflected in the original variable.
A variable or value passed along with a procedure call is called an
argument. Argument(s) are placed inside a bracket when you invoke the
procedure. For example:
Private Sub btnClick_Click(ByVal sender As System.Object, ByVal e As
System.EventArgs) Handles btnClick.Click
Call PromptUser()
End Sub
VB Code 16: Calling a procedure in VB
private void btnClick_Click(object sender, EventArgs e)
{
PromptUser();
}
C# Code 16: Calling a procedure in C#
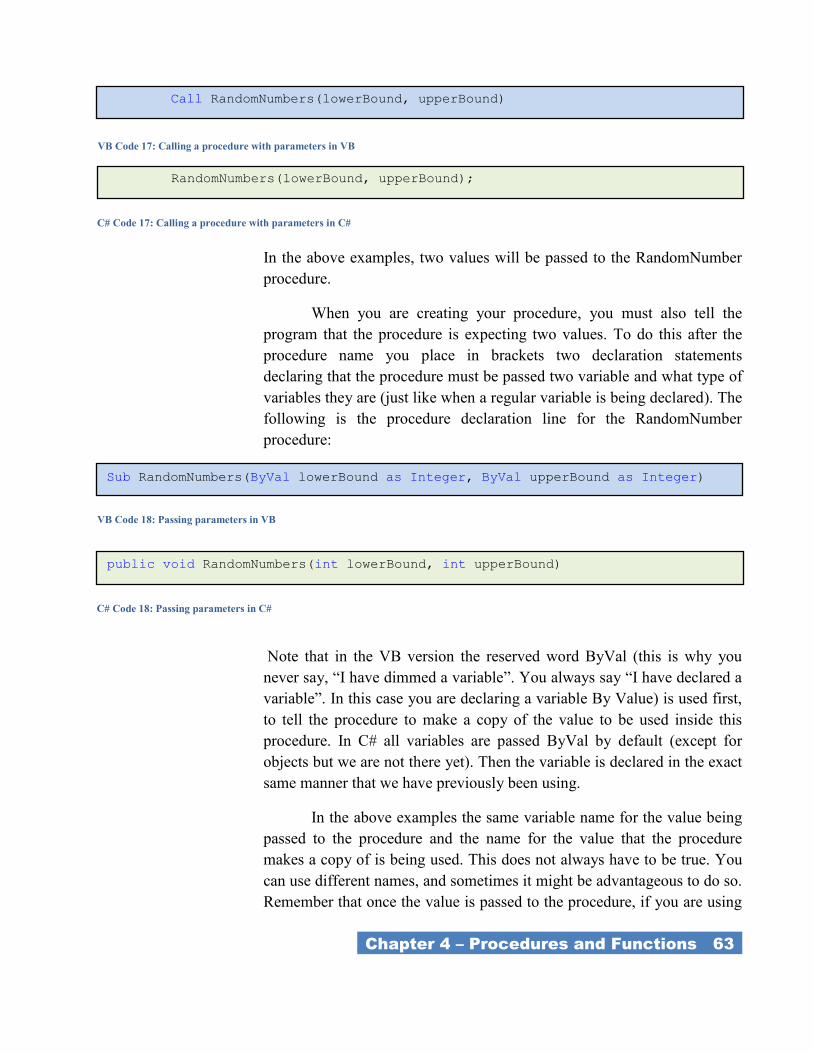
_Chapter 4 – Procedures and Functions 63_
In the above examples, two values will be passed to the RandomNumber
procedure.
When you are creating your procedure, you must also tell the
program that the procedure is expecting two values. To do this after the
procedure name you place in brackets two declaration statements
declaring that the procedure must be passed two variable and what type of
variables they are (just like when a regular variable is being declared). The
following is the procedure declaration line for the RandomNumber
procedure:
Note that in the VB version the reserved word ByVal (this is why you
never say, ―I have dimmed a variable‖. You always say ―I have declared a
variable‖. In this case you are declaring a variable By Value) is used first,
to tell the procedure to make a copy of the value to be used inside this
procedure. In C# all variables are passed ByVal by default (except for
objects but we are not there yet). Then the variable is declared in the exact
same manner that we have previously been using.
In the above examples the same variable name for the value being
passed to the procedure and the name for the value that the procedure
makes a copy of is being used. This does not always have to be true. You
can use different names, and sometimes it might be advantageous to do so.
Remember that once the value is passed to the procedure, if you are using
Call RandomNumbers(lowerBound, upperBound)
VB Code 17: Calling a procedure with parameters in VB
RandomNumbers(lowerBound, upperBound);
C# Code 17: Calling a procedure with parameters in C#
Sub RandomNumbers(ByVal lowerBound as Integer, ByVal upperBound as Integer)
VB Code 18: Passing parameters in VB
public void RandomNumbers(int lowerBound, int upperBound)
C# Code 18: Passing parameters in C#
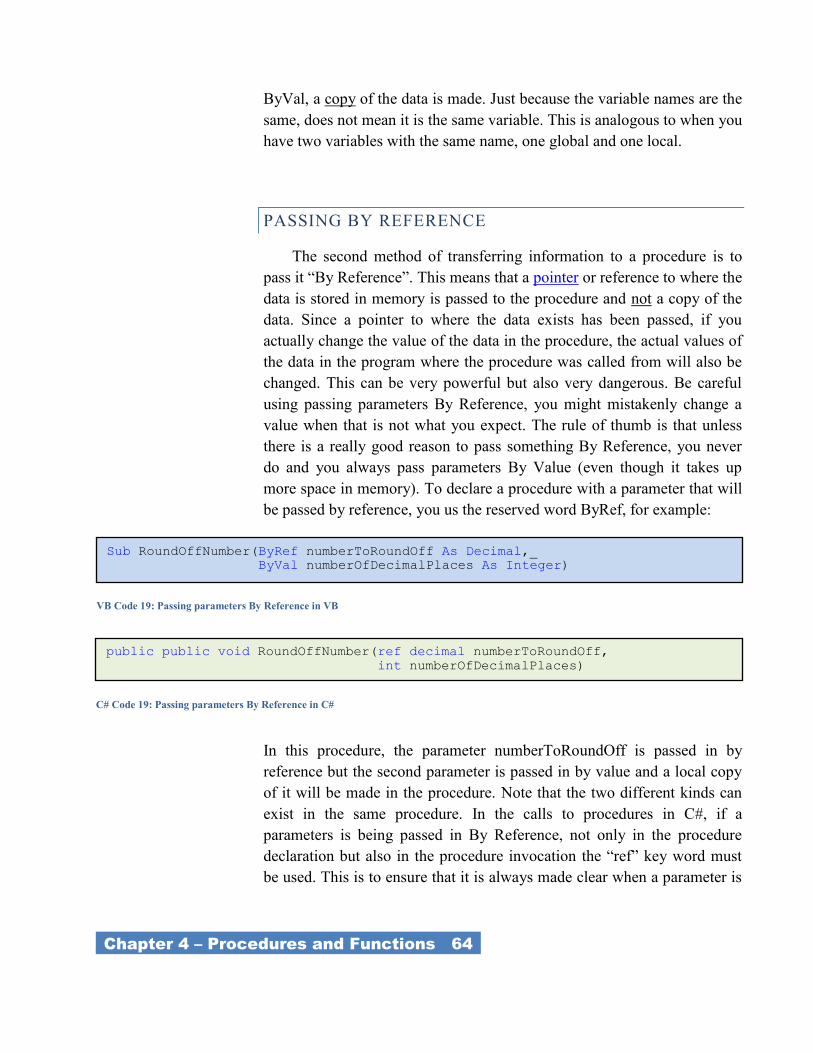
_Chapter 4 – Procedures and Functions 64_
ByVal, a copy of the data is made. Just because the variable names are the
same, does not mean it is the same variable. This is analogous to when you
have two variables with the same name, one global and one local.
PASSING BY REFERENCE
The second method of transferring information to a procedure is to
pass it ―By Reference‖. This means that a pointer or reference to where the
data is stored in memory is passed to the procedure and not a copy of the
data. Since a pointer to where the data exists has been passed, if you
actually change the value of the data in the procedure, the actual values of
the data in the program where the procedure was called from will also be
changed. This can be very powerful but also very dangerous. Be careful
using passing parameters By Reference, you might mistakenly change a
value when that is not what you expect. The rule of thumb is that unless
there is a really good reason to pass something By Reference, you never
do and you always pass parameters By Value (even though it takes up
more space in memory). To declare a procedure with a parameter that will
be passed by reference, you us the reserved word ByRef, for example:
In this procedure, the parameter numberToRoundOff is passed in by
reference but the second parameter is passed in by value and a local copy
of it will be made in the procedure. Note that the two different kinds can
exist in the same procedure. In the calls to procedures in C#, if a
parameters is being passed in By Reference, not only in the procedure
declaration but also in the procedure invocation the ―ref‖ key word must
be used. This is to ensure that it is always made clear when a parameter is
VB Code 19: Passing parameters By Reference in VB
public public void RoundOffNumber(ref decimal numberToRoundOff,
int numberOfDecimalPlaces)
C# Code 19: Passing parameters By Reference in C#
Sub RoundOffNumber(ByRef numberToRoundOff As Decimal,_
ByVal numberOfDecimalPlaces As Integer)
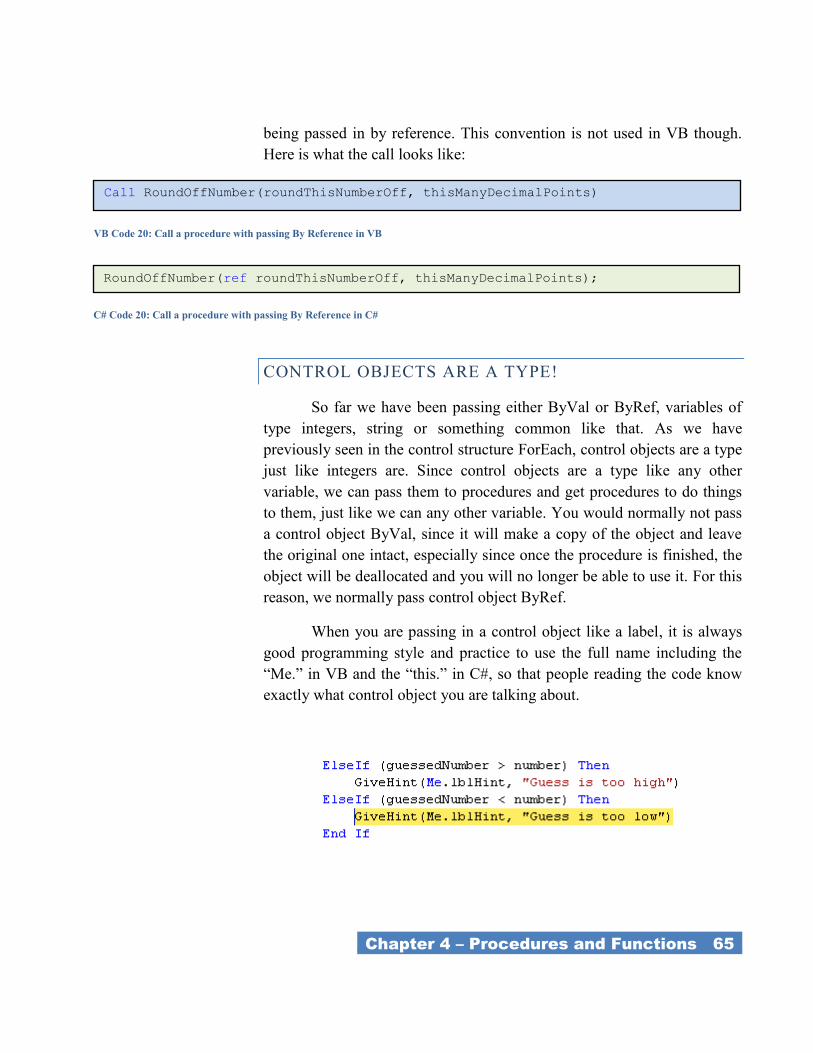
_Chapter 4 – Procedures and Functions 65_
being passed in by reference. This convention is not used in VB though.
Here is what the call looks like:
CONTROL OBJECTS ARE A TYPE!
So far we have been passing either ByVal or ByRef, variables of
type integers, string or something common like that. As we have
previously seen in the control structure ForEach, control objects are a type
just like integers are. Since control objects are a type like any other
variable, we can pass them to procedures and get procedures to do things
to them, just like we can any other variable. You would normally not pass
a control object ByVal, since it will make a copy of the object and leave
the original one intact, especially since once the procedure is finished, the
object will be deallocated and you will no longer be able to use it. For this
reason, we normally pass control object ByRef.
When you are passing in a control object like a label, it is always
good programming style and practice to use the full name including the
―Me.‖ in VB and the ―this.‖ in C#, so that people reading the code know
exactly what control object you are talking about.
VB Code 20: Call a procedure with passing By Reference in VB
RoundOffNumber(ref roundThisNumberOff, thisManyDecimalPoints);
C# Code 20: Call a procedure with passing By Reference in C#
Call RoundOffNumber(roundThisNumberOff, thisManyDecimalPoints)
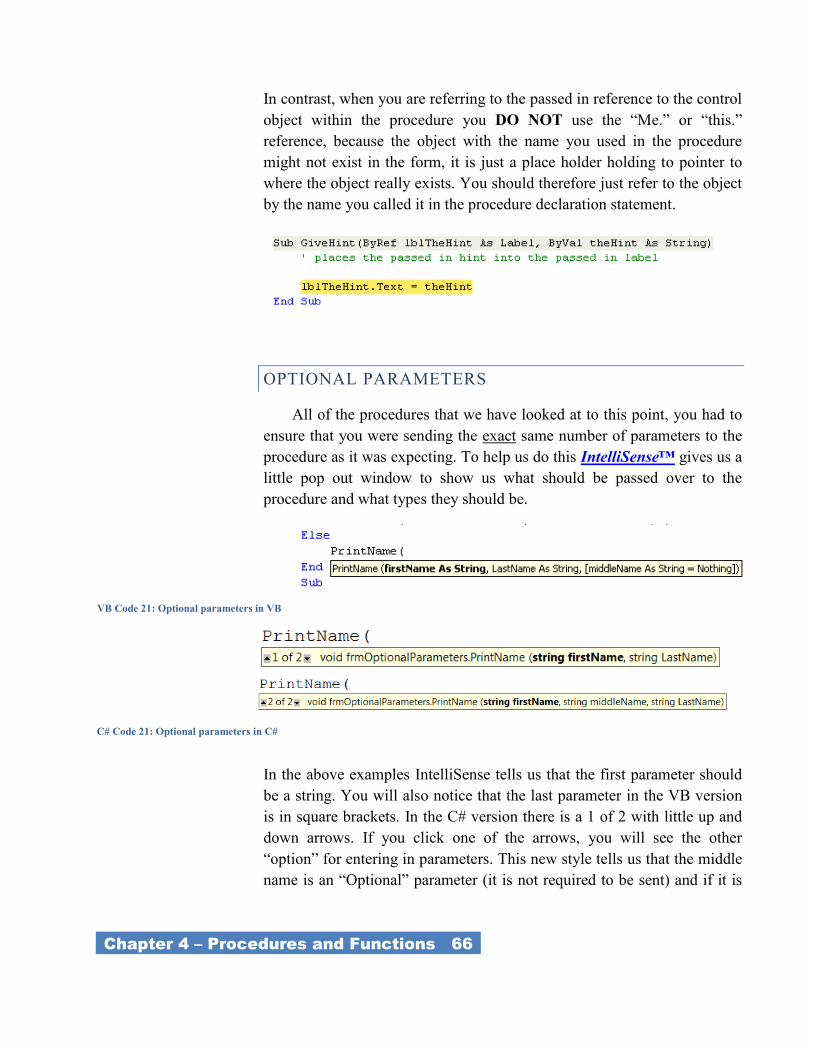
_Chapter 4 – Procedures and Functions 66_
In contrast, when you are referring to the passed in reference to the control
object within the procedure you DO NOT use the ―Me.‖ or ―this.‖
reference, because the object with the name you used in the procedure
might not exist in the form, it is just a place holder holding to pointer to
where the object really exists. You should therefore just refer to the object
by the name you called it in the procedure declaration statement.
OPTIONAL PARAMETERS
All of the procedures that we have looked at to this point, you had to
ensure that you were sending the exact same number of parameters to the
procedure as it was expecting. To help us do this IntelliSense™ gives us a
little pop out window to show us what should be passed over to the
procedure and what types they should be.
In the above examples IntelliSense tells us that the first parameter should
be a string. You will also notice that the last parameter in the VB version
is in square brackets. In the C# version there is a 1 of 2 with little up and
down arrows. If you click one of the arrows, you will see the other
―option‖ for entering in parameters. This new style tells us that the middle
name is an ―Optional‖ parameter (it is not required to be sent) and if it is
VB Code 21: Optional parameters in VB
C# Code 21: Optional parameters in C#
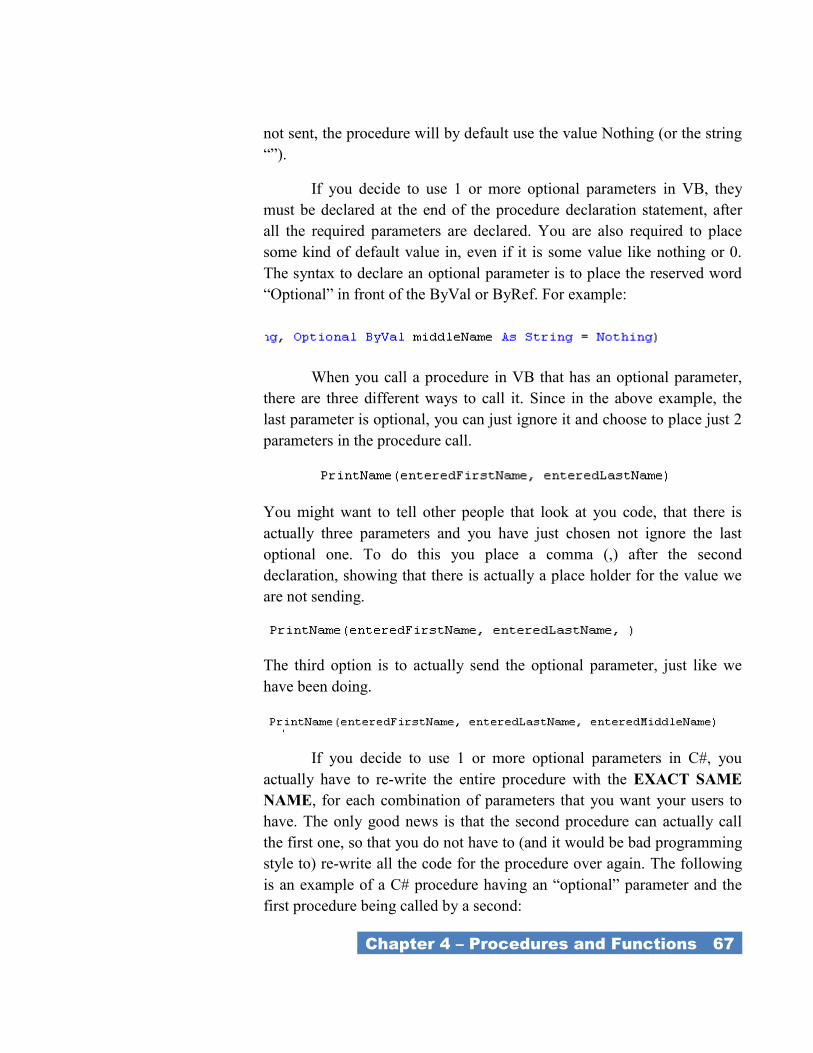
_Chapter 4 – Procedures and Functions 67_
not sent, the procedure will by default use the value Nothing (or the string
―‖).
If you decide to use 1 or more optional parameters in VB, they
must be declared at the end of the procedure declaration statement, after
all the required parameters are declared. You are also required to place
some kind of default value in, even if it is some value like nothing or 0.
The syntax to declare an optional parameter is to place the reserved word
―Optional‖ in front of the ByVal or ByRef. For example:
When you call a procedure in VB that has an optional parameter,
there are three different ways to call it. Since in the above example, the
last parameter is optional, you can just ignore it and choose to place just 2
parameters in the procedure call.
You might want to tell other people that look at you code, that there is
actually three parameters and you have just chosen not ignore the last
optional one. To do this you place a comma (,) after the second
declaration, showing that there is actually a place holder for the value we
are not sending.
The third option is to actually send the optional parameter, just like we
have been doing.
If you decide to use 1 or more optional parameters in C#, you
actually have to re-write the entire procedure with the EXACT SAME
NAME, for each combination of parameters that you want your users to
have. The only good news is that the second procedure can actually call
the first one, so that you do not have to (and it would be bad programming
style to) re-write all the code for the procedure over again. The following
is an example of a C# procedure having an ―optional‖ parameter and the
first procedure being called by a second:
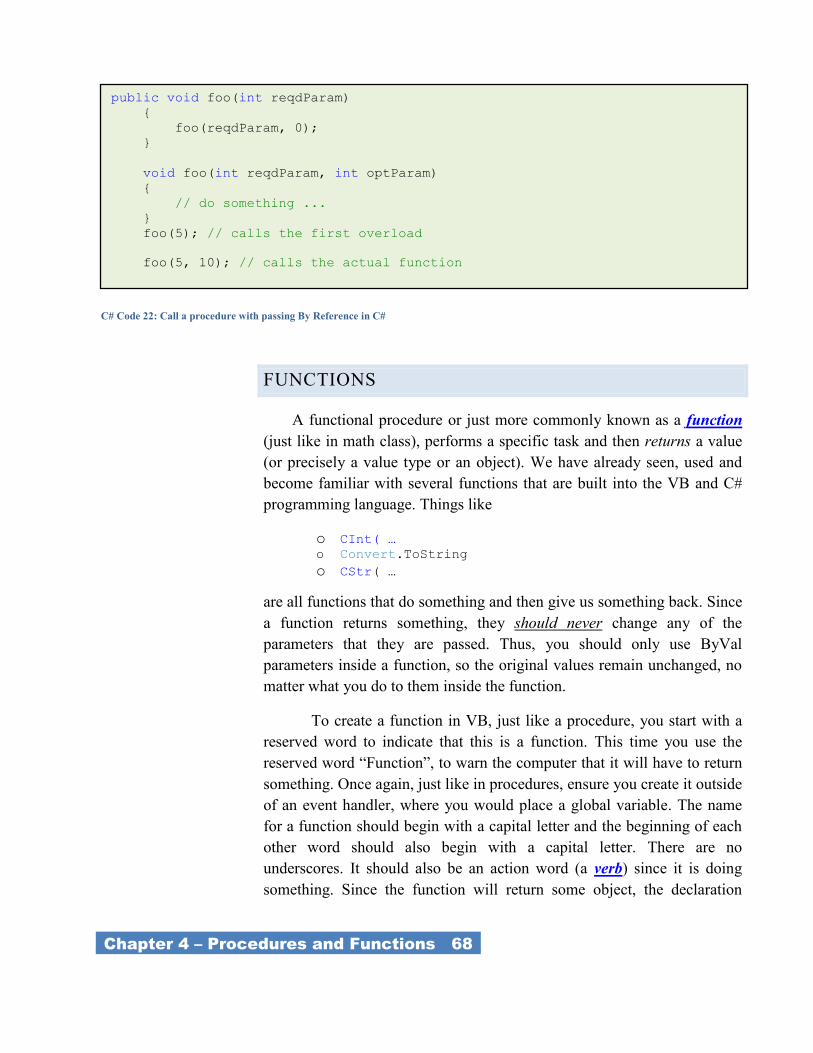
_Chapter 4 – Procedures and Functions 68_
FUNCTIONS
A functional procedure or just more commonly known as a function
(just like in math class), performs a specific task and then returns a value
(or precisely a value type or an object). We have already seen, used and
become familiar with several functions that are built into the VB and C#
programming language. Things like
o CInt( … o Convert.ToString
o CStr( …
are all functions that do something and then give us something back. Since
a function returns something, they should never change any of the
parameters that they are passed. Thus, you should only use ByVal
parameters inside a function, so the original values remain unchanged, no
matter what you do to them inside the function.
To create a function in VB, just like a procedure, you start with a
reserved word to indicate that this is a function. This time you use the
reserved word ―Function‖, to warn the computer that it will have to return
something. Once again, just like in procedures, ensure you create it outside
of an event handler, where you would place a global variable. The name
for a function should begin with a capital letter and the beginning of each
other word should also begin with a capital letter. There are no
underscores. It should also be an action word (a verb) since it is doing
something. Since the function will return some object, the declaration
RoundOffNumber(ref roundThisNumberOff, thisManyDecimalPoints);
C# Code 23: Call a procedure with passing By Reference in C#
public void foo(int reqdParam)
{
foo(reqdParam, 0);
}
void foo(int reqdParam, int optParam)
{
// do something ...
}
foo(5); // calls the first overload
foo(5, 10); // calls the actual function
C# Code 22: Call a procedure with passing By Reference in C#

_Chapter 4 – Procedures and Functions 69_
statement must include what type will be sent back. This is done at the end
of the function declaration, just outside the closed bracket. The following
VB function will return a random number, between the two parameters
that were passed in.
Notice the ―As Integer‖ at the end of the function declaration, just after
the end bracket.
In C#, there is no reserved word ―Procedure‖ or ―Function‖ like in
VB. You will remember that for a procedure we place the reserved word
void before the procedures name. This was to tell the computer that the
procedure will not return anything (i.e. it is a procedure). For a function
we replace that void with the type that will be passed back by the
function. This is the key that turns a procedure into a function in C#.
To return the value back to the piece of code that called the
function, we need to include a method to pass back our final answer. We
do this by using the reserved word ―Return‖. Whatever value (or variable)
is after this reserved word, will be passed back as the answer. Here is the
example for the random number function:
Just like we have been doing with all the functions that are built
into VB or C#, since it is a function and it will return some object or value,
we must assign the answer to something (hopefully a variable of some
kind, since assigning it right into a control object like a text box is bad
style). To do this we must place the function name after an assignment
statement, with the values that we are passing into the function. Here is the
example for the random number function.
VB Code 22: Function declaration in VB
Public GenerateRandomNumber int (int lowerBound, int upperBound);
C# Code 24: Function declaration in C#
Function GenerateRandomNumber (ByVal lowerBound As Integer, _
ByVal upperBound As Integer) As Integer
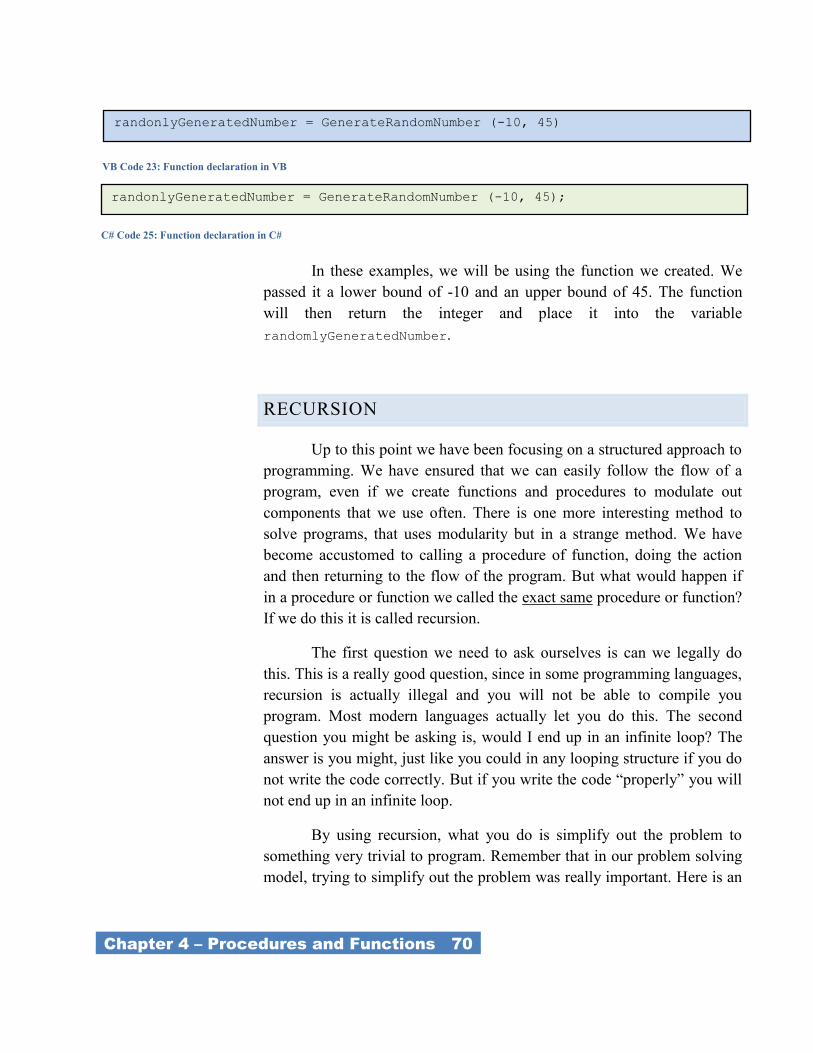
_Chapter 4 – Procedures and Functions 70_
In these examples, we will be using the function we created. We
passed it a lower bound of -10 and an upper bound of 45. The function
will then return the integer and place it into the variable
randomlyGeneratedNumber.
RECURSION
Up to this point we have been focusing on a structured approach to
programming. We have ensured that we can easily follow the flow of a
program, even if we create functions and procedures to modulate out
components that we use often. There is one more interesting method to
solve programs, that uses modularity but in a strange method. We have
become accustomed to calling a procedure of function, doing the action
and then returning to the flow of the program. But what would happen if
in a procedure or function we called the exact same procedure or function?
If we do this it is called recursion.
The first question we need to ask ourselves is can we legally do
this. This is a really good question, since in some programming languages,
recursion is actually illegal and you will not be able to compile you
program. Most modern languages actually let you do this. The second
question you might be asking is, would I end up in an infinite loop? The
answer is you might, just like you could in any looping structure if you do
not write the code correctly. But if you write the code ―properly‖ you will
not end up in an infinite loop.
By using recursion, what you do is simplify out the problem to
something very trivial to program. Remember that in our problem solving
model, trying to simplify out the problem was really important. Here is an
VB Code 23: Function declaration in VB
randonlyGeneratedNumber = GenerateRandomNumber (-10, 45);
C# Code 25: Function declaration in C#
randonlyGeneratedNumber = GenerateRandomNumber (-10, 45)
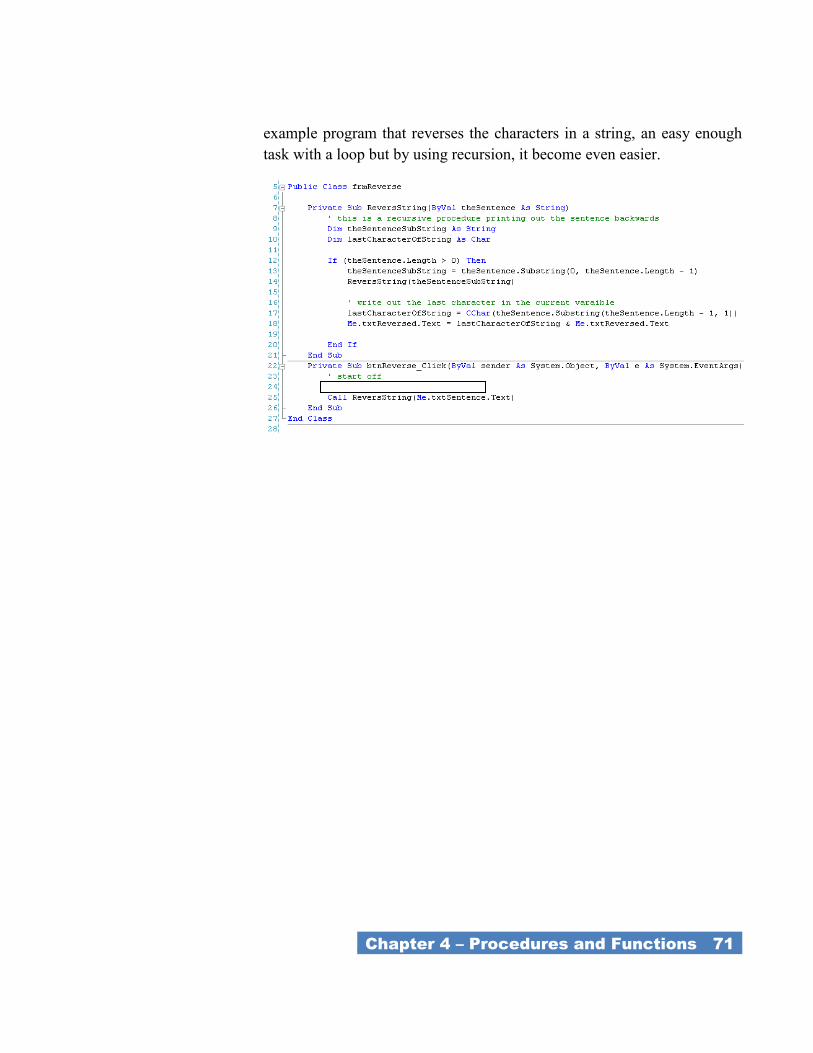
_Chapter 4 – Procedures and Functions 71_
example program that reverses the characters in a string, an easy enough
task with a loop but by using recursion, it become even easier.

CHAPTER 5 – HOLDING
DATA
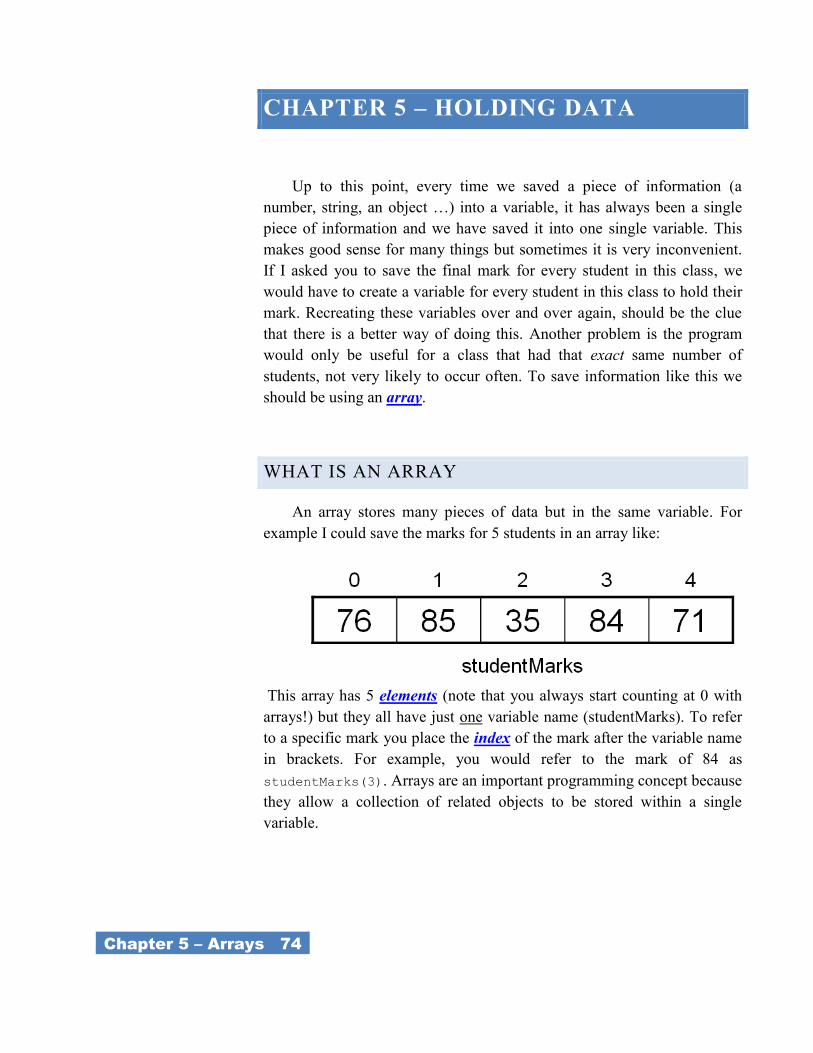
_Chapter 5 – Arrays 74_
CHAPTER 5 – HOLDING DATA
Up to this point, every time we saved a piece of information (a
number, string, an object …) into a variable, it has always been a single
piece of information and we have saved it into one single variable. This
makes good sense for many things but sometimes it is very inconvenient.
If I asked you to save the final mark for every student in this class, we
would have to create a variable for every student in this class to hold their
mark. Recreating these variables over and over again, should be the clue
that there is a better way of doing this. Another problem is the program
would only be useful for a class that had that exact same number of
students, not very likely to occur often. To save information like this we
should be using an array.
WHAT IS AN ARRAY
An array stores many pieces of data but in the same variable. For
example I could save the marks for 5 students in an array like:
This array has 5 elements (note that you always start counting at 0 with
arrays!) but they all have just one variable name (studentMarks). To refer
to a specific mark you place the index of the mark after the variable name
in brackets. For example, you would refer to the mark of 84 as
studentMarks(3). Arrays are an important programming concept because
they allow a collection of related objects to be stored within a single
variable.
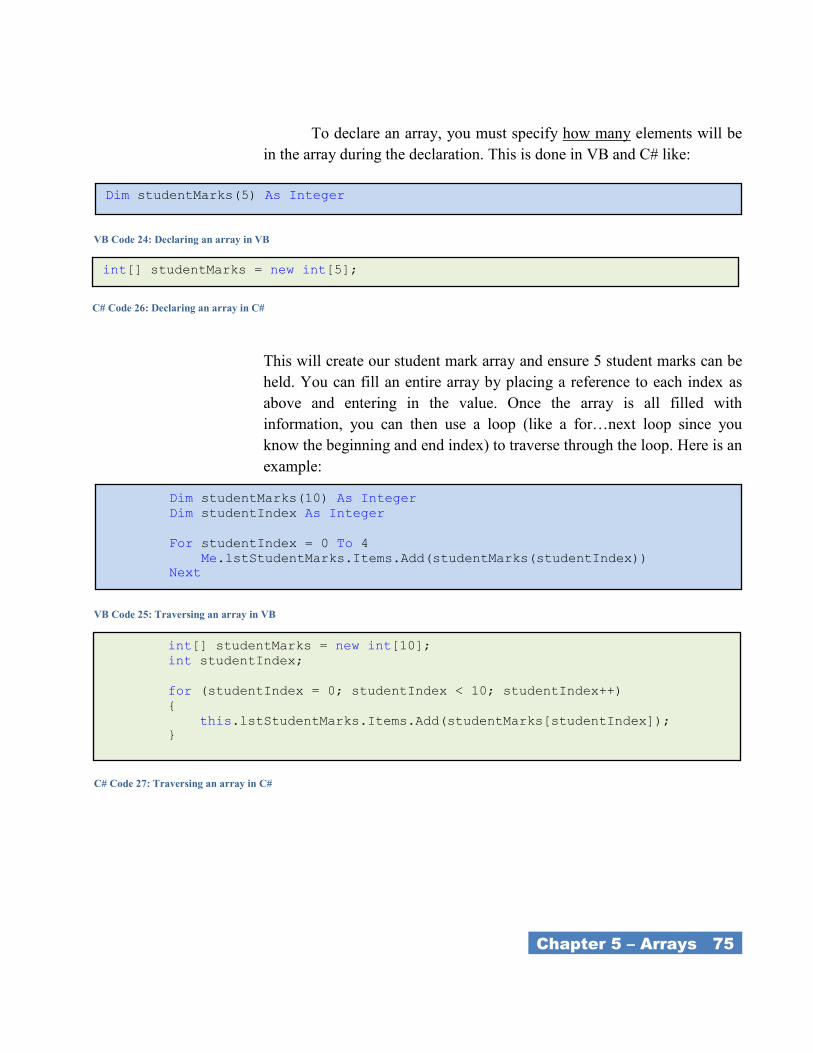
_Chapter 5 – Arrays 75_
To declare an array, you must specify how many elements will be
in the array during the declaration. This is done in VB and C# like:
This will create our student mark array and ensure 5 student marks can be
held. You can fill an entire array by placing a reference to each index as
above and entering in the value. Once the array is all filled with
information, you can then use a loop (like a for…next loop since you
know the beginning and end index) to traverse through the loop. Here is an
example:
VB Code 24: Declaring an array in VB
int[] studentMarks = new int[5];
C# Code 26: Declaring an array in C#
Dim studentMarks(5) As Integer
VB Code 25: Traversing an array in VB
int[] studentMarks = new int[10];
int studentIndex;
for (studentIndex = 0; studentIndex < 10; studentIndex++)
{
this.lstStudentMarks.Items.Add(studentMarks[studentIndex]);
}
C# Code 27: Traversing an array in C#
Dim studentMarks(10) As Integer
Dim studentIndex As Integer
For studentIndex = 0 To 4
Me.lstStudentMarks.Items.Add(studentMarks(studentIndex))
Next
_Chapter 5 – Arrays 76_
PASSING ARRAYS AS PARAMETERS
We know from the previous section that functions and procedures are
a great way to ensure that your program is modular in its design. Any time
a piece of code needs to be repeated more than once or twice, a function or
procedure might want to be used. When we used functions and
procedures, we passed variables by value (making a copy) or by reference
(passing the pointer); so that the function or procedure can do some
process on our data. We normally pass variables like integers, strings, and
doubles but we have seen that you can pass any object, like a picture box.
Since an array is just a variable that happens to hold several values and not
just one, it also can be passed to a function or procedure, either by value or
by reference.
There is some disagreement in the computer world whether it is wise
to pass arrays, especially large ones with many values in them, by value.
This is because you are making a complete copy of the array and it could
take up a large quantity of memory. Other programmers do not like the
idea of passing by reference if you do not want the original array to
change, because there is always the risk that you or someone that comes
after you, will change the array by accident. They argue that modern
computers have so much memory these days (as compared to the ―old
days‖) that the risk of changing the original array is not worth the potential
memory usage. We will continue to pass variables into parameters by
value, unless there is a really good reason that you want to pass the object
in by reference.
To pass an array into a function or procedure, you declare the array
inside the name of your sub-program, just like you have been doing for
regular variable, but you do not place any number inside the arrays
brackets. This is because the procedure or function does not know exactly
how many elements the array will have. If you had to set it to a fixed
amount, your procedure or function would not be very flexible. When the
array is passed into the procedure or function, it will determine how many
elements it has and an appropriate variable with that many elements will
be created. To declare an array in a sub-program, it would look like this in
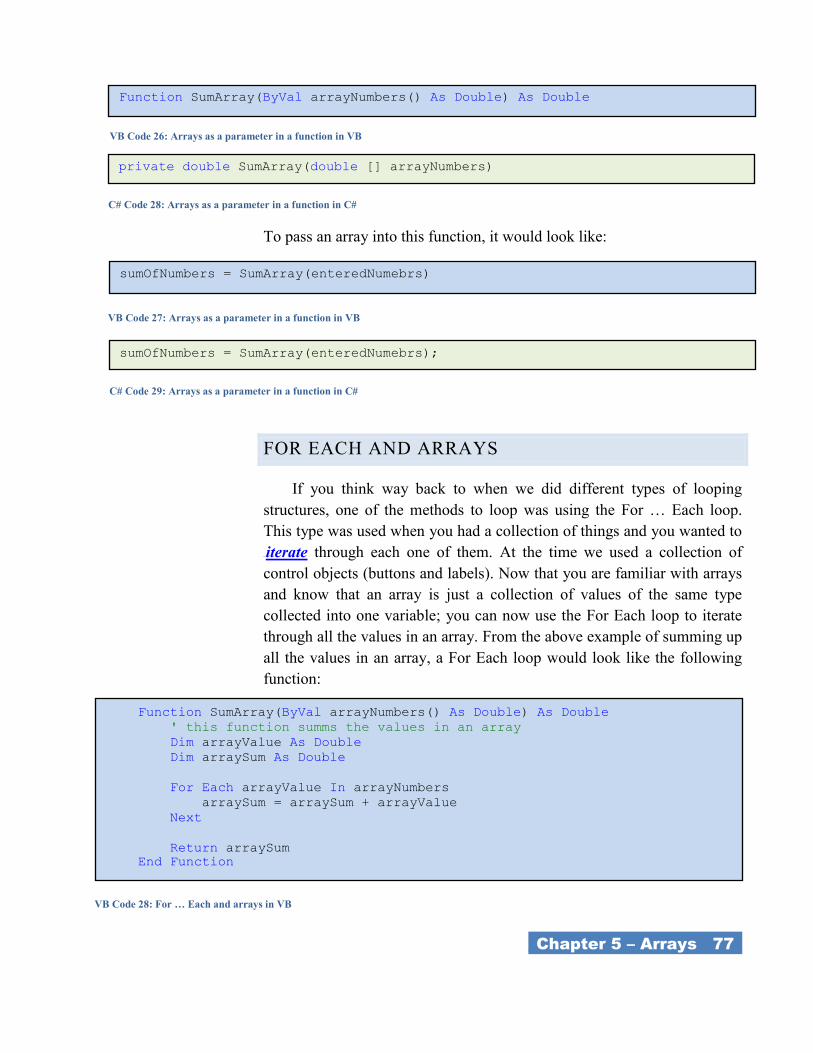
_Chapter 5 – Arrays 77_
To pass an array into this function, it would look like:
FOR EACH AND ARRAYS
If you think way back to when we did different types of looping
structures, one of the methods to loop was using the For … Each loop.
This type was used when you had a collection of things and you wanted to
TTTiterate through each one of them. At the time we used a collection of
control objects (buttons and labels). Now that you are familiar with arrays
and know that an array is just a collection of values of the same type
collected into one variable; you can now use the For Each loop to iterate
through all the values in an array. From the above example of summing up
all the values in an array, a For Each loop would look like the following
function:
VB Code 26: Arrays as a parameter in a function in VB
private double SumArray(double [] arrayNumbers)
C# Code 28: Arrays as a parameter in a function in C#
Function SumArray(ByVal arrayNumbers() As Double) As Double
VB Code 27: Arrays as a parameter in a function in VB
sumOfNumbers = SumArray(enteredNumebrs);
C# Code 29: Arrays as a parameter in a function in C#
sumOfNumbers = SumArray(enteredNumebrs)
VB Code 28: For … Each and arrays in VB
Function SumArray(ByVal arrayNumbers() As Double) As Double
' this function summs the values in an array
Dim arrayValue As Double
Dim arraySum As Double
For Each arrayValue In arrayNumbers
arraySum = arraySum + arrayValue
Next
Return arraySum
End Function
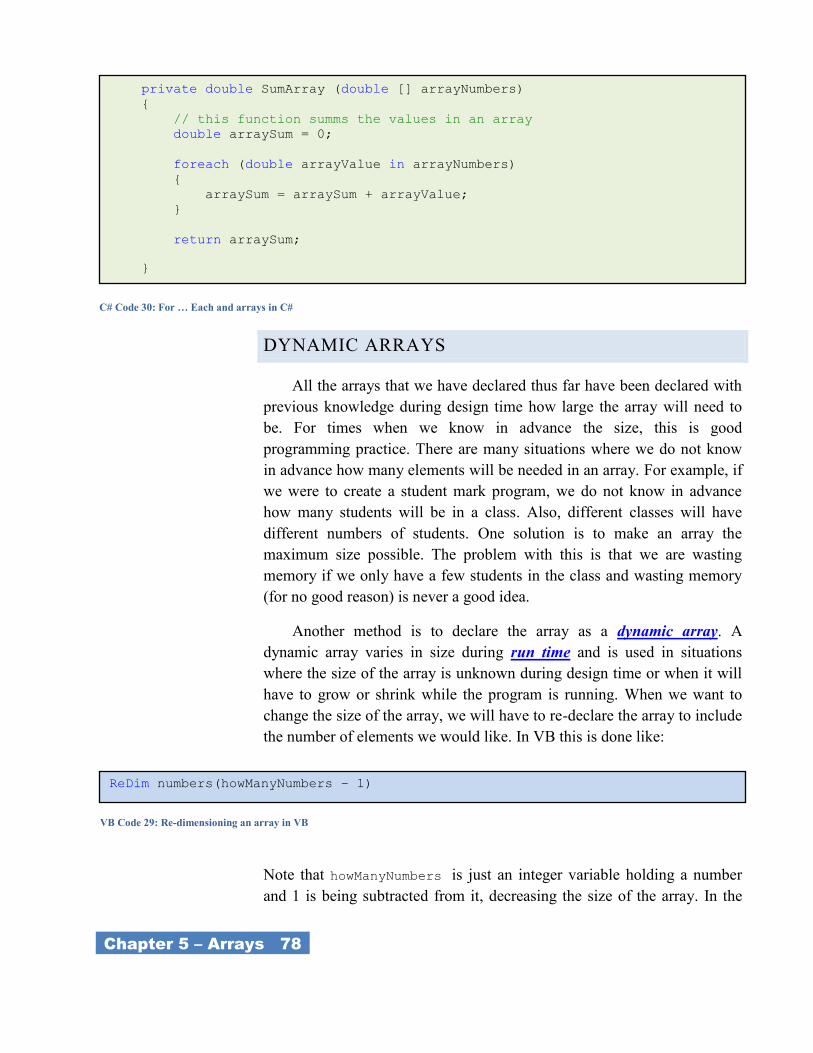
_Chapter 5 – Arrays 78_
DYNAMIC ARRAYS
All the arrays that we have declared thus far have been declared with
previous knowledge during design time how large the array will need to
be. For times when we know in advance the size, this is good
programming practice. There are many situations where we do not know
in advance how many elements will be needed in an array. For example, if
we were to create a student mark program, we do not know in advance
how many students will be in a class. Also, different classes will have
different numbers of students. One solution is to make an array the
maximum size possible. The problem with this is that we are wasting
memory if we only have a few students in the class and wasting memory
(for no good reason) is never a good idea.
Another method is to declare the array as a dynamic array. A
dynamic array varies in size during run time and is used in situations
where the size of the array is unknown during design time or when it will
have to grow or shrink while the program is running. When we want to
change the size of the array, we will have to re-declare the array to include
the number of elements we would like. In VB this is done like:
Note that howManyNumbers is just an integer variable holding a number
and 1 is being subtracted from it, decreasing the size of the array. In the
private double SumArray (double [] arrayNumbers)
{
// this function summs the values in an array
double arraySum = 0;
foreach (double arrayValue in arrayNumbers)
{
arraySum = arraySum + arrayValue;
}
return arraySum;
}
C# Code 30: For … Each and arrays in C#
VB Code 29: Re-dimensioning an array in VB
ReDim numbers(howManyNumbers – 1)
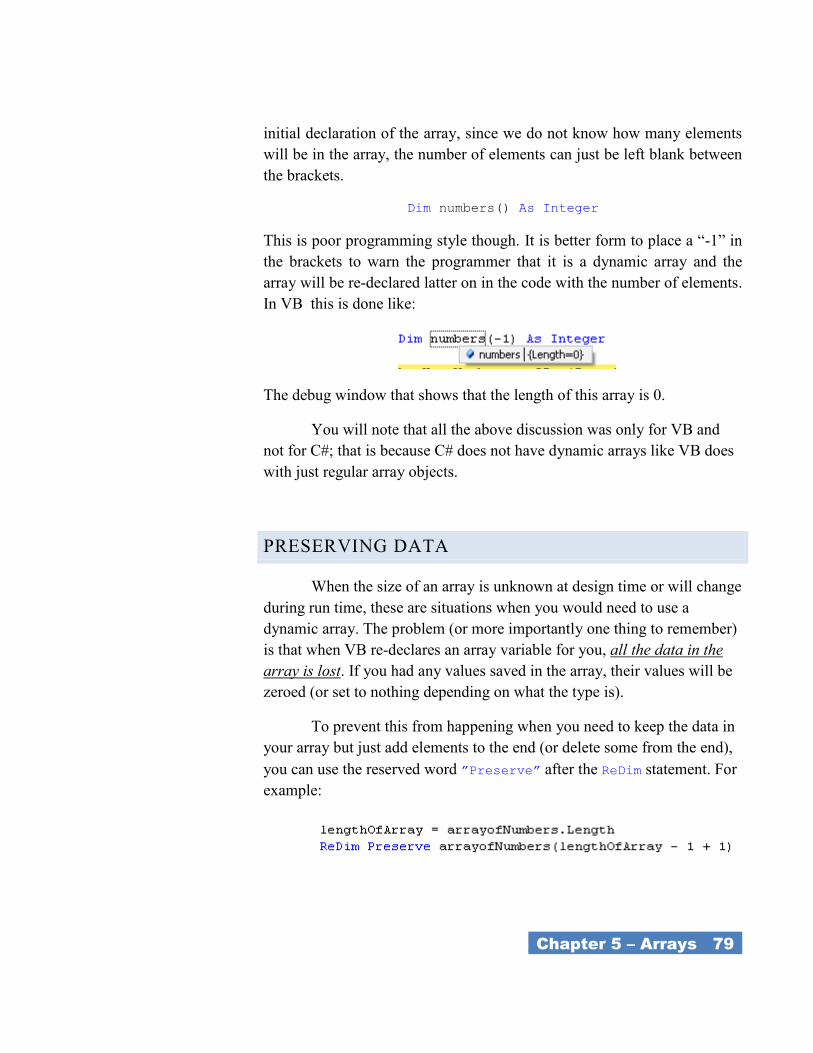
_Chapter 5 – Arrays 79_
initial declaration of the array, since we do not know how many elements
will be in the array, the number of elements can just be left blank between
the brackets.
Dim numbers() As Integer
This is poor programming style though. It is better form to place a ―-1‖ in
the brackets to warn the programmer that it is a dynamic array and the
array will be re-declared latter on in the code with the number of elements.
In VB this is done like:
The debug window that shows that the length of this array is 0.
You will note that all the above discussion was only for VB and
not for C#; that is because C# does not have dynamic arrays like VB does
with just regular array objects.
PRESERVING DATA
When the size of an array is unknown at design time or will change
during run time, these are situations when you would need to use a
dynamic array. The problem (or more importantly one thing to remember)
is that when VB re-declares an array variable for you, all the data in the
array is lost. If you had any values saved in the array, their values will be
zeroed (or set to nothing depending on what the type is).
To prevent this from happening when you need to keep the data in
your array but just add elements to the end (or delete some from the end),
you can use the reserved word ”Preserve” after the ReDim statement. For
example:
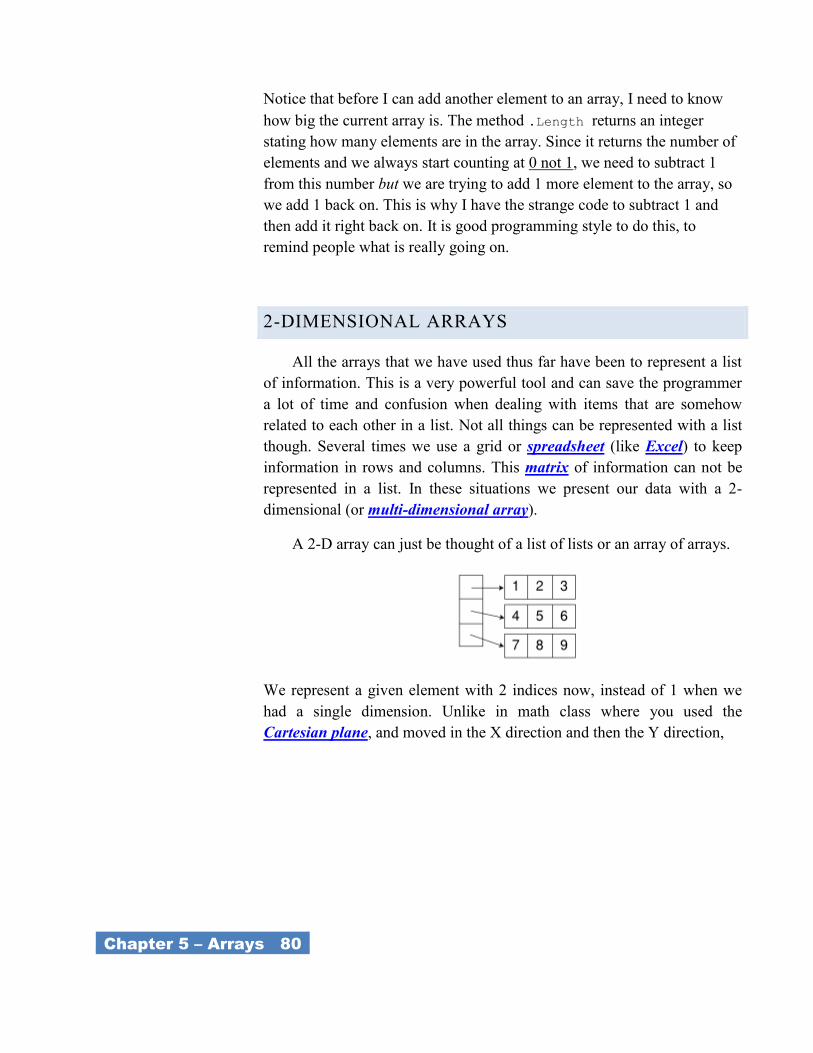
_Chapter 5 – Arrays 80_
Notice that before I can add another element to an array, I need to know
how big the current array is. The method .Length returns an integer
stating how many elements are in the array. Since it returns the number of
elements and we always start counting at 0 not 1, we need to subtract 1
from this number but we are trying to add 1 more element to the array, so
we add 1 back on. This is why I have the strange code to subtract 1 and
then add it right back on. It is good programming style to do this, to
remind people what is really going on.
2-DIMENSIONAL ARRAYS
All the arrays that we have used thus far have been to represent a list
of information. This is a very powerful tool and can save the programmer
a lot of time and confusion when dealing with items that are somehow
related to each other in a list. Not all things can be represented with a list
though. Several times we use a grid or spreadsheet (like Excel) to keep
information in rows and columns. This matrix of information can not be
represented in a list. In these situations we present our data with a 2-
dimensional (or multi-dimensional array).
A 2-D array can just be thought of a list of lists or an array of arrays.
We represent a given element with 2 indices now, instead of 1 when we
had a single dimension. Unlike in math class where you used the
Cartesian plane, and moved in the X direction and then the Y direction,
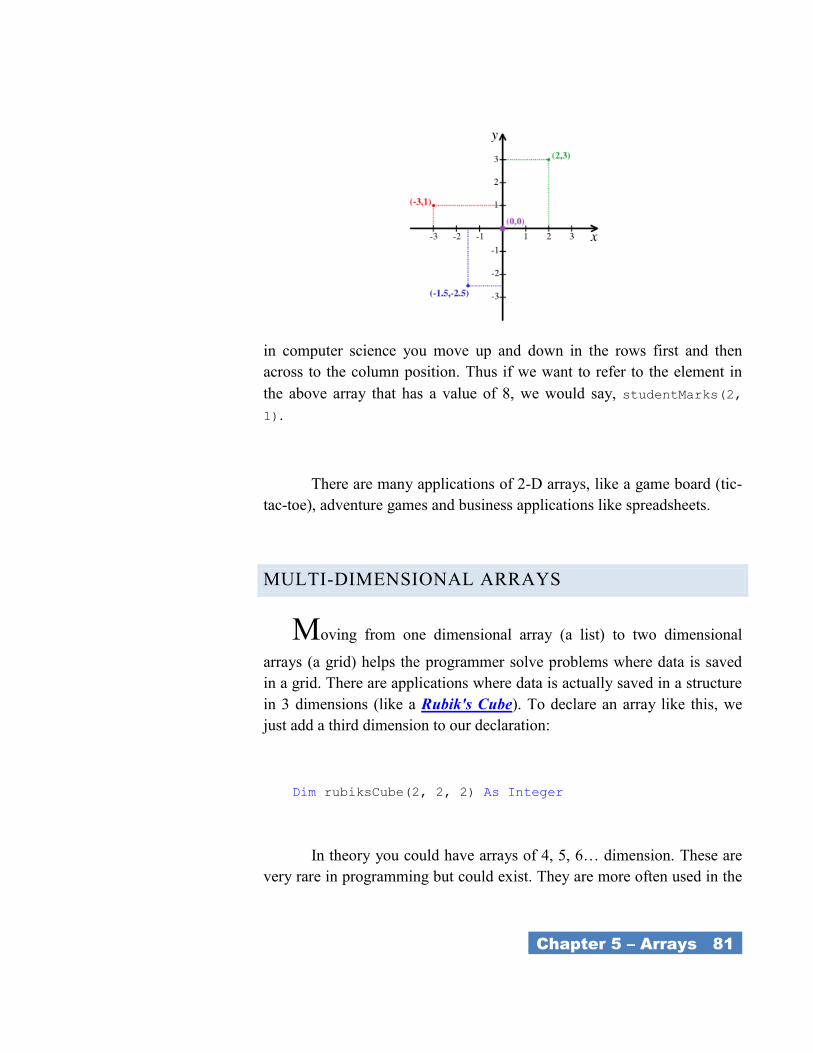
_Chapter 5 – Arrays 81_
in computer science you move up and down in the rows first and then
across to the column position. Thus if we want to refer to the element in
the above array that has a value of 8, we would say, studentMarks(2,
1).
There are many applications of 2-D arrays, like a game board (tic-
tac-toe), adventure games and business applications like spreadsheets.
MULTI-DIMENSIONAL ARRAYS
Moving from one dimensional array (a list) to two dimensional
arrays (a grid) helps the programmer solve problems where data is saved
in a grid. There are applications where data is actually saved in a structure
in 3 dimensions (like a Rubik's Cube). To declare an array like this, we
just add a third dimension to our declaration:
Dim rubiksCube(2, 2, 2) As Integer
In theory you could have arrays of 4, 5, 6… dimension. These are
very rare in programming but could exist. They are more often used in the
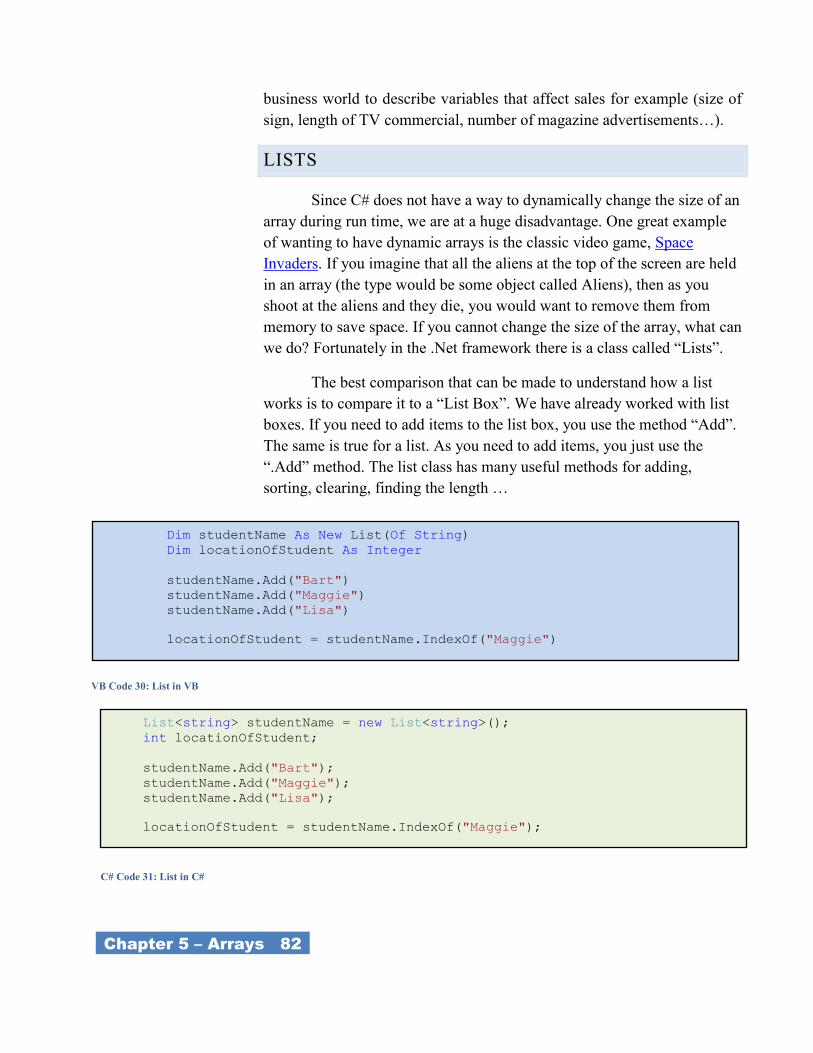
_Chapter 5 – Arrays 82_
business world to describe variables that affect sales for example (size of
sign, length of TV commercial, number of magazine advertisements…).
LISTS
Since C# does not have a way to dynamically change the size of an
array during run time, we are at a huge disadvantage. One great example
of wanting to have dynamic arrays is the classic video game, Space
Invaders. If you imagine that all the aliens at the top of the screen are held
in an array (the type would be some object called Aliens), then as you
shoot at the aliens and they die, you would want to remove them from
memory to save space. If you cannot change the size of the array, what can
we do? Fortunately in the .Net framework there is a class called ―Lists‖.
The best comparison that can be made to understand how a list
works is to compare it to a ―List Box‖. We have already worked with list
boxes. If you need to add items to the list box, you use the method ―Add‖.
The same is true for a list. As you need to add items, you just use the
―.Add‖ method. The list class has many useful methods for adding,
sorting, clearing, finding the length …
VB Code 30: List in VB
Dim studentName As New List(Of String)
Dim locationOfStudent As Integer
studentName.Add("Bart")
studentName.Add("Maggie")
studentName.Add("Lisa")
locationOfStudent = studentName.IndexOf("Maggie")
List<string> studentName = new List<string>();
int locationOfStudent;
studentName.Add("Bart");
studentName.Add("Maggie");
studentName.Add("Lisa");
locationOfStudent = studentName.IndexOf("Maggie");
C# Code 31: List in C#
_Chapter 5 – Arrays 83_
STACKS
LINK-LISTS
TREE

CHAPTER 6 –
REPRESENTING AND
SORTING DATA
_Chapter 6 – Representing and Sorting Data 86_
CHAPTER 6 – REPRESENTING AND
SORTING DATA
As programming and programming languages matured, there
developed a need to better deal with all kinds of data and data processing
in programming languages. In some of our previous programs that we
have made, we have used a ―Magic number‖ to represent something. For
example in the game of 21 (Blackjack) we might have used a 5 to
represent the 6 of clubs. In our calculator program when we were saving
the mathematical operator, we might have placed it in a string type.
Although this is useful and can get us around the problem of saving some
piece of information, saving 4 distinct values in a string is bad style and
can be dangerous. What would happen is we mistakenly placed ―\‖ and not
―/‖ in our if statement? Syntactically it is correct, so the complier would
not have warned us. Our code might not have also found the error (or it
might if we wrote really good code) and the program would have looked
like it was running correctly, even though it was not.
ENUMERATION
We know from past sections that whenever you know that a value
does not change (or changes very infrequently); you should not declare
this type of information as a variable but as a constant. When you need to
represent a constant but it can have one of a fixed set of values that
somehow relate to each other, how do you save that in one constant?
Examples of such a situation would be natural bodies such as the planets
in our solar system and data sets where you know all possible values at
compile time—for example, the choices on a menu or grade levels.
As an example if you are writing a program that lets the user enter
the planet that they would like to go visit on their next holiday (if that was
possible), you could just save it in a variable of type string. But there is a
predefined set of possible values that is constant (or in this case changes
very infrequent since Pluto was removed as a planet in 2006!). So why
have the possibility of somebody making a fat finger mistake in your
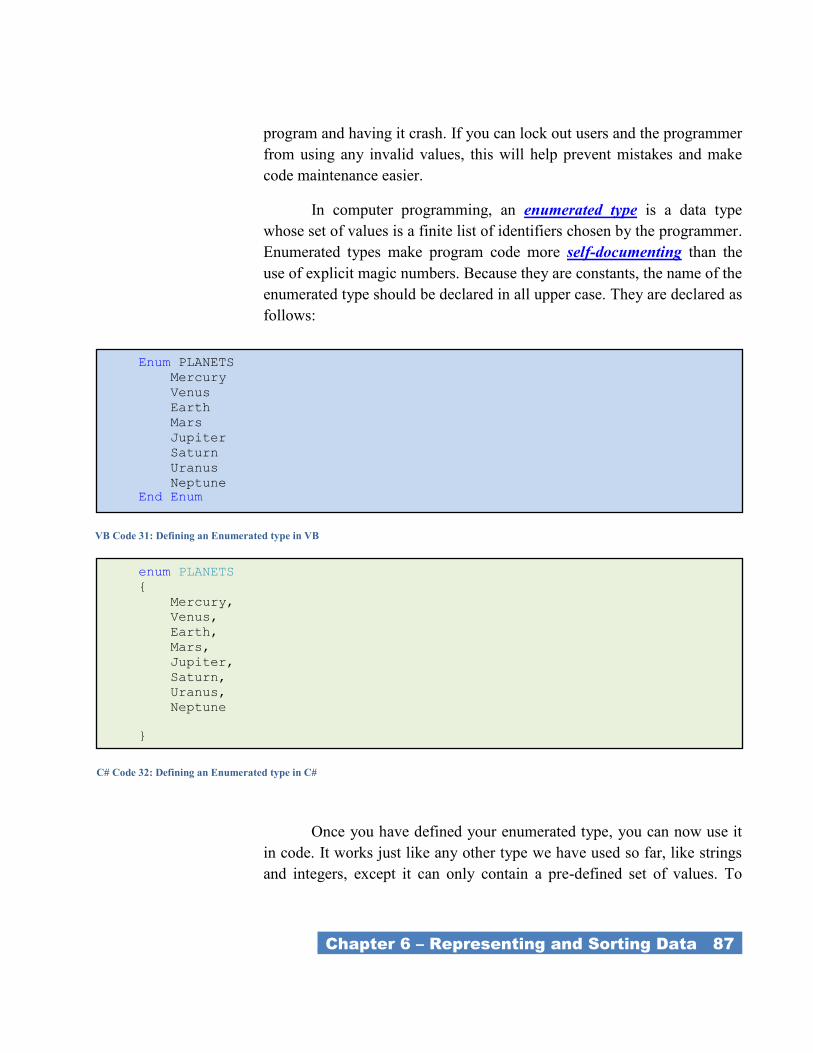
_Chapter 6 – Representing and Sorting Data 87_
program and having it crash. If you can lock out users and the programmer
from using any invalid values, this will help prevent mistakes and make
code maintenance easier.
In computer programming, an enumerated type is a data type
whose set of values is a finite list of identifiers chosen by the programmer.
Enumerated types make program code more self-documenting than the
use of explicit magic numbers. Because they are constants, the name of the
enumerated type should be declared in all upper case. They are declared as
follows:
Once you have defined your enumerated type, you can now use it
in code. It works just like any other type we have used so far, like strings
and integers, except it can only contain a pre-defined set of values. To
VB Code 31: Defining an Enumerated type in VB
enum PLANETS
{
Mercury,
Venus,
Earth,
Mars,
Jupiter,
Saturn,
Uranus,
Neptune
}
C# Code 32: Defining an Enumerated type in C#
Enum PLANETS
Mercury
Venus
Earth
Mars
Jupiter
Saturn
Uranus
Neptune
End Enum
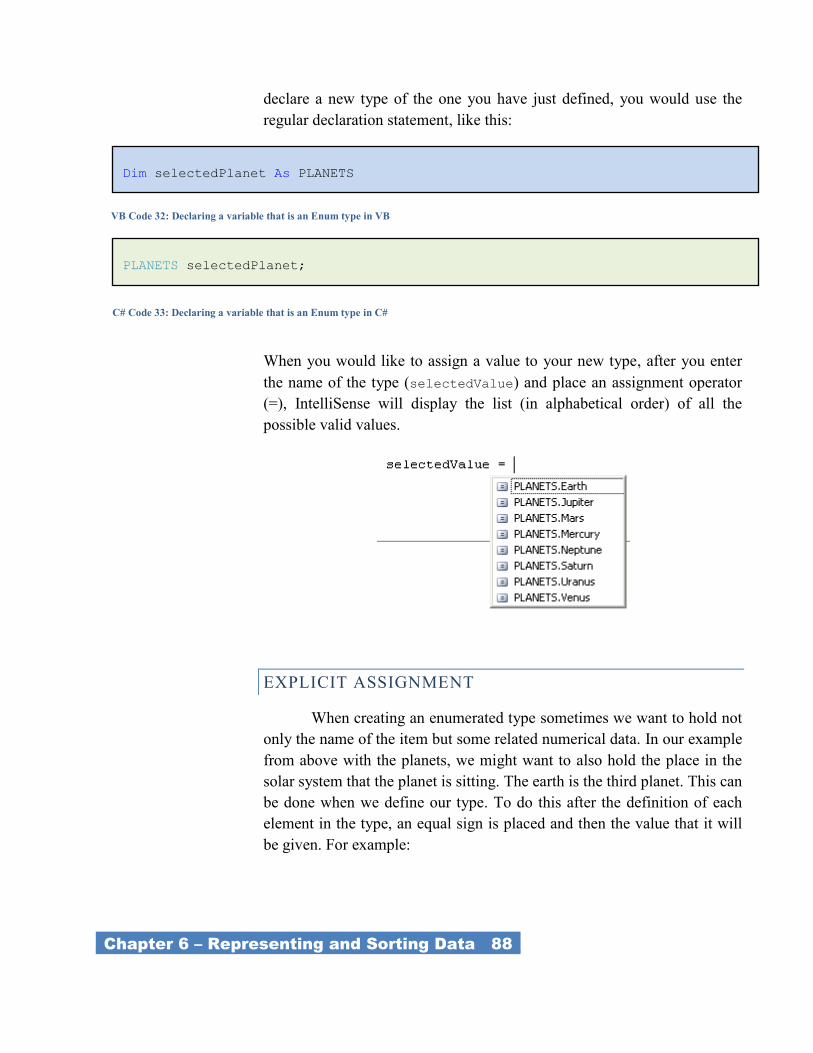
_Chapter 6 – Representing and Sorting Data 88_
declare a new type of the one you have just defined, you would use the
regular declaration statement, like this:
When you would like to assign a value to your new type, after you enter
the name of the type (selectedValue) and place an assignment operator
(=), IntelliSense will display the list (in alphabetical order) of all the
possible valid values.
EXPLICIT ASSIGNMENT
When creating an enumerated type sometimes we want to hold not
only the name of the item but some related numerical data. In our example
from above with the planets, we might want to also hold the place in the
solar system that the planet is sitting. The earth is the third planet. This can
be done when we define our type. To do this after the definition of each
element in the type, an equal sign is placed and then the value that it will
be given. For example:
VB Code 32: Declaring a variable that is an Enum type in VB
PLANETS selectedPlanet;
C# Code 33: Declaring a variable that is an Enum type in C#
Dim selectedPlanet As PLANETS
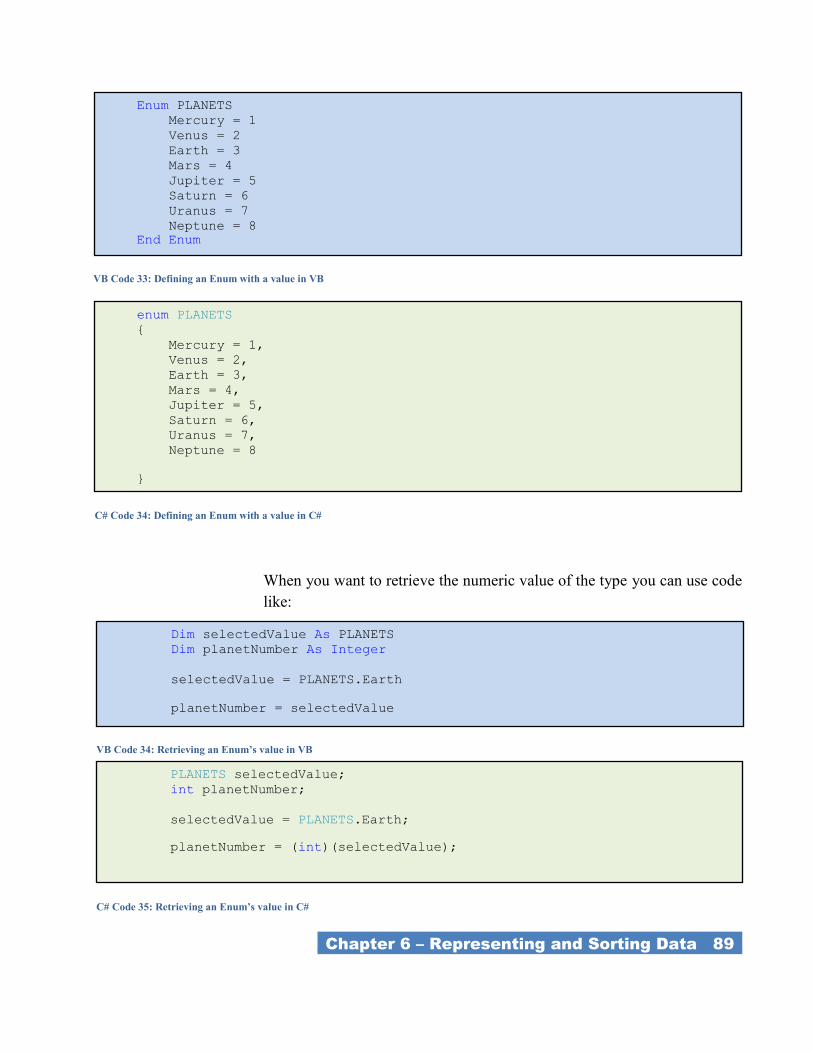
_Chapter 6 – Representing and Sorting Data 89_
When you want to retrieve the numeric value of the type you can use code
like:
VB Code 33: Defining an Enum with a value in VB
enum PLANETS
{
Mercury = 1,
Venus = 2,
Earth = 3,
Mars = 4,
Jupiter = 5,
Saturn = 6,
Uranus = 7,
Neptune = 8
}
C# Code 34: Defining an Enum with a value in C#
Enum PLANETS
Mercury = 1
Venus = 2
Earth = 3
Mars = 4
Jupiter = 5
Saturn = 6
Uranus = 7
Neptune = 8
End Enum
VB Code 34: Retrieving an Enum’s value in VB
Dim selectedValue As PLANETS
Dim planetNumber As Integer
selectedValue = PLANETS.Earth
planetNumber = selectedValue
PLANETS selectedValue;
int planetNumber;
selectedValue = PLANETS.Earth;
planetNumber = (int)(selectedValue);
C# Code 35: Retrieving an Enum’s value in C#
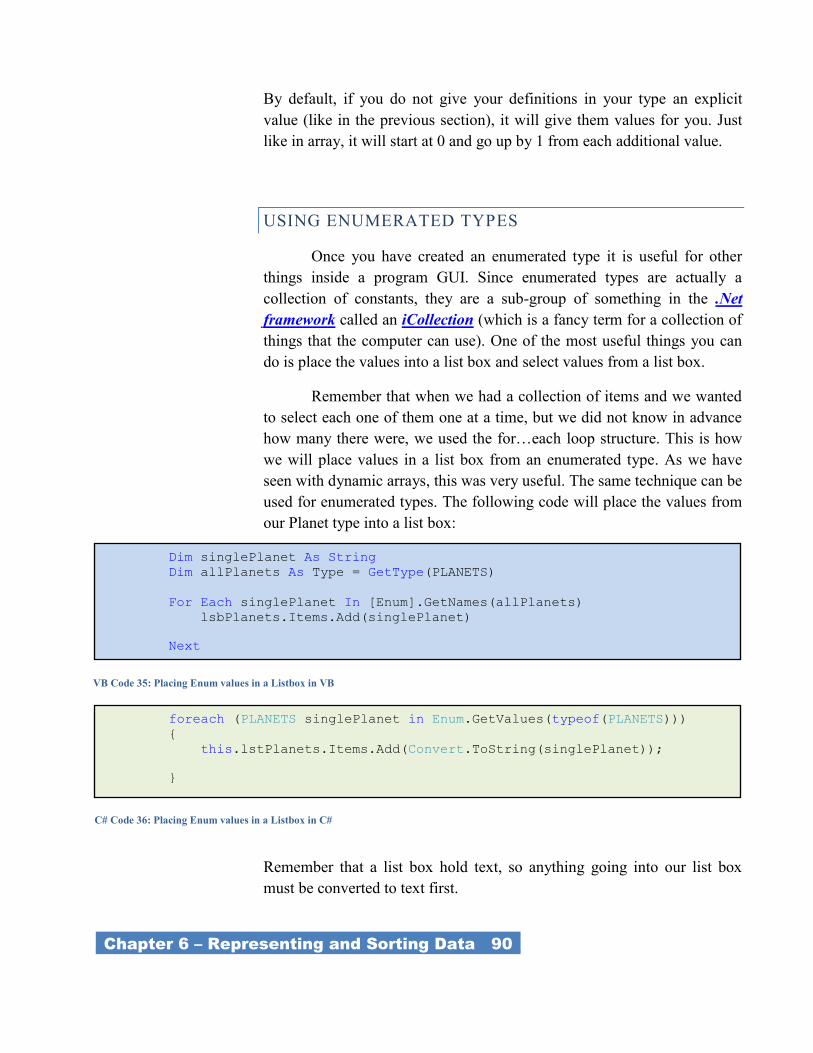
_Chapter 6 – Representing and Sorting Data 90_
By default, if you do not give your definitions in your type an explicit
value (like in the previous section), it will give them values for you. Just
like in array, it will start at 0 and go up by 1 from each additional value.
USING ENUMERATED TYPES
Once you have created an enumerated type it is useful for other
things inside a program GUI. Since enumerated types are actually a
collection of constants, they are a sub-group of something in the .Net
framework called an iCollection (which is a fancy term for a collection of
things that the computer can use). One of the most useful things you can
do is place the values into a list box and select values from a list box.
Remember that when we had a collection of items and we wanted
to select each one of them one at a time, but we did not know in advance
how many there were, we used the for…each loop structure. This is how
we will place values in a list box from an enumerated type. As we have
seen with dynamic arrays, this was very useful. The same technique can be
used for enumerated types. The following code will place the values from
our Planet type into a list box:
Remember that a list box hold text, so anything going into our list box
must be converted to text first.
VB Code 35: Placing Enum values in a Listbox in VB
foreach (PLANETS singlePlanet in Enum.GetValues(typeof(PLANETS)))
{
this.lstPlanets.Items.Add(Convert.ToString(singlePlanet));
}
C# Code 36: Placing Enum values in a Listbox in C#
Dim singlePlanet As String
Dim allPlanets As Type = GetType(PLANETS)
For Each singlePlanet In [Enum].GetNames(allPlanets)
lsbPlanets.Items.Add(singlePlanet)
Next
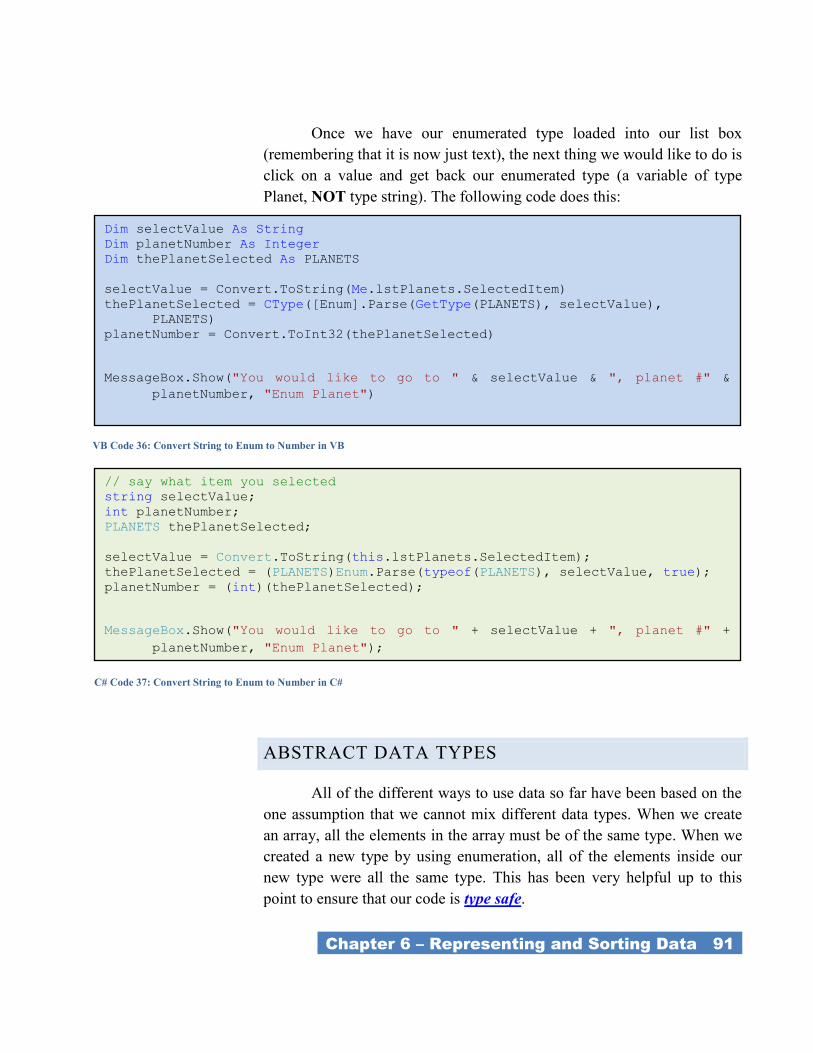
_Chapter 6 – Representing and Sorting Data 91_
Once we have our enumerated type loaded into our list box
(remembering that it is now just text), the next thing we would like to do is
click on a value and get back our enumerated type (a variable of type
Planet, NOT type string). The following code does this:
ABSTRACT DATA TYPES
All of the different ways to use data so far have been based on the
one assumption that we cannot mix different data types. When we create
an array, all the elements in the array must be of the same type. When we
created a new type by using enumeration, all of the elements inside our
new type were all the same type. This has been very helpful up to this
point to ensure that our code is type safe.
VB Code 36: Convert String to Enum to Number in VB
// say what item you selected
string selectValue;
int planetNumber;
PLANETS thePlanetSelected;
selectValue = Convert.ToString(this.lstPlanets.SelectedItem);
thePlanetSelected = (PLANETS)Enum.Parse(typeof(PLANETS), selectValue, true);
planetNumber = (int)(thePlanetSelected);
MessageBox.Show("You would like to go to " + selectValue + ", planet #" +
planetNumber, "Enum Planet");
C# Code 37: Convert String to Enum to Number in C#
Dim selectValue As String
Dim planetNumber As Integer
Dim thePlanetSelected As PLANETS
selectValue = Convert.ToString(Me.lstPlanets.SelectedItem)
thePlanetSelected = CType([Enum].Parse(GetType(PLANETS), selectValue),
PLANETS)
planetNumber = Convert.ToInt32(thePlanetSelected)
MessageBox.Show("You would like to go to " & selectValue & ", planet #" &
planetNumber, "Enum Planet")
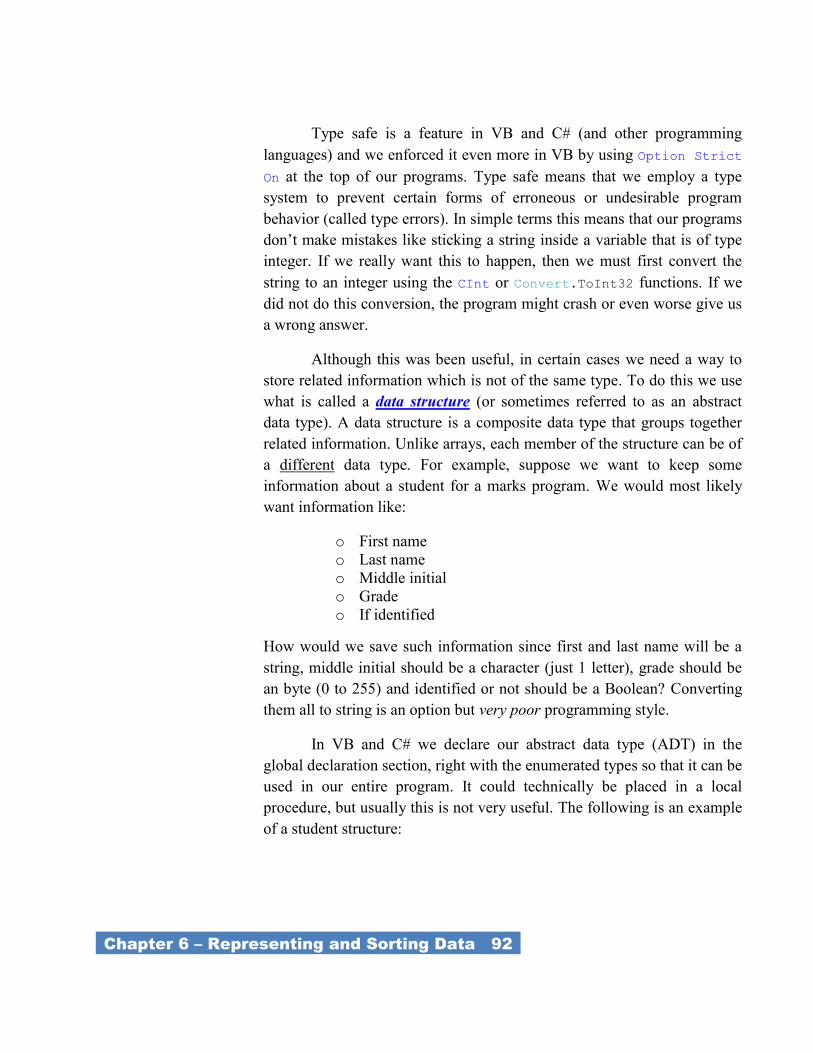
_Chapter 6 – Representing and Sorting Data 92_
Type safe is a feature in VB and C# (and other programming
languages) and we enforced it even more in VB by using Option Strict
On at the top of our programs. Type safe means that we employ a type
system to prevent certain forms of erroneous or undesirable program
behavior (called type errors). In simple terms this means that our programs
don’t make mistakes like sticking a string inside a variable that is of type
integer. If we really want this to happen, then we must first convert the
string to an integer using the CInt or Convert.ToInt32 functions. If we
did not do this conversion, the program might crash or even worse give us
a wrong answer.
Although this was been useful, in certain cases we need a way to
store related information which is not of the same type. To do this we use
what is called a data structure (or sometimes referred to as an abstract
data type). A data structure is a composite data type that groups together
related information. Unlike arrays, each member of the structure can be of
a different data type. For example, suppose we want to keep some
information about a student for a marks program. We would most likely
want information like:
o First name
o Last name
o Middle initial
o Grade
o If identified
How would we save such information since first and last name will be a
string, middle initial should be a character (just 1 letter), grade should be
an byte (0 to 255) and identified or not should be a Boolean? Converting
them all to string is an option but very poor programming style.
In VB and C# we declare our abstract data type (ADT) in the
global declaration section, right with the enumerated types so that it can be
used in our entire program. It could technically be placed in a local
procedure, but usually this is not very useful. The following is an example
of a student structure:
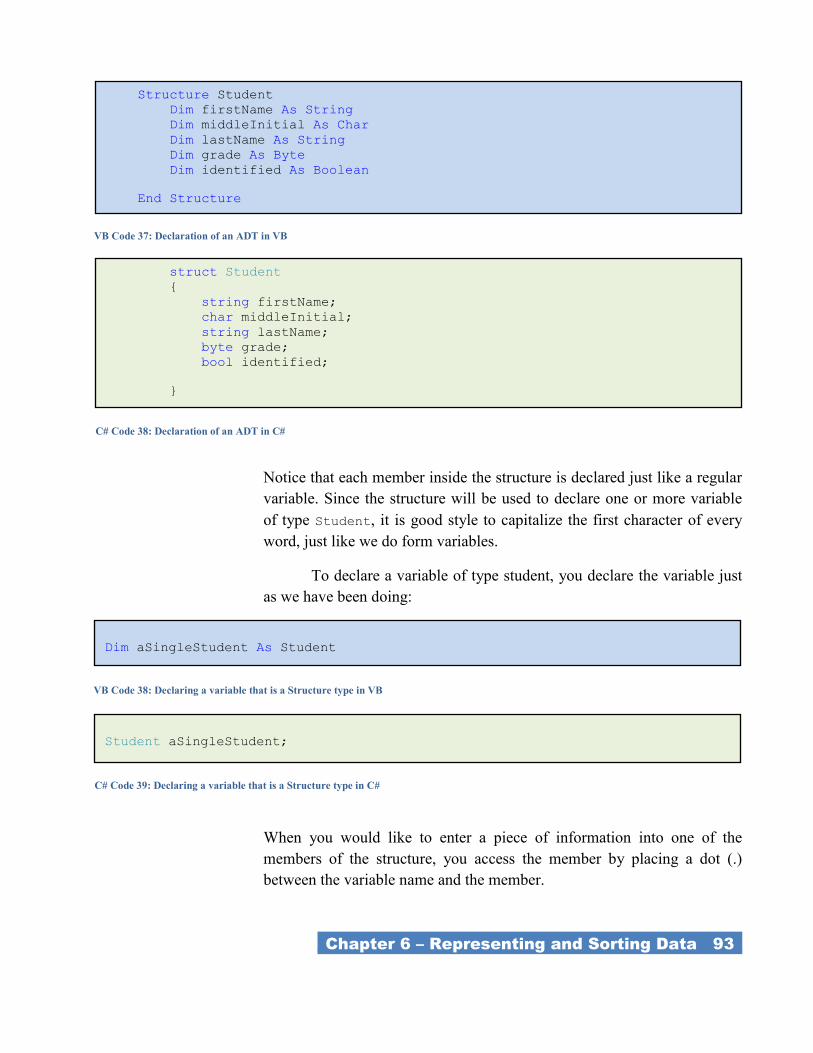
_Chapter 6 – Representing and Sorting Data 93_
Notice that each member inside the structure is declared just like a regular
variable. Since the structure will be used to declare one or more variable
of type Student, it is good style to capitalize the first character of every
word, just like we do form variables.
To declare a variable of type student, you declare the variable just
as we have been doing:
When you would like to enter a piece of information into one of the
members of the structure, you access the member by placing a dot (.)
between the variable name and the member.
VB Code 37: Declaration of an ADT in VB
struct Student
{
string firstName;
char middleInitial;
string lastName;
byte grade;
bool identified;
}
C# Code 38: Declaration of an ADT in C#
Structure Student
Dim firstName As String
Dim middleInitial As Char
Dim lastName As String
Dim grade As Byte
Dim identified As Boolean
End Structure
VB Code 38: Declaring a variable that is a Structure type in VB
Dim aSingleStudent As Student
Student aSingleStudent;
C# Code 39: Declaring a variable that is a Structure type in C#
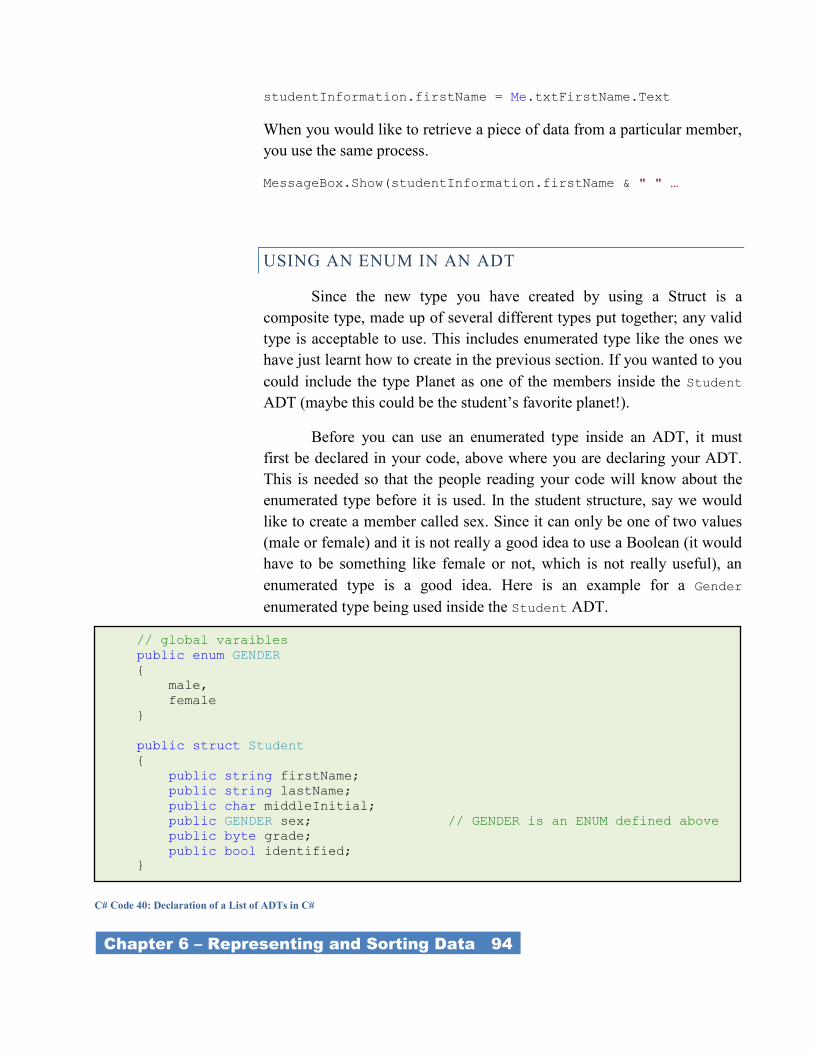
_Chapter 6 – Representing and Sorting Data 94_
studentInformation.firstName = Me.txtFirstName.Text
When you would like to retrieve a piece of data from a particular member,
you use the same process.
MessageBox.Show(studentInformation.firstName & " " …
USING AN ENUM IN AN ADT
Since the new type you have created by using a Struct is a
composite type, made up of several different types put together; any valid
type is acceptable to use. This includes enumerated type like the ones we
have just learnt how to create in the previous section. If you wanted to you
could include the type Planet as one of the members inside the Student
ADT (maybe this could be the student’s favorite planet!).
Before you can use an enumerated type inside an ADT, it must
first be declared in your code, above where you are declaring your ADT.
This is needed so that the people reading your code will know about the
enumerated type before it is used. In the student structure, say we would
like to create a member called sex. Since it can only be one of two values
(male or female) and it is not really a good idea to use a Boolean (it would
have to be something like female or not, which is not really useful), an
enumerated type is a good idea. Here is an example for a Gender
enumerated type being used inside the Student ADT.
// global varaibles
public enum GENDER
{
male,
female
}
public struct Student
{
public string firstName;
public string lastName;
public char middleInitial;
public GENDER sex; // GENDER is an ENUM defined above
public byte grade;
public bool identified;
}
C# Code 40: Declaration of a List of ADTs in C#
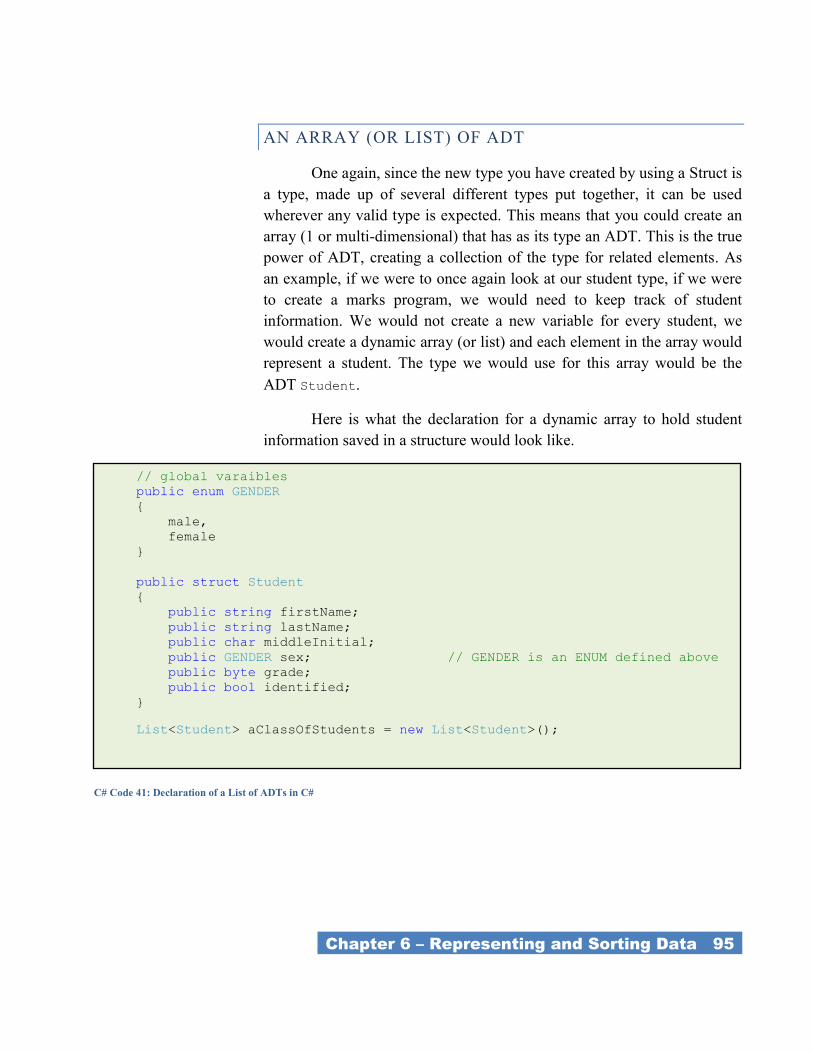
_Chapter 6 – Representing and Sorting Data 95_
AN ARRAY (OR LIST) OF ADT
One again, since the new type you have created by using a Struct is
a type, made up of several different types put together, it can be used
wherever any valid type is expected. This means that you could create an
array (1 or multi-dimensional) that has as its type an ADT. This is the true
power of ADT, creating a collection of the type for related elements. As
an example, if we were to once again look at our student type, if we were
to create a marks program, we would need to keep track of student
information. We would not create a new variable for every student, we
would create a dynamic array (or list) and each element in the array would
represent a student. The type we would use for this array would be the
ADT Student.
Here is what the declaration for a dynamic array to hold student
information saved in a structure would look like.
// global varaibles
public enum GENDER
{
male,
female
}
public struct Student
{
public string firstName;
public string lastName;
public char middleInitial;
public GENDER sex; // GENDER is an ENUM defined above
public byte grade;
public bool identified;
}
List<Student> aClassOfStudents = new List<Student>();
C# Code 41: Declaration of a List of ADTs in C#
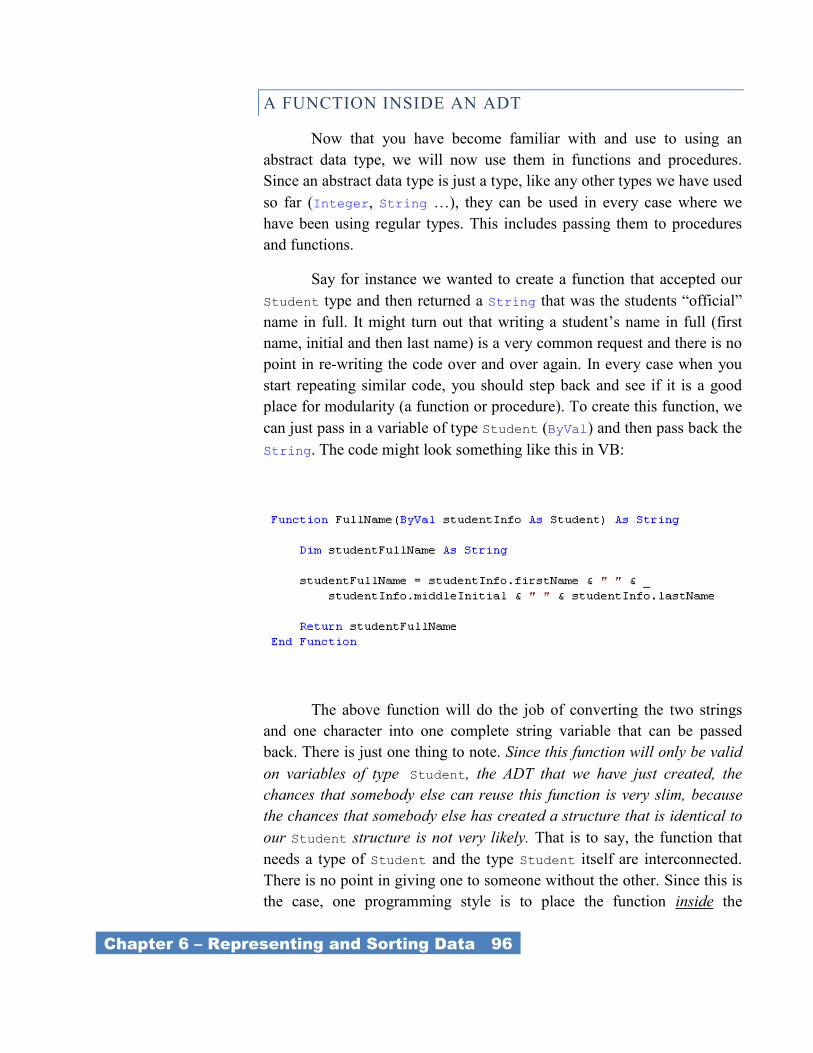
_Chapter 6 – Representing and Sorting Data 96_
A FUNCTION INSIDE AN ADT
Now that you have become familiar with and use to using an
abstract data type, we will now use them in functions and procedures.
Since an abstract data type is just a type, like any other types we have used
so far (Integer, String …), they can be used in every case where we
have been using regular types. This includes passing them to procedures
and functions.
Say for instance we wanted to create a function that accepted our
Student type and then returned a String that was the students ―official‖
name in full. It might turn out that writing a student’s name in full (first
name, initial and then last name) is a very common request and there is no
point in re-writing the code over and over again. In every case when you
start repeating similar code, you should step back and see if it is a good
place for modularity (a function or procedure). To create this function, we
can just pass in a variable of type Student (ByVal) and then pass back the
String. The code might look something like this in VB:
The above function will do the job of converting the two strings
and one character into one complete string variable that can be passed
back. There is just one thing to note. Since this function will only be valid
on variables of type Student, the ADT that we have just created, the
chances that somebody else can reuse this function is very slim, because
the chances that somebody else has created a structure that is identical to
our Student structure is not very likely. That is to say, the function that
needs a type of Student and the type Student itself are interconnected.
There is no point in giving one to someone without the other. Since this is
the case, one programming style is to place the function inside the
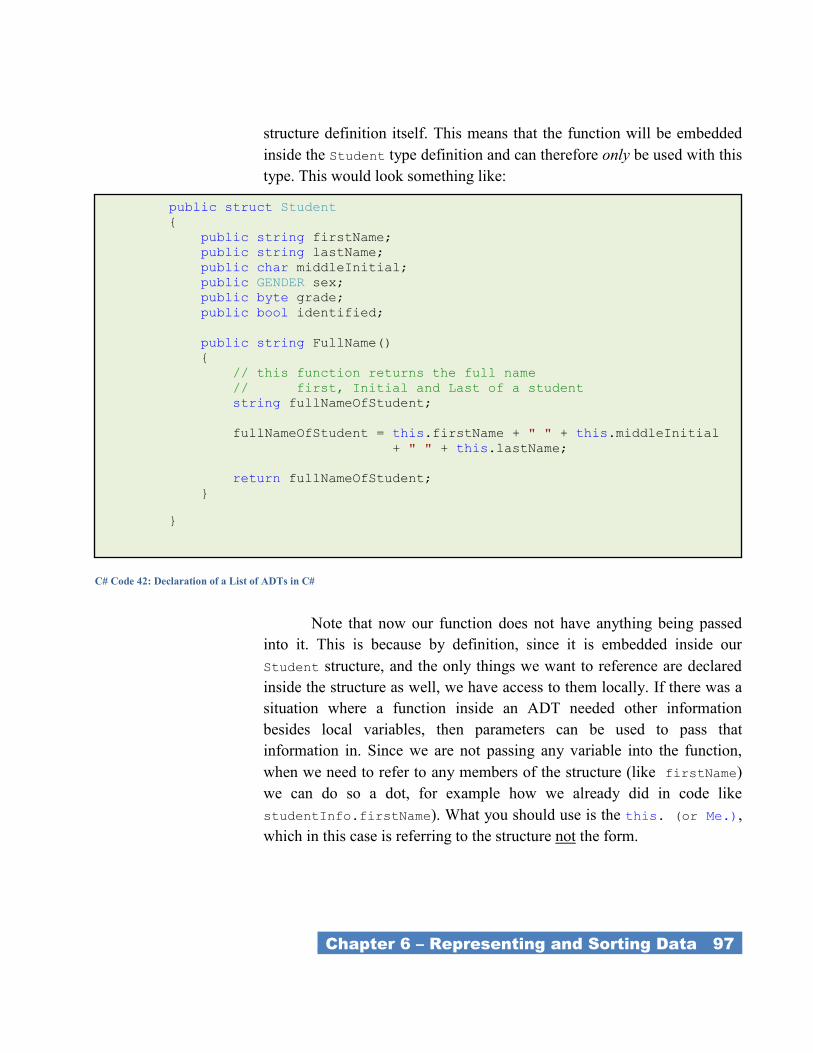
_Chapter 6 – Representing and Sorting Data 97_
structure definition itself. This means that the function will be embedded
inside the Student type definition and can therefore only be used with this
type. This would look something like:
Note that now our function does not have anything being passed
into it. This is because by definition, since it is embedded inside our
Student structure, and the only things we want to reference are declared
inside the structure as well, we have access to them locally. If there was a
situation where a function inside an ADT needed other information
besides local variables, then parameters can be used to pass that
information in. Since we are not passing any variable into the function,
when we need to refer to any members of the structure (like firstName)
we can do so a dot, for example how we already did in code like
studentInfo.firstName). What you should use is the this. (or Me.),
which in this case is referring to the structure not the form.
public struct Student
{
public string firstName;
public string lastName;
public char middleInitial;
public GENDER sex;
public byte grade;
public bool identified;
public string FullName()
{
// this function returns the full name
// first, Initial and Last of a student
string fullNameOfStudent;
fullNameOfStudent = this.firstName + " " + this.middleInitial
+ " " + this.lastName;
return fullNameOfStudent;
}
}
C# Code 42: Declaration of a List of ADTs in C#
_Chapter 6 – Representing and Sorting Data 98_
SEARCHING
LINEAR
BINARY
SORTING
BUBBLE SORT
SELECTION SORT
INSERTION SORT
QUICK SORT

CHAPTER 7 – READING AND
WRITING FILES
_Chapter 6 – Representing and Sorting Data 100_
CHAPTER 7 – READING AND WRITING
FILES
All of the programs we have written so far have all saved their
valuable information in memory. The only problem with this model is that
as soon as you exit the application or turn the computer off, all the
information that is in memory is lost. To save valuable pieces of
information we need a way to write and read that information from and to
disk.
Before we can go any further we need to be introduced to
―Imports―. Imports are used to add a set of library, that are provided by
Microsoft, to your application so that you can use them. In this case the set
of libraries that we are including are ―Imports―. System.IO is a set of
libraries that let the user do Input and Output to disk. This statement
comes right after you top comment section and before the ―Public
Class‖ statement.
FILE STREAM
To be able to actually open a file in Visual Basic you must
associate the file with a files stream object. This object can then perform
all the usual actions you would expect a file to be able to do, read, write
and so on. Since it is an object, it is a two step process; you must first
reserve the space in memory and then instantiate the object. This is done
like:
Dim aFileStream As FileStream
aFileStream = New FileStream(fileNameToOpen, FileMode.Open,
FileAccess.Read)
You will notice that the New method from this class has 3 mandatory
parameters. The first one is the location and name of the file. The easiest
way to get this information is through an open file dialogue box control
object. This is just another control object like a text box or a button in your
toolbox. The next parameter is an enumerated type that states what kind of
_Chapter 7 – Reading and Writing Files 101_
operation we are performing. In this case we are opening up the file (as
compared to creating a new one, truncating or appending). The last
parameter is also and enumerated type and states the action we are
performing (reading or writing).
STREAM READER
Once we have the file open, the next task is to be able to read in
the text. To do this we are going to use another class, this time called
―Stream Reader‖. This class gives us the ability to read either a single
character or line from a file streamer. Since in the last section we learned
how to open up a file, we are going to use that to read in one line of text at
a time. Instantiating a stream reader object looks like:
Dim aStreamReader As StreamReader
aStreamReader = New StreamReader(aFileStream)
aLineOfText = aStreamReader.ReadLine
You will notice that the New method from this class has 1 mandatory
parameters and it is a file stream object that we just learnt how to
instantiate. The method ReadLine then brings in one line at a time from
the file. In the above example we just place each line into a string variable.
The key to stop reading in a new line is when you reach the end of
a file. This is noted by returning a -1 from the Peek method in the
StreamReader class (Do While (aStreamReader.Peek > -1)). Also
once you are finished with the stream reader and filestream; it is always
good OO practice to close the objects down gracefully by using the close
method.
STREAM WRITER
The logical next step after learning how to read in a file would be
to write out a file. Once again VB has a class to help us with this,
StreamWriter. This class has a method that allows the user to take a line of
_Chapter 6 – Representing and Sorting Data 102_
text and write it out to a text file. Instantiating a stream writer object looks
like:
Dim aStreamWriter As StreamWriter
aStreamWriter = New aStreamWriter(aFileStream)
aStreamWriter.WriteLine(aLineOfText)
You will notice that the New method from this class has 1 mandatory
parameters and it is a file stream just like we used in the StreamReader
class. The method WriteLine as expected will take a line of text and write
it to the file.
Although we are using a file stream class again, we have to ensure
that we have it set up correctly for writing. You will remember that last
time it was set just to read in a file. To set it to create a new file and write
it out we would have to do the following:
Dim aFileStream As FileStream
aFileStream = New FileStream(fileNameToWrite,
FileMode.Create, FileAccess.Write)
You will notice that the second and third parameters have been changed to
reflect the fact that we will be creating a new file and writing to it. You
will also notice that the first parameter has changed to
―fileNameToWrite‖. Since this file name (most likely) does not already
exist, we will have to create it and that means using the open file dialog
box control object is not good. Fortunately VB has provided us with yet
another control object, the ―SaveFileDialog‖ control object. Once again
there is a ―show‖ method and a method to return the location and name of
the file we are saving.
CHAPTER 8 – USING OOP

_Chapter 8 – Using OOP 104_
CHAPTER 8 – USING OOP
(The following concepts, explanations and diagrams taken from a Sun tutorial on OOP)
We have been using OOP all along and you have not been aware
of it. The foundation of VB and C# (even all the way back to its 1.0
version) was built on OO concepts, to help make GUI programming
easier. Every time you drag a control object like a button onto a form, you
were doing OOP.
You did not have to re-write all the code that is needed for that
button to appear. You did not have to write all the code to change the text
that appears. And so on and so on. All the properties and methods were
written by someone else and you got to just use them. In this section we
are going to step back and look at the foundation of OOP and see how it is
implemented.
WHAT IS AN OBJECT?
Objects are key to understanding object-oriented technology. Look
around right now and you'll find many examples of real-world objects:
your dog, your desk, your television set, your bicycle.
Real-world objects share two characteristics: They all have state
and behavior. Dogs have state (name, colour, breed, hungry) and behavior
(barking, fetching, wagging tail). Bicycles also have state (current gear,
current pedal cadence, current speed) and behavior (changing gear,
changing pedal cadence, applying brakes). Identifying the state and
behavior for real-world objects is a great way to begin thinking in terms of
object-oriented programming.
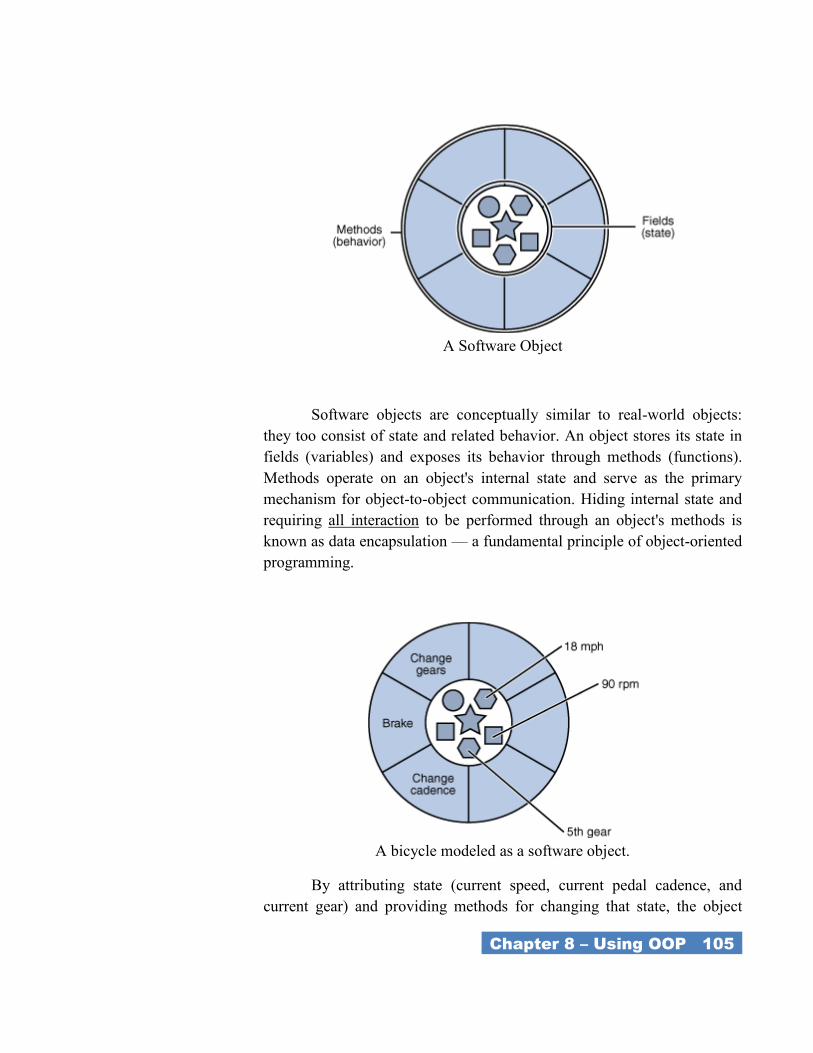
_Chapter 8 – Using OOP 105_
A Software Object
Software objects are conceptually similar to real-world objects:
they too consist of state and related behavior. An object stores its state in
fields (variables) and exposes its behavior through methods (functions).
Methods operate on an object's internal state and serve as the primary
mechanism for object-to-object communication. Hiding internal state and
requiring all interaction to be performed through an object's methods is
known as data encapsulation — a fundamental principle of object-oriented
programming.
A bicycle modeled as a software object.
By attributing state (current speed, current pedal cadence, and
current gear) and providing methods for changing that state, the object
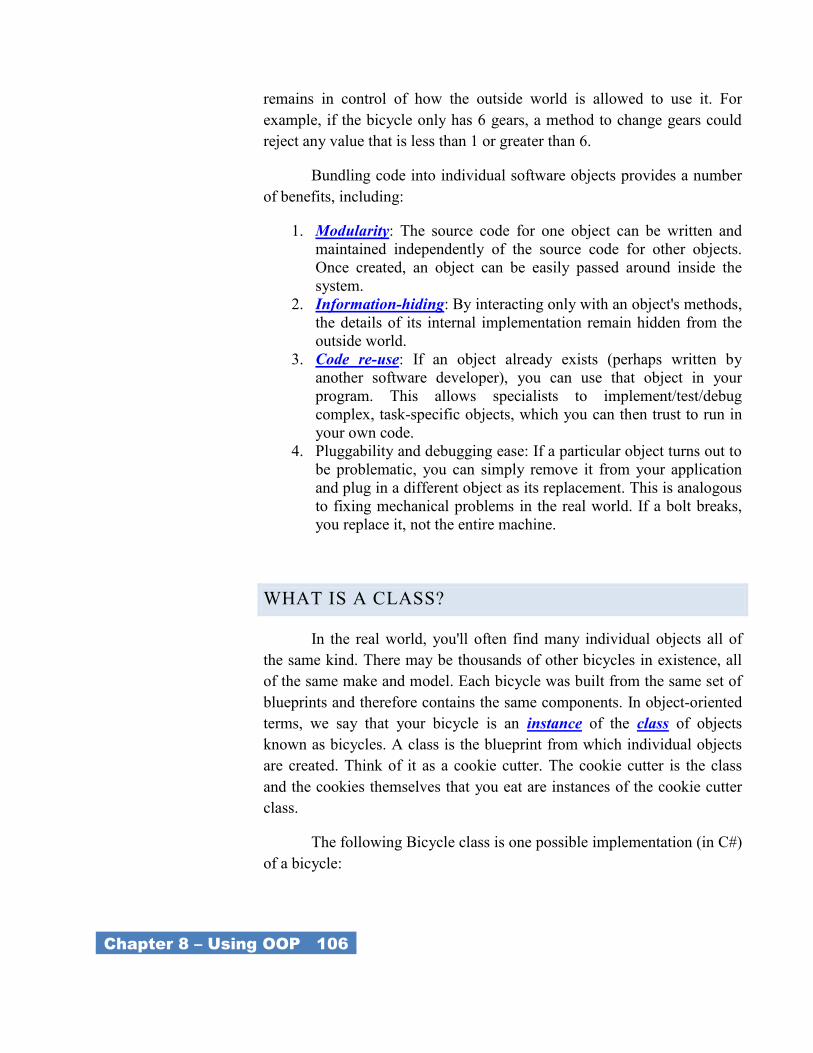
_Chapter 8 – Using OOP 106_
remains in control of how the outside world is allowed to use it. For
example, if the bicycle only has 6 gears, a method to change gears could
reject any value that is less than 1 or greater than 6.
Bundling code into individual software objects provides a number
of benefits, including:
1. Modularity: The source code for one object can be written and
maintained independently of the source code for other objects.
Once created, an object can be easily passed around inside the
system.
2. Information-hiding: By interacting only with an object's methods,
the details of its internal implementation remain hidden from the
outside world.
3. Code re-use: If an object already exists (perhaps written by
another software developer), you can use that object in your
program. This allows specialists to implement/test/debug
complex, task-specific objects, which you can then trust to run in
your own code.
4. Pluggability and debugging ease: If a particular object turns out to
be problematic, you can simply remove it from your application
and plug in a different object as its replacement. This is analogous
to fixing mechanical problems in the real world. If a bolt breaks,
you replace it, not the entire machine.
WHAT IS A CLASS?
In the real world, you'll often find many individual objects all of
the same kind. There may be thousands of other bicycles in existence, all
of the same make and model. Each bicycle was built from the same set of
blueprints and therefore contains the same components. In object-oriented
terms, we say that your bicycle is an instance of the class of objects
known as bicycles. A class is the blueprint from which individual objects
are created. Think of it as a cookie cutter. The cookie cutter is the class
and the cookies themselves that you eat are instances of the cookie cutter
class.
The following Bicycle class is one possible implementation (in C#)
of a bicycle:
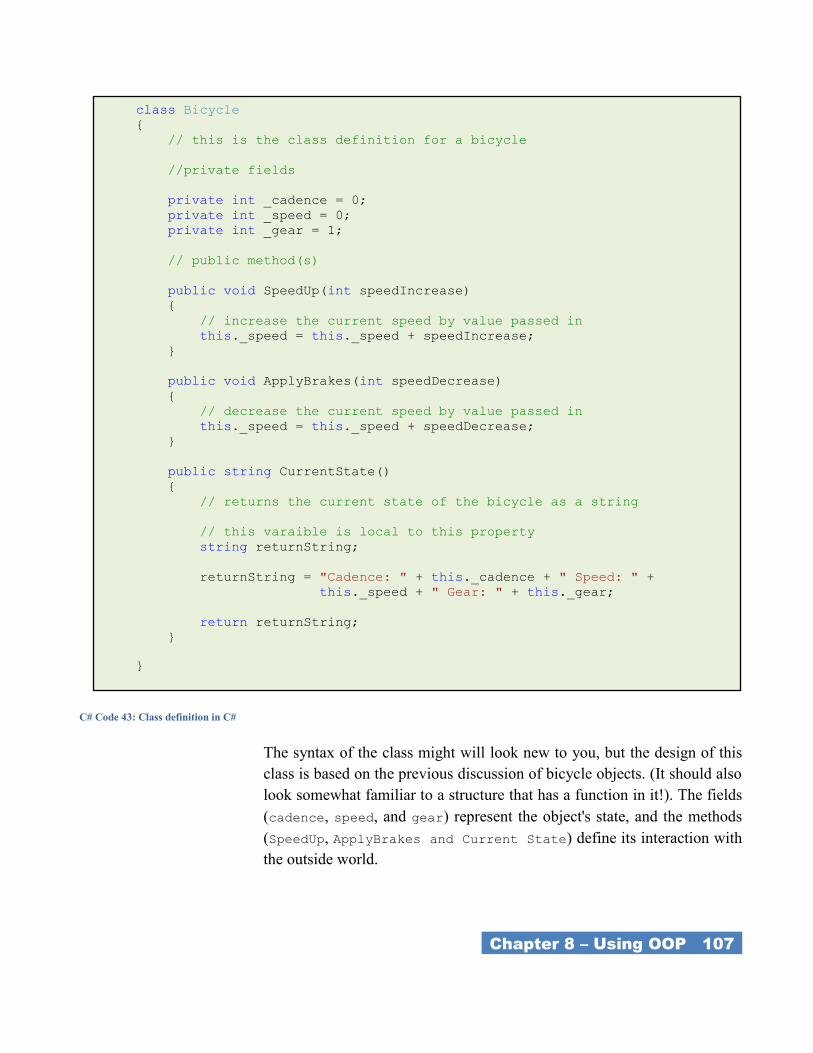
_Chapter 8 – Using OOP 107_
The syntax of the class might will look new to you, but the design of this
class is based on the previous discussion of bicycle objects. (It should also
look somewhat familiar to a structure that has a function in it!). The fields
(cadence, speed, and gear) represent the object's state, and the methods
(SpeedUp, ApplyBrakes and Current State) define its interaction with
the outside world.
C# Code 43: Class definition in C#
class Bicycle
{
// this is the class definition for a bicycle
//private fields
private int _cadence = 0;
private int _speed = 0;
private int _gear = 1;
// public method(s)
public void SpeedUp(int speedIncrease)
{
// increase the current speed by value passed in
this._speed = this._speed + speedIncrease;
}
public void ApplyBrakes(int speedDecrease)
{
// decrease the current speed by value passed in
this._speed = this._speed + speedDecrease;
}
public string CurrentState()
{
// returns the current state of the bicycle as a string
// this varaible is local to this property
string returnString;
returnString = "Cadence: " + this._cadence + " Speed: " +
this._speed + " Gear: " + this._gear;
return returnString;
}
}
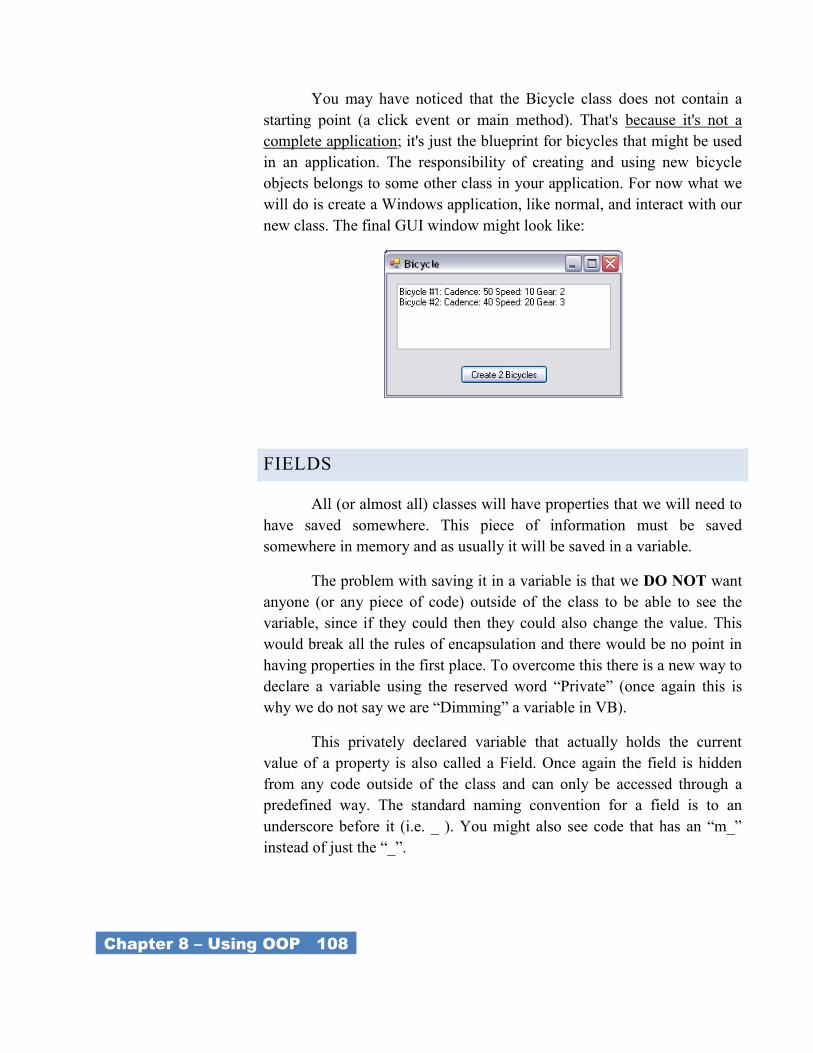
_Chapter 8 – Using OOP 108_
You may have noticed that the Bicycle class does not contain a
starting point (a click event or main method). That's because it's not a
complete application; it's just the blueprint for bicycles that might be used
in an application. The responsibility of creating and using new bicycle
objects belongs to some other class in your application. For now what we
will do is create a Windows application, like normal, and interact with our
new class. The final GUI window might look like:
FIELDS
All (or almost all) classes will have properties that we will need to
have saved somewhere. This piece of information must be saved
somewhere in memory and as usually it will be saved in a variable.
The problem with saving it in a variable is that we DO NOT want
anyone (or any piece of code) outside of the class to be able to see the
variable, since if they could then they could also change the value. This
would break all the rules of encapsulation and there would be no point in
having properties in the first place. To overcome this there is a new way to
declare a variable using the reserved word ―Private‖ (once again this is
why we do not say we are ―Dimming‖ a variable in VB).
This privately declared variable that actually holds the current
value of a property is also called a Field. Once again the field is hidden
from any code outside of the class and can only be accessed through a
predefined way. The standard naming convention for a field is to an
underscore before it (i.e. _ ). You might also see code that has an ―m_‖
instead of just the ―_‖.
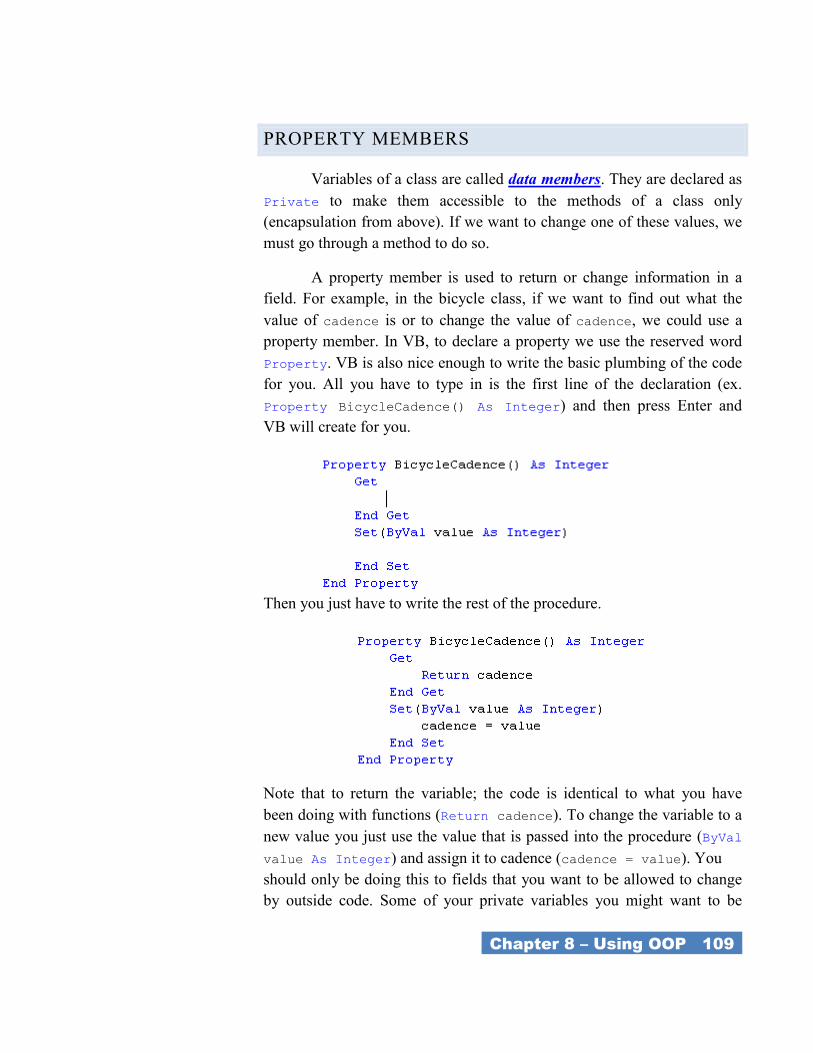
_Chapter 8 – Using OOP 109_
PROPERTY MEMBERS
Variables of a class are called data members. They are declared as
Private to make them accessible to the methods of a class only
(encapsulation from above). If we want to change one of these values, we
must go through a method to do so.
A property member is used to return or change information in a
field. For example, in the bicycle class, if we want to find out what the
value of cadence is or to change the value of cadence, we could use a
property member. In VB, to declare a property we use the reserved word
Property. VB is also nice enough to write the basic plumbing of the code
for you. All you have to type in is the first line of the declaration (ex.
Property BicycleCadence() As Integer) and then press Enter and
VB will create for you.
Then you just have to write the rest of the procedure.
Note that to return the variable; the code is identical to what you have
been doing with functions (Return cadence). To change the variable to a
new value you just use the value that is passed into the procedure (ByVal
value As Integer) and assign it to cadence (cadence = value). You
should only be doing this to fields that you want to be allowed to change
by outside code. Some of your private variables you might want to be
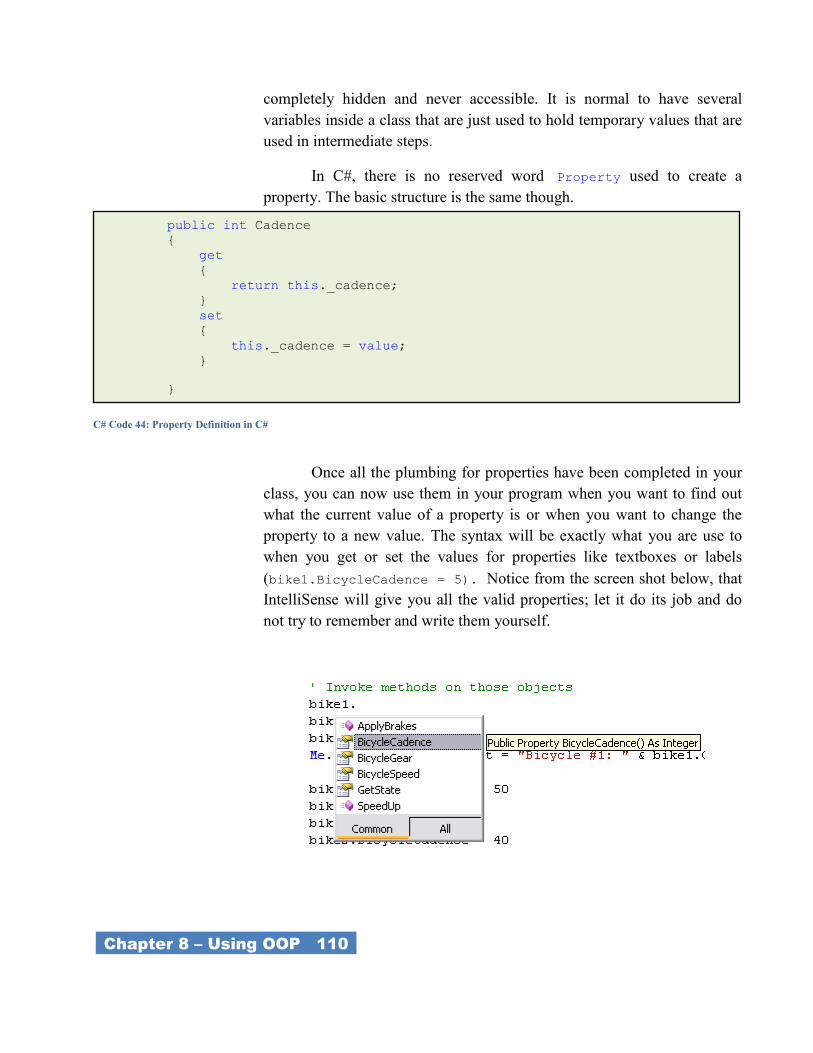
_Chapter 8 – Using OOP 110_
completely hidden and never accessible. It is normal to have several
variables inside a class that are just used to hold temporary values that are
used in intermediate steps.
In C#, there is no reserved word Property used to create a
property. The basic structure is the same though.
Once all the plumbing for properties have been completed in your
class, you can now use them in your program when you want to find out
what the current value of a property is or when you want to change the
property to a new value. The syntax will be exactly what you are use to
when you get or set the values for properties like textboxes or labels
(bike1.BicycleCadence = 5). Notice from the screen shot below, that
IntelliSense will give you all the valid properties; let it do its job and do
not try to remember and write them yourself.
C# Code 44: Property Definition in C#
public int Cadence
{
get
{
return this._cadence;
}
set
{
this._cadence = value;
}
}
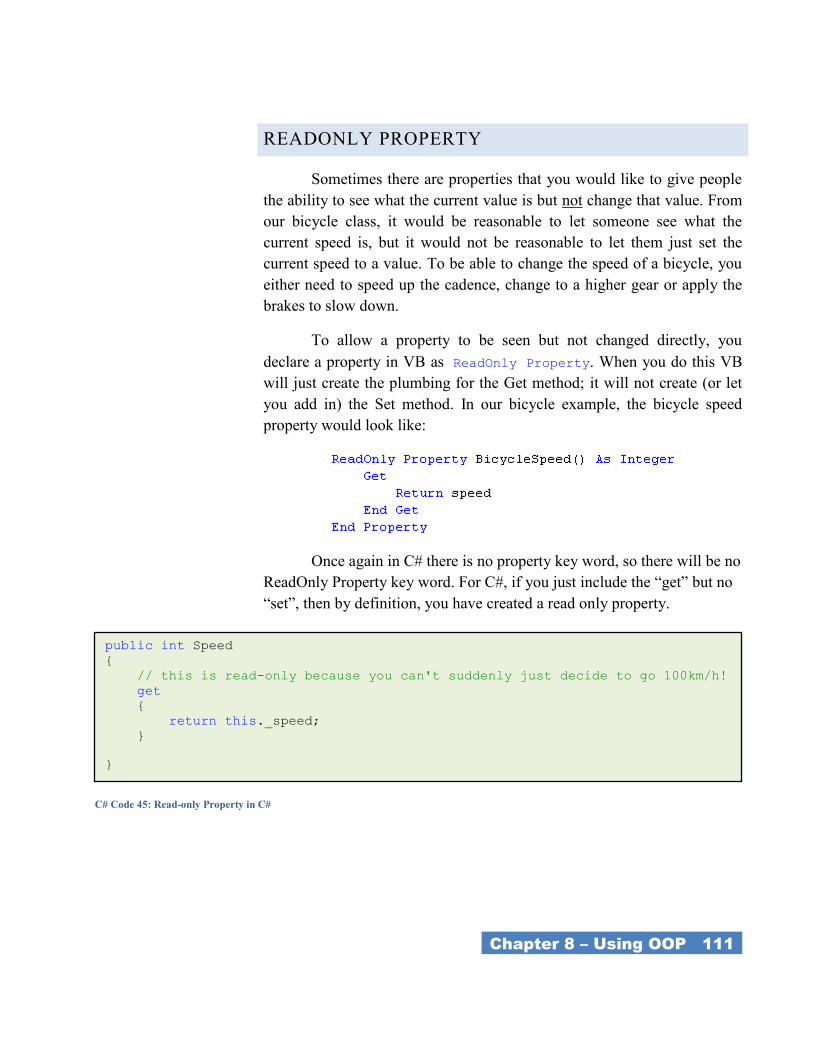
_Chapter 8 – Using OOP 111_
READONLY PROPERTY
Sometimes there are properties that you would like to give people
the ability to see what the current value is but not change that value. From
our bicycle class, it would be reasonable to let someone see what the
current speed is, but it would not be reasonable to let them just set the
current speed to a value. To be able to change the speed of a bicycle, you
either need to speed up the cadence, change to a higher gear or apply the
brakes to slow down.
To allow a property to be seen but not changed directly, you
declare a property in VB as ReadOnly Property. When you do this VB
will just create the plumbing for the Get method; it will not create (or let
you add in) the Set method. In our bicycle example, the bicycle speed
property would look like:
Once again in C# there is no property key word, so there will be no
ReadOnly Property key word. For C#, if you just include the ―get‖ but no
―set‖, then by definition, you have created a read only property.
C# Code 45: Read-only Property in C#
public int Speed
{
// this is read-only because you can't suddenly just decide to go 100km/h!
get
{
return this._speed;
}
}
_Chapter 8 – Using OOP 112_
METHODS
In structured programming, we used functions and procedures to
group together code that performed an action. The idea behind grouping
them together in a package, like a procedure or function, was code reuse.
The related code was used several times or we thought it could be used in
another program in the future. In OOP we will still need functions and
procedures to perform actions and to return values. In OOP functions and
procedures are called methods.
A method is a procedure or a function in a class. Methods are used
to perform actions on or return values from our fields. Just like in
structured programming methods might have none, one or several
parameters passed to them. Just like a function, a method might also have
a return value. The purpose of having methods in our class is to provide a
way for the class’s private variables to be accessed, changed and returned.
Remember in OOP, the data is hidden (encapsulation) and can only be
changed by the proper use of methods or properties.
Since methods are the only publicly available way for objects to
access or change their private variables, the methods will usually be
declared as Public. Since methods are just like procedures and functions,
the proper naming convention for methods is the same as procedures and
functions; each word starts with a capital letter, there are no underscores
and it must be an actions word (verb) since they are performing some
action. A method for our bicycle class would look something like:
Sometimes in our class, just like in our structured programming
code, we might have classes that we do not want to make visible to the
object but we would like to be used for ―background‖ work inside of our
class. Since we do not want the object to see them, we declare them as
Protected, so that any code inside of our class can see them, but no
outside object can use them. In our bicycle example, if you change the
gear that you are in, then the speed of the bicycle will change (given
everything else stays the same). We will therefore include a Protected
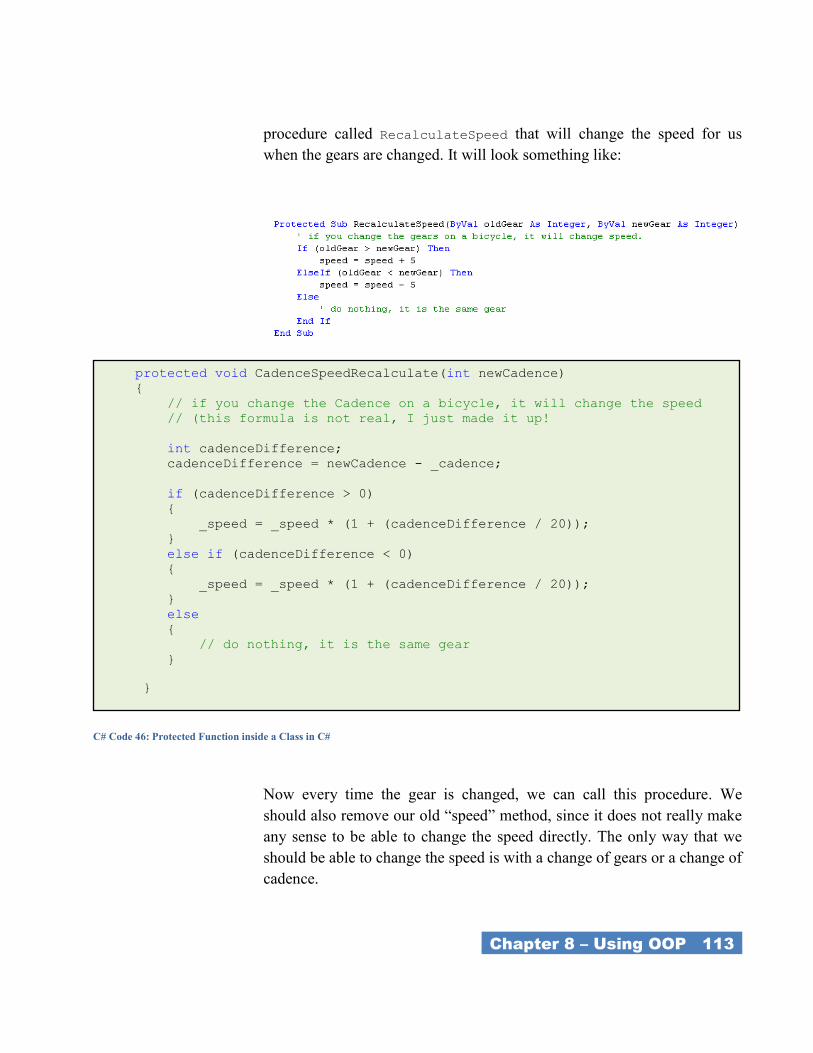
_Chapter 8 – Using OOP 113_
procedure called RecalculateSpeed that will change the speed for us
when the gears are changed. It will look something like:
Now every time the gear is changed, we can call this procedure. We
should also remove our old ―speed‖ method, since it does not really make
any sense to be able to change the speed directly. The only way that we
should be able to change the speed is with a change of gears or a change of
cadence.
C# Code 46: Protected Function inside a Class in C#
protected void CadenceSpeedRecalculate(int newCadence)
{
// if you change the Cadence on a bicycle, it will change the speed
// (this formula is not real, I just made it up!
int cadenceDifference;
cadenceDifference = newCadence - _cadence;
if (cadenceDifference > 0)
{
_speed = _speed * (1 + (cadenceDifference / 20));
}
else if (cadenceDifference < 0)
{
_speed = _speed * (1 + (cadenceDifference / 20));
}
else
{
// do nothing, it is the same gear
}
}
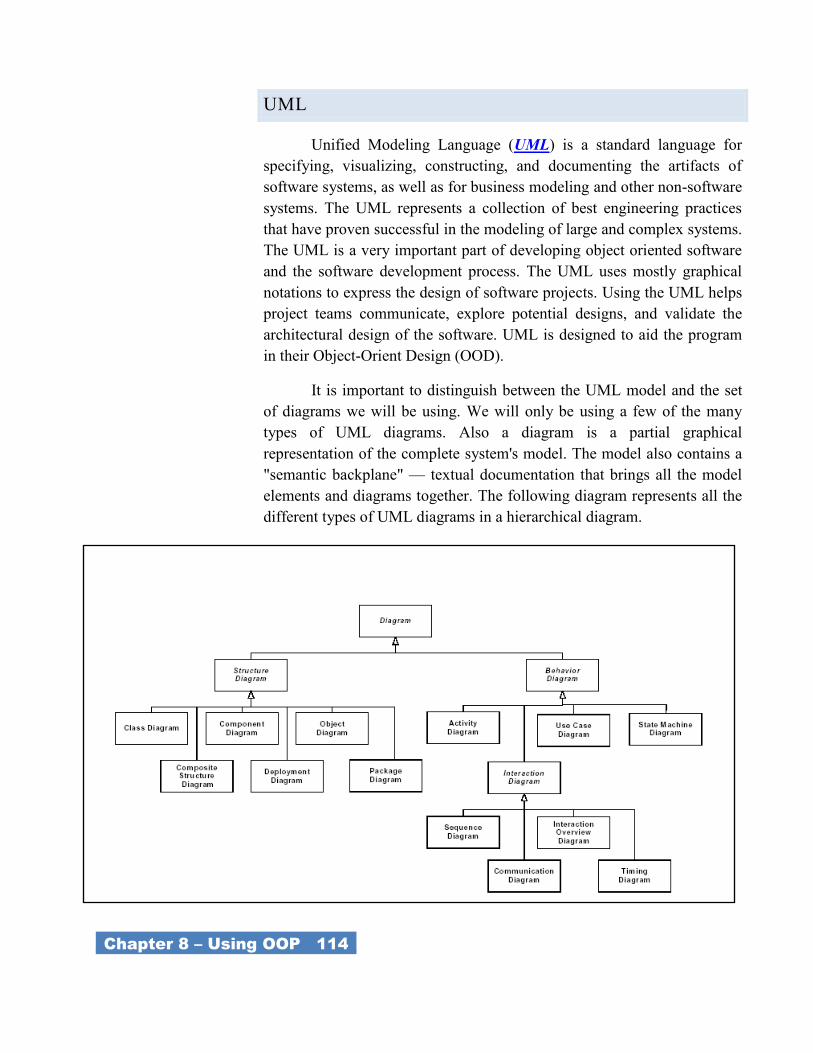
_Chapter 8 – Using OOP 114_
UML
Unified Modeling Language (UML) is a standard language for
specifying, visualizing, constructing, and documenting the artifacts of
software systems, as well as for business modeling and other non-software
systems. The UML represents a collection of best engineering practices
that have proven successful in the modeling of large and complex systems.
The UML is a very important part of developing object oriented software
and the software development process. The UML uses mostly graphical
notations to express the design of software projects. Using the UML helps
project teams communicate, explore potential designs, and validate the
architectural design of the software. UML is designed to aid the program
in their Object-Orient Design (OOD).
It is important to distinguish between the UML model and the set
of diagrams we will be using. We will only be using a few of the many
types of UML diagrams. Also a diagram is a partial graphical
representation of the complete system's model. The model also contains a
"semantic backplane" — textual documentation that brings all the model
elements and diagrams together. The following diagram represents all the
different types of UML diagrams in a hierarchical diagram.
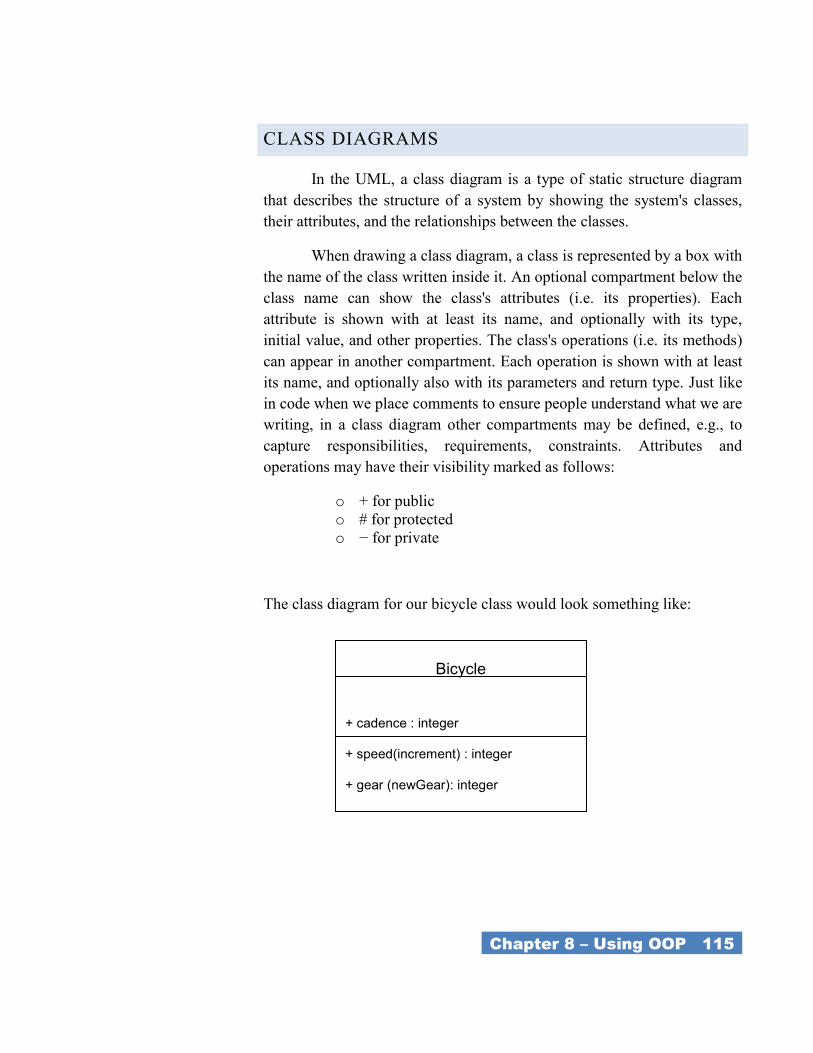
_Chapter 8 – Using OOP 115_
CLASS DIAGRAMS
In the UML, a class diagram is a type of static structure diagram
that describes the structure of a system by showing the system's classes,
their attributes, and the relationships between the classes.
When drawing a class diagram, a class is represented by a box with
the name of the class written inside it. An optional compartment below the
class name can show the class's attributes (i.e. its properties). Each
attribute is shown with at least its name, and optionally with its type,
initial value, and other properties. The class's operations (i.e. its methods)
can appear in another compartment. Each operation is shown with at least
its name, and optionally also with its parameters and return type. Just like
in code when we place comments to ensure people understand what we are
writing, in a class diagram other compartments may be defined, e.g., to
capture responsibilities, requirements, constraints. Attributes and
operations may have their visibility marked as follows:
o + for public
o # for protected
o − for private
The class diagram for our bicycle class would look something like:
Bicycle
+ cadence : integer
+ speed(increment) : integer
+ gear (newGear): integer
# RecalculateSpeed (oldGear : integer,
newGear: integer)
+ SpeedUp (increment : integer)
+ ApplyBrakes (decrement : integer)
_Chapter 9 – Creating Objects 116_
CHAPTER 8 – CREATING
OBJECTS
_Chapter 9 – Creating Objects 117_
CHAPTER 9 – CREATING OBJECTS
ENCAPSULATION
One important aspect of classes is that the methods of a class are
the only way to change the values of the private data (fields) of that class.
The reason for this is that the methods (and properties) use ―logic‖ to
ensure the operation is legal. For example, in the bicycle class, you cannot
change the variable speed directly you must use methods (or properties)
like (ChangeCadence, ChangeGear, SpeedUp, and ApplyBrakes). The
variables are not directly accessible to the Bicycle object and they are said
to be encapsulated by the class. Limiting access to data is call data hiding
and is the basis for encapsulation.
Encapsulation is accomplished by using an access modifier in
declarations of variables. Access modifiers are keywords that control
access to members:
o Private declares a member as accessible to the method of
the class only
o Protected declares a member that can be used from within
the class only
o Public explicitly declares a member available to an object
of the class.
CONSTRUCTORS
A constructor is a method that is automatically called by the New
keyword when an object is instantiated. Assignment of values to fields
(private variables) is normally done in the constructor. This is a better
method of assigning initial values to variables than the way we have been
doing, by assigning the value in the declaration statement (see example
below).
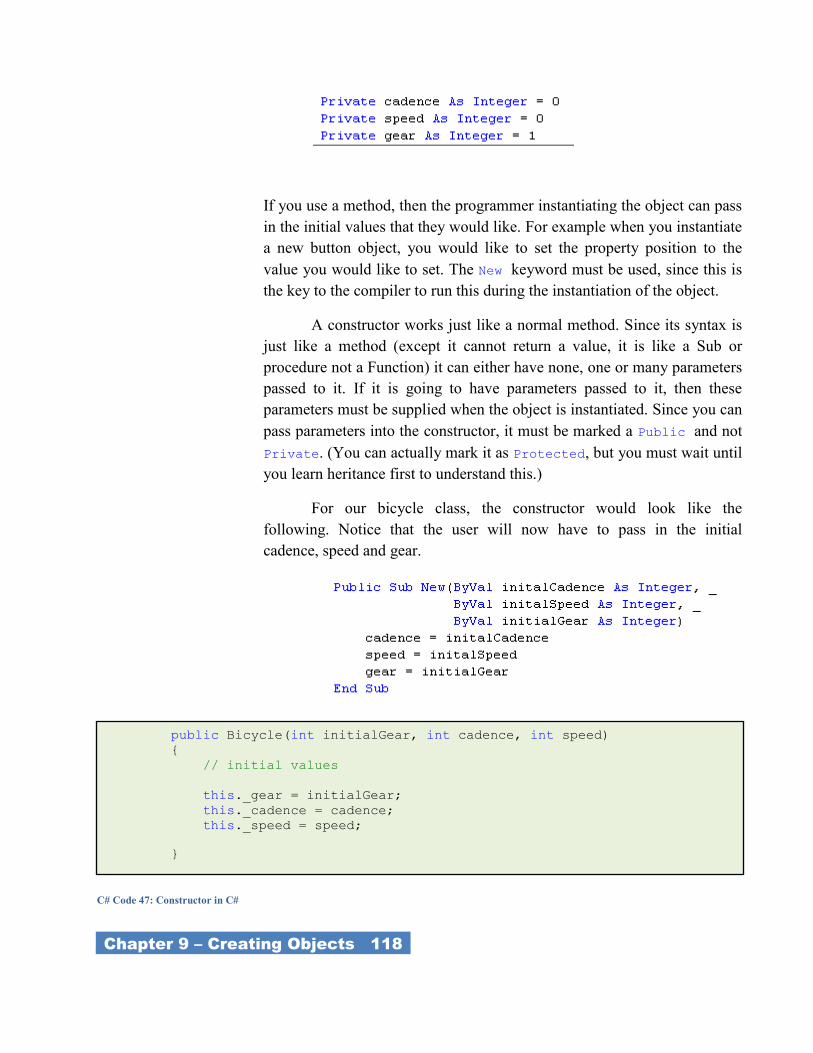
_Chapter 9 – Creating Objects 118_
If you use a method, then the programmer instantiating the object can pass
in the initial values that they would like. For example when you instantiate
a new button object, you would like to set the property position to the
value you would like to set. The New keyword must be used, since this is
the key to the compiler to run this during the instantiation of the object.
A constructor works just like a normal method. Since its syntax is
just like a method (except it cannot return a value, it is like a Sub or
procedure not a Function) it can either have none, one or many parameters
passed to it. If it is going to have parameters passed to it, then these
parameters must be supplied when the object is instantiated. Since you can
pass parameters into the constructor, it must be marked a Public and not
Private. (You can actually mark it as Protected, but you must wait until
you learn heritance first to understand this.)
For our bicycle class, the constructor would look like the
following. Notice that the user will now have to pass in the initial
cadence, speed and gear.
C# Code 47: Constructor in C#
public Bicycle(int initialGear, int cadence, int speed)
{
// initial values
this._gear = initialGear;
this._cadence = cadence;
this._speed = speed;
}
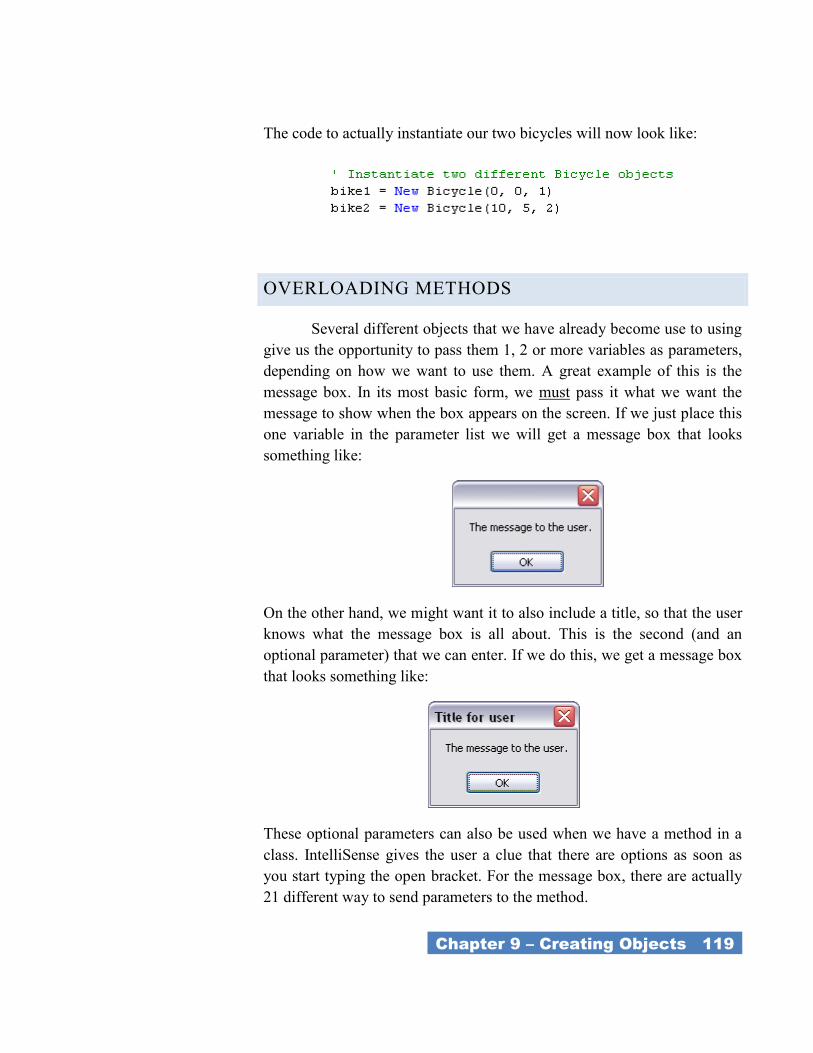
_Chapter 9 – Creating Objects 119_
The code to actually instantiate our two bicycles will now look like:
OVERLOADING METHODS
Several different objects that we have already become use to using
give us the opportunity to pass them 1, 2 or more variables as parameters,
depending on how we want to use them. A great example of this is the
message box. In its most basic form, we must pass it what we want the
message to show when the box appears on the screen. If we just place this
one variable in the parameter list we will get a message box that looks
something like:
On the other hand, we might want it to also include a title, so that the user
knows what the message box is all about. This is the second (and an
optional parameter) that we can enter. If we do this, we get a message box
that looks something like:
These optional parameters can also be used when we have a method in a
class. IntelliSense gives the user a clue that there are options as soon as
you start typing the open bracket. For the message box, there are actually
21 different way to send parameters to the method.
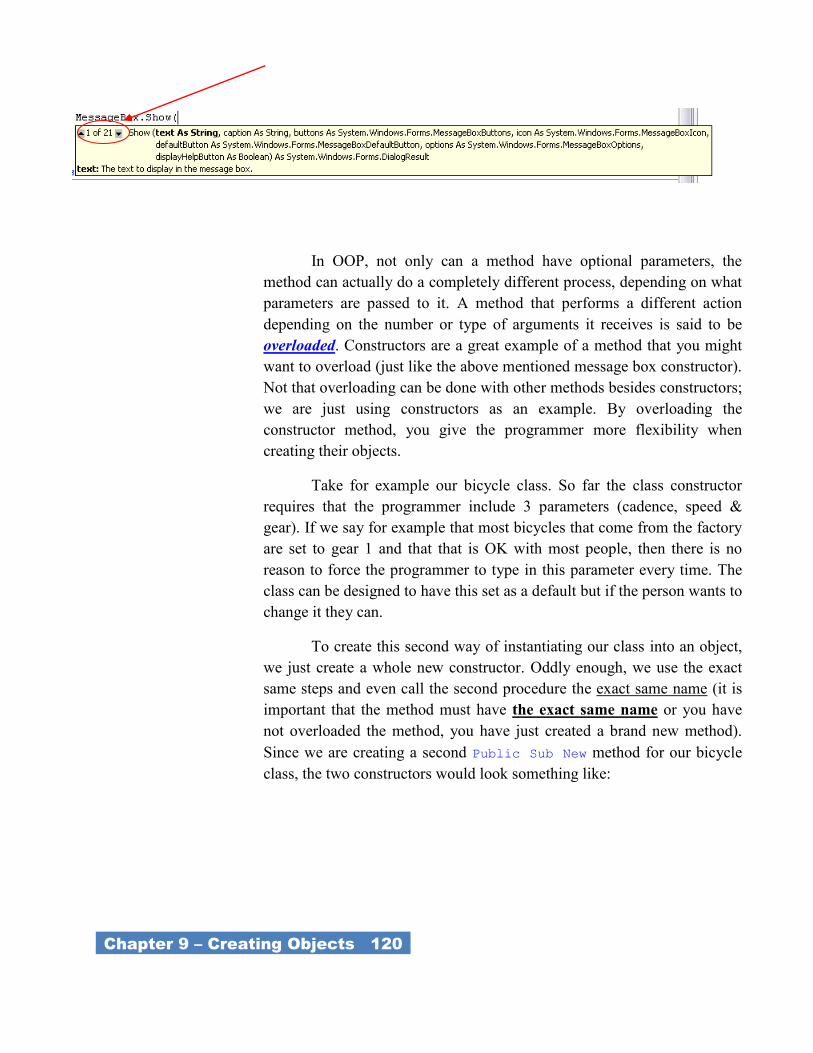
_Chapter 9 – Creating Objects 120_
In OOP, not only can a method have optional parameters, the
method can actually do a completely different process, depending on what
parameters are passed to it. A method that performs a different action
depending on the number or type of arguments it receives is said to be
overloaded. Constructors are a great example of a method that you might
want to overload (just like the above mentioned message box constructor).
Not that overloading can be done with other methods besides constructors;
we are just using constructors as an example. By overloading the
constructor method, you give the programmer more flexibility when
creating their objects.
Take for example our bicycle class. So far the class constructor
requires that the programmer include 3 parameters (cadence, speed &
gear). If we say for example that most bicycles that come from the factory
are set to gear 1 and that that is OK with most people, then there is no
reason to force the programmer to type in this parameter every time. The
class can be designed to have this set as a default but if the person wants to
change it they can.
To create this second way of instantiating our class into an object,
we just create a whole new constructor. Oddly enough, we use the exact
same steps and even call the second procedure the exact same name (it is
important that the method must have the exact same name or you have
not overloaded the method, you have just created a brand new method).
Since we are creating a second Public Sub New method for our bicycle
class, the two constructors would look something like:
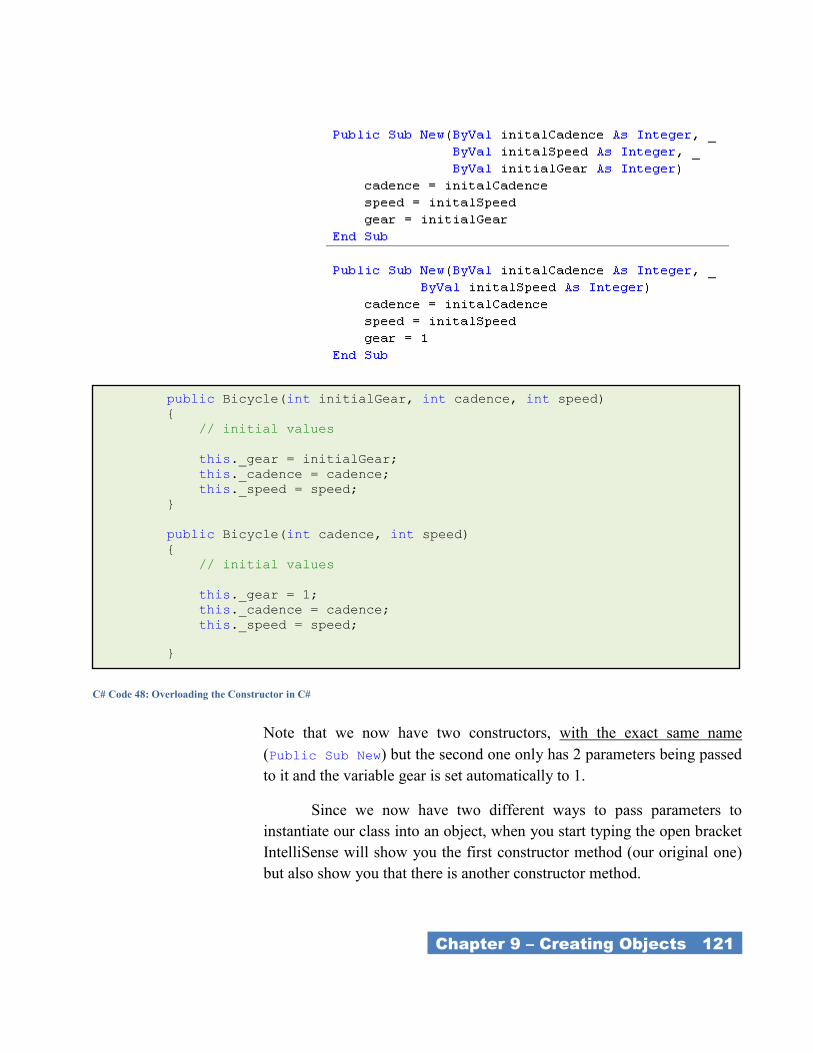
_Chapter 9 – Creating Objects 121_
Note that we now have two constructors, with the exact same name
(Public Sub New) but the second one only has 2 parameters being passed
to it and the variable gear is set automatically to 1.
Since we now have two different ways to pass parameters to
instantiate our class into an object, when you start typing the open bracket
IntelliSense will show you the first constructor method (our original one)
but also show you that there is another constructor method.
C# Code 48: Overloading the Constructor in C#
public Bicycle(int initialGear, int cadence, int speed)
{
// initial values
this._gear = initialGear;
this._cadence = cadence;
this._speed = speed;
}
public Bicycle(int cadence, int speed)
{
// initial values
this._gear = 1;
this._cadence = cadence;
this._speed = speed;
}
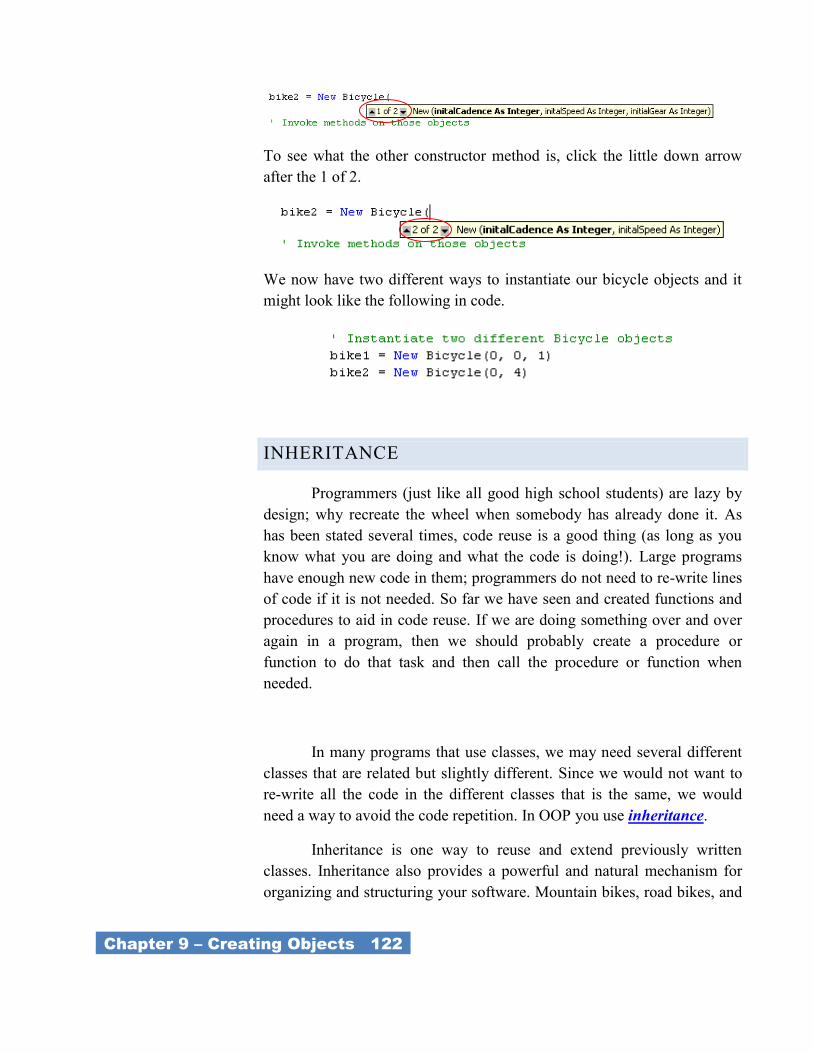
_Chapter 9 – Creating Objects 122_
To see what the other constructor method is, click the little down arrow
after the 1 of 2.
We now have two different ways to instantiate our bicycle objects and it
might look like the following in code.
INHERITANCE
Programmers (just like all good high school students) are lazy by
design; why recreate the wheel when somebody has already done it. As
has been stated several times, code reuse is a good thing (as long as you
know what you are doing and what the code is doing!). Large programs
have enough new code in them; programmers do not need to re-write lines
of code if it is not needed. So far we have seen and created functions and
procedures to aid in code reuse. If we are doing something over and over
again in a program, then we should probably create a procedure or
function to do that task and then call the procedure or function when
needed.
In many programs that use classes, we may need several different
classes that are related but slightly different. Since we would not want to
re-write all the code in the different classes that is the same, we would
need a way to avoid the code repetition. In OOP you use inheritance.
Inheritance is one way to reuse and extend previously written
classes. Inheritance also provides a powerful and natural mechanism for
organizing and structuring your software. Mountain bikes, road bikes, and
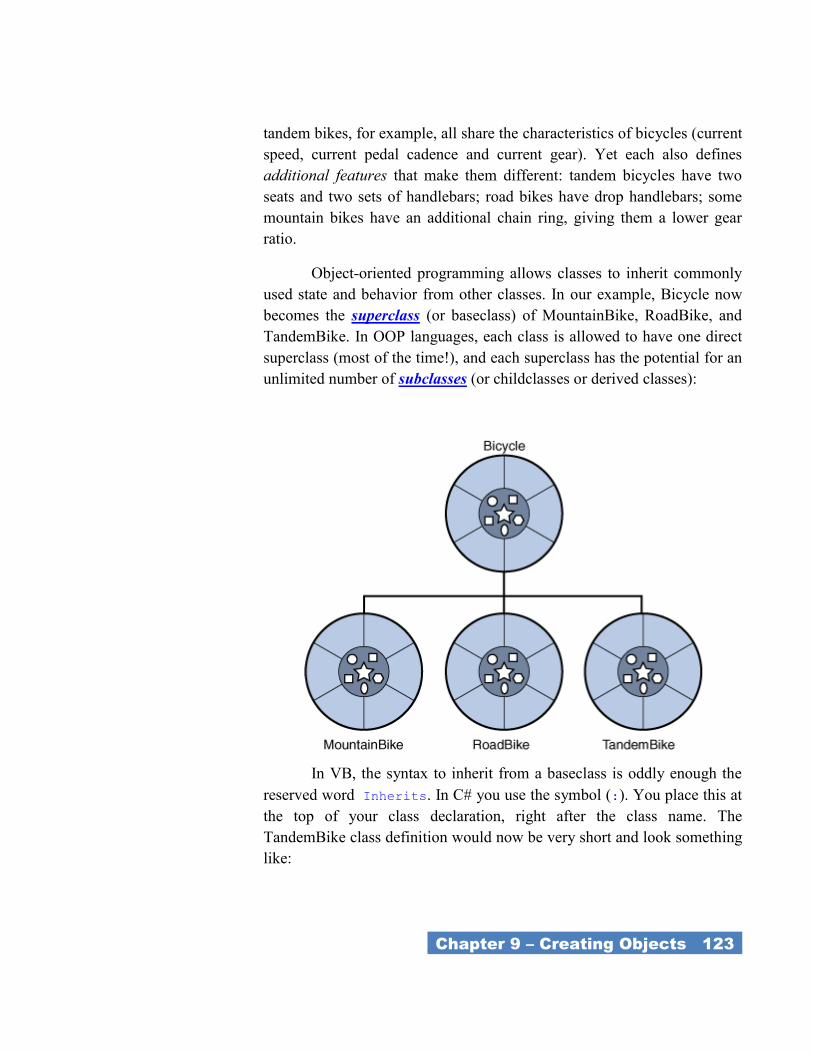
_Chapter 9 – Creating Objects 123_
tandem bikes, for example, all share the characteristics of bicycles (current
speed, current pedal cadence and current gear). Yet each also defines
additional features that make them different: tandem bicycles have two
seats and two sets of handlebars; road bikes have drop handlebars; some
mountain bikes have an additional chain ring, giving them a lower gear
ratio.
Object-oriented programming allows classes to inherit commonly
used state and behavior from other classes. In our example, Bicycle now
becomes the superclass (or baseclass) of MountainBike, RoadBike, and
TandemBike. In OOP languages, each class is allowed to have one direct
superclass (most of the time!), and each superclass has the potential for an
unlimited number of subclasses (or childclasses or derived classes):
In VB, the syntax to inherit from a baseclass is oddly enough the
reserved word Inherits. In C# you use the symbol (:). You place this at
the top of your class declaration, right after the class name. The
TandemBike class definition would now be very short and look something
like:
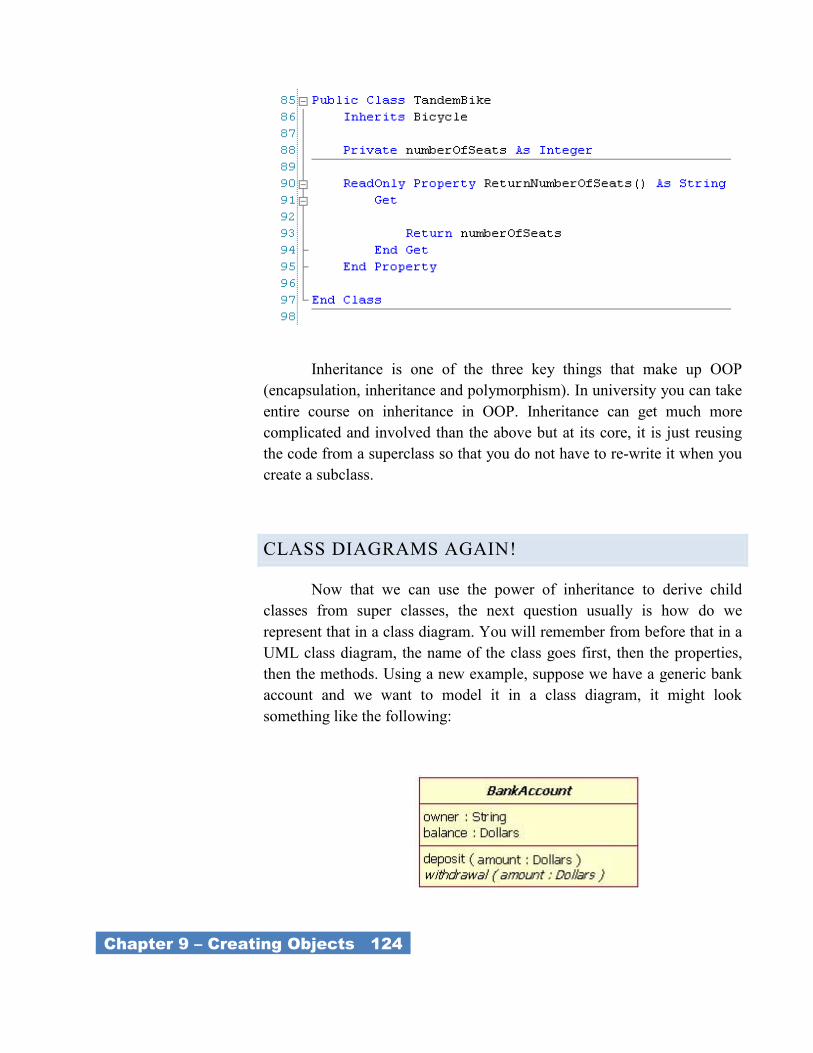
_Chapter 9 – Creating Objects 124_
Inheritance is one of the three key things that make up OOP
(encapsulation, inheritance and polymorphism). In university you can take
entire course on inheritance in OOP. Inheritance can get much more
complicated and involved than the above but at its core, it is just reusing
the code from a superclass so that you do not have to re-write it when you
create a subclass.
CLASS DIAGRAMS AGAIN!
Now that we can use the power of inheritance to derive child
classes from super classes, the next question usually is how do we
represent that in a class diagram. You will remember from before that in a
UML class diagram, the name of the class goes first, then the properties,
then the methods. Using a new example, suppose we have a generic bank
account and we want to model it in a class diagram, it might look
something like the following:
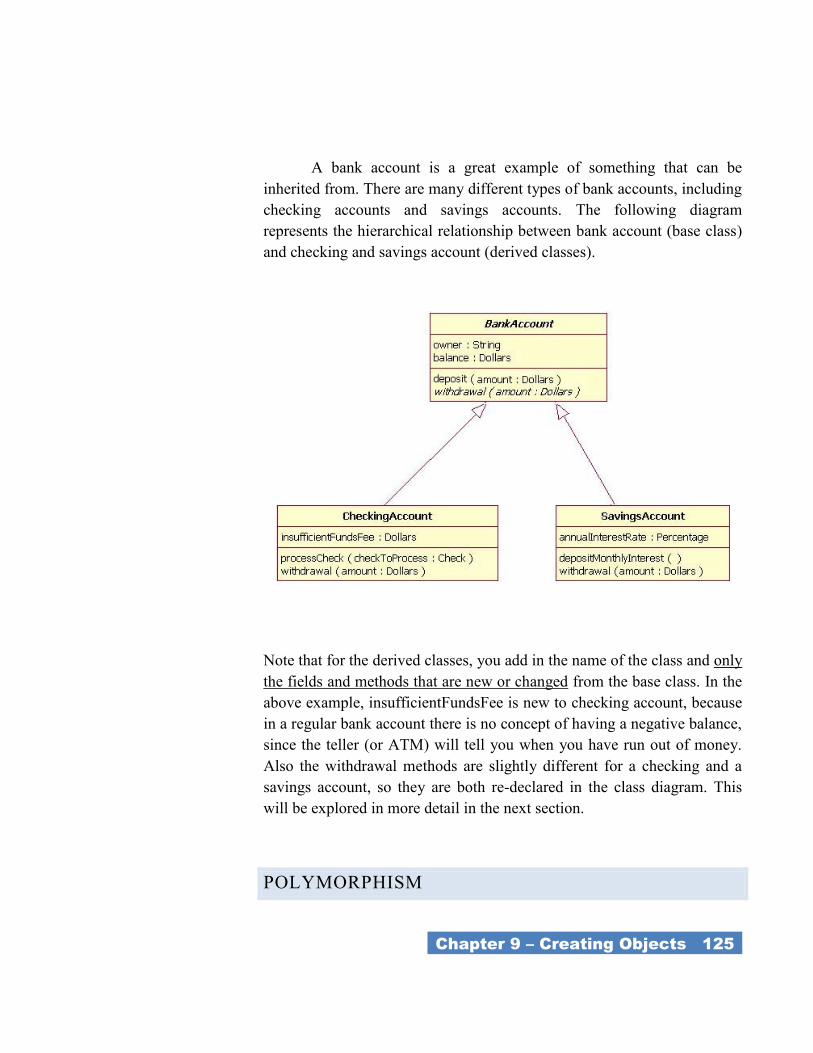
_Chapter 9 – Creating Objects 125_
A bank account is a great example of something that can be
inherited from. There are many different types of bank accounts, including
checking accounts and savings accounts. The following diagram
represents the hierarchical relationship between bank account (base class)
and checking and savings account (derived classes).
Note that for the derived classes, you add in the name of the class and only
the fields and methods that are new or changed from the base class. In the
above example, insufficientFundsFee is new to checking account, because
in a regular bank account there is no concept of having a negative balance,
since the teller (or ATM) will tell you when you have run out of money.
Also the withdrawal methods are slightly different for a checking and a
savings account, so they are both re-declared in the class diagram. This
will be explored in more detail in the next section.
POLYMORPHISM

_Chapter 9 – Creating Objects 126_
Once you have created a subclass of your parent class, it could
happen that you need to redefine how a certain method works, since it is
not exactly the same logic as the parent class. An example of this that you
have most likely already seen before is a regular text box and a password
input box. In a regular text box, the user types in characters and they show
up in the text box. The text box object itself has many methods and
properties, like .Text that we use all the time. A password text box is
actually derived from a text box but the text does not show up when you
type; a ―*‖ shows up for each character you type, so that somebody
looking over your shoulder can not see your password. The method that
places the characters into the text box still exists in a password text box
but it clearly needs to be changed, so someone cannot steel your password.
The process of redefining a base class method in a sub class is known as
polymorphism.
By using polymorphism, you can make the exactly same named
method appear polymorphic, that is changing its task to meet the needs of
the object calling it. For example, in our above example of inheritance, a
bank account has a withdrawal method. Our two derived classes redefined
how these methods will work in their classes, because maybe there is a
different withdrawal fee depending on the account type. A method that is
declared in ―general‖ in a supper class is declared with the key word
Overridable. This allows a sub class to redefine the method with a new
one in its class declaration. The sub class will use the same name for the
method that the supper class used, but use the key word Overrides, to
indicate that the new method should take precedence over the old one.
Members (or variables) that are general purpose (to be used in both the
parent and child class) should be declared as Protected so that they are
accessible to the derived class as well as the parent class. You can also use
the key word MyBase.XXX, to call the super class’s method and then just
add the code after this statement that changes the methods functionality.
This is really valuable because you would never want to copy and paste
code from the base class into child classes. If you did and latter you
needed to make a change, how would you find all the exact places where
the changes would need to be made? MyBase.XXX is often used in the
constructor (Note that the key words Overridable and Overrides are not
used in the declaration of the constructors in VB).
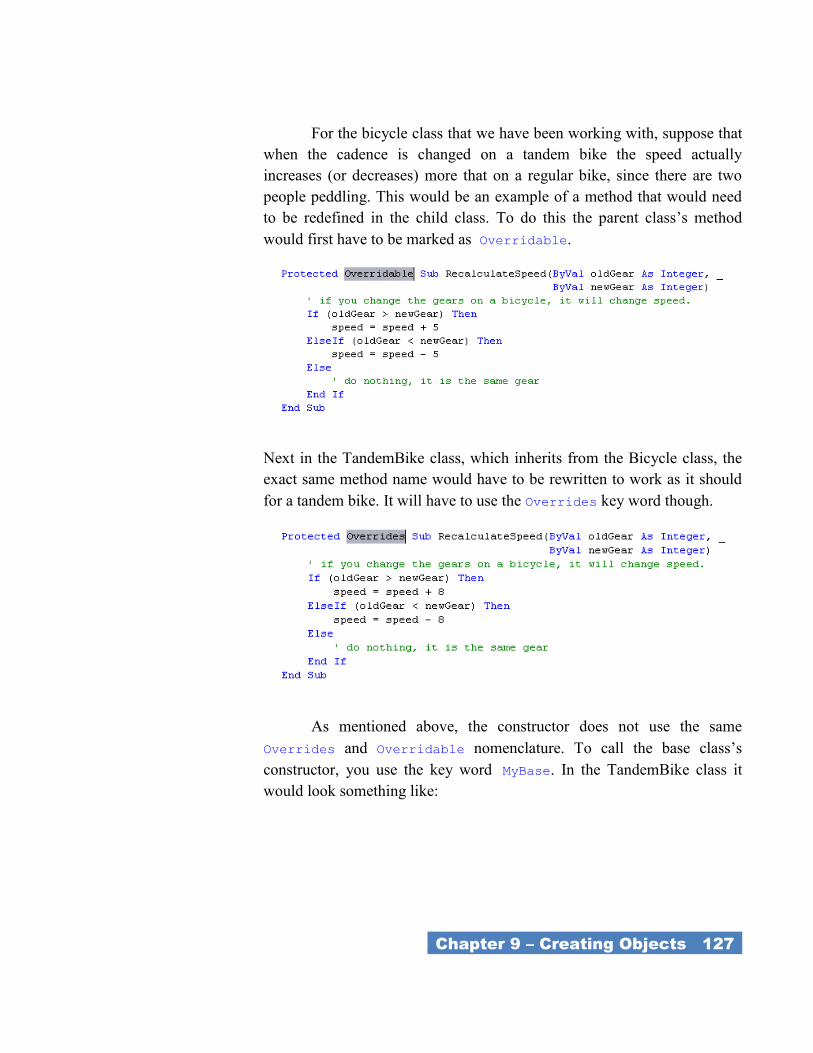
_Chapter 9 – Creating Objects 127_
For the bicycle class that we have been working with, suppose that
when the cadence is changed on a tandem bike the speed actually
increases (or decreases) more that on a regular bike, since there are two
people peddling. This would be an example of a method that would need
to be redefined in the child class. To do this the parent class’s method
would first have to be marked as Overridable.
Next in the TandemBike class, which inherits from the Bicycle class, the
exact same method name would have to be rewritten to work as it should
for a tandem bike. It will have to use the Overrides key word though.
As mentioned above, the constructor does not use the same
Overrides and Overridable nomenclature. To call the base class’s
constructor, you use the key word MyBase. In the TandemBike class it
would look something like:
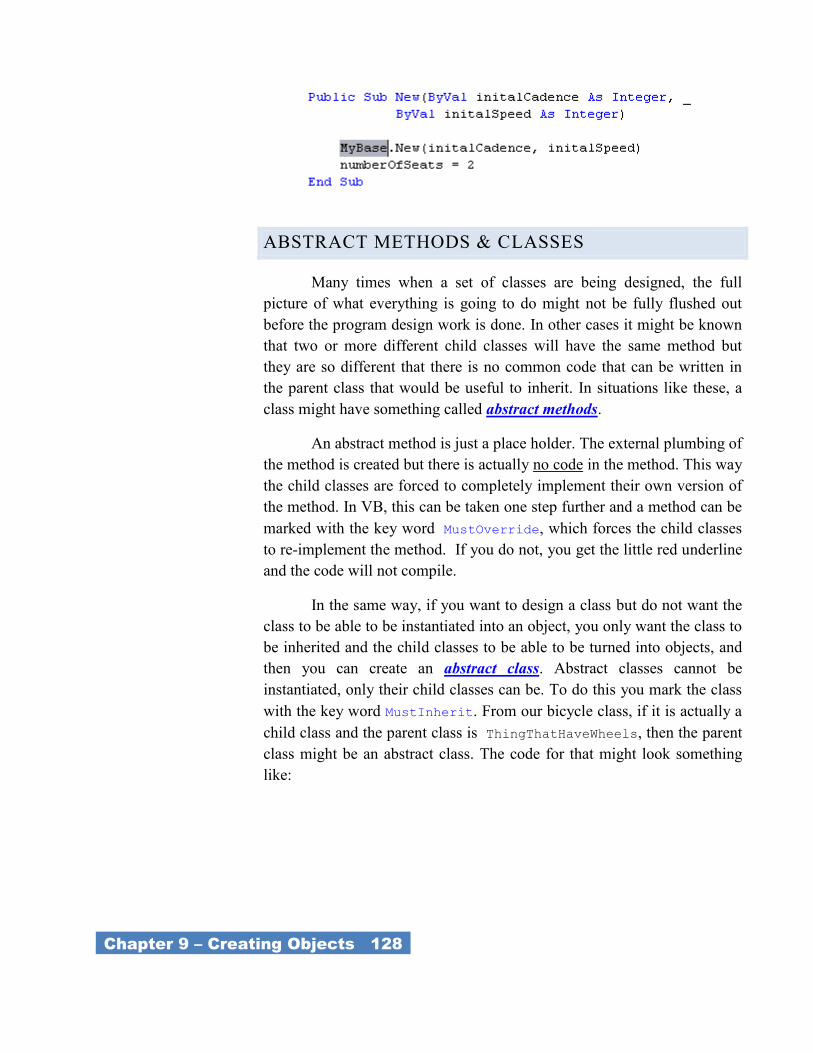
_Chapter 9 – Creating Objects 128_
ABSTRACT METHODS & CLASSES
Many times when a set of classes are being designed, the full
picture of what everything is going to do might not be fully flushed out
before the program design work is done. In other cases it might be known
that two or more different child classes will have the same method but
they are so different that there is no common code that can be written in
the parent class that would be useful to inherit. In situations like these, a
class might have something called abstract methods.
An abstract method is just a place holder. The external plumbing of
the method is created but there is actually no code in the method. This way
the child classes are forced to completely implement their own version of
the method. In VB, this can be taken one step further and a method can be
marked with the key word MustOverride, which forces the child classes
to re-implement the method. If you do not, you get the little red underline
and the code will not compile.
In the same way, if you want to design a class but do not want the
class to be able to be instantiated into an object, you only want the class to
be inherited and the child classes to be able to be turned into objects, and
then you can create an abstract class. Abstract classes cannot be
instantiated, only their child classes can be. To do this you mark the class
with the key word MustInherit. From our bicycle class, if it is actually a
child class and the parent class is ThingThatHaveWheels, then the parent
class might be an abstract class. The code for that might look something
like:
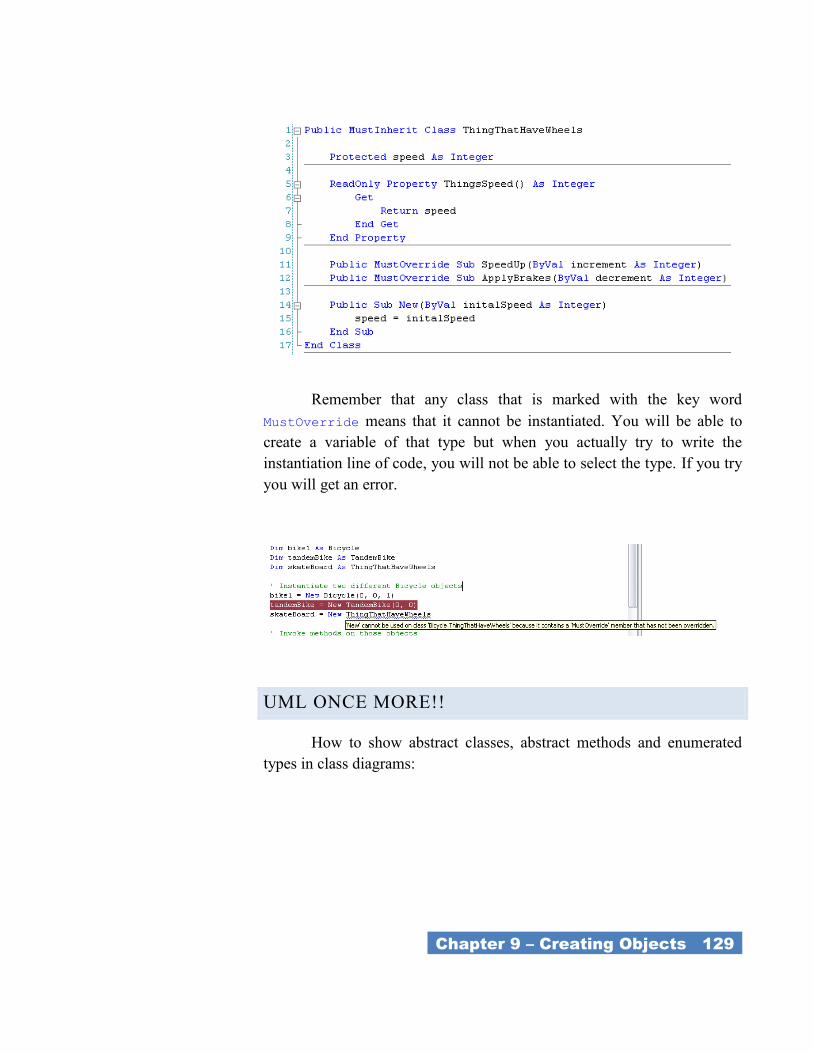
_Chapter 9 – Creating Objects 129_
Remember that any class that is marked with the key word
MustOverride means that it cannot be instantiated. You will be able to
create a variable of that type but when you actually try to write the
instantiation line of code, you will not be able to select the type. If you try
you will get an error.
UML ONCE MORE!!
How to show abstract classes, abstract methods and enumerated
types in class diagrams:
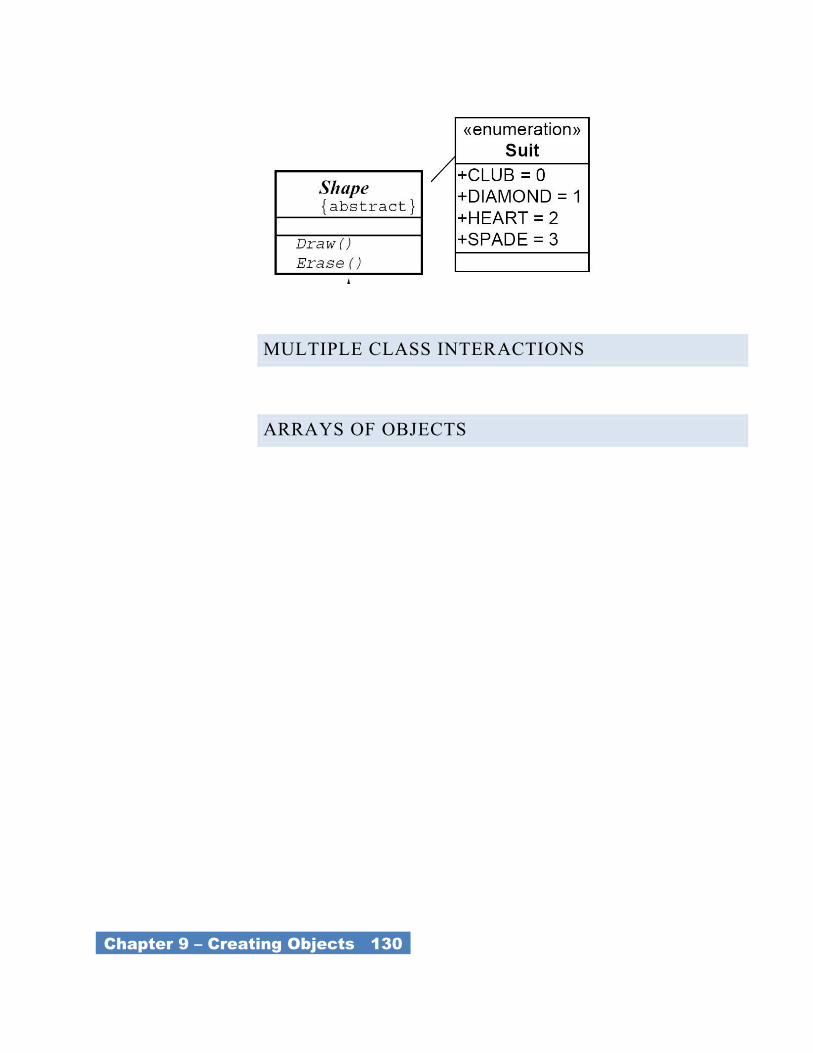
_Chapter 9 – Creating Objects 130_
MULTIPLE CLASS INTERACTIONS
ARRAYS OF OBJECTS
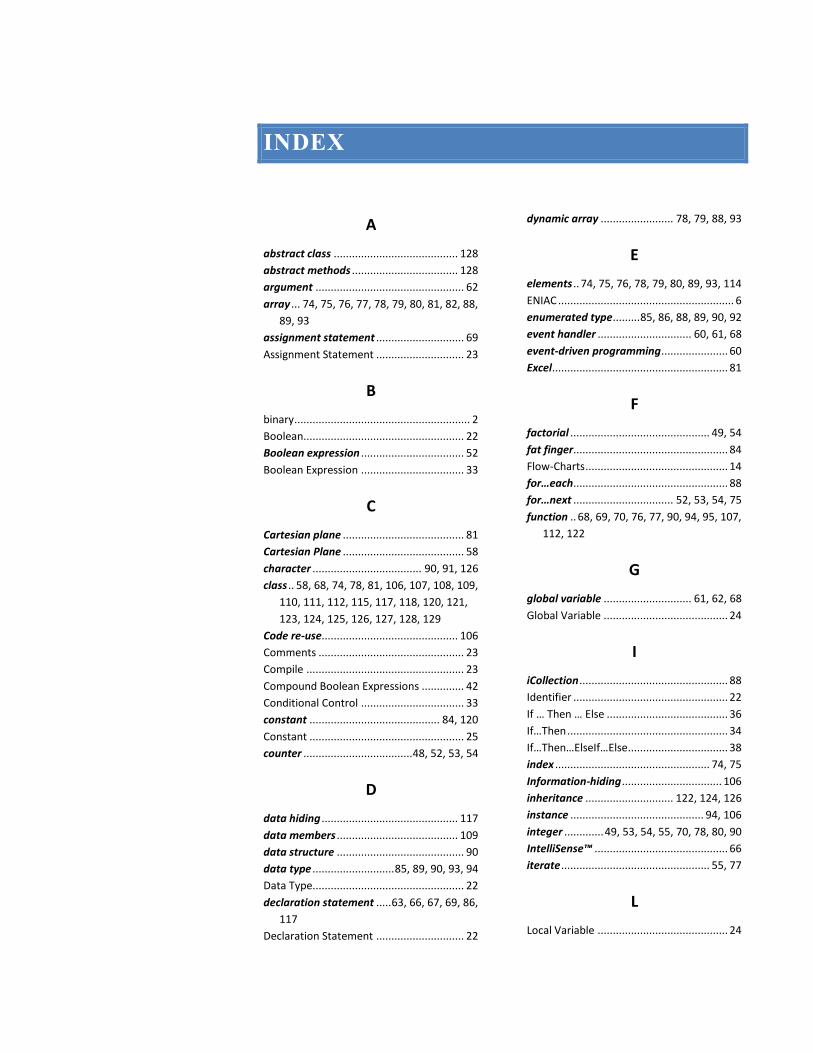
INDEX
A
abstract class ......................................... 128
abstract methods ................................... 128
argument ................................................. 62
array ... 74, 75, 76, 77, 78, 79, 80, 81, 82, 88,
89, 93
assignment statement ............................. 69
Assignment Statement ............................. 23
B
binary .......................................................... 2
Boolean..................................................... 22
Boolean expression .................................. 52
Boolean Expression .................................. 33
C
Cartesian plane ........................................ 81
Cartesian Plane ........................................ 58
character .................................... 90, 91, 126
class .. 58, 68, 74, 78, 81, 106, 107, 108, 109,
110, 111, 112, 115, 117, 118, 120, 121,
123, 124, 125, 126, 127, 128, 129
Code re-use............................................. 106
Comments ................................................ 23
Compile .................................................... 23
Compound Boolean Expressions .............. 42
Conditional Control .................................. 33
constant ........................................... 84, 120
Constant ................................................... 25
counter .................................... 48, 52, 53, 54
D
data hiding ............................................. 117
data members ........................................ 109
data structure .......................................... 90
data type ........................... 85, 89, 90, 93, 94
Data Type.................................................. 22
declaration statement ..... 63, 66, 67, 69, 86,
117
Declaration Statement ............................. 22
dynamic array ........................ 78, 79, 88, 93
E
elements .. 74, 75, 76, 78, 79, 80, 89, 93, 114
ENIAC .......................................................... 6
enumerated type ......... 85, 86, 88, 89, 90, 92
event handler ............................... 60, 61, 68
event-driven programming ...................... 60
Excel .......................................................... 81
F
factorial .............................................. 49, 54
fat finger................................................... 84
Flow-Charts ............................................... 14
for…each ................................................... 88
for…next ................................. 52, 53, 54, 75
function .. 68, 69, 70, 76, 77, 90, 94, 95, 107,
112, 122
G
global variable ............................. 61, 62, 68
Global Variable ......................................... 24
I
iCollection ................................................. 88
Identifier ................................................... 22
If … Then … Else ........................................ 36
If…Then ..................................................... 34
If…Then…ElseIf…Else................................. 38
index ................................................... 74, 75
Information-hiding ................................. 106
inheritance ............................. 122, 124, 126
instance ............................................ 94, 106
integer ............. 49, 53, 54, 55, 70, 78, 80, 90
IntelliSense™ ............................................ 66
iterate ................................................. 55, 77
L
Local Variable ........................................... 24
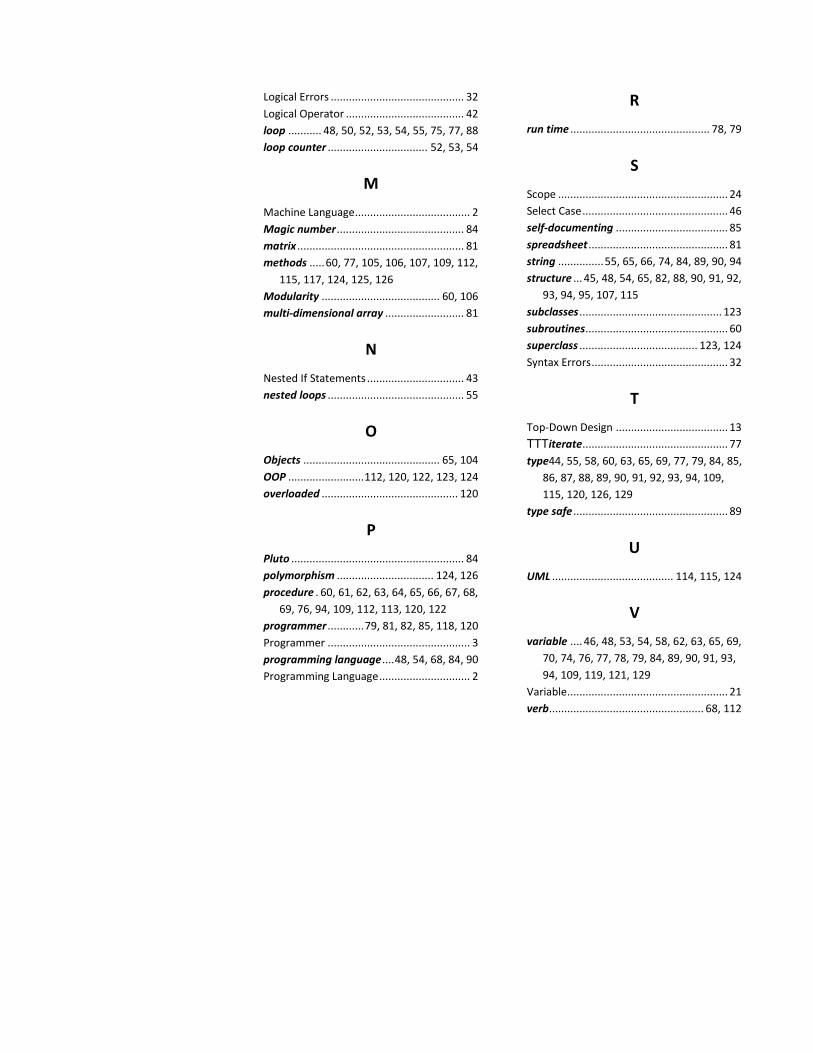
Logical Errors ............................................ 32
Logical Operator ....................................... 42
loop ........... 48, 50, 52, 53, 54, 55, 75, 77, 88
loop counter ................................. 52, 53, 54
M
Machine Language ...................................... 2
Magic number .......................................... 84
matrix ....................................................... 81
methods ..... 60, 77, 105, 106, 107, 109, 112,
115, 117, 124, 125, 126
Modularity ....................................... 60, 106
multi-dimensional array .......................... 81
N
Nested If Statements ................................ 43
nested loops ............................................. 55
O
Objects ............................................. 65, 104
OOP ......................... 112, 120, 122, 123, 124
overloaded ............................................. 120
P
Pluto ......................................................... 84
polymorphism ................................ 124, 126
procedure . 60, 61, 62, 63, 64, 65, 66, 67, 68,
69, 76, 94, 109, 112, 113, 120, 122
programmer ............ 79, 81, 82, 85, 118, 120
Programmer ............................................... 3
programming language .... 48, 54, 68, 84, 90
Programming Language .............................. 2
R
run time .............................................. 78, 79
S
Scope ........................................................ 24
Select Case ................................................ 46
self-documenting ..................................... 85
spreadsheet .............................................. 81
string ............... 55, 65, 66, 74, 84, 89, 90, 94
structure ... 45, 48, 54, 65, 82, 88, 90, 91, 92,
93, 94, 95, 107, 115
subclasses ............................................... 123
subroutines ............................................... 60
superclass ....................................... 123, 124
Syntax Errors ............................................. 32
T
Top-Down Design ..................................... 13
TTTiterate................................................ 77
type44, 55, 58, 60, 63, 65, 69, 77, 79, 84, 85,
86, 87, 88, 89, 90, 91, 92, 93, 94, 109,
115, 120, 126, 129
type safe ................................................... 89
U
UML ........................................ 114, 115, 124
V
variable .... 46, 48, 53, 54, 58, 62, 63, 65, 69,
70, 74, 76, 77, 78, 79, 84, 89, 90, 91, 93,
94, 109, 119, 121, 129
Variable ..................................................... 21
verb ................................................... 68, 112