Embed Size (px)
Citation preview
Kendriya Vidyalaya Sangathan
Patron Shri C. Neelap
Deputy Commissioner, KVS RO Guwahati
Regional Co-ordination & Compilation Shri D. Patle
Asstt. Commissioner, KVS RO Guwahati
School Co-ordination Shri S. Sarkar
Principal, KV IOC, Noonmati, Guwahati
Shri Ghan Shyam Pandey
Principal, KV New Bongaigaon,Assam
Subject Expert Shri Devmani Yadav
PGT(CS), KV New Bongaigaon,Assam
2
SL. No. UNITS CONTENTS NO. OF PERIODS Quarter : April to June
1. Computer History 1.1 Understanding Generations 4 1.2 Classification of Computer
2. Word Processor 2.1 File Menu 6 2.1.1 Create a new file 2.1.2 Open an existing file 2.1.3 Save the current file 2.1.4 Save As – saving a file with different name 2.1.5 Close the file 2.2 View Menu 2.2.1 Print Layout 2.2.2 Full Screen 2.2.3 Web Layout 2.2.4 Zooming 2.2.5 Ruler
3. Exploring Windows 3.1 Starting Windows Explorer 4 3.2 Components of Windows Explorer 3.3 Panes of Windows Explorer 3.4 Working with folder in left pane 3.5 Managing files and folders 3.6 Modes of view 3.7 File naming convention 3.8 Searching files 3.9 Creating Shortcuts
Quarter : July to September 4. Powerpoint
Presentation 4.1 Starting Powerpoint 24
4.1.1 Create a new file 4.1.2 Open an existing file 4.1.3 Save the current file 4.1.4 Save As – saving a file with different name 4.1.5 Close the file 4.2 Formatting a Presentation 4.2.1 Changing the font 4 2 2 Ch i h F Si S l d C l
3

4.2.4 Changing Text Alignment 4.2.5 Modifying Line Spacing 4.2.6 Creating Bulleted and Numbered Lists 4.2.7 Copying Formatting 4.3 Inserting Menu
4.3.1 Images 4.3.2 Table 4.3.3 Clip Art 4.3.4 Screen Shot 4.3.5 Shapes and SmartArt 4.3.6 Chart 4.3.7 Text Box, WordArt, Date & Time, Slide
Number, Symbols
4.3.8 Moving and Resizing an Image 4.4 Slide Show Menu 4.4.1 From Beginning 4.4.2 From Current Slide 4.4.3 Custom Slide Show 4.4.4 Setup Slide Show
Quarter : October to December 5. Excel Spreadsheet 5.1 Working in Excel 10 5.2 Introduction to Workbook and
Worksheet 5.3 Use in day to day life 5.4 Steps to start Excel 5.5 Components of Excel Screen 5.6 Various data types 5.7 Entering Data in Spreadsheet 5.8 About the Cell and Cell Address 5.9 Auto Sum 5.10 Formatting the Data in the Table
Quarter : January to March 6. Windows Accessories 6.1 Calculator 2 6.2 Onscreen Keyboard 6.3 Magnifier 6.4 Games 6.5 Virus & Anti-Virus
7. Control Panel 7.1 Display Properties 8 7.2 Setting of Mouse 7.3 Taskbar and Start Menu 7.4 Date and Time Settings
4
PREFACE In Class III, we learnt about the basics of a computer, its strength and
weaknesses. Also we learnt how to start and shut down a computer properly. We had also seen and identified the various part/components and peripherals of a computer system like Keyboard, Mouse and other input-output devices along with CPU and Memory Devices. We had learnt the various do’s and don’t of Computer Lab and also the precautions to be taken while opening and closing computer. We learnt to use Paint Brush for making wonderful drawings using computer. We had also learnt a lot about Word Processor like Microsoft Word and how to format a document using the various features of the software. And lastly we learnt about ever growing concept of Internet and its uses.
In Class IV, we will learnt about Computer History in Unit - I, how the computer has been evolved since its inception by comparing the various generation of computers and their classification.
In Unit –II , we will learn more about Word Processor especially the various views of a word document by exploring View Menu. In Unit-III, we will learn about one of the interesting concept/tool provided in Windows Operating System called Windows Explorer. In this unit we will learn how the content of our computer system can be viewed and managed from a single window. In Unit-IV, we will learn to make simple but effective presentation and setting up slide show by using the various tools available in Microsoft Powerpoint Presentation software. In Unit-V , we will learn some basic concepts about Excel Spreadsheet , used to make tables and do simple calculations that are to be carried out in our day to day activities. In Unit-VI, we will acquaint ourselves with the various components available in Windows Accessories and how and when we can use them. And in the last Unit-VII, we will try to explore Control Panel , and its use to manage various settings of our computer system.
5
As we have seen that since its inception computer has been evolved a lot for the last couple
of decades. In earlier days a computer was such a big machine that required space like a complete room and hence its maintenance cost was very much far away from a common man. A common man could not have thought to have a computer for his personal use. But now-a-days one in every three person is using computer in one way or the other. From bulky machine to as small as like a SIM card, this is possible because of the ever changing technological world. The old adage “Necessity is the mother of inventions” holds true for computer also because computers are invented as a result of man’s search for fast, accurate and reliable calculating devices. The Evolution of Computers is defined in terms of various eras. Let us take a look of them : A) MANUAL ERA :
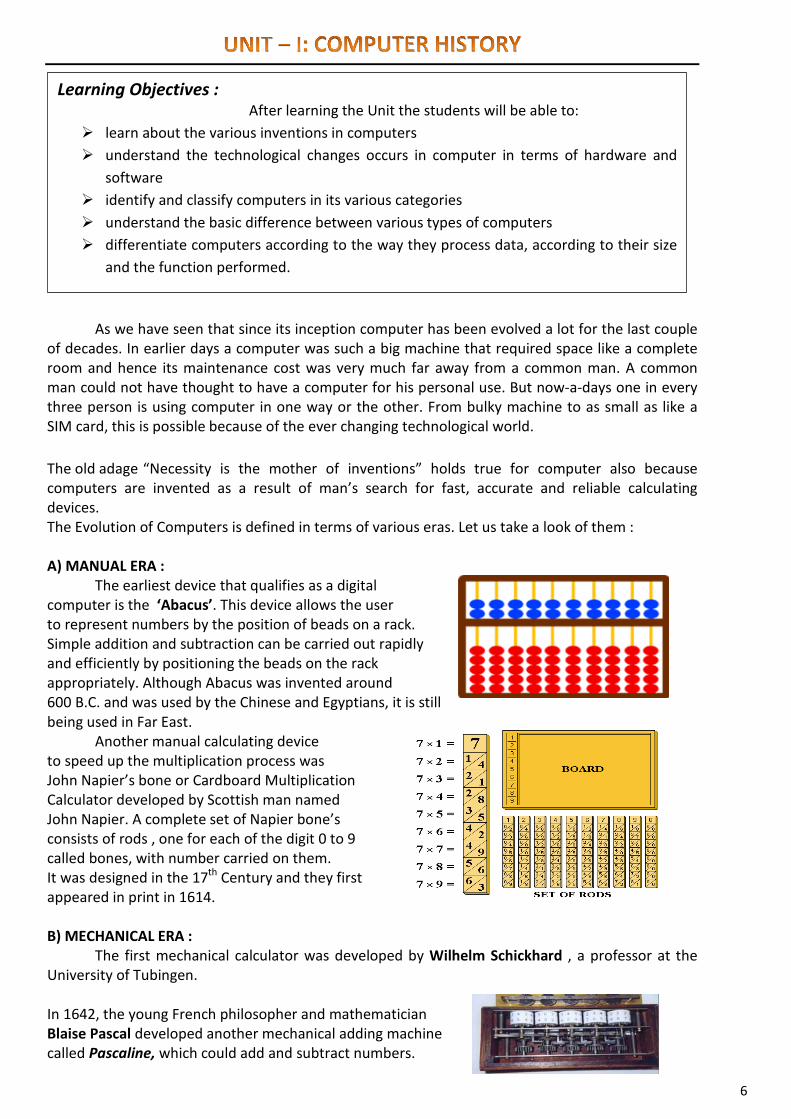
The earliest device that qualifies as a digital computer is the ‘Abacus’. This device allows the user to represent numbers by the position of beads on a rack. Simple addition and subtraction can be carried out rapidly and efficiently by positioning the beads on the rack appropriately. Although Abacus was invented around 600 B.C. and was used by the Chinese and Egyptians, it is still being used in Far East. Another manual calculating device to speed up the multiplication process was John Napier’s bone or Cardboard Multiplication Calculator developed by Scottish man named John Napier. A complete set of Napier bone’s consists of rods , one for each of the digit 0 to 9 called bones, with number carried on them. It was designed in the 17th Century and they first appeared in print in 1614. B) MECHANICAL ERA : The first mechanical calculator was developed by Wilhelm Schickhard , a professor at the University of Tubingen.
In 1642, the young French philosopher and mathematician Blaise Pascal developed another mechanical adding machine called Pascaline, which could add and subtract numbers.
Learning Objectives : After learning the Unit the students will be able to:
learn about the various inventions in computers understand the technological changes occurs in computer in terms of hardware and
software identify and classify computers in its various categories understand the basic difference between various types of computers differentiate computers according to the way they process data, according to their size
and the function performed.
6
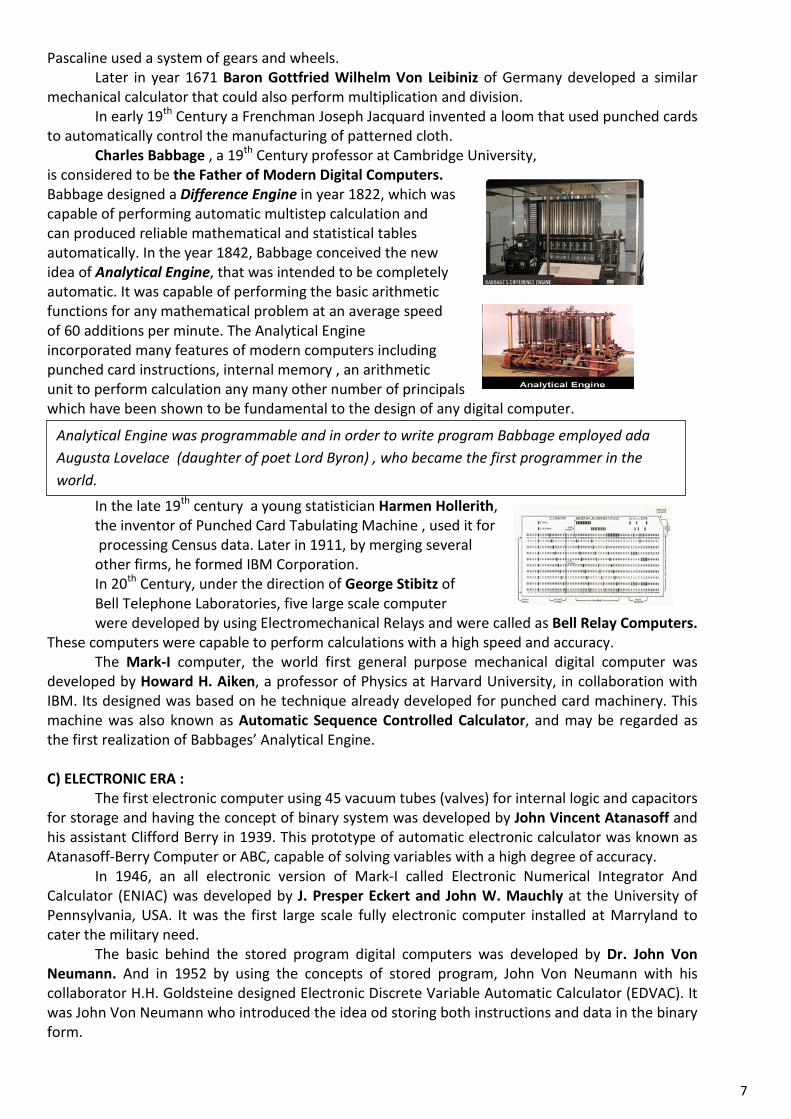
Pascaline used a system of gears and wheels.
Later in year 1671 Baron Gottfried Wilhelm Von Leibiniz of Germany developed a similar mechanical calculator that could also perform multiplication and division.
In early 19th Century a Frenchman Joseph Jacquard invented a loom that used punched cards to automatically control the manufacturing of patterned cloth.
Charles Babbage , a 19th Century professor at Cambridge University, is considered to be the Father of Modern Digital Computers. Babbage designed a Difference Engine in year 1822, which was capable of performing automatic multistep calculation and can produced reliable mathematical and statistical tables automatically. In the year 1842, Babbage conceived the new idea of Analytical Engine, that was intended to be completely automatic. It was capable of performing the basic arithmetic functions for any mathematical problem at an average speed of 60 additions per minute. The Analytical Engine incorporated many features of modern computers including punched card instructions, internal memory , an arithmetic unit to perform calculation any many other number of principals which have been shown to be fundamental to the design of any digital computer.
In the late 19th century a young statistician Harmen Hollerith, the inventor of Punched Card Tabulating Machine , used it for processing Census data. Later in 1911, by merging several other firms, he formed IBM Corporation. In 20th Century, under the direction of George Stibitz of Bell Telephone Laboratories, five large scale computer were developed by using Electromechanical Relays and were called as Bell Relay Computers.
These computers were capable to perform calculations with a high speed and accuracy. The Mark-I computer, the world first general purpose mechanical digital computer was
developed by Howard H. Aiken, a professor of Physics at Harvard University, in collaboration with IBM. Its designed was based on he technique already developed for punched card machinery. This machine was also known as Automatic Sequence Controlled Calculator, and may be regarded as the first realization of Babbages’ Analytical Engine. C) ELECTRONIC ERA : The first electronic computer using 45 vacuum tubes (valves) for internal logic and capacitors for storage and having the concept of binary system was developed by John Vincent Atanasoff and his assistant Clifford Berry in 1939. This prototype of automatic electronic calculator was known as Atanasoff-Berry Computer or ABC, capable of solving variables with a high degree of accuracy. In 1946, an all electronic version of Mark-I called Electronic Numerical Integrator And Calculator (ENIAC) was developed by J. Presper Eckert and John W. Mauchly at the University of Pennsylvania, USA. It was the first large scale fully electronic computer installed at Marryland to cater the military need. The basic behind the stored program digital computers was developed by Dr. John Von Neumann. And in 1952 by using the concepts of stored program, John Von Neumann with his collaborator H.H. Goldsteine designed Electronic Discrete Variable Automatic Calculator (EDVAC). It was John Von Neumann who introduced the idea od storing both instructions and data in the binary form.
Analytical Engine was programmable and in order to write program Babbage employed ada Augusta Lovelace (daughter of poet Lord Byron) , who became the first programmer in the world.
7

In 1949, at Cambridge University, a group of British Scientists headed by professor Maurice Wilkes developed Electronic Delay Storage Automatic Calculator (EDSAC), that was capable of performing Addition operation in 1500 microseconds and multiplication operation in 4000 microseconds. The UNIversal Automatic Computer (UNIAC) was first digital computer, produced by many companies like IBM, Universal Accounting Company, General Electronic Corporation etc . It was first commercial large scale digital computer produced in 1951. During the period of late 1940’s and early 1950’s many other stored program computers like JOHNIAC, MANIAC, ILLIAC etc were developed.
1.1 GENERATION OF COMPUTERS Generation in computer era provides a framework for the growth of computer industry and
generally characterizes the major developments in the computer industry. The modern computer era can be divided into Five generations distinguished by the basic electronic component within the computer. Each new logic unit let the computers faster in speed, smaller in size, more reliable and less expensive than their predecessors. Modern computers came in a variety of shapes, sizes and costs.
Computers were developed in Five different phases known as the Generation of Computers. Let’s discuss one by one in a little detail :
First Generation (1942-1955) The computers of this generation used Electronic Valves
(an array of Vacuum Tubes) as the basic component for memory and circuitry for central processing unit. These vacuum tubes were a fragile glass device like electric bulb, that could control and amplify electronic signals. They produced a lot of heat and were prone to frequent fusing/ damaging of the installations.
Therefore, they were used very expensive and could be afforded onlyby very large organizations.
Advantages : i) these computers were the fastest calculating device of their time. They could perform computations in milliseconds. ii) vacuum tube technology made possible the advent of electronic digital computers. Disadvantages : i) Too bulky in size ii) Air conditioning required to control the temperature iii) Prone to frequent hardware failure. iv) Commercial production was difficult and costly. v) Slow input and output operations. USEFUL POINTS : • Period : 1942-1955 • Component used : Vacuum tubes • Speed : milliseconds • Maximum memory capacity : 2000 inch • Mean-time before failure : minutes • Peripherals :
o I/O : Punched cards, Paper tape, Magnetic tape, Printer (online) o Secondary Storage : Punched Cards, Paper Tape, Magnetic Drum, Magnetic Disk etc
8
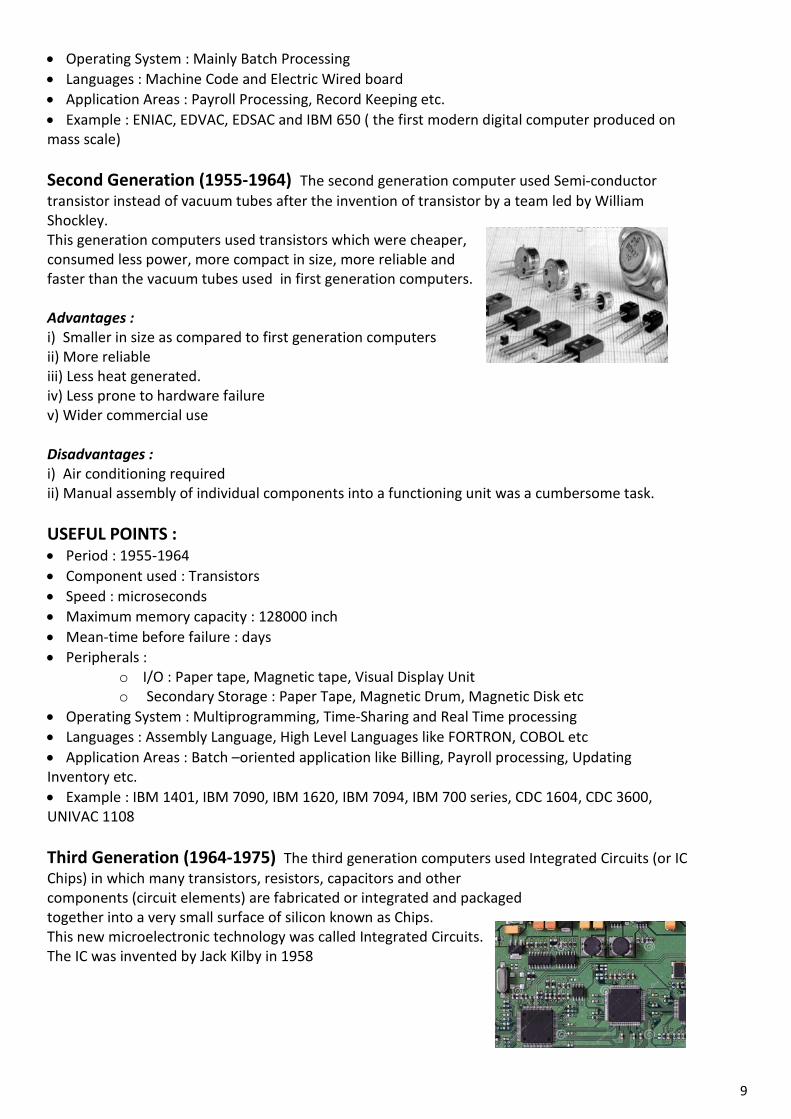
• Operating System : Mainly Batch Processing • Languages : Machine Code and Electric Wired board • Application Areas : Payroll Processing, Record Keeping etc. • Example : ENIAC, EDVAC, EDSAC and IBM 650 ( the first modern digital computer produced on mass scale) Second Generation (1955-1964) The second generation computer used Semi-conductor transistor instead of vacuum tubes after the invention of transistor by a team led by William Shockley. This generation computers used transistors which were cheaper, consumed less power, more compact in size, more reliable and faster than the vacuum tubes used in first generation computers. Advantages : i) Smaller in size as compared to first generation computers ii) More reliable iii) Less heat generated. iv) Less prone to hardware failure v) Wider commercial use Disadvantages : i) Air conditioning required ii) Manual assembly of individual components into a functioning unit was a cumbersome task. USEFUL POINTS : • Period : 1955-1964 • Component used : Transistors • Speed : microseconds • Maximum memory capacity : 128000 inch • Mean-time before failure : days • Peripherals :
o I/O : Paper tape, Magnetic tape, Visual Display Unit o Secondary Storage : Paper Tape, Magnetic Drum, Magnetic Disk etc
• Operating System : Multiprogramming, Time-Sharing and Real Time processing • Languages : Assembly Language, High Level Languages like FORTRON, COBOL etc • Application Areas : Batch –oriented application like Billing, Payroll processing, Updating Inventory etc. • Example : IBM 1401, IBM 7090, IBM 1620, IBM 7094, IBM 700 series, CDC 1604, CDC 3600, UNIVAC 1108 Third Generation (1964-1975) The third generation computers used Integrated Circuits (or IC Chips) in which many transistors, resistors, capacitors and other components (circuit elements) are fabricated or integrated and packaged together into a very small surface of silicon known as Chips. This new microelectronic technology was called Integrated Circuits. The IC was invented by Jack Kilby in 1958
9
Advantages : i) Smaller in size as compared to previous generation ii) More reliable than second generation computers iii) Low maintenance cost iv) Easily portable v) Commercial production was easier and cheaper. Disadvantages : i) Air conditioning required in many case ii) Highly sophisticated technology required for the manufacture of IC chips USEFUL POINTS : • Period : 1964-1975 • Component used : Integrated Circuits (IC) • Speed : nanoseconds • Maximum memory capacity : 4 million inch • Mean-time before failure : weeks to months • Peripherals :
o I/O : Typewriter terminal, Visual Display Unit, Optical Character Reader etc o Secondary Storage : Magnetic Disk, Extended Core Storage, Mass Storage devices
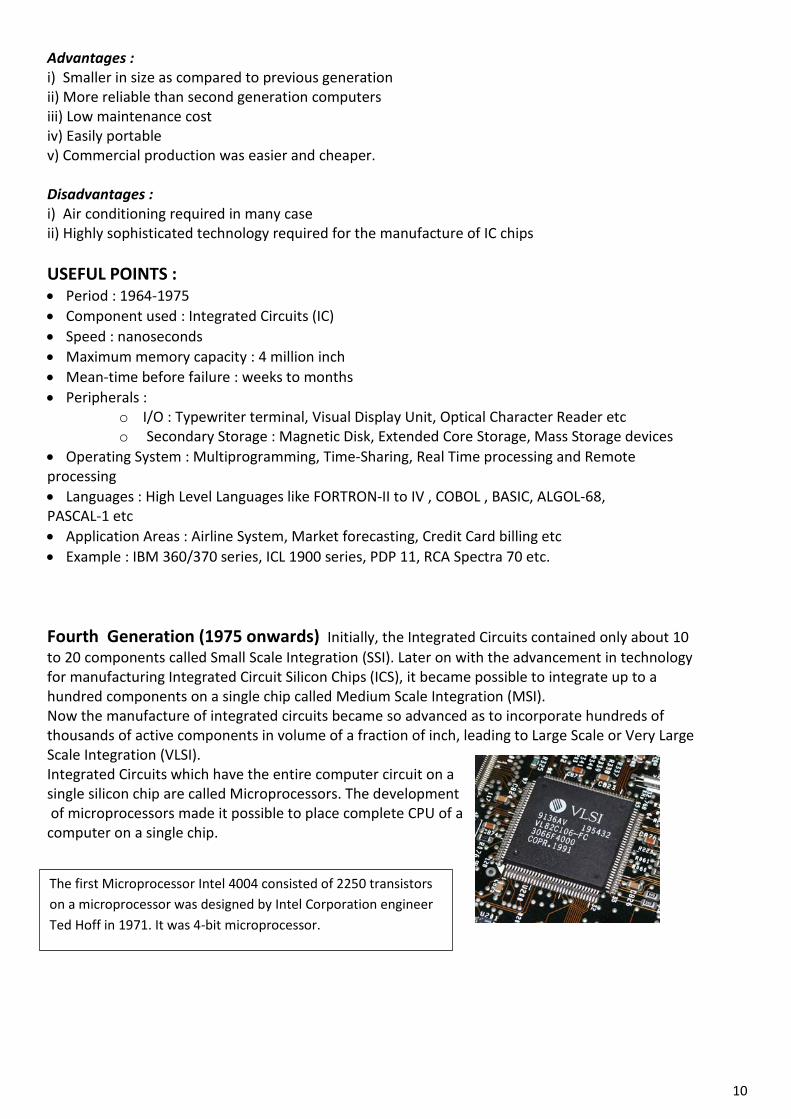
• Operating System : Multiprogramming, Time-Sharing, Real Time processing and Remote processing • Languages : High Level Languages like FORTRON-II to IV , COBOL , BASIC, ALGOL-68, PASCAL-1 etc • Application Areas : Airline System, Market forecasting, Credit Card billing etc • Example : IBM 360/370 series, ICL 1900 series, PDP 11, RCA Spectra 70 etc. Fourth Generation (1975 onwards) Initially, the Integrated Circuits contained only about 10 to 20 components called Small Scale Integration (SSI). Later on with the advancement in technology for manufacturing Integrated Circuit Silicon Chips (ICS), it became possible to integrate up to a hundred components on a single chip called Medium Scale Integration (MSI). Now the manufacture of integrated circuits became so advanced as to incorporate hundreds of thousands of active components in volume of a fraction of inch, leading to Large Scale or Very Large Scale Integration (VLSI). Integrated Circuits which have the entire computer circuit on a single silicon chip are called Microprocessors. The development of microprocessors made it possible to place complete CPU of a computer on a single chip.
The first Microprocessor Intel 4004 consisted of 2250 transistors on a microprocessor was designed by Intel Corporation engineer Ted Hoff in 1971. It was 4-bit microprocessor.
10
Advantages : i) Smaller in size because of high component density ii) Heat generated is negligible iii) Much faster in computation then previous generations iv) Less power consumption v) No air conditioning is required in most cases Disadvantages : i) Highly sophisticated technology is required for the manufacturing of VLSI chips ii) Highly skilled people are required in its manufacturing USEFUL POINTS : • Period : 1975 onward • Component used : Very Large Scale Integrated Circuits (IC) • Speed : picoseconds • Maximum memory capacity : 200 million inch • Mean-time before failure : months • Peripherals :
o I/O : Visual Display Unit, Optical Character Reader, Magnetic Ink Character Reader, Voice Recognition, Laser Printer etc
o Secondary Storage : Floppy disk , Hard Disk, CD-ROM, DVD etc • Operating System : Time-Sharing, Real Time processing and Network Distribution • Languages : All High Level Languages like C, C++, Java and other 4th generation languages
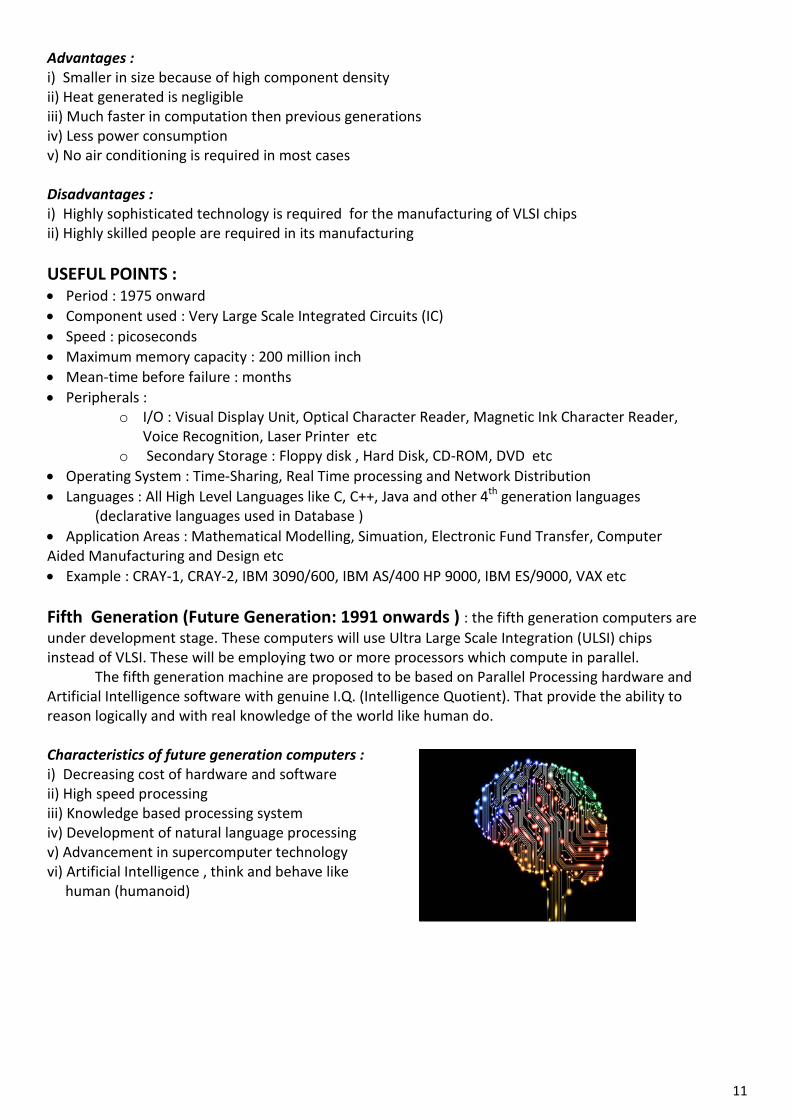
(declarative languages used in Database ) • Application Areas : Mathematical Modelling, Simuation, Electronic Fund Transfer, Computer Aided Manufacturing and Design etc • Example : CRAY-1, CRAY-2, IBM 3090/600, IBM AS/400 HP 9000, IBM ES/9000, VAX etc Fifth Generation (Future Generation: 1991 onwards ) : the fifth generation computers are under development stage. These computers will use Ultra Large Scale Integration (ULSI) chips instead of VLSI. These will be employing two or more processors which compute in parallel. The fifth generation machine are proposed to be based on Parallel Processing hardware and Artificial Intelligence software with genuine I.Q. (Intelligence Quotient). That provide the ability to reason logically and with real knowledge of the world like human do. Characteristics of future generation computers : i) Decreasing cost of hardware and software ii) High speed processing iii) Knowledge based processing system iv) Development of natural language processing v) Advancement in supercomputer technology vi) Artificial Intelligence , think and behave like human (humanoid)
11
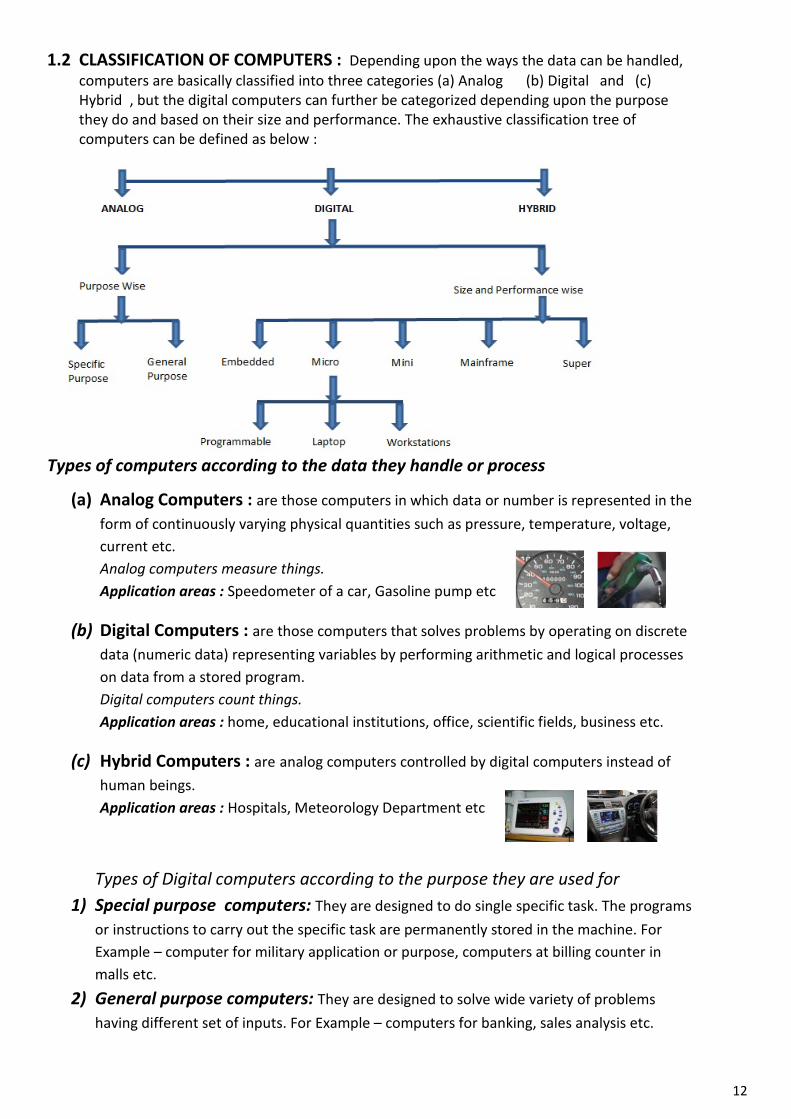
1.2 CLASSIFICATION OF COMPUTERS : Depending upon the ways the data can be handled,
computers are basically classified into three categories (a) Analog (b) Digital and (c) Hybrid , but the digital computers can further be categorized depending upon the purpose they do and based on their size and performance. The exhaustive classification tree of computers can be defined as below :
Types of computers according to the data they handle or process
(a) Analog Computers : are those computers in which data or number is represented in the form of continuously varying physical quantities such as pressure, temperature, voltage, current etc. Analog computers measure things. Application areas : Speedometer of a car, Gasoline pump etc
(b) Digital Computers : are those computers that solves problems by operating on discrete data (numeric data) representing variables by performing arithmetic and logical processes on data from a stored program. Digital computers count things. Application areas : home, educational institutions, office, scientific fields, business etc.
(c) Hybrid Computers : are analog computers controlled by digital computers instead of human beings. Application areas : Hospitals, Meteorology Department etc
Types of Digital computers according to the purpose they are used for 1) Special purpose computers: They are designed to do single specific task. The programs
or instructions to carry out the specific task are permanently stored in the machine. For Example – computer for military application or purpose, computers at billing counter in malls etc.
2) General purpose computers: They are designed to solve wide variety of problems having different set of inputs. For Example – computers for banking, sales analysis etc.
12
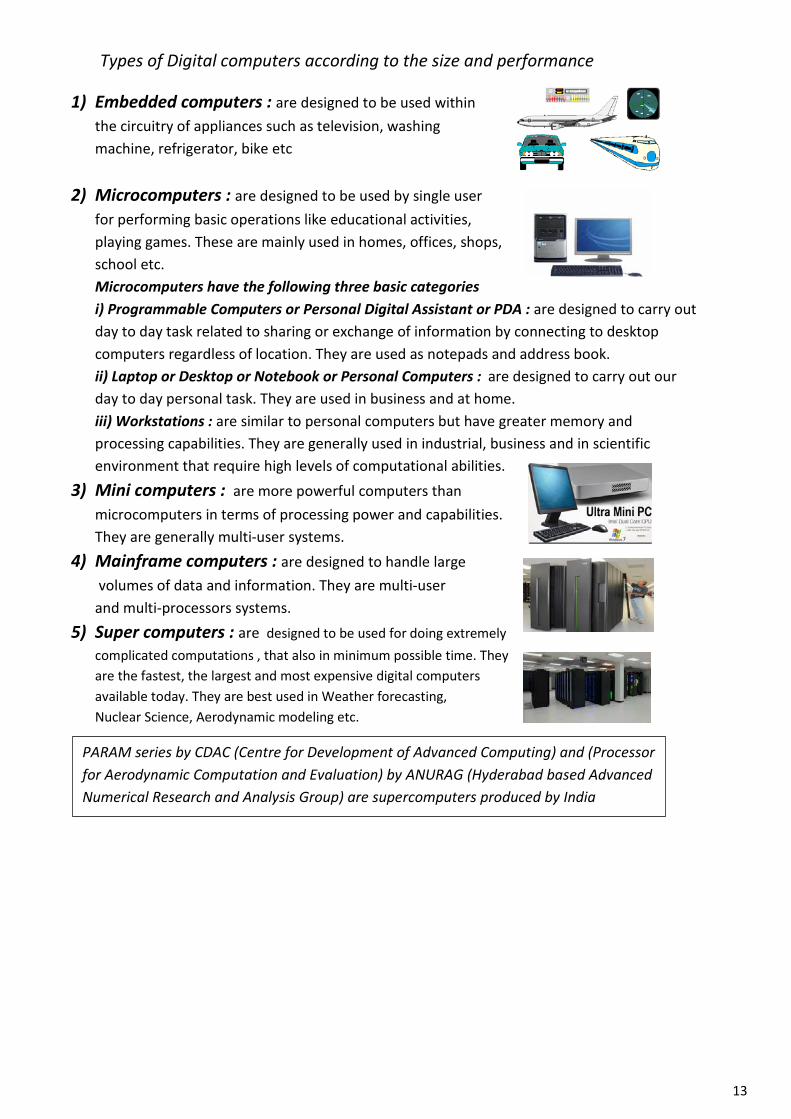
Types of Digital computers according to the size and performance
1) Embedded computers : are designed to be used within the circuitry of appliances such as television, washing machine, refrigerator, bike etc
2) Microcomputers : are designed to be used by single user for performing basic operations like educational activities, playing games. These are mainly used in homes, offices, shops, school etc. Microcomputers have the following three basic categories i) Programmable Computers or Personal Digital Assistant or PDA : are designed to carry out day to day task related to sharing or exchange of information by connecting to desktop computers regardless of location. They are used as notepads and address book. ii) Laptop or Desktop or Notebook or Personal Computers : are designed to carry out our day to day personal task. They are used in business and at home. iii) Workstations : are similar to personal computers but have greater memory and processing capabilities. They are generally used in industrial, business and in scientific environment that require high levels of computational abilities.
3) Mini computers : are more powerful computers than microcomputers in terms of processing power and capabilities. They are generally multi-user systems.
4) Mainframe computers : are designed to handle large volumes of data and information. They are multi-user and multi-processors systems.
5) Super computers : are designed to be used for doing extremely complicated computations , that also in minimum possible time. They are the fastest, the largest and most expensive digital computers available today. They are best used in Weather forecasting, Nuclear Science, Aerodynamic modeling etc.
PARAM series by CDAC (Centre for Development of Advanced Computing) and (Processor for Aerodynamic Computation and Evaluation) by ANURAG (Hyderabad based Advanced Numerical Research and Analysis Group) are supercomputers produced by India
13
Q 1. Name the first calculating device.
Q 2. Who is known as the father of modern digital computers ?
Q 3. Who is the world first computer programmer ?
Q 4. Name the technology or the basic component used in different generations of computers?
Q 5. Name any two supercomputers developed in India.
Q 6. What is the basic difference between a digital computer and an analog computer?
Q 7. Expand the following
i) EDSAC ii) UNIVAC iii) ENIAC iv) VLSI
Q 8. AI stands for ________________________________________ ?
Q 9. An ICU (Intensive Care Unit) of a hospital has _______________ computer to monitor the heart beat of a patient .
Q 10. Name the category of the computer that we generally use at home or in Educational institution.
14
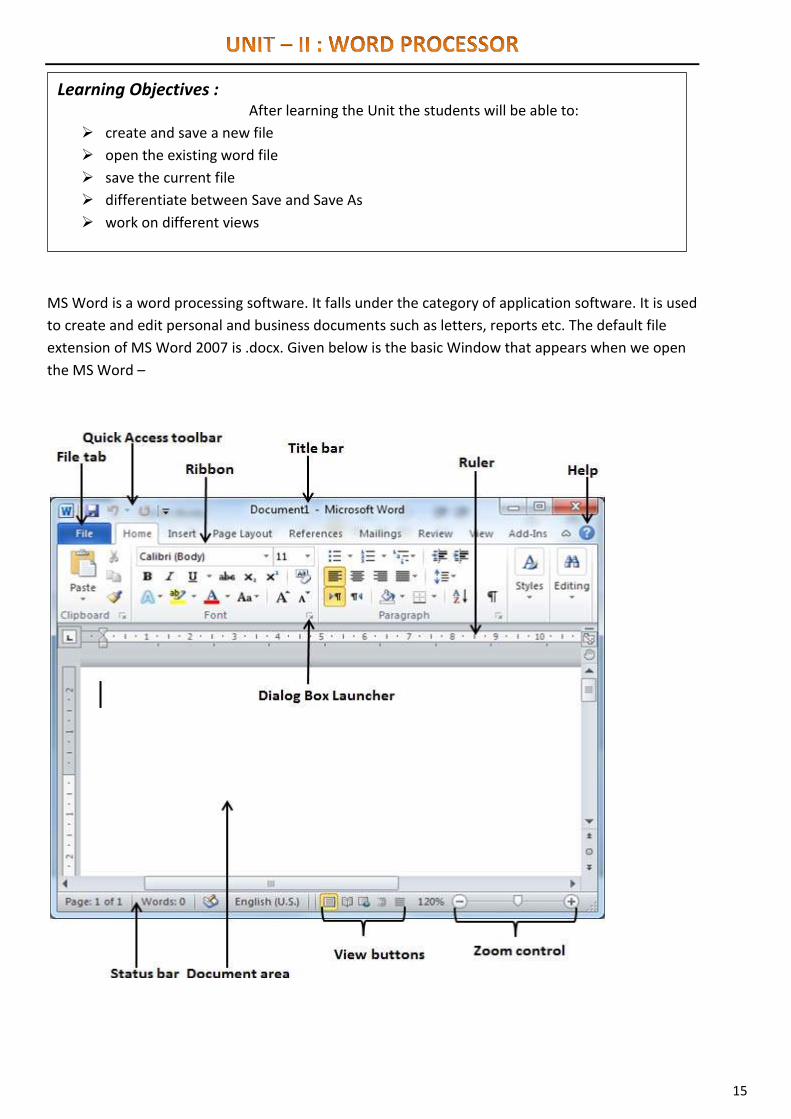
MS Word is a word processing software. It falls under the category of application software. It is used to create and edit personal and business documents such as letters, reports etc. The default file extension of MS Word 2007 is .docx. Given below is the basic Window that appears when we open the MS Word –
Learning Objectives : After learning the Unit the students will be able to:
create and save a new file open the existing word file save the current file differentiate between Save and Save As work on different views
15
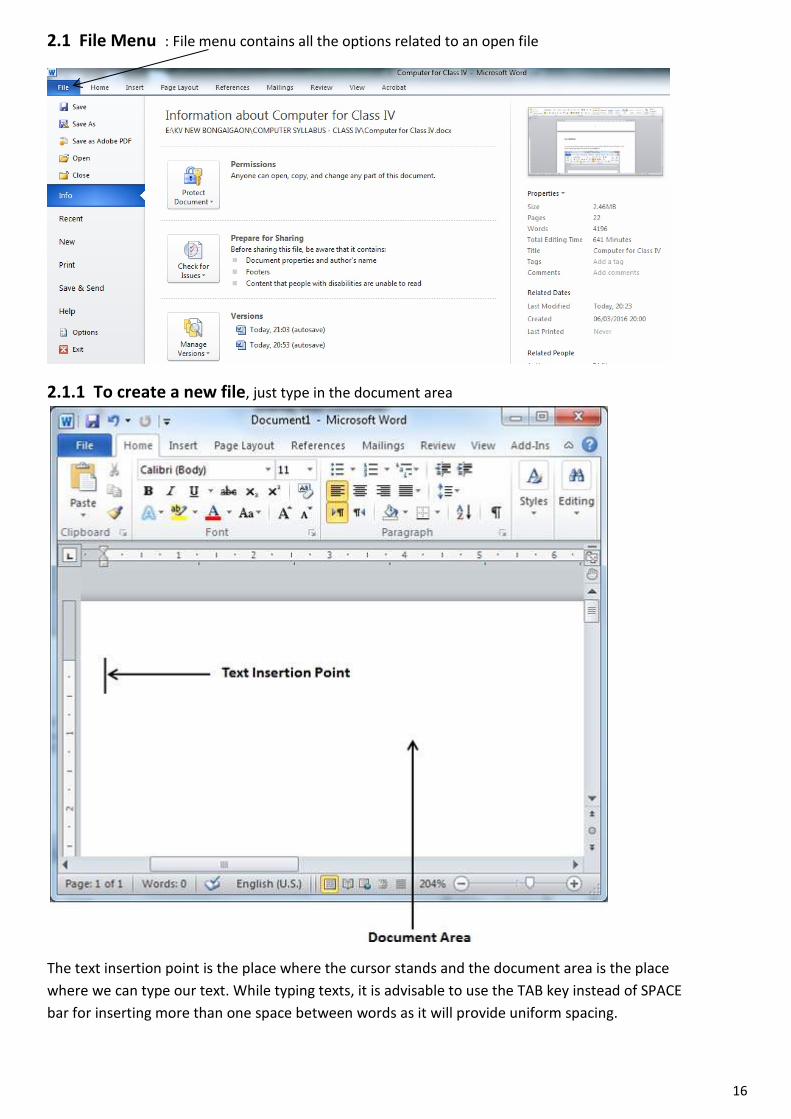
2.1 File Menu : File menu contains all the options related to an open file
2.1.1 To create a new file, just type in the document area
The text insertion point is the place where the cursor stands and the document area is the place where we can type our text. While typing texts, it is advisable to use the TAB key instead of SPACE bar for inserting more than one space between words as it will provide uniform spacing.
16
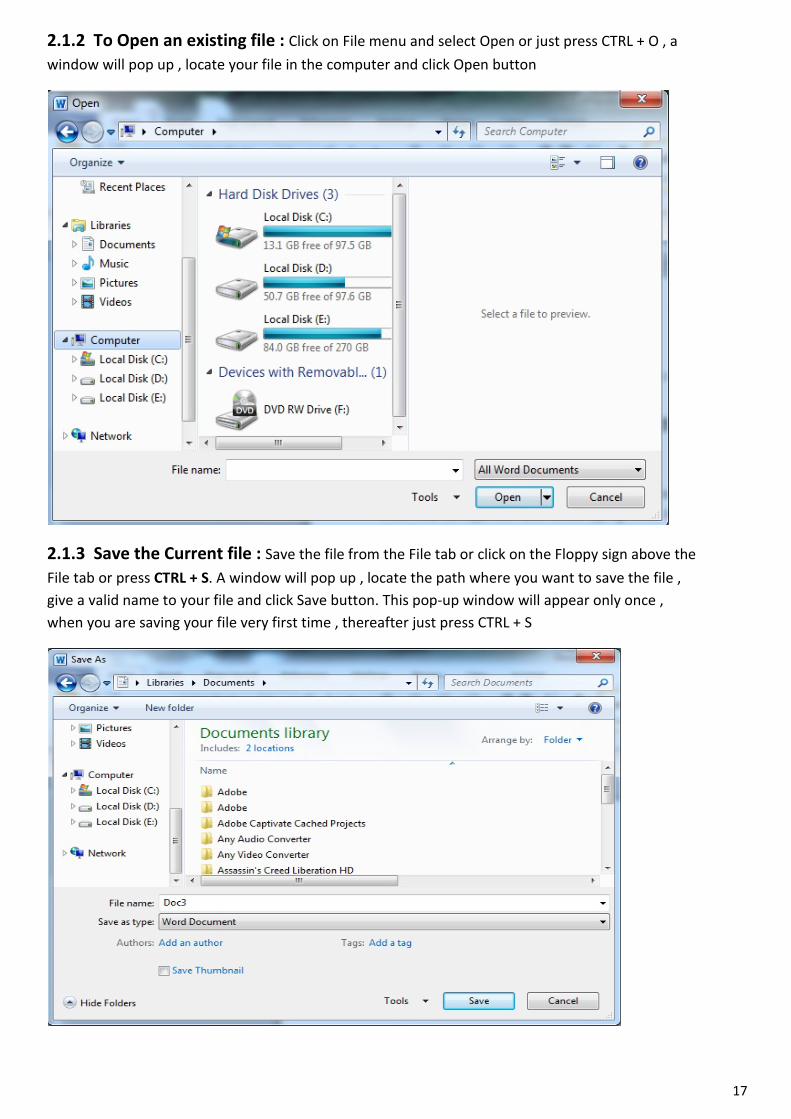
2.1.2 To Open an existing file : Click on File menu and select Open or just press CTRL + O , a window will pop up , locate your file in the computer and click Open button
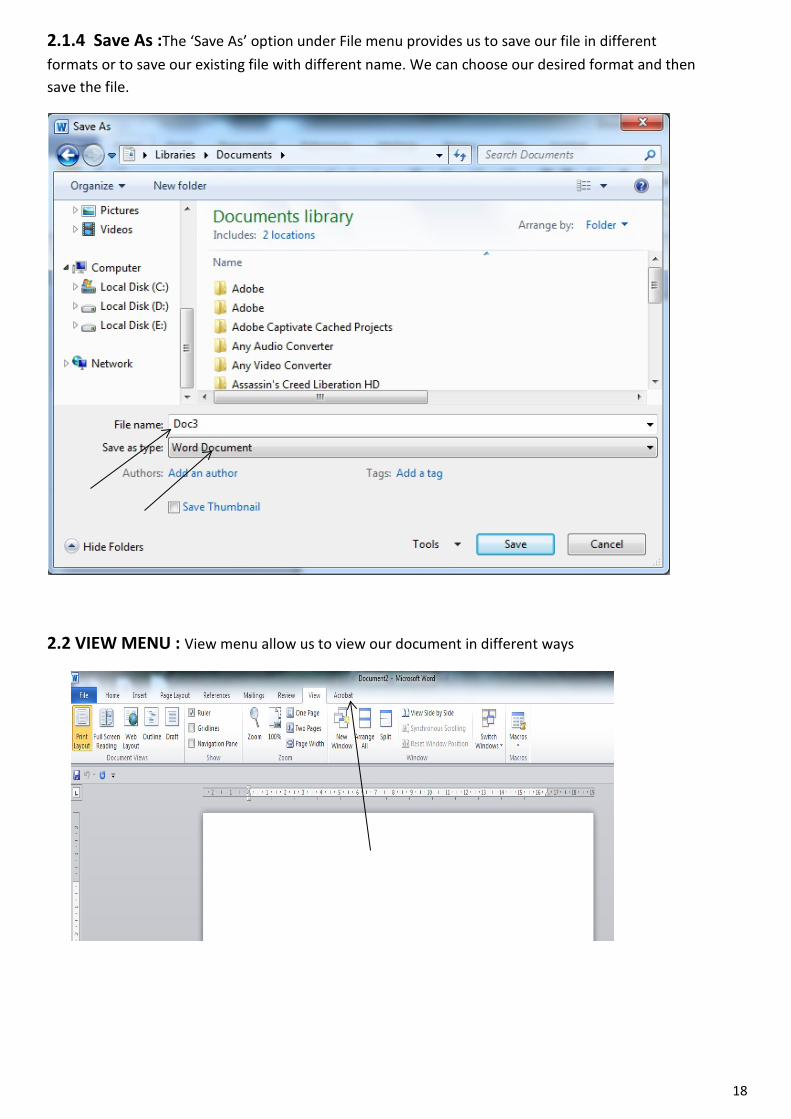
2.1.3 Save the Current file : Save the file from the File tab or click on the Floppy sign above the File tab or press CTRL + S. A window will pop up , locate the path where you want to save the file , give a valid name to your file and click Save button. This pop-up window will appear only once , when you are saving your file very first time , thereafter just press CTRL + S
17
2.1.4 Save As :The ‘Save As’ option under File menu provides us to save our file in different formats or to save our existing file with different name. We can choose our desired format and then save the file.
2.2 VIEW MENU : View menu allow us to view our document in different ways
18
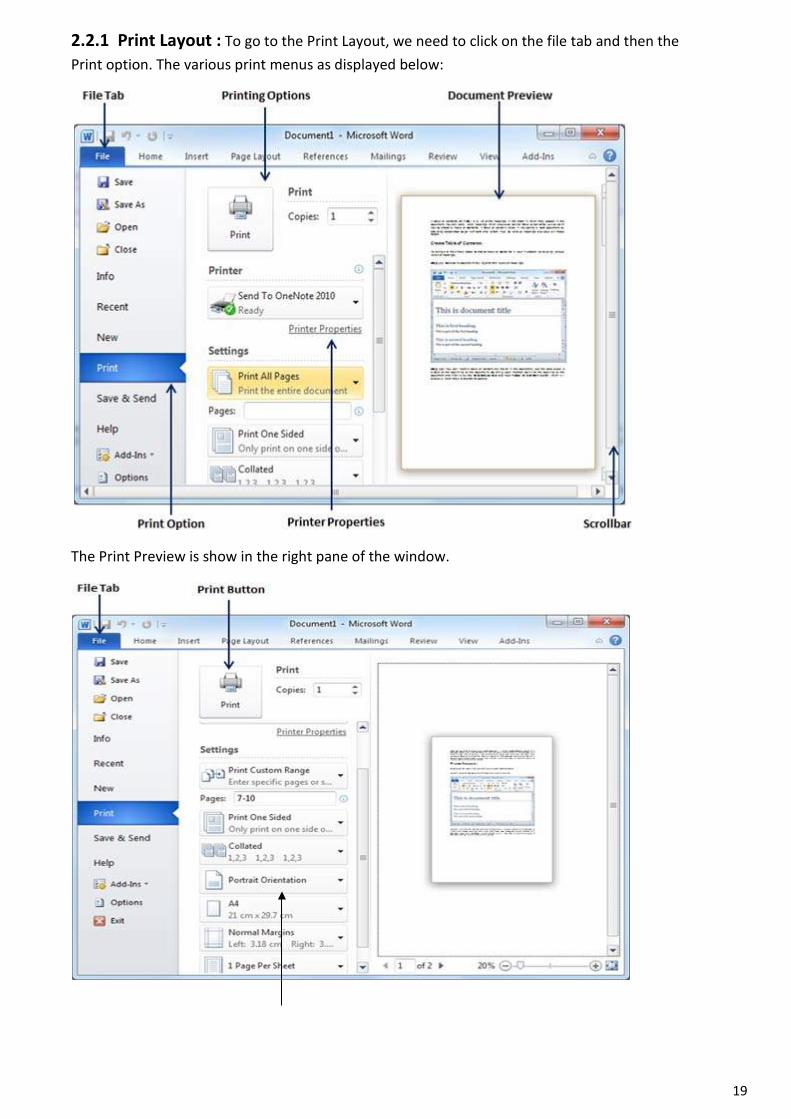
2.2.1 Print Layout : To go to the Print Layout, we need to click on the file tab and then the Print option. The various print menus as displayed below:
The Print Preview is show in the right pane of the window.
19
Here, we can select the type of Orientation we need our document to be printed on. Two orientations are available –
Portrait Landscape
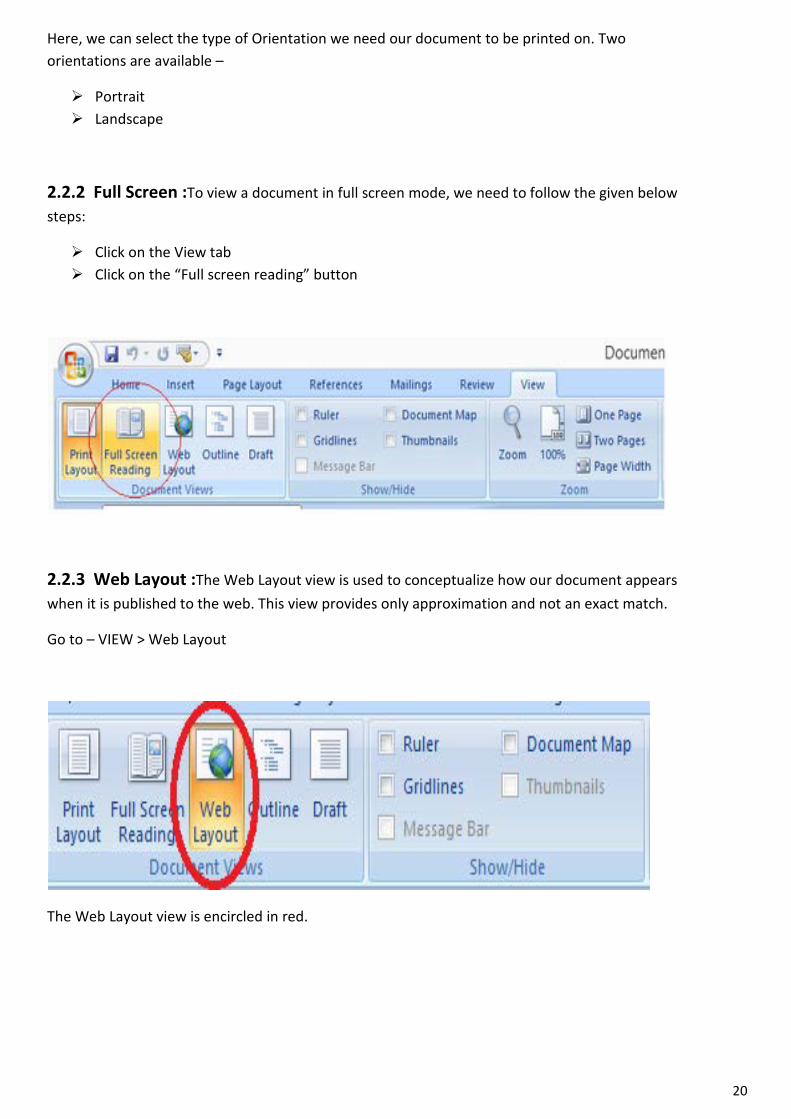
2.2.2 Full Screen :To view a document in full screen mode, we need to follow the given below steps:
Click on the View tab Click on the “Full screen reading” button
2.2.3 Web Layout :The Web Layout view is used to conceptualize how our document appears when it is published to the web. This view provides only approximation and not an exact match.
Go to – VIEW > Web Layout
The Web Layout view is encircled in red.
20
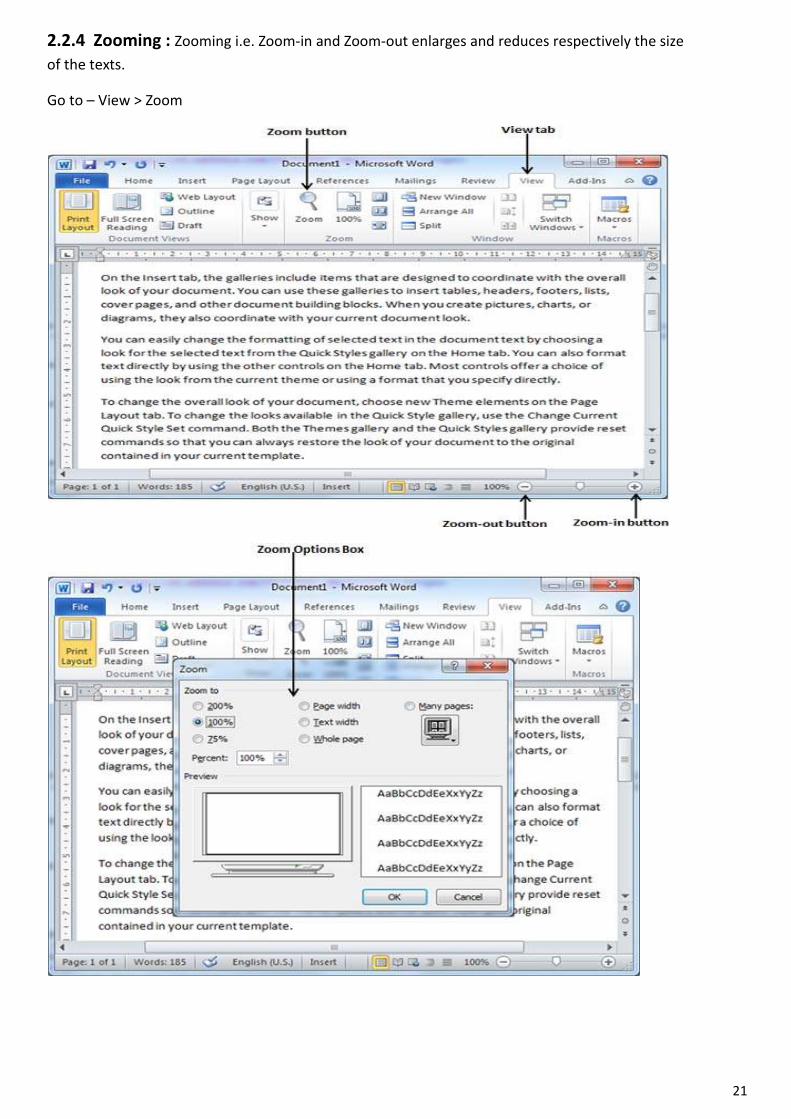
2.2.4 Zooming : Zooming i.e. Zoom-in and Zoom-out enlarges and reduces respectively the size of the texts.
Go to – View > Zoom
21
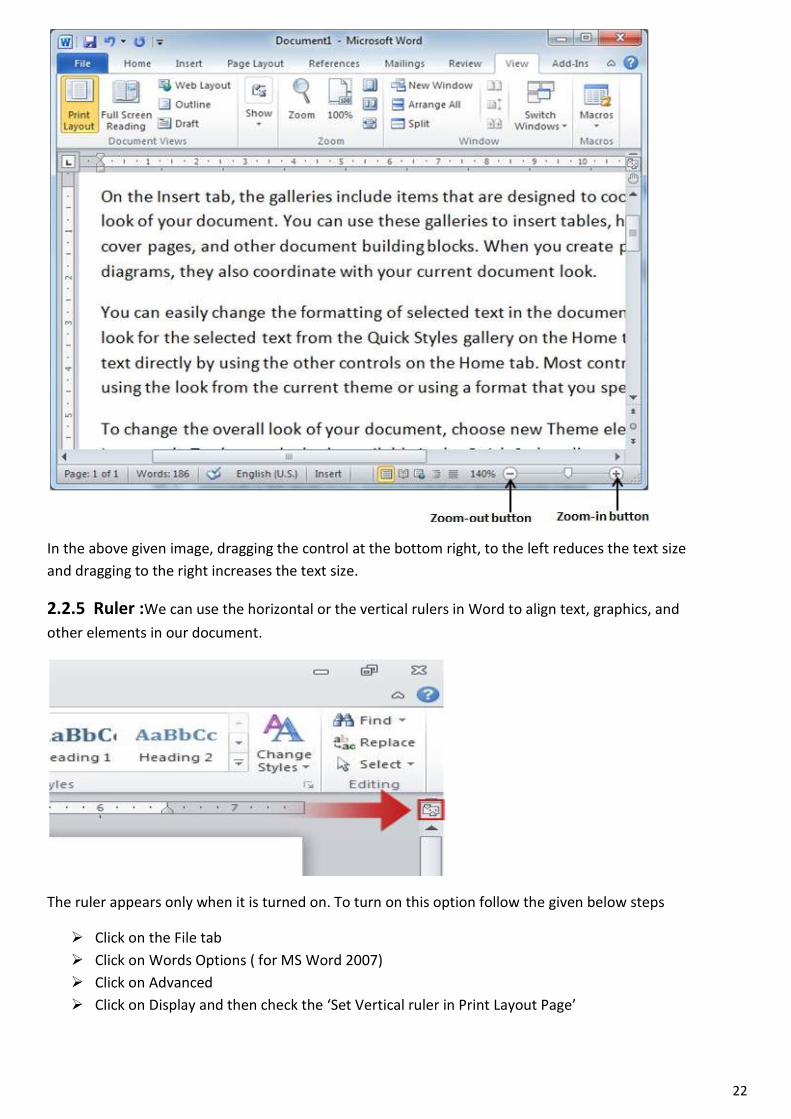
In the above given image, dragging the control at the bottom right, to the left reduces the text size and dragging to the right increases the text size.
2.2.5 Ruler :We can use the horizontal or the vertical rulers in Word to align text, graphics, and other elements in our document.
The ruler appears only when it is turned on. To turn on this option follow the given below steps
Click on the File tab Click on Words Options ( for MS Word 2007) Click on Advanced Click on Display and then check the ‘Set Vertical ruler in Print Layout Page’
22
Some of the important shortcuts are given below:
Open a file – CTRL + O Create a new document – CTRL + N Close a document – CTRL + W Save a file – CTRL + S Display the ‘Save as’ dialog box – F12 Copy – CTRL + C Paste –CTRL + V Cut – CTRL + X Undo – CTRL + Z Redo or repeat an action – CTRL + Y Cancel an action – ESC
Q 1. What is a word processor? Write at least two uses of it. Q 2. What is the default file extension of MS Word 2007/2010/2013? Q 3. What is the shortcut to open the Print Dialog Box? Q 4. How many types of Page orientation are there in MS Word? Name them. Q 5. ............................ is the shortcut key to paste in MS Word. Q 6. CTRL + A selects all the texts and graphics in the working document. (True/False) Q 7. The Web Layout view is used to preview our document before printing. (True/False) Q 8. It is possible only to Zoom-in but not Zoom-out in MS Word. (True/False) Q 9. ............................... positions the texts according to margin. Q 10. MS Word falls under which category of software?
1. Open MS Word and write Five sentences about yourself and save the file with your name
on the Desktop. 2. Open the file that you have just created write two more sentence about your parents and
save the file with the name My Family in D: drive. 3. Open the file that you have just created and set the page, margin and orientation of the
document for printing on a normal A4 size paper. 4. Open the file that you have just created and increase the font size to 16 , font style Calibri and
save the file with the name MyFile in a folder. 5. Create a new file say Ruler and write Five points ( 1 to 5 )about your country. Now adjust the space
between the text and the point number using the Ruler handles
23
3.1 STARTING WINDOWS EXPLORER
The Windows Explorer lets us view, open, copy and manage our files and folders in the Windows operating system. In Windows 8, the live tiles can be seen by clicking on the Windows logo or clicking on the left bottom corner of the window. The live tiles organizes various application into a single window and also provides live feed.
Learning Objectives : After learning the Unit the students will be able to:
create a folder delete a folder rename a folder move a folder make shortcut of a folder on desktop search particular file and folder in computer
24
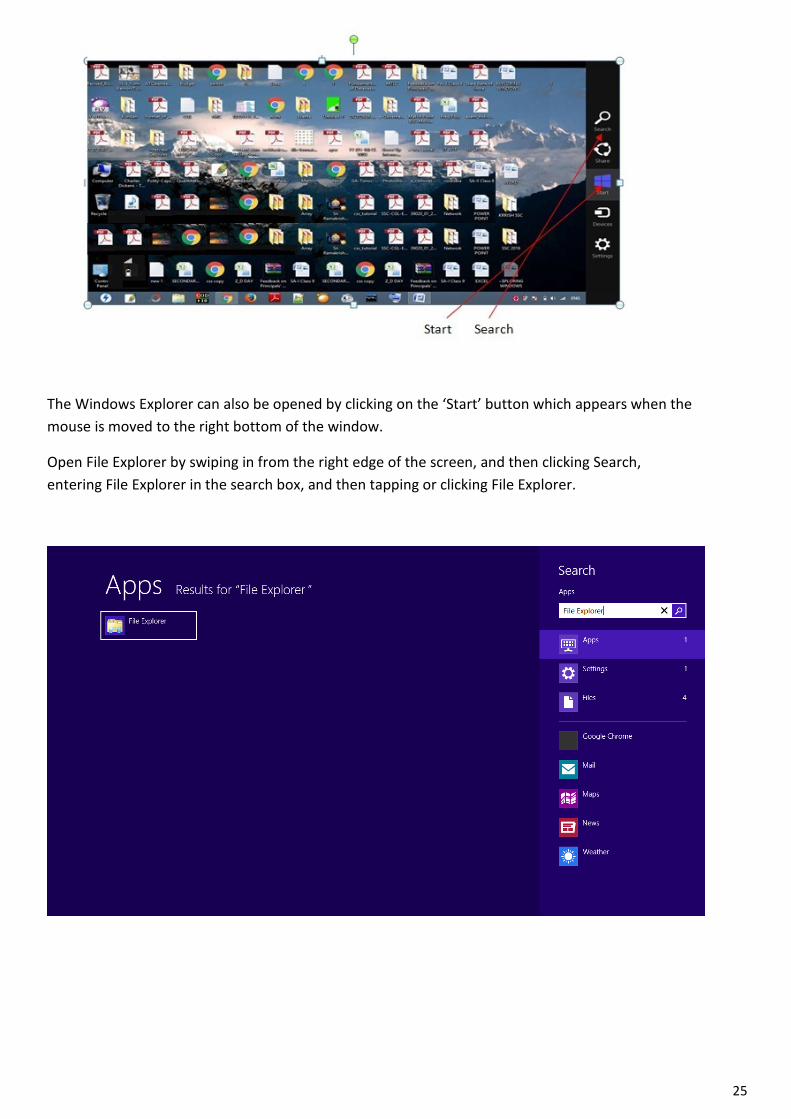
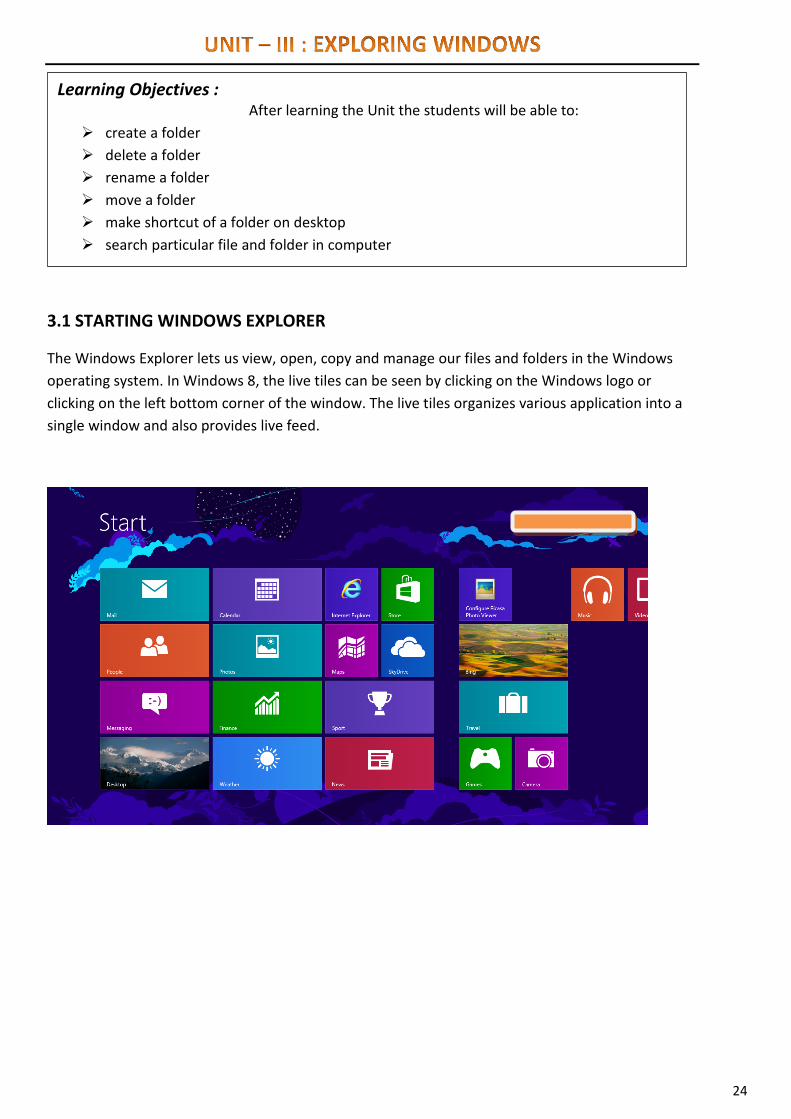
The Windows Explorer can also be opened by clicking on the ‘Start’ button which appears when the mouse is moved to the right bottom of the window.
Open File Explorer by swiping in from the right edge of the screen, and then clicking Search, entering File Explorer in the search box, and then tapping or clicking File Explorer.
25
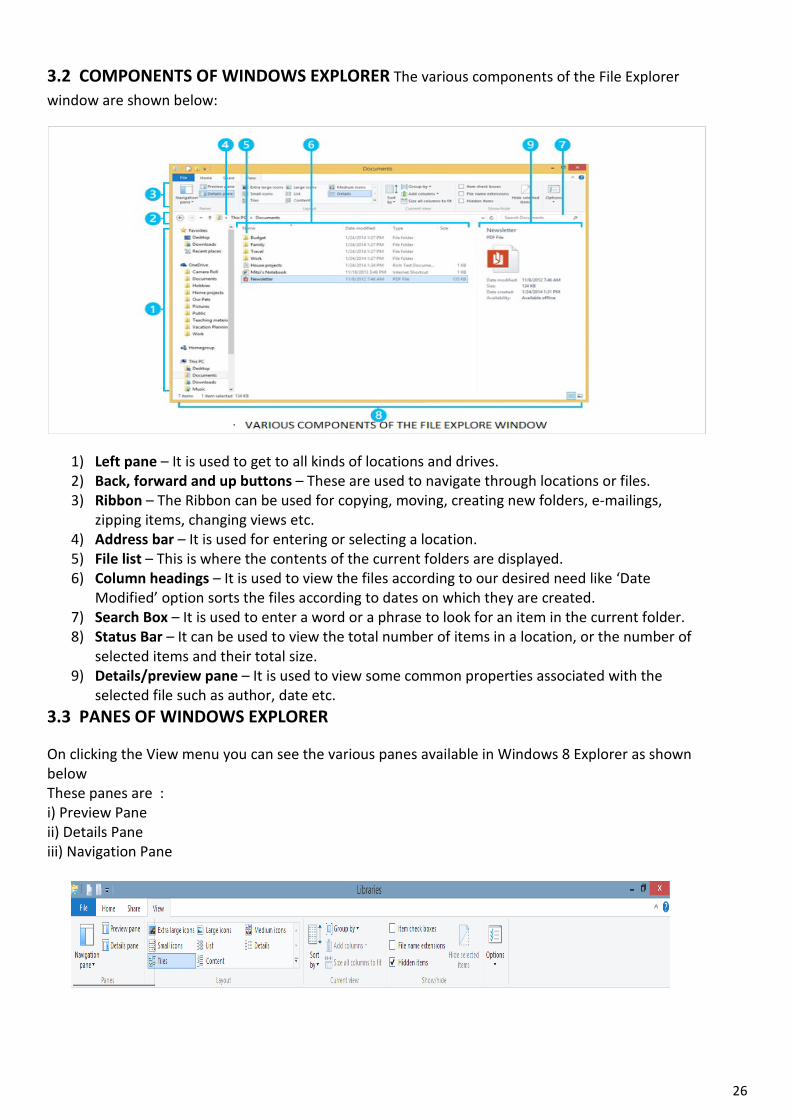
3.2 COMPONENTS OF WINDOWS EXPLORER The various components of the File Explorer window are shown below:
1) Left pane – It is used to get to all kinds of locations and drives. 2) Back, forward and up buttons – These are used to navigate through locations or files. 3) Ribbon – The Ribbon can be used for copying, moving, creating new folders, e-mailings,
zipping items, changing views etc. 4) Address bar – It is used for entering or selecting a location. 5) File list – This is where the contents of the current folders are displayed. 6) Column headings – It is used to view the files according to our desired need like ‘Date
Modified’ option sorts the files according to dates on which they are created. 7) Search Box – It is used to enter a word or a phrase to look for an item in the current folder. 8) Status Bar – It can be used to view the total number of items in a location, or the number of
selected items and their total size. 9) Details/preview pane – It is used to view some common properties associated with the
selected file such as author, date etc. 3.3 PANES OF WINDOWS EXPLORER
On clicking the View menu you can see the various panes available in Windows 8 Explorer as shown below These panes are : i) Preview Pane ii) Details Pane iii) Navigation Pane
26
3.4 WORKING WITH FOLDER IN LEFT PANE : On expanding a disk drive or clicking a window/folder like Desktop, Downloads, Recent Places etc. you can get the content of the window/folder on the Right Pane of the Windows Explorer. And on selecting and clicking a disk drive , you can get the files and folders of that particular drive on the Right Pane of the windows explorer and all the folders of that drive on Left Pane of the windows explorer. And now, you can move files and folders from on place to another by dragging and dropping the same from left pane to right pane and vice-versa.
3.5 MANAGING FILES AND FOLDERS IN WINDOWS EXPLORER : On selecting the folder in left pane of the windows explorer you can view the files present in that folder. Similarly you can view the content of a disk drive. You can even directly drag and drop file(s) or folder(s) from one location to another location same like copy and paste.
3.6 MODES OF VIEW :
The content shown on the right pane of the windows explorer can be viewed in one of the following modes Extra Large Icons, Large Icons, Medium Icons, Small Icons, List, Details, Tiles, Contents. Try it to view the effect of these modes.
3.7 FILE NAMING CONVENTION All the file systems follow the same general naming conventions for an individual file: a base file name and an optional extension, separated by a period. However, each file system may have own naming convention. Some of the basic rules followed while naming file sin Windows are listed below:
Use a period to separate the base file name from the extension in the name of a directory or file.
Use a backslash (\) to separate the components of a path. Use a backslash as required as part of volume names, for example, the "C:\" in
"C:\path\file". Do not assume case sensitivity. For example, WINDOWS and windows should be treated
equal. Use any character in the current code page for a name, including Unicode characters and
characters in the extended character set (128–255) except for the following reserved characters:
< (less than) > (greater than) : (colon) " (double quote) / (forward slash) \ (backslash) | (vertical bar or pipe) ? (question mark) * (asterisk)
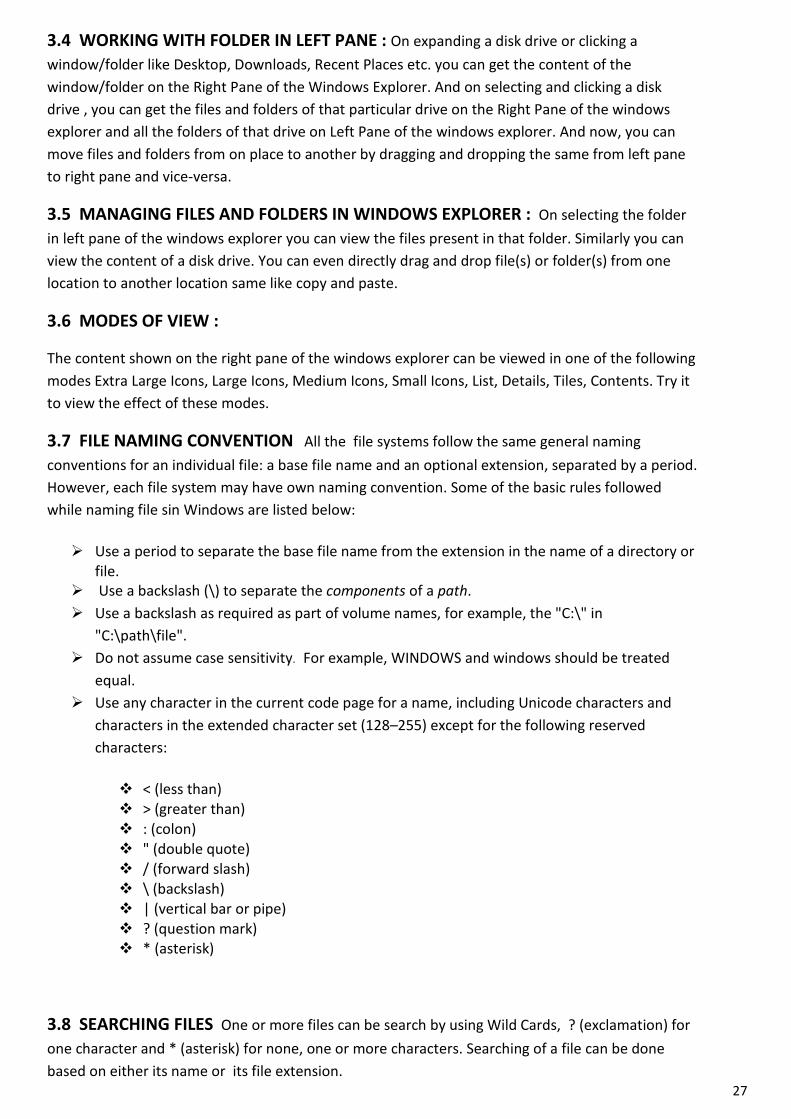
3.8 SEARCHING FILES One or more files can be search by using Wild Cards, ? (exclamation) for one character and * (asterisk) for none, one or more characters. Searching of a file can be done based on either its name or its file extension.
27
For Example : *.docx will search display all the document files or word files in the drive or path selected. Similarly abc.docx will search and display word file having name abc
The Search Box is shown below:
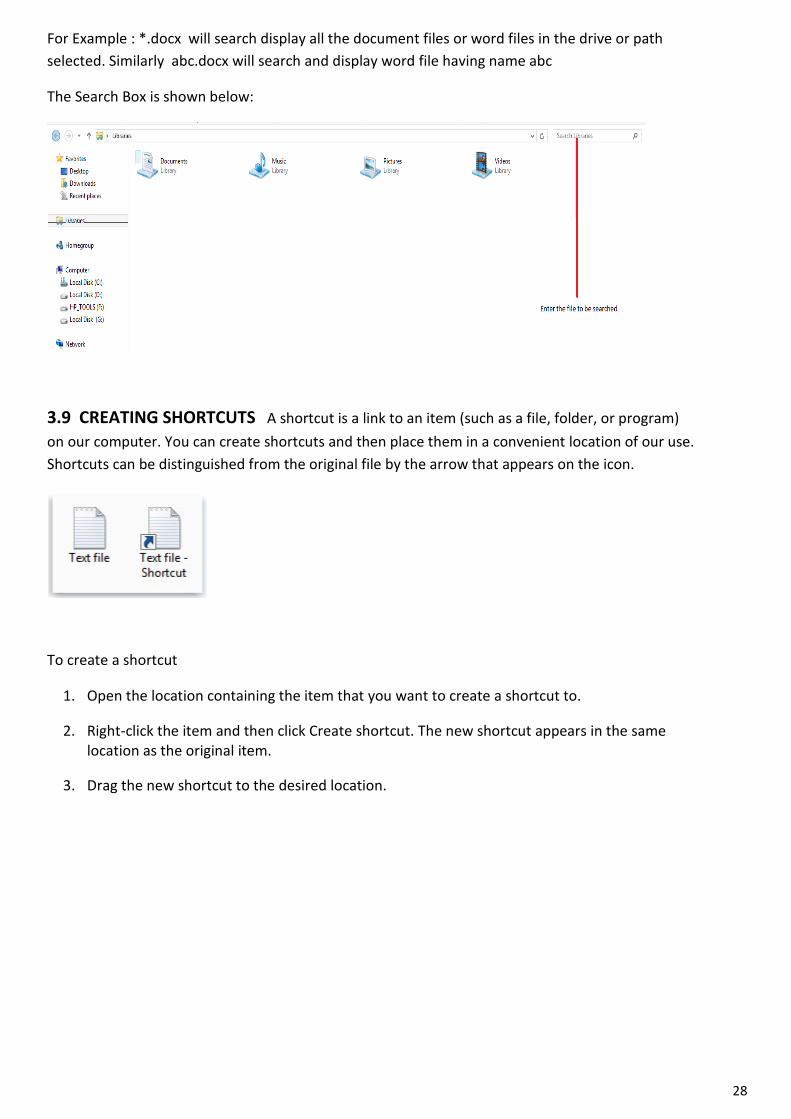
3.9 CREATING SHORTCUTS A shortcut is a link to an item (such as a file, folder, or program) on our computer. You can create shortcuts and then place them in a convenient location of our use. Shortcuts can be distinguished from the original file by the arrow that appears on the icon.
To create a shortcut
1. Open the location containing the item that you want to create a shortcut to.
2. Right-click the item and then click Create shortcut. The new shortcut appears in the same location as the original item.
3. Drag the new shortcut to the desired location.
28
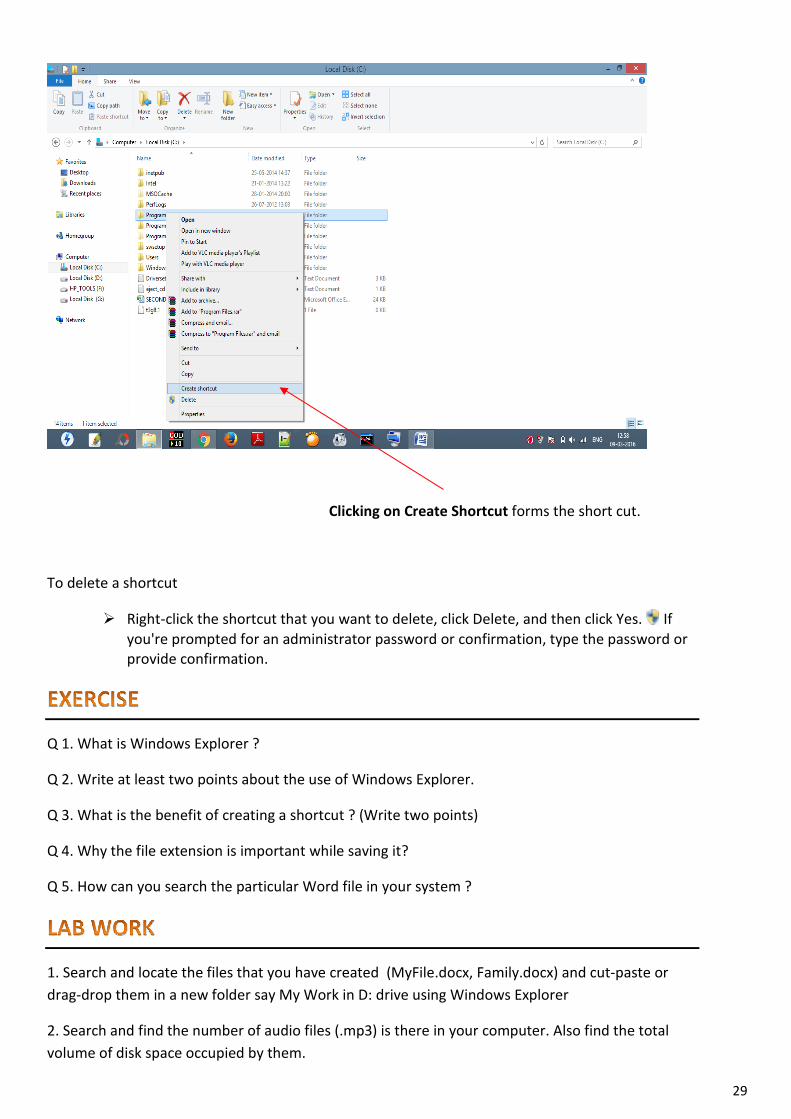
Clicking on Create Shortcut forms the short cut.
To delete a shortcut
Right-click the shortcut that you want to delete, click Delete, and then click Yes. If you're prompted for an administrator password or confirmation, type the password or provide confirmation.
Q 1. What is Windows Explorer ?
Q 2. Write at least two points about the use of Windows Explorer.
Q 3. What is the benefit of creating a shortcut ? (Write two points)
Q 4. Why the file extension is important while saving it?
Q 5. How can you search the particular Word file in your system ?
1. Search and locate the files that you have created (MyFile.docx, Family.docx) and cut-paste or drag-drop them in a new folder say My Work in D: drive using Windows Explorer
2. Search and find the number of audio files (.mp3) is there in your computer. Also find the total volume of disk space occupied by them.
29
Power point is an application software that helps us in presentation that supports text, graphics, pictures and other multimedia. The default file extension of MS power Point 2010 is .pptx.
4.1 STARTING POWERPOINT
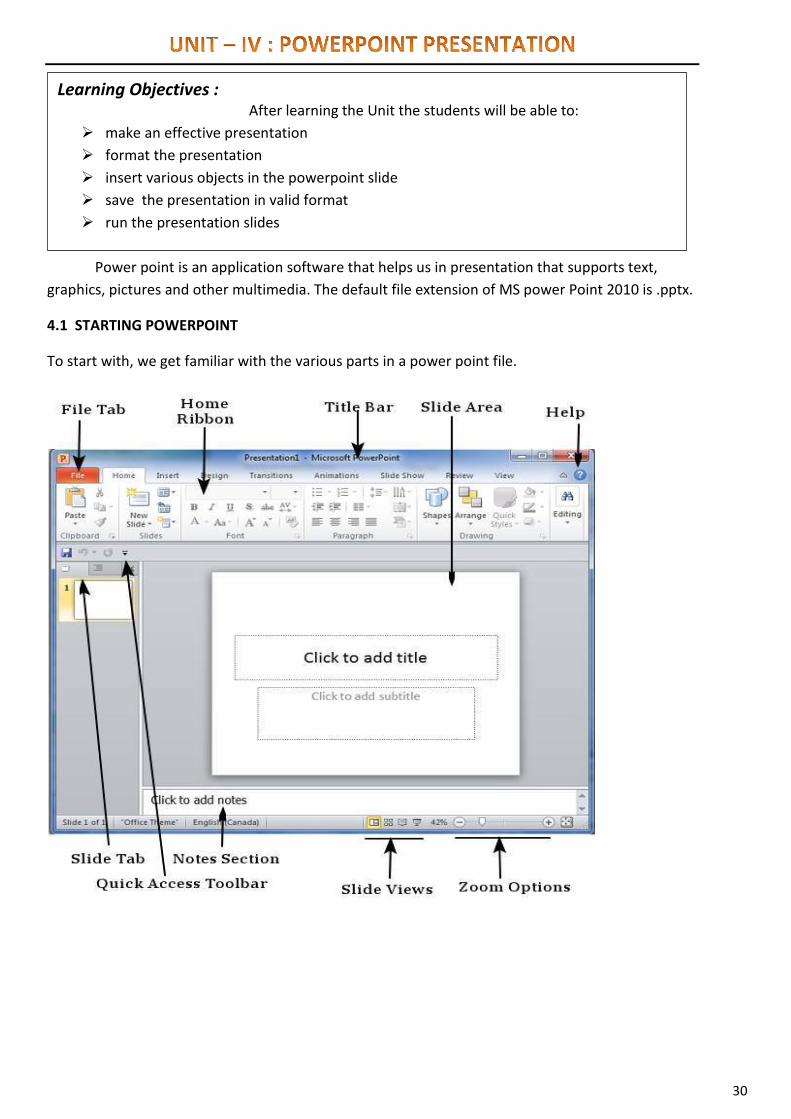
To start with, we get familiar with the various parts in a power point file.
Learning Objectives : After learning the Unit the students will be able to:
make an effective presentation format the presentation insert various objects in the powerpoint slide save the presentation in valid format run the presentation slides
30
File Tab: The file tab helps us to manage our power point file.
Ribbon: The Ribbon is composed of three components:
Tabs: They form the top part of the ribbon. Home, Insert etc. are some tabs. Groups: The group organizes related commands. Eg. Commands related to fonts, size,
alignment etc. Commands: Each group has commands in it.
Slide area: The Slide area helps us to add, edit texts and other multimedia in the slide.
Title bar: It appears at the top of the window where the file name can be found.
Slide view: The Slide view helps us to switch between PowerPoint views:
Normal Layout view: In this, the page is displayed in normal view. This view lets us to edit individual slides and re-arrange them.
Slide Sorter View: In this, the slides are displayed as matrix. This view lets us to re-arrange slides but not edit them.
Reading view: This view is similar to a slide show view.
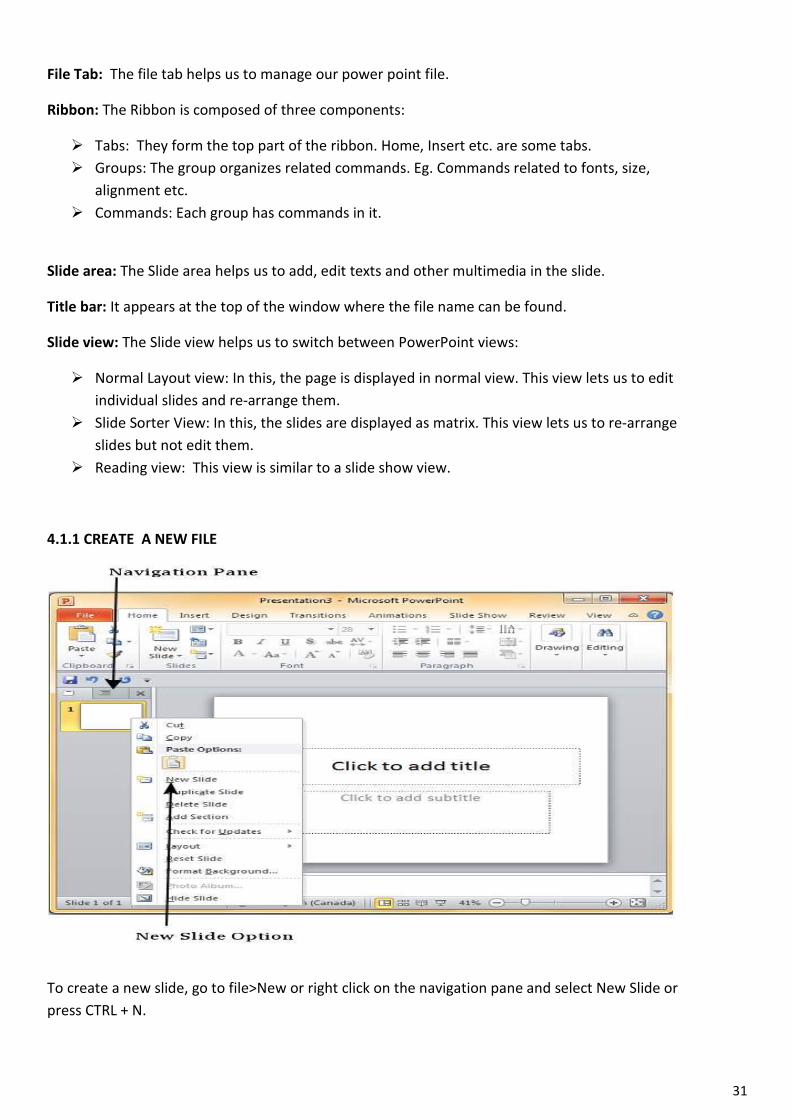
4.1.1 CREATE A NEW FILE
To create a new slide, go to file>New or right click on the navigation pane and select New Slide or press CTRL + N.
31
4.2 FORMATTING A PRESENTATION
PowerPoint lets us to format the presentation according to our needs and thereby enable us to create customized and impressive presentations.
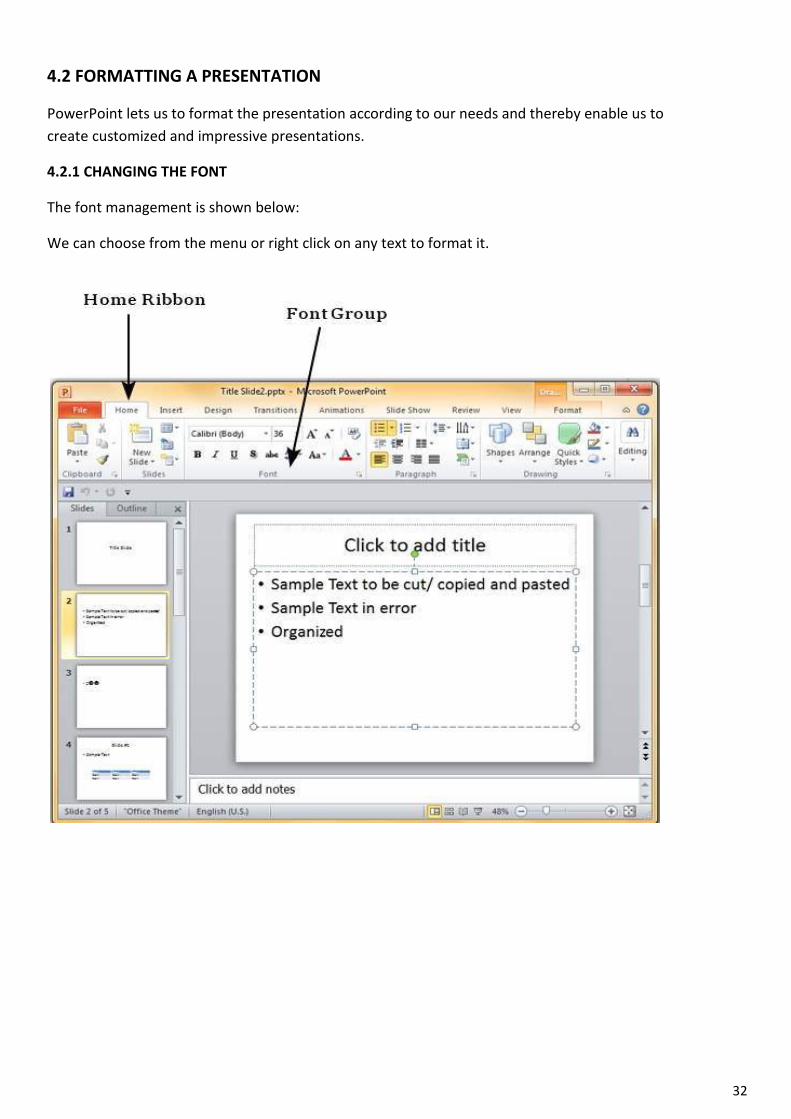
4.2.1 CHANGING THE FONT
The font management is shown below:
We can choose from the menu or right click on any text to format it.
32
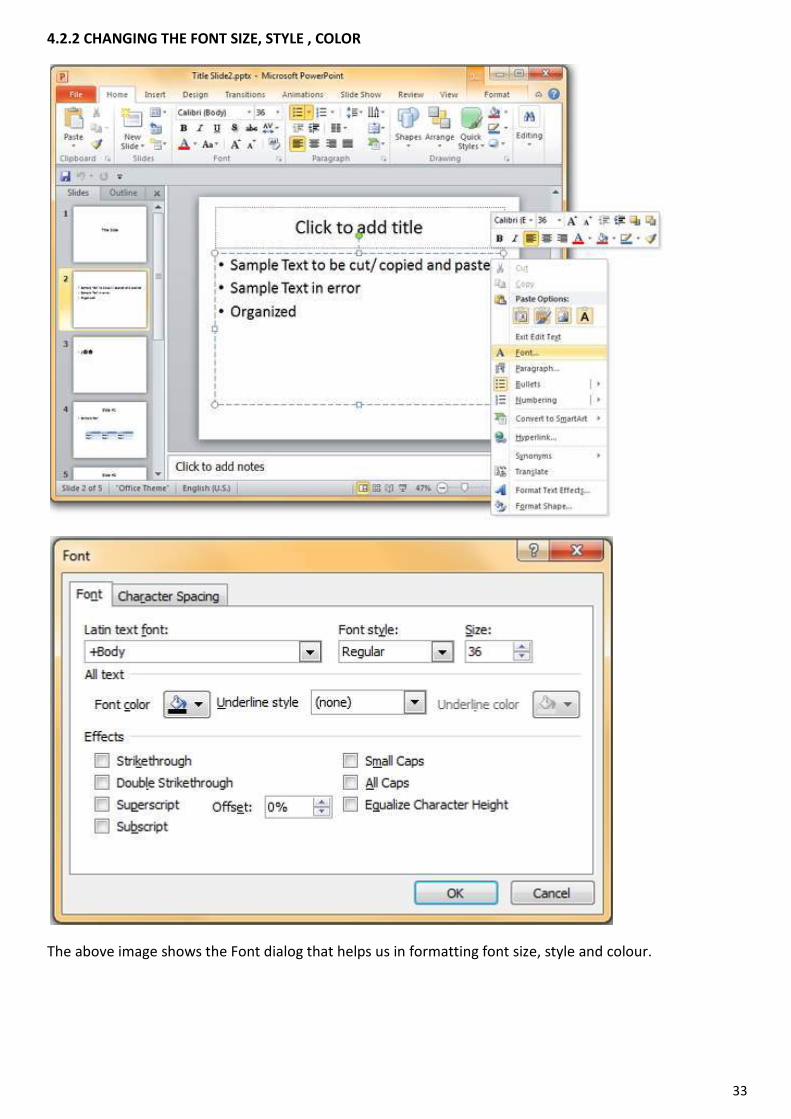
4.2.2 CHANGING THE FONT SIZE, STYLE , COLOR
The above image shows the Font dialog that helps us in formatting font size, style and colour.
33
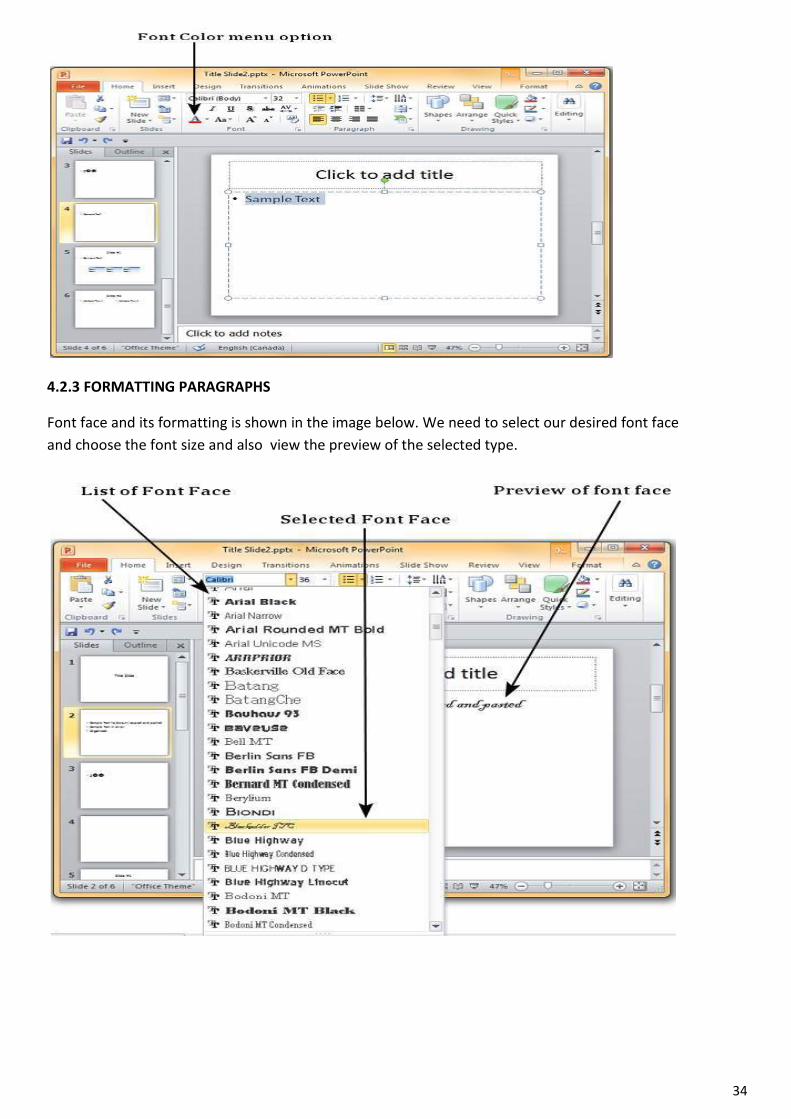
4.2.3 FORMATTING PARAGRAPHS
Font face and its formatting is shown in the image below. We need to select our desired font face and choose the font size and also view the preview of the selected type.
34
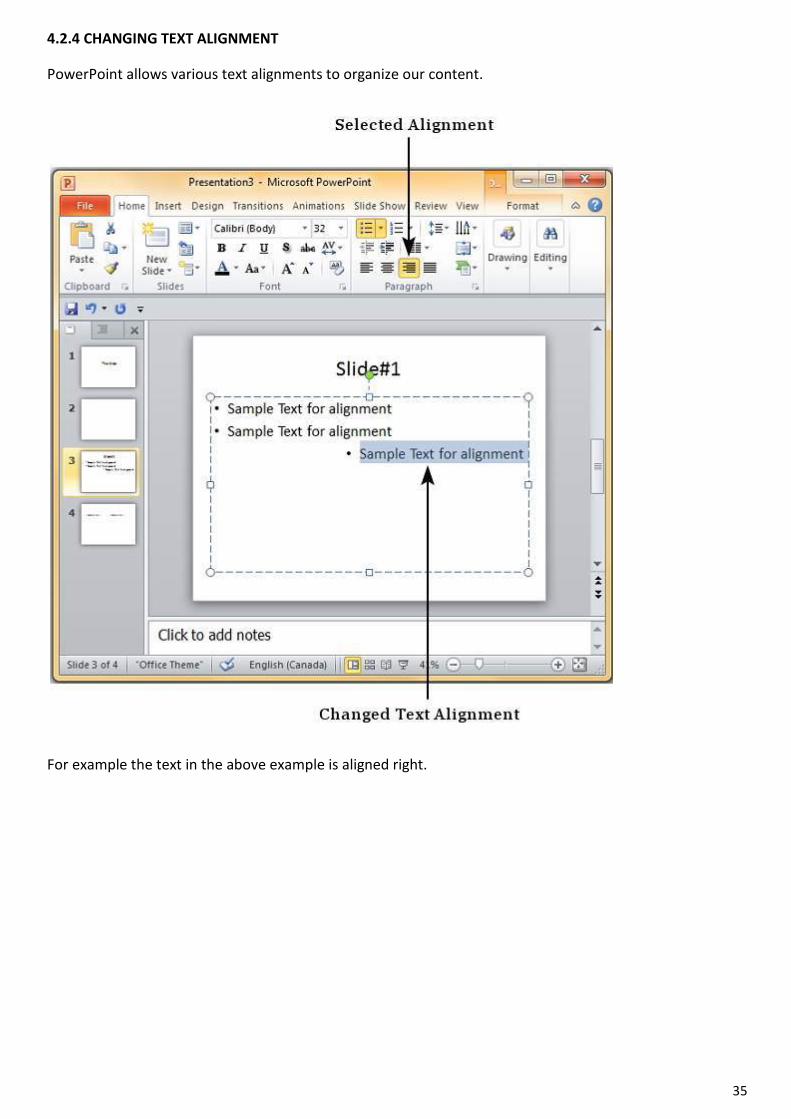
4.2.4 CHANGING TEXT ALIGNMENT
PowerPoint allows various text alignments to organize our content.
For example the text in the above example is aligned right.
35
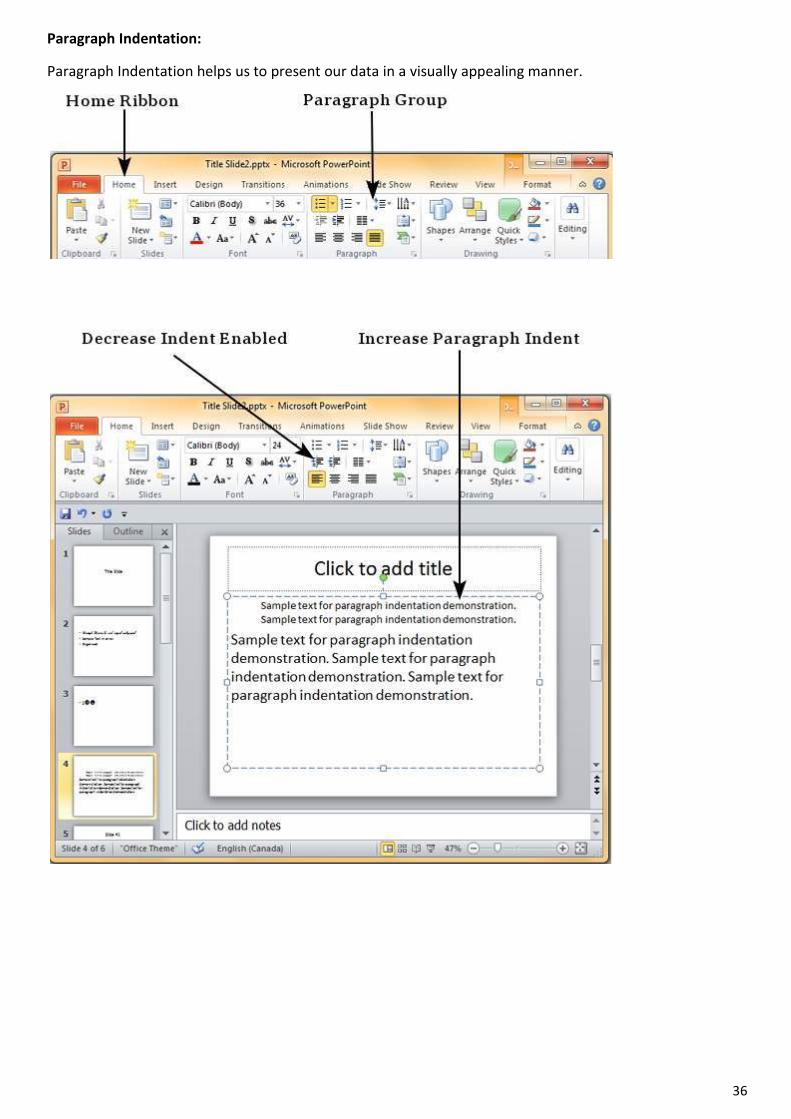
Paragraph Indentation:
Paragraph Indentation helps us to present our data in a visually appealing manner.
36
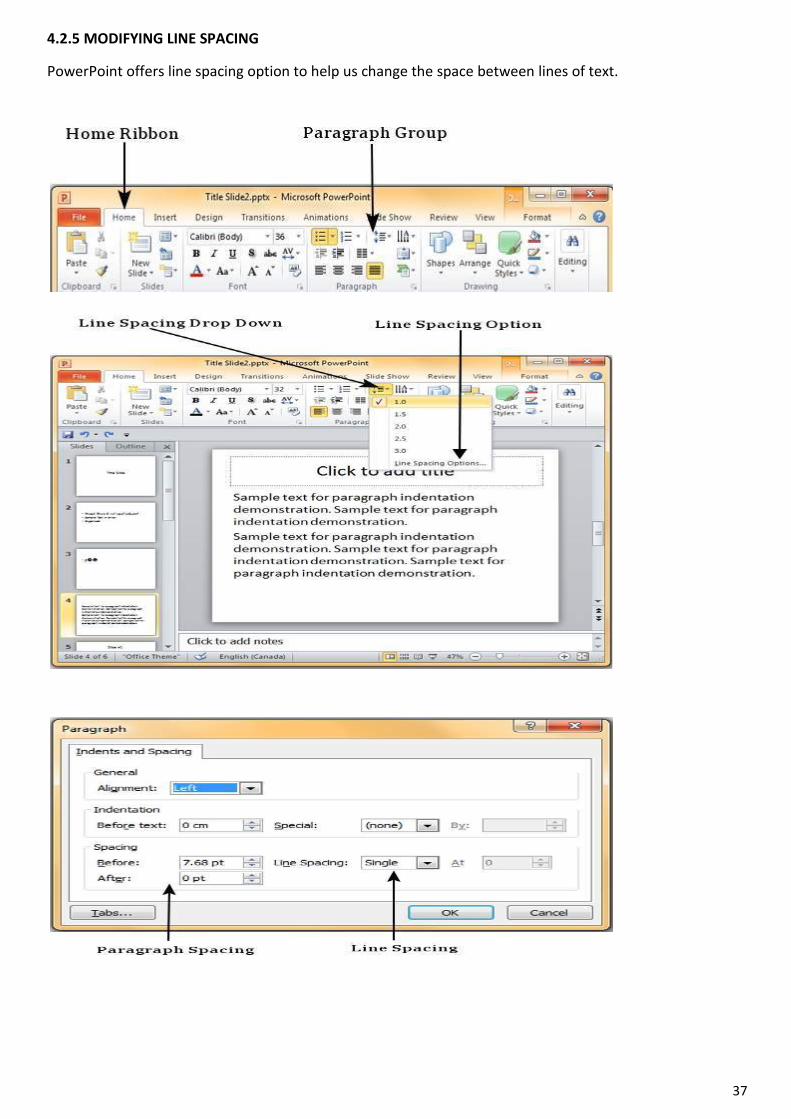
4.2.5 MODIFYING LINE SPACING
PowerPoint offers line spacing option to help us change the space between lines of text.
37
4.2.6 CREATING BULLETED AND NUMBERED LISTS
To create Bullet and Numbering, we need to right click on the area where we need to insert the bullets or numbering and then choose the desired bullet or number.
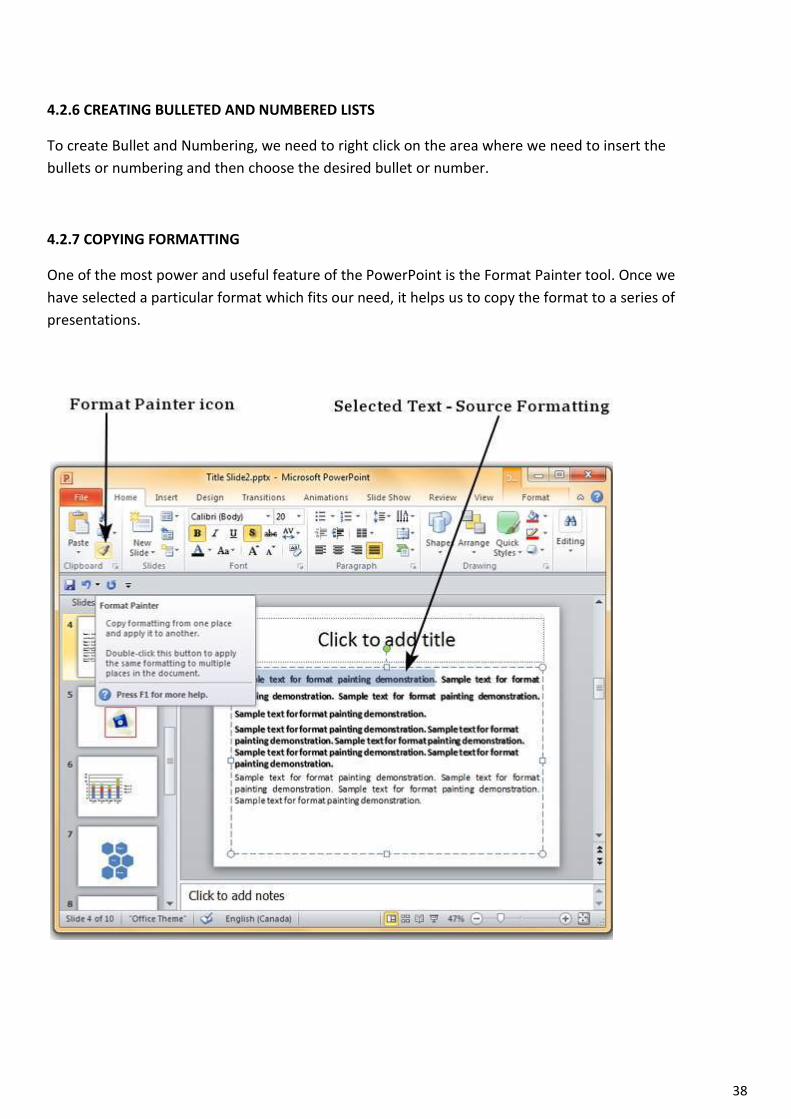
4.2.7 COPYING FORMATTING
One of the most power and useful feature of the PowerPoint is the Format Painter tool. Once we have selected a particular format which fits our need, it helps us to copy the format to a series of presentations.
38
4.3 INSERT MENU AND OTHER MULTIMEDIA CONTENTS
PowerPoint allows us to insert multimedia in our slide. It allows us to insert two types of pictures: Clipart – the ones that are online picture collections and can be searched from the clipart and the other is Picture: the ones that are available in our computer.
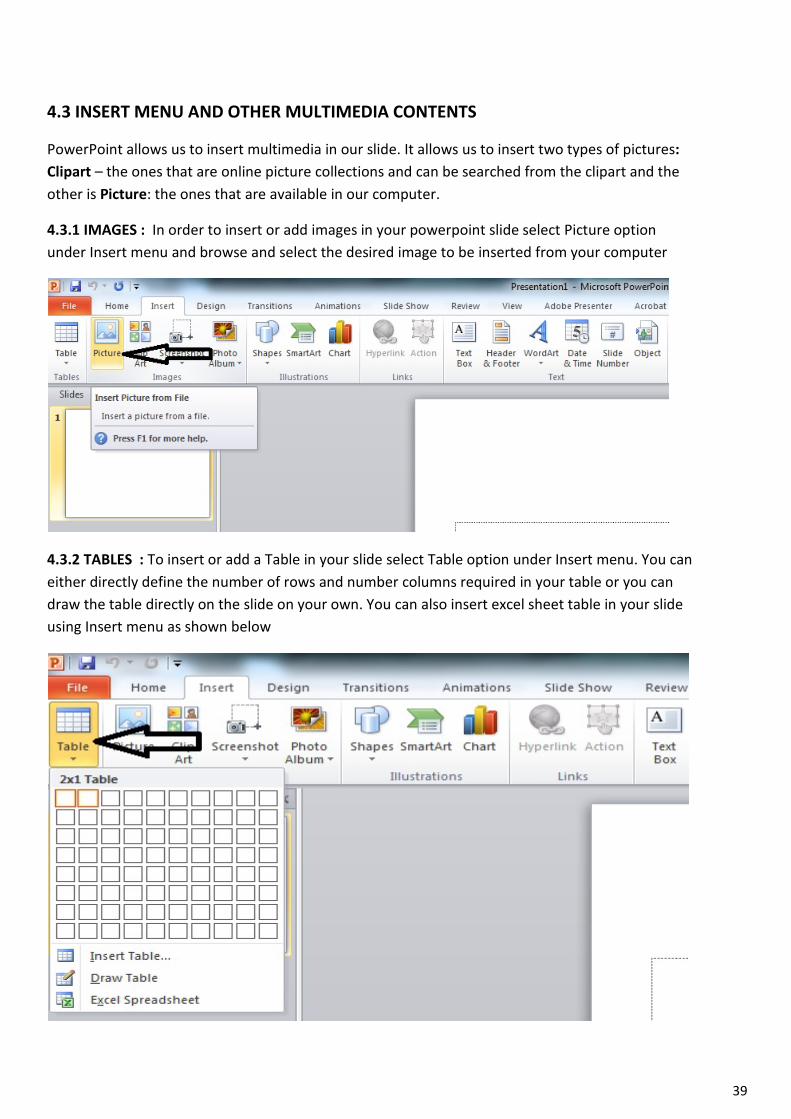
4.3.1 IMAGES : In order to insert or add images in your powerpoint slide select Picture option under Insert menu and browse and select the desired image to be inserted from your computer
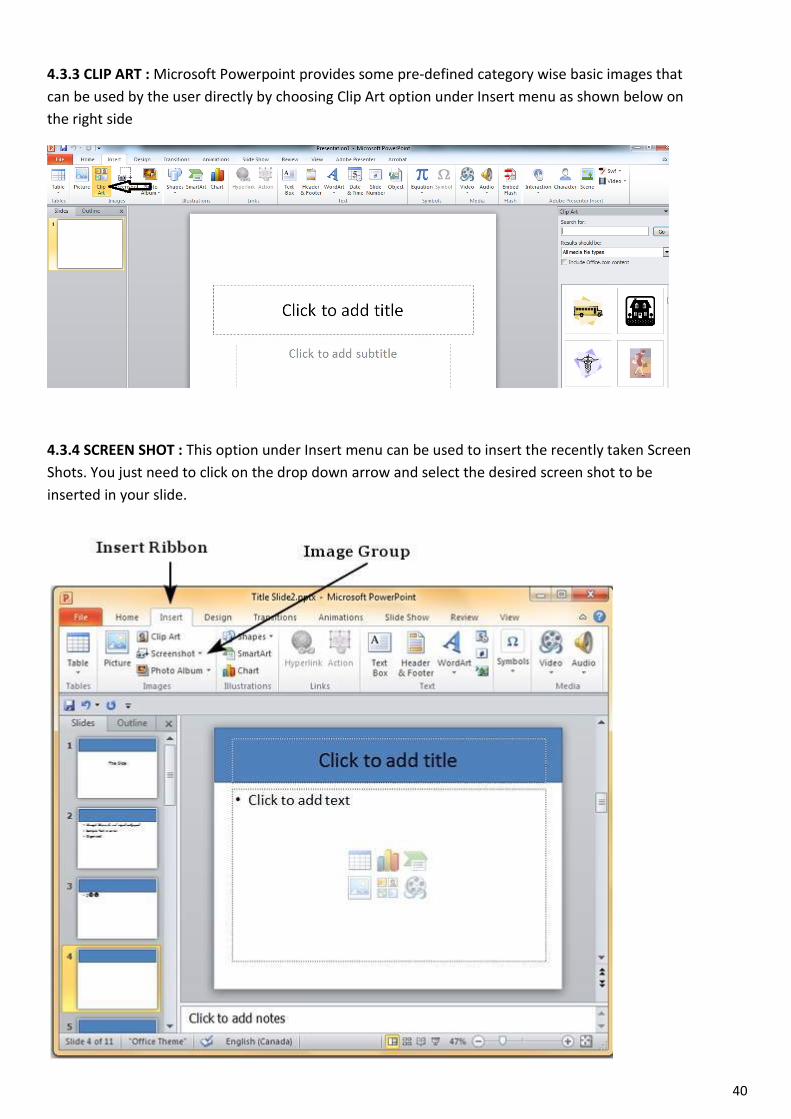
4.3.2 TABLES : To insert or add a Table in your slide select Table option under Insert menu. You can either directly define the number of rows and number columns required in your table or you can draw the table directly on the slide on your own. You can also insert excel sheet table in your slide using Insert menu as shown below
39
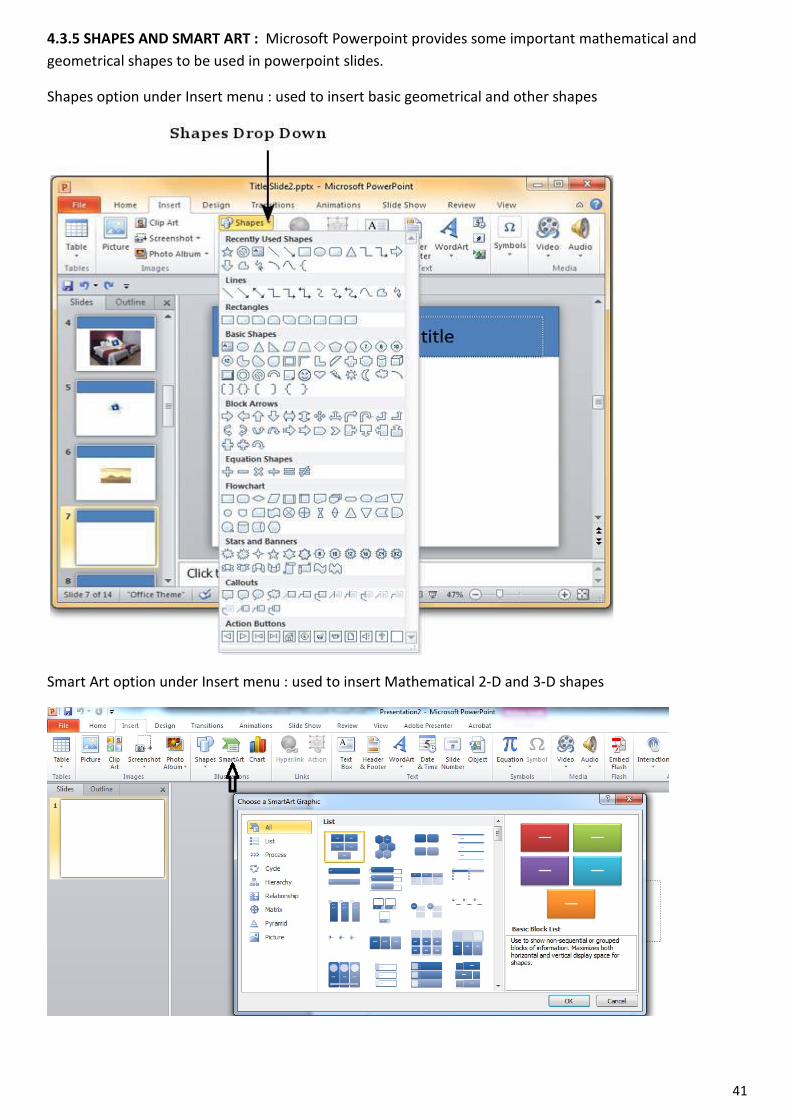
4.3.3 CLIP ART : Microsoft Powerpoint provides some pre-defined category wise basic images that can be used by the user directly by choosing Clip Art option under Insert menu as shown below on the right side
4.3.4 SCREEN SHOT : This option under Insert menu can be used to insert the recently taken Screen Shots. You just need to click on the drop down arrow and select the desired screen shot to be inserted in your slide.
40
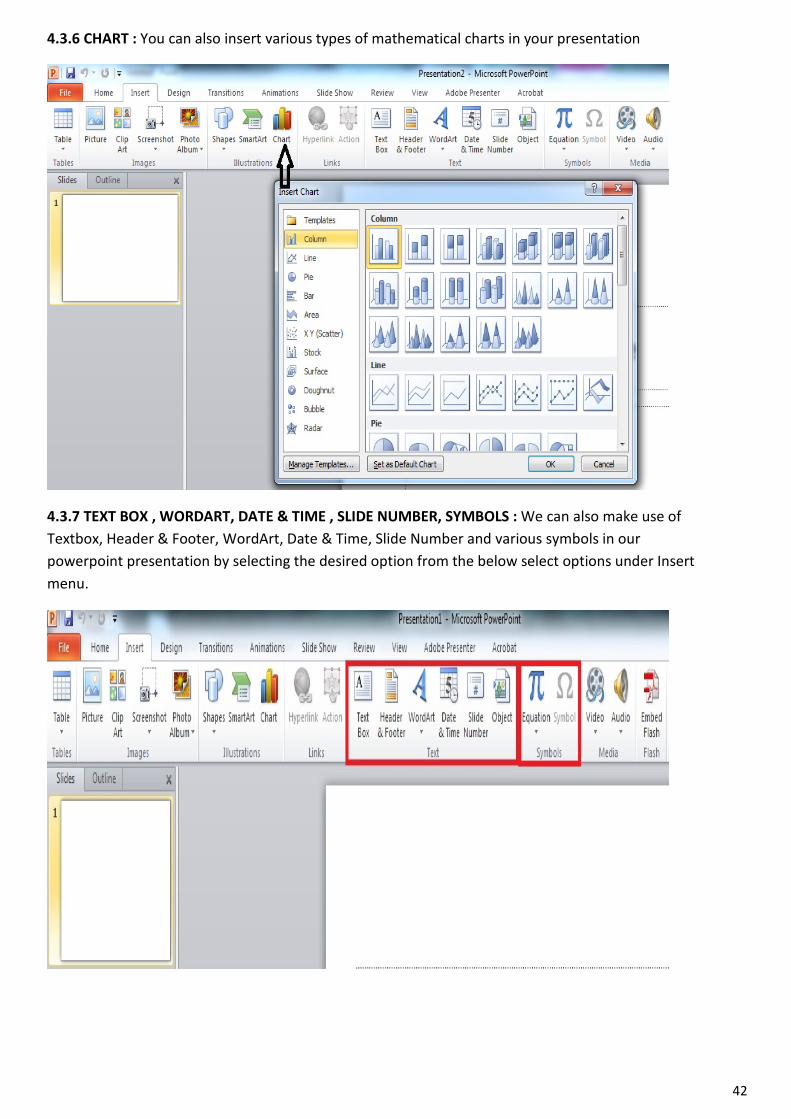
4.3.5 SHAPES AND SMART ART : Microsoft Powerpoint provides some important mathematical and geometrical shapes to be used in powerpoint slides.
Shapes option under Insert menu : used to insert basic geometrical and other shapes
Smart Art option under Insert menu : used to insert Mathematical 2-D and 3-D shapes
41
4.3.6 CHART : You can also insert various types of mathematical charts in your presentation
4.3.7 TEXT BOX , WORDART, DATE & TIME , SLIDE NUMBER, SYMBOLS : We can also make use of Textbox, Header & Footer, WordArt, Date & Time, Slide Number and various symbols in our powerpoint presentation by selecting the desired option from the below select options under Insert menu.
42
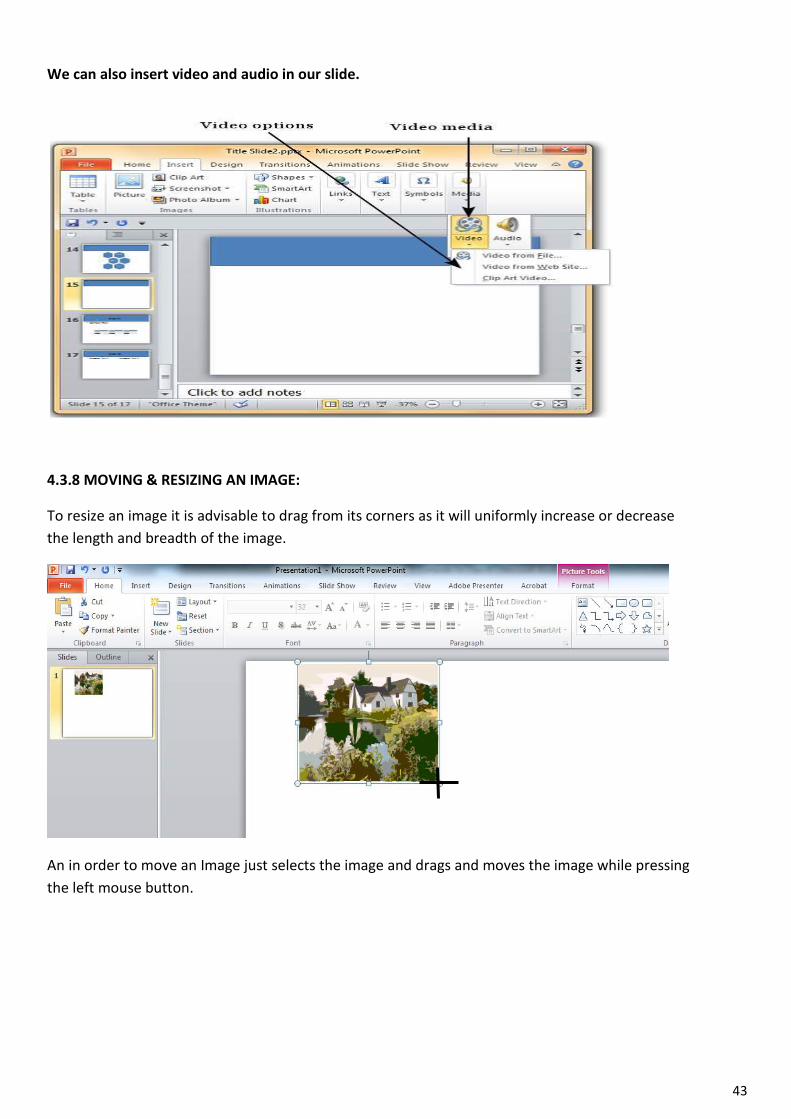
We can also insert video and audio in our slide.
4.3.8 MOVING & RESIZING AN IMAGE:
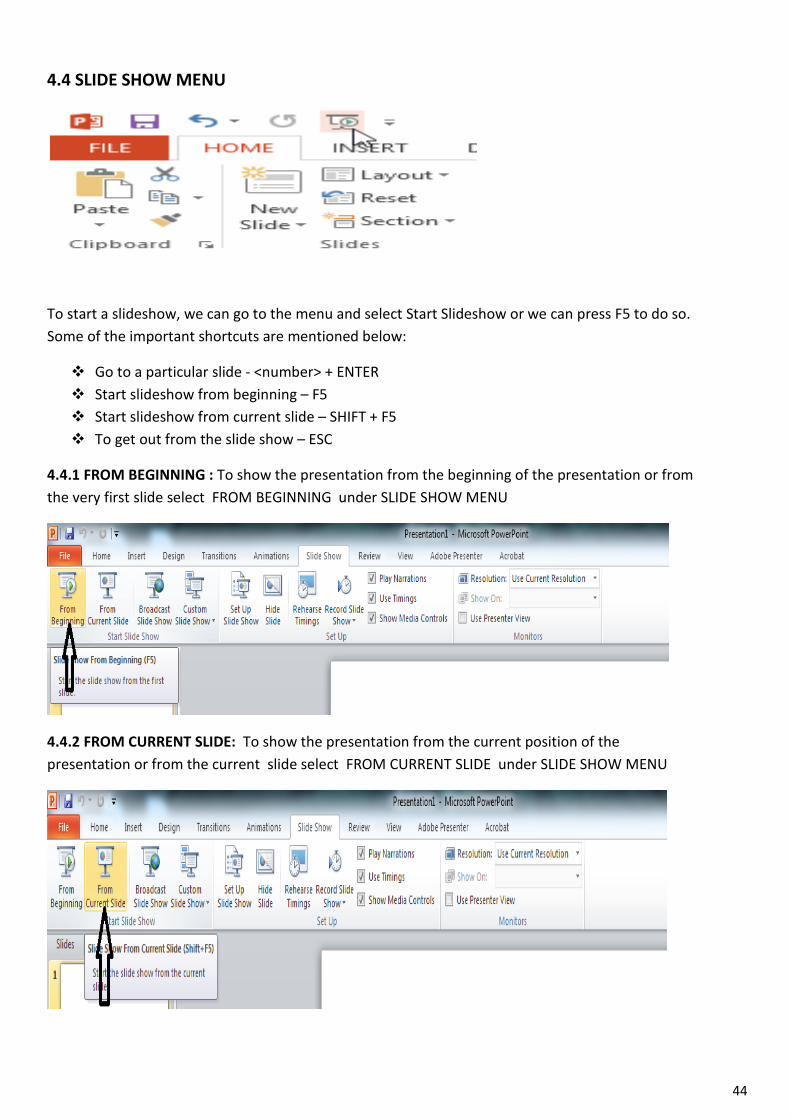
To resize an image it is advisable to drag from its corners as it will uniformly increase or decrease the length and breadth of the image.
An in order to move an Image just selects the image and drags and moves the image while pressing the left mouse button.
43
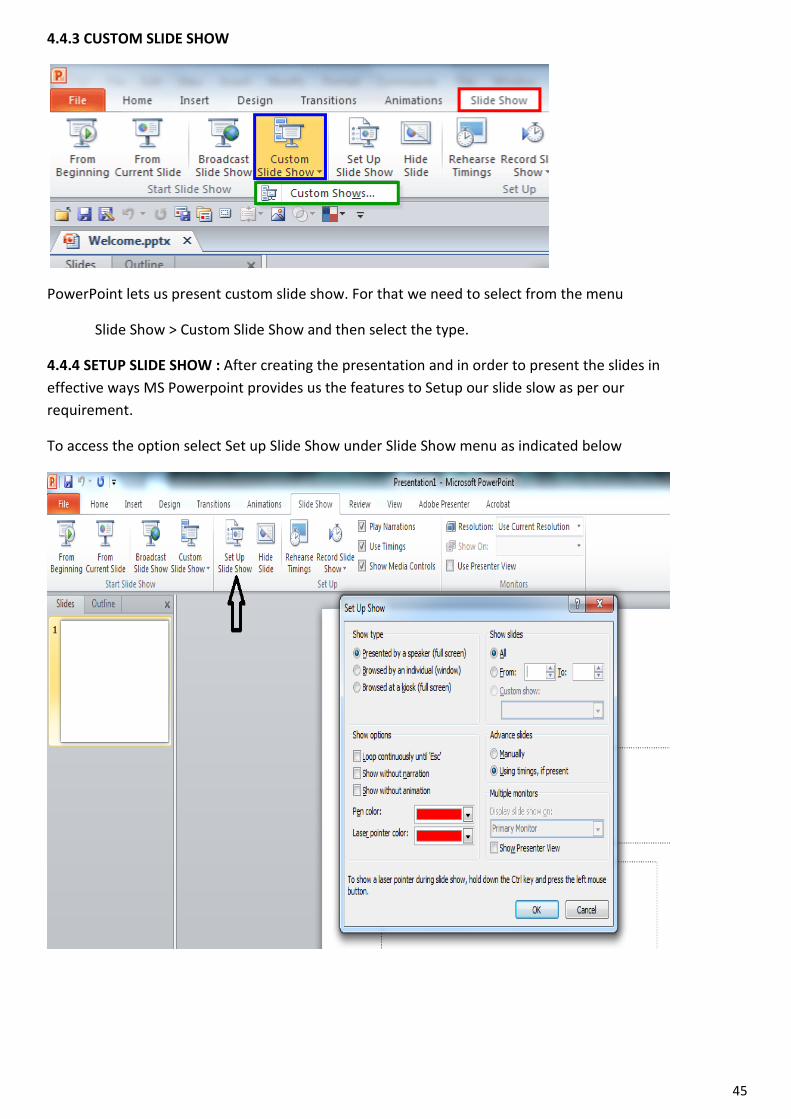
4.4 SLIDE SHOW MENU
To start a slideshow, we can go to the menu and select Start Slideshow or we can press F5 to do so. Some of the important shortcuts are mentioned below:
Go to a particular slide - <number> + ENTER Start slideshow from beginning – F5 Start slideshow from current slide – SHIFT + F5 To get out from the slide show – ESC
4.4.1 FROM BEGINNING : To show the presentation from the beginning of the presentation or from the very first slide select FROM BEGINNING under SLIDE SHOW MENU
4.4.2 FROM CURRENT SLIDE: To show the presentation from the current position of the presentation or from the current slide select FROM CURRENT SLIDE under SLIDE SHOW MENU
44
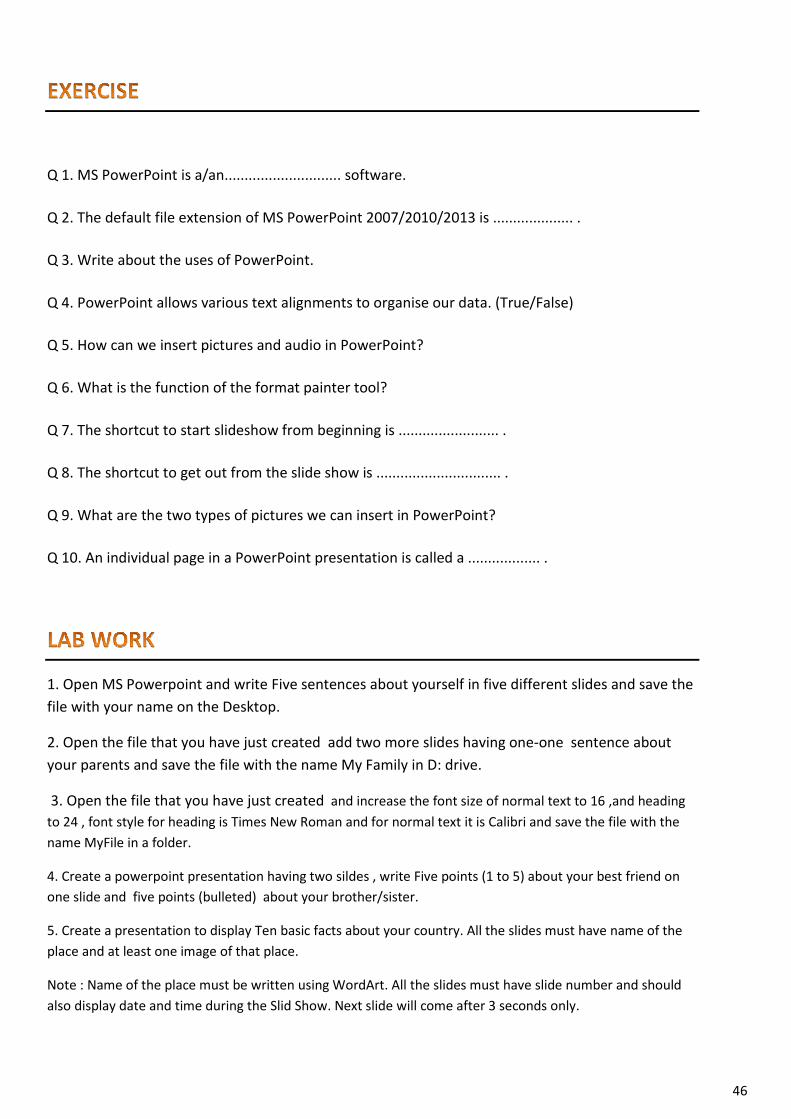
4.4.3 CUSTOM SLIDE SHOW
PowerPoint lets us present custom slide show. For that we need to select from the menu
Slide Show > Custom Slide Show and then select the type.
4.4.4 SETUP SLIDE SHOW : After creating the presentation and in order to present the slides in effective ways MS Powerpoint provides us the features to Setup our slide slow as per our requirement.
To access the option select Set up Slide Show under Slide Show menu as indicated below
45
Q 1. MS PowerPoint is a/an............................. software.
Q 2. The default file extension of MS PowerPoint 2007/2010/2013 is .................... .
Q 3. Write about the uses of PowerPoint.
Q 4. PowerPoint allows various text alignments to organise our data. (True/False)
Q 5. How can we insert pictures and audio in PowerPoint?
Q 6. What is the function of the format painter tool?
Q 7. The shortcut to start slideshow from beginning is ......................... .
Q 8. The shortcut to get out from the slide show is ............................... .
Q 9. What are the two types of pictures we can insert in PowerPoint?
Q 10. An individual page in a PowerPoint presentation is called a .................. .
1. Open MS Powerpoint and write Five sentences about yourself in five different slides and save the file with your name on the Desktop.
2. Open the file that you have just created add two more slides having one-one sentence about your parents and save the file with the name My Family in D: drive.
3. Open the file that you have just created and increase the font size of normal text to 16 ,and heading to 24 , font style for heading is Times New Roman and for normal text it is Calibri and save the file with the name MyFile in a folder.
4. Create a powerpoint presentation having two sildes , write Five points (1 to 5) about your best friend on one slide and five points (bulleted) about your brother/sister.
5. Create a presentation to display Ten basic facts about your country. All the slides must have name of the place and at least one image of that place.
Note : Name of the place must be written using WordArt. All the slides must have slide number and should also display date and time during the Slid Show. Next slide will come after 3 seconds only.
46

5.1 WORKING IN EXCEL
Excel is one of the most used software application. It is an application software. Working in Excel is very easy once we get to know about the various menus, features and the shortcut keys. The file extension of the Microsoft Excel 2007/2010/2013 is .xlsx .
Excel finds its use in various aspects of our life. It can be used in educational, financial and mathematical or statistical calculations. It also helps analyzing data with the help of various charts.
Ribbon: The Ribbon contains many tabs. They are File, Home, Insert, Page Layout, Formulas, Data, Review and View. The most frequently used features are contained in the Home tab.
We can minimize the Ribbon according to our need. To do so, we need to Right Click anywhere on the Ribbon and then Click ‘Minimize’ or press CTRL+F1.
Learning Objectives : After learning the Unit the students will be able to:
create a file in excel identify components of excel screen make a simple mark sheet on spreadsheet auto generate series like serial no, days, months, date etc do some auto computations like sum, average, maximum, minimum etc.
47
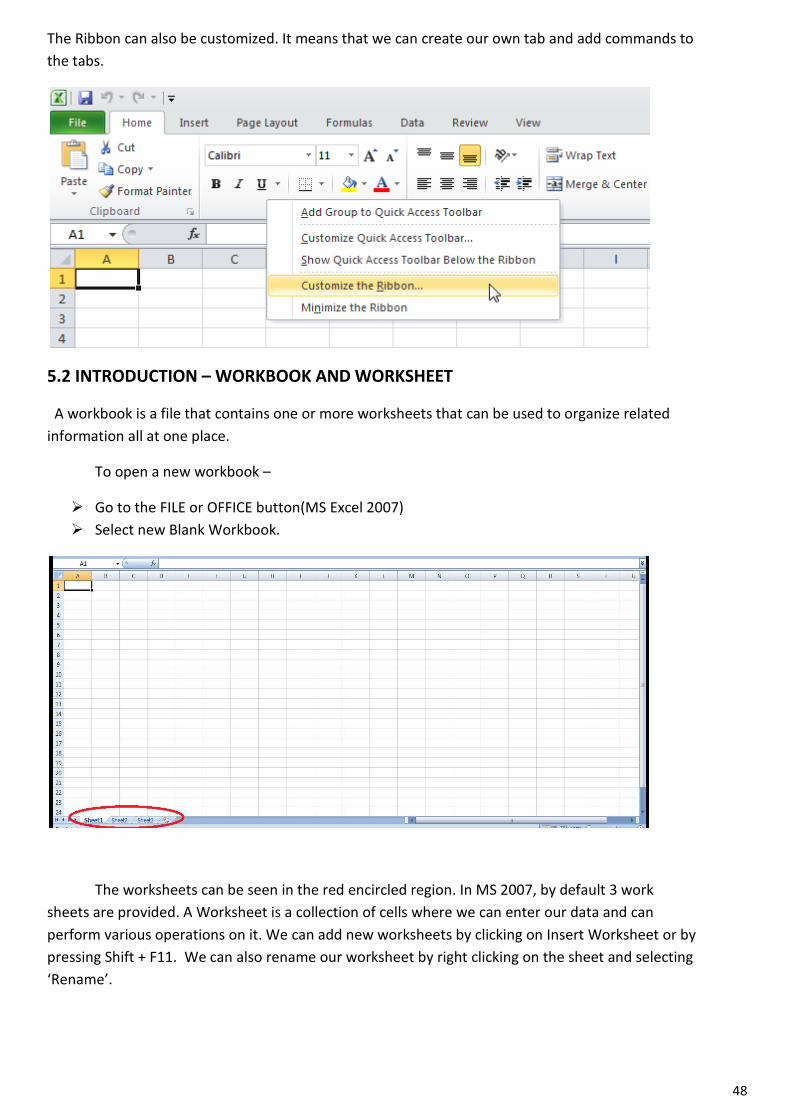
The Ribbon can also be customized. It means that we can create our own tab and add commands to the tabs.
5.2 INTRODUCTION – WORKBOOK AND WORKSHEET
A workbook is a file that contains one or more worksheets that can be used to organize related information all at one place.
To open a new workbook –
Go to the FILE or OFFICE button(MS Excel 2007) Select new Blank Workbook.
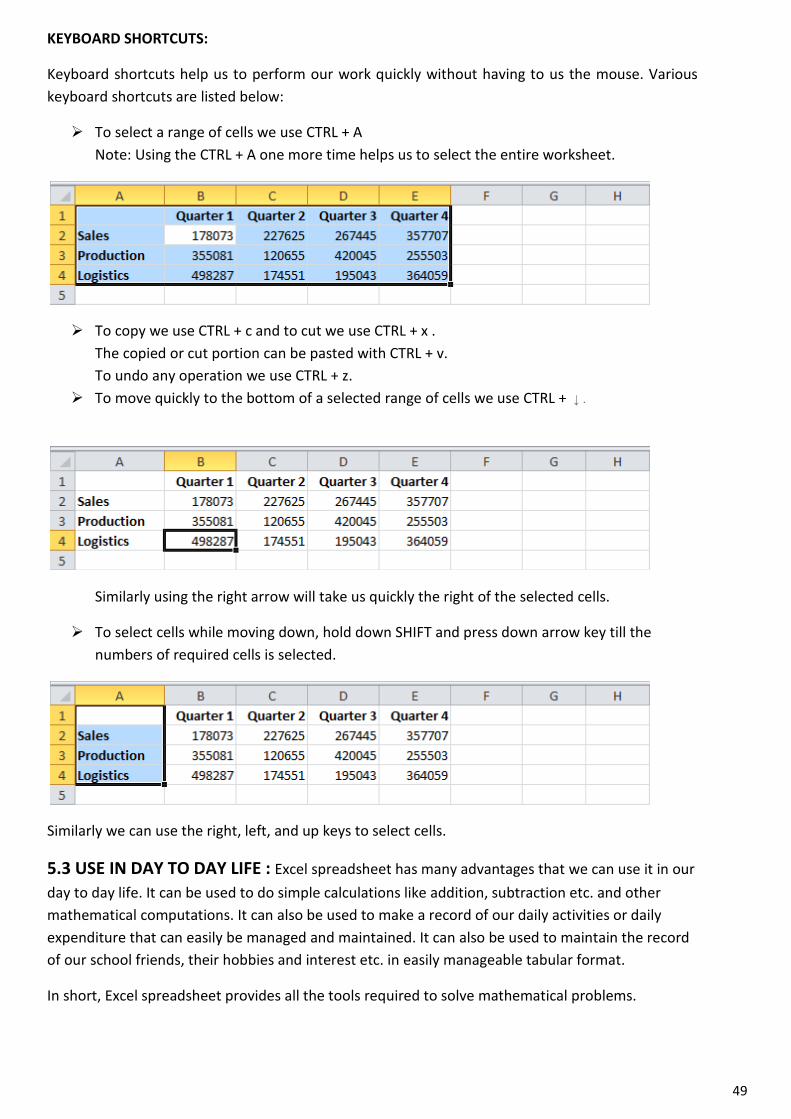
The worksheets can be seen in the red encircled region. In MS 2007, by default 3 work sheets are provided. A Worksheet is a collection of cells where we can enter our data and can perform various operations on it. We can add new worksheets by clicking on Insert Worksheet or by pressing Shift + F11. We can also rename our worksheet by right clicking on the sheet and selecting ‘Rename’.
48
KEYBOARD SHORTCUTS:
Keyboard shortcuts help us to perform our work quickly without having to us the mouse. Various keyboard shortcuts are listed below:
To select a range of cells we use CTRL + A Note: Using the CTRL + A one more time helps us to select the entire worksheet.
To copy we use CTRL + c and to cut we use CTRL + x . The copied or cut portion can be pasted with CTRL + v. To undo any operation we use CTRL + z.
To move quickly to the bottom of a selected range of cells we use CTRL + ↓ .
Similarly using the right arrow will take us quickly the right of the selected cells.
To select cells while moving down, hold down SHIFT and press down arrow key till the numbers of required cells is selected.
Similarly we can use the right, left, and up keys to select cells.
5.3 USE IN DAY TO DAY LIFE : Excel spreadsheet has many advantages that we can use it in our day to day life. It can be used to do simple calculations like addition, subtraction etc. and other mathematical computations. It can also be used to make a record of our daily activities or daily expenditure that can easily be managed and maintained. It can also be used to maintain the record of our school friends, their hobbies and interest etc. in easily manageable tabular format.
In short, Excel spreadsheet provides all the tools required to solve mathematical problems.
49
5.4 STEPS TO START EXCEL: In order to work with excel , we required to open a blank workbook first. This can be done either of the two ways :
First Way : Go to Start > All Programs > Microsoft Office > Microsoft Excel 2010
Second Way : Write Excel in Windows Search text field / box and press enter
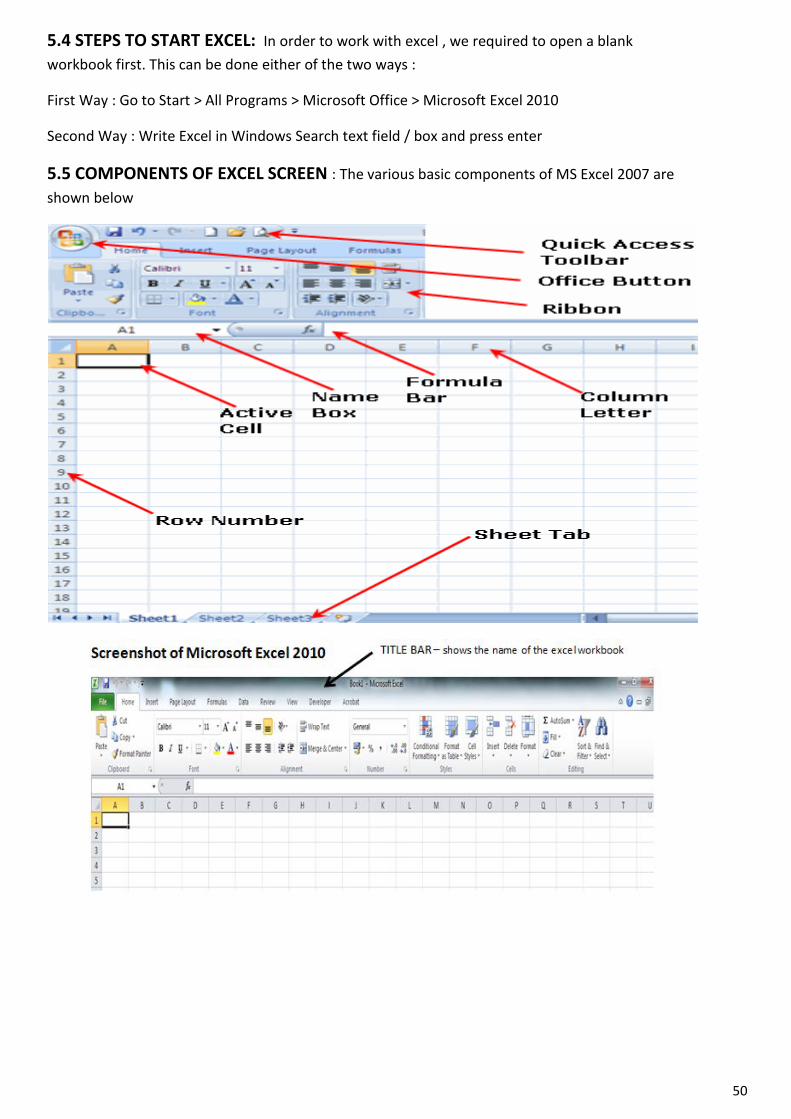
5.5 COMPONENTS OF EXCEL SCREEN : The various basic components of MS Excel 2007 are shown below
50
5.6 VARIOUS DATA TYPES
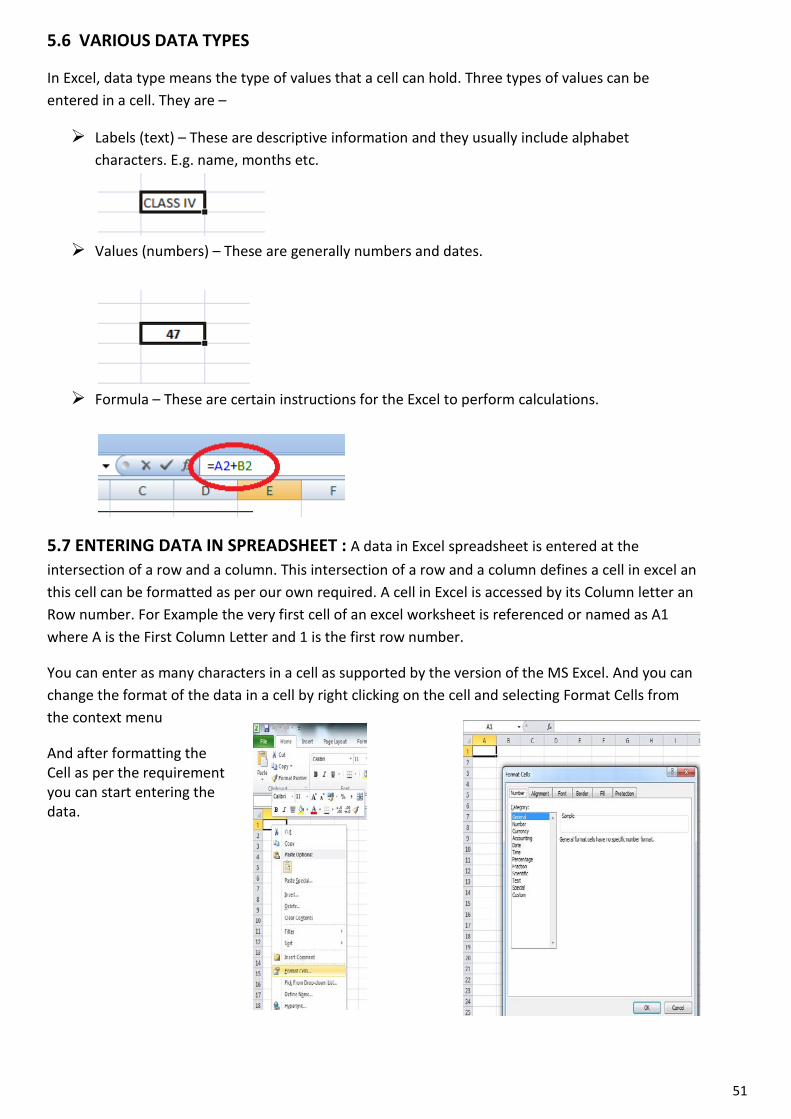
In Excel, data type means the type of values that a cell can hold. Three types of values can be entered in a cell. They are –
Labels (text) – These are descriptive information and they usually include alphabet characters. E.g. name, months etc.
Values (numbers) – These are generally numbers and dates.
Formula – These are certain instructions for the Excel to perform calculations.
5.7 ENTERING DATA IN SPREADSHEET : A data in Excel spreadsheet is entered at the intersection of a row and a column. This intersection of a row and a column defines a cell in excel an this cell can be formatted as per our own required. A cell in Excel is accessed by its Column letter an Row number. For Example the very first cell of an excel worksheet is referenced or named as A1 where A is the First Column Letter and 1 is the first row number.
You can enter as many characters in a cell as supported by the version of the MS Excel. And you can change the format of the data in a cell by right clicking on the cell and selecting Format Cells from the context menu
And after formatting the Cell as per the requirement you can start entering the data.
51
5.8 ABOUT THE CELL AND CELL ADDRESS
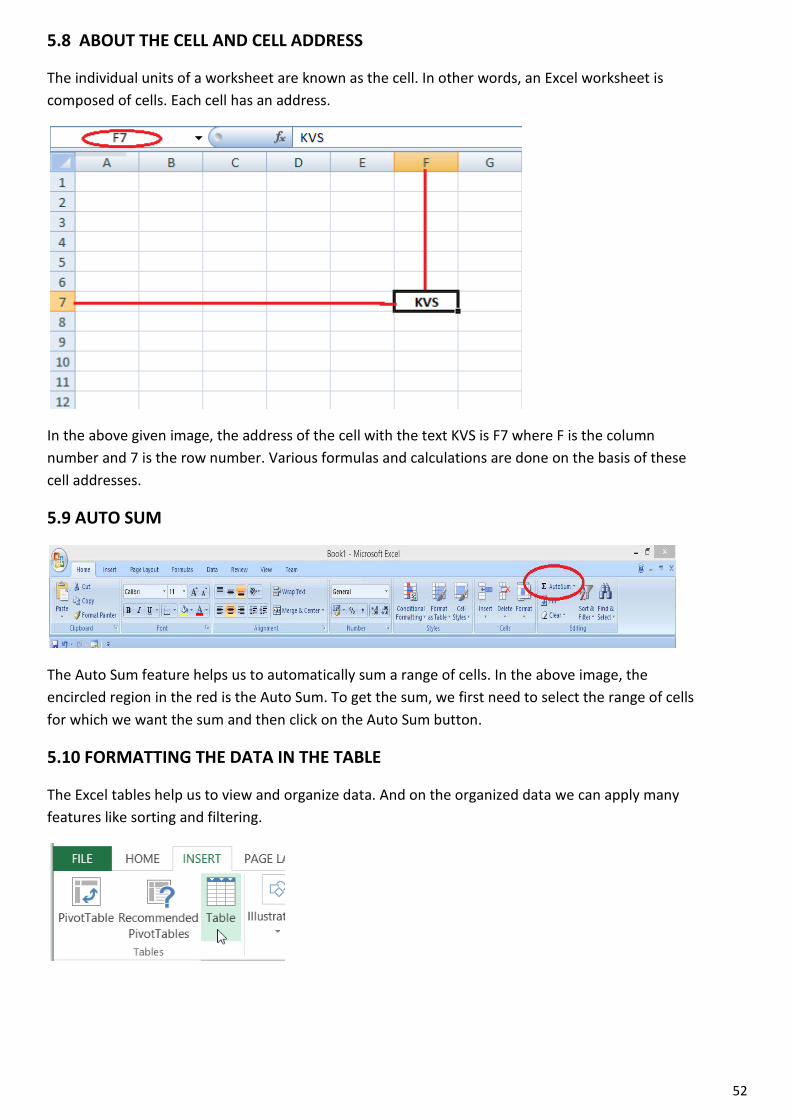
The individual units of a worksheet are known as the cell. In other words, an Excel worksheet is composed of cells. Each cell has an address.
In the above given image, the address of the cell with the text KVS is F7 where F is the column number and 7 is the row number. Various formulas and calculations are done on the basis of these cell addresses.
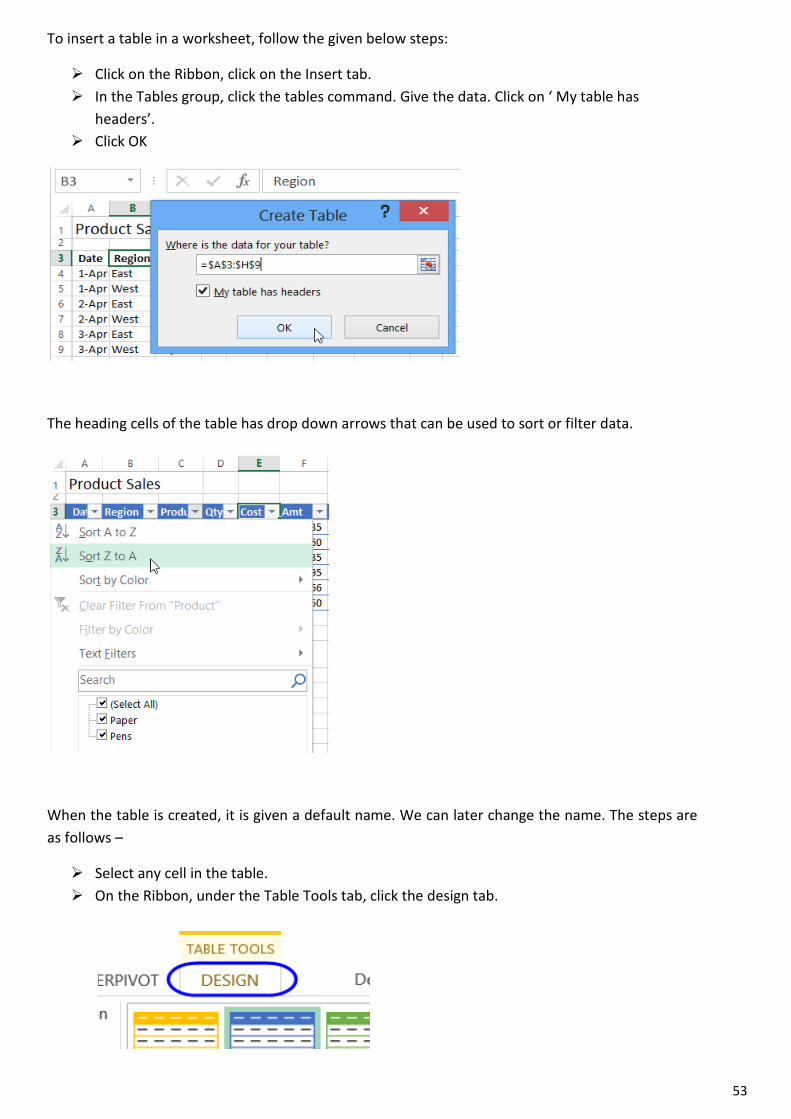
5.9 AUTO SUM
The Auto Sum feature helps us to automatically sum a range of cells. In the above image, the encircled region in the red is the Auto Sum. To get the sum, we first need to select the range of cells for which we want the sum and then click on the Auto Sum button.
5.10 FORMATTING THE DATA IN THE TABLE
The Excel tables help us to view and organize data. And on the organized data we can apply many features like sorting and filtering.
52
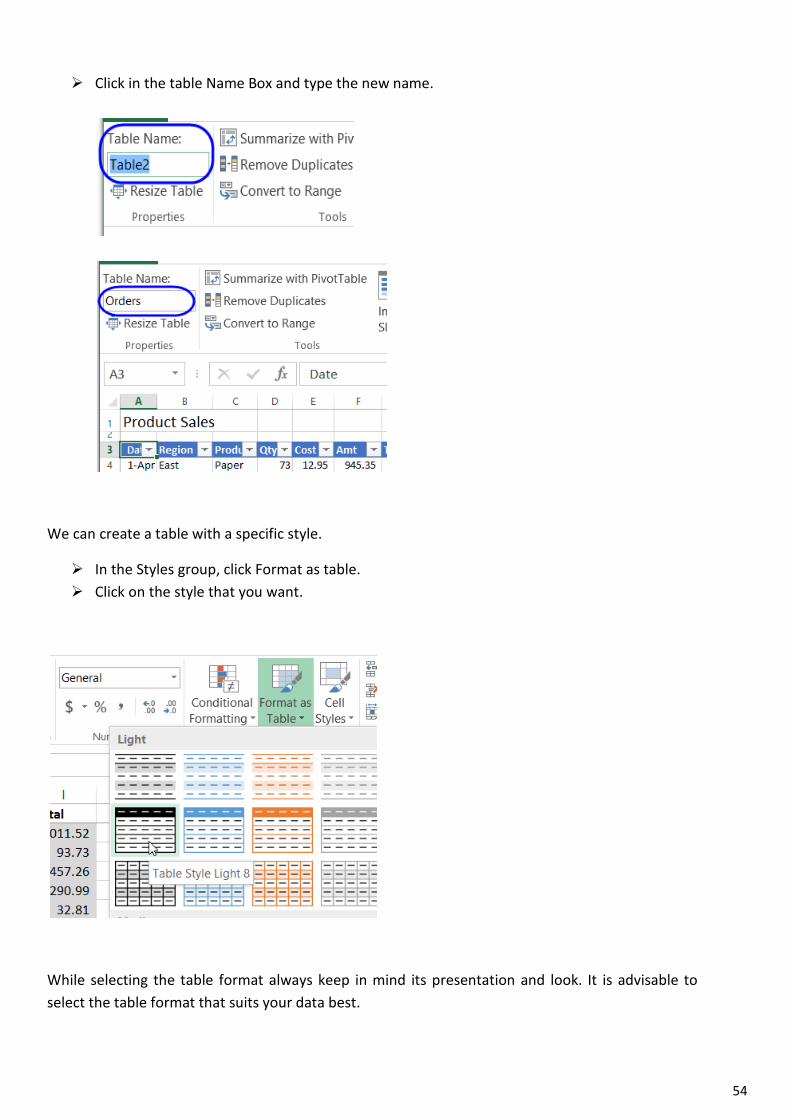
To insert a table in a worksheet, follow the given below steps:
Click on the Ribbon, click on the Insert tab. In the Tables group, click the tables command. Give the data. Click on ‘ My table has
headers’. Click OK
The heading cells of the table has drop down arrows that can be used to sort or filter data.
When the table is created, it is given a default name. We can later change the name. The steps are as follows –
Select any cell in the table. On the Ribbon, under the Table Tools tab, click the design tab.
53
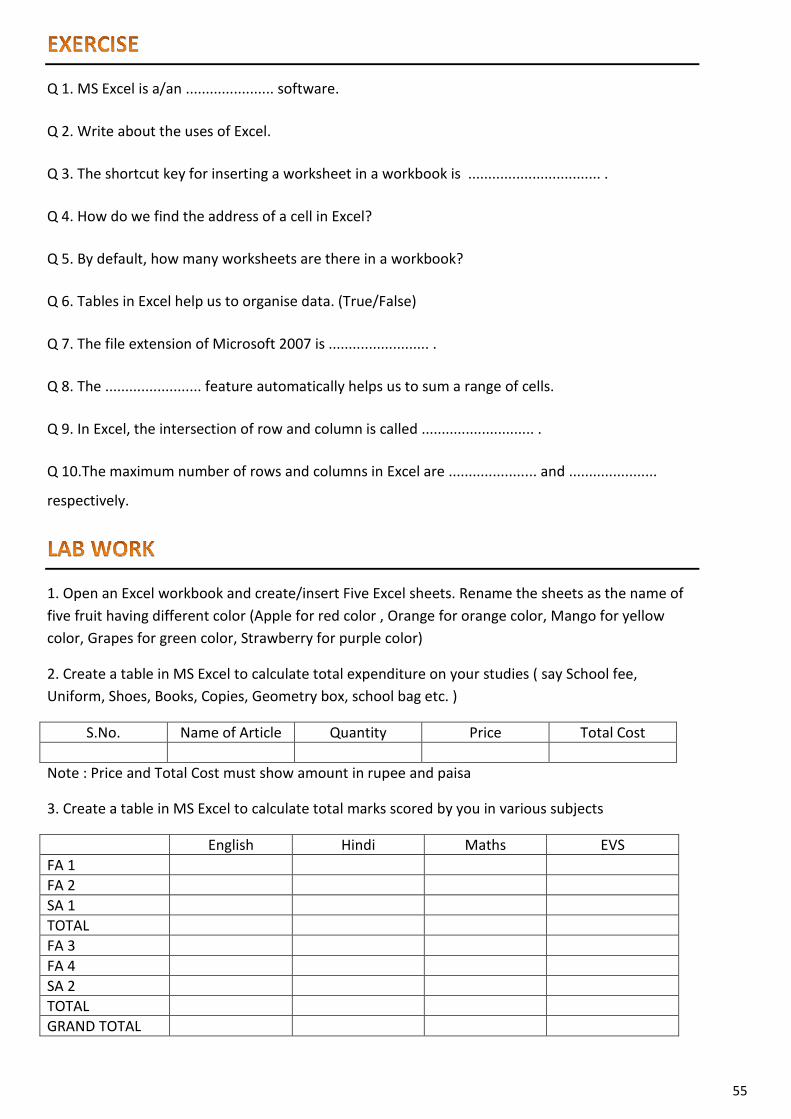
Click in the table Name Box and type the new name.
We can create a table with a specific style.
In the Styles group, click Format as table. Click on the style that you want.
While selecting the table format always keep in mind its presentation and look. It is advisable to select the table format that suits your data best.
54
Q 1. MS Excel is a/an ...................... software.
Q 2. Write about the uses of Excel.
Q 3. The shortcut key for inserting a worksheet in a workbook is ................................. .
Q 4. How do we find the address of a cell in Excel?
Q 5. By default, how many worksheets are there in a workbook?
Q 6. Tables in Excel help us to organise data. (True/False)
Q 7. The file extension of Microsoft 2007 is ......................... .
Q 8. The ........................ feature automatically helps us to sum a range of cells.
Q 9. In Excel, the intersection of row and column is called ............................ .
Q 10.The maximum number of rows and columns in Excel are ...................... and ......................
respectively.
1. Open an Excel workbook and create/insert Five Excel sheets. Rename the sheets as the name of five fruit having different color (Apple for red color , Orange for orange color, Mango for yellow color, Grapes for green color, Strawberry for purple color)
2. Create a table in MS Excel to calculate total expenditure on your studies ( say School fee, Uniform, Shoes, Books, Copies, Geometry box, school bag etc. )
S.No. Name of Article Quantity Price Total Cost Note : Price and Total Cost must show amount in rupee and paisa
3. Create a table in MS Excel to calculate total marks scored by you in various subjects
English Hindi Maths EVS FA 1 FA 2 SA 1 TOTAL FA 3 FA 4 SA 2 TOTAL GRAND TOTAL
55
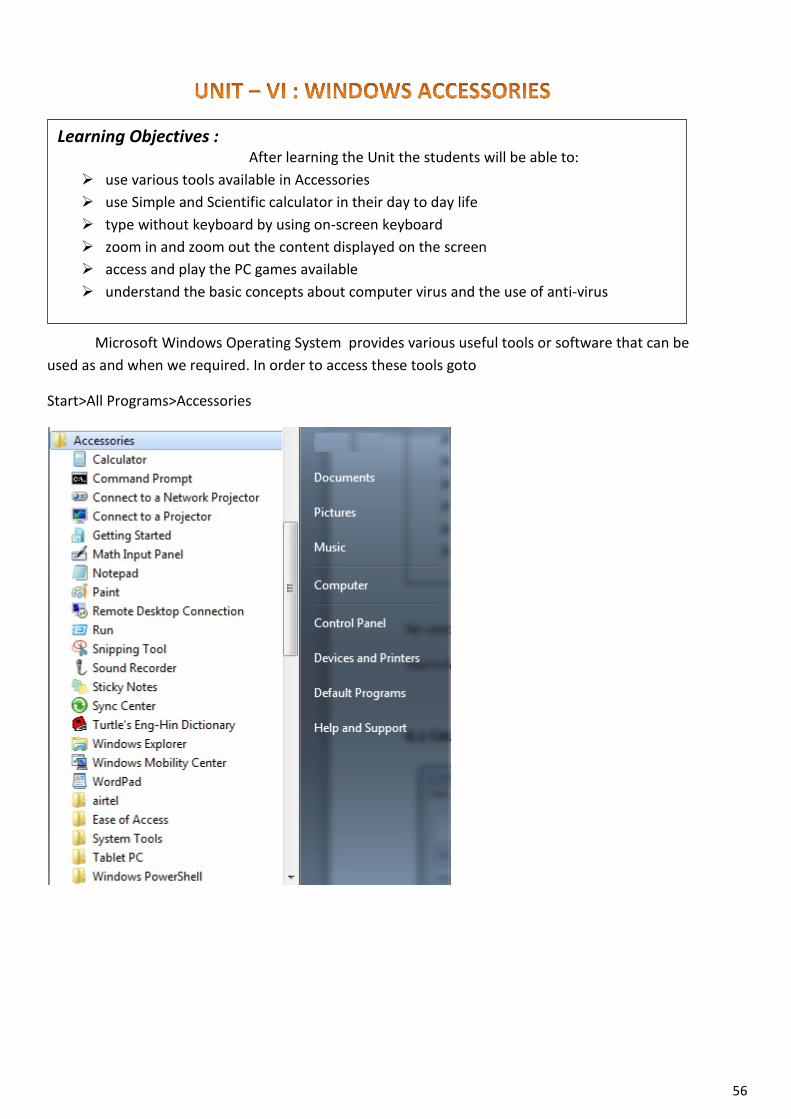
Microsoft Windows Operating System provides various useful tools or software that can be used as and when we required. In order to access these tools goto
Start>All Programs>Accessories
Learning Objectives : After learning the Unit the students will be able to:
use various tools available in Accessories use Simple and Scientific calculator in their day to day life type without keyboard by using on-screen keyboard zoom in and zoom out the content displayed on the screen access and play the PC games available understand the basic concepts about computer virus and the use of anti-virus
56
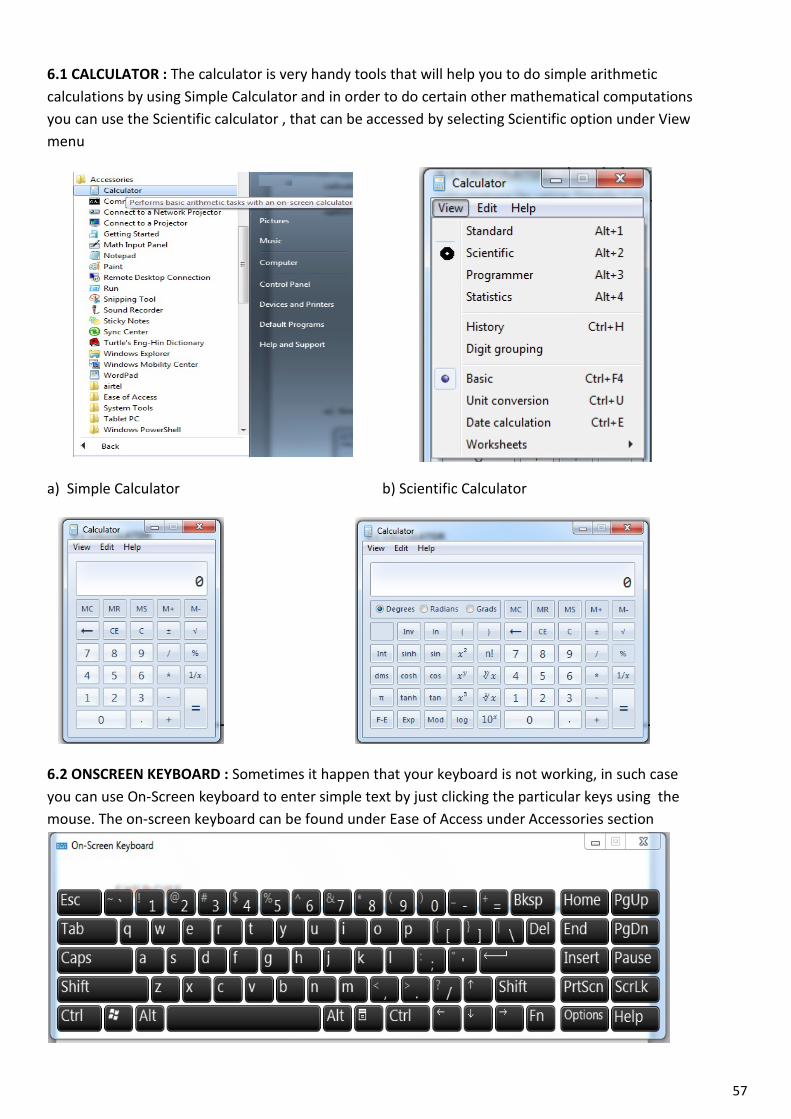
6.1 CALCULATOR : The calculator is very handy tools that will help you to do simple arithmetic calculations by using Simple Calculator and in order to do certain other mathematical computations you can use the Scientific calculator , that can be accessed by selecting Scientific option under View menu
a) Simple Calculator b) Scientific Calculator
6.2 ONSCREEN KEYBOARD : Sometimes it happen that your keyboard is not working, in such case you can use On-Screen keyboard to enter simple text by just clicking the particular keys using the mouse. The on-screen keyboard can be found under Ease of Access under Accessories section
57
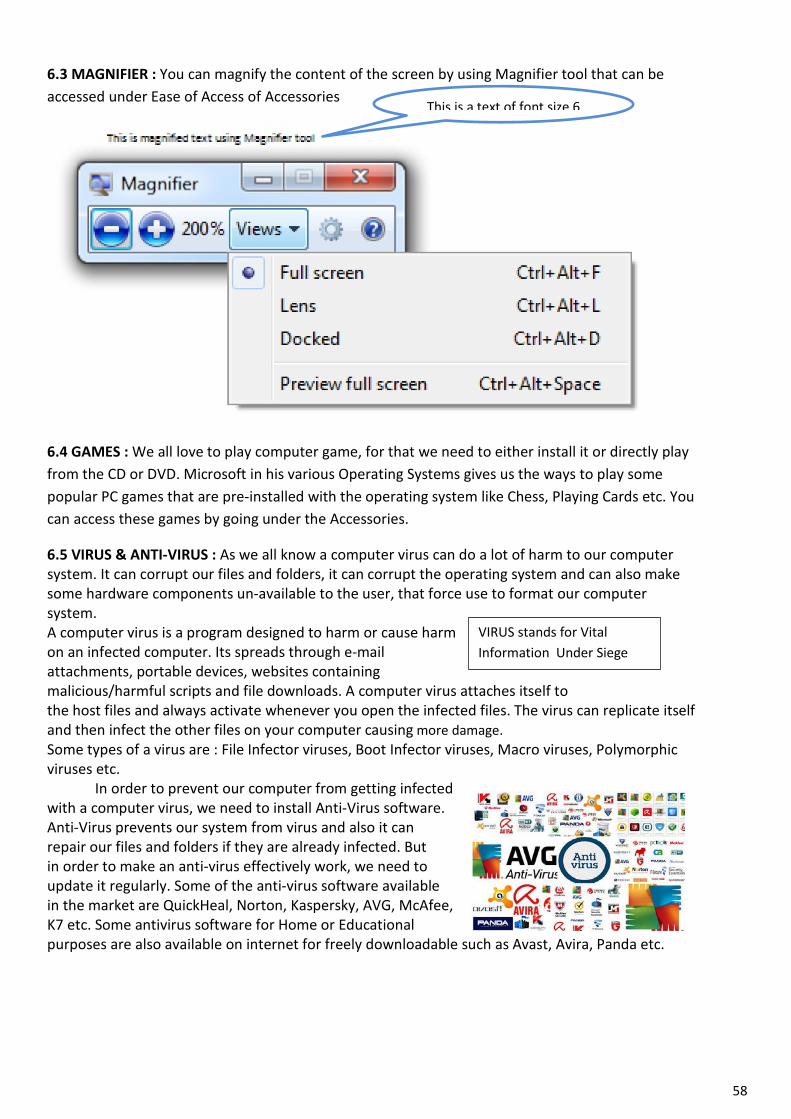
6.3 MAGNIFIER : You can magnify the content of the screen by using Magnifier tool that can be accessed under Ease of Access of Accessories
6.4 GAMES : We all love to play computer game, for that we need to either install it or directly play from the CD or DVD. Microsoft in his various Operating Systems gives us the ways to play some popular PC games that are pre-installed with the operating system like Chess, Playing Cards etc. You can access these games by going under the Accessories.
6.5 VIRUS & ANTI-VIRUS : As we all know a computer virus can do a lot of harm to our computer system. It can corrupt our files and folders, it can corrupt the operating system and can also make some hardware components un-available to the user, that force use to format our computer system. A computer virus is a program designed to harm or cause harm on an infected computer. Its spreads through e-mail attachments, portable devices, websites containing malicious/harmful scripts and file downloads. A computer virus attaches itself to the host files and always activate whenever you open the infected files. The virus can replicate itself and then infect the other files on your computer causing more damage. Some types of a virus are : File Infector viruses, Boot Infector viruses, Macro viruses, Polymorphic viruses etc.
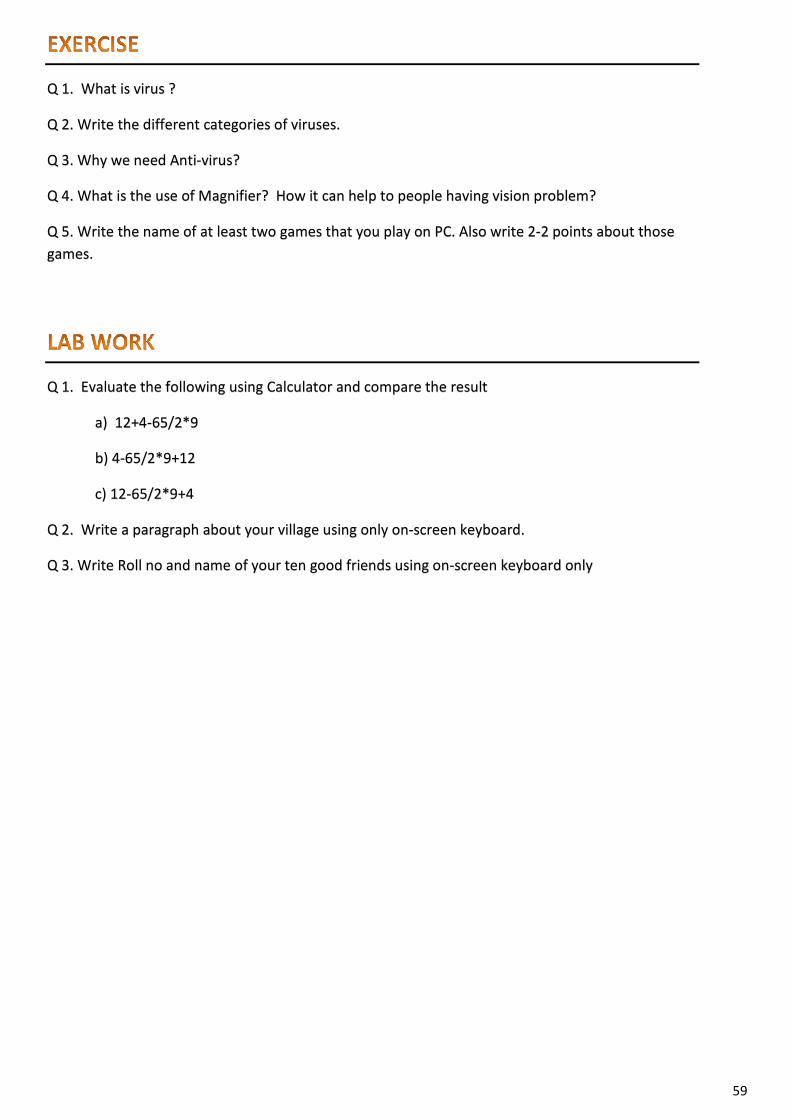
In order to prevent our computer from getting infected with a computer virus, we need to install Anti-Virus software. Anti-Virus prevents our system from virus and also it can repair our files and folders if they are already infected. But in order to make an anti-virus effectively work, we need to update it regularly. Some of the anti-virus software available in the market are QuickHeal, Norton, Kaspersky, AVG, McAfee, K7 etc. Some antivirus software for Home or Educational purposes are also available on internet for freely downloadable such as Avast, Avira, Panda etc.
This is a text of font size 6
VIRUS stands for Vital Information Under Siege
58
Q 1. What is virus ?
Q 2. Write the different categories of viruses.
Q 3. Why we need Anti-virus?
Q 4. What is the use of Magnifier? How it can help to people having vision problem?
Q 5. Write the name of at least two games that you play on PC. Also write 2-2 points about those games.
Q 1. Evaluate the following using Calculator and compare the result
a) 12+4-65/2*9
b) 4-65/2*9+12
c) 12-65/2*9+4
Q 2. Write a paragraph about your village using only on-screen keyboard.
Q 3. Write Roll no and name of your ten good friends using on-screen keyboard only
59
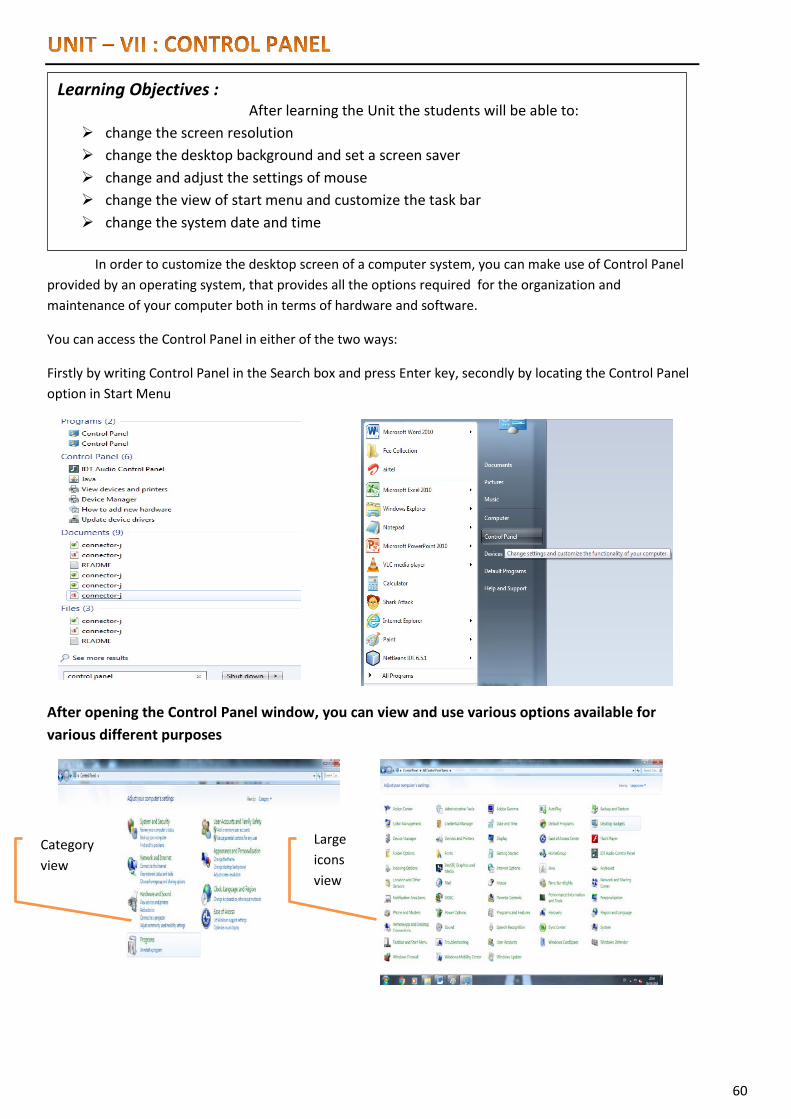
In order to customize the desktop screen of a computer system, you can make use of Control Panel provided by an operating system, that provides all the options required for the organization and maintenance of your computer both in terms of hardware and software.
You can access the Control Panel in either of the two ways:
Firstly by writing Control Panel in the Search box and press Enter key, secondly by locating the Control Panel option in Start Menu
After opening the Control Panel window, you can view and use various options available for various different purposes
Learning Objectives : After learning the Unit the students will be able to:
change the screen resolution change the desktop background and set a screen saver change and adjust the settings of mouse change the view of start menu and customize the task bar change the system date and time
Category view
Large icons view
60
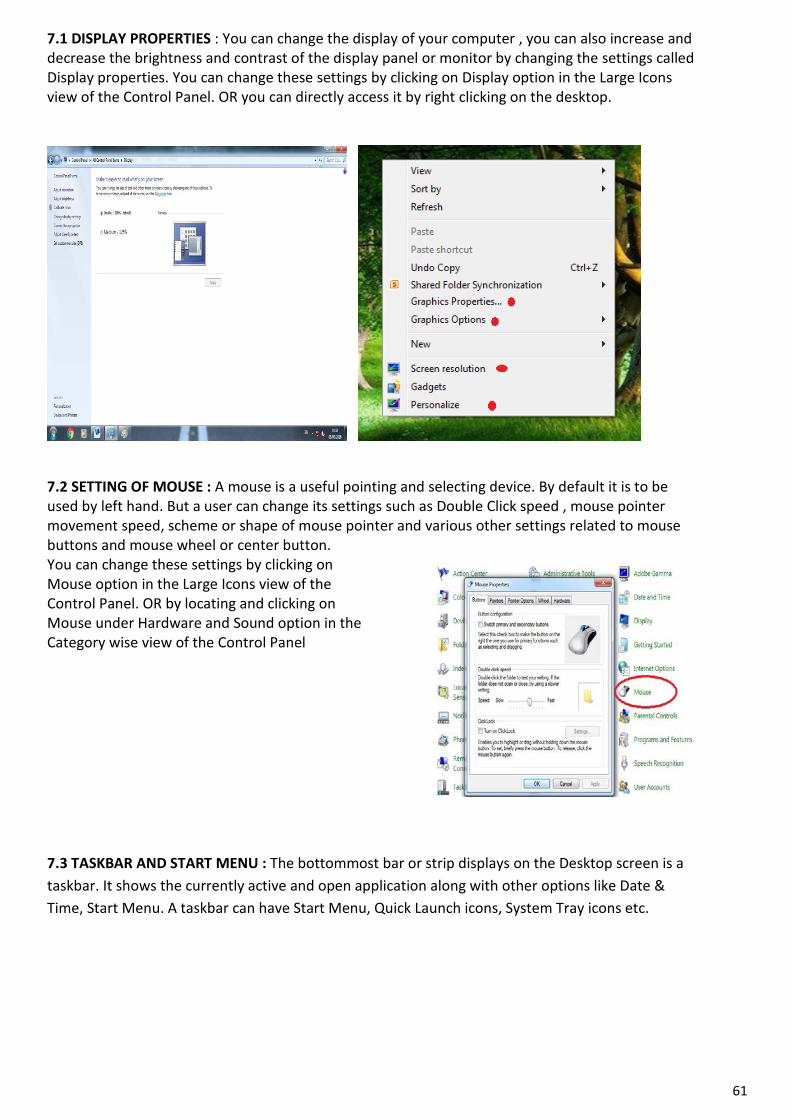
7.1 DISPLAY PROPERTIES : You can change the display of your computer , you can also increase and decrease the brightness and contrast of the display panel or monitor by changing the settings called Display properties. You can change these settings by clicking on Display option in the Large Icons view of the Control Panel. OR you can directly access it by right clicking on the desktop.
7.2 SETTING OF MOUSE : A mouse is a useful pointing and selecting device. By default it is to be used by left hand. But a user can change its settings such as Double Click speed , mouse pointer movement speed, scheme or shape of mouse pointer and various other settings related to mouse buttons and mouse wheel or center button. You can change these settings by clicking on Mouse option in the Large Icons view of the Control Panel. OR by locating and clicking on Mouse under Hardware and Sound option in the Category wise view of the Control Panel
7.3 TASKBAR AND START MENU : The bottommost bar or strip displays on the Desktop screen is a taskbar. It shows the currently active and open application along with other options like Date & Time, Start Menu. A taskbar can have Start Menu, Quick Launch icons, System Tray icons etc.
61
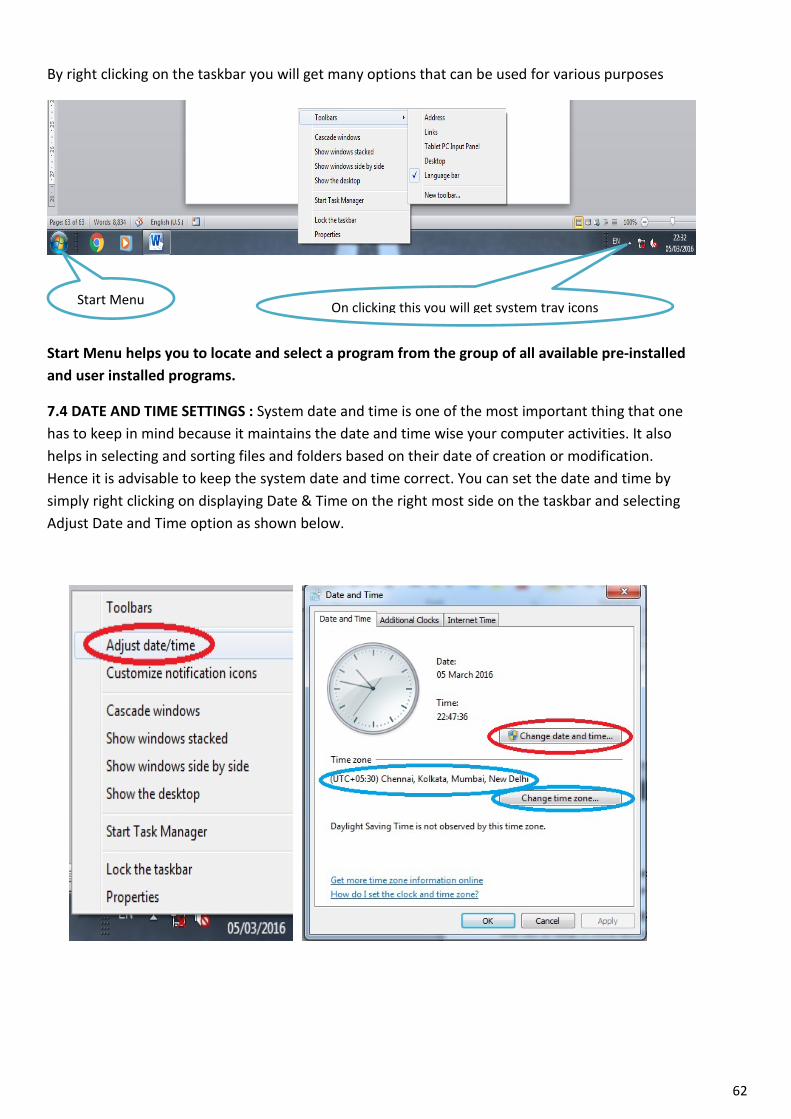
By right clicking on the taskbar you will get many options that can be used for various purposes
Start Menu helps you to locate and select a program from the group of all available pre-installed and user installed programs.
7.4 DATE AND TIME SETTINGS : System date and time is one of the most important thing that one has to keep in mind because it maintains the date and time wise your computer activities. It also helps in selecting and sorting files and folders based on their date of creation or modification. Hence it is advisable to keep the system date and time correct. You can set the date and time by simply right clicking on displaying Date & Time on the right most side on the taskbar and selecting Adjust Date and Time option as shown below.
Start Menu On clicking this you will get system tray icons
62
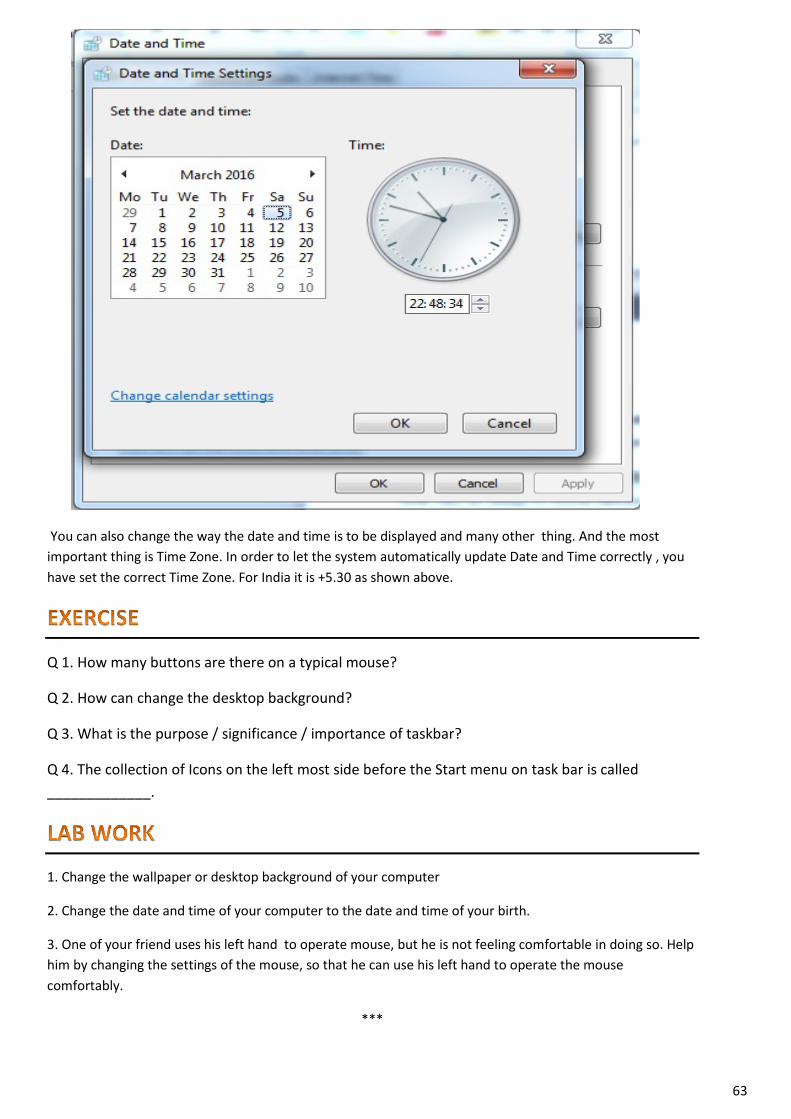
You can also change the way the date and time is to be displayed and many other thing. And the most important thing is Time Zone. In order to let the system automatically update Date and Time correctly , you have set the correct Time Zone. For India it is +5.30 as shown above.
Q 1. How many buttons are there on a typical mouse?
Q 2. How can change the desktop background?
Q 3. What is the purpose / significance / importance of taskbar?
Q 4. The collection of Icons on the left most side before the Start menu on task bar is called _____________.
1. Change the wallpaper or desktop background of your computer
2. Change the date and time of your computer to the date and time of your birth.
3. One of your friend uses his left hand to operate mouse, but he is not feeling comfortable in doing so. Help him by changing the settings of the mouse, so that he can use his left hand to operate the mouse comfortably.
***
63
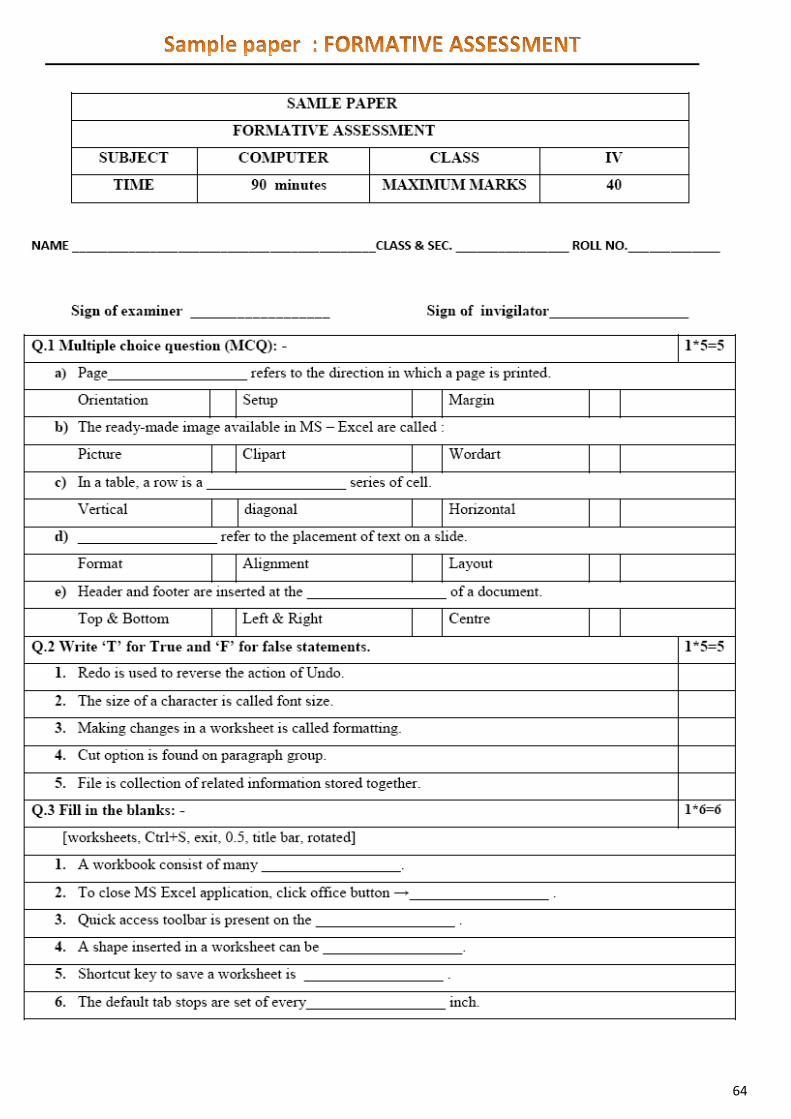
64
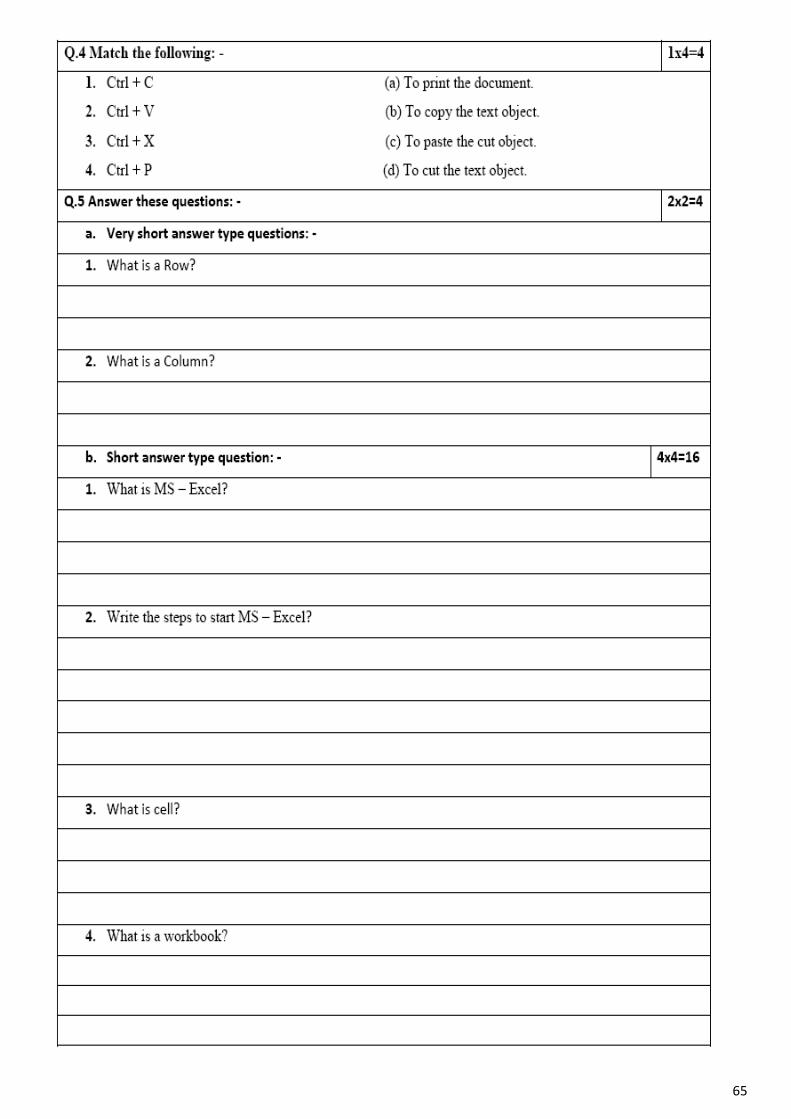
65
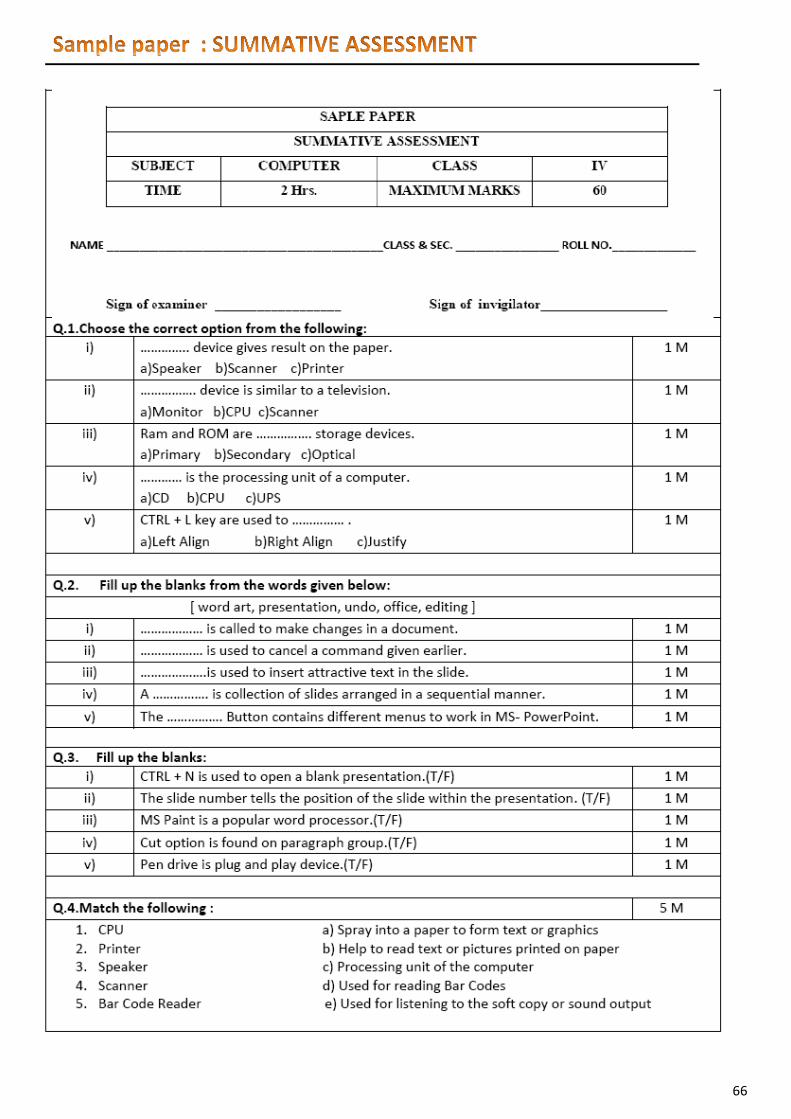
66
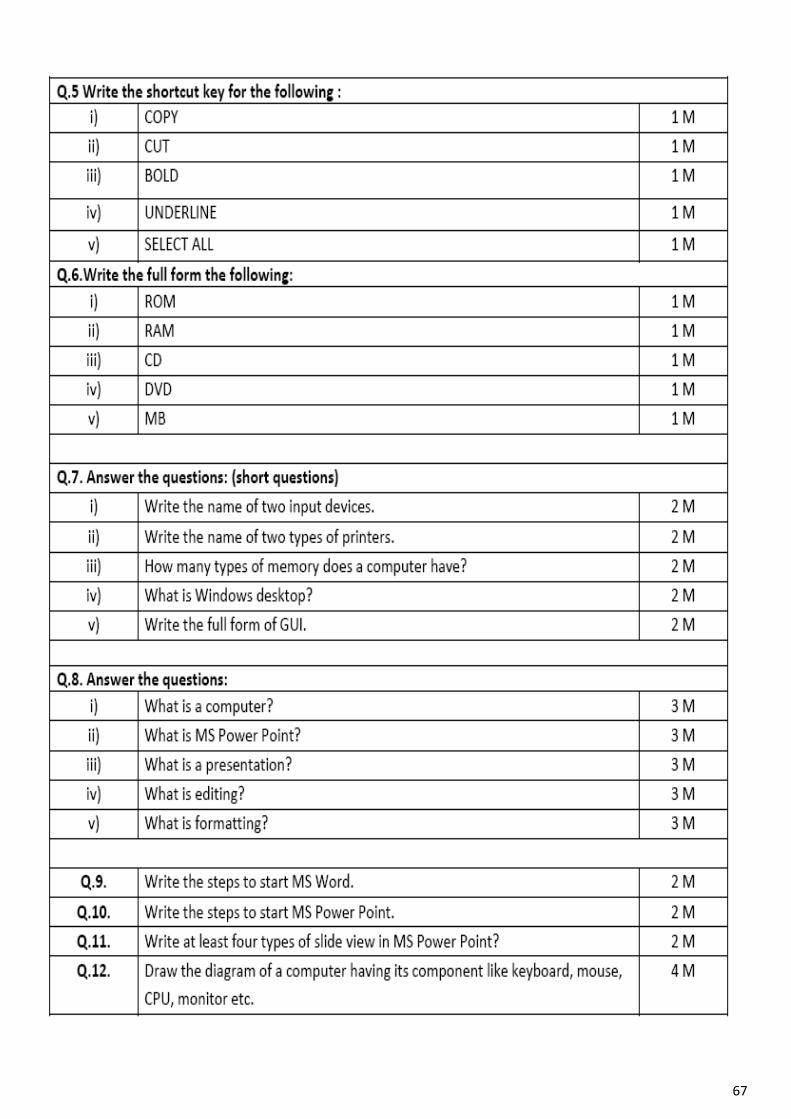
67