Embed Size (px)
Citation preview
Put Comrex On The Line. Toll Free in USA: 800-237-1776 • www.comrex.com e-mail: [email protected]
19 Pine Road, Devens, MA 01434 USA Tel: +1-978-784-1776 • Fax: +1-978-784-1717
Comrex Switchboard for Audio Codecs
Introduction
Comrex Switchboard for audio (formerly known as BRIC Traversal Server) is a feature that allows presence notification, status, and connection help (i.e., NAT Traversal) via a cloud-based service. Switchboard is delivered as a standard feature with ACCESS codecs, and can be purchased as an upgrade to BRIC-Link codecs. The Switchboard within the codec hardware provides the following functions:
• The ability for Comrex audio codecs to sync with a cloud based server and deliver status information
• The ability for Comrex audio codecs to determine their public IP address and the type of any NAT-style router that the codec may be behind, and display that information to the user
• The ability of Comrex audio codecs to display the presence (i.e., if a codec is attached to the Internet), status (i.e., if it’s actively connected to another codec), NAT info, and IP addresses of other codecs within the same fleet
• The ability to share this information with codecs outside the fleet (Shares)
• The ability to take instruction from the server on how best to traverse NATs when placing a call between two codecs
Besides the functions contained within the Switchboard driver inside the hardware codec, the server itself is the other key element to the system. This server will contain a Switchboard account, and the user will be required to enter information about their codec fleet into this account via the web.
It’s important to understand the distinction between these two pieces. The Switchboard driver within the codec is the portion that has been licensed and warranted by Comrex. The cloud server itself can be one that you deploy, or the one provided for free use by Comrex at switchboard.comrex.com. In the case of mission critical networks, it’s important to understand thatswitchboard.comrex.com is provided free of charge and at will. As such, Comrex offers no warranty as to availability of this server or of its function. The specific disclaimer about switchboard.comrex.com will be sent along with your account credentials.
If you have a network that requires absolute 100% availability of this server, the software that runs the Comrex Switchboard is available from Comrex in an executable format free of charge, with basic instructions on how to set it up. The address of the server used for these functions is configurable in the codec firmware.
Contact Comrex for details on obtaining this software.
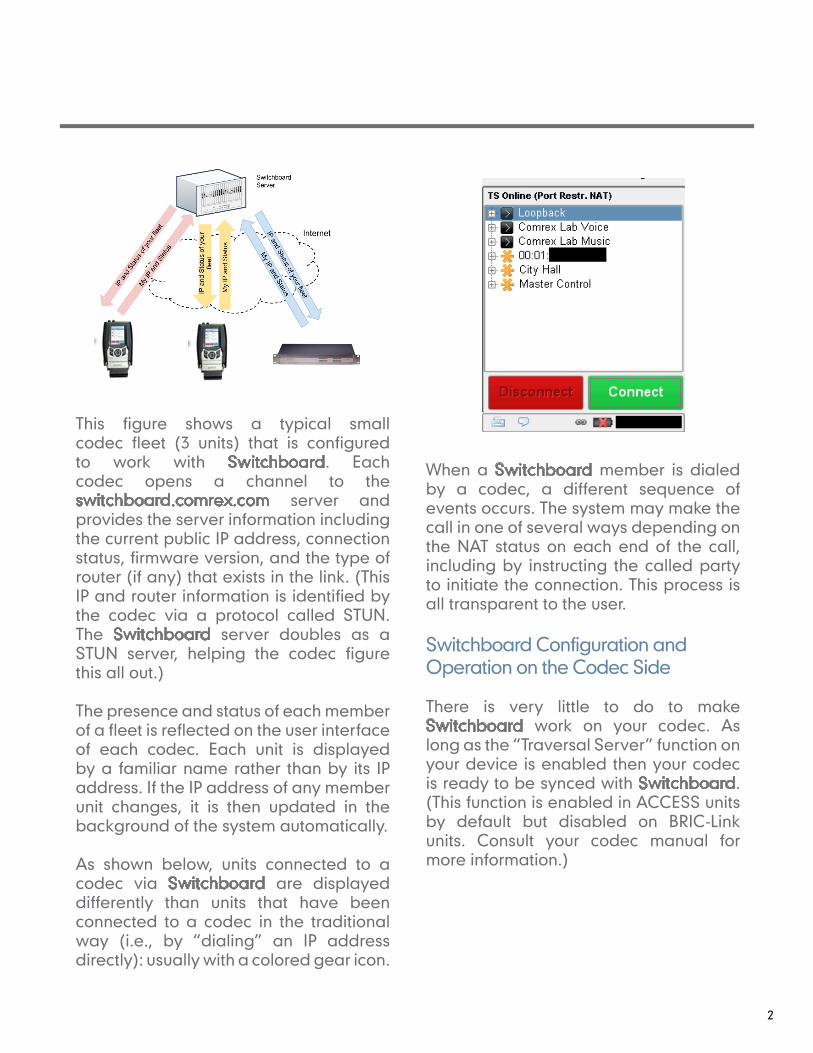
This figure shows a typical small codec fleet (3 units) that is configured to work with Switchboard. Each codec opens a channel to the switchboard.comrex.com server and provides the server information including the current public IP address, connection status, firmware version, and the type of router (if any) that exists in the link. (This IP and router information is identified by the codec via a protocol called STUN. The Switchboard server doubles as a STUN server, helping the codec figure this all out.)
The presence and status of each member of a fleet is reflected on the user interface of each codec. Each unit is displayed by a familiar name rather than by its IP address. If the IP address of any member unit changes, it is then updated in the background of the system automatically.
As shown below, units connected to a codec via Switchboard are displayed differently than units that have been connected to a codec in the traditional way (i.e., by “dialing” an IP address directly): usually with a colored gear icon.
When a Switchboard member is dialed by a codec, a different sequence of events occurs. The system may make the call in one of several ways depending on the NAT status on each end of the call, including by instructing the called party to initiate the connection. This process is all transparent to the user.
Switchboard Configuration and Operation on the Codec Side
There is very little to do to make Switchboard work on your codec. As long as the “Traversal Server” function on your device is enabled then your codec is ready to be synced with Switchboard. (This function is enabled in ACCESS units by default but disabled on BRIC-Link units. Consult your codec manual for more information.)
2
Switchboard Configuration on the Server Side
When Switchboard was purchased, you should have been given account credentials on switchboard.comrex.com. You will key that address into a web browser and access your server configuration page on the Internet. It is here that you will add the codecs in your fleet to your Switchboard account.
Adding codecs
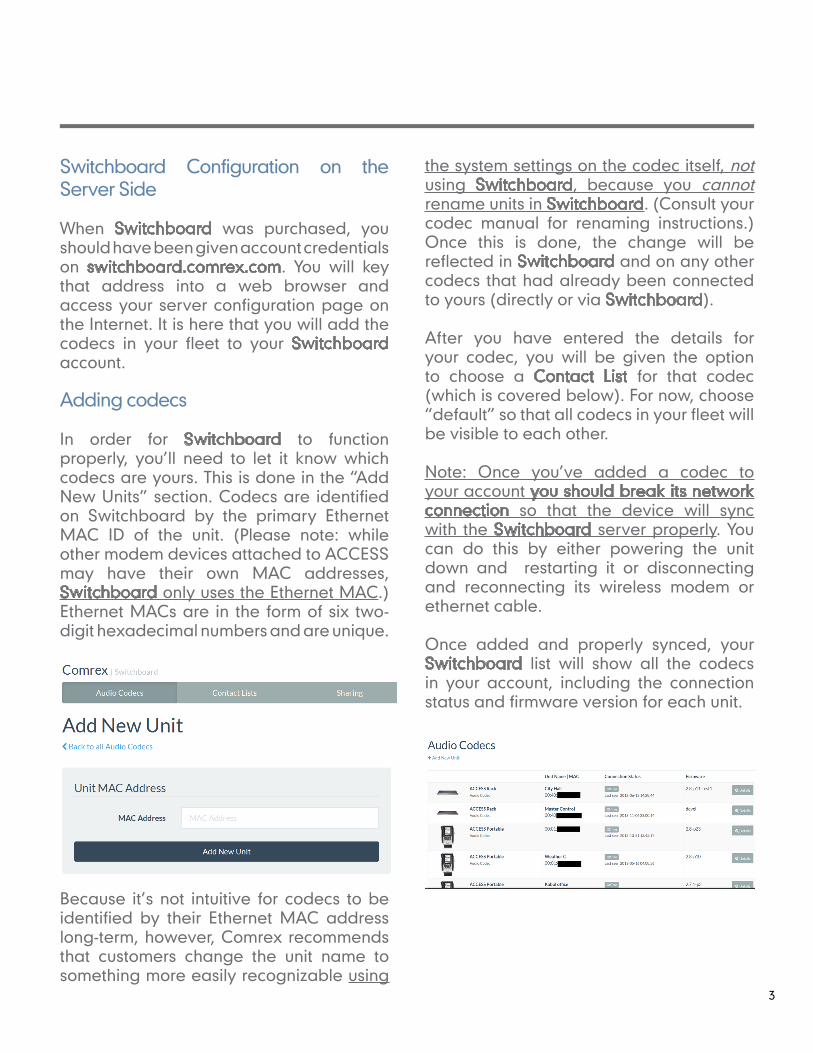
In order for Switchboard to function properly, you’ll need to let it know which codecs are yours. This is done in the “Add New Units” section. Codecs are identified on Switchboard by the primary Ethernet MAC ID of the unit. (Please note: while other modem devices attached to ACCESS may have their own MAC addresses, Switchboard only uses the Ethernet MAC.) Ethernet MACs are in the form of six two-digit hexadecimal numbers and are unique.
Because it’s not intuitive for codecs to be identified by their Ethernet MAC address long-term, however, Comrex recommends that customers change the unit name to something more easily recognizable using
the system settings on the codec itself, not using Switchboard, because you cannot rename units in Switchboard. (Consult your codec manual for renaming instructions.) Once this is done, the change will be reflected in Switchboard and on any other codecs that had already been connected to yours (directly or via Switchboard).
After you have entered the details for your codec, you will be given the option to choose a Contact List for that codec (which is covered below). For now, choose “default” so that all codecs in your fleet will be visible to each other.
Note: Once you’ve added a codec to your account you should break its network connection so that the device will sync with the Switchboard server properly. You can do this by either powering the unit down and restarting it or disconnecting and reconnecting its wireless modem or ethernet cable.
Once added and properly synced, your Switchboard list will show all the codecs in your account, including the connection status and firmware version for each unit.
3
For the simplest and most common configurations (where all the codecs in an account are able to see each other and there is only one account administrator) the Switchboard server setup process is now complete.
Codecs registered on the Switchboard server will display the presence and status of all other units in the same account.
Creating Additional Switchboard Users
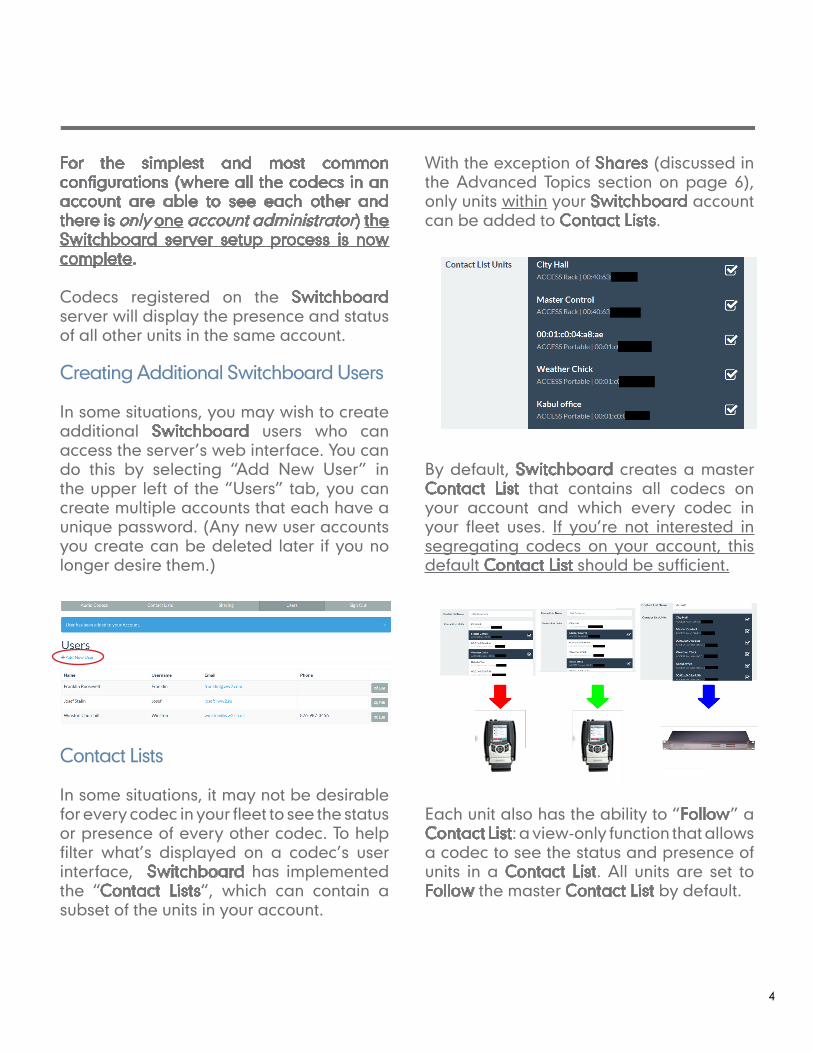
In some situations, you may wish to create additional Switchboard users who can access the server’s web interface. You can do this by selecting “Add New User” in the upper left of the “Users” tab, you can create multiple accounts that each have a unique password. (Any new user accounts you create can be deleted later if you no longer desire them.)
Contact Lists
In some situations, it may not be desirable for every codec in your fleet to see the status or presence of every other codec. To help filter what’s displayed on a codec’s user interface, Switchboard has implemented the “Contact Lists“, which can contain a subset of the units in your account.
With the exception of Shares (discussed in the Advanced Topics section on page 6), only units within your Switchboard account can be added to Contact Lists.
By default, Switchboard creates a master Contact List that contains all codecs on your account and which every codec in your fleet uses. If you’re not interested in segregating codecs on your account, this default Contact List should be sufficient.
Each unit also has the ability to “Follow” a Contact List: a view-only function that allows a codec to see the status and presence of units in a Contact List. All units are set to Follow the master Contact List by default.
4

Put Comrex On The Line.
To Follow a Contact List on a codec, first click on the “Details” button for that codec on the main screen in Switchboard.
Next, press the “Change” button near the middle of the following screen.
On the next screen, check the Contact List(s) that you want this codec to Follow and press “Update Contact List”.
One important point to remember: Following a Contact List on a codec only determines which units get displayed on that codec’s own list. It has no impact on how that codec itself is displayed on other devices.
5
Switchboard Shares
In some situations, you may want to allow a user outside of your account to see the status of a device in your fleet. Switchboard enables you to do this by Sharing your unit with them. A Share is a subset of your codec fleet that you define. Once it’s defined, you can invite other Switchboard users to add it to their accounts so that your codecs will be visible to them.
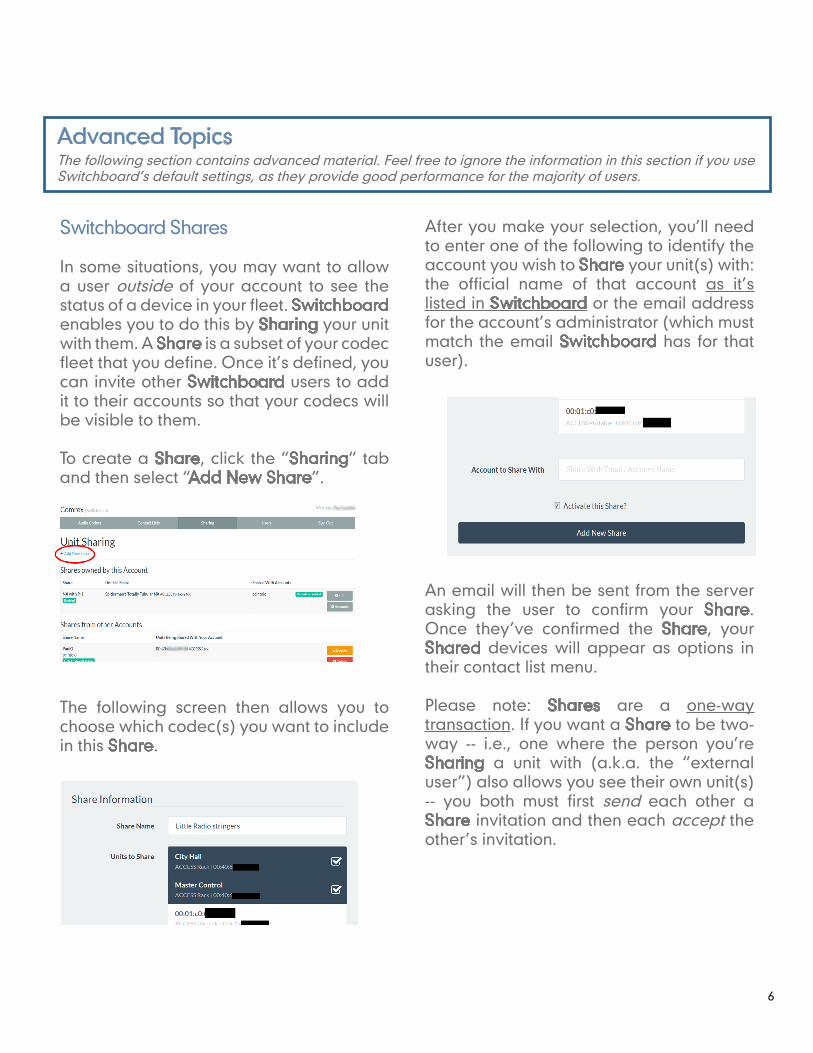
To create a Share, click the “Sharing“ tab and then select “Add New Share”.
The following screen then allows you to choose which codec(s) you want to include in this Share.
After you make your selection, you’ll need to enter one of the following to identify the account you wish to Share your unit(s) with: the official name of that account as it’s listed in Switchboard or the email address for the account’s administrator (which must match the email Switchboard has for that user).
An email will then be sent from the server asking the user to confirm your Share. Once they’ve confirmed the Share, your Shared devices will appear as options in their contact list menu.
Please note: Shares are a one-way transaction. If you want a Share to be two-way -- i.e., one where the person you’re Sharing a unit with (a.k.a. the “external user”) also allows you see their own unit(s) -- you both must first send each other a Share invitation and then each accept the other’s invitation.
6
Advanced TopicsThe following section contains advanced material. Feel free to ignore the information in this section if you use Switchboard’s default settings, as they provide good performance for the majority of users.
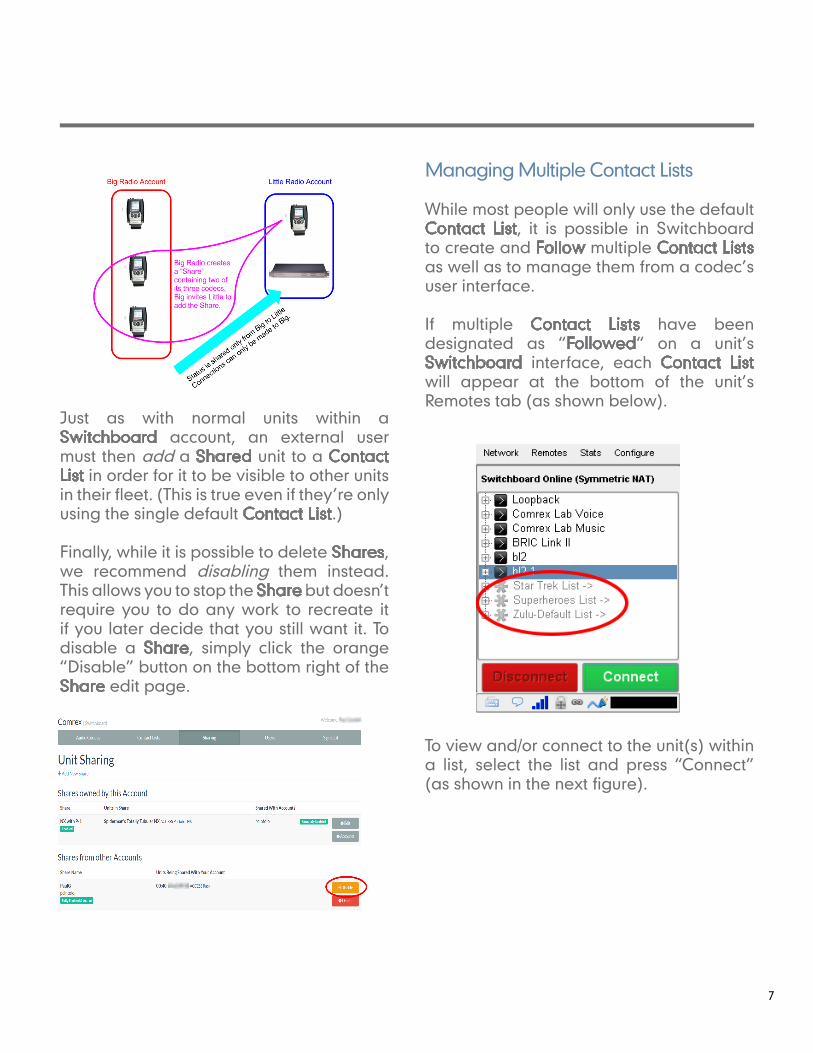
Just as with normal units within a Switchboard account, an external user must then add a Shared unit to a Contact List in order for it to be visible to other units in their fleet. (This is true even if they’re only using the single default Contact List.)
Finally, while it is possible to delete Shares, we recommend disabling them instead. This allows you to stop the Share but doesn’t require you to do any work to recreate it if you later decide that you still want it. To disable a Share, simply click the orange “Disable” button on the bottom right of the Share edit page.
Managing Multiple Contact Lists
While most people will only use the default Contact List, it is possible in Switchboard to create and Follow multiple Contact Lists as well as to manage them from a codec’s user interface.
If multiple Contact Lists have been designated as “Followed“ on a unit’s Switchboard interface, each Contact List will appear at the bottom of the unit’s Remotes tab (as shown below).
To view and/or connect to the unit(s) within a list, select the list and press “Connect” (as shown in the next figure).
7
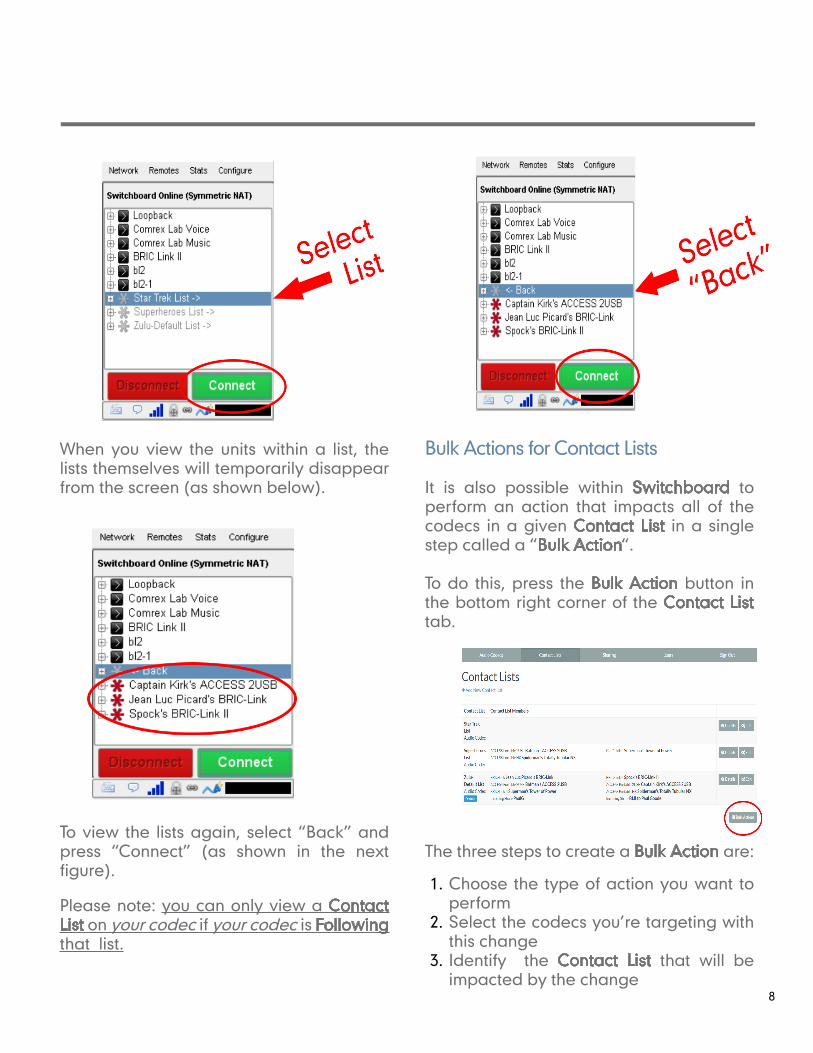
When you view the units within a list, the lists themselves will temporarily disappear from the screen (as shown below).
To view the lists again, select “Back” and press “Connect” (as shown in the next figure).
Please note: you can only view a Contact List on your codec if your codec is Following that list.
Bulk Actions for Contact Lists
It is also possible within Switchboard to perform an action that impacts all of the codecs in a given Contact List in a single step called a “Bulk Action“.
To do this, press the Bulk Action button in the bottom right corner of the Contact List tab.
The three steps to create a Bulk Action are:
1. Choose the type of action you want to perform
2. Select the codecs you’re targeting with this change
3. Identify the Contact List that will be impacted by the change
8
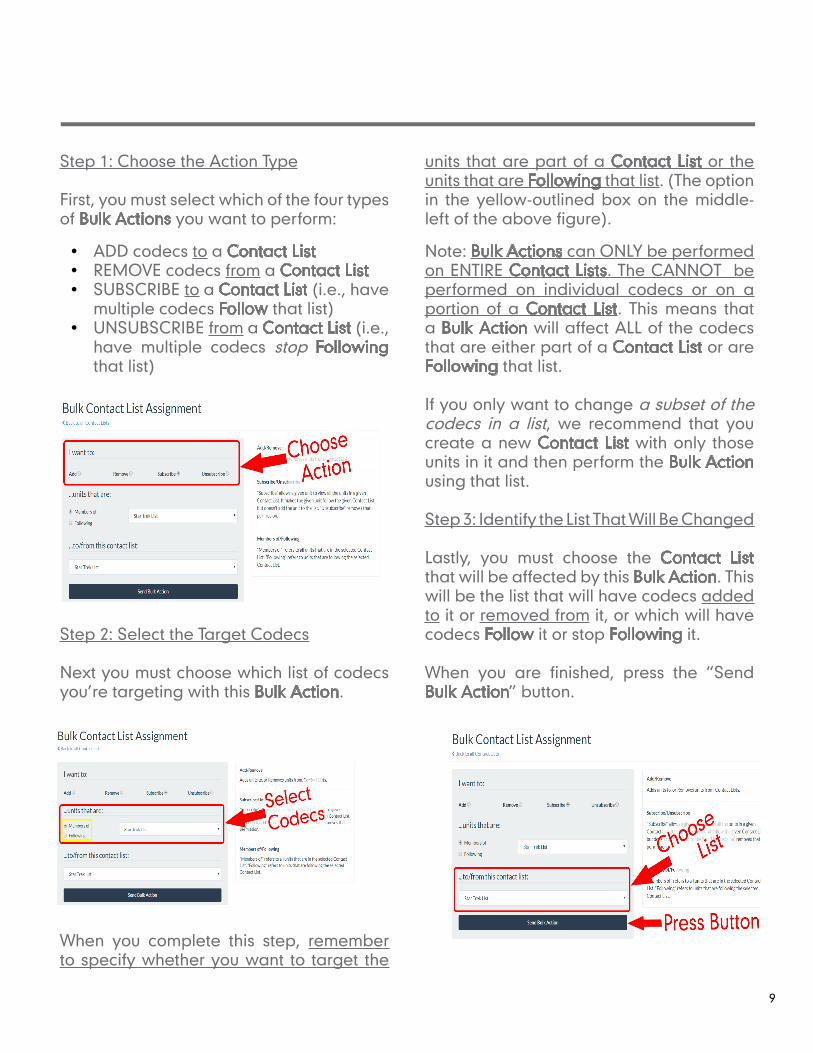
Step 1: Choose the Action Type
First, you must select which of the four types of Bulk Actions you want to perform:
• ADD codecs to a Contact List• REMOVE codecs from a Contact List• SUBSCRIBE to a Contact List (i.e., have
multiple codecs Follow that list)• UNSUBSCRIBE from a Contact List (i.e.,
have multiple codecs stop Following that list)
Step 2: Select the Target Codecs
Next you must choose which list of codecs you’re targeting with this Bulk Action.
When you complete this step, remember to specify whether you want to target the
units that are part of a Contact List or the units that are Following that list. (The option in the yellow-outlined box on the middle-left of the above figure).
Note: Bulk Actions can ONLY be performed on ENTIRE Contact Lists. The CANNOT be performed on individual codecs or on a portion of a Contact List. This means that a Bulk Action will affect ALL of the codecs that are either part of a Contact List or are Following that list.
If you only want to change a subset of the codecs in a list, we recommend that you create a new Contact List with only those units in it and then perform the Bulk Action using that list.
Step 3: Identify the List That Will Be Changed
Lastly, you must choose the Contact List that will be affected by this Bulk Action. This will be the list that will have codecs added to it or removed from it, or which will have codecs Follow it or stop Following it.
When you are finished, press the “Send Bulk Action” button.
9