Embed Size (px)
Citation preview
Configuring Proxy with Apache Knox 3
Configuring Proxy with Apache KnoxDate of Publish: 2018-07-15
http://docs.hortonworks.com
Configuring Proxy with Apache Knox | Contents | ii
Contents
Set Up Knox Proxy...................................................................................................4Example: Configure Knox Gateway for YARN UI............................................................................................ 6Example: Configure Knox Gateway for LDAP...................................................................................................8
Configuring the Knox Gateway............................................................................ 11Change the Master Secret...................................................................................................................................11Manually Redeploy Cluster Topologies.............................................................................................................12Enable WebSockets............................................................................................................................................ 13
Audit Gateway Activity..........................................................................................14Audit Log Fields.................................................................................................................................................14Change Roll Frequency of the Audit Log......................................................................................................... 15Configuring Storm Plugin Audit Log to File.................................................................................................... 15
Manually Configuring Knox Topology Files....................................................... 16Defining Cluster Topologies.............................................................................................................................. 16Configuring a Server for Knox.......................................................................................................................... 17
Set up Service URLs (Proxy a Service)................................................................................................ 17Validate Service Connectivity................................................................................................................ 19Add a New Service to the Knox Gateway.............................................................................................21
Mapping the Internal Nodes to External URLs................................................................................................. 23Set Up a Hostmap Provider................................................................................................................... 23Example of an EC2 Hostmap Provider..................................................................................................24Example of Sandbox Hostmap Provider................................................................................................25Enable Hostmap Debugging...................................................................................................................25
Configuring an Authentication Provider............................................................................................................ 25Set Up LDAP Authentication.................................................................................................................26Setting Up SPNEGO Authentication..................................................................................................... 34Setting up PAM Authentication............................................................................................................. 36Test an LDAP Provider..........................................................................................................................37Test HTTP Header Tokens.....................................................................................................................38Setting Up 2-Way SSL Authentication..................................................................................................38
Configuring a Federation Provider.....................................................................................................................39Set Up HeaderPreAuth Federation Provider.......................................................................................... 40Setting up JWT Federation Provider......................................................................................................41Setting up Pac4j Federation Provider.....................................................................................................41Set up SSOCookieProvider Federation Provider................................................................................... 41
Configuring Identity Assertion...........................................................................................................................43Define a Default Identity Assertion Provider........................................................................................ 45Concat Identity Assertion Provider........................................................................................................ 46Hadoop Group Lookup Identity Assertion Provider..............................................................................46Regular Expression Identity Assertion Provider....................................................................................48SwitchCase Identity Assertion Provider.................................................................................................49Configuring Group Mapping.................................................................................................................. 50
Set Up an Authorization Provider......................................................................................................................50Setting Up Knox Services for HA..................................................................................................................... 52

Configuring Proxy with Apache Knox | Contents | iii
HA Prerequisites..................................................................................................................................... 53Configure WebHDFS for Knox (HA)....................................................................................................53Configure Knox for HA......................................................................................................................... 55
Configuring Knox With Kerberos........................................................................ 56
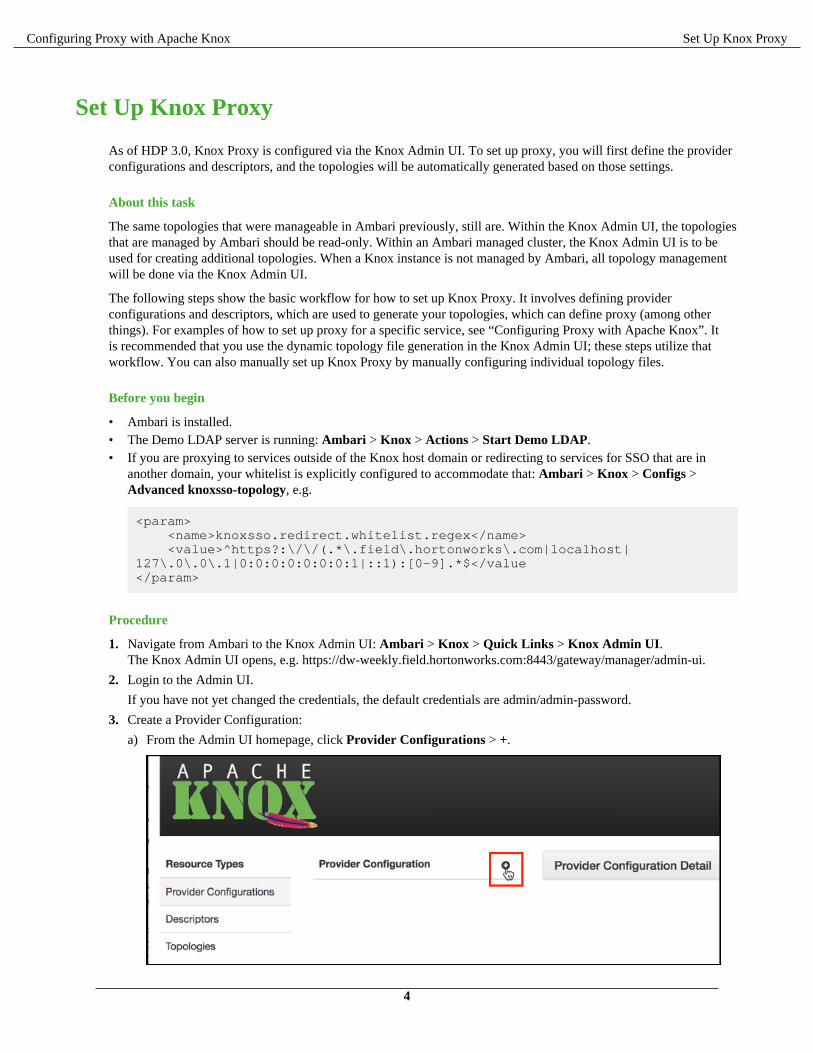
Configuring Proxy with Apache Knox Set Up Knox Proxy
Set Up Knox Proxy
As of HDP 3.0, Knox Proxy is configured via the Knox Admin UI. To set up proxy, you will first define the providerconfigurations and descriptors, and the topologies will be automatically generated based on those settings.
About this task
The same topologies that were manageable in Ambari previously, still are. Within the Knox Admin UI, the topologiesthat are managed by Ambari should be read-only. Within an Ambari managed cluster, the Knox Admin UI is to beused for creating additional topologies. When a Knox instance is not managed by Ambari, all topology managementwill be done via the Knox Admin UI.
The following steps show the basic workflow for how to set up Knox Proxy. It involves defining providerconfigurations and descriptors, which are used to generate your topologies, which can define proxy (among otherthings). For examples of how to set up proxy for a specific service, see “Configuring Proxy with Apache Knox”. Itis recommended that you use the dynamic topology file generation in the Knox Admin UI; these steps utilize thatworkflow. You can also manually set up Knox Proxy by manually configuring individual topology files.
Before you begin
• Ambari is installed.• The Demo LDAP server is running: Ambari > Knox > Actions > Start Demo LDAP.• If you are proxying to services outside of the Knox host domain or redirecting to services for SSO that are in
another domain, your whitelist is explicitly configured to accommodate that: Ambari > Knox > Configs >Advanced knoxsso-topology, e.g.
<param> <name>knoxsso.redirect.whitelist.regex</name> <value>^https?:\/\/(.*\.field\.hortonworks\.com|localhost|127\.0\.0\.1|0:0:0:0:0:0:0:1|::1):[0-9].*$</value</param>
Procedure
1. Navigate from Ambari to the Knox Admin UI: Ambari > Knox > Quick Links > Knox Admin UI.The Knox Admin UI opens, e.g. https://dw-weekly.field.hortonworks.com:8443/gateway/manager/admin-ui.
2. Login to the Admin UI.
If you have not yet changed the credentials, the default credentials are admin/admin-password.
3. Create a Provider Configuration:
a) From the Admin UI homepage, click Provider Configurations > +.
4
Configuring Proxy with Apache Knox Set Up Knox Proxy
The Create a New Provider Configuration wizard opens.b) Name the provider configuration: for example, hdp_ui_provider.c) Add an Authentication provider:
1. Click Add Provider.2. Select Authentication and click Next.3. Choose your Authentication Provider Type: LDAP, PAM, Kerberos, SSO (HeaderPreAuth), SSO
Cookie (SSOCookieProvider), JSON Web Tokens (JWT), CAS, OAuth, SAML, OpenID Connect,Anonymous.
Note: OAuth, OpenID Connect, and CAS are community supported, they are not officially supported byHortonworks.
4. Complete the required fields and click OK.d) Add an Authorization provider:
1. Click Add Provider.2. Select Authorization and click Next.3. Click Access Control Lists.4. Fill out the required fields and click OK.
e) Add an Identity Assertion provider:
1. Click Add Provider.2. Select Identity Assertion and click Next.3. Choose a Identity Assertion Provider Type: Default, Concatenation, SwitchCase, Regular Expression,
Hadoop Group Lookup (LDAP).
Recommended: Default.4. Fill out the required fields and click OK.
f) Add an HA provider:
1. Click Add Provider.2. Select HA and click Next.3. Select Add Service and click Next.4. Fill out the required fields and click OK.
4. Define Descriptors for the topology to auto-discover services from Ambari.
a) Create a new descriptor. From the Admin UI homepage, click Descriptors > +.b) Name the descriptor.c) Beside the Provider Configuration field, click the edit button and select the Provider Configuration you
created before.d) Add Services (e.g., JOBTRACKER, HIVE, HDFSUI, STORM) by clicking the checkbox beside the service.
If the service you are looking for is not listed, you can add it later by editing the configuration (the plus iconnext to services will present a text box.)
e) Add Discovery details:
Field Example value
Address http://dw-weekly.field.hortonworks.com:8080
Cluster dwweekly
Username admin
Password alias ambari-discovery-password
f) Click OK.
What to do nextVerify the topology was generated correctly. You can review the XML topology file for accuracy from Admin UIhomepage > Topologies > <topology name, e.g. devcluster>.
5
Configuring Proxy with Apache Knox Set Up Knox Proxy
Example: Configure Knox Gateway for YARN UIThis example shows you how to set up a new custom Knox topology for YARN UI and installing services for YARN.
Setting up Topology File
1. Login to Ambari and access Knox service page.
Knox Admin UI link could be found on the right pane of the Ambari’s Knox page.
Once this link is clicked, user will be asked to provide a username and password. This will be based on the ldapconfigured for the manager.
2. Accessing Knox admin UI page for topology creation
Once admin lands in to the Knox admin UI, there are fundamentally three steps more to create a topology ofdesired use case.
a. Create a custom provider configurationb. Define Descriptors for the topology to auto-discover services from Ambaric. Save and verify the topology which is created
Next steps will cover topology creation in detail.3. Creating a custom Provider Configuration
Admin can click on the “Provider Configurations” in left panel to list all available providers. Click on the “+”button on the right side to create a new provider.
Admin can select all the providers which are needed for defining “hdp_ui_provider”
• Authentication (Anonymous)• Authorization (AclsAuthz/Access Control Lists)• HAProvider (Default)• Identity-assertion (Default)
These 4 providers could be added by selecting each and giving values from the auto populated options. Detailedsteps are given below.
a. Add Authentication>Anonymous.b. Add Authorization>Access Control Lists.c. Add HAProvider>Default.d. Add Identity-Assertion>Default.e. Save the provider by clicking on save button at right bottom.
4. Defining Descriptors for topology: Click on “+” button near to Descriptor to define a new custom descriptor.
a. Add all details for a descriptor:
• Define a name for the descriptor• Select YARNUI from the below list• Configure Ambari address in “Discovery - Address”• Configure Ambari cluster name in “Discovery - Cluster”• Provide Ambari user name in “Discovery - Username”• “Discovery Password Alias” could be left as it is as below manual step to be ran on knox machine to avoid
configuring password.b. Creating password alias, e.g.,
[root@ctr-e138-1518143905142-240189-01-046340 services]# /usr/$REPO/$VERSION/knox/bin/knoxcli.sh create-alias ambari.discovery.passwordEnter password:Enter password again:
6
Configuring Proxy with Apache Knox Set Up Knox Proxy
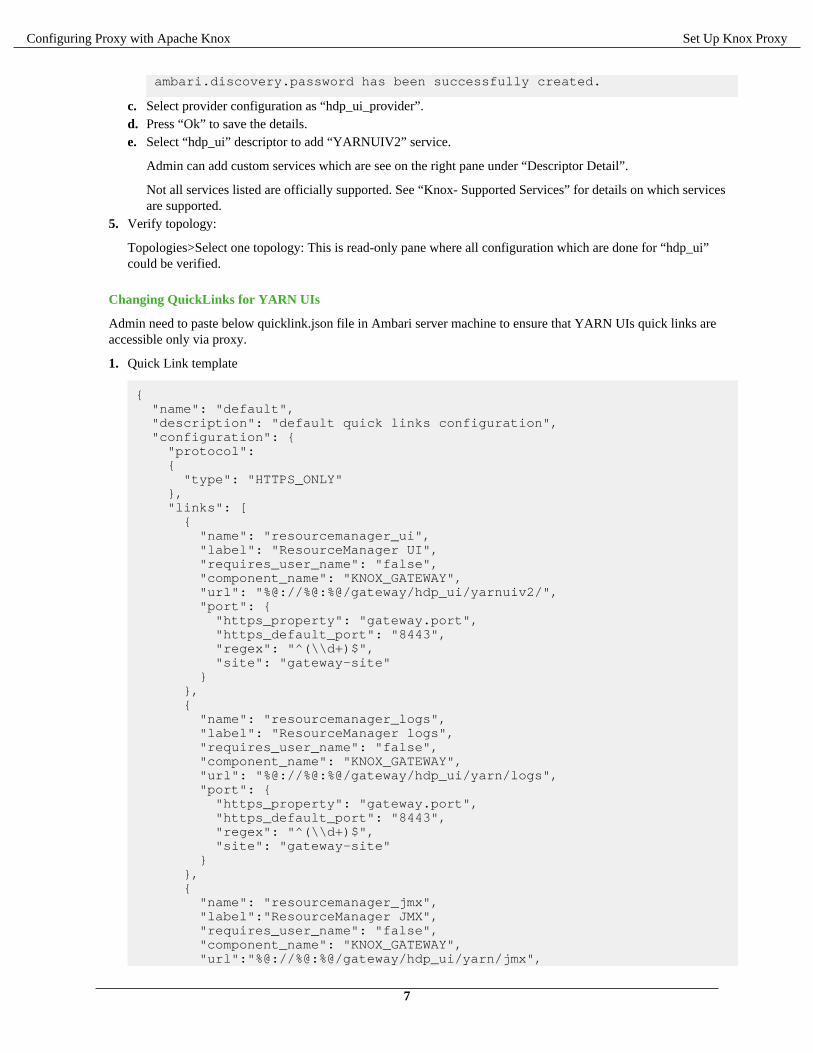
ambari.discovery.password has been successfully created.
c. Select provider configuration as “hdp_ui_provider”.d. Press “Ok” to save the details.e. Select “hdp_ui” descriptor to add “YARNUIV2” service.
Admin can add custom services which are see on the right pane under “Descriptor Detail”.
Not all services listed are officially supported. See “Knox- Supported Services” for details on which servicesare supported.
5. Verify topology:
Topologies>Select one topology: This is read-only pane where all configuration which are done for “hdp_ui”could be verified.
Changing QuickLinks for YARN UIs
Admin need to paste below quicklink.json file in Ambari server machine to ensure that YARN UIs quick links areaccessible only via proxy.
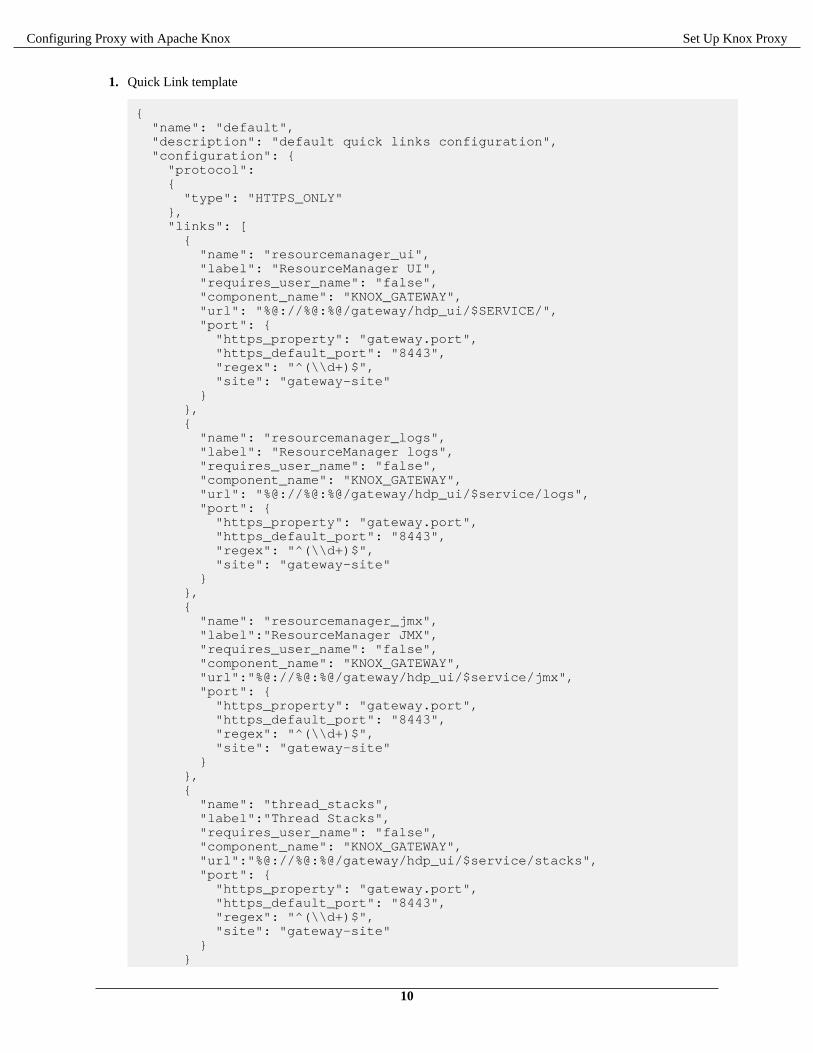
1. Quick Link template
{ "name": "default", "description": "default quick links configuration", "configuration": { "protocol": { "type": "HTTPS_ONLY" }, "links": [ { "name": "resourcemanager_ui", "label": "ResourceManager UI", "requires_user_name": "false", "component_name": "KNOX_GATEWAY", "url": "%@://%@:%@/gateway/hdp_ui/yarnuiv2/", "port": { "https_property": "gateway.port", "https_default_port": "8443", "regex": "^(\\d+)$", "site": "gateway-site" } }, { "name": "resourcemanager_logs", "label": "ResourceManager logs", "requires_user_name": "false", "component_name": "KNOX_GATEWAY", "url": "%@://%@:%@/gateway/hdp_ui/yarn/logs", "port": { "https_property": "gateway.port", "https_default_port": "8443", "regex": "^(\\d+)$", "site": "gateway-site" } }, { "name": "resourcemanager_jmx", "label":"ResourceManager JMX", "requires_user_name": "false", "component_name": "KNOX_GATEWAY", "url":"%@://%@:%@/gateway/hdp_ui/yarn/jmx",
7
Configuring Proxy with Apache Knox Set Up Knox Proxy
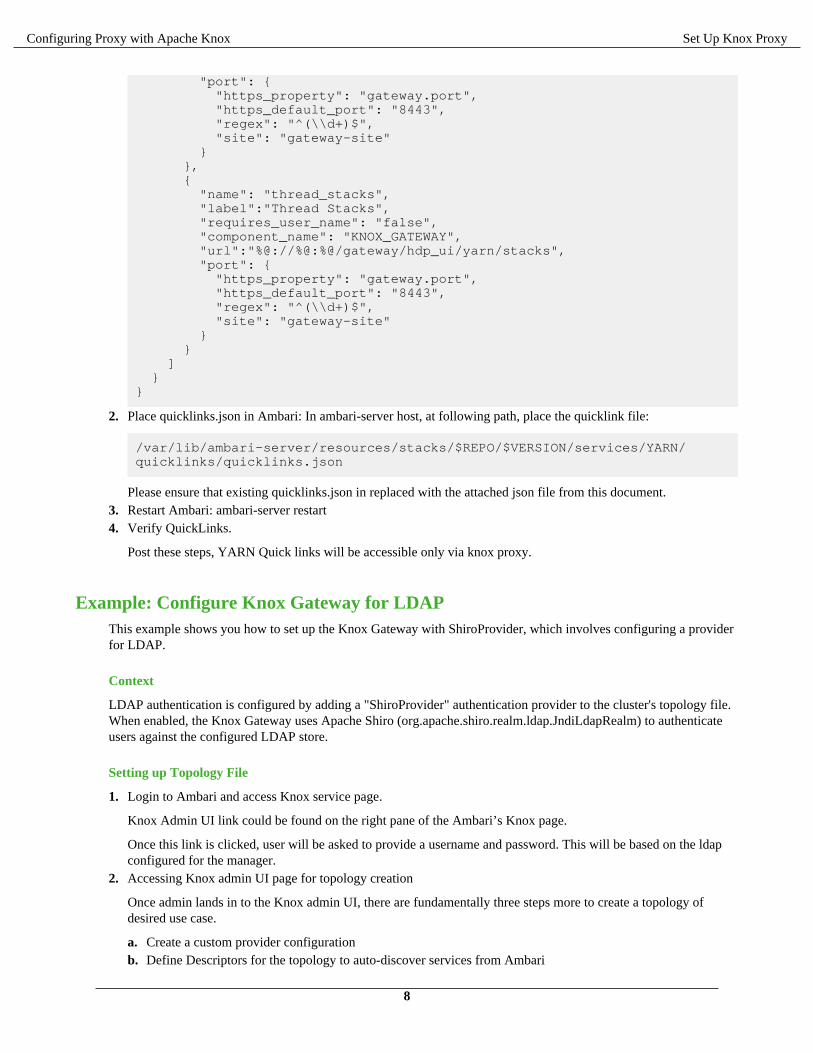
"port": { "https_property": "gateway.port", "https_default_port": "8443", "regex": "^(\\d+)$", "site": "gateway-site" } }, { "name": "thread_stacks", "label":"Thread Stacks", "requires_user_name": "false", "component_name": "KNOX_GATEWAY", "url":"%@://%@:%@/gateway/hdp_ui/yarn/stacks", "port": { "https_property": "gateway.port", "https_default_port": "8443", "regex": "^(\\d+)$", "site": "gateway-site" } } ] }}
2. Place quicklinks.json in Ambari: In ambari-server host, at following path, place the quicklink file:
/var/lib/ambari-server/resources/stacks/$REPO/$VERSION/services/YARN/quicklinks/quicklinks.json
Please ensure that existing quicklinks.json in replaced with the attached json file from this document.3. Restart Ambari: ambari-server restart4. Verify QuickLinks.
Post these steps, YARN Quick links will be accessible only via knox proxy.
Example: Configure Knox Gateway for LDAPThis example shows you how to set up the Knox Gateway with ShiroProvider, which involves configuring a providerfor LDAP.
Context
LDAP authentication is configured by adding a "ShiroProvider" authentication provider to the cluster's topology file.When enabled, the Knox Gateway uses Apache Shiro (org.apache.shiro.realm.ldap.JndiLdapRealm) to authenticateusers against the configured LDAP store.
Setting up Topology File
1. Login to Ambari and access Knox service page.
Knox Admin UI link could be found on the right pane of the Ambari’s Knox page.
Once this link is clicked, user will be asked to provide a username and password. This will be based on the ldapconfigured for the manager.
2. Accessing Knox admin UI page for topology creation
Once admin lands in to the Knox admin UI, there are fundamentally three steps more to create a topology ofdesired use case.
a. Create a custom provider configurationb. Define Descriptors for the topology to auto-discover services from Ambari
8
Configuring Proxy with Apache Knox Set Up Knox Proxy
c. Save and verify the topology which is created
Next steps will cover topology creation in detail.3. Creating a custom Provider Configuration
Admin can click on the “Provider Configurations” in left panel to list all available providers. Click on the “+”button on the right side to create a new provider.
Admin can select all the providers which are needed for defining “hdp_ui_provider”
• Authentication (LDAP)• Authorization (AclsAuthz/Access Control Lists)• HAProvider (Default)• Identity-assertion (Default)
These 4 providers could be added by selecting each and giving values from the auto populated options. Detailedsteps are given below.
a. Add Authentication>LDAP.b. Add Authorization>Access Control Lists.c. Add HAProvider>Default.d. Add Identity-Assertion>Default.e. Save the provider by clicking on save button at right bottom.
4. Defining Descriptors for topology: Click on “+” button near to Descriptor to define a new custom descriptor.
a. Add all details for a descriptor:
• Define a name for the descriptor• Select $Services from the below list• Configure Ambari address in “Discovery - Address”• Configure Ambari cluster name in “Discovery - Cluster”• Provide Ambari user name in “Discovery - Username”• “Discovery Password Alias” could be left as it is as below manual step to be ran on knox machine to avoid
configuring password.b. Creating password alias, e.g.,
[root@ctr-e138-1518143905142-240189-01-046340 services]# /usr/$REPO/$VERSION/knox/bin/knoxcli.sh create-alias ambari.discovery.passwordEnter password:Enter password again:ambari.discovery.password has been successfully created.
c. Select provider configuration as “hdp_ui_provider”.d. Press “Ok” to save the details.e. Select “hdp_ui” descriptor to add “$SERVICES”.
Admin can add custom services which are see on the right pane under “Descriptor Detail”.
Not all services listed are officially supported. See “Knox- Supported Services” for details on which servicesare supported.
5. Verify topology:
Topologies>Select one topology: This is read-only pane where all configuration which are done for “hdp_ui”could be verified.
Changing QuickLinks for $SERVICE UIs
Admin need to paste below quicklink.json file in Ambari server machine to ensure that $SERVICE UIs quick linksare accessible only via proxy.
9
Configuring Proxy with Apache Knox Set Up Knox Proxy
1. Quick Link template
{ "name": "default", "description": "default quick links configuration", "configuration": { "protocol": { "type": "HTTPS_ONLY" }, "links": [ { "name": "resourcemanager_ui", "label": "ResourceManager UI", "requires_user_name": "false", "component_name": "KNOX_GATEWAY", "url": "%@://%@:%@/gateway/hdp_ui/$SERVICE/", "port": { "https_property": "gateway.port", "https_default_port": "8443", "regex": "^(\\d+)$", "site": "gateway-site" } }, { "name": "resourcemanager_logs", "label": "ResourceManager logs", "requires_user_name": "false", "component_name": "KNOX_GATEWAY", "url": "%@://%@:%@/gateway/hdp_ui/$service/logs", "port": { "https_property": "gateway.port", "https_default_port": "8443", "regex": "^(\\d+)$", "site": "gateway-site" } }, { "name": "resourcemanager_jmx", "label":"ResourceManager JMX", "requires_user_name": "false", "component_name": "KNOX_GATEWAY", "url":"%@://%@:%@/gateway/hdp_ui/$service/jmx", "port": { "https_property": "gateway.port", "https_default_port": "8443", "regex": "^(\\d+)$", "site": "gateway-site" } }, { "name": "thread_stacks", "label":"Thread Stacks", "requires_user_name": "false", "component_name": "KNOX_GATEWAY", "url":"%@://%@:%@/gateway/hdp_ui/$service/stacks", "port": { "https_property": "gateway.port", "https_default_port": "8443", "regex": "^(\\d+)$", "site": "gateway-site" } }
10
Configuring Proxy with Apache Knox Configuring the Knox Gateway
] }}
2. Place quicklinks.json in Ambari: In ambari-server host, at following path, place the quicklink file:
/var/lib/ambari-server/resources/stacks/$REPO/$VERSION/services/$SERVICE/quicklinks/quicklinks.json
Please ensure that existing quicklinks.json in replaced with the attached json file from this document.3. Restart Ambari: ambari-server restart4. Verify QuickLinks.
Post these steps, $SERVICE Quick links will be accessible only via knox proxy.
Configuring the Knox Gateway
This section describes how to configure the Knox Gateway (proxy).
Knox Master Secret Overview
The master secret is required to start the gateway. The secret protects artifacts used by the gateway instance, such asthe keystore, trust stores and credential stores.
You configure the gateway to persist the master secret, which is saved in the $gatewaydir/data/security/master file.Ensure that this directory has the appropriate permissions set for your environment.
Attention: Ensure that the security directory, $gatewaydir/data/security, and its contents are readable andwritable only by the knox user. This is the most important layer of defense for master secret. Do not assumethat the encryption is sufficient protection.
You may persist the master secret by supplying the -persist-master switch at startup. This will result in a warningindicating that persisting the secret is less secure than providing it at startup. We do make some provisions in order toprotect the persisted password.
It is encrypted with AES 128 bit encryption and where possible the file permissions are set to only be accessible bythe user that the gateway is running as.
After persisting the secret, ensure that the file at config/security/master has the appropriate permissions set foryour environment. This is probably the most important layer of defense for master secret. Do not assume that theencryption if sufficient protection.
A specific user should be created to run the gateway this user will be the only user with permissions for the persistedmaster file.
You set the master secret during Knox installation.
For information on what services are supported for Knox Proxy, see the “Knox Supported Services Matrix”.
Related InformationKnox Supported Services Matrix
Change the Master SecretHow to change the Master Secret, when configuring the Knox Gateway.
11
Configuring Proxy with Apache Knox Configuring the Knox Gateway
About this task
The Master Secret can be changed under dire situations where the Administrator has to redo all the configurationsfor every gateway instance in a deployment, and no longer knows the Master Secret. Recreating the Master Secretrequires not only recreating the master, but also removing all existing keystores and reprovisioning the certificatesand credentials.
Attention:
Ensure that the security directory, $gateway/data/security, and its contents are readable and writable only bythe knox user. This is the most important layer of defense for master secret. Do not assume that the encryptionis sufficient protection.
Procedure
1. Enter:
cd {GATEWAY_HOME}bin/knoxcli.sh create-master --force
2. If there is an existing keystore, update the keystore.
Manually Redeploy Cluster TopologiesHow to manually redeploy cluster topologies, when configuring the Knox Gateway.
About this task
You are not required to manually redeploy clusters after updating cluster properties. The gateway monitors thetopology descriptor files in the $gatewaydir/conf/topologies directory and automatically redeploys the cluster if anydescriptor changes or a new one is added. (The corresponding deployment is in $gatewaydir/data/deployments.)
However, you must redeploy the clusters after changing any of the following gateway properties or gateway-widesettings:
• Time settings on the gateway host• Implementing or updating Kerberos• Implementing or updating SSL certificates• Changing a cluster alias
When making gateway-wide changes (such as implementing Kerberos or SSL), or if you change the system clock,you must redeploy all the Cluster Topologies.
When making changes that impact a single cluster, such as changing an alias or restoring from an earlier clustertopology descriptor file, you only redeploy the affected cluster.
Procedure
1. To verify the timestamp on the currently deployed cluster(s), visit: cd $gatewaydir/data/deployments.
2. To redeploy, enter:
Choice Enter
All clusters $gatewaydir/bin/knoxcli.cmd redeploy
A specific cluster cd $gatewaydir/bin/knoxcli.cmd redeploy --cluster $cluster_name
Where $cluster_name is the name of the cluster topology descriptor(without the .xml extension). For example, myCluster.
3. To verify that a new cluster WAR was created, enter:
12
Configuring Proxy with Apache Knox Configuring the Knox Gateway
Choice Enter
All clusters cd $gatewaydir/data/deployments
A specific cluster cd $gatewaydir/data/deployments
The system displays something similar to:
Choice Output
All clusterscd $gatewaydir/data/deployments
# .# ..# cluster.war.145514f4dc8# cluster.war.1457241b5dc# myCluster.war.145514f4dc8# myCluster.war.1457241b5dc# sandbox.war.145514f4dc8# sandbox.war.1457241b5dc 0 File(s) 0 bytes 8 Dir(s) 9,730,850,816 bytes free
A new file is created for each cluster, with the current timestamp.
A specific clustercd $gatewaydir/data/deployments
# .# ..# cluster.war.145514f4dc8# myCluster.war.145514f4dc8# myCluster.war.1457241b5dc# sandbox.war.145514f4dc8 0 File(s) 0 bytes 5 Dir(s) 9,730,977,792 bytes free
You should see that existing cluster war files are unchanged, but the warfile for myCluster was updated (has a current timestamp).
Enable WebSocketsHow to enable WebSockets, when configuring the Knox Gateway. Enabling WebSockets for Knox allows you toproxy applications that use WebSocket connections (e.g., Zeppelin.)
About this task
WebSocket is a communication protocol that allows full duplex communication over single TCP connection. Knoxprovides out-of-the-box support for WebSocket protocol, but currently, only text-based messages are supported.
By default, WebSocket functionality is disabled. WebSocket functionality must be enabled for Zeppelin UI(<role>ZEPPELINUI</role>) service definition to work.
Procedure
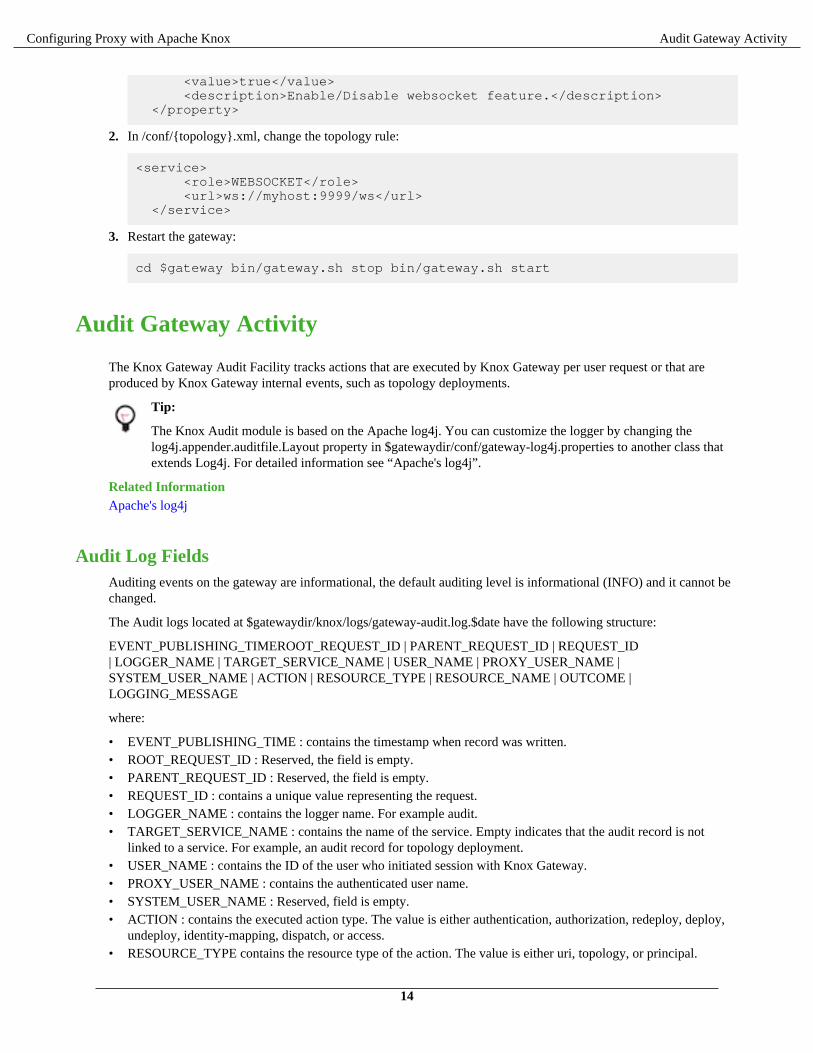
1. In /conf/gateway-site.xml, change gateway.websocket.feature.enabled to true:
<property> <name>gateway.websocket.feature.enabled</name>
13
Configuring Proxy with Apache Knox Audit Gateway Activity
<value>true</value> <description>Enable/Disable websocket feature.</description> </property>
2. In /conf/{topology}.xml, change the topology rule:
<service> <role>WEBSOCKET</role> <url>ws://myhost:9999/ws</url> </service>
3. Restart the gateway:
cd $gateway bin/gateway.sh stop bin/gateway.sh start
Audit Gateway Activity
The Knox Gateway Audit Facility tracks actions that are executed by Knox Gateway per user request or that areproduced by Knox Gateway internal events, such as topology deployments.
Tip:
The Knox Audit module is based on the Apache log4j. You can customize the logger by changing thelog4j.appender.auditfile.Layout property in $gatewaydir/conf/gateway-log4j.properties to another class thatextends Log4j. For detailed information see “Apache's log4j”.
Related InformationApache's log4j
Audit Log FieldsAuditing events on the gateway are informational, the default auditing level is informational (INFO) and it cannot bechanged.
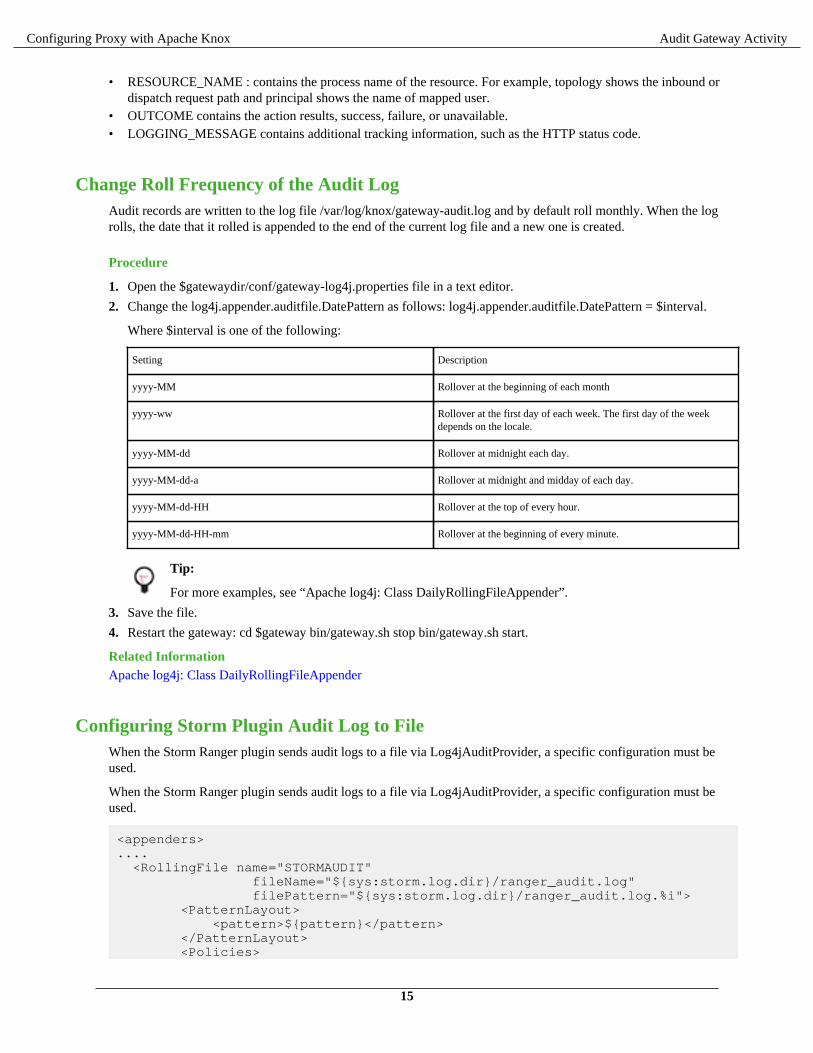
The Audit logs located at $gatewaydir/knox/logs/gateway-audit.log.$date have the following structure:
EVENT_PUBLISHING_TIMEROOT_REQUEST_ID | PARENT_REQUEST_ID | REQUEST_ID| LOGGER_NAME | TARGET_SERVICE_NAME | USER_NAME | PROXY_USER_NAME |SYSTEM_USER_NAME | ACTION | RESOURCE_TYPE | RESOURCE_NAME | OUTCOME |LOGGING_MESSAGE
where:
• EVENT_PUBLISHING_TIME : contains the timestamp when record was written.• ROOT_REQUEST_ID : Reserved, the field is empty.• PARENT_REQUEST_ID : Reserved, the field is empty.• REQUEST_ID : contains a unique value representing the request.• LOGGER_NAME : contains the logger name. For example audit.• TARGET_SERVICE_NAME : contains the name of the service. Empty indicates that the audit record is not
linked to a service. For example, an audit record for topology deployment.• USER_NAME : contains the ID of the user who initiated session with Knox Gateway.• PROXY_USER_NAME : contains the authenticated user name.• SYSTEM_USER_NAME : Reserved, field is empty.• ACTION : contains the executed action type. The value is either authentication, authorization, redeploy, deploy,
undeploy, identity-mapping, dispatch, or access.• RESOURCE_TYPE contains the resource type of the action. The value is either uri, topology, or principal.
14
Configuring Proxy with Apache Knox Audit Gateway Activity
• RESOURCE_NAME : contains the process name of the resource. For example, topology shows the inbound ordispatch request path and principal shows the name of mapped user.
• OUTCOME contains the action results, success, failure, or unavailable.• LOGGING_MESSAGE contains additional tracking information, such as the HTTP status code.
Change Roll Frequency of the Audit LogAudit records are written to the log file /var/log/knox/gateway-audit.log and by default roll monthly. When the logrolls, the date that it rolled is appended to the end of the current log file and a new one is created.
Procedure
1. Open the $gatewaydir/conf/gateway-log4j.properties file in a text editor.
2. Change the log4j.appender.auditfile.DatePattern as follows: log4j.appender.auditfile.DatePattern = $interval.
Where $interval is one of the following:
Setting Description
yyyy-MM Rollover at the beginning of each month
yyyy-ww Rollover at the first day of each week. The first day of the weekdepends on the locale.
yyyy-MM-dd Rollover at midnight each day.
yyyy-MM-dd-a Rollover at midnight and midday of each day.
yyyy-MM-dd-HH Rollover at the top of every hour.
yyyy-MM-dd-HH-mm Rollover at the beginning of every minute.
Tip:
For more examples, see “Apache log4j: Class DailyRollingFileAppender”.
3. Save the file.
4. Restart the gateway: cd $gateway bin/gateway.sh stop bin/gateway.sh start.
Related InformationApache log4j: Class DailyRollingFileAppender
Configuring Storm Plugin Audit Log to FileWhen the Storm Ranger plugin sends audit logs to a file via Log4jAuditProvider, a specific configuration must beused.
When the Storm Ranger plugin sends audit logs to a file via Log4jAuditProvider, a specific configuration must beused.
<appenders>.... <RollingFile name="STORMAUDIT" fileName="${sys:storm.log.dir}/ranger_audit.log" filePattern="${sys:storm.log.dir}/ranger_audit.log.%i"> <PatternLayout> <pattern>${pattern}</pattern> </PatternLayout> <Policies>
15
Configuring Proxy with Apache Knox Manually Configuring Knox Topology Files
<SizeBasedTriggeringPolicy size="100 MB"/> <!-- Or every 100 MB --> </Policies> <DefaultRolloverStrategy max="9"/> </RollingFile> <Loggers> ...... <Logger name="xaaudit" level="info"> <AppenderRef ref="STORMAUDIT"/> </Logger> </Loggers></appenders>
Storm uses log4j2 format for log4j configurations. In log4j.xml, the name of the logger (in this case, “xaaudit”) isneeded and not the whole class name with logger name; this is handled by the <Logger> tag.
Manually Configuring Knox Topology Files
If you choose not to use dynamic topology file generation via the Admin UI, you can manually configure your KnoxTopologies.
See "Set up Knox Proxy" for how to use dynamic topology file generation.
Defining Cluster TopologiesThe Knox Gateway supports one or more clusters. Each cluster configuration is defined in a topology deploymentdescriptor file in the $gateway/conf/topologies directory and is deployed to a corresponding WAR file in the$gateway/data/deployments directory. These files define how the gateway communicates with each cluster.
Topology Deployment Descriptor File Sections
The descriptor is an XML file contains the following sections:
• gateway/provider -- configuration settings enforced by the Knox Gateway while providing access to the cluster.• service -- defines the service URLs used by the gateway to proxy communications from external clients.
Cluster Topology Provider and Service Roles
The gateway automatically redeploys the cluster whenever it detects a new topology descriptor file, or detects achange in an existing topology descriptor file.
The following table provides an overview of the providers and services:
Type Role Description
gateway/provider hostmap Maps external to internal node hostnames,replacing the internal hostname with themapped external name when the hostname isembedded in a response from the cluster.
authentication Integrates an LDAP store to authenticateexternal requests accessing the cluster viathe Knox Gateway. Refer to Set Up LDAPAuthentication for more information.
federation Defines HTTP header authentication fields foran SSO or federation solution provider. Referto Set up HTTP Header Authentication forFederation/SSO
16
Configuring Proxy with Apache Knox Manually Configuring Knox Topology Files
Type Role Description
identity-assertion Responsible for the way that the authenticateduser's identity is asserted to the service thatthe request is intended for. Also maps externalauthenticated users to an internal cluster thatthe gateway asserts as the current sessionuser or group. Refer to Configure IdentityAssertion for more information.
authorization Service level authorization that restricts clusteraccess to specified users, groups, and/or IPaddresses. Refer to Configure Service LevelAuthorization for more information.
webappsec Configures a web application security pluginthat provides protection filtering againstCross Site Request Forgery Attacks. Refer toConfigure Web Application Security for moreinformation.
HA provider high availability Syncs all Knox instances to use the sametopologies credentials keystores.
service $service_name Binds a service with an internal URL thatthe gateway uses to proxy requests fromexternal clients to the internal cluster services.Refer to “Configure Service URLs” for moreinformation. E.G., NAMENODE, HDFS,JOBTRACKER, HIVE, KAFKA, STORM,etc.
Format
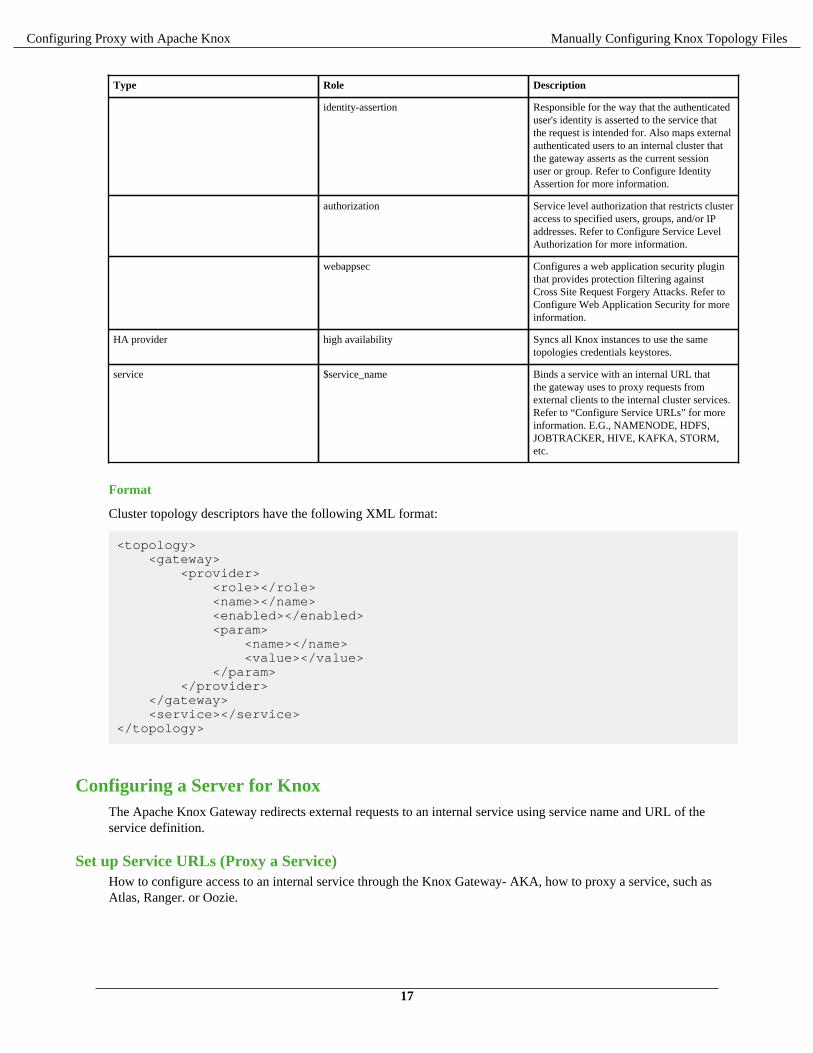
Cluster topology descriptors have the following XML format:
<topology> <gateway> <provider> <role></role> <name></name> <enabled></enabled> <param> <name></name> <value></value> </param> </provider> </gateway> <service></service></topology>
Configuring a Server for KnoxThe Apache Knox Gateway redirects external requests to an internal service using service name and URL of theservice definition.
Set up Service URLs (Proxy a Service)How to configure access to an internal service through the Knox Gateway- AKA, how to proxy a service, such asAtlas, Ranger. or Oozie.
17
Configuring Proxy with Apache Knox Manually Configuring Knox Topology Files
Procedure
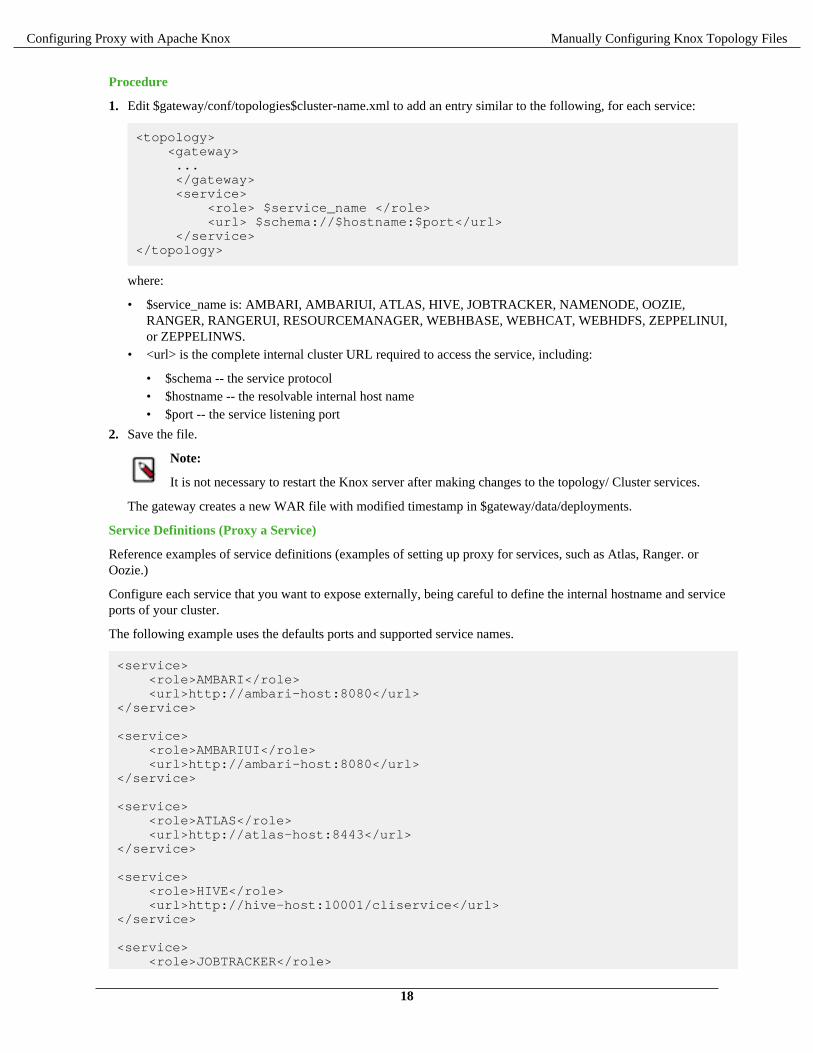
1. Edit $gateway/conf/topologies$cluster-name.xml to add an entry similar to the following, for each service:
<topology> <gateway> ... </gateway> <service> <role> $service_name </role> <url> $schema://$hostname:$port</url> </service></topology>
where:
• $service_name is: AMBARI, AMBARIUI, ATLAS, HIVE, JOBTRACKER, NAMENODE, OOZIE,RANGER, RANGERUI, RESOURCEMANAGER, WEBHBASE, WEBHCAT, WEBHDFS, ZEPPELINUI,or ZEPPELINWS.
• <url> is the complete internal cluster URL required to access the service, including:
• $schema -- the service protocol• $hostname -- the resolvable internal host name• $port -- the service listening port
2. Save the file.
Note:
It is not necessary to restart the Knox server after making changes to the topology/ Cluster services.
The gateway creates a new WAR file with modified timestamp in $gateway/data/deployments.
Service Definitions (Proxy a Service)
Reference examples of service definitions (examples of setting up proxy for services, such as Atlas, Ranger. orOozie.)
Configure each service that you want to expose externally, being careful to define the internal hostname and serviceports of your cluster.
The following example uses the defaults ports and supported service names.
<service> <role>AMBARI</role> <url>http://ambari-host:8080</url></service>
<service> <role>AMBARIUI</role> <url>http://ambari-host:8080</url></service>
<service> <role>ATLAS</role> <url>http://atlas-host:8443</url></service>
<service> <role>HIVE</role> <url>http://hive-host:10001/cliservice</url></service>
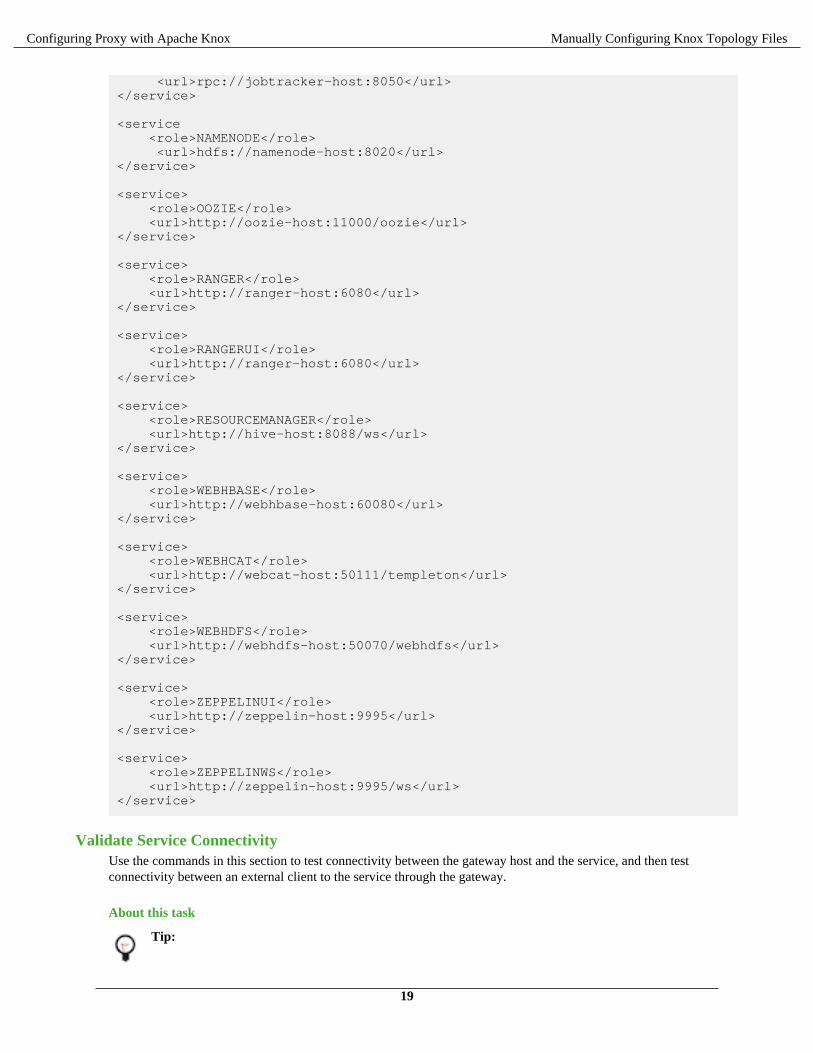
<service> <role>JOBTRACKER</role>
18
Configuring Proxy with Apache Knox Manually Configuring Knox Topology Files
<url>rpc://jobtracker-host:8050</url></service>
<service <role>NAMENODE</role> <url>hdfs://namenode-host:8020</url></service>
<service> <role>OOZIE</role> <url>http://oozie-host:11000/oozie</url></service>
<service> <role>RANGER</role> <url>http://ranger-host:6080</url></service>
<service> <role>RANGERUI</role> <url>http://ranger-host:6080</url></service>
<service> <role>RESOURCEMANAGER</role> <url>http://hive-host:8088/ws</url></service>
<service> <role>WEBHBASE</role> <url>http://webhbase-host:60080</url></service>
<service> <role>WEBHCAT</role> <url>http://webcat-host:50111/templeton</url></service>
<service> <role>WEBHDFS</role> <url>http://webhdfs-host:50070/webhdfs</url></service>
<service> <role>ZEPPELINUI</role> <url>http://zeppelin-host:9995</url></service>
<service> <role>ZEPPELINWS</role> <url>http://zeppelin-host:9995/ws</url></service>
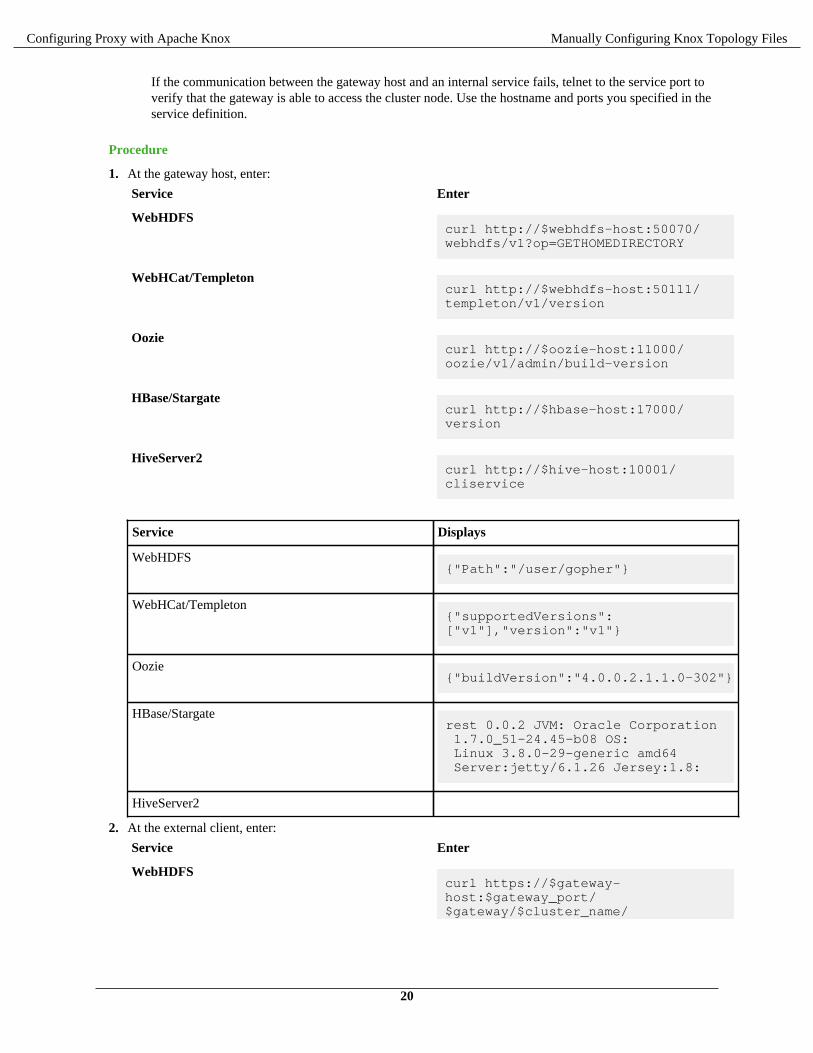
Validate Service ConnectivityUse the commands in this section to test connectivity between the gateway host and the service, and then testconnectivity between an external client to the service through the gateway.
About this task
Tip:
19
Configuring Proxy with Apache Knox Manually Configuring Knox Topology Files
If the communication between the gateway host and an internal service fails, telnet to the service port toverify that the gateway is able to access the cluster node. Use the hostname and ports you specified in theservice definition.
Procedure
1. At the gateway host, enter:
Service Enter
WebHDFScurl http://$webhdfs-host:50070/webhdfs/v1?op=GETHOMEDIRECTORY
WebHCat/Templetoncurl http://$webhdfs-host:50111/templeton/v1/version
Ooziecurl http://$oozie-host:11000/oozie/v1/admin/build-version
HBase/Stargatecurl http://$hbase-host:17000/version
HiveServer2curl http://$hive-host:10001/cliservice
Service Displays
WebHDFS{"Path":"/user/gopher"}
WebHCat/Templeton{"supportedVersions":["v1"],"version":"v1"}
Oozie{"buildVersion":"4.0.0.2.1.1.0-302"}
HBase/Stargaterest 0.0.2 JVM: Oracle Corporation 1.7.0_51-24.45-b08 OS: Linux 3.8.0-29-generic amd64 Server:jetty/6.1.26 Jersey:1.8:
HiveServer2
2. At the external client, enter:
Service Enter
WebHDFScurl https://$gateway-host:$gateway_port/$gateway/$cluster_name/
20
Configuring Proxy with Apache Knox Manually Configuring Knox Topology Files
Service Enter$webhdfs_service_name/v1?op=GETHOMEDIRECTORY
WebHCat/Templetoncurl https://$gateway-host:$gateway_port/$gateway/$cluster_name/$webhcat_service_name/v1/version
Ooziecurl https://$gateway-host:$gateway_port/$gateway/$cluster_name/$oozie_service_name/v1/admin/build-version
HBase/Stargatecurl http://$hbase-host:17000/version
HiveServer2curl https://$gateway-host:$gateway_port/$gateway/$cluster_name/$hive_service_name/cliservice
Service Displays
WebHDFS{"Path":"/user/gopher"}
WebHCat/Templeton{"supportedVersions":["v1"],"version":"v1"}
Oozie{"buildVersion":"4.0.0.2.1.1.0-302"}
HBase/Stargaterest 0.0.2 JVM: Oracle Corporation 1.7.0_51-24.45-b08 OS: Linux 3.8.0-29-generic amd64 Server:jetty/6.1.26 Jersey:1.8
HiveServer2
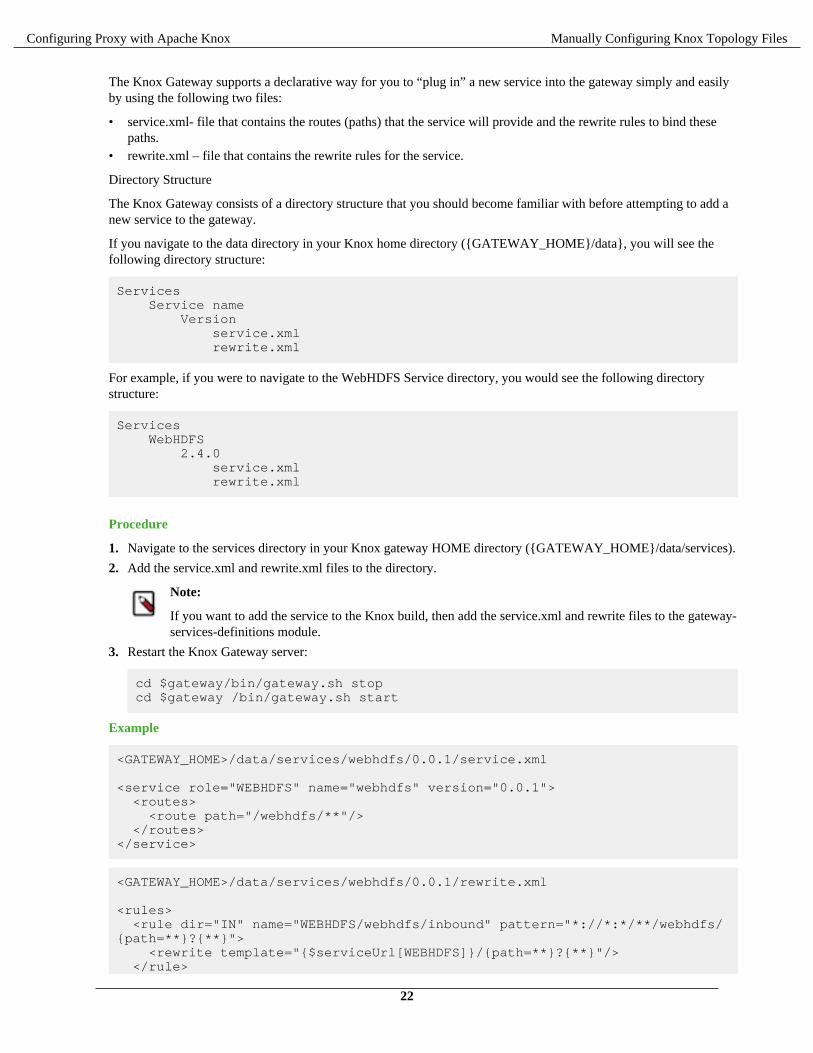
Add a New Service to the Knox GatewayThe Knox Gateway supports a declarative way for you to “plug in” a new service into the gateway simply and easilyby using a few files.
About this task
Overview
Services and service additions in the Knox Gateway are defined as extensions to existing Knox Gateway functionalitythat enable you to extend the gateway’s capabilities. You use these services to convert information contained in thetopology file to runtime descriptors.
21
Configuring Proxy with Apache Knox Manually Configuring Knox Topology Files
The Knox Gateway supports a declarative way for you to “plug in” a new service into the gateway simply and easilyby using the following two files:
• service.xml- file that contains the routes (paths) that the service will provide and the rewrite rules to bind thesepaths.
• rewrite.xml – file that contains the rewrite rules for the service.
Directory Structure
The Knox Gateway consists of a directory structure that you should become familiar with before attempting to add anew service to the gateway.
If you navigate to the data directory in your Knox home directory ({GATEWAY_HOME}/data}, you will see thefollowing directory structure:
Services Service name Version service.xml rewrite.xml
For example, if you were to navigate to the WebHDFS Service directory, you would see the following directorystructure:
Services WebHDFS 2.4.0 service.xml rewrite.xml
Procedure
1. Navigate to the services directory in your Knox gateway HOME directory ({GATEWAY_HOME}/data/services).
2. Add the service.xml and rewrite.xml files to the directory.
Note:
If you want to add the service to the Knox build, then add the service.xml and rewrite files to the gateway-services-definitions module.
3. Restart the Knox Gateway server:
cd $gateway/bin/gateway.sh stopcd $gateway /bin/gateway.sh start
Example
<GATEWAY_HOME>/data/services/webhdfs/0.0.1/service.xml
<service role="WEBHDFS" name="webhdfs" version="0.0.1"> <routes> <route path="/webhdfs/**"/> </routes></service>
<GATEWAY_HOME>/data/services/webhdfs/0.0.1/rewrite.xml
<rules> <rule dir="IN" name="WEBHDFS/webhdfs/inbound" pattern="*://*:*/**/webhdfs/{path=**}?{**}"> <rewrite template="{$serviceUrl[WEBHDFS]}/{path=**}?{**}"/> </rule>
22
Configuring Proxy with Apache Knox Manually Configuring Knox Topology Files
</rules>
Mapping the Internal Nodes to External URLsHostmapping is an advanced configuration topic. Generally, it is only required in deployments in virtualizedenvironments, such as Cloud deployments and some development and testing environments.
The isolation of the cluster is accomplished through virtualization that will hide the internal networking details (suchas IP addresses and/or hostnames) from the outside world, while exposing other IP addresses and/or hostnamesfor use by clients accessing the cluster from outside of the virtualized environment. The exposed IP addresses andhostnames are available for use in the topology descriptor service definitions. This configuration works great forrequests that are initiated from the external clients themselves which only ever use the Knox Gateway exposedendpoints.
Difficulties from these virtualized environments arise when the cluster redirects client requests to other nodes withinthe cluster and indicates the internal hostname locations, rather than those designated to be exposed externally. Sincethe services don't know or care whether a request is coming from an external or internal client, it uses its only view ofthe cluster, which is the internal details of the virtualized environment.
The Knox Gateway needs to know how to route a request that has been redirected by the service to an address that isnot actually accessible by the gateway. Hostmapping acts as an adapter that intercepts the redirects from the serviceand converts the indicated internal address to a known external address that Knox will be able to route to once theclient resends the request through the client facing gateway endpoint. The gateway uses the hostmap to replacethe internal hostname within the routing policy for the particular request with the externally exposed hostname.This enables the dispatching from the Knox Gateway to successfully connect to the service within the virtualizedenvironment. Otherwise, attempting to route to an internal-only address will result in connection failures.
A number of the REST API operations require multi-step interactions that facilitate the client's interaction withmultiple nodes within a distributed system. External clients performing multi-step operations use the URL providedby the gateway in the responses to form the next request. Since the routing policy is hidden by the gateway from theexternal clients, the fact that the subsequent requests in the multi-stepped interaction are mapped to the appropriateexternally exposed endpoints is not exposed to the client.
For example, when uploading a file with WebHDFS service:
1. The external client sends a request to the gateway WebHDFS service.2. The gateway proxies the request to WebHDFS using the service URL.3. WebHDFS determines which DataNodes to create the file on and returns the path for the upload as a Location
header in a HTTP redirect, which contains the datanode host information.4. The gateway augments the routing policy based on the datanode hostname in the redirect by mapping it to the
externally resolvable hostname.5. The external client continues to upload the file through the gateway.6. The gateway proxies the request to the datanode by using the augmented routing policy.7. The datanode returns the status of the upload and the gateway again translates the information without exposing
any internal cluster details.
Set Up a Hostmap ProviderHow to add the hostmap provider to the cluster topology descriptor and a parameter for each DataNode in the cluster.
Procedure
1. Open the cluster topology descriptor file, $cluster-name.xml, in a text editor.
2. Add the Hostmap provider totopology/gateway using the following format:
<provider> <role>hostmap</role> <name>static</name>
23
Configuring Proxy with Apache Knox Manually Configuring Knox Topology Files
<enabled>true</enabled> <param> <name>$external-name</name> <value>$internal-dn-host</value> </param></provider>
where:
• $cluster-name.xml is the name of the topology descriptor file, located in $gateway /conf/topologies.• $external-name is the value that the gateway uses to replace $internal_host host names in responses.• $internal-dn-host is a comma-separated list of host names that the gateway will replace when rewriting
responses.
3. To the hostmap provider, add a param for each additional DataNode in your cluster:
<param> <name>$external-name2</name> <value>$internal-dn2-host</value></param>
4. Save the file.Saving the results automatically deploys the topology with the change. The result is the creation of a new WARfile with modified timestamp in $gatewaydir/data/deployments.
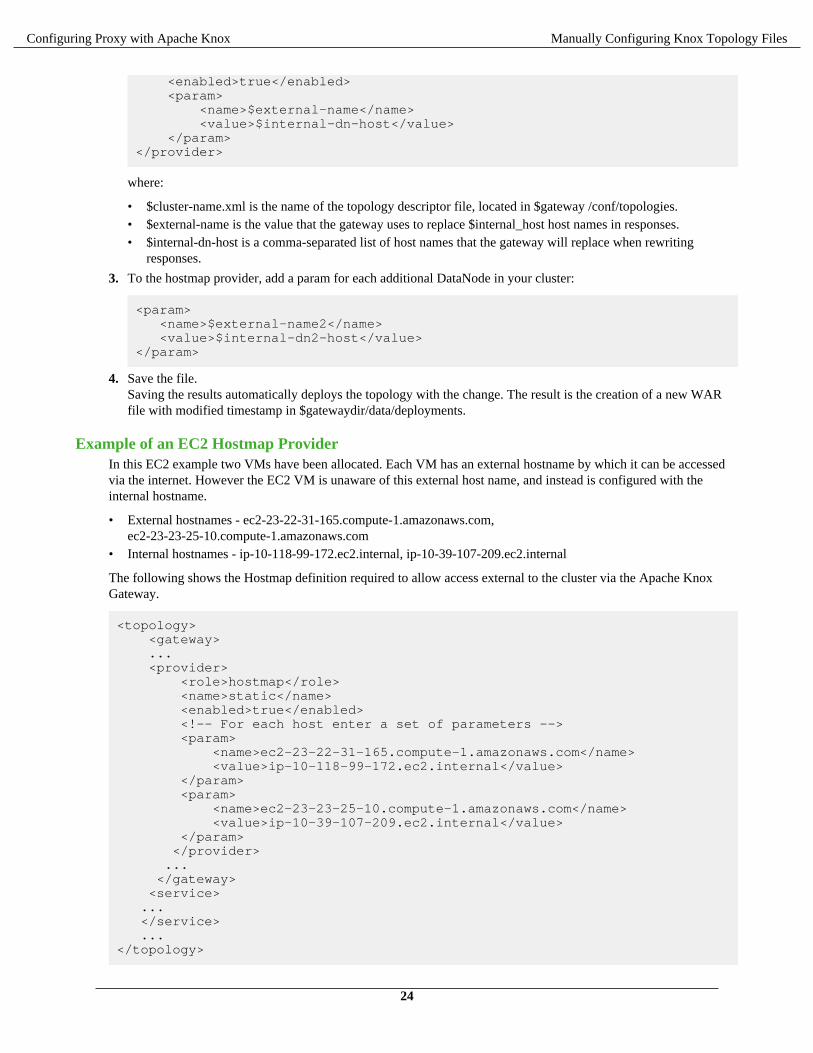
Example of an EC2 Hostmap ProviderIn this EC2 example two VMs have been allocated. Each VM has an external hostname by which it can be accessedvia the internet. However the EC2 VM is unaware of this external host name, and instead is configured with theinternal hostname.
• External hostnames - ec2-23-22-31-165.compute-1.amazonaws.com,ec2-23-23-25-10.compute-1.amazonaws.com
• Internal hostnames - ip-10-118-99-172.ec2.internal, ip-10-39-107-209.ec2.internal
The following shows the Hostmap definition required to allow access external to the cluster via the Apache KnoxGateway.
<topology> <gateway> ... <provider> <role>hostmap</role> <name>static</name> <enabled>true</enabled> <!-- For each host enter a set of parameters --> <param> <name>ec2-23-22-31-165.compute-1.amazonaws.com</name> <value>ip-10-118-99-172.ec2.internal</value> </param> <param> <name>ec2-23-23-25-10.compute-1.amazonaws.com</name> <value>ip-10-39-107-209.ec2.internal</value> </param> </provider> ... </gateway> <service> ... </service> ...</topology>
24
Configuring Proxy with Apache Knox Manually Configuring Knox Topology Files
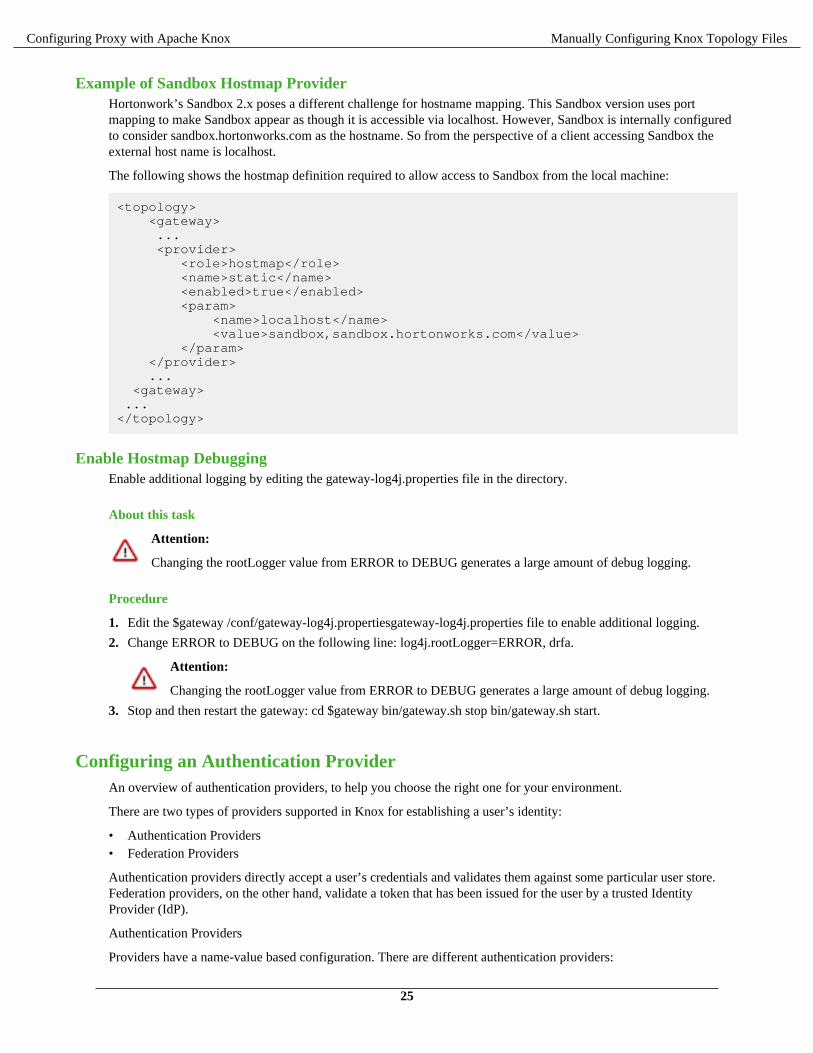
Example of Sandbox Hostmap ProviderHortonwork’s Sandbox 2.x poses a different challenge for hostname mapping. This Sandbox version uses portmapping to make Sandbox appear as though it is accessible via localhost. However, Sandbox is internally configuredto consider sandbox.hortonworks.com as the hostname. So from the perspective of a client accessing Sandbox theexternal host name is localhost.
The following shows the hostmap definition required to allow access to Sandbox from the local machine:
<topology> <gateway> ... <provider> <role>hostmap</role> <name>static</name> <enabled>true</enabled> <param> <name>localhost</name> <value>sandbox,sandbox.hortonworks.com</value> </param> </provider> ... <gateway> ...</topology>
Enable Hostmap DebuggingEnable additional logging by editing the gateway-log4j.properties file in the directory.
About this task
Attention:
Changing the rootLogger value from ERROR to DEBUG generates a large amount of debug logging.
Procedure
1. Edit the $gateway /conf/gateway-log4j.propertiesgateway-log4j.properties file to enable additional logging.
2. Change ERROR to DEBUG on the following line: log4j.rootLogger=ERROR, drfa.
Attention:
Changing the rootLogger value from ERROR to DEBUG generates a large amount of debug logging.
3. Stop and then restart the gateway: cd $gateway bin/gateway.sh stop bin/gateway.sh start.
Configuring an Authentication ProviderAn overview of authentication providers, to help you choose the right one for your environment.
There are two types of providers supported in Knox for establishing a user’s identity:
• Authentication Providers• Federation Providers
Authentication providers directly accept a user’s credentials and validates them against some particular user store.Federation providers, on the other hand, validate a token that has been issued for the user by a trusted IdentityProvider (IdP).
Authentication Providers
Providers have a name-value based configuration. There are different authentication providers:
25
Configuring Proxy with Apache Knox Manually Configuring Knox Topology Files
• Anonymous
Used by Knox to let the proxied service or UI do its own authentication.• LDAP
For LDAP/AD authentication with username and password. No SPNEGO/Kerberos support.• SPNEGO
For SPNEGO/Kerberos authentication with delegation tokens. No LDAP/AD support.• PAM
For PAM authentication with username and password, via ShiroProvider.
Federation Providers
There are different federation providers:
• HeaderPreAuth• SSOCookieProvider• JWT• Pac4j
Related InformationSetting up JWT Federation Provider
Setting up Pac4j Federation Provider
Set Up LDAP Authentication
Setting Up SPNEGO Authentication
Setting up PAM Authentication
Set Up HeaderPreAuth Federation Provider
Set up SSOCookieProvider Federation Provider
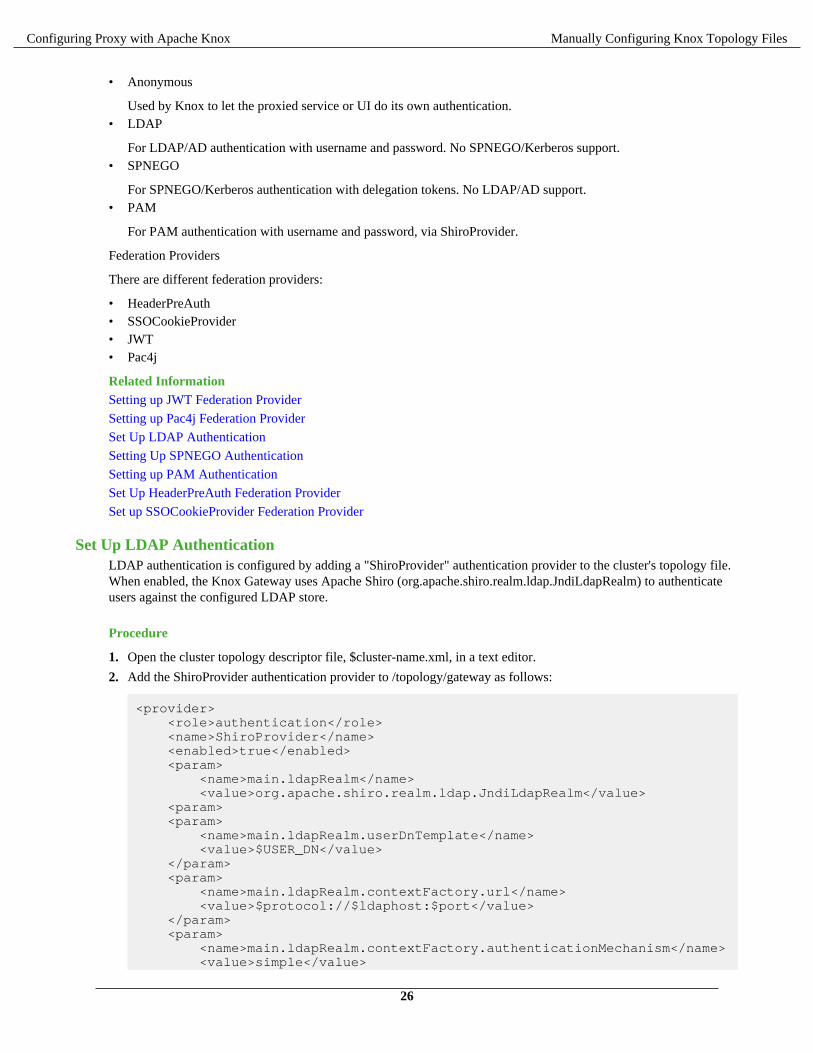
Set Up LDAP AuthenticationLDAP authentication is configured by adding a "ShiroProvider" authentication provider to the cluster's topology file.When enabled, the Knox Gateway uses Apache Shiro (org.apache.shiro.realm.ldap.JndiLdapRealm) to authenticateusers against the configured LDAP store.
Procedure
1. Open the cluster topology descriptor file, $cluster-name.xml, in a text editor.
2. Add the ShiroProvider authentication provider to /topology/gateway as follows:
<provider> <role>authentication</role> <name>ShiroProvider</name> <enabled>true</enabled> <param> <name>main.ldapRealm</name> <value>org.apache.shiro.realm.ldap.JndiLdapRealm</value> <param> <param> <name>main.ldapRealm.userDnTemplate</name> <value>$USER_DN</value> </param> <param> <name>main.ldapRealm.contextFactory.url</name> <value>$protocol://$ldaphost:$port</value> </param> <param> <name>main.ldapRealm.contextFactory.authenticationMechanism</name> <value>simple</value>
26
Configuring Proxy with Apache Knox Manually Configuring Knox Topology Files
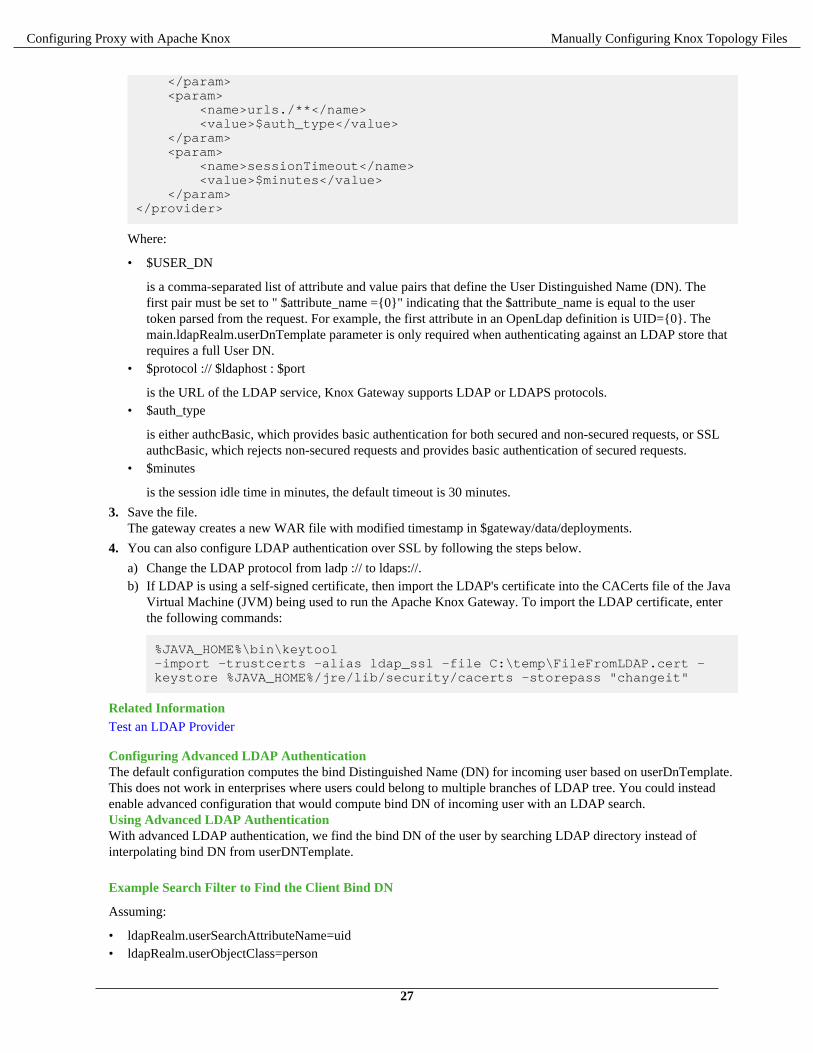
</param> <param> <name>urls./**</name> <value>$auth_type</value> </param> <param> <name>sessionTimeout</name> <value>$minutes</value> </param></provider>
Where:
• $USER_DN
is a comma-separated list of attribute and value pairs that define the User Distinguished Name (DN). Thefirst pair must be set to " $attribute_name ={0}" indicating that the $attribute_name is equal to the usertoken parsed from the request. For example, the first attribute in an OpenLdap definition is UID={0}. Themain.ldapRealm.userDnTemplate parameter is only required when authenticating against an LDAP store thatrequires a full User DN.
• $protocol :// $ldaphost : $port
is the URL of the LDAP service, Knox Gateway supports LDAP or LDAPS protocols.• $auth_type
is either authcBasic, which provides basic authentication for both secured and non-secured requests, or SSLauthcBasic, which rejects non-secured requests and provides basic authentication of secured requests.
• $minutes
is the session idle time in minutes, the default timeout is 30 minutes.
3. Save the file.The gateway creates a new WAR file with modified timestamp in $gateway/data/deployments.
4. You can also configure LDAP authentication over SSL by following the steps below.
a) Change the LDAP protocol from ladp :// to ldaps://.b) If LDAP is using a self-signed certificate, then import the LDAP's certificate into the CACerts file of the Java
Virtual Machine (JVM) being used to run the Apache Knox Gateway. To import the LDAP certificate, enterthe following commands:
%JAVA_HOME%\bin\keytool-import -trustcerts -alias ldap_ssl -file C:\temp\FileFromLDAP.cert -keystore %JAVA_HOME%/jre/lib/security/cacerts -storepass "changeit"
Related InformationTest an LDAP Provider
Configuring Advanced LDAP AuthenticationThe default configuration computes the bind Distinguished Name (DN) for incoming user based on userDnTemplate.This does not work in enterprises where users could belong to multiple branches of LDAP tree. You could insteadenable advanced configuration that would compute bind DN of incoming user with an LDAP search.Using Advanced LDAP AuthenticationWith advanced LDAP authentication, we find the bind DN of the user by searching LDAP directory instead ofinterpolating bind DN from userDNTemplate.
Example Search Filter to Find the Client Bind DN
Assuming:
• ldapRealm.userSearchAttributeName=uid• ldapRealm.userObjectClass=person
27
Configuring Proxy with Apache Knox Manually Configuring Knox Topology Files
• client specified login id = “guest”
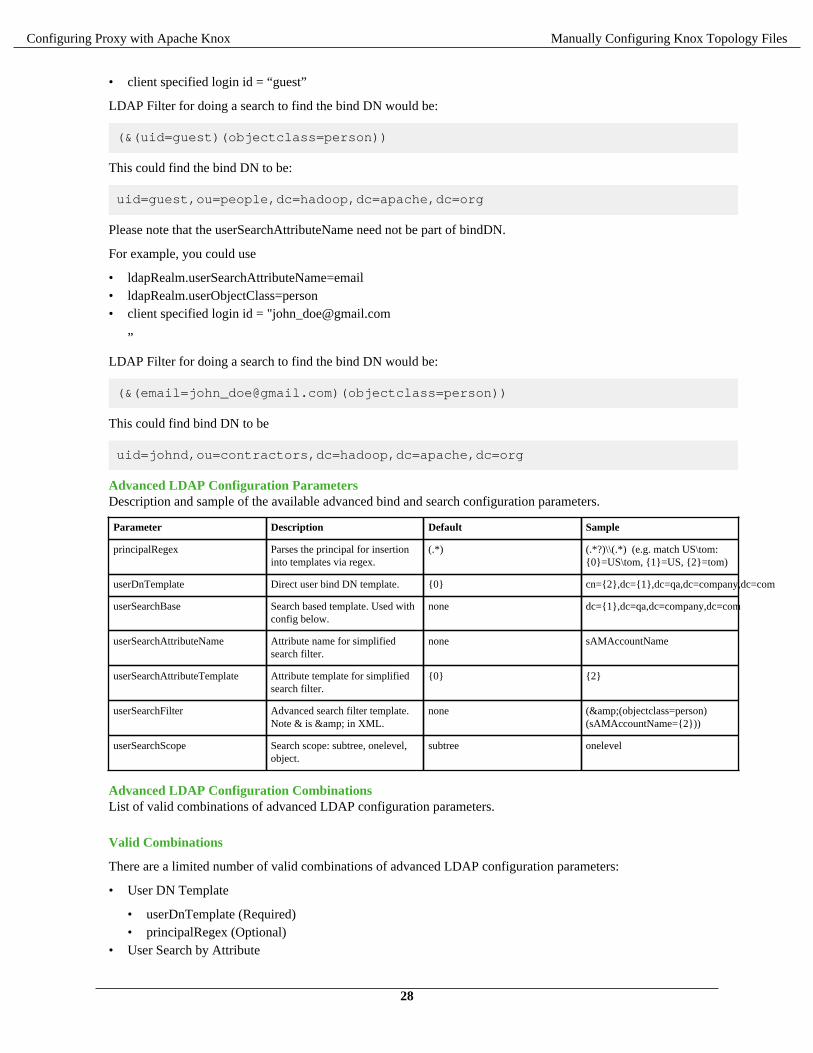
LDAP Filter for doing a search to find the bind DN would be:
(&(uid=guest)(objectclass=person))
This could find the bind DN to be:
uid=guest,ou=people,dc=hadoop,dc=apache,dc=org
Please note that the userSearchAttributeName need not be part of bindDN.
For example, you could use
• ldapRealm.userSearchAttributeName=email• ldapRealm.userObjectClass=person• client specified login id = "[email protected]
”
LDAP Filter for doing a search to find the bind DN would be:
(&([email protected])(objectclass=person))
This could find bind DN to be
uid=johnd,ou=contractors,dc=hadoop,dc=apache,dc=org
Advanced LDAP Configuration ParametersDescription and sample of the available advanced bind and search configuration parameters.
Parameter Description Default Sample
principalRegex Parses the principal for insertioninto templates via regex.
(.*) (.*?)\\(.*) (e.g. match US\tom:{0}=US\tom, {1}=US, {2}=tom)
userDnTemplate Direct user bind DN template. {0} cn={2},dc={1},dc=qa,dc=company,dc=com
userSearchBase Search based template. Used withconfig below.
none dc={1},dc=qa,dc=company,dc=com
userSearchAttributeName Attribute name for simplifiedsearch filter.
none sAMAccountName
userSearchAttributeTemplate Attribute template for simplifiedsearch filter.
{0} {2}
userSearchFilter Advanced search filter template.Note & is & in XML.
none (&(objectclass=person)(sAMAccountName={2}))
userSearchScope Search scope: subtree, onelevel,object.
subtree onelevel
Advanced LDAP Configuration CombinationsList of valid combinations of advanced LDAP configuration parameters.
Valid Combinations
There are a limited number of valid combinations of advanced LDAP configuration parameters:
• User DN Template
• userDnTemplate (Required)• principalRegex (Optional)
• User Search by Attribute
28
Configuring Proxy with Apache Knox Manually Configuring Knox Topology Files
• userSearchBase (Required)• userAttributeName (Required)• userAttributeTemplate (Optional)• userSearchScope (Optional)• principalRegex (Optional)
• User Search by Filter
• userSearchBase (Required)• userSearchFilter (Required)• userSearchScope (Optional)• principalRegex (Optional)
Advanced LDAP Configuration Precedence
The presence of multiple configuration combinations should be avoided. The rules below clarify which combinationstake precedence when present.
• userSearchBase takes precedence over userDnTemplate• userSearchFilter takes precedence over userSearchAttributeName
Advanced LDAP Authentication AddendumThis topic collects supplemental documentation on LDAP authentication.
Problem with userDnTemplate Based Authentication
UserDnTemplate based authentication uses configuration parameter ldapRealm.userDnTemplate. Typical value ofuserDNTemplate would look like uid={0},ou=people,dc=hadoop,dc=apache,dc=org.
To compute bind DN of the client, we swap the place holder {0} with login id provided by theclient. For example, if the login id provided by the client is "guest’, the computed bind DN would beuid=guest,ou=people,dc=hadoop,dc=apache,dc=org.
This keeps configuration simple.
However, this does not work if users belong to different branches of LDAP DIT. For example, if there are some usersunder ou=people,dc=hadoop,dc=apache,dc=org and some users under ou=contractors,dc=hadoop,dc=apache,dc=org,
We can not come up with userDnTemplate that would work for all the users.
Special Note on Parameter main ldapRealm contextFactory systemPassword
The value for this could have one of the following two formats:
• plaintextpassword• ${ALIAS=ldcSystemPassword}
The first format specifies the password in plain text in the provider configuration. Use of this format should be limitedfor testing and troubleshooting.
We strongly recommend using the second format ${ALIAS=ldcSystemPassword} in production. This format uses analias for the password stored in credential store. In the example ${ALIAS=ldcSystemPassword}, ldcSystemPasswordis the alias for the password stored in credential store.
Assuming the plain text password is “pa$$word”, and your topology file name is “test.xml”, you would use followingcommand to create the right password alias in credential store.
{GATEWAY_HOME}/bin/knoxcli.sh create-alias ldcSystemPassword --cluster test --value pa$$word
29
Configuring Proxy with Apache Knox Manually Configuring Knox Topology Files
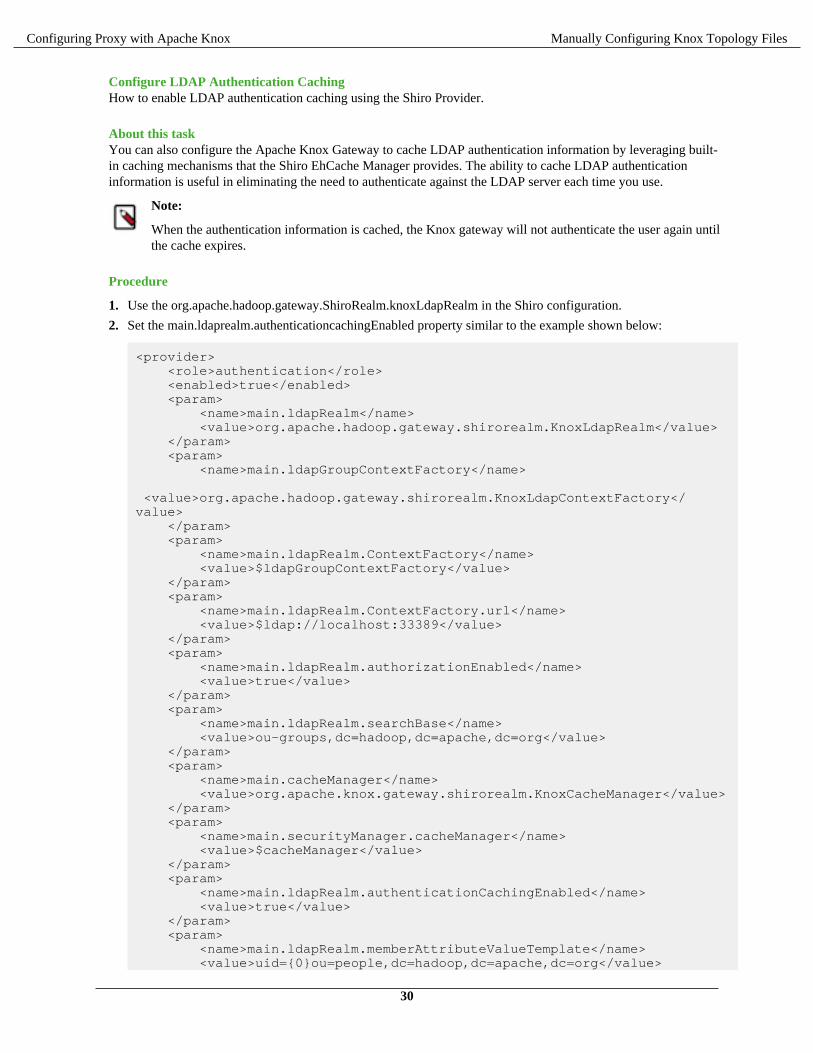
Configure LDAP Authentication CachingHow to enable LDAP authentication caching using the Shiro Provider.
About this taskYou can also configure the Apache Knox Gateway to cache LDAP authentication information by leveraging built-in caching mechanisms that the Shiro EhCache Manager provides. The ability to cache LDAP authenticationinformation is useful in eliminating the need to authenticate against the LDAP server each time you use.
Note:
When the authentication information is cached, the Knox gateway will not authenticate the user again untilthe cache expires.
Procedure
1. Use the org.apache.hadoop.gateway.ShiroRealm.knoxLdapRealm in the Shiro configuration.
2. Set the main.ldaprealm.authenticationcachingEnabled property similar to the example shown below:
<provider> <role>authentication</role> <enabled>true</enabled> <param> <name>main.ldapRealm</name> <value>org.apache.hadoop.gateway.shirorealm.KnoxLdapRealm</value> </param> <param> <name>main.ldapGroupContextFactory</name> <value>org.apache.hadoop.gateway.shirorealm.KnoxLdapContextFactory</value> </param> <param> <name>main.ldapRealm.ContextFactory</name> <value>$ldapGroupContextFactory</value> </param> <param> <name>main.ldapRealm.ContextFactory.url</name> <value>$ldap://localhost:33389</value> </param> <param> <name>main.ldapRealm.authorizationEnabled</name> <value>true</value> </param> <param> <name>main.ldapRealm.searchBase</name> <value>ou-groups,dc=hadoop,dc=apache,dc=org</value> </param> <param> <name>main.cacheManager</name> <value>org.apache.knox.gateway.shirorealm.KnoxCacheManager</value> </param> <param> <name>main.securityManager.cacheManager</name> <value>$cacheManager</value> </param> <param> <name>main.ldapRealm.authenticationCachingEnabled</name> <value>true</value> </param> <param> <name>main.ldapRealm.memberAttributeValueTemplate</name> <value>uid={0}ou=people,dc=hadoop,dc=apache,dc=org</value>
30
Configuring Proxy with Apache Knox Manually Configuring Knox Topology Files
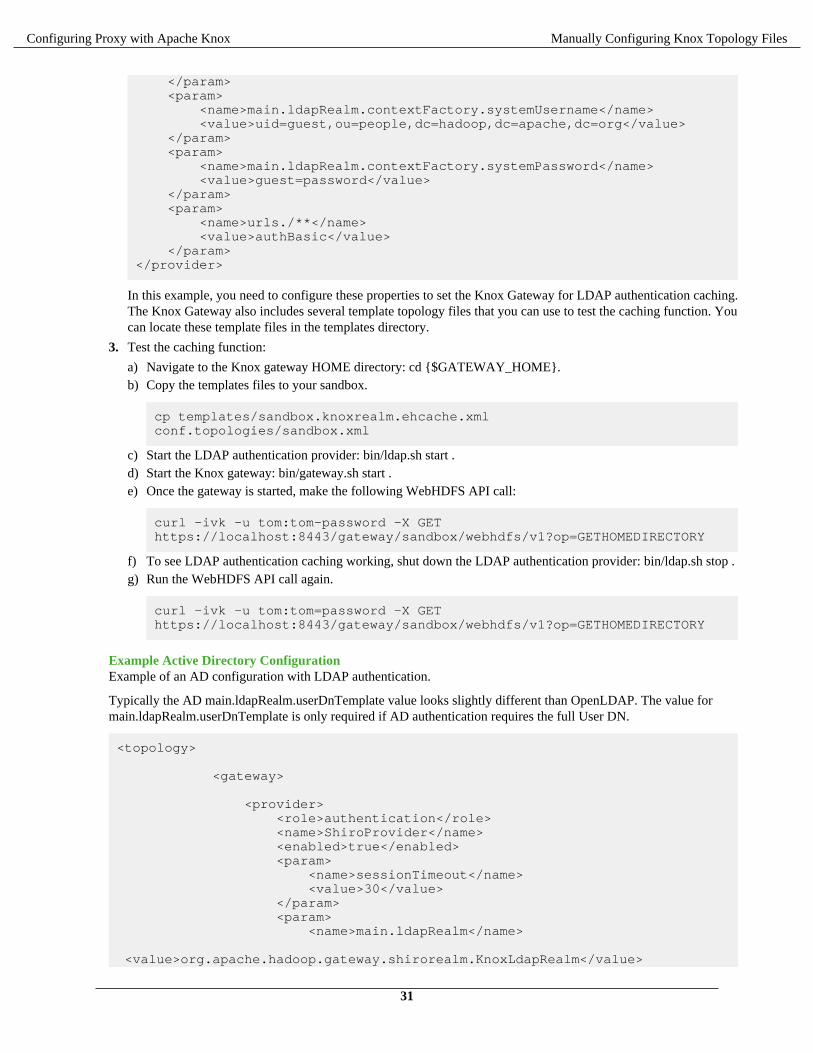
</param> <param> <name>main.ldapRealm.contextFactory.systemUsername</name> <value>uid=guest,ou=people,dc=hadoop,dc=apache,dc=org</value> </param> <param> <name>main.ldapRealm.contextFactory.systemPassword</name> <value>guest=password</value> </param> <param> <name>urls./**</name> <value>authBasic</value> </param></provider>
In this example, you need to configure these properties to set the Knox Gateway for LDAP authentication caching.The Knox Gateway also includes several template topology files that you can use to test the caching function. Youcan locate these template files in the templates directory.
3. Test the caching function:
a) Navigate to the Knox gateway HOME directory: cd {$GATEWAY_HOME}.b) Copy the templates files to your sandbox.
cp templates/sandbox.knoxrealm.ehcache.xmlconf.topologies/sandbox.xml
c) Start the LDAP authentication provider: bin/ldap.sh start .d) Start the Knox gateway: bin/gateway.sh start .e) Once the gateway is started, make the following WebHDFS API call:
curl -ivk -u tom:tom-password -X GEThttps://localhost:8443/gateway/sandbox/webhdfs/v1?op=GETHOMEDIRECTORY
f) To see LDAP authentication caching working, shut down the LDAP authentication provider: bin/ldap.sh stop .g) Run the WebHDFS API call again.
curl -ivk -u tom:tom=password -X GEThttps://localhost:8443/gateway/sandbox/webhdfs/v1?op=GETHOMEDIRECTORY
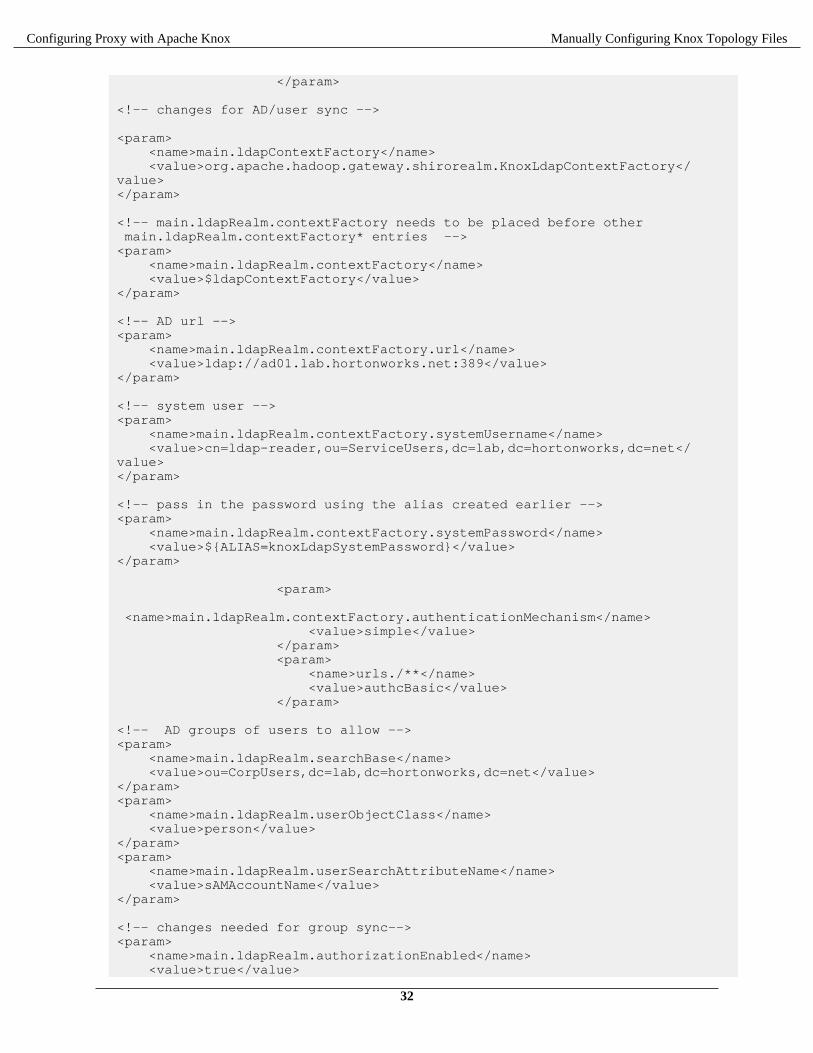
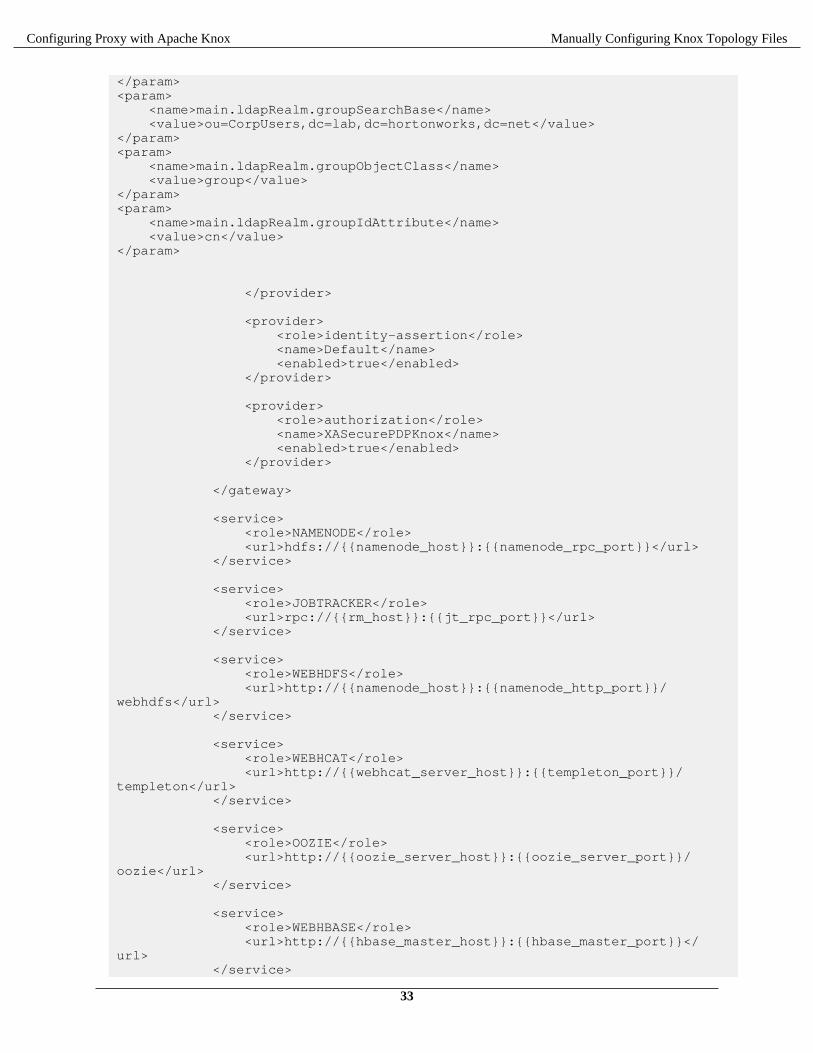
Example Active Directory ConfigurationExample of an AD configuration with LDAP authentication.
Typically the AD main.ldapRealm.userDnTemplate value looks slightly different than OpenLDAP. The value formain.ldapRealm.userDnTemplate is only required if AD authentication requires the full User DN.
<topology>
<gateway>
<provider> <role>authentication</role> <name>ShiroProvider</name> <enabled>true</enabled> <param> <name>sessionTimeout</name> <value>30</value> </param> <param> <name>main.ldapRealm</name> <value>org.apache.hadoop.gateway.shirorealm.KnoxLdapRealm</value>
31
Configuring Proxy with Apache Knox Manually Configuring Knox Topology Files
</param>
<!-- changes for AD/user sync -->
<param> <name>main.ldapContextFactory</name> <value>org.apache.hadoop.gateway.shirorealm.KnoxLdapContextFactory</value></param>
<!-- main.ldapRealm.contextFactory needs to be placed before other main.ldapRealm.contextFactory* entries --><param> <name>main.ldapRealm.contextFactory</name> <value>$ldapContextFactory</value></param>
<!-- AD url --><param> <name>main.ldapRealm.contextFactory.url</name> <value>ldap://ad01.lab.hortonworks.net:389</value> </param>
<!-- system user --><param> <name>main.ldapRealm.contextFactory.systemUsername</name> <value>cn=ldap-reader,ou=ServiceUsers,dc=lab,dc=hortonworks,dc=net</value></param>
<!-- pass in the password using the alias created earlier --><param> <name>main.ldapRealm.contextFactory.systemPassword</name> <value>${ALIAS=knoxLdapSystemPassword}</value></param>
<param> <name>main.ldapRealm.contextFactory.authenticationMechanism</name> <value>simple</value> </param> <param> <name>urls./**</name> <value>authcBasic</value> </param>
<!-- AD groups of users to allow --><param> <name>main.ldapRealm.searchBase</name> <value>ou=CorpUsers,dc=lab,dc=hortonworks,dc=net</value></param><param> <name>main.ldapRealm.userObjectClass</name> <value>person</value></param><param> <name>main.ldapRealm.userSearchAttributeName</name> <value>sAMAccountName</value></param>
<!-- changes needed for group sync--><param> <name>main.ldapRealm.authorizationEnabled</name> <value>true</value>
32
Configuring Proxy with Apache Knox Manually Configuring Knox Topology Files
</param><param> <name>main.ldapRealm.groupSearchBase</name> <value>ou=CorpUsers,dc=lab,dc=hortonworks,dc=net</value></param><param> <name>main.ldapRealm.groupObjectClass</name> <value>group</value></param><param> <name>main.ldapRealm.groupIdAttribute</name> <value>cn</value></param>
</provider>
<provider> <role>identity-assertion</role> <name>Default</name> <enabled>true</enabled> </provider>
<provider> <role>authorization</role> <name>XASecurePDPKnox</name> <enabled>true</enabled> </provider>
</gateway>
<service> <role>NAMENODE</role> <url>hdfs://{{namenode_host}}:{{namenode_rpc_port}}</url> </service>
<service> <role>JOBTRACKER</role> <url>rpc://{{rm_host}}:{{jt_rpc_port}}</url> </service>
<service> <role>WEBHDFS</role> <url>http://{{namenode_host}}:{{namenode_http_port}}/webhdfs</url> </service>
<service> <role>WEBHCAT</role> <url>http://{{webhcat_server_host}}:{{templeton_port}}/templeton</url> </service>
<service> <role>OOZIE</role> <url>http://{{oozie_server_host}}:{{oozie_server_port}}/oozie</url> </service>
<service> <role>WEBHBASE</role> <url>http://{{hbase_master_host}}:{{hbase_master_port}}</url> </service>
33
Configuring Proxy with Apache Knox Manually Configuring Knox Topology Files
<service> <role>HIVE</role> <url>http://{{hive_server_host}}:{{hive_http_port}}/{{hive_http_path}}</url> </service>
<service> <role>RESOURCEMANAGER</role> <url>http://{{rm_host}}:{{rm_port}}/ws</url> </service> </topology>
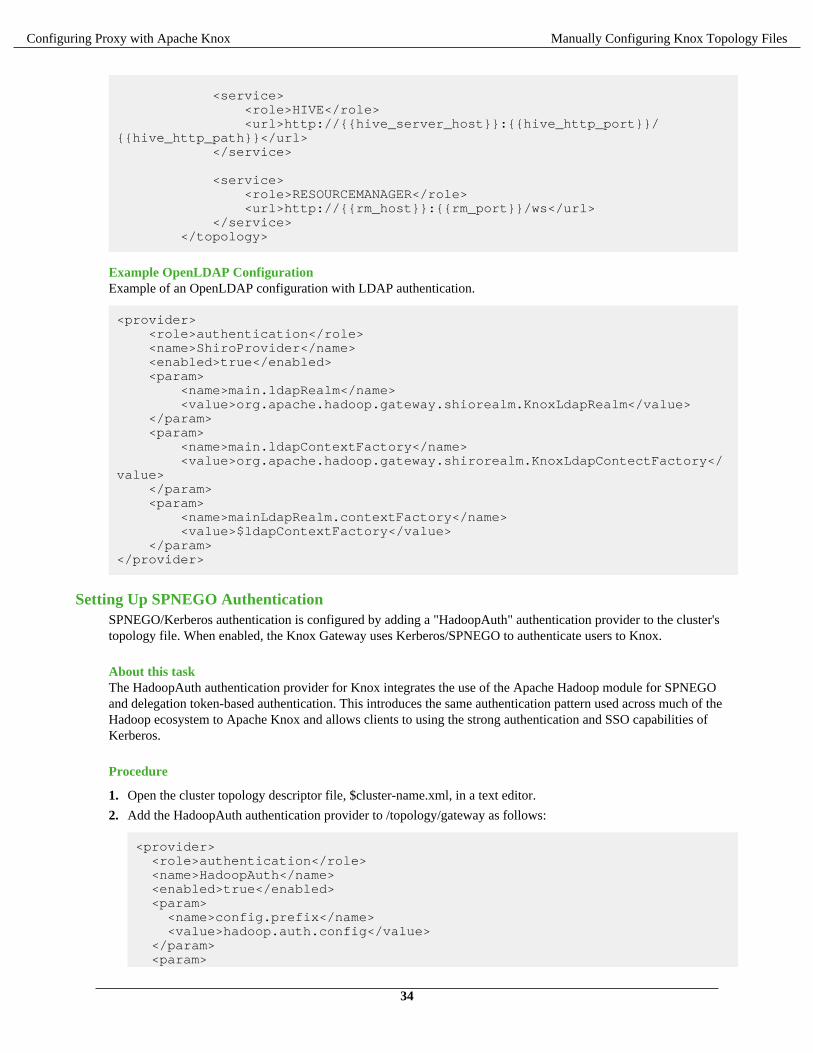
Example OpenLDAP ConfigurationExample of an OpenLDAP configuration with LDAP authentication.
<provider> <role>authentication</role> <name>ShiroProvider</name> <enabled>true</enabled> <param> <name>main.ldapRealm</name> <value>org.apache.hadoop.gateway.shiorealm.KnoxLdapRealm</value> </param> <param> <name>main.ldapContextFactory</name> <value>org.apache.hadoop.gateway.shirorealm.KnoxLdapContectFactory</value> </param> <param> <name>mainLdapRealm.contextFactory</name> <value>$ldapContextFactory</value> </param></provider>
Setting Up SPNEGO AuthenticationSPNEGO/Kerberos authentication is configured by adding a "HadoopAuth" authentication provider to the cluster'stopology file. When enabled, the Knox Gateway uses Kerberos/SPNEGO to authenticate users to Knox.
About this taskThe HadoopAuth authentication provider for Knox integrates the use of the Apache Hadoop module for SPNEGOand delegation token-based authentication. This introduces the same authentication pattern used across much of theHadoop ecosystem to Apache Knox and allows clients to using the strong authentication and SSO capabilities ofKerberos.
Procedure
1. Open the cluster topology descriptor file, $cluster-name.xml, in a text editor.
2. Add the HadoopAuth authentication provider to /topology/gateway as follows:
<provider> <role>authentication</role> <name>HadoopAuth</name> <enabled>true</enabled> <param> <name>config.prefix</name> <value>hadoop.auth.config</value> </param> <param>
34
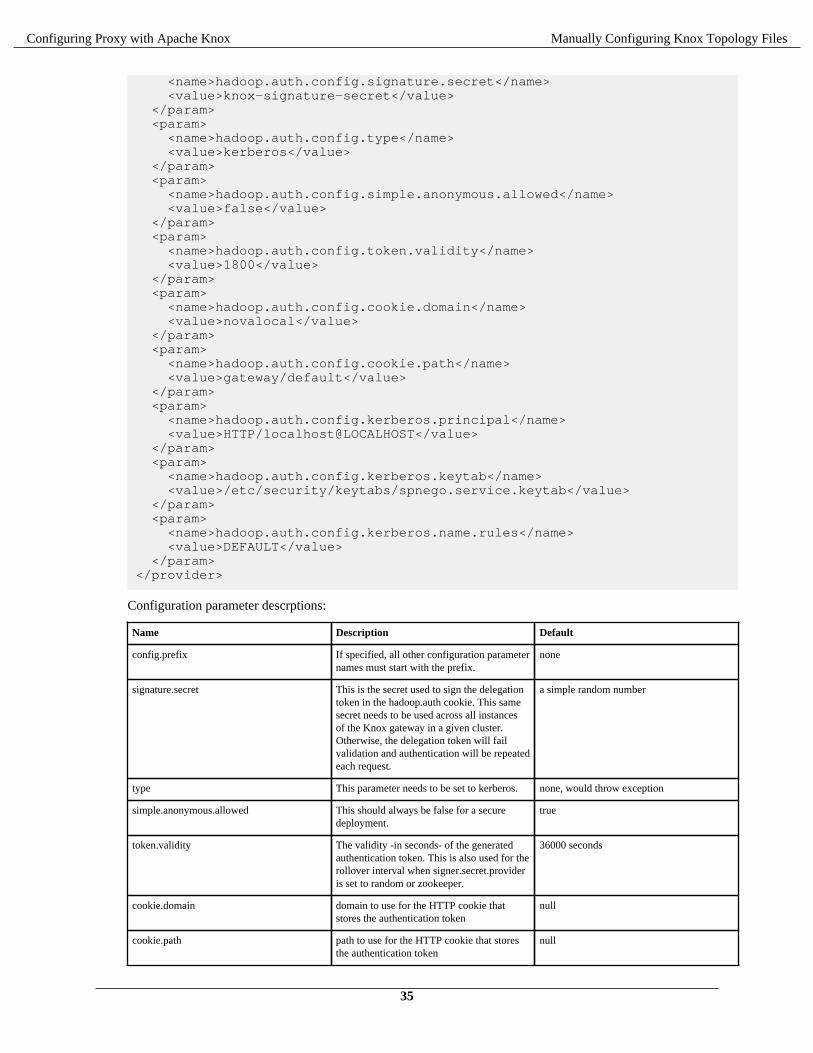
Configuring Proxy with Apache Knox Manually Configuring Knox Topology Files
<name>hadoop.auth.config.signature.secret</name> <value>knox-signature-secret</value> </param> <param> <name>hadoop.auth.config.type</name> <value>kerberos</value> </param> <param> <name>hadoop.auth.config.simple.anonymous.allowed</name> <value>false</value> </param> <param> <name>hadoop.auth.config.token.validity</name> <value>1800</value> </param> <param> <name>hadoop.auth.config.cookie.domain</name> <value>novalocal</value> </param> <param> <name>hadoop.auth.config.cookie.path</name> <value>gateway/default</value> </param> <param> <name>hadoop.auth.config.kerberos.principal</name> <value>HTTP/localhost@LOCALHOST</value> </param> <param> <name>hadoop.auth.config.kerberos.keytab</name> <value>/etc/security/keytabs/spnego.service.keytab</value> </param> <param> <name>hadoop.auth.config.kerberos.name.rules</name> <value>DEFAULT</value> </param></provider>
Configuration parameter descrptions:
Name Description Default
config.prefix If specified, all other configuration parameternames must start with the prefix.
none
signature.secret This is the secret used to sign the delegationtoken in the hadoop.auth cookie. This samesecret needs to be used across all instancesof the Knox gateway in a given cluster.Otherwise, the delegation token will failvalidation and authentication will be repeatedeach request.
a simple random number
type This parameter needs to be set to kerberos. none, would throw exception
simple.anonymous.allowed This should always be false for a securedeployment.
true
token.validity The validity -in seconds- of the generatedauthentication token. This is also used for therollover interval when signer.secret.provideris set to random or zookeeper.
36000 seconds
cookie.domain domain to use for the HTTP cookie thatstores the authentication token
null
cookie.path path to use for the HTTP cookie that storesthe authentication token
null
35
Configuring Proxy with Apache Knox Manually Configuring Knox Topology Files
Name Description Default
kerberos.principal The web-application Kerberos principalname. The Kerberos principal name muststart with HTTP/…. For example: HTTP/localhost@LOCALHOST
null
kerberos.keytab The path to the keytab file containing thecredentials for the kerberos principal. Forexample: /Users/lmccay/lmccay.keytab
null
kerberos.name.rules The name of the ruleset for extracting theusername from the kerberos principal.
DEFAULT
3. Save the file.The gateway creates a new WAR file with modified timestamp in $gateway/data/deployments.
What to do next
REST Invocation
Once a user logs in with kinit, their Kerberos session may be used across client requests with things such as curl. Thefollowing curl command can be used to request a directory listing from HDFS while authenticating with SPNEGO viathe –negotiate flag:
curl -k -i --negotiate -u : https://localhost:8443/gateway/sandbox/webhdfs/v1/tmp?op=LISTSTATUS
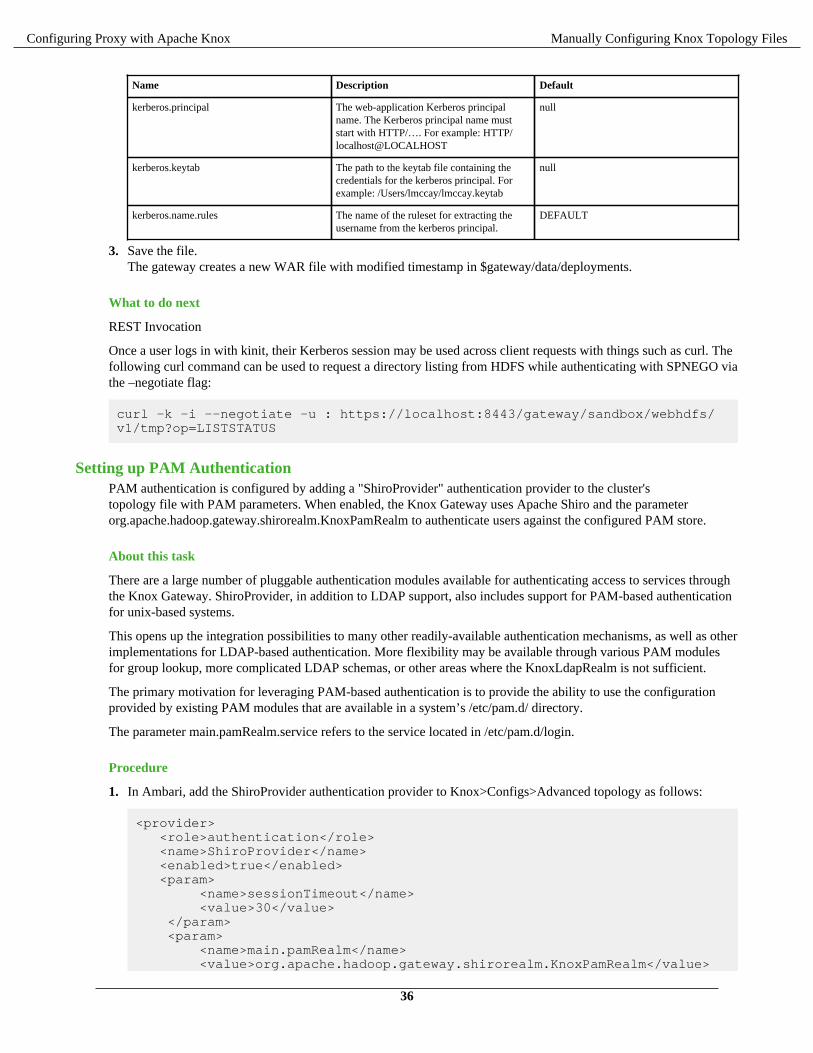
Setting up PAM AuthenticationPAM authentication is configured by adding a "ShiroProvider" authentication provider to the cluster'stopology file with PAM parameters. When enabled, the Knox Gateway uses Apache Shiro and the parameterorg.apache.hadoop.gateway.shirorealm.KnoxPamRealm to authenticate users against the configured PAM store.
About this task
There are a large number of pluggable authentication modules available for authenticating access to services throughthe Knox Gateway. ShiroProvider, in addition to LDAP support, also includes support for PAM-based authenticationfor unix-based systems.
This opens up the integration possibilities to many other readily-available authentication mechanisms, as well as otherimplementations for LDAP-based authentication. More flexibility may be available through various PAM modulesfor group lookup, more complicated LDAP schemas, or other areas where the KnoxLdapRealm is not sufficient.
The primary motivation for leveraging PAM-based authentication is to provide the ability to use the configurationprovided by existing PAM modules that are available in a system’s /etc/pam.d/ directory.
The parameter main.pamRealm.service refers to the service located in /etc/pam.d/login.
Procedure
1. In Ambari, add the ShiroProvider authentication provider to Knox>Configs>Advanced topology as follows:
<provider> <role>authentication</role> <name>ShiroProvider</name> <enabled>true</enabled> <param> <name>sessionTimeout</name> <value>30</value> </param> <param> <name>main.pamRealm</name> <value>org.apache.hadoop.gateway.shirorealm.KnoxPamRealm</value>
36
Configuring Proxy with Apache Knox Manually Configuring Knox Topology Files
</param> <param> <name>main.pamRealm.service</name> <value>login</value> </param> <param> <name>urls./**</name> <value>authcBasic</value> </param></provider>
2. Save the file.
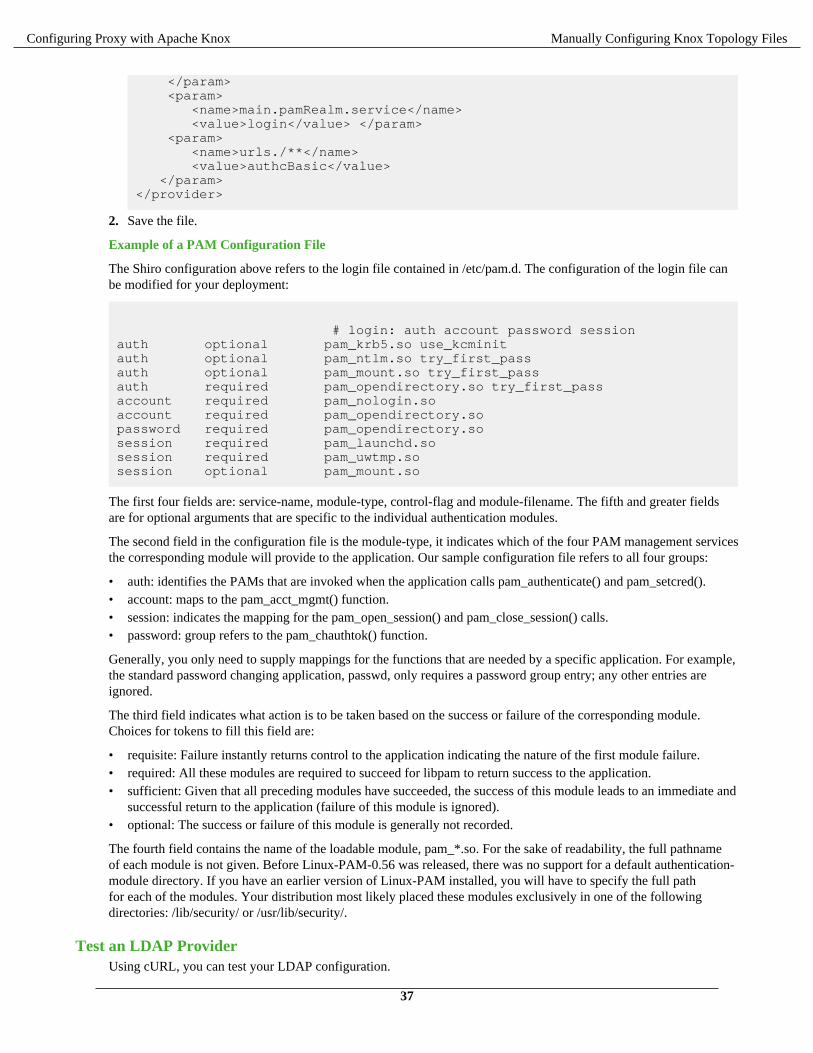
Example of a PAM Configuration File
The Shiro configuration above refers to the login file contained in /etc/pam.d. The configuration of the login file canbe modified for your deployment:
# login: auth account password sessionauth optional pam_krb5.so use_kcminitauth optional pam_ntlm.so try_first_passauth optional pam_mount.so try_first_passauth required pam_opendirectory.so try_first_passaccount required pam_nologin.soaccount required pam_opendirectory.sopassword required pam_opendirectory.sosession required pam_launchd.sosession required pam_uwtmp.sosession optional pam_mount.so
The first four fields are: service-name, module-type, control-flag and module-filename. The fifth and greater fieldsare for optional arguments that are specific to the individual authentication modules.
The second field in the configuration file is the module-type, it indicates which of the four PAM management servicesthe corresponding module will provide to the application. Our sample configuration file refers to all four groups:
• auth: identifies the PAMs that are invoked when the application calls pam_authenticate() and pam_setcred().• account: maps to the pam_acct_mgmt() function.• session: indicates the mapping for the pam_open_session() and pam_close_session() calls.• password: group refers to the pam_chauthtok() function.
Generally, you only need to supply mappings for the functions that are needed by a specific application. For example,the standard password changing application, passwd, only requires a password group entry; any other entries areignored.
The third field indicates what action is to be taken based on the success or failure of the corresponding module.Choices for tokens to fill this field are:
• requisite: Failure instantly returns control to the application indicating the nature of the first module failure.• required: All these modules are required to succeed for libpam to return success to the application.• sufficient: Given that all preceding modules have succeeded, the success of this module leads to an immediate and
successful return to the application (failure of this module is ignored).• optional: The success or failure of this module is generally not recorded.
The fourth field contains the name of the loadable module, pam_*.so. For the sake of readability, the full pathnameof each module is not given. Before Linux-PAM-0.56 was released, there was no support for a default authentication-module directory. If you have an earlier version of Linux-PAM installed, you will have to specify the full pathfor each of the modules. Your distribution most likely placed these modules exclusively in one of the followingdirectories: /lib/security/ or /usr/lib/security/.
Test an LDAP ProviderUsing cURL, you can test your LDAP configuration.
37
Configuring Proxy with Apache Knox Manually Configuring Knox Topology Files
Procedure
1. Open the command line on an external client.
Note:
cURL is not a built-in command line utility in Windows.
2. Enter the following command to list the contents of the directory tmp/test:
curl -i -k -u ldap_user : password -X GET / 'https://$gateway_host:8443/$gateway_path/$cluster_name/webhdfs/api/v1/tmp/test?op=LISTSTATUS
If the directory exists, a content list displays; if the user cannot be authenticated, the request is rejected with anHTTP status of 401 unauthorized.
Related InformationSet Up LDAP Authentication
Test HTTP Header TokensUsing cURL, you can test your HTTP Header Tokens configuration.
Procedure
Use following cURL command to request a directory listing from HDFS while passing in the expected headerSM_USER, note that the example is specific to sandbox:
curl -k -i --header "SM_USER: guest" -v 'https://localhost:8443/gateway/sandbox/webhdfs/v1/tmp?op=LISTSTATUS
Omitting the SM_USER: guest–header: guest” above results in a HTTP status 401 unauthorized
Setting Up 2-Way SSL AuthenticationMutual authentication with SSL provides the Knox gateway with the means to establish a strong trust relationshipwith another party. This is especially useful when applications that act on behalf of end-users send requests to Knox.
While this feature does establish an authenticated trust relationship with the client application, it does not determinethe end-user identity through this authentication. It will continue to look for credentials or tokens that represent theend-user within the request and authenticate or federate the identity accordingly.
To configure your Knox Gateway for 2-way SSL authentication, you must first configure the trust related elementswithin gateway-site.xml file. The table below lists the different elements that you can configure related to 2-waymutual authentication. Use following cURL command to request a directory listing from HDFS while passing in theexpected header SM_USER, note that the example is specific to sandbox:
Table 1: gateway-site.xml Configuration Elements
Name Description Possible Values Default Value
gateway.client.auth.needed Flag used to specify whetherauthentication is required forclient communications to theserver.
TRUE/FALSE FALSE
gateway.truststore.path The fully-qualified path to thetruststore that will be used.
gateway.jks
gateway.truststore.type The type of keystore used for thetruststore.
JKS
gateway.trust.allcerts Flag used to specify whethercertificates passed by the clientshould be automatically trusted.
TRUE/FALSE FALSE
38
Configuring Proxy with Apache Knox Manually Configuring Knox Topology Files
Name Description Possible Values Default Value
ssl.include.ciphers A comma separated list of ciphersto accept for SSL.
See the “JSSE Provider docs>TheSunJSSE Provider >CipherSuites” for possible ciphers.These can also contain regularexpressions as shown in the “Jettydocumentation”.
ssl.exclude.ciphers A comma separated list of ciphersto reject for SSL.
See the “JSSE Provider docs>TheSunJSSE Provider >CipherSuites” for possible ciphers.These can also contain regularexpressions as shown in the “Jettydocumentation”.
Once you have configured the gateway-site.xml file, all topologies deployed within the Knox gateway with mutualauthentication enabled will require all incoming connections to present trusted client certificates during the SSLhandshake process; otherwise, the server will be refuse the connection request.
Related InformationJSSE Provider docs>The SunJSSE Provider >Cipher Suites
Jetty Documentation
Configuring a Federation ProviderAn overview of federation providers, to help you choose the right one for your environment.
There are two types of providers supported in Knox for establishing a user’s identity:
• Authentication Providers• Federation Providers
Authentication providers directly accept a user’s credentials and validates them against some particular user store.Federation providers, on the other hand, validate a token that has been issued for the user by a trusted IdentityProvider (IdP).
There are different federation providers:
• HeaderPreAuth
HeaderPreAuth is a preauthenticated SSO provider.
A number of SSO solutions provide mechanisms for federating an authenticated identity across applications.These mechanisms are at times simple HTTP Header type tokens that can be used to propagate the identity acrossprocess boundaries.
Knox Gateway needs a pluggable mechanism for consuming these tokens and federating the asserted identitythrough an interaction with the cluster.
The HeaderPreAuth provider is configured within the topology file and has a minimal configuration that assumesSM_USER for CA SiteMinder. The following example is the bare minimum configuration for SiteMinder (withno IP address validation).
• SSOCookieProvider
The SSOCookieProvider enables the federation of the authentication event that occurred through KnoxSSO.KnoxSSO is a typical SP-initiated websso mechanism that sets a cookie to be presented by browsers toparticipating applications and cryptographically verified.
• JWT
The JWT federation provider accepts JWT tokens as Bearer tokens within the Authorization header of theincoming request. Upon successfully extracting and verifying the token, the request is then processed on behalf ofthe user represented by the JWT token.
39
Configuring Proxy with Apache Knox Manually Configuring Knox Topology Files
This provider is closely related to the Knox Token Service and is essentially the provider that is used to consumethe tokens issued by the Knox Token Service.
• Pac4j
Pac4j is a Java security engine to authenticate users, get their profiles and manage their authorizations in orderto secure Java web applications. It supports many authentication mechanisms for UI and web services and isimplemented by many frameworks and tools.
For Knox, it is used as a federation provider to support the OAuth, CAS, SAML and OpenID Connect protocols.It must be used for SSO, in association with the KnoxSSO service and optionally with the SSOCookieProvider foraccess to REST APIs.
Set Up HeaderPreAuth Federation ProviderHow to configure the HeaderPreAuth federation provider.
About this task
The Knox Gateway supports federation solution providers by accepting HTTP header tokens. This section explainshow to configure HTTP header fields for SSO or Federation solutions that have simple HTTP header-type tokens.
The gateway extracts the user identifier from the HTTP header field. The gateway can also extract the groupinformation and propagate it to the Identity-Assertion provider.
Note:
The Knox Gateway federation plug-in, HeaderPreAuth, trusts that the content provided in the authenticatedheader is valid. Using this provider requires proper network security.
Only use the HeaderPreAuth federation provider in environments where the identity system does not allow directaccess to the Knox Gateway. Allowing direct access exposes the gateway to identity spoofing. Hortonworksrecommends defining the preauth.ip.addresses parameter to ensure requests come from a specific IP addresses only.
Procedure
1. Open the cluster topology descriptor file, $cluster-name.xml, in a text editor.
2.Add a HeaderPreAuth federation provider to topology/gateway as follows:
<provider> <role>federation</role> <name>HeaderPreAuth</name> <enabled>true</enabled> <param> <name>preauth.validation.method</name> <value>$validation_type</value> </param> <param> <name>preauth.ip.addresses</name> <value>$trusted_ip</value> </param> <param> <name>preauth.custom.header</name> <value>$user_field</value> </param> <param> <name>preauth.custom.group.header</name> <value>$group_field</value> </param></provider>
Where the values of the parameters are specific to your environment:
40
Configuring Proxy with Apache Knox Manually Configuring Knox Topology Files
• $validation_type (Optional, recommended)
Indicates the type of trust, use either preauth.ip.validation indicating to trust only connections from the addressdefined in preauth.ip.addresses OR null (omitted) indicating to trust all IP addresses.
• $trusted_ip (Required when the pre-authentication method is set to preauth.ip.validation)
A comma-separated list of IP addresses, addresses may contain a wild card to indicate a subnet, such as10.0.0.*.
• $user_field
The name of the field in the header that contains the user name that the gateway extracts. Any incomingrequest that is missing the field is refused with HTTP status 401, unauthorized. If not otherwise specified, thedefault value is SM_USER.
• $group_field (Optional)
The name of the field in the header that contains the group name that the gateway extracts. Any incomingrequest that is missing the field results in no group name being extracted and the connection is allowed.
3. Save the file.The gateway creates a new WAR file with modified timestamp in $gateway/data/deployments.
Example SiteMinder Configuration
The following example is the bare minimum configuration for SiteMinder (with no IP address validation):
<provider> <role>federation</role> <name>HeaderPreAuth</name> <enabled>true</enabled> <param> <name>preauth.custom.header</name> <value>SM_USER</value> </param> <param> <name>preauth.ip.addresses</name> <value>10.10.0.*</value> </param></provider>
Related InformationApache Knox 0.13.0 User's Guide > Authentication
Setting up JWT Federation ProviderFor information on the JWT federation provider, see the “Apache Knox documentation”.Related InformationApache Knox 0.13.0 User's Guide > Authentication
Apache Knox 0.13.0 User's Guide > Pac4j Provider
Setting up Pac4j Federation ProviderFor information on the JWT federation provider, see the “Apache Knox documentation”.
Set up SSOCookieProvider Federation ProviderHow to configure the SSOCookieProvider.
About this task
The SSOCookieProvider enables the federation of the authentication event that occurred through KnoxSSO.KnoxSSO is a typical service provider-initiated webSSO mechanism that sets a cookie to be presented by browsers toparticipating applications and cryptographically verified.
41
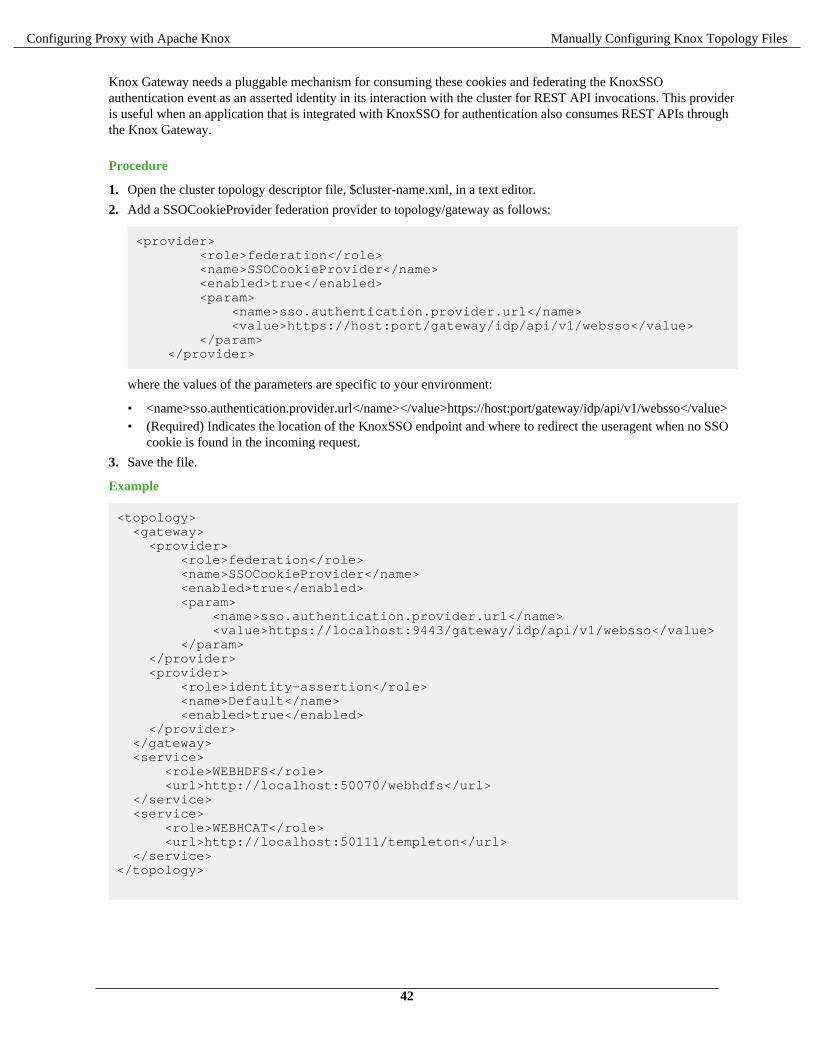
Configuring Proxy with Apache Knox Manually Configuring Knox Topology Files
Knox Gateway needs a pluggable mechanism for consuming these cookies and federating the KnoxSSOauthentication event as an asserted identity in its interaction with the cluster for REST API invocations. This provideris useful when an application that is integrated with KnoxSSO for authentication also consumes REST APIs throughthe Knox Gateway.
Procedure
1. Open the cluster topology descriptor file, $cluster-name.xml, in a text editor.
2. Add a SSOCookieProvider federation provider to topology/gateway as follows:
<provider> <role>federation</role> <name>SSOCookieProvider</name> <enabled>true</enabled> <param> <name>sso.authentication.provider.url</name> <value>https://host:port/gateway/idp/api/v1/websso</value> </param> </provider>
where the values of the parameters are specific to your environment:
• <name>sso.authentication.provider.url</name></value>https://host:port/gateway/idp/api/v1/websso</value>• (Required) Indicates the location of the KnoxSSO endpoint and where to redirect the useragent when no SSO
cookie is found in the incoming request.
3. Save the file.
Example
<topology> <gateway> <provider> <role>federation</role> <name>SSOCookieProvider</name> <enabled>true</enabled> <param> <name>sso.authentication.provider.url</name> <value>https://localhost:9443/gateway/idp/api/v1/websso</value> </param> </provider> <provider> <role>identity-assertion</role> <name>Default</name> <enabled>true</enabled> </provider> </gateway> <service> <role>WEBHDFS</role> <url>http://localhost:50070/webhdfs</url> </service> <service> <role>WEBHCAT</role> <url>http://localhost:50111/templeton</url> </service></topology>
42

Configuring Proxy with Apache Knox Manually Configuring Knox Topology Files
Configuring Identity AssertionThe Knox Gateway identity-assertion provider determines which principal to propagate to the backend cluster serviceand represent the authenticated user. This allows the Knox Gateway to accept requests from external users and for theinternal user to potentially be a product of a mapping, some transformation or other change to disambiguate the useridentity within the cluster.
There are multiple options for Identity Assertion Provider, configured in Ambari under Knox>Configs>Advancedtopology.
43
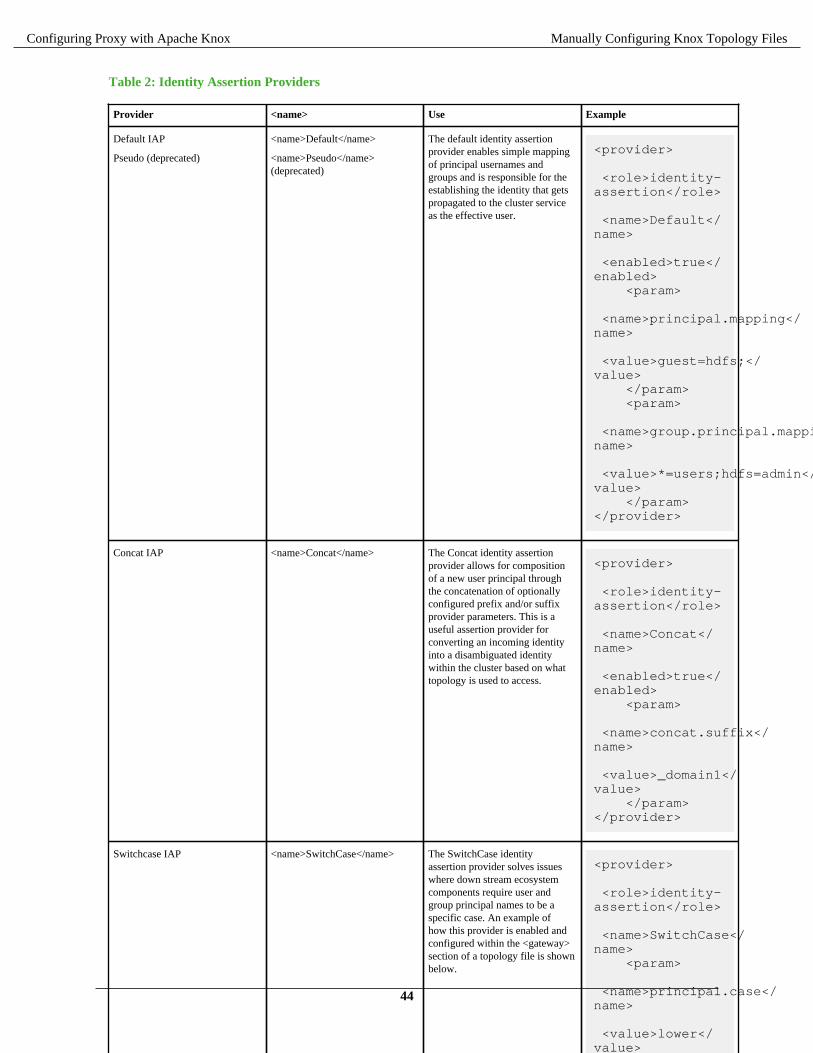
Configuring Proxy with Apache Knox Manually Configuring Knox Topology Files
Table 2: Identity Assertion Providers
Provider <name> Use Example
Default IAP
Pseudo (deprecated)
<name>Default</name>
<name>Pseudo</name>(deprecated)
The default identity assertionprovider enables simple mappingof principal usernames andgroups and is responsible for theestablishing the identity that getspropagated to the cluster serviceas the effective user.
<provider> <role>identity-assertion</role> <name>Default</name> <enabled>true</enabled> <param> <name>principal.mapping</name> <value>guest=hdfs;</value> </param> <param> <name>group.principal.mapping</name> <value>*=users;hdfs=admin</value> </param></provider>
Concat IAP <name>Concat</name> The Concat identity assertionprovider allows for compositionof a new user principal throughthe concatenation of optionallyconfigured prefix and/or suffixprovider parameters. This is auseful assertion provider forconverting an incoming identityinto a disambiguated identitywithin the cluster based on whattopology is used to access.
<provider> <role>identity-assertion</role> <name>Concat</name> <enabled>true</enabled> <param> <name>concat.suffix</name> <value>_domain1</value> </param></provider>
Switchcase IAP <name>SwitchCase</name> The SwitchCase identityassertion provider solves issueswhere down stream ecosystemcomponents require user andgroup principal names to be aspecific case. An example ofhow this provider is enabled andconfigured within the <gateway>section of a topology file is shownbelow.
<provider> <role>identity-assertion</role> <name>SwitchCase</name> <param> <name>principal.case</name> <value>lower</value> </param> <param> <name>group.principal.case</name> <value>upper</value> </param> <enabled>true</enabled></provider>
Regex IAP <name>Regex</name> The regular expression identityassertion provider allowsincoming identities to betranslated using a regularexpression, template and lookuptable. This will probably bemost useful in conjunction withthe HeaderPreAuth federationprovider.
<provider> <role>identity-assertion</role> <name>Regex</name> <enabled>true</enabled> <param> <name>input</name> <value>(.*)@(.*?)\..*</value> </param> <param> <name>output</name> <value>{1}_{[2]}</value> </param> <param> <name>lookup</name> <value>us=USA;ca=CANADA</value> </param></provider>
HadoopGroupLookup IAP <name>HadoopGroupProvider</name>
The Hadoop Group Lookupidentity assertion provider looksup the user’s ‘group membership’for authenticated users usingHadoop’s group mapping service(GroupMappingServiceProvider).
This allows existing investmentsto be leveraged within Knoxand used within the accesscontrol policy enforcement at theperimeter.
<provider> <role>identity-assertion</role> <name>HadoopGroupProvider</name> <enabled>true</enabled> <param> <name>hadoop.security.group.mapping</name> <value>org.apache.hadoop.security.LdapGroupsMapping</value> </param> <param> <name>hadoop.security.group.mapping.ldap.bind.user</name> <value>uid=tom,ou=people,dc=hadoop,dc=apache,dc=org</value> </param> <param> <name>hadoop.security.group.mapping.ldap.bind.password</name> <value>tom-password</value> </param> <param> <name>hadoop.security.group.mapping.ldap.url</name> <value>ldap://localhost:33389</value> </param> <param> <name>hadoop.security.group.mapping.ldap.base</name> <value></value> </param> <param> <name>hadoop.security.group.mapping.ldap.search.filter.user</name> <value>(&(|(objectclass=person)(objectclass=applicationProcess))(cn={0}))</value> </param> <param> <name>hadoop.security.group.mapping.ldap.search.filter.group</name> <value>(objectclass=groupOfNames)</value> </param> <param> <name>hadoop.security.group.mapping.ldap.search.attr.member</name> <value>member</value> </param> <param> <name>hadoop.security.group.mapping.ldap.search.attr.group.name</name> <value>cn</value> </param> </provider>
44
Configuring Proxy with Apache Knox Manually Configuring Knox Topology Files
Related InformationHadoop Group Lookup Identity Assertion Provider
Define a Default Identity Assertion Provider
SwitchCase Identity Assertion Provider
Regular Expression Identity Assertion Provider
Concat Identity Assertion Provider
Define a Default Identity Assertion ProviderThe default identity assertion provider enables simple mapping of principal usernames and groups and is responsiblefor the establishing the identity that gets propagated to the cluster service as the effective user.
About this task
When you define the Default identity-assertion provider without parameters, the authenticated user is asserted asthe authenticated user. For example, using simple assertion if a user authenticates as "guest", the user's identity forgrouping, authorization, and running the request is "guest". <name>Pseudo</name> identity assertion was renamed<name>Default</name>, but both are supported in config.
Procedure
1. Open the cluster topology descriptor file, $cluster-name.xml, in a text editor.
2. Add a Default identity-assertion provider totopology/gateway as follows:
<provider> <role>identity-assertion</role> <name>Default</name> <enabled>true</enabled></provider>
3. Save the file.The gateway creates a new WAR file with modified timestamp in $gateway/data/deployments.
Map Authenticated Users to Other UsersHow to add user mapping rule to an identity-assertion provider:
About this taskThe principal.mapping parameter of an identity-assertion provider determines the user name that the gateway asserts(uses as the authenticated user) for grouping, authorization, and to run the request on the cluster.
Procedure
1. Open the cluster topology descriptor file, $cluster-name.xml, in a text editor.
2. Add a Default identity-assertion provider to topology/gateway with the principal.mapping parameter as follows:
<provider> <role>identity-assertion</role> <name>Default</name> <enabled>true</enabled> <param> <name>principal.mapping</name> <value>$user_ids=$cluster_user;$user_ids=$cluster_user1;...</value> </param></provider>
where the value contains a semi-colon-separated list of external to internal user mappings, and the followingvariables match the names in your environment:
45
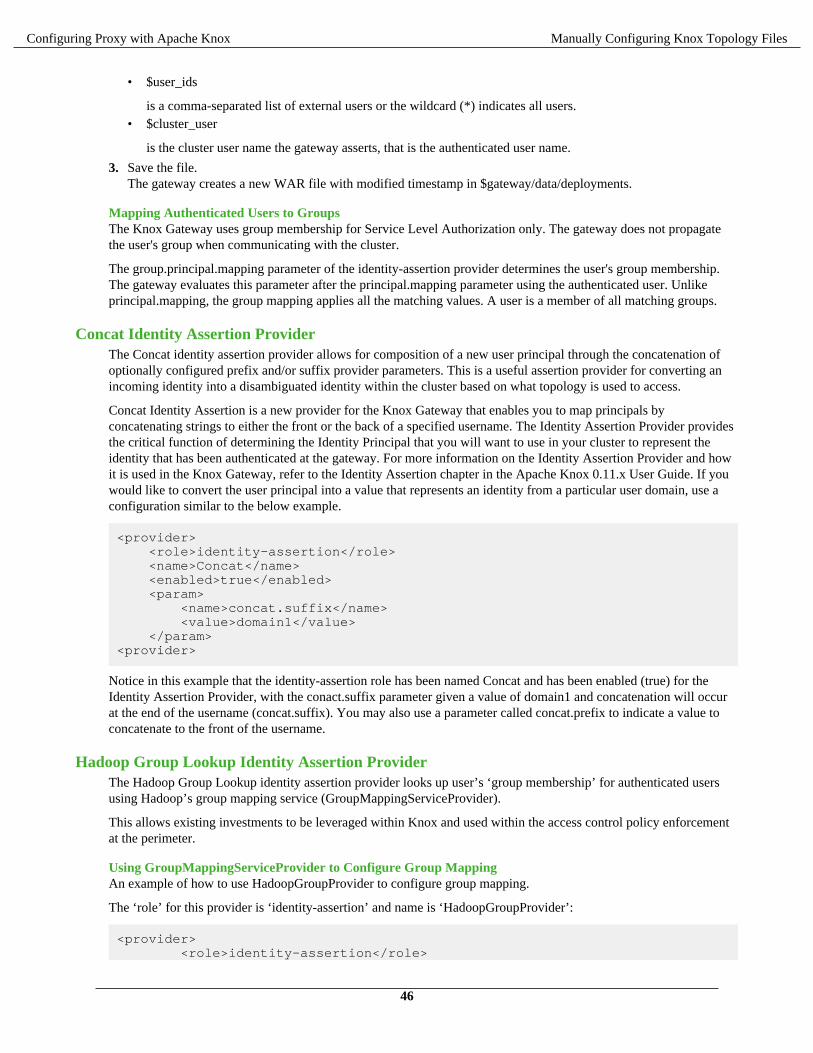
Configuring Proxy with Apache Knox Manually Configuring Knox Topology Files
• $user_ids
is a comma-separated list of external users or the wildcard (*) indicates all users.• $cluster_user
is the cluster user name the gateway asserts, that is the authenticated user name.
3. Save the file.The gateway creates a new WAR file with modified timestamp in $gateway/data/deployments.
Mapping Authenticated Users to GroupsThe Knox Gateway uses group membership for Service Level Authorization only. The gateway does not propagatethe user's group when communicating with the cluster.
The group.principal.mapping parameter of the identity-assertion provider determines the user's group membership.The gateway evaluates this parameter after the principal.mapping parameter using the authenticated user. Unlikeprincipal.mapping, the group mapping applies all the matching values. A user is a member of all matching groups.
Concat Identity Assertion ProviderThe Concat identity assertion provider allows for composition of a new user principal through the concatenation ofoptionally configured prefix and/or suffix provider parameters. This is a useful assertion provider for converting anincoming identity into a disambiguated identity within the cluster based on what topology is used to access.
Concat Identity Assertion is a new provider for the Knox Gateway that enables you to map principals byconcatenating strings to either the front or the back of a specified username. The Identity Assertion Provider providesthe critical function of determining the Identity Principal that you will want to use in your cluster to represent theidentity that has been authenticated at the gateway. For more information on the Identity Assertion Provider and howit is used in the Knox Gateway, refer to the Identity Assertion chapter in the Apache Knox 0.11.x User Guide. If youwould like to convert the user principal into a value that represents an identity from a particular user domain, use aconfiguration similar to the below example.
<provider> <role>identity-assertion</role> <name>Concat</name> <enabled>true</enabled> <param> <name>concat.suffix</name> <value>domain1</value> </param><provider>
Notice in this example that the identity-assertion role has been named Concat and has been enabled (true) for theIdentity Assertion Provider, with the conact.suffix parameter given a value of domain1 and concatenation will occurat the end of the username (concat.suffix). You may also use a parameter called concat.prefix to indicate a value toconcatenate to the front of the username.
Hadoop Group Lookup Identity Assertion ProviderThe Hadoop Group Lookup identity assertion provider looks up user’s ‘group membership’ for authenticated usersusing Hadoop’s group mapping service (GroupMappingServiceProvider).
This allows existing investments to be leveraged within Knox and used within the access control policy enforcementat the perimeter.
Using GroupMappingServiceProvider to Configure Group MappingAn example of how to use HadoopGroupProvider to configure group mapping.
The ‘role’ for this provider is ‘identity-assertion’ and name is ‘HadoopGroupProvider’:
<provider> <role>identity-assertion</role>
46
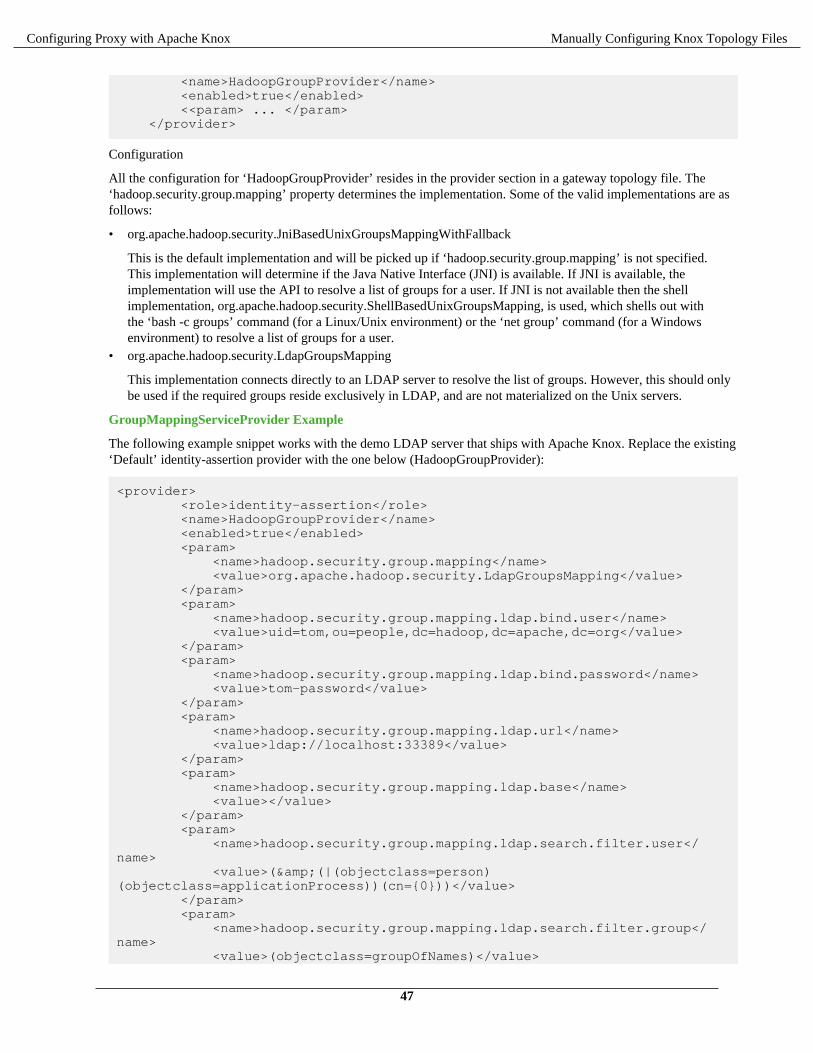
Configuring Proxy with Apache Knox Manually Configuring Knox Topology Files
<name>HadoopGroupProvider</name> <enabled>true</enabled> <<param> ... </param> </provider>
Configuration
All the configuration for ‘HadoopGroupProvider’ resides in the provider section in a gateway topology file. The‘hadoop.security.group.mapping’ property determines the implementation. Some of the valid implementations are asfollows:
• org.apache.hadoop.security.JniBasedUnixGroupsMappingWithFallback
This is the default implementation and will be picked up if ‘hadoop.security.group.mapping’ is not specified.This implementation will determine if the Java Native Interface (JNI) is available. If JNI is available, theimplementation will use the API to resolve a list of groups for a user. If JNI is not available then the shellimplementation, org.apache.hadoop.security.ShellBasedUnixGroupsMapping, is used, which shells out withthe ‘bash -c groups’ command (for a Linux/Unix environment) or the ‘net group’ command (for a Windowsenvironment) to resolve a list of groups for a user.
• org.apache.hadoop.security.LdapGroupsMapping
This implementation connects directly to an LDAP server to resolve the list of groups. However, this should onlybe used if the required groups reside exclusively in LDAP, and are not materialized on the Unix servers.
GroupMappingServiceProvider Example
The following example snippet works with the demo LDAP server that ships with Apache Knox. Replace the existing‘Default’ identity-assertion provider with the one below (HadoopGroupProvider):
<provider> <role>identity-assertion</role> <name>HadoopGroupProvider</name> <enabled>true</enabled> <param> <name>hadoop.security.group.mapping</name> <value>org.apache.hadoop.security.LdapGroupsMapping</value> </param> <param> <name>hadoop.security.group.mapping.ldap.bind.user</name> <value>uid=tom,ou=people,dc=hadoop,dc=apache,dc=org</value> </param> <param> <name>hadoop.security.group.mapping.ldap.bind.password</name> <value>tom-password</value> </param> <param> <name>hadoop.security.group.mapping.ldap.url</name> <value>ldap://localhost:33389</value> </param> <param> <name>hadoop.security.group.mapping.ldap.base</name> <value></value> </param> <param> <name>hadoop.security.group.mapping.ldap.search.filter.user</name> <value>(&(|(objectclass=person)(objectclass=applicationProcess))(cn={0}))</value> </param> <param> <name>hadoop.security.group.mapping.ldap.search.filter.group</name> <value>(objectclass=groupOfNames)</value>
47
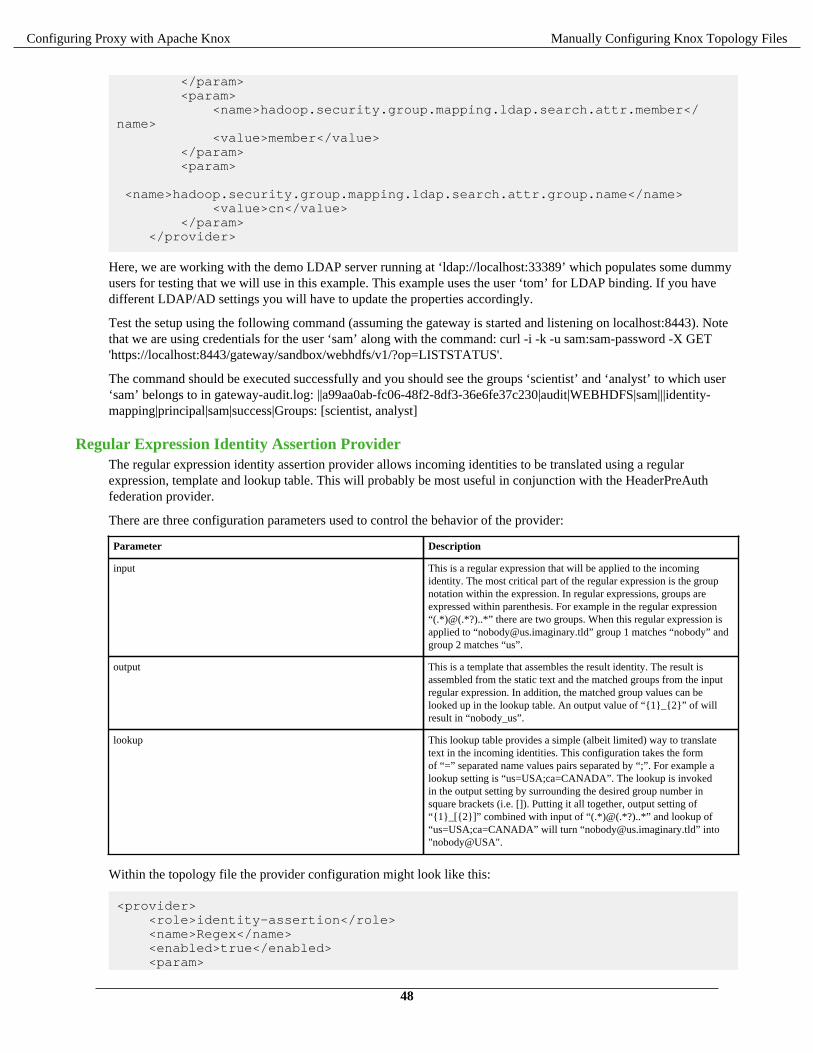
Configuring Proxy with Apache Knox Manually Configuring Knox Topology Files
</param> <param> <name>hadoop.security.group.mapping.ldap.search.attr.member</name> <value>member</value> </param> <param> <name>hadoop.security.group.mapping.ldap.search.attr.group.name</name> <value>cn</value> </param> </provider>
Here, we are working with the demo LDAP server running at ‘ldap://localhost:33389’ which populates some dummyusers for testing that we will use in this example. This example uses the user ‘tom’ for LDAP binding. If you havedifferent LDAP/AD settings you will have to update the properties accordingly.
Test the setup using the following command (assuming the gateway is started and listening on localhost:8443). Notethat we are using credentials for the user ‘sam’ along with the command: curl -i -k -u sam:sam-password -X GET'https://localhost:8443/gateway/sandbox/webhdfs/v1/?op=LISTSTATUS'.
The command should be executed successfully and you should see the groups ‘scientist’ and ‘analyst’ to which user‘sam’ belongs to in gateway-audit.log: ||a99aa0ab-fc06-48f2-8df3-36e6fe37c230|audit|WEBHDFS|sam|||identity-mapping|principal|sam|success|Groups: [scientist, analyst]
Regular Expression Identity Assertion ProviderThe regular expression identity assertion provider allows incoming identities to be translated using a regularexpression, template and lookup table. This will probably be most useful in conjunction with the HeaderPreAuthfederation provider.
There are three configuration parameters used to control the behavior of the provider:
Parameter Description
input This is a regular expression that will be applied to the incomingidentity. The most critical part of the regular expression is the groupnotation within the expression. In regular expressions, groups areexpressed within parenthesis. For example in the regular expression“(.*)@(.*?)..*” there are two groups. When this regular expression isapplied to “[email protected]” group 1 matches “nobody” andgroup 2 matches “us”.
output This is a template that assembles the result identity. The result isassembled from the static text and the matched groups from the inputregular expression. In addition, the matched group values can belooked up in the lookup table. An output value of “{1}_{2}” of willresult in “nobody_us”.
lookup This lookup table provides a simple (albeit limited) way to translatetext in the incoming identities. This configuration takes the formof “=” separated name values pairs separated by “;”. For example alookup setting is “us=USA;ca=CANADA”. The lookup is invokedin the output setting by surrounding the desired group number insquare brackets (i.e. []). Putting it all together, output setting of“{1}_[{2}]” combined with input of “(.*)@(.*?)..*” and lookup of“us=USA;ca=CANADA” will turn “[email protected]” into"nobody@USA".
Within the topology file the provider configuration might look like this:
<provider> <role>identity-assertion</role> <name>Regex</name> <enabled>true</enabled> <param>
48
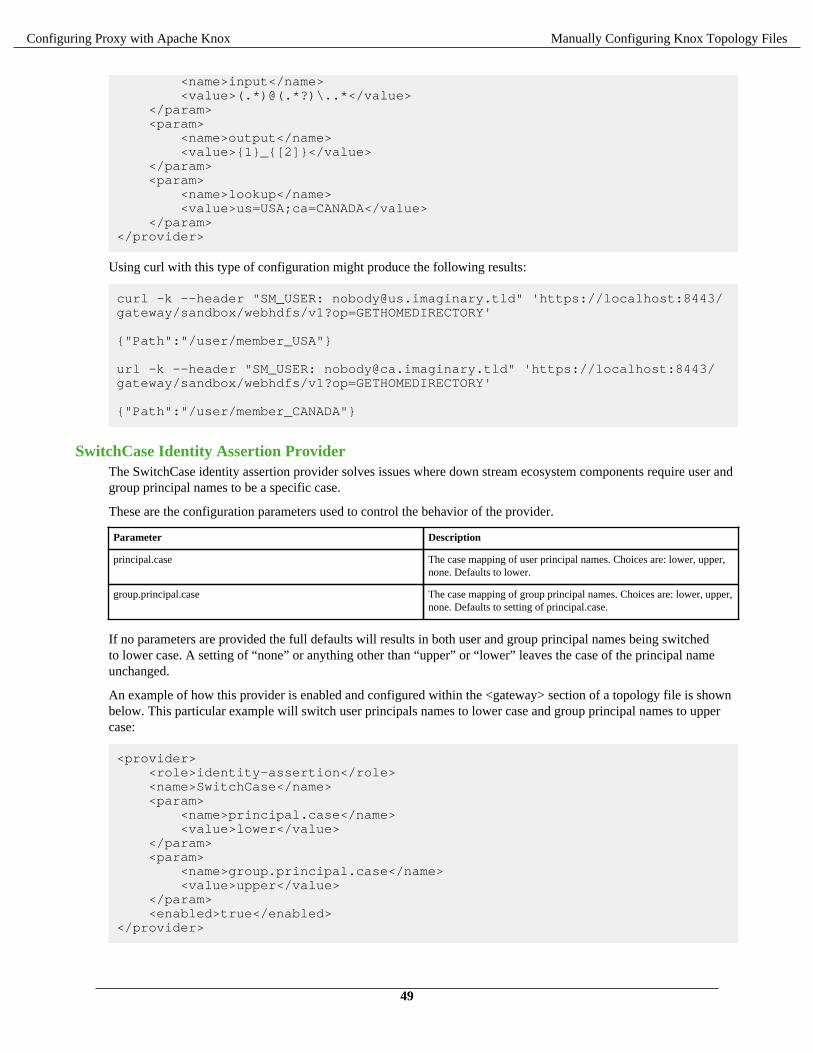
Configuring Proxy with Apache Knox Manually Configuring Knox Topology Files
<name>input</name> <value>(.*)@(.*?)\..*</value> </param> <param> <name>output</name> <value>{1}_{[2]}</value> </param> <param> <name>lookup</name> <value>us=USA;ca=CANADA</value> </param></provider>
Using curl with this type of configuration might produce the following results:
curl -k --header "SM_USER: [email protected]" 'https://localhost:8443/gateway/sandbox/webhdfs/v1?op=GETHOMEDIRECTORY'
{"Path":"/user/member_USA"}
url -k --header "SM_USER: [email protected]" 'https://localhost:8443/gateway/sandbox/webhdfs/v1?op=GETHOMEDIRECTORY'
{"Path":"/user/member_CANADA"}
SwitchCase Identity Assertion ProviderThe SwitchCase identity assertion provider solves issues where down stream ecosystem components require user andgroup principal names to be a specific case.
These are the configuration parameters used to control the behavior of the provider.
Parameter Description
principal.case The case mapping of user principal names. Choices are: lower, upper,none. Defaults to lower.
group.principal.case The case mapping of group principal names. Choices are: lower, upper,none. Defaults to setting of principal.case.
If no parameters are provided the full defaults will results in both user and group principal names being switchedto lower case. A setting of “none” or anything other than “upper” or “lower” leaves the case of the principal nameunchanged.
An example of how this provider is enabled and configured within the <gateway> section of a topology file is shownbelow. This particular example will switch user principals names to lower case and group principal names to uppercase:
<provider> <role>identity-assertion</role> <name>SwitchCase</name> <param> <name>principal.case</name> <value>lower</value> </param> <param> <name>group.principal.case</name> <value>upper</value> </param> <enabled>true</enabled></provider>
49
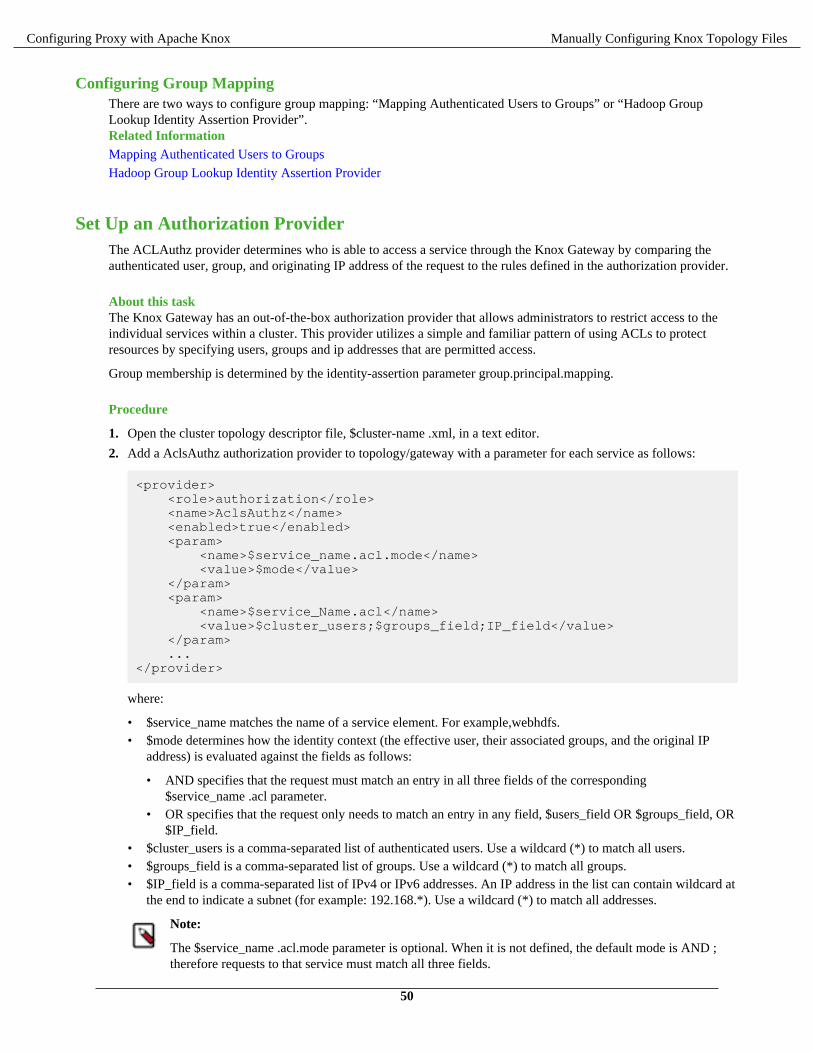
Configuring Proxy with Apache Knox Manually Configuring Knox Topology Files
Configuring Group MappingThere are two ways to configure group mapping: “Mapping Authenticated Users to Groups” or “Hadoop GroupLookup Identity Assertion Provider”.Related InformationMapping Authenticated Users to Groups
Hadoop Group Lookup Identity Assertion Provider
Set Up an Authorization ProviderThe ACLAuthz provider determines who is able to access a service through the Knox Gateway by comparing theauthenticated user, group, and originating IP address of the request to the rules defined in the authorization provider.
About this taskThe Knox Gateway has an out-of-the-box authorization provider that allows administrators to restrict access to theindividual services within a cluster. This provider utilizes a simple and familiar pattern of using ACLs to protectresources by specifying users, groups and ip addresses that are permitted access.
Group membership is determined by the identity-assertion parameter group.principal.mapping.
Procedure
1. Open the cluster topology descriptor file, $cluster-name .xml, in a text editor.
2. Add a AclsAuthz authorization provider to topology/gateway with a parameter for each service as follows:
<provider> <role>authorization</role> <name>AclsAuthz</name> <enabled>true</enabled> <param> <name>$service_name.acl.mode</name> <value>$mode</value> </param> <param> <name>$service_Name.acl</name> <value>$cluster_users;$groups_field;IP_field</value> </param> ...</provider>
where:
• $service_name matches the name of a service element. For example,webhdfs.• $mode determines how the identity context (the effective user, their associated groups, and the original IP
address) is evaluated against the fields as follows:
• AND specifies that the request must match an entry in all three fields of the corresponding$service_name .acl parameter.
• OR specifies that the request only needs to match an entry in any field, $users_field OR $groups_field, OR$IP_field.
• $cluster_users is a comma-separated list of authenticated users. Use a wildcard (*) to match all users.• $groups_field is a comma-separated list of groups. Use a wildcard (*) to match all groups.• $IP_field is a comma-separated list of IPv4 or IPv6 addresses. An IP address in the list can contain wildcard at
the end to indicate a subnet (for example: 192.168.*). Use a wildcard (*) to match all addresses.
Note:
The $service_name .acl.mode parameter is optional. When it is not defined, the default mode is AND ;therefore requests to that service must match all three fields.
50
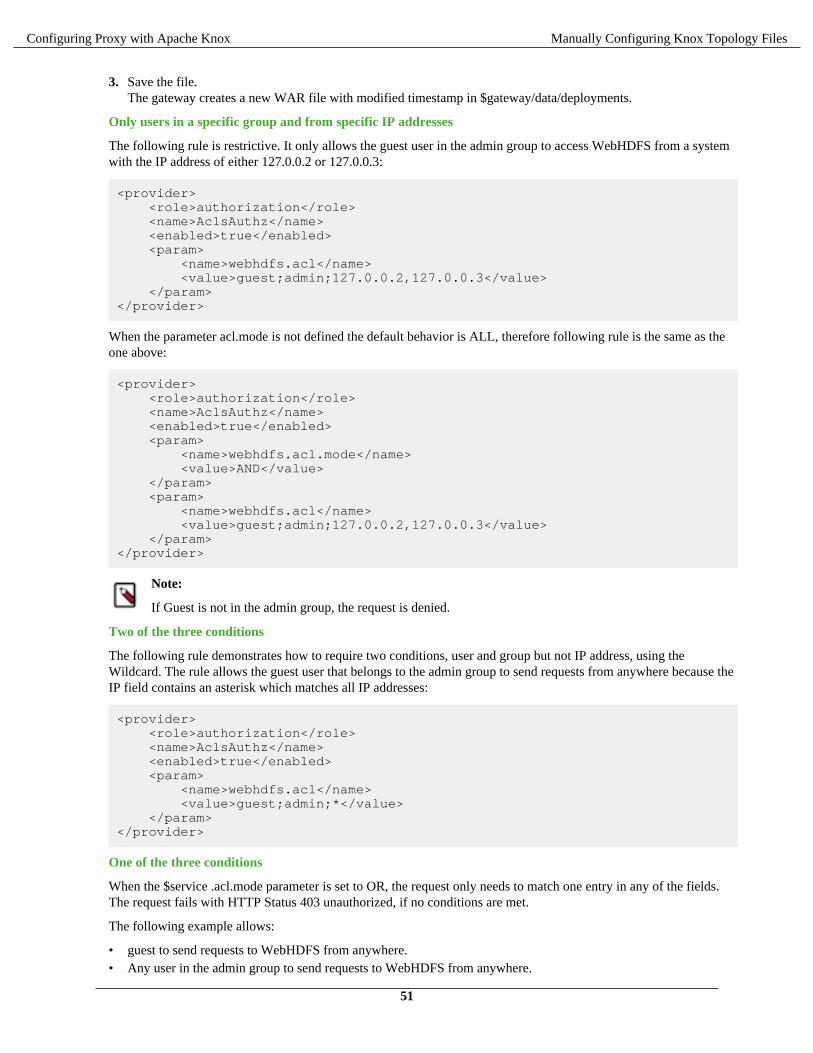
Configuring Proxy with Apache Knox Manually Configuring Knox Topology Files
3. Save the file.The gateway creates a new WAR file with modified timestamp in $gateway/data/deployments.
Only users in a specific group and from specific IP addresses
The following rule is restrictive. It only allows the guest user in the admin group to access WebHDFS from a systemwith the IP address of either 127.0.0.2 or 127.0.0.3:
<provider> <role>authorization</role> <name>AclsAuthz</name> <enabled>true</enabled> <param> <name>webhdfs.acl</name> <value>guest;admin;127.0.0.2,127.0.0.3</value> </param></provider>
When the parameter acl.mode is not defined the default behavior is ALL, therefore following rule is the same as theone above:
<provider> <role>authorization</role> <name>AclsAuthz</name> <enabled>true</enabled> <param> <name>webhdfs.acl.mode</name> <value>AND</value> </param> <param> <name>webhdfs.acl</name> <value>guest;admin;127.0.0.2,127.0.0.3</value> </param></provider>
Note:
If Guest is not in the admin group, the request is denied.
Two of the three conditions
The following rule demonstrates how to require two conditions, user and group but not IP address, using theWildcard. The rule allows the guest user that belongs to the admin group to send requests from anywhere because theIP field contains an asterisk which matches all IP addresses:
<provider> <role>authorization</role> <name>AclsAuthz</name> <enabled>true</enabled> <param> <name>webhdfs.acl</name> <value>guest;admin;*</value> </param></provider>
One of the three conditions
When the $service .acl.mode parameter is set to OR, the request only needs to match one entry in any of the fields.The request fails with HTTP Status 403 unauthorized, if no conditions are met.
The following example allows:
• guest to send requests to WebHDFS from anywhere.• Any user in the admin group to send requests to WebHDFS from anywhere.
51
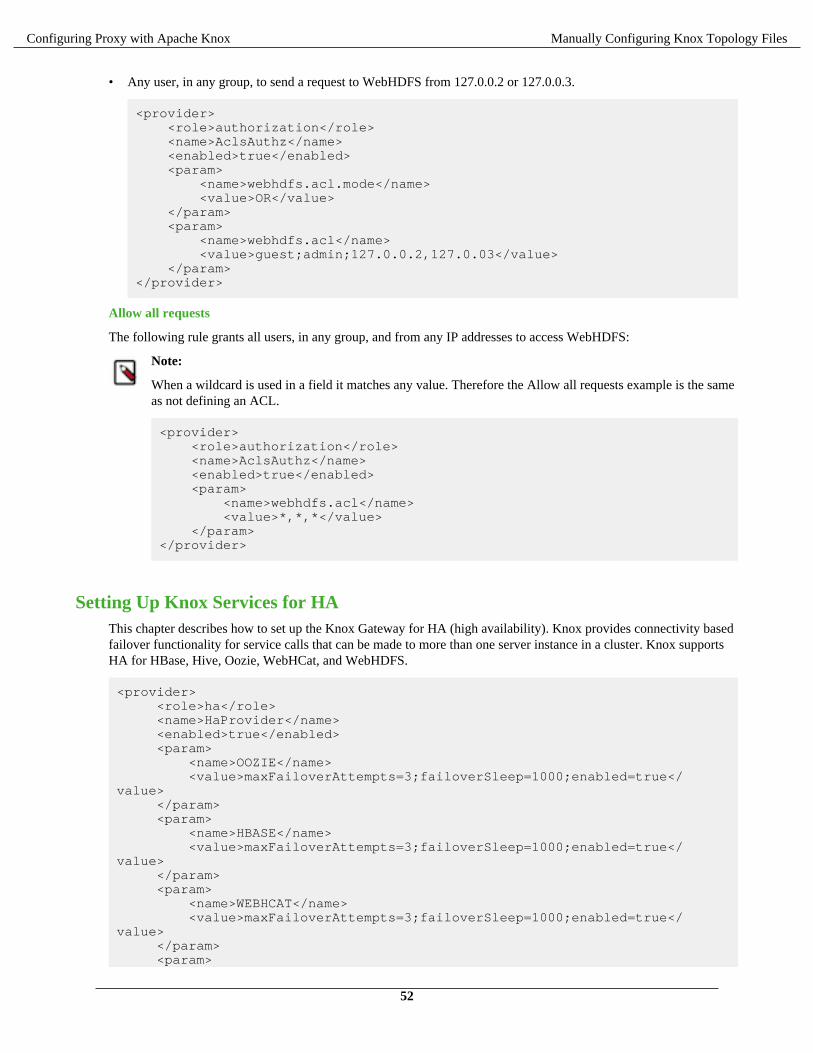
Configuring Proxy with Apache Knox Manually Configuring Knox Topology Files
• Any user, in any group, to send a request to WebHDFS from 127.0.0.2 or 127.0.0.3.
<provider> <role>authorization</role> <name>AclsAuthz</name> <enabled>true</enabled> <param> <name>webhdfs.acl.mode</name> <value>OR</value> </param> <param> <name>webhdfs.acl</name> <value>guest;admin;127.0.0.2,127.0.03</value> </param></provider>
Allow all requests
The following rule grants all users, in any group, and from any IP addresses to access WebHDFS:
Note:
When a wildcard is used in a field it matches any value. Therefore the Allow all requests example is the sameas not defining an ACL.
<provider> <role>authorization</role> <name>AclsAuthz</name> <enabled>true</enabled> <param> <name>webhdfs.acl</name> <value>*,*,*</value> </param></provider>
Setting Up Knox Services for HAThis chapter describes how to set up the Knox Gateway for HA (high availability). Knox provides connectivity basedfailover functionality for service calls that can be made to more than one server instance in a cluster. Knox supportsHA for HBase, Hive, Oozie, WebHCat, and WebHDFS.
<provider> <role>ha</role> <name>HaProvider</name> <enabled>true</enabled> <param> <name>OOZIE</name> <value>maxFailoverAttempts=3;failoverSleep=1000;enabled=true</value> </param> <param> <name>HBASE</name> <value>maxFailoverAttempts=3;failoverSleep=1000;enabled=true</value> </param> <param> <name>WEBHCAT</name> <value>maxFailoverAttempts=3;failoverSleep=1000;enabled=true</value> </param> <param>
52
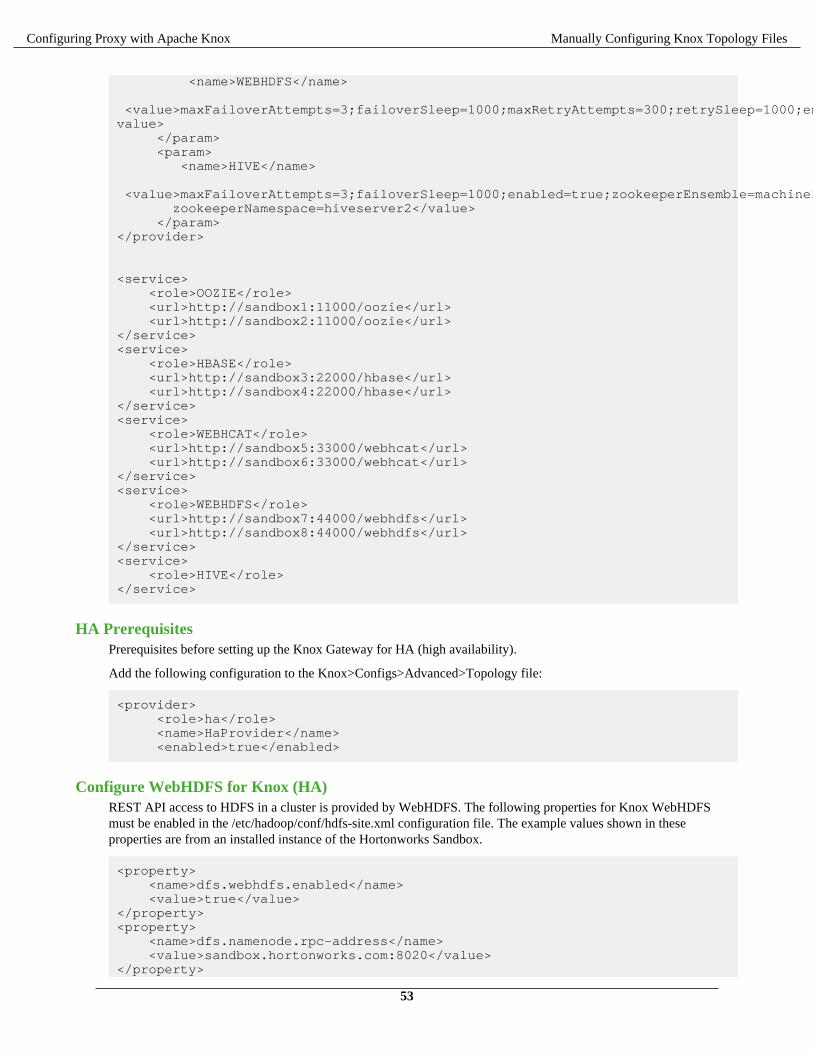
Configuring Proxy with Apache Knox Manually Configuring Knox Topology Files
<name>WEBHDFS</name> <value>maxFailoverAttempts=3;failoverSleep=1000;maxRetryAttempts=300;retrySleep=1000;enabled=true</value> </param> <param> <name>HIVE</name> <value>maxFailoverAttempts=3;failoverSleep=1000;enabled=true;zookeeperEnsemble=machine1:2181,machine2:2181,machine3:2181; zookeeperNamespace=hiveserver2</value> </param></provider>
<service> <role>OOZIE</role> <url>http://sandbox1:11000/oozie</url> <url>http://sandbox2:11000/oozie</url></service><service> <role>HBASE</role> <url>http://sandbox3:22000/hbase</url> <url>http://sandbox4:22000/hbase</url></service><service> <role>WEBHCAT</role> <url>http://sandbox5:33000/webhcat</url> <url>http://sandbox6:33000/webhcat</url></service><service> <role>WEBHDFS</role> <url>http://sandbox7:44000/webhdfs</url> <url>http://sandbox8:44000/webhdfs</url></service><service> <role>HIVE</role></service>
HA PrerequisitesPrerequisites before setting up the Knox Gateway for HA (high availability).
Add the following configuration to the Knox>Configs>Advanced>Topology file:
<provider> <role>ha</role> <name>HaProvider</name> <enabled>true</enabled>
Configure WebHDFS for Knox (HA)REST API access to HDFS in a cluster is provided by WebHDFS. The following properties for Knox WebHDFSmust be enabled in the /etc/hadoop/conf/hdfs-site.xml configuration file. The example values shown in theseproperties are from an installed instance of the Hortonworks Sandbox.
<property> <name>dfs.webhdfs.enabled</name> <value>true</value></property><property> <name>dfs.namenode.rpc-address</name> <value>sandbox.hortonworks.com:8020</value></property>
53
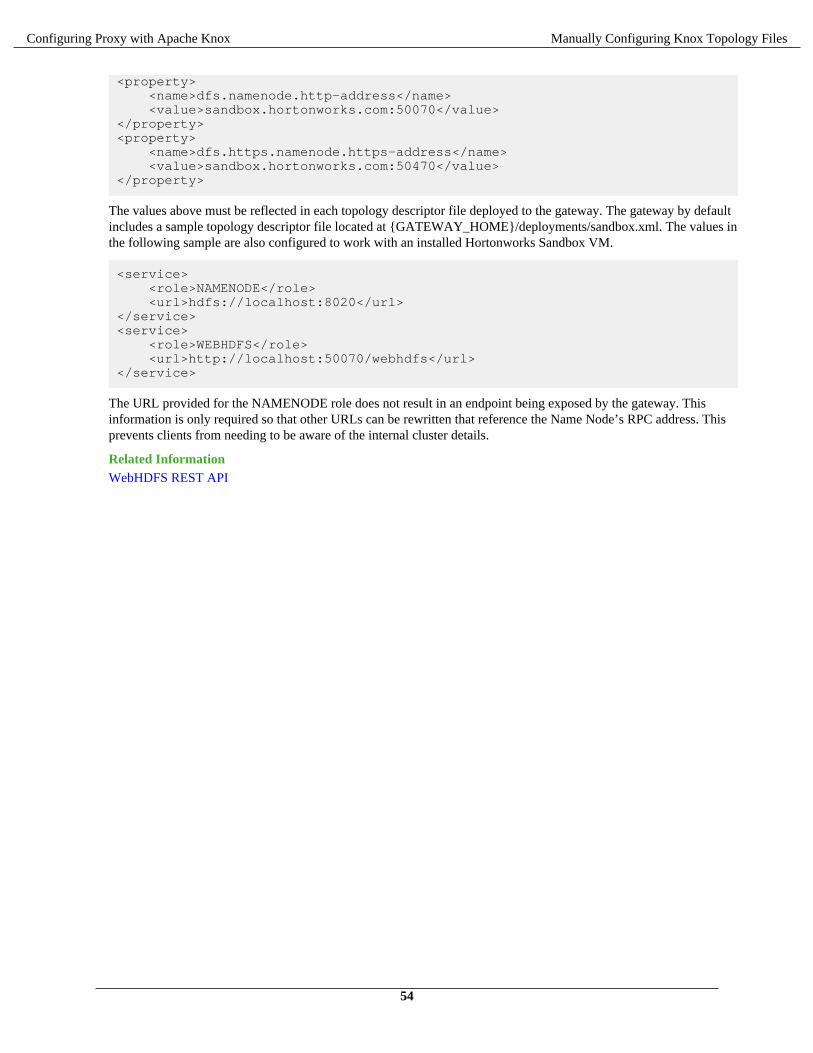
Configuring Proxy with Apache Knox Manually Configuring Knox Topology Files
<property> <name>dfs.namenode.http-address</name> <value>sandbox.hortonworks.com:50070</value></property><property> <name>dfs.https.namenode.https-address</name> <value>sandbox.hortonworks.com:50470</value></property>
The values above must be reflected in each topology descriptor file deployed to the gateway. The gateway by defaultincludes a sample topology descriptor file located at {GATEWAY_HOME}/deployments/sandbox.xml. The values inthe following sample are also configured to work with an installed Hortonworks Sandbox VM.
<service> <role>NAMENODE</role> <url>hdfs://localhost:8020</url></service><service> <role>WEBHDFS</role> <url>http://localhost:50070/webhdfs</url></service>
The URL provided for the NAMENODE role does not result in an endpoint being exposed by the gateway. Thisinformation is only required so that other URLs can be rewritten that reference the Name Node’s RPC address. Thisprevents clients from needing to be aware of the internal cluster details.
Related InformationWebHDFS REST API
54
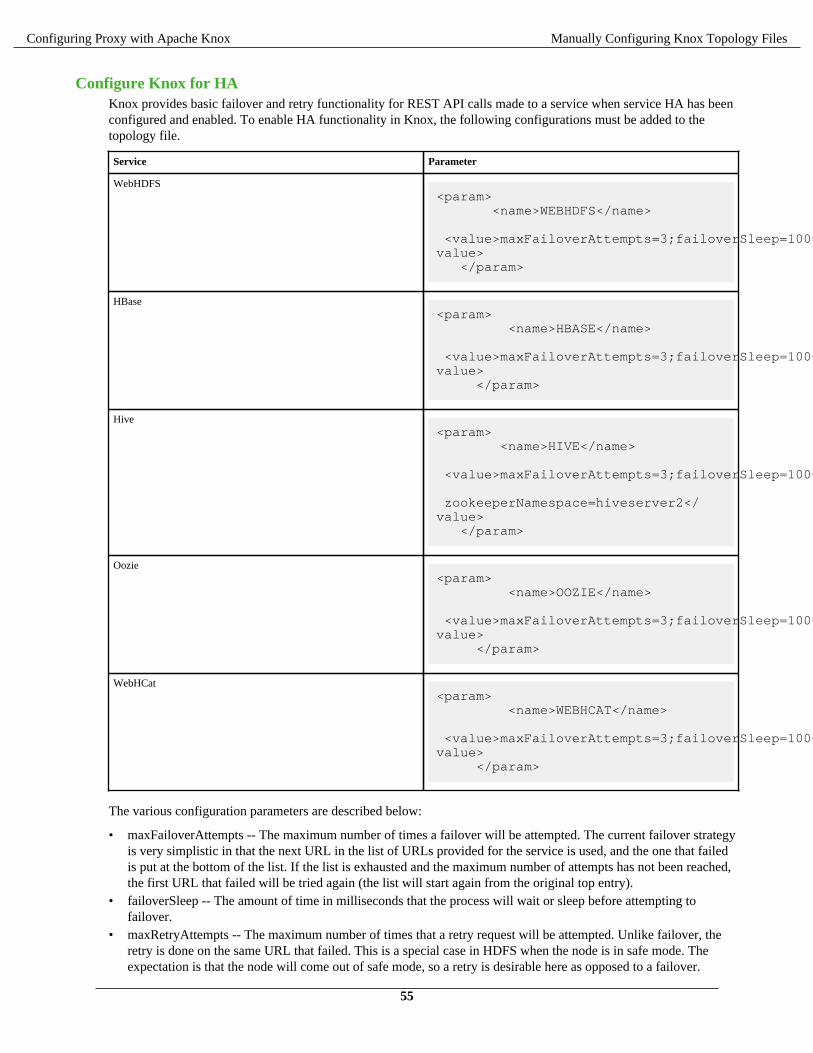
Configuring Proxy with Apache Knox Manually Configuring Knox Topology Files
Configure Knox for HAKnox provides basic failover and retry functionality for REST API calls made to a service when service HA has beenconfigured and enabled. To enable HA functionality in Knox, the following configurations must be added to thetopology file.
Service Parameter
WebHDFS<param> <name>WEBHDFS</name> <value>maxFailoverAttempts=3;failoverSleep=1000;maxRetryAttempts=300;retrySleep=1000;enabled=true</value> </param>
HBase<param> <name>HBASE</name> <value>maxFailoverAttempts=3;failoverSleep=1000;enabled=true</value> </param>
Hive<param> <name>HIVE</name> <value>maxFailoverAttempts=3;failoverSleep=1000;enabled=true;zookeeperEnsemble=machine1:2181,machine2:2181,machine3:2181; zookeeperNamespace=hiveserver2</value> </param>
Oozie<param> <name>OOZIE</name> <value>maxFailoverAttempts=3;failoverSleep=1000;enabled=true</value> </param>
WebHCat<param> <name>WEBHCAT</name> <value>maxFailoverAttempts=3;failoverSleep=1000;enabled=true</value> </param>
The various configuration parameters are described below:
• maxFailoverAttempts -- The maximum number of times a failover will be attempted. The current failover strategyis very simplistic in that the next URL in the list of URLs provided for the service is used, and the one that failedis put at the bottom of the list. If the list is exhausted and the maximum number of attempts has not been reached,the first URL that failed will be tried again (the list will start again from the original top entry).
• failoverSleep -- The amount of time in milliseconds that the process will wait or sleep before attempting tofailover.
• maxRetryAttempts -- The maximum number of times that a retry request will be attempted. Unlike failover, theretry is done on the same URL that failed. This is a special case in HDFS when the node is in safe mode. Theexpectation is that the node will come out of safe mode, so a retry is desirable here as opposed to a failover.
55
Configuring Proxy with Apache Knox Configuring Knox With Kerberos
• retrySleep -- The amount of time in milliseconds that the process will wait or sleep before a retry is issued.• enabled - Flag to turn the particular service on or off for HA.
The additional configuration parameters for Hive are described below:
• zookeeperEnsemble -- A comma separated list of host names (or IP addresses) of the zookeeper hosts that consistof the ensemble that the Hive servers register their information with. This value can be obtained from Hive’sconfig file hive-site.xml as the value for the parameter ‘hive.zookeeper.quorum’.
• zookeeperNamespace -- This is the namespace under which HiveServer2 information is registered in theZooKeeper ensemble. This value can be obtained from Hive’s config file hive-site.xml as the value for theparameter ‘hive.server2.zookeeper.namespace’.
For the service configuration itself, the additional URLs for standby nodes should be added to the list. The activeURL (at the time of configuration) should ideally be added at the top of the list. Example for HBase, Oozie,WebHCat, and WebHDFS:
<service> <role>{COMPONENT}</role> <url>http://{host1}:50070/{component}</url> <url>http://{host2}:50070/{component}</url></service>
Example for Hive:
<service> <role>HIVE</role></service>
Please note that there is no <url> tag specified here as the URLs for the Hive servers are obtained from ZooKeeper.
Configuring Knox With Kerberos
Once you have a cluster that uses Kerberos for authentication, you must configure Knox to work with that cluster.
About this taskTo enable the Knox Gateway to interact with a Kerberos-protected cluster, add a knox user and Knox Gatewayproperties to the cluster.
Procedure
1. Find the fully-qualified domain name of the host running the gateway: hostname -f.
If the Knox host does not have a static IP address, you can define the knox host as * for local developer testing.
2. At every Hadoop Master:
• Create a UNIX account for Knox:
useradd -g hadoop knox
• Edit core-site.xml to include the following lines (near the end of the file):
<property> <name>hadoop.proxyuser.knox.groups</name> <value>users</value></property>
<property> <name>hadoop.proxyuser.knox.hosts</name> <value>$knox-host</value>
56
Configuring Proxy with Apache Knox Configuring Knox With Kerberos
</property>
where $knox-host is the fully-qualified domain name of the host running the gateway.• Edit webhcat-site.xml to include the following lines (near the end of the file):
<property> <name>hadoop.proxyuser.knox.groups</name> <value>users</value></property>
<property> <name>hadoop.proxyuser.knox.hosts</name> <value>$knox-host</value></property>
where $knox_host is the fully-qualified domain name of the host running the gateway.
3. At the Oozie host, edit oozie-site.xml to include the following lines (near the end of the file):
<property> <name>oozie.service.ProxyUserService.proxyuser.knox.groups</name> <value>users</value></property>
<property> <name>oozie.service.ProxyUserService.proxyuser.knox.hosts</name> <value>$knox-host</value></property>
where $knox-host is the fully-qualified domain name of the host running the gateway.
4. At each node running HiveServer2, edit hive-site.xml to include the following properties and values:
<property> <name>hive.server2.enable.doAs</name> <value>true</value></property>
<property> <name>hive.server2.allow.user.substitution</name> <value>true</value></property>
<property> <name>hive.server2.transport.mode</name> <value>http</value> <description>Server transport mode. "binary" or "http".</description></property>
<property> <name>hive.server2.thrift.http.port</name> <value>10001</value> <description>Port number when in HTTP mode.</description></property>
<property> <name>hive.server2.thrift.http.path</name> <value>cliservice</value> <description>Path component of URL endpoint when in HTTP mode.</description></property>
57