Embed Size (px)
Citation preview
Creating a Website with MS Publisher
Getting Started with the Wizard ......................................................................................1
Editing the Home Page....................................................................................................3
Editing Text ................................................................................................................3
Editing and Inserting Graphics ....................................................................................4
Inserting Pictures.........................................................................................................6
Inserting a Table..........................................................................................................6
Inserting a Hyperlink...................................................................................................8
Inserting a New Page.......................................................................................................8
Saving the Website........................................................................................................ 10
Publishing the Website with SSH - Secure Shell FTP Client.......................................... 11
1
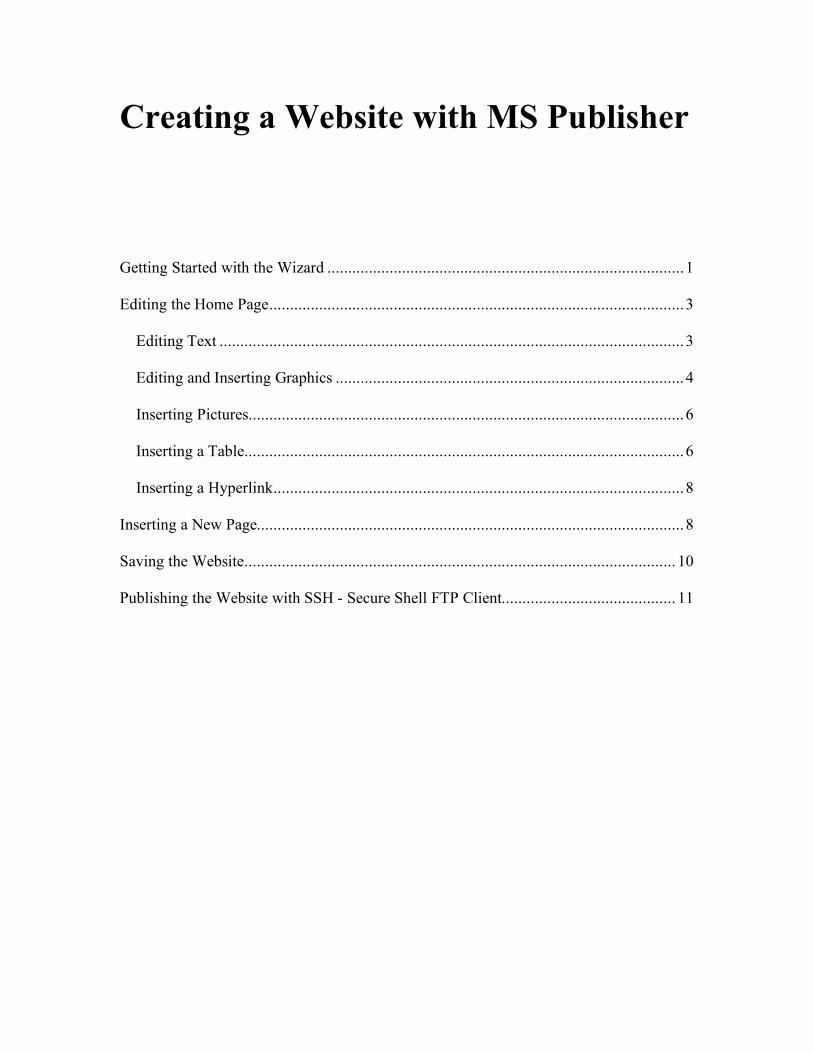
Getting Started with the Wizard Publisher gives you a variety of website design templates to choose from. A template contains color elements, graphics, and text formatting and placeholders for the pages that will make up the website. You can then modify the pages as you like. The website Wizard begins when you select a template.
1. Select the Web Sites publication type.
2. Select the Web Site design from those available.
3. Click OK in the Wizard dialog box to enter your personal information.
2
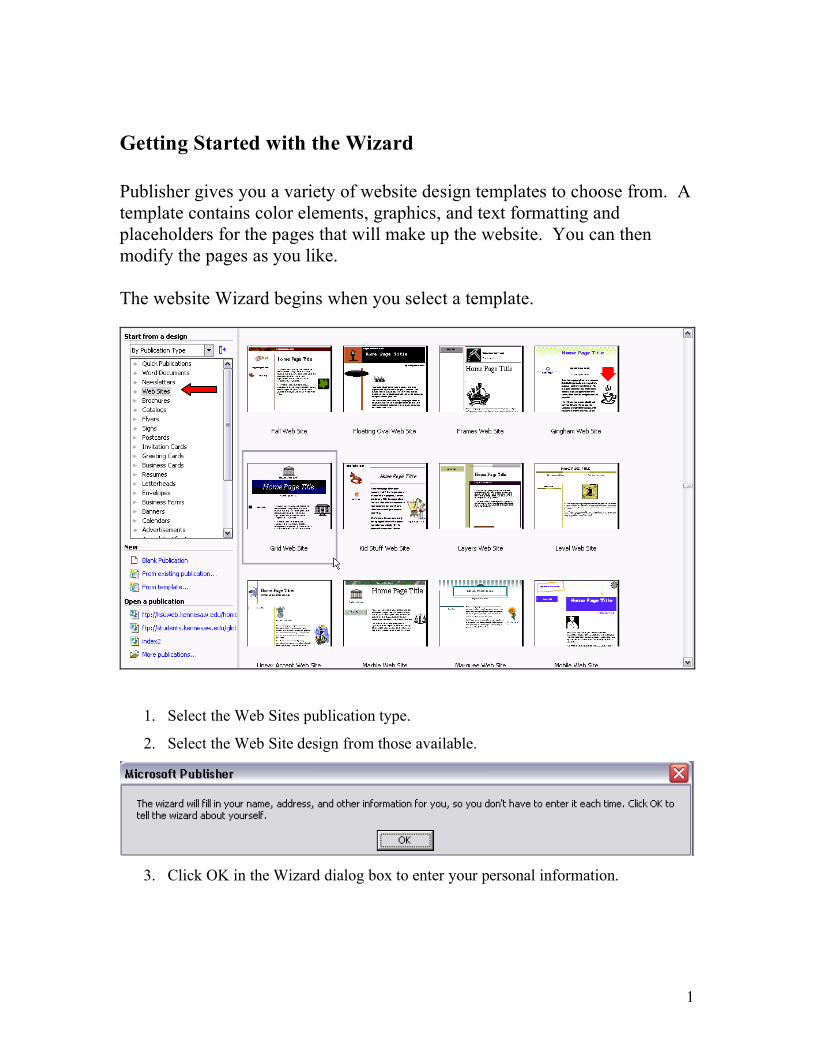
4. Select the Home/Family information set to edit.
5. Click in the information boxes and replace the information there with yours.
6. Click the Update button.
This completes the Wizard. You are now ready to edit the home page and add other
pages if you choose.
3
Editing the Home Page
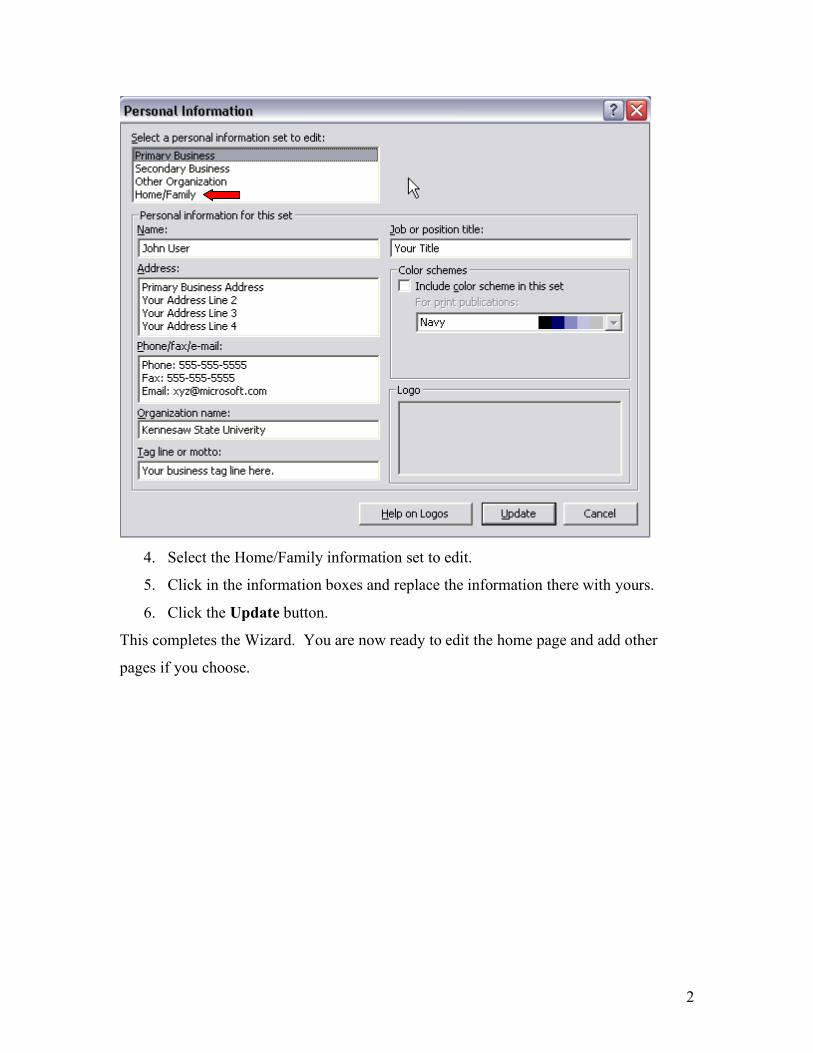
Editing Text
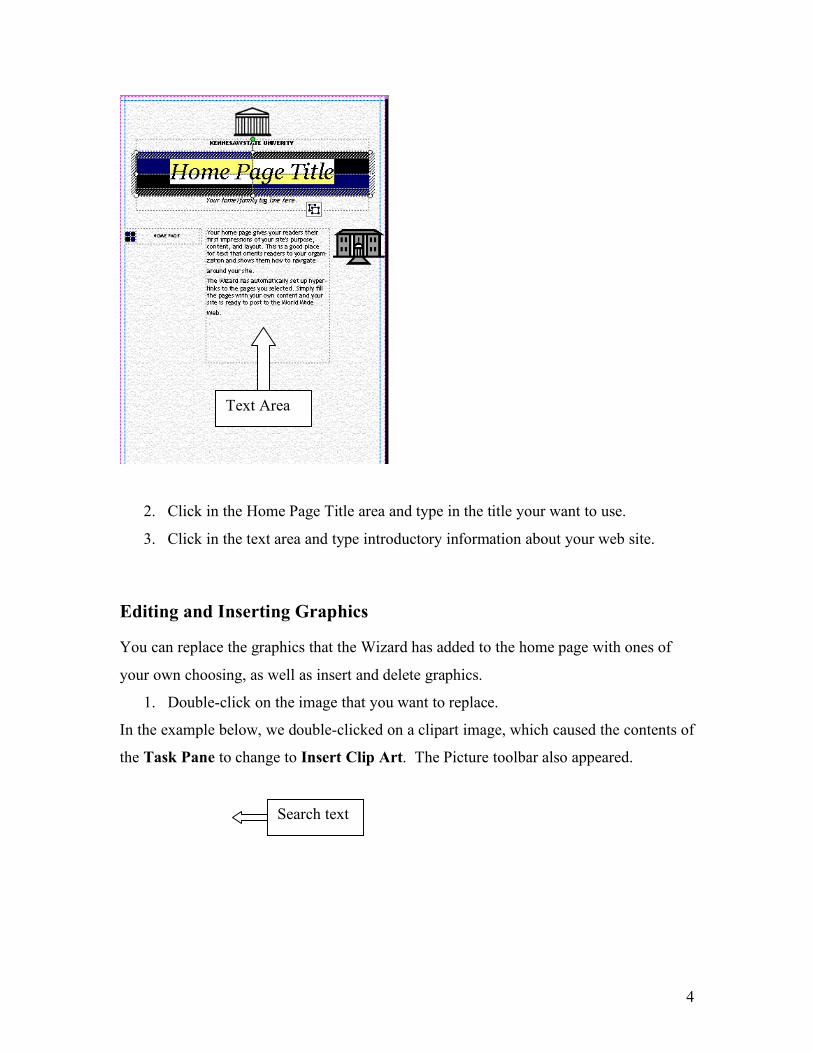
1. Click the Zoom In button on the toolbar to enlarge the view.
4
2. Click in the Home Page Title area and type in the title your want to use.
3. Click in the text area and type introductory information about your web site.
Editing and Inserting Graphics
You can replace the graphics that the Wizard has added to the home page with ones of
your own choosing, as well as insert and delete graphics.
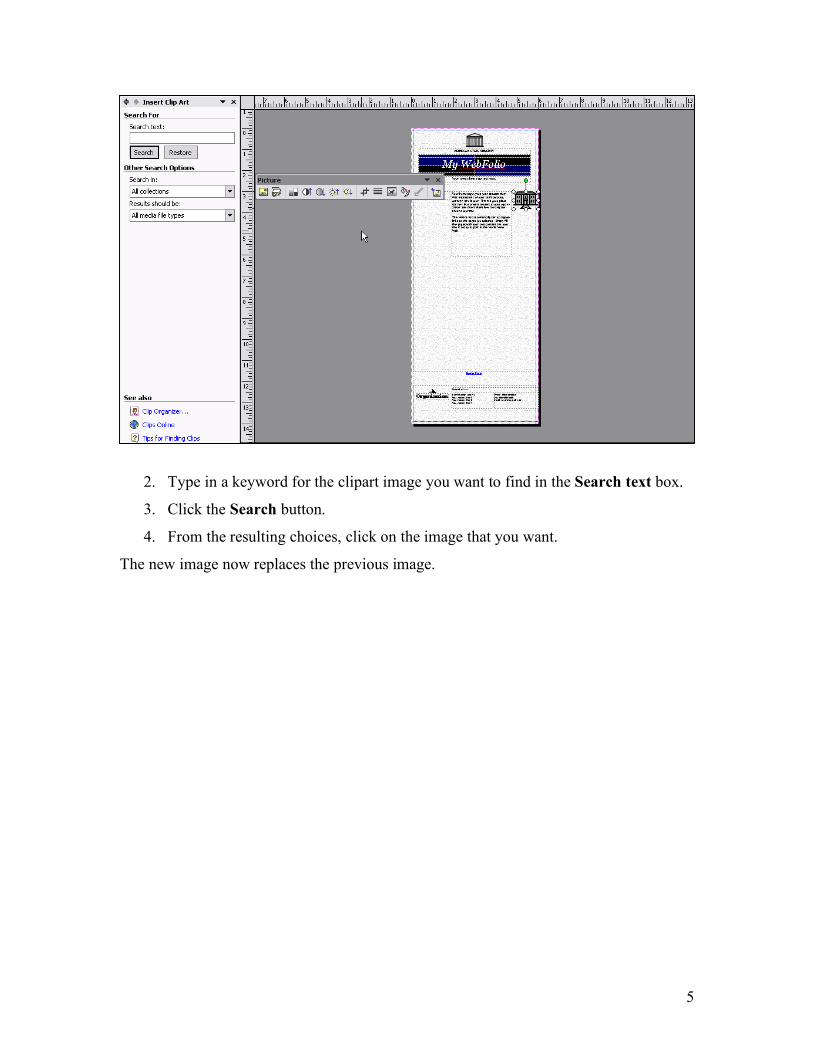
1. Double-click on the image that you want to replace.
In the example below, we double-clicked on a clipart image, which caused the contents of
the Task Pane to change to Insert Clip Art. The Picture toolbar also appeared.
Text Area
Search text
5
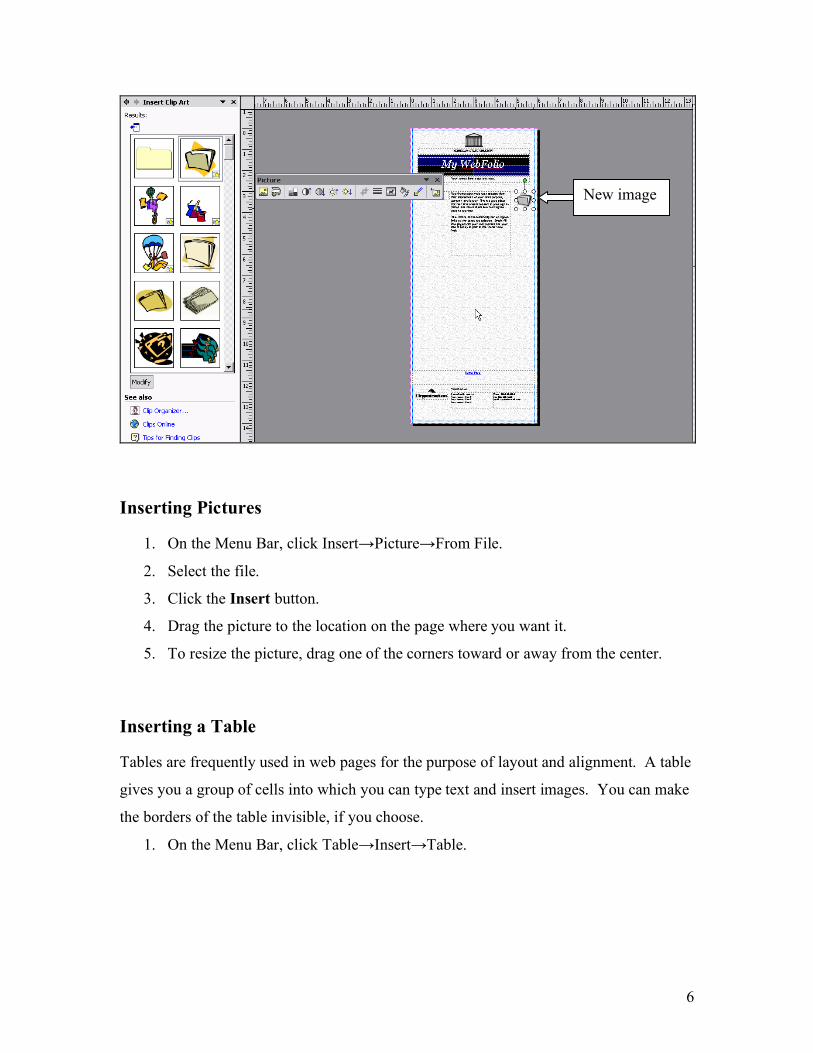
2. Type in a keyword for the clipart image you want to find in the Search text box.
3. Click the Search button.
4. From the resulting choices, click on the image that you want.
The new image now replaces the previous image.
6
Inserting Pictures
1. On the Menu Bar, click Insert→Picture→From File.
2. Select the file.
3. Click the Insert button.
4. Drag the picture to the location on the page where you want it.
5. To resize the picture, drag one of the corners toward or away from the center.
Inserting a Table
Tables are frequently used in web pages for the purpose of layout and alignment. A table
gives you a group of cells into which you can type text and insert images. You can make
the borders of the table invisible, if you choose.
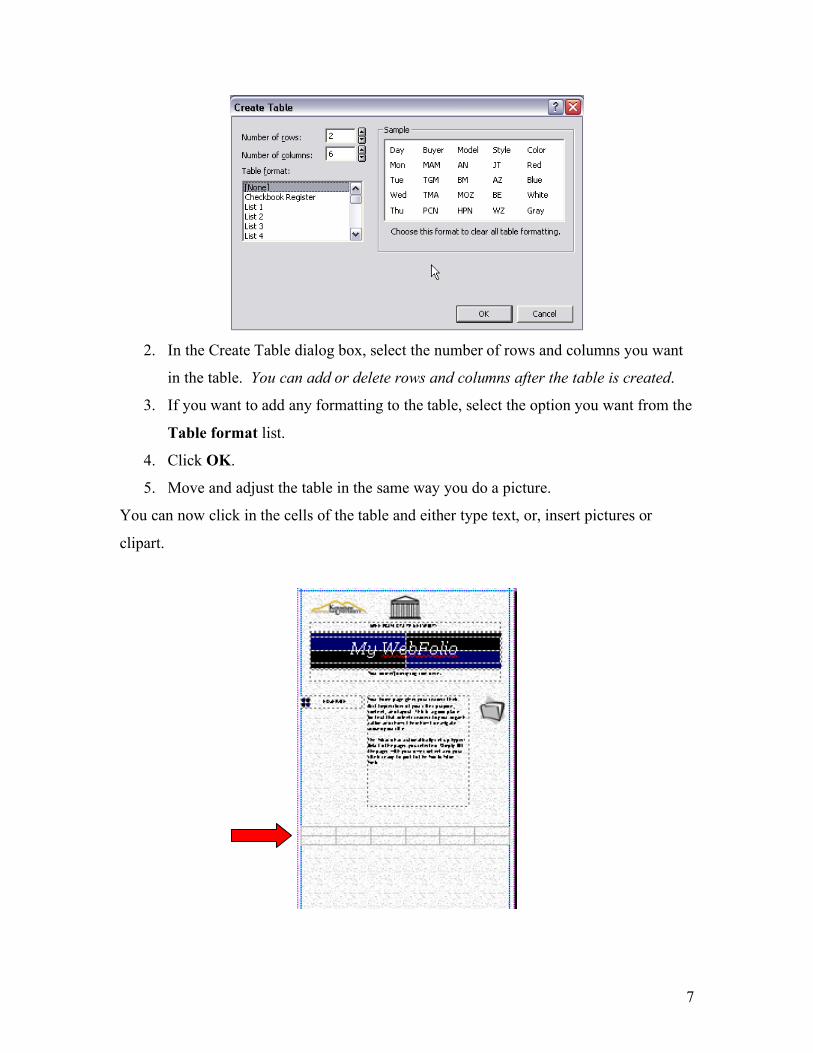
1. On the Menu Bar, click Table→Insert→Table.
New image
7
2. In the Create Table dialog box, select the number of rows and columns you want
in the table. You can add or delete rows and columns after the table is created.
3. If you want to add any formatting to the table, select the option you want from the
Table format list.
4. Click OK.
5. Move and adjust the table in the same way you do a picture.
You can now click in the cells of the table and either type text, or, insert pictures or
clipart.
8
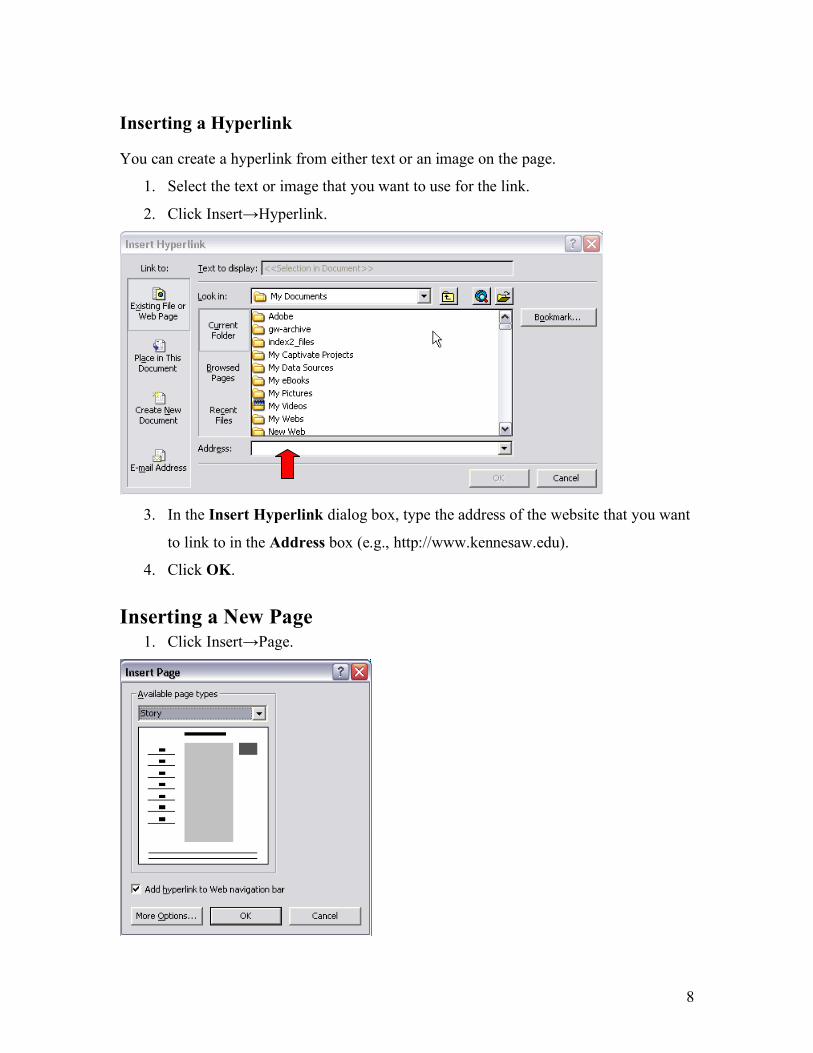
Inserting a Hyperlink
You can create a hyperlink from either text or an image on the page.
1. Select the text or image that you want to use for the link.
2. Click Insert→Hyperlink.
3. In the Insert Hyperlink dialog box, type the address of the website that you want
to link to in the Address box (e.g., http://www.kennesaw.edu).
4. Click OK.
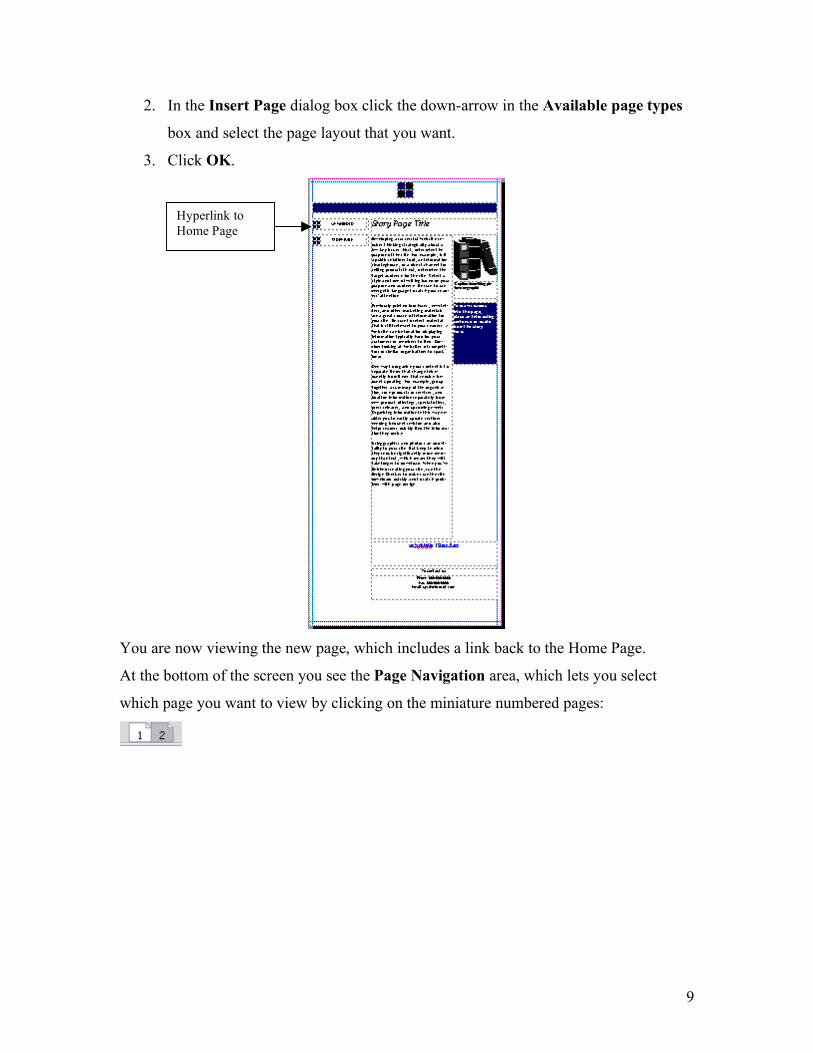
Inserting a New Page 1. Click Insert→Page.
9
2. In the Insert Page dialog box click the down-arrow in the Available page types
box and select the page layout that you want.
3. Click OK.
You are now viewing the new page, which includes a link back to the Home Page.
At the bottom of the screen you see the Page Navigation area, which lets you select
which page you want to view by clicking on the miniature numbered pages:
Hyperlink to Home Page
10
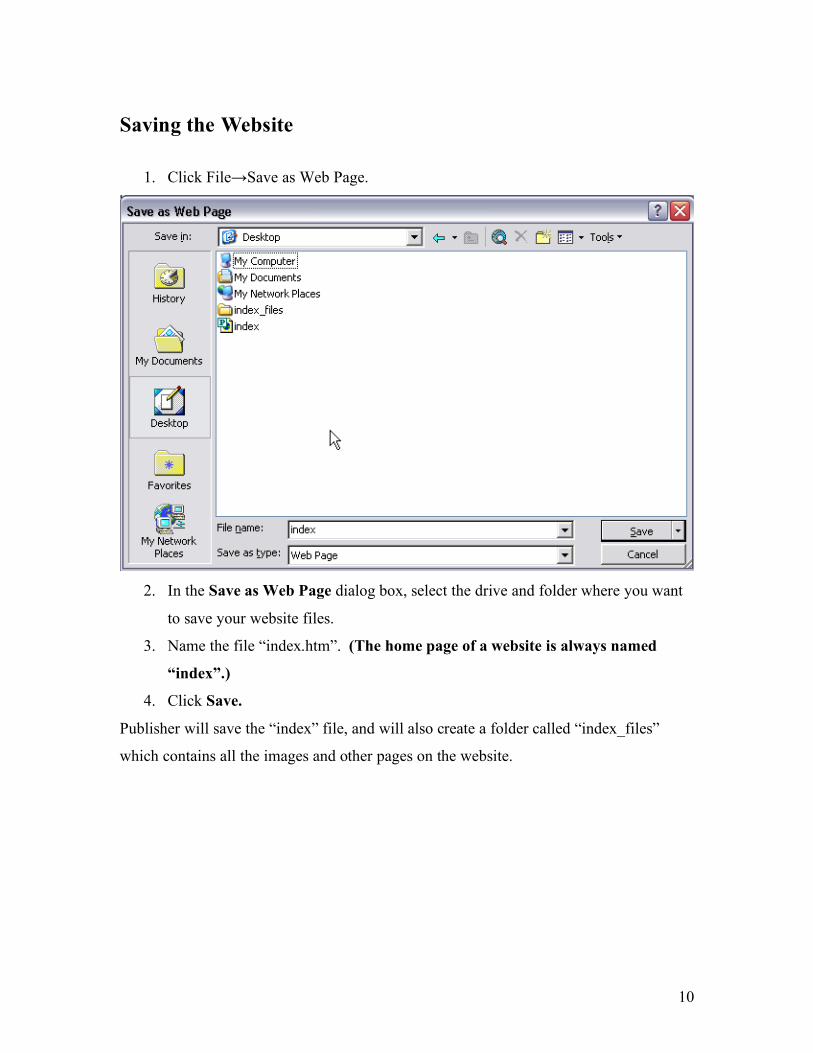
Saving the Website
1. Click File→Save as Web Page.
2. In the Save as Web Page dialog box, select the drive and folder where you want
to save your website files.
3. Name the file “index.htm”. (The home page of a website is always named
“index”.)
4. Click Save.
Publisher will save the “index” file, and will also create a folder called “index_files”
which contains all the images and other pages on the website.
11
Publishing the Website with SSH - Secure Shell FTP Client The Secure Shell FTP client is used to transfer files from one computer to another in a secure manner. This is especially useful when creating or updating your web pages. The main reason that it is needed is that creating and editing of web pages is usually not done on the web server but on a desktop or workstation computer. When a web page is created or edited on the local workstation, then the files need to be transferred to the web server. The Secure Shell FTP (sFTP) client should be installed on all computers on campus. To access sFTP on campus:
• If you are faculty/staff, you should be able to start sFTP by clicking on your “Start” button, then “All Programs”, then “SSH Secure Shell”, and then “Secure File Transfer Client”
• If you are a student working at a student lab computer, you should be able to go to
the “Start” button, then “Software”, then “SSH Secure Shell”, and then “Secure File Transfer Client”.
To download SSH Secure Shell FTP to your computer at home:
1. Open a web browser and go to http://its.kennesaw.edu/downloads
2. Enter your NetID and password. If you are faculty/staff, you can activate your NetID at http://netid.kennesaw.edu/downloads
3. Click on “I Agree”
4. Click on “Secure Shell”
5. Click on “Run” to install SSH Secure Shell FTP on your computer
To use SSH Secure Shell FTP:
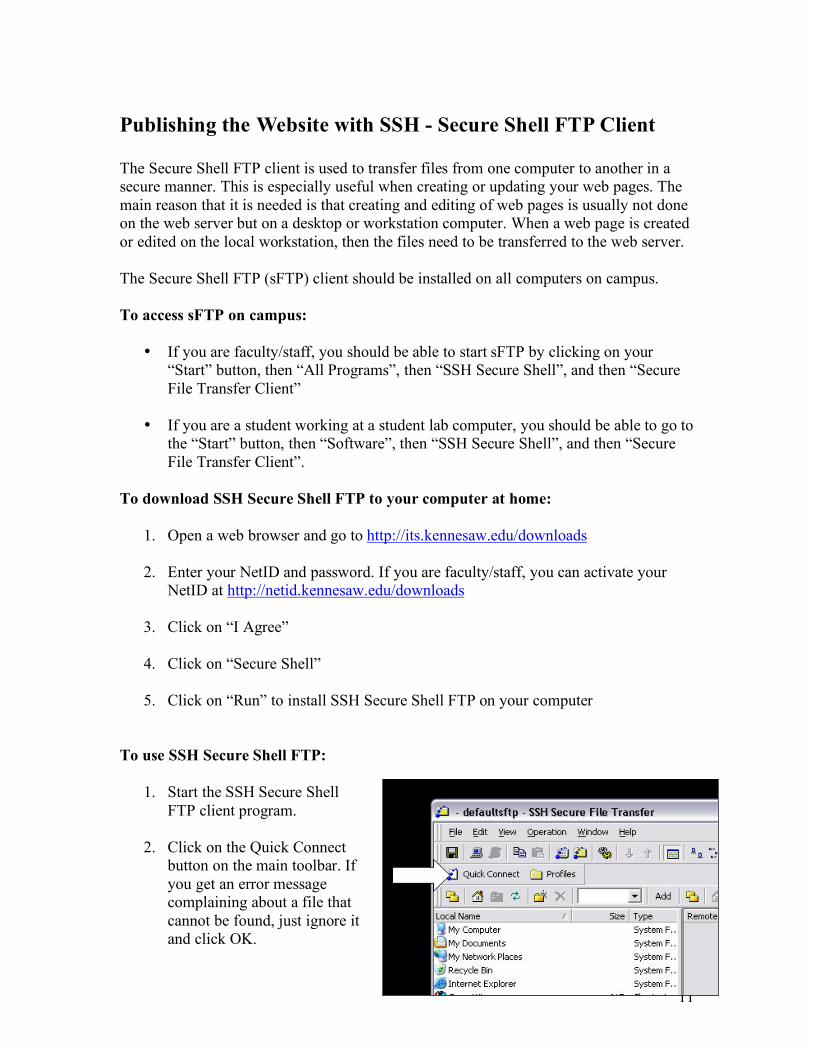
1. Start the SSH Secure Shell FTP client program.
2. Click on the Quick Connect
button on the main toolbar. If you get an error message complaining about a file that cannot be found, just ignore it and click OK.
12
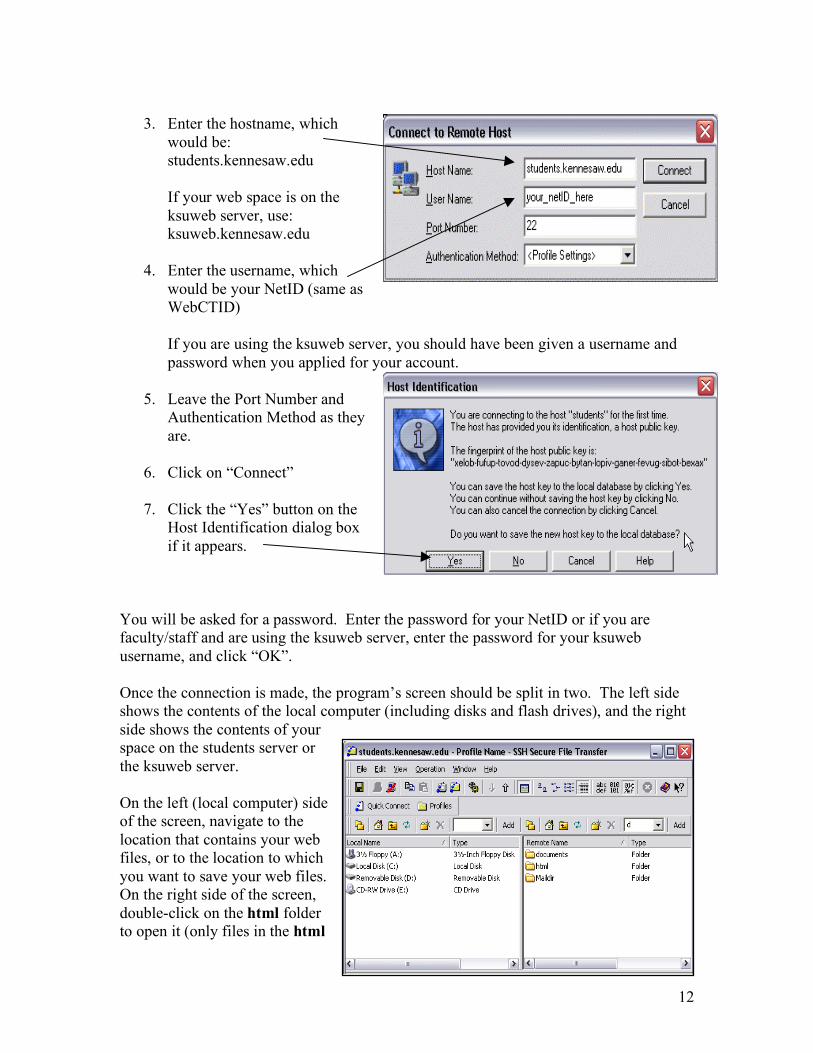
3. Enter the hostname, which
would be: students.kennesaw.edu
If your web space is on the ksuweb server, use: ksuweb.kennesaw.edu
4. Enter the username, which
would be your NetID (same as WebCTID) If you are using the ksuweb server, you should have been given a username and password when you applied for your account.
5. Leave the Port Number and
Authentication Method as they are.
6. Click on “Connect”
7. Click the “Yes” button on the
Host Identification dialog box if it appears.
You will be asked for a password. Enter the password for your NetID or if you are faculty/staff and are using the ksuweb server, enter the password for your ksuweb username, and click “OK”. Once the connection is made, the program’s screen should be split in two. The left side shows the contents of the local computer (including disks and flash drives), and the right side shows the contents of your space on the students server or the ksuweb server.
On the left (local computer) side of the screen, navigate to the location that contains your web files, or to the location to which you want to save your web files. On the right side of the screen, double-click on the html folder to open it (only files in the html
13
folder can be seen from the Internet). Two useful buttons for navigation:
On the local computer side, the home button takes you to the drive selection area in your “My Computer” window, where you can choose a disk, flash drive, or a folder on the hard drive. On the remote computer side, this button takes you to your home directory in your account on the server.
The “Up” button takes you up one level on the directory structure.
You can drag and drop files from one side to the other as you wish. Sending a file from your computer to the server is called uploading and getting a file from the server is called downloading. Note: Remember, your web pages must be in the html folder on the server to be accessible from the web. This is true for both the students server and the ksuweb server. To download a file from the server, drag it from the right side (remote) and drop it on the left side (local), or you can right click on the file and then click “download. To upload a file to the server, drag it from the left side (local), and drop it on the right side (remote), or you can right click on the file and then click upload.
8. To end the sFTP session, click the Disconnect button.