Embed Size (px)
Citation preview

Creating Quizzes in Camtasia 8
Camtasia Studio: Windows
ITaP Training www.itap.purdue.edu/learning Page 1 Revised
Tags: Camtasia; Quiz Questions? E-mail [email protected]
Tools within Camtasia allow you to create interactive quizzes inside of the videos you create. You can use these quizzes to emphasize key points, check for student completion of your videos, and/or to assess student learning of the covered content. If you want a record of student performance, quiz scores can be accessed by a nightly email and/or uploaded directly into Blackboard Learn.
Creating Camtasia Quizzes
Complete your movie before adding your quiz
Use the Camtasia Studios editing tool to make all desired changes to your recording before adding your quiz. This includes making cuts, adding alternate audio/video tracks, and adding video effects such as callouts. Inserting the quiz before editing is complete can complicate your recording’s timeline.
Turn on Quiz view
on the Cog Icon on the far left of your recording’s timeline
ITaP Training www.itap.purdue.edu/learning Page 2 Revised
Tags: Camtasia; Quiz Questions? E-mail [email protected]
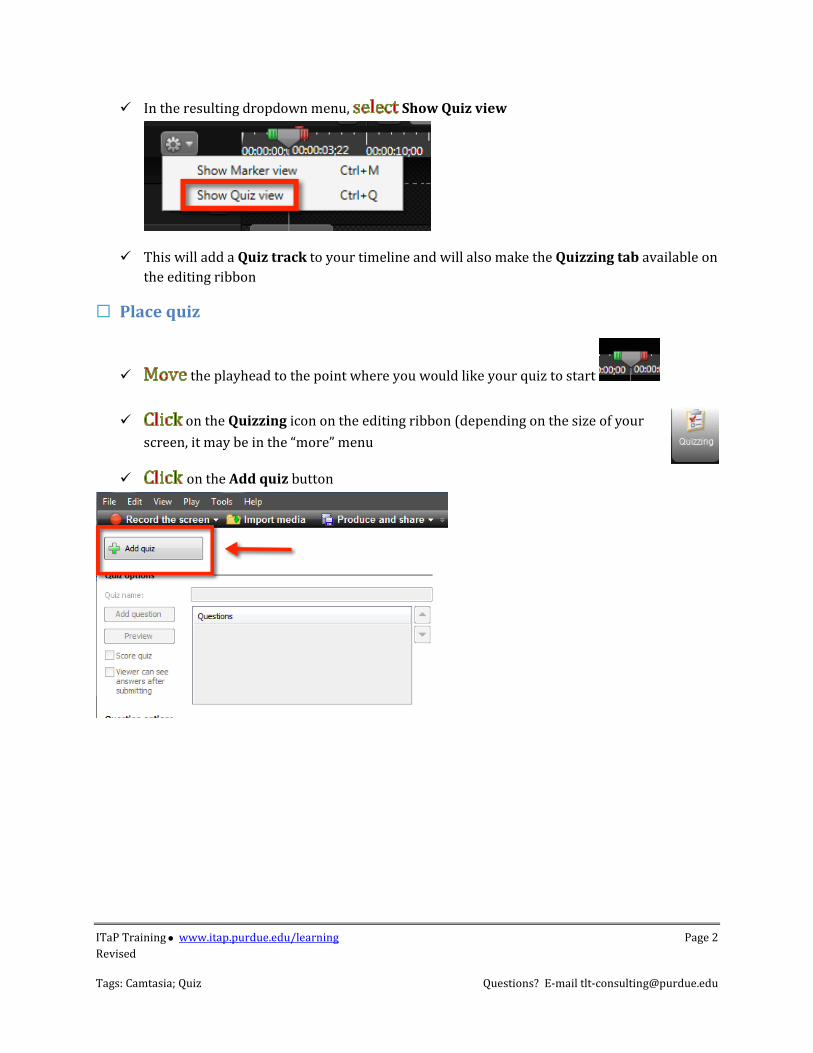
In the resulting dropdown menu, Show Quiz view
This will add a Quiz track to your timeline and will also make the Quizzing tab available on the editing ribbon
Place quiz
the playhead to the point where you would like your quiz to start
on the Quizzing icon on the editing ribbon (depending on the size of your screen, it may be in the “more” menu
on the Add quiz button

ITaP Training www.itap.purdue.edu/learning Page 3 Revised
Tags: Camtasia; Quiz Questions? E-mail [email protected]
You will now see your quiz above the playhead on the quiz area of the your recording’s timeline
the Quiz name field with the name of your quiz
Create quiz questions
There are two options to the left of the Quizzing screen under Quiz options:
i) Score quiz: Check this box if you would like your questions to be graded automatically. You will not see options for Answers (as described below) if this box is not checked.
ii) Viewer can see answers after submitting: Check this box if you would like your students to be able to review their answers and the correct answers immediately after the quiz.
Under Question options, the Question type that matches what you want to ask for Question 1. Your choices are: Multiple Choice, Fill in the Blank, Short Answer, and True/False.
ITaP Training www.itap.purdue.edu/learning Page 4 Revised
Tags: Camtasia; Quiz Questions? E-mail [email protected]
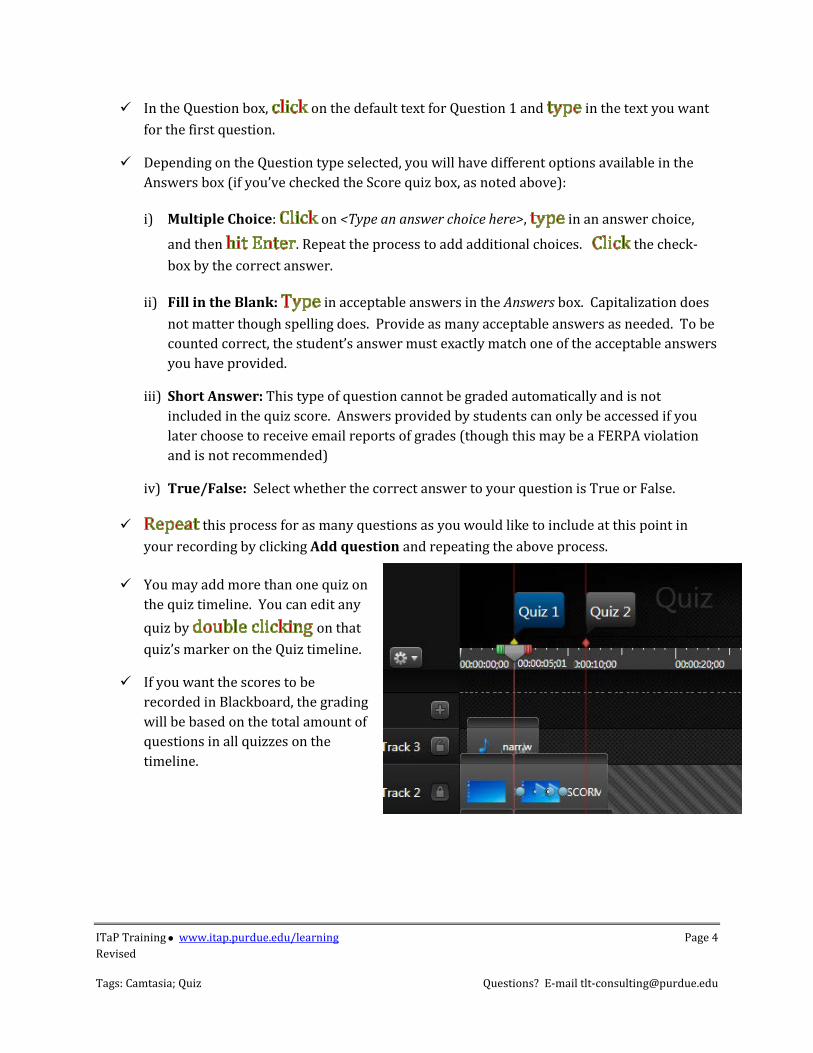
In the Question box, on the default text for Question 1 and in the text you want for the first question.
Depending on the Question type selected, you will have different options available in the Answers box (if you’ve checked the Score quiz box, as noted above):
i) Multiple Choice: on <Type an answer choice here>, in an answer choice,
and then . Repeat the process to add additional choices. the check-box by the correct answer.
ii) Fill in the Blank: in acceptable answers in the Answers box. Capitalization does not matter though spelling does. Provide as many acceptable answers as needed. To be counted correct, the student’s answer must exactly match one of the acceptable answers you have provided.
iii) Short Answer: This type of question cannot be graded automatically and is not included in the quiz score. Answers provided by students can only be accessed if you later choose to receive email reports of grades (though this may be a FERPA violation and is not recommended)
iv) True/False: Select whether the correct answer to your question is True or False.
this process for as many questions as you would like to include at this point in your recording by clicking Add question and repeating the above process.
You may add more than one quiz on the quiz timeline. You can edit any quiz by on that quiz’s marker on the Quiz timeline.
If you want the scores to be recorded in Blackboard, the grading will be based on the total amount of questions in all quizzes on the timeline.
ITaP Training www.itap.purdue.edu/learning Page 5 Revised
Tags: Camtasia; Quiz Questions? E-mail [email protected]
Due to rounding settings in Blackboard, it is suggested that you use an even number of questions in your video. Use of odd numbers may result in irregular quiz scores. For example, if you use 3 questions worth 15 points total, Blackboard may report the score of two correct answers as 9.9 instead of 10 due to rounding.
Producing your movie with a quiz
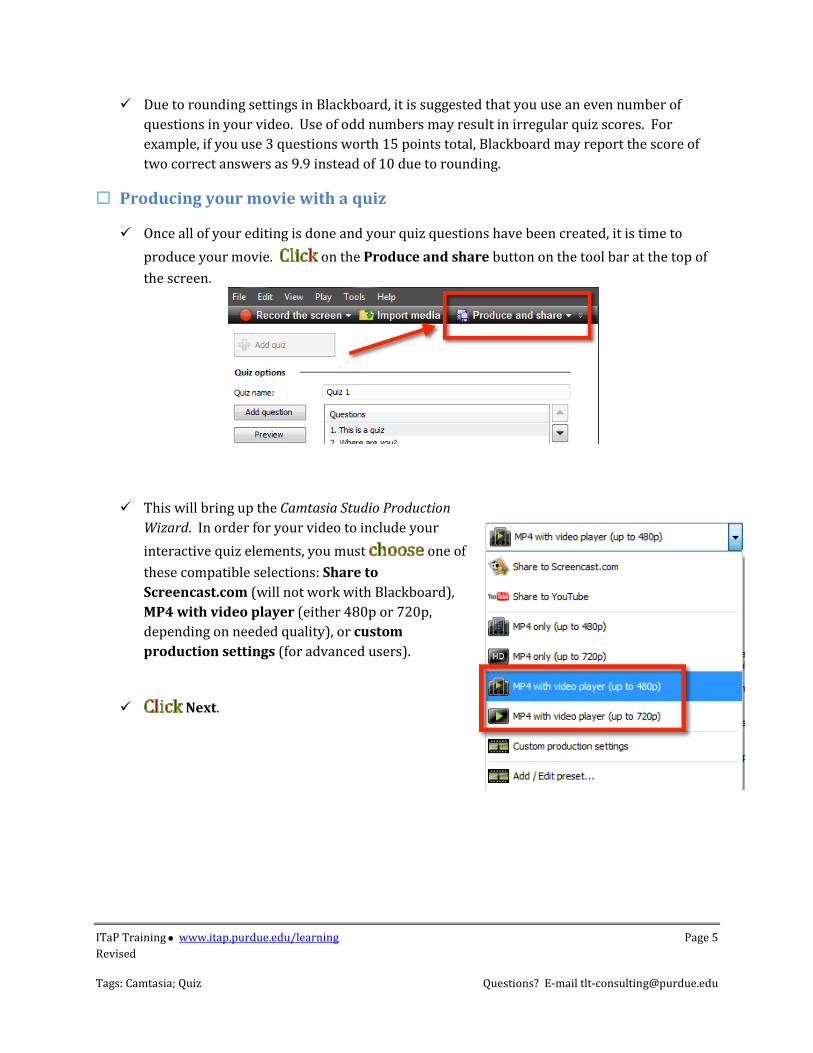
Once all of your editing is done and your quiz questions have been created, it is time to produce your movie. on the Produce and share button on the tool bar at the top of the screen.
This will bring up the Camtasia Studio Production Wizard. In order for your video to include your interactive quiz elements, you must one of these compatible selections: Share to Screencast.com (will not work with Blackboard), MP4 with video player (either 480p or 720p, depending on needed quality), or custom production settings (for advanced users).
Next.
ITaP Training www.itap.purdue.edu/learning Page 6 Revised
Tags: Camtasia; Quiz Questions? E-mail [email protected]
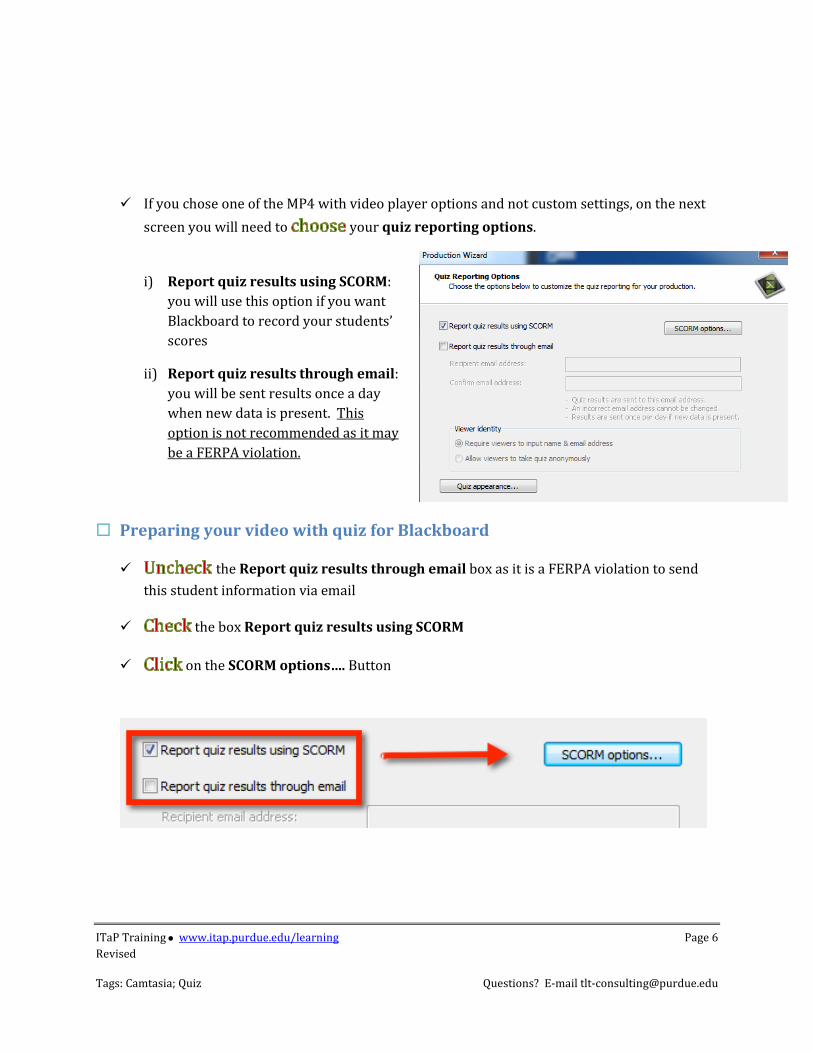
If you chose one of the MP4 with video player options and not custom settings, on the next screen you will need to your quiz reporting options.
i) Report quiz results using SCORM: you will use this option if you want Blackboard to record your students’ scores
ii) Report quiz results through email: you will be sent results once a day when new data is present. This option is not recommended as it may be a FERPA violation.
Preparing your video with quiz for Blackboard
the Report quiz results through email box as it is a FERPA violation to send this student information via email
the box Report quiz results using SCORM
on the SCORM options…. Button
ITaP Training www.itap.purdue.edu/learning Page 7 Revised
Tags: Camtasia; Quiz Questions? E-mail [email protected]
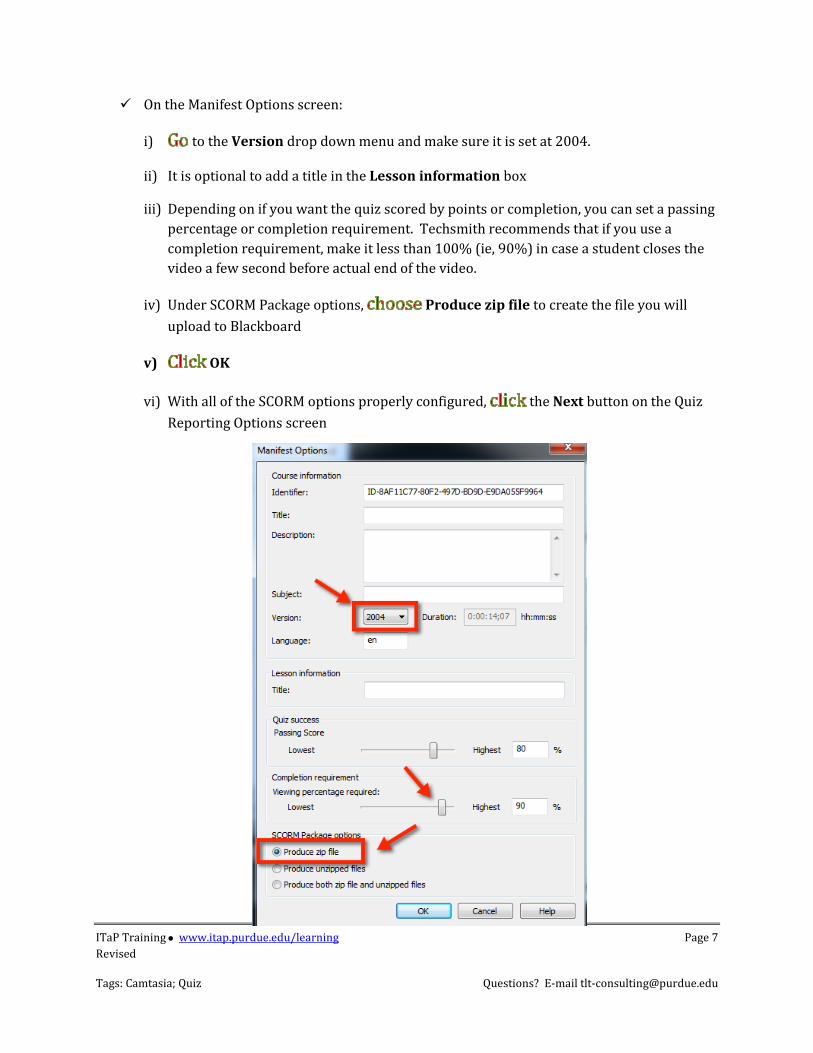
On the Manifest Options screen:
i) to the Version drop down menu and make sure it is set at 2004.
ii) It is optional to add a title in the Lesson information box
iii) Depending on if you want the quiz scored by points or completion, you can set a passing percentage or completion requirement. Techsmith recommends that if you use a completion requirement, make it less than 100% (ie, 90%) in case a student closes the video a few second before actual end of the video.
iv) Under SCORM Package options, Produce zip file to create the file you will upload to Blackboard
v) OK
vi) With all of the SCORM options properly configured, the Next button on the Quiz Reporting Options screen
ITaP Training www.itap.purdue.edu/learning Page 8 Revised
Tags: Camtasia; Quiz Questions? E-mail [email protected]
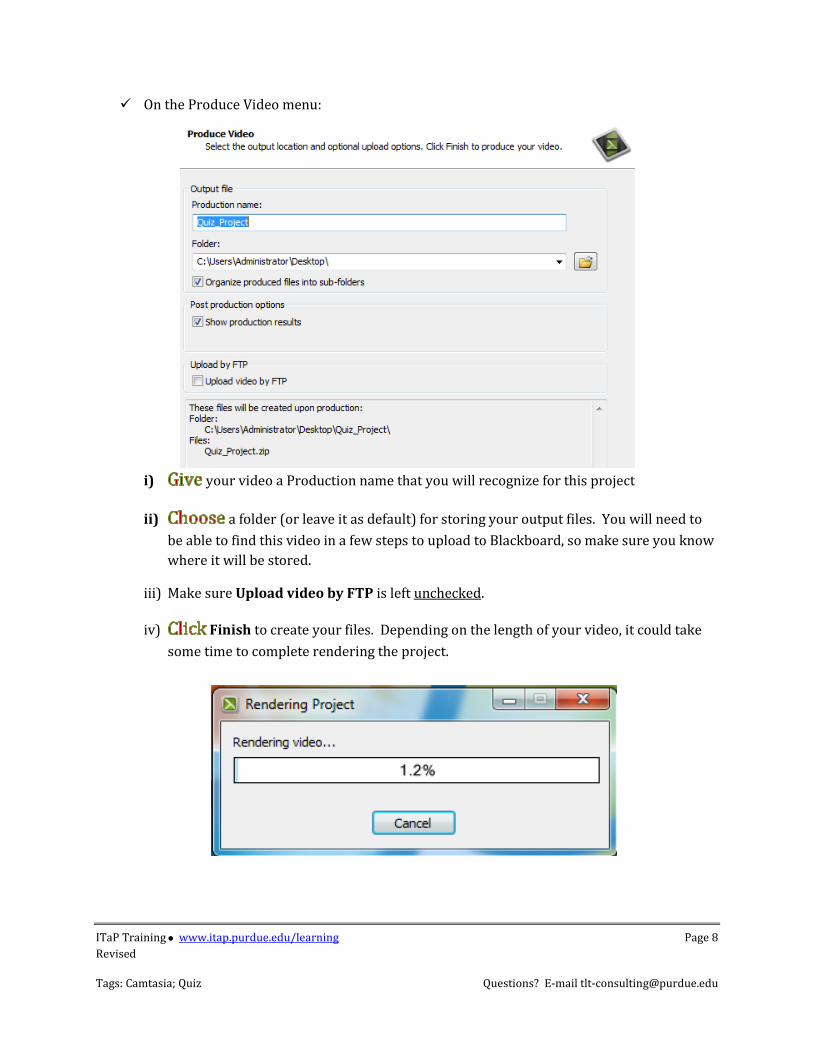
On the Produce Video menu:
i) your video a Production name that you will recognize for this project
ii) a folder (or leave it as default) for storing your output files. You will need to be able to find this video in a few steps to upload to Blackboard, so make sure you know where it will be stored.
iii) Make sure Upload video by FTP is left unchecked.
iv) Finish to create your files. Depending on the length of your video, it could take some time to complete rendering the project.
ITaP Training www.itap.purdue.edu/learning Page 9 Revised
Tags: Camtasia; Quiz Questions? E-mail [email protected]
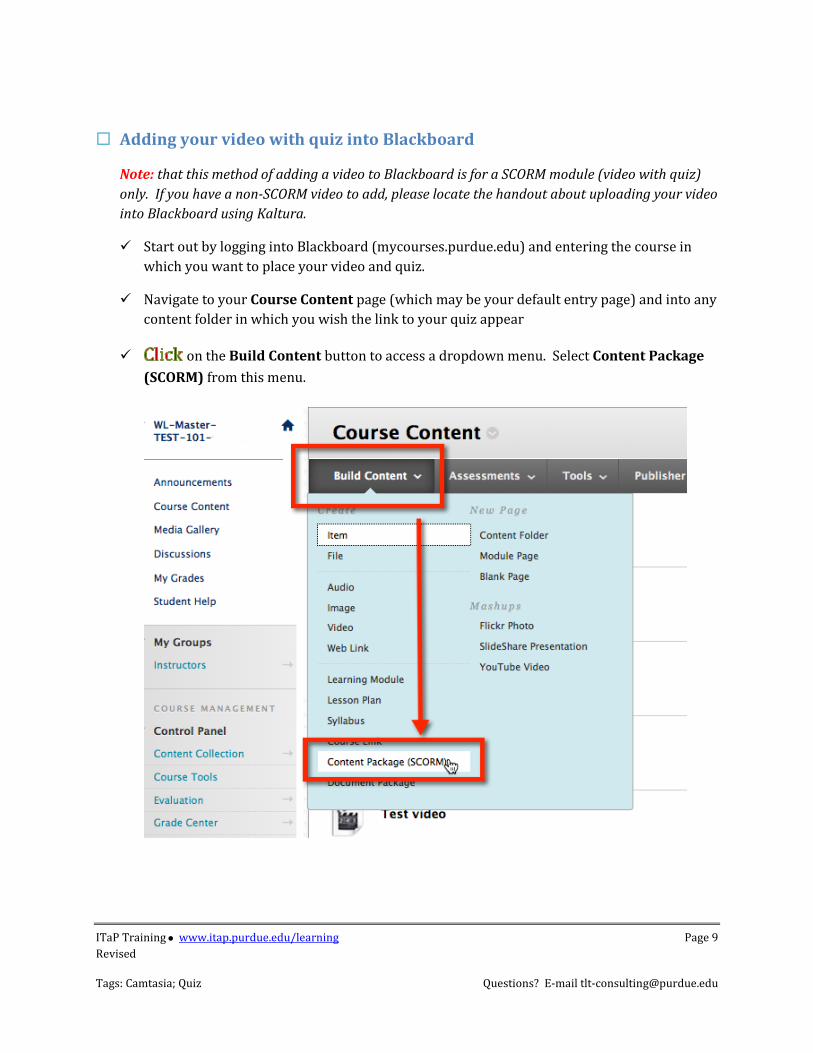
Adding your video with quiz into Blackboard
Note: that this method of adding a video to Blackboard is for a SCORM module (video with quiz) only. If you have a non-SCORM video to add, please locate the handout about uploading your video into Blackboard using Kaltura.
Start out by logging into Blackboard (mycourses.purdue.edu) and entering the course in which you want to place your video and quiz.
Navigate to your Course Content page (which may be your default entry page) and into any content folder in which you wish the link to your quiz appear
on the Build Content button to access a dropdown menu. Select Content Package (SCORM) from this menu.
ITaP Training www.itap.purdue.edu/learning Page 10 Revised
Tags: Camtasia; Quiz Questions? E-mail [email protected]
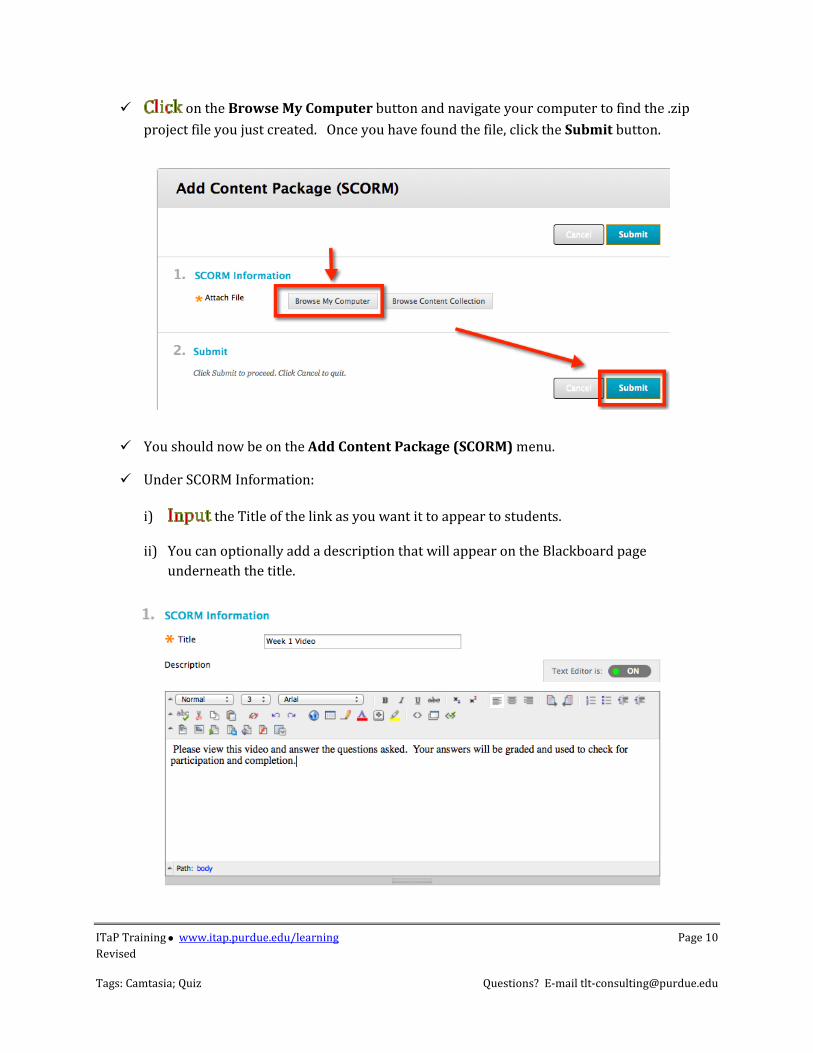
on the Browse My Computer button and navigate your computer to find the .zip project file you just created. Once you have found the file, click the Submit button.
You should now be on the Add Content Package (SCORM) menu.
Under SCORM Information:
i) the Title of the link as you want it to appear to students.
ii) You can optionally add a description that will appear on the Blackboard page underneath the title.
ITaP Training www.itap.purdue.edu/learning Page 11 Revised
Tags: Camtasia; Quiz Questions? E-mail [email protected]
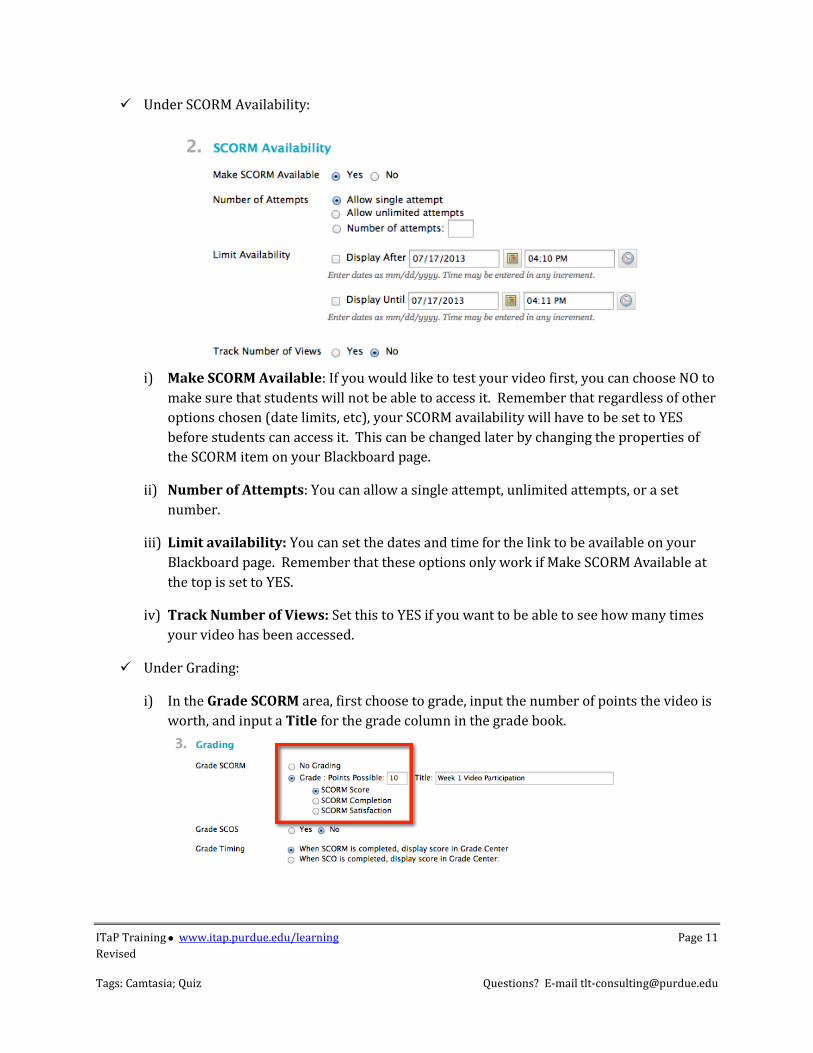
Under SCORM Availability:
i) Make SCORM Available: If you would like to test your video first, you can choose NO to make sure that students will not be able to access it. Remember that regardless of other options chosen (date limits, etc), your SCORM availability will have to be set to YES before students can access it. This can be changed later by changing the properties of the SCORM item on your Blackboard page.
ii) Number of Attempts: You can allow a single attempt, unlimited attempts, or a set number.
iii) Limit availability: You can set the dates and time for the link to be available on your Blackboard page. Remember that these options only work if Make SCORM Available at the top is set to YES.
iv) Track Number of Views: Set this to YES if you want to be able to see how many times your video has been accessed.
Under Grading:
i) In the Grade SCORM area, first choose to grade, input the number of points the video is worth, and input a Title for the grade column in the grade book.
ITaP Training www.itap.purdue.edu/learning Page 12 Revised
Tags: Camtasia; Quiz Questions? E-mail [email protected]
Note: This is the only time will be able to alter the Points Possible for your video. If you want to change this later, you will have to DELETE the SCORM object and re-upload it to start over.
If you choose SCORM Score, the score will be figured by dividing the total number of points by the total number of quiz questions in the video.
If you choose SCORM completion, points will be assigned for completion based upon the amount of the video watched compared to the completion percentage you set when producing the video in Camtasia.
If you choose SCORM Satisfaction, points will be assigned for satisfactorily answering quiz questions based upon the percentage correct you set when producing the video in Camtasia.
ii) Grade SCOS to NO
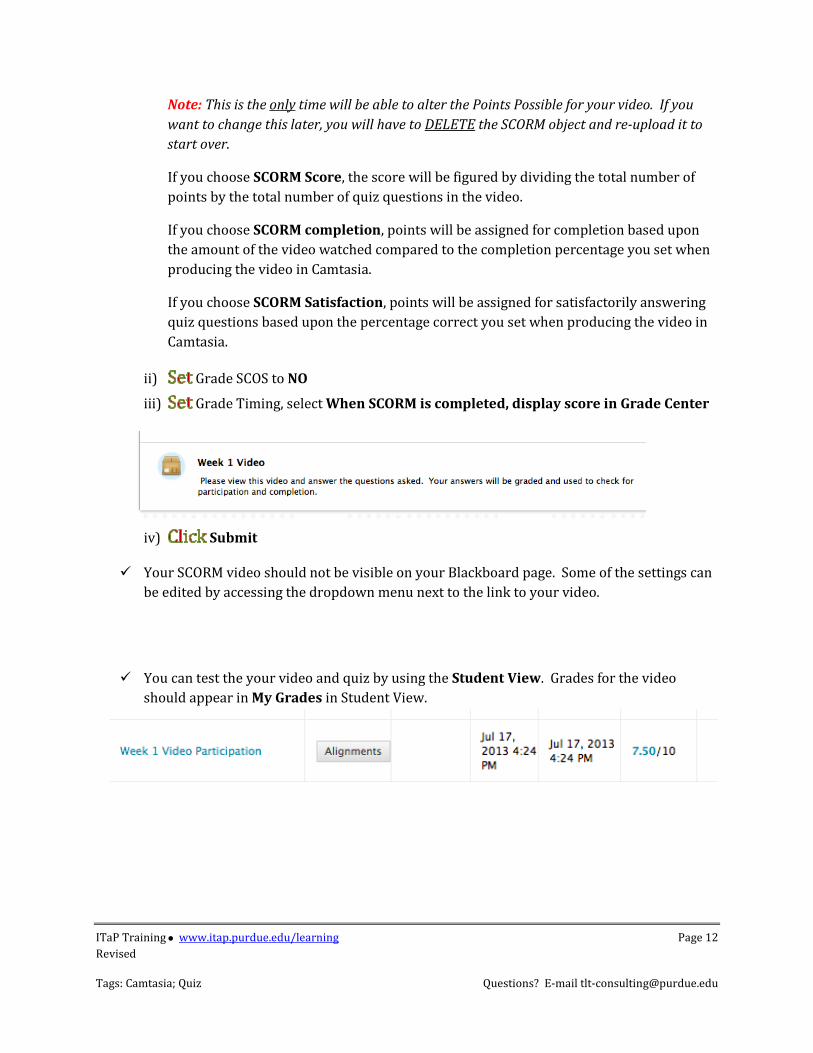
iii) Grade Timing, select When SCORM is completed, display score in Grade Center
iv) Submit
Your SCORM video should not be visible on your Blackboard page. Some of the settings can be edited by accessing the dropdown menu next to the link to your video.
You can test the your video and quiz by using the Student View. Grades for the video should appear in My Grades in Student View.