Embed Size (px)
Citation preview
Page 1 of 21
CS163 NetBeans Tutorial
NetBeans is a free computer program (developed by Sun and currently owned by Oracle) that
helps programmers create and manage computer programs, including programs written in C++ or
Java. NetBeans is an example of an Integrated Development Environment (IDE), where the C++
program that you're developing is integrated (embedded) into a larger computer program
(NetBeans) that includes many additional tools to help you organize, test, and repair any
problems with your program.
We'll be using NetBeans to develop our CS163 programs this semester. So to prepare for writing
your own computer programs, you'll need to learn the basics of how to create and run a simple
pre-written C++ program using NetBeans.
NetBeans is a large and somewhat complicated-looking program because it has a lot of features
that professional computer programmers can use. But fortunately we'll be able to ignore most of
that complexity, because as beginners we only need to use a few of the features of NetBeans. So
don't be intimidated by the way NetBeans looks at first.
This tutorial will show you how to use NetBeans to enter, compile, and run a simple "Hello
World" program written in C++. That C++ program (shown below) simply displays the phrase
“Hello, world!” in a display window called the "console".
For this tutorial, you don't need to understand all the details of the "Hello World" program. The
main thing right now is to learn how to use NetBeans to do the basic things you'll need to
do to create and save any computer program, including future programs that you will write. So
in this tutorial, you will:
Log into a CS lab computer,
Start NetBeans,
Enter the “Hello World” program that appears below into NetBeans,
Save your “Hello World” program,
Run the “Hello World” program,
If necessary, fix any typographical errors in your program, re-save it, and re-run it until
you get it working and your program displays the message “Hello, world!”.
Print it (so you can turn it in for grading).
Log out of the CS lab computer.
Page 2 of 21
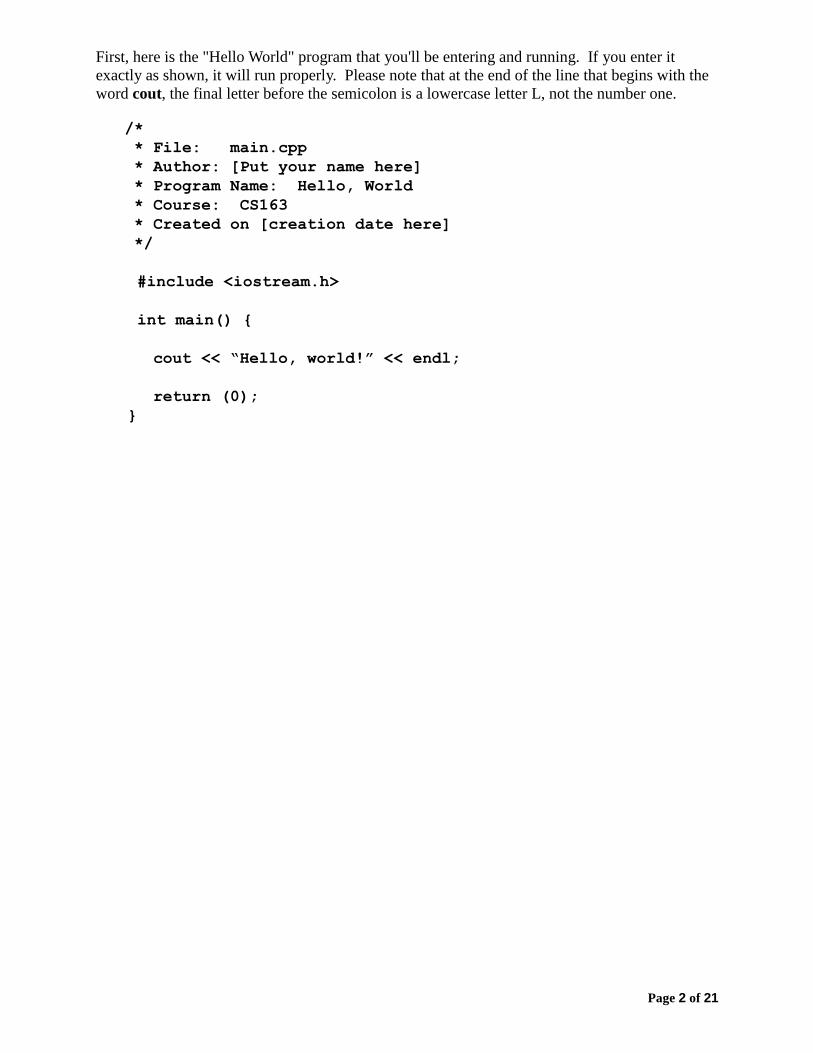
First, here is the "Hello World" program that you'll be entering and running. If you enter it
exactly as shown, it will run properly. Please note that at the end of the line that begins with the
word cout, the final letter before the semicolon is a lowercase letter L, not the number one.
/*
* File: main.cpp
* Author: [Put your name here]
* Program Name: Hello, World
* Course: CS163
* Created on [creation date here]
*/
#include <iostream.h>
int main() {
cout << “Hello, world!” << endl;
return (0);
}
Page 3 of 21
How to log into a CS Lab computer
1. Go to one of the Computer Science labs such as P115 (“The Dungeon”) or P107 (“The
Interrogation Room”) and sit down at any available computer.
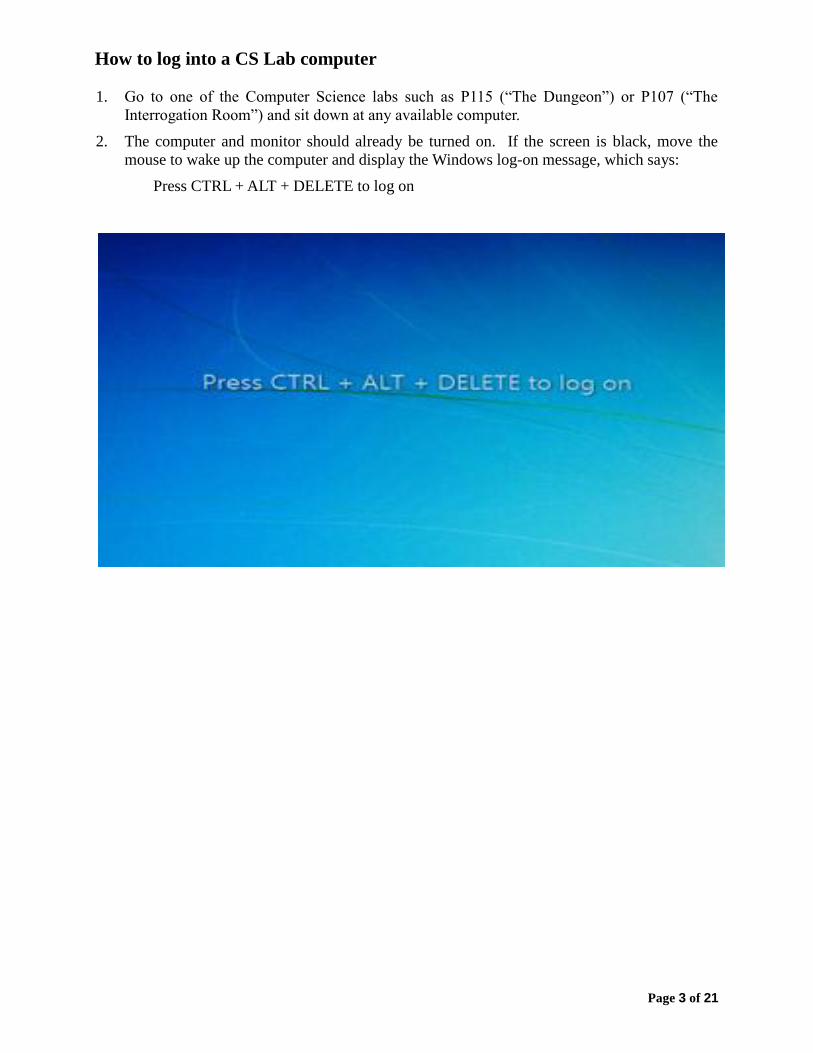
2. The computer and monitor should already be turned on. If the screen is black, move the
mouse to wake up the computer and display the Windows log-on message, which says:
Press CTRL + ALT + DELETE to log on
Page 4 of 21
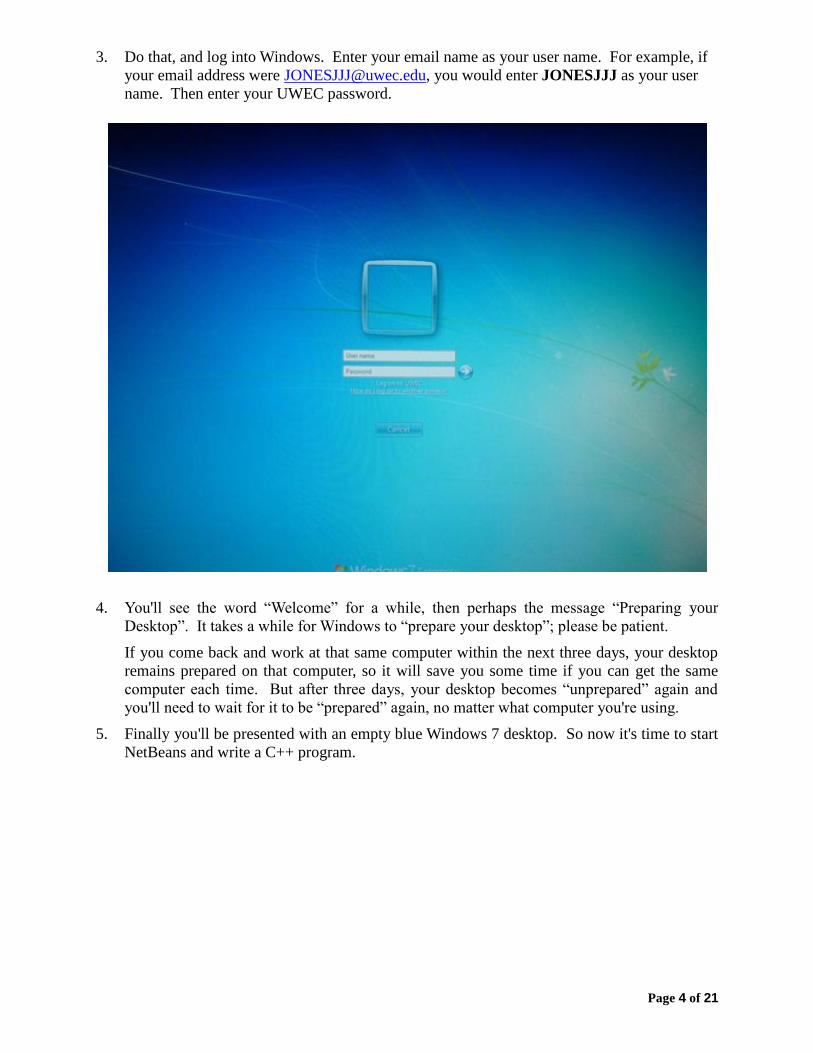
3. Do that, and log into Windows. Enter your email name as your user name. For example, if
your email address were [email protected], you would enter JONESJJJ as your user
name. Then enter your UWEC password.
4. You'll see the word “Welcome” for a while, then perhaps the message “Preparing your
Desktop”. It takes a while for Windows to “prepare your desktop”; please be patient.
If you come back and work at that same computer within the next three days, your desktop
remains prepared on that computer, so it will save you some time if you can get the same
computer each time. But after three days, your desktop becomes “unprepared” again and
you'll need to wait for it to be “prepared” again, no matter what computer you're using.
5. Finally you'll be presented with an empty blue Windows 7 desktop. So now it's time to start
NetBeans and write a C++ program.
Page 5 of 21
How to Start NetBeans
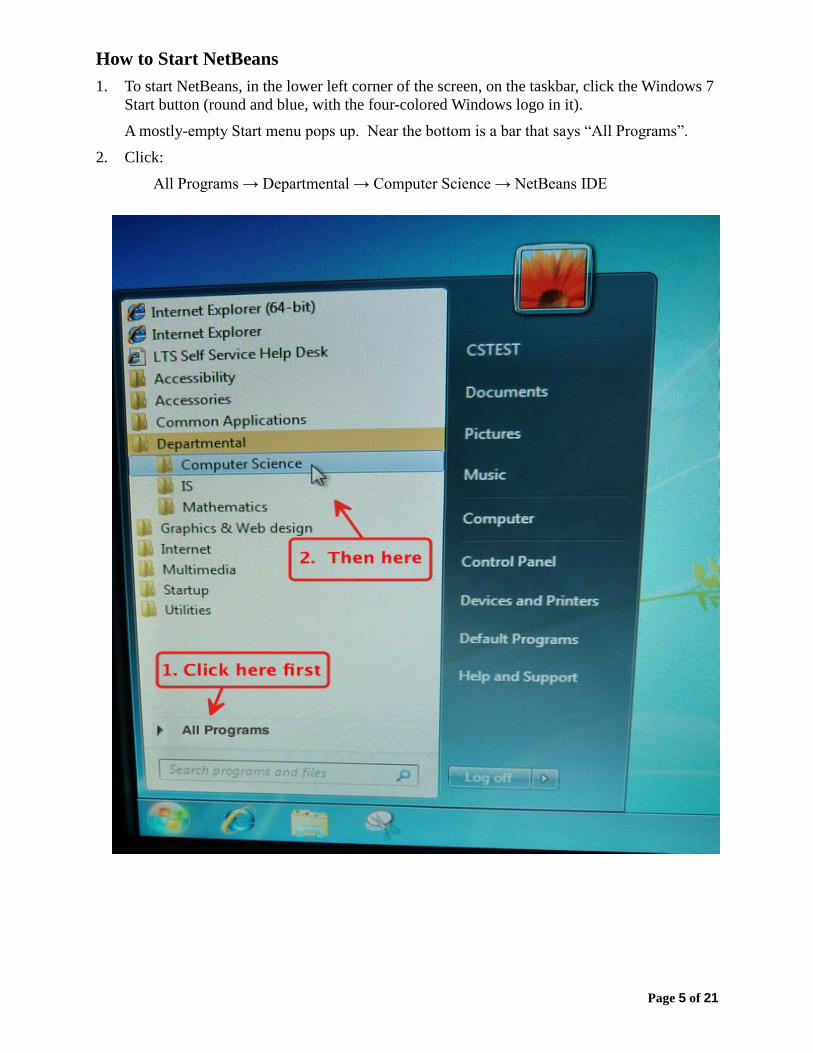
1. To start NetBeans, in the lower left corner of the screen, on the taskbar, click the Windows 7
Start button (round and blue, with the four-colored Windows logo in it).
A mostly-empty Start menu pops up. Near the bottom is a bar that says “All Programs”.
2. Click:
All Programs → Departmental → Computer Science → NetBeans IDE
Page 6 of 21
After a few seconds, the system will display the NetBeans IDE splash screen. NetBeans will
then spend some time loading some things that it needs into RAM.
NOTE: If a window then appears that says “Register your NetBeans IDE”, click “Never
Register”. The UWEC campus has already done so.
NOTE: If a window then appears that says “Help us improve the NetBeans IDE by
providing anonymous usage data.”, click “No, thank you”.

Page 7 of 21
A wide “Start Page” may appear that has two large areas labeled “Get Started” and “Extend
your IDE”. If so, at the lower center of that area is a checkbox labeled “Show On Startup”.
a) Remove the checkmark next to “Show On Startup”.
b) In the upper left corner of the entire NetBeans window is a light-blue tab labeled “Start
Page” with an X next to it. Click that X to close this Start Page.
Page 8 of 21
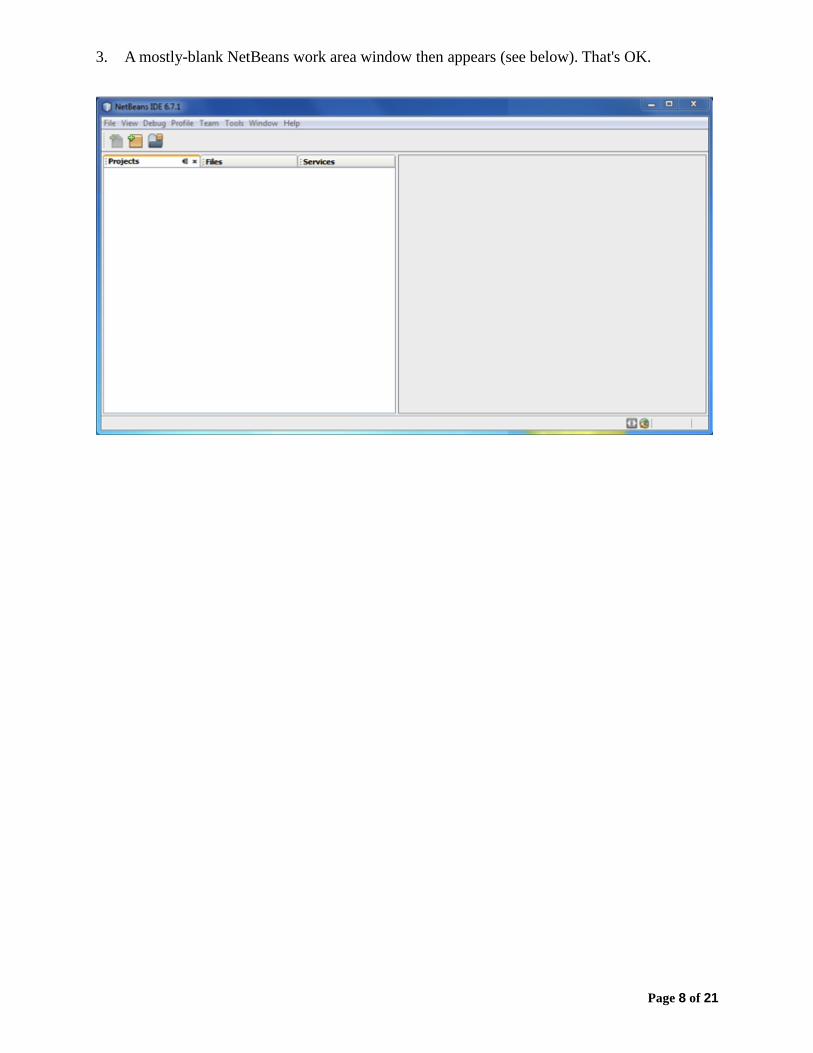
3. A mostly-blank NetBeans work area window then appears (see below). That's OK.
Page 9 of 21
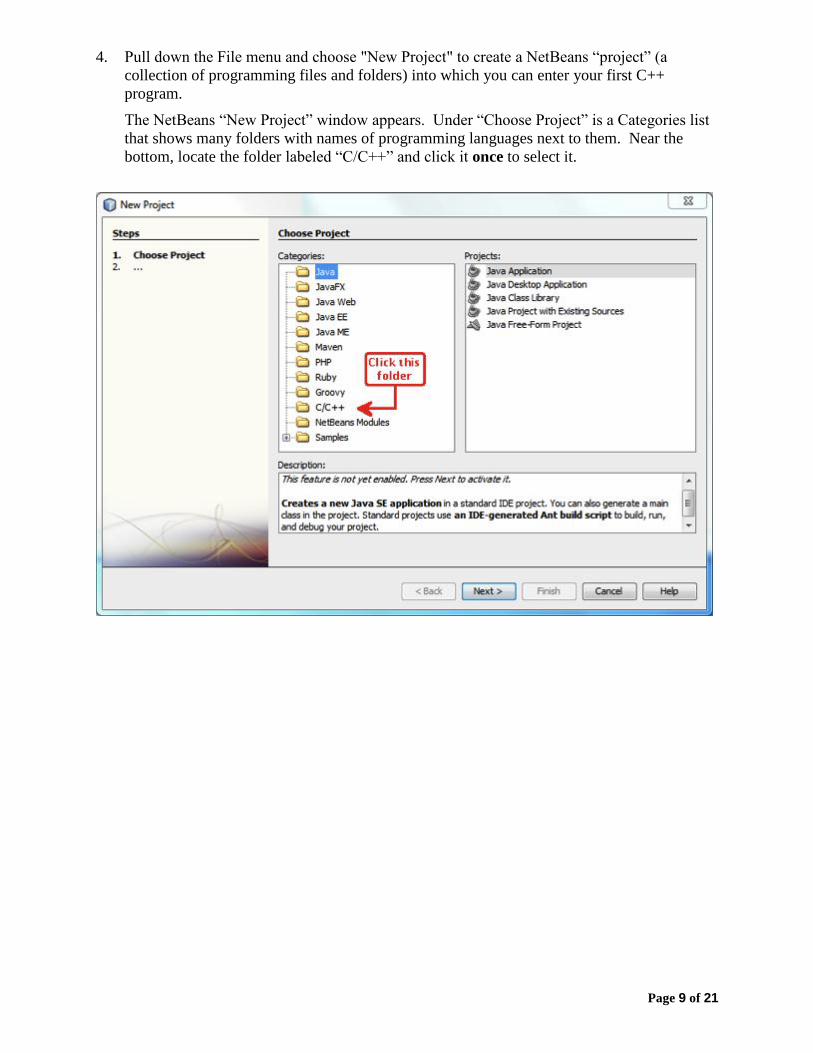
4. Pull down the File menu and choose "New Project" to create a NetBeans “project” (a
collection of programming files and folders) into which you can enter your first C++
program.
The NetBeans “New Project” window appears. Under “Choose Project” is a Categories list
that shows many folders with names of programming languages next to them. Near the
bottom, locate the folder labeled “C/C++” and click it once to select it.
Page 10 of 21
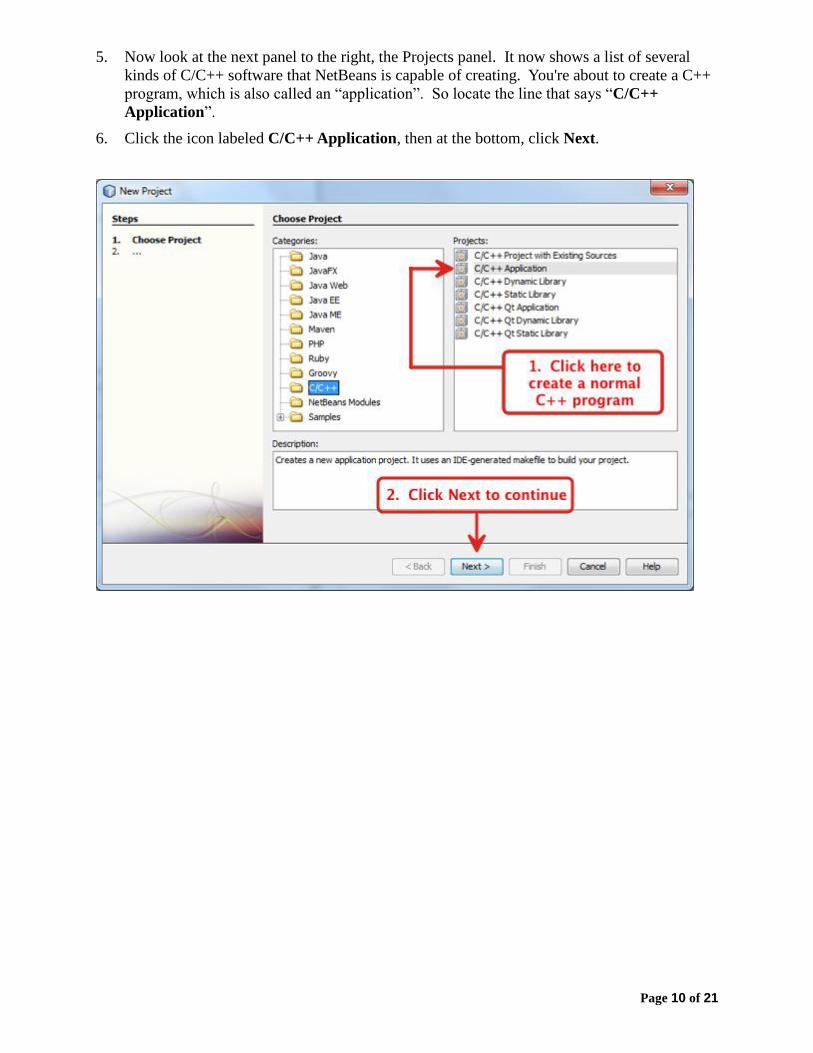
5. Now look at the next panel to the right, the Projects panel. It now shows a list of several
kinds of C/C++ software that NetBeans is capable of creating. You're about to create a C++
program, which is also called an “application”. So locate the line that says “C/C++
Application”.
6. Click the icon labeled C/C++ Application, then at the bottom, click Next.
Page 11 of 21
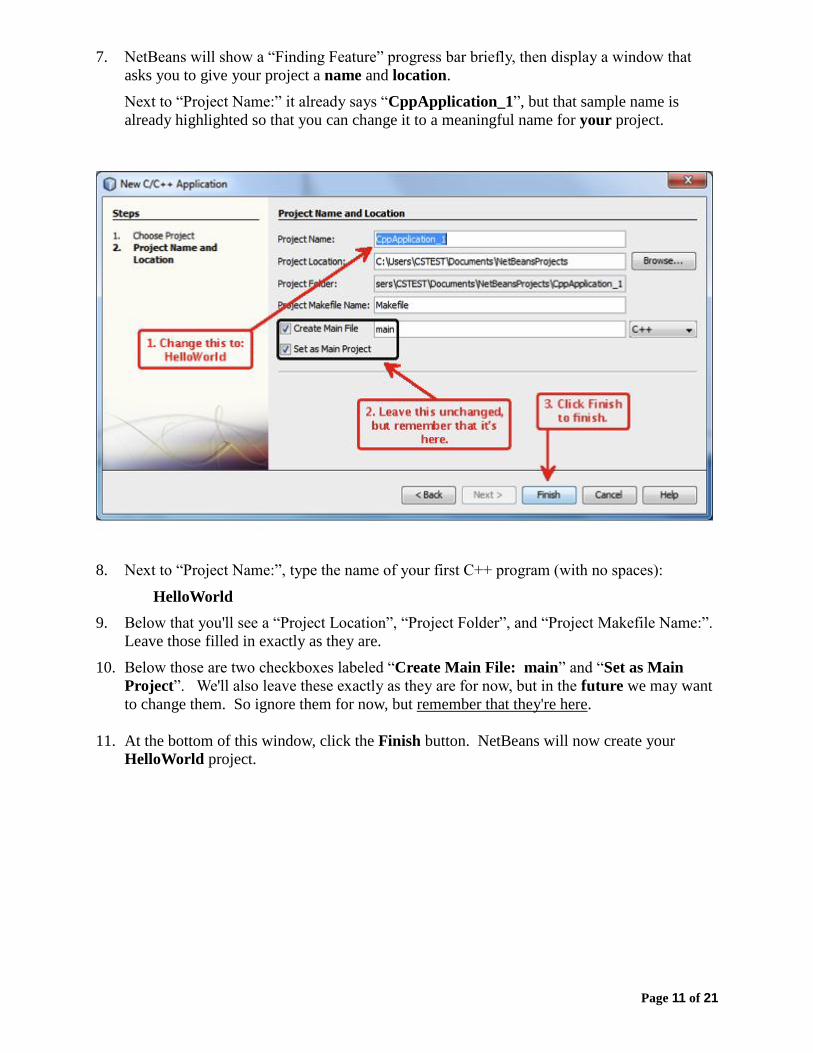
7. NetBeans will show a “Finding Feature” progress bar briefly, then display a window that
asks you to give your project a name and location.
Next to “Project Name:” it already says “CppApplication_1”, but that sample name is
already highlighted so that you can change it to a meaningful name for your project.
8. Next to “Project Name:”, type the name of your first C++ program (with no spaces):
HelloWorld
9. Below that you'll see a “Project Location”, “Project Folder”, and “Project Makefile Name:”.
Leave those filled in exactly as they are.
10. Below those are two checkboxes labeled “Create Main File: main” and “Set as Main
Project”. We'll also leave these exactly as they are for now, but in the future we may want
to change them. So ignore them for now, but remember that they're here.
11. At the bottom of this window, click the Finish button. NetBeans will now create your
HelloWorld project.
Page 12 of 21
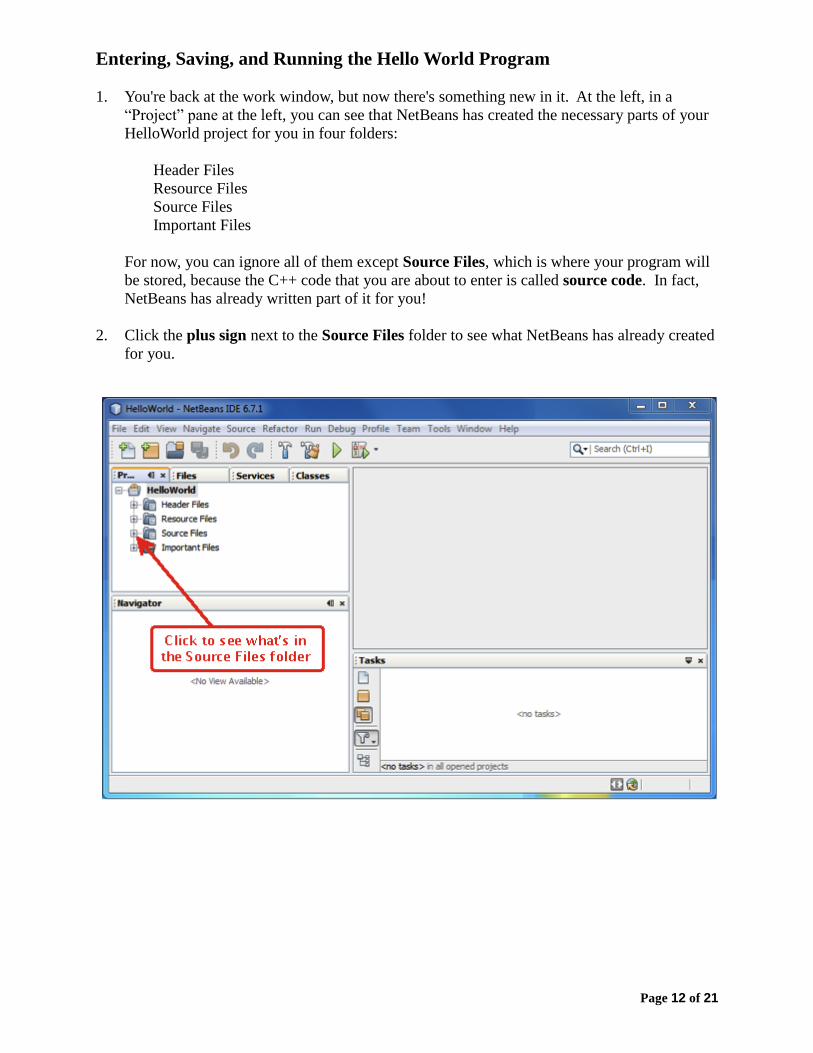
Entering, Saving, and Running the Hello World Program 1. You're back at the work window, but now there's something new in it. At the left, in a
“Project” pane at the left, you can see that NetBeans has created the necessary parts of your
HelloWorld project for you in four folders:
Header Files
Resource Files
Source Files
Important Files
For now, you can ignore all of them except Source Files, which is where your program will
be stored, because the C++ code that you are about to enter is called source code. In fact,
NetBeans has already written part of it for you!
2. Click the plus sign next to the Source Files folder to see what NetBeans has already created
for you.
Page 13 of 21
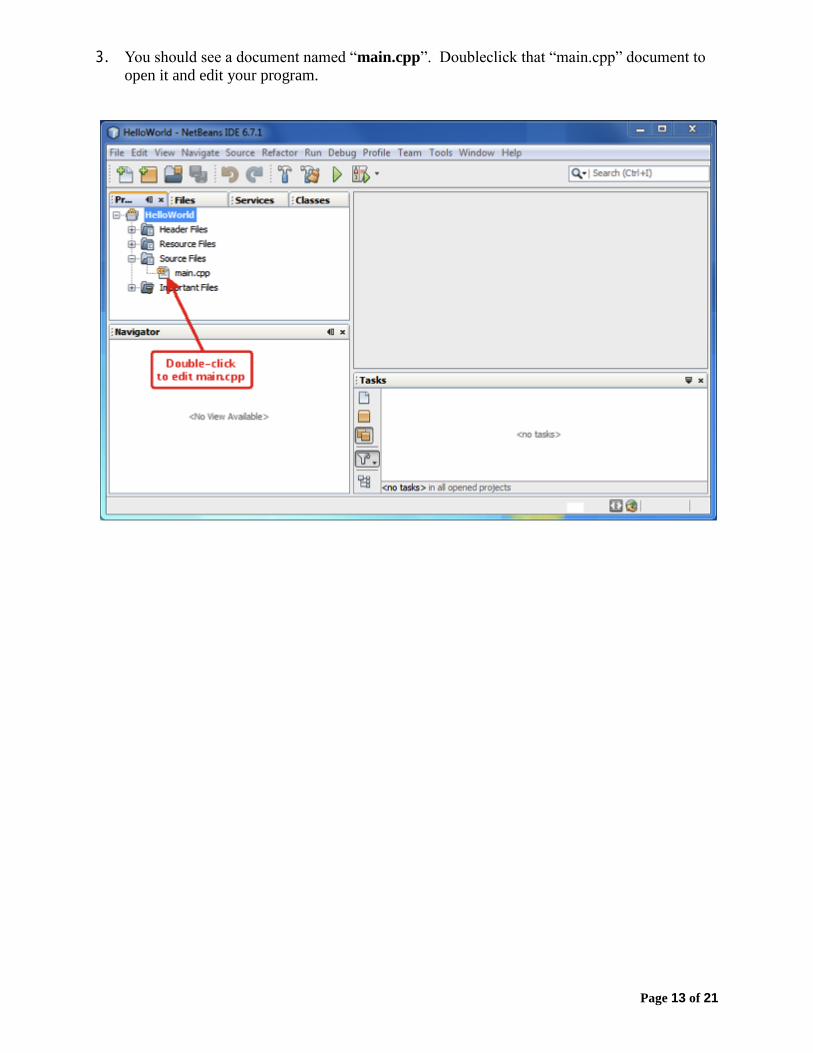
3. You should see a document named “main.cpp”. Doubleclick that “main.cpp” document to
open it and edit your program.
Page 14 of 21
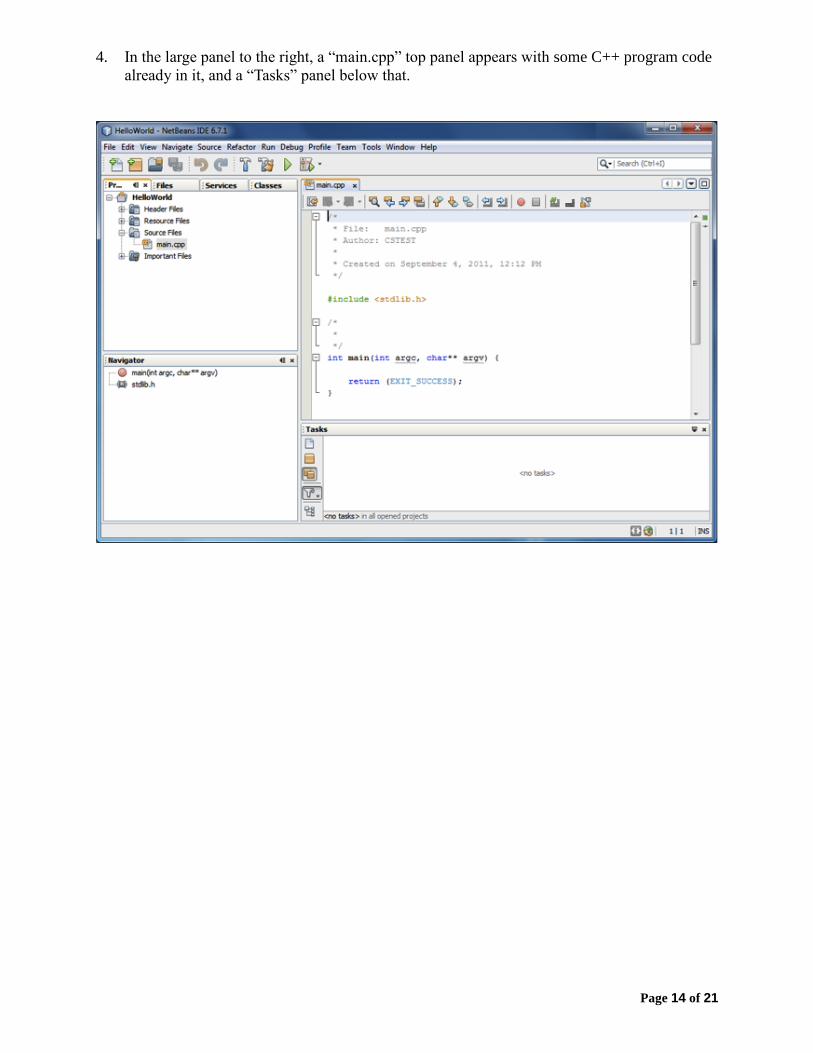
4. In the large panel to the right, a “main.cpp” top panel appears with some C++ program code
already in it, and a “Tasks” panel below that.
Page 15 of 21
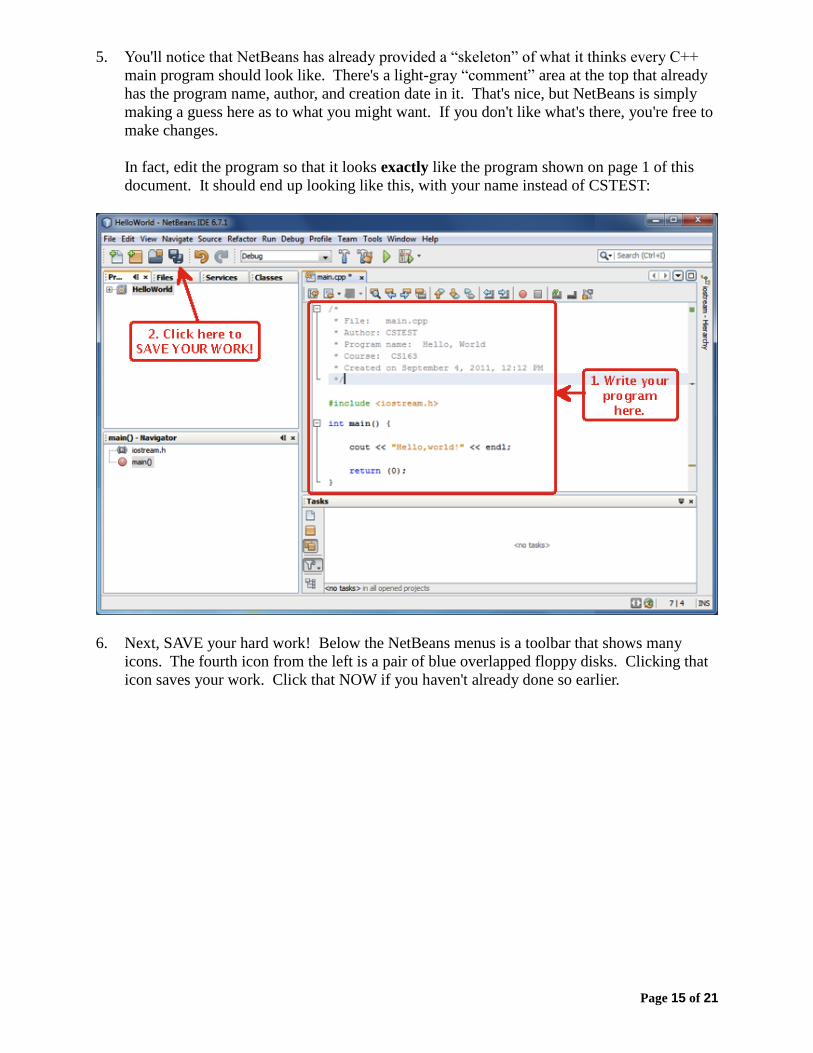
5. You'll notice that NetBeans has already provided a “skeleton” of what it thinks every C++
main program should look like. There's a light-gray “comment” area at the top that already
has the program name, author, and creation date in it. That's nice, but NetBeans is simply
making a guess here as to what you might want. If you don't like what's there, you're free to
make changes.
In fact, edit the program so that it looks exactly like the program shown on page 1 of this
document. It should end up looking like this, with your name instead of CSTEST:
6. Next, SAVE your hard work! Below the NetBeans menus is a toolbar that shows many
icons. The fourth icon from the left is a pair of blue overlapped floppy disks. Clicking that
icon saves your work. Click that NOW if you haven't already done so earlier.
Page 16 of 21
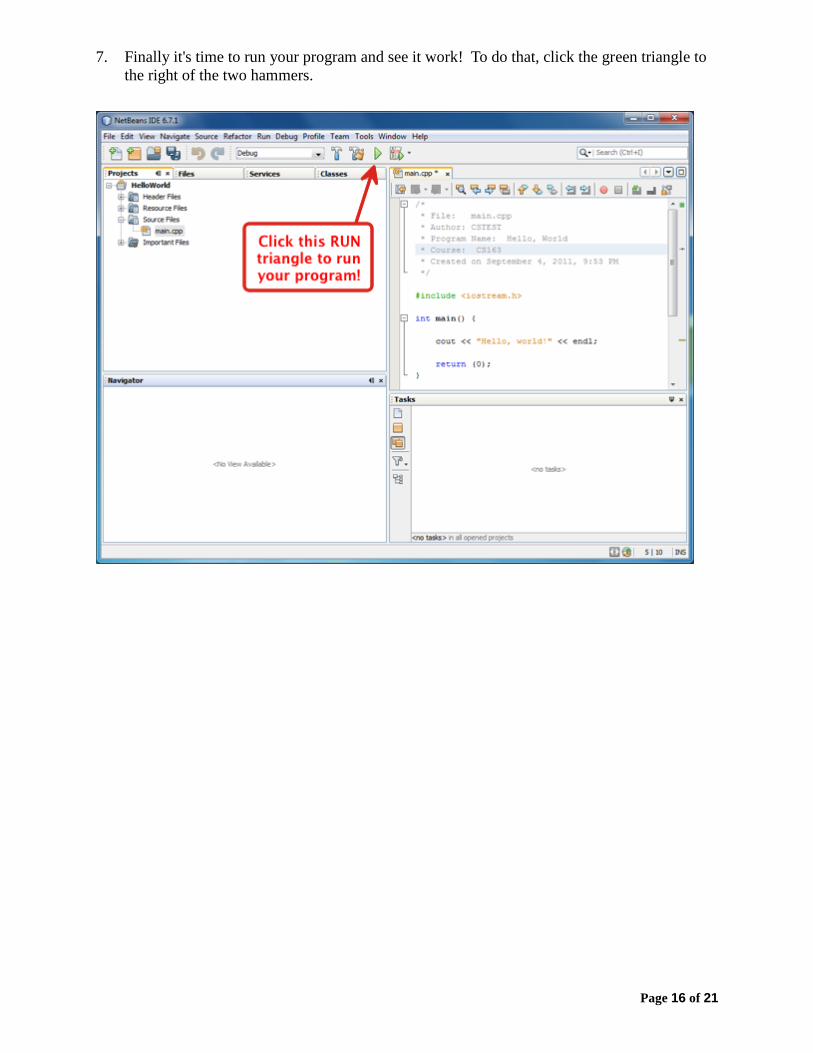
7. Finally it's time to run your program and see it work! To do that, click the green triangle to
the right of the two hammers.
Page 17 of 21
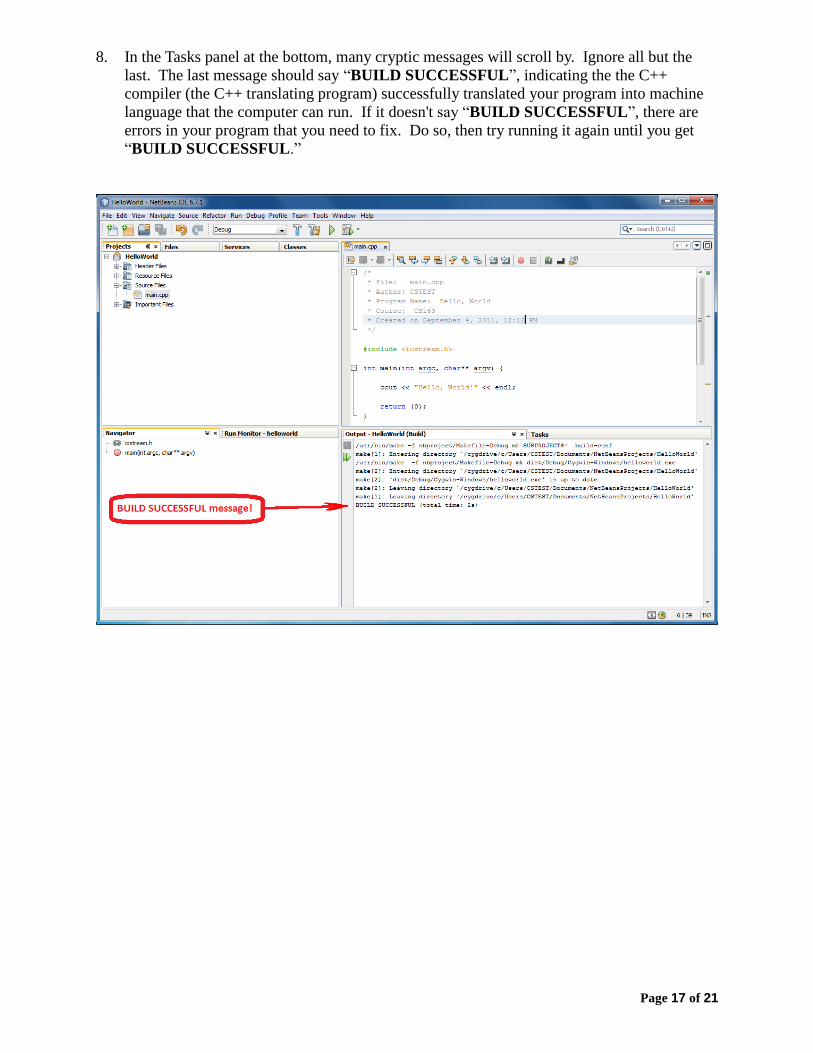
8. In the Tasks panel at the bottom, many cryptic messages will scroll by. Ignore all but the
last. The last message should say “BUILD SUCCESSFUL”, indicating the the C++
compiler (the C++ translating program) successfully translated your program into machine
language that the computer can run. If it doesn't say “BUILD SUCCESSFUL”, there are
errors in your program that you need to fix. Do so, then try running it again until you get
“BUILD SUCCESSFUL.”
Page 18 of 21
9. After it says BUILD SUCCESSFUL in the Tasks panel, in a few seconds more, the output
of your program will be displayed in the console at the bottom of NetBeans.
Hello, world!
That's the message that your C++ program produced. It works!
Congratulations! You have just successfully used a commercial-quality Interactive
Development Environment (NetBeans) to create your first working C++ program! That's a
huge first step. Reward yourself with something nice! But before you do...
Page 19 of 21
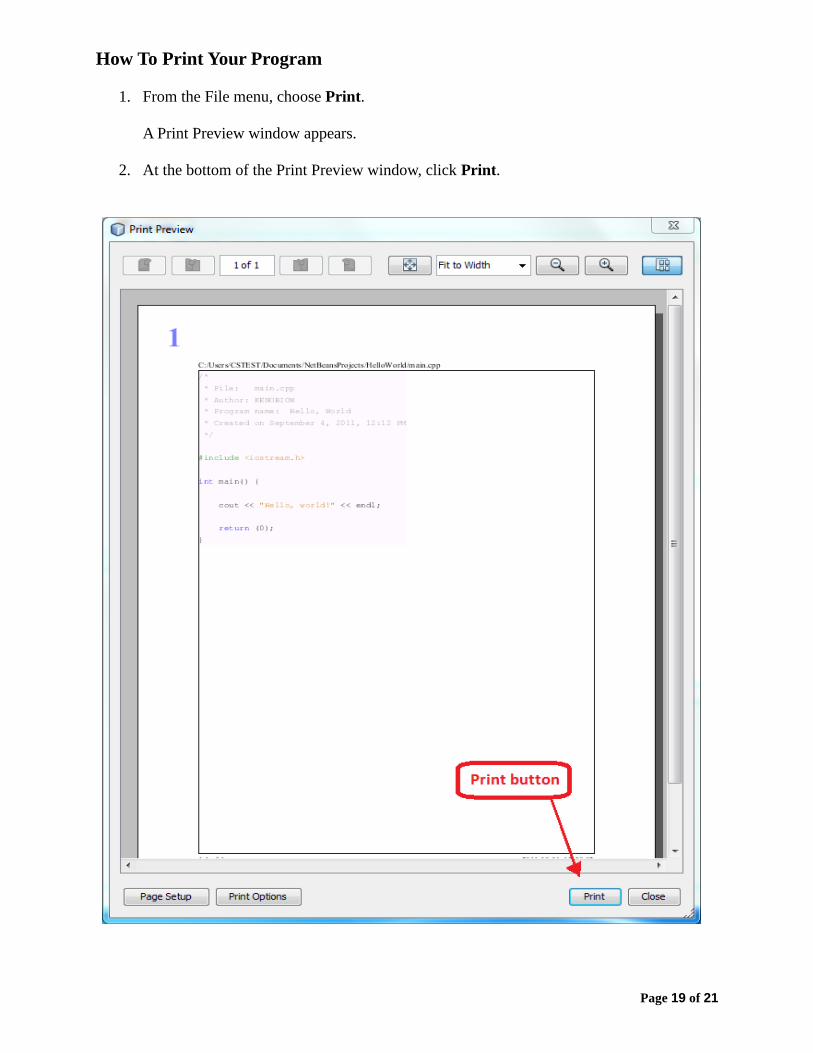
How To Print Your Program
1. From the File menu, choose Print.
A Print Preview window appears.
2. At the bottom of the Print Preview window, click Print.
Page 20 of 21
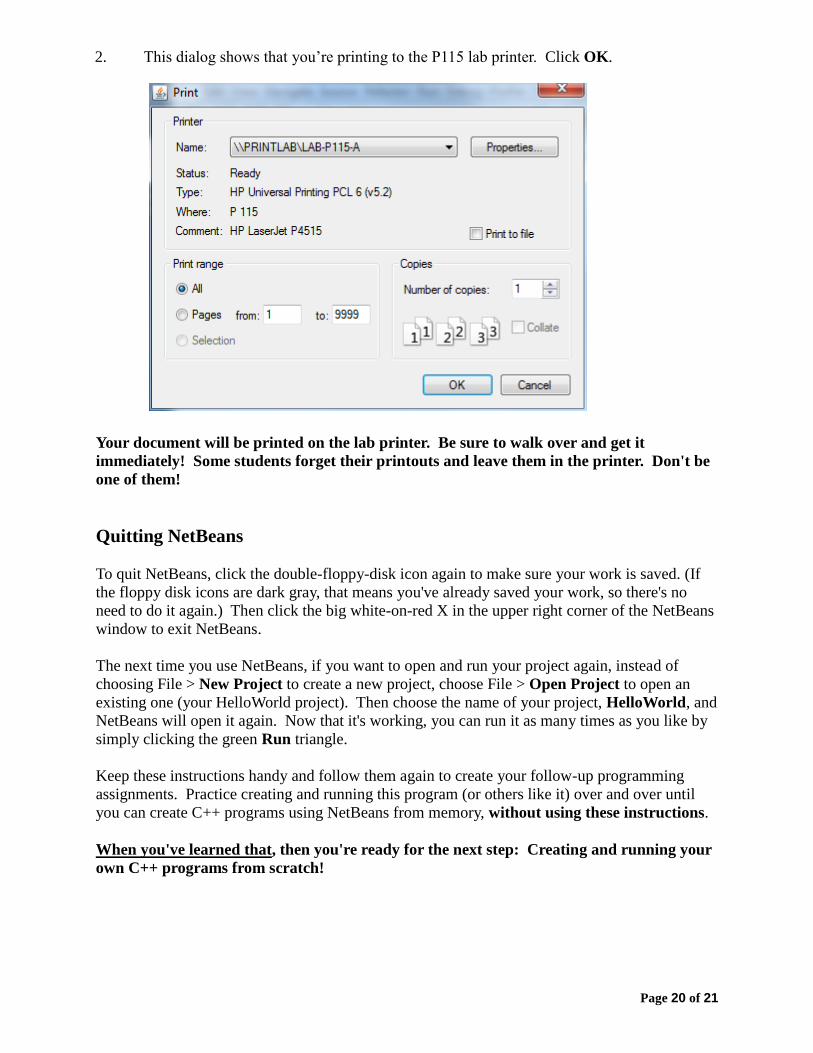
2. This dialog shows that you’re printing to the P115 lab printer. Click OK.
Your document will be printed on the lab printer. Be sure to walk over and get it
immediately! Some students forget their printouts and leave them in the printer. Don't be
one of them!
Quitting NetBeans To quit NetBeans, click the double-floppy-disk icon again to make sure your work is saved. (If
the floppy disk icons are dark gray, that means you've already saved your work, so there's no
need to do it again.) Then click the big white-on-red X in the upper right corner of the NetBeans
window to exit NetBeans.
The next time you use NetBeans, if you want to open and run your project again, instead of
choosing File > New Project to create a new project, choose File > Open Project to open an
existing one (your HelloWorld project). Then choose the name of your project, HelloWorld, and
NetBeans will open it again. Now that it's working, you can run it as many times as you like by
simply clicking the green Run triangle.
Keep these instructions handy and follow them again to create your follow-up programming
assignments. Practice creating and running this program (or others like it) over and over until
you can create C++ programs using NetBeans from memory, without using these instructions.
When you've learned that, then you're ready for the next step: Creating and running your
own C++ programs from scratch!
Page 21 of 21
How to Log Out From a CS Lab Computer 1. In the Windows 7 taskbar, at the bottom left corner of the screen, click the Start button.
2. Click Log Off.
3. Clean up your area before you go, and remember to reward yourself with something nice!