Embed Size (px)
Citation preview
© 2010-2021 Oryx Embedded 1 / 29
CycloneBOOT IAP Demo Quick Start Guide
IAP Demo Quick Start Guide
Nucleo-F767ZI & Nucleo-F429ZI
© 2010-2021 Oryx Embedded 2 / 29
CycloneBOOT IAP Demo Quick Start Guide
Contents
1 Introduction .................................................................................................................... 3
What does IAP stands for? ..................................................................................... 3
Package Description ............................................................................................... 4
Licensing ................................................................................................................ 4
2 Flash Memory Organization and Configuration .............................................................. 5
Flash Memory Map ................................................................................................. 5
Flash Partitions ....................................................................................................... 6
Flash Options Bytes ................................................................................................ 6
Vector Table Relocation .......................................................................................... 6
MCU Flash Configuration ........................................................................................ 7
STM32F767ZI Flash Configuration .................................................................. 7
STM32F429ZI Flash Configuration .................................................................. 8
3 Application Image .......................................................................................................... 9
Application Image Structure .................................................................................... 9
Application Image Processing ............................................................................... 10
Application Image Scenarios ................................................................................. 11
Scenario #1: No Encryption & Integrity Check ................................................ 11
Scenario #2: Encryption & Authentication ...................................................... 12
Scenario #3: Encryption & Signature ............................................................. 13
Application Image Generation ............................................................................... 14
4 HTTP Server IAP Demo ............................................................................................... 15
HTTP Server IAP Demo - Presentation ................................................................. 15
HTTP Server IAP Demo - Compilation .................................................................. 17
HTTP Server IAP Demo - Programming ............................................................... 18
HTTP Server IAP Demo - Images Generation ....................................................... 19
HTTP Server IAP Demo - Test Procedure ............................................................ 19
5 HTTPS Client IAP Demo .............................................................................................. 23
HTTPS Client IAP Demo - Presentation ................................................................ 23
HTTPS Client IAP Demo - Compilation ................................................................. 25
HTTPS Client IAP Demo - Programming .............................................................. 26
HTTPS Client IAP Demo - Test Procedure ........................................................... 27
6 Version History ............................................................................................................ 29
© 2010-2021 Oryx Embedded 3 / 29
CycloneBOOT IAP Demo Quick Start Guide
1 Introduction
What does IAP stands for?
IAP stands for In Application Programming. It allows an application to update itself without
the need of a static bootloader at the beginning of the flash memory.
IAP can be easily setup on microcontrollers with a special flash utility named “dual bank”. The
flash is divided in two distinct zones named “bank”, making it possible to:
- Execute a code in one bank while another bank is being erased or programmed.
- Save the CPU from being stalled during programming operations and protect the
system from power failures or other errors.
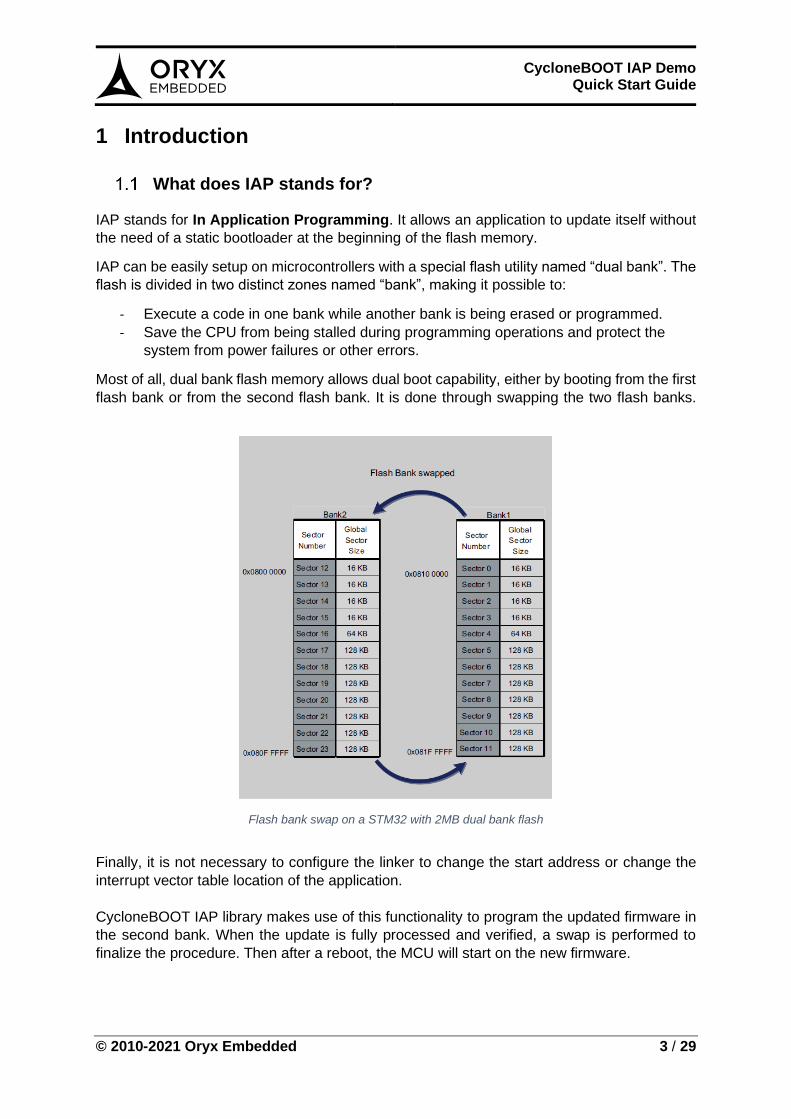
Most of all, dual bank flash memory allows dual boot capability, either by booting from the first
flash bank or from the second flash bank. It is done through swapping the two flash banks.
Flash bank swap on a STM32 with 2MB dual bank flash
Finally, it is not necessary to configure the linker to change the start address or change the
interrupt vector table location of the application.
CycloneBOOT IAP library makes use of this functionality to program the updated firmware in
the second bank. When the update is fully processed and verified, a swap is performed to
finalize the procedure. Then after a reboot, the MCU will start on the new firmware.
© 2010-2021 Oryx Embedded 4 / 29
CycloneBOOT IAP Demo Quick Start Guide
Package Description
The provided zip archive is a CycloneBOOT demonstration package based on IAP library
embedded in a HTTP server or a HTTPS client application. The demos run on STM32F4 and
STM32F7 MCUs with dual bank flash capability.
The archive consists of the following subfolders:
• common: contains features that are common to all Oryx libraries
• cyclone_boot: contains CycloneBOOT library (IAP library v1.0.1)
• cyclone_crypto: contains CycloneCRYPTO library (Crypto library)
• cyclone_ssl: contains CycloneSSL library (TLS/DTLS library)
• cyclone_tcp: contains CycloneTCP library (TCP/IP stack)
• demo: contains HTTP server IAP & HTTPS client IAP demos running on Nucleo-F429ZI
or Nucleo-F767ZI evaluation boards. You will find a GCC project for each demo with a
Makefile which lists all the sources needed to compile these demos.
• doc: contains a PDF Quick Start Guide for CycloneBOOT IAP demos
• scripts: contains .bat files to configure STM32 devices and generate application images
• third_party: contains third party libraries (cmsis, freertos, st)
• utils: contains CycloneBOOT Application Image Builder (a Win32 executable) and
CycloneTCP Resource Compiler
The present quick start guide consists of the following sections:
• Section 2 gives general explanations about flash memory organization and configuration
• Section 3 explains how to generate an application image with different update scenarios
• Section 4 describes how to test our HTTP Server IAP Demo
• Section 5 describes how to test our HTTPS Client IAP Demo
Licensing
CycloneBOOT IAP library and related demo applications are licensed under GPLv2 license or
under a royalty-free commercial license.
Please contact us for more information: [email protected]
© 2010-2021 Oryx Embedded 5 / 29
CycloneBOOT IAP Demo Quick Start Guide
2 Flash Memory Organization and Configuration
Flash Memory Map
STM32F4 and STM32F7 devices with 2MB Dual Bank Flash consists of 24 Flash sectors (refer
to the device datasheet):
Start Address Size Sector Bank
0x08000000 16KB Sector #0
Bank #1
0x08004000 16KB Sector #1
0x08008000 16KB Sector #2
0x0800C000 16KB Sector #3
0x08010000 64KB Sector #4
0x08020000 128KB Sector #5
0x08040000 128KB Sector #6
0x08060000 128KB Sector #7
0x08080000 128KB Sector #8
0x080A0000 128KB Sector #9
0x080C0000 128KB Sector #10
0x080E0000 128KB Sector #11
0x08100000 16KB Sector #12
Bank #2
0x08104000 16KB Sector #13
0x08108000 16KB Sector #14
0x0810C000 16KB Sector #15
0x08110000 64KB Sector #16
0x08120000 128KB Sector #17
0x08140000 128KB Sector #18
0x08160000 128KB Sector #19
0x08180000 128KB Sector #20
0x081A0000 128KB Sector #21
0x081C0000 128KB Sector #22
0x081E0000 128KB Sector #23
Notes:
- STM32F4 and STM32F7 devices with 2MB Dual Bank Flash share the same Memory Map.
- Some STM32 devices have a 1MB Dual Bank Flash, in that case there are two banks of 512KB each.
- Using the dual functionality means that the size of a firmware binary update will be limited to the size of the flash bank. (i.e. 2MB dual flash bank => 1MB per bank => maximum 1MB firmware binary size)
© 2010-2021 Oryx Embedded 6 / 29
CycloneBOOT IAP Demo Quick Start Guide
Flash Partitions
Any application using CycloneBOOT IAP on STM32F4 or STM32F7 devices with 2MB of flash
memory is organized as follows:
Start address End Address Size Region
0x08000000 0x080FFFFF 1MB Application image binary
0x08100000 0x081FFFFF 1MB Free space for update
Each time a swap is done, the contents of the “Application image binary” region become the
contents of the “Free space for update” region and vice-versa.
Note: STM32F4 and STM32F7 devices with 1MB dual bank flash have the same organization.
Flash Options Bytes
STM32F7 Flash Option Bytes MUST be configured correctly to enable the Dual Bank
functionality:
Name Value Description
nDBOOT 0 Dual Boot mode
nDBANK 0 Dual Bank mode
To trigger a swap between the two banks on STM32F7, the following options need to be set:
Name Value Description
BOOT_ADD0 0x2040 (0x08100000) Swap from bank1 to bank 2 BOOT_ADD1 0x2000 (0x08000000)
BOOT_ADD0 0x2000 (0x08000000) Swap from bank2 to bank 1 BOOT_ADD1 0x2040 (0x08100000)
Those options bytes can be configured with STM32 ST-LINK Utility GUI or CLI (the exact
procedure will be described later).
STM32F4 devices with dual bank flash use a simpler approach, where only one option byte
(nBFB2) is needed to trigger a swap between the two banks.
Vector Table Relocation
You MUST verify in “system_stm32fxxx.c” that the configuration of the “Vector Table location
in Internal FLASH” is valid: SCB->VTOR = FLASH_BASE | VECT_TAB_OFFSET
If not, application will fail at the first interruption event.
© 2010-2021 Oryx Embedded 7 / 29
CycloneBOOT IAP Demo Quick Start Guide
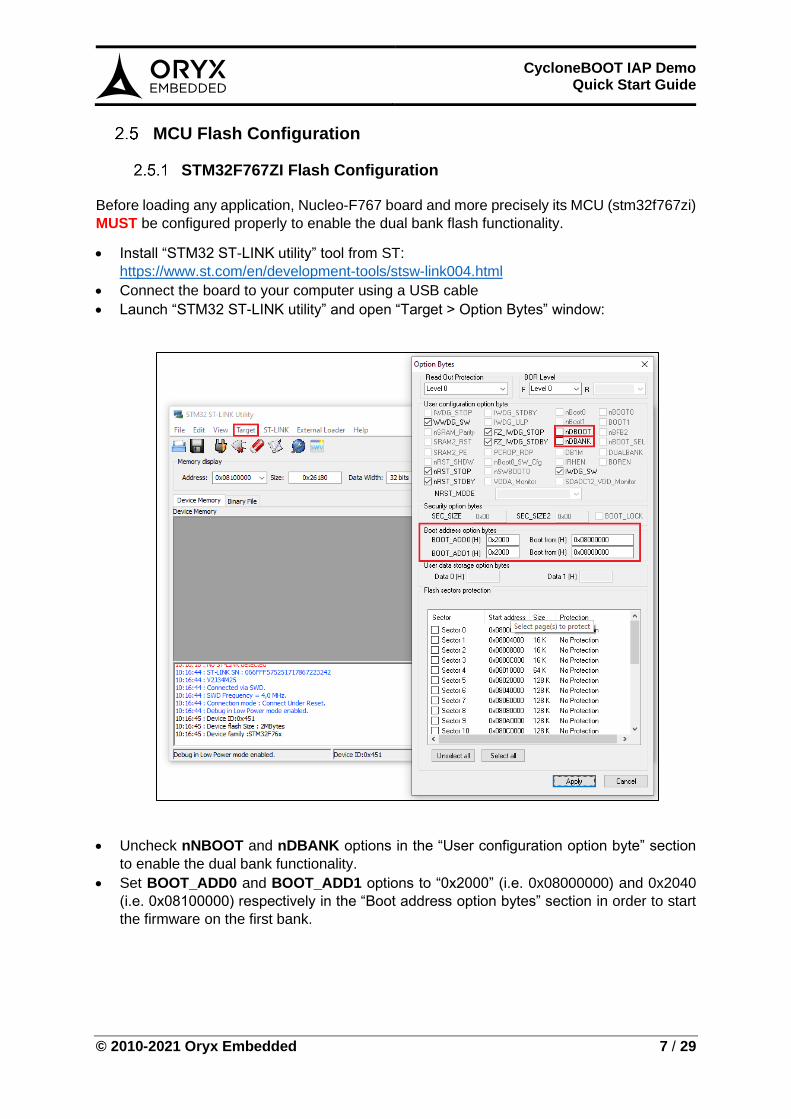
MCU Flash Configuration
STM32F767ZI Flash Configuration
Before loading any application, Nucleo-F767 board and more precisely its MCU (stm32f767zi)
MUST be configured properly to enable the dual bank flash functionality.
• Install “STM32 ST-LINK utility” tool from ST:
https://www.st.com/en/development-tools/stsw-link004.html
• Connect the board to your computer using a USB cable
• Launch “STM32 ST-LINK utility” and open “Target > Option Bytes” window:
• Uncheck nNBOOT and nDBANK options in the “User configuration option byte” section
to enable the dual bank functionality.
• Set BOOT_ADD0 and BOOT_ADD1 options to “0x2000” (i.e. 0x08000000) and 0x2040
(i.e. 0x08100000) respectively in the “Boot address option bytes” section in order to start
the firmware on the first bank.
© 2010-2021 Oryx Embedded 8 / 29
CycloneBOOT IAP Demo Quick Start Guide
You can also use “STM32 ST-LINK utility” in command line to configure the same options as
above:
ST-LINK_CLI.exe -c ID=0 SWD -OB nDBOOT=0 nDBANK=0 BOOT_ADD0=0x2000
BOOT_ADD1=0x2040
Note: A .bat file is provided for convenience in the “scripts” directory to automatically configure
theNucleo-F767ZI board (nucleo_f767zi_ConfigureOptionBytes.bat).
The ST-LINK_CLI.exe command will return the following messages:
C:\iap-firmware-update\scripts>ST-LINK_CLI.exe -c ID=0 SWD -OB
nDBOOT=0 nDBANK=0 BOOT_ADD0=0x2000 BOOT_ADD1=0x2000
STM32 ST-LINK CLI v3.5.0.0
STM32 ST-LINK Command Line Interface
ST-LINK SN: 066FFF575251717867223242
ST-LINK Firmware version: V2J34M25
Connected via SWD.
SWD Frequency = 4000K.
Target voltage = 3.2 V
Connection mode: Normal
Reset mode: Software reset
Device ID: 0x451
Device flash Size: 2048 Kbytes
Device family: STM32F76x
Updating option bytes...
Option bytes updated successfully.
C:\iap-firmware-update\scripts>PAUSE
STM32F429ZI Flash Configuration
STM32F4 MCU doesn’t make use of nDBOOT, nDBANK, BOOT_ADD0 and BOOT_ADD1
options. The only option that matter is nBFB2.
On Nucleo-F429ZI, just unset the nBFB2 options to start on the first bank.
A .bat file is also provided for convenience in the “scripts” directory to automatically configure
the Nucleo-F429ZI board (nucleo_f429zi_ConfigureOptionBytes.bat).
© 2010-2021 Oryx Embedded 9 / 29
CycloneBOOT IAP Demo Quick Start Guide
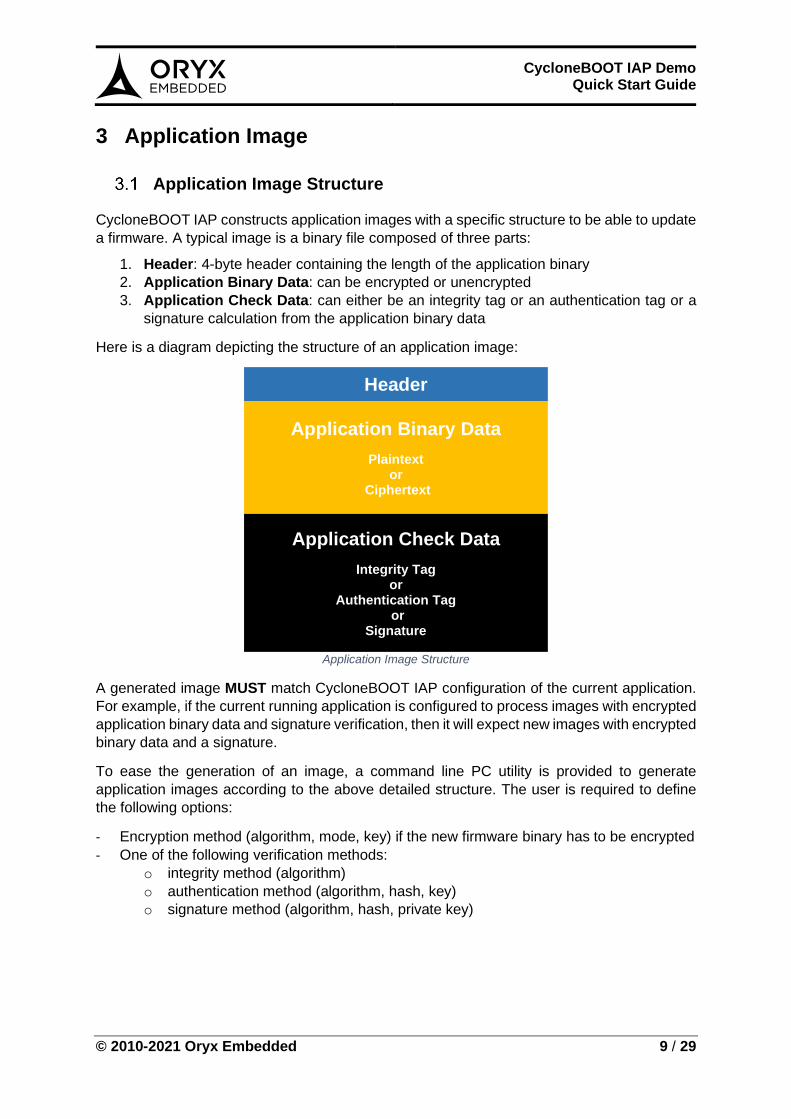
3 Application Image
Application Image Structure
CycloneBOOT IAP constructs application images with a specific structure to be able to update
a firmware. A typical image is a binary file composed of three parts:
1. Header: 4-byte header containing the length of the application binary
2. Application Binary Data: can be encrypted or unencrypted
3. Application Check Data: can either be an integrity tag or an authentication tag or a
signature calculation from the application binary data
Here is a diagram depicting the structure of an application image:
Header
Application Binary Data
Plaintext or
Ciphertext
Application Check Data
Integrity Tag or
Authentication Tag or
Signature
Application Image Structure
A generated image MUST match CycloneBOOT IAP configuration of the current application.
For example, if the current running application is configured to process images with encrypted
application binary data and signature verification, then it will expect new images with encrypted
binary data and a signature.
To ease the generation of an image, a command line PC utility is provided to generate
application images according to the above detailed structure. The user is required to define
the following options:
- Encryption method (algorithm, mode, key) if the new firmware binary has to be encrypted
- One of the following verification methods:
o integrity method (algorithm)
o authentication method (algorithm, hash, key)
o signature method (algorithm, hash, private key)
© 2010-2021 Oryx Embedded 10 / 29
CycloneBOOT IAP Demo Quick Start Guide
Application Image Processing
CycloneBOOT IAP will process an application image received through a specific protocol
defined in your user application. Then it will perform a swap between the two flash to finalize
the firmware update.
Here is the flow:
Step 1 Flash write process of the image block by block:
- In case of error, restart step 1 - Else jump to step 2
Step 2 Verification of the application check data:
- In case of error, restart to step 1 - Else jump to step 3
Step 3 Swap flash memory banks then jump to step 4
Step 4 Reset the microcontroller to finalize the update process
Important: CycloneBOOT IAP is not reentrant and needs to be protected against concurrent access with a mutex.
© 2010-2021 Oryx Embedded 11 / 29
CycloneBOOT IAP Demo Quick Start Guide
Application Image Scenarios
In this section, we will present three scenarios that cover three typical application
configurations.
As mentioned previously, the generated image MUST match CycloneBOOT IAP configuration
of the current running application. If not, the new image will be rejected by the image
verification process.
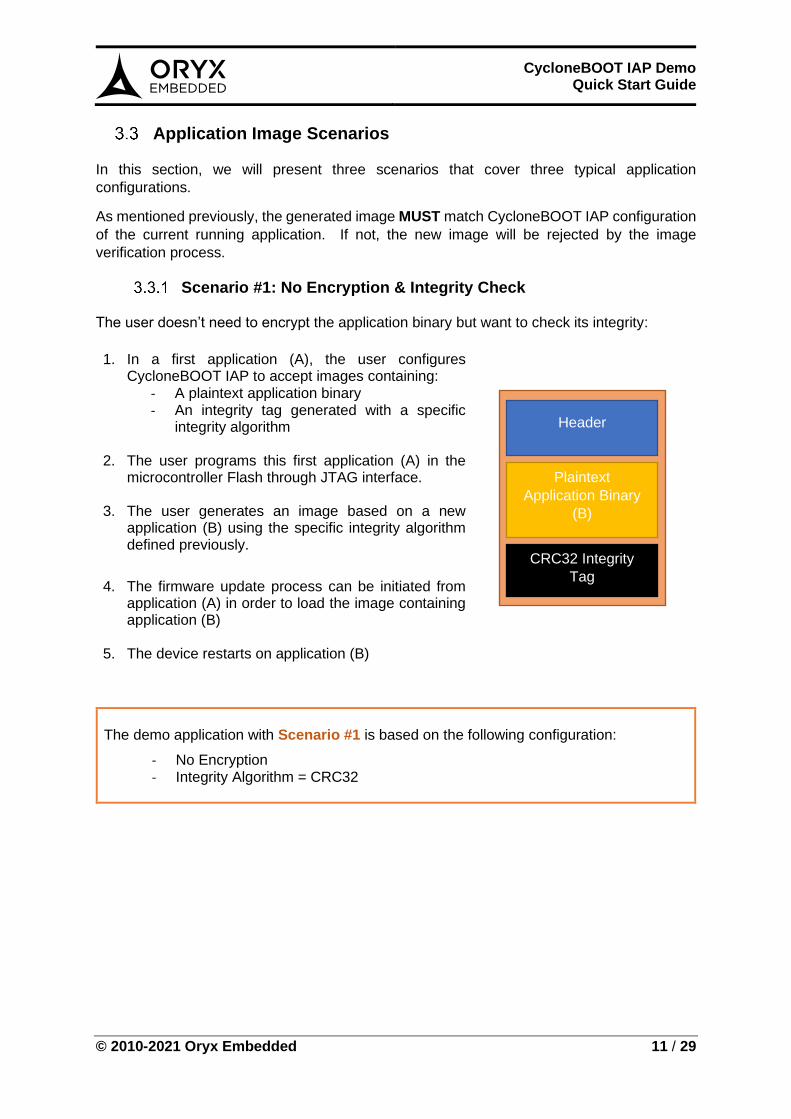
Scenario #1: No Encryption & Integrity Check
The user doesn’t need to encrypt the application binary but want to check its integrity:
1. In a first application (A), the user configures CycloneBOOT IAP to accept images containing:
- A plaintext application binary - An integrity tag generated with a specific
integrity algorithm
2. The user programs this first application (A) in the microcontroller Flash through JTAG interface.
3. The user generates an image based on a new application (B) using the specific integrity algorithm defined previously.
4. The firmware update process can be initiated from application (A) in order to load the image containing application (B)
5. The device restarts on application (B)
The demo application with Scenario #1 is based on the following configuration:
- No Encryption - Integrity Algorithm = CRC32
Header
Plaintext
Application Binary
(B)
CRC32 Integrity
Tag
© 2010-2021 Oryx Embedded 12 / 29
CycloneBOOT IAP Demo Quick Start Guide
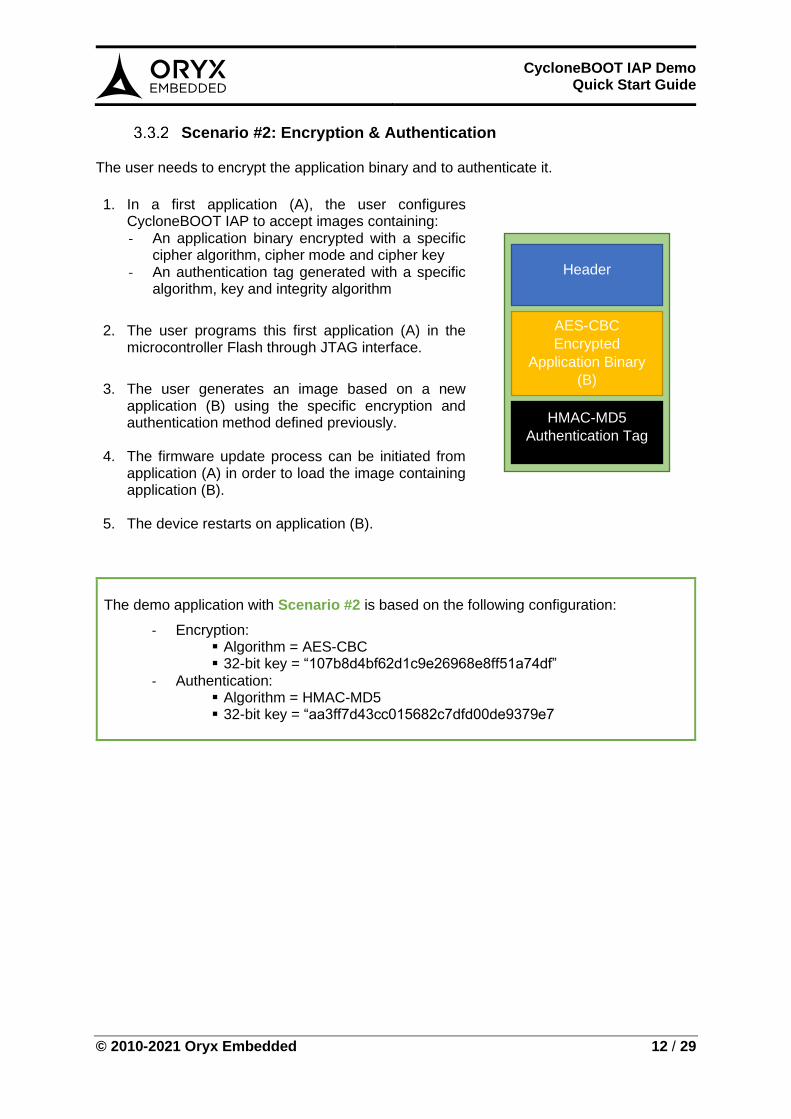
Scenario #2: Encryption & Authentication
The user needs to encrypt the application binary and to authenticate it.
1. In a first application (A), the user configures CycloneBOOT IAP to accept images containing: - An application binary encrypted with a specific
cipher algorithm, cipher mode and cipher key - An authentication tag generated with a specific
algorithm, key and integrity algorithm
2. The user programs this first application (A) in the microcontroller Flash through JTAG interface.
3. The user generates an image based on a new application (B) using the specific encryption and authentication method defined previously.
4. The firmware update process can be initiated from application (A) in order to load the image containing application (B).
5. The device restarts on application (B).
The demo application with Scenario #2 is based on the following configuration:
- Encryption: ▪ Algorithm = AES-CBC ▪ 32-bit key = “107b8d4bf62d1c9e26968e8ff51a74df”
- Authentication: ▪ Algorithm = HMAC-MD5 ▪ 32-bit key = “aa3ff7d43cc015682c7dfd00de9379e7
Header
AES-CBC
Encrypted
Application Binary
(B)
HMAC-MD5
Authentication Tag
© 2010-2021 Oryx Embedded 13 / 29
CycloneBOOT IAP Demo Quick Start Guide
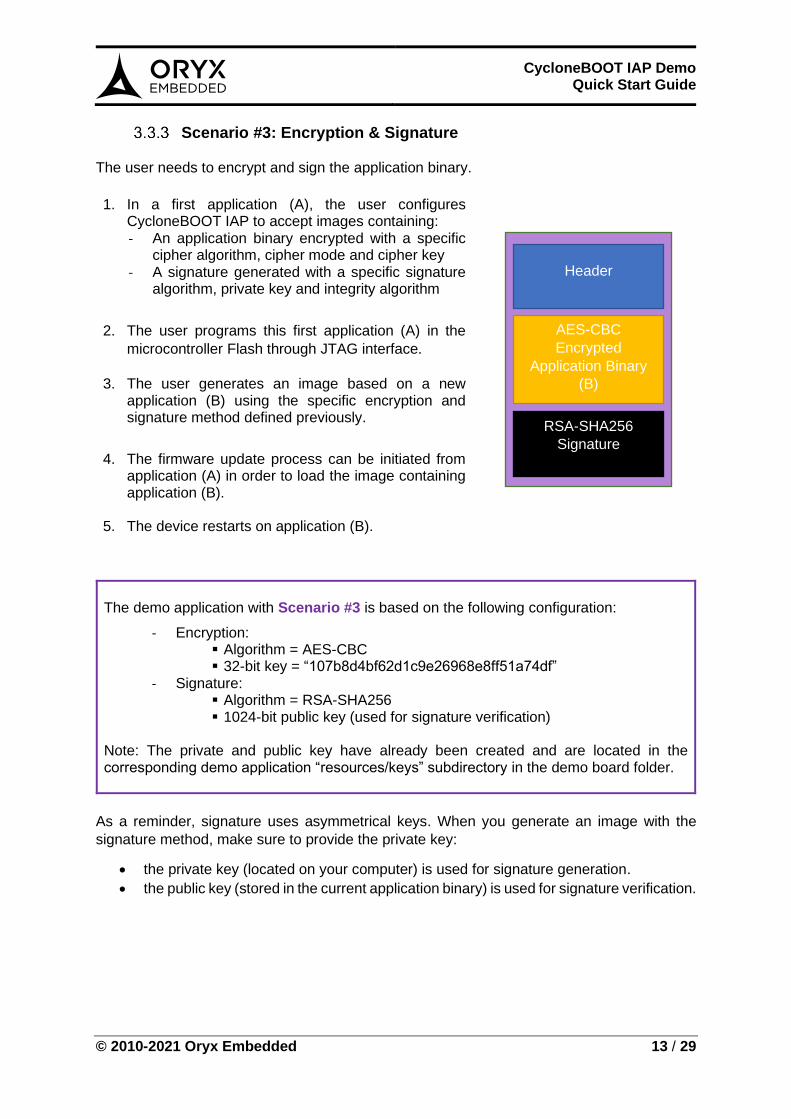
Scenario #3: Encryption & Signature
The user needs to encrypt and sign the application binary.
1. In a first application (A), the user configures CycloneBOOT IAP to accept images containing: - An application binary encrypted with a specific
cipher algorithm, cipher mode and cipher key - A signature generated with a specific signature
algorithm, private key and integrity algorithm
2. The user programs this first application (A) in the
microcontroller Flash through JTAG interface.
3. The user generates an image based on a new
application (B) using the specific encryption and signature method defined previously.
4. The firmware update process can be initiated from application (A) in order to load the image containing application (B).
5. The device restarts on application (B).
The demo application with Scenario #3 is based on the following configuration:
- Encryption: ▪ Algorithm = AES-CBC ▪ 32-bit key = “107b8d4bf62d1c9e26968e8ff51a74df”
- Signature: ▪ Algorithm = RSA-SHA256 ▪ 1024-bit public key (used for signature verification)
Note: The private and public key have already been created and are located in the corresponding demo application “resources/keys” subdirectory in the demo board folder.
As a reminder, signature uses asymmetrical keys. When you generate an image with the
signature method, make sure to provide the private key:
• the private key (located on your computer) is used for signature generation.
• the public key (stored in the current application binary) is used for signature verification.
Header
AES-CBC
Encrypted
Application Binary
(B)
RSA-SHA256
Signature
© 2010-2021 Oryx Embedded 14 / 29
CycloneBOOT IAP Demo Quick Start Guide
Application Image Generation
The tool app_image_builder.exe (located in “utils/ApplicationImageBuilder”) is provided in
order to create an application image (.img) from the binary file (.bin or binary generated by the
compiler).
Depending on the selected options:
• it can encrypt the binary file or leave it unencrypted.
• It can compute an integrity tag, an authentication tag or a signature directly from the
binary file (encrypted or non-encrypted).
Finally, it generates a binary image composed of 4-byte header (which contains the length of
the binary file), followed by the binary file itself (encrypted or non-encrypted) terminated by the
computed integrity tag or an authentication tag or a signature (check data).
The application header is used by CycloneBOOT IAP to make sure that the application will
not overflow the flash bank size of the device. The application check data are used to verify
either the integrity, the authentication or the signature of the application before processing to
a flash bank swap and finalizing the update by rebooting the device.
Here is an example on how to manually execute the tool through the command line. The
following command will generate a simple application image with CRC32 integrity method with
no encryption:
app_image_builder.exe -input <application_binary_name>.bin \
-output <application_image_name>.img -i crc32
Note: You can get a help message using the “-h” option
Important: Currently app_image_builder.exe only supports the following options values:
- Integrity algo (-i): crc32 - Authentication algo (-a): hmac-md5 - Signature algo (-s): rsa-sha256 - Encryption algo (-e): aes-cbc
Other options will come soon.
© 2010-2021 Oryx Embedded 15 / 29
CycloneBOOT IAP Demo Quick Start Guide
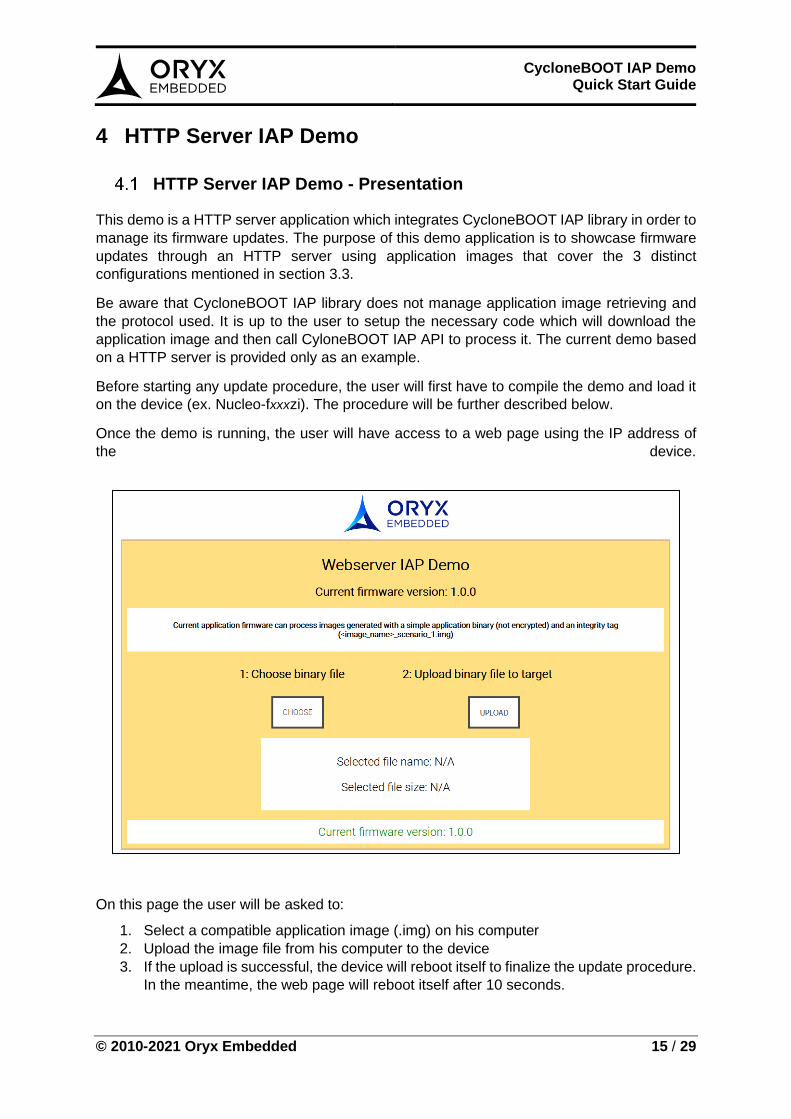
4 HTTP Server IAP Demo
HTTP Server IAP Demo - Presentation
This demo is a HTTP server application which integrates CycloneBOOT IAP library in order to
manage its firmware updates. The purpose of this demo application is to showcase firmware
updates through an HTTP server using application images that cover the 3 distinct
configurations mentioned in section 3.3.
Be aware that CycloneBOOT IAP library does not manage application image retrieving and
the protocol used. It is up to the user to setup the necessary code which will download the
application image and then call CyloneBOOT IAP API to process it. The current demo based
on a HTTP server is provided only as an example.
Before starting any update procedure, the user will first have to compile the demo and load it
on the device (ex. Nucleo-fxxxzi). The procedure will be further described below.
Once the demo is running, the user will have access to a web page using the IP address of
the device.
On this page the user will be asked to:
1. Select a compatible application image (.img) on his computer
2. Upload the image file from his computer to the device
3. If the upload is successful, the device will reboot itself to finalize the update procedure.
In the meantime, the web page will reboot itself after 10 seconds.
© 2010-2021 Oryx Embedded 16 / 29
CycloneBOOT IAP Demo Quick Start Guide
In the web interface, you will see an information message indicating which type of image the
current running firmware is able to process. Here are the 3 different messages:
• “This application can process image generated with a simple application (not encrypted)
and an integrity tag (Scenario 1)”
• “This application can process image generated with a cipher application (encrypted) and
an authentication tag (Scenario 2)”
• “This application can process image generated with a cipher application (encrypted) and
a signature (Scenario 3)”
The version of the application and the background color of the web page are defined in
"src/version.h". You should modify these parameters (version, background color) before
each compilation during the demonstration.
At the bottom of the page, you will get a status message corresponding to an action that has
been made or is still in progress. Depending on the success or failure of the action, you will
get a green or red message respectively. Here are typical status messages that you may get:
• ‘Current firmware version: x.x.x’: version of the current application firmware.
• ‘Unknown filetype. Please upload a binary (.img) file.’: incompatible application image file
format selected.
• ‘Uploading file…’: selected application image is being uploaded to the server.
• ‘Uploaded. Page will reload in 10 seconds...’: upload has been completed without errors
(image is valid) and the device is rebooting (along with the web page 10s later)
• ‘Unable to upload binary! Please try again.’: an error occurred during upload or image is
invalid.
• ‘An error occurred. Please try again.’: a generic error message.
© 2010-2021 Oryx Embedded 17 / 29
CycloneBOOT IAP Demo Quick Start Guide
HTTP Server IAP Demo - Compilation
The demo project is configured to easily handle the three scenarios described in section 3.3.
So, we provide three different compilation profiles:
• scenario_1_simple_app_and_integrity -> the resulting application will be able to
process an image with a simple non-encrypted application binary and an integrity tag.
• scenario_2_cipher_app_and_authentication -> the resulting application will be able to
process an image with an encrypted cipher application and an authentication tag.
• scenario_3_cipher_app_and_signature -> the resulting application will be able to
process an image with an encrypted cipher application binary and a signature.
Once the compilation profile is selected, CycloneBOOT IAP configuration will automatically be
adjusted according to the scenario requirements.
To compile the http_server_iap_demo, you will have to follow the steps bellow:
1. Open the “http_server_iap_demo” project in “demo/st/nucleo_fxxxzi” directory using
Keil MDK-ARM or STM32CubeIDE.
2. Select one of the above compilation profiles (for example scenario_1_simple_app_and_integrity)
and compile the demo using REBUILD.
3. You should get an application binary file which bears the same name as demo project
name: http_server_iap_demo.bin
Regardless of the IDE (1), the application binary file will automatically be copied to the root of
the demo project directory: “demo/st/nucleo_fxxxzi/http_server_iap_demo”.
(1) If you want to use the GCC project, you will first have to edit the Makefile in order to select the right compilation profile: COMPILATION_PROFILE=…
© 2010-2021 Oryx Embedded 18 / 29
CycloneBOOT IAP Demo Quick Start Guide
HTTP Server IAP Demo - Programming
Before programming the application binary on the device, you MUST ensure that the device
is running on the flash bank 1. If not, programming may fail, or the device may block in an
unknown state.
To load the application binary on the device, please follow the steps bellow:
1. Reconfigure the device using STM32 ST-Link Utility or the given .bat file as described in
section 2.5 (2)
2. Then the demo application can be programmed, using the debug/program command of
your IDE. If you make use of a command line tool, the application binary MUST be
programmed at address 0x08000000.
Notes:
- For convenience a pre-compiled “http_server_iap_demo.bin” binary file is already
provided in “demo/st/nucleo_fxxxzi/http_server_iap_demo” directory. This binary
file has been compiled with “scenario_1_simple_app_and_integrity” profile.
- A .bat file “nucleo_fxxxzi_loadHTTPServerIapDemoBin.bat” is provided in the
“scripts” directory to load the compiled application binary on the device flash
memory. You can use it to load the “pre-compiled” application binary on to the
device.
(2) If the .bat file return an error, unplug and re-plug the board and try to launch the .bat file again.
© 2010-2021 Oryx Embedded 19 / 29
CycloneBOOT IAP Demo Quick Start Guide
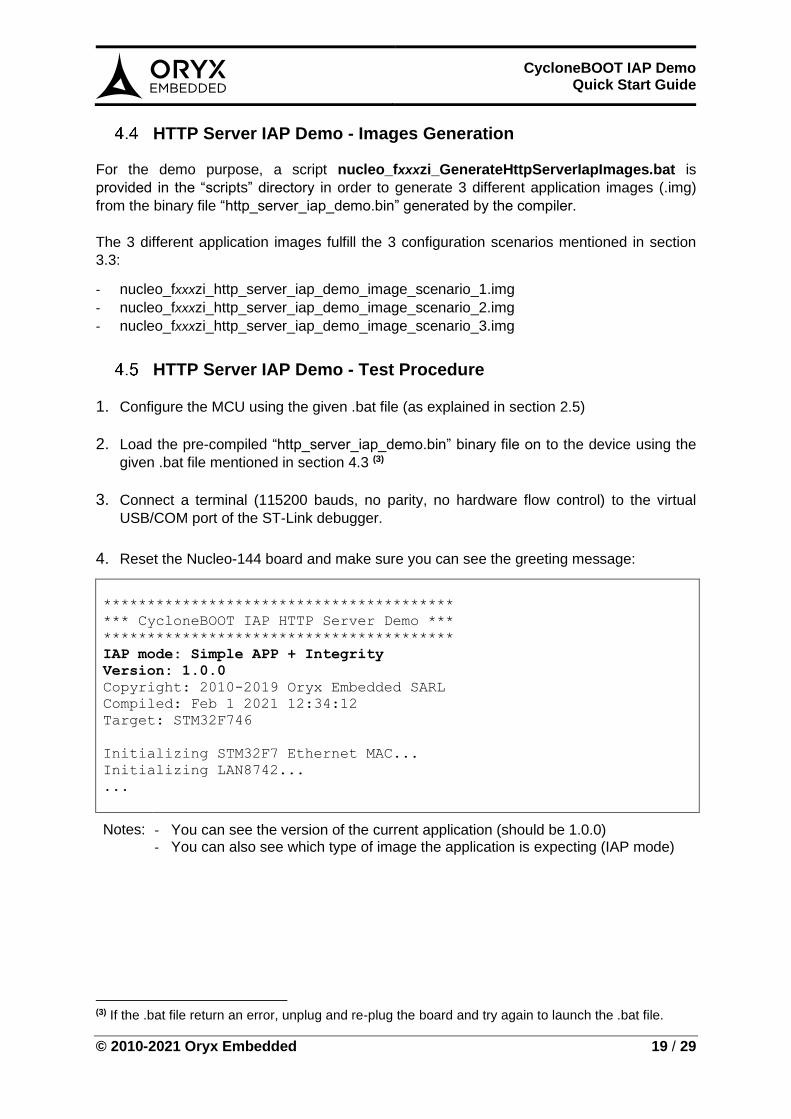
HTTP Server IAP Demo - Images Generation
For the demo purpose, a script nucleo_fxxxzi_GenerateHttpServerIapImages.bat is
provided in the “scripts” directory in order to generate 3 different application images (.img)
from the binary file “http_server_iap_demo.bin” generated by the compiler.
The 3 different application images fulfill the 3 configuration scenarios mentioned in section
3.3:
- nucleo_fxxxzi_http_server_iap_demo_image_scenario_1.img
- nucleo_fxxxzi_http_server_iap_demo_image_scenario_2.img
- nucleo_fxxxzi_http_server_iap_demo_image_scenario_3.img
HTTP Server IAP Demo - Test Procedure
1. Configure the MCU using the given .bat file (as explained in section 2.5)
2. Load the pre-compiled “http_server_iap_demo.bin” binary file on to the device using the
given .bat file mentioned in section 4.3 (3)
3. Connect a terminal (115200 bauds, no parity, no hardware flow control) to the virtual
USB/COM port of the ST-Link debugger.
4. Reset the Nucleo-144 board and make sure you can see the greeting message:
****************************************
*** CycloneBOOT IAP HTTP Server Demo ***
****************************************
IAP mode: Simple APP + Integrity
Version: 1.0.0
Copyright: 2010-2019 Oryx Embedded SARL
Compiled: Feb 1 2021 12:34:12
Target: STM32F746
Initializing STM32F7 Ethernet MAC...
Initializing LAN8742...
...
Notes:
- You can see the version of the current application (should be 1.0.0) - You can also see which type of image the application is expecting (IAP mode)
(3) If the .bat file return an error, unplug and re-plug the board and try again to launch the .bat file.
© 2010-2021 Oryx Embedded 20 / 29
CycloneBOOT IAP Demo Quick Start Guide
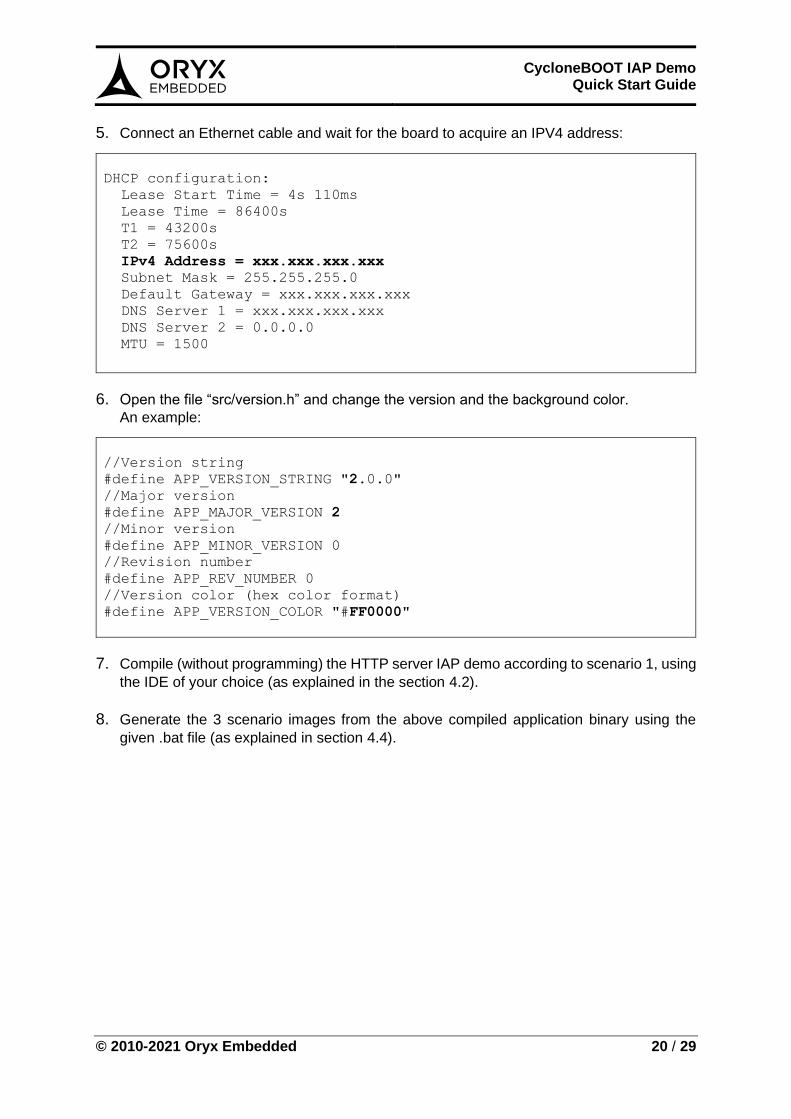
5. Connect an Ethernet cable and wait for the board to acquire an IPV4 address:
DHCP configuration:
Lease Start Time = 4s 110ms
Lease Time = 86400s
T1 = 43200s
T2 = 75600s
IPv4 Address = xxx.xxx.xxx.xxx
Subnet Mask = 255.255.255.0
Default Gateway = xxx.xxx.xxx.xxx
DNS Server 1 = xxx.xxx.xxx.xxx
DNS Server 2 = 0.0.0.0
MTU = 1500
6. Open the file “src/version.h” and change the version and the background color.
An example:
//Version string
#define APP_VERSION_STRING "2.0.0"
//Major version
#define APP_MAJOR_VERSION 2
//Minor version
#define APP_MINOR_VERSION 0
//Revision number
#define APP_REV_NUMBER 0
//Version color (hex color format)
#define APP_VERSION_COLOR "#FF0000"
7. Compile (without programming) the HTTP server IAP demo according to scenario 1, using
the IDE of your choice (as explained in the section 4.2).
8. Generate the 3 scenario images from the above compiled application binary using the
given .bat file (as explained in section 4.4).
© 2010-2021 Oryx Embedded 21 / 29
CycloneBOOT IAP Demo Quick Start Guide
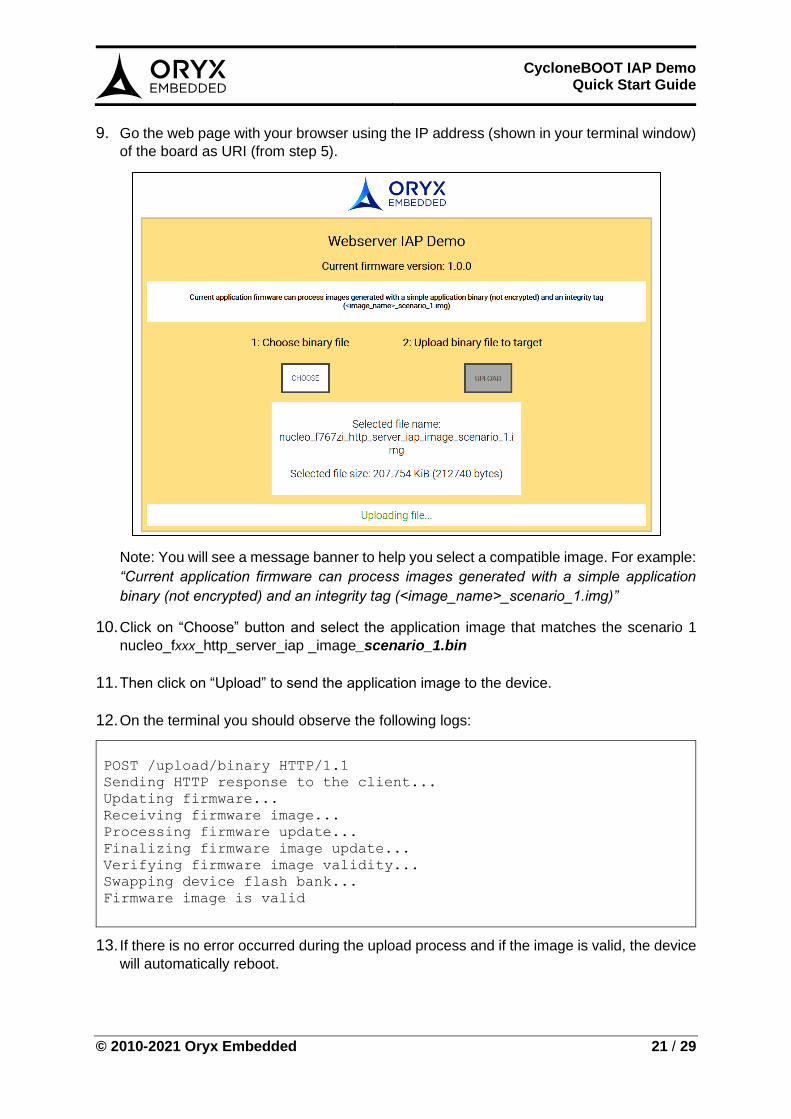
9. Go the web page with your browser using the IP address (shown in your terminal window)
of the board as URI (from step 5).
Note: You will see a message banner to help you select a compatible image. For example:
“Current application firmware can process images generated with a simple application
binary (not encrypted) and an integrity tag (<image_name>_scenario_1.img)”
10. Click on “Choose” button and select the application image that matches the scenario 1
nucleo_fxxx_http_server_iap _image_scenario_1.bin
11. Then click on “Upload” to send the application image to the device.
12. On the terminal you should observe the following logs:
POST /upload/binary HTTP/1.1
Sending HTTP response to the client...
Updating firmware...
Receiving firmware image...
Processing firmware update...
Finalizing firmware image update...
Verifying firmware image validity...
Swapping device flash bank...
Firmware image is valid
13. If there is no error occurred during the upload process and if the image is valid, the device
will automatically reboot.
© 2010-2021 Oryx Embedded 22 / 29
CycloneBOOT IAP Demo Quick Start Guide
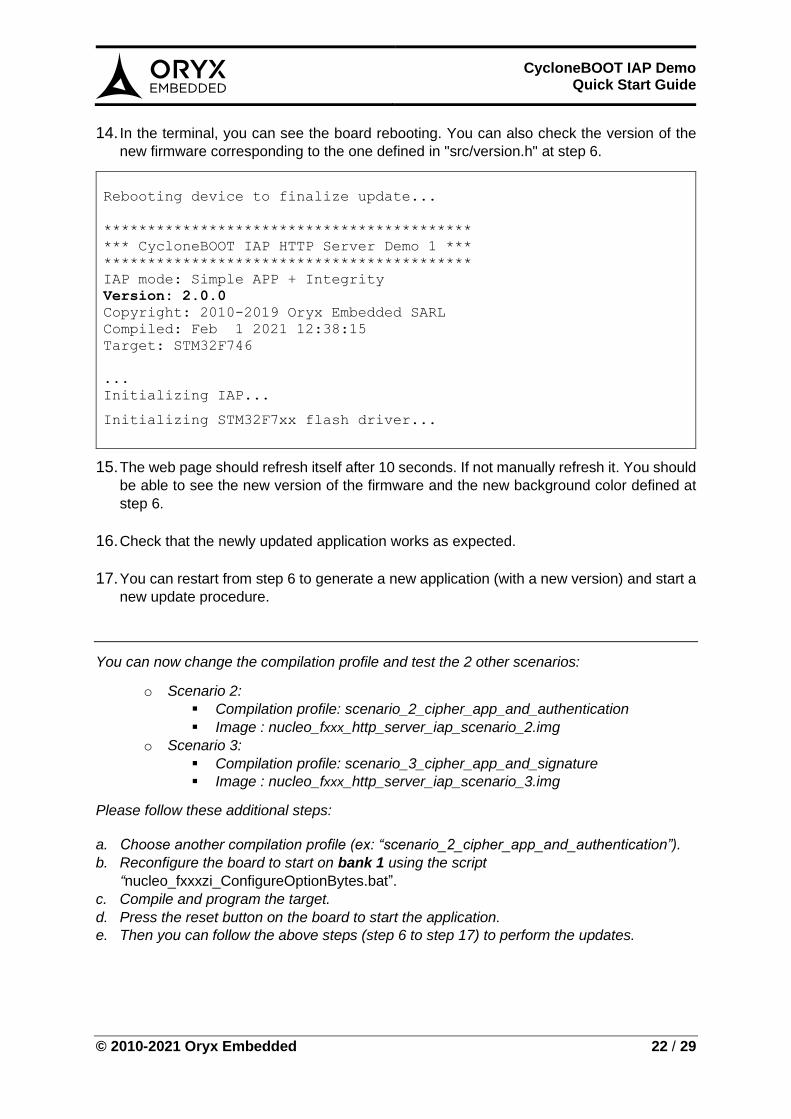
14. In the terminal, you can see the board rebooting. You can also check the version of the
new firmware corresponding to the one defined in "src/version.h" at step 6.
Rebooting device to finalize update...
******************************************
*** CycloneBOOT IAP HTTP Server Demo 1 ***
******************************************
IAP mode: Simple APP + Integrity
Version: 2.0.0
Copyright: 2010-2019 Oryx Embedded SARL
Compiled: Feb 1 2021 12:38:15
Target: STM32F746
...
Initializing IAP...
Initializing STM32F7xx flash driver...
15. The web page should refresh itself after 10 seconds. If not manually refresh it. You should
be able to see the new version of the firmware and the new background color defined at
step 6.
16. Check that the newly updated application works as expected.
17. You can restart from step 6 to generate a new application (with a new version) and start a
new update procedure.
You can now change the compilation profile and test the 2 other scenarios:
o Scenario 2:
▪ Compilation profile: scenario_2_cipher_app_and_authentication
▪ Image : nucleo_fxxx_http_server_iap_scenario_2.img
o Scenario 3:
▪ Compilation profile: scenario_3_cipher_app_and_signature
▪ Image : nucleo_fxxx_http_server_iap_scenario_3.img
Please follow these additional steps:
a. Choose another compilation profile (ex: “scenario_2_cipher_app_and_authentication”).
b. Reconfigure the board to start on bank 1 using the script
“nucleo_fxxxzi_ConfigureOptionBytes.bat”.
c. Compile and program the target.
d. Press the reset button on the board to start the application.
e. Then you can follow the above steps (step 6 to step 17) to perform the updates.
© 2010-2021 Oryx Embedded 23 / 29
CycloneBOOT IAP Demo Quick Start Guide
5 HTTPS Client IAP Demo
HTTPS Client IAP Demo - Presentation
Our HTTPS client IAP demo is a simple HTTPS client application which includes
CycloneBOOT IAP library to manage firmware update. The purpose of this application is to
demonstrate firmware update through a HTTPS client using application images that cover the
3 configurations mentioned in section 3.3. Please note that an internet connection is necessary
to use this demo.
Be aware that the CycloneBOOT IAP library does not manage application image retrieving
and the protocol to be used. It is up to the user to setup the necessary code that will download
the application image and then call CyloneBOOT IAP API to process it. The current demo
based on a HTTPS client is provided only as an example.
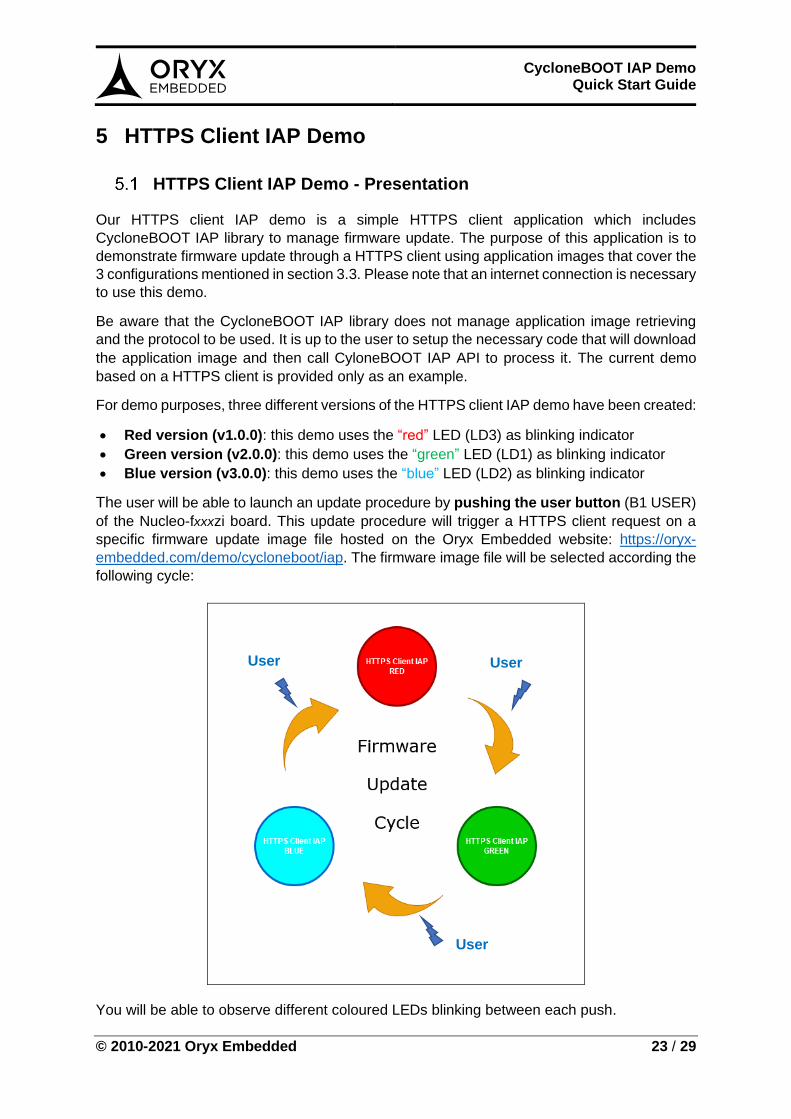
For demo purposes, three different versions of the HTTPS client IAP demo have been created:
• Red version (v1.0.0): this demo uses the “red” LED (LD3) as blinking indicator
• Green version (v2.0.0): this demo uses the “green” LED (LD1) as blinking indicator
• Blue version (v3.0.0): this demo uses the “blue” LED (LD2) as blinking indicator
The user will be able to launch an update procedure by pushing the user button (B1 USER)
of the Nucleo-fxxxzi board. This update procedure will trigger a HTTPS client request on a
specific firmware update image file hosted on the Oryx Embedded website: https://oryx-
embedded.com/demo/cycloneboot/iap. The firmware image file will be selected according the
following cycle:
You will be able to observe different coloured LEDs blinking between each push.
User
Button User
Button
User
Button
© 2010-2021 Oryx Embedded 24 / 29
CycloneBOOT IAP Demo Quick Start Guide
The selection of the next firmware update file will also be driven by the chosen scenario:
- If the running application is configured for the scenario 1 then it will select a firmware image compatible with the scenario 1 configuration.
- If the running application is configured for the scenario 2 then it will select a firmware image compatible with the scenario 2 configuration.
- If the running application is configured for the scenario 3 then it will select a firmware image compatible with the scenario 3 configuration.
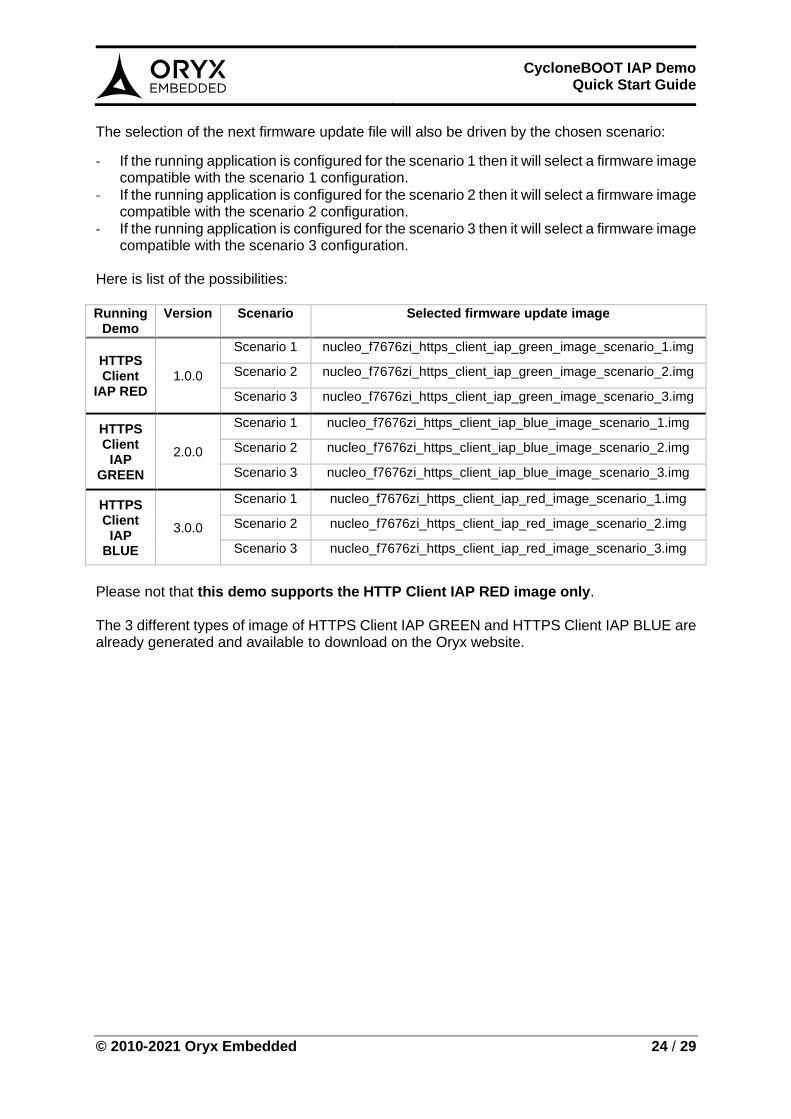
Here is list of the possibilities:
Running
Demo Version Scenario Selected firmware update image
HTTPS Client
IAP RED 1.0.0
Scenario 1 nucleo_f7676zi_https_client_iap_green_image_scenario_1.img
Scenario 2 nucleo_f7676zi_https_client_iap_green_image_scenario_2.img
Scenario 3 nucleo_f7676zi_https_client_iap_green_image_scenario_3.img
HTTPS Client
IAP GREEN
2.0.0
Scenario 1 nucleo_f7676zi_https_client_iap_blue_image_scenario_1.img
Scenario 2 nucleo_f7676zi_https_client_iap_blue_image_scenario_2.img
Scenario 3 nucleo_f7676zi_https_client_iap_blue_image_scenario_3.img
HTTPS Client
IAP BLUE
3.0.0
Scenario 1 nucleo_f7676zi_https_client_iap_red_image_scenario_1.img
Scenario 2 nucleo_f7676zi_https_client_iap_red_image_scenario_2.img
Scenario 3 nucleo_f7676zi_https_client_iap_red_image_scenario_3.img
Please not that this demo supports the HTTP Client IAP RED image only. The 3 different types of image of HTTPS Client IAP GREEN and HTTPS Client IAP BLUE are already generated and available to download on the Oryx website.

© 2010-2021 Oryx Embedded 25 / 29
CycloneBOOT IAP Demo Quick Start Guide
HTTPS Client IAP Demo - Compilation
The demo project is configured to easily handle the three scenarios described previously.
In order to achieve this, we provide three different compilation profiles:
• scenario_1_simple_app_and_integrity -> HTTPS Client IAP RED application will be
able to process an image with plaintext application binary (no encryption) and an integrity
tag.
• scenario_2_cipher_app_and_authentication -> HTTPS Client IAP RED application will
be able to process an image with cipher application (encrypted) and an authentication tag.
• scenario_3_cipher_app_and_signature -> HTTPS Client IAP RED application will be
able to process an image with cipher application binary (encrypted) and a signature.
Once the compilation profile is selected, CycloneBOOT IAP configuration will be adjusted according to the scenario requirements.
Follow the steps below to compile the https_client_iap_demo:
1. Open the “https_client_iap_demo” project in “demo/st/nucleo_fxxxzi” directory using
Keil MDK-ARM or STM32CubeIDE.
2. Select one of the above compilation profiles (for example
scenario_1_simple_app_and_integrity) and compile demo using REBUILD.
3. You should get an application binary file which bears the same name as the demo
project name: https_client_iap_demo.bin.
Regardless of the IDE, the application binary file will automatically be copied to the root of the
demo project directory: “demo/st/nucleo_fxxxzi/http_server_iap_demo”.
© 2010-2021 Oryx Embedded 26 / 29
CycloneBOOT IAP Demo Quick Start Guide
HTTPS Client IAP Demo - Programming
Before programming the application binary on to the device, you MUST ensure that the device
is running on the flash bank 1. If not, the programming may fail, or the device may block in an
unknown state.
To load the application binary on to the device, please follow the steps below:
1. Reconfigure the device using STM32 ST-Link Utility or the given .bat file as described in section 2.5 (4)
2. Then the demo application can be programmed as usual, using the debug/program command of your IDE (5). If you make use of a command line tool, the application binary MUST be programmed at address 0x08000000.
Notes:
- For convenience a pre-compiled “http_client_iap_demo.bin” (red version) binary file
is already provided in “demo/st/nucleo_fxxxzi/https_client_iap_demo” directory.
This binary file has been compiled with “scenario_1_simple_app_and_integrity”
profile.
- A .bat file “nucleo_fxxxzi_loadHTTPSClientIapDemoBin.bat” is provided in the
“scripts” directory to load the compiled application binary to the device flash
memory.
(4) If the .bat file returns an error, unplug and re-plug the board and try to launch the .bat file again. (5) If you want to use the GCC project, you will first have to edit the Makefile in order to select the right compilation profile: COMPILATION_PROFILE=…
© 2010-2021 Oryx Embedded 27 / 29
CycloneBOOT IAP Demo Quick Start Guide
HTTPS Client IAP Demo - Test Procedure
1. Configure the MCU using the given .bat file (as explained in section 2.5).
2. Load the pre-compiled “https_client_iap_demo.bin” binary file on the device using the
given .bat file mentioned in section 5.3. (6)
3. Connect a terminal (115200 bauds, no parity, no hardware flow control) to the virtual
USB/COM port of the ST-Link debugger.
4. Reset the Nucleo-144 board and make sure you can see the greeting message:
***********************************************
*** CycloneBOOT IAP HTTPS Client Demo (RED) ***
***********************************************
IAP mode: Simple APP + Integrity
Version: 1.0.0
Copyright: 2010-2019 Oryx Embedded SARL
Compiled: Feb 1 2021 12:34:12
Target: STM32F746
Initializing STM32F7 Ethernet MAC...
Initializing LAN8742...
...
Notes:
- You can see that the “RED” version of HTTPS Client IAP demo is running - You can see the version of the current application (should be 1.0.0) - You can also see which type of image the application is waiting for (IAP mode)
5. On the board, the red LED (LD3) should be blinking.
6. Connect an Ethernet cable and wait for the board to acquire an IPV4 address:
DHCP configuration:
Lease Start Time = 4s 110ms
Lease Time = 86400s
T1 = 43200s
T2 = 75600s
IPv4 Address = xxx.xxx.xxx.xxx
Subnet Mask = 255.255.255.0
Default Gateway = xxx.xxx.xxx.xxx
DNS Server 1 = xxx.xxx.xxx.xxx
DNS Server 2 = 0.0.0.0
MTU = 1500
(6) If the .bat file return an error, unplug and re-plug the board and try again to launch the .bat file.
© 2010-2021 Oryx Embedded 28 / 29
CycloneBOOT IAP Demo Quick Start Guide
7. Click on the user button (B1 USER) to trigger the firmware update.
8. You should observe the following messages in the terminal:
Initializing IAP...
Initializing STM32F4xx flash driver...
Running on flash bank 1...
Downloading firmware image
"nucleo_f767zi_https_client_iap_green_image_scenario_1.img"...
...
Processing firmware update...
Finalizing firmware image update...
Verifying firmware image validity...
Firmware image is valid
Swaping device flash bank...
...
9. If there is no error occurred during the reception and if the image is valid the device will
automatically reboot.
10. In the terminal, you can see the board rebooting. You can also check that the version of
the firmware has changed and that the GREEN version of the HTTPS client IAP demo is
now running.
Rebooting device to finalize update...
*************************************************
*** CycloneBOOT IAP HTTPS Client Demo (GREEN) ***
*************************************************
IAP mode: Simple APP + Integrity
Version: 2.0.0
Copyright: 2010-2019 Oryx Embedded SARL
Compiled: Feb 1 2021 12:38:15
Target: STM32F746
...
11. On the board, the green LED (LD1) should be blinking.
12. You can restart at step 7 to trigger other updates and check that the firmware update
cycle described in section 5.1 is followed.
You can now test the two other scenarios by following those additional steps:
f. Choose another compilation profile (ex: “scenario_2_cipher_app_and_authentication”).
g. Reconfigure the board to start on bank 1 using the script
“nucleo_fxxxzi_ConfigureOptionBytes.bat”.
h. Compile and program the target.
i. Press the reset button on the board to start the application.
j. Then you can follow above steps 7 to 12 to trigger updates.
© 2010-2021 Oryx Embedded 29 / 29
CycloneBOOT IAP Demo Quick Start Guide
6 Version History
Revision Date Modifications
1.0.0 2021/03/31 Initial release
1.0.1 2021/04/09 Minor content update
![附 属 書 Ⅰ 附 属 書 Ⅱ 附 属 書 Ⅲ - METI...Oryx dammah シロオリックス [Sahara Oryx; Scimitar-horned Oryx] Oryx leucoryx アラビアオリックス [Arabian Oryx;](https://img.pdfslide.net/doc/110x75/610ed737b544d54b153db177/e-a-e-a-e-a-meti-oryx-dammah-ffff.jpg)