Embed Size (px)
Citation preview
Oracle® Clinical Conducting a Study
Release 4.6.2
E18821-02
December 2011
This manual describes managing data in Oracle Clinical in an active clinical study, including capturing, cleaning, and extracting the study's data.
Oracle Clinical Conducting a Study, Release 4.6.2
E18821-02
Copyright © 1996, 2011, Oracle and/or its affiliates. All rights reserved.
This software and related documentation are provided under a license agreement containing restrictions on use and disclosure and are protected by intellectual property laws. Except as expressly permitted in your license agreement or allowed by law, you may not use, copy, reproduce, translate, broadcast, modify, license, transmit, distribute, exhibit, perform, publish, or display any part, in any form, or by any means. Reverse engineering, disassembly, or decompilation of this software, unless required by law for interoperability, is prohibited.
The information contained herein is subject to change without notice and is not warranted to be error-free. If you find any errors, please report them to us in writing.
If this is software or related documentation that is delivered to the U.S. Government or anyone licensing it on behalf of the U.S. Government, the following notice is applicable:
U.S. GOVERNMENT RIGHTS Programs, software, databases, and related documentation and technical data delivered to U.S. Government customers are "commercial computer software" or "commercial technical data" pursuant to the applicable Federal Acquisition Regulation and agency-specific supplemental regulations. As such, the use, duplication, disclosure, modification, and adaptation shall be subject to the restrictions and license terms set forth in the applicable Government contract, and, to the extent applicable by the terms of the Government contract, the additional rights set forth in FAR 52.227-19, Commercial Computer Software License (December 2007). Oracle America, Inc., 500 Oracle Parkway, Redwood City, CA 94065.
This software or hardware is developed for general use in a variety of information management applications. It is not developed or intended for use in any inherently dangerous applications, including applications that may create a risk of personal injury. If you use this software or hardware in dangerous applications, then you shall be responsible to take all appropriate fail-safe, backup, redundancy, and other measures to ensure its safe use. Oracle Corporation and its affiliates disclaim any liability for any damages caused by use of this software or hardware in dangerous applications.
Oracle and Java are registered trademarks of Oracle and/or its affiliates. Other names may be trademarks of their respective owners.
Intel and Intel Xeon are trademarks or registered trademarks of Intel Corporation. All SPARC trademarks are used under license and are trademarks or registered trademarks of SPARC International, Inc. AMD, Opteron, the AMD logo, and the AMD Opteron logo are trademarks or registered trademarks of Advanced Micro Devices. UNIX is a registered trademark of The Open Group.
This software or hardware and documentation may provide access to or information on content, products, and services from third parties. Oracle Corporation and its affiliates are not responsible for and expressly disclaim all warranties of any kind with respect to third-party content, products, and services. Oracle Corporation and its affiliates will not be responsible for any loss, costs, or damages incurred due to your access to or use of third-party content, products, or services.
iii
Contents
Preface ................................................................................................................................................................. xi
Audience....................................................................................................................................................... xiDocumentation Accessibility ..................................................................................................................... xiFinding Information and Patches on My Oracle Support ..................................................................... xiFinding Oracle Documentation............................................................................................................... xiiiRelated Documents ................................................................................................................................... xiiiConventions ............................................................................................................................................... xiv
1 Entering Data
Understanding the Data Entry Process ................................................................................................ 1-1DCI Structure ............................................................................................................................................ 1-2Entering CRF Data in a DCI ................................................................................................................... 1-3
Accessibility ........................................................................................................................................ 1-3Logging In CRF Header Information .............................................................................................. 1-4
Completing the Initial Log-In ................................................................................................... 1-4If Your Header Information Fails to Validate......................................................................... 1-5Completing the RDCM Window .............................................................................................. 1-5Logging In DCMs........................................................................................................................ 1-5If You Cannot Complete All DCMs ......................................................................................... 1-5
First-Pass Data Entry ........................................................................................................................ 1-6Initial Login and Data Entry............................................................................................................. 1-7Validating Data Entry........................................................................................................................ 1-8
Univariate Validation ................................................................................................................. 1-8System Responses to a Univariate Validation Failure........................................................... 1-8User Responses to a Univariate Validation Failure ............................................................... 1-8Indicators of an Existing Discrepancy ..................................................................................... 1-9Group and Form Validation...................................................................................................... 1-9
Second-Pass Data Entry..................................................................................................................... 1-9Reconciling Differences Between First- and Second-Pass Data ............................................... 1-11
Resolving First-Pass/Second-Pass Comparison Failures .................................................. 1-11Resolving Duplicate or Missing Records.............................................................................. 1-12Performing Comparison Reconciliation ............................................................................... 1-12
Making Adjustments During Data Entry ......................................................................................... 1-13Enrolling a Patient........................................................................................................................... 1-13Transferring Patient Data............................................................................................................... 1-13
iv
Handling Unplanned Events......................................................................................................... 1-15Changing Tasks ............................................................................................................................... 1-15Reviewing the DCI History ........................................................................................................... 1-15
Audit Trail Window ................................................................................................................ 1-16How the System Stores the Audit Trail ............................................................................... 1-16
Modifying DCIs..................................................................................................................................... 1-17Process the Reason for Change Window..................................................................................... 1-17Changing Header Information...................................................................................................... 1-18Updating Accessible Data.............................................................................................................. 1-18
System Validations Performed During Update Mode ....................................................... 1-19Performing a Privileged Update............................................................................................ 1-19
Modifying or Deleting Locked RDCIs and RDCMs .................................................................. 1-19To Modify Accessible RDCIs.................................................................................................. 1-20To Delete Logged-in RDCIs.................................................................................................... 1-20
Viewing Data.......................................................................................................................................... 1-20Scanned Image................................................................................................................................. 1-20Browse............................................................................................................................................... 1-21Browse the Audit Trail .................................................................................................................. 1-21
2 Customizing Data Entry Windows
Sequencing Data Entry............................................................................................................................ 2-1Query Sequencing .............................................................................................................................. 2-1DCI Book Sequencing........................................................................................................................ 2-1Using DCI Books ................................................................................................................................ 2-2
Completing DCIs from the DCI Book...................................................................................... 2-2Patient Enrollment ...................................................................................................................... 2-3
Tracking Page-Level Information .................................................................................................... 2-3Oracle Clinical Management of Unplanned DCIs ................................................................. 2-3Applying Page Statuses ............................................................................................................. 2-4Tracking Changes to a Page ...................................................................................................... 2-5
Navigation ................................................................................................................................................. 2-5Field Navigation................................................................................................................................. 2-5
Normal Field Navigation........................................................................................................... 2-5Auto Skip Navigation................................................................................................................. 2-6Conditional Navigation ............................................................................................................. 2-6
Other Navigation Features .............................................................................................................. 2-7Group Navigation....................................................................................................................... 2-7Display Received DCM Window ............................................................................................. 2-7Exit/Autosequence Behavior .................................................................................................... 2-7
Comments Permitted in DCIs .......................................................................................................... 2-8Investigator Comments.............................................................................................................. 2-9Operator Comments ................................................................................................................... 2-9
Physical Field Attributes ................................................................................................................ 2-10Color Indications on Data Entry Fields ................................................................................ 2-10Date and Time Field Formats................................................................................................. 2-10Using Long Fields .................................................................................................................... 2-11Modify Audit Comment ......................................................................................................... 2-11
v
Value-Setting Features.......................................................................................................................... 2-12Default Values ................................................................................................................................. 2-12
Single Default Values .............................................................................................................. 2-12Repeating Default Values ....................................................................................................... 2-12Second-Pass Sight Verification............................................................................................... 2-12
Lists of Values.................................................................................................................................. 2-12Insert/Delete Record in a Question Group.......................................................................... 2-13
3 Tracking DCMs
About DCM Tracking .............................................................................................................................. 3-1How Oracle Clinical Tracks DCMs....................................................................................................... 3-1
The Study Schedule ........................................................................................................................... 3-1How Optional Visits Interact with DCM Tracking ....................................................................... 3-2How Termination Visits Interact With DCM Tracking ................................................................ 3-3
DCM Tracking Tools ................................................................................................................................ 3-3Maintain Missing DCMs Window................................................................................................... 3-4DCM Detail Tracking Matrix Report............................................................................................... 3-5
How to Use This Report............................................................................................................. 3-5Report Parameters ...................................................................................................................... 3-5Data Entry Statuses..................................................................................................................... 3-7RDCM Validation Statuses ........................................................................................................ 3-7Not-received DCM Statuses ...................................................................................................... 3-8
Missing and Overdue DCMs Report............................................................................................... 3-8Investigator Corrections and Missing Pages Report..................................................................... 3-9
4 Using the Discrepancy Database
About the Discrepancy Database .......................................................................................................... 4-1Discrepancy Types ................................................................................................................................... 4-2Example: Using Discrepancies to Clean Data..................................................................................... 4-3Using Batch Validation............................................................................................................................ 4-4
Batch Validation Process ................................................................................................................... 4-5Locking Mechanism........................................................................................................................... 4-6Running Batch Validation................................................................................................................. 4-6Running TMS Validation .................................................................................................................. 4-6Creating and Activating Resource Groups for Batch Validation................................................ 4-6
Using Profiles............................................................................................................................................ 4-7Selecting a Profile ............................................................................................................................... 4-8Refining Profile Criteria .................................................................................................................... 4-8Changing a Profile ............................................................................................................................ 4-8
Temporary Changes ................................................................................................................... 4-8Permanent Changes.................................................................................................................... 4-8
Creating New Profiles ....................................................................................................................... 4-9Using the Maintain Discrepancy Database Window ..................................................................... 4-10
Single-Record View......................................................................................................................... 4-10Multi-Record View ......................................................................................................................... 4-12Maintain Discrepancy Database Window Fields ....................................................................... 4-12
vi
Changing Discrepancy Display Layout and Filtering the Data Displayed ............................ 4-16Changing the Display of Discrepancy Information ............................................................ 4-16Filtering Discrepancy Information ........................................................................................ 4-17Changing the Filter Values ..................................................................................................... 4-18Querying Within the Filter Limitations ................................................................................ 4-18
Viewing Univariate Discrepancies' Related Discrepancies....................................................... 4-18Viewing Multivariate Discrepancies' Responses........................................................................ 4-19Viewing a Discrepancy's History.................................................................................................. 4-19Viewing a Discrepancy's Internal Comment History ................................................................ 4-19
Managing Discrepancies...................................................................................................................... 4-20Discrepancy Status Codes.............................................................................................................. 4-21
System Status Code.................................................................................................................. 4-21Review Status Code ................................................................................................................. 4-21Resolution Status...................................................................................................................... 4-22Review Status Workflow Example........................................................................................ 4-22
Browse and Update Patient Data.................................................................................................. 4-22Entering Manual Discrepancies .................................................................................................... 4-23Including CRF Page Numbers With Discrepancies ................................................................... 4-24Maintaining Data Clarification Form (DCF) Information ........................................................ 4-24Modifying Groups of Discrepancies ............................................................................................ 4-24
Selecting a Group of Records to Change ............................................................................. 4-24Choosing a Change Type........................................................................................................ 4-25
Group-Updating Review Status.................................................................................................... 4-25Group-Updating CRF Page Numbers ......................................................................................... 4-26Group-Inserting Standard Text .................................................................................................... 4-26Group-Marking for Passive Review............................................................................................. 4-27Creating a DCF for a Hand-Selected Group of Discrepancies ................................................ 4-28
Using the Test Discrepancy Database ............................................................................................... 4-29
5 Using Data Clarification Forms
Description of Fields .............................................................................................................................. 5-2Creating DCFs ........................................................................................................................................ 5-3
Adding Multivariate Discrepancy's Procedure Variables to a DCF........................................... 5-4Adding, Removing, and Editing a DCF's Discrepancies ............................................................... 5-5
Adding a Discrepancy to a DCF ...................................................................................................... 5-5Removing a Discrepancy from a DCF............................................................................................. 5-5Editing Resolution and Comment Text .......................................................................................... 5-5
Viewing DCF Details............................................................................................................................... 5-6Maintaining DCF Discrepancy Query Details ................................................................................... 5-6Tracking DCF Pages ........................................................................................................................... 5-6Setting the DCF Status ........................................................................................................................ 5-7
Changing the DCF Status from the Maintain DCFs Window ..................................................... 5-8Changing the DCF Status When Printing the DCF Report.......................................................... 5-9Changing the DCF Status by Changing DCF Page Statuses........................................................ 5-9
Printing DCFs............................................................................................................................................ 5-9DCF Print Status.............................................................................................................................. 5-10About the Parameter New DCF Status to Assign ..................................................................... 5-11
vii
Troubleshooting: Unable to Print DCF ........................................................................................ 5-11Checking Owning User Account Through Oracle Clinical User Interface ..................... 5-12Checking Owning User Account Using SQL....................................................................... 5-12
Deleting DCFs ....................................................................................................................................... 5-12
6 Making Mass Changes
About Mass Changes ............................................................................................................................... 6-1Types of Mass Changes ........................................................................................................................... 6-2Defining a Mass Change Specification and Its Criteria .................................................................. 6-3
Defining the Mass Change Specification ........................................................................................ 6-3Naming and Describing the MCS............................................................................................. 6-3Defining the Scope of the Records to be Changed................................................................. 6-4Saving the Mass Change Specification .................................................................................... 6-4
Defining Candidate Data Set Criteria ............................................................................................ 6-4CDS Criteria Examples............................................................................................................... 6-5CDS Criteria Syntax ................................................................................................................... 6-5CDS Criteria Definition Rules ................................................................................................... 6-7Counting CDS Records .............................................................................................................. 6-7
Copying a Mass Change Specification ........................................................................................... 6-8Creating and Modifying the Candidate Data Set ............................................................................. 6-8
Viewing the CDS ............................................................................................................................... 6-8Rows.............................................................................................................................................. 6-8Columns ...................................................................................................................................... 6-9Status............................................................................................................................................. 6-9
Changing the Display and Processing Order................................................................................. 6-9Example ........................................................................................................................................ 6-9To Reorder the Display and Processing Order:................................................................... 6-10
Clearing a CDS ................................................................................................................................ 6-10Correcting Records ............................................................................................................................... 6-10
Making Mass Changes: Group Updating ................................................................................... 6-10Specifying Group Update Changes....................................................................................... 6-11Excluding Records from the Group Update ........................................................................ 6-12Running the Group Update on the CDS............................................................................... 6-12Testing that the Changes Are Valid ..................................................................................... 6-13Printing a Report of the CDS Changes ................................................................................. 6-14Viewing Group Update Histories.......................................................................................... 6-14Applying the Changes to the Database ................................................................................ 6-14Soft-Deleting RDCIs ................................................................................................................ 6-15
Changing Individual Records in the CDS ................................................................................... 6-15Closing a Mass Change Specification ............................................................................................... 6-16
7 Batch Loading Data
Setting Up for Batch Data Loading ....................................................................................................... 7-1Defining a Rollback Segment .......................................................................................................... 7-1Defining and Using Format Masks.................................................................................................. 7-2
STANDARD Mask Format ........................................................................................................ 7-2
viii
User-Specified Formats ............................................................................................................ 7-3Normalized Lab Data ................................................................................................................. 7-4
Batch Data Load Stages ........................................................................................................................... 7-5Load ..................................................................................................................................................... 7-5Prepare ................................................................................................................................................ 7-5Transfer ............................................................................................................................................... 7-5
Standard Batch Data Load and Out of Study Batch Data Load....................................................... 7-5Using the Batch Data Loader .................................................................................................... 7-6
Preprocessing Data Files ................................................................................................................... 7-6Subevent Number Not Supplied .............................................................................................. 7-6
Creating and Viewing Data File Entries ......................................................................................... 7-7Creating Data File Entries for Out of Study Batch Data Loads............................................ 7-7Creating Data File Entries for Standard Batch Data Loads................................................... 7-8
Selecting Data Files ............................................................................................................................ 7-9Loading Data ........................................................................................................................... 7-10
Understanding the Error Log .............................................................................................................. 7-12Batch Deleting Data .............................................................................................................................. 7-16
Auditing Data Deletion .................................................................................................................. 7-16Batch Data Load Reports...................................................................................................................... 7-16
Processed Data Report.................................................................................................................... 7-17
8 Data Extract
About Data Extract ................................................................................................................................... 8-1Data Extract Context................................................................................................................................. 8-2
Default View Creation Algorithm ................................................................................................... 8-2View Types.......................................................................................................................................... 8-2Rollsnaps ............................................................................................................................................. 8-3Access Accounts ................................................................................................................................. 8-3
Purging Study Access Accounts ............................................................................................... 8-4Table-Based Views ............................................................................................................................. 8-4Creating Extract Tables and Indexes ......................................................................................... 8-4
Workflow.................................................................................................................................................... 8-5Submit Views to PSUB ...................................................................................................................... 8-6
Creating SAS Views on Windows when SAS and Oracle Clinical are on Different Computers 8-6Full and Incremental Modes...................................................................................................... 8-7
Tasks in Conduct................................................................................................................................ 8-7Validation Status and Views ............................................................................................................ 8-7
For Pre-3.1-Style Study Views................................................................................................... 8-8For View Builder Study Views.................................................................................................. 8-8Rules for Setting Status Variables............................................................................................. 8-8
Create View Accounts ....................................................................................................................... 8-9Query Data Extract Views................................................................................................................. 8-9SAS Datasets ....................................................................................................................................... 8-9SAS Proc Reports............................................................................................................................. 8-10
Data Extract View Loader..................................................................................................................... 8-10Loading External Views ................................................................................................................. 8-11
ix
File Format for Externally Loaded Views.................................................................................... 8-11Example 1: Oracle Format....................................................................................................... 8-11Example 2: Oracle Format with Substitution Parameters.................................................. 8-11Example 3: SAS Format........................................................................................................... 8-12
Restrictions for Externally Loaded Views ................................................................................... 8-12Updating an Externally Loaded View ......................................................................................... 8-12Deleting an Externally Loaded View ........................................................................................... 8-13
9 Security Settings for Study Conduct
Freezing and Locking Data..................................................................................................................... 9-1About Freezing and Locking Data................................................................................................... 9-1Freezing Data ...................................................................................................................................... 9-2
Freezing Data by Site, Investigator, or Patients...................................................................... 9-3Freezing Data by Study.............................................................................................................. 9-3
Checking Frozen Status..................................................................................................................... 9-3Unfreezing Studies, Study Sites, Investigators, and Patients ...................................................... 9-3
Unfreezing Sites, Investigators, and Patients ......................................................................... 9-4Unfreezing a Study ..................................................................................................................... 9-4
Locking Data ...................................................................................................................................... 9-4Batch-Locking Data..................................................................................................................... 9-5Manually Locking RDCIs and RDCMs.................................................................................... 9-5
Enabling and Disabling Pass 2 Required ............................................................................................ 9-6
10 Graphic Patient Data Reports
Graphic Patient Data Report ............................................................................................................... 10-1Navigation and Format .................................................................................................................. 10-1Requirements ................................................................................................................................... 10-1
Patient Data Report Components....................................................................................................... 10-2Page Numbering ............................................................................................................................. 10-2Cover Page ....................................................................................................................................... 10-2
Blank Workbook PDRs............................................................................................................ 10-3Patient CRF PDRs .................................................................................................................... 10-3
CRF Data Section............................................................................................................................. 10-3CRF Header Information ........................................................................................................ 10-3CRF Section Header Information .......................................................................................... 10-4Approval and Verification Notices ....................................................................................... 10-4Response Data .......................................................................................................................... 10-4Format of Data Values............................................................................................................. 10-4End Notes.................................................................................................................................. 10-4Links to Other Sections ........................................................................................................... 10-5
Extended Text Audit History Section .......................................................................................... 10-5Audit History Report Section........................................................................................................ 10-5Discrepancy Detail Report Section ............................................................................................... 10-7Deleted CRFs Section...................................................................................................................... 10-7

x
Audit History Report ............................................................................................................................ 10-7
Index
xi
Preface
This manual describes managing data in Oracle Clinical in an active clinical study, including capturing, cleaning, and extracting the study's data.
This preface contains the following topics:
■ Audience on page xi
■ Documentation Accessibility on page xi
■ Finding Information and Patches on My Oracle Support on page xi
■ Finding Oracle Documentation on page xiii
■ Related Documents on page xiii
■ Conventions on page xiv
AudienceThe first two chapters of this document are intended for data entry managers and trainers. The remainder describe tasks that are typically the responsibility of a study's data manager.
Documentation AccessibilityFor information about Oracle's commitment to accessibility, visit the Oracle Accessibility Program website at http://www.oracle.com/pls/topic/lookup?ctx=acc&id=docacc.
Access to Oracle SupportOracle customers have access to electronic support through My Oracle Support. For information, visit http://www.oracle.com/pls/topic/lookup?ctx=acc&id=info or visit http://www.oracle.com/pls/topic/lookup?ctx=acc&id=trs if you are hearing impaired.
Finding Information and Patches on My Oracle SupportYour source for the latest information about Oracle Clinical is Oracle Support's self-service Web site My Oracle Support (formerly MetaLink).
Before you install and use Oracle Clinical, always visit the My Oracle Support Web site for the latest information, including alerts, White Papers, installation verification (smoke) tests, bulletins, and patches.
xii
Creating a My Oracle Support AccountYou must register at My Oracle Support to obtain a user name and password account before you can enter the Web site.
To register for My Oracle Support:
1. Open a Web browser to https://support.oracle.com.
2. Click the Register link to create a My Oracle Support account. The registration page opens.
3. Follow the instructions on the registration page.
Signing In to My Oracle SupportTo sign in to My Oracle Support:
1. Open a Web browser to https://support.oracle.com.
2. Click Sign In.
3. Enter your user name and password.
4. Click Go to open the My Oracle Support home page.
Finding Information on My Oracle SupportThere are many ways to find information on My Oracle Support.
Searching by Article IDThe fastest way to search for information, including alerts, White Papers, installation verification (smoke) tests, and bulletins is by the article ID number, if you know it.
To search by article ID:
1. Sign in to My Oracle Support at https://support.oracle.com.
2. Locate the Search box in the upper right corner of the My Oracle Support page.
3. Click the sources icon to the left of the search box, and then select Article ID from the list.
4. Enter the article ID number in the text box.
5. Click the magnifying glass icon to the right of the search box (or press the Enter key) to execute your search.
The Knowledge page displays the results of your search. If the article is found, click the link to view the abstract, text, attachments, and related products.
Searching by Product and TopicYou can use the following My Oracle Support tools to browse and search the knowledge base:
■ Product Focus — On the Knowledge page under Select Product, type part of the product name and the system immediately filters the product list by the letters you have typed. (You do not need to type "Oracle.") Select the product you want from the filtered list and then use other search or browse tools to find the information you need.
■ Advanced Search — You can specify one or more search criteria, such as source, exact phrase, and related product, to find information. This option is available from the Advanced link on almost all pages.
xiii
Finding Patches on My Oracle SupportBe sure to check My Oracle Support for the latest patches, if any, for your product. You can search for patches by patch ID or number, or by product or family.
To locate and download a patch:
1. Sign in to My Oracle Support at https://support.oracle.com.
2. Click the Patches & Updates tab. The Patches & Updates page opens and displays the Patch Search region. You have the following options:
■ In the Patch ID or Number field, enter the number of the patch you want. (This number is the same as the primary bug number fixed by the patch.) This option is useful if you already know the patch number.
■ To find a patch by product name, release, and platform, click the Product or Family link to enter one or more search criteria.
3. Click Search to execute your query. The Patch Search Results page opens.
4. Click the patch ID number. The system displays details about the patch. In addition, you can view the Read Me file before downloading the patch.
5. Click Download. Follow the instructions on the screen to download, save, and install the patch files.
Finding Oracle DocumentationThe Oracle Web site contains links to all Oracle user and reference documentation. You can view or download a single document or an entire product library.
Finding Oracle Health Sciences DocumentationTo get user documentation for Oracle Health Sciences applications, go to the Oracle Health Sciences Clinical Trials Applications Documentation page at:
http://www.oracle.com/technetwork/documentation/hsgbu-clinical-407519.html
Finding Other Oracle DocumentationTo get user documentation for other Oracle products:
1. Go to the following Web page:
http://www.oracle.com/technology/documentation/index.html
Alternatively, you can go to http://www.oracle.com, point to the Support tab, and then click Documentation.
2. Scroll to the product you need and click the link.
3. Click the link for the documentation you need.
Related DocumentsThis section lists the documents in the Oracle Clinical documentation set, followed by their part number. The most recent version of each guide is posted on the Oracle Web site; see "Finding Oracle Health Sciences Documentation" on page xiii.
Note: Always check the Oracle Health Sciences Documentation page to ensure you have the latest updates to the documentation.
xiv
■ Oracle Clinical Installation Guide (Part E18817)
■ Oracle Clinical Administrator's Guide (Part E18818)
■ Oracle Clinical Getting Started (Part E18819)
■ Oracle Clinical Creating a Study (Part E18820)
■ Oracle Clinical Conducting a Study (Part E18821)
■ Oracle Clinical Application Programming Interface Guide (Part E18866)
■ Oracle Clinical Remote Data Capture Onsite Administrator's Guide (Part E18823)
■ Oracle Clinical Remote Data Capture Onsite User's Guide (Part E18822)
■ Oracle Clinical Remote Data Capture Classic Data Entry User's Guide (Part E18824)
The release notes and the release content document are also posted in the Oracle Health Sciences documentation library.
In addition, Oracle Clinical customers can request a copy of the Oracle Clinical Stable Interface Technical Reference Manual from Oracle Support.
ConventionsThe following text conventions are used in this document:
Convention Meaning
boldface Boldface type indicates graphical user interface elements associated with an action, or terms defined in text or the glossary.
italic Italic type indicates book titles, emphasis, or placeholder variables for which you supply particular values.
monospace Monospace type indicates commands within a paragraph, URLs, code in examples, text that appears on the screen, or text that you enter.
1
Entering Data 1-1
1 Entering Data
This section contains the following topics:
■ Understanding the Data Entry Process on page 1-1
■ DCI Structure on page 1-2
■ Entering CRF Data in a DCI on page 1-3
■ Making Adjustments During Data Entry on page 1-13
■ Modifying DCIs on page 1-17
■ Viewing Data on page 1-20
The chapter describes the Oracle Clinical data entry process. It provides background information about the structure of the components you use to enter CRF data into Oracle Clinical, it outlines the tasks that data entry entails, and it describes the utilities you use to enter data.
Understanding the Data Entry ProcessEvery DCI begins with a header window, which Oracle Clinical uses to collect the information that uniquely identifies the DCI. For example, the header stores such information as the study and site names, the visit and patient number, and the visit date. The system provides some of this information, and you supply other items during initial data entry. When the system validates all of the header information, one or more DCMs displays. Each DCM is a logical grouping of questions collected together at a visit. The minimum configuration for a DCI then, is the header information plus one DCM.
When data entry occurs, your organization has defined a set of Data Collection Instruments (DCIs) that you use to collect the data that is saved, or committed, to the study database. Each DCI is modeled on the Case Report Forms (CRFs) that are utilized in the study to collect data at the clinical sites. The DCI is comprised of an informational section, which holds information about the data, such as the patient number and visit date, and one or more question section, which are named Data Collection Modules or DCMs.
1. Log-in the DCI header
2. First-pass data entry
3. Second-pass data entry
Entering a single CRF in Oracle Clinical is also a two-stage process: entering the header information, and entering the data. This process can be a single operation or
DCI Structure
1-2 Oracle Clinical Conducting a Study
separated into two. If a second pass is required, then after the first-pass data is validated the DCI can be invoked in second-pass data entry mode.
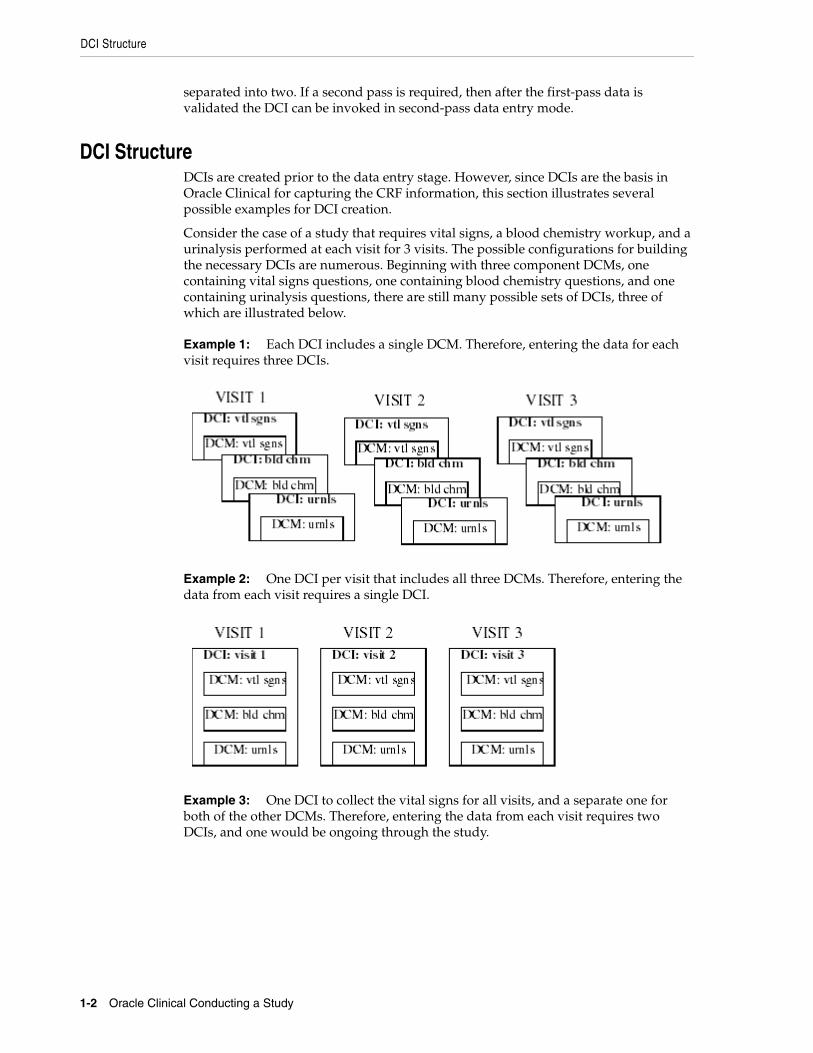
DCI StructureDCIs are created prior to the data entry stage. However, since DCIs are the basis in Oracle Clinical for capturing the CRF information, this section illustrates several possible examples for DCI creation.
Consider the case of a study that requires vital signs, a blood chemistry workup, and a urinalysis performed at each visit for 3 visits. The possible configurations for building the necessary DCIs are numerous. Beginning with three component DCMs, one containing vital signs questions, one containing blood chemistry questions, and one containing urinalysis questions, there are still many possible sets of DCIs, three of which are illustrated below.
Example 1: Each DCI includes a single DCM. Therefore, entering the data for each visit requires three DCIs.
Example 2: One DCI per visit that includes all three DCMs. Therefore, entering the data from each visit requires a single DCI.
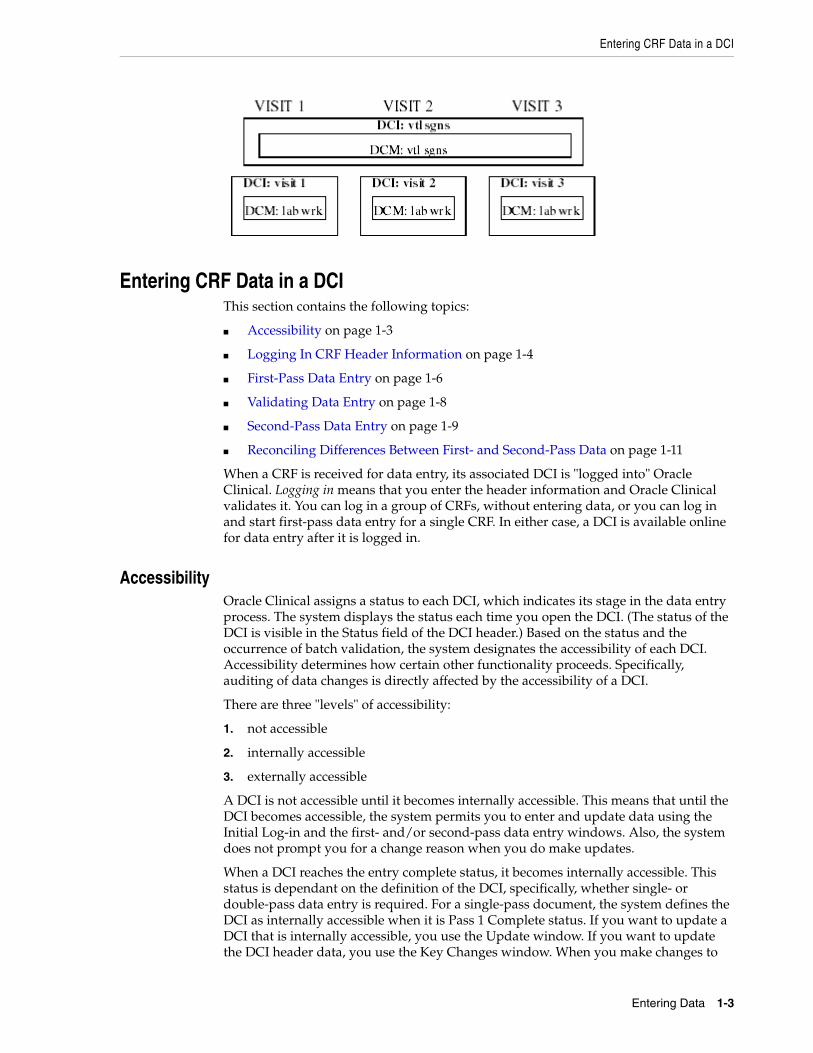
Example 3: One DCI to collect the vital signs for all visits, and a separate one for both of the other DCMs. Therefore, entering the data from each visit requires two DCIs, and one would be ongoing through the study.
Entering CRF Data in a DCI
Entering Data 1-3
Entering CRF Data in a DCIThis section contains the following topics:
■ Accessibility on page 1-3
■ Logging In CRF Header Information on page 1-4
■ First-Pass Data Entry on page 1-6
■ Validating Data Entry on page 1-8
■ Second-Pass Data Entry on page 1-9
■ Reconciling Differences Between First- and Second-Pass Data on page 1-11
When a CRF is received for data entry, its associated DCI is "logged into" Oracle Clinical. Logging in means that you enter the header information and Oracle Clinical validates it. You can log in a group of CRFs, without entering data, or you can log in and start first-pass data entry for a single CRF. In either case, a DCI is available online for data entry after it is logged in.
AccessibilityOracle Clinical assigns a status to each DCI, which indicates its stage in the data entry process. The system displays the status each time you open the DCI. (The status of the DCI is visible in the Status field of the DCI header.) Based on the status and the occurrence of batch validation, the system designates the accessibility of each DCI. Accessibility determines how certain other functionality proceeds. Specifically, auditing of data changes is directly affected by the accessibility of a DCI.
There are three "levels" of accessibility:
1. not accessible
2. internally accessible
3. externally accessible
A DCI is not accessible until it becomes internally accessible. This means that until the DCI becomes accessible, the system permits you to enter and update data using the Initial Log-in and the first- and/or second-pass data entry windows. Also, the system does not prompt you for a change reason when you do make updates.
When a DCI reaches the entry complete status, it becomes internally accessible. This status is dependant on the definition of the DCI, specifically, whether single- or double-pass data entry is required. For a single-pass document, the system defines the DCI as internally accessible when it is Pass 1 Complete status. If you want to update a DCI that is internally accessible, you use the Update window. If you want to update the DCI header data, you use the Key Changes window. When you make changes to
Entering CRF Data in a DCI
1-4 Oracle Clinical Conducting a Study
the data, the system displays the Audit Change Reason window, which prompts you select a change reason and include an explanatory comment, if necessary.
When an internally accessible document undergoes batch validation, it becomes externally accessible. This level of accessibility allows the document to be made available to users out the data entry group.
The following sections describe the process of entering a CRF into Oracle Clinical. They provide an overall picture of the process and understand many of the tasks. To more fully understand the features of working in the Data Entry modes, refer to "Managing Data Entry and User Preferences" in the Oracle Clinical Administrator's Guide.
Logging In CRF Header InformationThis section contains the following topics:
■ Completing the Initial Log-In on page 1-4
■ If Your Header Information Fails to Validate on page 1-5
■ Completing the RDCM Window on page 1-5
■ Logging In DCMs on page 1-5
■ If You Cannot Complete All DCMs on page 1-5
The first step in entering a CRF into Oracle Clinical is logging in the study or header information. To initiate this action, select Data Entry, then select Initial Log-In.If you have not yet selected a study, you are prompted for one now. If the study has a DCI Book, a new DCI Book window opens. See "Using DCI Books" on page 2-2 for instructions on entering data using a DCI book.
If the study does not have a DCI Book, the log-in window displays.
The actual window you see may be different because the field locations and prompts are customizable. However, the type of information being collected should be similar. The status field at this stage displays "not complete."
Completing the Initial Log-In To complete the Initial Log-In window:
1. Complete the Patient field, using the list of values (LOV) if you want.
When you complete the Patient field first, the system will automatically complete the Investigator and Site fields, if the patient is enrolled.
Depending on the value of the Unrolled Patient Alert setting, the system may present a warning window if the patient is not enrolled.
2. Complete the remaining unfilled fields.
3. Change any populated fields that are incorrect for the situation.
You should be able to change data in any field, unless the field has been protected from updating. If this is the case and you must change the entry, talk to your supervisor.
4. Select Save or Next Block, or tab out of the final field, to initiate the validation process.
The header should successfully validate unless you have failed to complete a mandatory field or if the information you entered duplicates other RDCIs in the
Entering CRF Data in a DCI
Entering Data 1-5
system. For additional information on these situations, read the section "If Your Header Information Fails to Validate" on page 1-5.
After the header information validates successfully, one of the following things happens:
■ A RDCM window appears directly below the header.
■ An associated DCM window displays in the area below the header.
■ The window clears in preparation for a new entry.
Each of these options is described separately. If the third choice occurs, complete all the required header fields, then move to first-pass entry.
If Your Header Information Fails to ValidateIf the header information has failed to validate because of a missing field, Oracle Clinical returns a message describing which field to complete. For example, a missing date results in the message "DCI Date must be entered."
If the validation failure occurred as a result of creating a duplicate record a different message box offers the following options:
■ Update Existing—the Received DCI window displays the existing DCI record in the correct mode to allow you to make changes to the saved data, such as correcting an incorrect planned event or DCI date. You may not be able to operate in this mode, because it requires special permissions.
Because Update Existing changes the keys, the system creates a new record version for audit/snapshot purposes.
■ Cancel—the Received DCI window displays in the state it was in before it was processed. You can change the values on the window to proceed with your work.
Completing the RDCM WindowIn most cases, when the header information validates successfully, Oracle Clinical either clears the window so you can log in another DCI, or proceeds immediately to a required DCM. In some instances, however, the system requires some contextual information to proceed. To obtain this information, Oracle Clinical presents a small window that displays immediately below the header.
The fields at the very left of the window indicate how many panels there are to complete—for example, one of two.
Logging In DCMsThis phase logs in the DCMs associated with the Received DCI. Depending on the study definition, all fields may be defaulted from information on the DCI, in which case this phase does not require any user input.
However, the study definition may require the input of one or more of the following DCM-level fields: Qualifying Value, Clinical Planned Event, Sub-event Number, DCM Date and Time, or Lab Name. If any of these fields requires user input, the DCM Log-In phase is also required.
If You Cannot Complete All DCMsIf you do not complete all the DCMs in a DCI during one session, the status of the DCI is set to pass 1 started. Within the DCI, the status of each completed DCM is set to pass 1 complete, and the status of each incomplete DCM is set to pass 1 started. When you
Entering CRF Data in a DCI
1-6 Oracle Clinical Conducting a Study
query RDCIs for first-pass data entry, the system selects DCIs with a status of pass 1 started by default.
First-Pass Data Entry Select the First-pass menu option to complete the initial entry of the data from a Case Report Form (CRF). Before entering the CRF data into the DCI the header information must be logged in and the status of the DCI marked "Received." DCIs in this state are sometimes referred to as Received DCIs, or RDCIs. If your study is set up to accommodate it (the Allow First Pass from Login flag is checked in the Maintain Study States window. To access it, select Conduct, then Security, then Clinical Study States), you can choose to do the data entry in the same operation as logging in the header or as a separate operation.
To complete first-pass data entry as a separate operation:
1. Select Data Entry then, select First-Pass Entry.
2. Find the RDCI to complete:
a. Complete the fields to locate the appropriate RDCI, such as Patient and Visit.
b. Execute the Query.
c. If the query finds multiple RDCIs, use Next Record to locate the right one.
The system returns only RDCIs with a status of received or pass 1 started.
If a DCI book displays, it completes some fields automatically from the row that is highlighted. If you need a different DCI book, you can place your cursor in the Book field, invoke a list of values, and choose a different one.
3. Select Next Block to invoke the first DCM.
The system displays the RDCM window under the RDCI header window. If there is more than one RDCM for the RDCI (see the indicator 1 of X in the first line of the RDCM window), scroll to the RDCM for which you want to enter data, using Next Record and Previous Record.
4. Select Next Block to move to the data entry window for the given RDCM. Oracle Clinical validates the following criteria:
■ Patient record is not frozen.
■ Received DCI is not locked.
■ Data entry form for the DCM is ready for data entry.
The system also checks that the RDCI and its RDCMs are of the appropriate status for the First-Pass Data Entry task. Standard starting statuses for performing first-pass data entry are received and pass 1 started, and the default behavior of the system is to query only RDCIs having these statuses.
You can explicitly query for a later-than-standard status if the accessible timestamp for the RDCI is more recent than the last time batch validation was executed for the study. This restriction guarantees that data that has become available for outside access (externally accessible data) cannot be modified except in Update mode (see "Updating Accessible Data" on page 1-18).
Entering CRF Data in a DCI
Entering Data 1-7
The cursor is positioned in the first field available for data entry. Default values, if they exist, are displayed in each field.
5. Enter data from the CRF into the appropriate fields.
Respond to any univariate validation failures as described in the section "Validating Data Entry" on page 1-8.
6. To complete first-pass entry, either Save or Exit.
If you have made changes, the Changes Pending dialog box offers the options:
■ Cancel – Places you back in Data Entry and allows you to continue.
■ Discard – Exits the window and discards all pending changes.
■ Save Incomplete – Saves pending changes, and exits the window with the RDCM in an incomplete state with a status of pass 1 started.
Initial Login and Data EntryTo complete first-pass data entry, together with logging in the header:
1. Select Data Entry then, select Initial Log-In and Entry.
2. Follow the steps in the section titled "Logging In CRF Header Information" on page 1-4, then proceed with Step 3 on page 1-6.
When you perform initial log-in and first-pass entry in the same operation, the document number field is filled in following log-in and remains there for your reference. If you do the operations separately you do not know the document number when it is system-generated.
Note: For DCMs that have had PASS 1 completed, you are not allowed to modify a DCM and the data for the DCM unless all of these conditions apply:
■ you are the same person who entered it
■ you are modifying the DCM or its data within the time frame specified by the long value of the JUSTENTERP1TIME row in the reference codelist OCL_DE_CONFIG (Refer to the "OCL_DE_CONFIG" in the Oracle Clinical Administrator's Guide.)
■ either PASS 2 is required or, if PASS 2 is not required, the document has not been batch validated. Note that the system populates the accessible time for documents that do not require PASS 2.
Note: If a field contains the word "ATTACHMENT" in uppercase followed by a version number and text, it represents an Extended Text Question that supports up to 10,000 characters. You cannot view the rest of the text or enter or update the response here. You can enter and update responses to these questions only in Oracle Clinical Remote Data Capture (RDC) Onsite.
If you are unable to enter text in an empty field, it may be because it is an Extended Text Question.
Entering CRF Data in a DCI
1-8 Oracle Clinical Conducting a Study
Validating Data EntryTo initiate form-level validation on the DCM data, select Save.
If the validation succeeds, Oracle Clinical invokes the next RDCI window, or the next Data Entry form—depending on the setting of the autosequence user preference. For more information on the implication of setting autosequence, see "Exit/Autosequence Behavior" on page 2-7.
Oracle Clinical validates data entered to ensure conformance with conditions specified during the data definition phase.
For an overview of how batch validation works across Oracle Clinical, see the "Executing Batch Validation" chapter in the Oracle Clinical Creating a Study manual.
Univariate ValidationAs the cursor is about to leave a response field, Oracle Clinical validates the data entered in the field, checking for each of the following criteria:
■ Value is entered where response has been defined as mandatory.
■ Length of value is less than or equal to the definition.
■ Decimal precision for numeric fields is less than or equal to the definition.
■ Data type (character, number, date) is correct.
■ Dates are at least as complete as the date type requires.
■ Value for a DCM question with a discrete value group (DVG), including an external DVG (thesaurus), is valid.
■ Value falls within the upper and lower bounds, if bounds exist, for numeric, date, or time fields.
System Responses to a Univariate Validation FailureIf the Univariate Validation Failure Alert configuration setting is disabled, and the Univariate Beep user preference is disabled, you are working in "silent" mode. The system creates a discrepancy for the error, but does not notify you.
If the Univariate Validation Failure Alert configuration setting is enabled, the system displays the Univariate Validation Failure window. You must respond to this window before the system allows you to continue to the next field (refer to "User Responses to a Univariate Validation Failure" on page 1-8). The window tells you what kind of univariate validation failed. If the Univariate Beep user preference is enabled, the system also beeps to indicate the error.
User Responses to a Univariate Validation FailureTo respond to the Univariate Validation Failure window, do one of the following:
Save—acknowledges that you know about the error, but you entered it exactly as typed and do not want to change it. A discrepancy is created in the discrepancy database. Enter a comment about the discrepancy in the Comment field, or type ### in this field to populate it with a description from the reference codelist discrepancy type code. This description corresponds to the type of univariate discrepancy.
Cancel—acknowledges that you may have entered the data incorrectly and want to re-enter the value. The data entry window is re-displayed, with your cursor at the beginning of the problem field. No discrepancy is created.
Entering CRF Data in a DCI
Entering Data 1-9
Indicators of an Existing DiscrepancySeveral display characteristics indicate that a discrepancy exists for a field. These indicators display in all entry modes except those where the operator is explicitly blinded to the presence of univariate validation failures.
■ blue—indicates an existing discrepancy
■ red—indicates multiple discrepancies, or a discrepancy plus an Investigator comment
■ (<Univ.>) displayed in the title bar of the data entry window—univariate discrepancy lamp, indicating a discrepancy
You can display a pop-up window with discrepancy information by invoking the Display Univariate Discrepancy function. If the Resolve Discrepancies during Data Entry configuration parameter is enabled, you can also modify the review status, comment, and mark the discrepancy as resolved.
Group and Form ValidationWhen a repeating DCM question group is defined, the Maximum Number Of Repeats Expected configuration parameter is set automatically. In addition, the Enforce Max Repeats flag can also be set to indicate if Oracle Clinical should enforce that specified maximum during data entry. If you try to enter more records than the number specified, Oracle Clinical either prevents entry or warns you, depending on how the Enforce Max Repeats flag is set.
Before you can save the data, Oracle Clinical performs several form-wide checks for the following conditions:
■ All mandatory fields either have values or an associated mandatory discrepancy.
■ In second-pass entry, all fields containing data in first-pass have data entered in second-pass.
You cannot complete second-pass entry until this criterion is met.
Second-Pass Data EntrySecond-pass data entry ensures that the data entered during the first-pass was entered correctly and verifies that it agrees with the CRF. If the study specifies that second-pass data entry is required the data is not accessible until second-pass entry is complete.
You can decide to perform second-pass data entry even if it is not required. For instance, you might do first-pass data entry when you receive faxed CRFs, and second-pass entry when the actual CRFs arrive with Investigator corrections.
If this requirement is toggled on, data becomes internally accessible after both first-pass and second-pass are complete. If this requirement is toggled off, data is "internally accessible" after second-pass is completed. Data that is internally accessible and has been batch validated is considered to be "externally accessible," which means data extract views will display the data.
The study administrator also defines two configuration settings that particularly affect the behavior of the Data Entry form in second-pass: Second-Pass Comparison Failure Alert, and Prevent Second-Pass Entry by First-Pass Operator. A second pass can require a total re-entry of each response, or may be satisfied with sight verification, depending on the DCM question definition.
To complete second-pass data entry:
Entering CRF Data in a DCI
1-10 Oracle Clinical Conducting a Study
1. Select Data Entry then, select Second-Pass Entry from the Oracle Clinical main menu.
If you are going directly from first- to second-pass entry, select Change Tasks and then Second-Pass Entry from the dialog that displays.
2. As in first-pass data entry, you can use either query or DCI book query sequencing to drive the order of the RDCIs for which you enter data.
As in first-pass, Oracle Clinical validates the following criteria:
■ Patient record is not frozen.
■ Received DCI is not locked.
■ Data Entry form for the DCM is ready for data entry.
Standard starting statuses for performing second-pass data entry are pass 1 complete and pass 2 started.
You can only continue entry for a later-than-standard status if the accessible timestamp for the RDCI is more recent than the last time batch validation was executed for the study. This restriction guarantees that accessible data cannot be modified except in Update mode.
The cursor is positioned in the first field available for data entry. If a question has been defined as second-pass sight-verifiable a value is displayed in that field. All other fields lacking default values are blank. Enter data for all fields except those defined as sight-verifiable.
Note: For a PASS 2 COMPLETE DCM, the system does not permit you to modify either the DCM or its data unless both of the following conditions are present:
■ You are modifying the DCM or its data within the time frame specified by the long value of the JUSTENTERP2TIME row in the reference codelist OCL_DE_CONFIG. (Refer to "OCL_DE_CONFIG" in the Oracle Clinical Administrator's Guide.)
■ The document is not externally accessible.
Note: In second-pass data entry, the data entry window initially displays the default value for repeating or nonrepeating questions, even if a different value was entered during first-pass data entry. But for default repeat values the entered value is displayed; these are considered "sight verified" by definition.
Note: If a field contains the word "ATTACHMENT" in uppercase followed by a version number and text, it represents an Extended Text Question that supports up to 10,000 characters. You cannot view the rest of the text or enter or update the response here. You can enter and update responses to these questions only in Oracle Clinical Remote Data Capture (RDC) Onsite.
If you are unable to enter text in an empty field, it may be because it is an Extended Text Question.
Entering CRF Data in a DCI
Entering Data 1-11
3. To complete second-pass entry, either Save or Exit.
If you have made changes, the Changes Pending dialog box offers the options:
Cancel—places you back in Data Entry and allows you to continue data entry.
Discard—exits the window and discards all pending changes.
Save Incomplete—saves pending changes and exits with the status of the RDCM as pass 2 started.
Reconciling Differences Between First- and Second-Pass DataOracle Clinical provides several ways to handle differences that arise between CRF data entered on the first pass and the second pass. These activities are usually performed by different people; also, differing permissions and configuration settings will have an effect, and handwriting is sometimes difficult to read—all of these situations are accounted for.
Resolving First-Pass/Second-Pass Comparison FailuresAs you enter the CRF information during second-pass data entry, the system compares each input value to the response entered during first-pass data entry. If the value does not match exactly, the system responds as follows:
■ If the Second-Pass Comparison Failure Alert configuration setting is disabled, Oracle Clinical records comparison failures without displaying the Comparison Failure window. To have the system notify you of comparison failure with a beep, enable the Univariate Beep user preference.
In this situation you should plan to perform a comparison reconciliation to ensure the validity of the data.
■ If the Second-Pass Comparison Failure Alert configuration setting is enabled, the Comparison Failure window displays the values entered during Pass 1 and Pass 2. Do one of the following:
– To accept or change the Pass 2 value, select Cancel to return to the Data Entry field.
– To select one of the displayed values, either use the mouse to double-click on the value in that field, or use the Next Field and Previous Field keys to highlight the values in turn. When the value you want is highlighted, select Save.
If you accept the Pass 2 value, the system performs univariate validation. If it detects a univariate validation failure in the new value, it displays the Univariate Validation Failure window before allowing you to proceed, just as with first-pass.
Note: In certain cases, the Comparison Failure window may open and display identical values for Pass 1 and Pass 2. You must select one of the values—it does not matter which one—in order for the RDCM's status to change to Pass 2 Complete.
This state occurs when the Pass 2 data entry operator first enters a response that is different from the Pass 1 response and chooses Save As Incomplete, then returns and changes the Pass 2 value to be the same as the Pass 1 value.
Entering CRF Data in a DCI
1-12 Oracle Clinical Conducting a Study
If you accept the Pass 1 value and it has a univariate discrepancy associated with it, Oracle Clinical does not re-display the Univariate Validation Failure window, but sets the field display characteristics to indicate the presence of the discrepancy (it displays with a blue background).
Resolving Duplicate or Missing RecordsWhen entering responses to a repeating question group during second-pass data entry, you may discover that a repeat from the CRF was either omitted or duplicated during first-pass entry.
To insert an omitted line
1. Place the cursor in the first field of the repeating question group preceding the omitted line.
2. Select Insert Record, which inserts a blank line after the existing line.
3. Enter the omitted response row.
To delete a duplicate line
1. Place the cursor in the first field of the response row to delete.
2. Select Delete Record.
You cannot insert or delete repeats into a repeating question group that has protected repeating defaults. Additionally, you cannot exceed the value specified for the Maximum Repeats Expected parameter, if that question group has Enforce Maximum Repeats enabled. To help you detect the presence of extra or omitted repeats, the maximum repeat number entered in first-pass entry is displayed when you enter the repeating group during second-pass entry.
Performing Comparison ReconciliationIf second-pass data is entered with the Second-Pass Comparison Failure Alert parameter disabled, then any first-pass/second-pass comparison failures are saved in the discrepancy database without the opportunity to make changes. These failures must be resolved using Comparison Reconciliation mode.
To perform comparison reconciliation:
1. Select Data Entry then, select Comparison Reconciliation.
2. Access the appropriate RDCI, using either query or DCI book sequencing.
By default, in Comparison Reconciliation mode the system queries only RDCIs having the status pass 2 pending.
However, you can query explicitly for RDCIs with a pass 2 complete status, if the accessible timestamp for the RDCI is more recent than the last time batch validation was executed for the study. Setting this restriction ensures that accessible data can be modified only in Update mode.
3. Move between fields marked as failing first-pass/second-pass comparison using the special navigation function Next Comparison Failure. You can recognize these fields by their blue background field.
4. Display the Comparison Failure window for the Pass 1 and Pass 2 values by invoking the Display Comparison Failure function. As you process each field, it returns to the default field color.
5. When you have resolved all the comparison failures, select Save.
Making Adjustments During Data Entry
Entering Data 1-13
You can close the window before resolving all the comparison failures: select Exit, and choose Save Incomplete or Discard:
Save Incomplete—saves all the changes you have made. When you return, only unresolved fields are highlighted.
Discard—throws away your changes.
You are not required to perform comparison reconciliation. If you visually scan and confirm that the Pass 2 values are correct, you can skip displaying the Comparison Failure window.
Making Adjustments During Data EntryThis section contains the following topics:
■ Enrolling a Patient on page 1-13
■ Transferring Patient Data on page 1-13
■ Handling Unplanned Events on page 1-15
■ Changing Tasks on page 1-15
■ Reviewing the DCI History on page 1-15
The preceding sections have described the most direct path to entering a CRF in Oracle Clinical. Because Oracle Clinical is highly configurable, you may have had questions as you completed the data entry process described. Read the appropriate section to learn how to make these adjustments during data entry.
Enrolling a PatientEnrolling a patient means assigning patient information to an existing patient position. Patient positions are created during the Study Design phase of Oracle Clinical, when specific patients become candidates for enrollment in a study. You may have to dynamically enroll a patient, if you are logging in a DCI before the patient enrollment is complete.
The changes you can make to the Maintain Patient Enrollment window depend upon where you invoke it from and whether the patient record is frozen.
If you invoke the form from a Log-In window, you see the information for only the current patient. If you invoke the form by selecting Data Entry then, selecting Patient Enrollment from the main menu, the window displays the data for all patients enrolled in the study.
Transferring Patient DataYou can transfer all data (RDCIs, RDCMs, responses, and discrepancies) from one patient record number to another. You might need to do this, for example, when a patient begins as a screening patient and becomes a normal patient. You can transfer all the data at once, or continue entering data based on the original patient number.
When you transfer RDCM patient data between patient record numbers, the RDCMs must be unique. This uniqueness is enforced at the DCM level, as the combination of DCM and qualifying value must be unique at a visit—CPE and subevent—for a patient.
To transfer patient data:
Making Adjustments During Data Entry
1-14 Oracle Clinical Conducting a Study
1. Select Conduct then, select Security then, select Patient Transfers. The system displays the Maintain Patient Transfers window.
2. In the Source Patient field, type the ID of the patient whose data is being transferred; you can also use the list of values.
3. In the Target Patient field, type the ID of the patient whose record will receive the data; you can also use the list of values.
4. To continue to enter data under the original patient ID, which will then be transferred to the new record, select the Ongoing Transfer? checkbox. For a one-time transfer, do not select it.
■ A patient may be the target in multiple one-time transfers.
■ An ongoing transfer may have only one source and one target patient.
5. In the Transfer Reason Code field, either type a reason code or use the list of values to select a code from the list. This field is validated against the list of active values in the installation reference codelist RDCI CHANGE REASON TYPE CODE.
6. In the Transfer Reason Comment field, type an explanatory comment, if necessary. This is an optional field.
7. Click the Save button to commit the record.
8. Click the Exit button. The system closes the Maintain Patient Transfers window.
9. From the tree, select Conduct then, select Security then, select Transfer Patients for a Study.
The "Transfer Patients for a Study" PSUB window opens.
10. Set the value of the parameters. Both parameters accept either "Y" or "N" as values.
■ If you choose to freeze the source patient position, the system prevents further data entry to the Source Patient ID, unless the transfer type is ongoing.
■ If you choose to transfer multivariate discrepancies, the system updates the multivariate discrepancies associated with the Source Patient to reflect the Target Patient information. Otherwise, the system makes these multivariate discrepancies obsolete.
11. Click the Submit Job button.
The system transfers all RDCIs, RDCMs, responses, and univariate discrepancies for all source patients to their respective target patients. The choices in Step 10 are then implemented.
After Oracle Clinical successfully transfers patient data, the Transferred? box is checked and the number of RDCIs transferred is recorded in the Transfer Comment field in the Patient Transfers window. Check the PSUB log file for more information.
After completing the patient transfer job, the system automatically runs the incremental expectedness calculation job for all patients whose data changed. See "Planning and Designing a Study" in the Oracle Clinical Creating a Study manual for more information.
Note: The Transfer Reason Code and Transfer Reason Comment fields are required to meet 21 CFR 11 auditing requirements.
Making Adjustments During Data Entry
Entering Data 1-15
Handling Unplanned EventsStudies are usually structured in terms of planned clinical events; usually visits. Oracle Clinical manages unplanned events using the Subevent field. An actual event is documented by a DCI being logged in; the assigned subevent number specifies whether the DCI was a planned or unplanned visit. A planned event has a subevent number equal to zero, and an unplanned visit has a number greater than zero.
To document an unplanned visit:
1. Access the Actual Events window for the patient by selecting the Actual Events function.
2. Enter a comment describing the reason for the unplanned visit.
3. Select Back to return to the calling window.
Changing TasksThere are two methods you can use to change from one data entry task to another:
1. Exit from the current data entry task, and select the other option from the Data Entry menu.
2. While in the Received DCI or Received DCM window, click Change Task and choose the alternative mode from the task-selection pop-up window
This choice preserves some of the key context; for instance, if you switch from Initial Log-In to Browse mode and return to Initial Log-In, the record you were working on when last in that task is re-displayed. Also any query criteria you enter in one mode are preserved in the new mode.
When changing modes using the Change Task function, your access privilege is controlled by the same permissions as for the equivalent main menu activity.
Reviewing the DCI HistoryYou can review audit trail information for Received DCIs, Received DCMs, and Responses, since Oracle Clinical captures all changes to patient data and their associated CRF header records. The Audit Trail function can be useful for reviewing the history of changes to data in a study, as well as for documenting the correct behavior of the Oracle Clinical software during a user-acceptance validation. The Audit Trail window is query-only; you cannot make changes to data here.
To review audit trail information for Received DCIs, Received DCMs, or Responses:
1. Invoke the Received DCI or the Received DCM from any data entry task.
2. Select the Show Audit function while in the RDCI or the RDCM window.
If the cursor is in the RDCI window when the function is invoked, the Audit Trail window shows all Received DCMs and all changed response data for the currently displayed Received DCI. If the cursor is in the Received DCM window, the Audit Trail window shows just that Received DCM, along with all changed response data and its parent Received DCI. (The Audit Trail window is not currently available from within the data entry window.)
Note: The audit trail only contains changes to study data, so the addition of new records to a study is not auditable.
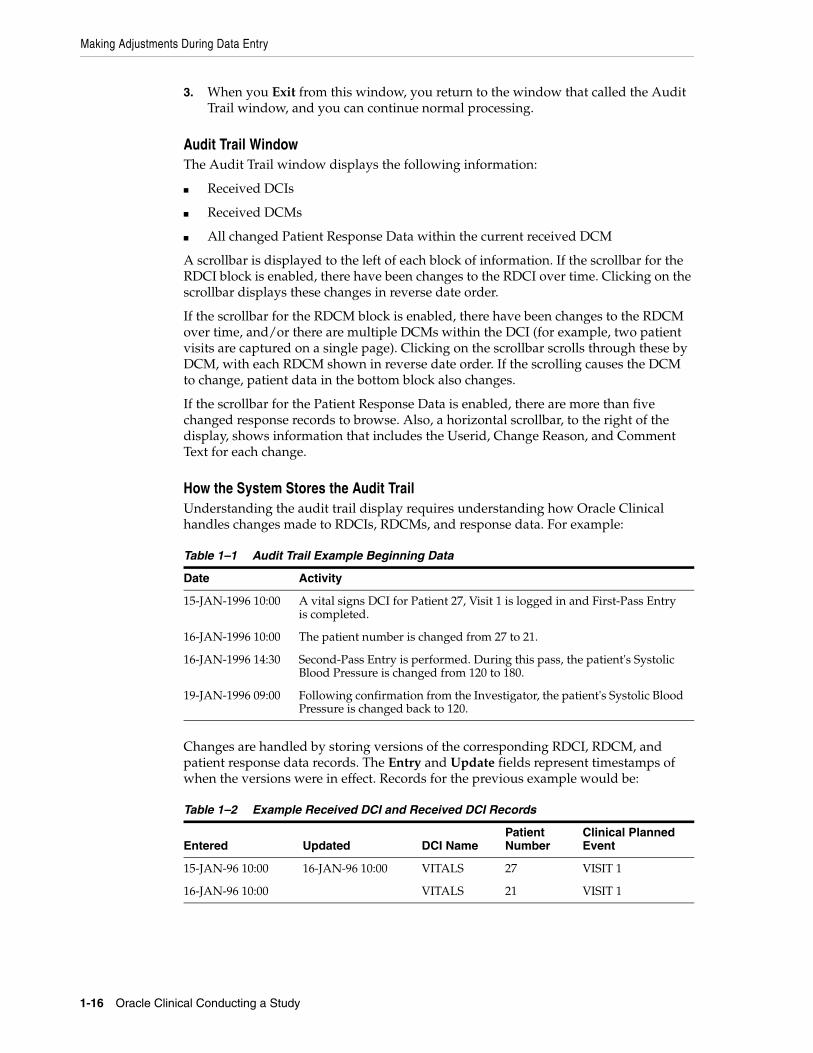
Making Adjustments During Data Entry
1-16 Oracle Clinical Conducting a Study
3. When you Exit from this window, you return to the window that called the Audit Trail window, and you can continue normal processing.
Audit Trail WindowThe Audit Trail window displays the following information:
■ Received DCIs
■ Received DCMs
■ All changed Patient Response Data within the current received DCM
A scrollbar is displayed to the left of each block of information. If the scrollbar for the RDCI block is enabled, there have been changes to the RDCI over time. Clicking on the scrollbar displays these changes in reverse date order.
If the scrollbar for the RDCM block is enabled, there have been changes to the RDCM over time, and/or there are multiple DCMs within the DCI (for example, two patient visits are captured on a single page). Clicking on the scrollbar scrolls through these by DCM, with each RDCM shown in reverse date order. If the scrolling causes the DCM to change, patient data in the bottom block also changes.
If the scrollbar for the Patient Response Data is enabled, there are more than five changed response records to browse. Also, a horizontal scrollbar, to the right of the display, shows information that includes the Userid, Change Reason, and Comment Text for each change.
How the System Stores the Audit Trail Understanding the audit trail display requires understanding how Oracle Clinical handles changes made to RDCIs, RDCMs, and response data. For example:
Changes are handled by storing versions of the corresponding RDCI, RDCM, and patient response data records. The Entry and Update fields represent timestamps of when the versions were in effect. Records for the previous example would be:
Table 1–1 Audit Trail Example Beginning Data
Date Activity
15-JAN-1996 10:00 A vital signs DCI for Patient 27, Visit 1 is logged in and First-Pass Entry is completed.
16-JAN-1996 10:00 The patient number is changed from 27 to 21.
16-JAN-1996 14:30 Second-Pass Entry is performed. During this pass, the patient's Systolic Blood Pressure is changed from 120 to 180.
19-JAN-1996 09:00 Following confirmation from the Investigator, the patient's Systolic Blood Pressure is changed back to 120.
Table 1–2 Example Received DCI and Received DCI Records
Entered Updated DCI NamePatient Number
Clinical Planned Event
15-JAN-96 10:00 16-JAN-96 10:00 VITALS 27 VISIT 1
16-JAN-96 10:00 VITALS 21 VISIT 1
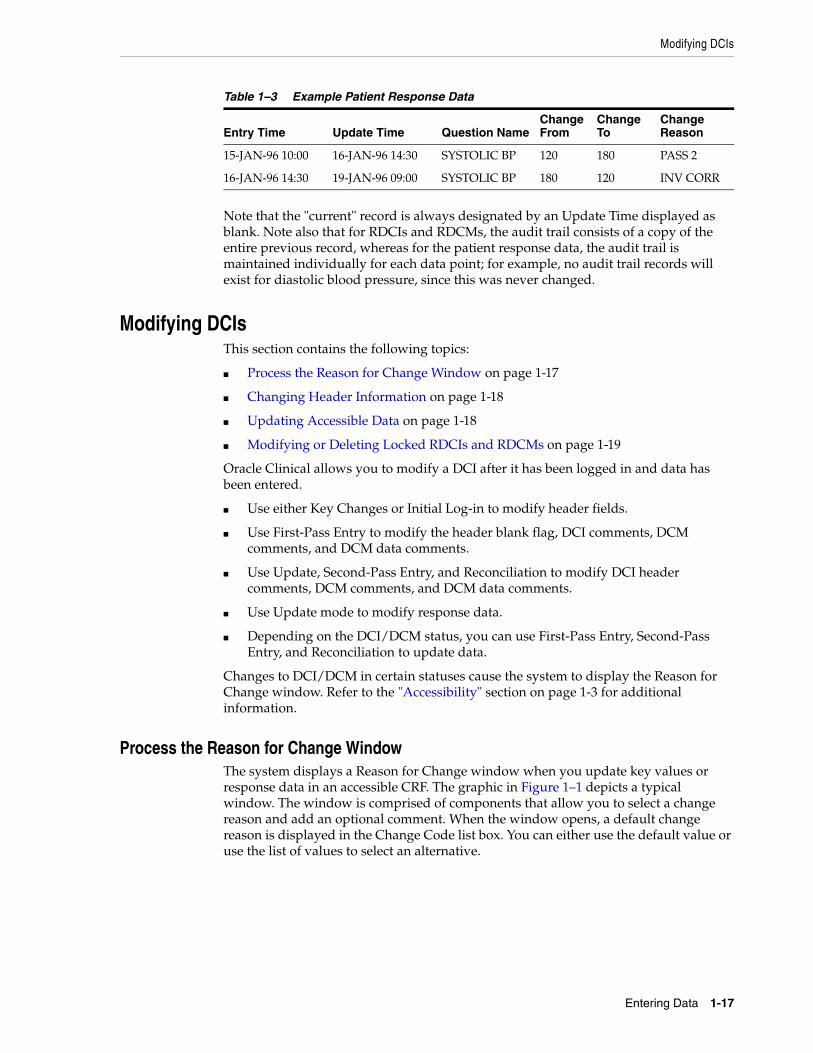
Modifying DCIs
Entering Data 1-17
Note that the "current" record is always designated by an Update Time displayed as blank. Note also that for RDCIs and RDCMs, the audit trail consists of a copy of the entire previous record, whereas for the patient response data, the audit trail is maintained individually for each data point; for example, no audit trail records will exist for diastolic blood pressure, since this was never changed.
Modifying DCIsThis section contains the following topics:
■ Process the Reason for Change Window on page 1-17
■ Changing Header Information on page 1-18
■ Updating Accessible Data on page 1-18
■ Modifying or Deleting Locked RDCIs and RDCMs on page 1-19
Oracle Clinical allows you to modify a DCI after it has been logged in and data has been entered.
■ Use either Key Changes or Initial Log-in to modify header fields.
■ Use First-Pass Entry to modify the header blank flag, DCI comments, DCM comments, and DCM data comments.
■ Use Update, Second-Pass Entry, and Reconciliation to modify DCI header comments, DCM comments, and DCM data comments.
■ Use Update mode to modify response data.
■ Depending on the DCI/DCM status, you can use First-Pass Entry, Second-Pass Entry, and Reconciliation to update data.
Changes to DCI/DCM in certain statuses cause the system to display the Reason for Change window. Refer to the "Accessibility" section on page 1-3 for additional information.
Process the Reason for Change WindowThe system displays a Reason for Change window when you update key values or response data in an accessible CRF. The graphic in Figure 1–1 depicts a typical window. The window is comprised of components that allow you to select a change reason and add an optional comment. When the window opens, a default change reason is displayed in the Change Code list box. You can either use the default value or use the list of values to select an alternative.
Table 1–3 Example Patient Response Data
Entry Time Update Time Question NameChange From
Change To
Change Reason
15-JAN-96 10:00 16-JAN-96 14:30 SYSTOLIC BP 120 180 PASS 2
16-JAN-96 14:30 19-JAN-96 09:00 SYSTOLIC BP 180 120 INV CORR
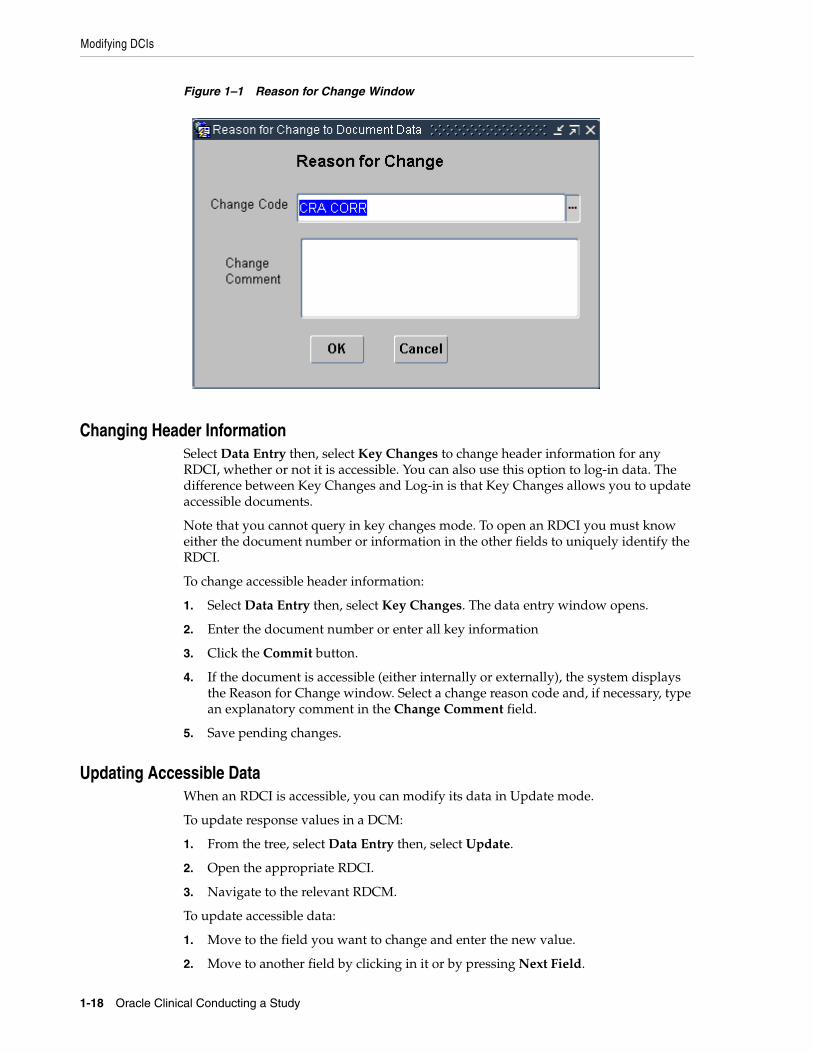
Modifying DCIs
1-18 Oracle Clinical Conducting a Study
Figure 1–1 Reason for Change Window
Changing Header InformationSelect Data Entry then, select Key Changes to change header information for any RDCI, whether or not it is accessible. You can also use this option to log-in data. The difference between Key Changes and Log-in is that Key Changes allows you to update accessible documents.
Note that you cannot query in key changes mode. To open an RDCI you must know either the document number or information in the other fields to uniquely identify the RDCI.
To change accessible header information:
1. Select Data Entry then, select Key Changes. The data entry window opens.
2. Enter the document number or enter all key information
3. Click the Commit button.
4. If the document is accessible (either internally or externally), the system displays the Reason for Change window. Select a change reason code and, if necessary, type an explanatory comment in the Change Comment field.
5. Save pending changes.
Updating Accessible DataWhen an RDCI is accessible, you can modify its data in Update mode.
To update response values in a DCM:
1. From the tree, select Data Entry then, select Update.
2. Open the appropriate RDCI.
3. Navigate to the relevant RDCM.
To update accessible data:
1. Move to the field you want to change and enter the new value.
2. Move to another field by clicking in it or by pressing Next Field.
Modifying DCIs
Entering Data 1-19
If the system detects a univariate error, it displays the Univariate Validation Failure window before allowing you to move to the next field.
3. If the new value passes univariate validation, select a reason for the change from the list of values in the Audit Change Reason Type window.
The system displays the Reason for Change window.
4. Optionally, enter a freeform comment describing the reason for the change.
5. Select Save to save it and return to the Data Entry window.
6. If necessary, resolve any duplicate or missing records.
7. Select Save to save all changes and return to the RDCI window.
System Validations Performed During Update ModeWhen you open an RDCI, the system verifies the following conditions:
■ the patient record is not frozen
■ the RDCI is not locked
■ the Data Entry form for the DCM is ready for data entry
■ the data is accessible, defined as:
– If second-pass is required for the study, status must be pass 2 complete.
– If second-pass is not required for the study, status may be pass 1 complete or higher.
Unsuccessful validations produce an error message which instructs you how to proceed.
Successful validation results in the appropriate Data Entry window appearing under the RDCI and RDCM windows. The window is populated with all the saved responses from the Data Entry process. Fields are color-coded to indicate the presence of univariate discrepancies, Investigator comments, and operator comments (manual discrepancies). For more explicit description of the color codes, read "Indicators of an Existing Discrepancy" on page 1-9.
As you update a value in a response field, the system performs a univariate validation check. If it validates, the system requires a reason for the change.
Performing a Privileged UpdateThe update tasks and processes are exactly the same in this mode. However, if the configuration setting Privileged Update is enabled, you can make changes to locked RDCIs and RDCMs, and you can add more than the maximum number of repeats in a repeating question group, even if Enforce Max Repeats is turned on.
Modifying or Deleting Locked RDCIs and RDCMsYou can make changes to an RDCI in any log-in mode. However, if the data is locked or already access by another user, you must have access to Key Changes mode to make changes. Changes made to a Received DCI affect its associated Received DCMs.
When you are delete an RDCI, the system "soft-deletes" it, which means that its status changes to REMOVED, but the record stays in the system. Oracle Clinical requires that
Note: You cannot change the document status in Update mode.
Viewing Data
1-20 Oracle Clinical Conducting a Study
records remain available to the system. The system considers records with the status REMOVED to be inactive.
To Modify Accessible RDCIs1. From the tree, select the Data Entry then, select Key Changes.
2. Enter the Document Number and press the Enter key. The system displays a Forms message window with a message that the document with that number already exists.
3. In the Forms window, click the Update Existing button.
4. Update the necessary fields. Use Next Block to navigate to the associated RDCMs, where you can also make changes.
5. Save to re-validate the Received DCI and Received DCMs.
6. Exit.
To Delete Logged-in RDCIs1. Select Data Entry then, select Key Changes.
2. Enter the Document Number and press Return.
3. From the Forms message box that displays, select Update Existing.
The RDCI displays.
4. Select Delete Record.
The system sets the Status field to REMOVED in the RDCI and all its associated RDCMs. This makes these records inactive, but leaves them in the database.
Select Exit from the Action menu when your changes are complete.
Viewing DataTwo menu items serve this function. One, Browse, allows you to view a specific RDCI and RDCM data record without making changes to the data. The other possibility is an option accessible from the Special menu.
This section contains the following topics:
■ Scanned Image on page 1-20
■ Browse on page 1-21
■ Browse the Audit Trail on page 1-21
Scanned ImageYou can invoke a scanned image of the CRF you are working with, if your site has set it up. For this task the Special menu provides various functions, such as Invoke Image; you may also be able to select a button on the toolbar. A request to your imaging system results in the scanned image displaying in another window. You can make this happen from the Log-In, Data Entry, or Discrepancy Database Management windows, provided that your site has been set up for this option. See "Interface Configuration" in the Oracle Clinical Application Programming Interface Guide manual that describes enabling and customizing this feature, where instructions are intended for API programmers. Because what you display and how you arrive at the display depends
Viewing Data
Entering Data 1-21
on the particular implementation for your site, Oracle does not provide details on how you interact with the system.
BrowseIf the configuration setting Manual Discrepancy in Browse is enabled, you can modify an existing operator comment or add a new one.
If the Browse Accessible Data configuration parameter is enabled, you can only browse accessible data. If this parameter is disabled, you can browse all data.
To browse data:
1. Select Data Entry then, select Browse.
You will be prompted to select a study, if you have not already selected one.
2. Select RDCIs.
Using query sequencing—RDCIs display in browse mode.
Using DCI book sequencing—use the fields in the DCI book to invoke the appropriate RDCIs.
By default, the system search includes records that are frozen, locked, and from other locations (all of which are unavailable in other tasks).
3. From the group of RDCIs presented, select Next Block to display the Data Entry window.
All the saved responses from the Data Entry process are displayed. Fields are color-coded to indicate the presence of unresolved univariate discrepancies, Investigator comments, and operator comments (manual discrepancies).
4. To view an operator comment, move to a color-coded field that indicates an <Oper.> lamp in the title, and select the Operator Comment function. If an operator comment already exists, it is displayed. If you have the appropriate privileges, you can create new operator comments, in addition to viewing existing ones.
5. Select Save, if you made changes.
6. Select Exit to leave the block.
Depending on your sequencing options and preferences, and your current entry mode, either your cursor returns to the RDCI Header window, or your cursor proceeds to the first enterable field of the next form in sequence.
Browsing data does not change the Received DCI or Received DCM status.
Browse the Audit Trail The Browse Audit Trail window displays the history of changes to RDCIs, RDCMs and Questions. All fields are display-only, but you may want to invoke the Editor window to browse responses that are too long to display completely in the Browse Audit Trail window. Click in the response field that you want to browse, then invoke the Editor window by selecting Data, then select Edit Field. Alternatively, press Ctrl + E.
AccessAccess the Browse Audit Trail window in either of the following ways:
Viewing Data
1-22 Oracle Clinical Conducting a Study
1. From the tree, select Conduct then, select Data Validation then, select Discrepancy Database menu path. The system opens the Profiles for Discrepancy Management window. Select Special then, select Audit RDCIs menu command.
2. In the Browse window, with a document open, select Action then, select Audit menu command.
2
Customizing Data Entry Windows 2-1
2 Customizing Data Entry Windows
This chapter contains the following topics:
■ Sequencing Data Entry on page 2-1
■ Navigation on page 2-5
■ Value-Setting Features on page 2-12
This chapter describes the Oracle Clinical features that affect how the data entry windows appear to you and how you can work most effectively in them:
Sequencing Data EntryThis section contains the following topics:
■ Query Sequencing on page 2-1
■ DCI Book Sequencing on page 2-1
■ Using DCI Books on page 2-2
■ Tracking Page-Level Information on page 2-3
You can determine the DCI sequence for entering data in two ways: by query, or by DCI book.
Query SequencingQuery sequencing lets you retrieve RDCIs by specifying field values that Oracle Clinical uses as selection criteria. The retrieved RDCIs are sorted in the order specified with the preference, RDCI Sort Order. The value choices are:
■ Document Number
■ Patient - Visit - DCI Name - DCI Date
■ Entry Order
You cannot use query sequencing when you are working in the Initial Log-In or Initial Log-In and First-Pass Entry tasks, since query sequencing works only in purely data entry modes.
DCI Book SequencingWhen DCI book sequencing is enabled, you can automate and enforce the order in which DCIs are processed, stepping through the specified range of pages in the DCI book in ascending page order.
Sequencing Data Entry
2-2 Oracle Clinical Conducting a Study
Using DCI BooksIf your site enforces the use of DCI books by enabling the study configuration parameter Initiate DE Session Using DCI Book, then the study default DCI book displays automatically when you select an option from the Data Entry menu. DCI books help you organize the DCIs required for a study. You can put all required DCIs in one book or use several.
If your site has enabled CRF page tracking, then the use of DCI books is required. Page tracking is defined through DCI books. Even if CRF page tracking is enabled for a study, you can turn it off for individual DCIs.
Completing DCIs from the DCI BookIn Initial Log-In and Entry, the DCI and visit values default from the DCI book, clearing the DCI date whenever the visit changes, and clearing the patient whenever the DCI book reaches the end of its sequence.
In modes that query existing RDCIs, such as first- or second-pass entry, Browse, or Update, you must query against an existing patient position to exercise DCI book sequencing.
Autosequencing Through DCI Books When autosequencing in modes that query existing RDCIs, the auto-stepping continues automatically to the next Received DCI that meets the task criteria, or until the end of the DCI book sequence is reached. For example, in first-pass entry, a query against Patient 1 brings back all DCI book pages for Patient 1 with a status of Received or Pass 1 Started, and skips pages not matching these statuses. The book is stepped through sequentially, but only returns pages whose status is appropriate to the current task.
Autosequence is turned on by default in first-pass and second-pass data entry; in other modes it is turned on, so that manually selecting RDCIs is the default. You can turn autosequencing on and off by selecting Autosequence from the Special menu. It is a toggle-type control; if you are in a mode where Autosequence is on by default, select Autosequence to turn it off, and select it again to turn it back on.
Manually Stepping Through DCI Books When manually stepping through a DCI book, you can select any DCI book page or indicate that you want to step to the next page.
To enter all the DCIs in order, click the RDCI window to enter the data from the first DCI in the book. Oracle Clinical will process each DCI in order.
To enter a subset of DCI book pages, enter the number of the first page in the Start Page field of the DCI Book window, and the number of the last page in the End Page field. Then click the RDCI window.
To enter a single DCI from the DCI book, click the DCI Book Page field that you want to enter, and then click the RDCI window.
Note: In a flexible study, where not all CRFs or visits are required for every patient, there is no indication in Oracle Clinical data entry of whether or not a visit or DCI is expected for a particular patient--unlike Oracle Clinical's Remote Data Capture (RDC) Release 4.6+, where visits and CRFs are displayed and CRFs are enterable only if they are expected.
Sequencing Data Entry
Customizing Data Entry Windows 2-3
Patient EnrollmentDCI book sequencing is based on patient associations. When you are working in Data Entry modes that query existing received DCIs, such as first- or second-pass entry, Browse, or Update, you must query against an existing patient position to utilize DCI book sequencing. If you perform a query and do not fill in the Patient field, DCI book sequencing does not occur, even if DCI book sequencing is enabled.
If you have the proper privileges, you can associate patients to a DCI book in the Design subsystem's Maintain Patient Positions window or the Data Entry subsystem's Maintain Patient Enrollment window.
In each of these windows, the field DCI Book Name establishes the name of the DCI book to associate with this patient position. A List of Values is available. If no DCI Book name is associated with a particular patient position, then Oracle Clinical uses either the DCI book currently used in data entry or the default DCI book assigned to the study when no DCI book is used.
The field is protected if production data has been entered for that patient.
Tracking Page-Level InformationPage tracking actually happens at the DCI level, since the DCI is the online version of the CRF. As you enter data into an RDCI, Oracle Clinical automatically translates that activity into page-level information, if CRF page tracking is enabled.
When you log in a DCI and it is validated, Oracle Clinical creates its pages based on your specifications. It stores a page number and a page-level status. The page numbering scheme is derived from your definition for planned pages. DCIs that do not appear in the DCI book, or DCIs that appear in the DCI book but for another event, use the unplanned numbering scheme. You can edit both the page numbering scheme and the page status. Oracle Clinical maintains a history of these changes, which you can display for that DCI.
Oracle Clinical Management of Unplanned DCIsWhen CRF page tracking is enabled for the study, the DCI definition includes information to specify the expected number of pages, as well as a numbering scheme to use for both planned and unplanned DCIs in the book. A DCI is regarded as planned or expected if it is in a DCI book, has a clinical planned event assigned, and an actual event number of zero. Anything else is regarded by the system as unexpected.
Unplanned Scenarios: Oracle Clinical tries to find the last page of the relevant DCI book for the specified visit. Oracle Clinical adds one unit to that page number, using the unplanned numbering scheme for the specified DCI. If that page number already exists in the book, Oracle Clinical assigns a temporary page number that consists of an "x" concatenated with a sequence number.
If there is no entry in the DCI book for that visit, Oracle Clinical finds the last page of the book and adds one unit, using the unplanned numbering scheme for that DCI.
A relevant DCI book is defined as follows:
■ a book assigned to a patient
■ if no book has been assigned to a patient, the book used to sequence the log-in function
■ if no book is used to sequence the log-in function, the default book defined at the study level
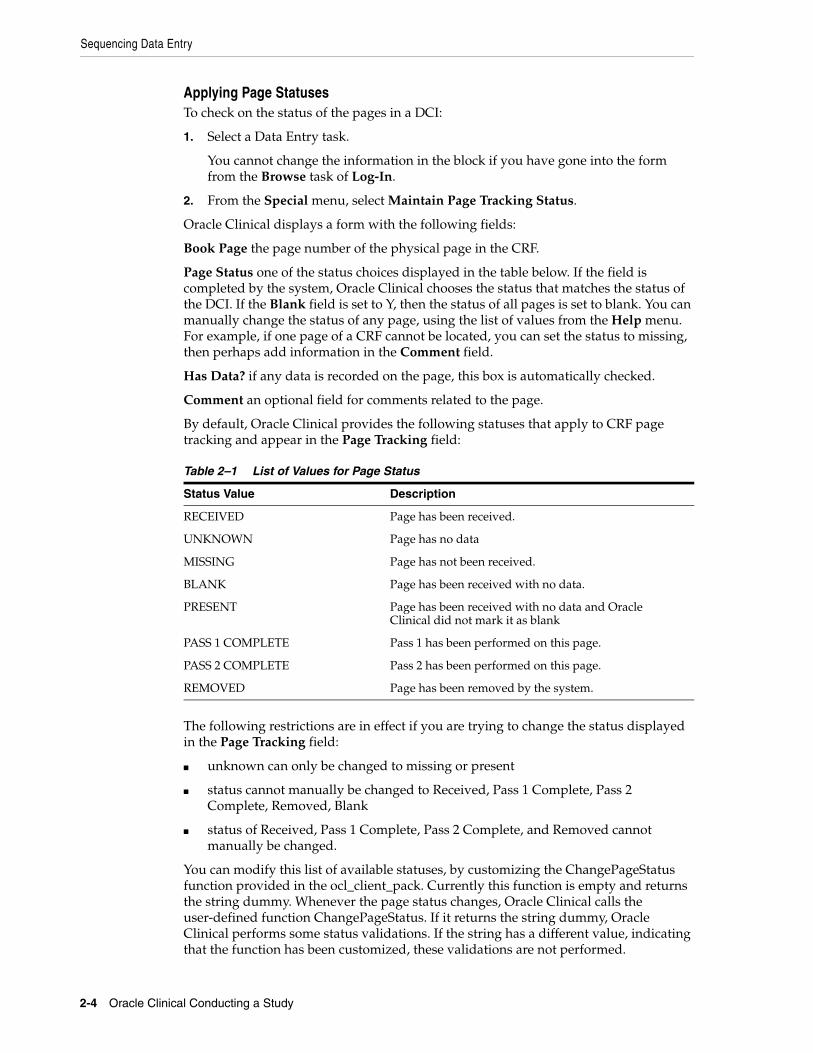
Sequencing Data Entry
2-4 Oracle Clinical Conducting a Study
Applying Page StatusesTo check on the status of the pages in a DCI:
1. Select a Data Entry task.
You cannot change the information in the block if you have gone into the form from the Browse task of Log-In.
2. From the Special menu, select Maintain Page Tracking Status.
Oracle Clinical displays a form with the following fields:
Book Page the page number of the physical page in the CRF.
Page Status one of the status choices displayed in the table below. If the field is completed by the system, Oracle Clinical chooses the status that matches the status of the DCI. If the Blank field is set to Y, then the status of all pages is set to blank. You can manually change the status of any page, using the list of values from the Help menu. For example, if one page of a CRF cannot be located, you can set the status to missing, then perhaps add information in the Comment field.
Has Data? if any data is recorded on the page, this box is automatically checked.
Comment an optional field for comments related to the page.
By default, Oracle Clinical provides the following statuses that apply to CRF page tracking and appear in the Page Tracking field:
The following restrictions are in effect if you are trying to change the status displayed in the Page Tracking field:
■ unknown can only be changed to missing or present
■ status cannot manually be changed to Received, Pass 1 Complete, Pass 2 Complete, Removed, Blank
■ status of Received, Pass 1 Complete, Pass 2 Complete, and Removed cannot manually be changed.
You can modify this list of available statuses, by customizing the ChangePageStatus function provided in the ocl_client_pack. Currently this function is empty and returns the string dummy. Whenever the page status changes, Oracle Clinical calls the user-defined function ChangePageStatus. If it returns the string dummy, Oracle Clinical performs some status validations. If the string has a different value, indicating that the function has been customized, these validations are not performed.
Table 2–1 List of Values for Page Status
Status Value Description
RECEIVED Page has been received.
UNKNOWN Page has no data
MISSING Page has not been received.
BLANK Page has been received with no data.
PRESENT Page has been received with no data and Oracle Clinical did not mark it as blank
PASS 1 COMPLETE Pass 1 has been performed on this page.
PASS 2 COMPLETE Pass 2 has been performed on this page.
REMOVED Page has been removed by the system.

Navigation
Customizing Data Entry Windows 2-5
Tracking Changes to a PageIn tracking the status of a page, you can go a step further and actually look at the history of changes to that page.
To check the history of a page:
1. From the Page Tracking Status block, click the History button. Oracle Clinical displays a form with the following fields:
Book Page (display only) the page number of the physical page in the CRF.
Page Status (display only) one of the status choices displayed in the table above. If the field is completed by the system, Oracle Clinical chooses the status that matches the status of the DCI.
Has Data? if any data is recorded on the page, this box is checked.
Comment an optional field for comments related to the page.
Created By a status field maintained by Oracle Clinical to track each individual making a change. It is display-only and tracks based on user IDs.
Created Date displays the date and time when the change was made.
2. Click Back to return to the previous block.
NavigationThis section contains the following topics:
■ Field Navigation on page 2-5
■ Other Navigation Features on page 2-7
■ Comments Permitted in DCIs on page 2-8
■ Physical Field Attributes on page 2-8
The section explains the unique navigation techniques available during data entry. Navigation in Data Entry is different from navigation in the rest of Oracle Clinical, since the underlying structure of the Data Entry windows is different from the rest of the system.
Most of the special functions described in this section can be accessed through the menus, but many functions also have icons on the toolbar or function key equivalents. To see a function key mapping for your keyboard, select Help Key Definitions from the Special menu. In this manual, all special functions are denoted in square brackets, for example, [Next Field].
The behavior of some navigational features can be controlled by configuration settings and user preferences.
Field NavigationWhen operating in data entry blocks, you can navigate between fields as described in the following sections.
Normal Field NavigationIn addition to navigating by mouse, you can navigate between fields by using the [Next Field] and [Previous Field] key sequences. At the last enterable field of a non-repeating block of questions, [Next Field] moves the cursor to the first enterable field of the next group of questions. Within a repeating question group at the last
Navigation
2-6 Oracle Clinical Conducting a Study
enterable field of a repeat, [Next Field] moves the cursor to the first enterable field of the next repeat, or, if that repeat is not enterable, to the next question group.
In repeating groups, [Down] and [Up] move your cursor to the same field on the next or previous record. If you are on the first repeat, [Up] moves the cursor out of the group into the first field on a line above the current field. When you are on the last repeat, if you cannot create new repeats, [Down] moves the cursor out of the group to the first field on a line below the current field. If you can create new repeats and are on the last repeat, [Down] creates a new repeat.
In non-repeating groups, [Down] moves your cursor to the first field on a line below the current field. Similarly, in non-repeating groups, [Up] moves your cursor to the first field on a line above the current field.
In repeating groups, [Previous Record] and [Next Record] move the cursor to the first enterable field in the previous or next record, respectively.
When navigating into a repeating group, [Up] and [Down] skip blank repeats.
Auto Skip NavigationWhen a DCM question is defined with the auto skip property enabled, the cursor automatically moves to the next field as soon as the field is filled to its maximum defined length.
By design then, a field with auto skip enabled will not accept data greater than the defined length. You can toggle this behavior on or off with a user preference. When disabled, an auto skip field behaves like a normal field and accepts the entry of data of any length, creating a discrepancy for lengths exceeding the maximum length. Auto skip is available only on fields with a length of 20 or fewer characters.
Conditional NavigationOne of the behaviors that can be specified when a question is defined allows for certain responses to trigger the cursor to jump to a target when [Next Field] or [Previous Field] is selected. Within a repeating question group, a target question within the same group but on or before the current question, triggers navigation to the target question on the next repeat.
Conditional branching covers the case where a response to a particular question eliminates the need to answer a number of subsequent questions. During data entry, when you enter the predefined response value to the question with conditional branching defined for it, the cursor automatically moves to the specified target field. You can override the default navigation and enter values in the skipped fields by repositioning your cursor using the mouse or the [Previous Field] keys.
As an example of conditional navigation, consider the question, "Have you ever been pregnant?" If this is defined to have conditional branching, when you enter "NO", the cursor passes over a group of pregnancy-specific questions to the first question and question group not pregnancy-related.
Note: If a field has been defined as nonenterable, the cursor skips over that field when you use [Next Field] and [Previous Field]. However, you can use the mouse to move to the field—for instance, to get field help information; but even in this case, the field is not updateable.
Navigation
Customizing Data Entry Windows 2-7
Conditional branching functionality also extends to numeric, time, and date fields. Oracle Clinical supports three methods of conditional navigation, based on the value entered: greater than, less than, or equal to the provided branch value.
Indicator questions automatically have the conditional navigation feature enabled. The target question default is either to the first enterable question following the question group associated with the indicator question, or the last enterable field of a question group if that is the last question group on the form. Standard navigation into the question group occurs when the response value entered equals the indicator value for the indicator question.
As an example of an indicator question, consider the question, "Do you have a history of allergies?". If this indicator question has a defined indicator value of "YES", and you enter "NO", the cursor jumps to the first field following the group of allergy history questions.
Other Navigation Features This section describes the following navigation features in Oracle Clinical.
Group Navigation[Next Block] and [Previous Block] move your cursor to the first enterable field of the next or previous question group. You can also navigate to any field, at random, by mouse click.
Display Received DCM WindowTo see the detailed Received DCM window, select the special function [RDCM].
Exit/Autosequence BehaviorOracle Clinical behaves in different ways when you have finished data entry on a particular form and selected Save. First, it preserves your changes and returns you to the header. If entry on the RDCM is complete, your changes are saved, and you exit the form. However, if the system determines that the form is not complete—for instance, if mandatory fields have not been filled out, or if fields entered in first pass were not entered in second pass, a message specifies what must be completed, and the cursor is placed in the first incomplete field.
To exit without saving changes, select Exit. If you have pending changes, the Changes Pending dialog box gives you the following choices. If you have made changes, the Changes Pending dialog box offers the options:
Cancel—Places you back in Data Entry and allows you to continue data entry.
Discard—Exits the form and discards all pending changes.
Save Incomplete—Saves pending changes, and exits the form with the RDCM in an incomplete state with a status of pass 2 started.
If you are not in First-Pass Data Entry and have not made any changes, clicking Exit exits the form without confirmation. If you are in First-Pass Data Entry and the RDCM has a status of Received, you can choose Discard or Save as Blank. The Save as Blank option sets the Blank flag to Y.
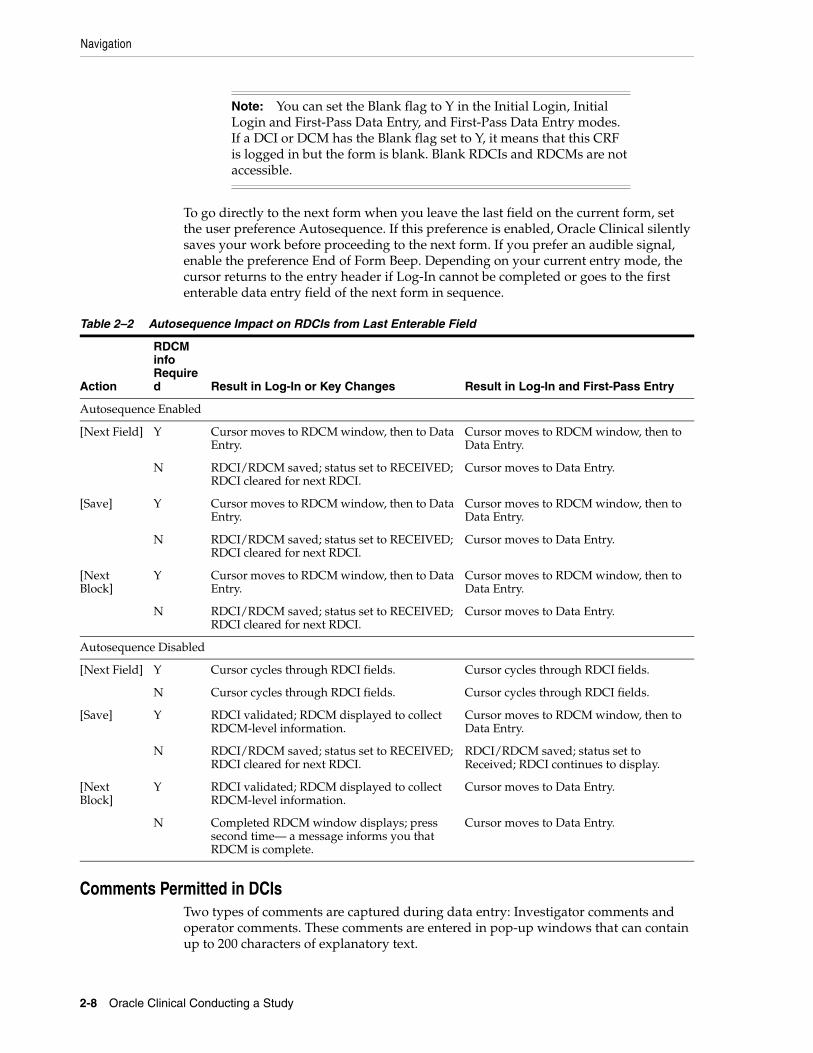
Navigation
2-8 Oracle Clinical Conducting a Study
To go directly to the next form when you leave the last field on the current form, set the user preference Autosequence. If this preference is enabled, Oracle Clinical silently saves your work before proceeding to the next form. If you prefer an audible signal, enable the preference End of Form Beep. Depending on your current entry mode, the cursor returns to the entry header if Log-In cannot be completed or goes to the first enterable data entry field of the next form in sequence.
Comments Permitted in DCIsTwo types of comments are captured during data entry: Investigator comments and operator comments. These comments are entered in pop-up windows that can contain up to 200 characters of explanatory text.
Note: You can set the Blank flag to Y in the Initial Login, Initial Login and First-Pass Data Entry, and First-Pass Data Entry modes. If a DCI or DCM has the Blank flag set to Y, it means that this CRF is logged in but the form is blank. Blank RDCIs and RDCMs are not accessible.
Table 2–2 Autosequence Impact on RDCIs from Last Enterable Field
Action
RDCM info Required Result in Log-In or Key Changes Result in Log-In and First-Pass Entry
Autosequence Enabled
[Next Field] Y Cursor moves to RDCM window, then to Data Entry.
Cursor moves to RDCM window, then to Data Entry.
N RDCI/RDCM saved; status set to RECEIVED; RDCI cleared for next RDCI.
Cursor moves to Data Entry.
[Save] Y Cursor moves to RDCM window, then to Data Entry.
Cursor moves to RDCM window, then to Data Entry.
N RDCI/RDCM saved; status set to RECEIVED; RDCI cleared for next RDCI.
Cursor moves to Data Entry.
[Next Block]
Y Cursor moves to RDCM window, then to Data Entry.
Cursor moves to RDCM window, then to Data Entry.
N RDCI/RDCM saved; status set to RECEIVED; RDCI cleared for next RDCI.
Cursor moves to Data Entry.
Autosequence Disabled
[Next Field] Y Cursor cycles through RDCI fields. Cursor cycles through RDCI fields.
N Cursor cycles through RDCI fields. Cursor cycles through RDCI fields.
[Save] Y RDCI validated; RDCM displayed to collect RDCM-level information.
Cursor moves to RDCM window, then to Data Entry.
N RDCI/RDCM saved; status set to RECEIVED; RDCI cleared for next RDCI.
RDCI/RDCM saved; status set to Received; RDCI continues to display.
[Next Block]
Y RDCI validated; RDCM displayed to collect RDCM-level information.
Cursor moves to Data Entry.
N Completed RDCM window displays; press second time— a message informs you that RDCM is complete.
Cursor moves to Data Entry.
Navigation
Customizing Data Entry Windows 2-9
Investigator CommentsThe Investigator may write an explanatory comment next to the actual question response. Use [Investigator Comment] to enter these comments and associate them with the CRF.
To enter Investigator comments:
1. Position the cursor in the field for which you want to add the comment.
2. Select the [Investigator Comment] function.
The Investigator Comment window appears.
3. Enter the Investigator's comment, exactly as it appears on the CRF.
4. Select Save to save the new comment and return to the original Data Entry window, or Cancel to discard the comment.
The Investigator comment is saved as part of the response, not in the discrepancy database.
A value with an Investigator comment displays in green, and an Investigator comment lamp (<Inv.>) displays in the Data Entry window title. If there is also a univariate discrepancy or operator comment for the field, the response value displays in red to indicate multiple comments or discrepancies, and the appropriate lamps are displayed in the window title.
Operator CommentsAs you enter responses from the CRF into the RDCI, you may find errors the Investigator made. However, your company's procedures may require you to enter the response exactly as it appears on the form.
You can use the Operator Comment window to record a comment about how the response appeared on the CRF. Your comment creates a manual discrepancy, which is recorded in the discrepancy database.
To record a manual discrepancy:
1. Position the cursor in the response field for which you want to enter the operator comment.
2. Select the [Operator Comment] function. The Operator Comment window appears. Enter information in the following fields:
Operator Comment Reason—A default reason is automatically filled in. If this is not correct, make a selection from the list of values.
Comment—Enter your comment.
3. Select Save to save the comment and return to the original Data Entry window. The Data Entry window is re-displayed, with the cursor at the beginning of the original input field. Select Cancel if you decide not to make the comment.
A value with an operator comment displays in blue, and an operator comment lamp (<Oper.>) displays in the Data Entry window title. If there is also an Investigator comment for the field, the value displays in red to indicate the presence of multiple comments or discrepancies, and all the appropriate lamps are displayed in the window title.
You can change the Discrepancy Review Status or Resolution if the Resolve Discrepancies During Data Entry configuration setting is enabled.
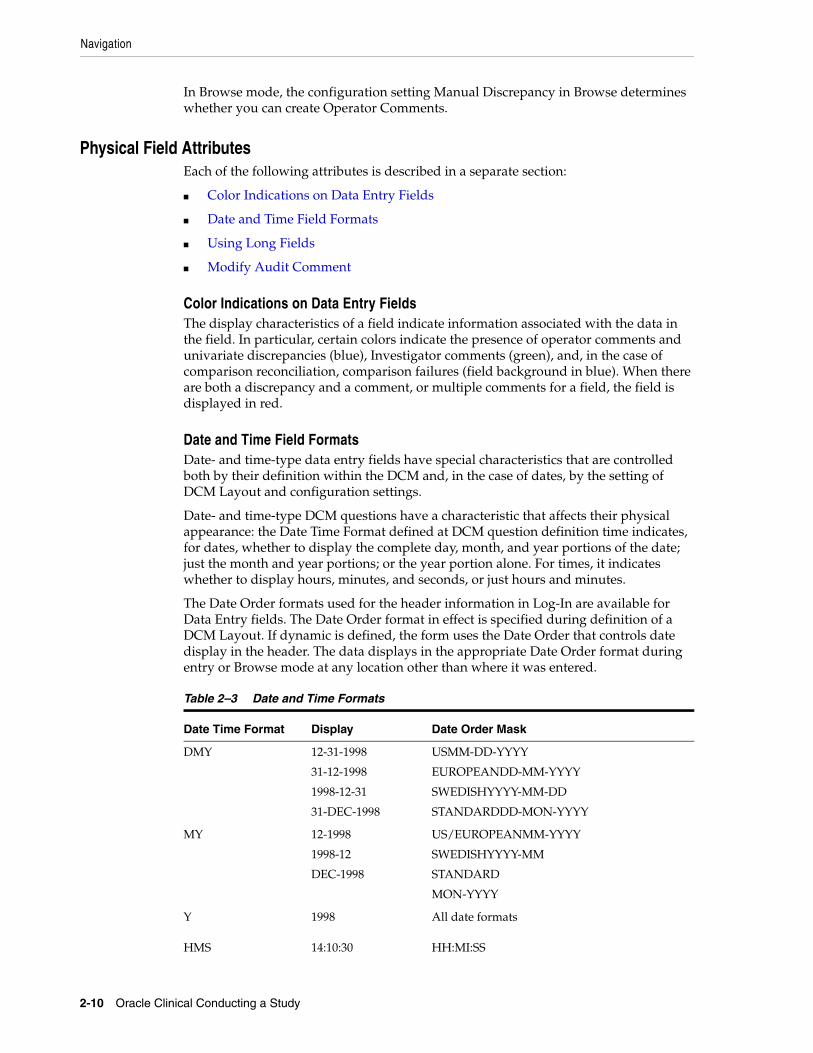
Navigation
2-10 Oracle Clinical Conducting a Study
In Browse mode, the configuration setting Manual Discrepancy in Browse determines whether you can create Operator Comments.
Physical Field AttributesEach of the following attributes is described in a separate section:
■ Color Indications on Data Entry Fields
■ Date and Time Field Formats
■ Using Long Fields
■ Modify Audit Comment
Color Indications on Data Entry FieldsThe display characteristics of a field indicate information associated with the data in the field. In particular, certain colors indicate the presence of operator comments and univariate discrepancies (blue), Investigator comments (green), and, in the case of comparison reconciliation, comparison failures (field background in blue). When there are both a discrepancy and a comment, or multiple comments for a field, the field is displayed in red.
Date and Time Field FormatsDate- and time-type data entry fields have special characteristics that are controlled both by their definition within the DCM and, in the case of dates, by the setting of DCM Layout and configuration settings.
Date- and time-type DCM questions have a characteristic that affects their physical appearance: the Date Time Format defined at DCM question definition time indicates, for dates, whether to display the complete day, month, and year portions of the date; just the month and year portions; or the year portion alone. For times, it indicates whether to display hours, minutes, and seconds, or just hours and minutes.
The Date Order formats used for the header information in Log-In are available for Data Entry fields. The Date Order format in effect is specified during definition of a DCM Layout. If dynamic is defined, the form uses the Date Order that controls date display in the header. The data displays in the appropriate Date Order format during entry or Browse mode at any location other than where it was entered.
Table 2–3 Date and Time Formats
Date Time Format Display Date Order Mask
DMY 12-31-1998
31-12-1998
1998-12-31
31-DEC-1998
USMM-DD-YYYY
EUROPEANDD-MM-YYYY
SWEDISHYYYY-MM-DD
STANDARDDD-MON-YYYY
MY 12-1998
1998-12
DEC-1998
US/EUROPEANMM-YYYY
SWEDISHYYYY-MM
STANDARD
MON-YYYY
Y 1998 All date formats
HMS 14:10:30 HH:MI:SS
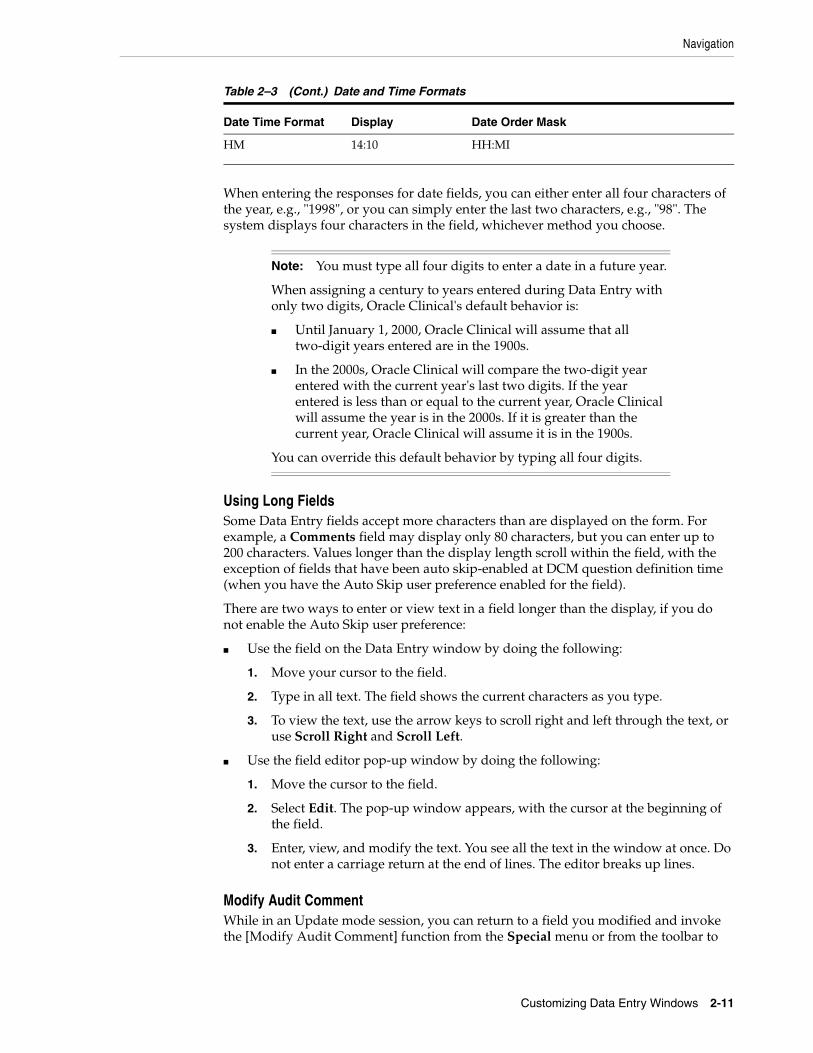
Navigation
Customizing Data Entry Windows 2-11
When entering the responses for date fields, you can either enter all four characters of the year, e.g., "1998", or you can simply enter the last two characters, e.g., "98". The system displays four characters in the field, whichever method you choose.
Using Long FieldsSome Data Entry fields accept more characters than are displayed on the form. For example, a Comments field may display only 80 characters, but you can enter up to 200 characters. Values longer than the display length scroll within the field, with the exception of fields that have been auto skip-enabled at DCM question definition time (when you have the Auto Skip user preference enabled for the field).
There are two ways to enter or view text in a field longer than the display, if you do not enable the Auto Skip user preference:
■ Use the field on the Data Entry window by doing the following:
1. Move your cursor to the field.
2. Type in all text. The field shows the current characters as you type.
3. To view the text, use the arrow keys to scroll right and left through the text, or use Scroll Right and Scroll Left.
■ Use the field editor pop-up window by doing the following:
1. Move the cursor to the field.
2. Select Edit. The pop-up window appears, with the cursor at the beginning of the field.
3. Enter, view, and modify the text. You see all the text in the window at once. Do not enter a carriage return at the end of lines. The editor breaks up lines.
Modify Audit CommentWhile in an Update mode session, you can return to a field you modified and invoke the [Modify Audit Comment] function from the Special menu or from the toolbar to
HM 14:10 HH:MI
Note: You must type all four digits to enter a date in a future year.
When assigning a century to years entered during Data Entry with only two digits, Oracle Clinical's default behavior is:
■ Until January 1, 2000, Oracle Clinical will assume that all two-digit years entered are in the 1900s.
■ In the 2000s, Oracle Clinical will compare the two-digit year entered with the current year's last two digits. If the year entered is less than or equal to the current year, Oracle Clinical will assume the year is in the 2000s. If it is greater than the current year, Oracle Clinical will assume it is in the 1900s.
You can override this default behavior by typing all four digits.
Table 2–3 (Cont.) Date and Time Formats
Date Time Format Display Date Order Mask
Value-Setting Features
2-12 Oracle Clinical Conducting a Study
display the Audit Comment window. In this window you can modify the audit comment you entered. This function is only available before you save your changes.
Value-Setting FeaturesThis section contains the following topics:
■ Default Values on page 2-12
■ Lists of Values on page 2-12
Default ValuesThe Data Entry features that Oracle Clinical provides assist in populating fields with values. Defaulting — both single and repeating — can only occur in interactive data entry. Loading data in batch mode is not covered under the heading "Data Entry" in this section.
Single Default ValuesDuring DCM question definition, a default response value can be defined for a given question in either a repeating or a non-repeating question group. When the field is displayed during both first-pass and second-pass entry, the default value displays in the field and need not be re-entered. If the field is enterable, you can modify the default value. In repeating question groups, single default values are displayed in each row when you first go to a new repeat, but are treated as entered data only if you explicitly enter data for other fields on the repeat.
Repeating Default ValuesDuring DCM question definition, repeating default values can be defined for repeating question groups, and these defaults can be protected so that they cannot be updated. In the Data Entry form, the repeating defaults are displayed in the fields. Unlike non-repeating defaults, entry of any data in any repeat of a DCM question group with repeating defaults causes all the repeat values to be saved.
If the repeating defaults have been protected in the DCM question group by enabling the Protect Repeating Defaults attribute, then the response fields are treated as non-enterable, even if the DCM question itself is enterable. In this case, you can also not insert repeats within the rows or delete repeats from the rows of repeating defaults. However, provided the DCM question group attribute Enforce Max Repeats is not enabled, you can add additional repeats after the end of the repeating defaults. In those repeats, the repeating default fields are enterable.
Second-Pass Sight VerificationA DCM question can be defined to require only sight verification during Second-pass Data Entry. In this case, during Second-pass Data Entry, the values of the response fields corresponding to these questions are pre-populated with the first-pass value to allow visual verification of correctness, so that you are not required to re-enter the value. This feature is used most often with long text fields, which can be more efficiently reviewed for accuracy visually rather than by retyping the entire text response.
Lists of ValuesDuring data entry, a list of values is available for fields that are defined with an associated Discrete Value Group (DVG).
Value-Setting Features
Customizing Data Entry Windows 2-13
When you move your cursor into a data entry field that supports lists of values, <List> appears on the status line at the bottom of the window. These lists of values always support autoreduction; they support autofill based on the value of a user preference. Also, entry by sequence number is available for DVGs enabled for it during DVG definition.
Assuming that all appropriate configuration settings and preferences are enabled:
■ Standard list of values behavior
To display all the values from the list of values for a field in a Data Entry window, select List. All values are displayed for you to choose.
■ Autoreduction
Autoreduction is enabled for all fields. To use it, enter a few characters in the field, and then click List. Only those values beginning with the characters you entered are displayed. If your entry matches one of the values exactly, or if only one value matches your partial entry, the system returns the value to your field.
■ Entry by sequence
You can enable this feature at DVG definition time. During Data Entry, if you know the sequence number of the value, enter the number in the data entry field. The system enters the value in the field as you navigate out of the field. For example, if you enter 1 in the Patient Position for Blood Pressure field, that field is automatically populated with the value sitting.
■ Autofill
If Autofill is enabled, fill in a unique combination of characters that matches only one value from the list of values, and the system fills in the rest of the values.
■ Duplicate Field, Duplicate Repeat Functions
In a repeating question group, you can copy the value of the same field from the previous repeat by invoking [Duplicate Field].
You can also copy all the values from the previous record to the current record by invoking [Duplicate Record]. The values replace all the values on the current repeat except those in non-enterable fields.
The [Duplicate Record] and [Duplicate Field] functions have no equivalents in non-repeating question groups.
Insert/Delete Record in a Question GroupWithin a repeating question group, you can insert and delete records by invoking [Delete Record] and [Insert Record]. Within protected repeating defaults you cannot invoke [Insert Record] or [Delete Record] unless you are in Update mode and have the configuration setting Privileged Update enabled.
The [Insert Record] and [Delete Record] functions have no equivalents in non-repeating question groups.

Value-Setting Features
2-14 Oracle Clinical Conducting a Study
3
Tracking DCMs 3-1
3 Tracking DCMs
Oracle Clinical provides several utilities for keeping account of all patient data expected during the course of a study, and for cleaning it once it is in the system.
This chapter contains the following topics:
■ About DCM Tracking on page 3-1
■ How Oracle Clinical Tracks DCMs on page 3-1
■ DCM Tracking Tools on page 3-3
About DCM TrackingBased on a schedule established during study design Oracle Clinical creates an internal schedule of expected visits—clinical planned events (CPEs)—and their associated Data Collection Modules (DCMs; groups of related questions), and checks if the expected responses to them arrive as planned. You can access this information through the Maintain Missing DCMs window in the Data Entry menu.
Oracle Clinical's DCM tracking process makes it possible to:
■ Track detailed DCM activity for a given patient within a specified time, ranging from past visits to planned future visits.
■ Control the reporting of DCMs that have optional and early termination visits.
■ Use the study's CPE schedule to project dates for Missing and Expected DCMs.
■ Focus on Missing and Overdue DCMs for studies, sites, patients, and visits.
How Oracle Clinical Tracks DCMsTo use the DCM tracking features effectively, it helps to understand some parts of how Oracle Clinical works internally.
This section explains the following:
■ The Study Schedule
■ How Optional Visits Interact with DCM Tracking on page 3-2
■ How Termination Visits Interact With DCM Tracking on page 3-3
The Study ScheduleOracle Clinical forecasts expected data from the study schedule. The study schedule is created during the following activities:
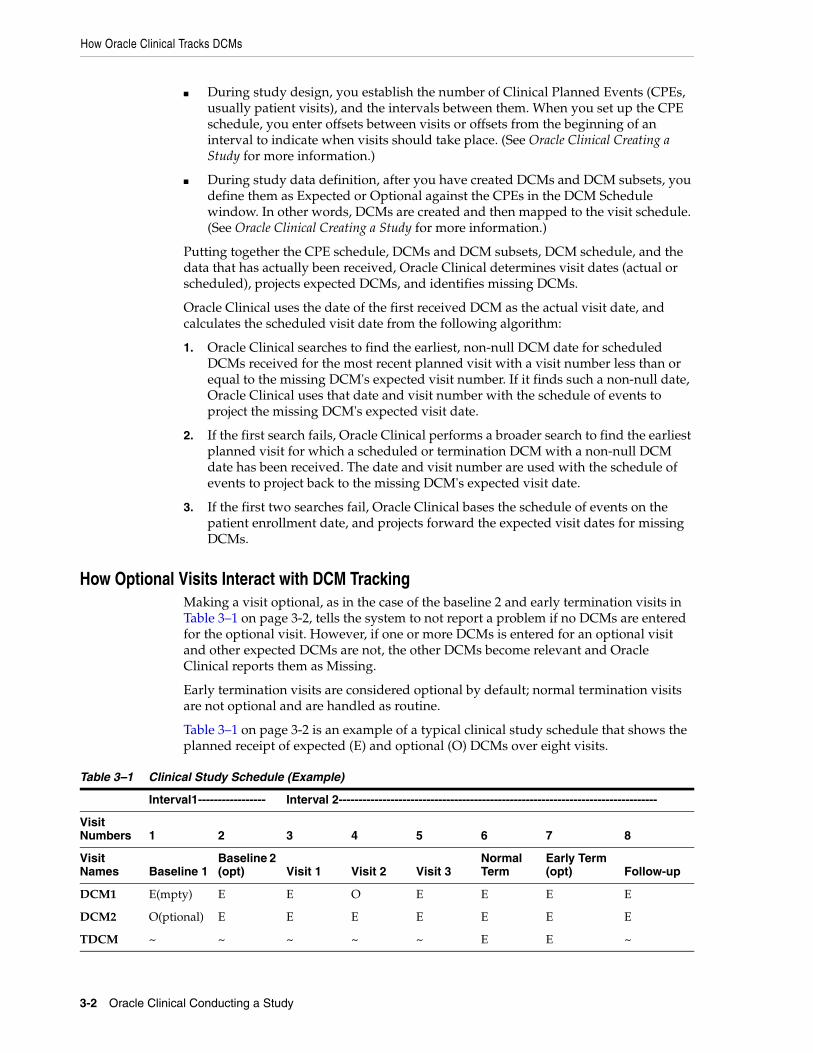
How Oracle Clinical Tracks DCMs
3-2 Oracle Clinical Conducting a Study
■ During study design, you establish the number of Clinical Planned Events (CPEs, usually patient visits), and the intervals between them. When you set up the CPE schedule, you enter offsets between visits or offsets from the beginning of an interval to indicate when visits should take place. (See Oracle Clinical Creating a Study for more information.)
■ During study data definition, after you have created DCMs and DCM subsets, you define them as Expected or Optional against the CPEs in the DCM Schedule window. In other words, DCMs are created and then mapped to the visit schedule. (See Oracle Clinical Creating a Study for more information.)
Putting together the CPE schedule, DCMs and DCM subsets, DCM schedule, and the data that has actually been received, Oracle Clinical determines visit dates (actual or scheduled), projects expected DCMs, and identifies missing DCMs.
Oracle Clinical uses the date of the first received DCM as the actual visit date, and calculates the scheduled visit date from the following algorithm:
1. Oracle Clinical searches to find the earliest, non-null DCM date for scheduled DCMs received for the most recent planned visit with a visit number less than or equal to the missing DCM's expected visit number. If it finds such a non-null date, Oracle Clinical uses that date and visit number with the schedule of events to project the missing DCM's expected visit date.
2. If the first search fails, Oracle Clinical performs a broader search to find the earliest planned visit for which a scheduled or termination DCM with a non-null DCM date has been received. The date and visit number are used with the schedule of events to project back to the missing DCM's expected visit date.
3. If the first two searches fail, Oracle Clinical bases the schedule of events on the patient enrollment date, and projects forward the expected visit dates for missing DCMs.
How Optional Visits Interact with DCM TrackingMaking a visit optional, as in the case of the baseline 2 and early termination visits in Table 3–1 on page 3-2, tells the system to not report a problem if no DCMs are entered for the optional visit. However, if one or more DCMs is entered for an optional visit and other expected DCMs are not, the other DCMs become relevant and Oracle Clinical reports them as Missing.
Early termination visits are considered optional by default; normal termination visits are not optional and are handled as routine.
Table 3–1 on page 3-2 is an example of a typical clinical study schedule that shows the planned receipt of expected (E) and optional (O) DCMs over eight visits.
Table 3–1 Clinical Study Schedule (Example)
Interval1----------------- Interval 2--------------------------------------------------------------------------------
Visit Numbers 1 2 3 4 5 6 7 8
Visit Names Baseline 1
Baseline 2 (opt) Visit 1 Visit 2 Visit 3
Normal Term
Early Term (opt) Follow-up
DCM1 E(mpty) E E O E E E E
DCM2 O(ptional) E E E E E E E
TDCM ~ ~ ~ ~ ~ E E ~
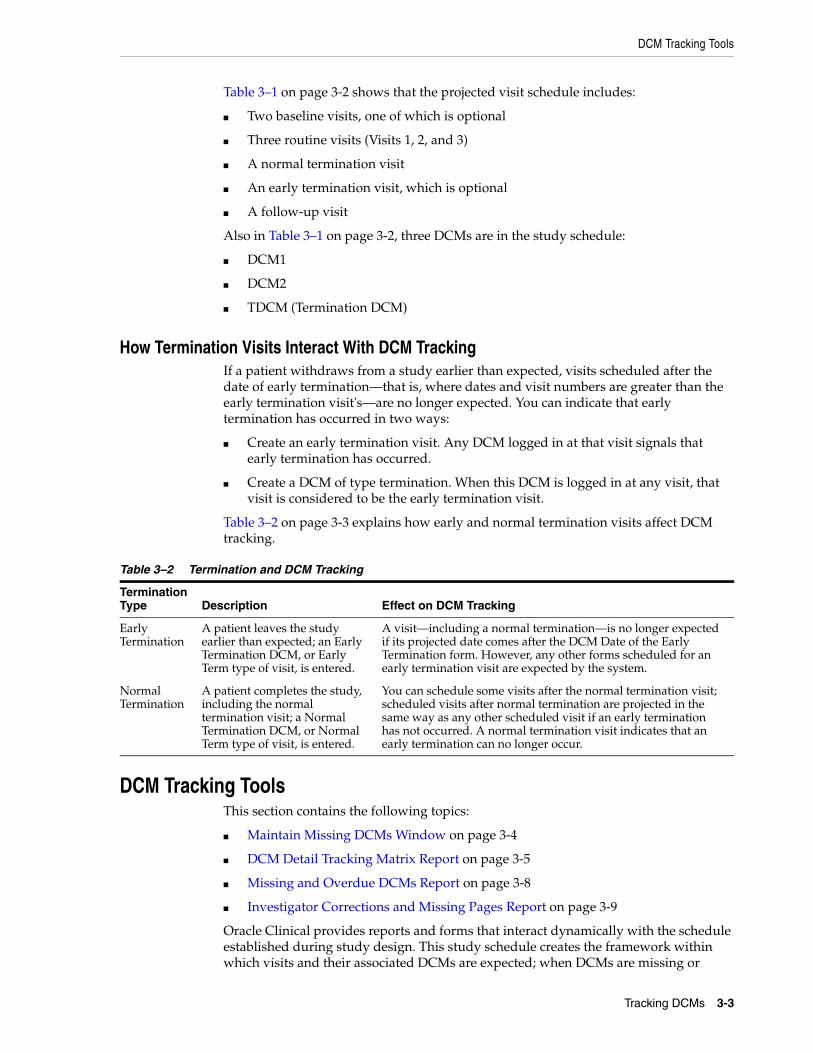
DCM Tracking Tools
Tracking DCMs 3-3
Table 3–1 on page 3-2 shows that the projected visit schedule includes:
■ Two baseline visits, one of which is optional
■ Three routine visits (Visits 1, 2, and 3)
■ A normal termination visit
■ An early termination visit, which is optional
■ A follow-up visit
Also in Table 3–1 on page 3-2, three DCMs are in the study schedule:
■ DCM1
■ DCM2
■ TDCM (Termination DCM)
How Termination Visits Interact With DCM TrackingIf a patient withdraws from a study earlier than expected, visits scheduled after the date of early termination—that is, where dates and visit numbers are greater than the early termination visit's—are no longer expected. You can indicate that early termination has occurred in two ways:
■ Create an early termination visit. Any DCM logged in at that visit signals that early termination has occurred.
■ Create a DCM of type termination. When this DCM is logged in at any visit, that visit is considered to be the early termination visit.
Table 3–2 on page 3-3 explains how early and normal termination visits affect DCM tracking.
DCM Tracking ToolsThis section contains the following topics:
■ Maintain Missing DCMs Window on page 3-4
■ DCM Detail Tracking Matrix Report on page 3-5
■ Missing and Overdue DCMs Report on page 3-8
■ Investigator Corrections and Missing Pages Report on page 3-9
Oracle Clinical provides reports and forms that interact dynamically with the schedule established during study design. This study schedule creates the framework within which visits and their associated DCMs are expected; when DCMs are missing or
Table 3–2 Termination and DCM Tracking
Termination Type Description Effect on DCM Tracking
Early Termination
A patient leaves the study earlier than expected; an Early Termination DCM, or Early Term type of visit, is entered.
A visit—including a normal termination—is no longer expected if its projected date comes after the DCM Date of the Early Termination form. However, any other forms scheduled for an early termination visit are expected by the system.
Normal Termination
A patient completes the study, including the normal termination visit; a Normal Termination DCM, or Normal Term type of visit, is entered.
You can schedule some visits after the normal termination visit; scheduled visits after normal termination are projected in the same way as any other scheduled visit if an early termination has not occurred. A normal termination visit indicates that an early termination can no longer occur.
DCM Tracking Tools
3-4 Oracle Clinical Conducting a Study
overdue or have discrepancies associated with them, they are reported in various levels of detail by the tools listed in Table 3–3 on page 3-4.
Maintain Missing DCMs WindowUse this window to query for missing DCMs and to mark them as Not Expected if appropriate.
Some DCMs marked as Missing may actually not be expected for that particular patient or visit. To prevent Oracle Clinical's giving a DCM a Missing status when it was not expected, mark it Not Expected in the Maintain Missing DCMs window, and add a comment about why you made the change.
You reach this window by selecting Missing DCMs from the Data Entry menu. Follow these steps:
1. Query for missing DCMs.
Oracle Clinical displays missing DCMs by patient number and then visit number. Scroll to the missing DCM subset you want.
2. Scroll to the right.
3. Uncheck the Expected? box if the DCM is not expected, and add optional comment text.
See information on other DCM Tracking Tools on page 3-3.
Table 3–3 Tools for Tracking Missing Data
Feature Purpose Menu Path
Maintain Missing DCMs Window
Allows queries for missing or missing and overdue DCMs. Optionally mark them as "not expected", then enter comments. Events marked "not expected" are not reported as missing.
From Data Entry menu, select Missing DCMs
DCM Detail Tracking Matrix Report
Provides detailed scheduling, data entry, and validation status for DCMs.
Reports associated discrepancies of up to three review statuses.
Responds dynamically to events such as early termination and nonexpected visits.
Projects future visits.
From Data Entry menu, select Data Entry Reports, and then DCM Detail Tracking Matrix
Missing and Overdue DCMs Report
Identifies missing DCMs per study, Investigator, patient, and visit.
From Data Entry menu, select Data Entry Reports, and then Missing and Overdue DCMs
Investigator Corrections and Missing Pages Report
Summary section listing patients whose data has outstanding problems; identifies RDCMs with missing pages.
From Conduct menu, select Conduct Reports, then select Data Validation, and then Investigator Corrections and Missing Pages
Notes:
■ You can check a DCM to make it Expected even if you had previously marked it as Unexpected.
■ You cannot update missing DCM information for frozen patient positions.
DCM Tracking Tools
Tracking DCMs 3-5
DCM Detail Tracking Matrix ReportThe DCM Detail Tracking Matrix report shows a detailed summary of DCM activities for one or more patients. See Example 3–1, "DCM Detail Tracking Matrix Report" on page 3-6 for a sample copy of the report, followed by an explanation of the information contained in the report.
To print this report, from the Data Entry menu, select Data Entry Reports, then select DCM Detail Tracking Matrix. See "Report Parameters" on page 3-5.
How to Use This ReportYou can use this report in a number of ways:
■ Set it up to run on a regular basis so that you can dynamically monitor DCM receipt and associated validation status.
■ Run the Missing and Overdue DCMs report first to see where problems exist, then run the DCM Detail Tracking Matrix for a more complete diagnosis of the DCM activity for a particular patient.
■ Specify that the report start at the earliest visit for which a DCM was missing, especially in a long-term study, with many months of DCM activity.
■ Specify that the report start at the present date and project into the future. This enables a Monitor who is planning visits to an Investigator to see what CRFs need to be collected.
■ Run the report to identify open problems when you are closing out a study.
Report ParametersWhen you run the report you can submit the following parameters:
■ Investigator. Choose one from the List of Values or leave the wildcard (%) default to see results for all Investigators in this study.
■ Site. Choose one from the List of Values or leave the wildcard (%) default to see results for all sites in this study.
■ Patient. Choose one from the lists of values or leave the wildcard (%) default to see results for all patients in this study. Oracle Clinical will divide the report into sections by patient.
■ DCM Short Name. Choose one from the list of values or leave the wildcard (%) default to see results for all DCMs in this study.
■ DCM Subset Name. Choose one from the list of values or leave the wildcard (%) default to see results for all DCM Subsets in this study.
■ Target Receipt Day Off Schedule. Optional; 29 if null.
■ Start Date. The first date for which you want to see response data.
■ End Date. The last date for which you want to see response data. If blank, the system uses the current date.
■ Only from Earliest Visit Having a Missing DCM?. Enter Y or N for Yes or No.
Note: In the DCM Detail Tracking Matrix report, DCMs are displayed in ascending order by their DCM ID, not according to the sequence number in the DCM scheduling window.
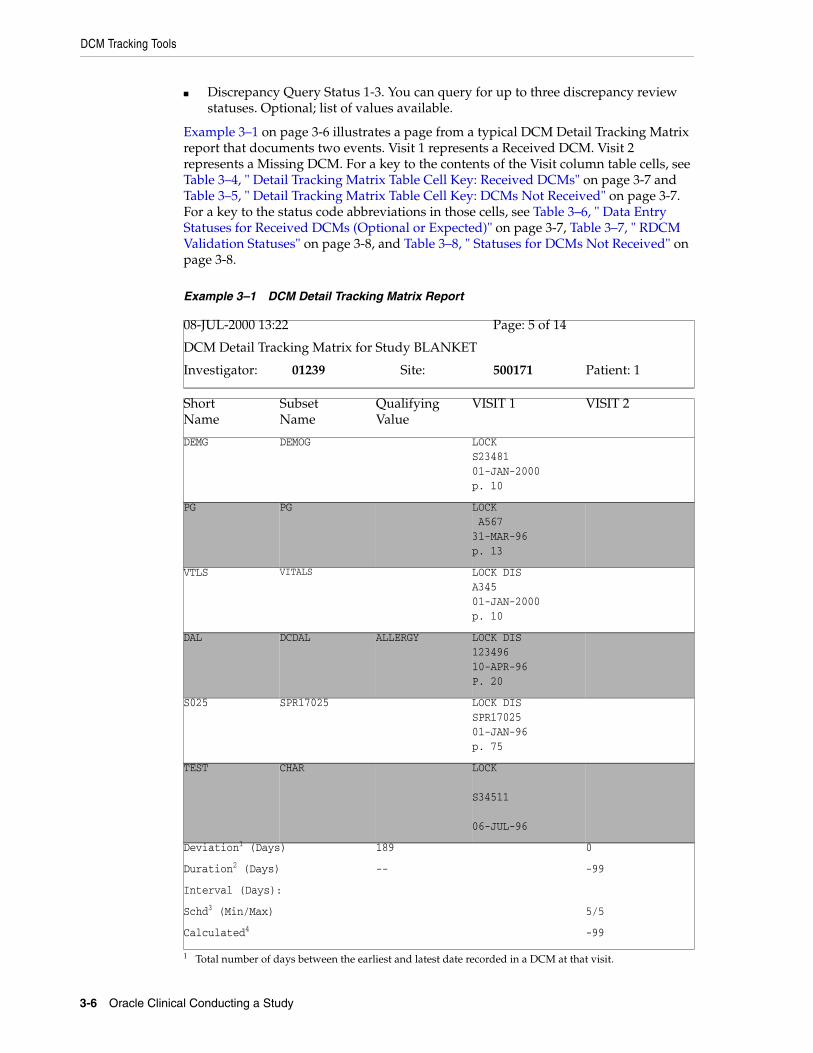
DCM Tracking Tools
3-6 Oracle Clinical Conducting a Study
■ Discrepancy Query Status 1-3. You can query for up to three discrepancy review statuses. Optional; list of values available.
Example 3–1 on page 3-6 illustrates a page from a typical DCM Detail Tracking Matrix report that documents two events. Visit 1 represents a Received DCM. Visit 2 represents a Missing DCM. For a key to the contents of the Visit column table cells, see Table 3–4, " Detail Tracking Matrix Table Cell Key: Received DCMs" on page 3-7 and Table 3–5, " Detail Tracking Matrix Table Cell Key: DCMs Not Received" on page 3-7. For a key to the status code abbreviations in those cells, see Table 3–6, " Data Entry Statuses for Received DCMs (Optional or Expected)" on page 3-7, Table 3–7, " RDCM Validation Statuses" on page 3-8, and Table 3–8, " Statuses for DCMs Not Received" on page 3-8.
Example 3–1 DCM Detail Tracking Matrix Report
08-JUL-2000 13:22 Page: 5 of 14
DCM Detail Tracking Matrix for Study BLANKET
Investigator: 01239 Site: 500171 Patient: 1
Short Name
Subset Name
Qualifying Value
VISIT 1 VISIT 2
DEMG DEMOG LOCK S2348101-JAN-2000p. 10
PG PG LOCK A56731-MAR-96p. 13
VTLS VITALS LOCK DISA34501-JAN-2000p. 10
DAL DCDAL ALLERGY LOCK DIS12349610-APR-96P. 20
S025 SPR17025 LOCK DISSPR1702501-JAN-96p. 75
TEST CHAR LOCK
S34511
06-JUL-96
Deviation1 (Days)
1 Total number of days between the earliest and latest date recorded in a DCM at that visit.
189 0
Duration2 (Days) -- -99
Interval (Days):
Schd3 (Min/Max) 5/5
Calculated4 -99
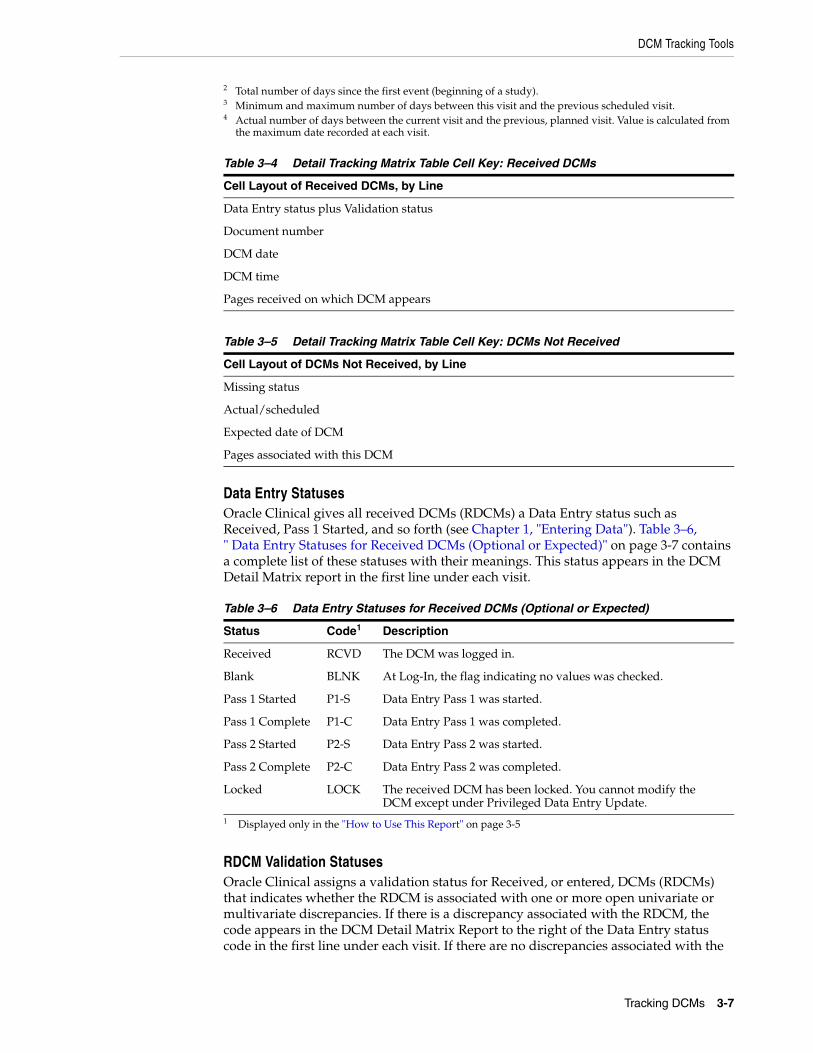
DCM Tracking Tools
Tracking DCMs 3-7
Data Entry StatusesOracle Clinical gives all received DCMs (RDCMs) a Data Entry status such as Received, Pass 1 Started, and so forth (see Chapter 1, "Entering Data"). Table 3–6, " Data Entry Statuses for Received DCMs (Optional or Expected)" on page 3-7 contains a complete list of these statuses with their meanings. This status appears in the DCM Detail Matrix report in the first line under each visit.
RDCM Validation StatusesOracle Clinical assigns a validation status for Received, or entered, DCMs (RDCMs) that indicates whether the RDCM is associated with one or more open univariate or multivariate discrepancies. If there is a discrepancy associated with the RDCM, the code appears in the DCM Detail Matrix Report to the right of the Data Entry status code in the first line under each visit. If there are no discrepancies associated with the
2 Total number of days since the first event (beginning of a study).3 Minimum and maximum number of days between this visit and the previous scheduled visit. 4 Actual number of days between the current visit and the previous, planned visit. Value is calculated from
the maximum date recorded at each visit.
Table 3–4 Detail Tracking Matrix Table Cell Key: Received DCMs
Cell Layout of Received DCMs, by Line
Data Entry status plus Validation status
Document number
DCM date
DCM time
Pages received on which DCM appears
Table 3–5 Detail Tracking Matrix Table Cell Key: DCMs Not Received
Cell Layout of DCMs Not Received, by Line
Missing status
Actual/scheduled
Expected date of DCM
Pages associated with this DCM
Table 3–6 Data Entry Statuses for Received DCMs (Optional or Expected)
Status Code1
1 Displayed only in the "How to Use This Report" on page 3-5
Description
Received RCVD The DCM was logged in.
Blank BLNK At Log-In, the flag indicating no values was checked.
Pass 1 Started P1-S Data Entry Pass 1 was started.
Pass 1 Complete P1-C Data Entry Pass 1 was completed.
Pass 2 Started P2-S Data Entry Pass 2 was started.
Pass 2 Complete P2-C Data Entry Pass 2 was completed.
Locked LOCK The received DCM has been locked. You cannot modify the DCM except under Privileged Data Entry Update.
DCM Tracking Tools
3-8 Oracle Clinical Conducting a Study
RDCM, no validation status code is displayed. Table 3–7, " RDCM Validation Statuses" contains the RDCM status code information.
A discrepancy is considered "open" if its status is current and it has not been resolved.
Not-received DCM StatusesDuring study definition, when you associate DCMs and DCM subsets with the DCM schedule, you mark them as either E (Expected) or O (Optional). DCMs that are not received and are marked as O in the DCM schedule simply get a status of Optional.
For a DCM marked E and Not Received on the expected visit date, the status indicates its degree of lateness, such as Missing, Off-targ, or Overdue (see Table 3–8, " Statuses for DCMs Not Received" on page 3-8).
Missing and Overdue DCMs ReportTo submit this report, from the Data Entry menu, select Data Entry Reports, then select Missing and Overdue DCMs.
This report provides the following information about missing and overdue DCMs for the parameters you select, organized by patient:
Table 3–7 RDCM Validation Statuses
Status Code Meaning
Not discrepant (Blank; no code.) No open discrepancies associated with the RDCM.
Discrepant DIS One or more open univariate discrepancies are associated with the RDCM.
Query QRY One or more open multivariate discrepancies are associated with the RDCM; you can define up to three review statuses and apply them to the RDCM.
Table 3–8 Statuses for DCMs Not Received
Status Code1
1 Displayed only in the "How to Use This Report" on page 3-5
Description
Optional O The DCM is not expected because it was defined as Optional during study definition.
Not Expected NOT-EXPT The DCM is not expected because a user gave it this status in the Maintain Missing DCMs window (see "Maintain Missing DCMs Window" on page 3-4).
Missing MISSING The DCM was not received at the expected visit, but other DCMs were received during that visit or subsequent visits.
Overdue OVERDUE The DCM was not received at the expected visit and 30 or more days have passed since the expected date for that visit; also, no other DCMs have been received for that visit or later visits.
Missing andOverdue
MSG&OVR The DCM is missing and 30 or more days have passed since the expected date for that visit.
OffTarget OFFTARG The DCM has not been received within the user-specified target days since the expected date for that visit. A user can specify a target date of 0-29 days from the expected visit.
Missing and Off-Target
MSG&OFFT The DCM is missing and the user-specified number of target days have passed since the expected date for that visit.
DCM Tracking Tools
Tracking DCMs 3-9
■ visit at which the DCM was expected to be collected
■ whether the DCM is missing or overdue
■ date of the visit, and whether the visit occurred (Actual; other DCMs were collected) or was only Scheduled (no other DCMs have been entered for the visit)
■ the number of days overdue
■ short name of the DCM and subset
■ missing DCM page(s)
To run this report, enter the following parameters:
■ Investigator. Choose one from the list of values or leave the wildcard (%) default to see results for all Investigators in this study.
■ Site. Choose one from the list of values or leave the wildcard (%) default to see results for all sites in this study.
■ Patient. Choose one from the list of values or leave the wildcard (%) default to see results for all patients in this study.
■ DCM Name. Choose one from the list of values or leave the wildcard (%) default to see results for all DCMs in this study.
■ Missing DCM Status. Choose one from the list of values or leave the wildcard (%) default to see results for all missing DCM statuses in this study. The abbreviations used for the list of values here are: M for Missing, O for Overdue, MO for Missing and Overdue, OT for Off Target, and MT for Missing and Off Target. See Table 3–8, " Statuses for DCMs Not Received" on page 3-8 for further information on the meaning of these statuses.
■ Start Date. The first date for which you want to see response data.
■ End Date. The last date for which you want to see response data. If blank, the system uses the current date.
■ Target Receipt Days Off Schedule. The number of days that the DCM is overdue. You can use this parameter to report DCMs that are exactly a certain number of days overdue.
Investigator Corrections and Missing Pages ReportTo submit this report, from the Conduct menu, select Conduct Reports, then select Data Validation, and then Investigator Corrections and Missing Pages.
This report provides the following information about missing pages for the parameters you select, organized by patient:
■ First a summary, giving, for each patient:
– first visit number and date of first visit
– latest visit number and date of latest visit
– next planned visit number and date
– status
■ Second, a detailed section organized by patient and visit, with information for each RDCM with a problem:
– number and date of visit when problem occurred
DCM Tracking Tools
3-10 Oracle Clinical Conducting a Study
– whether the visit was Actual (other DCMs were collected) or Scheduled (other DCMs were not collected)
– the nature of the problem (for example, missing pages)
To run this report, enter the following parameters:
■ Investigator. Choose an Investigator from the list of values.
■ Patient. Choose one from the list of values or leave the wildcard (%) default to see results for all patients in this study.
■ DCM Name. Choose one from the list of values or leave the wildcard (%) default to see results for all DCMs in this study.
■ Modified Since.
■ Modified Until.
■ Summary Reporting Inclusion Flag.
■ Discrepancy Reporting Inclusion Flag.
■ Missing Pages Reporting Inclusion Flag.
■ Company Name.

4
Using the Discrepancy Database 4-1
4 Using the Discrepancy Database
Oracle Clinical provides several utilities for cleaning data.
This chapter contains the following topics:
■ About the Discrepancy Database on page 4-1
■ Discrepancy Types on page 4-2
■ Example: Using Discrepancies to Clean Data on page 4-3
■ Using Batch Validation on page 4-4
■ Using Profiles on page 4-7
■ Using the Maintain Discrepancy Database Window on page 4-10
■ Managing Discrepancies on page 4-20
■ Using the Test Discrepancy Database on page 4-29
About the Discrepancy DatabaseOracle Clinical checks that all collected data conforms to restrictions built into the study by question definitions and Validation and Derivation Procedures. The system creates a Discrepancy record in the Discrepancy Database, either during manual data entry or update, batch data load, or Batch Validation, if the response to a question is invalid. Discrepancies usually result from human error: either transcription errors during data entry or illegible CRFs. They may also indicate flawed logic in Validation or Derivation Procedures or in question definitions, or real, though unexpected, clinical data.
Managing discrepancies includes reviewing them, investigating their cause, and either resolving them or declaring them irresolvable, so that your clinical data is as clean and complete as possible for analysis and submission to regulatory agencies. Resolving discrepancies most often means correcting incorrectly entered patient data, but may also mean editing Validation Procedures or question definitions.
To rerun changed Procedures, recheck data against changed question definitions, and re-evaluate changed data, run Batch Validation (see "Batch Validation Process" on page 4-5).
The system stores discrepancies separately from patient data, but associates each discrepancy with its Patient, Visit, Lab and other Received DCM header information and the specific response(s) that triggered its creation. Review statuses are used to track the process of resolving discrepancies; the past and current status(es) and related comments are also stored with each discrepancy (see "Single-Record View" on page 4-10).
Discrepancy Types
4-2 Oracle Clinical Conducting a Study
You can use profiles to control access to data entry update and to filter queries on the Discrepancy Database. See "Selecting a Profile" on page 4-8.
Oracle Clinical offers many utilities to help you resolve discrepancies, including:
■ Viewing CRF Images: If your company has set up this feature, you can view an image of the actual clinical report form that includes the discrepant response. From the Maintain Discrepancy Database window's Special menu, select Get Image. See "Browse and Update Patient Data" on page 4-22.
■ Data Clarification Forms (DCFs): To facilitate handling of large numbers of discrepancies, you can group them by review status, Investigator, site, DCM, visit, or any combination of these criteria, print a report based on the criteria you choose, and send it to an Investigator for review (see Chapter 5, "Using Data Clarification Forms"). DCFs contain discrepancies related to the data of only one patient.
■ Group Updates: Query for and hand-select a group of discrepancies and simultaneously update their review status, comment text, or CRF page numbers, mark them for passive review, or create DCFs for them. See "Selecting a Group of Records to Change" on page 4-24.
■ Mass Changes: Use SQL statements to select a set of patient data and make the same correction to all of it at once. See Chapter 6, "Making Mass Changes".
■ Reports: From the Conduct menu, select Conduct Report, then select Data Validation to run many data validation reports.
You may also use the Oracle Thesaurus Management System, which compares patient data responses to terms in standard dictionaries such as MedDRA and WHO-Drug (or your organization's internal dictionary) and, when fully integrated with Oracle Clinical, derives standard dictionary terms for Oracle Clinical responses.
To open the Maintain Discrepancy Database window, from the Conduct menu, select Data Validation, then select Discrepancy Database. To set up the system and administrative settings that control access to the discrepancy database, see the chapter on "Configuring Data Management Utilities" in the Oracle Clinical Administrator's Guide.
Discrepancy TypesOracle Clinical tracks four types of discrepancies:
■ Univariate. During data entry or batch data load, Oracle Clinical checks data entered as a response to a question against the definition of the question, and generates a discrepancy if the response does not meet the definition's specifications, such as: wrong data type or length, response not one of a discrete value group (for example, the answer to a Yes/No question is X), mandatory response missing, precision of response greater than allowed (for example, temperature of 98.689F), incorrect partial date (for example, day of month missing where required), or responses to the question that are above the upper bound or below the lower bound.
■ Multivariate. A response may have to meet the criteria set out in one or more Validation Procedures, which compare responses to one or more other responses for the same patient. The system creates discrepancies when it runs Validation Procedures, either during Batch Validation or manual execution of a Procedure.
■ Indicator. The response to an indicator question determines which set of the remaining questions require responses. For example, if the response to the
Example: Using Discrepancies to Clean Data
Using the Discrepancy Database 4-3
indicator question "Do you smoke?" is Yes, then the question "How often?" must also be collected. If the response to "Do you smoke?" is No, then "How often?" must not be collected. If a follow-up question is either not collected when it should be, or collected when it should not be, Oracle Clinical creates an indicator discrepancy during Batch Validation. The discrepancy is logged against the indicator question; for example, "Do you smoke?", not "How often?".
■ Manual. If there is a problem transcribing data from a CRF, you can enter a manual discrepancy. There are two types:
– Manual Data Point. If there is a problem with the CRF, such as illegibility, you can enter a manual discrepancy either during data entry (see Chapter 1, "Entering Data") or directly into the discrepancy database (see "Entering Manual Discrepancies" on page 4-23).
– Manual Header. This type of discrepancy is not directly associated with a single response, but with the CRF in general. You can enter a manual header discrepancy associated with a Received DCM directly in the Maintain Discrepancy Database window.
The system creates univariate, multivariate, and indicator discrepancies. Users create manual discrepancies.
Example: Using Discrepancies to Clean DataIn order to collect a patient's blood pressure, your organization creates two questions, one for the diastolic and one for the systolic number. To check the validity of the values entered in response to each question, each question is defined as being of data type Number and having an upper and lower limit marking an acceptable, medically plausible, range of values. In addition, your organization defines a Validation Procedure to compare the responses of questions collecting systolic and diastolic blood pressure and to create a discrepancy if the diastolic response value is higher than the systolic response value.
When the system finds a case where, at a particular visit, a patient's diastolic blood pressure is recorded as higher than the systolic blood pressure, it creates a multivariate discrepancy. If the diastolic value is out of the range defined for its question, the system also creates a univariate discrepancy. Both discrepancies appear in the Maintain Discrepancy Database window when you enter an appropriate query.
In the Maintain Discrepancy Database window you can click the More button in order to see the questions and their responses containing the blood pressure figures. If you select the diastolic question and click Details, you see both discrepancies, the multivariate one and the univariate one, listed in the bottom panel of the window.
If your organization has the feature set up, you can go to the Special menu and select Get Image to see an image of the actual paper CRF where the figures were recorded at the patient's visit. If you see that the two values were transposed during Data Entry, and if you have the necessary privileges, you can go to the Special menu, select Update Patient Data, correct the two values, enter a comment, and update the discrepancy's review status according to your organization's policies. Assuming that the diastolic value is now within range, the system closes both discrepancies during the next batch validation.
Alternatively, you could select the DCF Report? box for each question (Procedure variable) involved in the multivariate discrepancy, so that when the discrepancy is included in a DCF Report for an Investigator, both values are displayed. The Investigator then has the responsibility for directing the changes to be made. The
Using Batch Validation
4-4 Oracle Clinical Conducting a Study
changes are entered and the discrepancy review status updated according to your organization's policies.
Using Batch ValidationThe section contains the following topics:
■ Batch Validation Process on page 4-5
■ Locking Mechanism on page 4-6
■ Running Batch Validation on page 4-6
■ Running TMS Validation on page 4-6
The Batch Validation job, accessed from the Conduct menu by selecting Data Validation and then Batch Validation Session, checks data in a single study for all types of discrepancies. Most organizations set up Batch Validation to run at regular intervals, usually nightly.
Which Data is Processed During Batch ValidationBatch validation always runs incrementally; that is, it runs on selected data based on changes that have occurred since the last Batch Validation, as follows:
■ If a patient has any new or changed data, Batch Validation runs all Procedures over all data for that patient.
■ If the definition of a Procedure has been changed, Batch Validation runs that Procedure on all data for all patients, even if patient data has not changed.
■ If the definition of a question has been changed, Batch Validation runs a validation check on all responses to that question.
Discrepancy Creation and ObsolescenceAs the Batch Validation job processes data, it opens and "obsoletes" discrepancies and counts those that remain current, and reports all in its output file (viewable from the Batch Validation submission window by selecting Job Status and then View Output) as follows:
■ New Discrepancies. The system creates new discrepancies as appropriate on new or changed data or as a result of changes to Procedure or question definitions.
■ Obsolete Discrepancies. The system gives a status of Obsolete to previously created discrepancies that have been manually closed, either by correcting data or by giving them a status equivalent to Irresolvable.
■ Remain Current. Although the system runs the same Procedures and other validation checks on the same data (because it processes all of a patient's data whenever any of the patient's data is new or changed), the system does not replace existing discrepancies with new ones for the same error in the same data.
Note: If a derivation Procedure definition has been changed, and other validation or derivation Procedures are dependent on the changed Procedure (they use the value it derives), the system detects the dependencies and also runs the dependent Procedure(s) on all patients.
Using Batch Validation
Using the Discrepancy Database 4-5
In the Batch Validation output file you can see information on the number of discrepancies created during that run, the number that remain current, and the number that became obsolete. However, these numbers reflect only one run of Batch Validation, so the number of discrepancies remaining current includes only those records that were processed during that run because data or definitions had changed. If you want an accurate figure for the total number of existing discrepancies, go to the Maintain Discrepancy Database window and query for the information you need. The number of records retrieved by the query appears at the bottom of the window.
To see the total number of current discrepancies generated in the study by a single Procedure, execute the Procedure explicitly; from the Conduct menu, select Data Validation, then select Execute Single Procedure, and look at the .out file. See "Executing a Single Procedure" in the Oracle Clinical Creating a Study manual.
Batch Validation ProcessBatch validation includes six major phases that run sequentially and commit separately. Where noted, a major phase also has intermediate commits. The major phases are:
1. Univariate revalidation. The system checks patient data (question responses) against the definition of their questions. This is called "revalidation" because the system performs the same checks as the data is entered.
2. Discrete Value Group (DVG) resolution. Checks responses against the values defined for their question's discrete value group (list of valid values), if any. Includes subtypes that commit separately, in the following order:
a. DVG
b. DVG Subset
c. Thesaurus DVG
3. Procedures. Checks responses against the values of other responses, as specified in user-defined Validation Procedures. Also uses responses to derive values for derived questions as specified in user-defined Derivation Procedures. Separate commit for each Procedure, with all tracking related to the Procedure, in the following order:
a. Derivation Procedures. Processed in the order specified in the Sort field in the Maintain Derivation Procedures window. If two Procedures have the same Sort Order Number, they are processed in alphabetical order (by Procedure Name).
b. Validation Procedures. Processed after all derivation Procedures in alphabetical order by Procedure Name.
4. Indicator Questions. Checks if responses to questions defined as follow-ups to indicator questions have been collected when they should not have been collected or not collected when they should have been collected (see "Discrepancy Types" on page 4-2). In either case, the system associates the discrepancy with the indicator question value, not the follow-up question value(s).
5. Oracle Thesaurus Management System (TMS) integration. If TMS is fully integrated with Oracle Clinical, Batch Validation checks for verbatim term (Oracle Clinical Response) classifications created in TMS since the last Batch Validation run. For each occurrence of the same parent question with the same response, the system populates each of the associated derived question(s) with the requested TMS dictionary term or attribute. There are separate commits for each verbatim term and each of its derived values.
Using Batch Validation
4-6 Oracle Clinical Conducting a Study
6. Validation status. The most important tracking milestone for restarting processing after a failure is the successful completion timestamp. "Successful completion" logic assumes that all processing that determines what to process depending upon a timestamp (such as univariate re-execution or modified patient validation) takes the previous successful completion as a starting point until a subsequent Batch Validation succeeds. This means, for instance, that the processing will be repeated, but the derivative work will not need to be performed.
After completing the batch validation job, the system automatically runs the incremental expectedness calculation job for all patients whose data changed. If batch validation detects changes in Enhanced DCI Books, the system runs the full expectedness calculation job instead. See Oracle Clinical Creating a Study for more information.
In general, database changes are a significant part of the work, so a restart should execute the redundant processing significantly faster than the original process. Also, rollback segment use (and, in the TMS case, distributed commits) will be smaller.
Locking MechanismLocking to prevent multiple Batch Validation sessions for the same study from starting now uses transaction-independent named locks instead of row locks.
Running Batch ValidationTo run Batch Validation, from the Conduct menu, select Data Validation, then select Batch Validation.
1. Choose a study from the pop-up List of Values.
2. Click Submit Job. The system runs Batch Validation.
There are no choices other than the study name. Batch validation automatically runs all discrepancy checks for all data in the chosen study, as described in "Batch Validation Process" on page 4-5.
Running TMS ValidationIf you have an integrated TMS and Oracle Clinical environment, Batch Validation processes TMS procedures with Oracle Clinical procedures. You can run Batch Validation on TMS Procedures separately by following these instructions: To run TMS Batch Validation procedures separately, from the Conduct menu, select Data Validation, then select TMS Validation. If necessary, choose a study from the pop-up List of Values and click the Submit Job button. TMS Validation jobs operate the same way as the combined validation process.
Creating and Activating Resource Groups for Batch ValidationYou can use the Oracle database Resource Group feature to limit the percentage of CPU capacity used by Batch Validation when other processes—such as RDC data entry—with a higher priority need the resources. See the Oracle® Database Administrator's Guide 11g for details.
Use the following steps as an example of how to create and activate the resource group:
1. Log in as SYS or SYSDBA to the back end to grant privileges to RXC for the dbms_resource_manager package:
Using Profiles
Using the Discrepancy Database 4-7
EXEC DBMS_RESOURCE_MANAGER_PRIVS.GRANT_SYSTEM_PRIVILEGE - (GRANTEE_NAME => 'rxc', PRIVILEGE_NAME => 'ADMINISTER_RESOURCE_MANAGER', - ADMIN_OPTION => FALSE);
2. Log in as RXC to the back end and create the resource plan and resource groups:
BEGINDBMS_RESOURCE_MANAGER.CREATE_SIMPLE_PLAN(SIMPLE_PLAN => 'test_group',CONSUMER_GROUP1 => 'test_group1', GROUP1_CPU => 80,CONSUMER_GROUP2 => 'test_group2', GROUP2_CPU => 20);END;
3. As RXC, grant switching privileges to the RXCLIN_MOD role. This role is assigned to every user who runs batch validation where switching of resource groups takes place.
EXEC DBMS_RESOURCE_MANAGER_PRIVS.GRANT_SWITCH_CONSUMER_GROUP ('rxclin_mod', -'test_group1', FALSE);
4. Log in to Oracle Clinical, navigate to Admin, then Reference Codelists, then Local Reference Codelists, and query for OCL_STATE.
Add a new short value BV_RESOURCE_GRP with the resource group name as the long value and save.
5. Log in to the back end as either SYS or SYSTEM and make the resource plan active:
ALTER SYSTEM SET RESOURCE_MANAGER_PLAN ='test_group';
Using ProfilesThis section contains the following topics:
■ Selecting a Profile on page 4-8
■ Refining Profile Criteria on page 4-8
■ Changing a Profile on page 4-8
■ Creating New Profiles on page 4-9
In order to work in the Maintain Discrepancy Database window, you must have a valid profile. A profile is a named collection of access privileges and selection criteria. Profiles are set up by system administrators to control access to data in the discrepancy database. If you have the privileges necessary to modify the profile settings, you can use them as a filter for discrepancy queries. See Table 4–1, " Fields of the Profiles for Discrepancy Management Dialog Box" on page 4-9 for a list of query selection criteria available.
To open the Profiles dialog box, first open the Maintain Discrepancy Database window by accessing the Conduct menu, selecting Data Validation, and then selecting Discrepancy Database. The Profiles dialog box may open before you can access the Maintain Discrepancy Database window.
If either you or your administrator chooses a profile to be your default profile, you do not see the Profiles dialog box. If you want to open it, click the Profiles button in the Maintain Discrepancy Database window. To choose a profile as your default, select the Make This My Default Profile box in the lower-left corner of the Profiles dialog box.

Using Profiles
4-8 Oracle Clinical Conducting a Study
Selecting a ProfileYou can choose a profile by selecting a profile name from the profile list, modifying the query criteria, if necessary, and clicking the Use button. Oracle Clinical displays your choice in the title bar of the Maintain Discrepancy Database window. The list includes the following types of profiles:
■ Master profiles assigned to your user role.
■ Study profiles assigned to your user role.
■ Personal profiles created by you or the administrator.
■ Personal profiles created by others with your user role. (Select the Show all Users box to display other personal profiles.)
Refining Profile CriteriaThe More… button displays a pop-up box that contains additional fields you can use as profile criteria. The values you enter in these fields can include SQL wildcards. See Table 4–1, " Fields of the Profiles for Discrepancy Management Dialog Box" on page 4-9 for a list of query selection criteria available.
For more complex queries, you can enter SQL query conditions in the SQL Text field at the bottom of the box. Oracle recommends that you use this field only if you are familiar with both SQL and Oracle Clinical's underlying database structure.
Changing a Profile You can change the value of any unlocked field in the profile window. Oracle Clinical applies these changes to the selected profile when you click the Use button.
Temporary ChangesYou can use the profile setting as a temporary query filter without permanently applying your changes to the profile; modify the criteria, then click the Use button, leaving the Save My Changes box blank. To change the criteria later in the session, click the Change Profile button in the Maintain Discrepancy Database window to reopen the Profiles dialog box.
Permanent ChangesTo keep profile changes for later use, first check the Save My Changes box, then click Use.
Note: Your group's administrator may prevent you from modifying your default profile. If so, the Profiles dialog box does not open when you click the Profiles button.
Your group's administrator may prevent you from accessing some fields by locking them in your profile configuration. Locked fields have gray backgrounds, and the label text of locked box fields is in italics.
Information on creating master profiles is included in the Oracle Clinical Administrator's Guide chapter on configuring Discrepancy Management.
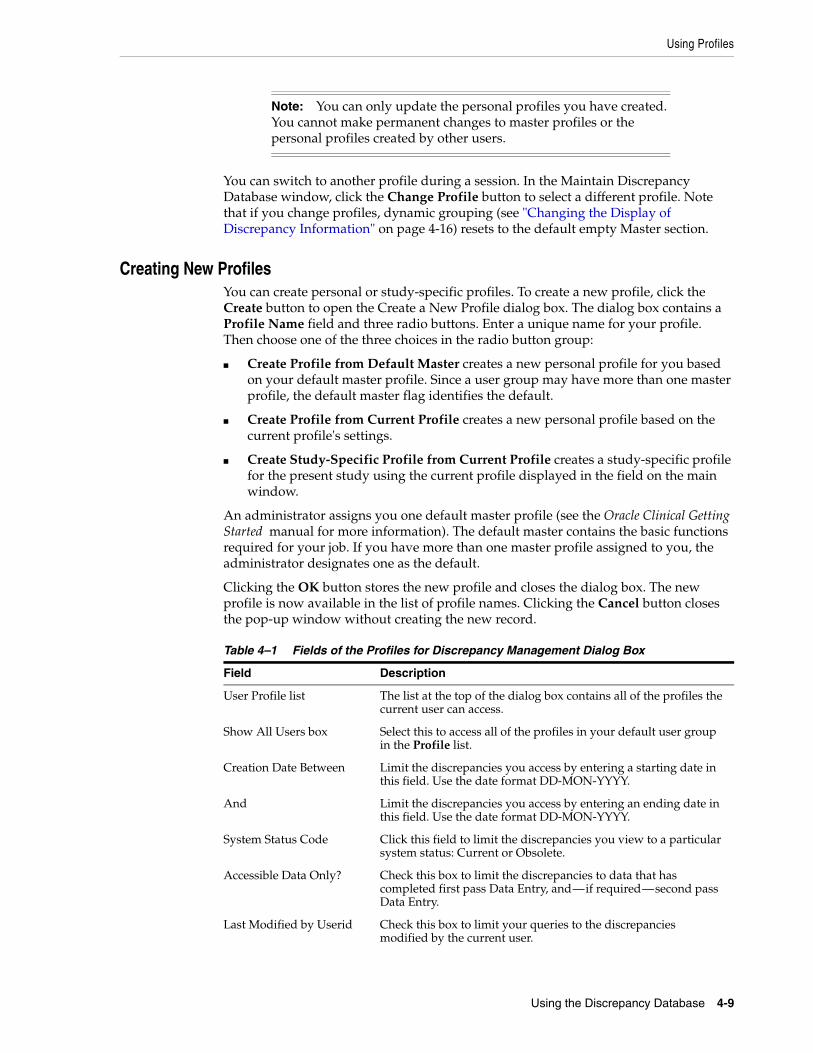
Using Profiles
Using the Discrepancy Database 4-9
You can switch to another profile during a session. In the Maintain Discrepancy Database window, click the Change Profile button to select a different profile. Note that if you change profiles, dynamic grouping (see "Changing the Display of Discrepancy Information" on page 4-16) resets to the default empty Master section.
Creating New ProfilesYou can create personal or study-specific profiles. To create a new profile, click the Create button to open the Create a New Profile dialog box. The dialog box contains a Profile Name field and three radio buttons. Enter a unique name for your profile. Then choose one of the three choices in the radio button group:
■ Create Profile from Default Master creates a new personal profile for you based on your default master profile. Since a user group may have more than one master profile, the default master flag identifies the default.
■ Create Profile from Current Profile creates a new personal profile based on the current profile's settings.
■ Create Study-Specific Profile from Current Profile creates a study-specific profile for the present study using the current profile displayed in the field on the main window.
An administrator assigns you one default master profile (see the Oracle Clinical Getting Started manual for more information). The default master contains the basic functions required for your job. If you have more than one master profile assigned to you, the administrator designates one as the default.
Clicking the OK button stores the new profile and closes the dialog box. The new profile is now available in the list of profile names. Clicking the Cancel button closes the pop-up window without creating the new record.
Note: You can only update the personal profiles you have created. You cannot make permanent changes to master profiles or the personal profiles created by other users.
Table 4–1 Fields of the Profiles for Discrepancy Management Dialog Box
Field Description
User Profile list The list at the top of the dialog box contains all of the profiles the current user can access.
Show All Users box Select this to access all of the profiles in your default user group in the Profile list.
Creation Date Between Limit the discrepancies you access by entering a starting date in this field. Use the date format DD-MON-YYYY.
And Limit the discrepancies you access by entering an ending date in this field. Use the date format DD-MON-YYYY.
System Status Code Click this field to limit the discrepancies you view to a particular system status: Current or Obsolete.
Accessible Data Only? Check this box to limit the discrepancies to data that has completed first pass Data Entry, and—if required—second pass Data Entry.
Last Modified by Userid Check this box to limit your queries to the discrepancies modified by the current user.
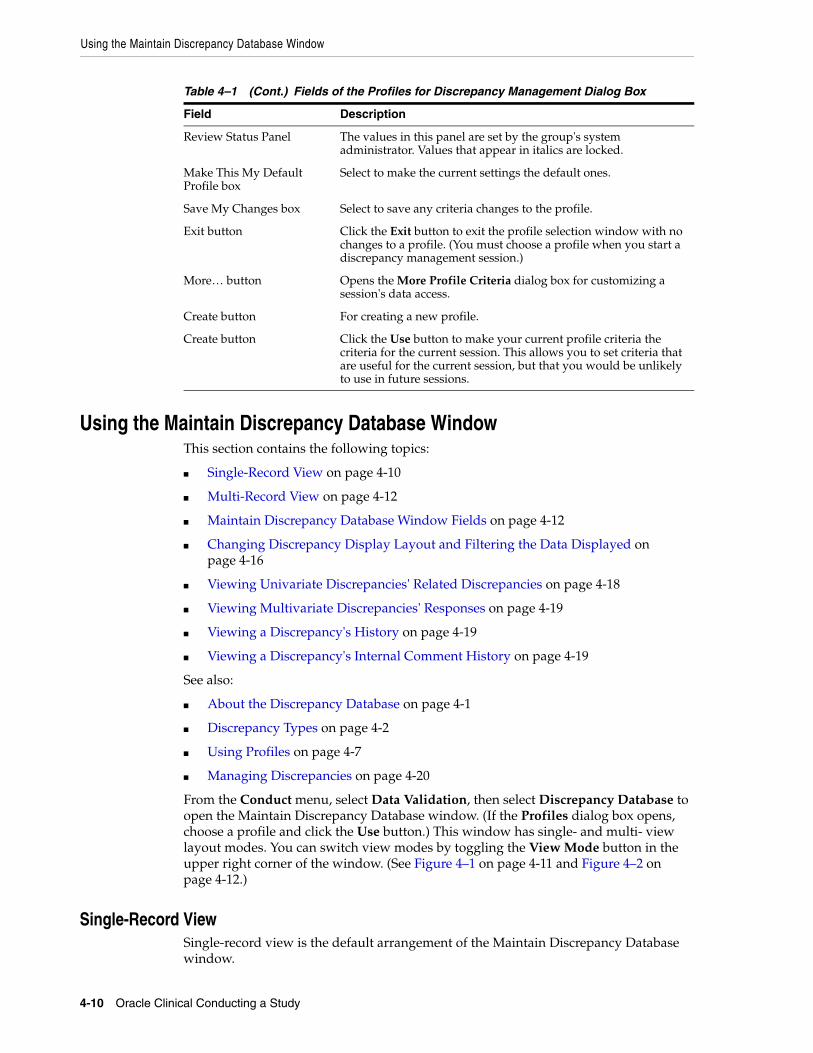
Using the Maintain Discrepancy Database Window
4-10 Oracle Clinical Conducting a Study
Using the Maintain Discrepancy Database WindowThis section contains the following topics:
■ Single-Record View on page 4-10
■ Multi-Record View on page 4-12
■ Maintain Discrepancy Database Window Fields on page 4-12
■ Changing Discrepancy Display Layout and Filtering the Data Displayed on page 4-16
■ Viewing Univariate Discrepancies' Related Discrepancies on page 4-18
■ Viewing Multivariate Discrepancies' Responses on page 4-19
■ Viewing a Discrepancy's History on page 4-19
■ Viewing a Discrepancy's Internal Comment History on page 4-19
See also:
■ About the Discrepancy Database on page 4-1
■ Discrepancy Types on page 4-2
■ Using Profiles on page 4-7
■ Managing Discrepancies on page 4-20
From the Conduct menu, select Data Validation, then select Discrepancy Database to open the Maintain Discrepancy Database window. (If the Profiles dialog box opens, choose a profile and click the Use button.) This window has single- and multi- view layout modes. You can switch view modes by toggling the View Mode button in the upper right corner of the window. (See Figure 4–1 on page 4-11 and Figure 4–2 on page 4-12.)
Single-Record ViewSingle-record view is the default arrangement of the Maintain Discrepancy Database window.
Review Status Panel The values in this panel are set by the group's system administrator. Values that appear in italics are locked.
Make This My Default Profile box
Select to make the current settings the default ones.
Save My Changes box Select to save any criteria changes to the profile.
Exit button Click the Exit button to exit the profile selection window with no changes to a profile. (You must choose a profile when you start a discrepancy management session.)
More… button Opens the More Profile Criteria dialog box for customizing a session's data access.
Create button For creating a new profile.
Create button Click the Use button to make your current profile criteria the criteria for the current session. This allows you to set criteria that are useful for the current session, but that you would be unlikely to use in future sessions.
Table 4–1 (Cont.) Fields of the Profiles for Discrepancy Management Dialog Box
Field Description
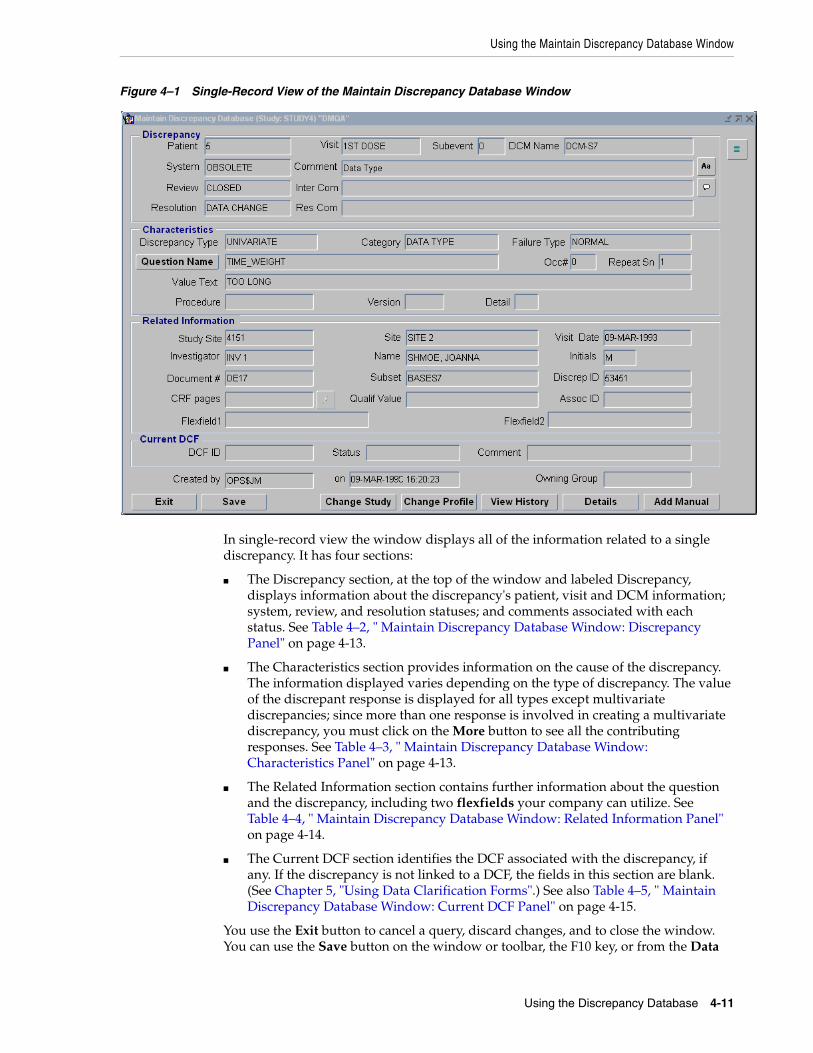
Using the Maintain Discrepancy Database Window
Using the Discrepancy Database 4-11
Figure 4–1 Single-Record View of the Maintain Discrepancy Database Window
In single-record view the window displays all of the information related to a single discrepancy. It has four sections:
■ The Discrepancy section, at the top of the window and labeled Discrepancy, displays information about the discrepancy's patient, visit and DCM information; system, review, and resolution statuses; and comments associated with each status. See Table 4–2, " Maintain Discrepancy Database Window: Discrepancy Panel" on page 4-13.
■ The Characteristics section provides information on the cause of the discrepancy. The information displayed varies depending on the type of discrepancy. The value of the discrepant response is displayed for all types except multivariate discrepancies; since more than one response is involved in creating a multivariate discrepancy, you must click on the More button to see all the contributing responses. See Table 4–3, " Maintain Discrepancy Database Window: Characteristics Panel" on page 4-13.
■ The Related Information section contains further information about the question and the discrepancy, including two flexfields your company can utilize. See Table 4–4, " Maintain Discrepancy Database Window: Related Information Panel" on page 4-14.
■ The Current DCF section identifies the DCF associated with the discrepancy, if any. If the discrepancy is not linked to a DCF, the fields in this section are blank. (See Chapter 5, "Using Data Clarification Forms".) See also Table 4–5, " Maintain Discrepancy Database Window: Current DCF Panel" on page 4-15.
You use the Exit button to cancel a query, discard changes, and to close the window. You can use the Save button on the window or toolbar, the F10 key, or from the Data

Using the Maintain Discrepancy Database Window
4-12 Oracle Clinical Conducting a Study
menu, select Save to save changes without exiting the window. See also Table 4–6, " Maintain Discrepancy Database window: outside of panels" on page 4-15.
In Enter Query mode, the field background color changes to blue. Click F7 to enter query mode, the Exit button to cancel a query, and F8 to execute a query. For more information on query functions, see "Introducing the Oracle Clinical Interface" in the Oracle Clinical Getting Started manual.
Multi-Record View To view the details of many discrepancies at the same time, click the Multi button in the upper right corner of the Maintain Discrepancy Database window. The discrepancy window displays discrepancy details in columns. (See Figure 4–2, "Multi-Record View of the Maintain Discrepancy Database" on page 4-12.)
Figure 4–2 Multi-Record View of the Maintain Discrepancy Database
Maintain Discrepancy Database Window FieldsThe following tables describe each field in each of the Maintain Discrepancy Database window's panels and the area outside the panels.
Note: If you perform a query in multi-record view, Oracle Clinical temporarily reverts to single-record view while executing the query. When finished, the system returns to multi-record view.
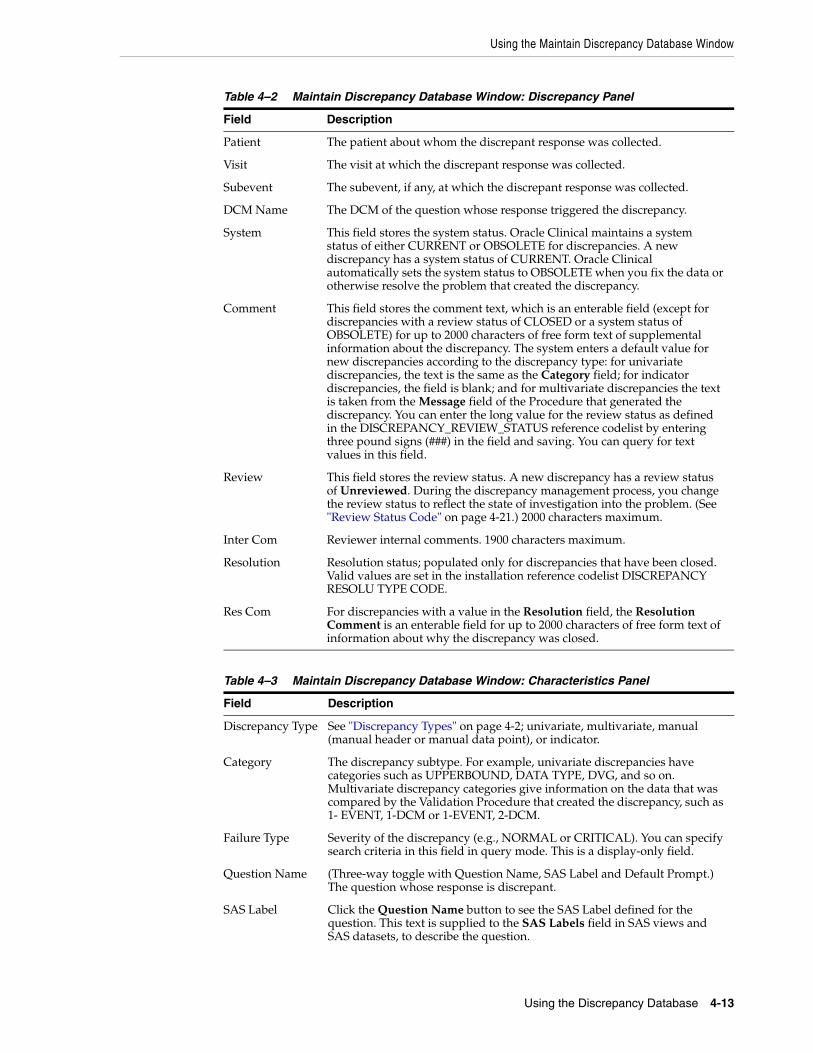
Using the Maintain Discrepancy Database Window
Using the Discrepancy Database 4-13
Table 4–2 Maintain Discrepancy Database Window: Discrepancy Panel
Field Description
Patient The patient about whom the discrepant response was collected.
Visit The visit at which the discrepant response was collected.
Subevent The subevent, if any, at which the discrepant response was collected.
DCM Name The DCM of the question whose response triggered the discrepancy.
System This field stores the system status. Oracle Clinical maintains a system status of either CURRENT or OBSOLETE for discrepancies. A new discrepancy has a system status of CURRENT. Oracle Clinical automatically sets the system status to OBSOLETE when you fix the data or otherwise resolve the problem that created the discrepancy.
Comment This field stores the comment text, which is an enterable field (except for discrepancies with a review status of CLOSED or a system status of OBSOLETE) for up to 2000 characters of free form text of supplemental information about the discrepancy. The system enters a default value for new discrepancies according to the discrepancy type: for univariate discrepancies, the text is the same as the Category field; for indicator discrepancies, the field is blank; and for multivariate discrepancies the text is taken from the Message field of the Procedure that generated the discrepancy. You can enter the long value for the review status as defined in the DISCREPANCY_REVIEW_STATUS reference codelist by entering three pound signs (###) in the field and saving. You can query for text values in this field.
Review This field stores the review status. A new discrepancy has a review status of Unreviewed. During the discrepancy management process, you change the review status to reflect the state of investigation into the problem. (See "Review Status Code" on page 4-21.) 2000 characters maximum.
Inter Com Reviewer internal comments. 1900 characters maximum.
Resolution Resolution status; populated only for discrepancies that have been closed. Valid values are set in the installation reference codelist DISCREPANCY RESOLU TYPE CODE.
Res Com For discrepancies with a value in the Resolution field, the Resolution Comment is an enterable field for up to 2000 characters of free form text of information about why the discrepancy was closed.
Table 4–3 Maintain Discrepancy Database Window: Characteristics Panel
Field Description
Discrepancy Type See "Discrepancy Types" on page 4-2; univariate, multivariate, manual (manual header or manual data point), or indicator.
Category The discrepancy subtype. For example, univariate discrepancies have categories such as UPPERBOUND, DATA TYPE, DVG, and so on. Multivariate discrepancy categories give information on the data that was compared by the Validation Procedure that created the discrepancy, such as 1- EVENT, 1-DCM or 1-EVENT, 2-DCM.
Failure Type Severity of the discrepancy (e.g., NORMAL or CRITICAL). You can specify search criteria in this field in query mode. This is a display-only field.
Question Name (Three-way toggle with Question Name, SAS Label and Default Prompt.) The question whose response is discrepant.
SAS Label Click the Question Name button to see the SAS Label defined for the question. This text is supplied to the SAS Labels field in SAS views and SAS datasets, to describe the question.

Using the Maintain Discrepancy Database Window
4-14 Oracle Clinical Conducting a Study
Default Prompt Click the Question Name, then SAS Label, to see the Default Prompt defined for the question. This is the label displayed in the Data Entry window for the field that collects data for the question.
Occ# The occurrence number of the question (for questions in Repeating question groups only).
Repeat Sn The repeat sequence number of the question (for Repeating questions only).
More... (Multivariate discrepancies only). Click this button to see the response data involved in generating the discrepancy, one or more of which may be discrepant. The Validation Values window appears, listing the questions and their responses that were used as variables in the Validation Procedure that generated the discrepancy. Questions are displayed as they are in the Procedure, as X.QUESTION_NAME where X is the DCM Question Group alias. If you want a question and its response to be included in the discrepancy's DCF, select the DCF Report? box (see Chapter 5, "Using Data Clarification Forms").
Value Text (Non-multivariate discrepancies only). The question response value that triggered the discrepancy (if any; may be blank for manual and indicator discrepancies).
Procedure The name of the Procedure that created the discrepancy (multivariate discrepancies only).
Version The version of the Procedure that created the discrepancy (multivariate discrepancies only).
Detail The Detail (program code) of the Procedure that created the discrepancy (multivariate discrepancies only).
Table 4–4 Maintain Discrepancy Database Window: Related Information Panel
Field Description
Study Site
Site
Visit Date The date of the visit at which the discrepant response was collected.
Investigator Code of the Investigator responsible for resolving the discrepancy.
Name Name of the Investigator responsible for resolving the discrepancy.
Initials Initials of the patient.
Document # DCI Page number of the discrepant response. For multivariate discrepancies, the DCI Page number of the question group defined as the primary reference in the definition of the Procedure that generated the discrepancy.
Subset The DCM Subset containing the discrepant data. For multivariate discrepancies, the DCM Subset containing the question group defined as the primary reference in the definition of the Procedure that generated the discrepancy.
Discrep ID The unique ID of the discrepancy.
CRF Pages The page number on the physical Case Report Form containing the discrepant response.
Qualif Value The response to the Qualifying question, if any, for the DCM containing the question with the discrepant response.
Table 4–3 (Cont.) Maintain Discrepancy Database Window: Characteristics Panel
Field Description
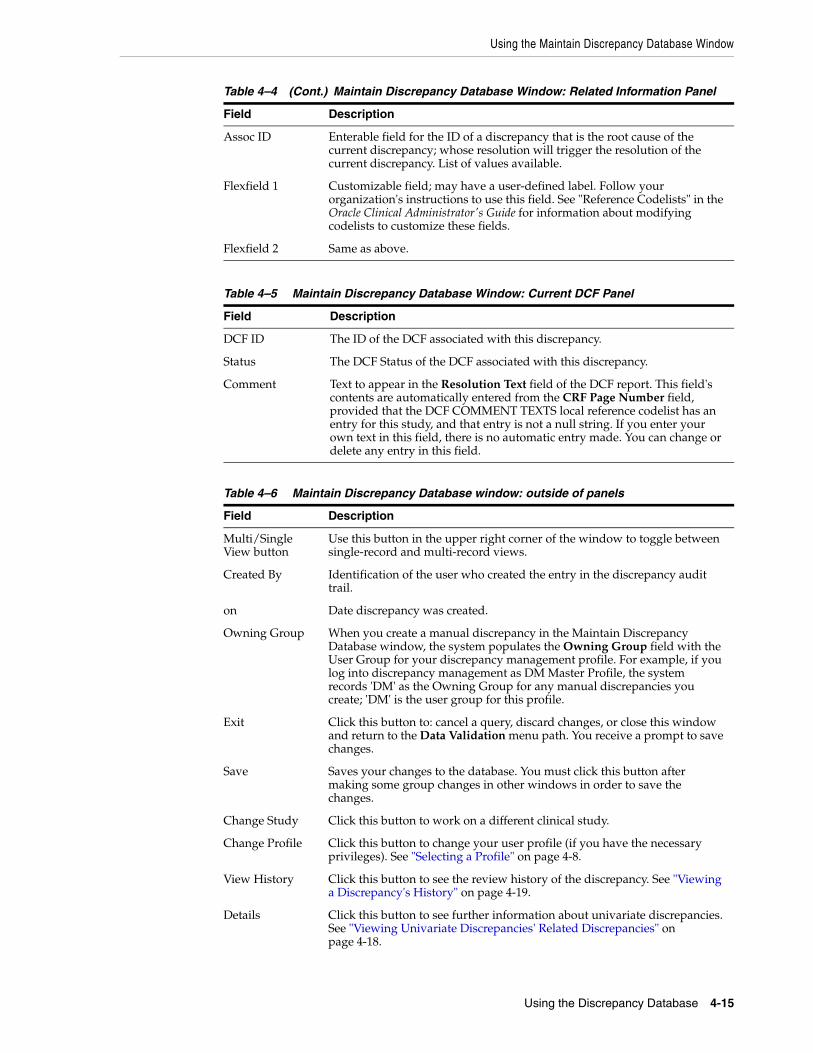
Using the Maintain Discrepancy Database Window
Using the Discrepancy Database 4-15
Assoc ID Enterable field for the ID of a discrepancy that is the root cause of the current discrepancy; whose resolution will trigger the resolution of the current discrepancy. List of values available.
Flexfield 1 Customizable field; may have a user-defined label. Follow your organization's instructions to use this field. See "Reference Codelists" in the Oracle Clinical Administrator's Guide for information about modifying codelists to customize these fields.
Flexfield 2 Same as above.
Table 4–5 Maintain Discrepancy Database Window: Current DCF Panel
Field Description
DCF ID The ID of the DCF associated with this discrepancy.
Status The DCF Status of the DCF associated with this discrepancy.
Comment Text to appear in the Resolution Text field of the DCF report. This field's contents are automatically entered from the CRF Page Number field, provided that the DCF COMMENT TEXTS local reference codelist has an entry for this study, and that entry is not a null string. If you enter your own text in this field, there is no automatic entry made. You can change or delete any entry in this field.
Table 4–6 Maintain Discrepancy Database window: outside of panels
Field Description
Multi/Single View button
Use this button in the upper right corner of the window to toggle between single-record and multi-record views.
Created By Identification of the user who created the entry in the discrepancy audit trail.
on Date discrepancy was created.
Owning Group When you create a manual discrepancy in the Maintain Discrepancy Database window, the system populates the Owning Group field with the User Group for your discrepancy management profile. For example, if you log into discrepancy management as DM Master Profile, the system records 'DM' as the Owning Group for any manual discrepancies you create; 'DM' is the user group for this profile.
Exit Click this button to: cancel a query, discard changes, or close this window and return to the Data Validation menu path. You receive a prompt to save changes.
Save Saves your changes to the database. You must click this button after making some group changes in other windows in order to save the changes.
Change Study Click this button to work on a different clinical study.
Change Profile Click this button to change your user profile (if you have the necessary privileges). See "Selecting a Profile" on page 4-8.
View History Click this button to see the review history of the discrepancy. See "Viewing a Discrepancy's History" on page 4-19.
Details Click this button to see further information about univariate discrepancies. See "Viewing Univariate Discrepancies' Related Discrepancies" on page 4-18.
Table 4–4 (Cont.) Maintain Discrepancy Database Window: Related Information Panel
Field Description
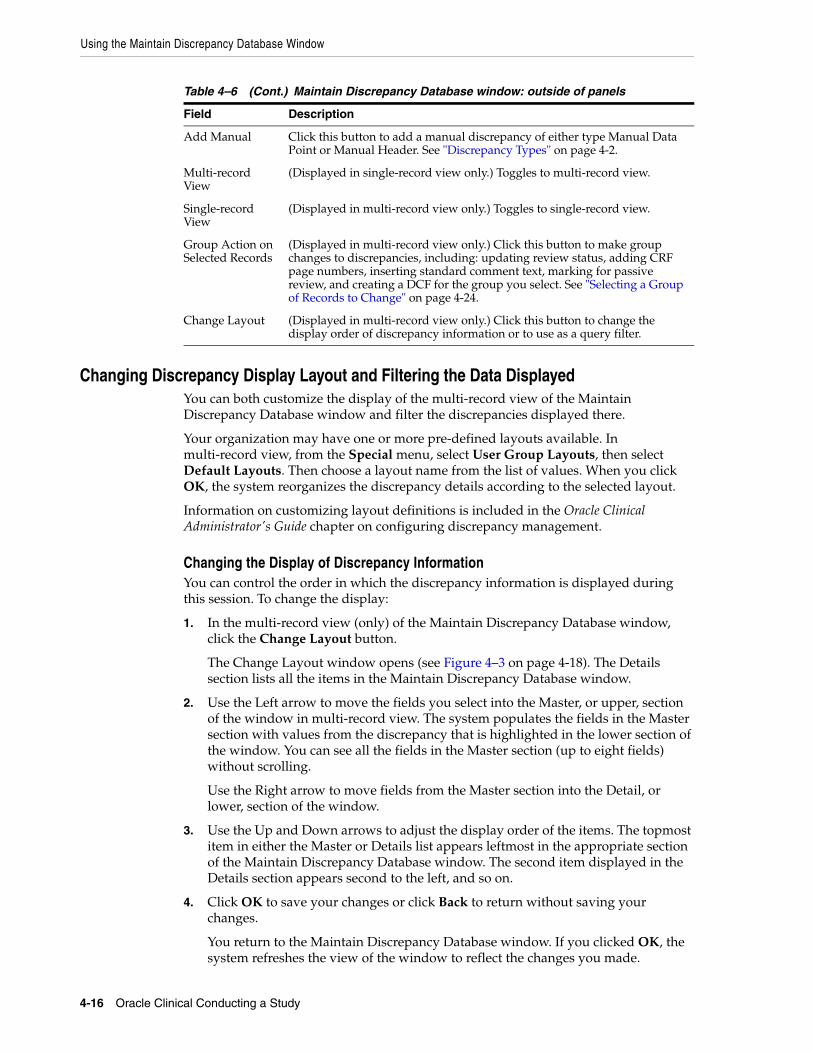
Using the Maintain Discrepancy Database Window
4-16 Oracle Clinical Conducting a Study
Changing Discrepancy Display Layout and Filtering the Data DisplayedYou can both customize the display of the multi-record view of the Maintain Discrepancy Database window and filter the discrepancies displayed there.
Your organization may have one or more pre-defined layouts available. In multi-record view, from the Special menu, select User Group Layouts, then select Default Layouts. Then choose a layout name from the list of values. When you click OK, the system reorganizes the discrepancy details according to the selected layout.
Information on customizing layout definitions is included in the Oracle Clinical Administrator's Guide chapter on configuring discrepancy management.
Changing the Display of Discrepancy InformationYou can control the order in which the discrepancy information is displayed during this session. To change the display:
1. In the multi-record view (only) of the Maintain Discrepancy Database window, click the Change Layout button.
The Change Layout window opens (see Figure 4–3 on page 4-18). The Details section lists all the items in the Maintain Discrepancy Database window.
2. Use the Left arrow to move the fields you select into the Master, or upper, section of the window in multi-record view. The system populates the fields in the Master section with values from the discrepancy that is highlighted in the lower section of the window. You can see all the fields in the Master section (up to eight fields) without scrolling.
Use the Right arrow to move fields from the Master section into the Detail, or lower, section of the window.
3. Use the Up and Down arrows to adjust the display order of the items. The topmost item in either the Master or Details list appears leftmost in the appropriate section of the Maintain Discrepancy Database window. The second item displayed in the Details section appears second to the left, and so on.
4. Click OK to save your changes or click Back to return without saving your changes.
You return to the Maintain Discrepancy Database window. If you clicked OK, the system refreshes the view of the window to reflect the changes you made.
Add Manual Click this button to add a manual discrepancy of either type Manual Data Point or Manual Header. See "Discrepancy Types" on page 4-2.
Multi-record View
(Displayed in single-record view only.) Toggles to multi-record view.
Single-record View
(Displayed in multi-record view only.) Toggles to single-record view.
Group Action on Selected Records
(Displayed in multi-record view only.) Click this button to make group changes to discrepancies, including: updating review status, adding CRF page numbers, inserting standard comment text, marking for passive review, and creating a DCF for the group you select. See "Selecting a Group of Records to Change" on page 4-24.
Change Layout (Displayed in multi-record view only.) Click this button to change the display order of discrepancy information or to use as a query filter.
Table 4–6 (Cont.) Maintain Discrepancy Database window: outside of panels
Field Description
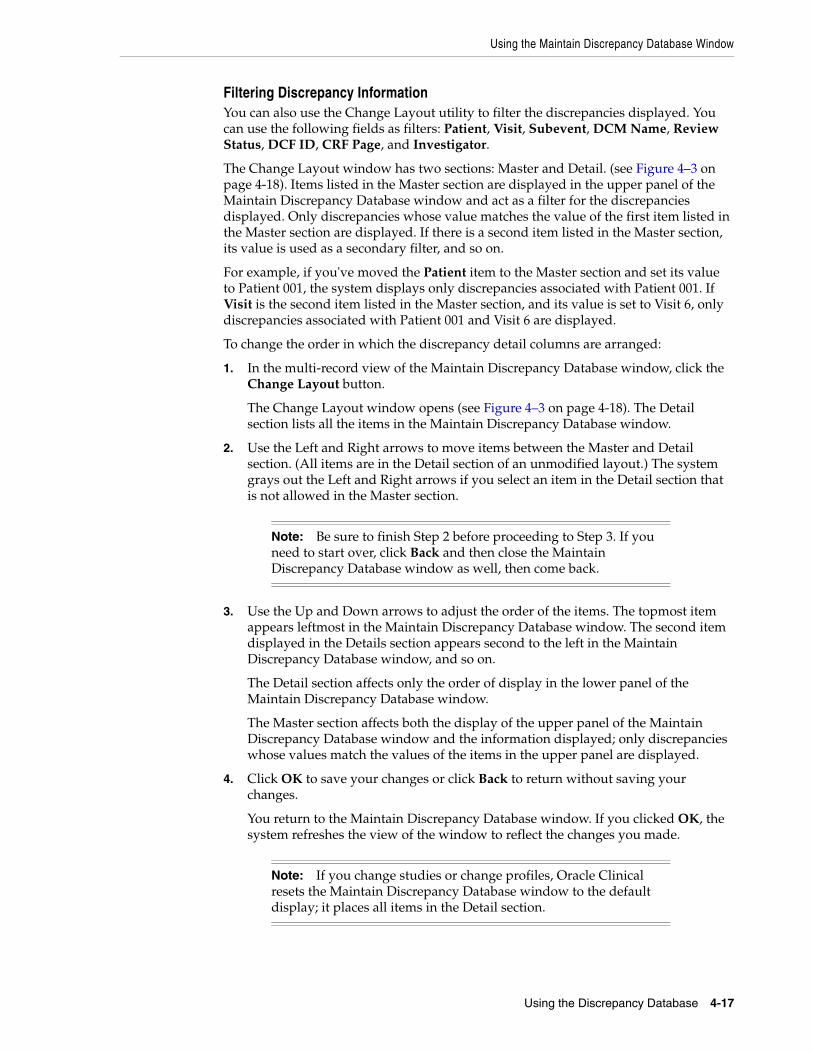
Using the Maintain Discrepancy Database Window
Using the Discrepancy Database 4-17
Filtering Discrepancy InformationYou can also use the Change Layout utility to filter the discrepancies displayed. You can use the following fields as filters: Patient, Visit, Subevent, DCM Name, Review Status, DCF ID, CRF Page, and Investigator.
The Change Layout window has two sections: Master and Detail. (see Figure 4–3 on page 4-18). Items listed in the Master section are displayed in the upper panel of the Maintain Discrepancy Database window and act as a filter for the discrepancies displayed. Only discrepancies whose value matches the value of the first item listed in the Master section are displayed. If there is a second item listed in the Master section, its value is used as a secondary filter, and so on.
For example, if you've moved the Patient item to the Master section and set its value to Patient 001, the system displays only discrepancies associated with Patient 001. If Visit is the second item listed in the Master section, and its value is set to Visit 6, only discrepancies associated with Patient 001 and Visit 6 are displayed.
To change the order in which the discrepancy detail columns are arranged:
1. In the multi-record view of the Maintain Discrepancy Database window, click the Change Layout button.
The Change Layout window opens (see Figure 4–3 on page 4-18). The Detail section lists all the items in the Maintain Discrepancy Database window.
2. Use the Left and Right arrows to move items between the Master and Detail section. (All items are in the Detail section of an unmodified layout.) The system grays out the Left and Right arrows if you select an item in the Detail section that is not allowed in the Master section.
3. Use the Up and Down arrows to adjust the order of the items. The topmost item appears leftmost in the Maintain Discrepancy Database window. The second item displayed in the Details section appears second to the left in the Maintain Discrepancy Database window, and so on.
The Detail section affects only the order of display in the lower panel of the Maintain Discrepancy Database window.
The Master section affects both the display of the upper panel of the Maintain Discrepancy Database window and the information displayed; only discrepancies whose values match the values of the items in the upper panel are displayed.
4. Click OK to save your changes or click Back to return without saving your changes.
You return to the Maintain Discrepancy Database window. If you clicked OK, the system refreshes the view of the window to reflect the changes you made.
Note: Be sure to finish Step 2 before proceeding to Step 3. If you need to start over, click Back and then close the Maintain Discrepancy Database window as well, then come back.
Note: If you change studies or change profiles, Oracle Clinical resets the Maintain Discrepancy Database window to the default display; it places all items in the Detail section.
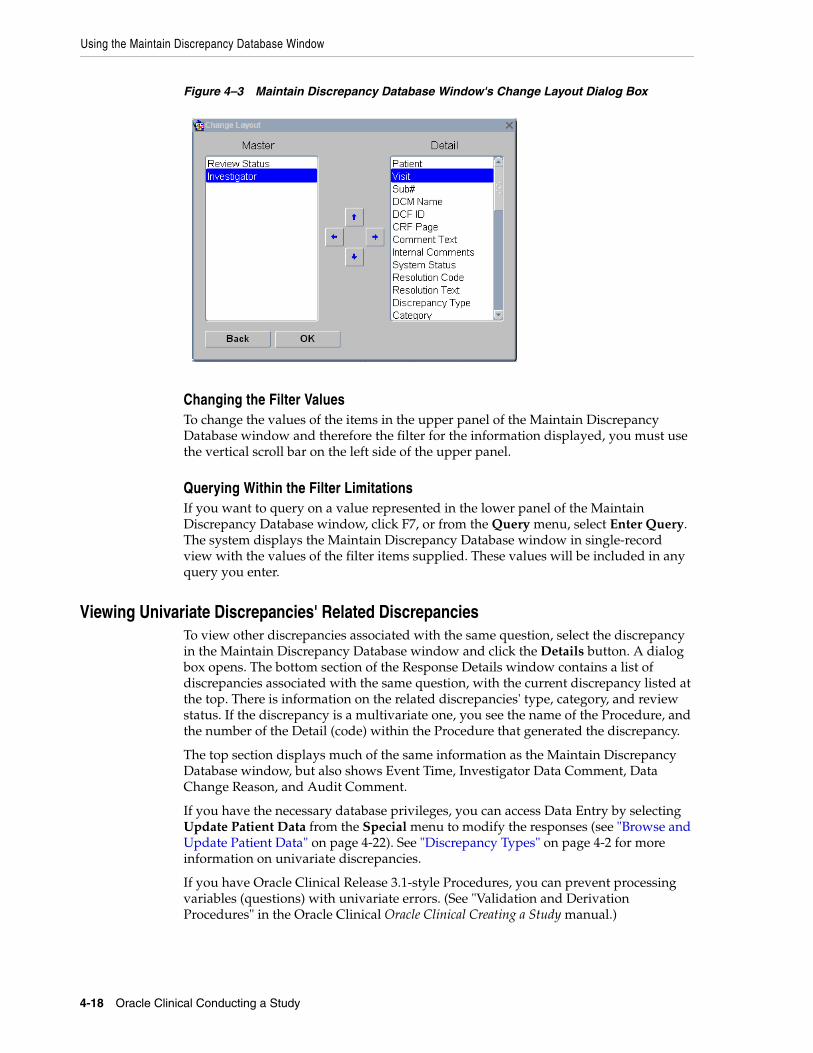
Using the Maintain Discrepancy Database Window
4-18 Oracle Clinical Conducting a Study
Figure 4–3 Maintain Discrepancy Database Window's Change Layout Dialog Box
Changing the Filter ValuesTo change the values of the items in the upper panel of the Maintain Discrepancy Database window and therefore the filter for the information displayed, you must use the vertical scroll bar on the left side of the upper panel.
Querying Within the Filter LimitationsIf you want to query on a value represented in the lower panel of the Maintain Discrepancy Database window, click F7, or from the Query menu, select Enter Query. The system displays the Maintain Discrepancy Database window in single-record view with the values of the filter items supplied. These values will be included in any query you enter.
Viewing Univariate Discrepancies' Related DiscrepanciesTo view other discrepancies associated with the same question, select the discrepancy in the Maintain Discrepancy Database window and click the Details button. A dialog box opens. The bottom section of the Response Details window contains a list of discrepancies associated with the same question, with the current discrepancy listed at the top. There is information on the related discrepancies' type, category, and review status. If the discrepancy is a multivariate one, you see the name of the Procedure, and the number of the Detail (code) within the Procedure that generated the discrepancy.
The top section displays much of the same information as the Maintain Discrepancy Database window, but also shows Event Time, Investigator Data Comment, Data Change Reason, and Audit Comment.
If you have the necessary database privileges, you can access Data Entry by selecting Update Patient Data from the Special menu to modify the responses (see "Browse and Update Patient Data" on page 4-22). See "Discrepancy Types" on page 4-2 for more information on univariate discrepancies.
If you have Oracle Clinical Release 3.1-style Procedures, you can prevent processing variables (questions) with univariate errors. (See "Validation and Derivation Procedures" in the Oracle Clinical Oracle Clinical Creating a Study manual.)
Using the Maintain Discrepancy Database Window
Using the Discrepancy Database 4-19
Viewing Multivariate Discrepancies' ResponsesMultivariate discrepancies are created by Validation Procedures that compare multiple question responses as variables. They are associated with all the question responses that created the discrepancy (see "Discrepancy Types" on page 4-2).
To view the response data that triggered a multivariate discrepancy, select the discrepancy in the single-record view of the Maintain Discrepancy Database window and click the More button. (The system displays the More button only for multivariate, accessible discrepancies.) The Validation Values window opens, listing the questions (Procedure variables) whose responses triggered the discrepancy, with the response value. If you have the necessary database privileges, you can access Data Entry from the Special menu, by selecting Update Patient Data to modify the responses (see "Browse and Update Patient Data" on page 4-22).
You can select any question from the list and click the Details button to view any other discrepancies associated with that question (in the bottom section, with the current discrepancy listed at the top). You cannot change the response data from this window.
Viewing a Discrepancy's HistoryOracle Clinical generates a discrepancy history record whenever there is a change in the discrepancy's:
■ Review status
■ Resolution status
■ Internal comment text
■ Resolution text
■ Either or both flexfields
To view the history of a discrepancy, select the discrepancy in the Maintain Discrepancy Database window and click the View History button. The Discrepancy History window opens. The history record includes all of a discrepancy's change details, as well as the changes' owners and timestamps. Click the icon to the right of the Internal Comments field to read the internal comments.
The Discrepancy History window is display-only. Click the Back button to return to the Maintain Discrepancy Database window.
Viewing a Discrepancy's Internal Comment HistoryTo view all of a selected discrepancy's internal comments, click the Internal Comments button (to the right of the Inter Com field in single mode) of the Maintain Discrepancy Database window. The Internal Comment History window opens. It displays comments in chronological order, with the most recent entries at the top of the list. Each entry includes a header with the internal comment's creator's user name, user group, and the creation timestamp. This listing is read-only.
Note: If you want the response value of a question (Procedure variable) to be displayed in the discrepancy's DCF Report, select its DCF Report? box. For more information on DCFs, see Chapter 5, "Using Data Clarification Forms".
Managing Discrepancies
4-20 Oracle Clinical Conducting a Study
Managing DiscrepanciesThis section contains the following topics:
■ Discrepancy Status Codes on page 4-21
■ Browse and Update Patient Data on page 4-22
■ Entering Manual Discrepancies on page 4-23
■ Including CRF Page Numbers With Discrepancies on page 4-24
■ Maintaining Data Clarification Form (DCF) Information on page 4-24
■ Modifying Groups of Discrepancies on page 4-24
■ Group-Updating Review Status on page 4-25
■ Group-Updating CRF Page Numbers on page 4-26
■ Group-Inserting Standard Text on page 4-26
■ Group-Marking for Passive Review on page 4-27
■ Creating a DCF for a Hand-Selected Group of Discrepancies on page 4-28
Your organization must set up a process for resolving discrepancies, and create a review status for each stage of the process. Each person who completes one stage of the process must update the review status of the discrepancy in the Discrepancy Database. Oracle Clinical provides tools for you to use in the review process, including these special functions available from the Special menu from the Maintain Discrepancy Database window:
■ Scanned CRF images. If your organization has set up this feature, from the Special menu, select Get Image to see an image of the actual paper CRF used to collect the data that led to this discrepancy. (To set up this link initially, your system administrator must modify the procedure OCL_CLIENT_PACK.PASSKEYS database function to call the imaging system. See the Interfacing from Oracle Clinical manual.)
■ Show RDCM information. If you have the necessary database privileges, you can view a discrepancy's DCM responses directly from the Maintain Discrepancy Database window. From the Special menu, select Show RDCM Info.
■ Audit RDCIs. View the history of changes to Received DCM(S) and Received DCI(S) involved in a discrepancy, including the original and update timestamps, comments, and owners.
■ Data Clarification Forms. You can group similar discrepancies for a single patient together on a Data Clarification Form and send them out for review. See Chapter 5, "Using Data Clarification Forms".
■ CRF Page Tracking. You can associate the discrepancy with the page number of the physical Case Report Form where the discrepant response was recorded. See "Including CRF Page Numbers With Discrepancies" on page 4-24.
If you determine that a discrepancy was caused by entering incorrect data, and you have the necessary privileges, you can go to the Data Entry window in Update mode directly from the Maintain Discrepancy Database window and update the data. See "Browse and Update Patient Data" on page 4-22.
You can also create discrepancies manually. See "Entering Manual Discrepancies" on page 4-23.
Managing Discrepancies
Using the Discrepancy Database 4-21
Discrepancy Status CodesDiscrepancies are associated with three types of status codes: system, review, and resolution.
System Status CodeThe system automatically assigns a system status code to each discrepancy that reflects the actual state of the data that triggered the creation of the discrepancy. The system status code is CURRENT as long as the data is discrepant. When the data is no longer discrepant—either because the data is updated or because the validation procedure or question attribute that flagged the data as discrepant is changed in such a way that the data is no longer discrepant—the system automatically updates the system status to OBSOLETE.
Review Status CodeOracle Clinical ships with these review status codes:
■ Unreviewed: Oracle Clinical assigns an initial review status value of Unreviewed to each new discrepancy.
■ CRA Review: Assigned to the Clinical Research Associate for review.
■ DM Review: Assigned to the Data Manager for review
■ INV Review: Assigned to the Investigator for review.
■ TMS in Progress: The system assigns this status to discrepancies that are currently owned by Oracle Thesaurus Management System (TMS). This happens when a question response that is set up to be coded to a dictionary term in Oracle Thesaurus Management System (TMS) cannot be automatically classified, and First Review is set to TMS, or after a user in Oracle Clinical has set the status to TMS Evaluation. You cannot take any action on this discrepancy in Oracle Clinical.
■ TMS Evaluation: If a TMS user has a question about a response that he or she is trying to code in TMS, he or she can assign an action to the term asking for clarification or some other action. The system then assigns a status such as INV Review (this is configurable; see the Oracle Thesaurus Management System User's Guide for information). After you take the action on the term, set the discrepancy's status to TMS Evaluation so that batch validation transfers ownership of the discrepancy back to TMS and changes its status to TMS in Progress.
■ Resolved: Not assigned to any person or process. Setting a discrepancy's status to RESOLVED does not cause the system to close the discrepancy. That happens only when the data is no longer discrepant, either because the data has been updated to a nondiscrepant value or because the validation procedure or question attribute that flagged the value as discrepant has been changed in such a way that the existing value is no longer considered discrepant.
If you set the discrepancy review status to Resolved, you must also select a resolution status.
■ Irresolvable: Not assigned to any person or process because it is not possible to resolve the discrepancy. Setting a discrepancy's status to IRRESOLVABLE does not cause the system to close the discrepancy.
If you set the discrepancy review status to Irresolvable, you must also select a resolution status.
■ Closed: The system sets a discrepancy's status to Closed when it is resolved by either updating the data to a nondiscrepant value or changing the validation
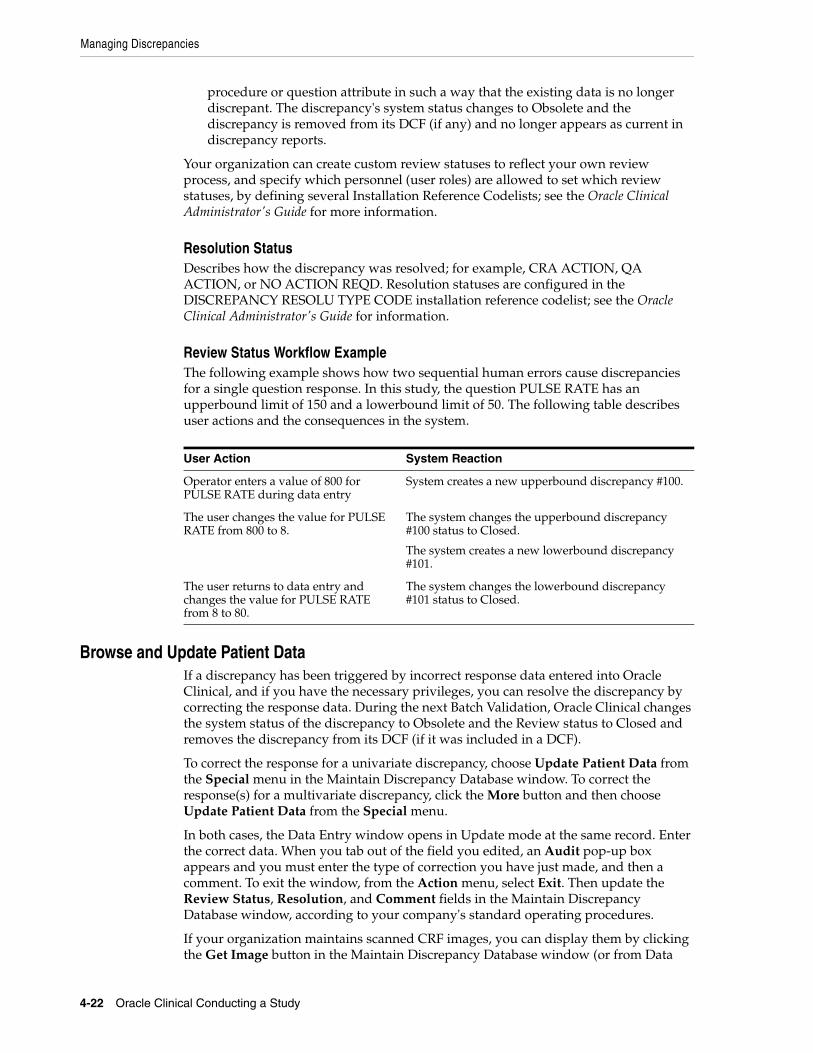
Managing Discrepancies
4-22 Oracle Clinical Conducting a Study
procedure or question attribute in such a way that the existing data is no longer discrepant. The discrepancy's system status changes to Obsolete and the discrepancy is removed from its DCF (if any) and no longer appears as current in discrepancy reports.
Your organization can create custom review statuses to reflect your own review process, and specify which personnel (user roles) are allowed to set which review statuses, by defining several Installation Reference Codelists; see the Oracle Clinical Administrator's Guide for more information.
Resolution StatusDescribes how the discrepancy was resolved; for example, CRA ACTION, QA ACTION, or NO ACTION REQD. Resolution statuses are configured in the DISCREPANCY RESOLU TYPE CODE installation reference codelist; see the Oracle Clinical Administrator's Guide for information.
Review Status Workflow ExampleThe following example shows how two sequential human errors cause discrepancies for a single question response. In this study, the question PULSE RATE has an upperbound limit of 150 and a lowerbound limit of 50. The following table describes user actions and the consequences in the system.
Browse and Update Patient DataIf a discrepancy has been triggered by incorrect response data entered into Oracle Clinical, and if you have the necessary privileges, you can resolve the discrepancy by correcting the response data. During the next Batch Validation, Oracle Clinical changes the system status of the discrepancy to Obsolete and the Review status to Closed and removes the discrepancy from its DCF (if it was included in a DCF).
To correct the response for a univariate discrepancy, choose Update Patient Data from the Special menu in the Maintain Discrepancy Database window. To correct the response(s) for a multivariate discrepancy, click the More button and then choose Update Patient Data from the Special menu.
In both cases, the Data Entry window opens in Update mode at the same record. Enter the correct data. When you tab out of the field you edited, an Audit pop-up box appears and you must enter the type of correction you have just made, and then a comment. To exit the window, from the Action menu, select Exit. Then update the Review Status, Resolution, and Comment fields in the Maintain Discrepancy Database window, according to your company's standard operating procedures.
If your organization maintains scanned CRF images, you can display them by clicking the Get Image button in the Maintain Discrepancy Database window (or from Data
User Action System Reaction
Operator enters a value of 800 for PULSE RATE during data entry
System creates a new upperbound discrepancy #100.
The user changes the value for PULSE RATE from 800 to 8.
The system changes the upperbound discrepancy #100 status to Closed.
The system creates a new lowerbound discrepancy #101.
The user returns to data entry and changes the value for PULSE RATE from 8 to 80.
The system changes the lowerbound discrepancy #101 status to Closed.
Managing Discrepancies
Using the Discrepancy Database 4-23
Entry). You can make an immediate comparison of the original CRF and the data entered into Oracle Clinical.
Entering Manual DiscrepanciesIf there is a general problem with a visit record, you can enter a manual header discrepancy. This type of discrepancy is not directly associated with a single response, but to a Received DCM's data in general. You can enter manual header discrepancies only from the Maintain Discrepancy Database window.
If you are unable to enter a particular response because, for example, the entry is illegible in the Case Report Form, you can create a manual data point discrepancy, either from the Data Entry window or directly in the Maintain Discrepancy Database window.
To create a manual discrepancy from the Maintain Discrepancy Database window:
1. Select an existing discrepancy that is similar to the discrepancy you are creating; the system populates the record you are creating with the values of the currently selected discrepancy. (If there are no similar discrepancies, the current selection does not matter.)
2. Click the Add Manual button in the lower right corner of the window. The Add a Manual Discrepancy dialog box opens, populated with values inherited from the selected discrepancy in the Maintain Discrepancy Database window.
3. Choose a Discrepancy Type radio button.
4. Adjust the inherited values that populate the dialog box. The data point fields are only active if you selected the Manual (Data Point) radio button.
You can clear all values by clicking the Clear button.
5. Optional: Add comment text, internal comment text and resolution text. If your organization has standard text values for comments for univariate discrepancies, they become available when you select a field. Enter a standard text name, or choose a name from the standard text list of values.
You can define custom standard text; see the Oracle Clinical Administrator's Guide for information.
6. Select a Review Status from the list of values. The current profile may limit the list.
7. Click Save to create the new discrepancy. Click Back to close the dialog box without creating a discrepancy; the dialog box closes.
The system does not display the new discrepancy until you query the Discrepancy Database again.
Note: If you click the question mark (?) Help icon from this window, you get information on the Question and question group associated with the response.
Note: The system opens with Manual Header as the default Discrepancy type. Choose Manual (Data Point) if the discrepancy concerns a particular question response.
Managing Discrepancies
4-24 Oracle Clinical Conducting a Study
Including CRF Page Numbers With DiscrepanciesIf your study is using CRF Page Tracking, you can store the number of the page of the Case Report Form on which the discrepant response was originally collected. (You can see a scanned image of the actual CRF by selecting Get Image from the Special menu, if your organization has set this up.)
From single-record view, click the CRF Page Number button located next to the CRF Pages field. In multi-record view, select multiple records and use the Group Function to populate the page numbers. (See "Group-Updating CRF Page Numbers" on page 4-26.) If the CRF Page Tracking option is enabled, the system retrieves the page numbers. Otherwise, the DCI Book associated with the current patient is referenced.
If there is no patient-specific book, the system populates the field with the default book for the study.
Maintaining Data Clarification Form (DCF) Information You can directly access Data Clarification Form information related to a discrepancy directly from the Maintain Discrepancy Database window. (For more information on DCFs, see Chapter 5, "Using Data Clarification Forms".) From the Special menu, select Data Clarification Forms. If the current discrepancy is associated with a DCF, the Maintain Data Clarification Form opens to display the details of the DCF. Otherwise, the Maintain Data Clarification Form opens in query mode.
Modifying Groups of DiscrepanciesWith the Group Function utility, you can query for and select a group of discrepancies and simultaneously update their review status, comment text, or CRF page numbers, mark them for passive review, or create DCFs for them. To access the Group Function utility, open the Maintain Discrepancy Database window in multi-record view; from the Conduct menu, select Data Validation, then select Discrepancy Database, and then the Multi button. You can make the several types of changes, including:
■ Group-Updating Review Status on page 4-25
■ Group-Updating CRF Page Numbers on page 4-26
■ Group-Inserting Standard Text on page 4-26
■ Group-Marking for Passive Review on page 4-27
■ Creating a DCF for a Hand-Selected Group of Discrepancies on page 4-28
The process involves the following general steps:
■ Selecting a Group of Records to Change on page 4-24
■ Choosing a Change Type on page 4-25
■ Making the change and saving your work
Selecting a Group of Records to Change Select records using the standard Windows selecting procedure: Ctrl-click individual selections or Shift-click a successive group of records.To select all records, from the
Note: It is possible that the currently selected profile restricts viewing the discrepancy you just created.
Managing Discrepancies
Using the Discrepancy Database 4-25
Special menu, select Select All. Once selected, records are displayed as white text on a dark blue background.
Ctrl-click to toggle the selected state of any individual record. Clicking on any selected record without also pressing Ctrl deselects all records.
Choosing a Change TypeAfter you have selected the record(s) to change:
1. Click the Group Action on Selected Records button located the upper right corner of the Master section.
The Discrepancy Group Functions dialog box opens.
2. Choose the type of group change to make to the selected records by clicking one of the radio buttons.
3. Click OK to proceed, or click Back to return and halt the Group Function.
The system tests that the change you want to make is valid for all chosen records. If any records fail this validation check, you receive an error message and the Group Function dialog box closes.
If all selected records are valid, the Value Selection dialog box opens.
Group-Updating Review StatusThis Group Function allows a user to change the review status code for multiple discrepancies. You must assign the same status to all the discrepancies you select. If you select the status Irresolvable, you must also apply the same resolution code to all selected discrepancies. To update the review status of a group of discrepancies:
1. Select a group of records to update (see "Selecting a Group of Records to Change" on page 4-24).
2. Click the Group Function button located in the upper right corner of the Maintain Discrepancy Database window.
3. Click the Update Review Status Code radio button.
4. Click OK. The system verifies that you have the necessary database privileges to update review status. If so, a list of review status values opens.
5. Select a review status value.
(If you select review status Irresolvable, the Resolution Codes List of Values dialog box opens. Choose a resolution code to apply to all selected records.)
6. Click OK to assign the selected code to all of the selected records. Click Cancel to halt the group change. In either case, you return to the Maintain Discrepancy Database window.
Notes:
■ Your group changes are not permanent until you save them in the Maintain Discrepancy Database window (except for creating DCFs).
■ The Select All function takes place on the Web server; if you have a large group of records, selecting them all may take a while to process.
Managing Discrepancies
4-26 Oracle Clinical Conducting a Study
7. Click Save to commit your changes to the database.
Group-Updating CRF Page Numbers If your study is using CRF Page Tracking, you can apply CRF page numbers to a group of selected discrepancy records. See "Including CRF Page Numbers With Discrepancies" on page 4-24.
1. Select a group of records to which to apply CRF page number values (See "Selecting a Group of Records to Change" on page 4-24).
2. Click the Group Action on Selected Records button located in the upper right corner of the Master section. The Discrepancy Group Functions dialog box opens.
3. Click the Update CRF Page Numbers radio button. The system verifies that you have the necessary database privileges to update the CRF Page field and that all of the selected records have not already been assigned a CRF Page.
4. Click OK to generate the page numbers, or click Cancel to halt the Group Function. In either case, you return to the Maintain Discrepancy Database window.
5. Click Save to commit your changes to the database.
Group-Inserting Standard Text You can use the Group Function to insert the same text into one of the Comment fields for multiple discrepancies at the same time. The fields into which you can make group text insertions are Comments, Internal Comments, and Resolution Comments.
If predefined standard text is available for the type of discrepancy you selected, you can choose a standard comment and insert it (press F9 to see the list of values). If not, you can enter free form text and insert it into all the selected discrepancies' records.
To insert predefined standard text:
1. Select a group of records to update (see "Selecting a Group of Records to Change" on page 4-24).
2. Click the Group Action on Selected Records button located the upper right corner of the Master section. The Discrepancy Group Functions dialog box opens.
3. Click the radio button for the field into which you want to insert standard text: Standard Text for Comments, Standard Text for Internal Comments, or Standard Text for Resolution.
4. Click OK. (Click Back to exit without making changes). The system verifies that you have the database privileges necessary to insert standard comments, and that all of the discrepancies are in the same category. If so, a list of standard text options opens.
5. Select a standard text option. You can query in this dialog box. Enter a standard text value or part of a value plus wildcards (%) in the Text field, then click the Search button.
Note: Your group changes are not permanent until you save them in the Maintain Discrepancy Database window.
Note: Your group changes are not permanent until you save them in the Maintain Discrepancy Database window.

Managing Discrepancies
Using the Discrepancy Database 4-27
6. In the Maintain Discrepancy Database window, click Save to commit your changes to the database. Click Exit to abandon your changes.
If you chose Manual, Manual Header, or Multivariate discrepancies, and there is no standard text value, the system opens the Comment Text Editor:
1. Select a group of records to update (see "Selecting a Group of Records to Change" on page 4-24).
2. Click the Group Action on Selected Records button located the upper right corner of the Master section. The Discrepancy Group Functions dialog box opens.
3. Click the radio button for the field into which you want to insert standard text: Comments, Internal Comments, or Resolution Comments.
4. Click OK. (Click Back to exit without making changes). The system verifies that you have the database privileges necessary to insert comments, and that all of the discrepancies are in the same category. If so, the Comment Text Editor window opens.
5. Enter free form text.
6. Click OK to complete the group change, or Cancel to return to the Maintain Discrepancy Database window. If you click OK, a Forms window opens which lists the number of discrepancies that will be updated and prompts you to press F10 to commit the changes to the database.
7. Click OK to close the Forms window, then press F10 to commit these changes to the database.
Group-Marking for Passive ReviewPassive Review is a status that allows you to reduce the number of discrepancy queries and the number of discrepancies on a DCF by associating one or more discrepancies with a primary discrepancy. You can then include all the discrepancies in a single query. When you create the DCF, do not include discrepancies marked as Passive Review in the printed DCF.
Example If you have a page with three lab results and all three lab results are missing, you would have three discrepancies such as:
■ AST lab units missing, please provide.
■ ALT lab units missing, please provide.
■ RBC lab units missing, please provide.
You could send three queries, but to save time, money, and paper you could choose to send only one query such as: Page 7 all lab units are missing, please provide.
To do this, mark the second two discrepancies for passive review associated with the first discrepancy as the primary discrepancy. Then create a DCF, include all three discrepancies in the DCF, but mark the primary discrepancy's status as For Distribution and the other discrepancies' status as Not For Distribution. When you print the DCF, only the primary discrepancy appears, but all three are included in the electronic DCF.
Note: Your group changes are not permanent until you save them in the Maintain Discrepancy Database window.
Managing Discrepancies
4-28 Oracle Clinical Conducting a Study
When the answer to the query returns, you can update the data for all three discrepancies.
To associate discrepancies with a primary discrepancy:
1. In the Maintain Discrepancy Database multi-record view, make a note of the ID of the primary discrepancy and its current review status.
2. Select the secondary discrepancies and the primary discrepancy in the Maintain Discrepancy Database window; see Selecting a Group of Records to Change on page 4-24.
3. Click the Group Action on Selected Records button located the upper right corner of the Master section.
The Discrepancy Group Functions dialog box opens.
4. Click the Mark for Passive Review radio button and then click OK. The Discrepancy Association and Passive Review dialog box opens.
5. Enter the ID of the primary discrepancy. A list of values is available.
6. Enter a review status for the primary discrepancy. You can set a new review status for it here. A list of values is available.
7. Enter a passive review status for the secondary discrepancies or leave it as the default value: Passive Review. A list of values is available.
8. Click OK to save changes and return to the Maintain Discrepancy Database window. You must press Save again there to save the changes to the database.
OR
Click Back to return to the Maintain Discrepancy Database window without saving your changes.
Creating a DCF for a Hand-Selected Group of Discrepancies You can create a DCF for discrepancies that you hand-select by using the Group Function from the Maintain Discrepancy Database window, in multi-record view. See Chapter 5, "Using Data Clarification Forms" for information on DCFs and how to create them by using selection criteria.
Note: You may want to add a status called PASSIVE, for example, to the DISCREPANCY REV STATUS CODE specifically for this purpose. You must also assign user roles to the code in the
Note: If you are using V3.1-style Procedures in your study, you can avoid creating secondary discrepancies by defining your Validation Procedures so that they do not process variables (Questions) with univariate discrepancies. See "Validation and Derivation Procedures" in the Oracle Clinical Creating a Study manual.
Note: A DCF can contain discrepancies associated with only one patient. Selecting discrepancy records for more than one patient causes the system to create multiple DCFs.
Using the Test Discrepancy Database
Using the Discrepancy Database 4-29
1. Select the discrepancy records upon which to base the DCFs (See "Selecting a Group of Records to Change" on page 4-24).
2. Click the Group Function button located in the upper right corner of the Maintain Discrepancy Database window.
3. Click the Create DCFs radio button.
4. Click OK. The system verifies that you have the database privileges necessary to create DCFs, and that the selected records are not currently active on any existing DCFs. If appropriate, the Create DCF dialog box opens.
5. Enter values into the five fields. Except for the Description field, each field has an accompanying list of values:
a. In the Owning User field, enter or select the person responsible for the DCFs. The system defaults to the current user.
b. Write a description in the Description field. The system places this text in the Description field of the new DCF for the selected records.
c. In the Non-Distribution Status field, select Passive Review or another status. Discrepancies with the status you choose here are included in the DCF but do not appear in the printed report.
d. Choose a standard header text value from the list of values.
e. Choose a standard footer text value from the list of values.
6. Click OK (or click Cancel to halt the group change). The system creates one new DCF for each patient whose discrepancies you selected.
The system displays the number of created DCFs in a message box when it finishes processing the change.
7. The new DCF is now listed in the Maintain Discrepancy Database window for each discrepancy. You can also see the new DCF in the Maintain Data Clarification Forms window (see Chapter 5, "Using Data Clarification Forms").
Using the Test Discrepancy DatabaseFrom the Definition menu, select Test a Study, then select Discrepancy Database to view discrepancies created on test data.
Any discrepancies resulting from entering test data or running Procedures in test mode are entered in the Test Discrepancy Database. Unlike production mode, each time you run a test, the previous discrepancy data for that test is erased in the Test Discrepancy Database.
Oracle Clinical provides a duplicate set of data tables, called a Test Database, for the purpose of testing Data Entry windows, data extract views, Procedures, and DCFs.
Note: The Create DCF Group Function saves the new DCF(s) to the database directly when you perform step 6 of the following instructions—not when you save your changes in the Maintain Discrepancy Database window as with other Group Functions.
Caution: When you perform the next step—Step 6—the system saves the new DCF records to the database.
Using the Test Discrepancy Database
4-30 Oracle Clinical Conducting a Study
Whenever you do anything in test mode (using any menu path with the word "test"), Oracle Clinical points your account to the test tables, so you cannot corrupt the data in the production database. Oracle Clinical populates the test tables with a few dummy sites, Investigators, and patients, each of which contains "dummy" in its name. You may need to add more test data.
Note: When you create test data, we suggest you follow a naming convention that is easily distinguishable from production data, such as including the word "test" or the letter "T", so that any reports you generate are easily identifiable as test reports.
5
Using Data Clarification Forms 5-1
5 Using Data Clarification Forms
This chapter includes the following topics related to creating and using Data Clarification Forms (DCFs). Information on setting up DCFs is available in the Discrepancy Configuration chapter of the Oracle Clinical Administrator's Guide.
■ Description of Fields on page 5-2
■ Creating DCFs on page 5-3
■ Printing DCFs on page 5-9
■ Adding, Removing, and Editing a DCF's Discrepancies on page 5-5
■ Viewing DCF Details on page 5-6
■ Maintaining DCF Discrepancy Query Details on page 5-6
■ Tracking DCF Pages on page 5-6
■ Setting the DCF Status on page 5-7
■ Deleting DCFs on page 5-12
To open the Maintain Data Clarification Forms window, from the Conduct menu, select Data Validation, then select Data Clarification Form. You can also navigate to the window directly from the Maintain Discrepancy Database window. See Chapter 4, "Using the Discrepancy Database".
DCFs enable you to organize discrepancies into groups based on criteria such as Investigator, site, and/or DCM. You specify the criteria and Oracle Clinical creates one DCF for each patient whose records match the criteria. You can create custom header and footer information for the DCF.
A particular discrepancy can appear as ACTIVE on only one DCF. You can manually add and remove discrepancies from DCFs. When a discrepancy's status is updated so that it no longer matches the status criteria for the DCF, the system releases it from the DCF.
Print and Electronic DCFs After you have created a DCF, you can generate a DCF Report printout listing all its discrepancies and send it to an Investigator for review. Oracle Clinical keeps track of each report generated for each DCF and which discrepancies are described on each page. See "Viewing Current Details of Discrepancies on a Page" on page 5-7. If you are an Investigator with access to Oracle Clinical, you can view the DCF in the Maintain Data Clarifications Form window, use the link to the Maintain Discrepancy Database window to update discrepancies' status, and use the Update Patient Data link to change incorrectly entered data. Or you can mark your comments on the paper report and send it back for the changes to be entered.
Description of Fields
5-2 Oracle Clinical Conducting a Study
DCF Discrepancy Selection Criteria The criteria you can use to select discrepancies for inclusion on the DCF are:
■ Discrepancy Status. Specify the status of the discrepancies you want to include in the DCF. You can specify those you want to have appear in the report (such as INV REVIEW) and those you want to include in the DCF but do not want to appear in the report (such as PASSIVE REVIEW). You can also choose to include discrepancies with a resolution status; this may be useful when discrepancies have been resolved internally and need only be checked by the Investigator. You must also choose whether or not to include discrepancies with a status of OBSOLETE.
■ Any number of the following: Investigator, site, and patient. Oracle Clinical limits your choices to those Investigators, sites, and patients associated with discrepancies that fulfill the status criteria you selected.
■ One of the following: Patient, Patient Visit, DCM, or Discrepancy. Oracle Clinical limits your choices to those associated with discrepancies that fulfill the status criteria you selected.
Description of Fields This section contains brief descriptions of the fields of the Maintain Data Clarification Forms utility.
These fields are available by clicking the Details button:
Table 5–1 Field Descriptions for the Maintain Data Clarification Forms Utility
Field Description
DCF Number The unique identifier assigned by the system to the DCF record.
Status The DCF's current state in the review process. Click F9 for a list of values. The system assigns a status of CREATED to new DCFs. The default statuses are: Created, Draft, Final, Sent, Received, Reviewed, Closed. You can set the status in the Maintain DCFs window and when you print the DCF Report. After the DCF Report has been sent, the system also sets the DCF status based on the status of its DCF Pages. DCFs also have a Print Status, which is different. See "Viewing Current Details of Discrepancies on a Page" on page 5-7, "Changing the DCF Status from the Maintain DCFs Window" on page 5-8 and "DCF Print Status" on page 5-10. You can change statuses and make them optional in the Installation reference codelists DCF STATUS CODES and DCF OPTIONAL STATUS CODES.
Description Free text description of the DCF. The creator of the DCF supplies this value. If you have the necessary privileges, you can modify this value.
Patient Unique identifier of the patient position. DCFs include discrepancies associated with only one patient's data.
Investigator The code and name of the Investigator. If a single Investigator was specified for the DCF, all of the discrepancies on this DCF are specific to this Investigator.
Site Name of the site. If a single site was specified for the DCF, all of the discrepancies on this DCF are specific to this site.
Owning User The person responsible for the DCF. The default is the user who logs the DCF.
Creating DCFs
Using Data Clarification Forms 5-3
Creating DCFs There are two approaches to creating DCFs. You can create them by specifying criteria for the discrepancies you want the DCF to include, or you can individually select a group of discrepancies with the grouping utility in the Maintain Discrepancy Database window (see "Creating a DCF for a Hand-Selected Group of Discrepancies" on page 4-28). This section describes creating DCFs by specifying criteria for discrepancies and Adding Multivariate Discrepancy's Procedure Variables to a DCF on page 5-4.
Before you can create a DCF, you must set a review status for each of the discrepancies you want to include in it. From the Conduct menu, select Data Validation, then select Maintain Discrepancy Database.
See introductory information at Chapter 5, "Using Data Clarification Forms" and "Description of Fields" on page 5-2.
To create a DCF:
1. Open the Maintain Data Clarification Form window. From the Conduct menu, select Data Validation, then select Data Clarification Forms.
2. Click the Create DCF button. The Create DCF window dialog box opens.
3. Specify which discrepancies you want to include in the DCF in terms of their Discrepancy Review Status (see Discrepancy Status Codes on page 4-21):
■ Discrepancy Status for Distribution. (For example, Investigator REVIEW.) Discrepancies with this status (that also fulfill other selection criteria) appear on printed reports for this DCF as well as the Discrepancies window of the Maintain Data Clarification Forms window.
■ Discrepancy Status for Non-distribution. (For example, PASSIVE REVIEW.) Discrepancies with this status (that fulfill other selection criteria) do not appear on any printed reports for this DCF, though they do appear in the Discrepancies window of the Maintain Data Clarification Forms window.
■ Discrepancy Resolution for Resolved Status. (For example, RESOLVED or IRRESOLVABLE.) Normally resolved discrepancies are released from the DCF
Table 5–2 Additional Fields
Field Description
Distribution Status
This field is set when the DCF is created and identifies the review status of discrepancies to include on the DCF report.
Non-Distribution Status
This field is set when the DCF is created and identifies the review status of discrepancies to withhold from the DCF report.
Resolved Status This field is set when the DCF is created and identifies the resolution status of discrepancies to include in this DCF. This allows a DCF report to be generated that contains only discrepancies that have been resolved internally, and are being forwarded to the Investigator for confirmation.
Selection Criteria This field contains ranges that were applied when the DCF was created. If the DCF was created from the Discrepancy window using a Group Function, this field is set to "Multi Select".
Printed Last Timestamp of the last print action. This field is populated for all Print Status codes.
Printed By Use the name of the last print action. This field is populated for all Print Status codes.
Creating DCFs
5-4 Oracle Clinical Conducting a Study
and do not appear in reports, though they are displayed in the Discrepancies window of the Maintain Data Clarification Forms window. Entering a value in this field allows you to create a DCF Report containing resolved discrepancies for review.
4. Choose to include or exclude discrepancies of system status OBSOLETE; set the Exclude Obsolete? box. If selected, obsolete discrepancies are excluded from the DCF.
5. Limit the scope of the DCF by setting specific values. The system limits the lists of values for each field according to the discrepancy statuses you entered. For example, the Specific Investigator field list of values lists only the Investigators identified in discrepancies that match the review and resolution status codes you specified in Step 3. Set at least one of the parameters listed in the substeps a and/or b:
a. Select a specific Investigator, site, and/or patient position. The system limits the lists of values to Investigators, sites, and patient positions with the same status codes you specified in step 3.
b. Choose one: Patient, Patient Visit, DCM, or Discrepancy. The system limits the lists of values to patient visits, DCMs, or discrepancies with the same status codes you specified in step 3.
6. In the Owning User field, enter a user identifier to be responsible for the DCF. The system sets the field to the current user by default, but you can choose any user in the system who has the necessary database privileges.
7. Describe the DCF in the Description field. The system displays this freeform text in all subsequent displays of the DCF.
8. Select standard header and footer text identifiers from their lists of values. (F9 or the List Values button in the toolbar)
9. Finish:
■ Click the Create button to create at least one new DCF with all of the current settings. Oracle Clinical creates one DCF for each patient whose records match the criteria.
■ Click the Back button to close the Create DCF dialog box without saving the DCF.
■ Click the Clear button to erase all your settings but remain in the dialog box.
See "Setting the DCF Status" on page 5-7.
Adding Multivariate Discrepancy's Procedure Variables to a DCFMultivariate discrepancies are created by Validation Procedures that compare multiple question responses as variables. You can choose which responses to display in the DCF.
From the single-record view of the Maintain Discrepancy Database window, select the multivariate discrepancy and click the More... button. The Validation Values window opens, listing the procedure variable (question) names whose responses triggered the discrepancy. Select the DCF Report? boxes of each variable whose response value you want to include in the discrepancy's DCF.
Adding, Removing, and Editing a DCF's Discrepancies
Using Data Clarification Forms 5-5
Adding, Removing, and Editing a DCF's Discrepancies This section contains the following topics:
■ Adding a Discrepancy to a DCF on page 5-5
■ Removing a Discrepancy from a DCF on page 5-5
■ Editing Resolution and Comment Text on page 5-5
To add and remove a DCF's discrepancies, select a DCF and click the Discrepancies button to open the Maintain DCFs window. Opening the Maintain DCFs window in this manner displays only the discrepancies associated with the selected DCF. You can add and remove discrepancies, maintain question and resolution text, and change the current discrepancy.
Adding a Discrepancy to a DCFWhen you add discrepancies after you have created the DCF, you can only add discrepancies that match the above criteria and are not already ACTIVE on the current DCF.
You can add a discrepancy to a DCF by clicking the Add button. If this button is grayed out, the current status of the DCF does not permit adding to the DCF. The list of values lists all discrepancies not currently assigned to a DCF that correspond to the criteria specified when the DCF was created. Select a discrepancy from the list of values to add it.
Removing a Discrepancy from a DCFYou can remove a discrepancy from a DCF by selecting the discrepancy and clicking the Remove button. If this button is grayed out, the current status of the DCF—either FINAL or SENT—does not permit removing the discrepancy.
If you remove a discrepancy from a DCF that has not yet been SENT, the discrepancy is deleted from the DCF. If the DCF has progressed beyond the SENT status, the discrepancy is still visible in the report, but its status is RELEASED.
Editing Resolution and Comment TextThe system generates resolution (if any) and comment text during DCF creation from information in the Discrepancy Database window. You can modify the resolution and comment text of a discrepancy by clicking the Discrepancies button to display the Discrepancies window, selecting a discrepancy, and clicking the Text button to open
Note: If you determine that a discrepancy has been triggered by another discrepant response, and that the resolution of the original (or primary) discrepancy would resolve the secondary one, you can mark the secondary discrepancy for passive review, associated with the primary discrepancy. See "Group-Marking for Passive Review" on page 4-27.
Note: When you remove a discrepancy from a DCF, either before or after the DCF reaches a status of FINAL or SENT, it is available for inclusion in other DCFs. Removing or releasing the discrepancy from a DCF does not change its review status.
Viewing DCF Details
5-6 Oracle Clinical Conducting a Study
the editing window. If the fields are grayed out, the current status of the DCF or the system configuration settings do not permit editing.
Viewing DCF DetailsFrom the Maintain Data Clarification Form window (from the Conduct menu, select Validation, then select Data Clarification Forms) click the Details button to view all existing DCFs and their details, including the information from the DCF window and Distribution, Non-distribution, and Resolved statuses; selection criteria, and when and by whom the DCF was last printed. In addition, from this window you can click:
■ Status History. Displays each DCF Status that has been applied to the DCF, a description of the DCF Status, the date applied and the person who applied the status, as well as their comments.
■ Print History. Displays a record of each printing of the DCF, including the Print Status at the time of the printing, a description of the Print Status, the date printed and person who printed it.
Maintaining DCF Discrepancy Query DetailsIf you have selected a complex set of discrepancies in a DCF and you want to change some of their discrepancy details, you can open your DCF discrepancy set directly in a version of the Maintain Discrepancy Database window. This feature spares you the necessity of recreating the query in the discrepancy database. From the Conduct menu, select Data Validation, then select Data Clarification Forms, then click the Discrepancies button, and finally, the Discrepancy Maintenance button to open the DCF Discrepancy Query window. This window's functionality is identical to the Maintain Discrepancy Database window, except that you can only access it from the default Master profile for your group.
Tracking DCF Pages Oracle Clinical automatically assigns page release numbers to all DCF print jobs. When a final version is initially printed, it is assigned a release number of zero. The system increments the release number whenever you reprint the final version.
To see DCF page tracking information, click the DCF Pages button from the Maintain Data Clarification Forms window. The following information is displayed:
■ Page Number. Each page number corresponds to a printed page.
■ Release Number. The most recent release number for the DCF Report.
■ Page Status. You can set a status for individual DCF Report pages if they differ from each other. Available page statuses are: Missing, Sent and Received. If you set a page status that is different from other pages in the same DCF, or different from the DCF Status, the system automatically recomputes the DCF Status (see Table 5–3) on page 5-7.
■ Status Date. The status date identifies when the print job was performed.
■ Reference Number. This field is enterable and its use is determined by your organization.
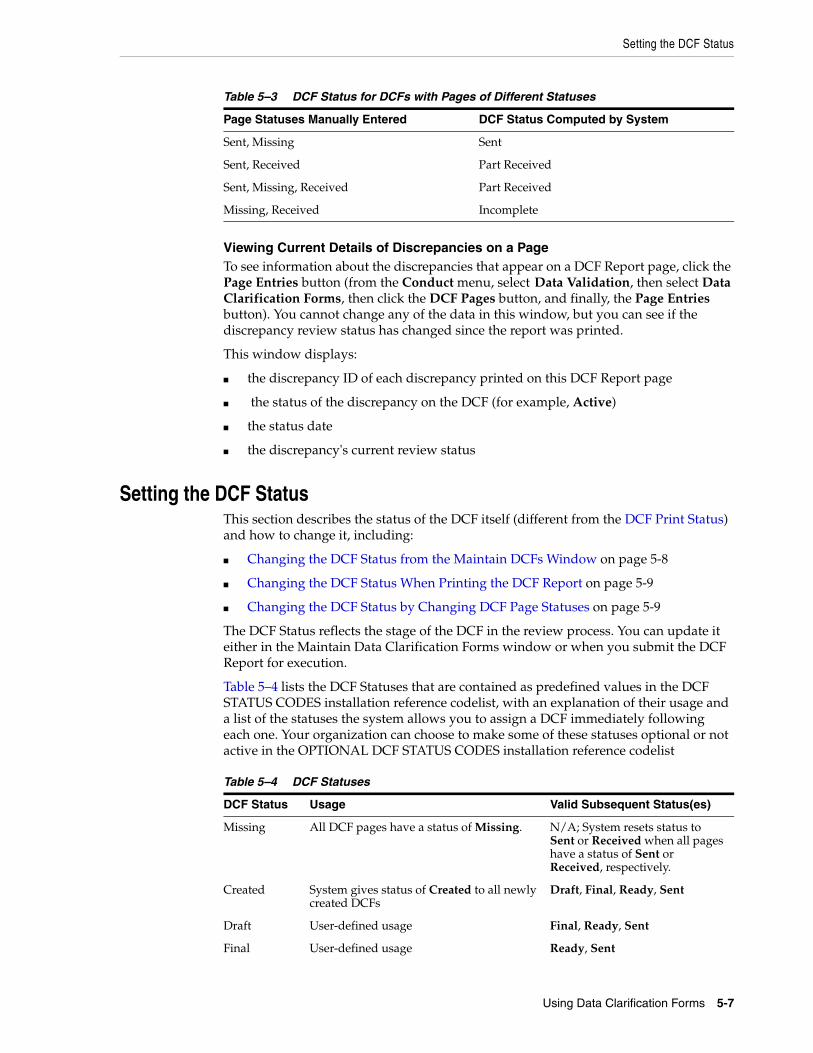
Setting the DCF Status
Using Data Clarification Forms 5-7
Viewing Current Details of Discrepancies on a PageTo see information about the discrepancies that appear on a DCF Report page, click the Page Entries button (from the Conduct menu, select Data Validation, then select Data Clarification Forms, then click the DCF Pages button, and finally, the Page Entries button). You cannot change any of the data in this window, but you can see if the discrepancy review status has changed since the report was printed.
This window displays:
■ the discrepancy ID of each discrepancy printed on this DCF Report page
■ the status of the discrepancy on the DCF (for example, Active)
■ the status date
■ the discrepancy's current review status
Setting the DCF Status This section describes the status of the DCF itself (different from the DCF Print Status) and how to change it, including:
■ Changing the DCF Status from the Maintain DCFs Window on page 5-8
■ Changing the DCF Status When Printing the DCF Report on page 5-9
■ Changing the DCF Status by Changing DCF Page Statuses on page 5-9
The DCF Status reflects the stage of the DCF in the review process. You can update it either in the Maintain Data Clarification Forms window or when you submit the DCF Report for execution.
Table 5–4 lists the DCF Statuses that are contained as predefined values in the DCF STATUS CODES installation reference codelist, with an explanation of their usage and a list of the statuses the system allows you to assign a DCF immediately following each one. Your organization can choose to make some of these statuses optional or not active in the OPTIONAL DCF STATUS CODES installation reference codelist
Table 5–3 DCF Status for DCFs with Pages of Different Statuses
Page Statuses Manually Entered DCF Status Computed by System
Sent, Missing Sent
Sent, Received Part Received
Sent, Missing, Received Part Received
Missing, Received Incomplete
Table 5–4 DCF Statuses
DCF Status Usage Valid Subsequent Status(es)
Missing All DCF pages have a status of Missing. N/A; System resets status to Sent or Received when all pages have a status of Sent or Received, respectively.
Created System gives status of Created to all newly created DCFs
Draft, Final, Ready, Sent
Draft User-defined usage Final, Ready, Sent
Final User-defined usage Ready, Sent
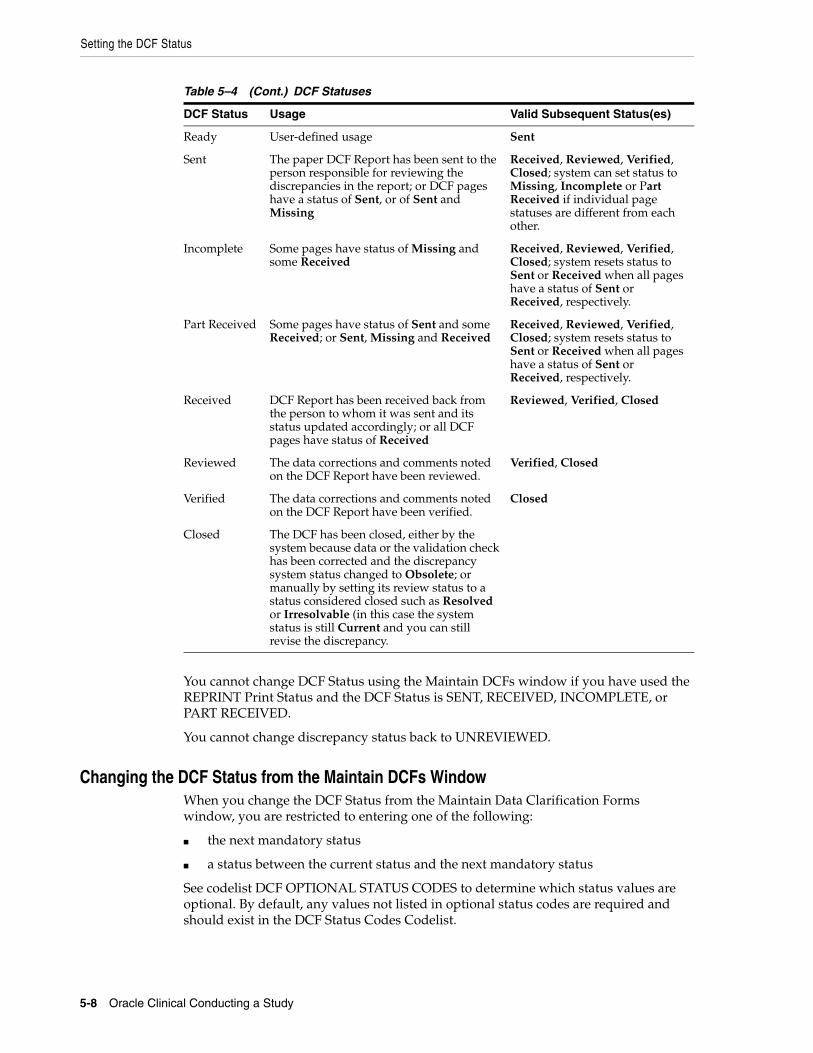
Setting the DCF Status
5-8 Oracle Clinical Conducting a Study
You cannot change DCF Status using the Maintain DCFs window if you have used the REPRINT Print Status and the DCF Status is SENT, RECEIVED, INCOMPLETE, or PART RECEIVED.
You cannot change discrepancy status back to UNREVIEWED.
Changing the DCF Status from the Maintain DCFs WindowWhen you change the DCF Status from the Maintain Data Clarification Forms window, you are restricted to entering one of the following:
■ the next mandatory status
■ a status between the current status and the next mandatory status
See codelist DCF OPTIONAL STATUS CODES to determine which status values are optional. By default, any values not listed in optional status codes are required and should exist in the DCF Status Codes Codelist.
Ready User-defined usage Sent
Sent The paper DCF Report has been sent to the person responsible for reviewing the discrepancies in the report; or DCF pages have a status of Sent, or of Sent and Missing
Received, Reviewed, Verified, Closed; system can set status to Missing, Incomplete or Part Received if individual page statuses are different from each other.
Incomplete Some pages have status of Missing and some Received
Received, Reviewed, Verified, Closed; system resets status to Sent or Received when all pages have a status of Sent or Received, respectively.
Part Received Some pages have status of Sent and some Received; or Sent, Missing and Received
Received, Reviewed, Verified, Closed; system resets status to Sent or Received when all pages have a status of Sent or Received, respectively.
Received DCF Report has been received back from the person to whom it was sent and its status updated accordingly; or all DCF pages have status of Received
Reviewed, Verified, Closed
Reviewed The data corrections and comments noted on the DCF Report have been reviewed.
Verified, Closed
Verified The data corrections and comments noted on the DCF Report have been verified.
Closed
Closed The DCF has been closed, either by the system because data or the validation check has been corrected and the discrepancy system status changed to Obsolete; or manually by setting its review status to a status considered closed such as Resolved or Irresolvable (in this case the system status is still Current and you can still revise the discrepancy.
Table 5–4 (Cont.) DCF Statuses
DCF Status Usage Valid Subsequent Status(es)

Printing DCFs
Using Data Clarification Forms 5-9
You cannot change DCF status from the Maintain DCFs window if you have used the REPRINT print status and the status is SENT, RECEIVED, INCOMPLETE, or PART RECEIVED.
You cannot change discrepancy status back to UNREVIEWED.
Changing the DCF Status When Printing the DCF ReportTo change the DCF status here, enter a value from the list of values for the parameter New DCF Status to Assign. After the system prints the report, it changes the DCF Status to the value you set here. See "About the Parameter New DCF Status to Assign" on page 5-11 and Table 5–4, " DCF Statuses".
Changing the DCF Status by Changing DCF Page StatusesIf you update the status of the DCF's pages individually, the system automatically recomputes the DCF status to Missing, Part Received, or Incomplete when the pages have different statuses, or Sent Or Received after you have set all page statuses to either Sent or Received (see Table 5–4 on page 5-7). Until the system has reset the DCF status to Sent Or Received, you cannot reset the DCF status manually.
Printing DCFsThis section includes the following topics:
■ DCF Print Status on page 5-10
■ About the Parameter New DCF Status to Assign on page 5-11
■ Troubleshooting: Unable to Print DCF on page 5-11
Use the DCF Report to print one or more DCFs.
Oracle Clinical keeps track of each printing of a DCF, including the page content of each printing (see "Tracking DCF Pages" on page 5-6 and "DCF Print Status" on page 5-10).
You can submit the report in three locations:
■ From the Conduct menu, select Data Validation, and then select DCF Report (portrait)—for a vertical paper orientation
■ From the Conduct menu, select Data Validation, and then select DCF Report (landscape)—for a horizontal paper orientation)
■ From the Conduct menu, select Data Validation, then select Data Clarification Forms, and click the Print DCF button. (This produces a horizontal paper orientation.)
From any location, you can print one or more DCFs. The submission form is the same. It is possible to enter invalid criteria combinations. If you do so, the job will not work. Enter submission information as follows:
Single DCF ID If you only want to print a single DCF, enter its ID here. A list of values is available.
If you want to print more than one DCF in the same DCF Report, you can use the next four fields in any combination to set criteria for the DCFs to include.
Batch Status for DCFs If you want to print multiple DCFs with the same DCF status, choose the status from the list of values.
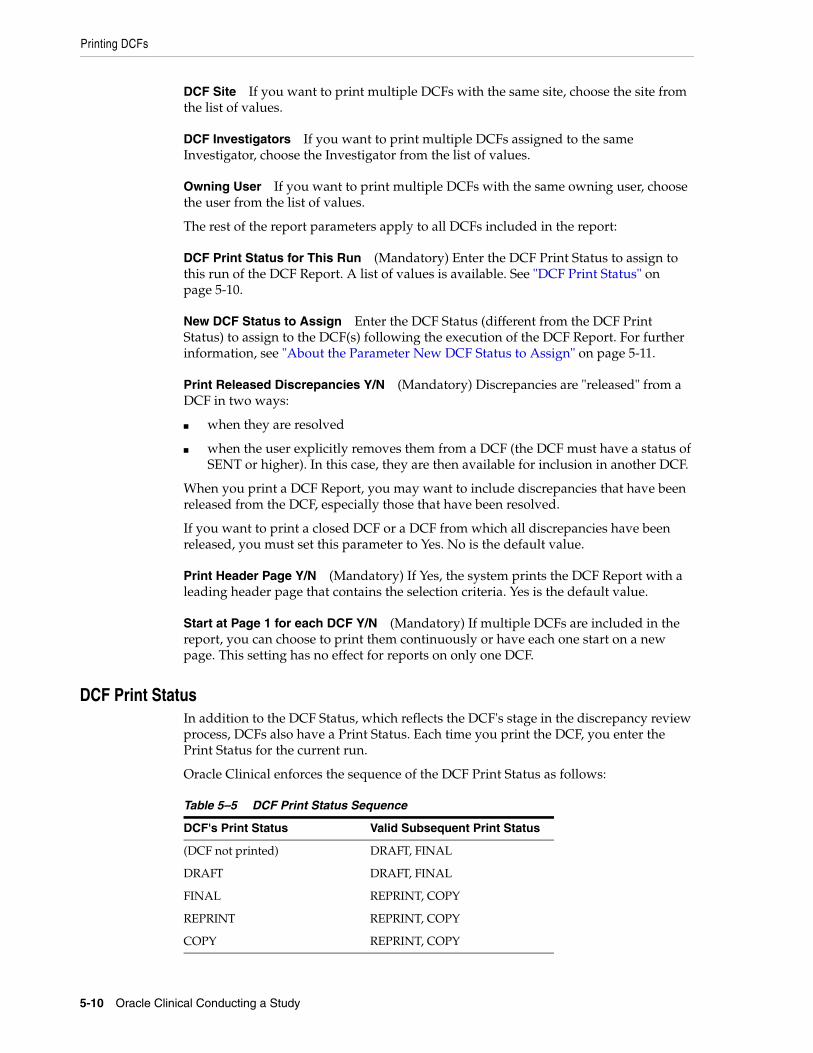
Printing DCFs
5-10 Oracle Clinical Conducting a Study
DCF Site If you want to print multiple DCFs with the same site, choose the site from the list of values.
DCF Investigators If you want to print multiple DCFs assigned to the same Investigator, choose the Investigator from the list of values.
Owning User If you want to print multiple DCFs with the same owning user, choose the user from the list of values.
The rest of the report parameters apply to all DCFs included in the report:
DCF Print Status for This Run (Mandatory) Enter the DCF Print Status to assign to this run of the DCF Report. A list of values is available. See "DCF Print Status" on page 5-10.
New DCF Status to Assign Enter the DCF Status (different from the DCF Print Status) to assign to the DCF(s) following the execution of the DCF Report. For further information, see "About the Parameter New DCF Status to Assign" on page 5-11.
Print Released Discrepancies Y/N (Mandatory) Discrepancies are "released" from a DCF in two ways:
■ when they are resolved
■ when the user explicitly removes them from a DCF (the DCF must have a status of SENT or higher). In this case, they are then available for inclusion in another DCF.
When you print a DCF Report, you may want to include discrepancies that have been released from the DCF, especially those that have been resolved.
If you want to print a closed DCF or a DCF from which all discrepancies have been released, you must set this parameter to Yes. No is the default value.
Print Header Page Y/N (Mandatory) If Yes, the system prints the DCF Report with a leading header page that contains the selection criteria. Yes is the default value.
Start at Page 1 for each DCF Y/N (Mandatory) If multiple DCFs are included in the report, you can choose to print them continuously or have each one start on a new page. This setting has no effect for reports on only one DCF.
DCF Print StatusIn addition to the DCF Status, which reflects the DCF's stage in the discrepancy review process, DCFs also have a Print Status. Each time you print the DCF, you enter the Print Status for the current run.
Oracle Clinical enforces the sequence of the DCF Print Status as follows:
Table 5–5 DCF Print Status Sequence
DCF's Print Status Valid Subsequent Print Status
(DCF not printed) DRAFT, FINAL
DRAFT DRAFT, FINAL
FINAL REPRINT, COPY
REPRINT REPRINT, COPY
COPY REPRINT, COPY
Printing DCFs
Using Data Clarification Forms 5-11
If the DCF has not been printed or has been printed using Print Status of DRAFT, then the only valid Print Status is DRAFT or FINAL. You can run a DRAFT report for a DCF as many times as you want, but you can run a FINAL report only once.
When you print a DCF Report with a print status of FINAL, the system assigns a release number of zero to that printing, and creates a page release number of zero for each page.
If the DCF has been printed using Print Status of FINAL and another DCF needs to be printed, you must select a Print Status of REPRINT or COPY:
■ Setting the Print Status to REPRINT creates a new release with a new release number (incremented by one). If discrepancies have been resolved or released since the last time the DCF Report was run, the content of the report will differ, and pages may change.
■ Setting the Print Status to COPY results in an exact copy of the last run of the report. Even if individual discrepancy statuses have changed, the report is exactly the same as it was at the last run, and has the same release number.
You can see the page-specific contents of a specific version of a DCF Report in the DCF Pages window (see "Tracking DCF Pages" on page 5-6).
About the Parameter New DCF Status to Assign When you submit the DCF Report for printing, you must specify the status (DCF Status, not DCF Print Status; see "Setting the DCF Status" on page 5-7) that you want the DCF itself to have after it is printed. If you are printing more than one DCF in the report, they are all assigned the same status. If you are printing a DRAFT or FINAL DCF, you must enter a value.
The following constraints apply:
■ You must choose a DCF Status that comes after the DCF Status of the DCF(s) being printed or that status will not be assigned to the DCF. To see the order of statuses, look at the DCF STATUS CODES installation reference codelist.
■ You cannot enter a status that comes after the next required status. To see which statuses are required, look at the DCF OPTIONAL STATUS CODES installation reference codelist. By default, the required statuses are: Created, Sent, and Closed.
You can also change a DCF's status in the Maintain Data Clarification Forms window (see "Changing the DCF Status from the Maintain DCFs Window" on page 5-8) or by changing the status of a DCF's pages.
Troubleshooting: Unable to Print DCFIf you are unable to print a DCF Report, check the following:
■ If you are printing a DRAFT or FINAL DCF, you must enter a value for New DCF Status to Assign parameter.
■ If a FINAL report has been printed, the DCF print status must be REPRINT or COPY. Otherwise the DCF print status must be DRAFT or FINAL. You can tell if a FINAL report has been printed by clicking the DCF Pages button. If there are any pages listed, a FINAL report has been printed.
■ The DCF owning user may not be entered in Oracle Accounts. To check this, use one of the methods below.
Deleting DCFs
5-12 Oracle Clinical Conducting a Study
Checking Owning User Account Through Oracle Clinical User InterfaceYou can find the owning user and check their account through the UI.
1. Query for the DCF in the Maintaining Data Clarification Forms window.
2. Highlight the DCF and click the Details button. The DCF Details window opens.
3. Read the Owning User field and make a note of the user ID.
4. From the Admin menu, select Users, then select Oracle Accounts, and query for the user ID.
5. If it is not listed, add it.
Checking Owning User Account Using SQLYou can use SQL to check the owning user information.
1. To find the owning user of the DCF, enter this SQL query:
select owning_user from data_clarification_forms where dcf_id=xxxxx;
2. If the owning_user query in the above step returns a value, execute this query, substituting the value for returned_value, to check if the owning user has an Oracle user account:
select count(*) from oracle_accounts oa where ORACLE_ACCOUNT_NAME='returned_value';
If the count is zero, the owning user does not have an account.
3. From the Admin menu, select Users, then select Oracle Accounts, and add the account.
Deleting DCFs If you entered the wrong criteria for the information you wanted to include in the DCF, you can delete the DCF and create a new one. You can delete a DCF only when its DCF Status is CREATED, DRAFT, CLOSED or FINAL. To delete a DCF, select it in the Maintain Data Clarification Forms form and perform a delete operation. If the operation fails, the current status of the DCF does not permit deletion.
Note: When you delete a DCF, the system releases all discrepancies associated with it.
6
Making Mass Changes 6-1
6 Making Mass Changes
This chapter contains the following topics:
■ About Mass Changes on page 6-1
■ Types of Mass Changes on page 6-2
■ Defining a Mass Change Specification and Its Criteria on page 6-3
■ Creating and Modifying the Candidate Data Set on page 6-8
■ Correcting Records on page 6-10
■ Closing a Mass Change Specification on page 6-16
About Mass ChangesOracle Clinical provides the Mass Changes utility for correcting errors in multiple records at the same time. You can update patient response data, RDCM keys, or RDCI keys. For example, if many patient positions were logged into an incorrectly spelled site, instead of correcting each record individually, you can apply the correct spelling to all of them in one operation.
To use the Mass Change utility, you need an understanding of SQL and of Oracle Clinical tables and columns. For information on Oracle Clinical's tables and columns, see the Oracle Clinical Stable Interface Technical Reference Manual, available from Oracle Support.
Complete the following tasks to make a mass change:
■ Identify the change type — RDCM Key, RDCI Key, Soft-delete RDCI, or Responses — as you open the Mass Change utility.
■ Specify the records you need to change by defining a Mass Change Specification (MCS) consisting of a few basic identifiers such as the DCM and/or Discrepancy Type, plus one or more SQL statements identifying further criteria for inclusion in the mass change. See "Defining the Mass Change Specification" on page 6-3. You can count the records that meet the criteria and refine your MCS before using it to generate a set of records called a Candidate Data Set (CDS).
■ Generate the Candidate Data Set. The system includes all the records that meet the criteria defined in the MCS.
■ Within the context of the CDS, change records by performing one or more group updates, one at a time, excluding any records you do not want changed from a particular group update, either with a SQL Where clause or by explicitly excluding individual records. You can also update records in the CDS individually. You can test the validity of changes before applying them to the database.
Types of Mass Changes
6-2 Oracle Clinical Conducting a Study
■ Apply changes to the database. Records marked for change are changed in the database if the change is valid. Those records cannot be changed again through the same CDS. If you want to change them again as a group, you can copy the MCS and generate another CDS from the same criteria (see "Copying a Mass Change Specification" on page 6-8). Any records that were marked for exclusion, or which could not be changed because the change was invalid, can still be changed through the original CDS.
Oracle Clinical stores all of the details of applied mass changes in the following Oracle Clinical tables: RESPONSES, RDCI_HISTORY, and DISCREPANCY_ENTRIES.
After completing the mass changes job, the system automatically runs the incremental expectedness calculation job for all patients whose data changed. See Oracle Clinical Creating a Study for more information.
To perform all types of mass changes, you must have one of the following database roles: RXC_MC, RXC_SUPER, or RXC_SUPER_NOGL. To test mass change options only, you must have the database role RXC_MC_TEST. In addition, you can make changes with the Mass Change utility only on data that you are allowed to update through Data Entry. Privileged update is required for changing locked data, or the data of "frozen" patients.
For an explanation of RDCIs and RDCMs, question groups and questions, see the Oracle Clinical Creating a Study manual.
Types of Mass ChangesThere are four types of data changes you can make with the Mass Changes utility, described below. From the Conduct menu, select Mass Changes, and choose the kind of change you need to make. The choices are:
■ RDCI Key Changes
■ RDCI Soft Deletes
■ RDCM Key Changes
■ Response Changes
RDCI Key Changes changes errors in DCI Header information (the keys that identify the RDCI) entered during Data Entry Log-In, such as logging the data for one patient under the identifier of another patient, or the wrong visit identifier for multiple patients.
RDCI keys include: Document_number, Patient, Clinical_Planned_Event_Name, DCI_Date, DCI_Time, Subevent_Number, DCI_short_name, Investigator, Site, Blank_Flag, and Comment_Text.
RDCI Soft Deletes soft-deletes whole RDCIs; this would be necessary, for example, if an operator logged in many RDCIs under the wrong study. Soft-delete means that the system keeps a record of the change. You cannot use Mass Changes to correct these errors; the RDCIs must be properly re-entered. The process for mass RDCI soft deletes
Note: In RDCI Key Changes, you can change the DCI name. However, if you enter the name of a DCI that includes DCMs that are qualified in any way—by event, subevent, qualifying value, lab, etc.—you get a failure.
Defining a Mass Change Specification and Its Criteria
Making Mass Changes 6-3
is somewhat different from other mass changes; see "Soft-Deleting RDCIs" on page 6-15.
RDCM Key Changes changes errors made to a specific RDCM Header within an RDCI, in one or more of the following fields: Qualifying Value, DCM_DATE, DCM_Time, Clinical_Planned_Event, Blank Flag, Subevent_Number, Data_Comment_Text, and Comment_Text. You can change header information for one or more RDCMs in an RDCI at a time.
Response Changes changes responses to particular questions. This might be necessary, for example, if a data entry operator incorrectly transcribed a coded value for a particular question. You can change responses to one question group in an RDCI/RDCM combination at a time. If you need to change responses in multiple question groups, you must create a separate MCS for each one.
Defining a Mass Change Specification and Its Criteria This section contains the following topics:
■ Defining the Mass Change Specification on page 6-3
■ Defining Candidate Data Set Criteria on page 6-4
■ Copying a Mass Change Specification on page 6-8
The Mass Change utility has two panels. The top panel, which shows the change type and study name in its title bar, is where you define the MCS you want to perform by giving it a name, description, and other details (see "Defining the Mass Change Specification" on page 6-3). The CDS Criteria panel, below, is where you build a SQL statement to specify the records to which you want to apply the mass change (see "Defining Candidate Data Set Criteria" on page 6-4).
Defining the Mass Change SpecificationIn the top panel, create an MCS that describes the records you need to update. The Mass Change utility opens with this panel in multi-record view. To view all of the fields for one record at once, click the Single button.
Naming and Describing the MCSEnter the fields as follows:
Name Enter a unique name for the change.
Description Describe the change in a way that will help you and other users know why you are making the change and whether the MCS is appropriate for reuse.
Status The system sets the MCS's status automatically throughout its lifecycle. You cannot manually change the status. MCS statuses include:
■ SPECIFIED. The MCS has been defined.
■ CREATED. The CDS has been generated.
■ COMPLETE. The MCS is closed and its records cannot be changed again through this MCS. Either changes have been successfully applied in the database to all CDS records, or the MCS has been manually closed.
Change Reason Choose a value from the List of Values (LOV).
Defining a Mass Change Specification and Its Criteria
6-4 Oracle Clinical Conducting a Study
The Change Reason LOV for Response changes is derived from the installation reference codelist DATA CHANGE REASON TYPE CODE. The Change Reason LOV for RDCI and RDCM Key Changes and RDCI Soft Deletes is derived from the installation reference codelist RDCI CHANGE REASON TYPE CODE.
Audit Comment Enter a comment detailing the change to be made.
Defining the Scope of the Records to be ChangedThe parameters required to define the particular records to be changed vary, according to the type of change you select. All possible parameters are listed below:
DCM Name From the LOV, choose the name of the DCM associated with the records you need to change. The LOV includes all DCMs defined for the study. This field is required for Response changes. For other types of mass changes you can enter either a DCM Name, a DCI Book, or both.
DCI Book From the LOV, choose the name of the DCI Book associated with the records you need to change. The LOV includes all DCI Books defined for the study. This field is always optional.
Start Pg # If you entered a value in the DCI Book field, you must also enter the first page of the DCI Book that is associated with the records you need to change.
Disc Type If you need to change multiple records that have raised discrepancies of a certain type, choose the type from the LOV.
Max CDS Records Enter the maximum number of records you want to change in this transaction. Limiting the size of the CDS before you create it can help avoid having the system labor excessively over a mistake in the selection criteria. The default value is set in the local reference codelist OCL_MC_PREFS; initially it is set to 1000.
Question Group Name This field appears only for Response changes. From the LOV, choose the name of the question group that contains the question whose responses you need to correct. The LOV displays the names of all the question groups in the DCM you specified above.
Question Names This field appears only for Response changes. There are four Question Names fields. Enter the name(s) of the questions whose responses you need to correct. You must enter a value in the first Question Names field or CDS creation will not work.
Saving the Mass Change SpecificationYou can save an MCS even before you specify the CDS criteria, and return to it later.
Defining Candidate Data Set Criteria The lower panel of the Mass Change Utility window, titled Criteria, is a self-validating SQL statement editor. Use it to refine the criteria limiting the number of records to be retrieved for the CDS of the mass change, beyond those specified in the top panel.
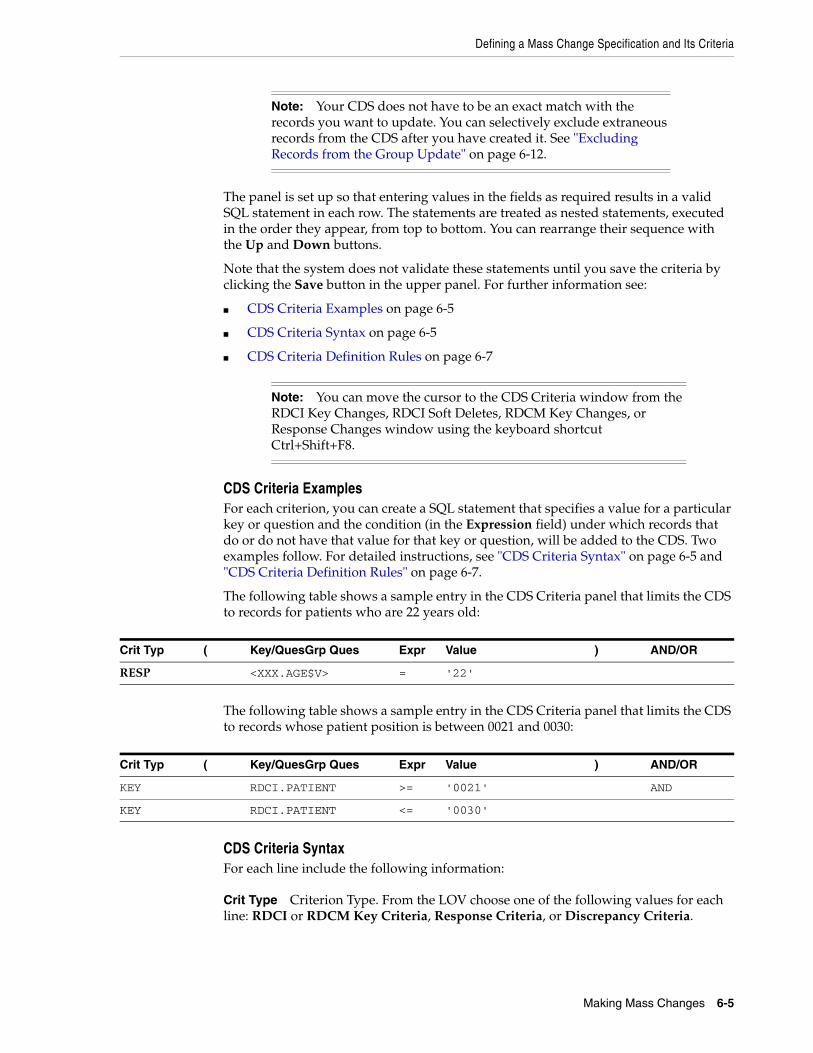
Defining a Mass Change Specification and Its Criteria
Making Mass Changes 6-5
The panel is set up so that entering values in the fields as required results in a valid SQL statement in each row. The statements are treated as nested statements, executed in the order they appear, from top to bottom. You can rearrange their sequence with the Up and Down buttons.
Note that the system does not validate these statements until you save the criteria by clicking the Save button in the upper panel. For further information see:
■ CDS Criteria Examples on page 6-5
■ CDS Criteria Syntax on page 6-5
■ CDS Criteria Definition Rules on page 6-7
CDS Criteria ExamplesFor each criterion, you can create a SQL statement that specifies a value for a particular key or question and the condition (in the Expression field) under which records that do or do not have that value for that key or question, will be added to the CDS. Two examples follow. For detailed instructions, see "CDS Criteria Syntax" on page 6-5 and "CDS Criteria Definition Rules" on page 6-7.
The following table shows a sample entry in the CDS Criteria panel that limits the CDS to records for patients who are 22 years old:
The following table shows a sample entry in the CDS Criteria panel that limits the CDS to records whose patient position is between 0021 and 0030:
CDS Criteria Syntax For each line include the following information:
Crit Type Criterion Type. From the LOV choose one of the following values for each line: RDCI or RDCM Key Criteria, Response Criteria, or Discrepancy Criteria.
Note: Your CDS does not have to be an exact match with the records you want to update. You can selectively exclude extraneous records from the CDS after you have created it. See "Excluding Records from the Group Update" on page 6-12.
Note: You can move the cursor to the CDS Criteria window from the RDCI Key Changes, RDCI Soft Deletes, RDCM Key Changes, or Response Changes window using the keyboard shortcut Ctrl+Shift+F8.
Crit Typ ( Key/QuesGrp Ques Expr Value ) AND/OR
RESP <XXX.AGE$V> = '22'
Crit Typ ( Key/QuesGrp Ques Expr Value ) AND/OR
KEY RDCI.PATIENT >= '0021' AND
KEY RDCI.PATIENT <= '0030'
Defining a Mass Change Specification and Its Criteria
6-6 Oracle Clinical Conducting a Study
If you include statements for more than one criterion type, you must sort them in key, resp, and then disc order, and you must include an AND in the And/Or column between each different criterion type set of statements.
( If you are using more than one criterion, or statement, and you need parentheses in your SQL statement to override default precedence such as ORs, then enter an opening parenthesis here and a closing one at the end of the statement.
Key/Ques Grp Ques The value you enter here is either a key column or a question group question, depending on whether the Criterion Type is RDCI or RDCM Key Criteria, Response Criteria, or Discrepancy Criteria. An LOV is available.
This field is required, but the system does not validate your entry until you save your criteria.
■ For criteria of type RDCI Key or RDCM Key, enter a key column whose value you want to use as a filter to specify which records to change:
You can choose columns not in the LOV as long as they are of the format table_alias.column_name
where:
table_alias is one of the table aliases in the LOV.
column_name is any column in the table_alias table.
■ For Response criteria, enter a question group question whose response value you want to use as a filter to specify which records to change:
<question_group_name-n.question$X>
Where:
question_group_name specifies a Question Group Name, if applicable.
A period (.) separates Question Group Name from Question Name, if you state both parameters.
question specifies Question Name, if applicable.
-n (where n is a non-zero occurrence) If the question has multiple occurrences, you can specify a specific occurrence. You can obtain this number from the field's LOV. This parameter is optional.
A dollar symbol separates question values from column occurrence values.
X specifies a column occurrence with one of the following values:
■ v specifies value text (Use for numeric comparisons.)
■ e specifies exception value text
■ d specifies data comment text
■ f exception_value_text (If present; otherwise value text. Use for character string comparisons.)
■ For Discrepancy criteria, choose a discrepancy attribute from the LOV. The choices vary, depending on the type of discrepancy you specified in the top panel of the MCS. They include:
■ For Manual, Indicator, and Manual Header discrepancies: comment text, creation timestamp, discrepancy review status code, internal comment text, and irresolvable flag.
Defining a Mass Change Specification and Its Criteria
Making Mass Changes 6-7
■ For univariate discrepancies, you have all the choices listed above, plus discrepancy type code.
■ For multivariate discrepancies you have all the choices listed above plus Procedure name and Procedure detail test order sequence.
All attributes have the prefix "DE" for the DISCREPANCY_ENTRIES table.
Expr Choose a standard SQL expression from the LOV. Choices include: In, Not in, Is, Is not, Like, Not like, <, <=, =, <>, !=, >=, >.
Value Enter a valid value for the key or question you entered in the Key/Ques Grp Ques field. Depending on the type of mass change, the LOV shows valid keys or column names. You can manually enter contextually valid entries not in the LOV. Enclose character data values in single quotes ('value').
) If you used an opening parenthesis at the beginning of the statement, use a closing parenthesis here.
AND/OR If you are using more than one criterion, you must enter a Boolean relationship between each sequential pair: either AND or OR. Only the final statement should not be followed by either AND or OR.
CDS Criteria Definition RulesAs you define your criteria you must follow these rules:
■ Unless you specified a DCM Name or DCI Book in the top panel, you must create at least one row in the bottom panel in order to generate a CDS.
■ You must enclose non-numeric data values in single quotes ('). See the example entries in the Value column in "CDS Criteria Examples" on page 6-5.
■ You can specify only one discrepancy criterion per mass change operation, and the discrepancy criterion must be the last one defined.
■ Include criterion types in the following order, with all Key-type criteria first, then all Response-type criteria, then the Discrepancy-type criterion:
1. Key
2. Response
3. Disc
■ You must enter AND between criterion types.
Counting CDS RecordsAfter you have defined the MCS, before or after specifying the CDS criteria, you can count the number of records the CDS contains, or would contain if it were created as currently defined. You can use the count as a test that the actual number of records you are to work on is within a reasonable and expected range. Obtain the CDS count at any time by clicking the Count CDS button.
Note: If you enclose numeric values in single quotes, the system treats the value as a character string, so '15' is greater than '1234' for strings but not for numerics.
Do not enclose column names in quotes.
Creating and Modifying the Candidate Data Set
6-8 Oracle Clinical Conducting a Study
Copying a Mass Change Specification If an existing MCS shares many of the attributes of the mass change you want to make, you can copy it as a starting point. From the Special menu, choose Copy Mass Change, and give the new mass change record a unique name. The system takes the copied record's change type as the default, but you can change it.
You can view the MCSs that have already been created by running a report; from the Conduct menu, select Conduct Reports, then select Mass Change Reports, and finally, Mass Change Specifications. For each MCS the report shows the associated status, change reason, DCM, question group, question, and discrepancy type, as applicable.
You can also run a query in the Mass Change Specifications window.
Creating and Modifying the Candidate Data Set This section includes the following topics:
■ Viewing the CDS on page 6-8
■ Changing the Display and Processing Order on page 6-9
■ Clearing a CDS on page 6-10
See also "Correcting Records" on page 6-10.
When you have specified the records to change, click the Create CDS button to generate the CDS, which includes all records that match the conditions defined in the MCS. The system changes the MCS status from SPECIFIED to CREATED. If no records meet all the criteria, the system does not generate a CDS.
You can delete a CDS while the MCS's status is either SPECIFIED or CREATED; that is, until you actually use it to apply one or more changes to one or more records.
Viewing the CDS To view the CDS, click the Go CDS button or press the keyboard combination Shift+Ctrl+F2. The Candidate Data Set window opens, displaying a row for each data entry record that meets the criteria you defined in the MCS.
RowsIn most cases, each row represents an RDCI. An RDCI corresponds to a Case Report Form (CRF) and has its own Document Number. There may be more than one row per RDCI for Response changes.
■ For RDCI Key Changes and RDCI Soft Deletes, each row is an RDCI.
Note: If you choose a change type for which you do not have access privileges, the system prevents you from viewing it.
Note: After the MCS has a status of CDS Created (or higher) you can no longer add criteria. However, you can add a Where clause to the CDS itself, or copy the MCS and modify the copy. You can also clear the CDS. See "Excluding Records from the Group Update" on page 6-12, "Copying a Mass Change Specification" on page 6-8, and "Clearing a CDS" on page 6-10.
Creating and Modifying the Candidate Data Set
Making Mass Changes 6-9
■ For RDCM Key Changes, each row is an RDCM. However, because you can include only one RDCM in an MCS, each row also represents one RDCI.
■ For Response Key Changes, you can include only one question group (and up to four questions) from one RDCM in the MCS. Each question has its own column, displayed in the order you listed them in the MCS. If the question group is not a Repeating question group, there will be one row per RDCI. However, if it is a Repeating question group, there is one row for each repeat.
Columns The columns displayed vary somewhat according to which type of change you are making. RDCI Keys are displayed for all types of changes. RDCM Keys are included for RDCM Key changes and for Response changes. Question Groups and questions are also displayed for Response changes.
The columns whose values you can change also vary, depending on the change type. Each one has a duplicate column with a white background labeled "New" For example, in addition to grayed fields for these columns, an RDCI Key Changes CDS also contains New Site, New Investigator, and New DCI Date columns. The system initially populates these fields with their current values.
When you make and save changes in the CDS, the system displays the new value in the column labeled "New" when you apply the changes to the database, the system changes the background color of all columns in each row with applied changes to gray, and you can no longer make changes to that row through the current CDS.
StatusThe status of each record is displayed in the ST (Status) field:
■ UN - Unchanged
■ IG - Ignore (do not process)
■ CH - Changed in the CDS (but not yet in the database)
■ VS - Successfully validated (but not applied to the database)
■ VF - Validation failed (and not applied to the database)
■ AS - Successfully applied changes to the database
■ AF - Application of changes to the database failed
Changing the Display and Processing OrderOracle Clinical processes the records in the order in which they are displayed. Therefore, be careful to arrange them in such a way that they will not fail validation or application because they conflict with an existing record in the database.
You can sort records on four fields: Patient, Visit Number, Subevent Number, and DCI Short Name. You can designate any of these four as the primary, secondary (and so on) field on which to sort, and choose either ascending order or descending order for each.
ExampleIf you have Patient E8, Visit 1, with four subevents, numbers 0-3, and you want to increment each subevent number by one, write a group update that reads:
subevent_number_new = subevent_number+1 where patient = 'E8'
Correcting Records
6-10 Oracle Clinical Conducting a Study
You must arrange the records with subevent number sorted in descending order because only Subevent 3 will not conflict with an existing record when incremented by 1; there is no existing Subevent 4, but there are existing Subevents 1-3.
To Reorder the Display and Processing Order:1. Click the Reorder button or enter keyboard combination Ctrl+Shift+F11.
2. Select the field you want to serve as the primary sort field.
3. Use the Up or Down arrow to move that field to the top of the list.
4. Repeat Steps 2 and 3 for the other fields.
5. Choose either Ascending or Descending sort order for each field.
6. Click OK. Oracle Clinical rearranges the records and you return to the CDS window.
Clearing a CDSIf your criteria returned few target records or is not inclusive enough, it may make sense to clear it and start over with the criteria specification. This is possible only when the MCS status is CREATED. To clear the CDS, from the Special menu, select Clear CDS. This action clears all records from the CDS and changes the status of the MCS back to Specified. You can then edit the specification and recreate the CDS.
Use the Audit Comment field to document the reason for this change. The system adds the comment to each record in the CDS.
Correcting Records This section contains the following topics:
■ Making Mass Changes: Group Updating on page 6-10
■ Changing Individual Records in the CDS on page 6-15
Before you apply changes to the database, you can work on the CDS to specify the changes you want to make, using group updates and/or changes to individual records. You can perform more than one group update to a CDS, but only one at a time. You must also be careful to exclude any records you do not want changed during each group update, either with a SQL Where clause or by explicitly excluding individual records.
Making Mass Changes: Group Updating This section describes group updating—making the same change, or changes, to more than one record in one operation. The steps include:
■ Specifying Group Update Changes on page 6-11
■ Excluding Records from the Group Update (optional) on page 6-12
■ Running the Group Update on the CDS on page 6-12
■ Testing that the Changes Are Valid (optional) on page 6-13
■ Applying the Changes to the Database on page 6-14
Additional information is available by:
■ Printing a Report of the CDS Changes on page 6-14
Correcting Records
Making Mass Changes 6-11
■ Viewing Group Update Histories on page 6-14
Specifying Group Update ChangesFrom the Candidate Data Set window, click the Grp Updates button or enter the keyboard combination Ctrl+A to open the Group Updates pop-up window. The window has two columns. The left column, labeled 'Column/Question' lists all the fields you can change.
To specify the changes, do the following:
1. For each key or question whose value you want to change, enter the new value to the right of the key or question name. Do one of the following:
■ Select a value from the LOV. Each field contains a list of the valid values for that field.
In the case of keys, the LOV also contains the values key and new_key; for example, Site and New_Site. If you enter the value (not new) key, when you run the group update, the value is changed back to the value the records had when the CDS was created. The new_key value is equivalent to the most recent value set for the field. You can use it, for example, to change the value to the existing value concatenated with a suffix, such as new_key||'_XX'. For example, where the site has already been changed to General_Hospital, you could change it to General_Hospital_Oncology.
In the case of responses, the LOV includes value and new_value, where value is the value of the question response when the CDS was created and new_value is the most recent change. You can use these values the same way you use key and new_key.
■ Enter a fixed value surrounded by single quotes; for example: 'value'. To update to a fixed date value, use the format 'MM-DD-YYYY' (including the single quotes). The system converts the date to the internal 'YYYYMMDD' date format.
■ Enter a SQL statement. For example, to add 40 days to value dci_date, enter:to_char(to_date(dci_date,'YYYYMMDD')+40,'YYYYMMDD')in the update column of a expression.dci_date_new
2. (Optional) Enter a Where clause to specify which records in the CDS should be updated. Do not include the word "where" in the clause; it is supplied by the system.
If you are making a response change, refer to the question response values as VALUE_TEXT1, or VALUE_TEXT2, and so on, where VALUE_TEXT1 is the current value of the first question you entered in the MCS. See Example 6–1, "Response Change" on page 6-12. Do not use the question name in the Where clause.
3. (Optional) If you want to explicitly exclude individual records from the group update, you can click the Back button and exclude the records, then return to the Group Update window to run the update. The system saves your settings in the Group Update window. See "Excluding Records from the Group Update" on page 6-12.
4. Update the records within the CDS. See "Running the Group Update on the CDS" on page 6-12.
Correcting Records
6-12 Oracle Clinical Conducting a Study
Example 6–1 Response Change
To change the value of the Child Bearing Potential question to "No" for all male patients, where "Sex" is the first question displayed and "Child Bearing Potential" is the second question displayed, do the following in the Group Update window:
1. In the Where... field enter: VALUE_TEXT1='MALE'
2. In the child_bearing_potential_new field, enter 'NO' for the new value.
Example 6–2 RDCI Key Change
If a data entry operator logged information collected at Visit 6 for Patient 11 for Patient 111 instead, you can correct the mistakes for all of Patient 11's Visit 6 records by doing the following:
1. In the Where... field enter: CLINICAL_PLANNED_EVENT_NAME='VISIT6' AND PATIENT=111 AND DATE=20050606
2. In the patient_new field enter: 11
Excluding Records from the Group UpdateIf there are records you want to exclude from a particular group update, you must exclude them before running the update. You can use two methods to exclude them:
■ Manual Exclusion. Select the record(s) you want to exclude from the update, and click the Exclude button. To select the records, do one of the following:
– Use Shift+Click or Ctrl+Click.
– From the Special menu, select Select All. You will then need to select the subset you do want to change and click Include.
■ Enter a Where clause in the Group Update window to specify records to include in the update, effectively excluding those records that do not meet the conditions of the Where clause. See "Specifying Group Update Changes" on page 6-11 for further information.
Excluding a record changes its status to IG, for Ignore. To reinstate a record's candidate status, select it and click the Include button.
Running the Group Update on the CDSWhen you finish specifying the group update, click the Do Grp Update button in the Group Updates dialog box. The system makes the changes to the CDS only, and makes a record of the group change.
The changes you enter will be applied to all the records in the CDS unless:
Note: If the CDS is very large relative to your system's resources and throughput, the response to invoking the Select All function can be slow.
Note: Selecting multiple records in the CDS serves no other purpose than to include or exclude records. Any change you apply to a CDS applies to all included records, whether they are selected or not selected.
Correcting Records
Making Mass Changes 6-13
■ They have a status of IG (because they were manually excluded; see "Excluding Records from the Group Update" on page 6-12) or AS (because changes have already been applied to the database for the record through this CDS).
■ You can write a Where clause in the appropriate field in this window to identify a smaller group of records to which to apply the change.
Testing that the Changes Are ValidBefore you commit your changes to the database, you can test if the changes are valid. Validation is optional. If you proceed directly to applying the changes to the database, the system runs the same validation test as part of the process and does not apply changes that would result in invalid data.
Running validation explicitly, in advance, gives you the opportunity to correct problems before you try to apply the changes.
To validate pending changes, click the Validate button in the Candidate Data Set window. The system displays a message when it completes testing the changes. Close the message box and review the Status field for each record:
■ VS. The specified change(s) would result in valid data.
The next time you apply changes to the database for this CDS, this record will be updated.
■ VF. At least one of the record's specified change(s) would result in invalid data. A message is displayed in the Validation Comment field explaining the reason for the failure.
The next time you apply changes to the database for this CDS, records with a status of VF will not be updated.
For all types of changes except RDCI Soft Delete, the system does not run validation tests on records with a status of either UN or IG (explicitly excluded from change). These records retain the same status after validation. For RDCI Soft Deletes, the system does validate records with a status of UN (see "Soft-Deleting RDCIs" on page 6-15).
See "Applying the Changes to the Database" on page 6-14.
Correcting Records
6-14 Oracle Clinical Conducting a Study
Printing a Report of the CDS ChangesYou can print a report that lists, record by record, all the changes specified in the CDS; from the Conduct menu, select Conduct Reports, then select Mass Change Reports, and finally, Change Type. Choose the name of the CDS from the drop-down list.
Viewing Group Update HistoriesTo view a history of a CDS's group updates, click the Grp Updates button, and then the Grp Update Hist button. The field Grp Upd # (Group Update Number) tells how many group updates have been performed on the CDS. Query for any change by number to see the SQL statement(s) generated by that group update to the CDS.
In addition, the How Changed field in the CDS window indicates how each record was last updated; either manually (a change to an individual record performed through this utility), or by a group update (includes the sequential number of the update).
Applying the Changes to the DatabaseChanges you make to records in the CDS, whether individual record changes or group updates, are reflected only in the CDS until you explicitly apply the changes to the database.
To apply changes to the database, save the CDS and click the Apply button. The system applies changes to records with a status of CH and VS; in the case of RDCI Soft Deletes only, it also applies changes to (soft-deletes) all records with a status of UN (see "Soft-Deleting RDCIs" on page 6-15).
Note on Faulty Error Messages: The system gives incorrect error messages under certain circumstances when you attempt to update locked data, whether the data was explicitly locked or locked as part of "freezing" the patient, study, Investigator, or study site. System behavior is correct in terms of what data you are allowed to update, but the error message is incorrect.
If you do not have Privileged Update, you are not allowed to update locked data. The system correctly prevents you from updating data but may give an error message like "No update allowed to the RDCM buffer" or "Visit Name [or some other field] is not updateable."
If you do have Privileged Update, you are allowed to update locked data and soft-delete locked RDCIs. The system correctly allows you to update the data. However, instead of warning you that the data is locked, it may give an error message like "RDCI is not protected because at least one of its RDCMs is locked and you have privileged update."
In addition, if you try to update a record that contains no data (not a null value) you receive an error message that the record has been changed since the CDS was created. The error message is incorrect, but it is true that you cannot update the record using mass changes. Records with no data occur, for example, when a question is added to a DCM question group after data has been collected for the DCM, or when an indicator question response is entered but no data was collected. You must update these records in Data Entry Update.
Correcting Records
Making Mass Changes 6-15
The system displays a message when it completes applying the changes. Close the message box and review the Status field for each record:
■ AS. The specified change(s) have been successfully applied to the real record in the database.
■ AF. Because at least one of the record's specified change(s) would result in invalid data, none of the changes specified for the record were applied. A message is displayed in the Validation Comment field explaining the reason for the failure.
The system gives the wrong error message when you try to apply locked data or data for frozen patients; see "Note on Faulty Error Messages" on page 6-14.
If you successfully apply changes to all records, the system then changes the mass change record's status to Complete, which prevents any more changes from this MCS.
Soft-Deleting RDCIsAn RDCI corresponds to a CRF, or Oracle Clinical "document". The only change you can make to an RDCI through the RDCI Soft Deletes Mass Change utility is to delete the entire CRF. You might want to do this, for example, if an operator logged in many RDCIs under the wrong study. You cannot use Mass Changes to correct these errors; the RDCIs need to be properly re-entered.
The system maintains a record of the existence of the RDCI for audit purposes; it is not deleted entirely (hard-deleted).
To soft-delete RDCIs, do the following:
1. From the Conduct menu, select Mass Changes, then select RDCI Soft Deletes.
2. Create an MCS the same way you do for other types of mass changes; see "Defining a Mass Change Specification and Its Criteria" on page 6-3.
3. Click Create CDS to generate the CDS containing all the RDCIs that meet the criteria you set in the MCS.
4. Click Go CDS to view the generated CDS. Each row represents one RDCI, or CRF, identified by its document number.
5. Carefully review each RDCI to determine if you really want to delete it. If not, select it and click the Exclude button. You can use Shift+Click and Ctrl+Click to select more than one record at a time, or from the Special menu, select Select All and then select records and click Include to delete just those records.
The system changes the status of the excluded records to IG.
6. (Optional) Click the Validate button to test the changes. The system tests all records with a status of UN.
7. Click Apply to apply the changes to the database. The system soft-deletes all RDCIs in the CDS with a status of UN or VS. The system retains a record of each soft-deleted RDCI for audit purposes, but no longer uses or processes the data in any way.
Changing Individual Records in the CDSIf you have specified a manageable number of records, or if the changes you need to make are not uniform, it may be an efficient strategy to make changes to the CDS's values one at a time. To make changes to a single record in a CDS, do the following:
1. Select the record you want to change.
Closing a Mass Change Specification
6-16 Oracle Clinical Conducting a Study
2. Make the changes you want. You can change the value in any field that has a white background. Select a field and enter a value, or choose a value from the LOV if there is one.
3. Repeat Steps 1 and 2 with a different record (optional).
4. Save. The system sets the status of the changed records to CH (Changed). It does nothing to records you have not changed.
5. Click the Validate button (optional). The system tests the validity of the changes you made. If the change(s) made to a record are valid, the system sets the status of the record to VS for Validation Succeeded. If a record's change(s) are not valid, the system changes the status to VF for Validation Failed and inserts a reason for the failure in the Validation Comment field (see "Testing that the Changes Are Valid" on page 6-13).
6. Click the Apply button to apply the changes to the database (see "Applying the Changes to the Database" on page 6-14). The system attempts to apply all changes made since the last Apply. If you ran group updates on the CDS as well as making individual record changes to the database, both the group update and the individual changes are applied.
■ If you ran a validation check before applying the changes, the system applies changes to all records with a status of VS and sets their status to AS.
■ If you did not run a validation check before applying the changes, the system attempts to apply changes to all records with a status of CH. If a record's change is valid, the system applies the change and sets the record's status to AS. If the change is invalid, the system does not apply the change and sets the record's status to AF.
Records with a status of AS and AF are not changed.
The system gives the wrong error message when you try to update locked data or data for frozen patients; see "Note on Faulty Error Messages" on page 6-14.
Closing a Mass Change SpecificationIf you successfully apply changes to all records, the system then changes the MCS's status to Complete, which prevents any more changes being made from this MCS.
You can also explicitly close an MCS: from the Special menu, select Close. The system changes the MCS's status to Complete.
Note: You can still copy MCSs when they have a status of Complete. You can then use the copy to generate a new CDS using the same criteria, or modify the criteria and then generate a new CDS.
7
Batch Loading Data 7-1
7 Batch Loading Data
The chapter contains the following topics:
■ Setting Up for Batch Data Loading on page 7-1
■ Batch Data Load Stages on page 7-5
■ Standard Batch Data Load and Out of Study Batch Data Load on page 7-5
■ Using the Batch Data Loader on page 7-6
■ Understanding the Error Log on page 7-12
■ Batch Deleting Data on page 7-16
The Batch Data Loader can load large amounts of data from sources such as labs, avoiding manual data entry.
The Batch Data Loader is designed only to update response data, not header keys. To update the header keys, you must perform a hard delete and reload the data. See "Batch Deleting Data" on page 7-16 for instructions and cautions about this procedure.
The Batch Data Loader cannot handle the following types of data:
■ DCI Modules that specify clinical planned events
■ DCI/DCM combinations that have different collect time flags; for example, both the DCI and the DCM should collect time data, or neither should.
■ DCI/DCM combinations with different dates and times
■ Optional DCMs
In a flexible study, after completing the batch data load, the system automatically runs the incremental expectedness calculation job for all patients whose data changed. See Oracle Clinical Creating a Study for more information.
Setting Up for Batch Data LoadingThis section contains the following topics:
■ Defining a Rollback Segment on page 7-1
■ Defining and Using Format Masks on page 7-2
Defining a Rollback Segment To prevent exceeding the rollback segment space and causing the entire job to fail, you can choose to run the batch data loader in its own rollback segment. Define the rollback segment as follows:
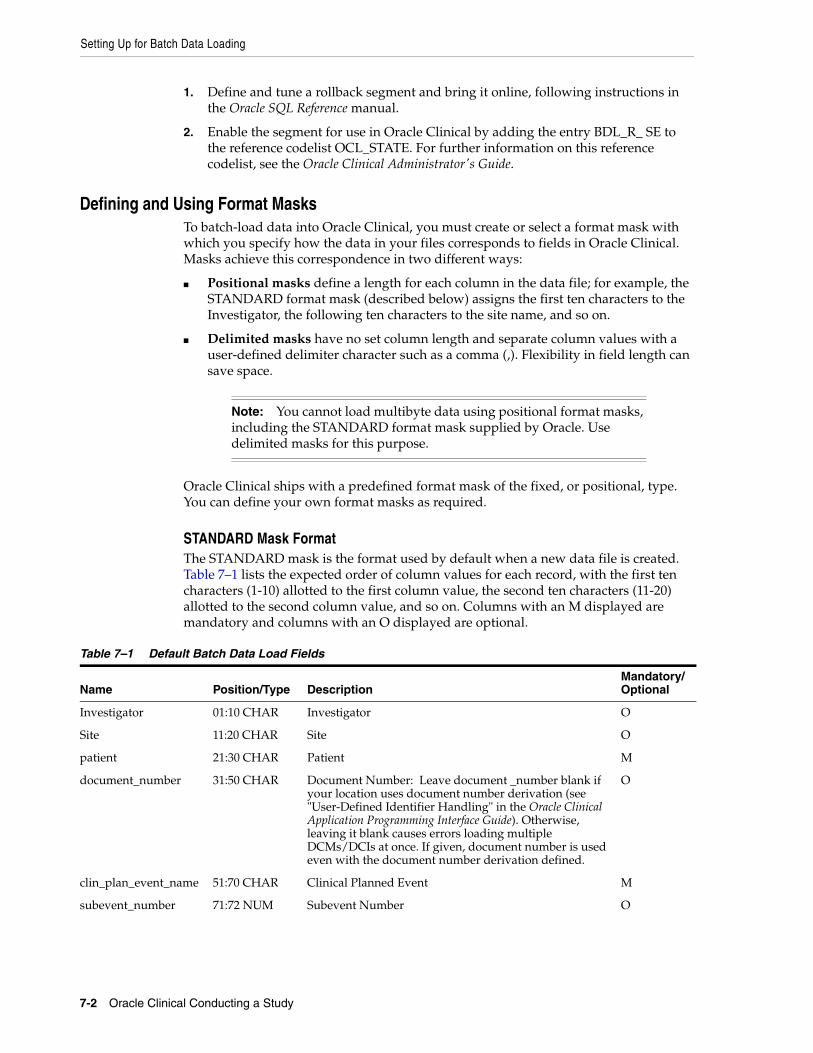
Setting Up for Batch Data Loading
7-2 Oracle Clinical Conducting a Study
1. Define and tune a rollback segment and bring it online, following instructions in the Oracle SQL Reference manual.
2. Enable the segment for use in Oracle Clinical by adding the entry BDL_R_ SE to the reference codelist OCL_STATE. For further information on this reference codelist, see the Oracle Clinical Administrator's Guide.
Defining and Using Format MasksTo batch-load data into Oracle Clinical, you must create or select a format mask with which you specify how the data in your files corresponds to fields in Oracle Clinical. Masks achieve this correspondence in two different ways:
■ Positional masks define a length for each column in the data file; for example, the STANDARD format mask (described below) assigns the first ten characters to the Investigator, the following ten characters to the site name, and so on.
■ Delimited masks have no set column length and separate column values with a user-defined delimiter character such as a comma (,). Flexibility in field length can save space.
Oracle Clinical ships with a predefined format mask of the fixed, or positional, type. You can define your own format masks as required.
STANDARD Mask FormatThe STANDARD mask is the format used by default when a new data file is created. Table 7–1 lists the expected order of column values for each record, with the first ten characters (1-10) allotted to the first column value, the second ten characters (11-20) allotted to the second column value, and so on. Columns with an M displayed are mandatory and columns with an O displayed are optional.
Note: You cannot load multibyte data using positional format masks, including the STANDARD format mask supplied by Oracle. Use delimited masks for this purpose.
Table 7–1 Default Batch Data Load Fields
Name Position/Type DescriptionMandatory/Optional
Investigator 01:10 CHAR Investigator O
Site 11:20 CHAR Site O
patient 21:30 CHAR Patient M
document_number 31:50 CHAR Document Number: Leave document _number blank if your location uses document number derivation (see "User-Defined Identifier Handling" in the Oracle Clinical Application Programming Interface Guide). Otherwise, leaving it blank causes errors loading multiple DCMs/DCIs at once. If given, document number is used even with the document number derivation defined.
O
clin_plan_event_name 51:70 CHAR Clinical Planned Event M
subevent_number 71:72 NUM Subevent Number O
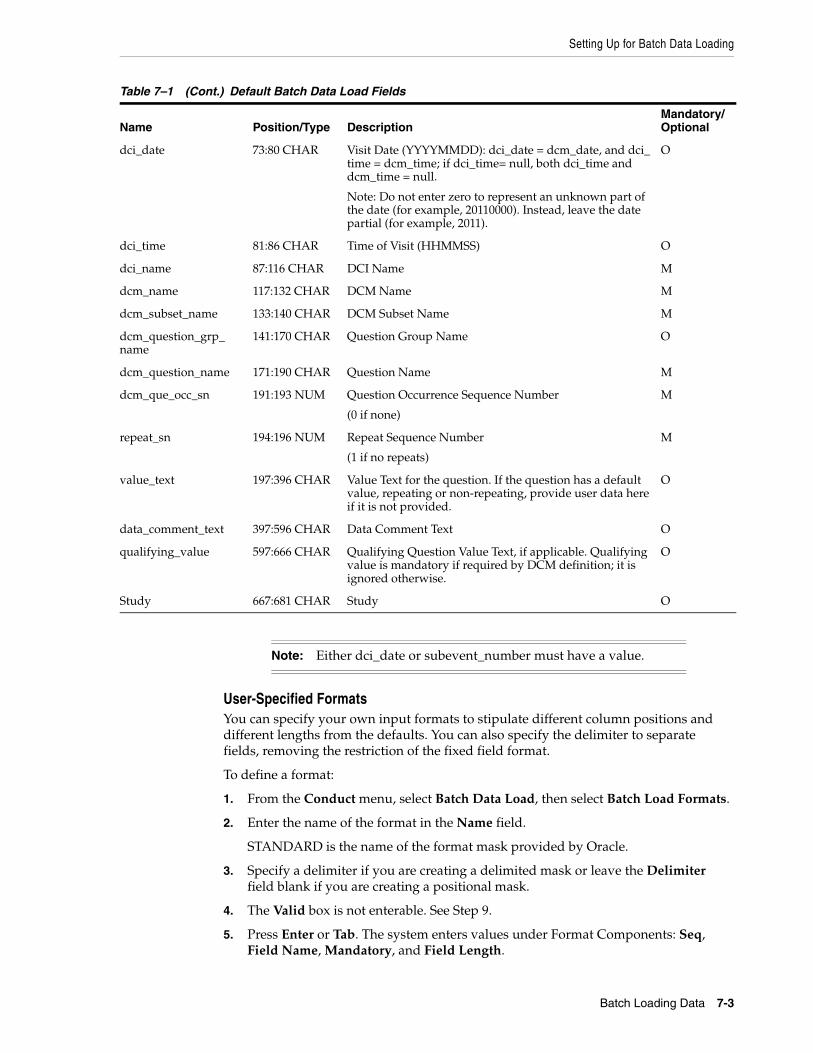
Setting Up for Batch Data Loading
Batch Loading Data 7-3
User-Specified Formats You can specify your own input formats to stipulate different column positions and different lengths from the defaults. You can also specify the delimiter to separate fields, removing the restriction of the fixed field format.
To define a format:
1. From the Conduct menu, select Batch Data Load, then select Batch Load Formats.
2. Enter the name of the format in the Name field.
STANDARD is the name of the format mask provided by Oracle.
3. Specify a delimiter if you are creating a delimited mask or leave the Delimiter field blank if you are creating a positional mask.
4. The Valid box is not enterable. See Step 9.
5. Press Enter or Tab. The system enters values under Format Components: Seq, Field Name, Mandatory, and Field Length.
dci_date 73:80 CHAR Visit Date (YYYYMMDD): dci_date = dcm_date, and dci_time = dcm_time; if dci_time= null, both dci_time and dcm_time = null.
Note: Do not enter zero to represent an unknown part of the date (for example, 20110000). Instead, leave the date partial (for example, 2011).
O
dci_time 81:86 CHAR Time of Visit (HHMMSS) O
dci_name 87:116 CHAR DCI Name M
dcm_name 117:132 CHAR DCM Name M
dcm_subset_name 133:140 CHAR DCM Subset Name M
dcm_question_grp_name
141:170 CHAR Question Group Name O
dcm_question_name 171:190 CHAR Question Name M
dcm_que_occ_sn 191:193 NUM Question Occurrence Sequence Number
(0 if none)
M
repeat_sn 194:196 NUM Repeat Sequence Number
(1 if no repeats)
M
value_text 197:396 CHAR Value Text for the question. If the question has a default value, repeating or non-repeating, provide user data here if it is not provided.
O
data_comment_text 397:596 CHAR Data Comment Text O
qualifying_value 597:666 CHAR Qualifying Question Value Text, if applicable. Qualifying value is mandatory if required by DCM definition; it is ignored otherwise.
O
Study 667:681 CHAR Study O
Note: Either dci_date or subevent_number must have a value.
Table 7–1 (Cont.) Default Batch Data Load Fields
Name Position/Type DescriptionMandatory/Optional
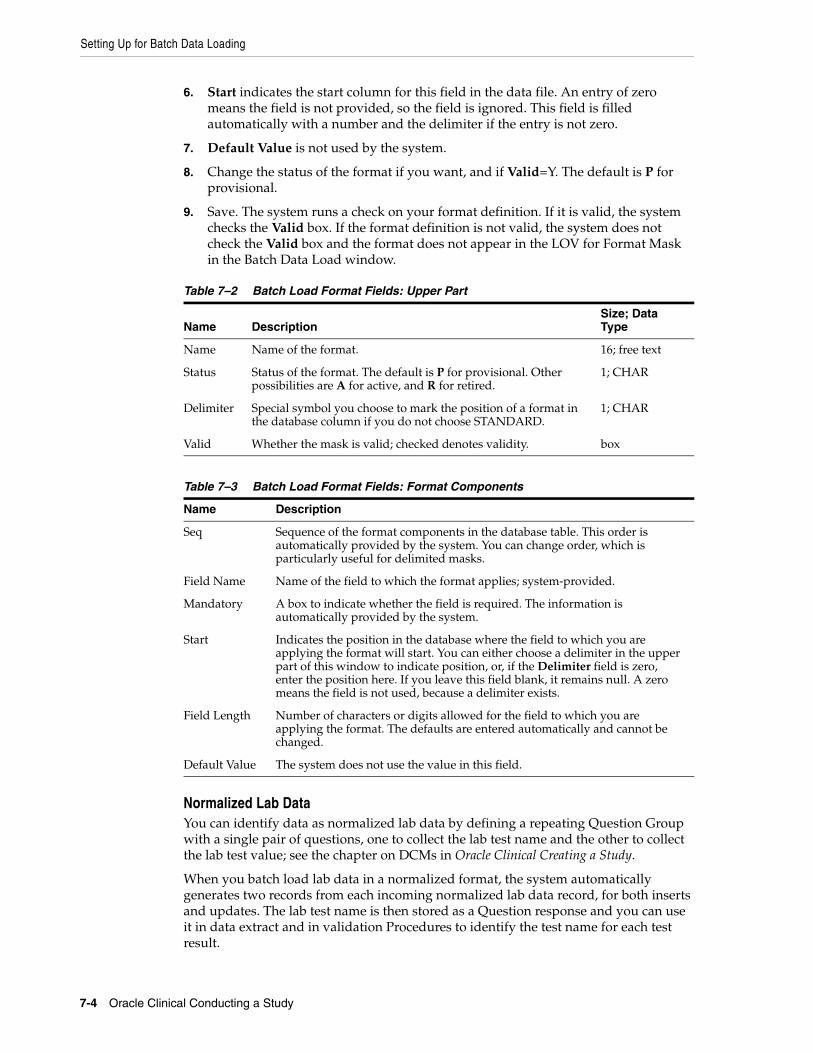
Setting Up for Batch Data Loading
7-4 Oracle Clinical Conducting a Study
6. Start indicates the start column for this field in the data file. An entry of zero means the field is not provided, so the field is ignored. This field is filled automatically with a number and the delimiter if the entry is not zero.
7. Default Value is not used by the system.
8. Change the status of the format if you want, and if Valid=Y. The default is P for provisional.
9. Save. The system runs a check on your format definition. If it is valid, the system checks the Valid box. If the format definition is not valid, the system does not check the Valid box and the format does not appear in the LOV for Format Mask in the Batch Data Load window.
Normalized Lab DataYou can identify data as normalized lab data by defining a repeating Question Group with a single pair of questions, one to collect the lab test name and the other to collect the lab test value; see the chapter on DCMs in Oracle Clinical Creating a Study.
When you batch load lab data in a normalized format, the system automatically generates two records from each incoming normalized lab data record, for both inserts and updates. The lab test name is then stored as a Question response and you can use it in data extract and in validation Procedures to identify the test name for each test result.
Table 7–2 Batch Load Format Fields: Upper Part
Name DescriptionSize; Data Type
Name Name of the format. 16; free text
Status Status of the format. The default is P for provisional. Other possibilities are A for active, and R for retired.
1; CHAR
Delimiter Special symbol you choose to mark the position of a format in the database column if you do not choose STANDARD.
1; CHAR
Valid Whether the mask is valid; checked denotes validity. box
Table 7–3 Batch Load Format Fields: Format Components
Name Description
Seq Sequence of the format components in the database table. This order is automatically provided by the system. You can change order, which is particularly useful for delimited masks.
Field Name Name of the field to which the format applies; system-provided.
Mandatory A box to indicate whether the field is required. The information is automatically provided by the system.
Start Indicates the position in the database where the field to which you are applying the format will start. You can either choose a delimiter in the upper part of this window to indicate position, or, if the Delimiter field is zero, enter the position here. If you leave this field blank, it remains null. A zero means the field is not used, because a delimiter exists.
Field Length Number of characters or digits allowed for the field to which you are applying the format. The defaults are entered automatically and cannot be changed.
Default Value The system does not use the value in this field.
Standard Batch Data Load and Out of Study Batch Data Load
Batch Loading Data 7-5
For example, from records with a normalized input file format as follows:
,,2,,VISIT1,0,20110101,,HEMA,HEMA,HEMA,LAB,HCT,0,1,43 ,,2,,VISIT1,0,20110101,,HEMA,HEMA,HEMA,LAB,HGB,0,2,17
where the lab test names are HCT and HGB, the respective lab test values for the patient are 43 and 17, the lab test Question name is LTEST and the lab test result name is LVALUE, the Batch Data Load process converts the preceding two input records to the following four records:
,,2,,VISIT1,0,20110101,,HEMA,HEMA,HEMA,LAB,LTEST,0,1,HCT ,,2,,VISIT1,0,20110101,,HEMA,HEMA,HEMA,LAB,LVALUE,0,1,43 ,,2,,VISIT1,0,20110101,,HEMA,HEMA,HEMA,LAB,LTEST,0,2,HGB ,,2,,VISIT1,0,20110101,,HEMA,HEMA,HEMA,LAB,LVALUE,0,2,17
Batch Data Load StagesThe batch load process includes several stages: Load, Prepare, and Transfer. You can choose to process data one stage at a time, checking error files after each stage and then proceeding to the next stage, or peform a combination of stages; see "Using the Batch Data Loader" on page 7-6.
Load Moves the data in the data files from the server to the Oracle Clinical database table Temporary Batch Data Items (TBDI).
Prepare Updates the TBDI table, and creates the Temporary Batch DCI and Temporary Batch DCM tables. During this stage the system looks for completeness and consistency of the records, whether the keys are valid, and checks for locked RDCMs.
Also during this stage, records from the data files are divided into INSERT and UPDATE records. INSERT records are those that do not already exist in Oracle Clinical, and need to be created; UPDATE records are those that have updated information for Received DCIs and Received DCMs that already exist in Oracle Clinical. These records are termed pending inserts and pending updates, respectively.
You can run the Detail Load Impact Report, or the Summary version of this report, after the Prepare stage to get a list of how many RDCMs have been updated or inserted.
Transfer Moves the data from the temporary database tables (Temporary Batch Data Items, Temporary Batch DCIs, and Temporary Batch DCMs) to the permanent Oracle Clinical tables (RDCMs, RDCIs, Responses, and Actual Events) if necessary.
Standard Batch Data Load and Out of Study Batch Data LoadOracle Clinical offers two batch data load processes. Both processes can handle multiple data files at a time.
Standard Batch Data Load This option can handle only a single DCM in a single DCI in each data file; this usually corresponds to a single, relatively simple CRF (see Oracle
Using the Batch Data Loader
7-6 Oracle Clinical Conducting a Study
Clinical Creating a Study for information on DCMs and DCIs). All data must be for a single study.
To use this process, select Batch Data Load from the Conduct menu.
Out of Study Batch Data Load This option can handle multiple DCMs in a DCI, and multiple DCIs in a data file and can process data from multiple studies at the same time. You may choose to use the Out of Study option even for a single study because it allows multiple DCMs and DCIs per data file.
To use this process, select Out of Study Load from the Conduct menu.
Using the Batch Data Loader This section describes the following steps:
■ Preprocessing Data Files on page 7-6
■ Creating and Viewing Data File Entries on page 7-7
■ Selecting Data Files on page 7-9
■ Loading Data on page 7-10
Preprocessing Data FilesBefore you start loading data into Oracle Clinical, some preprocessing may be necessary to bring data into conformity with required format standards.
If you are using a positional, or fixed, format, including the shipped STANDARD mask, each value occupies a fixed column position, as listed in Table 7–1. If there is no data in any one field, that field must contain spaces to make the record conform to the fixed format. The fields for subevent number, Investigator, site, document number, and DCM question group name may be left blank, in which case the individual field is calculated automatically. (See "Subevent Number Not Supplied" on page 7-6 for a discussion on what occurs when the subevent number is left blank.) If the data is not in the correct fixed format, batch data load will not succeed.
Subevent Number Not SuppliedWhen a subevent number is not supplied in the data file, the system attempts to derive a subevent number by following an algorithm that matches existing data for the patient against data being processed in the current batch load. The system follows these steps that comprise the algorithm:
1. For each patient/clinical planned event, the system derives a table of existing subevent numbers, and the minimum/maximum dates/times associated with them.
All data files being loaded as a group, as well as data in the Received DCMs and Received DCIs tables, are subject to the algorithm's actions.
2. The system processes each null subevent number in the incoming data file(s) in ascending date/time order. This is achieved by checking, in the order of existing
Note: Do not leave any empty lines in the load file. The system treats each line in the load file as a record. If there is an empty line, the system takes that as an empty record and invokes an error.
Using the Batch Data Loader
Batch Loading Data 7-7
or already allocated subevents, whether the DCM date and DCM time of the new data falls within the minimum/maximum dates/times of the existing subevents.
For the purpose of matching, null DCM times are treated as 00:00:00, or the earliest time for that date.
3. If the new data falls within the range of an existing subevent or one already allocated, it is assigned that subevent number.
4. If the new data does not fall within the range of an existing subevent, a new one is allocated, and the date and time of the new data is associated with it. Subsequently processed records that match are therefore allocated the same subevent number.
You cannot use this matching algorithm to automatically allocate subevent numbers for duplicate DCMs, because it does not include a check on whether the new subevent assignment will cause a collision with existing Received DCMs. For example, if data for subevent 0 already exists at 01-DEC-99 00:00:00, and new data for an existing DCM is processed with the same date, it will be assigned subevent 0 and will be detected by later phases in the Prepare stage as an update of the existing data. If the new data has a different document number, the document will be rejected during Prepare as a mismatched update.
Similarly, new data with time information that falls within the range of existing data will be matched to the existing subevent and will be later rejected as a mismatched update on time. For example, if data for subevent 1 exists at 01-DEC-99 00:00:00 and 02-DEC-99 00:00:00, and new data for a DCM that exists (at 01-DEC-ok
9 08:00:00, for instance) is processed at 01-DEC-99 12:00:00, it will be assigned subevent 1 and be detected by later phases in the Prepare stage as an update of the existing data. Since the times differ, it will be rejected.
Creating and Viewing Data File EntriesYou must log information about the files into Oracle Clinical—that is, create entries for the data files so that Oracle Clinical can access and process them.
■ Creating Data File Entries for Out of Study Batch Data Loads on page 7-7
■ Creating Data File Entries for Standard Batch Data Loads on page 7-8
Creating Data File Entries for Out of Study Batch Data Loads1. From the Conduct menu, select Out of Study Load, then select Batch Load Data
Files.
The Maintain Out of Study Batch Load Data File window opens. The system automatically populates the Creation TS field with the current date and time and the Status field with RECEIVED. You cannot change these fields; they change automatically as the data files are processed.
2. Enter a data file name in the Name field.
Note: For test mode, from the Definition menu, select Test a Study, choose Out of Study Load, and then select Batch Data Load Files.
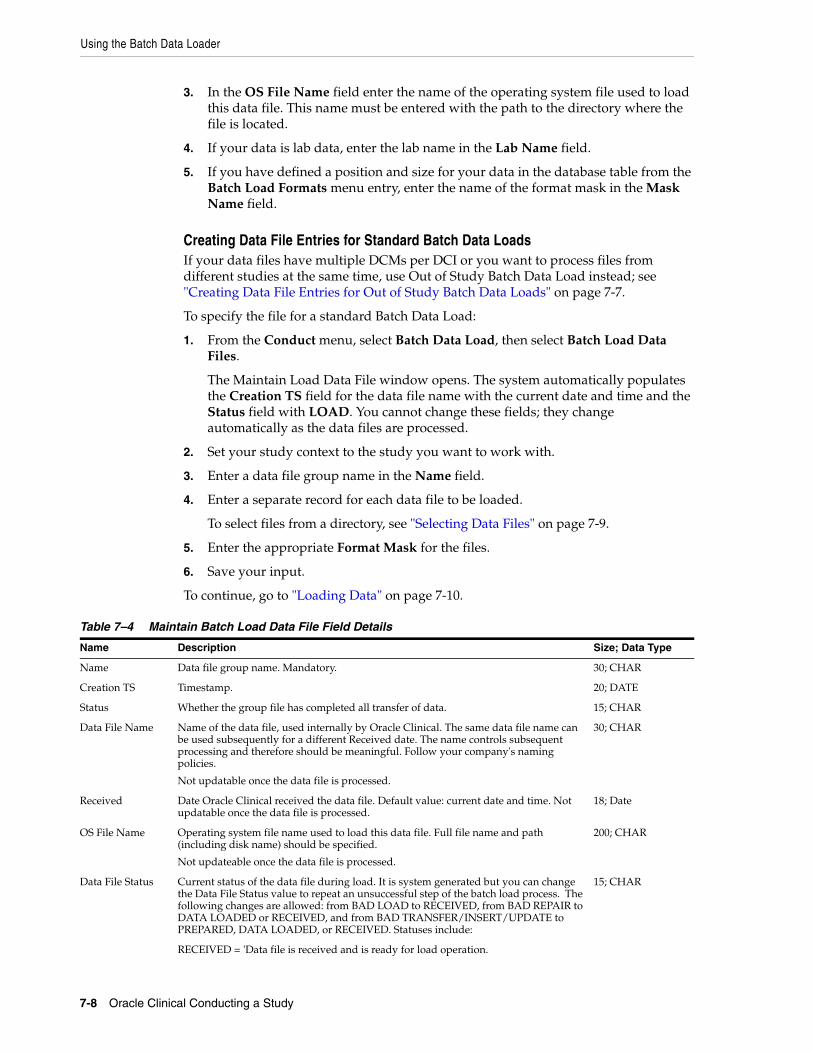
Using the Batch Data Loader
7-8 Oracle Clinical Conducting a Study
3. In the OS File Name field enter the name of the operating system file used to load this data file. This name must be entered with the path to the directory where the file is located.
4. If your data is lab data, enter the lab name in the Lab Name field.
5. If you have defined a position and size for your data in the database table from the Batch Load Formats menu entry, enter the name of the format mask in the Mask Name field.
Creating Data File Entries for Standard Batch Data LoadsIf your data files have multiple DCMs per DCI or you want to process files from different studies at the same time, use Out of Study Batch Data Load instead; see "Creating Data File Entries for Out of Study Batch Data Loads" on page 7-7.
To specify the file for a standard Batch Data Load:
1. From the Conduct menu, select Batch Data Load, then select Batch Load Data Files.
The Maintain Load Data File window opens. The system automatically populates the Creation TS field for the data file name with the current date and time and the Status field with LOAD. You cannot change these fields; they change automatically as the data files are processed.
2. Set your study context to the study you want to work with.
3. Enter a data file group name in the Name field.
4. Enter a separate record for each data file to be loaded.
To select files from a directory, see "Selecting Data Files" on page 7-9.
5. Enter the appropriate Format Mask for the files.
6. Save your input.
To continue, go to "Loading Data" on page 7-10.
Table 7–4 Maintain Batch Load Data File Field Details
Name Description Size; Data Type
Name Data file group name. Mandatory. 30; CHAR
Creation TS Timestamp. 20; DATE
Status Whether the group file has completed all transfer of data. 15; CHAR
Data File Name Name of the data file, used internally by Oracle Clinical. The same data file name can be used subsequently for a different Received date. The name controls subsequent processing and therefore should be meaningful. Follow your company's naming policies.
Not updatable once the data file is processed.
30; CHAR
Received Date Oracle Clinical received the data file. Default value: current date and time. Not updatable once the data file is processed.
18; Date
OS File Name Operating system file name used to load this data file. Full file name and path (including disk name) should be specified.
Not updateable once the data file is processed.
200; CHAR
Data File Status Current status of the data file during load. It is system generated but you can change the Data File Status value to repeat an unsuccessful step of the batch load process. The following changes are allowed: from BAD LOAD to RECEIVED, from BAD REPAIR to DATA LOADED or RECEIVED, and from BAD TRANSFER/INSERT/UPDATE to PREPARED, DATA LOADED, or RECEIVED. Statuses include:
15; CHAR
RECEIVED = 'Data file is received and is ready for load operation.
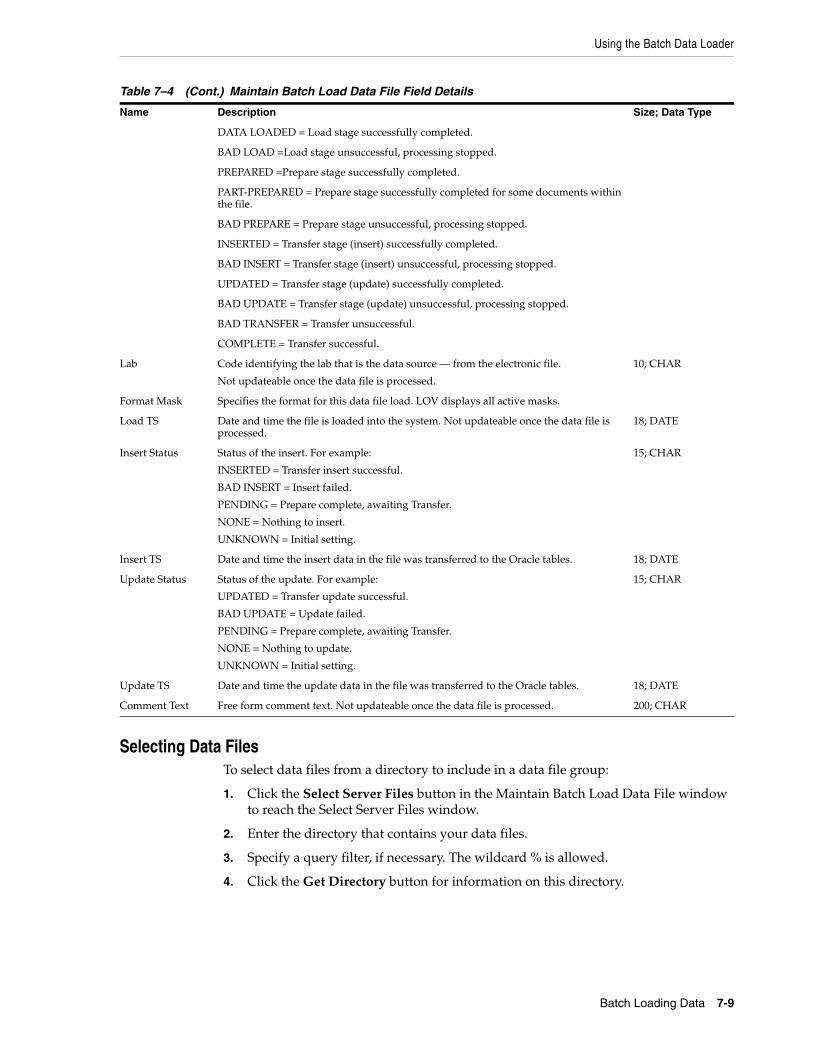
Using the Batch Data Loader
Batch Loading Data 7-9
Selecting Data FilesTo select data files from a directory to include in a data file group:
1. Click the Select Server Files button in the Maintain Batch Load Data File window to reach the Select Server Files window.
2. Enter the directory that contains your data files.
3. Specify a query filter, if necessary. The wildcard % is allowed.
4. Click the Get Directory button for information on this directory.
DATA LOADED = Load stage successfully completed.
BAD LOAD =Load stage unsuccessful, processing stopped.
PREPARED =Prepare stage successfully completed.
PART-PREPARED = Prepare stage successfully completed for some documents within the file.
BAD PREPARE = Prepare stage unsuccessful, processing stopped.
INSERTED = Transfer stage (insert) successfully completed.
BAD INSERT = Transfer stage (insert) unsuccessful, processing stopped.
UPDATED = Transfer stage (update) successfully completed.
BAD UPDATE = Transfer stage (update) unsuccessful, processing stopped.
BAD TRANSFER = Transfer unsuccessful.
COMPLETE = Transfer successful.
Lab Code identifying the lab that is the data source — from the electronic file.
Not updateable once the data file is processed.
10; CHAR
Format Mask Specifies the format for this data file load. LOV displays all active masks.
Load TS Date and time the file is loaded into the system. Not updateable once the data file is processed.
18; DATE
Insert Status Status of the insert. For example:
INSERTED = Transfer insert successful.
BAD INSERT = Insert failed.
PENDING = Prepare complete, awaiting Transfer.
NONE = Nothing to insert.
UNKNOWN = Initial setting.
15; CHAR
Insert TS Date and time the insert data in the file was transferred to the Oracle tables. 18; DATE
Update Status Status of the update. For example:
UPDATED = Transfer update successful.
BAD UPDATE = Update failed.
PENDING = Prepare complete, awaiting Transfer.
NONE = Nothing to update.
UNKNOWN = Initial setting.
15; CHAR
Update TS Date and time the update data in the file was transferred to the Oracle tables. 18; DATE
Comment Text Free form comment text. Not updateable once the data file is processed. 200; CHAR
Table 7–4 (Cont.) Maintain Batch Load Data File Field Details
Name Description Size; Data Type
Using the Batch Data Loader
7-10 Oracle Clinical Conducting a Study
5. Click in the Select column next to each data file you want to include. You can use the Select All and Deselect All buttons and the navigation buttons at the bottom of the window.
6. Save your input.
Loading Data If you are using the standard Batch Data Load, select Batch Data Load from the Conduct menu. If you are using Out of Study Batch Data Load, select Out of Study Load from the Conduct menu. After that the procedure is the same.
To successfully load data from an external source into Oracle Clinical tables you must perform all three batch data load stages, in order: Load, Prepare, and Transfer; see "Batch Data Load Stages" on page 7-5. You can choose to perform a single stage or multiple stages at a time. Performing a single stage allows you to check the error file just for that stage and takes less time.
1. Select one of the following menu options:
■ Load Batch Data
■ Prepare Batch Data
■ Transfer Batch Data
■ Load/Prepare Batch Data
■ Load/Prepare/Transfer Batch Data
■ Load/Prepare/Privileged Transfer. This option allows you to update locked data, and is available only if you have special privileges. If you select this option the system automatically updates locked data without prompts if updates to additional data are loaded.
The appropriate Parameterized Submission (PSUB) form is displayed with the parameters required for the stage or stages you selected.
2. Enter values for the job's parameters. The parameters displayed depend on the stage or stages you selected. The complete list of parameters includes:
Note: If information is retrieved a second time for the same directory in the same session, and if Refresh? is selected, another query goes to the operating system; otherwise, you would see outdated information.
Table 7–5 Standard and Out of Study Batch Data Load Parameters
Stage Parameter Name Description
Load Datafile Group ID of the data file group you want to load. A list of values is available.
Load Max No. of Bad Data Allowed During Load
Maximum number of bad records allowed before the system ends the entire process. If fewer than the maximum number of bad records are found, the batch load continues; the bad records are not loaded, but are reported in the log file.
Prepare OS File ID for Prepare ID of the data file group you want to prepare. A list of values is available.
Prepare Max No. of Errors Allowed During Prepare
Maximum number of bad records allowed before the system ends the entire process. If fewer than the maximum number of bad records are found, the batch load continues; the bad records are not loaded, but are reported in the log file.
Using the Batch Data Loader
Batch Loading Data 7-11
3. Click the Job Details button to display the Submission Details window and set the appropriate fields; see Oracle Clinical Getting Started for details. Then click Back to return to the Submission of Module window.
4. Click Submit Job.
5. Click the Job Status button to monitor progress of the batch job.
If there is a problem loading the data, the load stops and an error message appears. To review details about why the load was aborted, look at the log file created during the batch load. See "Understanding the Error Log".
6. If necessary (that is, if you have selected one of the steps that does not execute all three stages), select one of the subsequent steps to continue processing the batch data load.
7. Repeat Steps 2 through 6 until the batch data load is completed successfully.
You can use the Batch Job window to query on your job ID to see when it completes, or you can use the Maintain Batch Load Data File window or the Maintain Out of Study Batch Data Load File window to view the status of the batch job; the system automatically updates the Data File Status (DF Status) depending on your menu selection and the success of the current batch load stage.
Prepare Prepare to Completion? Whether to complete the Prepare phase or to accept a partial completion.
Prepare Spool Directory for Reloadable Data Files
If Prepare to Completion is Y, reloadable data files are placed in the directory entered in this field. If no location is given, the files are placed in the environment variable $RXC_BDL_DIR defined in the user's file named oclrc/login.com. If there are no reloadable files, the completed files are placed in $RXC_LOG.
Transfer Data File Group ID for Transfer ID of the data file group you want to transfer. A list of values is available.
Transfer Transfer Mode The mode in which the transfer should take place. Values include:
INSERT - Transfer only pending insert records.
UPDATE - Transfer only pending updates records.
BOTH - Transfer both pending inserts and pending update records.
Note: If you are using Out of Study load and are loading DCIs with multiple DCMs, select BOTH for proper processing. The process sees the records in the first Received DCM in a Received DCI as inserts and the records in subsequent Received DCMs as updates to the existing Received DCI.
Note: After the Transfer stage you must indicate if you want to purge pending or bad updates or inserts by displaying the Maintain Batch Load Data File form.
To delete inserted (new) records included in the batch file, select Purge Inserts from the Special menu. Update Status should be UPDATED, and Insert Status should be PENDING or BAD INSERT.
To delete updates (additions to existing records), select Purge Updates from the Special menu. Insert Status should be INSERTED, and Update Status should be PENDING or BAD UPDATE.
Table 7–5 (Cont.) Standard and Out of Study Batch Data Load Parameters
Stage Parameter Name Description
Understanding the Error Log
7-12 Oracle Clinical Conducting a Study
In the Maintain Batch Load Data File window you can also change the comment text (only before processing starts) for a data file or purge either the pending inserts or pending updates, which are records of the data files not successfully inserted into the Temporary Batch Data Items, Temporary Batch DCIs, or Temporary Batch DCMs tables.
Purging Pending Inserts and Updates in the Maintain Batch Data Load Window In the bottom part of this window, place the cursor on the data file group name with the appropriate data file status and then select either Purge Updates or Purge Inserts from the Special menu.
Purging Pending Inserts and Updates for Out of Study Load Files To purge pending inserts or pending updates of Out of Study Load files:
1. Query for the data file in the Maintain Out of Study Batch Load Data File window.
In the bottom half of the window the last part of each data file group name contains the study name for which the data was loaded. Note the study name and the data file group names for which you want to purge inserts and/or updates.
2. Navigate to the Maintain Batch Data Load Files window, select the appropriate study and query for the data file group name.
3. In the bottom part of this window, place the cursor on the data file group name with the appropriate data file status and then select either Purge Updates or Purge Inserts from the Special menu.
Understanding the Error LogThe log file keeps track of the status of every discrete job during the Transfer process, including the names of the data files being loaded, summary information, and errors. If the transfer is successful, the log shows the status at the beginning and at the end.
The batch data loader also performs error checking during the Prepare phase. To diagnose errors, follow these steps:
1. Open the .log file to get a general overview of the errors. When data files fail, you can check the log file for the status code of RECEIVED or PREPARED. The data file will not contain these status codes.
2. Open the .out file to see specific details about the errors.
■ First review the error messages, and use Table 7–6 to diagnose them.
■ Then review the Error Reporting Table that follows each reported error to get a more detailed analysis of the problems. Table 7–7 shows an example of the Error Reporting Table.
Note: The default error log is overwritten at each stage of the batch data load. To retain the error log you must enter a new name in the Output File field of the Submission Details window of PSUB.
Understanding the Error Log
Batch Loading Data 7-13
Table 7–6 Error Messages During Prepare Phase
Error Explanation/Action
Warning: The following patient(s) have freeze_flag set. This message is generated if the freeze flag is set on any patient in the data file. To remove the warning, unfreeze the patient.
Warning: The following patient(s) are either not assigned to a site, have site assignments inconsistent with that in the data file, or they are not from the present location.
Correct the patients and site assignments displayed in the message.
If patients are not from the current location, this is a fatal error.
Fatal error: Aborting due to the presence of patients and/or Investigators from locations other than the present location in the data file.
This message and the previous one are generated if patients in the data file do not have a study site assignment or have an incompatible study site assignment with an Investigator. To remove the warning, correct the patient's study site assignment.
Warning: The following Investigator(s) are either not assigned to a site or have site assignments inconsistent with that in the data file, or they are not from the present location.
This message is generated if there are patients or Investigators in the data file who do not belong to the current location. To remove the warning, correct the location of the patient.
If they are not from the current location, this is a fatal error.
Warning: Locked DCI(s) present in data file. The contents of the data file will update data already in RECEIVED_DCIS, but the DCI indicates that it is locked for data update. The row in the data file is uniquely identified by the reported sets of keys. Use the Privileged Transfer task, if you have access to it, to update locked data.
Warning: Locked DCM(s) present in data file. The contents of the data file will update data already in RECEIVED_DCMS, but the DCM indicates that it is locked for data update. The row in the data file is uniquely identified by the reported sets of keys. Use the Privileged Transfer task, if you have access to it, to update locked data.
Error: The following candidate(s) for insert(s) have document numbers that are present in RECEIVED_DCIS.
The data file contains data to insert into RECEIVED_DCIS, but the document number in the data file is already present in RECEIVED_DCIS.
Correct the document number.
This error may also be caused, in the case of manual Batch Data Load, by a key change in the document. Use Log-In to change keys.
Error: Mismatch between RDCI and TBDCI in visit date and/or time.
The contents of the data file will update data already in RECEIVED_DCIS, but the visit date or visit time in the data file do not match data in RECEIVED_DCIS.
Correct the visit date and/or time, or use Log-In to update the existing data.
Error: Mismatch between RDCM and TBDCM in visit date and/or time.
The contents of the data file will update data already in RECEIVED_DCMS, but the visit date or visit time in the data file do not match data in RECEIVED_DCMS.
Correct the visit date and/or time.
Error: Mismatch between RDCI and TBDCI in document number.
The contents of the data file will update data already in RECEIVED_DCIS, but the document number in the data file does not match data in RECEIVED_DCIS.
Correct the document number.

Understanding the Error Log
7-14 Oracle Clinical Conducting a Study
Error: Row(s) in data file have same patient, event, and subevent but different document number, visit date, and/or time.
There is duplicate data in the data file corresponding to the same combination of identifying keys.
Correct the document number, visit date, or visit time in the data file.
Error: Question name and occurrence number combination is not collected in the Question Group.
The question name and the occurrence number combination in the data file does not match the question group in the same row in the same data file.
Correct the question name, occurrence number, or question group name.
Error: Question name and occurrence number combination is not collected in any Question group.
The question name and the occurrence number combination in the data file does not match any question groups.
Match the question name and the occurrence number combination with the correct question group.
Error: The following Investigator(s) are not valid. Check the validity of Investigator names.
Error: The following site(s) are not valid. Check the validity of site names.
Error: The following patient(s) are not valid. Check the validity of patient positions.
Error: The following clinical planned event(s) are not valid.
Check the validity of the clinical planned events.
Fatal error: Aborting due to presence of invalid keys. The data file contains data for which unique identifiers cannot be found for the corresponding character keys. The system aborts immediately after reporting the character keys causing this error.
Correct the invalid keys.
Error: Invalid date or time in the data file. The data file contains invalid dates or times.
Correct the dates and times.
Error: Question group q_grp_name either doesn't exist or is not collected in the DCM.
The data file contains invalid question groups.
Use valid question groups.
Error occurred while preparing the data file.
Updating Data_Files with status: BAD PREPARE
Errors occurred during the Prepare phase, and the database was updated accordingly.
Updating Data_Files with status: PREPARED No errors occurred during the Prepare phase, and the database was updated accordingly.
Error: Question name and occurrence number combination occurs in multiple collected Question groups.
Question name and occurrence sequence number combinations appear in multiple question groups.
Correct the data so that such unique occurrences happen only in one question group.
Fatal Error: Internal inconsistency in DCI/DCM definition.
DCIs and DCMs are not set up correctly in the system.
Check the setup of DCIs and DCMs.
Error: The following qualifying value(s) are not valid for the qualifying Question.
There are mismatching qualifying values between a qualifying question and n discrete values for that question.
Either update the discrete values or change the data file to match the discrete values.
Error: Mismatch between RDCI and TBDCI in Investigator.
The contents of the data file will update data already in RECEIVED_DCIS, but the Investigator in the data file does not match data in RECEIVED_DCIS. To remove this error, correct the Investigator.
Table 7–6 (Cont.) Error Messages During Prepare Phase
Error Explanation/Action
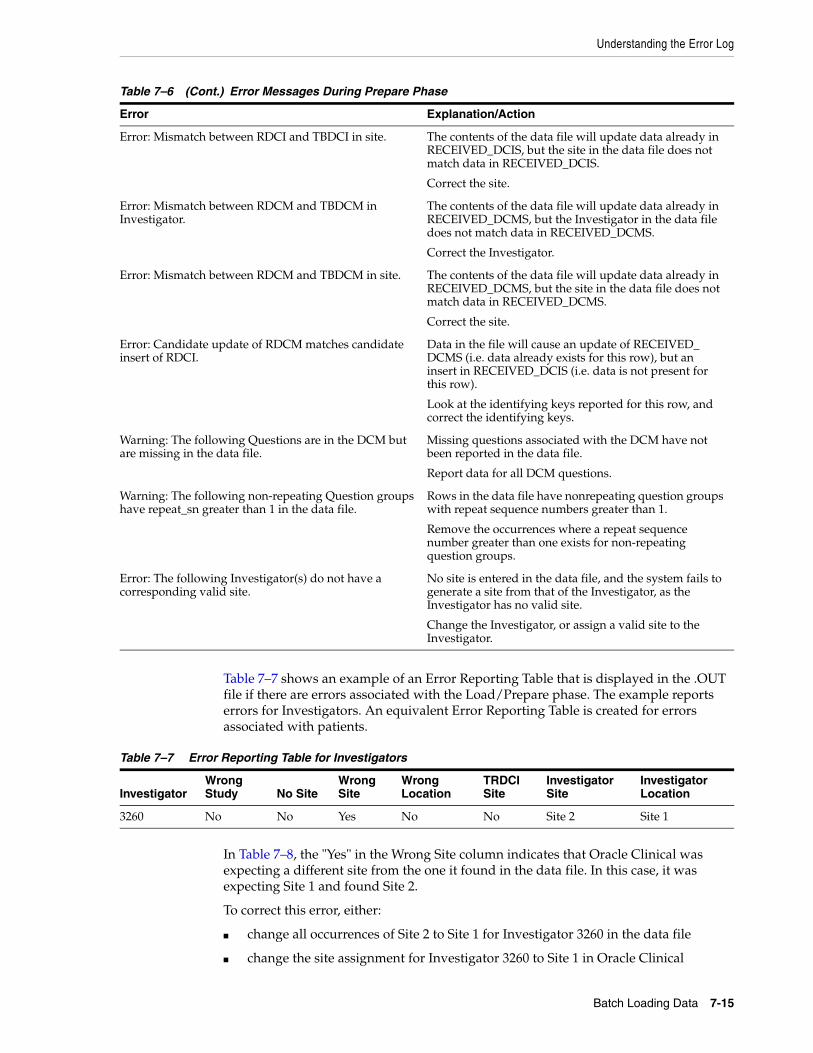
Understanding the Error Log
Batch Loading Data 7-15
Table 7–7 shows an example of an Error Reporting Table that is displayed in the .OUT file if there are errors associated with the Load/Prepare phase. The example reports errors for Investigators. An equivalent Error Reporting Table is created for errors associated with patients.
In Table 7–8, the "Yes" in the Wrong Site column indicates that Oracle Clinical was expecting a different site from the one it found in the data file. In this case, it was expecting Site 1 and found Site 2.
To correct this error, either:
■ change all occurrences of Site 2 to Site 1 for Investigator 3260 in the data file
■ change the site assignment for Investigator 3260 to Site 1 in Oracle Clinical
Error: Mismatch between RDCI and TBDCI in site. The contents of the data file will update data already in RECEIVED_DCIS, but the site in the data file does not match data in RECEIVED_DCIS.
Correct the site.
Error: Mismatch between RDCM and TBDCM in Investigator.
The contents of the data file will update data already in RECEIVED_DCMS, but the Investigator in the data file does not match data in RECEIVED_DCMS.
Correct the Investigator.
Error: Mismatch between RDCM and TBDCM in site. The contents of the data file will update data already in RECEIVED_DCMS, but the site in the data file does not match data in RECEIVED_DCMS.
Correct the site.
Error: Candidate update of RDCM matches candidate insert of RDCI.
Data in the file will cause an update of RECEIVED_DCMS (i.e. data already exists for this row), but an insert in RECEIVED_DCIS (i.e. data is not present for this row).
Look at the identifying keys reported for this row, and correct the identifying keys.
Warning: The following Questions are in the DCM but are missing in the data file.
Missing questions associated with the DCM have not been reported in the data file.
Report data for all DCM questions.
Warning: The following non-repeating Question groups have repeat_sn greater than 1 in the data file.
Rows in the data file have nonrepeating question groups with repeat sequence numbers greater than 1.
Remove the occurrences where a repeat sequence number greater than one exists for non-repeating question groups.
Error: The following Investigator(s) do not have a corresponding valid site.
No site is entered in the data file, and the system fails to generate a site from that of the Investigator, as the Investigator has no valid site.
Change the Investigator, or assign a valid site to the Investigator.
Table 7–7 Error Reporting Table for Investigators
InvestigatorWrong Study No Site
Wrong Site
Wrong Location
TRDCI Site
Investigator Site
Investigator Location
3260 No No Yes No No Site 2 Site 1
Table 7–6 (Cont.) Error Messages During Prepare Phase
Error Explanation/Action
Batch Deleting Data
7-16 Oracle Clinical Conducting a Study
After the Transfer stage, the log shows the number of records updated and the number of records inserted.
Batch Deleting DataAfter loading an Out of Study file, you can delete all data associated with a bad data file or data file group in the PSUB window, Deleting Study Information; this window is reached by selecting Security from the Conduct menu, and then selecting Delete Study Information. Specifying the DCI name or document number is optional. Possible values for the files are provided by the <List> function.
In addition to deleting bad batch loaded study data, you can also delete batch data loads of externally maintained data where the audit history is maintained in an external system. There are also two types of manually entered data that can be deleted from Oracle Clinical without causing problems with the audit trail:
■ First-pass data entered into a study but never made accessible
■ Data in development databases where audit is not required
After completing the batch data delete job, the system automatically runs the full expectedness calculation job. See Oracle Clinical Creating a Study for more information.
Auditing Data DeletionThe Oracle Clinical table Study_DATA_DELETE_AUDIT records each time a batch data delete job is run. The table records:
■ the parameters used to invoke the deletion
■ the actual number of each object that is deleted by the run
This audit table enables you to document the use and impact of the data deletion facility, and may help you diagnose whether a problem has been caused by a hard data delete.
Batch Data Load ReportsFrom the Conduct menu, select Conduct Reports, then select Batch Data Load to find several reports on batch loaded data.
Table 7–8 Other Examples of Possible Errors
If "Yes" Under.... Then...
No Site No site was found. Oracle Clinical shows the correct site under "Investigator Site."
Wrong Location The wrong location was given. Oracle Clinical shows the correct location under "Investigator Location."
Wrong Study The wrong study was given. In this case, Oracle Clinical cannot anticipate what is the right study.
Note: Deleting study information is a hard delete; you will not be able to rollback changes made after such a delete. Use this function with extreme care. You can change data entry information and maintain an audit trail by selecting Update from the Data Entry menu and making changes in Data Entry Update mode.
Batch Data Load Reports
Batch Loading Data 7-17
Processed Data ReportThis report would be better titled the Prepared Data Report because it displays data in the temporary tables following the successful completion of the Prepare stage of a batch data load. Data that has gone through the Transfer stage (after the Prepare stage) does not appear in the report.

Batch Data Load Reports
7-18 Oracle Clinical Conducting a Study
8
Data Extract 8-1
8 Data Extract
This chapter contains the following topics:
■ About Data Extract on page 8-1
■ Data Extract Context on page 8-2
■ Workflow on page 8-5
■ Data Extract View Loader on page 8-10
About Data ExtractOracle Clinical's Data Extract subsystem is a set of facilities to present patient and clinical study data that meets the demands of external applications related to statistical analysis and reporting. Data is presented for external access via standard and custom views (that is, database views) created in study access accounts.
Oracle Clinical stores data in tables that are normalized and generic, in that the underlying table structure of the data is the same from one study to another.
This chapter describes those data extract features and processes that fall under the heading "Conducting a Study". For data extract tasks performed in the Global Library and Definition subsystems, see "Data Extract" in the manual Oracle Clinical Creating a Study. See the "Utilities" chapter of the Oracle Clinical Administrator's Guide for information on regenerating and updating views.
Views created before Oracle Clinical V3.1 ("pre-3.1 views") continue to be supported, although you cannot have pre-3.1 views in the same study as views created in V3.1 and later. As of V3.1, views are created by the View Builder, which is a toolkit that provides the means to:
■ Customize and interactively view default, DCM-based views.
■ Create questions derived at the time of data extract.
■ Customize how views are created by, for example:
– controlling the view mode
– controlling the view granted for view access
– controlling the default attributes of the view's questions.
■ Create cross-study views by program, project, or user-defined study set.
View data can be transferred into database tables for better system performance during user analysis, reporting, and browsing operations. You also can create in-study unions within a study; these union all the data extract views that use the same key and view templates across the study.
Data Extract Context
8-2 Oracle Clinical Conducting a Study
Data Extract ContextThis section contains the following topics:
■ Default View Creation Algorithm
■ View Types on page 8-2
■ Rollsnaps on page 8-3
■ Access Accounts on page 8-3
■ Table-Based Views on page 8-4
■ Creating Extract Tables and Indexes on page 8-4
To create a structure more conducive to data analysis, the Data Extract facility allows data to be accessed or extracted via Oracle or SAS views.
De-normalized Oracle views, termed data extract views, are created with SQL statements; these views join together and organize the study data so that responses to DCM questions are presented in the context of study, Investigator, patient, and RDCM.
For every Oracle view created, a corresponding SAS view is also created. Data extract views correspond to DCMs, and there is at least one view for every DCM; a DCM with repeating questions may have several.
Default View Creation AlgorithmData extract is always done at the study level, either within a single study or across multiple studies. You can perform data extract for all DCMs, though it is not done for all the DCMs by default. For View Builder-enabled studies, you can default the View Definitions from DCMs. You can perform this default when the DCM is activated, or on an ad-hoc basis by choosing Default View Definition from the Special menu.
Data extract views are created as follows:
For every DCM, one view is created to contain the data for all non-repeating DCM question groups in the DCM. The name of the data extract view is the DCM short name. For each repeating question group in a DCM, a view is created whose name is the DCM short name plus the DCM question group short name.
For example: in the study ORACLIN, a DCM called ET, with the short name ET, has three DCM question groups: SD_DOSAGE, TREADMILL_INFO, AND EXERCISE_STAGE, with the short names SD, TI, and ES, respectively. SD_DOSAGE and TREADMILL_INFO are non-repeating question groups, while EXERCISE_STAGE is repeating. These views are created for this DCM:
■ ET: Contains the data for the two non-repeating question groups, SD_DOSAGE and TREADMILL_INFO.
■ ETES: Contains the data for the repeating question group, EXERCISE_STAGE.
If a third non-repeating question group is added to this DCM, the data is included in the existing ET view; but if another repeating group is added to the DCM, another view is created.
View TypesData extract views fall under the following categories:
■ Current views display all data, including data not yet validated. The account type TEST is the same as Current, except that it uses the T test tables. Test type accounts create data extract views for provisional view definitions, while the Current
Data Extract Context
Data Extract 8-3
account creates data extract views for active view definitions only for View Builder-enabled studies.
■ Stable views display only data that has been made accessible through data entry and has been through Batch Validation. A Stable view looks the way it did after completing its last Batch Validation.
■ Snapshot views display data as it looked at a particular moment in time during the data collection process. You can pick any Batch Validation run time (stability point) as the base date for a snapshot.
■ Rolling Snapshots are refreshed on demand to reflect the current Stable view of the data.
Once you have defined and created the data extract views, you can submit batch jobs to create SAS datasets and SAS Proc Prints, and then analyze the data.
RollsnapsThe Rolling Snapshot—or Rollsnap—account is a study access account for holding data extract tables equivalent to Stable accounts, except that data extraction has to be explicitly run to update its contents. A system-defined snapshot, Rollsnap, is created and automatically updated to reflect the Batch Validation timestamp at the last table refresh. Maintenance of this account can therefore be scheduled asynchronously with Batch Validation.
For instance, if Batch Validation runs nightly, the Rollsnap account could be refreshed on a weekly basis. If required, the Rollsnap account could be refreshed after each Batch Validation and always reflect the latest Stable account.
View definitions created as views and not tables in this account view their data as of the Snapshot timestamp and thus are consistent with the data extracted to tables. Under this structure, with appropriate privileges, database objects in this account can be accessed with the prefix Study$ROLLSNAP.
Access AccountsIn creating a clinical study state for a study (from the Conduct menu, select Security, then select Clinical Study States), you automatically create access accounts. These accounts are owned by one of the following kinds of account — Current, Stable, Rollsnap or Test. The only accounts you can create are Snapshot accounts.
The Oracle account name is the name of the study concatenated with $, concatenated with the account type. Snapshot accounts follow the naming convention of Study$your_choice_of_name. When you run the PSUB form Maintain Data Extract Views, you run your job in one of the account types described in order to create the view.
You cannot log on to these accounts, but you can describe and select from the views, if you have the appropriate security, by logging on to SQL*Plus in your own account, and typing — for example:
desc ORACLIN$CURRENT.ET
SAS views are created on the server, in the RXC_SAS_VIEW directory, with this structure: a subdirectory for each study, and under each study, subdirectories for each account type — for example:
RXC_SAS_VIEW/oraclin/current
A subdirectory is created for each new Snapshot or Rollsnap account — for example:
Data Extract Context
8-4 Oracle Clinical Conducting a Study
RXC_SAS_VIEW/oraclin/snap
The RXC_SAS_VIEW path is set by the Administrator as an Oracle Clinical environment variable.
Purging Study Access AccountsYou can remove access accounts from a study by running the Purge Study Access Accounts batch job. The batch job allows you to remove one access account at a time; you cannot remove all the accounts from a particular study.
To run this job:
1. From the Conduct menu, select Data Extract, then select Remove Account. The PSUB window for this job opens.
2. In the Name of Study Access Account field, enter the account you want to remove or choose one from the LOV.
3. Run or schedule the job.
Table-Based ViewsThe Table-Based Views option is available for all accounts, and enables you to specify that particular access accounts will contain Oracle tables of extracted data instead of views. Queries against table-based extracted data will reduce activity against the RESPONSES and RECEIVED_DCMS tables. You can also control indexing of these tables.
Despite its name, the Table-based Views option still enables you to see views with the names of DCMs or View Definitions that are based on the data extract tables.
When you create a table-based view, you need to choose a tablespace for tables and one for indexes that is large enough to meet your needs. The Maintain Study Access Accounts window provides fields for you to enter these tablespaces.
Some relevant information to help in estimating tablespace may be found in the table VIEW_ACCOUNT_STATISTICS in the RXC account. See the OracleAS10gR2 documentation for information about calculating the space needed.
Creating Extract Tables and Indexes Although indexing is a task that could be considered better covered under the Definition subsystem in Oracle Clinical, it is treated here because the menu entry is under Conduct.
Follow these steps:
1. Set up additional tablespaces to store the extract data and extract indexes, calling them, for example, RXC_EXTRACT_DATA and RXC_EXTRACT_IDX, respectively.
2. Locate the installation reference codelist DX_VIEW_TABLESPACE, and enter the name(s) of the tablespace(s) allotted to extract data (for this example, RXC_EXTRACT_DATA) in the Long Value column. The Short Value column will just be a sequential number. Each tablespace name requires a row.
3. Locate the installation reference codelist DX_INDEX_TABLESPACE, and enter the name(s) of the tablespace(s) allotted to the extract index(es) (for this example,
Note: Union views cannot be represented as tables.

Workflow
Data Extract 8-5
RXC_EXTRACT_IDX) in the Long Value column. The Short Value column will just be a sequential number. Each tablespace name requires a row.
4. From the Conduct menu, select Data Extract, then select Study Access Accounts, set the View/Table column to TABLE for study access accounts where you want table views.
Study access accounts of types Snapshot and Rollsnap (see "View Types" on page 8-2 and "Rollsnaps" on page 8-3) can be made into table views.
5. For the same study you chose in Step 4, from the Definition menu, select Data Extract View Builder, then select View Definitions.
6. Change the Type field to TABLE from VIEW for each definition where you want a table view.
Both the view definition and the study access account must be set to TABLE for table views to occur.
7. In the Indexes window (from the Conduct menu, select Data Extract, then select Indexes), specify the indexes required for the underlying tables. For example, most tables need to be indexed on patient and visit, which are common search fields.
a. In the View Name to Index field, invoke the LOV and choose a view name from the list.
b. Enter a description for the view name in the Index Description field.
c. In each Template Columns to Index Column Name field, invoke the LOV to see the view columns, and choose the ones you want to use as index columns.
d. Save, then exit the Maintain Indexes window.
8. In the Data Extract Views window (from the Conduct menu, select Data Extract, then select Data Extract Views), choose the type and name of the study access account you want, and run in full mode.
WorkflowThis section contains the following topics:
■ Submit Views to PSUB on page 8-6
■ Creating SAS Views on Windows when SAS and Oracle Clinical are on Different Computers on page 8-6
■ Tasks in Conduct on page 8-7
■ Validation Status and Views on page 8-7
■ Create View Accounts on page 8-9
■ Query Data Extract Views on page 8-9
■ SAS Datasets on page 8-9
■ SAS Proc Reports on page 8-10
See the data extract chapter in the manual Oracle Clinical Creating a Study for data extract tasks that precede the tasks you perform in the Conduct subsystem. See the Oracle Clinical Administrator's Guide for additional data extract information.
After you create a view definition you must generate the views in the Maintain Data Extract Views window; from the Conduct menu, select Data Extract, then Data Extract
Workflow
8-6 Oracle Clinical Conducting a Study
Views. This PSUB job generates both Oracle and SAS views from the same definitions unless your database is running on Windows and SAS is installed on a different server; see "Creating SAS Views on Windows when SAS and Oracle Clinical are on Different Computers" on page 8-6.
Submit Views to PSUBAfter you create a view definition (see the Data Extract chapter) you must generate the views in the Maintain Data Extract Views window; from the Conduct menu, select Data Extract, then select Data Extract Views. This PSUB job generates Oracle and SAS views from the same definitions.
To create the data extract views (or tables) in the database, Navigate to Conduct, then Data Extract, and finally Data Extract Views. The Data Extract Views window opens. Select the account type of the view and the account that matches the view. The account type is optional, but the account must match the account type. For all types except Snapshot, the account is study$type. For example: study1$CURRENT.
For all the values you provide in the form, there is a LOV. The system fills in the default for the SAS queue name with SYS$BATCH, the View Creation Mode with data_only, and the default for View Maintenance Mode with incremental; see "Full and Incremental Modes" on page 8-7. The View Creation Mode parameter applies only to studies where the View Builder is not enabled, and Oracle Clinical ignores the entry in this field unless it is relevant.
The SAS queue name determines how a job is submitted. Oracle Clinical submits one job to the CPU running Oracle Clinical—the batch queue name, which can be seen in the Submission Details window. Oracle Clinical then writes a program to create the corresponding SAS views and submits this program to a potentially different queue, named Queue Name to Submit SAS, of the CPU running SAS.
View Maintenance, like any PSUB job, is automated, occurring as a batch job that can be scheduled.
Creating SAS Views on Windows when SAS and Oracle Clinical are on Different ComputersOracle recommends installing SAS on the same computer where your Oracle Clinical database is installed. It is also possible to install them on different computers, but in that case running the Data Extract Views PSUB job only creates the SAS pass-through view files on the SAS server —it does not automatically launch the batch job to create the actual views. You must manually launch the SAS View Creation batch job as follows:
1. Log on to the SAS server using your local account.
2. Change directories to %RXC_SAS_VIEW.
3. Change directories to study where study is the name of the study for which you are generating views.
4. Change directories to study_access_account where study_access_account is the name of the account for which you are generating views; for example, current, test or the user-defined name of a snapshot.
5. Set the server environment:
set p1=db_name
set p2=code_env
opa_setup
Workflow
Data Extract 8-7
where db_name is a database instance name and code_env is a code environment designation.
6. Run the SAS view generation job:
rxcdxbvb_sasjob.bat
The batch job launches the creation of a SAS pass-through view for each DX view defined for the study and account.
Full and Incremental ModesThe two modes handle view maintenance as follows:
■ Updating the View Templates linked to DCMs. Incremental mode updates only views that have been modified since the last job. Full mode updates all views. They both report the total number of linked DCMs fetched.
■ Generating view text from view structures created using the View Builder. Only full mode does view text generation. Incremental mode does not do text generation at all.
■ Maintains Study Access Accounts. This step includes activities such as creating, deleting accounts, and assigning privileges to the roles set under View Definition. Both modes loop through all accounts being maintained. Full mode drops and recreates the account, but incremental mode only grants Select, Connect, and Create type privileges to the account.
Both modes do the following tasks for all records:
■ Creating views when view creation is specified for the View Definition and Access Account
■ Creating tables when table creation is specified for the View Definition and Access Account
■ Creating union views in Study Set Access Accounts
■ Creating union views in Study Access Accounts
Tasks in ConductIn Conduct, you can specify view definitions that then become the basis for creating Oracle views or Oracle tables in the access accounts, which are new Oracle accounts made for views. You can also create Snapshot views. Finally, you can submit account names to the PSUB utility to extract the data.
You can also create SAS datasets and SAS Proc Reports in Conduct. For these two functions, you can reduce overhead and decrease confusion by restricting view creation to meaningful views. For example, for a default view definition for a DCM named CONMED, assume a custom view that includes the CONMED data, some derived information, and selected information from a demographic DCM. In this case preventing generation of CONMED can avoid problems.
Validation Status and ViewsThis section includes the following topics:
■ For Pre-3.1-Style Study Views
■ For View Builder Study Views
■ Rules for Setting Status Variables
Workflow
8-8 Oracle Clinical Conducting a Study
For Pre-3.1-Style Study ViewsThe View Creation Mode field in the PSUB window allows you to specify whether and how the validation status of the data should be included in the views.
When you specify in this field that response status information should be included in view creation, this applies to all views except externally loaded views.
You can create views in three modes:
■ with (response) data only
■ with both response and validation status data in the same view
■ with validation status and response data in separate views
For View Builder Study ViewsStudy views created with the View Builder are restricted to data-only mode. You can include the validation status in a view of this kind by adding the information as an extended attribute of a question (see Chapter 7, "Utilities", in the Oracle Clinical Administrator's Guide for instructions). You can choose to default the validation status by triggering a setting in the DX Installation Configuration window. In View Template Details, you can choose to include validation status in any type of view definition.
Rules for Setting Status VariablesOracle Clinical maintains a Status field that reflects the validation status of each Response field. This field validation status consists of three characters: the first represents univariate validation; the second, multivariate; and the third, manual comments.
The rules for computing the univariate, multivariate, and manual validation statuses are listed below. These are listed in descending order of priority.
Higher priority indicates that a rule is applied before another with lower priority. As soon as a rule for status determination is satisfied, the process of computing the validation status ends.
O - Outstanding Indicates that the response has at least one unresolved discrepancy still under review. This condition applies to all three status variables.
I - Irresolvable Indicates that the response does not have any outstanding system-generated or manual discrepancies, but has at least one resolved discrepancy with a status of Irresolvable. This condition applies to all three status variables.
K - Confirmed Indicates that the response does not have any outstanding discrepancies, but has at least one resolved discrepancy with a status of Confirmed, that is, confirmed as a true verified value by a reviewer. This condition applies to all three status variables.
C - Clean Indicates that the response has discrepancies that were resolved or made obsolete by either a data change or change in an edit check.
■ Univariate status is C when a univariate discrepancy is eliminated by a change to the data or a change to an edit check so that the discrepancy is now Obsolete.
■ Multivariate status is C when a multivariate discrepancy is eliminated by a change to the data or a change to the validation procedure so that the discrepancy is now Obsolete.
Workflow
Data Extract 8-9
■ Manual status is C when the response has at least one manual discrepancy that is manually resolved with a resolution status code having superseded long_value in the codelist.
N - None Indicates no discrepancy ever existed for the response.
■ Univariate status is N when a response has no univariate discrepancies.
■ Multivariate status is N when a response has no multivariate discrepancies.
■ Manual status is N when a response has no manual discrepancies, excluding those with a resolution status code having NON DISCREPANT long_value in the codelist.
Create View AccountsTo implement view selectivity—that is, to submit only those views you want—mark study (set) access accounts as Create or Drop in either the Maintain Study Access Accounts or the Maintain Study Set Access Accounts window. Open these windows by selecting Data Extract from the Conduct menu. These windows enable you to view existing study access accounts. You can also create Snapshot accounts.
When the fields in the Maintain Study Access Accounts window are completed the way you want them, you can submit the access account to the PSUB form, Maintain Data Extract Views, to obtain views. You need only create access accounts once; you do not need to create them at all if you are satisfied with the default views.
The Maintain Study Set Access Accounts window has the same fields as the Maintain Study Access Accounts form. The available studies however, are sets of studies.
At least two of the studies in a cross-study view must belong to a study set for an account to be created.
Query Data Extract ViewsThe Query Data Extract View module lets you view existing data extract views, whether they are standard Oracle Clinical-generated views, user-defined views created via View Builder, or externally loaded views.
You can query existing data extract views; from the Conduct menu, select Data Extract, then select Qry Data Extract Views. All active views are listed in the Query Data Extract Views window. The Query Data Extract Views window is read-only; you cannot create, update, or delete a data extract view from this window. In addition, the module does not display the text of a data extract view. Its function is simply to display all existing data extract views.
When the Qy? box is selected, the view is a custom view created through the View Builder. When the Source field contains a value, the view was created from an externally loaded file. When neither of these fields has a value, the view is a standard data extract view defaulted from a DCM.
SAS DatasetsSAS datasets are true extracts, in that these datasets are removed and held in an unchanging and final form for eventual analysis. If you want to see new data, you have to create a new SAS dataset.
Oracle views are dynamic: the data they retrieve changes as the data in Oracle Clinical changes, although they change in different ways, according to the account type. So the data in a Current Oracle view may change as new data is entered into the system; a
Data Extract View Loader
8-10 Oracle Clinical Conducting a Study
Stable Oracle view may reflect new data each time Batch Validation is run; while the data in an Oracle Snapshot view does not change, by definition.
To create an SAS dataset, from the Conduct menu, select Data Extract, then select SAS Datasets. The Create SAS Datasets PSUB window appears. Enter the account type and the name of the data extract view for which you want to create the SAS dataset. Then choose the queue name to submit SAS, which may be different from the batch queue name in the Submission Details window.
For more information on Oracle Clinical and SAS data, see "Data Extract" in the manual Oracle Clinical Creating a Study.
SAS Proc ReportsTo create an SAS Proc report, from the Conduct menu, select Data Extract, and then select PROC Report. The PSUB window Create Proc Report appears.
Note that you can limit the Proc Print report not only to a specific data extract view name, but also by patient and Investigator.
Data Extract View LoaderThis section contains the following topics:
■ Loading External Views on page 8-11
■ File Format for Externally Loaded Views on page 8-11
■ Restrictions for Externally Loaded Views on page 8-12
■ Updating an Externally Loaded View on page 8-12
■ Deleting an Externally Loaded View on page 8-13
The Data Extract View Loader allows you to load an externally created data extract view definition statement into the Oracle Clinical database. Once it is loaded, the view definition statement is treated like other Oracle Clinical data extract views: it is used to create data extract views and SAS views specified for the study.
The Data Extract View Loader has a limited purpose: it allows you to load data extract view definition statements, including those you cannot create through the View Builder. It is not an alternative to the View Builder.
Oracle Clinical simply inserts the SQL view definition statement and the SAS view definition statement into a table and acts on them at data extract view maintenance time. At that time, both the data extract view and the SAS view are created from user-provided statements in the data files.
Do not load an extract view you can build through the View Builder, for the following reasons:
■ No definitional information is maintained for externally loaded views. Oracle Clinical does not keep track of which DCMs, DCM question groups, or questions are involved in the loaded view.
Consequently, if an Oracle Clinical element changes, for example, a question referred to in the loaded view is retired, Oracle Clinical does not automatically recognize that the view is no longer valid.
■ No validation is performed on externally loaded views.
Question misspellings or syntactic errors are not detected at load time, and result in a failure status at data extract view maintenance time.
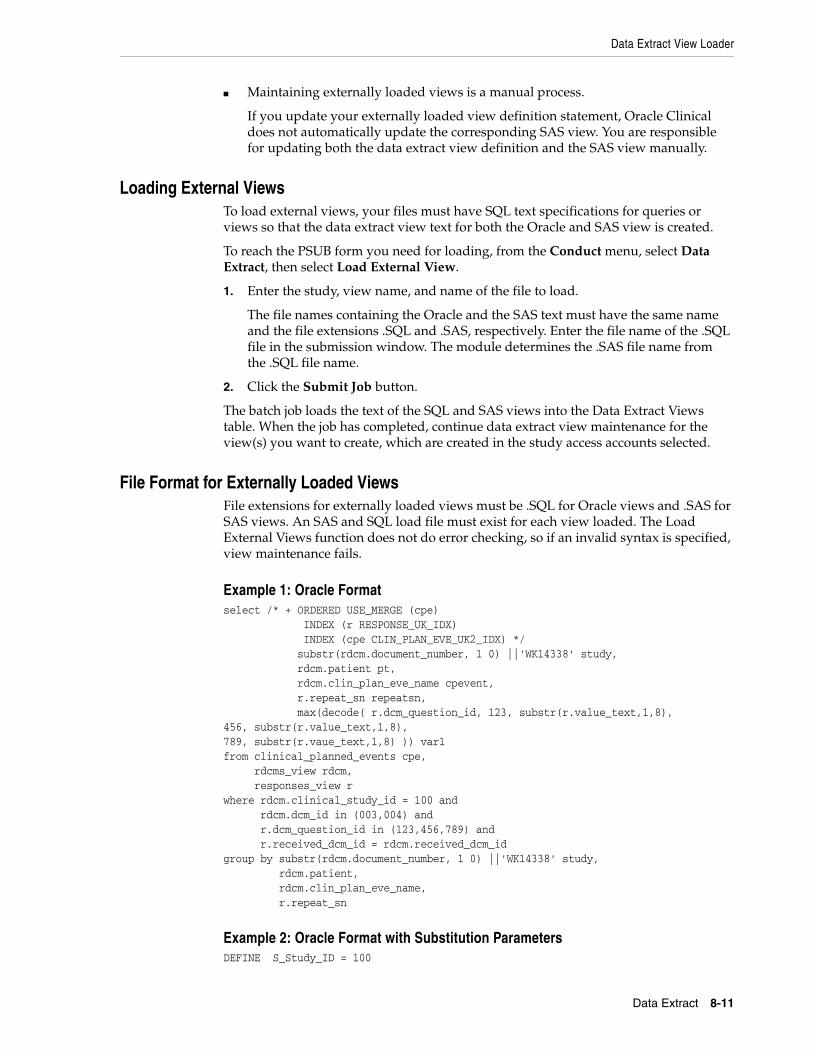
Data Extract View Loader
Data Extract 8-11
■ Maintaining externally loaded views is a manual process.
If you update your externally loaded view definition statement, Oracle Clinical does not automatically update the corresponding SAS view. You are responsible for updating both the data extract view definition and the SAS view manually.
Loading External ViewsTo load external views, your files must have SQL text specifications for queries or views so that the data extract view text for both the Oracle and SAS view is created.
To reach the PSUB form you need for loading, from the Conduct menu, select Data Extract, then select Load External View.
1. Enter the study, view name, and name of the file to load.
The file names containing the Oracle and the SAS text must have the same name and the file extensions .SQL and .SAS, respectively. Enter the file name of the .SQL file in the submission window. The module determines the .SAS file name from the .SQL file name.
2. Click the Submit Job button.
The batch job loads the text of the SQL and SAS views into the Data Extract Views table. When the job has completed, continue data extract view maintenance for the view(s) you want to create, which are created in the study access accounts selected.
File Format for Externally Loaded ViewsFile extensions for externally loaded views must be .SQL for Oracle views and .SAS for SAS views. An SAS and SQL load file must exist for each view loaded. The Load External Views function does not do error checking, so if an invalid syntax is specified, view maintenance fails.
Example 1: Oracle Formatselect /* + ORDERED USE_MERGE (cpe) INDEX (r RESPONSE_UK_IDX) INDEX (cpe CLIN_PLAN_EVE_UK2_IDX) */ substr(rdcm.document_number, 1 0) ||'WK14338' study, rdcm.patient pt, rdcm.clin_plan_eve_name cpevent, r.repeat_sn repeatsn, max(decode( r.dcm_question_id, 123, substr(r.value_text,1,8),456, substr(r.value_text,1,8), 789, substr(r.vaue_text,1,8) )) var1from clinical_planned_events cpe, rdcms_view rdcm, responses_view rwhere rdcm.clinical_study_id = 100 and rdcm.dcm_id in (003,004) and r.dcm_question_id in (123,456,789) and r.received_dcm_id = rdcm.received_dcm_idgroup by substr(rdcm.document_number, 1 0) ||'WK14338' study, rdcm.patient, rdcm.clin_plan_eve_name, r.repeat_sn
Example 2: Oracle Format with Substitution ParametersDEFINE S_Study_ID = 100
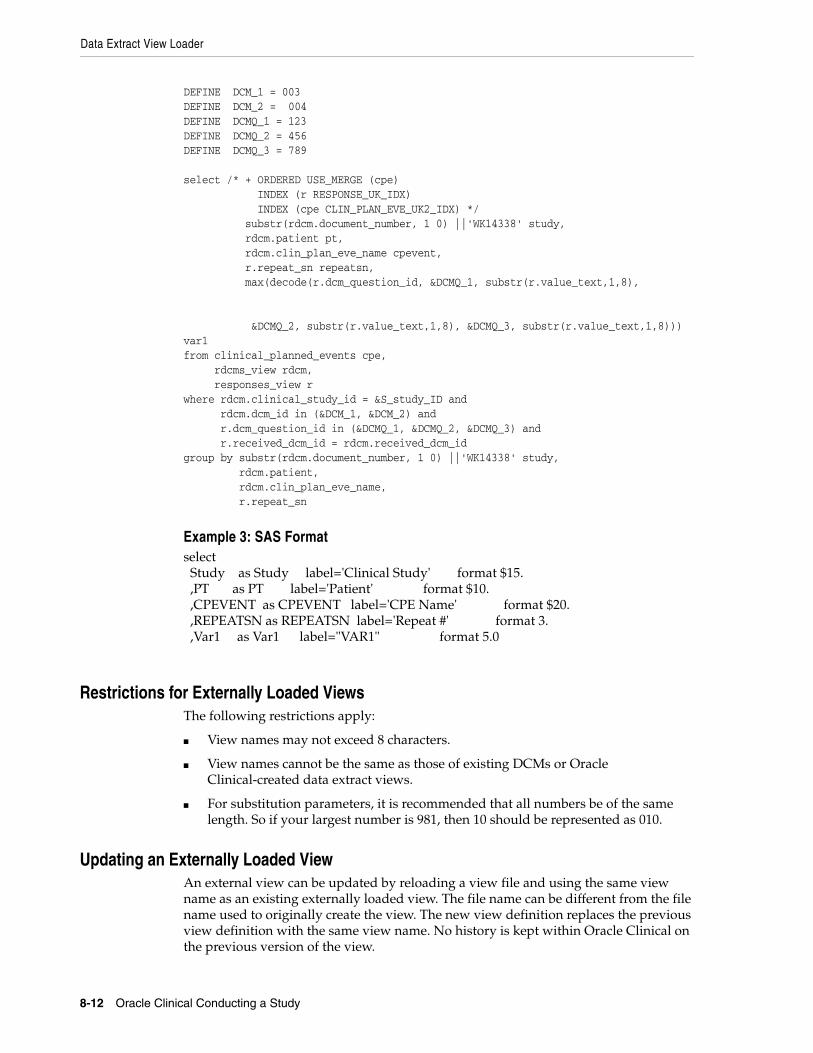
Data Extract View Loader
8-12 Oracle Clinical Conducting a Study
DEFINE DCM_1 = 003DEFINE DCM_2 = 004DEFINE DCMQ_1 = 123DEFINE DCMQ_2 = 456DEFINE DCMQ_3 = 789
select /* + ORDERED USE_MERGE (cpe) INDEX (r RESPONSE_UK_IDX) INDEX (cpe CLIN_PLAN_EVE_UK2_IDX) */ substr(rdcm.document_number, 1 0) ||'WK14338' study, rdcm.patient pt, rdcm.clin_plan_eve_name cpevent, r.repeat_sn repeatsn, max(decode(r.dcm_question_id, &DCMQ_1, substr(r.value_text,1,8),
&DCMQ_2, substr(r.value_text,1,8), &DCMQ_3, substr(r.value_text,1,8))) var1from clinical_planned_events cpe, rdcms_view rdcm, responses_view rwhere rdcm.clinical_study_id = &S_study_ID and rdcm.dcm_id in (&DCM_1, &DCM_2) and r.dcm_question_id in (&DCMQ_1, &DCMQ_2, &DCMQ_3) and r.received_dcm_id = rdcm.received_dcm_idgroup by substr(rdcm.document_number, 1 0) ||'WK14338' study, rdcm.patient, rdcm.clin_plan_eve_name, r.repeat_sn
Example 3: SAS Formatselect Study as Study label='Clinical Study' format $15. ,PT as PT label='Patient' format $10. ,CPEVENT as CPEVENT label='CPE Name' format $20. ,REPEATSN as REPEATSN label='Repeat #' format 3. ,Var1 as Var1 label="VAR1" format 5.0
Restrictions for Externally Loaded ViewsThe following restrictions apply:
■ View names may not exceed 8 characters.
■ View names cannot be the same as those of existing DCMs or Oracle Clinical-created data extract views.
■ For substitution parameters, it is recommended that all numbers be of the same length. So if your largest number is 981, then 10 should be represented as 010.
Updating an Externally Loaded ViewAn external view can be updated by reloading a view file and using the same view name as an existing externally loaded view. The file name can be different from the file name used to originally create the view. The new view definition replaces the previous view definition with the same view name. No history is kept within Oracle Clinical on the previous version of the view.
Data Extract View Loader
Data Extract 8-13
Deleting an Externally Loaded ViewTo delete an externally loaded view, from the Conduct menu, select Data Extract, then select Delete External View. A PSUB window called Mark an Externally Loaded View for Deletion appears. Enter the name of the view you want to delete. Click the Submit Job button. The view is marked for deletion. The next time data extract view maintenance is run, this view is deleted.

Data Extract View Loader
8-14 Oracle Clinical Conducting a Study
9
Security Settings for Study Conduct 9-1
9 Security Settings for Study Conduct
This chapter contains the following topics:
■ Freezing and Locking Data on page 9-1
■ Enabling and Disabling Pass 2 Required on page 9-6
The other windows under Security in the Conduct menu are documented as follows:
■ Clinical Study States are covered in "Maintaining Clinical Study States" in the Oracle Clinical Creating a Study manual.
■ Patient Transfers are covered in this manual in "Transferring Patient Data" on page 1-13.
■ The Delete Study Information batch job is covered in this manual in "Batch Deleting Data" on page 7-16.
Freezing and Locking DataThis section contains the following topics:
■ About Freezing and Locking Data on page 9-1
■ Freezing Data on page 9-2
■ Checking Frozen Status on page 9-3
■ Unfreezing Studies, Study Sites, Investigators, and Patients on page 9-3
■ Locking Data on page 9-4
About Freezing and Locking DataAfter response data has been reviewed and cleaned, you may want to ensure that no one makes changes to it unless explicitly authorized. You may also want to prevent any new data from being entered for a particular study or study site, or by a particular Investigator.
Oracle Clinical includes two related mechanisms for data security: Freezing and Locking. These mechanisms are described below and contrasted in Table 9–1, " Comparison of Freezing and Locking Data" on page 9-2.
About Locking DataLocking prevents changes to previously collected data except by users with privileged update. You can lock data collected in a particular RDCM or RDCI, or lock all data for which a particular Investigator is responsible in a single study, or all data in a study
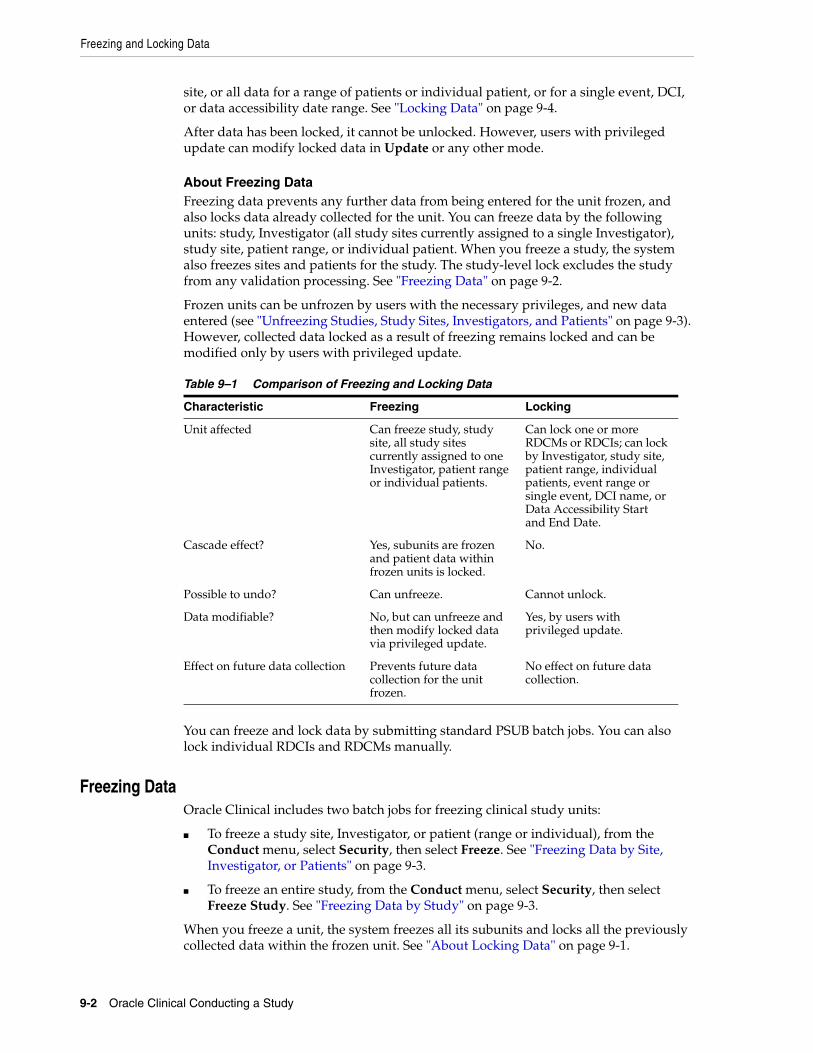
Freezing and Locking Data
9-2 Oracle Clinical Conducting a Study
site, or all data for a range of patients or individual patient, or for a single event, DCI, or data accessibility date range. See "Locking Data" on page 9-4.
After data has been locked, it cannot be unlocked. However, users with privileged update can modify locked data in Update or any other mode.
About Freezing DataFreezing data prevents any further data from being entered for the unit frozen, and also locks data already collected for the unit. You can freeze data by the following units: study, Investigator (all study sites currently assigned to a single Investigator), study site, patient range, or individual patient. When you freeze a study, the system also freezes sites and patients for the study. The study-level lock excludes the study from any validation processing. See "Freezing Data" on page 9-2.
Frozen units can be unfrozen by users with the necessary privileges, and new data entered (see "Unfreezing Studies, Study Sites, Investigators, and Patients" on page 9-3). However, collected data locked as a result of freezing remains locked and can be modified only by users with privileged update.
You can freeze and lock data by submitting standard PSUB batch jobs. You can also lock individual RDCIs and RDCMs manually.
Freezing DataOracle Clinical includes two batch jobs for freezing clinical study units:
■ To freeze a study site, Investigator, or patient (range or individual), from the Conduct menu, select Security, then select Freeze. See "Freezing Data by Site, Investigator, or Patients" on page 9-3.
■ To freeze an entire study, from the Conduct menu, select Security, then select Freeze Study. See "Freezing Data by Study" on page 9-3.
When you freeze a unit, the system freezes all its subunits and locks all the previously collected data within the frozen unit. See "About Locking Data" on page 9-1.
Table 9–1 Comparison of Freezing and Locking Data
Characteristic Freezing Locking
Unit affected Can freeze study, study site, all study sites currently assigned to one Investigator, patient range or individual patients.
Can lock one or more RDCMs or RDCIs; can lock by Investigator, study site, patient range, individual patients, event range or single event, DCI name, or Data Accessibility Start and End Date.
Cascade effect? Yes, subunits are frozen and patient data within frozen units is locked.
No.
Possible to undo? Can unfreeze. Cannot unlock.
Data modifiable? No, but can unfreeze and then modify locked data via privileged update.
Yes, by users with privileged update.
Effect on future data collection Prevents future data collection for the unit frozen.
No effect on future data collection.
Freezing and Locking Data
Security Settings for Study Conduct 9-3
Freezing Data by Site, Investigator, or PatientsTo freeze and lock data:
1. Enter information about the unit you want to freeze. Choose either Investigator, Study Site, or Patient (range or individual):
■ Investigator. Select an Investigator from the LOV to freeze all study sites for which this Investigator is the current Investigator.
■ Study Site. Select a site from the LOV to freeze all collected patient data in this study for this site.
■ Patient Range. Select the low and high ends from the LOV of a range of patients to be "frozen". Or enter either one without the other to freeze the data for a single patient.
2. To submit the job for immediate execution, click Submit Job.
To schedule the job to run in the future, click the Schedule button to enter the execution time and date.
Refer to the "Submitting batch jobs and reports" section of the Getting Started manual for additional information on running a PSUB batch job.
Freezing Data by StudyThe Freeze Study and All Sites and Patients in the Study batch job operates on the study you have been working on. If you need to freeze a different study, choose Select Study from the Special menu.
When you freeze a study, all its sites and patients are also frozen.
There are no parameters to enter. To freeze the study immediately, click the Submit Job button. To schedule the job to run in the future, click Job Details and then Schedule, and enter a time and date on which to freeze the study.
Refer to the "Submitting batch jobs and reports" section of the Getting Started manual for additional information on running a PSUB batch job.
See "Freezing and Locking Data" on page 9-1 for further information.
Checking Frozen StatusBefore allowing any CRF to be logged in or any data to be entered or updated, Oracle Clinical checks the status of the study, Investigator, and patient, ensuring that all levels of data are unfrozen. If any levels of data are frozen, Oracle Clinical displays an error message and does not continue processing the update.
You can see whether data has been frozen in different locations in Oracle Clinical, depending on the frozen unit, or level:
■ To see if a study is frozen, from the Conduct menu, select Security, then select Clinical Study States, and look at the Frozen? flag for the study.
■ To see if a study site is frozen, from the Design menu, select Investigators and Sites, then select Study Sites, and look at the Frzn flag for the study site.
■ To see if a patient is frozen, from the Design menu, select Patient Positions, then select Patients, and look at the Frozen? flag for the patient.
Unfreezing Studies, Study Sites, Investigators, and PatientsOracle Clinical includes two batch jobs for unfreezing:
Freezing and Locking Data
9-4 Oracle Clinical Conducting a Study
■ To unfreeze a study site, Investigator, or patient (range or individual), from the Conduct menu, select Security, then select Unfreeze. See "Unfreezing Sites, Investigators, and Patients" on page 9-4.
■ To unfreeze data for an entire study, from the Conduct menu, select Security, then select Unfreeze Study. See "Unfreezing a Study" on page 9-4
When you unfreeze, all collected data locked by the freeze remains locked. See "About Locking Data" on page 9-1.
Unfreezing Sites, Investigators, and PatientsTo unfreeze, you must start by unfreezing the largest unit that was frozen, and explicitly unfreeze each subunit. For example, if a patient is frozen because the study site to which the patient is assigned was frozen, you must unfreeze the study site as well as the patient.
1. Enter information about the unit for which you want to unfreeze data. Choose Investigator, Study Site, and/or Patient. Enter the low and high ends of the range to unfreeze a group of patients, or enter either a low or high value to unfreeze a single patient.
2. To submit the job for immediate execution, click Submit Job.
To schedule the job for future execution, click the Schedule button to enter the execution time and date.
Unfreezing a StudyWhen you unfreeze a study, only the study itself is unfrozen. The study sites and patients remain frozen until you explicitly unfreeze them by selecting Security, and then selecting Unfreeze from the Conduct menu.
When you unfreeze a study, you can add new patients and data for those patients, but existing patients remain frozen unless you explicitly unfreeze them.
The Unfreeze Study batch job operates on the study you have been working on. If you need to unfreeze a different study, choose Select Study from the Special menu.
There are no parameters to enter. To unfreeze the study immediately, click the Submit Job button. To schedule the job to run in the future, click Job Details and then Schedule, and enter a time and date on which to unfreeze the study.
Refer to the "Submitting batch jobs and reports" section of the Getting Started manual for additional information on running a PSUB batch job.
Locking Data Locked data cannot be modified except by users with privileged update. After data has been locked, it cannot be unlocked.
Oracle Clinical provides three methods for locking collected patient data:
■ To lock all collected data associated with a particular Investigator, study site, patient range (or single patient), clinical planned event, accessible date range, or
Note: If you are working in a flexible study and you unfreeze a patient whose Enhanced DCI Book was activated while the patient was frozen, run the expectedness calculation job manually from Special menu in the Enhanced DCI Book window; see Oracle Clinical Creating a Study.
Freezing and Locking Data
Security Settings for Study Conduct 9-5
DCI name, from the Conduct menu, select Security, then select Lock. See "Batch-Locking Data" on page 9-5.
■ To lock one or more Received DCIs or Received DCMs—corresponding to one or more CRFs or portions of a CRF—from the Conduct menu, select Security, select Lock Received DCIs/DCMs. See "Manually Locking RDCIs and RDCMs" on page 9-5.
■ In addition, when you freeze a study, Investigator, study site or patient, the patient data associated with that unit is automatically locked. See "Freezing and Locking Data" on page 9-1.
Batch-Locking DataTo batch-lock data:
1. Enter information about the unit for which you want to lock data. Enter information for only one type of unit:
■ Investigator. Select an Investigator from the LOV to lock all collected patient data in this study for all the sites for which this Investigator is the current Investigator.
■ Study Site. Select a site from the LOV to lock all collected patient data in this study for this site.
■ Patient Range. Select the low and high ends of a range of patients from the LOV. Or enter either one without the other to lock the data for a single patient.
■ Clinical Planned Event Range. Select the first and last visit in a range of CPEs (visits) to lock data for all patients collected at those CPEs. Or enter either one without the other to lock data for a single CPE.
■ Accessible Data Range. Enter the first and last date in a range to lock all data that became accessible during that period.
2. To submit the job for immediate execution, click Submit Job.
To schedule the job to run in the future, click the Schedule button to enter the execution time and date.
Refer to the "Submitting batch jobs and reports" section of the Getting Started manual for additional information on running a PSUB job.
Manually Locking RDCIs and RDCMsTo lock data for one or more RDCIs—each of which corresponds to the responses to a CRF for a single patient at a single visit—or one or more of the RDCMs contained in a RDCI, do the following:
1. From the Conduct menu, select Security, then select Lock Received DCIs/DCMs.
:
Note
Data is accessible when Data Entry is complete. If Second Pass Data Entry is not required in the study, data is accessible when First Pass Data Entry is complete for the RDCI or RDCM. If Second Pass Data Entry is required in the study, data is accessible when Second Pass is complete.
Enabling and Disabling Pass 2 Required
9-6 Oracle Clinical Conducting a Study
2. Enter a query to retrieve the RDCIs you want to lock. It does not need to be an exact match; you can select RDCIs to lock from the query results.
3. For each RDCI you want to lock, select its Lock box.
Alternatively, to lock all the RDCIs that meet your query criteria, select Lock All Recs from the Special menu. The system locks all retrieved RDCIs, even if they are not in the visible portion of the window.
Alternatively, if you want to lock an RDCM, put the cursor on the RDCI that contains the RDCM you want to lock, click the Received DCMs button, and select Lock for the RDCM you want to lock.
4. Save. This process may take a few minutes, depending on the number of RDCIs affected by the action. Click Exit to return to the main menu.
See "Freezing and Locking Data" on page 9-1 for further information.
Enabling and Disabling Pass 2 RequiredYou can choose to require Second Pass Data Entry on a study-by-study basis. The Enable/Disable Pass 2 Required batch job changes the Pass 2 Required status for the currently selected study.
The consequences of changing this requirement in an ongoing study with existing data are:
■ If you require Pass 2 for a study with previously collected data, the collected data becomes inaccessible until Pass 2 Data Entry is completed.
■ If you disable Pass 2 Required for a study with collected data with Pass 2 complete, there is no change to data with Pass 2 complete. If there is any data with only Pass 1 complete, it becomes accessible.
To enable or disable Pass 2 Required for a study:
1. From the Conduct menu, select Security, then choose Enable/Disable Second Pass Required. The Enables Disables Second Pass for a study window opens.
If you have not selected a study during this Oracle Clinical session, the study window also opens.
2. If you do not have a study currently selected, or you want to change the Pass 2 Required setting for a study other than the one you have currently selected, choose the study you want to change.
The window populates the Second Pass Reqd? (Y/N) field with the Pass 2 Required behavior that will take effect when you run this job. If this field is Y, Second Pass is not required for the selected study, but it will be after you submit the job.
3. Submit the job.
Note: Lock RDCMs only rarely. In most cases, locking the whole RDCI (or more data) is more useful.
10
Graphic Patient Data Reports 10-1
10 Graphic Patient Data Reports
This chapter contains the following topics:
■ Graphic Patient Data Report on page 10-1
■ Patient Data Report Components on page 10-2
■ Audit History Report on page 10-7
Patient Data Reports can display clinical data as it would appear in a CRF, and can include Investigator comments, discrepancy information, and an audit history. Alternatively, you can run a report from Oracle Clinical that displays only the audit history.
Graphic Patient Data ReportThis section contains the following topics:
■ Navigation and Format on page 10-1
■ Requirements on page 10-1
The graphic Patient Data Report (PDR) enables you to generate reports that consist of individual or sets of documents, using criteria that you determine. You can use the PDR to print out a set of blank CRFs, which you can then fill in by hand, or you can print out an entire casebook for a particular patient.
Navigation and FormatYou can run the graphic PDR in either Portrait or Landscape format. Launch the Report Submission window for your selected format: from the Conduct menu, select Conduct Reports, then select Data Validation, and choose Graphic Patient Data Report (portrait) or Graphic Patient Data Report (landscape). The format choice affects the non-CRF sections of the report only. Each CRF is presented in the format in which it was designed. This makes it possible, in the case of CRFs with landscape layouts, to have a report with the Audit History Report Section and Audit History Report Section in portrait layout, and the CRFs in landscape.
You can also run the Audit History Report, which prints only the Audit History Report Section of the PDR.
RequirementsIn order to run reports in Oracle Clinical, your system administrator or the sponsor should provide you with the name of a report server to use when you run reports. You
Patient Data Report Components
10-2 Oracle Clinical Conducting a Study
should ensure that this name is displayed in the Server/Queue field at the top of the Report Submission window when you initiate the process to run a report.
Patient Data Report ComponentsThis section contains the following topics:
■ Page Numbering on page 10-2
■ Cover Page on page 10-2
■ CRF Data Section on page 10-3
■ Audit History Report Section on page 10-5
■ Discrepancy Detail Report Section on page 10-7
■ Deleted CRFs Section on page 10-7
In the Patient CRF PDR that is generated in PDF mode, the Audit History, Discrepancy Data, and Deleted CRFs sections are grouped together in an Appendix.
Page NumberingThe system provides general information about the report in the header and footer areas of certain pages in the report. Pages that reproduce a CRF display the actual CRF header and footer information.
The information that may be present in non-CRF pages includes:
■ The CRF number and an abbreviation of the section, with a sub-page number for multipage sections, is displayed in the upper right corner of the End Note pages.
For example, the following may be present in a header:
4.OS.2
This indicates that the current page is the second page in the Overflow Section for the fourth CRF in the PDR.
■ The page number; in the Classic Blank CRF report, all pages in the report are numbered sequentially.
Cover PageA cover page is generated for each Graphic PDR that Oracle Clinical produces. The purpose of the cover page is to provide information about the PDR. The components that may be included in a PDR cover page are listed and described in Table 10–1.
Table 10–1 PDR Cover Page Components
Component PDR Type Description
Title Both A general description of the contents of the PDR. This may be either:
■ "CRF Report for Study <study name>"
■ "Blank Case Report Form for Study <study name>"
Report Run by Patient CRF The name of the user who initiated the PDR. This is the full name that is associated with the user name.
At Patient CRF The timestamp that the system started to run the report.
Book Blank Workbook The name of the book you designated for the report.
Patient Data Report Components
Graphic Patient Data Reports 10-3
Blank Workbook PDRsThe cover page for the blank workbook PDR includes:
■ the name of the study
■ the name of the book
The blank workbook for a patient also includes the patient number.
Patient CRF PDRsThe content on the cover page for the Patient CRF PDR is dependent on the parameters used to define the settings for the report and the data that is included in the constituent CRFs. However, each PDR includes a title, the "Report Run by" and timestamp line, and a legend.
CRF Data SectionThe CRF Data section is present in all graphic PDRs.
CRF Header InformationAll CRF header and CRF section header information that is included in the source CRF is included in the PDR. The layout of this section is similar to the layout in the respective PDF or character CRF. The fields that are included in this section are:
Patient Blank Workbook for Patient
The name of the patient whose information is printed in the blank CRFs. Note that in Patient CRFs, this information may be included in the Report Parameters.
Filter Patient CRF A listing of the search criteria when you choose Use Current Selections in the Reports window.
Report Parameters
Patient CRF A listing of the parameters you selected in the Report Submission window.
Legend Patient CRF A display of font styles and formatting that is utilized in the current PDR. Its purpose is to provide a reference for reading data and information in the report.
Patient (with initials) Frozen (if the Patient is frozen)
Site Name Investigator Name
CRF Number Blank Flag Status (Y or N)
CRF Status (data entry status) Visit Date
Visit Name (CPE) Document Number
Entry Time Entered By
Latest Modification Time Locked Status (Y or N)
Discrepancy Status Approval Status
Approval Time Approver Name
Verification Status Verification Time
Verifier Comment Text
Table 10–1 (Cont.) PDR Cover Page Components
Component PDR Type Description
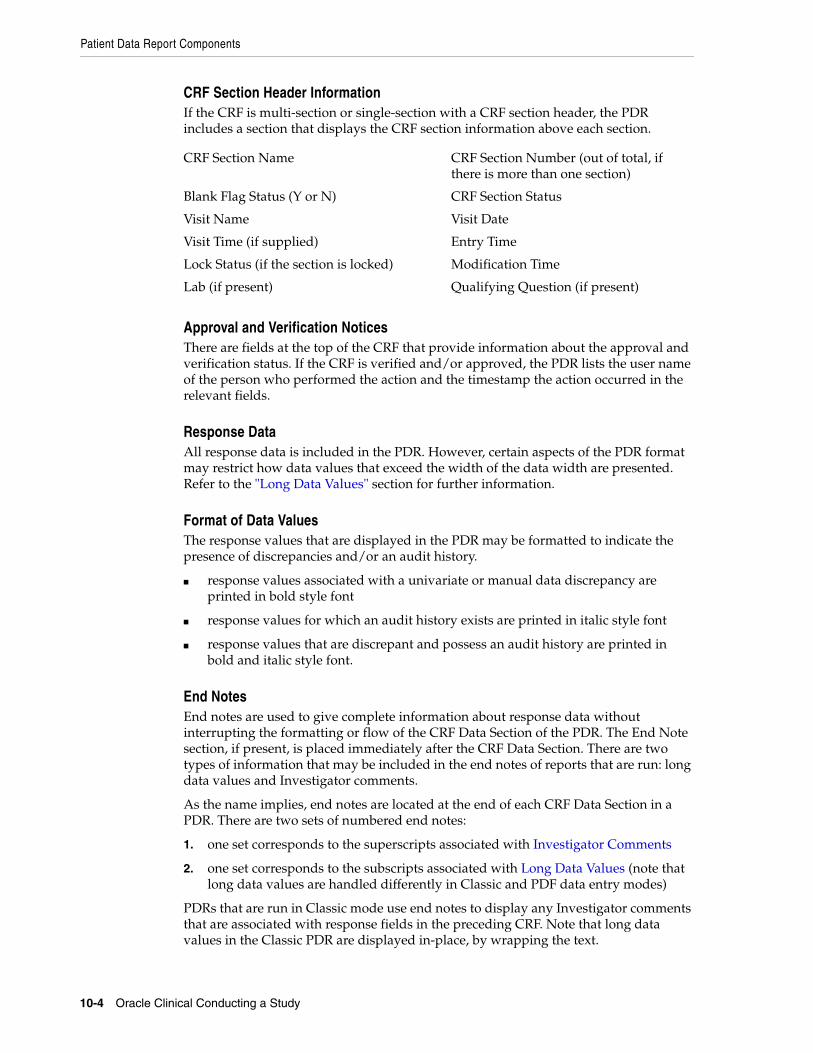
Patient Data Report Components
10-4 Oracle Clinical Conducting a Study
CRF Section Header InformationIf the CRF is multi-section or single-section with a CRF section header, the PDR includes a section that displays the CRF section information above each section.
Approval and Verification NoticesThere are fields at the top of the CRF that provide information about the approval and verification status. If the CRF is verified and/or approved, the PDR lists the user name of the person who performed the action and the timestamp the action occurred in the relevant fields.
Response DataAll response data is included in the PDR. However, certain aspects of the PDR format may restrict how data values that exceed the width of the data width are presented. Refer to the "Long Data Values" section for further information.
Format of Data ValuesThe response values that are displayed in the PDR may be formatted to indicate the presence of discrepancies and/or an audit history.
■ response values associated with a univariate or manual data discrepancy are printed in bold style font
■ response values for which an audit history exists are printed in italic style font
■ response values that are discrepant and possess an audit history are printed in bold and italic style font.
End NotesEnd notes are used to give complete information about response data without interrupting the formatting or flow of the CRF Data Section of the PDR. The End Note section, if present, is placed immediately after the CRF Data Section. There are two types of information that may be included in the end notes of reports that are run: long data values and Investigator comments.
As the name implies, end notes are located at the end of each CRF Data Section in a PDR. There are two sets of numbered end notes:
1. one set corresponds to the superscripts associated with Investigator Comments
2. one set corresponds to the subscripts associated with Long Data Values (note that long data values are handled differently in Classic and PDF data entry modes)
PDRs that are run in Classic mode use end notes to display any Investigator comments that are associated with response fields in the preceding CRF. Note that long data values in the Classic PDR are displayed in-place, by wrapping the text.
CRF Section Name CRF Section Number (out of total, if there is more than one section)
Blank Flag Status (Y or N) CRF Section Status
Visit Name Visit Date
Visit Time (if supplied) Entry Time
Lock Status (if the section is locked) Modification Time
Lab (if present) Qualifying Question (if present)
Patient Data Report Components
Graphic Patient Data Reports 10-5
Investigator Comments If an Investigator comment is associated with a datapoint, a superscript is inserted adjacent to the field. The superscripts start at "1" for each CRF and increment regularly for each occurrence of an Investigator comment. The entire content of each Investigator comment is viewable in the Investigator Comments section, which is in the End Notes.
Long Data Values Response data values that exceed the length of the response field in the CRF PDF are marked with a subscript number adjacent to data field. The subscripts start at "1" for each CRF and increment regularly for each long data value in the CRF. The entire contents of the response field is included in a listing of such values in the Overflow section, which is in the End Notes.
The exception is responses to questions of type Extended Text. For these questions, the CRF PDF displays a prefix beginning with the word "ATTACHMENT" in uppercase and including the version number of the attachment that contains the full text of the response, then the beginning of the response text. There is no superscript.
In addition, for each Extended Text question response there is a separate ancillary page labeled with the name of the CRF and the question. If the text, which can be up to 10,000 characters, does not fit on one page, the report includes additional pages as required. The Extended Text ancillary data pages are not included in the Overflow section.
Links to Other SectionsIf a discrepancy is associated with the CRF, the PDR inserts a hyperlink after the End Notes section that allows you to navigate to the Discrepancy Data section. Similarly, if any response value in the CRF contains an audit trail, the PDR inserts a hyperlink at the bottom of the Response Data section that allows you to navigate to the Response History section.
Extended Text Audit History SectionIf an Extended Text Question response has one audit history entry, the Extended Text Audit History page displays the full "Changed From" text. The "Changed To" value is displayed as the current data on the Extended Text ancillary page. If there are multiple audit history entries, the Changed From value is in the previous entry. Extended Text ancillary pages are the first ancillary pages displayed after the CRF data page.
Audit History Report SectionThe Audit History Report section is present in a Patient CRF PDR if the following two conditions are met:
■ It has been specified in the PDR definition process, that is, the Report Response History? parameter is set to Y when the report is submitted.
■ There is an audit history associated with at least one datapoint in the associated CRF.
Note: The version number includes a subversion number following the decimal point; for example, 4.3 where 4 is the number of times a user revised the text and .3 is the number of times the system stored the text, which happens each time the user closes the Show Extended Text dialog box by clicking OK after updating text in RDC Onsite. The subversion number is used for internal auditing only.
Patient Data Report Components
10-6 Oracle Clinical Conducting a Study
There is a separate page or set of pages for each CRF in the report that contains an audit trail. The following information is included:
For CRFs entered from RDC Onsite, the CRF creation timestamp is the time the document was first saved, whether saved Complete or Incomplete.
When combined with field-level audit history, the complete history for each field can be constructed, with the caveats noted below.
■ For responses initially saved as null, while the CRF is in status Pass1 Started or Entry Started, the time a response changed from null to not null is not available. Once the CRF is saved Complete, field-level audit histories include an entry for the change from null to not null.
■ If optional DCI and DCM header fields like Comment are not entered with initial data entry, the times these fields changed from null to not null values are not available.
■ If a DCM is marked Blank with the initial save, and responses are subsequently entered, the times these responses were entered after the blank flag is unchecked are not available.
However, the Blank Flag history itself indicates the time the blank flag is unchecked. It can be assumed that at least one, if not all responses would have been entered at that time. Further, assuming the document is saved Complete at
■ Document Number
■ Patient Number
■ Visit Number
■ CRF Name
■ Site
■ Visit Date
■ CRF Page
■ Section Name
■ Qualifying Prompt
■ Qualifying Value
■ Section Visit
■ Section Date
■ Question Group Number
■ Question Group Name
■ Field Name
■ Row Number
■ Value Changed From
■ Value Changed To
■ Impact on Resequence
■ Change Timestamp
■ User Who Made Change
■ Change Reason
■ Change Reason Comment
■ CRF Creation Timestamp
■ CRF Created By
Note: If an Extended Text question response has an audit history, the Audit History section displays:
■ ATTACHMENT V<X.Y> where X is the version number of the full text attachment and Y is a number used for internal auditing only; for example, 4.3 where 4 is the number of times a user revised the text and .3 is the number of times the system stored the text, which happens each time the user closes the Show Extended Text dialog box by clicking OK after updating text.
■ A portion of the response text.

Audit History Report
Graphic Patient Data Reports 10-7
this time, subsequent changes of other fields from null to not null values is reported as part of the audit histories for those fields.
Discrepancy Detail Report SectionThe Discrepancy Data section of the PDR lists the discrepancies that are associated with the data that is presented in the CRF Data Section. It is present in the PDR under two conditions:
1. it has been specified in the PDR definition process, that is, the Report Discrepancies? parameter is set to Y in the Report Submission window, and
2. there is discrepant data in the associated CRF.
The discrepancies associated with a given CRF are set off in a separate subsection. However, more than one discrepancy record may be present on each page. For each discrepancy, the PDR includes the following information:
Deleted CRFs SectionThis section lists all CRFs that have been deleted. If the report includes CRFs that have been deleted, they are listed in this section, which is located at the end of the PDR.
Audit History ReportThe Audit History Report is a subset of the Graphic PDR that includes the Audit History Report Section only.
To run the Audit History Report:
1. From the Conduct menu, select Conduct Reports, select Data Validation, then choose the report orientation you want to use: Audit History (portrait) or Audit History (landscape).
2. Choose a site. The Audit History Report returns data from exactly one site.
3. Enter the starting patient number. This parameter is required.
4. (Optional) Enter an ending Patient Number. If you leave this parameter blank, the report returns the audit history of the patient in the Starting Patient field only.
5. (Optional) Choose a date range for which you want to examine audit history. You can choose a starting date, ending date, and qualify whether these dates represent the visit date or the date that data was first entered in the system.
■ Document Number
■ Discrepancy ID
■ Site
■ Patient Number
■ Visit
■ Visit Date
■ CRF
■ CRF Section
■ Qualifying Value
■ Response Field
■ Row
■ Value Text
■ Type of Discrepancy
■ Status
■ Review Status
■ Discrepancy Text
■ Internal Comment Text
■ Resolution Type
■ Resolution Reason
Audit History Report
10-8 Oracle Clinical Conducting a Study
6. (Optional) Choose an approval status for data included in the report. Approval status choices are: Approved, Not Approved, Undone (for data that was once approved but approval was removed), and Awaiting Reappr (for data that has been modified since approval). You can also choose All Statuses to include data regardless of approval status setting.
7. (Optional) Choose a verification status for the report data. Verification statuses include: Verified, Not Verified, Awaiting Re-Ver, and Undone. You can also choose All Statuses.
8. Submit the job, schedule its submission, or click Job Details.
Index-1
Index
Numerics3.1-Style Procedures, 4-18
Aaccessible data
browsing, 1-21updating, 1-18
actual eventtransfer of batch data to, 7-5
audit trail, 1-15browsing, 1-21extended example of, 1-16 to 1-17
auto fill, 2-13auto reduction, 2-13
Bbatch data load
document number in, 7-13error diagnosis in, 7-12error messages in, 7-12 to 7-16and inserts, 7-16load/prepare process, 7-15logging status of, 7-12overwritten error log in, 7-12prepare process, 7-12and privileged transfer, 7-13transfer process, 7-12, 7-16and updates, 7-16
Batch Data Loadercreating a data file group, 7-9document number in, 7-2file format for, 7-2load process, 7-5prepare process, 7-5transfer process, 7-5, 7-11updatability of files in, 7-8, 7-9
batch jobsloading external views as, 8-11as method of freezing and locking, 9-2, 9-3, 9-5as method of unfreezing, 9-3
batch queuename, 8-6, 8-10
batch validation
of nonstandard RDCIs, 1-6, 1-10Blank flag, 3-7
CC (Clean) validation status, 8-8case report forms. See CRFsCDS
clearing, 6-10counting, 6-7creating, 6-4criteria syntax, 6-5
Change Layout button, 4-16, 4-17Clean (C) validation status, 8-8codelists
OCL_DE_CONFIG, 1-7, 1-10RDCI CHANGE REASON TYPE CODE, 1-14
comparison reconciliation, 1-12Confirmed (K) validation status, 8-8copying
values in data entry, 2-13CPE schedule, 3-2CRF page numbers
and group updating discrepancies, 4-26CRFs
entering data in a DCI, 1-3logging in header information, 1-4
DData Collection Instrument (DCI)
lockedin batch data load, 7-13
Data Collection Instruments. See DCIsData Collection Module (DCM)
expected, 3-2, 3-8locked, 9-5
in batch data load, 7-13missing, 3-2, 3-3, 3-8off-target, 3-8overdue, 3-4, 3-8reported validation status of, 3-4scheduling
reported, 3-4status of
in reports, 3-4
Index-2
tracking, 3-3via optional visits, 3-2
Data Collection Modules. See DCMsdata entry
and lists of values, 2-12making adjustments during, 1-13navigating during, 2-5reported status of DCMs in, 3-4, 3-7setting values in, 2-12 to 2-13understanding process, 1-1Update mode, 1-6, 1-10, 2-13
Privileged, 9-2validating, 1-8
data entry operatorfor both first- and second-pass, 1-9exceeding Max Repeats expected, 2-12modifying locked RDCIs and RDCMs, 1-6, 1-10,
9-4modifying values of repeating Question
Groups, 2-13overriding protected repeating defaults, 2-12
Data Extract Viewcreating, 8-3file-naming algorithmlisting, 8-9Oracle and SAStest, 8-2validation status variables for, 8-8 to 8-9see also Snapshots
Data Extract View Loader, 8-10 to 8-12deleting files from, 8-13error checking, 8-10file name syntax for, 8-11Oracle table examples of, 8-11 to 8-12purpose of, 8-10
Data File Name, in batch data load, 7-8 to 7-9DCF
and multivariate procedure variables, 5-4creating, 5-3discrepancy query details, 5-6tracking pages, 5-6
DCF COMMENT TEXTS codelist, 4-15DCF STATUS CODES codelist, 5-2, 5-7, 5-11DCIs
accessing, 1-3changing header information for, 1-18definition, 1-1entering CRF data in, 1-3modifying, 1-17Received. See RDCIsstructure, 1-2
DCM Detail Tracking Matrix report, 3-4, 3-5 to 3-8example of, 3-5uses of, 3-5
dcmli, 2-1DCMs
definition, 1-1expected, 3-2logging in, 1-5tracking, 3-1
discrepancygrouping, 4-24history, viewing, 4-19including status of, in data extract views, 8-9management, 4-1open, 3-8reported in DCM Detail Tracking matrix, 3-4status for distribution, 5-3status for resolved status, 5-3types, 4-2univariate
Update Patient Data, 4-22DISCREPANCY RESOLU TYPE CODE
codelist, 4-13DISCREPANCY_REVIEW_STATUS codelist, 4-13document number
in batch data load, 7-13in Batch Data Loader, 7-2
duplicate recordsresolving, 1-12
DX_INDEX_TABLESPACE codelist, 8-4DX_VIEW_TABLESPACE codelist, 8-4dynamic grouping, 4-16
EEarly Termination, 3-3enrollment. See patient enrollmenterror messages, in batch data load, 7-12
Ffield
long, in data entry, 2-12first-pass data entry, 1-6freezing
definition of, 9-2investigators, 9-2patients, 9-2studies, 9-2see also unfreezing
GGet Directory button, 7-9Get Image, 4-22group and form validation, 1-9Group Function utility, 4-24
II (Irresolvable) validation status, 8-8image, get, 4-22Initial Log-In screen
completing, 1-4Irresolvable (I) validation status, 8-8
KK (Confirmed) validation status, 8-8
Index-3
Llayout
discrepancy database form, 4-16List of Values (LOV)
in data entry, 2-12Load External Views function, 8-11locking
data, by batch job, 9-5definition of, 9-1
Mmanual discrepancies, 4-19manual status, in data extract, 8-9mass changes, 6-1Missing DCMs, 3-1missing records
resolving, 1-12multivariate
adding procedure variables to DCF, 5-4multivariate status, in data extract, 8-9
NN (None) validation status, 8-9None (N) validation status, 8-9Not-received DCM statuses, 3-8
OO (Outstanding) validation status, 8-8OCL_STATE codelist, 7-1offsets
as basis for DCM tracking, 3-2OPTIONAL DCF STATUS CODES codelist, 5-7Out of Study Batch Data Loader
and insertspurging, 7-12
and updatespurging, 7-12
Outstanding (O) validation status, 8-8
PPASS 1 COMPLETE, 1-10, 3-7PASS 1 STARTED, 3-7PASS 2 COMPLETE, 3-7PASS 2 STARTED, 1-10, 3-7patient data
transferring, 1-13patient enrollment, 1-13patients
assignment ofin batch data load, 7-13
frozen, 1-6, 1-10, 9-2, 9-4in batch data load, 7-13updating DCM data for, 3-4
privileged update, 1-19privileges
and locking and freezing, 9-2
Proc Print report, 8-10profile
new, 4-9selecting, 4-7
Purge Inserts menu option, 7-11Purge Updates menu option, 7-12
QQuery Data Extract View module, 8-9Question Groups
repeatingcopying values of, in data entry, 2-13
queue name to submit to SAS, 8-6, 8-10
RRDCIs
auditing, 1-15 to 1-17definition, 1-6locked, 1-6, 1-10status of, 1-6
RDCM see Received DCMRDCM window, 1-6RDCMs
auditing, 1-16status of, 1-6
Received DCIslocking, 9-1, 9-5transfer to, of TBDCIs, 7-5
Received DCMslocked, 3-7
in batch data load, 7-5locking, 9-1, 9-5transfer to, of TBDCMs, 7-5validating, 3-7validation status, 3-7
resolving recordsduplicate, 1-12missing, 1-12
Responsedefining a default value for, 2-12transfer to, of TBDRs, 7-5
review status codes, 4-21group updating, 4-25
SSAS
datasetscreating, 8-9creating Proc Print reports on, 8-10directory structure of, 8-3
see also Data Extract Viewschedule intervals, 3-2Second-Pass comparison failure alert, 1-9second-pass data entry
procedure for, 1-9 to 1-10and sight verification, 2-12toggling requirement for, 1-9
security
Index-4
levels of, for Responses, 9-2by locking and freezing, 9-1
Select Server Files window, 7-9sequence number
of Discrete Value, 2-13sequencing
DCI Book, 1-10query, 1-10
sight verification, 1-9, 1-10, 2-12Snapshots, 8-3Stable data extract views, 8-3Batch Data Loader
and inserts, 7-9pending, 7-5purging, 7-12
and timestamps, 7-9and updates, 7-9
pending, 7-5purging, 7-12
studiesfrozen, 9-2
study schedule, 3-1
TTemporary Batch Data Item (TBDI), 7-5Temporary Batch DCI (TBDCI), 7-5Temporary Batch DCM (TBDCM), 7-5test views, 8-2tracking DCF pages, 5-6
Uunfreezing
investigators, 9-4patients, 9-4procedures, 9-3studies, 9-4
univariate status, in data extract, 8-9univariate validation
criteria, 1-8failure, 1-8
unplanned visits, 1-15Unreviewed review status, 4-21
Vvalidation procedures
excluded, in frozen studies, 9-2validation status variables, 8-8 to 8-9views
external see Data Extract View Loadervisit
algorithm for calculating date of, 3-2and DCM scheduling, 3-3expected. See CPEsoptional, 3-2unplanned. See unplanned visits