Embed Size (px)
Citation preview
2013 Summer Workshop on mobile app development
Day 2
SIG on Innovative Software, COMP, HKBU
1
Special Interest Group on Innovative Software 2012-2013
Workshop on mobile app development
Day 2: Android App Development - Application Fundamentals
Contents
1 Setup development environment and emulator ................................................... 2
1.1 Download and install ADT (Android Developer Tools) ............................... 2
1.2 Prepare and control your emulator ........................................................... 2
1.3 Monitor and debug in the emulator .......................................................... 6
2 Understand Android apps ...................................................................................... 7
2.1 Application components ............................................................................ 7
2.2 Application resources ................................................................................. 9
2.3 App properties ........................................................................................... 9
3 Create your first Android app .............................................................................. 10
4 Run and debug your apps .................................................................................... 13
4.1 Use an emulator ....................................................................................... 13
4.2 Use a real device ...................................................................................... 14
5 Adding more UI elements .................................................................................... 17
5.1 Understand the UI XML layout structure ................................................. 18
5.2 Add an image to your app ........................................................................ 19
6 Handle user input & using WebView for HTML5 mobile app .............................. 21
7. Publish your app .................................................................................................. 28
7.1. Prepare your app icon .............................................................................. 28
7.2. Change the app name and apply localization .......................................... 29
7.3. Sign and export the APK ........................................................................... 30
8. Reference and learning resources: ...................................................................... 33
Prepared by Mr. Felix Tam, Committee Member of the Special Interest Group (SIG) on Innovative Software
2012-2013, Department of Computer Science, Hong Kong Baptist University.
All rights reserved. All content copyright and other rights reserved by its respective owners. Any content,
trademark(s), or other material that may be found on this document remains the copyright of its
respective owner(s). In no way does the Special Interest Group on Innovative Software claim ownership
or responsibility for such items, and you should seek legal consent for any use of such materials from its
owner.

2013 Summer Workshop on mobile app development
Day 2
SIG on Innovative Software, COMP, HKBU
2
1 Setup development environment and emulator
1.1 Download and install ADT (Android Developer Tools)
Tools that you will need for Android app development:
Option 1:
� Eclipse IDE with built-in ADT (Android Developer Tools)
Option 2:
� Eclipse IDE for Java Developers
� Java SDK
� ADT plugin for Eclipse
� Android SDK
We will choose option 1 in this tutorial (64bit) and please get a copy of the
All-in-One package from: http://developer.android.com/sdk/index.html
*Please make sure you have your JDK 1.7 (x64) installed on your computer. You may
get it from
http://download.oracle.com/otn-pub/java/jdk/7u25-b17/jdk-7u25-windows-x64.exe.
Extract the zip file in C:\ and navigate to
C:\adt-bundle-windows-x86_64-20130522\eclipse. Double click eclipse.exe to start
the Android development tool. Choose your own workspace when asked.
1.2 Prepare and control your emulator
The package contains the latest Android system image (4.2.2, as of 2013-06-25) and
2013 Summer Workshop on mobile app development
Day 2
SIG on Innovative Software, COMP, HKBU
3
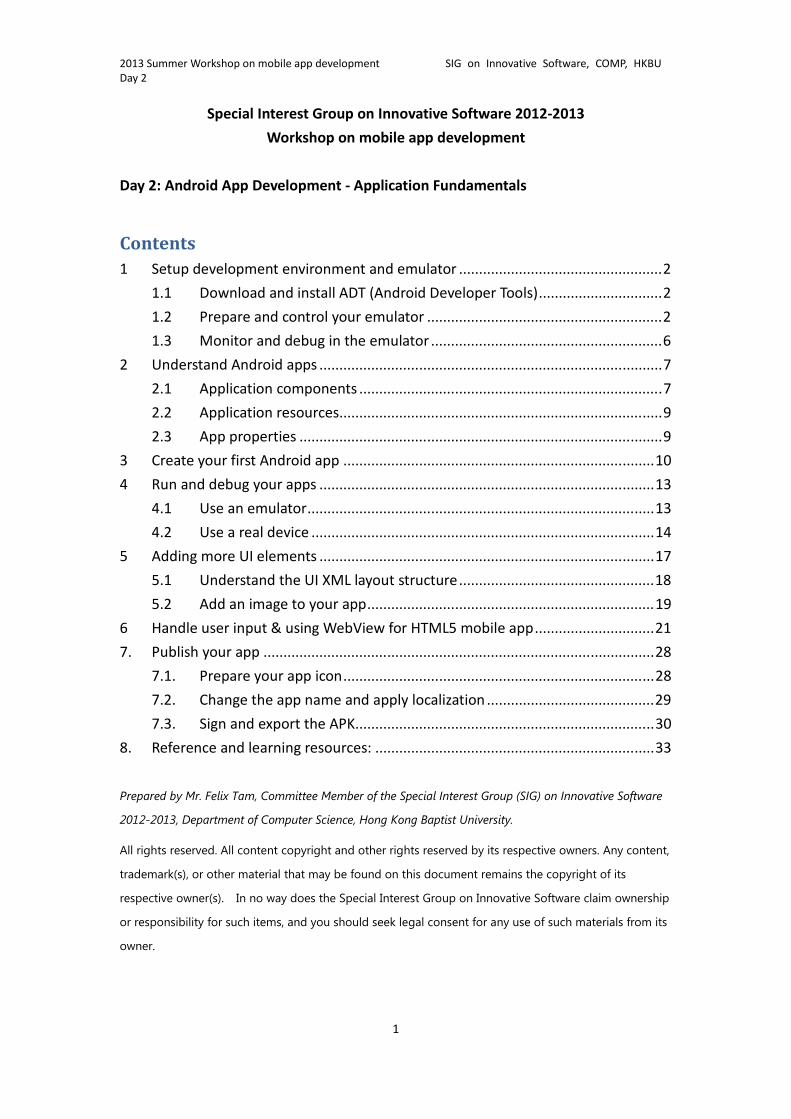
we will base on this to create an Android 4.2.2 emulator. Except where noted,
examples used in our tutorials (Day 1 - 3) are still compatible with Android API Level
8 or above.
Close the Welcome! tab and click on the icon of Android Virtual Device Manager in
the toolbar.
Click on New and input the parameters as the screenshot shown below.
2013 Summer Workshop on mobile app development
Day 2
SIG on Innovative Software, COMP, HKBU
4
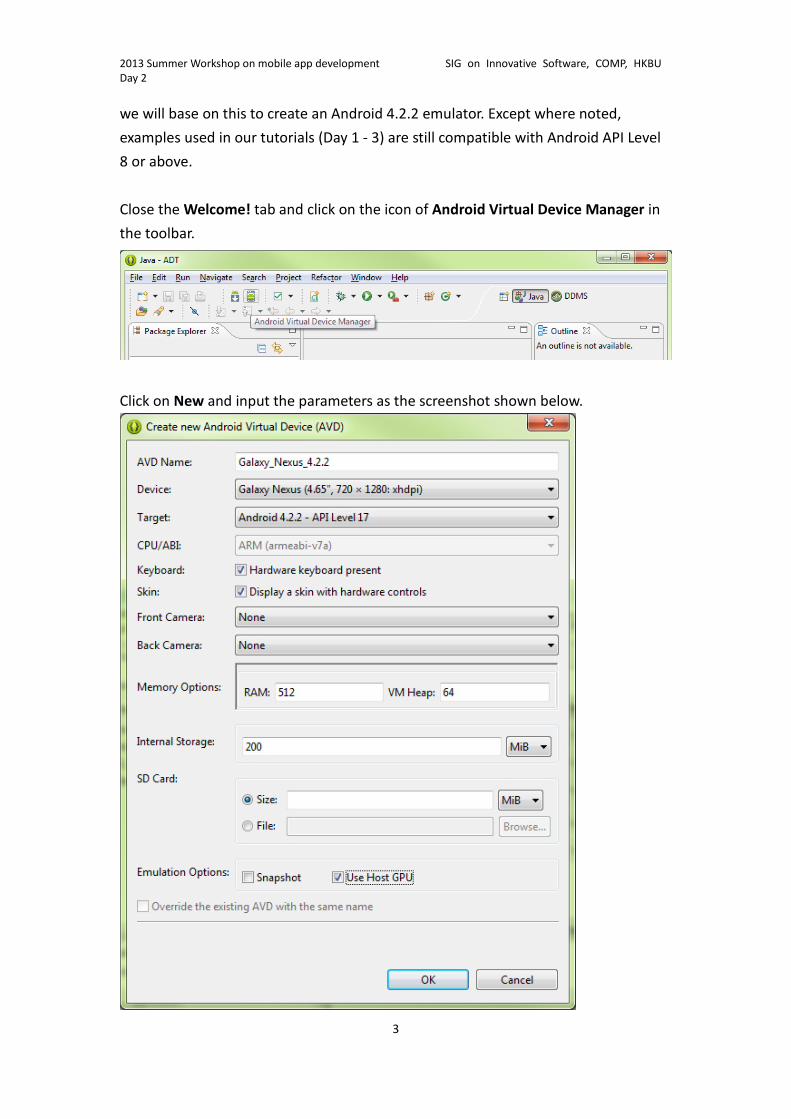
Click on Start to start the emulator. If you received an error message like Emulator
error: This AVD's configuration is missing a kernel file, please make sure the system
environment variable is set to the path of your SDK directory with variable name
ANDROID_SDK_ROOT
To set the system environment variable, click on Start > Right click Computer >
Advanced system settings > Advanced > Environment Variables. Click New or Edit
ANDROID_SDK_ROOT variable, and then specify the path of the SDK folder. E.g. C:\
adt-bundle-windows-x86\sdk
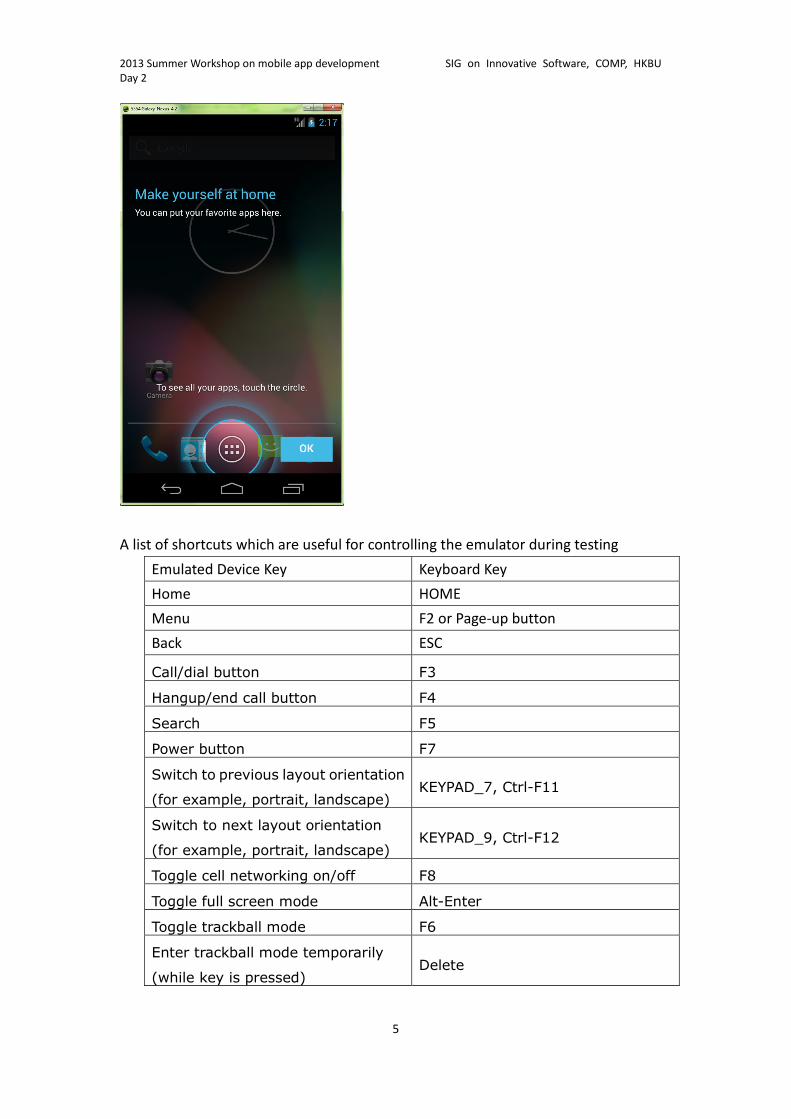
After the Android system is started successfully, you will see the following screen in
the emulator.
*If the Auto Monitor Logcat dialog is promoted, select Yes, monitor logcat… and
click the OK button.
2013 Summer Workshop on mobile app development
Day 2
SIG on Innovative Software, COMP, HKBU
5
A list of shortcuts which are useful for controlling the emulator during testing
Emulated Device Key Keyboard Key
Home HOME
Menu F2 or Page-up button
Back ESC
Call/dial button F3
Hangup/end call button F4
Search F5
Power button F7
Switch to previous layout orientation
(for example, portrait, landscape) KEYPAD_7, Ctrl-F11
Switch to next layout orientation
(for example, portrait, landscape) KEYPAD_9, Ctrl-F12
Toggle cell networking on/off F8
Toggle full screen mode Alt-Enter
Toggle trackball mode F6
Enter trackball mode temporarily
(while key is pressed) Delete
2013 Summer Workshop on mobile app development
Day 2
SIG on Innovative Software, COMP, HKBU
6
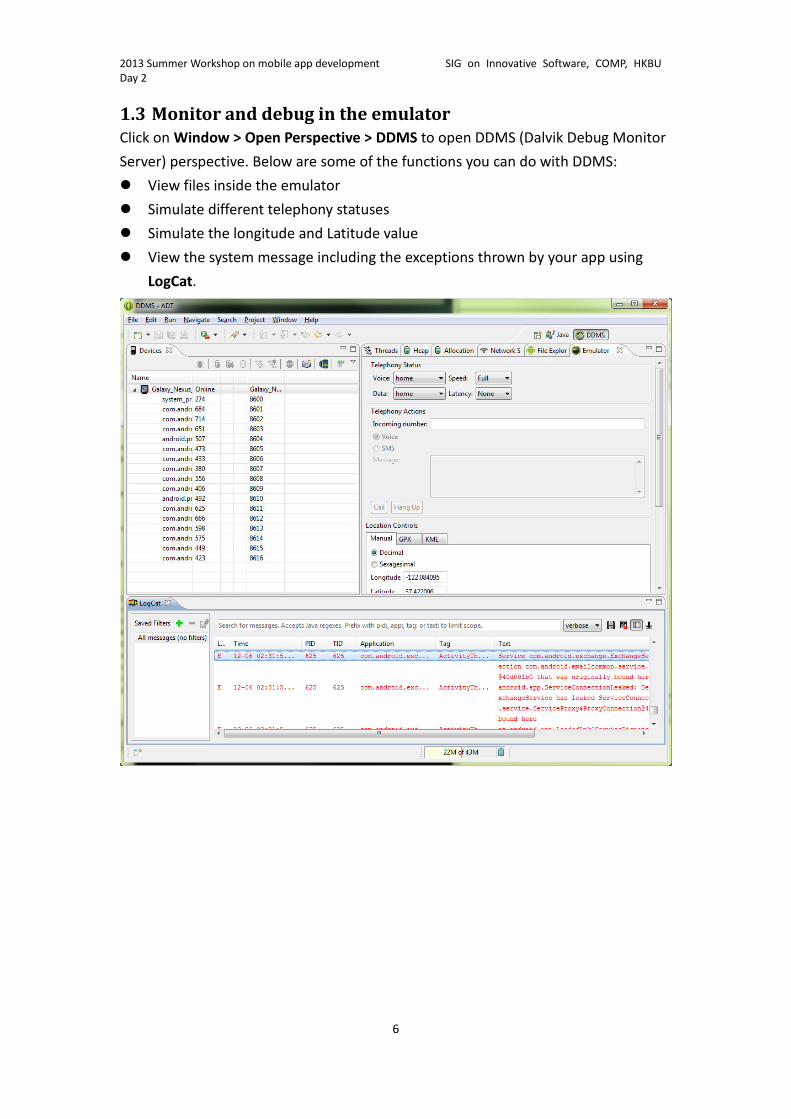
1.3 Monitor and debug in the emulator
Click on Window > Open Perspective > DDMS to open DDMS (Dalvik Debug Monitor
Server) perspective. Below are some of the functions you can do with DDMS:
� View files inside the emulator
� Simulate different telephony statuses
� Simulate the longitude and Latitude value
� View the system message including the exceptions thrown by your app using
LogCat.
2013 Summer Workshop on mobile app development
Day 2
SIG on Innovative Software, COMP, HKBU
7
2 Understand Android apps
2.1 Application components
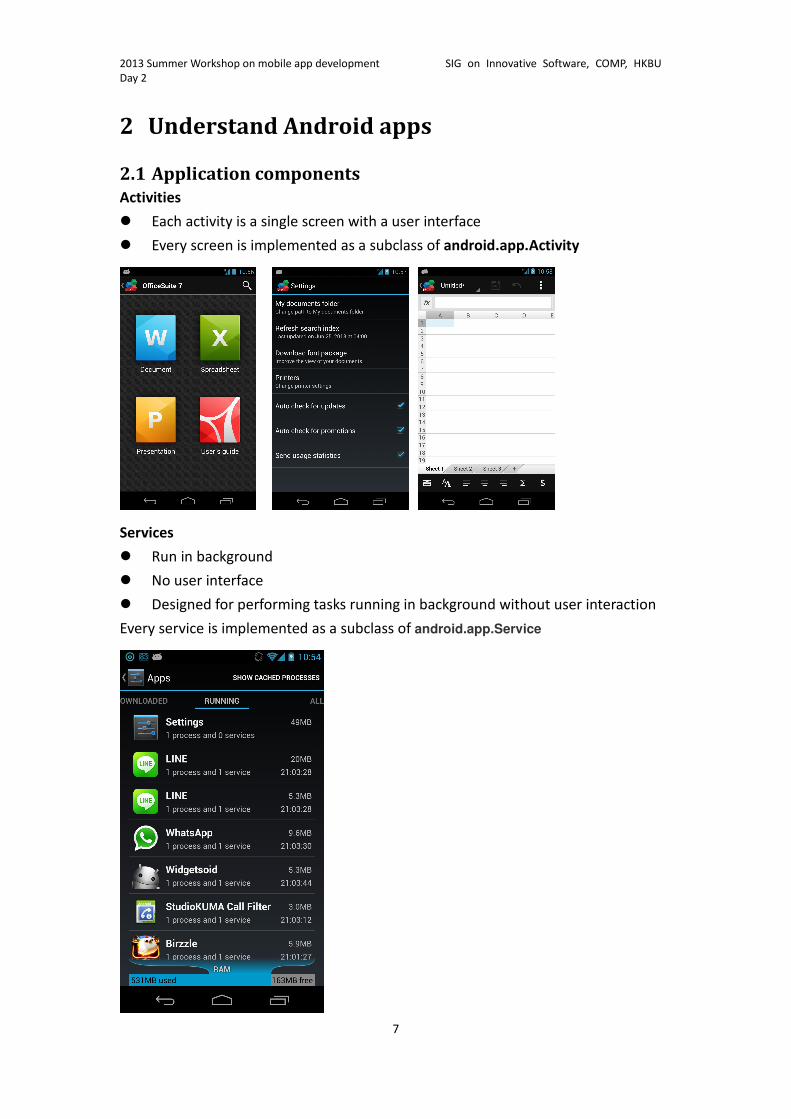
Activities
� Each activity is a single screen with a user interface
� Every screen is implemented as a subclass of android.app.Activity
Services
� Run in background
� No user interface
� Designed for performing tasks running in background without user interaction
Every service is implemented as a subclass of android.app.Service

2013 Summer Workshop on mobile app development
Day 2
SIG on Innovative Software, COMP, HKBU
8
Fragment (Introduced since API Level 11 / v4 support library)
� Represents a particular interface which encapsulated in an activity.
� Reusable UI
� Excellent interaction with ActionBar
Content providers
� A shared set of application data
� E.g. Contacts, Calendar (Android 4.0)
Broadcast receivers
� A component designed to respond to global broadcast announcements
� System broadcast announcements E.g. change of battery status/network status
etc.
2013 Summer Workshop on mobile app development
Day 2
SIG on Innovative Software, COMP, HKBU
9
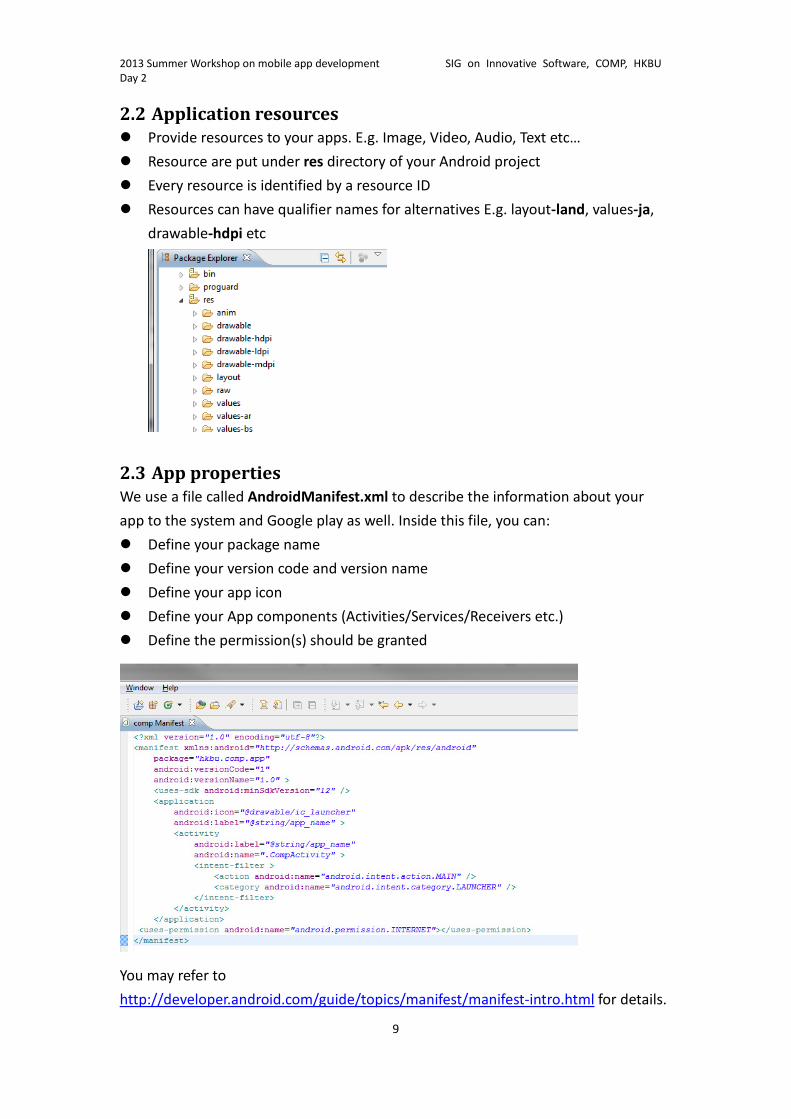
2.2 Application resources
� Provide resources to your apps. E.g. Image, Video, Audio, Text etc…
� Resource are put under res directory of your Android project
� Every resource is identified by a resource ID
� Resources can have qualifier names for alternatives E.g. layout-land, values-ja,
drawable-hdpi etc
2.3 App properties
We use a file called AndroidManifest.xml to describe the information about your
app to the system and Google play as well. Inside this file, you can:
� Define your package name
� Define your version code and version name
� Define your app icon
� Define your App components (Activities/Services/Receivers etc.)
� Define the permission(s) should be granted
You may refer to
http://developer.android.com/guide/topics/manifest/manifest-intro.html for details.
2013 Summer Workshop on mobile app development
Day 2
SIG on Innovative Software, COMP, HKBU
10
3 Create your first Android app
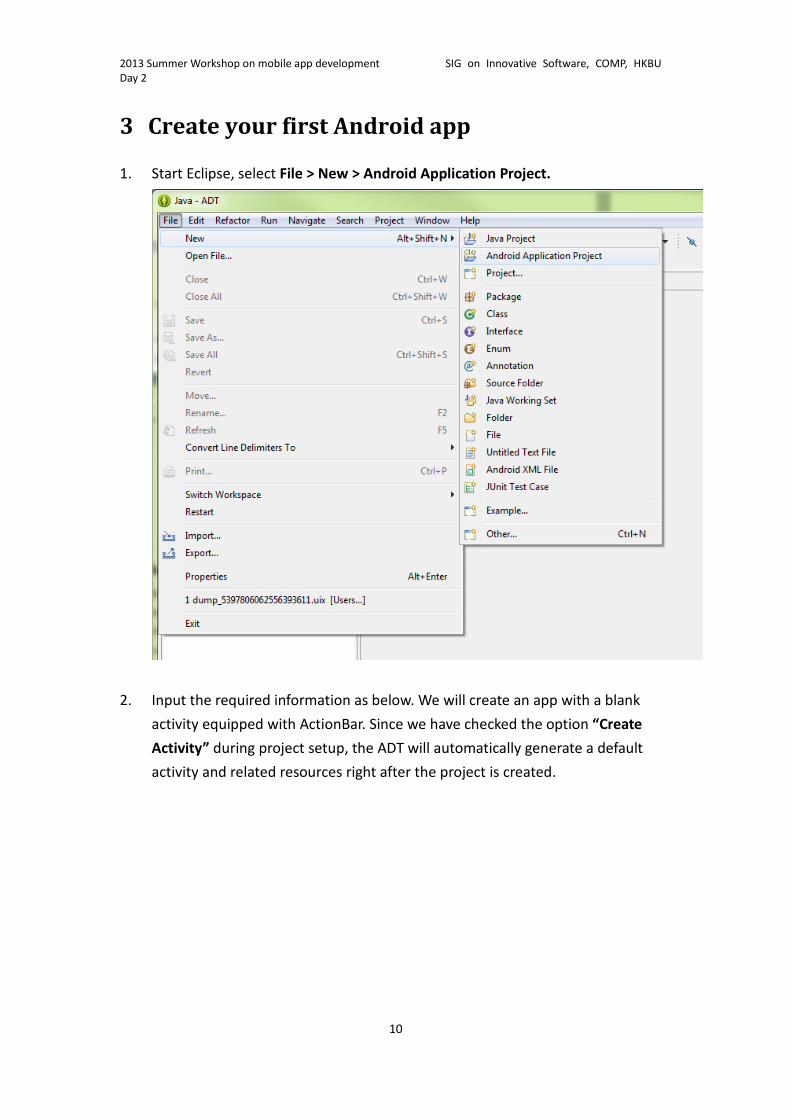
1. Start Eclipse, select File > New > Android Application Project.
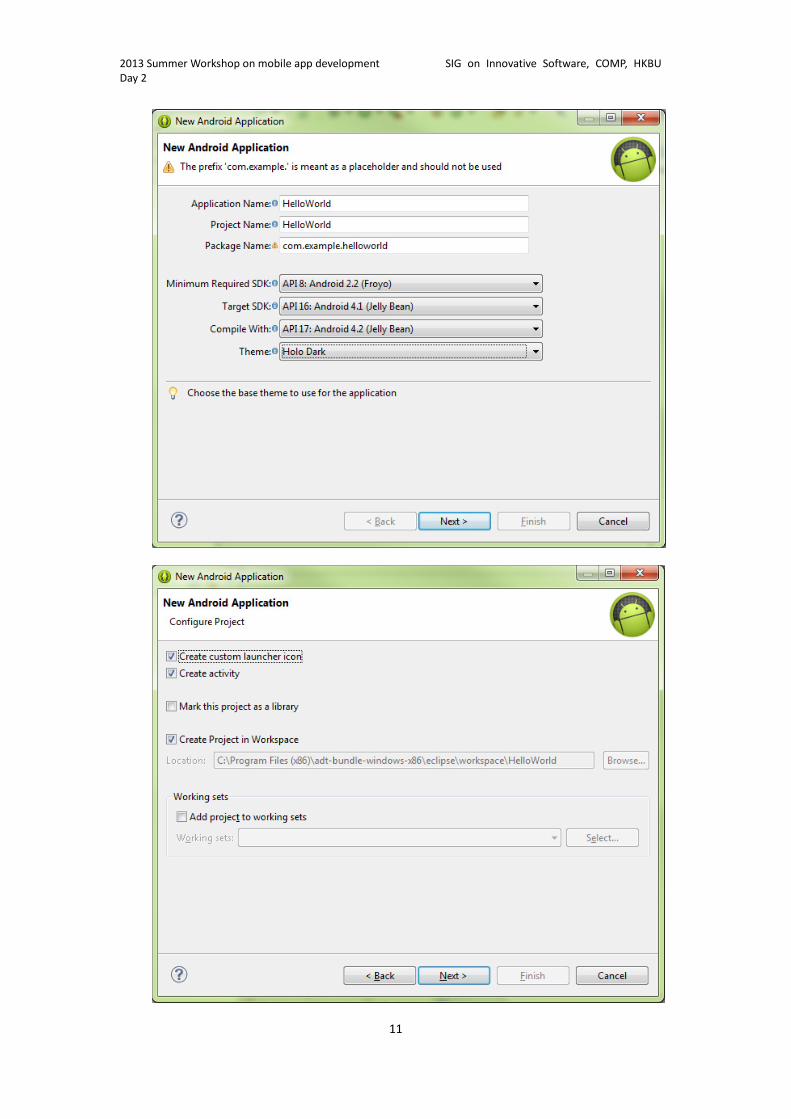
2. Input the required information as below. We will create an app with a blank
activity equipped with ActionBar. Since we have checked the option “Create
Activity” during project setup, the ADT will automatically generate a default
activity and related resources right after the project is created.
2013 Summer Workshop on mobile app development
Day 2
SIG on Innovative Software, COMP, HKBU
11
2013 Summer Workshop on mobile app development
Day 2
SIG on Innovative Software, COMP, HKBU
12
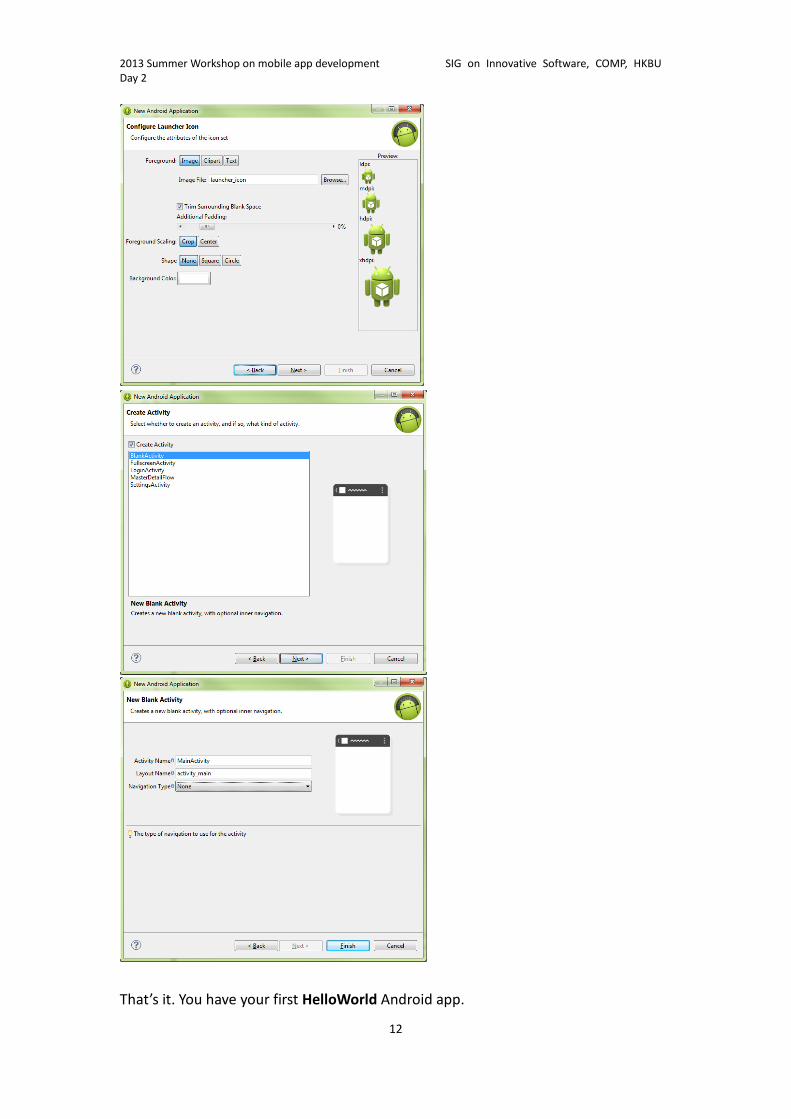
That’s it. You have your first HelloWorld Android app.
2013 Summer Workshop on mobile app development
Day 2
SIG on Innovative Software, COMP, HKBU
13
4 Run and debug your apps
4.1 Use an emulator
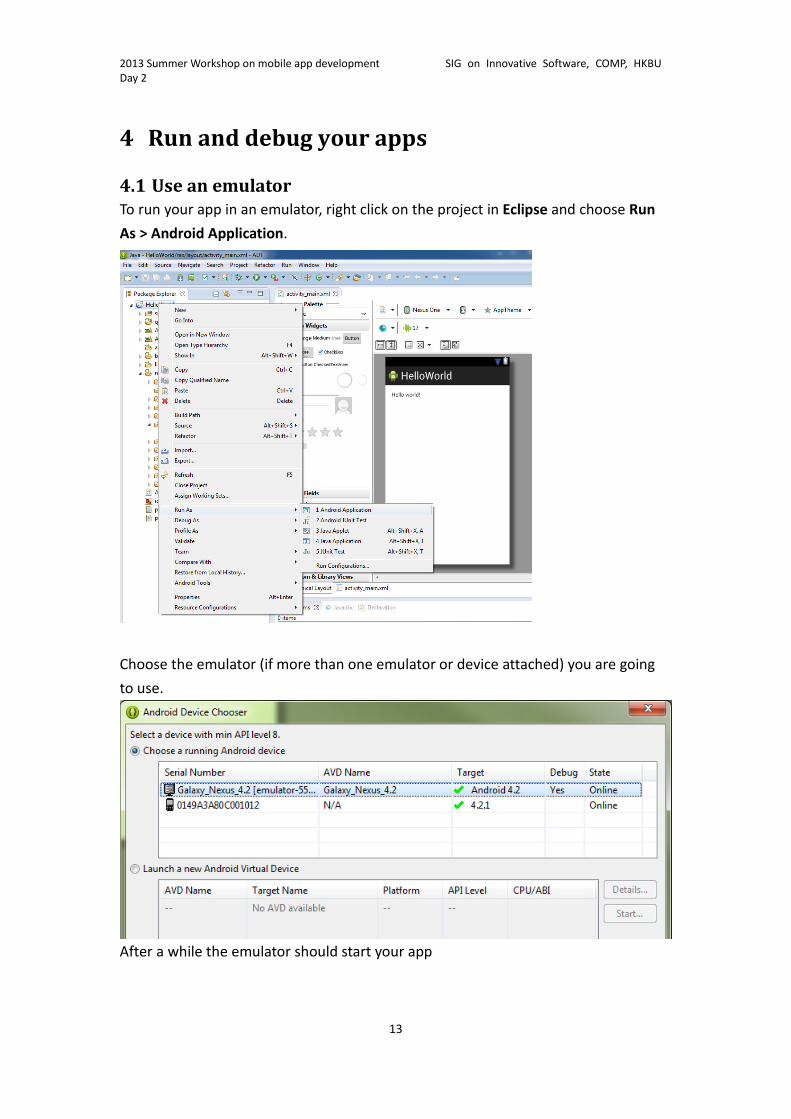
To run your app in an emulator, right click on the project in Eclipse and choose Run
As > Android Application.
Choose the emulator (if more than one emulator or device attached) you are going
to use.
After a while the emulator should start your app
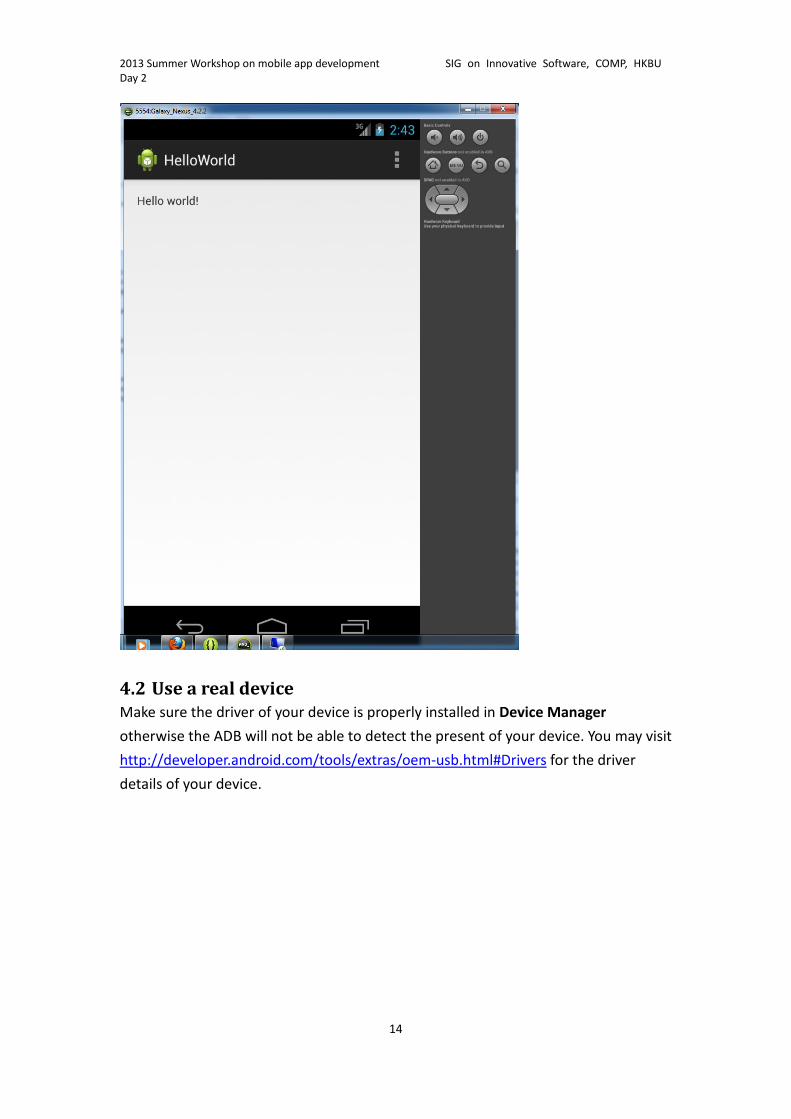
2013 Summer Workshop on mobile app development
Day 2
SIG on Innovative Software, COMP, HKBU
14
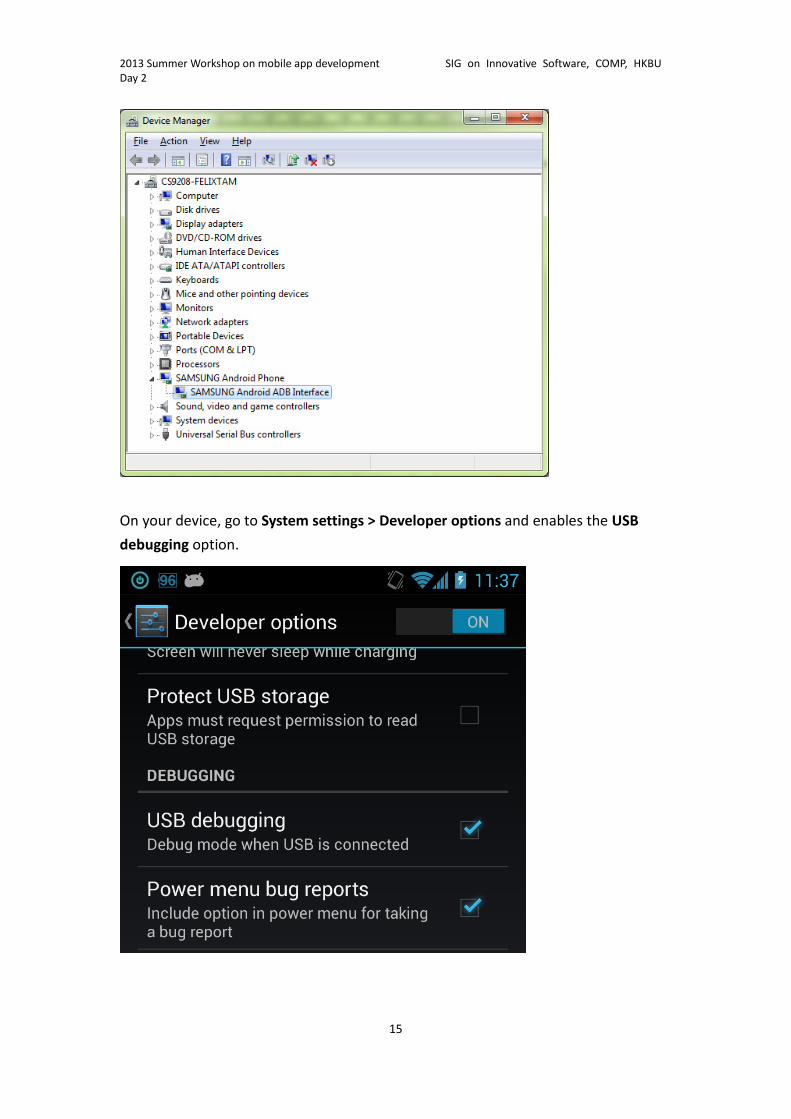
4.2 Use a real device
Make sure the driver of your device is properly installed in Device Manager
otherwise the ADB will not be able to detect the present of your device. You may visit
http://developer.android.com/tools/extras/oem-usb.html#Drivers for the driver
details of your device.
2013 Summer Workshop on mobile app development
Day 2
SIG on Innovative Software, COMP, HKBU
15
On your device, go to System settings > Developer options and enables the USB
debugging option.
2013 Summer Workshop on mobile app development
Day 2
SIG on Innovative Software, COMP, HKBU
16
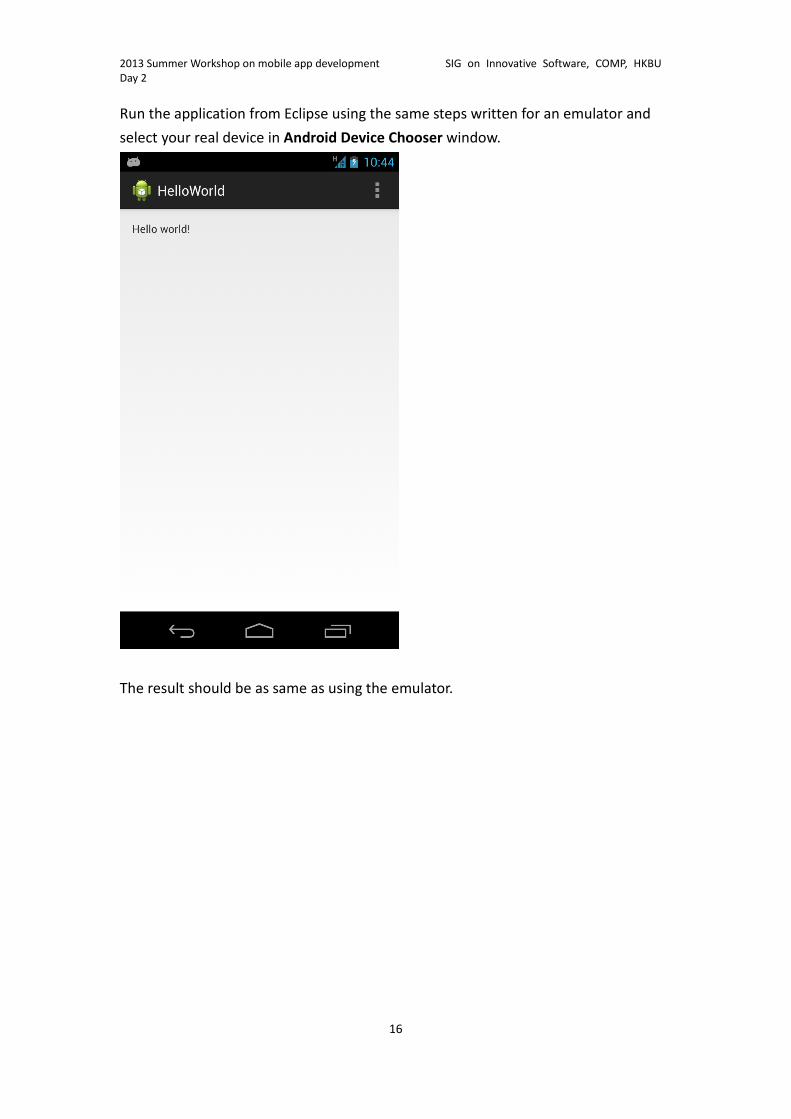
Run the application from Eclipse using the same steps written for an emulator and
select your real device in Android Device Chooser window.
The result should be as same as using the emulator.
2013 Summer Workshop on mobile app development
Day 2
SIG on Innovative Software, COMP, HKBU
17
5 Adding more UI elements
All UI elements are built using View
and ViewGroup objects in an
application. The View can be
extended to a TextView,
ImageView, WebView etc, and the
ViewGroup serves as layout
architecture which describes how
the View to be organized in an
activity. Apart from building UI
directly using Java code, we can
also create the interface using XML document. By using XML markups, we can
simplify our code and make debugging easier.
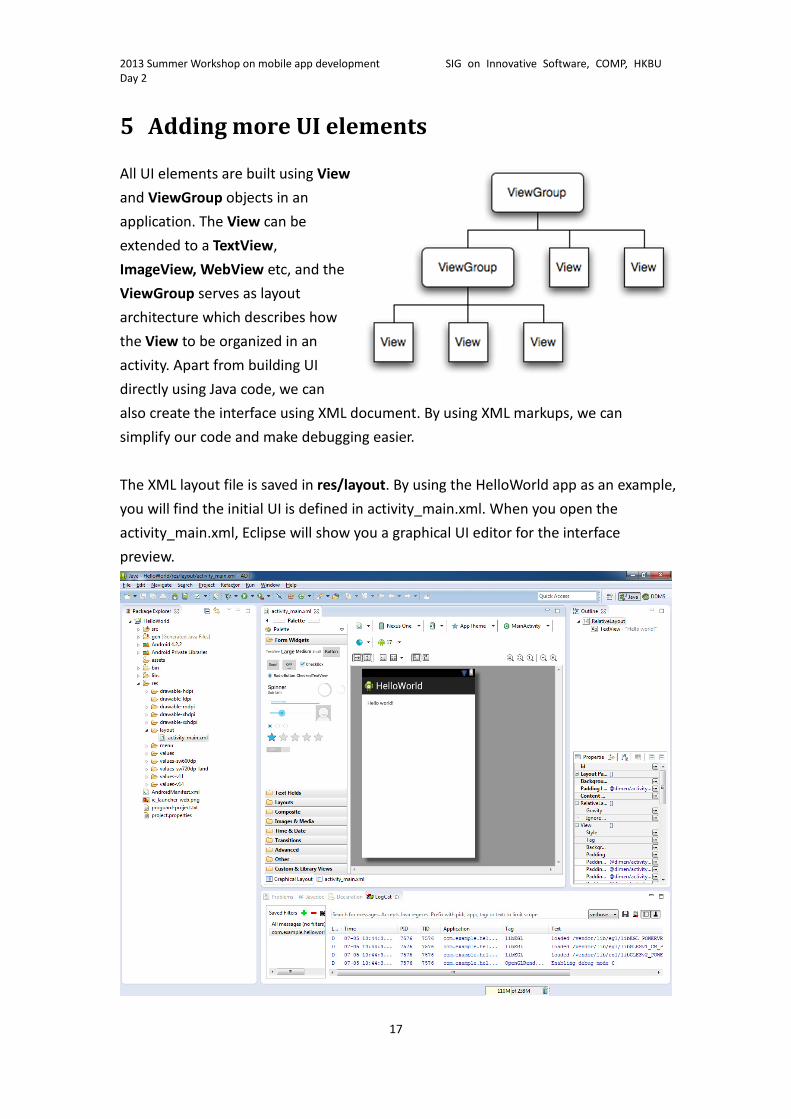
The XML layout file is saved in res/layout. By using the HelloWorld app as an example,
you will find the initial UI is defined in activity_main.xml. When you open the
activity_main.xml, Eclipse will show you a graphical UI editor for the interface
preview.
2013 Summer Workshop on mobile app development
Day 2
SIG on Innovative Software, COMP, HKBU
18
However, the GUI editor is not sophisticated enough. The final appearance of the
interface layout may differ from the preview in the editor. Therefore, the best
practice is to create the UI elements by using XML markups directly. To do this, you
can click on the xxx.xml tab.
5.1 Understand the UI XML layout structure
Using the activity_main.xml as an example:
<RelativeLayout xmlns:android="http://schemas.android.com/apk/res/android"
xmlns:tools="http://schemas.android.com/tools"
android:layout_width="match_parent"
android:layout_height="match_parent"
android:paddingBottom="@dimen/activity_vertical_margin"
android:paddingLeft="@dimen/activity_horizontal_margin"
android:paddingRight="@dimen/activity_horizontal_margin"
android:paddingTop="@dimen/activity_vertical_margin"
tools:context=".MainActivity" >
<TextView
android:layout_width="wrap_content"
android:layout_height="wrap_content"
android:text="@string/hello_world" />
</RelativeLayout>
The RelativeLayout is a ViewGroup which holds its children in a relative way. The
above RelativeLayout has only one child – TextView. Android uses TextView to
display text to users. For a complete list of ViewGroups and Views, please refer to
http://developer.android.com/reference/android/view/ViewGroup.html and
http://developer.android.com/reference/android/view/View.html respectively.
Each kind of ViewGroups or Views has its own attributes. The attributes usually start
with android:xxx where the xxx is the property name of an attribute. Different
ViewGroups and Views share some common attributes but some of them are
unique.
To have a quick outlook on different layouts and UI elements, please go to
http://developer.android.com/guide/topics/ui/declaring-layout.html#CommonLayou
ts for the samples. Now, we will see how to add an image just below the text in our
activity_main.xml.
2013 Summer Workshop on mobile app development
Day 2
SIG on Innovative Software, COMP, HKBU
19
5.2 Add an image to your app
1. Prepare an image. You may download this image
http://developer.android.com/images/sdk-cube.png as an example.
2. Put the image under res/drawable-hdpi. If this folder is not found, you can
create it manually using the Package Explorer in Eclipse.
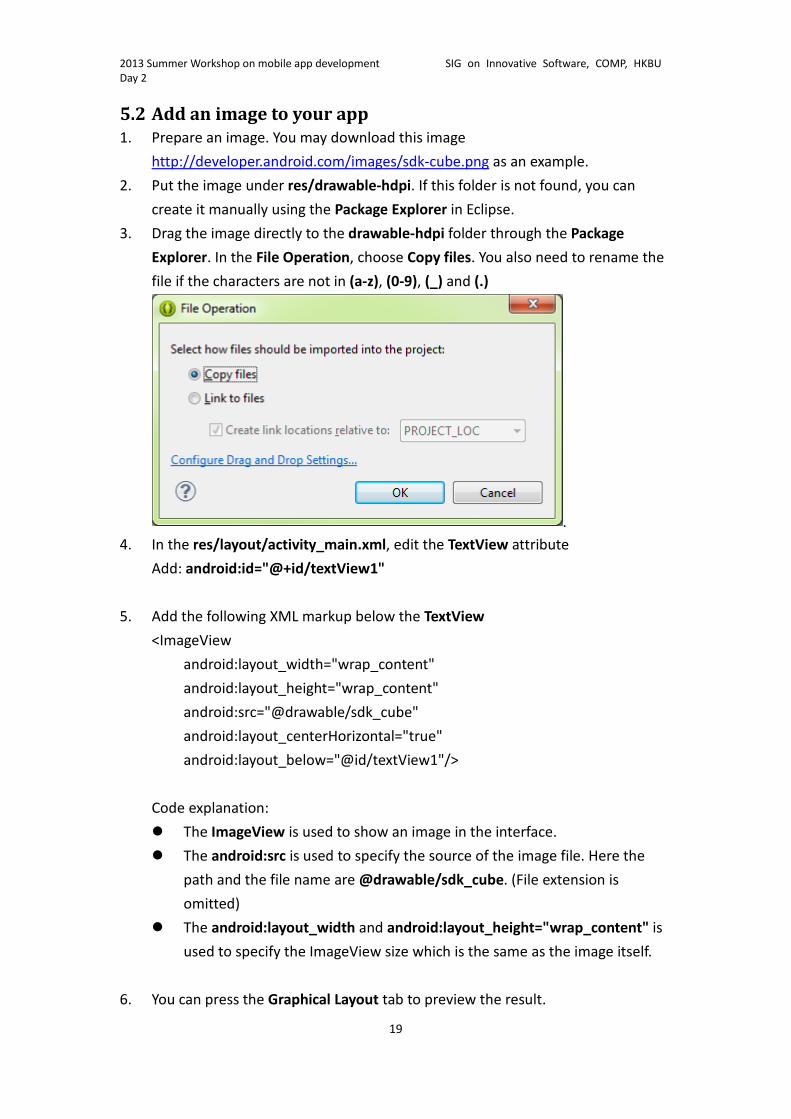
3. Drag the image directly to the drawable-hdpi folder through the Package
Explorer. In the File Operation, choose Copy files. You also need to rename the
file if the characters are not in (a-z), (0-9), (_) and (.)
.
4. In the res/layout/activity_main.xml, edit the TextView attribute
Add: android:id="@+id/textView1"
5. Add the following XML markup below the TextView
<ImageView
android:layout_width="wrap_content"
android:layout_height="wrap_content"
android:src="@drawable/sdk_cube"
android:layout_centerHorizontal="true"
android:layout_below="@id/textView1"/>
Code explanation:
� The ImageView is used to show an image in the interface.
� The android:src is used to specify the source of the image file. Here the
path and the file name are @drawable/sdk_cube. (File extension is
omitted)
� The android:layout_width and android:layout_height="wrap_content" is
used to specify the ImageView size which is the same as the image itself.
6. You can press the Graphical Layout tab to preview the result.
2013 Summer Workshop on mobile app development
Day 2
SIG on Innovative Software, COMP, HKBU
20
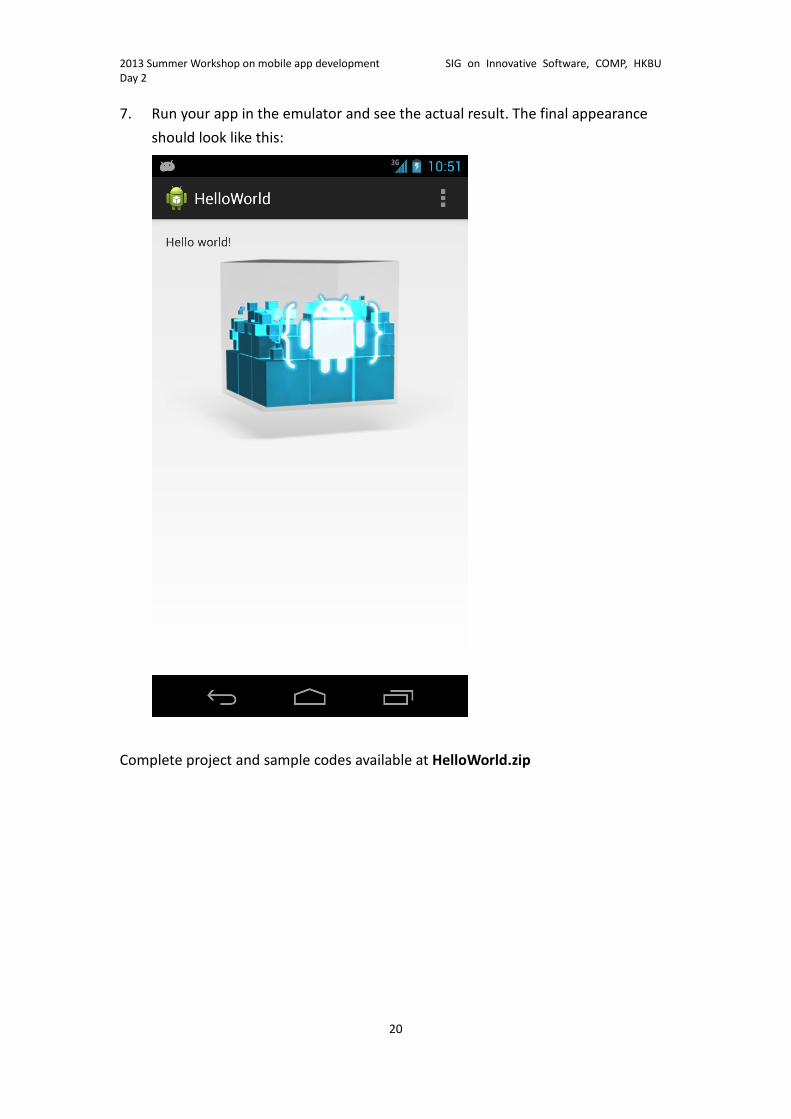
7. Run your app in the emulator and see the actual result. The final appearance
should look like this:
Complete project and sample codes available at HelloWorld.zip
2013 Summer Workshop on mobile app development
Day 2
SIG on Innovative Software, COMP, HKBU
21
6 Handle user input & using WebView for HTML5
mobile app
In this section, we will create an app to intercept user input and incorporate some
HTML5 mobile app frameworks. Below are some frameworks which are popular:
� Sencha Touch
� jQuery Mobile
� jQTouch
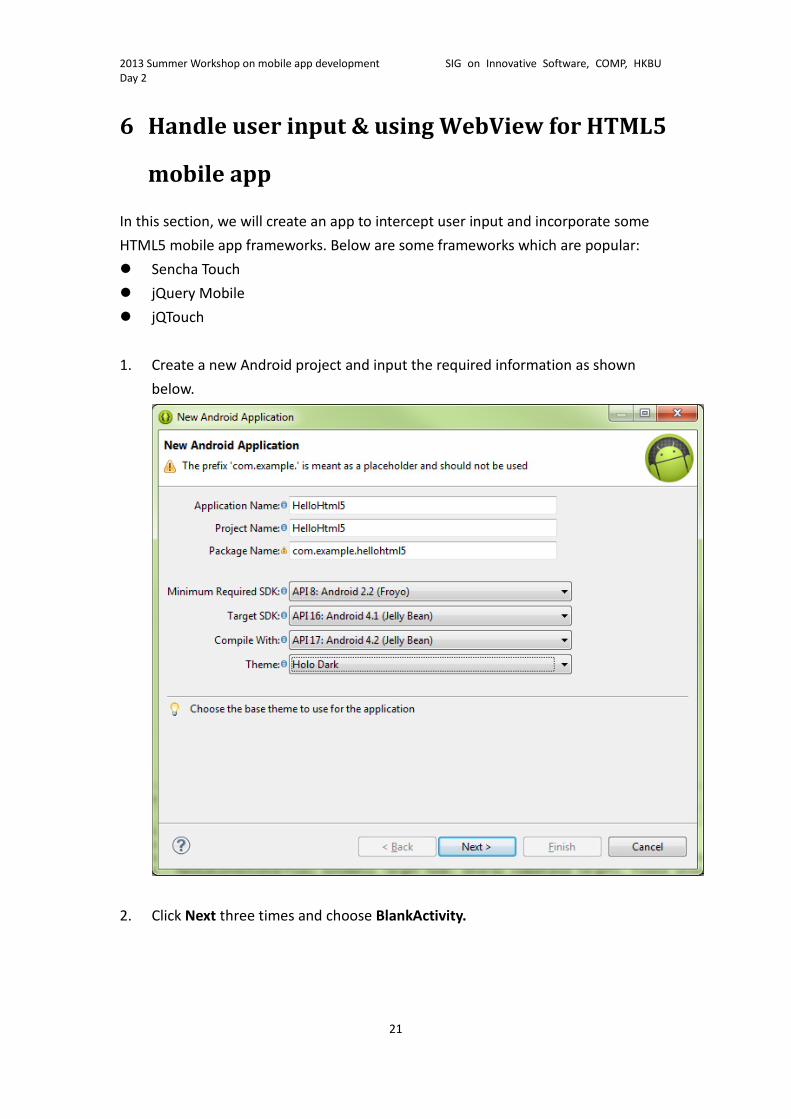
1. Create a new Android project and input the required information as shown
below.
2. Click Next three times and choose BlankActivity.

2013 Summer Workshop on mobile app development
Day 2
SIG on Innovative Software, COMP, HKBU
22
3. Click Next and Finish to create the project.
4. Delete the default generated TextView in activity_main.xml
5. Remove the attributes android:paddingXXXX from the RelativeLayout.
6. Add a LinearLayout inside the default RelativeLayout in activity_main.xml using
the markup below. We will use this LinearLayout to hold the address bar
(EditText) and the Go button.
<LinearLayout
android:layout_width="match_parent"
android:layout_height="wrap_content"
android:id="@+id/linearLayout1">
</LinearLayout>
7. Inside this LinearLayout, we will add an EditText as an address bar and add a
button next to it. To add an EditText, use the markup below:
<EditText
android:id="@+id/editText1"
android:layout_width="wrap_content"
android:layout_height="wrap_content"
android:layout_weight="1"
android:hint="Enter URL"
2013 Summer Workshop on mobile app development
Day 2
SIG on Innovative Software, COMP, HKBU
23
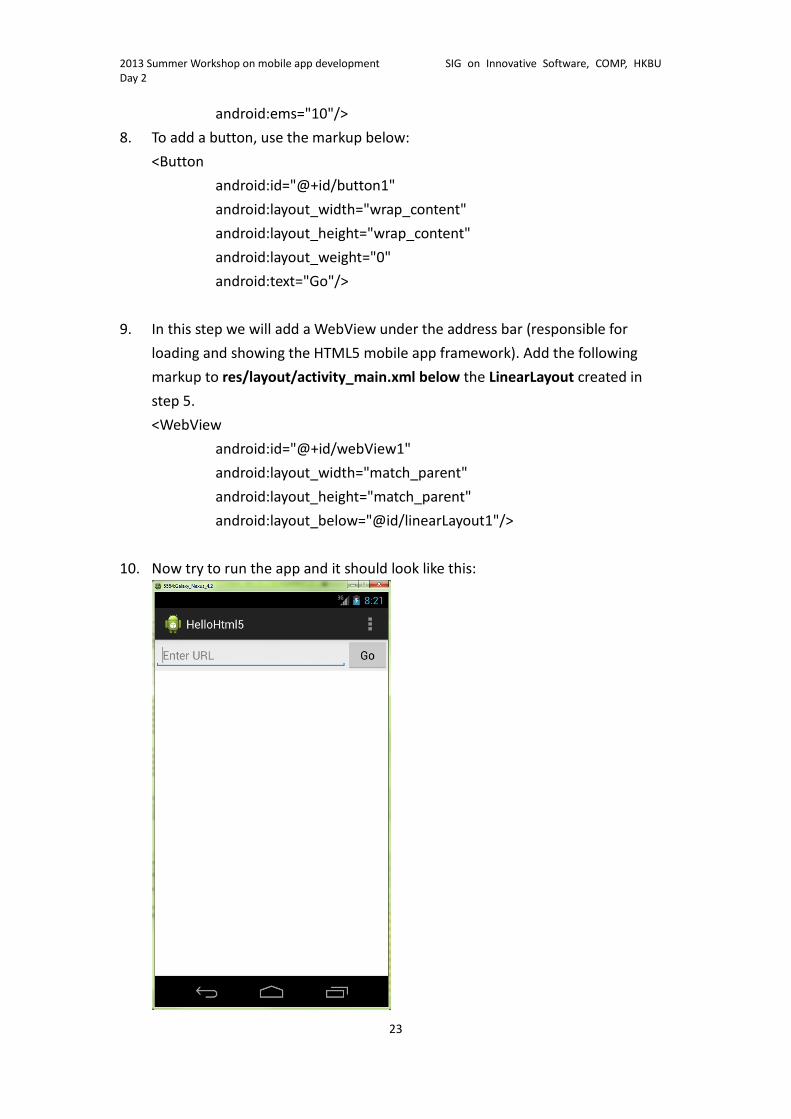
android:ems="10"/>
8. To add a button, use the markup below:
<Button
android:id="@+id/button1"
android:layout_width="wrap_content"
android:layout_height="wrap_content"
android:layout_weight="0"
android:text="Go"/>
9. In this step we will add a WebView under the address bar (responsible for
loading and showing the HTML5 mobile app framework). Add the following
markup to res/layout/activity_main.xml below the LinearLayout created in
step 5.
<WebView
android:id="@+id/webView1"
android:layout_width="match_parent"
android:layout_height="match_parent"
android:layout_below="@id/linearLayout1"/>
10. Now try to run the app and it should look like this:
2013 Summer Workshop on mobile app development
Day 2
SIG on Innovative Software, COMP, HKBU
24
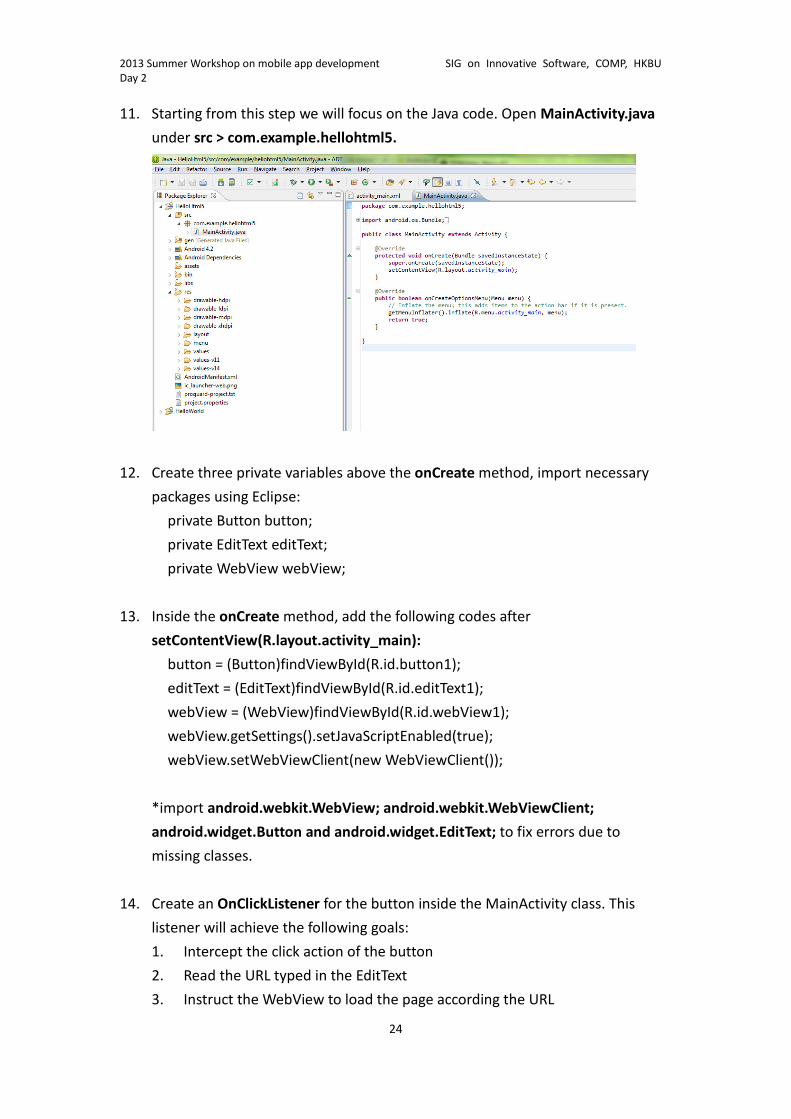
11. Starting from this step we will focus on the Java code. Open MainActivity.java
under src > com.example.hellohtml5.
12. Create three private variables above the onCreate method, import necessary
packages using Eclipse:
private Button button;
private EditText editText;
private WebView webView;
13. Inside the onCreate method, add the following codes after
setContentView(R.layout.activity_main):
button = (Button)findViewById(R.id.button1);
editText = (EditText)findViewById(R.id.editText1);
webView = (WebView)findViewById(R.id.webView1);
webView.getSettings().setJavaScriptEnabled(true);
webView.setWebViewClient(new WebViewClient());
*import android.webkit.WebView; android.webkit.WebViewClient;
android.widget.Button and android.widget.EditText; to fix errors due to
missing classes.
14. Create an OnClickListener for the button inside the MainActivity class. This
listener will achieve the following goals:
1. Intercept the click action of the button
2. Read the URL typed in the EditText
3. Instruct the WebView to load the page according the URL
2013 Summer Workshop on mobile app development
Day 2
SIG on Innovative Software, COMP, HKBU
25
private OnClickListener buttonClick = new OnClickListener(){
@Override
public void onClick(View arg0) {
webView.loadUrl(editText.getText().toString());
}
};
*You should import android.view.View.OnClickListener when prompted for
OnClickListener in Eclipse. Import android.view.View too.
15. Bound the OnClickListener to the Go button using follow code in onCreate():
button.setOnClickListener(buttonClick);
16. Since the app will access Internet to load the HTML5 framework demo, we need
to declare necessary permission in AndroidManifest.xml. Add the following
permission declaration above the application element.
<uses-permission android:name="android.permission.INTERNET" />
17. Run the app and test the HTML5 frameworks, type the links below in the
address bar and tap on the Go button.
*You are recommended to use a real device instead of emulator for having a
better experience in this example.
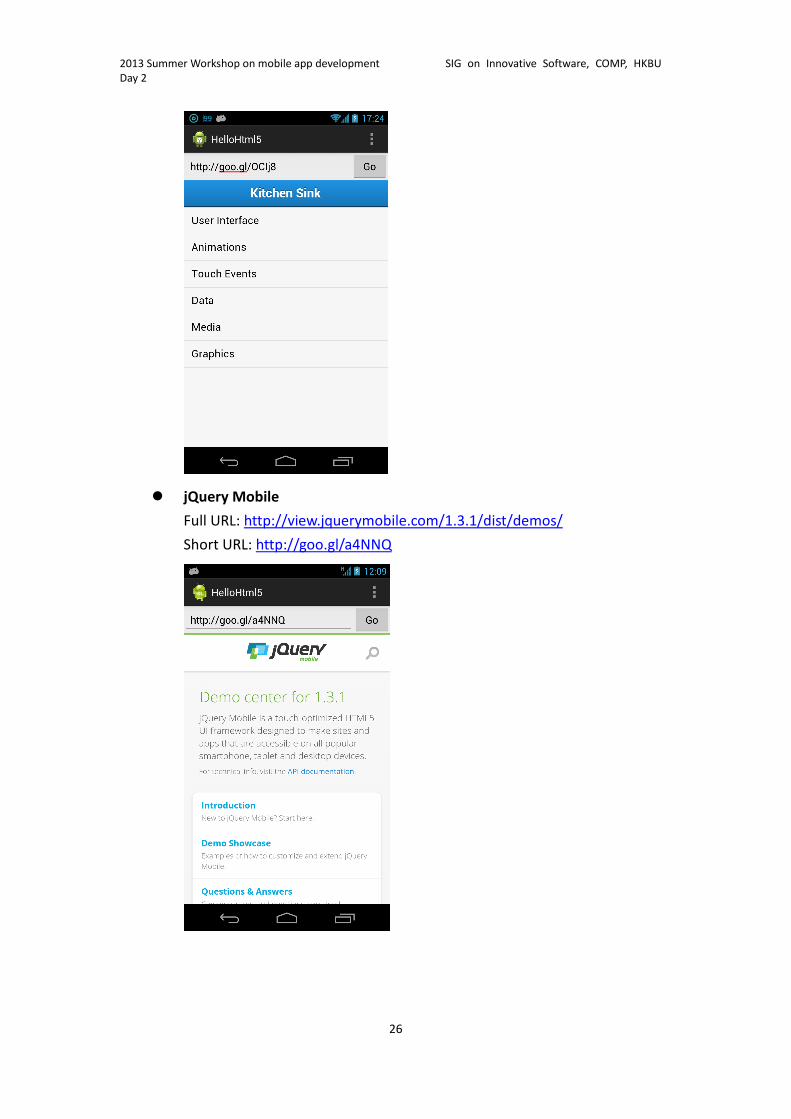
� Sencha Touch
Full URL:
http://cdn.sencha.io/touch/sencha-touch-2.1.0/examples/kitchensink/inde
x.html
Short URL: http://goo.gl/OCIj8
2013 Summer Workshop on mobile app development
Day 2
SIG on Innovative Software, COMP, HKBU
26
� jQuery Mobile
Full URL: http://view.jquerymobile.com/1.3.1/dist/demos/
Short URL: http://goo.gl/a4NNQ
2013 Summer Workshop on mobile app development
Day 2
SIG on Innovative Software, COMP, HKBU
27
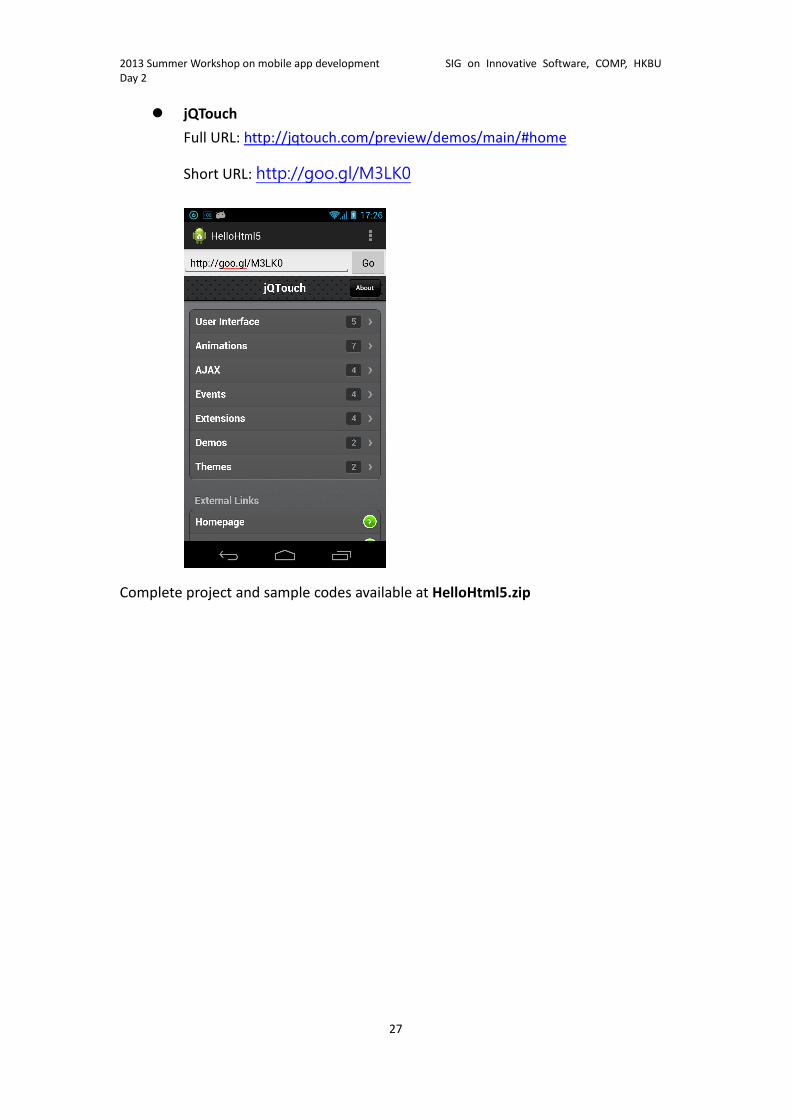
� jQTouch
Full URL: http://jqtouch.com/preview/demos/main/#home
Short URL: http://goo.gl/M3LK0
Complete project and sample codes available at HelloHtml5.zip
2013 Summer Workshop on mobile app development
Day 2
SIG on Innovative Software, COMP, HKBU
28
7. Publish your app
Before publishing the app to Google Play Store or distribute it to someone else, you
should design an icon for your app instead of using the default one. Also, you may
need to change the app name according to your preference later on.
7.1. Prepare your app icon
For the app icon, we have to prepare at least four different sizes for different screen
resolutions. Namely: ldpi, mdpi, hdpi and xhdpi (There is also tvdpi). In the following
steps, we will base on the previous example which is completed in section 6.
1. Please prepare an app icon and resize it to 36x36px for ldpi, 48x48 for mdpi,
72x72 for hdpi and 96 x 96 for xhdpi. For the app icon design guideline. Please
refer to
http://developer.android.com/guide/practices/ui_guidelines/icon_design_lau
ncher.html. You can also get some free icons at www.iconarchive.com
2. Put the icon with the same file name (E.g. icon.png) into drawable-hdpi (72x72),
drawable-mdpi (48x48) and drawable-ldpi (36x36) respectively.
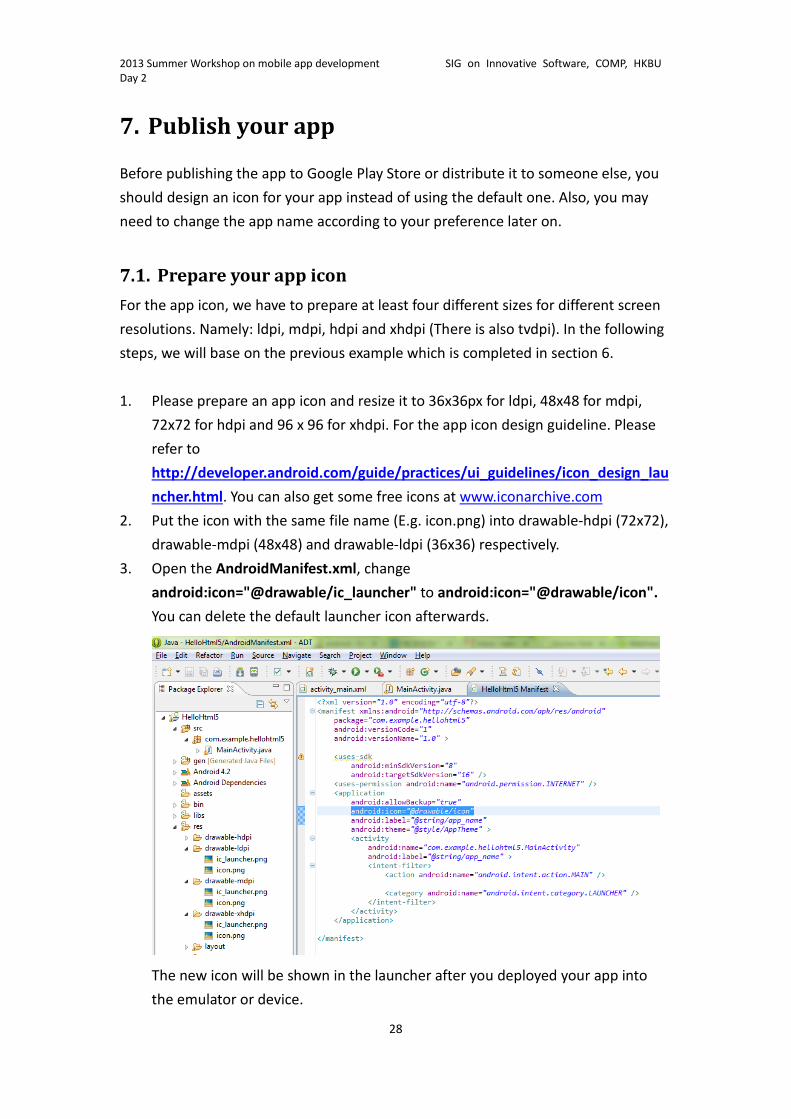
3. Open the AndroidManifest.xml, change
android:icon="@drawable/ic_launcher" to android:icon="@drawable/icon".
You can delete the default launcher icon afterwards.
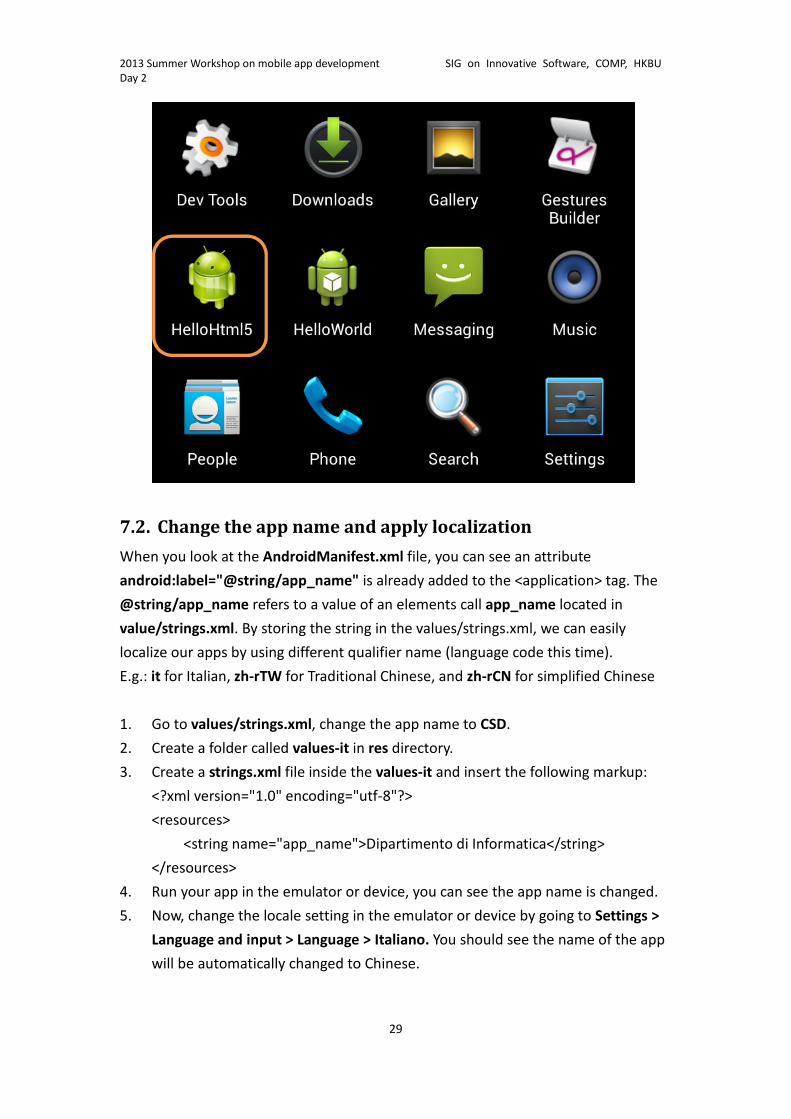
The new icon will be shown in the launcher after you deployed your app into
the emulator or device.
2013 Summer Workshop on mobile app development
Day 2
SIG on Innovative Software, COMP, HKBU
29
7.2. Change the app name and apply localization
When you look at the AndroidManifest.xml file, you can see an attribute
android:label="@string/app_name" is already added to the <application> tag. The
@string/app_name refers to a value of an elements call app_name located in
value/strings.xml. By storing the string in the values/strings.xml, we can easily
localize our apps by using different qualifier name (language code this time).
E.g.: it for Italian, zh-rTW for Traditional Chinese, and zh-rCN for simplified Chinese
1. Go to values/strings.xml, change the app name to CSD.
2. Create a folder called values-it in res directory.
3. Create a strings.xml file inside the values-it and insert the following markup:
<?xml version="1.0" encoding="utf-8"?>
<resources>
<string name="app_name">Dipartimento di Informatica</string>
</resources>
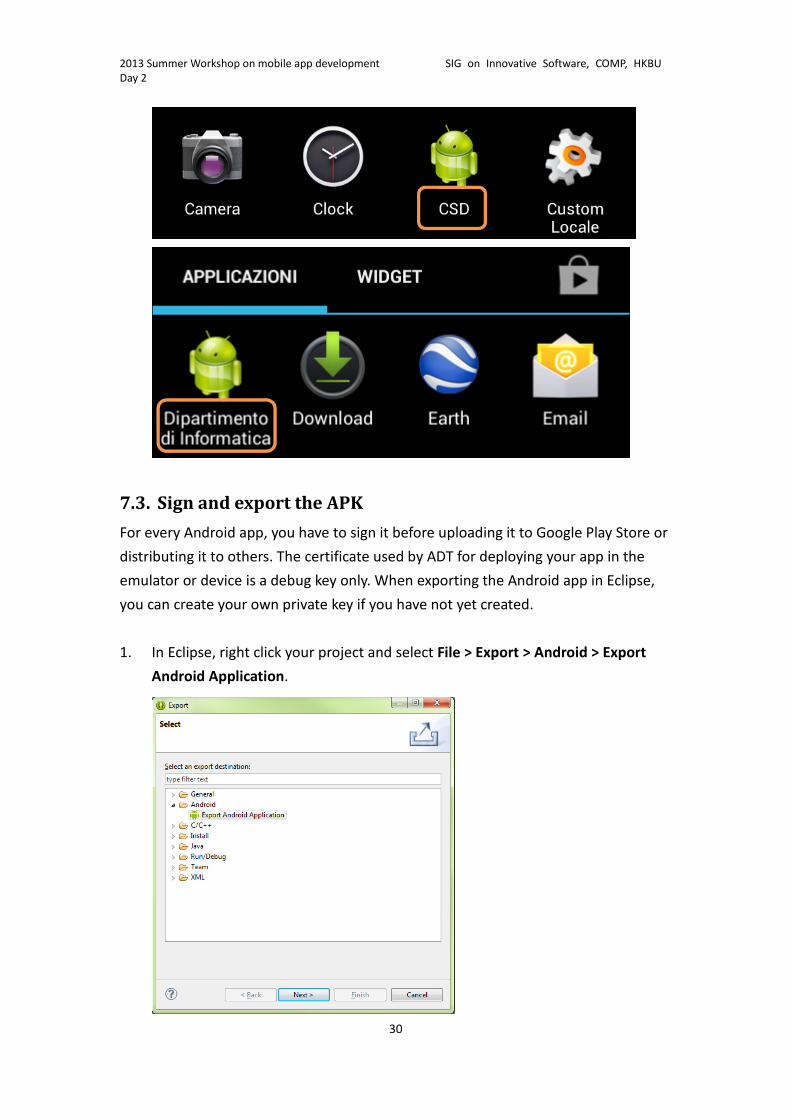
4. Run your app in the emulator or device, you can see the app name is changed.
5. Now, change the locale setting in the emulator or device by going to Settings >
Language and input > Language > Italiano. You should see the name of the app
will be automatically changed to Chinese.
2013 Summer Workshop on mobile app development
Day 2
SIG on Innovative Software, COMP, HKBU
30
7.3. Sign and export the APK
For every Android app, you have to sign it before uploading it to Google Play Store or
distributing it to others. The certificate used by ADT for deploying your app in the
emulator or device is a debug key only. When exporting the Android app in Eclipse,
you can create your own private key if you have not yet created.
1. In Eclipse, right click your project and select File > Export > Android > Export
Android Application.
2013 Summer Workshop on mobile app development
Day 2
SIG on Innovative Software, COMP, HKBU
31
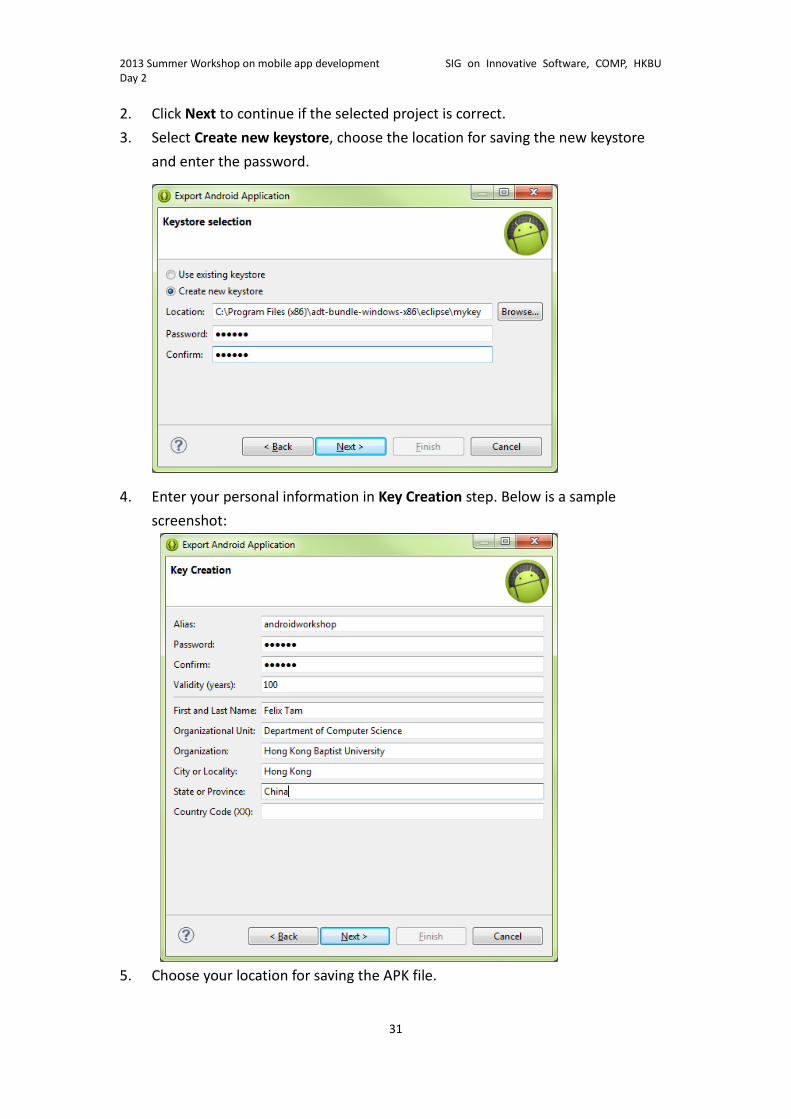
2. Click Next to continue if the selected project is correct.
3. Select Create new keystore, choose the location for saving the new keystore
and enter the password.
4. Enter your personal information in Key Creation step. Below is a sample
screenshot:
5. Choose your location for saving the APK file.

2013 Summer Workshop on mobile app development
Day 2
SIG on Innovative Software, COMP, HKBU
32
6. Now you are ready to distribute your APK file to Google Play Store or install it
directly in any devices.
2013 Summer Workshop on mobile app development
Day 2
SIG on Innovative Software, COMP, HKBU
33
8. Reference and learning resources:
• Official Android developer website:
http://developer.android.com/index.html
• Many common questions raised by other developers previously:
http://stackoverflow.com/
• Many Android tutorials with complete source code:
http://www.anddev.org
• Different ways for implementing listeners in Android app
http://tseng-blog.nge-web.net/blog/2009/02/14/implementing-listeners-in-you
r-android-java-application/
• Special Interest Group on Innovative Software homepage:
http://www.comp.hkbu.edu.hk/~sigis/