Embed Size (px)
Citation preview
Literature PN 18338 Rev. 2/14©2014 Apeks
DELUXE ONE-PIECE WEBBED HARNESS ULTRALIGHT PLATE (PN 388040)
If you have any questions regarding the information found in this manual,please contact your regional Apeks Dealer or Distributor. Distributor information is available on the Apeks website at: www.apeks.co.uk
Assembly of the deluxe one piece webbed harness to ultralight plate is now complete. Fit and adjust to your diving preference. Excess straps can be cut to the proper length with scissors and webbing ends burned with a lighter to prevent unraveling.
Contents• 12’ of Webbing with Center Grommet (1)• Crotch Strap with Integrated Flat D-ring (1)• Flat D-Rings (3)• Angled D-rings (2)• 3-Bar Slides (6 metal, 1 plastic)• Retainer Loops (3)• Neo Sleeves (2)• S/S Heavy Duty Buckle (1)
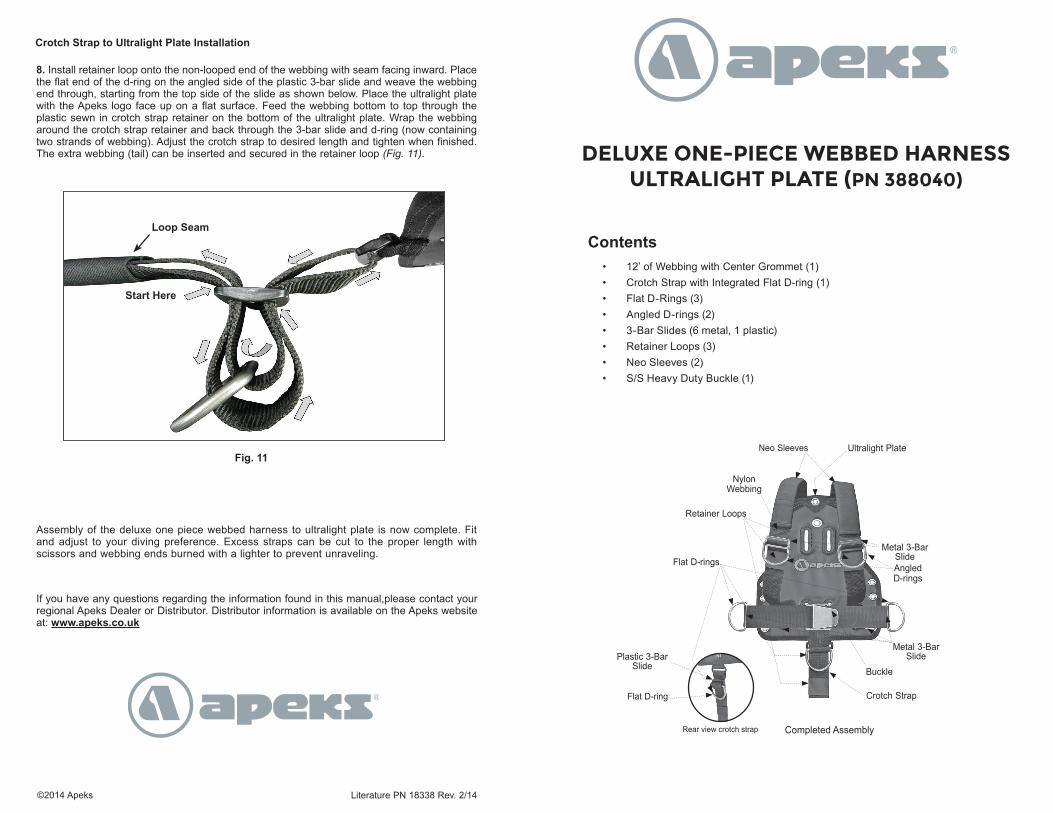
Completed Assembly
Angled D-rings
Buckle
Ultralight Plate
Crotch Strap
NylonWebbing
Metal 3-Bar Slide
Neo Sleeves
Rear view crotch strap
Flat D-ring
Plastic 3-Bar Slide
Flat D-rings
Retainer Loops
Metal 3-Bar Slide
Crotch Strap to Ultralight Plate Installation
Fig. 11
Start Here
Loop Seam
8. Install retainer loop onto the non-looped end of the webbing with seam facing inward. Place the flat end of the d-ring on the angled side of the plastic 3-bar slide and weave the webbing end through, starting from the top side of the slide as shown below. Place the ultralight plate with the Apeks logo face up on a flat surface. Feed the webbing bottom to top through the plastic sewn in crotch strap retainer on the bottom of the ultralight plate. Wrap the webbing around the crotch strap retainer and back through the 3-bar slide and d-ring (now containing two strands of webbing). Adjust the crotch strap to desired length and tighten when finished. The extra webbing (tail) can be inserted and secured in the retainer loop (Fig. 11).
Deluxe One-Piece Webbed Harness Installation Instructions Deluxe One-Piece Webbed Harness Installation Instructions2 3
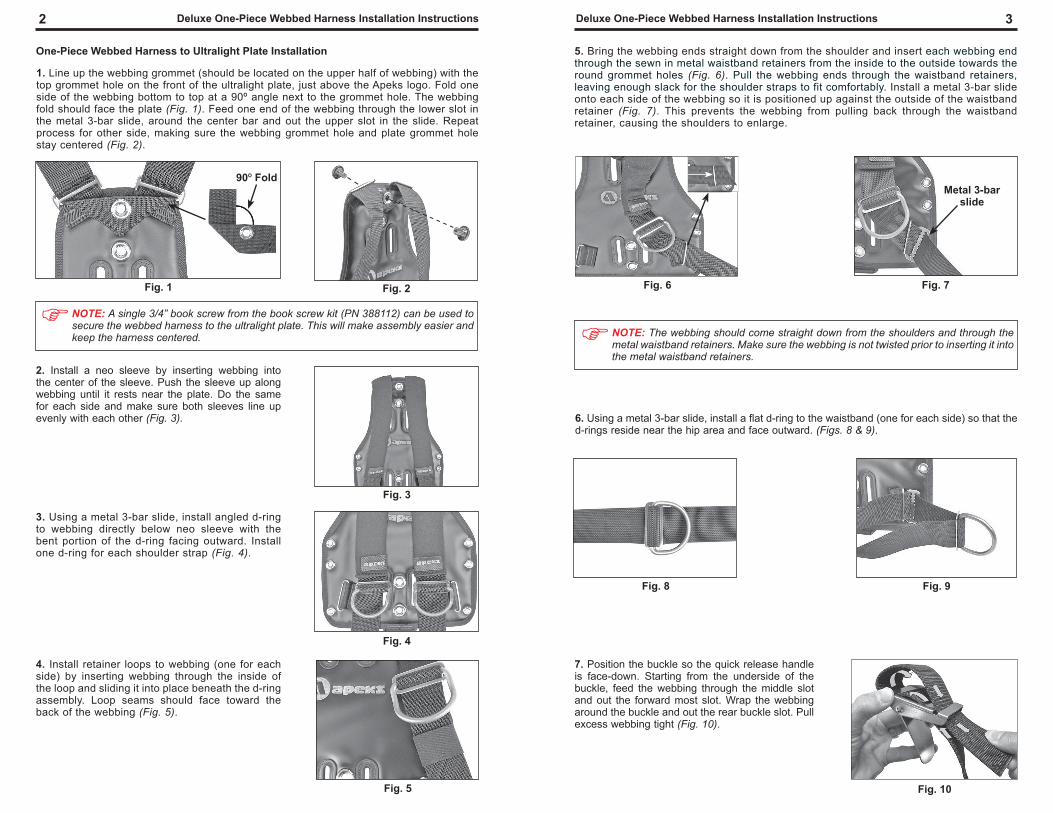
Fig. 5
Metal 3-bar slide
Fig. 6 Fig. 7
6. Using a metal 3-bar slide, install a flat d-ring to the waistband (one for each side) so that the d-rings reside near the hip area and face outward. (Figs. 8 & 9).
Fig. 8 Fig. 9
7. Position the buckle so the quick release handle is face-down. Starting from the underside of the buckle, feed the webbing through the middle slot and out the forward most slot. Wrap the webbing around the buckle and out the rear buckle slot. Pull excess webbing tight (Fig. 10).
Fig. 10
Fig. 4
2. Install a neo sleeve by inserting webbing into the center of the sleeve. Push the sleeve up along webbing until it rests near the plate. Do the same for each side and make sure both sleeves line up evenly with each other (Fig. 3).
3. Using a metal 3-bar slide, install angled d-ring to webbing directly below neo sleeve with the bent portion of the d-ring facing outward. Install one d-ring for each shoulder strap (Fig. 4).
4. Install retainer loops to webbing (one for each side) by inserting webbing through the inside of the loop and sliding it into place beneath the d-ring assembly. Loop seams should face toward the back of the webbing (Fig. 5).
Fig. 3
5. Bring the webbing ends straight down from the shoulder and insert each webbing end through the sewn in metal waistband retainers from the inside to the outside towards the round grommet holes (Fig. 6). Pull the webbing ends through the waistband retainers, leaving enough slack for the shoulder straps to fit comfortably. Install a metal 3-bar slide onto each side of the webbing so it is positioned up against the outside of the waistband retainer (Fig. 7). This prevents the webbing from pulling back through the waistband retainer, causing the shoulders to enlarge.
NOTE: The webbing should come straight down from the shoulders and through the metal waistband retainers. Make sure the webbing is not twisted prior to inserting it into the metal waistband retainers.
One-Piece Webbed Harness to Ultralight Plate Installation
Fig. 2Fig. 1
NOTE: A single 3/4” book screw from the book screw kit (PN 388112) can be used to secure the webbed harness to the ultralight plate. This will make assembly easier and keep the harness centered.
1. Line up the webbing grommet (should be located on the upper half of webbing) with the top grommet hole on the front of the ultralight plate, just above the Apeks logo. Fold one side of the webbing bottom to top at a 90º angle next to the grommet hole. The webbing fold should face the plate (Fig. 1). Feed one end of the webbing through the lower slot in the metal 3-bar slide, around the center bar and out the upper slot in the slide. Repeat process for other side, making sure the webbing grommet hole and plate grommet hole stay centered (Fig. 2).
90º Fold