Embed Size (px)
Citation preview

Detailed
Image
Auto Detailing Guide
www.DetailedImage.com
Wash and Dry
Why Should You Wash Your Car?
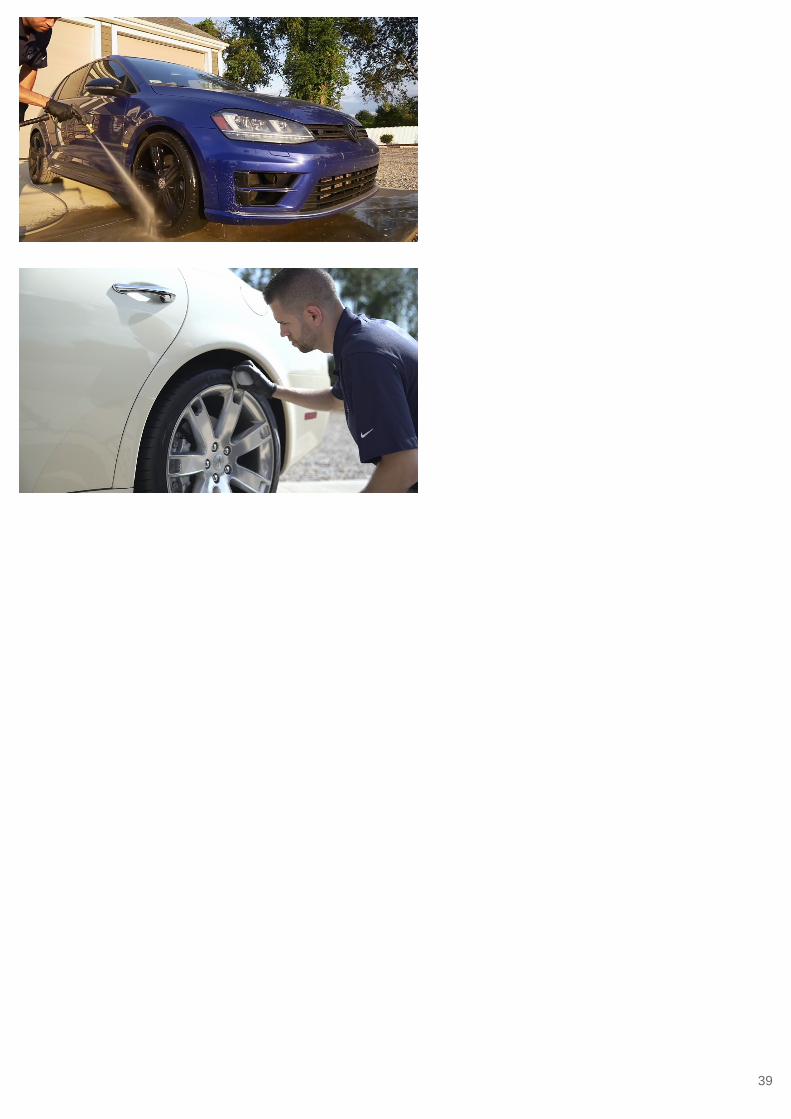
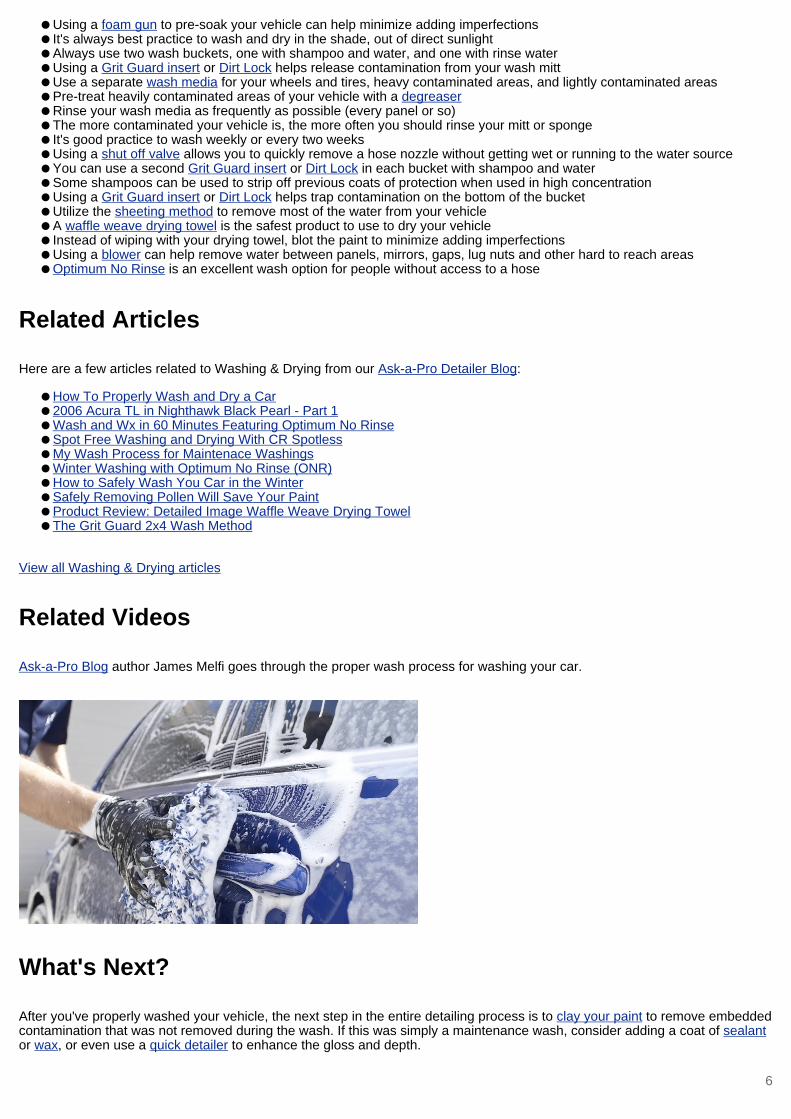
Washing and drying is the foundation of any detail, whether it's simply maintaining your vehicle with a wash and dry or the startof a long detailing process. It's often overlooked that properly washing and drying your vehicle is the single most important stepin any detailing process. This is due to the fact that most imperfections (swirls, scratches, water spots, etc.) are added to yourpaint during the washing and drying phase. With the proper tools, products and technique, you can easily minimize addingimperfections to your paint. There are various methods you can use to properly wash, which will be explained below in detail.
How Often Should You Wash Your Car?
We recommend washing once every week or two.
Pre-wash Setup
There's a few things you want to do to get setup prior to any wash using a hose as your source of water. Properly preparingeverything before you start your wash process will help things go smoother, which can help cut down on the time it takes towash your vehicle. Being able to properly wash quickly will cut down on the chances of water spots forming on your vehicle,which can require a lot of time and effort to remove. To further eliminate any possibility of adding water spots to your paint, youcan invest in a water purifier system, which removes any minerals from your water making it nearly impossible for water spots toform.
Recommended Setup Procedure Prior to Washing
● Step 1: Attach your hose to your water source● Optional Step: Set up your in-line water purifier for a mineral free wash● Step 2: Unwind the hose and walk it around your vehicle and ensure you can easily spray and rinse every panel● Step 3: Attach the shut-off valve to the end of your hose (make sure the valve is closed)● Step 4: Turn on your water source● Step 5: Attach your spray nozzle to the shut-off valve coupler● Step 6: Place the Grit Guard insert or Dirt Lock into your designated rinse bucket● Step 7: Turn your shut-off valve to open● Step 8: Fill each bucket up about half way up with water● Step 9: Soak your wash media in the clean rinse bucket until you are ready to wash
Pre-wash Degreasing
When heavy contamination has built up over time, you may want to utilize a stronger cleaner than just your shampoo, such as a degreaser, to help break up and loosen dirt, tar, sap, bird droppings, and other stubborn forms of contamination. It's usually bestto degrease prior to shampooing your vehicle, so that as you shampoo your vehicle, it ensures there is no degreaser remainingon your vehicle. It's important to note that most degreasers will usually remove protective layers of sealant or wax, so use asneeded. It's important that you know you'll need to re-apply your coat(s) of protection.
Pre-wash Degreasing How-To
Note: Always read the directions of your product first and follow their recommendations when outlined. Also, check to makesure the product you are using is safe to use on the surface you plan on degreasing.
● Step 1: Choose your desired strength of the degreaser, many products can be diluted, while maintaining effectiveness● Step 2: Starting with the lower portion of your vehicle working upwards, mist the degreaser onto your vehicle● Step 3: Let the product dwell on your vehicle (usually 30 seconds - 5 minutes) as it works to break up and loosen the
contamination from your vehicle● Step 4: Choose a wash media to use and soak it in the clean water for a few seconds● Step 5: Working in small areas, wipe the area you are degreasing with the wash media, using as little pressure as possible● Step 6: Rinse the wash media in a separate rinse bucket, running your mitt or sponge over the Grit Guard insert or Dirt
Lock to release as much contamination as possible● Step 7: Repeat steps 2 through 6 until each area on your vehicle you degreased has been agitated with the wash media
and water● Step 8: When finished degreasing, clean out your two buckets and fill them up with fresh water● Step 9: Proceed to wash and dry your vehicle
Traditional Two Bucket Wash
Using the two bucket wash method is one of the safest ways to maintain your vehicle while minimizing the possibility of addingimperfections to the paint. It's very beneficial to master this technique as it can be used in conjunction with various otherwashing methods, such as washing with a foam gun and using a rinseless shampoo.
Traditional Two Bucket Wash How-To
● Step 1: Follow the Pre-wash Setup Procedure● Step 2: Pour roughly an ounce (or as directed on the bottle) of shampoo into your non-rinse bucket● Step 3: Spray the bucket with shampoo to generate some lather and suds● Step 4: Take your wash mitt or sponge from the rinse bucket, and dunk it into the bucket full of suds● Step 5: Starting from the top of your vehicle, gently glide your wash mitt / sponge across a section of your vehicle, using
little to no added pressure● Step 6: Clean your wash media in your rinse bucket, running your mitt or sponge over the Grit Guard insert or Dirt Lock to
release as much contamination as possible● Step 7: Repeat steps 4 through 6 until your entire vehicle has been washed● Step 8: Thoroughly rinse off the suds from your vehicle● Step 9: Turn the shut-off valve to the off position and remove your spray nozzle● Step 10: Turn the shut-off valve back on and use the free flowing water to perform the sheeting method● Step 11: Proceed to drying your vehicle
Incorporating a Foam Gun
Using a Gilmour Foamaster II Foam Gun in conjunction with your two bucket wash method can further minimize addingimperfections to your paint, as well as add some fun to your wash process. The main benefit is that you can pre-soak yourvehicle with shampoo without the need to touch your paint. This allows the surfactants in the shampoo to start liftingcontamination from the surface of your vehicle, which can also speed up the wash process.
How-To Wash using a Gilmour Foamaster II Foam Gun
● Step 1: Follow the Pre-wash Setup Procedure, making sure you use the Gilmour nozzle that comes with the Foamaster II● Step 2: Pour roughly an ounce (or as directed on the bottle) of shampoo into your non-rinse bucket● Step 3: Spray the bucket with shampoo to generate some lather and suds● Step 4: Pour the appropriate amount of shampoo into the foam gun reservoir and add water if desired (we like 4 - 6 ounces
of shampoo with 4 - 6 ounces of water)● Step 5: Adjust the dial to the appropriate dilution setting (we like Setting E for maximum suds)● Step 6: Shake the foam gun tank to mix the shampoo and water, which helps generate more suds● Step 7: Attach the foam gun tank to the foam gun nozzle● Step 8: Starting from the top of your vehicle, cover your entire vehicle in suds with the foam gun● Step 9: Take your wash mitt or sponge from the rinse bucket, and dunk it into the bucket full of suds● Step 10: Starting from the top of your vehicle, gently glide your wash mitt / sponge across a section of your vehicle, using
little to no added pressure● Step 11: Clean your wash media in your rinse bucket, running your mitt or sponge over the Grit Guard insert or Dirt Lock to
release as much contamination as possible● Step 12: Repeat steps 7 through 9 until your entire vehicle has been washed
● Step 13: Remove the foam gun and thoroughly rinse off the suds from your vehicle● Step 14: Turn the shut-off valve to the off position and remove your spray nozzle● Step 15: Turn the shut-off valve back on and use the free flowing water to perform the sheeting method● Step 16: Proceed to drying your vehicle
Note: There is no one right dilution ratio for a foam gun and any shampoo combination. We recommend you experiment withdifferent ratios to see what you like best. If you provide a richer concentration expect more suds and a slicker surface whilewashing, but if you want a great value try diluting it more.
Sheeting Method
The sheeting method is a simple process that allows you to dry most of your vehicle without ever needing to touch the paint witha drying towel. The main idea behind the sheeting method is to create a cascading effect where the water flowing onto the carcombines with the water already on the surface, pulling it down off of the vehicle. Simple physics states that like particles sticktogether, which is why this method is so successful. When done properly, especially on a vehicle with a sealant or wax on it, youare left with only a few drops of water on each panel, which can easily be absorbed with your drying towel.
How-To Perform the Sheeting Technique
Note: This should be performed after you vehicle has been properly washed following the recommended steps. Also, make sureyour hose is dispensing free flowing water prior to starting.
● Step 1: Starting from the top of your vehicle moving left to right, flood the roof until water is pouring off the edge● Step 2: Quickly lower the hose a little to "catch" the water falling from the roof, this time moving right to left● Step 3: Lower the hose again and continue in the opposite direction moving left to right● Step 4: Continue this technique until you reach the lowest panels of your vehicle● Step 5: Finish drying your vehicle
Drying Your Vehicle
One of the most common mistakes people make when detailing is improperly drying their vehicle. This is often a major cause ofadding imperfections to your paint. Before putting a towel to your paint, if you have access to a blower, we recommend blowingout panel gaps, trim pieces, lug nuts, between mirrors and glass, and lights. This helps prevent the continuous drip from thesecommon areas which can be a pain when you are performing other detailing steps. For a drying towel, we highly recommendusing a microfiber waffle weave drying towel for removing any water left behind (after performing the sheeting method ofcourse). Waffle weave towels are textured so that it can help pull remaining contamination away from the surface rather thandragging it across the paint like a chamois (such as The Absorber or Shamwow). It's also much softer than a cotton bath towel,and can hold more than 5x it's weight in water.
How-To Properly Dry Your Vehicle
● Step 1: If you haven't already, be sure to perform the sheeting technique to remove a majority of the water● Step 2: If you have access to a blower, blow out panel gaps, trim pieces, lug nuts, between mirrors and glass, and lights to
stop any dripping● Step 3: Starting from the top of your vehicle working down, blot dry (avoid dragging as much as possible) any remaining
drops of water with your waffle weave drying towel.
Note: If you are performing a maintenance wash and don't plan on doing any steps afterwards, we recommend going over yourpaint with a quick detailer and a plush microfiber towel to remove any tiny droplets of water and to enhance your paints finish. Ifyou are moving on to claying or Polish, a few tiny drops remaining on your vehicle are OK, as the next steps will remove them.
Rinseless Wash
The latest in wash technology allows you to wash your car without the need of a hose for rinsing afterward. You still need waterof course, but simply one or two buckets full will do. This allows you to wash your car in your garage, in an apartment complexor condo, or virtually anywhere you can fill up a couple gallons of water. Watch as Optimum No Rinse or Chemical Guys HoseFree Eco Wash encapsulates dirt and other contamination and lifts it from the surface for safe removal. Keep your car clean andsave the environment at the same time with this paint safe, eco-friendly style of washing.
Rinseless Wash How-To
● Step 1: Insert your Grit Guard or Dirt Lock to the bottom of your bucket● Step 2: Fill your bucket with 3 to 4 gallons of warm water● Step 3: Pour in 1 oz. of Optimum No Rinse per 2 gallons of water in your bucket● Step 4: Soak your wash media in the water and ONR solution● Step 5: Wash the surface using little to no added pressure and allow the ONR to lift contamination off of the surface● Step 6: Rinse your wash medium and glide it across the Grit Guard or Dirt Lock insert to help release as much
contamination as possible● Step 7: Repeat steps 4 - 6 until your entire vehicle has been washed● Step 8: Blot dry using waffle weave drying towels● Step 9: Follow up with your choice of quick detailer and a plush microfiber towel to ensure no streaking or water is left
behind
Note: On heavily contaminated vehicles, we recommend pre-treating the panel you are working on with a mixture of ONR in a spray bottle, prior to washing. This will help lift the contamination prior to touching your vehicle, helping minimize adding anyimperfections to the paint.
Waterless Wash
This is the perfect step to use a day or two after a wash when there is simply a layer of light dust on your paint. Waterless washoptions are simple, quick and effective. These products are like quick detailers, loaded with cleaners and surfactants to helpremove light contamination without marring your finish. Our two most popular products are Poorboy's Spray & Wipe and Chemical Guys Go Green! Waterless Wash. They are best used with plush microfiber towels. Please know that this does notreplace traditional washes. On heavily contaminated vehicles, you will add marring and swirls to the finish, waterless washesare designed to remove a layer of light dust safely.
Waterless Wash How-To
● Step 1: Mist the waterless wash product onto the surface you are trying to clean● Step 2: Let product dwell for 30 seconds to a couple of minutes● Step 3: Using a plush microfiber towel, gently wipe the surface clean● Step 4: Using a second plush microfiber towel, buff away any streaks● Step 5: Repeat steps 1 - 4 until the entire vehicle has been cleaned
Note: For added lubricity, you can mist the microfiber towel prior to wiping the dusty surface.
Iron Removers
Iron removers safely and effectively dissolve iron buildup on the paint or embedded in it. Using an iron remover reduces oreliminates the need for a clay bar. Clay bars can mar the paint and take a lot of time to use, so iron removers are very effectiveby comparison. Upon completion the paint should be cleaner, thus improving the results of your polishing and protecting steps.
● Step 1: After thoroughly washing the car with a soapy solution, rinse it well so nothing remains on the surface.● Step 2: Either continually keep the car wet or dry completely before Step 3 so as to avoid water marks.● Step 3: Spray the iron remover onto the paint surface and wheels then wait a bit, following the instructions of the product.
(Some products may vary in wait times, but it's usually a few minutes or less. Most iron removers will show off the ironremoval by turning a red or purple color, indicating it's reacting properly and working.)
● Step 4: After waiting the specified time period, rinse off the surface completely and inspect for any remaining iron deposits.● Step 5: Repeat Step 3 as necessary. Usually on older cars, even when there doesn't look to be any contamination on the
surface, spraying an iron remover a second time will show some left over spots.● Step 6: After doing a final rinse, dry the car in shade as usual and proceed to the next step, whether it be clay bar,
polishing or protecting.
Facts and Tips
● Use as little pressure as possible with your wash medium● Allow the shampoo to do most of the cleaning, not your force
● Using a foam gun to pre-soak your vehicle can help minimize adding imperfections● It's always best practice to wash and dry in the shade, out of direct sunlight● Always use two wash buckets, one with shampoo and water, and one with rinse water● Using a Grit Guard insert or Dirt Lock helps release contamination from your wash mitt● Use a separate wash media for your wheels and tires, heavy contaminated areas, and lightly contaminated areas● Pre-treat heavily contaminated areas of your vehicle with a degreaser● Rinse your wash media as frequently as possible (every panel or so)● The more contaminated your vehicle is, the more often you should rinse your mitt or sponge● It's good practice to wash weekly or every two weeks● Using a shut off valve allows you to quickly remove a hose nozzle without getting wet or running to the water source● You can use a second Grit Guard insert or Dirt Lock in each bucket with shampoo and water● Some shampoos can be used to strip off previous coats of protection when used in high concentration● Using a Grit Guard insert or Dirt Lock helps trap contamination on the bottom of the bucket● Utilize the sheeting method to remove most of the water from your vehicle● A waffle weave drying towel is the safest product to use to dry your vehicle● Instead of wiping with your drying towel, blot the paint to minimize adding imperfections● Using a blower can help remove water between panels, mirrors, gaps, lug nuts and other hard to reach areas● Optimum No Rinse is an excellent wash option for people without access to a hose
Related Articles
Here are a few articles related to Washing & Drying from our Ask-a-Pro Detailer Blog:
● How To Properly Wash and Dry a Car● 2006 Acura TL in Nighthawk Black Pearl - Part 1● Wash and Wx in 60 Minutes Featuring Optimum No Rinse● Spot Free Washing and Drying With CR Spotless● My Wash Process for Maintenace Washings● Winter Washing with Optimum No Rinse (ONR)● How to Safely Wash You Car in the Winter● Safely Removing Pollen Will Save Your Paint● Product Review: Detailed Image Waffle Weave Drying Towel● The Grit Guard 2x4 Wash Method
View all Washing & Drying articles
Related Videos
Ask-a-Pro Blog author James Melfi goes through the proper wash process for washing your car.
What's Next?
After you've properly washed your vehicle, the next step in the entire detailing process is to clay your paint to remove embeddedcontamination that was not removed during the wash. If this was simply a maintenance wash, consider adding a coat of sealantor wax, or even use a quick detailer to enhance the gloss and depth.
6
Clay Bar
What Does a Clay Bar Do?
Using a clay bar will remove embedded surface contamination that still remains after a maintenance wash. Sometimes thecontamination removed is not always visible on the paint to the naked eye. After using a clay bar on your paint you will be leftwith a surface that is as smooth as glass and properly prepped. It is now ready for polish or for you to apply layers of protection.Not only can you clay your vehicles paint, but glass, wheels, lights and more. A common misconception about using a clay baris that it has an impact on removing swirls and scratches, it does not.
How Often Should You Clay Bar?
We recommend using a clay bar roughly twice a year, or before details where you plan on polishing the paint. If your car issubject to industrial fallout or heavily contaminated areas, using a clay bar more often may be required.
Clay Bar Prep
Before using a clay bar, your car should be washed and dried to remove a majority of contamination on your vehicle. The morecontaminated the paint is the more likely imperfections can be added during the clay bar process.
Choosing a Clay Lubricant
There are two common types of clay lube, quick detailers and a combination of water and shampoo solution. The clay barlubricant provides a slick surface for you to glide your clay over. If you use the clay on paint without clay lube, you'll notice thatthe clay won't slide across your paint and you can easily add marring and leave behind pieces of clay on your paint which canbe a pain to remove.
Many detailers use a quick detailer as their clay lube. We recommend using one that has some cleaning power and little or noprotective properties. This helps loosen the embedded contamination from the paint and yields great results. Poorboy's Spray &Wipe is a good clay lube because it's a great cleaner and creates a slick surface to work on.
Another popular option is to use a mixture of Optimum No Rinse and water. It has cleaning agents that help lift contaminationfrom the surface, provides a slippery surface to glide your clay over and cleans up nicely. Simply add 2 ounces of ONR to agallon of water and you have yourself a great clay bar lubricant.
How To Clay Bar
● Step 1: Wash and dry your vehicle● Step 2: Break off a small piece of clay that you will be working with and shape it into a flat surface● Step 3: Working in small 18" x 18" sections, mist the clay bar lubricant over your working area, so that every square inch is
covered in clay lube● Step 4: Gently glide the clay bar over your working area using overlapping passes going left to right or up and down. Note:
You do not want to rely on a lot of downward force to clean the paint. You should allow the clay to absorb thecontamination. Stubborn contamination can require a good amount of time, clay lube and passes to remove.
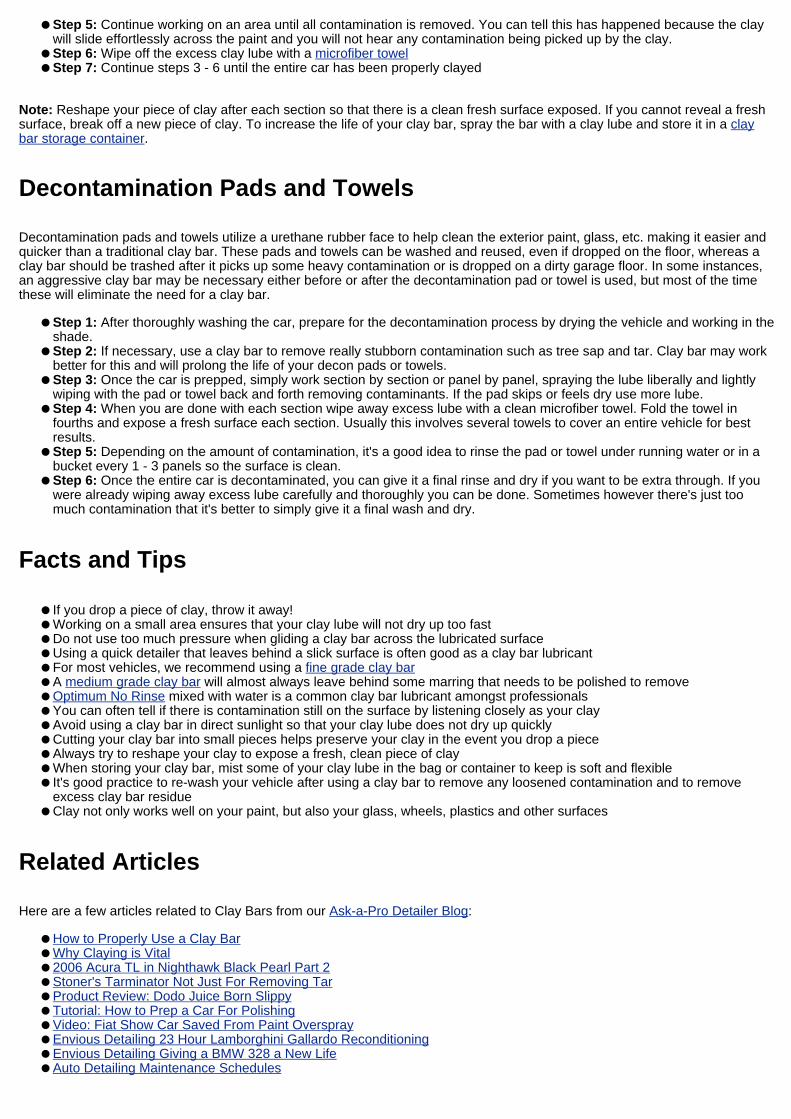
● Step 5: Continue working on an area until all contamination is removed. You can tell this has happened because the claywill slide effortlessly across the paint and you will not hear any contamination being picked up by the clay.
● Step 6: Wipe off the excess clay lube with a microfiber towel● Step 7: Continue steps 3 - 6 until the entire car has been properly clayed
Note: Reshape your piece of clay after each section so that there is a clean fresh surface exposed. If you cannot reveal a freshsurface, break off a new piece of clay. To increase the life of your clay bar, spray the bar with a clay lube and store it in a claybar storage container.
Decontamination Pads and Towels
Decontamination pads and towels utilize a urethane rubber face to help clean the exterior paint, glass, etc. making it easier andquicker than a traditional clay bar. These pads and towels can be washed and reused, even if dropped on the floor, whereas aclay bar should be trashed after it picks up some heavy contamination or is dropped on a dirty garage floor. In some instances,an aggressive clay bar may be necessary either before or after the decontamination pad or towel is used, but most of the timethese will eliminate the need for a clay bar.
● Step 1: After thoroughly washing the car, prepare for the decontamination process by drying the vehicle and working in theshade.
● Step 2: If necessary, use a clay bar to remove really stubborn contamination such as tree sap and tar. Clay bar may workbetter for this and will prolong the life of your decon pads or towels.
● Step 3: Once the car is prepped, simply work section by section or panel by panel, spraying the lube liberally and lightlywiping with the pad or towel back and forth removing contaminants. If the pad skips or feels dry use more lube.
● Step 4: When you are done with each section wipe away excess lube with a clean microfiber towel. Fold the towel infourths and expose a fresh surface each section. Usually this involves several towels to cover an entire vehicle for bestresults.
● Step 5: Depending on the amount of contamination, it's a good idea to rinse the pad or towel under running water or in abucket every 1 - 3 panels so the surface is clean.
● Step 6: Once the entire car is decontaminated, you can give it a final rinse and dry if you want to be extra through. If youwere already wiping away excess lube carefully and thoroughly you can be done. Sometimes however there's just toomuch contamination that it's better to simply give it a final wash and dry.
Facts and Tips
● If you drop a piece of clay, throw it away!● Working on a small area ensures that your clay lube will not dry up too fast● Do not use too much pressure when gliding a clay bar across the lubricated surface● Using a quick detailer that leaves behind a slick surface is often good as a clay bar lubricant● For most vehicles, we recommend using a fine grade clay bar● A medium grade clay bar will almost always leave behind some marring that needs to be polished to remove● Optimum No Rinse mixed with water is a common clay bar lubricant amongst professionals● You can often tell if there is contamination still on the surface by listening closely as your clay● Avoid using a clay bar in direct sunlight so that your clay lube does not dry up quickly● Cutting your clay bar into small pieces helps preserve your clay in the event you drop a piece● Always try to reshape your clay to expose a fresh, clean piece of clay● When storing your clay bar, mist some of your clay lube in the bag or container to keep is soft and flexible● It's good practice to re-wash your vehicle after using a clay bar to remove any loosened contamination and to remove
excess clay bar residue● Clay not only works well on your paint, but also your glass, wheels, plastics and other surfaces
Related Articles
Here are a few articles related to Clay Bars from our Ask-a-Pro Detailer Blog:
● How to Properly Use a Clay Bar● Why Claying is Vital● 2006 Acura TL in Nighthawk Black Pearl Part 2● Stoner's Tarminator Not Just For Removing Tar● Product Review: Dodo Juice Born Slippy● Tutorial: How to Prep a Car For Polishing● Video: Fiat Show Car Saved From Paint Overspray● Envious Detailing 23 Hour Lamborghini Gallardo Reconditioning● Envious Detailing Giving a BMW 328 a New Life● Auto Detailing Maintenance Schedules
View all Clay Bar articles
Related Videos
Ask-a-Pro Blog author James Melfi goes through his process of decontaminating and claying your paint.
What's Next?
After your paint has been clayed it is good practice to give the car a re-wash before proceeding to the next step, which is polishing your paint. Re-washing your vehicle can ensure that any loosened contamination is removed and that all of the claybar lubricant is removed. The wash should go much quicker since there should be nearly no contamination on the vehicle andyou should be able to sheet dry very effectively since your paint will be ultra smooth. After the re-wash, then you want to polishyour paint.
9
Polish
Why Polish Your Car?
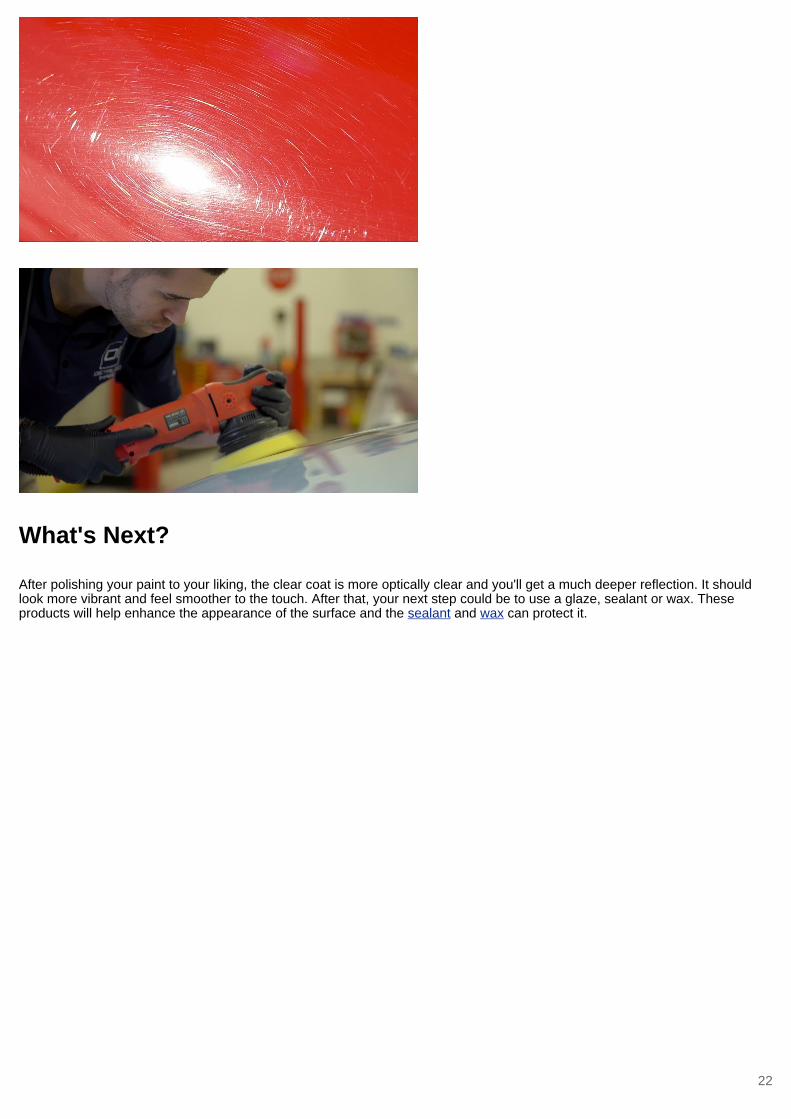
Polishing is the step in the detailing process that yields the most dramatic difference in your paint's appearance. The objective ofpolishing is to remove imperfections in the clear coat that cause the paint to look dull. Surface imperfections can include swirls, scratches, water spots, etchings, industrial fallout, oxidation, etc. These surface imperfections cause light to fragment instead ofpassing directly through the clear coat yielding less gloss and depth. When these imperfections are removed, you will reveal thetrue potential of your vehicle's paint.
A swirl mark is a very thin and shallow scratch on the surface of your paint, that often comes from washing and dryingimproperly. Waxes, sealants and most glazes will not permanently remove these surface imperfections at best they will hidethem temporarily. To eliminate these imperfections safely and permanently you want to polish the surface starting with a lessaggressive polish and using more aggressive polishes as needed. The chemical polishing agents and/or the polishing particleswill safely remove the extremely fine imperfections.
When To Polish Your Car
We recommend only polishing as needed, which is typically around one to two times per year during a full detail. After athorough multiple step polishing process has been completed you can maintain the finish properly using the correct washing anddrying products and techniques. Keeping the paint in good condition will ensure it needs less frequent polishing.
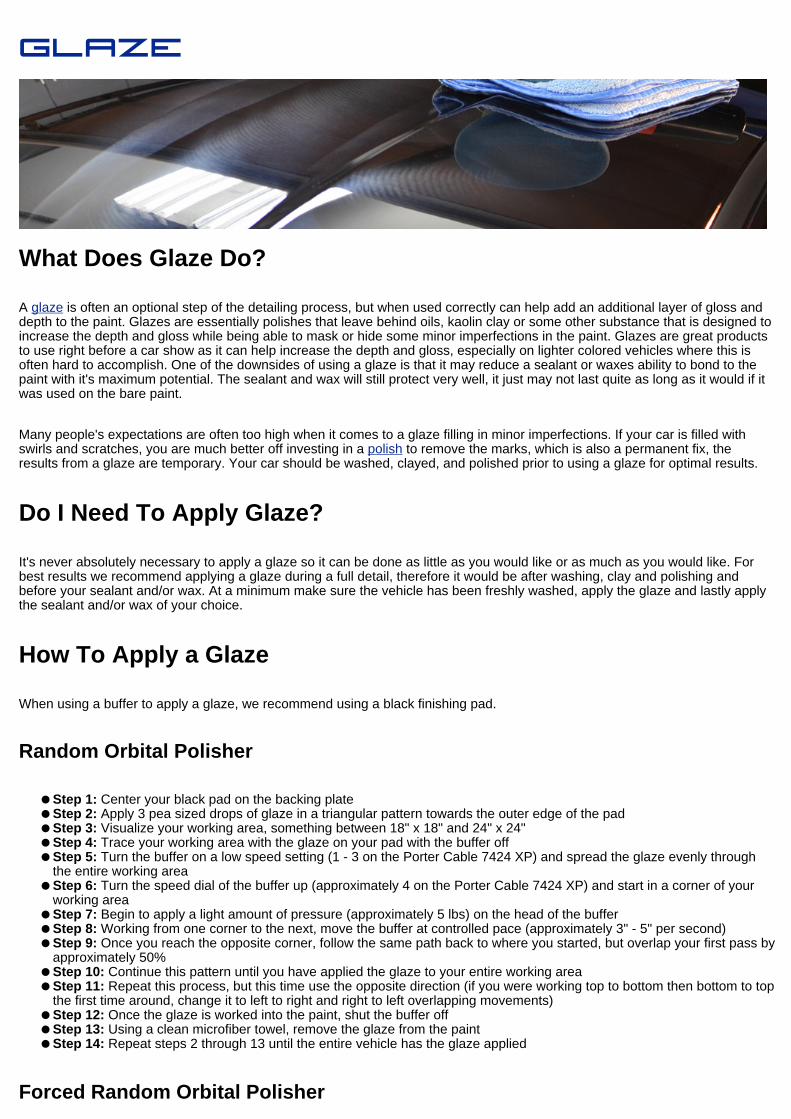
Why Use a Buffer?
While you can polish by hand, it is highly recommended to use a quality buffer for maximum results. When you removeimperfections in your paint, you are working in polishing particles thoroughly and evenly. To do this by hand, you need to use afair amount of pressure while moving the pad rather quickly. To put it in perspective, the standard in the industry for buffers isthe Porter Cable 7424 XP. This buffer can generate 6,800 oscillations per minute at full speed very safely and effectively.Imagine trying to move your arm 6,800 times per minute for hours on end, all while exerting 10 - 15 lbs of pressure on theapplicator pad. It's impossible to duplicate by hand and it can be tiresome to do a small fraction of this work by hand.
Another main advantage of a buffer is its ability to work with various pads that help increase the polishing power. For example ablue pad is extremely soft so it's used for extremely fine polishes, but if you use an orange pad it's more dense and can work ina medium cutting polish extremely well. Best of all these pads all use the same hook and loop backing so you simply slap themon and pull them off with ease and no tools are needed. Below we will outline some of the most popular buffers for detailers andwhat pads and polishes they work great with. There is no one best buffer and there is no one best combination of pad andpolishes, however our recommendations come from years of experience and consistently yield excellent results.
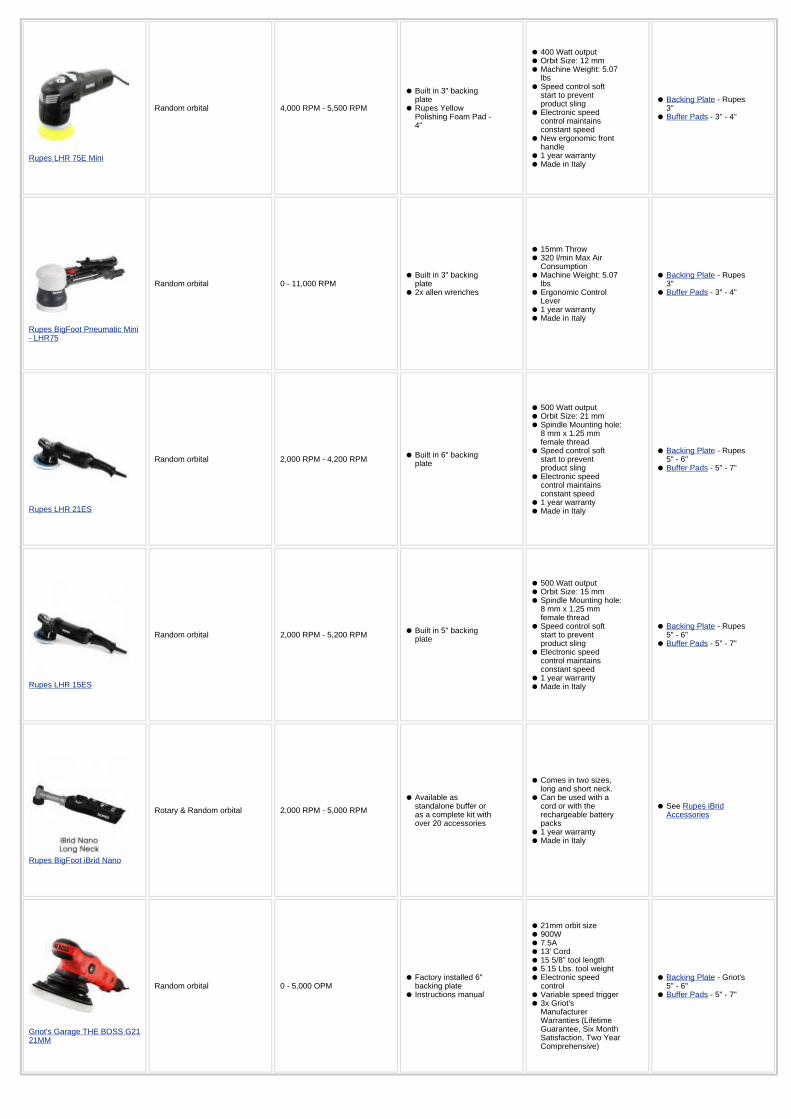
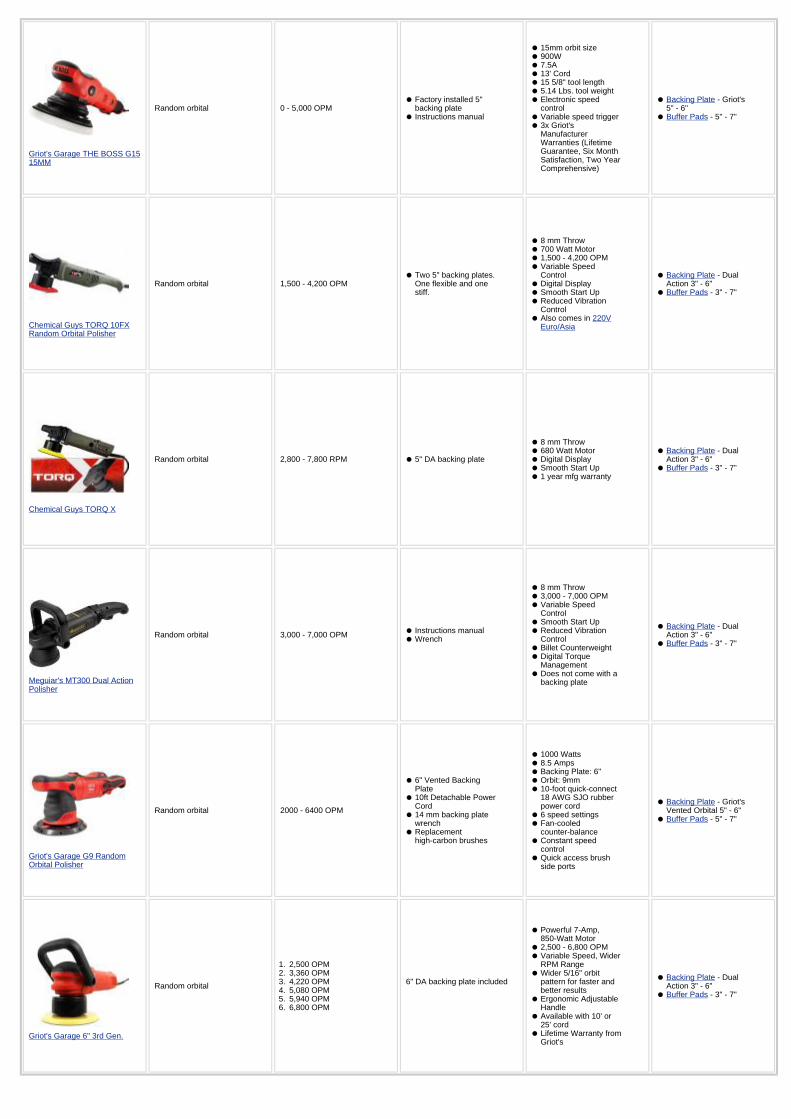
To see a comparison of the technical specifications between buffers please check out our Buffer Comparison Chart below.
Buffer Comparison Chart
Buffer Type Speed Dial Comes With SpecificationsCompatibleBacking Plates &Pads
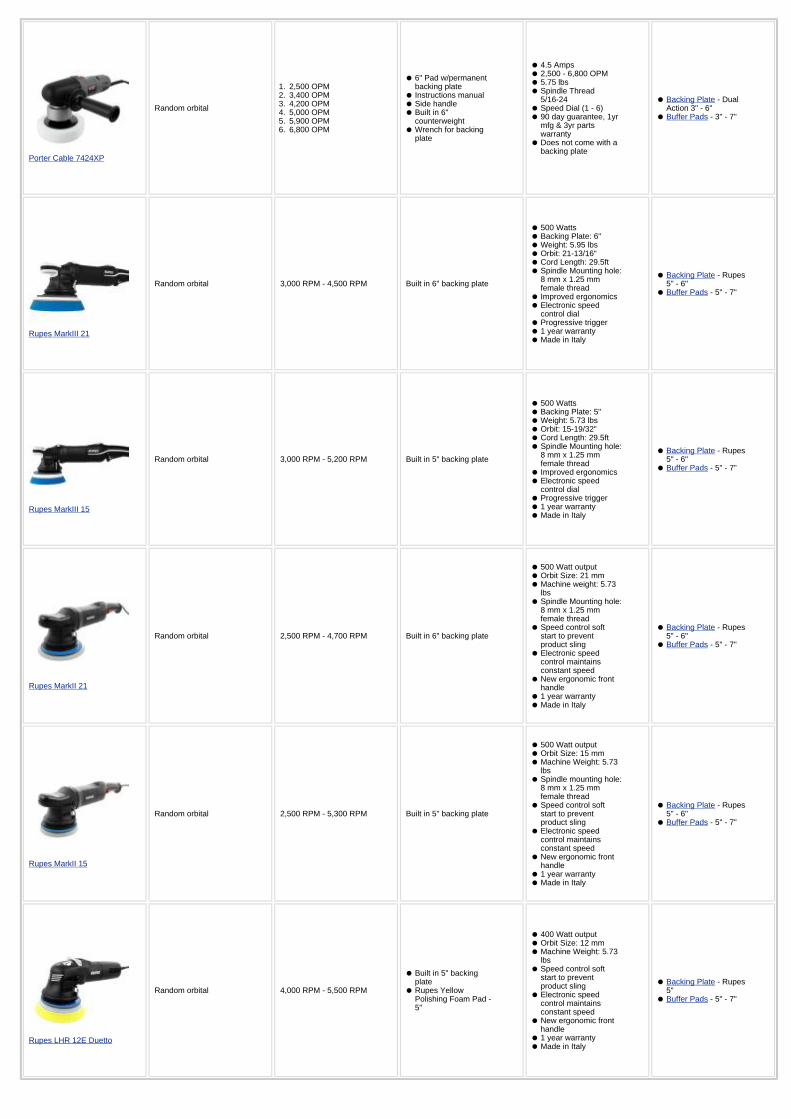
Porter Cable 7424XP
Random orbital
1. 2,500 OPM2. 3,400 OPM3. 4,200 OPM4. 5,000 OPM5. 5,900 OPM6. 6,800 OPM
● 6" Pad w/permanentbacking plate
● Instructions manual● Side handle● Built in 6"
counterweight● Wrench for backing
plate
● 4.5 Amps● 2,500 - 6,800 OPM● 5.75 lbs● Spindle Thread
5/16-24● Speed Dial (1 - 6)● 90 day guarantee, 1yr
mfg & 3yr partswarranty
● Does not come with abacking plate
● Backing Plate - DualAction 3" - 6"
● Buffer Pads - 3" - 7"
Rupes MarkIII 21
Random orbital 3,000 RPM - 4,500 RPM Built in 6" backing plate
● 500 Watts● Backing Plate: 6"● Weight: 5.95 lbs● Orbit: 21-13/16"● Cord Length: 29.5ft● Spindle Mounting hole:
8 mm x 1.25 mmfemale thread
● Improved ergonomics● Electronic speed
control dial● Progressive trigger● 1 year warranty● Made in Italy
● Backing Plate - Rupes5" - 6"
● Buffer Pads - 5" - 7"
Rupes MarkIII 15
Random orbital 3,000 RPM - 5,200 RPM Built in 5" backing plate
● 500 Watts● Backing Plate: 5"● Weight: 5.73 lbs● Orbit: 15-19/32"● Cord Length: 29.5ft● Spindle Mounting hole:
8 mm x 1.25 mmfemale thread
● Improved ergonomics● Electronic speed
control dial● Progressive trigger● 1 year warranty● Made in Italy
● Backing Plate - Rupes5" - 6"
● Buffer Pads - 5" - 7"
Rupes MarkII 21
Random orbital 2,500 RPM - 4,700 RPM Built in 6" backing plate
● 500 Watt output● Orbit Size: 21 mm● Machine weight: 5.73
lbs● Spindle Mounting hole:
8 mm x 1.25 mmfemale thread
● Speed control softstart to preventproduct sling
● Electronic speedcontrol maintainsconstant speed
● New ergonomic fronthandle
● 1 year warranty● Made in Italy
● Backing Plate - Rupes5" - 6"
● Buffer Pads - 5" - 7"
Rupes MarkII 15
Random orbital 2,500 RPM - 5,300 RPM Built in 5" backing plate
● 500 Watt output● Orbit Size: 15 mm● Machine Weight: 5.73
lbs● Spindle mounting hole:
8 mm x 1.25 mmfemale thread
● Speed control softstart to preventproduct sling
● Electronic speedcontrol maintainsconstant speed
● New ergonomic fronthandle
● 1 year warranty● Made in Italy
● Backing Plate - Rupes5" - 6"
● Buffer Pads - 5" - 7"
Rupes LHR 12E Duetto
Random orbital 4,000 RPM - 5,500 RPM
● Built in 5" backingplate
● Rupes YellowPolishing Foam Pad -5"
● 400 Watt output● Orbit Size: 12 mm● Machine Weight: 5.73
lbs● Speed control soft
start to preventproduct sling
● Electronic speedcontrol maintainsconstant speed
● New ergonomic fronthandle
● 1 year warranty● Made in Italy
● Backing Plate - Rupes5"
● Buffer Pads - 5" - 7"
Rupes LHR 75E Mini
Random orbital 4,000 RPM - 5,500 RPM
● Built in 3" backingplate
● Rupes YellowPolishing Foam Pad -4"
● 400 Watt output● Orbit Size: 12 mm● Machine Weight: 5.07
lbs● Speed control soft
start to preventproduct sling
● Electronic speedcontrol maintainsconstant speed
● New ergonomic fronthandle
● 1 year warranty● Made in Italy
● Backing Plate - Rupes3"
● Buffer Pads - 3" - 4"
Rupes BigFoot Pneumatic Mini- LHR75
Random orbital 0 - 11,000 RPM● Built in 3" backing
plate● 2x allen wrenches
● 15mm Throw● 320 l/min Max Air
Consumption● Machine Weight: 5.07
lbs● Ergonomic Control
Lever● 1 year warranty● Made in Italy
● Backing Plate - Rupes3"
● Buffer Pads - 3" - 4"
Rupes LHR 21ES
Random orbital 2,000 RPM - 4,200 RPM● Built in 6" backing
plate
● 500 Watt output● Orbit Size: 21 mm● Spindle Mounting hole:
8 mm x 1.25 mmfemale thread
● Speed control softstart to preventproduct sling
● Electronic speedcontrol maintainsconstant speed
● 1 year warranty● Made in Italy
● Backing Plate - Rupes5" - 6"
● Buffer Pads - 5" - 7"
Rupes LHR 15ES
Random orbital 2,000 RPM - 5,200 RPM● Built in 5" backing
plate
● 500 Watt output● Orbit Size: 15 mm● Spindle Mounting hole:
8 mm x 1.25 mmfemale thread
● Speed control softstart to preventproduct sling
● Electronic speedcontrol maintainsconstant speed
● 1 year warranty● Made in Italy
● Backing Plate - Rupes5" - 6"
● Buffer Pads - 5" - 7"
Rupes BigFoot iBrid Nano
Rotary & Random orbital 2,000 RPM - 5,000 RPM
● Available asstandalone buffer oras a complete kit withover 20 accessories
● Comes in two sizes,long and short neck.
● Can be used with acord or with therechargeable batterypacks
● 1 year warranty● Made in Italy
● See Rupes iBridAccessories
Griot's Garage THE BOSS G2121MM
Random orbital 0 - 5,000 OPM● Factory installed 6"
backing plate● Instructions manual
● 21mm orbit size● 900W● 7.5A● 13' Cord● 15 5/8" tool length● 5.15 Lbs. tool weight● Electronic speed
control● Variable speed trigger● 3x Griot's
ManufacturerWarranties (LifetimeGuarantee, Six MonthSatisfaction, Two YearComprehensive)
● Backing Plate - Griot's5" - 6"
● Buffer Pads - 5" - 7"
Griot's Garage THE BOSS G1515MM
Random orbital 0 - 5,000 OPM● Factory installed 5"
backing plate● Instructions manual
● 15mm orbit size● 900W● 7.5A● 13' Cord● 15 5/8" tool length● 5.14 Lbs. tool weight● Electronic speed
control● Variable speed trigger● 3x Griot's
ManufacturerWarranties (LifetimeGuarantee, Six MonthSatisfaction, Two YearComprehensive)
● Backing Plate - Griot's5" - 6"
● Buffer Pads - 5" - 7"
Chemical Guys TORQ 10FXRandom Orbital Polisher
Random orbital 1,500 - 4,200 OPM● Two 5" backing plates.
One flexible and onestiff.
● 8 mm Throw● 700 Watt Motor● 1,500 - 4,200 OPM● Variable Speed
Control● Digital Display● Smooth Start Up● Reduced Vibration
Control● Also comes in 220V
Euro/Asia
● Backing Plate - DualAction 3" - 6"
● Buffer Pads - 3" - 7"
Chemical Guys TORQ X
Random orbital 2,800 - 7,800 RPM ● 5" DA backing plate
● 8 mm Throw● 680 Watt Motor● Digital Display● Smooth Start Up● 1 year mfg warranty
● Backing Plate - DualAction 3" - 6"
● Buffer Pads - 3" - 7"
Meguiar's MT300 Dual ActionPolisher
Random orbital 3,000 - 7,000 OPM● Instructions manual● Wrench
● 8 mm Throw● 3,000 - 7,000 OPM● Variable Speed
Control● Smooth Start Up● Reduced Vibration
Control● Billet Counterweight● Digital Torque
Management● Does not come with a
backing plate
● Backing Plate - DualAction 3" - 6"
● Buffer Pads - 3" - 7"
Griot's Garage G9 RandomOrbital Polisher
Random orbital 2000 - 6400 OPM
● 6" Vented BackingPlate
● 10ft Detachable PowerCord
● 14 mm backing platewrench
● Replacementhigh-carbon brushes
● 1000 Watts● 8.5 Amps● Backing Plate: 6"● Orbit: 9mm● 10-foot quick-connect
18 AWG SJO rubberpower cord
● 6 speed settings● Fan-cooled
counter-balance● Constant speed
control● Quick access brush
side ports
● Backing Plate - Griot'sVented Orbital 5" - 6"
● Buffer Pads - 5" - 7"
Griot's Garage 6" 3rd Gen.
Random orbital
1. 2,500 OPM2. 3,360 OPM3. 4,220 OPM4. 5,080 OPM5. 5,940 OPM6. 6,800 OPM
6" DA backing plate included
● Powerful 7-Amp,850-Watt Motor
● 2,500 - 6,800 OPM● Variable Speed, Wider
RPM Range● Wider 5/16" orbit
pattern for faster andbetter results
● Ergonomic AdjustableHandle
● Available with 10' or25' cord
● Lifetime Warranty fromGriot's
● Backing Plate - DualAction 3" - 6"
● Buffer Pads - 3" - 7"
Griot's Garage 3"
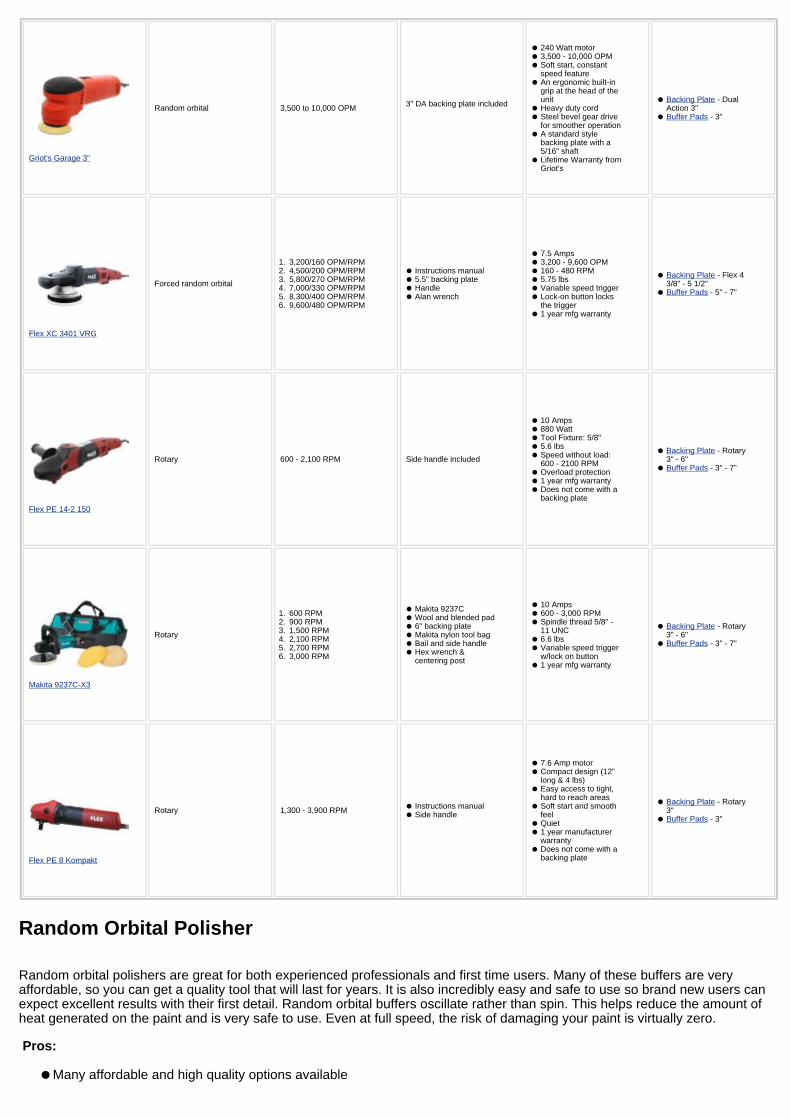
Random orbital 3,500 to 10,000 OPM 3" DA backing plate included
● 240 Watt motor● 3,500 - 10,000 OPM● Soft start, constant
speed feature● An ergonomic built-in
grip at the head of theunit
● Heavy duty cord● Steel bevel gear drive
for smoother operation● A standard style
backing plate with a5/16" shaft
● Lifetime Warranty fromGriot's
● Backing Plate - DualAction 3"
● Buffer Pads - 3"
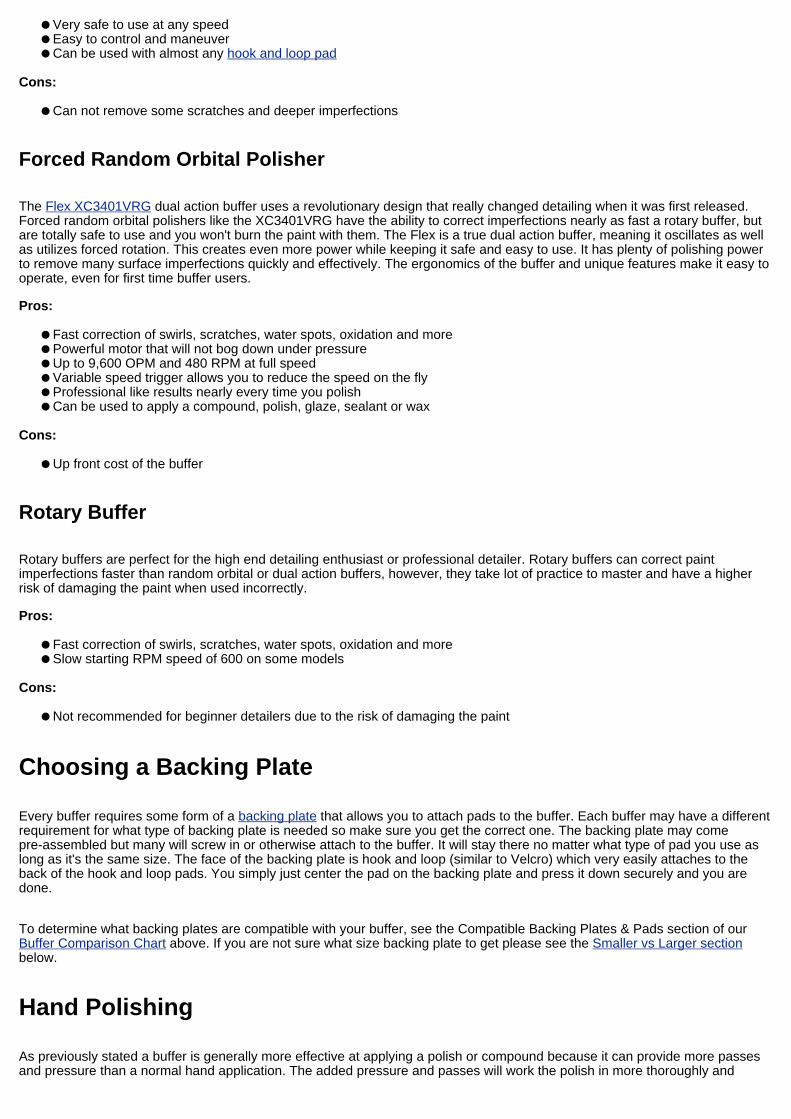
Flex XC 3401 VRG
Forced random orbital
1. 3,200/160 OPM/RPM2. 4,500/200 OPM/RPM3. 5,800/270 OPM/RPM4. 7,000/330 OPM/RPM5. 8,300/400 OPM/RPM6. 9,600/480 OPM/RPM
● Instructions manual● 5.5" backing plate● Handle● Alan wrench
● 7.5 Amps● 3,200 - 9,600 OPM● 160 - 480 RPM● 5.75 lbs● Variable speed trigger● Lock-on button locks
the trigger● 1 year mfg warranty
● Backing Plate - Flex 43/8" - 5 1/2"
● Buffer Pads - 5" - 7"
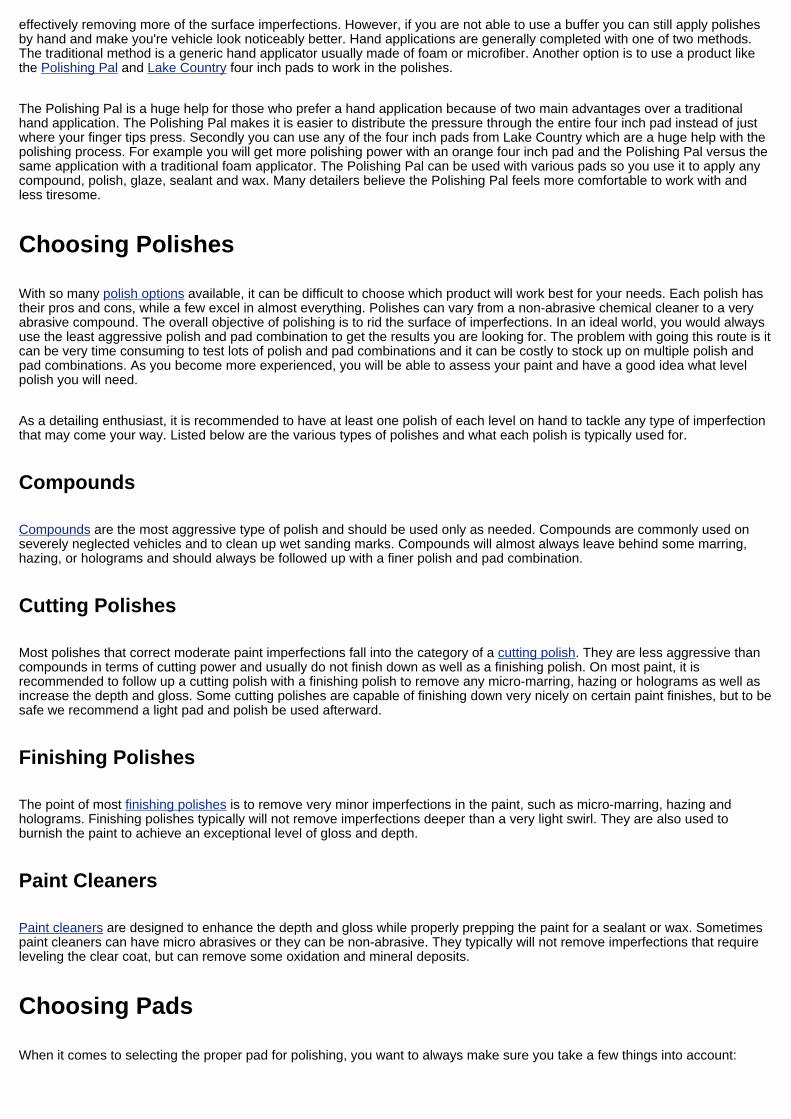
Flex PE 14-2 150
Rotary 600 - 2,100 RPM Side handle included
● 10 Amps● 880 Watt● Tool Fixture: 5/8"● 5.6 lbs● Speed without load:
600 - 2100 RPM● Overload protection● 1 year mfg warranty● Does not come with a
backing plate
● Backing Plate - Rotary3" - 6"
● Buffer Pads - 3" - 7"
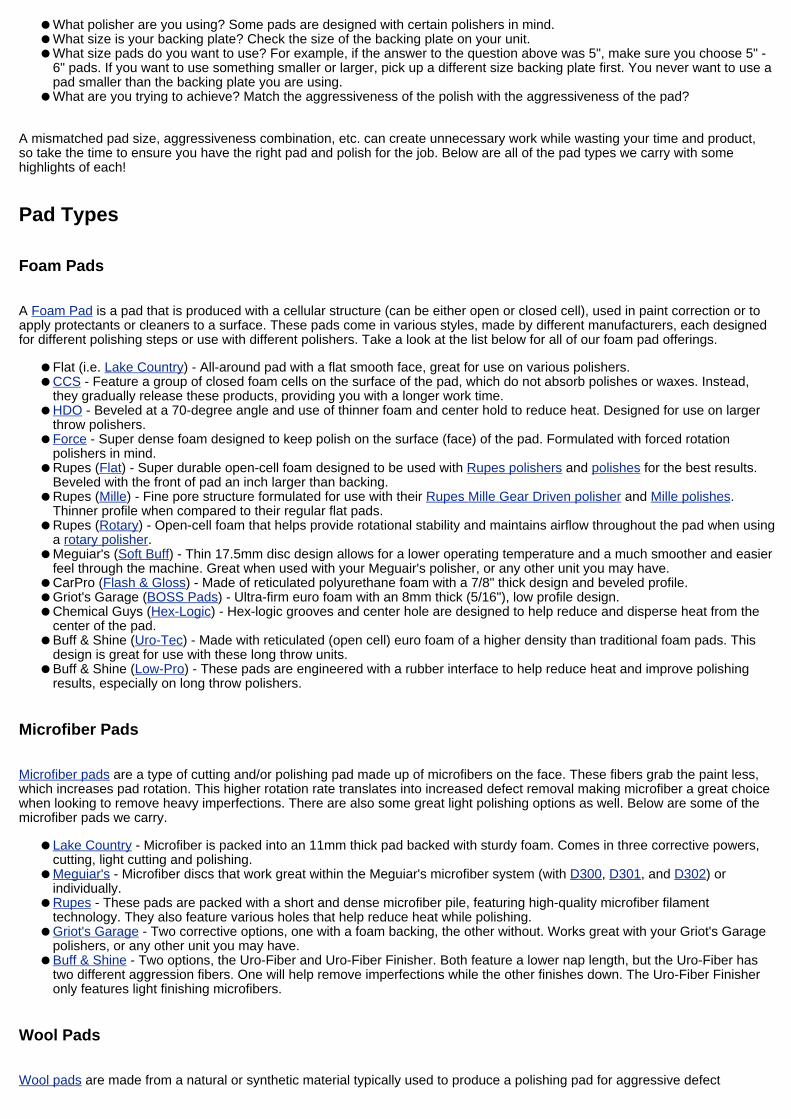
Makita 9237C-X3
Rotary
1. 600 RPM2. 900 RPM3. 1,500 RPM4. 2,100 RPM5. 2,700 RPM6. 3,000 RPM
● Makita 9237C● Wool and blended pad● 6" backing plate● Makita nylon tool bag● Bail and side handle● Hex wrench &
centering post
● 10 Amps● 600 - 3,000 RPM● Spindle thread 5/8" -
11 UNC● 6.6 lbs● Variable speed trigger
w/lock on button● 1 year mfg warranty
● Backing Plate - Rotary3" - 6"
● Buffer Pads - 3" - 7"
Flex PE 8 Kompakt
Rotary 1,300 - 3,900 RPM● Instructions manual● Side handle
● 7.6 Amp motor● Compact design (12"
long & 4 lbs)● Easy access to tight,
hard to reach areas● Soft start and smooth
feel● Quiet● 1 year manufacturer
warranty● Does not come with a
backing plate
● Backing Plate - Rotary3"
● Buffer Pads - 3"
Random Orbital Polisher
Random orbital polishers are great for both experienced professionals and first time users. Many of these buffers are veryaffordable, so you can get a quality tool that will last for years. It is also incredibly easy and safe to use so brand new users canexpect excellent results with their first detail. Random orbital buffers oscillate rather than spin. This helps reduce the amount ofheat generated on the paint and is very safe to use. Even at full speed, the risk of damaging your paint is virtually zero.
Pros:
● Many affordable and high quality options available
● Very safe to use at any speed● Easy to control and maneuver● Can be used with almost any hook and loop pad
Cons:
● Can not remove some scratches and deeper imperfections
Forced Random Orbital Polisher
The Flex XC3401VRG dual action buffer uses a revolutionary design that really changed detailing when it was first released.Forced random orbital polishers like the XC3401VRG have the ability to correct imperfections nearly as fast a rotary buffer, butare totally safe to use and you won't burn the paint with them. The Flex is a true dual action buffer, meaning it oscillates as wellas utilizes forced rotation. This creates even more power while keeping it safe and easy to use. It has plenty of polishing powerto remove many surface imperfections quickly and effectively. The ergonomics of the buffer and unique features make it easy tooperate, even for first time buffer users.
Pros:
● Fast correction of swirls, scratches, water spots, oxidation and more● Powerful motor that will not bog down under pressure● Up to 9,600 OPM and 480 RPM at full speed● Variable speed trigger allows you to reduce the speed on the fly● Professional like results nearly every time you polish● Can be used to apply a compound, polish, glaze, sealant or wax
Cons:
● Up front cost of the buffer
Rotary Buffer
Rotary buffers are perfect for the high end detailing enthusiast or professional detailer. Rotary buffers can correct paintimperfections faster than random orbital or dual action buffers, however, they take lot of practice to master and have a higherrisk of damaging the paint when used incorrectly.
Pros:
● Fast correction of swirls, scratches, water spots, oxidation and more● Slow starting RPM speed of 600 on some models
Cons:
● Not recommended for beginner detailers due to the risk of damaging the paint
Choosing a Backing Plate
Every buffer requires some form of a backing plate that allows you to attach pads to the buffer. Each buffer may have a differentrequirement for what type of backing plate is needed so make sure you get the correct one. The backing plate may comepre-assembled but many will screw in or otherwise attach to the buffer. It will stay there no matter what type of pad you use aslong as it's the same size. The face of the backing plate is hook and loop (similar to Velcro) which very easily attaches to theback of the hook and loop pads. You simply just center the pad on the backing plate and press it down securely and you aredone.
To determine what backing plates are compatible with your buffer, see the Compatible Backing Plates & Pads section of our Buffer Comparison Chart above. If you are not sure what size backing plate to get please see the Smaller vs Larger sectionbelow.
Hand Polishing
As previously stated a buffer is generally more effective at applying a polish or compound because it can provide more passesand pressure than a normal hand application. The added pressure and passes will work the polish in more thoroughly and
effectively removing more of the surface imperfections. However, if you are not able to use a buffer you can still apply polishesby hand and make you're vehicle look noticeably better. Hand applications are generally completed with one of two methods.The traditional method is a generic hand applicator usually made of foam or microfiber. Another option is to use a product likethe Polishing Pal and Lake Country four inch pads to work in the polishes.
The Polishing Pal is a huge help for those who prefer a hand application because of two main advantages over a traditionalhand application. The Polishing Pal makes it is easier to distribute the pressure through the entire four inch pad instead of justwhere your finger tips press. Secondly you can use any of the four inch pads from Lake Country which are a huge help with thepolishing process. For example you will get more polishing power with an orange four inch pad and the Polishing Pal versus thesame application with a traditional foam applicator. The Polishing Pal can be used with various pads so you use it to apply anycompound, polish, glaze, sealant and wax. Many detailers believe the Polishing Pal feels more comfortable to work with andless tiresome.
Choosing Polishes
With so many polish options available, it can be difficult to choose which product will work best for your needs. Each polish hastheir pros and cons, while a few excel in almost everything. Polishes can vary from a non-abrasive chemical cleaner to a veryabrasive compound. The overall objective of polishing is to rid the surface of imperfections. In an ideal world, you would alwaysuse the least aggressive polish and pad combination to get the results you are looking for. The problem with going this route is itcan be very time consuming to test lots of polish and pad combinations and it can be costly to stock up on multiple polish andpad combinations. As you become more experienced, you will be able to assess your paint and have a good idea what levelpolish you will need.
As a detailing enthusiast, it is recommended to have at least one polish of each level on hand to tackle any type of imperfectionthat may come your way. Listed below are the various types of polishes and what each polish is typically used for.
Compounds
Compounds are the most aggressive type of polish and should be used only as needed. Compounds are commonly used onseverely neglected vehicles and to clean up wet sanding marks. Compounds will almost always leave behind some marring,hazing, or holograms and should always be followed up with a finer polish and pad combination.
Cutting Polishes
Most polishes that correct moderate paint imperfections fall into the category of a cutting polish. They are less aggressive thancompounds in terms of cutting power and usually do not finish down as well as a finishing polish. On most paint, it isrecommended to follow up a cutting polish with a finishing polish to remove any micro-marring, hazing or holograms as well asincrease the depth and gloss. Some cutting polishes are capable of finishing down very nicely on certain paint finishes, but to besafe we recommend a light pad and polish be used afterward.
Finishing Polishes
The point of most finishing polishes is to remove very minor imperfections in the paint, such as micro-marring, hazing andholograms. Finishing polishes typically will not remove imperfections deeper than a very light swirl. They are also used toburnish the paint to achieve an exceptional level of gloss and depth.
Paint Cleaners
Paint cleaners are designed to enhance the depth and gloss while properly prepping the paint for a sealant or wax. Sometimespaint cleaners can have micro abrasives or they can be non-abrasive. They typically will not remove imperfections that requireleveling the clear coat, but can remove some oxidation and mineral deposits.
Choosing Pads
When it comes to selecting the proper pad for polishing, you want to always make sure you take a few things into account:
● What polisher are you using? Some pads are designed with certain polishers in mind.● What size is your backing plate? Check the size of the backing plate on your unit.● What size pads do you want to use? For example, if the answer to the question above was 5", make sure you choose 5" -
6" pads. If you want to use something smaller or larger, pick up a different size backing plate first. You never want to use apad smaller than the backing plate you are using.
● What are you trying to achieve? Match the aggressiveness of the polish with the aggressiveness of the pad?
A mismatched pad size, aggressiveness combination, etc. can create unnecessary work while wasting your time and product,so take the time to ensure you have the right pad and polish for the job. Below are all of the pad types we carry with somehighlights of each!
Pad Types
Foam Pads
A Foam Pad is a pad that is produced with a cellular structure (can be either open or closed cell), used in paint correction or toapply protectants or cleaners to a surface. These pads come in various styles, made by different manufacturers, each designedfor different polishing steps or use with different polishers. Take a look at the list below for all of our foam pad offerings.
● Flat (i.e. Lake Country) - All-around pad with a flat smooth face, great for use on various polishers.● CCS - Feature a group of closed foam cells on the surface of the pad, which do not absorb polishes or waxes. Instead,
they gradually release these products, providing you with a longer work time.● HDO - Beveled at a 70-degree angle and use of thinner foam and center hold to reduce heat. Designed for use on larger
throw polishers.● Force - Super dense foam designed to keep polish on the surface (face) of the pad. Formulated with forced rotation
polishers in mind.● Rupes (Flat) - Super durable open-cell foam designed to be used with Rupes polishers and polishes for the best results.
Beveled with the front of pad an inch larger than backing.● Rupes (Mille) - Fine pore structure formulated for use with their Rupes Mille Gear Driven polisher and Mille polishes.
Thinner profile when compared to their regular flat pads.● Rupes (Rotary) - Open-cell foam that helps provide rotational stability and maintains airflow throughout the pad when using
a rotary polisher.● Meguiar's (Soft Buff) - Thin 17.5mm disc design allows for a lower operating temperature and a much smoother and easier
feel through the machine. Great when used with your Meguair's polisher, or any other unit you may have.● CarPro (Flash & Gloss) - Made of reticulated polyurethane foam with a 7/8" thick design and beveled profile.● Griot's Garage (BOSS Pads) - Ultra-firm euro foam with an 8mm thick (5/16"), low profile design.● Chemical Guys (Hex-Logic) - Hex-logic grooves and center hole are designed to help reduce and disperse heat from the
center of the pad.● Buff & Shine (Uro-Tec) - Made with reticulated (open cell) euro foam of a higher density than traditional foam pads. This
design is great for use with these long throw units.● Buff & Shine (Low-Pro) - These pads are engineered with a rubber interface to help reduce heat and improve polishing
results, especially on long throw polishers.
Microfiber Pads
Microfiber pads are a type of cutting and/or polishing pad made up of microfibers on the face. These fibers grab the paint less,which increases pad rotation. This higher rotation rate translates into increased defect removal making microfiber a great choicewhen looking to remove heavy imperfections. There are also some great light polishing options as well. Below are some of themicrofiber pads we carry.
● Lake Country - Microfiber is packed into an 11mm thick pad backed with sturdy foam. Comes in three corrective powers,cutting, light cutting and polishing.
● Meguiar's - Microfiber discs that work great within the Meguiar's microfiber system (with D300, D301, and D302) orindividually.
● Rupes - These pads are packed with a short and dense microfiber pile, featuring high-quality microfiber filamenttechnology. They also feature various holes that help reduce heat while polishing.
● Griot's Garage - Two corrective options, one with a foam backing, the other without. Works great with your Griot's Garagepolishers, or any other unit you may have.
● Buff & Shine - Two options, the Uro-Fiber and Uro-Fiber Finisher. Both feature a lower nap length, but the Uro-Fiber hastwo different aggression fibers. One will help remove imperfections while the other finishes down. The Uro-Fiber Finisheronly features light finishing microfibers.
Wool Pads
Wool pads are made from a natural or synthetic material typically used to produce a polishing pad for aggressive defect
removal, especially when using a rotary machine. Take a look at the list below for some of the wool pads we carry.
● Lake Country - A few different options, some with a foam backing and other without. Works best when paired with a heavycutting polish, targeting heavy imperfections.
● Rupes - The pads were designed with the LH19E Rotary unit in mind but can be used with other rotary or DA units. Thesepads help remove heavy imperfections while running cooler during the polishing process.
● Buff & Shine - These pads use 100% soft, processed wool and the individual fibers are knitted onto the pad, not twisted.
Miscellaneous
Below are a few other polishing options you cannot forget, by glass and hand polishing. With glass being incredibly hard, werecommend using glass polishing discs and a glass specific polish (i.e. CarPro Ceriglass). For hand polishing, the 4" FoamPads fit perfectly on the Polishing Pal. Polishing by hand is a lot of work, but this combo makes for great spot polishing and/orprotection applications.
● Hand (Polishing Pal + Foam Pads)● Glass (Lake Country Glass Polishing Discs)
Smaller vs Larger
Different pad sizes can have an impact on how well the buffer works in a polish, control, maneuverability, and how fast you cancover an area.
Smaller pads, in general, will offer you more control with any buffer. Smaller pads also make it easier to maneuver buffers intighter areas, around corners and closer to trim pieces. On the downside, a smaller pad will fill up with product faster than alarger pad. For maximum results, especially when polishing, it's best to swap the pads out for fresh ones more frequently,especially with the smaller pads. We recommend changing the pad out for a fresh one every couple panels, so you may use 4 -6 pads per coat. In general, the fresher the pad, the better the results.
Larger pads can cover a larger surface area in less time. This is particularly helpful with a sealant or wax which only needs to bespread nice and thin. We recommend using 2 - 4 pads per coat so you get maximum results while polishing. The downside tothis larger surface area is that it's slightly less effective when trying to thoroughly work in a polish.
With random orbital buffers, such as the Porter Cable 7424 XP, the smaller the pad, the more effective you'll be able to work inpolishes. This is due to the fact that you are concentrating more of the buffers energy over a smaller area. Larger pads on arandom orbital do not break down polishes as effectively as smaller pads because the energy is distributed over a larger area.
With a rotary buffer, the opposite holds true. Smaller pads offer less polishing power versus a larger pad. On a rotary buffer, theouter edge of the pad is spinning the fastest. The larger the pad is, the more cut you are going to get out of a rotary buffer. Thiscan correct imperfections faster than smaller pads, however, the risk of leaving behind hazing or holograms is much higher withlarger pads on a rotary buffer.
There is no one right size pad, it just depends on your specific goals and the buffer you choose. In general, if we have to pickone size we recommend the 5.5" pads as they are a nice happy medium. The 5.5" pads provide enough corrective power whilecovering plenty of surface area to complete the detail in a timely manner.
Pad Cleaning and Storage
As you progress through your polishing process, your pads will become saturated with polishing product and clearcoat removedfrom the surface. Because of this, you want to make sure you are using 4-6 pads per polishing step and to clean your padsduring use. Swapping out pads and cleaning often will not only help increase your polishing results, but it will prolong the life ofyour pads. After you are done polishing, clean your pads thoroughly and let them air dry completely. Once dry, store in an openbag and in a closet, drawer, etc. Keep the bag open (i.e. DI Accessories Recloseable Storage Bag) so that you do not lock inany moisture during storage.
Foam Pads - We have three options that we like, two for cleaning during the polishing process and one after. If you are lookingto clean during polishing we recommend using either a foam pad cleaning brush or pad washer. If you clean with a foam padcleaning brush, we recommend flipping the pad over and brushing the face of the pad with the brush. This helps remove anypolish and clearcoat on the face of the pad without using any water. It does not, however, remove any soaked up product, so westill recommend swapping out your pads as much as possible when using this cleaning method.
If you are using a pad washer, once you are all set up (water and pad washer), submerge the pad in water and against the grate
and turn your unit on. This will spin the pad across the grate and remove polish and clear coat leaving it in the water. Back thepad out of the water and off the grate and continue to spin until dry.
One of our favorite cleaning processes, however, is to clean at the end. Leave a bucket with water and pad cleaning solution tothe side and toss pads in after every panel. This lets them soak, not allowing any polish to dry in the pad. After you are donepolishing, take your bucket of pads and rinse them under running water, using a cleaner to help remove any excess polish.
Microfiber Pads - These pads have a tendency to matt down during polishing, so it is very important to clean often while in use,along with one final cleaning at the end. To clean, simply use compressed air to blow the pads clean, keep them dry and lowertemperature all at once. If you do not have excess to compressed air, a pad cleaning brush will do the trick as well.
Wool Pads - Just like microfiber pads, wool pads can matt down during use. To clean we recommend a combination ofcompressed air, along with a pad cleaning spur. Both work great to keep the pads clean, cool and lasting longer during thepolishing process. After you are done polishing, use the spur or compressed air again, or a pad washer for one final cleaningbefore storage.
How To Polish
Properly polishing your paint to remove imperfections can take lots of practice to master, but if you follow these steps as closelyas possible, you'll get the best results in the shortest amount of time. Before you polish your vehicle, the paint should already be
washed and clayed for maximum results.
Proper Lighting
In order to know if you are getting the results you are looking for when polishing, it is extremely important to invest in qualitylighting. One of the most cost effective light sources you can purchase is a Scangrip light. Using the proper lighting will revealimperfections in your paint and give you a clear understanding if the polishing combination you selected is going to give you theresults you'll be looking for.
Taping
To help reduce the risk of damaging any part of your vehicle, it is best to tape off the areas you want to protect. By properlytaping, it also allows you to get as close to trim pieces as possible without damaging them. There are many quality options onthe market but we recommend the 3M Automotive Performance Masking Tape. This will release easily from your paint with littleto no residue left behind and is easy to clean up. We recommend taping off any area you do not want to polish or get anyproduct on. Common areas to tape are your trim pieces, around emblems, headlights, tail lights, around clear bras, and more.When in doubt, tape it up, it's better to prevent a problem than to create one.
Random Orbital Polisher
● Step 1: Attach the appropriate backing plate to the buffer● Step 2: Center your pad on the backing plate● Step 3: Apply several pea sized drops of polish on the outer edge of the pad (apply a few extra drops to a fresh pad● Step 4: Visualize your working area, starting with a small 12" x 12" box on a horizontal surface● Step 5: Trace your working area with the polish on your pad with the buffer off● Step 6: Turn the buffer on a low speed setting (1 - 3 on a Porter Cable 7424 XP) and spread the polish evenly through the
entire 12" x 12" working area● Step 7: Turn the speed dial of the buffer up (5 or 6 on a Porter Cable 7424 XP) and start in a corner of your 12" x 12"
working area● Step 8: Begin to apply roughly 15 - 20 lbs of pressure on the head of the buffer● Step 9: Working from one corner to the next, move the buffer at a pace of 1" per second while exerting the 15 - 20 lbs of
pressure● Step 10: Once you reach the opposite corner, follow the same path back to where you started, but overlap your first pass
by approximately 50%● Step 11: Continue this pattern until you have polished your entire 12" x 12" working area● Step 12: Polish the area again, but this time use the opposite direction (if you were working top to bottom then bottom to
top the first time around, change it to left to right and right to left overlapping movements)● Step 13: Polish the area the same as you did the first time, but this time use slightly less pressure● Step 14: If the polish is broken down (usually looks like a clear milky haze), shut the buffer off● Step 15: Using a clean microfiber towel, remove the broken down polish from the paint
● Step 16: Assess your work with your light source to ensure you have achieved the results you were looking for● Step 17: Repeat steps 3 through 16 until the entire vehicle has been polished
Note: After every couple of panels, replace your pad with a fresh one for maximum results. If you are working with a limitednumber of pads, clean out the pad after every few sections using a medium bristled toothbrush and the buffer on a low speed(do this away from the car as it can potentially dust quite a bit).
Forced Random Orbital Polisher
● Step 1: Center your pad on the backing plate of your buffer● Step 2: Apply several pea sized drops of polish on the outer edge of the pad (apply a few extra drops to a fresh pad● Step 3: Visualize your working area, starting with a small 12" x 12" box on a horizontal surface● Step 4: Trace your working area with the polish on your pad with the buffer off● Step 5: Set the speed dial to your desired working speed (between 4 and 6 is recommended for the Flex XC 3401 VRG)● Step 6: Using the variable speed trigger, spread the product around your 12" x 12" working area at a low speed● Step 7: Starting in one corner of your working area, pull the trigger to full speed and lock in your speed● Step 8: Begin to apply roughly 15 - 20 lbs of pressure on the head of the buffer● Step 9: Working from one corner to the next, move the buffer at a pace of 1" - 2" per second while exerting the 15 - 20 lbs
of pressure● Step 10: Once you reach the opposite corner, follow the same path back to where you started, but overlap your first pass
by approximately 50%● Step 11: Continue this pattern until you have polished your entire 12" x 12" working area● Step 12: Polish the area again, but this time use the opposite direction (if you were working top to bottom then bottom to
top the first time around, change it to left to right and right to left overlapping movements)● Step 13: Polish the area the same as you did the first time, but this time use slightly less pressure● Step 14: If the polish is broken down (usually looks like a clear milky haze), shut the buffer off● Step 15: Using a clean microfiber towel, remove the broken down polish from the paint● Step 16: Assess your work with your light source to ensure you have achieved the results you were looking for● Step 17: Repeat steps 2 through 16 until the entire vehicle has been polished
Note: After every couple of panels, replace your pad with a fresh one for maximum results. If you are working with a limitednumber of pads, clean out the pad after every few sections using a medium bristled toothbrush and the buffer on a low speed(do this away from the car as it can potentially dust quite a bit).
Rotary Buffer
● Step 1: Attach the appropriate backing plate to the buffer● Step 2: Center your pad on the backing plate● Step 3: Apply several pea sized drops of polish on the outer edge of the pad (apply a few extra drops to a fresh pad● Step 4: Visualize your working area, starting with a small 12" x 12" box on a horizontal surface● Step 5: Trace your working area with the polish on your pad with the buffer off● Step 6: Turn the buffer on the lowest speed setting and spread the polish evenly through the entire 12" x 12" working area● Step 7: Turn the speed dial of the buffer up to a comfortable working speed (between 1000 - 1500 RPMs is common)● Step 8: Very little pressure is needed when using a rotary buffer, try to use just a hair more than the weight of the buffer● Step 9: Working from one corner to the next, move the buffer at a pace of 2" - 3" per second while making sure you always
keep the buffer moving● Step 10: Once you reach the opposite corner, follow the same path back to where you started, but overlap your first pass
by approximately 50%● Step 11: Continue this pattern until you have polished your entire 12" x 12" working area● Step 12: Polish the area again, but this time use the opposite direction (if you were working top to bottom then bottom to
top the first time around, change it to left to right and right to left overlapping movements)● Step 13: Polish the area the same as you did the first time, but this time use even less pressure● Step 14: If the polish is broken down (usually looks like a clear milky haze), shut the buffer off● Step 15: Using a clean microfiber towel, remove the broken down polish from the paint● Step 16: Assess your work with your light source to ensure you have achieved the results you were looking for● Step 17: Repeat steps 3 through 16 until the entire vehicle has been polished
Note: After every couple of panels, replace your pad with a fresh one for maximum results. If you are working with a limitednumber of pads, clean out the pad after every few sections using a medium bristled toothbrush and the buffer on a low speed(do this away from the car as it can potentially dust quite a bit).
Hand Polishing
● Step 1: If you are using the Polishing Pal select the desired pad and center it on the Polishing Pal● Step 2: Apply a few pea sized drops of polish to the face of a clean pad (when the pad is new you can apply a few extra
drops)● Step 3: Spread the product over a 18" x 18" area or less with extremely light pressure to distribute the product evenly● Step 4: Work the polish in with medium to firm pressure in a circular motion● Step 5: Overlap each pass by 50% working left to right and then up and down● Step 6: Remove the excess product immediately or within a few minutes with a clean microfiber towel● Step 7: Assess your work with your light source to ensure you have achieved the results you were looking for● Step 8: Repeat steps 1 through 7 until the entire vehicle has been polished
Upon completion the paint should have less swirls, oxidation and other surface imperfections. With a more optically clearsurface you will now get a deeper gloss and a better shine. Additionally your sealant or wax used afterward will bond to thiscleaner and smoother surface better so you can expect increased durability from the protection.
Facts and Tips
● The smaller the section you work in, the better your results will be● Do not rush the polishing process, it is very time consuming but the results are worth it● When using a random orbital or dual action buffer, apply roughly 15 - 20 lbs of pressure● Always match the aggressiveness of the product with the aggressiveness of the pad● Swap out your pad for a fresh one every couple of panels for maximum results● Keep a bucket of water and Snappy Clean solution by your side to soak your pads as soon as you are done● Using the proper lighting when polishing is important to assess your results accurately● Smaller pads offer you more control and can get in tighter areas● Larger pads can spread products quickly, which is great when applying a sealant● Rotary buffers should be used by experienced detailers and professionals● Tape off your trim, glass, and any other area you do not want polish to potentially damage● Use 3 pea sized drops of polish per working area, many detailers use too much product
Related Articles
Here are a few articles related to Polishing from our Ask-a-Pro Detailer Blog:
● Polishing How to With Meguiars m105 & m205● Ask-A-Pro Removing Water Spots From the Paint● Tutorial: How to Prep a Car for Polishing● Polishing With the 4 Spot Pad for Better Results● 1 Step, 2 Step, The various Types of Polishing Process● Full Wet Sanding of 2005 Acura RL in Nighthawk Black Pearl to Reduce Orange Peel● How Much Polish Should I Use on My Pad● Meguiars DA Microfiber Polishing System● Assessing Paint Condition and Deciding on a Correction Process● Video: Surbuf Pads, m105 and the Porter Cable 7424xp
View all Polishing articles
Related Videos
Ask-a-Pro Blog author James Melfi explains where paint swirls and scratches come from in the first video below. In the secondvideo, James shows you how to properly polish your car paint.
What's Next?
After polishing your paint to your liking, the clear coat is more optically clear and you'll get a much deeper reflection. It shouldlook more vibrant and feel smoother to the touch. After that, your next step could be to use a glaze, sealant or wax. Theseproducts will help enhance the appearance of the surface and the sealant and wax can protect it.
22
Glaze
What Does Glaze Do?
A glaze is often an optional step of the detailing process, but when used correctly can help add an additional layer of gloss anddepth to the paint. Glazes are essentially polishes that leave behind oils, kaolin clay or some other substance that is designed toincrease the depth and gloss while being able to mask or hide some minor imperfections in the paint. Glazes are great productsto use right before a car show as it can help increase the depth and gloss, especially on lighter colored vehicles where this isoften hard to accomplish. One of the downsides of using a glaze is that it may reduce a sealant or waxes ability to bond to thepaint with it's maximum potential. The sealant and wax will still protect very well, it just may not last quite as long as it would if itwas used on the bare paint.
Many people's expectations are often too high when it comes to a glaze filling in minor imperfections. If your car is filled withswirls and scratches, you are much better off investing in a polish to remove the marks, which is also a permanent fix, theresults from a glaze are temporary. Your car should be washed, clayed, and polished prior to using a glaze for optimal results.
Do I Need To Apply Glaze?
It's never absolutely necessary to apply a glaze so it can be done as little as you would like or as much as you would like. Forbest results we recommend applying a glaze during a full detail, therefore it would be after washing, clay and polishing andbefore your sealant and/or wax. At a minimum make sure the vehicle has been freshly washed, apply the glaze and lastly applythe sealant and/or wax of your choice.
How To Apply a Glaze
When using a buffer to apply a glaze, we recommend using a black finishing pad.
Random Orbital Polisher
● Step 1: Center your black pad on the backing plate● Step 2: Apply 3 pea sized drops of glaze in a triangular pattern towards the outer edge of the pad● Step 3: Visualize your working area, something between 18" x 18" and 24" x 24"● Step 4: Trace your working area with the glaze on your pad with the buffer off● Step 5: Turn the buffer on a low speed setting (1 - 3 on the Porter Cable 7424 XP) and spread the glaze evenly through
the entire working area● Step 6: Turn the speed dial of the buffer up (approximately 4 on the Porter Cable 7424 XP) and start in a corner of your
working area● Step 7: Begin to apply a light amount of pressure (approximately 5 lbs) on the head of the buffer● Step 8: Working from one corner to the next, move the buffer at controlled pace (approximately 3" - 5" per second)● Step 9: Once you reach the opposite corner, follow the same path back to where you started, but overlap your first pass by
approximately 50%● Step 10: Continue this pattern until you have applied the glaze to your entire working area● Step 11: Repeat this process, but this time use the opposite direction (if you were working top to bottom then bottom to top
the first time around, change it to left to right and right to left overlapping movements)● Step 12: Once the glaze is worked into the paint, shut the buffer off● Step 13: Using a clean microfiber towel, remove the glaze from the paint● Step 14: Repeat steps 2 through 13 until the entire vehicle has the glaze applied
Forced Random Orbital Polisher
● Step 1: Center your black pad on the backing plate● Step 2: Apply 3 pea sized drops of glaze in a triangular pattern towards the outer edge of the pad● Step 3: Visualize your working area, something between 18" x 18" and 24" x 24"● Step 4: Trace your working area with the glaze on your pad with the buffer off● Step 5: Set the buffer to your desired work speed (usually between 2 - 3 is recommended for the Flex XC 3401 VRG)● Step 6: Using the variable speed trigger, spread the product around your working area at a low speed● Step 7: Begin to apply a light amount of pressure (approximately 5 lbs) on the head of the buffer● Step 8: Working from one corner to the next, move the buffer at controlled pace (approximately 5" per second)● Step 9: Once you reach the opposite corner, follow the same path back to where you started, but overlap your first pass by
approximately 50%● Step 10: Continue this pattern until you have applied the glaze to your entire working area● Step 11: Repeat this process, but this time use the opposite direction (if you were working top to bottom then bottom to top
the first time around, change it to left to right and right to left overlapping movements)● Step 12: Once the glaze is worked into the paint, shut the buffer off● Step 13: Using a clean microfiber towel, remove the glaze from the paint● Step 14: Repeat steps 2 through 13 until the entire vehicle has the glaze applied
Rotary Buffer
● Step 1: Attach the appropriate backing plate to the buffer● Step 2: Center your black pad on the backing plate● Step 3: Apply 3 pea sized drops of polish in a triangular pattern towards the outer edge of the pad● Step 4: Visualize your working area, somewhere between 18" x 18" and 24" x 24"● Step 5: Trace your working area with the polish on your pad with the buffer off● Step 6: Turn the buffer on the lowest speed setting and spread the glaze evenly through the working area● Step 7: Turn the speed dial of the buffer up to a comfortable working speed (between 700 - 900 RPMs is common)● Step 8: Very little to no added pressure when applying the glaze● Step 9: Working from one corner to the next, move the buffer at a pace of 5" - 6" per second while making sure you always
keep the buffer moving● Step 10: Once you reach the opposite corner, follow the same path back to where you started, but overlap your first pass
by approximately 50%● Step 11: Continue this pattern until you have polished your entire working area● Step 12: Polish the area again, but this time use the opposite direction (if you were working top to bottom then bottom to
top the first time around, change it to left to right and right to left overlapping movements)● Step 13: Once the glaze is worked into the paint, shut the buffer off● Step 14: Using a clean microfiber towel, remove the excess glaze from the paint● Step 15: Repeat steps 3 through 14 until the entire vehicle has the glaze applied
Hand Application
● Step 1: Dispense about 2 pea sized drops in the center of the foam hand applicator pad● Step 2: Outline your 18" x 18" working area● Step 3: Gently spread the glaze thinly and evenly in your working area● Step 4: Using light pressure work the glaze into the paint using overlapping circular motions● Step 5: Wait 2 - 5 minutes then use a clean microfiber towel to remove the excess glaze● Step 6: Repeat steps 1 through 5 until the entire vehicle has the glaze applied
Facts and Tips
● Glazes can help increase the depth and gloss in the paint● The filling of light imperfections is only temporary and will return over time● Do not expect a glaze to fill in too many imperfections, only the slightest imperfection can be masked● Glazes typically cannot be layered, so only one coat is necessary for maximum results
Related Articles
Here are a few articles related to Glazes from our Ask-a-Pro Detailer Blog:
● When to Glaze and When to Compound Polish Away Defects● Product Review: Dodo Juice Lime Prime Lite Cleaner Glaze● Learn Something New, Don't Read The Instructions● 36 Hour Paint Correction Detail Rolls Royce Phantom

● Todd Cooperiders Top 10 Favorite Detailing Products● 1966 Corvette Stingray Paint Correction Detail● Product Guide and Review: Klasse High Gloss Sealant Glaze KSG● 5 Car Detailing Products for Advanced Users● DJ Mayo Studios: 350z Paint Correction● Product Review: Chemical Guys Blacklight
View all Glaze articles
What's Next?
After applying the glaze to your paint, the next step is to protect the exterior paint. This can be done with a sealant or wax or acombination of both. If you want to apply both apply the sealant first and layer the wax on after.
25
Sealant
What Do Sealants Do?
The primary purpose of a sealant is to properly protect your vehicle from the elements. Sealants are designed to bond to yourpaint and provide roughly 3 to 6 months of protection. This is significantly longer protection than what a carnauba wax offers,which is typically 3 to 8 weeks. The barrier of protection that sealants provide help minimize contamination from embedding in toyour paint and makes maintaining your vehicle significantly easier. Another benefit of a sealant is that it will enhance the look ofyour paint by giving you sharper reflections and more depth and gloss.
Layering and Cure Times
Applying multiple coats will increase the strength of the protection and durability of the protection. The most important thing tonote is that when you want to apply more than one coat, you have to let the previous coat cure. Each sealant's cure time willvary and environmental conditions (i.e. temperature, humidity, etc.) can impact cure times. Most sealants will cure within 1 - 24hours and the vast majority of any sealant will be cured within the first hour. If you have the time waiting 24 hours is ideal to beabsolutely certain but if you are in a rush waiting a minimum of one hour should still work very well for most sealants.
How Long Do Sealants Last?
In general, sealants typically last between 3 to 6 months. There are many factors that go into determining how long a sealant willlast. Some of the major factors are if your car is stored in a garage or outside, how many miles are driven, the type of weatherconditions your vehicle is exposed to, how well your paint was prepped prior to applying the sealant, the frequency of washingyour vehicle, and type of shampoo. The key is to reapply your coat of protection before the previous coat runs out. As youmaintain your vehicle, keep an eye out for how well the water beads and sheets off your paint. If water begins to pool on yourpaint, then chances are there is little to no protection remaining and it's advised to apply another coat of sealant. A good rule ofthumb is to reapply a coat of sealant once a season (4 times a year).
How To Apply a Sealant
The key when applying a sealant is to stretch the product as thin and far as possible. The saying "less is more" definitely appliesto any quality sealant. We do not recommend applying a sealant with a rotary buffer, but it is fine to use a random orbital or dualaction buffer using a soft foam polishing pad. Hand applications also work very well and help you get in to tight spaces moreeffectively.
Random Orbital Polisher
● Step 1: Center your blue pad on the backing plate● Step 2: Apply 2 pea sized drops of your sealant on the pad (fresh pads may require a few extra drops)● Step 3: Visualize your working area, since you're spreading the product as far as possible, it can be as large as a panel● Step 4: Trace your working area with the sealant on your pad with the buffer off● Step 5: Turn the buffer on a low speed setting (1 - 3 on the Porter Cable 7424 XP) and spread the sealant evenly through
the entire working area● Step 6: Turn the speed dial of the buffer up (approximately 3 on the Porter Cable 7424 XP) and start in a corner of your
working area● Step 7: Working from one corner to the next, move the buffer at controlled pace (approximately 3" - 5" per second) using
no additional pressure
● Step 8: Once you reach the opposite corner, follow the same path back to where you started, but overlap your first pass byapproximately 50%
● Step 9: Continue this pattern until you have applied the sealant to your entire working area● Step 10: Repeat this process, but this time use the opposite direction (if you were working top to bottom then bottom to top
the first time around, change it to left to right and right to left overlapping movements)● Step 11: Once the sealant is spread thinly and evenly over the paint, shut the buffer off● Step 12: Using a clean microfiber towel, remove the sealant from the paint● Step 13: Repeat steps 2 through 12 until the entire vehicle has the sealant applied
Forced Random Orbital Polisher
● Step 1: Center your blue pad on the backing plate● Step 2: Apply 2 pea sized drops of your sealant on the pad (fresh pads may require a few extra drops)● Step 3: Visualize your working area, since you're spreading the product as far as possible, it can be as large as a panel● Step 4: Trace your working area with the sealant on your pad with the buffer off● Step 5: Turn the buffer on a low speed setting and spread the sealant evenly through the entire working area● Step 6: Turn the speed dial of the buffer up one setting and start in a corner of your working area● Step 7: Working from one corner to the next, move the buffer at controlled pace (approximately 3" - 5" per second) using
no additional pressure● Step 8: Once you reach the opposite corner, follow the same path back to where you started, but overlap your first pass by
approximately 50%● Step 9: Continue this pattern until you have applied the sealant to your entire working area● Step 10: Repeat this process, but this time use the opposite direction (if you were working top to bottom then bottom to top
the first time around, change it to left to right and right to left overlapping movements)● Step 11: Once the sealant is spread thinly and evenly over the paint, shut the buffer off● Step 12: Using a clean microfiber towel, remove the sealant from the paint● Step 13: Repeat steps 2 through 12 until the entire vehicle has the sealant applied
Hand Application
● Step 1: Dispense about 2 pea sized drops in the center of the foam hand applicator pad● Step 2: Outline your working area, since you're spreading the product as far as possible, it can be as large as a panel● Step 3: Gently spread the sealant as thinly and evenly in your working area● Step 4: Using light pressure spread the sealant on the paint using overlapping circular motions● Step 5: Wait 10 - 20 minutes then use a clean microfiber towel to remove the excess sealant● Step 6: Repeat steps 1 through 5 until the entire vehicle has the sealant applied
Facts and Tips
● In general, sealants last somewhere between 3 to 6 months● When applying a sealant, it's best to spread it as thin as possible● In general, you should give each coat of sealant at least 1 hour to cure and bond to the paint● Sealants can be layered to increase the depth and gloss as well as protection● Sealants can be topped with a wax to get the best of both worlds in terms of looks and durability
Related Articles
Here are a few articles related to Sealants from our Ask-a-Pro Detailer Blog:
● The Multi Purposefull Klasse AIO, Why You Need a Bottle● Product Guide and Review: Klasse High Glosse Sealant Glaze KSG● Product Review: Blackfire Wet Diamond Paint Sealant● Product Review: Menzerna Power Lock Sealant● Product Review: Optimum Opti Seal Spray Sealant● Cure Times for Sealants and Waxes● Product Review: Chemical Guys Blacklight● Optimum Poli Seal to the Rescue● 2011 m3 New Car Prep: Opti Coat 2.0 Application, Install Appearance Mods● Field Test on Wifes Car With Chemical Guys Jet Seal 109
View all Sealant articles
What's Next?

After applying a sealant, it's best to let the coat cure for at least one hour before applying a second coat or a wax. You may optto top your sealant with a carnauba wax to help increase the depth and gloss in the paint. Natural carnauba waxes also tend tobead water better than sealants, so maintaining your vehicle is slightly easier when it is protected by a carnauba wax.
28
Coatings
What Are Semi-Permanent Paint Coatings?
While the idea of "wipe on, wipe off" still applies, the application process of coatings differs quite a bit from both sealants andwaxes. Rather than applying to the entire car, waiting some period of time to cure, then removing the residue, a coatingapplication is done panel by panel and sometimes even sections of a single panel due to its quick drying time.
A coating starts as a liquid that is poured onto an applicator and applied to a section of the paint. Coatings react with air quicklyand start drying and becoming harder, turning into the resistant layer described above. Before the coating is fully hardened, itneeds to be leveled. This is accomplished by wiping off remaining residue from the coated section after a certain amount of timehas passed, using a quality microfiber towel.
This amount of time depends on the coating that you're using, but generally speaking it's anywhere from 1 - 3 minutes on thelow end, 5 - 10 minutes for some "medium" drying coatings and then 15 - 20+ minutes for slower coatings. It's always a goodidea to have a timer handy when working with a coating because you do not want a coating to dry too much before leveling.This will lead to a hazy finish which will at the very least require quite a bit of elbow grease to fix and at worst may requirepolishing the coated section to fully remove the badly applied coating layer.
How To Apply a Coating
In short, the application of a coating includes:
● Step 1: Make sure the vehicle has been thoroughly cleaned, which ideally includes a wash, iron remover, decontaminationpad/towel or clay bar. Polishing before hand is also a must to ensure the surface is clean, smooth and looking it's best.
● Step 2: Apply a few drops to a small section of your applicator or applicator towel. Using very light pressure work thecoating into the paint spreading it very thin, working in a logical pattern to cover a panel or small section.
● Step 3: When your timer reaches the point you should start leveling take a clean microfiber towel and lightly wipe awayexcess product, starting from the same place you first applied the coating. This will ensure the coating is applied evenlyand level for maximum protection and aesthetics.
● Step 4: Inspect your results upon completion, if you see some haze, try wiping the area again to remove it. If you still seesome haze repeat Steps 2 and 3 right away.
● Step 5: After the panel or section looks good continue with Steps 1 - 4 until the entire car is protected.
Layering and Cure Times
Similar to the dry times mentioned above, cure times will vary from coating to coating. By "dry time" I'm referring to the coatinggoing from liquid to a more solid state during application, at which point it needs to be leveled with a towel for a proper bond andgood looks. "Cure time" refers to the amount of time a coating needs to fully harden and be resistant to the environment and thistime starts after the coating is leveled. Most coating manufacturers require a cure time of 24 hours before the coating can beexposed to water that can potentially dry on the surface. Most also require no washing with any detergents for 4 - 7 days afterapplication. Generally, coatings will fully cure anywhere from 1 - 4 weeks. This cure time can be accelerated by using certainlamps to speed up the curing process.
Layering is possible with most coatings, but again, very different than when using waxes or sealants. In the case of coatings,you will usually need to apply a second layer within 30 - 60 minutes of the first layer in order to get a bond with the first layer.Reason being, once the coatings start to dry and cure, they become more and more hydrophobic and resistant to anythingsticking, including consecutive layers of that same coating. If you try to apply another layer on top of a coating after a few days,it will simply "reject" it and it would be a waste of time. Most coatings can work with two layers and some 3 - 5 or more, but it willvary depending on the manufacturer. Make sure you consult the label or manufacturer for specifics about layering.
How Long Do Coatings Last?
As mentioned in the first paragraph, coatings generally last 1 - 3+ years. This means that a coating will be reapplied much lessfrequently than waxes or sealants, but that doesn't mean that you can't apply a wax or sealant on top of the coating. It's actuallyencouraged so as to provide even more protection and protect the coating investment. Due to a coating application requiringpolishing prior, you'll want to reapply a coating at a point where it's starting to diminish due to age or when the paint startslooking a bit swirled and it's time again for polishing. This will vary depending on maintenance done to the coated vehicle.
Maintenance and Re-Application
There is nothing special when it comes to coating maintenance aside from not being able to use clay bar. Clay bars have strongcleaning power and can diminish the coating to some extent. Using chemicals such as IronX and TarX when necessary will bemuch better for the longevity of the coating. Otherwise, proper washing and drying techniques will keep the coating looking goodand continuously protecting.
Re-application will depend on the look of the car, strength of the coating after a certain time and personal preference. Asmentioned above, some level of polishing is required prior to applying a coating. This should be done either when the coating ison its last legs or if the paint condition is not to your liking anymore. If polishing to remove defects, keep in mind that somecoatings can withstand a fine polishing, which means that you may be able to remove some swirl marks without fully removingthe coating. At this point you need to decide whether you want to do a more involved polishing and re-apply the coating or if yousimply want to stay on top of it with a wax or sealant every few months until the coating gives way and needs to be appliedagain.
Facts and Tips
● Similar to waxes and sealants, there are numerous coatings available. Most coatings are intended to protect the paint, butthere are also options for wheels, glass, plastic, vinyl, leather, fabric, etc. Generally speaking, the application process isvery similar for all coatings and for all areas of the car. Obviously you want to heed the manufacturer's instructionsbecause a mistake in coating application can be costly in terms of both time and money.
● Coatings can be seen as a sacrificial layer to help preserve the paint on a vehicle. As we mentioned above, at some pointyou will need to polish the car again and reapply the coating. We hope that at this time, all or most the required polishing isbeing done within the coating layer, thus preserving the clear coat as much as possible. Since the coating adds ameasurable layer of protection to the paint surface, this layer can absorb a lot of swirl marks, stains, etching, etc. and helpkeep the clear coat practically new.
● During application, it's important to keep in mind that the leveling process is usually quicker than the application process.This means that you need to be mindful of the time frame between application and leveling on a certain section of thepaint, otherwise you may end up with an uneven layer of the coating. Quick example: assume applying a coating thatneeds to dry for 2 minutes before leveling to a fender left to right. Also assume the fender size takes exactly 2 minutes tocover. So we're at 0:00 at the start, 1:00 at the middle and 2:00 at the end of that fender. (In this example we'll ignore the5-10 seconds to put down the applicator and pick up the leveling towel and assume a second person is doing the levelingas soon as 1st person finishes application). We must make sure we're at 2:00 at start, 3:00 in middle and 4:00 at the end ofthat fender. This ensures that each section has dried to roughly the 2 minute mark. If you level too quickly, you may end upwith a more durable thicker layer of coating at the start of the panel, but thinner at the end.
● Working in small sections is encouraged so you're not too rushed. Another way to help resolve leveling issues above is todo 2 layers of the coating and simply start from the opposite end of the panel on the second coating to try and apply asevenly as possible.
Related Articles
Here are a few articles related to Coatings from our Ask-a-Pro Detailer Blog:
● The Benefits of a Paint Coating● Coating Application: How To Reduce Marring● Maintaining Your Paint Coating● 22PLE Application● CarPro Cquartz UK Edition: Application Process● Harley Davidson Detail | 22PLE VM1 and VR1 Coating● 2012 Ferrari FF Paint Correction Featuring 22PLE Coating and Review
View all Coatings articles
Related Videos
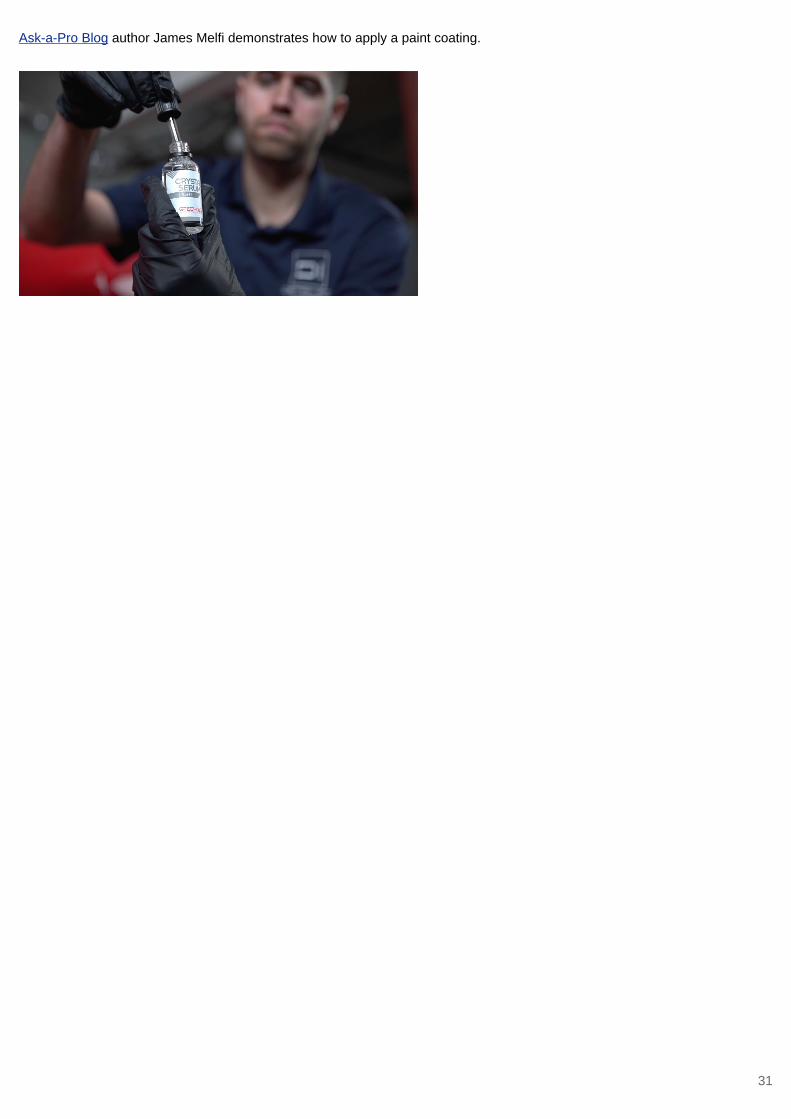
Ask-a-Pro Blog author James Melfi demonstrates how to apply a paint coating.
31
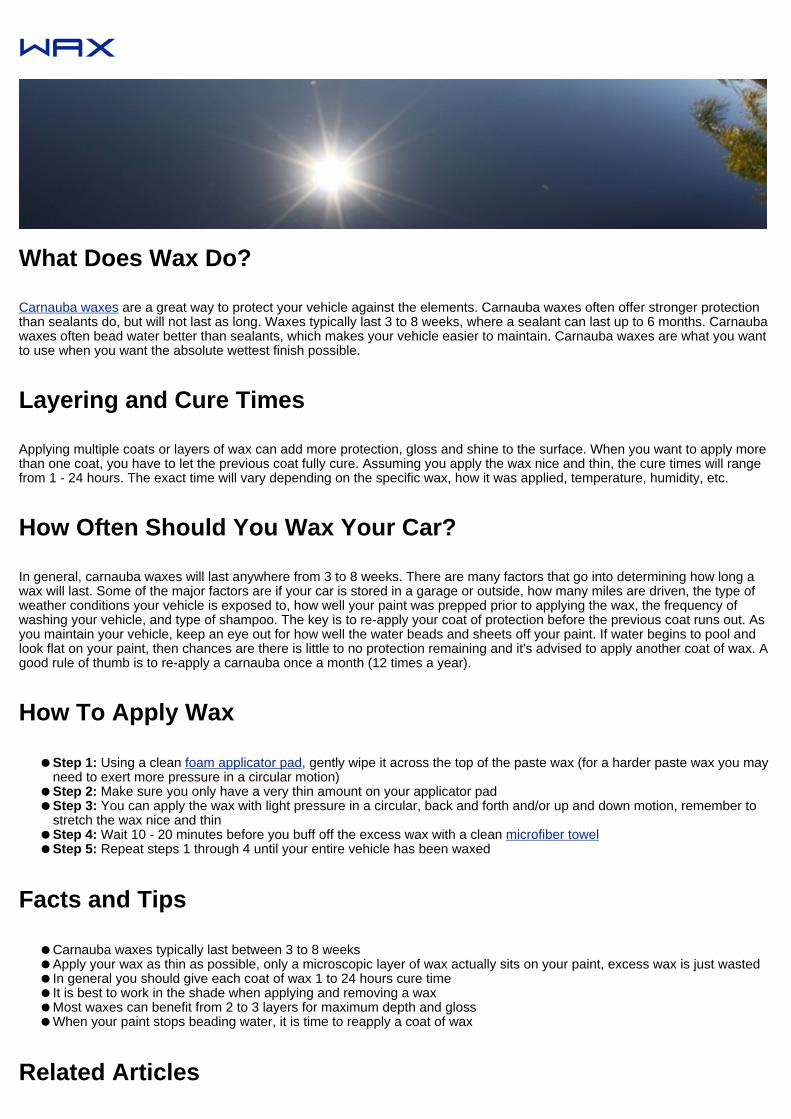
Wax
What Does Wax Do?
Carnauba waxes are a great way to protect your vehicle against the elements. Carnauba waxes often offer stronger protectionthan sealants do, but will not last as long. Waxes typically last 3 to 8 weeks, where a sealant can last up to 6 months. Carnaubawaxes often bead water better than sealants, which makes your vehicle easier to maintain. Carnauba waxes are what you wantto use when you want the absolute wettest finish possible.
Layering and Cure Times
Applying multiple coats or layers of wax can add more protection, gloss and shine to the surface. When you want to apply morethan one coat, you have to let the previous coat fully cure. Assuming you apply the wax nice and thin, the cure times will rangefrom 1 - 24 hours. The exact time will vary depending on the specific wax, how it was applied, temperature, humidity, etc.
How Often Should You Wax Your Car?
In general, carnauba waxes will last anywhere from 3 to 8 weeks. There are many factors that go into determining how long awax will last. Some of the major factors are if your car is stored in a garage or outside, how many miles are driven, the type ofweather conditions your vehicle is exposed to, how well your paint was prepped prior to applying the wax, the frequency ofwashing your vehicle, and type of shampoo. The key is to re-apply your coat of protection before the previous coat runs out. Asyou maintain your vehicle, keep an eye out for how well the water beads and sheets off your paint. If water begins to pool andlook flat on your paint, then chances are there is little to no protection remaining and it's advised to apply another coat of wax. Agood rule of thumb is to re-apply a carnauba once a month (12 times a year).
How To Apply Wax
● Step 1: Using a clean foam applicator pad, gently wipe it across the top of the paste wax (for a harder paste wax you mayneed to exert more pressure in a circular motion)
● Step 2: Make sure you only have a very thin amount on your applicator pad● Step 3: You can apply the wax with light pressure in a circular, back and forth and/or up and down motion, remember to
stretch the wax nice and thin● Step 4: Wait 10 - 20 minutes before you buff off the excess wax with a clean microfiber towel● Step 5: Repeat steps 1 through 4 until your entire vehicle has been waxed
Facts and Tips
● Carnauba waxes typically last between 3 to 8 weeks● Apply your wax as thin as possible, only a microscopic layer of wax actually sits on your paint, excess wax is just wasted● In general you should give each coat of wax 1 to 24 hours cure time● It is best to work in the shade when applying and removing a wax● Most waxes can benefit from 2 to 3 layers for maximum depth and gloss● When your paint stops beading water, it is time to reapply a coat of wax
Related Articles
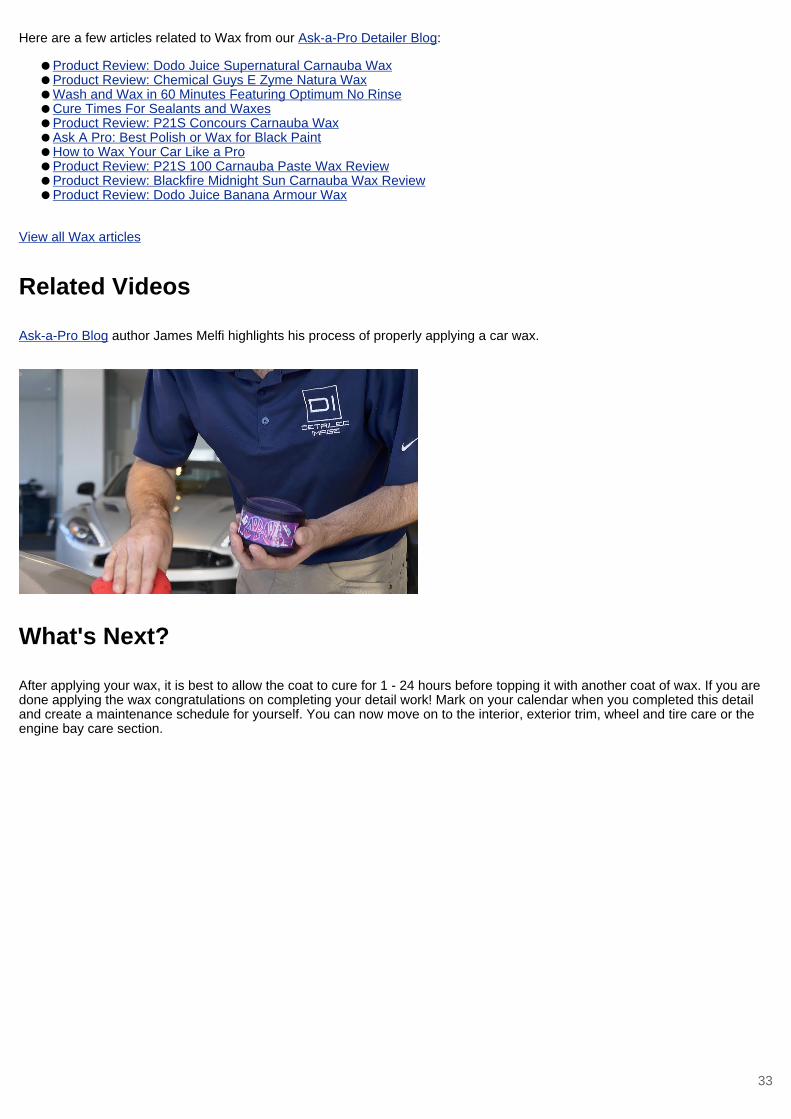
Here are a few articles related to Wax from our Ask-a-Pro Detailer Blog:
● Product Review: Dodo Juice Supernatural Carnauba Wax● Product Review: Chemical Guys E Zyme Natura Wax● Wash and Wax in 60 Minutes Featuring Optimum No Rinse● Cure Times For Sealants and Waxes● Product Review: P21S Concours Carnauba Wax● Ask A Pro: Best Polish or Wax for Black Paint● How to Wax Your Car Like a Pro● Product Review: P21S 100 Carnauba Paste Wax Review● Product Review: Blackfire Midnight Sun Carnauba Wax Review● Product Review: Dodo Juice Banana Armour Wax
View all Wax articles
Related Videos
Ask-a-Pro Blog author James Melfi highlights his process of properly applying a car wax.
What's Next?
After applying your wax, it is best to allow the coat to cure for 1 - 24 hours before topping it with another coat of wax. If you aredone applying the wax congratulations on completing your detail work! Mark on your calendar when you completed this detailand create a maintenance schedule for yourself. You can now move on to the interior, exterior trim, wheel and tire care or theengine bay care section.
33

Microfiber Towels
What Is Microfiber?
Microfiber products are absolutely essential to high quality detailing for both the interior and exterior of any vehicle. Microfibertowels, applicators, wash mitts and pads are used in virtually every area of detailing. You may use microfiber products to cleanthe paint, leather, wheels, glass, interior and so much more. The uses are literally endless so you can never have enough topquality microfiber products.
Microfiber is made up of a unique blend of materials with an innovative weave and fiber designs made of ultra fine syntheticyarn. The synthetic yarn is usually comprised of 70% - 80% polyester with 20% - 30% polyamide depending on the specifictowel. Each strand is approximately 0.2 denier, which is equivalent to 1/20th of a strand of silk or 1/100th of a human hair. Thecross section of a microfiber strand resembles an asterisk (*), which allows them to collect and trap particles whereas traditionaltowels push particles around or temporarily collect them. On dry surfaces the microfiber towels use electrostatic energy to easilylift and collect large amounts of dust, dirt and other particles in to the micro-wedges of each fiber.
Is All Microfiber The Same?
People often will splurge on their wax but spend far less on microfiber products when they are truly the backbone of a gooddetail. Investing in quality towels and caring for them will greatly increase your results while saving you time and money in thelong run. The life of your microfiber products will vary based on the quality of the towel and how well you care for them. Not allmicrofiber towels are created equal so low quality towels may feel nice at first but they often break down rapidly with just a fewwashes. At DetailedImage.com we take great pride in selecting only top quality towels that will last for years with good care.
Microfiber Care
Generally we recommend you maintain three groups of towels, storing them in separate containers. The first group is thepristine new towels that you use on the most sensitive surfaces such as the exterior paint, gages, navigation screens, etc. Thesecond group are towels still in great condition but may be a bit worn, which we use for interior cleanings, glass care, leathertreatments, etc. All other towels in the third group may have visible stains and be noticeably worn down. Use these towels foryour dirty jobs like cleaning the exhaust tips, engine bay detailing, door jambs, etc.
When you receive your towels you should wash them just to ensure they are clean and free from any contaminants they mayhave come in contact with while in transit. Before washing any microfiber make sure you have removed any stickers or labelsthat come on some new microfiber towels. Never wash microfiber towels with any other fabrics as the microfiber towels willcollect the lint, which can greatly reduce the effectiveness of any microfiber product. Microfiber is virtually free of lint so you canwash them with other microfiber products only. Do not use any detergent with fabric softener or bleach in it. Using fabricsoftener will deposit a coating on the microfiber strands that clogs the pores, which reduces absorbency, cleaning ability andcan lead to streaking. If you are not sure what to use you can pick up the DI Microfiber Micro-Restore Microfiber DetergentConcentrate, which has no fabric softener, bleach or added scent. If you are looking for additional cleaning power you can addone teaspoon per towel of distilled white vinegar.
When you are done washing the towels you can air dry them to be extra cautious, however many detailers need the help of adryer due to time constraints which is generally fine. Do not use any dryer sheets and make sure you have cleaned the lint filterand removed any other lint particles. Again the microfiber towels will collect lint from other fabrics so do not dry it with otherfabrics. Try to use just enough heat to dry the towels and do not overheat the towels. Excessive amounts of heat can harm thelong term health of the towel.
As mentioned above the towels should be separated and stored according to their condition and we generally recommend three
groups. Put them in an air tight storage container like a zip lock bag (i.e. DI Accessories Reclosable Storage Bag) or arubbermaid container that is labeled to avoid dust and dirt settling on your recently cleaned towels. Remember microfiberproducts have a natural electrostatic charge and will literally pull contaminants in so it's very important to store them properly.
Facts and Tips
● Always remove any tags on microfiber products to minimize the risk of marring the paint● Always wash new microfiber towels prior to using them for the first time● Never use fabric softener when washing or drying your towels● Group your towels together, such as paint safe towels, wheel and tire towels, interior towels, etc.● Adding distilled white vinegar to your rinse cycle can help further clean your microfiber● If your towels lose their absorbency, try boiling them to dissolve product and reopen the pores● Store your clean microfiber towels in labeled microfiber storage bags● Always wash your microfiber with microfiber, avoid mixing them with other fabrics
Related Articles
Here are a few articles related to Microfiber from our Ask-a-Pro Detailer Blog:
● Proper Microfiber Care● Microfiber Towel Storage and Organization● Product Review: Detailed Image Waffle Weave Drying Towel● Product Review: DI Microfiber Autofiber Zero Edge Towel● Ask A Pro: Bonnets for Use on a Porter Cable?● Product Review: DI Microfiber Waffle Weave Drying Towel● How to Determine Your Microfiber Needs● How to Properly Wash and Dry a Car● Todd Cooperiders top 10 Favorite Detailing Products● How to Clean and Properly Care for Microfiber Towels
View all Microfiber articles
35

Wheel and Tire
Why Wheel Care Is Important
Wheels can drastically change the appearance of any vehicle, which is proven by the huge after market offering. Having wheelscovered in brake dust is a complete eye sore and can take away from the overall look of any vehicle. Wheels that look brandnew, on the other hand, can turn heads and really show off your car. Properly caring for your wheels is not difficult or timeconsuming when maintained on a regular basis.
Caring for your wheels consists of properly removing contamination, polishing them to a high shine, then protecting them tomake maintaining your wheels significantly easier. Stubborn brake dust can often be difficult to remove, but usually can berestored to a like new finish with the proper products and tools.
How Often Should You Care For Your Wheels?
We recommend maintaining your wheels with a basic wash of soap and water with a dedicated wash mitt, every time you cleanyour vehicle (1 to 2 weeks). Thorough cleaning of your wheels and adding layer(s) of protection should be done every 2 to 3months.
Wheel Care How-To
When caring for your wheels it is important that you have the proper products and tools. It is also important to know what type ofwheels you have so you use the proper products on them. If you have factory alloy wheels, chances are they have a layer ofclear coat on your wheels. This makes things easy because you can use a variety of wheel cleaners without worrying aboutoxidizing your wheels finish. You can also treat them like you would your clear coat on your paint, which means you can wash,clay, polish and protect your wheels. After market or upgraded wheels that have a high polished finish or bare metal need to betreated carefully, otherwise you may oxidize the finish and potentially damage your wheels.
Your wheels should be completely cool when you start to clean them. If you have been out driving, even just a little bit, givethem ample time to cool down before using any cleaner on them. You can spray them down with water to help them cool downbut it may take some additional time for them to reach air temperature so you can begin cleaning. Clean the wheels in the shadewhenever possible to avoid water marks or rinse them frequently while in direct sunlight.
Clean and Maintain
The best way to clean and maintain your wheels is by using some automotive shampoo and water with a dedicated wash mitt.This is safe for every type of wheel finish and also means you are not spending money on wheel cleaners. This is a veryeffective way to care for your wheels if you follow two things 1) maintaining your wheels on a regular basis 2) you have a coatingof protection on your wheels.
Soap and water will help remove loose contaminants and clean wheels that are well maintained but often times stubborn buildups will require a wheel cleaner. The safest bet is to use a pH balanced (aka pH neutral) wheel cleaner, such as P21S GelWheel Cleaner or the SONAX Wheel Cleaner Full Effect. They can be used on any type of wheel finish and you can increasethe cleaning power by letting the product dwell for several minutes if you are in the shade. Acidic wheel cleaners are highlyeffective but they can easily oxidize or tarnish polished wheels and other sensitive wheel finishes. Acidic wheel cleaners shouldonly be used on factory wheels with a thick clear coat on them. When you are done rinse the wheels with a steady stream ofwater, be especially thorough near the lug nuts. If you see any remaining stains spot treat them with the same cleaner and a
soft cloth or a wheel safe brush. Using a nylon brush or a brush with very stiff bristles can add swirls to the finish of the wheel,so look for brushes with very soft bristles or natural fibers. If you still have some remaining stains try a quality metal polish,which can generally be applied to most bare metals and clear coated wheels, see below (Polishing Wheels) for moreinformation.
To effectively clean the inner barrels of your wheels, we highly recommend investing in an EZ Detail Brush. If you haveprotected your inner barrels with some protection (chances are you needed to do this with the wheels off of the vehicle) thenyou can dip the brush in soap and water and brake dust should come off very easily. If your wheels were not protected, spraysome wheel cleaner on the inner parts of your wheels as well as your EZ Detail Brush to get a deeper clean. We recommendcleaning the inner barrels of your wheels first because when you pull the bristles back out, it can transfer some dirt andcontamination on the face of your wheels.
Using a clay bar on your wheels is an effective way to properly prep the surface and remove stubborn brake dust. Be carefulusing one on high polished wheels as you could add micro-marring or swirls that can be difficult to remove.
Polish
Polishing your wheels can help increase the depth and gloss of your wheels as well as remove minor surface imperfections. Ifyour wheels have a clear coat on them, then you can treat them the same as you would polishing your paint. If your wheelsconsist of bare metal, such as the lip of your wheel, you can polish them using a metal polish to increase gloss and depth andremove minor imperfections.
How-To Polish Wheels
● Step 1: Dispense a pea sized drop of metal polish on a foam applicator pad● Step 2: Using as little pressure as possible, spread the polish thinly over the area you wish to polish● Step 3: Starting with light pressure work the polish into the wheel, increasing pressure as needed● Step 4: Continue working the polish into the wheel until the polish turns to a clear milky haze● Step 5: Using a clean microfiber towel, remove the broken down polish● Step 6: Repeat steps 1 through 5 until the entire wheel has been polished
Note: Always test your polish on a small inconspicuous area before polishing your entire wheel.
Protect
When it comes to keeping your wheels looking like new for long periods of time you want to make sure your wheels are alwaysprotected. While you can use a sealant or wax to protect your wheels, there are some products that are designed specifically foryour wheels. Poorboy's World Wheel Sealant is our favorite wheel protectant as it is easy to apply and remove, leaves behind asuper slick surface so brake dust slides right off, is designed to withstand high temperatures that brakes produce, increases thedepth and gloss of your wheels and makes cleaning your wheels a breeze.
Wheel Care Facts and Tips
● Maintain your wheels with shampoo and water with a dedicated wash media● Keeping a coating of protection on your wheels will make maintaining them significantly easier● Always use a pH balanced wheel cleaner when dealing with after market wheels● Acidic based wheel cleaners can easily oxidize a high polished finish● Using a clay bar can effectively prep your wheels for polishing and protecting● Polishing your wheels can increase the depth and gloss as well as remove some imperfections● Protecting your wheels with a sealant is the key to easy maintenance on your wheels
Why Tire Care Is Important
Caring for your tires means more than just slapping on some tire dressing and calling it a day. A lot of detailing enthusiasts donot understand the importance of properly prepping your tires before applying a dressing. Properly prepping your tires can helpincrease the durability of your dressing and minimize tire dressing sling.
There are various types of tire dressing on the market: water based and silicone based. Water based tire dressings getabsorbed into your rubber and can actually nourish your rubber keeping them soft and flexible. Silicone based tire dressingsmainly sit on the surface of your tire, which often leads to tire dressing sling. Silicone based dressings can dry out your rubber
and also brown it over time. Silicone based dressings are typically glossier than water based dressings.
How Often Should You Care For Your Tires?
We recommend dressing your tires after each wash (every 1 to 2 weeks). The condition of your tires will determine if they needto be cleaned and prepped. If you wash your tires and there is still dirt and contamination, we recommend using a degreaser onyour tires to clean them and strip off any previous tire dressing. If you have high polished wheels, make sure the tire cleaner issafe for your wheel finish, in case you get product on them.
Tire Care How-To
Cleaning your tires is pretty simple. We recommend using a dedicated wash mitt or sponge (foam media tends to work bettersince it's more durable) for your wheels and tires. Wash them with soap and water and assess if they need a deeper cleaning. Ifyou are looking to get the most out of your dressing, we recommend cleaning your tires with a degreaser, such as P21S TotalAuto Wash, and a firm brush. Soak your tires with the degreaser and allow it to penetrate for a couple of minutes. Scrub yourtires with the brush to remove the heavy contamination.
Applying the tire dressing is pretty straight forward. Simply dispense some tire dressing onto an applicator pad and work it intoyour tires. You want to use as little product as possible to prevent sling onto your paint. You are better off applying multiple thincoats of tire dressing than one thick coat. For complete even coverage, move your vehicle forward or backwards to applydressing on the part of the tire that was closest to the ground.
Tire Care Facts and Tips
● Silicone based tire dressings have a higher tendency to sling up onto your paint● Water based tire dressings get absorbed into your tires and nourish your rubber● Properly prepping your tires prior to applying a dressing can increase durability and prevent tire dressing sling● Always apply your tire dressing in thin, even coats● Drive your vehicle a few feet forward after applying the first coat of dressing so you can get an even application on the part
of the tire that was closest to the ground
Related Articles
Here are a few articles related to Wheel & Tire Care from our Ask-a-Pro Detailer Blog:
● Product Review: TUF Shine Inc.● Video: Utah Detailing and TUF Shine Dressing● How to Clean Your Tires With a Purpose● How to Clean and Shine Your Tires● How to Detail Your Wheels and Tires Using Meguiars Products● Product Review: Chemical Guys Bare Bones● Product Review: Chemical Guys Fade 2 Black● Product Review: Sonax Wheel Cleaner Full Effect● How to Detail Your Wheels, Tires, and Wheel Wells● Wheel Cleaning Basics
View all Wheel & Tire Care articles
Related Videos
Ask-a-Pro Blog author James Melfi goes through the process of properly cleaning your wheels in the first video below. In thesecond video, James explains how to properly dress your tires.
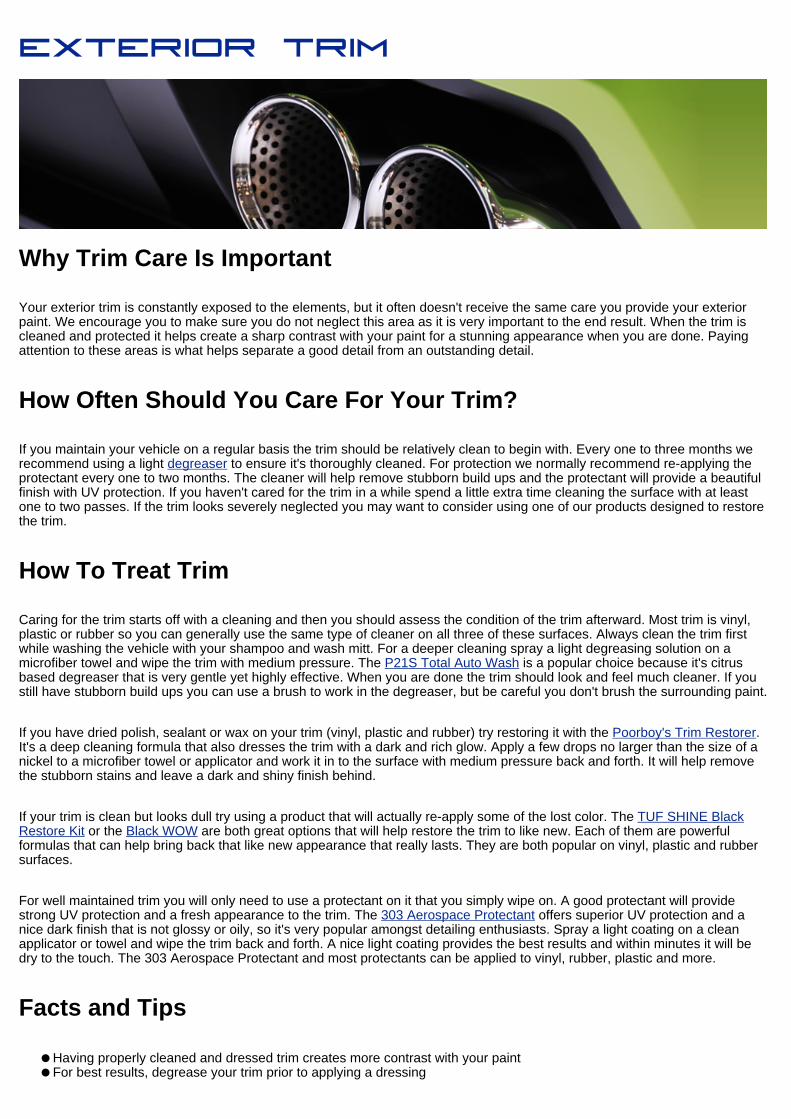
Exterior Trim
Why Trim Care Is Important
Your exterior trim is constantly exposed to the elements, but it often doesn't receive the same care you provide your exteriorpaint. We encourage you to make sure you do not neglect this area as it is very important to the end result. When the trim iscleaned and protected it helps create a sharp contrast with your paint for a stunning appearance when you are done. Payingattention to these areas is what helps separate a good detail from an outstanding detail.
How Often Should You Care For Your Trim?
If you maintain your vehicle on a regular basis the trim should be relatively clean to begin with. Every one to three months werecommend using a light degreaser to ensure it's thoroughly cleaned. For protection we normally recommend re-applying theprotectant every one to two months. The cleaner will help remove stubborn build ups and the protectant will provide a beautifulfinish with UV protection. If you haven't cared for the trim in a while spend a little extra time cleaning the surface with at leastone to two passes. If the trim looks severely neglected you may want to consider using one of our products designed to restorethe trim.
How To Treat Trim
Caring for the trim starts off with a cleaning and then you should assess the condition of the trim afterward. Most trim is vinyl,plastic or rubber so you can generally use the same type of cleaner on all three of these surfaces. Always clean the trim firstwhile washing the vehicle with your shampoo and wash mitt. For a deeper cleaning spray a light degreasing solution on amicrofiber towel and wipe the trim with medium pressure. The P21S Total Auto Wash is a popular choice because it's citrusbased degreaser that is very gentle yet highly effective. When you are done the trim should look and feel much cleaner. If youstill have stubborn build ups you can use a brush to work in the degreaser, but be careful you don't brush the surrounding paint.
If you have dried polish, sealant or wax on your trim (vinyl, plastic and rubber) try restoring it with the Poorboy's Trim Restorer.It's a deep cleaning formula that also dresses the trim with a dark and rich glow. Apply a few drops no larger than the size of anickel to a microfiber towel or applicator and work it in to the surface with medium pressure back and forth. It will help removethe stubborn stains and leave a dark and shiny finish behind.
If your trim is clean but looks dull try using a product that will actually re-apply some of the lost color. The TUF SHINE BlackRestore Kit or the Black WOW are both great options that will help restore the trim to like new. Each of them are powerfulformulas that can help bring back that like new appearance that really lasts. They are both popular on vinyl, plastic and rubbersurfaces.
For well maintained trim you will only need to use a protectant on it that you simply wipe on. A good protectant will providestrong UV protection and a fresh appearance to the trim. The 303 Aerospace Protectant offers superior UV protection and anice dark finish that is not glossy or oily, so it's very popular amongst detailing enthusiasts. Spray a light coating on a cleanapplicator or towel and wipe the trim back and forth. A nice light coating provides the best results and within minutes it will bedry to the touch. The 303 Aerospace Protectant and most protectants can be applied to vinyl, rubber, plastic and more.
Facts and Tips
● Having properly cleaned and dressed trim creates more contrast with your paint● For best results, degrease your trim prior to applying a dressing
● Make sure you are using a dressing that provides UV protection to prevent fading● Using a brush can help provide a deeper cleaning to your trim pieces● Old wax build ups can be removed with a degreaser
Related Articles
Here are a few articles related to Trim Care from our Ask-a-Pro Detailer Blog:
● Ask A Pro: How to Remove Excess Polish From Crevices● Cleaning Door Jambs and Other Filthy Places on an Otherwise Clean Car● Headlight Restoration Process● How to Remove Dried on Wax from Textured Black Plastic or Rubber Moldings● Clearing Hazy Head Lamp Housings on a Budget● Product Review: Meguiars DA Microfiber Correction System● How to Restore Trim Using Poorboys World Trim Restorer● How Do I Remove the Car Dealership Stickers, Decals, Badges, or Emblems From My Car● Removing Polish and Wax From Rubber Trim● Exhaust Tip Detailing
View all Trim Care articles
41

Glass
Why Glass Care Is Important
Caring for your glass is not only important for aesthetics but it's also critical for driving safely. If too much glass cleaner is left onthe glass you can expect to see streaking and hazing which can be a detriment to your vision. This can be especially dangerouswhen driving in the evening so make sure you take the time to clean your glass properly. We understand that streaks arecommon and very frustrating but don't worry we'll show you the products and techniques needed for streak free glass cleanings.
How Often Should You Care For Your Glass?
You should care for your glass on an as needed basis to ensure you always have the best visibility when driving.
How To Clean Interior Glass
To get the most out of your glass cleaning both for the exterior and interior, the first thing you should do is roll your windowsdown a couple of inches so you can clean the very top of the glass effectively. Many detailers forget to do this step and if youdrive with the windows partially down afterward you may see this area you missed. Follow the same technique that is outlinedbelow for best results. We also recommend that you spray a light degreaser (i.e. P21S Total Auto Wash) on a cloth and wipe theinside and outside edges of the window seal to ensure that it is clean.
When caring for interior glass you are usually dealing with different problems than your exterior glass. Interior glass can besubject to bodily oils from people touching windows, product over spray from treating your trim pieces, smoke residue and mostcommonly moisture from simply breathing inside the vehicle. While reaching certain parts of interior glass may be difficult, caringfor the glass is pretty straight forward.
One of the most common mistakes we see in detailing is people using too much glass cleaner. Use just enough cleaner toremove contaminants and residue on the glass. The more product you use the more you need to buff off in the latter steps. Werecommend using a total of 3 microfiber towels to care for your glass. One all purpose towel to apply the glass cleaner, asecond all purpose towel to buff off visible residue and a third, low nap, glass specific microfiber towel to buff to a streak freefinish. If you use just one towel you are almost guaranteed to see streaks afterward. We fold each one of these towels (16" x16") in fourths and expose a fresh surface for each section of glass you are working on. This is especially important for thesecond and third towel so you can effectively remove the excess glass cleaner. Folding the towel in fourths gives you eight freshsurfaces and increases the value of any towel by utilizing the entire surface area instead of overusing just the middle section.
Another common mistake we see is working on the glass in direct sun. You must care for glass when it is cool and in the shade,otherwise you greatly increase the chances of leaving behind some streaking.
After you have put the vehicle in the shade the first step is to mist a small amount of glass cleaner on a microfiber towel foldedin fourths. Avoid spraying your glass directly to prevent yourself from getting over spray on the trim pieces. It's actually best tospray the product onto the towel outside of the vehicle. Remember to use just enough glass cleaner to clean the glass, you canalways mist your towel again if you need more product. Using the slightly misted towel apply some moderate pressure, slowlyworking the product into the glass while keeping the towel flat. Pass over each area multiple times to ensure you clean the glassfrom different angles. Take your second microfiber towel and buff off the excess product as best you can right after. Work in alogical pattern up and down and then side to side to ensure you don't accidentally miss any areas. Complete slow overlappingpasses with moderate pressure while holding the towel flat. Finally, take your glass specific microfiber towel and repeat thesame process to ensure no streaks have escaped.
The process listed above is pretty easy however reaching every corner of the glass can be challenging. We recommend using a
Stoner Invisible Glass Reach and Clean Microfiber Mop Tool to effectively clean and reach the corners of your windshieldeffortlessly. Without a tool like this, it is difficult to apply pressure in to the lower corners of the front and rear windshield. Followthe same basic process listed above applying just enough cleaner to one microfiber bonnet and use the other glass microfiberbonnet to buff off the left over product. You can also simply wrap microfiber towels around the head of the mini-mop to get thesame effect. Another tip when treating the front windshield is to sit on the passenger side of the car when cleaning the driversside glass. This helps you get behind the steering wheel a little bit easier.
If you have tinted glass make sure you use a tint friendly cleaner that does not use ammonia or harsh chemicals. The StonerInvisible Glass and the Chemical Guys Window Clean are two great choices that are completely safe on the tinted surfaces.
If you have fog forming on your front windshield make sure you turn off the recirculate mode from your heating and coolingsystem. The recirculate mode recycles the air currently in your cabin which contains more moisture. Moisture will often cling tothe cooler glass forming a fog, which can reduce your visibility. Turning off the recirculate mode will help.
How To Clean Exterior Glass
Your exterior glass is exposed to various elements as you drive and even when you are parked. Caring for your exterior glass issomewhat similar to caring for your paint, but remember glass is actually much harder. You want to thoroughly clean it and thenprotect it from the elements. To clean the glass you can wash, clay and even polish it so it is truly clean and clear. By protectingyour exterior glass afterward with a sealant your maintenance will be much easier and you can improve your visibility duringpoor driving conditions.
If your glass needs just a basic cleaning, wash it as you would the rest of your vehicle. When you are done, follow the samecleaning steps as you would for your interior glass (see above), using multiple microfiber towels and just enough glass cleaner.
To give your exterior glass a deeper cleaning, you may want to consider using a clay bar. A clay bar can help removecontaminants trapped on top of the glass and in the micro-pores of the glass. The process here is virtually identical to the wayyou use a clay bar on the paint.
If you have very faint water marks on your glass distilled white vinegar is a good home remedy. Unfortunately some water marketchings are too deep for the vinegar solution to remove, so in these situations we highly recommend using the Glass ScienceGlass Scrub. This is a unique cream glass polish designed to dissolve mineral deposits and remove light etchings, sap, roadgrime and more. Even if you think your glass is clean the Glass Scrub will make it look noticeably cleaner and moisture will rolloff easier instead of clinging to contaminants. The Glass Scrub needs to be applied to a wet surface, so the best time to use thisproduct is just after washing and before drying. With the glass wet apply a dime sized drop to a wet foam applicator and buff it inwith medium pressure in a circular motion. Use more product as need be but try not to use an excessive amount because theGlass Scrub needs to be thoroughly rinsed off when you are done.
After your glass is clean and clear you can protect it with a sealant. This will help moisture (i.e. rain, sleet and snow) form smallbeads that roll right off with ease. It will also help prolong the life of your wipers since you won't have to use them as often andthere is less friction. You can use a glass specific protectant such as the Glass Science Rain Clear or a sealant used on thepaint. The Rain Clear is a gel based formula that needs to be applied thin and buffed off with medium pressure and a cleanmicrofiber towel. A traditional sealant like those used on the paint can also be used to protect the exterior glass. Both optionswill help repel the moisture and make driving much simpler no matter the weather.
Facts and Tips
● Use as little glass cleaner as possible to minimize streaking● Never use ammonia based glass cleaners on tinted windows● Use multiple towels to clean your glass, this will help reduce streaking● Always clean your glass when it is cool to the touch and out of direct sunlight● Protect your exterior glass to reduce maintenance and to improve visibility during poor weather conditions● Using a glass polish or distilled white vinegar can help remove water spots on glass● Before cleaning the glass roll down the window and clean the very top of the glass and the window seal
Related Articles
Here are a few articles related to Glass Care from our Ask-a-Pro Detailer Blog:
● Product Review: Sonax Glass Cleaner
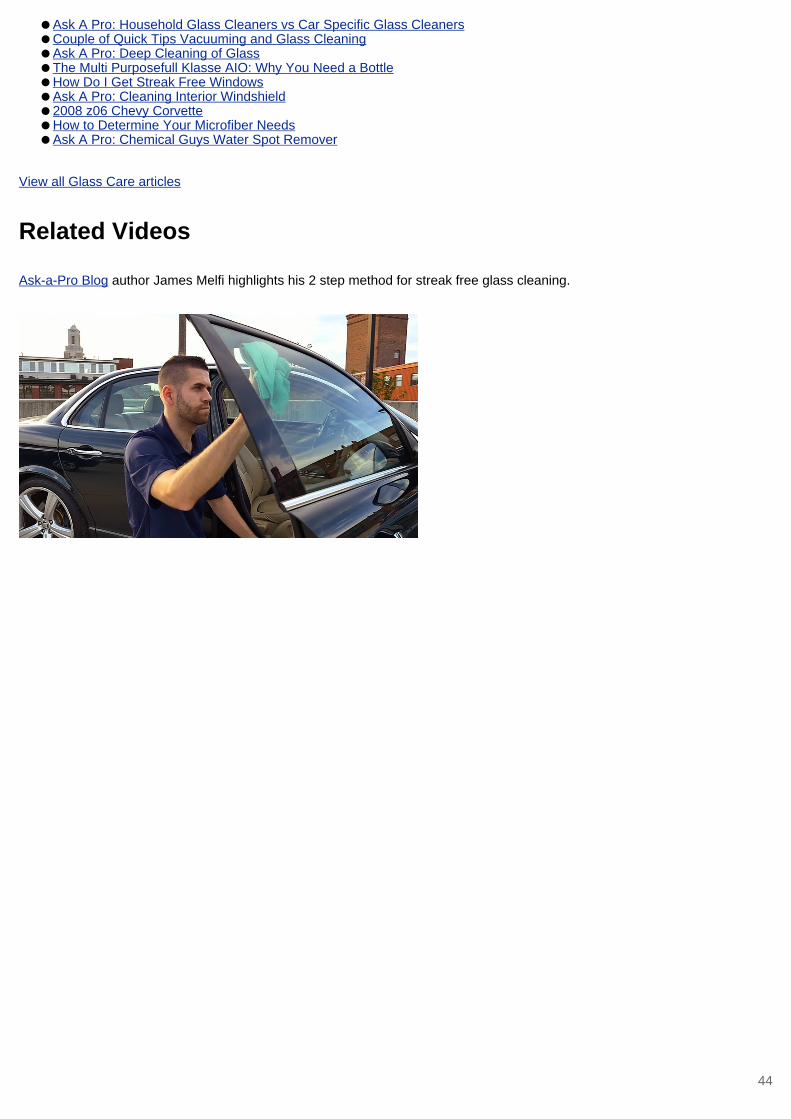
● Ask A Pro: Household Glass Cleaners vs Car Specific Glass Cleaners● Couple of Quick Tips Vacuuming and Glass Cleaning● Ask A Pro: Deep Cleaning of Glass● The Multi Purposefull Klasse AIO: Why You Need a Bottle● How Do I Get Streak Free Windows● Ask A Pro: Cleaning Interior Windshield● 2008 z06 Chevy Corvette● How to Determine Your Microfiber Needs● Ask A Pro: Chemical Guys Water Spot Remover
View all Glass Care articles
Related Videos
Ask-a-Pro Blog author James Melfi highlights his 2 step method for streak free glass cleaning.
44
Interior
Why Interior Care Is Important
Caring for your interior is just as important as your exterior. You spend the most time inside your vehicle and your passengersoften take notice of how clean, or not so clean, your interior is. It's important to protect your interior trim and leather from harmfulUV rays that can potentially dry out and fade your interior. Keep your interior looking like new so you enjoy getting into yourvehicle each and every time.
How To Clean and Protect Carpet
Caring for your fabrics is pretty simple, but unfortunately your carpets often see the most wear and tear since you are constantlybringing in dirt, debris and contamination from your shoes. First off remove your mats and be careful not to dump dirt andpebbles on the mat on to the carpets while removing them. A quick vacuum will help remove the obvious build ups if you haven'tcleaned the carpets and mats recently, but don't get fussy you'll vacuum them again later in this process. A firm bristle brush isone of the most underrated tools in detailing and can be used next to loosen debris embedded in the carpets. Start brushing in acorner and work your way towards one mid point from all corners and sections. Once you've made a pile of debris, use avacuum to remove it. Continue this same process for each fabric section and if you have fabric seats start with them and moveon to the carpets and mats second.
After making an initial pass with the brush and vacuum, spot treat any stains with a fabric cleaner. Most cleaners should dwellon the fabric for 1 - 2 minutes, then scrub them again with a bristle brush in multiple different directions with medium pressure.The brushes bristles will get in between the carpet fibers and help bring contaminants to the surface. At the same time thebristles will break up stains and build ups on the surface. If stubborn stains persist spray them again with your cleaner and dipyour brush in a tray of hot water before scrubbing them again with medium to firm pressure. When you are satisfied with thecleaning, use the vacuum if needed to remove any visible debris.
Once your carpet has completely dried, we recommend protecting your carpet. The 303 Fabric Guard is a great example of afabric protectant. This will help prevent stains from forming in the future and will make cleaning your fabrics easier in the longrun. Simply mist some product onto your carpet, mats and upholstery for a barrier of protection and you are done. The carpetswill continue to look and feel completely natural but they will resist moisture and stains
How To Care For Interior Trim
Most interior trim (dashboard, console, doors, etc.) consists of a combination of vinyl, plastic, rubber and leather, which can becared for with many of the same products, so there is no need to get a product for each material. Some products are strictlymeant for cleaning, some are just for protection and others have a combination of both. In general products strictly meant forcleaning or protection are more effective than options that do both. If you need a serious cleaning then we highly recommendpicking up a separate cleaner and protectant. Even if your vehicle is relatively clean we recommend at a minimum of 1 - 2 timesper year you use just a cleaner on the interior for a more thorough cleaning. If your vehicle is well maintained than you may beable to use a cleaner and protectant in one bottle for maintenance cleanings.
For the vinyl, plastic, rubber, carpets and mats the 303 Spot Cleaner is a great product. It's a highly effective and very versatileformula that is very gentle. If you want some outstanding protection afterward the 303 Aerospace Protectant is a great choice forrubber, leather, vinyl, plastic, etc. It leaves a nice dark finish that is not glossy or greasy while providing outstanding UVprotection. If you want a cleaner and protectant in one the Nextzett Cockpit Premium is a great choice for rubber, plastic, vinyl,etc. It has some light cleaning agents but also leaves UV protection that looks stunning with zero oily residue left behind.
How To Care For Leather Seats
Beautiful leather is synonymous with clean leather and when the leather is looking its best it is a source of tremendous pride forautomobile owners. Leather seats are one of the very first things we notice when entering a vehicle and dirty seats not only lookbad but it can harm the long term health of the seats. Modern day leather can be comprised from a variety of natural andsynthetic materials. Very few vehicles actually use just raw leather and many of them have a coating on them to help protectagainst wear and tear. All of these material are prone to drying out and breaking down over time so regular maintenance isessential.
Caring for virtually any type of seat involves the same basic steps which are cleaning, conditioning and protection. Inevitablyover time dirt, dust, human oils, etc. work themselves deep in to the seats and can be quite challenging to remove. A good leather cleaner should be able to safely separate those contaminants and help bring them to the surface for removal. A quality leather conditioner can help keep the leather soft and flexible yet strong and durable. Cleaners and conditioners should notleave a glossy or oily finish behind. Lastly some protection can help prevent UV fading while preserving the color and finish fordecades to come. With proper care the seats will look and feel outstanding year round while increasing the resale value.
In general products that clean and condition in one bottle are not as effective as a separate cleaner and conditioner. The tradeoff with using separate products is that it can cost more and they may take more time to apply. If interested in just a leathercleaner we recommend the Leatherique Prestine Clean or the Connolly Leather Cleaner. For conditioning the LeatheriqueRejuvenator Oil and the Connolly Hide Care Leather Conditioner are two top notch choices. If you want to clean and condition inone bottle the SONAX Leather Foam and Nextzett Leather Care are some of the many great choices we have available. Forprotection afterward the 303 Aerospace Protectant is always a favorite for it's world renowned ability to block UV rays.
Leatherique Leather Care Application
Leatherique leather care products are some of the best in the industry. They have been the product of choice for the Bentleyand Rolls Royce Owners Clubs. Leatherique can restore faded, hardened and neglected leather but it can also maintain brandnew leather in great condition. They work extremely well on synthetic leathers "leatherette", coated leathers, vinyl seats and somuch more! Both products use all natural active ingredients with no dyes to provide high quality leather care. The processleaves the seats feeling completely natural without a greasy or oily residue. The application is a two step process consisting ofthe Leatherique Rejuvenator Oil and Leatherique Prestine Clean. If you are working on seats that have not been well cared forrecently you can expect to use more product, but well maintained or newer seats will need less product. The application of theseproducts is unique in that the conditioner is applied first and the cleaner is applied second.
Start off using the Leatherique Rejuvenator Oil, which will penetrate the surface and condition your leather top to bottom. Applythe product liberally on your leather seats with either your bare hands or a soft applicator pad (i.e. terry cloth applicator). Youcan use a leather brush to help work the product deeper into the leather's pores if desired. Don't forget to do the head rests,back of the seats, sides, bolsters, arm rests and really work it in to creases and folds. If the product readily absorbs in to theseat you can apply more product until there is some visibly left on the surface. Each seat may need anywhere from .5 ounces to2 ounces. When you are done back your vehicle into direct sun and if it's not sunny out you can use a hair dryer or turn on theheated seats. The heat will help open the pores of the leather and thin out the Rejuvenator Oil so it can penetrate in to everycrevice of the leather. Ideally, you want to let the Rejuvenator Oil sit for a full day but a minimum of one to two hours still worksvery well. If none of these heat sources are are available to you don't worry the product will still work well on it's own, just let it sitthe minimum of one to two hours.
After you've let the product sit on the leather for as long as possible, the surface may be a bit tacky to the touch, which is a goodsign. At this time the Rejuvenator Oil has removed many of the embedded contaminants and forced them up to the surface.Now you will apply the Prestine Clean directly on top of the surface with a clean applicator pad (i.e. terry cloth applicator) orclean microfiber towel. Apply anywhere from .5 to 1.5 ounces per seat, working it in thoroughly with light pressure. Let thePrestine Clean sit on the leather for another 15 to 30 minutes. Take a slightly damp towel, using warm water, and remove bothproducts from the leather with light pressure. Immediately follow up with a dry towel to remove any visible moisture. The seatsshould now look and feel incredible with no greasy or oily mess left behind at all. The leather will have a completely naturalfinish and be well nourished to help prevent future problems.
Facts and Tips
● A clean interior shows you take pride in your vehicle● Cleaning and conditioning your leather on a regular basis will keep the leather looking great year round● Protect your leather with a product that blocks UV rays● Leather seats should never feel greasy or oily and avoid any product that adds a shine to the leather● A scrub brush is arguably the most important tool to clean any fabric● Microfiber towels are great for interior cleanings because they collect and trap dust particles● As you exit the vehicle try to not twist on the seat, over time this can remove material from the surface● Make sure you and your passengers don't have any sharp buttons, belts, etc. on your bottom side that can harm the
leather● Keep the interior clean by removing any wrappers, bottles and trash as soon as possible
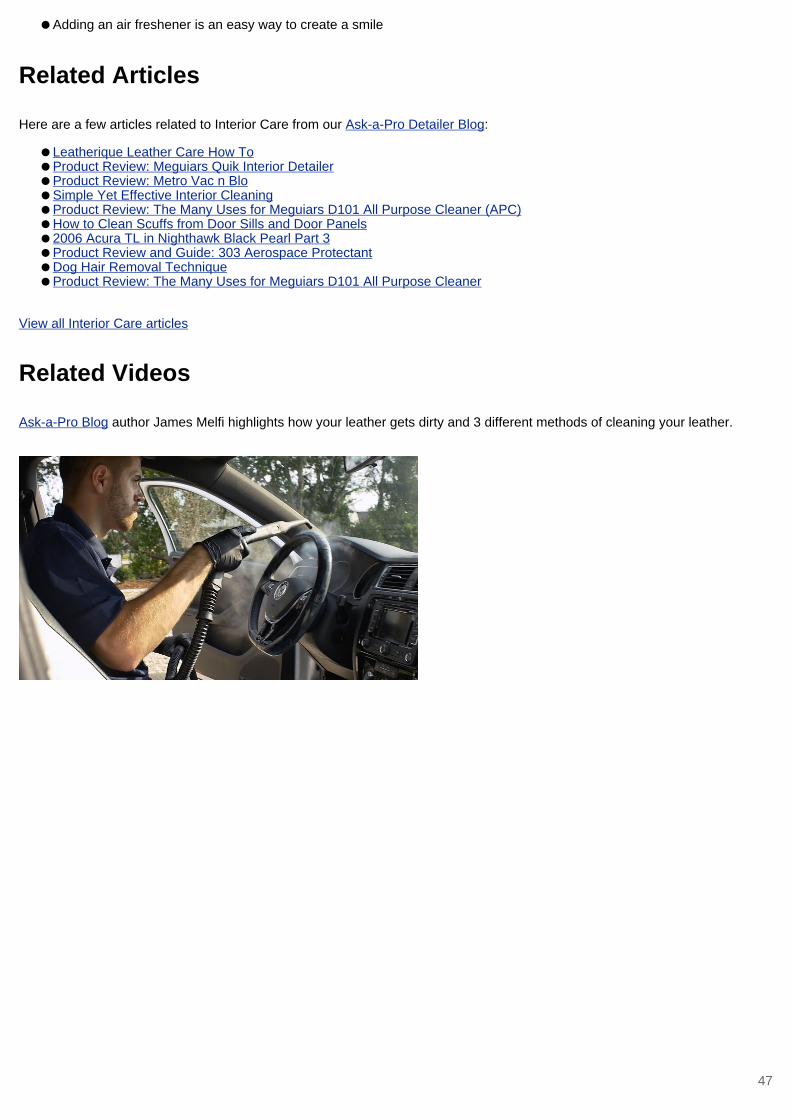
● Adding an air freshener is an easy way to create a smile
Related Articles
Here are a few articles related to Interior Care from our Ask-a-Pro Detailer Blog:
● Leatherique Leather Care How To● Product Review: Meguiars Quik Interior Detailer● Product Review: Metro Vac n Blo● Simple Yet Effective Interior Cleaning● Product Review: The Many Uses for Meguiars D101 All Purpose Cleaner (APC)● How to Clean Scuffs from Door Sills and Door Panels● 2006 Acura TL in Nighthawk Black Pearl Part 3● Product Review and Guide: 303 Aerospace Protectant● Dog Hair Removal Technique● Product Review: The Many Uses for Meguiars D101 All Purpose Cleaner
View all Interior Care articles
Related Videos
Ask-a-Pro Blog author James Melfi highlights how your leather gets dirty and 3 different methods of cleaning your leather.
47

Engine Bay
Is It Safe To Detail Your Engine Bay?
Detailing the engine bay can often seem overwhelming and potentially scary but in reality it's one of the easiest areas to carefor. Many owners fear they will ruin some part of the engine with a simple cleaning, but the truth is the modern day engine bay isso well protected it's hardly a concern anymore. With minimal effort you will be amazed at how easy and affordable it is to makeyour engine bay look like new again. You only need a degreaser, protectant, protectant applicator and a cloth or brush to workin the degreaser. The process should only take 20 - 45 minutes depending on how dirty the engine bay is.
How Often Should You Detail Your Engine Bay?
The engine bay should be detailed every 3 - 6 months to keep it clean and well protected.
Prep Work and Precautions
While the vast majority of vehicles are extremely easy and safe to work on we'll go over some basic precautions that apply tosome select vehicles. If you are working on a classic car or any older model (mid 1990's and older) you may want to be extracautious. Electrical components are generally well covered, but if you have any visible avoid hitting them with a high pressurewater flow. They are meant to resist moisture but it's possible to get water in there if you were careless or if they were defective.To be conservative wrap exposed electrical connections in tin foil. The air intakes are usually protected but avoid hitting themwith a direct stream of water, if needed cover them with a plastic bag because you don't want to flood the air intake with water. Ifyou have an exposed aftermarket air filter make sure it's covered by a plastic bag. If you have any exposed belts or fans coverthem up with a plastic bag or tin foil. After you have checked off these areas you are ready to begin detailing. Again most ofthese areas are not of concern to the modern day vehicle but you should check just to be safe.
How To Detail Your Engine Bay
● Step 1: Prior to starting, the engine bay should not be hot but it's okay if it's just barely warm. Some detailers will turn thecar on for 1 - 2 minutes just to get it a little bit warm.
● Step 2: Mist a light degreasing solution across the entire engine bay including the flipped up hood. Many light degreaserswill work but the P21S Total Auto Wash is a common choice as it's a citrus based degreaser that is gentle yet powerful. Letit dwell for at least 1 - 2 minutes.
● Step 3: Agitate visible build ups with a brush or rag. A small brush like the Mini EZ Detail Brush is very helpful as it get's into those tough to reach areas with ease.
● Step 4: Apply a fine mist of water starting top down to rinse away the dirt and contaminants.● Step 5: Spot treat any remaining areas and re-rinse the engine bay down with a fine mist of water.● Step 6: Dry the engine bay top down with a microfiber towel and you should see a noticeable improvement already. If
needed, use compressed air beforehand to help remove any small pools of water that may be hard to access.● Step 7: If any of the vinyl, plastic, or rubber are faded use a product like the Chemical Guys Black on Black or the TUF
SHINE Black Restore to bring a darker and richer appearance back. If the material is not faded but you'd like to provide adarker appearance and protection, apply your favorite protectant to the surface. The 303 Aerospace Protectant is a popularchoice as it leaves outstanding protection and adds a like-new finish to anything vinyl, plastic and rubber. Do not apply theprotectant or cleaners to any mechanical pieces like moving belts and fans.
● Step 8: Remove any plastic bags or tin foil you used and start the engine just to be certain you are all set.
Upon completion the engine bay should look outstanding and be protected for months to come!
Facts and Tips
● Many fear cleaning the engine bay when it's actually one of the easiest areas to care for● It can take as little as 20 minutes to clean and protect the entire engine bay● The modern day engine bay is so well protected it's quite easy and safe to care for● A degreaser, protectant and cloths are all you need● Generally speaking water will not harm the engine bay, it's designed to resist moisture● Don't use WD-40 or Windex to clean the engine bay● Clean and protect the engine bay at least twice per year● Don't forget to care for the hood that gets flipped up● An EZ Detail Brush can help you reach down in to the engine bay
Related Articles
Here are a few articles related to Engine Bay Detailing from our Ask-a-Pro Detailer Blog:
● 2006 Acura TL in Nighthawk Black Pearl Part 1● How to Detail Your Engine Bay● Product Review and Guide: 303 Aerospace Protectant● Why You Need a Bottle of the Multi Purposefull Klasse AIO● Product Review: DI Boars Hair Detailing Brush● Product Review: Chemical Guys Fade 2 Black● 2008 m6 in Black Sapphire Metallic● Product Review: Mini EZ Detail Brush● Ferrari f40 60 Hour Restorative Detail by Todd Cooperider and Craig Reed● Learn Something New, Don't Read the Instructions
View all Engine Bay articles
49
Detailing Dictionary
The definitions below were specifically created to help define various detailing terms, they are not general definitions.Understanding these detailing terms is critical to ensuring you have the information you need to detail at a high level. Werecommend reading all of these definitions in addition to reading through the rest of our Detailing Guide and our Ask a ProDetailer Blog.
22ple Brand
1. After years of research and development 22ple has created car care protection products that will truly amaze you. They areknown for their innovative high silica-content glass coatings that can be applied to your paint, metal, wheels, and plastic trimpieces. With these coatings offering just the right combination of gloss and durability, 22ple has its sights set on becomingthe innovative leader in car protection!
303 Brand
1. Since 1980, when the brand was developed originally for the aerospace/aviation industry, 303 has been the premiumchoice for avid boaters, car enthusiasts, homeowners, etc. 303 products offer a diverse line of protectants and cleanersdesigned to keep the things you love looking and performing like new. From Protectants to Detailers, 303's top of the lineproducts have been exceeding the highest expectations of even the most avid users. They can help you clean and protectalmost your entire interior of your vehicle including carpets, seats, console, leather, etc. Not only are 303 products great forautomobiles they are recommended by manufacturers of boat/RV awning, spa cover manufacturers, outdoor furnituremanufacturers, 303 products are trusted and recommended everywhere. In fact, 303 Fabric Guard is the only fabric guardproduct recommended by leading outdoor manufacturer, Sunbrella for water repellency retreatment of their fabrics. 303products is owned and manufactured by Gold Eagle Co, headquartered in Chicago, IL. Gold Eagle Co. was founded in1932, and is the manufacturer of several leading brands, including STA-BIL Fuel Stabilizer, HEET Gas-Line Antifreeze,and104+ Octane Boost. This great brand has created so many high quality products you are going to love!
3D Brand
1. With over two decades of research and development 3D has established a solid name as a leader in the car wash,detailing, and car care industry. 3D works hard to provide innovative products at a great value to their customers. Productslike the Speed (polish and protect) have taken the detailing world by storm and showed off their high-quality, value-basedproduct development. With a large variety of products, you will find everything you need from shampoos to dressings, topolishes and much more!
3M Brand
1. 3M is a global fortune 500 company whose many innovations have improved the daily life of people all over the world. Theyhave made products that allow you to drive at night easier, made buildings safer, and made consumer electronics lighter,less energy-intensive and less harmful to the environment. 3M is always coming up with new innovative ideas that willcontinue to help shape the world as we know it.
Abrasive
1. A particle suspended in a liquid used to polish or compound paint.2. Aluminum Oxide particles attached to paper to form sand paper.
Acid
1. A corrosive material (pH less than 7) that is generally used for wheel cleaning.
Adhere
1. To stick to. To not easily be removed."This polish is adhering to the paint."
Adhesion
1. The force between two objects that are stuck together."The paint has good adhesion to the substrate."
Alcantara
1. Composite material, generally made of Polyester and Polyurethane.
Alkaline
1. Any substance with a pH value greater than 7; also referred to as a "base."
All in One (AIO)
1. A product intended to not only clean, but add gloss and protection in one step.
Alloy
1. A compound formed with more than one type of metal or nonmetal.
AMPs
1. or Amperage is a measurement for the consumption or amount of electricity used.
Anodized
1. A metallic surface that has been electrically treated to produce a cosmetically pleasing, corrosion resistant finish.
APC
1. All Purpose Cleaner. A cleaner that can be used in many situations for cleaning multiple surfaces.
APEX Steam Brand
1. APEX Steam works hard to provide their customers with high-quality steam cleaners to help them save money and valuabletime while on the job. Skipping on harmful chemicals, APEX steam cleaners will help you clean various surfaces using onlyhigh-temperature steam. APEX makes several high quality models that come standard essential accessories included witheach unit and a fantastic warranty, APEX Steam is a company you will want to work with.
Applicator Pad
1. A pad used to apply product. This could be a coating, sealant, wax, or anything else that is applied to a surface of a car,inside or out.
Backing Plate
1. The plate that is attached to a polisher. Polishing pads are attached to this plate with hook and loop material.
Baked Dry
1. A term used to describe the use of heat to accelerate the drying or curing of paint, clear coat, chemicals or film.
Base Coat
1. Also referred to as "Color Coat," the layer(s) of paint on top of the primer and below the clear coat.
Beveled Edge on Pads
1. Rounded corners on the edge of foam pads.
Biodegradable
1. Describes any substance that organically decomposes.
Blackfire Brand
1. Blackfire produces high quality detailing supplies that really help you take your detailing to the next level. Many of theproducts were upgraded at the end of 2017 as they revamped this already great line of products and refreshed thepackaging. They also are now known as Blackfire Pro Detailer's Choice, to drive home their mission of creating qualityproducts professional detailers will enjoy. They have some outstanding waxes, sealants, polishes, shampoos, quickdetailers, wheel cleaners, tire dressings and more. Each product is uniquely well balanced so it's easy to use and achievestop-notch results.
Blotting
1. The process of placing a towel down on a surface and lifting it straight up when drying rather than dragging the towel overthe surface, to help reduce the chance of marring the paint.
Blower
1. Gas or electric power tool that forces warm air through a round tube to concentrate the air in one direction. They arecommonly used to dry cracks, crevices, grills, spoilers, and other areas tough to dry with a towel.
Body Shop Safe
1. Describes a chemical which will not interfere with the process of painting a car (i.e. cause fisheyes, adhesion problems, orother unwanted side effects).
Brake Dust
1. Iron particles from the brake rotor and pads, commonly deposited on wheels.
Brush
1. A tool comprised of either natural or synthetic bristles to displace dry particulates or agitate liquid cleaning chemicals.Commonly used on soft surfaces like carpets, mats, fabric seats, soft convertible tops and leather. Usually has a handle forhand usage but some brushes can attach to buffers.
Buff and Shine Brand
1. Buff and Shine was founded by Richard Umbrell in the 1980's after he listened to his father complain about how poorlysome pads were made for detailers. Richard designed and tested some pads that far surpassed some "leading pads" andthus a business was born. As the business evolved they developed a philosophy to focus on quality, listen to the users andimprove the technology. They custom designed tools to make some of the best pads possible and detailers have beenloving them for decades now.
Buffer
1. A power tool which can be a rotary machine or a dual action machine. Used for applying protection, buffing, polishing, orsanding paint or clear coat.
Buffer Trails
1. An unwanted result on the paint or clear coat from improper buffer usage.
Carnauba
1. A type of wax, commonly sourced from Brazil, which is mixed with other ingredients to form a paste or liquid automotivewax.
CarPro Brand
1. CarPro has developed some of the most exciting products in the detailing industry that are loved by professional detaielrsand weekend detailers. They offer a wide range of detailing products including shampoos, tar remover, contaminantremover, glass polish, polishes, ceramic coatings, sealants, trim protection and so much more. The revolutionary IronX andCquartz products combined with other top notch items have quickly made them an industry leader that detailers simply can'tget enough of. Check out the CarPro products today!
CCS Pads
1. A patented technology of Lake Country Mfg. which uses groups of closed foam cells on the surface of a buffing pad whichdo not absorb polishes or waxes.
Chemical Guys Brand
1. Chemical Guys is committed to providing high quality detailing products that produce only the highest quality results. Forover 30 years they have manufactured and distributed products to every kind of detailer around the world. They produce awide variety of waxes, sealants, glazes, polishes, metal polishes, degreasers, dressings and so much more. Best of allChemical Guys constantly refine their products and develops new ones, so you always have the latest and greatest.Chemical Guys keeps their finger on the pulse of the detailing community, which helps them develop products on thecutting edge of detailing technology. Their wide range of products is sure to help you throughout your detailing process. Trysome of the Chemical Guys products and you'll know why they have a worldwide following.
Chrome
1. An electroplated finish of chromium typically applied over a metal or plastic substrate.
Clay Bar
1. A soft and malleable synthetic bar that can remove contamination from smooth and non-porous automotive surfaces (i.e.glass, clear coat). You must spray clay lube on the surface beforehand so the bar will glide over the surface safely.
Clay Lube
1. Lubricant specifically made to assist a clay bar to glide over the surface it is being used on.
Clay Magic Brand
1. Clay Magic produces some of the finest clay bars in the detailing industry. Clay Magic is the original, seven patented claybar that was developed during the early 1990s. Clay Magic started making clay bars to help safely clean vehicles from theeveryday contaminants that your vehicle comes in contact with. Contaminants such as brake dust, rail dust, industrial fallout, tree sap, paint overspray, bug smear, road grime, etc. can leave your vehicles surface dirty and rough to the touch.Clay Magic clay bars help safely remove these contaminants from your vehicle so it can be optically clear and aestheticallypleasing. Simply spray clay lube (quick detailer) over a small area and then glide the bar side to side and you'll instantlynotice the surface is cleaner and smoother. It's safe to use on almost all paint, glass and clear coated surfaces.
Cleaner
1. A chemical designed to emulsify dirt or contaminants.
Cleaner Wax
1. A type of wax containing a chemical paint cleanser to remove very minor surface defects and contaminant build ups whileleaving a layer of protection at the same time.
Cleaning
1. The act of removing foreign dirt/particulates/contamination from a surface.
Clear Bra / Paint Protection Film
1. Urethane film applied to painted surfaces to preserve them, specifically preventing chips and scratches.
Clear Coat
1. Paint without color. It is the final coat in modern paint systems applied on top of paint to preserve it.
Cloth Seats
1. Seating surfaces with a fabric/broadcloth covering.
Coating
1. Any product that adds measurable thickness to the top of paint, and creates a cross linked barrier with extended durability.
Collinite Brand
1. Collinite is located in Utica, New York and was founded in 1936 by Charles H. Collins. Collinite has a long standing heritageto quality products. They believe that many manufacturers have been looking past the quality of their own products, insteadfocusing on marketing. Collinite took advantage of this and invested its time into quality of production. All of Collinite'sproducts are made in the USA and hand poured in small kettle-sized quantities to ensure top shelf quality. The quality ofCollinite products spread like wildfire via word-of-mouth and after 1994 and business really picked up. Along the wayCollinite products collected 5 first place awards in industry-wide product tests. This success all came without advertising,modern packaging, and an internal sales force. Collinite products truly stand for "It's what's inside that counts."
Colourlock Brand
1. Description Coming Soon!
Compound
1. A paste or cream containing aggressive abrasive particles designed to quickly remove noticeable defects in the paint orclear coat.
Concentrate
1. A product that is intended to have water added by the end user.
Contaminant
1. Any foreign particle rested, embedded, or bonded to any part of a vehicle that would ideally be removed when cleaning.
Counterweight
1. The component in a Dual Action polisher that balances the eccentric orbital motion of the tool.
CR Spotless Brand
1. CR Spotless is committed to providing you quality water that will not leave watermarks while cleaning your home,automobile, boat, etc. They produce high quality water filtration systems that de-ionize water and remove impurities. TheCR Spotless water filtration systems allow you to wash without fear of watermarks and you don't even have to dry thesurface. This type of innovation has made CR Spotless the premier name in the industry. Try one of their portable or wallmounted units and use it all around your home and vehicles.
Cure
1. The action of a paint or coating cross-linking to form a stable matrix or film. Gases will evaporate from the surfaces duringthis process so you should not protect the surface until this process is complete.
Cure time
1. The duration of the curing process, or length of time between application of a product and that product reaching a fullystable state.
Cutting
1. Removing the top layer of paint or clear coat via polishing or compounding. This is done most effectively with a buffer.
Cutting Pad
1. An aggressive pad that gets attached to a buffer to help remove noticeable surface imperfections in the clear coat or paint.
DeFelsko Brand
1. DeFelsko Corporation, a leading U.S. Manufacturer of coating thickness gages and inspection instruments, has beendelivering Simple, Durable and Accurate gages since 1966. Family owned and operated in Northern New York, their stateof the art facility houses research, development, manufacturing, quality, sales and service departments.
Over the years, DeFelsko has pioneered many technologies including the first combination ferrous/non-ferrous gage toautomatically recognize the substrate and take a measurement and the first hand-held ultrasonic coating thickness gage fornon-metal substrates including plastic, wood and concrete. Starting with the mechanical PosiTest FM and GM, DeFelskohas shown a commitment to excellence in manufacturing and after sales support. DeFelsko actively participates in severalkey organizations (SSPC, NACE, ASTM, ISO) to improve and promote the science of coating inspection.
DeFelsko is recognized as a premier American manufacturer of quality inspection instruments.
Degreaser
1. A solvent chemical designed to emulsify and flush oils and greases from a surface.
Detail Guardz Brand
1. Detail Guardz, formerly known as Hose-eez, developed a product in 2015 to help stop an age old problem: cord and hosejamming under your tires. The Detail Guardz Tire Guard features patented rollers, which not only help stop frustrating tirejamming, but they help guide the hose or cord around the tire. This allows you to pull and move your cords and hosesaround your car so much easier than before! In 2016 online sales of the Tire Guard took off and this simple, yet extremelyeffective product, became a staple in many detailing garages.
Detailer Brand
1. With Detailer by DetailedImage.com, you can represent yourself as a detailer everywhere you go. Under Armour T-Shirts?Check. Under Armour Hoodies? Check. What about banners, stickers, tool bags? Check, check and that's right, youguessed it, check. The Detailer brand features various simple, yet functional and high-quality products that help you notonly promote the detailing industry as a profession, but as a great hobby as well. Take pride in your profession or yourfavorite hobby and show it off to others! This is a Detailer brand you will want to support!
Detailer's Helper Brand
1. Detailer's Helper specializes in belts that are paint safe and allow detailers to carry their favorite detailing products withease. These belts were made by owner of Detailer's Helper, Kevin Davis, who is a professional detailer. Kevin wanted aneasier way to carry items with him while detailing, while not having to worry about scratching the paint with the material,metal buckles, etc. After some testing, the Detailer's Helper belt was born and comes with various pocket configurations forprofessional detailers and weekend warriors alike!
Detailing Outlaws Brand
1. The Detailing Outlaws brand was born in 2017 and excels in manufacturing high quality and innovative detailing products.Their focus is "outside the box" thinking and coming up with products that help solve a detailing problem. The Buckanizerhelps keep your wash media organized and is only the first product with many more game changers to come!
Dilute
1. The process of adding water to reduce the concentration of a liquid product.
Dodo Juice Brand
1. Dodo Juice is a new detailing brand from the United Kingdom that has quickly garnered the attention and acclaim of somethe highest quality auto detailers in the world. Detailed Image is extremely proud to be one of the very first companies in theUSA to sell this product. The creators of Dodo Juice think outside the box, which has lead them to the create some of thehighest quality waxes and products in the industry. They experiment with a vast array of natural ingredients (bees wax,candelilla wax, coconut oil, monton wax, orange oil, carnauba wax, etc.), combinations of ingredients and more to give thedetailing community some of it's finest products. These unique ingredients help differentiate each one of their special waxesto meet the exact needs of each kind of detailer. Every wax contains a unique blend of ingredients that maximize the shineof various colors and come in the soft or hard version. Dodo Juice products are created by a very small group of highlyskilled technicians, who ensure only the highest quality products are created. Each pot of wax is hand poured andinspected for absolute perfection.
Dressing
1. A product designed to moisturize and protect rubber, plastic, or vinyl surfaces which may also contain ingredients to leavesome level of gloss behind.
Dry Sanding
1. The action of sanding without the use of water.
Drying
1. The act of removing moisture from a surface.
Dual Action (DA) Buffer
1. Refers to a polisher which both oscillates and rotates in order to remove paint defects or apply protection. Generallyconsidered more user friendly than a direct drive rotary polisher.
Durability
1. Refers to longevity. Length of time a product will last before evaporating or breaking down.
Duragloss Brand
1. Dr. William Bailey and his brother Jerry founded Duragloss in 1975 after their dissatisfaction with the car detailing productsthat were being offered at the time. Difficult to use, not very durable, and moderate result products plagued the market andso after two years of research and approximately one hundred trial formulations, Duragloss took the market by storm. Afterbeing known for high quality, easy to use products, Duragloss continued to develop over 50 products to help enthusiastsand professionals alike. So if you take pride in the way your vehicle looks try Duragloss products!
Dwell Time
1. The period of time you let a chemical/product sit on an automotive surface.
Elcometer Brand
1. Ever since the first Elcometer gauge was manufactured in 1947, their philosophy has been to provide industry-leading,innovative, high-quality products; supported by a best-in-class customer experience at a competitive price. By concentratingon these core values, Elcometer has grown into a global network with representation in over 170 countries. They have beenresponsible for creating many industry-leading devices that have made their name synonymous with quality meters andgages. Their products are absolutely essential for any professional detailer, body shop, car collector, restoration shop, etc.With a range of products, Elcometer has anything to meet your inspection needs!
Enamel Paint
1. A resin-type finish which cures to a hard gloss. Can be either pigmented with color or a clear coat.
Engine Bay
1. The compartment of a vehicle containing the engine and other mechanical components such as the alternator, air cleaner,battery, etc.
Environmental Protection Agency (EPA)
1. Department of the United States government responsible for protecting human health and the environment. As it relates todetailing the EPA regulates the allowable emission of pollutants into the environment from vehicles and the products thatcare for them.
Fabric
1. A material produced from woven natural or synthetic fibers.
Fabric Guard
1. A protectant that repels dirt or liquids from fabrics.
Fine Grade
1. A term typically used to describe a clay bar or polish that is only mildly aggressive or abrasive.
Finishing
1. The final step in the paint correction process, intended to remove any remaining fine surface defects or haze.
Finishing Pad
1. A soft pad that is used to produce a high gloss finish.
Fish Eye
1. A type of defect caused by contamination left on a surface during the painting process.
Flash Point
1. The temperature at which a chemical or solvent vaporizes and/or ignites.
Flat Pads
1. Pads that have no grooves or dimples in the face of the pad.
Flat Paint
1. Having no texture or orange peel.2. Having little to no gloss or shine.
Flex Brand
1. Flex tools is a leading designer of innovative and highly efficient power tools. Flex produces a wide variety of buffers,grinders and drills for over 80 years. They are a European based company that is now sweeping through the US. Theirbuffers produce outstanding results that have made them extremely popular with high end detailers. The remarkablebalance of power and safety has led to the Flex XC 3401 VRG buffer becoming one of the the most desirable buffers in thedetailing industry. It has plenty of power with minimal risks of burning or otherwise harming your vehicle. It can removepermanently remove the majority of the swirls and other fine imperfections in your vehicle's clear coat to reveal a deep andglossy shine.
Foam Gun
1. An apparatus that connects to a typical garden hose which uses water pressure and a soap/detergent to produce suds,usually for washing automotive exteriors.
Foam Lance
1. An apparatus that attaches to a pressure washer to produce suds from a soap or detergent to help wash the vehicle'sexterior.
Foam Pad
1. A pad produced with a cellular structure (can be either open or closed cell), used in paint correction or to apply protectantsor cleaners to a surface.
Fortador Brand
1. Fortador's company policy is to, "create effective solutions with no shortcuts". These units are powered by motors made byLamborghini, yes you heard that right, the same company that makes those iconic sports cars! You will notice bothcompanies have a similar logo as they are affiliated by sharing parts, styling and a commitment to excellence. Thesepowerful machines help you save valuable time when cleaning. No more double cleaning or waiting for your steam cleanerto heat up, Fortador knocks out dirt, grime, bacteria, germs and more super fast and easy. One machine can even supportup to three users at a time! This means you can save more of your valuable detailing time. State of the art featurescombined with incredible styling screams high quality professional work. Not only do they work incredibly well, but they runefficiently so you can save on operating costs. When you see and feel these units in person you know they will take yourdetailing business to the next level.
Gel Coat
1. A type of epoxy finish used to produce a smooth finish over composite materials such as fiberglass or carbon fiber.
Ghosting
1. When a nearly invisible mark appears in or on the clear coat or paint. It is common to see ghosting when you remove abadge, sticker or decal because the clear coat underneath is preserved extremely well and the surrounding clear coat maybe oxidized, creating a contrast.
Gilmour Brand
1. Gilmour has been making top quality products for the auto, home and garden industry for decades. They are part of theRobert Bosch Tool Company and pride themselves on manufacturing nothing but the best tools. They invest the time in todeveloping top quality products made from only the finest parts. Rest assured anything you buy with the Gilmour name willwork great and last for years to come. They are known to detailers for their foam guns, hoses, hi-flow shut off valves andmore. Each one of their products is something you'll be using for years to come and they guarantee it on most products withtheir Lifetime Replacement Policy. Very few, if any, companies back up their products with this kind of guarantee and this iswhy they have been so successful!
Glass
1. A solid material possessing high strength and transparency.
Glass Science Brand
1. Glass Science is a division of the Unelko Corporation which specializes in the cleaning and protection of automotive andhousehold surfaces. For the automotive industry their primary interests are in providing improved visibility for drivers bykeeping the glass clean and clear. Reduced visibility from inclement weather such as rain, sleet and snow can be a serioushazard. Keeping your glass optically clear during these conditions is easy when you have the right products. The GlassScience Glass Scrub is a special glass cleaner that will help you deep clean the glass so it is truly clean. The next step is toseal the glass with the Rain Clear Gel, which forces moisture to bead up and roll off with ease. Lastly you can apply the FogClear to the interior glass to reduce fog and keep your interior glass fog free. With any of the Glass Science products youare sure to see your glass in a whole new light.
Glaze
1. A product containing a mixture of oils and solids designed to feed porous single stage finishes and/or temporarily maskminor surface defects in order to provide a high gloss finish.
Gloss
1. An objective measurement of the "shine" of a paint finish, typically representative of reflective clarity.
Griot's Garage Brand
1. Griots Garage has been making car care products since 1988! Whether they were just starting out in a garage or as aninternational recognized brand, they always focused on product quality. In the beginning stages of the company, if theproduct quality fell short then they would ask the manufacturer to make improvements. This set the tone for Griots to takematters into their own hands and start making their own products. Today they continue on as innovators of high qualityproducts they can be proud of. With the Griot's line of products can always be sure they you will be able to have fun witheffective detailing products.
Grit Guard
1. A plastic screen designed to allow dirt and particulates to settle at the bottom of a wash bucket, reducing the risk ofre-contamination of a wash mitt or sponge.
Grit Guard Brand
1. Grit Guard provides washing solutions to help you wash more effectively and with less risks of adding swirls to your paint.The washing process is where the majority of new swirls are introduced to the paint. Help keep your washing mitt clean andsafe with the Grit Guard inserts.
GSM
1. Grams per square meter; A measurement of weight for microfiber towels to add standardization.
Gtechniq Brand
1. In 2004, scientists at Gtechniq created a line of products aimed towards perfecting all surfaces on a car. After lots of time,testing, and hard work, Gtechniq is now a high end detailing system for car care professionals and enthusiasts alike. Theystand out from the competition because of their Smart Surface Science, which combines micro-abrasive finishingtechnology along with unique bonding elements. These two features combine together to help produce a great finish on thevarious surfaces of the interior and exterior of your vehicle. Gtechniq offers a wide range of products designed to clean,polish, and protect the various materials on your vehicle with ease. They specialize in coatings that protect your vehicle fornot just days, weeks or months but for years! If you have a love of science and cars you will really appreciate the Gtechniqbrand!
Gyeon Brand
1. Gyeon offers a range of premium quality detailing products designed to help you achieve outstanding results, every time.Each product customers purchase will come with all information to help you easily achieve the best results. This falls right inline with their mission, which is to always "deliver the most technologically advanced products, at very competitive prices".Whether it is product development, customer service, detailing education. or overall constant improvement in their products,Gyeon takes pride in detailing products and the detailing industry as a whole.
Here is more from Gyeon "While known worldwide for their Quartz Coatings, GYEON is a full range car care manufactureroffering innovative products used by weekend enthusiast detailers and top level professionals alike. With a focus onuser-friendly products that deliver pro results, GYEON is growing rapidly with success in over 50 countries. The product linecovers everything you would need to perform a full detailing and protection service from start to finish, from surfacedecontamination to coating, and everything in between. Stand out products like Foam, Bathe, Smoothie Wash Mitt, Iron,WetCoat, CanCoat, Mohs, and the Silk Drier are must haves in any detailing arsenal."
Hack Job
1. Generally, this is a detailing job not performed up to the standards of a high quality detail."Did you see the hack job the detailer from dealership did to that car?"
Hand Applied
1. Using an applicator or pad by hand, to correct paint or to apply product.
Hazardous Chemicals
1. Any chemical that presents a significant threat to the environment or the health of those exposed to it without properpersonal protection equipment.
Haze
1. Lacking clarity, usually describing the appearance of the clear coat. A common effect of aggressive machine polishing thatcan be removed with a finer pad and polish combination.
Headlights
1. Lighting which illuminates the area in front of a vehicle to provide visibility in dark ambient conditions.
Headliner
1. The fabric or vinyl covering on a vehicle's interior roof.
High End Detailing
1. A type of detailing which involves an above-average level of dedication and effort to provide the best possible results.
HighLine Meter Brand
1. The HighLine Meter Paint Thickness Gauges will help you measure the thickness of your paint with ease! HighLine workshard to provide it's customers with high quality gauges at very affordable prices. These gauges are specifically designed tobe used by car enthusiasts, used car dealers, body shops, high quality auto detailers and anyone else interested inmeasuring the depth of their paint. Measuring the depth of your paint will help you assess the thickness of the clear coat,which will in turn help you determine exactly how to care for it best. With the high quality and affordability of these greatunits, Detailed Image is excited to offer HighLine Meters!
Holograms
1. See Buffer Trails
Hook and Loop
1. Fabric that has either a hook or loop attached, when touched together they temporarily join together.
HydroSilex Brand
1. HydroSilex is a multinational company with boards and branches all over the world. They specialize in the chemical industryand are committed to releasing high quality detailing products, which is evident with their first release, Recharge. With theiroverall vision of quality and user-friendly products they have quickly become extremely popular amongst detailers.
IGL Coatings Brand
1. IGL Coatings strives to not only offer high-quality automotive coatings, but cleaners and conditioners as well. You can findproducts for trim, wheels, windows, interior and so much more in their offerings. Best yet, most products contain all-naturalingredients or are formulated with reduced hazardous chemicals that can be found in other products on the market.
IK Brand
1. Behind the IK brand there is an international group of people united by the passion to develop new ways of spraying. IKworks hard to make it easier, safer and more efficient in various areas, along with car detailing. These high quality,innovative tools will help save you not only time but money as well.
Industrial Fall Out
1. Also known as rail rust, embedded iron particles in the surface of the paint.
Iron Remover
1. A product used to remove ferrous material that gets adhered to the exterior surface of a car.
Jenesco Brand
1. Jenesco specializes in providing customers with high end ozone generators. Ozone gases are designed to help you removeodors, mold and mildew by destroying the molecules, bacteria, and spores associated with them. This ozone gas canactually go anywhere air can go (between fibers, into cracks, into the AC system), allowing it to penetrate hard to reachareas. The molecules of this ozone gas then attach themselves to the molecules of the mold, mildew or odors, chemicallychanging the structure and destroying them at the source. Jenesco offers various models to choose from and if you arehaving issues with mold, mildew, and or removing pesky odors, these units are for you!
Jescar Brand
1. Since 1978 Jescar has been the US distributor of Menzerna Polishing Compounds introducing German quality to theautomotive assembly plants and ultimately to the professional detailing market. With their unique understanding of theautomotive products market, Jescar expanded beyond only polish to develop its superior range of car care products, andsome of our fan-favorite products were born! Jescar Finishing Products is now manufacturing their new high-performanceGerman engineered compounds and polishes that take paint correction to a new level of quality.
With over 40 years of experience in industrial polishing and high-gloss surface applications, Jescar is committed to theautomotive detailing market with innovative new product development for the ultimate in car care.
Karcher Brand
1. In 1950 Alfred Krcher invented the high-pressure cleaner. Since then Karcher has expanded and grown into a complete lineof award winning pressure washers. They work hard to provide high quality machines at great prices to their customers.From small electric pressure washers to large gas units, Karcher has something for everyone to be excited about. If you arelooking for an easy and effective way to clean your car, siding, driveway, decks, windows, and many other household jobs,Karcher Pressure Washers should be your choice.
Kenotek Brand
1. Since 1988 Kenotek has specialized in producing innovative and high-end car detailing and carwash products. Whether youare a professional or weekend warrior, every product in the Kenotek line is formulated with high-quality ingredients andhelps you achieve excellent results!
Kevin Brown Method
1. The original KBM article was delivered in e-mail form, outlining a simple set of instructions that enabled a polishingenthusiast to drastically increase the cutting and finishing performance of a typical random orbital polisher.
The KBM dictates that the simplest aspects of polishing are continuously considered or calibrated, including: frequent padcleaning (to control paint residue build-up); the targeted use of a supplemental wetting agent (to extend the use of a singleapplication of buffing liquid, to better distribute buffing liquid across the pad face, to increase cut); the implementation ofmachine tilt or the targeted addition of user-applied pressure (to equalize pressure across the pad face, to minimize thepercentage of pad face contacting the polishing area, to increase the width of the pad's contact patch across a curved orcrowned panel shape); the use of low polishing speed (for smooth, controlled, and comfortable machine operation, for lowerpad and panel temperatures, and to allow more time for the pad to conform to the polishing surface, particularly whenuser-applied pressure or machine tilt is increased).
Klasse Brand
1. Klasse revolutionized automotive surface care and has since built a reputation as a leader in durability, shine, andprotection.
Kranzle Brand
1. Kranzle is a German-based company dedicated to providing high-quality pressure washing systems to users all over theworld. Kranzle was launched in 1974 by Josef Kranzle. From the very beginning, the utmost importance was to alwaysprovide superior quality on all of their units. This amazing quality shines through even in their products today. Kranzle hasestablished a high-end image in the cleaning industry and continues to innovate and grow.
Kwazar Brand
1. The Kwazar Pro+ line has been available in over 100 Countries for years and they are well known for their high qualityspray bottle designs. From marine to residential, and even commercial, Kwazar has a bottle for every situation. If you arelooking for high quality, 360 spraying angle, chemical resistant spray bottles, check out the Kwazar Pro+ line!
Lacquer
1. A type of paint technology (typically single stage) which cures to form a thick, high gloss finish. Often referred to morespecifically as "cellulose lacquer" in automotive finishes.
Lake Country Brand
1. Lake Country is a pioneering manufacturer of buffing and polishing products sold worldwide.
Layering
1. Multiple applications of a paint or coating over a substrate, intended to produce a thicker final result or "film build."2. Multiple applications of a sealant or wax protecting the paint or clear coat.
LC Power Tools Brand
1. LC Power Tools is a branch of the popular polishing pad brand, Lake Country Manufacturing. Lake Country alwaysprioritized real world testing and user feedback when developing new pads and made sure they worked hand in hand withthe popular polishers on the market. With LC Power Tools, they are taking the "Innovation to Make Life Easier" mantra, butinstead of focusing on pads, they are creating innovative, user-defined tools to help you step up your polishing game. TheUDOS Polisher is first in line of many more great tools to come.
Leather
1. Material produced from natural or synthetic hydes that have undergone a finishing or "tanning" process. Can be finishedand dyed in multiple ways and may or may not have a urethane protective top layer applied.
Leather Cleaner
1. A chemical designed to safely remove dirt and foreign oils from the surface and pores of a leather surface. Oftenleather-specific cleaners are pH neutral in order to avoid damaging the material or causing accelerated wear.
Leather Conditioner
1. A lotion-like product designed to feed a leather hyde with oils to keep it soft and supple, and prevent cracks or rotting.
Leatherique Brand
1. Leatherique is a very special company that is run much different than most businesses you may encounter. GeorgePavilsko Sr. founded the business in 1968 and its still owned and operated by the Pavlisko family. However George did notstart out looking to form a business, he simply wanted a solution for restoring leather. He developed leather care solutionsthat were producing exceptional results. His leather care products evolved into a business which is now currently operatedby George Pavlisko Jr. These products have gained a world wide following and are used today by some exclusiveorganizations such as the Smithsonian Museum, Henry Ford Museum and The Old Harrah Collection. They are also theleading leather care provider for many car clubs like the Rolls Royce Owners Club, BMW Owners Club, Porsche OwnersClub and many more. The Leatherique employees are far more than just employees. Leatherique has a group of highlytalented, enthusiastic employees that really embody leather care. The employees are generally long tenured and use theproducts they work with. Many employees have personally restored leather and work on their own automobiles andfurniture. Therefore when you call with a technical question you get a highly qualified response. We find this extremely rarein a day and age when calls are often handled overseas by someone reading from a manual. The Leatherique employeesprovide invaluable insight on leather care which continues to make their leather products top notch. The Leatheriqueproducts are developed in secret so the familys secret ingredients remain unknown. They have however shared that theirproducts are made with a complex blend of collagens, animal proteins and absolutely no fillers. Many other brands usefillers that make the leather temporarily look and feel great but can have potentially harmful long term affects. Leatheriqueprefers to use only the most effective ingredients that truly care for the leather, not just make it look good for today. This hashelped them develop some one of the best cleaning and conditioning formulas on the market with the Rejuvenator Oil andPrestine Clean. Leatherique also make a variety of leather dyes, crack fillers and other leather restoration products.
Lexol Brand
1. Lexol products are a division of Summit Industries based in Atlanta, Georgia. This privately owned business purchased theLexol company in 1977 due to their excellent reputation for leather preservation and maintenance. They originally providedleather care to the equestrian market and expanded in to shoes, automobiles, luggage and more. Lexol is sold throughoutthe US and in international markets. Their products give you everything you need to clean, condition and dress your leather.
LSP
1. Last Step Protection; the final step you take to protect the paint.
Lubricant
1. A barrier between two surfaces that add slickness to prevent marring or scratching.
Makita Brand
1. With nearly 90 years of experience in advanced motor design, Makita applies the latest innovation to engineer andmanufacture the best power tools in the world. Makita Power Tools have more power and less weight, and are morecompact and more efficient than any other. At jobsites around the world, professional users are dumping the old, getting thenew and gearing-up with Makita. Makita offers more solutions for the professional trade.
Marine 31 Brand
1. Some car detailing products can work great on boats, but yet they are not specifically formulated for marine use. WithMarine 31, you get products designed for Marine usage and tested out in the toughest conditions. You'll be able to cleanand protect your fiberglass, gelcoat, vinyl seats and so much more! Marine 31 formulated each of these products to workincredibly well while still being environmentally friendly. If you are looking for a detailing line of products for any of yourmarine toys give Marine 31 a try today!
Medium Grade
1. Refers to the aggressiveness of a clay bar or polish, which is greater than that of a fine grade, They are more likely to marthe paint or clear coat but are stronger options than their fine grade counterparts.
Meguiar's Brand
1. Meguiar's celebrated 100 years of business in 2001 and they continue to impress the world with their top quality products. Itis still a family run business that is in it's 4th generation inside the Meguiar's family. They started with humble beginnings asa furniture polish laboratory and progressed into automobiles when horse carriages used the same wood as furniture. Fromthere they expanded in to more car care products as the automobiles popularity rose. The Meguiar's family was committedto designing the best products on the market and they were rewarded with an ever growing customer base. The familyworked hard and began selling to manufacturers, body shops, professional car detailers, consumers and more. As theMeguiar's name became synonymous with car care the customer base grew outside the US and they are now a globallyrecognized name in car care. The Meguiar's products have won countless awards and been used by many winners of thePebble Beach Concours d'Elegance. Company headquarters are in Irvine, CA but they have a 200,000 square foot state ofthe art production facility in Nashville, TN. This new facility helps them manufacture over 300 unique products to help youcare for virtually every square inch of your car. Meguiar's is car care crazy and they definitely have the products to meetand exceed your needs.
Menzerna Brand
1. Menzerna is one of the highest regarded brands in the automotive detailing industry. The German company was founded in1888 and their current headquarters are still in Germany more than 130 years later. The continuous growth of this businesshas forced them to expand their operations in to France and Morocco. Menzerna has clearly established themselves as oneof the worlds leading suppliers of polishes for automotive surfaces and more. These polishes help make many differentsurfaces smooth, clean and aesthetically pleasing. Many leading automotive manufacturers work closely with Menzerna todevelop the most effective and efficient polishes. Recently Menzerna created a new type of polish that delivers amazingresults. Previous polishes used larger particles for more cutting power but they left the surface much rougher, whichrequires additional work. The new polishes use some of the smallest and smoothest abrasive particles ever put in to apolish. This helped deliver great cutting power with a remarkably smooth finish that looks outstanding. This type ofinnovation has kept Menzerna one step ahead of their competitors. Over the last five years they have developed so manynew products that they already account for 35% of their yearly revenue. While they quickly develop and produce products,quality is always the top concern. Menzerna is ISO 9001 certified which means their products meet some of the highestquality controls in the world. Part of being certified includes: documentation of all processes, standardized procedures forsupplier qualification, strict control of incoming goods, in-process quality control, traceability of all manufactured batchesand regular management reviews. This extensive list of qualifications is independently verified to ensure Menzerna onlydelivers the absolute highest quality products. Menzerna continues to raise the bar for detailing brands and we can't wait tosee what they will come up with next.
Metal Polish
1. A polish containing chemicals and abrasives specifically made for metal.
Metal Wax
1. A protectant for metal surfaces designed to hold up to higher temps such as exhaust tips and wheels.
Metallic
1. Small metal flakes (micas) in paint, used for an aesthetic purpose.
Metering System
1. A device used to precisely mix or dilute chemicals.
Metro Vacuums Brand
1. Metro Vacuums was started with a $50 gift from Israel Sterns father-in-law in 1939. He turned that small investment into alarge manufacturer of high quality vacuums and other related products. Metro produces a variety of machines that are allalmost directly related to the forced circulation of air. Most commonly they sell vacuums that are amongst some of the mostwell balanced tools on the market for suction power, features, durability, capabilities and more. Metro has been expandingtheir product line since the 1980s into more specialized areas. The vacuums they have developed for cleaning computersand other electronic equipment is a great example of this. Metro is one of the worlds leading suppliers of electronic carevacuums. They also now produce inflators, deflators, pumps, fans, pet drying blowers, motor cycle dryers, Data Vacuumsand more. All of these tools meet exceedingly high standards so you can be assured of a quality long term investment withall Metro products.
Micro-suede
1. A type of synthetic fabric made with tightly woven fine fibers, which appear similar to natural suede.
Microfiber
1. Fabric produced from a blend of fine synthetic fibers (typically polyester/polyamide), designed to provide superior moisturewicking and surface cleaning.
Microfiber Detergent
1. A cleaner used for washing microfiber products that does not leave behind any detergents to help maximize the lifespan ofmicrofiber products.
Microfiber Pad
1. A type of cutting and/or polishing pad made up of microfibers on the face.
Mobile Detailer
1. Detailer without a fixed location. Someone who will come to your location.
MSDS
1. Material Safety Data Sheet; Information on the product you purchased. It may include information on proper use or potentialhazards for the product.
Multi-Step Process
1. A series of different tasks carried out to produce a final result.
Mytee Brand
1. Mytee is one of oldest carpet cleaning machine company in the industry today. The company has roots dating back to 1977but the Mytee brand itself started in 1994, with John LaBarbera and the portable water heater product at the time, the MyteeHot. With high quality, awesome technology and customer service, Mytee quickly rose to the top of the hot water extractorindustry. Today Mytee manufacturers some of the industrys finest hot water extractors for auto detailing. Their highperformance carpet cleaners range from compact and portable to large, commercial units. They have multiple machinesthat will be sure to meet any of your detailing needs!
NanoSkin Brand
1. With new state of the art technology NanoSkin has been manufacturing a complete line of detailing supplies that includeprotective shields, waxes, polishes, compounds, cleaners, glazes, and other specialty cleaning products. This started in2003 when NanoSkin first started its research and development with the latest nanotechnology advances. The AutoScrubpads are their prized jewel which shows the exact innovation NanoSkin has become known for. This pad has saved peopletime, money, and energy when removing contamination from the paint. NanoSkin vows to improve surface quality, reducingpolishing time, enhancing surface durability, and surface brightness with future advancements. According to NanoSkin thisinnovation will "make life easier while saving time for the more important things in life".
Nextzett Brand
1. Nextzett was formed after Einszett closed in 2015 and it is comprised largely of the team that worked at Einszett anddeveloped many of the Einszett aka 1Z products we all love. Many of the products are exactly the same and some havealready been enhanced for improved performance! This team is dedicated to keeping up the proud Einszett traditions whilemoving the brand forward with new innovations.
The history of Einszett is a German line of high-quality auto detailing supplies. Founded in 1936, Einszett has based theircompany on one simple philosophy that remains until this day: produce a premium quality formula without compromisesand offer excellent customer service. By staying small and privately owned, they were able to take advantage of beinginnovative and focused on their original mission. Einszett became certified ISO 9001, one of only a handful of productmanufacturers that can make this claim. Their passion for perfection and quality helped them develop much industryleading products and gain a strong following amongst enthusiasts and professionals worldwide.
One Step Polish
1. A single polishing step to correct defects in the paint or clear coat.
OPMs
1. Orbits Per Minute The amount of times per minute the center of the backing plate will rotate around the center of themachine.
Optimum Brand
1. Optimum car care products is an independently owned and operated detailing brand that produces high quality detailingsupplies for those interested in high quality results. To create the most effective products possible Optimum works withpaint manufacturers and other OEM suppliers to understand all the products, materials and new technology used in theindustry. This helps Optimum research and design products that meet and exceeds the needs of professional detailers andweekend detailers alike. Optimum then sends their products out to top detailers around the country for feedback, whichhelps them continuously refine their products. Their products are easy to use in the sun or shade and they are very easy touse. Optimum puts a tremendous emphasis on creating environmentally friendly products as well. Each product is designedto have minimal environmental impact where ever possible. The Optimum line of products is extremely well balanced and itreally makes this an outstanding all around brand! Detailed Image has all of Optimum's newest products including some oftheir most recently improved products. We highly recommend you try the Optimum line of products today!
Orange Peel
1. A slightly bumpy painted surface that resembles the texture of an orange's exterior skin.
Orbital Buffer
1. Uses a fixed oscillating pattern without rotation to work a product on the surface.
Original Finish
1. A finish that was applied at the factory, not done by a body shop.
ORM-D
1. A postal service designation for products which are considered "Other Regulated Materials for Domestic Transport Only."This means it could be dangerous to transport due to pressure from an aerosol container or their potentially harmful/causticnature.
OSHA
1. The Occupational Safety and Health Administration, an office of the US Department of Labor responsible for the oversightof workplace safety guidelines for the use of best practices and personal protection equipment.
Overlapping passes
1. A technique utilized while applying a polish or protection where each pass overlaps the previous pass by 50% to ensurethorough application.
Overspray
1. Airborne particulates generated during the application of a sprayed paint or coating which bond to unintended surfaces.
Oxidation
1. The result of a porous material becoming dry and/or brittle due to prolonged exposure to sun and air. Often manifests itselfas a dull, chalky appearance on the surface of clear coat, paint, rubber, etc.
P&S Brand
1. With over 50 years of experience in the detail products industry, P&S provides high quality detailing products for almost anydetailing step. Many of these products are even hand-picked by Renny Doyle after extensive testing and used by Renny inhis day to day details. P&S and Renny will continue to evolve and improve the Double Black Renny Doyle Collection, alongwith all P&S products, so that you can use the same products as a world-class detailer.
P21S Brand
1. P21S car care products was founded in Germany and its headquarters are still there today. Much like German automanufacturers this German car care manufacturer strives for perfection. Their products must excel at every aspect of theirjob and meet the worlds most demanding standards. A good example of this is when virtually every other manufacturerused an acidic wheel cleaning formula, P21S was thinking outside the box. Acidic formulas can be too strong for somewheel finishes, so P21S found a neutral pH cleaner that was just as effective and totally safe on all wheels. In 2007 theywere the first company to use pure carnauba wax, where as other companies were using far less carnauba content. Theresults are an unbelievably glossy finish from the new P21S 100% Carnauba Wax, which is rivaled by few if any products.This kind of innovation and pursuit of excellence has kept P21S as one of the worlds most trusted and highly regardedbrands in car care.
Pads
1. See Applicator Pad

Paint Cleaner
1. A chemical which uses solvents and/or very mild abrasives to remove contaminants from painted surfaces, preparing themfor further polishing or the application of a protective product.
Paint Gauges
1. Precision instruments which use either mechanical or electronic means to measure the thickness of paint film applied overa substrate.
Paint Prep Pads
1. Pads with a urethane rubber face, used as an alternative to a clay bar, to decontaminate painted surfaces.
Paint Preparation
1. The process of readying paint for a wax, sealant, or coating. This can include washing, decontamination, compounding, andpolishing.
Paintwork Cleansers
1. See Paint Cleaner
Petroleum Distillates
1. Organic compounds derived from crude oil through a refining process.
pH Scale
1. A numeric scale ranging from 0-14 which describes the acidity or alkalinity of a substance. A pH of 7 is considered neutral.
Pig Tail
1. A pattern of deep scratches, resembling a pigs curly tail, most often caused by trapped particulates during the process ofsanding or polishing with a Dual Action Polisher.
Pinnacle Brand
1. Pinnacle was created to satisfy and exceed the demands of car care enthusiasts seeking perfection. They started out withone single ingredient, carnauba wax which is very hard and clear. The wax protects the leaves from the Tree of Life, whichis a tall palm tree found in northern Brazil. The leaves are collected and the wax is separated from the leaves and thengraded. Pinnacle only uses No. 1 Yellow, which is the finest grade carnauba available. Pinnacle then refines the wax onemore time to ensure all impurities are removed and the result is pure ivory carnauba which goes in to every Pinnacle wax.The result is a head turning shine that is extremely crisp and reflective. This same kind of refinement and meticulousattention to detail goes in to every product Pinnacle creates. They pursue perfection with each product and haveestablished themselves as one of the premium manufacturers of high quality car care products.
Plastic
1. Material made of synthetic or organic compounds with a moderate to low melting point which is easily molded into a varietyof forms. Often used both inside and outside automobiles due to it's relatively good durability, lightweight and low cost.
Pneumatic
1. Describes a type of power tool which is powered by a high volume of compressed air.
Polish
1. A liquid or paste with suspended abrasive particles intended to remove mild to moderate defects from a surface and refiningits finish.
Polisher
1. A power tool used to correct surface defects or apply protection on paint, glass, or plastic surfaces.
Polishing Pad
1. A medium grade pad designed to work with a polish to remove moderate surface defects.
Poorboy's World Brand
1. Poorboy's World Inc. was founded in 2002 and is family owned and operated. The founder Steve, has been detailing forover 35 years, 20+ of them professionally. He has detailed National Show winners as well as everyday vehicles. Poorboy'sWorld Inc. is headquartered in Florida, with distributors around the world and growing. All the products are proudly made inthe USA. Steve works with his chemist to develop, produce and distribute products efficiently & quickly. Their product list isvery extensive and covers virtually every area of detailing. With Poorboy's World products you will be able to fully detail theinterior, exterior and engine bay with ease. The products create a show car shine every time but are easy enough foranyone to use. Poorboy's World has a very simplistic view towards the creation of their products. They must be highlyeffective, easy to use and affordable. Elaborate packaging and other "fluff" is not their style. These products get right downto business with impressive results at a great value. All of their products can be used in the sun or shade and apply andremove with ease. The overall value of these products is exceptional, which has led to their world wide following.
Porter Cable Brand
1. Porter Cable is one of the most well established names in the power tool industry and throughout the world. They havebeen in business for over 100 years designing and manufacturing tools to help people and businesses accomplish theirgoals. Porter Cable is an ISO 9001 certified company which requires the company to have extensive documentation andknowledge about their supplies, suppliers, production process, quality control and more. Porter Cable tools are meant towithstand countless hours in the harshest conditions. They include a warranty with almost every tool they make and haveservice centers around the US and beyond to ensure you have a great experience with them. Porter Cable has won manymajor awards for design innovation and engineering. In 1996 the Smithsonian Museum created a new section for archivedmaterials and honored Porter Cable by placing many original tools and company memorabilia in the exhibit. Porter Cable'sability to engineer products at the highest level has helped them become a fixture atop the US power tool industry.
Pre-Wash
1. The use of chemicals such as tar removers, degreasers, iron dissolvers, or soap to help clean prior to starting the normalwash process.
Professional Detailer
1. A person who is capable of cleaning, polishing and protecting an automobile at a high level while acting in a professionalmanner in all aspects of their business.
Protection
1. Any product which provides a sacrificial barrier between the environment and a vehicle's material surfaces, slowing naturaldeterioration.
PSI
1. Pounds per Square Inch, a measure of pressure which can apply to gases or liquids.
Quick Detailer
1. A liquid product designed to add lubricity between a towel and surface, allowing the safe removal of dust or oils on asurface. These products may also contain gloss enhancers or some protection.
Raggtopp Brand
1. Raggtopp Convertible Care products are exclusively tested and endorsed by The Haartz Corporation, original equipmentmanufacturer of convertible topping for virtually every American and European convertible automobile manufacturedthroughout the world. This goes to show how credible the Raggtopp products are for convertible top care. RaggtoppConvertible Care Products are exclusively designed for the auto-care professional and convertible top enthusiast whodemands the very best manufacturer approved convertible top cleaner and protectant. Raggtopp Convertible Care productsdo not contain silicone and will not harm paint, chrome, glass or plastic windows. If you are a convertible owner, Raggtoppproducts are a must have!
Rail Dust
1. Red or rust color spots on the finish that can penetrate deep into the clear. Caused from transport or embedded brake dust.
Random Orbital Buffer
1. A power tool which attaches to a backing plate and buffing pad that uses random oscillation to spread a product onto asurface and/or utilize an abrasive to remove surface defects from a surface.
Reliable Brand
1. Reliable was founded in 1955 by the father of the current CEO, making it a very successful family business! They havealways focused on customer service and product innovation. This focus has helped Reliable grow from a small provider ofsimple sewing machines, to a much larger company specializing in creating machines in several different markets. Fromsewing, fabric care, irons, to steam cleaners, Reliable has a variety of quality products to choose from. Their professionalsteam cleaning products are used in detail shops, dentist offices, jewelry stores, hospitals, restaurants, and various othercommercial applications. Reliable products use steam to help clean which can sterilize without the use of any harmfulchemicals. Steam cleaners have become popular in detailing for cleaning carpets, crevices, exterior trim, center consoles,seats and so much more. You can find a variety of these steam cleaners, which are great for detailing anything from yourcar to your home, here at Detailed Image!
Resin
1. Thick liquid which is most often used to harden composite materials such as fiberglass or carbon fiber.2. A liquid ingredient in some protective coatings and sealants.
resqme Brand
1. Laurent Colasse, founder of resqme, Inc. originally introduced the LifeHammer in the late nineties to help keep people safefrom vehicular entrapment situations. After this product being a hit, resqme strived to make a smaller, more accessible toolthat anyone can carry on a day to day basis. The resqme car escape tool was released and was used by first respondentsacross the country. Since then, resqme has made it their mission to help people become more safety conscious and helpsave lives with simple, convenient tools. Everything from wake up driving alarms, personal safety alarms, to pepper spray,resqme is a company that will keep you and your loved ones safe during some of lifes unfortunate events.
Restore
1. To bring back to a previous or original condition.
RIDS
1. Random Isolated Deep Scratches; random in the fact that there is no "pattern" to the scratches.
Rinseless Shampoo
1. A type of shampoo that is typically low sudsing and high in polymers to provide lubricity without the need to flush awayexcess residue with water.
Rotary
1. A buffer that has no secondary action to its rotation."ZOFRO Polishing Machine (Zero Offset Forced Rotation Orbital)"
RPMs
1. Revolutions Per Minute; How many times in a minute the backing plate on a rotary machine rotates.
Rupes Brand
1. Rupes has been following the key principles of being intuitive, quick, creative, and innovative since 1947. This has allowedthem to become one of the leaders of the international tool market today. You can find many of their products world wide,from Europe to Japan, to South Africa and Australia. Their LHR15ES and LHR21ES polishers are well known to thedetailing community and they show the exact type of quality and innovation that Rupes has been known for.
RZ Mask Brand
1. RZ founder Steve Torbenson was a big extreme sports fan and enjoyed riding dirt bikes, 4 wheelers, etc. The dirt, dust, andpollen, however, tried to put a damper on the fun. So in 2010, Steve invented a filtration mask sleek enough to fit under ahelmet, comfortable for all-day use, a particulate rating of 99.9%, with replaceable filters and long-term durability. Themasks feature lots of innovative technology so they are very comfortable while functional.Detailers can be protected from polishing dust, odors, vapors, pollen and more while looking professional.
Sanding
1. The use of various grits of sandpaper to remove material from a surface.
Scangrip Brand
1. For more than 100 years Scangrip has been manufacturing high quality, innovative hand tools for the industrial andautomotive sectors. They have achieved tremendous success with their range of durable and functional work lights forvarious professionals, especially car detailers. The Colourmatch line of lights will help you spot any imperfection in yourpaint with an unparalleled amount of perfection and ease of use. With the focus on design, functionality, and leading LEDtechnology, Scangrip is cemented as a top company in the automotive/detailing industry.
Scratches
1. Below surface defects which typically appear linear in nature.
Sealant
1. A type of synthetic protectant, usually polymer or resin based, with durability that is usually longer than that of a wax, butless than that of a coating. It also enhances the appearance of paint.
Semi-Permanent Coating
1. A strong, cross-linked film that is typically based on strong base elements (e.g. silica, ceramic) which is more resistant todegradation than a sealant or wax.
Shampoo
1. A liquid or gel which contains a surfactant and a co-surfactant designed to help loosen dirt and contaminants and create aslick surface so the paint is not easily marred while washing.
Sheeting Method
1. A drying technique using water to dry the car. Using an open ended hose, at a low pressure, you flow water from the highersurfaces down. This cascade effect of water can remove 80+% of water from the surface of your car.
Shine
1. A subjective term typically used to describe a surface with high gloss and reflective properties.
Short Cycle
1. To not fully work the polish. Fast arm movement, and not allowing the polish to fully do its intended job to correct or finishpaint.
Single Stage Paint
1. Paint that does not require clear coat.
SM Arnold Brand
1. Since 1928 SM Arnold's goal was to enable their customers to sell quality products at a competitive price. With this goal inmind they have grown to offer one of the most extensive lines of cleaning maintenance accessories in the United Statestoday. They manufacture and import high quality products such as chamois, wash mitts, buffing and polishing pads,applicators, sponges, microfibers, brushes, brooms, and much more! Many of these products are even made right here inthe USA. Their slogan says it all, "When it comes to cleaning care products... We shine!".
Smooth / Soft Start
1. The function of a machine to not immediately go to the full selected speed or RPMs/OPMs.
Snappy Cleaner
1. A powdered detergent used to gently and thoroughly clean and refresh microfiber towels or foam pads.
Solution Finish Brand
1. Solution Finish originated in Huntington Beach, California and maintains manufacturing facilities in Long Beach, Californiaso the products are proudly made in the USA. They are committed to providing the most effective and highest quality trimrestoration products for professional detailers and detailing enthusiasts. Their award winning Black Trim Restorer removesoxidation, it doesn't just cover it up like many other "quick fix" products. Solution Finish combines ancient ingredients andadvanced polymer technology to create a unique product. It truly restores and protects any originally black plastic or vinyltrim, leaving a deep, rich black finish without the "wet look" and greasy residue. A consumer driven company, SolutionFinish continually researches and seeks feedback from customers to ensure their product surpasses expectations and isabsolutely the best in the business. We highly recommend you try Solution Finish if you're looking to restore your faded,oxidized black trim to a like new finish!
Solvent
1. A chemical substance which dissolves other dissimilar chemicals.
Sonax Brand
1. SONAX products are made to provide outstanding results while being environmentally friendly. They pride themselves onbeing innovators of high quality detailing supplies that both professional detailers and weekend detailers will love. Theyconstantly research ways to improve their products so they can offer the best in the business. The SONAX Wheel CleanerFull Effect is a great example of their innovation and determination to be an industry leader. This cleaner has provided adeeper and faster cleaning than anything they have developed before. They stay focused on making the productsenvironmentally friendly as well so you know you are using safe and effective products.
Spindle Threads
1. The threaded connection between a polisher's spindle/arbor and a backing plate, measured in size and pitch.
Spray on Protection
1. Any sealant, wax, or coating which can be atomized for easy application.
Spray on Sealant
1. A form of spray on protection with properties similar to a traditional polymer sealant.
SprayMaster Brand
1. SprayMaster works hard to provide customers with high-quality spray bottles and triggers, ready to tackle any cleaning jobyou can even think of throwing at them. If you have a heavy degreaser or a light cleaning quick detailer, SprayMaster has abottle for you.
Steam Cleaner / Steamer
1. A tool that uses a boiler to generate pressurized, high temperature water vapor which can be used to clean or emulsifysoluble substances with minimal saturation. Also useful to destroy mold spores and bacteria.
Stoner Brand
1. Stoner was founded over 60 years ago and is located in Lancaster County, PA. This company is really top notch with boththeir products and the way they conduct business. Stoner has over 300 different products that primarily come in aerosolcontainers. They supply products to over 6,000 different manufacturers, businesses, organizations, governmental agencies,etc. Stoner strives to provide outstanding products and work environment. Stoner was the proud recipient of the 2003 of theMalcolm Baldrige National Quality Award. This award recognizes excellence in operations and manufacturing that isextremely difficult to win. Stoner is only one of fourteen small businesses to ever win this award. Top quality products havenever been created with a sacrifice in the quality of the work culture. Employees have high morale and really appreciateworking for an honest and reputable company. Our personal experiences with Stoner employees have been outstanding.Each employee is very knowledgeable, polite and helpful. All orders are packed safely and shipped in a very timely manner.Try some of the outstanding products from Stoner today and experience their high quality products.
Streaks
1. Remaining residue left behind after you have attempted to wipe away excess product.
Surfactant
1. A compound often used in shampoos, soaps, all purpose cleaners, and degreasers to emulsify and carry dirt andcontaminants away from a surface.
Swirls
1. Random, circular below-surface defects, which cumulatively often resemble a spider web when viewed under direct lighting.
Synthetic Leather / Leatherette
1. Artificial leather. A man-made product to resemble real leather.
Taillights
1. Lighting to provide illumination to the rear of a vehicle, often also used as a visual indicator of braking, reversing, or toindicate turns.
Tape
1. Usually low tack masking style tape used to protect trim from being hit with a pad during correction or polishing.
Teflon
1. A registered trademark of DuPont Co., a chemical compound with non-stick properties known as PTFE(Polytetrafluoroethylene).
The Last Detail Brand
1. TLD Products is known for their product called The Last Cut. The owner of the company is an active detailer that worksdirectly with their chemist for product development and testing. Their main focus is to provide products that you can dependon and customer service that you can rely on. Versatility, ease of use and consistent results were the main factors that werekept in mind during product development and final testing. These factors will also remain valid during future productdevelopment. It is known that all detailers do not have the ability to be in perfect conditions during every job, thereforehaving products that will be able to adapt to various environmental/work conditions will provide detailers with a better overallwork experience. TLD Products has a goal to develop products that are strong enough for the professional detailer yet easyenough for the weekend detailing enthusiasts.
The Rag Company Brand
1. The Rag Company works hard to not only provide the finest microfiber products at a great value, they also are looking toeducate readers about what to look for in microfiber. They source towels from around the world with a variety ofpolyester/polyamide ratios to provide you with all the options and information so you can make an informed decision onwhat works best for you. They carry some shop towels at a great value but they are more known for taking tremendouspride in their wide selection of extremely high quality towels that last a long time. Even though that may mean somecustomers purchase fewer towels, since these high-quality towels last so long, the Rag Company is very okay with that.They want to only provide their customers with the best towels at the best price!
Three Step
1. A paint correction process comprised of three distinct stages of defect removal; can describe any combination of sanding,compounding, or polishing procedures to produce a refined finish.
Throw
1. The distance the center of the backing plate travels in reference to the center point of the head of the machine.
Tornador Brand
1. Tornador inventor, Dennis Dehn, was working with Japanese associates to help develop various detailing products. Somestuck, some did not, but they kept working. From a lunch and a simple dust can cleaning idea, the Tornador was born.Featuring patented tornado like air movement Tornador has come up with some real detailing game changers. Fromcleaning guns that take any cleaning solution and make them a foam, to a foam gun to use on the exterior of your car, to asimple blower, Tornador has the tool for you. All work with your air compressor and are perfect for the detailer who does nothave access to a lot of water. High quality and innovation are huge features of Tornador tools and they are determined tokeep producing new tools to make your car detailing easier than before!
Trim
1. Metal, vinyl, leather or plastic components on a vehicle's interior or exterior which are attached to the main body, intendedfor protection or ornamentation.
Tuf Shine Brand
1. TUF SHINE is an innovative company best known for their amazing permanent tire shine. Detailers who try the TUF SHINETire Clearcoat are blown away by the remarkably dark finish that is not oily or greasy at all. The tires look amazing for yearsto come and really impress. TUF SHINE prides themselves on creating top quality products that exceed the expectations ofthe most demanding detailers. Creating products that solve issues detailers have faced for decades is an amazingachievement for this company. Please take a minute to review all the products they have to offer and learn more aboutthem.
Two Bucket Method
1. An approach to traditionally washing a car which employs separate buckets for soaping and rinsing a wash mitt, sponge, orbrush.
Two Step
1. A paint correction process comprised of two distinct stages of defect removal; typically one step of compounding and onestep of polishing, but can describe any combination of either.
UV Rays
1. Also referred to as Ultraviolet Radiation, UV has a shorter wavelength than visible light. UV exposure can cause thedegradation of many automotive materials such as paint, rubber, vinyl, and leather unless adequate protection is present.
Vacuum
1. A tool which employs an electric motor to generate suction, used to collect either wet or dry dirt and grime.
Vapamore Brand
1. Vapamore prides themselves on superior design, intelligent engineering, and high quality customer service. EveryVapamore product is built and rigorously tested so that every machine meets all of their high quality standards. Each one ofthe various size machines offers a 100% natural, chemical-free cleaning method that purifies your car, boat, RV, home, etc.and protects the health of your family by skipping harmful chemicals when cleaning. In the Italian language, vapore meanssteam and amore means love hence, the love of steam. Pick up a Vapamore and fall in love with steam cleaning today!
Vapor Systems Brand
1. In 1996 Steve Clingan established the company, Midwest EcoSteam located in Springfield, MO. In 1998 the company namewas changed to Vapor Systems LLC / Steam Cleaners Direct. Vapor Systems LLC imports the very best steam cleanersdirectly from Italy and distributes them to U.S. businesses and residences throughout the country. With over 16 years in theindustry you can be assured that Steve Clingan has been able to sustain longevity by knowing the products inside and out,being service oriented after the sale, and having one of the very best products and warranties on the market.
Vinyl
1. A form of plastic polymer often used to produce dashboard, door panel, and seat coverings as well as convertible tops.
Waffle
1. A type of towel or pad with a surface containing "pockets" or waves, similar in appearance to a breakfast waffle.
Waffle Weave
1. A type of microfiber towel typically used for drying a vehicle after washing, or for streak-free glass cleaning.
Wash Media
1. The tool used to wash the exterior of your vehicle.
Wash Mitt
1. A type of wash media consisting of natural or synthetic fibers as opposed to a foam sponge material. There's typically aplace to put you hand inside, hence the term "mitt".
Washing
1. The cleaning of the vehicle's exterior in order to prep it for the following steps, usually the decontamination step.
Water Based
1. A product that has water as the main ingredient as opposed to an oil or silicone.
Water Marks
1. The minerals that are left over when hard water evaporates. These can lead to the physical etching which can causeserious damage to a vehicle's exterior surfaces.
Water Purification
1. Removing minerals and elements from hard water through a filtering system.
Water Soluble
1. Something that is able to dissolve in water.
Water Spot Remover
1. Product that is used to remove minerals on the surface after water has dried.
Waterless Wash
1. A product with a high concentration of polymers designed to quickly emulsify and encapsulate dirt and grime for saferemoval with minimal water usage.
Watts
1. or Wattage is a measure of the amount of work electricity does. Volts x Amps = Watts.
Wax
1. A natural substance harvested from various organic sources which can be applied to paint and other glossy surfaces toprovide protection.
Weathering
1. Descriptive term for the effects of deterioration (patina) due to environmental exposure.
Wet Sanding
1. The use of water or other lubricants during the sanding process to carry abraded material away from the work surface andprevent loading of the sandpaper.
Wheel Woolies Brand
1. Wheel Woolies are manufactured by Braun Automotive, which has been around since 1875. Braun has been manufacturingvarious industrial brushes over the years, but really gained a following when the Wheel Woolie Brushes won the award forthe 2014 Detailing Accessory Product of the Year. The high quality fibers, sturdy yet light handle, etc. really took wheelcleaning to the next level. Braun has since built upon the success of the Wheel Woolie and expanded their line of highquality detailing brushes to meet any of your automotive detailing needs.
Wolfgang Brand
1. Wolfgang was developed by Bob McKee and a large team of German chemists. He set out to create a paint sealant thatcould bridge the gap between carnauba waxes and long-lasting paint sealants, while combining their most desirable traits.After years of testing and help from a German chemist, Wolfgang was born. Wolfgang is a German formula of superpolymers, but it is manufactured, bottled, and marketed all here in the US! From paint sealants, to shampoos, waxes,polishes, etc. Wolfgang covers all of your bases.
Wool
1. Natural or synthetic material typically used to produce a polishing pad for aggressive defect removal.
72
73
Index
Title Page ............................................................................................................. p. 1Wash and Dry ...................................................................................................... p. 2
Why Should You Wash Your Car? ................................................................. p. 2How Often Should You Wash Your Car? ....................................................... p. 2Pre-wash Setup .............................................................................................. p. 2Pre-wash Degreasing ..................................................................................... p. 2
Pre-wash Degreasing How-To .................................................................. p. 2Traditional Two Bucket Wash ......................................................................... p. 3Incorporating a Foam Gun ............................................................................. p. 3Sheeting Method ............................................................................................ p. 4Drying Your Vehicle ........................................................................................ p. 4Rinseless Wash .............................................................................................. p. 4Waterless Wash ............................................................................................. p. 5Iron Removers ................................................................................................ p. 5Facts and Tips ................................................................................................ p. 5Related Articles .............................................................................................. p. 6Related Videos ............................................................................................... p. 6What's Next? .................................................................................................. p. 6
Clay Bar ............................................................................................................... p. 7What Does a Clay Bar Do? ............................................................................ p. 7How Often Should You Clay Bar? .................................................................. p. 7Clay Bar Prep ................................................................................................. p. 7Choosing a Clay Lubricant ............................................................................. p. 7How To Clay Bar ............................................................................................ p. 7Decontamination Pads and Towels ................................................................ p. 8Facts and Tips ................................................................................................ p. 8Related Articles .............................................................................................. p. 8Related Videos ............................................................................................... p. 9What's Next? .................................................................................................. p. 9
Polish ................................................................................................................... p. 10Why Polish Your Car? .................................................................................... p. 10When To Polish Your Car ............................................................................... p. 10Why Use a Buffer? ......................................................................................... p. 10
Buffer Comparison Chart .......................................................................... p. 10Random Orbital Polisher ........................................................................... p. 14Forced Random Orbital Polisher .............................................................. p. 15
74
Rotary Buffer ............................................................................................. p. 15Choosing a Backing Plate .............................................................................. p. 15Hand Polishing ............................................................................................... p. 15Choosing Polishes .......................................................................................... p. 16
Compounds .............................................................................................. p. 16Cutting Polishes ........................................................................................ p. 16Finishing Polishes ..................................................................................... p. 16Paint Cleaners .......................................................................................... p. 16
Choosing Pads ............................................................................................... p. 16Pad Types ................................................................................................. p. 17Smaller vs Larger ...................................................................................... p. 18Pad Cleaning and Storage ........................................................................ p. 18
How To Polish ................................................................................................ p. 19Proper Lighting ......................................................................................... p. 19Taping ....................................................................................................... p. 19Random Orbital Polisher ........................................................................... p. 19Forced Random Orbital Polisher .............................................................. p. 20Rotary Buffer ............................................................................................. p. 20Hand Polishing .......................................................................................... p. 20
Facts and Tips ................................................................................................ p. 21Related Articles .............................................................................................. p. 21Related Videos ............................................................................................... p. 21What's Next? .................................................................................................. p. 22
Glaze ................................................................................................................... p. 23What Does Glaze Do? .................................................................................... p. 23Do I Need To Apply Glaze? ............................................................................ p. 23How To Apply a Glaze .................................................................................... p. 23
Random Orbital Polisher ........................................................................... p. 23Forced Random Orbital Polisher .............................................................. p. 23Rotary Buffer ............................................................................................. p. 24Hand Application ....................................................................................... p. 24
Facts and Tips ................................................................................................ p. 24Related Articles .............................................................................................. p. 24What's Next? .................................................................................................. p. 25
Sealant ................................................................................................................. p. 26What Do Sealants Do? ................................................................................... p. 26Layering and Cure Times ............................................................................... p. 26How Long Do Sealants Last? ......................................................................... p. 26How To Apply a Sealant ................................................................................. p. 26
75
Random Orbital Polisher ........................................................................... p. 26Forced Random Orbital Polisher .............................................................. p. 27Hand Application ....................................................................................... p. 27
Facts and Tips ................................................................................................ p. 27Related Articles .............................................................................................. p. 27What's Next? .................................................................................................. p. 27
Coatings ............................................................................................................... p. 29What Are Semi-Permanent Paint Coatings? .................................................. p. 29How To Apply a Coating ................................................................................. p. 29Layering and Cure Times ............................................................................... p. 29How Long Do Coatings Last? ......................................................................... p. 30Maintenance and Re-Application ................................................................... p. 30Facts and Tips ................................................................................................ p. 30Related Articles .............................................................................................. p. 30Related Videos ............................................................................................... p. 30
Wax ...................................................................................................................... p. 32What Does Wax Do? ...................................................................................... p. 32Layering and Cure Times ............................................................................... p. 32How Often Should You Wax Your Car? ......................................................... p. 32How To Apply Wax ......................................................................................... p. 32Facts and Tips ................................................................................................ p. 32Related Articles .............................................................................................. p. 32Related Videos ............................................................................................... p. 33What's Next? .................................................................................................. p. 33
Microfiber Towels ................................................................................................. p. 34What Is Microfiber? ........................................................................................ p. 34Is All Microfiber The Same? ........................................................................... p. 34Microfiber Care ............................................................................................... p. 34Facts and Tips ................................................................................................ p. 35Related Articles .............................................................................................. p. 35
Wheel and Tire .................................................................................................... p. 36Why Wheel Care Is Important ........................................................................ p. 36How Often Should You Care For Your Wheels? ............................................ p. 36Wheel Care How-To ....................................................................................... p. 36
Clean and Maintain ................................................................................... p. 36Polish ........................................................................................................ p. 37Protect ...................................................................................................... p. 37
Wheel Care Facts and Tips ............................................................................ p. 37Why Tire Care Is Important ............................................................................ p. 37
76
How Often Should You Care For Your Tires? ................................................ p. 38Tire Care How-To ........................................................................................... p. 38Tire Care Facts and Tips ................................................................................ p. 38Related Articles .............................................................................................. p. 38Related Videos ............................................................................................... p. 38
Exterior Trim ........................................................................................................ p. 40Why Trim Care Is Important ........................................................................... p. 40How Often Should You Care For Your Trim? ................................................. p. 40How To Treat Trim ......................................................................................... p. 40Facts and Tips ................................................................................................ p. 40Related Articles .............................................................................................. p. 41
Glass .................................................................................................................... p. 42Why Glass Care Is Important ......................................................................... p. 42How Often Should You Care For Your Glass? ............................................... p. 42How To Clean Interior Glass .......................................................................... p. 42How To Clean Exterior Glass ......................................................................... p. 43Facts and Tips ................................................................................................ p. 43Related Articles .............................................................................................. p. 43Related Videos ............................................................................................... p. 44
Interior .................................................................................................................. p. 45Why Interior Care Is Important ....................................................................... p. 45How To Clean and Protect Carpet ................................................................. p. 45How To Care For Interior Trim ....................................................................... p. 45How To Care For Leather Seats .................................................................... p. 45
Leatherique Leather Care Application ...................................................... p. 46Facts and Tips ................................................................................................ p. 46Related Articles .............................................................................................. p. 47Related Videos ............................................................................................... p. 47
Engine Bay .......................................................................................................... p. 48Is It Safe To Detail Your Engine Bay? ............................................................ p. 48How Often Should You Detail Your Engine Bay? ........................................... p. 48Prep Work and Precautions ........................................................................... p. 48How To Detail Your Engine Bay ..................................................................... p. 48Facts and Tips ................................................................................................ p. 48Related Articles .............................................................................................. p. 49
Detailing Dictionary .............................................................................................. p. 50Index .................................................................................................................... p. 73