Embed Size (px)
Citation preview

Nested tables in SAP Adobe Forms
For more tips, tutorials, Interview questions, certification questions, please visit SAPTechnical.com
SAP Adobe Forms
Nested tables in Adobe Forms
From
Nested tables in SAP Adobe Forms
For more tips, tutorials, Interview questions, certification questions, please visit SAPTechnical.com
Nested tables in Adobe Forms
This Tutorial demonstrates on using Nested Tables in Adobe Forms.
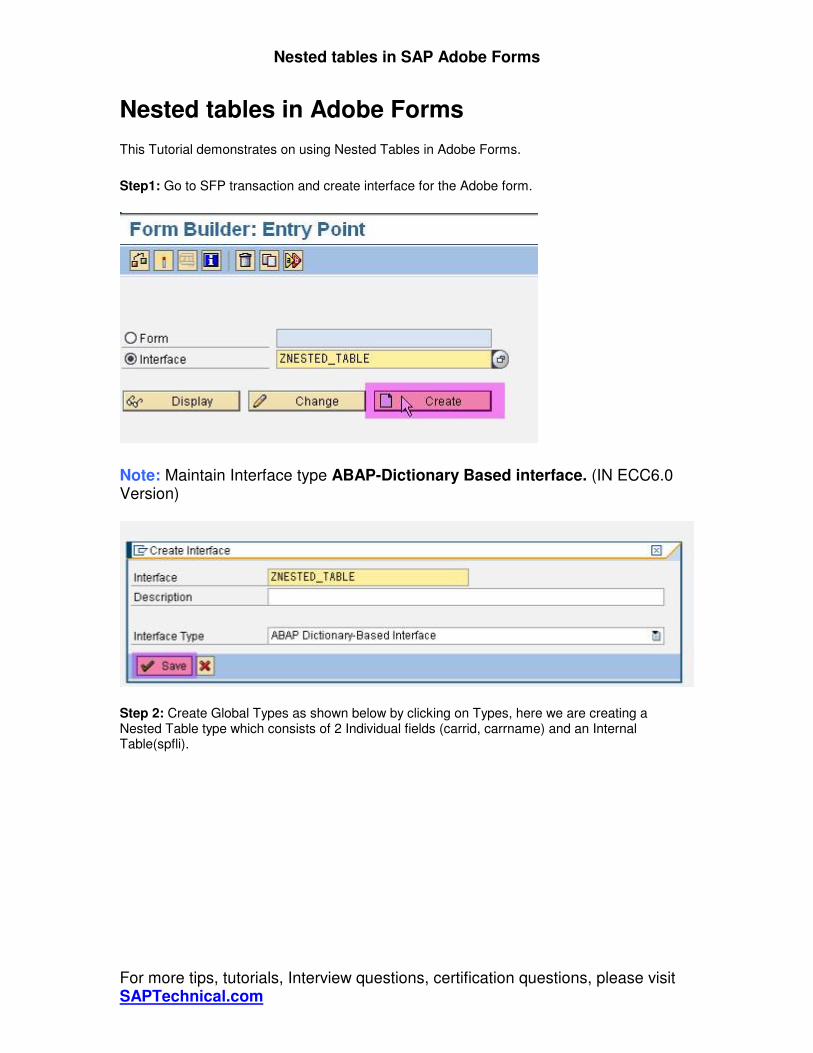
Step1: Go to SFP transaction and create interface for the Adobe form.
Note: Maintain Interface type ABAP-Dictionary Based interface. (IN ECC6.0 Version)
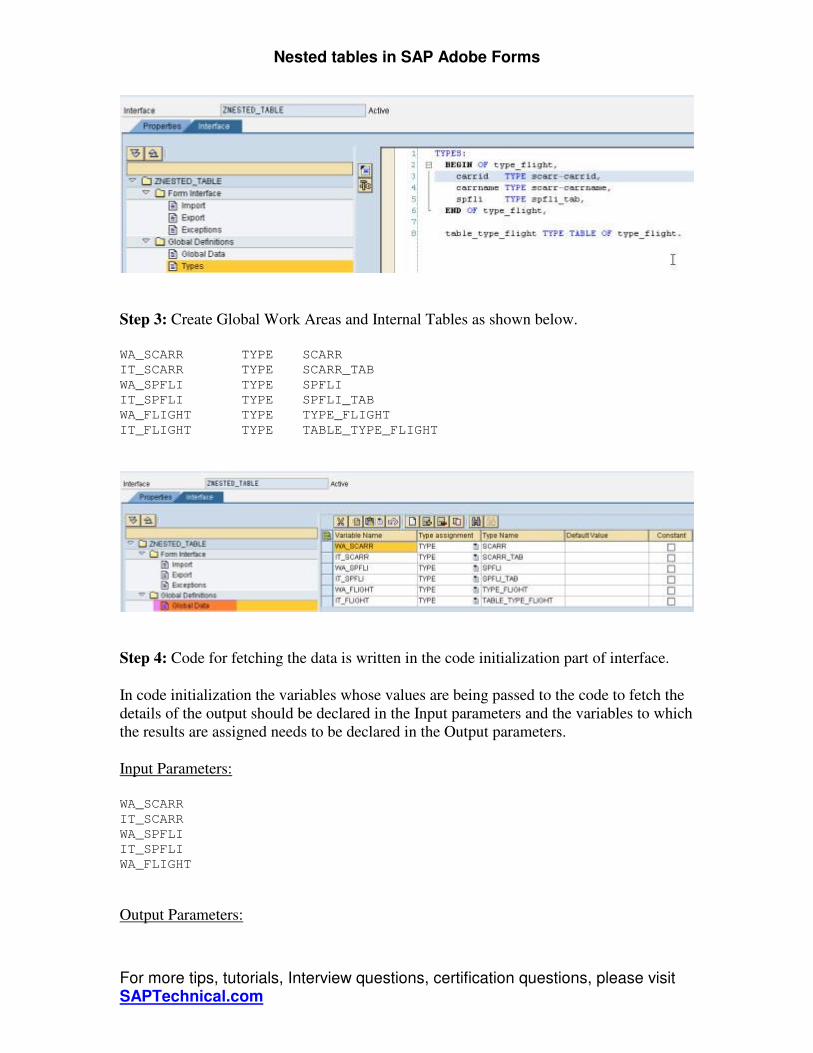
Step 2: Create Global Types as shown below by clicking on Types, here we are creating a Nested Table type which consists of 2 Individual fields (carrid, carrname) and an Internal Table(spfli).
Nested tables in SAP Adobe Forms
For more tips, tutorials, Interview questions, certification questions, please visit SAPTechnical.com
Step 3: Create Global Work Areas and Internal Tables as shown below.
WA_SCARR TYPE SCARR
IT_SCARR TYPE SCARR_TAB
WA_SPFLI TYPE SPFLI
IT_SPFLI TYPE SPFLI_TAB
WA_FLIGHT TYPE TYPE_FLIGHT
IT_FLIGHT TYPE TABLE_TYPE_FLIGHT
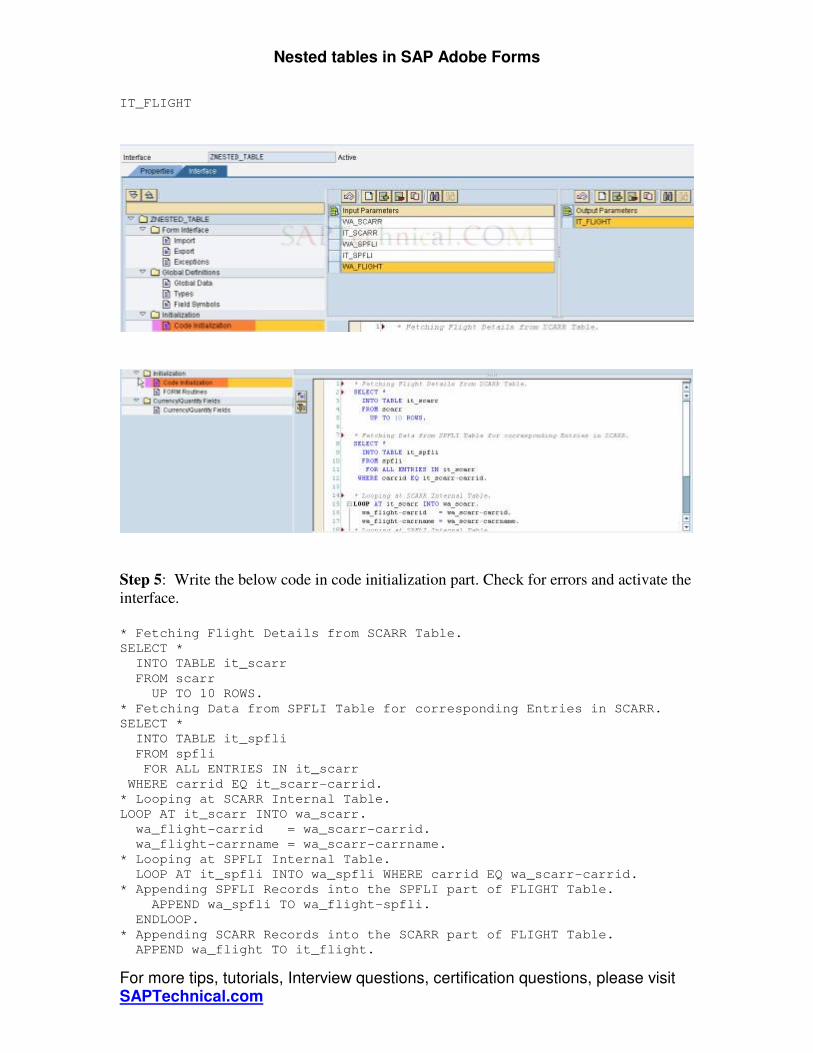
Step 4: Code for fetching the data is written in the code initialization part of interface.
In code initialization the variables whose values are being passed to the code to fetch the
details of the output should be declared in the Input parameters and the variables to which
the results are assigned needs to be declared in the Output parameters.
Input Parameters:
WA_SCARR
IT_SCARR
WA_SPFLI
IT_SPFLI
WA_FLIGHT
Output Parameters:
Nested tables in SAP Adobe Forms
For more tips, tutorials, Interview questions, certification questions, please visit SAPTechnical.com
IT_FLIGHT
Step 5: Write the below code in code initialization part. Check for errors and activate the
interface.
* Fetching Flight Details from SCARR Table.
SELECT *
INTO TABLE it_scarr
FROM scarr
UP TO 10 ROWS.
* Fetching Data from SPFLI Table for corresponding Entries in SCARR.
SELECT *
INTO TABLE it_spfli
FROM spfli
FOR ALL ENTRIES IN it_scarr
WHERE carrid EQ it_scarr-carrid.
* Looping at SCARR Internal Table.
LOOP AT it_scarr INTO wa_scarr.
wa_flight-carrid = wa_scarr-carrid.
wa_flight-carrname = wa_scarr-carrname.
* Looping at SPFLI Internal Table.
LOOP AT it_spfli INTO wa_spfli WHERE carrid EQ wa_scarr-carrid.
* Appending SPFLI Records into the SPFLI part of FLIGHT Table.
APPEND wa_spfli TO wa_flight-spfli.
ENDLOOP.
* Appending SCARR Records into the SCARR part of FLIGHT Table.
APPEND wa_flight TO it_flight.
Nested tables in SAP Adobe Forms
For more tips, tutorials, Interview questions, certification questions, please visit SAPTechnical.com
CLEAR wa_flight.
ENDLOOP.
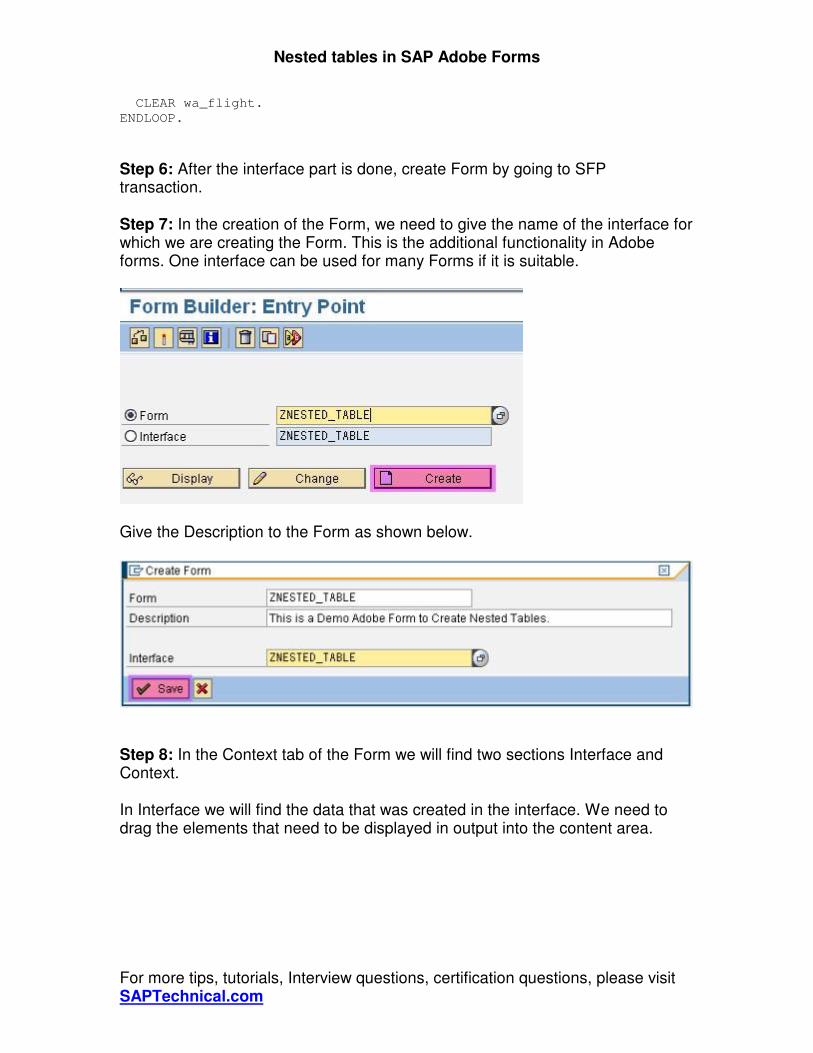
Step 6: After the interface part is done, create Form by going to SFP transaction.
Step 7: In the creation of the Form, we need to give the name of the interface for which we are creating the Form. This is the additional functionality in Adobe forms. One interface can be used for many Forms if it is suitable.
Give the Description to the Form as shown below.
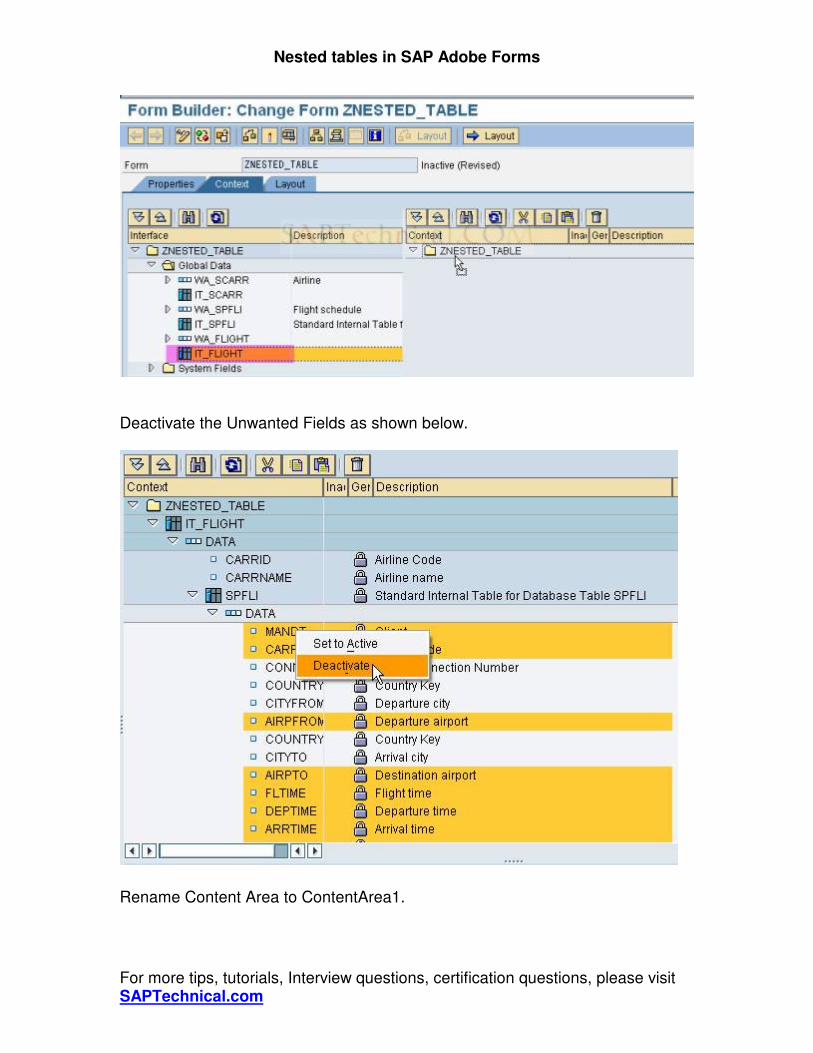
Step 8: In the Context tab of the Form we will find two sections Interface and Context.
In Interface we will find the data that was created in the interface. We need to drag the elements that need to be displayed in output into the content area.
Nested tables in SAP Adobe Forms
For more tips, tutorials, Interview questions, certification questions, please visit SAPTechnical.com
Deactivate the Unwanted Fields as shown below.
Rename Content Area to ContentArea1.
Nested tables in SAP Adobe Forms
For more tips, tutorials, Interview questions, certification questions, please visit SAPTechnical.com
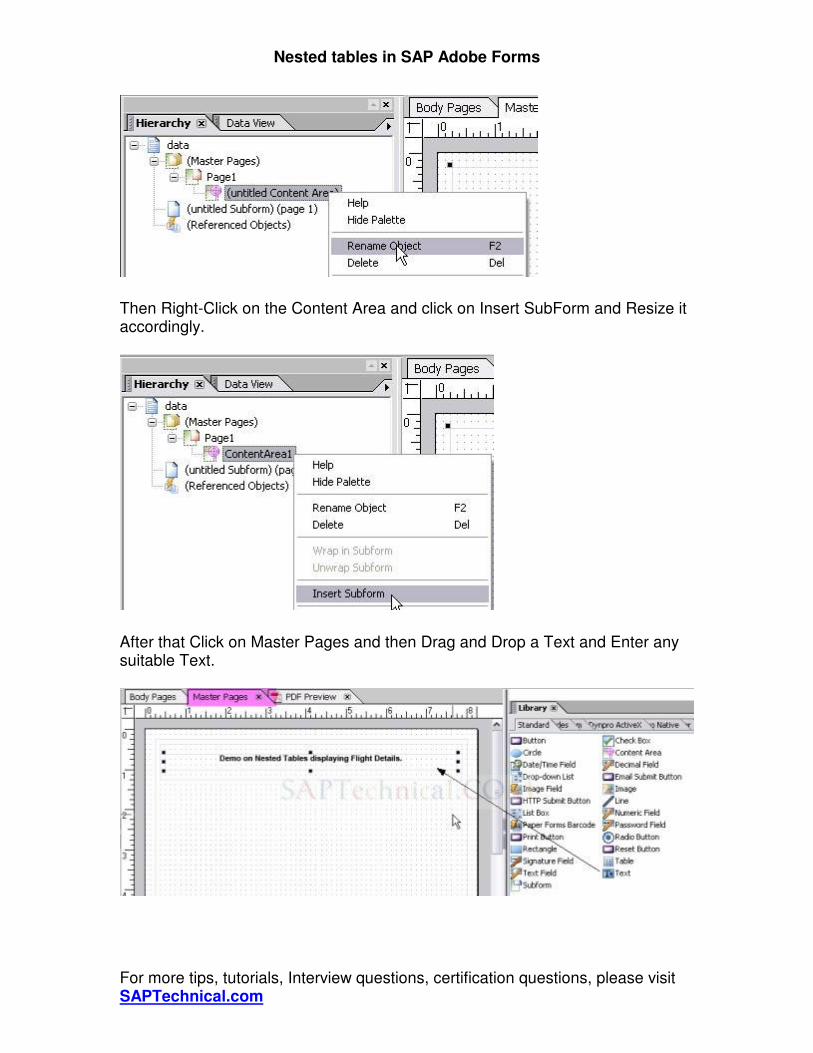
Then Right-Click on the Content Area and click on Insert SubForm and Resize it accordingly.
After that Click on Master Pages and then Drag and Drop a Text and Enter any suitable Text.
Nested tables in SAP Adobe Forms
For more tips, tutorials, Interview questions, certification questions, please visit SAPTechnical.com
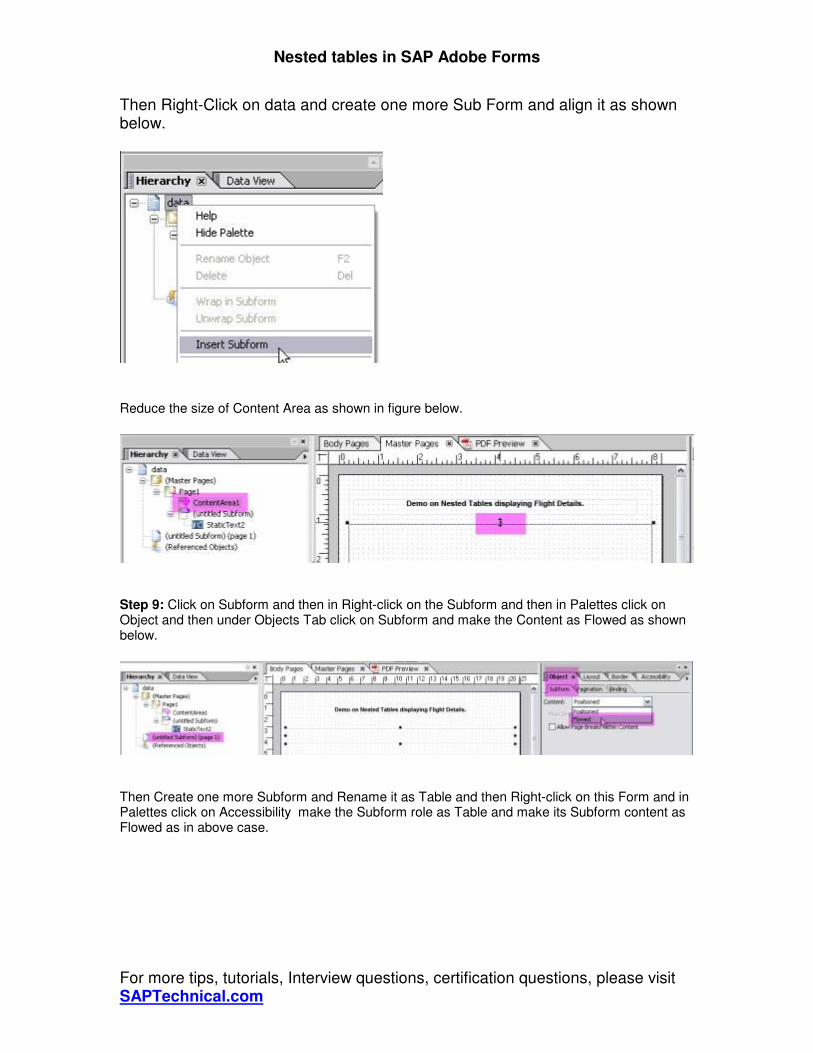
Then Right-Click on data and create one more Sub Form and align it as shown below.
Reduce the size of Content Area as shown in figure below.
Step 9: Click on Subform and then in Right-click on the Subform and then in Palettes click on Object and then under Objects Tab click on Subform and make the Content as Flowed as shown below.
Then Create one more Subform and Rename it as Table and then Right-click on this Form and in Palettes click on Accessibility make the Subform role as Table and make its Subform content as Flowed as in above case.
Nested tables in SAP Adobe Forms
For more tips, tutorials, Interview questions, certification questions, please visit SAPTechnical.com
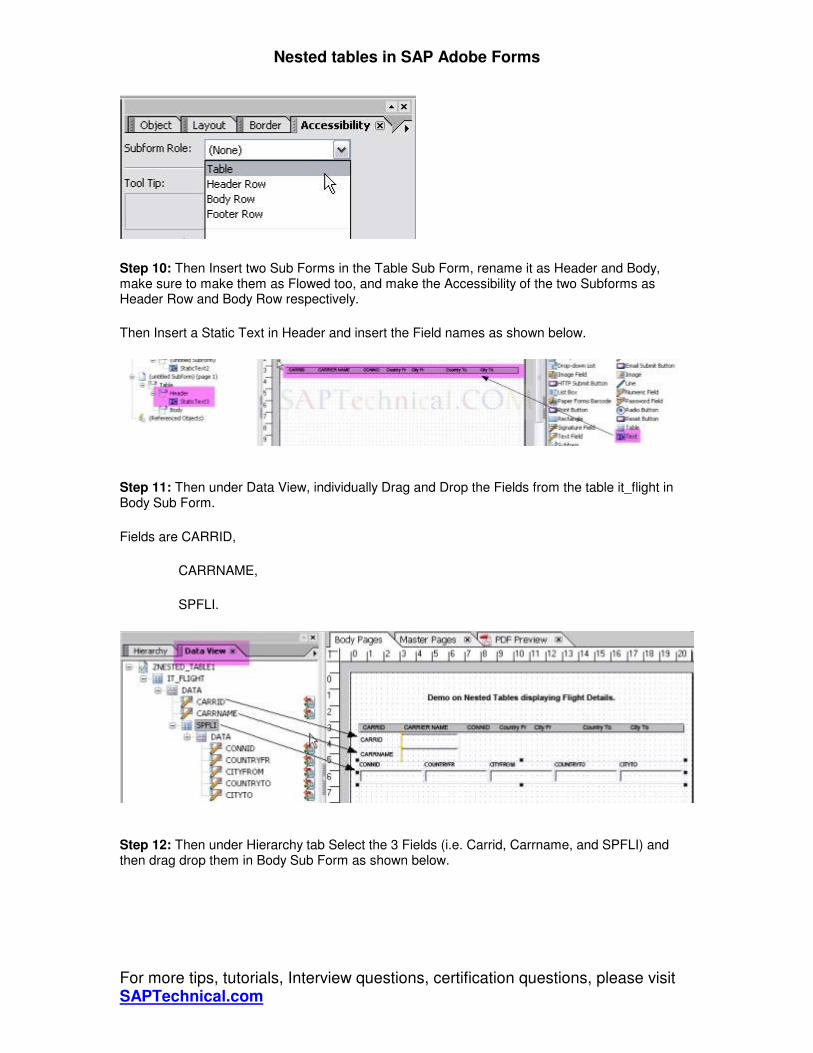
Step 10: Then Insert two Sub Forms in the Table Sub Form, rename it as Header and Body, make sure to make them as Flowed too, and make the Accessibility of the two Subforms as Header Row and Body Row respectively.
Then Insert a Static Text in Header and insert the Field names as shown below.
Step 11: Then under Data View, individually Drag and Drop the Fields from the table it_flight in Body Sub Form.
Fields are CARRID,
CARRNAME,
SPFLI.
Step 12: Then under Hierarchy tab Select the 3 Fields (i.e. Carrid, Carrname, and SPFLI) and then drag drop them in Body Sub Form as shown below.
Nested tables in SAP Adobe Forms
For more tips, tutorials, Interview questions, certification questions, please visit SAPTechnical.com
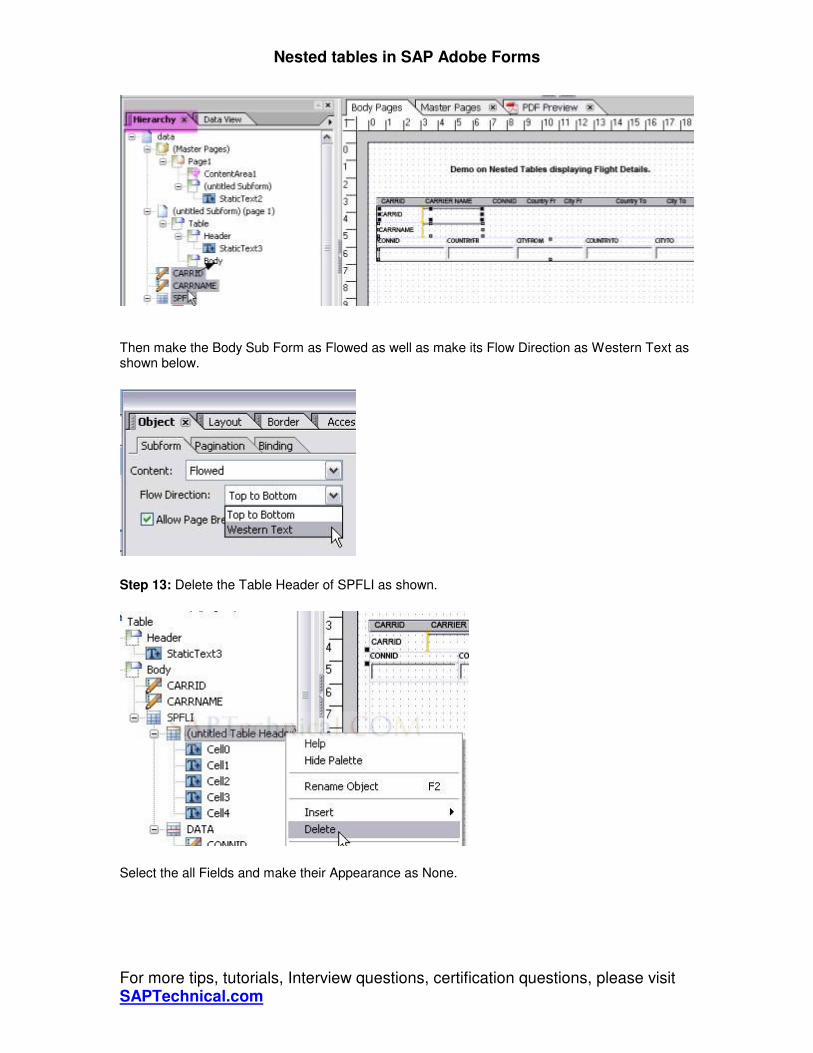
Then make the Body Sub Form as Flowed as well as make its Flow Direction as Western Text as shown below.
Step 13: Delete the Table Header of SPFLI as shown.
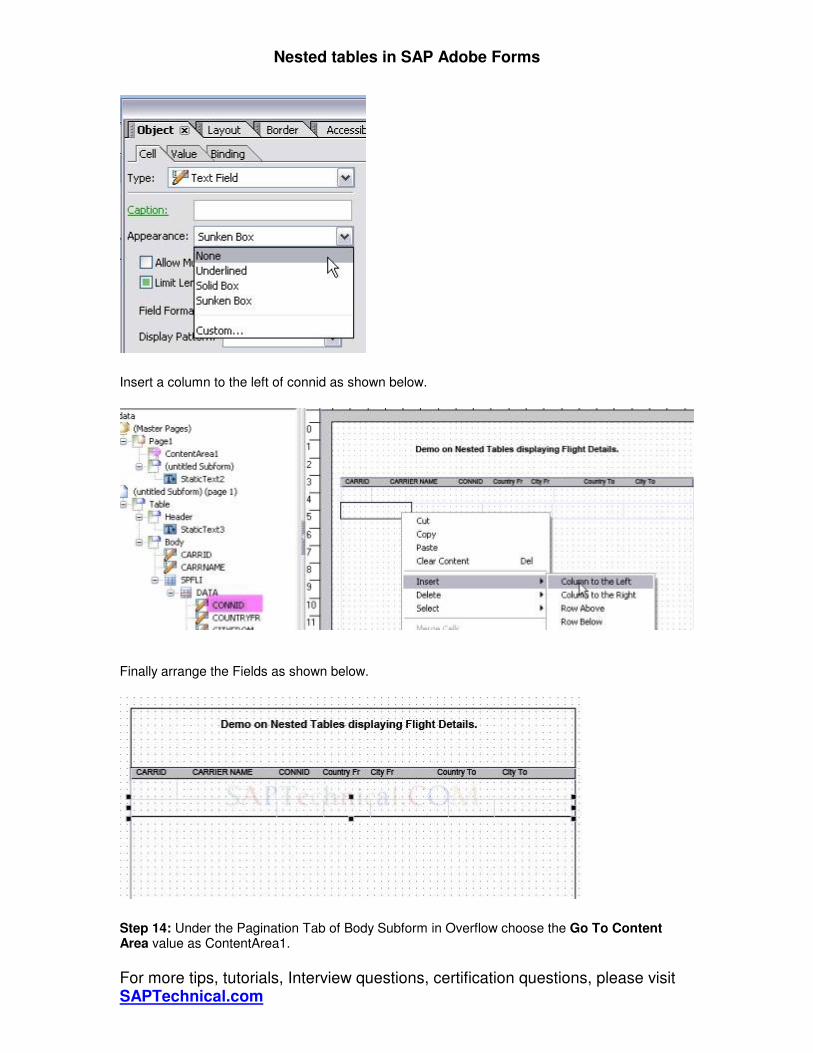
Select the all Fields and make their Appearance as None.
Nested tables in SAP Adobe Forms
For more tips, tutorials, Interview questions, certification questions, please visit SAPTechnical.com
Insert a column to the left of connid as shown below.
Finally arrange the Fields as shown below.
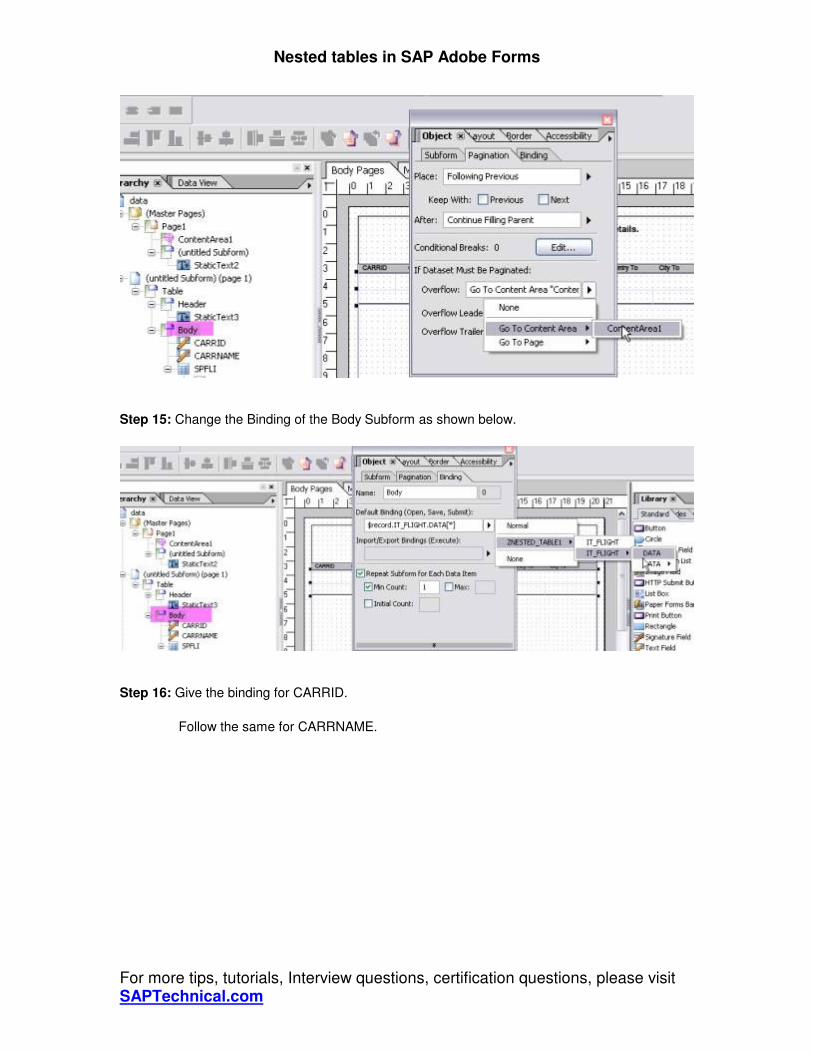
Step 14: Under the Pagination Tab of Body Subform in Overflow choose the Go To Content Area value as ContentArea1.
Nested tables in SAP Adobe Forms
For more tips, tutorials, Interview questions, certification questions, please visit SAPTechnical.com
Step 15: Change the Binding of the Body Subform as shown below.
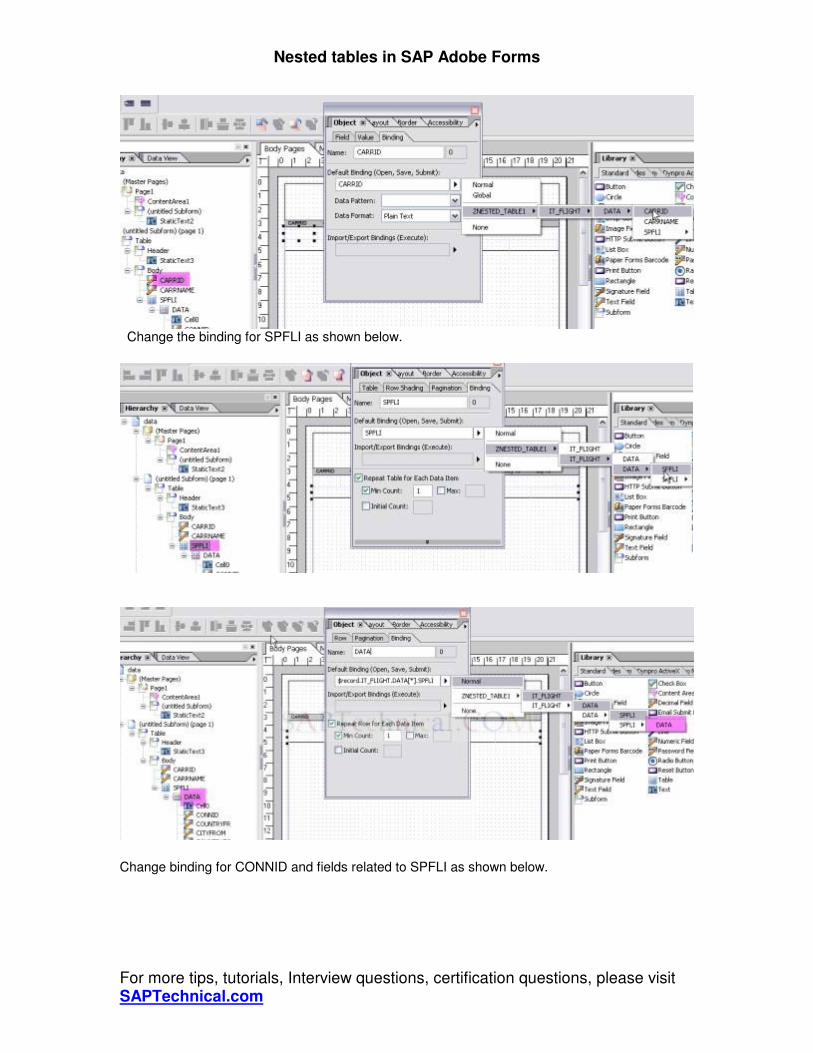
Step 16: Give the binding for CARRID.
Follow the same for CARRNAME.
Nested tables in SAP Adobe Forms
For more tips, tutorials, Interview questions, certification questions, please visit SAPTechnical.com
Change the binding for SPFLI as shown below.
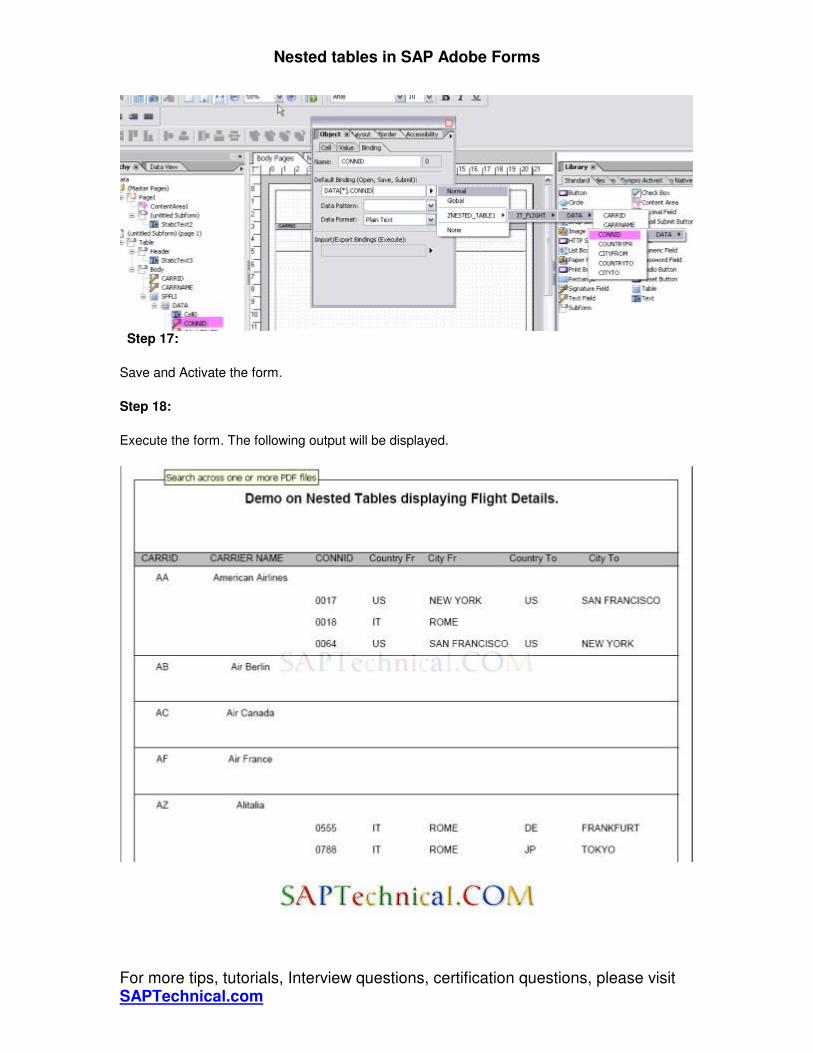
Change binding for CONNID and fields related to SPFLI as shown below.
Nested tables in SAP Adobe Forms
For more tips, tutorials, Interview questions, certification questions, please visit SAPTechnical.com
Step 17:
Save and Activate the form.
Step 18:
Execute the form. The following output will be displayed.