Embed Size (px)
Citation preview
KICKBACKHartke
KICKBACK 15
o
POWERHEADPHONESDIRECT OUT HIGHMIDLOWSHAPE
IN OUT
VOLUME
INPUT
SHAPE
1K 90 -15 +15 -15 +15 -15 +15
0 0 0
0
0dB
Hartke SystemsHS1200 BASS AMPLIFIER 120 WATTS Transient Attack ®
HS1200 BASS COMBO
Important Safety Instructions
1. Please read all instructions before operating the unit.
2. Keep these instructions for future reference. 3. Please heed all safety warnings. 4. Follow manufacturers instructions.
5. Do not use this unit near water or moisture.
6. Clean only with a damp cloth.
7. Do not block any of the ventilation openings. Install in accordance with the manufacturers instructions.
8. Do not install near any heat sources such as radiators, heat registers, stoves, or other apparatus (includ-ing amplifiers) that produce heat.
9. Do not defeat the safety purpose of the polarized or grounding-type plug. A polarized plug has two
blades with one wider than the other. A grounding type plug has two blades and a third grounding prong. The wide blade or third prong is provided for your safety. When the provided plug does not fit your outlet, consult an electrician for replacement of the obsolete outlet.
10. Protect the power cord from being walked on and pinched particularly at plugs, convenience recep-tacles and at the point at which they exit from the unit.
11. Unplug this unit during lightning storms or when unused for long periods of time.
12. Refer all servicing to qualified personnel. Servicing is required when the unit has been damaged in any way, such as power supply cord or plug damage, or if liquid has been spilled or objects have fallen into the unit, the unit has been exposed to rain or moisture, does not operate normally, or has been dropped.
WARNING: To reduce the risk of fire or electric shock, do not expose this unit to rain or moisture.
The lightning flash with an arrowhead symbol within an equilateral triangle, is intended to alert the user to the presence of uninsulated "dangerous voltage" within the products enclosure that may be of sufficient magni-tude to constitute a risk of electric shock to persons.
The exclamation point within an equilateral triangle is intended to alert the user to the presence of important operating and maintenance (servicing) instructions in the literature accompanying the product.
Caution: To reduce the hazard of electrical shock, do not remove cover or back.
No user serviceable parts inside. Please refer all servic-ing to qualified personnel.
Copyright 2005 - 2009, Samson Technologies Corp.Printed December, 2009 v1.0Samson Technologies Corp.45 Gilpin AvenueHauppauge, New York 11788-8816Phone: 1-800-3-SAMSON (1-800-372-6766)Fax: 631-784-2201 www.samsontech.com
Table of ContentsENGLISHIntroduction. . . . . . . . . . . . . . . . . . . . . . . . . . . . . . . . . . . . . . . . . . . . . . . . . . . . . . . . . . . . . . . . . . . . . . . . . . .4Kickback Features . . . . . . . . . . . . . . . . . . . . . . . . . . . . . . . . . . . . . . . . . . . . . . . . . . . . . . . . . . . . . . . . . . . . .5Guided Tour - Front Panel . . . . . . . . . . . . . . . . . . . . . . . . . . . . . . . . . . . . . . . . . . . . . . . . . . . . . . . . . . . . . .6Guided Tour - Rear Panel . . . . . . . . . . . . . . . . . . . . . . . . . . . . . . . . . . . . . . . . . . . . . . . . . . . . . . . . . . . . . . .8Setting Up and Using Your Kickback Amplifier . . . . . . . . . . . . . . . . . . . . . . . . . . . . . . . . . . . . . . . . . .9Using Equalization. . . . . . . . . . . . . . . . . . . . . . . . . . . . . . . . . . . . . . . . . . . . . . . . . . . . . . . . . . . . . . . . 11-13The Effect of the Shape Control . . . . . . . . . . . . . . . . . . . . . . . . . . . . . . . . . . . . . . . . . . . . . . . . . . . . . . .14Specifications . . . . . . . . . . . . . . . . . . . . . . . . . . . . . . . . . . . . . . . . . . . . . . . . . . . . . . . . . . . . . . . . . . . . . . . .59
FRANÇAISIntroduction. . . . . . . . . . . . . . . . . . . . . . . . . . . . . . . . . . . . . . . . . . . . . . . . . . . . . . . . . . . . . . . . . . . . . . . . . .15Fonctions du Kickback . . . . . . . . . . . . . . . . . . . . . . . . . . . . . . . . . . . . . . . . . . . . . . . . . . . . . . . . . . . . . . . .16Visite guidée — Face avant . . . . . . . . . . . . . . . . . . . . . . . . . . . . . . . . . . . . . . . . . . . . . . . . . . . . . . . . . . .17Visite guidée — Face arrière . . . . . . . . . . . . . . . . . . . . . . . . . . . . . . . . . . . . . . . . . . . . . . . . . . . . . . . . . .19Mise en oeuvre et utilisation du Kickback. . . . . . . . . . . . . . . . . . . . . . . . . . . . . . . . . . . . . . . . . . . . . .20Utilisation de l'égalisation . . . . . . . . . . . . . . . . . . . . . . . . . . . . . . . . . . . . . . . . . . . . . . . . . . . . . . . . 22-24Effets de la fonction Shape sur le son . . . . . . . . . . . . . . . . . . . . . . . . . . . . . . . . . . . . . . . . . . . . . . . . . .25Caractéristiques techniques. . . . . . . . . . . . . . . . . . . . . . . . . . . . . . . . . . . . . . . . . . . . . . . . . . . . . . . . . . .60
DEUTSCHEEinleitung . . . . . . . . . . . . . . . . . . . . . . . . . . . . . . . . . . . . . . . . . . . . . . . . . . . . . . . . . . . . . . . . . . . . . . . . . . . .26Kickback Features . . . . . . . . . . . . . . . . . . . . . . . . . . . . . . . . . . . . . . . . . . . . . . . . . . . . . . . . . . . . . . . . . . . .27Geführter Rundgang - Vorderseite . . . . . . . . . . . . . . . . . . . . . . . . . . . . . . . . . . . . . . . . . . . . . . . . . . . .28Geführter Rundgang - Rückseite . . . . . . . . . . . . . . . . . . . . . . . . . . . . . . . . . . . . . . . . . . . . . . . . . . . . . .30Kickback-Verstärker einrichten und einsetzen . . . . . . . . . . . . . . . . . . . . . . . . . . . . . . . . . . . . . 31-32Kickback-Verstärker einrichten und einsetzen . . . . . . . . . . . . . . . . . . . . . . . . . . . . . . . . . . . . . . . . .32EQ einsetzen . . . . . . . . . . . . . . . . . . . . . . . . . . . . . . . . . . . . . . . . . . . . . . . . . . . . . . . . . . . . . . . . . . . . . 33-35Wirkung des Shape-Reglers . . . . . . . . . . . . . . . . . . . . . . . . . . . . . . . . . . . . . . . . . . . . . . . . . . . . . . . . . . .36Technische Daten . . . . . . . . . . . . . . . . . . . . . . . . . . . . . . . . . . . . . . . . . . . . . . . . . . . . . . . . . . . . . . . . . . . .61
ESPAÑOLIntroducción . . . . . . . . . . . . . . . . . . . . . . . . . . . . . . . . . . . . . . . . . . . . . . . . . . . . . . . . . . . . . . . . . . . . . . . . .37Características del Kickback . . . . . . . . . . . . . . . . . . . . . . . . . . . . . . . . . . . . . . . . . . . . . . . . . . . . . . . . . . .38Recorrido guiado - Panel frontal. . . . . . . . . . . . . . . . . . . . . . . . . . . . . . . . . . . . . . . . . . . . . . . . . . . . . . .39Recorrido guiado - Panel trasero . . . . . . . . . . . . . . . . . . . . . . . . . . . . . . . . . . . . . . . . . . . . . . . . . . . . . .41Manejo de su amplificador Kickback . . . . . . . . . . . . . . . . . . . . . . . . . . . . . . . . . . . . . . . . . . . . . . 42-43Uso de la ecualización . . . . . . . . . . . . . . . . . . . . . . . . . . . . . . . . . . . . . . . . . . . . . . . . . . . . . . . . . . . . 44-46El efecto del control Shape. . . . . . . . . . . . . . . . . . . . . . . . . . . . . . . . . . . . . . . . . . . . . . . . . . . . . . . . . . . .47Especificaciones técnicas . . . . . . . . . . . . . . . . . . . . . . . . . . . . . . . . . . . . . . . . . . . . . . . . . . . . . . . . . . . . .62
ITALIANOIntroduzione . . . . . . . . . . . . . . . . . . . . . . . . . . . . . . . . . . . . . . . . . . . . . . . . . . . . . . . . . . . . . . . . . . . . . . . . .48Caratteristiche. . . . . . . . . . . . . . . . . . . . . . . . . . . . . . . . . . . . . . . . . . . . . . . . . . . . . . . . . . . . . . . . . . . . . . . .49Tour guidato - Pannello frontale. . . . . . . . . . . . . . . . . . . . . . . . . . . . . . . . . . . . . . . . . . . . . . . . . . . . . . .50Tour guidato - Pannello posteriore . . . . . . . . . . . . . . . . . . . . . . . . . . . . . . . . . . . . . . . . . . . . . . . . . . . .52Configurare e utilizzare l'amplificatore Kickback . . . . . . . . . . . . . . . . . . . . . . . . . . . . . . . . . . . . . . .53Usare l'Equalizzazione . . . . . . . . . . . . . . . . . . . . . . . . . . . . . . . . . . . . . . . . . . . . . . . . . . . . . . . . . . . . 55-57Effetto del controllo Shape. . . . . . . . . . . . . . . . . . . . . . . . . . . . . . . . . . . . . . . . . . . . . . . . . . . . . . . . . . . .58Specifiche . . . . . . . . . . . . . . . . . . . . . . . . . . . . . . . . . . . . . . . . . . . . . . . . . . . . . . . . . . . . . . . . . . . . . . . . . . . .63
Introduction
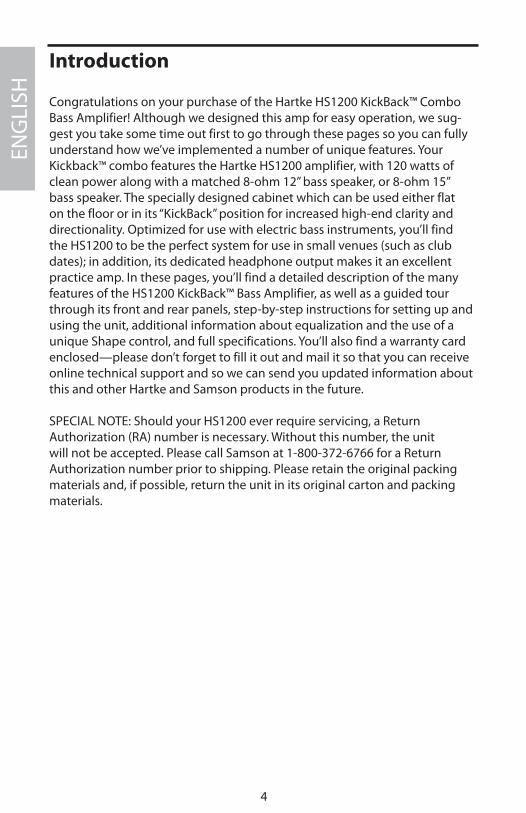
Congratulations on your purchase of the Hartke HS1200 KickBack™ Combo Bass Amplifier! Although we designed this amp for easy operation, we sug-gest you take some time out first to go through these pages so you can fully understand how we’ve implemented a number of unique features. Your Kickback™ combo features the Hartke HS1200 amplifier, with 120 watts of clean power along with a matched 8-ohm 12” bass speaker, or 8-ohm 15” bass speaker. The specially designed cabinet which can be used either flat on the floor or in its “KickBack” position for increased high-end clarity and directionality. Optimized for use with electric bass instruments, you’ll find the HS1200 to be the perfect system for use in small venues (such as club dates); in addition, its dedicated headphone output makes it an excellent practice amp. In these pages, you’ll find a detailed description of the many features of the HS1200 KickBack™ Bass Amplifier, as well as a guided tour through its front and rear panels, step-by-step instructions for setting up and using the unit, additional information about equalization and the use of a unique Shape control, and full specifications. You’ll also find a warranty card enclosed—please don’t forget to fill it out and mail it so that you can receive online technical support and so we can send you updated information about this and other Hartke and Samson products in the future.
SPECIAL NOTE: Should your HS1200 ever require servicing, a Return Authorization (RA) number is necessary. Without this number, the unit will not be accepted. Please call Samson at 1-800-372-6766 for a Return Authorization number prior to shipping. Please retain the original packing materials and, if possible, return the unit in its original carton and packing materials.
ENG
LISH
4
Kickback Features
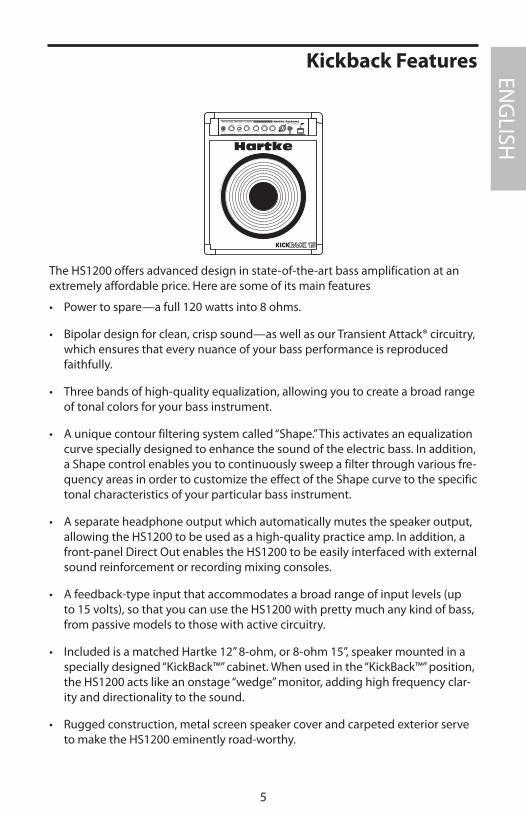
The HS1200 offers advanced design in state-of-the-art bass amplification at an extremely affordable price. Here are some of its main features
• Power to spare—a full 120 watts into 8 ohms.
• Bipolar design for clean, crisp sound—as well as our Transient Attack® circuitry, which ensures that every nuance of your bass performance is reproduced faithfully.
• Three bands of high-quality equalization, allowing you to create a broad range of tonal colors for your bass instrument.
• A unique contour filtering system called “Shape.” This activates an equalization curve specially designed to enhance the sound of the electric bass. In addition, a Shape control enables you to continuously sweep a filter through various fre-quency areas in order to customize the effect of the Shape curve to the specific tonal characteristics of your particular bass instrument.
• A separate headphone output which automatically mutes the speaker output, allowing the HS1200 to be used as a high-quality practice amp. In addition, a front-panel Direct Out enables the HS1200 to be easily interfaced with external sound reinforcement or recording mixing consoles.
• A feedback-type input that accommodates a broad range of input levels (up to 15 volts), so that you can use the HS1200 with pretty much any kind of bass, from passive models to those with active circuitry.
• Included is a matched Hartke 12” 8-ohm, or 8-ohm 15”, speaker mounted in a specially designed “KickBack™” cabinet. When used in the “KickBack™” position, the HS1200 acts like an onstage “wedge” monitor, adding high frequency clar-ity and directionality to the sound.
• Rugged construction, metal screen speaker cover and carpeted exterior serve to make the HS1200 eminently road-worthy.
Hartke
KICKBACK 15
o
POWERHEADPHONESDIRECT OUT HIGHMIDLOWSHAPE
IN OUT
VOLUME
INPUT
SHAPE
1K 90 -15 +15 -15 +15 -15 +15
0 0 0
0
0dB
Hartke SystemsHS1200 BASS AMPLIFIER 120 WATTS Transient Attack ®
ENG
LISH
5
Guided Tour - Front Panel
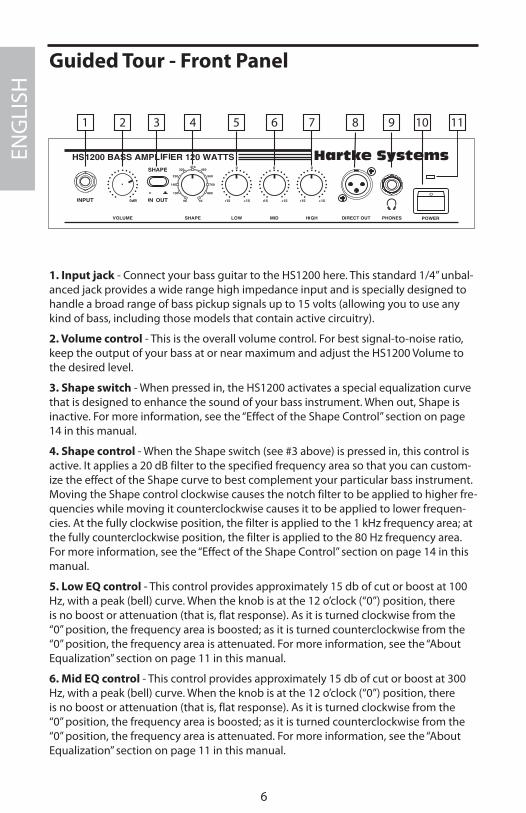
1. Input jack - Connect your bass guitar to the HS1200 here. This standard 1/4” unbal-anced jack provides a wide range high impedance input and is specially designed to handle a broad range of bass pickup signals up to 15 volts (allowing you to use any kind of bass, including those models that contain active circuitry).
2. Volume control - This is the overall volume control. For best signal-to-noise ratio, keep the output of your bass at or near maximum and adjust the HS1200 Volume to the desired level.
3. Shape switch - When pressed in, the HS1200 activates a special equalization curve that is designed to enhance the sound of your bass instrument. When out, Shape is inactive. For more information, see the “Effect of the Shape Control” section on page 14 in this manual.
4. Shape control - When the Shape switch (see #3 above) is pressed in, this control is active. It applies a 20 dB filter to the specified frequency area so that you can custom-ize the effect of the Shape curve to best complement your particular bass instrument. Moving the Shape control clockwise causes the notch filter to be applied to higher fre-quencies while moving it counterclockwise causes it to be applied to lower frequen-cies. At the fully clockwise position, the filter is applied to the 1 kHz frequency area; at the fully counterclockwise position, the filter is applied to the 80 Hz frequency area. For more information, see the “Effect of the Shape Control” section on page 14 in this manual.
5. Low EQ control - This control provides approximately 15 db of cut or boost at 100 Hz, with a peak (bell) curve. When the knob is at the 12 o’clock (“0”) position, there is no boost or attenuation (that is, flat response). As it is turned clockwise from the “0” position, the frequency area is boosted; as it is turned counterclockwise from the “0” position, the frequency area is attenuated. For more information, see the “About Equalization” section on page 11 in this manual.
6. Mid EQ control - This control provides approximately 15 db of cut or boost at 300 Hz, with a peak (bell) curve. When the knob is at the 12 o’clock (“0”) position, there is no boost or attenuation (that is, flat response). As it is turned clockwise from the “0” position, the frequency area is boosted; as it is turned counterclockwise from the “0” position, the frequency area is attenuated. For more information, see the “About Equalization” section on page 11 in this manual.
o
2 31 4 5 6 7 10 1198
ENG
LISH
6
Guided Tour - Front Panel
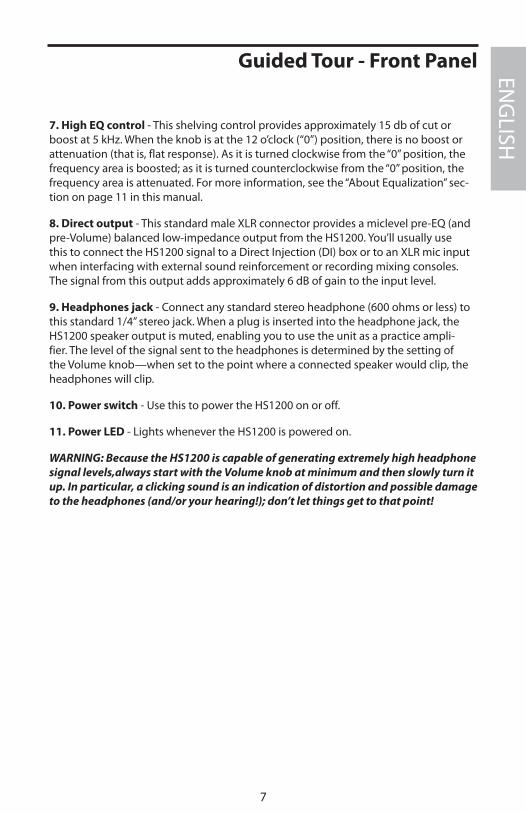
7. High EQ control - This shelving control provides approximately 15 db of cut or boost at 5 kHz. When the knob is at the 12 o’clock (“0”) position, there is no boost or attenuation (that is, flat response). As it is turned clockwise from the “0” position, the frequency area is boosted; as it is turned counterclockwise from the “0” position, the frequency area is attenuated. For more information, see the “About Equalization” sec-tion on page 11 in this manual.
8. Direct output - This standard male XLR connector provides a miclevel pre-EQ (and pre-Volume) balanced low-impedance output from the HS1200. You’ll usually use this to connect the HS1200 signal to a Direct Injection (DI) box or to an XLR mic input when interfacing with external sound reinforcement or recording mixing consoles. The signal from this output adds approximately 6 dB of gain to the input level.
9. Headphones jack - Connect any standard stereo headphone (600 ohms or less) to this standard 1/4” stereo jack. When a plug is inserted into the headphone jack, the HS1200 speaker output is muted, enabling you to use the unit as a practice ampli-fier. The level of the signal sent to the headphones is determined by the setting of the Volume knob—when set to the point where a connected speaker would clip, the headphones will clip.
10. Power switch - Use this to power the HS1200 on or off.
11. Power LED - Lights whenever the HS1200 is powered on.
WARNING: Because the HS1200 is capable of generating extremely high headphone signal levels,always start with the Volume knob at minimum and then slowly turn it up. In particular, a clicking sound is an indication of distortion and possible damage to the headphones (and/or your hearing!); don’t let things get to that point!
ENG
LISH
7
Guided Tour - Rear Panel
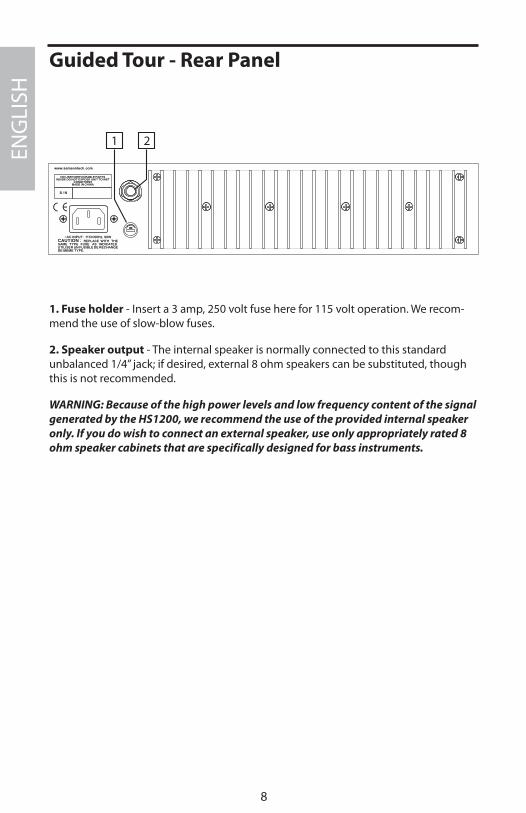
1. Fuse holder - Insert a 3 amp, 250 volt fuse here for 115 volt operation. We recom-mend the use of slow-blow fuses.
2. Speaker output - The internal speaker is normally connected to this standard unbalanced 1/4” jack; if desired, external 8 ohm speakers can be substituted, though this is not recommended.
WARNING: Because of the high power levels and low frequency content of the signal generated by the HS1200, we recommend the use of the provided internal speaker only. If you do wish to connect an external speaker, use only appropriately rated 8 ohm speaker cabinets that are specifically designed for bass instruments.
FUSE
ENG
LISH
8
Setting Up and Using Your Kickback Amplifier
Setting up your Hartke Systems HS1200 KickBack™ Bass Amplifier is a simple procedure, which takes only a few minutes:
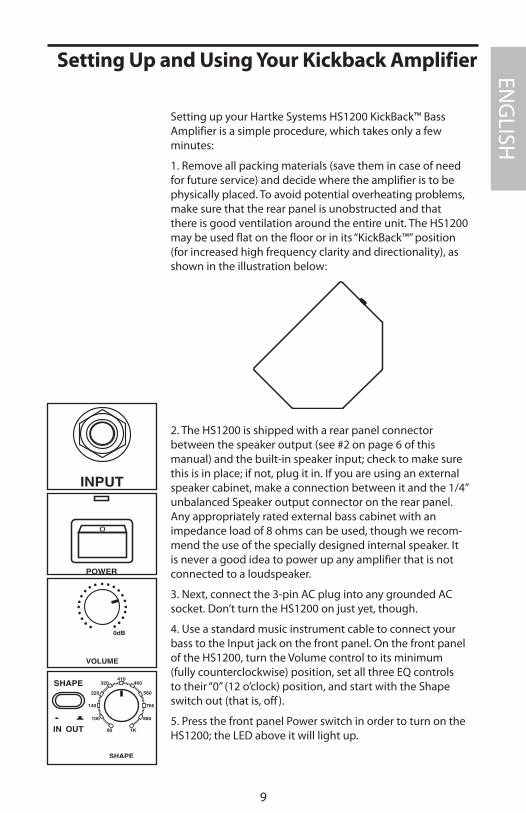
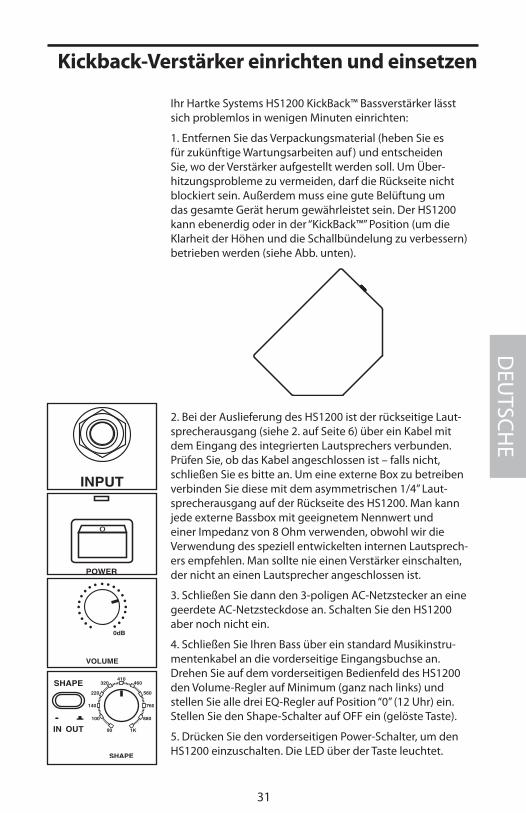
1. Remove all packing materials (save them in case of need for future service) and decide where the amplifier is to be physically placed. To avoid potential overheating problems, make sure that the rear panel is unobstructed and that there is good ventilation around the entire unit. The HS1200 may be used flat on the floor or in its “KickBack™” position (for increased high frequency clarity and directionality), as shown in the illustration below:
2. The HS1200 is shipped with a rear panel connector between the speaker output (see #2 on page 6 of this manual) and the built-in speaker input; check to make sure this is in place; if not, plug it in. If you are using an external speaker cabinet, make a connection between it and the 1/4” unbalanced Speaker output connector on the rear panel. Any appropriately rated external bass cabinet with an impedance load of 8 ohms can be used, though we recom-mend the use of the specially designed internal speaker. It is never a good idea to power up any amplifier that is not connected to a loudspeaker.
3. Next, connect the 3-pin AC plug into any grounded AC socket. Don’t turn the HS1200 on just yet, though.
4. Use a standard music instrument cable to connect your bass to the Input jack on the front panel. On the front panel of the HS1200, turn the Volume control to its minimum (fully counterclockwise) position, set all three EQ controls to their “0” (12 o’clock) position, and start with the Shape switch out (that is, off ).
5. Press the front panel Power switch in order to turn on the HS1200; the LED above it will light up.
o
ENG
LISH
9
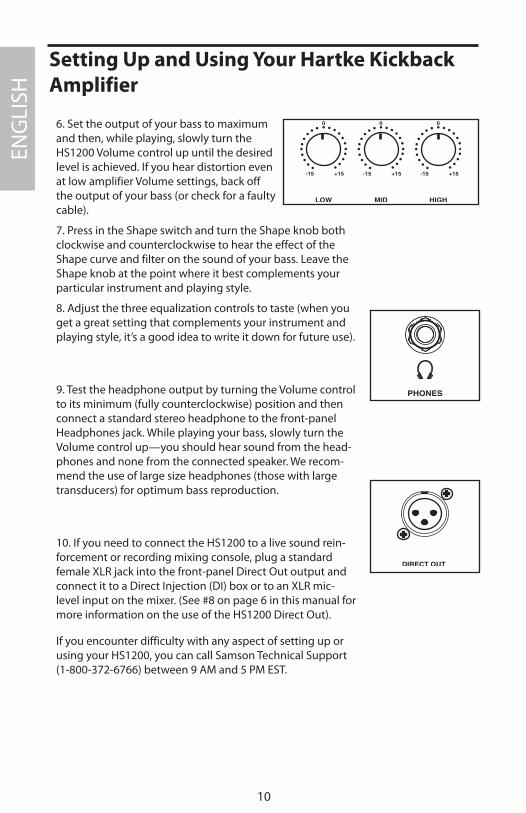
6. Set the output of your bass to maximum and then, while playing, slowly turn the HS1200 Volume control up until the desired level is achieved. If you hear distortion even at low amplifier Volume settings, back off the output of your bass (or check for a faulty cable).
7. Press in the Shape switch and turn the Shape knob both clockwise and counterclockwise to hear the effect of the Shape curve and filter on the sound of your bass. Leave the Shape knob at the point where it best complements your particular instrument and playing style.
8. Adjust the three equalization controls to taste (when you get a great setting that complements your instrument and playing style, it’s a good idea to write it down for future use).
9. Test the headphone output by turning the Volume control to its minimum (fully counterclockwise) position and then connect a standard stereo headphone to the front-panel Headphones jack. While playing your bass, slowly turn the Volume control up—you should hear sound from the head-phones and none from the connected speaker. We recom-mend the use of large size headphones (those with large transducers) for optimum bass reproduction.
10. If you need to connect the HS1200 to a live sound rein-forcement or recording mixing console, plug a standard female XLR jack into the front-panel Direct Out output and connect it to a Direct Injection (DI) box or to an XLR mic-level input on the mixer. (See #8 on page 6 in this manual for more information on the use of the HS1200 Direct Out).
If you encounter difficulty with any aspect of setting up or using your HS1200, you can call Samson Technical Support (1-800-372-6766) between 9 AM and 5 PM EST.
Setting Up and Using Your Hartke Kickback Amplifier
ENG
LISH
10
Using Equalization
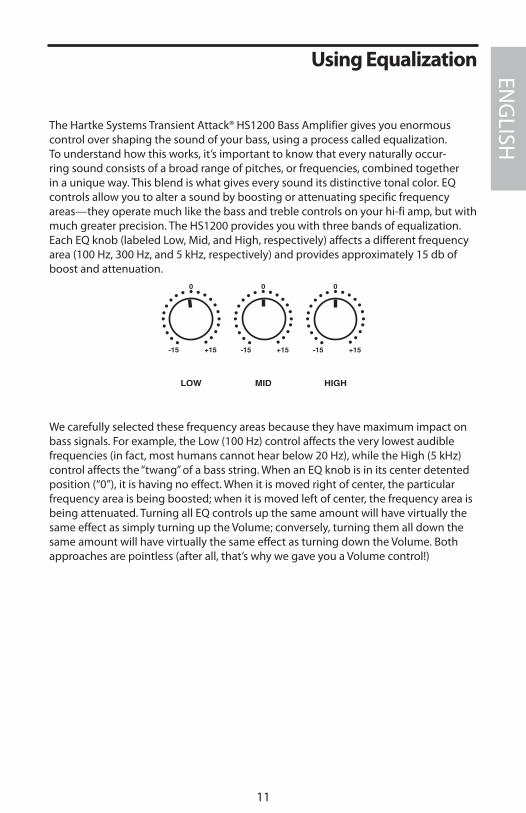
The Hartke Systems Transient Attack® HS1200 Bass Amplifier gives you enormous control over shaping the sound of your bass, using a process called equalization. To understand how this works, it’s important to know that every naturally occur-ring sound consists of a broad range of pitches, or frequencies, combined together in a unique way. This blend is what gives every sound its distinctive tonal color. EQ controls allow you to alter a sound by boosting or attenuating specific frequency areas—they operate much like the bass and treble controls on your hi-fi amp, but with much greater precision. The HS1200 provides you with three bands of equalization. Each EQ knob (labeled Low, Mid, and High, respectively) affects a different frequency area (100 Hz, 300 Hz, and 5 kHz, respectively) and provides approximately 15 db of boost and attenuation.
We carefully selected these frequency areas because they have maximum impact on bass signals. For example, the Low (100 Hz) control affects the very lowest audible frequencies (in fact, most humans cannot hear below 20 Hz), while the High (5 kHz) control affects the “twang” of a bass string. When an EQ knob is in its center detented position (“0”), it is having no effect. When it is moved right of center, the particular frequency area is being boosted; when it is moved left of center, the frequency area is being attenuated. Turning all EQ controls up the same amount will have virtually the same effect as simply turning up the Volume; conversely, turning them all down the same amount will have virtually the same effect as turning down the Volume. Both approaches are pointless (after all, that’s why we gave you a Volume control!)
ENG
LISH
11
Using Equalization
In many instances, the best way to deal with equalization is to think in terms of which frequency areas you need to attenuate, as opposed to which ones you need to boost. Be aware that boosting a frequency area also has the effect of boosting the overall signal; specifically, too much Low EQ boost can actually cause overload distortion or even harm a connected speaker.
The specific EQ you will apply to your bass signal is very much dependent upon your particular instrument and personal taste and playing style. However, here are a few general suggestions:
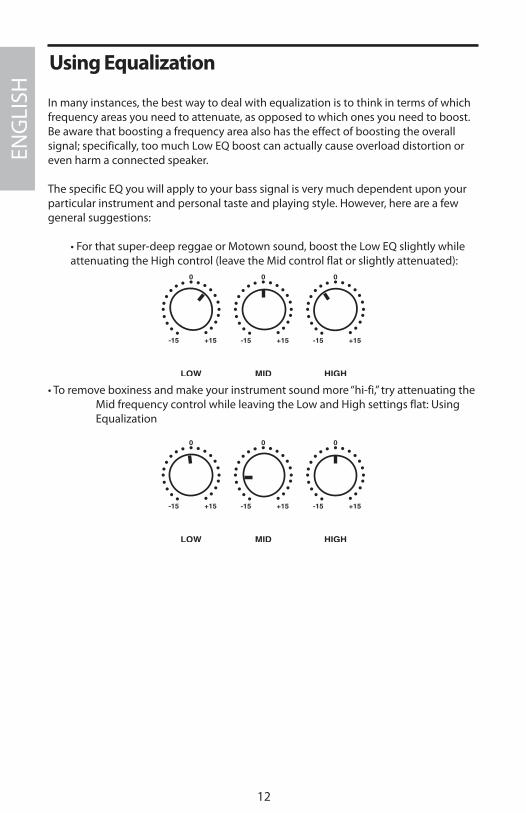
• For that super-deep reggae or Motown sound, boost the Low EQ slightly while attenuating the High control (leave the Mid control flat or slightly attenuated):
• To remove boxiness and make your instrument sound more “hi-fi,” try attenuating the Mid frequency control while leaving the Low and High settings flat: Using Equalization
ENG
LISH
12
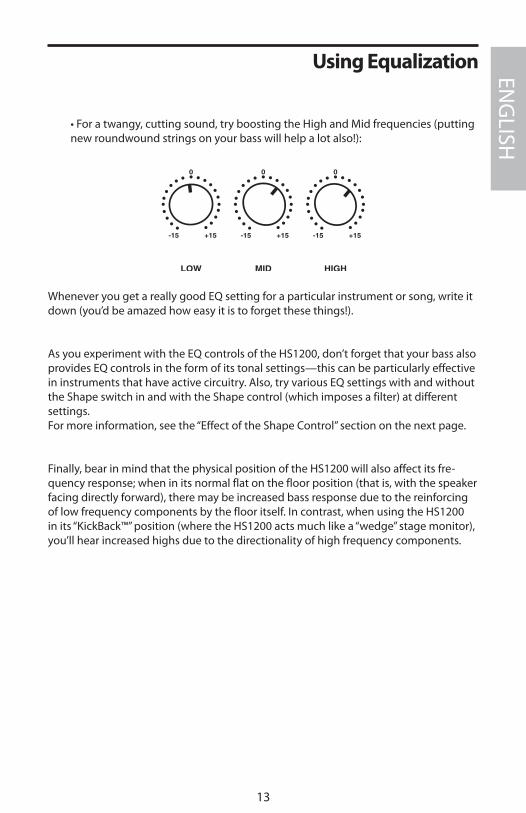
• For a twangy, cutting sound, try boosting the High and Mid frequencies (putting new roundwound strings on your bass will help a lot also!):
Whenever you get a really good EQ setting for a particular instrument or song, write it down (you’d be amazed how easy it is to forget these things!).
As you experiment with the EQ controls of the HS1200, don’t forget that your bass also provides EQ controls in the form of its tonal settings—this can be particularly effective in instruments that have active circuitry. Also, try various EQ settings with and without the Shape switch in and with the Shape control (which imposes a filter) at different settings.For more information, see the “Effect of the Shape Control” section on the next page.
Finally, bear in mind that the physical position of the HS1200 will also affect its fre-quency response; when in its normal flat on the floor position (that is, with the speaker facing directly forward), there may be increased bass response due to the reinforcing of low frequency components by the floor itself. In contrast, when using the HS1200 in its “KickBack™” position (where the HS1200 acts much like a “wedge” stage monitor), you’ll hear increased highs due to the directionality of high frequency components.
Using Equalization ENG
LISH
13
The Effect of the Shape Control
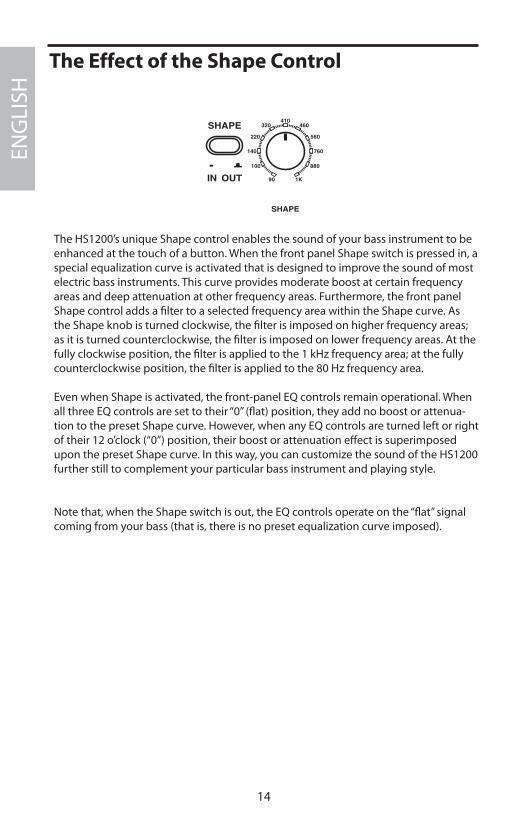
The HS1200’s unique Shape control enables the sound of your bass instrument to be enhanced at the touch of a button. When the front panel Shape switch is pressed in, a special equalization curve is activated that is designed to improve the sound of most electric bass instruments. This curve provides moderate boost at certain frequency areas and deep attenuation at other frequency areas. Furthermore, the front panel Shape control adds a filter to a selected frequency area within the Shape curve. As the Shape knob is turned clockwise, the filter is imposed on higher frequency areas; as it is turned counterclockwise, the filter is imposed on lower frequency areas. At the fully clockwise position, the filter is applied to the 1 kHz frequency area; at the fully counterclockwise position, the filter is applied to the 80 Hz frequency area.
Even when Shape is activated, the front-panel EQ controls remain operational. When all three EQ controls are set to their “0” (flat) position, they add no boost or attenua-tion to the preset Shape curve. However, when any EQ controls are turned left or right of their 12 o’clock (“0”) position, their boost or attenuation effect is superimposed upon the preset Shape curve. In this way, you can customize the sound of the HS1200 further still to complement your particular bass instrument and playing style.
Note that, when the Shape switch is out, the EQ controls operate on the “flat” signal coming from your bass (that is, there is no preset equalization curve imposed).
ENG
LISH
14
Introduction
Merci d'avoir choisi le combo basse Hartke HS1200 KickBack™ ! Bien que nous ayons conçu cet amplificateur avec un but de simplicité d'utilisation, nous vous conseillons de prendre le temps de lire ces quelques pages pour comprendre les fonctions uniques de cet ampli. Ce combo Kickback™ est équipé d'un amplificateur Hartke HS1200, avec une puissance de 120 Watts et un son exceptionnellement clair, associé à un haut-parleur adapté de 31 cm (12 pouces) et 8 Ohms, ou de 38 cm (15 pouces) et 8 Ohms. Le baffle de conception spéciale peut être utilisé droit sur le sol ou en position inclinée, ce qui favorise la dispersion des hautes fréquences. Optimisé pour la guitare basse, le HS1200 est l'ampli parfait pour les petits concerts (en piano-bar, par exemple ). De plus, sa sortie casque en fait l'ampli par excellence pour le travail personnel. Dans ces pages, vous trouverez une description détaillée de l'ampli basse HS1200 KickBack™, une visite guidée des faces avant et arrière, des explications pas-à-pas sur la mise en oeuvre et l'utilisation de l'appareil, des informations supplémentaires sur l'égalisation et l'utilisation de la fonc-tion Shape, et les caractéristiques détaillées. Vous trouverez également une carte d'enregistrement — n'oubliez pas de remplir cette carte et de nous la renvoyer pour bénéficier de notre assistance technique téléphonique (ou en ligne), pour recevoir les mises à jour sur ce produit ou sur d'autres produits Hartke et Samson.
REMARQUE : Si vous devez faire réparer votre HS1200, vous devez obtenir un numéro d'autorisation de retour. Sans ce numéro, le produit ne sera pas accepté. Appelez Samson au 1-800-372-6766 pour obtenir un numéro d'auto-risation de retour avant tout envoi. Conservez l'emballage original, et si possi-ble, renvoyez le produit dans le carton et l'emballage d'origine.
FRAN
ÇAIS
15

Fonctions du Kickback
Le HS1200 fait appel à des circuits électroniques avancés spécifiques à l'amplifi-cation basse, pour un prix de vente qui reste tout à fait abordable. Voici quelques unes des fonctions principales de l'amplificateur :
• Puissant — 120 Watts dans 8 Ohms.
• Conception bipolaire pour un son clair et précis, et circuit Transient Attack®, vous garantissant que chaque nuance de votre jeu sera reproduite avec fidé-lité.
• Égalisation haute qualité à trois bandes, vous permettant de créer une vaste palette de sonorités pour votre basse.
• Filtre de contour unique “Shape”. Ce circuit active une courbe d'égalisation conçue spécifiquement pour la basse électrique. De plus, le bouton Shape vous permet de modifier la fréquence du filtre pour adapter la courbe du filtre Shape aux caractéristiques sonores de votre propre instrument.
• Une sortie casque séparée coupe automatiquement la sortie haut-parleur, ce qui permet d'utiliser le HS1200 comme ampli de travail personnel de haute qualité. De plus, la sortie Direct Out de la face avant vous permet de connecter le HS1200 à n'importe quelle console de sonorisation ou d'enregistrement.
• L'entrée spéciale permet la connexion de tous types de niveaux d'entrée (jus-qu'à 15 Volts), ce qui vous permet d'utiliser le HS1200 avec n'importe quel type de basse, passive ou active.
• Haut-parleur Hartke de 31 cm (12 pouces) et 8 Ohms, ou de 38 cm (15 pouces) et 8 Ohms, installé dans un baffle spécial “KickBack™”. Lorsque vous l'utilisez en position inclinée, le HS1200 fonctionne comme un retour de scène bain de pied, vous permettant d'apprécier la réponse et la clarté dans les hautes fré-quences.
• Construction ultra robuste, protection de haut-parleur en métal et finition en moquette pour les concerts et les tournées.
Hartke
KICKBACK 15
o
POWERHEADPHONESDIRECT OUT HIGHMIDLOWSHAPE
IN OUT
VOLUME
INPUT
SHAPE
1K 90 -15 +15 -15 +15 -15 +15
0 0 0
0
0dB
Hartke SystemsHS1200 BASS AMPLIFIER 120 WATTS Transient Attack ®
FRA
NÇA
IS
16
Visite guidée — Face avant
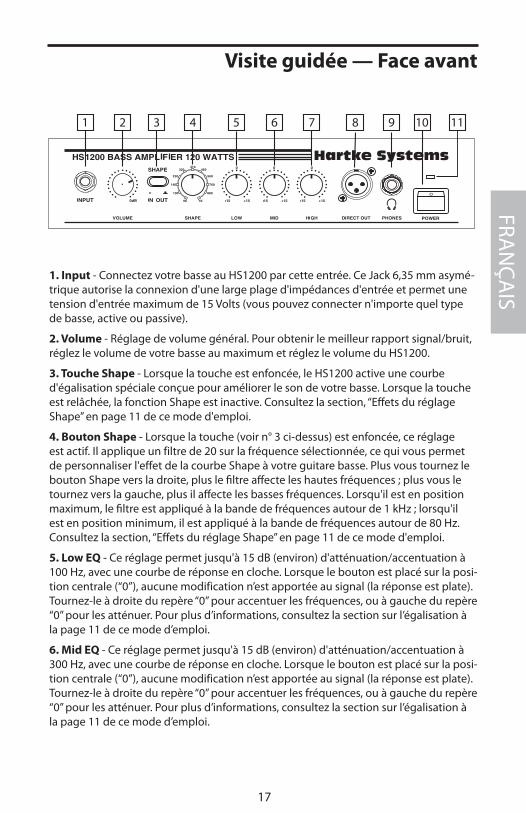
1. Input - Connectez votre basse au HS1200 par cette entrée. Ce Jack 6,35 mm asymé-trique autorise la connexion d'une large plage d'impédances d'entrée et permet une tension d'entrée maximum de 15 Volts (vous pouvez connecter n'importe quel type de basse, active ou passive).
2. Volume - Réglage de volume général. Pour obtenir le meilleur rapport signal/bruit, réglez le volume de votre basse au maximum et réglez le volume du HS1200.
3. Touche Shape - Lorsque la touche est enfoncée, le HS1200 active une courbe d'égalisation spéciale conçue pour améliorer le son de votre basse. Lorsque la touche est relâchée, la fonction Shape est inactive. Consultez la section, “Effets du réglage Shape” en page 11 de ce mode d'emploi.
4. Bouton Shape - Lorsque la touche (voir n° 3 ci-dessus) est enfoncée, ce réglage est actif. Il applique un filtre de 20 sur la fréquence sélectionnée, ce qui vous permet de personnaliser l'effet de la courbe Shape à votre guitare basse. Plus vous tournez le bouton Shape vers la droite, plus le filtre affecte les hautes fréquences ; plus vous le tournez vers la gauche, plus il affecte les basses fréquences. Lorsqu'il est en position maximum, le filtre est appliqué à la bande de fréquences autour de 1 kHz ; lorsqu'il est en position minimum, il est appliqué à la bande de fréquences autour de 80 Hz. Consultez la section, “Effets du réglage Shape” en page 11 de ce mode d'emploi.
5. Low EQ - Ce réglage permet jusqu'à 15 dB (environ) d'atténuation/accentuation à 100 Hz, avec une courbe de réponse en cloche. Lorsque le bouton est placé sur la posi-tion centrale (“0”), aucune modification n’est apportée au signal (la réponse est plate). Tournez-le à droite du repère “0” pour accentuer les fréquences, ou à gauche du repère “0” pour les atténuer. Pour plus d’informations, consultez la section sur l’égalisation à la page 11 de ce mode d’emploi.
6. Mid EQ - Ce réglage permet jusqu'à 15 dB (environ) d'atténuation/accentuation à 300 Hz, avec une courbe de réponse en cloche. Lorsque le bouton est placé sur la posi-tion centrale (“0”), aucune modification n’est apportée au signal (la réponse est plate). Tournez-le à droite du repère “0” pour accentuer les fréquences, ou à gauche du repère “0” pour les atténuer. Pour plus d’informations, consultez la section sur l’égalisation à la page 11 de ce mode d’emploi.
o
2 31 4 5 6 7 10 1198
FRAN
ÇAIS
17
Visite guidée — Face avant
7. High EQ - Ce réglage permet jusqu'à 15 dB (environ) d'atténuation/accentuation à 5 kHz, avec une courbe de réponse de type Baxendall. Lorsque le bouton est placé sur la position centrale (“0”), aucune modification n’est apportée au signal (la réponse est plate). Tournez-le à droite du repère “0” pour accentuer les fréquences, ou à gauche du repère “0” pour les atténuer. Pour plus d’informations, consultez la section sur l’égalisa-tion à la page 11 de ce mode d’emploi.
8. Sortie Direct - Cette embase XLR mâle symétrique basse impédance porte le signal à niveau micro pré-égalisation (et pré-volume) du HS1200. Utilisez cette sortie pour la connexion du HS1200 à un boîtier de Direct (DI) ou à l'entrée micro XLR d'une console de sonorisation ou d'enregistrement. Le niveau de ce signal est supérieur d'environ 6 dB au niveau d'entrée.
9. Embase casque (Headphones) - Connectez votre casque stéréo (600 Ohms maxi-mum) à cette sortie stéréo en Jack 6,35 mm. Lorsque vous insérez une fiche dans cette embase, le haut-parleur du HS1200 est coupé, ce qui vous permet de travailler au casque sans déranger votre entourage. Le niveau de la sortie casque varie avec la posi-tion du bouton de volume — une position excessive qui entraînerait une saturation du haut-parleur entraînera de la même façon une saturation du casque.
10. Interrupteur secteur Power - Utilisez cet interrupteur pour placer le HS1200 sous ou hors tension.
11. Témoin d'alimentation à Led - S'allume lorsque le HS1200 est sous tension.
ATTENTION : Le HS1200 peut générer des niveaux sonores dans le casque qui peu-vent être extrêmement élevés : Commencez toujours par régler le bouton de volume au minimum et montez progressivement le niveau. Les bruits de "clic" indiquent la présence d'une distorsion et de dommages possibles au casque (et/ou à votre audi-tion !). Veillez à ne JAMAIS utiliser des niveaux sonores excessifs !
FRA
NÇA
IS
18
Visite guidée — Face arrière
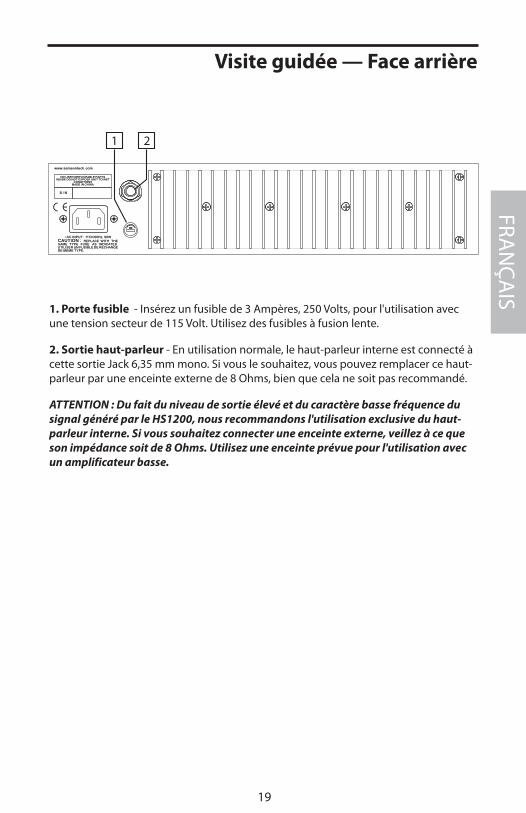
1. Porte fusible - Insérez un fusible de 3 Ampères, 250 Volts, pour l'utilisation avec une tension secteur de 115 Volt. Utilisez des fusibles à fusion lente.
2. Sortie haut-parleur - En utilisation normale, le haut-parleur interne est connecté à cette sortie Jack 6,35 mm mono. Si vous le souhaitez, vous pouvez remplacer ce haut-parleur par une enceinte externe de 8 Ohms, bien que cela ne soit pas recommandé.
ATTENTION : Du fait du niveau de sortie élevé et du caractère basse fréquence du signal généré par le HS1200, nous recommandons l'utilisation exclusive du haut-parleur interne. Si vous souhaitez connecter une enceinte externe, veillez à ce que son impédance soit de 8 Ohms. Utilisez une enceinte prévue pour l'utilisation avec un amplificateur basse.
FUSE
FRAN
ÇAIS
19
Mise en oeuvre et utilisation du Kickback
La procédure de configuration de votre combo basse Hartke HS1200 KickBack™ est très simple et ne prend que quelques minutes :
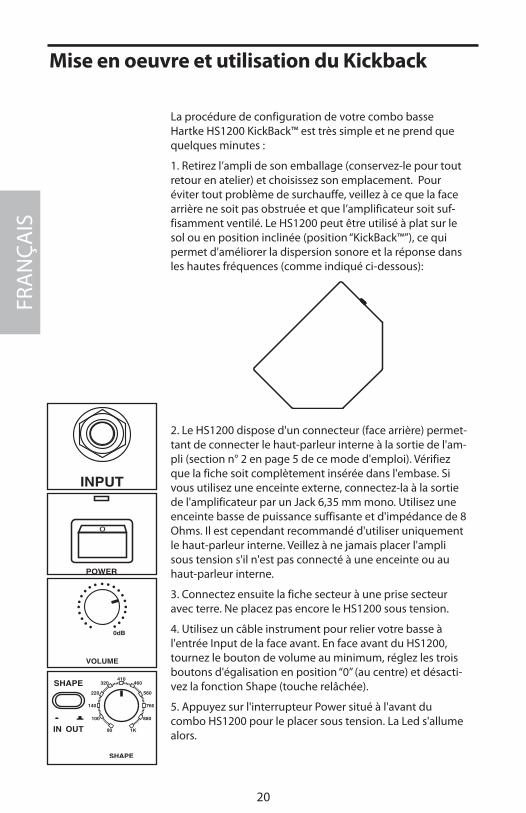
1. Retirez l’ampli de son emballage (conservez-le pour tout retour en atelier) et choisissez son emplacement. Pour éviter tout problème de surchauffe, veillez à ce que la face arrière ne soit pas obstruée et que l’amplificateur soit suf-fisamment ventilé. Le HS1200 peut être utilisé à plat sur le sol ou en position inclinée (position “KickBack™”), ce qui permet d'améliorer la dispersion sonore et la réponse dans les hautes fréquences (comme indiqué ci-dessous):
2. Le HS1200 dispose d'un connecteur (face arrière) permet-tant de connecter le haut-parleur interne à la sortie de l'am-pli (section n° 2 en page 5 de ce mode d'emploi). Vérifiez que la fiche soit complètement insérée dans l'embase. Si vous utilisez une enceinte externe, connectez-la à la sortie de l'amplificateur par un Jack 6,35 mm mono. Utilisez une enceinte basse de puissance suffisante et d'impédance de 8 Ohms. Il est cependant recommandé d'utiliser uniquement le haut-parleur interne. Veillez à ne jamais placer l'ampli sous tension s'il n'est pas connecté à une enceinte ou au haut-parleur interne.
3. Connectez ensuite la fiche secteur à une prise secteur avec terre. Ne placez pas encore le HS1200 sous tension.
4. Utilisez un câble instrument pour relier votre basse à l'entrée Input de la face avant. En face avant du HS1200, tournez le bouton de volume au minimum, réglez les trois boutons d'égalisation en position “0” (au centre) et désacti-vez la fonction Shape (touche relâchée).
5. Appuyez sur l'interrupteur Power situé à l'avant du combo HS1200 pour le placer sous tension. La Led s'allume alors.
o
FRA
NÇA
IS
20
6. Réglez le niveau de la basse au maximum et, tout en jouant, montez progressivement le bouton de volume du HS1200 jusqu’à ce que vous obteniez le niveau souhaité. Si vous entendez de la distorsion avec un niveau peu élevé, réduisez le niveau de sortie de la basse (ou vérifiez votre câble).
7. Appuyez sur la touche Shape puis tournez le bouton Shape vers la gauche et la droite pour contrôler l'effet de la courbe et du filtre Shape sur votre son. Placez le bouton Shape sur la position convenant le mieux aux caractéristi-ques sonores de votre instrument et à votre style de jeu.
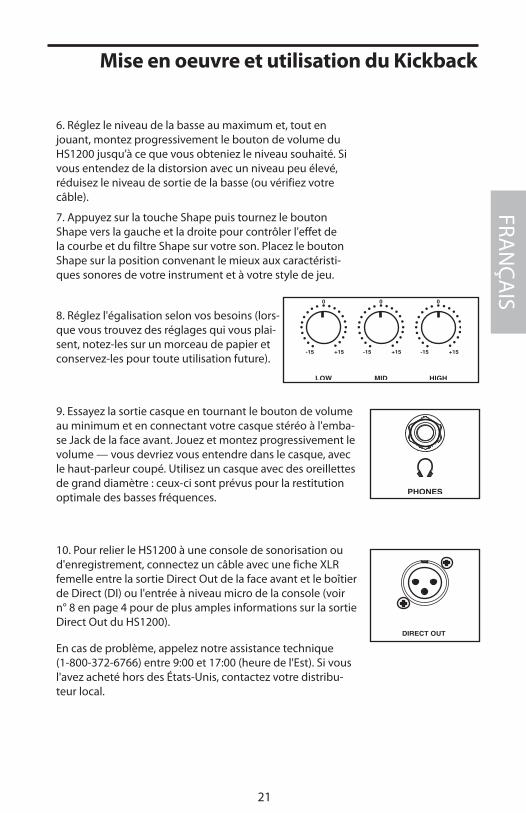
8. Réglez l'égalisation selon vos besoins (lors-que vous trouvez des réglages qui vous plai-sent, notez-les sur un morceau de papier et conservez-les pour toute utilisation future).
9. Essayez la sortie casque en tournant le bouton de volume au minimum et en connectant votre casque stéréo à l'emba-se Jack de la face avant. Jouez et montez progressivement le volume — vous devriez vous entendre dans le casque, avec le haut-parleur coupé. Utilisez un casque avec des oreillettes de grand diamètre : ceux-ci sont prévus pour la restitution optimale des basses fréquences.
10. Pour relier le HS1200 à une console de sonorisation ou d'enregistrement, connectez un câble avec une fiche XLR femelle entre la sortie Direct Out de la face avant et le boîtier de Direct (DI) ou l'entrée à niveau micro de la console (voir n° 8 en page 4 pour de plus amples informations sur la sortie Direct Out du HS1200).
En cas de problème, appelez notre assistance technique (1-800-372-6766) entre 9:00 et 17:00 (heure de l'Est). Si vous l'avez acheté hors des États-Unis, contactez votre distribu-teur local.
Mise en oeuvre et utilisation du Kickback
FRAN
ÇAIS
21

Utilisation de l'égalisation
Les combos basse Hartke HS1200 offrent un contrôle exceptionnel sur la réponse sonore de votre basse grâce à la section d'égalisation. Pour en comprendre le fonc-tionnement, il est important de savoir que tous les sons naturels sont composés d'une gamme étendue de tons, ou fréquences, combinées de façon unique. Cette combinai-son détermine la couleur tonale distincte de chaque son. Les réglages d'égalisation permettent de modifier les sons en accentuant ou atténuant des bandes de fréquen-ces spécifiques. Ils fonctionnent presque de la même façon que les réglages des basses fréquences et des hautes fréquences d'un amplificateur hi-fi, mais avec bien plus de précision. Le HS1200 dispose de trois bandes d'égalisation. Chaque bouton d'égalisation (Low, Mid, et High) affecte une plage de fréquences différentes (100 Hz, 300 Hz et 5 kHz) avec une atténuation/accentuation maximale de 15 dB.
Nous avons sélectionné ces fréquences avec soin car elles ont un impact maximum sur le son de la guitare basse. Par exemple, le réglage Low (100 Hz) affecte les fré-quences audibles les plus basses (la plupart des humains ne peuvent pas entendre les fréquences inférieures à 20 Hz), alors que le réglage High (5 kHz) affecte la précision dans le haut du spectre. Lorsqu'un bouton d'égalisation est en position centrale (“0”), il est sans effet sur le son. À partir de la position centrale, tournez le bouton vers la droite pour accentuer la fréquence et vers la gauche pour l'atténuer. Le fait de tournez les trois boutons en même temps avec la même valeur vers la droite ou vers la gauche revient quasiment à monter ou baisser le volume général. Il est préférable d'utiliser le bouton de volume pour obtenir le même résultat.
FRA
NÇA
IS
22
Utilisation de l'égalisation
La plupart du temps, la meilleure façon d'utiliser l'égalisation consiste à déterminer les fréquences à atténuer plutôt que celles qui doivent être accentuées. Il est important de savoir que l'accentuation d'une bande de fréquences accentue également le signal général. Pour être plus spécifique, lorsque les basses fréquences sont accentuées exagérément, une surcharge et de la distorsion peuvent se produire, et les haut-parleurs peuvent être endommagés.
La façon dont vous réglez l'égalisation pour le signal de votre basse dépend surtout des caractéristiques de votre instrument, de vos goûts et de votre style musical. Voici tout de même certaines suggestions générales :
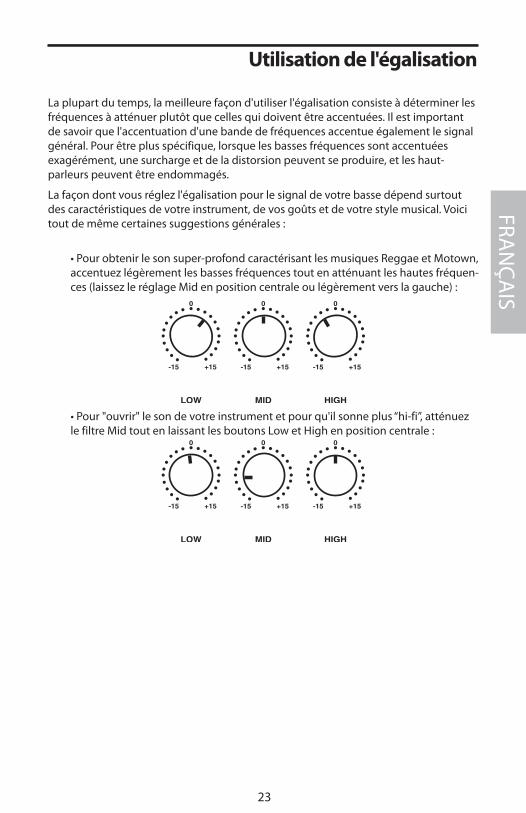
• Pour obtenir le son super-profond caractérisant les musiques Reggae et Motown, accentuez légèrement les basses fréquences tout en atténuant les hautes fréquen-ces (laissez le réglage Mid en position centrale ou légèrement vers la gauche) :
• Pour "ouvrir" le son de votre instrument et pour qu'il sonne plus “hi-fi”, atténuez le filtre Mid tout en laissant les boutons Low et High en position centrale :
FRAN
ÇAIS
23
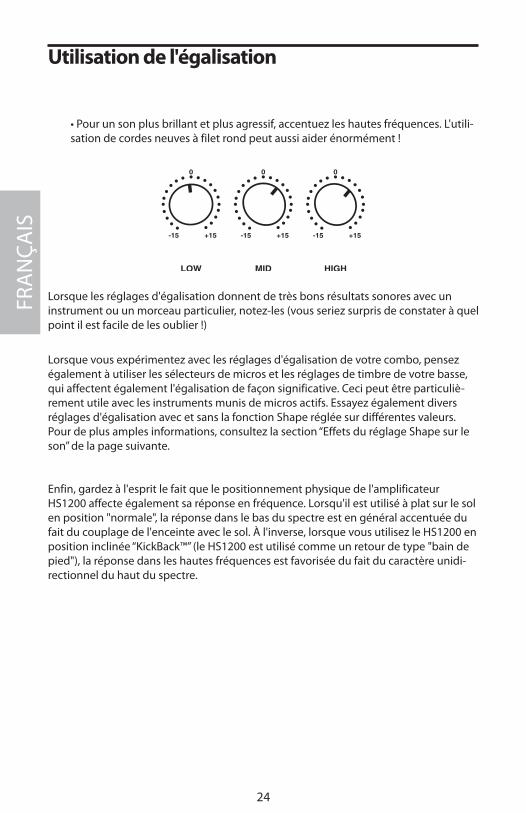
• Pour un son plus brillant et plus agressif, accentuez les hautes fréquences. L'utili-sation de cordes neuves à filet rond peut aussi aider énormément !
Lorsque les réglages d'égalisation donnent de très bons résultats sonores avec un instrument ou un morceau particulier, notez-les (vous seriez surpris de constater à quel point il est facile de les oublier !)
Lorsque vous expérimentez avec les réglages d'égalisation de votre combo, pensez également à utiliser les sélecteurs de micros et les réglages de timbre de votre basse, qui affectent également l'égalisation de façon significative. Ceci peut être particuliè-rement utile avec les instruments munis de micros actifs. Essayez également divers réglages d'égalisation avec et sans la fonction Shape réglée sur différentes valeurs.Pour de plus amples informations, consultez la section “Effets du réglage Shape sur le son” de la page suivante.
Enfin, gardez à l'esprit le fait que le positionnement physique de l'amplificateur HS1200 affecte également sa réponse en fréquence. Lorsqu'il est utilisé à plat sur le sol en position "normale", la réponse dans le bas du spectre est en général accentuée du fait du couplage de l'enceinte avec le sol. À l'inverse, lorsque vous utilisez le HS1200 en position inclinée “KickBack™” (le HS1200 est utilisé comme un retour de type "bain de pied"), la réponse dans les hautes fréquences est favorisée du fait du caractère unidi-rectionnel du haut du spectre.
Utilisation de l'égalisation FR
AN
ÇAIS
24
Effets de la fonction Shape sur le son
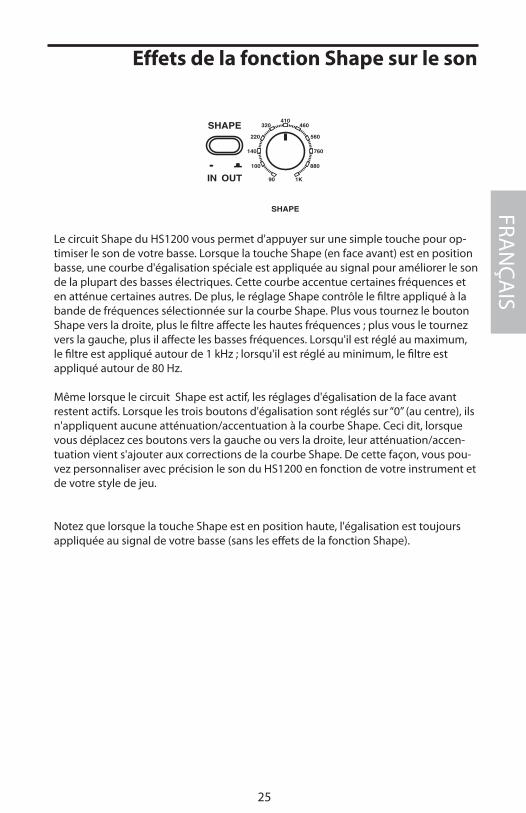
Le circuit Shape du HS1200 vous permet d'appuyer sur une simple touche pour op-timiser le son de votre basse. Lorsque la touche Shape (en face avant) est en position basse, une courbe d'égalisation spéciale est appliquée au signal pour améliorer le son de la plupart des basses électriques. Cette courbe accentue certaines fréquences et en atténue certaines autres. De plus, le réglage Shape contrôle le filtre appliqué à la bande de fréquences sélectionnée sur la courbe Shape. Plus vous tournez le bouton Shape vers la droite, plus le filtre affecte les hautes fréquences ; plus vous le tournez vers la gauche, plus il affecte les basses fréquences. Lorsqu'il est réglé au maximum, le filtre est appliqué autour de 1 kHz ; lorsqu'il est réglé au minimum, le filtre est appliqué autour de 80 Hz.
Même lorsque le circuit Shape est actif, les réglages d'égalisation de la face avant restent actifs. Lorsque les trois boutons d'égalisation sont réglés sur “0” (au centre), ils n'appliquent aucune atténuation/accentuation à la courbe Shape. Ceci dit, lorsque vous déplacez ces boutons vers la gauche ou vers la droite, leur atténuation/accen-tuation vient s'ajouter aux corrections de la courbe Shape. De cette façon, vous pou-vez personnaliser avec précision le son du HS1200 en fonction de votre instrument et de votre style de jeu.
Notez que lorsque la touche Shape est en position haute, l'égalisation est toujours appliquée au signal de votre basse (sans les effets de la fonction Shape).
FRAN
ÇAIS
25
Einleitung
Herzlichen Glückwunsch zum Kauf eines Hartke HS1200 KickBack™ Combo Bassverstärkers! Obwohl diese Amps sehr bedienungsfreundlich konzipiert sind, sollten Sie zunächst diese Seiten durchlesen, damit Sie verstehen, wie eine Reihe neuartiger Funktionen implementiert wurden. Ihr Kickback™ Combo ist ausgestattet mit dem Hartke HS1200 Verstärker und 120 Watt an sauberer Ausgangsleistung sowie einem abgestimmten 8-Ohm 12” oder 8-Ohm 15" Basslautsprecher. Das speziell entwickelte Gehäuse kann entweder bündig auf dem Boden oder zurückgekippt aufgestellt werden, um die Klarheit der Höhen und die Schallbündelung zu verbessern. Der HS1200 ist für E-Bässe optimiert und ist für den Einsatz in kleinen Veranstaltungsorten (z. B. Clubs) perfekt geeignet. Zudem ist er mit seinem speziellen Kopfhörer-ausgang hervorragend als Übungsverstärker einsetzbar. Auf diesen Seiten finden Sie eine detaillierte Beschreibung der zahlreichen Funktionen des HS1200 KickBack™ Bassverstärkers sowie einen geführten Rundgang durch die vorder- und rückseitigen Bedienfelder, schrittweise Anleitungen zum Einrichten und Betreiben des Amps, zusätzliche Informationen über den Einsatz des EQs und der neuartigen Shape-Regelung sowie vollständige Technische Daten. Sie werden auch eine Garantiekarte finden, die Sie aus-füllen und an uns schicken sollten, damit Sie online technischen Support erhalten und wir Ihnen in Zukunft aktuelle Informationen über dieses und andere Hartke- und Samson-Produkte schicken können.
SPEZIELLER HINWEIS: Wenn Ihr HS1200 einmal gewartet werden muss, benötigen Sie eine Return Authorization-Nummer (RA/Rücksendeberechtig-ungsnummer). Ohne diese Nummer wird das Gerät nicht angenommen. Bitte rufen Sie Samson unter 1-800-372-6766 an, um vor dem Verschicken des Geräts eine Return Authorization-Nummer zu erhalten. Heben Sie das Originalverpackungsmaterial auf und schicken Sie den Verstärker möglichst im originalen Karton mit Verpackungsmaterial zurück.
DEU
TSCH
E
26
Kickback Features
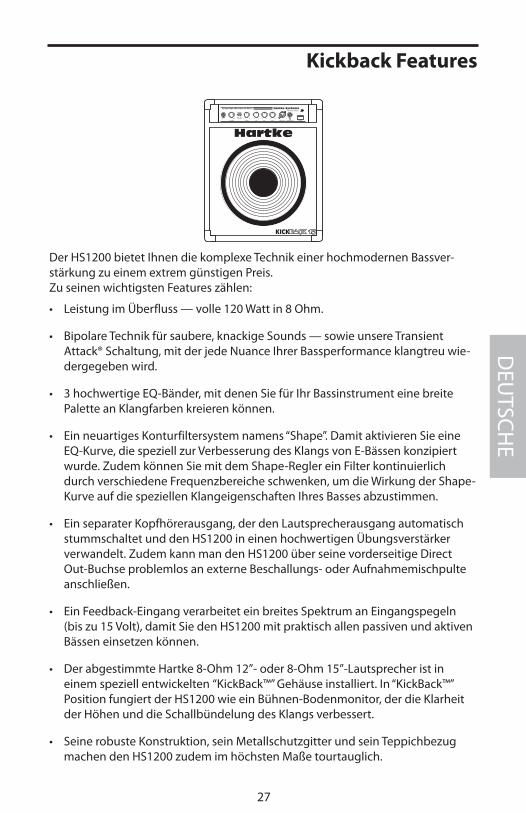
Der HS1200 bietet Ihnen die komplexe Technik einer hochmodernen Bassver-stärkung zu einem extrem günstigen Preis. Zu seinen wichtigsten Features zählen:
• Leistung im Überfluss — volle 120 Watt in 8 Ohm.
• Bipolare Technik für saubere, knackige Sounds — sowie unsere Transient Attack® Schaltung, mit der jede Nuance Ihrer Bassperformance klangtreu wie-dergegeben wird.
• 3 hochwertige EQ-Bänder, mit denen Sie für Ihr Bassinstrument eine breite Palette an Klangfarben kreieren können.
• Ein neuartiges Konturfiltersystem namens “Shape”. Damit aktivieren Sie eine EQ-Kurve, die speziell zur Verbesserung des Klangs von E-Bässen konzipiert wurde. Zudem können Sie mit dem Shape-Regler ein Filter kontinuierlich durch verschiedene Frequenzbereiche schwenken, um die Wirkung der Shape-Kurve auf die speziellen Klangeigenschaften Ihres Basses abzustimmen.
• Ein separater Kopfhörerausgang, der den Lautsprecherausgang automatisch stummschaltet und den HS1200 in einen hochwertigen Übungsverstärker verwandelt. Zudem kann man den HS1200 über seine vorderseitige Direct Out-Buchse problemlos an externe Beschallungs- oder Aufnahmemischpulte anschließen.
• Ein Feedback-Eingang verarbeitet ein breites Spektrum an Eingangspegeln (bis zu 15 Volt), damit Sie den HS1200 mit praktisch allen passiven und aktiven Bässen einsetzen können.
• Der abgestimmte Hartke 8-Ohm 12”- oder 8-Ohm 15”-Lautsprecher ist in einem speziell entwickelten “KickBack™” Gehäuse installiert. In “KickBack™” Position fungiert der HS1200 wie ein Bühnen-Bodenmonitor, der die Klarheit der Höhen und die Schallbündelung des Klangs verbessert.
• Seine robuste Konstruktion, sein Metallschutzgitter und sein Teppichbezug machen den HS1200 zudem im höchsten Maße tourtauglich.
Hartke
KICKBACK 15
o
POWERHEADPHONESDIRECT OUT HIGHMIDLOWSHAPE
IN OUT
VOLUME
INPUT
SHAPE
1K 90 -15 +15 -15 +15 -15 +15
0 0 0
0
0dB
Hartke SystemsHS1200 BASS AMPLIFIER 120 WATTS Transient Attack ®
DEU
TSCHE
27
Geführter Rundgang - Vorderseite
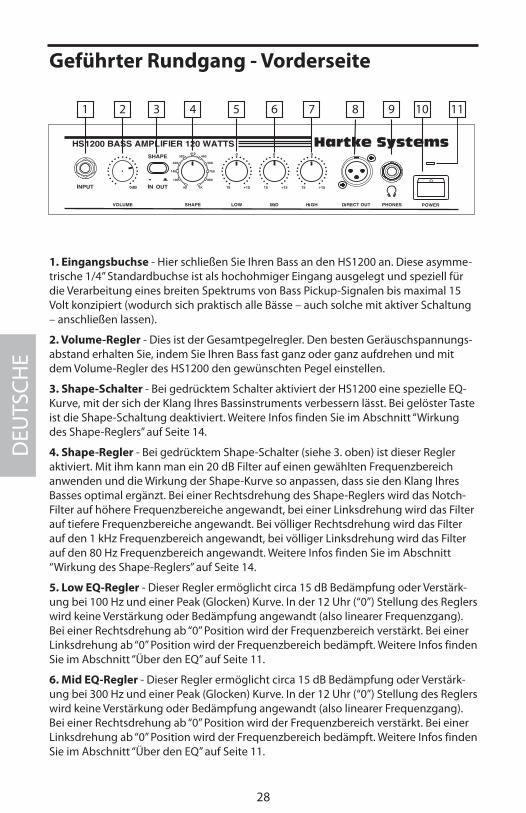
1. Eingangsbuchse - Hier schließen Sie Ihren Bass an den HS1200 an. Diese asymme-trische 1/4” Standardbuchse ist als hochohmiger Eingang ausgelegt und speziell für die Verarbeitung eines breiten Spektrums von Bass Pickup-Signalen bis maximal 15 Volt konzipiert (wodurch sich praktisch alle Bässe – auch solche mit aktiver Schaltung – anschließen lassen).
2. Volume-Regler - Dies ist der Gesamtpegelregler. Den besten Geräuschspannungs-abstand erhalten Sie, indem Sie Ihren Bass fast ganz oder ganz aufdrehen und mit dem Volume-Regler des HS1200 den gewünschten Pegel einstellen.
3. Shape-Schalter - Bei gedrücktem Schalter aktiviert der HS1200 eine spezielle EQ-Kurve, mit der sich der Klang Ihres Bassinstruments verbessern lässt. Bei gelöster Taste ist die Shape-Schaltung deaktiviert. Weitere Infos finden Sie im Abschnitt “Wirkung des Shape-Reglers” auf Seite 14.
4. Shape-Regler - Bei gedrücktem Shape-Schalter (siehe 3. oben) ist dieser Regler aktiviert. Mit ihm kann man ein 20 dB Filter auf einen gewählten Frequenzbereich anwenden und die Wirkung der Shape-Kurve so anpassen, dass sie den Klang Ihres Basses optimal ergänzt. Bei einer Rechtsdrehung des Shape-Reglers wird das Notch-Filter auf höhere Frequenzbereiche angewandt, bei einer Linksdrehung wird das Filter auf tiefere Frequenzbereiche angewandt. Bei völliger Rechtsdrehung wird das Filter auf den 1 kHz Frequenzbereich angewandt, bei völliger Linksdrehung wird das Filter auf den 80 Hz Frequenzbereich angewandt. Weitere Infos finden Sie im Abschnitt “Wirkung des Shape-Reglers” auf Seite 14.
5. Low EQ-Regler - Dieser Regler ermöglicht circa 15 dB Bedämpfung oder Verstärk-ung bei 100 Hz und einer Peak (Glocken) Kurve. In der 12 Uhr (“0”) Stellung des Reglers wird keine Verstärkung oder Bedämpfung angewandt (also linearer Frequenzgang). Bei einer Rechtsdrehung ab “0” Position wird der Frequenzbereich verstärkt. Bei einer Linksdrehung ab “0” Position wird der Frequenzbereich bedämpft. Weitere Infos finden Sie im Abschnitt “Über den EQ” auf Seite 11.
6. Mid EQ-Regler - Dieser Regler ermöglicht circa 15 dB Bedämpfung oder Verstärk-ung bei 300 Hz und einer Peak (Glocken) Kurve. In der 12 Uhr (“0”) Stellung des Reglers wird keine Verstärkung oder Bedämpfung angewandt (also linearer Frequenzgang). Bei einer Rechtsdrehung ab “0” Position wird der Frequenzbereich verstärkt. Bei einer Linksdrehung ab “0” Position wird der Frequenzbereich bedämpft. Weitere Infos finden Sie im Abschnitt “Über den EQ” auf Seite 11.
o
2 31 4 5 6 7 10 1198
DEU
TSCH
E
28
Geführter Rundgang - Vorderseite
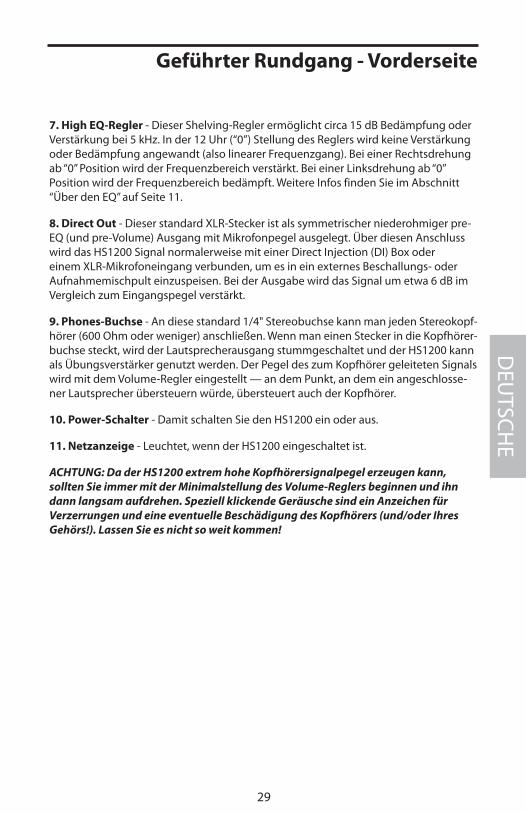
7. High EQ-Regler - Dieser Shelving-Regler ermöglicht circa 15 dB Bedämpfung oder Verstärkung bei 5 kHz. In der 12 Uhr (“0”) Stellung des Reglers wird keine Verstärkung oder Bedämpfung angewandt (also linearer Frequenzgang). Bei einer Rechtsdrehung ab “0” Position wird der Frequenzbereich verstärkt. Bei einer Linksdrehung ab “0” Position wird der Frequenzbereich bedämpft. Weitere Infos finden Sie im Abschnitt “Über den EQ” auf Seite 11.
8. Direct Out - Dieser standard XLR-Stecker ist als symmetrischer niederohmiger pre-EQ (und pre-Volume) Ausgang mit Mikrofonpegel ausgelegt. Über diesen Anschluss wird das HS1200 Signal normalerweise mit einer Direct Injection (DI) Box oder einem XLR-Mikrofoneingang verbunden, um es in ein externes Beschallungs- oder Aufnahmemischpult einzuspeisen. Bei der Ausgabe wird das Signal um etwa 6 dB im Vergleich zum Eingangspegel verstärkt.
9. Phones-Buchse - An diese standard 1/4" Stereobuchse kann man jeden Stereokopf-hörer (600 Ohm oder weniger) anschließen. Wenn man einen Stecker in die Kopfhörer-buchse steckt, wird der Lautsprecherausgang stummgeschaltet und der HS1200 kann als Übungsverstärker genutzt werden. Der Pegel des zum Kopfhörer geleiteten Signals wird mit dem Volume-Regler eingestellt — an dem Punkt, an dem ein angeschlosse-ner Lautsprecher übersteuern würde, übersteuert auch der Kopfhörer.
10. Power-Schalter - Damit schalten Sie den HS1200 ein oder aus.
11. Netzanzeige - Leuchtet, wenn der HS1200 eingeschaltet ist.
ACHTUNG: Da der HS1200 extrem hohe Kopfhörersignalpegel erzeugen kann, sollten Sie immer mit der Minimalstellung des Volume-Reglers beginnen und ihn dann langsam aufdrehen. Speziell klickende Geräusche sind ein Anzeichen für Verzerrungen und eine eventuelle Beschädigung des Kopfhörers (und/oder Ihres Gehörs!). Lassen Sie es nicht so weit kommen!
DEU
TSCHE
29
Geführter Rundgang - Rückseite
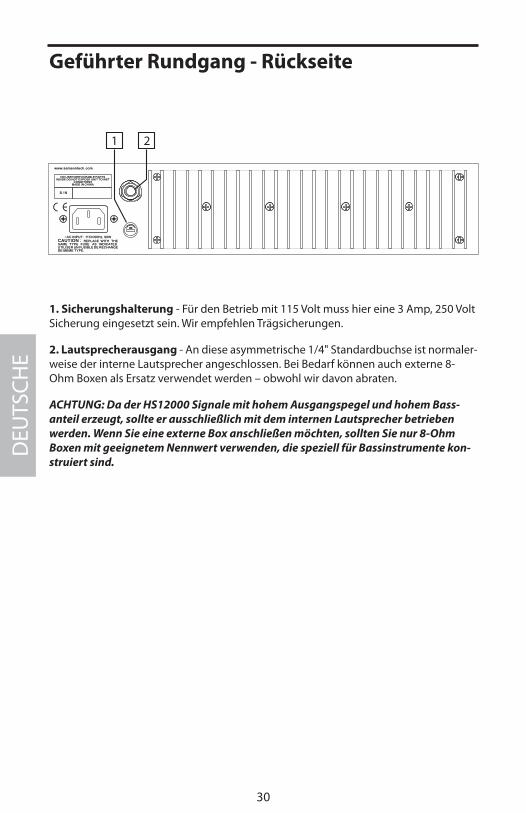
1. Sicherungshalterung - Für den Betrieb mit 115 Volt muss hier eine 3 Amp, 250 Volt Sicherung eingesetzt sein. Wir empfehlen Trägsicherungen.
2. Lautsprecherausgang - An diese asymmetrische 1/4" Standardbuchse ist normaler-weise der interne Lautsprecher angeschlossen. Bei Bedarf können auch externe 8-Ohm Boxen als Ersatz verwendet werden – obwohl wir davon abraten.
ACHTUNG: Da der HS12000 Signale mit hohem Ausgangspegel und hohem Bass-anteil erzeugt, sollte er ausschließlich mit dem internen Lautsprecher betrieben werden. Wenn Sie eine externe Box anschließen möchten, sollten Sie nur 8-Ohm Boxen mit geeignetem Nennwert verwenden, die speziell für Bassinstrumente kon-struiert sind.
FUSE
DEU
TSCH
E
30
Kickback-Verstärker einrichten und einsetzen
Ihr Hartke Systems HS1200 KickBack™ Bassverstärker lässt sich problemlos in wenigen Minuten einrichten:
1. Entfernen Sie das Verpackungsmaterial (heben Sie es für zukünftige Wartungsarbeiten auf ) und entscheiden Sie, wo der Verstärker aufgestellt werden soll. Um Über-hitzungsprobleme zu vermeiden, darf die Rückseite nicht blockiert sein. Außerdem muss eine gute Belüftung um das gesamte Gerät herum gewährleistet sein. Der HS1200 kann ebenerdig oder in der “KickBack™” Position (um die Klarheit der Höhen und die Schallbündelung zu verbessern) betrieben werden (siehe Abb. unten).
2. Bei der Auslieferung des HS1200 ist der rückseitige Laut-sprecherausgang (siehe 2. auf Seite 6) über ein Kabel mit dem Eingang des integrierten Lautsprechers verbunden. Prüfen Sie, ob das Kabel angeschlossen ist – falls nicht, schließen Sie es bitte an. Um eine externe Box zu betreiben verbinden Sie diese mit dem asymmetrischen 1/4” Laut-sprecherausgang auf der Rückseite des HS1200. Man kann jede externe Bassbox mit geeignetem Nennwert und einer Impedanz von 8 Ohm verwenden, obwohl wir die Verwendung des speziell entwickelten internen Lautsprech-ers empfehlen. Man sollte nie einen Verstärker einschalten, der nicht an einen Lautsprecher angeschlossen ist.
3. Schließen Sie dann den 3-poligen AC-Netzstecker an eine geerdete AC-Netzsteckdose an. Schalten Sie den HS1200 aber noch nicht ein.
4. Schließen Sie Ihren Bass über ein standard Musikinstru-mentenkabel an die vorderseitige Eingangsbuchse an. Drehen Sie auf dem vorderseitigen Bedienfeld des HS1200 den Volume-Regler auf Minimum (ganz nach links) und stellen Sie alle drei EQ-Regler auf Position “0” (12 Uhr) ein. Stellen Sie den Shape-Schalter auf OFF ein (gelöste Taste).
5. Drücken Sie den vorderseitigen Power-Schalter, um den HS1200 einzuschalten. Die LED über der Taste leuchtet.
o
DEU
TSCHE
31
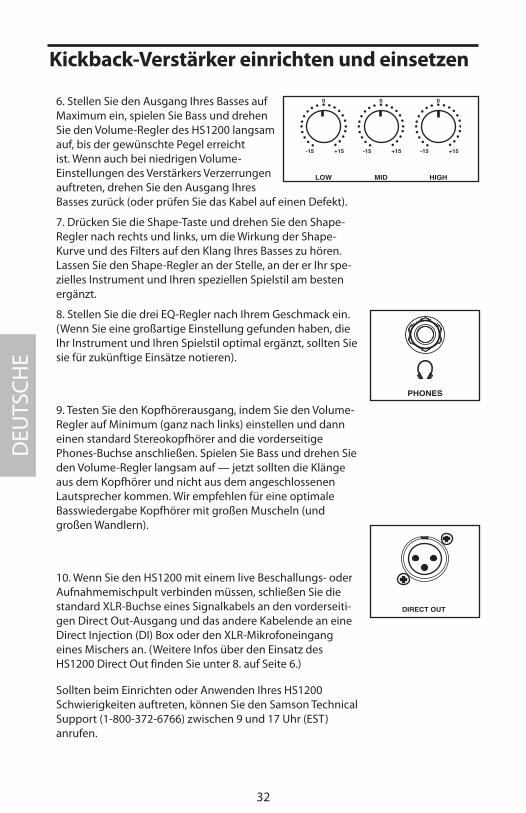
6. Stellen Sie den Ausgang Ihres Basses auf Maximum ein, spielen Sie Bass und drehen Sie den Volume-Regler des HS1200 langsam auf, bis der gewünschte Pegel erreicht ist. Wenn auch bei niedrigen Volume-Einstellungen des Verstärkers Verzerrungen auftreten, drehen Sie den Ausgang Ihres Basses zurück (oder prüfen Sie das Kabel auf einen Defekt).
7. Drücken Sie die Shape-Taste und drehen Sie den Shape-Regler nach rechts und links, um die Wirkung der Shape-Kurve und des Filters auf den Klang Ihres Basses zu hören. Lassen Sie den Shape-Regler an der Stelle, an der er Ihr spe-zielles Instrument und Ihren speziellen Spielstil am besten ergänzt.
8. Stellen Sie die drei EQ-Regler nach Ihrem Geschmack ein. (Wenn Sie eine großartige Einstellung gefunden haben, die Ihr Instrument und Ihren Spielstil optimal ergänzt, sollten Sie sie für zukünftige Einsätze notieren).
9. Testen Sie den Kopfhörerausgang, indem Sie den Volume-Regler auf Minimum (ganz nach links) einstellen und dann einen standard Stereokopfhörer and die vorderseitige Phones-Buchse anschließen. Spielen Sie Bass und drehen Sie den Volume-Regler langsam auf — jetzt sollten die Klänge aus dem Kopfhörer und nicht aus dem angeschlossenen Lautsprecher kommen. Wir empfehlen für eine optimale Basswiedergabe Kopfhörer mit großen Muscheln (und großen Wandlern).
10. Wenn Sie den HS1200 mit einem live Beschallungs- oder Aufnahmemischpult verbinden müssen, schließen Sie die standard XLR-Buchse eines Signalkabels an den vorderseiti-gen Direct Out-Ausgang und das andere Kabelende an eine Direct Injection (DI) Box oder den XLR-Mikrofoneingang eines Mischers an. (Weitere Infos über den Einsatz des HS1200 Direct Out finden Sie unter 8. auf Seite 6.)
Sollten beim Einrichten oder Anwenden Ihres HS1200 Schwierigkeiten auftreten, können Sie den Samson Technical Support (1-800-372-6766) zwischen 9 und 17 Uhr (EST) anrufen.
Kickback-Verstärker einrichten und einsetzen
DEU
TSCH
E
32
EQ einsetzen
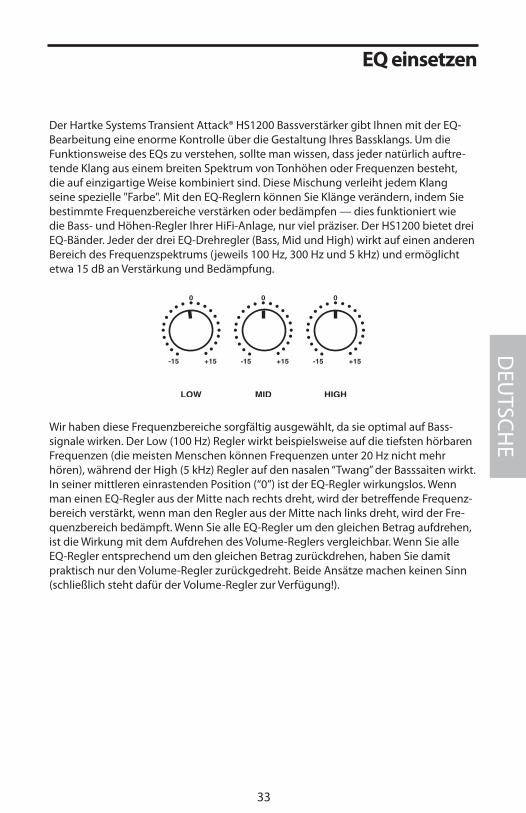
Der Hartke Systems Transient Attack® HS1200 Bassverstärker gibt Ihnen mit der EQ-Bearbeitung eine enorme Kontrolle über die Gestaltung Ihres Bassklangs. Um die Funktionsweise des EQs zu verstehen, sollte man wissen, dass jeder natürlich auftre-tende Klang aus einem breiten Spektrum von Tonhöhen oder Frequenzen besteht, die auf einzigartige Weise kombiniert sind. Diese Mischung verleiht jedem Klang seine spezielle "Farbe". Mit den EQ-Reglern können Sie Klänge verändern, indem Sie bestimmte Frequenzbereiche verstärken oder bedämpfen — dies funktioniert wie die Bass- und Höhen-Regler Ihrer HiFi-Anlage, nur viel präziser. Der HS1200 bietet drei EQ-Bänder. Jeder der drei EQ-Drehregler (Bass, Mid und High) wirkt auf einen anderen Bereich des Frequenzspektrums (jeweils 100 Hz, 300 Hz und 5 kHz) und ermöglicht etwa 15 dB an Verstärkung und Bedämpfung.
Wir haben diese Frequenzbereiche sorgfältig ausgewählt, da sie optimal auf Bass-signale wirken. Der Low (100 Hz) Regler wirkt beispielsweise auf die tiefsten hörbaren Frequenzen (die meisten Menschen können Frequenzen unter 20 Hz nicht mehr hören), während der High (5 kHz) Regler auf den nasalen “Twang” der Basssaiten wirkt. In seiner mittleren einrastenden Position (“0”) ist der EQ-Regler wirkungslos. Wenn man einen EQ-Regler aus der Mitte nach rechts dreht, wird der betreffende Frequenz-bereich verstärkt, wenn man den Regler aus der Mitte nach links dreht, wird der Fre-quenzbereich bedämpft. Wenn Sie alle EQ-Regler um den gleichen Betrag aufdrehen, ist die Wirkung mit dem Aufdrehen des Volume-Reglers vergleichbar. Wenn Sie alle EQ-Regler entsprechend um den gleichen Betrag zurückdrehen, haben Sie damit praktisch nur den Volume-Regler zurückgedreht. Beide Ansätze machen keinen Sinn (schließlich steht dafür der Volume-Regler zur Verfügung!).
DEU
TSCHE
33
EQ einsetzen
In vielen Fällen sollten Sie bei der EQ-Bearbeitung zuerst überlegen, welche Frequenz-bereiche bedämpft werden müssen, und danach erst überlegen, welche Bereiche verstärkt werden müssen. Beim Verstärken eines Frequenzbereichs wird auch das gesamte Signal verstärkt. Besonders bei einer zu hohen Tieffrequenz-Verstärkung via EQ können Überlastungsverzerrungen auftreten oder sogar die Lautsprecher beschä-digt werden.
Welche EQ-Bearbeitung Sie auf Ihr Basssignal anwenden, hängt sehr stark von Ihrem speziellen Instrument, persönlichen Geschmack und Spielstil ab. Hier einige allge-meine Vorschläge:
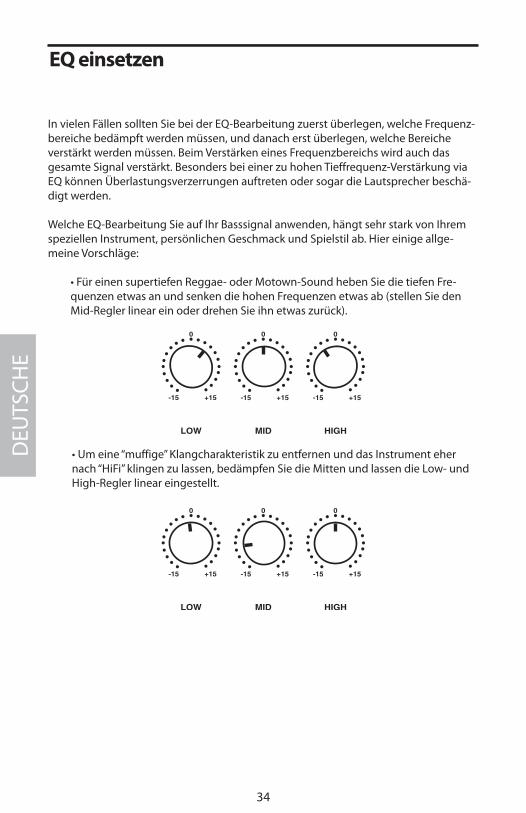
• Für einen supertiefen Reggae- oder Motown-Sound heben Sie die tiefen Fre-quenzen etwas an und senken die hohen Frequenzen etwas ab (stellen Sie den Mid-Regler linear ein oder drehen Sie ihn etwas zurück).
• Um eine “muffige” Klangcharakteristik zu entfernen und das Instrument eher nach “HiFi” klingen zu lassen, bedämpfen Sie die Mitten und lassen die Low- und High-Regler linear eingestellt.
DEU
TSCH
E
34
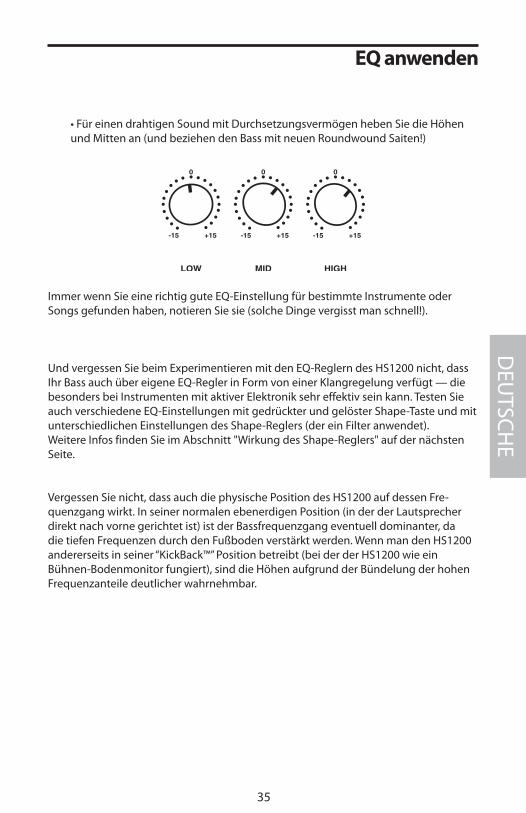
• Für einen drahtigen Sound mit Durchsetzungsvermögen heben Sie die Höhen und Mitten an (und beziehen den Bass mit neuen Roundwound Saiten!)
Immer wenn Sie eine richtig gute EQ-Einstellung für bestimmte Instrumente oder Songs gefunden haben, notieren Sie sie (solche Dinge vergisst man schnell!).
Und vergessen Sie beim Experimentieren mit den EQ-Reglern des HS1200 nicht, dass Ihr Bass auch über eigene EQ-Regler in Form von einer Klangregelung verfügt — die besonders bei Instrumenten mit aktiver Elektronik sehr effektiv sein kann. Testen Sie auch verschiedene EQ-Einstellungen mit gedrückter und gelöster Shape-Taste und mit unterschiedlichen Einstellungen des Shape-Reglers (der ein Filter anwendet).Weitere Infos finden Sie im Abschnitt "Wirkung des Shape-Reglers" auf der nächsten Seite.
Vergessen Sie nicht, dass auch die physische Position des HS1200 auf dessen Fre-quenzgang wirkt. In seiner normalen ebenerdigen Position (in der der Lautsprecher direkt nach vorne gerichtet ist) ist der Bassfrequenzgang eventuell dominanter, da die tiefen Frequenzen durch den Fußboden verstärkt werden. Wenn man den HS1200 andererseits in seiner “KickBack™” Position betreibt (bei der der HS1200 wie ein Bühnen-Bodenmonitor fungiert), sind die Höhen aufgrund der Bündelung der hohen Frequenzanteile deutlicher wahrnehmbar.
EQ anwenden
DEU
TSCHE
35
Wirkung des Shape-Reglers
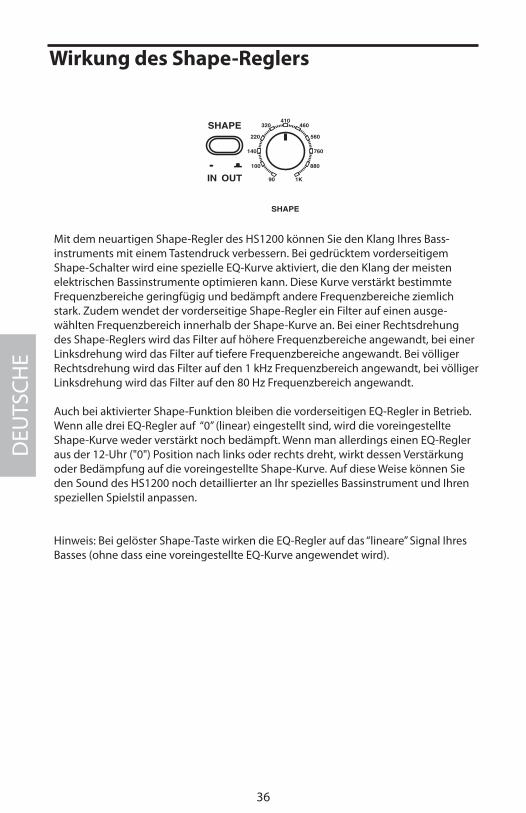
Mit dem neuartigen Shape-Regler des HS1200 können Sie den Klang Ihres Bass-instruments mit einem Tastendruck verbessern. Bei gedrücktem vorderseitigem Shape-Schalter wird eine spezielle EQ-Kurve aktiviert, die den Klang der meisten elektrischen Bassinstrumente optimieren kann. Diese Kurve verstärkt bestimmte Frequenzbereiche geringfügig und bedämpft andere Frequenzbereiche ziemlich stark. Zudem wendet der vorderseitige Shape-Regler ein Filter auf einen ausge-wählten Frequenzbereich innerhalb der Shape-Kurve an. Bei einer Rechtsdrehung des Shape-Reglers wird das Filter auf höhere Frequenzbereiche angewandt, bei einer Linksdrehung wird das Filter auf tiefere Frequenzbereiche angewandt. Bei völliger Rechtsdrehung wird das Filter auf den 1 kHz Frequenzbereich angewandt, bei völliger Linksdrehung wird das Filter auf den 80 Hz Frequenzbereich angewandt.
Auch bei aktivierter Shape-Funktion bleiben die vorderseitigen EQ-Regler in Betrieb. Wenn alle drei EQ-Regler auf “0” (linear) eingestellt sind, wird die voreingestellte Shape-Kurve weder verstärkt noch bedämpft. Wenn man allerdings einen EQ-Regler aus der 12-Uhr ("0") Position nach links oder rechts dreht, wirkt dessen Verstärkung oder Bedämpfung auf die voreingestellte Shape-Kurve. Auf diese Weise können Sie den Sound des HS1200 noch detaillierter an Ihr spezielles Bassinstrument und Ihren speziellen Spielstil anpassen.
Hinweis: Bei gelöster Shape-Taste wirken die EQ-Regler auf das “lineare” Signal Ihres Basses (ohne dass eine voreingestellte EQ-Kurve angewendet wird).
DEU
TSCH
E
36
Introducción
¡Felicidades y gracias por la compra de nuestro Combo para bajo Hartke HS1200 KickBack™! Aunque hemos diseñado este amplificador para que sea muy sencillo de usar, le recomendamos que dedique unos minutos a leer estas páginas para que pueda sacar todo el partido a las funciones exclusivas que hemos incluido en él. Su combo Kickback™ está compuesto por el amplificador Hartke HS1200, con 120 watios de potencia para un sonido de gran claridad y de un altavoz de graves de 12” y 8 ohmios o uno de 15”, perfectamente emparejados. Su recinto acústico de diseño exclusivo le permite usar esta unidad tanto tumbada plana o en su posición de "cuña", para una mayor claridad y direccionalidad. Optimizado para su uso con bajos eléctricos, encontrará que el HS1200 es el compañero perfecto para pequeñas actuaciones (discotecas, clubs...); además, su exclusiva salida de auriculares hace que también resulte ideal para ensayos. En estas páginas, encontrará una descripción detallada de las características del combo para bajo HS1200 KickBack™, así como un recorrido guiado por su panel de control, instrucciones paso-a-paso para su configuración y uso, información adicional acerca de la ecualización y el uso de nuestro exclusivo control Shape y unas completas especificaciones técnicas. También encontrará una tarjeta de garantía—¡no se olvide de cumplimentarla y remitírnosla! Esto le permitirá recibir soporte técnico online y mantenerse informado en todo momento sobre este y otros productos Hartke y Samson en el futuro.
NOTA ESPECIAL: En el improbable caso de que su HS1200 deba ser reparado, DEBERA conseguir un número de autorización de devolución (RA). Sin este número, ningún aparato es aceptado en fábrica. Rogamos que se ponga en contacto con Samson en el 1-800-372-6766 para que le facilitemos este número RA antes de devolvernos su aparato. Conserve el embalaje original y todas las protecciones y, si es posible, devuélvanos la unidad dentro de ellos.
ESPAÑ
OL
37
Características del Kickback
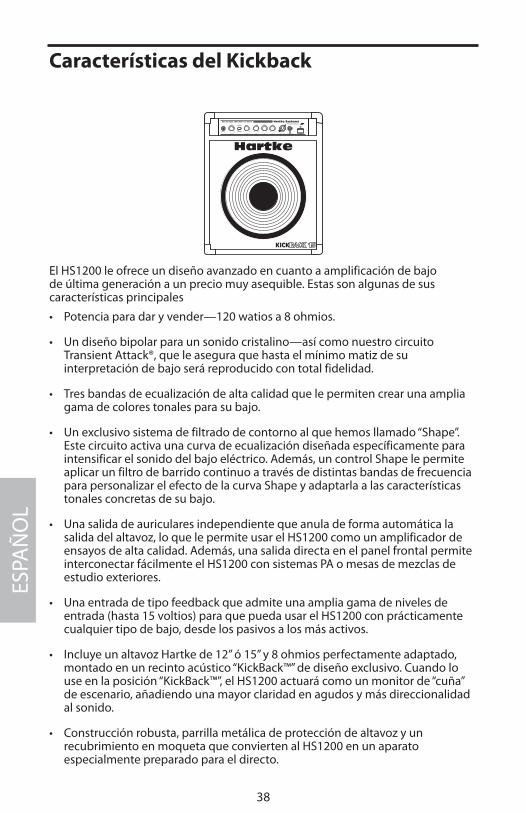
El HS1200 le ofrece un diseño avanzado en cuanto a amplificación de bajo de última generación a un precio muy asequible. Estas son algunas de sus características principales
• Potencia para dar y vender—120 watios a 8 ohmios.
• Un diseño bipolar para un sonido cristalino—así como nuestro circuito Transient Attack®, que le asegura que hasta el mínimo matiz de su interpretación de bajo será reproducido con total fidelidad.
• Tres bandas de ecualización de alta calidad que le permiten crear una amplia gama de colores tonales para su bajo.
• Un exclusivo sistema de filtrado de contorno al que hemos llamado “Shape”. Este circuito activa una curva de ecualización diseñada específicamente para intensificar el sonido del bajo eléctrico. Además, un control Shape le permite aplicar un filtro de barrido continuo a través de distintas bandas de frecuencia para personalizar el efecto de la curva Shape y adaptarla a las características tonales concretas de su bajo.
• Una salida de auriculares independiente que anula de forma automática la salida del altavoz, lo que le permite usar el HS1200 como un amplificador de ensayos de alta calidad. Además, una salida directa en el panel frontal permite interconectar fácilmente el HS1200 con sistemas PA o mesas de mezclas de estudio exteriores.
• Una entrada de tipo feedback que admite una amplia gama de niveles de entrada (hasta 15 voltios) para que pueda usar el HS1200 con prácticamente cualquier tipo de bajo, desde los pasivos a los más activos.
• Incluye un altavoz Hartke de 12” ó 15” y 8 ohmios perfectamente adaptado, montado en un recinto acústico “KickBack™” de diseño exclusivo. Cuando lo use en la posición “KickBack™”, el HS1200 actuará como un monitor de “cuña” de escenario, añadiendo una mayor claridad en agudos y más direccionalidad al sonido.
• Construcción robusta, parrilla metálica de protección de altavoz y un recubrimiento en moqueta que convierten al HS1200 en un aparato especialmente preparado para el directo.
Hartke
KICKBACK 15
o
POWERHEADPHONESDIRECT OUT HIGHMIDLOWSHAPE
IN OUT
VOLUME
INPUT
SHAPE
1K 90 -15 +15 -15 +15 -15 +15
0 0 0
0
0dB
Hartke SystemsHS1200 BASS AMPLIFIER 120 WATTS Transient Attack ®
ESPA
ÑO
L
38
Recorrido guiado - Panel frontal
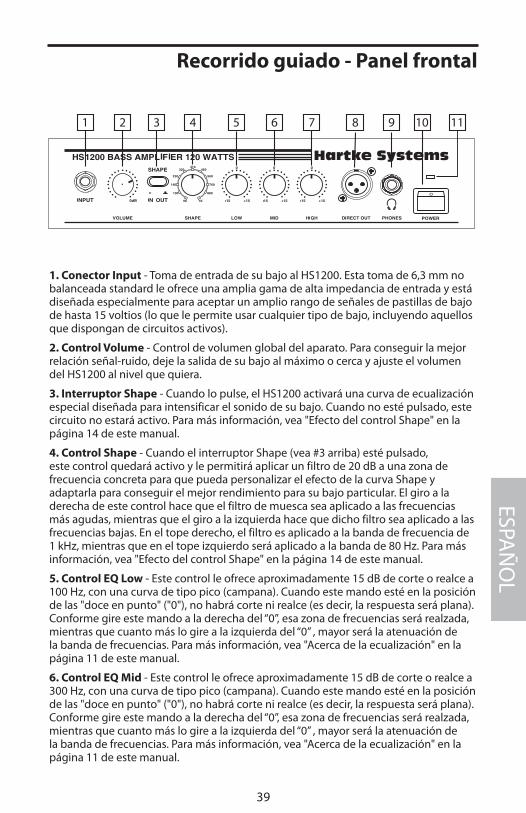
1. Conector Input - Toma de entrada de su bajo al HS1200. Esta toma de 6,3 mm no balanceada standard le ofrece una amplia gama de alta impedancia de entrada y está diseñada especialmente para aceptar un amplio rango de señales de pastillas de bajo de hasta 15 voltios (lo que le permite usar cualquier tipo de bajo, incluyendo aquellos que dispongan de circuitos activos).
2. Control Volume - Control de volumen global del aparato. Para conseguir la mejor relación señal-ruido, deje la salida de su bajo al máximo o cerca y ajuste el volumen del HS1200 al nivel que quiera.
3. Interruptor Shape - Cuando lo pulse, el HS1200 activará una curva de ecualización especial diseñada para intensificar el sonido de su bajo. Cuando no esté pulsado, este circuito no estará activo. Para más información, vea "Efecto del control Shape" en la página 14 de este manual.
4. Control Shape - Cuando el interruptor Shape (vea #3 arriba) esté pulsado, este control quedará activo y le permitirá aplicar un filtro de 20 dB a una zona de frecuencia concreta para que pueda personalizar el efecto de la curva Shape y adaptarla para conseguir el mejor rendimiento para su bajo particular. El giro a la derecha de este control hace que el filtro de muesca sea aplicado a las frecuencias más agudas, mientras que el giro a la izquierda hace que dicho filtro sea aplicado a las frecuencias bajas. En el tope derecho, el filtro es aplicado a la banda de frecuencia de 1 kHz, mientras que en el tope izquierdo será aplicado a la banda de 80 Hz. Para más información, vea "Efecto del control Shape" en la página 14 de este manual.
5. Control EQ Low - Este control le ofrece aproximadamente 15 dB de corte o realce a 100 Hz, con una curva de tipo pico (campana). Cuando este mando esté en la posición de las "doce en punto" ("0"), no habrá corte ni realce (es decir, la respuesta será plana). Conforme gire este mando a la derecha del “0”, esa zona de frecuencias será realzada, mientras que cuanto más lo gire a la izquierda del “0” , mayor será la atenuación de la banda de frecuencias. Para más información, vea "Acerca de la ecualización" en la página 11 de este manual.
6. Control EQ Mid - Este control le ofrece aproximadamente 15 dB de corte o realce a 300 Hz, con una curva de tipo pico (campana). Cuando este mando esté en la posición de las "doce en punto" ("0"), no habrá corte ni realce (es decir, la respuesta será plana). Conforme gire este mando a la derecha del “0”, esa zona de frecuencias será realzada, mientras que cuanto más lo gire a la izquierda del “0” , mayor será la atenuación de la banda de frecuencias. Para más información, vea "Acerca de la ecualización" en la página 11 de este manual.
o
2 31 4 5 6 7 10 1198
ESPAÑ
OL
39
Recorrido guiado - Panel frontal
7. Control EQ High - Este control de ecualización de tipo estantería le ofrece aproximadamente 15 dB de corte o realce a 5 kHz. Cuando este mando esté en la posición de las "doce en punto" ("0"), no habrá corte ni realce (es decir, la respuesta será plana). Conforme gire este mando a la derecha del “0”, esa zona de frecuencias será realzada, mientras que cuanto más lo gire a la izquierda del “0” , mayor será la atenuación de la banda de frecuencias. Para más información, vea "Acerca de la ecualización" en la página 11 de este manual.
8. Salida directa (Direct out) - Este conector XLR macho standard le ofrece una salida balanceada de baja impedancia, con nivel de micro y pre-EQ (también pre-volumen) del HS1200. Por lo general, utilizará esta salida directa para conectar la señal del HS1200 a una unidad de inyección directa (DI) o a una entrada de micro XLR cuando quiera interconectar este amplificador a una mesa de mezclas de estudio o un sistema PA exterior. La señal de esta salida añade aproximadamente 6 dB de ganancia al nivel de entrada.
9. Conector de auriculares (Phones) - Conecte cualquier tipo de auriculares stereo standard (600 ohmios o menos) a esta clavija de 6,3 mm stereo standard. Tan pronto como introduzca una clavija en esta toma, la salida de altavoz del HS1200 quedará anulada, lo que le permitirá usar esta unidad como un amplificador para ensayos. El nivel de la señal enviada a los auriculares vendrá determinado por el ajuste del mando Volume—los auriculares saturarán en el mismo punto en el que lo haría el altavoz interno.
10. Interruptor Power - Uselo para encender y apagar el HS1200.
11. Piloto Power - Se iluminará para indicarle que el HS1200 está encendido.
PRECAUCION: Dado que el HS1200 es capaz de generar niveles de señal de auriculares muy altos, comience siempre con el mando Volume al mínimo y vaya subiéndolo lentamente a partir de ahí. En concreto, un sonido de chasquido es una indicación clara de distorsión y de posibles daños a los auriculares (y/o, lo que es peor, ¡ a sus oídos!); ¡no permita que las cosas lleguen a ese extremo!
ESPA
ÑO
L
40
Recorrido guiado - Panel trasero
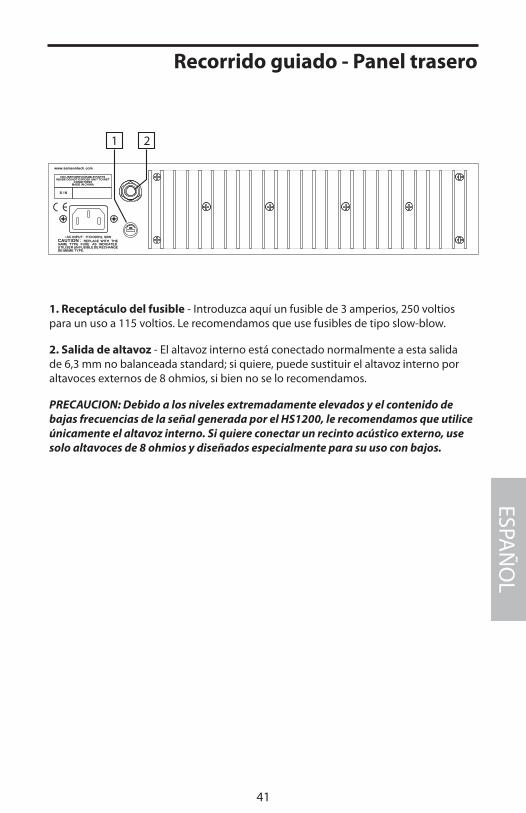
1. Receptáculo del fusible - Introduzca aquí un fusible de 3 amperios, 250 voltios para un uso a 115 voltios. Le recomendamos que use fusibles de tipo slow-blow.
2. Salida de altavoz - El altavoz interno está conectado normalmente a esta salida de 6,3 mm no balanceada standard; si quiere, puede sustituir el altavoz interno por altavoces externos de 8 ohmios, si bien no se lo recomendamos.
PRECAUCION: Debido a los niveles extremadamente elevados y el contenido de bajas frecuencias de la señal generada por el HS1200, le recomendamos que utilice únicamente el altavoz interno. Si quiere conectar un recinto acústico externo, use solo altavoces de 8 ohmios y diseñados especialmente para su uso con bajos.
FUSE
ESPAÑ
OL
41
Manejo de su amplificador Kickback
La configuración y manejo de su combo para bajo HS1200 KickBack™ de Hartke Systems es un proceso muy sencillo y que solo le ocupará unos pocos minutos:
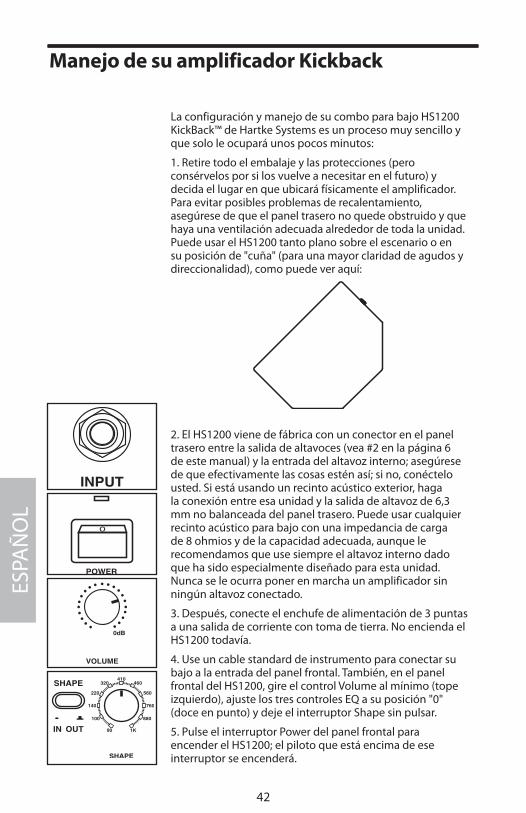
1. Retire todo el embalaje y las protecciones (pero consérvelos por si los vuelve a necesitar en el futuro) y decida el lugar en que ubicará físicamente el amplificador. Para evitar posibles problemas de recalentamiento, asegúrese de que el panel trasero no quede obstruido y que haya una ventilación adecuada alrededor de toda la unidad. Puede usar el HS1200 tanto plano sobre el escenario o en su posición de "cuña" (para una mayor claridad de agudos y direccionalidad), como puede ver aquí:
2. El HS1200 viene de fábrica con un conector en el panel trasero entre la salida de altavoces (vea #2 en la página 6 de este manual) y la entrada del altavoz interno; asegúrese de que efectivamente las cosas estén así; si no, conéctelo usted. Si está usando un recinto acústico exterior, haga la conexión entre esa unidad y la salida de altavoz de 6,3 mm no balanceada del panel trasero. Puede usar cualquier recinto acústico para bajo con una impedancia de carga de 8 ohmios y de la capacidad adecuada, aunque le recomendamos que use siempre el altavoz interno dado que ha sido especialmente diseñado para esta unidad. Nunca se le ocurra poner en marcha un amplificador sin ningún altavoz conectado.
3. Después, conecte el enchufe de alimentación de 3 puntas a una salida de corriente con toma de tierra. No encienda el HS1200 todavía.
4. Use un cable standard de instrumento para conectar su bajo a la entrada del panel frontal. También, en el panel frontal del HS1200, gire el control Volume al mínimo (tope izquierdo), ajuste los tres controles EQ a su posición "0" (doce en punto) y deje el interruptor Shape sin pulsar.
5. Pulse el interruptor Power del panel frontal para encender el HS1200; el piloto que está encima de ese interruptor se encenderá.
o
ESPA
ÑO
L
42

6. Ajuste la salida de su bajo al máximo y después, mientras toca, suba lentamente el control Volume del HS1200 hasta llegar al nivel que quiera. Si escucha distorsión incluso con valores bajos del mando Volume, reduzca la salida de su bajo (o verifique que no haya ningún cable dañado).
7. Pulse el interruptor Shape y gire el mando Shape a derecha e izquierda para observar el efecto de la curva Shape y del filtro sobre el sonido de su bajo. Deje el mando Shape en la posición que le ofrezca los mejores resultados para su bajo y estilo musical concretos.
8. Ajuste los tres controles de ecualización a su gusto (cuando localice unos ajustes que le den un buen rendimiento para su bajo y estilo, tome nota de ellos para que pueda volver a usarlos en el futuro).
9. Compruebe la salida de auriculares colocando el control Volume al mínimo (tope izquierdo) y después conectando unos auriculares stereo standard en la salida Phones del panel frontal. Mientras toca en su bajo, vaya subiendo lentamente el control Volume—ahora debería escuchar el sonido en sus auriculares y el altavoz conectado no debería sonar. Le recomendamos que use auriculares de tamaño grande (con transductores grandes, no de tipo botón) para una reproducción óptima de los graves.
10. Si necesita interconectar el HS1200 a una mesa de mezclas de estudio o de directo, conecte un cable con clavija XLR hembra standard entre la salida Direct Out del panel frontal y una unidad de inyección directa (DI) o una entrada XLR de nivel de micro de la mesa de mezclas. (Vea #8 en la página 6 de este manual para más información acerca del uso de esta salida directa).
Si ha seguido todos los pasos anteriores y sigue teniendo cualquier tipo de problema, póngase en contacto con el departamento de soporte técnico de Samson en el teléfono (1-800-372-6766) en horario de 9 AM a 5 PM EST.
Manejo de su amplificador Kickback
ESPAÑ
OL
43
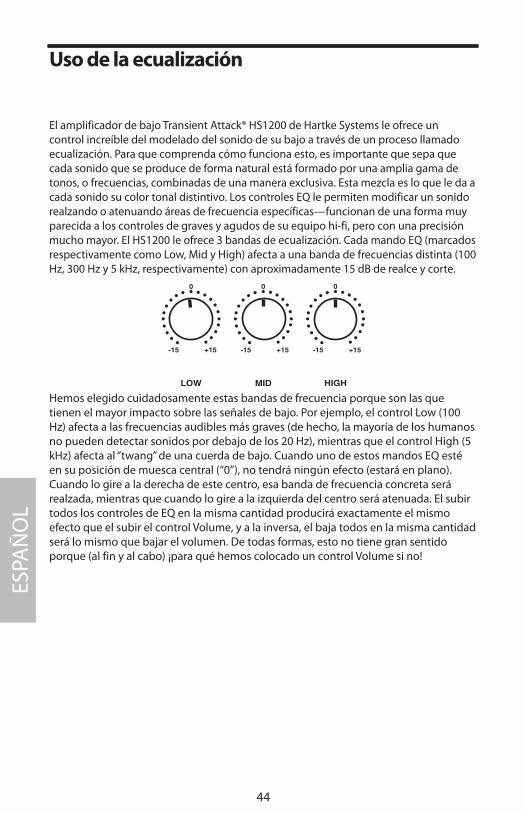
Uso de la ecualización
El amplificador de bajo Transient Attack® HS1200 de Hartke Systems le ofrece un control increíble del modelado del sonido de su bajo a través de un proceso llamado ecualización. Para que comprenda cómo funciona esto, es importante que sepa que cada sonido que se produce de forma natural está formado por una amplia gama de tonos, o frecuencias, combinadas de una manera exclusiva. Esta mezcla es lo que le da a cada sonido su color tonal distintivo. Los controles EQ le permiten modificar un sonido realzando o atenuando áreas de frecuencia específicas—funcionan de una forma muy parecida a los controles de graves y agudos de su equipo hi-fi, pero con una precisión mucho mayor. El HS1200 le ofrece 3 bandas de ecualización. Cada mando EQ (marcados respectivamente como Low, Mid y High) afecta a una banda de frecuencias distinta (100 Hz, 300 Hz y 5 kHz, respectivamente) con aproximadamente 15 dB de realce y corte.
Hemos elegido cuidadosamente estas bandas de frecuencia porque son las que tienen el mayor impacto sobre las señales de bajo. Por ejemplo, el control Low (100 Hz) afecta a las frecuencias audibles más graves (de hecho, la mayoría de los humanos no pueden detectar sonidos por debajo de los 20 Hz), mientras que el control High (5 kHz) afecta al “twang” de una cuerda de bajo. Cuando uno de estos mandos EQ esté en su posición de muesca central (“0”), no tendrá ningún efecto (estará en plano). Cuando lo gire a la derecha de este centro, esa banda de frecuencia concreta será realzada, mientras que cuando lo gire a la izquierda del centro será atenuada. El subir todos los controles de EQ en la misma cantidad producirá exactamente el mismo efecto que el subir el control Volume, y a la inversa, el baja todos en la misma cantidad será lo mismo que bajar el volumen. De todas formas, esto no tiene gran sentido porque (al fin y al cabo) ¡para qué hemos colocado un control Volume si no!
ESPA
ÑO
L
44
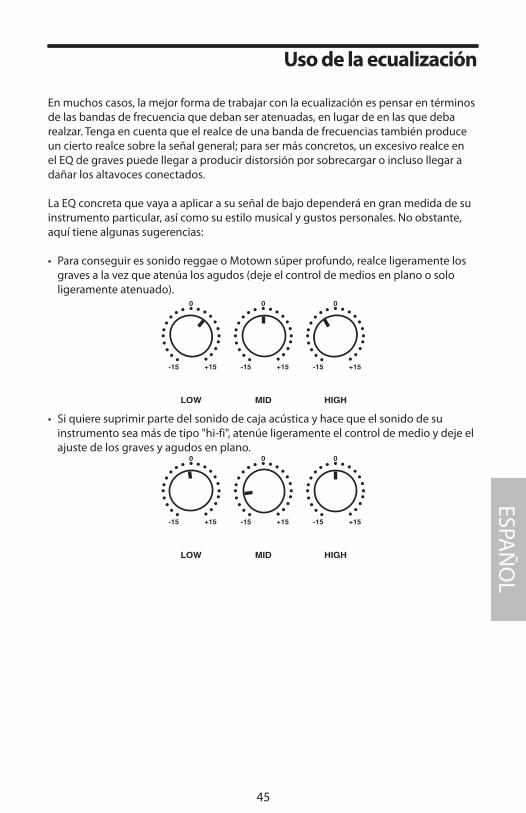
Uso de la ecualización
En muchos casos, la mejor forma de trabajar con la ecualización es pensar en términos de las bandas de frecuencia que deban ser atenuadas, en lugar de en las que deba realzar. Tenga en cuenta que el realce de una banda de frecuencias también produce un cierto realce sobre la señal general; para ser más concretos, un excesivo realce en el EQ de graves puede llegar a producir distorsión por sobrecargar o incluso llegar a dañar los altavoces conectados.
La EQ concreta que vaya a aplicar a su señal de bajo dependerá en gran medida de su instrumento particular, así como su estilo musical y gustos personales. No obstante, aquí tiene algunas sugerencias:
• Para conseguir es sonido reggae o Motown súper profundo, realce ligeramente los graves a la vez que atenúa los agudos (deje el control de medios en plano o solo ligeramente atenuado).
• Si quiere suprimir parte del sonido de caja acústica y hace que el sonido de su instrumento sea más de tipo "hi-fi", atenúe ligeramente el control de medio y deje el ajuste de los graves y agudos en plano.
ESPAÑ
OL
45
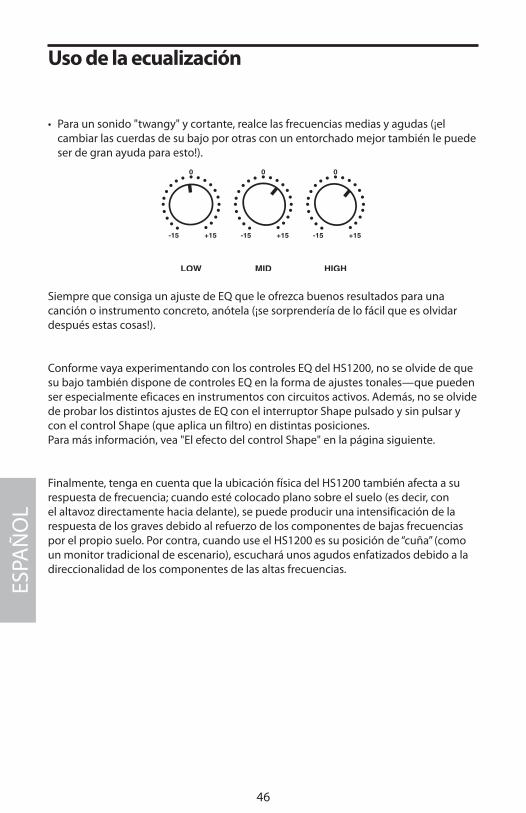
• Para un sonido "twangy" y cortante, realce las frecuencias medias y agudas (¡el cambiar las cuerdas de su bajo por otras con un entorchado mejor también le puede ser de gran ayuda para esto!).
Siempre que consiga un ajuste de EQ que le ofrezca buenos resultados para una canción o instrumento concreto, anótela (¡se sorprendería de lo fácil que es olvidar después estas cosas!).
Conforme vaya experimentando con los controles EQ del HS1200, no se olvide de que su bajo también dispone de controles EQ en la forma de ajustes tonales—que pueden ser especialmente eficaces en instrumentos con circuitos activos. Además, no se olvide de probar los distintos ajustes de EQ con el interruptor Shape pulsado y sin pulsar y con el control Shape (que aplica un filtro) en distintas posiciones.Para más información, vea "El efecto del control Shape" en la página siguiente.
Finalmente, tenga en cuenta que la ubicación física del HS1200 también afecta a su respuesta de frecuencia; cuando esté colocado plano sobre el suelo (es decir, con el altavoz directamente hacia delante), se puede producir una intensificación de la respuesta de los graves debido al refuerzo de los componentes de bajas frecuencias por el propio suelo. Por contra, cuando use el HS1200 es su posición de “cuña” (como un monitor tradicional de escenario), escuchará unos agudos enfatizados debido a la direccionalidad de los componentes de las altas frecuencias.
Uso de la ecualización
ESPA
ÑO
L
46
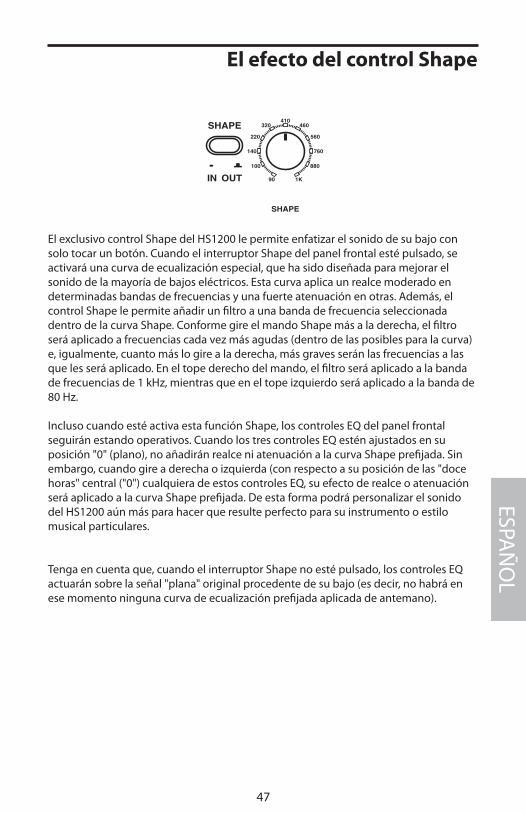
El efecto del control Shape
El exclusivo control Shape del HS1200 le permite enfatizar el sonido de su bajo con solo tocar un botón. Cuando el interruptor Shape del panel frontal esté pulsado, se activará una curva de ecualización especial, que ha sido diseñada para mejorar el sonido de la mayoría de bajos eléctricos. Esta curva aplica un realce moderado en determinadas bandas de frecuencias y una fuerte atenuación en otras. Además, el control Shape le permite añadir un filtro a una banda de frecuencia seleccionada dentro de la curva Shape. Conforme gire el mando Shape más a la derecha, el filtro será aplicado a frecuencias cada vez más agudas (dentro de las posibles para la curva) e, igualmente, cuanto más lo gire a la derecha, más graves serán las frecuencias a las que les será aplicado. En el tope derecho del mando, el filtro será aplicado a la banda de frecuencias de 1 kHz, mientras que en el tope izquierdo será aplicado a la banda de 80 Hz.
Incluso cuando esté activa esta función Shape, los controles EQ del panel frontal seguirán estando operativos. Cuando los tres controles EQ estén ajustados en su posición "0" (plano), no añadirán realce ni atenuación a la curva Shape prefijada. Sin embargo, cuando gire a derecha o izquierda (con respecto a su posición de las "doce horas" central ("0") cualquiera de estos controles EQ, su efecto de realce o atenuación será aplicado a la curva Shape prefijada. De esta forma podrá personalizar el sonido del HS1200 aún más para hacer que resulte perfecto para su instrumento o estilo musical particulares.
Tenga en cuenta que, cuando el interruptor Shape no esté pulsado, los controles EQ actuarán sobre la señal "plana" original procedente de su bajo (es decir, no habrá en ese momento ninguna curva de ecualización prefijada aplicada de antemano).
ESPAÑ
OL
47
Introduzione
Congratulazioni per aver scelto l'amplificatore combo per basso Hartke HS1200 KickBack™! Sebbene si tratti di un'unità progettata per consentire la massima semplicità d'utilizzo, ti consigliamo comunque di leggere le pagine di questo manuale per conoscere le diverse funzioni e comprendere come ogni esclusiva caratteristica è stata implementata nell’amplificatore. Il combo Kickback™ racchiude al suo interno un amplificatore Hartke HS1200, in grado di erogare 120 watt di potenza pura, perfettamente accoppiato ad un altoparlante per basso da 12" o da 15" (su 8-ohm). Dotato di un cabinet progettato in modo specifico e collocabile in posizione eretta o reclinata (per aumentare la chiarezza delle alte frequenze e miglio-rare la direzionalità), il combo HS1200 KickBack™ è un'unità ottimizzata per i bassi elettrici e rappresenta il sistema perfetto nell'ambito di eventi o concerti di piccole dimensioni (ad esempio, le serate nei club). Inoltre, l'uscita cuffie dedicata lo rende l'unità amp ideale per studiare ed esercitarsi. In queste pagine troverai la descrizione dettagliata delle diverse caratte-ristiche dell'amplificatore HS1200 KickBack™, oltre ad un tour guidato dei pannelli frontale e posteriore, una guida ‘passo-passo’ per la configurazione e l’impiego dell'unità, ulteriori informazioni riguardanti l’equalizzazione e l'esclusivo controllo Shape, oltre alle specifiche tecniche complete. Inclusa nella documentazione allegata troverai anche la cartolina di garan-zia—non dimenticare di compilarla ed inviarla alla sede Hartke, in modo da poter ottenere il supporto tecnico e ricevere tutte le novità riguardanti i prodotti Hartke e Samson.
NOTE SPECIALI: Nel caso in cui la tua unità HS1200 dovesse necessitare di assistenza tecnica, prima di effettuarne la spedizione occorre ottenere il numero di Return Authorization (RA). Senza questo numero, l’unità non sarà accettata. Per ottenere il numero RA necessario alla spedizione dell’unità, contatta la sede Samson al numero telefonico 1-800-372-6766. Ti preghiamo di conservare il cartone originale e tutto il materiale d’imballo e, se possibile, di utilizzarlo per effettuare l’eventuale spedizione.
ITA
LIA
NO
48

Caratteristiche
Il combo HS1200 offre un'amplificazione per basso "allo-stato-dell'arte" racchiusa in un design avanzato, ad un prezzo assolutamente accessibile. Ecco alcune delle caratteristiche principali:
• Potenza da vendere!—120 watt su 8 ohm.
• Design bipolare per un suono pulito e incisivo, ed esclusiva circuitazione Transient Attack® che garantisce la fedele riproduzione di ogni sfumatura dell'esecuzione strumentale.
• Equalizzazione a tre bande d’elevata qualità che consente di conferire al tuo basso un’ampia gamma di colori tonali.
• Esclusivo sistema di filtering chiamato “Shape”, che attiva una curva di equalizza-zione realizzata specificatamente per migliorare e ottimizzare il suono del basso elettrico. Inoltre, il controllo Shape dedicato consente lo sweep continuo del filtro attraverso diverse aree di frequenze, in modo da personalizzare l’effetto della curva Shape in base alla specifica caratteristica tonale del tuo particolare strumento.
• Uscita cuffie separata che disattiva automaticamente l’uscita Speaker, permettendo di utilizzare il combo HS1200 come un 'Practice Amp' d’elevata qualità. In aggiunta a ciò, l’uscita Direct Out presente sul pannello frontale consente di interfacciare HS1200 ad un sistema di Sound Reinforcement esterno o ad un mixer per la registrazione audio
• Un ingresso “feedback-type” in grado di accogliere un’ampia gamma di livelli d’in-gresso (fino a 15 volts), così da poter utilizzare HS1200 praticamente con qualsiasi tipo di basso, dai modelli passivi a quelli con circuitazione attiva.
• Altoparlante Hartke da 12”/8-ohm o da 15”/8-ohm, perfettamente accoppiato e mon-tato in uno speciale cabinet con design “kickback”. Se impiegato nella sua configu-razione “Kickback™” (ovvero, in posizione reclinata), HS1200 opera come un perfetto “wedge” monitor da palco, apportando maggiore chiarezza e direzionalità al suono.
• La costruzione robusta, la protezione metallica dell’altoparlante e la copertura ester-na rendono l’amplificatore HS1200 l’unità perfetta per un impiego “on the road”.
Hartke
KICKBACK 15
o
POWERHEADPHONESDIRECT OUT HIGHMIDLOWSHAPE
IN OUT
VOLUME
INPUT
SHAPE
1K 90 -15 +15 -15 +15 -15 +15
0 0 0
0
0dB
Hartke SystemsHS1200 BASS AMPLIFIER 120 WATTS Transient Attack ®
ITALIA
NO
49

Tour guidato - Pannello frontale
1. Input (jack d’ingresso) - Collega il tuo basso al combo HS1200 usando questo connettore jack standard bilanciato da 1/4”, specificatamente progettato per gestire i segnali provenienti da una grande varietà di pickup (fino a 15 volts) e che fornisce un ingresso ad ampia gamma e con impedenza elevata - ciò consente di poter impiegare qualsiasi tipo di basso, inclusi i modelli con circuitazione attiva).
2. Manopola Volume - Si tratta del controllo di volume generale. Per ottenere il miglior rapporto segnale/rumore, regola il volume d’uscita del basso al massimo livel-lo o quasi, quindi regola il Volume di HS1200 al livello desiderato.
3. Selettore Shape - Se premuto (tasto inserito), HS1200 attiva una speciale curva d’equalizzazione studiata espressamente per migliorare il suono del basso elettrico. Disinserendo il tasto, la funzione Shape risulterà disattivata. Per maggiori informazio-ni, consulta la sezione “Effetto del controllo Shape” a pag.14 di questo manuale.
4. Controllo Shape - Con il selettore Shape premuto (vedi il precedente punto #3), questo controllo risulterà operativo. La manopola Shape applica un filtro a 20dB all’area di frequenza specificata, in modo tale da poter personalizzare l’effetto della curva Shape e complementare al meglio il tuo particolare strumento/basso. La rotazione in senso orario della manopola Shape applica il filtro Notch alle alte frequenze, mentre la rotazione in senso anti-orario agisce sulle basse frequenze. Regolando la manopola completamente in senso orario, il filtro verrà applicato ad un’area di frequenze centrata a 1 kHz; con la manopola posizionata completamente in senso anti-orario, il filtro verrà applicato ad un’area di frequenze centrata a 80 Hz. Per maggiori informazioni, consulta la sezione “Effetto del controllo Shape” a pag.11 di questo manuale.
5. Controllo EQ Low - Questo controllo consente un taglio o un incremento di circa 15dB in un’area di frequenze centrata a 100 Hz, con una curva Peak (a campana). Con la manopola posizionata a “ore 12” (valore “0”), non avviene alcun taglio o incre-mento (ovvero, la risposta è “flat”). Ruotando la manopola in senso orario a partire dalla posizione centrale “0”, l’area di frequenze verrà esaltata, mentre ruotando in senso anti-orario, l’area di frequenze verrà attenuata. Per maggiori informazioni, con-sulta la sezione “Usare l’equalizzazione” a pag.8 di questo manuale.
o
2 31 4 5 6 7 10 1198
ITA
LIA
NO
50
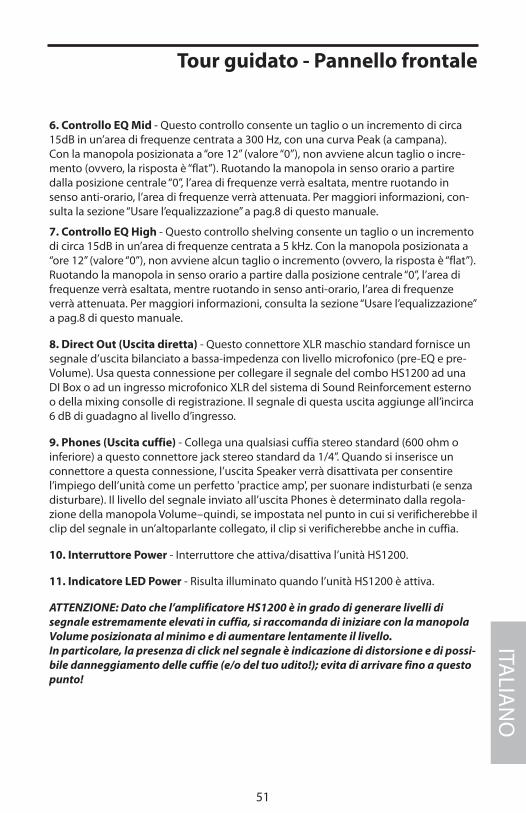
Tour guidato - Pannello frontale
6. Controllo EQ Mid - Questo controllo consente un taglio o un incremento di circa 15dB in un’area di frequenze centrata a 300 Hz, con una curva Peak (a campana). Con la manopola posizionata a “ore 12” (valore “0”), non avviene alcun taglio o incre-mento (ovvero, la risposta è “flat”). Ruotando la manopola in senso orario a partire dalla posizione centrale “0”, l’area di frequenze verrà esaltata, mentre ruotando in senso anti-orario, l’area di frequenze verrà attenuata. Per maggiori informazioni, con-sulta la sezione “Usare l’equalizzazione” a pag.8 di questo manuale.
7. Controllo EQ High - Questo controllo shelving consente un taglio o un incremento di circa 15dB in un’area di frequenze centrata a 5 kHz. Con la manopola posizionata a “ore 12” (valore “0”), non avviene alcun taglio o incremento (ovvero, la risposta è “flat”). Ruotando la manopola in senso orario a partire dalla posizione centrale “0”, l’area di frequenze verrà esaltata, mentre ruotando in senso anti-orario, l’area di frequenze verrà attenuata. Per maggiori informazioni, consulta la sezione “Usare l’equalizzazione” a pag.8 di questo manuale.
8. Direct Out (Uscita diretta) - Questo connettore XLR maschio standard fornisce un segnale d’uscita bilanciato a bassa-impedenza con livello microfonico (pre-EQ e pre-Volume). Usa questa connessione per collegare il segnale del combo HS1200 ad una DI Box o ad un ingresso microfonico XLR del sistema di Sound Reinforcement esterno o della mixing consolle di registrazione. Il segnale di questa uscita aggiunge all’incirca 6 dB di guadagno al livello d’ingresso.
9. Phones (Uscita cuffie) - Collega una qualsiasi cuffia stereo standard (600 ohm o inferiore) a questo connettore jack stereo standard da 1/4”. Quando si inserisce un connettore a questa connessione, l’uscita Speaker verrà disattivata per consentire l’impiego dell’unità come un perfetto 'practice amp', per suonare indisturbati (e senza disturbare). Il livello del segnale inviato all’uscita Phones è determinato dalla regola-zione della manopola Volume–quindi, se impostata nel punto in cui si verificherebbe il clip del segnale in un’altoparlante collegato, il clip si verificherebbe anche in cuffia.
10. Interruttore Power - Interruttore che attiva/disattiva l’unità HS1200.
11. Indicatore LED Power - Risulta illuminato quando l’unità HS1200 è attiva.
ATTENZIONE: Dato che l’amplificatore HS1200 è in grado di generare livelli di segnale estremamente elevati in cuffia, si raccomanda di iniziare con la manopola Volume posizionata al minimo e di aumentare lentamente il livello. In particolare, la presenza di click nel segnale è indicazione di distorsione e di possi-bile danneggiamento delle cuffie (e/o del tuo udito!); evita di arrivare fino a questo punto!
ITALIA
NO
51
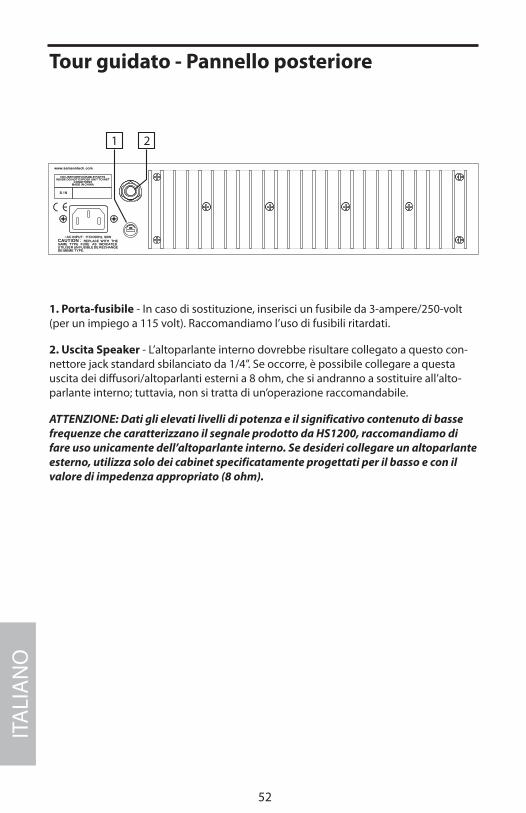
Tour guidato - Pannello posteriore
1. Porta-fusibile - In caso di sostituzione, inserisci un fusibile da 3-ampere/250-volt (per un impiego a 115 volt). Raccomandiamo l’uso di fusibili ritardati.
2. Uscita Speaker - L’altoparlante interno dovrebbe risultare collegato a questo con-nettore jack standard sbilanciato da 1/4”. Se occorre, è possibile collegare a questa uscita dei diffusori/altoparlanti esterni a 8 ohm, che si andranno a sostituire all’alto-parlante interno; tuttavia, non si tratta di un’operazione raccomandabile.
ATTENZIONE: Dati gli elevati livelli di potenza e il significativo contenuto di basse frequenze che caratterizzano il segnale prodotto da HS1200, raccomandiamo di fare uso unicamente dell’altoparlante interno. Se desideri collegare un altoparlante esterno, utilizza solo dei cabinet specificatamente progettati per il basso e con il valore di impedenza appropriato (8 ohm).
FUSE
ITA
LIA
NO
52
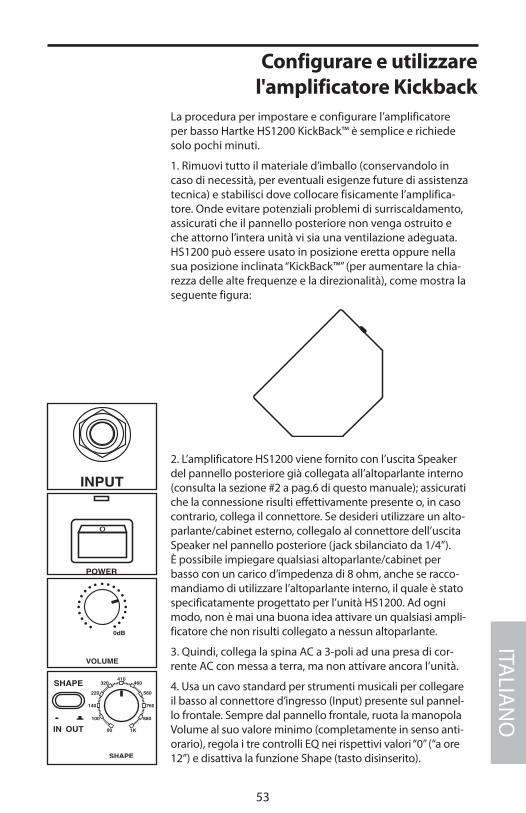
Configurare e utilizzare l'amplificatore Kickback
La procedura per impostare e configurare l’amplificatore per basso Hartke HS1200 KickBack™ è semplice e richiede solo pochi minuti.
1. Rimuovi tutto il materiale d’imballo (conservandolo in caso di necessità, per eventuali esigenze future di assistenza tecnica) e stabilisci dove collocare fisicamente l’amplifica-tore. Onde evitare potenziali problemi di surriscaldamento, assicurati che il pannello posteriore non venga ostruito e che attorno l’intera unità vi sia una ventilazione adeguata. HS1200 può essere usato in posizione eretta oppure nella sua posizione inclinata “KickBack™” (per aumentare la chia-rezza delle alte frequenze e la direzionalità), come mostra la seguente figura:
2. L’amplificatore HS1200 viene fornito con l’uscita Speaker del pannello posteriore già collegata all’altoparlante interno (consulta la sezione #2 a pag.6 di questo manuale); assicurati che la connessione risulti effettivamente presente o, in caso contrario, collega il connettore. Se desideri utilizzare un alto-parlante/cabinet esterno, collegalo al connettore dell’uscita Speaker nel pannello posteriore (jack sbilanciato da 1/4”). È possibile impiegare qualsiasi altoparlante/cabinet per basso con un carico d’impedenza di 8 ohm, anche se racco-mandiamo di utilizzare l’altoparlante interno, il quale è stato specificatamente progettato per l’unità HS1200. Ad ogni modo, non è mai una buona idea attivare un qualsiasi ampli-ficatore che non risulti collegato a nessun altoparlante.
3. Quindi, collega la spina AC a 3-poli ad una presa di cor-rente AC con messa a terra, ma non attivare ancora l’unità.
4. Usa un cavo standard per strumenti musicali per collegare il basso al connettore d’ingresso (Input) presente sul pannel-lo frontale. Sempre dal pannello frontale, ruota la manopola Volume al suo valore minimo (completamente in senso anti-orario), regola i tre controlli EQ nei rispettivi valori “0” (“a ore 12”) e disattiva la funzione Shape (tasto disinserito).
o
ITALIA
NO
53
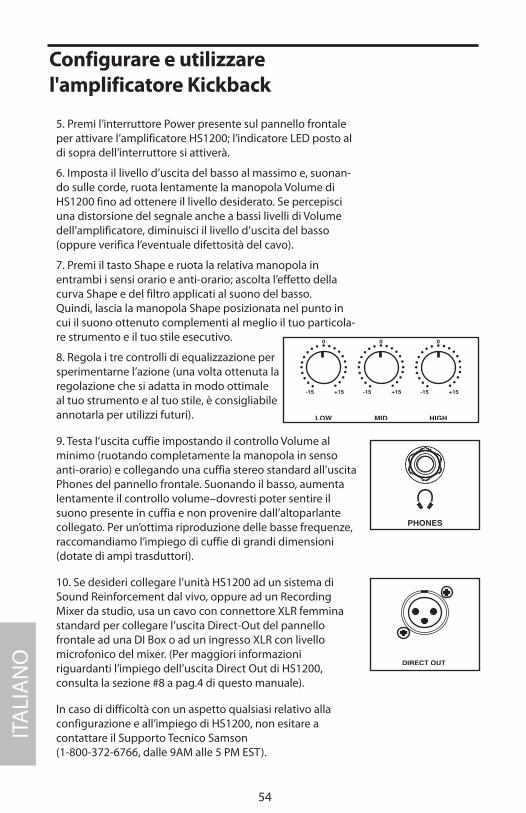
5. Premi l’interruttore Power presente sul pannello frontale per attivare l’amplificatore HS1200; l’indicatore LED posto al di sopra dell’interruttore si attiverà.
6. Imposta il livello d’uscita del basso al massimo e, suonan-do sulle corde, ruota lentamente la manopola Volume di HS1200 fino ad ottenere il livello desiderato. Se percepisci una distorsione del segnale anche a bassi livelli di Volume dell’amplificatore, diminuisci il livello d’uscita del basso (oppure verifica l’eventuale difettosità del cavo).
7. Premi il tasto Shape e ruota la relativa manopola in entrambi i sensi orario e anti-orario; ascolta l’effetto della curva Shape e del filtro applicati al suono del basso. Quindi, lascia la manopola Shape posizionata nel punto in cui il suono ottenuto complementi al meglio il tuo particola-re strumento e il tuo stile esecutivo.
8. Regola i tre controlli di equalizzazione per sperimentarne l’azione (una volta ottenuta la regolazione che si adatta in modo ottimale al tuo strumento e al tuo stile, è consigliabile annotarla per utilizzi futuri).
9. Testa l’uscita cuffie impostando il controllo Volume al minimo (ruotando completamente la manopola in senso anti-orario) e collegando una cuffia stereo standard all’uscita Phones del pannello frontale. Suonando il basso, aumenta lentamente il controllo volume–dovresti poter sentire il suono presente in cuffia e non provenire dall’altoparlante collegato. Per un’ottima riproduzione delle basse frequenze, raccomandiamo l’impiego di cuffie di grandi dimensioni (dotate di ampi trasduttori).
10. Se desideri collegare l’unità HS1200 ad un sistema di Sound Reinforcement dal vivo, oppure ad un Recording Mixer da studio, usa un cavo con connettore XLR femmina standard per collegare l’uscita Direct-Out del pannello frontale ad una DI Box o ad un ingresso XLR con livello microfonico del mixer. (Per maggiori informazioni riguardanti l’impiego dell’uscita Direct Out di HS1200, consulta la sezione #8 a pag.4 di questo manuale).
In caso di difficoltà con un aspetto qualsiasi relativo alla configurazione e all’impiego di HS1200, non esitare a contattare il Supporto Tecnico Samson (1-800-372-6766, dalle 9AM alle 5 PM EST).
Configurare e utilizzare l'amplificatore Kickback
ITA
LIA
NO
54
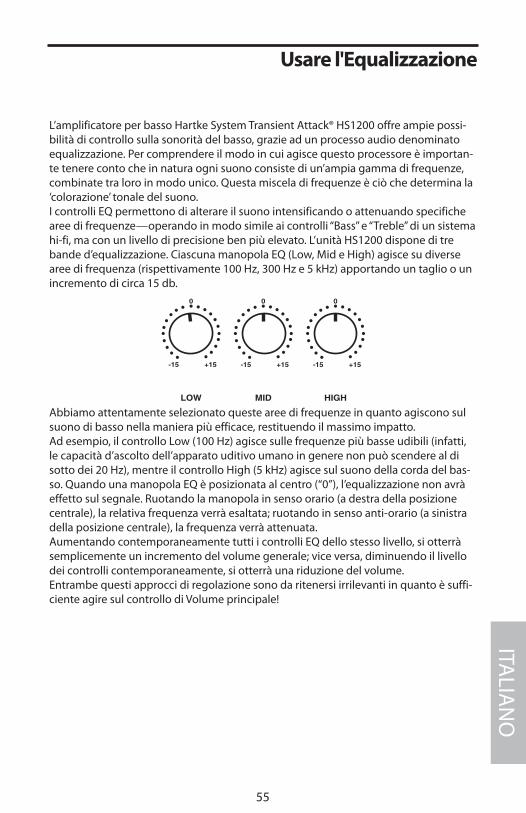
Usare l'Equalizzazione
L’amplificatore per basso Hartke System Transient Attack® HS1200 offre ampie possi-bilità di controllo sulla sonorità del basso, grazie ad un processo audio denominato equalizzazione. Per comprendere il modo in cui agisce questo processore è importan-te tenere conto che in natura ogni suono consiste di un’ampia gamma di frequenze, combinate tra loro in modo unico. Questa miscela di frequenze è ciò che determina la ‘colorazione’ tonale del suono. I controlli EQ permettono di alterare il suono intensificando o attenuando specifiche aree di frequenze—operando in modo simile ai controlli “Bass” e “Treble” di un sistema hi-fi, ma con un livello di precisione ben più elevato. L’unità HS1200 dispone di tre bande d’equalizzazione. Ciascuna manopola EQ (Low, Mid e High) agisce su diverse aree di frequenza (rispettivamente 100 Hz, 300 Hz e 5 kHz) apportando un taglio o un incremento di circa 15 db.
Abbiamo attentamente selezionato queste aree di frequenze in quanto agiscono sul suono di basso nella maniera più efficace, restituendo il massimo impatto. Ad esempio, il controllo Low (100 Hz) agisce sulle frequenze più basse udibili (infatti, le capacità d’ascolto dell’apparato uditivo umano in genere non può scendere al di sotto dei 20 Hz), mentre il controllo High (5 kHz) agisce sul suono della corda del bas-so. Quando una manopola EQ è posizionata al centro (“0”), l’equalizzazione non avrà effetto sul segnale. Ruotando la manopola in senso orario (a destra della posizione centrale), la relativa frequenza verrà esaltata; ruotando in senso anti-orario (a sinistra della posizione centrale), la frequenza verrà attenuata. Aumentando contemporaneamente tutti i controlli EQ dello stesso livello, si otterrà semplicemente un incremento del volume generale; vice versa, diminuendo il livello dei controlli contemporaneamente, si otterrà una riduzione del volume. Entrambe questi approcci di regolazione sono da ritenersi irrilevanti in quanto è suffi-ciente agire sul controllo di Volume principale!
ITALIA
NO
55
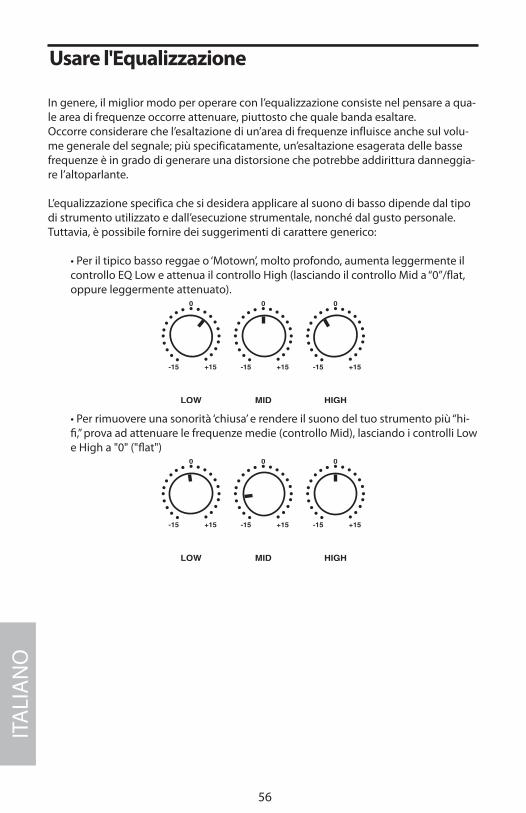
Usare l'Equalizzazione
In genere, il miglior modo per operare con l’equalizzazione consiste nel pensare a qua-le area di frequenze occorre attenuare, piuttosto che quale banda esaltare. Occorre considerare che l’esaltazione di un’area di frequenze influisce anche sul volu-me generale del segnale; più specificatamente, un’esaltazione esagerata delle basse frequenze è in grado di generare una distorsione che potrebbe addirittura danneggia-re l’altoparlante.
L’equalizzazione specifica che si desidera applicare al suono di basso dipende dal tipo di strumento utilizzato e dall’esecuzione strumentale, nonché dal gusto personale. Tuttavia, è possibile fornire dei suggerimenti di carattere generico:
• Per il tipico basso reggae o ‘Motown’, molto profondo, aumenta leggermente il controllo EQ Low e attenua il controllo High (lasciando il controllo Mid a “0”/flat, oppure leggermente attenuato).
• Per rimuovere una sonorità ‘chiusa’ e rendere il suono del tuo strumento più “hi-fi,” prova ad attenuare le frequenze medie (controllo Mid), lasciando i controlli Low e High a "0" ("flat")
ITA
LIA
NO
56
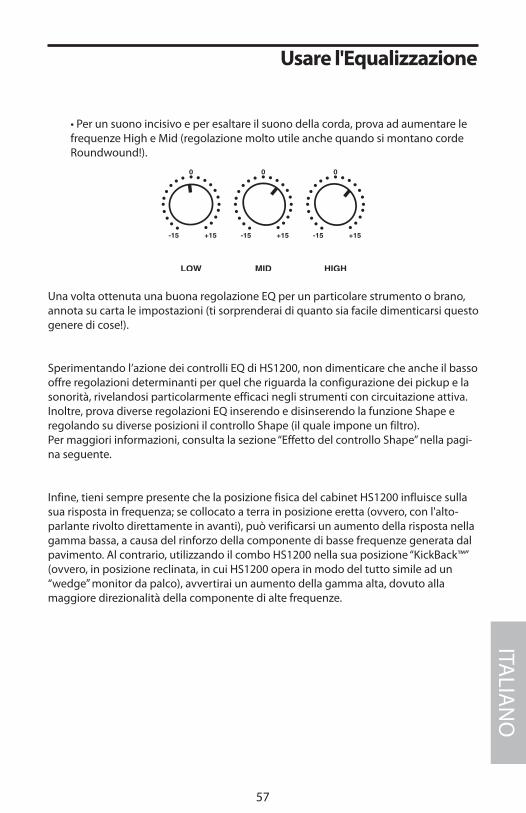
• Per un suono incisivo e per esaltare il suono della corda, prova ad aumentare le frequenze High e Mid (regolazione molto utile anche quando si montano corde Roundwound!).
Una volta ottenuta una buona regolazione EQ per un particolare strumento o brano, annota su carta le impostazioni (ti sorprenderai di quanto sia facile dimenticarsi questo genere di cose!).
Sperimentando l’azione dei controlli EQ di HS1200, non dimenticare che anche il basso offre regolazioni determinanti per quel che riguarda la configurazione dei pickup e la sonorità, rivelandosi particolarmente efficaci negli strumenti con circuitazione attiva. Inoltre, prova diverse regolazioni EQ inserendo e disinserendo la funzione Shape e regolando su diverse posizioni il controllo Shape (il quale impone un filtro).Per maggiori informazioni, consulta la sezione “Effetto del controllo Shape” nella pagi-na seguente.
Infine, tieni sempre presente che la posizione fisica del cabinet HS1200 influisce sulla sua risposta in frequenza; se collocato a terra in posizione eretta (ovvero, con l'alto-parlante rivolto direttamente in avanti), può verificarsi un aumento della risposta nella gamma bassa, a causa del rinforzo della componente di basse frequenze generata dal pavimento. Al contrario, utilizzando il combo HS1200 nella sua posizione “KickBack™” (ovvero, in posizione reclinata, in cui HS1200 opera in modo del tutto simile ad un “wedge” monitor da palco), avvertirai un aumento della gamma alta, dovuto alla maggiore direzionalità della componente di alte frequenze.
Usare l'Equalizzazione
ITALIA
NO
57
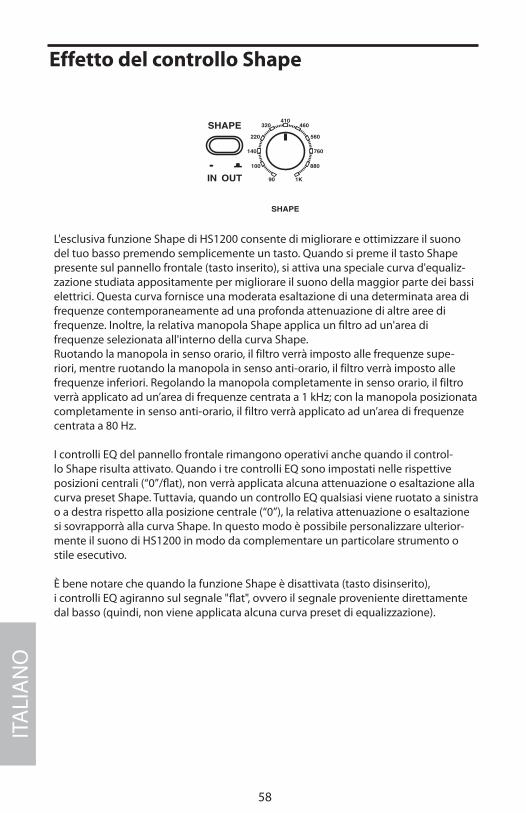
Effetto del controllo Shape
L'esclusiva funzione Shape di HS1200 consente di migliorare e ottimizzare il suono del tuo basso premendo semplicemente un tasto. Quando si preme il tasto Shape presente sul pannello frontale (tasto inserito), si attiva una speciale curva d'equaliz-zazione studiata appositamente per migliorare il suono della maggior parte dei bassi elettrici. Questa curva fornisce una moderata esaltazione di una determinata area di frequenze contemporaneamente ad una profonda attenuazione di altre aree di frequenze. Inoltre, la relativa manopola Shape applica un filtro ad un'area di frequenze selezionata all'interno della curva Shape. Ruotando la manopola in senso orario, il filtro verrà imposto alle frequenze supe-riori, mentre ruotando la manopola in senso anti-orario, il filtro verrà imposto alle frequenze inferiori. Regolando la manopola completamente in senso orario, il filtro verrà applicato ad un’area di frequenze centrata a 1 kHz; con la manopola posizionata completamente in senso anti-orario, il filtro verrà applicato ad un’area di frequenze centrata a 80 Hz.
I controlli EQ del pannello frontale rimangono operativi anche quando il control-lo Shape risulta attivato. Quando i tre controlli EQ sono impostati nelle rispettive posizioni centrali (“0”/flat), non verrà applicata alcuna attenuazione o esaltazione alla curva preset Shape. Tuttavia, quando un controllo EQ qualsiasi viene ruotato a sinistra o a destra rispetto alla posizione centrale (“0”), la relativa attenuazione o esaltazione si sovrapporrà alla curva Shape. In questo modo è possibile personalizzare ulterior-mente il suono di HS1200 in modo da complementare un particolare strumento o stile esecutivo.
È bene notare che quando la funzione Shape è disattivata (tasto disinserito), i controlli EQ agiranno sul segnale "flat", ovvero il segnale proveniente direttamente dal basso (quindi, non viene applicata alcuna curva preset di equalizzazione).
ITA
LIA
NO
58
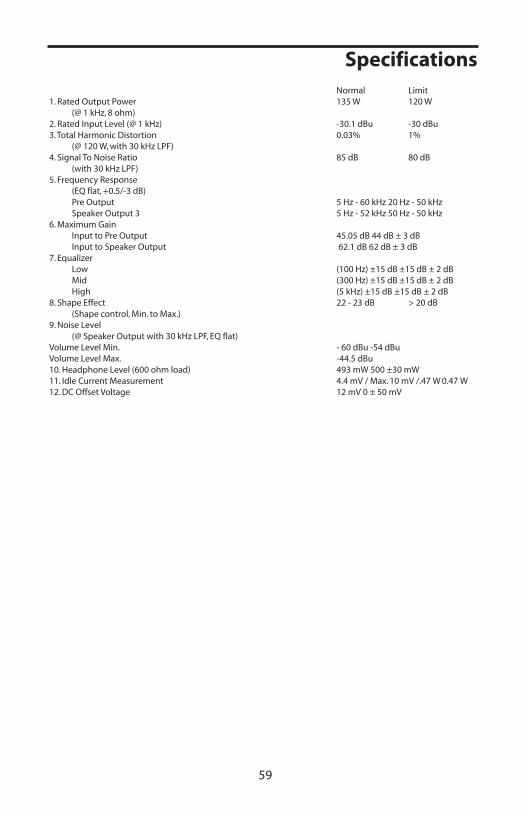
59
Normal Limit1.RatedOutputPower 135W 120W (@1kHz,8ohm)2.RatedInputLevel(@1kHz) -30.1dBu -30dBu3.TotalHarmonicDistortion 0.03% 1% (@120W,with30kHzLPF)4.SignalToNoiseRatio 85dB 80dB (with30kHzLPF)5.FrequencyResponse (EQflat,+0.5/-3dB) PreOutput 5Hz-60kHz20Hz-50kHz SpeakerOutput3 5Hz-52kHz50Hz-50kHz6.MaximumGain InputtoPreOutput 45.05dB44dB±3dB InputtoSpeakerOutput 62.1dB62dB±3dB7.Equalizer Low (100Hz)±15dB±15dB±2dB Mid (300Hz)±15dB±15dB±2dB High (5kHz)±15dB±15dB±2dB8.ShapeEffect 22-23dB >20dB (Shapecontrol,Min.toMax.)9.NoiseLevel (@SpeakerOutputwith30kHzLPF,EQflat)VolumeLevelMin. -60dBu-54dBuVolumeLevelMax. -44.5dBu10.HeadphoneLevel(600ohmload) 493mW500±30mW11.IdleCurrentMeasurement 4.4mV/Max.10mV/.47 W0.47 W12.DCOffsetVoltage 12mV0±50mV
Specifications
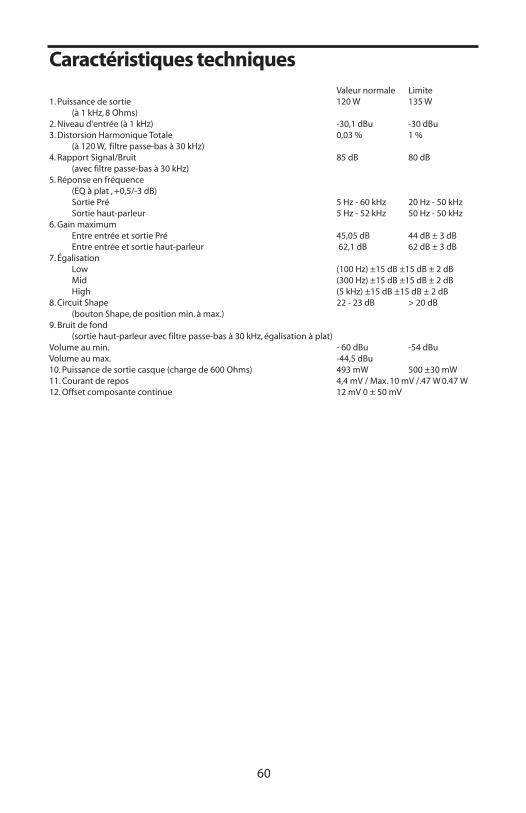
60
Valeurnormale Limite1.Puissancedesortie 120W 135W (à1kHz,8Ohms)2.Niveaud'entrée(à1kHz) -30,1dBu -30dBu3.DistorsionHarmoniqueTotale 0,03% 1% (à120W,filtrepasse-basà30kHz)4.RapportSignal/Bruit 85dB 80dB (avecfiltrepasse-basà30kHz)5.Réponseenfréquence (EQàplat,+0,5/-3dB) SortiePré 5Hz-60kHz 20Hz-50kHz Sortiehaut-parleur 5Hz-52kHz 50Hz-50kHz6.Gainmaximum EntreentréeetsortiePré 45,05dB 44dB±3dB Entreentréeetsortiehaut-parleur 62,1dB 62dB±3dB7.Égalisation Low (100Hz)±15dB±15dB±2dB Mid (300Hz)±15dB±15dB±2dB High (5kHz)±15dB±15dB±2dB8.CircuitShape 22-23dB >20dB (boutonShape,depositionmin.àmax.)9.Bruitdefond (sortiehaut-parleuravecfiltrepasse-basà30kHz,égalisationàplat)Volumeaumin. -60dBu -54dBuVolumeaumax. -44,5dBu10.Puissancedesortiecasque(chargede600Ohms) 493mW 500±30mW11.Courantderepos 4,4mV/Max.10mV/.47 W0.47 W12.Offsetcomposantecontinue 12mV0±50mV
Caractéristiques techniques
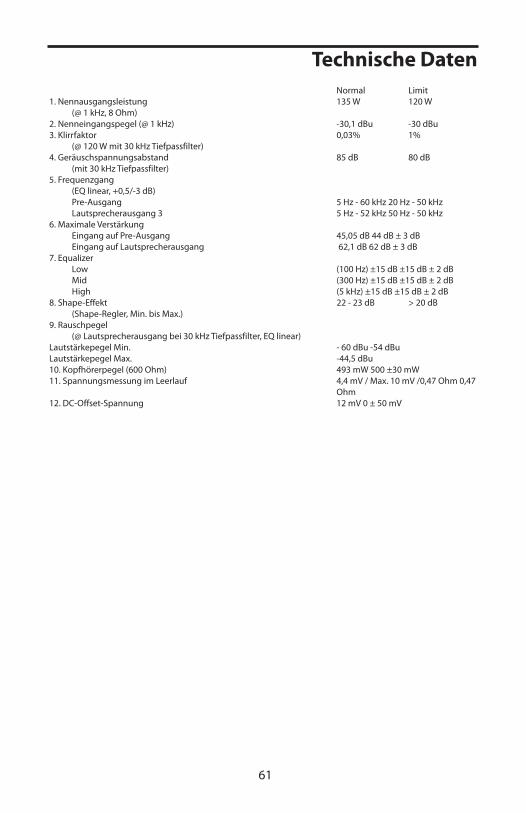
61
Normal Limit1. Nennausgangsleistung 135 W 120 W (@ 1 kHz, 8 Ohm)2. Nenneingangspegel (@ 1 kHz) -30,1 dBu -30 dBu3. Klirrfaktor 0,03% 1% (@ 120 W mit 30 kHz Tiefpassfilter)4. Geräuschspannungsabstand 85 dB 80 dB (mit 30 kHz Tiefpassfilter)5. Frequenzgang (EQ linear, +0,5/-3 dB) Pre-Ausgang 5 Hz - 60 kHz 20 Hz - 50 kHz Lautsprecherausgang 3 5 Hz - 52 kHz 50 Hz - 50 kHz6. Maximale Verstärkung Eingang auf Pre-Ausgang 45,05 dB 44 dB ± 3 dB Eingang auf Lautsprecherausgang 62,1 dB 62 dB ± 3 dB7. Equalizer Low (100 Hz) ±15 dB ±15 dB ± 2 dB Mid (300 Hz) ±15 dB ±15 dB ± 2 dB High (5 kHz) ±15 dB ±15 dB ± 2 dB8. Shape-Effekt 22 - 23 dB > 20 dB (Shape-Regler, Min. bis Max.)9. Rauschpegel (@ Lautsprecherausgang bei 30 kHz Tiefpassfilter, EQ linear)Lautstärkepegel Min. - 60 dBu -54 dBuLautstärkepegel Max. -44,5 dBu10. Kopfhörerpegel (600 Ohm) 493 mW 500 ±30 mW11. Spannungsmessung im Leerlauf 4,4 mV / Max. 10 mV /0,47 Ohm 0,47
Ohm12. DC-Offset-Spannung 12 mV 0 ± 50 mV
Technische Daten
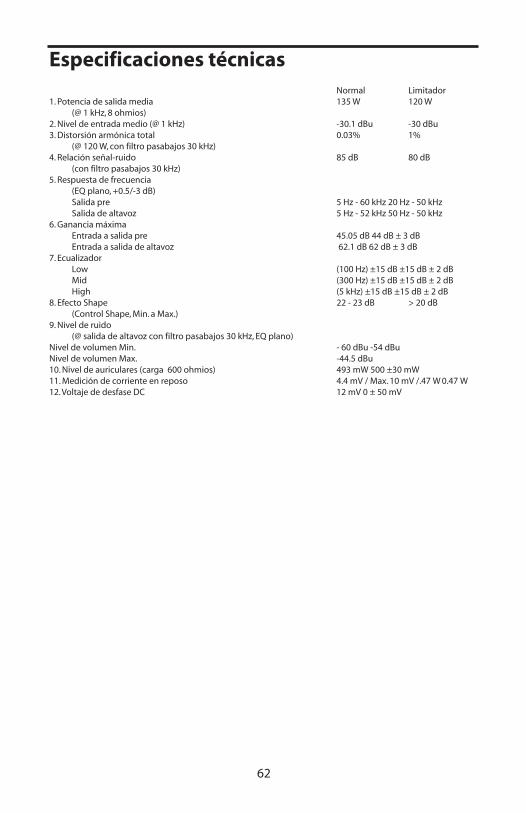
62
Normal Limitador1.Potenciadesalidamedia 135W 120W (@1kHz,8ohmios)2.Niveldeentradamedio(@1kHz) -30.1dBu -30dBu3.Distorsiónarmónicatotal 0.03% 1% (@120W,confiltropasabajos30kHz)4.Relaciónseñal-ruido 85dB 80dB (confiltropasabajos30kHz)5.Respuestadefrecuencia (EQplano,+0.5/-3dB) Salidapre 5Hz-60kHz20Hz-50kHz Salidadealtavoz 5Hz-52kHz50Hz-50kHz6.Gananciamáxima Entradaasalidapre 45.05dB44dB±3dB Entradaasalidadealtavoz 62.1dB62dB±3dB7.Ecualizador Low (100Hz)±15dB±15dB±2dB Mid (300Hz)±15dB±15dB±2dB High (5kHz)±15dB±15dB±2dB8.EfectoShape 22-23dB >20dB (ControlShape,Min.aMax.)9.Nivelderuido (@salidadealtavozconfiltropasabajos30kHz,EQplano)NiveldevolumenMin. -60dBu-54dBuNiveldevolumenMax. -44.5dBu10.Niveldeauriculares(carga600ohmios) 493mW500±30mW11.Medicióndecorrienteenreposo 4.4mV/Max.10mV/.47 W0.47 W12.VoltajededesfaseDC 12mV0±50mV
Especificaciones técnicas
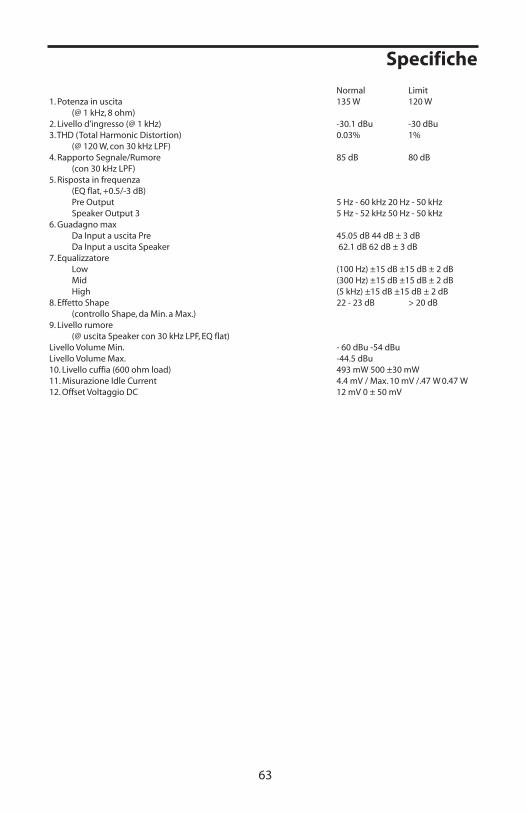
63
Normal Limit1.Potenzainuscita 135W 120W (@1kHz,8ohm)2.Livellod'ingresso(@1kHz) -30.1dBu -30dBu3.THD(TotalHarmonicDistortion) 0.03% 1% (@120W,con30kHzLPF)4.RapportoSegnale/Rumore 85dB 80dB (con30kHzLPF)5.Rispostainfrequenza (EQflat,+0.5/-3dB) PreOutput 5Hz-60kHz20Hz-50kHz SpeakerOutput3 5Hz-52kHz50Hz-50kHz6.Guadagnomax DaInputauscitaPre 45.05dB44dB±3dB DaInputauscitaSpeaker 62.1dB62dB±3dB7.Equalizzatore Low (100Hz)±15dB±15dB±2dB Mid (300Hz)±15dB±15dB±2dB High (5kHz)±15dB±15dB±2dB8.EffettoShape 22-23dB >20dB (controlloShape,daMin.aMax.)9.Livellorumore (@uscitaSpeakercon30kHzLPF,EQflat)LivelloVolumeMin. -60dBu-54dBuLivelloVolumeMax. -44.5dBu10.Livellocuffia(600ohmload) 493mW500±30mW11.MisurazioneIdleCurrent 4.4mV/Max.10mV/.47 W0.47 W12.OffsetVoltaggioDC 12mV0±50mV
Specifiche

Hartke45 Gilpin Avenue
Hauppauge, New York 11788-8816Phone: 1-800-3-SAMSON (1-800-372-6766)
Fax: 631-784-2201 www.hartke.com