Embed Size (px)
Citation preview
Dry Erase Wallcovering Magnetic Receptive
Installation Instructions Inspection of Material Material should be carefully inspected BEFORE CUTTING to confirm the correct product, proper width and quantity ordered has been received. Verify magnetic receptivity. If there are different lot numbers, organize prior to installation so you are using only the same lot numbers together f o r a n y o ne w al l . Number the rolls (blue painters tape or pencil on backing) for installing in appropriate sequence. Use only a lead pencil (no inks!) for marking the wall covering on the reverse side of the dry erase surface. If you notice any damage or wallcovering surface concerns…do not proceed to install. Call MDC Customer Care, 800-621-4006 to report those concerns. By proceeding to install the material, you are authorizing approval of the material as being acceptable to you after your inspection.
Storage of Material
Acclimate the material on the installation site for two days prior to installation. Temperature should be between 55 degrees F and 100 degrees F. Relative humidity should not exceed 40%. Take care to protect the rolls adequately during this storage time.
Surface Preparation Proper surface preparation is critical for a high quality wallcovering installation. Any imperfections in the wall to be covered will telegraph to the surface of the installed material. Surface must be clean, smooth, dry, structurally sound and uniform in color. Any existing imperfections in the wall surface, such as: cracks, taped joints, indents or nail heads- - should be addressed and sanded smooth to be left undetectable. A minimum of a Gypsum Association level 4 finish is required, and a level 5 finish is recommended. Ballpoint ink, grease, crayon or any other surface contaminant should be cleaned, sealed and/or removed. Examine your surface carefully and do not install over an impermeable surface. Verify that your surface has no impermeable layer in place, such as an alkyd coating or a varnish, lacquer or shellac. Apply a coat of Roman UltraPrime, PRO-977 over the dust free wall surface. Priming will allow a better bond to the wall surface, help with re-positioning during installation and aid the adhesive to dry out as intended.
• Measure the moisture content of each surface with a moisture meter. They should each not exceed 5% moisture content.
• Apply product when the relative humidity in the installation area does not exceed 40% and the temperature is above 55 degrees F and below 100 degrees F. Those conditions should be maintained in all areas of both storage and installation for two days prior to and for four days after the installation.
• If there are any concerns regarding the surface to be covered, a test installation of at least one strip, applied three days in advance of the main installation is recommended. Seek site approval of those results before proceeding.
Application of the Wallcovering
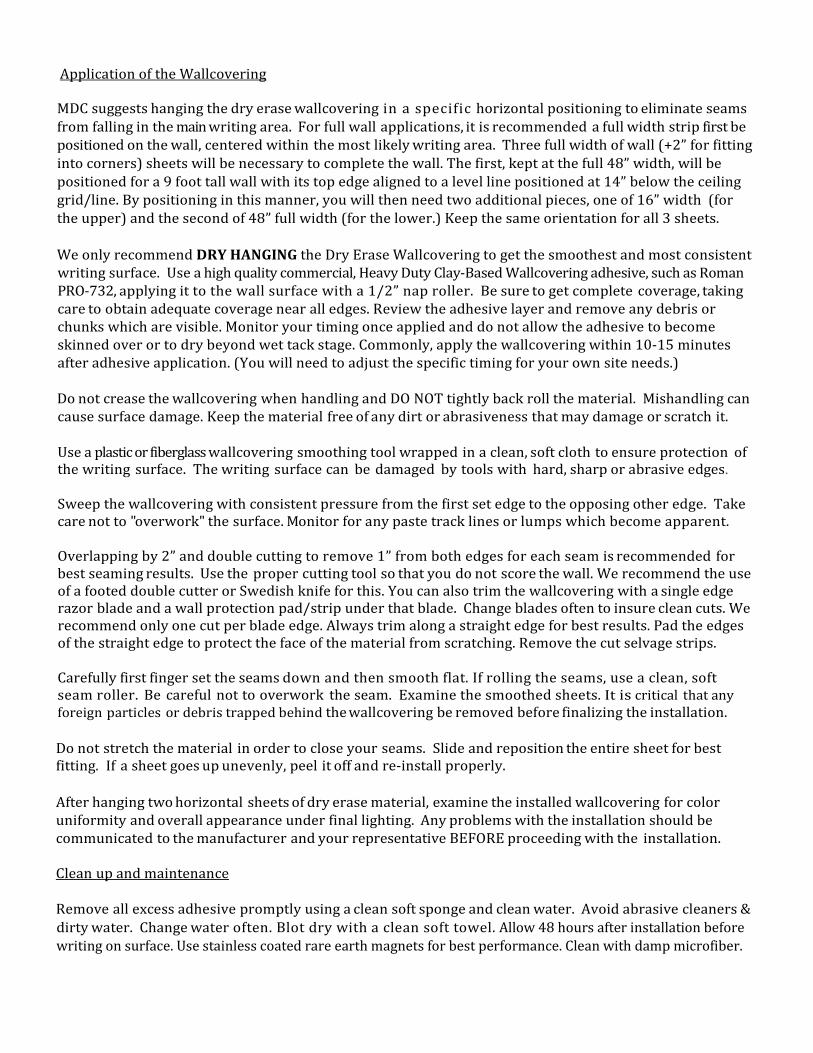
MDC suggests hanging the dry erase wallcovering in a specific horizontal positioning to eliminate seams from falling in the main writing area. For full wall applications, it is recommended a full width strip first be positioned on the wall, centered within the most likely writing area. Three full width of wall (+2” for fitting into corners) sheets will be necessary to complete the wall. The first, kept at the full 48” width, will be positioned for a 9 foot tall wall with its top edge aligned to a level line positioned at 14” below the ceiling grid/line. By positioning in this manner, you will then need two additional pieces, one of 16” width (for the upper) and the second of 48” full width (for the lower.) Keep the same orientation for all 3 sheets. We only recommend DRY HANGING the Dry Erase Wallcovering to get the smoothest and most consistent writing surface. Use a high quality commercial, Heavy Duty Clay-Based Wallcovering adhesive, such as Roman PRO-732, applying it to the wall surface with a 1/2” nap roller. Be sure to get complete coverage, taking care to obtain adequate coverage near all edges. Review the adhesive layer and remove any debris or chunks which are visible. Monitor your timing once applied and do not allow the adhesive to become skinned over or to dry beyond wet tack stage. Commonly, apply the wallcovering within 10-15 minutes after adhesive application. (You will need to adjust the specific timing for your own site needs.) Do not crease the wallcovering when handling and DO NOT tightly back roll the material. Mishandling can cause surface damage. Keep the material free of any dirt or abrasiveness that may damage or scratch it.
Use a plastic or fiberglass wallcovering smoothing tool wrapped in a clean, soft cloth to ensure protection of the writing surface. The writing surface can be damaged by tools with hard, sharp or abrasive edges. Sweep the wallcovering with consistent pressure from the first set edge to the opposing other edge. Take care not to "overwork" the surface. Monitor for any paste track lines or lumps which become apparent. Overlapping by 2” and double cutting to remove 1” from both edges for each seam is recommended for best seaming results. Use the proper cutting tool so that you do not score the wall. We recommend the use of a footed double cutter or Swedish knife for this. You can also trim the wallcovering with a single edge razor blade and a wall protection pad/strip under that blade. Change blades often to insure clean cuts. We recommend only one cut per blade edge. Always trim along a straight edge for best results. Pad the edges of the straight edge to protect the face of the material from scratching. Remove the cut selvage strips. Carefully first finger set the seams down and then smooth flat. If rolling the seams, use a clean, soft seam roller. Be careful not to overwork the seam. Examine the smoothed sheets. It is critical that any foreign particles or debris trapped behind the wallcovering be removed before finalizing the installation.
Do not stretch the material in order to close your seams. Slide and reposition the entire sheet for best fitting. If a sheet goes up unevenly, peel it off and re-install properly.
After hanging two horizontal sheets of dry erase material, examine the installed wallcovering for color uniformity and overall appearance under final lighting. Any problems with the installation should be communicated to the manufacturer and your representative BEFORE proceeding with the installation.
Clean up and maintenance
Remove all excess adhesive promptly using a clean soft sponge and clean water. Avoid abrasive cleaners & dirty water. Change water often. Blot dry with a clean soft towel. Allow 48 hours after installation before writing on surface. Use stainless coated rare earth magnets for best performance. Clean with damp microfiber.