Embed Size (px)
Citation preview
Dynamics CRM Quick Start Guide:
Nintex Workflow 2013
Last updated Monday, May 11, 2015
Legal NoticesFor the latest information, please see http://en-us.nintex.com/company/legal.
© Copyright 2015 Nintex UK Ltd. | Privacy Policy | Terms & Conditions | Cookie Preferences | Nintex Support
-i-
Dynamics CRM Quick Start Guide: Nintex Workflow 2013
Contents
Legal Notices iIntroduction 1
Prerequisites 1List of Dynamics CRM actions 1Adding Dynamics CRM actions 2
Using Dynamics CRM actions in workflows 3Create and configure the sample list 3Create and configure the sample list workflow 3
Next Steps 10
© Copyright 2015 Nintex UK Ltd. | Privacy Policy | Terms & Conditions | Cookie Preferences | Nintex Support
-ii-
Dynamics CRM Quick Start Guide: Nintex Workflow 2013
IntroductionThis guide provides information about connecting workflows in Nintex Workflow to your Microsoft Dynamics CRM instance.
Using Dynamics CRM workflow actions, you can create, update, and delete records in a Microsoft Dynamics CRM instance, as well as either quickly retrieve a single record based on the value of a single field or retrieve multiple records based on more complex filter criteria. Dynamics CRM workflow actions support both standard and custom entit-ies in Microsoft Dynamics CRM.
Prerequisites
Note: This guide assumes that you are familiar with the concepts and oper-ation of SharePoint, NintexWorkflow, and Microsoft Dynamics CRM.
Before you can add Dynamics CRM actions to Nintex Workflow, the following pre-requisites must be satisfied.
l You must have a Nintex Workflow license that is enabled for Nintex Live. l You must have access to a Microsoft Dynamics CRM instance.
A Microsoft Dynamics CRM Online trial service can be used for evaluation pur-poses. You can obtain a 30-day Microsoft Dynamics CRM Online trial service from your Office 365 subscription. The following procedure describes how to add a Microsoft Dynamics CRM Online trial service to your Office 365 subscription.To add a Microsoft Dynamics CRM Online trial service to Office 365 1. Using your browser, log into the Office 365 subscription. 2. Go to Admin > Office 365 > purchase services. 3. Navigate to the Microsoft Dynamics CRM Online Trial service, and
then click Trial. 4. From the Confirm your order page, click try now. 5. From the Order receipt page, click continue.
List of Dynamics CRM actionsThe following Dynamics CRM actions are available from the Nintex Live Catalog.
l Dynamics CRM change user status: Changes the status of a user. l Dynamics CRM create record: Creates a single record for a standard or custom
entity. l Dynamics CRM create user: Creates a user. l Dynamics CRM delete record: Deletes a single record, given the unique record
identifier for that record, for a standard or custom entity. l Dynamics CRM query record: Retrieves the record identifiers of multiple records,
satisfying specified filter criteria, from a standard or custom entity. l Dynamics CRM retrieve record: Retrieves a single record, containing the specified
value of a single specified field, from a standard or custom entity. l Dynamics CRM update record: Updates a single record, given the unique record
identifier for that record, for a standard or custom entity. l Dynamics CRM update user: Updates a user.
© Copyright 2015 Nintex UK Ltd. | Privacy Policy | Terms & Conditions | Cookie Preferences | Nintex Support
-1-
Dynamics CRM Quick Start Guide: Nintex Workflow 2013
Adding Dynamics CRM actionsDynamics CRM actions must be added to your Nintex Workflow environment before use. Once added, the workflow actions can then be included in workflows created in Nintex Workflow.
To add Dynamics CRM actions to Nintex Workflow
1. Access the Workflow designer. 2. From the ribbon of the NintexWorkflow designer, click Catalog. 3. In the Nintex Live Catalog dialog box, in the search box on the upper right, type
"Dynamics CRM" and then press ENTER.Dynamics CRM actions are listed. For a list of Dynamics CRM actions, see "List of Dynamics CRM actions" on the previous page.
Note: You may need to navigate to additional pages to see all of the actions.
4. For each action listed, click Add. 5. Click Close to close the Nintex Live Catalog dialog box.
The Dynamics CRM actions are now available in the Nintex Workflow designer, in the Integration category of the Workflow Actions toolbox.
© Copyright 2015 Nintex UK Ltd. | Privacy Policy | Terms & Conditions | Cookie Preferences | Nintex Support
-2-
Dynamics CRM Quick Start Guide: Nintex Workflow 2013
Using Dynamics CRM actions in workflowsThe following sample list workflow illustrates how Dynamics CRM workflow actions can be used to perform business tasks in Microsoft Dynamics CRM from Nintex Workflow.
Create and configure the sample listThis list workflow example demonstrates how to automatically create a contact, with an associated account and an initial task, whenever a new item is added to a Contacts list.
To prepare the sample list
1. In SharePoint, add a new Contacts list to the team site. 2. Add a new single line of text column, named Alternate Contact ID, to the
Contacts list added in the previous step. This column is used to store the unique record identifier of the corresponding con-tact in Microsoft Dynamics CRM, created by the sample list workflow whenever a contact is created in this list.
Create and configure the sample list workflowThis list workflow example illustrates how to define a Dynamics CRM connection and then use the Dynamics CRM create record and Dynamics CRM update record workflow actions, in concert with other workflow actions and workflow variables, to cre-ate a contact, with an associated account and task, in Microsoft Dynamics CRM whenever a contact is added to the sample list in Office 365.
The following procedures describe how to create, save, publish, and run the site work-flow example, and assumes that you are starting in the Nintex Workflow designer.
© Copyright 2015 Nintex UK Ltd. | Privacy Policy | Terms & Conditions | Cookie Preferences | Nintex Support
-3-
Dynamics CRM Quick Start Guide: Nintex Workflow 2013
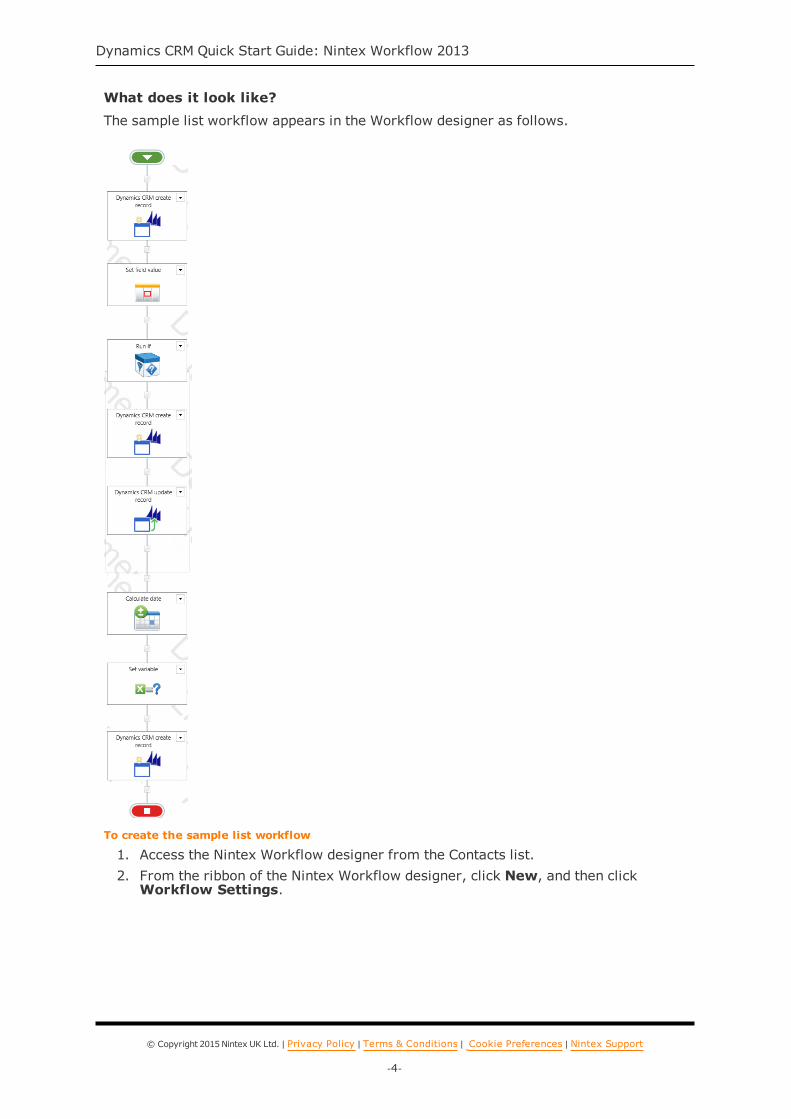
What does it look like?
The sample list workflow appears in the Workflow designer as follows.
To create the sample list workflow
1. Access the Nintex Workflow designer from the Contacts list. 2. From the ribbon of the Nintex Workflow designer, click New, and then click
Workflow Settings.
© Copyright 2015 Nintex UK Ltd. | Privacy Policy | Terms & Conditions | Cookie Preferences | Nintex Support
-4-
Dynamics CRM Quick Start Guide: Nintex Workflow 2013
3. In the Workflow Settings dialog box, set property values as follows and then click Save.
Property name Property value
Title Add contacts to Dynamics CRM
Start manually false (cleared check box)
Start when items are created Yes
Start when items are modified No
To create a Dynamics CRM connection
1. From the ribbon of the Nintex Workflow designer, click Connection Manager. 2. In the Connection Manager dialog box, click New. 3. In the Create Connection dialog box, from the Provider drop-down list, select
Dynamics CRM. 4. Select the desired scope for this connection.
User restricts use of the connection to the current user account while Site allows use of the connection across the SharePoint site.
5. In Server URL, specify the URL of the Microsoft Dynamics CRM instance in which the workflow action should search for the record. The appropriate URL depends on the specifics of your Microsoft Dynamics CRM instance.For example, if you are using a Microsoft Dynamics CRM Online instance in North America, the URL should resemble the following sample URL:https://<organization>.crm.dynamics.com
6. In the toolbar at the top of the Create Connection dialog box, click Save. The connection is saved and the dialog box is closed.
7. In the Connection Manager dialog box, to the right of the new connection, click Test. The message "Testing connection" appears briefly, and then an image rep-resenting the test results is displayed to the right of the Test button for the selec-ted connection.
: Connection is working
: Error encountered during test; hover over image for more details
© Copyright 2015 Nintex UK Ltd. | Privacy Policy | Terms & Conditions | Cookie Preferences | Nintex Support
-5-
Dynamics CRM Quick Start Guide: Nintex Workflow 2013
To configure the sample list workflow
Note: References inserted into property values are indicated by red text. For example, a reference to the current site URL is indicated by "Current site URL". For more information about inserting references, see the product help.
1. Create the workflow variables for IDs and dates. A. Click the down arrow for Workflow Settings in the ribbon and then click
Variables. B. In the Workflow Variables dialog box, for each variable below, click New,
set property values as follows, and then click Save.
Name Type Default value Show on start form
AccountID Single line of text (leave blank) No
ContactID Single line of text (leave blank) No
ConvertedTaskDate Single line of text (leave blank) No
TaskDate Date and Time Blank No
C. Click Close to close the Workflow Variables dialog box. 2. Create a record for the contact: Add and configure an instance of Dynamics
CRM create record.The Dynamics CRM create record workflow action creates a new record for a specified entity, using a specified set of user credentials, and returns the URL and unique identifier for the new record. In this case, the workflow action cre-ates a contact in Microsoft Dynamics CRM using the information from the current item in the sample list. All of the workflow actions for Dynamics CRM Connector are included in the Nin-tex Live category of the Workflow Actions toolbox in the Nintex Workflow designer. A. Add the workflow action to the design canvas. B. Double-click the action to display the configuration settings dialog box, set
property values as follows, and then click Save.
Property name Property value
Connection (select the Dynamics CRM connection previously defined)
Create Contact
Note: The workflow actions in Dynamics CRM Connector use the logical names of entit-ies and entity attributes in Microsoft Dynamics CRM.
Fields > Add field
(create the following fields)
Field Valuelastname Last Namefirstname First Nameemailaddress1 Email Address
Record ID ContactID
© Copyright 2015 Nintex UK Ltd. | Privacy Policy | Terms & Conditions | Cookie Preferences | Nintex Support
-6-
Dynamics CRM Quick Start Guide: Nintex Workflow 2013
3. Set the value of the list column Alternate Contact ID: Add and configure an instance of Set field value. A. Add the workflow action to the design canvas, immediately after Dynam-
ics CRM create record. B. Double-click the action to display the configuration settings dialog box, set
property values as follows, and then click Save.
Property name Property value
Set Alternate Contact ID
Equals Value, ContactID
4. Create a container for adding account records: Add and configure an instance of Run If. A. Add the workflow action to the design canvas, immediately after Set
field value. B. Double-click the action to display the configuration settings dialog box, set
property values as follows, and then click Save.
Property name Property value
Condition If current item field equals value
Where Company, is not empty
5. Create an account record for the company: Add and configure an instance of Dynamics CRM create record. A. Add the workflow action to the design canvas, within the Run If workflow
action added in the previous step. B. Double-click the action to display the configuration settings dialog box, set
property values as follows, and then click Save.
Property name Property value
Connection (select the Dynamics CRM connection previously defined)
Create Account
Fields > Add field (create the following fields)
Field Valuename Company (from Item Properties)description Sample company
Record ID AccountID
© Copyright 2015 Nintex UK Ltd. | Privacy Policy | Terms & Conditions | Cookie Preferences | Nintex Support
-7-
Dynamics CRM Quick Start Guide: Nintex Workflow 2013
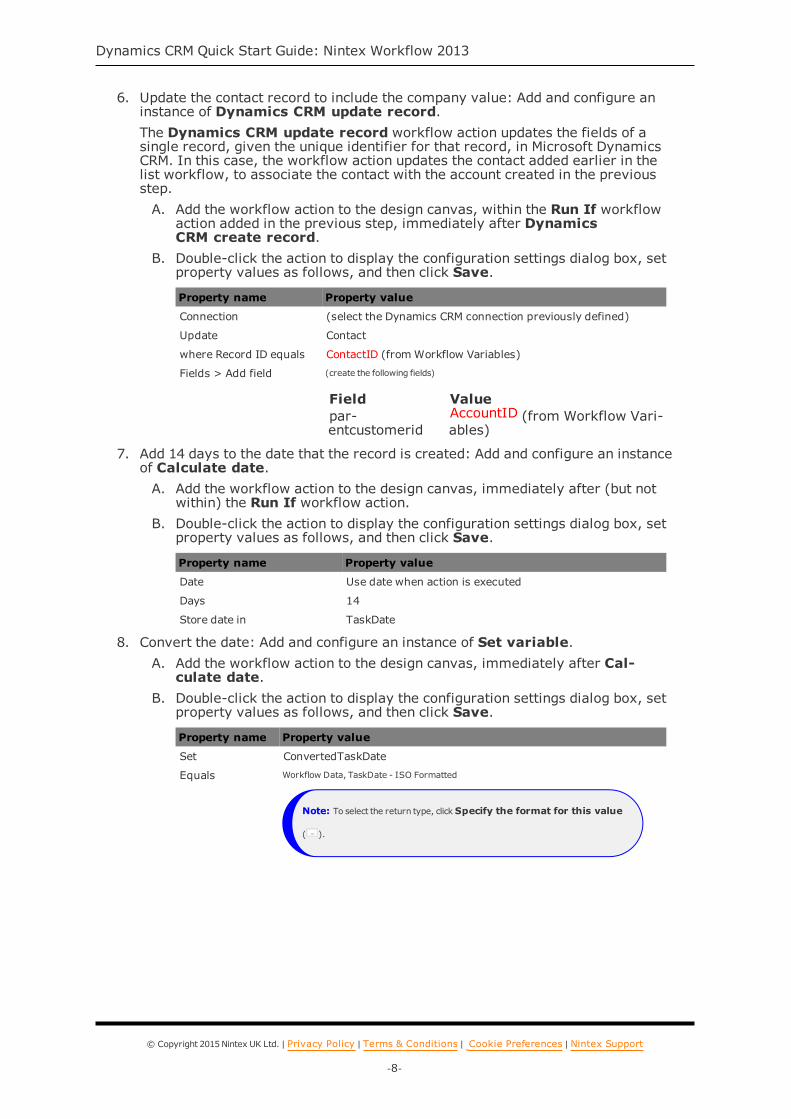
6. Update the contact record to include the company value: Add and configure an instance of Dynamics CRM update record.The Dynamics CRM update record workflow action updates the fields of a single record, given the unique identifier for that record, in Microsoft Dynamics CRM. In this case, the workflow action updates the contact added earlier in the list workflow, to associate the contact with the account created in the previous step. A. Add the workflow action to the design canvas, within the Run If workflow
action added in the previous step, immediately after Dynamics CRM create record.
B. Double-click the action to display the configuration settings dialog box, set property values as follows, and then click Save.
Property name Property value
Connection (select the Dynamics CRM connection previously defined)
Update Contact
where Record ID equals ContactID (from Workflow Variables)
Fields > Add field (create the following fields)
Field Valuepar-entcustomerid
AccountID (from Workflow Vari-ables)
7. Add 14 days to the date that the record is created: Add and configure an instance of Calculate date. A. Add the workflow action to the design canvas, immediately after (but not
within) the Run If workflow action. B. Double-click the action to display the configuration settings dialog box, set
property values as follows, and then click Save.
Property name Property value
Date Use date when action is executed
Days 14
Store date in TaskDate
8. Convert the date: Add and configure an instance of Set variable. A. Add the workflow action to the design canvas, immediately after Cal-
culate date. B. Double-click the action to display the configuration settings dialog box, set
property values as follows, and then click Save.
Property name Property value
Set ConvertedTaskDate
Equals Workflow Data, TaskDate - ISO Formatted
Note: To select the return type, click Specify the format for this value
( ).
© Copyright 2015 Nintex UK Ltd. | Privacy Policy | Terms & Conditions | Cookie Preferences | Nintex Support
-8-
Dynamics CRM Quick Start Guide: Nintex Workflow 2013
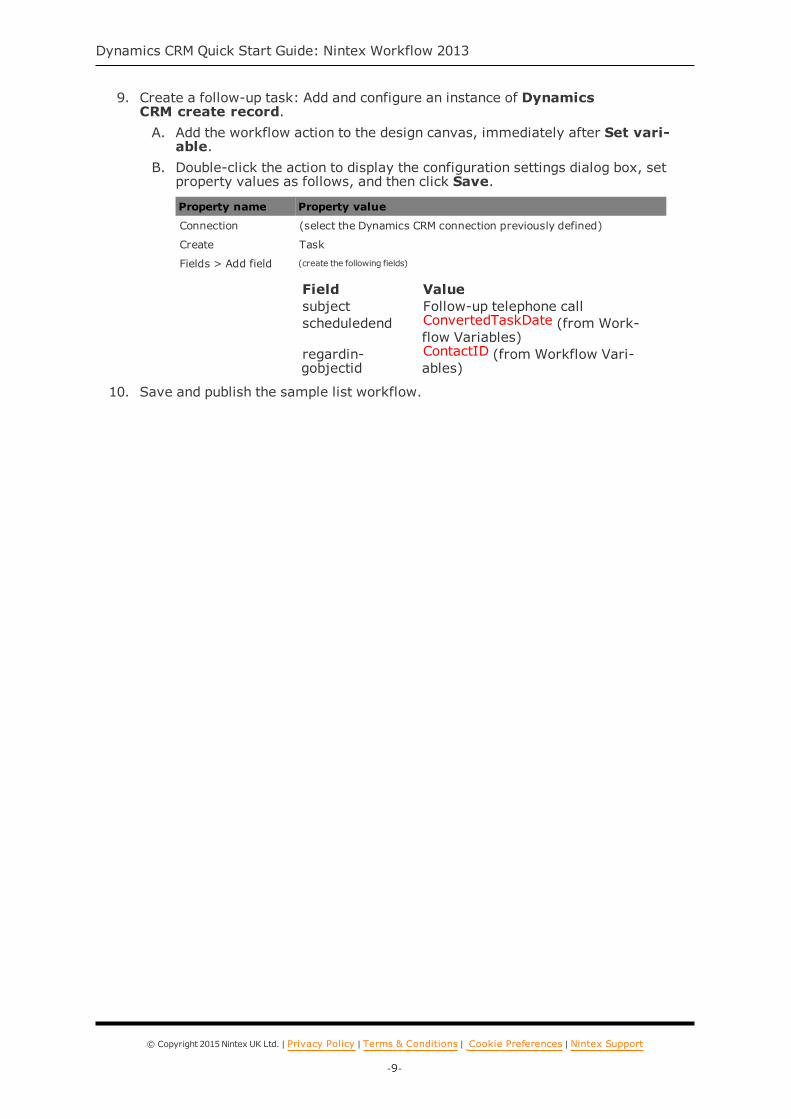
9. Create a follow-up task: Add and configure an instance of Dynamics CRM create record. A. Add the workflow action to the design canvas, immediately after Set vari-
able. B. Double-click the action to display the configuration settings dialog box, set
property values as follows, and then click Save.
Property name Property value
Connection (select the Dynamics CRM connection previously defined)
Create Task
Fields > Add field (create the following fields)
Field Valuesubject Follow-up telephone callscheduledend ConvertedTaskDate (from Work-
flow Variables)regardin-gobjectid
ContactID (from Workflow Vari-ables)
10. Save and publish the sample list workflow.
© Copyright 2015 Nintex UK Ltd. | Privacy Policy | Terms & Conditions | Cookie Preferences | Nintex Support
-9-
Dynamics CRM Quick Start Guide: Nintex Workflow 2013
Next StepsTo run the sample list workflow, add items to the sample Contacts list. The sample list workflow runs automatically whenever an item is added to the sample list.
Once the sample list workflow is completed, you can view the results in Microsoft Dynamics CRM.
© Copyright 2015 Nintex UK Ltd. | Privacy Policy | Terms & Conditions | Cookie Preferences | Nintex Support
-10-
Dynamics CRM Quick Start Guide: Nintex Workflow 2013