Embed Size (px)
Citation preview
ESDA-Administrator Manual
Page 1
E-platform for School Development & Accountability (ESDA)
Version 4.5.x
Administrator Manual
2017
ESDA-Administrator Manual
Page 2
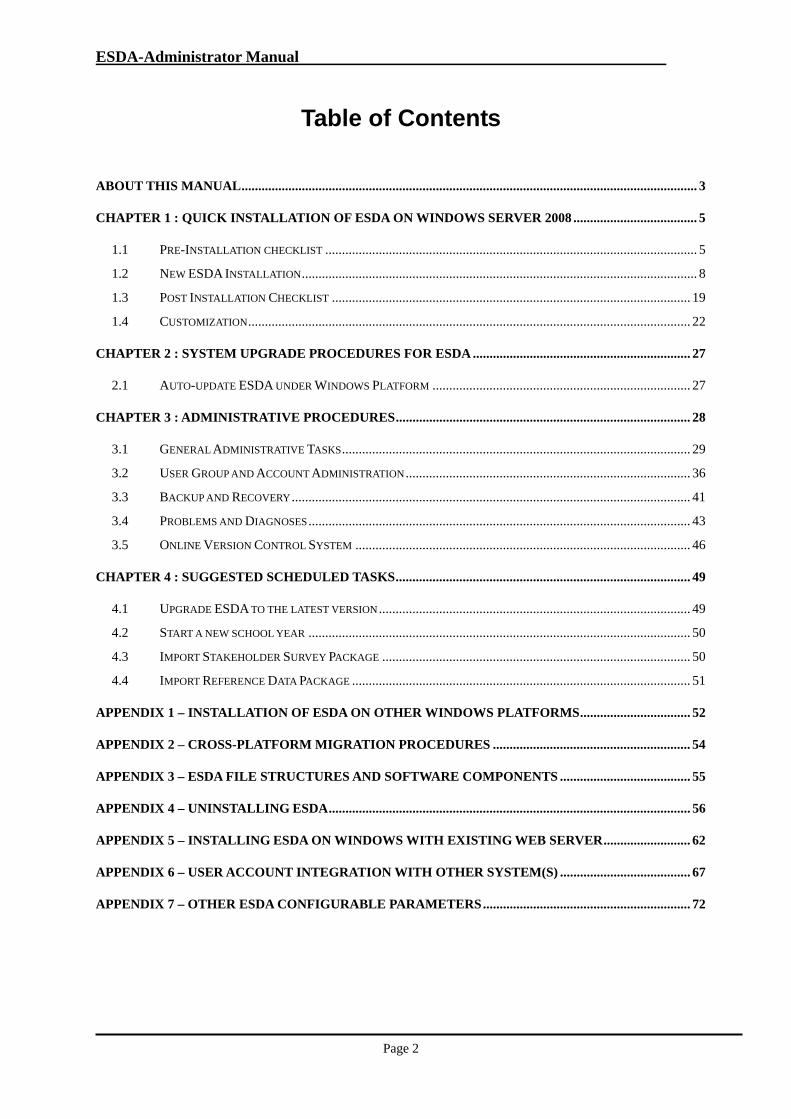
Table of Contents
ABOUT THIS MANUAL ........................................................................................................................................ 3
CHAPTER 1 : QUICK INSTALLATION OF ESDA ON WINDOWS SERVER 2008 ..................................... 5
1.1 PRE-INSTALLATION CHECKLIST ............................................................................................................... 5
1.2 NEW ESDA INSTALLATION ...................................................................................................................... 8
1.3 POST INSTALLATION CHECKLIST ........................................................................................................... 19
1.4 CUSTOMIZATION .................................................................................................................................... 22
CHAPTER 2 : SYSTEM UPGRADE PROCEDURES FOR ESDA ................................................................. 27
2.1 AUTO-UPDATE ESDA UNDER WINDOWS PLATFORM ............................................................................. 27
CHAPTER 3 : ADMINISTRATIVE PROCEDURES ........................................................................................ 28
3.1 GENERAL ADMINISTRATIVE TASKS ........................................................................................................ 29
3.2 USER GROUP AND ACCOUNT ADMINISTRATION ..................................................................................... 36
3.3 BACKUP AND RECOVERY ....................................................................................................................... 41
3.4 PROBLEMS AND DIAGNOSES .................................................................................................................. 43
3.5 ONLINE VERSION CONTROL SYSTEM .................................................................................................... 46
CHAPTER 4 : SUGGESTED SCHEDULED TASKS ........................................................................................ 49
4.1 UPGRADE ESDA TO THE LATEST VERSION ............................................................................................. 49
4.2 START A NEW SCHOOL YEAR .................................................................................................................. 50
4.3 IMPORT STAKEHOLDER SURVEY PACKAGE ............................................................................................ 50
4.4 IMPORT REFERENCE DATA PACKAGE ..................................................................................................... 51
APPENDIX 1 – INSTALLATION OF ESDA ON OTHER WINDOWS PLATFORMS ................................. 52
APPENDIX 2 – CROSS-PLATFORM MIGRATION PROCEDURES ........................................................... 54
APPENDIX 3 – ESDA FILE STRUCTURES AND SOFTWARE COMPONENTS ....................................... 55
APPENDIX 4 – UNINSTALLING ESDA ............................................................................................................ 56
APPENDIX 5 – INSTALLING ESDA ON WINDOWS WITH EXISTING WEB SERVER .......................... 62
APPENDIX 6 – USER ACCOUNT INTEGRATION WITH OTHER SYSTEM(S) ....................................... 67
APPENDIX 7 – OTHER ESDA CONFIGURABLE PARAMETERS .............................................................. 72
ESDA-Administrator Manual
Page 3
About this manual
This Administrator Manual is written on how to administer E-platform for School
Development & Accountability (ESDA) version 4.5.x. For SEP specific information, please
refer to its original edition.
The target readers of this Administrator Manual is System Administrator, or those who are
authorized to install and administer ESDA server.
This Manual has the following four chapters -
Chapter 1 Quick Installation of ESDA on Windows Server
Chapter 2 System Upgrading for ESDA
Chapter 3 Administrative Procedures
Chapter 4 Suggested scheduled tasks
Besides the general administrative tasks mentioned in the above chapters, there are some
further guidelines provided in the Appendices on the related features of ESDA.
Appendix 1 Installation of ESDA on other Windows Platforms
Appendix 2 Cross Platform Migration Procedures
Appendix 3 ESDA File structure and software Components
Appendix 4 Uninstalling ESDA
Appendix 5 Installing ESDA on Other Web server
Appendix 6 User account integration with other system(s)
Appendix 7 User account integration with Windows Active Directory
Special note about version 4.5.x:
Unlike previous version of ESDA, this version 4.5.x is completely rewritten in PHP 5. In
order to integrate better with the operating system, Windows based Zend Server Community
Edition is used. New features such as online program fix and data patching are now available;
but they are not implemented in Linux edition.
ESDA-Administrator Manual
Page 4
How to contact us
EDB welcomes schools to share with us their opinions and good practices in using ESDA. Please
contact the Indicators Section of the Education Bureau to express any views and suggestions, or to
share experiences by phone, fax or e-mail:
Telephone (852) 2892-6577
(852) 2892-6544
Fax (852) 2119-9074
E-mail [email protected]
ESDA-Administrator Manual
Page 5
Chapter 1 : Quick Installation of ESDA on Windows Server 2008
This chapter provides the installation procedures for ESDA v4.5.x under Windows
Server 2008. Other than Windows Server 2008, the ESDA can be installed in the following
operating systems:
Windows Server 2012
Windows 7 & Windows 8
For detailed information, please refer to the relevant Appendices.
Windows Server 2003 End of life
Microsoft has announced that the end of life (EOL) for Windows Server 2003
(WS2003) is 14 July 2015, users can no longer get the extended support. There will
be no patches or security updates, WS2003 systems will become a security risk and
compliance nightmare. Therefore, it is necessary to complete the system upgrade
from WS2003 to WS2008 or its newer version before the EOL date.
The following are three major steps involved in the installation procedures:
Pre-Installation Checklist
Installation of ESDA
Post-Installation Checklist
1.1 Pre-Installation checklist
This section describes the pre-installation tasks such as identifying hardware
requirements and gathering the necessary installation information that the Administrator should
perform before moving onto the installation.
1.1.1 Suggested System Configurations
ESDA must be installed in a computer system with the configurations as stated in Appendix 1.
To ensure satisfactory performance, schools may refer to the following suggested system
configurations: Suggested system configurations
1. Processor Intel Xeon CPU 3.2 GHz or above
2. Memory 8 GB RAM or above
3. Hard Disk 10 GB Free storage space
ESDA-Administrator Manual
Page 6
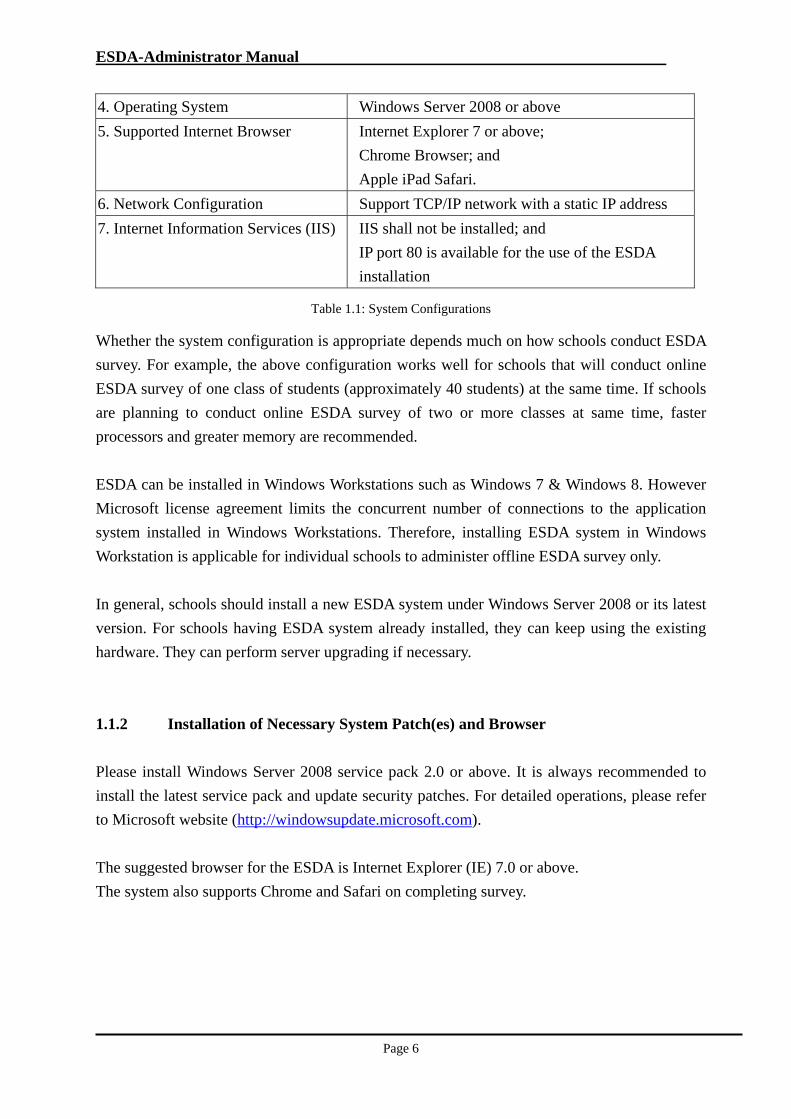
4. Operating System Windows Server 2008 or above
5. Supported Internet Browser Internet Explorer 7 or above;
Chrome Browser; and
Apple iPad Safari.
6. Network Configuration Support TCP/IP network with a static IP address
7. Internet Information Services (IIS) IIS shall not be installed; and
IP port 80 is available for the use of the ESDA
installation
Table 1.1: System Configurations
Whether the system configuration is appropriate depends much on how schools conduct ESDA
survey. For example, the above configuration works well for schools that will conduct online
ESDA survey of one class of students (approximately 40 students) at the same time. If schools
are planning to conduct online ESDA survey of two or more classes at same time, faster
processors and greater memory are recommended.
ESDA can be installed in Windows Workstations such as Windows 7 & Windows 8. However
Microsoft license agreement limits the concurrent number of connections to the application
system installed in Windows Workstations. Therefore, installing ESDA system in Windows
Workstation is applicable for individual schools to administer offline ESDA survey only.
In general, schools should install a new ESDA system under Windows Server 2008 or its latest
version. For schools having ESDA system already installed, they can keep using the existing
hardware. They can perform server upgrading if necessary.
1.1.2 Installation of Necessary System Patch(es) and Browser
Please install Windows Server 2008 service pack 2.0 or above. It is always recommended to
install the latest service pack and update security patches. For detailed operations, please refer
to Microsoft website (http://windowsupdate.microsoft.com).
The suggested browser for the ESDA is Internet Explorer (IE) 7.0 or above.
The system also supports Chrome and Safari on completing survey.
ESDA-Administrator Manual
Page 7
1.1.3 Other Recommended Software
It is always recommended to install Anti-Virus software and update the latest virus signature on
the computer in which the ESDA is installed.
1.1.4 Network Configuration Checking
The ESDA package uses port 80 for Apache HTTP server. The Administrator is advised to
disable the IIS service to make sure that port 80 is available for Apache HTTP server. If the
server is using the IIS service for other purposes, the Administrator is advised to modify the
Apache HTTP server port 80 to 8080. For detailed procedures, please refer to Appendix 5.
A static IP address should be assigned to the computer in which the ESDA is installed. If the
server is designed for Internet access, it must be protected by a firewall and assigned to a
routable IP address.
For any ESDA server that is connected to the Internet directly and allow Internet acccess,
additional protection should be added such as using HTTPS port (i.e. port 443) instead of
HTTP port (i.e. port 80). For details about SSL configuration, please refer to Appendix 5.
1.1.5 Reference Site for Checking Licensing Issue on Operating System
Windows Server 2008 supports two Windows Client Access Licenses (CAL): Device-based
and User-based Windows CAL. Windows Device CALs might make most economic and
administrative sense for an organization with multiple users for one device. Whereas,
Windows User CALs might make most sense for an organization with many users who need
access to the network from “unknown devices” ,or an organization with employees who access
the network via multiple devices.
For detailed information, please refer to Microsoft Product licensing website
(http://www.microsoftvolumelicensing.com/userights/).
ESDA-Administrator Manual
Page 8
1.2 New ESDA Installation
Once all the necessary components for the ESDA installation have been verified, the
Administrator is ready to install the ESDA.
1.2.1 Installing ESDA
Step 1: Download the ESDA
1) Login to the Windows Server 2008 as an Administrator, or as a user with administration
rights.
2) Launch Internet Explorer and enter the URL “http://esda.edb.gov.hk”.
3) Download the full ESDA installation program (i.e. esda-v4.5.x.exe) and save it to your
computer desktop.
Step 2: ESDA installation
Special Notes for Windows System Locale
If you are using English Windows Operation System, you shall change the Windows
locale to Chinese (Hong Kong S.A.R.) before installation. For details, please refer to
“Change the System locale” after this section.
ESDA-Administrator Manual
Page 9
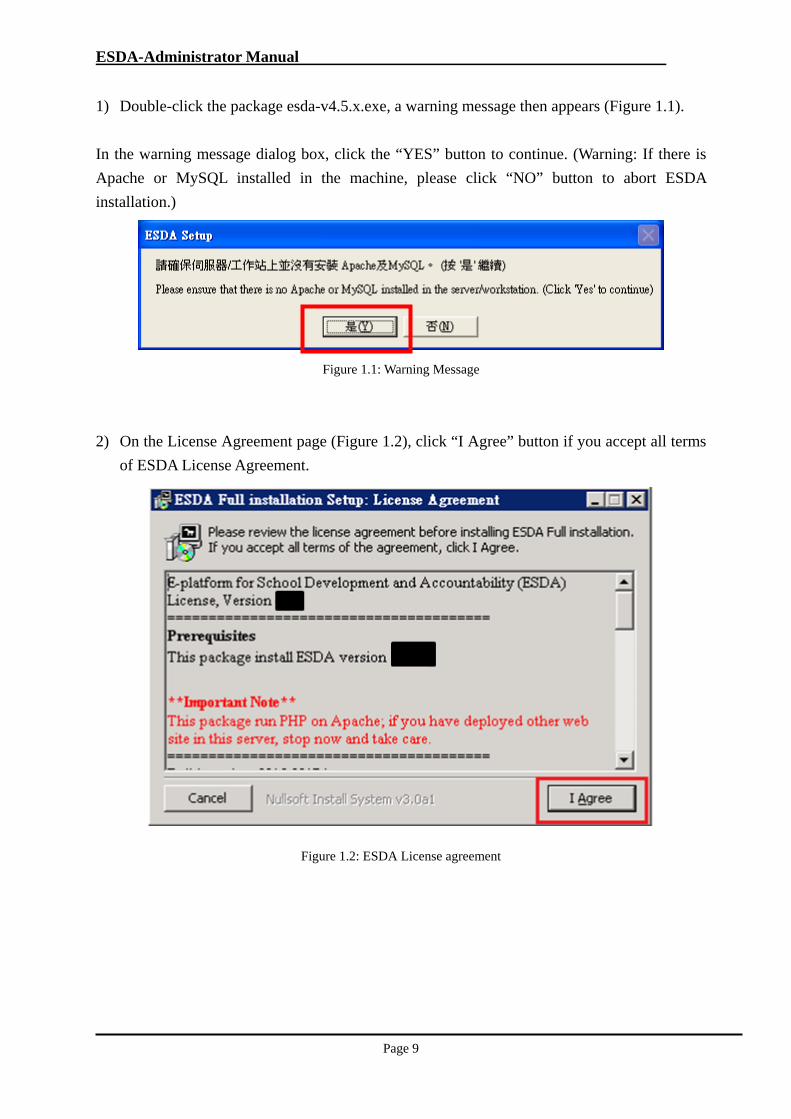
1) Double-click the package esda-v4.5.x.exe, a warning message then appears (Figure 1.1).
In the warning message dialog box, click the “YES” button to continue. (Warning: If there is
Apache or MySQL installed in the machine, please click “NO” button to abort ESDA
installation.)
Figure 1.1: Warning Message
2) On the License Agreement page (Figure 1.2), click “I Agree” button if you accept all terms
of ESDA License Agreement.
Figure 1.2: ESDA License agreement
ESDA-Administrator Manual
Page 10
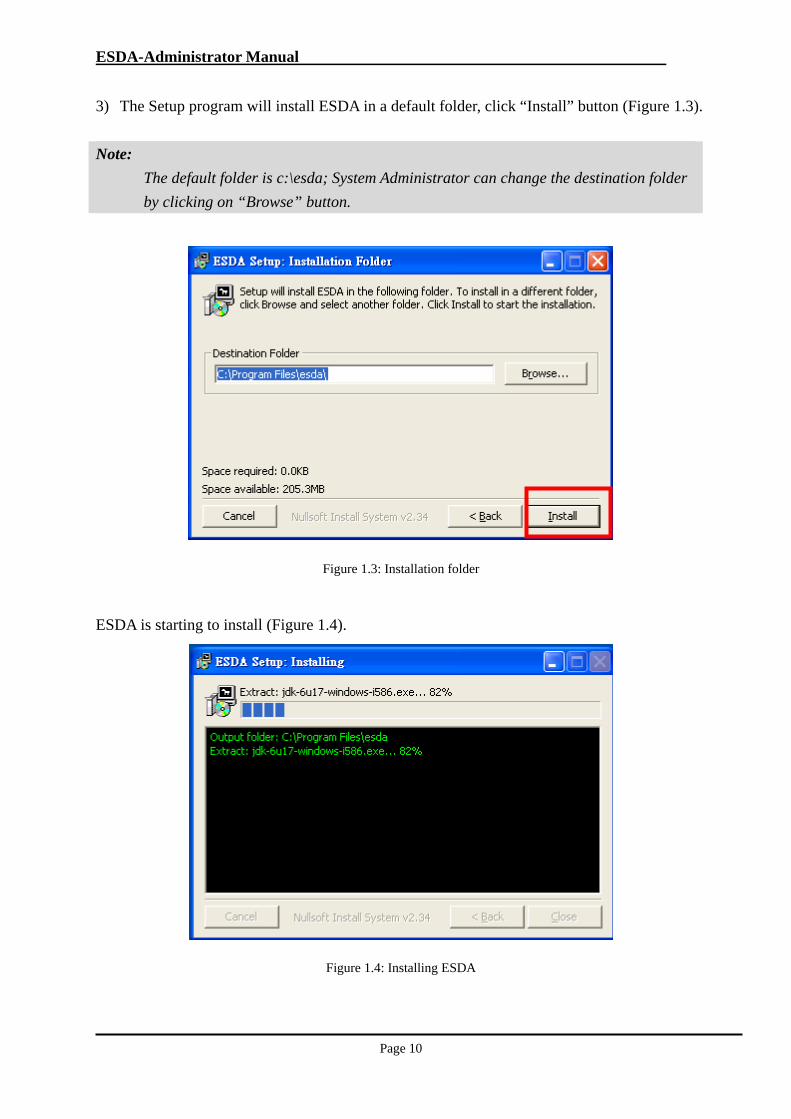
3) The Setup program will install ESDA in a default folder, click “Install” button (Figure 1.3).
Note:
The default folder is c:\esda; System Administrator can change the destination folder
by clicking on “Browse” button.
Figure 1.3: Installation folder
ESDA is starting to install (Figure 1.4).
Figure 1.4: Installing ESDA
ESDA-Administrator Manual
Page 11
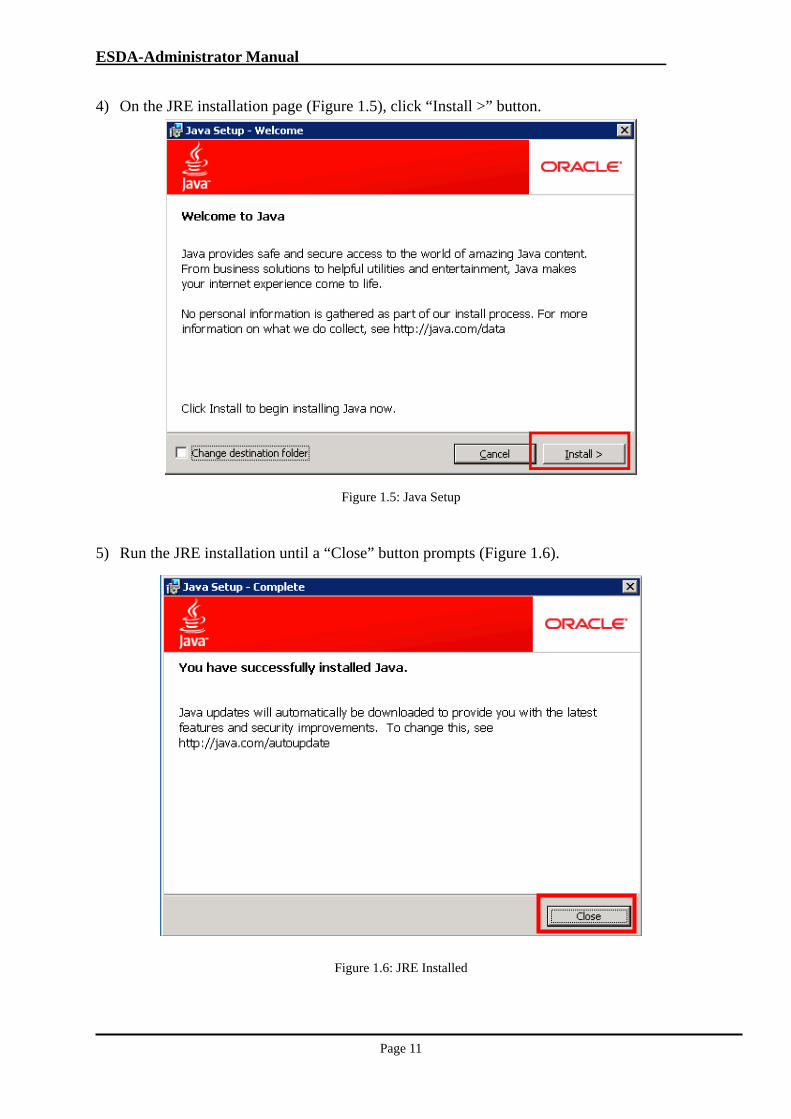
4) On the JRE installation page (Figure 1.5), click “Install >” button.
Figure 1.5: Java Setup
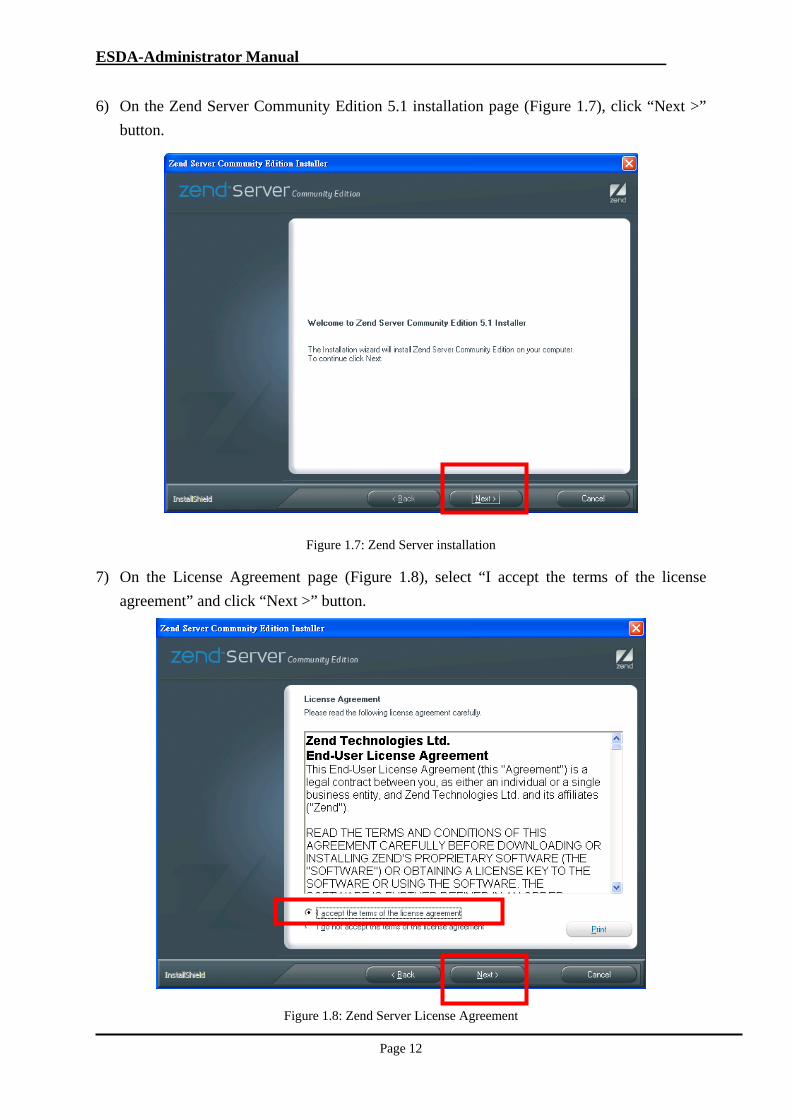
5) Run the JRE installation until a “Close” button prompts (Figure 1.6).
Figure 1.6: JRE Installed
ESDA-Administrator Manual
Page 12
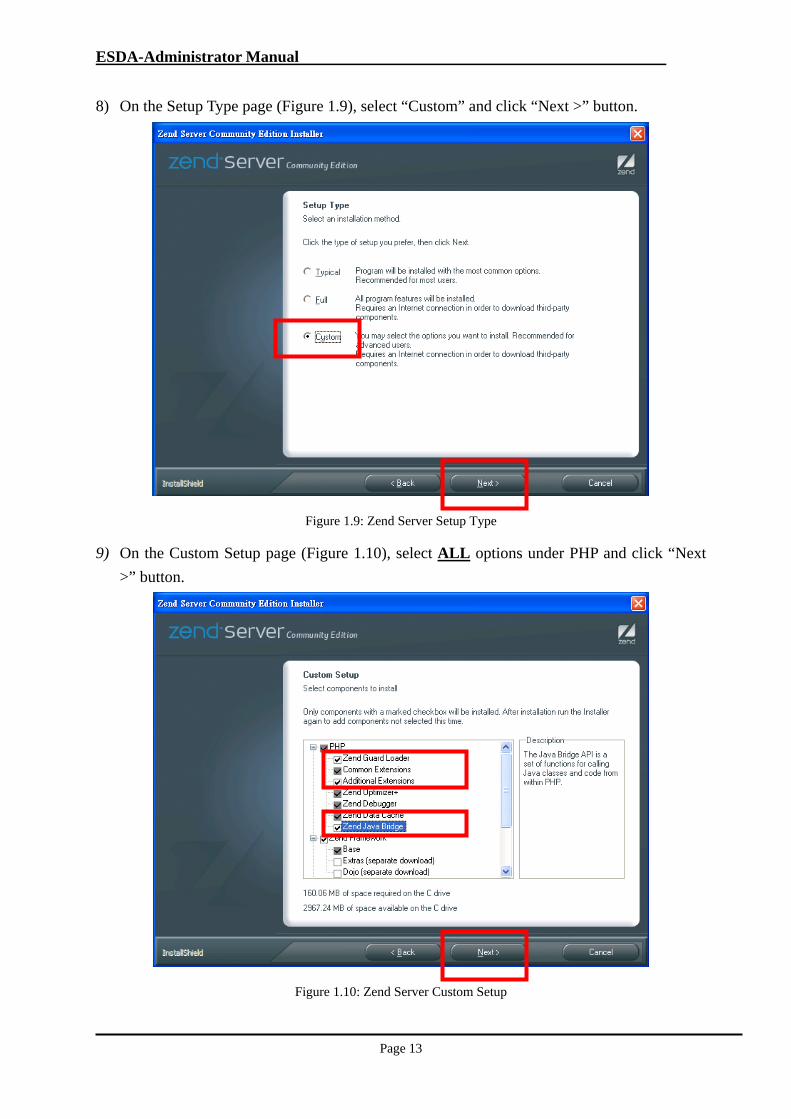
6) On the Zend Server Community Edition 5.1 installation page (Figure 1.7), click “Next >”
button.
Figure 1.7: Zend Server installation
7) On the License Agreement page (Figure 1.8), select “I accept the terms of the license
agreement” and click “Next >” button.
Figure 1.8: Zend Server License Agreement
ESDA-Administrator Manual
Page 13
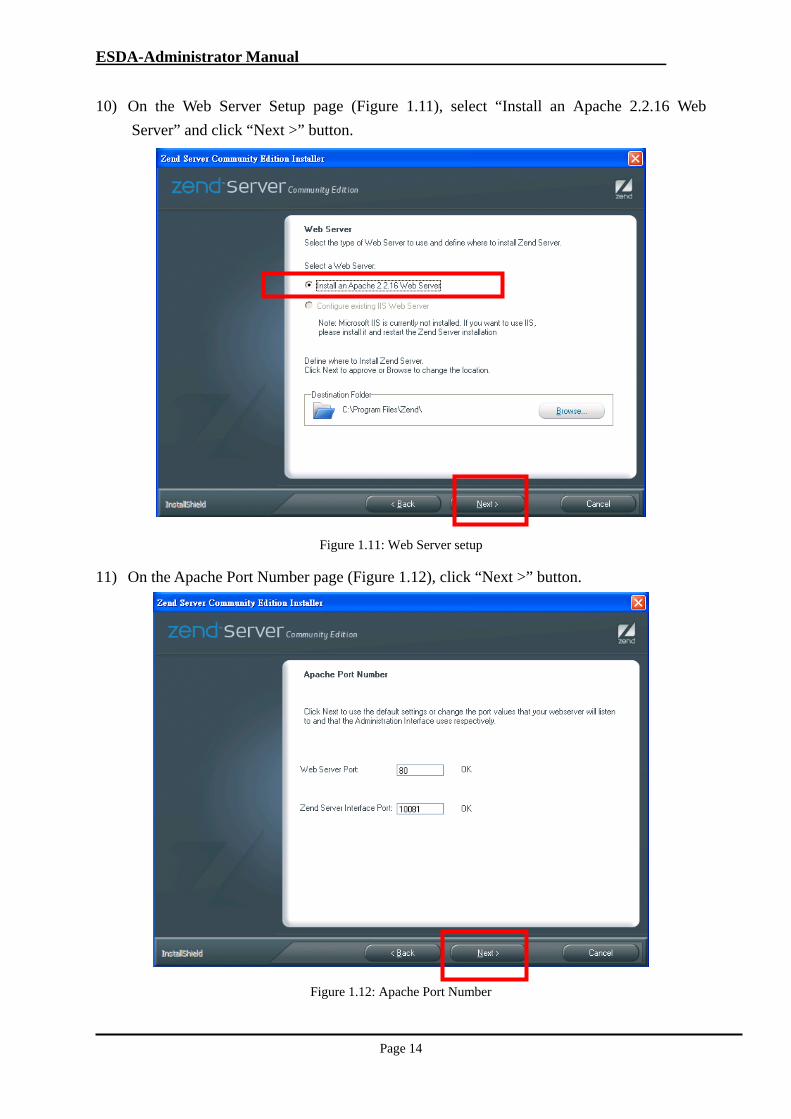
8) On the Setup Type page (Figure 1.9), select “Custom” and click “Next >” button.
Figure 1.9: Zend Server Setup Type
9) On the Custom Setup page (Figure 1.10), select ALL options under PHP and click “Next
>” button.
Figure 1.10: Zend Server Custom Setup
ESDA-Administrator Manual
Page 14
10) On the Web Server Setup page (Figure 1.11), select “Install an Apache 2.2.16 Web
Server” and click “Next >” button.
Figure 1.11: Web Server setup
11) On the Apache Port Number page (Figure 1.12), click “Next >” button.
Figure 1.12: Apache Port Number
ESDA-Administrator Manual
Page 15
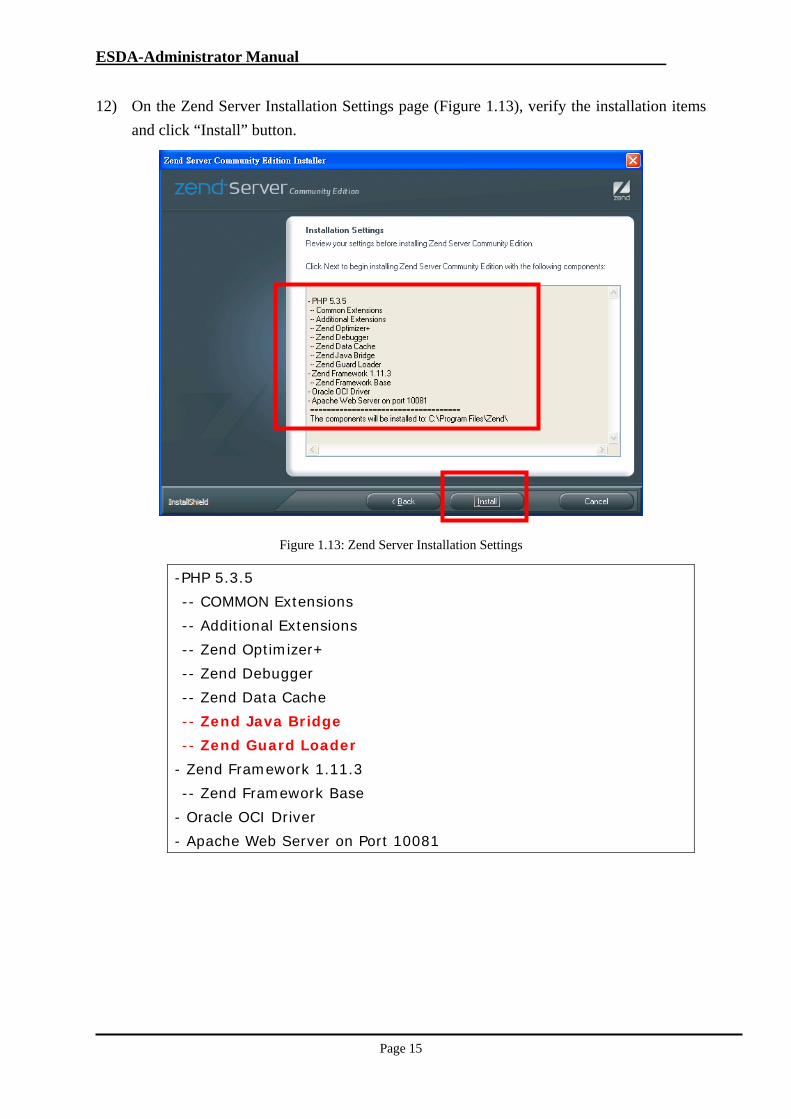
12) On the Zend Server Installation Settings page (Figure 1.13), verify the installation items
and click “Install” button.
Figure 1.13: Zend Server Installation Settings
-PHP 5.3.5 -- COMMON Extensions -- Additional Extensions -- Zend Optimizer+ -- Zend Debugger -- Zend Data Cache -- Zend Java Bridge -- Zend Guard Loader
- Zend Framework 1.11.3 -- Zend Framework Base
- Oracle OCI Driver - Apache Web Server on Port 10081
ESDA-Administrator Manual
Page 16
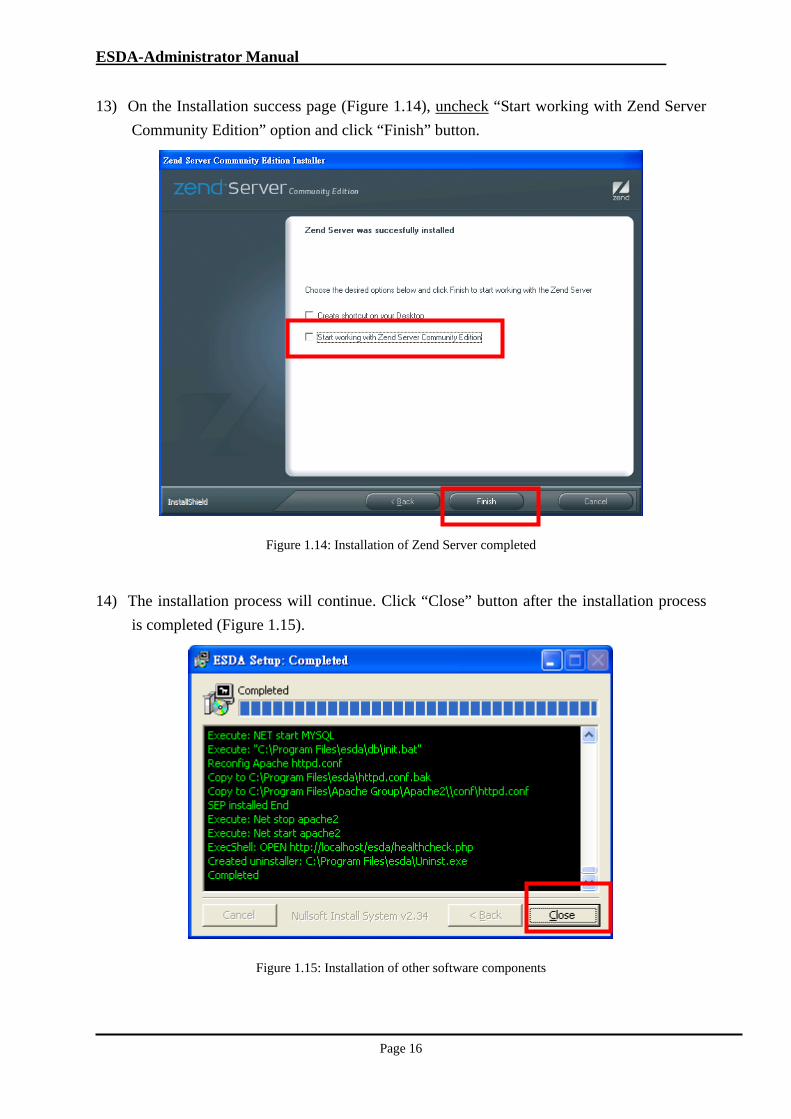
13) On the Installation success page (Figure 1.14), uncheck “Start working with Zend Server
Community Edition” option and click “Finish” button.
Figure 1.14: Installation of Zend Server completed
14) The installation process will continue. Click “Close” button after the installation process
is completed (Figure 1.15).
Figure 1.15: Installation of other software components
ESDA-Administrator Manual
Page 17
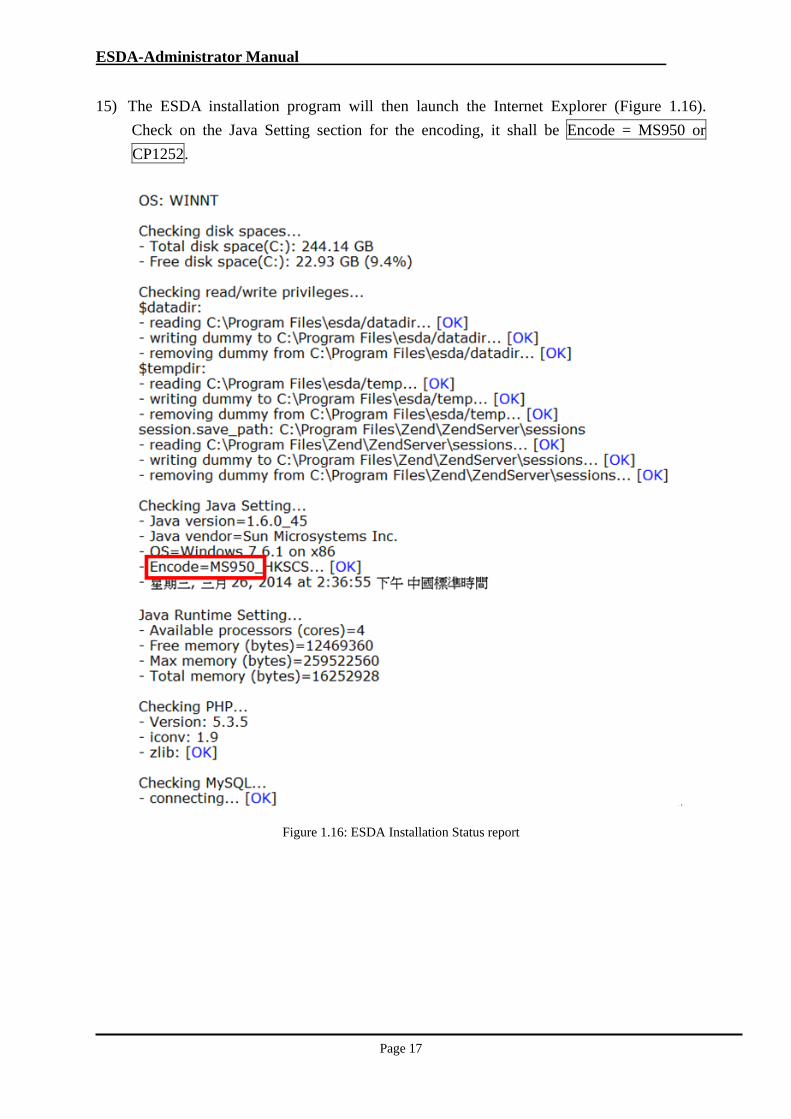
15) The ESDA installation program will then launch the Internet Explorer (Figure 1.16).
Check on the Java Setting section for the encoding, it shall be Encode = MS950 or
CP1252.
Figure 1.16: ESDA Installation Status report
ESDA-Administrator Manual
Page 18
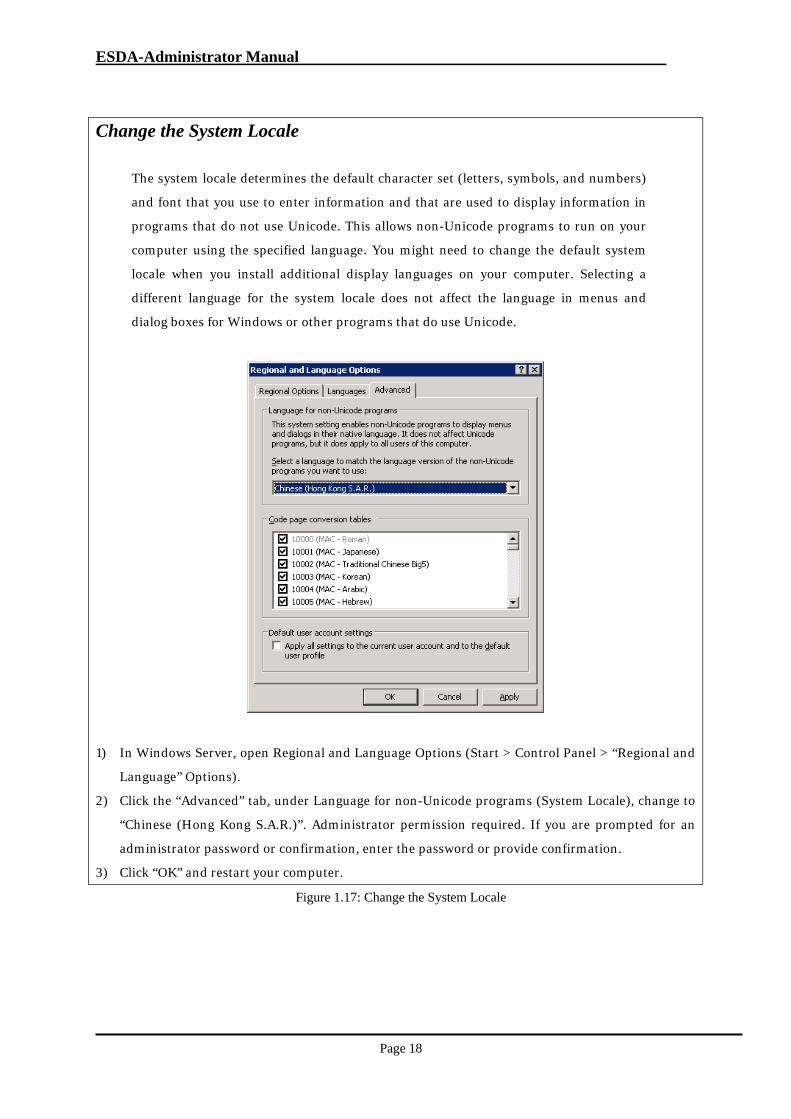
Change the System Locale
The system locale determines the default character set (letters, symbols, and numbers)
and font that you use to enter information and that are used to display information in
programs that do not use Unicode. This allows non-Unicode programs to run on your
computer using the specified language. You might need to change the default system
locale when you install additional display languages on your computer. Selecting a
different language for the system locale does not affect the language in menus and
dialog boxes for Windows or other programs that do use Unicode.
1) In Windows Server, open Regional and Language Options (Start > Control Panel > “Regional and
Language” Options).
2) Click the “Advanced” tab, under Language for non-Unicode programs (System Locale), change to
“Chinese (Hong Kong S.A.R.)”. Administrator permission required. If you are prompted for an
administrator password or confirmation, enter the password or provide confirmation.
3) Click “OK” and restart your computer.
Figure 1.17: Change the System Locale
ESDA-Administrator Manual
Page 19
1.3 Post Installation Checklist
The following steps are the post installation checking procedures to verify that the ESDA
is functional and usable.
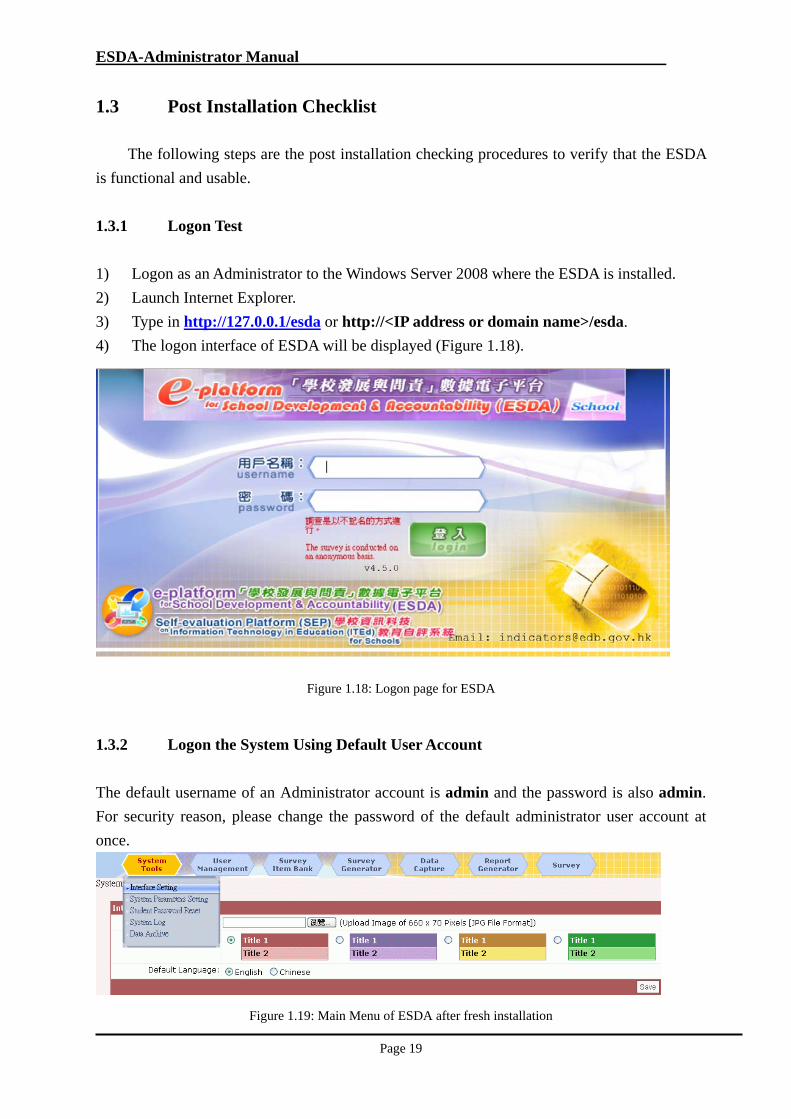
1.3.1 Logon Test
1) Logon as an Administrator to the Windows Server 2008 where the ESDA is installed.
2) Launch Internet Explorer.
3) Type in http://127.0.0.1/esda or http://<IP address or domain name>/esda.
4) The logon interface of ESDA will be displayed (Figure 1.18).
Figure 1.18: Logon page for ESDA
1.3.2 Logon the System Using Default User Account
The default username of an Administrator account is admin and the password is also admin.
For security reason, please change the password of the default administrator user account at
once.
Figure 1.19: Main Menu of ESDA after fresh installation
ESDA-Administrator Manual
Page 20
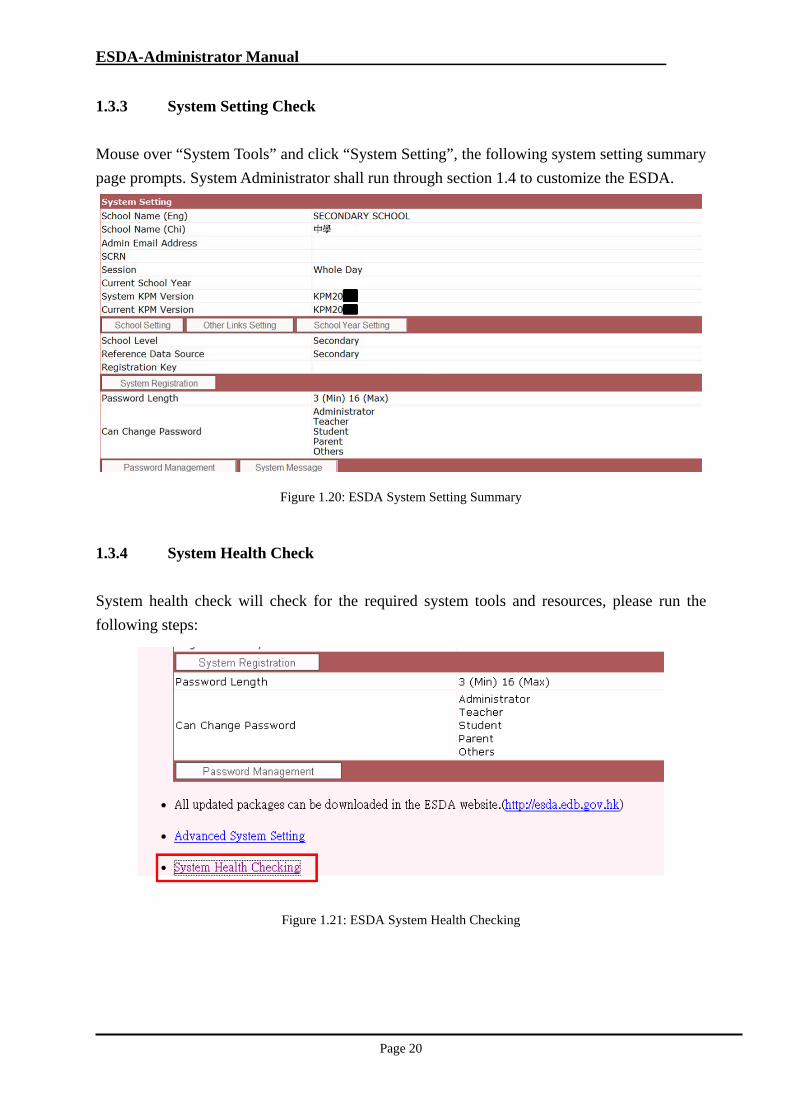
1.3.3 System Setting Check
Mouse over “System Tools” and click “System Setting”, the following system setting summary
page prompts. System Administrator shall run through section 1.4 to customize the ESDA.
Figure 1.20: ESDA System Setting Summary
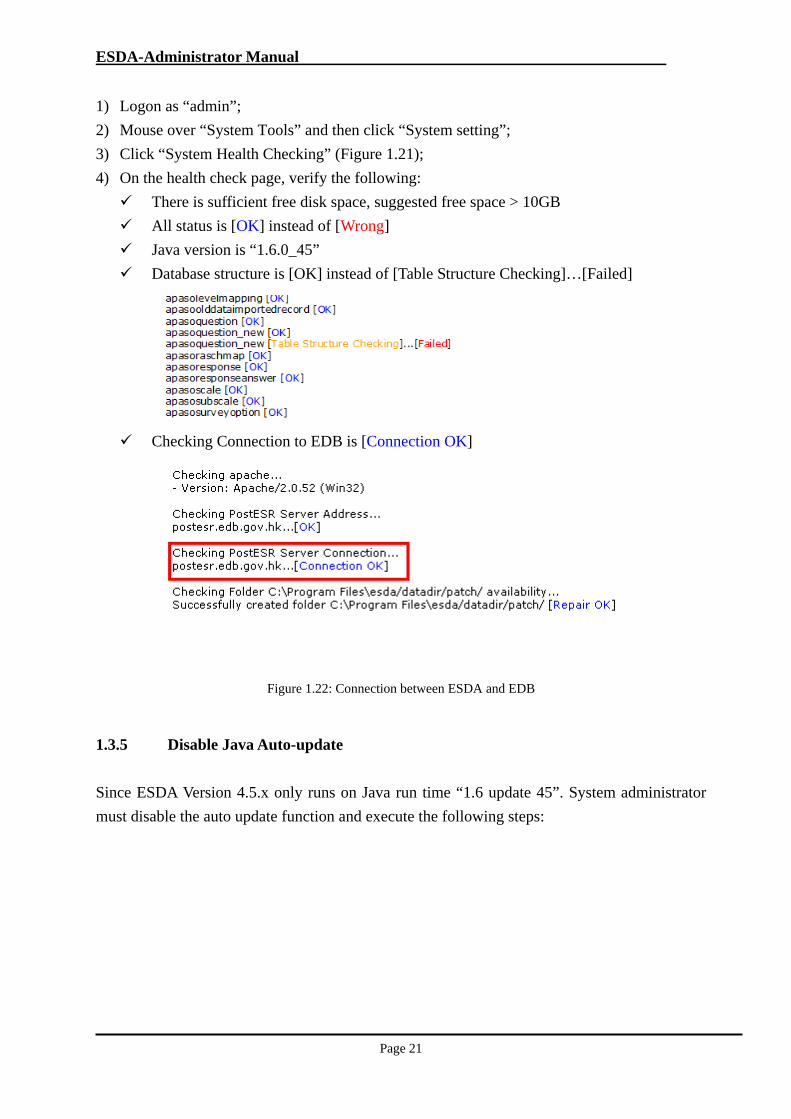
1.3.4 System Health Check
System health check will check for the required system tools and resources, please run the
following steps:
Figure 1.21: ESDA System Health Checking
ESDA-Administrator Manual
Page 21
1) Logon as “admin”;
2) Mouse over “System Tools” and then click “System setting”;
3) Click “System Health Checking” (Figure 1.21);
4) On the health check page, verify the following:
There is sufficient free disk space, suggested free space > 10GB
All status is [OK] instead of [Wrong]
Java version is “1.6.0_45”
Database structure is [OK] instead of [Table Structure Checking]…[Failed]
Checking Connection to EDB is [Connection OK]
Figure 1.22: Connection between ESDA and EDB
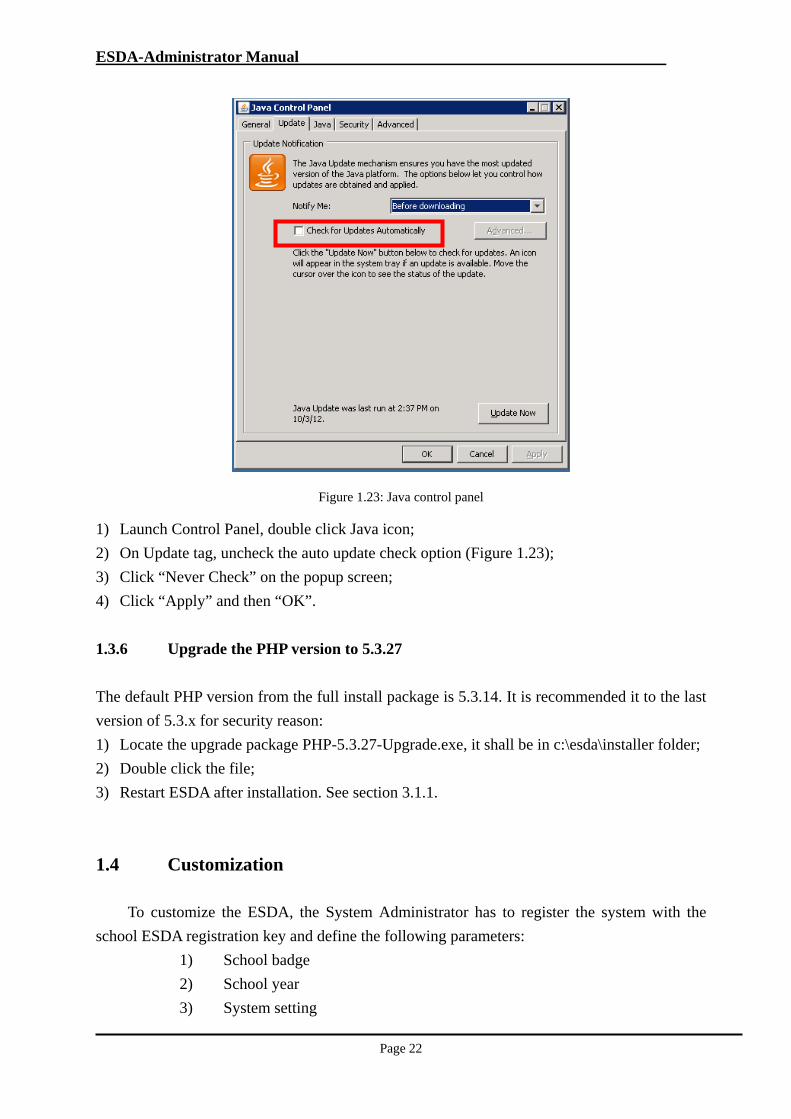
1.3.5 Disable Java Auto-update
Since ESDA Version 4.5.x only runs on Java run time “1.6 update 45”. System administrator
must disable the auto update function and execute the following steps:
ESDA-Administrator Manual
Page 22
Figure 1.23: Java control panel
1) Launch Control Panel, double click Java icon;
2) On Update tag, uncheck the auto update check option (Figure 1.23);
3) Click “Never Check” on the popup screen;
4) Click “Apply” and then “OK”.
1.3.6 Upgrade the PHP version to 5.3.27
The default PHP version from the full install package is 5.3.14. It is recommended it to the last
version of 5.3.x for security reason:
1) Locate the upgrade package PHP-5.3.27-Upgrade.exe, it shall be in c:\esda\installer folder;
2) Double click the file;
3) Restart ESDA after installation. See section 3.1.1.
1.4 Customization
To customize the ESDA, the System Administrator has to register the system with the
school ESDA registration key and define the following parameters:
1) School badge
2) School year
3) System setting

ESDA-Administrator Manual
Page 23
1.4.1 Upload School Badge
The Administrator can update School Badge in “Interface Setting” (Figure 1.24).
1) Mouse over “System Tools” and then click “Interface Setting” button.
2) Click “browse” button to upload a new School Badge in JPEG format.
3) The Administrator can change the system color and the default language.
4) Click “Save” button.
Figure 1.24: System Parameters Settings
1.4.2 Update School Year
System Administrator can update “Current School Year” if necessary (Figure 1.25).
1) Mouse over “System Tools” and then click “System Setting”.
2) Click “School Year Setting”.
3) Select “Current School Year”.
4) Click “Save” button.
Figure 1.25: System Parameters Settings
ESDA-Administrator Manual
Page 24
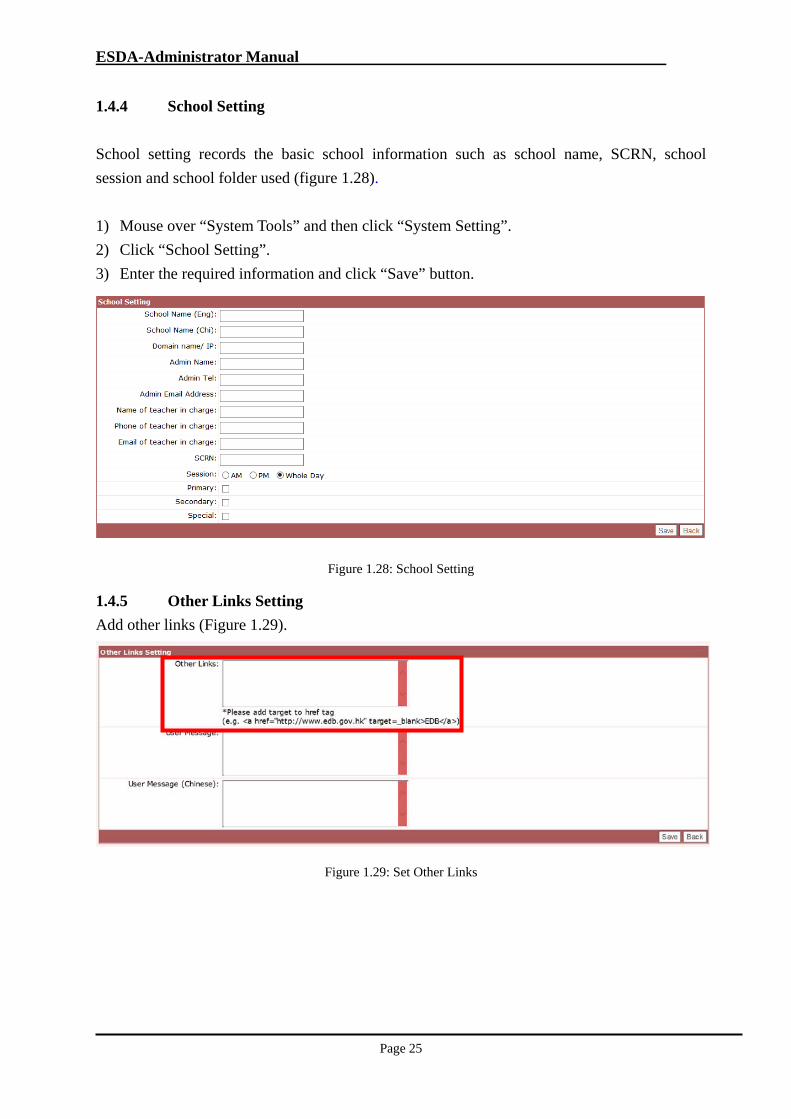
1.4.3 System Registration
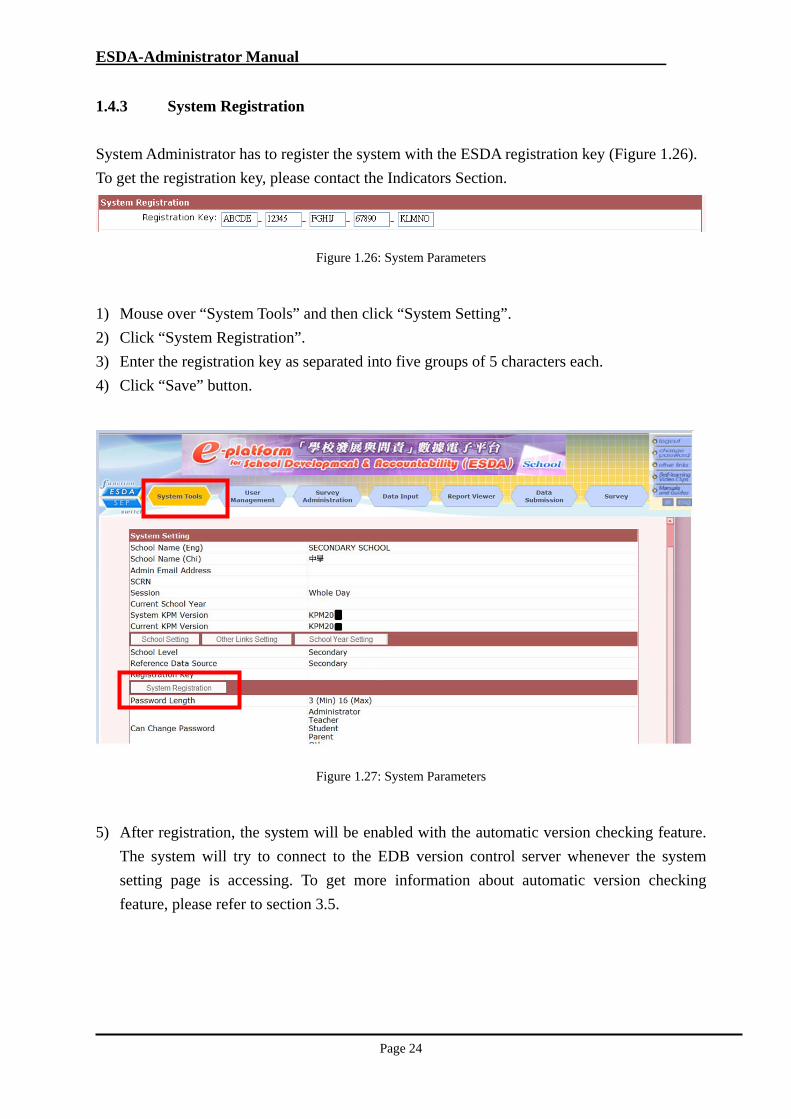
System Administrator has to register the system with the ESDA registration key (Figure 1.26).
To get the registration key, please contact the Indicators Section.
Figure 1.26: System Parameters
1) Mouse over “System Tools” and then click “System Setting”.
2) Click “System Registration”.
3) Enter the registration key as separated into five groups of 5 characters each.
4) Click “Save” button.
Figure 1.27: System Parameters
5) After registration, the system will be enabled with the automatic version checking feature.
The system will try to connect to the EDB version control server whenever the system
setting page is accessing. To get more information about automatic version checking
feature, please refer to section 3.5.
ESDA-Administrator Manual
Page 25
1.4.4 School Setting
School setting records the basic school information such as school name, SCRN, school
session and school folder used (figure 1.28).
1) Mouse over “System Tools” and then click “System Setting”.
2) Click “School Setting”.
3) Enter the required information and click “Save” button.
Figure 1.28: School Setting
1.4.5 Other Links Setting
Add other links (Figure 1.29).
Figure 1.29: Set Other Links
ESDA-Administrator Manual
Page 26
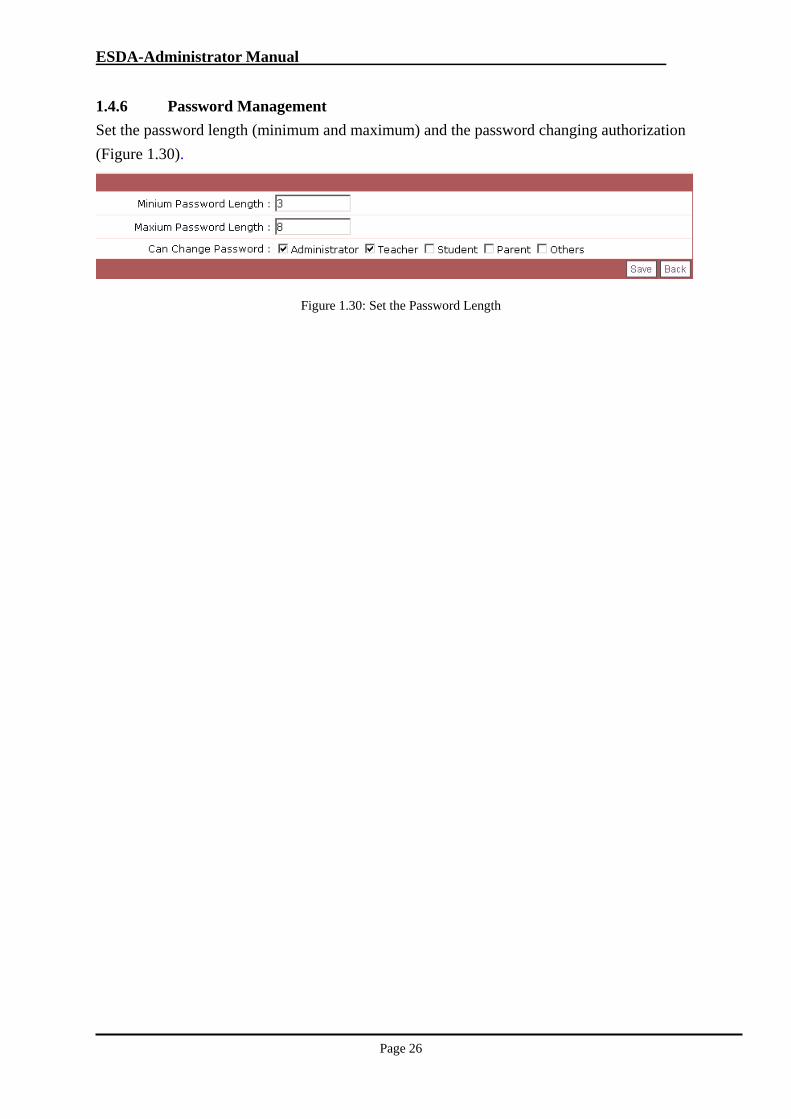
1.4.6 Password Management
Set the password length (minimum and maximum) and the password changing authorization
(Figure 1.30).
Figure 1.30: Set the Password Length
ESDA-Administrator Manual
Page 27
Chapter 2 : System Upgrade Procedures for ESDA
Starting from version 4.0.0, ESDA upgrade packages are listed in the system update page.
For Windows platform, system upgrade automation is a built-in function. For non-Windows
platform, the system update page will provide procedure or package. The following sections
describe how to upgrade the system under different platforms.
2.1 Auto-update ESDA under Windows Platform
It is assuming that school is running ESDA version 4.0.0 or above. To use system
auto-update, make sure that your system is connecting the Internet and accessible EDB servers.
For detail, please refer to section 1.3.4 system health check.
Step 1: System Backup
1) Logon to ESDA as “admin”;
2) Select “System Tools” > “System Backup Procedure”;
3) Click “Generate”.
4) Click the backup file URL and download the backup file to local folder.
Step 2: Auto update
1) Logon to ESDA as “admin”;
2) Select “System Tools” > “System Update”;
3) Click “Refresh”;
4) Click “Download” and “Install” button sequentially until all the updates are completed.
(For operation details, please refer to section 3.1.3)
Step 3: Restart the services
1) Logon the Windows server as “administrator”;
2) Locate the ESDA installer folder, e.g. c:/program files/esda/installer;
3) Run “serverRestart.bat”.
Post installation Checklist:
Schools shall also run the post installation steps as stated in section 1.3.1 to 1.3.4 after auto
update.
ESDA-Administrator Manual
Page 28
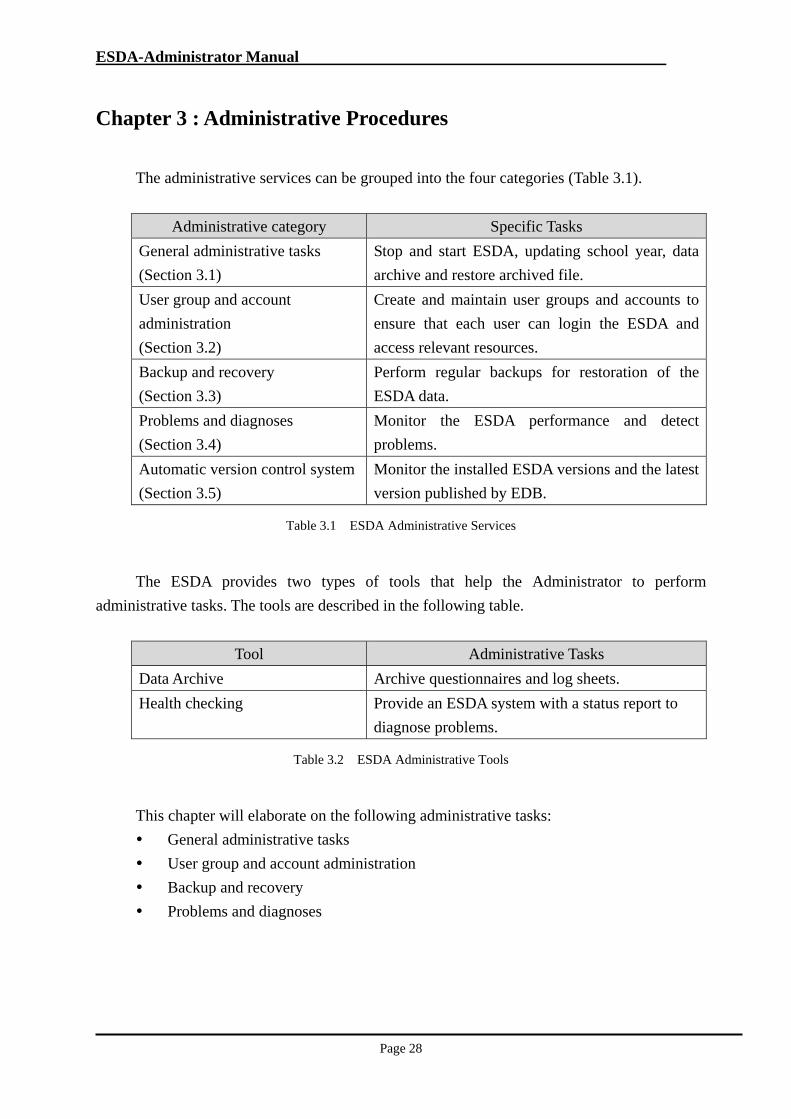
Chapter 3 : Administrative Procedures
The administrative services can be grouped into the four categories (Table 3.1).
Administrative category Specific Tasks
General administrative tasks
(Section 3.1)
Stop and start ESDA, updating school year, data
archive and restore archived file.
User group and account
administration
(Section 3.2)
Create and maintain user groups and accounts to
ensure that each user can login the ESDA and
access relevant resources.
Backup and recovery
(Section 3.3)
Perform regular backups for restoration of the
ESDA data.
Problems and diagnoses
(Section 3.4)
Monitor the ESDA performance and detect
problems.
Automatic version control system
(Section 3.5)
Monitor the installed ESDA versions and the latest
version published by EDB.
Table 3.1 ESDA Administrative Services
The ESDA provides two types of tools that help the Administrator to perform
administrative tasks. The tools are described in the following table.
Tool Administrative Tasks
Data Archive Archive questionnaires and log sheets.
Health checking Provide an ESDA system with a status report to
diagnose problems.
Table 3.2 ESDA Administrative Tools
This chapter will elaborate on the following administrative tasks:
General administrative tasks
User group and account administration
Backup and recovery
Problems and diagnoses
ESDA-Administrator Manual
Page 29
3.1 General Administrative Tasks
To maintain the system, some administrative tasks have to be performed regularly. To
stop or start the ESDA system, the Administrator can stop or start the Apache and MySQL
service. After stopping the Apache and MySQL service, no one can access the ESDA. For
checking the system status, the simplest way is Logon / Logout the system. The system should
work properly if there is no problem in both Logon and Logout procedures. For each new
school year, the Administrator should change the current school year before importing new
user accounts.
3.1.1 Stop and Start ESDA
This section describes how to stop and start the ESDA.
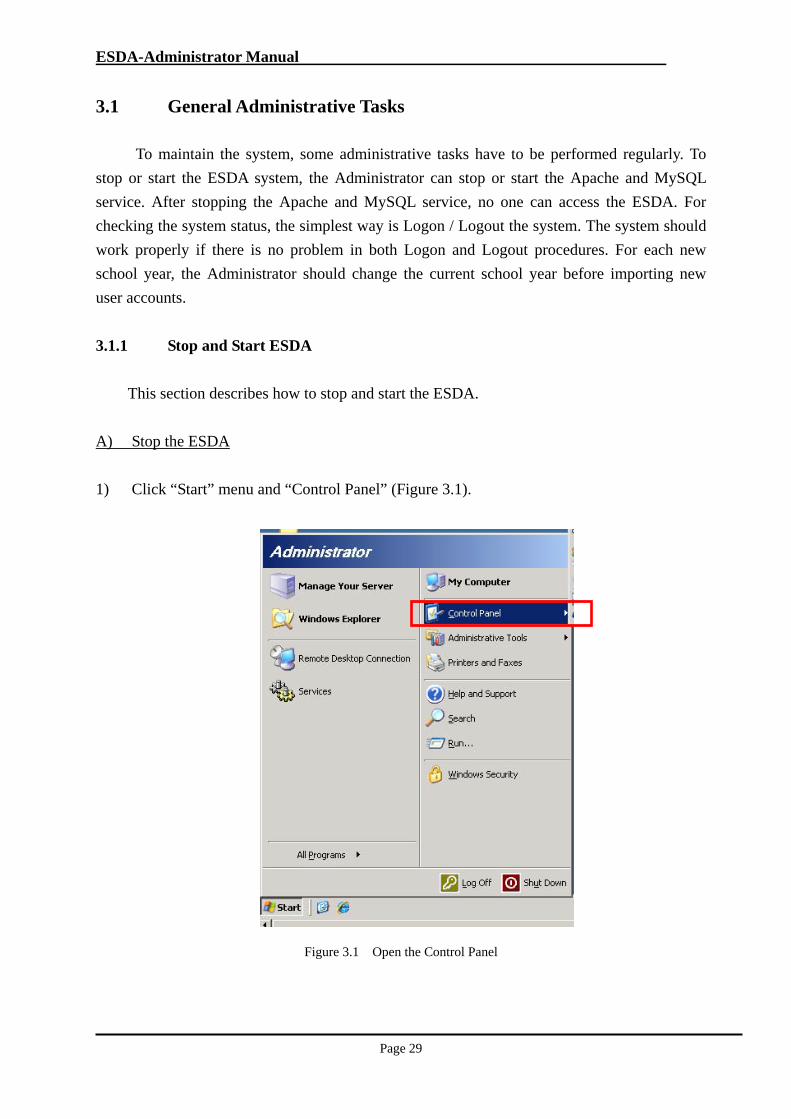
A) Stop the ESDA
1) Click “Start” menu and “Control Panel” (Figure 3.1).
Figure 3.1 Open the Control Panel
ESDA-Administrator Manual
Page 30
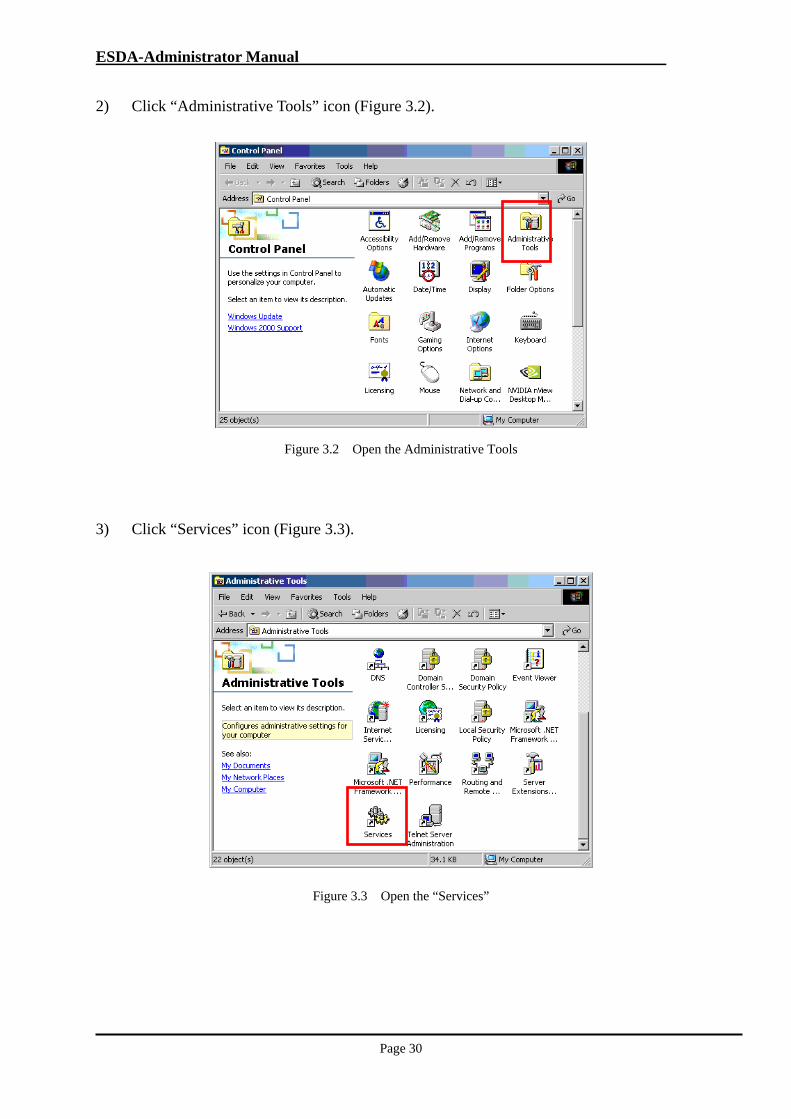
2) Click “Administrative Tools” icon (Figure 3.2).
Figure 3.2 Open the Administrative Tools
3) Click “Services” icon (Figure 3.3).
Figure 3.3 Open the “Services”
ESDA-Administrator Manual
Page 31
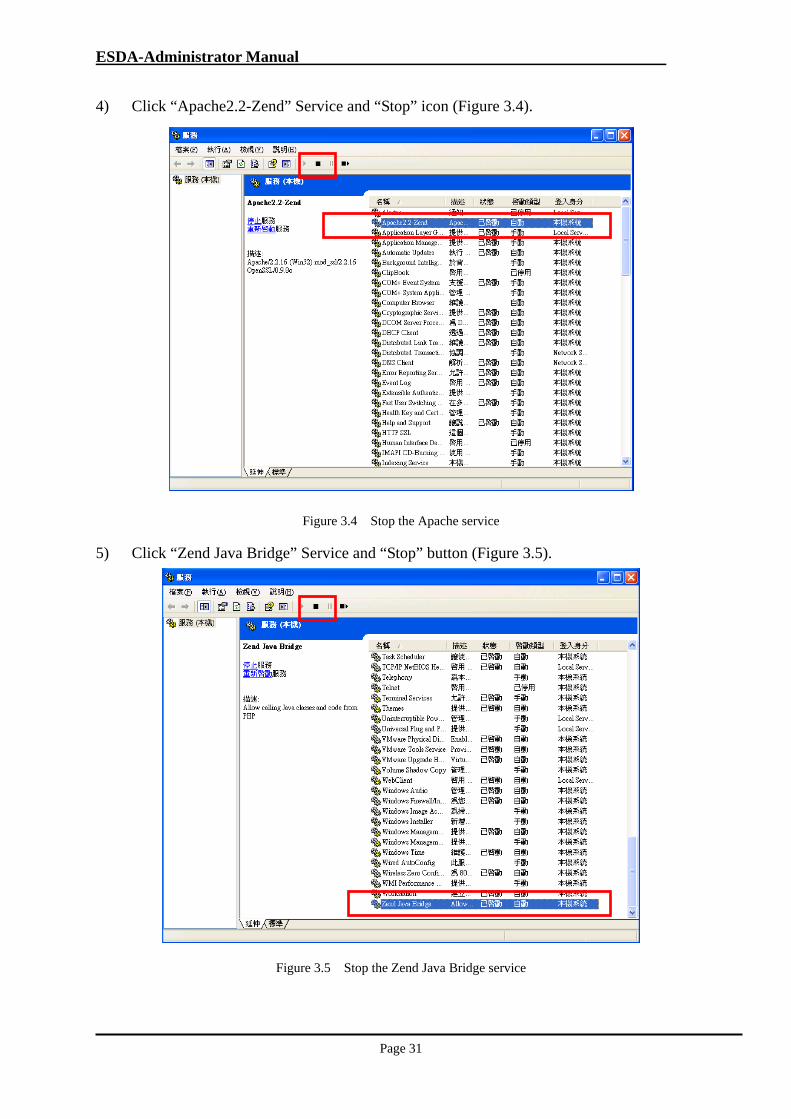
4) Click “Apache2.2-Zend” Service and “Stop” icon (Figure 3.4).
Figure 3.4 Stop the Apache service
5) Click “Zend Java Bridge” Service and “Stop” button (Figure 3.5).
Figure 3.5 Stop the Zend Java Bridge service
ESDA-Administrator Manual
Page 32
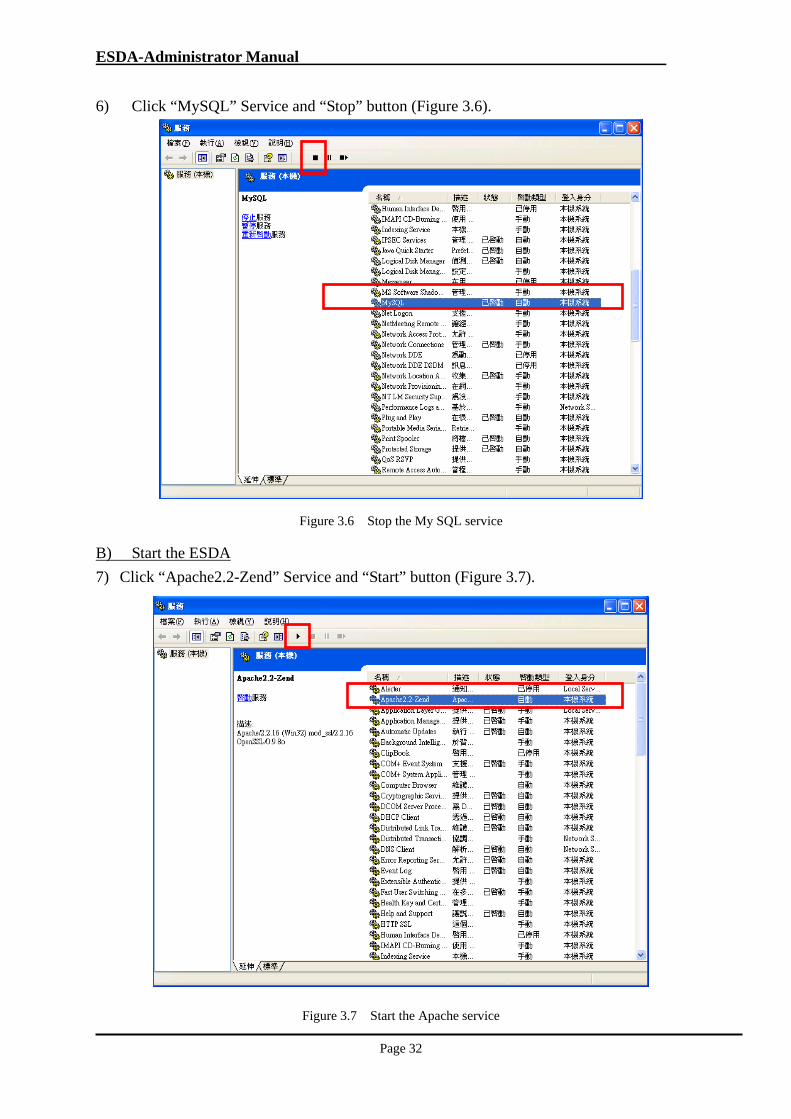
6) Click “MySQL” Service and “Stop” button (Figure 3.6).
Figure 3.6 Stop the My SQL service
B) Start the ESDA
7) Click “Apache2.2-Zend” Service and “Start” button (Figure 3.7).
Figure 3.7 Start the Apache service
ESDA-Administrator Manual
Page 33
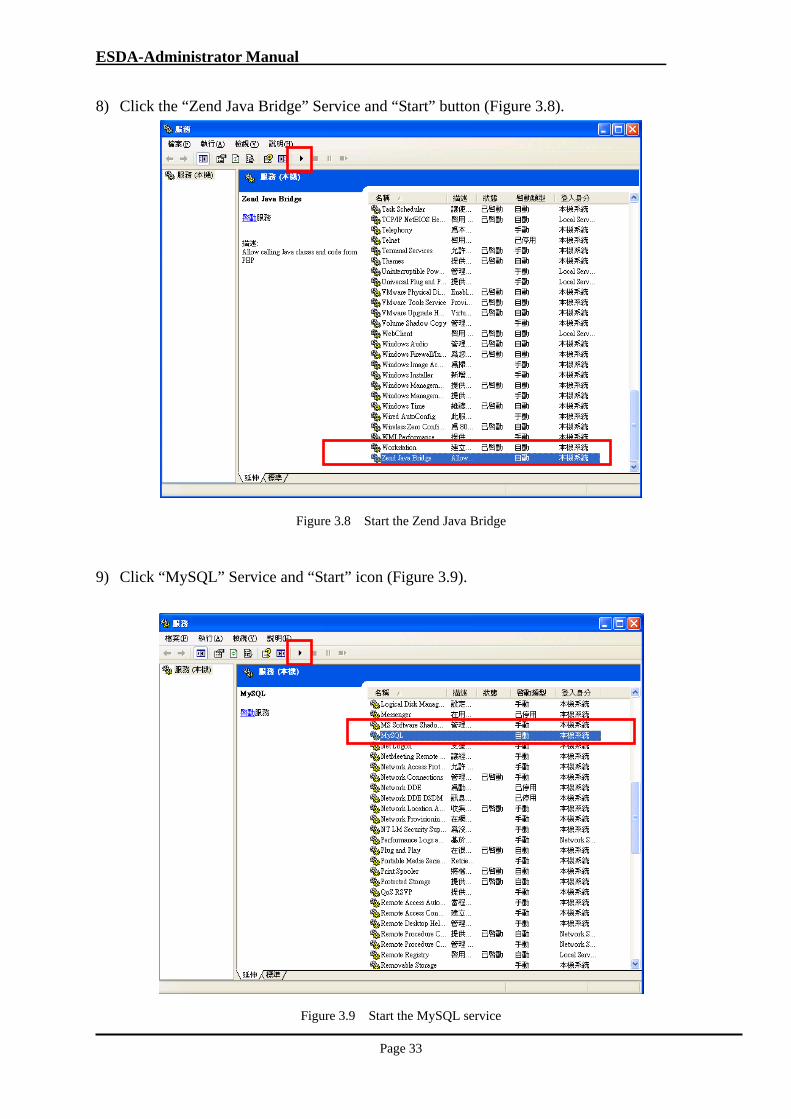
8) Click the “Zend Java Bridge” Service and “Start” button (Figure 3.8).
Figure 3.8 Start the Zend Java Bridge
9) Click “MySQL” Service and “Start” icon (Figure 3.9).
Figure 3.9 Start the MySQL service
ESDA-Administrator Manual
Page 34
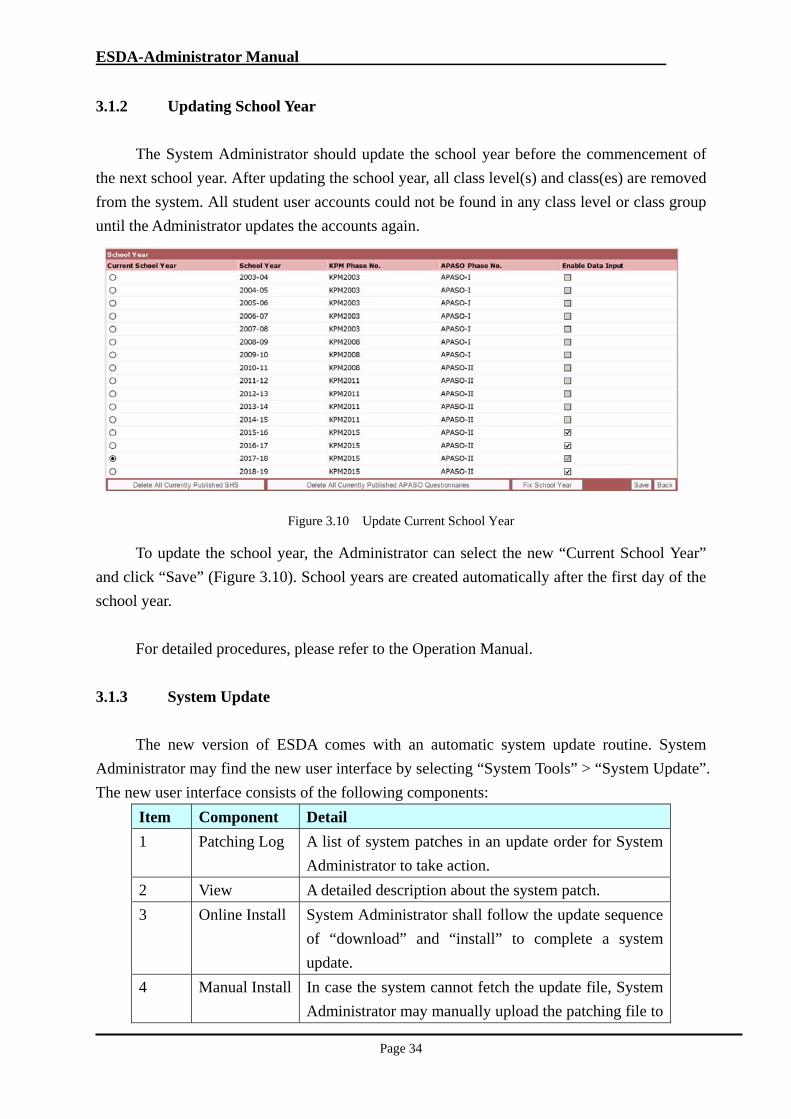
3.1.2 Updating School Year
The System Administrator should update the school year before the commencement of
the next school year. After updating the school year, all class level(s) and class(es) are removed
from the system. All student user accounts could not be found in any class level or class group
until the Administrator updates the accounts again.
Figure 3.10 Update Current School Year
To update the school year, the Administrator can select the new “Current School Year”
and click “Save” (Figure 3.10). School years are created automatically after the first day of the
school year.
For detailed procedures, please refer to the Operation Manual.
3.1.3 System Update
The new version of ESDA comes with an automatic system update routine. System
Administrator may find the new user interface by selecting “System Tools” > “System Update”.
The new user interface consists of the following components:
Item Component Detail
1 Patching Log A list of system patches in an update order for System
Administrator to take action.
2 View A detailed description about the system patch.
3 Online Install System Administrator shall follow the update sequence
of “download” and “install” to complete a system
update.
4 Manual Install In case the system cannot fetch the update file, System
Administrator may manually upload the patching file to
ESDA-Administrator Manual
Page 35
the system and then press the “install” button.
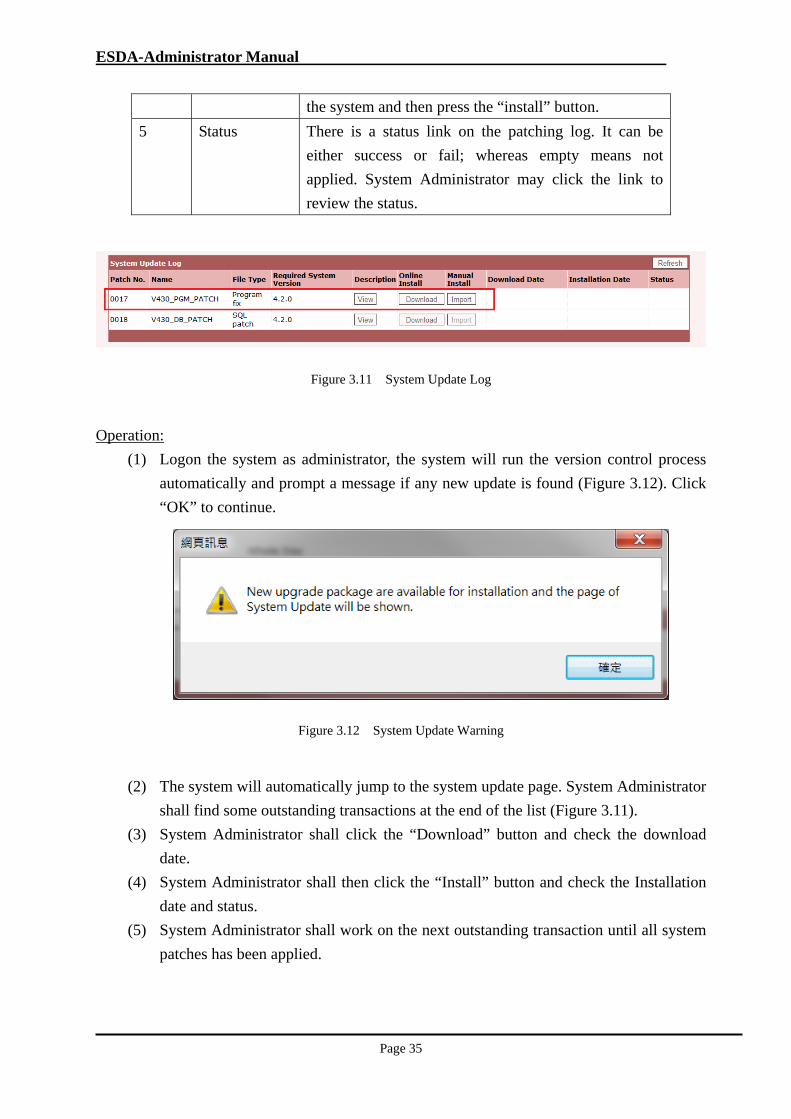
5 Status There is a status link on the patching log. It can be
either success or fail; whereas empty means not
applied. System Administrator may click the link to
review the status.
Figure 3.11 System Update Log
Operation:
(1) Logon the system as administrator, the system will run the version control process
automatically and prompt a message if any new update is found (Figure 3.12). Click
“OK” to continue.
Figure 3.12 System Update Warning
(2) The system will automatically jump to the system update page. System Administrator
shall find some outstanding transactions at the end of the list (Figure 3.11).
(3) System Administrator shall click the “Download” button and check the download
date.
(4) System Administrator shall then click the “Install” button and check the Installation
date and status.
(5) System Administrator shall work on the next outstanding transaction until all system
patches has been applied.
ESDA-Administrator Manual
Page 36
Note:
It is recommended that System Administrator shall run a backup on the existing system
before making any change to the system.
3.2 User Group and Account Administration ESDA has five types of pre-defined groups and three types of user accounts. For groups,
they are System Group, Form Group, Class Group, Survey group, and Privilege Group. For
user accounts, they are students and/or parents, teachers and administrators.
3.2.1 Introduction to Groups and User accounts
This section illustrates details of the pre-defined groups and user accounts.
A) Groups
The five types of groups are System Group, Form Group, Class Group, Survey group,
and Privilege Group. All these pre-defined groups cannot be added or deleted. These five
groups are used to help the Administrator to group a list of users with common properties. Each
group includes its respective Chinese and English names, as well as a list of users. Except
Survey Group, they all have privileges assigned.
“System Group” includes pre-defined user groups which cannot be added or deleted.
They are: 1) Administrator, 2) Teacher, 3) Student, 4) Parent and 5) Others.
“Form Group” is used to group students into forms. Schools can define Form Group
according to the operating class levels. It includes a “CLASSLVL” code.
“Class Group” is used to group students into classes. Schools can define Class Group
according to the operating class levels. It includes a “CLASSCODE” code. The relationship
between classes (e.g. 1A) and forms (e.g. P1) can be built when adding or updating the classes.
Form Group and Class Group can be created through the web interface or created
automatically through Excel file import. Codes (“CLASSLVL” and “CLASSCODE”) must be
assigned to Form Group and Class Group of a particular school year.
“Survey Group” is used to group users with common properties (e.g. students with
computers at home, and students without computers at home) for group comparison in a survey
analysis. The resulting privilege(s) for each account is/are the aggregated privileges of all
groups that the user belongs to. There are two types of survey groups. The Global Survey
Group is created by the Administrator and can be used for respondents assigned by the Survey
Manager when creating a survey. The Local Survey Group is created by the Survey Manager
and can be used in a particular survey only.
ESDA-Administrator Manual
Page 37
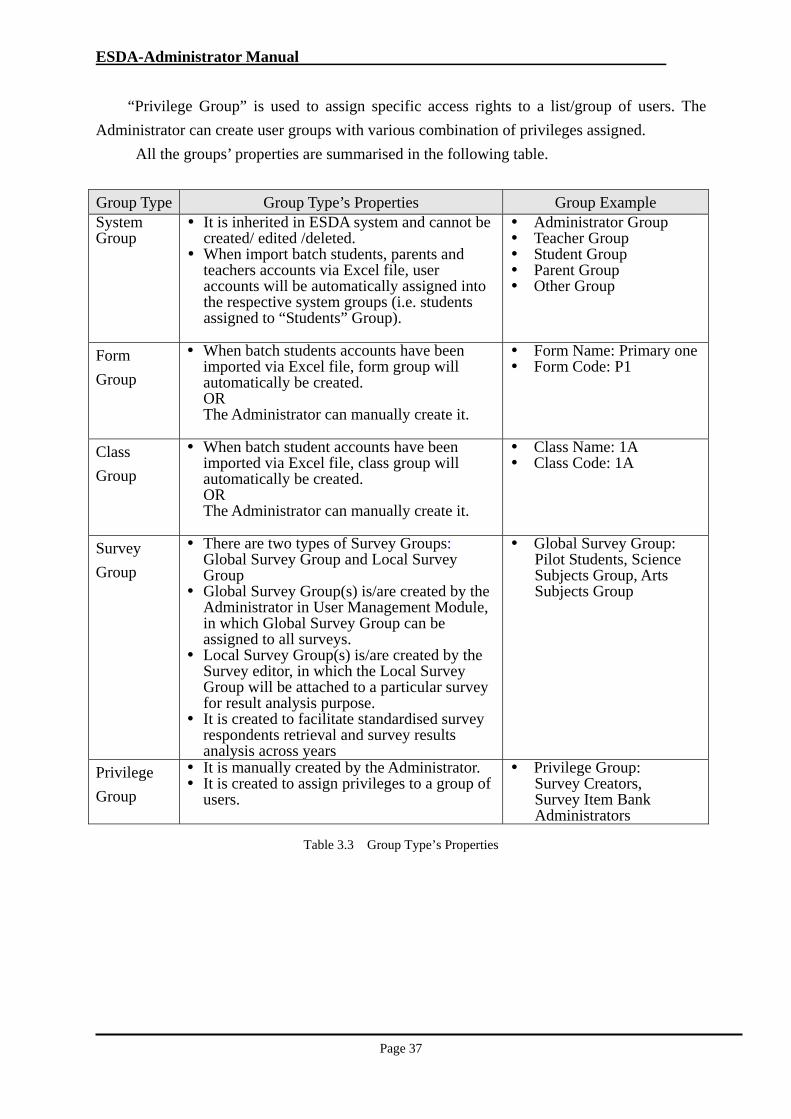
“Privilege Group” is used to assign specific access rights to a list/group of users. The
Administrator can create user groups with various combination of privileges assigned.
All the groups’ properties are summarised in the following table.
Group Type Group Type’s Properties Group Example System Group
It is inherited in ESDA system and cannot be created/ edited /deleted.
When import batch students, parents and teachers accounts via Excel file, user accounts will be automatically assigned into the respective system groups (i.e. students assigned to “Students” Group).
Administrator Group Teacher Group Student Group Parent Group Other Group
Form
Group
When batch students accounts have been imported via Excel file, form group will automatically be created. OR The Administrator can manually create it.
Form Name: Primary one Form Code: P1
Class
Group
When batch student accounts have been imported via Excel file, class group will automatically be created. OR The Administrator can manually create it.
Class Name: 1A Class Code: 1A
Survey
Group
There are two types of Survey Groups: Global Survey Group and Local Survey Group
Global Survey Group(s) is/are created by the Administrator in User Management Module, in which Global Survey Group can be assigned to all surveys.
Local Survey Group(s) is/are created by the Survey editor, in which the Local Survey Group will be attached to a particular survey for result analysis purpose.
It is created to facilitate standardised survey respondents retrieval and survey results analysis across years
Global Survey Group: Pilot Students, Science Subjects Group, Arts Subjects Group
Privilege
Group
It is manually created by the Administrator. It is created to assign privileges to a group of
users.
Privilege Group: Survey Creators, Survey Item Bank Administrators
Table 3.3 Group Type’s Properties
ESDA-Administrator Manual
Page 38
B) User Accounts
In the ESDA, there are three types of user accounts. They are students and/or parents,
teachers and administrators. To create student and/or parent user accounts, the Administrator
can import the Student users from WebSAMS or create them in the ESDA system. To create
teacher user accounts, the Administrator can import teacher user accounts from spreadsheet or
create them in the ESDA. To create administrator user account, the Administrator can create it
in the ESDA.
3.2.2 Group Planning Strategy
Planning of grouping strategy in ESDA will streamline administration. This section
presents the guidelines for implementing survey groups and privilege groups.
A) Survey Group Planning
The Administrator is advised to set up survey group for a particular survey (e.g. 1A
Intranet System Usage) and add the appropriate user accounts (e.g. 1A Student User Accounts)
to the survey group. This can facilitate cross group (e.g. 1A and 1B) and time (e.g. Intranet
usage survey for 1A between 12-March-2017 and 12-April-2017) comparison for survey
analysis.
B) Privilege Group Planning
The Administrator is advised to create privilege group(s) based on resource access needs.
For example, creating a privilege group with survey item bank management rights for the
Survey Manager, or creating a privilege group to manage school based attribute(s).
3.2.3 Account Policy Planning
The account policy determines how passwords should be used by user accounts. The
account policy sets the requirements for:
Password minimum length
Password uniqueness
Set the changing password authorization to each user type
To use an account policy to provide security for user accounts, the Administrator may
consider the following:
Define a minimum length for password. The longer the password, the higher the
security level. In a medium security system, the recommended password length is
6-8 characters.
Unique password for all user accounts.
ESDA-Administrator Manual
Page 39
Before a new school year starts, the Administrator needs to update student user accounts
(Please refer to section 3.2.5). Within a school year, the Administrator may need to update
student user account (e.g. a student is transferred from 1A to 1B).
If school has set up school-based Intranet system, the Administrator can replace the
“LOGINID” and “PASSWORD” column in the EXCEL file by the login name and password
of the school-based Intranet. For detailed operation procedures, please refer to the Operation
Manual.
3.2.4 Add, Edit and Delete Groups and Users Accounts
The Administrator can add, edit and delete Groups and User Accounts. For detailed
operation procedures, please refer to the Operation Manual.
3.2.5 Import User Accounts from WebSAMS
To facilitate the Administrator to create student accounts, a set of procedures is prepared
for the Administrator to extract the student accounts from WebSAMS. For detailed procedures,
please refer to the Operation Manual.
When importing user accounts from the EXCEL file, the system will perform the
following tasks: 1) add new user accounts, 2) update existing user accounts, 3) delete existing
user accounts, and 4) create Class Groups (forms and classes). The system uses the registration
number to compare user accounts between/among existing user accounts in the database and
the user information in the EXCEL file. Detailed descriptions of the tasks are as follows:
1) There is a user in the EXCEL file but there is no existing user account with the same
registration number in the database. The system creates a new user account with the data
in the EXCEL file. (Add a new user account)
2) There is a user account in the database as well as a user in the EXCEL file with the same
registration number. The system updates the user account in the database with the data in
the EXCEL file. The class and form are also updated (class promotion) according to the
user information in the EXCEL file. (Update an existing user account)
3) There is a user account in the database but no user data in the EXCEL file with the same
registration number. Then the system removes the user account from the database.
(Delete an existing user account)
4) The system creates Class Groups (forms and classes) if the Class Groups do not exist in
the specific school year. The system creates Class Groups according to the
“CLASSCODE” and “CLASSLVL” in the EXCEL files. It uses the “CLASSCODE” and
ESDA-Administrator Manual
Page 40
“CLASSLVL as the Chinese names, English names, and codes of the Class Groups. The
system compares the current school year and the code in the Class Group and creates new
Class Groups if the codes do not exist in the database. The codes in the Class Groups are
used to prevent duplicated creation of Class Groups in the same school year. For example,
if the school year is “2017-18” and there is a Class Group with a code “1A”, when the
Administrator imports a 2017-18 school year EXCEL file with “1A” in “CLASSCODE”
field, the system will not create a Class Group “1A”.
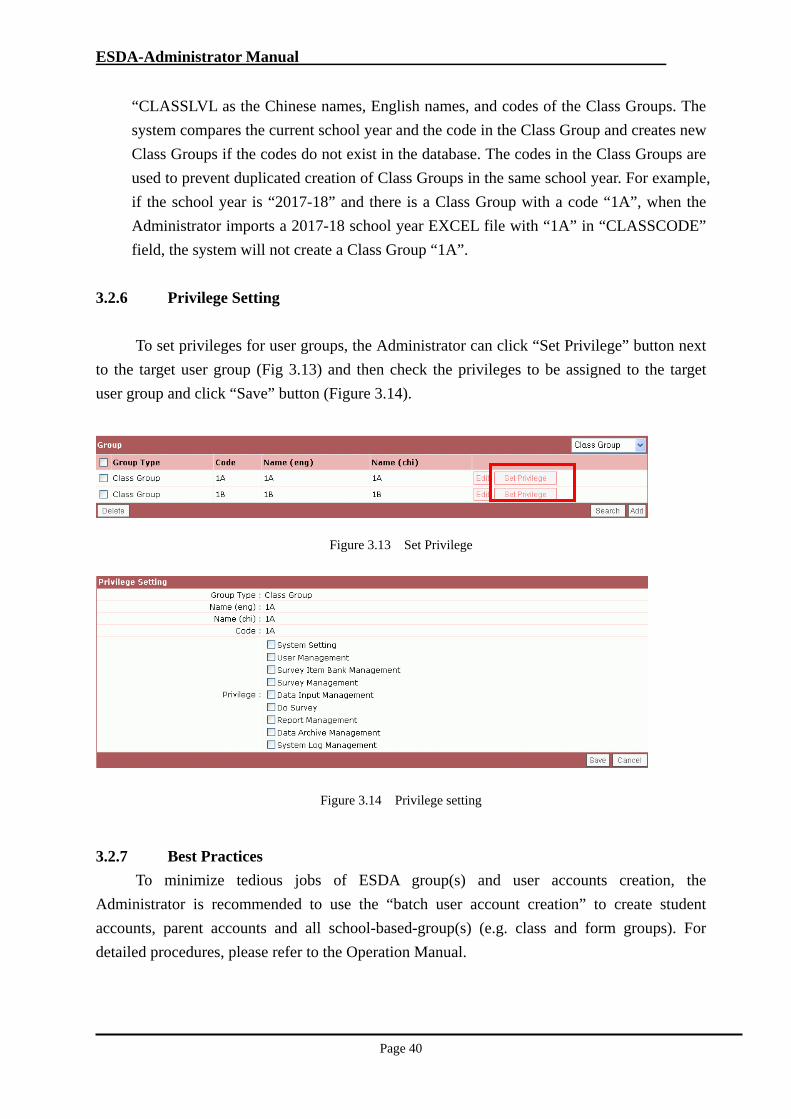
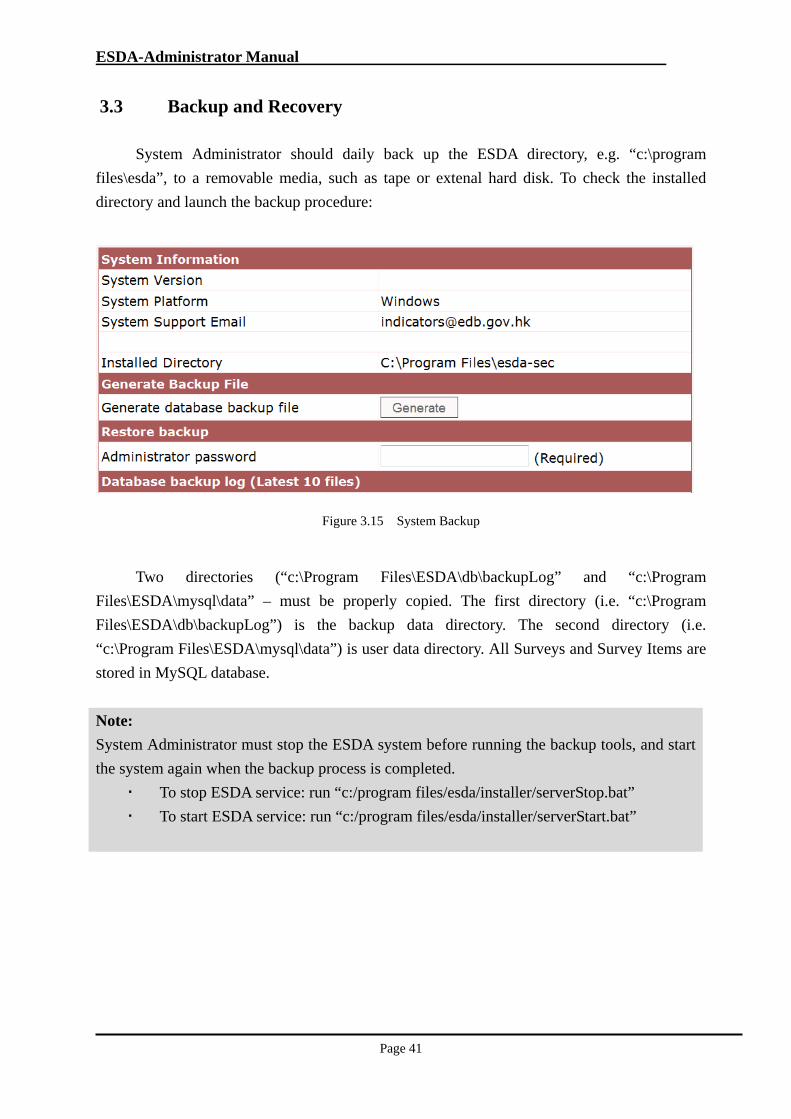
3.2.6 Privilege Setting
To set privileges for user groups, the Administrator can click “Set Privilege” button next
to the target user group (Fig 3.13) and then check the privileges to be assigned to the target
user group and click “Save” button (Figure 3.14).
Figure 3.13 Set Privilege
Figure 3.14 Privilege setting
3.2.7 Best Practices
To minimize tedious jobs of ESDA group(s) and user accounts creation, the
Administrator is recommended to use the “batch user account creation” to create student
accounts, parent accounts and all school-based-group(s) (e.g. class and form groups). For
detailed procedures, please refer to the Operation Manual.
ESDA-Administrator Manual
Page 41
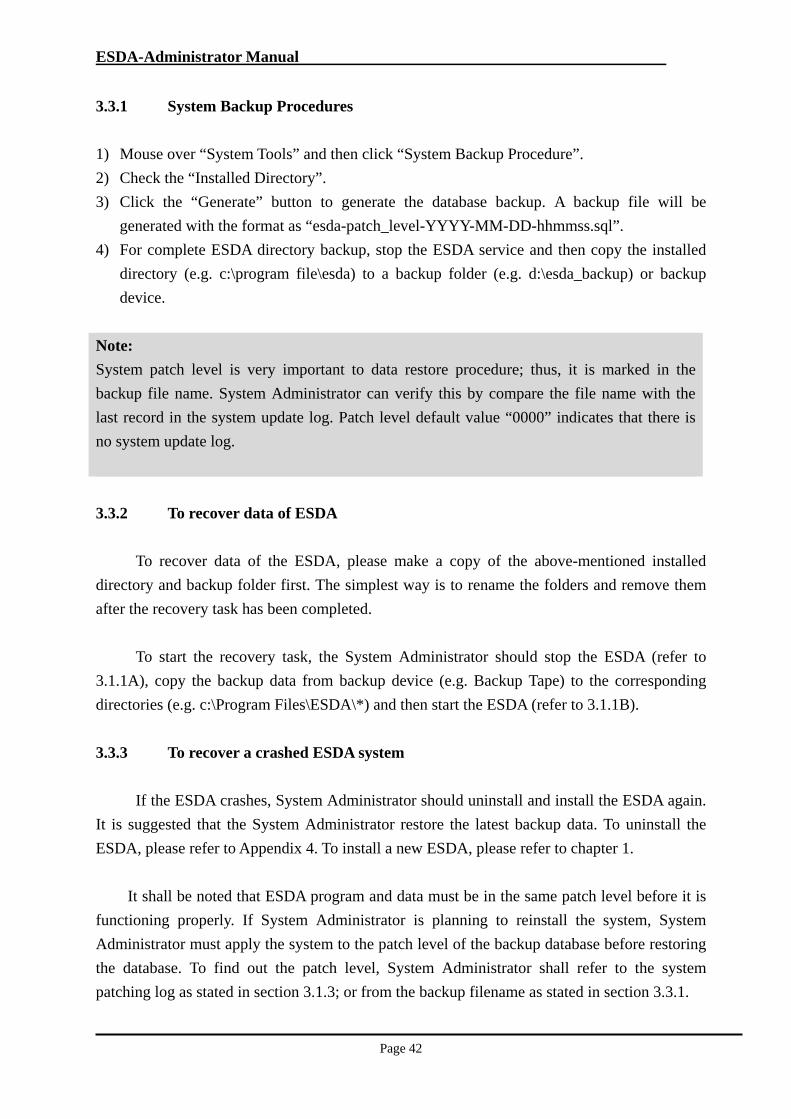
3.3 Backup and Recovery
System Administrator should daily back up the ESDA directory, e.g. “c:\program
files\esda”, to a removable media, such as tape or extenal hard disk. To check the installed
directory and launch the backup procedure:
Figure 3.15 System Backup
Two directories (“c:\Program Files\ESDA\db\backupLog” and “c:\Program
Files\ESDA\mysql\data” – must be properly copied. The first directory (i.e. “c:\Program
Files\ESDA\db\backupLog”) is the backup data directory. The second directory (i.e.
“c:\Program Files\ESDA\mysql\data”) is user data directory. All Surveys and Survey Items are
stored in MySQL database.
Note:
System Administrator must stop the ESDA system before running the backup tools, and start
the system again when the backup process is completed.
To stop ESDA service: run “c:/program files/esda/installer/serverStop.bat”
To start ESDA service: run “c:/program files/esda/installer/serverStart.bat”
ESDA-Administrator Manual
Page 42
3.3.1 System Backup Procedures
1) Mouse over “System Tools” and then click “System Backup Procedure”.
2) Check the “Installed Directory”.
3) Click the “Generate” button to generate the database backup. A backup file will be
generated with the format as “esda-patch_level-YYYY-MM-DD-hhmmss.sql”.
4) For complete ESDA directory backup, stop the ESDA service and then copy the installed
directory (e.g. c:\program file\esda) to a backup folder (e.g. d:\esda_backup) or backup
device.
Note:
System patch level is very important to data restore procedure; thus, it is marked in the
backup file name. System Administrator can verify this by compare the file name with the
last record in the system update log. Patch level default value “0000” indicates that there is
no system update log.
3.3.2 To recover data of ESDA
To recover data of the ESDA, please make a copy of the above-mentioned installed
directory and backup folder first. The simplest way is to rename the folders and remove them
after the recovery task has been completed.
To start the recovery task, the System Administrator should stop the ESDA (refer to
3.1.1A), copy the backup data from backup device (e.g. Backup Tape) to the corresponding
directories (e.g. c:\Program Files\ESDA\*) and then start the ESDA (refer to 3.1.1B).
3.3.3 To recover a crashed ESDA system
If the ESDA crashes, System Administrator should uninstall and install the ESDA again.
It is suggested that the System Administrator restore the latest backup data. To uninstall the
ESDA, please refer to Appendix 4. To install a new ESDA, please refer to chapter 1.
It shall be noted that ESDA program and data must be in the same patch level before it is
functioning properly. If System Administrator is planning to reinstall the system, System
Administrator must apply the system to the patch level of the backup database before restoring
the database. To find out the patch level, System Administrator shall refer to the system
patching log as stated in section 3.1.3; or from the backup filename as stated in section 3.3.1.
ESDA-Administrator Manual
Page 43
3.4 Problems and Diagnoses This section describes the tools and procedures for some common problems that may be
encountered.
3.4.1 Resetting User Password
The Administrator can select a class (e.g. Form 1A), select the student(s) and click “Reset
Password” button. For detailed procedures, please refer to the Operation Manual.
3.4.2 Windows Event Log Monitoring
The Windows Server 2008 provides a tool called “Event Viewer”. With Event Viewer,
the Administrator can monitor events recorded in event logs. According to the event logs, the
Administrator can understand the system workload and the corresponding effect on the
system's resources. The event logs assist the Administrator to diagnose problems. According to
the information from Microsoft (http://www.microsoft.com), the recommended procedures are:
1) Logon Windows Server 2008 as an server administrator
2) Click Start Control Panel Administrative Tools Event Viewer.
3) To open Event Viewer and to refresh the view, on the Action menu click Refresh.
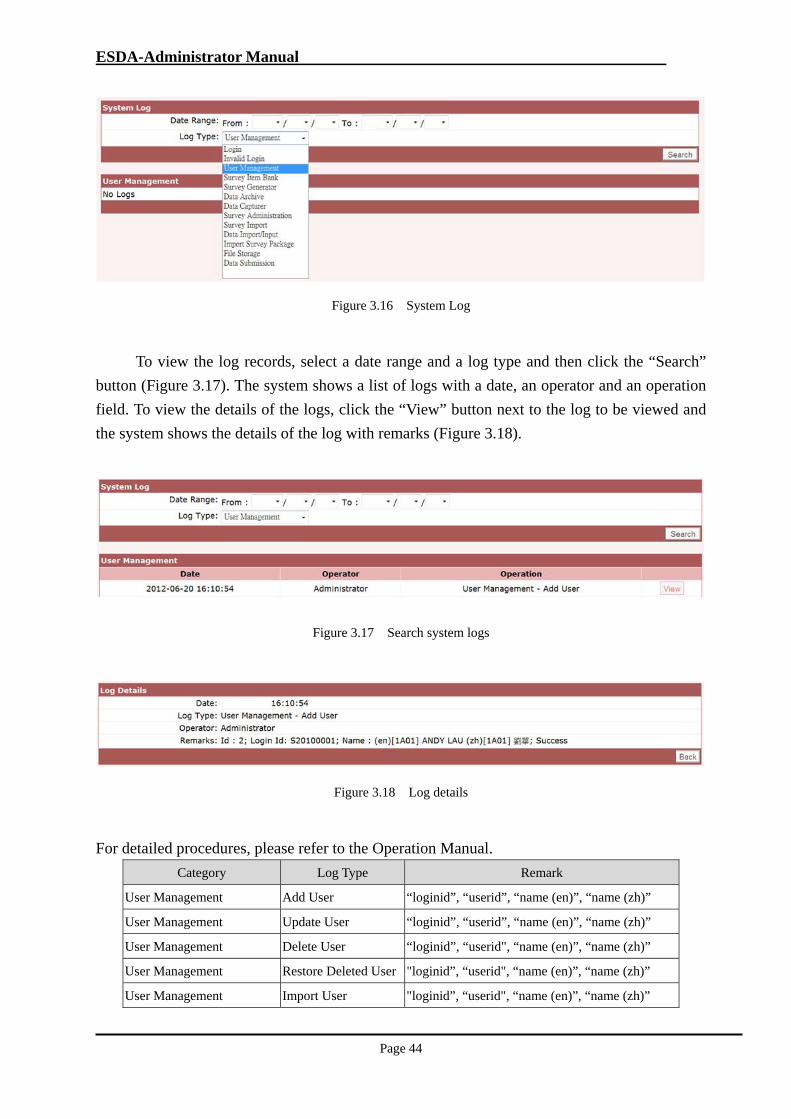
3.4.3 ESDA System Log Monitoring
In the ESDA, there are six types of system log to help the Administrator to review daily
operations. They are Logon, Invalid Logon, User Management, Survey Item Bank, Survey
Generator, Data Archive and Data Capturer (Figure 3.16). For each type of operations, the
system logs contain different detailed information. Table 3.4 shows the details recorded in each
type of operation.
ESDA-Administrator Manual
Page 44
Figure 3.16 System Log
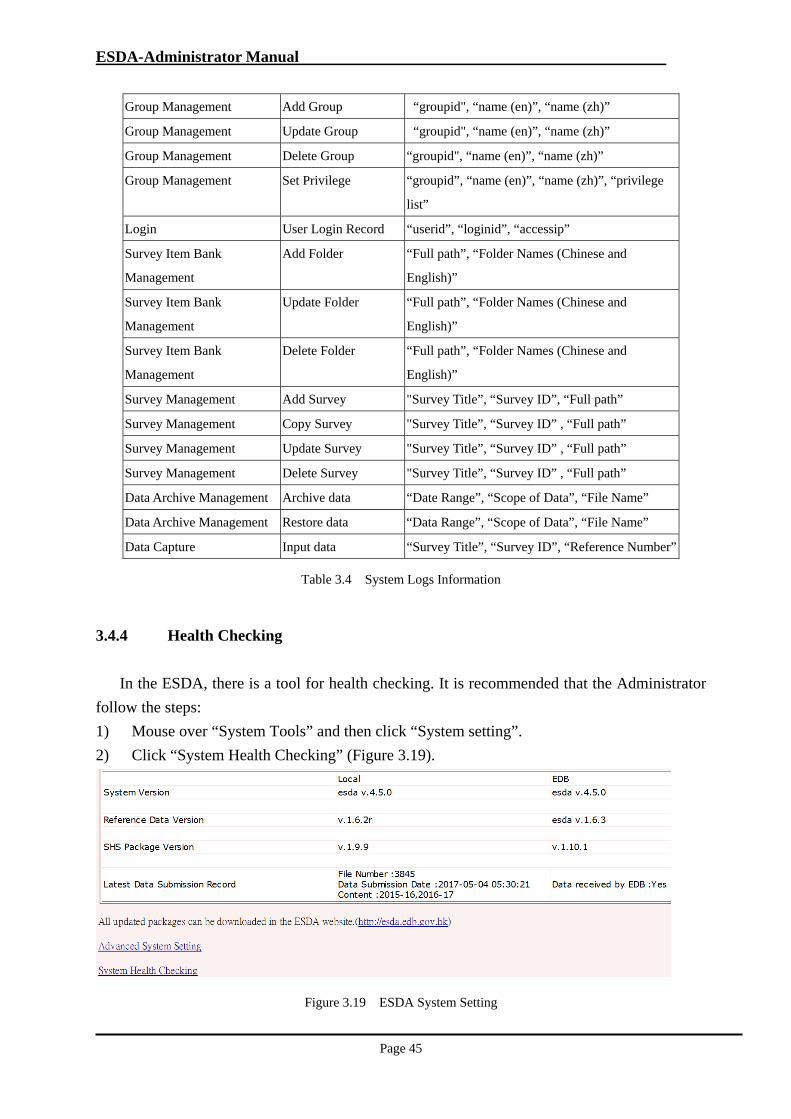
To view the log records, select a date range and a log type and then click the “Search”
button (Figure 3.17). The system shows a list of logs with a date, an operator and an operation
field. To view the details of the logs, click the “View” button next to the log to be viewed and
the system shows the details of the log with remarks (Figure 3.18).
Figure 3.17 Search system logs
Figure 3.18 Log details
For detailed procedures, please refer to the Operation Manual.
Category Log Type Remark
User Management Add User “loginid”, “userid”, “name (en)”, “name (zh)”
User Management Update User “loginid”, “userid”, “name (en)”, “name (zh)”
User Management Delete User “loginid”, “userid", “name (en)”, “name (zh)”
User Management Restore Deleted User "loginid”, “userid", “name (en)”, “name (zh)”
User Management Import User "loginid”, “userid", “name (en)”, “name (zh)”
ESDA-Administrator Manual
Page 45
Group Management Add Group “groupid", “name (en)”, “name (zh)”
Group Management Update Group “groupid", “name (en)”, “name (zh)”
Group Management Delete Group “groupid", “name (en)”, “name (zh)”
Group Management Set Privilege “groupid”, “name (en)”, “name (zh)”, “privilege
list”
Login User Login Record “userid”, “loginid”, “accessip”
Survey Item Bank
Management
Add Folder “Full path”, “Folder Names (Chinese and
English)”
Survey Item Bank
Management
Update Folder “Full path”, “Folder Names (Chinese and
English)”
Survey Item Bank
Management
Delete Folder “Full path”, “Folder Names (Chinese and
English)”
Survey Management Add Survey "Survey Title”, “Survey ID”, “Full path”
Survey Management Copy Survey "Survey Title”, “Survey ID” , “Full path”
Survey Management Update Survey "Survey Title”, “Survey ID” , “Full path”
Survey Management Delete Survey "Survey Title”, “Survey ID” , “Full path”
Data Archive Management Archive data “Date Range”, “Scope of Data”, “File Name”
Data Archive Management Restore data “Data Range”, “Scope of Data”, “File Name”
Data Capture Input data “Survey Title”, “Survey ID”, “Reference Number”
Table 3.4 System Logs Information
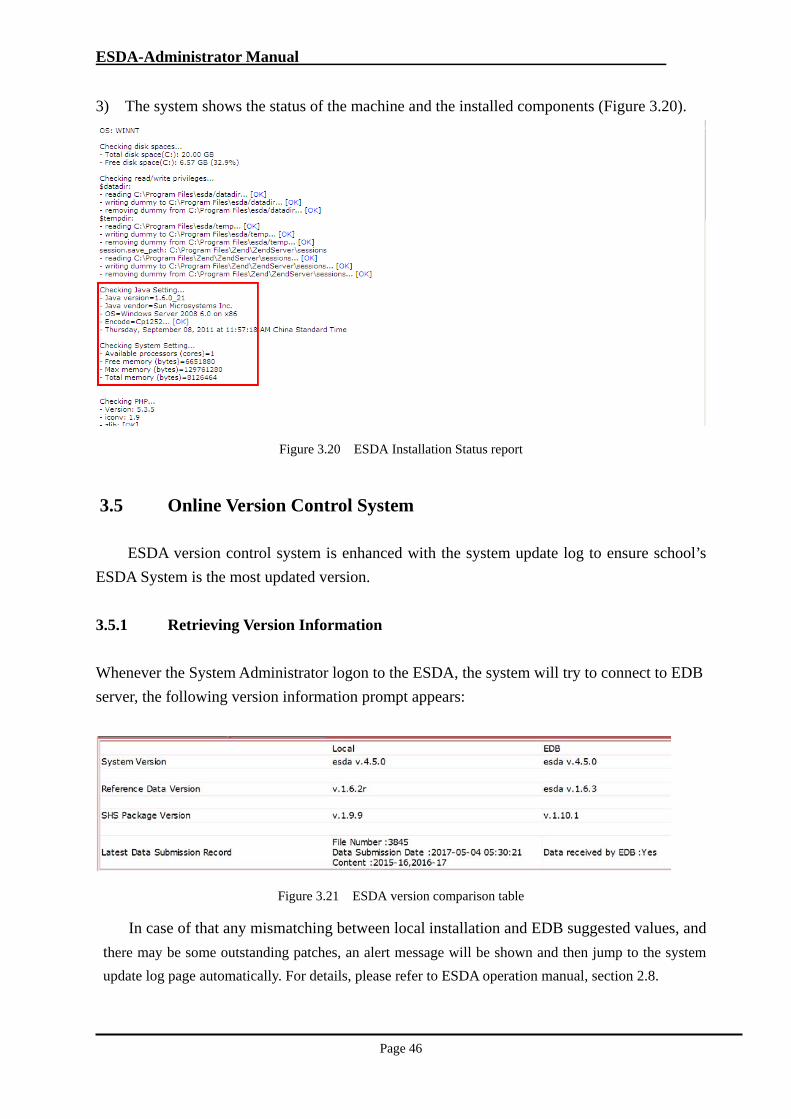
3.4.4 Health Checking
In the ESDA, there is a tool for health checking. It is recommended that the Administrator
follow the steps:
1) Mouse over “System Tools” and then click “System setting”.
2) Click “System Health Checking” (Figure 3.19).
Figure 3.19 ESDA System Setting
ESDA-Administrator Manual
Page 46
3) The system shows the status of the machine and the installed components (Figure 3.20).
Figure 3.20 ESDA Installation Status report
3.5 Online Version Control System ESDA version control system is enhanced with the system update log to ensure school’s
ESDA System is the most updated version.
3.5.1 Retrieving Version Information
Whenever the System Administrator logon to the ESDA, the system will try to connect to EDB
server, the following version information prompt appears:
Figure 3.21 ESDA version comparison table
In case of that any mismatching between local installation and EDB suggested values, and
there may be some outstanding patches, an alert message will be shown and then jump to the system
update log page automatically. For details, please refer to ESDA operation manual, section 2.8.

ESDA-Administrator Manual
Page 47
Figure 3.22 ESDA new update message
3.5.2 Retrieving Data submission status
Whenever schools submitted ESDA data to EDB, the system will retrieve the
confirmation status of the submitted data package throught the version control module.
Confirmation information will be retrieved no matter schools are sending data to EDB via CDS
or sending it directly to the EDB server.
3.5.3 To disable the Version Control System
System Administrator may disable or by-pass the version control system by the following
methods:
1) Mouse over “System Tools” and click “System Setting”;
2) Click “Advanced System Setting” link;
3) Check “No” in “Enable ‘Version Check’ ”; Click “Save” button.
Figure 3.23 ESDA advanced system setting
ESDA-Administrator Manual
Page 48
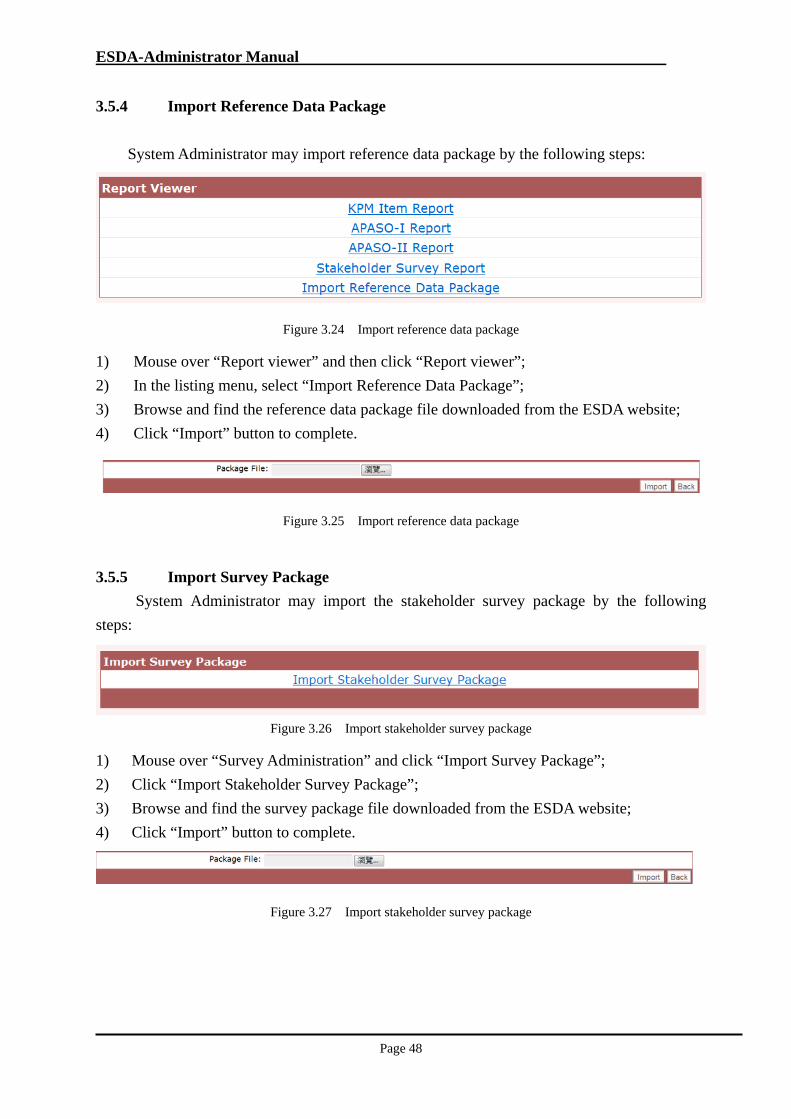
3.5.4 Import Reference Data Package
System Administrator may import reference data package by the following steps:
Figure 3.24 Import reference data package
1) Mouse over “Report viewer” and then click “Report viewer”;
2) In the listing menu, select “Import Reference Data Package”;
3) Browse and find the reference data package file downloaded from the ESDA website;
4) Click “Import” button to complete.
Figure 3.25 Import reference data package
3.5.5 Import Survey Package
System Administrator may import the stakeholder survey package by the following
steps:
Figure 3.26 Import stakeholder survey package
1) Mouse over “Survey Administration” and click “Import Survey Package”;
2) Click “Import Stakeholder Survey Package”;
3) Browse and find the survey package file downloaded from the ESDA website;
4) Click “Import” button to complete.
Figure 3.27 Import stakeholder survey package
ESDA-Administrator Manual
Page 49
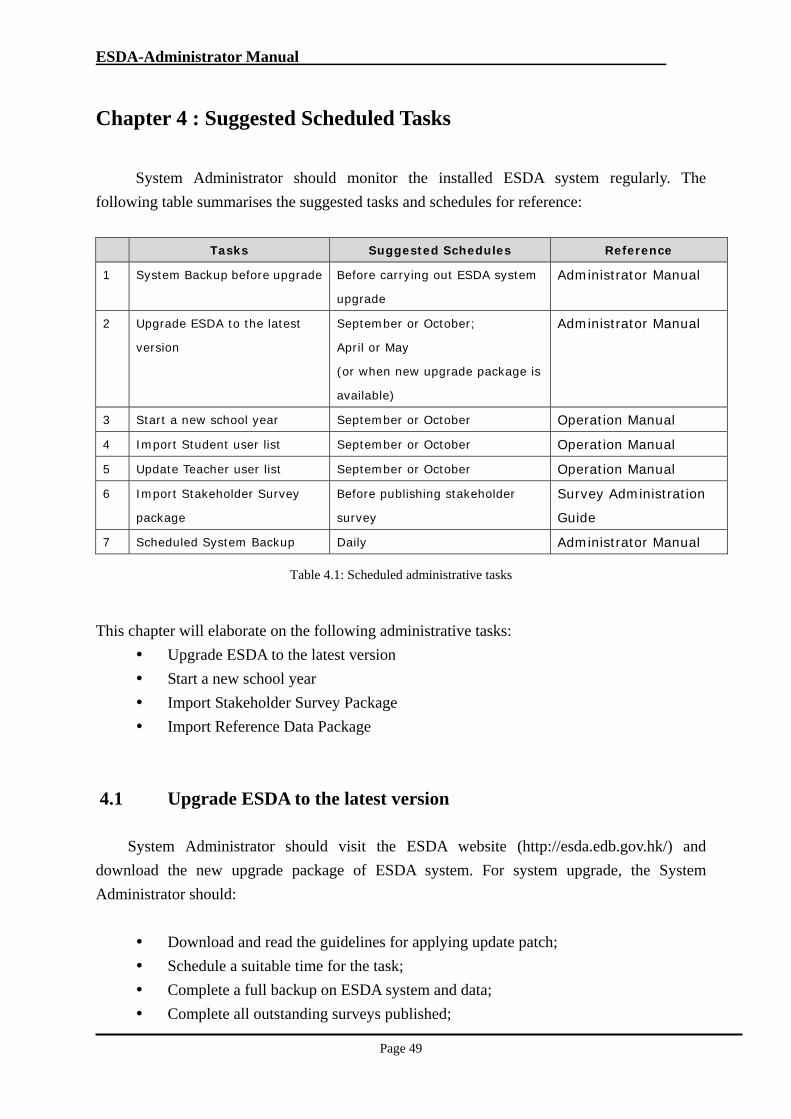
Chapter 4 : Suggested Scheduled Tasks
System Administrator should monitor the installed ESDA system regularly. The
following table summarises the suggested tasks and schedules for reference:
Tasks Suggested Schedules Reference
1 System Backup before upgrade Before carrying out ESDA system
upgrade
Administrator Manual
2 Upgrade ESDA to the latest
version
September or October;
April or May
(or when new upgrade package is
available)
Administrator Manual
3 Start a new school year September or October Operation Manual
4 Import Student user list September or October Operation Manual
5 Update Teacher user list September or October Operation Manual
6 Import Stakeholder Survey
package
Before publishing stakeholder
survey
Survey Administration
Guide
7 Scheduled System Backup Daily Administrator Manual
Table 4.1: Scheduled administrative tasks
This chapter will elaborate on the following administrative tasks:
Upgrade ESDA to the latest version
Start a new school year
Import Stakeholder Survey Package
Import Reference Data Package
4.1 Upgrade ESDA to the latest version System Administrator should visit the ESDA website (http://esda.edb.gov.hk/) and
download the new upgrade package of ESDA system. For system upgrade, the System
Administrator should:
Download and read the guidelines for applying update patch;
Schedule a suitable time for the task;
Complete a full backup on ESDA system and data;
Complete all outstanding surveys published;
ESDA-Administrator Manual
Page 50
Print all survey reports and save all softcopies (if applicable);
Be prepared for roll back procedure (in case the upgrade task fails);
Run the upgrade and verify if it is completed successfully.
4.2 Start a new school year The ESDA system can store student records of one school year only. When the system has
been set to a new school year, all student records in the previous school year are deleted.
Therefore before changing the system to a new school year, it is necessary to do the following:
Complete a full backup on ESDA system and data;
Complete all outstanding surveys published;
Print all survey reports and save all softcopies (if applicable);
Be prepared for roll back procedure;
Change the school year;
Import student records for the new school year;
Update teacher records for the new school year;
Import stakeholder survey package for the new school year;
Import reference data package for the new school year (if necessary).
Warning:
Once the system has changed into a new school year with student records
imported, there is no other means to restore it back to its previous stage
other than the system rolls back. Contact the Indicators Section of the
Education Bureau if you have problems to roll back your system at this
point.
4.3 Import Stakeholder Survey Package For each school year, EDB will publish a specific stakeholder survey package for that
school year. School should download and import the stakeholder survey package for the
current school year. Before importing the package, the System Administrator should:
Change the current school year;
Import student user lists;
ESDA-Administrator Manual
Page 51
Download the stakeholder survey package from the ESDA website;
Import the package to the system;
Since uploading the package to the system may take some time, the System
Administrator must be patient until “100% completed” is shown in the status bar;
Download and import the reference data if available;
Publish the stakeholder surveys or APASO surveys for that year.
4.3.1 To cancel a published survey
A published survey without any response can be cancelled. To cancel a survey, click
“Detail” button next to the survey listed in System Administration. Click “Cancel
Survey” button.
4.3.2 To reset the ESDA survey and KPM data
The System Administrator can remove all the published stakeholder surveys,
APASO surveys and KPM data to the stage that it was imported. You should obtain
an activation key from EDB to complete the process. Contact the Indicators Section
of the Education Bureau in case you are planning to do so.
4.4 Import Reference Data Package EDB may publish a territory wide reference data together with the KPM report. School
should download and import the reference data package. Before importing the package, the
System Administrator should:
Download the reference data package from the ESDA website;
Import the package to the system;
Since uploading the package to the system may take some time, the System
Administrator must be patient until “100% completed” is shown in the status bar;
Run the KPM reports to get the latest version.
ESDA-Administrator Manual
Page 52
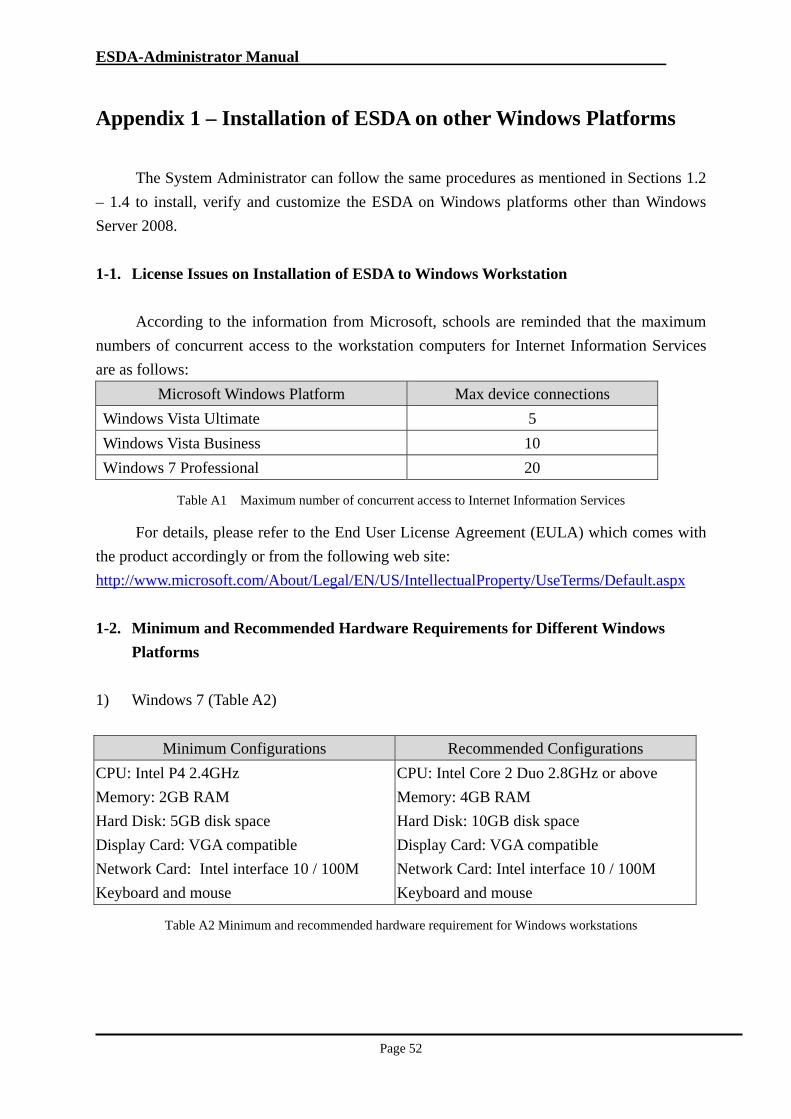
Appendix 1 – Installation of ESDA on other Windows Platforms
The System Administrator can follow the same procedures as mentioned in Sections 1.2
– 1.4 to install, verify and customize the ESDA on Windows platforms other than Windows
Server 2008.
1-1. License Issues on Installation of ESDA to Windows Workstation
According to the information from Microsoft, schools are reminded that the maximum
numbers of concurrent access to the workstation computers for Internet Information Services
are as follows:
Microsoft Windows Platform Max device connections
Windows Vista Ultimate 5
Windows Vista Business 10
Windows 7 Professional 20
Table A1 Maximum number of concurrent access to Internet Information Services
For details, please refer to the End User License Agreement (EULA) which comes with
the product accordingly or from the following web site:
http://www.microsoft.com/About/Legal/EN/US/IntellectualProperty/UseTerms/Default.aspx
1-2. Minimum and Recommended Hardware Requirements for Different Windows
Platforms
1) Windows 7 (Table A2)
Minimum Configurations Recommended Configurations
CPU: Intel P4 2.4GHz
Memory: 2GB RAM
Hard Disk: 5GB disk space
Display Card: VGA compatible
Network Card: Intel interface 10 / 100M
Keyboard and mouse
CPU: Intel Core 2 Duo 2.8GHz or above
Memory: 4GB RAM
Hard Disk: 10GB disk space
Display Card: VGA compatible
Network Card: Intel interface 10 / 100M
Keyboard and mouse
Table A2 Minimum and recommended hardware requirement for Windows workstations
ESDA-Administrator Manual
Page 53
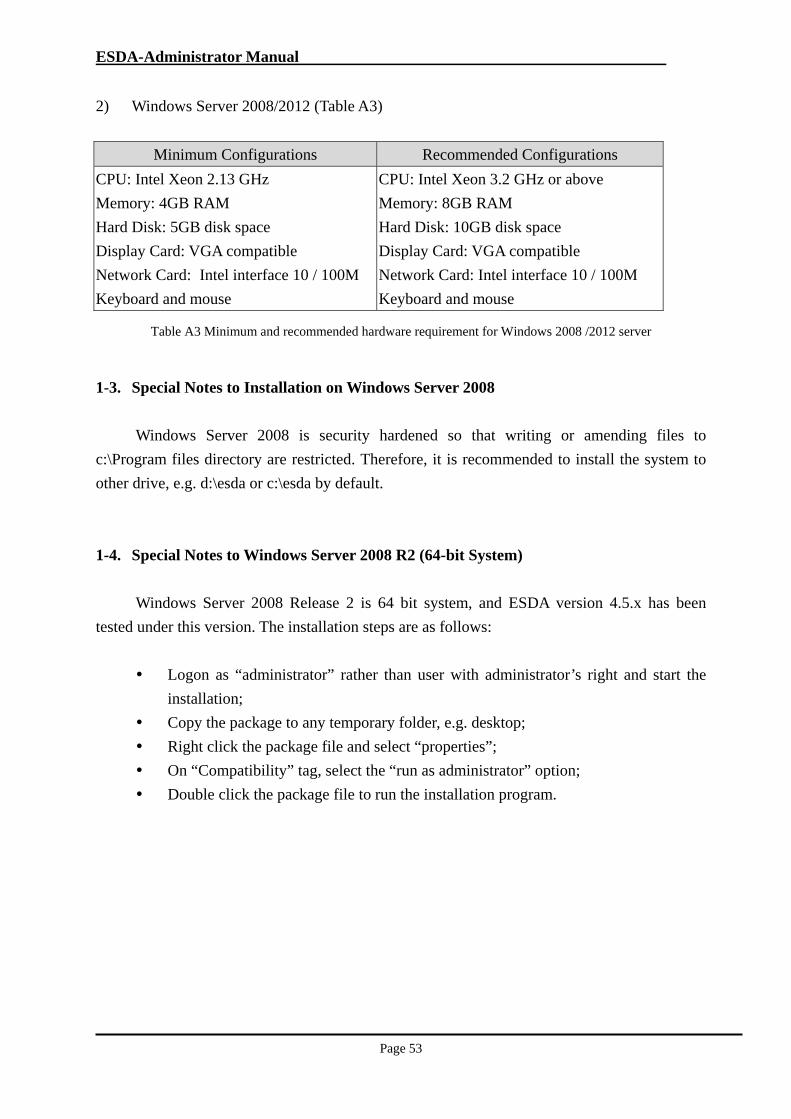
2) Windows Server 2008/2012 (Table A3)
Minimum Configurations Recommended Configurations
CPU: Intel Xeon 2.13 GHz
Memory: 4GB RAM
Hard Disk: 5GB disk space
Display Card: VGA compatible
Network Card: Intel interface 10 / 100M
Keyboard and mouse
CPU: Intel Xeon 3.2 GHz or above
Memory: 8GB RAM
Hard Disk: 10GB disk space
Display Card: VGA compatible
Network Card: Intel interface 10 / 100M
Keyboard and mouse
Table A3 Minimum and recommended hardware requirement for Windows 2008 /2012 server
1-3. Special Notes to Installation on Windows Server 2008
Windows Server 2008 is security hardened so that writing or amending files to
c:\Program files directory are restricted. Therefore, it is recommended to install the system to
other drive, e.g. d:\esda or c:\esda by default.
1-4. Special Notes to Windows Server 2008 R2 (64-bit System)
Windows Server 2008 Release 2 is 64 bit system, and ESDA version 4.5.x has been
tested under this version. The installation steps are as follows:
Logon as “administrator” rather than user with administrator’s right and start the
installation;
Copy the package to any temporary folder, e.g. desktop;
Right click the package file and select “properties”;
On “Compatibility” tag, select the “run as administrator” option;
Double click the package file to run the installation program.
ESDA-Administrator Manual
Page 54
Appendix 2 – Cross-Platform Migration Procedures
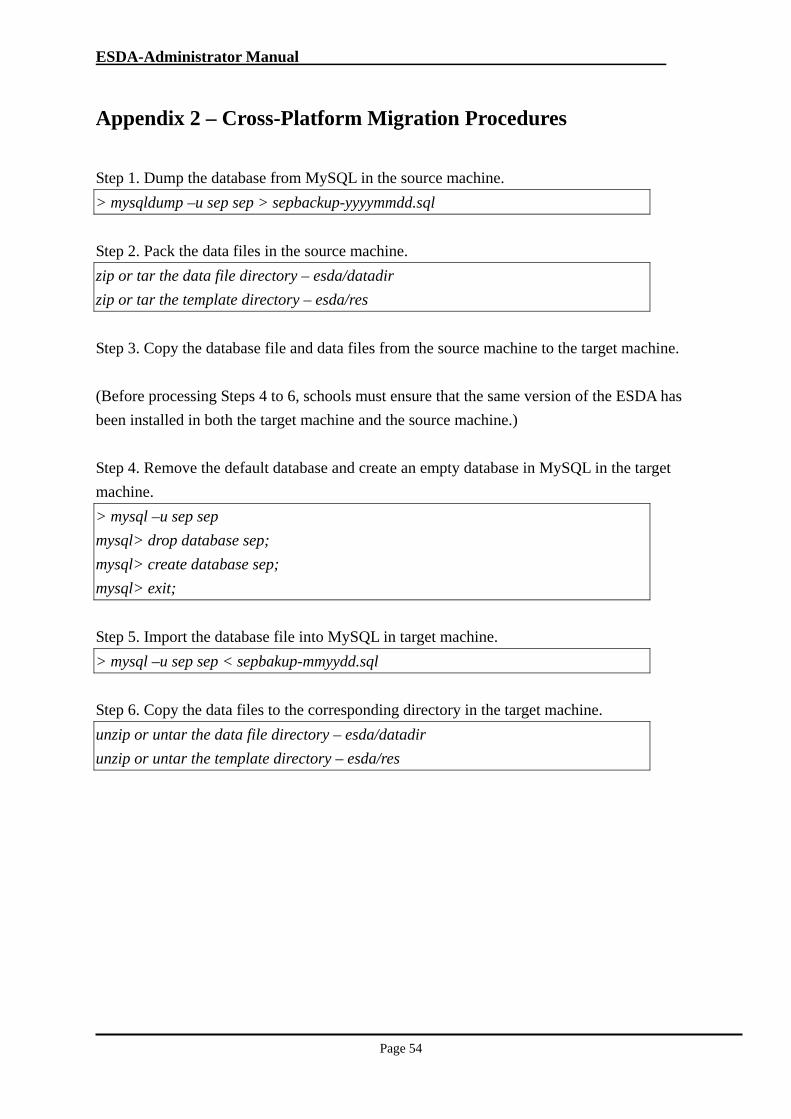
Step 1. Dump the database from MySQL in the source machine.
> mysqldump –u sep sep > sepbackup-yyyymmdd.sql
Step 2. Pack the data files in the source machine.
zip or tar the data file directory – esda/datadir
zip or tar the template directory – esda/res
Step 3. Copy the database file and data files from the source machine to the target machine.
(Before processing Steps 4 to 6, schools must ensure that the same version of the ESDA has
been installed in both the target machine and the source machine.)
Step 4. Remove the default database and create an empty database in MySQL in the target
machine.
> mysql –u sep sep
mysql> drop database sep;
mysql> create database sep;
mysql> exit;
Step 5. Import the database file into MySQL in target machine.
> mysql –u sep sep < sepbakup-mmyydd.sql
Step 6. Copy the data files to the corresponding directory in the target machine.
unzip or untar the data file directory – esda/datadir
unzip or untar the template directory – esda/res
ESDA-Administrator Manual
Page 55
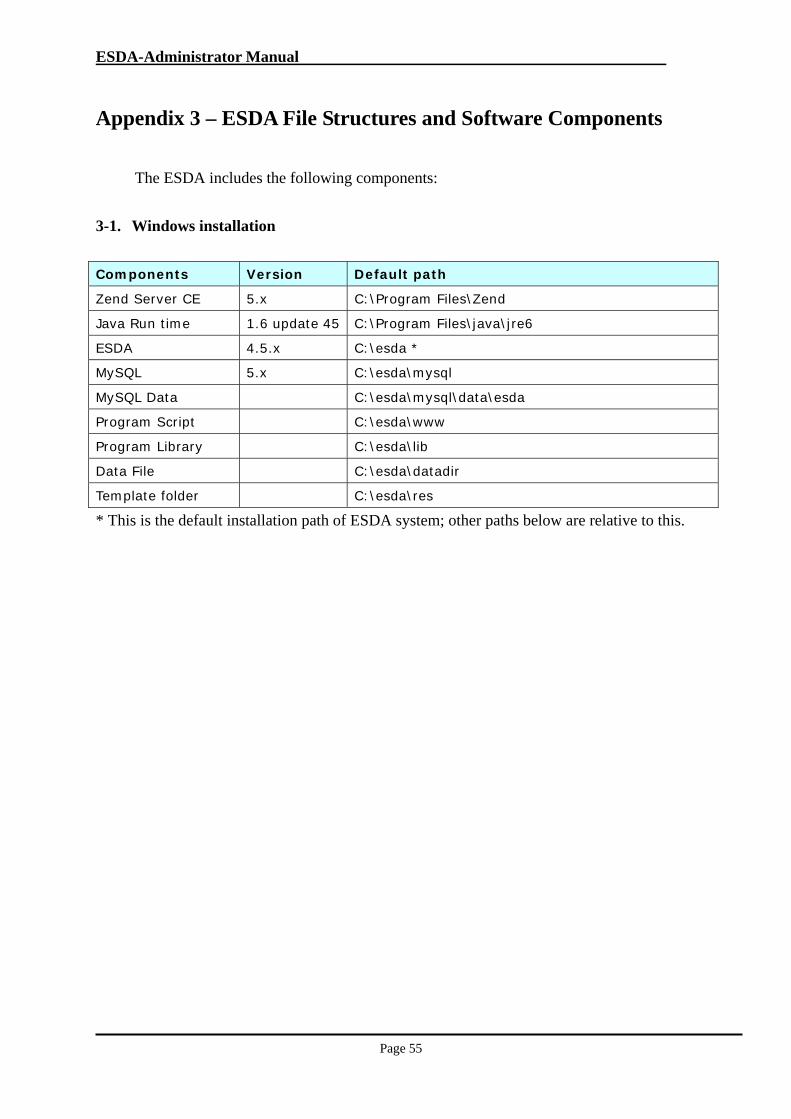
Appendix 3 – ESDA File Structures and Software Components
The ESDA includes the following components:
3-1. Windows installation
Components Version Default path
Zend Server CE 5.x C:\Program Files\Zend
Java Run time 1.6 update 45 C:\Program Files\java\jre6
ESDA 4.5.x C:\esda *
MySQL 5.x C:\esda\mysql
MySQL Data C:\esda\mysql\data\esda
Program Script C:\esda\www
Program Library C:\esda\lib
Data File C:\esda\datadir
Template folder C:\esda\res
* This is the default installation path of ESDA system; other paths below are relative to this.
ESDA-Administrator Manual
Page 56
Appendix 4 – Uninstalling ESDA
I. ESDA Version 3.x
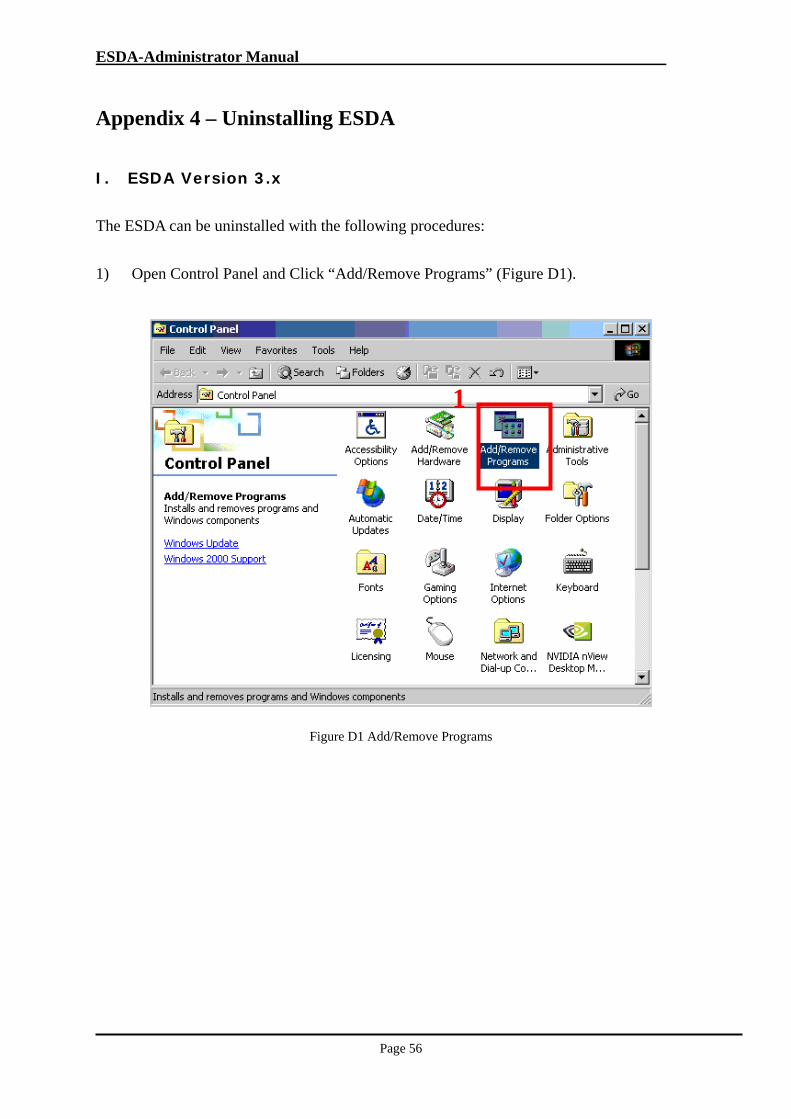
The ESDA can be uninstalled with the following procedures:
1) Open Control Panel and Click “Add/Remove Programs” (Figure D1).
Figure D1 Add/Remove Programs
1
ESDA-Administrator Manual
Page 57
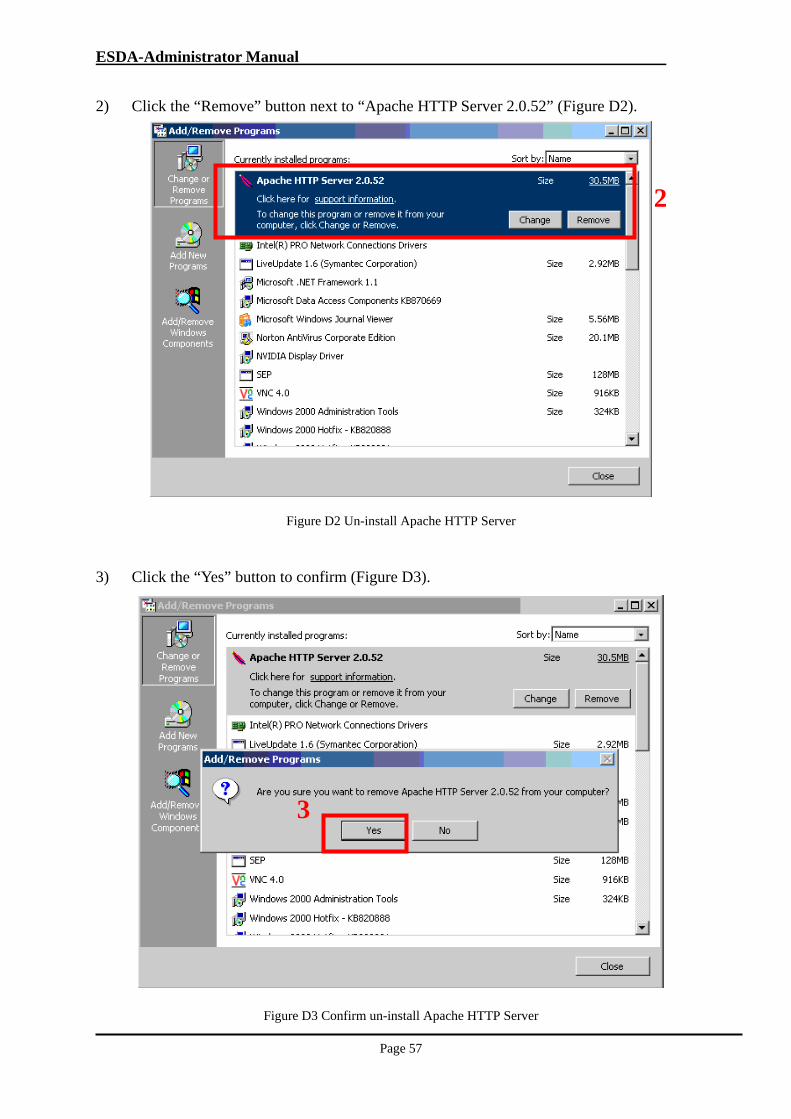
2) Click the “Remove” button next to “Apache HTTP Server 2.0.52” (Figure D2).
Figure D2 Un-install Apache HTTP Server
3) Click the “Yes” button to confirm (Figure D3).
Figure D3 Confirm un-install Apache HTTP Server
2
3
ESDA-Administrator Manual
Page 58
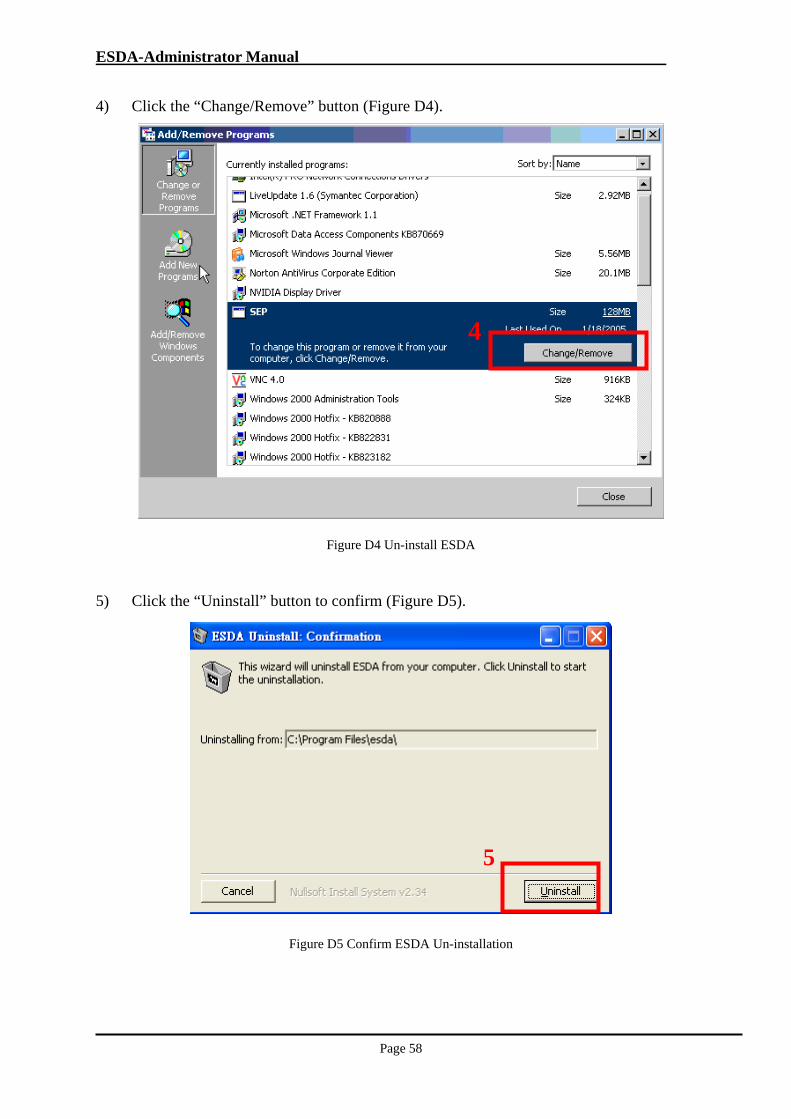
4) Click the “Change/Remove” button (Figure D4).
Figure D4 Un-install ESDA
5) Click the “Uninstall” button to confirm (Figure D5).
Figure D5 Confirm ESDA Un-installation
4
5

ESDA-Administrator Manual
Page 59
6) Click the “Close” button to complete (Figure D6).
Figure D6 Un-install ESDA completed
7) Select the Apache2 folder, and delete the “Apache2” directory (Figure D7).
Figure D7 Remove Apache2 directory
6
7
ESDA-Administrator Manual
Page 60
II. ESDA Version 4.5.x
The ESDA can be uninstalled with the following procedures:
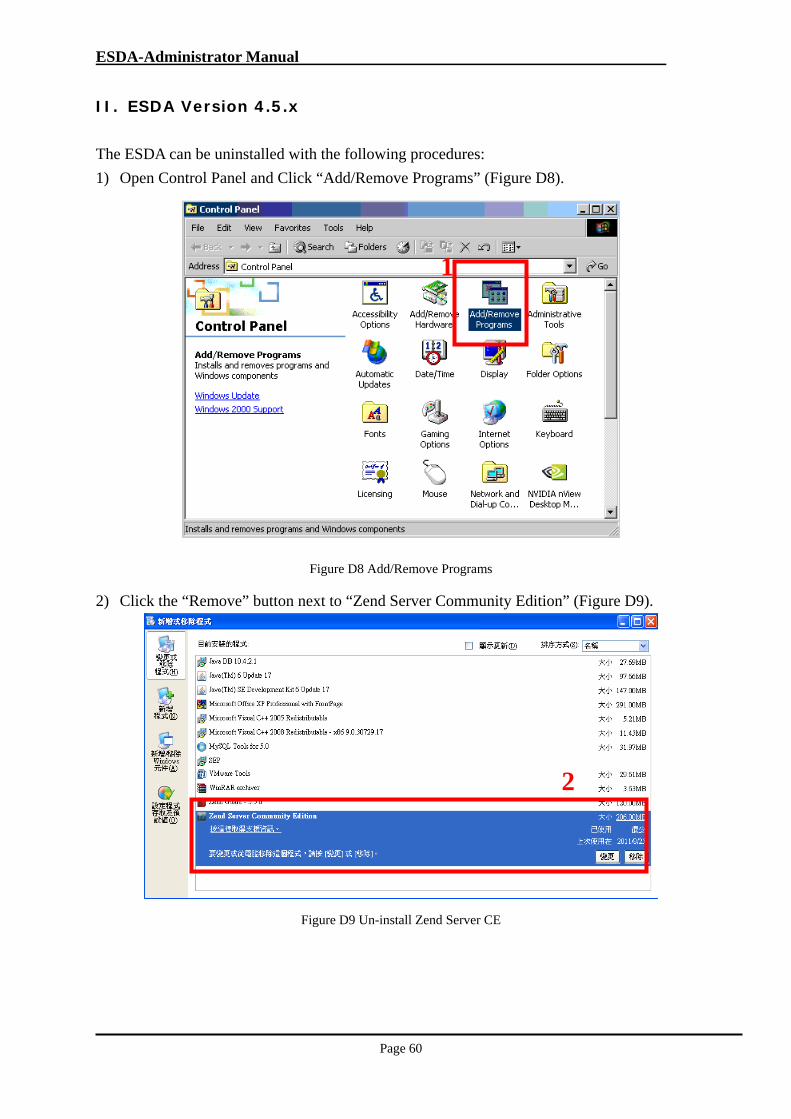
1) Open Control Panel and Click “Add/Remove Programs” (Figure D8).
Figure D8 Add/Remove Programs
2) Click the “Remove” button next to “Zend Server Community Edition” (Figure D9).
Figure D9 Un-install Zend Server CE
1
2
ESDA-Administrator Manual
Page 61
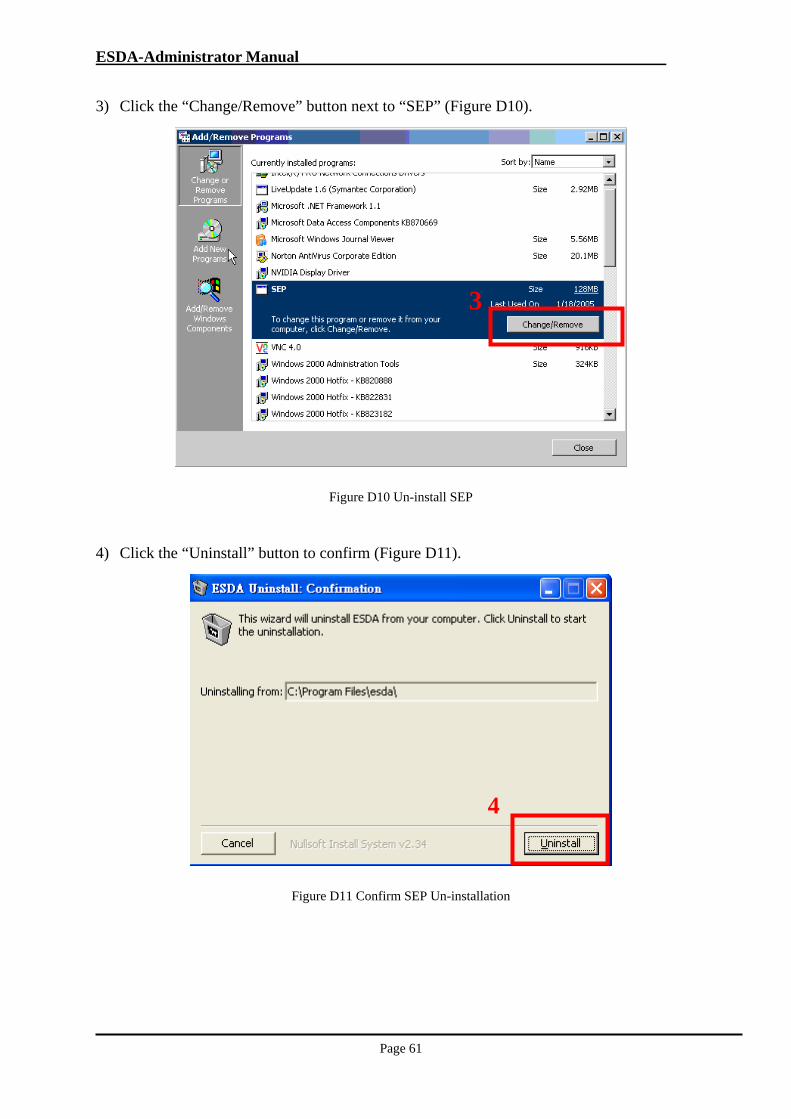
3) Click the “Change/Remove” button next to “SEP” (Figure D10).
Figure D10 Un-install SEP
4) Click the “Uninstall” button to confirm (Figure D11).
Figure D11 Confirm SEP Un-installation
3
4
ESDA-Administrator Manual
Page 62
Appendix 5 – Installing ESDA on Windows with existing Web
Server
5-1 Installing ESDA on Windows with existing IIS running
Stop‐run the IIS Web server in the Windows control panel
Follow the steps in section 1.2.1 to complete installation
Edit the Apache configuration file
(e.g. C:\Program Files\Zend\Apache2\conf\httpd.conf)
- Change the listening port 80 (e.g. Listen 80 => Listen 8080)
Restart the Apache2 Service (please refer to section 3.1.1)
Start IIS Service
Access the system with the new port
- e.g. http://127.0.0.1:8080/esda/ OR http://<ipaddress>/esda/
Note: Please update the domain name or IP in system settings.
5-2 Configure Apache Server to run on Port 443
To configure Apache Server to run on Port 443, a valid server certificate file is required.
Schools may purchase a valid e-Cert from some trustee parties or schools may follow the
following steps to generate a self signed certificate file:
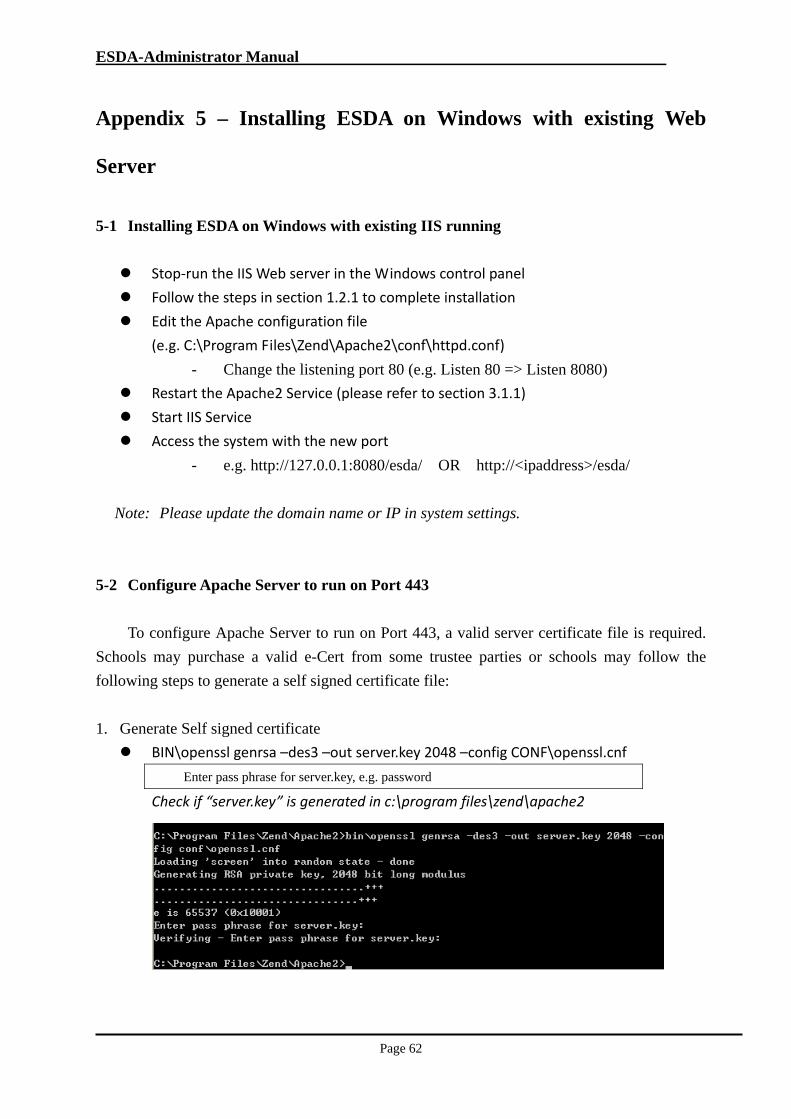
1. Generate Self signed certificate
BIN\openssl genrsa –des3 –out server.key 2048 –config CONF\openssl.cnf
Enter pass phrase for server.key, e.g. password
Check if “server.key” is generated in c:\program files\zend\apache2
ESDA-Administrator Manual
Page 63
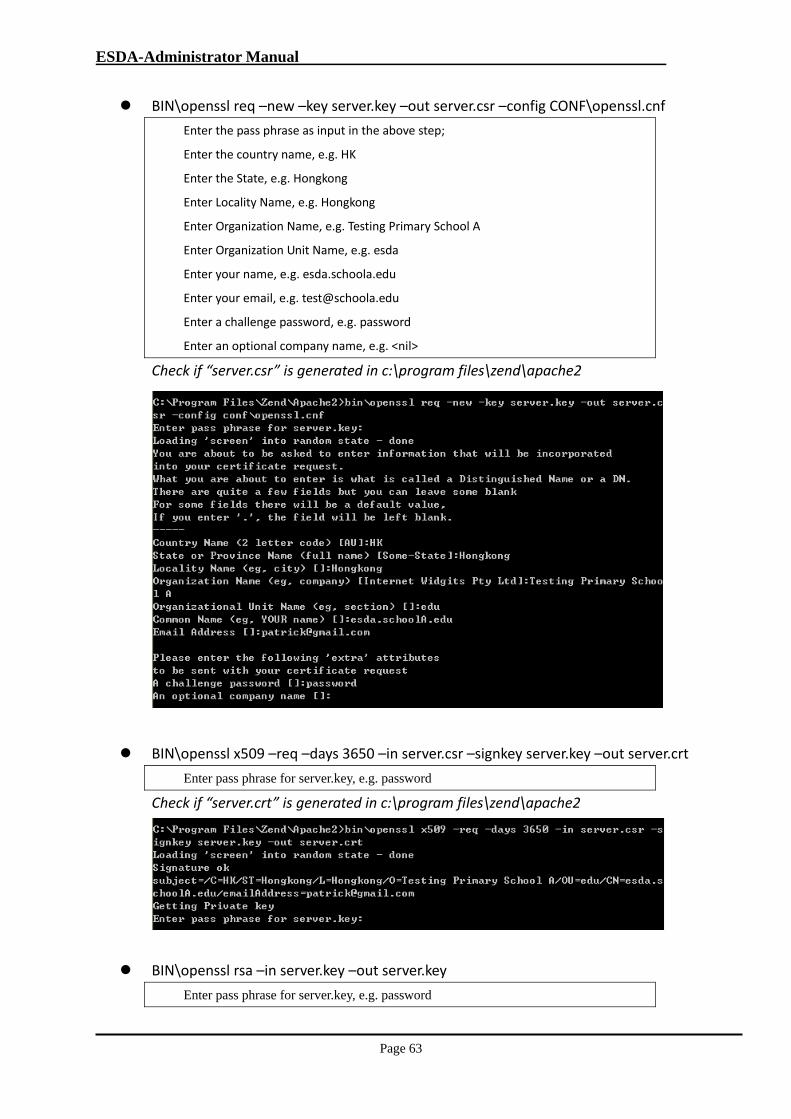
BIN\openssl req –new –key server.key –out server.csr –config CONF\openssl.cnf
Enter the pass phrase as input in the above step;
Enter the country name, e.g. HK
Enter the State, e.g. Hongkong
Enter Locality Name, e.g. Hongkong
Enter Organization Name, e.g. Testing Primary School A
Enter Organization Unit Name, e.g. esda
Enter your name, e.g. esda.schoola.edu
Enter your email, e.g. [email protected]
Enter a challenge password, e.g. password
Enter an optional company name, e.g. <nil>
Check if “server.csr” is generated in c:\program files\zend\apache2
BIN\openssl x509 –req –days 3650 –in server.csr –signkey server.key –out server.crt
Enter pass phrase for server.key, e.g. password
Check if “server.crt” is generated in c:\program files\zend\apache2
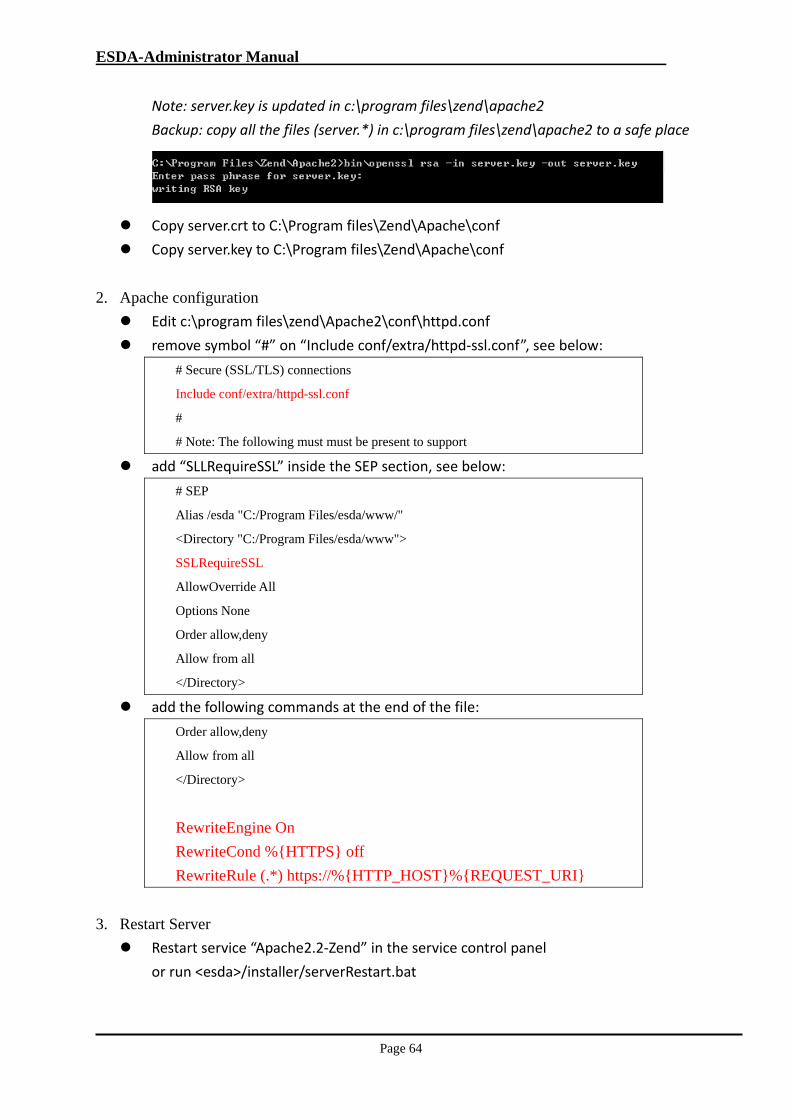
BIN\openssl rsa –in server.key –out server.key
Enter pass phrase for server.key, e.g. password
ESDA-Administrator Manual
Page 64
Note: server.key is updated in c:\program files\zend\apache2
Backup: copy all the files (server.*) in c:\program files\zend\apache2 to a safe place
Copy server.crt to C:\Program files\Zend\Apache\conf
Copy server.key to C:\Program files\Zend\Apache\conf
2. Apache configuration
Edit c:\program files\zend\Apache2\conf\httpd.conf
remove symbol “#” on “Include conf/extra/httpd‐ssl.conf”, see below:
# Secure (SSL/TLS) connections
Include conf/extra/httpd-ssl.conf
#
# Note: The following must must be present to support
add “SLLRequireSSL” inside the SEP section, see below:
# SEP
Alias /esda "C:/Program Files/esda/www/"
<Directory "C:/Program Files/esda/www">
SSLRequireSSL
AllowOverride All
Options None
Order allow,deny
Allow from all
</Directory>
add the following commands at the end of the file:
Order allow,deny
Allow from all
</Directory>
RewriteEngine On
RewriteCond %{HTTPS} off
RewriteRule (.*) https://%{HTTP_HOST}%{REQUEST_URI}
3. Restart Server
Restart service “Apache2.2‐Zend” in the service control panel
or run <esda>/installer/serverRestart.bat
ESDA-Administrator Manual
Page 65
Unable to start Apache on 64‐bit server:
Warning: SSLSessionCache: Invalid argument: size has to be >= 8192 bytes
Solution:
1) Open a command prompt, run the following command:
# dir /x c:\
2) Check the short name for “c:\program files (x86)”
3) Edit Apache2/conf/extra/httpd‐ssl.conf (line 56), replacing “C:\Program files
(x86)” with its short name, “C:/PROGRA\~2/” as shown:
#SSLSessionCache "shmcb:C:\Program Files (x86)\Zend\Apache2/logs/ssl_scache(512000)"
SSLSessionCache "shmcb:C:/PROGRA\~2/Zend/Apache2/logs/ssl_scache(512000)"
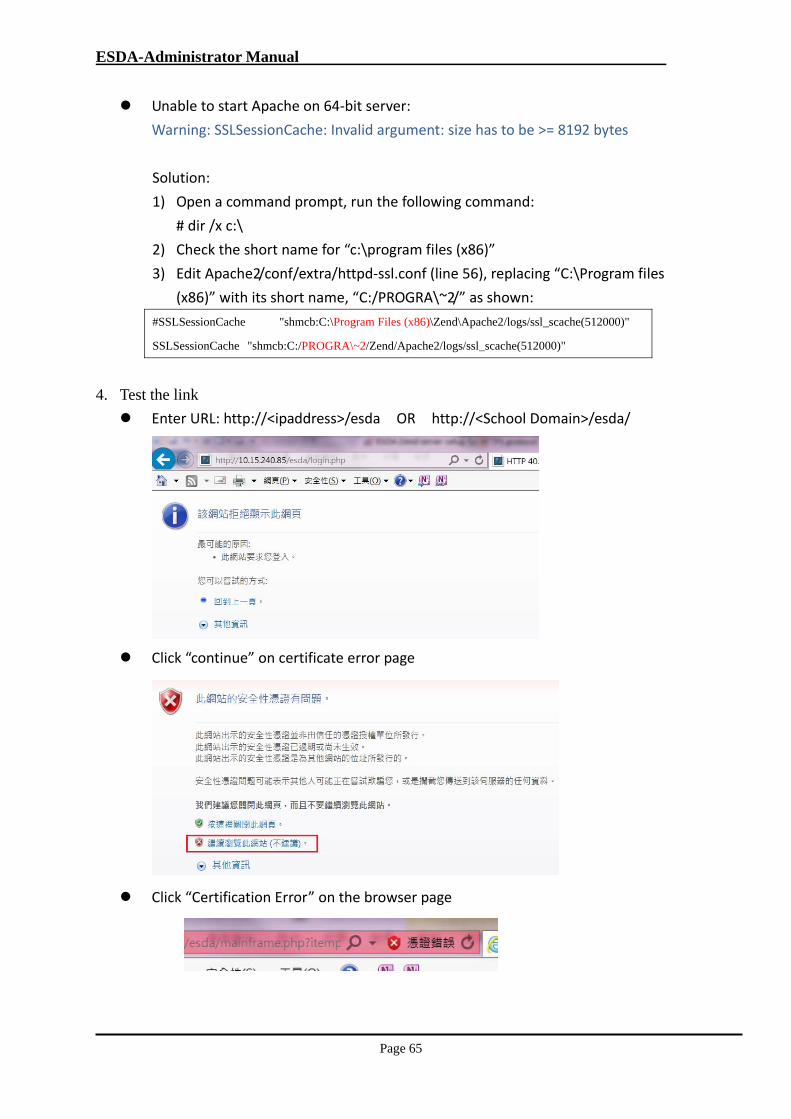
4. Test the link
Enter URL: http://<ipaddress>/esda OR http://<School Domain>/esda/
Click “continue” on certificate error page
Click “Certification Error” on the browser page

ESDA-Administrator Manual
Page 66
Check certificate details
Add server name in DNS or host table. As always the “host” file is under
C:\windows\system32\drivers\etc\ or %systemroot%\system32\drivers\etc\
.
Try URL: https://esda.schoolA.edu/esda
esda.schoolA.edu <ip_address>
ESDA-Administrator Manual
Page 67
Appendix 6 – User Account Integration with Other System(s)
6-1 Planning for the Integration
With the “UAI with other system(s)”, you are allowed to integrate ESDA user accounts
with various systems which include OpenLDAP, Active Directory, or any database systems.
To enable the UAI, you need to prepare a PHP script called “SEPAuthorization.php”
located in “[ESDA]/userscript/” and add a variable “$EnableOtherAuthorization” to
“[ESDA]/conf/profile.php” with value “true”.
Note:
Schools are expected to create and modify “[ESDA]/userscript/SEPAuthorization.php” file
only. If you add or modify other files, you should back up your scripts together with the
“SEPAuthorization.php” file. Otherwise, ESDA patch(es) provided by EDB may overwrite
the scripts.
You can retrieve more information from the following websites -
For PHP: http://www.php.net
For OpenLDAP: http://www.openldap.org
For Active Directory: http://www.microsoft.com
To perform a simple UAI testing, you can search a user account (e.g. admin) and enter
value in field “REMOTEID” (a user account with the value entered in “Remote ID” must exist
in the master system). Login ESDA with login ID (e.g. admin) in ESDA and password in the
master system.
6-2 Configuring ESDA for the Integration
To enable UAI in SEP, you should follow these steps:-
1. Edit PHP.INI file to include required PHP Module(s)
2. Update the ESDA Configuration File, add a variable “$EnableOtherAuthorization” with
value “true” in [ESDA]/config/profile.php.
3. Create an authorisation script (SEPAuthorization.php) and put it under [ESDA]/userscript/.
Note: If “Integrating with other system(s)” is selected, “Change Password” and “Student
Password Reset” will be disabled. Password checking will also be ignored when importing
user accounts.
ESDA-Administrator Manual
Page 68
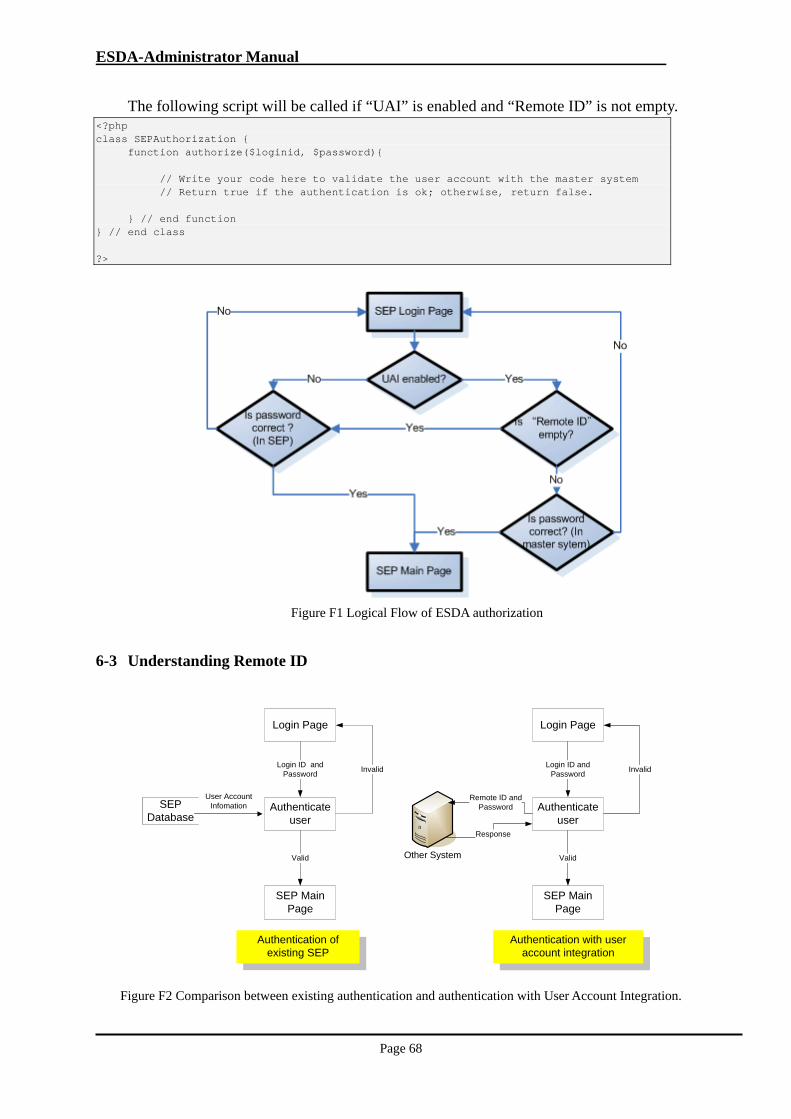
The following script will be called if “UAI” is enabled and “Remote ID” is not empty. <?php class SEPAuthorization { function authorize($loginid, $password){ // Write your code here to validate the user account with the master system // Return true if the authentication is ok; otherwise, return false. } // end function } // end class ?>
Figure F1 Logical Flow of ESDA authorization
6-3 Understanding Remote ID
Login Page
Authenticate user
User Account InfomationSEP
Database
InvalidLogin ID and
Password
SEP Main Page
Valid
Login Page
Authenticate user
InvalidLogin ID and
Password
SEP Main Page
ValidOther System
Remote ID andPassword
Response
Authentication of existing SEP
Authentication with user account integration
Figure F2 Comparison between existing authentication and authentication with User Account Integration.
ESDA-Administrator Manual
Page 69
Each user should have a corresponding account in the master system. For mapping user
accounts between ESDA and the master system, a new user property field, “REMOTEID”, will
be provided. For teacher and other user account import, there is a “REMOTEID” field added.
For student user account import, “REMOTEID” and “PARENTREMOTEID” fields are added.
You can extract student accounts with respective remote IDs by the following sample SQL
statement. SELECT b.SCHYEAR, '#' || a.REGNO as REGNO, a.CLASSLVL, a.CLASSCODE, a.CLASSNO, a.ENNAME,
a.CHNAME as CHNAME , a.SEX, 's' || a.REGNO as LOGINID, 's' || a.REGNO as PASSWORD, substr(DOB, 0, 10) as
DOB, 's' || a.REGNO as REMOTEID, 'ps' || a.REGNO as PARENTREMOTEID FROM TB_STU_STUDENT as a,
TB_STU_STUSCHREC as b where a.stuid = b.stuid AND a.CLASSLVL != '' and a.CLASSNO != 0 AND b.schyear =
2017
Note: In order to handle some ESDA accounts, e.g. “parents”or “others” accounts which may
not exist in the master system, the respective remote IDs will be checked. If the remote ID is
empty, it is an ESDA account authenticated on ESDA database.
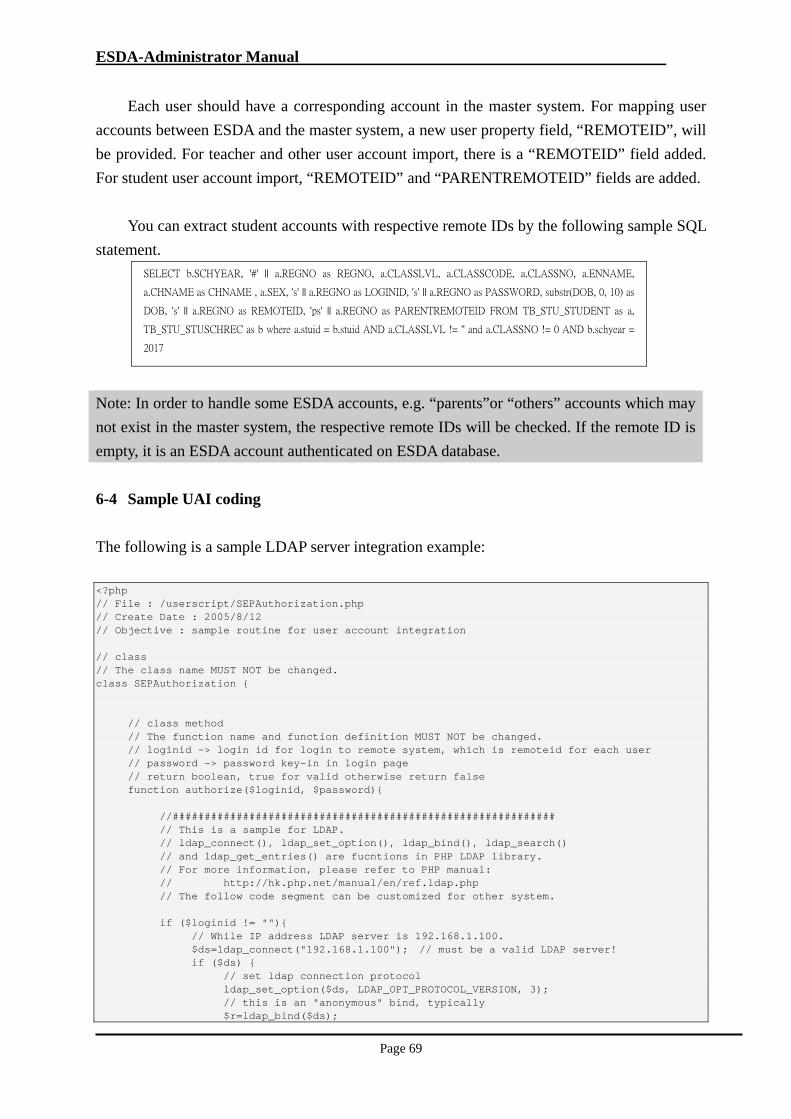
6-4 Sample UAI coding
The following is a sample LDAP server integration example:
<?php // File : /userscript/SEPAuthorization.php // Create Date : 2005/8/12 // Objective : sample routine for user account integration // class // The class name MUST NOT be changed. class SEPAuthorization { // class method // The function name and function definition MUST NOT be changed. // loginid -> login id for login to remote system, which is remoteid for each user // password -> password key-in in login page // return boolean, true for valid otherwise return false function authorize($loginid, $password){ //############################################################ // This is a sample for LDAP. // ldap_connect(), ldap_set_option(), ldap_bind(), ldap_search() // and ldap_get_entries() are fucntions in PHP LDAP library. // For more information, please refer to PHP manual: // http://hk.php.net/manual/en/ref.ldap.php // The follow code segment can be customized for other system. if ($loginid != ""){ // While IP address LDAP server is 192.168.1.100. $ds=ldap_connect("192.168.1.100"); // must be a valid LDAP server! if ($ds) { // set ldap connection protocol ldap_set_option($ds, LDAP_OPT_PROTOCOL_VERSION, 3); // this is an "anonymous" bind, typically $r=ldap_bind($ds);
ESDA-Administrator Manual
Page 70
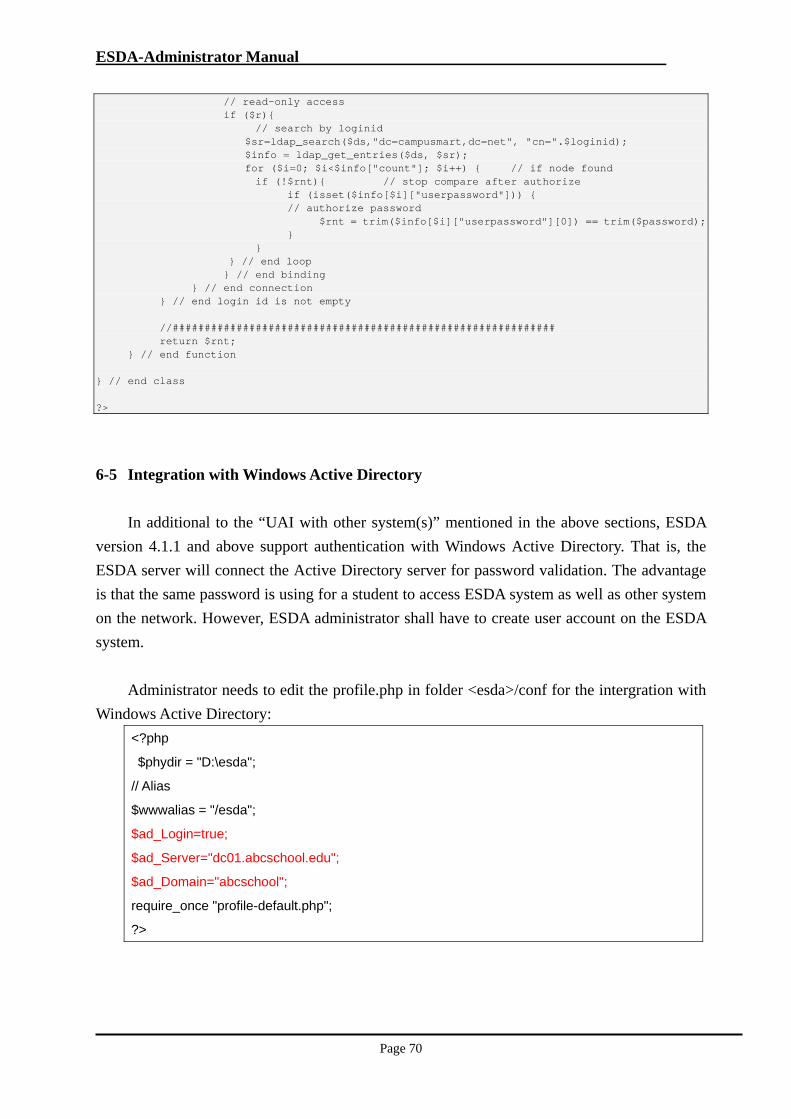
// read-only access if ($r){ // search by loginid $sr=ldap_search($ds,"dc=campusmart,dc=net", "cn=".$loginid); $info = ldap_get_entries($ds, $sr); for ($i=0; $i<$info["count"]; $i++) { // if node found if (!$rnt){ // stop compare after authorize if (isset($info[$i]["userpassword"])) { // authorize password $rnt = trim($info[$i]["userpassword"][0]) == trim($password); } } } // end loop } // end binding } // end connection } // end login id is not empty //############################################################ return $rnt; } // end function } // end class ?>
6-5 Integration with Windows Active Directory
In additional to the “UAI with other system(s)” mentioned in the above sections, ESDA
version 4.1.1 and above support authentication with Windows Active Directory. That is, the
ESDA server will connect the Active Directory server for password validation. The advantage
is that the same password is using for a student to access ESDA system as well as other system
on the network. However, ESDA administrator shall have to create user account on the ESDA
system.
Administrator needs to edit the profile.php in folder <esda>/conf for the intergration with
Windows Active Directory:
<?php
$phydir = "D:\esda";
// Alias
$wwwalias = "/esda";
$ad_Login=true;
$ad_Server="dc01.abcschool.edu";
$ad_Domain="abcschool";
require_once "profile-default.php";
?>
ESDA-Administrator Manual
Page 71
The authentication logic is as follows:
The input account name is found on the local database and status is active
The input password is matching with the value stored in active directory
Note: Unlike “UAI with other system(s)”, remote user ID is not used for this integration
method. School administrator should prepare an account list with login ID equivalent to
username in Windows Active Directory. All accounts except “admin” should be created in the
active directory.
ESDA-Administrator Manual
Page 72
Appendix 7 – Other ESDA configurable parameters
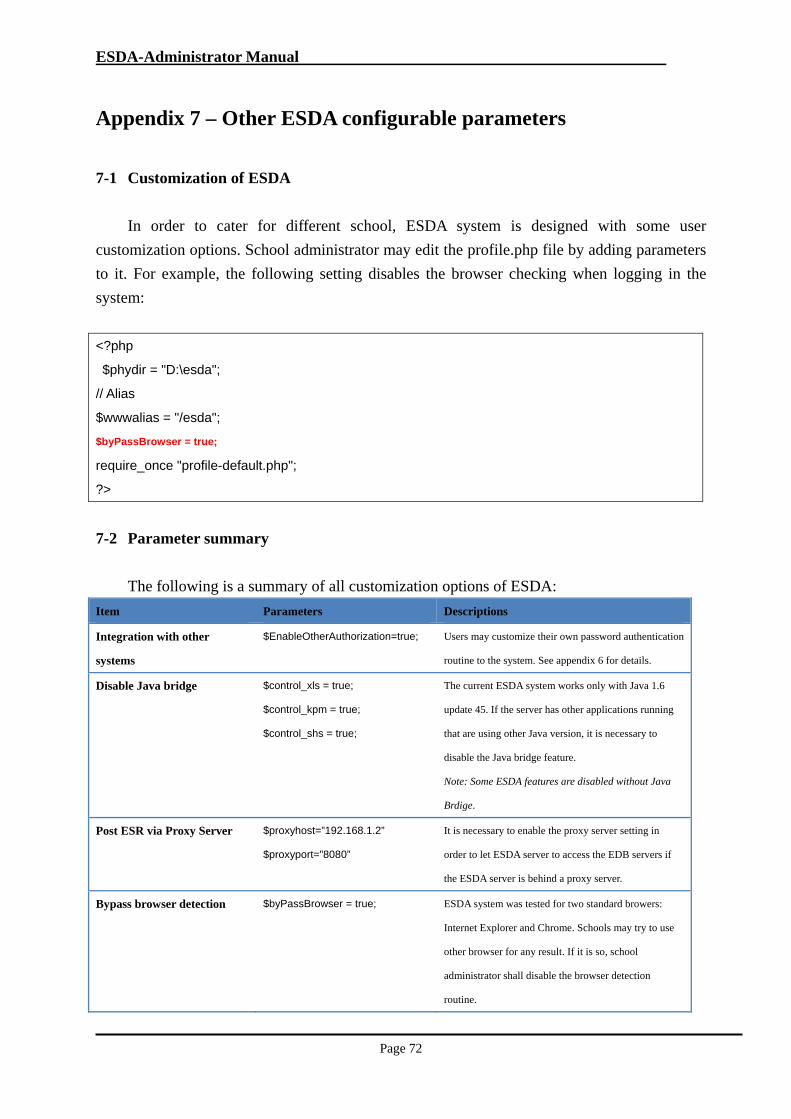
7-1 Customization of ESDA
In order to cater for different school, ESDA system is designed with some user
customization options. School administrator may edit the profile.php file by adding parameters
to it. For example, the following setting disables the browser checking when logging in the
system:
<?php
$phydir = "D:\esda";
// Alias
$wwwalias = "/esda";
$byPassBrowser = true;
require_once "profile-default.php";
?>
7-2 Parameter summary
The following is a summary of all customization options of ESDA:
Item Parameters Descriptions
Integration with other
systems
$EnableOtherAuthorization=true; Users may customize their own password authentication
routine to the system. See appendix 6 for details.
Disable Java bridge $control_xls = true;
$control_kpm = true;
$control_shs = true;
The current ESDA system works only with Java 1.6
update 45. If the server has other applications running
that are using other Java version, it is necessary to
disable the Java bridge feature.
Note: Some ESDA features are disabled without Java
Brdige.
Post ESR via Proxy Server $proxyhost=”192.168.1.2”
$proxyport=”8080”
It is necessary to enable the proxy server setting in
order to let ESDA server to access the EDB servers if
the ESDA server is behind a proxy server.
Bypass browser detection $byPassBrowser = true; ESDA system was tested for two standard browers:
Internet Explorer and Chrome. Schools may try to use
other browser for any result. If it is so, school
administrator shall disable the browser detection
routine.
ESDA-Administrator Manual
Page 73
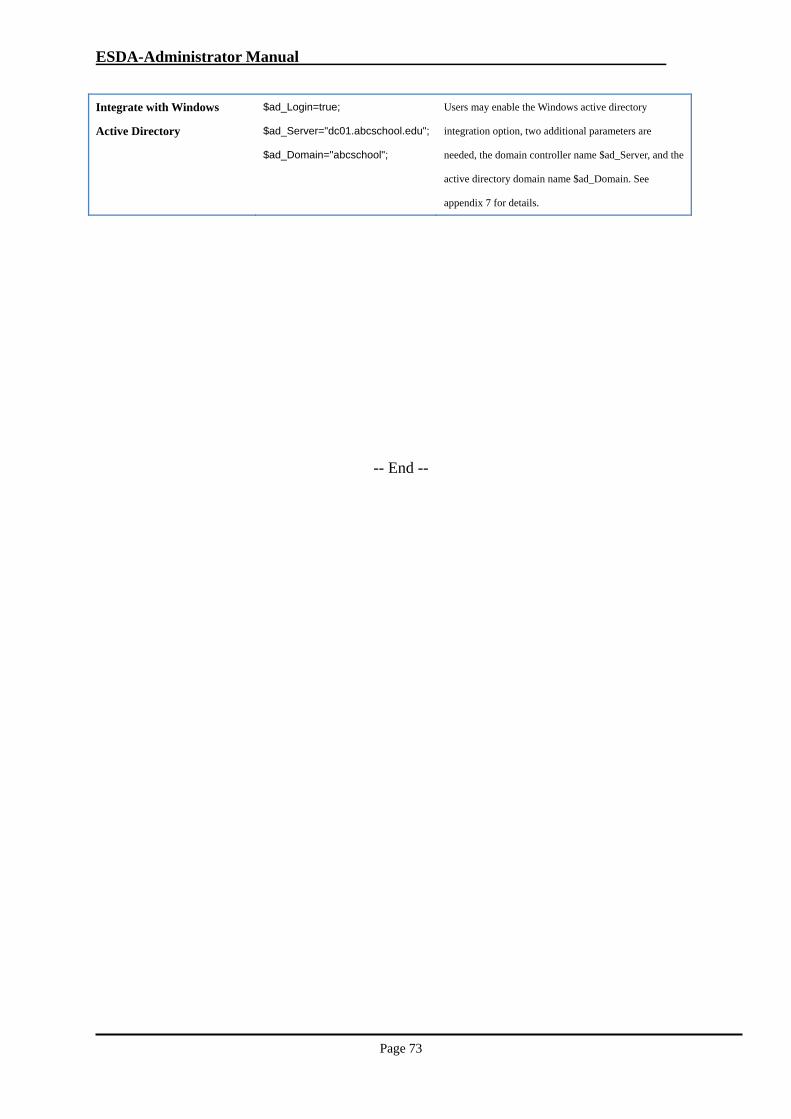
Integrate with Windows
Active Directory
$ad_Login=true;
$ad_Server="dc01.abcschool.edu";
$ad_Domain="abcschool";
Users may enable the Windows active directory
integration option, two additional parameters are
needed, the domain controller name $ad_Server, and the
active directory domain name $ad_Domain. See
appendix 7 for details.
-- End --