Embed Size (px)
Citation preview

Easy VPN Configuration Guide, Cisco IOSRelease 12.4
Americas HeadquartersCisco Systems, Inc.170 West Tasman DriveSan Jose, CA 95134-1706USAhttp://www.cisco.comTel: 408 526-4000 800 553-NETS (6387)Fax: 408 527-0883

THE SPECIFICATIONS AND INFORMATION REGARDING THE PRODUCTS IN THIS MANUAL ARE SUBJECT TO CHANGE WITHOUT NOTICE. ALL STATEMENTS,INFORMATION, AND RECOMMENDATIONS IN THIS MANUAL ARE BELIEVED TO BE ACCURATE BUT ARE PRESENTED WITHOUT WARRANTY OF ANY KIND,EXPRESS OR IMPLIED. USERS MUST TAKE FULL RESPONSIBILITY FOR THEIR APPLICATION OF ANY PRODUCTS.
THE SOFTWARE LICENSE AND LIMITED WARRANTY FOR THE ACCOMPANYING PRODUCT ARE SET FORTH IN THE INFORMATION PACKET THAT SHIPPEDWITH THE PRODUCT AND ARE INCORPORATED HEREIN BY THIS REFERENCE. IF YOU ARE UNABLE TO LOCATE THE SOFTWARE LICENSE OR LIMITEDWARRANTY, CONTACT YOUR CISCO REPRESENTATIVE FOR A COPY.
The Cisco implementation of TCP header compression is an adaptation of a program developed by the University of California, Berkeley (UCB) as part of UCB’s public domain versionof the UNIX operating system. All rights reserved. Copyright © 1981, Regents of the University of California.
NOTWITHSTANDING ANY OTHER WARRANTY HEREIN, ALL DOCUMENT FILES AND SOFTWARE OF THESE SUPPLIERS ARE PROVIDED “AS IS” WITH ALLFAULTS. CISCO AND THE ABOVE-NAMED SUPPLIERS DISCLAIM ALL WARRANTIES, EXPRESSED OR IMPLIED, INCLUDING, WITHOUT LIMITATION, THOSE OFMERCHANTABILITY, FITNESS FOR A PARTICULAR PURPOSE AND NONINFRINGEMENT OR ARISING FROM A COURSE OF DEALING, USAGE, OR TRADEPRACTICE.
IN NO EVENT SHALL CISCO OR ITS SUPPLIERS BE LIABLE FOR ANY INDIRECT, SPECIAL, CONSEQUENTIAL, OR INCIDENTAL DAMAGES, INCLUDING,WITHOUT LIMITATION, LOST PROFITS OR LOSS OR DAMAGE TO DATA ARISING OUT OF THE USE OR INABILITY TO USE THIS MANUAL, EVEN IF CISCO ORITS SUPPLIERS HAVE BEEN ADVISED OF THE POSSIBILITY OF SUCH DAMAGES.
Cisco and the Cisco logo are trademarks or registered trademarks of Cisco and/or its affiliates in the U.S. and other countries. To view a list of Cisco trademarks, go to this URL: www.cisco.com/go/trademarks. Third-party trademarks mentioned are the property of their respective owners. The use of the word partner does not imply a partnership relationshipbetween Cisco and any other company. (1110R)
Any Internet Protocol (IP) addresses and phone numbers used in this document are not intended to be actual addresses and phone numbers. Any examples, command display output,network topology diagrams, and other figures included in the document are shown for illustrative purposes only. Any use of actual IP addresses or phone numbers in illustrative contentis unintentional and coincidental.
© 2011 Cisco Systems, Inc. All rights reserved.
C O N T E N T S
Cisco Easy VPN Remote 1
Finding Feature Information 1
Prerequisites for Cisco Easy VPN Remote 1
Restrictions for Cisco Easy VPN Remote 2
Information About Cisco Easy VPN Remote 4
Benefits of the Cisco Easy VPN Remote Feature 4
Cisco Easy VPN Remote Overview 5
Modes of Operation 5
Client Mode and Network Extension Mode Scenarios 6
Authentication with Cisco Easy VPN Remote 8
Use of Preshared Keys 9
Use of Digital Certificates 9
Use of Xauth 9
Web-Based Activation 10
Web-Based Activation Portal Page 11
VPN Authentication Bypass 12
VPN Tunnel Authentication 14
Successful Authentication 14
Deactivation 15
802.1x Authentication 16
Tunnel Activation Options 17
Automatic Activation 17
Manual Activation 17
Traffic-Triggered Activation 17
Dead Peer Detection Stateless Failover Support 18
Backup Server List Local Configuration 18
Backup Server List AutoConfiguration 18
Cisco Easy VPN Remote Features 19
Default Inside Interface 20
Easy VPN Configuration Guide, Cisco IOS Release 12.4 iii
Multiple Inside Interfaces 20
Multiple Outside Interfaces 20
VLAN Support 21
Multiple Subnet Support 21
NAT Interoperability Support 21
Local Address Support 22
Peer Hostname 22
Proxy DNS Server Support 22
Cisco IOS Firewall Support 23
Easy VPN Remote and Server on the Same Interface 23
Easy VPN Remote and Site to Site on the Same Interface 23
Cisco Easy VPN Remote Web Managers 23
Dead Peer Detection Periodic Message Option 24
Load Balancing 24
Management Enhancements 24
PFS Support 24
Dial Backup 25
Dial Backup Using a Dial-on-Demand Solution 25
Dial Backup Using Object Tracking 26
Easy VPN Remote Dial Backup Support Configuration 26
Dynamically Addressed Environments 26
Dial Backup Examples 26
Virtual IPsec Interface Support 26
Dual Tunnel Support 29
Banner 32
Configuration Management Enhancements (Pushing a Configuration URL Through a
Mode-Configuration Exchange) 32
Reactivate Primary Peer 32
Identical Addressing Support 33
cTCP Support on Easy VPN Clients 34
Easy VPN Server on a VPN 3000 Series Concentrator 34
Peer Configuration on a Cisco Easy VPN Remote Using the Hostname 35
Interactive Hardware Client Authentication Version 3.5 35
IPsec Tunnel Protocol 35
IPsec Group 35
Contents
Easy VPN Configuration Guide, Cisco IOS Release 12.4iv
Group Lock 36
Xauth 36
Split Tunneling 36
IKE Proposals 36
New IPsec SA 36
How to Configure Cisco Easy VPN Remote 37
Remote Tasks 37
Configuring and Assigning the Easy VPN Remote Configuration 37
Verifying the Cisco Easy VPN Configuration 40
Configuring Save Password 41
Configuring Manual Tunnel Control 42
Configuring Automatic Tunnel Control 44
Configuring Multiple Inside Interfaces 45
Configuring Multiple Outside Interfaces 47
Configuring Multiple Subnet Support 48
Configuring Proxy DNS Server Support 50
What to Do Next 50
Configuring Dial Backup 51
Resetting a VPN Connection 51
Monitoring and Maintaining VPN and IKE Events 52
Configuring a Virtual Interface 53
Troubleshooting Dual Tunnel Support 55
Configuring Reactivate (a Default) Primary Peer 56
Configuring Identical Addressing Support 57
Configuring cTCP on an Easy VPN Client 61
Configuring cTCP on an Easy VPN Client 62
Web Interface Tasks 63
Configuring Web-Based Activation 63
Monitoring and Maintaining Web-Based Activation 64
Troubleshooting the VPN Connection 68
Troubleshooting a VPN Connection Using the Cisco Easy VPN Remote Feature 68
Troubleshooting the Client Mode of Operation 68
Troubleshooting Remote Management 69
Examples 69
Troubleshooting Dead Peer Detection 69
Contents
Easy VPN Configuration Guide, Cisco IOS Release 12.4 v
Examples 69
Configuration Examples for Cisco Easy VPN Remote 70
Easy VPN Remote Configuration Examples 70
Client Mode Configuration Examples 70
Cisco Easy VPN Client in Client Mode (Cisco 831) Example 70
Cisco Easy VPN Client in Client Mode (Cisco 837) Example 72
Cisco Easy VPN Client in Client Mode (Cisco 1700 Series) Example 73
Local Address Support for Easy VPN Remote Example 75
Network Extension Mode Configuration Examples 75
Cisco Easy VPN Client in Network Extension Mode (Cisco 831) Example 76
Cisco Easy VPN Client in Network Extension Mode (Cisco 837) Example 77
Cisco Easy VPN Client in Network Extension Mode (Cisco 1700 Series) Example 78
Save Password Configuration Example 80
PFS Support Examples 80
Dial Backup Examples 81
Web-Based Activation Example 86
Easy VPN Remote with Virtual IPsec Interface Support Configuration Examples 86
Virtual IPsec Interface Generic Virtual Access 86
Virtual IPsec Interface Virtual Access Derived from Virtual Template 87
When the Tunnel Is Down 88
When the Tunnel Is Up 89
Dual Tunnel Configuration Example 90
Dual Tunnel Show Output Examples 91
Reactivate Primary Peer Example 94
Identical Addressing Support Configuration Example 95
cTCP on an Easy VPN Client (Remote Device) Examples 95
Easy VPN Server Configuration Examples 95
Cisco Easy VPN Server Without Split Tunneling Example 96
Cisco Easy VPN Server Configuration with Split Tunneling Example 97
Cisco Easy VPN Server Configuration with Xauth Example 98
Easy VPN Server Interoperability Support Example 100
Additional References 101
Feature Information for Easy VPN Remote 105
Glossary 109
Easy VPN Remote RSA Signature Support 113
Contents
Easy VPN Configuration Guide, Cisco IOS Release 12.4vi

Finding Feature Information 113
Prerequisites for Easy VPN Remote RSA Signature Support 113
Restrictions for Easy VPN Remote RSA Signature Support 114
Information About Easy VPN Remote RSA Signature Support 114
Easy VPN Remote RSA Signature Support Overview 114
How to Configure Easy VPN Remote RSA Signature Support 114
Configuring Easy VPN Remote RSA Signature Support 114
Troubleshooting Easy VPN RSA Signature Support 114
Additional References 115
Feature Information for Easy VPN Remote RSA Signature Support 116
Easy VPN Server 119
Finding Feature Information 119
Restrictions for Easy VPN Server 119
Information About Easy VPN Server 121
How It Works 121
RADIUS Support for Group Profiles 122
For a Cisco Secure Access Control Server 122
For All Other RADIUS Servers 125
RADIUS Support for User Profiles 125
For All Other RADIUS Servers 126
Supported Protocols 126
Functions Supported by Easy VPN Server 127
Mode Configuration Version 6 Support 128
Xauth Version 6 Support 128
IKE DPD 128
Split Tunneling Control 128
Initial Contact 128
Group-Based Policy Control 129
User-Based Policy Control 129
Framed-IP-Address 129
DHCP Client Proxy 129
User-Save-Password 130
User-Include-Local-LAN 130
User-VPN-Group 130
Group-Lock 130
Contents
Easy VPN Configuration Guide, Cisco IOS Release 12.4 vii
How It works 130
Session Monitoring for VPN Group Access 131
Virtual IPsec Interface Support on a Server 131
Virtual Tunnel Interface Per-User Attribute Support 132
Banner Auto-Update and Browser Proxy 132
Banner 132
Auto-Update 132
Browser Proxy 132
Configuration Management Enhancements 132
Pushing a Configuration URL Through a Mode-Configuration Exchange 133
After the Configuration Has Been Acquired by the Easy VPN Remote Device 133
How to Configure This Feature 133
Per User AAA Policy Download with PKI 133
Per-User Attribute Support for Easy VPN Servers 134
Local Easy VPN AAA Server 134
Remote Easy VPN AAA Server 134
Per-User Attributes 134
Syslog Message Enhancements 134
Easy VPN Syslog Messages That Are Supported 135
Network Admission Control Support for Easy VPN 135
Central Policy Push Firewall Policy Push 136
Syslog Support for CPP Firewall Policy Push 136
Password Aging 137
Split DNS 137
cTCP 137
VRF Assignment by a AAA Server 138
How to Configure Easy VPN Server 138
Enabling Policy Lookup via AAA 139
Defining Group Policy Information for Mode Configuration Push 140
Enabling VPN Session Monitoring 145
Verifying a VPN Session 146
Applying Mode Configuration and Xauth 147
Enabling Reverse Route Injection for the Client 148
Enabling IKE Dead Peer Detection 151
Configuring RADIUS Server Support 151
Contents
Easy VPN Configuration Guide, Cisco IOS Release 12.4viii

Verifying Easy VPN Server 152
Configuring a Banner 153
Configuring Auto Upgrade 154
Configuring Browser Proxy 155
Configuring the Pushing of a Configuration URL Through aMode-Configuration Exchange 156
Configuring Per User AAA Download with PKI--Configuring the Crypto PKI Trustpoint 157
Configuring the Actual Per User AAA Download with PKI 159
Configuring Per-User Attributes on a Local Easy VPN AAA Server 161
Enabling Easy VPN Syslog Messages 163
Defining a CPP Firewall Policy Push Using a Local AAA Server 163
What to Do Next 165
Applying a CPP Firewall Policy Push to the Configuration Group 165
Defining a CPP Firewall Policy Push Using a Remote AAA Server 166
What to Do Next 166
Adding the VSA CPP-Policy Under the Group Definition 166
Verifying CPP Firewall Policy Push 167
Configuring Password Aging 167
Configuring Split DNS 169
Verifying Split DNS 170
Monitoring and Maintaining Split DNS 171
Configuring an Easy VPN Server to Obtain an IP Address from a DHCP Server 172
Verifying DHCP Client Proxy 174
Monitoring and Maintaining DHCP Client Proxy 175
Configuring cTCP 176
Verifying cTCP 177
Monitoring and Maintaining a cTCP Configuration 177
Clearing a cTCP Configuration 178
Troubleshooting a cTCP Configuration 178
Configuration Examples for Easy VPN Server 179
Configuring Cisco IOS for Easy VPN Server Example 180
RADIUS Group Profile with IPsec AV Pairs Example 181
RADIUS User Profile with IPsec AV Pairs Example 182
Backup Gateway with Maximum Logins and Maximum Users Example 182
Easy VPN with an IPsec Virtual Tunnel Interface Example 182
Pushing a Configuration URL Through a Mode-ConfigurationExchange Examples 183
Contents
Easy VPN Configuration Guide, Cisco IOS Release 12.4 ix
Per User AAA Policy Download with PKI Example 184
Per-User Attributes on an Easy VPN Server Example 187
Network Admission Control Example 189
Configuring Password Aging Example 191
Split DNS Examples 192
DHCP Client Proxy Examples 193
cTCP Session Example 194
VRF Assignment by a AAA Server Example 195
Additional References 195
Feature Information for Easy VPN Server 197
Glossary 199
Contents
Easy VPN Configuration Guide, Cisco IOS Release 12.4x
Cisco Easy VPN Remote
This document provides information on configuring and monitoring the Cisco Easy VPN Remote featureto create IPsec Virtual Private Network (VPN) tunnels between a supported router and an Easy VPNserver (Cisco IOS router, VPN 3000 concentrator, or Cisco PIX Firewall) that supports this form of IPsecencryption and decryption.
• Finding Feature Information, page 1• Prerequisites for Cisco Easy VPN Remote, page 1• Restrictions for Cisco Easy VPN Remote, page 2• Information About Cisco Easy VPN Remote, page 4• How to Configure Cisco Easy VPN Remote, page 37• Configuration Examples for Cisco Easy VPN Remote, page 70• Additional References, page 101• Feature Information for Easy VPN Remote, page 105• Glossary, page 109
Finding Feature InformationYour software release may not support all the features documented in this module. For the latest featureinformation and caveats, see the release notes for your platform and software release. To find informationabout the features documented in this module, and to see a list of the releases in which each feature issupported, see the Feature Information Table at the end of this document.
Use Cisco Feature Navigator to find information about platform support and Cisco software image support.To access Cisco Feature Navigator, go to www.cisco.com/go/cfn. An account on Cisco.com is not required.
Prerequisites for Cisco Easy VPN RemoteCisco Easy VPN Remote Feature
• A Cisco 800 series router running Cisco IOS Release 12.2(15)T, 12.3(2)T, 12.3(4)T, 12.3(7)T, or12.3(7)XR2 configured as a Cisco Easy VPN remote.
• A Cisco 1700 series router running Cisco IOS Release 12.2(15)T, 12.3(2)T, 12.3(4)T, 12.3(7)T, or12.3(7)XR, configured as a Cisco Easy VPN remote.
• A Cisco 1800 series fixed configuration router running Cisco IOS Release 12.3(8)YI.• A Cisco uBR905 or Cisco uBR925 cable access router running Cisco IOS Release 12.2(15)T,
configured as a Cisco Easy VPN remote.
Easy VPN Configuration Guide, Cisco IOS Release 12.4 1
• Another Cisco router or VPN concentrator that supports the Cisco Easy VPN Server feature and that isconfigured as a Cisco IOS Easy VPN server. See the “Prerequisites for Cisco Easy VPN Remote, page 1” section for a detailed list.
• A Dynamic Host Configuration Protocol (DHCP) server pool must be configured, for details see theDHCP Features Roadmap.
• An Easy VPN Server must be configured, for details see Easy VPN Server.• Optionally, an Easy VPN Server on a Cisco PIX Firewall can be configured, for details see Easy VPN
Server.
Reactivate Primary Peer Feature
• An existing Easy VPN remote configuration can be enhanced to accommodate the Reactivate PrimaryPeer feature using the peer command (and default keyword) and the idle-time command. After thetunnel between the Easy VPN remote and a nondefault peer is working, the Reactivate Primary Peerfeatures takes effect, that is, the Easy VPN remote periodically tries to check the connectivity with theprimary peer. Any time the Easy VPN remote detects that the link is working, the Easy VPN remotetears down the existing connection and brings up the tunnel with the primary peer.
Restrictions for Cisco Easy VPN RemoteRequired Easy VPN Servers
The Cisco Easy VPN Remote feature requires that the destination peer be a Cisco IOS Easy VPN server orVPN concentrator that supports the Cisco Easy VPN Server feature. At the time of publication, servers orconcentrators that support this feature include the following platforms when running the indicated softwarereleases:
• Cisco 806, Cisco 826, Cisco 827, Cisco 828, Cisco 831, Cisco 836, and Cisco 837 routers--Cisco IOSRelease 12.2(8)T or later release. Cisco 800 series routers are not supported in Cisco IOS Release12.3(7)XR, but they are supported in Cisco IOS Release 12.3(7)XR2.
• Cisco 870 series--Cisco IOS Release 12.3(8)YI1.• Cisco 1700 series--Cisco IOS Release 12.2(8)T or later release.• Cisco 1800 series fixed configuration router--Cisco IOS Release 12.3(8)YI.• Cisco 1812 router--Cisco IOS Release 12.3(8)YH.• Cisco 2600 series--Cisco IOS Release 12.2(8)T or later release.• Cisco 3620--Cisco IOS Release 12.2(8)T or later release.• Cisco 3640--Cisco IOS Release 12.2(8)T or later release.• Cisco 3660--Cisco IOS Release 12.2(8)T or later release.• Cisco 7100 series VPN routers--Cisco IOS Release 12.2(8)T or later release.• Cisco 7200 series routers--Cisco IOS Release 12.2(8)T or later release.• Cisco 7500 series routers--Cisco IOS Release 12.2(8)T or later release.• Cisco PIX 500 series--Software Release 6.2 or later release.• Cisco VPN 3000 series--Software Release 3.11 or later release.
Only ISAKMP Policy Group 2 Supported on Easy VPN Servers
The Unity Protocol supports only Internet Security Association Key Management Protocol (ISAKMP)policies that use group 2 (1024-bit Diffie-Hellman) Internet Key Exchange (IKE) negotiation, so the EasyVPN server being used with the Cisco Easy VPN Remote feature must be configured for a group 2
Cisco Easy VPN Remote Restrictions for Cisco Easy VPN Remote
Easy VPN Configuration Guide, Cisco IOS Release 12.42
ISAKMP policy. The Easy VPN server cannot be configured for ISAKMP group 1 or group 5 when beingused with a Cisco Easy VPN client.
Transform Sets Supported
To ensure a secure tunnel connection, the Cisco Easy VPN Remote feature does not support transform setsthat provide encryption without authentication (ESP-DES and ESP-3DES) or transform sets that provideauthentication without encryption (ESP-NULL ESP-SHA-HMAC and ESP-NULL ESP-MD5-HMAC).
Note The Cisco Unity Client Protocol does not support Authentication Header (AH) authentication, butEncapsulation Security Protocol (ESP) is supported.
Dial Backup for Easy VPN Remotes
Line-status-based backup is not supported in this feature.
Network Address Translation Interoperability Support
Network Address Translation (NAT) interoperability is not supported in client mode with split tunneling.
Multicast and Static NAT
Multicast and static NAT are supported only for Easy VPN remotes using dynamic virtual tunnel interfaces(DVTIs).
Virtual IPsec Interface Restrictions
• For the Virtual IPsec Interface Support feature to work, virtual templates support is needed.• If you are using a virtual tunnel interface on the Easy VPN remote device, it is recommended that you
configure the server for a virtual tunnel interface.
Dual Tunnel Support
The following restrictions apply if you are using dual tunnels that share common inside and outsideinterfaces:
• If dual tunnels are configured, one of the tunnels should have a split tunnel configured on the server.• Web Intercept can be configured for only one of the tunnels. Web Intercept should not be used for the
voice tunnel.• Web Intercept cannot be used for IP phones until authorization proxy becomes aware of how to bypass
the IP phone.• Some features, such as Pushing a Configuration URL Through a Mode-Configuration Exchange, can
be used only through a single tunnel.
cTCP Support on Easy VPN Clients
• cTCP listens on only up to 10 ports.• If there are other applications registered for the port on which cTCP is enabled, those applications will
not work.
Cisco Easy VPN RemoteRestrictions for Cisco Easy VPN Remote
Easy VPN Configuration Guide, Cisco IOS Release 12.4 3
Universal Client Mode Using DHCP
• The Easy VPN Remote feature does not support universal client mode using DHCP.
Local-Traffic Triggered Activation
This feature helps to set up the Easy VPN connection with locally generated interesting traffic.
Preconditions
• Easy VPN should be configured in Connect ACL mode.• The local traffic feature will be enabled only when at least one inactive EasyVPN tunnel is in connect
ACL mode.• The local traffic feature will be automatically disabled for the following conditions: all the Easy VPN
tunnels in Connect ACL mode are active, and when none of the VPN client configuration are inConnect ACL mode.
Cascaded ACLs
Cascaded ACLs are used to add new networks in the Easy VPN interest list. None of the entries in ACLshould match the inside interface network. If a match occurs, Easy VPN fails to create NAT rules and,hence, packets will not be translated by Easy VPN.
Information About Cisco Easy VPN Remote• Benefits of the Cisco Easy VPN Remote Feature, page 4• Cisco Easy VPN Remote Overview, page 5• Modes of Operation, page 5• Authentication with Cisco Easy VPN Remote, page 8• Tunnel Activation Options, page 17• Dead Peer Detection Stateless Failover Support, page 18• Cisco Easy VPN Remote Features, page 19• Easy VPN Server on a VPN 3000 Series Concentrator, page 34
Benefits of the Cisco Easy VPN Remote Feature• Allows dynamic configuration of end-user policy, requiring less manual configuration by end users
and field technicians, thus reducing errors and further service calls.• Allows the provider to change equipment and network configurations as needed, with little or no
reconfiguration of the end-user equipment.• Provides for centralized security policy management.• Enables large-scale deployments with rapid user provisioning.• Eliminates the need for end users to purchase and configure external VPN devices.• Eliminates the need for end users to install and configure Easy VPN Client software on their PCs.• Offloads the creation and maintenance of the VPN connections from the PC to the router.• Reduces interoperability problems between the different PC-based software VPN clients, external
hardware-based VPN solutions, and other VPN applications.• Sets up a single IPsec tunnel regardless of the number of multiple subnets that are supported and the
size of the split-include list.
Benefits of the Cisco Easy VPN Remote Feature Information About Cisco Easy VPN Remote
Easy VPN Configuration Guide, Cisco IOS Release 12.44
Cisco Easy VPN Remote OverviewCable modems, xDSL routers, and other forms of broadband access provide high-performance connectionsto the Internet, but many applications also require the security of VPN connections that perform a highlevel of authentication and that encrypt the data between two particular endpoints. However, establishing aVPN connection between two routers can be complicated and typically requires tedious coordinationbetween network administrators to configure the VPN parameters of the two routers.
The Cisco Easy VPN Remote feature eliminates much of this tedious work by implementing Cisco UnityClient Protocol, which allows most VPN parameters to be defined at a Cisco IOS Easy VPN server. Thisserver can be a dedicated VPN device, such as a Cisco VPN 3000 concentrator or a Cisco PIX Firewall or aCisco IOS router that supports the Cisco Unity Client Protocol.
After the Cisco Easy VPN server has been configured, a VPN connection can be created with minimalconfiguration on an Easy VPN remote, such as a Cisco 800 series router or a Cisco 1700 series router.When the Easy VPN remote initiates the VPN tunnel connection, the Cisco Easy VPN server pushes theIPsec policies to the Easy VPN remote and creates the corresponding VPN tunnel connection.
The Cisco Easy VPN Remote feature provides for automatic management of the following details:
• Negotiating tunnel parameters, such as addresses, algorithms, and lifetime.• Establishing tunnels according to the parameters that were set.• Automatically creating the NAT or Port Address Translation (PAT) and associated access lists that are
needed, if any.• Authenticating users, that is, ensuring that users are who they say they are by way of usernames, group
names, and passwords.• Managing security keys for encryption and decryption.• Authenticating, encrypting, and decrypting data through the tunnel.
Modes of OperationThe Cisco Easy VPN Remote feature supports three modes of operation: client, network extension, andnetwork extension plus:
• Client--Specifies that NAT or PAT be done so that the PCs and other hosts at the remote end of theVPN tunnel form a private network that does not use any IP addresses in the IP address space of thedestination server.
An enhancement has been made so that the IP address that is received via mode configuration isautomatically assigned to an available loopback interface. The IPsec security associations (SAs) for this IPaddress are automatically created by Easy VPN Remote. The IP address is typically used fortroubleshooting (using ping, Telnet, and Secure Shell).
• Network extension--Specifies that the PCs and other hosts at the client end of the VPN tunnel shouldbe given IP addresses that are fully routable and reachable by the destination network over thetunneled network so that they form one logical network. PAT is not used, which allows the client PCsand hosts to have direct access to the PCs and hosts at the destination network.
• Network extension plus (mode network-plus)--Identical to network extension mode with the additionalcapability of being able to request an IP address via mode configuration and automatically assign it toan available loopback interface. The IPsec SAs for this IP address are automatically created by EasyVPN Remote. The IP address is typically used for troubleshooting (using ping, Telnet, and SecureShell).
Cisco Easy VPN Remote OverviewInformation About Cisco Easy VPN Remote
Easy VPN Configuration Guide, Cisco IOS Release 12.4 5
Note This functionality is supported only when the Cisco Easy VPN server and the Cisco Easy VPN client havethe same type of Easy VPN configuration. In other words, both must use a Legacy Easy VPNconfiguration, or both must use a DVTI configuration.
All modes of operation also optionally support split tunneling, which allows secure access to corporateresources through the VPN tunnel while also allowing Internet access through a connection to an Internetservice provider (ISP) or other service--thereby eliminating the corporate network from the path for webaccess.
• Client Mode and Network Extension Mode Scenarios, page 6
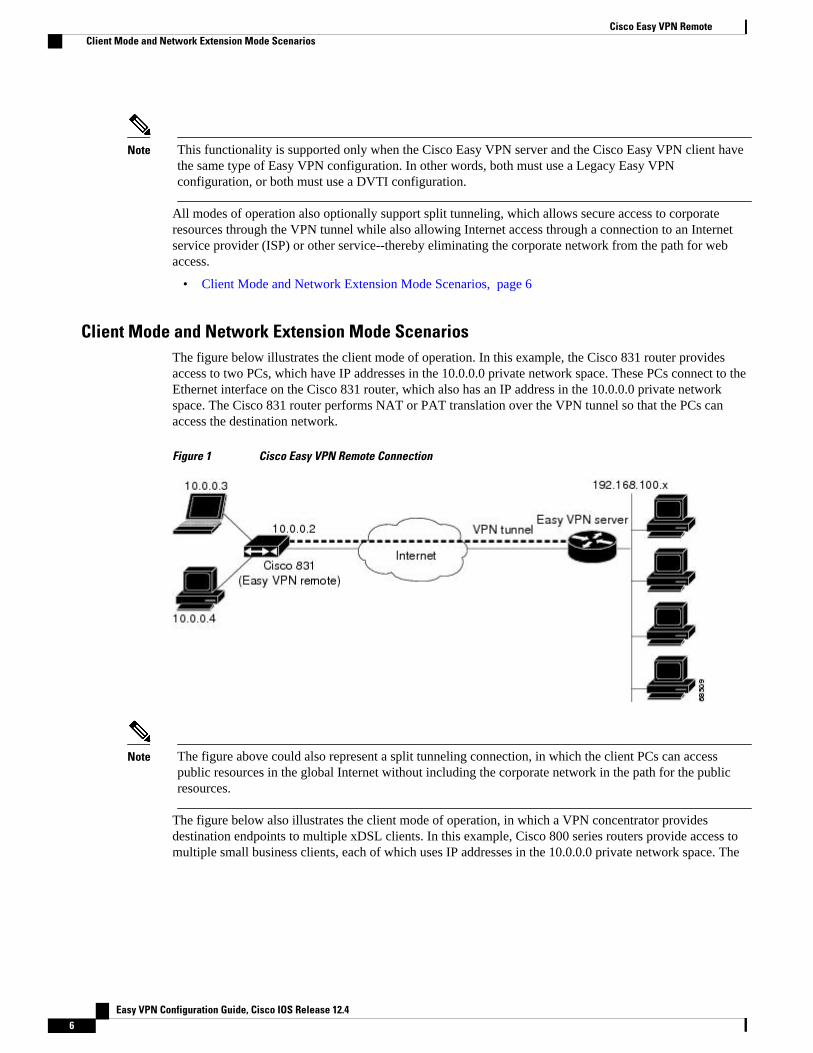
Client Mode and Network Extension Mode ScenariosThe figure below illustrates the client mode of operation. In this example, the Cisco 831 router providesaccess to two PCs, which have IP addresses in the 10.0.0.0 private network space. These PCs connect to theEthernet interface on the Cisco 831 router, which also has an IP address in the 10.0.0.0 private networkspace. The Cisco 831 router performs NAT or PAT translation over the VPN tunnel so that the PCs canaccess the destination network.
Figure 1 Cisco Easy VPN Remote Connection
Note The figure above could also represent a split tunneling connection, in which the client PCs can accesspublic resources in the global Internet without including the corporate network in the path for the publicresources.
The figure below also illustrates the client mode of operation, in which a VPN concentrator providesdestination endpoints to multiple xDSL clients. In this example, Cisco 800 series routers provide access tomultiple small business clients, each of which uses IP addresses in the 10.0.0.0 private network space. The
Cisco Easy VPN Remote Client Mode and Network Extension Mode Scenarios
Easy VPN Configuration Guide, Cisco IOS Release 12.46
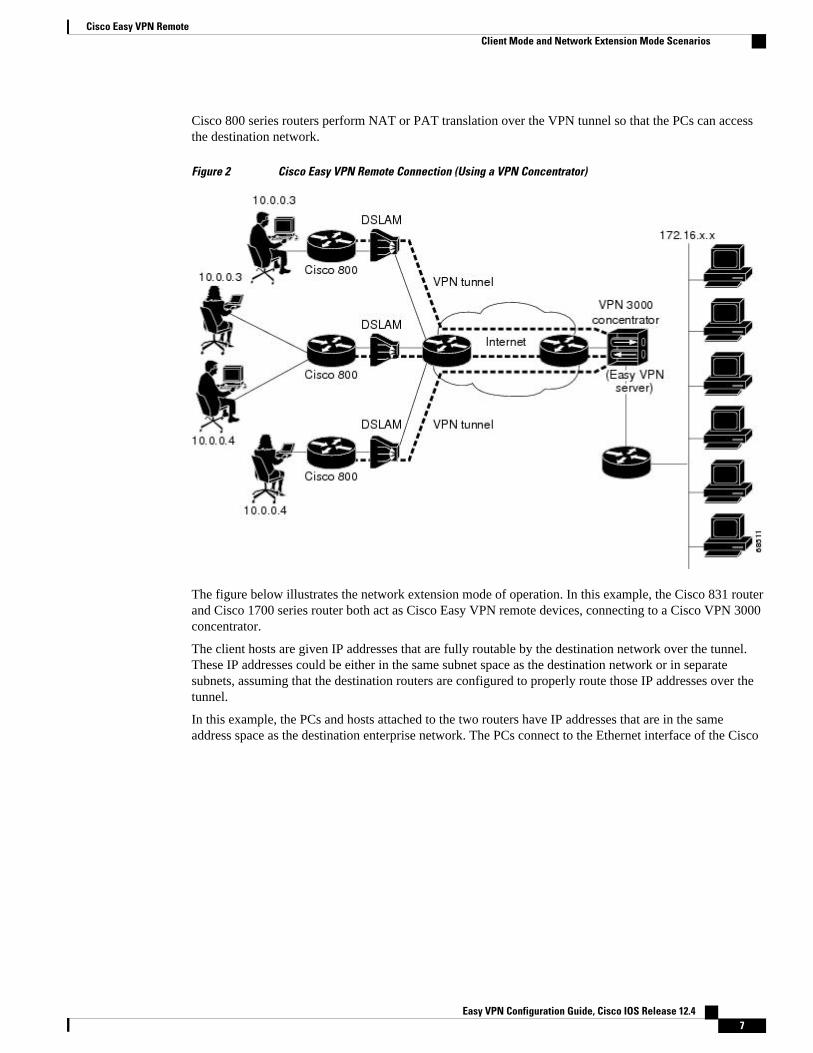
Cisco 800 series routers perform NAT or PAT translation over the VPN tunnel so that the PCs can accessthe destination network.
Figure 2 Cisco Easy VPN Remote Connection (Using a VPN Concentrator)
The figure below illustrates the network extension mode of operation. In this example, the Cisco 831 routerand Cisco 1700 series router both act as Cisco Easy VPN remote devices, connecting to a Cisco VPN 3000concentrator.
The client hosts are given IP addresses that are fully routable by the destination network over the tunnel.These IP addresses could be either in the same subnet space as the destination network or in separatesubnets, assuming that the destination routers are configured to properly route those IP addresses over thetunnel.
In this example, the PCs and hosts attached to the two routers have IP addresses that are in the sameaddress space as the destination enterprise network. The PCs connect to the Ethernet interface of the Cisco
Cisco Easy VPN RemoteClient Mode and Network Extension Mode Scenarios
Easy VPN Configuration Guide, Cisco IOS Release 12.4 7
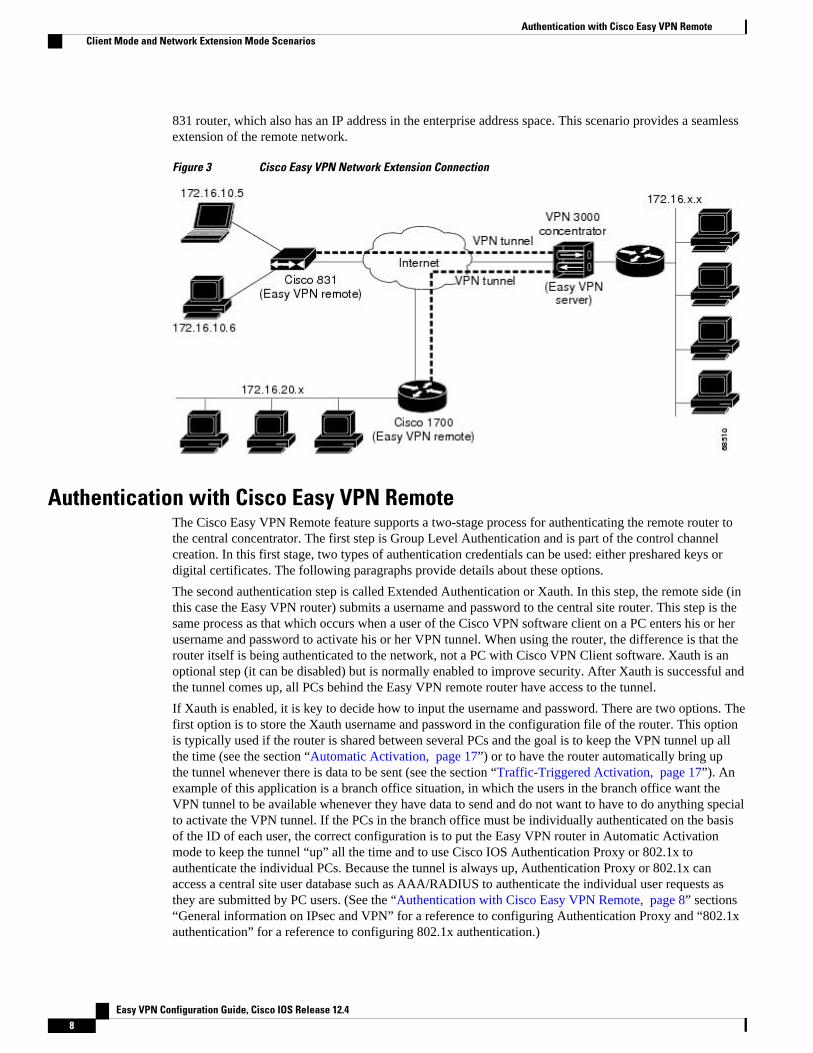
831 router, which also has an IP address in the enterprise address space. This scenario provides a seamlessextension of the remote network.
Figure 3 Cisco Easy VPN Network Extension Connection
Authentication with Cisco Easy VPN RemoteThe Cisco Easy VPN Remote feature supports a two-stage process for authenticating the remote router tothe central concentrator. The first step is Group Level Authentication and is part of the control channelcreation. In this first stage, two types of authentication credentials can be used: either preshared keys ordigital certificates. The following paragraphs provide details about these options.
The second authentication step is called Extended Authentication or Xauth. In this step, the remote side (inthis case the Easy VPN router) submits a username and password to the central site router. This step is thesame process as that which occurs when a user of the Cisco VPN software client on a PC enters his or herusername and password to activate his or her VPN tunnel. When using the router, the difference is that therouter itself is being authenticated to the network, not a PC with Cisco VPN Client software. Xauth is anoptional step (it can be disabled) but is normally enabled to improve security. After Xauth is successful andthe tunnel comes up, all PCs behind the Easy VPN remote router have access to the tunnel.
If Xauth is enabled, it is key to decide how to input the username and password. There are two options. Thefirst option is to store the Xauth username and password in the configuration file of the router. This optionis typically used if the router is shared between several PCs and the goal is to keep the VPN tunnel up allthe time (see the section “Automatic Activation, page 17”) or to have the router automatically bring upthe tunnel whenever there is data to be sent (see the section “Traffic-Triggered Activation, page 17”). Anexample of this application is a branch office situation, in which the users in the branch office want theVPN tunnel to be available whenever they have data to send and do not want to have to do anything specialto activate the VPN tunnel. If the PCs in the branch office must be individually authenticated on the basisof the ID of each user, the correct configuration is to put the Easy VPN router in Automatic Activationmode to keep the tunnel “up” all the time and to use Cisco IOS Authentication Proxy or 802.1x toauthenticate the individual PCs. Because the tunnel is always up, Authentication Proxy or 802.1x canaccess a central site user database such as AAA/RADIUS to authenticate the individual user requests asthey are submitted by PC users. (See the “Authentication with Cisco Easy VPN Remote, page 8” sections“General information on IPsec and VPN” for a reference to configuring Authentication Proxy and “802.1xauthentication” for a reference to configuring 802.1x authentication.)
Authentication with Cisco Easy VPN Remote Client Mode and Network Extension Mode Scenarios
Easy VPN Configuration Guide, Cisco IOS Release 12.48

The second option for entry of the Xauth username and password is not to store it on the router. Instead, aPC user who is connected to the router is presented with a special web page that allows the user tomanually enter the username and password (see the section “Manual Activation, page 17”). The routersends the username and password to the central site concentrator, and if the username and password arecorrect, the tunnel comes up. The typical application for this configuration is a teleworker network. Theteleworker wants to control when the tunnel is up and has to enter his or her personal user credentials(which could include one-time passwords) to activate the tunnel. Also, the network administrator may wantteleworker tunnels up only when someone is using them to conserve resources on the central concentrators.(See the section “Web-Based Activation, page 10” for details about this configuration.)
The Xauth username and password can also be manually entered from the command-line interface (CLI) ofthe router. This method is not recommended for most situations because the user must first log in to therouter (and needs a user ID on the router to do so). However, it can be useful for network administratorsduring troubleshooting.
• Use of Preshared Keys, page 9• Use of Digital Certificates, page 9• Use of Xauth, page 9• Web-Based Activation, page 10• 802.1x Authentication, page 16
Use of Preshared KeysUsing preshared keys, each peer is aware of the key of the other peer. Preshared keys are displayed inrunning configurations, so they can be seen by anyone (referred to as clear format). When a more securetype of authentication is required, Cisco software also supports another type of preshared key: theencrypted preshared key.
Using an encrypted preshared key for authentication allows you to securely store plain-text passwords intype 6 (encrypted) format in NVRAM. A group preshared key can be preconfigured on both VPN-tunnelpeers. The encrypted form of the keyword can be seen in the running configuration, but the actual keywordis not visible. (For more information about encrypted preshared keys, see Encrypted Preshared Key.)
Use of Digital CertificatesDigital certificates provide for the support of Rivest, Shamir, and Adelman (RSA) signatures on Easy VPNremote devices. The support is provided through a RSA certificate that can be stored on or off the remotedevice.
Note The recommended timeout for Easy VPN using digital certificates is 40 seconds.
For more information about digital certificates, see the Easy VPN Remote RSA Signature Support featureguide, Release 12.3(7)T1.
Use of XauthXauth is an additional level of authentication that can be used. Xauth is applicable when either grouppreshared keys or digital certificates are used. Xauth credentials can be entered using a web interfacemanager, such as Security Device Manager (SDM), or using the CLI. (See the section “Cisco Easy VPNRemote Web Managers, page 23.”)
The Save Password feature allows the Xauth username and password to be saved in the Easy VPN Remoteconfiguration so that you are not required to enter the username and password manually. One-Time
Cisco Easy VPN RemoteUse of Preshared Keys
Easy VPN Configuration Guide, Cisco IOS Release 12.4 9
Passwords (OTPs) are not supported by the Save Password feature and must be entered manually whenXauth is requested. The Easy VPN server must be configured to “Allow Saved Passwords.” (For moreinformation about how to configure the Save Password feature, see the section “Dead Peer DetectionPeriodic Message Option, page 24.”)
Xauth is controlled by the Easy VPN server. When the Cisco IOS Easy VPN server requests Xauthauthentication, the following messages are displayed on the console of the router:
EZVPN: Pending XAuth Request, Please enter the following command:crypto ipsec client ezvpn xauth
When you see this message, you can provide the necessary user ID, password, and other information byentering the crypto ipsec client ezvpn connect command and responding to the prompts that follow.
The recommended Xauth timeout is 50 seconds or fewer.
Note The timeout for entering the username and password is determined by the configuration of the Cisco IOSEasy VPN server. For servers running Cisco IOS software, this timeout value is specified by the cryptoisakmp xauth timeout command.
Web-Based ActivationWeb-Based Activation provides a user-friendly method for a remote teleworker to authenticate the VPNtunnel between his or her remote Easy VPN router and the central site router. This feature allowsadministrators to set up their remote LANs so that the initial HTTP request that is coming from any of theremote PCs is intercepted by the remote Easy VPN router. A login page is returned to the user, whereby theuser may enter credentials to authenticate the VPN tunnel. After the VPN tunnel comes up, all users behindthis remote site can access the corporate LAN without being reprompted for the username and password.Alternatively, the user may choose to bypass the VPN tunnel and connect only to the Internet, in whichcase a password is not required.
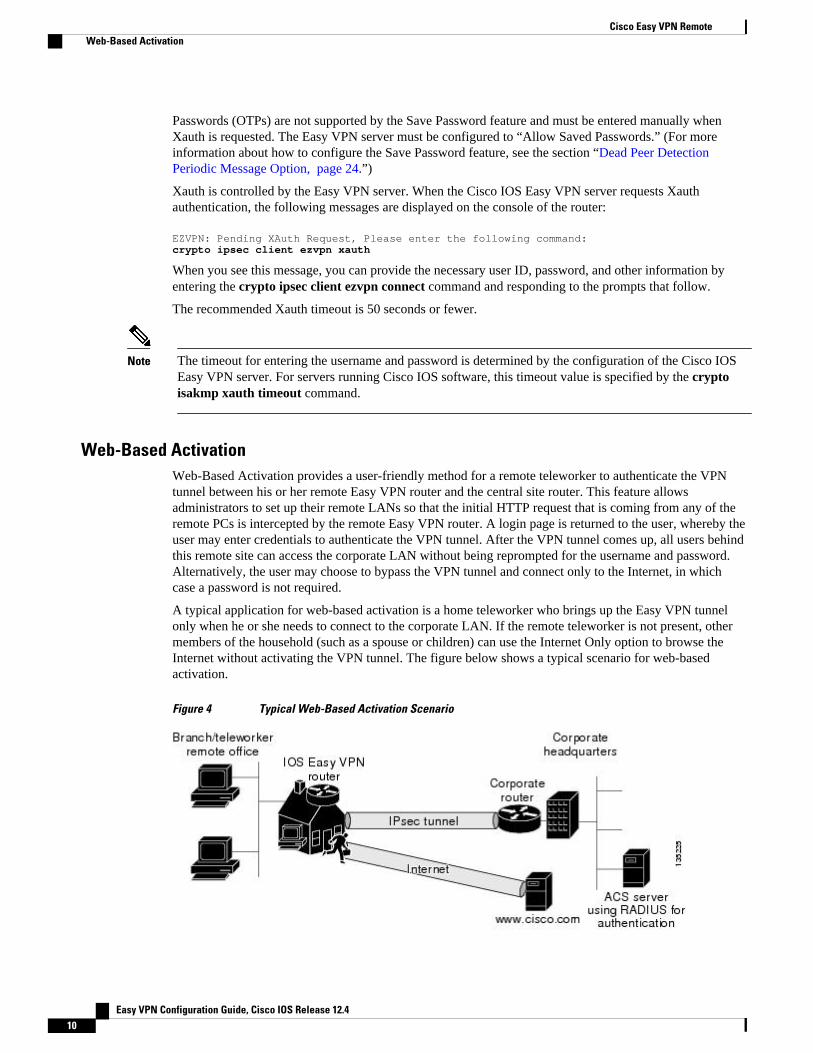
A typical application for web-based activation is a home teleworker who brings up the Easy VPN tunnelonly when he or she needs to connect to the corporate LAN. If the remote teleworker is not present, othermembers of the household (such as a spouse or children) can use the Internet Only option to browse theInternet without activating the VPN tunnel. The figure below shows a typical scenario for web-basedactivation.
Figure 4 Typical Web-Based Activation Scenario
Cisco Easy VPN Remote Web-Based Activation
Easy VPN Configuration Guide, Cisco IOS Release 12.410
Note Entering the Xauth credentials brings up the tunnel for all users who are behind this remote site. After thetunnel is up, any additional PCs that are behind the remote site do not get prompted for Xauth credentials.Web-Based Activation is an authentication to bring up the VPN tunnel for all remote PCs and cannot beconsidered individual user authentication. Individual user authentication for VPN tunnel access is availableusing the Cisco IOS Authentication Proxy or 802.1x features, which can be configured on the remote EasyVPN router. (See the “Web-Based Activation, page 10” sections “General information on IPsec and VPN”for a reference to configuring Authentication Proxy and “802.1x authentication” for a reference toconfiguring 802.1x authentication.)
To configure web-based activation, see the section “Configuring Web-Based Activation, page 63.”
The following sections show the various screen shots that a remote teleworker sees when the Web-BasedActivation feature is turned on:
• Web-Based Activation Portal Page, page 11
• VPN Authentication Bypass, page 12
• VPN Tunnel Authentication, page 14
• Successful Authentication, page 14
• Deactivation, page 15
Web-Based Activation Portal Page
The figure below is an example of a web-based activation portal page. The user may choose to connect tothe corporate LAN by clicking Connect Now or he or she may choose to connect only to the Internet byclicking Internet Only.
Cisco Easy VPN RemoteWeb-Based Activation Portal Page
Easy VPN Configuration Guide, Cisco IOS Release 12.4 11
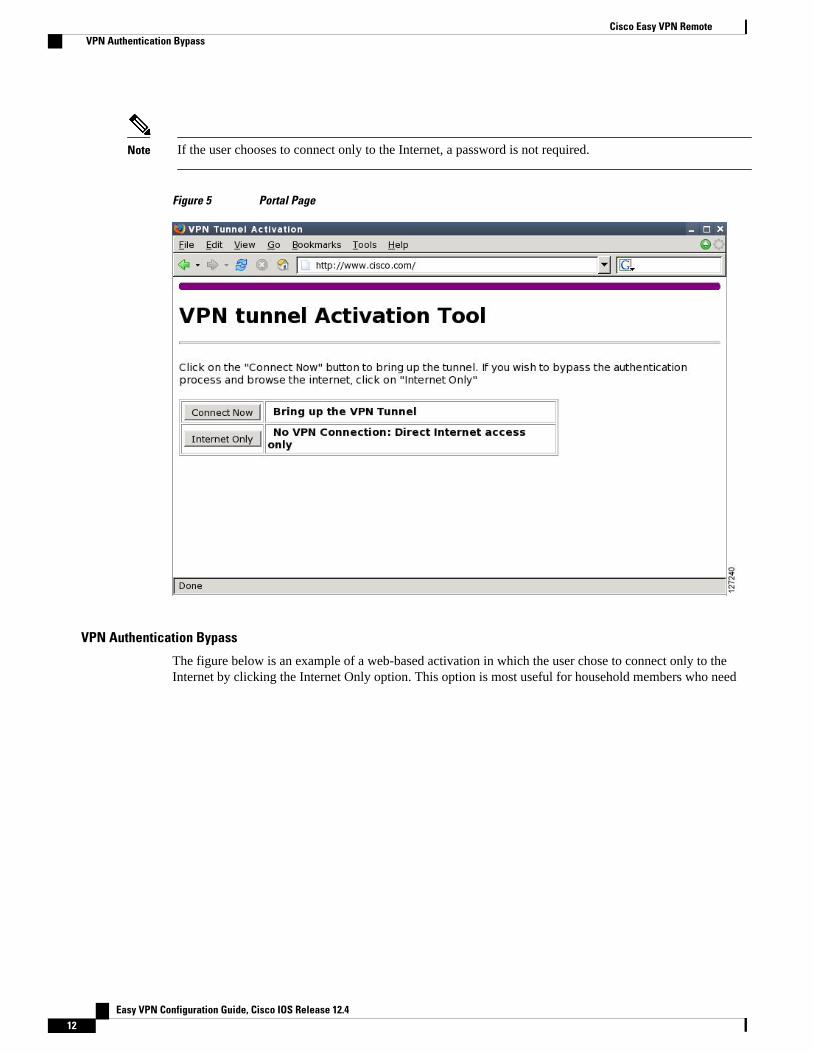
Note If the user chooses to connect only to the Internet, a password is not required.
Figure 5 Portal Page
VPN Authentication Bypass
The figure below is an example of a web-based activation in which the user chose to connect only to theInternet by clicking the Internet Only option. This option is most useful for household members who need
Cisco Easy VPN Remote VPN Authentication Bypass
Easy VPN Configuration Guide, Cisco IOS Release 12.412
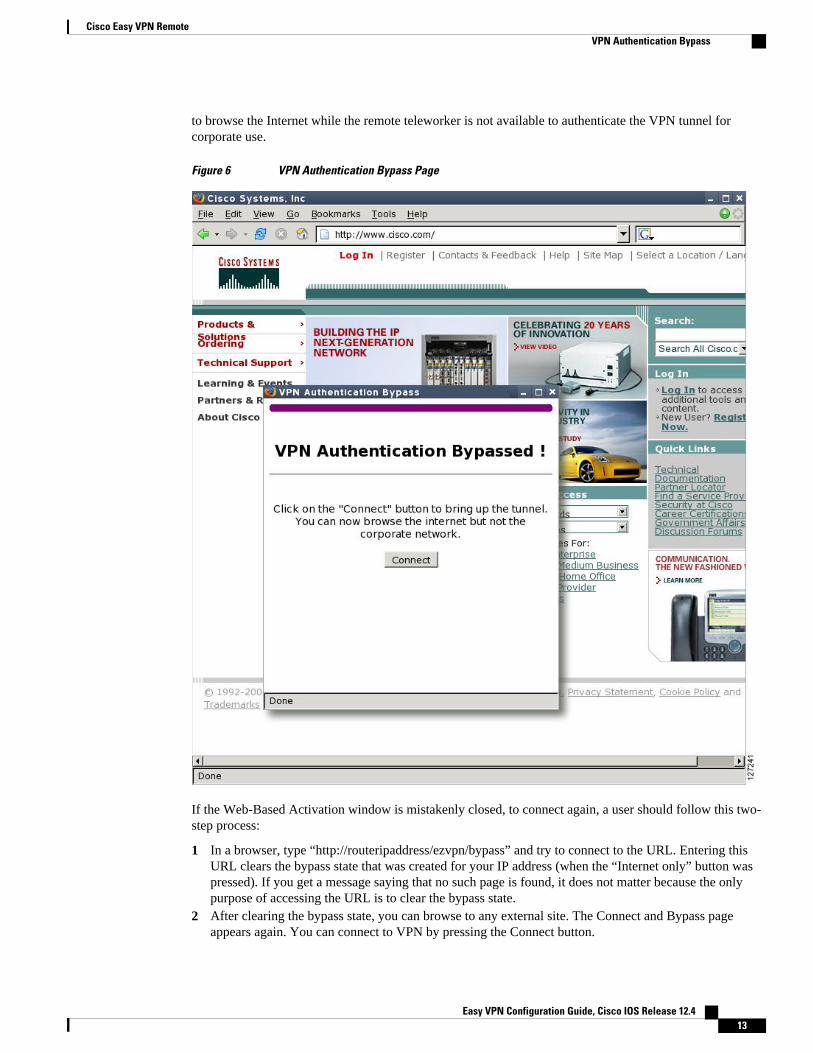
to browse the Internet while the remote teleworker is not available to authenticate the VPN tunnel forcorporate use.
Figure 6 VPN Authentication Bypass Page
If the Web-Based Activation window is mistakenly closed, to connect again, a user should follow this two-step process:
1 In a browser, type “http://routeripaddress/ezvpn/bypass” and try to connect to the URL. Entering thisURL clears the bypass state that was created for your IP address (when the “Internet only” button waspressed). If you get a message saying that no such page is found, it does not matter because the onlypurpose of accessing the URL is to clear the bypass state.
2 After clearing the bypass state, you can browse to any external site. The Connect and Bypass pageappears again. You can connect to VPN by pressing the Connect button.
Cisco Easy VPN RemoteVPN Authentication Bypass
Easy VPN Configuration Guide, Cisco IOS Release 12.4 13
VPN Tunnel Authentication
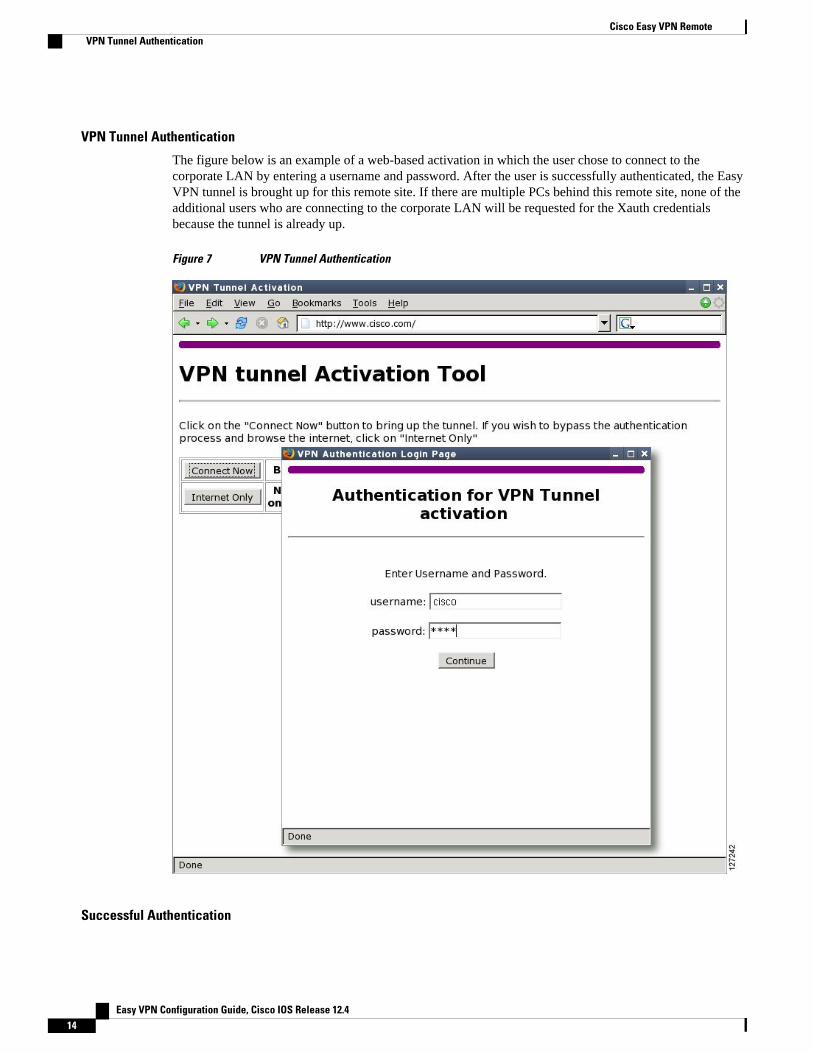
The figure below is an example of a web-based activation in which the user chose to connect to thecorporate LAN by entering a username and password. After the user is successfully authenticated, the EasyVPN tunnel is brought up for this remote site. If there are multiple PCs behind this remote site, none of theadditional users who are connecting to the corporate LAN will be requested for the Xauth credentialsbecause the tunnel is already up.
Figure 7 VPN Tunnel Authentication
Successful Authentication
Cisco Easy VPN Remote VPN Tunnel Authentication
Easy VPN Configuration Guide, Cisco IOS Release 12.414
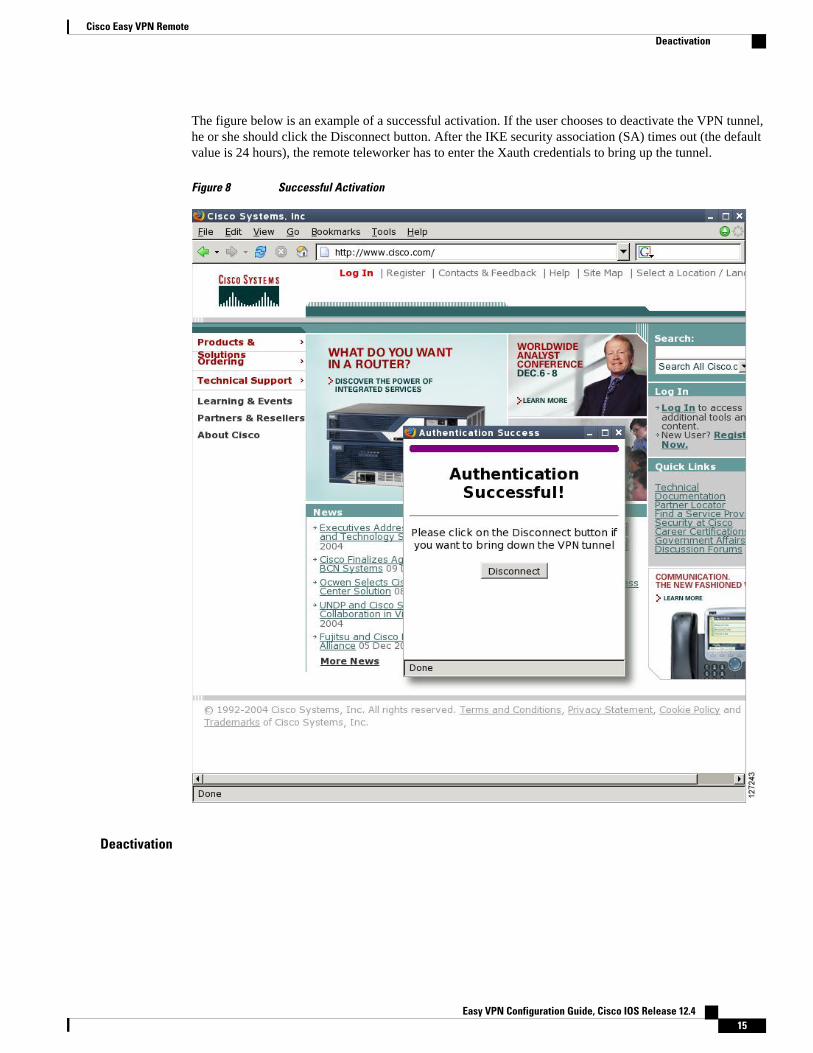
The figure below is an example of a successful activation. If the user chooses to deactivate the VPN tunnel,he or she should click the Disconnect button. After the IKE security association (SA) times out (the defaultvalue is 24 hours), the remote teleworker has to enter the Xauth credentials to bring up the tunnel.
Figure 8 Successful Activation
Deactivation
Cisco Easy VPN RemoteDeactivation
Easy VPN Configuration Guide, Cisco IOS Release 12.4 15
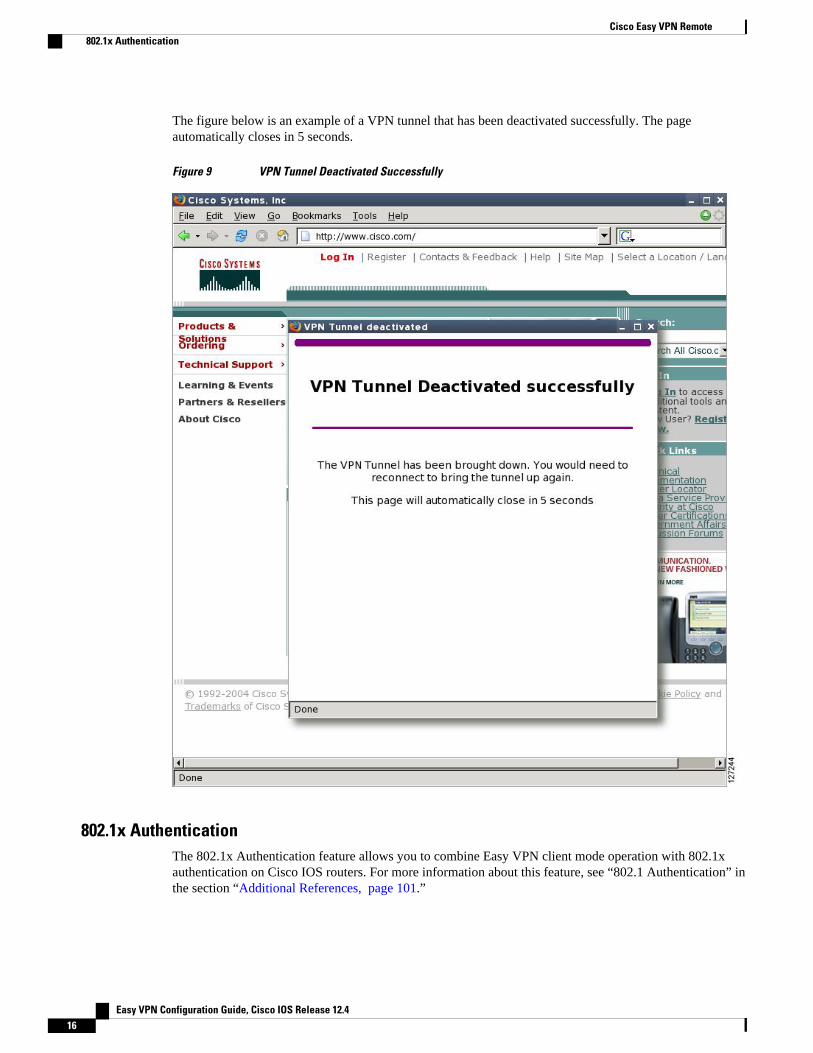
The figure below is an example of a VPN tunnel that has been deactivated successfully. The pageautomatically closes in 5 seconds.
Figure 9 VPN Tunnel Deactivated Successfully
802.1x AuthenticationThe 802.1x Authentication feature allows you to combine Easy VPN client mode operation with 802.1xauthentication on Cisco IOS routers. For more information about this feature, see “802.1 Authentication” inthe section “Additional References, page 101.”
Cisco Easy VPN Remote 802.1x Authentication
Easy VPN Configuration Guide, Cisco IOS Release 12.416
Tunnel Activation OptionsThere are three tunnel activation options:
• Automatic activation• Manual activation• Traffic-triggered activation (not available in Cisco IOS Release 12.3(11)T)
Tunnel connect and disconnect options are available with SDM.
• Automatic Activation, page 17
• Manual Activation, page 17
• Traffic-Triggered Activation, page 17
Automatic ActivationThe Cisco Easy VPN tunnel is automatically connected when the Cisco Easy VPN Remote feature isconfigured on an interface. If the tunnel times out or fails, the tunnel automatically reconnects and retriesindefinitely.
To specify automatic tunnel control on a Cisco Easy VPN remote device, you need to configure the cryptoipsec client ezvpn command and then the connect auto command. However, you do not need to use thesetwo commands when you are creating a new Easy VPN remote configuration because the default is“automatic.”
To disconnect or reset a particular tunnel, you should use the clear crypto ipsec client ezvpn command, oryou can use SDM.
Manual ActivationThe Cisco Easy VPN Remote software implements manual control of the Cisco Easy VPN tunnels so thatyou can establish and terminate the tunnel on demand.
To specify manual tunnel control on a Cisco Easy VPN remote device, you need to input the crypto ipsecclient ezvpn command and then the connect manual command.
The manual setting means that the Cisco Easy VPN remote will wait for a command before attempting toestablish the Cisco Easy VPN Remote connection. When the tunnel times out or fails, subsequentconnections will also have to wait for the command.
If the configuration is manual, the tunnel is connected only after you issue the command crypto ipsecclient ezvpn connect .
To disconnect or reset a particular tunnel, you should use the clear crypto ipsec client ezvpn command, oryou can use SDM.
See the “Configuring Manual Tunnel Control, page 42” section for specific information on how toconfigure manual control of a tunnel.
Traffic-Triggered Activation
Tunnel Activation OptionsAutomatic Activation
Easy VPN Configuration Guide, Cisco IOS Release 12.4 17
Note This feature is not available in Cisco IOS Release 12.3(11)T.
The Traffic-Triggered Activation feature is recommended for transactional-based VPN applications. It isalso recommended for use with the Easy VPN dial backup feature for the backup Easy VPN configurationso that backup is activated only when there is traffic to send across the tunnel.
To use Access Control List (ACL) tunnel control, you must first describe the traffic that is considered“interesting.” For more information about ACLs, refer to the “ IP Access List Overview ” chapter of theCisco IOS Security Configuration Guide: Securing the Data Plane . To actually configure an ACL-triggered tunnel, use the crypto ipsec client ezvpn command with the connect acl command.
Dead Peer Detection Stateless Failover SupportTwo options are available for configuring Dead Peer Detection Stateless Failover Support:
• Backup Server List Local Configuration• Backup Server List Auto Configuration
• Backup Server List Local Configuration, page 18
• Backup Server List AutoConfiguration, page 18
Backup Server List Local ConfigurationBackup Server List Local Configuration allows users to enter multiple peer statements. With this featureconfigured, if the client is connecting to a peer and the negotiation fails, Easy VPN fails over to the nextpeer. This failover continues through the list of peers. When the last peer is reached, Easy VPN rolls overto the first peer. The IKE and IPsec SAs to the previous peer are deleted. Multiple peer statements work forboth IP addresses as well as for hostnames. Setting or unsetting the peer statements will not affect the orderof the peer statements.
To use this feature, use the peer command after the crypto ipsec client ezvpn command.
Backup Server List AutoConfigurationEasy VPN remote that is based on Cisco IOS software can have up to 10 backup servers configured forredundancy. The Backup Server feature allows the Easy VPN server to “push” the backup server list to theEasy VPN remote.
The backup list allows the administrator to control the backup servers to which a specific Easy VPN remotewill connect in case of failure, retransmissions, or dead peer detection (DPD) messages.
Note Before the backup server feature can work, the backup server list has to be configured on the server.
How a Backup Server Works
If remote A goes to server A and the connection fails, remote A goes to server B. If server B has a backuplist configured, that list will override the backup server list of server A. If the connection to server B fails,remote A will continue through the backup servers that have been configured.
Dead Peer Detection Stateless Failover Support Backup Server List Local Configuration
Easy VPN Configuration Guide, Cisco IOS Release 12.418
Note If you are in auto mode and you have a failure, you will transition automatically from server A to server B.However, if you are in manual mode, you have to configure the transition manually. To configure thetransition manually, use the crypto ipsec client ezvpn command with the connect keyword.
No new configuration is required at the Easy VPN remote to enable this feature. If you want to display thecurrent server, you can use the show crypto ipsec client ezvpn command. If you want to find out whichpeers were pushed by the Easy VPN server, you can use the same command.
To troubleshoot this feature, use the debug crypto ipsec client ezvpn command. If more information isneeded for troubleshooting purposes, use the debug crypto isakmp command. The show crypto ipsecclient ezvpn command may also be used for troubleshooting.
Cisco Easy VPN Remote FeaturesThe Cisco Easy VPN Remote feature is a collection of features that improves the capabilities of the CiscoEasy VPN Remote feature introduced in Cisco IOS Release 12.2(4)YA. The Cisco Easy VPN Remotefeature includes the following:
• Default Inside Interface, page 20
• Multiple Inside Interfaces, page 20
• Multiple Outside Interfaces, page 20
• VLAN Support, page 21
• Multiple Subnet Support, page 21
• NAT Interoperability Support, page 21
• Local Address Support, page 22
• Peer Hostname, page 22
• Proxy DNS Server Support, page 22
• Cisco IOS Firewall Support, page 23
• Easy VPN Remote and Server on the Same Interface, page 23
• Easy VPN Remote and Site to Site on the Same Interface, page 23
• Cisco Easy VPN Remote Web Managers, page 23
• Dead Peer Detection Periodic Message Option, page 24
• Load Balancing, page 24
• Management Enhancements, page 24
• PFS Support, page 24
• Dial Backup, page 25
• Virtual IPsec Interface Support, page 26
• Dual Tunnel Support, page 29
• Banner, page 32
• Configuration Management Enhancements (Pushing a Configuration URL Through a Mode-Configuration Exchange), page 32
• Reactivate Primary Peer, page 32
• Identical Addressing Support, page 33
• cTCP Support on Easy VPN Clients, page 34
Cisco Easy VPN Remote FeaturesBackup Server List AutoConfiguration
Easy VPN Configuration Guide, Cisco IOS Release 12.4 19
Default Inside InterfaceEasy VPN Remote supports the autoconfiguration of the default Easy VPN inside interface for Cisco 800series routers. The interface Ethernet 0 is the default inside interface.
If you want to disable the default inside interface and configure another inside interface on the Cisco 800series router, you must configure the other inside interface first and then disable the default inside interface.You can use the following command to disable the default inside interface:
no crypto ipsec client ezvpn
name inside
If you did not configure the other inside interface first before disabling the default inside interface, you willreceive a message such as the following (see lines three and four):
Router(config)# interface ethernet0Router(config-if)# no crypto ipsec client ezvpn hw-client insideCannot remove the single inside interface unlessone other inside interface is configured
Multiple Inside InterfacesInside interface support is enhanced in the Cisco Easy VPN Remote feature to support multiple insideinterfaces for all platforms. Inside interfaces can be configured manually with the enhanced command.:
interface
interface-namecrypto ipsec client ezvpn name [outside | inside
Note Multiple inside interfaces are supported only when the Cisco Easy VPN server and the Cisco Easy VPNclient have the same type of Easy VPN configuration. In other words, both must use a Legacy Easy VPNconfiguration, or both must use a DVTI configuration.
See the “Configuring Multiple Inside Interfaces, page 45” section for information on how to configuremore than one inside interface.
Multiple inside interfaces offer the following capabilities:
• Up to eight inside interfaces are supported on the Cisco 800 and Cisco 1700 series routers.• At least one inside interface must be configured for each outside interface; otherwise, the Cisco Easy
VPN Remote feature does not establish a connection.• Adding a new inside interface or removing an existing inside interface automatically resets the Cisco
Easy VPN Remote connection (the currently established tunnel). You must reconnect a manuallyconfigured tunnel, and if Xauth is required by the Cisco Easy VPN server, the user is reprompted. Ifyou have set the Cisco Easy VPN Remote configuration to connect automatically and no Xauth isrequired, no user input is required.
• Inside interfaces that are configured or the default setting can be shown by using the show cryptoipsec client ezvpn command.
Multiple Outside InterfacesThe Easy VPN Remote feature supports one Easy VPN tunnel per outside interface. You can configure upto four Easy VPN tunnels per Cisco router. Each Easy VPN tunnel can have multiple inside interfaces
Cisco Easy VPN Remote Default Inside Interface
Easy VPN Configuration Guide, Cisco IOS Release 12.420
configured, but they cannot overlap with another Easy VPN tunnel unless dial backup is configured. Formore information about dial backup, see the section “Dial Backup, page 25.” To configure multipleoutside interfaces, use the crypto ipsec client ezvpn command and outside keyword.
To disconnect or clear a specific tunnel, the clear crypto ipsec client ezvpn command specifies the IPsecVPN tunnel name. If there is no tunnel name specified, all existing tunnels are cleared.
See the “Configuring Multiple Outside Interfaces, page 47” section for more information on configuringmore than one outside interface.
VLAN SupportVLAN support allows VLANs to be configured as valid Easy VPN inside interfaces, which was notpossible before Cisco IOS Release 12.3(7)XR. With this feature, SAs can be established at connectionusing the VLAN subnet address or mask as a source proxy.
For the inside interface support on VLANs to work, you must define each VLAN as an Easy VPN insideinterface. In addition, IPsec SAs should be established for each inside interface in the same manner as forother inside interfaces. For more information about inside and outside interfaces, see the sections “MultipleInside Interfaces, page 20” and “Multiple Outside Interfaces, page 20.”
Inside interface support on VLANs is supported only on Cisco routers that support VLANs.
Multiple Subnet SupportFor situations in which you have multiple subnets connected to an Easy VPN inside interface, you canoptionally include these subnets in the Easy VPN tunnel. First, you must specify the subnets that should beincluded by defining them in an ACL. To configure an ACL, see “Access control lists, configuring” in the“Additional References, page 101” section. Next, you have to use the acl command after the crypto ipsecclient ezvpn (global) command to link your ACL to the Easy VPN configuration. Easy VPN Remote willautomatically create the IPsec SAs for each subnet that is defined in the ACL as well as for the subnets thatare defined on the Easy VPN inside interface.
Note Multiple subnets are not supported in client mode.
Note This functionality is supported only when the Cisco Easy VPN server and the Cisco Easy VPN client havethe same type of Easy VPN configuration. In other words, both must use a Legacy Easy VPNconfiguration, or both must use a DVTI configuration.
NAT Interoperability SupportCisco Easy VPN Remote supports interoperability with NAT. You can have a NAT configuration and aCisco Easy VPN Remote configuration that coexist. When an IPsec VPN tunnel is down, the NATconfiguration works.
In the Cisco Easy VPN Remote feature, the router automatically restores the previous NAT configurationwhen the IPsec VPN tunnel is torn down. The user-defined access lists are not disturbed. Users cancontinue to access nontunnel areas of the Internet when the tunnel times out or disconnects.
Cisco Easy VPN RemoteVLAN Support
Easy VPN Configuration Guide, Cisco IOS Release 12.4 21

Note NAT interoperability is not supported in client mode with split tunneling.
Local Address SupportThe Cisco Easy VPN Remote feature is enhanced to support an additional local-address attribute. Thisattribute specifies which interface is used to determine the IP address that is used to source the Easy VPNRemote tunnel traffic. After specifying the interface with the local-address command, you can manuallyassign a static IP address to the interface or use the cable-modem dhcp-proxy interface command toautomatically configure the specified interface with a public IP address. See the “Configuring Proxy DNSServer Support, page 50” section for configuration information.
Local Address Support is available for all platforms, but it is more applicable to the Cisco uBR905 andCisco uBR925 cable access routers in conjunction with the cable-modem dhcp-proxy interface command.Typically, the loopback interface is the interface used to source tunnel traffic for the Cisco uBR905 andCisco uBR925 cable access routers.
In a typical DOCSIS network, the Cisco uBR905 and Cisco uBR925 cable access routers are normallyconfigured with a private IP address on the cable modem interface. In the initial Cisco Easy VPN Remotefeature, a public IP address was required on the cable modem interface to support the Easy VPN remote.
In the Cisco Easy VPN Remote feature, cable providers can use the Cable DHCP Proxy feature to obtain apublic IP address and assign it to the cable modem interface, which is usually the loopback interface.
For more information on the cable-modem dhcp-proxy interface command, see the Master CommandsList at http://www.cisco.com/en/US/docs/ios/mcl/allreleasemcl/all_book.html .
Note The cable-modem dhcp-proxy interface command is supported only for the Cisco uBR905 and CiscouBR925 cable access routers.
Peer HostnameThe peer in a Cisco Easy VPN Remote configuration can be defined as an IP address or a hostname.Typically, when a peer is defined as a hostname, a DNS lookup is done immediately to get an IP address. Inthe Cisco Easy VPN Remote feature, the peer hostname operation is enhanced to support DNS entrychanges. The text string of the hostname is stored so that the DNS lookup is done at the time of the tunnelconnection, not when the peer is defined as a hostname.
See the “Configuring and Assigning the Easy VPN Remote Configuration, page 37” section forinformation on enabling the peer hostname functionality.
Proxy DNS Server SupportWhen the Easy VPN tunnel is down, the DNS addresses of the ISP or cable provider should be used toresolve DNS requests. When the WAN connection is up, the DNS addresses of the enterprise should beused.
As a way of implementing use of the DNS addresses of the cable provider when the WAN connection isdown, the router in a Cisco Easy VPN Remote configuration can be configured to act as a proxy DNSserver. The router, acting as a proxy DNS server for LAN-connected users, receives DNS queries fromlocal users on behalf of the real DNS server. The DHCP server then can send out the LAN address of the
Cisco Easy VPN Remote Local Address Support
Easy VPN Configuration Guide, Cisco IOS Release 12.422
router as the IP address of the DNS server. After the WAN connection comes up, the router forwards theDNS queries to the real DNS server and caches the DNS query records.
See the “Configuring Proxy DNS Server Support, page 50” section for information on enabling theproxy DNS server functionality.
Cisco IOS Firewall SupportThe Cisco Easy VPN Remote feature works in conjunction with Cisco IOS Firewall configurations on allplatforms.
Easy VPN Remote and Server on the Same InterfaceThis feature allows the Easy VPN remote and Easy VPN server to be supported on the same interface,making it possible to both establish a tunnel to another Easy VPN server and terminate the Easy VPNsoftware client on the same interface simultaneously. A typical application would be a geographicallyremote location for which Easy VPN Remote is being used to connect to a corporate Easy VPN server andalso to terminate local software client users.
For more information about the Easy VPN Remote and Server on the Same Interface feature, see “EasyVPN Remote and Server on the Same Interface” in the section “Additional References, page 101.”
Easy VPN Remote and Site to Site on the Same InterfaceThis feature allows the Easy VPN remote and site to site (crypto map) to be supported on the sameinterface, making it possible to both establish a tunnel to another Easy VPN server and have another site tosite on the same interface simultaneously. A typical application would be a third-party VPN serviceprovider that is managing a remote router via the site-to-site tunnel and using Easy VPN Remote to connectthe remote site to a corporate Easy VPN server.
For more information about the Easy VPN Remote and Site to Site on the Same Interface feature, see “EasyVPN Remote and Site to Site on the Same Interface” in the section “Additional References, page 101.”
Cisco Easy VPN Remote Web ManagersWeb interface managers may be used to manage the Cisco Easy VPN Remote feature. One such webinterface manager is SDM, which is supported on the Cisco 830 series, Cisco 1700 series, Cisco 2600series, Cisco 3600 series, and Cisco 3700 series routers. SDM enables you to connect or disconnect thetunnel and provides a web interface for Xauth. For more information about SDM, see Cisco SecurityDevice Manager .
A second web interface manager is the Cisco Router Web Setup (CRWS) tool, which is supported on theCisco 806 router. The CRWS provides a similar web interface as SDM.
A third web interface manager, Cisco Easy VPN Remote Web Manager, is used to manage the Cisco EasyVPN Remote feature for Cisco uBR905 and Cisco uBR925 cable access routers. You do not need access tothe CLI to manage the Cisco Easy VPN remote connection.
The web interface managers allow you to do the following:
• See the current status of the Cisco Easy VPN remote tunnel.• Connect a tunnel that is configured for manual control.• Disconnect a tunnel that is configured for manual control or reset a tunnel configured for automatic
connection.• Be prompted for Xauth information, if needed.
Cisco Easy VPN RemoteCisco IOS Firewall Support
Easy VPN Configuration Guide, Cisco IOS Release 12.4 23
See the “Troubleshooting the VPN Connection, page 68” section for more information about Cisco EasyVPN Remote Web Manager.
Dead Peer Detection Periodic Message OptionThe dead peer detection periodic message option allows you to configure your router to query the livelinessof its IKE peer at regular intervals. The benefit of this approach over the default approach (on-demand deadpeer detection) is earlier detection of dead peers. For more information about the dead peer detectionperiodic message option, see “Dead peer detection” in the section “Additional References, page 101.”
Load BalancingWhen the Cisco VPN 3000 concentrator is configured for load balancing, the VPN 3000 will accept anincoming IKE request from the VPN remote on its virtual IP address. If the device is loaded and unable toaccept more traffic, the VPN 3000 will send a notify message that contains an IP address that represents thenew IKE server to which the remote should connect. The old connection will be torn down and a newconnection established to the redirected VPN gateway.
There is no configuration required for load balancing to occur. If the VPN gateway is configured for loadbalancing, and it notifies the VPN remote that it is performing load balancing, the VPN remote has accessto the load balancing feature.
To verify whether load balancing is occurring, use the debug crypto isakmp, debug crypto ipsec clientezvpn, and show crypto ipsec commands. To troubleshoot the load balancing process, use the showcrypto ipsec command.
Management EnhancementsManagement enhancements for Easy VPN remotes allow for the remote management of the VPN remote.The feature provides for the IPv4 address to be pushed by configuration mode to the VPN remote. The IPv4address is assigned to the first available loopback interface on the VPN remote, and any existing staticallydefined loopbacks are not overridden. On disconnect, the address and loopback interface are removed fromthe list of active interfaces.
After the VPN remote is connected, the loopback interface should be accessible from the remote end of thetunnel. All PAT activities will be translated through this interface IP address.
If a loopback exists, and an IP address is associated with it and its state is unassigned, the interface is agood candidate for mode configuration address management.
Note After you assign an address to the loopback interface, if you save the configuration to NVRAM and rebootthe VPN remote, the configuration address is permanently contained in the configuration. If you saved theconfiguration to NVRAM and rebooted the VPN remote, you must enter configuration mode and removethe IP address from the loopback interface manually.
You can use the show ip interface command with the brief keyword to verify that a loopback has beenremoved. The output of this show command also displays the interface.
PFS SupportThe PFS configuration mode attribute is sent by the server if requested by the VPN remote device. If anysubsequent connection by the remote device shows that PFS is not received by the remote, PFS will not besent in IPsec proposal suites.
Cisco Easy VPN Remote Dead Peer Detection Periodic Message Option
Easy VPN Configuration Guide, Cisco IOS Release 12.424
Note The PFS group that will be proposed in the IPsec proposal suites is the same as the group used for IKE.
You can use the show crypto ipsec client ezvpn command to display the PFS group and to verify that youare using PFS.
Dial Backup
Note The Dial Backup feature is not available in Cisco IOS Release 12.3(11)T.
Dial backup for Easy VPN remotes allows you to configure a dial backup tunnel connection on your remotedevice. The backup feature is “brought up” only when real data has to be sent, eliminating the need forexpensive dialup or ISDN links that must be created and maintained even when there is no traffic.
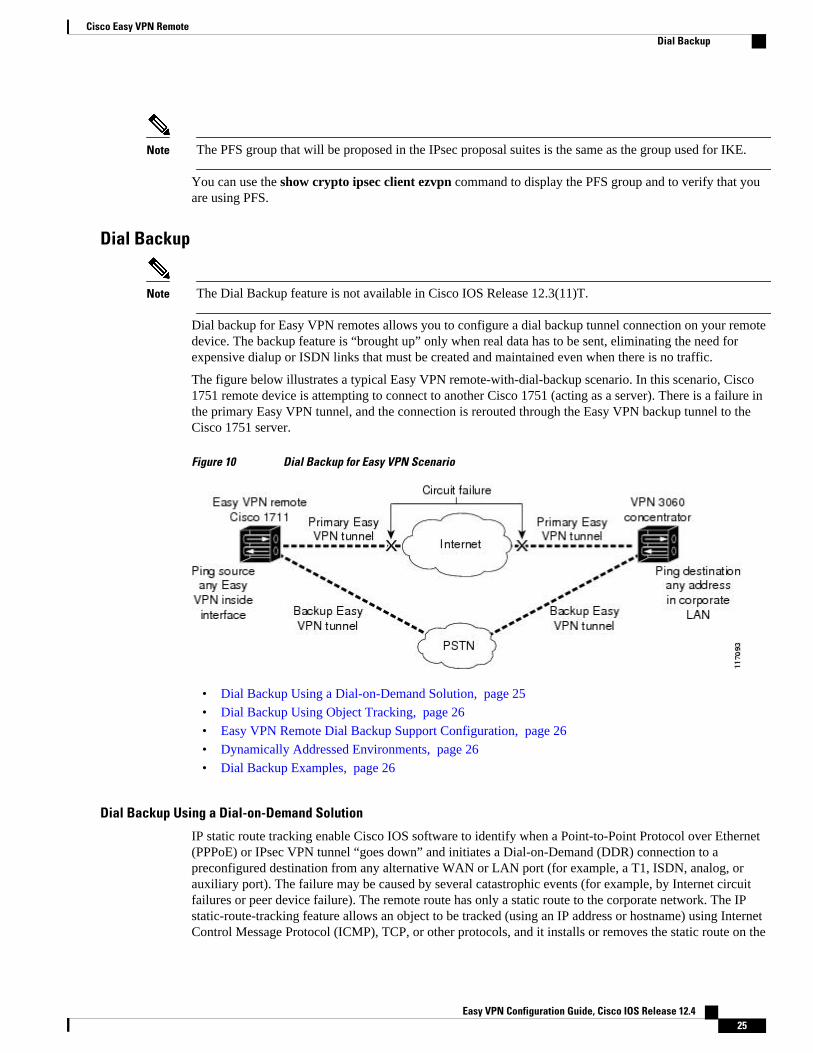
The figure below illustrates a typical Easy VPN remote-with-dial-backup scenario. In this scenario, Cisco1751 remote device is attempting to connect to another Cisco 1751 (acting as a server). There is a failure inthe primary Easy VPN tunnel, and the connection is rerouted through the Easy VPN backup tunnel to theCisco 1751 server.
Figure 10 Dial Backup for Easy VPN Scenario
• Dial Backup Using a Dial-on-Demand Solution, page 25
• Dial Backup Using Object Tracking, page 26
• Easy VPN Remote Dial Backup Support Configuration, page 26
• Dynamically Addressed Environments, page 26
• Dial Backup Examples, page 26
Dial Backup Using a Dial-on-Demand Solution
IP static route tracking enable Cisco IOS software to identify when a Point-to-Point Protocol over Ethernet(PPPoE) or IPsec VPN tunnel “goes down” and initiates a Dial-on-Demand (DDR) connection to apreconfigured destination from any alternative WAN or LAN port (for example, a T1, ISDN, analog, orauxiliary port). The failure may be caused by several catastrophic events (for example, by Internet circuitfailures or peer device failure). The remote route has only a static route to the corporate network. The IPstatic-route-tracking feature allows an object to be tracked (using an IP address or hostname) using InternetControl Message Protocol (ICMP), TCP, or other protocols, and it installs or removes the static route on the
Cisco Easy VPN RemoteDial Backup
Easy VPN Configuration Guide, Cisco IOS Release 12.4 25
basis of the state of the tracked object. If the tracking feature determines that Internet connectivity is lost,the default route for the primary interface is removed, and the floating static route for the backup interfaceis enabled.
Dial Backup Using Object Tracking
IP static route tracking must be configured for dial backup on an Easy VPN remote device to work. Theobject tracking configuration is independent of the Easy VPN remote dial backup configuration. (For moreinformation about object tracking, see the feature guide Reliable Static Routing Backup Using ObjectTracking.)
Easy VPN Remote Dial Backup Support Configuration
You can configure dial backup for your Easy VPN remote using two Easy VPN remote options that allow aconnection to the backup Easy VPN configuration and a connection to the tracking system.
• To specify the Easy VPN configuration that will be activated when backup is triggered, use thebackup command after the crypto ipsec client ezvpn (global) command.
• The Easy VPN remote device registers to the tracking system to get the notifications for change in thestate of the object. Use the track command to inform the tracking process that the Easy VPN remotedevice is interested in tracking an object, which is identified by the object number. The trackingprocess, in turn, informs the Easy VPN remote device when the state of this object changes. Thisnotification prompts the Easy VPN remote device when the state of this object changes. Thisnotification prompts the Easy VPN remote device to bring up the backup connection when the trackedobject state is DOWN. When the tracked object is UP again, the backup connection is torn down andthe Easy VPN remote device will switch back to using the primary connection.
Note Only one backup configuration is supported for each primary Easy VPN configuration. Each insideinterface must specify the primary and backup Easy VPN configuration.
Dynamically Addressed Environments
To allow dial backup to be deployed in dynamically addressed environments, use the IP SLA Pre-RoutedICMP Echo Probe feature. (For more information about this feature, see the Release Notes for Cisco 1700Series Routers for Cisco IOS Release 12.3(7)XR. To use the IP SLA Pre-Routed ICMP Echo Probe feature,use the icmp-echo command with the source-interface keyword.
Dial Backup Examples
For examples of dial backup configurations, see the section “Dial Backup Examples, page 81.”
Virtual IPsec Interface SupportThe Virtual IPsec Interface Support feature provides a routable interface to selectively send traffic todifferent Easy VPN concentrators as well as to the Internet.
Before Cisco IOS Release 12.4(4)T, at the tunnel-up/tunnel-down transition, attributes that were pushedduring the mode configuration had to be parsed and applied. When such attributes resulted in theconfigurations being applied on the interface, the existing configuration had to be overridden. With theVirtual IPsec Interface Support feature, the tunnel-up configuration can be applied to separate interfaces,making it easier to support separate features at tunnel-up time. Features that are applied to the traffic going
Cisco Easy VPN Remote Dial Backup Using Object Tracking
Easy VPN Configuration Guide, Cisco IOS Release 12.426

into the tunnel can be separate from the features that are applied to traffic that is not going through thetunnel (for example, split-tunnel traffic and traffic leaving the device when the tunnel is not up). When theEasy VPN negotiation is successful, the line protocol state of the virtual-access interface gets changed toup. When the Easy VPN tunnel goes down because the security association (SA) expires or is deleted, theline protocol state of the virtual-access interfaces changes to down.
Routes act as traffic selectors in an Easy VPN virtual interface, that is, the routes replace the access list onthe crypto map. In a virtual-interface configuration, Easy VPN negotiates a single IPsec SA if the EasyVPN server has been configured with a dynamic virtual IPsec interface. This single SA is createdirrespective of the Easy VPN mode that is configured.
After the SA is established, routes that point to the virtual-access interface are added to direct traffic to thecorporate network. Easy VPN also adds a route to the VPN concentrator so that IPsec-encapsulated packetsget routed to the corporate network. A default route that points to the virtual-access interface is added in thecase of a nonsplit mode. When the Easy VPN server “pushes” the split tunnel, the split tunnel subnetbecomes the destination to which the routes that point to the virtual access are added. In either case, if thepeer (VPN concentrator) is not directly connected, Easy VPN adds a route to the peer.
Note Most routers that run the Cisco Easy VPN Client software have a default route configured. The defaultroute that is configured should have a metric value greater than 1. The metric value must be greater than 1because Easy VPN adds a default route that has a metric value of 1. The route points to the virtual-accessinterface so that all traffic is directed to the corporate network when the concentrator does not “push” thesplit tunnel attribute.
For more information about the IPsec Virtual Tunnel Interface feature, see the document IPSec VirtualTunnel Interface (URL link provided in the “Virtual IPsec Interface Support, page 26” section of thisdocument [“General Information on IPsec and VPN”]).
The table below presents the different methods of configuring a remote device and the correspondingheadend IPsec aggregator configurations. Each row represents a way to configure a remote device. Thethird column shows the different headend configurations that can be used with IPsec interfaces. See thesecond table below for a description of terms that are used in the first table below and Virtual IPsecInterface Support, page 26.
Table 1 How Different Remote Device Configurations Interact with Various Headendsand Configurations
Remote DeviceConfigurations
Cisco IOS Headend--Using Crypto Maps
Cisco IOS Headend --Using IPsec Interfaces
VPN3000/ASA
Crypto maps • Supported. -- --
Cisco Easy VPN RemoteVirtual IPsec Interface Support
Easy VPN Configuration Guide, Cisco IOS Release 12.4 27
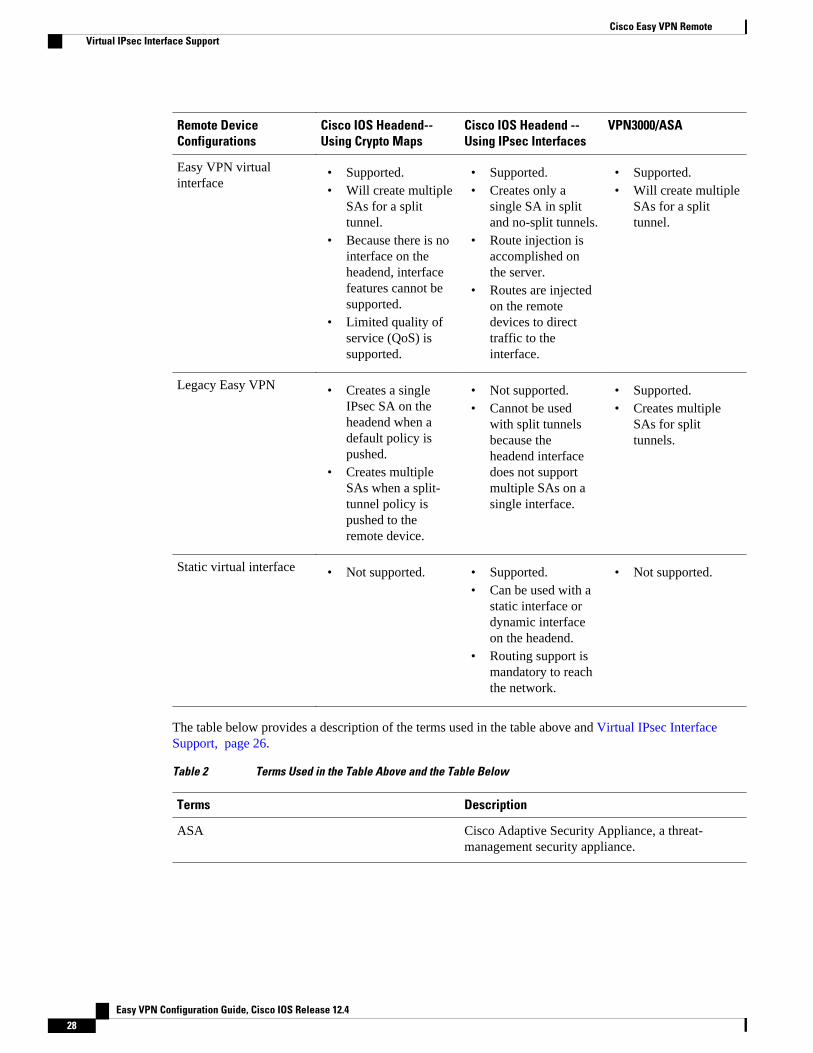
Remote DeviceConfigurations
Cisco IOS Headend--Using Crypto Maps
Cisco IOS Headend --Using IPsec Interfaces
VPN3000/ASA
Easy VPN virtualinterface
• Supported.• Will create multiple
SAs for a splittunnel.
• Because there is nointerface on theheadend, interfacefeatures cannot besupported.
• Limited quality ofservice (QoS) issupported.
• Supported.• Creates only a
single SA in splitand no-split tunnels.
• Route injection isaccomplished onthe server.
• Routes are injectedon the remotedevices to directtraffic to theinterface.
• Supported.• Will create multiple
SAs for a splittunnel.
Legacy Easy VPN • Creates a singleIPsec SA on theheadend when adefault policy ispushed.
• Creates multipleSAs when a split-tunnel policy ispushed to theremote device.
• Not supported.• Cannot be used
with split tunnelsbecause theheadend interfacedoes not supportmultiple SAs on asingle interface.
• Supported.• Creates multiple
SAs for splittunnels.
Static virtual interface • Not supported. • Supported.• Can be used with a
static interface ordynamic interfaceon the headend.
• Routing support ismandatory to reachthe network.
• Not supported.
The table below provides a description of the terms used in the table above and Virtual IPsec InterfaceSupport, page 26.
Table 2 Terms Used in the Table Above and the Table Below
Terms Description
ASA Cisco Adaptive Security Appliance, a threat-management security appliance.
Cisco Easy VPN Remote Virtual IPsec Interface Support
Easy VPN Configuration Guide, Cisco IOS Release 12.428
Terms Description
Crypto maps Commonly used for configuring IPsec tunnels. Thecrypto map is attached to an interface. For moreinformation on crypto maps, see the “CreatingCrypto Map Sets” section in the ConfiguringSecurity for VPNs with IPsec chapter of the CiscoIOS Security Configuration Guide: SecureConnectivity. (URL link provided in the VirtualIPsec Interface Support, page 26 section of thisdocument.)
Easy VPN dual tunnel remote device Two Easy VPN remote device configurations inwhich both are using a dynamic IPsec virtual tunnelinterface.
Easy VPN virtual interface remote device (EasyVPN virtual interface)
Easy VPN remote configuration that configures theusage of a dynamic IPsec virtual tunnel interface.
IPsec interface Consists of static and dynamic IPsec virtualinterfaces.
IPsec Virtual Tunnel Interface Tunnel interface that is created from a virtualtemplate tunnel interface using mode IPsec. Formore information on virtual tunnel interfaceconfigurations, see the document IPSec VirtualTunnel Interface ( URL link provided in the VirtualIPsec Interface Support, page 26 section of thisdocument [General Information on IPsec andVPN ]).
Legacy Easy VPN Easy VPN remote device configuration that usescrypto maps and does not use IPsec interfaces.
Static IPsec virtual tunnel interface (static virtualtunnel interface)
Tunnel interface used with mode IPsec thatproposes and accepts only an ipv4 any any selector.For more information on static virtual tunnelinterface configurations, see the document IPSecVirtual Tunnel Interface (URL link provided in thesection of this document [General Information onIPsec and VPN]).
VPN 3000 Cisco VPN 3000 series routers.
Dual Tunnel SupportEasy VPN now supports the ability to configure two easy VPN tunnels that have the same inside andoutside interfaces. The feature is called the Easy VPN Dual Tunnel. Configuring multiple tunnels on asingle remote device can be accomplished in a number of ways, which are listed in the table below alongwith their configuration and usage considerations. Further discussion in this section refers to only one suchmethod of configuring dual tunnels using Easy VPN tunnels that have virtual interfaces. This method willbe referred to as Dual Tunnel Support.
Cisco Easy VPN RemoteDual Tunnel Support
Easy VPN Configuration Guide, Cisco IOS Release 12.4 29
In a dual-tunnel Easy VPN setup, each Easy VPN tunnel is configured using virtual IPsec interface support,as shown in the section “Virtual IPsec Interface Support, page 26.” Each Easy VPN tunnel has its uniquevirtual interface, which is created when the Easy VPN configuration is complete.
There are two possible combinations in which the dual tunnels can be used.
• Dual Easy VPN tunnels that have one tunnel using a nonsplit tunnel policy and the other tunnel using asplit tunnel policy that has been pushed from the respective headend.
• Dual Easy VPN tunnel in which both tunnels are using an independent split tunnel policy that has beenpushed from the respective headend.
Note It is not permitted to have dual Easy VPN tunnels in which both tunnels are using a nonsplit tunnel policy.
The Easy VPN dual tunnel makes use of route injections to direct the appropriate traffic through the correctEasy VPN virtual tunnel interface. When the Easy VPN tunnel on the remote device “comes up,” it“learns” the split or nonsplit policy from the headend. The Easy VPN remote device injects routes in itsrouting table that correspond to the nonsplit networks that have been learned. If the headend pushes anonsplit tunnel policy to the Easy VPN remote device, the Easy VPN remote device installs a default routein its routing table that directs all traffic out of the Easy VPN virtual interface that corresponds to this EasyVPN tunnel. If the headend pushes split-tunnel networks to the remote device, the remote device installsspecific routes to the split networks in its routing table, directing the traffic to these networks out of thevirtual tunnel interface.
Note Dual Tunnel Easy VPN uses destination-based routing to send traffic to the respective tunnels.
Output features can be applied to this virtual interface. Examples of such output features are Cisco IOSquality of service and Cisco IOS Firewall. These features must be configured on the virtual template that isconfigured in the Easy VPN client configuration.
The table below explains how this feature should be used. See Dual Tunnel Support, page 29 for adescription of terms that are used in Dual Tunnel Support, page 29 and the table below.
Table 3 Dual Tunnel Usage Guidelines
Dual Tunnel Combinations Headends Supported Configuration and UsageConsiderations on the Easy VPNRemote Device and Headend
Two legacy Easy VPN tunnels Cisco IOS software, ASA, andVPN 3000
• Two tunnels cannot share acommon outside interface.
• Two tunnels cannot share acommon inside interface.
• The two tunnels should useseparate inside and outsideinterfaces.
• Traffic from an insideinterface that belongs to oneEasy VPN tunnel cannot bepushed into another tunnel.
Cisco Easy VPN Remote Dual Tunnel Support
Easy VPN Configuration Guide, Cisco IOS Release 12.430
Dual Tunnel Combinations Headends Supported Configuration and UsageConsiderations on the Easy VPNRemote Device and Headend
One legacy Easy VPN tunnel andone crypto map
Cisco IOS software, ASA, andVPN 3000
The crypto map can share thesame outside interface as thelegacy Easy VPN clientconfiguration. However, thebehavior of the two remotedevices depends on the mode ofEasy VPN as well as the IPsecselectors of the crypto map andthe Easy VPN remote device.This is not a recommendedcombination.
One legacy Easy VPN tunnel andone static virtual interface
Cisco IOS software Both tunnels cannot terminate onthe same headend. The staticvirtual interface remote devicetunnel has to be terminated on astatic virtual interface on theheadend router. The legacy EasyVPN remote device tunnel canterminate on the virtual tunnelinterface or crypto map that isconfigured on the headend.
One legacy Easy VPN tunnel andone Easy VPN virtual interface
Cisco IOS software, ASA, andVPN 3000
• Both tunnels cannotterminate on the sameheadend.
• The legacy Easy VPN tunneland the Easy VPN virtualinterface can share acommon inside and outsideinterface.
• An Easy VPN virtualinterface should be used onlywith split tunneling.
• Legacy Easy VPN can use asplit tunnel or no split tunnel.
• The Web-Based Activationfeature cannot be applied onboth Easy VPN tunnels.
• Using two Easy VPN virtualinterfaces is preferable tousing this combination.
Cisco Easy VPN RemoteDual Tunnel Support
Easy VPN Configuration Guide, Cisco IOS Release 12.4 31
Dual Tunnel Combinations Headends Supported Configuration and UsageConsiderations on the Easy VPNRemote Device and Headend
One Easy VPN virtual interfaceand one static virtual interface
Cisco IOS software • Both tunnels cannotterminate on the same peer.The static virtual interfaceand the Easy VPN virtualinterface can use the sameoutside interface.
• The Easy VPN virtualinterface should use splittunneling.
Two Easy VPN virtual interfaces Cisco IOS software, ASA, andVPN 3000
• Both tunnels cannotterminate on the same peer.
• At least one of the tunnelsshould use split tunneling.
• Web-Based Activationcannot be applied to bothEasy VPN tunnels.
BannerThe Easy VPN server pushes a banner to the Easy VPN remote device. The Easy VPN remote device canuse the banner during Xauth and web-based activation. The Easy VPN remote device displays the bannerthe first time that the Easy VPN tunnel is brought up.
The banner is configured under group configuration on the Easy VPN server.
Configuration Management Enhancements (Pushing a Configuration URL Through a Mode-Configuration Exchange)
After this feature has been configured on the server using the commands configuration url andconfiguration version (after use of the crypto isakmp client configuration group command), the servercan “push” the configuration URL and configuration version number to the Easy VPN remote device. Withthis information, the Easy VPN remote device can download the configuration content and apply it to itsrunning configuration. For more information about this feature, see the section “ConfigurationManagement Enhancements” in the Easy VPN Server feature module.
Reactivate Primary PeerThe Reactivate Primary Peer feature allows a default primary peer to be defined. The default primary peer(a server) is one that is considered better than other peers for reasons such as lower cost, shorter distance, ormore bandwidth. With this feature configured, if Easy VPN fails over during Phase 1 SA negotiations fromthe primary peer to the next peer in its backup list, and if the primary peer is again available, theconnections with the backup peer are torn down and the connection is again made with the primary peer.
Dead Peer Detection is one of the mechanisms that acts as a trigger for primary peer reactivation. Idletimers that are configured under Easy VPN is another triggering mechanism. When configured, the idle
Cisco Easy VPN Remote Banner
Easy VPN Configuration Guide, Cisco IOS Release 12.432
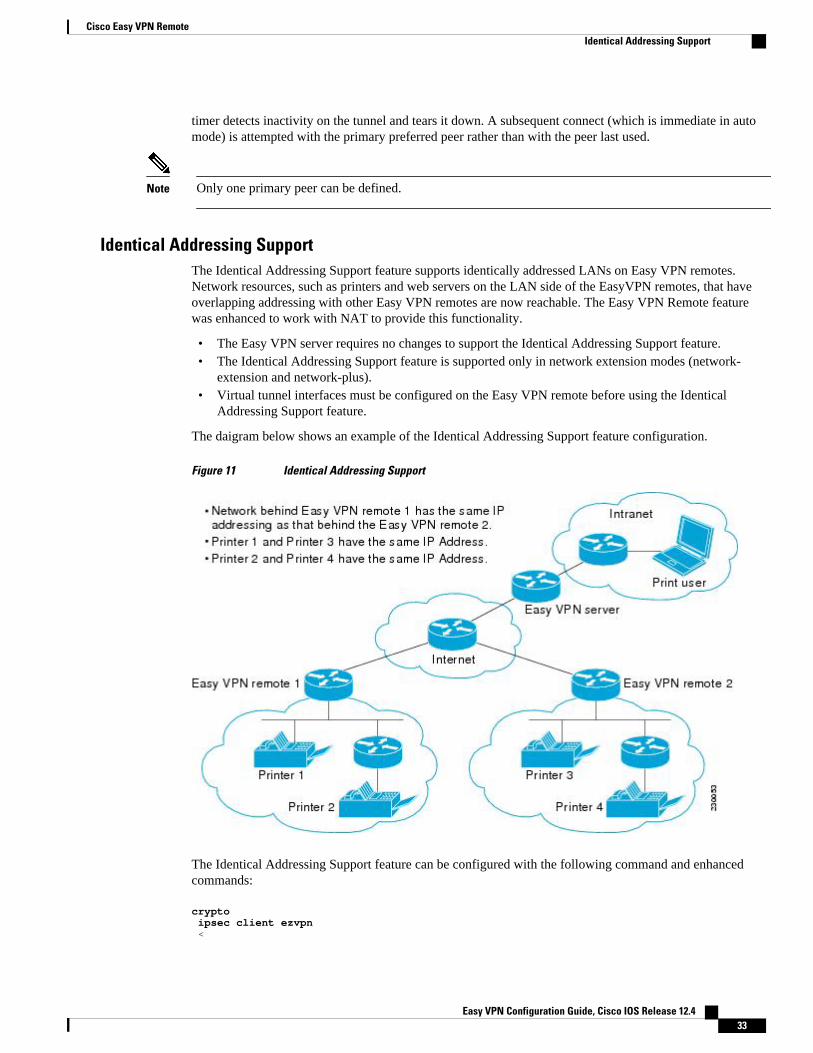
timer detects inactivity on the tunnel and tears it down. A subsequent connect (which is immediate in automode) is attempted with the primary preferred peer rather than with the peer last used.
Note Only one primary peer can be defined.
Identical Addressing SupportThe Identical Addressing Support feature supports identically addressed LANs on Easy VPN remotes.Network resources, such as printers and web servers on the LAN side of the EasyVPN remotes, that haveoverlapping addressing with other Easy VPN remotes are now reachable. The Easy VPN Remote featurewas enhanced to work with NAT to provide this functionality.
• The Easy VPN server requires no changes to support the Identical Addressing Support feature.• The Identical Addressing Support feature is supported only in network extension modes (network-
extension and network-plus).• Virtual tunnel interfaces must be configured on the Easy VPN remote before using the Identical
Addressing Support feature.
The daigram below shows an example of the Identical Addressing Support feature configuration.
Figure 11 Identical Addressing Support
The Identical Addressing Support feature can be configured with the following command and enhancedcommands:
crypto ipsec client ezvpn <
Cisco Easy VPN RemoteIdentical Addressing Support
Easy VPN Configuration Guide, Cisco IOS Release 12.4 33
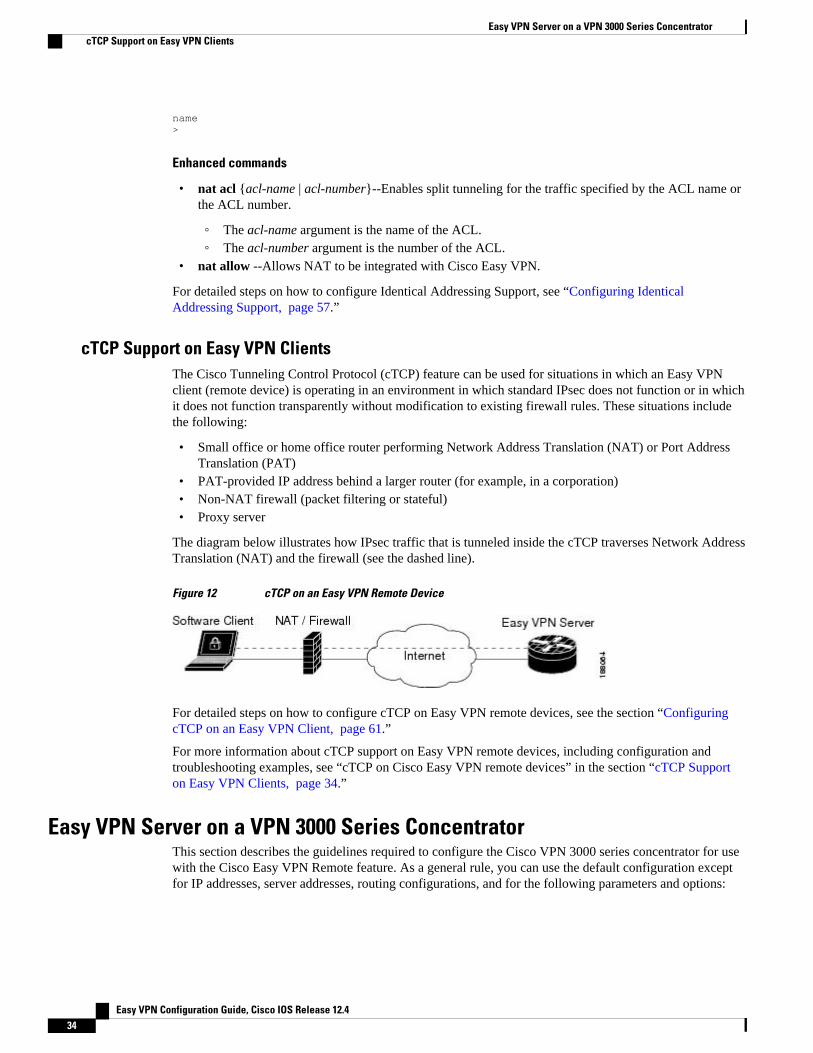
name>
Enhanced commands
• nat acl {acl-name | acl-number}--Enables split tunneling for the traffic specified by the ACL name orthe ACL number.
◦ The acl-name argument is the name of the ACL.◦ The acl-number argument is the number of the ACL.
• nat allow --Allows NAT to be integrated with Cisco Easy VPN.
For detailed steps on how to configure Identical Addressing Support, see “Configuring IdenticalAddressing Support, page 57.”
cTCP Support on Easy VPN ClientsThe Cisco Tunneling Control Protocol (cTCP) feature can be used for situations in which an Easy VPNclient (remote device) is operating in an environment in which standard IPsec does not function or in whichit does not function transparently without modification to existing firewall rules. These situations includethe following:
• Small office or home office router performing Network Address Translation (NAT) or Port AddressTranslation (PAT)
• PAT-provided IP address behind a larger router (for example, in a corporation)• Non-NAT firewall (packet filtering or stateful)• Proxy server
The diagram below illustrates how IPsec traffic that is tunneled inside the cTCP traverses Network AddressTranslation (NAT) and the firewall (see the dashed line).
Figure 12 cTCP on an Easy VPN Remote Device
For detailed steps on how to configure cTCP on Easy VPN remote devices, see the section “ConfiguringcTCP on an Easy VPN Client, page 61.”
For more information about cTCP support on Easy VPN remote devices, including configuration andtroubleshooting examples, see “cTCP on Cisco Easy VPN remote devices” in the section “cTCP Supporton Easy VPN Clients, page 34.”
Easy VPN Server on a VPN 3000 Series ConcentratorThis section describes the guidelines required to configure the Cisco VPN 3000 series concentrator for usewith the Cisco Easy VPN Remote feature. As a general rule, you can use the default configuration exceptfor IP addresses, server addresses, routing configurations, and for the following parameters and options:
Easy VPN Server on a VPN 3000 Series Concentrator cTCP Support on Easy VPN Clients
Easy VPN Configuration Guide, Cisco IOS Release 12.434
Note You must be using Cisco VPN 3000 series concentrator software Release 3.11 or later to support CiscoEasy VPN software clients and remotes.
• Peer Configuration on a Cisco Easy VPN Remote Using the Hostname, page 35
• Interactive Hardware Client Authentication Version 3.5, page 35
• IPsec Tunnel Protocol, page 35
• IPsec Group, page 35
• Group Lock, page 36
• Xauth, page 36
• Split Tunneling, page 36
• IKE Proposals, page 36
• New IPsec SA, page 36
Peer Configuration on a Cisco Easy VPN Remote Using the HostnameAfter you have configured the Cisco Easy VPN server on the VPN 3000 concentrator to use hostname as itsidentity, you must configure the peer on the Cisco Easy VPN remote using the hostname. You can eitherconfigure DNS on the client to resolve the peer hostname or configure the peer hostname locally on theclient using the ip host command. As an example, you can configure the peer hostname locally on an EasyVPN remote as follows:
ip host crypto-gw.cisco.com 10.0.0.1
Or you can configure the Easy VPN remote to use the hostname with the peer command and hostnameargument, as follows:
peer crypto-gw.cisco.com.
Interactive Hardware Client Authentication Version 3.5The Cisco Easy VPN Remote feature does not support the Interactive Hardware Client AuthenticationVersion 3.5 feature. This feature must be disabled. You can disable the feature on the VPN 3000 seriesconcentrator by clicking the HW Client tab on the Configuration | User Management | Base Groupscreen.
IPsec Tunnel ProtocolIPsec Tunnel Protocol enables the IPsec tunnel protocol so that it is available for users. The IPsec TunnelProtocol is configured on the Cisco VPN 3000 series concentrator by clicking the General tab on theConfiguration | User Management | Base Group screen.
IPsec GroupIPsec group configures the Cisco VPN 3000 series concentrator with a group name and password thatmatch the values configured for the Cisco Easy VPN remote configuration on the router. These values areconfigured on the router with the group group-name key group-key command and arguments. The valuesare configured on the Cisco VPN 3000 series concentrator using the Configuration | User Management |Groups screen.
Cisco Easy VPN RemotePeer Configuration on a Cisco Easy VPN Remote Using the Hostname
Easy VPN Configuration Guide, Cisco IOS Release 12.4 35
Group LockIf you are defining multiple users in multiple groups on the VPN 3000 series concentrator, you must checkthe Group Lock box in the IPsec tab to prevent users in one group from logging in with the parameters ofanother group. For example, if you have configured one group for split tunneling access and another groupwithout split tunneling access, clicking the Group Lock box prevents users in the second group fromgaining access to the split tunneling features. The Group Lock checkbox appears in the IPsec tab in theConfiguration | User Management | Base Group screen and in the IPsec tab in the Configuration | UserManagement | Groups | Add/Modify screens.
XauthTo use Xauth, set the Authentication parameter to None. The Authentication parameter appears in theIPsec tab in the Configuration | User Management | Base Group screen and in the IPsec tab in theConfiguration | User Management | Groups | Add/Modify screens.
Split TunnelingThe Configuration | User Management | Base Group, Mode Configuration Parameters Tab screenincludes a Split Tunnel option with a checkbox that says “Allow the networks in the list to bypass thetunnel.”
IKE ProposalsThe Cisco VPN 3000 series concentrator is preconfigured with a default IKE proposal,CiscoVPNClient-3DES-MD5, that can be used with Cisco Easy VPN remotes. This IKE proposal supportspreshared keys with Xauth using the MD5/HMAC-128 algorithm and Diffie-Hellman Group 2.
This IKE proposal is active by default, but you should verify that it is still an active proposal using theConfiguration | System | Tunneling Protocols | IPsec | IKE Proposals screen.
In addition, as part of configuring the Cisco VPN 3000 series concentrator--for the Cisco Easy VPNRemote image, you do not need to create a new IPsec SA. Use the default IKE and Easy VPN remotelifetime configured on the Cisco VPN 3000 series concentrator.
Note You can also use the default IKE proposals IKE-DES-MD5 and IKE-3DES-MD5, but they do not enableXauth support by default.
New IPsec SAYou can create a new IPsec SA. Cisco Easy VPN clients use a SA having the following parameters:
• Authentication Algorithm=ESP/MD5/HMAC-128• Encryption Algorithm=DES-56 or 3DES-168 (recommended)• Encapsulation Mode=Tunnel• IKE Proposal=CiscoVPNClient-3DES-MD5 (preferred)
The Cisco VPN 3000 series concentrator is preconfigured with several default security associations (SAs),but they do not meet the IKE proposal requirements. To use an IKE proposal of CiscoVPNClient-3DES-MD5, copy the ESP/IKE-3DES-MD5 SA and modify it to use CiscoVPNClient-3DES-MD5 as its IKE
Cisco Easy VPN Remote Group Lock
Easy VPN Configuration Guide, Cisco IOS Release 12.436
proposal. An IKE proposal is configured on the VPN 3000 series concentrator using the Configuration |Policy Management | Traffic Management | Security Associations screen.
How to Configure Cisco Easy VPN Remote• Remote Tasks, page 37
• Web Interface Tasks, page 63
• Troubleshooting the VPN Connection, page 68
Remote Tasks• Configuring and Assigning the Easy VPN Remote Configuration, page 37
• Verifying the Cisco Easy VPN Configuration, page 40
• Configuring Save Password, page 41
• Configuring Manual Tunnel Control, page 42
• Configuring Automatic Tunnel Control, page 44
• Configuring Multiple Inside Interfaces, page 45
• Configuring Multiple Outside Interfaces, page 47
• Configuring Multiple Subnet Support, page 48
• Configuring Proxy DNS Server Support, page 50
• Configuring Dial Backup, page 51
• Resetting a VPN Connection, page 51
• Monitoring and Maintaining VPN and IKE Events, page 52
• Configuring a Virtual Interface, page 53
• Troubleshooting Dual Tunnel Support, page 55
• Configuring Reactivate (a Default) Primary Peer, page 56
• Configuring Identical Addressing Support, page 57
• Configuring cTCP on an Easy VPN Client, page 61
• Configuring cTCP on an Easy VPN Client, page 62
Configuring and Assigning the Easy VPN Remote ConfigurationThe router acting as the Easy VPN remote must create a Cisco Easy VPN Remote configuration and assignit to the outgoing interface. To configure and assign the remote configuration, perform the following steps.
Remote TasksHow to Configure Cisco Easy VPN Remote
Easy VPN Configuration Guide, Cisco IOS Release 12.4 37
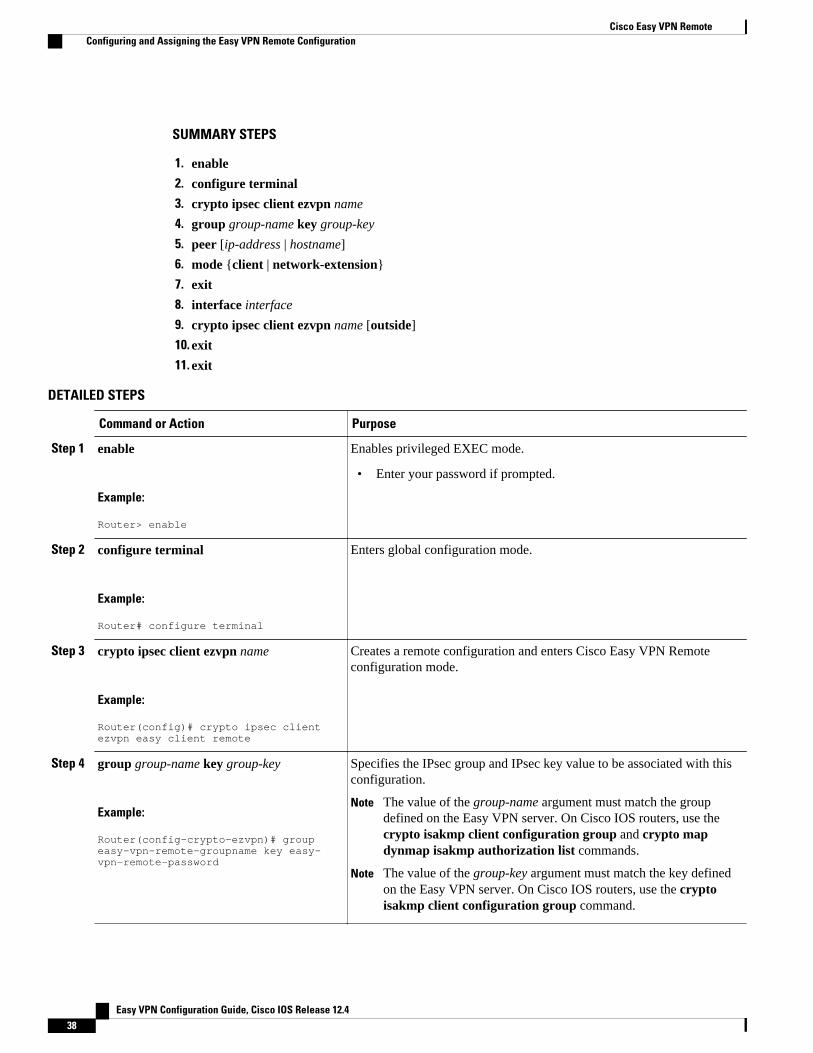
SUMMARY STEPS
1. enable
2. configure terminal
3. crypto ipsec client ezvpn name
4. group group-name key group-key
5. peer [ip-address | hostname]
6. mode {client | network-extension}
7. exit
8. interface interface
9. crypto ipsec client ezvpn name [outside]
10. exit
11. exit
DETAILED STEPS
Command or Action Purpose
Step 1 enable
Example:
Router> enable
Enables privileged EXEC mode.
• Enter your password if prompted.
Step 2 configure terminal
Example:
Router# configure terminal
Enters global configuration mode.
Step 3 crypto ipsec client ezvpn name
Example:
Router(config)# crypto ipsec client ezvpn easy client remote
Creates a remote configuration and enters Cisco Easy VPN Remoteconfiguration mode.
Step 4 group group-name key group-key
Example:
Router(config-crypto-ezvpn)# group easy-vpn-remote-groupname key easy-vpn-remote-password
Specifies the IPsec group and IPsec key value to be associated with thisconfiguration.
Note The value of the group-name argument must match the groupdefined on the Easy VPN server. On Cisco IOS routers, use thecrypto isakmp client configuration group and crypto mapdynmap isakmp authorization list commands.
Note The value of the group-key argument must match the key definedon the Easy VPN server. On Cisco IOS routers, use the cryptoisakmp client configuration group command.
Cisco Easy VPN Remote Configuring and Assigning the Easy VPN Remote Configuration
Easy VPN Configuration Guide, Cisco IOS Release 12.438

Command or Action Purpose
Step 5 peer [ip-address | hostname]
Example:
Router(config-crypto-ezvpn)# peer 192.185.0.5
Specifies the IP address or hostname for the destination peer (typicallythe IP address on the outside interface of the destination route).
• Multiple peers may be configured.
Note You must have a DNS server configured and available to use thehostname argument.
Step 6 mode {client | network-extension}
Example:
Router(config-crypto-ezvpn)# mode client
Specifies the type of VPN connection that should be made.
• client --Specifies that the router is configured for VPN clientoperation, using NAT or PAT address translation. Client operation isthe default if the type of VPN connection is not specified
• network-extension --Specifies that the router is to become a remoteextension of the enterprise network at the destination of the VPNconnection.
Step 7 exit
Example:
Router (config-crypto-ezvpn)# exit
Exits Cisco Easy VPN Remote configuration mode.
Step 8 interface interface
Example:
Router (config)# interface Ethernet1
Enters interface configuration mode for the interface.
• This interface will become the outside interface for the NAT or PATtranslation.
Step 9 crypto ipsec client ezvpn name [outside]
Example:
Router (config-if)# crypto ipsec client ezvpn easy_vpn_remote1 outside
Assigns the Cisco Easy VPN Remote configuration to the interface.
• This configuration automatically creates the necessary NAT or PATtranslation parameters and initiates the VPN connection (if you arein client mode).
Note The inside interface must be specified on Cisco 1700 and higherplatforms.
Step 10 exit
Example:
Router (config-if)# exit
Exits interface configuration mode.
Step 11 exit
Example:
Router (config)# exit
Exits global configuration mode.
Cisco Easy VPN RemoteConfiguring and Assigning the Easy VPN Remote Configuration
Easy VPN Configuration Guide, Cisco IOS Release 12.4 39

Verifying the Cisco Easy VPN ConfigurationTo verify that the Cisco Easy VPN Remote configuration has been correctly configured, that theconfiguration has been assigned to an interface, and that the IPsec VPN tunnel has been established,perform the following steps.
SUMMARY STEPS
1. Display the current state of the Cisco Easy VPN Remote connection using the show crypto ipsec clientezvpn command. The following is typical output for a Cisco 1700 series router using client mode:
2. Display the NAT or PAT configuration that was automatically created for the VPN connection usingthe show ip nat statistics command. The “Dynamic mappings” field of this display gives the details forthe NAT or PAT translation that is occurring on the VPN tunnel.
DETAILED STEPS
Step 1 Display the current state of the Cisco Easy VPN Remote connection using the show crypto ipsec client ezvpncommand. The following is typical output for a Cisco 1700 series router using client mode:
Example:
Router# show crypto ipsec client ezvpn Tunnel name : hw1 Inside interface list: FastEthernet0/0, Serial0/0, Outside interface: Serial1/0 Current State: IPSEC_ACTIVE Last Event: SOCKET_UP Address: 10.0.0.5 Mask: 255.255.255.255 Default Domain: cisco.comTunnel name : hw2 Inside interface list: Serial0/1, Outside interface: Serial1/1 Current State: IPSEC_ACTIVE Last Event: SOCKET_UP Default Domain: cisco.com
Step 2 Display the NAT or PAT configuration that was automatically created for the VPN connection using the show ip natstatistics command. The “Dynamic mappings” field of this display gives the details for the NAT or PAT translationthat is occurring on the VPN tunnel.
Example:
Router# show ip nat statistics Total active translations: 0 (0 static, 0 dynamic; 0 extended)Outside interfaces: cable-modem0Inside interfaces: Ethernet0Hits: 1489 Misses: 1Expired translations: 1Dynamic mappings:-- Inside Sourceaccess-list 198 pool enterprise refcount 0 pool enterprise: netmask 255.255.255.0
Cisco Easy VPN Remote Verifying the Cisco Easy VPN Configuration
Easy VPN Configuration Guide, Cisco IOS Release 12.440
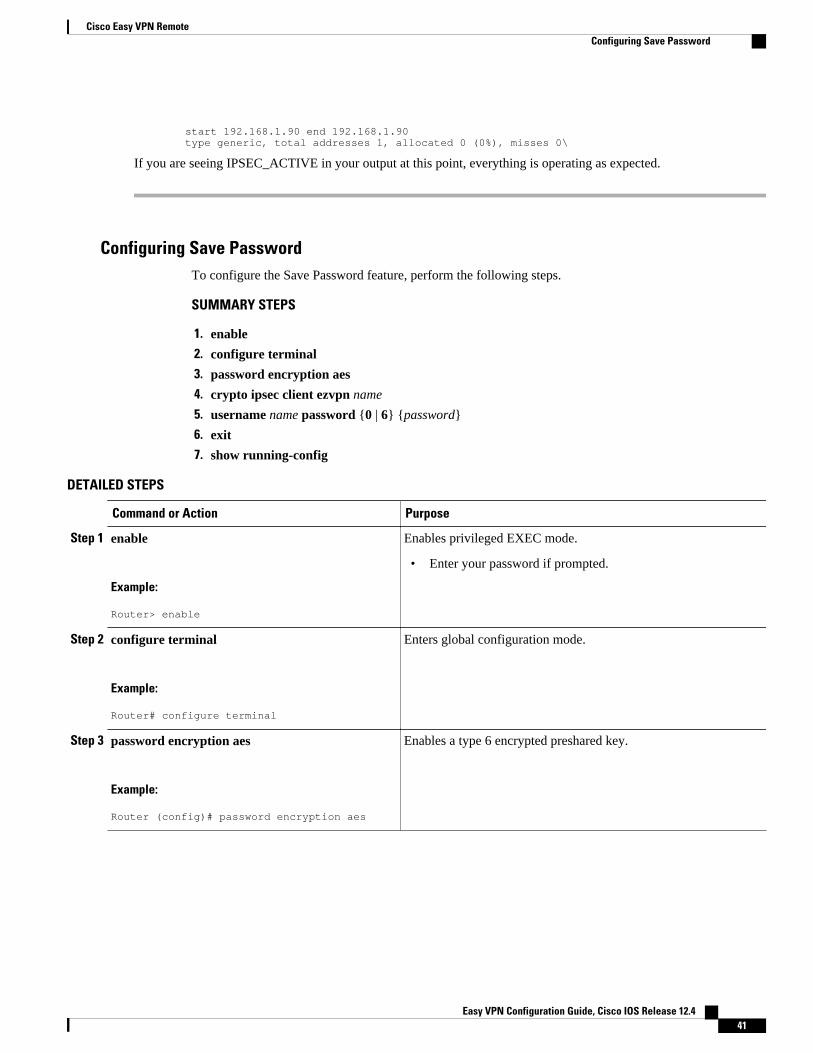
start 192.168.1.90 end 192.168.1.90 type generic, total addresses 1, allocated 0 (0%), misses 0\
If you are seeing IPSEC_ACTIVE in your output at this point, everything is operating as expected.
Configuring Save PasswordTo configure the Save Password feature, perform the following steps.
SUMMARY STEPS
1. enable
2. configure terminal
3. password encryption aes
4. crypto ipsec client ezvpn name
5. username name password {0 | 6} {password}
6. exit
7. show running-config
DETAILED STEPS
Command or Action Purpose
Step 1 enable
Example:
Router> enable
Enables privileged EXEC mode.
• Enter your password if prompted.
Step 2 configure terminal
Example:
Router# configure terminal
Enters global configuration mode.
Step 3 password encryption aes
Example:
Router (config)# password encryption aes
Enables a type 6 encrypted preshared key.
Cisco Easy VPN RemoteConfiguring Save Password
Easy VPN Configuration Guide, Cisco IOS Release 12.4 41
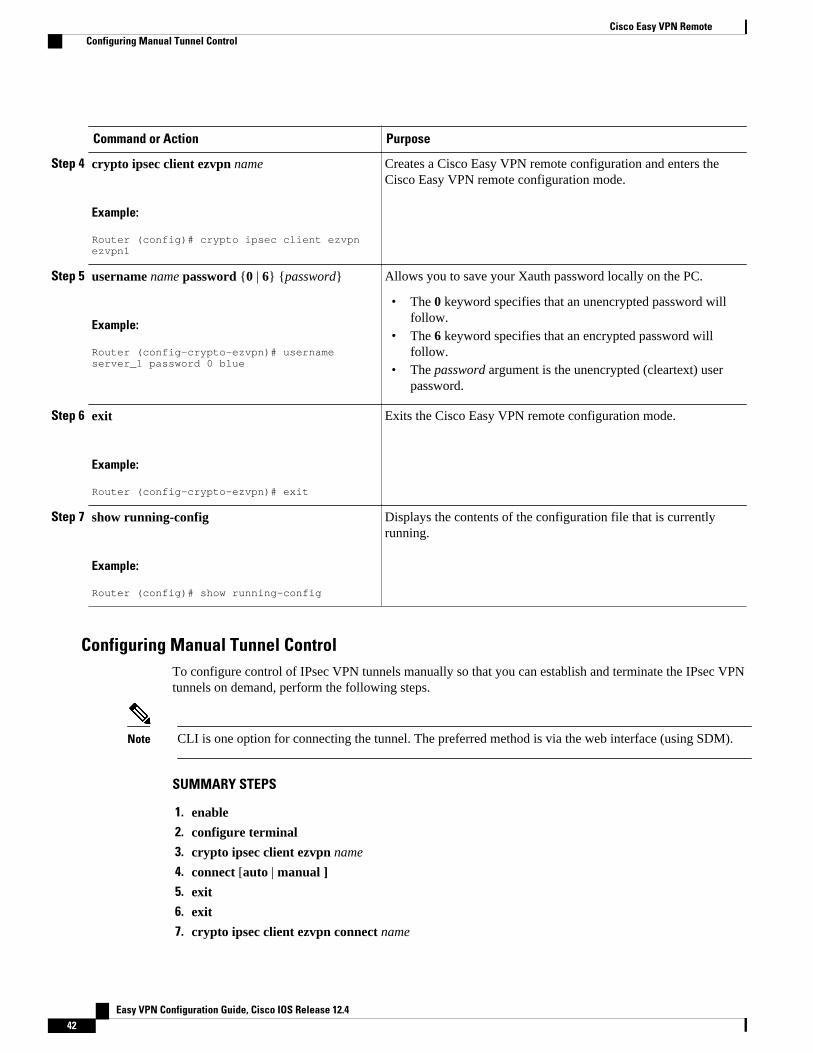
Command or Action Purpose
Step 4 crypto ipsec client ezvpn name
Example:
Router (config)# crypto ipsec client ezvpn ezvpn1
Creates a Cisco Easy VPN remote configuration and enters theCisco Easy VPN remote configuration mode.
Step 5 username name password {0 | 6} {password}
Example:
Router (config-crypto-ezvpn)# username server_1 password 0 blue
Allows you to save your Xauth password locally on the PC.
• The 0 keyword specifies that an unencrypted password willfollow.
• The 6 keyword specifies that an encrypted password willfollow.
• The password argument is the unencrypted (cleartext) userpassword.
Step 6 exit
Example:
Router (config-crypto-ezvpn)# exit
Exits the Cisco Easy VPN remote configuration mode.
Step 7 show running-config
Example:
Router (config)# show running-config
Displays the contents of the configuration file that is currentlyrunning.
Configuring Manual Tunnel ControlTo configure control of IPsec VPN tunnels manually so that you can establish and terminate the IPsec VPNtunnels on demand, perform the following steps.
Note CLI is one option for connecting the tunnel. The preferred method is via the web interface (using SDM).
SUMMARY STEPS
1. enable
2. configure terminal
3. crypto ipsec client ezvpn name
4. connect [auto | manual ]
5. exit
6. exit
7. crypto ipsec client ezvpn connect name
Cisco Easy VPN Remote Configuring Manual Tunnel Control
Easy VPN Configuration Guide, Cisco IOS Release 12.442
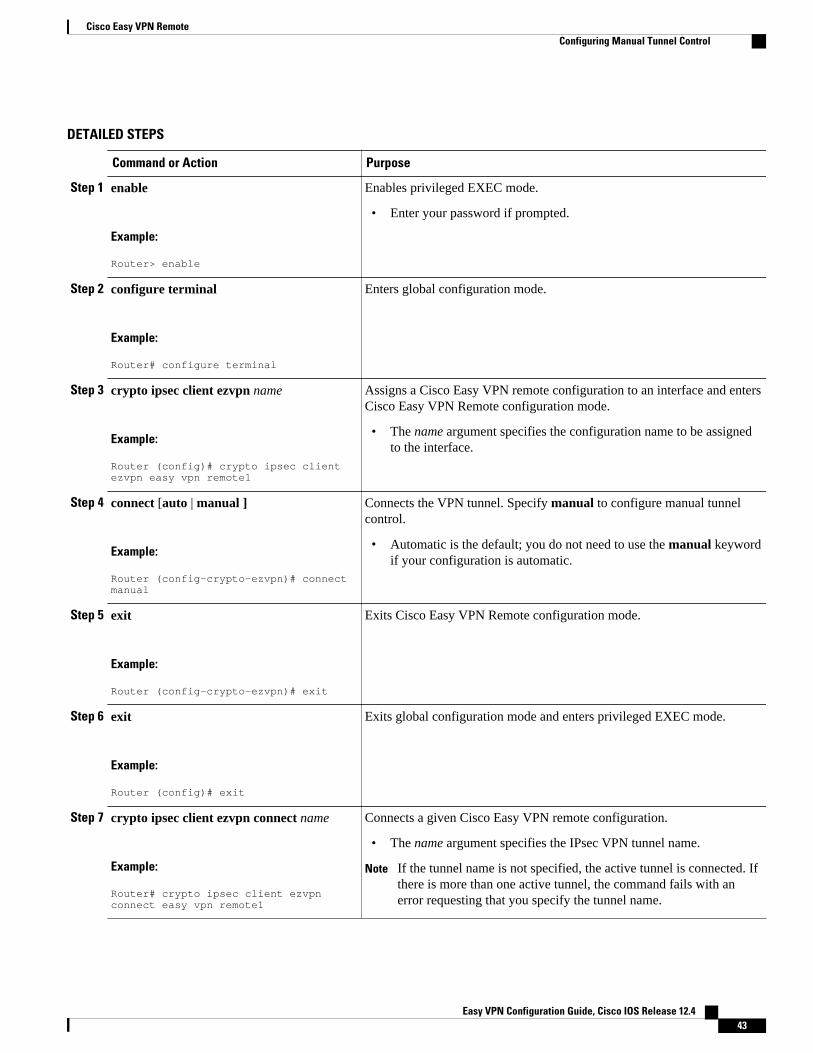
DETAILED STEPS
Command or Action Purpose
Step 1 enable
Example:
Router> enable
Enables privileged EXEC mode.
• Enter your password if prompted.
Step 2 configure terminal
Example:
Router# configure terminal
Enters global configuration mode.
Step 3 crypto ipsec client ezvpn name
Example:
Router (config)# crypto ipsec client ezvpn easy vpn remote1
Assigns a Cisco Easy VPN remote configuration to an interface and entersCisco Easy VPN Remote configuration mode.
• The name argument specifies the configuration name to be assignedto the interface.
Step 4 connect [auto | manual ]
Example:
Router (config-crypto-ezvpn)# connect manual
Connects the VPN tunnel. Specify manual to configure manual tunnelcontrol.
• Automatic is the default; you do not need to use the manual keywordif your configuration is automatic.
Step 5 exit
Example:
Router (config-crypto-ezvpn)# exit
Exits Cisco Easy VPN Remote configuration mode.
Step 6 exit
Example:
Router (config)# exit
Exits global configuration mode and enters privileged EXEC mode.
Step 7 crypto ipsec client ezvpn connect name
Example:
Router# crypto ipsec client ezvpn connect easy vpn remote1
Connects a given Cisco Easy VPN remote configuration.
• The name argument specifies the IPsec VPN tunnel name.
Note If the tunnel name is not specified, the active tunnel is connected. Ifthere is more than one active tunnel, the command fails with anerror requesting that you specify the tunnel name.
Cisco Easy VPN RemoteConfiguring Manual Tunnel Control
Easy VPN Configuration Guide, Cisco IOS Release 12.4 43
Configuring Automatic Tunnel ControlTo configure automatic tunnel control, perform the following steps.
SUMMARY STEPS
1. enable
2. configure terminal
3. crypto ipsec client ezvpn name
4. connect [auto | manual]
5. exit
6. exit
7. crypto ipsec client ezvpn connect name
DETAILED STEPS
Command or Action Purpose
Step 1 enable
Example:
Router> enable
Enables privileged EXEC mode.
• Enter your password if prompted.
Step 2 configure terminal
Example:
Router# configure terminal
Enters global configuration mode.
Step 3 crypto ipsec client ezvpn name
Example:
Router (config)# crypto ipsec client ezvpn easy vpn remote1
Assigns a Cisco Easy VPN remote configuration to an interface andenters Cisco Easy VPN Remote configuration mode.
• Specify the configuration name to be assigned to the interface.
Step 4 connect [auto | manual]
Example:
Router (config-crypto-ezvpn)# connect auto
Connects the VPN tunnel.
• Specify auto to configure automatic tunnel control. Automatic is thedefault; you do not need to use this command if your configuration isautomatic.
Cisco Easy VPN Remote Configuring Automatic Tunnel Control
Easy VPN Configuration Guide, Cisco IOS Release 12.444
Command or Action Purpose
Step 5 exit
Example:
Router (config-crypto-ezvpn)# exit
Exits Cisco Easy VPN Remote configuration mode.
Step 6 exit
Example:
Router (config)# exit
Exits global configuration mode and enters privileged EXEC mode.
Step 7 crypto ipsec client ezvpn connect name
Example:
Router# crypto ipsec client ezvpn connect easy vpn remote1
Connects a given Cisco Easy VPN remote configuration.
• The name argument specifies the IPsec VPN tunnel name.
Note If the tunnel name is not specified, the active tunnel is connected. Ifthere is more than one active tunnel, the command fails with anerror requesting that you specify the tunnel name.
Configuring Multiple Inside InterfacesYou can configure up to three inside interfaces for all platforms.
Note Multiple inside interfaces are supported only when the Cisco Easy VPN server and the Cisco Easy VPNclient have the same type of Easy VPN configuration. In other words, both must use a Legacy Easy VPNconfiguration, or both must use a DVTI configuration.
You need to manually configure each inside interface using the following procedure.
SUMMARY STEPS
1. enable
2. configure terminal
3. interface interface-name
4. exit
5. crypto ipsec client ezvpn name [outside | inside]
6. interface interface-name
7. exit
8. crypto ipsec client ezvpn name [outside | inside]
Cisco Easy VPN RemoteConfiguring Multiple Inside Interfaces
Easy VPN Configuration Guide, Cisco IOS Release 12.4 45
DETAILED STEPS
Command or Action Purpose
Step 1 enable
Example:
Router> enable
Enables privileged EXEC mode.
• Enter your password if prompted.
Step 2 configure terminal
Example:
Router# configure terminal
Enters global configuration mode.
Step 3 interface interface-name
Example:
Router (config)# interface Ethernet0
Selects the interface you want to configure by specifying theinterface name and enters interface configuration mode.
Step 4 exit
Example:
Router (config-if)# exit
Exits interface configuration mode.
Step 5 crypto ipsec client ezvpn name [outside | inside]
Example:
Router (config)# crypto ipsec client ezvpn easy vpn remote 1 inside
Specifies the Cisco Easy VPN remote configuration name to beassigned to the first inside interface.
• You must specify inside for each inside interface.
Step 6 interface interface-name
Example:
Router (config)# interface Ethernet1
Selects the next interface you want to configure by specifying thenext interface name and enters interface configuration mode.
Step 7 exit
Example:
Router (config-if)# exit
Exits interface configuration mode.
Cisco Easy VPN Remote Configuring Multiple Inside Interfaces
Easy VPN Configuration Guide, Cisco IOS Release 12.446
Command or Action Purpose
Step 8 crypto ipsec client ezvpn name [outside | inside]
Example:
Router (config)# crypto ipsec client ezvpn easy vpn remote2 inside
Specifies the Cisco Easy VPN remote configuration name to beassigned to the next inside interface.
• You must specify inside for each inside interface.
Repeat Step 3 through Step 4 to configure an additional tunnel ifdesired.
Configuring Multiple Outside InterfacesYou can configure multiple tunnels for outside interfaces, setting up a tunnel for each outside interface.You can configure a maximum of four tunnels using the following procedure for each outside interface.
SUMMARY STEPS
1. enable
2. configure terminal
3. interface interface-name
4. exit
5. crypto ipsec client ezvpn name [outside | inside]
6. interface interface-name
7. exit
8. crypto ipsec client ezvpn name [outside | inside]
DETAILED STEPS
Command or Action Purpose
Step 1 enable
Example:
Router> enable
Enables privileged EXEC mode.
• Enter your password if prompted.
Step 2 configure terminal
Example:
Router# configure terminal
Enters global configuration mode.
Step 3 interface interface-name
Example:
Router (config)# interface Ethernet0
Selects the first outside interface you want to configure by specifyingthe interface name and enters interface configuration mode.
Cisco Easy VPN RemoteConfiguring Multiple Outside Interfaces
Easy VPN Configuration Guide, Cisco IOS Release 12.4 47
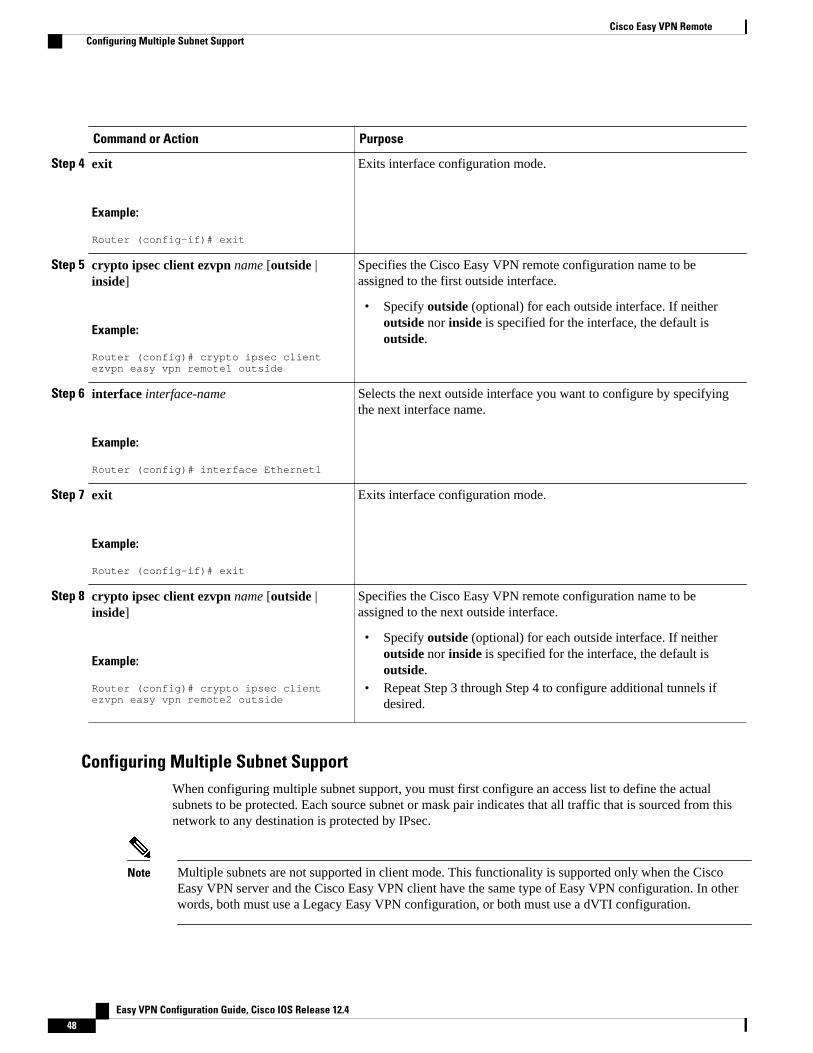
Command or Action Purpose
Step 4 exit
Example:
Router (config-if)# exit
Exits interface configuration mode.
Step 5 crypto ipsec client ezvpn name [outside |inside]
Example:
Router (config)# crypto ipsec client ezvpn easy vpn remote1 outside
Specifies the Cisco Easy VPN remote configuration name to beassigned to the first outside interface.
• Specify outside (optional) for each outside interface. If neitheroutside nor inside is specified for the interface, the default isoutside.
Step 6 interface interface-name
Example:
Router (config)# interface Ethernet1
Selects the next outside interface you want to configure by specifyingthe next interface name.
Step 7 exit
Example:
Router (config-if)# exit
Exits interface configuration mode.
Step 8 crypto ipsec client ezvpn name [outside |inside]
Example:
Router (config)# crypto ipsec client ezvpn easy vpn remote2 outside
Specifies the Cisco Easy VPN remote configuration name to beassigned to the next outside interface.
• Specify outside (optional) for each outside interface. If neitheroutside nor inside is specified for the interface, the default isoutside.
• Repeat Step 3 through Step 4 to configure additional tunnels ifdesired.
Configuring Multiple Subnet SupportWhen configuring multiple subnet support, you must first configure an access list to define the actualsubnets to be protected. Each source subnet or mask pair indicates that all traffic that is sourced from thisnetwork to any destination is protected by IPsec.
Note Multiple subnets are not supported in client mode. This functionality is supported only when the CiscoEasy VPN server and the Cisco Easy VPN client have the same type of Easy VPN configuration. In otherwords, both must use a Legacy Easy VPN configuration, or both must use a dVTI configuration.
Cisco Easy VPN Remote Configuring Multiple Subnet Support
Easy VPN Configuration Guide, Cisco IOS Release 12.448
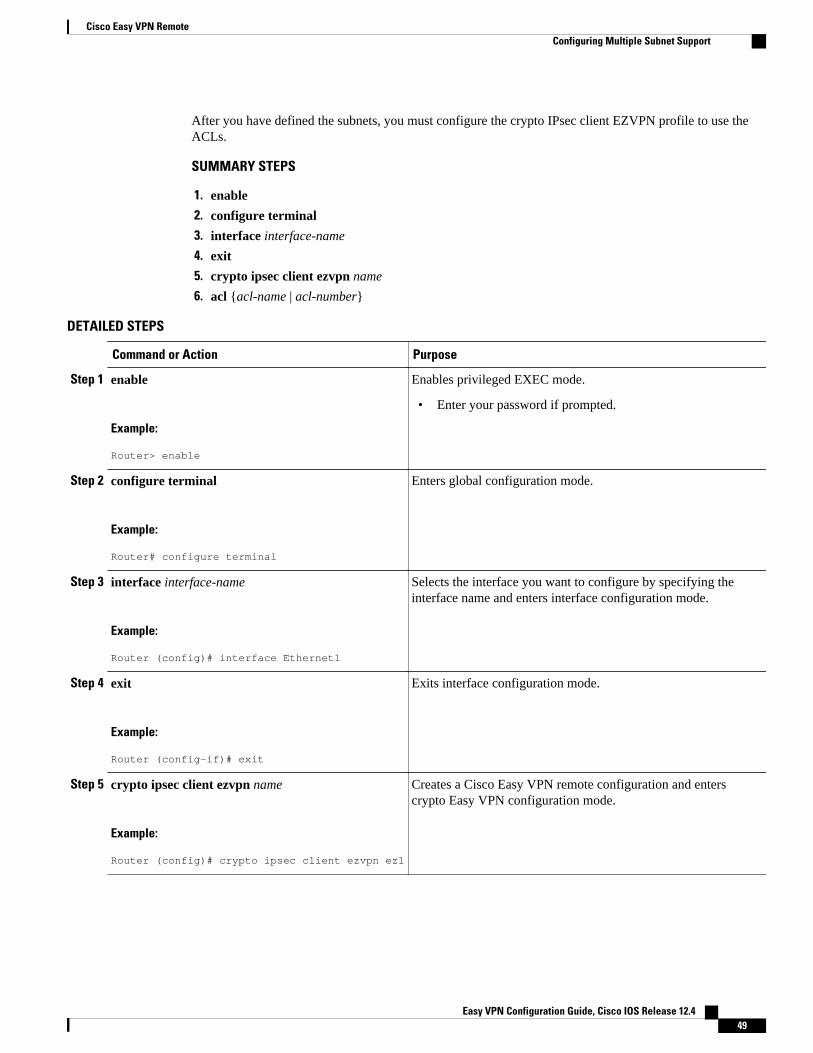
After you have defined the subnets, you must configure the crypto IPsec client EZVPN profile to use theACLs.
SUMMARY STEPS
1. enable
2. configure terminal
3. interface interface-name
4. exit
5. crypto ipsec client ezvpn name
6. acl {acl-name | acl-number}
DETAILED STEPS
Command or Action Purpose
Step 1 enable
Example:
Router> enable
Enables privileged EXEC mode.
• Enter your password if prompted.
Step 2 configure terminal
Example:
Router# configure terminal
Enters global configuration mode.
Step 3 interface interface-name
Example:
Router (config)# interface Ethernet1
Selects the interface you want to configure by specifying theinterface name and enters interface configuration mode.
Step 4 exit
Example:
Router (config-if)# exit
Exits interface configuration mode.
Step 5 crypto ipsec client ezvpn name
Example:
Router (config)# crypto ipsec client ezvpn ez1
Creates a Cisco Easy VPN remote configuration and enterscrypto Easy VPN configuration mode.
Cisco Easy VPN RemoteConfiguring Multiple Subnet Support
Easy VPN Configuration Guide, Cisco IOS Release 12.4 49
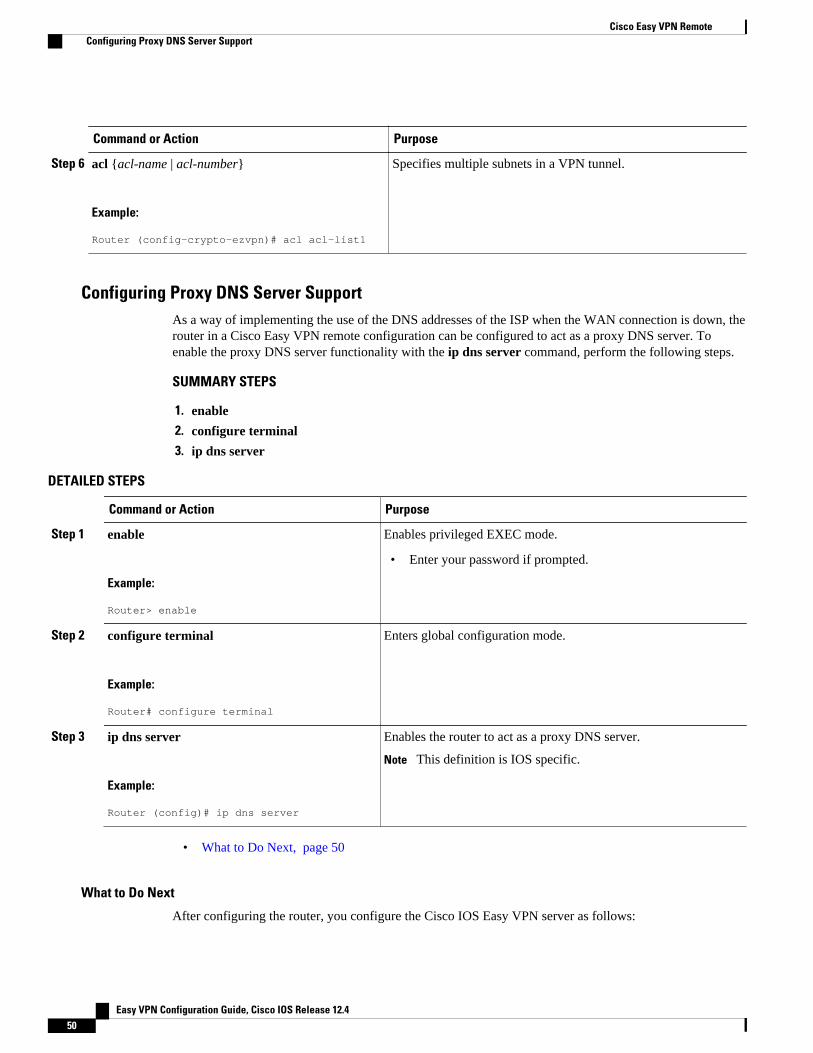
Command or Action Purpose
Step 6 acl {acl-name | acl-number}
Example:
Router (config-crypto-ezvpn)# acl acl-list1
Specifies multiple subnets in a VPN tunnel.
Configuring Proxy DNS Server SupportAs a way of implementing the use of the DNS addresses of the ISP when the WAN connection is down, therouter in a Cisco Easy VPN remote configuration can be configured to act as a proxy DNS server. Toenable the proxy DNS server functionality with the ip dns server command, perform the following steps.
SUMMARY STEPS
1. enable
2. configure terminal
3. ip dns server
DETAILED STEPS
Command or Action Purpose
Step 1 enable
Example:
Router> enable
Enables privileged EXEC mode.
• Enter your password if prompted.
Step 2 configure terminal
Example:
Router# configure terminal
Enters global configuration mode.
Step 3 ip dns server
Example:
Router (config)# ip dns server
Enables the router to act as a proxy DNS server.
Note This definition is IOS specific.
• What to Do Next, page 50
What to Do Next
After configuring the router, you configure the Cisco IOS Easy VPN server as follows:
Cisco Easy VPN Remote Configuring Proxy DNS Server Support
Easy VPN Configuration Guide, Cisco IOS Release 12.450
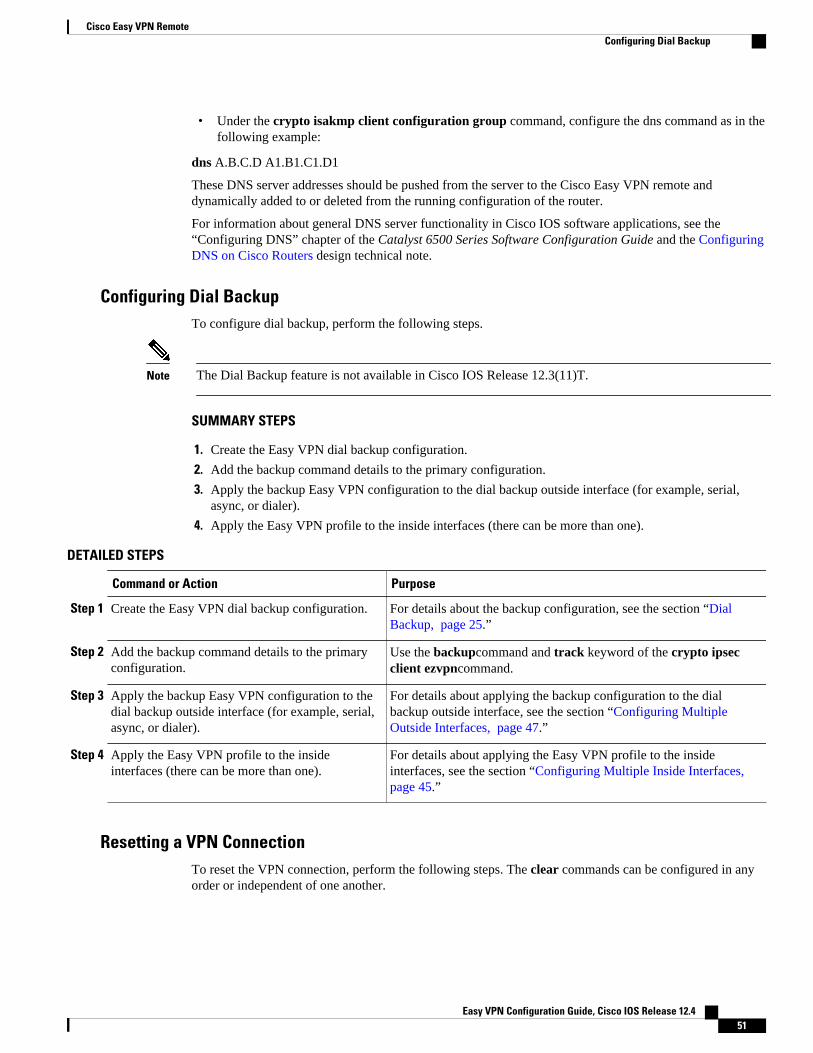
• Under the crypto isakmp client configuration group command, configure the dns command as in thefollowing example:
dns A.B.C.D A1.B1.C1.D1
These DNS server addresses should be pushed from the server to the Cisco Easy VPN remote anddynamically added to or deleted from the running configuration of the router.
For information about general DNS server functionality in Cisco IOS software applications, see the“Configuring DNS” chapter of the Catalyst 6500 Series Software Configuration Guide and the ConfiguringDNS on Cisco Routers design technical note.
Configuring Dial BackupTo configure dial backup, perform the following steps.
Note The Dial Backup feature is not available in Cisco IOS Release 12.3(11)T.
SUMMARY STEPS
1. Create the Easy VPN dial backup configuration.
2. Add the backup command details to the primary configuration.
3. Apply the backup Easy VPN configuration to the dial backup outside interface (for example, serial,async, or dialer).
4. Apply the Easy VPN profile to the inside interfaces (there can be more than one).
DETAILED STEPS
Command or Action Purpose
Step 1 Create the Easy VPN dial backup configuration. For details about the backup configuration, see the section “DialBackup, page 25.”
Step 2 Add the backup command details to the primaryconfiguration.
Use the backupcommand and track keyword of the crypto ipsecclient ezvpncommand.
Step 3 Apply the backup Easy VPN configuration to thedial backup outside interface (for example, serial,async, or dialer).
For details about applying the backup configuration to the dialbackup outside interface, see the section “Configuring MultipleOutside Interfaces, page 47.”
Step 4 Apply the Easy VPN profile to the insideinterfaces (there can be more than one).
For details about applying the Easy VPN profile to the insideinterfaces, see the section “Configuring Multiple Inside Interfaces, page 45.”
Resetting a VPN ConnectionTo reset the VPN connection, perform the following steps. The clear commands can be configured in anyorder or independent of one another.
Cisco Easy VPN RemoteConfiguring Dial Backup
Easy VPN Configuration Guide, Cisco IOS Release 12.4 51
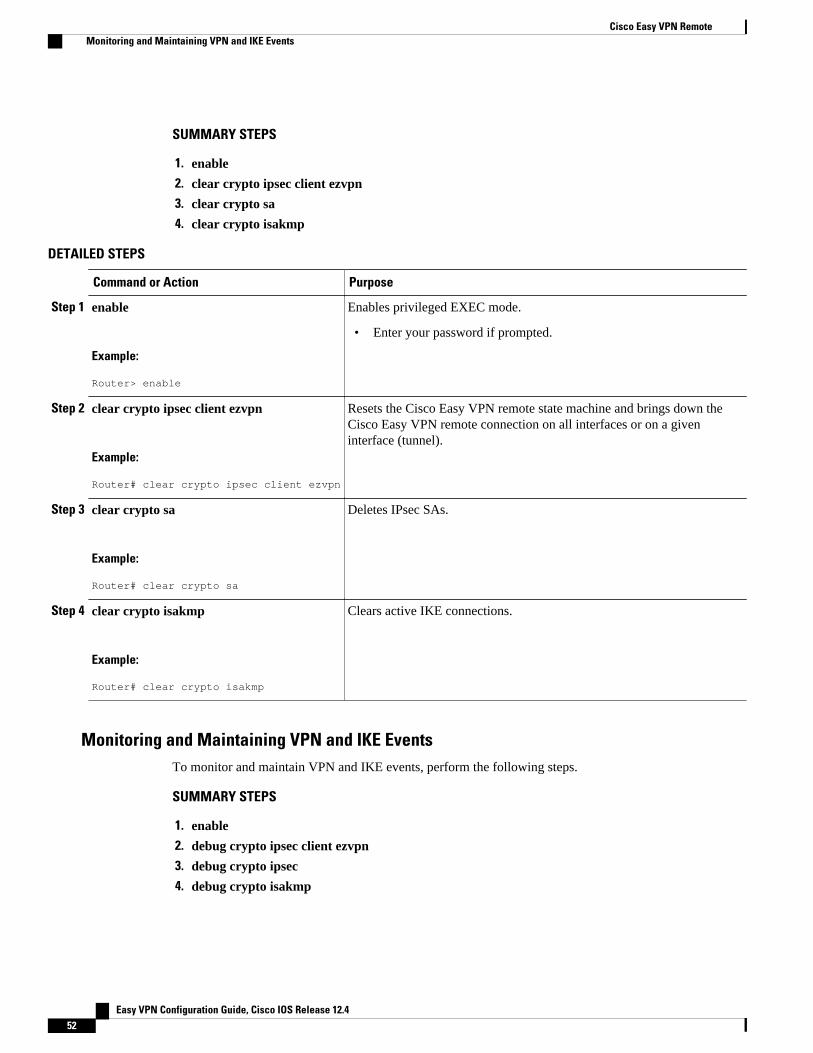
SUMMARY STEPS
1. enable
2. clear crypto ipsec client ezvpn
3. clear crypto sa
4. clear crypto isakmp
DETAILED STEPS
Command or Action Purpose
Step 1 enable
Example:
Router> enable
Enables privileged EXEC mode.
• Enter your password if prompted.
Step 2 clear crypto ipsec client ezvpn
Example:
Router# clear crypto ipsec client ezvpn
Resets the Cisco Easy VPN remote state machine and brings down theCisco Easy VPN remote connection on all interfaces or on a giveninterface (tunnel).
Step 3 clear crypto sa
Example:
Router# clear crypto sa
Deletes IPsec SAs.
Step 4 clear crypto isakmp
Example:
Router# clear crypto isakmp
Clears active IKE connections.
Monitoring and Maintaining VPN and IKE EventsTo monitor and maintain VPN and IKE events, perform the following steps.
SUMMARY STEPS
1. enable
2. debug crypto ipsec client ezvpn
3. debug crypto ipsec
4. debug crypto isakmp
Cisco Easy VPN Remote Monitoring and Maintaining VPN and IKE Events
Easy VPN Configuration Guide, Cisco IOS Release 12.452
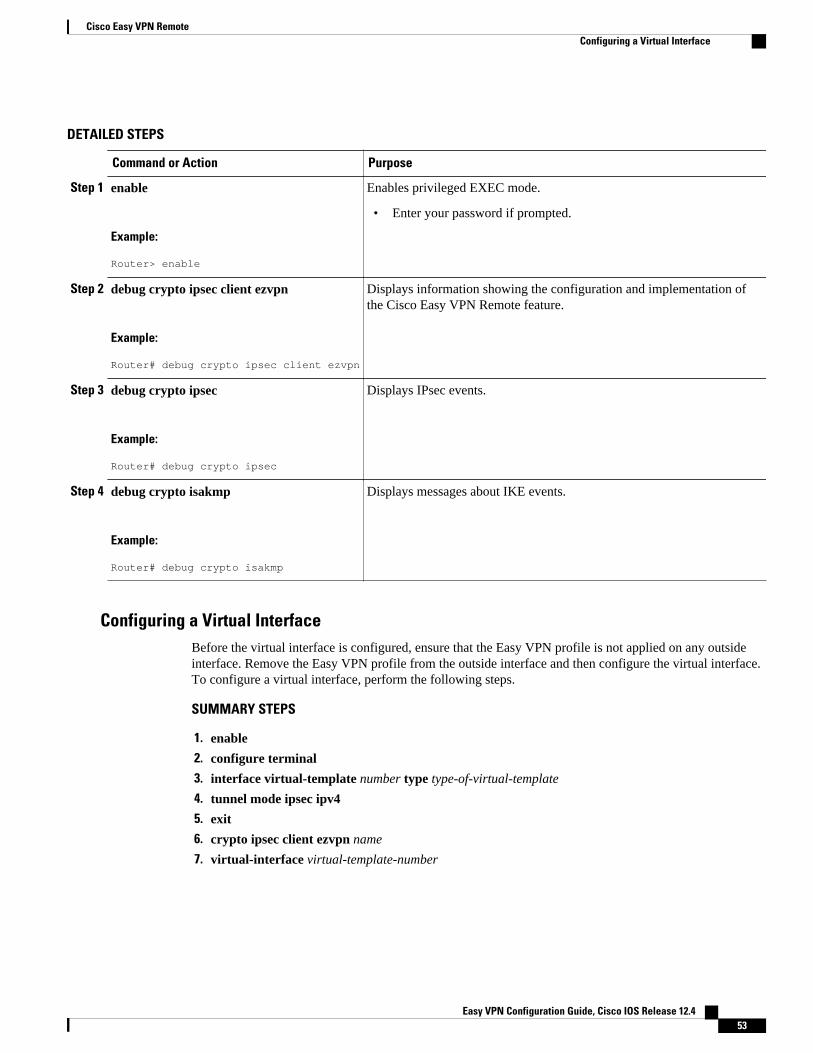
DETAILED STEPS
Command or Action Purpose
Step 1 enable
Example:
Router> enable
Enables privileged EXEC mode.
• Enter your password if prompted.
Step 2 debug crypto ipsec client ezvpn
Example:
Router# debug crypto ipsec client ezvpn
Displays information showing the configuration and implementation ofthe Cisco Easy VPN Remote feature.
Step 3 debug crypto ipsec
Example:
Router# debug crypto ipsec
Displays IPsec events.
Step 4 debug crypto isakmp
Example:
Router# debug crypto isakmp
Displays messages about IKE events.
Configuring a Virtual InterfaceBefore the virtual interface is configured, ensure that the Easy VPN profile is not applied on any outsideinterface. Remove the Easy VPN profile from the outside interface and then configure the virtual interface.To configure a virtual interface, perform the following steps.
SUMMARY STEPS
1. enable
2. configure terminal
3. interface virtual-template number type type-of-virtual-template
4. tunnel mode ipsec ipv4
5. exit
6. crypto ipsec client ezvpn name
7. virtual-interface virtual-template-number
Cisco Easy VPN RemoteConfiguring a Virtual Interface
Easy VPN Configuration Guide, Cisco IOS Release 12.4 53
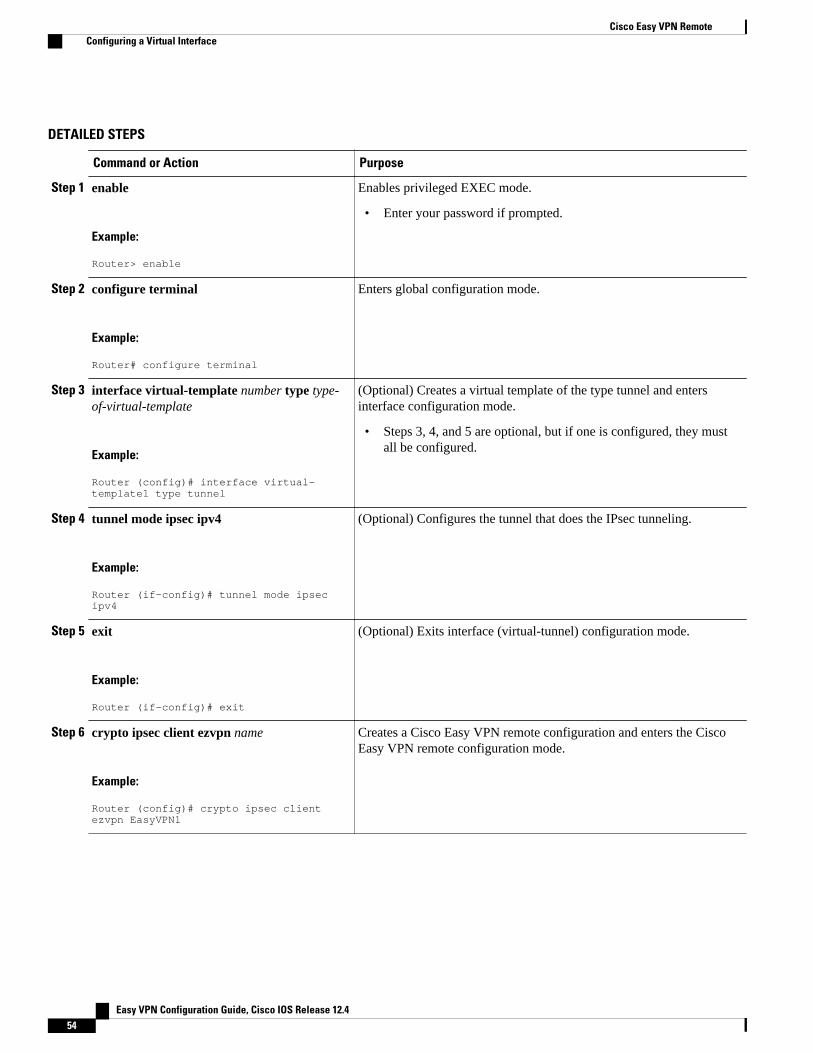
DETAILED STEPS
Command or Action Purpose
Step 1 enable
Example:
Router> enable
Enables privileged EXEC mode.
• Enter your password if prompted.
Step 2 configure terminal
Example:
Router# configure terminal
Enters global configuration mode.
Step 3 interface virtual-template number type type-of-virtual-template
Example:
Router (config)# interface virtual-template1 type tunnel
(Optional) Creates a virtual template of the type tunnel and entersinterface configuration mode.
• Steps 3, 4, and 5 are optional, but if one is configured, they mustall be configured.
Step 4 tunnel mode ipsec ipv4
Example:
Router (if-config)# tunnel mode ipsec ipv4
(Optional) Configures the tunnel that does the IPsec tunneling.
Step 5 exit
Example:
Router (if-config)# exit
(Optional) Exits interface (virtual-tunnel) configuration mode.
Step 6 crypto ipsec client ezvpn name
Example:
Router (config)# crypto ipsec client ezvpn EasyVPN1
Creates a Cisco Easy VPN remote configuration and enters the CiscoEasy VPN remote configuration mode.
Cisco Easy VPN Remote Configuring a Virtual Interface
Easy VPN Configuration Guide, Cisco IOS Release 12.454
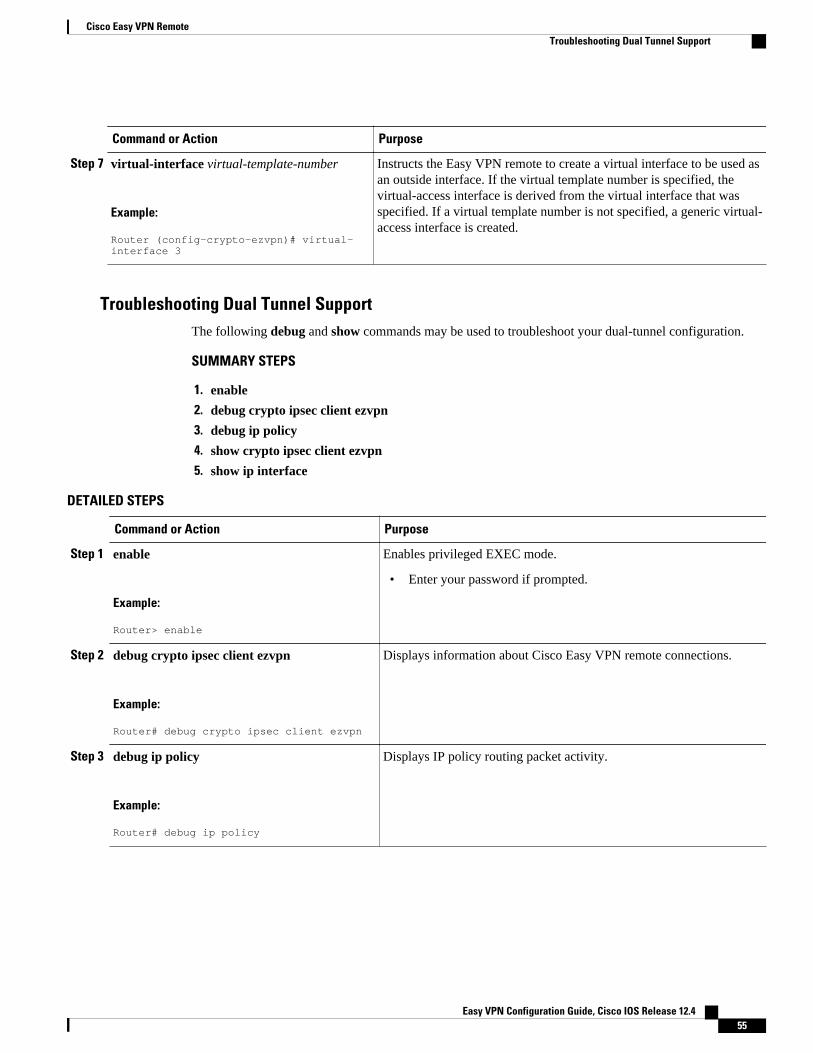
Command or Action Purpose
Step 7 virtual-interface virtual-template-number
Example:
Router (config-crypto-ezvpn)# virtual-interface 3
Instructs the Easy VPN remote to create a virtual interface to be used asan outside interface. If the virtual template number is specified, thevirtual-access interface is derived from the virtual interface that wasspecified. If a virtual template number is not specified, a generic virtual-access interface is created.
Troubleshooting Dual Tunnel SupportThe following debug and show commands may be used to troubleshoot your dual-tunnel configuration.
SUMMARY STEPS
1. enable
2. debug crypto ipsec client ezvpn
3. debug ip policy
4. show crypto ipsec client ezvpn
5. show ip interface
DETAILED STEPS
Command or Action Purpose
Step 1 enable
Example:
Router> enable
Enables privileged EXEC mode.
• Enter your password if prompted.
Step 2 debug crypto ipsec client ezvpn
Example:
Router# debug crypto ipsec client ezvpn
Displays information about Cisco Easy VPN remote connections.
Step 3 debug ip policy
Example:
Router# debug ip policy
Displays IP policy routing packet activity.
Cisco Easy VPN RemoteTroubleshooting Dual Tunnel Support
Easy VPN Configuration Guide, Cisco IOS Release 12.4 55
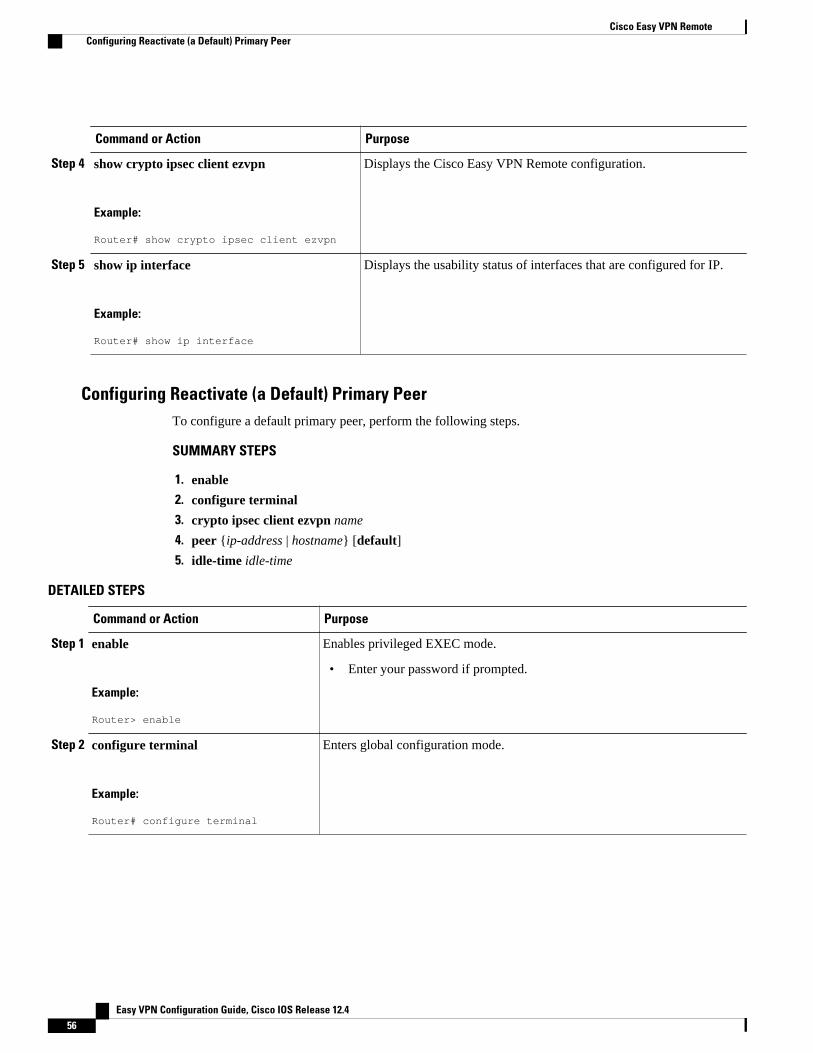
Command or Action Purpose
Step 4 show crypto ipsec client ezvpn
Example:
Router# show crypto ipsec client ezvpn
Displays the Cisco Easy VPN Remote configuration.
Step 5 show ip interface
Example:
Router# show ip interface
Displays the usability status of interfaces that are configured for IP.
Configuring Reactivate (a Default) Primary PeerTo configure a default primary peer, perform the following steps.
SUMMARY STEPS
1. enable
2. configure terminal
3. crypto ipsec client ezvpn name
4. peer {ip-address | hostname} [default]
5. idle-time idle-time
DETAILED STEPS
Command or Action Purpose
Step 1 enable
Example:
Router> enable
Enables privileged EXEC mode.
• Enter your password if prompted.
Step 2 configure terminal
Example:
Router# configure terminal
Enters global configuration mode.
Cisco Easy VPN Remote Configuring Reactivate (a Default) Primary Peer
Easy VPN Configuration Guide, Cisco IOS Release 12.456
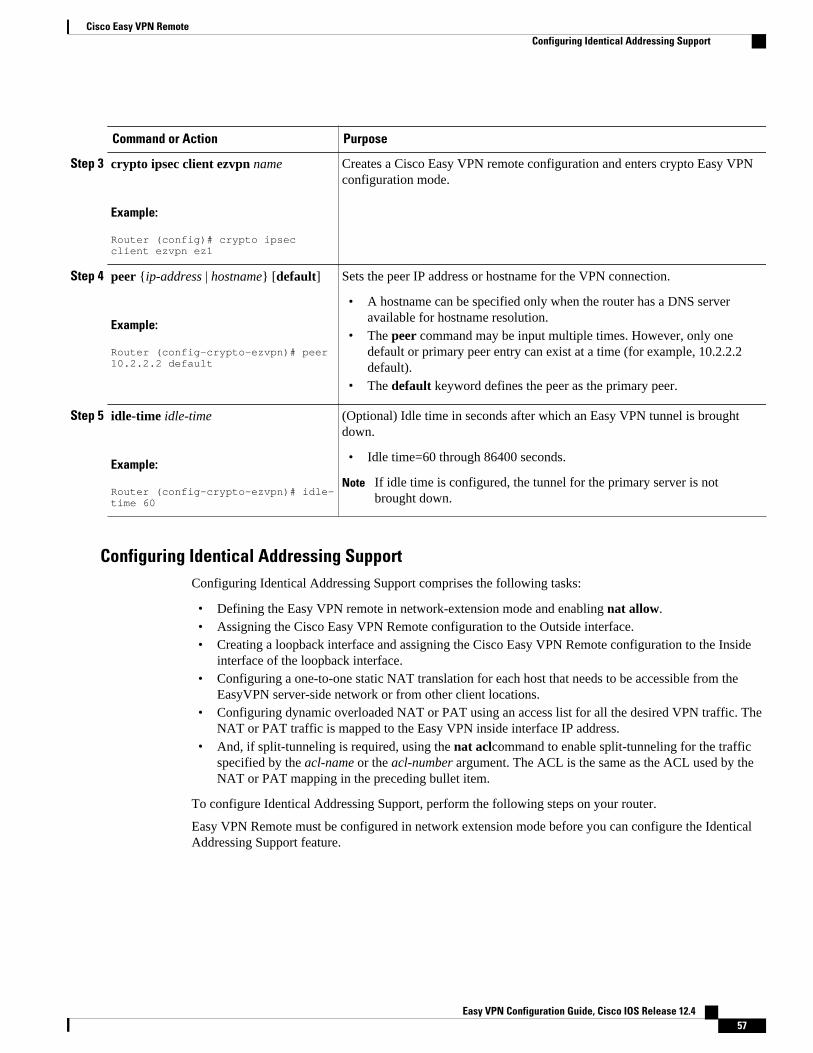
Command or Action Purpose
Step 3 crypto ipsec client ezvpn name
Example:
Router (config)# crypto ipsec client ezvpn ez1
Creates a Cisco Easy VPN remote configuration and enters crypto Easy VPNconfiguration mode.
Step 4 peer {ip-address | hostname} [default]
Example:
Router (config-crypto-ezvpn)# peer 10.2.2.2 default
Sets the peer IP address or hostname for the VPN connection.
• A hostname can be specified only when the router has a DNS serveravailable for hostname resolution.
• The peer command may be input multiple times. However, only onedefault or primary peer entry can exist at a time (for example, 10.2.2.2default).
• The default keyword defines the peer as the primary peer.
Step 5 idle-time idle-time
Example:
Router (config-crypto-ezvpn)# idle-time 60
(Optional) Idle time in seconds after which an Easy VPN tunnel is broughtdown.
• Idle time=60 through 86400 seconds.
Note If idle time is configured, the tunnel for the primary server is notbrought down.
Configuring Identical Addressing SupportConfiguring Identical Addressing Support comprises the following tasks:
• Defining the Easy VPN remote in network-extension mode and enabling nat allow.• Assigning the Cisco Easy VPN Remote configuration to the Outside interface.• Creating a loopback interface and assigning the Cisco Easy VPN Remote configuration to the Inside
interface of the loopback interface.• Configuring a one-to-one static NAT translation for each host that needs to be accessible from the
EasyVPN server-side network or from other client locations.• Configuring dynamic overloaded NAT or PAT using an access list for all the desired VPN traffic. The
NAT or PAT traffic is mapped to the Easy VPN inside interface IP address.• And, if split-tunneling is required, using the nat aclcommand to enable split-tunneling for the traffic
specified by the acl-name or the acl-number argument. The ACL is the same as the ACL used by theNAT or PAT mapping in the preceding bullet item.
To configure Identical Addressing Support, perform the following steps on your router.
Easy VPN Remote must be configured in network extension mode before you can configure the IdenticalAddressing Support feature.
Cisco Easy VPN RemoteConfiguring Identical Addressing Support
Easy VPN Configuration Guide, Cisco IOS Release 12.4 57
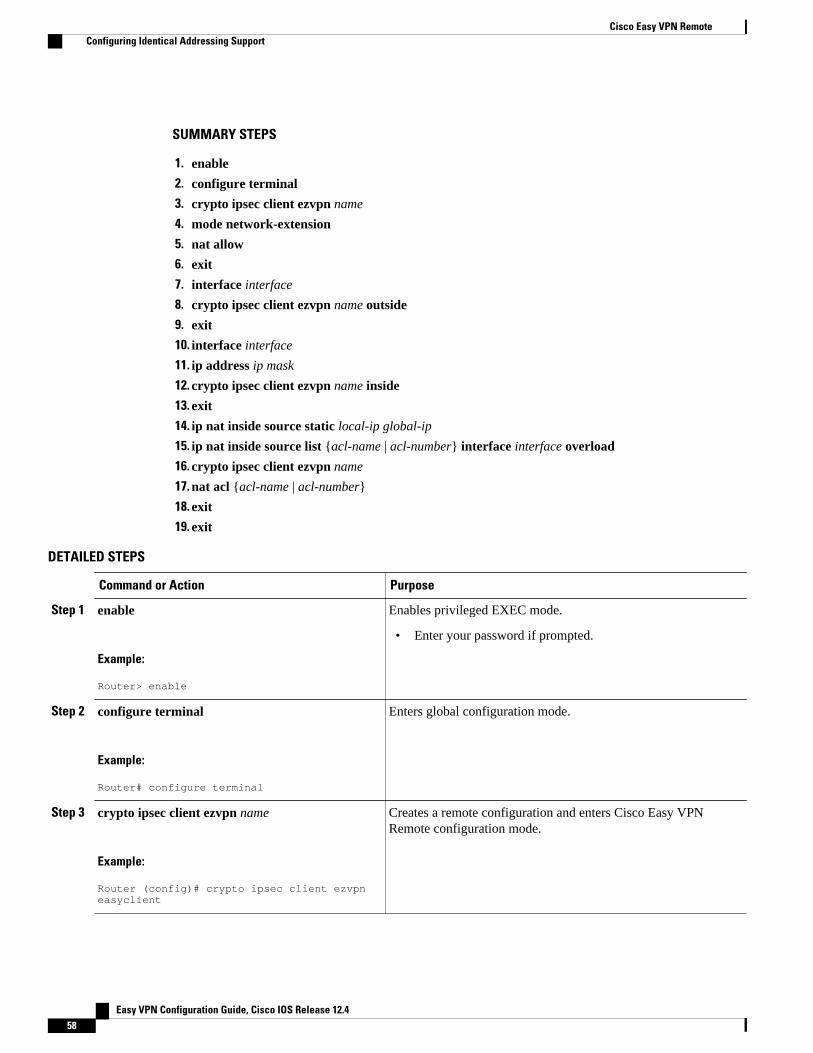
SUMMARY STEPS
1. enable
2. configure terminal
3. crypto ipsec client ezvpn name
4. mode network-extension
5. nat allow
6. exit
7. interface interface
8. crypto ipsec client ezvpn name outside
9. exit
10. interface interface
11. ip address ip mask
12. crypto ipsec client ezvpn name inside
13. exit
14. ip nat inside source static local-ip global-ip
15. ip nat inside source list {acl-name | acl-number} interface interface overload
16. crypto ipsec client ezvpn name
17. nat acl {acl-name | acl-number}
18. exit
19. exit
DETAILED STEPS
Command or Action Purpose
Step 1 enable
Example:
Router> enable
Enables privileged EXEC mode.
• Enter your password if prompted.
Step 2 configure terminal
Example:
Router# configure terminal
Enters global configuration mode.
Step 3 crypto ipsec client ezvpn name
Example:
Router (config)# crypto ipsec client ezvpn easyclient
Creates a remote configuration and enters Cisco Easy VPNRemote configuration mode.
Cisco Easy VPN Remote Configuring Identical Addressing Support
Easy VPN Configuration Guide, Cisco IOS Release 12.458
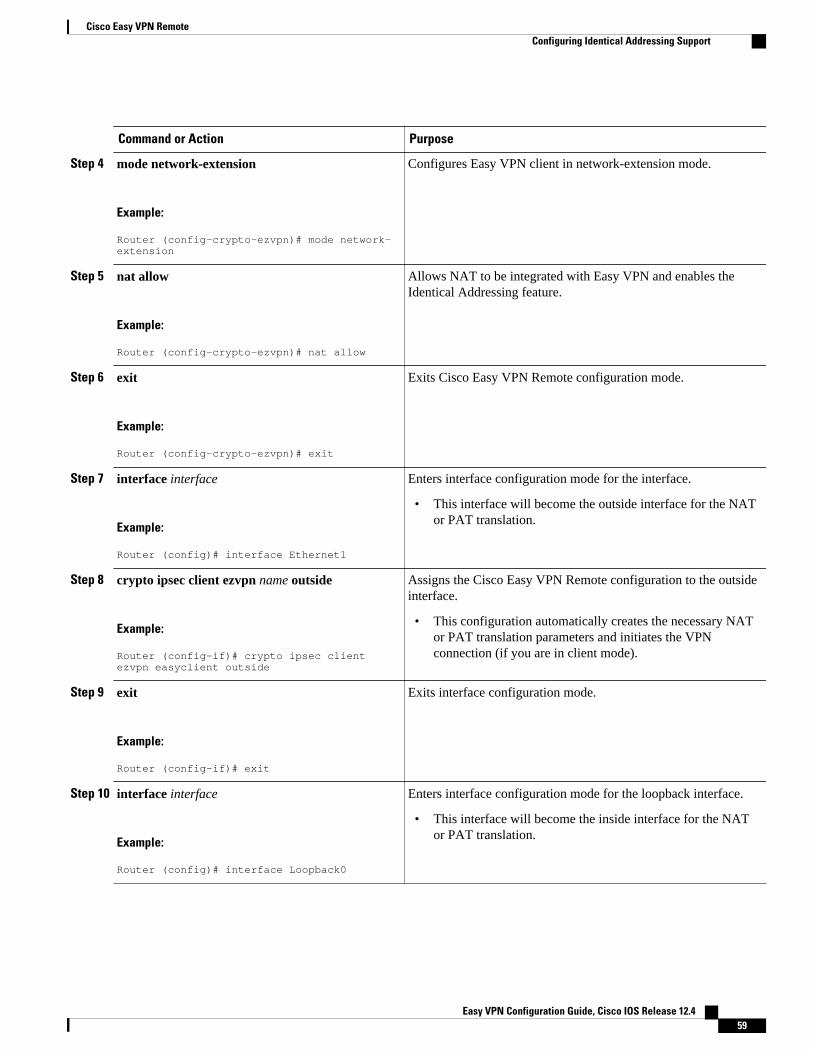
Command or Action Purpose
Step 4 mode network-extension
Example:
Router (config-crypto-ezvpn)# mode network-extension
Configures Easy VPN client in network-extension mode.
Step 5 nat allow
Example:
Router (config-crypto-ezvpn)# nat allow
Allows NAT to be integrated with Easy VPN and enables theIdentical Addressing feature.
Step 6 exit
Example:
Router (config-crypto-ezvpn)# exit
Exits Cisco Easy VPN Remote configuration mode.
Step 7 interface interface
Example:
Router (config)# interface Ethernet1
Enters interface configuration mode for the interface.
• This interface will become the outside interface for the NATor PAT translation.
Step 8 crypto ipsec client ezvpn name outside
Example:
Router (config-if)# crypto ipsec client ezvpn easyclient outside
Assigns the Cisco Easy VPN Remote configuration to the outsideinterface.
• This configuration automatically creates the necessary NATor PAT translation parameters and initiates the VPNconnection (if you are in client mode).
Step 9 exit
Example:
Router (config-if)# exit
Exits interface configuration mode.
Step 10 interface interface
Example:
Router (config)# interface Loopback0
Enters interface configuration mode for the loopback interface.
• This interface will become the inside interface for the NATor PAT translation.
Cisco Easy VPN RemoteConfiguring Identical Addressing Support
Easy VPN Configuration Guide, Cisco IOS Release 12.4 59

Command or Action Purpose
Step 11 ip address ip mask
Example:
Router (config-if)# ip address 10.1.1.1 255.255.255.252
Assigns the IP address and mask to the loopback interface.
Step 12 crypto ipsec client ezvpn name inside
Example:
Router (config-if)# crypto ipsec client ezvpn easyclient inside
Assigns the Cisco Easy VPN Remote configuration to the insideinterface.
Step 13 exit
Example:
Router (config-if)# exit
Exits interface configuration mode.
Step 14 ip nat inside source static local-ip global-ip
Example:
Router (config)# ip nat inside source static 10.10.10.10 5.5.5.5
Configure a one-to-one static NAT translation for each host thatneeds to be accessible from the Easy VPN server side network, orfrom other client locations.
Step 15 ip nat inside source list {acl-name | acl-number}interface interface overload
Example:
Router (config)# ip nat inside source list 100 interface Loopback0 overload
Configure dynamic overloaded NAT or PAT, which uses an ACLfor all the desired VPN traffic. The NAT and PAT traffic ismapped to the Easy VPN inside interface IP address.
• The acl-name argument is the name of the ACL.• The acl-number argument is the number of the ACL.
Step 16 crypto ipsec client ezvpn name
Example:
Router (config)# crypto ipsec client ezvpn easyclient
(Optional, if using split tunneling) Enters Cisco Easy VPNRemote configuration mode.
Cisco Easy VPN Remote Configuring Identical Addressing Support
Easy VPN Configuration Guide, Cisco IOS Release 12.460
Command or Action Purpose
Step 17 nat acl {acl-name | acl-number}
Example:
Router (config-crypto-ezvpn)# nat acl 100
(Optional, if using split tunneling) Enables split-tunneling for thetraffic specified by the acl-name or the acl-number argument. TheACL is the same as the ACL used by the NAT or PAT mapping inthe Step 15.
• The acl-name argument is the name of the ACL.• The acl-number argument is the number of the ACL.
Step 18 exit
Example:
Router (config-crypto-ezvpn)# exit
Exits Cisco Easy VPN Remote configuration mode.
Step 19 exit
Example:
Router (config)# exit
Exits global configuration mode.
Configuring cTCP on an Easy VPN ClientTo configure cTCP on an Easy VPN client (remote device), perform the following steps.
SUMMARY STEPS
1. enable
2. configure terminal
3. crypto ctcp [keepalive number-of-seconds| port port-number]
4. crypto ipsec client ezvpn name
5. ctcp port port-number
DETAILED STEPS
Command or Action Purpose
Step 1 enable
Example:
Router> enable
Enables privileged EXEC mode.
• Enter your password if prompted.
Cisco Easy VPN RemoteConfiguring cTCP on an Easy VPN Client
Easy VPN Configuration Guide, Cisco IOS Release 12.4 61
Command or Action Purpose
Step 2 configure terminal
Example:
Router# configure terminal
Enters global configuration mode.
Step 3 crypto ctcp [keepalive number-of-seconds|port port-number]
Example:
Router (config)# crypto ctcp keepalive 15
Sets cTCP keepalive interval for the remote device.
• number-of-seconds --Number of seconds between keepalives. Value= 5 through 3600.
• port port-number-- Port number that cTCP listens to. Up to 10numbers can be configured.
Note The cTCP client has to send periodic keepalives to the server tokeep NAT or firewall sessions alive.
Step 4 crypto ipsec client ezvpn name
Example:
Router (config)# crypto ipsec client ezvpn ezvpn1
Creates a Cisco Easy VPN remote configuration and enters Cisco EasyVPN remote configuration mode.
Step 5 ctcp port port-number
Example:
Router (config-crypto-ezvpn)# ctcp port 200
Sets the port number for cTCP encapsulation for Easy VPN.
• port-number --Port number on the hub. Value = 1 through 65535.
Configuring cTCP on an Easy VPN Client
Note To restrict the client from sending traffic in clear text when a tunnel is down, perform the following steps.
>
SUMMARY STEPS
1. enable
2. configure terminal
3. crypto ipsec client ezvpn name
4. flow allow acl [name| number]
Cisco Easy VPN Remote Configuring cTCP on an Easy VPN Client
Easy VPN Configuration Guide, Cisco IOS Release 12.462
DETAILED STEPS
Command or Action Purpose
Step 1 enable
Example:
Router> enable
Enables privileged EXEC mode.
• Enter your password if prompted.
Step 2 configure terminal
Example:
Router# configure terminal
Enters global configuration mode.
Step 3 crypto ipsec client ezvpn name
Example:
Router (config)# crypto ipsec client ezvpn ezvpn1
Creates a Cisco Easy VPN remote configuration and enters CiscoEasy VPN remote configuration mode.
Step 4 flow allow acl [name| number]
Example:
Router (config-crypto-ezvpn)# flow allow acl 102
Restricts the client from sending traffic in clear text when thetunnel is down.
• name-- Access list name.• number-- Access list number. Value = 100 through 199.
Web Interface Tasks• Configuring Web-Based Activation, page 63
• Monitoring and Maintaining Web-Based Activation, page 64
Configuring Web-Based ActivationTo configure a LAN so that any HTTP requests coming from any of the PCs on the private LAN areintercepted, providing corporate users with access to the corporate Web page, perform the following steps.
SUMMARY STEPS
1. enable
2. configure terminal
3. crypto ipsec client ezvpn name
4. xauth userid mode {http-intercept | interactive | local}
Web Interface TasksConfiguring Web-Based Activation
Easy VPN Configuration Guide, Cisco IOS Release 12.4 63
DETAILED STEPS
Command or Action Purpose
Step 1 enable
Example:
Router> enable
Enables privileged EXEC mode.
• Enter your password if prompted.
Step 2 configure terminal
Example:
Router# configure terminal
Enters global configuration mode.
Step 3 crypto ipsec client ezvpn name
Example:
Router (config)# crypto ipsec client ezvpn easy vpn remote1
Assigns a Cisco Easy VPN remote configuration to an interfaceand enters Cisco Easy VPN Remote configuration mode.
• The name argument specifies the configuration name to beassigned to the interface.
Step 4 xauth userid mode {http-intercept | interactive |local}
Example:
Router (config-crypto-ezvpn)# xauth userid mode http-intercept
Specifies how the VPN device handles Xauth requests or promptsfrom the server.
Monitoring and Maintaining Web-Based ActivationTo monitor and maintain web-based activation, perform the following steps. (The debug and showcommands may be used independently, or they may all be configured.)
SUMMARY STEPS
1. enable
2. debug crypto ipsec client ezvpn
3. debug ip auth-proxy ezvpn
4. show crypto ipsec client ezvpn
5. show ip auth-proxy config
Cisco Easy VPN Remote Monitoring and Maintaining Web-Based Activation
Easy VPN Configuration Guide, Cisco IOS Release 12.464
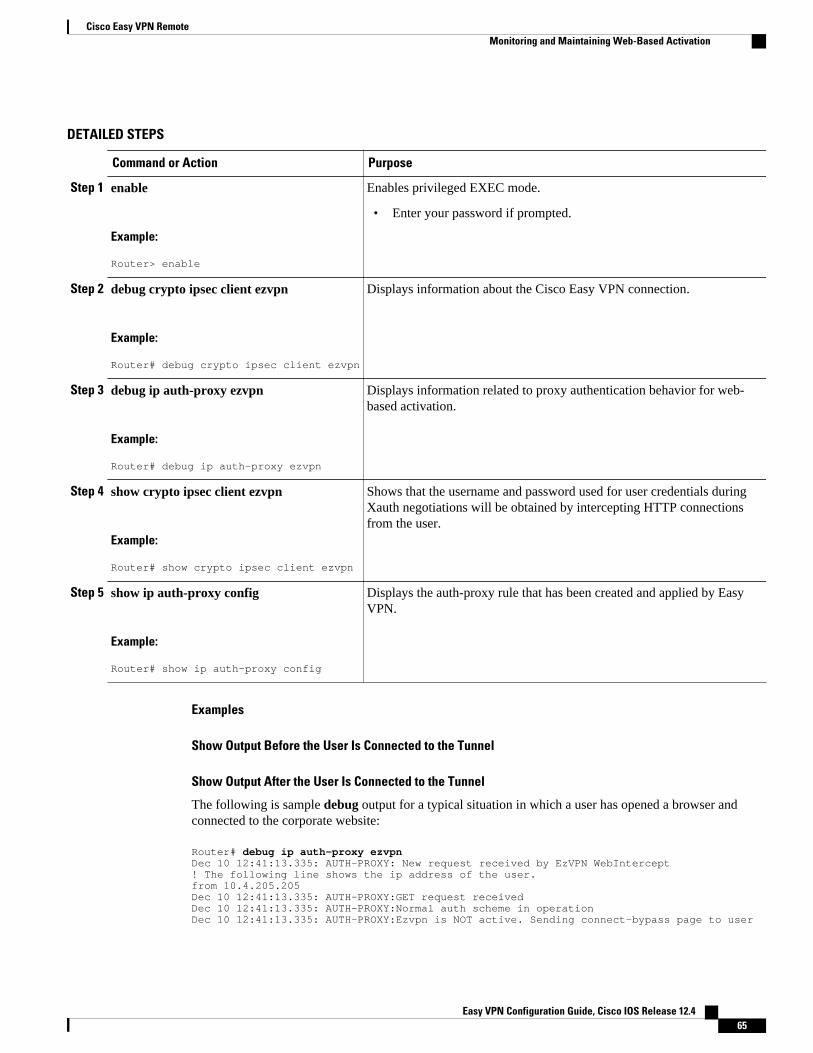
DETAILED STEPS
Command or Action Purpose
Step 1 enable
Example:
Router> enable
Enables privileged EXEC mode.
• Enter your password if prompted.
Step 2 debug crypto ipsec client ezvpn
Example:
Router# debug crypto ipsec client ezvpn
Displays information about the Cisco Easy VPN connection.
Step 3 debug ip auth-proxy ezvpn
Example:
Router# debug ip auth-proxy ezvpn
Displays information related to proxy authentication behavior for web-based activation.
Step 4 show crypto ipsec client ezvpn
Example:
Router# show crypto ipsec client ezvpn
Shows that the username and password used for user credentials duringXauth negotiations will be obtained by intercepting HTTP connectionsfrom the user.
Step 5 show ip auth-proxy config
Example:
Router# show ip auth-proxy config
Displays the auth-proxy rule that has been created and applied by EasyVPN.
Examples
Show Output Before the User Is Connected to the Tunnel
Show Output After the User Is Connected to the Tunnel
The following is sample debug output for a typical situation in which a user has opened a browser andconnected to the corporate website:
Router# debug ip auth-proxy ezvpnDec 10 12:41:13.335: AUTH-PROXY: New request received by EzVPN WebIntercept! The following line shows the ip address of the user.from 10.4.205.205Dec 10 12:41:13.335: AUTH-PROXY:GET request received Dec 10 12:41:13.335: AUTH-PROXY:Normal auth scheme in operationDec 10 12:41:13.335: AUTH-PROXY:Ezvpn is NOT active. Sending connect-bypass page to user
Cisco Easy VPN RemoteMonitoring and Maintaining Web-Based Activation
Easy VPN Configuration Guide, Cisco IOS Release 12.4 65
At this point, the user chooses “connect” on his or her browser:
Dec 10 12:42:43.427: AUTH-PROXY: New request received by EzVPN WebInterceptfrom 10.4.205.205Dec 10 12:42:43.427: AUTH-PROXY:POST request receivedDec 10 12:42:43.639: AUTH-PROXY:Found attribute <connect> in formDec 10 12:42:43.639: AUTH-PROXY:Sending POST data to EzVPNDec 10 12:42:43.639: EZVPN(tunnel22): Communication from Interceptor application.Request/Response from 10.4.205.205, via Ethernet0Dec 10 12:42:43.639: connect: Connect NowDec 10 12:42:43.639: EZVPN(tunnel22): Received CONNECT from 10.4.205.205!Dec 10 12:42:43.643: EZVPN(tunnel22): Current State: CONNECT_REQUIREDDec 10 12:42:43.643: EZVPN(tunnel22): Event: CONNECTDec 10 12:42:43.643: EZVPN(tunnel22): ezvpn_connect_request
Easy VPN contacts the server:
Dec 10 12:42:43.643: EZVPN(tunnel22): Found valid peer 192.168.0.1Dec 10 12:42:43.643: EZVPN(tunnel22): Added PSK for address 192.168.0.1Dec 10 12:42:43.643: EZVPN(tunnel22): New State: READYDec 10 12:42:44.815: EZVPN(tunnel22): Current State: READYDec 10 12:42:44.815: EZVPN(tunnel22): Event: IKE_PFSDec 10 12:42:44.815: EZVPN(tunnel22): No state changeDec 10 12:42:44.819: EZVPN(tunnel22): Current State: READYDec 10 12:42:44.819: EZVPN(tunnel22): Event: CONN_UPDec 10 12:42:44.819: EZVPN(tunnel22): ezvpn_conn_up B8E86EC7 E88A8A18 D0D51422 8AFF32B7
The server requests Xauth information:
Dec 10 12:42:44.823: EZVPN(tunnel22): No state changeDec 10 12:42:44.827: EZVPN(tunnel22): Current State: READYDec 10 12:42:44.831: EZVPN(tunnel22): Event: XAUTH_REQUESTDec 10 12:42:44.831: EZVPN(tunnel22): ezvpn_xauth_requestDec 10 12:42:44.831: EZVPN(tunnel22): ezvpn_parse_xauth_msgDec 10 12:42:44.831: EZVPN: Attributes sent in xauth request message:Dec 10 12:42:44.831: XAUTH_TYPE_V2(tunnel22): 0Dec 10 12:42:44.831: XAUTH_USER_NAME_V2(tunnel22):Dec 10 12:42:44.831: XAUTH_USER_PASSWORD_V2(tunnel22):Dec 10 12:42:44.831: XAUTH_MESSAGE_V2(tunnel22) <Enter Username and Password.>Dec 10 12:42:44.831: EZVPN(tunnel22): Requesting following info for xauthDec 10 12:42:44.831: username:(Null)Dec 10 12:42:44.835: password:(Null)Dec 10 12:42:44.835: message:Enter Username and Password.Dec 10 12:42:44.835: EZVPN(tunnel22): New State: XAUTH_REQ
The username and password prompt are displayed in the browser of the user:
Dec 10 12:42:44.835: AUTH-PROXY: Response to POST is CONTINUEDec 10 12:42:44.839: AUTH-PROXY: Displayed POST response successfullyDec 10 12:42:44.843: AUTH-PROXY:Served POST response to the user
When the user enters his or her username and password, the following is sent to the server:
Dec 10 12:42:55.343: AUTH-PROXY: New request received by EzVPN WebIntercept from 10.4.205.205Dec 10 12:42:55.347: AUTH-PROXY:POST request receivedDec 10 12:42:55.559: AUTH-PROXY:No of POST parameters is 3Dec 10 12:42:55.559: AUTH-PROXY:Found attribute <username> in formDec 10 12:42:55.559: AUTH-PROXY:Found attribute <password> in formDec 10 12:42:55.559: AUTH-PROXY:Found attribute <ok> in formDec 10 12:42:55.563: AUTH-PROXY:Sending POST data to EzVPNDec 10 12:42:55.563: EZVPN(tunnel22): Communication from Interceptor application. Request/Response from 10.4.205.205, via Ethernet0Dec 10 12:42:55.563: username:httpDec 10 12:42:55.563: password:<omitted>Dec 10 12:42:55.563: ok:ContinueDec 10 12:42:55.563: EZVPN(tunnel22): Received usename|password from 10.4.205.205!
Cisco Easy VPN Remote Monitoring and Maintaining Web-Based Activation
Easy VPN Configuration Guide, Cisco IOS Release 12.466

Dec 10 12:42:55.567: EZVPN(tunnel22): Current State: XAUTH_PROMPTDec 10 12:42:55.567: EZVPN(tunnel22): Event: XAUTH_REQ_INFO_READYDec 10 12:42:55.567: EZVPN(tunnel22): ezvpn_xauth_replyDec 10 12:42:55.567: XAUTH_TYPE_V2(tunnel22): 0Dec 10 12:42:55.567: XAUTH_USER_NAME_V2(tunnel22): httpDec 10 12:42:55.567: XAUTH_USER_PASSWORD_V2(tunnel22): <omitted>Dec 10 12:42:55.567: EZVPN(tunnel22): New State: XAUTH_REPLIEDDec 10 12:42:55.891: EZVPN(tunnel22): Current State: XAUTH_REPLIEDDec 10 12:42:55.891: EZVPN(tunnel22): Event: XAUTH_STATUSDec 10 12:42:55.891: EZVPN(tunnel22): xauth status received: Success
After using the tunnel, the user chooses “Disconnect”:
Dec 10 12:48:17.267: EZVPN(tunnel22): Received authentic disconnect credentialDec 10 12:48:17.275: EZVPN(): Received an HTTP request: disconnectDec 10 12:48:17.275: %CRYPTO-6-EZVPN_CONNECTION_DOWN: (Client) User= Group=tunnel22 Client_public_addr=192.168.0.13 Server_public_addr=192.168.0.1 Assigned_client_addr=10.3.4.5
The following output from the two show commands (show crypto ipsec client ezvpn and show ip auth-proxy config) displays what you might see before a user is connected to a VPN tunnel:
Router# show crypto ipsec client ezvpn tunnel22Tunnel name : tunnel22Inside interface list: Ethernet0Outside interface: Ethernet1Current State: CONNECT_REQUIREDLast Event: RESETSave Password: Disallowed! Note the next line. XAuth credentials: HTTP intercepted HTTP return code : 200 IP addr being prompted: 0.0.0.0Current EzVPN Peer: 192.168.0.1Router# show ip auth-proxy configAuthentication global cache time is 60 minutesAuthentication global absolute time is 0 minutesAuthentication Proxy Watch-list is disabledAuthentication Proxy Rule Configuration! Note that the next line is the Easy VPN-defined internal rule. Auth-proxy name ezvpn401*** Applied on Ethernet0 http list not specified inactivity-timer 60 minutes
The following output from the two show commands (show crypto ipsec client ezvpn and show ip auth-proxy config) displays what you might see after the user has been connected to the tunnel:
Router# show crypto ipsec client ezvpn tunnel22Tunnel name : tunnel22Inside interface list: Ethernet0Outside interface: Ethernet1Current State: IPSEC_ACTIVELast Event: SOCKET_UPAddress: 10.3.4.5Mask: 255.255.255.255Save Password: Disallowed XAuth credentials: HTTP intercepted HTTP return code : 200 IP addr being prompted: 192.168.0.0Current EzVPN Peer: 192.168.0.1Router# show ip auth-proxy configAuthentication global cache time is 60 minutesAuthentication global absolute time is 0 minutesAuthentication Proxy Watch-list is disabledAuth-proxy name ezvpnWeb*** (EzVPN-defined internal rule)http list not specified inactivity-timer 60 minutes
Cisco Easy VPN RemoteMonitoring and Maintaining Web-Based Activation
Easy VPN Configuration Guide, Cisco IOS Release 12.4 67
Troubleshooting the VPN Connection• Troubleshooting a VPN Connection Using the Cisco Easy VPN Remote Feature, page 68
• Troubleshooting the Client Mode of Operation, page 68
• Troubleshooting Remote Management, page 69
• Troubleshooting Dead Peer Detection, page 69
Troubleshooting a VPN Connection Using the Cisco Easy VPN Remote FeatureTo troubleshoot a VPN connection created using the Cisco Easy VPN Remote feature, use the followingsuggested techniques.
• Be aware that any changes to an active Cisco Easy VPN remote configuration or IP address changes tothe involved interfaces, such as adding or removing an inside interface, result in a reset of the CiscoEasy VPN Remote connection.
• Enable debugging of the Cisco Easy VPN Remote feature using the debug crypto ipsec clientezvpncommand.
• Enable debugging of IKE events using the debug crypto ipsecand debug crypto isakmpcommands.• Display the active IPsec VPN connections using the show crypto engine connections active
command.• To reset the VPN connection, use the clear crypto ipsec client ezvpn command. If you have
debugging enabled, you might prefer to use the clear crypto sa and clear crypto isakmp commands.
Troubleshooting the Client Mode of OperationThe following information may be used to troubleshoot the Easy VPN Remote configuration for the clientmode of operation.
In client mode, the Cisco Easy VPN Remote feature automatically configures the NAT or PAT translationand access lists that are needed to implement the VPN tunnel. These configurations are automaticallycreated when the IPsec VPN connection is initiated. When the tunnel is torn down, the NAT or PAT andaccess list configurations are automatically deleted.
The NAT or PAT configuration is created with the following assumptions:
• The ip nat inside command is applied to all inside interfaces, including default inside interfaces. Thedefault inside interface is the Ethernet 0 interface (for the Cisco 806, Cisco 826, Cisco 827, Cisco 828,Cisco 831, Cisco 836, and Cisco 837 routers).
• The ip nat outside command is applied to the interface that is configured with the Cisco Easy VPNRemote configuration. On the Cisco 800 series and Cisco 1700 series routers, the outside interface isconfigured with the Cisco Easy VPN Remote configuration. On the Cisco 1700 series routers, Cisco2600 series routers, Cisco 3600 series routers, and Cisco 3700 series routers, multiple outsideinterfaces can be configured.
Note Configuring the ip nat inside and ip nat outsidecommands on the EasyVPN outside and inside interfacesrespectively leads to undefined behavior. This configuration is considered invalid.
Troubleshooting the VPN Connection Troubleshooting a VPN Connection Using the Cisco Easy VPN Remote Feature
Easy VPN Configuration Guide, Cisco IOS Release 12.468
Tip The NAT or PAT translation and access list configurations that are created by the Cisco Easy VPN Remotefeature are not written to either the startup configuration or running configuration files. Theseconfigurations, however, can be displayed using the show ip nat statistics and show access-listcommands.
Troubleshooting Remote ManagementTo troubleshoot remote management of the VPN remote, use the show ip interface command. Using thebrief keyword, you can verify that the loopback has been removed and that the interface is shown correctly.
• Examples, page 69
Examples
Following is a typical example of output from the show ip interface command.
Router# show ip interface briefInterface IP-Address OK? Method Status ProtocolEthernet0 unassigned YES NVRAM administratively down down Ethernet1 10.0.0.11 YES NVRAM up up Loopback0 192.168.6.1 YES manual up up Loopback1 10.12.12.12 YES NVRAM up upRouter# show ip interface briefInterface IP-Address OK? Method Status ProtocolEthernet0 unassigned YES NVRAM administratively down downEthernet1 10.0.0.11 YES NVRAM up upLoopback1 10.12.12.12 YES NVRAM up up
Troubleshooting Dead Peer DetectionTo troubleshoot dead peer detection, use the show crypto ipsec client ezvpn command.
• Examples, page 69
Examples
The following typical output displays the current server and the peers that have been pushed by the EasyVPN server:
Router# show crypto ipsec client ezvpnEasy VPN Remote Phase: 4Tunnel name : ez1Inside interface list: Loopback1,Outside interface: Ethernet1 Current State: IPSEC_ACTIVELast Event: CONNECTAddress: 192.168.6.5Mask: 255.255.255.255DNS Primary: 10.2.2.2DNS Secondary: 10.2.2.3NBMS/WINS Primary: 10.6.6.6Default Domain: cisco.comSave Password: AllowedCurrent EzVPN Peer:10.0.0.110Backup Gateways
Cisco Easy VPN RemoteTroubleshooting Remote Management
Easy VPN Configuration Guide, Cisco IOS Release 12.4 69
(0): green.cisco.com (1): blue
Configuration Examples for Cisco Easy VPN Remote• Easy VPN Remote Configuration Examples, page 70• Easy VPN Server Configuration Examples, page 95
Easy VPN Remote Configuration Examples• Client Mode Configuration Examples, page 70• Local Address Support for Easy VPN Remote Example, page 75• Network Extension Mode Configuration Examples, page 75• Save Password Configuration Example, page 80• PFS Support Examples, page 80• Dial Backup Examples, page 81• Web-Based Activation Example, page 86• Easy VPN Remote with Virtual IPsec Interface Support Configuration Examples, page 86• Dual Tunnel Configuration Example, page 90• Dual Tunnel Show Output Examples, page 91• Reactivate Primary Peer Example, page 94• Identical Addressing Support Configuration Example, page 95• cTCP on an Easy VPN Client (Remote Device) Examples, page 95
Client Mode Configuration ExamplesThe examples in this section show configurations for the Cisco Easy VPN Remote feature in client mode.Also shown are the Cisco IOS Easy VPN server configurations that correspond to these clientconfigurations.
Note Typically, users configure the Cisco 800 series routers with the SDM or CRWS web interface, not byentering CLI commands. However, the configurations shown here for the Cisco 800 series routers displaytypical configurations that can be used if manual configuration is desired.
• Cisco Easy VPN Client in Client Mode (Cisco 831) Example, page 70• Cisco Easy VPN Client in Client Mode (Cisco 837) Example, page 72• Cisco Easy VPN Client in Client Mode (Cisco 1700 Series) Example, page 73
Cisco Easy VPN Client in Client Mode (Cisco 831) Example
In the following example, a Cisco 831 router is configured as an Easy VPN remote using the Cisco EasyVPN Remote feature in client mode. This example shows the following components of the Cisco EasyVPN Remote configuration:
• DHCP server pool--The ip dhcp pool command creates a pool of IP addresses to be assigned to thePCs connected to the Ethernet 0 interface of the router. The pool assigns addresses in the class C
Easy VPN Remote Configuration Examples Configuration Examples for Cisco Easy VPN Remote
Easy VPN Configuration Guide, Cisco IOS Release 12.470
private address space (192.168.100.0) and configures each PC so that its default route is192.168.100.1, which is the IP address assigned to the Ethernet interface of the router. The DHCPlease period is one day.
• Cisco Easy VPN remote configuration--The first crypto ipsec client ezvpn easy vpn remotecommand (global configuration mode) creates a Cisco Easy VPN remote configuration named “easyvpn remote.” This configuration specifies the group name “easy vpn remote-groupname” and theshared key value “easy vpn remote-password,” and it sets the peer destination to the IP address192.185.0.5 (which is the address assigned to the interface connected to the Internet on the destinationpeer router). The Cisco Easy VPN Remote configuration is configured for the default client mode.
Note If DNS is also configured on the router, the peer keyword option also supports a hostname instead of an IPaddress.
• The second crypto ipsec client ezvpn easy vpn remote command (interface configuration mode)assigns the Cisco Easy VPN Remote configuration to the Ethernet 1 interface so that all traffic that isreceived and transmitted on that interface is sent through the VPN tunnel.
! Cisco Router Web Setup Template!no service padno service tcp-small-serversno service udp-small-serversservice timestamps debug uptimeservice timestamps log uptimeservice password-encryption!hostname 806Router !!ip subnet-zeroip domain-lookupip dhcp excluded-address 10.10.10.1 !ip dhcp pool CLIENT import all network 10.10.10.0 255.255.255.255 default-router 10.10.10.1 lease 1 0 0 !!crypto ipsec client ezvpn easy_vpn_remote peer 192.168.0.5 group easy_vpn_remote_groupname key easy_vpn_remote_password mode client!!interface Ethernet0 ip address 10.10.10.1 255.255.255.255 no cdp enable hold-queue 32 in!interface Ethernet1 ip address dhcp no cdp enable crypto ipsec client ezvpn easy_vpn_remote!ip classlessip http server!!ip route 10.0.0.0 10.0.0.0 Ethernet1!line con 0
Cisco Easy VPN RemoteCisco Easy VPN Client in Client Mode (Cisco 831) Example
Easy VPN Configuration Guide, Cisco IOS Release 12.4 71
exec-timeout 120 0 stopbits 1line vty 0 4 exec-timeout 0 0 login local
Cisco Easy VPN Client in Client Mode (Cisco 837) Example
In the following example, a Cisco 837 router is configured as an Easy VPN remote using the Cisco EasyVPN Remote feature in the client mode of operation. This example shows the following components of theCisco Easy VPN remote configuration:
• PPPoE configuration--The ATM 0 interface is configured to support PPPoE connections over theDialer 1 virtual interface. Because the interfaces use PPPoE, a DHCP IP address pool is not required toprovide IP addresses to the connected PCs.
• Cisco Easy VPN Remote configuration--The first crypto ipsec client ezvpn command (globalconfiguration mode) creates a Cisco Easy VPN remote configuration named “easy vpn remote.” Thisconfiguration specifies the group name “easy vpn remote-groupname” and the shared key value of“easy vpn remote-password,” and it sets the peer destination to the IP address 10.0.0.5 (which is theaddress assigned to the interface connected to the Internet on the destination peer router). The CiscoEasy VPN remote configuration is configured for the default client mode.
Note If DNS is also configured on the router, the peer keyword option also supports a hostname instead of an IPaddress.
• The second crypto ipsec client ezvpn command (interface configuration mode) assigns the CiscoEasy VPN remote configuration to the Dialer 1 interface so that all traffic received and transmitted onthat interface is sent through the VPN tunnel.
version 12.2no service padservice timestamps debug uptimeservice timestamps log uptimeno service password-encryption!hostname c827!!mmi polling-interval 60no mmi auto-configureno mmi pvcmmi snmp-timeout 180ip subnet-zero!ip ssh time-out 120ip ssh authentication-retries 3vpdn enable!vpdn-group pppoe request-dialin protocol pppoe ip mtu adjust!!!crypto ipsec client ezvpn easy_vpn_remote group easy_vpn_remote_groupname key easy_vpn_remote_password mode client peer 10.0.0.5!!!interface Ethernet0
Cisco Easy VPN Remote Cisco Easy VPN Client in Client Mode (Cisco 837) Example
Easy VPN Configuration Guide, Cisco IOS Release 12.472
ip address 10.0.0.117 255.0.0.0 hold-queue 100 out!interface ATM0 no ip address no atm ilmi-keepalive pvc 1/40 pppoe-client dial-pool-number 1 ! dsl operating-mode auto!interface Dialer1 ip address 10.0.0.3 255.0.0.0 ip mtu 1492 encapsulation ppp dialer pool 1 crypto ipsec client ezvpn easy_vpn_remote!ip classlessip route 0.0.0.0 0.0.0.0 ATM0ip route 0.0.0.0 0.0.0.0 Dialer1 permanentip route 10.0.0.0 255.0.0.0 10.0.0.13ip http serverip pim bidir-enable!line con 0 stopbits 1line vty 0 4 login!scheduler max-task-time 5000end
Cisco Easy VPN Client in Client Mode (Cisco 1700 Series) Example
In the following example, a Cisco 1753 router is configured as an Easy VPN remote using the Cisco EasyVPN Remote feature in the client mode of operation. This example shows a running configuration of aCisco 1753 that has two inside interfaces and one outside interface on one tunnel. The connect autocommand manually establishes the IPsec VPN tunnel.
Router# show running-configBuilding configuration...Current configuration : 881 bytes ! version 12.2 service timestamps debug uptime service timestamps log uptime no service password-encryption ! hostname mma-1753 ! ! memory-size iomem 15 ip subnet-zero !! ! ip ssh time-out 120 ip ssh authentication-retries 3 ! ! ! crypto ipsec client ezvpn easy_vpn_remote connect auto group ezvpn key ezvpn mode client peer 10.6.6.1 ! ! ! interface FastEthernet0/0 ip address 10.4.4.2 255.255.255.0 speed auto
Cisco Easy VPN RemoteCisco Easy VPN Client in Client Mode (Cisco 1700 Series) Example
Easy VPN Configuration Guide, Cisco IOS Release 12.4 73
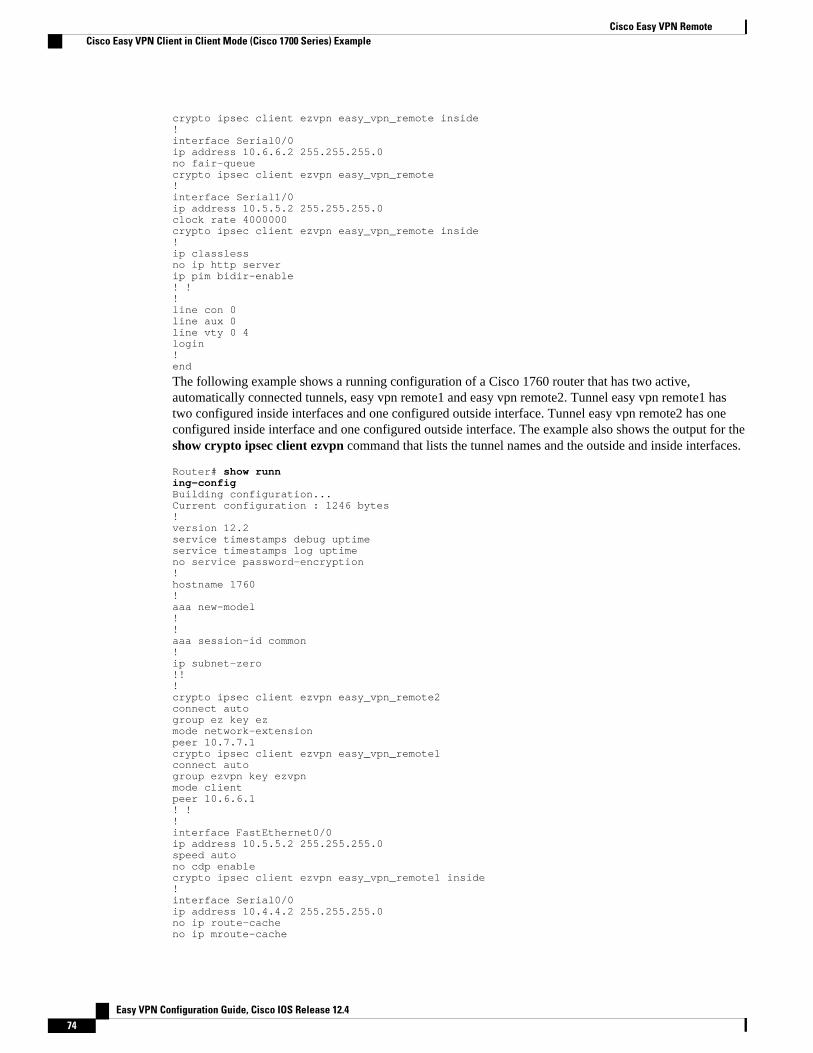
crypto ipsec client ezvpn easy_vpn_remote inside ! interface Serial0/0 ip address 10.6.6.2 255.255.255.0 no fair-queue crypto ipsec client ezvpn easy_vpn_remote! interface Serial1/0 ip address 10.5.5.2 255.255.255.0 clock rate 4000000 crypto ipsec client ezvpn easy_vpn_remote inside ! ip classless no ip http server ip pim bidir-enable ! ! ! line con 0 line aux 0 line vty 0 4 login ! end
The following example shows a running configuration of a Cisco 1760 router that has two active,automatically connected tunnels, easy vpn remote1 and easy vpn remote2. Tunnel easy vpn remote1 hastwo configured inside interfaces and one configured outside interface. Tunnel easy vpn remote2 has oneconfigured inside interface and one configured outside interface. The example also shows the output for theshow crypto ipsec client ezvpn command that lists the tunnel names and the outside and inside interfaces.
Router# show running-configBuilding configuration...Current configuration : 1246 bytes ! version 12.2 service timestamps debug uptime service timestamps log uptime no service password-encryption ! hostname 1760 ! aaa new-model ! ! aaa session-id common ! ip subnet-zero !! ! crypto ipsec client ezvpn easy_vpn_remote2 connect auto group ez key ez mode network-extension peer 10.7.7.1 crypto ipsec client ezvpn easy_vpn_remote1 connect auto group ezvpn key ezvpn mode client peer 10.6.6.1 ! ! ! interface FastEthernet0/0 ip address 10.5.5.2 255.255.255.0 speed auto no cdp enable crypto ipsec client ezvpn easy_vpn_remote1 inside ! interface Serial0/0 ip address 10.4.4.2 255.255.255.0 no ip route-cache no ip mroute-cache
Cisco Easy VPN Remote Cisco Easy VPN Client in Client Mode (Cisco 1700 Series) Example
Easy VPN Configuration Guide, Cisco IOS Release 12.474
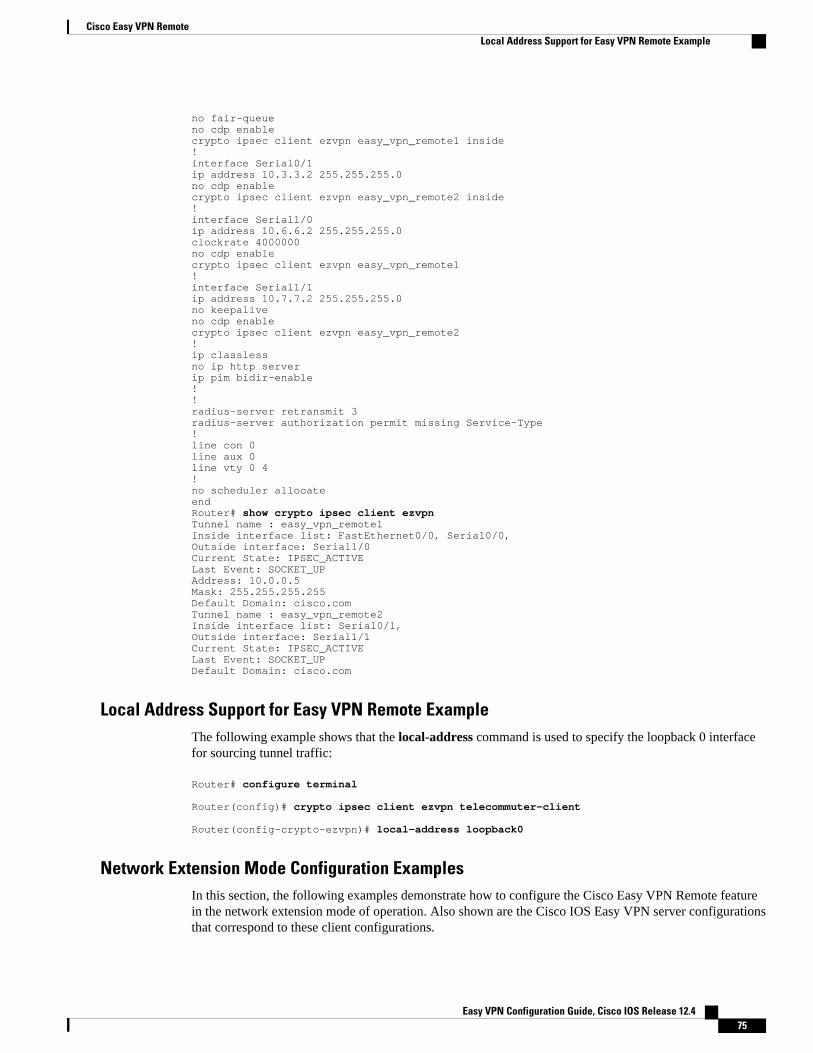
no fair-queue no cdp enable crypto ipsec client ezvpn easy_vpn_remote1 inside ! interface Serial0/1 ip address 10.3.3.2 255.255.255.0 no cdp enable crypto ipsec client ezvpn easy_vpn_remote2 inside ! interface Serial1/0 ip address 10.6.6.2 255.255.255.0 clockrate 4000000 no cdp enable crypto ipsec client ezvpn easy_vpn_remote1 ! interface Serial1/1 ip address 10.7.7.2 255.255.255.0 no keepalive no cdp enable crypto ipsec client ezvpn easy_vpn_remote2 ! ip classless no ip http server ip pim bidir-enable ! ! radius-server retransmit 3 radius-server authorization permit missing Service-Type ! line con 0 line aux 0 line vty 0 4 ! no scheduler allocate endRouter# show crypto ipsec client ezvpnTunnel name : easy_vpn_remote1 Inside interface list: FastEthernet0/0, Serial0/0, Outside interface: Serial1/0 Current State: IPSEC_ACTIVE Last Event: SOCKET_UP Address: 10.0.0.5 Mask: 255.255.255.255 Default Domain: cisco.comTunnel name : easy_vpn_remote2 Inside interface list: Serial0/1, Outside interface: Serial1/1 Current State: IPSEC_ACTIVE Last Event: SOCKET_UP Default Domain: cisco.com
Local Address Support for Easy VPN Remote ExampleThe following example shows that the local-address command is used to specify the loopback 0 interfacefor sourcing tunnel traffic:
Router# configure terminal Router(config)# crypto ipsec client ezvpn telecommuter-client Router(config-crypto-ezvpn)# local-address loopback0
Network Extension Mode Configuration ExamplesIn this section, the following examples demonstrate how to configure the Cisco Easy VPN Remote featurein the network extension mode of operation. Also shown are the Cisco IOS Easy VPN server configurationsthat correspond to these client configurations.
Cisco Easy VPN RemoteLocal Address Support for Easy VPN Remote Example
Easy VPN Configuration Guide, Cisco IOS Release 12.4 75
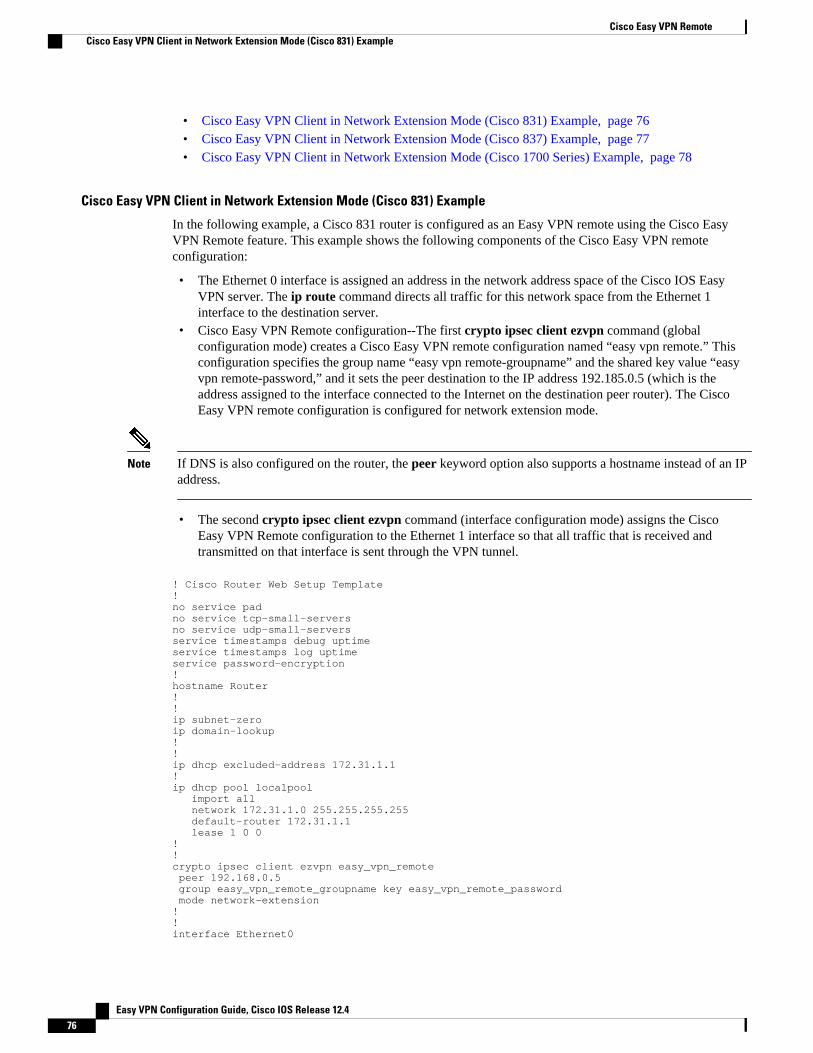
• Cisco Easy VPN Client in Network Extension Mode (Cisco 831) Example, page 76• Cisco Easy VPN Client in Network Extension Mode (Cisco 837) Example, page 77• Cisco Easy VPN Client in Network Extension Mode (Cisco 1700 Series) Example, page 78
Cisco Easy VPN Client in Network Extension Mode (Cisco 831) Example
In the following example, a Cisco 831 router is configured as an Easy VPN remote using the Cisco EasyVPN Remote feature. This example shows the following components of the Cisco Easy VPN remoteconfiguration:
• The Ethernet 0 interface is assigned an address in the network address space of the Cisco IOS EasyVPN server. The ip route command directs all traffic for this network space from the Ethernet 1interface to the destination server.
• Cisco Easy VPN Remote configuration--The first crypto ipsec client ezvpn command (globalconfiguration mode) creates a Cisco Easy VPN remote configuration named “easy vpn remote.” Thisconfiguration specifies the group name “easy vpn remote-groupname” and the shared key value “easyvpn remote-password,” and it sets the peer destination to the IP address 192.185.0.5 (which is theaddress assigned to the interface connected to the Internet on the destination peer router). The CiscoEasy VPN remote configuration is configured for network extension mode.
Note If DNS is also configured on the router, the peer keyword option also supports a hostname instead of an IPaddress.
• The second crypto ipsec client ezvpn command (interface configuration mode) assigns the CiscoEasy VPN Remote configuration to the Ethernet 1 interface so that all traffic that is received andtransmitted on that interface is sent through the VPN tunnel.
! Cisco Router Web Setup Template!no service padno service tcp-small-serversno service udp-small-serversservice timestamps debug uptimeservice timestamps log uptimeservice password-encryption!hostname Router!!ip subnet-zeroip domain-lookup!!ip dhcp excluded-address 172.31.1.1 !ip dhcp pool localpool import all network 172.31.1.0 255.255.255.255 default-router 172.31.1.1 lease 1 0 0 !!crypto ipsec client ezvpn easy_vpn_remote peer 192.168.0.5 group easy_vpn_remote_groupname key easy_vpn_remote_password mode network-extension !!interface Ethernet0
Cisco Easy VPN Remote Cisco Easy VPN Client in Network Extension Mode (Cisco 831) Example
Easy VPN Configuration Guide, Cisco IOS Release 12.476
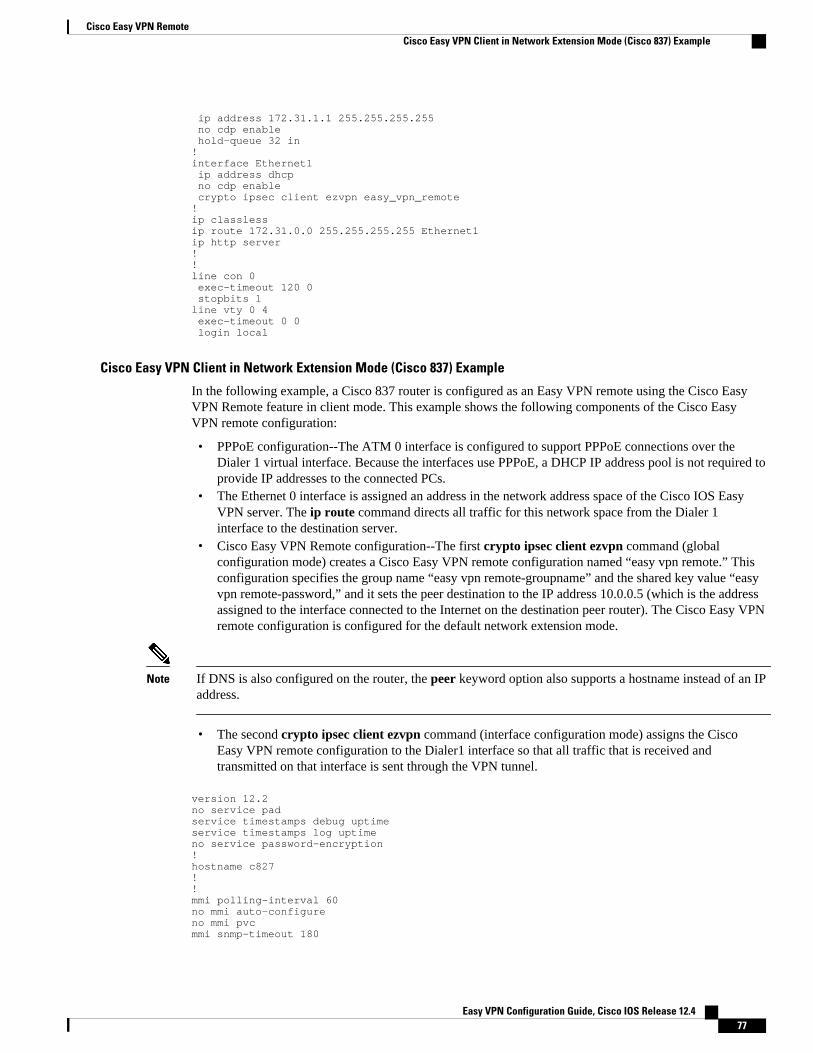
ip address 172.31.1.1 255.255.255.255 no cdp enable hold-queue 32 in!interface Ethernet1 ip address dhcp no cdp enable crypto ipsec client ezvpn easy_vpn_remote!ip classlessip route 172.31.0.0 255.255.255.255 Ethernet1ip http server!!line con 0 exec-timeout 120 0 stopbits 1line vty 0 4 exec-timeout 0 0 login local
Cisco Easy VPN Client in Network Extension Mode (Cisco 837) Example
In the following example, a Cisco 837 router is configured as an Easy VPN remote using the Cisco EasyVPN Remote feature in client mode. This example shows the following components of the Cisco EasyVPN remote configuration:
• PPPoE configuration--The ATM 0 interface is configured to support PPPoE connections over theDialer 1 virtual interface. Because the interfaces use PPPoE, a DHCP IP address pool is not required toprovide IP addresses to the connected PCs.
• The Ethernet 0 interface is assigned an address in the network address space of the Cisco IOS EasyVPN server. The ip route command directs all traffic for this network space from the Dialer 1interface to the destination server.
• Cisco Easy VPN Remote configuration--The first crypto ipsec client ezvpn command (globalconfiguration mode) creates a Cisco Easy VPN remote configuration named “easy vpn remote.” Thisconfiguration specifies the group name “easy vpn remote-groupname” and the shared key value “easyvpn remote-password,” and it sets the peer destination to the IP address 10.0.0.5 (which is the addressassigned to the interface connected to the Internet on the destination peer router). The Cisco Easy VPNremote configuration is configured for the default network extension mode.
Note If DNS is also configured on the router, the peer keyword option also supports a hostname instead of an IPaddress.
• The second crypto ipsec client ezvpn command (interface configuration mode) assigns the CiscoEasy VPN remote configuration to the Dialer1 interface so that all traffic that is received andtransmitted on that interface is sent through the VPN tunnel.
version 12.2no service padservice timestamps debug uptimeservice timestamps log uptimeno service password-encryption!hostname c827!!mmi polling-interval 60no mmi auto-configureno mmi pvcmmi snmp-timeout 180
Cisco Easy VPN RemoteCisco Easy VPN Client in Network Extension Mode (Cisco 837) Example
Easy VPN Configuration Guide, Cisco IOS Release 12.4 77
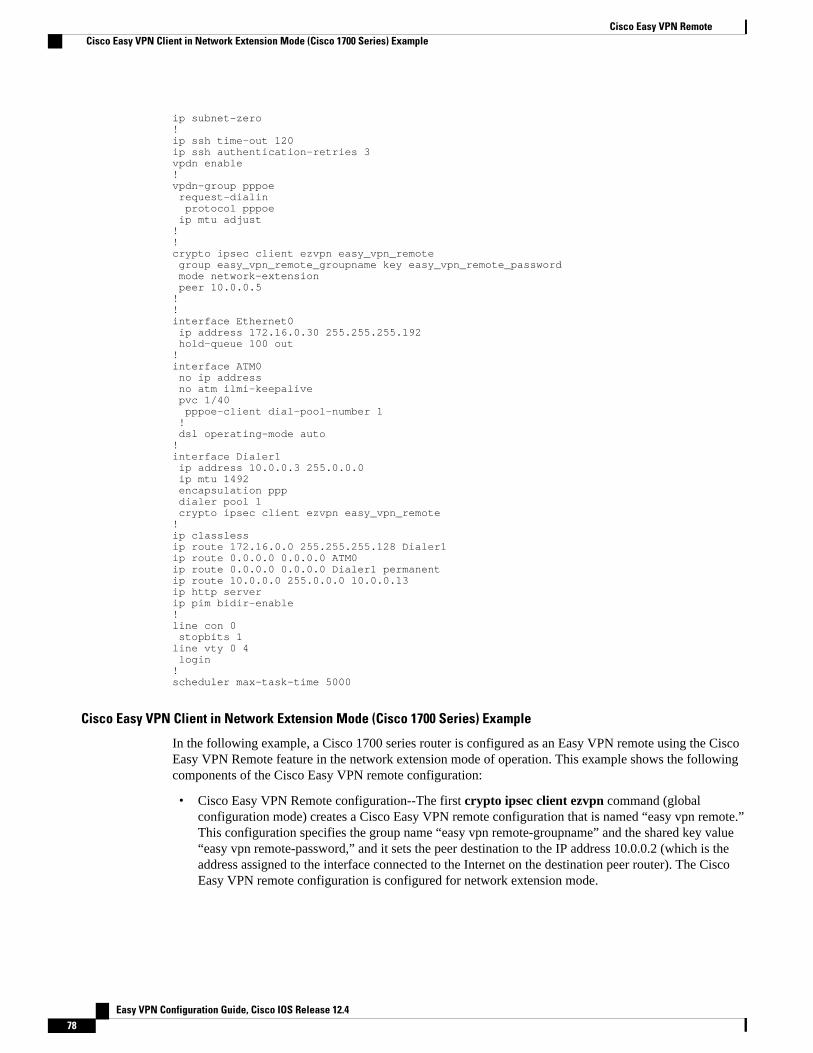
ip subnet-zero!ip ssh time-out 120ip ssh authentication-retries 3vpdn enable!vpdn-group pppoe request-dialin protocol pppoe ip mtu adjust!!crypto ipsec client ezvpn easy_vpn_remote group easy_vpn_remote_groupname key easy_vpn_remote_password mode network-extension peer 10.0.0.5!!interface Ethernet0 ip address 172.16.0.30 255.255.255.192 hold-queue 100 out!interface ATM0 no ip address no atm ilmi-keepalive pvc 1/40 pppoe-client dial-pool-number 1 ! dsl operating-mode auto!interface Dialer1 ip address 10.0.0.3 255.0.0.0 ip mtu 1492 encapsulation ppp dialer pool 1 crypto ipsec client ezvpn easy_vpn_remote!ip classlessip route 172.16.0.0 255.255.255.128 Dialer1ip route 0.0.0.0 0.0.0.0 ATM0ip route 0.0.0.0 0.0.0.0 Dialer1 permanentip route 10.0.0.0 255.0.0.0 10.0.0.13ip http serverip pim bidir-enable!line con 0 stopbits 1line vty 0 4 login!scheduler max-task-time 5000
Cisco Easy VPN Client in Network Extension Mode (Cisco 1700 Series) Example
In the following example, a Cisco 1700 series router is configured as an Easy VPN remote using the CiscoEasy VPN Remote feature in the network extension mode of operation. This example shows the followingcomponents of the Cisco Easy VPN remote configuration:
• Cisco Easy VPN Remote configuration--The first crypto ipsec client ezvpn command (globalconfiguration mode) creates a Cisco Easy VPN remote configuration that is named “easy vpn remote.”This configuration specifies the group name “easy vpn remote-groupname” and the shared key value“easy vpn remote-password,” and it sets the peer destination to the IP address 10.0.0.2 (which is theaddress assigned to the interface connected to the Internet on the destination peer router). The CiscoEasy VPN remote configuration is configured for network extension mode.
Cisco Easy VPN Remote Cisco Easy VPN Client in Network Extension Mode (Cisco 1700 Series) Example
Easy VPN Configuration Guide, Cisco IOS Release 12.478
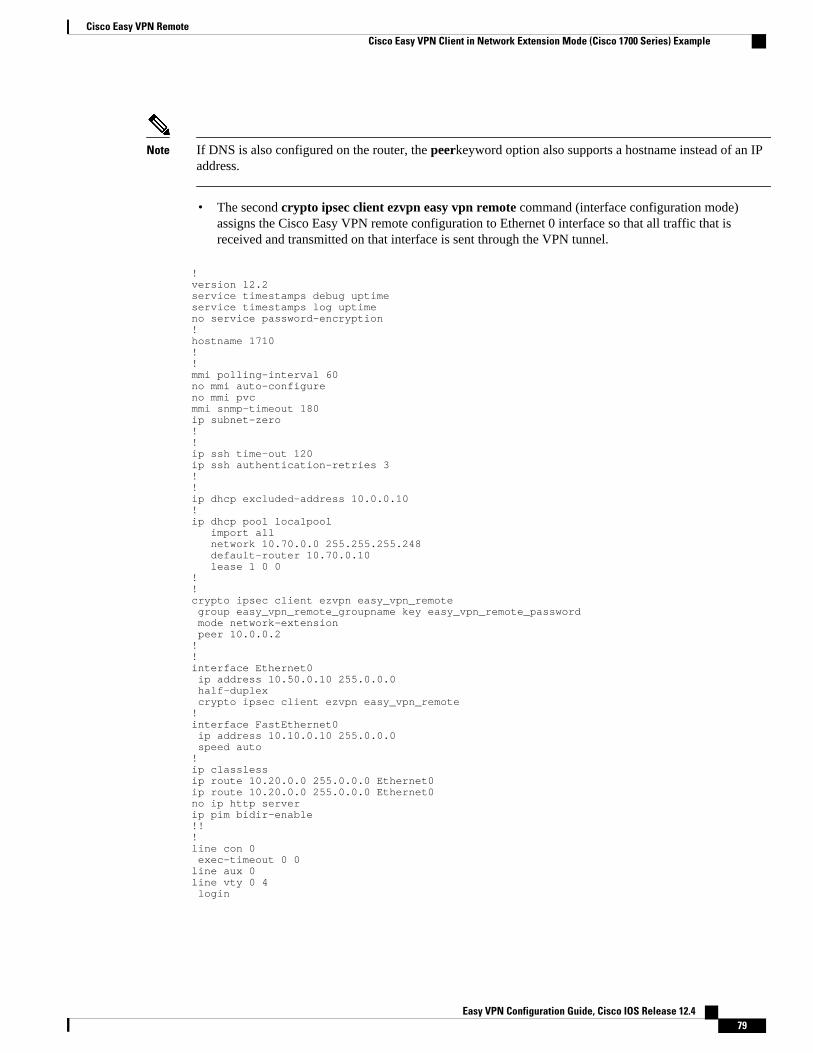
Note If DNS is also configured on the router, the peerkeyword option also supports a hostname instead of an IPaddress.
• The second crypto ipsec client ezvpn easy vpn remote command (interface configuration mode)assigns the Cisco Easy VPN remote configuration to Ethernet 0 interface so that all traffic that isreceived and transmitted on that interface is sent through the VPN tunnel.
!version 12.2service timestamps debug uptimeservice timestamps log uptimeno service password-encryption!hostname 1710!!mmi polling-interval 60no mmi auto-configureno mmi pvcmmi snmp-timeout 180ip subnet-zero!!ip ssh time-out 120ip ssh authentication-retries 3!!ip dhcp excluded-address 10.0.0.10 !ip dhcp pool localpool import all network 10.70.0.0 255.255.255.248 default-router 10.70.0.10 lease 1 0 0 !!crypto ipsec client ezvpn easy_vpn_remote group easy_vpn_remote_groupname key easy_vpn_remote_password mode network-extension peer 10.0.0.2!!interface Ethernet0 ip address 10.50.0.10 255.0.0.0 half-duplex crypto ipsec client ezvpn easy_vpn_remote!interface FastEthernet0 ip address 10.10.0.10 255.0.0.0 speed auto!ip classlessip route 10.20.0.0 255.0.0.0 Ethernet0ip route 10.20.0.0 255.0.0.0 Ethernet0no ip http serverip pim bidir-enable!!!line con 0 exec-timeout 0 0line aux 0line vty 0 4 login
Cisco Easy VPN RemoteCisco Easy VPN Client in Network Extension Mode (Cisco 1700 Series) Example
Easy VPN Configuration Guide, Cisco IOS Release 12.4 79
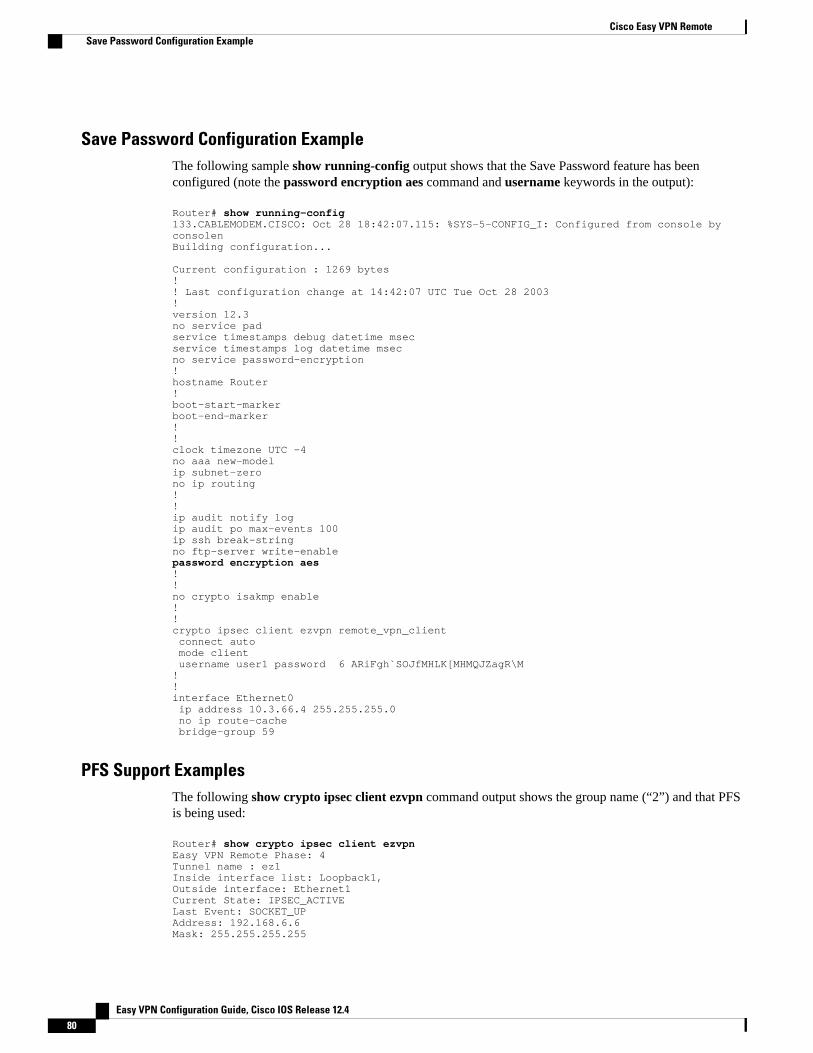
Save Password Configuration ExampleThe following sample show running-config output shows that the Save Password feature has beenconfigured (note the password encryption aes command and username keywords in the output):
Router# show running-config133.CABLEMODEM.CISCO: Oct 28 18:42:07.115: %SYS-5-CONFIG_I: Configured from console by consolenBuilding configuration... Current configuration : 1269 bytes!! Last configuration change at 14:42:07 UTC Tue Oct 28 2003!version 12.3no service padservice timestamps debug datetime msecservice timestamps log datetime msecno service password-encryption!hostname Router!boot-start-markerboot-end-marker!!clock timezone UTC -4no aaa new-modelip subnet-zerono ip routing!!ip audit notify logip audit po max-events 100ip ssh break-string no ftp-server write-enablepassword encryption aes!! no crypto isakmp enable!!crypto ipsec client ezvpn remote_vpn_client connect auto mode client username user1 password 6 ARiFgh`SOJfMHLK[MHMQJZagR\M!!interface Ethernet0 ip address 10.3.66.4 255.255.255.0 no ip route-cache bridge-group 59
PFS Support ExamplesThe following show crypto ipsec client ezvpn command output shows the group name (“2”) and that PFSis being used:
Router# show crypto ipsec client ezvpnEasy VPN Remote Phase: 4Tunnel name : ez1Inside interface list: Loopback1,Outside interface: Ethernet1 Current State: IPSEC_ACTIVELast Event: SOCKET_UPAddress: 192.168.6.6Mask: 255.255.255.255
Cisco Easy VPN Remote Save Password Configuration Example
Easy VPN Configuration Guide, Cisco IOS Release 12.480
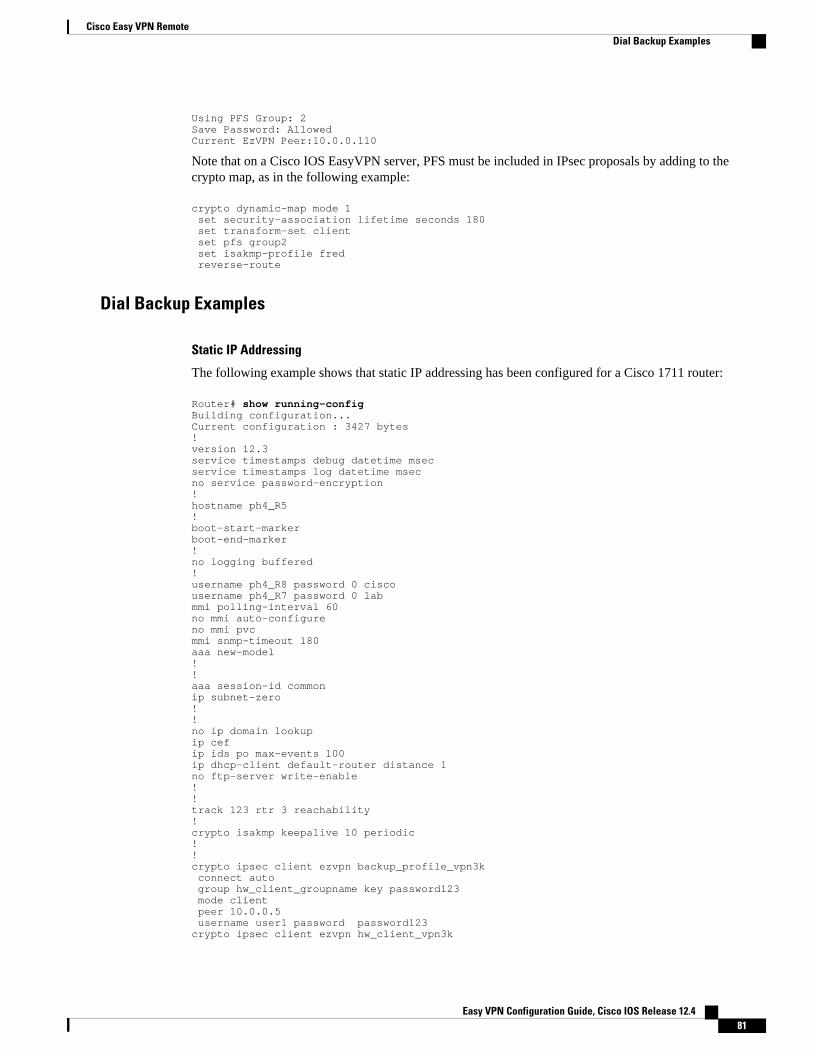
Using PFS Group: 2Save Password: AllowedCurrent EzVPN Peer:10.0.0.110
Note that on a Cisco IOS EasyVPN server, PFS must be included in IPsec proposals by adding to thecrypto map, as in the following example:
crypto dynamic-map mode 1 set security-association lifetime seconds 180 set transform-set client set pfs group2 set isakmp-profile fred reverse-route
Dial Backup Examples
Static IP Addressing
The following example shows that static IP addressing has been configured for a Cisco 1711 router:
Router# show running-configBuilding configuration...Current configuration : 3427 bytes!version 12.3service timestamps debug datetime msecservice timestamps log datetime msecno service password-encryption!hostname ph4_R5!boot-start-markerboot-end-marker!no logging buffered!username ph4_R8 password 0 ciscousername ph4_R7 password 0 labmmi polling-interval 60no mmi auto-configureno mmi pvcmmi snmp-timeout 180aaa new-model!! aaa session-id commonip subnet-zero!!no ip domain lookupip cefip ids po max-events 100ip dhcp-client default-router distance 1no ftp-server write-enable!!track 123 rtr 3 reachability! crypto isakmp keepalive 10 periodic! !crypto ipsec client ezvpn backup_profile_vpn3k connect auto group hw_client_groupname key password123 mode client peer 10.0.0.5 username user1 password password123crypto ipsec client ezvpn hw_client_vpn3k
Cisco Easy VPN RemoteDial Backup Examples
Easy VPN Configuration Guide, Cisco IOS Release 12.4 81
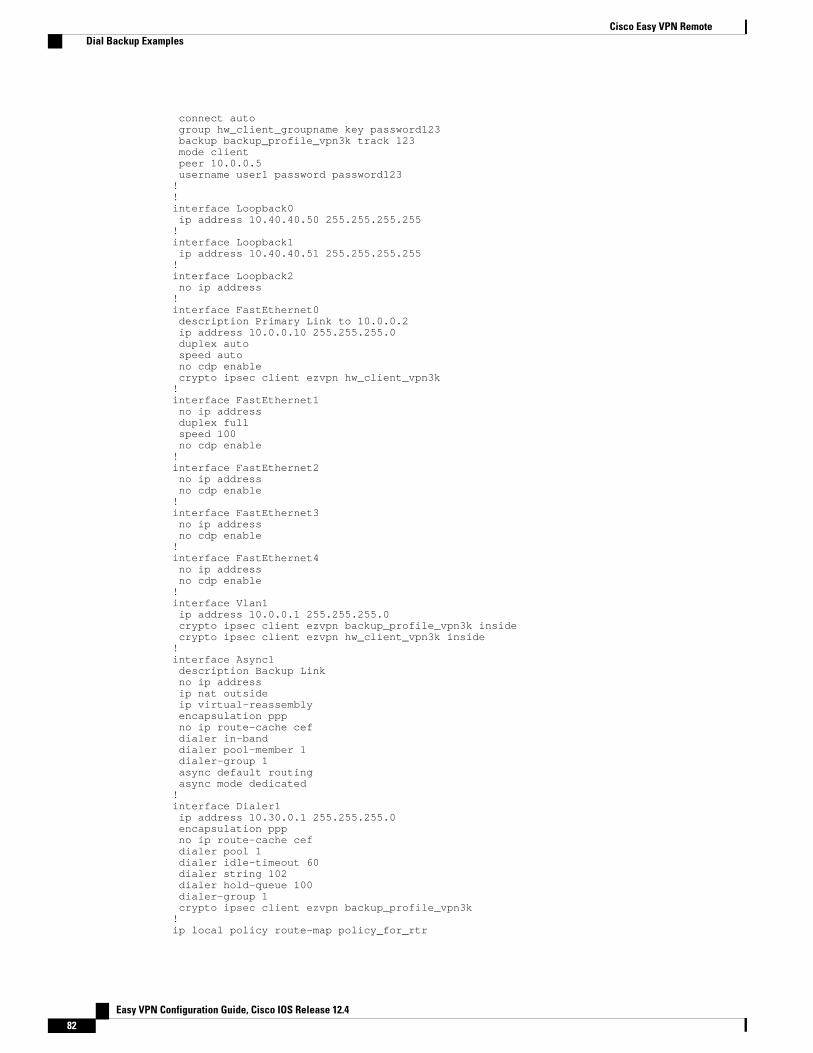
connect auto group hw_client_groupname key password123 backup backup_profile_vpn3k track 123 mode client peer 10.0.0.5 username user1 password password123!!interface Loopback0 ip address 10.40.40.50 255.255.255.255!interface Loopback1 ip address 10.40.40.51 255.255.255.255!interface Loopback2 no ip address!interface FastEthernet0 description Primary Link to 10.0.0.2 ip address 10.0.0.10 255.255.255.0 duplex auto speed auto no cdp enable crypto ipsec client ezvpn hw_client_vpn3k!interface FastEthernet1 no ip address duplex full speed 100 no cdp enable!interface FastEthernet2 no ip address no cdp enable! interface FastEthernet3 no ip address no cdp enable!interface FastEthernet4 no ip address no cdp enable!interface Vlan1 ip address 10.0.0.1 255.255.255.0 crypto ipsec client ezvpn backup_profile_vpn3k inside crypto ipsec client ezvpn hw_client_vpn3k inside!interface Async1 description Backup Link no ip address ip nat outside ip virtual-reassembly encapsulation ppp no ip route-cache cef dialer in-band dialer pool-member 1 dialer-group 1 async default routing async mode dedicated!interface Dialer1 ip address 10.30.0.1 255.255.255.0 encapsulation ppp no ip route-cache cef dialer pool 1 dialer idle-timeout 60 dialer string 102 dialer hold-queue 100 dialer-group 1 crypto ipsec client ezvpn backup_profile_vpn3k!ip local policy route-map policy_for_rtr
Cisco Easy VPN Remote Dial Backup Examples
Easy VPN Configuration Guide, Cisco IOS Release 12.482
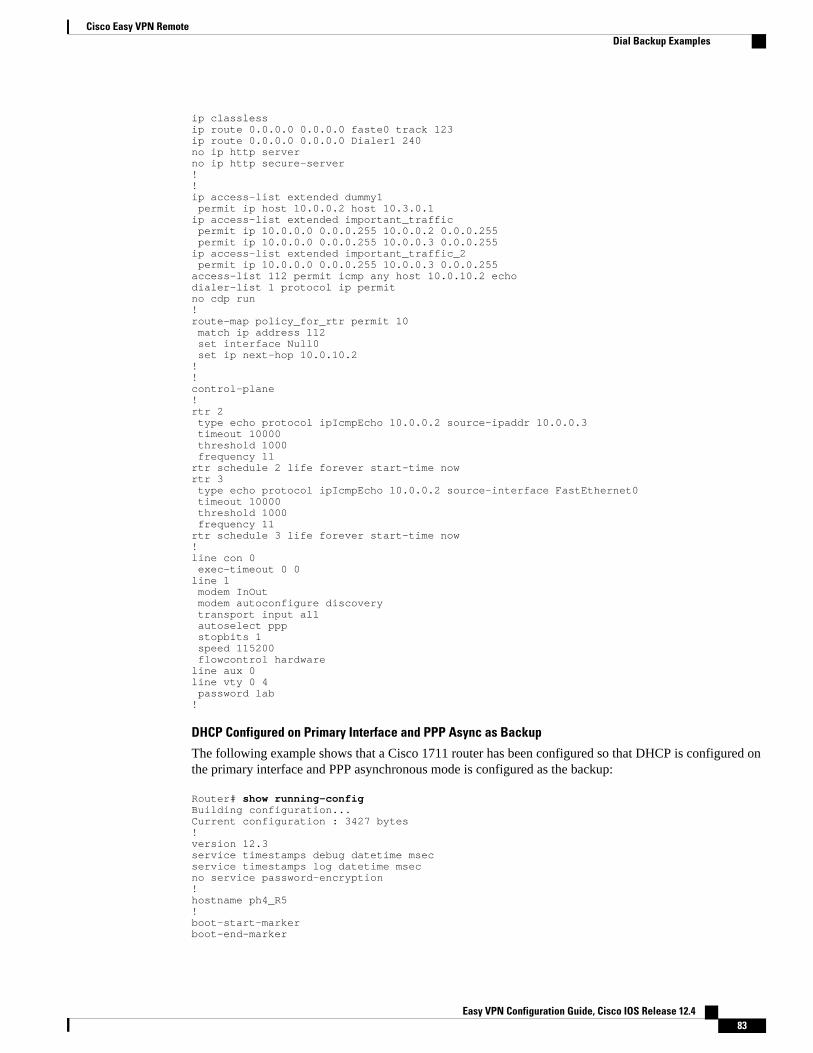
ip classlessip route 0.0.0.0 0.0.0.0 faste0 track 123ip route 0.0.0.0 0.0.0.0 Dialer1 240no ip http serverno ip http secure-server!!ip access-list extended dummy1 permit ip host 10.0.0.2 host 10.3.0.1ip access-list extended important_traffic permit ip 10.0.0.0 0.0.0.255 10.0.0.2 0.0.0.255 permit ip 10.0.0.0 0.0.0.255 10.0.0.3 0.0.0.255ip access-list extended important_traffic_2 permit ip 10.0.0.0 0.0.0.255 10.0.0.3 0.0.0.255access-list 112 permit icmp any host 10.0.10.2 echodialer-list 1 protocol ip permitno cdp run!route-map policy_for_rtr permit 10 match ip address 112 set interface Null0 set ip next-hop 10.0.10.2!!control-plane!rtr 2 type echo protocol ipIcmpEcho 10.0.0.2 source-ipaddr 10.0.0.3 timeout 10000 threshold 1000 frequency 11rtr schedule 2 life forever start-time nowrtr 3 type echo protocol ipIcmpEcho 10.0.0.2 source-interface FastEthernet0 timeout 10000 threshold 1000 frequency 11rtr schedule 3 life forever start-time now!line con 0 exec-timeout 0 0line 1 modem InOut modem autoconfigure discovery transport input all autoselect ppp stopbits 1 speed 115200 flowcontrol hardwareline aux 0line vty 0 4 password lab!
DHCP Configured on Primary Interface and PPP Async as Backup
The following example shows that a Cisco 1711 router has been configured so that DHCP is configured onthe primary interface and PPP asynchronous mode is configured as the backup:
Router# show running-configBuilding configuration...Current configuration : 3427 bytes!version 12.3service timestamps debug datetime msecservice timestamps log datetime msecno service password-encryption!hostname ph4_R5!boot-start-markerboot-end-marker
Cisco Easy VPN RemoteDial Backup Examples
Easy VPN Configuration Guide, Cisco IOS Release 12.4 83
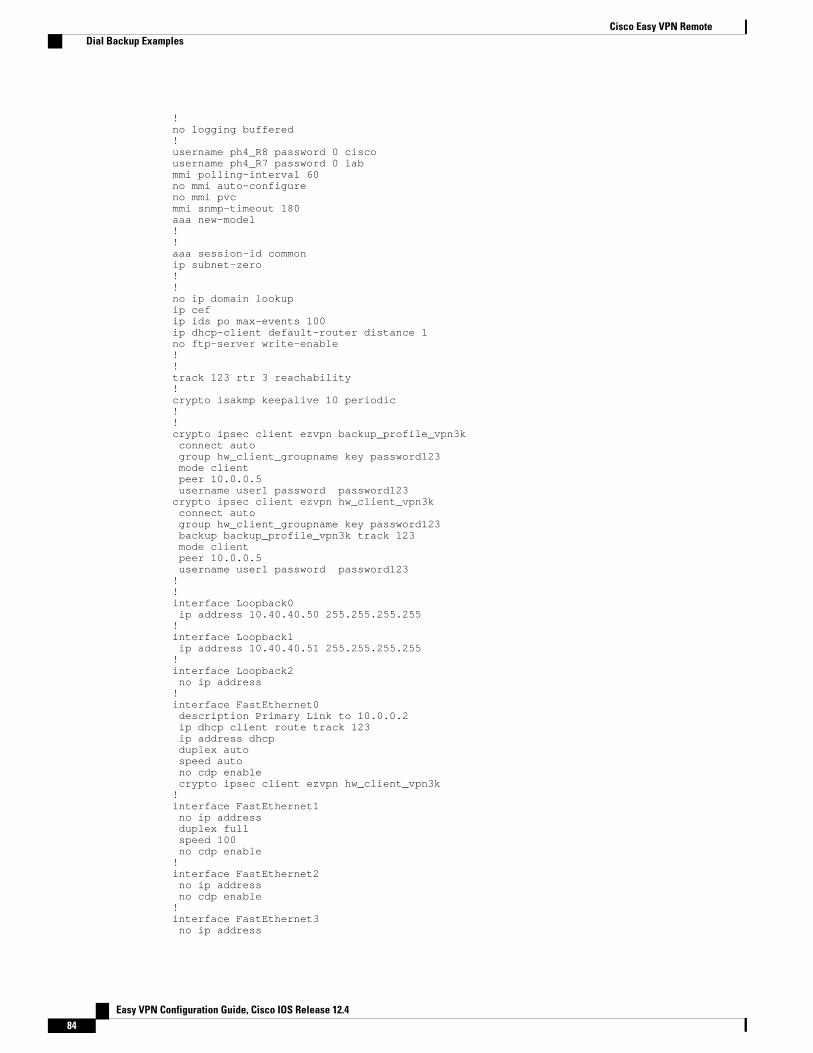
!no logging buffered!username ph4_R8 password 0 ciscousername ph4_R7 password 0 labmmi polling-interval 60no mmi auto-configureno mmi pvcmmi snmp-timeout 180aaa new-model!!aaa session-id commonip subnet-zero!!no ip domain lookupip cefip ids po max-events 100ip dhcp-client default-router distance 1no ftp-server write-enable!!track 123 rtr 3 reachability! crypto isakmp keepalive 10 periodic!!crypto ipsec client ezvpn backup_profile_vpn3k connect auto group hw_client_groupname key password123 mode client peer 10.0.0.5 username user1 password password123crypto ipsec client ezvpn hw_client_vpn3k connect auto group hw_client_groupname key password123 backup backup_profile_vpn3k track 123 mode client peer 10.0.0.5 username user1 password password123!!interface Loopback0 ip address 10.40.40.50 255.255.255.255!interface Loopback1 ip address 10.40.40.51 255.255.255.255!interface Loopback2 no ip address!interface FastEthernet0 description Primary Link to 10.0.0.2 ip dhcp client route track 123 ip address dhcp duplex auto speed auto no cdp enable crypto ipsec client ezvpn hw_client_vpn3k!interface FastEthernet1 no ip address duplex full speed 100 no cdp enable!interface FastEthernet2 no ip address no cdp enable! interface FastEthernet3 no ip address
Cisco Easy VPN Remote Dial Backup Examples
Easy VPN Configuration Guide, Cisco IOS Release 12.484
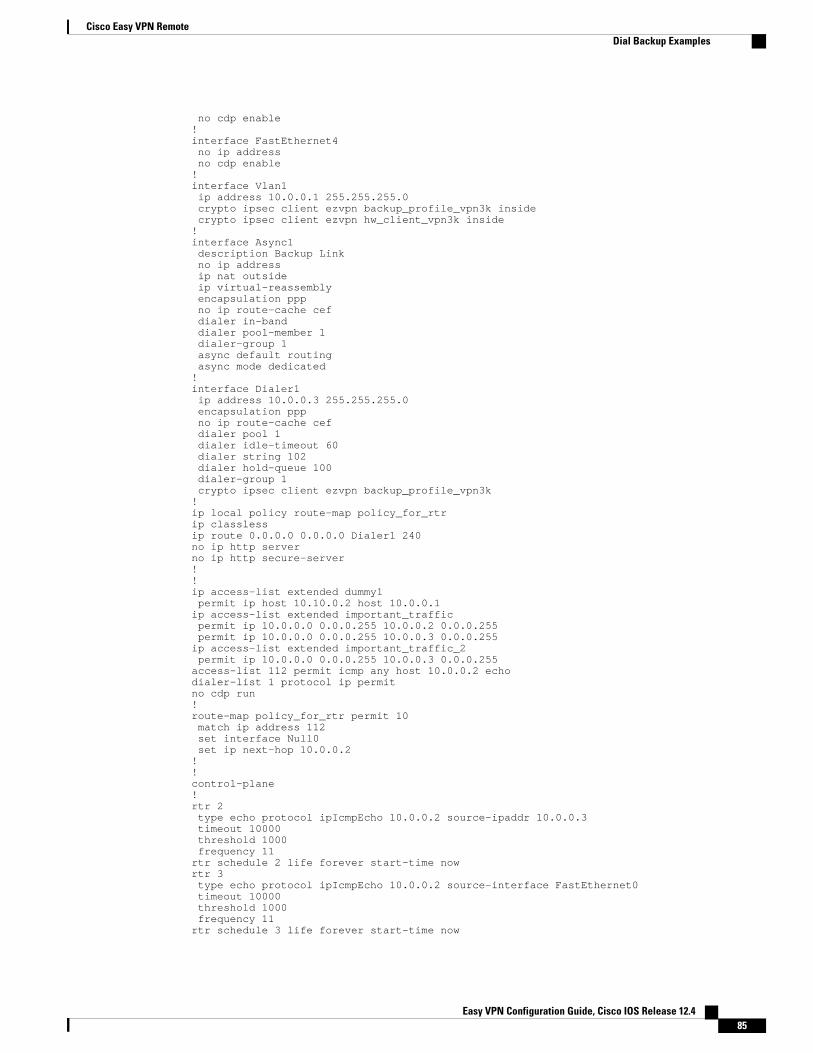
no cdp enable!interface FastEthernet4 no ip address no cdp enable!interface Vlan1 ip address 10.0.0.1 255.255.255.0 crypto ipsec client ezvpn backup_profile_vpn3k inside crypto ipsec client ezvpn hw_client_vpn3k inside!interface Async1 description Backup Link no ip address ip nat outside ip virtual-reassembly encapsulation ppp no ip route-cache cef dialer in-band dialer pool-member 1 dialer-group 1 async default routing async mode dedicated!interface Dialer1 ip address 10.0.0.3 255.255.255.0 encapsulation ppp no ip route-cache cef dialer pool 1 dialer idle-timeout 60 dialer string 102 dialer hold-queue 100 dialer-group 1 crypto ipsec client ezvpn backup_profile_vpn3k!ip local policy route-map policy_for_rtrip classlessip route 0.0.0.0 0.0.0.0 Dialer1 240no ip http serverno ip http secure-server!!ip access-list extended dummy1 permit ip host 10.10.0.2 host 10.0.0.1ip access-list extended important_traffic permit ip 10.0.0.0 0.0.0.255 10.0.0.2 0.0.0.255 permit ip 10.0.0.0 0.0.0.255 10.0.0.3 0.0.0.255ip access-list extended important_traffic_2 permit ip 10.0.0.0 0.0.0.255 10.0.0.3 0.0.0.255access-list 112 permit icmp any host 10.0.0.2 echodialer-list 1 protocol ip permitno cdp run!route-map policy_for_rtr permit 10 match ip address 112 set interface Null0 set ip next-hop 10.0.0.2!!control-plane!rtr 2 type echo protocol ipIcmpEcho 10.0.0.2 source-ipaddr 10.0.0.3 timeout 10000 threshold 1000 frequency 11rtr schedule 2 life forever start-time nowrtr 3 type echo protocol ipIcmpEcho 10.0.0.2 source-interface FastEthernet0 timeout 10000 threshold 1000 frequency 11rtr schedule 3 life forever start-time now
Cisco Easy VPN RemoteDial Backup Examples
Easy VPN Configuration Guide, Cisco IOS Release 12.4 85
!line con 0 exec-timeout 0 0line 1 modem InOut modem autoconfigure discovery transport input all autoselect ppp stopbits 1 speed 115200 flowcontrol hardwareline aux 0line vty 0 4 password lab!
Web-Based Activation ExampleThe following example shows that HTTP connections from the user are to be intercepted and that the usercan do web-based authentication (192.0.0.13 is the VPN client device and 192.0.0.1 is the server device):
crypto ipsec client ezvpn tunnel22 connect manual group tunnel22 key 22tunnel mode client peer 192.168.0.1 xauth userid mode http-intercept!!interface Ethernet0 ip address 10.4.23.15 255.0.0.0 crypto ipsec client ezvpn tunnel22 inside!interface Ethernet1 ip address 192.168.0.13 255.255.255.128 duplex auto crypto ipsec client ezvpn tunnel22!
Easy VPN Remote with Virtual IPsec Interface Support Configuration ExamplesThe following examples indicate that Virtual IPsec Interface Support has been configured on the Easy VPNremote devices.
• Virtual IPsec Interface Generic Virtual Access, page 86• Virtual IPsec Interface Virtual Access Derived from Virtual Template, page 87• When the Tunnel Is Down, page 88• When the Tunnel Is Up, page 89
Virtual IPsec Interface Generic Virtual Access
The following example shows an Easy VPN remote device with virtual-interface support using a genericvirtual-access IPsec interface.
!version 12.4service timestamps debug datetime msecservice timestamps log datetime msecno service password-encryption!hostname Router!boot-start-markerboot-end-marker
Cisco Easy VPN Remote Web-Based Activation Example
Easy VPN Configuration Guide, Cisco IOS Release 12.486
!!no aaa new-model!resource policy!clock timezone IST 0ip subnet-zerono ip dhcp use vrf connected!!crypto ipsec client ezvpn ez connect manual group easy key cisco mode client peer 10.3.0.2 virtual-interface xauth userid mode interactive!!interface Ethernet0/0 ip address 10.1.0.2 255.255.255.0 no keepalive no cdp enable crypto ipsec client ezvpn ez inside!interface Ethernet1/0 ip address 10.2.0.1 255.255.255.0 no keepalive no cdp enable crypto ipsec client ezvpn ez!ip classlessip route 0.0.0.0 0.0.0.0 10.2.0.2 2no ip http serverno ip http secure-server!!line con 0line aux 0line vty 0 4 login!end
Virtual IPsec Interface Virtual Access Derived from Virtual Template
The following example shows an Easy VPN remote device with virtual-interface support using a virtual-template-derived virtual-access IPsec interface:
!version 12.4service timestamps debug datetime msecservice timestamps log datetime msecno service password-encryption!hostname Router!boot-start-markerboot-end-marker!!no aaa new-model!resource policy!clock timezone IST 0ip subnet-zerono ip dhcp use vrf connected!!
Cisco Easy VPN RemoteVirtual IPsec Interface Virtual Access Derived from Virtual Template
Easy VPN Configuration Guide, Cisco IOS Release 12.4 87
crypto ipsec client ezvpn ez connect manual group easy key cisco mode client peer 10.3.0.2 virtual-interface 1 xauth userid mode interactive!!interface Ethernet0/0 ip address 10.1.0.2 255.255.255.0 no keepalive no cdp enable crypto ipsec client ezvpn ez inside!interface Ethernet1/0 ip address 10.2.0.1 255.255.255.0 no keepalive no cdp enable crypto ipsec client ezvpn ez!interface Virtual-Template1 type tunnel no ip address tunnel mode ipsec ipv4!!ip classlessip route 0.0.0.0 0.0.0.0 10.2.0.2 2no ip http serverno ip http secure-server!!line con 0line aux 0line vty 0 4 login!end
When the Tunnel Is Down
The result of a virtual-interface configuration on an Easy VPN profile is the creation of a virtual-accessinterface. This interface provides IPsec encapsulation. The output below shows the configuration of avirtual-access interface when Easy VPN is “down.”
Router# show running-config interface virtual-access 2Building configuration...Current configuration : 99 bytes!interface Virtual-Access2 no ip address tunnel source Ethernet1/0 tunnel mode ipsec ipv4end
A virtual-interface configuration results in the creation of a virtual-access interface. This virtual-accessinterface is made automatically outside the interface of the Easy VPN profile. The routes that are addedlater when the Easy VPN tunnels come up point to this virtual interface for sending the packets to thecorporate network. If crypto ipsec client ezvpn name outside (crypto ipsec client ezvpn namecommandand outside keyword) is applied on a real interface, that interface is used as the IKE (IPsec) endpoint (thatis, IKE and IPsec packets use the address on the interface as the source address).
Router# show crypto ipsec client ezvpnEasy VPN Remote Phase: 5Tunnel name : ezInside interface list: Ethernet0/0Outside interface: Virtual-Access2 (bound to Ethernet1/0)Current State: CONNECT_REQUIRED
Cisco Easy VPN Remote When the Tunnel Is Down
Easy VPN Configuration Guide, Cisco IOS Release 12.488
Last Event: TRACKED OBJECT UPSave Password: DisallowedCurrent EzVPN Peer: 10.3.0.2
Because a virtual interface, or for that matter any interface, is routable, routes act like traffic selectors.When the Easy VPN tunnel is “down,” there are no routes pointing to the virtual interface, as shown in thefollowing example:
Router# show ip routeCodes: C - connected, S - static, R - RIP, M - mobile, B - BGP D - EIGRP, EX - EIGRP external, O - OSPF, IA - OSPF inter area N1 - OSPF NSSA external type 1, N2 - OSPF NSSA external type 2 E1 - OSPF external type 1, E2 - OSPF external type 2 i - IS-IS, su - IS-IS summary, L1 - IS-IS level-1, L2 - IS-IS level-2 ia - IS-IS inter area, * - candidate default, U - per-user static route o - ODR, P - periodic downloaded static routeGateway of last resort is 10.2.0.2 to network 0.0.0.0 10.0.0.0/24 is subnetted, 2 subnetsC 10.2.0.0 is directly connected, Ethernet1/0C 10.1.0.0 is directly connected, Ethernet0/0S* 0.0.0.0/0 [2/0] via 10.2.0.2
When the Tunnel Is UpIn the case of client or network plus mode, Easy VPN creates a loopback interface and assigns the addressthat is pushed in mode configuration. To assign the address of the loopback to the interface, use the ipunnumberedcommand (ip unnumbered loopback). In the case of network extension mode, the virtualaccess will be configured as ip unnumbered ethernet0 (the bound interface).
Router# show running-config interface virtual-access 2Building configuration...Current configuration : 138 bytes!interface Virtual-Access2 ip unnumbered Loopback0 tunnel source Ethernet1/0 tunnel destination 10.3.0.2 tunnel mode ipsec ipv4endRouter# show crypto ipsec client ezvpnEasy VPN Remote Phase: 5Tunnel name : ezInside interface list: Ethernet0/0Outside interface: Virtual-Access2 (bound to Ethernet1/0)Current State: IPSEC_ACTIVELast Event: SOCKET_UPAddress: 10.5.0.2Mask: 255.255.255.255DNS Primary: 10.6.0.2NBMS/WINS Primary: 10.7.0.1Default Domain: cisco.comUsing PFS Group: 2Save Password: DisallowedSplit Tunnel List: 1 Address : 10.4.0.0 Mask : 255.255.255.0 Protocol : 0x0 Source Port: 0 Dest Port : 0Current EzVPN Peer: 10.3.0.2
When the tunnels come up, Easy VPN adds either a default route that points to the virtual-access interfaceor adds routes for all the split attributes of the subnets that point to the virtual-access interface. Easy VPNalso adds a route to the peer (destination or concentrator) if the peer is not directly connected to the EasyVPN device.
The following show ip route command output examples are for virtual IPsec interface situations in which asplit tunnel attribute was sent by the server and a split tunnel attribute was not sent, respectively.
Cisco Easy VPN RemoteWhen the Tunnel Is Up
Easy VPN Configuration Guide, Cisco IOS Release 12.4 89
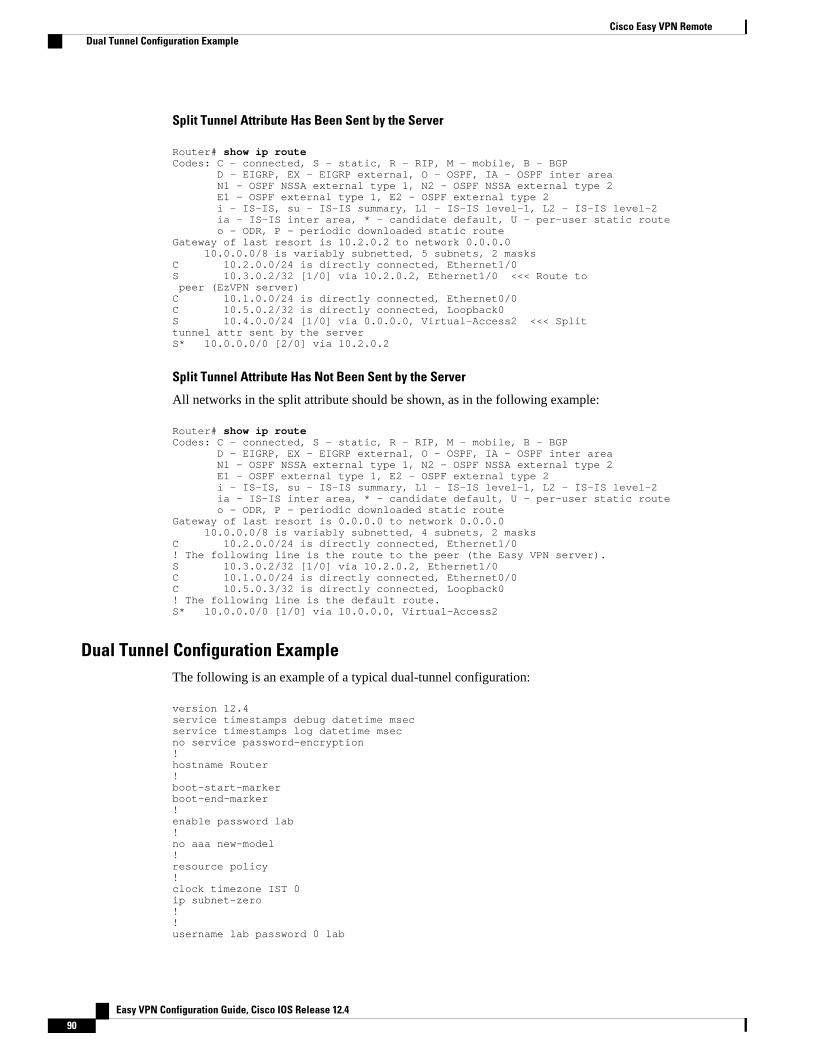
Split Tunnel Attribute Has Been Sent by the Server
Router# show ip routeCodes: C - connected, S - static, R - RIP, M - mobile, B - BGP D - EIGRP, EX - EIGRP external, O - OSPF, IA - OSPF inter area N1 - OSPF NSSA external type 1, N2 - OSPF NSSA external type 2 E1 - OSPF external type 1, E2 - OSPF external type 2 i - IS-IS, su - IS-IS summary, L1 - IS-IS level-1, L2 - IS-IS level-2 ia - IS-IS inter area, * - candidate default, U - per-user static route o - ODR, P - periodic downloaded static routeGateway of last resort is 10.2.0.2 to network 0.0.0.0 10.0.0.0/8 is variably subnetted, 5 subnets, 2 masksC 10.2.0.0/24 is directly connected, Ethernet1/0S 10.3.0.2/32 [1/0] via 10.2.0.2, Ethernet1/0 <<< Route to peer (EzVPN server)C 10.1.0.0/24 is directly connected, Ethernet0/0C 10.5.0.2/32 is directly connected, Loopback0S 10.4.0.0/24 [1/0] via 0.0.0.0, Virtual-Access2 <<< Splittunnel attr sent by the serverS* 10.0.0.0/0 [2/0] via 10.2.0.2
Split Tunnel Attribute Has Not Been Sent by the Server
All networks in the split attribute should be shown, as in the following example:
Router# show ip routeCodes: C - connected, S - static, R - RIP, M - mobile, B - BGP D - EIGRP, EX - EIGRP external, O - OSPF, IA - OSPF inter area N1 - OSPF NSSA external type 1, N2 - OSPF NSSA external type 2 E1 - OSPF external type 1, E2 - OSPF external type 2 i - IS-IS, su - IS-IS summary, L1 - IS-IS level-1, L2 - IS-IS level-2 ia - IS-IS inter area, * - candidate default, U - per-user static route o - ODR, P - periodic downloaded static routeGateway of last resort is 0.0.0.0 to network 0.0.0.0 10.0.0.0/8 is variably subnetted, 4 subnets, 2 masksC 10.2.0.0/24 is directly connected, Ethernet1/0! The following line is the route to the peer (the Easy VPN server).S 10.3.0.2/32 [1/0] via 10.2.0.2, Ethernet1/0C 10.1.0.0/24 is directly connected, Ethernet0/0C 10.5.0.3/32 is directly connected, Loopback0! The following line is the default route.S* 10.0.0.0/0 [1/0] via 10.0.0.0, Virtual-Access2
Dual Tunnel Configuration ExampleThe following is an example of a typical dual-tunnel configuration:
version 12.4service timestamps debug datetime msecservice timestamps log datetime msecno service password-encryption!hostname Router!boot-start-markerboot-end-marker!enable password lab!no aaa new-model!resource policy!clock timezone IST 0ip subnet-zero!!username lab password 0 lab
Cisco Easy VPN Remote Dual Tunnel Configuration Example
Easy VPN Configuration Guide, Cisco IOS Release 12.490
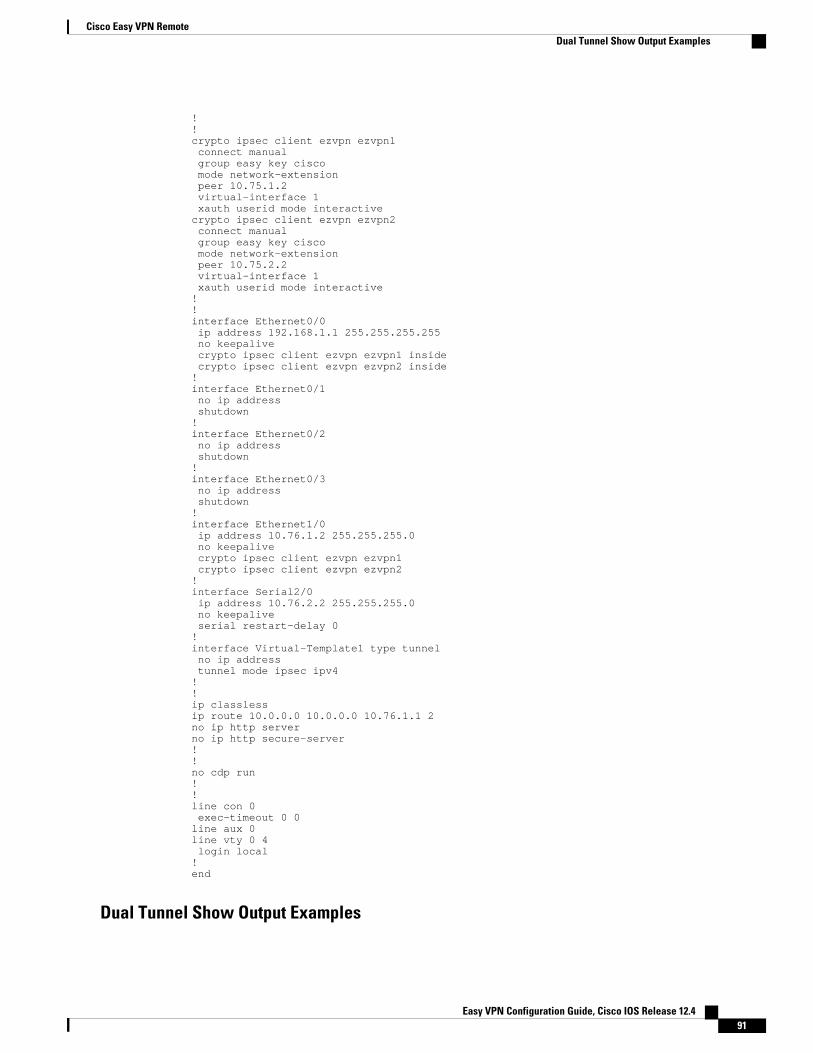
!!crypto ipsec client ezvpn ezvpn1 connect manual group easy key cisco mode network-extension peer 10.75.1.2 virtual-interface 1 xauth userid mode interactivecrypto ipsec client ezvpn ezvpn2 connect manual group easy key cisco mode network-extension peer 10.75.2.2 virtual-interface 1 xauth userid mode interactive!!interface Ethernet0/0 ip address 192.168.1.1 255.255.255.255 no keepalive crypto ipsec client ezvpn ezvpn1 inside crypto ipsec client ezvpn ezvpn2 inside!interface Ethernet0/1 no ip address shutdown!interface Ethernet0/2 no ip address shutdown!interface Ethernet0/3 no ip address shutdown!interface Ethernet1/0 ip address 10.76.1.2 255.255.255.0 no keepalive crypto ipsec client ezvpn ezvpn1 crypto ipsec client ezvpn ezvpn2!interface Serial2/0 ip address 10.76.2.2 255.255.255.0 no keepalive serial restart-delay 0!interface Virtual-Template1 type tunnel no ip address tunnel mode ipsec ipv4!!ip classlessip route 10.0.0.0 10.0.0.0 10.76.1.1 2no ip http serverno ip http secure-server!!no cdp run!!line con 0 exec-timeout 0 0line aux 0line vty 0 4 login local!end
Dual Tunnel Show Output Examples
Cisco Easy VPN RemoteDual Tunnel Show Output Examples
Easy VPN Configuration Guide, Cisco IOS Release 12.4 91
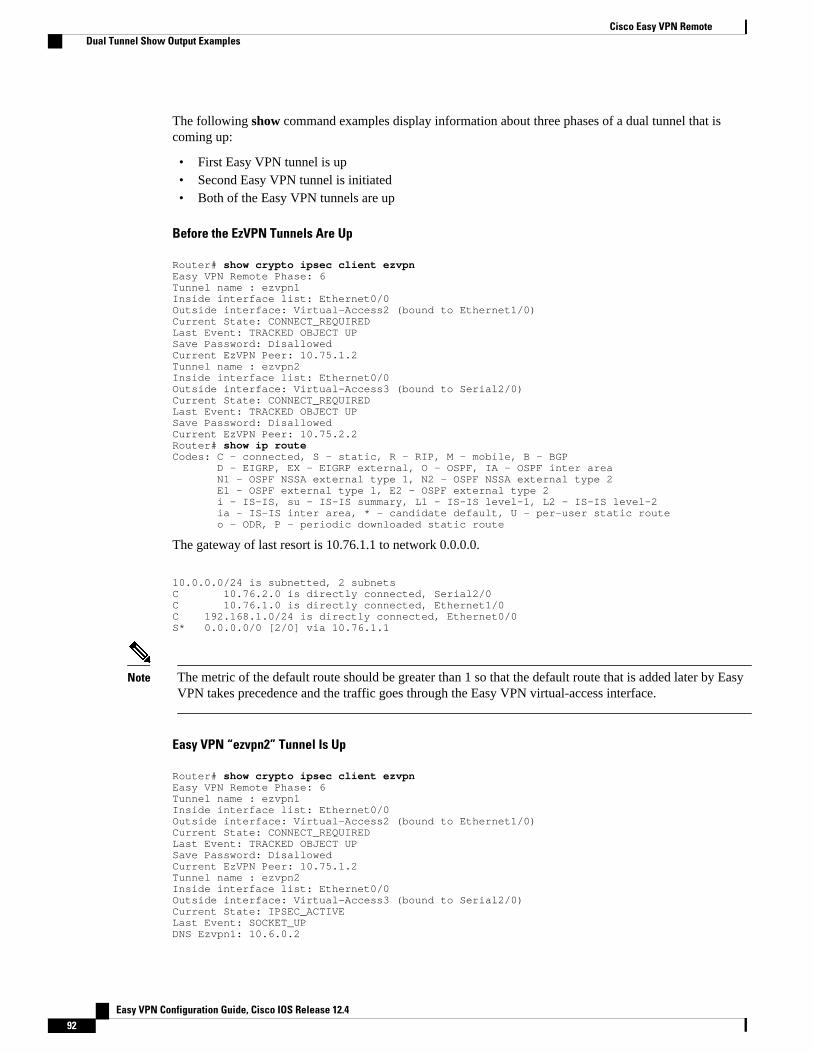
The following show command examples display information about three phases of a dual tunnel that iscoming up:
• First Easy VPN tunnel is up• Second Easy VPN tunnel is initiated• Both of the Easy VPN tunnels are up
Before the EzVPN Tunnels Are Up
Router# show crypto ipsec client ezvpnEasy VPN Remote Phase: 6Tunnel name : ezvpn1Inside interface list: Ethernet0/0Outside interface: Virtual-Access2 (bound to Ethernet1/0)Current State: CONNECT_REQUIREDLast Event: TRACKED OBJECT UPSave Password: DisallowedCurrent EzVPN Peer: 10.75.1.2Tunnel name : ezvpn2Inside interface list: Ethernet0/0Outside interface: Virtual-Access3 (bound to Serial2/0)Current State: CONNECT_REQUIREDLast Event: TRACKED OBJECT UPSave Password: DisallowedCurrent EzVPN Peer: 10.75.2.2Router# show ip routeCodes: C - connected, S - static, R - RIP, M - mobile, B - BGP D - EIGRP, EX - EIGRP external, O - OSPF, IA - OSPF inter area N1 - OSPF NSSA external type 1, N2 - OSPF NSSA external type 2 E1 - OSPF external type 1, E2 - OSPF external type 2 i - IS-IS, su - IS-IS summary, L1 - IS-IS level-1, L2 - IS-IS level-2 ia - IS-IS inter area, * - candidate default, U - per-user static route o - ODR, P - periodic downloaded static route
The gateway of last resort is 10.76.1.1 to network 0.0.0.0.
10.0.0.0/24 is subnetted, 2 subnetsC 10.76.2.0 is directly connected, Serial2/0C 10.76.1.0 is directly connected, Ethernet1/0C 192.168.1.0/24 is directly connected, Ethernet0/0S* 0.0.0.0/0 [2/0] via 10.76.1.1
Note The metric of the default route should be greater than 1 so that the default route that is added later by EasyVPN takes precedence and the traffic goes through the Easy VPN virtual-access interface.
Easy VPN “ezvpn2” Tunnel Is Up
Router# show crypto ipsec client ezvpnEasy VPN Remote Phase: 6Tunnel name : ezvpn1Inside interface list: Ethernet0/0Outside interface: Virtual-Access2 (bound to Ethernet1/0)Current State: CONNECT_REQUIREDLast Event: TRACKED OBJECT UPSave Password: DisallowedCurrent EzVPN Peer: 10.75.1.2Tunnel name : ezvpn2Inside interface list: Ethernet0/0Outside interface: Virtual-Access3 (bound to Serial2/0)Current State: IPSEC_ACTIVELast Event: SOCKET_UPDNS Ezvpn1: 10.6.0.2
Cisco Easy VPN Remote Dual Tunnel Show Output Examples
Easy VPN Configuration Guide, Cisco IOS Release 12.492
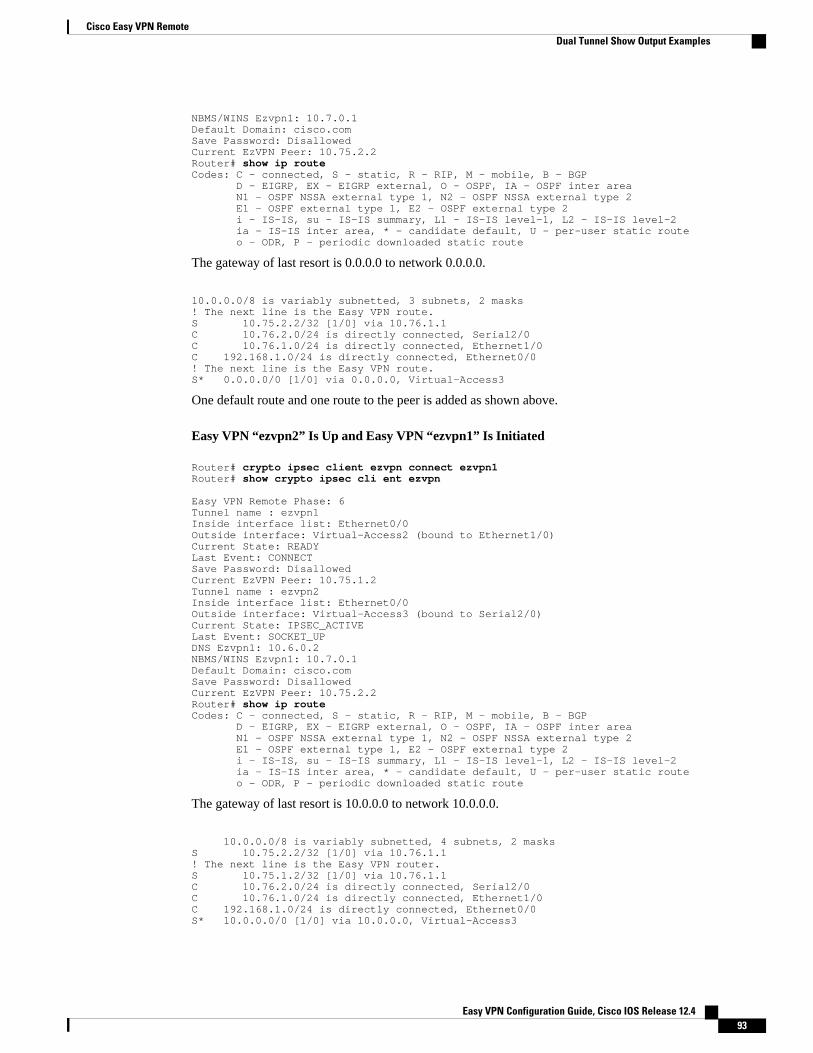
NBMS/WINS Ezvpn1: 10.7.0.1Default Domain: cisco.comSave Password: DisallowedCurrent EzVPN Peer: 10.75.2.2Router# show ip routeCodes: C - connected, S - static, R - RIP, M - mobile, B - BGP D - EIGRP, EX - EIGRP external, O - OSPF, IA - OSPF inter area N1 - OSPF NSSA external type 1, N2 - OSPF NSSA external type 2 E1 - OSPF external type 1, E2 - OSPF external type 2 i - IS-IS, su - IS-IS summary, L1 - IS-IS level-1, L2 - IS-IS level-2 ia - IS-IS inter area, * - candidate default, U - per-user static route o - ODR, P - periodic downloaded static route
The gateway of last resort is 0.0.0.0 to network 0.0.0.0.
10.0.0.0/8 is variably subnetted, 3 subnets, 2 masks! The next line is the Easy VPN route.S 10.75.2.2/32 [1/0] via 10.76.1.1C 10.76.2.0/24 is directly connected, Serial2/0C 10.76.1.0/24 is directly connected, Ethernet1/0C 192.168.1.0/24 is directly connected, Ethernet0/0! The next line is the Easy VPN route.S* 0.0.0.0/0 [1/0] via 0.0.0.0, Virtual-Access3
One default route and one route to the peer is added as shown above.
Easy VPN “ezvpn2” Is Up and Easy VPN “ezvpn1” Is Initiated
Router# crypto ipsec client ezvpn connect ezvpn1Router# show crypto ipsec cli ent ezvpn
Easy VPN Remote Phase: 6Tunnel name : ezvpn1Inside interface list: Ethernet0/0Outside interface: Virtual-Access2 (bound to Ethernet1/0)Current State: READYLast Event: CONNECTSave Password: DisallowedCurrent EzVPN Peer: 10.75.1.2Tunnel name : ezvpn2Inside interface list: Ethernet0/0Outside interface: Virtual-Access3 (bound to Serial2/0)Current State: IPSEC_ACTIVELast Event: SOCKET_UPDNS Ezvpn1: 10.6.0.2NBMS/WINS Ezvpn1: 10.7.0.1Default Domain: cisco.comSave Password: DisallowedCurrent EzVPN Peer: 10.75.2.2Router# show ip routeCodes: C - connected, S - static, R - RIP, M - mobile, B - BGP D - EIGRP, EX - EIGRP external, O - OSPF, IA - OSPF inter area N1 - OSPF NSSA external type 1, N2 - OSPF NSSA external type 2 E1 - OSPF external type 1, E2 - OSPF external type 2 i - IS-IS, su - IS-IS summary, L1 - IS-IS level-1, L2 - IS-IS level-2 ia - IS-IS inter area, * - candidate default, U - per-user static route o - ODR, P - periodic downloaded static route
The gateway of last resort is 10.0.0.0 to network 10.0.0.0.
10.0.0.0/8 is variably subnetted, 4 subnets, 2 masksS 10.75.2.2/32 [1/0] via 10.76.1.1! The next line is the Easy VPN router.S 10.75.1.2/32 [1/0] via 10.76.1.1C 10.76.2.0/24 is directly connected, Serial2/0C 10.76.1.0/24 is directly connected, Ethernet1/0C 192.168.1.0/24 is directly connected, Ethernet0/0S* 10.0.0.0/0 [1/0] via 10.0.0.0, Virtual-Access3
Cisco Easy VPN RemoteDual Tunnel Show Output Examples
Easy VPN Configuration Guide, Cisco IOS Release 12.4 93
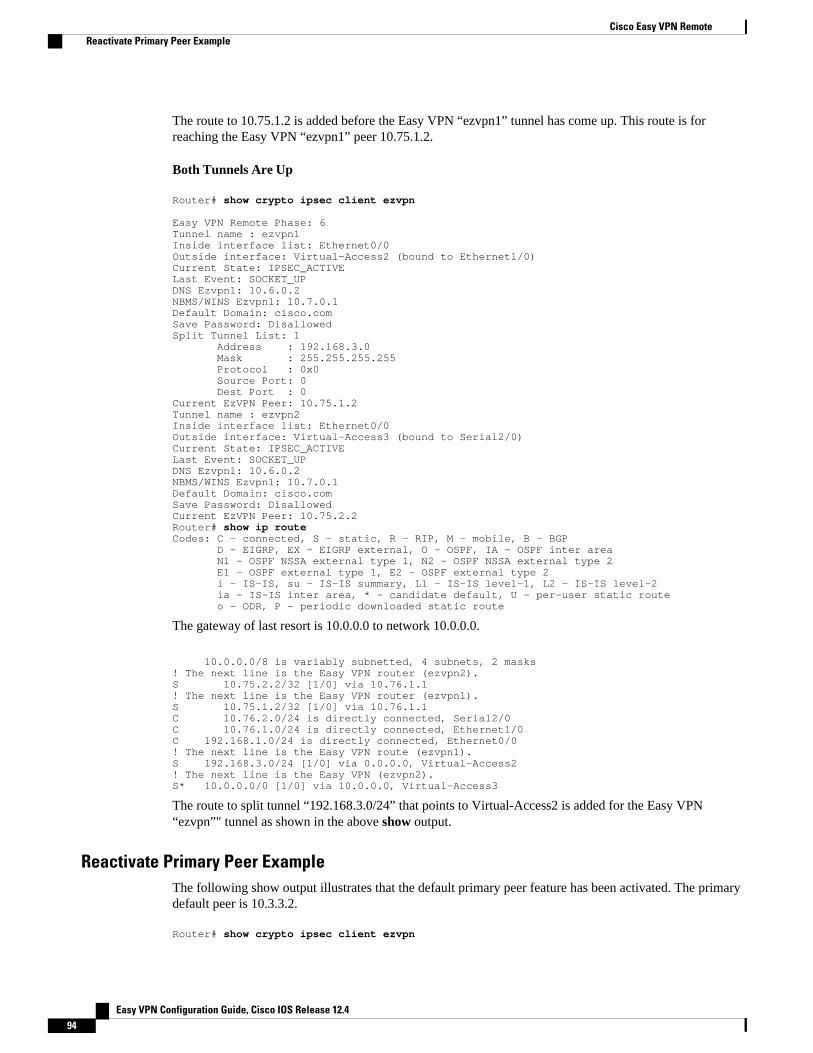
The route to 10.75.1.2 is added before the Easy VPN “ezvpn1” tunnel has come up. This route is forreaching the Easy VPN “ezvpn1” peer 10.75.1.2.
Both Tunnels Are Up
Router# show crypto ipsec client ezvpn Easy VPN Remote Phase: 6Tunnel name : ezvpn1Inside interface list: Ethernet0/0Outside interface: Virtual-Access2 (bound to Ethernet1/0)Current State: IPSEC_ACTIVELast Event: SOCKET_UPDNS Ezvpn1: 10.6.0.2NBMS/WINS Ezvpn1: 10.7.0.1Default Domain: cisco.comSave Password: DisallowedSplit Tunnel List: 1 Address : 192.168.3.0 Mask : 255.255.255.255 Protocol : 0x0 Source Port: 0 Dest Port : 0Current EzVPN Peer: 10.75.1.2Tunnel name : ezvpn2Inside interface list: Ethernet0/0Outside interface: Virtual-Access3 (bound to Serial2/0)Current State: IPSEC_ACTIVELast Event: SOCKET_UPDNS Ezvpn1: 10.6.0.2NBMS/WINS Ezvpn1: 10.7.0.1Default Domain: cisco.comSave Password: DisallowedCurrent EzVPN Peer: 10.75.2.2Router# show ip routeCodes: C - connected, S - static, R - RIP, M - mobile, B - BGP D - EIGRP, EX - EIGRP external, O - OSPF, IA - OSPF inter area N1 - OSPF NSSA external type 1, N2 - OSPF NSSA external type 2 E1 - OSPF external type 1, E2 - OSPF external type 2 i - IS-IS, su - IS-IS summary, L1 - IS-IS level-1, L2 - IS-IS level-2 ia - IS-IS inter area, * - candidate default, U - per-user static route o - ODR, P - periodic downloaded static route
The gateway of last resort is 10.0.0.0 to network 10.0.0.0.
10.0.0.0/8 is variably subnetted, 4 subnets, 2 masks! The next line is the Easy VPN router (ezvpn2).S 10.75.2.2/32 [1/0] via 10.76.1.1! The next line is the Easy VPN router (ezvpn1).S 10.75.1.2/32 [1/0] via 10.76.1.1C 10.76.2.0/24 is directly connected, Serial2/0C 10.76.1.0/24 is directly connected, Ethernet1/0C 192.168.1.0/24 is directly connected, Ethernet0/0! The next line is the Easy VPN route (ezvpn1).S 192.168.3.0/24 [1/0] via 0.0.0.0, Virtual-Access2! The next line is the Easy VPN (ezvpn2).S* 10.0.0.0/0 [1/0] via 10.0.0.0, Virtual-Access3
The route to split tunnel “192.168.3.0/24” that points to Virtual-Access2 is added for the Easy VPN“ezvpn”" tunnel as shown in the above show output.
Reactivate Primary Peer ExampleThe following show output illustrates that the default primary peer feature has been activated. The primarydefault peer is 10.3.3.2.
Router# show crypto ipsec client ezvpn
Cisco Easy VPN Remote Reactivate Primary Peer Example
Easy VPN Configuration Guide, Cisco IOS Release 12.494
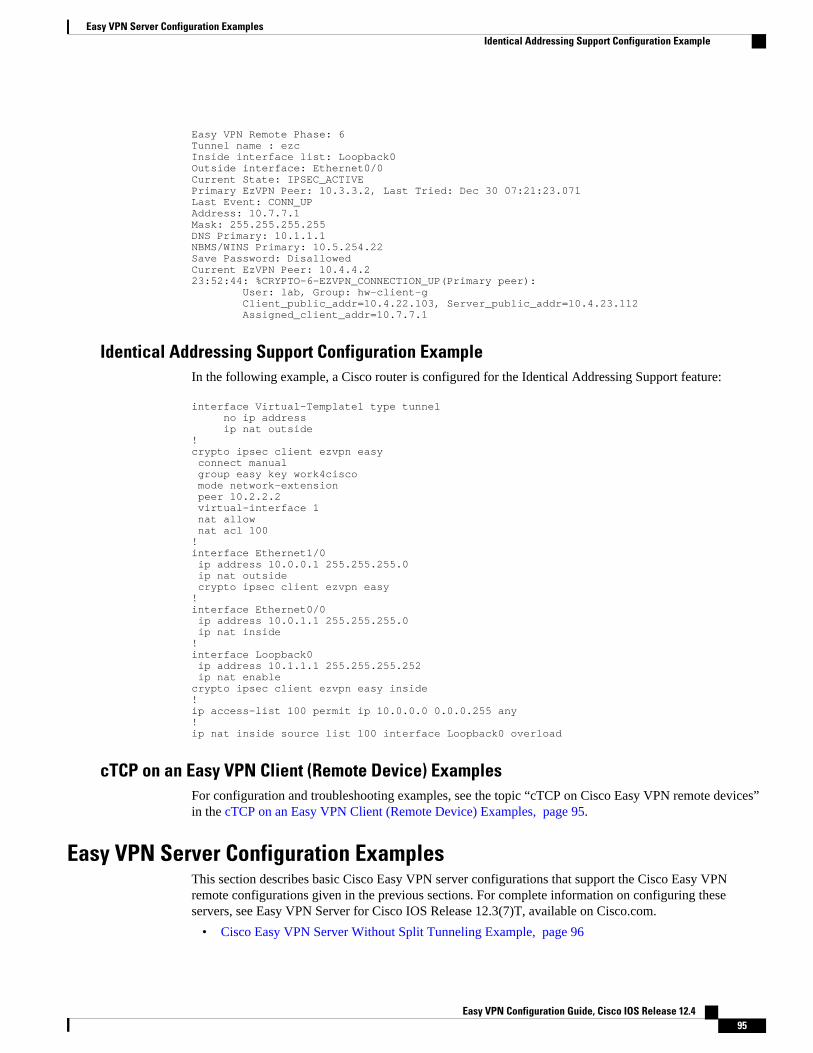
Easy VPN Remote Phase: 6Tunnel name : ezcInside interface list: Loopback0Outside interface: Ethernet0/0 Current State: IPSEC_ACTIVEPrimary EzVPN Peer: 10.3.3.2, Last Tried: Dec 30 07:21:23.071Last Event: CONN_UPAddress: 10.7.7.1Mask: 255.255.255.255DNS Primary: 10.1.1.1NBMS/WINS Primary: 10.5.254.22Save Password: DisallowedCurrent EzVPN Peer: 10.4.4.223:52:44: %CRYPTO-6-EZVPN_CONNECTION_UP(Primary peer): User: lab, Group: hw-client-g Client_public_addr=10.4.22.103, Server_public_addr=10.4.23.112 Assigned_client_addr=10.7.7.1
Identical Addressing Support Configuration ExampleIn the following example, a Cisco router is configured for the Identical Addressing Support feature:
interface Virtual-Template1 type tunnel no ip address ip nat outside!crypto ipsec client ezvpn easy connect manual group easy key work4cisco mode network-extension peer 10.2.2.2 virtual-interface 1 nat allow nat acl 100!interface Ethernet1/0 ip address 10.0.0.1 255.255.255.0 ip nat outside crypto ipsec client ezvpn easy !interface Ethernet0/0 ip address 10.0.1.1 255.255.255.0 ip nat inside !interface Loopback0 ip address 10.1.1.1 255.255.255.252 ip nat enablecrypto ipsec client ezvpn easy inside!ip access-list 100 permit ip 10.0.0.0 0.0.0.255 any!ip nat inside source list 100 interface Loopback0 overload
cTCP on an Easy VPN Client (Remote Device) ExamplesFor configuration and troubleshooting examples, see the topic “cTCP on Cisco Easy VPN remote devices”in the cTCP on an Easy VPN Client (Remote Device) Examples, page 95.
Easy VPN Server Configuration ExamplesThis section describes basic Cisco Easy VPN server configurations that support the Cisco Easy VPNremote configurations given in the previous sections. For complete information on configuring theseservers, see Easy VPN Server for Cisco IOS Release 12.3(7)T, available on Cisco.com.
• Cisco Easy VPN Server Without Split Tunneling Example, page 96
Easy VPN Server Configuration ExamplesIdentical Addressing Support Configuration Example
Easy VPN Configuration Guide, Cisco IOS Release 12.4 95
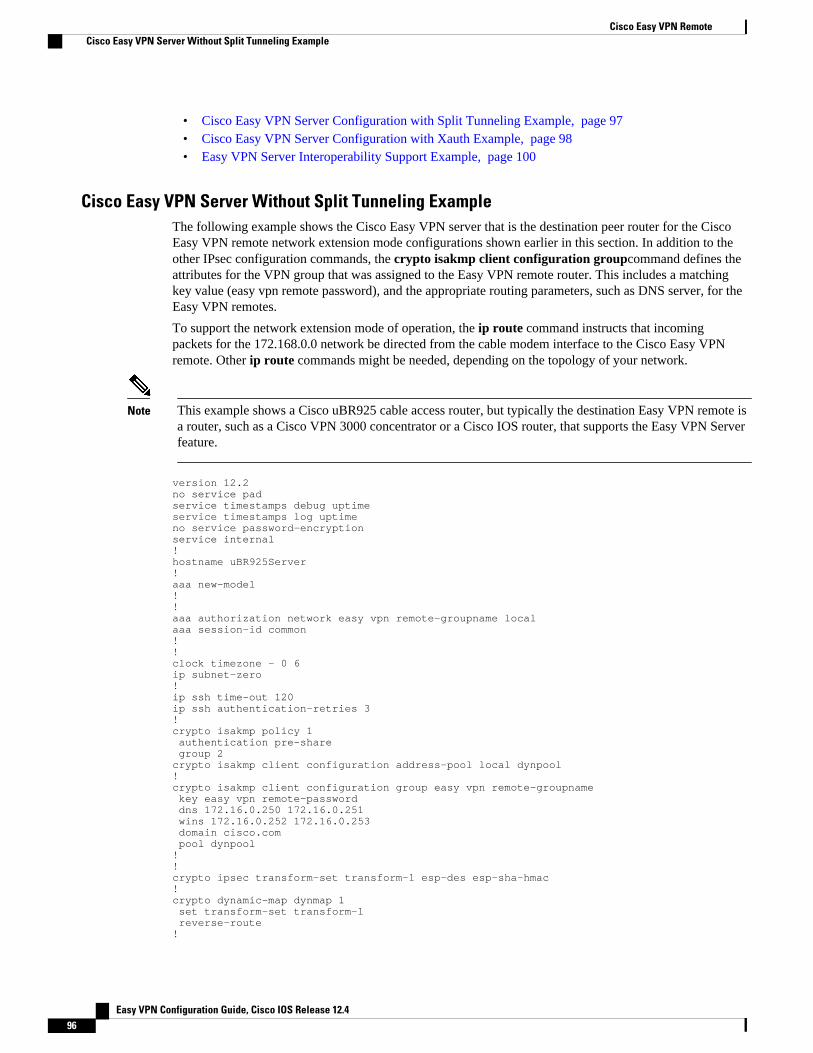
• Cisco Easy VPN Server Configuration with Split Tunneling Example, page 97• Cisco Easy VPN Server Configuration with Xauth Example, page 98• Easy VPN Server Interoperability Support Example, page 100
Cisco Easy VPN Server Without Split Tunneling ExampleThe following example shows the Cisco Easy VPN server that is the destination peer router for the CiscoEasy VPN remote network extension mode configurations shown earlier in this section. In addition to theother IPsec configuration commands, the crypto isakmp client configuration groupcommand defines theattributes for the VPN group that was assigned to the Easy VPN remote router. This includes a matchingkey value (easy vpn remote password), and the appropriate routing parameters, such as DNS server, for theEasy VPN remotes.
To support the network extension mode of operation, the ip route command instructs that incomingpackets for the 172.168.0.0 network be directed from the cable modem interface to the Cisco Easy VPNremote. Other ip route commands might be needed, depending on the topology of your network.
Note This example shows a Cisco uBR925 cable access router, but typically the destination Easy VPN remote isa router, such as a Cisco VPN 3000 concentrator or a Cisco IOS router, that supports the Easy VPN Serverfeature.
version 12.2no service padservice timestamps debug uptimeservice timestamps log uptimeno service password-encryptionservice internal!hostname uBR925Server!aaa new-model!!aaa authorization network easy vpn remote-groupname local aaa session-id common!!clock timezone - 0 6ip subnet-zero!ip ssh time-out 120ip ssh authentication-retries 3!crypto isakmp policy 1 authentication pre-share group 2crypto isakmp client configuration address-pool local dynpool!crypto isakmp client configuration group easy vpn remote-groupname key easy vpn remote-password dns 172.16.0.250 172.16.0.251 wins 172.16.0.252 172.16.0.253 domain cisco.com pool dynpool!!crypto ipsec transform-set transform-1 esp-des esp-sha-hmac !crypto dynamic-map dynmap 1 set transform-set transform-1 reverse-route!
Cisco Easy VPN Remote Cisco Easy VPN Server Without Split Tunneling Example
Easy VPN Configuration Guide, Cisco IOS Release 12.496
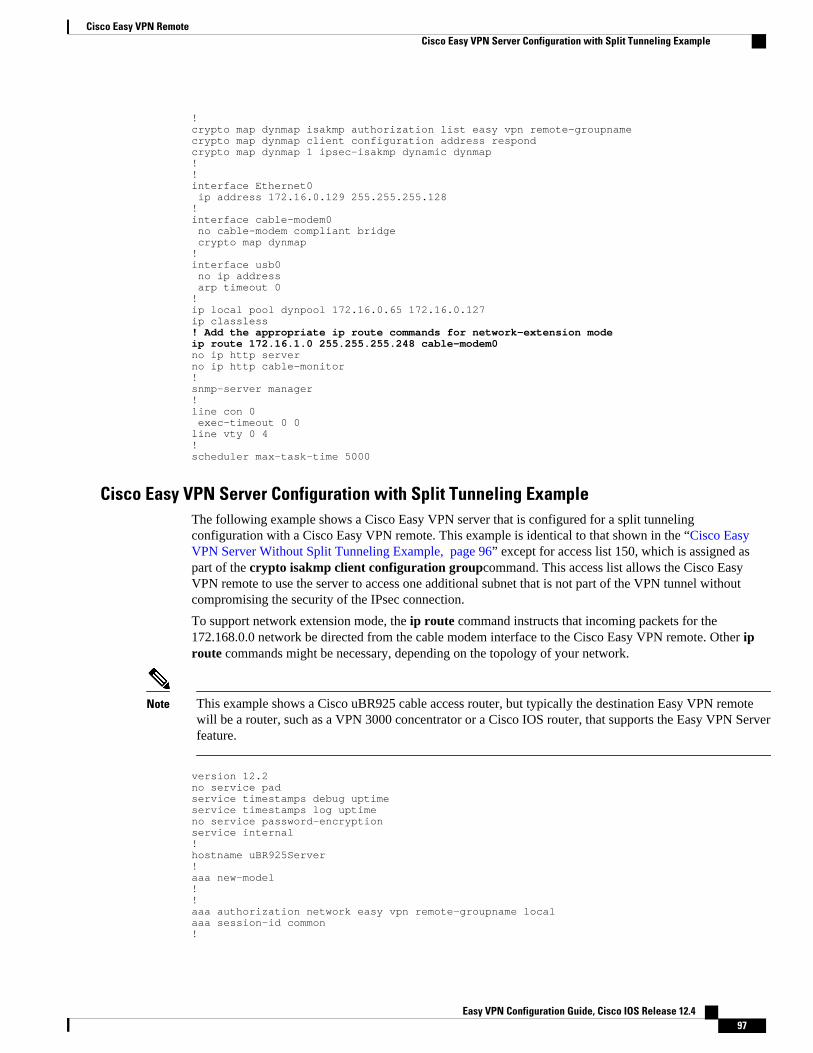
!crypto map dynmap isakmp authorization list easy vpn remote-groupnamecrypto map dynmap client configuration address respondcrypto map dynmap 1 ipsec-isakmp dynamic dynmap !!interface Ethernet0 ip address 172.16.0.129 255.255.255.128!interface cable-modem0 no cable-modem compliant bridge crypto map dynmap!interface usb0 no ip address arp timeout 0!ip local pool dynpool 172.16.0.65 172.16.0.127 ip classless! Add the appropriate ip route commands for network-extension mode ip route 172.16.1.0 255.255.255.248 cable-modem0 no ip http serverno ip http cable-monitor!snmp-server manager!line con 0 exec-timeout 0 0line vty 0 4!scheduler max-task-time 5000
Cisco Easy VPN Server Configuration with Split Tunneling ExampleThe following example shows a Cisco Easy VPN server that is configured for a split tunnelingconfiguration with a Cisco Easy VPN remote. This example is identical to that shown in the “Cisco EasyVPN Server Without Split Tunneling Example, page 96” except for access list 150, which is assigned aspart of the crypto isakmp client configuration groupcommand. This access list allows the Cisco EasyVPN remote to use the server to access one additional subnet that is not part of the VPN tunnel withoutcompromising the security of the IPsec connection.
To support network extension mode, the ip route command instructs that incoming packets for the172.168.0.0 network be directed from the cable modem interface to the Cisco Easy VPN remote. Other iproute commands might be necessary, depending on the topology of your network.
Note This example shows a Cisco uBR925 cable access router, but typically the destination Easy VPN remotewill be a router, such as a VPN 3000 concentrator or a Cisco IOS router, that supports the Easy VPN Serverfeature.
version 12.2no service padservice timestamps debug uptimeservice timestamps log uptimeno service password-encryptionservice internal!hostname uBR925Server!aaa new-model!!aaa authorization network easy vpn remote-groupname local aaa session-id common!
Cisco Easy VPN RemoteCisco Easy VPN Server Configuration with Split Tunneling Example
Easy VPN Configuration Guide, Cisco IOS Release 12.4 97
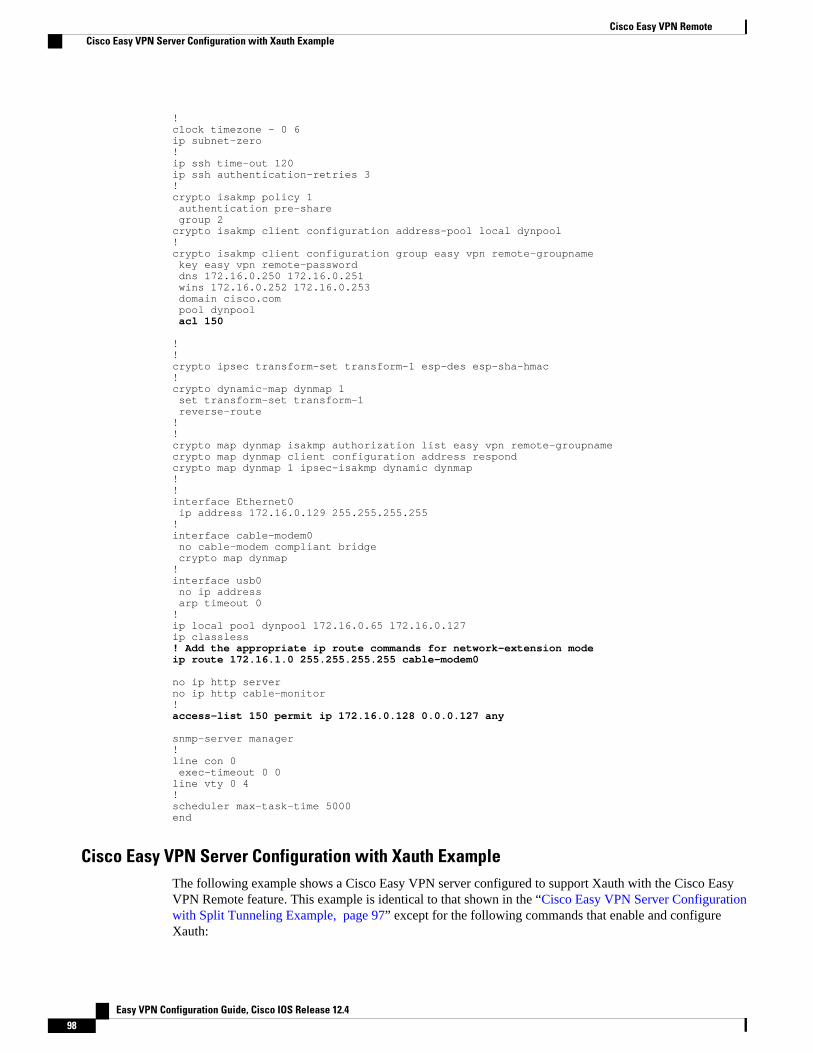
!clock timezone - 0 6ip subnet-zero!ip ssh time-out 120ip ssh authentication-retries 3!crypto isakmp policy 1 authentication pre-share group 2crypto isakmp client configuration address-pool local dynpool!crypto isakmp client configuration group easy vpn remote-groupname key easy vpn remote-password dns 172.16.0.250 172.16.0.251 wins 172.16.0.252 172.16.0.253 domain cisco.com pool dynpool acl 150 !!crypto ipsec transform-set transform-1 esp-des esp-sha-hmac !crypto dynamic-map dynmap 1 set transform-set transform-1 reverse-route!!crypto map dynmap isakmp authorization list easy vpn remote-groupnamecrypto map dynmap client configuration address respondcrypto map dynmap 1 ipsec-isakmp dynamic dynmap !!interface Ethernet0 ip address 172.16.0.129 255.255.255.255!interface cable-modem0 no cable-modem compliant bridge crypto map dynmap!interface usb0 no ip address arp timeout 0!ip local pool dynpool 172.16.0.65 172.16.0.127 ip classless! Add the appropriate ip route commands for network-extension modeip route 172.16.1.0 255.255.255.255 cable-modem0 no ip http serverno ip http cable-monitor!access-list 150 permit ip 172.16.0.128 0.0.0.127 any snmp-server manager!line con 0 exec-timeout 0 0line vty 0 4!scheduler max-task-time 5000end
Cisco Easy VPN Server Configuration with Xauth ExampleThe following example shows a Cisco Easy VPN server configured to support Xauth with the Cisco EasyVPN Remote feature. This example is identical to that shown in the “Cisco Easy VPN Server Configurationwith Split Tunneling Example, page 97” except for the following commands that enable and configureXauth:
Cisco Easy VPN Remote Cisco Easy VPN Server Configuration with Xauth Example
Easy VPN Configuration Guide, Cisco IOS Release 12.498
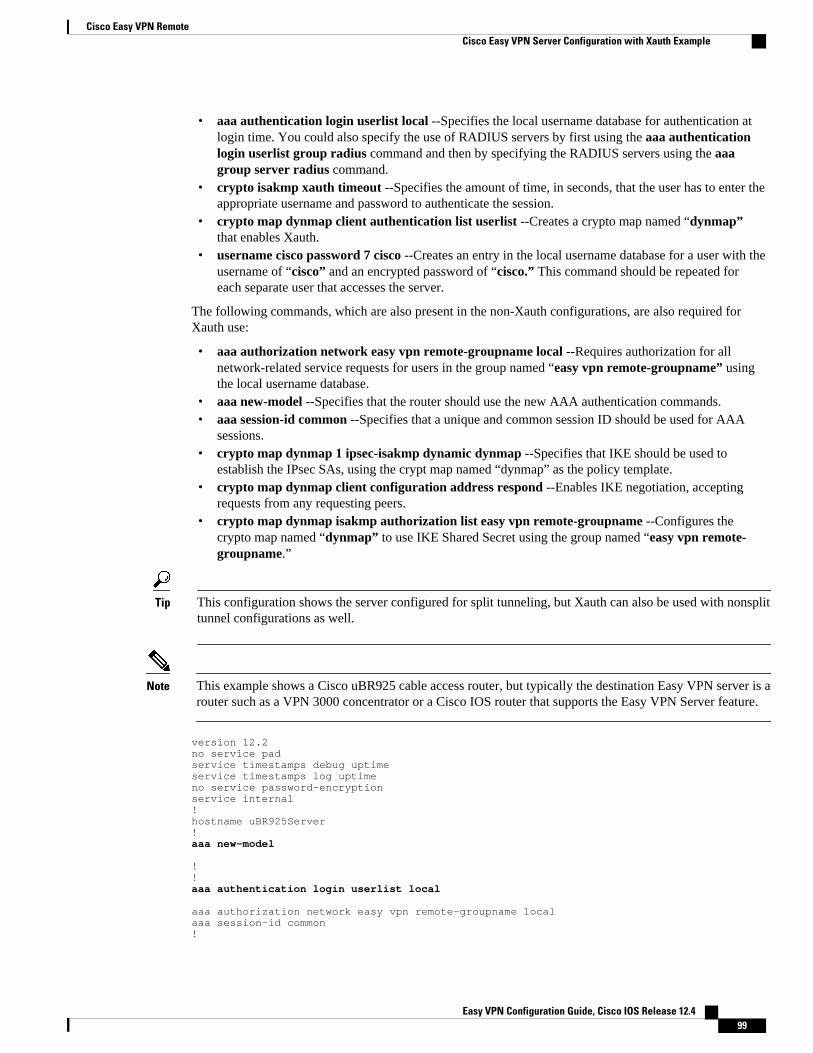
• aaa authentication login userlist local --Specifies the local username database for authentication atlogin time. You could also specify the use of RADIUS servers by first using the aaa authenticationlogin userlist group radius command and then by specifying the RADIUS servers using the aaagroup server radius command.
• crypto isakmp xauth timeout --Specifies the amount of time, in seconds, that the user has to enter theappropriate username and password to authenticate the session.
• crypto map dynmap client authentication list userlist --Creates a crypto map named “dynmap”that enables Xauth.
• username cisco password 7 cisco --Creates an entry in the local username database for a user with theusername of “cisco” and an encrypted password of “cisco.” This command should be repeated foreach separate user that accesses the server.
The following commands, which are also present in the non-Xauth configurations, are also required forXauth use:
• aaa authorization network easy vpn remote-groupname local --Requires authorization for allnetwork-related service requests for users in the group named “easy vpn remote-groupname” usingthe local username database.
• aaa new-model --Specifies that the router should use the new AAA authentication commands.• aaa session-id common --Specifies that a unique and common session ID should be used for AAA
sessions.• crypto map dynmap 1 ipsec-isakmp dynamic dynmap --Specifies that IKE should be used to
establish the IPsec SAs, using the crypt map named “dynmap” as the policy template.• crypto map dynmap client configuration address respond --Enables IKE negotiation, accepting
requests from any requesting peers.• crypto map dynmap isakmp authorization list easy vpn remote-groupname --Configures the
crypto map named “dynmap” to use IKE Shared Secret using the group named “easy vpn remote-groupname.”
Tip This configuration shows the server configured for split tunneling, but Xauth can also be used with nonsplittunnel configurations as well.
Note This example shows a Cisco uBR925 cable access router, but typically the destination Easy VPN server is arouter such as a VPN 3000 concentrator or a Cisco IOS router that supports the Easy VPN Server feature.
version 12.2no service padservice timestamps debug uptimeservice timestamps log uptimeno service password-encryptionservice internal!hostname uBR925Server!aaa new-model !!aaa authentication login userlist local aaa authorization network easy vpn remote-groupname local aaa session-id common!
Cisco Easy VPN RemoteCisco Easy VPN Server Configuration with Xauth Example
Easy VPN Configuration Guide, Cisco IOS Release 12.4 99
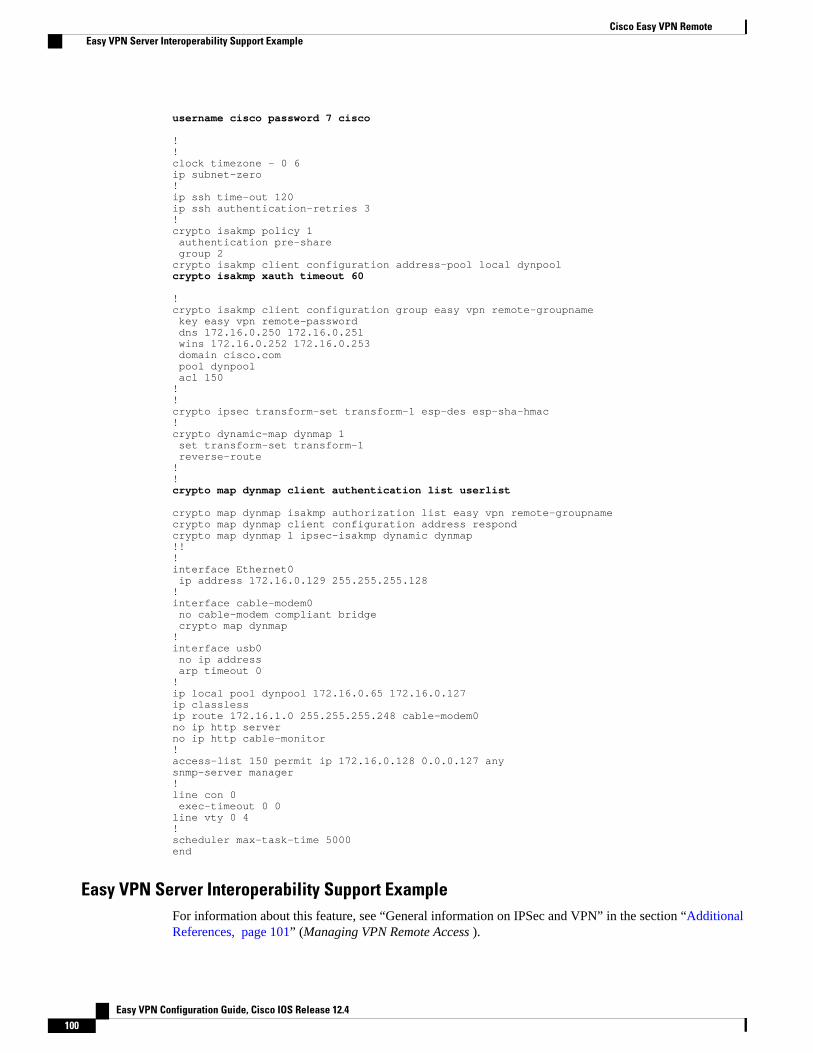
username cisco password 7 cisco !!clock timezone - 0 6ip subnet-zero!ip ssh time-out 120ip ssh authentication-retries 3!crypto isakmp policy 1 authentication pre-share group 2crypto isakmp client configuration address-pool local dynpoolcrypto isakmp xauth timeout 60 !crypto isakmp client configuration group easy vpn remote-groupname key easy vpn remote-password dns 172.16.0.250 172.16.0.251 wins 172.16.0.252 172.16.0.253 domain cisco.com pool dynpool acl 150 !!crypto ipsec transform-set transform-1 esp-des esp-sha-hmac !crypto dynamic-map dynmap 1 set transform-set transform-1 reverse-route!!crypto map dynmap client authentication list userlist crypto map dynmap isakmp authorization list easy vpn remote-groupnamecrypto map dynmap client configuration address respondcrypto map dynmap 1 ipsec-isakmp dynamic dynmap !!!interface Ethernet0 ip address 172.16.0.129 255.255.255.128!interface cable-modem0 no cable-modem compliant bridge crypto map dynmap!interface usb0 no ip address arp timeout 0!ip local pool dynpool 172.16.0.65 172.16.0.127 ip classlessip route 172.16.1.0 255.255.255.248 cable-modem0 no ip http serverno ip http cable-monitor!access-list 150 permit ip 172.16.0.128 0.0.0.127 any snmp-server manager!line con 0 exec-timeout 0 0line vty 0 4!scheduler max-task-time 5000end
Easy VPN Server Interoperability Support ExampleFor information about this feature, see “General information on IPSec and VPN” in the section “AdditionalReferences, page 101” (Managing VPN Remote Access ).
Cisco Easy VPN Remote Easy VPN Server Interoperability Support Example
Easy VPN Configuration Guide, Cisco IOS Release 12.4100
Additional ReferencesRelated Documents
Related Topic Document Title
Platform-specific documentation •
Cisco 800 series routers • Cisco 800 Series Routers• Cisco 806 Router and SOHO 71 Router
Hardware Installation Guide• Cisco 806 Router Software Configuration
Guide• Cisco 826, 827, 828, 831, 836, and 837 and
SOHO 76, 77, 78, 91, 96, and 97 RoutersSoftware Configuration Guide
• Cisco 826 and SOHO 76 Router HardwareInstallation Guide
• Cisco 827 and SOHO 77 Routers HardwareInstallation Guide
• Cisco 828 and SOHO 78 Routers HardwareInstallation Guide
• Cisco 837 ADSL Broadband Router
Cisco uBR905 and Cisco uBR925 cable accessrouters
• Cisco uBR925 Cable Access Router HardwareInstallation Guide
• Cisco uBR905 Hardware Installation Guide• Cisco uBR905/uBR925 Cable Access Router
Software Configuration Guide• Cisco uBR905 Cable Access Router
Subscriber Setup Quick Start Card• Cisco uBR925 Cable Access Router
Subscriber Setup Quick Start Card• Cisco uBR925 Cable Access Router Quick
Start User Guide
Cisco Easy VPN RemoteAdditional References
Easy VPN Configuration Guide, Cisco IOS Release 12.4 101
Related Topic Document Title
Cisco 1700 series routers • Cisco 1700 Series Router SoftwareConfiguration Guide
• Cisco 1710 Security Router HardwareInstallation Guide
• Cisco 1710 Security Router SoftwareConfiguration Guide
• Cisco 1711 Security Access Router• Cisco 1720 Series Router Hardware
Installation Guide• Cisco 1721 Access Router Hardware
Installation Guide• Cisco 1750 Series Router Hardware
Installation Guide• Cisco 1751 Router Hardware Installation
Guide• Cisco 1751 Router Software Configuration
Guide• Cisco 1760 Modular Access Router Hardware
Installation Guide
Also see the Cisco IOS release notes for Cisco IOSRelease 12.2(4)YA:
• SOHO 70 and Cisco 800 Series--ReleaseNotes for Release 12.2(4)YA
• Release Notes for Cisco uBR905 and CiscouBR925 Cable Access Routers for Cisco IOSRelease 12.2 YA
• Cisco 1700 Series--Release Notes for Release12.2(4)YA
Cisco 2600 series, Cisco 3600 series, and Cisco3700 series routers
• Cisco 2600 Series Multiservice Platforms• Cisco 2600 Series Routers Hardware
Installation Guide • Cisco 3600 Series Multiservice Platforms• Cisco 3600 Series Hardware Installation Guide• Cisco 3700 Series Multiservice Access Routers• Cisco 3700 Series Routers Hardware
Installation Guide• Cisco 2600 Series, 3600 Series, and 3700
Series Regulatory Compliance and SafetyInformation on Cisco.com
IPsec and VPN documentation
Cisco Easy VPN Remote Additional References
Easy VPN Configuration Guide, Cisco IOS Release 12.4102
Related Topic Document Title
802.1x authentication • Configuring Cisco IOS Easy VPN Remotewith 802.1X Authentication (white paper)
• VPN Access Control Using 802.1X LocalAuthentication
Access Control Lists Configuration • IP Access List Overview
Configuration information (additional in-depth) • Cisco IOS Security Command Reference --Provides a reference for each of the Cisco IOScommands used to configure IPsec encryptionand related security features.
• SSL VPN -- Provides information about SSLVPN.
cTCP on Cisco Easy VPN remote devices • EFT Deployment Guide for Cisco TunnelControl Protocol on Cisco EasyVPN
Dead peer detection • IPSec Dead Peer Detection Periodic MessageOption
DHCP configuration • “Configuring the Cisco IOS DHCP Client ” inthe Cisco IOS IP Addressing ConfigurationGuide
Digital certificates (RSA signature support) • Easy VPN Remote RSA Signature Support
DNS, configuration • Configuring DNS on Cisco Routers
Easy VPN Server feature, which provides CiscoUnity client support for the Cisco Easy VPNRemote feature
• Easy VPN Server• Cisco Easy VPN• Configuring NAC with IPsec Dynamic Virtual
Tunnel Interface
Encrypted Preshared Key feature • Encrypted Preshared Key
Cisco Easy VPN RemoteAdditional References
Easy VPN Configuration Guide, Cisco IOS Release 12.4 103
Related Topic Document Title
IPsec and VPN, general information • Deploying IPsec -- Provides an overview ofIPsec encryption and its key concepts, alongwith sample configurations. Also provides alink to many other documents on relatedtopics.
• Configuring Authorization and Revocation ofCertificates in a PKI -- Describes the conceptof digital certificates and how they are used toauthenticate IPsec users.
• Configuring Authentication Proxy• An Introduction to IP Security (IPsec)
Encryption -- Provides a step-by-stepdescription of how to configure IPsecencryption.
• Configuring VPN Settings --Providesinformation about configuring a PIX firewallto operate as a Cisco Secure VPN client.
• Configuring Security for VPNs with IPsec --Provides information about configuring cryptomaps.
• IPSec Virtual Tunnel Interface --Providesinformation about IPsec virtual tunnelinterfaces.
• IP technical tips sections on Cisco.com.
Object tracking • Reliable Static Routing Backup Using ObjectTracking
Standards
Standards Title
No new or modified standards are supported by thisfeature.
--
Cisco Easy VPN Remote Additional References
Easy VPN Configuration Guide, Cisco IOS Release 12.4104
MIBs
MIBs MIBs Link
• CISCO-IPSEC-FLOW-MONITOR-MIB--Contains attributes describing IPsec-basedVPNs (Internet Engineering Task Force (IETF)IPSec Working Group Draft).
• CISCO-IPSEC-MIB--Describes Ciscoimplementation-specific attributes for Ciscorouters implementing IPsec VPNs.
• CISCO-IPSEC-POLICY-MAP-MIB--Extendsthe CISCO-IPSEC-FLOW-MONITOR-MIB tomap dynamically created structures to thepolicies, transforms, cryptomaps, and otherstructures that created or are using them.
To locate and download MIBs for selectedplatforms, Cisco IOS software releases, and featuresets, use Cisco MIB Locator found at the followingURL:
http://www.cisco.com/go/mibs
RFCs
RFCs Title
No new or modified RFCs are supported by thisfeature.
--
Technical Assistance
Description Link
The Cisco Support and Documentation websiteprovides online resources to downloaddocumentation, software, and tools. Use theseresources to install and configure the software andto troubleshoot and resolve technical issues withCisco products and technologies. Access to mosttools on the Cisco Support and Documentationwebsite requires a Cisco.com user ID andpassword.
http://www.cisco.com/cisco/web/support/index.html
Feature Information for Easy VPN RemoteThe following table provides release information about the feature or features described in this module.This table lists only the software release that introduced support for a given feature in a given softwarerelease train. Unless noted otherwise, subsequent releases of that software release train also support thatfeature.
Use Cisco Feature Navigator to find information about platform support and Cisco software image support.To access Cisco Feature Navigator, go to www.cisco.com/go/cfn. An account on Cisco.com is not required.
Cisco Easy VPN RemoteFeature Information for Easy VPN Remote
Easy VPN Configuration Guide, Cisco IOS Release 12.4 105
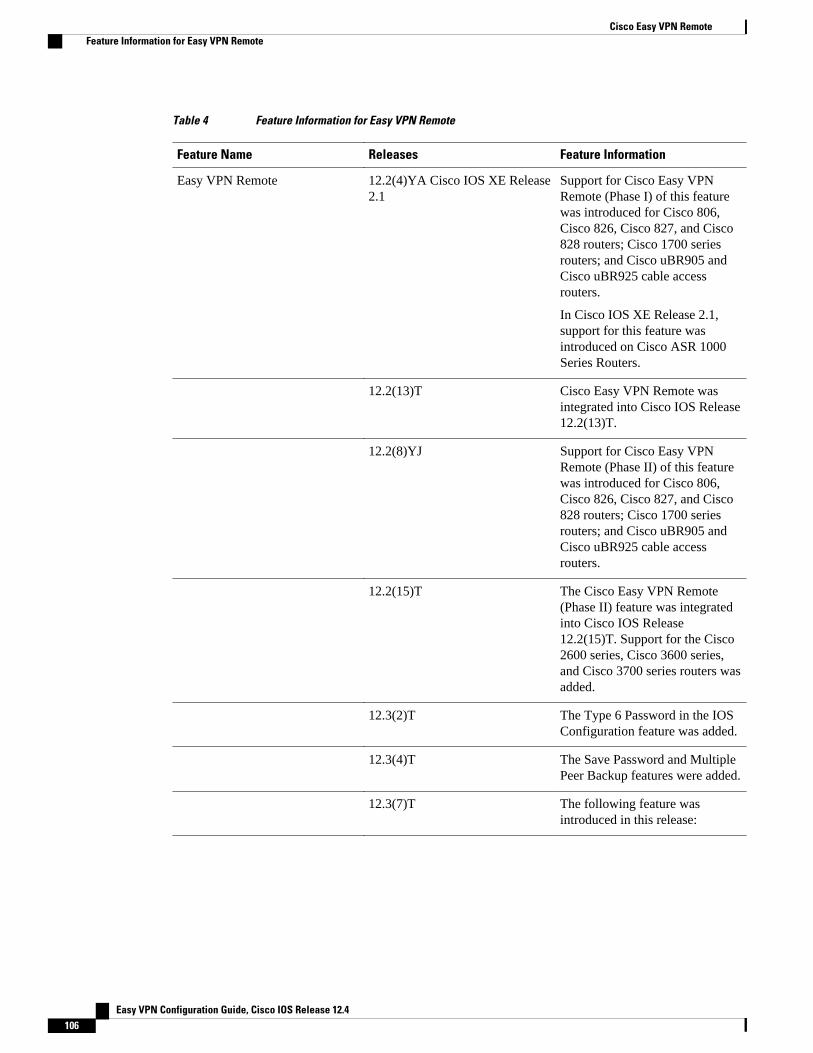
Table 4 Feature Information for Easy VPN Remote
Feature Name Releases Feature Information
Easy VPN Remote 12.2(4)YA Cisco IOS XE Release2.1
Support for Cisco Easy VPNRemote (Phase I) of this featurewas introduced for Cisco 806,Cisco 826, Cisco 827, and Cisco828 routers; Cisco 1700 seriesrouters; and Cisco uBR905 andCisco uBR925 cable accessrouters.
In Cisco IOS XE Release 2.1,support for this feature wasintroduced on Cisco ASR 1000Series Routers.
12.2(13)T Cisco Easy VPN Remote wasintegrated into Cisco IOS Release12.2(13)T.
12.2(8)YJ Support for Cisco Easy VPNRemote (Phase II) of this featurewas introduced for Cisco 806,Cisco 826, Cisco 827, and Cisco828 routers; Cisco 1700 seriesrouters; and Cisco uBR905 andCisco uBR925 cable accessrouters.
12.2(15)T The Cisco Easy VPN Remote(Phase II) feature was integratedinto Cisco IOS Release12.2(15)T. Support for the Cisco2600 series, Cisco 3600 series,and Cisco 3700 series routers wasadded.
12.3(2)T The Type 6 Password in the IOSConfiguration feature was added.
12.3(4)T The Save Password and MultiplePeer Backup features were added.
12.3(7)T The following feature wasintroduced in this release:
Cisco Easy VPN Remote Feature Information for Easy VPN Remote
Easy VPN Configuration Guide, Cisco IOS Release 12.4106
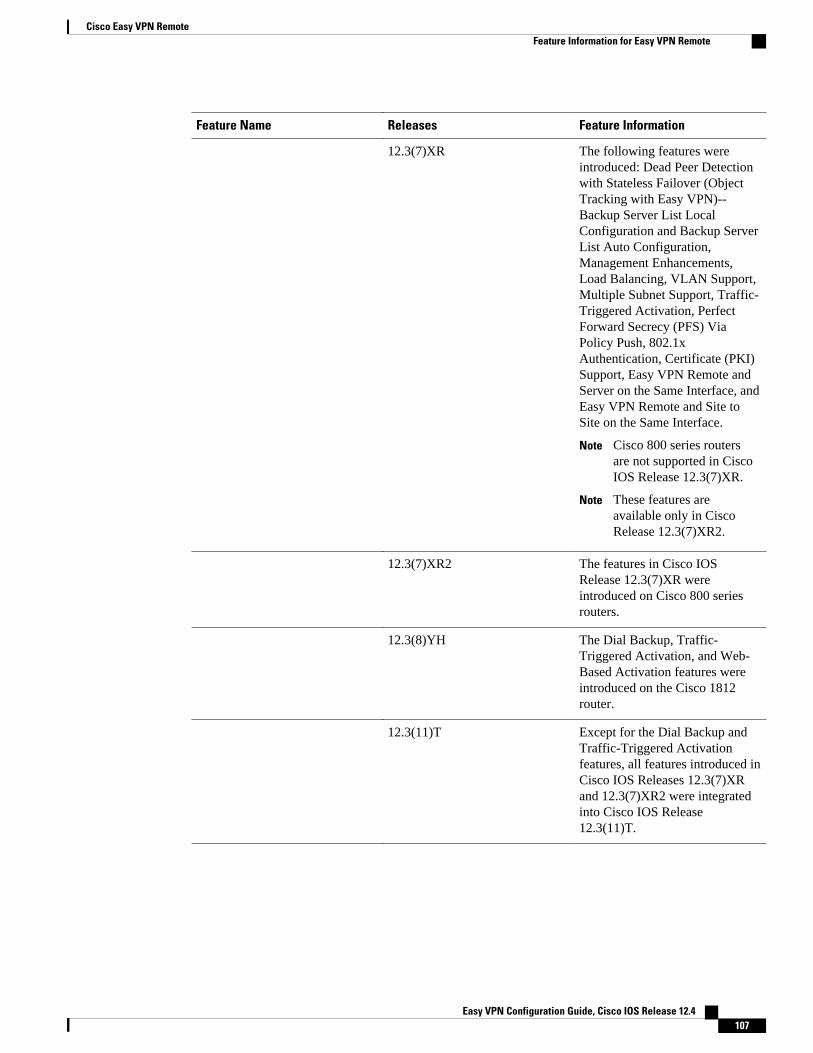
Feature Name Releases Feature Information
12.3(7)XR The following features wereintroduced: Dead Peer Detectionwith Stateless Failover (ObjectTracking with Easy VPN)--Backup Server List LocalConfiguration and Backup ServerList Auto Configuration,Management Enhancements,Load Balancing, VLAN Support,Multiple Subnet Support, Traffic-Triggered Activation, PerfectForward Secrecy (PFS) ViaPolicy Push, 802.1xAuthentication, Certificate (PKI)Support, Easy VPN Remote andServer on the Same Interface, andEasy VPN Remote and Site toSite on the Same Interface.
Note Cisco 800 series routersare not supported in CiscoIOS Release 12.3(7)XR.
Note These features areavailable only in CiscoRelease 12.3(7)XR2.
12.3(7)XR2 The features in Cisco IOSRelease 12.3(7)XR wereintroduced on Cisco 800 seriesrouters.
12.3(8)YH The Dial Backup, Traffic-Triggered Activation, and Web-Based Activation features wereintroduced on the Cisco 1812router.
12.3(11)T Except for the Dial Backup andTraffic-Triggered Activationfeatures, all features introduced inCisco IOS Releases 12.3(7)XRand 12.3(7)XR2 were integratedinto Cisco IOS Release12.3(11)T.
Cisco Easy VPN RemoteFeature Information for Easy VPN Remote
Easy VPN Configuration Guide, Cisco IOS Release 12.4 107
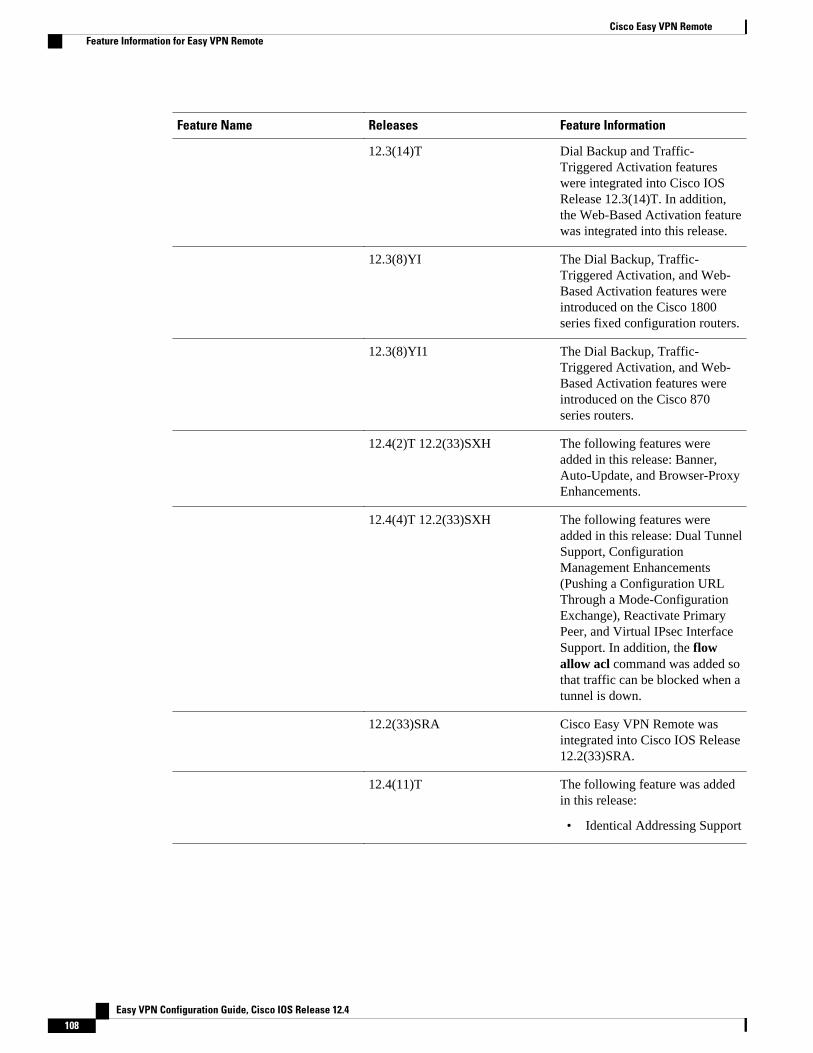
Feature Name Releases Feature Information
12.3(14)T Dial Backup and Traffic-Triggered Activation featureswere integrated into Cisco IOSRelease 12.3(14)T. In addition,the Web-Based Activation featurewas integrated into this release.
12.3(8)YI The Dial Backup, Traffic-Triggered Activation, and Web-Based Activation features wereintroduced on the Cisco 1800series fixed configuration routers.
12.3(8)YI1 The Dial Backup, Traffic-Triggered Activation, and Web-Based Activation features wereintroduced on the Cisco 870series routers.
12.4(2)T 12.2(33)SXH The following features wereadded in this release: Banner,Auto-Update, and Browser-ProxyEnhancements.
12.4(4)T 12.2(33)SXH The following features wereadded in this release: Dual TunnelSupport, ConfigurationManagement Enhancements(Pushing a Configuration URLThrough a Mode-ConfigurationExchange), Reactivate PrimaryPeer, and Virtual IPsec InterfaceSupport. In addition, the flowallow acl command was added sothat traffic can be blocked when atunnel is down.
12.2(33)SRA Cisco Easy VPN Remote wasintegrated into Cisco IOS Release12.2(33)SRA.
12.4(11)T The following feature was addedin this release:
• Identical Addressing Support
Cisco Easy VPN Remote Feature Information for Easy VPN Remote
Easy VPN Configuration Guide, Cisco IOS Release 12.4108
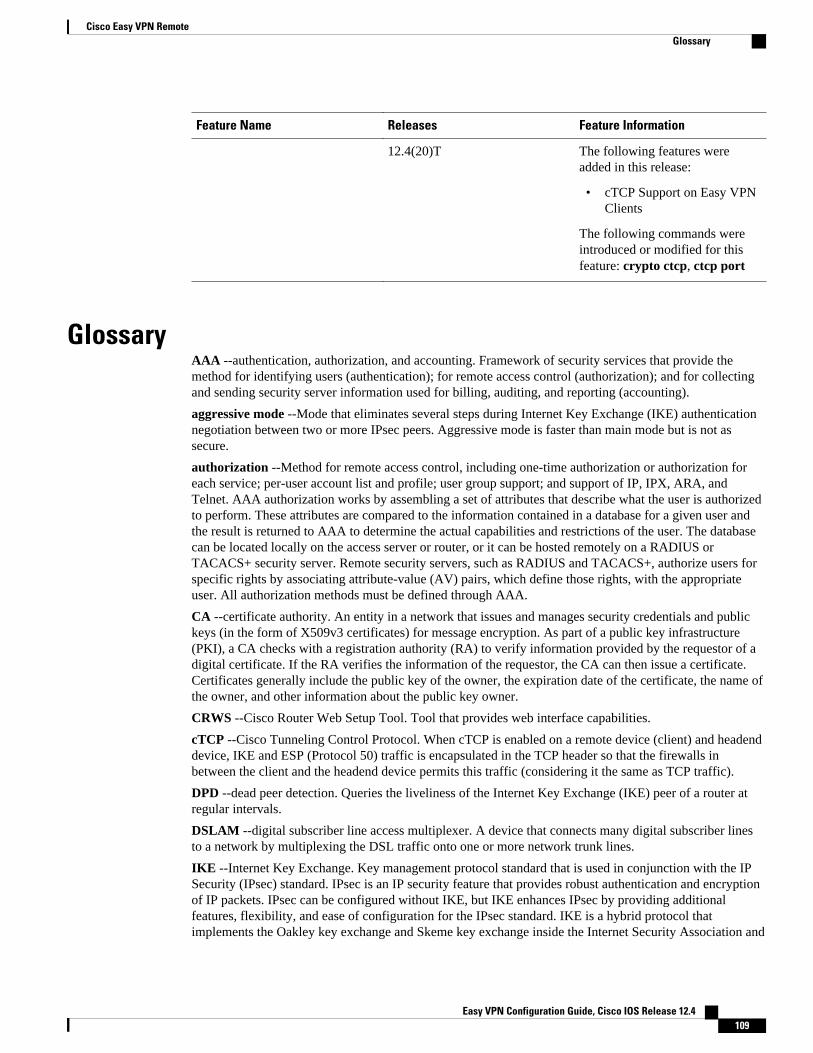
Feature Name Releases Feature Information
12.4(20)T The following features wereadded in this release:
• cTCP Support on Easy VPNClients
The following commands wereintroduced or modified for thisfeature: crypto ctcp, ctcp port
GlossaryAAA --authentication, authorization, and accounting. Framework of security services that provide themethod for identifying users (authentication); for remote access control (authorization); and for collectingand sending security server information used for billing, auditing, and reporting (accounting).
aggressive mode --Mode that eliminates several steps during Internet Key Exchange (IKE) authenticationnegotiation between two or more IPsec peers. Aggressive mode is faster than main mode but is not assecure.
authorization --Method for remote access control, including one-time authorization or authorization foreach service; per-user account list and profile; user group support; and support of IP, IPX, ARA, andTelnet. AAA authorization works by assembling a set of attributes that describe what the user is authorizedto perform. These attributes are compared to the information contained in a database for a given user andthe result is returned to AAA to determine the actual capabilities and restrictions of the user. The databasecan be located locally on the access server or router, or it can be hosted remotely on a RADIUS orTACACS+ security server. Remote security servers, such as RADIUS and TACACS+, authorize users forspecific rights by associating attribute-value (AV) pairs, which define those rights, with the appropriateuser. All authorization methods must be defined through AAA.
CA --certificate authority. An entity in a network that issues and manages security credentials and publickeys (in the form of X509v3 certificates) for message encryption. As part of a public key infrastructure(PKI), a CA checks with a registration authority (RA) to verify information provided by the requestor of adigital certificate. If the RA verifies the information of the requestor, the CA can then issue a certificate.Certificates generally include the public key of the owner, the expiration date of the certificate, the name ofthe owner, and other information about the public key owner.
CRWS --Cisco Router Web Setup Tool. Tool that provides web interface capabilities.
cTCP --Cisco Tunneling Control Protocol. When cTCP is enabled on a remote device (client) and headenddevice, IKE and ESP (Protocol 50) traffic is encapsulated in the TCP header so that the firewalls inbetween the client and the headend device permits this traffic (considering it the same as TCP traffic).
DPD --dead peer detection. Queries the liveliness of the Internet Key Exchange (IKE) peer of a router atregular intervals.
DSLAM --digital subscriber line access multiplexer. A device that connects many digital subscriber linesto a network by multiplexing the DSL traffic onto one or more network trunk lines.
IKE --Internet Key Exchange. Key management protocol standard that is used in conjunction with the IPSecurity (IPsec) standard. IPsec is an IP security feature that provides robust authentication and encryptionof IP packets. IPsec can be configured without IKE, but IKE enhances IPsec by providing additionalfeatures, flexibility, and ease of configuration for the IPsec standard. IKE is a hybrid protocol thatimplements the Oakley key exchange and Skeme key exchange inside the Internet Security Association and
Cisco Easy VPN RemoteGlossary
Easy VPN Configuration Guide, Cisco IOS Release 12.4 109
Key Management Protocol (ISAKMP) framework. ISAKMP, Oakley, and Skeme are security protocolsimplemented by IKE.
IPsec --IP Security Protocol. Framework of open standards that provides data confidentiality, dataintegrity, and data authentication between participating peers. IPsec provides these security services at theIP layer. IPsec uses IKE to handle negotiation of protocols and algorithms based on local policy and togenerate the encryption and authentication keys to be used by IPsec. IPsec can be used to protect one ormore data flows between a pair of hosts, between a pair of security gateways, or between a securitygateway and a host.
main mode --Mode that ensures the highest level of security when two or more IPsec peers are negotiatingIKE authentication. It requires more processing time than aggressive mode.
MIB --Management Information Base. Database of network management information that is used andmaintained by a network management protocol, such as Simple Network Management Protocol (SNMP) orCommon Management Information Protocol (CMIP). The value of a MIB object can be changed orretrieved using SNMP or CMIP commands, usually through a graphical user interface (GUI) networkmanagement system (NMS). MIB objects are organized in a tree structure that includes public (standard)and private (proprietary) branches.
peer --Router or device that participates as an endpoint in IPsec and IKE.
preshared key --Shared, secret key that uses IKE for authentication.
QoS --quality of service. Capability of a network to provide better service to selected network traffic overvarious technologies, including Frame Relay; Asynchronous Transfer Mode (ATM); Ethernet; and 802.1networks, SONET, and IP-routed networks that may use any or all of these underlying technologies.
RADIUS --Remote Authentication Dial-In User Service. Distributed client or server system that securesnetworks against unauthorized access. RADIUS clients run on Cisco routers and send authenticationrequests to a central RADIUS server that contains all user authentication and network service accessinformation.
SA --security association. Instance of security policy and keying material applied to a data flow. Both IKEand IPsec use SAs, although SAs are independent of one another. IPsec SAs are unidirectional, and they areunique in each security protocol. An IKE SA is used by IKE only, and unlike the IPsec SA, it isbidirectional. IKE negotiates and establishes SAs on behalf of IPsec. A user can also establish IPsec SAsmanually.
A set of SAs are needed for a protected data pipe, one per direction per protocol. For example, if you havea pipe that supports encapsulating security payload (ESP) between peers, one ESP SA is required for eachdirection. SAs are uniquely identified by destination (IPsec endpoint) address, security protocol (AH orESP), and security parameter index (SPI).
SDM --Security Device Manager. Web interface manager that enables you to connect or disconnect a VPNtunnel and that provides a web interface for extended authentication (Xauth).
SNMP --Simple Network Management Protocol. Application-layer protocol that provides a messageformat for communication between SNMP managers and agents.
trap --Message sent by an SNMP agent to a network management system, console, or terminal to indicatethe occurrence of a significant event, such as a specifically defined condition or a threshold that wasreached.
VPN --Virtual Private Network. Enables IP traffic to travel securely over a public TCP/IP network byencrypting all traffic from one network to another. A VPN uses tunnels to encrypt all information at the IPlevel.
Cisco Easy VPN Remote Glossary
Easy VPN Configuration Guide, Cisco IOS Release 12.4110
Cisco and the Cisco logo are trademarks or registered trademarks of Cisco and/or its affiliates in the U.S.and other countries. To view a list of Cisco trademarks, go to this URL: www.cisco.com/go/trademarks.Third-party trademarks mentioned are the property of their respective owners. The use of the word partnerdoes not imply a partnership relationship between Cisco and any other company. (1110R)
Any Internet Protocol (IP) addresses and phone numbers used in this document are not intended to beactual addresses and phone numbers. Any examples, command display output, network topology diagrams,and other figures included in the document are shown for illustrative purposes only. Any use of actual IPaddresses or phone numbers in illustrative content is unintentional and coincidental.
Cisco Easy VPN Remote
Easy VPN Configuration Guide, Cisco IOS Release 12.4 111

Easy VPN Server Configuration Examples
Easy VPN Configuration Guide, Cisco IOS Release 12.4112

Easy VPN Remote RSA Signature Support
The Easy VPN Remote RSA Signature Support feature provides support for the Rivest, Shamir, andAdleman (RSA) signatures on Easy VPN remote devices. The support is provided through RSAcertificates that can be stored on or off the remote devices.
• Finding Feature Information, page 113• Prerequisites for Easy VPN Remote RSA Signature Support, page 113• Restrictions for Easy VPN Remote RSA Signature Support, page 114• Information About Easy VPN Remote RSA Signature Support, page 114• How to Configure Easy VPN Remote RSA Signature Support, page 114• Additional References, page 115• Feature Information for Easy VPN Remote RSA Signature Support, page 116
Finding Feature InformationYour software release may not support all the features documented in this module. For the latest featureinformation and caveats, see the release notes for your platform and software release. To find informationabout the features documented in this module, and to see a list of the releases in which each feature issupported, see the Feature Information Table at the end of this document.
Use Cisco Feature Navigator to find information about platform support and Cisco software image support.To access Cisco Feature Navigator, go to www.cisco.com/go/cfn. An account on Cisco.com is not required.
Prerequisites for Easy VPN Remote RSA Signature Support• You must have a Cisco Virtual Private Network (VPN) remote device and be familiar with configuring
the device.• You must have a certification authority (CA) available to your network before you configure this
interoperability feature. The CA must support the public key infrastructure (PKI) protocol of CiscoSystems, which is the Simple Certificate Enrollment Protocol (SCEP) (formerly called certificateenrollment protocol [CEP]).
• You should be familiar with IP Security (IPsec) and PKI and with configuring RSA key pairs andCAs.
Easy VPN Configuration Guide, Cisco IOS Release 12.4 113
Restrictions for Easy VPN Remote RSA Signature Support• This feature should be configured only when you configure both IPsec and Internet Key Exchange
(IKE) on your network.• Easy VPN does not support RSA signature and preshared key authentication at the same time. A router
can have one or more RSA signature-authenticated Easy VPN tunnels or preshared key-authenticatedEasy VPN tunnels. However, only tunnels with the same authentication method are up at any time.
• Cisco IOS software does not support CA server public keys that are greater than 2048 bits.
Information About Easy VPN Remote RSA Signature Support• Easy VPN Remote RSA Signature Support Overview, page 114
Easy VPN Remote RSA Signature Support OverviewThe Easy VPN Remote RSA Signature Support feature allows you to configure RSA signatures on yourEasy VPN remote device. The signatures can be stored on or off your remote device.
How to Configure Easy VPN Remote RSA Signature Support• Configuring Easy VPN Remote RSA Signature Support, page 114
• Troubleshooting Easy VPN RSA Signature Support, page 114
Configuring Easy VPN Remote RSA Signature SupportTo enable the RSA signatures, when you are configuring the Easy VPN remote and assigning theconfiguration to the outgoing interface, you must omit the group command. The content of the firstOrganizational Unit (OU) field will be used as the group. For information about configuring Cisco EasyVPN remote devices, refer to the Cisco Easy VPN Remote module.
Troubleshooting Easy VPN RSA Signature SupportTo troubleshoot your Easy VPN remote RSA signature configuration, you can use the following debugcommands. The debug commands can be used in any order or individually.
SUMMARY STEPS
1. enable
2. debug crypto ipsec client ezvpn
3. debug crypto isakmp
Easy VPN Remote RSA Signature Support Overview Restrictions for Easy VPN Remote RSA Signature Support
Easy VPN Configuration Guide, Cisco IOS Release 12.4114
DETAILED STEPS
Command or Action Purpose
Step 1 enable
Example:
Router> enable
Enables privileged EXEC mode.
• Enter your password if prompted.
Step 2 debug crypto ipsec client ezvpn
Example:
Router# debug crypto ipsec client ezvpn
Displays information about the VPN tunnel as it relates to the Easy VPNremote configuration.
Step 3 debug crypto isakmp
Example:
Router# debug crypto isakmp
Displays messages about IKE events.
Additional ReferencesRelated Documents
Related Topic Document Title
Cisco IOS commands Cisco IOS Master Commands List, All Releases
Security commands Cisco IOS Security Command Reference
Configuring Internet Key Exchange for IPsec VPNs Configuring Internet Key Exchange for IPsec VPNs
Deploying RSA keys Deploying RSA Keys Within a PKI
Certificate Authorities • Easy VPN Server• Cisco IOS PKI Overview: Understanding and
Planning a PKI• Deploying RSA Keys Within a PKI• Configuring Certificate Enrollment for a PKI
Configuring a Cisco Easy VPN remote device Cisco Easy VPN Remote
Easy VPN Remote RSA Signature SupportAdditional References
Easy VPN Configuration Guide, Cisco IOS Release 12.4 115
Standards
Standard Title
None --
MIBs
MIB MIBs Link
None To locate and download MIBs for selectedplatforms, Cisco software releases, and feature sets,use Cisco MIB Locator found at the followingURL:
http://www.cisco.com/go/mibs
RFCs
RFC Title
None --
Technical Assistance
Description Link
The Cisco Support and Documentation websiteprovides online resources to downloaddocumentation, software, and tools. Use theseresources to install and configure the software andto troubleshoot and resolve technical issues withCisco products and technologies. Access to mosttools on the Cisco Support and Documentationwebsite requires a Cisco.com user ID andpassword.
http://www.cisco.com/cisco/web/support/index.html
Feature Information for Easy VPN Remote RSA SignatureSupport
The following table provides release information about the feature or features described in this module.This table lists only the software release that introduced support for a given feature in a given softwarerelease train. Unless noted otherwise, subsequent releases of that software release train also support thatfeature.
Use Cisco Feature Navigator to find information about platform support and Cisco software image support.To access Cisco Feature Navigator, go to www.cisco.com/go/cfn. An account on Cisco.com is not required.
Easy VPN Remote RSA Signature Support Feature Information for Easy VPN Remote RSA Signature Support
Easy VPN Configuration Guide, Cisco IOS Release 12.4116
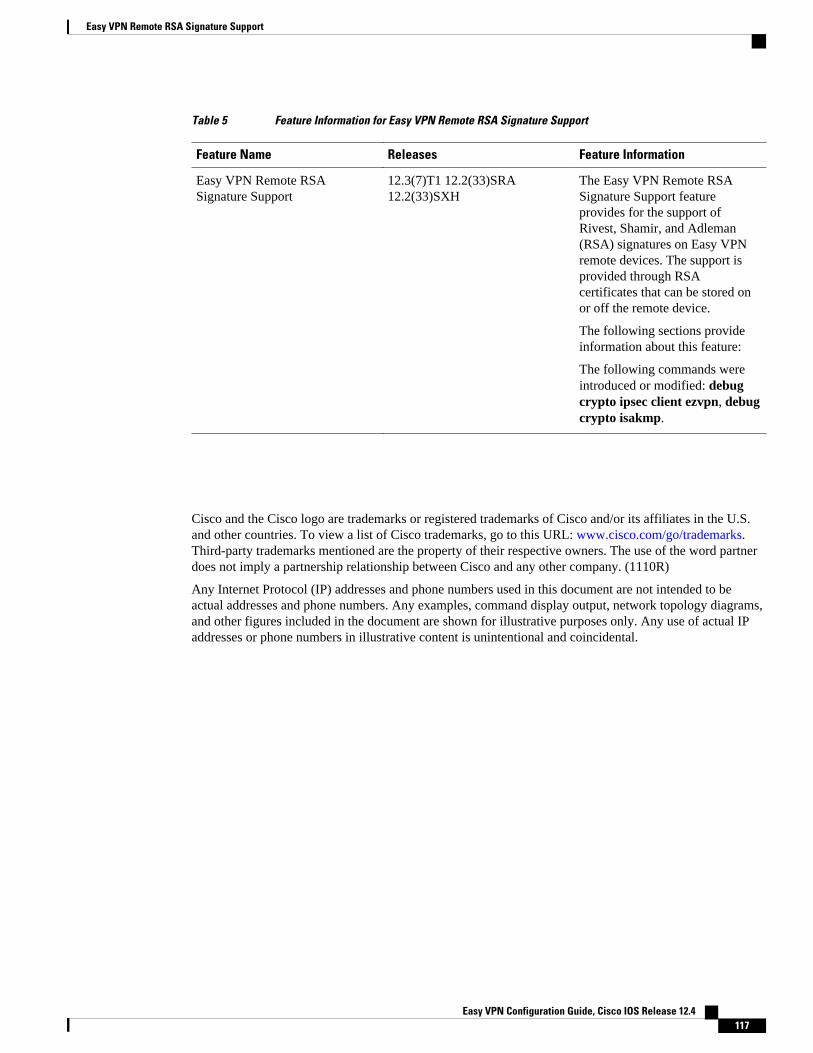
Table 5 Feature Information for Easy VPN Remote RSA Signature Support
Feature Name Releases Feature Information
Easy VPN Remote RSASignature Support
12.3(7)T1 12.2(33)SRA12.2(33)SXH
The Easy VPN Remote RSASignature Support featureprovides for the support ofRivest, Shamir, and Adleman(RSA) signatures on Easy VPNremote devices. The support isprovided through RSAcertificates that can be stored onor off the remote device.
The following sections provideinformation about this feature:
The following commands wereintroduced or modified: debugcrypto ipsec client ezvpn, debugcrypto isakmp.
Cisco and the Cisco logo are trademarks or registered trademarks of Cisco and/or its affiliates in the U.S.and other countries. To view a list of Cisco trademarks, go to this URL: www.cisco.com/go/trademarks.Third-party trademarks mentioned are the property of their respective owners. The use of the word partnerdoes not imply a partnership relationship between Cisco and any other company. (1110R)
Any Internet Protocol (IP) addresses and phone numbers used in this document are not intended to beactual addresses and phone numbers. Any examples, command display output, network topology diagrams,and other figures included in the document are shown for illustrative purposes only. Any use of actual IPaddresses or phone numbers in illustrative content is unintentional and coincidental.
Easy VPN Remote RSA Signature Support
Easy VPN Configuration Guide, Cisco IOS Release 12.4 117

Troubleshooting Easy VPN RSA Signature Support
Easy VPN Configuration Guide, Cisco IOS Release 12.4118
Easy VPN Server
The Easy VPN Server feature allows a remote end user to communicate using IP Security (IPsec) with anyCisco IOS Virtual Private Network (VPN) gateway. Centrally managed IPsec policies are “pushed” to theclient device by the server, minimizing configuration by the end user.
• Finding Feature Information, page 119• Restrictions for Easy VPN Server, page 119• Information About Easy VPN Server, page 121• How to Configure Easy VPN Server, page 138• Configuration Examples for Easy VPN Server, page 179• Additional References, page 195• Feature Information for Easy VPN Server, page 197• Glossary, page 199
Finding Feature InformationYour software release may not support all the features documented in this module. For the latest featureinformation and caveats, see the release notes for your platform and software release. To find informationabout the features documented in this module, and to see a list of the releases in which each feature issupported, see the Feature Information Table at the end of this document.
Use Cisco Feature Navigator to find information about platform support and Cisco software image support.To access Cisco Feature Navigator, go to www.cisco.com/go/cfn. An account on Cisco.com is not required.
Restrictions for Easy VPN ServerNonsupported Protocols
The table below outlines IPsec protocol options and attributes that are not supported by Cisco VPN clients,so these options and attributes should not be configured on the router for these clients.
Easy VPN Configuration Guide, Cisco IOS Release 12.4 119
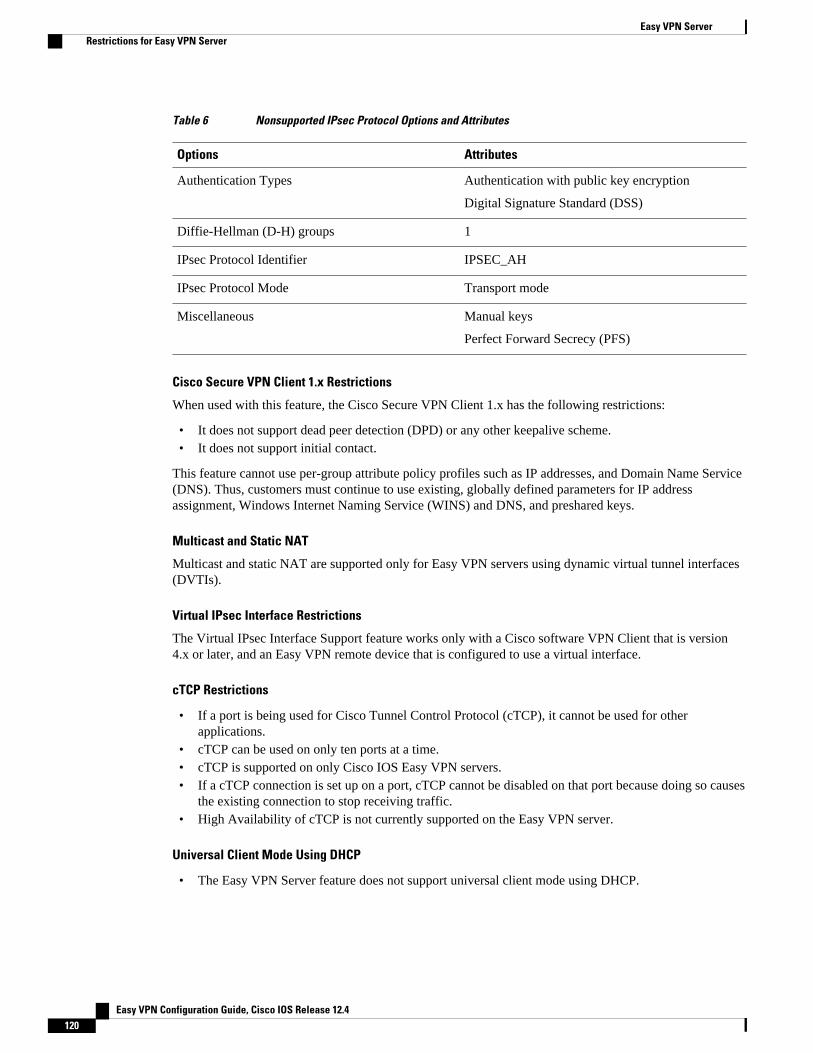
Table 6 Nonsupported IPsec Protocol Options and Attributes
Options Attributes
Authentication Types Authentication with public key encryption
Digital Signature Standard (DSS)
Diffie-Hellman (D-H) groups 1
IPsec Protocol Identifier IPSEC_AH
IPsec Protocol Mode Transport mode
Miscellaneous Manual keys
Perfect Forward Secrecy (PFS)
Cisco Secure VPN Client 1.x Restrictions
When used with this feature, the Cisco Secure VPN Client 1.x has the following restrictions:
• It does not support dead peer detection (DPD) or any other keepalive scheme.• It does not support initial contact.
This feature cannot use per-group attribute policy profiles such as IP addresses, and Domain Name Service(DNS). Thus, customers must continue to use existing, globally defined parameters for IP addressassignment, Windows Internet Naming Service (WINS) and DNS, and preshared keys.
Multicast and Static NAT
Multicast and static NAT are supported only for Easy VPN servers using dynamic virtual tunnel interfaces(DVTIs).
Virtual IPsec Interface Restrictions
The Virtual IPsec Interface Support feature works only with a Cisco software VPN Client that is version4.x or later, and an Easy VPN remote device that is configured to use a virtual interface.
cTCP Restrictions
• If a port is being used for Cisco Tunnel Control Protocol (cTCP), it cannot be used for otherapplications.
• cTCP can be used on only ten ports at a time.• cTCP is supported on only Cisco IOS Easy VPN servers.• If a cTCP connection is set up on a port, cTCP cannot be disabled on that port because doing so causes
the existing connection to stop receiving traffic.• High Availability of cTCP is not currently supported on the Easy VPN server.
Universal Client Mode Using DHCP
• The Easy VPN Server feature does not support universal client mode using DHCP.
Easy VPN Server Restrictions for Easy VPN Server
Easy VPN Configuration Guide, Cisco IOS Release 12.4120
Information About Easy VPN Server• How It Works, page 121
• RADIUS Support for Group Profiles, page 122
• RADIUS Support for User Profiles, page 125
• Supported Protocols, page 126
• Functions Supported by Easy VPN Server, page 127
How It WorksWhen the client initiates a connection with a Cisco IOS VPN device, the “conversation” that occursbetween the peers consists of device authentication via Internet Key Exchange (IKE), followed by userauthentication using IKE Extended Authentication (Xauth), VPN policy push (using Mode Configuration),and IPsec security association (SA) creation. An overview of this process is as follows:
• The client initiates IKE Phase 1 via aggressive mode (AM) if a preshared key is to be used forauthentication; the client initiates main mode (MM) if digital certificates are used. If the clientidentifies itself with a preshared key, the accompanying group name entered in the configuration GUI(ID_KEY_ID) is used to identify the group profile associated with this client. If digital certificates areused, the organizational unit (OU) field of a distinguished name (DN) is used to identify the groupprofile.
Note Because the client may be configured for preshared key authentication, which initiates IKE AM, it isrecommended that the administrator change the identity of the Cisco IOS VPN device via the cryptoisakmp identity hostname command. This will not affect certificate authentication via IKE MM.
• The client attempts to establish an IKE SA between its public IP address and the public IP address ofthe Cisco IOS VPN device. To reduce the amount of manual configuration on the client, everycombination of encryption and hash algorithms, in addition to authentication methods and D-H groupsizes, is proposed.
• Depending on its IKE policy configuration, the Cisco IOS VPN device will determine which proposalis acceptable to continue negotiating Phase 1.
Tip IKE policy is global for the Cisco IOS VPN device and can consist of several proposals. In the case ofmultiple proposals, the Cisco IOS VPN device will use the first match, so you should always list your mostsecure policies first.
Note Device authentication ends and user authentication begins at this point.
• After the IKE SA is successfully established, and if the Cisco IOS VPN device is configured forXauth, the client waits for a “username/password” challenge and then responds to the challenge of thepeer. The information that is entered is checked against authentication entities using authentication,authorization, and accounting (AAA) protocols such as RADIUS and TACACS+. Token cards may
How It WorksInformation About Easy VPN Server
Easy VPN Configuration Guide, Cisco IOS Release 12.4 121
also be used via AAA proxy. During Xauth, it is also possible for a user-specific attribute to beretrieved if the credentials of that user are validated via RADIUS.
Note VPN devices that are configured to handle remote clients should always be configured to enforce userauthentication.
• If the Cisco IOS VPN device indicates that authentication was successful, the client requests furtherconfiguration parameters from the peer. The remaining system parameters (for example, IP address,DNS, and split tunnel attributes) are pushed to the client at this time using Mode Configuration.
Note The IP address pool and group preshared key (if Rivest, Shamir, and Adelman [RSA] signatures are notbeing used) are the only required parameter in a group profile, all other parameters are optional.
• After each client is assigned an internal IP address via Mode Configuration, it is important that theCisco IOS VPN device knows how to route packets through the appropriate VPN tunnel. Reverseroute injection (RRI) will ensure that a static route is created on the Cisco IOS VPN device for eachclient internal IP address.
Note It is recommended that you enable RRI on the crypto map (static or dynamic) for the support of VPNclients unless the crypto map is being applied to a Generic Routing Encapsulation (GRE) tunnel that isalready being used to distribute routing information.
• After the configuration parameters have been successfully received by the client, IKE quick mode isinitiated to negotiate IPsec SA establishment.
• After IPsec SAs are created, the connection is complete.
RADIUS Support for Group ProfilesGroup policy information is stored in a profile that can be defined locally in the router configuration or on aRADIUS server that is accessible by the Cisco IOS VPN device. If RADIUS is used, you must configureaccess to the server and allow the Cisco IOS VPN device to send requests to the server.
To define group policy attributes for RADIUS, you must do the following task on your RADIUS server:
• Define a user that has a name equal to the group name as defined in the client graphical user interface(GUI). For example, if users will be connecting to the Cisco IOS VPN device using the group name“sales,” you will need a user whose name is “sales.” The password for this user is “cisco,” which is aspecial identifier that is used by the router for RADIUS purposes. The username must then be made amember of a group in which the correct policy is defined. For simplicity, it is recommended that thegroup name be the same as the username.
• For a Cisco Secure Access Control Server, page 122
• For All Other RADIUS Servers, page 125
For a Cisco Secure Access Control Server
RADIUS Support for Group Profiles For a Cisco Secure Access Control Server
Easy VPN Configuration Guide, Cisco IOS Release 12.4122
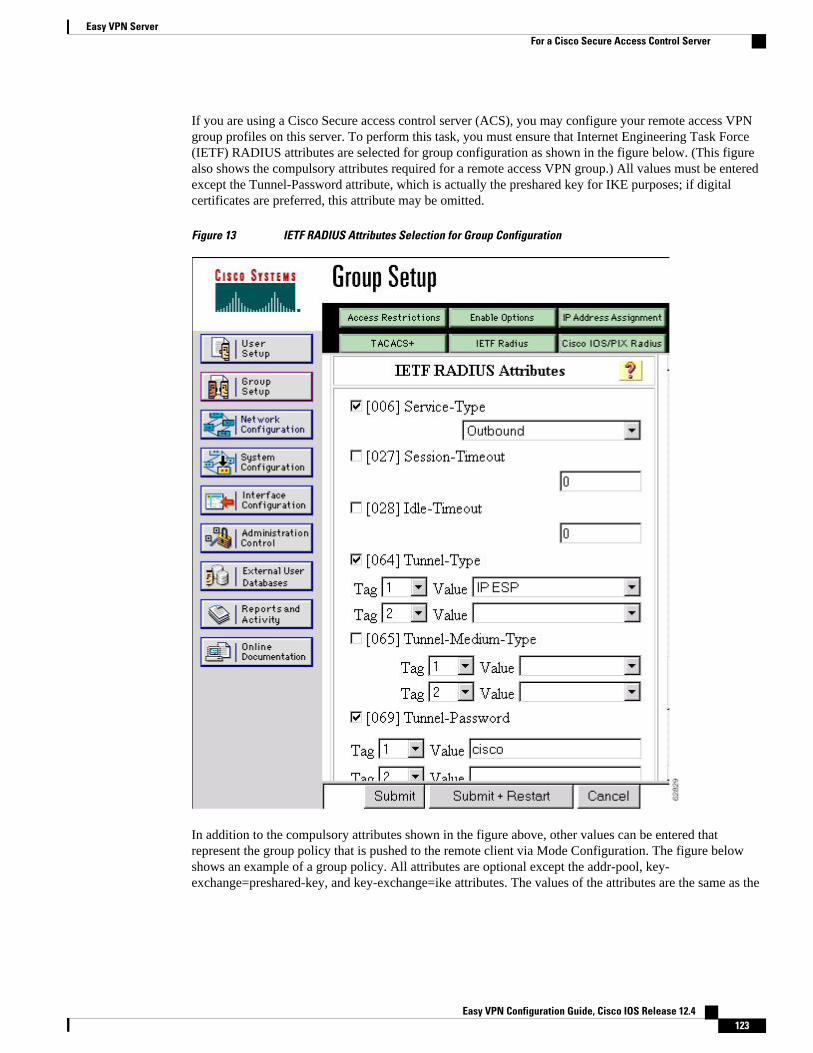
If you are using a Cisco Secure access control server (ACS), you may configure your remote access VPNgroup profiles on this server. To perform this task, you must ensure that Internet Engineering Task Force(IETF) RADIUS attributes are selected for group configuration as shown in the figure below. (This figurealso shows the compulsory attributes required for a remote access VPN group.) All values must be enteredexcept the Tunnel-Password attribute, which is actually the preshared key for IKE purposes; if digitalcertificates are preferred, this attribute may be omitted.
Figure 13 IETF RADIUS Attributes Selection for Group Configuration
In addition to the compulsory attributes shown in the figure above, other values can be entered thatrepresent the group policy that is pushed to the remote client via Mode Configuration. The figure belowshows an example of a group policy. All attributes are optional except the addr-pool, key-exchange=preshared-key, and key-exchange=ike attributes. The values of the attributes are the same as the
Easy VPN ServerFor a Cisco Secure Access Control Server
Easy VPN Configuration Guide, Cisco IOS Release 12.4 123
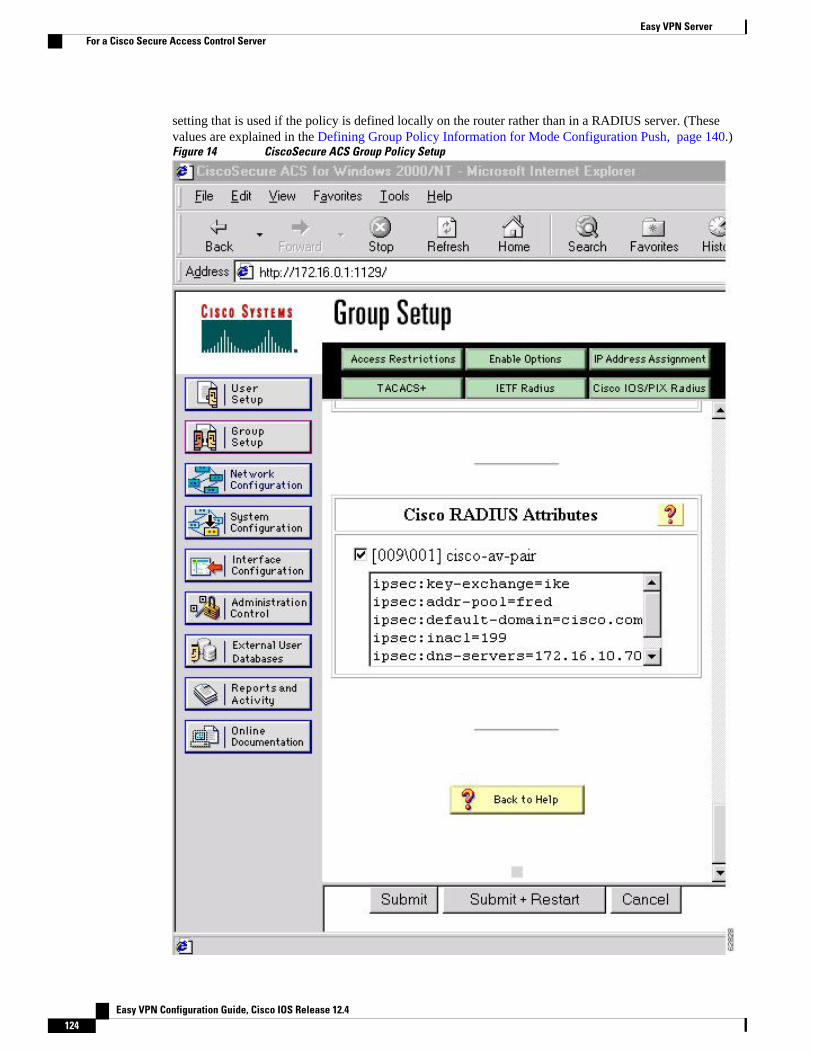
setting that is used if the policy is defined locally on the router rather than in a RADIUS server. (Thesevalues are explained in the Defining Group Policy Information for Mode Configuration Push, page 140.)Figure 14 CiscoSecure ACS Group Policy Setup
Easy VPN Server For a Cisco Secure Access Control Server
Easy VPN Configuration Guide, Cisco IOS Release 12.4124
After the group profile is created, a user who is a member of the group should be added. (Remember thatthe username that is defined maps to the group name as defined on the remote client, and the passworddefined for the username in the RADIUS database must be “cisco.”) If digital certificates are the preferredmethod of IKE authentication, the username should reflect the OU field in the certificate presented by theremote client.
For All Other RADIUS ServersEnsure that your RADIUS server allows you to define attribute-value (AV) pairs. (For an example, see the Configuring Cisco IOS for Easy VPN Server Example, page 180).
Note If digital certificates are used, the username defined in RADIUS must be equal to the OU field of the DN ofthe certificate of the client.
RADIUS Support for User ProfilesAttributes may also be applied on a per-user basis. If you apply attributes on a per-user basis, you canoverride a group attribute value with an individual user attribute. The attributes are retrieved at the time thatuser authentication via Xauth occurs. The attributes are then combined with group attributes and appliedduring Mode Configuration.
User-based attributes are available only if RADIUS is being used for user authentication.
To define user policy attributes for RADIUS, you must do the following task on your RADIUS server:
• Define a user or add attributes to the existing profile of a user in your RADIUS database. Thepassword for the user will be used during Xauth user authentication, or you may proxy to a third-partyserver, such as a token card server.
RADIUS Support for User ProfilesFor All Other RADIUS Servers
Easy VPN Configuration Guide, Cisco IOS Release 12.4 125

The figure below shows how CiscoSecure ACS may be used for user authentication and for the assignmentof a Framed-IP-Address attribute that may be pushed to the client. The presence of this attribute means thatthe local address pool defined for the group to which that user belongs will be overridden.
Figure 15 CiscoSecure ACS User Profile Setup
• For All Other RADIUS Servers, page 126
For All Other RADIUS ServersEnsure that your RADIUS server allows you to define AV pairs. (For an example, see Configuring CiscoIOS for Easy VPN Server Example, page 180.)
Supported ProtocolsThe table below outlines supported IPsec protocol options and attributes that can be configured for thisfeature. (See Supported Protocols, page 126 for nonsupported options and attributes.)
Supported Protocols For All Other RADIUS Servers
Easy VPN Configuration Guide, Cisco IOS Release 12.4126
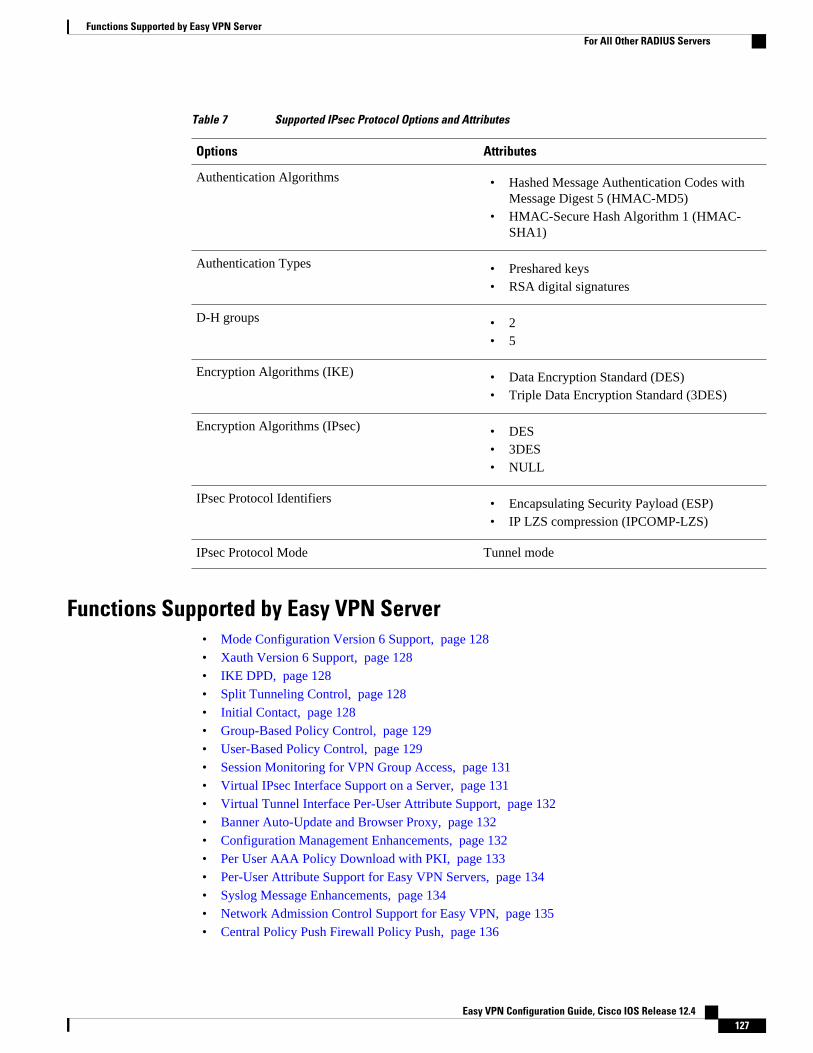
Table 7 Supported IPsec Protocol Options and Attributes
Options Attributes
Authentication Algorithms • Hashed Message Authentication Codes withMessage Digest 5 (HMAC-MD5)
• HMAC-Secure Hash Algorithm 1 (HMAC-SHA1)
Authentication Types • Preshared keys• RSA digital signatures
D-H groups • 2• 5
Encryption Algorithms (IKE) • Data Encryption Standard (DES)• Triple Data Encryption Standard (3DES)
Encryption Algorithms (IPsec) • DES• 3DES• NULL
IPsec Protocol Identifiers • Encapsulating Security Payload (ESP)• IP LZS compression (IPCOMP-LZS)
IPsec Protocol Mode Tunnel mode
Functions Supported by Easy VPN Server• Mode Configuration Version 6 Support, page 128• Xauth Version 6 Support, page 128• IKE DPD, page 128• Split Tunneling Control, page 128• Initial Contact, page 128• Group-Based Policy Control, page 129• User-Based Policy Control, page 129• Session Monitoring for VPN Group Access, page 131• Virtual IPsec Interface Support on a Server, page 131• Virtual Tunnel Interface Per-User Attribute Support, page 132• Banner Auto-Update and Browser Proxy, page 132• Configuration Management Enhancements, page 132• Per User AAA Policy Download with PKI, page 133• Per-User Attribute Support for Easy VPN Servers, page 134• Syslog Message Enhancements, page 134• Network Admission Control Support for Easy VPN, page 135• Central Policy Push Firewall Policy Push, page 136
Functions Supported by Easy VPN ServerFor All Other RADIUS Servers
Easy VPN Configuration Guide, Cisco IOS Release 12.4 127
• Password Aging, page 137
• Split DNS, page 137
• cTCP, page 137
• VRF Assignment by a AAA Server, page 138
Mode Configuration Version 6 SupportMode Configuration version 6 is now supported for more attributes (as described in an IETF draftsubmission).
Xauth Version 6 SupportCisco IOS has been enhanced to support version 6 of Xauth. Xauth for user authentication is based on anIETF draft submission.
IKE DPDThe client implements a new keepalives scheme--IKE DPD.
DPD allows two IPsec peers to determine whether the other is still “alive” during the lifetime of a VPNconnection. DPD is useful because a host may reboot, or the dialup link of a remote user may disconnectwithout notifying the peer that the VPN connection has gone away. When an IPsec host determines that aVPN connection no longer exists, the host can notify a user, attempt to switch to another IPsec host, orclean up valuable resources that were allocated for the peer that no longer exists.
A Cisco IOS VPN device can be configured to send and reply to DPD messages. DPD messages are sent ifno other traffic is being passed through the VPN tunnel. If a configured amount of time has lapsed since thelast inbound data was received, DPD will send a message (“DPD R-U-THERE”) the next time it sendsoutbound IPsec data to the peer. DPD messages are unidirectional and are automatically sent by Cisco VPNclients. DPD must be configured on the router only if the router wishes to send DPD messages to the VPNclient to determine the health of the client.
Split Tunneling ControlRemote clients can support split tunneling, which enables a client to have intranet and Internet access at thesame time. If split tunneling is not configured, the client will direct all traffic through the tunnel, eventraffic destined for the Internet.
Initial ContactIf a client is suddenly disconnected, the gateway may not be notified. Consequently, removal of connectioninformation (IKE and IPsec SAs) for that client will not immediately occur. Thus, if the client attempts toreconnect to the gateway again, the gateway will refuse the connection because the previous connectioninformation is still valid.
To avoid such a scenario, a new capability called initial contact has been introduced; it is supported by allCisco VPN products. If a client or router is connecting to another Cisco gateway for the first time, an initialcontact message is sent that tells the receiver to ignore and delete any old connection information that hasbeen maintained for that newly connecting peer. Initial contact ensures that connection attempts are notrefused because of SA synchronization problems, which are often identified via invalid security parameterindex (SPI) messages and which require devices to have their connections cleared.
Easy VPN Server Mode Configuration Version 6 Support
Easy VPN Configuration Guide, Cisco IOS Release 12.4128
Group-Based Policy ControlPolicy attributes such as IP addresses, DNS, and split tunnel access can be provided on a per-group or per-user basis.
User-Based Policy ControlAttributes may also be applied on a per-user basis. You can override a group attribute value with anindividual user attribute. The attributes are retrieved at the time that user authentication via Xauth occurs.They are then combined with group attributes and applied during Mode Configuration.
From Cisco IOS Release 12.3(4)T forward, attributes can be applied on a per-user basis after the user hasbeen authenticated. These attributes can override any similar group attributes. User-based attributes areavailable only if RADIUS is used as the database.
• Framed-IP-Address, page 129
• DHCP Client Proxy, page 129
• User-Save-Password, page 130
• User-Include-Local-LAN, page 130
• User-VPN-Group, page 130
• Group-Lock, page 130
• How It works, page 130
Framed-IP-Address
To select the Framed-IP-Address attribute for CiscoSecure for NT, do the following: Under the user profile,choose the “use this IP address” option under addressing and manually enter the address. (You shouldcheck the method of configuring a framed IP address with your own RADIUS server because thisprocedure will vary.)
Note If a framed IP address is present, and there is also a local pool address configured for the group that theuser belongs to, the framed IP address will override the local pool setting.
DHCP Client Proxy
Easy VPN servers currently assign an IP address to a remote device using either a local pool that isconfigured on the router or the framed IP address attribute that is defined in RADIUS. Effective with CiscoIOS Release 12.4(9)T, the DHCP Client Proxy feature provides the option of configuring an Easy VPNserver to obtain an IP address from a DHCP server. The IP address is pushed to the remote device usingmode configuration.
Note This feature does not include functionality for the DHCP server to push the DNS, WINS server, or domainname to the remote client.
To configure DHCP Client Proxy, see the Configuring an Easy VPN Server to Obtain an IP Address from aDHCP Server, page 172.
Easy VPN ServerGroup-Based Policy Control
Easy VPN Configuration Guide, Cisco IOS Release 12.4 129
Benefits of DHCP Client Proxy
• The functionality provided with this feature helps in the creation of DDNS (dynamic Domain NameSystem) entries when a DNS server exists in conjunction with the DHCP server.
• The user is not restricted to IP address pools.
User-Save-Password
As per the group description, the User-Save-Password attribute can be received in addition to the groupvariant (Save-Password), but if it is received, it will override the value asserted by the group.
The following is an output example of a RADIUS AV pair for the User-Save-Password attribute:
ipsec:user-save-password=1
User-Include-Local-LAN
As per the group description, the User-Include-Local-LAN attribute can be received in addition to thegroup variant (Include-Local-LAN), but if it is received, it will override the value asserted by the group.
The following is an output example of a RADIUS AV pair for the User-Include-Local LAN attribute:
ipsec:user-include-local-lan=1
User-VPN-Group
The User-VPN-Group attribute is a replacement for the Group-Lock, page 130 attribute. It allows supportfor both preshared key and RSA signature authentication mechanisms such as certificates.
If you need to check that the group a user is attempting to connect to is indeed the group the user belongsto, use the User-VPN-Group attribute. The administrator sets this attribute to a string, which is the groupthat the user belongs to. The group the user belongs to is matched against the VPN group as defined bygroup name (ID_KEY_ID) for preshared keys or by the OU field of a certificate. If the groups do notmatch, the client connection is terminated.
This feature works only with AAA RADIUS. Local Xauth authentication must still use the Group-Lockattribute.
The following is an output example of a RADIUS AV pair for the Use-VPN-Group attribute:
ipsec:user-vpn-group=cisco
Group-Lock
If you are using preshared keys (no certificates or other RSA signature authentication mechanisms) withRADIUS or local AAA, you can continue to use the Group-Lock attribute. If you are using preshared keys(no certificates or other RSA signature authentication mechanisms) with RADIUS only, you can eithercontinue to use the Group-Lock attribute or you can use the new User-VPN-Group, page 130 attribute.
How It works
The group lock feature, introduced in Cisco IOS 12.2(13)T, allows you to perform an extra authenticationcheck during Xauth. With this feature enabled, the user must enter a username, group name, and userpassword during Xauth to authenticate. The username and group name can be entered in any of thefollowing formats: “username/group name,” “username\group name,” “username%group name,” or“username group name.” The group name entered during Xauth is compared by the Server with the group
Easy VPN Server User-Save-Password
Easy VPN Configuration Guide, Cisco IOS Release 12.4130
name sent for preshared key device authentication. If they do not match, the server denies the connection.To enable this feature, use the group-lock command for the group.
Cisco IOS software does not strip the @group from the Xauth username, so the username user@group mustexist in the local or external AAA database pointed to by the ISAKMP profile selected at Phase 1 (machinegroup authentication).
Caution Do not use the Group-Lock attribute if you are using RSA signature authentication mechanisms such ascertificates. Use the User-VPN-Group, page 130 attribute instead. The User-VPN-Group attribute isrecommended regardless of whether preshared keys or RSA signature is used as the method ofauthentication when an external AAA database is used.
Session Monitoring for VPN Group AccessIt is possible to mimic the functionality provided by some RADIUS servers for limiting the maximumnumber of connections to a specific server group and also for limiting the number of simultaneous loginsfor users in that group. After user-defined thresholds are defined in each VPN group, connections will bedenied until counts drop below these thresholds.
If you use a RADIUS server, such as CiscoSecure ACS, it is recommended that you enable this sessioncontrol on the RADIUS server if the functionality is provided. In this way, usage can be controlled across anumber of servers by one central repository. When enabling this feature on the router itself, onlyconnections to groups on that specific device are monitored. Load-sharing scenarios are not accuratelyaccounted for.
To configure session monitoring using command-line interface (CLI), use the crypto isakmp clientconfiguration group command and the max-users and max-logins subcommands.
The following is an output example of RADIUS AV pairs that have been added to the relevant group:
ipsec:max-users=1000ipsec:max-logins=1
Virtual IPsec Interface Support on a ServerVirtual IPsec Interface Support on a Server allows you to selectively send traffic to different Easy VPNconcentrators (servers) as well as to the Internet.
Before Cisco IOS Release 12.4(4)T, at the tunnel-up/tunnel-down transition, attributes that were pushedduring the mode configuration had to be parsed and applied. When such attributes resulted in theconfigurations being applied on the interface, the existing configuration had to be overridden.
With the Virtual IPsec Interface Support feature, the tunnel-up configuration can be applied to separateinterfaces, making it easier to support separate features at tunnel-up. Features that are applied to the trafficgoing into the tunnel can be separate from the features that are applied to traffic that is not going throughthe tunnel (for example, split-tunnel traffic and traffic leaving the device when the tunnel is not up). Whenthe Easy VPN negotiation is successful, the line protocol state of the virtual-access interface gets changedto up. When the Easy VPN tunnel goes down because the SA expires or is deleted, the line protocol state ofthe virtual-access interfaces changes to down.
Easy VPN ServerSession Monitoring for VPN Group Access
Easy VPN Configuration Guide, Cisco IOS Release 12.4 131
Note This feature does not support multicast.
For more information about this feature, see the “Cisco Easy VPN Remote” module in the Cisco IOSSecurity Configuration Guide: Secure Connectivity . (This feature is configured on the Easy VPN remotedevice.)
For information about the IPsec Virtual Tunnel Interface feature, see the “ IPsec Virtual Tunnel Interface”module in the Cisco IOS Security Configuration Guide: Secure Connectivity .
Virtual Tunnel Interface Per-User Attribute SupportEffective with Cisco IOS Release 12.4(9)T, Virtual Tunnel Interface provides per-user attribute support forEasy VPN servers.
For more information about this feature, see the “ IPsec Virtual Tunnel Interface ” module in the Cisco IOSSecurity Configuration Guide: Secure Connectivity .
Banner Auto-Update and Browser ProxyThe following features provide support for attributes that aid in the management of the Cisco Easy VPNremote device.
• Banner, page 132
• Auto-Update, page 132
• Browser Proxy, page 132
Banner
An Easy VPN server can be configured to push the banner to the Easy VPN remote device. A banner isneeded for the web-based activation feature. The banner is displayed when the Easy VPN tunnel is up onthe Easy VPN remote console or as a HTML page in the case of web-based activation.
Auto-Update
An Easy VPN server can be configured to provide an automated mechanism for software and firmwareupgrades on an Easy VPN remote device.
Browser Proxy
An Easy VPN server can be configured so that an Easy VPN remote device can access resources on thecorporate network. Using this feature, the user does not have to manually modify the proxy settings of hisor her web browser when connecting to the corporate network using Cisco IOS VPN Client or manuallyrevert the proxy settings upon disconnecting.
Configuration Management Enhancements
• Pushing a Configuration URL Through a Mode-Configuration Exchange, page 133
• After the Configuration Has Been Acquired by the Easy VPN Remote Device, page 133
• How to Configure This Feature, page 133
Easy VPN Server Virtual Tunnel Interface Per-User Attribute Support
Easy VPN Configuration Guide, Cisco IOS Release 12.4132
Pushing a Configuration URL Through a Mode-Configuration Exchange
When remote devices connect to a corporate gateway for creating an IPsec VPN tunnel, some policy andconfiguration information has to be applied to the remote device when the VPN tunnel is active to allow theremote device to become a part of the corporate VPN.
The Pushing a Configuration URL Through a Mode-Configuration Exchange feature provides for a mode-configuration attribute that “pushes” a URL from the concentrator (server) to the Cisco IOS Easy VPNremote device. The URL contains the configuration information that the remote device has to downloadand apply to the running configuration, and it contains the Cisco IOS CLI listing. (For more informationabout a Cisco IOS CLI listing, see Cisco IOS documentation for the configuration url command.) The CLIfor this feature is configured on the concentrator.
The configuration that is pushed to the remote device is persistent by default. That is, the configuration isapplied when the IPsec tunnel is “up,” but it is not withdrawn when the IPsec tunnel goes “down.”However, it is possible to write a section of configuration that is transient in nature, in which case theconfiguration of the section is reverted when the tunnel is disconnected.
There are no restrictions on where the configuration distribution server is physically located. However, it isrecommended that a secure protocol such as HTTPS (Secure HTTP) be used to retrieve the configuration.The configuration server can be located in the corporate network, so because the transfer happens throughthe IPsec tunnel, insecure access protocols (HTTP) can be used.
Regarding backward compatibility: the remote device asks for the CONFIGURATION-URL andCONFIGURATION-VERSION attributes. Because the CONFIGURATION-URL andCONFIGURATION-VERSION attributes are not mandatory attributes, the server sends them only if it hasthem configured for the group. There is no built-in restriction to push the configuration, but bootstrapconfigurations (such as for the IP address) cannot be sent because those configurations are required to setup the Easy VPN tunnel, and the CONFIGURATION-URL comes into effect only after the Easy VPNtunnel comes up.
After the Configuration Has Been Acquired by the Easy VPN Remote Device
After the configuration has been acquired by the Easy VPN remote device, the remote device sends a newISAKMP notification to the Easy VPN server. The notification contains several manageability informationmessages about the client (remote device). The Easy VPN server takes two actions when this information isreceived:
• The Easy VPN server caches the information in its peer database. The information can be displayed byusing the show crypto isakmp peer config command. This command output displays allmanageability information that is sent by the client (remote device).
• If accounting is enabled, the Easy VPN server sends an accounting update record that contains themanageability information messages about the remote device to the accounting RADIUS server. Thisaccounting update is later available in the accounting log of the RADIUS server.
How to Configure This Feature
The commands that are used to configure this feature and the attributes CONFIGURATION-URL andCONFIGURATION-VERSION are described in the crypto isakmp client configuration groupcommanddocumentation.
Per User AAA Policy Download with PKI
Easy VPN ServerPushing a Configuration URL Through a Mode-Configuration Exchange
Easy VPN Configuration Guide, Cisco IOS Release 12.4 133
With the Support of Per User AAA Policy Download with PKI feature, user attributes are obtained fromthe AAA server and pushed to the remote device through mode configuration. The username that is used toget the attributes is retrieved from the remote device certificate.
Per-User Attribute Support for Easy VPN ServersThe Per-User Attribute Support for Easy VPN Servers feature provides users with the ability to supportper-user attributes on Easy VPN servers. These attributes are applied on the virtual access interface.
• Local Easy VPN AAA Server, page 134• Remote Easy VPN AAA Server, page 134• Per-User Attributes, page 134
Local Easy VPN AAA Server
For a local Easy VPN AAA server, the per-user attributes can be applied at the group level or at the userlevel using the command-line interface (CLI).
To configure per-user attributes for a local Easy VPN server, see Configuring Per-User Attributes on aLocal Easy VPN AAA Server, page 161.
Remote Easy VPN AAA Server
Attribute value (AV) pairs can be defined on a remote Easy VPN AAA server as shown in this example:
cisco-avpair = “ip:outacl#101=permit tcp any any established
Per-User Attributes
The following per-user attributes are currently defined in the AAA server and are applicable to IPsec:
• inacl• interface-config• outacl• route• rte-fltr-in• rte-fltr-out• sub-policy-In• sub-policy-Out• policy-route• prefix
Syslog Message EnhancementsSome new syslog messages have been added for Easy VPN in Cisco IOS Release 12.4(4)T. The syslogmessages can be enabled on your server by using the command-line interface (CLI). The format of thesyslog messages is as follows:
timestamp: %CRYPTO-6-VPN_TUNNEL_STATUS: (Server) <event message> User=<username> Group=<groupname> Client_public_addr=<ip_addr> Server_public_addr=<ip addr>
For an authentication-passed event, the syslog message looks like the following:
Jul 25 23:33:06.847: %CRYPTO-6-VPN_TUNNEL_STATUS: (Server) Authentication PASS
Easy VPN Server Per-User Attribute Support for Easy VPN Servers
Easy VPN Configuration Guide, Cisco IOS Release 12.4134
ED User=blue Group=Cisco1760group Client_public_addr=10.20.20.1 Server_public_addr=10.20.20.2
Three of the messages (Max users, Max logins, and Group does not exist) are authorization issues and areprinted only with the group name in the format. The reason for only the group name being printed is thatauthorization check happens much before mode configuration happens. Therefore, the peer information isnot yet present and cannot be printed. The following is an example of a “Group does not exit” message.
*Jun 30 18:02:58.107: %CRYPTO-6-VPN_TUNNEL_STATUS: Group: group_1 does not exist
• Easy VPN Syslog Messages That Are Supported, page 135
Easy VPN Syslog Messages That Are Supported
Both ezvpn_connection_up and ezvpn_connection_down were already supported in a previous release ofsyslog messages. The enhancements in Cisco IOS Release 12.4(4)T follow the same format, but newsyslogs are introduced. The added syslogs are as follows:
• Authentication Passed• Authentication Rejected
◦ Group Lock Enabled◦ Incorrect Username or Password◦ Max Users exceeded/Max Logins exceeded◦ No. of Retries exceeded
• Authentication Failed (AAA Not Contactable)• IP Pool Not present/No Free IP Address available in the pool• ACL associated with Ezvpn policy but NOT defined (hence, no split tunneling possible)• Save password Turned ON• Incorrect firewall record being sent by Client (incorrect vendor | product | capability)• Authentication Rejected
◦ Access restricted via incoming interface◦ Group does not exist
Network Admission Control Support for Easy VPNNetwork Admission Control was introduced in Cisco IOS Release 12.3(8)T as a way to determine whethera PC client should be allowed to connect to the LAN. Network Admission Control uses ExtensibleAuthentication Protocol over UDP (EAPoUDP) to query the Cisco trust agent on the PC and allows a PC toaccess the network if the client status is healthy. Different policies can be applied on the server to deny orlimit access of PCs that are infected.
Effective with Cisco IOS Release 12.4(4)T, Network Admission Control can now be used to monitor thestatus of remote PC clients as well. After the Easy VPN tunnel comes up and the PC starts to send traffic,the traffic is intercepted at the Easy VPN server, and the posture validation process starts. The posturevalidation process consists of sending an EAPoUDP request over the Easy VPN tunnel and querying theCisco trust agent. The authentication server is configured inside the trusted network, behind the IPsecaggregator.
The configuration of an Easy VPN server that has Network Admission Control enabled is shown in theoutput in Network Admission Control Example, page 189.
Easy VPN ServerEasy VPN Syslog Messages That Are Supported
Easy VPN Configuration Guide, Cisco IOS Release 12.4 135
Central Policy Push Firewall Policy PushThe Easy VPN server supports Central Policy Push (CPP) Firewall Policy Push. This feature allowsadministrators to push policies that enforce security to the Cisco Easy VPN (software) Client and relatedfirewall software.
A split tunnel enables access to corporate networks, but it also allows a remote device to be exposed toattacks from the Internet. This feature enables the server to determine whether to allow or deny a tunnel ifthe remote device does not have a required firewall, thereby reducing exposure to attacks.
The following firewall types are supported:
• Cisco-Integrated-firewall (central-policy-push)• Cisco-Security-Agent (check-presence)• Zonelabs-Zonealarm (both)• Zonelabs-ZonealarmPro (both)
The server can be used either to check the presence of a firewall on the client (remote device) using thecheck-presence option or to specify the specifics of the firewall policies that must be applied by the clientusing the central-policy-push.
Note The policy check-presence command and keyword, which are used with this feature, replace the firewallare-u-there command functionality that was supported before Cisco IOS Release 12.4(6)T. The firewallare-u-there command will continue to be supported for backward compatibility.
To enable this feature, see the Defining a CPP Firewall Policy Push Using a Local AAA Server, page 163and Applying a CPP Firewall Policy Push to the Configuration Group, page 165.
• Syslog Support for CPP Firewall Policy Push, page 136
Syslog Support for CPP Firewall Policy Push
Syslog support can be enabled using the crypto logging ezvpn command on your router. CPP syslogmessages will be printed for the following error conditions:
• If policy is configured on a group configuration (using the firewall policy command), but a globalpolicy with the same name is not defined (using the crypto isakmp client firewall command). Thesyslog message is as follows:
Policy enabled on group configuration but not defined
Tunnel setup proceeds as normal (with the firewall).
• If an incorrect firewall request (vendor/product/cap incorrect order) is received, the syslog message isas follows:
Incorrect firewall record received from client
• If a policy mismatch occurs between the Cisco VPN Client and the server, the syslog is as follows:
CPP policy mismatch between client and headend
Easy VPN Server Central Policy Push Firewall Policy Push
Easy VPN Configuration Guide, Cisco IOS Release 12.4136

Password AgingPrior to Cisco IOS Release 12.4(6)T, EasyVPN remote devices (clients) sent username and passwordvalues to the Easy VPN server, which in turn sent them to the AAA subsystem. The AAA subsystemgenerated an authentication request to the RADIUS server. If the password had expired, the RADIUSserver replied with an authentication failure. The reason for the failure was not passed back to the AAAsubsystem. The user was denied access due to authentication failure, but he or she did not know that thefailure was due to password expiration.
Effective with Cisco IOS Release 12.4(6)T, if you have configured the Password Aging feature, theEasyVPN client is notified when a password has expired, and you are prompted to enter a new password.To configure the Password Aging feature, see the section Configuring Password Aging, page 167.
For more information about Password Aging, see the reference for “Password Aging” in the section Additional References, page 195 (subsection “Related Documents).
Split DNSEffective with Cisco IOS Release 12.4(9)T, split DNS functionality is available on Easy VPN servers. Thisfeature enables the Easy VPN hardware client to use primary and secondary DNS values to resolve DNSqueries. These values are pushed by the Easy VPN server to the Easy VPN remote device. To configurethis feature on your server, use the split-dns command (see the Defining Group Policy Information forMode Configuration Push, page 140). Configuring this command adds the split-dns attribute to the policygroup. The attribute will include the list of domain names that you configured. All other names will beresolved using the public DNS server.
For more information about configuring split DNS, see “Configuring Split and Dynamic DNS on the CiscoVPN 3000” at the following URL: http://www.cisco.com/warp/public/471/dns_split_dynam.pdf.
cTCPThe Cisco Tunneling Control Protocol (cTCP) feature can be used for situations in which an Easy VPNremote device is operating in an environment in which standard IPsec does not function or in which it doesnot function transparently without modification to existing firewall rules. These situations include thefollowing:
• Small or home office router performing Network Address Translation (NAT) or Port AddressTranslation (PAT)
• PAT-provided IP address behind a larger router (for example, in a corporation)• Non-NAT firewall (packet filtering or stateful)• Proxy server
The firewall should be configured to allow the headend to accept cTCP connections on the configuredcTCP port. This configuration is enabled on the Easy VPN server. If the firewall is not configured, it willnot allow the cTCP traffic.
Note cTCP traffic is actually Transmission Control Protocol (TCP) traffic. cTCP packets are IKE orEncapsulating Security Payload (ESP) packets that are being transmitted over TCP.
The cTCP server sends a gratuitous ACK message to the client whenever the data received from the clientover the cTCP session established reaches 3 kilobytes (KB). A similar procedure is followed by the client.
Easy VPN ServerPassword Aging
Easy VPN Configuration Guide, Cisco IOS Release 12.4 137
By default, this gratuitous ACK message is sent to keep the NAT or firewall sessions between the cTCPserver and cTCP client alive. The data size at which gratuitous ACK messages are sent is not configurable.
Keepalives that are sent by a client or server do not keep the sessions alive when the server or client sendsdata at a high speed.
The cTCP server sending ACK message ensures that NAT or firewall sessions do not drop packets whenthere is one-way traffic and the data is large. It also ensures that an acknowledgement is provided from thedevice receiving the data.
VRF Assignment by a AAA ServerTo assign VRF to Easy VPN users, the following attributes should be enabled on a AAA server:
Cisco-avpair “ip:interface-config=ip vrf forwarding example1”Cisco-avpair “ip:interface-config=ip unnumbered loopback10”
How to Configure Easy VPN Server• Enabling Policy Lookup via AAA, page 139• Defining Group Policy Information for Mode Configuration Push, page 140• Enabling VPN Session Monitoring, page 145• Verifying a VPN Session, page 146• Applying Mode Configuration and Xauth, page 147• Enabling Reverse Route Injection for the Client, page 148• Enabling IKE Dead Peer Detection, page 151• Configuring RADIUS Server Support, page 151• Verifying Easy VPN Server, page 152• Configuring a Banner, page 153• Configuring Auto Upgrade, page 154• Configuring Browser Proxy, page 155• Configuring the Pushing of a Configuration URL Through aMode-Configuration Exchange, page156• Configuring Per User AAA Download with PKI--Configuring the Crypto PKI Trustpoint, page 157• Configuring the Actual Per User AAA Download with PKI, page 159• Configuring Per-User Attributes on a Local Easy VPN AAA Server, page 161• Enabling Easy VPN Syslog Messages, page 163• Defining a CPP Firewall Policy Push Using a Local AAA Server, page 163• Applying a CPP Firewall Policy Push to the Configuration Group, page 165• Defining a CPP Firewall Policy Push Using a Remote AAA Server, page 166• Adding the VSA CPP-Policy Under the Group Definition, page 166• Verifying CPP Firewall Policy Push, page 167• Configuring Password Aging, page 167• Configuring Split DNS, page 169• Verifying Split DNS, page 170• Monitoring and Maintaining Split DNS, page 171• Configuring an Easy VPN Server to Obtain an IP Address from a DHCP Server, page 172• Verifying DHCP Client Proxy, page 174
Easy VPN Server VRF Assignment by a AAA Server
Easy VPN Configuration Guide, Cisco IOS Release 12.4138
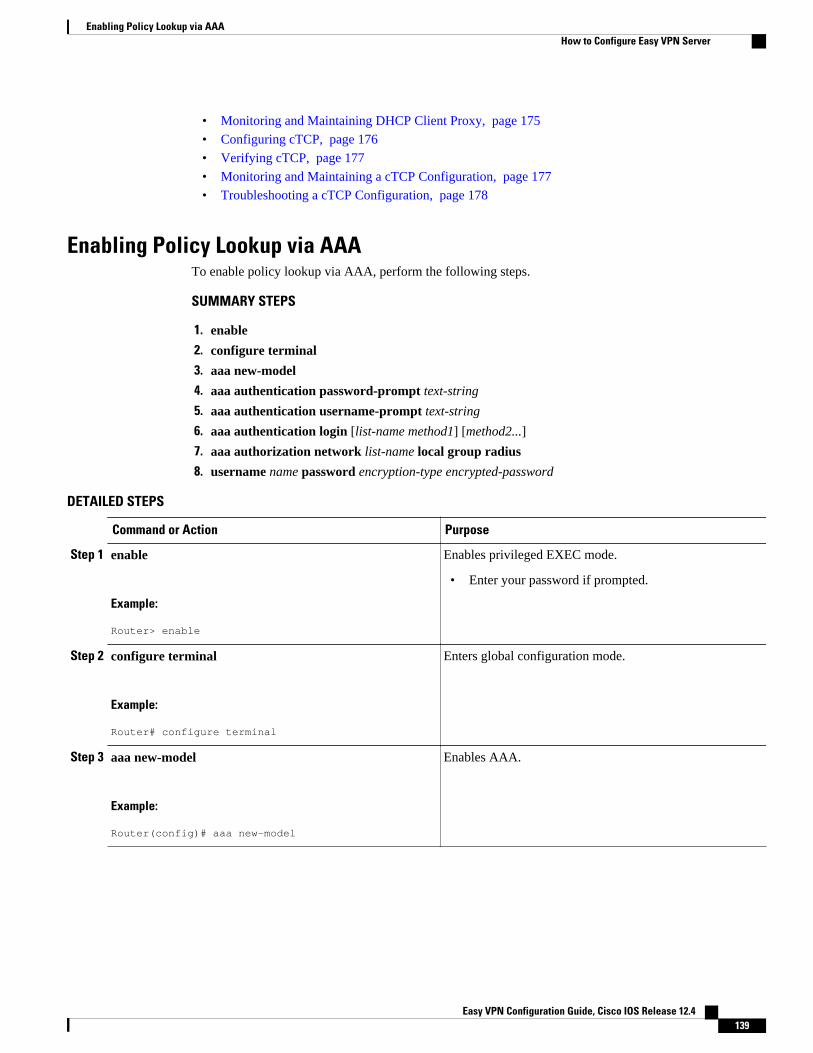
• Monitoring and Maintaining DHCP Client Proxy, page 175
• Configuring cTCP, page 176
• Verifying cTCP, page 177
• Monitoring and Maintaining a cTCP Configuration, page 177
• Troubleshooting a cTCP Configuration, page 178
Enabling Policy Lookup via AAATo enable policy lookup via AAA, perform the following steps.
SUMMARY STEPS
1. enable
2. configure terminal
3. aaa new-model
4. aaa authentication password-prompt text-string
5. aaa authentication username-prompt text-string
6. aaa authentication login [list-name method1] [method2...]
7. aaa authorization network list-name local group radius
8. username name password encryption-type encrypted-password
DETAILED STEPS
Command or Action Purpose
Step 1 enable
Example:
Router> enable
Enables privileged EXEC mode.
• Enter your password if prompted.
Step 2 configure terminal
Example:
Router# configure terminal
Enters global configuration mode.
Step 3 aaa new-model
Example:
Router(config)# aaa new-model
Enables AAA.
Enabling Policy Lookup via AAAHow to Configure Easy VPN Server
Easy VPN Configuration Guide, Cisco IOS Release 12.4 139
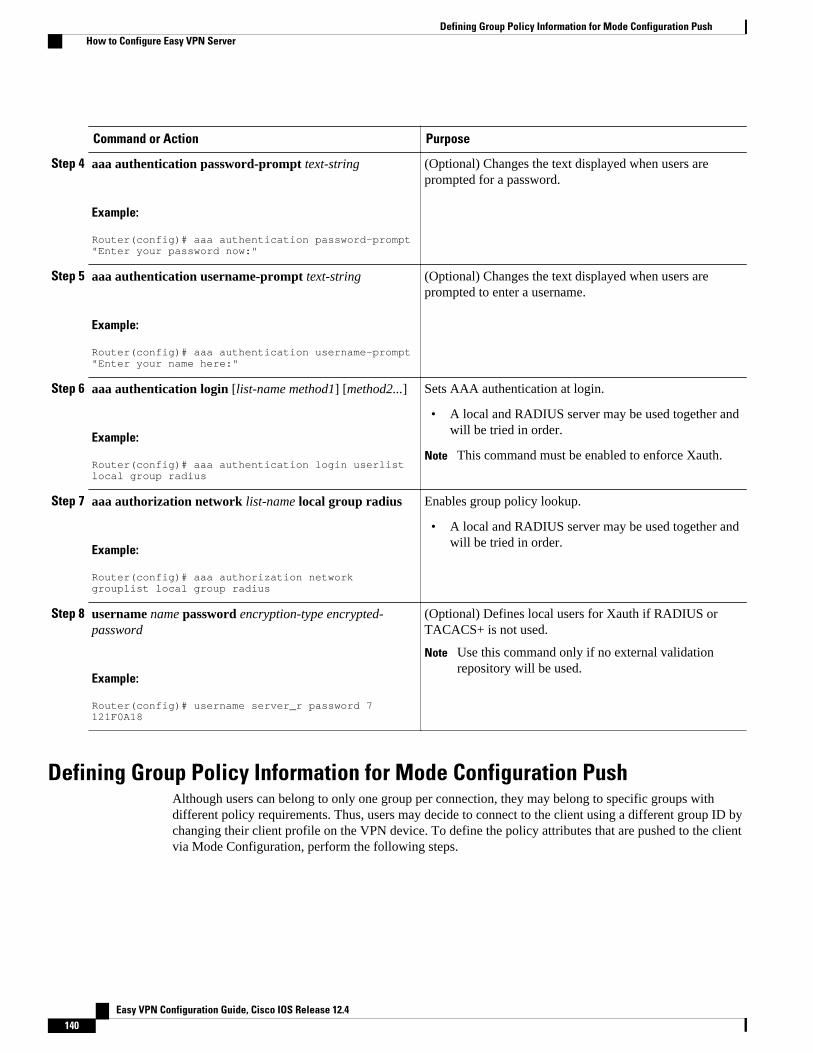
Command or Action Purpose
Step 4 aaa authentication password-prompt text-string
Example:
Router(config)# aaa authentication password-prompt "Enter your password now:"
(Optional) Changes the text displayed when users areprompted for a password.
Step 5 aaa authentication username-prompt text-string
Example:
Router(config)# aaa authentication username-prompt "Enter your name here:"
(Optional) Changes the text displayed when users areprompted to enter a username.
Step 6 aaa authentication login [list-name method1] [method2...]
Example:
Router(config)# aaa authentication login userlist local group radius
Sets AAA authentication at login.
• A local and RADIUS server may be used together andwill be tried in order.
Note This command must be enabled to enforce Xauth.
Step 7 aaa authorization network list-name local group radius
Example:
Router(config)# aaa authorization network grouplist local group radius
Enables group policy lookup.
• A local and RADIUS server may be used together andwill be tried in order.
Step 8 username name password encryption-type encrypted-password
Example:
Router(config)# username server_r password 7 121F0A18
(Optional) Defines local users for Xauth if RADIUS orTACACS+ is not used.
Note Use this command only if no external validationrepository will be used.
Defining Group Policy Information for Mode Configuration PushAlthough users can belong to only one group per connection, they may belong to specific groups withdifferent policy requirements. Thus, users may decide to connect to the client using a different group ID bychanging their client profile on the VPN device. To define the policy attributes that are pushed to the clientvia Mode Configuration, perform the following steps.
Defining Group Policy Information for Mode Configuration Push How to Configure Easy VPN Server
Easy VPN Configuration Guide, Cisco IOS Release 12.4140
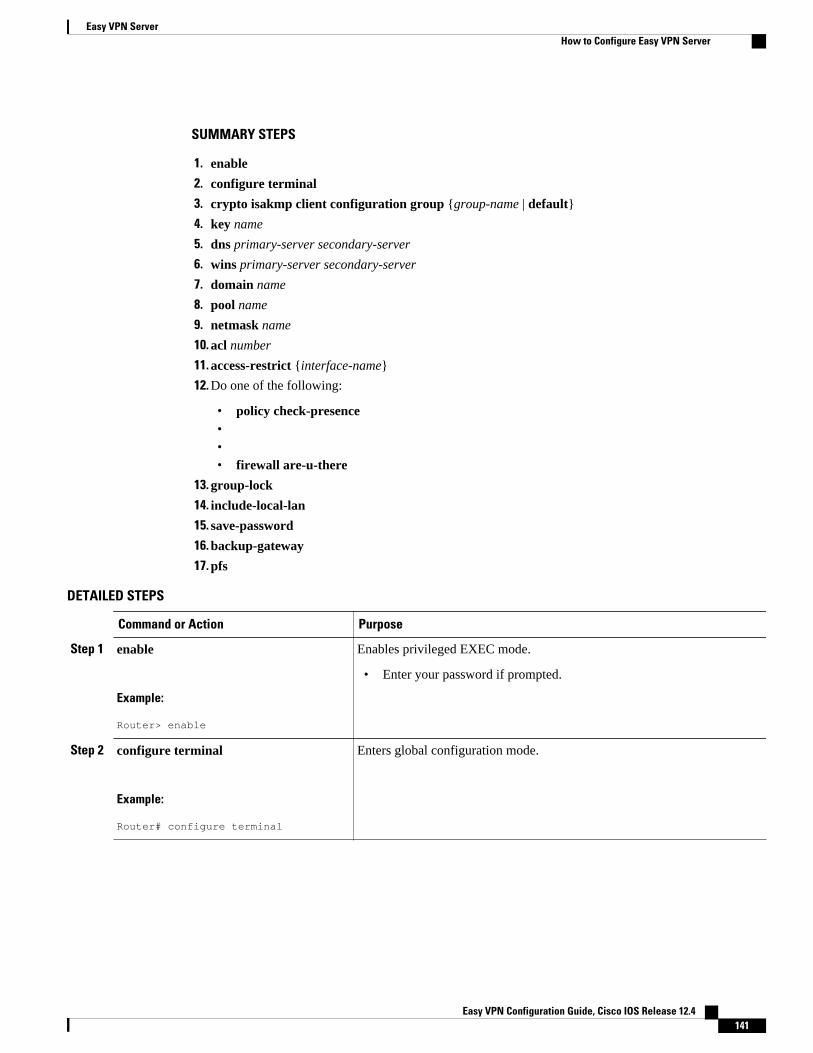
SUMMARY STEPS
1. enable
2. configure terminal
3. crypto isakmp client configuration group {group-name | default}
4. key name
5. dns primary-server secondary-server
6. wins primary-server secondary-server
7. domain name
8. pool name
9. netmask name
10. acl number
11. access-restrict {interface-name}
12. Do one of the following:
• policy check-presence••• firewall are-u-there
13. group-lock
14. include-local-lan
15. save-password
16. backup-gateway
17. pfs
DETAILED STEPS
Command or Action Purpose
Step 1 enable
Example:
Router> enable
Enables privileged EXEC mode.
• Enter your password if prompted.
Step 2 configure terminal
Example:
Router# configure terminal
Enters global configuration mode.
Easy VPN ServerHow to Configure Easy VPN Server
Easy VPN Configuration Guide, Cisco IOS Release 12.4 141
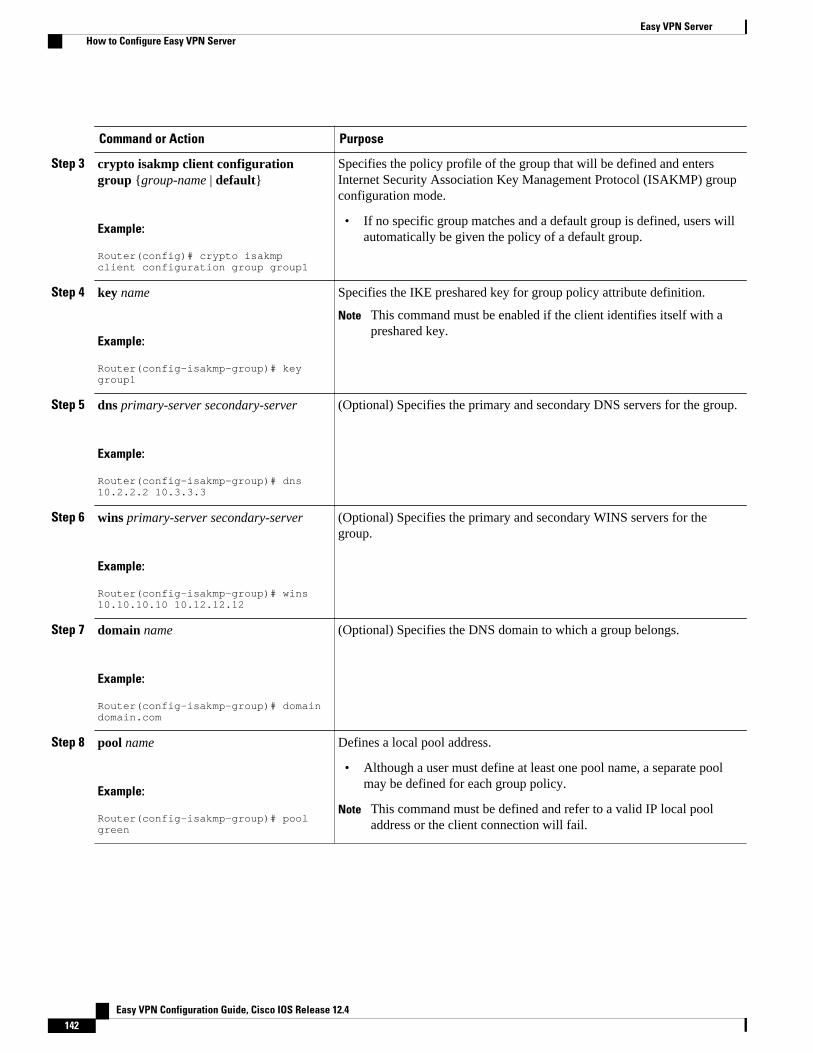
Command or Action Purpose
Step 3 crypto isakmp client configurationgroup {group-name | default}
Example:
Router(config)# crypto isakmp client configuration group group1
Specifies the policy profile of the group that will be defined and entersInternet Security Association Key Management Protocol (ISAKMP) groupconfiguration mode.
• If no specific group matches and a default group is defined, users willautomatically be given the policy of a default group.
Step 4 key name
Example:
Router(config-isakmp-group)# key group1
Specifies the IKE preshared key for group policy attribute definition.
Note This command must be enabled if the client identifies itself with apreshared key.
Step 5 dns primary-server secondary-server
Example:
Router(config-isakmp-group)# dns 10.2.2.2 10.3.3.3
(Optional) Specifies the primary and secondary DNS servers for the group.
Step 6 wins primary-server secondary-server
Example:
Router(config-isakmp-group)# wins 10.10.10.10 10.12.12.12
(Optional) Specifies the primary and secondary WINS servers for thegroup.
Step 7 domain name
Example:
Router(config-isakmp-group)# domain domain.com
(Optional) Specifies the DNS domain to which a group belongs.
Step 8 pool name
Example:
Router(config-isakmp-group)# pool green
Defines a local pool address.
• Although a user must define at least one pool name, a separate poolmay be defined for each group policy.
Note This command must be defined and refer to a valid IP local pooladdress or the client connection will fail.
Easy VPN Server How to Configure Easy VPN Server
Easy VPN Configuration Guide, Cisco IOS Release 12.4142
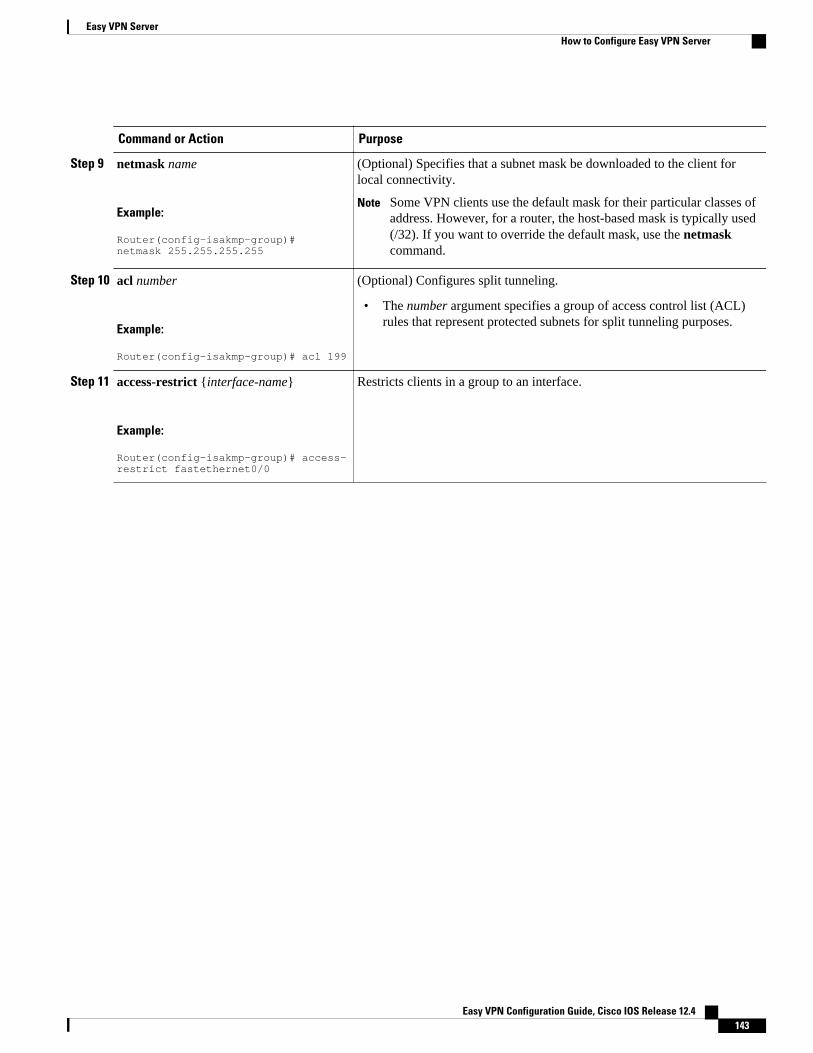
Command or Action Purpose
Step 9 netmask name
Example:
Router(config-isakmp-group)# netmask 255.255.255.255
(Optional) Specifies that a subnet mask be downloaded to the client forlocal connectivity.
Note Some VPN clients use the default mask for their particular classes ofaddress. However, for a router, the host-based mask is typically used(/32). If you want to override the default mask, use the netmaskcommand.
Step 10 acl number
Example:
Router(config-isakmp-group)# acl 199
(Optional) Configures split tunneling.
• The number argument specifies a group of access control list (ACL)rules that represent protected subnets for split tunneling purposes.
Step 11 access-restrict {interface-name}
Example:
Router(config-isakmp-group)# access-restrict fastethernet0/0
Restricts clients in a group to an interface.
Easy VPN ServerHow to Configure Easy VPN Server
Easy VPN Configuration Guide, Cisco IOS Release 12.4 143
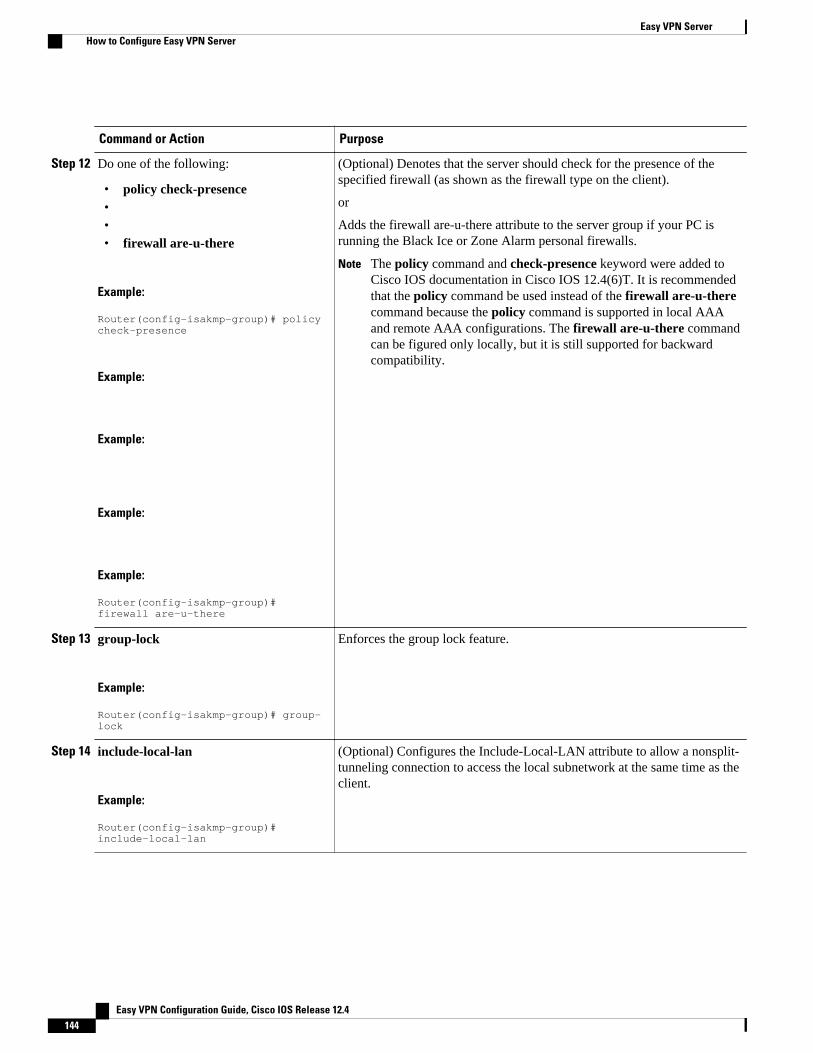
Command or Action Purpose
Step 12 Do one of the following:
• policy check-presence••• firewall are-u-there
Example:
Router(config-isakmp-group)# policy check-presence
Example:
Example:
Example:
Example:
Router(config-isakmp-group)# firewall are-u-there
(Optional) Denotes that the server should check for the presence of thespecified firewall (as shown as the firewall type on the client).
or
Adds the firewall are-u-there attribute to the server group if your PC isrunning the Black Ice or Zone Alarm personal firewalls.
Note The policy command and check-presence keyword were added toCisco IOS documentation in Cisco IOS 12.4(6)T. It is recommendedthat the policy command be used instead of the firewall are-u-therecommand because the policy command is supported in local AAAand remote AAA configurations. The firewall are-u-there commandcan be figured only locally, but it is still supported for backwardcompatibility.
Step 13 group-lock
Example:
Router(config-isakmp-group)# group-lock
Enforces the group lock feature.
Step 14 include-local-lan
Example:
Router(config-isakmp-group)# include-local-lan
(Optional) Configures the Include-Local-LAN attribute to allow a nonsplit-tunneling connection to access the local subnetwork at the same time as theclient.
Easy VPN Server How to Configure Easy VPN Server
Easy VPN Configuration Guide, Cisco IOS Release 12.4144
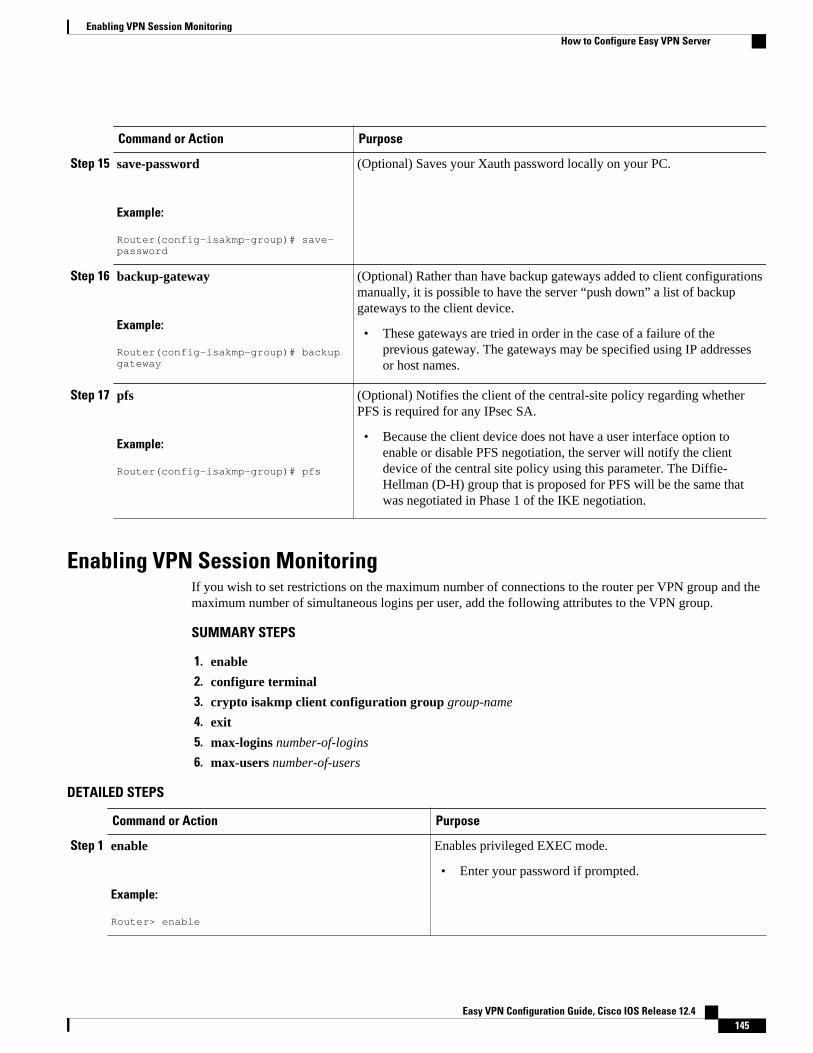
Command or Action Purpose
Step 15 save-password
Example:
Router(config-isakmp-group)# save-password
(Optional) Saves your Xauth password locally on your PC.
Step 16 backup-gateway
Example:
Router(config-isakmp-group)# backup gateway
(Optional) Rather than have backup gateways added to client configurationsmanually, it is possible to have the server “push down” a list of backupgateways to the client device.
• These gateways are tried in order in the case of a failure of theprevious gateway. The gateways may be specified using IP addressesor host names.
Step 17 pfs
Example:
Router(config-isakmp-group)# pfs
(Optional) Notifies the client of the central-site policy regarding whetherPFS is required for any IPsec SA.
• Because the client device does not have a user interface option toenable or disable PFS negotiation, the server will notify the clientdevice of the central site policy using this parameter. The Diffie-Hellman (D-H) group that is proposed for PFS will be the same thatwas negotiated in Phase 1 of the IKE negotiation.
Enabling VPN Session MonitoringIf you wish to set restrictions on the maximum number of connections to the router per VPN group and themaximum number of simultaneous logins per user, add the following attributes to the VPN group.
SUMMARY STEPS
1. enable
2. configure terminal
3. crypto isakmp client configuration group group-name
4. exit
5. max-logins number-of-logins
6. max-users number-of-users
DETAILED STEPS
Command or Action Purpose
Step 1 enable
Example:
Router> enable
Enables privileged EXEC mode.
• Enter your password if prompted.
Enabling VPN Session MonitoringHow to Configure Easy VPN Server
Easy VPN Configuration Guide, Cisco IOS Release 12.4 145
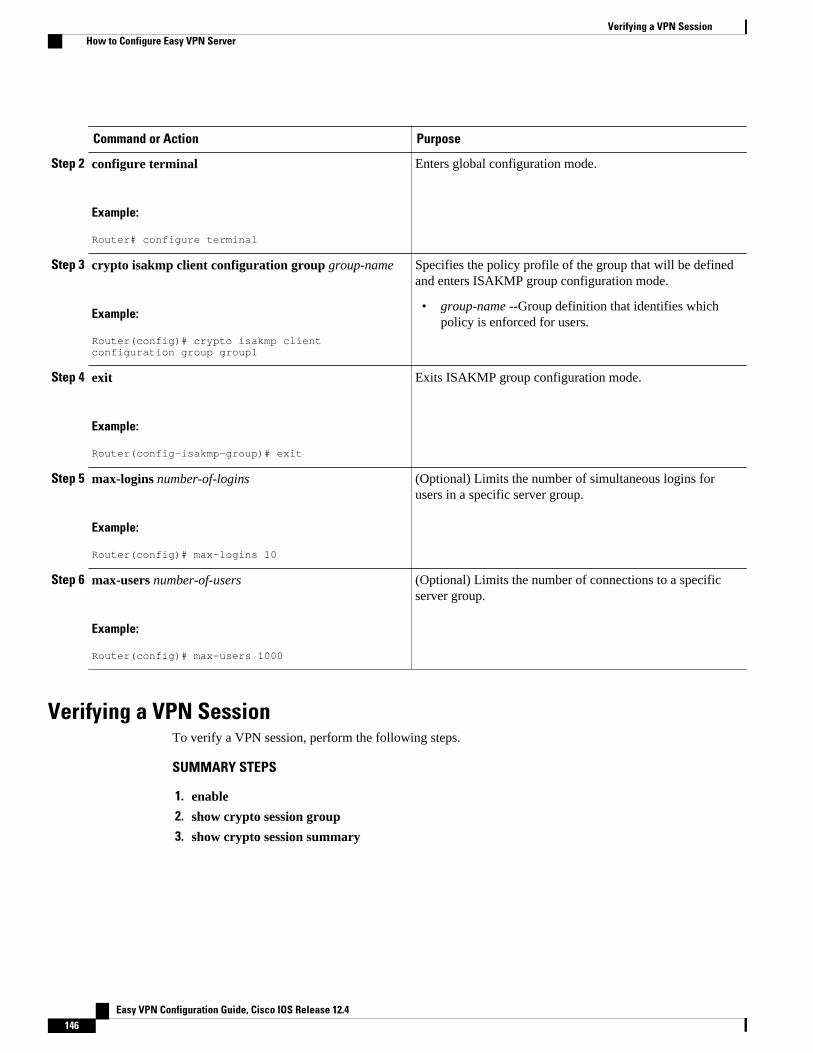
Command or Action Purpose
Step 2 configure terminal
Example:
Router# configure terminal
Enters global configuration mode.
Step 3 crypto isakmp client configuration group group-name
Example:
Router(config)# crypto isakmp client configuration group group1
Specifies the policy profile of the group that will be definedand enters ISAKMP group configuration mode.
• group-name --Group definition that identifies whichpolicy is enforced for users.
Step 4 exit
Example:
Router(config-isakmp-group)# exit
Exits ISAKMP group configuration mode.
Step 5 max-logins number-of-logins
Example:
Router(config)# max-logins 10
(Optional) Limits the number of simultaneous logins forusers in a specific server group.
Step 6 max-users number-of-users
Example:
Router(config)# max-users 1000
(Optional) Limits the number of connections to a specificserver group.
Verifying a VPN SessionTo verify a VPN session, perform the following steps.
SUMMARY STEPS
1. enable
2. show crypto session group
3. show crypto session summary
Verifying a VPN Session How to Configure Easy VPN Server
Easy VPN Configuration Guide, Cisco IOS Release 12.4146
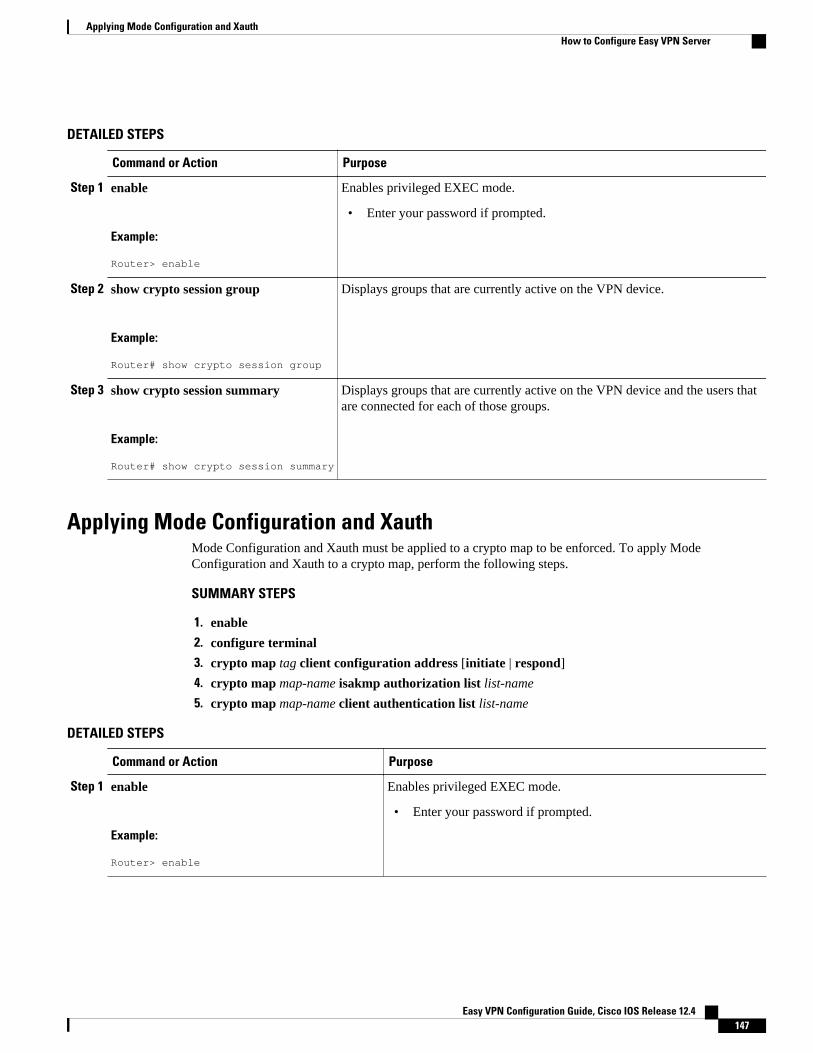
DETAILED STEPS
Command or Action Purpose
Step 1 enable
Example:
Router> enable
Enables privileged EXEC mode.
• Enter your password if prompted.
Step 2 show crypto session group
Example:
Router# show crypto session group
Displays groups that are currently active on the VPN device.
Step 3 show crypto session summary
Example:
Router# show crypto session summary
Displays groups that are currently active on the VPN device and the users thatare connected for each of those groups.
Applying Mode Configuration and XauthMode Configuration and Xauth must be applied to a crypto map to be enforced. To apply ModeConfiguration and Xauth to a crypto map, perform the following steps.
SUMMARY STEPS
1. enable
2. configure terminal
3. crypto map tag client configuration address [initiate | respond]
4. crypto map map-name isakmp authorization list list-name
5. crypto map map-name client authentication list list-name
DETAILED STEPS
Command or Action Purpose
Step 1 enable
Example:
Router> enable
Enables privileged EXEC mode.
• Enter your password if prompted.
Applying Mode Configuration and XauthHow to Configure Easy VPN Server
Easy VPN Configuration Guide, Cisco IOS Release 12.4 147
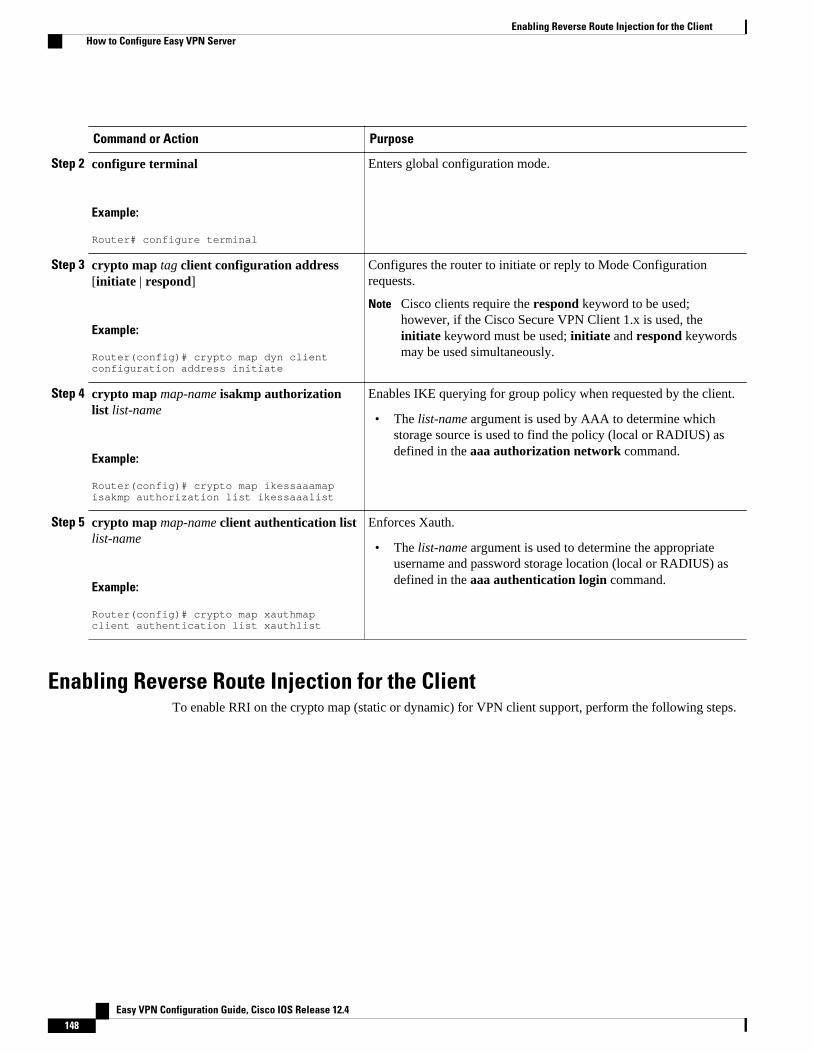
Command or Action Purpose
Step 2 configure terminal
Example:
Router# configure terminal
Enters global configuration mode.
Step 3 crypto map tag client configuration address[initiate | respond]
Example:
Router(config)# crypto map dyn client configuration address initiate
Configures the router to initiate or reply to Mode Configurationrequests.
Note Cisco clients require the respond keyword to be used;however, if the Cisco Secure VPN Client 1.x is used, theinitiate keyword must be used; initiate and respond keywordsmay be used simultaneously.
Step 4 crypto map map-name isakmp authorizationlist list-name
Example:
Router(config)# crypto map ikessaaamap isakmp authorization list ikessaaalist
Enables IKE querying for group policy when requested by the client.
• The list-name argument is used by AAA to determine whichstorage source is used to find the policy (local or RADIUS) asdefined in the aaa authorization network command.
Step 5 crypto map map-name client authentication listlist-name
Example:
Router(config)# crypto map xauthmap client authentication list xauthlist
Enforces Xauth.
• The list-name argument is used to determine the appropriateusername and password storage location (local or RADIUS) asdefined in the aaa authentication login command.
Enabling Reverse Route Injection for the ClientTo enable RRI on the crypto map (static or dynamic) for VPN client support, perform the following steps.
Enabling Reverse Route Injection for the Client How to Configure Easy VPN Server
Easy VPN Configuration Guide, Cisco IOS Release 12.4148
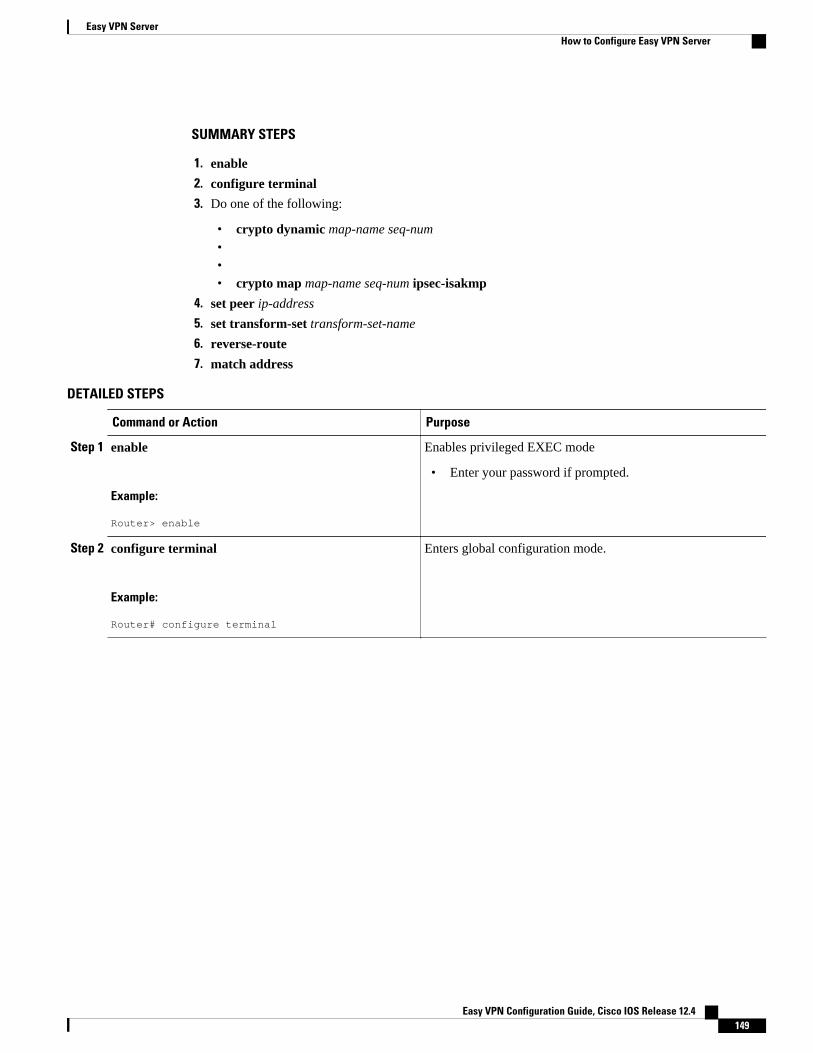
SUMMARY STEPS
1. enable
2. configure terminal
3. Do one of the following:
• crypto dynamic map-name seq-num••• crypto map map-name seq-num ipsec-isakmp
4. set peer ip-address
5. set transform-set transform-set-name
6. reverse-route
7. match address
DETAILED STEPS
Command or Action Purpose
Step 1 enable
Example:
Router> enable
Enables privileged EXEC mode
• Enter your password if prompted.
Step 2 configure terminal
Example:
Router# configure terminal
Enters global configuration mode.
Easy VPN ServerHow to Configure Easy VPN Server
Easy VPN Configuration Guide, Cisco IOS Release 12.4 149
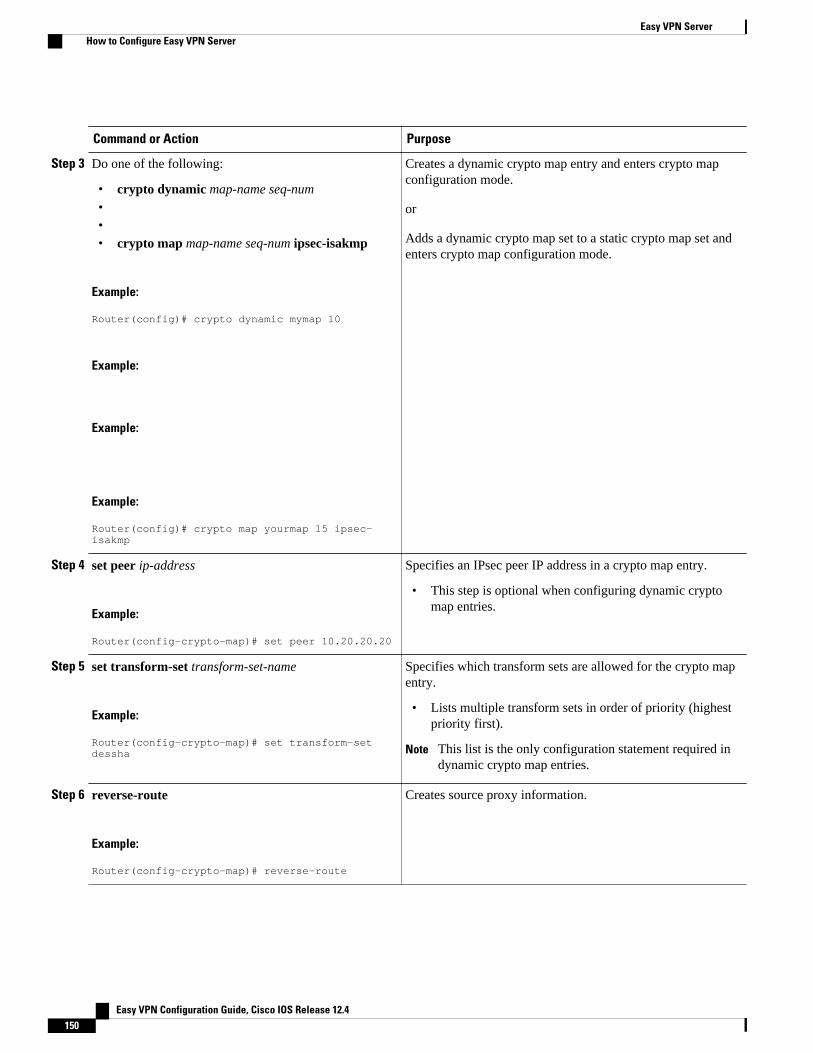
Command or Action Purpose
Step 3 Do one of the following:
• crypto dynamic map-name seq-num••• crypto map map-name seq-num ipsec-isakmp
Example:
Router(config)# crypto dynamic mymap 10
Example:
Example:
Example:
Router(config)# crypto map yourmap 15 ipsec-isakmp
Creates a dynamic crypto map entry and enters crypto mapconfiguration mode.
or
Adds a dynamic crypto map set to a static crypto map set andenters crypto map configuration mode.
Step 4 set peer ip-address
Example:
Router(config-crypto-map)# set peer 10.20.20.20
Specifies an IPsec peer IP address in a crypto map entry.
• This step is optional when configuring dynamic cryptomap entries.
Step 5 set transform-set transform-set-name
Example:
Router(config-crypto-map)# set transform-set dessha
Specifies which transform sets are allowed for the crypto mapentry.
• Lists multiple transform sets in order of priority (highestpriority first).
Note This list is the only configuration statement required indynamic crypto map entries.
Step 6 reverse-route
Example:
Router(config-crypto-map)# reverse-route
Creates source proxy information.
Easy VPN Server How to Configure Easy VPN Server
Easy VPN Configuration Guide, Cisco IOS Release 12.4150
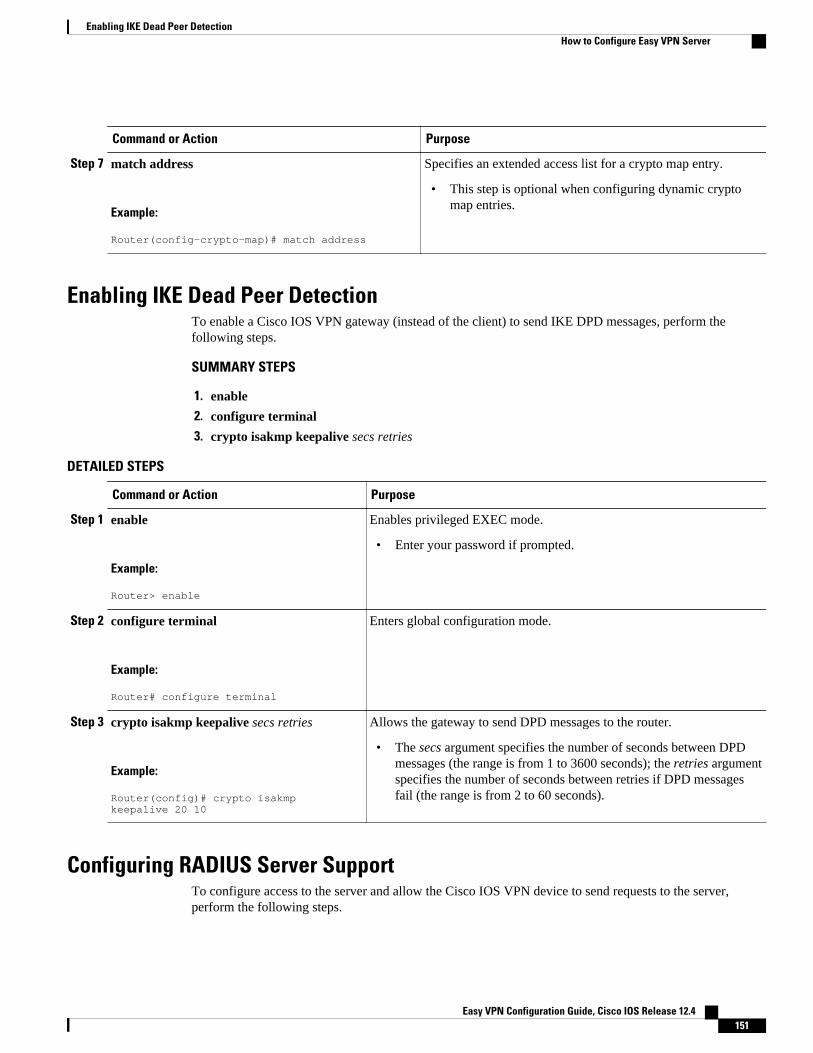
Command or Action Purpose
Step 7 match address
Example:
Router(config-crypto-map)# match address
Specifies an extended access list for a crypto map entry.
• This step is optional when configuring dynamic cryptomap entries.
Enabling IKE Dead Peer DetectionTo enable a Cisco IOS VPN gateway (instead of the client) to send IKE DPD messages, perform thefollowing steps.
SUMMARY STEPS
1. enable
2. configure terminal
3. crypto isakmp keepalive secs retries
DETAILED STEPS
Command or Action Purpose
Step 1 enable
Example:
Router> enable
Enables privileged EXEC mode.
• Enter your password if prompted.
Step 2 configure terminal
Example:
Router# configure terminal
Enters global configuration mode.
Step 3 crypto isakmp keepalive secs retries
Example:
Router(config)# crypto isakmp keepalive 20 10
Allows the gateway to send DPD messages to the router.
• The secs argument specifies the number of seconds between DPDmessages (the range is from 1 to 3600 seconds); the retries argumentspecifies the number of seconds between retries if DPD messagesfail (the range is from 2 to 60 seconds).
Configuring RADIUS Server SupportTo configure access to the server and allow the Cisco IOS VPN device to send requests to the server,perform the following steps.
Enabling IKE Dead Peer DetectionHow to Configure Easy VPN Server
Easy VPN Configuration Guide, Cisco IOS Release 12.4 151

SUMMARY STEPS
1. enable
2. configure terminal
3. radius server host ip-address [auth-port port-number] [acct-port port-number] [key string]
DETAILED STEPS
Command or Action Purpose
Step 1 enable
Example:
Router> enable
Enables privileged EXEC mode.
• Enter your password if prompted.
Step 2 configure terminal
Example:
Router# configure terminal
Enters global configuration mode.
Step 3 radius server host ip-address [auth-port port-number] [acct-portport-number] [key string]
Example:
Router(config)# radius server host 192.168.1.1. auth-port 1645 acct-port 1646 key XXXX
Specifies a RADIUS server host.
Note This step is required if you choose to storegroup policy information in a RADIUSserver.
Verifying Easy VPN ServerTo verify your configurations for this feature, perform the following steps.
SUMMARY STEPS
1. enable
2. show crypto map [interface interface | tag map-name]
DETAILED STEPS
Command or Action Purpose
Step 1 enable
Example:
Router> enable
Enables privileged EXEC mode.
• Enter your password if prompted.
Verifying Easy VPN Server How to Configure Easy VPN Server
Easy VPN Configuration Guide, Cisco IOS Release 12.4152
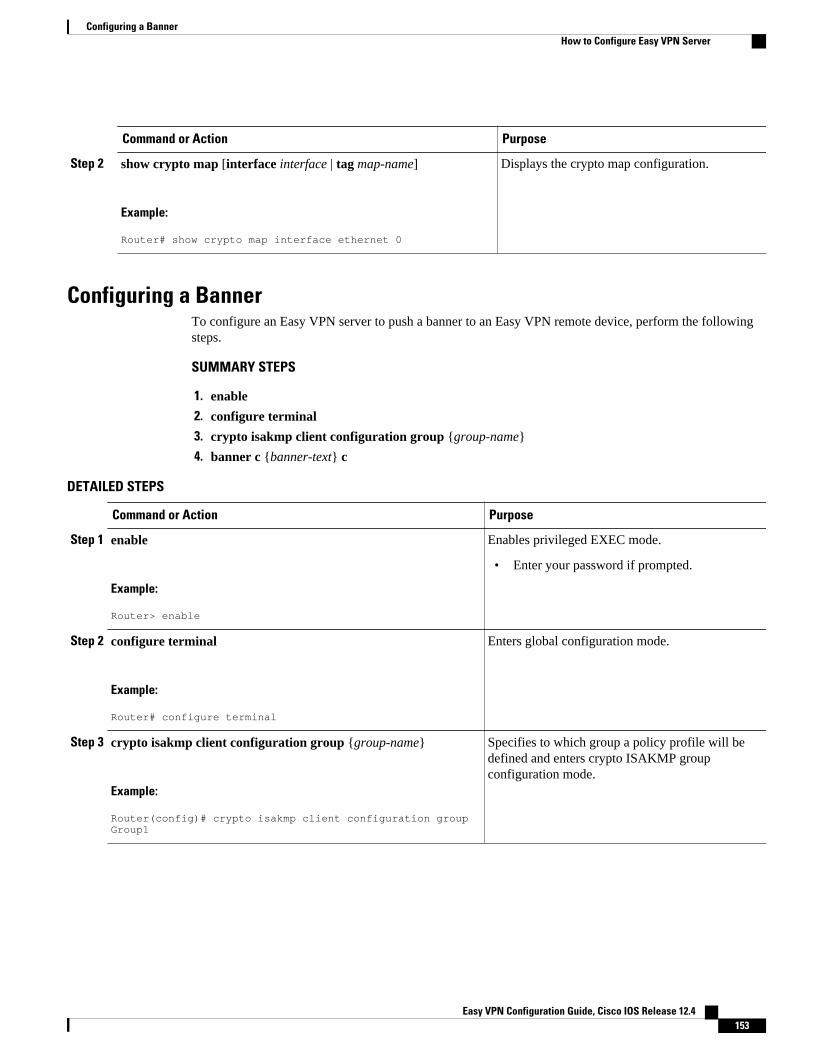
Command or Action Purpose
Step 2 show crypto map [interface interface | tag map-name]
Example:
Router# show crypto map interface ethernet 0
Displays the crypto map configuration.
Configuring a BannerTo configure an Easy VPN server to push a banner to an Easy VPN remote device, perform the followingsteps.
SUMMARY STEPS
1. enable
2. configure terminal
3. crypto isakmp client configuration group {group-name}
4. banner c {banner-text} c
DETAILED STEPS
Command or Action Purpose
Step 1 enable
Example:
Router> enable
Enables privileged EXEC mode.
• Enter your password if prompted.
Step 2 configure terminal
Example:
Router# configure terminal
Enters global configuration mode.
Step 3 crypto isakmp client configuration group {group-name}
Example:
Router(config)# crypto isakmp client configuration group Group1
Specifies to which group a policy profile will bedefined and enters crypto ISAKMP groupconfiguration mode.
Configuring a BannerHow to Configure Easy VPN Server
Easy VPN Configuration Guide, Cisco IOS Release 12.4 153
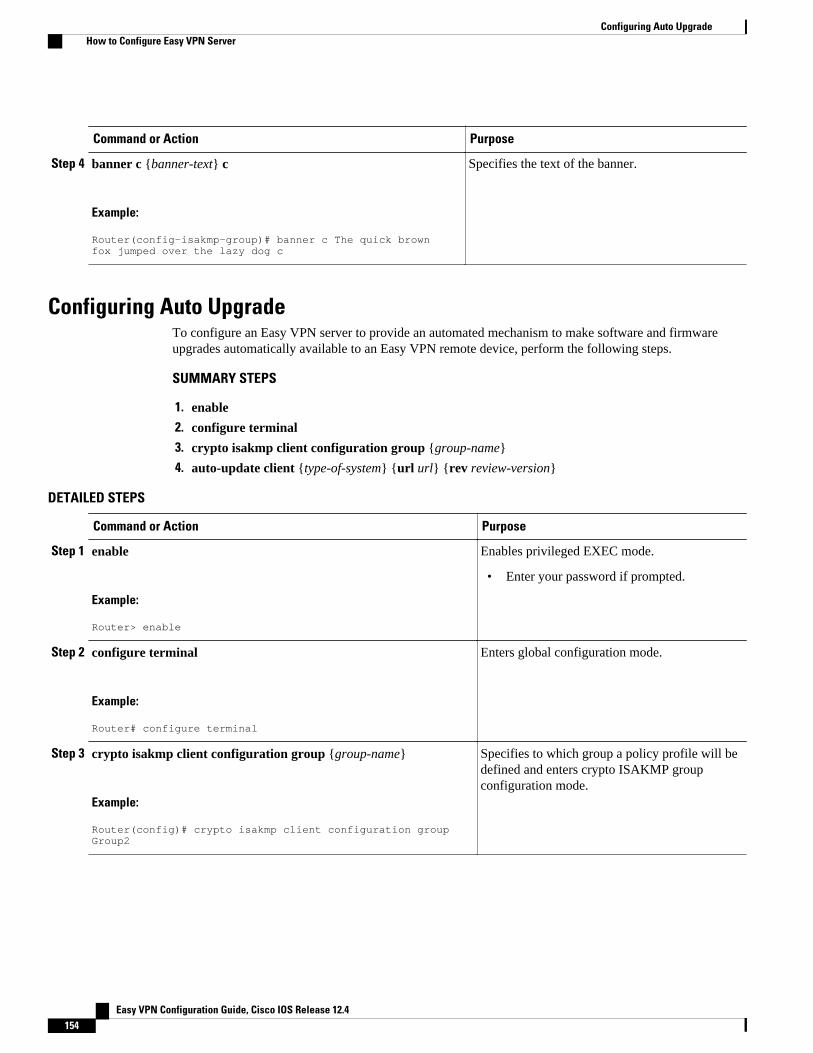
Command or Action Purpose
Step 4 banner c {banner-text} c
Example:
Router(config-isakmp-group)# banner c The quick brown fox jumped over the lazy dog c
Specifies the text of the banner.
Configuring Auto UpgradeTo configure an Easy VPN server to provide an automated mechanism to make software and firmwareupgrades automatically available to an Easy VPN remote device, perform the following steps.
SUMMARY STEPS
1. enable
2. configure terminal
3. crypto isakmp client configuration group {group-name}
4. auto-update client {type-of-system} {url url} {rev review-version}
DETAILED STEPS
Command or Action Purpose
Step 1 enable
Example:
Router> enable
Enables privileged EXEC mode.
• Enter your password if prompted.
Step 2 configure terminal
Example:
Router# configure terminal
Enters global configuration mode.
Step 3 crypto isakmp client configuration group {group-name}
Example:
Router(config)# crypto isakmp client configuration group Group2
Specifies to which group a policy profile will bedefined and enters crypto ISAKMP groupconfiguration mode.
Configuring Auto Upgrade How to Configure Easy VPN Server
Easy VPN Configuration Guide, Cisco IOS Release 12.4154
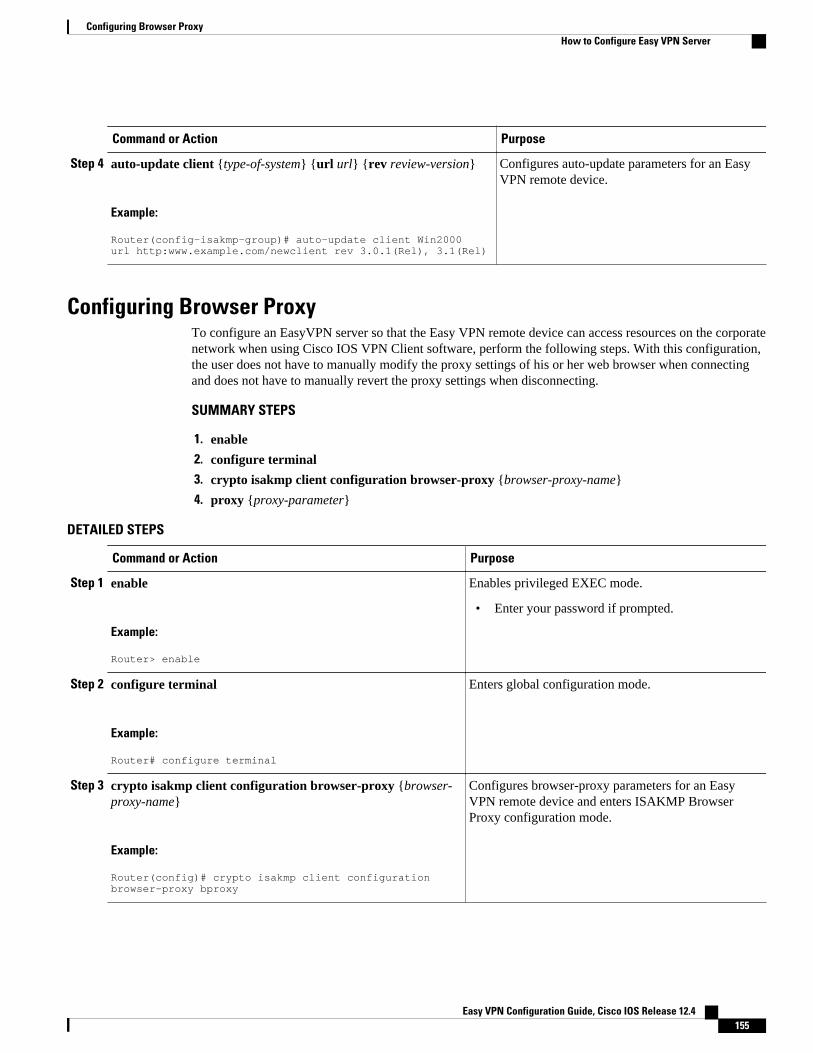
Command or Action Purpose
Step 4 auto-update client {type-of-system} {url url} {rev review-version}
Example:
Router(config-isakmp-group)# auto-update client Win2000 url http:www.example.com/newclient rev 3.0.1(Rel), 3.1(Rel)
Configures auto-update parameters for an EasyVPN remote device.
Configuring Browser ProxyTo configure an EasyVPN server so that the Easy VPN remote device can access resources on the corporatenetwork when using Cisco IOS VPN Client software, perform the following steps. With this configuration,the user does not have to manually modify the proxy settings of his or her web browser when connectingand does not have to manually revert the proxy settings when disconnecting.
SUMMARY STEPS
1. enable
2. configure terminal
3. crypto isakmp client configuration browser-proxy {browser-proxy-name}
4. proxy {proxy-parameter}
DETAILED STEPS
Command or Action Purpose
Step 1 enable
Example:
Router> enable
Enables privileged EXEC mode.
• Enter your password if prompted.
Step 2 configure terminal
Example:
Router# configure terminal
Enters global configuration mode.
Step 3 crypto isakmp client configuration browser-proxy {browser-proxy-name}
Example:
Router(config)# crypto isakmp client configuration browser-proxy bproxy
Configures browser-proxy parameters for an EasyVPN remote device and enters ISAKMP BrowserProxy configuration mode.
Configuring Browser ProxyHow to Configure Easy VPN Server
Easy VPN Configuration Guide, Cisco IOS Release 12.4 155
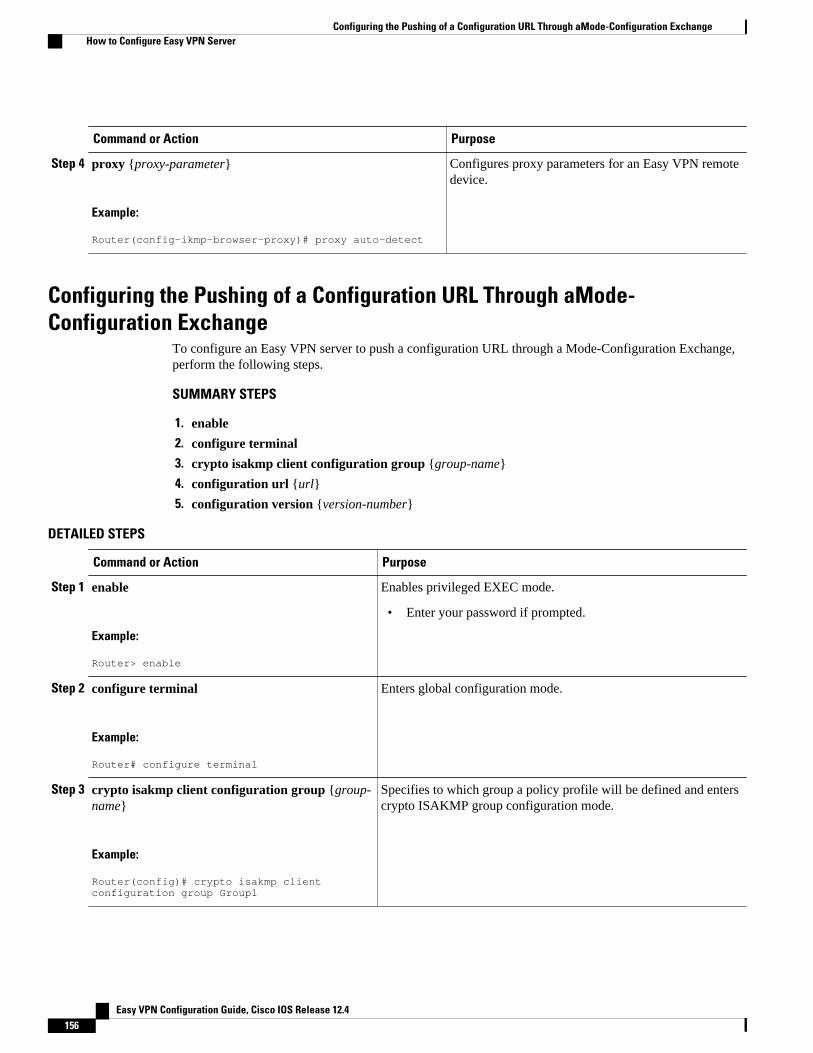
Command or Action Purpose
Step 4 proxy {proxy-parameter}
Example:
Router(config-ikmp-browser-proxy)# proxy auto-detect
Configures proxy parameters for an Easy VPN remotedevice.
Configuring the Pushing of a Configuration URL Through aMode-Configuration Exchange
To configure an Easy VPN server to push a configuration URL through a Mode-Configuration Exchange,perform the following steps.
SUMMARY STEPS
1. enable
2. configure terminal
3. crypto isakmp client configuration group {group-name}
4. configuration url {url}
5. configuration version {version-number}
DETAILED STEPS
Command or Action Purpose
Step 1 enable
Example:
Router> enable
Enables privileged EXEC mode.
• Enter your password if prompted.
Step 2 configure terminal
Example:
Router# configure terminal
Enters global configuration mode.
Step 3 crypto isakmp client configuration group {group-name}
Example:
Router(config)# crypto isakmp client configuration group Group1
Specifies to which group a policy profile will be defined and enterscrypto ISAKMP group configuration mode.
Configuring the Pushing of a Configuration URL Through aMode-Configuration Exchange How to Configure Easy VPN Server
Easy VPN Configuration Guide, Cisco IOS Release 12.4156
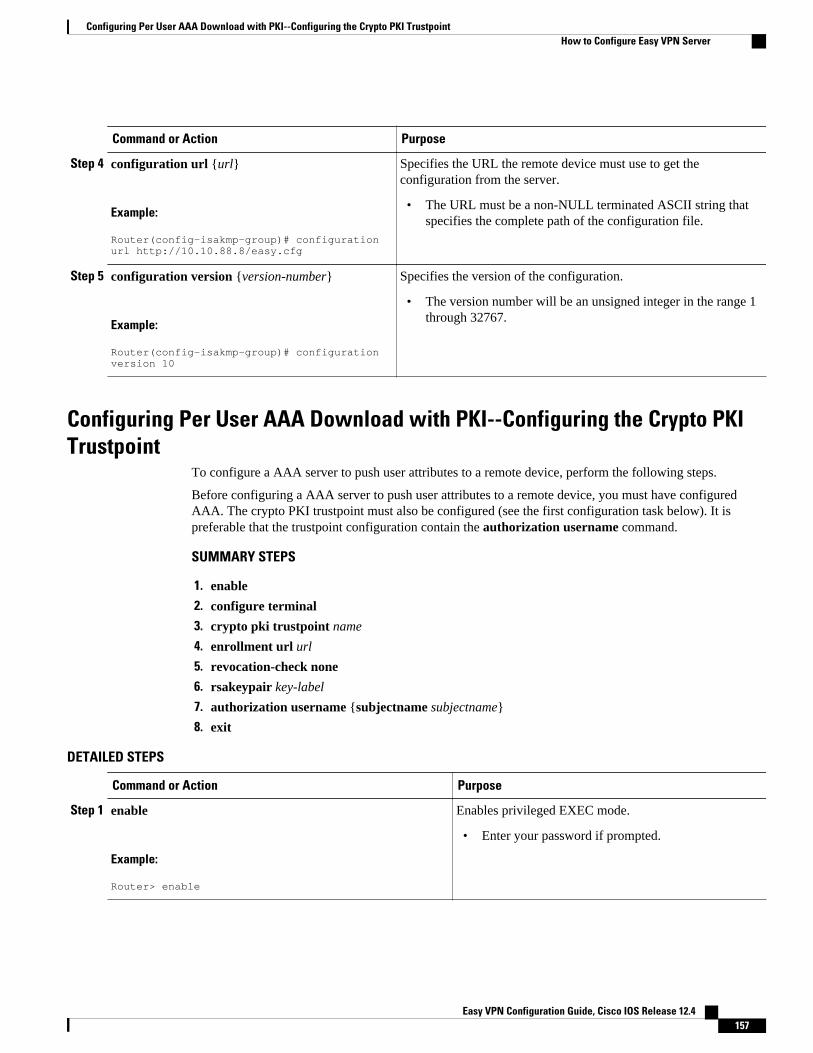
Command or Action Purpose
Step 4 configuration url {url}
Example:
Router(config-isakmp-group)# configuration url http://10.10.88.8/easy.cfg
Specifies the URL the remote device must use to get theconfiguration from the server.
• The URL must be a non-NULL terminated ASCII string thatspecifies the complete path of the configuration file.
Step 5 configuration version {version-number}
Example:
Router(config-isakmp-group)# configuration version 10
Specifies the version of the configuration.
• The version number will be an unsigned integer in the range 1through 32767.
Configuring Per User AAA Download with PKI--Configuring the Crypto PKITrustpoint
To configure a AAA server to push user attributes to a remote device, perform the following steps.
Before configuring a AAA server to push user attributes to a remote device, you must have configuredAAA. The crypto PKI trustpoint must also be configured (see the first configuration task below). It ispreferable that the trustpoint configuration contain the authorization username command.
SUMMARY STEPS
1. enable
2. configure terminal
3. crypto pki trustpoint name
4. enrollment url url
5. revocation-check none
6. rsakeypair key-label
7. authorization username {subjectname subjectname}
8. exit
DETAILED STEPS
Command or Action Purpose
Step 1 enable
Example:
Router> enable
Enables privileged EXEC mode.
• Enter your password if prompted.
Configuring Per User AAA Download with PKI--Configuring the Crypto PKI TrustpointHow to Configure Easy VPN Server
Easy VPN Configuration Guide, Cisco IOS Release 12.4 157
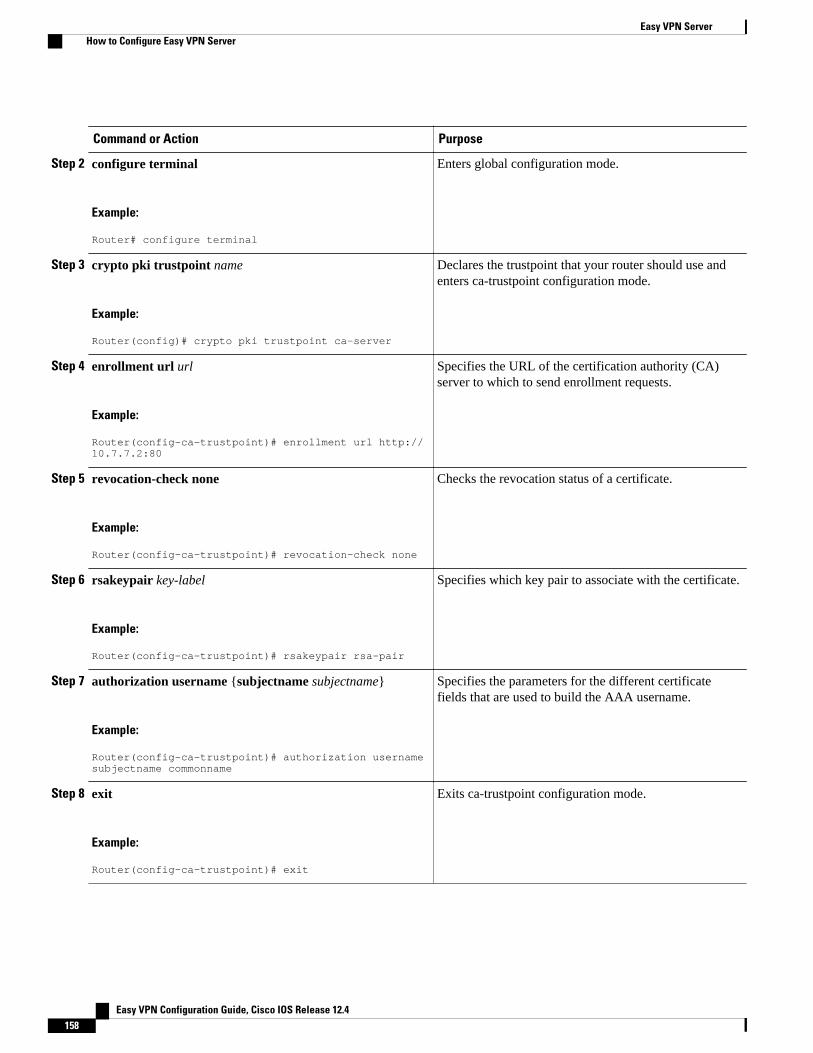
Command or Action Purpose
Step 2 configure terminal
Example:
Router# configure terminal
Enters global configuration mode.
Step 3 crypto pki trustpoint name
Example:
Router(config)# crypto pki trustpoint ca-server
Declares the trustpoint that your router should use andenters ca-trustpoint configuration mode.
Step 4 enrollment url url
Example:
Router(config-ca-trustpoint)# enrollment url http://10.7.7.2:80
Specifies the URL of the certification authority (CA)server to which to send enrollment requests.
Step 5 revocation-check none
Example:
Router(config-ca-trustpoint)# revocation-check none
Checks the revocation status of a certificate.
Step 6 rsakeypair key-label
Example:
Router(config-ca-trustpoint)# rsakeypair rsa-pair
Specifies which key pair to associate with the certificate.
Step 7 authorization username {subjectname subjectname}
Example:
Router(config-ca-trustpoint)# authorization username subjectname commonname
Specifies the parameters for the different certificatefields that are used to build the AAA username.
Step 8 exit
Example:
Router(config-ca-trustpoint)# exit
Exits ca-trustpoint configuration mode.
Easy VPN Server How to Configure Easy VPN Server
Easy VPN Configuration Guide, Cisco IOS Release 12.4158
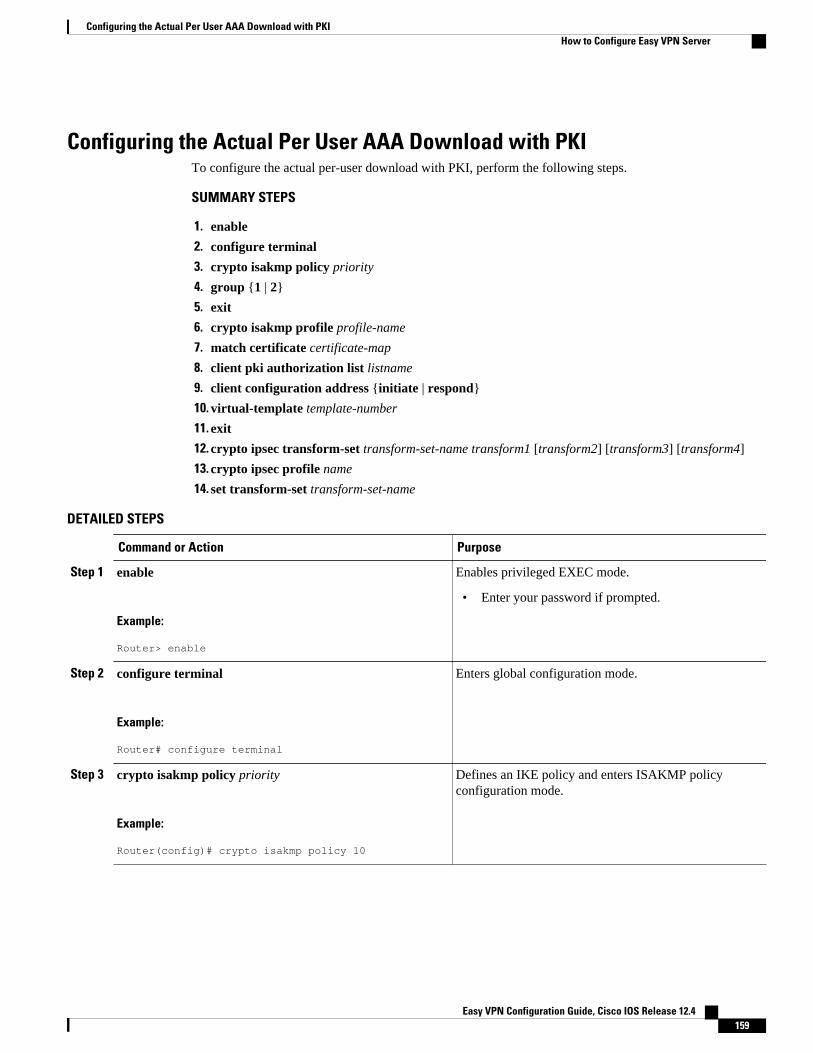
Configuring the Actual Per User AAA Download with PKITo configure the actual per-user download with PKI, perform the following steps.
SUMMARY STEPS
1. enable
2. configure terminal
3. crypto isakmp policy priority
4. group {1 | 2}
5. exit
6. crypto isakmp profile profile-name
7. match certificate certificate-map
8. client pki authorization list listname
9. client configuration address {initiate | respond}
10. virtual-template template-number
11. exit
12. crypto ipsec transform-set transform-set-name transform1 [transform2] [transform3] [transform4]
13. crypto ipsec profile name
14. set transform-set transform-set-name
DETAILED STEPS
Command or Action Purpose
Step 1 enable
Example:
Router> enable
Enables privileged EXEC mode.
• Enter your password if prompted.
Step 2 configure terminal
Example:
Router# configure terminal
Enters global configuration mode.
Step 3 crypto isakmp policy priority
Example:
Router(config)# crypto isakmp policy 10
Defines an IKE policy and enters ISAKMP policyconfiguration mode.
Configuring the Actual Per User AAA Download with PKIHow to Configure Easy VPN Server
Easy VPN Configuration Guide, Cisco IOS Release 12.4 159
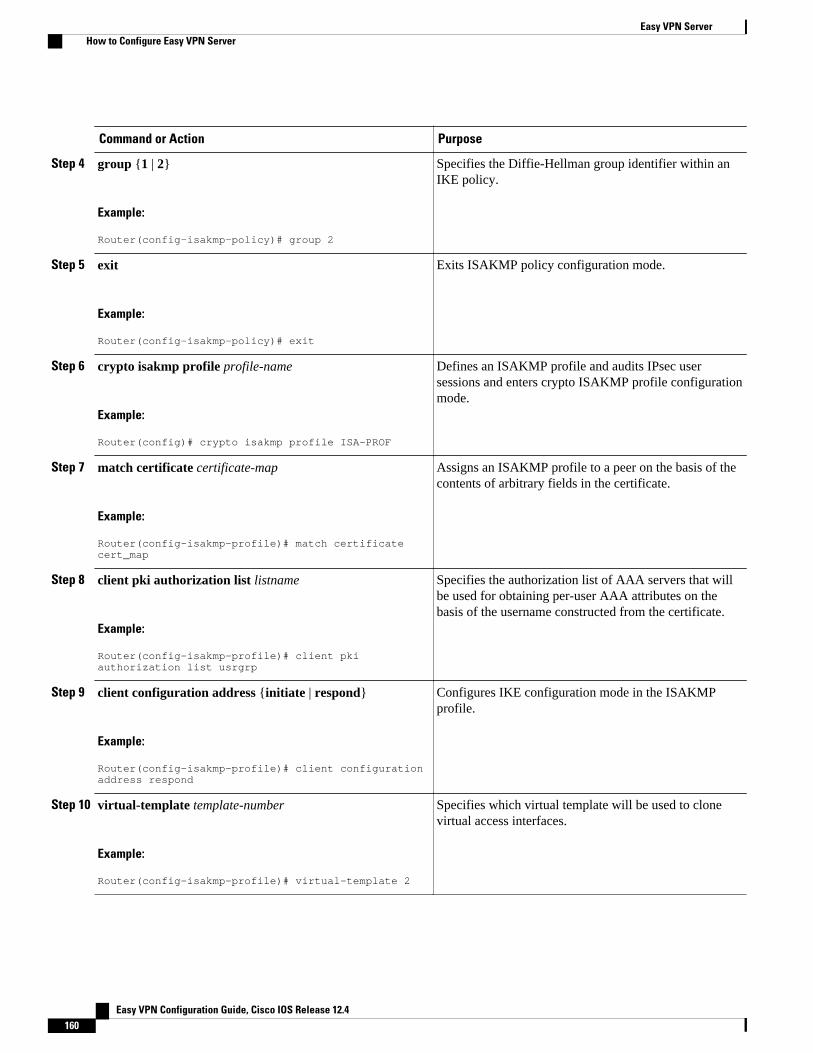
Command or Action Purpose
Step 4 group {1 | 2}
Example:
Router(config-isakmp-policy)# group 2
Specifies the Diffie-Hellman group identifier within anIKE policy.
Step 5 exit
Example:
Router(config-isakmp-policy)# exit
Exits ISAKMP policy configuration mode.
Step 6 crypto isakmp profile profile-name
Example:
Router(config)# crypto isakmp profile ISA-PROF
Defines an ISAKMP profile and audits IPsec usersessions and enters crypto ISAKMP profile configurationmode.
Step 7 match certificate certificate-map
Example:
Router(config-isakmp-profile)# match certificate cert_map
Assigns an ISAKMP profile to a peer on the basis of thecontents of arbitrary fields in the certificate.
Step 8 client pki authorization list listname
Example:
Router(config-isakmp-profile)# client pki authorization list usrgrp
Specifies the authorization list of AAA servers that willbe used for obtaining per-user AAA attributes on thebasis of the username constructed from the certificate.
Step 9 client configuration address {initiate | respond}
Example:
Router(config-isakmp-profile)# client configuration address respond
Configures IKE configuration mode in the ISAKMPprofile.
Step 10 virtual-template template-number
Example:
Router(config-isakmp-profile)# virtual-template 2
Specifies which virtual template will be used to clonevirtual access interfaces.
Easy VPN Server How to Configure Easy VPN Server
Easy VPN Configuration Guide, Cisco IOS Release 12.4160
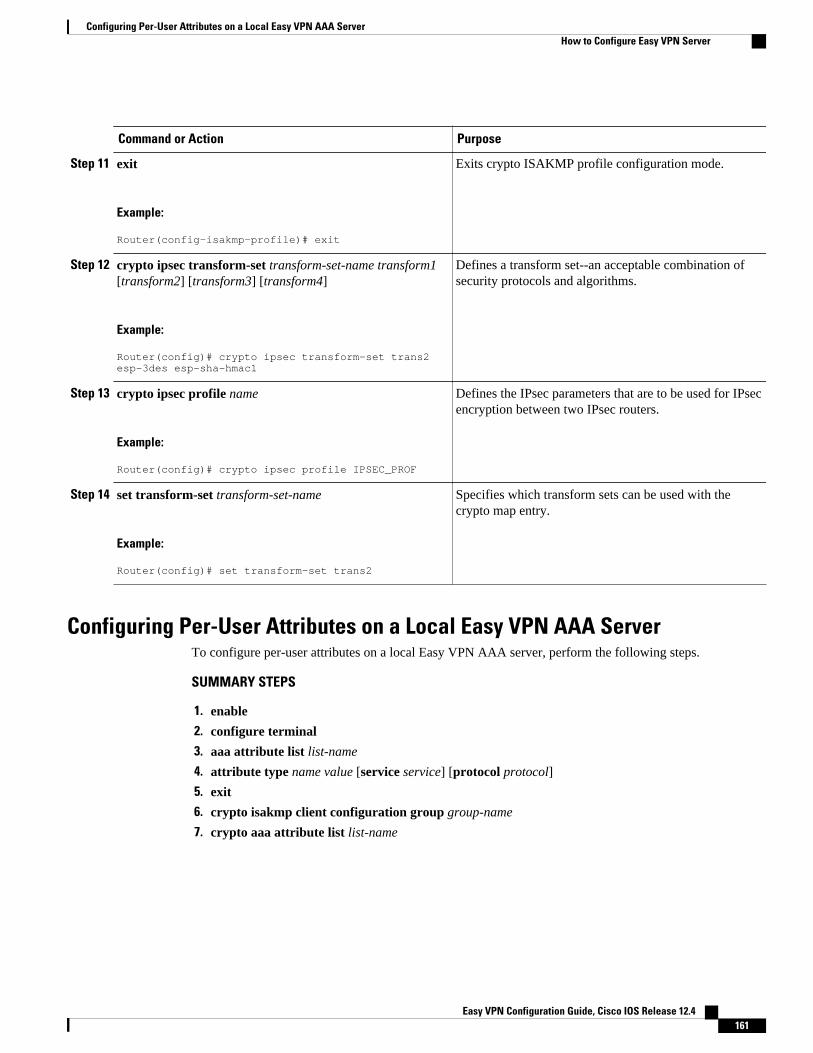
Command or Action Purpose
Step 11 exit
Example:
Router(config-isakmp-profile)# exit
Exits crypto ISAKMP profile configuration mode.
Step 12 crypto ipsec transform-set transform-set-name transform1[transform2] [transform3] [transform4]
Example:
Router(config)# crypto ipsec transform-set trans2 esp-3des esp-sha-hmac1
Defines a transform set--an acceptable combination ofsecurity protocols and algorithms.
Step 13 crypto ipsec profile name
Example:
Router(config)# crypto ipsec profile IPSEC_PROF
Defines the IPsec parameters that are to be used for IPsecencryption between two IPsec routers.
Step 14 set transform-set transform-set-name
Example:
Router(config)# set transform-set trans2
Specifies which transform sets can be used with thecrypto map entry.
Configuring Per-User Attributes on a Local Easy VPN AAA ServerTo configure per-user attributes on a local Easy VPN AAA server, perform the following steps.
SUMMARY STEPS
1. enable
2. configure terminal
3. aaa attribute list list-name
4. attribute type name value [service service] [protocol protocol]
5. exit
6. crypto isakmp client configuration group group-name
7. crypto aaa attribute list list-name
Configuring Per-User Attributes on a Local Easy VPN AAA ServerHow to Configure Easy VPN Server
Easy VPN Configuration Guide, Cisco IOS Release 12.4 161
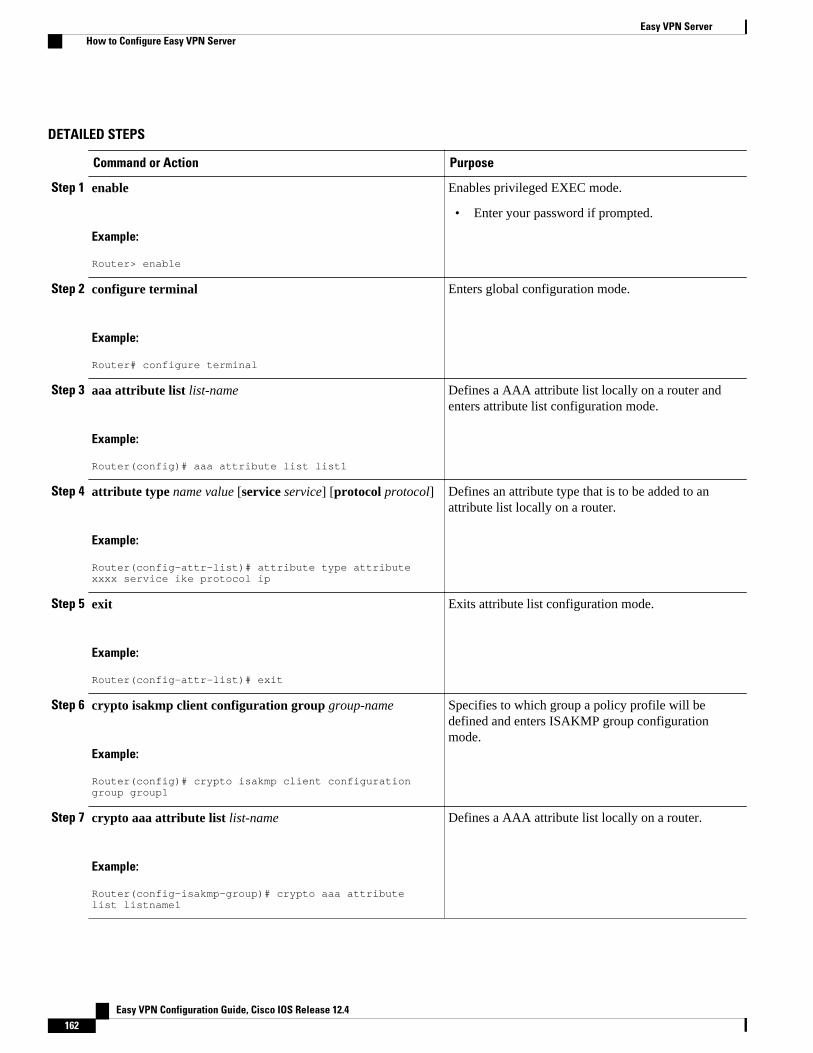
DETAILED STEPS
Command or Action Purpose
Step 1 enable
Example:
Router> enable
Enables privileged EXEC mode.
• Enter your password if prompted.
Step 2 configure terminal
Example:
Router# configure terminal
Enters global configuration mode.
Step 3 aaa attribute list list-name
Example:
Router(config)# aaa attribute list list1
Defines a AAA attribute list locally on a router andenters attribute list configuration mode.
Step 4 attribute type name value [service service] [protocol protocol]
Example:
Router(config-attr-list)# attribute type attribute xxxx service ike protocol ip
Defines an attribute type that is to be added to anattribute list locally on a router.
Step 5 exit
Example:
Router(config-attr-list)# exit
Exits attribute list configuration mode.
Step 6 crypto isakmp client configuration group group-name
Example:
Router(config)# crypto isakmp client configuration group group1
Specifies to which group a policy profile will bedefined and enters ISAKMP group configurationmode.
Step 7 crypto aaa attribute list list-name
Example:
Router(config-isakmp-group)# crypto aaa attribute list listname1
Defines a AAA attribute list locally on a router.
Easy VPN Server How to Configure Easy VPN Server
Easy VPN Configuration Guide, Cisco IOS Release 12.4162
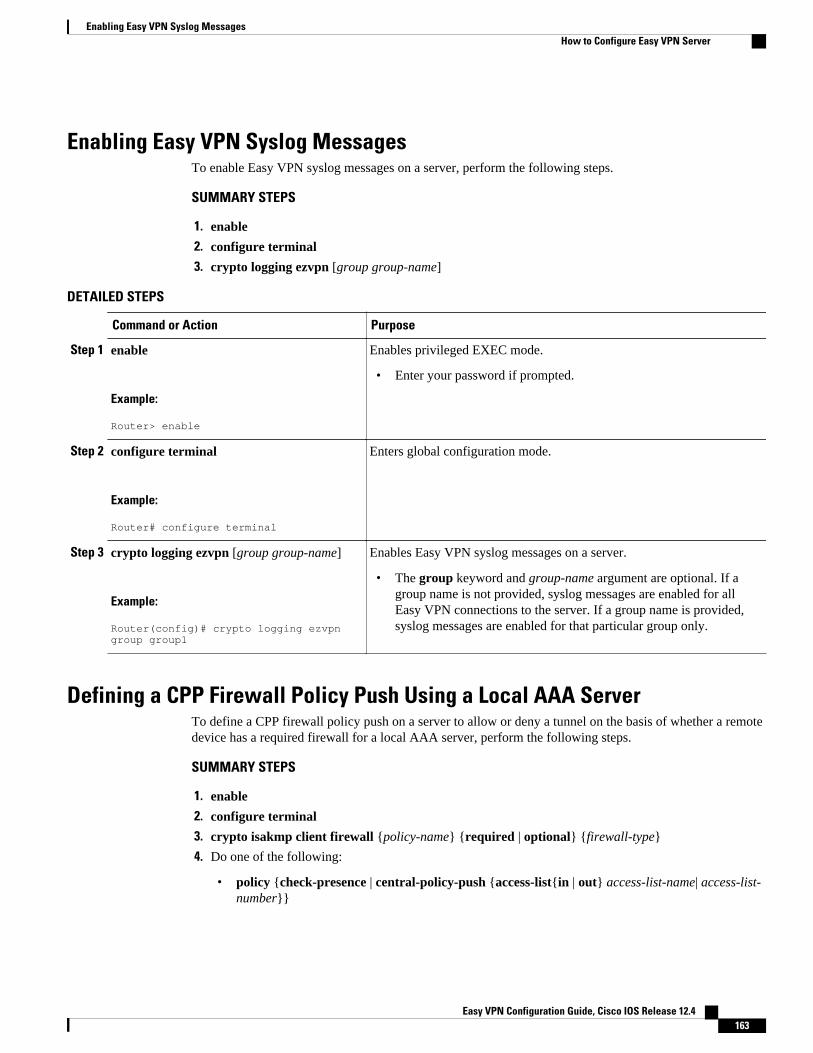
Enabling Easy VPN Syslog MessagesTo enable Easy VPN syslog messages on a server, perform the following steps.
SUMMARY STEPS
1. enable
2. configure terminal
3. crypto logging ezvpn [group group-name]
DETAILED STEPS
Command or Action Purpose
Step 1 enable
Example:
Router> enable
Enables privileged EXEC mode.
• Enter your password if prompted.
Step 2 configure terminal
Example:
Router# configure terminal
Enters global configuration mode.
Step 3 crypto logging ezvpn [group group-name]
Example:
Router(config)# crypto logging ezvpn group group1
Enables Easy VPN syslog messages on a server.
• The group keyword and group-name argument are optional. If agroup name is not provided, syslog messages are enabled for allEasy VPN connections to the server. If a group name is provided,syslog messages are enabled for that particular group only.
Defining a CPP Firewall Policy Push Using a Local AAA ServerTo define a CPP firewall policy push on a server to allow or deny a tunnel on the basis of whether a remotedevice has a required firewall for a local AAA server, perform the following steps.
SUMMARY STEPS
1. enable
2. configure terminal
3. crypto isakmp client firewall {policy-name} {required | optional} {firewall-type}
4. Do one of the following:
• policy {check-presence | central-policy-push {access-list{in | out} access-list-name| access-list-number}}
Enabling Easy VPN Syslog MessagesHow to Configure Easy VPN Server
Easy VPN Configuration Guide, Cisco IOS Release 12.4 163
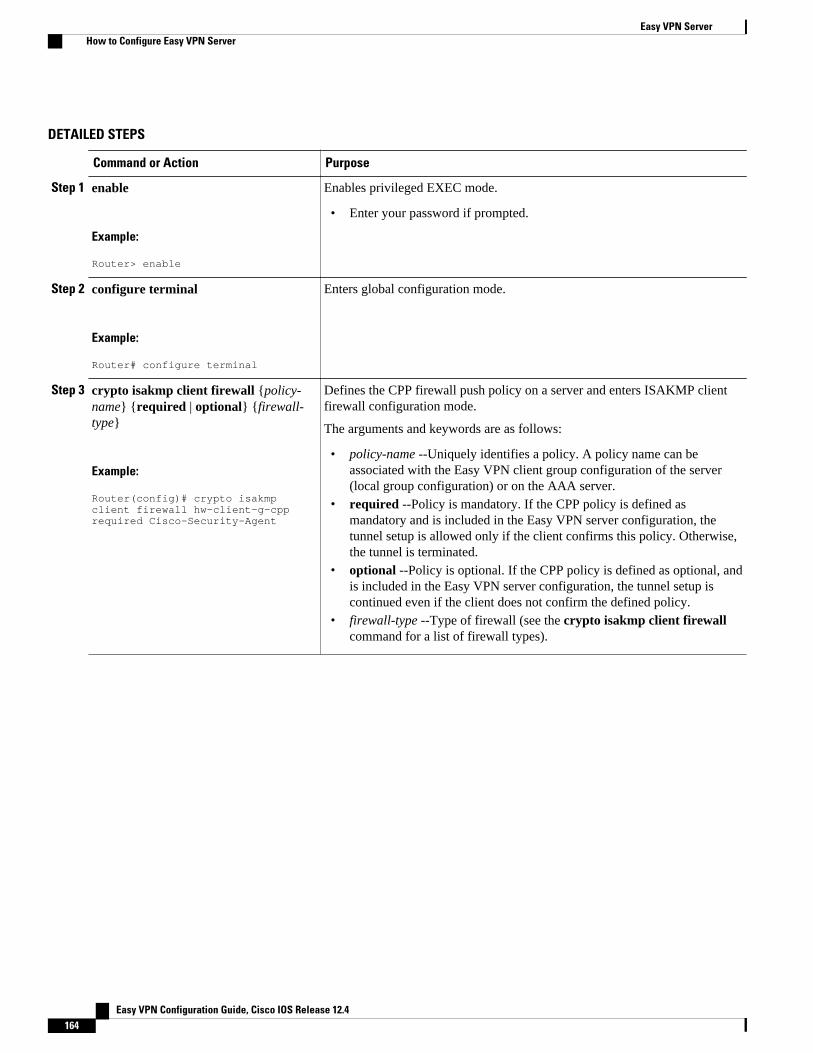
DETAILED STEPS
Command or Action Purpose
Step 1 enable
Example:
Router> enable
Enables privileged EXEC mode.
• Enter your password if prompted.
Step 2 configure terminal
Example:
Router# configure terminal
Enters global configuration mode.
Step 3 crypto isakmp client firewall {policy-name} {required | optional} {firewall-type}
Example:
Router(config)# crypto isakmp client firewall hw-client-g-cpp required Cisco-Security-Agent
Defines the CPP firewall push policy on a server and enters ISAKMP clientfirewall configuration mode.
The arguments and keywords are as follows:
• policy-name --Uniquely identifies a policy. A policy name can beassociated with the Easy VPN client group configuration of the server(local group configuration) or on the AAA server.
• required --Policy is mandatory. If the CPP policy is defined asmandatory and is included in the Easy VPN server configuration, thetunnel setup is allowed only if the client confirms this policy. Otherwise,the tunnel is terminated.
• optional --Policy is optional. If the CPP policy is defined as optional, andis included in the Easy VPN server configuration, the tunnel setup iscontinued even if the client does not confirm the defined policy.
• firewall-type --Type of firewall (see the crypto isakmp client firewallcommand for a list of firewall types).
Easy VPN Server How to Configure Easy VPN Server
Easy VPN Configuration Guide, Cisco IOS Release 12.4164
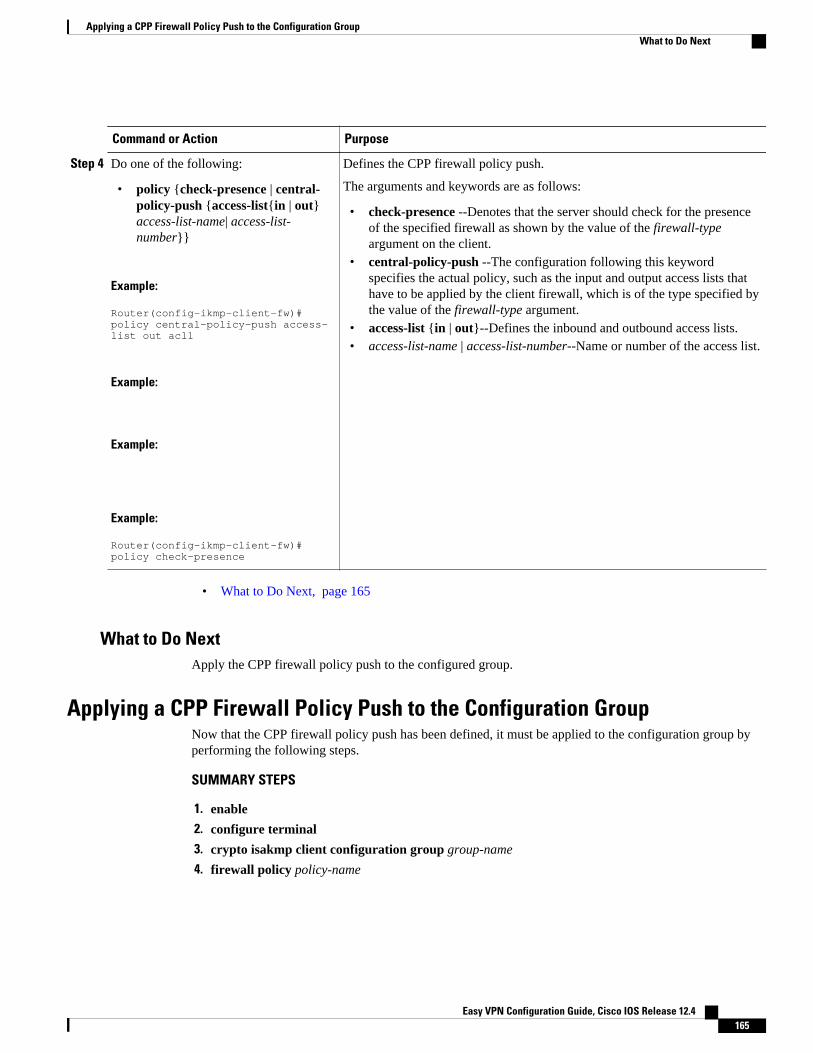
Command or Action Purpose
Step 4 Do one of the following:
• policy {check-presence | central-policy-push {access-list{in | out}access-list-name| access-list-number}}
Example:
Router(config-ikmp-client-fw)# policy central-policy-push access-list out acl1
Example:
Example:
Example:
Router(config-ikmp-client-fw)# policy check-presence
Defines the CPP firewall policy push.
The arguments and keywords are as follows:
• check-presence --Denotes that the server should check for the presenceof the specified firewall as shown by the value of the firewall-typeargument on the client.
• central-policy-push --The configuration following this keywordspecifies the actual policy, such as the input and output access lists thathave to be applied by the client firewall, which is of the type specified bythe value of the firewall-type argument.
• access-list {in | out}--Defines the inbound and outbound access lists.• access-list-name | access-list-number--Name or number of the access list.
• What to Do Next, page 165
What to Do NextApply the CPP firewall policy push to the configured group.
Applying a CPP Firewall Policy Push to the Configuration GroupNow that the CPP firewall policy push has been defined, it must be applied to the configuration group byperforming the following steps.
SUMMARY STEPS
1. enable
2. configure terminal
3. crypto isakmp client configuration group group-name
4. firewall policy policy-name
Applying a CPP Firewall Policy Push to the Configuration GroupWhat to Do Next
Easy VPN Configuration Guide, Cisco IOS Release 12.4 165
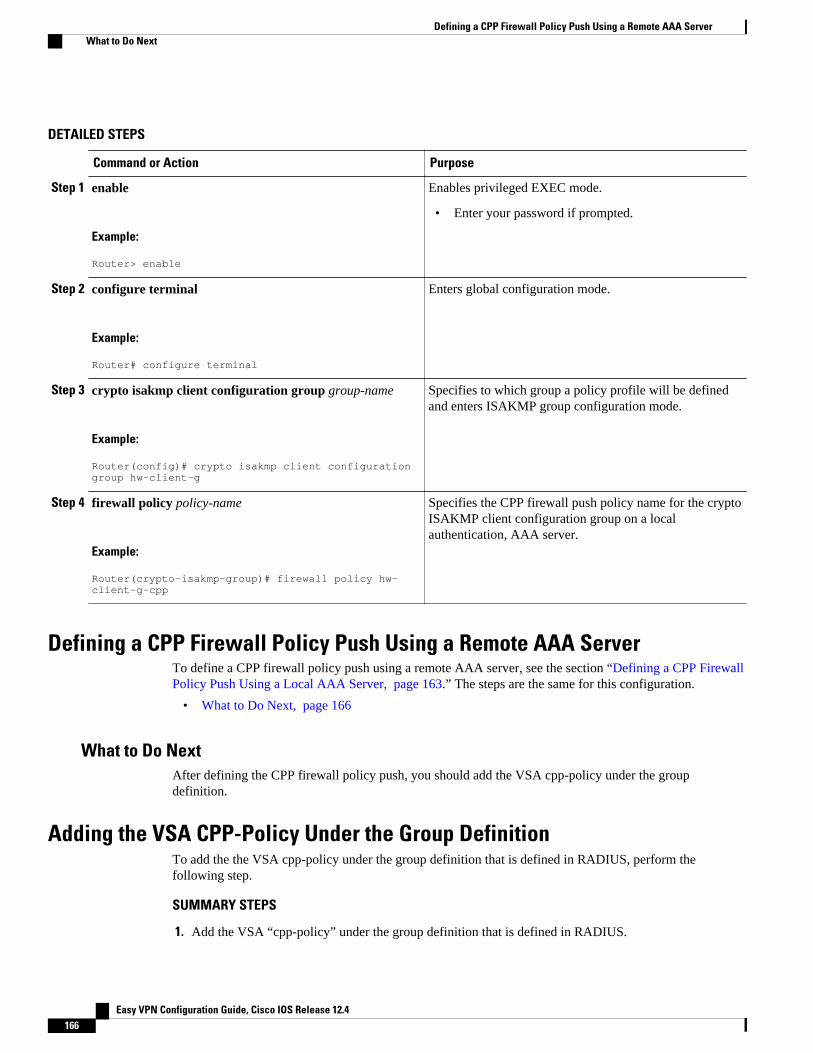
DETAILED STEPS
Command or Action Purpose
Step 1 enable
Example:
Router> enable
Enables privileged EXEC mode.
• Enter your password if prompted.
Step 2 configure terminal
Example:
Router# configure terminal
Enters global configuration mode.
Step 3 crypto isakmp client configuration group group-name
Example:
Router(config)# crypto isakmp client configuration group hw-client-g
Specifies to which group a policy profile will be definedand enters ISAKMP group configuration mode.
Step 4 firewall policy policy-name
Example:
Router(crypto-isakmp-group)# firewall policy hw-client-g-cpp
Specifies the CPP firewall push policy name for the cryptoISAKMP client configuration group on a localauthentication, AAA server.
Defining a CPP Firewall Policy Push Using a Remote AAA ServerTo define a CPP firewall policy push using a remote AAA server, see the section “Defining a CPP FirewallPolicy Push Using a Local AAA Server, page 163.” The steps are the same for this configuration.
• What to Do Next, page 166
What to Do NextAfter defining the CPP firewall policy push, you should add the VSA cpp-policy under the groupdefinition.
Adding the VSA CPP-Policy Under the Group DefinitionTo add the the VSA cpp-policy under the group definition that is defined in RADIUS, perform thefollowing step.
SUMMARY STEPS
1. Add the VSA “cpp-policy” under the group definition that is defined in RADIUS.
Defining a CPP Firewall Policy Push Using a Remote AAA Server What to Do Next
Easy VPN Configuration Guide, Cisco IOS Release 12.4166
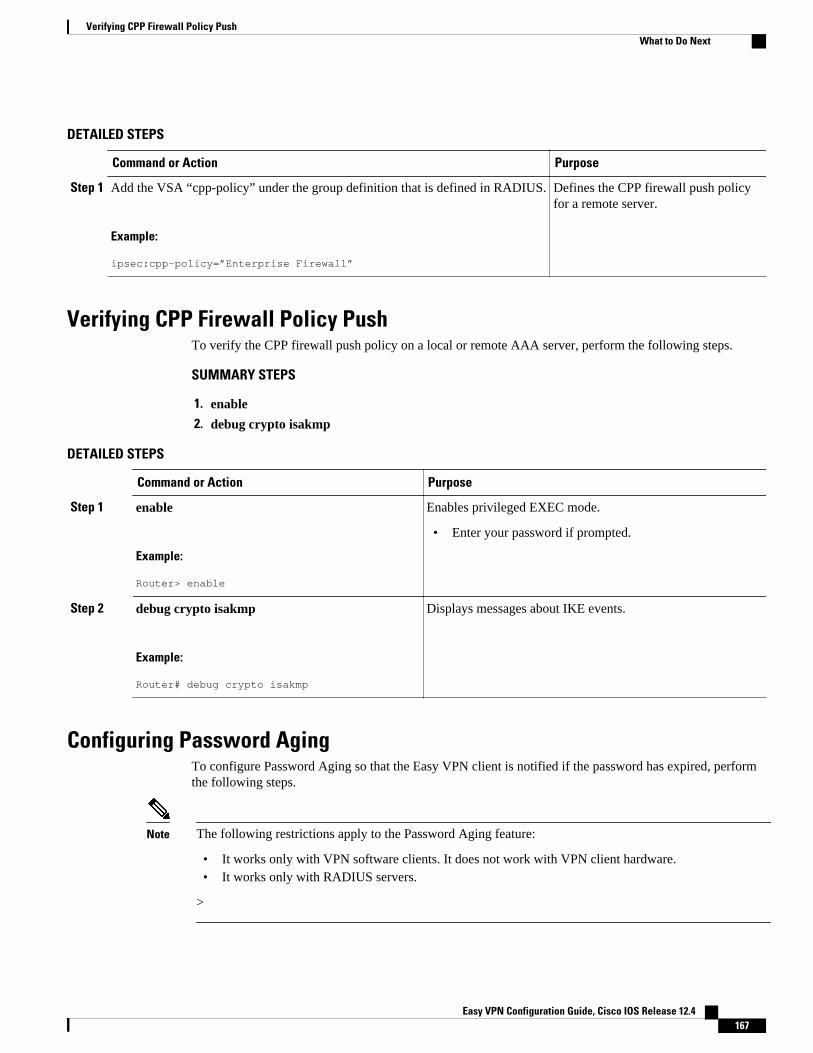
DETAILED STEPS
Command or Action Purpose
Step 1 Add the VSA “cpp-policy” under the group definition that is defined in RADIUS.
Example:
ipsec:cpp-policy=”Enterprise Firewall”
Defines the CPP firewall push policyfor a remote server.
Verifying CPP Firewall Policy PushTo verify the CPP firewall push policy on a local or remote AAA server, perform the following steps.
SUMMARY STEPS
1. enable
2. debug crypto isakmp
DETAILED STEPS
Command or Action Purpose
Step 1 enable
Example:
Router> enable
Enables privileged EXEC mode.
• Enter your password if prompted.
Step 2 debug crypto isakmp
Example:
Router# debug crypto isakmp
Displays messages about IKE events.
Configuring Password AgingTo configure Password Aging so that the Easy VPN client is notified if the password has expired, performthe following steps.
Note The following restrictions apply to the Password Aging feature:
• It works only with VPN software clients. It does not work with VPN client hardware.• It works only with RADIUS servers.
>
Verifying CPP Firewall Policy PushWhat to Do Next
Easy VPN Configuration Guide, Cisco IOS Release 12.4 167
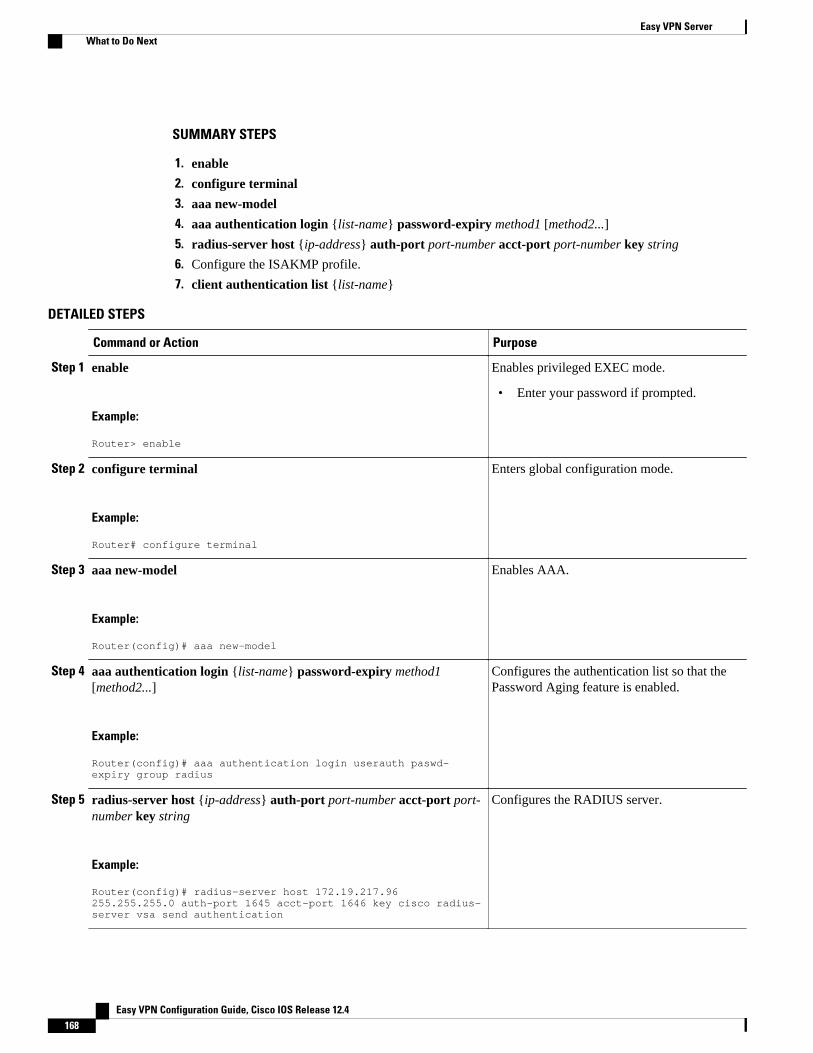
SUMMARY STEPS
1. enable
2. configure terminal
3. aaa new-model
4. aaa authentication login {list-name} password-expiry method1 [method2...]
5. radius-server host {ip-address} auth-port port-number acct-port port-number key string
6. Configure the ISAKMP profile.
7. client authentication list {list-name}
DETAILED STEPS
Command or Action Purpose
Step 1 enable
Example:
Router> enable
Enables privileged EXEC mode.
• Enter your password if prompted.
Step 2 configure terminal
Example:
Router# configure terminal
Enters global configuration mode.
Step 3 aaa new-model
Example:
Router(config)# aaa new-model
Enables AAA.
Step 4 aaa authentication login {list-name} password-expiry method1[method2...]
Example:
Router(config)# aaa authentication login userauth paswd-expiry group radius
Configures the authentication list so that thePassword Aging feature is enabled.
Step 5 radius-server host {ip-address} auth-port port-number acct-port port-number key string
Example:
Router(config)# radius-server host 172.19.217.96 255.255.255.0 auth-port 1645 acct-port 1646 key cisco radius-server vsa send authentication
Configures the RADIUS server.
Easy VPN Server What to Do Next
Easy VPN Configuration Guide, Cisco IOS Release 12.4168
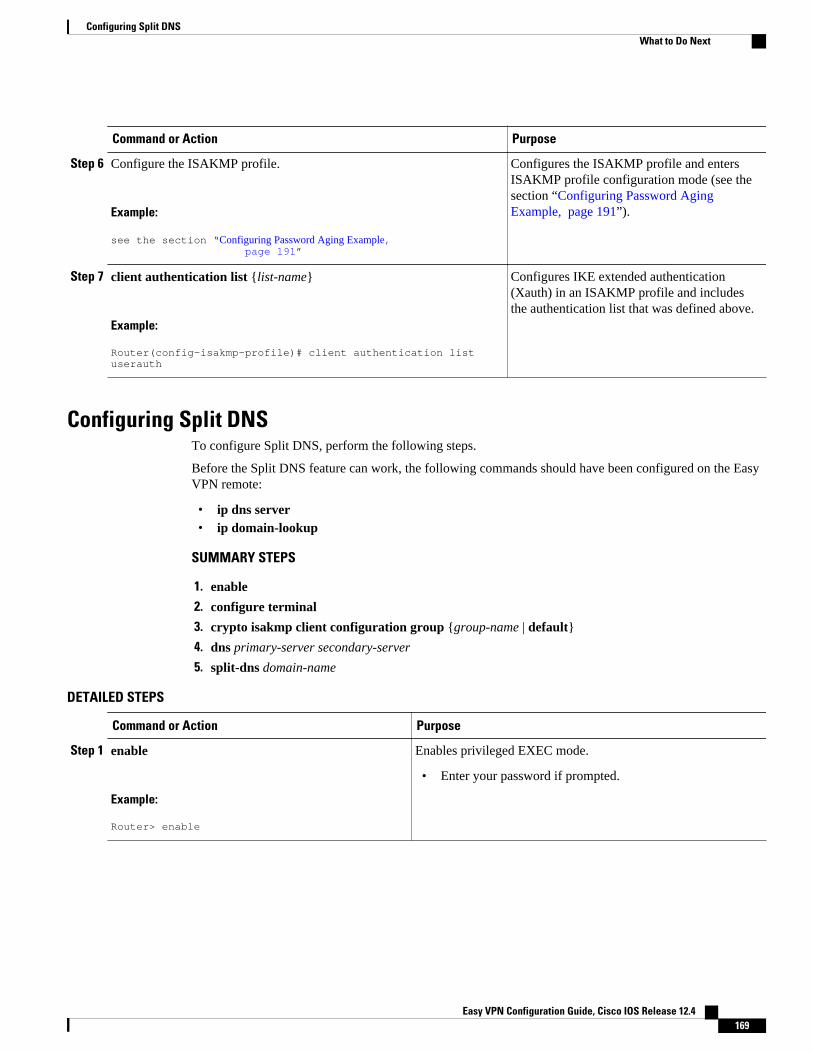
Command or Action Purpose
Step 6 Configure the ISAKMP profile.
Example:
see the section “Configuring Password Aging Example, page 191”
Configures the ISAKMP profile and entersISAKMP profile configuration mode (see thesection “Configuring Password AgingExample, page 191”).
Step 7 client authentication list {list-name}
Example:
Router(config-isakmp-profile)# client authentication list userauth
Configures IKE extended authentication(Xauth) in an ISAKMP profile and includesthe authentication list that was defined above.
Configuring Split DNSTo configure Split DNS, perform the following steps.
Before the Split DNS feature can work, the following commands should have been configured on the EasyVPN remote:
• ip dns server• ip domain-lookup
SUMMARY STEPS
1. enable
2. configure terminal
3. crypto isakmp client configuration group {group-name | default}
4. dns primary-server secondary-server
5. split-dns domain-name
DETAILED STEPS
Command or Action Purpose
Step 1 enable
Example:
Router> enable
Enables privileged EXEC mode.
• Enter your password if prompted.
Configuring Split DNSWhat to Do Next
Easy VPN Configuration Guide, Cisco IOS Release 12.4 169
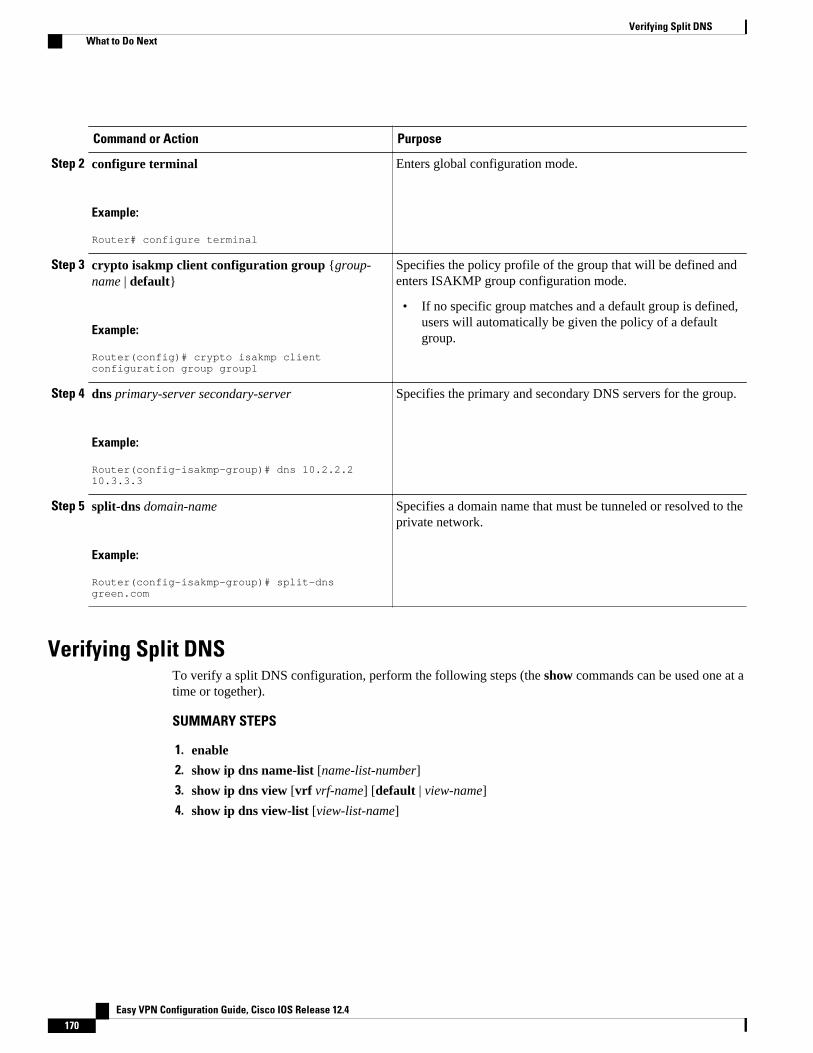
Command or Action Purpose
Step 2 configure terminal
Example:
Router# configure terminal
Enters global configuration mode.
Step 3 crypto isakmp client configuration group {group-name | default}
Example:
Router(config)# crypto isakmp client configuration group group1
Specifies the policy profile of the group that will be defined andenters ISAKMP group configuration mode.
• If no specific group matches and a default group is defined,users will automatically be given the policy of a defaultgroup.
Step 4 dns primary-server secondary-server
Example:
Router(config-isakmp-group)# dns 10.2.2.2 10.3.3.3
Specifies the primary and secondary DNS servers for the group.
Step 5 split-dns domain-name
Example:
Router(config-isakmp-group)# split-dns green.com
Specifies a domain name that must be tunneled or resolved to theprivate network.
Verifying Split DNSTo verify a split DNS configuration, perform the following steps (the show commands can be used one at atime or together).
SUMMARY STEPS
1. enable
2. show ip dns name-list [name-list-number]
3. show ip dns view [vrf vrf-name] [default | view-name]
4. show ip dns view-list [view-list-name]
Verifying Split DNS What to Do Next
Easy VPN Configuration Guide, Cisco IOS Release 12.4170
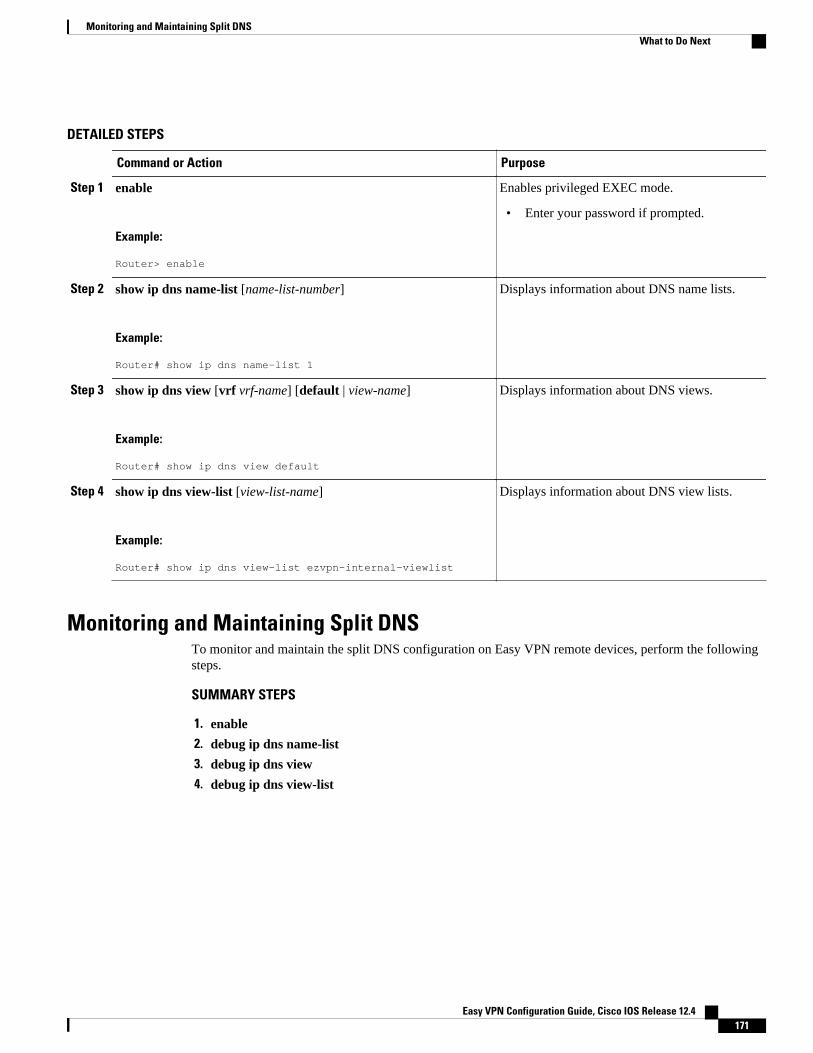
DETAILED STEPS
Command or Action Purpose
Step 1 enable
Example:
Router> enable
Enables privileged EXEC mode.
• Enter your password if prompted.
Step 2 show ip dns name-list [name-list-number]
Example:
Router# show ip dns name-list 1
Displays information about DNS name lists.
Step 3 show ip dns view [vrf vrf-name] [default | view-name]
Example:
Router# show ip dns view default
Displays information about DNS views.
Step 4 show ip dns view-list [view-list-name]
Example:
Router# show ip dns view-list ezvpn-internal-viewlist
Displays information about DNS view lists.
Monitoring and Maintaining Split DNSTo monitor and maintain the split DNS configuration on Easy VPN remote devices, perform the followingsteps.
SUMMARY STEPS
1. enable
2. debug ip dns name-list
3. debug ip dns view
4. debug ip dns view-list
Monitoring and Maintaining Split DNSWhat to Do Next
Easy VPN Configuration Guide, Cisco IOS Release 12.4 171

DETAILED STEPS
Command or Action Purpose
Step 1 enable
Example:
Router> enable
Enables privileged EXEC mode.
• Enter your password if prompted.
Step 2 debug ip dns name-list
Example:
Router# debug ip dns name-list
Enables debugging output for Domain Name System (DNS) name-list events.
Step 3 debug ip dns view
Example:
Router# debug ip dns view
Enables debugging output for DNS view events.
Step 4 debug ip dns view-list
Example:
Router# debug ip dns view-list
Enables debugging output for DNS view-list events.
Configuring an Easy VPN Server to Obtain an IP Address from a DHCPServer
When the Easy VPN server selects the method for address assignment, it does so in the following order ofprecedence:
1 Selects the Framed IP address2 Uses the IP address from the authentication server (group/user)3 Uses the global IKE address pools4 Uses DHCP
Note To enable the Easy VPN server to obtain an IP address from a DHCP server, remove other addressassignments.
To configure an Easy VPN server to obtain an IP address from a DHCP server, perform the followingsteps.
Configuring an Easy VPN Server to Obtain an IP Address from a DHCP Server What to Do Next
Easy VPN Configuration Guide, Cisco IOS Release 12.4172
SUMMARY STEPS
1. enable
2. configure terminal
3. crypto isakmp client configuration group group-name
4. dhcp server {ip-address | hostname}
5. dhcp timeout time
6. dhcp giaddr scope
DETAILED STEPS
Command or Action Purpose
Step 1 enable
Example:
Router> enable
Enables privileged EXEC mode.
• Enter your password if prompted.
Step 2 configure terminal
Example:
Router# configure terminal
Enters global configuration mode.
Step 3 crypto isakmp client configuration group group-name
Example:
Router(config)# crypto isakmp client configuration group group1
Specifies to which group a policy profile will be defined.
Note Entering this command places the CLI in ISAKMP groupconfiguration mode. From this mode, you can usesubcommands to specify characteristics for the grouppolicy.
Step 4 dhcp server {ip-address | hostname}
Example:
Router(config-isakmp-group)# dhcp server 10.10.1.2
Specifies a primary (and backup) DHCP server to allocate IPaddresses to MS users entering a particular public data network(PDN) access point.
Step 5 dhcp timeout time
Example:
Router(config-isakmp-group)# dhcp timeout 6
Sets the wait time in seconds before the next DHCP server on thelist is tried.
Easy VPN ServerWhat to Do Next
Easy VPN Configuration Guide, Cisco IOS Release 12.4 173
Command or Action Purpose
Step 6 dhcp giaddr scope
Example:
Router(config-isakmp-group)# dhcp giaddr 10.1.1.4
Specifies the giaddr for the DHCP scope.
Verifying DHCP Client ProxyTo verify your DHCP client proxy configuration, perform the following steps (use the show commands oneat a time or together).
SUMMARY STEPS
1. enable
2. show dhcp lease
3. show ip dhcp pool
4. show ip dhcp binding
DETAILED STEPS
Command or Action Purpose
Step 1 enable
Example:
Router> enable
Enables privileged EXEC mode.
• Enter your password if prompted.
Step 2 show dhcp lease
Example:
Router# show dhcp lease
Displays information about the DHCP address pools.
Note Use this command when an external DHCP is used.
Step 3 show ip dhcp pool
Example:
Router# show ip dhcp pool
Displays information about the DHCP address pools.
Note This command is applicable only when the Easy VPN server is also the DHCPserver (generally not the case because in most cases, the DHCP server is anexternal server).
Verifying DHCP Client Proxy What to Do Next
Easy VPN Configuration Guide, Cisco IOS Release 12.4174
Command or Action Purpose
Step 4 show ip dhcp binding
Example:
Router# show ip dhcp binding
Displays address bindings on the DHCP server.
Note This command is applicable only when the Easy VPN server is also the DHCPserver (generally not the case because in most cases, the DHCP server is anexternal server).
Monitoring and Maintaining DHCP Client ProxyTo monitor and maintain your DHCP client proxy configuration, perform the following steps (use thedebug commands one at a time or together).
SUMMARY STEPS
1. enable
2. debug crypto isakmp
3. debug dhcp
4. debug dhcp detail
5. debug ip dhcp server events
DETAILED STEPS
Command or Action Purpose
Step 1 enable
Example:
Router> enable
Enables privileged EXEC mode.
• Enter your password if prompted.
Step 2 debug crypto isakmp
Example:
Router# debug crypto isakmp
Displays messages about Internet Key Exchange (IKE) event.
Step 3 debug dhcp
Example:
Router# debug dhcp
Reports server events, like address assignments and database updates.
Monitoring and Maintaining DHCP Client ProxyWhat to Do Next
Easy VPN Configuration Guide, Cisco IOS Release 12.4 175
Command or Action Purpose
Step 4 debug dhcp detail
Example:
Router# debug dhcp detail
Displays detailed DHCP debugging information.
Step 5 debug ip dhcp server events
Example:
Router# debug ip dhcp server events
Reports server events, like address assignments and database updates.
Note This command is applicable only when the Easy VPN server is also theDHCP server (generally not the case because in most cases, the DHCPserver is an external server).
Configuring cTCPTo enable cTCP, perform the following steps on your Easy VPN server.
Before configuring cTCP, you should have configured crypto IPsec.
SUMMARY STEPS
1. enable
2. configure terminal
3. crypto ctcp port [port-number]
DETAILED STEPS
Command or Action Purpose
Step 1 enable
Example:
Router> enable
Enables privileged EXEC mode.
• Enter your password if prompted.
Step 2 configure terminal
Example:
Router# configure terminal
Enters global configuration mode.
Step 3 crypto ctcp port [port-number]
Example:
Router(config)# crypto ctcp port 120
Configures cTCP encapsulation for Easy VPN.
• Up to 10 port numbers can be configured.• If the port-number argument is not configured, cTCP is enabled on port
80 by default.
Configuring cTCP What to Do Next
Easy VPN Configuration Guide, Cisco IOS Release 12.4176
Verifying cTCPTo verify your cTCP configuration, perform the following steps (the show commands can be used one at atime or together).
SUMMARY STEPS
1. enable
2. show crypto ctcp [peer ip-address]
DETAILED STEPS
Command or Action Purpose
Step 1 enable
Example:
Router> enable
Enables privileged EXEC mode.
• Enter your password if prompted.
Step 2 show crypto ctcp [peer ip-address]
Example:
Router# show crypto ctcp peer 10.76.235.21
Displays information about a specific cTCP peer.
Monitoring and Maintaining a cTCP ConfigurationTo monitor and maintain your cTCP configuration, perform the following steps.
SUMMARY STEPS
1. enable
2. debug crypto ctcp
DETAILED STEPS
Command or Action Purpose
Step 1 enable
Example:
Router> enable
Enables privileged EXEC mode.
• Enter your password if prompted.
Verifying cTCPWhat to Do Next
Easy VPN Configuration Guide, Cisco IOS Release 12.4 177
Command or Action Purpose
Step 2 debug crypto ctcp
Example:
Router# debug crypto ctcp
Displays information about a cTCP session.
• Clearing a cTCP Configuration, page 178
Clearing a cTCP ConfigurationTo clear a cTCP configuration, perform the following steps.
SUMMARY STEPS
1. enable
2. clear crypto ctcp [peer ip-address]
DETAILED STEPS
Command or Action Purpose
Step 1 enable
Example:
Router> enable
Enables privileged EXEC mode.
• Enter your password if prompted.
Step 2 clear crypto ctcp [peer ip-address]
Example:
Router# clear crypto ctcp peer 10.76.23.21
Displays information about a cTCP session.
Troubleshooting a cTCP ConfigurationTo troubleshoot a cTCP configuration, perform the following steps.
Troubleshooting a cTCP Configuration Clearing a cTCP Configuration
Easy VPN Configuration Guide, Cisco IOS Release 12.4178
SUMMARY STEPS
1. To ensure that the cTCP session is in the CTCP_ACK_RECEIVED state, use the show crypto ctcpcommand.
2. If the cTCP session is not in the CTCP_ACK_RECEIVED state, enable the debug crypto ctcpcommand and then try using the show crypto ctcp command again.
3. If no cTCP bugs are seen, ensure that the firewall is allowing the cTCP packets to get to the server(check the firewall configuration).
4. If the firewall configuration is correct, debugging is enabled, and you do not see any cTCP debugs onyour console, you must find out why the cTCP port on the router is not receiving packets. If you do notsee any cTCP debugs and a cTCP session has not been set up, there is a possibility that cTCP packetsthat are actually TCP packets could have been delivered to a TCP stack instead of to the cTCP port. Byenabling the debug ip packet and debug ip tcp packet commands, you may be able to determinewhether the packet is being given to the TCP stack.
DETAILED STEPS
Step 1 To ensure that the cTCP session is in the CTCP_ACK_RECEIVED state, use the show crypto ctcp command.
Step 2 If the cTCP session is not in the CTCP_ACK_RECEIVED state, enable the debug crypto ctcp command and then tryusing the show crypto ctcp command again.
Step 3 If no cTCP bugs are seen, ensure that the firewall is allowing the cTCP packets to get to the server (check the firewallconfiguration).
Step 4 If the firewall configuration is correct, debugging is enabled, and you do not see any cTCP debugs on your console,you must find out why the cTCP port on the router is not receiving packets. If you do not see any cTCP debugs and acTCP session has not been set up, there is a possibility that cTCP packets that are actually TCP packets could havebeen delivered to a TCP stack instead of to the cTCP port. By enabling the debug ip packet and debug ip tcp packetcommands, you may be able to determine whether the packet is being given to the TCP stack.
Configuration Examples for Easy VPN Server• Configuring Cisco IOS for Easy VPN Server Example, page 180
• RADIUS Group Profile with IPsec AV Pairs Example, page 181
• RADIUS User Profile with IPsec AV Pairs Example, page 182
• Backup Gateway with Maximum Logins and Maximum Users Example, page 182
• Easy VPN with an IPsec Virtual Tunnel Interface Example, page 182
• Pushing a Configuration URL Through a Mode-ConfigurationExchange Examples, page 183
• Per User AAA Policy Download with PKI Example, page 184
• Per-User Attributes on an Easy VPN Server Example, page 187
• Network Admission Control Example, page 189
• Configuring Password Aging Example, page 191
• Split DNS Examples, page 192
• DHCP Client Proxy Examples, page 193
Easy VPN ServerConfiguration Examples for Easy VPN Server
Easy VPN Configuration Guide, Cisco IOS Release 12.4 179

• cTCP Session Example, page 194• VRF Assignment by a AAA Server Example, page 195
Configuring Cisco IOS for Easy VPN Server ExampleThe following example shows how to define group policy information locally for mode configuration. Inthis example, a group name is named “cisco” and another group name is named “default.” The policy isenforced for all users who do not offer a group name that matches “cisco.”
! Enable policy look-up via AAA. For authentication and authorization, send requests to! RADIUS first, then try local policy.aaa new-modelaaa authentication login userlist group radius localaaa authorization network grouplist group radius localenable password XXXX!username cisco password 0 ciscoclock timezone PST -8ip subnet-zero! Configure IKE policies, which are assessed in order so that the first policy thatmatches the proposal of the client will be used.crypto isakmp policy 1 group 2!crypto isakmp policy 3 hash md5 authentication pre-share group 2crypto isakmp identity hostname!! Define “cisco” group policy information for mode config push.crypto isakmp client configuration group cisco key cisco dns 10.2.2.2 10.2.2.3 wins 10.6.6.6 domain cisco.com pool green acl 199! Define default group policy for mode config push.crypto isakmp client configuration group default key cisco dns 10.2.2.2 10.3.2.3 pool green acl 199!!crypto ipsec transform-set dessha esp-des esp-sha-hmac !crypto dynamic-map mode 1 set transform-set dessha !! Apply mode config and xauth to crypto map “mode.” The list names that are defined here! must match the list names that are defined in the AAA section of the config.crypto map mode client authentication list userlistcrypto map mode isakmp authorization list grouplistcrypto map mode client configuration address respondcrypto map mode 1 ipsec-isakmp dynamic mode !!controller ISA 1/1!! interface FastEthernet0/0 ip address 10.6.1.8 255.255.0.0 ip route-cache ip mroute-cache duplex auto speed auto crypto map mode
Configuring Cisco IOS for Easy VPN Server Example Configuration Examples for Easy VPN Server
Easy VPN Configuration Guide, Cisco IOS Release 12.4180
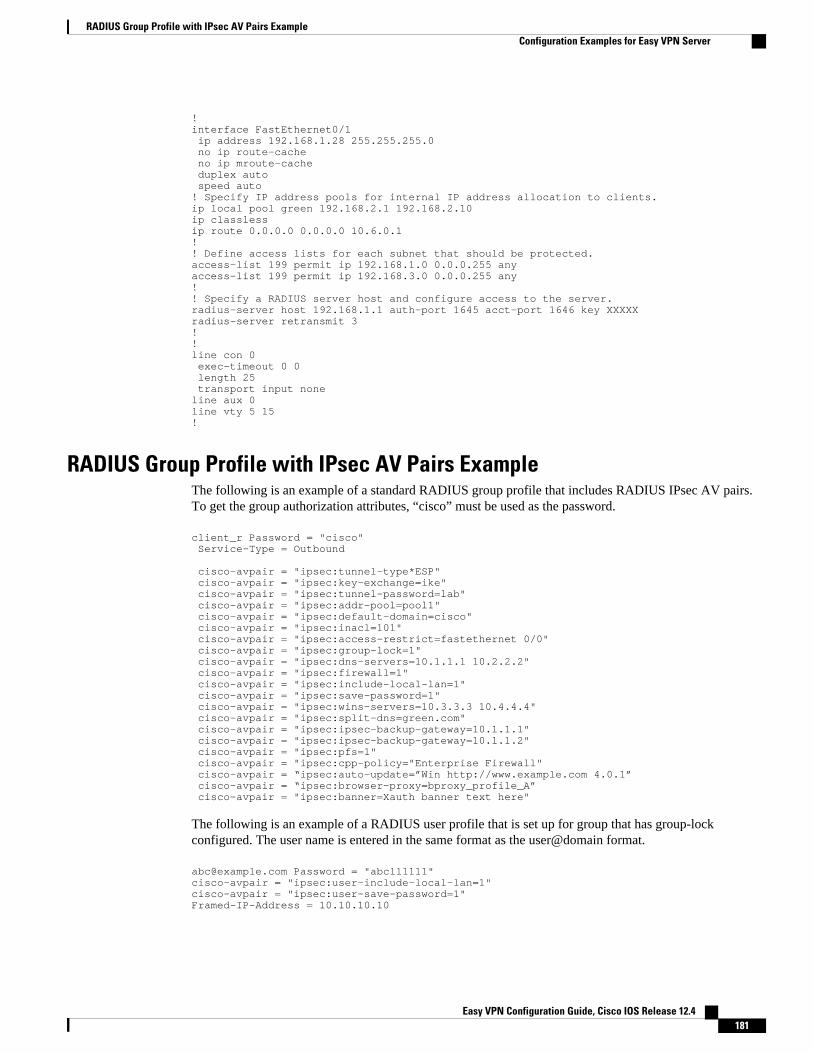
!interface FastEthernet0/1 ip address 192.168.1.28 255.255.255.0 no ip route-cache no ip mroute-cache duplex auto speed auto! Specify IP address pools for internal IP address allocation to clients.ip local pool green 192.168.2.1 192.168.2.10ip classlessip route 0.0.0.0 0.0.0.0 10.6.0.1!! Define access lists for each subnet that should be protected.access-list 199 permit ip 192.168.1.0 0.0.0.255 anyaccess-list 199 permit ip 192.168.3.0 0.0.0.255 any!! Specify a RADIUS server host and configure access to the server.radius-server host 192.168.1.1 auth-port 1645 acct-port 1646 key XXXXXradius-server retransmit 3!!line con 0 exec-timeout 0 0 length 25 transport input noneline aux 0line vty 5 15!
RADIUS Group Profile with IPsec AV Pairs ExampleThe following is an example of a standard RADIUS group profile that includes RADIUS IPsec AV pairs.To get the group authorization attributes, “cisco” must be used as the password.
client_r Password = "cisco" Service-Type = Outbound cisco-avpair = "ipsec:tunnel-type*ESP" cisco-avpair = "ipsec:key-exchange=ike" cisco-avpair = "ipsec:tunnel-password=lab" cisco-avpair = "ipsec:addr-pool=pool1" cisco-avpair = "ipsec:default-domain=cisco" cisco-avpair = "ipsec:inacl=101" cisco-avpair = "ipsec:access-restrict=fastethernet 0/0" cisco-avpair = "ipsec:group-lock=1" cisco-avpair = "ipsec:dns-servers=10.1.1.1 10.2.2.2" cisco-avpair = "ipsec:firewall=1" cisco-avpair = "ipsec:include-local-lan=1" cisco-avpair = "ipsec:save-password=1" cisco-avpair = "ipsec:wins-servers=10.3.3.3 10.4.4.4" cisco-avpair = "ipsec:split-dns=green.com" cisco-avpair = "ipsec:ipsec-backup-gateway=10.1.1.1" cisco-avpair = "ipsec:ipsec-backup-gateway=10.1.1.2" cisco-avpair = "ipsec:pfs=1" cisco-avpair = "ipsec:cpp-policy="Enterprise Firewall" cisco-avpair = “ipsec:auto-update=”Win http://www.example.com 4.0.1” cisco-avpair = “ipsec:browser-proxy=bproxy_profile_A” cisco-avpair = "ipsec:banner=Xauth banner text here"
The following is an example of a RADIUS user profile that is set up for group that has group-lockconfigured. The user name is entered in the same format as the user@domain format.
[email protected] Password = "abcll1111"cisco-avpair = "ipsec:user-include-local-lan=1"cisco-avpair = "ipsec:user-save-password=1"Framed-IP-Address = 10.10.10.10
RADIUS Group Profile with IPsec AV Pairs ExampleConfiguration Examples for Easy VPN Server
Easy VPN Configuration Guide, Cisco IOS Release 12.4 181
RADIUS User Profile with IPsec AV Pairs ExampleThe following is an example of a standard RADIUS user profile that includes RADIUS IPsec AV pairs.These user attributes will be obtained during Xauth.
ualluall Password = "uall1234" cisco-avpair = "ipsec:user-vpn-group=unity" cisco-avpair = "ipsec:user-include-local-lan=1" cisco-avpair = "ipsec:user-save-password=1" Framed-IP-Address = 10.10.10.10
Backup Gateway with Maximum Logins and Maximum Users ExampleThe following example shows that five backup gateways have been configured, that the maximum usershave been set to 250, and that maximum logins have been set to 2:
crypto isakmp client configuration group sdm key 6 RMZPPMRQMSdiZNJg`EBbCWTKSTi\d[ pool POOL1 acl 150 backup-gateway 172.16.12.12 backup-gateway 172.16.12.13 backup-gateway 172.16.12.14 backup-gateway 172.16.12.130 backup-gateway 172.16.12.131 max-users 250 max-logins 2
Easy VPN with an IPsec Virtual Tunnel Interface ExampleThe following output shows that Easy VPN has been configured with an IPsec virtual tunnel interface.
!version 12.4service timestamps debug datetime msecservice timestamps log datetime msecno service password-encryption!hostname Router!boot-start-markerboot-end-marker!!aaa new-model!!aaa authentication login default localaaa authorization network default local !aaa session-id common!resource policy! clock timezone IST 0ip subnet-zeroip cefno ip domain lookupno ip dhcp use vrf connected!username lab password 0 lab!crypto isakmp policy 3 authentication pre-share
RADIUS User Profile with IPsec AV Pairs Example Configuration Examples for Easy VPN Server
Easy VPN Configuration Guide, Cisco IOS Release 12.4182
group 2crypto isakmp xauth timeout 90!crypto isakmp client configuration group easy key cisco domain foo.com pool dpool acl 101crypto isakmp profile vi match identity group easy isakmp authorization list default client configuration address respond client configuration group easy virtual-template 1!!crypto ipsec transform-set set esp-3des esp-sha-hmac !crypto ipsec profile vi set transform-set set set isakmp-profile vi!!interface Loopback0 ip address 10.4.0.1 255.255.255.0!interface Ethernet0/0 ip address 10.3.0.2 255.255.255.0 no keepalive no cdp enableinterface Ethernet1/0 no ip address no keepalive no cdp enable!interface Virtual-Template1 type tunnel ip unnumbered Ethernet0/0 tunnel mode ipsec ipv4 tunnel protection ipsec profile vi!ip local pool dpool 10.5.0.1 10.5.0.10!ip classlessip route 10.2.0.0 255.255.255.0 10.3.0.1no ip http serverno ip http secure-server! !access-list 101 permit ip 10.4.0.0 0.0.0.255 anyno cdp run!!line con 0line aux 0line vty 0 4!end
Pushing a Configuration URL Through a Mode-ConfigurationExchangeExamples
The following show crypto ipsec client ezvpn command output displays the mode configuration URLlocation and version:
Router# show crypto ipsec client ezvpnEasy VPN Remote Phase: 5Tunnel name : branchInside interface list: Vlan1Outside interface: FastEthernet0
Pushing a Configuration URL Through a Mode-ConfigurationExchange ExamplesConfiguration Examples for Easy VPN Server
Easy VPN Configuration Guide, Cisco IOS Release 12.4 183
Current State: IPSEC_ACTIVELast Event: SOCKET_UPAddress: 172.16.1.209Mask: 255.255.255.255Default Domain: cisco.comSave Password: AllowedConfiguration URL [version]: tftp://172.16.30.2/branch.cfg [11]Config status: applied, Last successfully applied version: 11Current EzVPN Peer: 192.168.10.1
The following show crypto isakmp peers config command output displays all manageability informationthat is sent by the remote device.
Router# show crypto isakmp peers configClient-Public-Addr=192.168.10.2:500; Client-Assigned-Addr=172.16.1.209; Client-Group=branch; Client-User=branch; Client-Hostname=branch.; Client-Platform=Cisco 1711; Client-Serial=FOC080210E2 (412454448); Client-Config-Version=11; Client-Flash=33292284; Client-Available-Flash=10202680; Client-Memory=95969280; Client-Free-Memory=14992140; Client-Image=flash:c1700-advipservicesk9-mz.ef90241;Client-Public-Addr=192.168.10.3:500; Client-Assigned-Addr=172.16.1.121; Client-Group=store; Client-User=store; Client-Hostname=831-storerouter.; Client-Platform=Cisco C831; Client-Serial=FOC08472UXR (1908379618); Client-Config-Version=2; Client-Flash=24903676; Client-Available-Flash=5875028; Client-Memory=45298688; Client-Free-Memory=6295596; Client-Image=flash:c831-k9o3y6-mz.ef90241
Per User AAA Policy Download with PKI ExampleThe following output shows that the Per User AAA Policy Download with PKI feature has been configuredon the Easy VPN server.
Router# show running-configBuilding configuration...Current configuration : 7040 bytes!! Last configuration change at 21:06:51 UTC Tue Jun 28 2005!version 12.4no service padservice timestamps debug uptimeservice timestamps log uptimeno service password-encryption!hostname GEN!boot-start-markerboot-end-marker!!aaa new-model!!aaa group server radius usrgrppki server 10.76.248.201 auth-port 1645 acct-port 1646!aaa authentication login xauth group usrgrppkiaaa authentication login usrgrp group usrgrppkiaaa authorization network usrgrp group usrgrppki !aaa session-id common!resource policy!ip subnet-zero!!ip cef!!ip address-pool local!
Per User AAA Policy Download with PKI Example Configuration Examples for Easy VPN Server
Easy VPN Configuration Guide, Cisco IOS Release 12.4184
!crypto pki trustpoint ca-server enrollment url http://10.7.7.2:80 revocation-check none rsakeypair rsa-pair ! Specify the field within the certificate that will be used as a username to do a per-user AAA lookup into the RADIUS database. In this example, the contents of the commonname will be used to do a AAA lookup. In the absence of this statement, by default the contents of the “unstructured name” field in the certificate is used for AAA lookup. authorization username subjectname commonname!!crypto pki certificate map CERT-MAP 1 subject-name co yourname name co yourname!crypto pki certificate chain ca-server certificate 02 308201EE 30820157 A0030201 02020102 300D0609 2A864886 F70D0101 04050030 14311230 10060355 04031309 63612D73 65727665 72301E17 0D303530 36323832 30303731 345A170D 30363036 32383230 30373134 5A301531 13301106 092A8648 86F70D01 09021604 47454E2E 30819F30 0D06092A 864886F7 0D010101 05000381 8D003081 89028181 00ABF8F0 FDFFDF8D F22098D6 A48EE0C3 F505DD96 C0022EA4 EAB95EE8 1F97F450 990BB0E6 F2B7151F C5C79391 93822FE4 DEE5B00C A03412BB 9B715AAD D6C31F93 D8802658 AF9A8866 63811942 913D0C02 C3E328CC 1C046E94 F73B7C1A 4497F86E 74A627BC B809A3ED 293C15F2 8DCFA217 5160F9A4 09D52044 350F85AF 08B357F5 D7020301 0001A34F 304D300B 0603551D 0F040403 0205A030 1F060355 1D230418 30168014 F9BC4498 3DA4D51D 451EFEFD 5B1F5F73 8D7B1C9B 301D0603 551D0E04 1604146B F6B2DFD1 1FE237FF 23294129 E55D9C48 CCB04630 0D06092A 864886F7 0D010104 05000381 81004AFF 2BE300C1 15D0B191 C20D06E0 260305A6 9DF610BB 24211516 5AE73B62 78E01FE4 0785776D 3ADFA3E2 CE064432 1C93E82D 93B5F2AB 9661EDD3 499C49A8 F87CA553 9132F239 1D50187D 21CC3148 681F5043 2F2685BC F544F4FF 8DF535CB E55B5F36 31FFF025 8969D9F8 418C8AB7 C569B022 46C3C63A 22DD6516 C503D6C8 3D81 quit certificate ca 01 30820201 3082016A A0030201 02020101 300D0609 2A864886 F70D0101 04050030 14311230 10060355 04031309 63612D73 65727665 72301E17 0D303530 36323832 30303535 375A170D 30383036 32373230 30353537 5A301431 12301006 03550403 13096361 2D736572 76657230 819F300D 06092A86 4886F70D 01010105 0003818D 00308189 02818100 BA1A4413 96339C6B D36BD720 D25C9A44 E0627A29 97E06F2A 69B268ED 08C7144E 7058948D BEA512D4 40588B87 322C5D79 689427CA 5C54B3BA 82FAEC53 F6AC0B5C 615D032C 910CA203 AC6AB681 290D9EED D31EB185 8D98E1E7 FF73613C 32290FD6 A0CBDC40 6E4D6B39 DE1D86BA DE77A55E F15299FF 97D7C185 919F81C1 30027E0F 02030100 01A36330 61300F06 03551D13 0101FF04 05300301 01FF300E 0603551D 0F0101FF 04040302 0186301F 0603551D 23041830 168014F9 BC44983D A4D51D45 1EFEFD5B 1F5F738D 7B1C9B30 1D060355 1D0E0416 0414F9BC 44983DA4 D51D451E FEFD5B1F 5F738D7B 1C9B300D 06092A86 4886F70D 01010405 00038181 003EF397 F4D98BDE A4322FAF 4737800F 1671F77E BD6C45AE FB91B28C F04C98F0 135A40C6 635FDC29 63C73373 5D5BBC9A F1BBD235 F66CE1AD 6B4BFC7A AB18C8CC 1AB93AF3 7AC67436 930E9C81 F43F7570 A8FE09AE 3DEA01D1 DA6BD0CB 83F9A77F 1DFAFE5E 2F1F206B F1FDD8BE 6BB57A3C 8D03115D B1F64A3F 7A7557C1 09B0A34A DB quit!!crypto isakmp policy 10 group 2crypto isakmp keepalive 10crypto isakmp profile ISA-PROF match certificate CERT-MAP isakmp authorization list usrgrp client pki authorization list usrgrp client configuration address respond client configuration group pkiuser virtual-template 2!!crypto ipsec transform-set trans2 esp-3des esp-sha-hmac !crypto ipsec profile IPSEC_PROF set transform-set trans2 !
Easy VPN ServerConfiguration Examples for Easy VPN Server
Easy VPN Configuration Guide, Cisco IOS Release 12.4 185
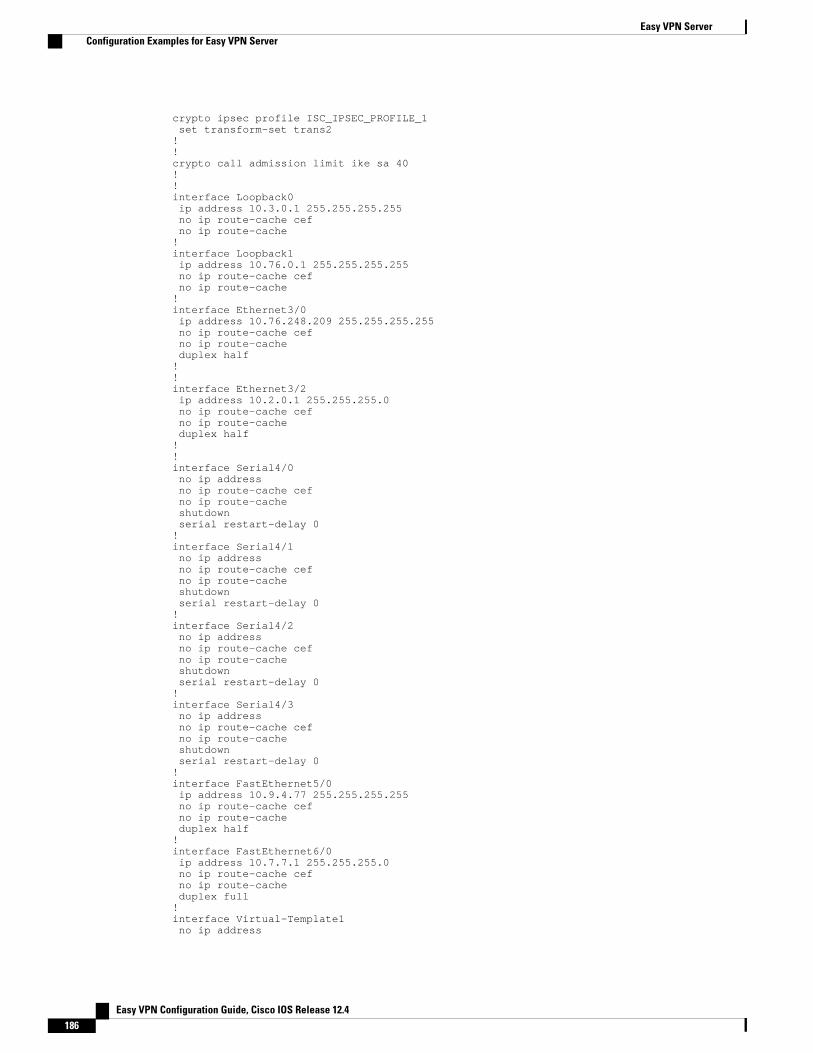
crypto ipsec profile ISC_IPSEC_PROFILE_1 set transform-set trans2 ! !crypto call admission limit ike sa 40!!interface Loopback0 ip address 10.3.0.1 255.255.255.255 no ip route-cache cef no ip route-cache!interface Loopback1 ip address 10.76.0.1 255.255.255.255 no ip route-cache cef no ip route-cache!interface Ethernet3/0 ip address 10.76.248.209 255.255.255.255 no ip route-cache cef no ip route-cache duplex half!!interface Ethernet3/2 ip address 10.2.0.1 255.255.255.0 no ip route-cache cef no ip route-cache duplex half!!interface Serial4/0 no ip address no ip route-cache cef no ip route-cache shutdown serial restart-delay 0!interface Serial4/1 no ip address no ip route-cache cef no ip route-cache shutdown serial restart-delay 0!interface Serial4/2 no ip address no ip route-cache cef no ip route-cache shutdown serial restart-delay 0! interface Serial4/3 no ip address no ip route-cache cef no ip route-cache shutdown serial restart-delay 0!interface FastEthernet5/0 ip address 10.9.4.77 255.255.255.255 no ip route-cache cef no ip route-cache duplex half!interface FastEthernet6/0 ip address 10.7.7.1 255.255.255.0 no ip route-cache cef no ip route-cache duplex full!interface Virtual-Template1 no ip address
Easy VPN Server Configuration Examples for Easy VPN Server
Easy VPN Configuration Guide, Cisco IOS Release 12.4186
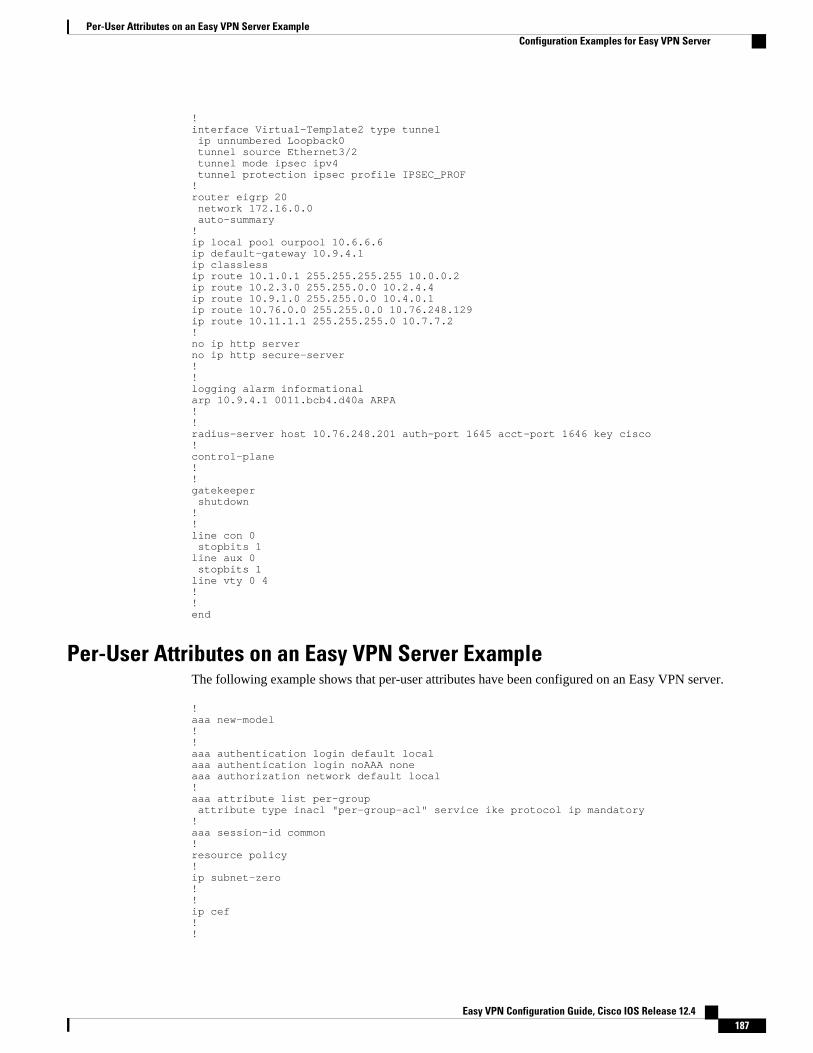
!interface Virtual-Template2 type tunnel ip unnumbered Loopback0 tunnel source Ethernet3/2 tunnel mode ipsec ipv4 tunnel protection ipsec profile IPSEC_PROF!router eigrp 20 network 172.16.0.0 auto-summary!ip local pool ourpool 10.6.6.6ip default-gateway 10.9.4.1ip classlessip route 10.1.0.1 255.255.255.255 10.0.0.2ip route 10.2.3.0 255.255.0.0 10.2.4.4ip route 10.9.1.0 255.255.0.0 10.4.0.1ip route 10.76.0.0 255.255.0.0 10.76.248.129ip route 10.11.1.1 255.255.255.0 10.7.7.2!no ip http serverno ip http secure-server!!logging alarm informationalarp 10.9.4.1 0011.bcb4.d40a ARPA!!radius-server host 10.76.248.201 auth-port 1645 acct-port 1646 key cisco!control-plane!!gatekeeper shutdown!!line con 0 stopbits 1line aux 0 stopbits 1line vty 0 4! !end
Per-User Attributes on an Easy VPN Server ExampleThe following example shows that per-user attributes have been configured on an Easy VPN server.
!aaa new-model!!aaa authentication login default localaaa authentication login noAAA noneaaa authorization network default local !aaa attribute list per-group attribute type inacl "per-group-acl" service ike protocol ip mandatory!aaa session-id common!resource policy!ip subnet-zero!!ip cef!!
Per-User Attributes on an Easy VPN Server ExampleConfiguration Examples for Easy VPN Server
Easy VPN Configuration Guide, Cisco IOS Release 12.4 187
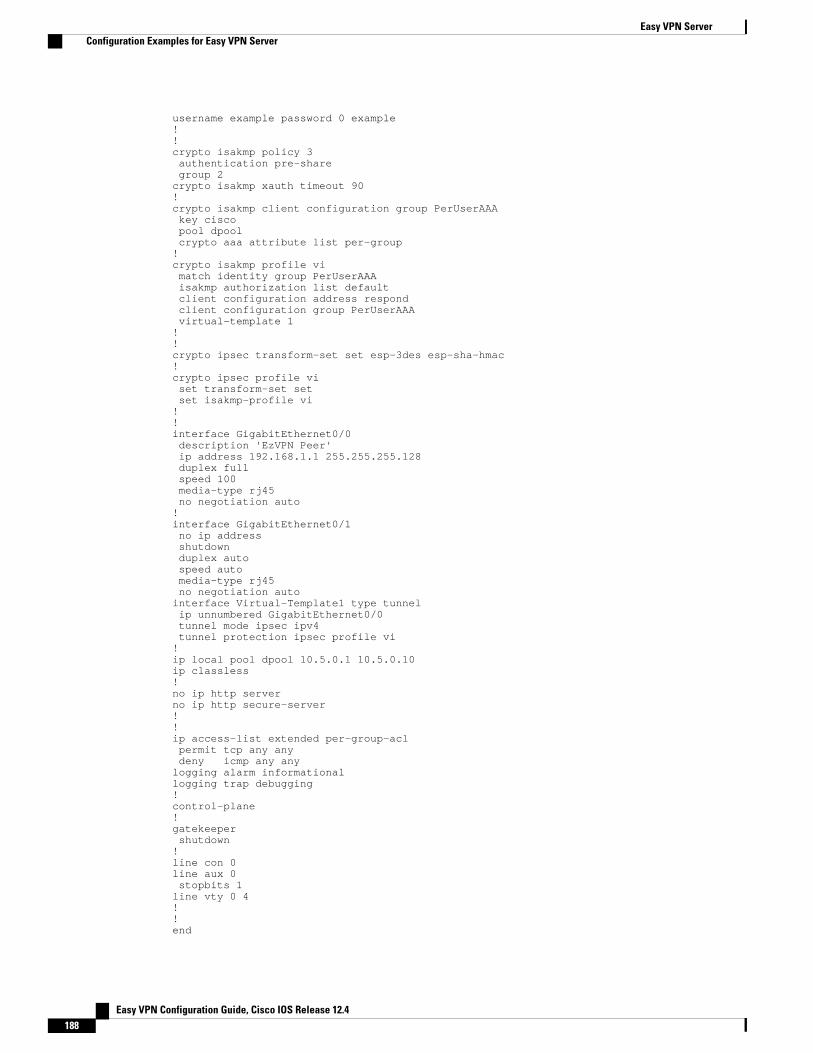
username example password 0 example!!crypto isakmp policy 3 authentication pre-share group 2crypto isakmp xauth timeout 90!crypto isakmp client configuration group PerUserAAA key cisco pool dpool crypto aaa attribute list per-group!crypto isakmp profile vi match identity group PerUserAAA isakmp authorization list default client configuration address respond client configuration group PerUserAAA virtual-template 1!!crypto ipsec transform-set set esp-3des esp-sha-hmac !crypto ipsec profile vi set transform-set set set isakmp-profile vi!!interface GigabitEthernet0/0 description 'EzVPN Peer' ip address 192.168.1.1 255.255.255.128 duplex full speed 100 media-type rj45 no negotiation auto!interface GigabitEthernet0/1 no ip address shutdown duplex auto speed auto media-type rj45 no negotiation autointerface Virtual-Template1 type tunnel ip unnumbered GigabitEthernet0/0 tunnel mode ipsec ipv4 tunnel protection ipsec profile vi!ip local pool dpool 10.5.0.1 10.5.0.10ip classless!no ip http serverno ip http secure-server!!ip access-list extended per-group-acl permit tcp any any deny icmp any anylogging alarm informationallogging trap debugging!control-plane!gatekeeper shutdown!line con 0line aux 0 stopbits 1line vty 0 4!!end
Easy VPN Server Configuration Examples for Easy VPN Server
Easy VPN Configuration Guide, Cisco IOS Release 12.4188
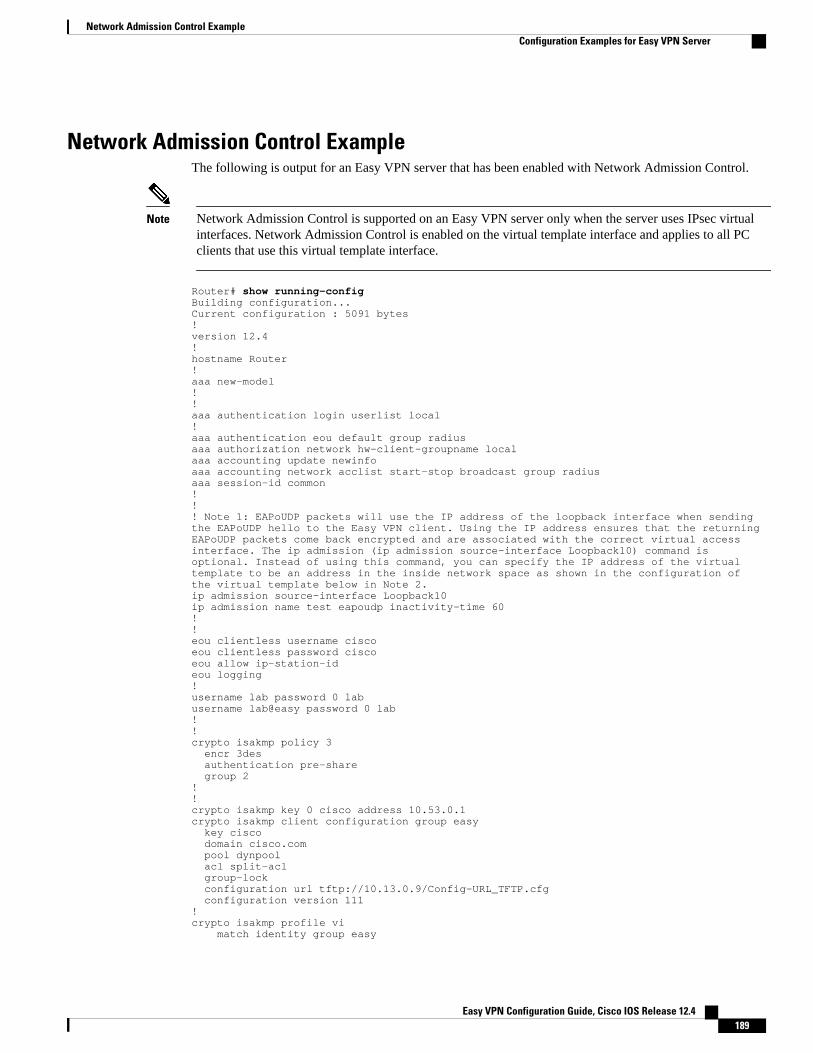
Network Admission Control ExampleThe following is output for an Easy VPN server that has been enabled with Network Admission Control.
Note Network Admission Control is supported on an Easy VPN server only when the server uses IPsec virtualinterfaces. Network Admission Control is enabled on the virtual template interface and applies to all PCclients that use this virtual template interface.
Router# show running-configBuilding configuration...Current configuration : 5091 bytes!version 12.4!hostname Router!aaa new-model!!aaa authentication login userlist local!aaa authentication eou default group radiusaaa authorization network hw-client-groupname localaaa accounting update newinfoaaa accounting network acclist start-stop broadcast group radiusaaa session-id common!!! Note 1: EAPoUDP packets will use the IP address of the loopback interface when sending the EAPoUDP hello to the Easy VPN client. Using the IP address ensures that the returning EAPoUDP packets come back encrypted and are associated with the correct virtual access interface. The ip admission (ip admission source-interface Loopback10) command is optional. Instead of using this command, you can specify the IP address of the virtual template to be an address in the inside network space as shown in the configuration of the virtual template below in Note 2.ip admission source-interface Loopback10ip admission name test eapoudp inactivity-time 60!!eou clientless username ciscoeou clientless password ciscoeou allow ip-station-ideou logging!username lab password 0 labusername lab@easy password 0 lab!!crypto isakmp policy 3 encr 3des authentication pre-share group 2!!crypto isakmp key 0 cisco address 10.53.0.1crypto isakmp client configuration group easy key cisco domain cisco.com pool dynpool acl split-acl group-lock configuration url tftp://10.13.0.9/Config-URL_TFTP.cfg configuration version 111!crypto isakmp profile vi match identity group easy
Network Admission Control ExampleConfiguration Examples for Easy VPN Server
Easy VPN Configuration Guide, Cisco IOS Release 12.4 189
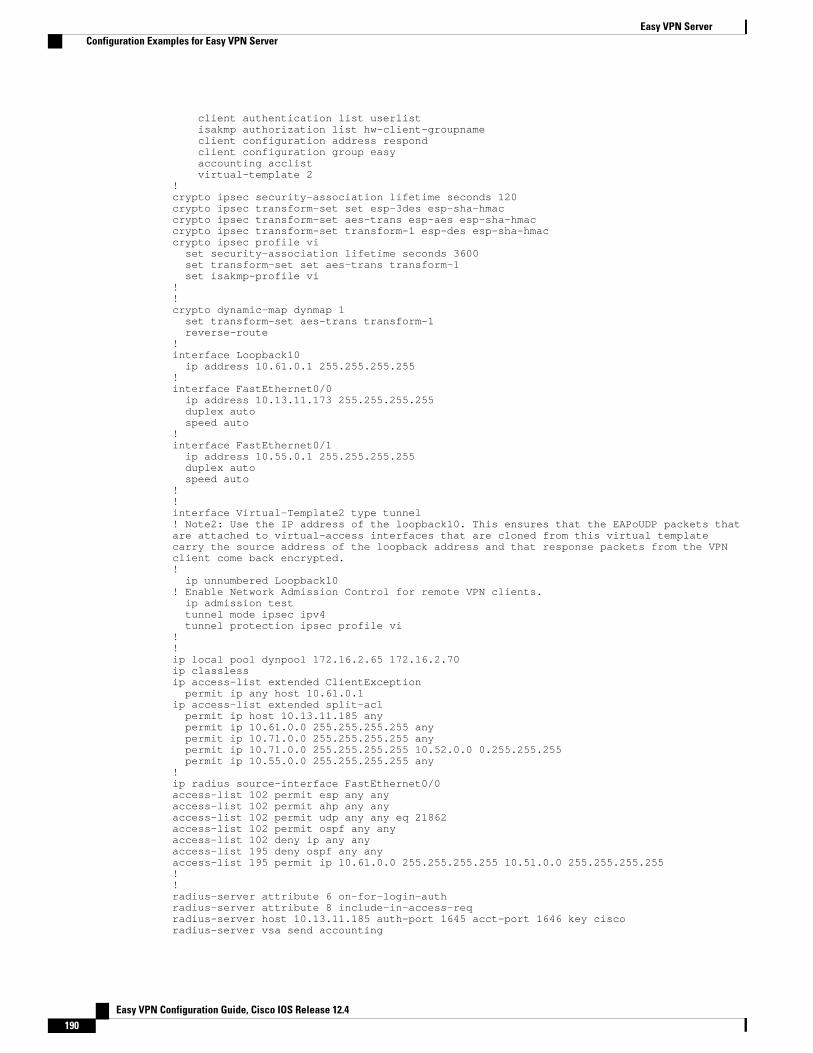
client authentication list userlist isakmp authorization list hw-client-groupname client configuration address respond client configuration group easy accounting acclist virtual-template 2!crypto ipsec security-association lifetime seconds 120crypto ipsec transform-set set esp-3des esp-sha-hmaccrypto ipsec transform-set aes-trans esp-aes esp-sha-hmaccrypto ipsec transform-set transform-1 esp-des esp-sha-hmaccrypto ipsec profile vi set security-association lifetime seconds 3600 set transform-set set aes-trans transform-1 set isakmp-profile vi!!crypto dynamic-map dynmap 1 set transform-set aes-trans transform-1 reverse-route!interface Loopback10 ip address 10.61.0.1 255.255.255.255!interface FastEthernet0/0 ip address 10.13.11.173 255.255.255.255 duplex auto speed auto!interface FastEthernet0/1 ip address 10.55.0.1 255.255.255.255 duplex auto speed auto!!interface Virtual-Template2 type tunnel! Note2: Use the IP address of the loopback10. This ensures that the EAPoUDP packets that are attached to virtual-access interfaces that are cloned from this virtual template carry the source address of the loopback address and that response packets from the VPN client come back encrypted.! ip unnumbered Loopback10! Enable Network Admission Control for remote VPN clients. ip admission test tunnel mode ipsec ipv4 tunnel protection ipsec profile vi!!ip local pool dynpool 172.16.2.65 172.16.2.70ip classlessip access-list extended ClientException permit ip any host 10.61.0.1ip access-list extended split-acl permit ip host 10.13.11.185 any permit ip 10.61.0.0 255.255.255.255 any permit ip 10.71.0.0 255.255.255.255 any permit ip 10.71.0.0 255.255.255.255 10.52.0.0 0.255.255.255 permit ip 10.55.0.0 255.255.255.255 any!ip radius source-interface FastEthernet0/0access-list 102 permit esp any anyaccess-list 102 permit ahp any anyaccess-list 102 permit udp any any eq 21862access-list 102 permit ospf any anyaccess-list 102 deny ip any anyaccess-list 195 deny ospf any anyaccess-list 195 permit ip 10.61.0.0 255.255.255.255 10.51.0.0 255.255.255.255!!radius-server attribute 6 on-for-login-authradius-server attribute 8 include-in-access-reqradius-server host 10.13.11.185 auth-port 1645 acct-port 1646 key ciscoradius-server vsa send accounting
Easy VPN Server Configuration Examples for Easy VPN Server
Easy VPN Configuration Guide, Cisco IOS Release 12.4190
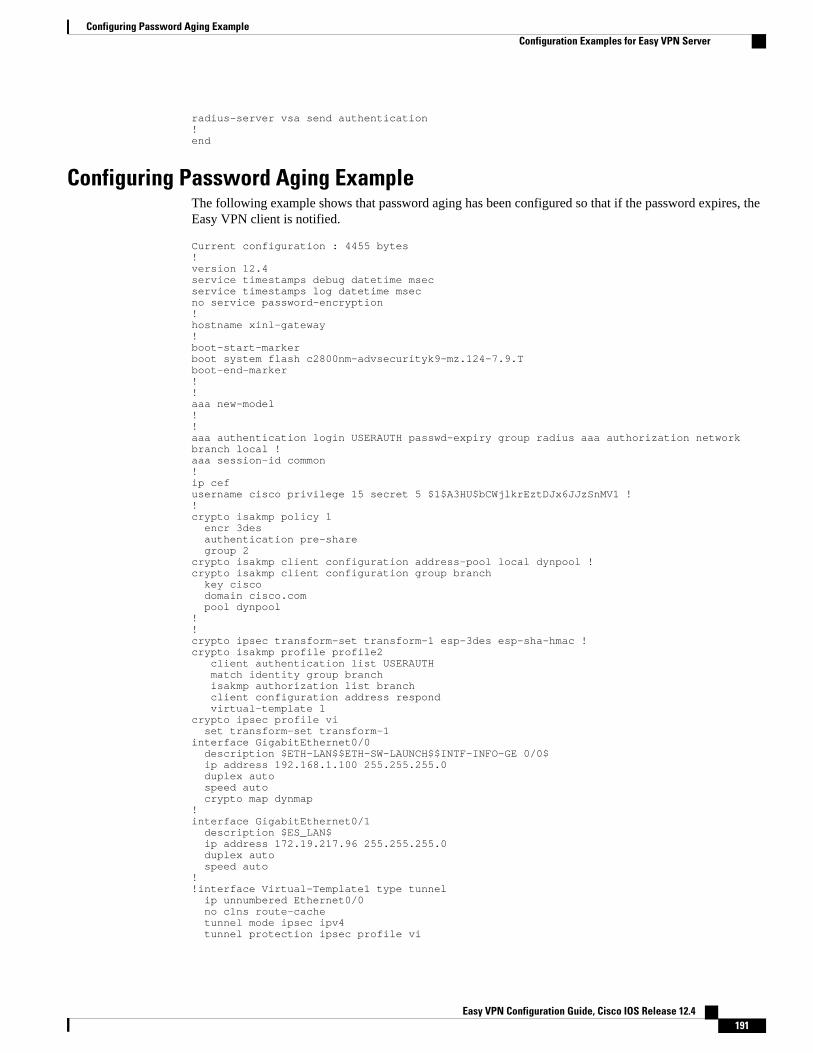
radius-server vsa send authentication!end
Configuring Password Aging ExampleThe following example shows that password aging has been configured so that if the password expires, theEasy VPN client is notified.
Current configuration : 4455 bytes!version 12.4service timestamps debug datetime msecservice timestamps log datetime msecno service password-encryption!hostname xinl-gateway!boot-start-markerboot system flash c2800nm-advsecurityk9-mz.124-7.9.Tboot-end-marker!!aaa new-model!!aaa authentication login USERAUTH passwd-expiry group radius aaa authorization network branch local !aaa session-id common!ip cefusername cisco privilege 15 secret 5 $1$A3HU$bCWjlkrEztDJx6JJzSnMV1 !!crypto isakmp policy 1 encr 3des authentication pre-share group 2crypto isakmp client configuration address-pool local dynpool !crypto isakmp client configuration group branch key cisco domain cisco.com pool dynpool!!crypto ipsec transform-set transform-1 esp-3des esp-sha-hmac !crypto isakmp profile profile2 client authentication list USERAUTH match identity group branch isakmp authorization list branch client configuration address respond virtual-template 1crypto ipsec profile vi set transform-set transform-1interface GigabitEthernet0/0 description $ETH-LAN$$ETH-SW-LAUNCH$$INTF-INFO-GE 0/0$ ip address 192.168.1.100 255.255.255.0 duplex auto speed auto crypto map dynmap!interface GigabitEthernet0/1 description $ES_LAN$ ip address 172.19.217.96 255.255.255.0 duplex auto speed auto!!interface Virtual-Template1 type tunnel ip unnumbered Ethernet0/0 no clns route-cache tunnel mode ipsec ipv4 tunnel protection ipsec profile vi
Configuring Password Aging ExampleConfiguration Examples for Easy VPN Server
Easy VPN Configuration Guide, Cisco IOS Release 12.4 191
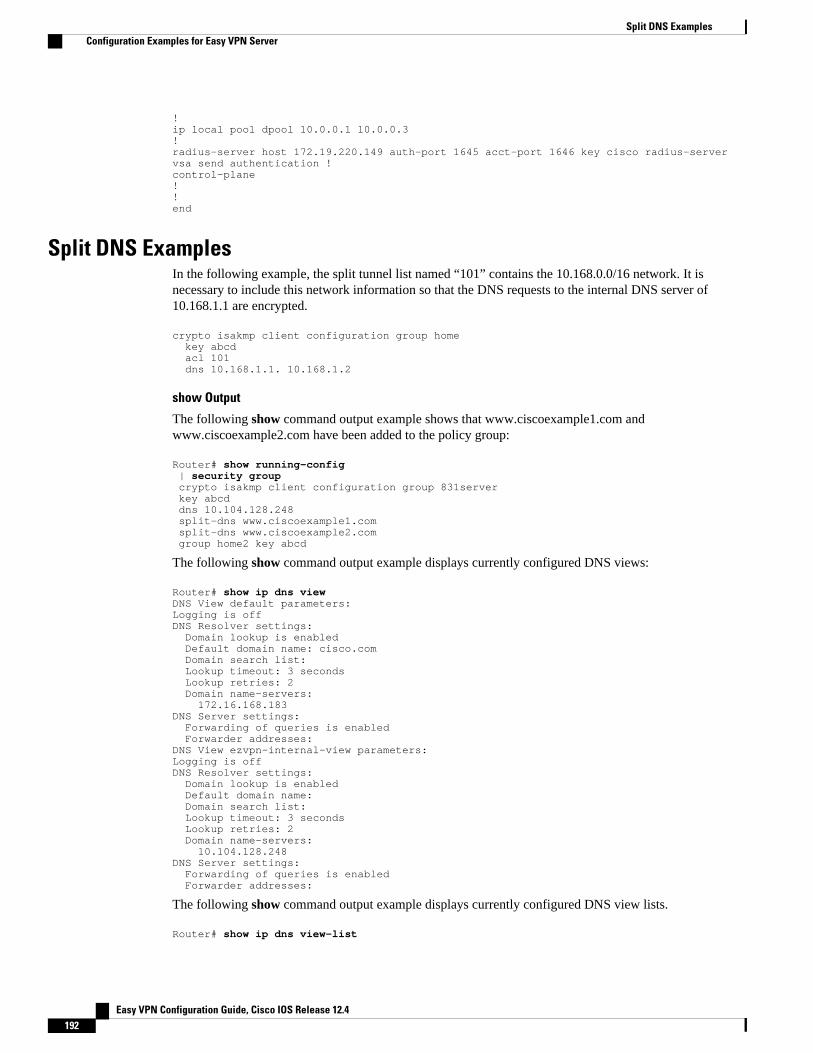
!ip local pool dpool 10.0.0.1 10.0.0.3!radius-server host 172.19.220.149 auth-port 1645 acct-port 1646 key cisco radius-server vsa send authentication !control-plane!!end
Split DNS ExamplesIn the following example, the split tunnel list named “101” contains the 10.168.0.0/16 network. It isnecessary to include this network information so that the DNS requests to the internal DNS server of10.168.1.1 are encrypted.
crypto isakmp client configuration group home key abcd acl 101 dns 10.168.1.1. 10.168.1.2
show Output
The following show command output example shows that www.ciscoexample1.com andwww.ciscoexample2.com have been added to the policy group:
Router# show running-config | security group crypto isakmp client configuration group 831server key abcd dns 10.104.128.248 split-dns www.ciscoexample1.com split-dns www.ciscoexample2.com group home2 key abcd
The following show command output example displays currently configured DNS views:
Router# show ip dns viewDNS View default parameters:Logging is offDNS Resolver settings: Domain lookup is enabled Default domain name: cisco.com Domain search list: Lookup timeout: 3 seconds Lookup retries: 2 Domain name-servers: 172.16.168.183DNS Server settings: Forwarding of queries is enabled Forwarder addresses:DNS View ezvpn-internal-view parameters:Logging is offDNS Resolver settings: Domain lookup is enabled Default domain name: Domain search list: Lookup timeout: 3 seconds Lookup retries: 2 Domain name-servers: 10.104.128.248DNS Server settings: Forwarding of queries is enabled Forwarder addresses:
The following show command output example displays currently configured DNS view lists.
Router# show ip dns view-list
Split DNS Examples Configuration Examples for Easy VPN Server
Easy VPN Configuration Guide, Cisco IOS Release 12.4192

View-list ezvpn-internal-viewlist: View ezvpn-internal-view: Evaluation order: 10 Restrict to ip dns name-list: 1 View default: Evaluation order: 20
The following show command output displays DNS name lists.
Router# show ip dns name-listip dns name-list 1 permit www.ciscoexample1.com permit www.ciscoexample2.com
DHCP Client Proxy ExamplesThe following examples display DHCP client proxy output information using show and debug commands.
show Output
Note To use the show ip dhcp command, the DHCP server must be a Cisco IOS server.
The following show ip dhcp pool command output provides information about the DHCP parameters:
Router# show ip dhcp poolPool dynpool : Utilization mark (high/low) : 100 / 0 Subnet size (first/next) : 0 / 0 Total addresses : 254 Leased addresses : 1 Pending event : none 1 subnet is currently in the pool: Current index IP address range Leased addresses 10.3.3.1 - 10.3.3.254 1 No relay targets associated with class aclass
The following show ip dhcp command output provides information about the DHCP bindings:
Router# show ip dhcp bindingBindings from all pools not associated with VRF:IP address Client-ID/ Lease expiration Type Hardware address/User name 10.3.3.5 0065.7a76.706e.2d63. Apr 04 2006 06:01 AM Automatic 6c69.656e.74
debug Output
The following example shows how the debug crypto isakmp and debug ip dhcp server eventscommandscan be used to troubleshoot your DHCP client proxy support configuration:
*Apr 3 06:01:32.047: ISAKMP: Config payload REQUEST *Apr 3 06:01:32.047: ISAKMP:(1002):checking request:*Apr 3 06:01:32.047: ISAKMP: IP4_ADDRESS*Apr 3 06:01:32.047: ISAKMP: IP4_NETMASK*Apr 3 06:01:32.047: ISAKMP: MODECFG_CONFIG_URL*Apr 3 06:01:32.047: ISAKMP: MODECFG_CONFIG_VERSION*Apr 3 06:01:32.047: ISAKMP: IP4_DNS*Apr 3 06:01:32.047: ISAKMP: IP4_DNS*Apr 3 06:01:32.047: ISAKMP: IP4_NBNS*Apr 3 06:01:32.047: ISAKMP: IP4_NBNS*Apr 3 06:01:32.047: ISAKMP: SPLIT_INCLUDE*Apr 3 06:01:32.047: ISAKMP: SPLIT_DNS*Apr 3 06:01:32.047: ISAKMP: DEFAULT_DOMAIN
DHCP Client Proxy ExamplesConfiguration Examples for Easy VPN Server
Easy VPN Configuration Guide, Cisco IOS Release 12.4 193
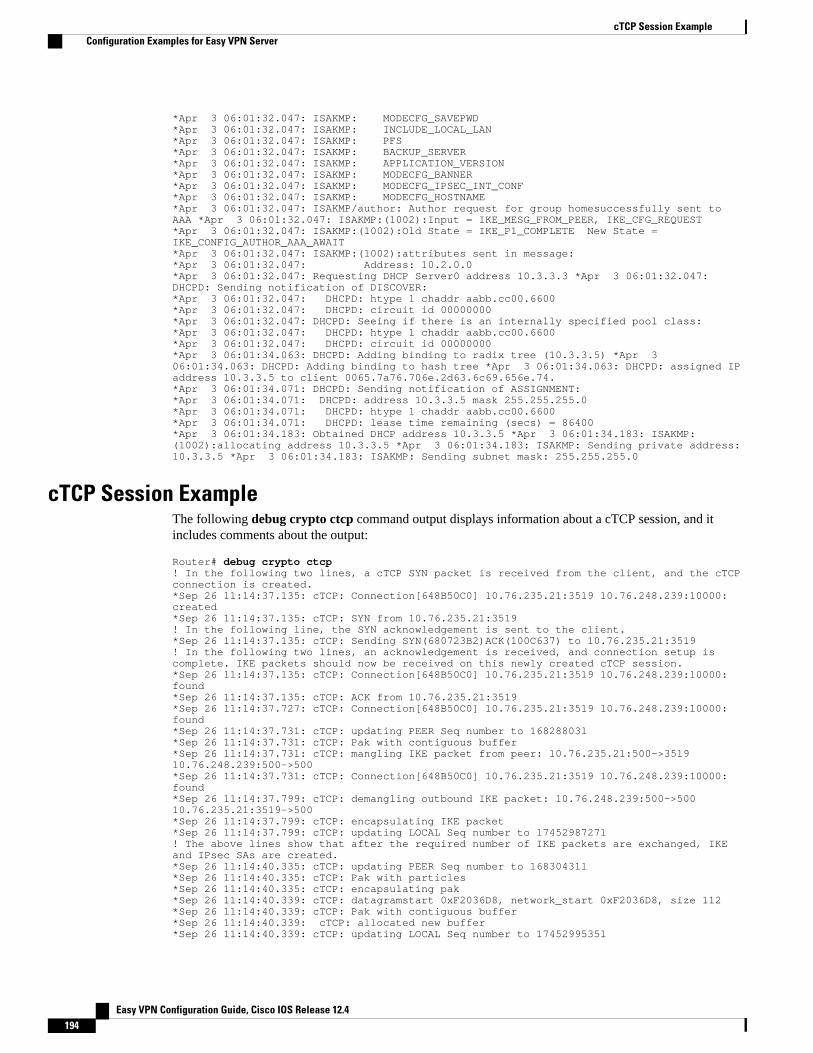
*Apr 3 06:01:32.047: ISAKMP: MODECFG_SAVEPWD*Apr 3 06:01:32.047: ISAKMP: INCLUDE_LOCAL_LAN*Apr 3 06:01:32.047: ISAKMP: PFS*Apr 3 06:01:32.047: ISAKMP: BACKUP_SERVER*Apr 3 06:01:32.047: ISAKMP: APPLICATION_VERSION*Apr 3 06:01:32.047: ISAKMP: MODECFG_BANNER*Apr 3 06:01:32.047: ISAKMP: MODECFG_IPSEC_INT_CONF*Apr 3 06:01:32.047: ISAKMP: MODECFG_HOSTNAME*Apr 3 06:01:32.047: ISAKMP/author: Author request for group homesuccessfully sent to AAA *Apr 3 06:01:32.047: ISAKMP:(1002):Input = IKE_MESG_FROM_PEER, IKE_CFG_REQUEST*Apr 3 06:01:32.047: ISAKMP:(1002):Old State = IKE_P1_COMPLETE New State = IKE_CONFIG_AUTHOR_AAA_AWAIT*Apr 3 06:01:32.047: ISAKMP:(1002):attributes sent in message:*Apr 3 06:01:32.047: Address: 10.2.0.0*Apr 3 06:01:32.047: Requesting DHCP Server0 address 10.3.3.3 *Apr 3 06:01:32.047: DHCPD: Sending notification of DISCOVER:*Apr 3 06:01:32.047: DHCPD: htype 1 chaddr aabb.cc00.6600*Apr 3 06:01:32.047: DHCPD: circuit id 00000000*Apr 3 06:01:32.047: DHCPD: Seeing if there is an internally specified pool class:*Apr 3 06:01:32.047: DHCPD: htype 1 chaddr aabb.cc00.6600*Apr 3 06:01:32.047: DHCPD: circuit id 00000000*Apr 3 06:01:34.063: DHCPD: Adding binding to radix tree (10.3.3.5) *Apr 3 06:01:34.063: DHCPD: Adding binding to hash tree *Apr 3 06:01:34.063: DHCPD: assigned IP address 10.3.3.5 to client 0065.7a76.706e.2d63.6c69.656e.74.*Apr 3 06:01:34.071: DHCPD: Sending notification of ASSIGNMENT:*Apr 3 06:01:34.071: DHCPD: address 10.3.3.5 mask 255.255.255.0*Apr 3 06:01:34.071: DHCPD: htype 1 chaddr aabb.cc00.6600*Apr 3 06:01:34.071: DHCPD: lease time remaining (secs) = 86400*Apr 3 06:01:34.183: Obtained DHCP address 10.3.3.5 *Apr 3 06:01:34.183: ISAKMP:(1002):allocating address 10.3.3.5 *Apr 3 06:01:34.183: ISAKMP: Sending private address: 10.3.3.5 *Apr 3 06:01:34.183: ISAKMP: Sending subnet mask: 255.255.255.0
cTCP Session ExampleThe following debug crypto ctcp command output displays information about a cTCP session, and itincludes comments about the output:
Router# debug crypto ctcp! In the following two lines, a cTCP SYN packet is received from the client, and the cTCP connection is created.*Sep 26 11:14:37.135: cTCP: Connection[648B50C0] 10.76.235.21:3519 10.76.248.239:10000: created*Sep 26 11:14:37.135: cTCP: SYN from 10.76.235.21:3519! In the following line, the SYN acknowledgement is sent to the client.*Sep 26 11:14:37.135: cTCP: Sending SYN(680723B2)ACK(100C637) to 10.76.235.21:3519! In the following two lines, an acknowledgement is received, and connection setup is complete. IKE packets should now be received on this newly created cTCP session.*Sep 26 11:14:37.135: cTCP: Connection[648B50C0] 10.76.235.21:3519 10.76.248.239:10000: found*Sep 26 11:14:37.135: cTCP: ACK from 10.76.235.21:3519*Sep 26 11:14:37.727: cTCP: Connection[648B50C0] 10.76.235.21:3519 10.76.248.239:10000: found*Sep 26 11:14:37.731: cTCP: updating PEER Seq number to 16828803l*Sep 26 11:14:37.731: cTCP: Pak with contiguous buffer*Sep 26 11:14:37.731: cTCP: mangling IKE packet from peer: 10.76.235.21:500->3519 10.76.248.239:500->500*Sep 26 11:14:37.731: cTCP: Connection[648B50C0] 10.76.235.21:3519 10.76.248.239:10000: found*Sep 26 11:14:37.799: cTCP: demangling outbound IKE packet: 10.76.248.239:500->500 10.76.235.21:3519->500*Sep 26 11:14:37.799: cTCP: encapsulating IKE packet*Sep 26 11:14:37.799: cTCP: updating LOCAL Seq number to 1745298727l! The above lines show that after the required number of IKE packets are exchanged, IKE and IPsec SAs are created.*Sep 26 11:14:40.335: cTCP: updating PEER Seq number to 16830431l*Sep 26 11:14:40.335: cTCP: Pak with particles*Sep 26 11:14:40.335: cTCP: encapsulating pak*Sep 26 11:14:40.339: cTCP: datagramstart 0xF2036D8, network_start 0xF2036D8, size 112*Sep 26 11:14:40.339: cTCP: Pak with contiguous buffer*Sep 26 11:14:40.339: cTCP: allocated new buffer*Sep 26 11:14:40.339: cTCP: updating LOCAL Seq number to 1745299535l
cTCP Session Example Configuration Examples for Easy VPN Server
Easy VPN Configuration Guide, Cisco IOS Release 12.4194
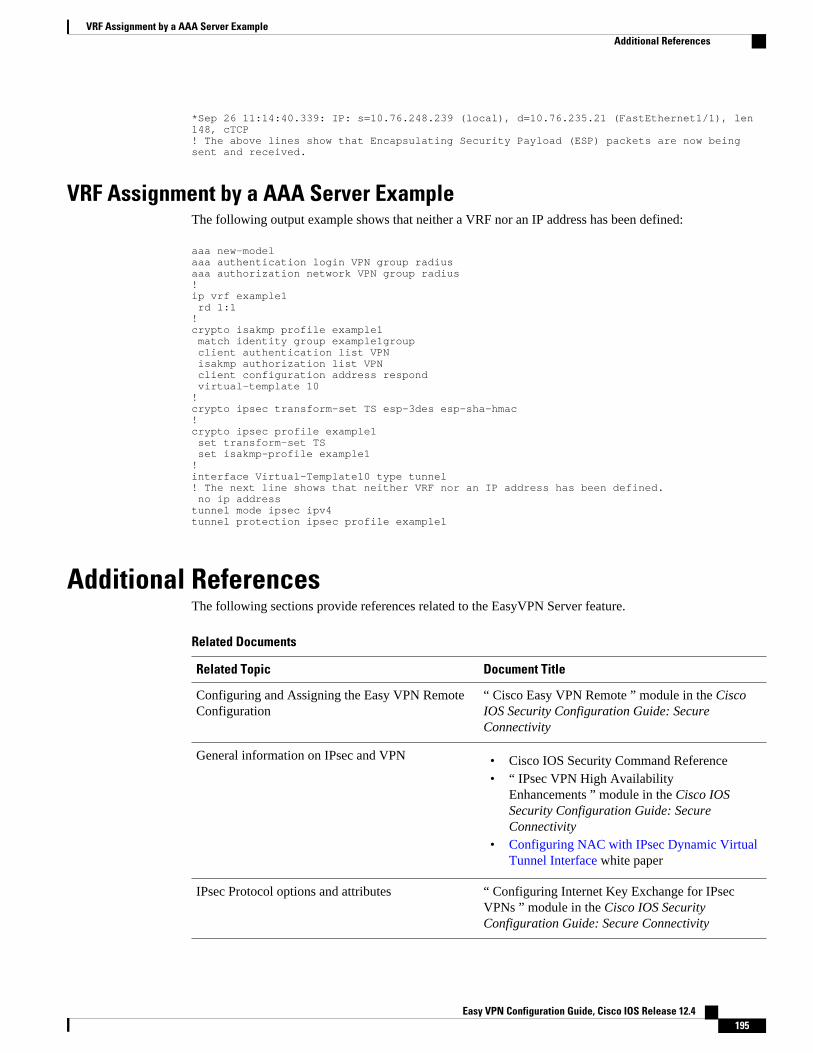
*Sep 26 11:14:40.339: IP: s=10.76.248.239 (local), d=10.76.235.21 (FastEthernet1/1), len 148, cTCP! The above lines show that Encapsulating Security Payload (ESP) packets are now being sent and received.
VRF Assignment by a AAA Server ExampleThe following output example shows that neither a VRF nor an IP address has been defined:
aaa new-modelaaa authentication login VPN group radiusaaa authorization network VPN group radius !ip vrf example1 rd 1:1!crypto isakmp profile example1 match identity group example1group client authentication list VPN isakmp authorization list VPN client configuration address respond virtual-template 10!crypto ipsec transform-set TS esp-3des esp-sha-hmac !crypto ipsec profile example1 set transform-set TS set isakmp-profile example1!interface Virtual-Template10 type tunnel! The next line shows that neither VRF nor an IP address has been defined. no ip addresstunnel mode ipsec ipv4tunnel protection ipsec profile example1
Additional ReferencesThe following sections provide references related to the EasyVPN Server feature.
Related Documents
Related Topic Document Title
Configuring and Assigning the Easy VPN RemoteConfiguration
“ Cisco Easy VPN Remote ” module in the CiscoIOS Security Configuration Guide: SecureConnectivity
General information on IPsec and VPN • Cisco IOS Security Command Reference• “ IPsec VPN High Availability
Enhancements ” module in the Cisco IOSSecurity Configuration Guide: SecureConnectivity
• Configuring NAC with IPsec Dynamic VirtualTunnel Interface white paper
IPsec Protocol options and attributes “ Configuring Internet Key Exchange for IPsecVPNs ” module in the Cisco IOS SecurityConfiguration Guide: Secure Connectivity
VRF Assignment by a AAA Server ExampleAdditional References
Easy VPN Configuration Guide, Cisco IOS Release 12.4 195
Related Topic Document Title
IPsec virtual tunnels “ IPsec Virtual Tunnel Interface ” module in theCisco IOS Security Configuration Guide: SecureConnectivity
Network Admission Control “ Network Admission Control ” module in theCisco IOS Security Configuration Guide: SecuringUser Services
RRI “ IPSec VPN High Availability Enhancements ”module in the Cisco IOS Security ConfigurationGuide: Secure Connectivity
Standards
Standard Title
None -
MIBs
MIB MIBs Link
None To locate and download MIBs for selectedplatforms, Cisco IOS software releases, and featuresets, use Cisco MIB Locator found at the followingURL:
http://www.cisco.com/go/mibs
RFCs
RFC Title
None -
Easy VPN Server Additional References
Easy VPN Configuration Guide, Cisco IOS Release 12.4196
Technical Assistance
Description Link
The Cisco Support website provides extensiveonline resources, including documentation and toolsfor troubleshooting and resolving technical issueswith Cisco products and technologies.
To receive security and technical information aboutyour products, you can subscribe to variousservices, such as the Product Alert Tool (accessedfrom Field Notices), the Cisco Technical ServicesNewsletter, and Really Simple Syndication (RSS)Feeds.
Access to most tools on the Cisco Support websiterequires a Cisco.com user ID and password.
http://www.cisco.com/techsupport
Feature Information for Easy VPN ServerThe following table provides release information about the feature or features described in this module.This table lists only the software release that introduced support for a given feature in a given softwarerelease train. Unless noted otherwise, subsequent releases of that software release train also support thatfeature.
Use Cisco Feature Navigator to find information about platform support and Cisco software image support.To access Cisco Feature Navigator, go to www.cisco.com/go/cfn. An account on Cisco.com is not required.
Table 8 Feature Information for Easy VPN Server
Feature Name Releases Feature Information
Easy VPN Server 12.2(8)T The Easy VPN Server featureintroduces server support for theCisco VPN Client Release 3.xand later software clients andCisco VPN hardware clients(such as the Cisco 800, Cisco900, Cisco 1700, VPN 3002, andPIX 501 devices). This featureallows a remote end user tocommunicate using IP Security(IPsec) with any Cisco IOSVirtual Private Network (VPN)gateway. Centrally managedIPsec policies are “pushed” to theclient device by the server,minimizing configuration by theend user.
Easy VPN ServerFeature Information for Easy VPN Server
Easy VPN Configuration Guide, Cisco IOS Release 12.4 197
Feature Name Releases Feature Information
12.3(2)T The following commands wereintroduced or modified: RADIUSsupport for user profiles, user-based policy control, sessionmonitoring for VPN groupaccess, backup-gateway list, andPFS.
12.3(7)T The netmask command wasintegrated for use on the EasyVPN server.
For information aboutconfiguring this command, seethe following section:
12.4(2)T 12.2(33)SXH The following feature was addedin this release:
• Banner, Auto-Update, andBrowser ProxyEnhancements
12.4(6)T The Central Policy Push FirewallPolicy Push feature was added.
12.2(33)SRA This feature was integrated intoCisco IOS Release 12.2(33)SRA.
Easy VPN Server Feature Information for Easy VPN Server
Easy VPN Configuration Guide, Cisco IOS Release 12.4198
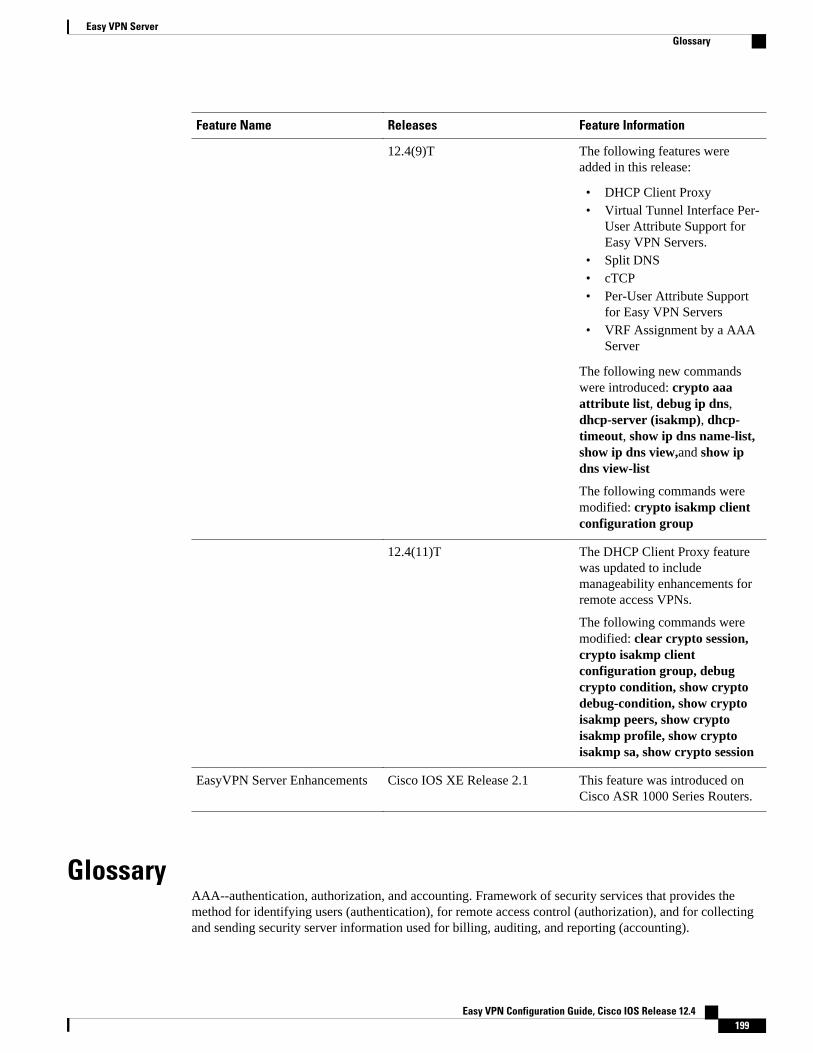
Feature Name Releases Feature Information
12.4(9)T The following features wereadded in this release:
• DHCP Client Proxy• Virtual Tunnel Interface Per-
User Attribute Support forEasy VPN Servers.
• Split DNS• cTCP• Per-User Attribute Support
for Easy VPN Servers• VRF Assignment by a AAA
Server
The following new commandswere introduced: crypto aaaattribute list, debug ip dns,dhcp-server (isakmp), dhcp-timeout, show ip dns name-list,show ip dns view,and show ipdns view-list
The following commands weremodified: crypto isakmp clientconfiguration group
12.4(11)T The DHCP Client Proxy featurewas updated to includemanageability enhancements forremote access VPNs.
The following commands weremodified: clear crypto session,crypto isakmp clientconfiguration group, debugcrypto condition, show cryptodebug-condition, show cryptoisakmp peers, show cryptoisakmp profile, show cryptoisakmp sa, show crypto session
EasyVPN Server Enhancements Cisco IOS XE Release 2.1 This feature was introduced onCisco ASR 1000 Series Routers.
GlossaryAAA--authentication, authorization, and accounting. Framework of security services that provides themethod for identifying users (authentication), for remote access control (authorization), and for collectingand sending security server information used for billing, auditing, and reporting (accounting).
Easy VPN ServerGlossary
Easy VPN Configuration Guide, Cisco IOS Release 12.4 199
aggressive mode (AM)--Mode during Internet Key Exchange negotiation. Compared to main mode (MM),AM eliminates several steps, which makes it faster but less secure than MM. Cisco IOS software willrespond in aggressive mode to an Internet Key Exchange (IKE) peer that initiates aggressive mode.
AV pair--attribute-value pair. Additional authentication and authorization information in the followingformat: Cisco:AVPair=“protocol:attribute=value”.
IKE--Internet Key Exchange. Hybrid protocol that implements Oakley key exchange and Skeme keyexchange inside the ISAKMP framework. Although IKE can be used with other protocols, its initialimplementation is with IPsec. IKE provides authentication of the IPsec peers, negotiates IPsec keys, andnegotiates IPsec security associations.
IPsec--IP Security Protocol. Framework of open standards that provides data confidentiality, data integrity,and data authentication between participating peers. IPsec provides these security services at the IP layer.IPsec uses IKE to handle negotiation of protocols and algorithms based on local policy and to generate theencryption and authentication keys to be used by IPsec. IPsec can be used to protect one or more data flowsbetween a pair of hosts, between a pair of security gateways, or between a security gateway and a host.
ISAKMP--Internet Security Association Key Management Protocol. Protocol framework that definespayload formats, the mechanics of implementing a key exchange protocol, and the negotiation of a securityassociation.
MM--main mode. Mode that is slower than aggressive mode but more secure and more flexible thanaggressive mode because it can offer an IKE peer more security proposals. The default action for IKEauthentication (Rivest, Shamir, and Adelman signature (rsa-sig), RSA encryption (rsa-encr), or preshared)is to initiate main mode.
policy push --Allows administrators to push policies that enforce security to the Cisco Easy VPN(software) Client and related firewall software.
reverse route injection (RRI)--Simplified network design for VPNs on which there is a requirement forredundancy or load balancing. RRI works with both dynamic and static crypto maps.
In the dynamic case, as remote peers establish IPsec security associations with an RRI enabled router, astatic route is created for each subnet or host protected by that remote peer. For static crypto maps, a staticroute is created for each destination of an extended access-list rule.
SA--security association. Description of how two or more entities will utilize security services tocommunicate securely. For example, an IPsec SA defines the encryption algorithm (if used), theauthentication algorithm, and the shared session key to be used during the IPsec connection.
Both IPsec and IKE require and use SAs to identify the parameters of their connections. IKE can negotiateand establish its own SA. The IPsec SA is established either by IKE or by manual user configuration.
VPN --Virtual Private Network. Framework that consists of multiple peers transmitting private datasecurely to one another over an otherwise public infrastructure. In this framework, inbound and outboundnetwork traffic is protected using protocols that tunnel and encrypt all data. This framework permitsnetworks to extend beyond their local topology, while remote users are provided with the appearance andfunctionality of a direct network connection.
Cisco and the Cisco logo are trademarks or registered trademarks of Cisco and/or its affiliates in the U.S.and other countries. To view a list of Cisco trademarks, go to this URL: www.cisco.com/go/trademarks.Third-party trademarks mentioned are the property of their respective owners. The use of the word partnerdoes not imply a partnership relationship between Cisco and any other company. (1110R)
Any Internet Protocol (IP) addresses and phone numbers used in this document are not intended to beactual addresses and phone numbers. Any examples, command display output, network topology diagrams,
Easy VPN Server
Easy VPN Configuration Guide, Cisco IOS Release 12.4200

and other figures included in the document are shown for illustrative purposes only. Any use of actual IPaddresses or phone numbers in illustrative content is unintentional and coincidental.
Easy VPN Server
Easy VPN Configuration Guide, Cisco IOS Release 12.4 201

VRF Assignment by a AAA Server Example
Easy VPN Configuration Guide, Cisco IOS Release 12.4202