Embed Size (px)
Citation preview
SANDIA REPORTSAND2002-3924Unlimited ReleasePrinted December 2002
Editing Tips for Writers of TechnicalPublications in the Joint NuclearWeapons Publication System (JNWPS)
Tara S. Allen
Prepared bySandia National LaboratoriesAlbuquerque, New Mexico 87185 and Livermore, California 94550
Sandia is a multiprogram laboratory operated by Sandia Corporation,a Lockheed Martin Company, for the United States Department ofEnergy under Contract DE-AC04-94AL85000.
Approved for public release; further dissemination unlimited.

Issued by Sandia National Laboratories, operated for the United States Departmentof Energy by Sandia Corporation.
NOTICE: This report was prepared as an account of work sponsored by an agencyof the United States Government. Neither the United States Government, nor anyagency thereof, nor any of their employees, nor any of their contractors,subcontractors, or their employees, make any warranty, express or implied, orassume any legal liability or responsibility for the accuracy, completeness, orusefulness of any information, apparatus, product, or process disclosed, or representthat its use would not infringe privately owned rights. Reference herein to anyspecific commercial product, process, or service by trade name, trademark,manufacturer, or otherwise, does not necessarily constitute or imply its endorsement,recommendation, or favoring by the United States Government, any agency thereof,or any of their contractors or subcontractors. The views and opinions expressedherein do not necessarily state or reflect those of the United States Government, anyagency thereof, or any of their contractors.
Printed in the United States of America. This report has been reproduced directlyfrom the best available copy.
Available to DOE and DOE contractors fromU.S. Department of EnergyOffice of Scientific and Technical InformationP.O. Box 62Oak Ridge, TN 37831
Telephone: (865)576-8401Facsimile: (865)576-5728E-Mail: [email protected] ordering: http://www.doe.gov/bridge
Available to the public fromU.S. Department of CommerceNational Technical Information Service5285 Port Royal RdSpringfield, VA 22161
Telephone: (800)553-6847Facsimile: (703)605-6900E-Mail: [email protected] order: http://www.ntis.gov/ordering.htm
3
SAND2002-3924Unlimited Release
Printed December 2002
Editing TipsFor Writers of Technical Publications
In the Joint Nuclear Weapons PublicationSystem (JNWPS)
Tara S. AllenTechnical Publications/Aircraft Compatibility Department
Sandia National LaboratoriesP.O. Box 5800
Albuquerque, NM 87185-0645
Abstract
These editing tips contain helpful suggestions to assist writers who are writing,editing, and publishing technical publications in the JNWPS. The suggestionsclarify some of the most common writing problems and requirements of twopublications used in the JNWPS: DOE-DTRA TP 1-1, Joint Nuclear WeaponsPublications System Operating Procedures, Specifications, and Standards, andUnited States Government Printing Office Style Manual. Topics includerequirements for abbreviations, formats for drafts, layouts of illustrations andtables, appropriate wording for interim changes, guidance for creating a list ofeffective pages, how to insert and delete pages and paragraphs, referencing othertechnical publications, use of revision bars, requirements for safety precautions,use of hyphens, and how to place warnings, cautions, and notes. Also includedare a writer’s checklist, samples of draft title pages, and a section of helpful tipsfor the writers who use the department’s desktop publishing software program,Adobe� FrameMaker�.

4
Acknowledgment
The author thanks the following Technical Publications Department 2912 staff members for theircontributions to the Adobe� FrameMaker� addendum: Scott Lunsford, Charlotte Johnson,Silviano Candelaria, and John Roberts.

5
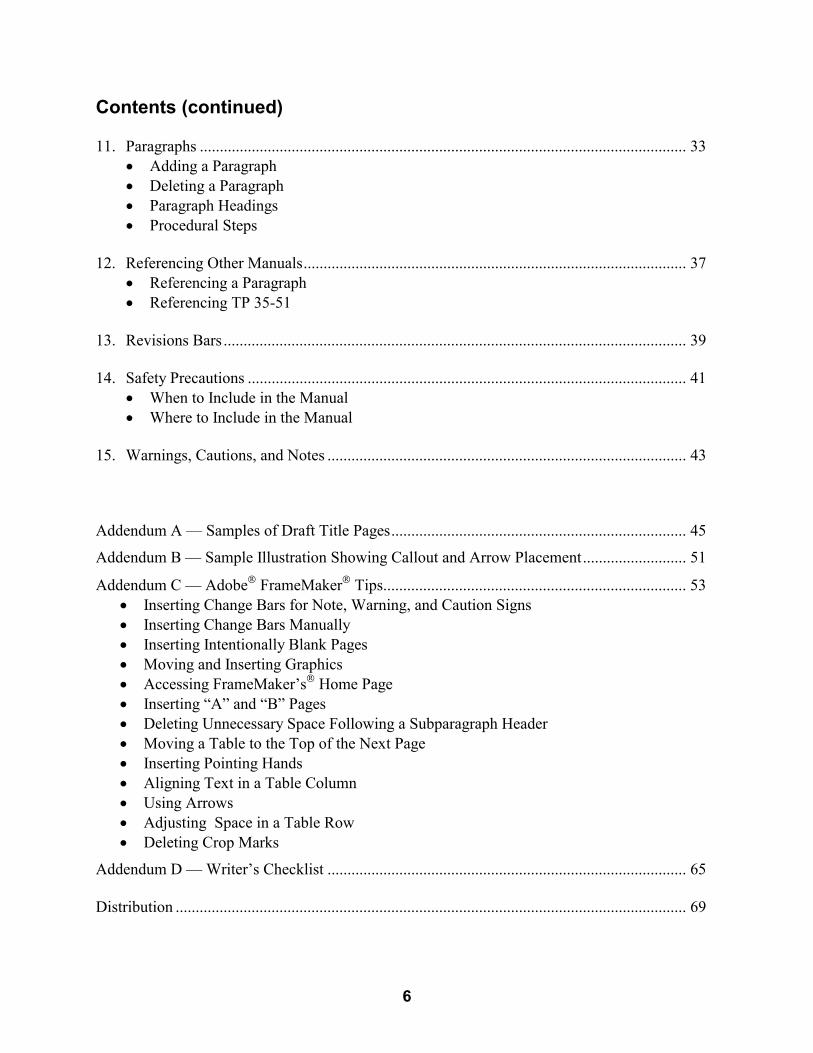
Contents
1. Abbreviations and Acronyms ......................................................................................... 7� When to Use� Approximately vs. Approx.� Resources
2. Authentication Page Army Tracking Number.................................................................... 9 3. Drafts .................................................................................................................................. 11 4. Footnotes ............................................................................................................................ 13 5. Grammar, Capitalization, and Compound Words .............................................................. 15
� Which vs. That� Capitalization� Compound Words
6. Hyphens and Dashes........................................................................................................... 17
7. Illustrations and Tables....................................................................................................... 19� Location� Arrows � Callouts� Pointing Hands� Formatting Tables� Text on Same Page as Figure or Table
8. Interim Changes.................................................................................................................. 27
� Wording of Instructions� Proposed Interim Changes
9. List of Effective Pages........................................................................................................ 29
� Identifying “A” and “B” Pages in the LOEP� Total Number of Pages
10. Pages................................................................................................................................... 31
� Inserting “A” and “B” Pages� Identifying “A” and “B” Pages in the LOEP� Backup Pages� Blank Pages
6
Contents (continued) 11. Paragraphs .......................................................................................................................... 33
� Adding a Paragraph� Deleting a Paragraph� Paragraph Headings� Procedural Steps
12. Referencing Other Manuals................................................................................................ 37
� Referencing a Paragraph� Referencing TP 35-51
13. Revisions Bars .................................................................................................................... 39 14. Safety Precautions .............................................................................................................. 41
� When to Include in the Manual� Where to Include in the Manual
15. Warnings, Cautions, and Notes .......................................................................................... 43
Addendum A — Samples of Draft Title Pages.......................................................................... 45
Addendum B — Sample Illustration Showing Callout and Arrow Placement.......................... 51
Addendum C — Adobe� FrameMaker� Tips............................................................................ 53� Inserting Change Bars for Note, Warning, and Caution Signs� Inserting Change Bars Manually� Inserting Intentionally Blank Pages� Moving and Inserting Graphics� Accessing FrameMaker’s� Home Page� Inserting “A” and “B” Pages� Deleting Unnecessary Space Following a Subparagraph Header� Moving a Table to the Top of the Next Page� Inserting Pointing Hands� Aligning Text in a Table Column� Using Arrows� Adjusting Space in a Table Row� Deleting Crop Marks
Addendum D — Writer’s Checklist .......................................................................................... 65
Distribution ................................................................................................................................ 69
7
Editing TipsFor Writers of Technical Publications
In the Joint Nuclear Weapons PublicationSystem (JNWPS)
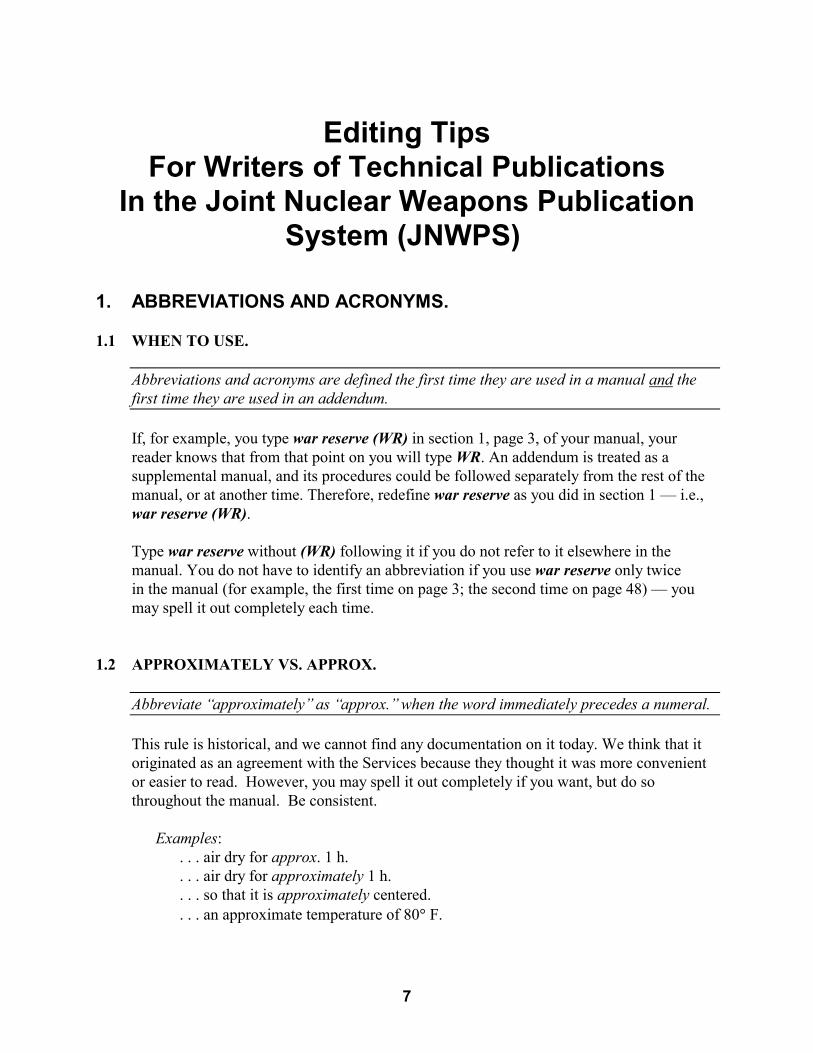
1. ABBREVIATIONS AND ACRONYMS.
1.1 WHEN TO USE.
Abbreviations and acronyms are defined the first time they are used in a manual and thefirst time they are used in an addendum.
If, for example, you type war reserve (WR) in section 1, page 3, of your manual, yourreader knows that from that point on you will type WR. An addendum is treated as asupplemental manual, and its procedures could be followed separately from the rest of themanual, or at another time. Therefore, redefine war reserve as you did in section 1 — i.e.,war reserve (WR).
Type war reserve without (WR) following it if you do not refer to it elsewhere in themanual. You do not have to identify an abbreviation if you use war reserve only twicein the manual (for example, the first time on page 3; the second time on page 48) — youmay spell it out completely each time.
1.2 APPROXIMATELY VS. APPROX.
Abbreviate “approximately” as “approx.” when the word immediately precedes a numeral.
This rule is historical, and we cannot find any documentation on it today. We think that itoriginated as an agreement with the Services because they thought it was more convenientor easier to read. However, you may spell it out completely if you want, but do sothroughout the manual. Be consistent.
Examples:. . . air dry for approx. 1 h.. . . air dry for approximately 1 h.. . . so that it is approximately centered.. . . an approximate temperature of 80� F.

8
1.3 RESOURCES.
Use government and Sandia resources to correctly write abbreviations and acronyms.
Before going to the dictionary, use the following sources:
� United States Government Printing Office Style Manual, section 9, forabbreviations. Department writers should have their own copies of this style guide.
� Sandia Report, SAND2002-2019, for Sandia-approved technical abbreviations andacronyms. The report is on the Sandia web.
9
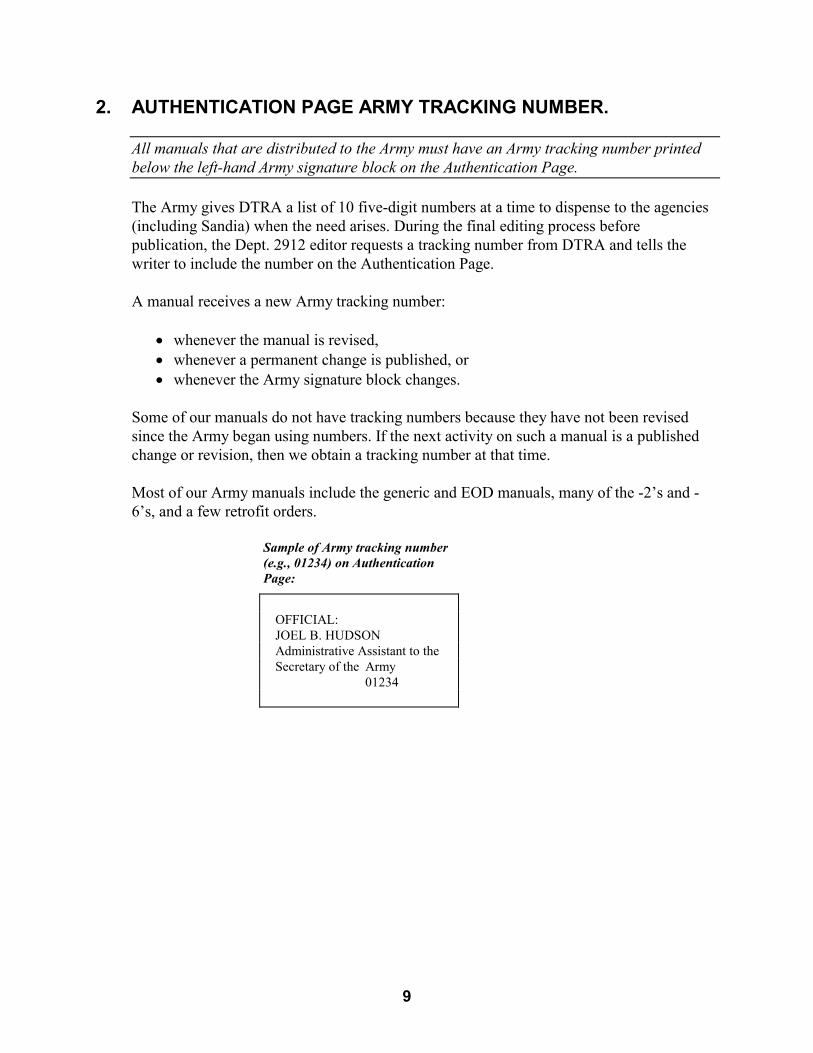
2. AUTHENTICATION PAGE ARMY TRACKING NUMBER.
All manuals that are distributed to the Army must have an Army tracking number printedbelow the left-hand Army signature block on the Authentication Page.
The Army gives DTRA a list of 10 five-digit numbers at a time to dispense to the agencies(including Sandia) when the need arises. During the final editing process beforepublication, the Dept. 2912 editor requests a tracking number from DTRA and tells thewriter to include the number on the Authentication Page.
A manual receives a new Army tracking number:
� whenever the manual is revised,� whenever a permanent change is published, or� whenever the Army signature block changes.
Some of our manuals do not have tracking numbers because they have not been revisedsince the Army began using numbers. If the next activity on such a manual is a publishedchange or revision, then we obtain a tracking number at that time. Most of our Army manuals include the generic and EOD manuals, many of the -2’s and -6’s, and a few retrofit orders.
Sample of Army tracking number(e.g., 01234) on AuthenticationPage:
OFFICIAL:JOEL B. HUDSONAdministrative Assistant to theSecretary of the Army
01234

10
THIS PAGE INTENTIONALLY LEFT BLANK.
11
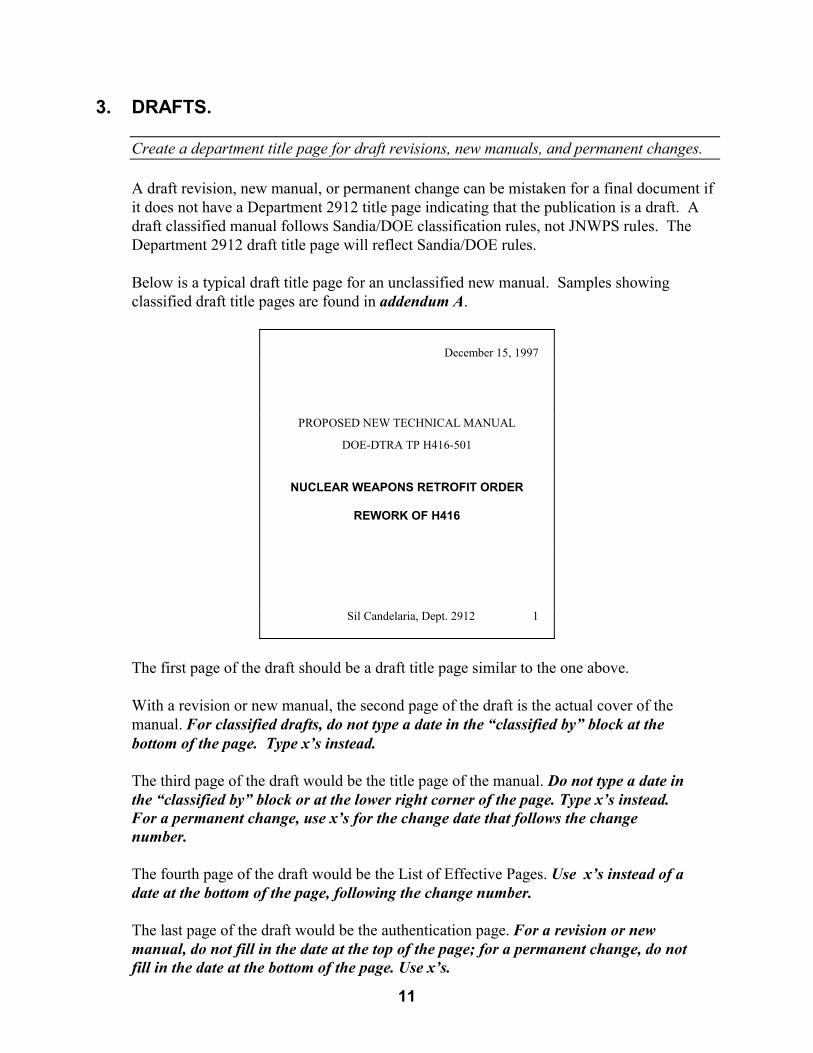
3. DRAFTS.
Create a department title page for draft revisions, new manuals, and permanent changes.
A draft revision, new manual, or permanent change can be mistaken for a final document ifit does not have a Department 2912 title page indicating that the publication is a draft. Adraft classified manual follows Sandia/DOE classification rules, not JNWPS rules. TheDepartment 2912 draft title page will reflect Sandia/DOE rules.
Below is a typical draft title page for an unclassified new manual. Samples showingclassified draft title pages are found in addendum A.
December 15, 1997
PROPOSED NEW TECHNICAL MANUAL
DOE-DTRA TP H416-501
NUCLEAR WEAPONS RETROFIT ORDER
REWORK OF H416
Sil Candelaria, Dept. 2912 1
The first page of the draft should be a draft title page similar to the one above.
With a revision or new manual, the second page of the draft is the actual cover of themanual. For classified drafts, do not type a date in the “classified by” block at thebottom of the page. Type x’s instead.
The third page of the draft would be the title page of the manual. Do not type a date inthe “classified by” block or at the lower right corner of the page. Type x’s instead.For a permanent change, use x’s for the change date that follows the changenumber.
The fourth page of the draft would be the List of Effective Pages. Use x’s instead of adate at the bottom of the page, following the change number.
The last page of the draft would be the authentication page. For a revision or newmanual, do not fill in the date at the top of the page; for a permanent change, do notfill in the date at the bottom of the page. Use x’s.

12
THIS PAGE INTENTIONALLY LEFT BLANK.
13
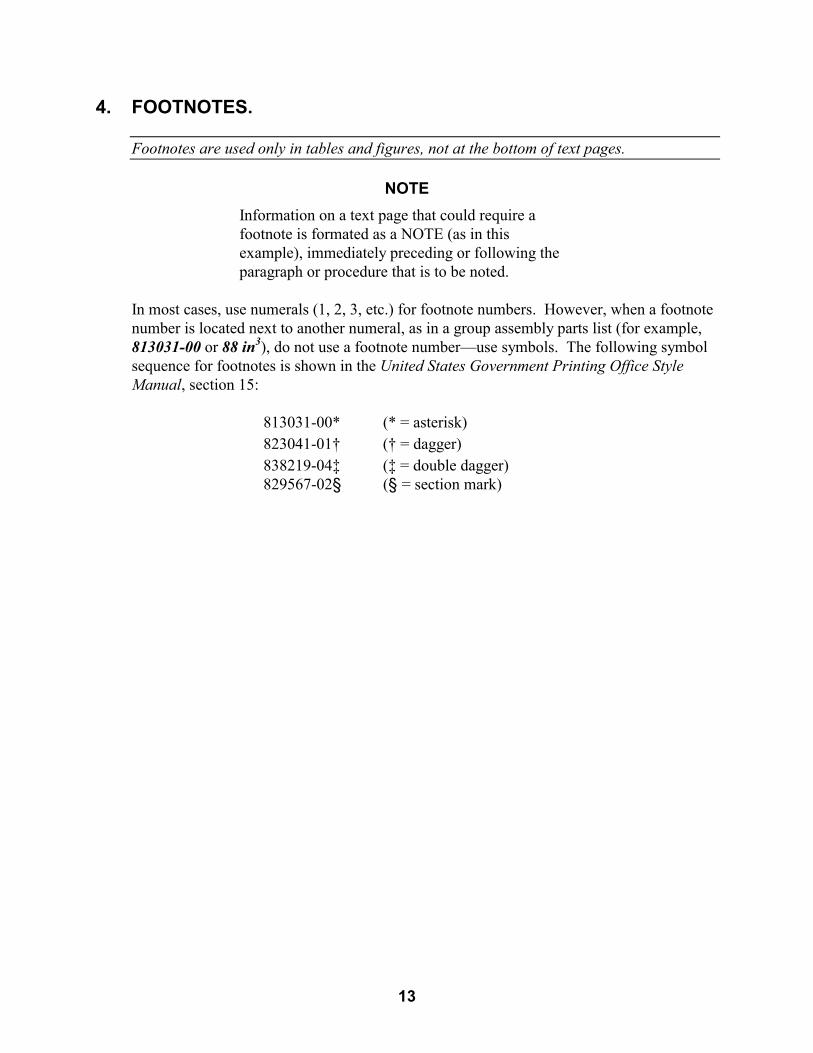
4. FOOTNOTES.
Footnotes are used only in tables and figures, not at the bottom of text pages.
NOTEInformation on a text page that could require afootnote is formated as a NOTE (as in thisexample), immediately preceding or following theparagraph or procedure that is to be noted.
In most cases, use numerals (1, 2, 3, etc.) for footnote numbers. However, when a footnotenumber is located next to another numeral, as in a group assembly parts list (for example,813031-00 or 88 in3), do not use a footnote number—use symbols. The following symbolsequence for footnotes is shown in the United States Government Printing Office StyleManual, section 15:
813031-00* (* = asterisk)823041-01† († = dagger)838219-04‡ (‡ = double dagger)829567-02§ (§ = section mark)

14
THIS PAGE INTENTIONALLY LEFT BLANK
15
5. GRAMMAR, CAPITALIZATION, AND COMPOUND WORDS.
5.1 WHICH VS. THAT.
“Which” introduces nonessential clauses. “That” introduces essential clauses. They are notinterchangeable.
Example of a nonessential clause (the word “which” is preceded by a comma and the clauseends with a comma or a period):
The report, which I sent you last week, should be of help.
The example sentence above contains a nonessential clause—which I sent you lastweek. It is nonessential because the sentence is just as important if we leave it out andsay: The report should be of help. It doesn’t matter when you sent the report; what’simportant is that the report should be of help.
Example of an essential clause (the word “that” is not preceded by a comma):
The report that I sent you last week should be of some help.
The example sentence above has an essential clause—that I sent you last week. It isessential because you are specifying the report that you sent last week. You do not wantto confuse it with a report you might have sent two weeks ago or that someone elsemight have sent. Only the report sent last week by you is important. This clause cannotbe left out.
The following is an example from one of our manuals—something that could be writtentwo ways with two different meanings:
� An essential clause, where the word “that” is not preceded by a comma:
The TES is a specially designed seal that is intended to display visibleindications.
The clause that is intended to display visible indications is essential. The clausecannot be left out; therefore, we use “that.” You don’t want to only say, The TES is aseal. The rest of the clause is the important part of the sentence.
(5. continued)
16
5.1 WHICH VS. THAT (continued).
� A nonessential clause, where the word “which” is preceded by a comma.
The TES, which is intended to display visible indications, is a speciallydesigned seal.
The clause which is intended to display visible indications is nonessential, so we use“which”; the clause could be omitted. The sentence could simply say, The TES is aspecially designed seal, and you’d get your point across. But you want to give thereader some extra, nonessential information—that the TES is intended to displayvisible indications—which is not the essential part of your sentence.
5.2 CAPITALIZATION.
Use government and Sandia resources to identify words that are capitalized.
Before going to the dictionary, use the following sources:
� United States Government Printing Office Style Manual, sections 3 and 4, forcapitalization. Department writers should have their own copies of this style guide.
� Sandia Report, SAND2002-2019, for Sandia-approved technical abbreviations andacronyms and for identifying the definitions that should be capitalized. The reportis on the Sandia web.
NOTEMost acronyms, when spelled out in full, are not capitalized!
5.3 COMPOUND WORDS.
Use government and Sandia resources to identify compound words.
Before going to the dictionary, look up compound words and hyphenation in the UnitedStates Government Printing Office Style Manual, sections 6 and 7. Department writersshould have their own copies of this style guide.
17
6. HYPHENS AND DASHES.
6.1 HYPHENS.
Know when to insert a hyphen following a numeral.
When a number and a noun form a one-thought modifier before a noun (as in six-storybuilding), make the noun singular (story) and hyphenate the expression (six-story) thatcomes before the noun (building). For example:
� USE A HYPHEN:a 5-liter container (“liter” is singular and needs the hyphen)
� DON’T USE A HYPHEN:a container that holds 5 liters (no hyphen with plural “liters”)
� USE A HYPHEN:an 8-foot ceiling (“foot” is singular and needs the hyphen)
� DON’T USE A HYPHEN:a ceiling 8 feet above the floor (no hyphen with plural “feet”)
When two or more hyphenated adjectives have a common basic element and this element isshown only with the last term (as in 10- to 12-hour trip), insert a suspending hyphen afterthe incomplete adjective (10- ) to indicate a relationship with the last term (trip). Forexample:
� USE ONE SUSPENDING HYPHEN (e.g., 6-):a 6- to 8-week delay (a space follows the first hyphen) (“week” is singular)
� USE TWO SUSPENDING HYPHENS (e.g., 6- and 12- ):6-, 12-, and 24-month CDs (a comma and a space follow the first and secondhyphens) (“month” is singular)
The same rule applies when using numbers with abbreviations. For example:
� 9-V battery (we are pronouncing this as “nine volt battery”; without the hyphen, wewould be pronouncing it as “nine volts battery,” which would be incorrect English)
� 3-in width (we are pronouncing this as “three inch width”; without the hyphen, wewould be pronouncing it as “three inches width,” which would be incorrect English)
(6. continued)
18
6.2 DASHES.
Should a hyphen be a dash? Should an en-dash be an em-dash?
Use an en-dash ( – ) to take the place of “through.”
For example:The meeting will be October 10–15.
Use an em-dash ( — ) to signify a break in thought.
For example:Don’t believe him—ever!
In TP writing, we also use an em-dash when referring to the headings and subheadings inother TPs. See the section on Referencing Other Manuals.
19
7. ILLUSTRATIONS AND TABLES.
7.1 LOCATION.
Place illustrations and tables at the top of the page.
TP 1-1 TP 1-1 suggests that, “whenever possible,” figures be located on the same page asthe related text or on a facing page. We have seen manuals other than ours thatshow figures at the top of the page but their text references are found in all kindsof locations: (a) on the page preceding the figure, (b) on the same page as thefigure, (c) on the same page, but preceding the illustration, (d) on the same page,but following a illustration, and (e) not on a “facing” page!
History The Military Liaison Technical Publications group long ago decided to beconsistent with illustration and table locations and to always place them at the topof the page following the text reference. Because TP 1-1 gave us lots of choices, itwas easy and more convenient to follow this one rule. One of the main benefitswas not having to constantly resize our illustrations to fit particular pages ormanuals. The goal was consistency—to avoid a page-layout hodgepodge.
Suppose you write a new manual and want to place all your illustrations and tables so thatthey are always placed on the same page as their text references. Here’s what you mighthave to do:
. . . the following are NOT recommended . . . !� You resize each illustration to fit in a specific space immediately following the
text reference. [Depending on the space, some of those illustrations might have tobe sized awfully tiny! Too bad you’re not using the original size as is, thus savingyourself a lot of time.]
� Sometimes the space for the illustration (or table) is too small, so you put theillustration on the next page. [You can be inconsistent; after all, TP 1-1 says youcan do it both ways.] [P.S. The next page isn’t a “facing” page, but so what?]
� Like the illustrations, you shrink the type size of some of your tables so that theyfit. But not all tables; the standard type size is okay for the others. [Consistency?]
BOO! You place one of your illustrations or a table before the text reference. [Does itmatter that your readers won’t know why it’s there or what it’s about until thebottom of the page—or maybe the next page—where it’s referenced?]
(7. continued)
20
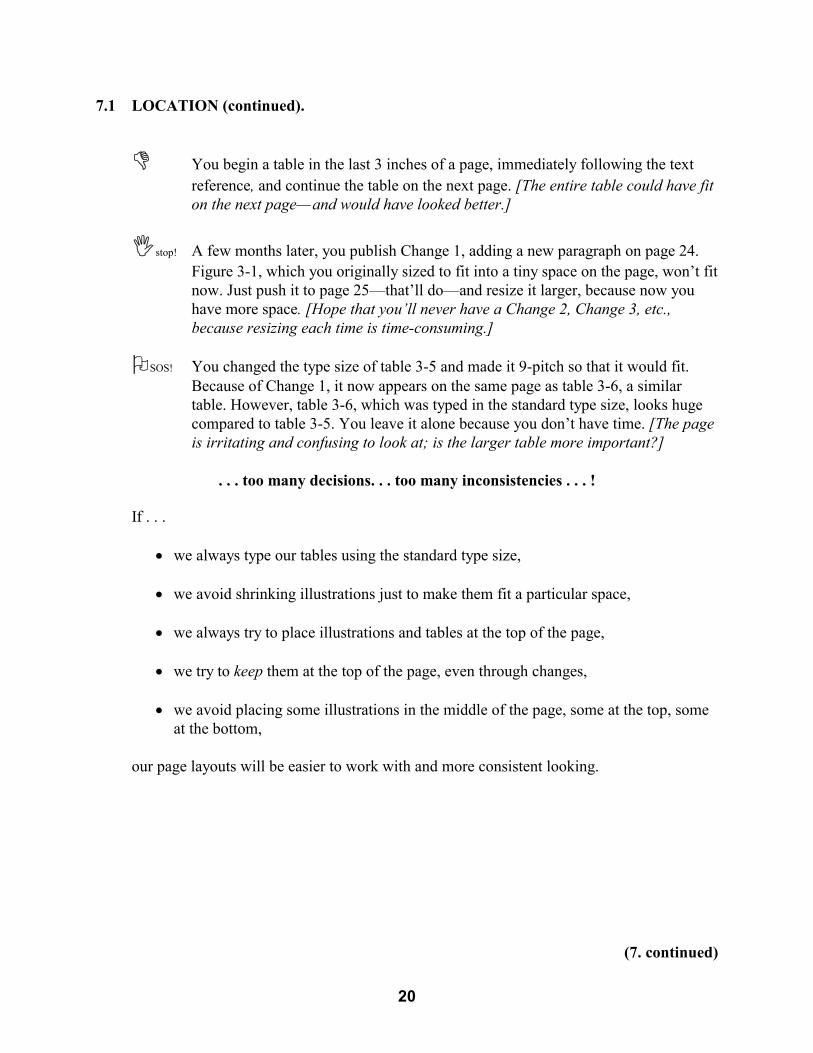
7.1 LOCATION (continued).
� You begin a table in the last 3 inches of a page, immediately following the textreference, and continue the table on the next page. [The entire table could have fiton the next page—and would have looked better.]
�stop! A few months later, you publish Change 1, adding a new paragraph on page 24.Figure 3-1, which you originally sized to fit into a tiny space on the page, won’t fitnow. Just push it to page 25—that’ll do—and resize it larger, because now youhave more space. [Hope that you’ll never have a Change 2, Change 3, etc.,because resizing each time is time-consuming.]
�SOS! You changed the type size of table 3-5 and made it 9-pitch so that it would fit.Because of Change 1, it now appears on the same page as table 3-6, a similartable. However, table 3-6, which was typed in the standard type size, looks hugecompared to table 3-5. You leave it alone because you don’t have time. [The pageis irritating and confusing to look at; is the larger table more important?]
. . . too many decisions. . . too many inconsistencies . . . !
If . . .
� we always type our tables using the standard type size,
� we avoid shrinking illustrations just to make them fit a particular space,
� we always try to place illustrations and tables at the top of the page,
� we try to keep them at the top of the page, even through changes,
� we avoid placing some illustrations in the middle of the page, some at the top, someat the bottom,
our page layouts will be easier to work with and more consistent looking.
(7. continued)

21
7.1 LOCATION (continued).
Samples
The following samples illustrate the TP 1-1 variations for the placement of illustrations andtables and their corresponding text references. Dept. 2912 follows samples (c) and (f).
(a) �Sample page 18
Figure followed by textreference on same page
(b) �Sample page 19
Text reference followed byfigure, which is sized smallto fit on same page.
(c) �Sample pages 20 and 21
Text reference on one page followed by figure at top offacing page (original size of figure retained).
Fig. 3-1
3-1 text text text (fig. 3-1)text.
3-1-1 text text text texttext text.
3-1.2 text text text text tettext text text text.
18
3-1.3 text text text text texttext text text text text texttext text text text text texttext.
3-1.4 text text text text (fig.3-2) text text.
Fig. 3-2
19
3-2 text text text text texttext text text text text texttext.
3-2.1 text text text text texttext (fig. 3-3).
3-2.2 text text text text texttext text.
20
Fig. 3-3
3-2.3 text text text text texttext text text text.
3-2.4 text text text.
21
(d) �Sample pages 22 and 23
Figure at top of page followed by text reference on nextfacing page.
(e) �Sample pages 25 and 26
Figure followed by text reference on next nonfacing page.
Fig. 3-4
3-3 text text text text text.
3-3-1 text text text texttext text text text.
22
3-3.2 text text text text texttext text text text text texttext text text text text texttext.
3-3.3 text text text text(fig. 3-4) text text.
3-3.4 text text text text texttext text.
23
Fig. 3-5
3-4 text text text text texttext text text text text texttext text text text text.
25
3-4.1 text text text text texttext text text text text texttext text text text.
3-4.2 text text text text texttext text text text (fig. 3-5).
3-4.3 text text text text texttext text text text.
26
(f) �Sample pages 27 and 28
Text reference followed by figure on next nonfacing page(original size of figure retained).
3-4.4 text text text text texttext text text text text texttext text text text text texttext.
3-4.5 text text text text(fig. 3-6) text text.
3-4.6 text text text text texttext text.
27
Fig. 3-6
3-5 text text text text text.
3-5-1 text text text texttext text text text.
28
(7. continued)
22
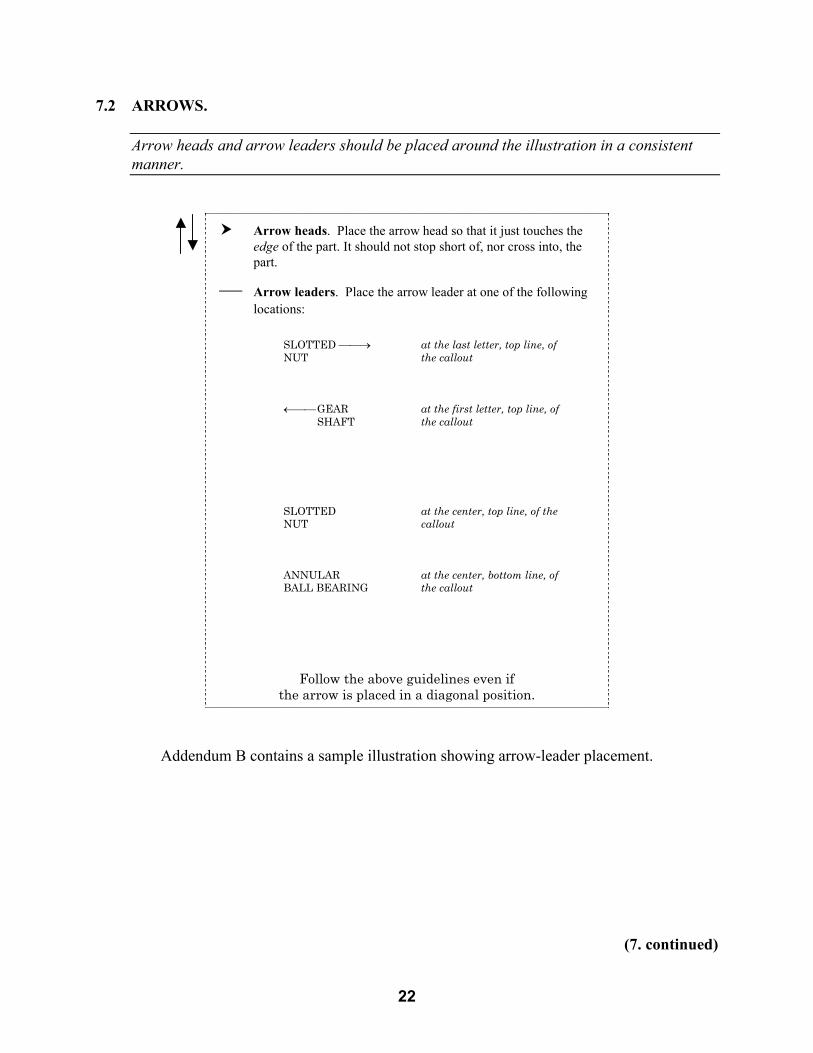
7.2 ARROWS.
Arrow heads and arrow leaders should be placed around the illustration in a consistentmanner.
� Arrow heads. Place the arrow head so that it just touches theedge of the part. It should not stop short of, nor cross into, thepart.
� Arrow leaders. Place the arrow leader at one of the followinglocations:
SLOTTED ��� at the last letter, top line, ofNUT the callout
���GEAR at the first letter, top line, ofSHAFT the callout
SLOTTED at the center, top line, of theNUT callout
ANNULAR at the center, bottom line, ofBALL BEARING the callout
Follow the above guidelines even ifthe arrow is placed in a diagonal position.
Addendum B contains a sample illustration showing arrow-leader placement.
(7. continued)
23
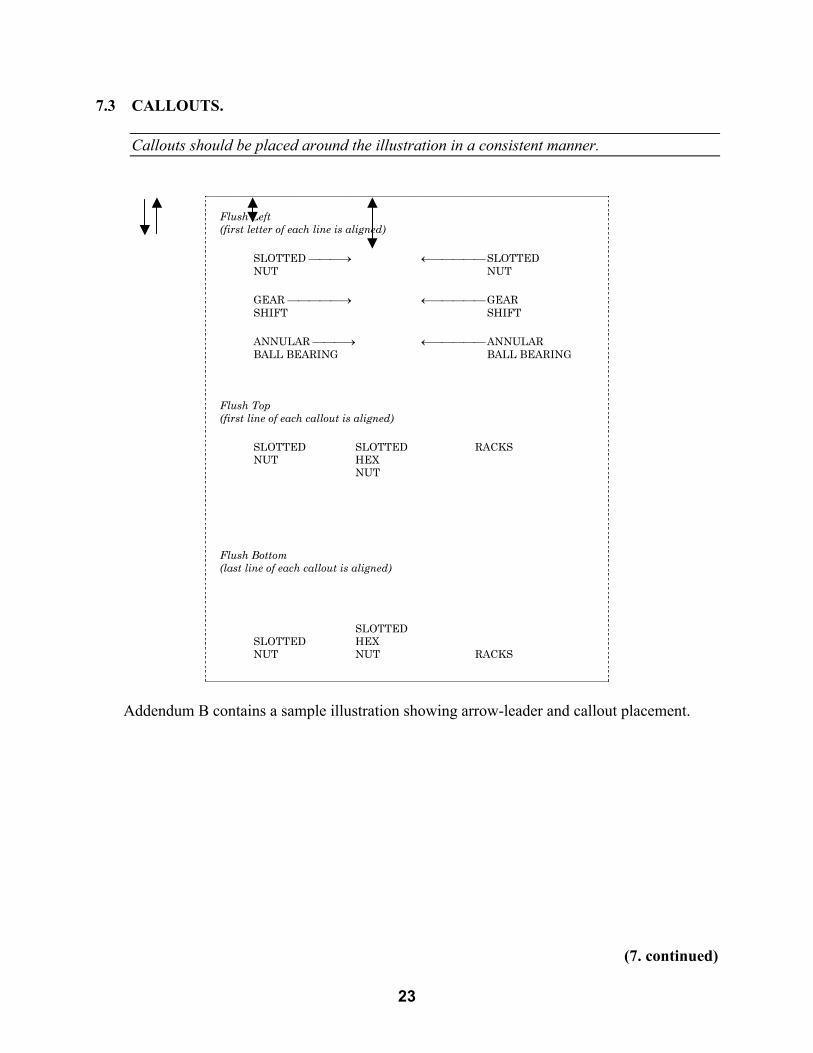
7.3 CALLOUTS.
Callouts should be placed around the illustration in a consistent manner.
Flush Left(first letter of each line is aligned)
SLOTTED ���� ������SLOTTEDNUT NUT
GEAR ������ ������GEARSHIFT SHIFT
ANNULAR ���� ������ANNULARBALL BEARING BALL BEARING
Flush Top(first line of each callout is aligned)
SLOTTED SLOTTED RACKSNUT HEX NUT
Flush Bottom(last line of each callout is aligned)
SLOTTED SLOTTED HEX NUT NUT RACKS
Addendum B contains a sample illustration showing arrow-leader and callout placement.
(7. continued)
24
7.4 POINTING HANDS.
When you change part of a drawing or photo, use a “pointing hand” to point to the area onthe drawing that you changed.
Always place the pointing hand outside the “margin” of the drawing or photo—never insidethe drawing or photo.
A pointing hand looks like this and can be turned in any direction:
�However…If a callout (with arrow) is revised or added and points to the changed part,place a revision bar next to the callout and DO NOT use a pointing hand.
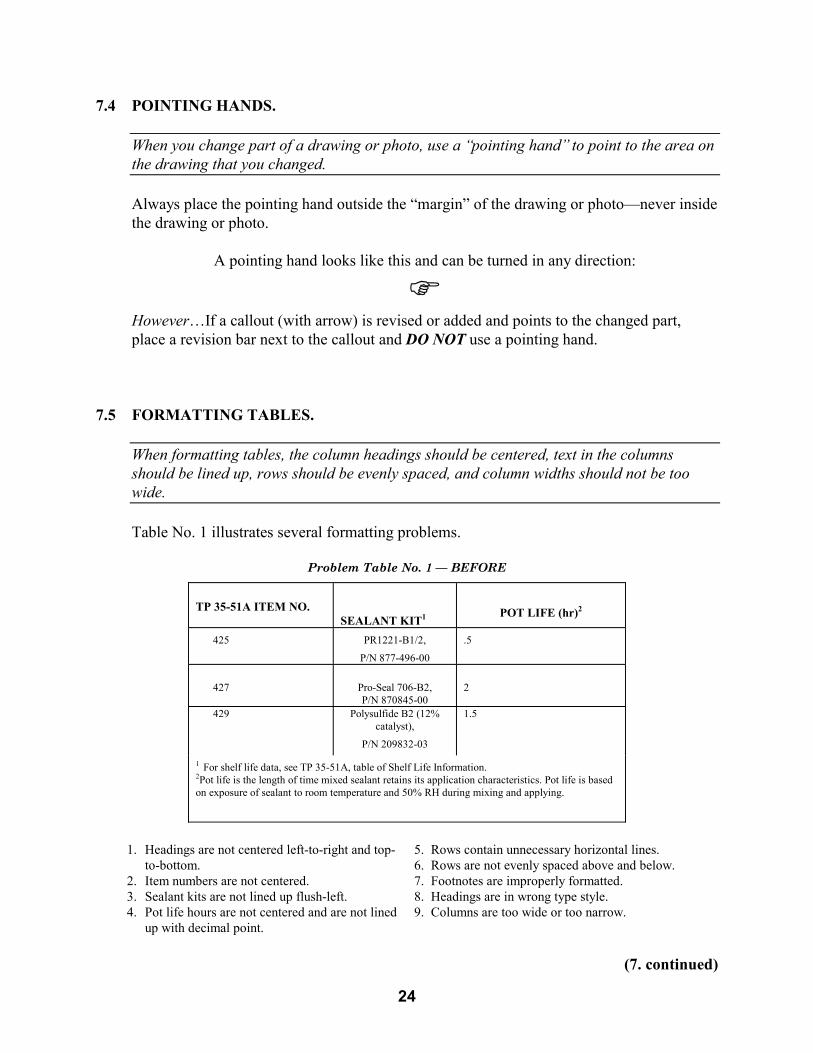
7.5 FORMATTING TABLES.
When formatting tables, the column headings should be centered, text in the columnsshould be lined up, rows should be evenly spaced, and column widths should not be toowide.
Table No. 1 illustrates several formatting problems.
Problem Table No. 1 — BEFORE
TP 35-51A ITEM NO.SEALANT KIT1 POT LIFE (hr)2
425 PR1221-B1/2,
P/N 877-496-00
.5
427 Pro-Seal 706-B2,P/N 870845-00
2
429 Polysulfide B2 (12%catalyst),
P/N 209832-03
1.5
1 For shelf life data, see TP 35-51A, table of Shelf Life Information.2Pot life is the length of time mixed sealant retains its application characteristics. Pot life is basedon exposure of sealant to room temperature and 50% RH during mixing and applying.
1. Headings are not centered left-to-right and top-to-bottom.
5. Rows contain unnecessary horizontal lines.6. Rows are not evenly spaced above and below.
2. Item numbers are not centered. 7. Footnotes are improperly formatted.3. Sealant kits are not lined up flush-left. 8. Headings are in wrong type style.4. Pot life hours are not centered and are not lined
up with decimal point.9. Columns are too wide or too narrow.
(7. continued)
25
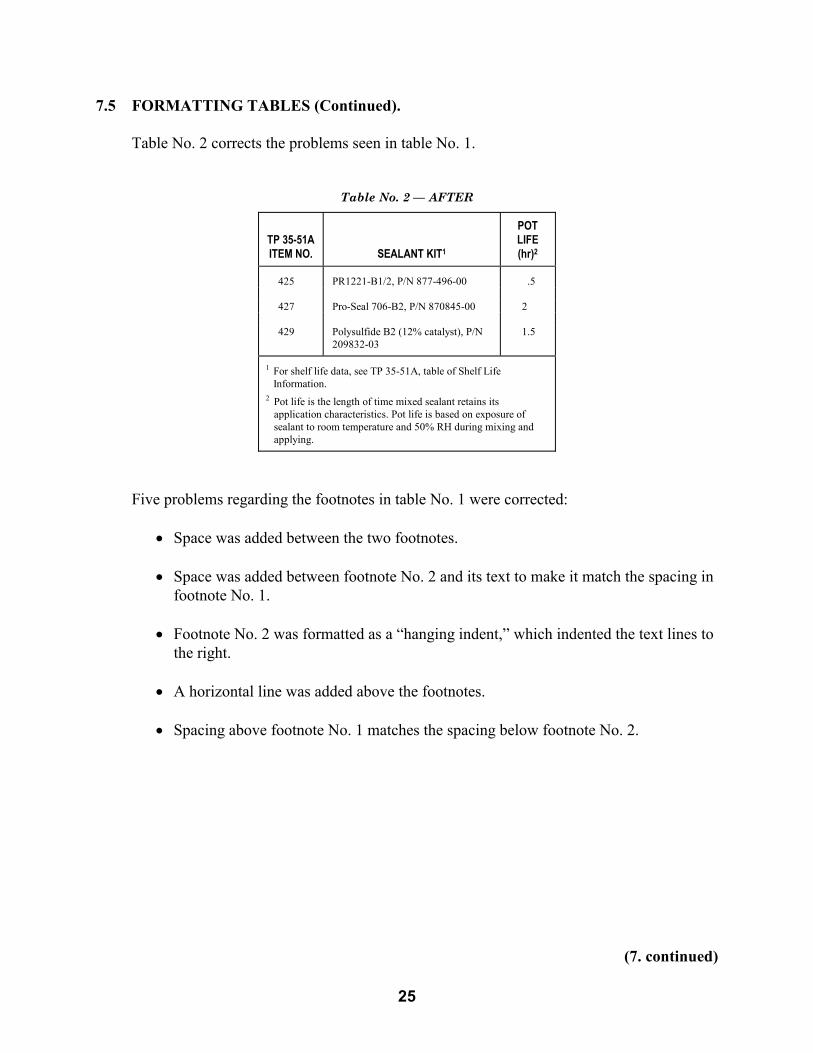
7.5 FORMATTING TABLES (Continued).
Table No. 2 corrects the problems seen in table No. 1.
Table No. 2 — AFTER
TP 35-51AITEM NO. SEALANT KIT1
POTLIFE(hr)2
425 PR1221-B1/2, P/N 877-496-00 .5
427 Pro-Seal 706-B2, P/N 870845-00 2
429 Polysulfide B2 (12% catalyst), P/N209832-03
1.5
1 For shelf life data, see TP 35-51A, table of Shelf LifeInformation.
2 Pot life is the length of time mixed sealant retains itsapplication characteristics. Pot life is based on exposure ofsealant to room temperature and 50% RH during mixing andapplying.
Five problems regarding the footnotes in table No. 1 were corrected:
� Space was added between the two footnotes.
� Space was added between footnote No. 2 and its text to make it match the spacing infootnote No. 1.
� Footnote No. 2 was formatted as a “hanging indent,” which indented the text lines tothe right.
� A horizontal line was added above the footnotes.
� Spacing above footnote No. 1 matches the spacing below footnote No. 2.
(7. continued)
26
7.6 TEXT ON SAME PAGE AS FIGURE OR TABLE.
Place text on the same page and below a figure or table only if the figure/table takes upless than one-half the page, including the figure or table title.
If you put text below a figure or table, be sure to separate the text from the figure/table byone-half inch or more. Measure from the bottom edge of the figure title to the top edge ofthe first line of text. For tables, measure from the bottom edge of the table.
For adding or deleting figures and tablesand how to number them,
see the sections on adding and deleting paragraphs.
27
8. INTERIM CHANGES.
8.1 WORDING OF INSTRUCTIONS.
An interim change (IC) tells the reader to add, delete, or change words, parts of sentences,or entire paragraphs, tables, and illustrations.
There are three ways to phrase the directions that you want to convey:
� Changing one to three words:
a. Page xx, par. xx, change “xxxxxxxx” to “xxxxxxxx.”
� Changing most or all of a line or sentence:
b. Page xx, par. xx, change second line to read: “ . . . xxxxx xxxxx xxxxxxxxxx. xxxxx. . . .”
c. Page xx, par. xx, change second sentence to read: “ . . . xxxxx xxxxx xxxxxxxxxx xxxxx.”
� Adding a new paragraph [or table, or warning, etc.]:
c. Page xx, par. yy, following par. xx, insert new paragraph to read as follows:
yy. xxxxxxx xxxxxxx xxxxxxx xxxxxxx xxxxxxxxxx xxxxxxx xxxxxxx xxxxxxx xxxxxxxxxxxxxx xxxxxxx xxxxxxx xxxxxxx.
Note: When adding a new paragraph, insert space between the direction and the newtext, and further indent the new text. Do not use quotation marks, because the newtext is indented.
(8. continued)

28
8.2 PROPOSED INTERIM CHANGES.
When writing a proposed (draft) IC, mark it so that it is not mistaken for a final IC.
A proposed IC differs from a final IC in three ways:
� “COORDINATION COPY” or “DRAFT” is placed at the top and bottom of the firstpage:
� The title of the IC is changed from “CHANGE” to “PROPOSED INTERIMCHANGE.”
� Paragraph 1 of the IC is changed from “This is interim change number . . .” to“This is proposed interim change number . . . .”
29
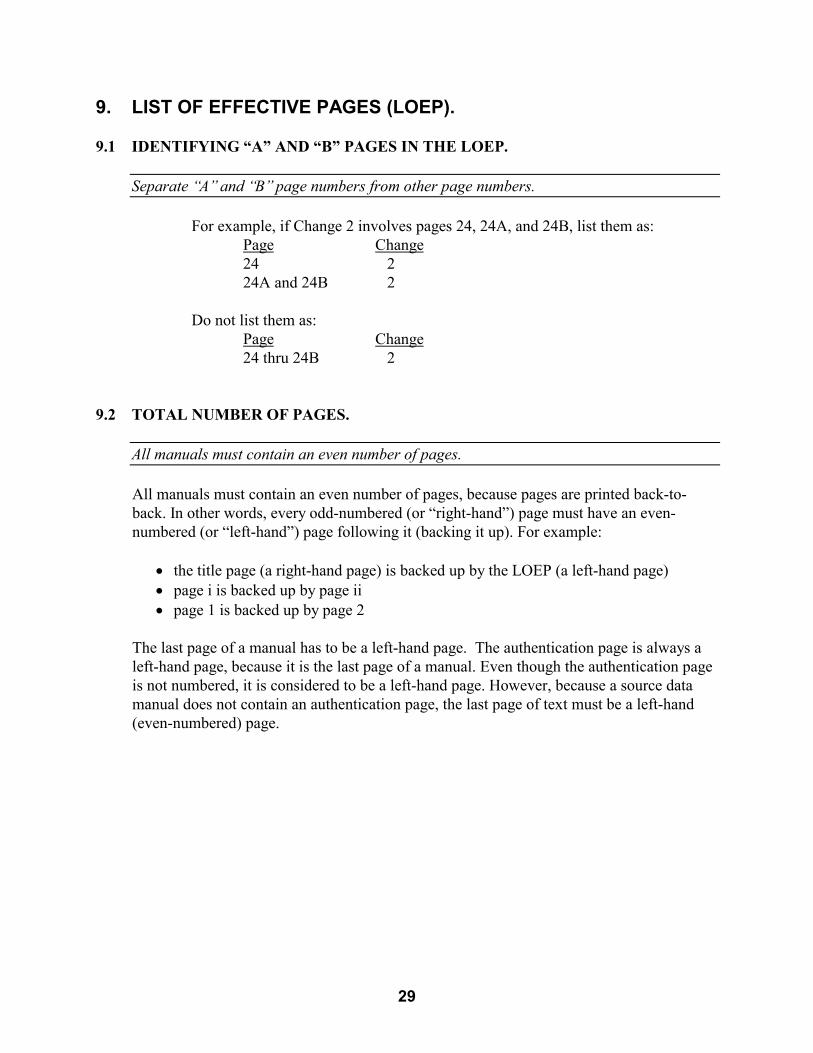
9. LIST OF EFFECTIVE PAGES (LOEP).
9.1 IDENTIFYING “A” AND “B” PAGES IN THE LOEP.
Separate “A” and “B” page numbers from other page numbers.
For example, if Change 2 involves pages 24, 24A, and 24B, list them as:Page Change24 224A and 24B 2
Do not list them as:Page Change24 thru 24B 2
9.2 TOTAL NUMBER OF PAGES.
All manuals must contain an even number of pages.
All manuals must contain an even number of pages, because pages are printed back-to-back. In other words, every odd-numbered (or “right-hand”) page must have an even-numbered (or “left-hand”) page following it (backing it up). For example:
� the title page (a right-hand page) is backed up by the LOEP (a left-hand page)� page i is backed up by page ii� page 1 is backed up by page 2
The last page of a manual has to be a left-hand page. The authentication page is always aleft-hand page, because it is the last page of a manual. Even though the authentication pageis not numbered, it is considered to be a left-hand page. However, because a source datamanual does not contain an authentication page, the last page of text must be a left-hand(even-numbered) page.

30
THIS PAGE INTENTIONALLY LEFT BLANK.
31
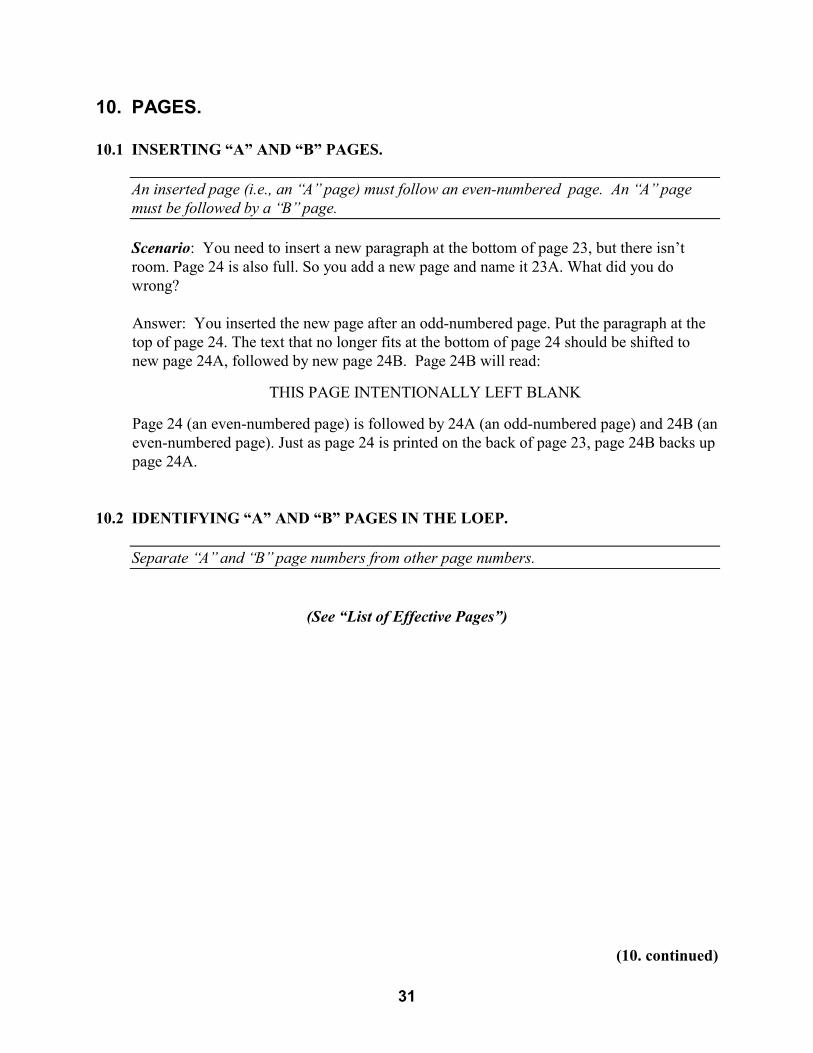
10. PAGES.
10.1 INSERTING “A” AND “B” PAGES.
An inserted page (i.e., an “A” page) must follow an even-numbered page. An “A” pagemust be followed by a “B” page.
Scenario: You need to insert a new paragraph at the bottom of page 23, but there isn’troom. Page 24 is also full. So you add a new page and name it 23A. What did you dowrong?
Answer: You inserted the new page after an odd-numbered page. Put the paragraph at thetop of page 24. The text that no longer fits at the bottom of page 24 should be shifted tonew page 24A, followed by new page 24B. Page 24B will read:
THIS PAGE INTENTIONALLY LEFT BLANK
Page 24 (an even-numbered page) is followed by 24A (an odd-numbered page) and 24B (aneven-numbered page). Just as page 24 is printed on the back of page 23, page 24B backs uppage 24A.
10.2 IDENTIFYING “A” AND “B” PAGES IN THE LOEP.
Separate “A” and “B” page numbers from other page numbers.
(See “List of Effective Pages”)
(10. continued)

32
10.3 BACKUP PAGES.
When preparing a change to a manual, do not print backup pages.
Every odd-numbered page in a manual is “backed up” by an even-numbered page . . . or . . .every even-numbered page is backed up by an odd-numbered page. A double-sided page iscalled a “leaf.” Text is printed on both sides of the leaf.
Who is responsible for providing backup pages to the Print Shop? The department ASA(not the writer).
Example:� You revise page 15 as a change 3 to a manual.
� You give the ASA page 15, which she will send to the Print Shop for publishing. TheASA knows that page 16 (which is not part of change 3) must be sent to the PrintShop as a backup page to page 15.
� The ASA pulls page 16 from the department’s master files and includes it with thePrint Shop order.
10.4 BLANK PAGES.
Blank pages are even-numbered pages.
If necessary, insert a blank page (which reads “THIS PAGE INTENTIONALLY LEFTBLANK”) at the end of a section so that the next section starts on an odd-numbered (right-hand) page.
A blank page is always an even-numbered (left-hand) page. It is not good editing layout foran odd-numbered page to be a blank.
33
11. PARAGRAPHS.
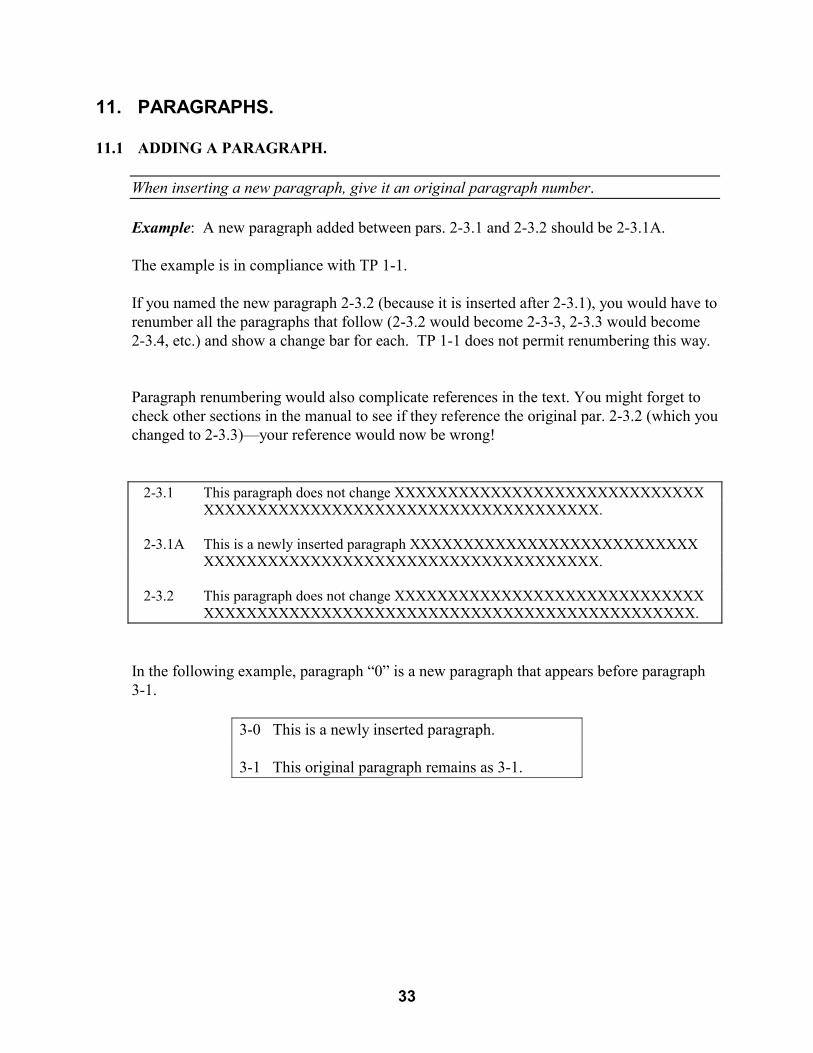
11.1 ADDING A PARAGRAPH.
When inserting a new paragraph, give it an original paragraph number.
Example: A new paragraph added between pars. 2-3.1 and 2-3.2 should be 2-3.1A.
The example is in compliance with TP 1-1.
If you named the new paragraph 2-3.2 (because it is inserted after 2-3.1), you would have torenumber all the paragraphs that follow (2-3.2 would become 2-3-3, 2-3.3 would become2-3.4, etc.) and show a change bar for each. TP 1-1 does not permit renumbering this way.
Paragraph renumbering would also complicate references in the text. You might forget tocheck other sections in the manual to see if they reference the original par. 2-3.2 (which youchanged to 2-3.3)—your reference would now be wrong!
2-3.1 This paragraph does not change XXXXXXXXXXXXXXXXXXXXXXXXXXXXXXXXXXXXXXXXXXXXXXXXXXXXXXXXXXXXXXXXXX.
2-3.1A This is a newly inserted paragraph XXXXXXXXXXXXXXXXXXXXXXXXXXXXXXXXXXXXXXXXXXXXXXXXXXXXXXXXXXXXXXXX.
2-3.2 This paragraph does not change XXXXXXXXXXXXXXXXXXXXXXXXXXXXXXXXXXXXXXXXXXXXXXXXXXXXXXXXXXXXXXXXXXXXXXXXXXX.
In the following example, paragraph “0” is a new paragraph that appears before paragraph3-1.
3-0 This is a newly inserted paragraph.
3-1 This original paragraph remains as 3-1.

34
(11. continued)
35
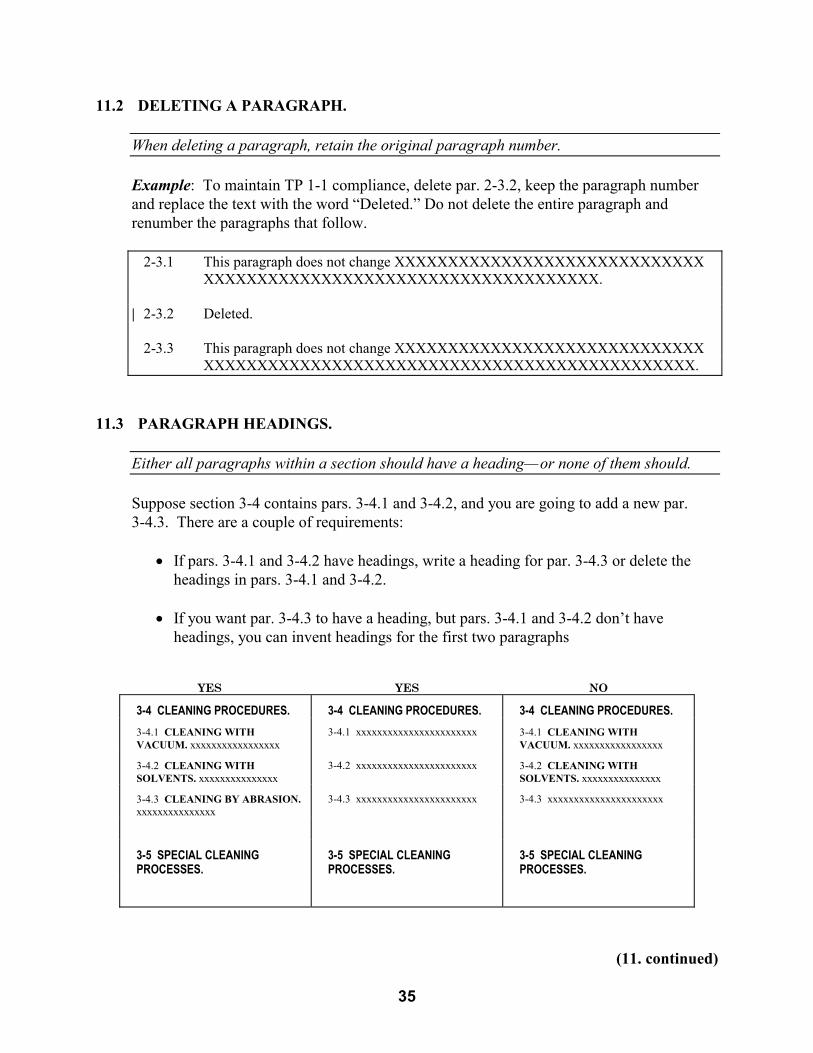
11.2 DELETING A PARAGRAPH.
When deleting a paragraph, retain the original paragraph number.
Example: To maintain TP 1-1 compliance, delete par. 2-3.2, keep the paragraph numberand replace the text with the word “Deleted.” Do not delete the entire paragraph andrenumber the paragraphs that follow.
2-3.1 This paragraph does not change XXXXXXXXXXXXXXXXXXXXXXXXXXXXXXXXXXXXXXXXXXXXXXXXXXXXXXXXXXXXXXXXXX.
| 2-3.2 Deleted.
2-3.3 This paragraph does not change XXXXXXXXXXXXXXXXXXXXXXXXXXXXXXXXXXXXXXXXXXXXXXXXXXXXXXXXXXXXXXXXXXXXXXXXXXX.
11.3 PARAGRAPH HEADINGS.
Either all paragraphs within a section should have a heading—or none of them should.
Suppose section 3-4 contains pars. 3-4.1 and 3-4.2, and you are going to add a new par.3-4.3. There are a couple of requirements:
� If pars. 3-4.1 and 3-4.2 have headings, write a heading for par. 3-4.3 or delete theheadings in pars. 3-4.1 and 3-4.2.
� If you want par. 3-4.3 to have a heading, but pars. 3-4.1 and 3-4.2 don’t haveheadings, you can invent headings for the first two paragraphs
YES YES NO
3-4 CLEANING PROCEDURES. 3-4 CLEANING PROCEDURES. 3-4 CLEANING PROCEDURES.
3-4.1 CLEANING WITHVACUUM. xxxxxxxxxxxxxxxxx
3-4.1 xxxxxxxxxxxxxxxxxxxxxxx 3-4.1 CLEANING WITHVACUUM. xxxxxxxxxxxxxxxxx
3-4.2 CLEANING WITHSOLVENTS. xxxxxxxxxxxxxxx
3-4.2 xxxxxxxxxxxxxxxxxxxxxxx 3-4.2 CLEANING WITHSOLVENTS. xxxxxxxxxxxxxxx
3-4.3 CLEANING BY ABRASION.xxxxxxxxxxxxxxx
3-4.3 xxxxxxxxxxxxxxxxxxxxxxx 3-4.3 xxxxxxxxxxxxxxxxxxxxxx
3-5 SPECIAL CLEANINGPROCESSES.
3-5 SPECIAL CLEANINGPROCESSES.
3-5 SPECIAL CLEANINGPROCESSES.
(11. continued)
36
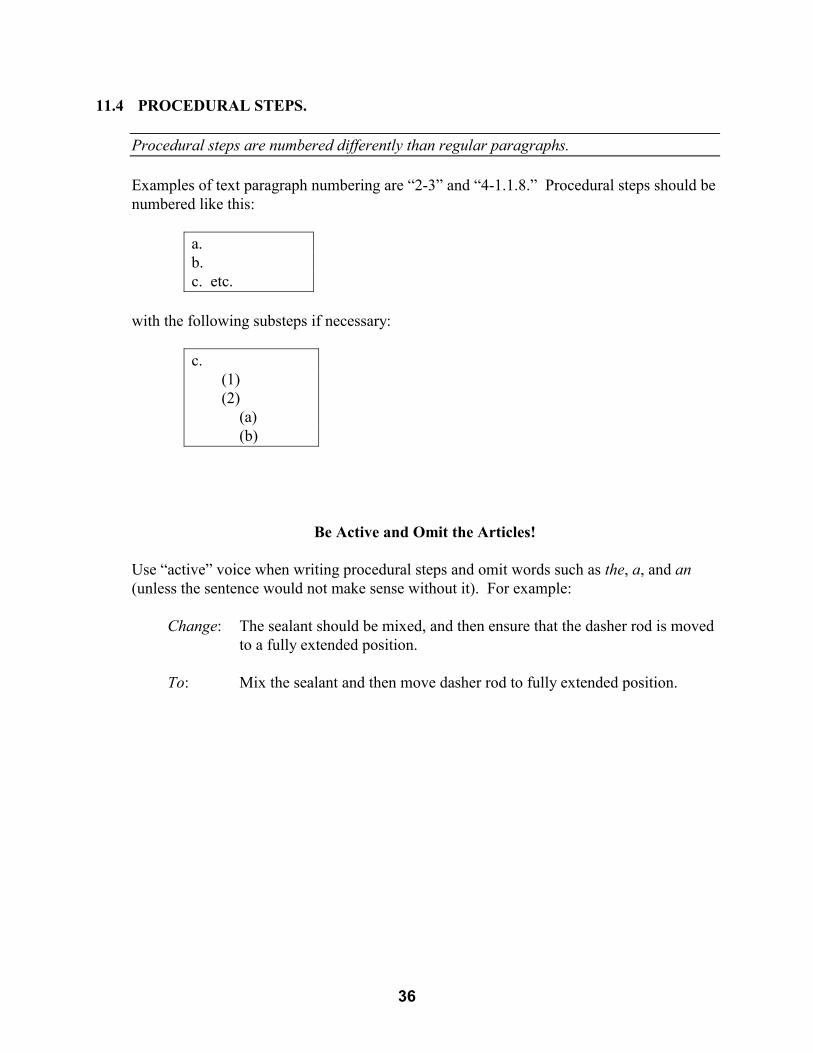
11.4 PROCEDURAL STEPS.
Procedural steps are numbered differently than regular paragraphs.
Examples of text paragraph numbering are “2-3” and “4-1.1.8.” Procedural steps should benumbered like this:
a.b.c. etc.
with the following substeps if necessary:
c.(1)(2)
(a)(b)
Be Active and Omit the Articles!
Use “active” voice when writing procedural steps and omit words such as the, a, and an(unless the sentence would not make sense without it). For example:
Change: The sealant should be mixed, and then ensure that the dasher rod is movedto a fully extended position.
To: Mix the sealant and then move dasher rod to fully extended position.

37
THIS PAGE INTENTIONALLY LEFT BLANK.
38
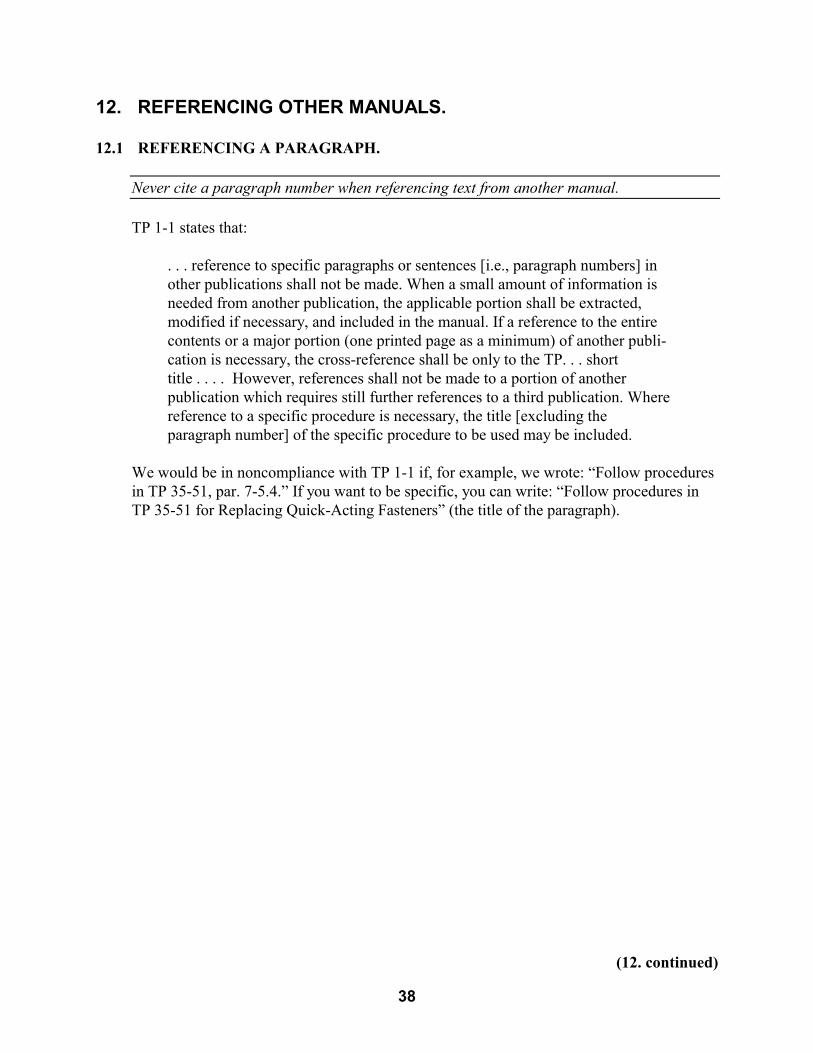
12. REFERENCING OTHER MANUALS.
12.1 REFERENCING A PARAGRAPH.
Never cite a paragraph number when referencing text from another manual.
TP 1-1 states that:
. . . reference to specific paragraphs or sentences [i.e., paragraph numbers] inother publications shall not be made. When a small amount of information isneeded from another publication, the applicable portion shall be extracted,modified if necessary, and included in the manual. If a reference to the entirecontents or a major portion (one printed page as a minimum) of another publi-cation is necessary, the cross-reference shall be only to the TP. . . shorttitle . . . . However, references shall not be made to a portion of anotherpublication which requires still further references to a third publication. Wherereference to a specific procedure is necessary, the title [excluding theparagraph number] of the specific procedure to be used may be included.
We would be in noncompliance with TP 1-1 if, for example, we wrote: “Follow proceduresin TP 35-51, par. 7-5.4.” If you want to be specific, you can write: “Follow procedures inTP 35-51 for Replacing Quick-Acting Fasteners” (the title of the paragraph).
(12. continued)
39
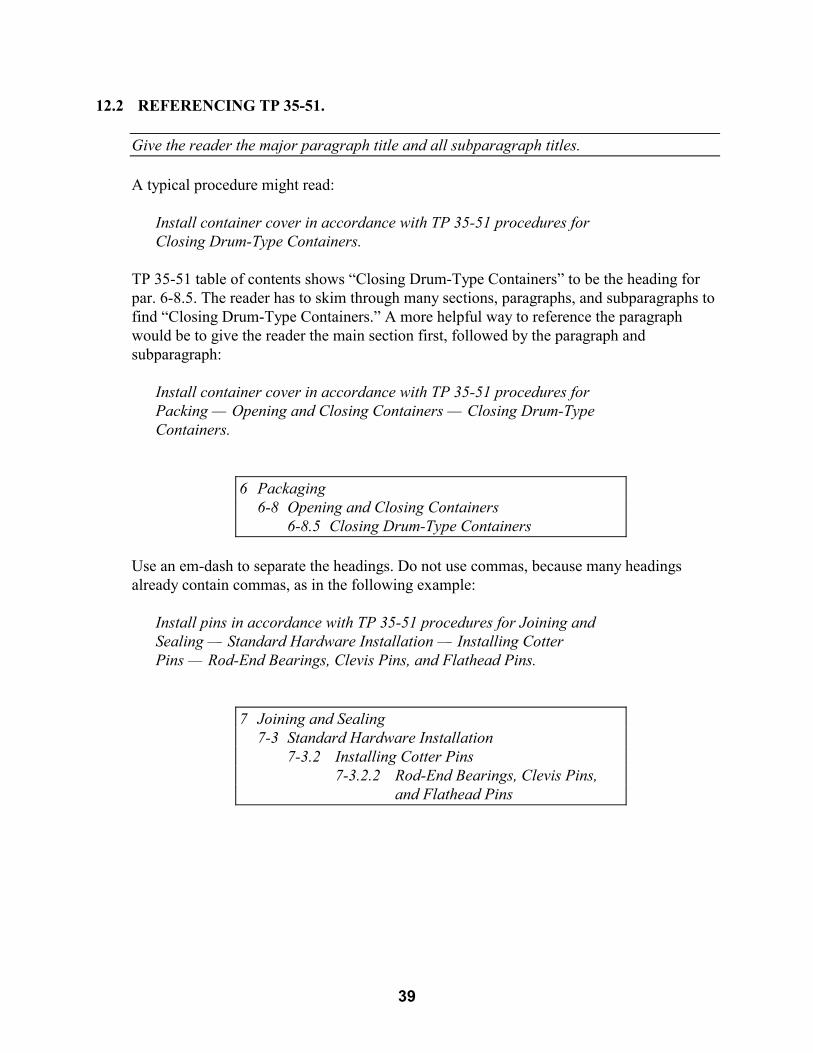
12.2 REFERENCING TP 35-51.
Give the reader the major paragraph title and all subparagraph titles.
A typical procedure might read:
Install container cover in accordance with TP 35-51 procedures forClosing Drum-Type Containers.
TP 35-51 table of contents shows “Closing Drum-Type Containers” to be the heading forpar. 6-8.5. The reader has to skim through many sections, paragraphs, and subparagraphs tofind “Closing Drum-Type Containers.” A more helpful way to reference the paragraphwould be to give the reader the main section first, followed by the paragraph andsubparagraph:
Install container cover in accordance with TP 35-51 procedures forPacking — Opening and Closing Containers — Closing Drum-TypeContainers.
6 Packaging6-8 Opening and Closing Containers
6-8.5 Closing Drum-Type Containers
Use an em-dash to separate the headings. Do not use commas, because many headingsalready contain commas, as in the following example:
Install pins in accordance with TP 35-51 procedures for Joining andSealing — Standard Hardware Installation — Installing CotterPins — Rod-End Bearings, Clevis Pins, and Flathead Pins.
7 Joining and Sealing7-3 Standard Hardware Installation
7-3.2 Installing Cotter Pins7-3.2.2 Rod-End Bearings, Clevis Pins,
and Flathead Pins
40
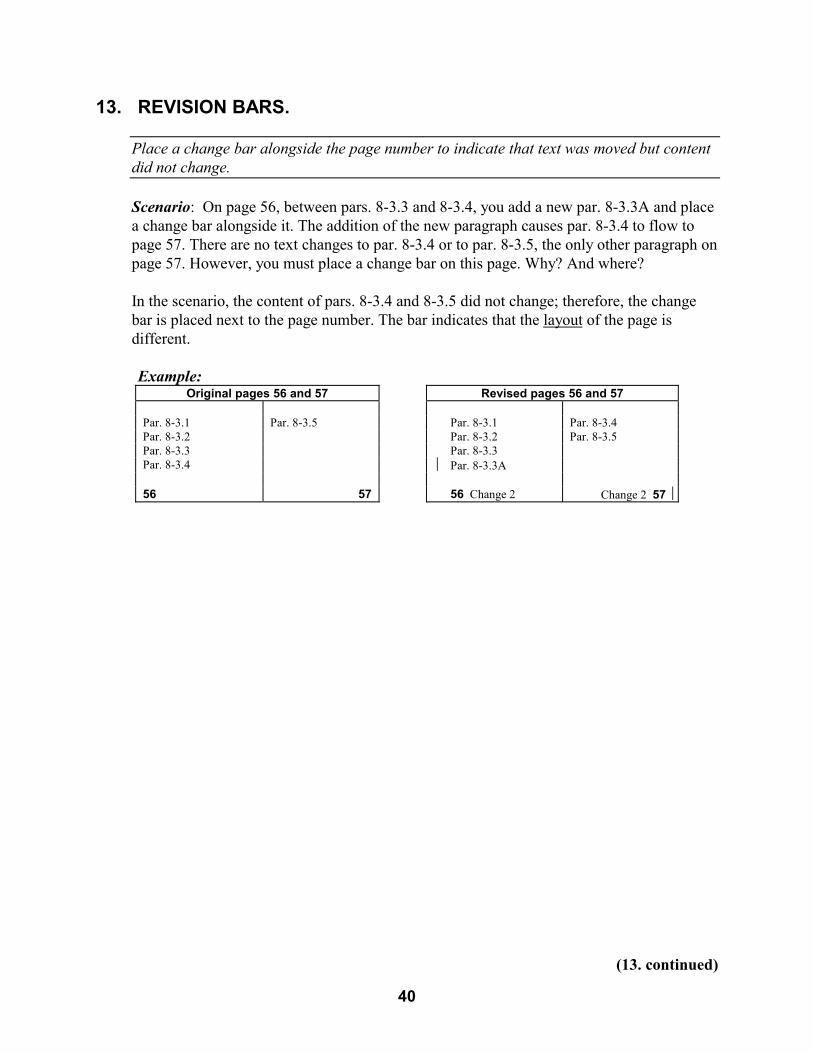
13. REVISION BARS.
Place a change bar alongside the page number to indicate that text was moved but contentdid not change.
Scenario: On page 56, between pars. 8-3.3 and 8-3.4, you add a new par. 8-3.3A and placea change bar alongside it. The addition of the new paragraph causes par. 8-3.4 to flow topage 57. There are no text changes to par. 8-3.4 or to par. 8-3.5, the only other paragraph onpage 57. However, you must place a change bar on this page. Why? And where?
In the scenario, the content of pars. 8-3.4 and 8-3.5 did not change; therefore, the changebar is placed next to the page number. The bar indicates that the layout of the page isdifferent.
Example:Original pages 56 and 57 Revised pages 56 and 57
Par. 8-3.1 Par. 8-3.5 Par. 8-3.1 Par. 8-3.4Par. 8-3.2 Par. 8-3.2 Par. 8-3.5Par. 8-3.3 Par. 8-3.3Par. 8-3.4 � Par. 8-3.3A
56 57 56 Change 2 Change 2 57 �
(13. continued)

41
13. REVISION BARS (continued).
We also place a change bar alongside the page number to indicate a newly added blankpage.
The text will read THIS PAGE INTENTIONALLY LEFT BLANK and is always a left-hand page.
In the example below, pars. 8-3.4 and 8-3.5 were originally located on page 58.
8-3.4 xxxxxxxxxxxxxxxxxxxxx
xxxxxxxxxxxxxxxxxxxxxxxxxx
xxxxxxxxxxxxxxxxxxxxxxxxxx
xxxxxxxxxxxxxxxxxxxxxxxxxx
xxxxxxxxxxxxxxxxxxxxxxxxxx
xxxxxxxxxxxxxxxxxxxxxxxxxx
8-3.5 xxxxxxxxxxxxxxxxxxxxx
xxxxxxxxxxxxxxxxxxxxxxxxxx
58
Change 2 adds a new paragraph to follow par. 8-3.4—par. 8-3.4A. Because it won’t fit onpage 58, a new page 58A is added to the manual. A new blank page 58B must also beadded at this time.
8-3.4 xxxxxxxxxxxxxxxxxxxxx 8-3.4A xxxxxxxxxxxxxxxxxxxxx |
xxxxxxxxxxxxxxxxxxxxxxxxxx 8-3.5 xxxxxxxxxxxxxxxxxxxxxx
xxxxxxxxxxxxxxxxxxxxxxxxxx THIS PAGE . . . BLANK.
xxxxxxxxxxxxxxxxxxxxxxxxxx
xxxxxxxxxxxxxxxxxxxxxxxxxx
xxxxxxxxxxxxxxxxxxxxxxxxxx [right-hand pg] [left-hand pg]
� 58 Change 2 Change 2 58A � 58B Change 2
Because the layout of page 58 changed, the page number needs a revision bar. Because ablank page 58B has been added, the page number needs a revision bar. Because text onpage 58A has been added, the page number does not require a revision bar.
42
14. SAFETY PRECAUTIONS.
14.1 WHEN TO INCLUDE IN THE MANUAL.
A safety precautions page (or separate section pertaining to safety precautions) must beincluded in a manual if the manual contains safety issues.
TP 1-1 states that:
Safety precautions shall be included in procedural-type technical manualsunless a comprehensive section on safety is included in the manual.
14.2 WHERE TO INCLUDE IN THE MANUAL.
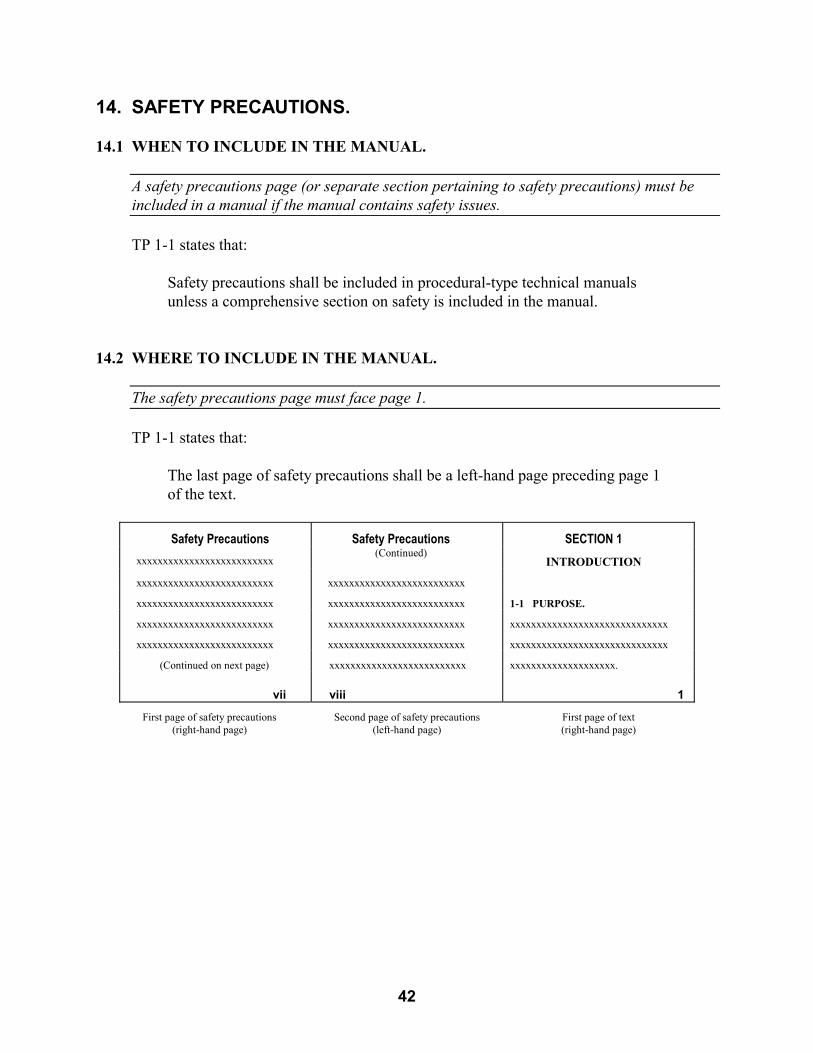
The safety precautions page must face page 1.
TP 1-1 states that:
The last page of safety precautions shall be a left-hand page preceding page 1of the text.
Safety Precautions Safety Precautions SECTION 1
xxxxxxxxxxxxxxxxxxxxxxxxxx(Continued)
INTRODUCTION
xxxxxxxxxxxxxxxxxxxxxxxxxx xxxxxxxxxxxxxxxxxxxxxxxxxx
xxxxxxxxxxxxxxxxxxxxxxxxxx xxxxxxxxxxxxxxxxxxxxxxxxxx 1-1 PURPOSE.
xxxxxxxxxxxxxxxxxxxxxxxxxx xxxxxxxxxxxxxxxxxxxxxxxxxx xxxxxxxxxxxxxxxxxxxxxxxxxxxxxx
xxxxxxxxxxxxxxxxxxxxxxxxxx xxxxxxxxxxxxxxxxxxxxxxxxxx xxxxxxxxxxxxxxxxxxxxxxxxxxxxxx
(Continued on next page) xxxxxxxxxxxxxxxxxxxxxxxxxx xxxxxxxxxxxxxxxxxxxx.
vii viii 1
First page of safety precautions Second page of safety precautions First page of text(right-hand page) (left-hand page) (right-hand page)

43
THIS PAGE INTENTIONALLY LEFT BLANK.
44
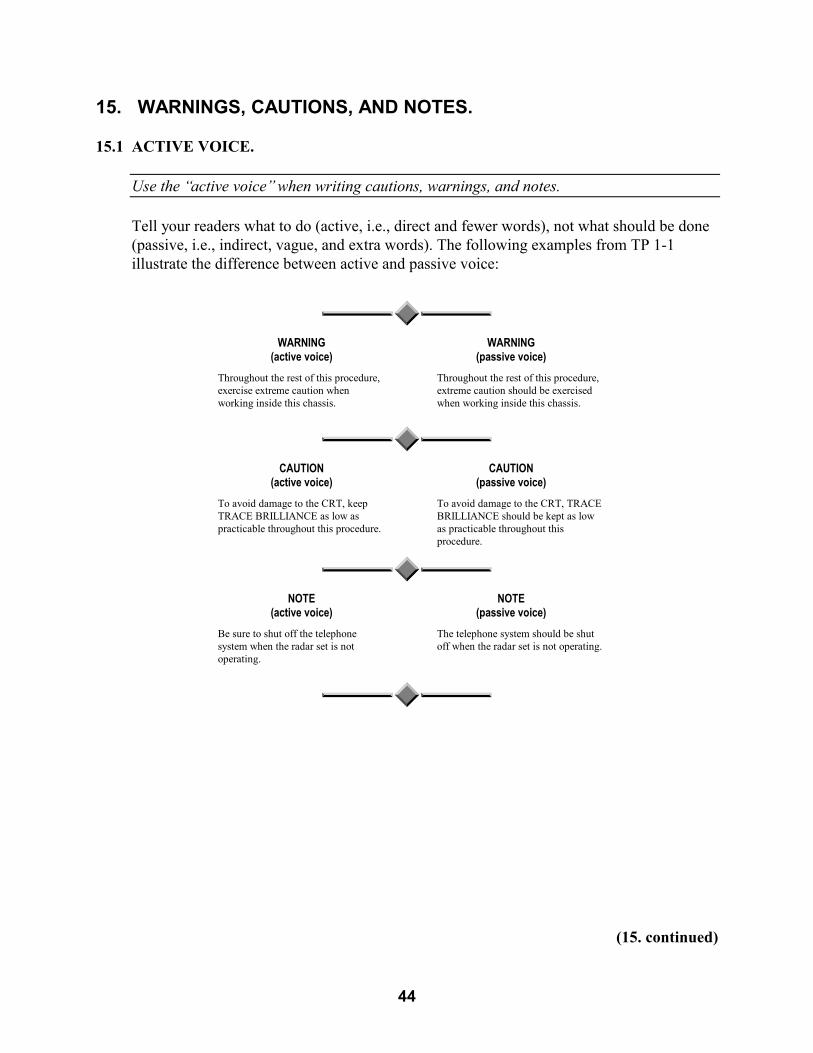
15. WARNINGS, CAUTIONS, AND NOTES.
15.1 ACTIVE VOICE.
Use the “active voice” when writing cautions, warnings, and notes.
Tell your readers what to do (active, i.e., direct and fewer words), not what should be done(passive, i.e., indirect, vague, and extra words). The following examples from TP 1-1illustrate the difference between active and passive voice:
WARNING(active voice)
WARNING(passive voice)
Throughout the rest of this procedure,exercise extreme caution whenworking inside this chassis.
Throughout the rest of this procedure,extreme caution should be exercisedwhen working inside this chassis.
CAUTION(active voice)
CAUTION(passive voice)
To avoid damage to the CRT, keepTRACE BRILLIANCE as low aspracticable throughout this procedure.
To avoid damage to the CRT, TRACEBRILLIANCE should be kept as lowas practicable throughout thisprocedure.
NOTE(active voice)
NOTE(passive voice)
Be sure to shut off the telephonesystem when the radar set is notoperating.
The telephone system should be shutoff when the radar set is not operating.
(15. continued)
45
15.2 HAZARD AND RESULT.
State the hazard, followed by the result or reason.
Correctly worded warnings and cautions state the hazard and the result or reason unlessobvious. However, don’t take it for granted that it is obvious to everyone. For clarity andimportance, state the hazard first:
“To prevent damage to tubing [this is the hazard], exercise care when installing theassembly.”
Do not write what you don’t mean. For example, if you write the sentence as:
“Exercise care when installing the assembly to prevent damage to tubing.”
. . . the sentence would mean that you are installing the assembly in order to preventdamage to the tubing.
15.3 PLACEMENT ON THE PAGE.
Warnings and cautions precede the applicable text; notes can go either way.
WARNINGS AND CAUTIONS. A warning or caution must be placed immediately beforethe text paragraph or procedural step that it is referring to.
NOTES. Notes may be placed immediately before or immediately after the applicable text,depending on what makes sense and is most helpful to the reader. In either situation, keepthe note and its applicable text on the same page.
� If the note is meant to read like a footnote, put it after the text.
� If the reader must have the information before he or she performs a procedural step,then place the note before the step.

46
ADDENDUM A
SAMPLES OF DRAFT TITLE PAGES

47
UNCLASSIFIED DRAFT COVER
Date of draft
PROPOSED CHANGE 3 TO TECHNICAL MANUALDOE-DTRA TP XXX-XXX
MAIN TITLE
SUBTITLE
Writer’s Name, Dept. 2912

48
CRD OR SRD DRAFT COVER(This sample is unclassified)
Date of draft
PROPOSED REVISION OF TECHNICAL MANUALDOE-DTRA TP XXX-XXX
MAIN TITLE
SUBTITLE (U)
Pursuant to and in accordance with…PARAGRAPH Director, Information Security Oversight Office, this….
CLASSIFICATION:
Writer’s Name, Dept. 2912
RESTRICTED DATA …NOTICE…This document contains Restricted Data as Reproduction of this document requiresdefined in the Atomic Energy Act of 1954. the written consent of the originator,Unauthorized disclosure subject to his/her successor, or higher authority.administrative and criminal sanctions.
This document is not centrally controlledClassified by: XXXX, Mgr., within Sandia National Laboratories.Technical Publications, Dept. 2912Date: (date of draft)Derived from: CG-W-5, 10/16/95

49
CFRD OR SFRD DRAFT COVER(This sample is unclassified)
Date of draft
PROPOSED REVISION OF TECHNICAL MANUALDOE-DTRA TP XXX-XXX
MAIN TITLE
SUBTITLE (U)
Pursuant to and in accordance with…PARAGRAPH Director, Information Security Oversight Office, this….
CLASSIFICATION:
Writer’s Name, Dept. 2912
FORMERLY RESTRICTED DATA …NOTICE…Unauthorized disclosure subject to adminis- Reproduction of this document requirestrative and criminal sanctions. Handle as the written consent of the originator,Restricted Data in foreign dissemination. his/her successor, or higher authority.Section 144.b. Atomic Energy Act, 1954.
This document is not centrally controlledClassified by: XXX, Mgr., within Sandia National Laboratories.Technical Publications, Dept. 2912Date: (date of draft)Derived from: CG-W-5, 10/16/95

50
CNWDI DRAFT COVER(This sample is unclassified)
Date of draft
PROPOSED NEW SOURCE DATA MANUALDOE-DTRA TP XXX-XXX
MAIN TITLE
SUBTITLE (U)
CRITICAL NUCLEAR WEAPON DESIGN INFORMATIONDOD DIRECTIVE 5210.2 APPLIES
Pursuant to and in accordance with…PARAGRAPH Director, Information Security Oversight Office, this….
CLASSIFICATION:
Writer’s Name, Dept. 2912
RESTRICTED DATA …NOTICE…This document contains Restricted Data as Reproduction of this document requiresdefined in the Atomic Energy Act of 1954. the written consent of the originator,Unauthorized disclosure subject to his/her successor, or higher authority.administrative and criminal sanctions.
This document is not centrally controlledClassified by: XXXX, Mgr., within Sandia National Laboratories.Technical Publications, Dept. 2912Date: (date of draft)Derived from: CG-W-5, 10/16/95

51
THIS PAGE INTENTIONALLY LEFT BLANK

52
ADDENDUM B
SAMPLE ILLUSTRATIONSHOWING CALLOUT AND ARROW PLACEMENT
53

54
ADDENDUM C
ADOBE� FRAMEMAKER� TIPS
55
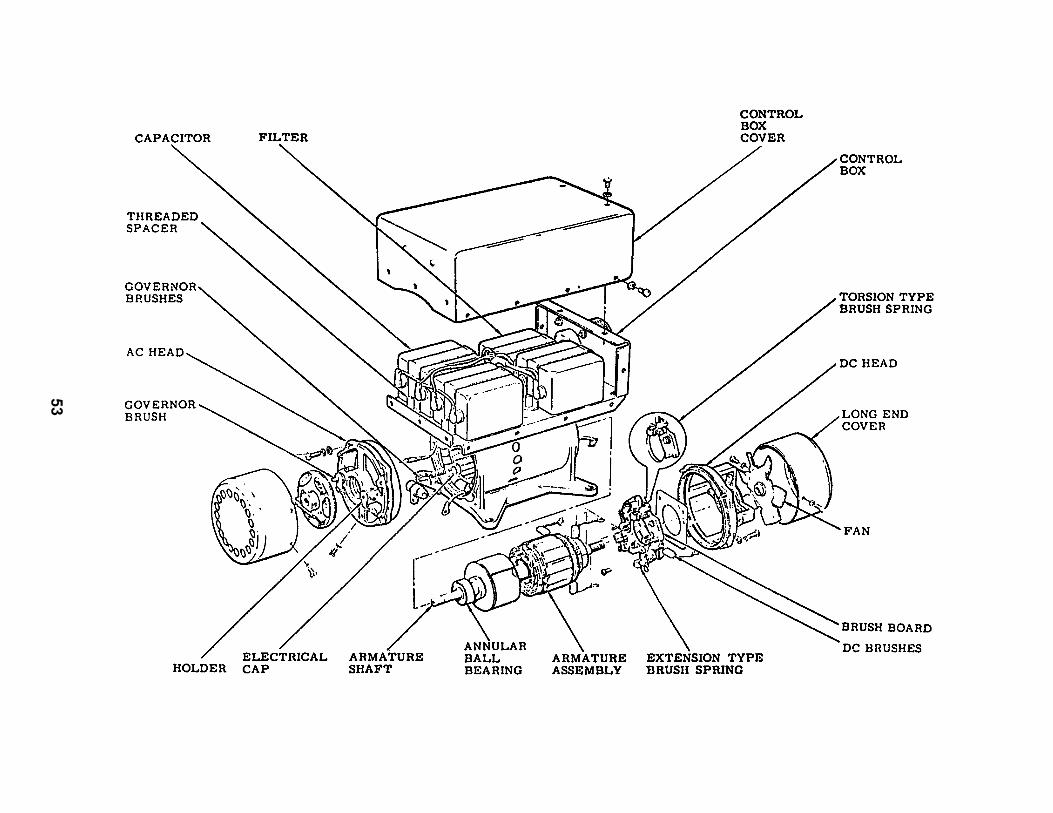
C1. INSERTING CHANGE BARS FOR NOTE, WARNING, ANDCAUTION SIGNS.
The following instructions guide you in drawing change bars for NOTE, WARNING, andCAUTION signs. FrameMaker� does not allow change bars to appear alongside the titles ofthese signs. For example:
EXAMPLE NOTEThis is a note. See how the change bar appears tothe side of this text but not the title itself?
1. Go to Graphics>Tools.
2. Choose Line tool .
3. Holding shift key, click and draw a line from top of change bar to top of sign title. Forexample:
EXAMPLE NOTEThis is a note. See how the change bar appears tothe side of the title and the text?
Reactivate the line by clicking once on it, then choose from the Graphics Tool Bar the Line
Widths icon .
1. Click Set.
2. Tab to fourth field and type in “6 pt.”
3. Click Set.
4. Click Line Widths icon again and choose fourth line width.
To adjust the alignment of the line to the change bar, reactivate the drawn line and nudge it byholding the Alt key and position it with the arrow keys.
56
C2. INSERTING CHANGE BARS MANUALLY.
The following instructions describe how to insert change bars manually. Using the option toautomatically set change bars (for example, the Automatic Change Bars feature and the Clear AllChange Bars feature) is not recommended for JNWPS editing.
NOTEBefore you begin inserting change bars, remove thechange bars from the previous version of yourdocument.
1. Go to Format>Document>Change Bars.
2. Make the following changes on the pop-up window:
a. Change “Distance from Column” to 0.15 in.b. Change “Thickness” to 6.0 pt.c. Change “Position” to Side Closer to Page Edged. Change “Color” to Blacke. Unclick “Automatic Change Bars” and “Clear All Change Bars” if they aren’t alreadyf. Click Set
3. After making a change, highlight it and go to Format>Style>Change Bar. The changebar will appear to the side of your change.
NOTEFrameMaker� will not allow change bars to appearto the sides of NOTE, WARNING, and CAUTIONsigns. If you need a change bar to reflect a changeor addition to any of these signs, see InsertingChange Bars for Note, Warning, and Caution Signs.
57
C3. INSERTING INTENTIONALLY BLANK PAGES.
A graphic, which informs the reader of pages that are intentionally left blank, has been designedfor your use. The instructions below show you how to insert the graphic.
1. At the end of your last text line on the last page of your section, hit Enter. A newparagraph will follow. Do not worry about the tag that appears—it doesn’t matter.
2. Go to Format>Paragraphs>Designer (or press Ctrl M). This is the Paragraph Designer.
3. From the Basic tab, click the down arrow of the Paragraph Tag, choose Intent Blank,then click Apply. A page should appear with the title “THIS PAGE INTENTIONALLYLEFT BLANK.”
58
C4. MOVING AND INSERTING GRAPHICS.
To ensure the quality of an illustration or photo, use the following instructions to move a graphicthroughout your document. (These instructions also should be followed if you are inserting anew graphic.)
1. Hold Ctrl key and click on border of frame, then hit Delete key. This should delete frame,graphic, and figure title.
2. Go to page where you want to place graphic.
3. Click on Graphics>Tools and choose from it the Graphic Frame icon .
4. With this tool, draw an appropriate-sized frame for your graphic, starting at top left cornerof page.
5. Go to Graphics>Runaround Properties and check “Run around Bounding Box.” Thenclick Set. Doing this pushes your text below the frame.
NOTETo import your graphic into the frame, make surethe frame is activated; that is, the frame should haveeight small black boxes—or handles—appearingaround the border. If the frame is not activated, holdthe Control key and click on the border.
6. Go to File>Import>File and locate folder where your graphic is housed. Single-click thegraphic and click Import (or double-click the graphic) and it will automatically appear inyour frame.
7. Adjust graphic or frame accordingly.
59
C5. ACCESSING FRAMEMAKER’S� HOME PAGE.
Follow the instructions below to access FrameMaker’s� home page for answers to yourquestions—or to answer someone else’s question.
1. Begin at the FrameMaker� Menu bar.2. Click Help.3. Click Adobe Links.4. Click Home Page.5. At the home page and under Support in the red banner, click Support home.6. At the next page, click User to User Forums.7. At the next page, scroll down until you find Adobe FrameMaker on the left side of your
screen, then click All Platforms.8. On the following screen and above the Registered Users Login, press the hotlink for
Search.9. Click the second choice in the Search box—“Search forum messages only under the
current forum or topic threat (FrameMaker)”—and then type keywords for your topic inthe field below. You will then see a series of qeustions that other users such as yourselfhave asked and answered. Perhaps your answer is one of them.
For example:In the search field, type “special characters.” A series of user questions will appear. You canscan these questions to see if any of them are similar to yours. Maybe someone has answered italready.
60
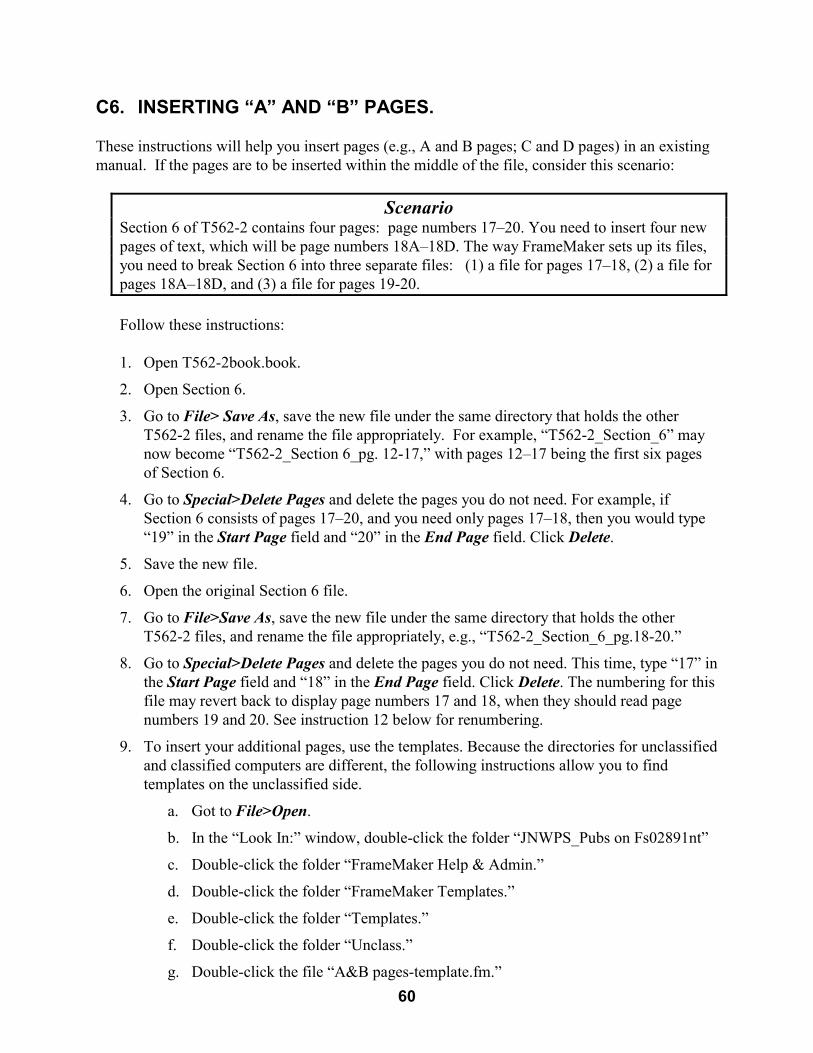
C6. INSERTING “A” AND “B” PAGES.
These instructions will help you insert pages (e.g., A and B pages; C and D pages) in an existingmanual. If the pages are to be inserted within the middle of the file, consider this scenario:
ScenarioSection 6 of T562-2 contains four pages: page numbers 17–20. You need to insert four newpages of text, which will be page numbers 18A–18D. The way FrameMaker sets up its files,you need to break Section 6 into three separate files: (1) a file for pages 17–18, (2) a file forpages 18A–18D, and (3) a file for pages 19-20.
Follow these instructions:
1. Open T562-2book.book.
2. Open Section 6.
3. Go to File> Save As, save the new file under the same directory that holds the otherT562-2 files, and rename the file appropriately. For example, “T562-2_Section_6” maynow become “T562-2_Section 6_pg. 12-17,” with pages 12–17 being the first six pagesof Section 6.
4. Go to Special>Delete Pages and delete the pages you do not need. For example, ifSection 6 consists of pages 17–20, and you need only pages 17–18, then you would type“19” in the Start Page field and “20” in the End Page field. Click Delete.
5. Save the new file.
6. Open the original Section 6 file.
7. Go to File>Save As, save the new file under the same directory that holds the otherT562-2 files, and rename the file appropriately, e.g., “T562-2_Section_6_pg.18-20.”
8. Go to Special>Delete Pages and delete the pages you do not need. This time, type “17” inthe Start Page field and “18” in the End Page field. Click Delete. The numbering for thisfile may revert back to display page numbers 17 and 18, when they should read pagenumbers 19 and 20. See instruction 12 below for renumbering.
9. To insert your additional pages, use the templates. Because the directories for unclassifiedand classified computers are different, the following instructions allow you to findtemplates on the unclassified side.
a. Got to File>Open.
b. In the “Look In:” window, double-click the folder “JNWPS_Pubs on Fs02891nt”
c. Double-click the folder “FrameMaker Help & Admin.”
d. Double-click the folder “FrameMaker Templates.”
e. Double-click the folder “Templates.”
f. Double-click the folder “Unclass.”
g. Double-click the file “A&B pages-template.fm.”
61
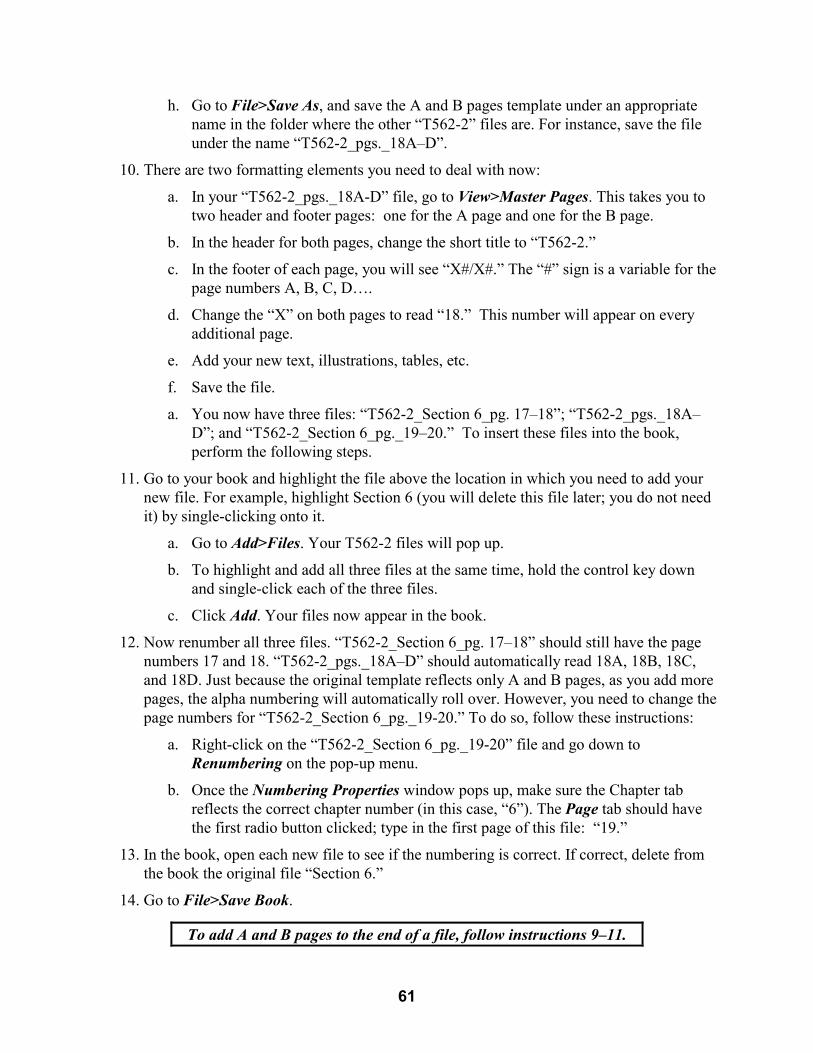
h. Go to File>Save As, and save the A and B pages template under an appropriatename in the folder where the other “T562-2” files are. For instance, save the fileunder the name “T562-2_pgs._18A–D”.
10. There are two formatting elements you need to deal with now:
a. In your “T562-2_pgs._18A-D” file, go to View>Master Pages. This takes you totwo header and footer pages: one for the A page and one for the B page.
b. In the header for both pages, change the short title to “T562-2.”
c. In the footer of each page, you will see “X#/X#.” The “#” sign is a variable for thepage numbers A, B, C, D….
d. Change the “X” on both pages to read “18.” This number will appear on everyadditional page.
e. Add your new text, illustrations, tables, etc.
f. Save the file.
a. You now have three files: “T562-2_Section 6_pg. 17–18”; “T562-2_pgs._18A–D”; and “T562-2_Section 6_pg._19–20.” To insert these files into the book,perform the following steps.
11. Go to your book and highlight the file above the location in which you need to add yournew file. For example, highlight Section 6 (you will delete this file later; you do not needit) by single-clicking onto it.
a. Go to Add>Files. Your T562-2 files will pop up.
b. To highlight and add all three files at the same time, hold the control key downand single-click each of the three files.
c. Click Add. Your files now appear in the book.
12. Now renumber all three files. “T562-2_Section 6_pg. 17–18” should still have the pagenumbers 17 and 18. “T562-2_pgs._18A–D” should automatically read 18A, 18B, 18C,and 18D. Just because the original template reflects only A and B pages, as you add morepages, the alpha numbering will automatically roll over. However, you need to change thepage numbers for “T562-2_Section 6_pg._19-20.” To do so, follow these instructions:
a. Right-click on the “T562-2_Section 6_pg._19-20” file and go down toRenumbering on the pop-up menu.
b. Once the Numbering Properties window pops up, make sure the Chapter tabreflects the correct chapter number (in this case, “6”). The Page tab should havethe first radio button clicked; type in the first page of this file: “19.”
13. In the book, open each new file to see if the numbering is correct. If correct, delete fromthe book the original file “Section 6.”
14. Go to File>Save Book.
To add A and B pages to the end of a file, follow instructions 9–11.
62
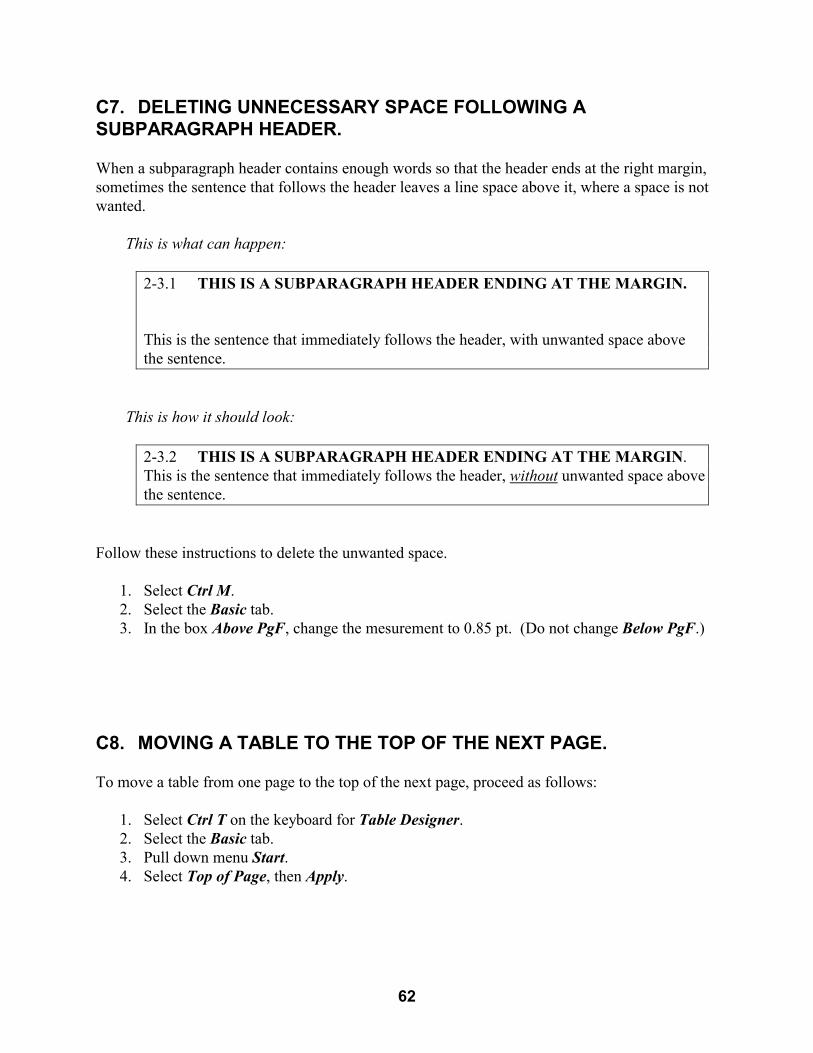
C7. DELETING UNNECESSARY SPACE FOLLOWING ASUBPARAGRAPH HEADER.
When a subparagraph header contains enough words so that the header ends at the right margin,sometimes the sentence that follows the header leaves a line space above it, where a space is notwanted.
This is what can happen:
2-3.1 THIS IS A SUBPARAGRAPH HEADER ENDING AT THE MARGIN.
This is the sentence that immediately follows the header, with unwanted space abovethe sentence.
This is how it should look:
2-3.2 THIS IS A SUBPARAGRAPH HEADER ENDING AT THE MARGIN.This is the sentence that immediately follows the header, without unwanted space abovethe sentence.
Follow these instructions to delete the unwanted space.
1. Select Ctrl M.2. Select the Basic tab.3. In the box Above PgF, change the mesurement to 0.85 pt. (Do not change Below PgF.)
C8. MOVING A TABLE TO THE TOP OF THE NEXT PAGE.
To move a table from one page to the top of the next page, proceed as follows:
1. Select Ctrl T on the keyboard for Table Designer. 2. Select the Basic tab.3. Pull down menu Start.4. Select Top of Page, then Apply.
63
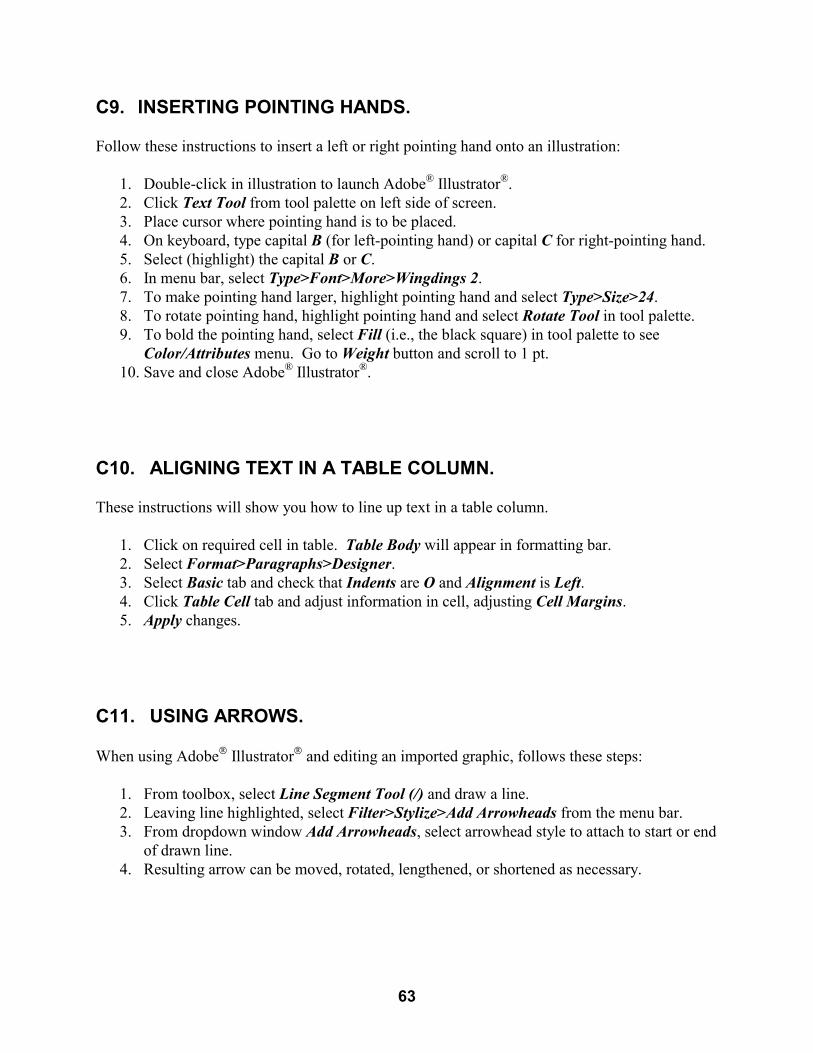
C9. INSERTING POINTING HANDS.
Follow these instructions to insert a left or right pointing hand onto an illustration:
1. Double-click in illustration to launch Adobe® Illustrator®. 2. Click Text Tool from tool palette on left side of screen.3. Place cursor where pointing hand is to be placed.4. On keyboard, type capital B (for left-pointing hand) or capital C for right-pointing hand.5. Select (highlight) the capital B or C.6. In menu bar, select Type>Font>More>Wingdings 2. 7. To make pointing hand larger, highlight pointing hand and select Type>Size>24. 8. To rotate pointing hand, highlight pointing hand and select Rotate Tool in tool palette.9. To bold the pointing hand, select Fill (i.e., the black square) in tool palette to see
Color/Attributes menu. Go to Weight button and scroll to 1 pt.10. Save and close Adobe® Illustrator®.
C10. ALIGNING TEXT IN A TABLE COLUMN.
These instructions will show you how to line up text in a table column.
1. Click on required cell in table. Table Body will appear in formatting bar.2. Select Format>Paragraphs>Designer.3. Select Basic tab and check that Indents are O and Alignment is Left.4. Click Table Cell tab and adjust information in cell, adjusting Cell Margins. 5. Apply changes.
C11. USING ARROWS.
When using Adobe� Illustrator� and editing an imported graphic, follows these steps:
1. From toolbox, select Line Segment Tool (/) and draw a line.2. Leaving line highlighted, select Filter>Stylize>Add Arrowheads from the menu bar. 3. From dropdown window Add Arrowheads, select arrowhead style to attach to start or end
of drawn line.4. Resulting arrow can be moved, rotated, lengthened, or shortened as necessary.

64
C12. ADJUSTING SPACE IN A TABLE ROW.
If your table headings have too little top-margin space above the text, compared to the amount ofbottom-margin space below the text, like this:
1ST COLUMN HEADING2ND COLUMN
HEADING
Then do this:
1. Highlight entire row.2. Open paragraph designer (Ctrl M).3. Click on Table Cell tab.4. In Cell Margin column, adjust the top from 0.0 to 5.0 (or to whatever number you need to
make the space above the text match the space below the text). Make no otheradjustments, and do not select anything in the pull-down lists.
Your table should now look like this:
1ST COLUMN HEADING2ND COLUMN
HEADING
C13. DELETING CROP MARKS.
Sometimes crop marks may appear on the computer screen and on the printed illustration. Dothe following to delete the crop marks:
1. Go to Objects on the tool bar.2. Click on Crop Marks.3. Choose Release.

65
THIS PAGE INTENTIONALLY LEFT BLANK

66
ADDENDUM D
WRITER’S CHECKLIST
67
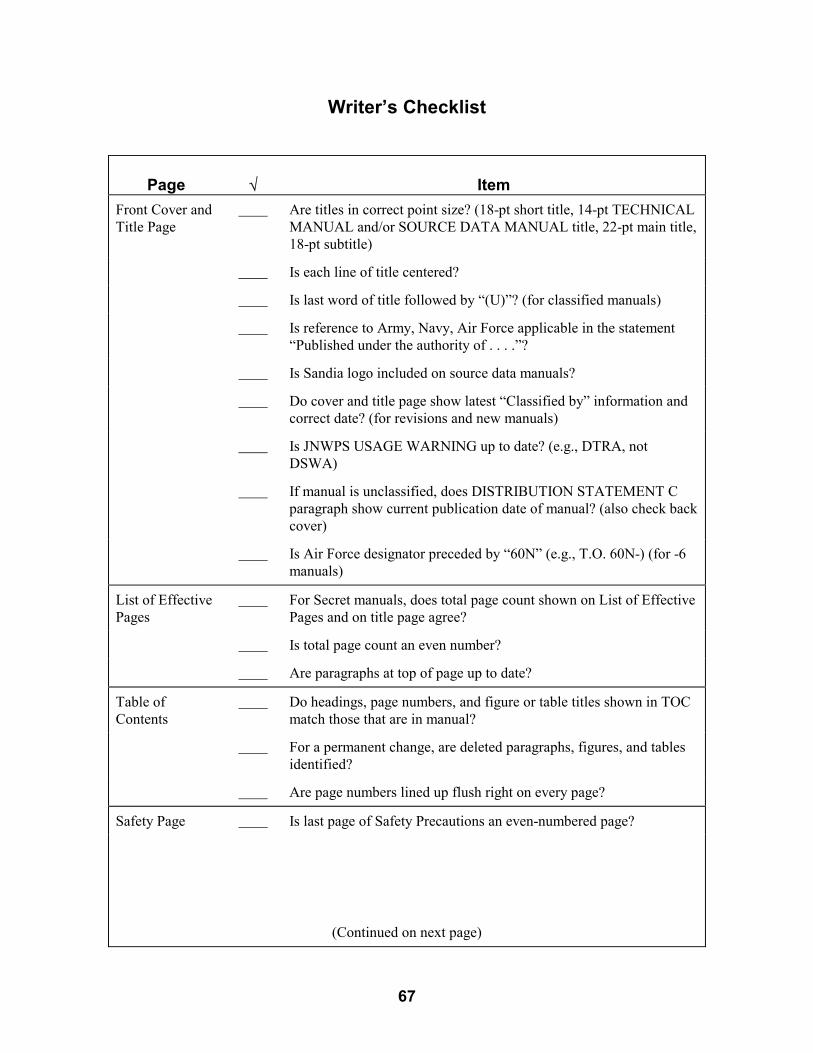
Writer’s Checklist
Page � ItemFront Cover andTitle Page
Are titles in correct point size? (18-pt short title, 14-pt TECHNICALMANUAL and/or SOURCE DATA MANUAL title, 22-pt main title,18-pt subtitle)
Is each line of title centered?
Is last word of title followed by “(U)”? (for classified manuals)
Is reference to Army, Navy, Air Force applicable in the statement“Published under the authority of . . . .”?
Is Sandia logo included on source data manuals?
Do cover and title page show latest “Classified by” information andcorrect date? (for revisions and new manuals)
Is JNWPS USAGE WARNING up to date? (e.g., DTRA, notDSWA)
If manual is unclassified, does DISTRIBUTION STATEMENT Cparagraph show current publication date of manual? (also check backcover)
Is Air Force designator preceded by “60N” (e.g., T.O. 60N-) (for -6manuals)
List of EffectivePages
For Secret manuals, does total page count shown on List of EffectivePages and on title page agree?
Is total page count an even number?
Are paragraphs at top of page up to date?
Table ofContents
Do headings, page numbers, and figure or table titles shown in TOCmatch those that are in manual?
For a permanent change, are deleted paragraphs, figures, and tablesidentified?
Are page numbers lined up flush right on every page?
Safety Page Is last page of Safety Precautions an even-numbered page?
(Continued on next page)
68
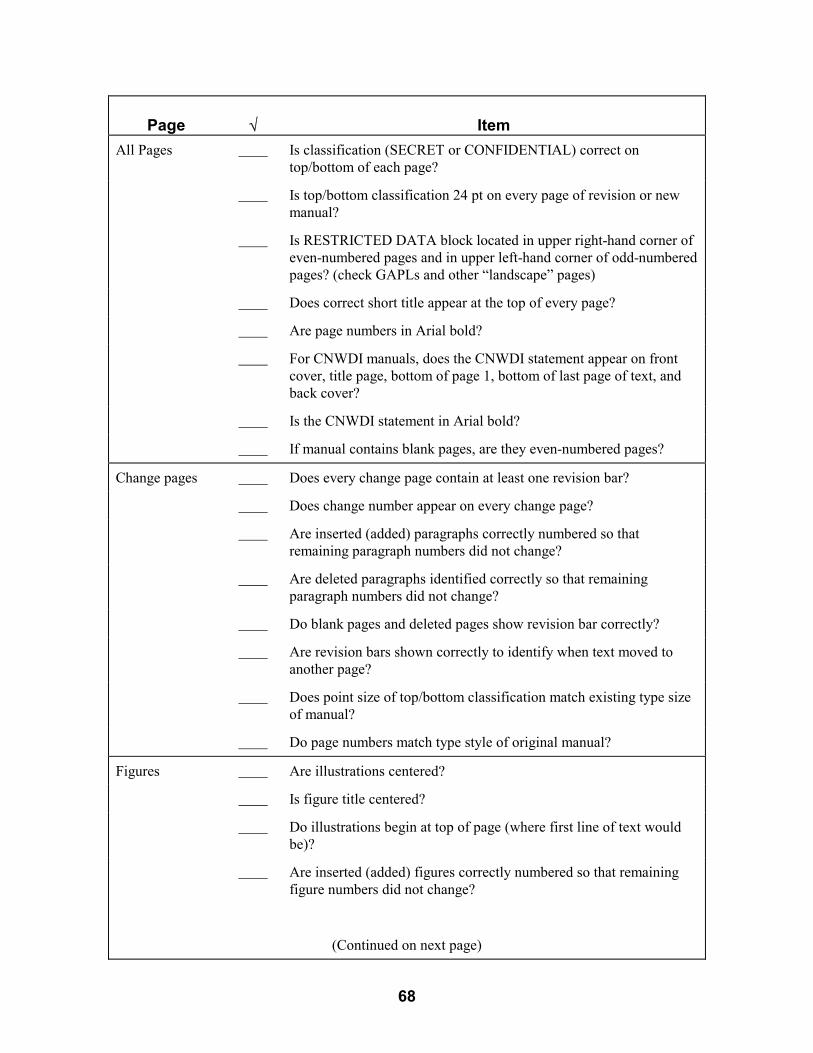
Page � ItemAll Pages Is classification (SECRET or CONFIDENTIAL) correct on
top/bottom of each page?
Is top/bottom classification 24 pt on every page of revision or newmanual?
Is RESTRICTED DATA block located in upper right-hand corner ofeven-numbered pages and in upper left-hand corner of odd-numberedpages? (check GAPLs and other “landscape” pages)
Does correct short title appear at the top of every page?
Are page numbers in Arial bold?
For CNWDI manuals, does the CNWDI statement appear on frontcover, title page, bottom of page 1, bottom of last page of text, andback cover?
Is the CNWDI statement in Arial bold?
If manual contains blank pages, are they even-numbered pages?
Change pages Does every change page contain at least one revision bar?
Does change number appear on every change page?
Are inserted (added) paragraphs correctly numbered so thatremaining paragraph numbers did not change?
Are deleted paragraphs identified correctly so that remainingparagraph numbers did not change?
Do blank pages and deleted pages show revision bar correctly?
Are revision bars shown correctly to identify when text moved toanother page?
Does point size of top/bottom classification match existing type sizeof manual?
Do page numbers match type style of original manual?
Figures Are illustrations centered?
Is figure title centered?
Do illustrations begin at top of page (where first line of text wouldbe)?
Are inserted (added) figures correctly numbered so that remainingfigure numbers did not change?
(Continued on next page)
69
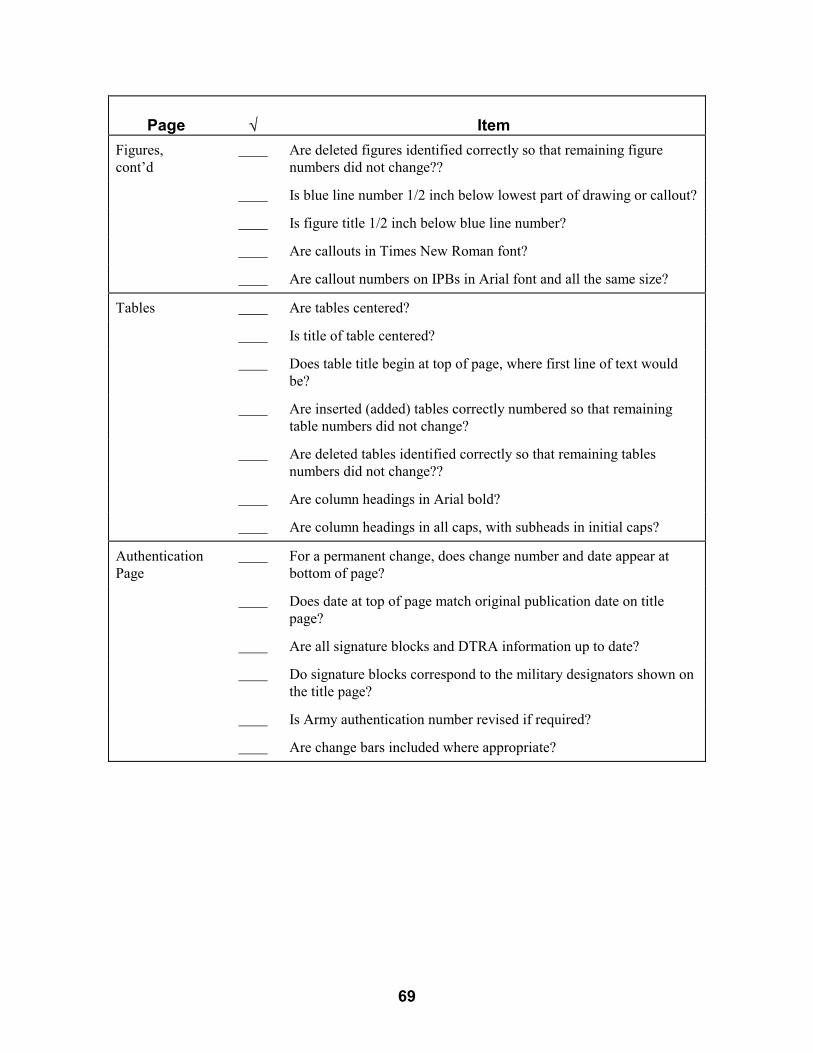
Page � ItemFigures,cont’d
Are deleted figures identified correctly so that remaining figurenumbers did not change??
Is blue line number 1/2 inch below lowest part of drawing or callout?
Is figure title 1/2 inch below blue line number?
Are callouts in Times New Roman font?
Are callout numbers on IPBs in Arial font and all the same size?
Tables Are tables centered?
Is title of table centered?
Does table title begin at top of page, where first line of text wouldbe?
Are inserted (added) tables correctly numbered so that remainingtable numbers did not change?
Are deleted tables identified correctly so that remaining tablesnumbers did not change??
Are column headings in Arial bold?
Are column headings in all caps, with subheads in initial caps?
AuthenticationPage
For a permanent change, does change number and date appear atbottom of page?
Does date at top of page match original publication date on titlepage?
Are all signature blocks and DTRA information up to date?
Do signature blocks correspond to the military designators shown onthe title page?
Is Army authentication number revised if required?
Are change bars included where appropriate?
70
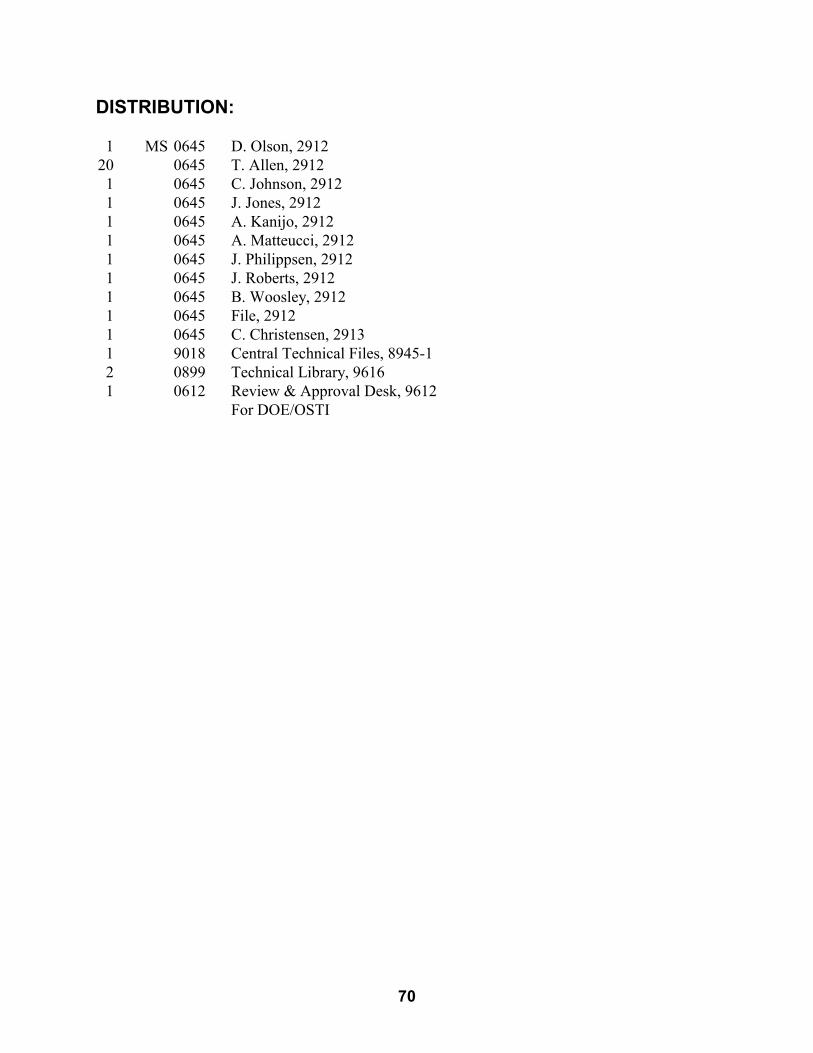
DISTRIBUTION:
1 MS 0645 D. Olson, 291220 0645 T. Allen, 29121 0645 C. Johnson, 29121 0645 J. Jones, 29121 0645 A. Kanijo, 29121 0645 A. Matteucci, 29121 0645 J. Philippsen, 29121 0645 J. Roberts, 29121 0645 B. Woosley, 29121 0645 File, 29121 0645 C. Christensen, 29131 9018 Central Technical Files, 8945-12 0899 Technical Library, 96161 0612 Review & Approval Desk, 9612
For DOE/OSTI

71
THIS PAGE INTENTIONALLY LEFT BLANK