Embed Size (px)
Citation preview
Editing with Adobe Premiere ProInstructor: Greg Stanwood
Class Objectives
Learn good file management skills Learn the basics of editing with Adobe Premiere Pro Learn to edit a short video using aroll, broll, music, and still images
Again, the primary focus of this curriculum is to ensure that you assemble your projectscorrectly and that you understand where all your files are saved so that you never lose yourwork. The more advanced and aesthetic aspects of editing are best to learn on your own or inour advanced editing class.
If you follow these instructions while working in class or on your own, you will never loseyour work, and your project and files will be organized in a way that makes sense. Please followthem closely, even if you think you already know how to capture and organize your projects.
Getting Started
Basic Components of Workstations Keyboard Rightclicking Volume Headsets
File Management Create a new file on the desktop that is titled Adobe Premiere Pro Workshop Inside this folder, create two more folders
Media Files the folder that will hold the “ingredients” for your program videofiles, clips you capture from your DV tapes, photos, music, etc.
Project Files the folder that will hold your project file, which is the “recipe” of yourprogram and show how the “ingredients” are used
1
Opening Adobe Premiere Pro
Click on this icon, located in your computer’s dock
(When you first open Adobe Premiere Pro, you may be prompted to reset your scratchdisks. If so, please refer “Setting your Scratch Disks” below.)
Creating a New Project
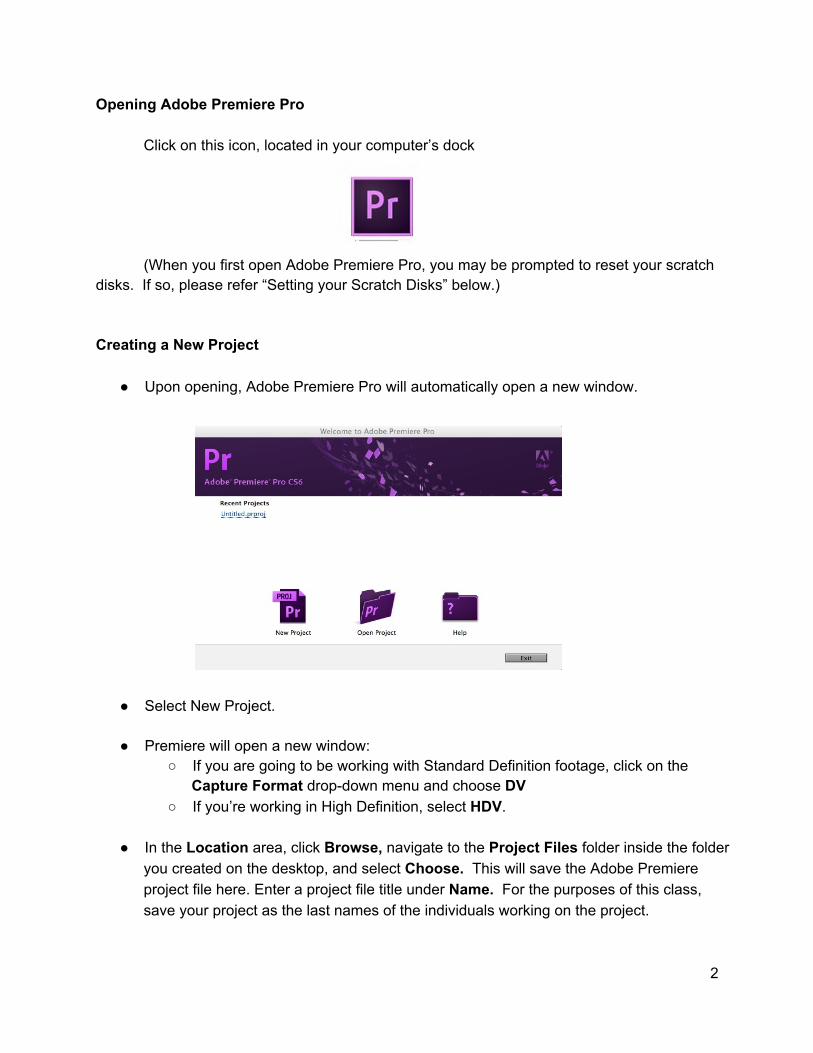
Upon opening, Adobe Premiere Pro will automatically open a new window.
Select New Project.
Premiere will open a new window: If you are going to be working with Standard Definition footage, click on the
Capture Format dropdown menu and choose DV If you’re working in High Definition, select HDV.
In the Location area, click Browse, navigate to the Project Files folder inside the folderyou created on the desktop, and select Choose. This will save the Adobe Premiereproject file here. Enter a project file title under Name. For the purposes of this class,save your project as the last names of the individuals working on the project.
2
Setting the Scratch Disks:
Navigate to the Scratch Disks tab. Scratch disks allow you to set permanent destinations for subsidiary files created
while you are working in Adobe Premiere Pro that will help your project stayorganized.
Select the Browse button under the Capture Video section, navigate to the Media Filesfolder inside the folder you created on the desktop, and select Choose.
Set the same destination for the scratch disks under Captured Audio, Video Previewsand Audio Previews.
Continue by clicking OK.
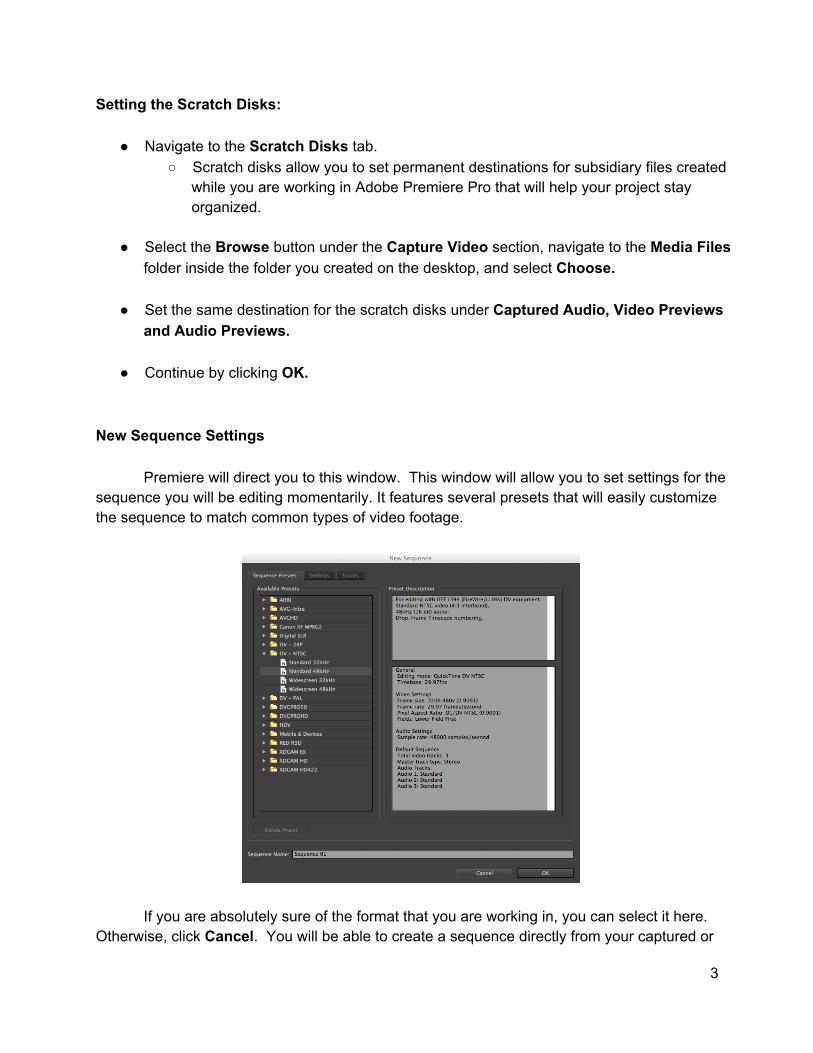
New Sequence Settings
Premiere will direct you to this window. This window will allow you to set settings for thesequence you will be editing momentarily. It features several presets that will easily customizethe sequence to match common types of video footage.
If you are absolutely sure of the format that you are working in, you can select it here.Otherwise, click Cancel. You will be able to create a sequence directly from your captured or
3
imported footage at a later point. Otherwise, name your sequence under Sequence Name clickOK to continue.
Saving Project Files
You should then immediately ensure that your project is saved in the Project Files folder that youcreated on your desktop (File > Save As…).
Resetting the Premiere Pro Workspace
You can reset the workspace to its default appearance by clicking on Window >Workspace> Reset Current Workspace.
Understanding the Adobe Premiere Pro Workspace
There are 4 main windows in Adobe Premiere Pro.
Project (bottom left): This window holds a list of your master media clips, sequences and bins(folders for your media). This window also holds the Media Browser. Click the tab next toProject to open the Media Browser. You can browse the computer for media. You can drag anddrop files from here to the project window to import them.
Source (upper left): Window used for viewing clips and also for adjusting filters and otheraspects of these clips. This is the window that displays information specific to the clip that youhave selected.
Timeline (lower center):The Timeline shows your audio and video clips in a linear sequence and lets you edit andarrange them. This is where the majority of your editing should take place. While sometrimming can be done in the Source, we encourage you to get used to trimming and editingwithin the Timeline.
Program (upper right): The program window is used for viewing the results of the work youhave done on the Timeline. This will be the final output of your video, including all effects,transitions, text, and so on.
To view the Title Safe and Action Safe frames of your video, select click Safe Margins inthe dropdown menu in the upper righthand corner of either the Source or Program windows.The outlined boxes represent Title Safe and Action Safe. Some TVs will crop out the portion of
4

your image that falls outside these boxes, so you will want to make sure all of the images thatyou care about reside within these guidelines.
In the workspace, you will also see these items.
Audio Master Meters (bottom right): Allows you to track audio levels and peaks as you playthrough your source footage or your edited sequences.
Tools (bottom center): This is the narrow window that holds the tools that you can use toaccomplish various tasks. In this class, we will only be covering the Selection Tool (V usedfor moving clips on the Timeline), the Razor Tool (C used for cutting clips), and the RippleEdit Tool (B used for trimming clips). These tools are the most useful when beginning to edit,with the others becoming more useful as you get more comfortable with the program.
Creating Bins
It is wise to keep your Project window well organized in a way that lets you find specificclips quickly and easily. Create a bin by holding down the “control” key and clicking the mouse inthe Project window and selecting New Bin, or by clicking the New Bin icon at the bottom of theProject window. You can also use the keyboard shortcut Command /. Make as many bins asyou need to organize your project and name them appropriately (ARoll, BRoll, Logos, Music,etc).
Importing Media
For this class, we will import media from the Editing Class Assets on your desktop. Toimport these files into Adobe Premiere Pro, go to the top menu screen in Adobe Premiere Proand select File>Import or Command I. Use the popup window to find the file you wish toimport and then click Import. The imported media will appear as clips in your Project window.
You can also import files by selecting them in the Media Browser and dragging them tothe Project window.
Viewing a Clip
Doubleclick on a clip in the Project window, and it will appear in the Source window.Here you can trim it with the I (Mark In) and O (Mark Out) keys before bringing it into yourTimeline.
5
While working in the Source you will notice that there are the Effect Controls tab, whichallow you to manipulate both video and audio of the clip being viewed in the Source window.
Video and Audio Tracks
Once you start laying clips in your Timeline, you will notice a couple of different tracks.Your video tracks are displayed on top of the Timeline. Underneath these are audio tracks,displayed on the bottom.
Playhead
This is the red vertical line that is topped with a blue marker on the Timeline and cutsdown through all of the tracks. This shows you which frame you are looking at on the program,and is key to navigating through the Timeline. (Please note: When navigating through theTimeline, click your mouse in the Timeline in the space that contains the timecode. This willallow you to easily place the playhead where you want to.)
Creating a New Sequence Based on Footage Settings:
If you already created your sequence using a preset at the beginning of the class, skipthis step. If not, continue on here.
To create a sequence with settings that match your imported footage, drag one of yourvideo clips (one that is representative of the type of how most of your video is shot) to the NewItem icon in the bottom righthand corner of the Project window. This will create a new sequencecontaining that clip, but more importantly, with settings that correctly match your footage.Rename the sequence as you choose. This step also adds the clip to the Timeline, in case youwant to delete it from there.
Editing
Welledited projects are trimmed to get their message across as clearly and conciselyas possible. They also contain a good amount of broll (cutaway footage) when appropriate andonly use solid speaking points. So, our goal in this class will be to take a few interview clips,trim them down to the most essential, concise portions possible, and then cover the visuals withsome interesting broll to illustrate the topic being discussed. We will then add logos, titles, andmusic.
6
ThreePoint Editing
1. Start (or In) point on clip to be added2. End (or Out) point on clip to be added3. Start point on Timeline (where in the Timeline you want your clip to be added, usually
determined by where you drag the clip)
Managing your clips on the Timeline:
To bring a clip onto the Timeline, drag it from Source window into the Timeline and drop itinto the spot where you want it. Notice that you can place the clip on top of or next to another clipin the Timeline, as well as place the clip into different tracks.
Stacked Clips
Video If video clips are stacked on top of one another, only the top clip will be visible Audio Stacked audio tracks will all play simultaneously when the playhead runs over
them
Navigating Clips in the Timeline or Source Viewer
Place the playhead at the beginning of the section you want to watch and press thespacebar. Press the spacebar again to stop.
To control the motion of the playhead, you can use the keyboard keys J (play forward), K(stop), and L (play backwards).
Press J or L more than once to increase the speed of forward/reverse playback. To advance the playhead one frame, press the forward arrow once. To move the playhead back one frame, press the back arrow once. To go to the beginning of the sequence or clip, press the home key. To go to the end of the sequence or clip, press the end key.
Razor Tool
Park the playhead where you want to make the cut. Bring your mouse to the Tools menu and click on the Razor Tool (icon looks like a
razor) or press C. Bring your mouse (which should now be shaped like the razor) back to the point on the
7
clip where your playhead is and click. A seam (or edit) will appear where the cursor playhead is parked. After making all additional cuts, you must switch back to the Selection Tool (either by
clicking in the tool palette or by typing V) to select the portions or the clip that you wish todelete.
Trimming in the Timeline
With the Selection Tool (V) selected, place the mouse on the furthest edge of the clipuntil the mouse arrow becomes a red bracket with small arrows pointing left and right. When thishappens, click on your mouse and drag the edge of the clip to the desired point
Ripple Edit Tool
This is just another way to trim a clip. When using this tool, you will see a yellow bracket.Click and drag on the clip that you want to trim or lengthen. The rest of the clips in your Timelinewill move along with your edit, so you do not have to reposition the other clips afterwards.
Snapping
This button is in the top lefthand corner of the Timeline or you can simply tap the S key. Whenenabled, the playhead will “snap” to the closest edit point while you are trimming a clip.
Video Transitions
Go to the Effects tab in the Project window Drop down the Video Transitions menu The disclosure triangle will twirl down showing a list of the various transition types that
you can choose from; each of these options also has a submenu of more options youcan choose from
Select a transition Drag it over and then drop it in between the two clips you would like to apply the transition
to The transition will appear on the Timeline as a purple stripe across the top of the edit
seam.
Audio Levels
8
The easiest way to adjust audio levels is to drag the yellow line that crosses the audio onevery track. Dragging it upwards will make the media play louder, dragging it down will soften it.Aim to have your audio PEAK at 12 dBs.
Effects
To add an effect to a particular clip, go to the Effects tab in the Project window Drop down Video Effects Each of these options will also have a submenu of more options you can try Select the effect you would like to try Drag it on top of the clip you want to apply it to in the Timeline
Once you have the effect applied to the right clip and rendered, rightclick or controlclickon the clip and select Copy. You can now paste this filter to other clips, by selecting the otherclips, rightclicking or controlclicking on the group of clips and selecting Paste Attributes. Thiswill apply all modifications, including added effects, to the other selected clips.
Titles and Text
Go to File > New > Title or hit Command T. A new window will open that will allow youto set the size and name your title. Click OK.
A window will appear with several title design options. Click in the window showing thevideo to start typing. You can change the text and adjust size, font, style and color underthe title properties. You can select a title style under the title style tab.
Under the title window tab, click on this button to select still, scroll or roll. Once you have entered the text, close the title window and drag the clip from the project
to the Timeline. Place the text clip on a track directly above another clip and it will betransposed on the clip.
If you wish to have a specific colored background, place the text over an empty portion ofthe Timeline, or insert a Color Matte by going to File > New > Color Matte... If youwant a standard black background, you can select Black Video... from the same menu.
Adjust the length of the text by dragging the ends in the Timeline.
Exporting Your Video for Denver Open Media
Click File > Export > Media... Make sure the Source Range is set to Entire Sequence (or that you have properly
selected the portion of your program that you want to export)
9
Set Format to QuickTime Set Preset to HD 1080i 29.97, H.264, AAC 48kHz (if your program is in HD or high
definition) Set Preset to NTSC, H.264, AAC 48kHz (if your program is in SD or standard definition) Click on Output Name to name your file and choose where to save it Make sure the Export Video and Export Audio boxes are checked Click the Export button
Exporting Your Video for Other Destinations
Click File > Export > Media... Make sure the Source Range is set to Entire Sequence (or that you have properly
selected the portion of your program that you want to export) Click on Output Name to name your file and choose where to save it Click the Queue button to open Adobe Media Encoder Select one of the System Presets (YouTube, Apple Devices, DVD, etc.) and drag it to the
Queue on the left Click on the green arrow to being the export
Extra Information
Creating DVD Chapters
If you want your DVD to have chapters, create chapter markers in the Adobe PremierePro sequence before exporting to DVD.
In the sequence, make sure none of the clips are selected (if they are, click in a grey partof the Timeline to unselect)
Move the playhead to the location where you want a chapter to begin Rightclick or controlclick in the timeline and choose Marker>Set Encore Chapter
Marker; a dialogue box will appear You can name the marker; this name will appear in the DVD menu Click OK
Capturing Video Footage from Tape
Connect your camera or deck Choose File>Capture Use stop, play, rewind, fastforward buttons to search the footage
10
Mark in and out points of where you want to start and end capturing of the footage thatyou want by using the bracket buttons (Set In point and Set Out point)
In the Capture section of the window (bottom righthand corner), check Scene Detect; thiswill create a new file for every time there was a stop/start in recording on the tape
Push the In/Out button to begin capturing
Version Control
If you want to keep different versions of your project (i.e., for different edit sessions thatyou work on your project), you can duplicate your sequence. Rightclick or controlclick on thesequence name in the Project window and choose Duplicate. You can name your sequencesby date or sequentially, however you want to organize them.
Practice!
Remember, editing takes practice, so now that you’ve taken this intro course, keepediting and your skills will grow.
11