Embed Size (px)
Citation preview

EFFORTLESSSWIMMING
Mastering Freestyle Technique: How to swim faster, longer and easier (and look good doing it)
Before you start... EFFORTLESSSWIMMING
Dear Fellow Swimmer,
Thank you very much for investing your money, confidence and time into this course.
We've done our best to keep it as simple as possible and concise as possible… eliminating all the fluff and jargon and leaving only useful drills that will get results fast.
If you follow the drills in the order that we outline for you, there is no question that you can be swimming fast, smooth and effortless freestyle in a very short time.
Sam has won an Australian National Title in the 100m IM using these same drills.
It's worked for us, it's worked for hundreds of others, and it can work for you.To make this program super easy to use we've included two options of learning:
1 – You can read this eBook and follow the drills step by step.2 – And you can also watch the video version of the drills and follow along live from your TV or computer.
We've also included a drill card with all the drills on there so you can print it off and take it to the pool with you. So, without further ado… let's get started.
Sincerely,
Brenton Ford
Before you start... EFFORTLESSSWIMMING
1.
2.
3.
4.
5.
Start slowly: As you progress through each of the drills, you might find yourself getting excited about your new freestyle technique. Excellent! Stay on track and make sure you master each drill before you move onto the next one. If you're having trouble with a drill, putting on a pair of flippers/fins might help you. Try it using a pair of flippers and once you've “got it”, practice the drill without flippers.
Start small: Have you ever swam 1000 yards or meters without stopping? It can become boring, quickly. With each of these drills, it's best to practice them in lengths of 25 meters or yards, depending on where you are training. This way you can remain laser-focused on the drill for 20-30 seconds and then give yourself a few seconds to refocus before starting the next length. With each drill, I highly recommend doing at least 12 lengths before moving onto the next drill.
Start right: We've all heard the saying 'Something done 99% right is still 100% wrong'. Performing these drills is no different. Whatever you do, don't rush through them just to 'get them done'. Focus on each drill, get it right, master it and then move onto the next one.
Start with the end in mind: The goal of these drills is to transform your stroke into a powerful and smooth freestyle which looks good, feels good and most of all kicks arse in the water. I've found myself getting frustrated while swimming sometimes because it might just not be my day. If this happens to you, take a deep breath, relax and move onto something else. You can always come back to it tomorrow. Rest assured that if you follow our instructions step by step, it will be impossible for you not to improve.
Just start: Read through this entire book and then start putting your new knowledge into action. Start with the Introductory Lesson first. Are you ready to go? Let's do it!
5 TIPS for using this program
EFFORTLESSSWIMMING
INTRODUCTORY LESSON
Balance and body positionThis is something we’re taught as children but not so much as adults. I think that many of us have forgotten the importance of balance and body position, particularly if you we’re never
taught it properly from the beginning. The drills in this lesson might be easy, but whatever you do, DO NOT SKIP PAST THEM! If you get this right, the rest will come easily.
Introductory Lesson EFFORTLESSSWIMMING
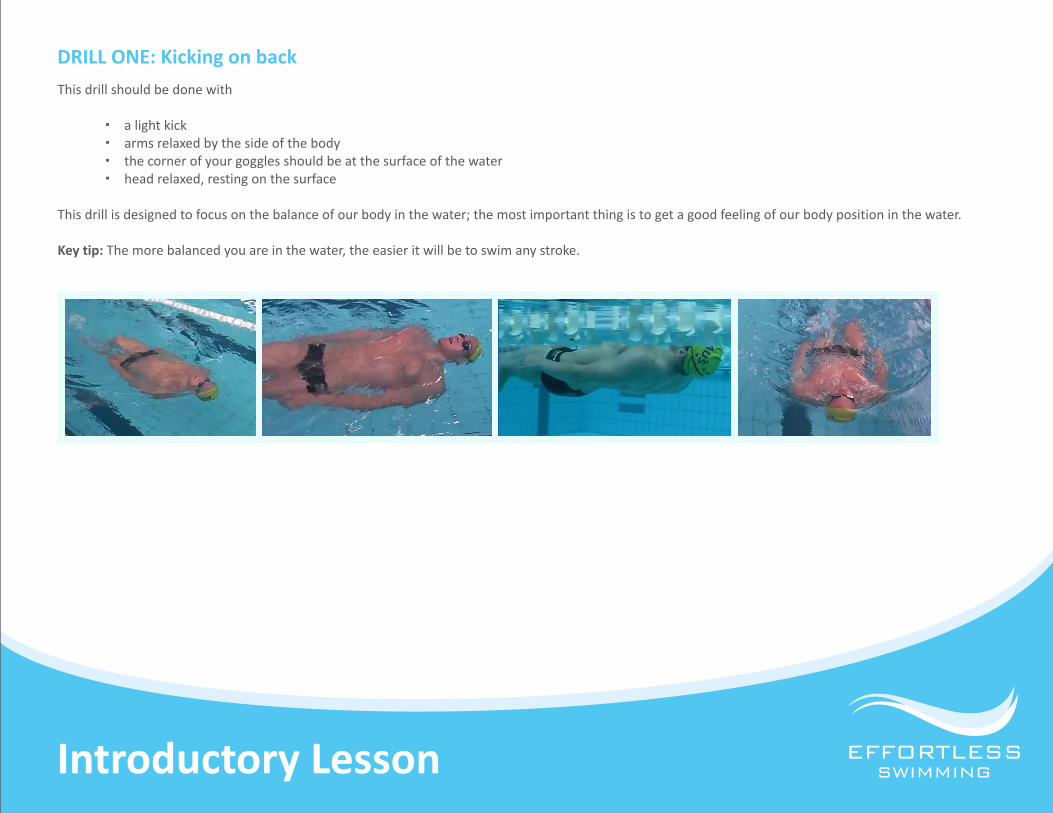
DRILL ONE: Kicking on back
This drill should be done with
a light kick arms relaxed by the side of the body the corner of your goggles should be at the surface of the water head relaxed, resting on the surface
This drill is designed to focus on the balance of our body in the water; the most important thing is to get a good feeling of our body position in the water.
Key tip: The more balanced you are in the water, the easier it will be to swim any stroke.
Introductory Lesson EFFORTLESSSWIMMING
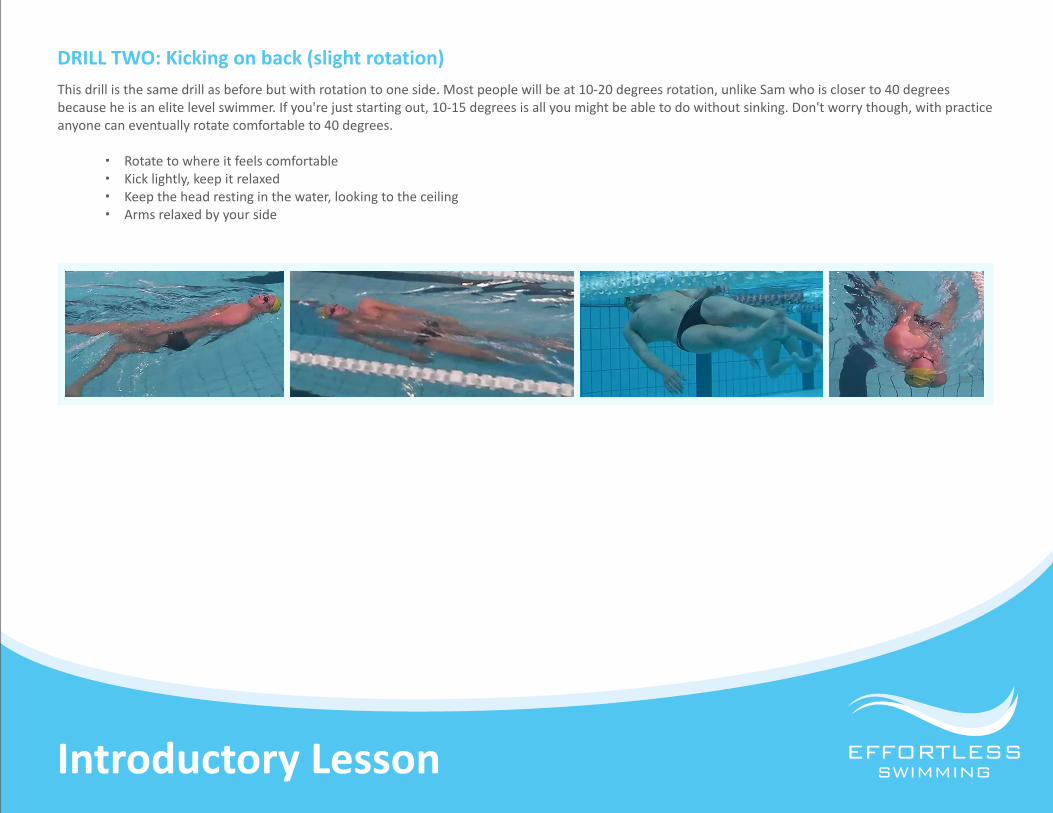
This drill is the same drill as before but with rotation to one side. Most people will be at 10-20 degrees rotation, unlike Sam who is closer to 40 degrees because he is an elite level swimmer. If you're just starting out, 10-15 degrees is all you might be able to do without sinking. Don't worry though, with practice anyone can eventually rotate comfortable to 40 degrees.
Rotate to where it feels comfortable Kick lightly, keep it relaxed Keep the head resting in the water, looking to the ceiling Arms relaxed by your side
DRILL TWO: Kicking on back (slight rotation)
Introductory Lesson EFFORTLESSSWIMMING
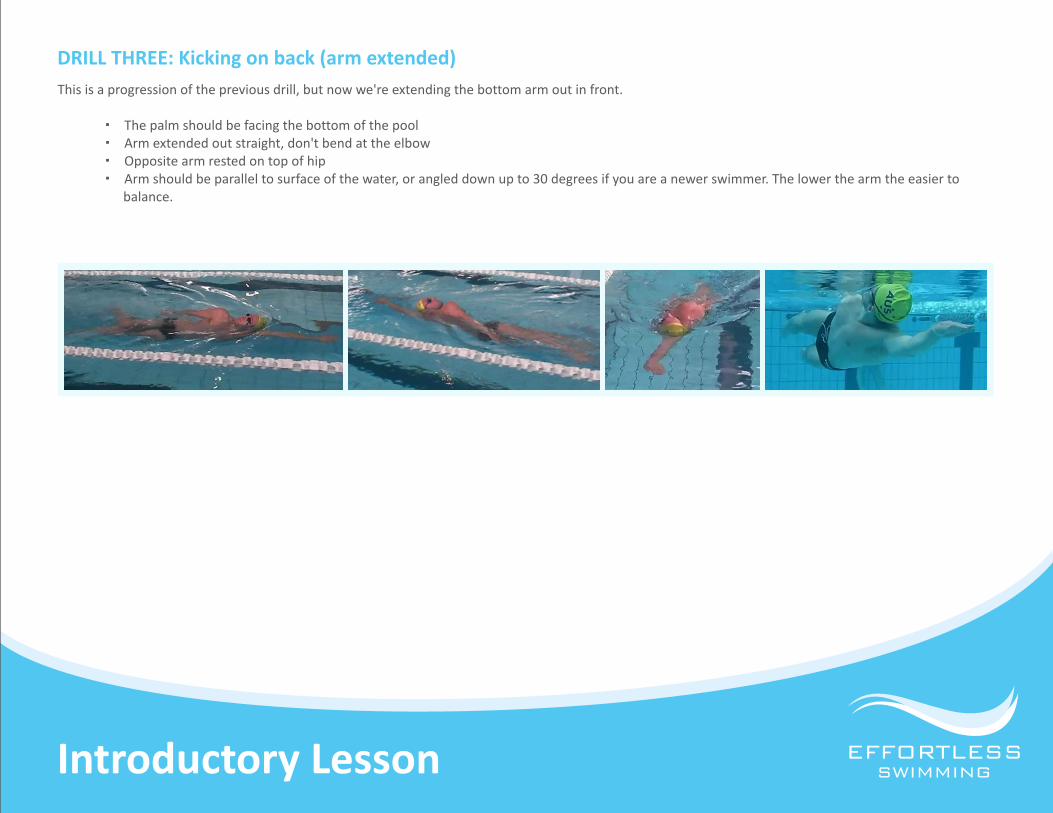
This is a progression of the previous drill, but now we're extending the bottom arm out in front.
The palm should be facing the bottom of the pool Arm extended out straight, don't bend at the elbow Opposite arm rested on top of hip Arm should be parallel to surface of the water, or angled down up to 30 degrees if you are a newer swimmer. The lower the arm the easier to balance.
DRILL THREE: Kicking on back (arm extended)

Introductory Lesson EFFORTLESSSWIMMING
Now we're starting to progress towards freestyle. This drill is where we start to feel correct balance for freestyle.
Angle the body at 90 degrees, have it facing the side wall of the pool Eyes looking directly down to the bottom of the pool Head almost completely submerged Relaxed kick To breath, rotate your head to the side. For newer swimmers, rotate to your back, then take a breath and then return to your side.
DRILL FOUR: Kick on side (arms by side)
Introductory Lesson EFFORTLESSSWIMMING
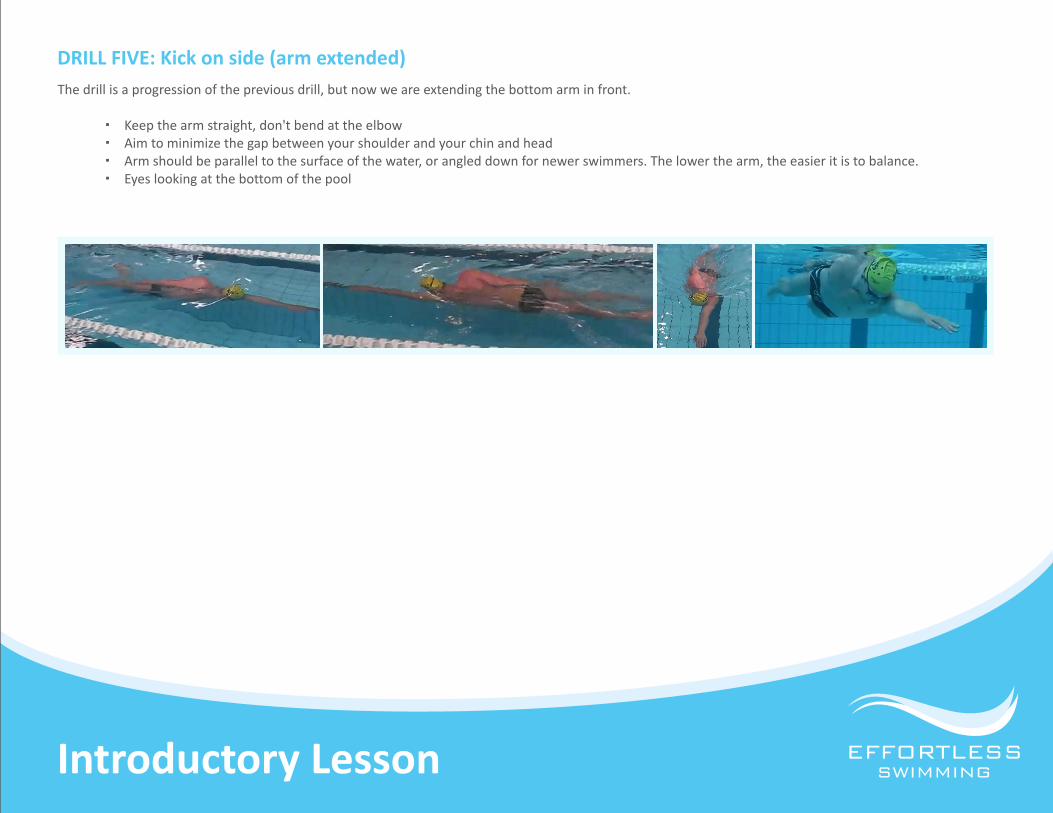
The drill is a progression of the previous drill, but now we are extending the bottom arm in front.
Keep the arm straight, don't bend at the elbow Aim to minimize the gap between your shoulder and your chin and head Arm should be parallel to the surface of the water, or angled down for newer swimmers. The lower the arm, the easier it is to balance. Eyes looking at the bottom of the pool
DRILL FIVE: Kick on side (arm extended)
EFFORTLESSSWIMMING
LESSON ONE
Alternating sides and developing powerNow we've worked on body balance and body position, it's time to introduce body roll.
Body roll is simply alternating side to side. As we mentioned earlier, freestyle is swam by alternating from side to side, not on your front. Most of your power will come from your ability
to rotate from side to side so it's crucial to a good freestyle.
Lesson One EFFORTLESSSWIMMING
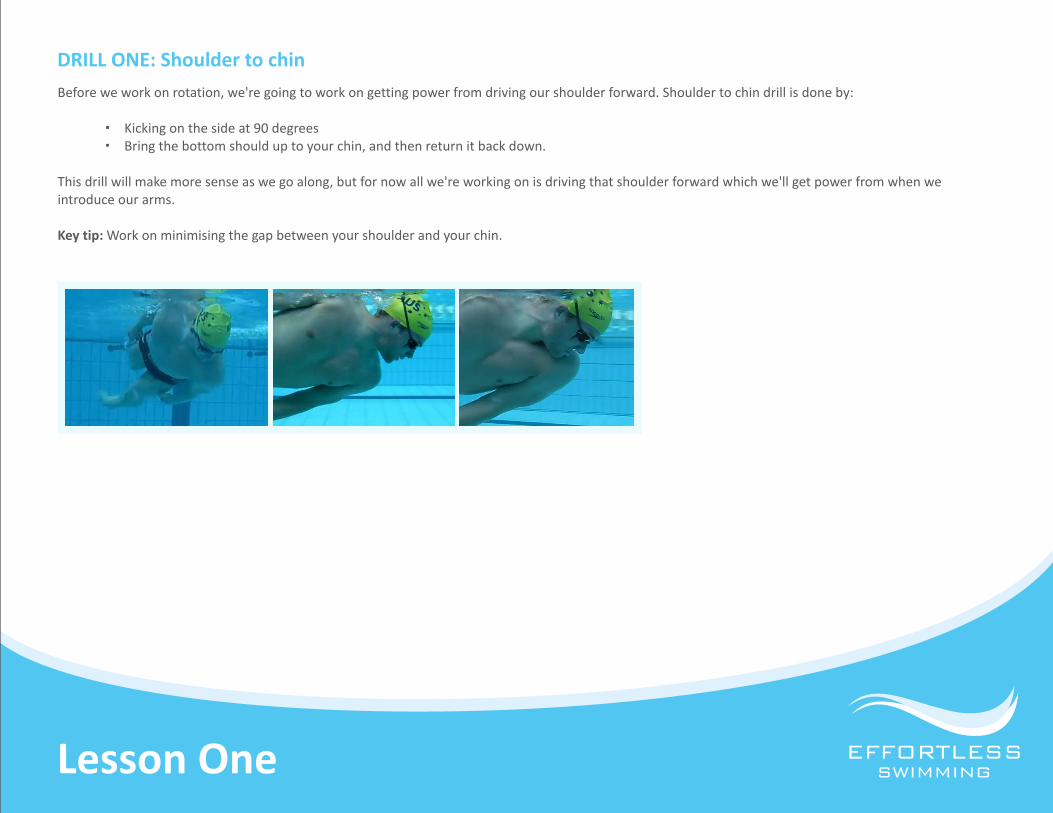
DRILL ONE: Shoulder to chin
Before we work on rotation, we're going to work on getting power from driving our shoulder forward. Shoulder to chin drill is done by:
Kicking on the side at 90 degrees Bring the bottom should up to your chin, and then return it back down.
This drill will make more sense as we go along, but for now all we're working on is driving that shoulder forward which we'll get power from when we introduce our arms.
Key tip: Work on minimising the gap between your shoulder and your chin.
Lesson One EFFORTLESSSWIMMING
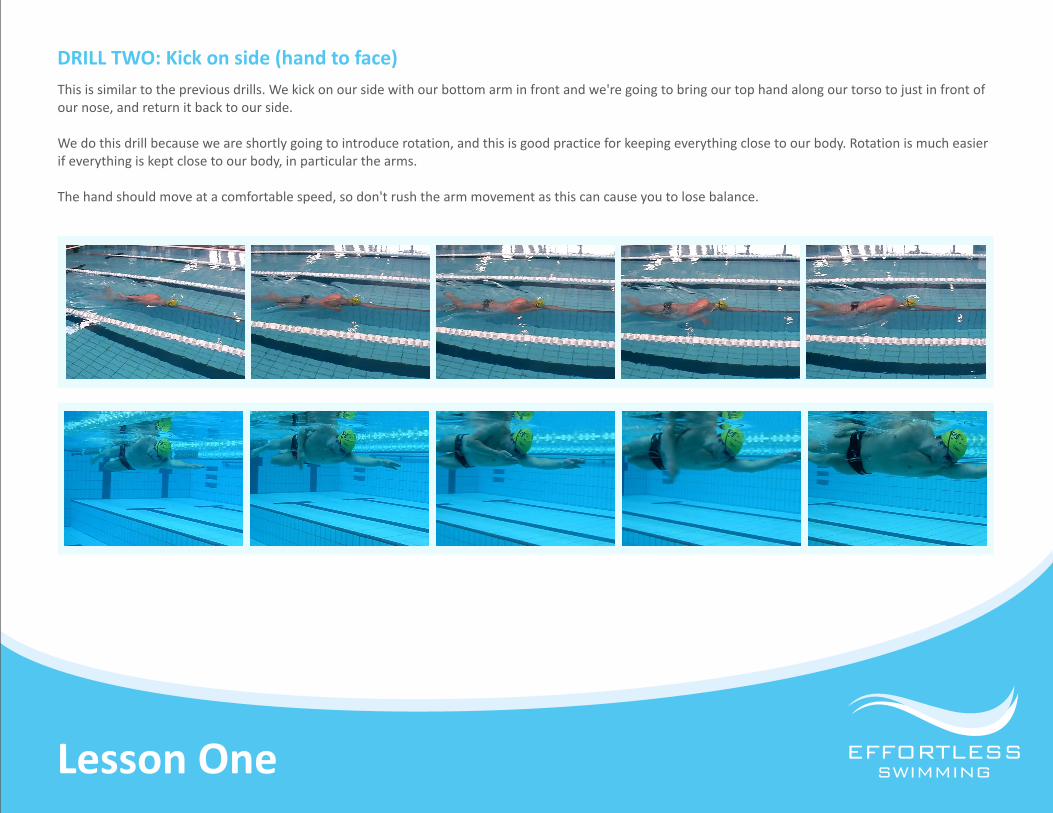
This is similar to the previous drills. We kick on our side with our bottom arm in front and we're going to bring our top hand along our torso to just in front of our nose, and return it back to our side.
We do this drill because we are shortly going to introduce rotation, and this is good practice for keeping everything close to our body. Rotation is much easier if everything is kept close to our body, in particular the arms.
The hand should move at a comfortable speed, so don't rush the arm movement as this can cause you to lose balance.
DRILL TWO: Kick on side (hand to face)

Lesson One EFFORTLESSSWIMMING
As before, kick on the side with the bottom arm extended, but now bring the top arm alongside your torso and then out in front to make it the leading arm.
As your hand passes your shoulder, begin your pull through with the opposite arm by pointing your fingertips to the bottom of the pool. Keep your eyes looking to the bottom of the pool Keep both arms under the water
With this drill we're looking for the correct timing of the switch, that is, beginning the pull through at the right time. As we mentioned before, as the top arm passes your shoulders, begin the pull through with the opposite arm. You can see Sam looks like a torpedo in the water and his body could fit through a very small hole. This is an important part of fast freestyle.
DRILL THREE: Kick on side (with switch)
Lesson One EFFORTLESSSWIMMING
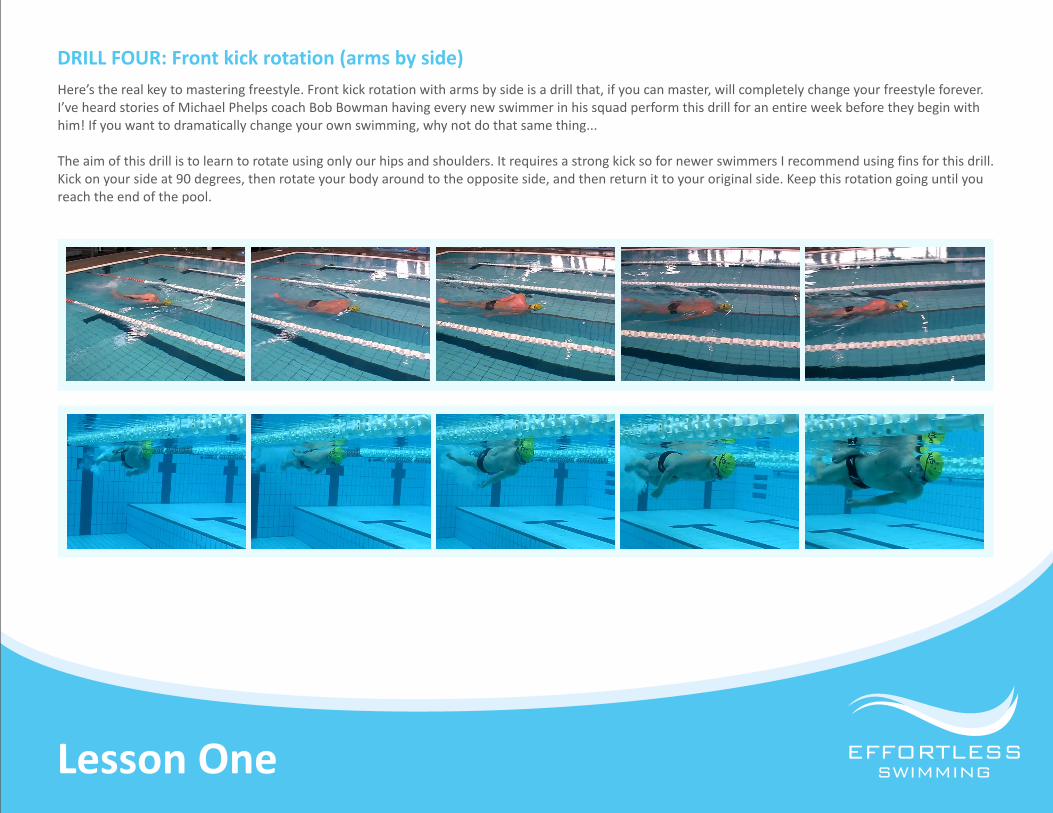
Here’s the real key to mastering freestyle. Front kick rotation with arms by side is a drill that, if you can master, will completely change your freestyle forever. I’ve heard stories of Michael Phelps coach Bob Bowman having every new swimmer in his squad perform this drill for an entire week before they begin with him! If you want to dramatically change your own swimming, why not do that same thing...
The aim of this drill is to learn to rotate using only our hips and shoulders. It requires a strong kick so for newer swimmers I recommend using fins for this drill. Kick on your side at 90 degrees, then rotate your body around to the opposite side, and then return it to your original side. Keep this rotation going until you reach the end of the pool.
DRILL FOUR: Front kick rotation (arms by side)
Lesson One EFFORTLESSSWIMMING
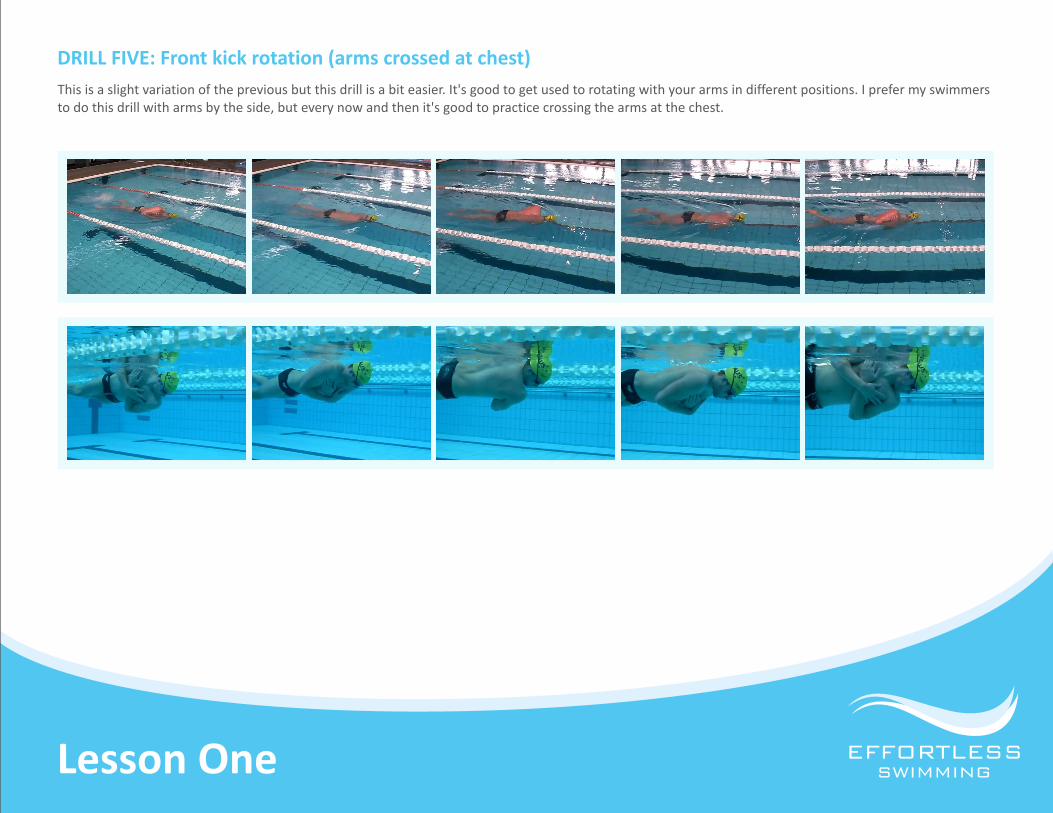
This is a slight variation of the previous but this drill is a bit easier. It's good to get used to rotating with your arms in different positions. I prefer my swimmers to do this drill with arms by the side, but every now and then it's good to practice crossing the arms at the chest.
DRILL FIVE: Front kick rotation (arms crossed at chest)
Lesson One EFFORTLESSSWIMMING
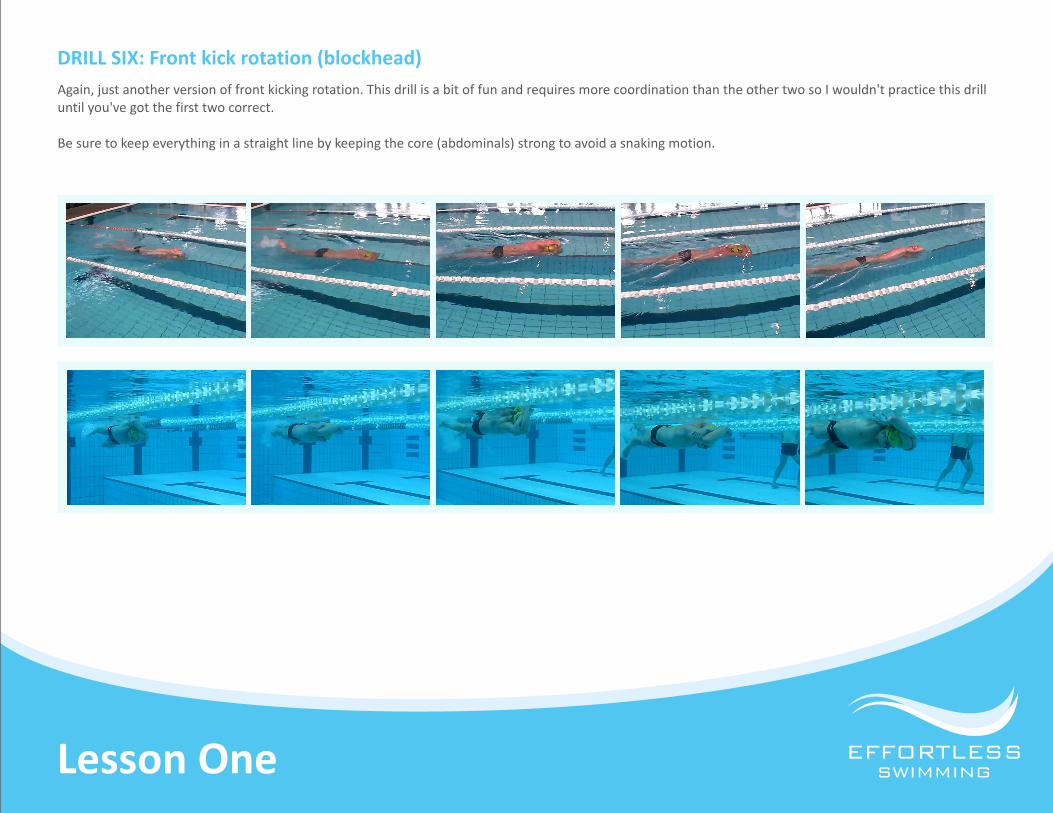
Again, just another version of front kicking rotation. This drill is a bit of fun and requires more coordination than the other two so I wouldn't practice this drill until you've got the first two correct.
Be sure to keep everything in a straight line by keeping the core (abdominals) strong to avoid a snaking motion.
DRILL SIX: Front kick rotation (blockhead)

EFFORTLESSSWIMMING
LESSON TWO
Bringing in the arms
We've worked on body balance and position, and we've mastered rotation from side to side, now it's time to practice our arm position and timing.

Lesson Two EFFORTLESSSWIMMING
To begin, we're going to practice the correct recovery position by doing shark fin drill. The drill gets its name from the shape our arm makes above the water. To do this we:
Drag the fingertips along the surface of the water, alongside your body Lead with a high elbow Pause the hand just after the head, where you would normally enter the water Return the arm to your side Keep the hand relaxed and allow the force of the water to push it backwards
DRILL ONE: Shark fin drill (with pause and return)
Lesson Two EFFORTLESSSWIMMING
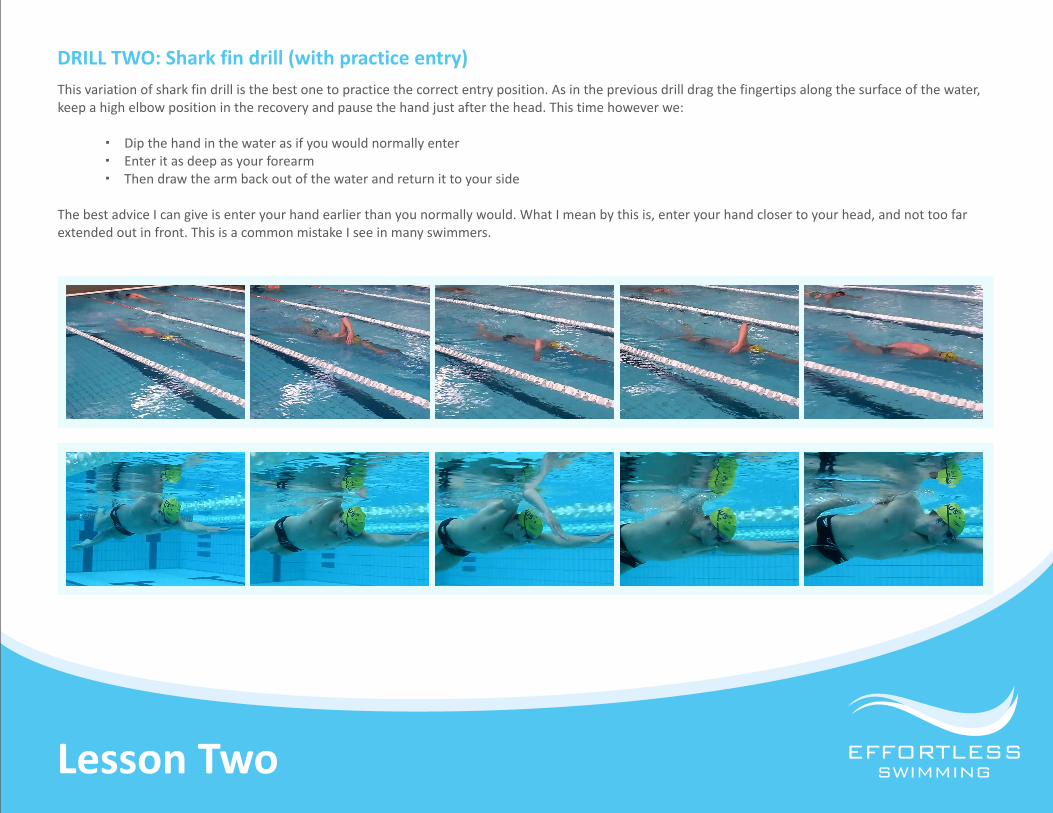
This variation of shark fin drill is the best one to practice the correct entry position. As in the previous drill drag the fingertips along the surface of the water, keep a high elbow position in the recovery and pause the hand just after the head. This time however we:
Dip the hand in the water as if you would normally enter Enter it as deep as your forearm Then draw the arm back out of the water and return it to your side
The best advice I can give is enter your hand earlier than you normally would. What I mean by this is, enter your hand closer to your head, and not too far extended out in front. This is a common mistake I see in many swimmers.
DRILL TWO: Shark fin drill (with practice entry)
Lesson Two EFFORTLESSSWIMMING
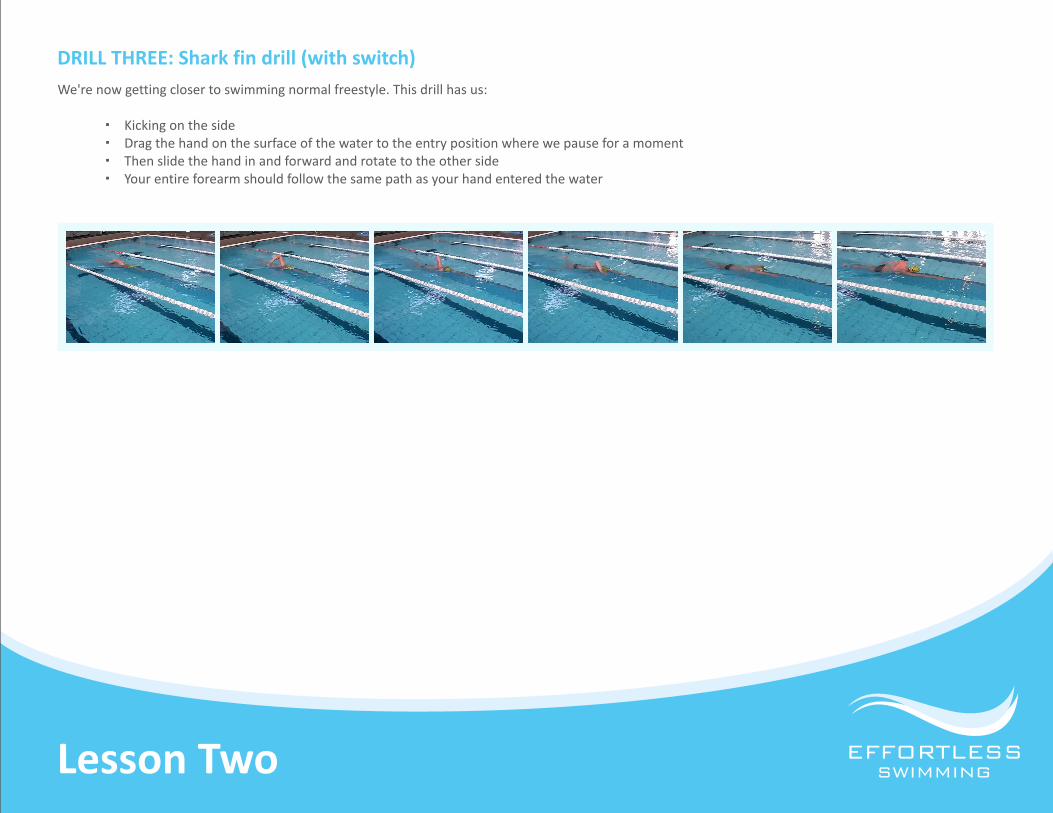
We're now getting closer to swimming normal freestyle. This drill has us:
Kicking on the side Drag the hand on the surface of the water to the entry position where we pause for a moment Then slide the hand in and forward and rotate to the other side Your entire forearm should follow the same path as your hand entered the water
DRILL THREE: Shark fin drill (with switch)
EFFORTLESSSWIMMING
LESSON THREE
The Whole Body
Now that we've progressed from body balance, to arms, to the whole freestyle stroke, Lesson Three will help you refine your freestyle technique with drills which are performed by
many of the world's best swimmers. Many of these drills are taught by Sam's coach who has been a coach on the Australian Olympic team. Let's get into it!
Lesson Three EFFORTLESSSWIMMING
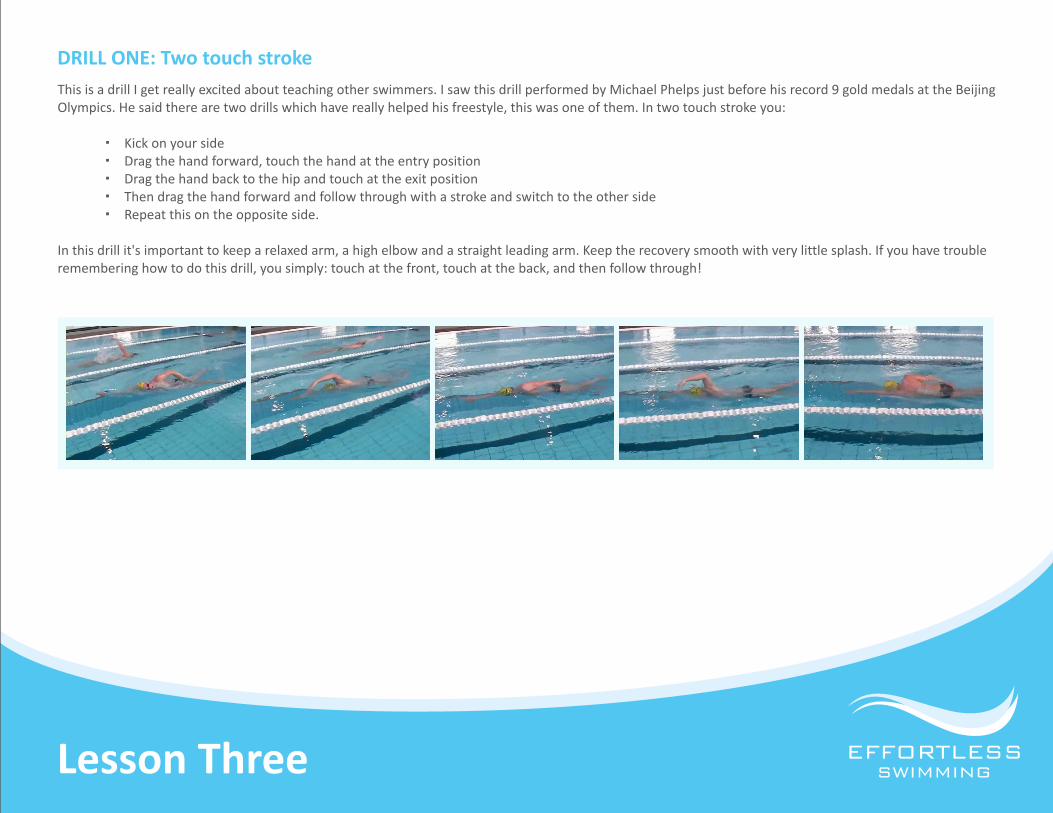
This is a drill I get really excited about teaching other swimmers. I saw this drill performed by Michael Phelps just before his record 9 gold medals at the Beijing Olympics. He said there are two drills which have really helped his freestyle, this was one of them. In two touch stroke you:
Kick on your side Drag the hand forward, touch the hand at the entry position Drag the hand back to the hip and touch at the exit position Then drag the hand forward and follow through with a stroke and switch to the other side Repeat this on the opposite side.
In this drill it's important to keep a relaxed arm, a high elbow and a straight leading arm. Keep the recovery smooth with very little splash. If you have trouble remembering how to do this drill, you simply: touch at the front, touch at the back, and then follow through!
DRILL ONE: Two touch stroke
Lesson Three EFFORTLESSSWIMMING
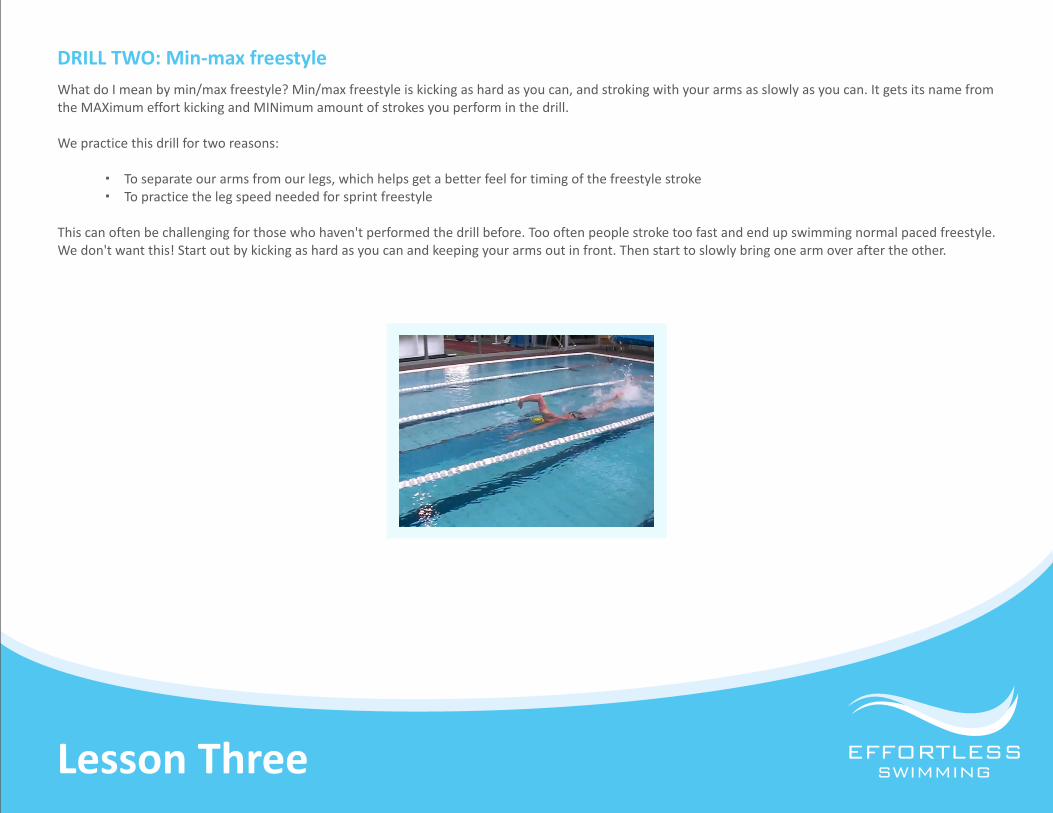
What do I mean by min/max freestyle? Min/max freestyle is kicking as hard as you can, and stroking with your arms as slowly as you can. It gets its name from the MAXimum effort kicking and MINimum amount of strokes you perform in the drill.
We practice this drill for two reasons:
To separate our arms from our legs, which helps get a better feel for timing of the freestyle stroke To practice the leg speed needed for sprint freestyle
This can often be challenging for those who haven't performed the drill before. Too often people stroke too fast and end up swimming normal paced freestyle. We don't want this! Start out by kicking as hard as you can and keeping your arms out in front. Then start to slowly bring one arm over after the other.
DRILL TWO: Min-max freestyle
Lesson Three EFFORTLESSSWIMMING
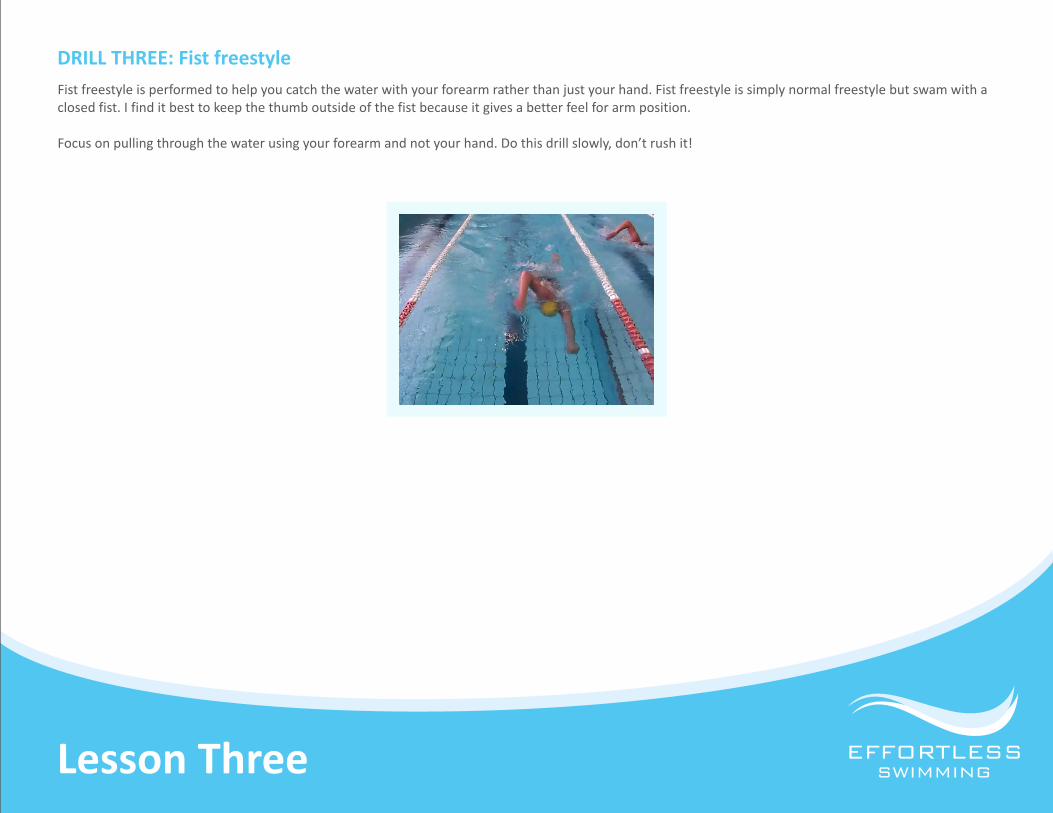
Fist freestyle is performed to help you catch the water with your forearm rather than just your hand. Fist freestyle is simply normal freestyle but swam with a closed fist. I find it best to keep the thumb outside of the fist because it gives a better feel for arm position.
Focus on pulling through the water using your forearm and not your hand. Do this drill slowly, don’t rush it!
DRILL THREE: Fist freestyle
Lesson Three EFFORTLESSSWIMMING
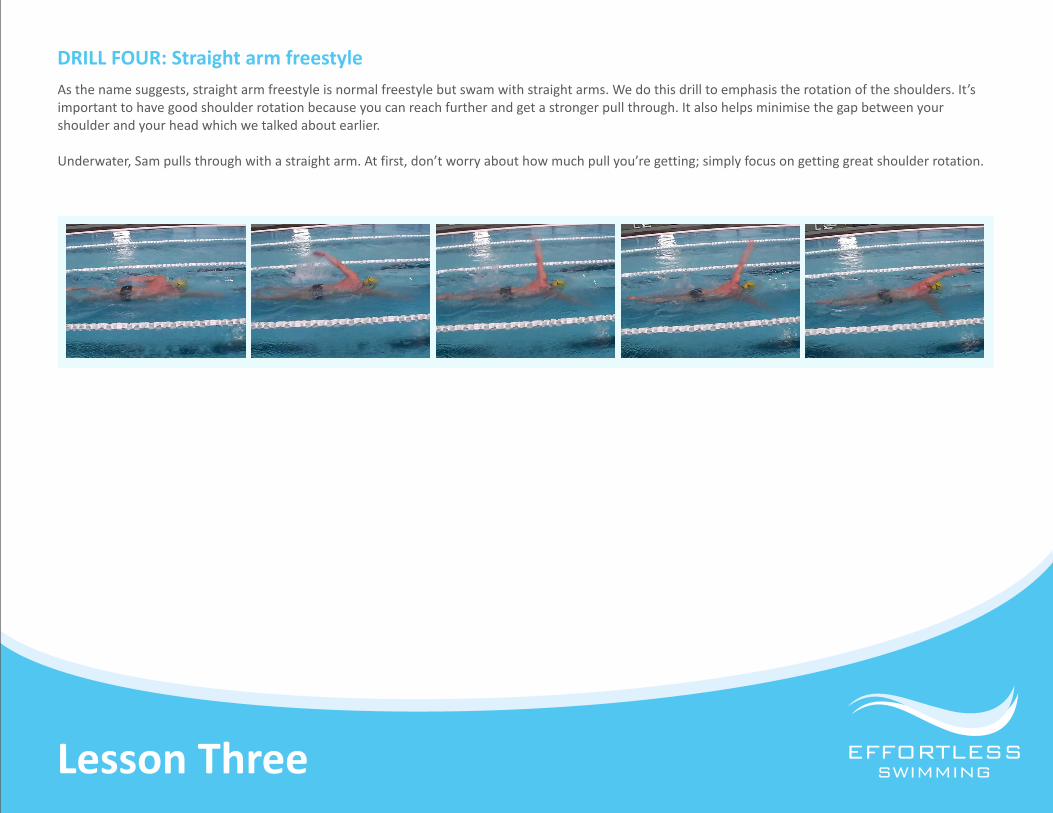
As the name suggests, straight arm freestyle is normal freestyle but swam with straight arms. We do this drill to emphasis the rotation of the shoulders. It’s important to have good shoulder rotation because you can reach further and get a stronger pull through. It also helps minimise the gap between your shoulder and your head which we talked about earlier.
Underwater, Sam pulls through with a straight arm. At first, don’t worry about how much pull you’re getting; simply focus on getting great shoulder rotation.
DRILL FOUR: Straight arm freestyle
Lesson Three EFFORTLESSSWIMMING
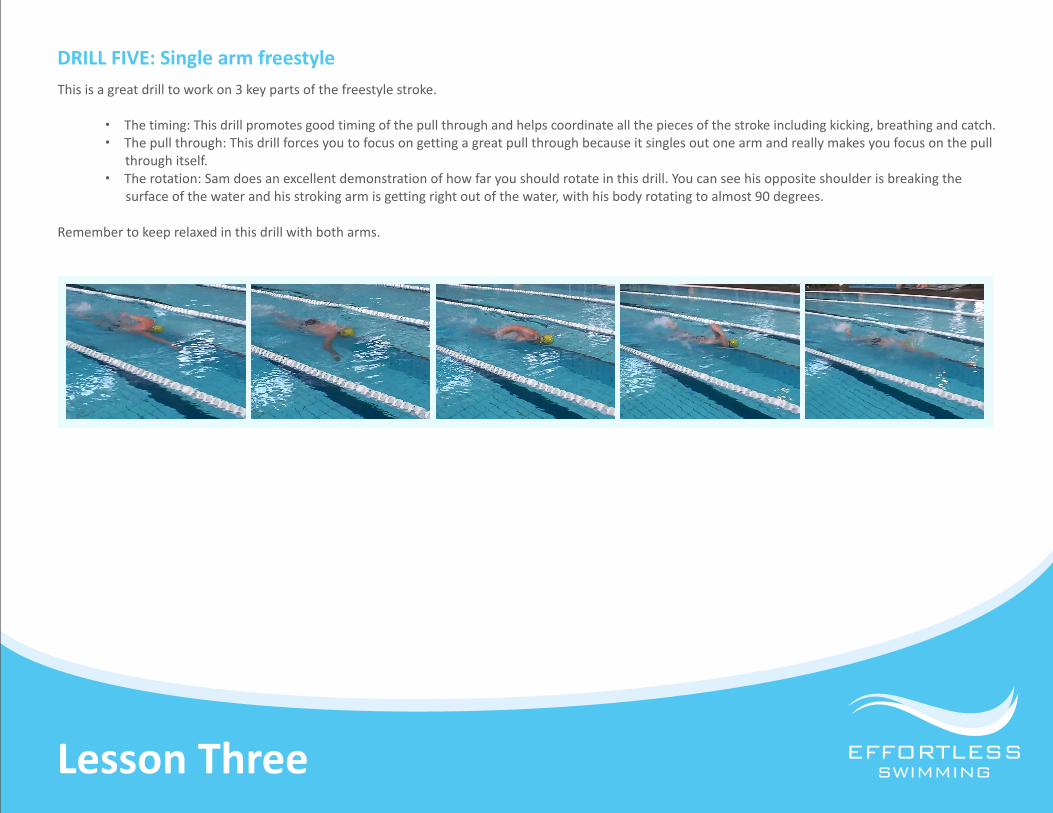
This is a great drill to work on 3 key parts of the freestyle stroke.
The timing: This drill promotes good timing of the pull through and helps coordinate all the pieces of the stroke including kicking, breathing and catch. The pull through: This drill forces you to focus on getting a great pull through because it singles out one arm and really makes you focus on the pull
through itself. The rotation: Sam does an excellent demonstration of how far you should rotate in this drill. You can see his opposite shoulder is breaking the
surface of the water and his stroking arm is getting right out of the water, with his body rotating to almost 90 degrees.
Remember to keep relaxed in this drill with both arms.
DRILL FIVE: Single arm freestyle
EFFORTLESSSWIMMING
LESSON FOUR
Putting it together
Lesson Four EFFORTLESSSWIMMING
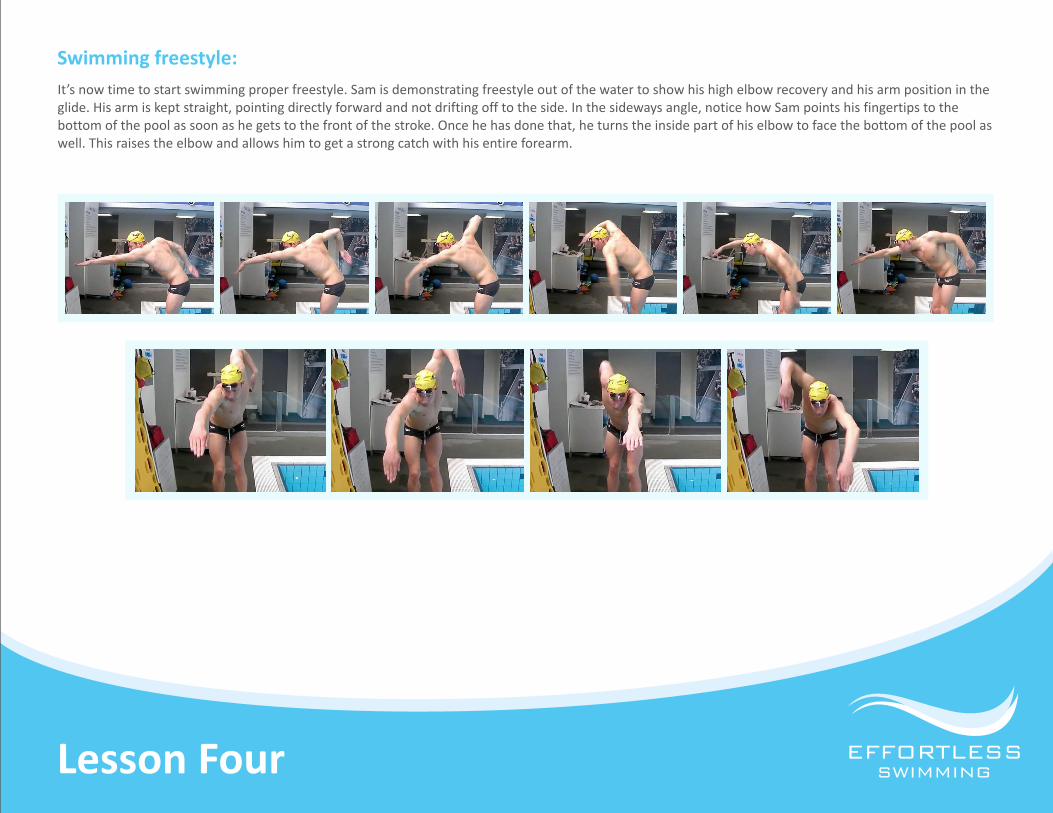
It’s now time to start swimming proper freestyle. Sam is demonstrating freestyle out of the water to show his high elbow recovery and his arm position in the glide. His arm is kept straight, pointing directly forward and not drifting off to the side. In the sideways angle, notice how Sam points his fingertips to the bottom of the pool as soon as he gets to the front of the stroke. Once he has done that, he turns the inside part of his elbow to face the bottom of the pool as well. This raises the elbow and allows him to get a strong catch with his entire forearm.
Swimming freestyle:
Conclusion EFFORTLESSSWIMMING
We hope you've enjoyed using our simple and easy to follow program. It's our goal that you learn to master freestyle so you too can swim effortlessly through the water. We know that if you follow our system step by step your freestyle will change for the better.
We've helped hundreds of people learn to swim smoothly with these drills, and we know you're going to be one of them if you truly desire.
Stick with it and we hope to share our love of swimming with you for years and years.
Sincerely,
Brenton Ford