Embed Size (px)
Citation preview

Electing Community Eligibility for your school(s) or district
These instructions are meant to serve as written and visual step-by-step instructions to aid in gathering and evaluating student eligibility data for election to the Community Eligibility Provision (CEP). An accurate Identified Student Percentage (ISP) is crucial to ensuring sponsors operating the CEP receive the appropriate Federal reimbursement rate for their School Meal Programs. This requires good reporting practices, both from sponsors to the State agency, and from the State agency to USDA’s Food and Nutrition Service.
Sponsors electing CEP are required to provide all election documentation to the state agency for review by June 30th.
Information to pull for Community Eligibility Provision
1. Download enrollment list for school (or schools) directly from student system for April 1. a. This list must be directly from the student enrollment system. Often a registrar or student
services representative can help to gather this list if Nutrition Services does not have access to the system.
b. This list should be provided to you electronically in an excel format and include student name, school, SSID number, birthdate, District ID number, Address, etc. Save this list in a CEP election folder on your computer.
c. If April 1 falls on a weekend, enrollment may be pulled from the first Monday following April 1. (Ex. April 3, 2017)
2. Download Direct Certification matches from previous year – July through April. Do not include matches made after the first match download of April (usually the first Monday).
a. This list must be directly from the ODE direct certification website, downloaded and saved on your computer as an excel document. Do not upload this document into your eligibility system.
3. Download Non-match list from year previous to April 1 (July – April). Save this file as an excel worksheet to your CEP election folder on your computer.

4. Gather homeless, migrant, and foster documentation. This includes emails from migrant student or homeless student liaisons, State Agency letters of foster student status, DHS SNAP confirmation letters. Scan and save all such documents in CEP Election folder on your computer.
a. Lists provided by homeless or migrant liaisons must be from liaison’s email or have the liaison’s signature.
4. Pull Benefit Issuance Document current as of April 1 – the source of this may vary depending on the method of eligibility tracking at the site (point of service software, excel spreadsheet). This list should include all eligibility categories (Free, Reduced, and Paid).
a. Ensure that this document is up to date prior to downloading (Make sure that all students listed were enrolled on April 1). This will be your working document to determine your total ISP.
b. The Benefit Issuance Document must contain the following information: i. Student SSID
ii. District Student ID iii. Student Last Name and Student First Name (If the student prefers a nickname or
something other than their legal name, it is best practice to note this on this document as well)
iv. School of Attendance v. Eligibility status
vi. Eligibility determination date vii. Eligibility category (Foster, Migrant, Homeless, DC)
viii. Determination Method (DC list, State Agency letter, migrant, homeless or foster liaison)
How to Determine Identified Student Percentage
1. Use the ODE Matching tool (provided on the CEP website: http://www.oregon.gov/ode/students-and-family/childnutrition/SNP/Pages/CEP.aspx) to match students on the direct certification list to students on the enrollment list. Save this tool to your CEP election folder on your computer.
a. On Step 1 tab, copy and paste information requested from enrollment list to matching tool.

b. On Step 2 tab, copy the entire direct certification file without the headings (starting at cell A2). Make sure all data is highlighted before you copy.
i. Once the DC list is copied, go to the matching tool, and place the cursor in cell A2 on tab 2 and paste values only.
c. Go back to Step 1 tab and copy all data, beginning in cell A2 and ensuring that all information is selected before copying.
d. Go to the Match tab and place your cursor in cell A2 and paste in copied information (values only).
e. You may see that the system is working, so don’t worry if the information does not show immediately. Once everything has been calculated, you should see any students on the direct certification list that match students on your enrollment list. If a student matches, their name will appear in the right-hand columns. If there is a match, but a discrepancy in birthdate, you will note that the name will be highlighted in red. Double check to ensure that in fact the student on the enrollment list is the same student as that on the direct certification list. (This can be done by verifying similar address, head of household, etc.).
f. Save this table as part of your back up documentation in your CEP election folder.
2. On the Benefit Issuance Document, add a match column
a. In the Match column, indicate the students that were matched by the Direct Certification Matching tool by entering “Y DC”.
b. If a student is indicated as directly certified on your Benefit Issuance Document, but did not match through the match tool, it may be that there is some discrepancy between the information in the sponsor enrollment system and the information in the DHS database. This can be anything from misspelling of a first name to the hyphenation of a last name. You may still manually search the downloaded direct certification lists in these cases. If you find a student through manual search, indicate this by highlighting the student name in the direct certification list and saving to your CEP election folder.
3. Extended eligibility – a student may be extended eligibility from a sibling/household member on the DC list.
a. To show connection between student on DC list and extended eligibility student:

i. Save a screen shot of registration system showing the students in the same household – same address or same guardian – in the CEP Election folder on your computer.
ii. Indicate in the Benefit Issuance Document that the match has been made by entering “Y extended”.
4. Non-match download – this is a list of all children in the DHS system that are receiving SNAP benefits, but have not been matched to a specific school.
a. When working with the non-match list, students will not have assigned SSID numbers and therefore cannot be matched using the ODE match tool.
b. Since the downloaded list is in excel format, you can use the data filter option to narrow your results.
i. Open the non-match list, in the Data tab, select the Filter button. You will see arrowed drop down boxes appear in each heading cell.
ii. Click on the drop down box under city and filter by the city or cities where your
students reside. From there, you can filter based on any of the headings listed.
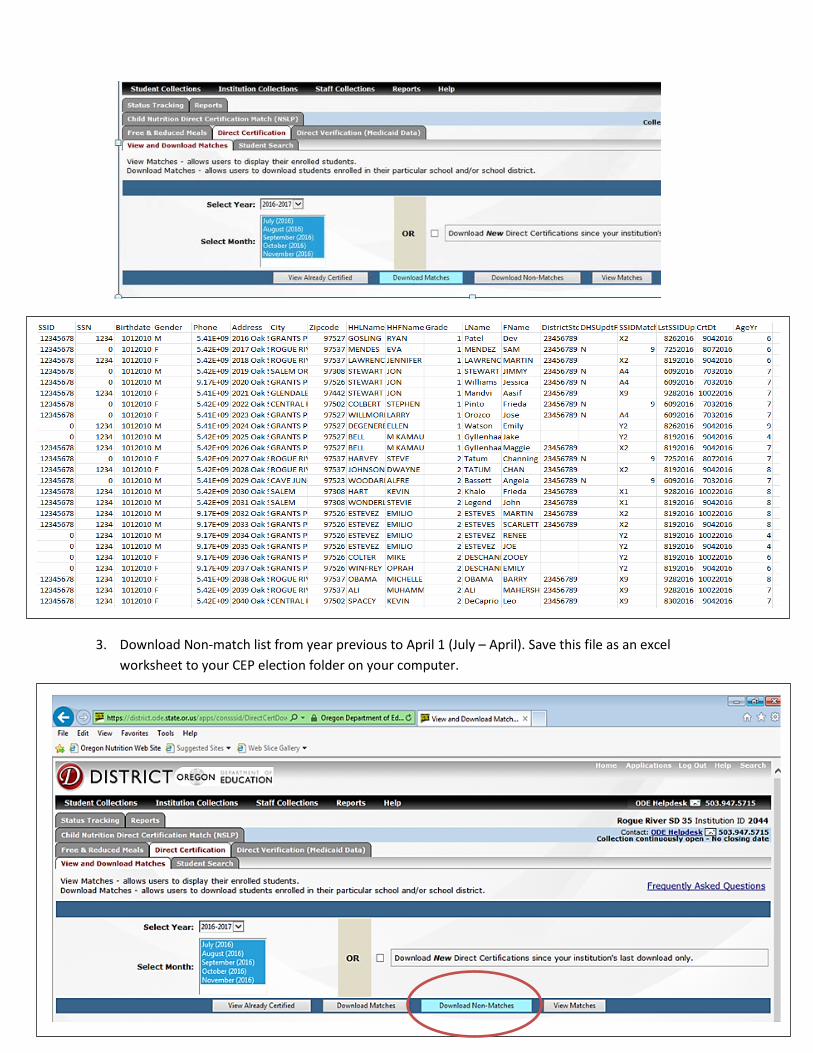
c. Once the list is filtered, find students by clicking the “Find” button on the far right of the page tool bar search by student name (last OR first).
d. When a matching student name is found, ensure that this is a student match by comparing, birthdate, address, age, etc.
e. Once a match has been verified, yellow highlight that student row in the non-match list and save.
f. Indicate in the Benefit Issuance Document that a match has been made by entering “Y Non-match” into the “Match” column.
5. Student search function in DC system – if a student cannot be found on DC list or non-match list, use the Student Search function on the ODE DC website.
g. If a student match is found through Student Search, click the Pdf icon to the left of the student name and save the resulting document to the CEP Election folder on your computer.
h. In the Benefit Issuance Document, indicate that a match has been made by entering “Y extend” in the Match column.

6. Other Categorically Eligible – Migrant/Homeless/Foster a. Review lists/emails/letters provided by migrant or homeless liaisons or State Agencies to
determine if a student listed on the enrolled list matches and qualifies for categorical eligibility.
b. When a matching student is found, indicate in the Benefit Issuance Document that a match has been made by entering “Y liaison list” or “Y letter” into the “Match” column.
c. Save the backup documentation to the CEP election folder.
How to complete the Election Spreadsheet
1. How to complete election spreadsheet a. Download current election spreadsheet from the ODE CEP website:
http://www.oregon.gov/ode/students-and-family/childnutrition/SNP/Pages/CEP.aspx
b. Use your Benefit Issuance Document (working copy) to add up the accurate number of students in each of the categories listed on the election spreadsheet. (Excel data filters and formulas are great ways to work within this document to determine total numbers)
i. Make sure that each student is only counted once. For instance, a student may be homeless and directly certified, but may only be counted in one of the qualifying categories.
ii. Make sure only students with eligibility certification dates between July and the first dc match in April (first Sunday in April) are included in your count.
c. Once numbers have been determined, complete the election spreadsheet. d. Once you have entered the numbers in the spreadsheet, you will note a CEP percentage in
the last column of the worksheet. This is the Identified Student Percentage (ISP) and is determined by dividing the Total Identified Students by the Total Enrolled Students on April 1 of the election year.
e. To determine your Free Claiming percentage, multiply the CEP percentage by 1.6 and round to two points after the decimal point. For instance, if the CEP percentage is 42.5%, the free claiming percentage is 44.73 x 1.6 = 71.568. The Free Claiming percentage will be 71.57%.
Information to send to ODE to elect CEP
Once you have completed compiling your numbers and have completed the election spreadsheet, you will send the following items in a zipped file through Secure File Transfer to [email protected].
1. The election spreadsheet 2. All primary source documentation saved to your CEP election folder. This includes:
a. The enrollment list downloaded from the student database b. The direct certification list downloaded from the ODE match system c. The highlighted and saved non-match list downloaded from the ODE match system d. Any homeless, migrant, foster or other agency information used to certify students e. All pdfs saved from student search in the ODE direct certification system f. The saved copy of your completed ODE match tool
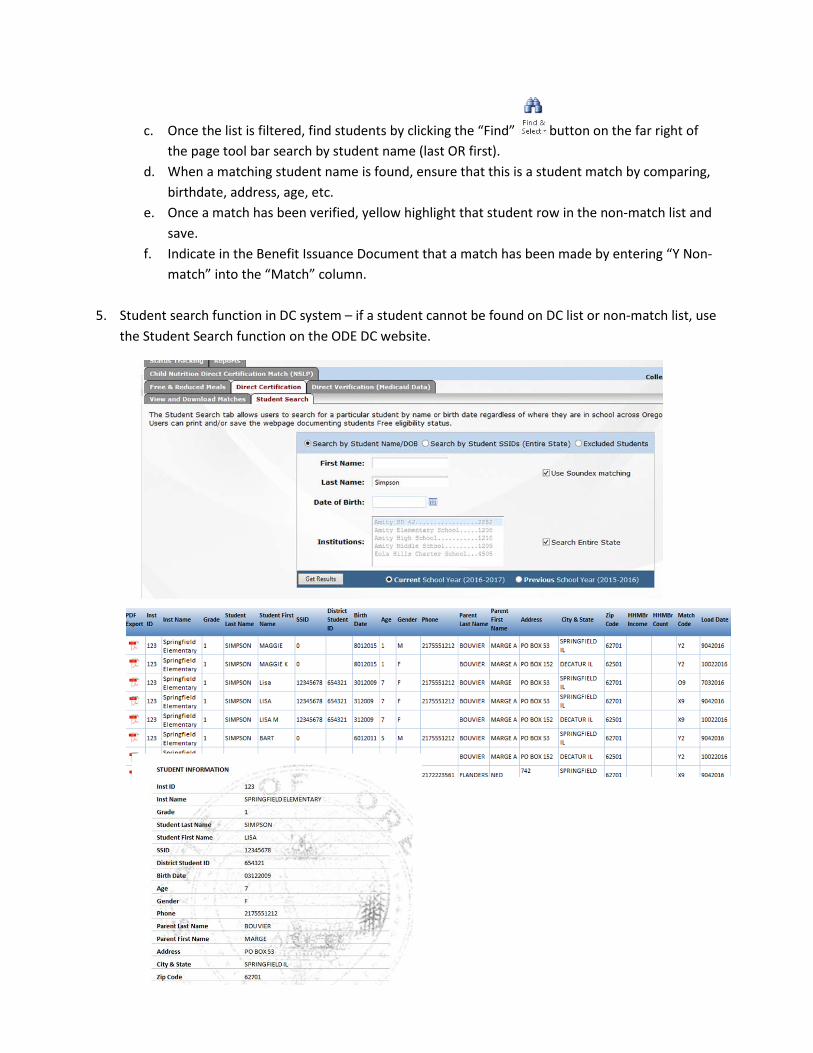
3. Make sure that all of the documents required are saved to your CEP election folder. 4. To zip the folder so that you can send it through Secure file transfer, do the following:
a. Right click on the CEP election folder b. Select Send to and then select Compressed (zipped) folder
c. Once you have done this, you will see a folder of the same name “CEP election” with a
zipper on the icon. d. This is the file that you will select when you Secure file transfer your information to
[email protected] 5. Secure File Transfer Instructions
a. Navigate to web site - https://district.ode.state.or.us/home/ b. Click on Secure File Transfer from menu in right column c. After the Secure File Transfer Window opens:

i. Go to Who Receives the file? Find the ode.schoolnutrition mailbox in the ODE Email List, click on the name and click the arrow to move to the ODE Recipient field.
ii. Go down to Who is Sending the File? field and enter your email address. iii. Go to Locate your file to send: field and browse for the file you want to send iv. Enter a message if you have one v. Type in the Image Validation/Send File
vi. Click Send File
The attached file will be sent to the School Nutrition mailbox and you will receive an email from the ODE Helpdesk stating a secure file was sent.
Election Approval
1. ODE Staff will validate the election form numbers based on the supporting primary source documentation.
2. A letter with the approved election form is returned to you. 3. CNPweb is updated to reflect the approved ISP.


![[S]electing Europe](https://img.pdfslide.net/doc/110x75/61e63e6d04357b467120f175/selecting-europe.jpg)