Embed Size (px)
Citation preview
Elementary Scheduling Master
And Scheduling
Information Technology Department
Revised July 8, 2019

SBCUSD – Information Technology Page 3
Table of Contents
Lesson 1 – Overview ...................................................................................................................... 5
Lesson 2 – Print Current Master Schedule and Update .................................................................. 6
Lesson 3 – Modify Next Years’ Scheduling Master ....................................................................... 8 Change a Section......................................................................................................................... 9 Add a Section ............................................................................................................................ 13 Inactivate a Section (delete) ...................................................................................................... 16
Lesson 4 - Move Incoming Students Into Permanent Sections .................................................... 17
Lesson 5 – Scheduling Students Not in the 9000 Sections ........................................................... 20 Lesson 6 – Scheduling Reports ..................................................................................................... 22
The Scheduling Master Schedule Report .................................................................................. 22 Scheduling Class Load Analysis Report ................................................................................... 23 Class List by Section ................................................................................................................. 24
Class List by Teacher ................................................................................................................ 25
Lesson 7 – Scheduling Students in the New Year’s Database ...................................................... 26
Add a Student into a Section ..................................................................................................... 26 Change a Student to a Different Section ................................................................................... 27
Lesson 8 - Print Class List for the New Year ............................................................................... 28 Class Rosters Report ................................................................................................................. 29
Class Load Analysis Report ...................................................................................................... 30

Aeries - Elementary Master Scheduling
SBCUSD – Information Technology Page 4
Training and Support
You may contact the following offices for assistance with the Aeries system:
Attendance Accounting Room and program issues
(909) 381-1147
Student Records Enrollment issues
(909) 880-6615
Information Technology Department Training related questions
(909) 386-2550 or [email protected]
Information Technology Help Desk Computer and Hardware issues
(909) 888-4357
Security Specialist Security and Login Access
(909) 386-2550 or [email protected]
Reports Department Help with Reports
(909) 386-2550 or [email protected]

Aeries - Elementary Master Scheduling
SBCUSD – Information Technology Page 5
Lesson 1 – Overview
Listed below are some processes that Information Technology (IT) will perform automatically in
preparation for the next school year.
The rollover to the 2019-20 database will happen on June 21, 2019.
IT will make a copy of your current master schedule and put it into the Scheduling Process
> Scheduling Master area of Aeries. You can add, delete, and edit the classes for the new
school year in the Scheduling Master.
IT will also download students into interim 9000 sections in Scheduling Process >
Scheduling Master based on their grade level, e.g. 9099 – TK, 9000 – Kinder, 9001 – 1st
Grade, 9002 – 2nd Grade, and so on. This will happen on a daily basis.
IT will automatically populate each student’s Next School field every other week. This
information is based on the Streets table and Permit Code status. Do not change this field
unless it is for 999 Out of District. The Next Schl field is found on the Student Data >
Demographics screen.
On the first day of school, IT will automatically populate the Enrollment Reason code to E2
– Returning to District for all students. This is found on the Student Data > Attendance
Enrollment screen.
If a student transfers to another school after you have placed them into their permanent
section, they will automatically disappear when Information Technology creates the New
Year’s database.
If there are still students listed in the temporary sections (e.g., 9000, 9001, etc.) when the new
database is created, the students will rollover into the new year’s database as pre-enrolled and
you can continue moving students into their permanent sections in the Scheduling Process >
Master Scheduling screen.
Keep working in the Scheduling Master until you see that the school year has changed to
2019-2020 and then switch to the Master Schedule and follow the instructions that begin on
page 24. Try to complete the scheduling by the last day of this school year.
Aeries - Elementary Master Scheduling
SBCUSD – Information Technology Page 6
Lesson 2 – Print Current Master Schedule and Update
Use the steps in this lesson to print your current master schedule so that you can manually
update it with new year’s information, e.g. teacher changes.
1. Login to Aeries and choose the current school year’s database.
2. From the Navigation pane, click on Reports.
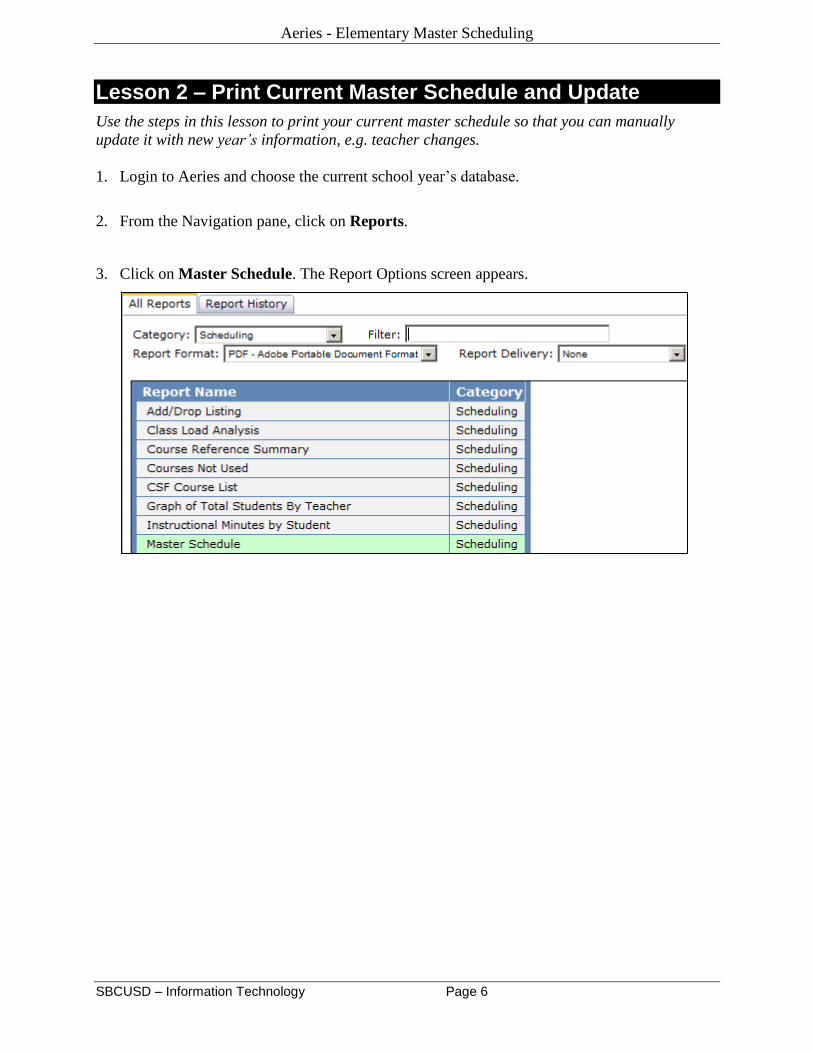
3. Click on Master Schedule. The Report Options screen appears.
Aeries - Elementary Master Scheduling
SBCUSD – Information Technology Page 7
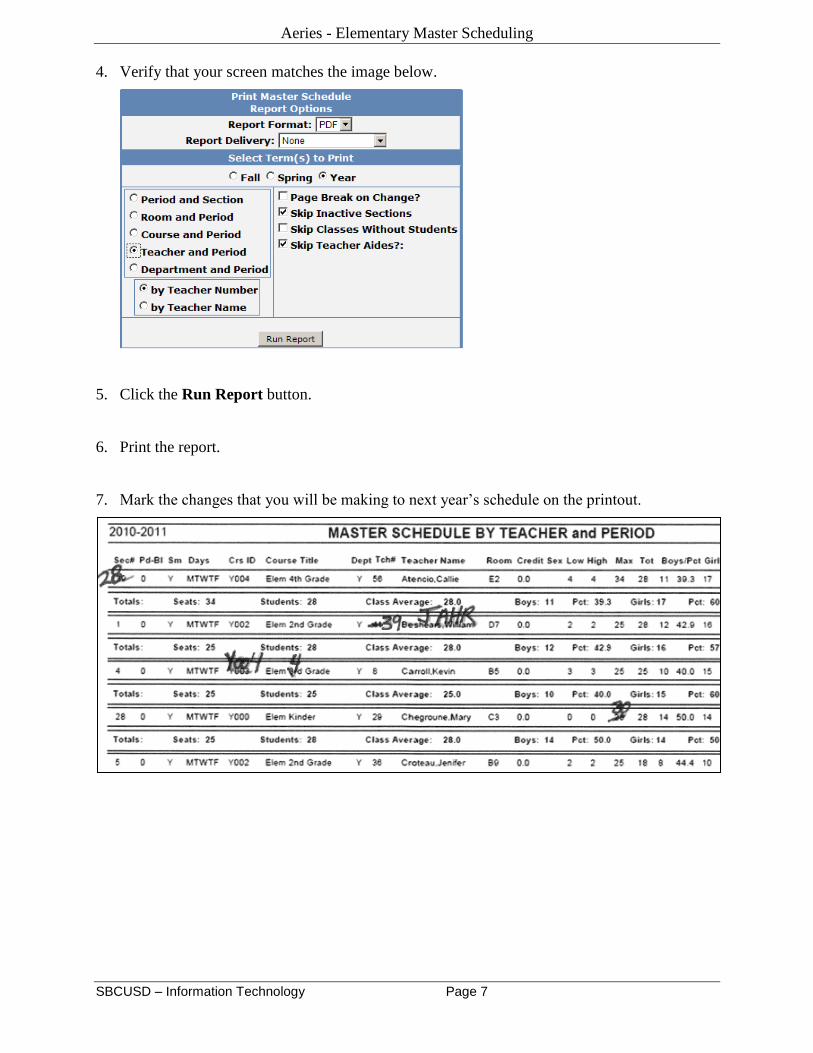
4. Verify that your screen matches the image below.
5. Click the Run Report button.
6. Print the report.
7. Mark the changes that you will be making to next year’s schedule on the printout.
\
Aeries - Elementary Master Scheduling
SBCUSD – Information Technology Page 8
Lesson 3 – Modify Next Years’ Scheduling Master
The first step in getting next year teacher’s sections (classes) ready is to modify, add, and delete
all the teacher sections your site will be offering next year. At Elementary level, a section
represents a teacher’s class.
IMPORTANT: If you edit a section after adding students from the 9000
sections (for example changing the teacher, room etc), all of the students will
be deleted and you will have to add them manually by going to Student Data
> Scheduling > Course Requests / Schedule. If you have this issue, please call
a Trainer for assistance with this process.
1. Login to Aeries using the current school year.
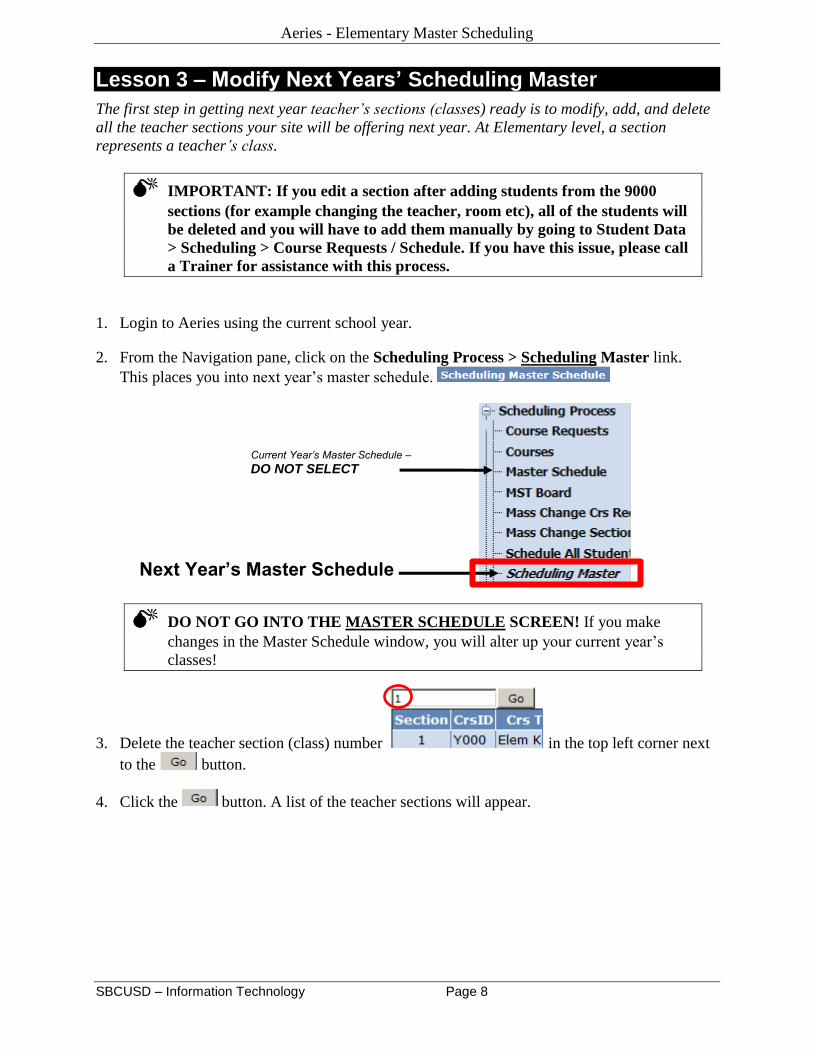
2. From the Navigation pane, click on the Scheduling Process > Scheduling Master link.
This places you into next year’s master schedule.
DO NOT GO INTO THE MASTER SCHEDULE SCREEN! If you make
changes in the Master Schedule window, you will alter up your current year’s
classes!
3. Delete the teacher section (class) number in the top left corner next
to the button.
4. Click the button. A list of the teacher sections will appear.
Current Year’s Master Schedule –
DO NOT SELECT
Next Year’s Master Schedule
Aeries - Elementary Master Scheduling
SBCUSD – Information Technology Page 9
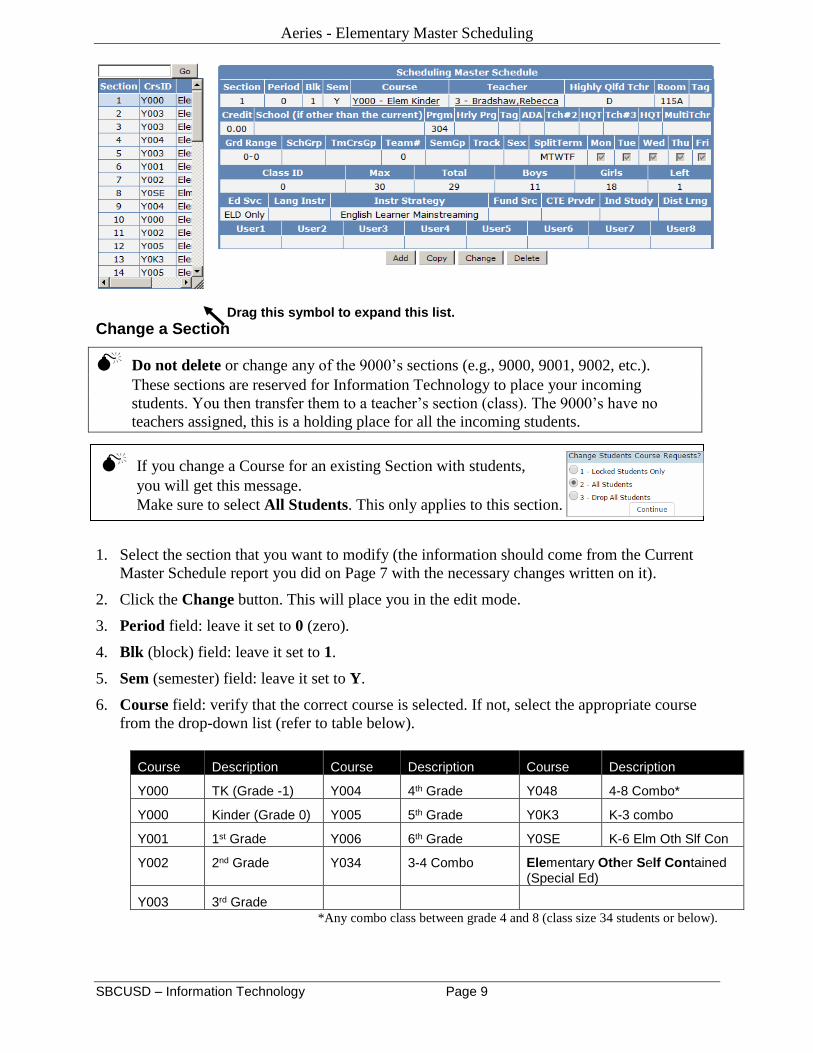
Change a Section
Do not delete or change any of the 9000’s sections (e.g., 9000, 9001, 9002, etc.).
These sections are reserved for Information Technology to place your incoming
students. You then transfer them to a teacher’s section (class). The 9000’s have no
teachers assigned, this is a holding place for all the incoming students.
1. Select the section that you want to modify (the information should come from the Current
Master Schedule report you did on Page 7 with the necessary changes written on it).
2. Click the Change button. This will place you in the edit mode.
3. Period field: leave it set to 0 (zero).
4. Blk (block) field: leave it set to 1.
5. Sem (semester) field: leave it set to Y.
6. Course field: verify that the correct course is selected. If not, select the appropriate course
from the drop-down list (refer to table below).
Course Description Course Description Course Description
Y000 TK (Grade -1) Y004 4th Grade Y048 4-8 Combo*
Y000 Kinder (Grade 0) Y005 5th Grade Y0K3 K-3 combo
Y001 1st Grade Y006 6th Grade Y0SE K-6 Elm Oth Slf Con
Y002 2nd Grade Y034 3-4 Combo Elementary Other Self Contained (Special Ed)
Y003 3rd Grade
*Any combo class between grade 4 and 8 (class size 34 students or below).
Drag this symbol to expand this list.
If you change a Course for an existing Section with students,
you will get this message.
Make sure to select All Students. This only applies to this section.
Aeries - Elementary Master Scheduling
SBCUSD – Information Technology Page 10
7. Teacher field: if this year’s teacher will be teaching the same section next year, do nothing.
If a new teacher will be teaching this section, select the new teacher from the drop-down list.
If the new teacher has not been hired yet, select one of the SUB teachers from the drop-down
list. Do not use the same SUB teacher for more than one section.
You can change a SUB or Teacher to a Teacher Name any time before school
starts. The day school starts and beyond, please call Attendance Accounting to
have the new teacher added so student attendance is not lost.
8. Highly Qualified Teacher field: not used by elementary schools. If there is a value in the
field you can delete it but not necessary.
Aeries - Elementary Master Scheduling
SBCUSD – Information Technology Page 11
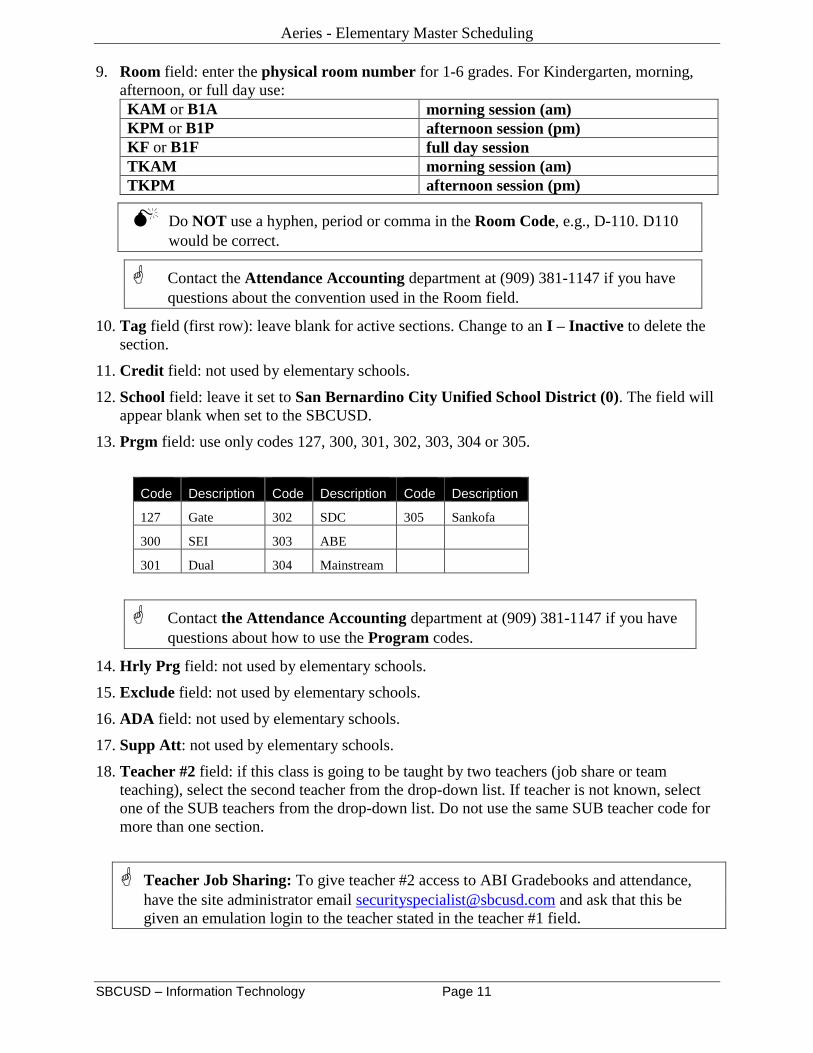
9. Room field: enter the physical room number for 1-6 grades. For Kindergarten, morning,
afternoon, or full day use:
KAM or B1A morning session (am)
KPM or B1P afternoon session (pm)
KF or B1F full day session
TKAM morning session (am)
TKPM afternoon session (pm)
Do NOT use a hyphen, period or comma in the Room Code, e.g., D-110. D110
would be correct.
Contact the Attendance Accounting department at (909) 381-1147 if you have
questions about the convention used in the Room field.
10. Tag field (first row): leave blank for active sections. Change to an I – Inactive to delete the
section.
11. Credit field: not used by elementary schools.
12. School field: leave it set to San Bernardino City Unified School District (0). The field will
appear blank when set to the SBCUSD.
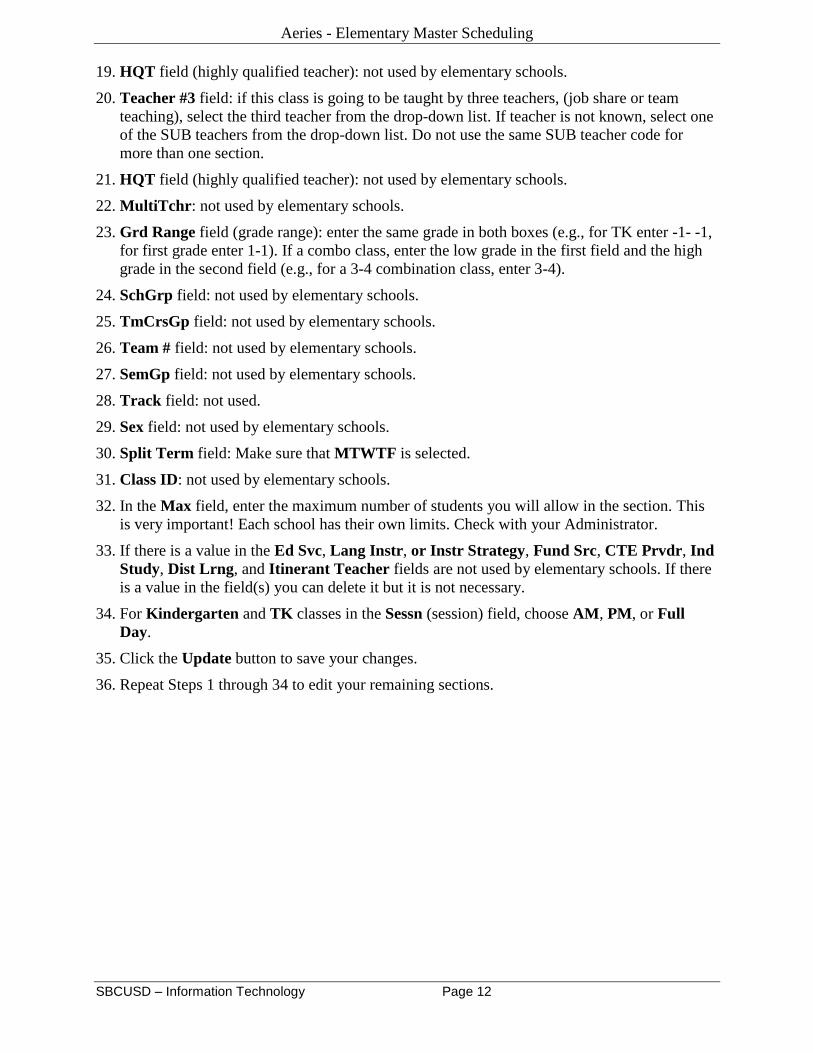
13. Prgm field: use only codes 127, 300, 301, 302, 303, 304 or 305.
Code Description Code Description Code Description
127 Gate 302 SDC 305 Sankofa
300 SEI 303 ABE
301 Dual 304 Mainstream
Contact the Attendance Accounting department at (909) 381-1147 if you have
questions about how to use the Program codes.
14. Hrly Prg field: not used by elementary schools.
15. Exclude field: not used by elementary schools.
16. ADA field: not used by elementary schools.
17. Supp Att: not used by elementary schools.
18. Teacher #2 field: if this class is going to be taught by two teachers (job share or team
teaching), select the second teacher from the drop-down list. If teacher is not known, select
one of the SUB teachers from the drop-down list. Do not use the same SUB teacher code for
more than one section.
Teacher Job Sharing: To give teacher #2 access to ABI Gradebooks and attendance,
have the site administrator email [email protected] and ask that this be
given an emulation login to the teacher stated in the teacher #1 field.
Aeries - Elementary Master Scheduling
SBCUSD – Information Technology Page 12
19. HQT field (highly qualified teacher): not used by elementary schools.
20. Teacher #3 field: if this class is going to be taught by three teachers, (job share or team
teaching), select the third teacher from the drop-down list. If teacher is not known, select one
of the SUB teachers from the drop-down list. Do not use the same SUB teacher code for
more than one section.
21. HQT field (highly qualified teacher): not used by elementary schools.
22. MultiTchr: not used by elementary schools.
23. Grd Range field (grade range): enter the same grade in both boxes (e.g., for TK enter -1- -1,
for first grade enter 1-1). If a combo class, enter the low grade in the first field and the high
grade in the second field (e.g., for a 3-4 combination class, enter 3-4).
24. SchGrp field: not used by elementary schools.
25. TmCrsGp field: not used by elementary schools.
26. Team # field: not used by elementary schools.
27. SemGp field: not used by elementary schools.
28. Track field: not used.
29. Sex field: not used by elementary schools.
30. Split Term field: Make sure that MTWTF is selected.
31. Class ID: not used by elementary schools.
32. In the Max field, enter the maximum number of students you will allow in the section. This
is very important! Each school has their own limits. Check with your Administrator.
33. If there is a value in the Ed Svc, Lang Instr, or Instr Strategy, Fund Src, CTE Prvdr, Ind
Study, Dist Lrng, and Itinerant Teacher fields are not used by elementary schools. If there
is a value in the field(s) you can delete it but it is not necessary.
34. For Kindergarten and TK classes in the Sessn (session) field, choose AM, PM, or Full
Day.
35. Click the Update button to save your changes.
36. Repeat Steps 1 through 34 to edit your remaining sections.
Aeries - Elementary Master Scheduling
SBCUSD – Information Technology Page 13
Add a Section
1. Login to Aeries using the current school year.
2. From the Navigation pane, click on the Scheduling Process > Scheduling Master link.
This places you into next year’s master schedule.
3. Click the Add button.
4. Leave the Section field blank. The system will automatically populate this field.
5. Input 0 (zero) into the Period field.
6. Input 1 into the Blk (block) field.
7. Input Y into the Sem (semester) field.
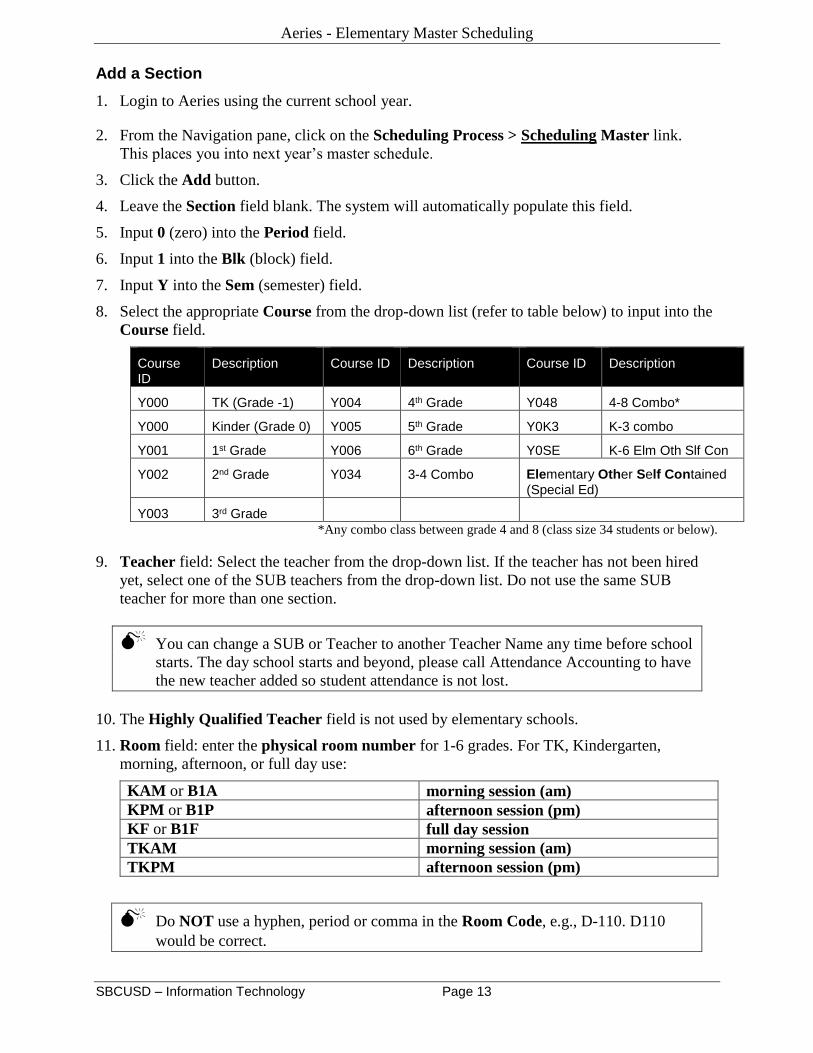
8. Select the appropriate Course from the drop-down list (refer to table below) to input into the
Course field.
Course ID
Description Course ID Description Course ID Description
Y000 TK (Grade -1) Y004 4th Grade Y048 4-8 Combo*
Y000 Kinder (Grade 0) Y005 5th Grade Y0K3 K-3 combo
Y001 1st Grade Y006 6th Grade Y0SE K-6 Elm Oth Slf Con
Y002 2nd Grade Y034 3-4 Combo Elementary Other Self Contained (Special Ed)
Y003 3rd Grade
*Any combo class between grade 4 and 8 (class size 34 students or below).
9. Teacher field: Select the teacher from the drop-down list. If the teacher has not been hired
yet, select one of the SUB teachers from the drop-down list. Do not use the same SUB
teacher for more than one section.
You can change a SUB or Teacher to another Teacher Name any time before school
starts. The day school starts and beyond, please call Attendance Accounting to have
the new teacher added so student attendance is not lost.
10. The Highly Qualified Teacher field is not used by elementary schools.
11. Room field: enter the physical room number for 1-6 grades. For TK, Kindergarten,
morning, afternoon, or full day use:
KAM or B1A morning session (am)
KPM or B1P afternoon session (pm)
KF or B1F full day session
TKAM morning session (am)
TKPM afternoon session (pm)
Do NOT use a hyphen, period or comma in the Room Code, e.g., D-110. D110
would be correct.
Aeries - Elementary Master Scheduling
SBCUSD – Information Technology Page 14
Contact the Attendance Accounting department at (909) 381-1147 if you have
questions about the convention used in the Room field.
12. Leave the Tag field (first row) blank for active sections Change to I – Inactive to delete the
section.
13. The Credit field is not used by elementary schools.
14. In the School field, choose San Bernardino City Unified School District (0). The field will
appear blank when set to the SBCUSD.
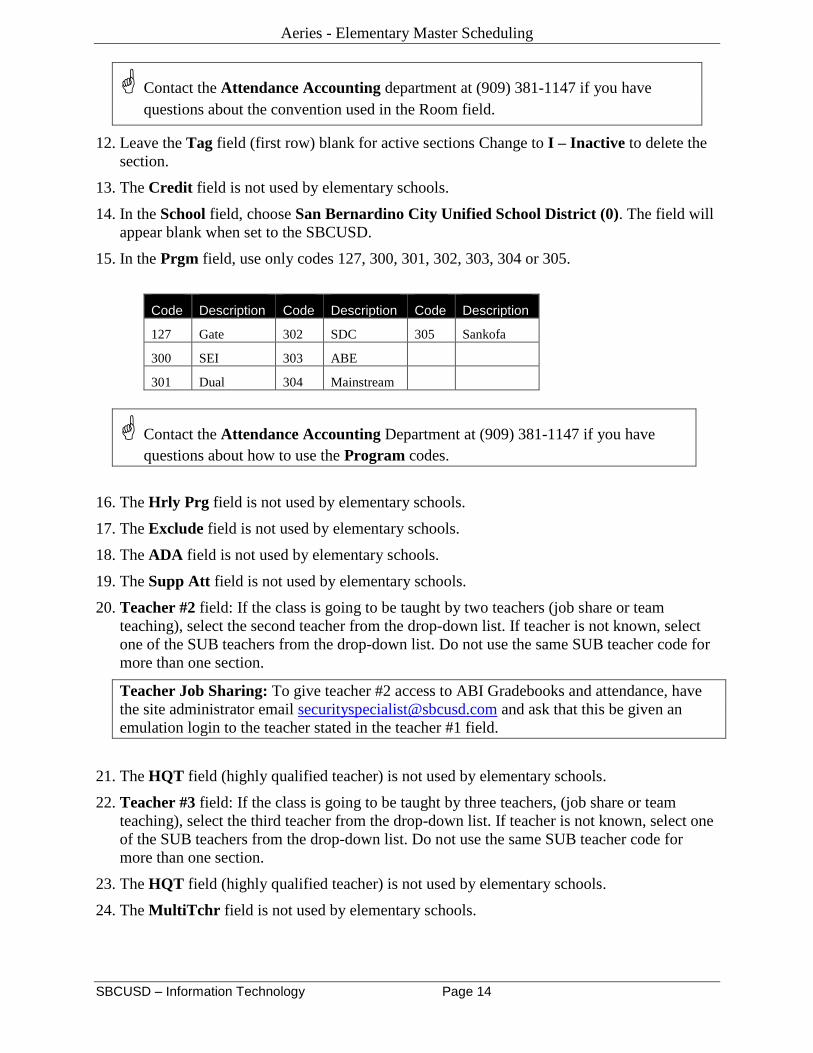
15. In the Prgm field, use only codes 127, 300, 301, 302, 303, 304 or 305.
Code Description Code Description Code Description
127 Gate 302 SDC 305 Sankofa
300 SEI 303 ABE
301 Dual 304 Mainstream
Contact the Attendance Accounting Department at (909) 381-1147 if you have
questions about how to use the Program codes.
16. The Hrly Prg field is not used by elementary schools.
17. The Exclude field is not used by elementary schools.
18. The ADA field is not used by elementary schools.
19. The Supp Att field is not used by elementary schools.
20. Teacher #2 field: If the class is going to be taught by two teachers (job share or team
teaching), select the second teacher from the drop-down list. If teacher is not known, select
one of the SUB teachers from the drop-down list. Do not use the same SUB teacher code for
more than one section.
Teacher Job Sharing: To give teacher #2 access to ABI Gradebooks and attendance, have
the site administrator email [email protected] and ask that this be given an
emulation login to the teacher stated in the teacher #1 field.
21. The HQT field (highly qualified teacher) is not used by elementary schools.
22. Teacher #3 field: If the class is going to be taught by three teachers, (job share or team
teaching), select the third teacher from the drop-down list. If teacher is not known, select one
of the SUB teachers from the drop-down list. Do not use the same SUB teacher code for
more than one section.
23. The HQT field (highly qualified teacher) is not used by elementary schools.
24. The MultiTchr field is not used by elementary schools.
Aeries - Elementary Master Scheduling
SBCUSD – Information Technology Page 15
25. In the Grd Range field (grade range), enter the same grade in both boxes
(e.g., for TK enter -1, for first grade enter 1-1). If a combo class, enter the low grade in the
first field and the high grade in the second field (e.g., for a 3-4 combination class, enter 3-4).
26. The SchGrp field is not used by elementary schools.
27. The TmCrsGp field is not used by elementary schools.
28. The Team# field is not used by elementary schools.
29. The SemGp field is not used by elementary schools.
30. The Track field is not used.
31. The Sex field is not used by elementary schools.
32. In the Split Term field, select MTWTF Meeting daily Monday-Friday. A check mark now
appears in the Mon, Tue, Wed, Thu, and Fri check boxes.
33. The Class ID field is not used by elementary schools.
34. In the Max field, enter the maximum number of students you will allow in the section. This
is very important! Check with your Administrator.
35. The Ed Svc, Lang Instr, or Instr Strategy, Fund Src, CTE Prvdr, Ind Study, Dist Lrng,
and Itinerant Teacher fields are not used by elementary schools. If there is a value in the
field(s) you can delete them, but it is not necessary.
36. For TK and Kindergarten classes in the Sessn (session) field, choose AM, PM, or Full
Day.
37. Click the Insert button to save your changes.
After you have completed your scheduling master, print the Scheduling Master
Schedule report to check it for errors. The steps to run this report can be found in
Lesson 5 – Scheduling Reports.
Aeries - Elementary Master Scheduling
SBCUSD – Information Technology Page 16
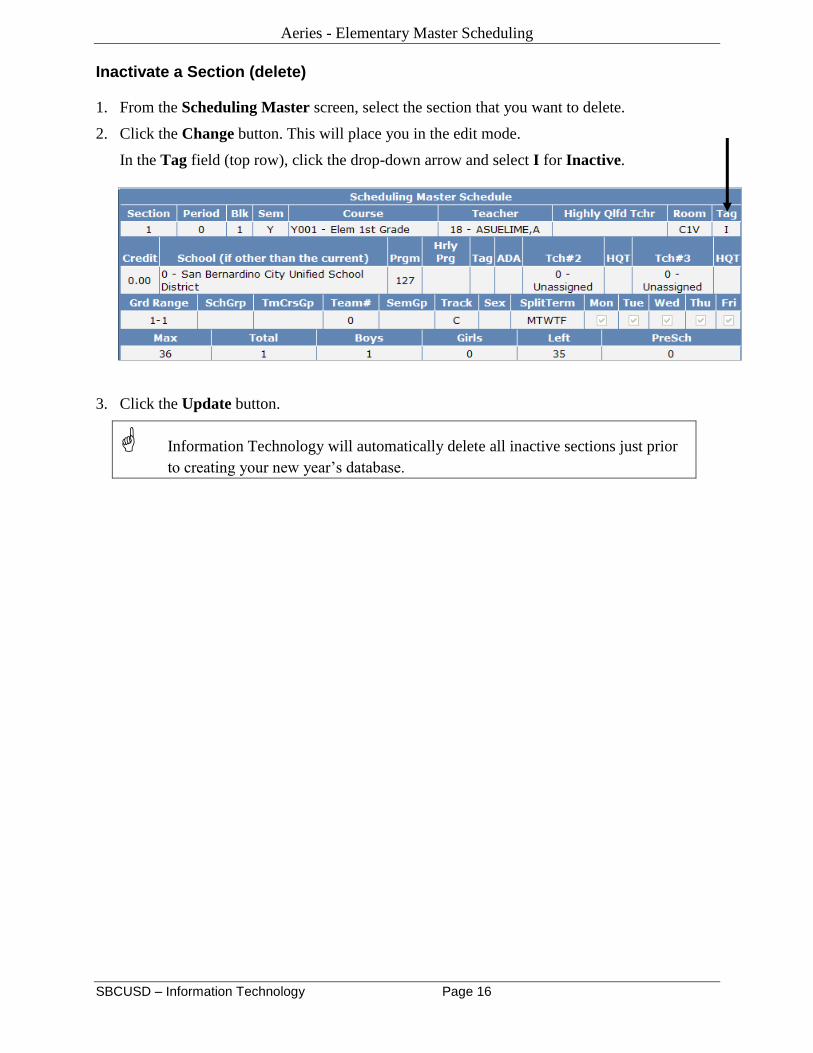
Inactivate a Section (delete)
1. From the Scheduling Master screen, select the section that you want to delete.
2. Click the Change button. This will place you in the edit mode.
In the Tag field (top row), click the drop-down arrow and select I for Inactive.
3. Click the Update button.
Information Technology will automatically delete all inactive sections just prior
to creating your new year’s database.
Aeries - Elementary Master Scheduling
SBCUSD – Information Technology Page 17
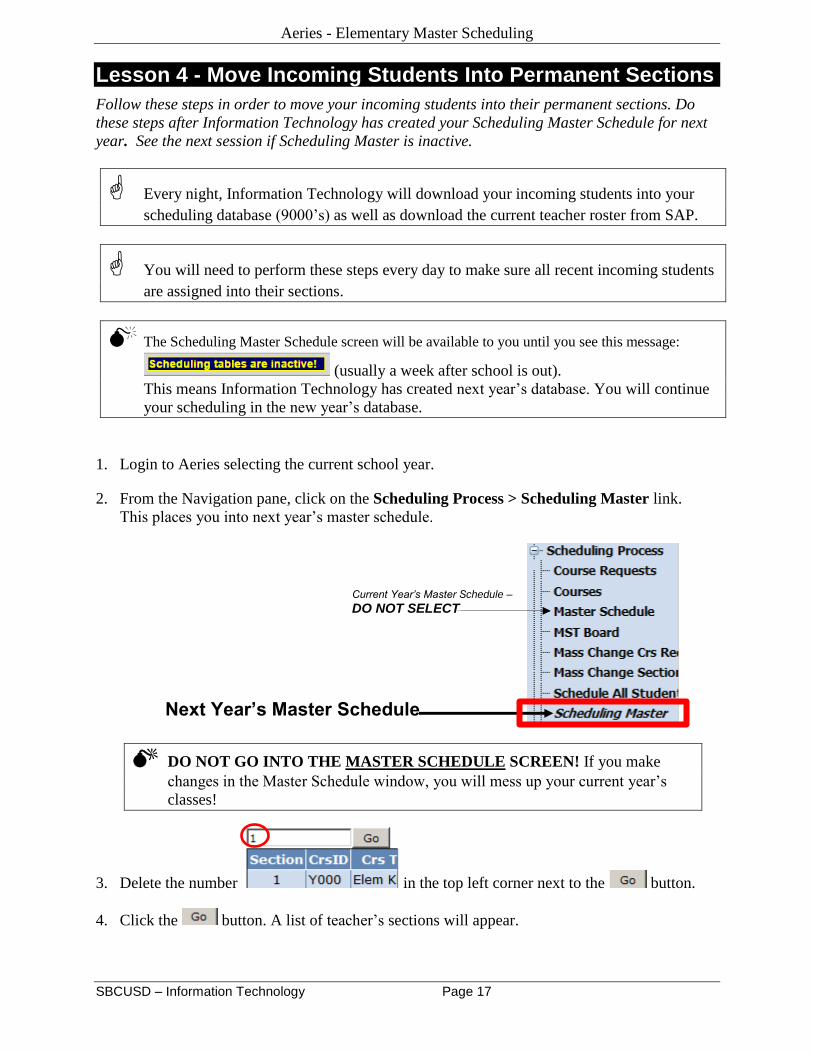
Lesson 4 - Move Incoming Students Into Permanent Sections
Follow these steps in order to move your incoming students into their permanent sections. Do
these steps after Information Technology has created your Scheduling Master Schedule for next
year. See the next session if Scheduling Master is inactive.
Every night, Information Technology will download your incoming students into your
scheduling database (9000’s) as well as download the current teacher roster from SAP.
You will need to perform these steps every day to make sure all recent incoming students
are assigned into their sections.
The Scheduling Master Schedule screen will be available to you until you see this message:
(usually a week after school is out).
This means Information Technology has created next year’s database. You will continue
your scheduling in the new year’s database.
1. Login to Aeries selecting the current school year.
2. From the Navigation pane, click on the Scheduling Process > Scheduling Master link.
This places you into next year’s master schedule.
DO NOT GO INTO THE MASTER SCHEDULE SCREEN! If you make
changes in the Master Schedule window, you will mess up your current year’s
classes!
3. Delete the number in the top left corner next to the button.
4. Click the button. A list of teacher’s sections will appear.
Current Year’s Master Schedule –
DO NOT SELECT
Next Year’s Master Schedule
Aeries - Elementary Master Scheduling
SBCUSD – Information Technology Page 18
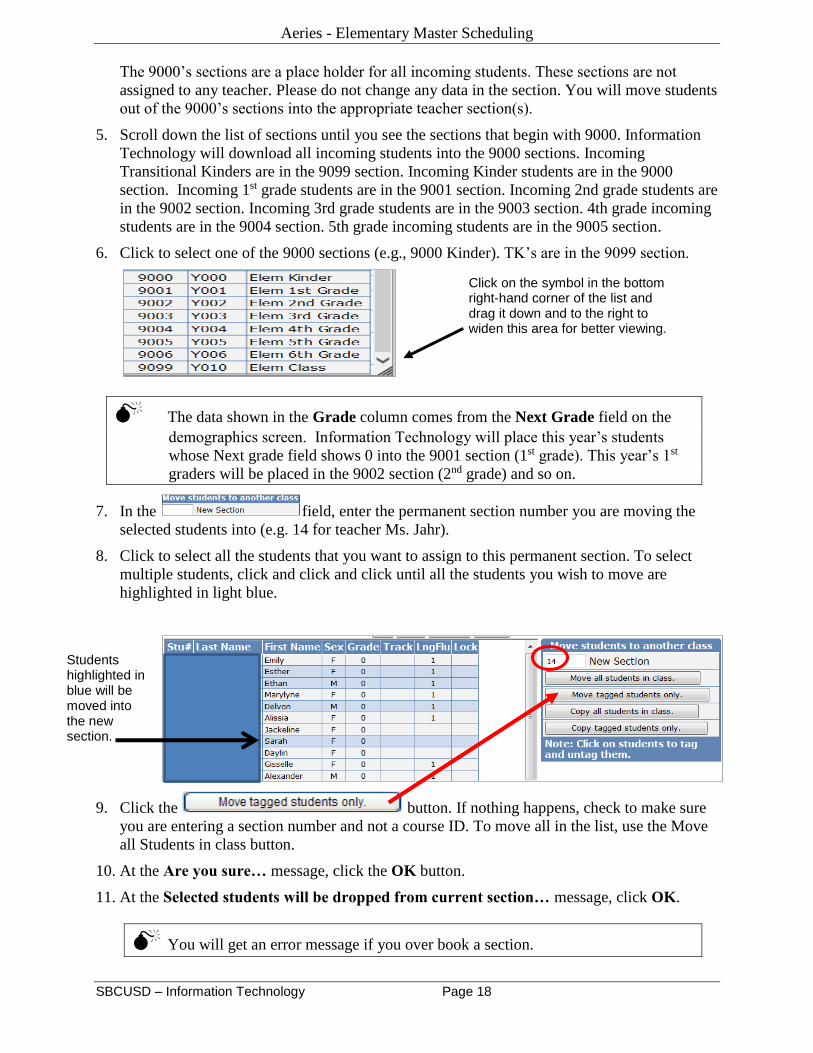
The 9000’s sections are a place holder for all incoming students. These sections are not
assigned to any teacher. Please do not change any data in the section. You will move students
out of the 9000’s sections into the appropriate teacher section(s).
5. Scroll down the list of sections until you see the sections that begin with 9000. Information
Technology will download all incoming students into the 9000 sections. Incoming
Transitional Kinders are in the 9099 section. Incoming Kinder students are in the 9000
section. Incoming 1st grade students are in the 9001 section. Incoming 2nd grade students are
in the 9002 section. Incoming 3rd grade students are in the 9003 section. 4th grade incoming
students are in the 9004 section. 5th grade incoming students are in the 9005 section.
6. Click to select one of the 9000 sections (e.g., 9000 Kinder). TK’s are in the 9099 section.
The data shown in the Grade column comes from the Next Grade field on the
demographics screen. Information Technology will place this year’s students
whose Next grade field shows 0 into the 9001 section (1st grade). This year’s 1st
graders will be placed in the 9002 section (2nd grade) and so on.
7. In the field, enter the permanent section number you are moving the
selected students into (e.g. 14 for teacher Ms. Jahr).
8. Click to select all the students that you want to assign to this permanent section. To select
multiple students, click and click and click until all the students you wish to move are
highlighted in light blue.
9. Click the button. If nothing happens, check to make sure
you are entering a section number and not a course ID. To move all in the list, use the Move
all Students in class button.
10. At the Are you sure… message, click the OK button.
11. At the Selected students will be dropped from current section… message, click OK.
You will get an error message if you over book a section.
Students highlighted in blue will be moved into the new section.
Click on the symbol in the bottom right-hand corner of the list and drag it down and to the right to widen this area for better viewing.
Aeries - Elementary Master Scheduling
SBCUSD – Information Technology Page 19
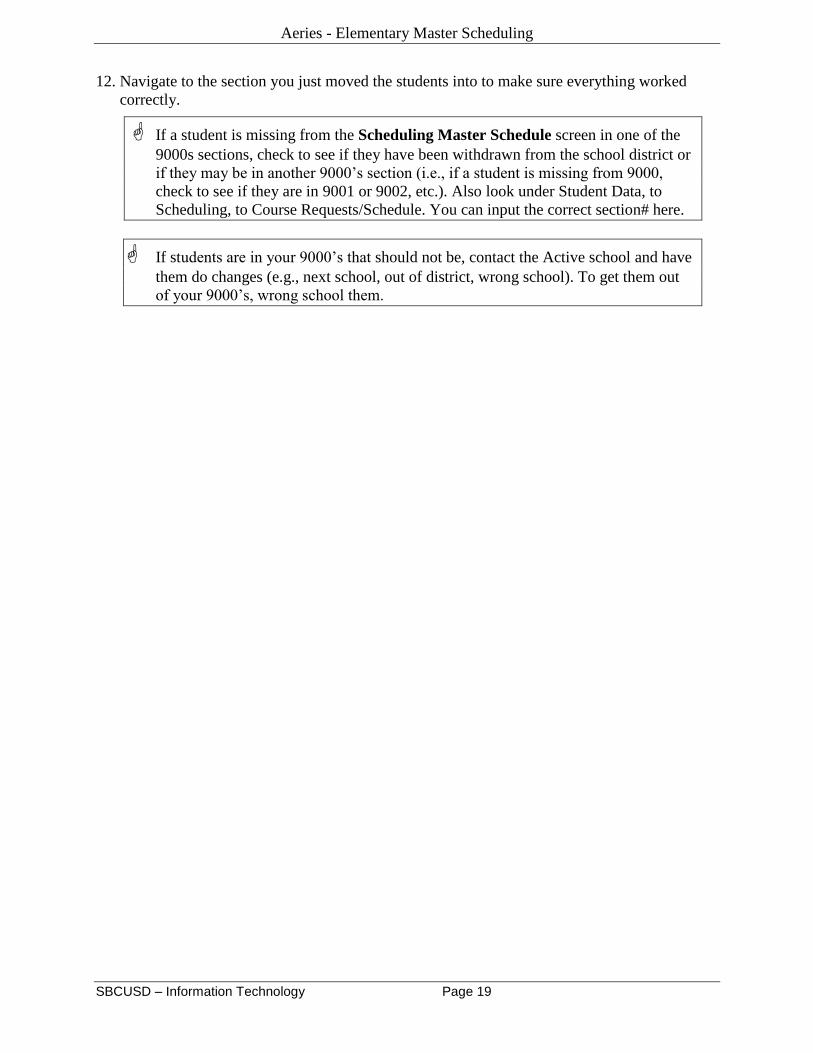
12. Navigate to the section you just moved the students into to make sure everything worked
correctly.
If a student is missing from the Scheduling Master Schedule screen in one of the
9000s sections, check to see if they have been withdrawn from the school district or
if they may be in another 9000’s section (i.e., if a student is missing from 9000,
check to see if they are in 9001 or 9002, etc.). Also look under Student Data, to
Scheduling, to Course Requests/Schedule. You can input the correct section# here.
If students are in your 9000’s that should not be, contact the Active school and have
them do changes (e.g., next school, out of district, wrong school). To get them out
of your 9000’s, wrong school them.
Aeries - Elementary Master Scheduling
SBCUSD – Information Technology Page 20
Lesson 5 – Scheduling Students Not in the 9000 Sections
If you do not find one of your students in the 9000 sections, but comes up for your site on the
Demographics screen, follow the steps below. If they do not show for your site, search the
District’s database. If they are active at another site, that site must do the Next School change
before you will see the student in your 9000 section. If the student is inactive in the District’s
database, you can activate (enroll) them for your site, and then they will show in your 9000’s the
next day. If you are enrolling a brand new student to our District, follow the procedures for
enrolling. If you have questions, please contact the Registrar, Traci Butts at 880-6615.
1. Login to the current year’s database.
2. Search for the student that you cannot find in the 9000 sections.
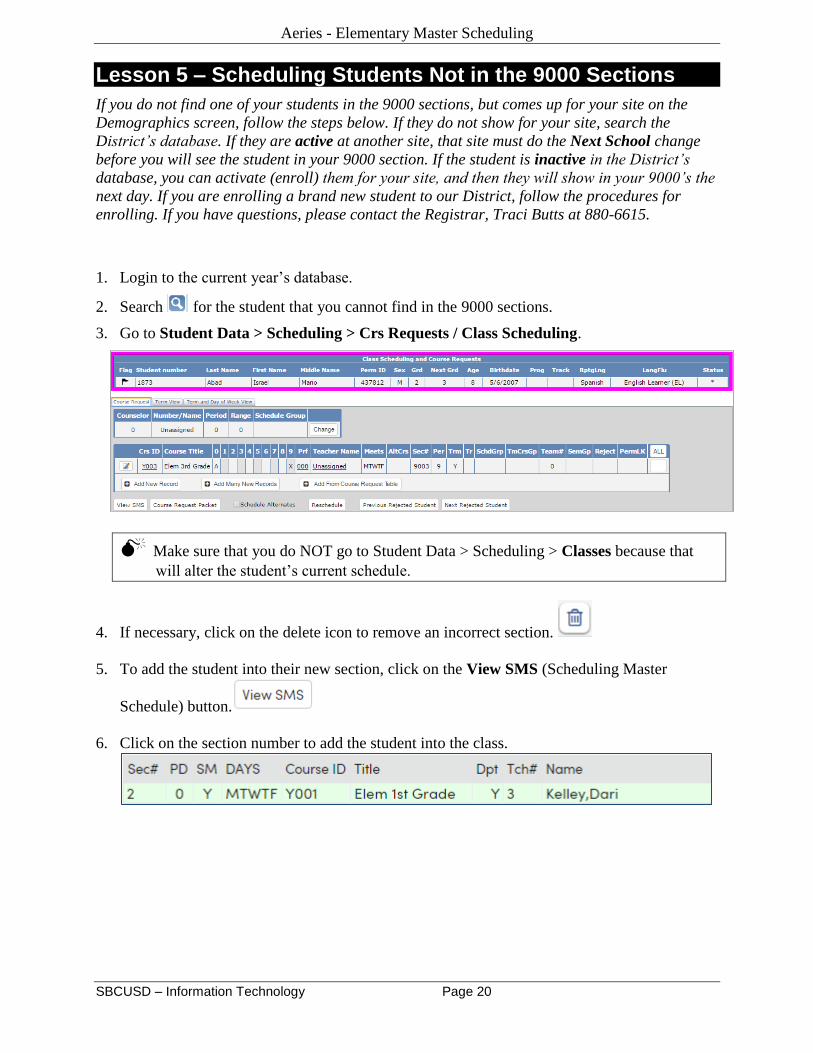
3. Go to Student Data > Scheduling > Crs Requests / Class Scheduling.
Make sure that you do NOT go to Student Data > Scheduling > Classes because that
will alter the student’s current schedule.
4. If necessary, click on the delete icon to remove an incorrect section.
5. To add the student into their new section, click on the View SMS (Scheduling Master
Schedule) button.
6. Click on the section number to add the student into the class.
Aeries - Elementary Master Scheduling
SBCUSD – Information Technology Page 21
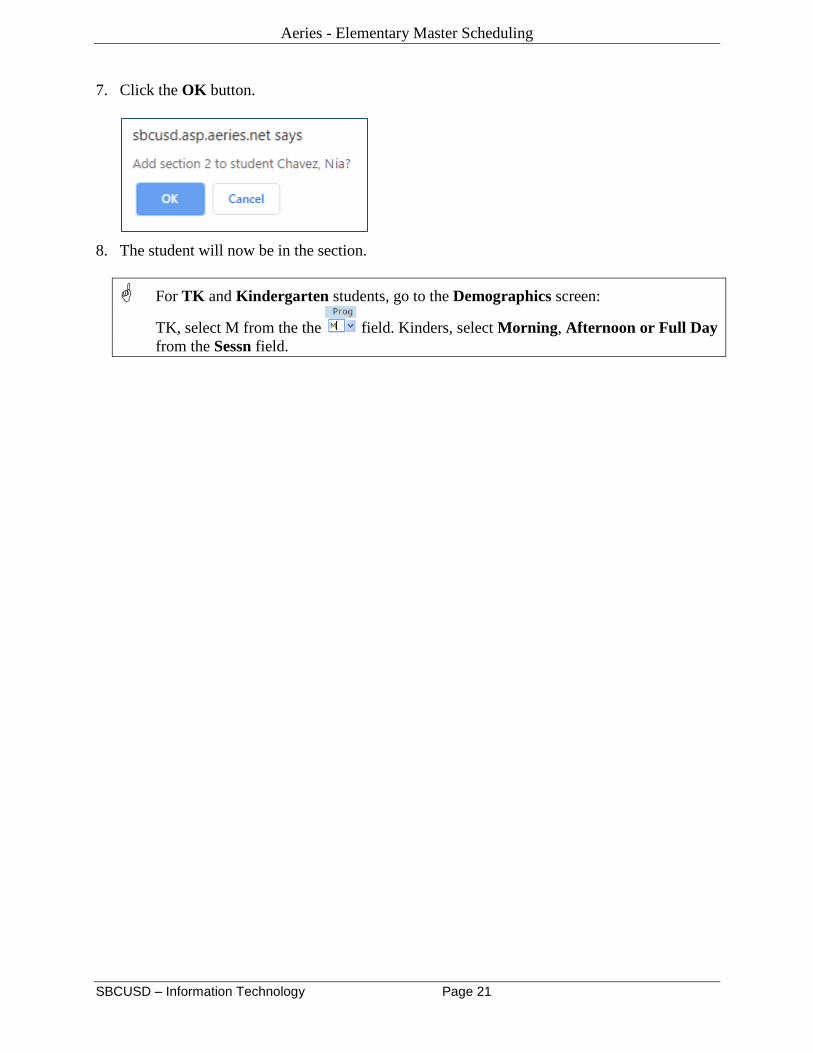
7. Click the OK button.
8. The student will now be in the section.
For TK and Kindergarten students, go to the Demographics screen:
TK, select M from the the field. Kinders, select Morning, Afternoon or Full Day
from the Sessn field.

Aeries - Elementary Master Scheduling
SBCUSD – Information Technology Page 22
Lesson 6 – Scheduling Reports
After you have assigned all your incoming students, you may want to run scheduling reports to
check the accuracy of your scheduling master schedule.
The Scheduling Master Schedule Report This report will show the teachers, their sections, rooms, total room count, and boy and girl
count for next year.
1. Login to the current year’s database.
2. From the Navigation pane, click on Scheduling Process > Reports link.
3. Click to select the Scheduling Master Schedule report.
4. Select the options in the picture and then click on .
5. At the Report Viewer screen, click View Report.
Aeries - Elementary Master Scheduling
SBCUSD – Information Technology Page 23
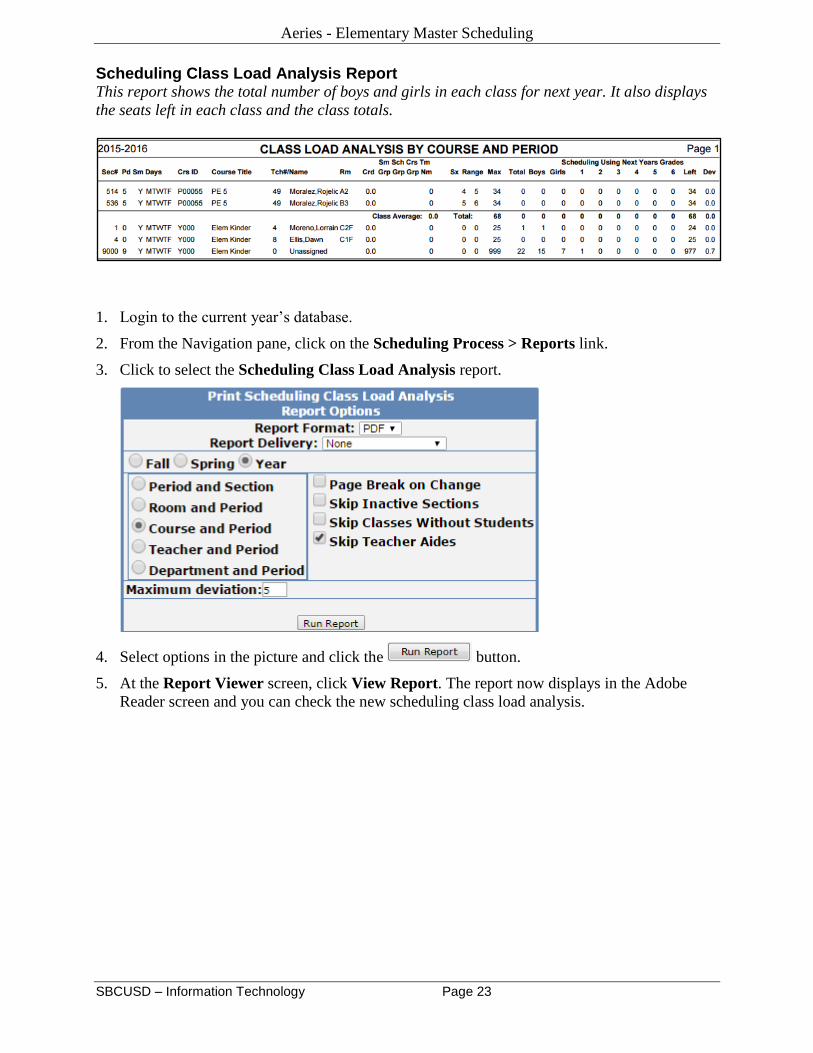
Scheduling Class Load Analysis Report This report shows the total number of boys and girls in each class for next year. It also displays
the seats left in each class and the class totals.
1. Login to the current year’s database.
2. From the Navigation pane, click on the Scheduling Process > Reports link.
3. Click to select the Scheduling Class Load Analysis report.
4. Select options in the picture and click the button.
5. At the Report Viewer screen, click View Report. The report now displays in the Adobe
Reader screen and you can check the new scheduling class load analysis.
Aeries - Elementary Master Scheduling
SBCUSD – Information Technology Page 24
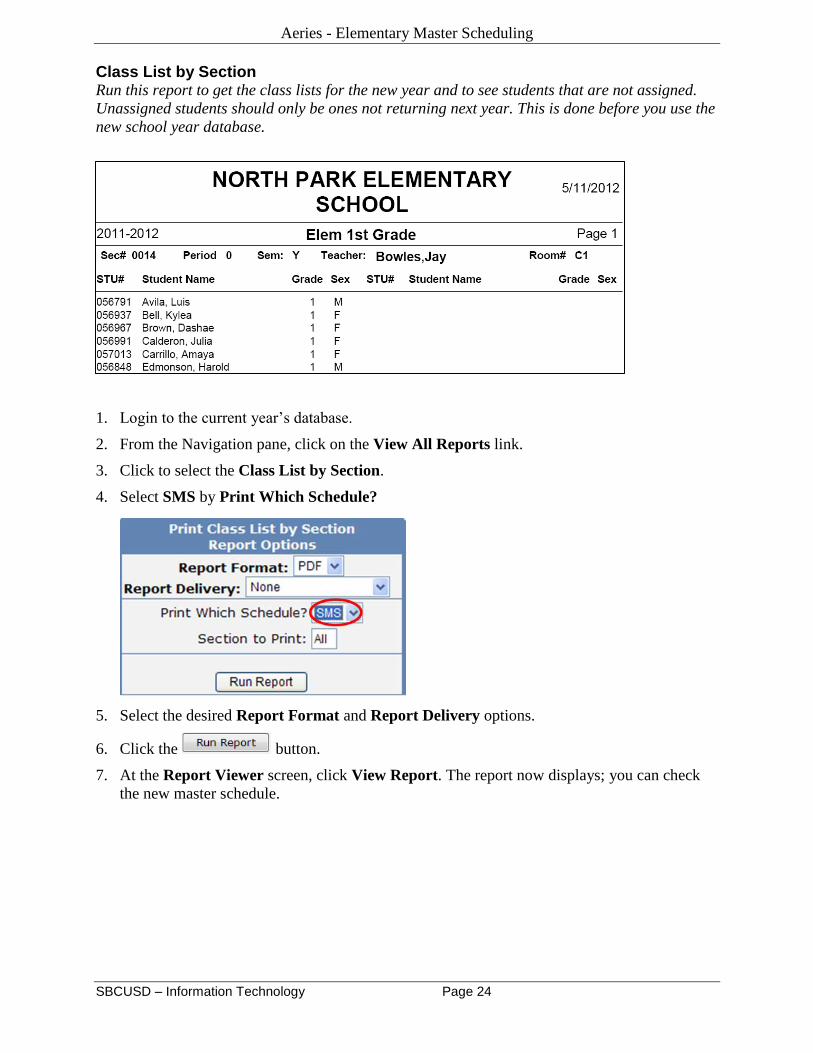
Class List by Section Run this report to get the class lists for the new year and to see students that are not assigned.
Unassigned students should only be ones not returning next year. This is done before you use the
new school year database.
1. Login to the current year’s database.
2. From the Navigation pane, click on the View All Reports link.
3. Click to select the Class List by Section.
4. Select SMS by Print Which Schedule?
5. Select the desired Report Format and Report Delivery options.
6. Click the button.
7. At the Report Viewer screen, click View Report. The report now displays; you can check
the new master schedule.

Aeries - Elementary Master Scheduling
SBCUSD – Information Technology Page 25
Class List by Teacher Run this report to get the class lists for the New Year and to see students that are not assigned.
Unassigned students should only be ones not returning next year. This is done using the
Scheduling Master Schedule before you are logging into the new school year database.
1. Login to the current year’s database.
2. From the Navigation pane, click on the View All Reports link.
3. Click to select the Class List by Teacher.
4. Select the desired Report Format and Report Delivery options.
5. Check the box for Print Classes for next year?
6. Click the button.
7. At the Report Viewer screen, click View Report.
The teacher name on this report comes from the Student Data > Demographics screen.
Aeries - Elementary Master Scheduling
SBCUSD – Information Technology Page 26
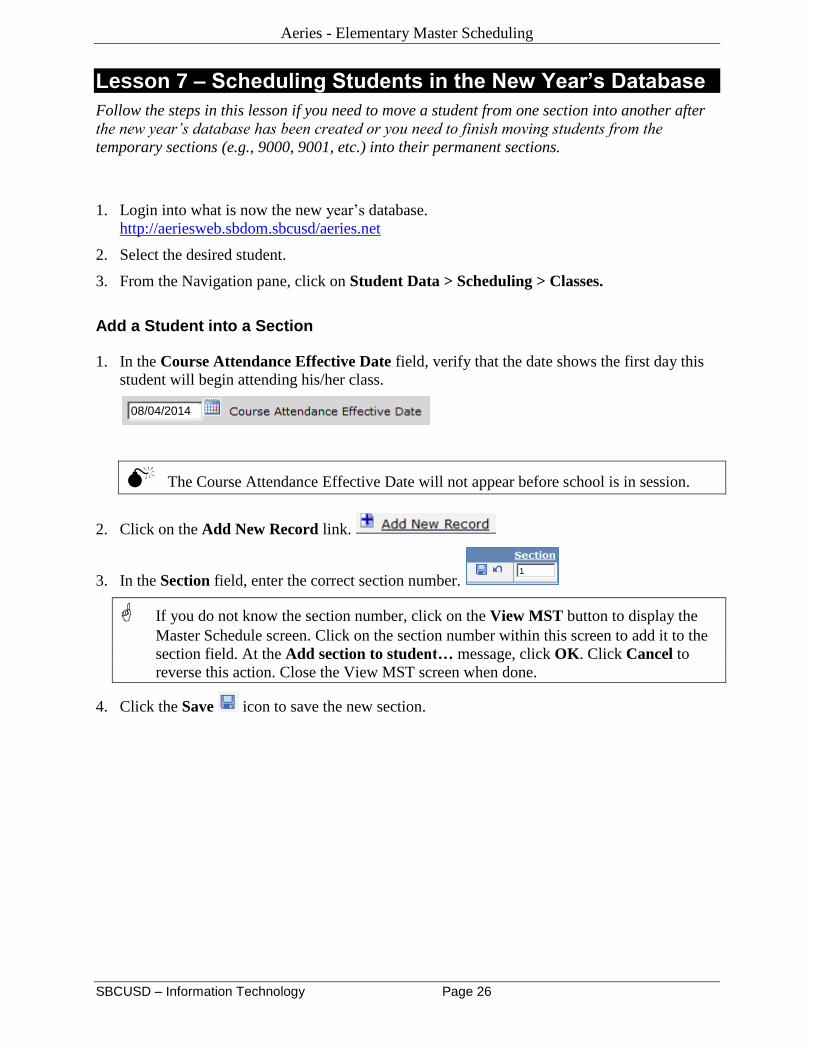
Lesson 7 – Scheduling Students in the New Year’s Database
Follow the steps in this lesson if you need to move a student from one section into another after
the new year’s database has been created or you need to finish moving students from the
temporary sections (e.g., 9000, 9001, etc.) into their permanent sections.
1. Login into what is now the new year’s database.
http://aeriesweb.sbdom.sbcusd/aeries.net
2. Select the desired student.
3. From the Navigation pane, click on Student Data > Scheduling > Classes.
Add a Student into a Section
1. In the Course Attendance Effective Date field, verify that the date shows the first day this
student will begin attending his/her class.
The Course Attendance Effective Date will not appear before school is in session.
2. Click on the Add New Record link.
3. In the Section field, enter the correct section number.
If you do not know the section number, click on the View MST button to display the
Master Schedule screen. Click on the section number within this screen to add it to the
section field. At the Add section to student… message, click OK. Click Cancel to
reverse this action. Close the View MST screen when done.
4. Click the Save icon to save the new section.
08/04/2014
Aeries - Elementary Master Scheduling
SBCUSD – Information Technology Page 27
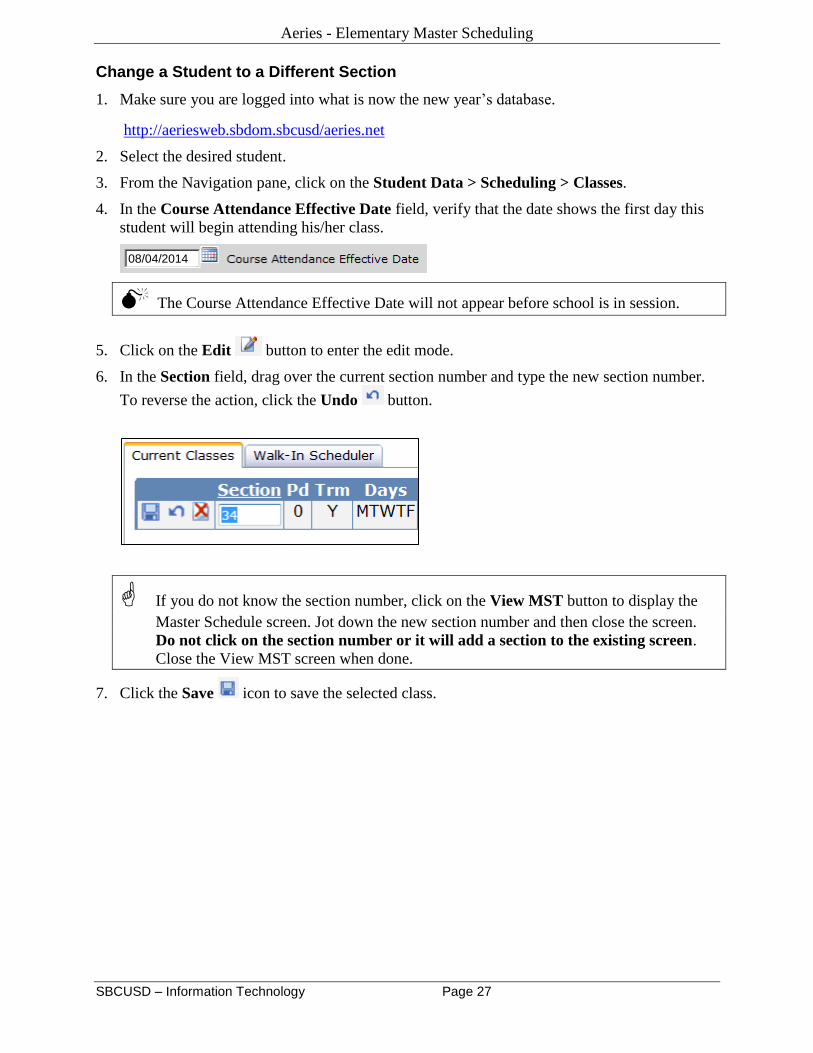
Change a Student to a Different Section
1. Make sure you are logged into what is now the new year’s database.
http://aeriesweb.sbdom.sbcusd/aeries.net
2. Select the desired student.
3. From the Navigation pane, click on the Student Data > Scheduling > Classes.
4. In the Course Attendance Effective Date field, verify that the date shows the first day this
student will begin attending his/her class.
The Course Attendance Effective Date will not appear before school is in session.
5. Click on the Edit button to enter the edit mode.
6. In the Section field, drag over the current section number and type the new section number.
To reverse the action, click the Undo button.
If you do not know the section number, click on the View MST button to display the
Master Schedule screen. Jot down the new section number and then close the screen.
Do not click on the section number or it will add a section to the existing screen.
Close the View MST screen when done.
7. Click the Save icon to save the selected class.
08/04/2014
Aeries - Elementary Master Scheduling
SBCUSD – Information Technology Page 28
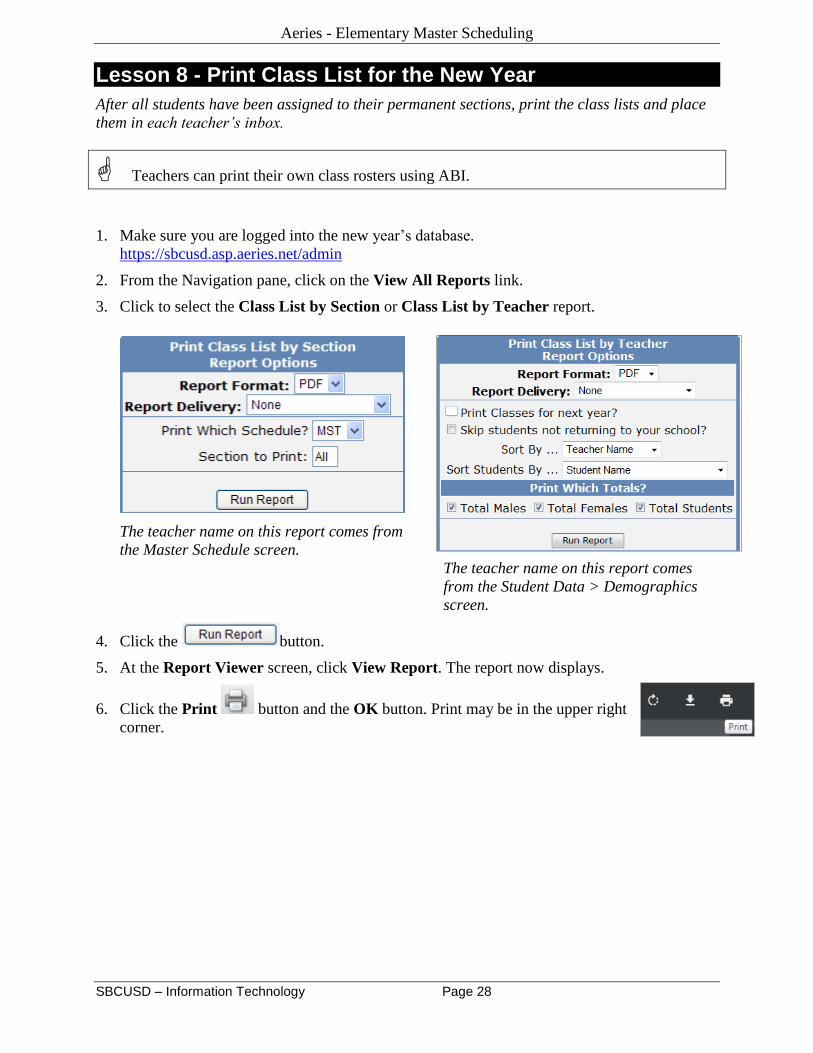
Lesson 8 - Print Class List for the New Year
After all students have been assigned to their permanent sections, print the class lists and place
them in each teacher’s inbox.
Teachers can print their own class rosters using ABI.
1. Make sure you are logged into the new year’s database.
https://sbcusd.asp.aeries.net/admin
2. From the Navigation pane, click on the View All Reports link.
3. Click to select the Class List by Section or Class List by Teacher report.
The teacher name on this report comes from
the Master Schedule screen.
The teacher name on this report comes
from the Student Data > Demographics
screen.
4. Click the button.
5. At the Report Viewer screen, click View Report. The report now displays.
6. Click the Print button and the OK button. Print may be in the upper right
corner.
Aeries - Elementary Master Scheduling
SBCUSD – Information Technology Page 29
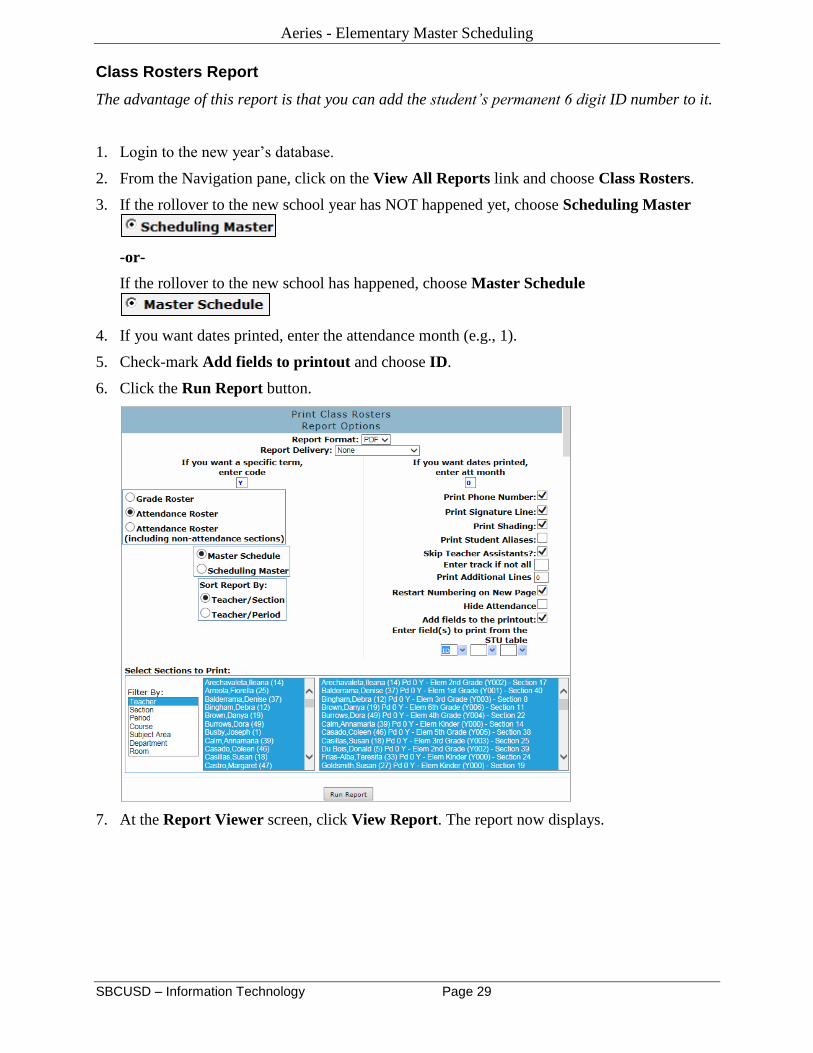
Class Rosters Report
The advantage of this report is that you can add the student’s permanent 6 digit ID number to it.
1. Login to the new year’s database.
2. From the Navigation pane, click on the View All Reports link and choose Class Rosters.
3. If the rollover to the new school year has NOT happened yet, choose Scheduling Master
-or-
If the rollover to the new school has happened, choose Master Schedule
4. If you want dates printed, enter the attendance month (e.g., 1).
5. Check-mark Add fields to printout and choose ID.
6. Click the Run Report button.
7. At the Report Viewer screen, click View Report. The report now displays.
Aeries - Elementary Master Scheduling
SBCUSD – Information Technology Page 30
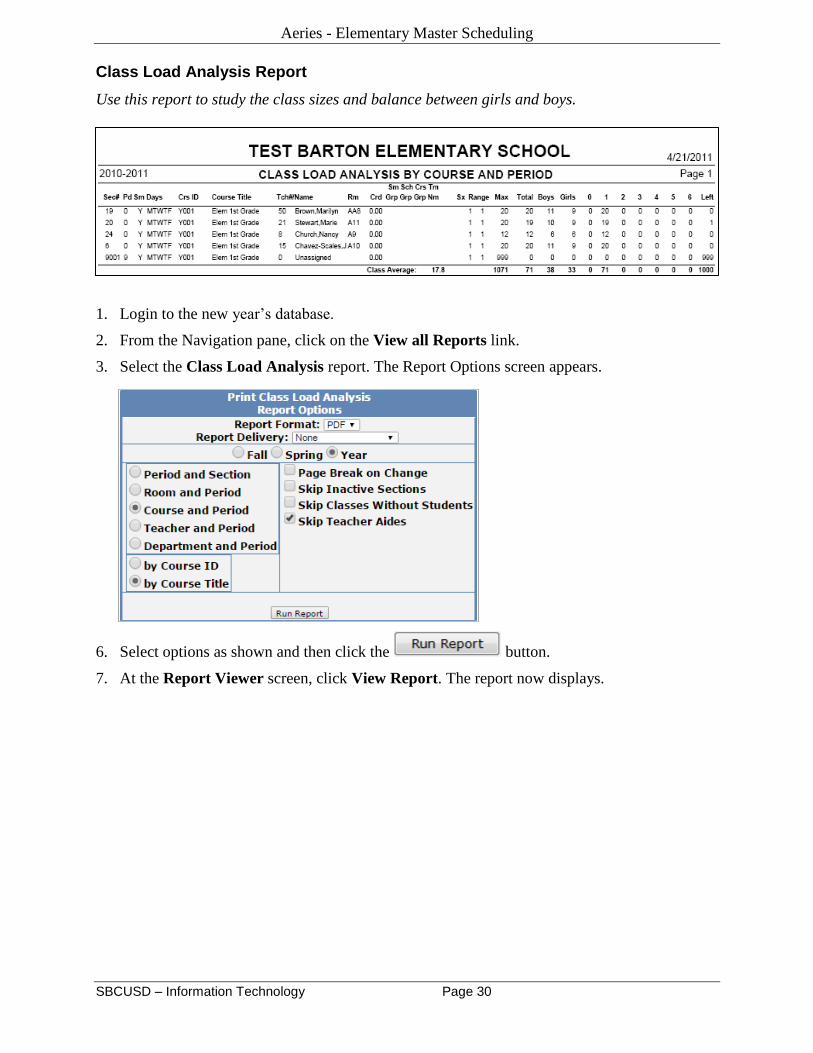
Class Load Analysis Report
Use this report to study the class sizes and balance between girls and boys.
1. Login to the new year’s database.
2. From the Navigation pane, click on the View all Reports link.
3. Select the Class Load Analysis report. The Report Options screen appears.
6. Select options as shown and then click the button.
7. At the Report Viewer screen, click View Report. The report now displays.