Embed Size (px)
Citation preview
20 October 2010
Administration Guide
Endpoint Security VPN
R75

© 2010 Check Point Software Technologies Ltd.
All rights reserved. This product and related documentation are protected by copyright and distributed under licensing restricting their use, copying, distribution, and decompilation. No part of this product or related documentation may be reproduced in any form or by any means without prior written authorization of Check Point. While every precaution has been taken in the preparation of this book, Check Point assumes no responsibility for errors or omissions. This publication and features described herein are subject to change without notice.
RESTRICTED RIGHTS LEGEND:
Use, duplication, or disclosure by the government is subject to restrictions as set forth in subparagraph (c)(1)(ii) of the Rights in Technical Data and Computer Software clause at DFARS 252.227-7013 and FAR 52.227-19.
TRADEMARKS:
Refer to the Copyright page (http://www.checkpoint.com/copyright.html) for a list of our trademarks.
Refer to the Third Party copyright notices (http://www.checkpoint.com/3rd_party_copyright.html) for a list of relevant copyrights and third-party licenses.
Important Information Latest Documentation
The latest version of this document is at: http://supportcontent.checkpoint.com/documentation_download?ID=11562
For additional technical information, visit the Check Point Support Center (http://supportcenter.checkpoint.com).
Revision History
Date Description
20 October 2010 Added procedure for restoring the TTM file with customizations ("Restoring Settings" on page 24).
14 October 2010 Added a Firewall rule for MEP support ("Making a Desktop Rule for MEP" on page 74).
10 October 2010 Added support for Microsoft Windows server platforms.
07 October 2010 To reflect the easy process of moving from SecureClient to Endpoint Security VPN, migration is changed to upgrading.
Added Microsoft Windows Editions to Supported Platforms
Add procedure for changing Desktop Policy to allow MEP ("Installing Desktop Security Policy" on page 46).
28 September 2010 Updated features lists
13 September 2010 Initial version
Feedback
Check Point is engaged in a continuous effort to improve its documentation.
Please help us by sending your comments (mailto:[email protected]?subject=Feedback on Endpoint Security VPN R75 Administration Guide).

Contents
Important Information ............................................................................................. 3 Introduction to Endpoint Security VPN ................................................................. 6
Features Overview .............................................................................................. 6 Connectivity Features in Detail ....................................................................... 7 Security Features in Detail .............................................................................. 8
Topology Architecture .......................................................................................... 8 Encryption Domains ........................................................................................ 9 External Resources in Encryption Domain .....................................................10
Quick Start - Helping the Users ........................................................................... 11 Prepackaging .....................................................................................................11 Provisioning ........................................................................................................11 Simple Installation ..............................................................................................11 Endpoint Security VPN Client Icon .....................................................................12 Helping Users Create a Site ...............................................................................12
Preparing the Gateway Fingerprint ................................................................13 Using the Site Wizard ....................................................................................13 Opening the Site Wizard Again ......................................................................15
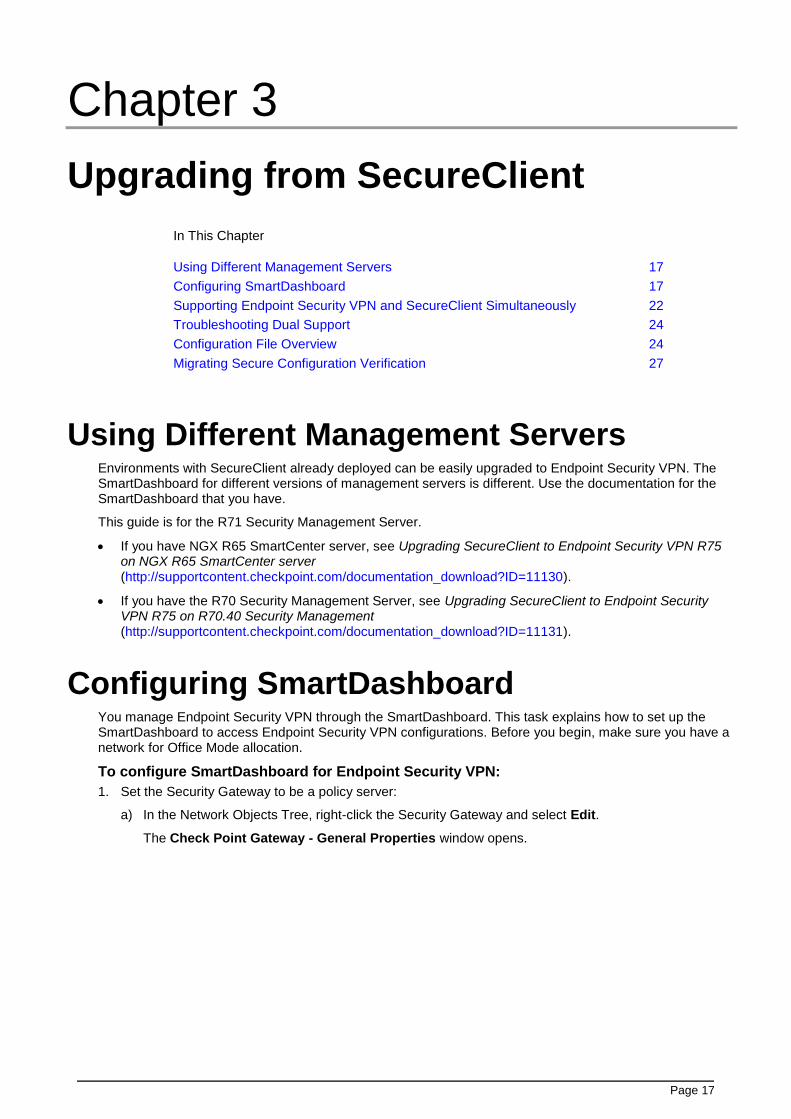
Helping Users with Basic Client Operations ........................................................16 Upgrading from SecureClient .............................................................................. 17
Using Different Management Servers .................................................................17 Configuring SmartDashboard .............................................................................17 Supporting Endpoint Security VPN and SecureClient Simultaneously ................22 Troubleshooting Dual Support ............................................................................24 Configuration File Overview ................................................................................24
Restoring Settings .........................................................................................24 Centrally Managing the Configuration File .....................................................25 Parameters in the Configuration File ..............................................................26
Migrating Secure Configuration Verification ........................................................27 Setting Up Endpoint Security VPN ...................................................................... 28
Installing Hotfix on Security Gateways ................................................................28 Required Gateway Settings ................................................................................29 Configuring a Policy Server ................................................................................34 Remote Access Modes .......................................................................................35 Upgrading Clients from the Gateway ..................................................................35 Configuring Endpoint Security VPN Client ..........................................................36
Authentication Schemes and Certificates .......................................................37 Advanced Client Settings ...............................................................................42 MSI Packaging Tool CLI ................................................................................44
Preparing the Client Installation Process ............................................................44 Configuring Endpoint Security VPN Features .................................................... 46
Installing Desktop Security Policy .......................................................................46 Managing Desktop Firewalls ...............................................................................47
The Desktop Firewall .....................................................................................47 Rules .............................................................................................................48 Default Policy .................................................................................................49 Logs and Alerts ..............................................................................................49 Wireless Hotspot/Hotel Registration ...............................................................49 Planning Desktop Security Policy...................................................................49 Operations on the Rule Base .........................................................................49 Making the Desktop Security Policy ...............................................................50
Secure Configuration Verification (SCV) .............................................................51 Check Point SCV Checks ..............................................................................52
Configuring the SCV Policy ............................................................................52 Configuring SCV Enforcement .......................................................................53 Configuring SCV Exceptions ..........................................................................53 Traditional Mode ............................................................................................53 Installing and Running SCV Plugins on the Client ..........................................54 SCV Policy Syntax .........................................................................................54
Secure Domain Logon (SDL) ..............................................................................68 Configuring SDL ............................................................................................68 Configuring Windows Cached Credentials .....................................................69 Using SDL in Windows XP .............................................................................69 SDL in Windows Vista and Windows 7 ..........................................................69
Multiple Entry Point (MEP) ..................................................................................70 Configuring Entry Point Choice ......................................................................70 Defining MEP Method ....................................................................................71 Implicit MEP ...................................................................................................71 Manual MEP ..................................................................................................73 Making a Desktop Rule for MEP ....................................................................74
Global Properties for Endpoint Security VPN Gateways .....................................74 Authentication Settings ..................................................................................75 Connect Mode ...............................................................................................76 Roaming ........................................................................................................76 Location Aware Connectivity ..........................................................................76 Idle VPN Tunnel .............................................................................................79 Intelligent Auto-Detect ....................................................................................79 Smart Card Removal Detection .....................................................................80 Configuring Hotspot Access ...........................................................................80 Configuring Upgrades ....................................................................................82 Using the Packaging Tool ..............................................................................82
Configuring Log Uploads ....................................................................................83 Configuring Post Connect Scripts .......................................................................84
Endpoint Security VPN API .................................................................................. 85 The Endpoint Security VPN API .........................................................................85 Introduction to the Client OPSEC API .................................................................85
General Error Tracing Functions ....................................................................85 Service Notification Functions ........................................................................85
Function Return Codes .......................................................................................86 Functions from Client to Service .........................................................................87 Notification Identifiers .........................................................................................92
TrNotificationID ..............................................................................................92 Functions from Service to Client .........................................................................96
Command Line Options...................................................................................... 101 Monitoring and Troubleshooting ....................................................................... 103
SmartView Tracker and Endpoint Security VPN ............................................... 103 Collecting Logs ................................................................................................. 104 Endpoint Security VPN Files ............................................................................. 105 "Unsupported Services" Message .................................................................... 106 Configuring No-Router Environments ............................................................... 107 Connection Terminates .................................................................................... 107 Troubleshooting the Firewall ............................................................................. 107 Troubleshooting SCV ....................................................................................... 107 Traffic Dropped for Anti-spoofing ...................................................................... 108
Page 6
Chapter 1
Introduction to Endpoint Security VPN
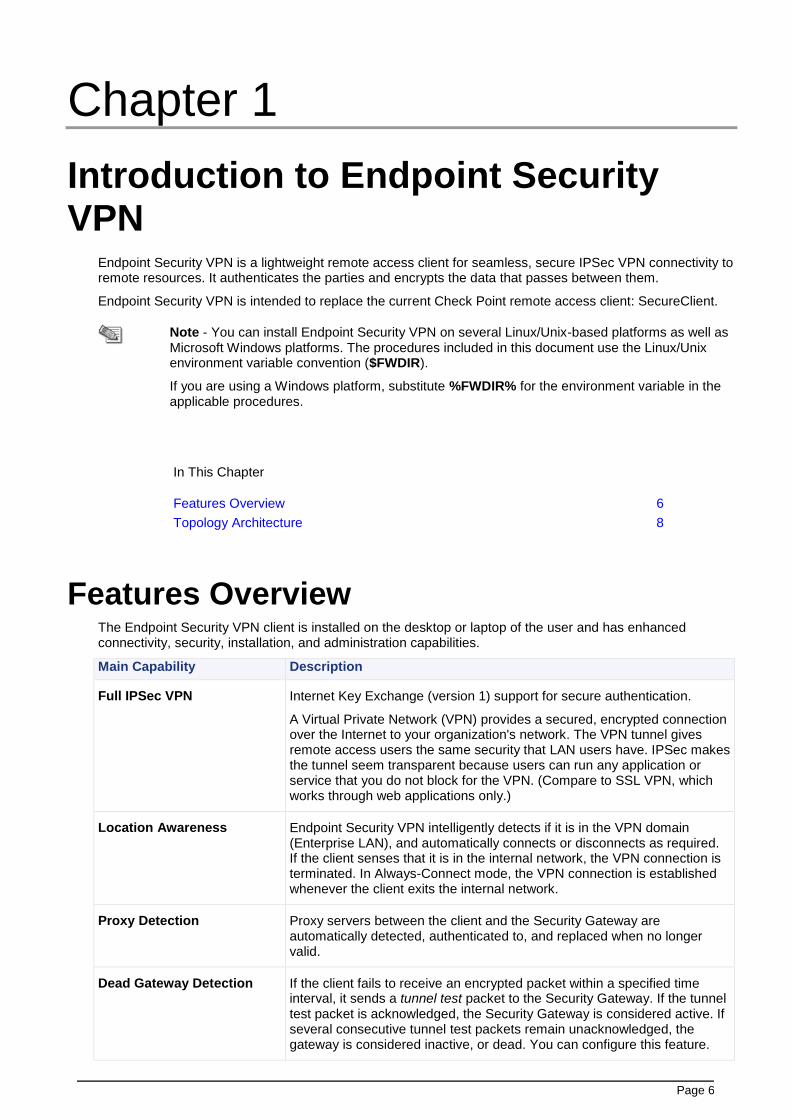
Endpoint Security VPN is a lightweight remote access client for seamless, secure IPSec VPN connectivity to remote resources. It authenticates the parties and encrypts the data that passes between them.
Endpoint Security VPN is intended to replace the current Check Point remote access client: SecureClient.
Note - You can install Endpoint Security VPN on several Linux/Unix-based platforms as well as Microsoft Windows platforms. The procedures included in this document use the Linux/Unix environment variable convention ($FWDIR).
If you are using a Windows platform, substitute %FWDIR% for the environment variable in the applicable procedures.
In This Chapter
Features Overview 6
Topology Architecture 8
Features Overview The Endpoint Security VPN client is installed on the desktop or laptop of the user and has enhanced connectivity, security, installation, and administration capabilities.
Main Capability Description
Full IPSec VPN Internet Key Exchange (version 1) support for secure authentication.
A Virtual Private Network (VPN) provides a secured, encrypted connection over the Internet to your organization's network. The VPN tunnel gives remote access users the same security that LAN users have. IPSec makes the tunnel seem transparent because users can run any application or service that you do not block for the VPN. (Compare to SSL VPN, which works through web applications only.)
Location Awareness Endpoint Security VPN intelligently detects if it is in the VPN domain (Enterprise LAN), and automatically connects or disconnects as required. If the client senses that it is in the internal network, the VPN connection is terminated. In Always-Connect mode, the VPN connection is established whenever the client exits the internal network.
Proxy Detection Proxy servers between the client and the Security Gateway are automatically detected, authenticated to, and replaced when no longer valid.
Dead Gateway Detection If the client fails to receive an encrypted packet within a specified time interval, it sends a tunnel test packet to the Security Gateway. If the tunnel test packet is acknowledged, the Security Gateway is considered active. If several consecutive tunnel test packets remain unacknowledged, the gateway is considered inactive, or dead. You can configure this feature.
Features Overview
Introduction to Endpoint Security VPN Page 7
Main Capability Description
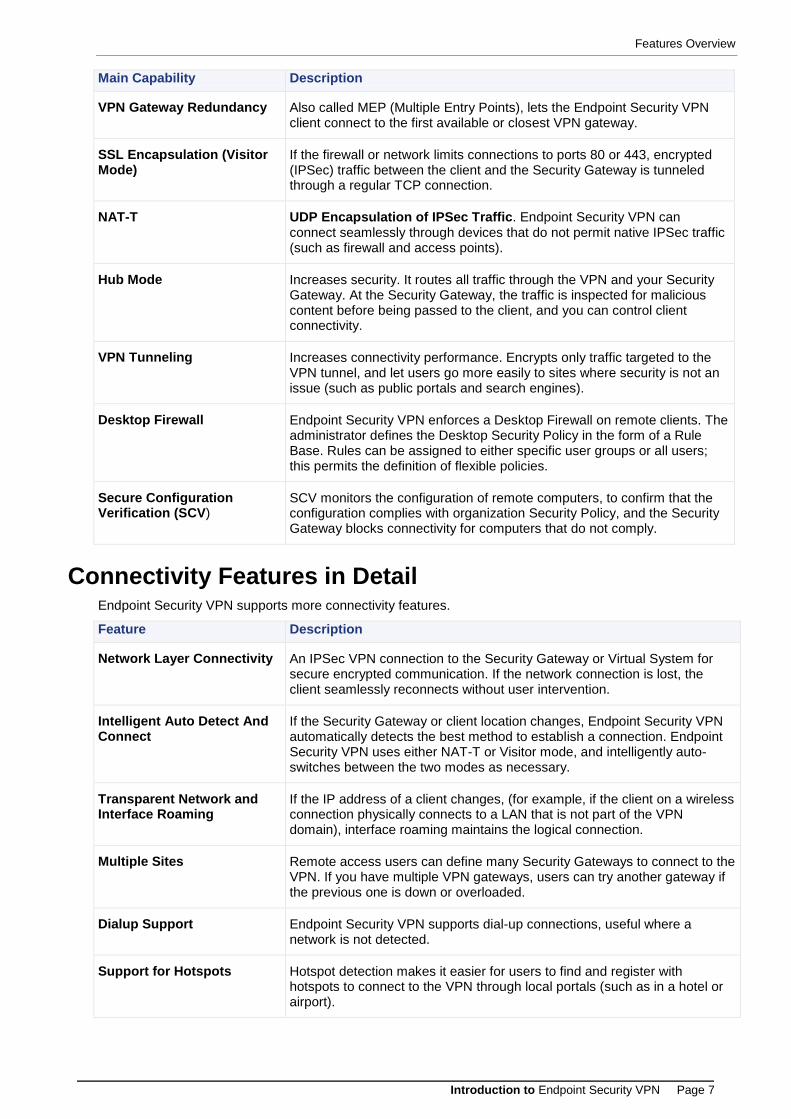
VPN Gateway Redundancy Also called MEP (Multiple Entry Points), lets the Endpoint Security VPN client connect to the first available or closest VPN gateway.
SSL Encapsulation (Visitor Mode)
If the firewall or network limits connections to ports 80 or 443, encrypted (IPSec) traffic between the client and the Security Gateway is tunneled through a regular TCP connection.
NAT-T UDP Encapsulation of IPSec Traffic. Endpoint Security VPN can connect seamlessly through devices that do not permit native IPSec traffic (such as firewall and access points).
Hub Mode Increases security. It routes all traffic through the VPN and your Security Gateway. At the Security Gateway, the traffic is inspected for malicious content before being passed to the client, and you can control client connectivity.
VPN Tunneling Increases connectivity performance. Encrypts only traffic targeted to the VPN tunnel, and let users go more easily to sites where security is not an issue (such as public portals and search engines).
Desktop Firewall Endpoint Security VPN enforces a Desktop Firewall on remote clients. The administrator defines the Desktop Security Policy in the form of a Rule Base. Rules can be assigned to either specific user groups or all users; this permits the definition of flexible policies.
Secure Configuration Verification (SCV)
SCV monitors the configuration of remote computers, to confirm that the configuration complies with organization Security Policy, and the Security Gateway blocks connectivity for computers that do not comply.
Connectivity Features in Detail Endpoint Security VPN supports more connectivity features.
Feature Description
Network Layer Connectivity An IPSec VPN connection to the Security Gateway or Virtual System for secure encrypted communication. If the network connection is lost, the client seamlessly reconnects without user intervention.
Intelligent Auto Detect And Connect
If the Security Gateway or client location changes, Endpoint Security VPN automatically detects the best method to establish a connection. Endpoint Security VPN uses either NAT-T or Visitor mode, and intelligently auto-switches between the two modes as necessary.
Transparent Network and Interface Roaming
If the IP address of a client changes, (for example, if the client on a wireless connection physically connects to a LAN that is not part of the VPN domain), interface roaming maintains the logical connection.
Multiple Sites Remote access users can define many Security Gateways to connect to the VPN. If you have multiple VPN gateways, users can try another gateway if the previous one is down or overloaded.
Dialup Support Endpoint Security VPN supports dial-up connections, useful where a network is not detected.
Support for Hotspots Hotspot detection makes it easier for users to find and register with hotspots to connect to the VPN through local portals (such as in a hotel or airport).
Topology Architecture
Introduction to Endpoint Security VPN Page 8
Feature Description
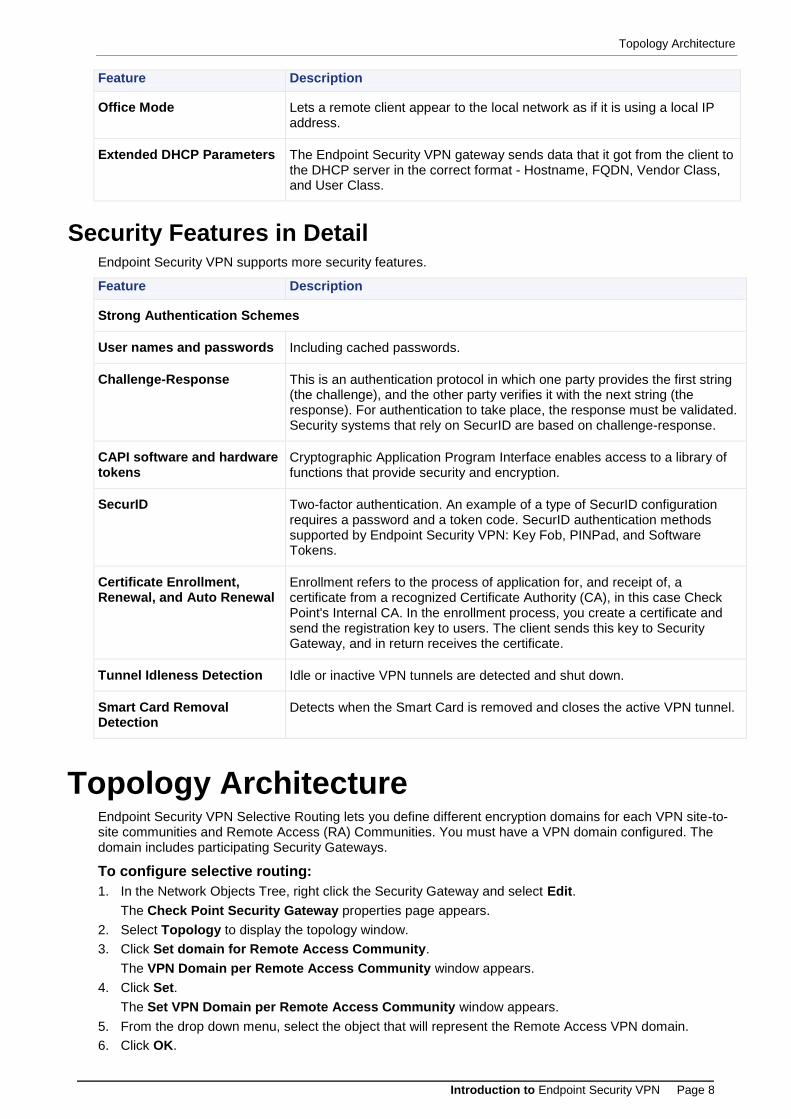
Office Mode Lets a remote client appear to the local network as if it is using a local IP address.
Extended DHCP Parameters The Endpoint Security VPN gateway sends data that it got from the client to the DHCP server in the correct format - Hostname, FQDN, Vendor Class, and User Class.
Security Features in Detail Endpoint Security VPN supports more security features.
Feature Description
Strong Authentication Schemes
User names and passwords Including cached passwords.
Challenge-Response This is an authentication protocol in which one party provides the first string (the challenge), and the other party verifies it with the next string (the response). For authentication to take place, the response must be validated. Security systems that rely on SecurID are based on challenge-response.
CAPI software and hardware tokens
Cryptographic Application Program Interface enables access to a library of functions that provide security and encryption.
SecurID Two-factor authentication. An example of a type of SecurID configuration requires a password and a token code. SecurID authentication methods supported by Endpoint Security VPN: Key Fob, PINPad, and Software Tokens.
Certificate Enrollment, Renewal, and Auto Renewal
Enrollment refers to the process of application for, and receipt of, a certificate from a recognized Certificate Authority (CA), in this case Check Point's Internal CA. In the enrollment process, you create a certificate and send the registration key to users. The client sends this key to Security Gateway, and in return receives the certificate.
Tunnel Idleness Detection Idle or inactive VPN tunnels are detected and shut down.
Smart Card Removal Detection
Detects when the Smart Card is removed and closes the active VPN tunnel.
Topology Architecture Endpoint Security VPN Selective Routing lets you define different encryption domains for each VPN site-to-site communities and Remote Access (RA) Communities. You must have a VPN domain configured. The domain includes participating Security Gateways.
To configure selective routing:
1. In the Network Objects Tree, right click the Security Gateway and select Edit.
The Check Point Security Gateway properties page appears.
2. Select Topology to display the topology window.
3. Click Set domain for Remote Access Community.
The VPN Domain per Remote Access Community window appears.
4. Click Set.
The Set VPN Domain per Remote Access Community window appears.
5. From the drop down menu, select the object that will represent the Remote Access VPN domain.
6. Click OK.
Topology Architecture
Introduction to Endpoint Security VPN Page 9
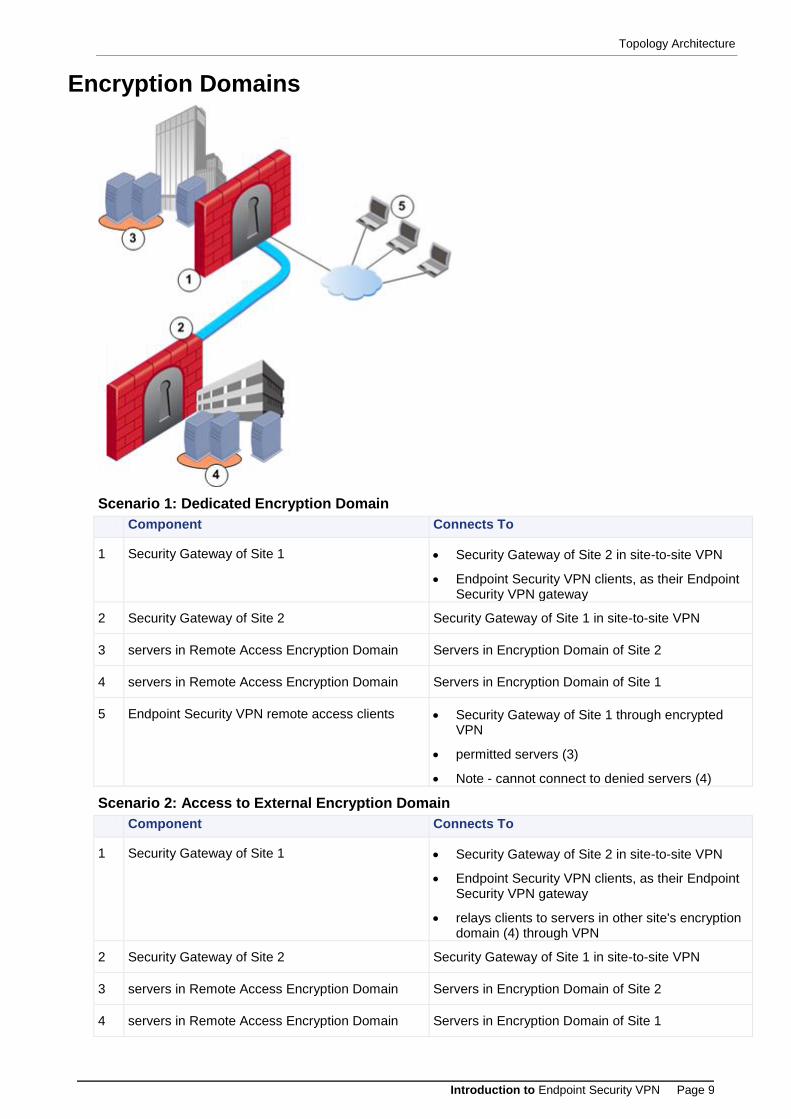
Encryption Domains
Scenario 1: Dedicated Encryption Domain
Component Connects To
1 Security Gateway of Site 1 Security Gateway of Site 2 in site-to-site VPN
Endpoint Security VPN clients, as their Endpoint Security VPN gateway
2 Security Gateway of Site 2 Security Gateway of Site 1 in site-to-site VPN
3 servers in Remote Access Encryption Domain Servers in Encryption Domain of Site 2
4 servers in Remote Access Encryption Domain Servers in Encryption Domain of Site 1
5 Endpoint Security VPN remote access clients Security Gateway of Site 1 through encrypted VPN
permitted servers (3)
Note - cannot connect to denied servers (4)
Scenario 2: Access to External Encryption Domain
Component Connects To
1 Security Gateway of Site 1 Security Gateway of Site 2 in site-to-site VPN
Endpoint Security VPN clients, as their Endpoint Security VPN gateway
relays clients to servers in other site's encryption domain (4) through VPN
2 Security Gateway of Site 2 Security Gateway of Site 1 in site-to-site VPN
3 servers in Remote Access Encryption Domain Servers in Encryption Domain of Site 2
4 servers in Remote Access Encryption Domain Servers in Encryption Domain of Site 1

Topology Architecture
Introduction to Endpoint Security VPN Page 10
Component Connects To
5 Endpoint Security VPN remote access clients Security Gateway of Site 1 through encrypted VPN
permitted servers (3 and 4)
Note - clients can reach servers of two sites with one authentication session, and their activity in both sites is logged
External Resources in Encryption Domain
Component Connects To
1 Security Gateway of Site 1 Endpoint Security VPN clients, as their Endpoint Security VPN gateway (5)
external resource (4)
redirects clients (5) to external resource (4)
2 Remote Access Encryption Domain encrypted domain of Security Gateway (1) that includes an external resource
3 servers in Encryption Domain external resource
4 external (Internet or DMZ) resource in Encryption Domain
server in Encryption Domain
Endpoint Security VPN clients if the Security Gateway redirects
5 Endpoint Security VPN remote access clients Security Gateway of Site 1 through encrypted VPN
permitted servers (3)
external resource (4), through Security Gateway redirect

Page 11
Chapter 2
Quick Start - Helping the Users This chapter is a quick start for administrators who are familiar with Check Point SecureClient and other Check Point endpoint products. It assumes you have configured the gateway to enable Endpoint Security VPN functionality.
In This Chapter
Prepackaging 11
Provisioning 11
Simple Installation 11
Endpoint Security VPN Client Icon 12
Helping Users Create a Site 12
Helping Users with Basic Client Operations 16
Prepackaging You can create a package of the Endpoint Security VPN client with predefined settings for the default site, authentication method, and other global settings.
If users have a predefined package, they can connect on the first try, without knowing the IP address of the gateway or that there are other authentication options.
This is a quick start procedure. Details are explained later ("Configuring Endpoint Security VPN Client" on page 36).
To prepackage a client:
1. Install the default client.
2. Open the client in Administration mode:
32-bit systems - C:\Program Files\CheckPoint\Endpoint Connect\AdminMode.bat
64-bit systems - C:\Program Files(x86)\CheckPoint\Endpoint Connect\AdminMode.bat
3. Configure the client options (VPN Options > Sites and Advanced tabs).
4. Open the Administration tab and generate a new client MSI.
Provisioning Distribute the client package to all users in a single provisioning task to ensure consistency.
To provision clients, choose one of these options:
You can send the MSI file with GPO updates.
You can send the URL of the client package on the gateway.
Simple Installation Users can easily install Endpoint Security VPN on any computer without a reboot after installation.
To install Endpoint Security VPN, users do this:
1. Download the MSI package and execute it with a double-click.
Endpoint Security VPN Client Icon
Quick Start - Helping the Users Page 12
2. Click Next to start.
3. Accept the agreement.
4. Confirm a destination folder.
5. Confirm that the installation should start.
6. Click Finish.
When installation is complete, the Endpoint Security VPN icon appears in the notification area (system tray).
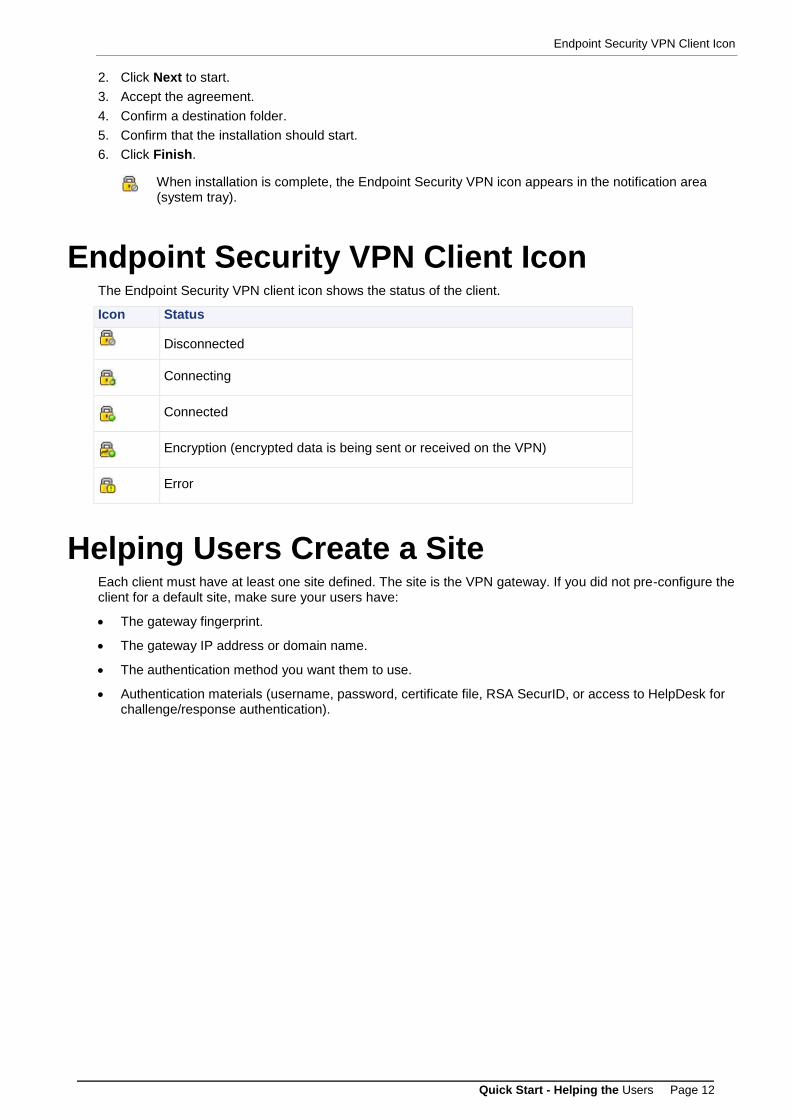
Endpoint Security VPN Client Icon The Endpoint Security VPN client icon shows the status of the client.
Icon Status
Disconnected
Connecting
Connected
Encryption (encrypted data is being sent or received on the VPN)
Error
Helping Users Create a Site Each client must have at least one site defined. The site is the VPN gateway. If you did not pre-configure the client for a default site, make sure your users have:
The gateway fingerprint.
The gateway IP address or domain name.
The authentication method you want them to use.
Authentication materials (username, password, certificate file, RSA SecurID, or access to HelpDesk for challenge/response authentication).
Helping Users Create a Site
Quick Start - Helping the Users Page 13
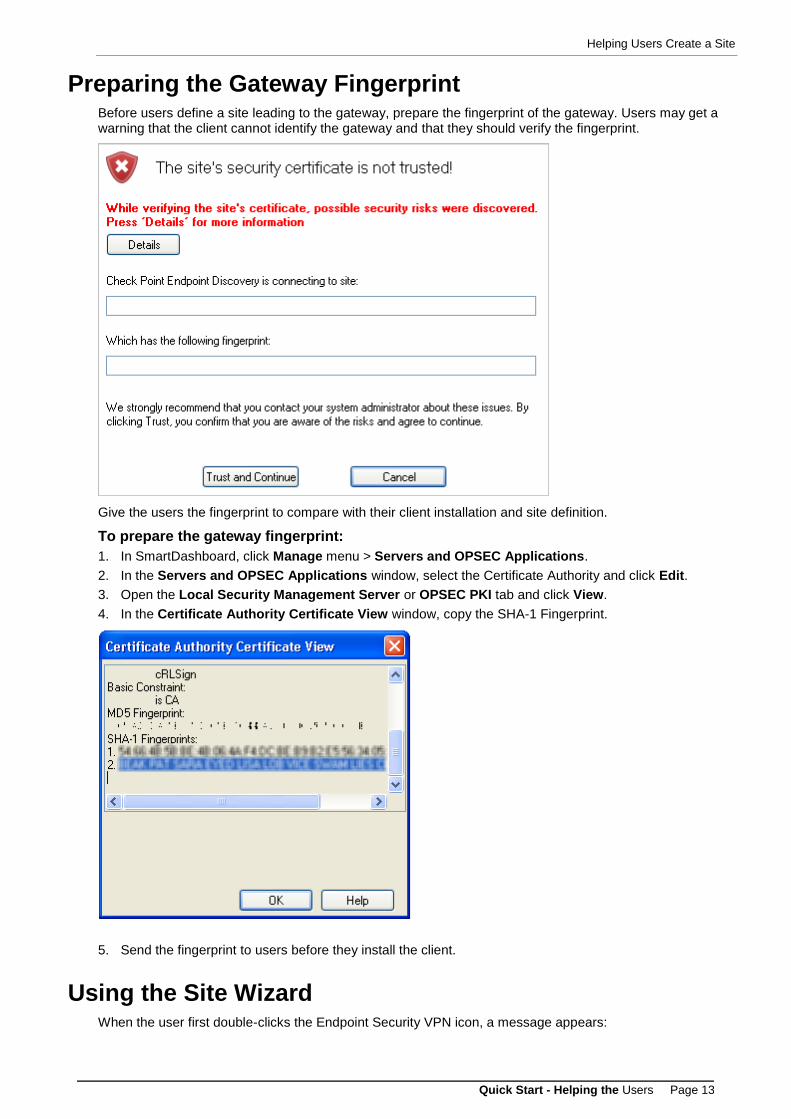
Preparing the Gateway Fingerprint Before users define a site leading to the gateway, prepare the fingerprint of the gateway. Users may get a warning that the client cannot identify the gateway and that they should verify the fingerprint.
Give the users the fingerprint to compare with their client installation and site definition.
To prepare the gateway fingerprint:
1. In SmartDashboard, click Manage menu > Servers and OPSEC Applications.
2. In the Servers and OPSEC Applications window, select the Certificate Authority and click Edit.
3. Open the Local Security Management Server or OPSEC PKI tab and click View.
4. In the Certificate Authority Certificate View window, copy the SHA-1 Fingerprint.
5. Send the fingerprint to users before they install the client.
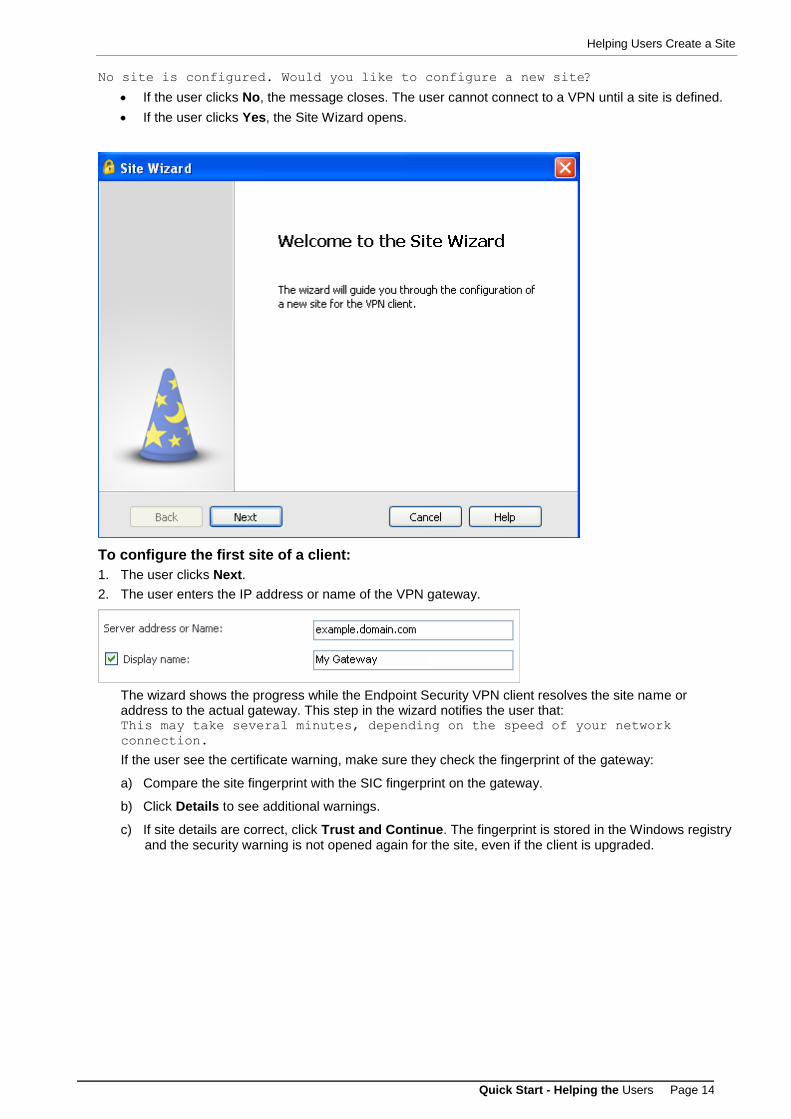
Using the Site Wizard When the user first double-clicks the Endpoint Security VPN icon, a message appears:
Helping Users Create a Site
Quick Start - Helping the Users Page 14
No site is configured. Would you like to configure a new site?
If the user clicks No, the message closes. The user cannot connect to a VPN until a site is defined.
If the user clicks Yes, the Site Wizard opens.
To configure the first site of a client:
1. The user clicks Next.
2. The user enters the IP address or name of the VPN gateway.
The wizard shows the progress while the Endpoint Security VPN client resolves the site name or address to the actual gateway. This step in the wizard notifies the user that: This may take several minutes, depending on the speed of your network
connection.
If the user see the certificate warning, make sure they check the fingerprint of the gateway:
a) Compare the site fingerprint with the SIC fingerprint on the gateway.
b) Click Details to see additional warnings.
c) If site details are correct, click Trust and Continue. The fingerprint is stored in the Windows registry and the security warning is not opened again for the site, even if the client is upgraded.
Helping Users Create a Site
Quick Start - Helping the Users Page 15
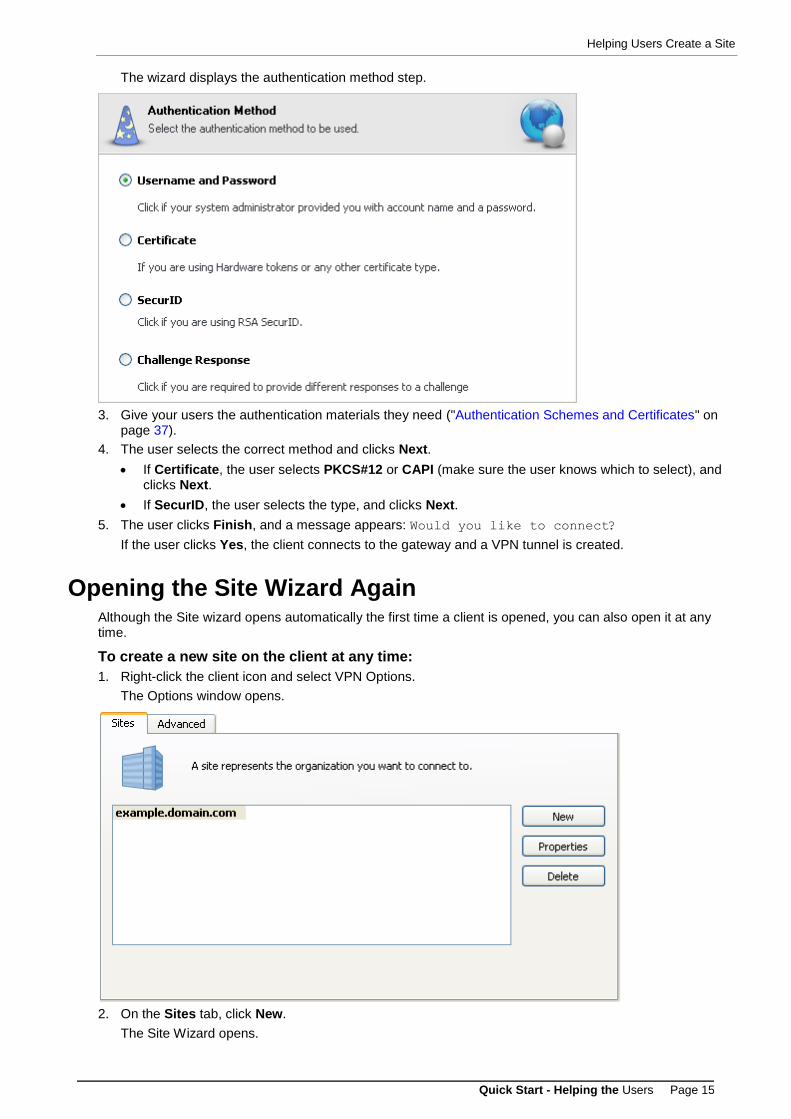
The wizard displays the authentication method step.
3. Give your users the authentication materials they need ("Authentication Schemes and Certificates" on
page 37).
4. The user selects the correct method and clicks Next.
If Certificate, the user selects PKCS#12 or CAPI (make sure the user knows which to select), and clicks Next.
If SecurID, the user selects the type, and clicks Next.
5. The user clicks Finish, and a message appears: Would you like to connect?
If the user clicks Yes, the client connects to the gateway and a VPN tunnel is created.
Opening the Site Wizard Again Although the Site wizard opens automatically the first time a client is opened, you can also open it at any time.
To create a new site on the client at any time:
1. Right-click the client icon and select VPN Options.
The Options window opens.
2. On the Sites tab, click New.
The Site Wizard opens.
Helping Users with Basic Client Operations
Quick Start - Helping the Users Page 16
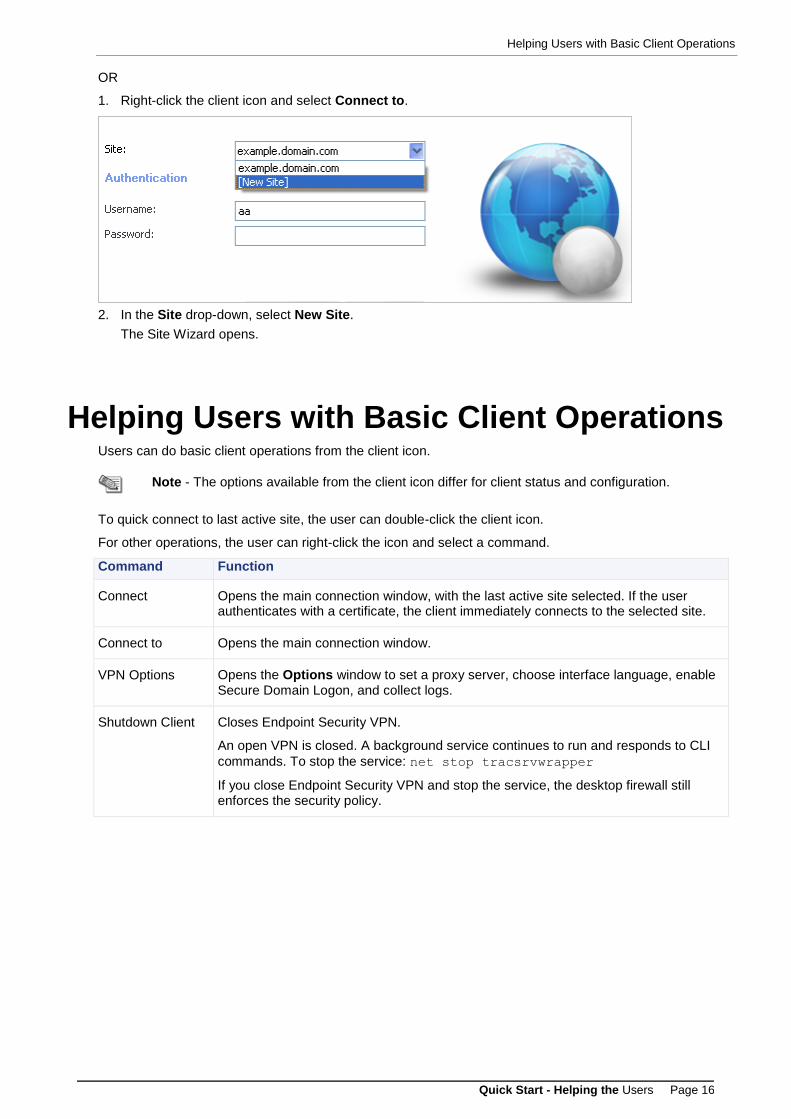
OR
1. Right-click the client icon and select Connect to.
2. In the Site drop-down, select New Site.
The Site Wizard opens.
Helping Users with Basic Client Operations Users can do basic client operations from the client icon.
Note - The options available from the client icon differ for client status and configuration.
To quick connect to last active site, the user can double-click the client icon.
For other operations, the user can right-click the icon and select a command.
Command Function
Connect Opens the main connection window, with the last active site selected. If the user authenticates with a certificate, the client immediately connects to the selected site.
Connect to Opens the main connection window.
VPN Options Opens the Options window to set a proxy server, choose interface language, enable Secure Domain Logon, and collect logs.
Shutdown Client Closes Endpoint Security VPN.
An open VPN is closed. A background service continues to run and responds to CLI
commands. To stop the service: net stop tracsrvwrapper
If you close Endpoint Security VPN and stop the service, the desktop firewall still enforces the security policy.
Page 17
Chapter 3
Upgrading from SecureClient
In This Chapter
Using Different Management Servers 17
Configuring SmartDashboard 17
Supporting Endpoint Security VPN and SecureClient Simultaneously 22
Troubleshooting Dual Support 24
Configuration File Overview 24
Migrating Secure Configuration Verification 27
Using Different Management Servers Environments with SecureClient already deployed can be easily upgraded to Endpoint Security VPN. The SmartDashboard for different versions of management servers is different. Use the documentation for the SmartDashboard that you have.
This guide is for the R71 Security Management Server.
If you have NGX R65 SmartCenter server, see Upgrading SecureClient to Endpoint Security VPN R75 on NGX R65 SmartCenter server (http://supportcontent.checkpoint.com/documentation_download?ID=11130).
If you have the R70 Security Management Server, see Upgrading SecureClient to Endpoint Security VPN R75 on R70.40 Security Management (http://supportcontent.checkpoint.com/documentation_download?ID=11131).
Configuring SmartDashboard You manage Endpoint Security VPN through the SmartDashboard. This task explains how to set up the SmartDashboard to access Endpoint Security VPN configurations. Before you begin, make sure you have a network for Office Mode allocation.
To configure SmartDashboard for Endpoint Security VPN:
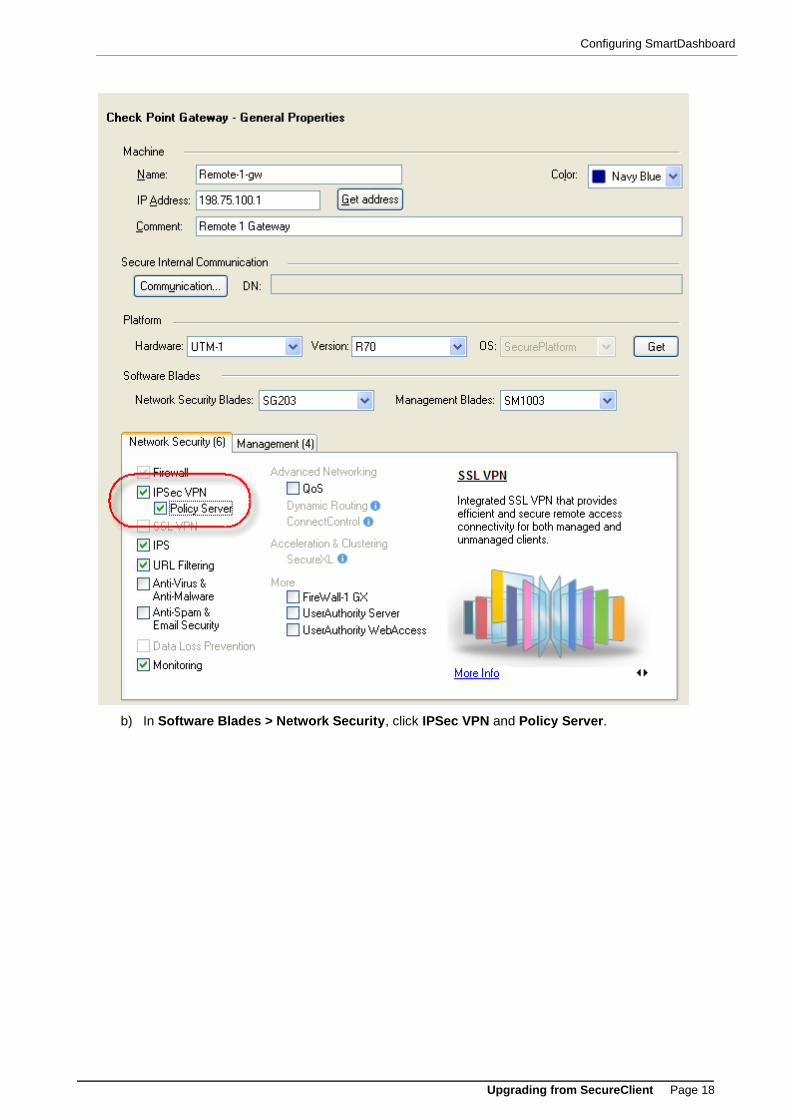
1. Set the Security Gateway to be a policy server:
a) In the Network Objects Tree, right-click the Security Gateway and select Edit.
The Check Point Gateway - General Properties window opens.
Configuring SmartDashboard
Upgrading from SecureClient Page 18
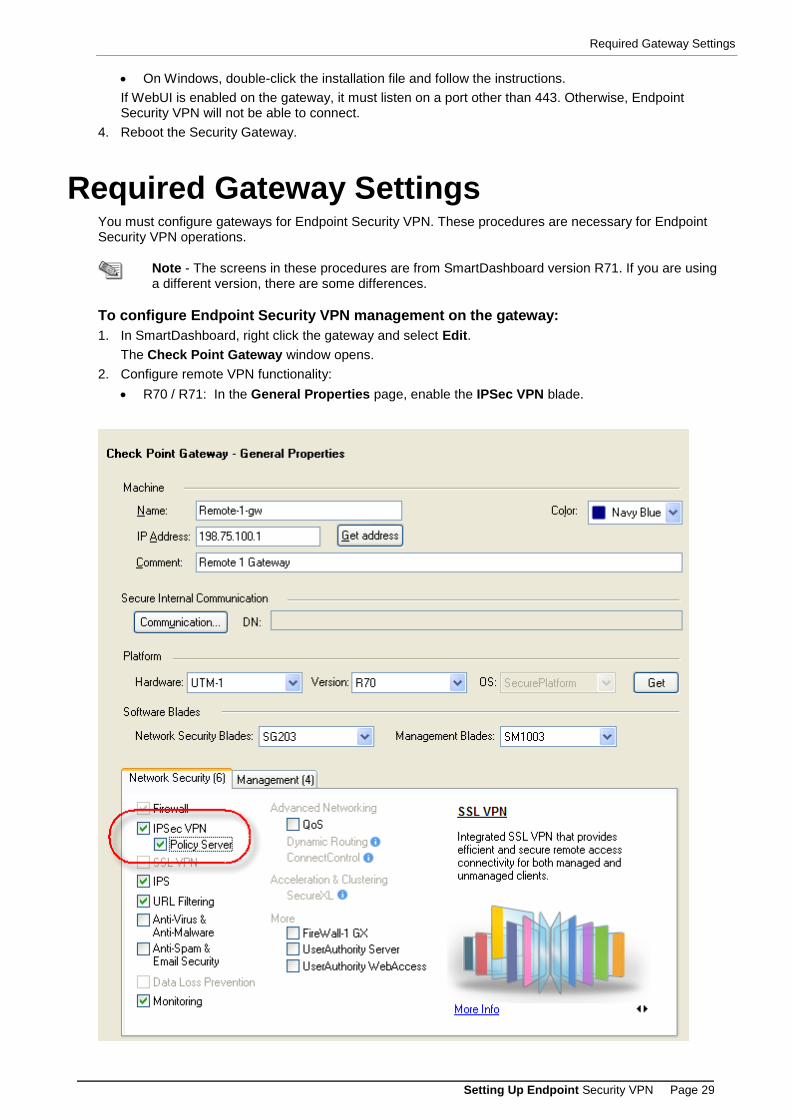
b) In Software Blades > Network Security, click IPSec VPN and Policy Server.
Configuring SmartDashboard
Upgrading from SecureClient Page 19
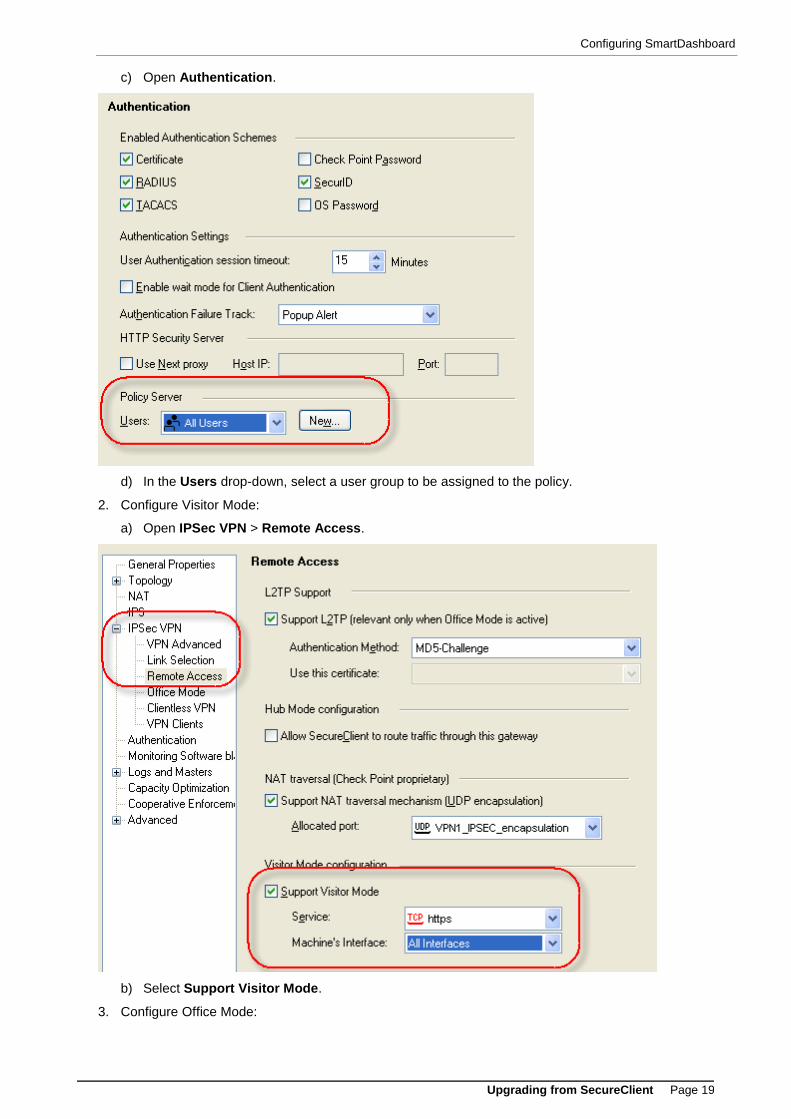
c) Open Authentication.
d) In the Users drop-down, select a user group to be assigned to the policy.
2. Configure Visitor Mode:
a) Open IPSec VPN > Remote Access.
b) Select Support Visitor Mode.
3. Configure Office Mode:
Configuring SmartDashboard
Upgrading from SecureClient Page 20
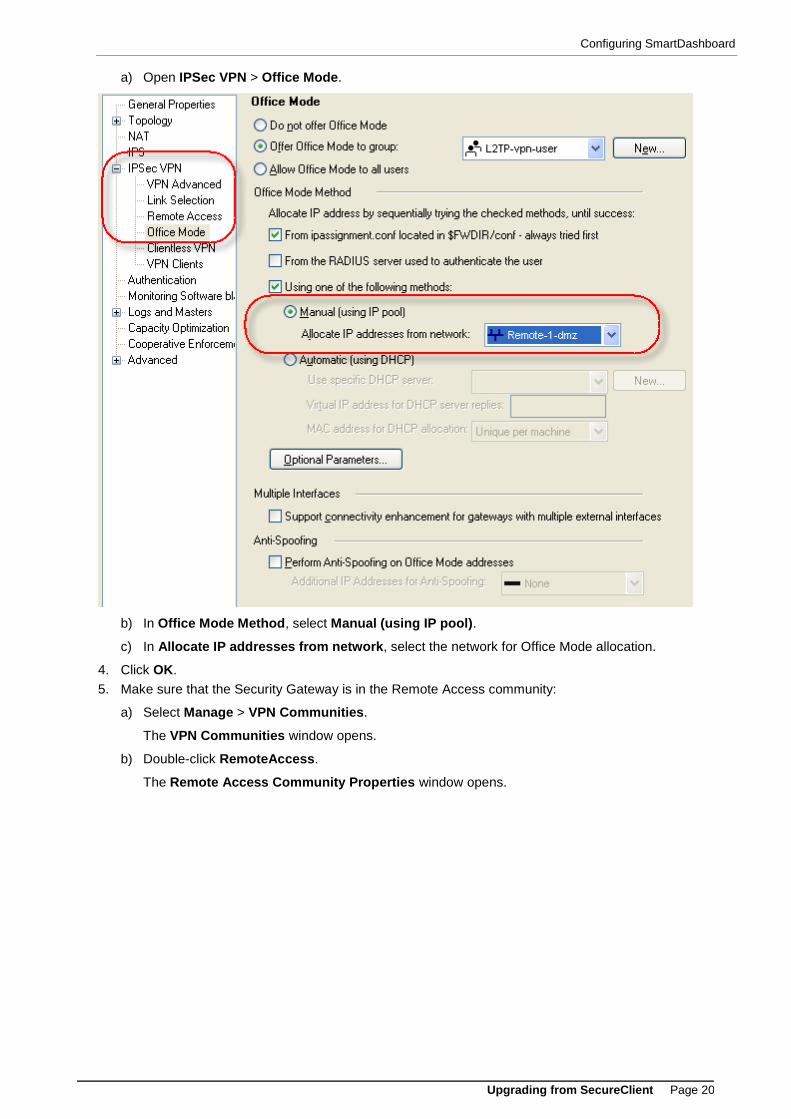
a) Open IPSec VPN > Office Mode.
b) In Office Mode Method, select Manual (using IP pool).
c) In Allocate IP addresses from network, select the network for Office Mode allocation.
4. Click OK.
5. Make sure that the Security Gateway is in the Remote Access community:
a) Select Manage > VPN Communities.
The VPN Communities window opens.
b) Double-click RemoteAccess.
The Remote Access Community Properties window opens.
Configuring SmartDashboard
Upgrading from SecureClient Page 21
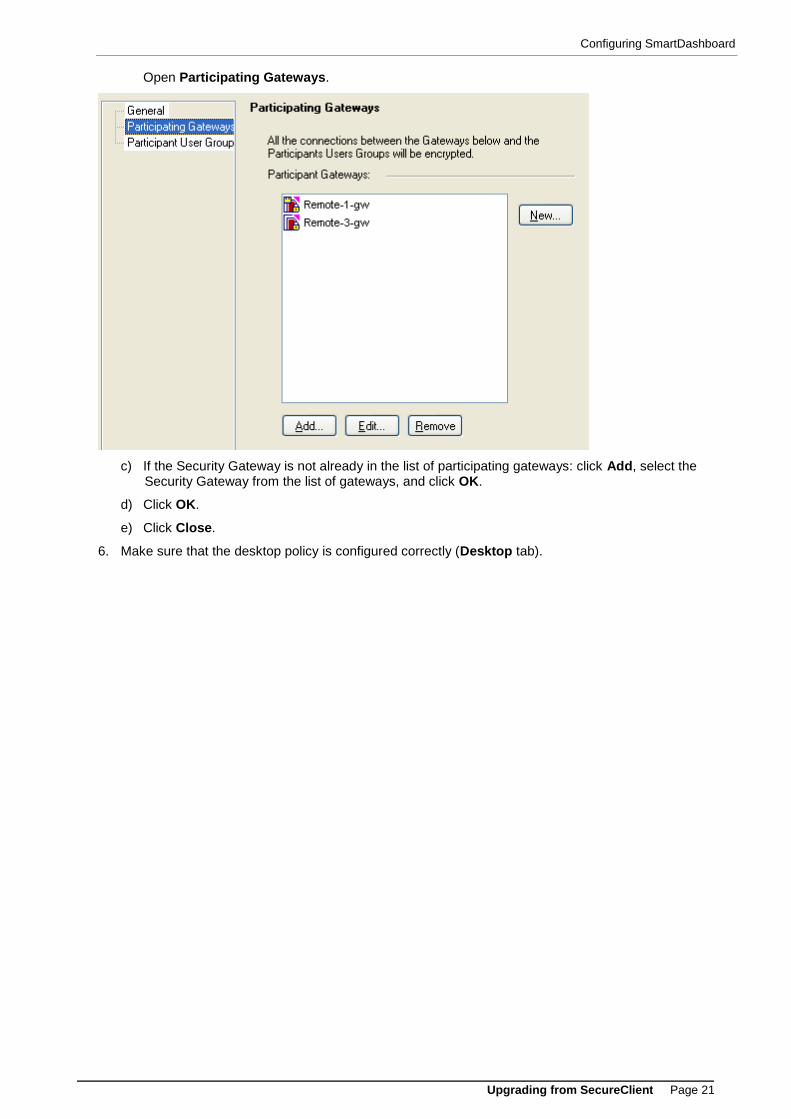
Open Participating Gateways.
c) If the Security Gateway is not already in the list of participating gateways: click Add, select the
Security Gateway from the list of gateways, and click OK.
d) Click OK.
e) Click Close.
6. Make sure that the desktop policy is configured correctly (Desktop tab).
Supporting Endpoint Security VPN and SecureClient Simultaneously
Upgrading from SecureClient Page 22
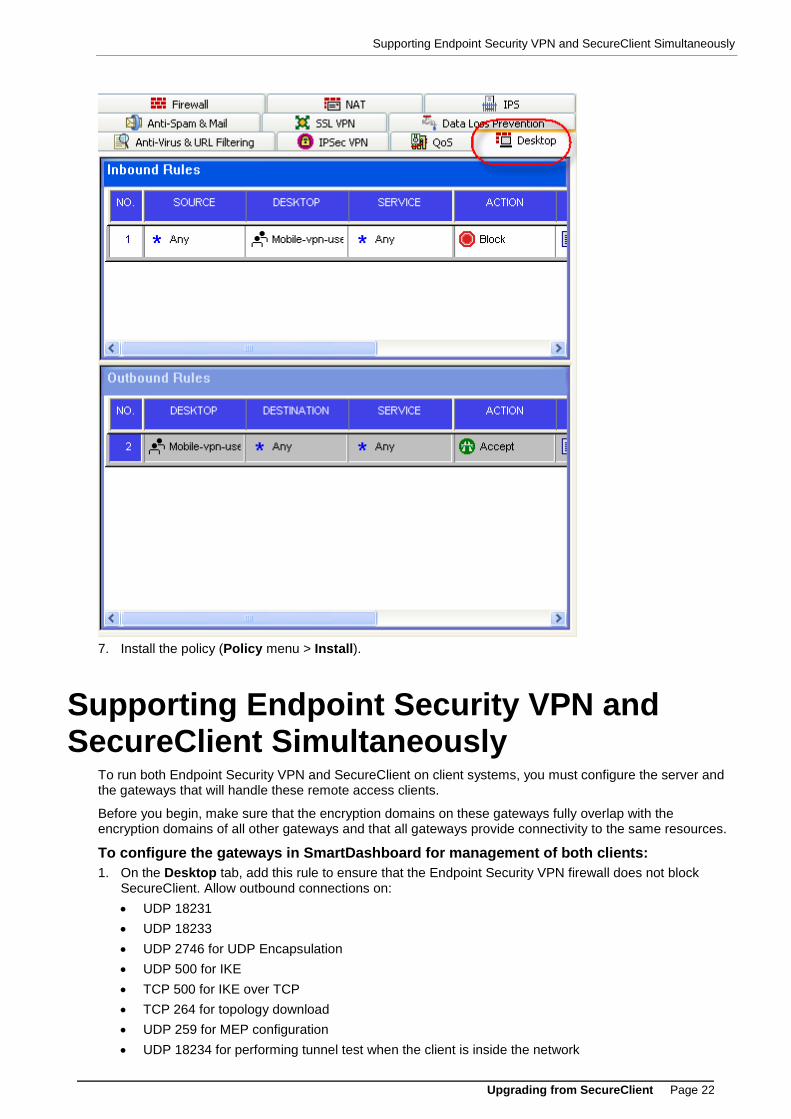
7. Install the policy (Policy menu > Install).
Supporting Endpoint Security VPN and SecureClient Simultaneously
To run both Endpoint Security VPN and SecureClient on client systems, you must configure the server and the gateways that will handle these remote access clients.
Before you begin, make sure that the encryption domains on these gateways fully overlap with the encryption domains of all other gateways and that all gateways provide connectivity to the same resources.
To configure the gateways in SmartDashboard for management of both clients:
1. On the Desktop tab, add this rule to ensure that the Endpoint Security VPN firewall does not block SecureClient. Allow outbound connections on:
UDP 18231
UDP 18233
UDP 2746 for UDP Encapsulation
UDP 500 for IKE
TCP 500 for IKE over TCP
TCP 264 for topology download
UDP 259 for MEP configuration
UDP 18234 for performing tunnel test when the client is inside the network
Supporting Endpoint Security VPN and SecureClient Simultaneously
Upgrading from SecureClient Page 23
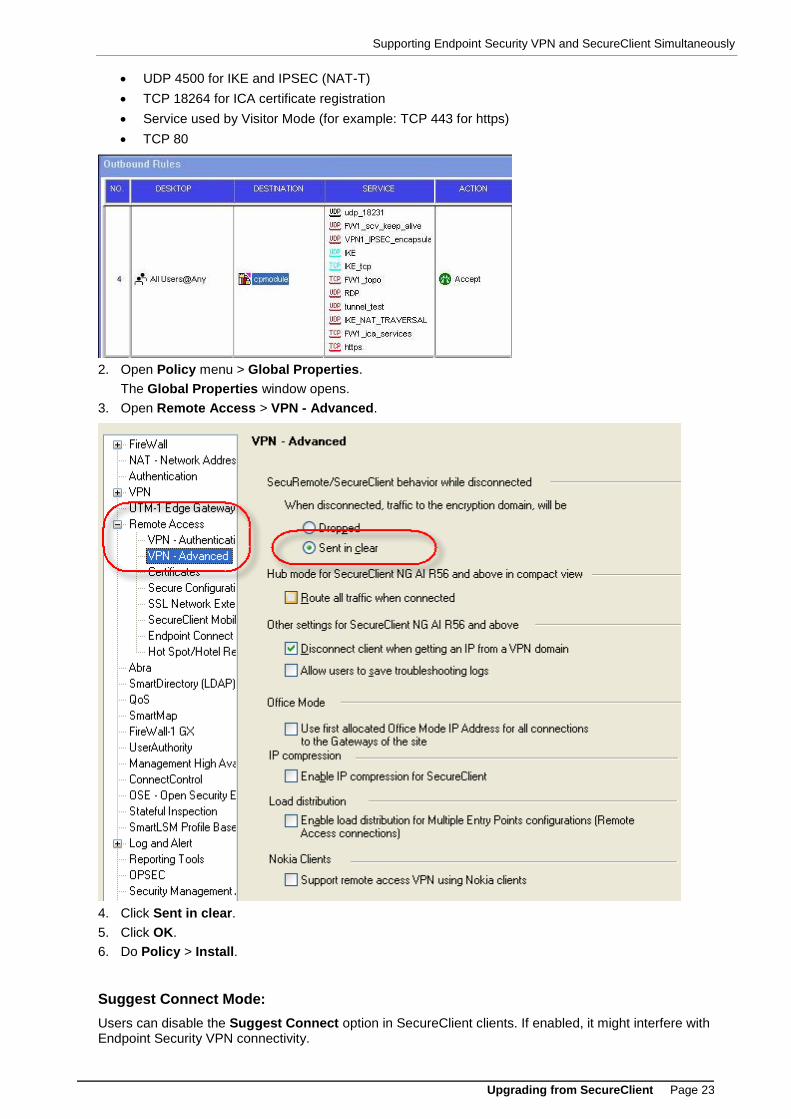
UDP 4500 for IKE and IPSEC (NAT-T)
TCP 18264 for ICA certificate registration
Service used by Visitor Mode (for example: TCP 443 for https)
TCP 80
2. Open Policy menu > Global Properties.
The Global Properties window opens.
3. Open Remote Access > VPN - Advanced.
4. Click Sent in clear.
5. Click OK.
6. Do Policy > Install.
Suggest Connect Mode:
Users can disable the Suggest Connect option in SecureClient clients. If enabled, it might interfere with Endpoint Security VPN connectivity.
Troubleshooting Dual Support
Upgrading from SecureClient Page 24
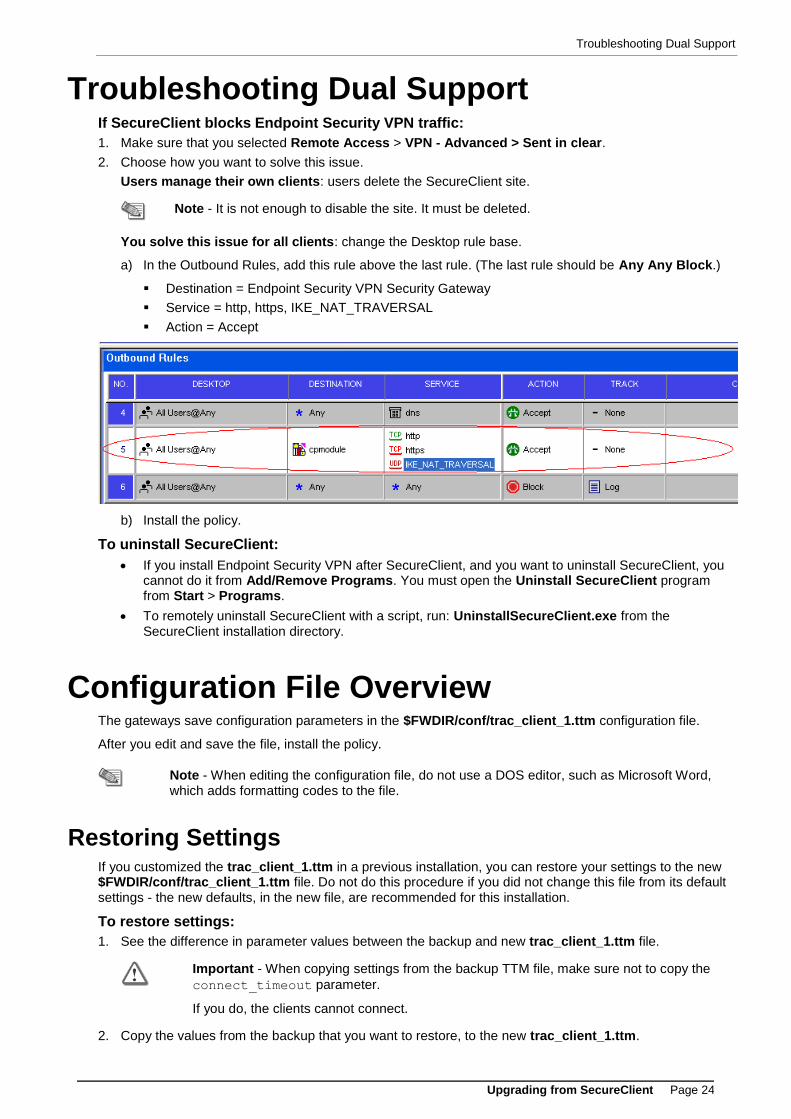
Troubleshooting Dual Support If SecureClient blocks Endpoint Security VPN traffic:
1. Make sure that you selected Remote Access > VPN - Advanced > Sent in clear.
2. Choose how you want to solve this issue.
Users manage their own clients: users delete the SecureClient site.
Note - It is not enough to disable the site. It must be deleted.
You solve this issue for all clients: change the Desktop rule base.
a) In the Outbound Rules, add this rule above the last rule. (The last rule should be Any Any Block.)
Destination = Endpoint Security VPN Security Gateway
Service = http, https, IKE_NAT_TRAVERSAL
Action = Accept
b) Install the policy.
To uninstall SecureClient:
If you install Endpoint Security VPN after SecureClient, and you want to uninstall SecureClient, you cannot do it from Add/Remove Programs. You must open the Uninstall SecureClient program from Start > Programs.
To remotely uninstall SecureClient with a script, run: UninstallSecureClient.exe from the SecureClient installation directory.
Configuration File Overview The gateways save configuration parameters in the $FWDIR/conf/trac_client_1.ttm configuration file.
After you edit and save the file, install the policy.
Note - When editing the configuration file, do not use a DOS editor, such as Microsoft Word, which adds formatting codes to the file.
Restoring Settings If you customized the trac_client_1.ttm in a previous installation, you can restore your settings to the new $FWDIR/conf/trac_client_1.ttm file. Do not do this procedure if you did not change this file from its default settings - the new defaults, in the new file, are recommended for this installation.
To restore settings:
1. See the difference in parameter values between the backup and new trac_client_1.ttm file.
Important - When copying settings from the backup TTM file, make sure not to copy the
connect_timeout parameter.
If you do, the clients cannot connect.
2. Copy the values from the backup that you want to restore, to the new trac_client_1.ttm.
Configuration File Overview
Upgrading from SecureClient Page 25
3. Save the file.
4. Install the policy.
Centrally Managing the Configuration File If the configuration file on each gateway is identical, you can manage one copy of the configuration file on the Security Management Server. This file is copied to the Security Gateways when you install the policy.
Important - You must use the newest configuration file installed on the gateway for Endpoint Security VPN. This is important, because if you do not install Endpoint Security VPN on the Security Management Server, the server will have an outdated configuration file that does not support new features.
To centrally manage the configuration file:
1. On the gateway, save a backup of $FWDIR/conf/trac_client_1.ttm.
2. From the gateway, copy trac_client_1.ttm to the server.
3. Open $FWDIR/conf/fwrl.conf and find the % SEGMENT FILTERLOAD section.
4. Within this section, add this line:
NAME = conf/trac_client_1.ttm;DST = conf/trac_client_1.ttm;
This copies the file to the Endpoint Security VPN gateways whenever you run Install Policy.
5. Save the file and install the policy.
When clients download the new policy from the gateway, configuration changes are applied.
Configuration File Overview
Upgrading from SecureClient Page 26
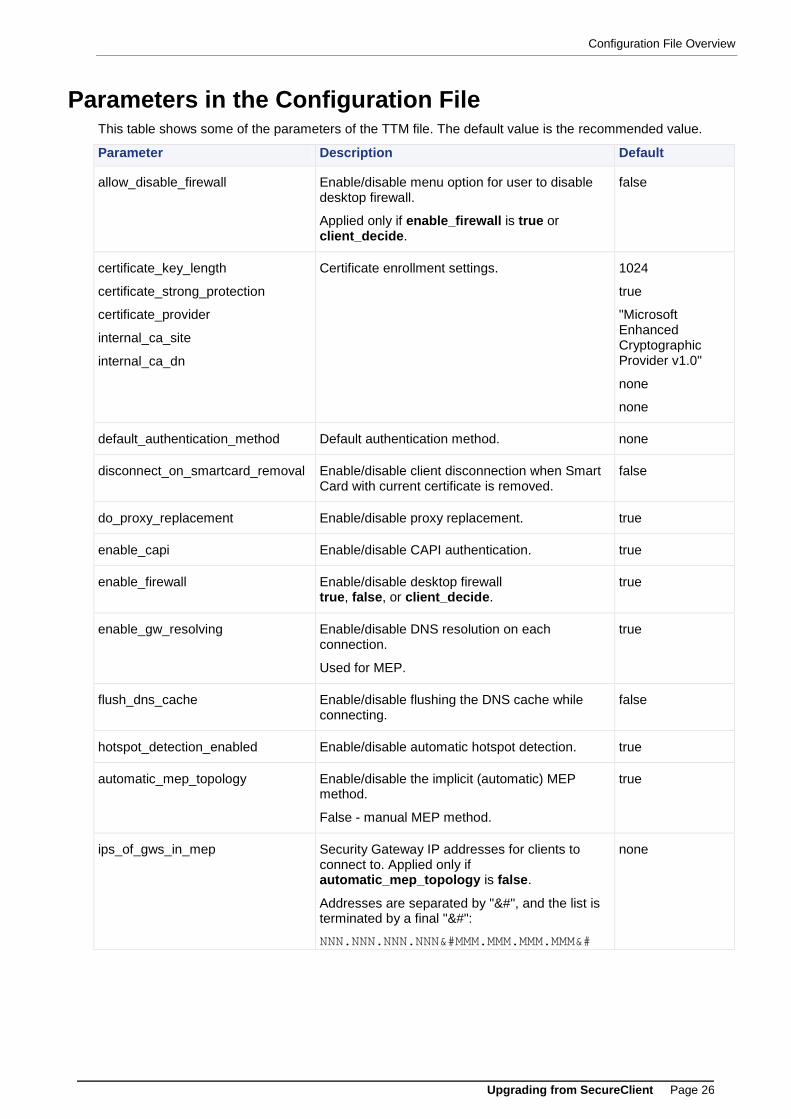
Parameters in the Configuration File This table shows some of the parameters of the TTM file. The default value is the recommended value.
Parameter Description Default
allow_disable_firewall Enable/disable menu option for user to disable desktop firewall.
Applied only if enable_firewall is true or client_decide.
false
certificate_key_length
certificate_strong_protection
certificate_provider
internal_ca_site
internal_ca_dn
Certificate enrollment settings. 1024
true
"Microsoft Enhanced Cryptographic Provider v1.0"
none
none
default_authentication_method Default authentication method. none
disconnect_on_smartcard_removal Enable/disable client disconnection when Smart Card with current certificate is removed.
false
do_proxy_replacement Enable/disable proxy replacement. true
enable_capi Enable/disable CAPI authentication. true
enable_firewall Enable/disable desktop firewall true, false, or client_decide.
true
enable_gw_resolving Enable/disable DNS resolution on each connection.
Used for MEP.
true
flush_dns_cache Enable/disable flushing the DNS cache while connecting.
false
hotspot_detection_enabled Enable/disable automatic hotspot detection. true
automatic_mep_topology Enable/disable the implicit (automatic) MEP method.
False - manual MEP method.
true
ips_of_gws_in_mep Security Gateway IP addresses for clients to connect to. Applied only if automatic_mep_topology is false.
Addresses are separated by "&#", and the list is terminated by a final "&#":
NNN.NNN.NNN.NNN&#MMM.MMM.MMM.MMM&#
none
Migrating Secure Configuration Verification
Upgrading from SecureClient Page 27
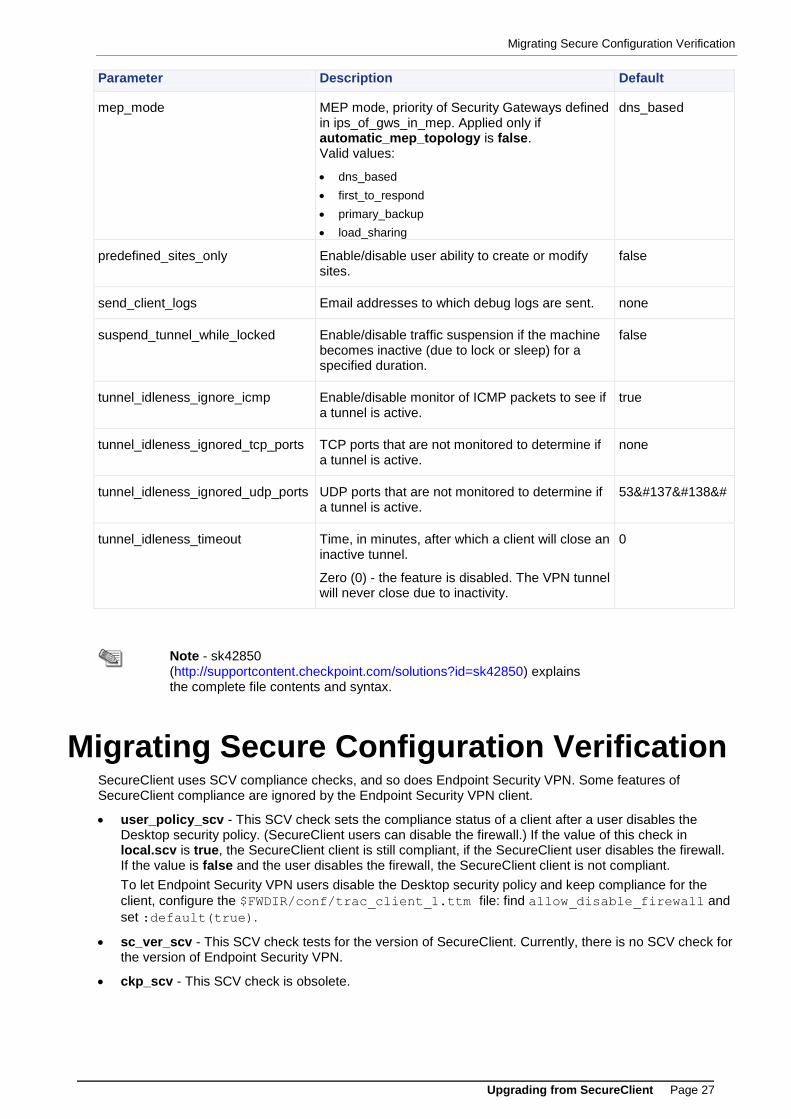
Parameter Description Default
mep_mode MEP mode, priority of Security Gateways defined in ips_of_gws_in_mep. Applied only if automatic_mep_topology is false. Valid values:
dns_based
first_to_respond
primary_backup
load_sharing
dns_based
predefined_sites_only Enable/disable user ability to create or modify sites.
false
send_client_logs Email addresses to which debug logs are sent. none
suspend_tunnel_while_locked Enable/disable traffic suspension if the machine becomes inactive (due to lock or sleep) for a specified duration.
false
tunnel_idleness_ignore_icmp Enable/disable monitor of ICMP packets to see if a tunnel is active.
true
tunnel_idleness_ignored_tcp_ports TCP ports that are not monitored to determine if a tunnel is active.
none
tunnel_idleness_ignored_udp_ports UDP ports that are not monitored to determine if a tunnel is active.
53‰Š&#
tunnel_idleness_timeout Time, in minutes, after which a client will close an inactive tunnel.
Zero (0) - the feature is disabled. The VPN tunnel will never close due to inactivity.
0
Note - sk42850 (http://supportcontent.checkpoint.com/solutions?id=sk42850) explains the complete file contents and syntax.
Migrating Secure Configuration Verification SecureClient uses SCV compliance checks, and so does Endpoint Security VPN. Some features of SecureClient compliance are ignored by the Endpoint Security VPN client.
user_policy_scv - This SCV check sets the compliance status of a client after a user disables the Desktop security policy. (SecureClient users can disable the firewall.) If the value of this check in local.scv is true, the SecureClient client is still compliant, if the SecureClient user disables the firewall. If the value is false and the user disables the firewall, the SecureClient client is not compliant.
To let Endpoint Security VPN users disable the Desktop security policy and keep compliance for the
client, configure the $FWDIR/conf/trac_client_1.ttm file: find allow_disable_firewall and
set :default(true).
sc_ver_scv - This SCV check tests for the version of SecureClient. Currently, there is no SCV check for the version of Endpoint Security VPN.
ckp_scv - This SCV check is obsolete.
Page 28
Chapter 4
Setting Up Endpoint Security VPN Install a supported Check Point Security Management Server and Security Gateway.
Install a Endpoint Security VPN client on a local machine. You will use this client to pre-configure the client packages for your users.
In This Chapter
Installing Hotfix on Security Gateways 28
Required Gateway Settings 29
Configuring a Policy Server 34
Remote Access Modes 35
Upgrading Clients from the Gateway 35
Configuring Endpoint Security VPN Client 36
Preparing the Client Installation Process 44
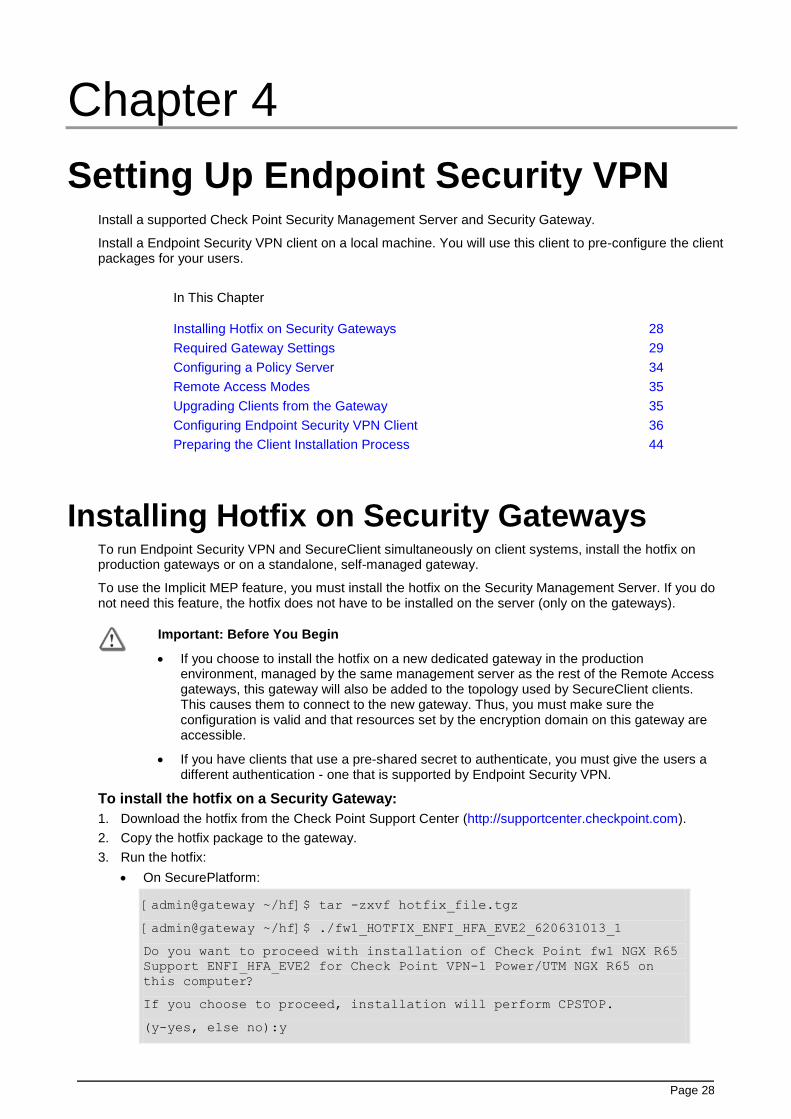
Installing Hotfix on Security Gateways To run Endpoint Security VPN and SecureClient simultaneously on client systems, install the hotfix on production gateways or on a standalone, self-managed gateway.
To use the Implicit MEP feature, you must install the hotfix on the Security Management Server. If you do not need this feature, the hotfix does not have to be installed on the server (only on the gateways).
Important: Before You Begin
If you choose to install the hotfix on a new dedicated gateway in the production environment, managed by the same management server as the rest of the Remote Access gateways, this gateway will also be added to the topology used by SecureClient clients. This causes them to connect to the new gateway. Thus, you must make sure the configuration is valid and that resources set by the encryption domain on this gateway are accessible.
If you have clients that use a pre-shared secret to authenticate, you must give the users a different authentication - one that is supported by Endpoint Security VPN.
To install the hotfix on a Security Gateway:
1. Download the hotfix from the Check Point Support Center (http://supportcenter.checkpoint.com).
2. Copy the hotfix package to the gateway.
3. Run the hotfix:
On SecurePlatform:
[admin@gateway ~/hf]$ tar -zxvf hotfix_file.tgz
[admin@gateway ~/hf]$ ./fw1_HOTFIX_ENFI_HFA_EVE2_620631013_1
Do you want to proceed with installation of Check Point fw1 NGX R65
Support ENFI_HFA_EVE2 for Check Point VPN-1 Power/UTM NGX R65 on
this computer?
If you choose to proceed, installation will perform CPSTOP.
(y-yes, else no):y
Required Gateway Settings
Setting Up Endpoint Security VPN Page 29
On Windows, double-click the installation file and follow the instructions.
If WebUI is enabled on the gateway, it must listen on a port other than 443. Otherwise, Endpoint Security VPN will not be able to connect.
4. Reboot the Security Gateway.
Required Gateway Settings You must configure gateways for Endpoint Security VPN. These procedures are necessary for Endpoint Security VPN operations.
Note - The screens in these procedures are from SmartDashboard version R71. If you are using a different version, there are some differences.
To configure Endpoint Security VPN management on the gateway:
1. In SmartDashboard, right click the gateway and select Edit.
The Check Point Gateway window opens.
2. Configure remote VPN functionality:
R70 / R71: In the General Properties page, enable the IPSec VPN blade.
Required Gateway Settings
Setting Up Endpoint Security VPN Page 30
NGX R65: In the General Properties page > Check Point Products, select VPN.
Note - This is for all IPSec VPN functionality, not just Endpoint Security VPN.
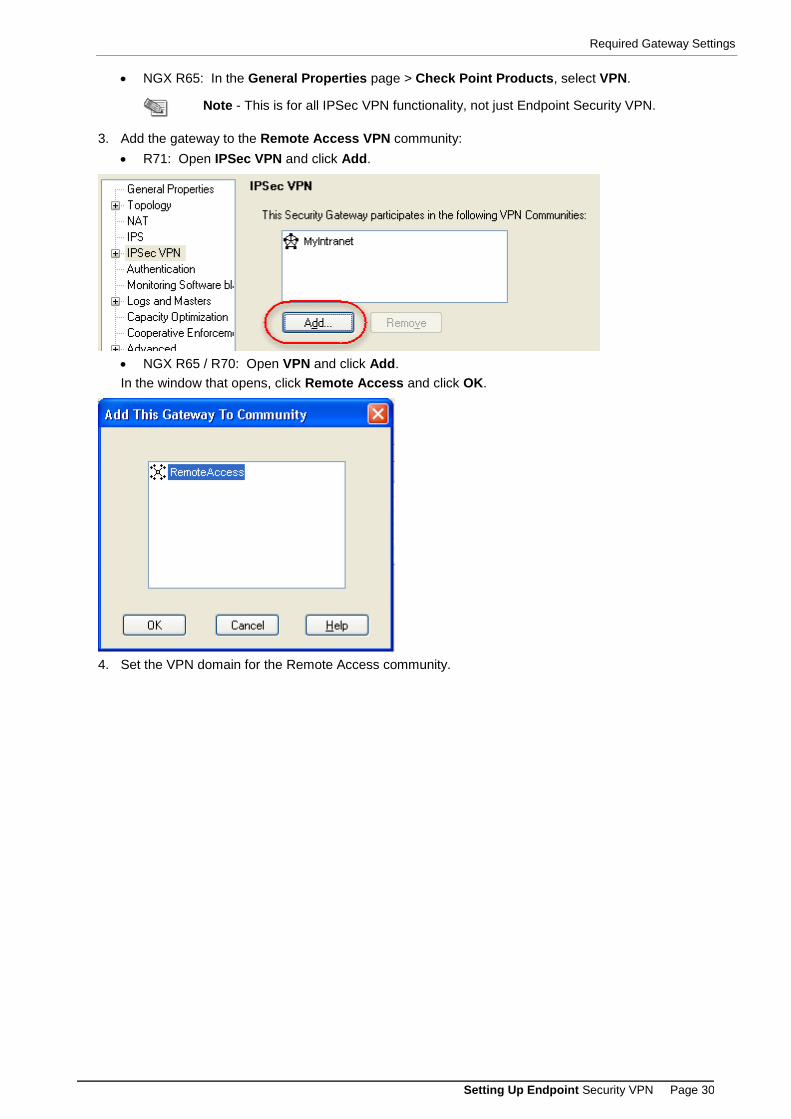
3. Add the gateway to the Remote Access VPN community:
R71: Open IPSec VPN and click Add.
NGX R65 / R70: Open VPN and click Add.
In the window that opens, click Remote Access and click OK.
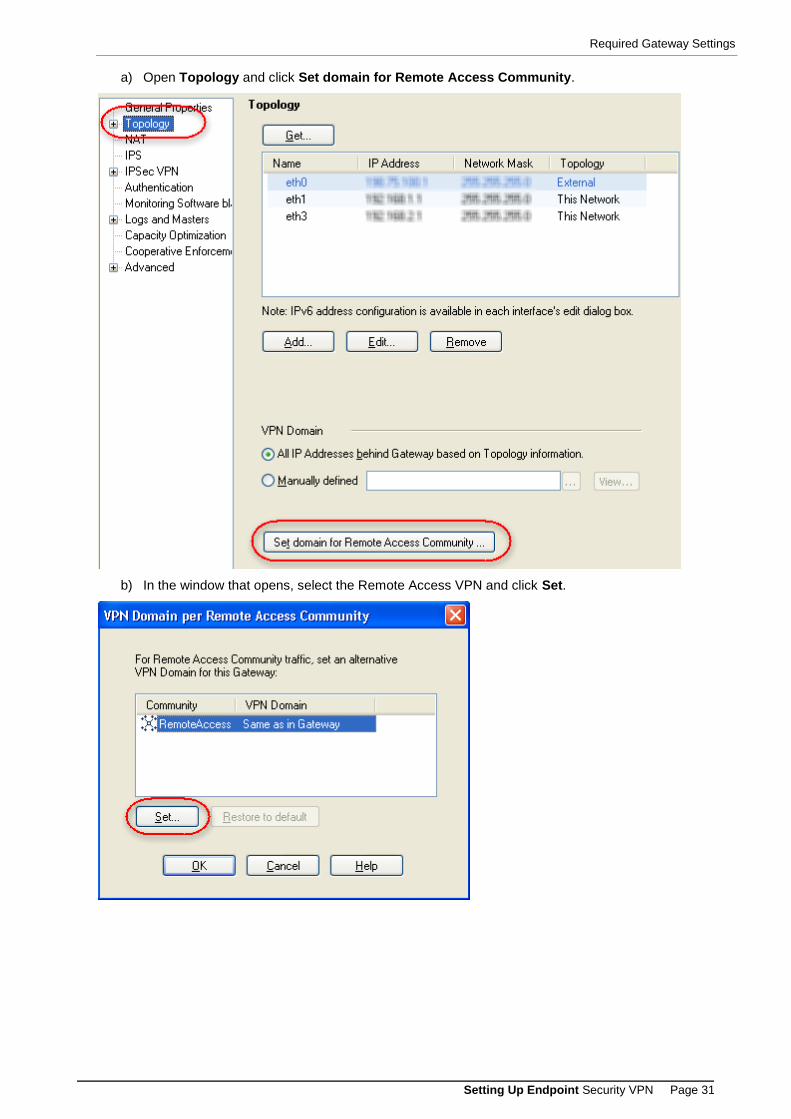
4. Set the VPN domain for the Remote Access community.
Required Gateway Settings
Setting Up Endpoint Security VPN Page 31
a) Open Topology and click Set domain for Remote Access Community.
b) In the window that opens, select the Remote Access VPN and click Set.
Required Gateway Settings
Setting Up Endpoint Security VPN Page 32
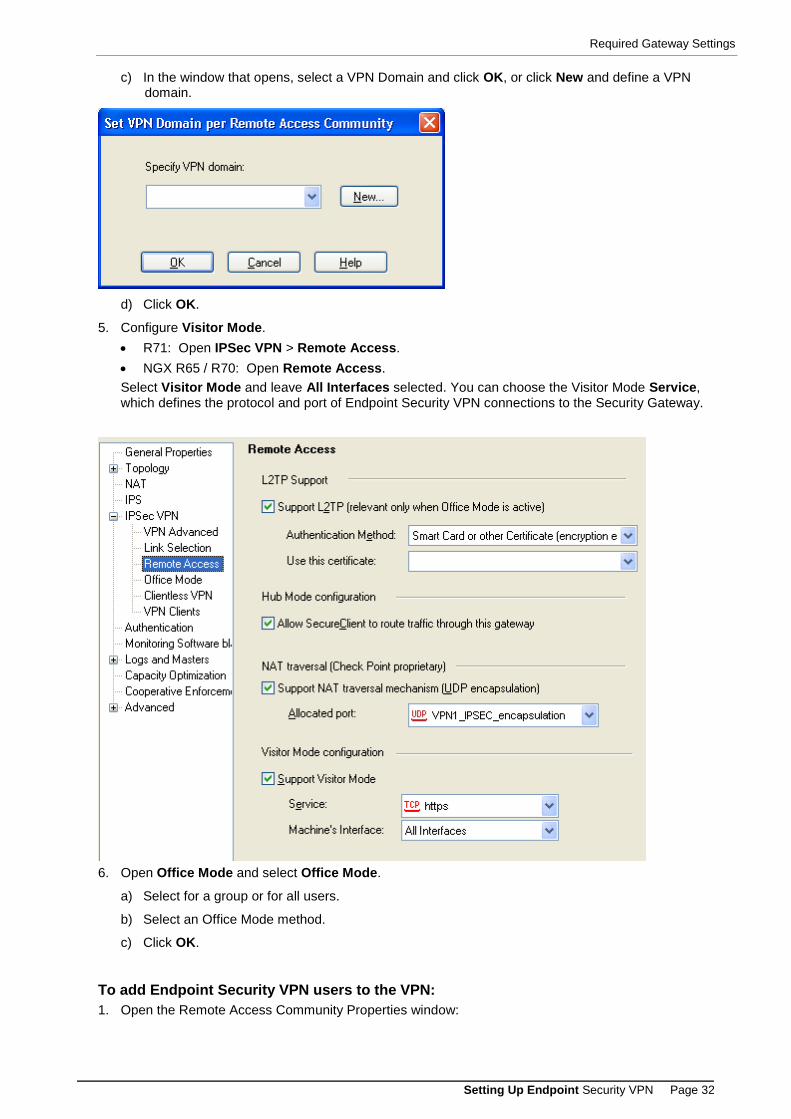
c) In the window that opens, select a VPN Domain and click OK, or click New and define a VPN domain.
d) Click OK.
5. Configure Visitor Mode.
R71: Open IPSec VPN > Remote Access.
NGX R65 / R70: Open Remote Access.
Select Visitor Mode and leave All Interfaces selected. You can choose the Visitor Mode Service, which defines the protocol and port of Endpoint Security VPN connections to the Security Gateway.
6. Open Office Mode and select Office Mode.
a) Select for a group or for all users.
b) Select an Office Mode method.
c) Click OK.
To add Endpoint Security VPN users to the VPN:
1. Open the Remote Access Community Properties window:

Required Gateway Settings
Setting Up Endpoint Security VPN Page 33
R70 / R71: Open the IPSec VPN tab on SmartDashboard.
NGX R65: Open the VPN tab on SmartDashboard.
2. Double-click the Remote Access VPN community.
3. Open Participant User Groups. Make sure all Endpoint Security VPN client users are added.
You can leave All Users.
You can click Add to add existing user groups to the community.
You can click New to create a new user group or add an LDAP group.
4. Open Participating Gateways. Make sure the gateway you want to manage Endpoint Security VPN clients is listed.
5. Close OK.
To configure encryption for the VPN:
1. Open Policy menu > Global Properties.
2. Open Encryption Properties.
R71: Open Remote Access > VPN - Authentication and Encryption and click Advanced.
NGX R65 / R70: Open Remote Access > VPN - IKE (Phase 1).

Configuring a Policy Server
Setting Up Endpoint Security VPN Page 34
3. In the Support encryption algorithms list, make sure that at least one AES encryption algorithm is
selected.
4. In the Use encryption algorithm list, select an enabled AES encryption algorithm.
Important - The client does not support DES algorithms. You must select an AES algorithm.
You can enable support for DES algorithms, if you also enable support for at least one AES algorithm.
Configuring a Policy Server The Policy Server functionality in a Security Gateway is the Desktop Security Policy management. If you do not enable a Policy Server, the Desktop rule base and the SCV checks will not be applied.
To define a gateway as the Policy Server:
1. In SmartDashboard, right-click the gateway that will serve as the Policy Server and select Edit.
The Check Point Gateway window opens.
2. Enable Policy Server functionality:
R70 / R71: In Software Blades > Network Security, click IPSec VPN and Policy Server.
NGX R65: In Check Point Products, click VPN and SecureClient Policy Server.
Remote Access Modes
Setting Up Endpoint Security VPN Page 35
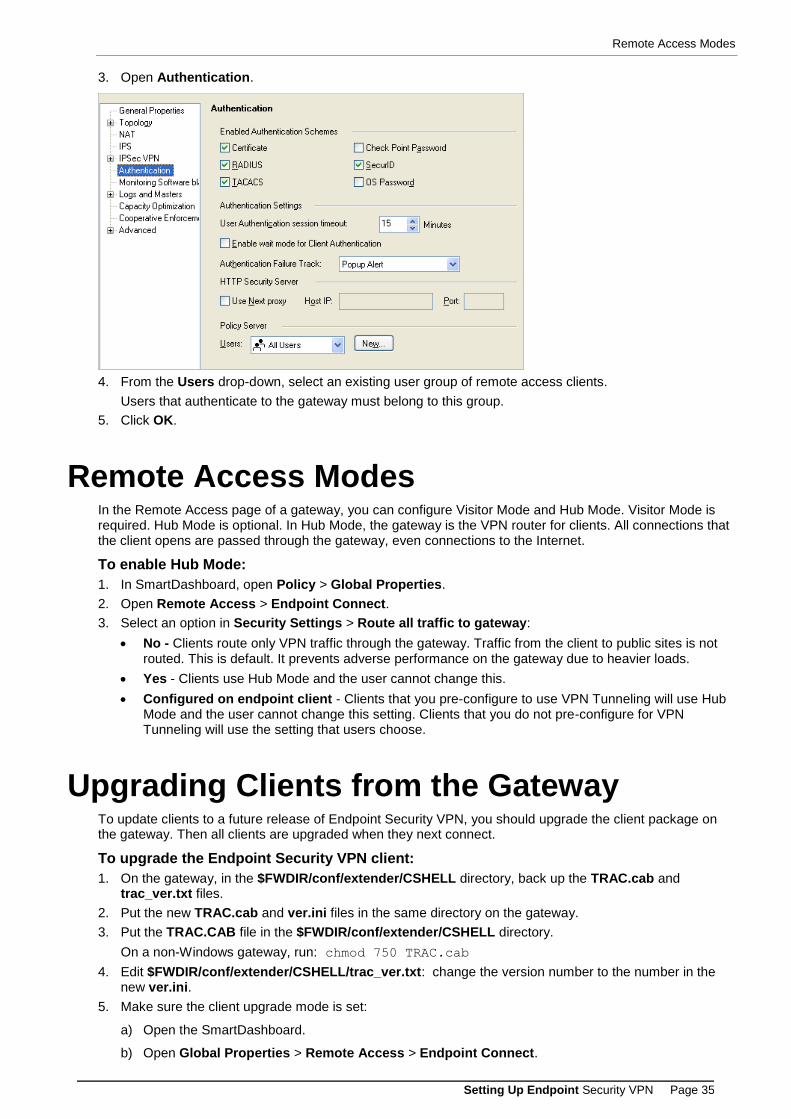
3. Open Authentication.
4. From the Users drop-down, select an existing user group of remote access clients.
Users that authenticate to the gateway must belong to this group.
5. Click OK.
Remote Access Modes In the Remote Access page of a gateway, you can configure Visitor Mode and Hub Mode. Visitor Mode is required. Hub Mode is optional. In Hub Mode, the gateway is the VPN router for clients. All connections that the client opens are passed through the gateway, even connections to the Internet.
To enable Hub Mode:
1. In SmartDashboard, open Policy > Global Properties.
2. Open Remote Access > Endpoint Connect.
3. Select an option in Security Settings > Route all traffic to gateway:
No - Clients route only VPN traffic through the gateway. Traffic from the client to public sites is not routed. This is default. It prevents adverse performance on the gateway due to heavier loads.
Yes - Clients use Hub Mode and the user cannot change this.
Configured on endpoint client - Clients that you pre-configure to use VPN Tunneling will use Hub Mode and the user cannot change this setting. Clients that you do not pre-configure for VPN Tunneling will use the setting that users choose.
Upgrading Clients from the Gateway To update clients to a future release of Endpoint Security VPN, you should upgrade the client package on the gateway. Then all clients are upgraded when they next connect.
To upgrade the Endpoint Security VPN client:
1. On the gateway, in the $FWDIR/conf/extender/CSHELL directory, back up the TRAC.cab and trac_ver.txt files.
2. Put the new TRAC.cab and ver.ini files in the same directory on the gateway.
3. Put the TRAC.CAB file in the $FWDIR/conf/extender/CSHELL directory.
On a non-Windows gateway, run: chmod 750 TRAC.cab
4. Edit $FWDIR/conf/extender/CSHELL/trac_ver.txt: change the version number to the number in the new ver.ini.
5. Make sure the client upgrade mode is set:
a) Open the SmartDashboard.
b) Open Global Properties > Remote Access > Endpoint Connect.
Configuring Endpoint Security VPN Client
Setting Up Endpoint Security VPN Page 36
c) Set Client upgrade mode to Ask user (to let user confirm upgrade) or Always upgrade (automatic upgrade).
d) Click OK.
6. Install the policy.
When the client connects to the gateway, the user is prompted for an automatic upgrade of the newer version.
Configuring Endpoint Security VPN Client You can create a package of the Endpoint Security VPN client with pre-defined settings, such as a VPN site and authentication methods. When you deploy the package to users, it is easier for them to connect quickly.
Endpoint Security VPN Administration mode lets you create pre-configured packages. You open one instance of the client, configure all settings, and save the client MSI.
If any of these features are disabled on the client in Administration mode, change the configuration of the gateways ("Global Properties for Endpoint Security VPN Gateways" on page 74).
To create a pre-configured package:
1. Open the client in Administration mode:
32-bit systems - C:\Program Files\CheckPoint\Endpoint Connect\AdminMode.bat
64-bit systems - C:\Program Files(x86)\CheckPoint\Endpoint Connect\AdminMode.bat
2. Right-click the client icon and select VPN Options.
The Options window opens, with the Administration tab.
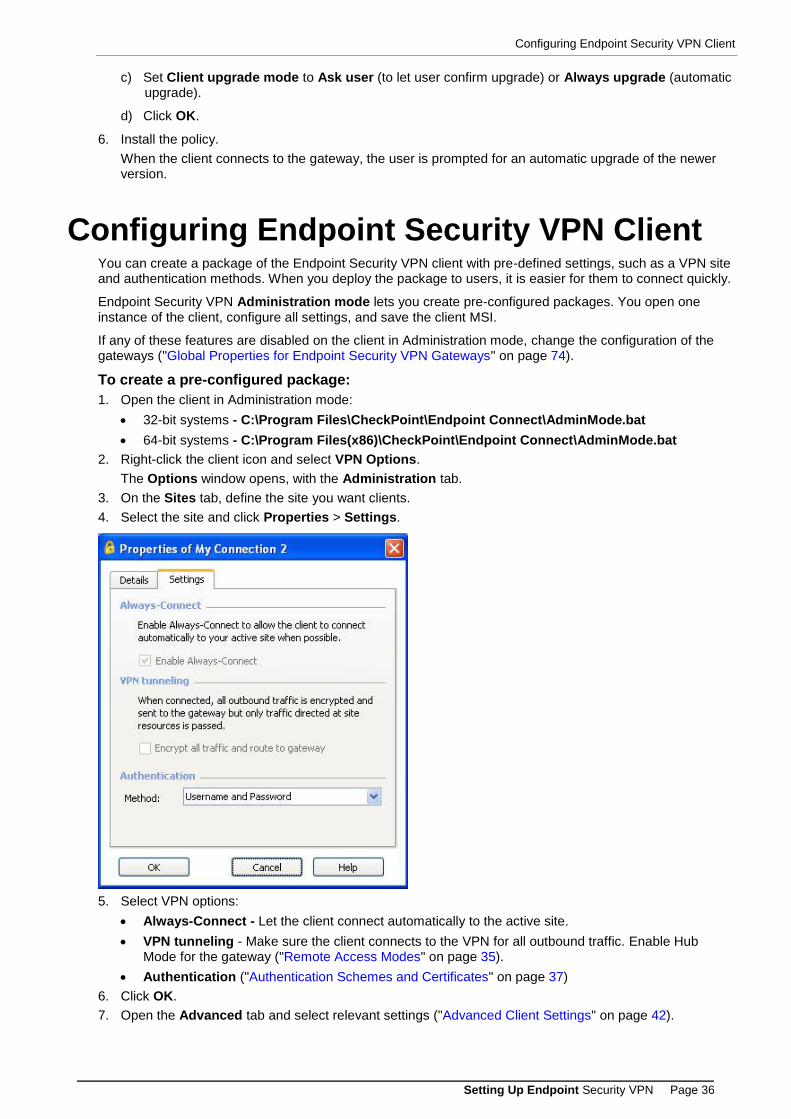
3. On the Sites tab, define the site you want clients.
4. Select the site and click Properties > Settings.
5. Select VPN options:
Always-Connect - Let the client connect automatically to the active site.
VPN tunneling - Make sure the client connects to the VPN for all outbound traffic. Enable Hub Mode for the gateway ("Remote Access Modes" on page 35).
Authentication ("Authentication Schemes and Certificates" on page 37)
6. Click OK.
7. Open the Advanced tab and select relevant settings ("Advanced Client Settings" on page 42).
Configuring Endpoint Security VPN Client
Setting Up Endpoint Security VPN Page 37
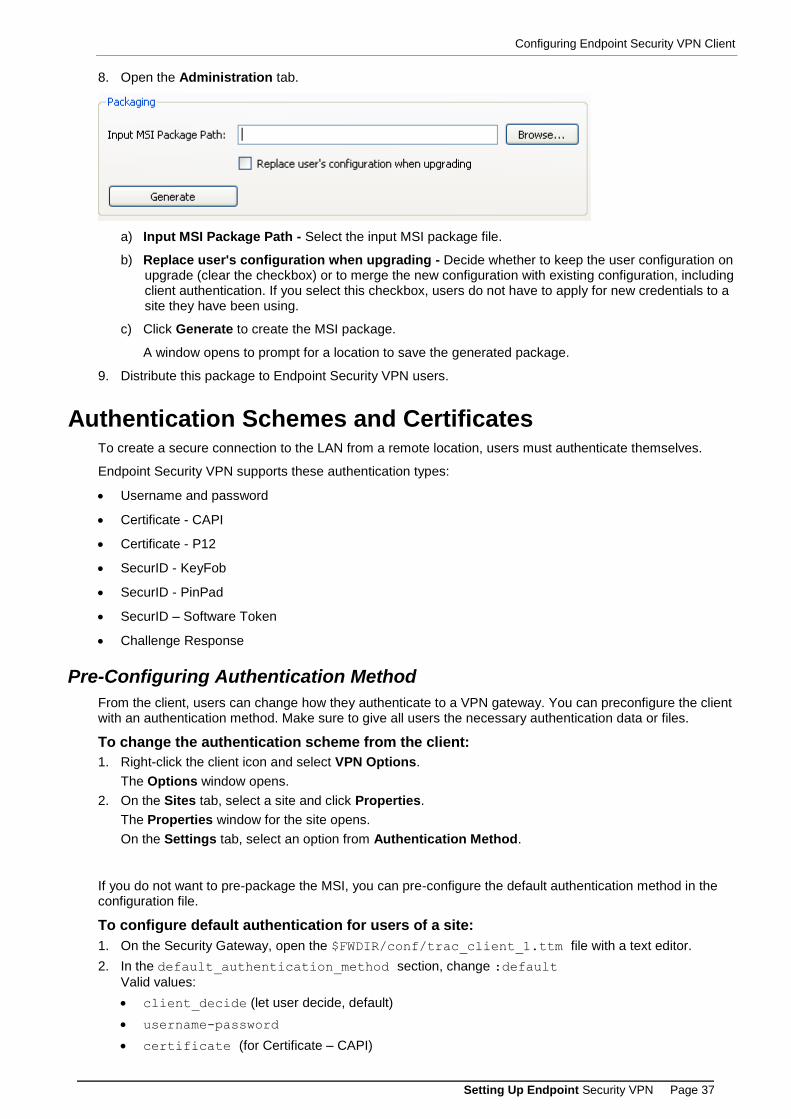
8. Open the Administration tab.
a) Input MSI Package Path - Select the input MSI package file.
b) Replace user's configuration when upgrading - Decide whether to keep the user configuration on upgrade (clear the checkbox) or to merge the new configuration with existing configuration, including client authentication. If you select this checkbox, users do not have to apply for new credentials to a site they have been using.
c) Click Generate to create the MSI package.
A window opens to prompt for a location to save the generated package.
9. Distribute this package to Endpoint Security VPN users.
Authentication Schemes and Certificates To create a secure connection to the LAN from a remote location, users must authenticate themselves.
Endpoint Security VPN supports these authentication types:
Username and password
Certificate - CAPI
Certificate - P12
SecurID - KeyFob
SecurID - PinPad
SecurID – Software Token
Challenge Response
Pre-Configuring Authentication Method
From the client, users can change how they authenticate to a VPN gateway. You can preconfigure the client with an authentication method. Make sure to give all users the necessary authentication data or files.
To change the authentication scheme from the client:
1. Right-click the client icon and select VPN Options.
The Options window opens.
2. On the Sites tab, select a site and click Properties.
The Properties window for the site opens.
On the Settings tab, select an option from Authentication Method.
If you do not want to pre-package the MSI, you can pre-configure the default authentication method in the configuration file.
To configure default authentication for users of a site:
1. On the Security Gateway, open the $FWDIR/conf/trac_client_1.ttm file with a text editor.
2. In the default_authentication_method section, change :default
Valid values:
client_decide (let user decide, default)
username-password
certificate (for Certificate – CAPI)
Configuring Endpoint Security VPN Client
Setting Up Endpoint Security VPN Page 38
p12-certificate
securIDKeyFob
securIDPinPad
SoftID
challenge-response
3. Save the file and install the policy.
When clients download the new policy from the gateway, configuration changes are applied.
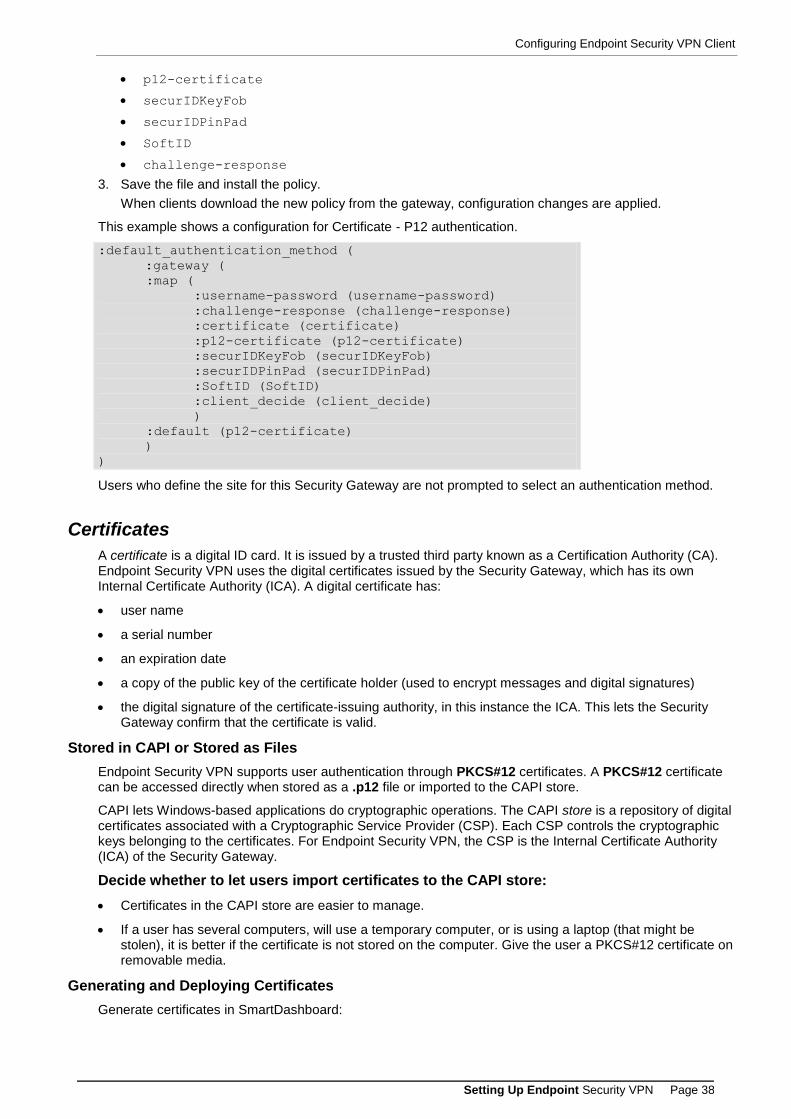
This example shows a configuration for Certificate - P12 authentication.
:default_authentication_method (
:gateway (
:map (
:username-password (username-password)
:challenge-response (challenge-response)
:certificate (certificate)
:p12-certificate (p12-certificate)
:securIDKeyFob (securIDKeyFob)
:securIDPinPad (securIDPinPad)
:SoftID (SoftID)
:client_decide (client_decide)
)
:default (p12-certificate)
)
)
Users who define the site for this Security Gateway are not prompted to select an authentication method.
Certificates
A certificate is a digital ID card. It is issued by a trusted third party known as a Certification Authority (CA). Endpoint Security VPN uses the digital certificates issued by the Security Gateway, which has its own Internal Certificate Authority (ICA). A digital certificate has:
user name
a serial number
an expiration date
a copy of the public key of the certificate holder (used to encrypt messages and digital signatures)
the digital signature of the certificate-issuing authority, in this instance the ICA. This lets the Security Gateway confirm that the certificate is valid.
Stored in CAPI or Stored as Files
Endpoint Security VPN supports user authentication through PKCS#12 certificates. A PKCS#12 certificate can be accessed directly when stored as a .p12 file or imported to the CAPI store.
CAPI lets Windows-based applications do cryptographic operations. The CAPI store is a repository of digital certificates associated with a Cryptographic Service Provider (CSP). Each CSP controls the cryptographic keys belonging to the certificates. For Endpoint Security VPN, the CSP is the Internal Certificate Authority (ICA) of the Security Gateway.
Decide whether to let users import certificates to the CAPI store:
Certificates in the CAPI store are easier to manage.
If a user has several computers, will use a temporary computer, or is using a laptop (that might be stolen), it is better if the certificate is not stored on the computer. Give the user a PKCS#12 certificate on removable media.
Generating and Deploying Certificates
Generate certificates in SmartDashboard:

Configuring Endpoint Security VPN Client
Setting Up Endpoint Security VPN Page 39
Enroll Certificate (Generate Registration Key). Initiate a certificate that will be pending for the user. The result is a registration key. The user completes the creation of the certificate with the registration key. The result can be a certificate stored as a PKCS#12 file or stored in the CAPI.
Generate PKCS#12 File. Generate a PKCS#12 certificate and save it to a file. The user authenticates with the PKCS#12 file.
Generating Registration Keys
Generate a registration key from SmartDashboard to let users import certificates to the CAPI store.
To generate a registration key:
1. In SmartDashboard, click Manage menu > Users and Administrators.
The Users and Administrators window opens.
2. Select one user and click Edit.
The User Properties window opens.
3. Open Certificates.
4. Click Initiate.
The registration key is generated. Give it to the user.
The registration key has an expiration date. If the user does not complete the task before the expiration date, the registration key is deleted.
Generating PKCS#12 Files
Generate a certificate file from SmartDashboard.
To generate a certificate file:
1. In SmartDashboard, click Manage menu > Users and Administrators.
The Users and Administrators window opens.
2. Select one user and click Edit.
The User Properties window opens.
3. Open Certificates.
4. Click Generate and save.
5. Let the user choose and confirm a password.
6. Save the certificate to a file.
The certificate file is generated. Give it to the user.
Helping Users Enroll and Renew Certificates
Tell the users whether they should use CAPI or P12 certificates.
Users can enroll and renew certificates. Make sure that users have:
the registration key
for CAPI enrollment, the name of the provider
for P12 renewal, the password of the certificate
To enroll a certificate in the client:
1. Right-click the client icon, and select VPN Options.
2. On the Sites tab, select the site and click Properties.
The site Properties window opens.
Configuring Endpoint Security VPN Client
Setting Up Endpoint Security VPN Page 40
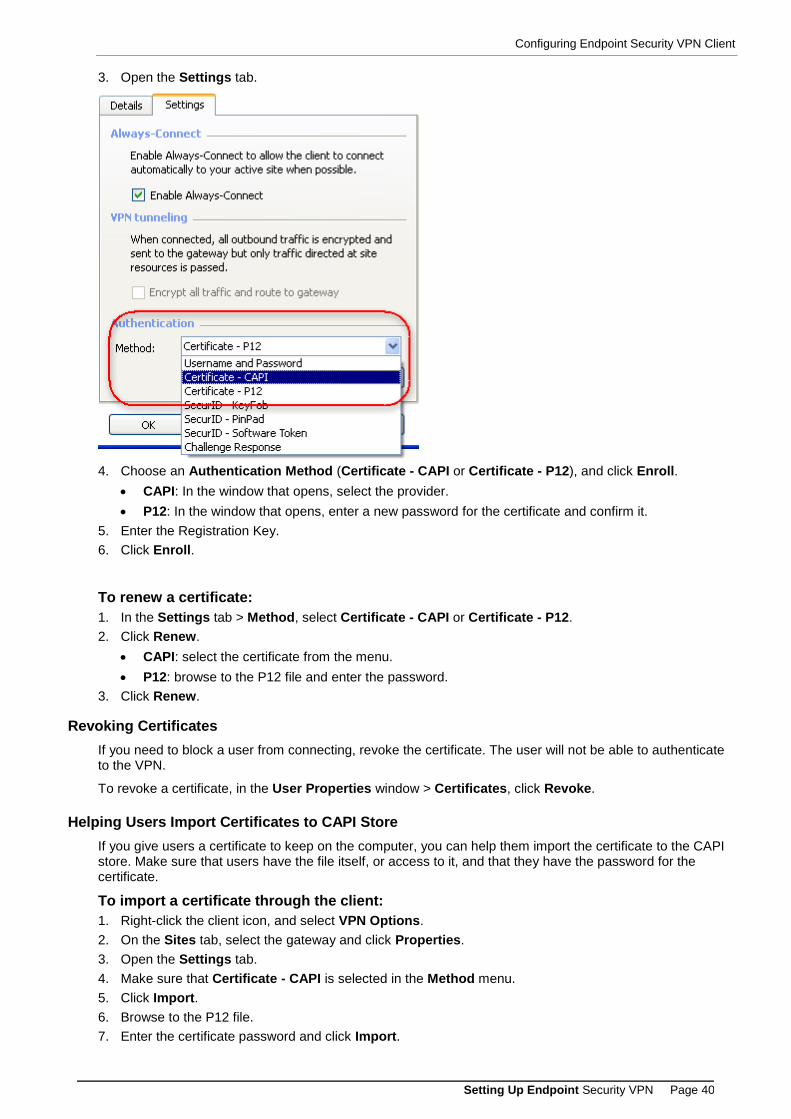
3. Open the Settings tab.
4. Choose an Authentication Method (Certificate - CAPI or Certificate - P12), and click Enroll.
CAPI: In the window that opens, select the provider.
P12: In the window that opens, enter a new password for the certificate and confirm it.
5. Enter the Registration Key.
6. Click Enroll.
To renew a certificate:
1. In the Settings tab > Method, select Certificate - CAPI or Certificate - P12.
2. Click Renew.
CAPI: select the certificate from the menu.
P12: browse to the P12 file and enter the password.
3. Click Renew.
Revoking Certificates
If you need to block a user from connecting, revoke the certificate. The user will not be able to authenticate to the VPN.
To revoke a certificate, in the User Properties window > Certificates, click Revoke.
Helping Users Import Certificates to CAPI Store
If you give users a certificate to keep on the computer, you can help them import the certificate to the CAPI store. Make sure that users have the file itself, or access to it, and that they have the password for the certificate.
To import a certificate through the client:
1. Right-click the client icon, and select VPN Options.
2. On the Sites tab, select the gateway and click Properties.
3. Open the Settings tab.
4. Make sure that Certificate - CAPI is selected in the Method menu.
5. Click Import.
6. Browse to the P12 file.
7. Enter the certificate password and click Import.
Configuring Endpoint Security VPN Client
Setting Up Endpoint Security VPN Page 41
To import a certificate through Windows file explorer:
1. Double-click the P12 file.
The certificate import wizard opens.
2. Click Next.
The path of the file to import is shown.
3. Click Next, and enter the password for the private key.
4. Select an option:
Enable strong private key protection - Users are prompted to enter the password whenever the private key is used.
Mark this key exportable - Users can back up and move the key.
5. Click Next.
6. Select to import to CAPI store, or browse to a storage folder.
7. Click Finish.
Disabling CAPI Authentication
Endpoint Security VPN supports user authentication with PKCS#12 certificates. A PKCS#12 certificate can be accessed directly or imported to the CAPI store.
If you do not want users to authenticate with certificates stored in the CAPI store:
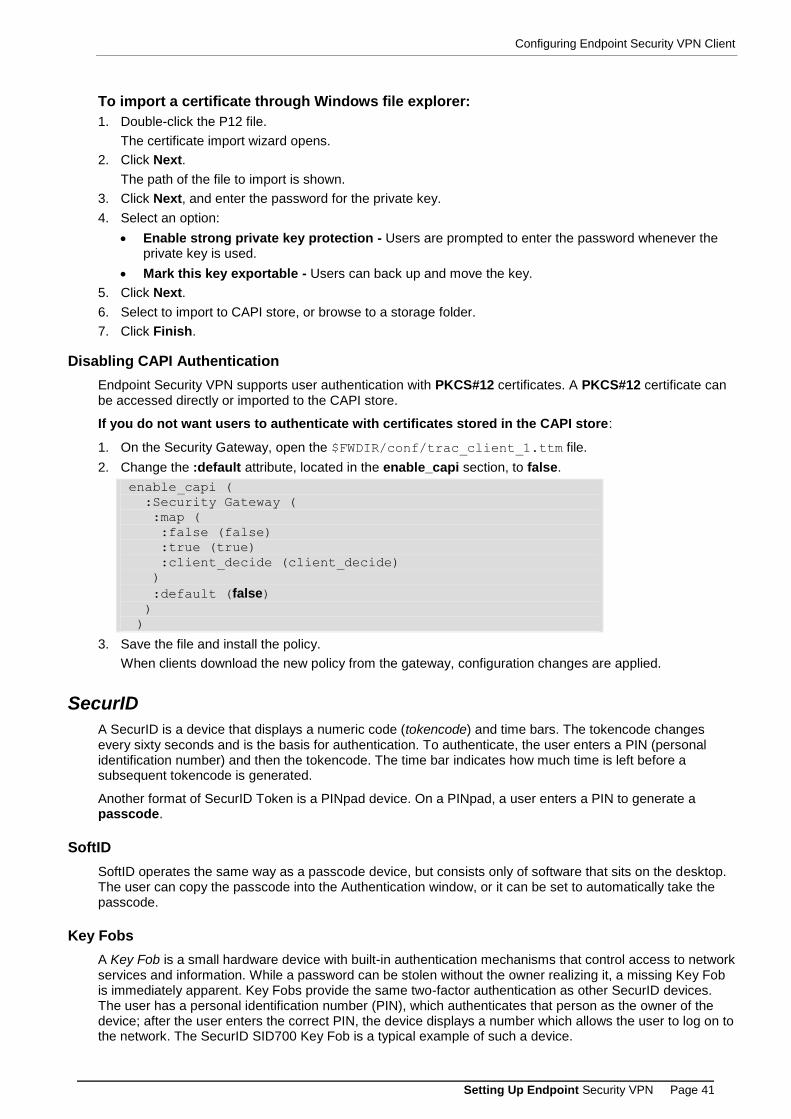
1. On the Security Gateway, open the $FWDIR/conf/trac_client_1.ttm file.
2. Change the :default attribute, located in the enable_capi section, to false.
enable_capi (
:Security Gateway (
:map (
:false (false)
:true (true)
:client_decide (client_decide)
)
:default (false) )
)
3. Save the file and install the policy.
When clients download the new policy from the gateway, configuration changes are applied.
SecurID
A SecurID is a device that displays a numeric code (tokencode) and time bars. The tokencode changes every sixty seconds and is the basis for authentication. To authenticate, the user enters a PIN (personal identification number) and then the tokencode. The time bar indicates how much time is left before a subsequent tokencode is generated.
Another format of SecurID Token is a PINpad device. On a PINpad, a user enters a PIN to generate a passcode.
SoftID
SoftID operates the same way as a passcode device, but consists only of software that sits on the desktop. The user can copy the passcode into the Authentication window, or it can be set to automatically take the passcode.
Key Fobs
A Key Fob is a small hardware device with built-in authentication mechanisms that control access to network services and information. While a password can be stolen without the owner realizing it, a missing Key Fob is immediately apparent. Key Fobs provide the same two-factor authentication as other SecurID devices. The user has a personal identification number (PIN), which authenticates that person as the owner of the device; after the user enters the correct PIN, the device displays a number which allows the user to log on to the network. The SecurID SID700 Key Fob is a typical example of such a device.
Configuring Endpoint Security VPN Client
Setting Up Endpoint Security VPN Page 42
Working with RSA Hard and Soft Tokens
If you use SecurID for authentication, you must define users on an RSA ACE management server. You must also add SecurID users to a group with an external user profile account that includes SecurID as the Authentication Method.
Refer to SecureID RSA documentation of how to configure RSA with Check Point Security Gateways.
To configure RSA SoftID:
1. Make a remote user group on the Ace Server.
2. Supply the SDTID token file (or multiple tokens) to the remote users.
3. Instruct remote users on how to import the tokens.
Challenge-Response
Challenge-response is an authentication protocol in which one party provides the first string (the challenge), and the other party verifies it with the next string (the response). For authentication to take place, the response is validated. Security systems that rely on smart cards are based on challenge-response.
Authentication Timeout
Authentication Timeout is how long a client password is valid before the user must enter it again. By default, this is one day.
To change Authentication Timeout:
1. On SmartDashboard, open the Global Properties window > Remote Access page.
2. In Authentication Timeout, select Validation timeout every and enter a value in minutes.
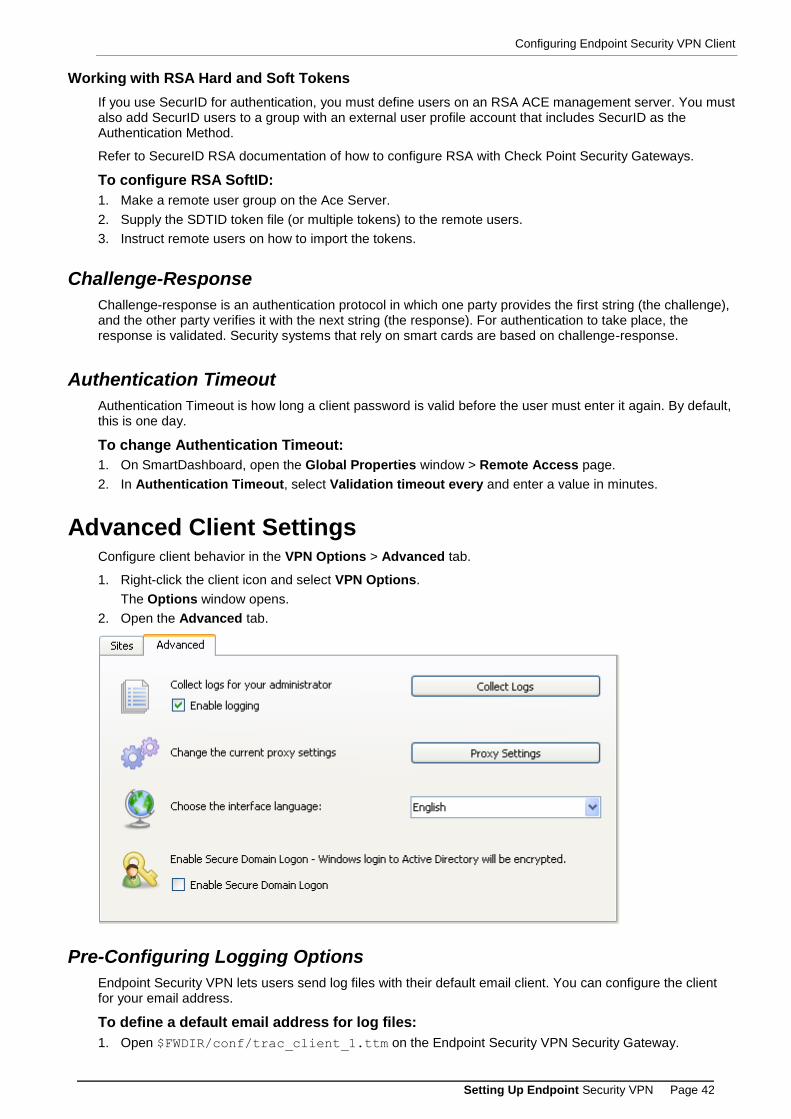
Advanced Client Settings Configure client behavior in the VPN Options > Advanced tab.
1. Right-click the client icon and select VPN Options.
The Options window opens.
2. Open the Advanced tab.
Pre-Configuring Logging Options
Endpoint Security VPN lets users send log files with their default email client. You can configure the client for your email address.
To define a default email address for log files:
1. Open $FWDIR/conf/trac_client_1.ttm on the Endpoint Security VPN Security Gateway.
Configuring Endpoint Security VPN Client
Setting Up Endpoint Security VPN Page 43
2. Enter a default email address in the send_client_logs attribute.
:send_client_logs (
:Security Gateway (
:default
)
)
If no default email address is defined, users can click Collect Logs in the Options > Advanced window of the Endpoint Security VPN client. This action stores all client logs in a single CAB file, which users can send to you for troubleshooting.
3. Save the file and install the policy.
When clients download the new policy from the gateway, configuration changes are applied.
Pre-Configuring Proxy Settings
Note - Remote-location proxy-server settings are usually detected automatically.
If a user is at a remote site that has a proxy server, the Endpoint Security VPN client must be configured to pass through the proxy server to reach the gateway.
If you know that this will be an issue, you can configure this option when you prepare the client MSI file. Otherwise, you can help your user configure the proxy server when the issue comes up.
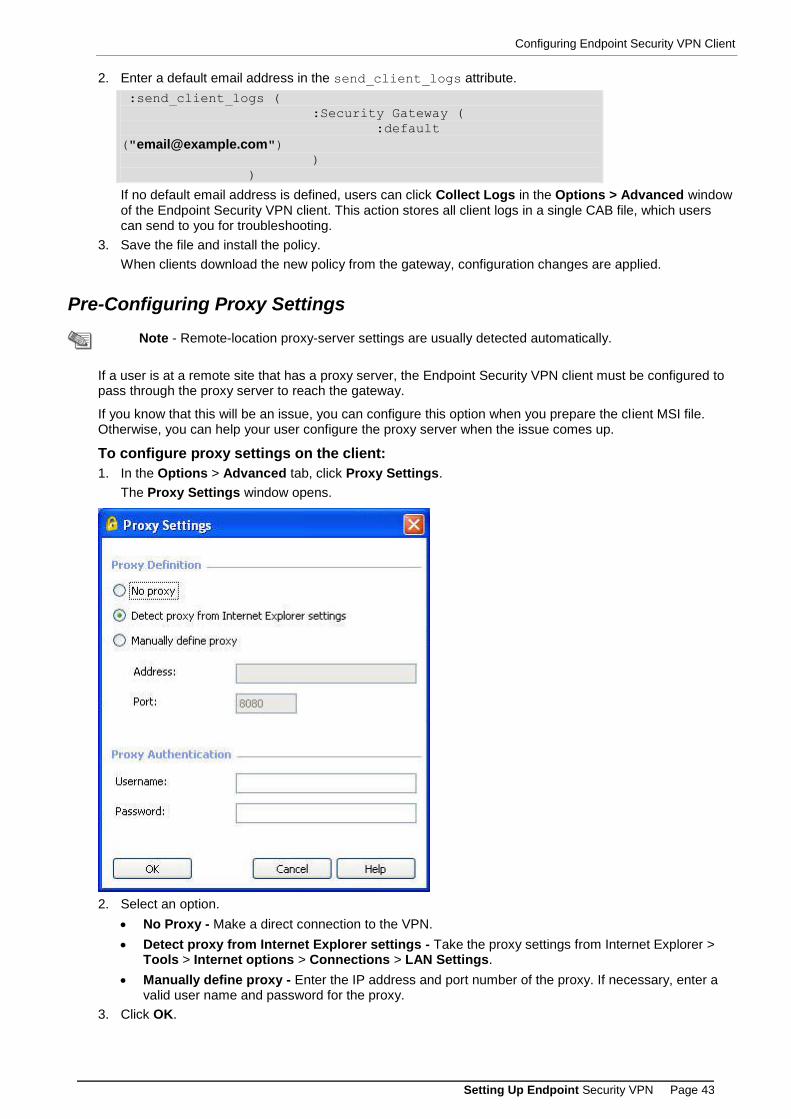
To configure proxy settings on the client:
1. In the Options > Advanced tab, click Proxy Settings.
The Proxy Settings window opens.
2. Select an option.
No Proxy - Make a direct connection to the VPN.
Detect proxy from Internet Explorer settings - Take the proxy settings from Internet Explorer > Tools > Internet options > Connections > LAN Settings.
Manually define proxy - Enter the IP address and port number of the proxy. If necessary, enter a valid user name and password for the proxy.
3. Click OK.
Preparing the Client Installation Process
Setting Up Endpoint Security VPN Page 44
Pre-Configuring Client Interface Language
If a user wants a different language for the interface of the client, you can help them select another language.
To change the interface language:
1. Open the Options > Advanced tab.
2. From the Choose the interface language drop-down menu, select the language you want.
Pre-Configuring SDL Enable
You can enable SDL ("Secure Domain Logon (SDL)" on page 68) for the Endpoint Security VPN client.
To enable SDL in the client:
1. Open the Options > Advanced tab.
2. Click Enable Secure Domain Logon.
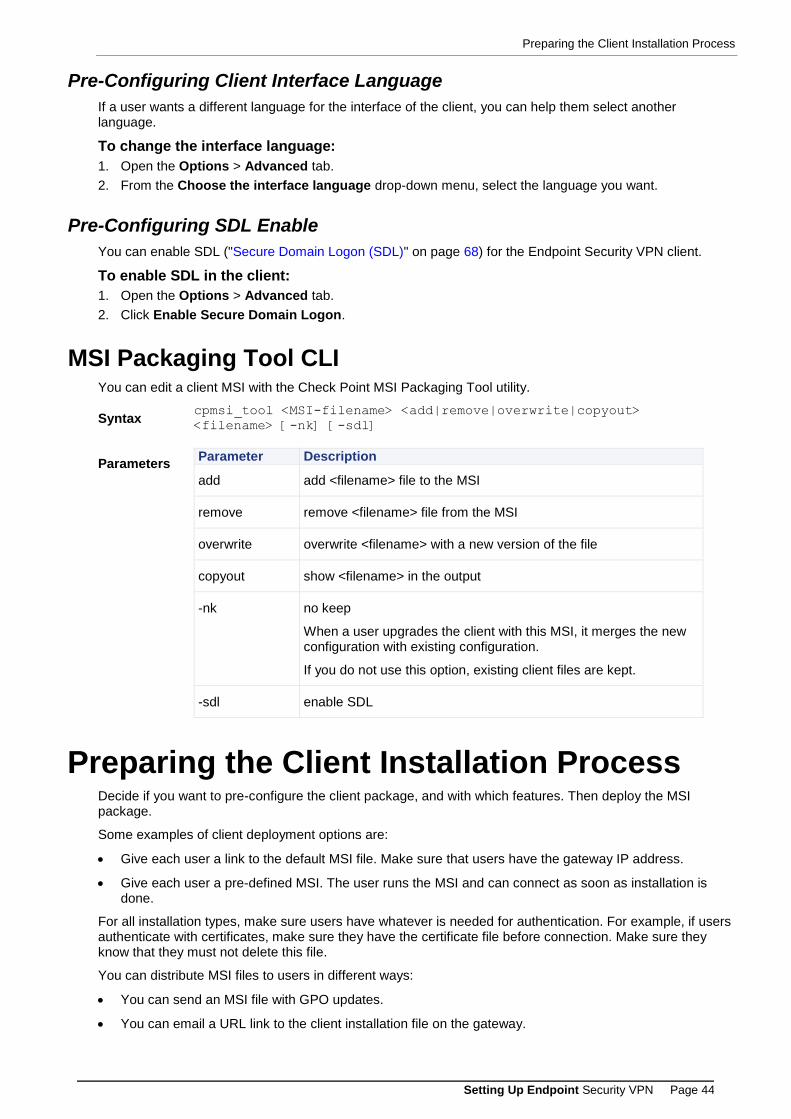
MSI Packaging Tool CLI You can edit a client MSI with the Check Point MSI Packaging Tool utility.
Syntax cpmsi_tool <MSI-filename> <add|remove|overwrite|copyout>
<filename> [-nk] [-sdl]
Parameters Parameter Description
add add <filename> file to the MSI
remove remove <filename> file from the MSI
overwrite overwrite <filename> with a new version of the file
copyout show <filename> in the output
-nk no keep
When a user upgrades the client with this MSI, it merges the new configuration with existing configuration.
If you do not use this option, existing client files are kept.
-sdl enable SDL
Preparing the Client Installation Process Decide if you want to pre-configure the client package, and with which features. Then deploy the MSI package.
Some examples of client deployment options are:
Give each user a link to the default MSI file. Make sure that users have the gateway IP address.
Give each user a pre-defined MSI. The user runs the MSI and can connect as soon as installation is done.
For all installation types, make sure users have whatever is needed for authentication. For example, if users authenticate with certificates, make sure they have the certificate file before connection. Make sure they know that they must not delete this file.
You can distribute MSI files to users in different ways:
You can send an MSI file with GPO updates.
You can email a URL link to the client installation file on the gateway.

Preparing the Client Installation Process
Setting Up Endpoint Security VPN Page 45
To install Endpoint Security VPN:
1. Put the client installation package on the client computer.
2. Double-click the MSI file.
3. Follow the instructions on the installation wizard.
Note - On Windows Vista and Windows 7, there may be a prompt to allow access, depending on the UAC settings.
Page 46
Chapter 5
Configuring Endpoint Security VPN Features
If you do any of these procedures, you must install the policy to apply feature changes to clients.
In This Chapter
Installing Desktop Security Policy 46
Managing Desktop Firewalls 47
Secure Configuration Verification (SCV) 51
Secure Domain Logon (SDL) 68
Multiple Entry Point (MEP) 70
Global Properties for Endpoint Security VPN Gateways 74
Configuring Log Uploads 83
Configuring Post Connect Scripts 84
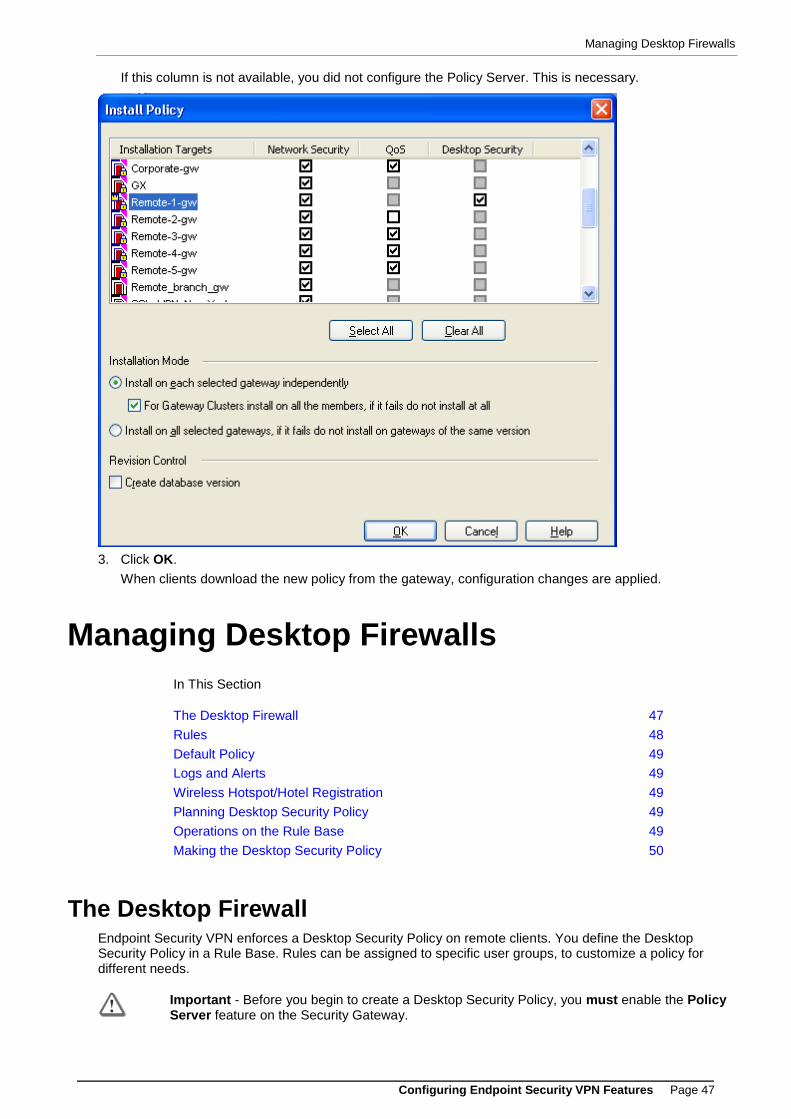
Installing Desktop Security Policy To install the Desktop Security policy:
1. Click Policy menu > Install.
2. In the Install Policy window, select Desktop Security for the Endpoint Security VPN gateway.
Managing Desktop Firewalls
Configuring Endpoint Security VPN Features Page 47
If this column is not available, you did not configure the Policy Server. This is necessary.
3. Click OK.
When clients download the new policy from the gateway, configuration changes are applied.
Managing Desktop Firewalls
In This Section
The Desktop Firewall 47
Rules 48
Default Policy 49
Logs and Alerts 49
Wireless Hotspot/Hotel Registration 49
Planning Desktop Security Policy 49
Operations on the Rule Base 49
Making the Desktop Security Policy 50
The Desktop Firewall Endpoint Security VPN enforces a Desktop Security Policy on remote clients. You define the Desktop Security Policy in a Rule Base. Rules can be assigned to specific user groups, to customize a policy for different needs.
Important - Before you begin to create a Desktop Security Policy, you must enable the Policy Server feature on the Security Gateway.
Managing Desktop Firewalls
Configuring Endpoint Security VPN Features Page 48
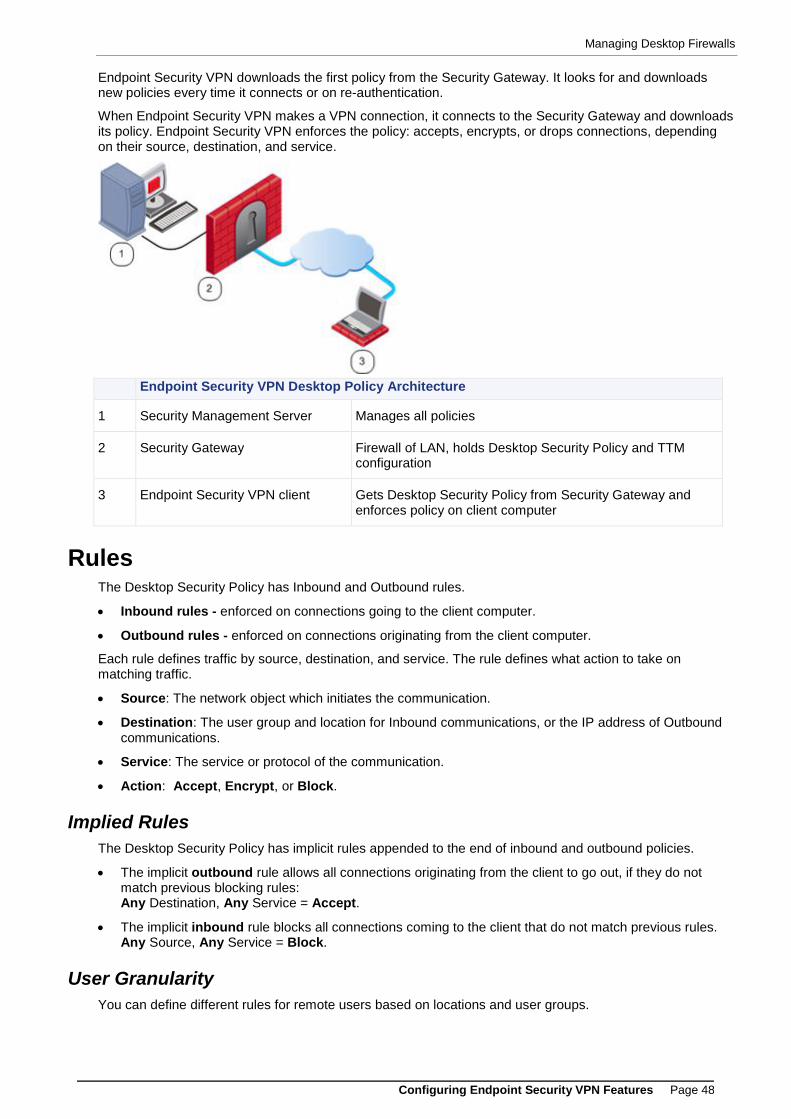
Endpoint Security VPN downloads the first policy from the Security Gateway. It looks for and downloads new policies every time it connects or on re-authentication.
When Endpoint Security VPN makes a VPN connection, it connects to the Security Gateway and downloads its policy. Endpoint Security VPN enforces the policy: accepts, encrypts, or drops connections, depending on their source, destination, and service.
Endpoint Security VPN Desktop Policy Architecture
1 Security Management Server Manages all policies
2 Security Gateway Firewall of LAN, holds Desktop Security Policy and TTM configuration
3 Endpoint Security VPN client Gets Desktop Security Policy from Security Gateway and enforces policy on client computer
Rules The Desktop Security Policy has Inbound and Outbound rules.
Inbound rules - enforced on connections going to the client computer.
Outbound rules - enforced on connections originating from the client computer.
Each rule defines traffic by source, destination, and service. The rule defines what action to take on matching traffic.
Source: The network object which initiates the communication.
Destination: The user group and location for Inbound communications, or the IP address of Outbound communications.
Service: The service or protocol of the communication.
Action: Accept, Encrypt, or Block.
Implied Rules
The Desktop Security Policy has implicit rules appended to the end of inbound and outbound policies.
The implicit outbound rule allows all connections originating from the client to go out, if they do not match previous blocking rules: Any Destination, Any Service = Accept.
The implicit inbound rule blocks all connections coming to the client that do not match previous rules. Any Source, Any Service = Block.
User Granularity
You can define different rules for remote users based on locations and user groups.
Managing Desktop Firewalls
Configuring Endpoint Security VPN Features Page 49
Locations - Set rules to be implemented by physical location. For example, a user with a laptop in the office building will have a less restrictive policy than when the same user on the same laptop connects from a public wireless access point.
User Groups - Set rules to be implemented for some users and not others. For example, define restrictive rules for most users, but give system administrators more access privileges.
Rules are applied to user groups, not individual users. Endpoint Security VPN does not inherently identify user groups, so it must obtain group definitions from the Security Gateway. The gateway resolves the user groups of the authenticated user and sends this information to the Endpoint Security VPN client. Endpoint Security VPN enforces the rules applicable to the user, according to groups.
Rules can also be applied to radius groups on the RADIUS server.
Default Policy If a Endpoint Security VPN client is disconnected from the Security Gateway, the client enforces a default policy. The default policy is the last valid policy that was downloaded from the Security Gateway. This policy is enforced until Endpoint Security VPN connects to the Security Gateway and enforces an updated personalized policy.
Logs and Alerts Desktop Security log messages are saved locally on the client system in:
32-bit systems - C:\Program Files\CheckPoint\Endpoint Connect\trac_fwpktlog.log
64-bit systems - C:\Program Files(x86)\CheckPoint\Endpoint Connect\trac_fwpktlog.log
Alerts are saved and uploaded to the Security Management Server, when Endpoint Security VPN connects or re-authentication occurs. Alerts can be viewed in SmartView Tracker.
Wireless Hotspot/Hotel Registration Wireless hotspot is a wireless broadband Internet access service available at public locations such as airport lounges, coffee shops, and hotels.
The user launches a web browser and attempts to connect to the Internet. The browser is automatically redirected by the hotspot server to the Hotspot welcome page for registration. In the registration process, the user enters the required information. When registered, the user gains access to the Internet.
This feature supports users with restrictive outbound policies or with Hub Mode (everything goes through the Security Gateway), or both. Therefore, even if users connect to a gateway for all Internet communication, they can still access the hotspot to register.
Planning Desktop Security Policy Balance considerations of security and convenience. A policy should permit desktop users to work as freely as possible, but also reduce the threat of attack from malicious third parties.
In the Inbound policy, allow only services that connect to a specific server running on the relevant port.
In the Outbound policy, use rules to block only specific problematic services (such as Netbus), and allow all others.
Remember: Implied rules may allow or block services not explicitly handled by previous rules. For example, if the user runs an FTP server, the inbound rules must explicitly allow connections to the FTP server.
Operations on the Rule Base Define the Desktop Security Policy. Rules are managed in order: what is blocked by a previous rule cannot be allowed later. The right-click menu of the Rule Base is:
Add - Add a rule above or below the selected rule.
Disable - Rules that are currently not implemented, but may be in the future, can be disabled.
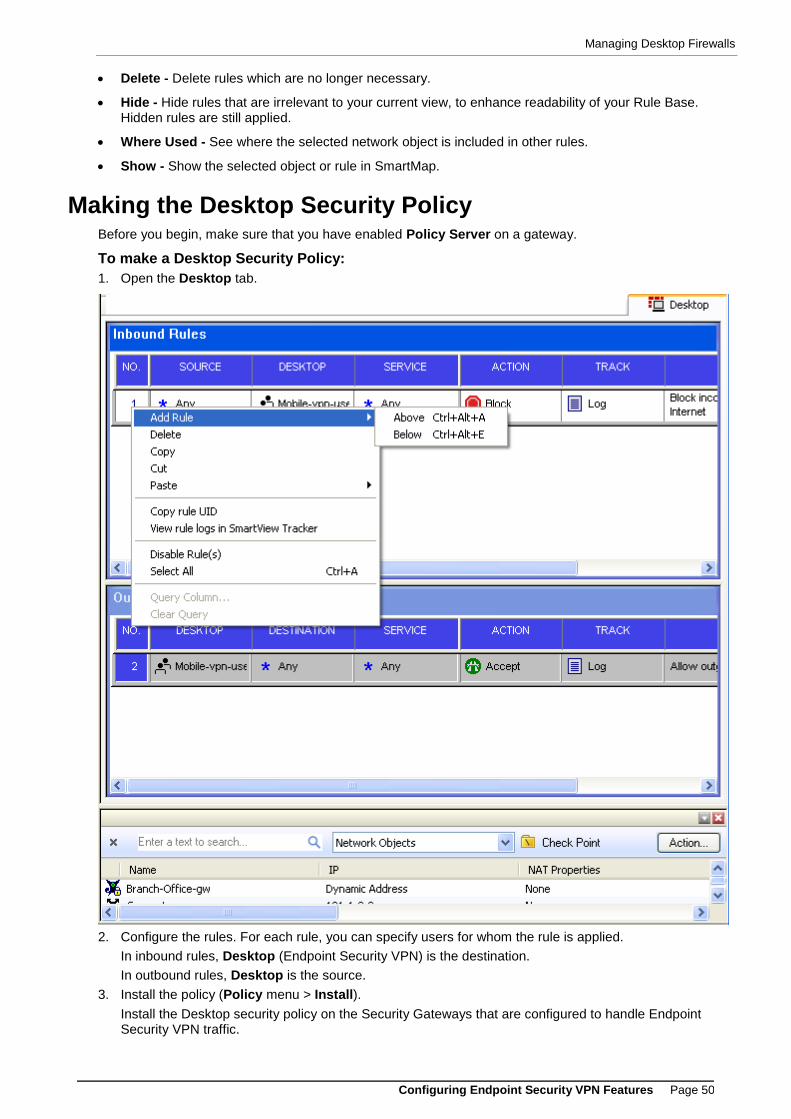
Managing Desktop Firewalls
Configuring Endpoint Security VPN Features Page 50
Delete - Delete rules which are no longer necessary.
Hide - Hide rules that are irrelevant to your current view, to enhance readability of your Rule Base. Hidden rules are still applied.
Where Used - See where the selected network object is included in other rules.
Show - Show the selected object or rule in SmartMap.
Making the Desktop Security Policy Before you begin, make sure that you have enabled Policy Server on a gateway.
To make a Desktop Security Policy:
1. Open the Desktop tab.
2. Configure the rules. For each rule, you can specify users for whom the rule is applied.
In inbound rules, Desktop (Endpoint Security VPN) is the destination.
In outbound rules, Desktop is the source.
3. Install the policy (Policy menu > Install).
Install the Desktop security policy on the Security Gateways that are configured to handle Endpoint Security VPN traffic.
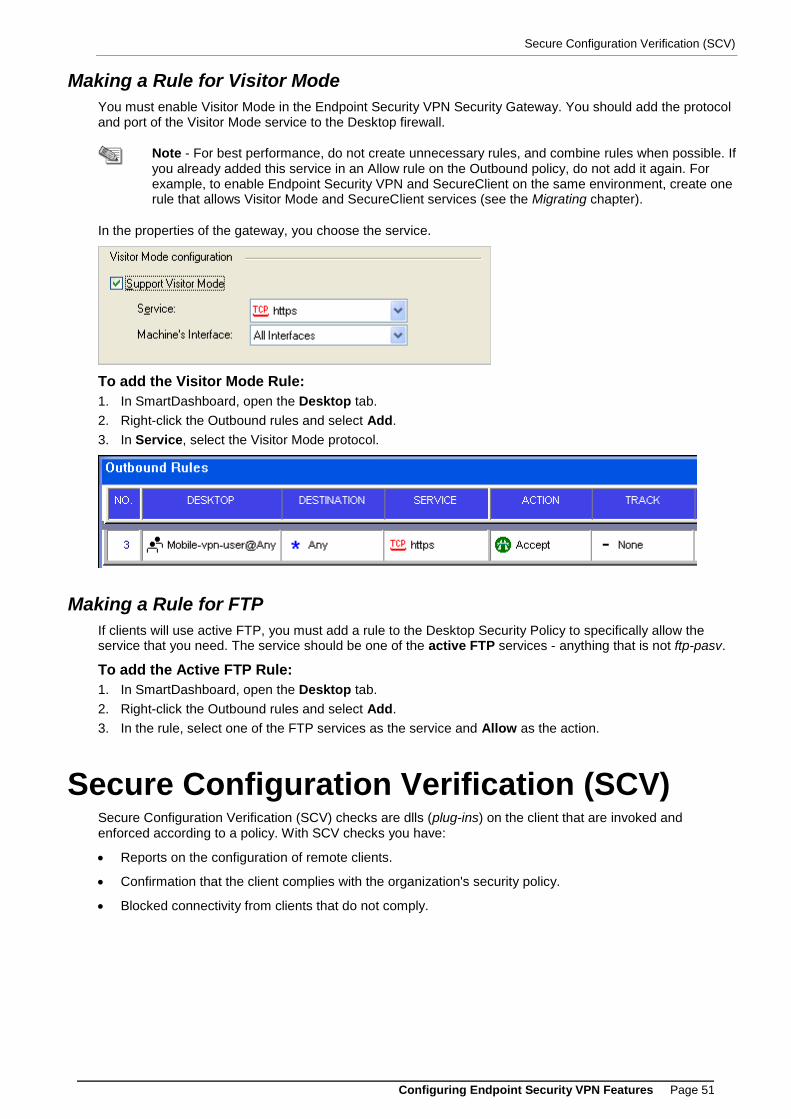
Secure Configuration Verification (SCV)
Configuring Endpoint Security VPN Features Page 51
Making a Rule for Visitor Mode
You must enable Visitor Mode in the Endpoint Security VPN Security Gateway. You should add the protocol and port of the Visitor Mode service to the Desktop firewall.
Note - For best performance, do not create unnecessary rules, and combine rules when possible. If you already added this service in an Allow rule on the Outbound policy, do not add it again. For example, to enable Endpoint Security VPN and SecureClient on the same environment, create one rule that allows Visitor Mode and SecureClient services (see the Migrating chapter).
In the properties of the gateway, you choose the service.
To add the Visitor Mode Rule:
1. In SmartDashboard, open the Desktop tab.
2. Right-click the Outbound rules and select Add.
3. In Service, select the Visitor Mode protocol.
Making a Rule for FTP
If clients will use active FTP, you must add a rule to the Desktop Security Policy to specifically allow the service that you need. The service should be one of the active FTP services - anything that is not ftp-pasv.
To add the Active FTP Rule:
1. In SmartDashboard, open the Desktop tab.
2. Right-click the Outbound rules and select Add.
3. In the rule, select one of the FTP services as the service and Allow as the action.
Secure Configuration Verification (SCV) Secure Configuration Verification (SCV) checks are dlls (plug-ins) on the client that are invoked and enforced according to a policy. With SCV checks you have:
Reports on the configuration of remote clients.
Confirmation that the client complies with the organization's security policy.
Blocked connectivity from clients that do not comply.
Secure Configuration Verification (SCV)
Configuring Endpoint Security VPN Features Page 52
In This Section
Check Point SCV Checks 52
Configuring the SCV Policy 52
Configuring SCV Enforcement 53
Configuring SCV Exceptions 53
Traditional Mode 53
Installing and Running SCV Plugins on the Client 54
SCV Policy Syntax 54
Check Point SCV Checks The default SCV checks (plug-ins) are part of the Endpoint Security VPN installation.
OS Monitor - verifies Operating System version, Service Pack, and Screen Saver configuration (activation time, password protection, etc.).
HotFix Monitor - verifies that operating system security patches are installed, or not installed.
Group Monitor - verifies that the user logged into the operating system and is a member of specified Domain User Groups.
Process Monitor - verifies that a process is running, or not running, on the client machine (for example, that a file sharing application is not running, or that Anti-virus is running).
Browser Monitor - verifies Internet Explorer version and configuration settings, such as Java and ActiveX options.
Registry Monitor - verifies System Registry keys, values, and their contents.
Anti-virus Monitor - verifies that an Anti-virus is running and checks its version. Supported: Norton, Trend Office Scan, and McAfee.
SCVMonitor - verifies the version of the SCV product, specifically the versions of the SCV DLLs installed on the client's machine.
HWMonitor - verifies CPU type, family, and model.
Configuring the SCV Policy An SCV Policy is a set of rules based on the checks that the SCV plug-ins provide. These rules decide whether a client is compliant. For example, to block a client that runs a file-sharing application, define a rule in the SCV Policy that verifies that this application is not running.
Note - The SCV check described in this example is among the pre-defined SCV checks included with the Security Management server. This check must be configured to check for the specific process.
If the client passes all the SCV checks, the client is compliant.
If the client fails one of the checks, it is not compliant.
Define the SCV policy through the $FWDIR/conf/local.scv file on the Security Management Server. The local.scv file is pushed to the Security Gateway when you do Install Desktop Policy.
Important - You must install the policy from the SmartDashboard, as described here. If you use the command-line, the SCV checks are not included in the policy.
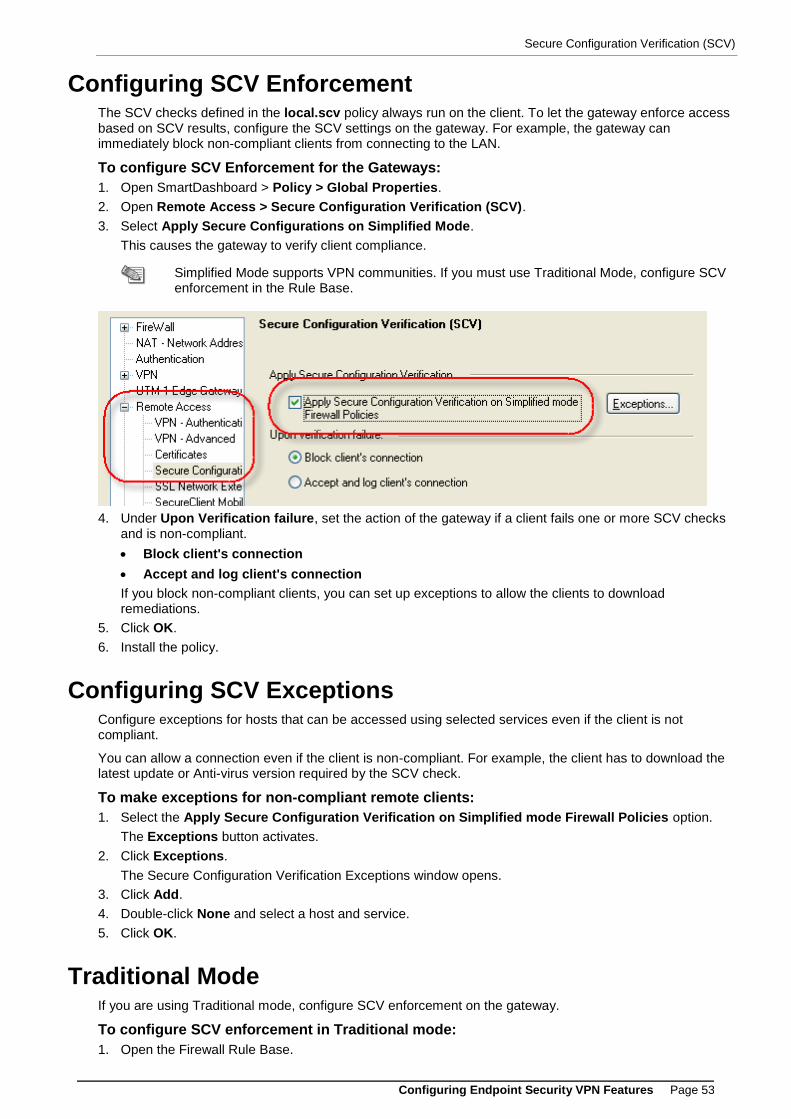
Secure Configuration Verification (SCV)
Configuring Endpoint Security VPN Features Page 53
Configuring SCV Enforcement The SCV checks defined in the local.scv policy always run on the client. To let the gateway enforce access based on SCV results, configure the SCV settings on the gateway. For example, the gateway can immediately block non-compliant clients from connecting to the LAN.
To configure SCV Enforcement for the Gateways:
1. Open SmartDashboard > Policy > Global Properties.
2. Open Remote Access > Secure Configuration Verification (SCV).
3. Select Apply Secure Configurations on Simplified Mode.
This causes the gateway to verify client compliance.
Simplified Mode supports VPN communities. If you must use Traditional Mode, configure SCV enforcement in the Rule Base.
4. Under Upon Verification failure, set the action of the gateway if a client fails one or more SCV checks
and is non-compliant.
Block client's connection
Accept and log client's connection
If you block non-compliant clients, you can set up exceptions to allow the clients to download remediations.
5. Click OK.
6. Install the policy.
Configuring SCV Exceptions Configure exceptions for hosts that can be accessed using selected services even if the client is not compliant.
You can allow a connection even if the client is non-compliant. For example, the client has to download the latest update or Anti-virus version required by the SCV check.
To make exceptions for non-compliant remote clients:
1. Select the Apply Secure Configuration Verification on Simplified mode Firewall Policies option.
The Exceptions button activates.
2. Click Exceptions.
The Secure Configuration Verification Exceptions window opens.
3. Click Add.
4. Double-click None and select a host and service.
5. Click OK.
Traditional Mode If you are using Traditional mode, configure SCV enforcement on the gateway.
To configure SCV enforcement in Traditional mode:
1. Open the Firewall Rule Base.
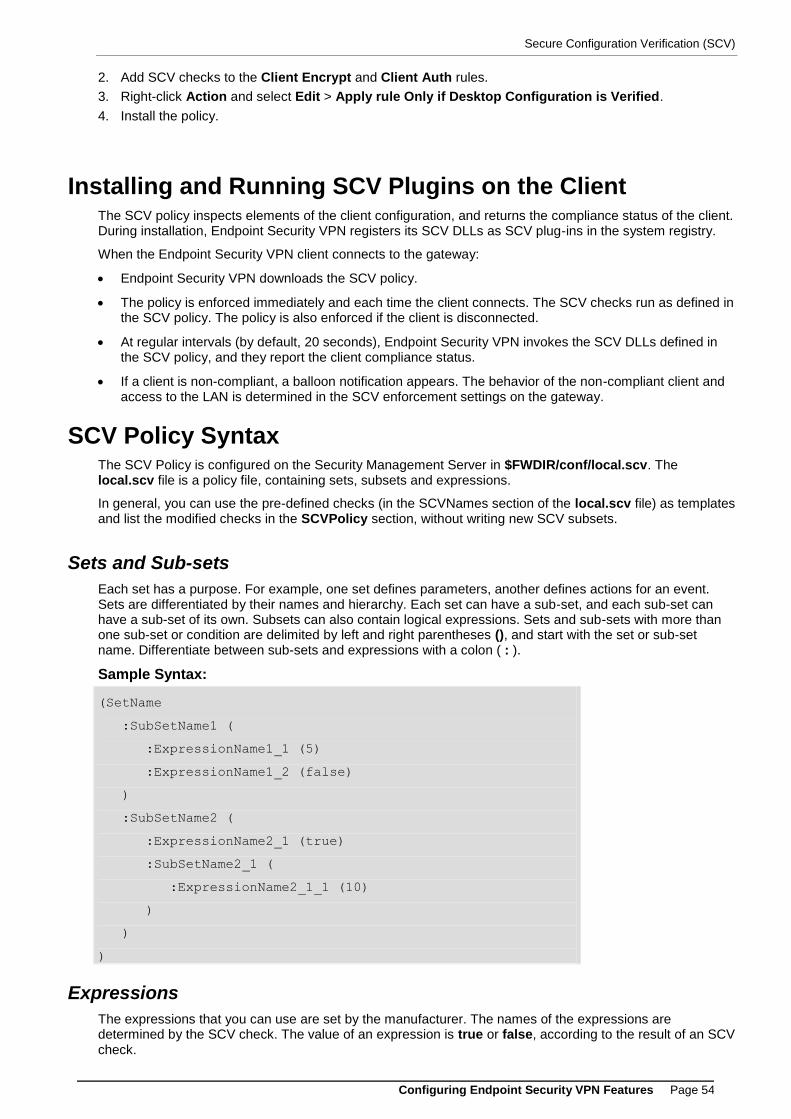
Secure Configuration Verification (SCV)
Configuring Endpoint Security VPN Features Page 54
2. Add SCV checks to the Client Encrypt and Client Auth rules.
3. Right-click Action and select Edit > Apply rule Only if Desktop Configuration is Verified.
4. Install the policy.
Installing and Running SCV Plugins on the Client The SCV policy inspects elements of the client configuration, and returns the compliance status of the client. During installation, Endpoint Security VPN registers its SCV DLLs as SCV plug-ins in the system registry.
When the Endpoint Security VPN client connects to the gateway:
Endpoint Security VPN downloads the SCV policy.
The policy is enforced immediately and each time the client connects. The SCV checks run as defined in the SCV policy. The policy is also enforced if the client is disconnected.
At regular intervals (by default, 20 seconds), Endpoint Security VPN invokes the SCV DLLs defined in the SCV policy, and they report the client compliance status.
If a client is non-compliant, a balloon notification appears. The behavior of the non-compliant client and access to the LAN is determined in the SCV enforcement settings on the gateway.
SCV Policy Syntax The SCV Policy is configured on the Security Management Server in $FWDIR/conf/local.scv. The local.scv file is a policy file, containing sets, subsets and expressions.
In general, you can use the pre-defined checks (in the SCVNames section of the local.scv file) as templates and list the modified checks in the SCVPolicy section, without writing new SCV subsets.
Sets and Sub-sets
Each set has a purpose. For example, one set defines parameters, another defines actions for an event. Sets are differentiated by their names and hierarchy. Each set can have a sub-set, and each sub-set can have a sub-set of its own. Subsets can also contain logical expressions. Sets and sub-sets with more than one sub-set or condition are delimited by left and right parentheses (), and start with the set or sub-set name. Differentiate between sub-sets and expressions with a colon ( : ).
Sample Syntax:
(SetName
:SubSetName1 (
:ExpressionName1_1 (5)
:ExpressionName1_2 (false)
)
:SubSetName2 (
:ExpressionName2_1 (true)
:SubSetName2_1 (
:ExpressionName2_1_1 (10)
)
)
)
Expressions
The expressions that you can use are set by the manufacturer. The names of the expressions are determined by the SCV check. The value of an expression is true or false, according to the result of an SCV check.

Secure Configuration Verification (SCV)
Configuring Endpoint Security VPN Features Page 55
Example:
:browser_major_version (7)
This expression is a Check Point SCV check. It checks whether the version of the Internet Explorer browser installed on the client is 7.x. If the major version is 7, this expression is true.
Grouping Expressions
If several expressions appear one after the other, they are checked on AND logic. Only if all expressions are true, then the value of all of them together is true.
Example:
:browser_major_version (7)
:browser_minor_version (0)
If the version of Internet Explorer is 7 AND the minor version is 0 (version 7.0), the result is true. If the version is 6.0, the first expression is false and the second one is true: result is false.
Influential Expressions
Some expressions can influence the way in which others are evaluated.
Example:
:browser_major_version (7)
:browser_minor_version (0)
:browser_version_operand (">=")
The third expression influences the way that the first and second are evaluated. If the version of Internet Explorer is greater than or equal to (">=") 7.0, the result is true. If the version is 6.7, the result is false. If the version is 7.1, the result is true.
Logical Sections
Sometimes it is necessary to use a logical OR between expressions, instead of the default logical AND. Use labels to make this work. A label has a number, which differentiates between different OR sections.
begin_or begin_or (or#) - end (or#)
The begin_or (or#) label starts a section containing several expressions. The end of this section is marked by an end (or#) label. All expressions inside this section are evaluated on OR, resulting in one value for the section.
Example:
:begin_or(or1)
:browser_major_version (5)
:browser_major_version (6)
:end(or1)
This section checks if the version of Internet Explorer is 6 OR 7. If it is one or the other, the section is true.
begin_and begin_and (and#) - end (and#)
The begin_and (and#) label starts a section to evaluate on AND. The end of this section is marked by a end (and#). Use this label to nest AND sections inside OR sections.
Example:

Secure Configuration Verification (SCV)
Configuring Endpoint Security VPN Features Page 56
If you consider 6.x browsers to be secure because of lack of components, and new browsers to be secure, define the this section.
:begin_or (or1)
:begin_and (and1)
:browser_major_version (7)
:browser_minor_version (0)
:browser_version_operand (">=")
:end (and1)
:begin_and (and2)
:browser_major_version (6)
:browser_minor_version (0)
:browser_version_operand ("<=")
:end (and2)
:end (or1)
The first AND section checks if the version of IE >= 7.0. The second AND section checks whether the version of IE is <=6.0. The entire section is true if the version is greater than (or equal to) 7.0, OR lower than (or equal to) 6.0.
Expressions and Labels with Special Meanings
Some expressions and labels are reserved for specific purposes.
Example:
:browser_major_version (7)
:browser_minor_version (0)
:browser_version_operand (">=")
:begin_admin (admin)
:send_log (alert)
:mismatchmessage ("The version of your Internet Explorer
browser is old. For security reasons, users with old
browsers are not allowed to access the network of the
organization. Please upgrade your Internet Explorer to
version 7.0 or higher.")
:end (admin)
begin_admin begin_admin (admin) - end (admin)
This label is a section of actions for clients that were not checked by previous expressions in the subset (nothing relevant was installed on the client), or that returned false for all the expressions.
mismatchmessage mismatchmessage ("Message")
This expression is used as part of the begin_admin (admin) - end (admin) section. It sets the message to show on the remote user's desktop, to notify the user that the computer is not compliant. The message is shown only if the expression is false. We recommend that you use this text to tell the user what to do to resolve the issue.
send_log send_log (alert)
This expression is for each SCV check. The value sets where the SCV check sends the logs.
alert - A log with the non-compliant reason is sent to SmartView Tracker.
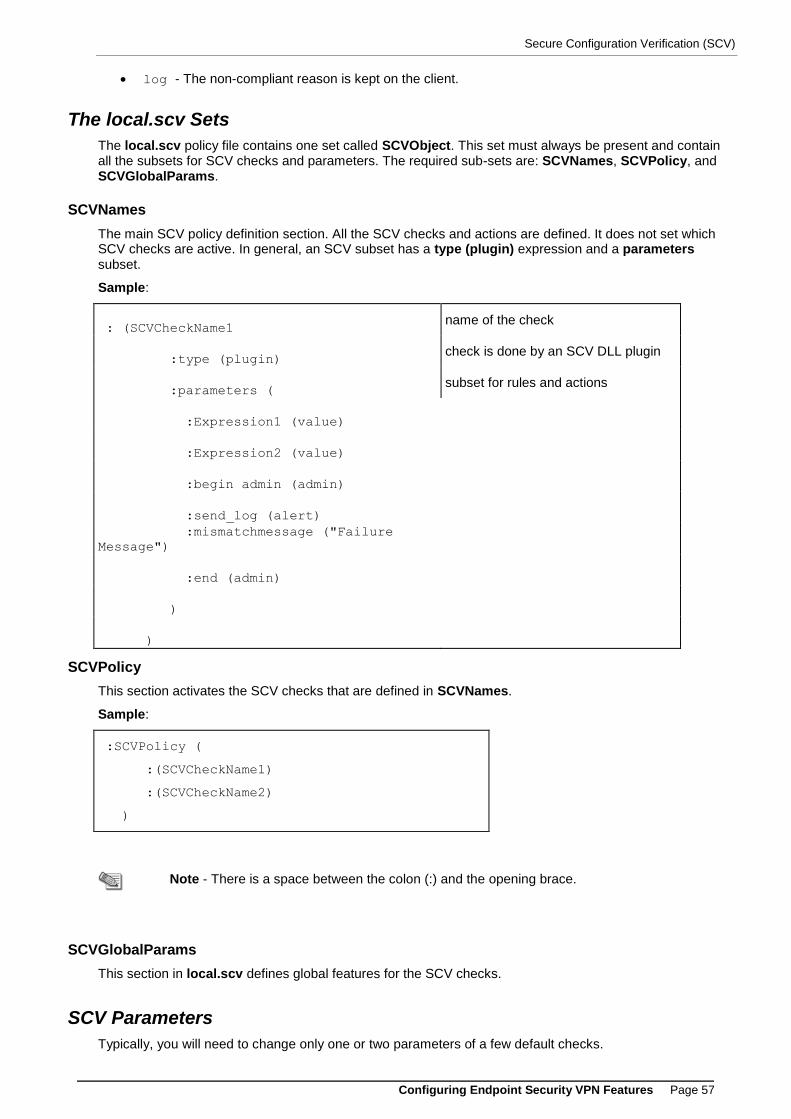
Secure Configuration Verification (SCV)
Configuring Endpoint Security VPN Features Page 57
log - The non-compliant reason is kept on the client.
The local.scv Sets
The local.scv policy file contains one set called SCVObject. This set must always be present and contain all the subsets for SCV checks and parameters. The required sub-sets are: SCVNames, SCVPolicy, and SCVGlobalParams.
SCVNames
The main SCV policy definition section. All the SCV checks and actions are defined. It does not set which SCV checks are active. In general, an SCV subset has a type (plugin) expression and a parameters subset.
Sample:
: (SCVCheckName1 name of the check
:type (plugin) check is done by an SCV DLL plugin
:parameters ( subset for rules and actions
:Expression1 (value)
:Expression2 (value)
:begin_admin (admin)
:send_log (alert)
:mismatchmessage ("Failure
Message")
:end (admin)
)
)
SCVPolicy
This section activates the SCV checks that are defined in SCVNames.
Sample:
:SCVPolicy (
:(SCVCheckName1)
:(SCVCheckName2)
)
Note - There is a space between the colon (:) and the opening brace.
SCVGlobalParams
This section in local.scv defines global features for the SCV checks.
SCV Parameters
Typically, you will need to change only one or two parameters of a few default checks.
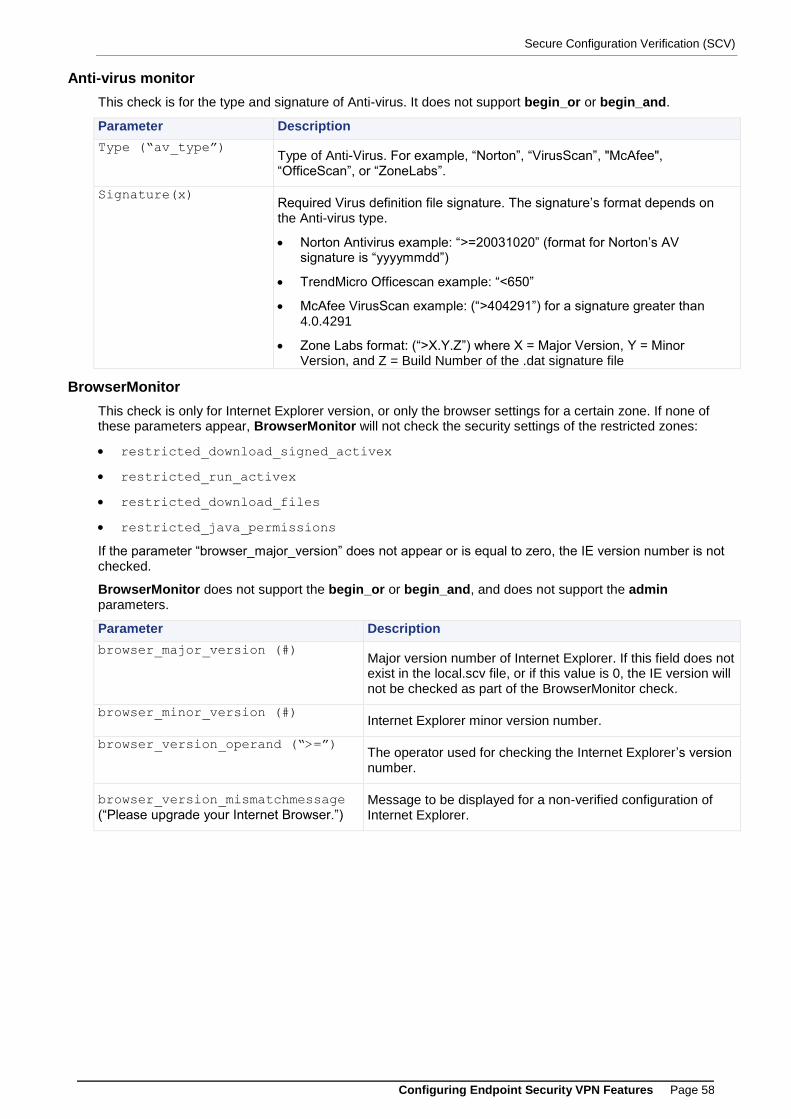
Secure Configuration Verification (SCV)
Configuring Endpoint Security VPN Features Page 58
Anti-virus monitor
This check is for the type and signature of Anti-virus. It does not support begin_or or begin_and.
Parameter Description
Type (“av_type”) Type of Anti-Virus. For example, “Norton”, “VirusScan”, "McAfee", “OfficeScan”, or “ZoneLabs”.
Signature(x) Required Virus definition file signature. The signature’s format depends on the Anti-virus type.
Norton Antivirus example: “>=20031020” (format for Norton’s AV signature is “yyyymmdd”)
TrendMicro Officescan example: “<650”
McAfee VirusScan example: (“>404291”) for a signature greater than 4.0.4291
Zone Labs format: (“>X.Y.Z”) where X = Major Version, Y = Minor Version, and Z = Build Number of the .dat signature file
BrowserMonitor
This check is only for Internet Explorer version, or only the browser settings for a certain zone. If none of these parameters appear, BrowserMonitor will not check the security settings of the restricted zones:
restricted_download_signed_activex
restricted_run_activex
restricted_download_files
restricted_java_permissions
If the parameter “browser_major_version” does not appear or is equal to zero, the IE version number is not checked.
BrowserMonitor does not support the begin_or or begin_and, and does not support the admin parameters.
Parameter Description
browser_major_version (#) Major version number of Internet Explorer. If this field does not exist in the local.scv file, or if this value is 0, the IE version will not be checked as part of the BrowserMonitor check.
browser_minor_version (#) Internet Explorer minor version number.
browser_version_operand (“>=”) The operator used for checking the Internet Explorer’s version number.
browser_version_mismatchmessage
(“Please upgrade your Internet Browser.”) Message to be displayed for a non-verified configuration of Internet Explorer.

Secure Configuration Verification (SCV)
Configuring Endpoint Security VPN Features Page 59
Parameter Description
intranet_download_signed_activex
(enable) The maximum permission level that IE should have for downloading signed ActiveX controls from within the local Intranet.
intranet_run_activex (enable) The maximum permission level that IE should have for running signed ActiveX controls from within the local Intranet.
intranet_download_files (enable) The maximum permission level that IE should have for downloading files from within the local Intranet.
intranet_java_permissions (low) The maximum security level that IE Explorer should have for running java applets from within the local Intranet.
trusted_download_signed_activex
(enable) The maximum permission level that IE should have for downloading signed ActiveX controls from trusted zones.
trusted_run_activex (enable) The maximum permission level that IE should have for running signed ActiveX controls from trusted zones.
trusted_download_files (enable) The maximum permission level that IE should have for downloading files from trusted zones.
trusted_java_permissions
(medium) The maximum security level that IE should have for running java applets from trusted zones.
internet_download_signed_activex
(disable) The maximum permission level that IE should have for downloading signed ActiveX controls from the Internet.
Internet_run_activex (disable) The maximum permission level that IE should have for running signed ActiveX controls from the Internet.
internet_download_files
(disable) The maximum permission level that IE should have for downloading files from the Internet.
internet_java_permissions
(disable) The maximum security level that IE should have for running java applets from the Internet.
restricted_download_signed_activ
ex (disable) The maximum permission level that IE should have for downloading signed ActiveX controls from restricted zones.
restricted_run_activex (disable) The maximum permission level that IE should have for running signed ActiveX controls from restricted zones.
restricted_download_files
(disable) The maximum permission level that IE should have for downloading files from restricted zones.
restricted_java_permissions
(disable) The maximum security level that IE should have for running java applets from restricted zones.
send_log (type) Whether to send a log to Security Management server for specifying that the client is not verified: log or alert.
Does not support begin_admin.
internet_options_mismach_message
(“Your Internet browser settings
do not meet policy
requirements”)
Mismatch message for the Internet Explorer settings.
Groupmonitor
This checks that the logged on user belongs to the expected domain user groups.
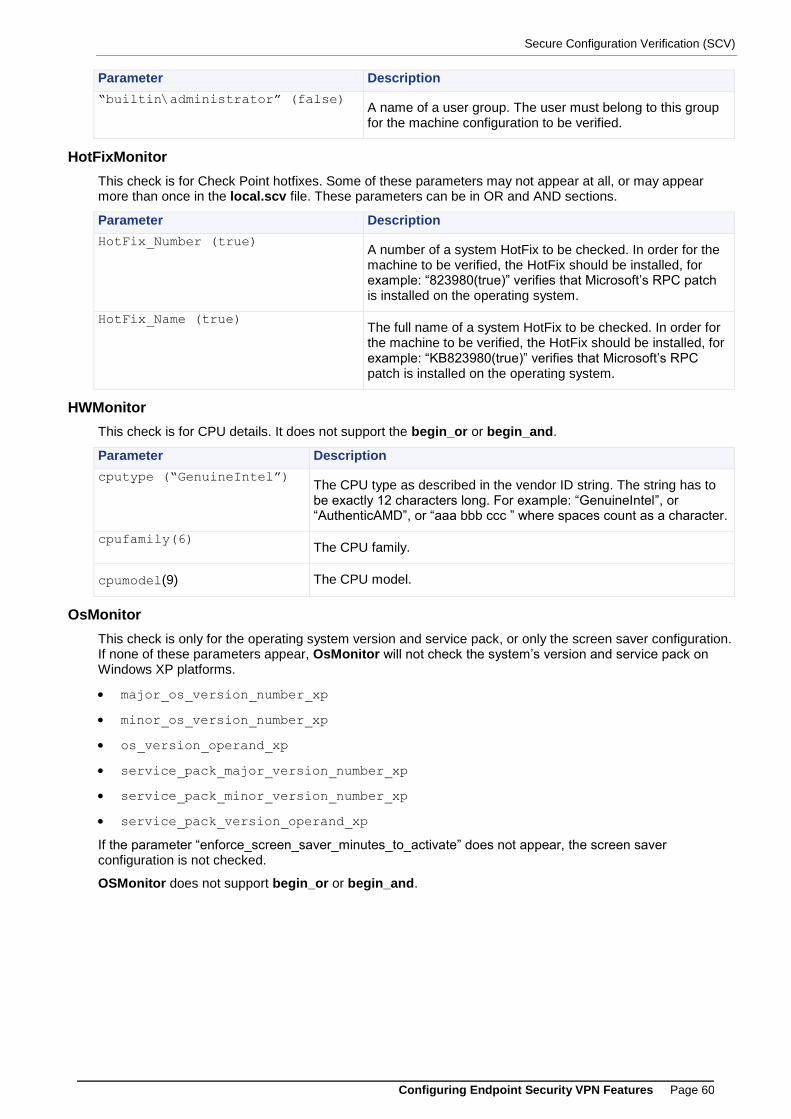
Secure Configuration Verification (SCV)
Configuring Endpoint Security VPN Features Page 60
Parameter Description
“builtin\administrator” (false) A name of a user group. The user must belong to this group for the machine configuration to be verified.
HotFixMonitor
This check is for Check Point hotfixes. Some of these parameters may not appear at all, or may appear more than once in the local.scv file. These parameters can be in OR and AND sections.
Parameter Description
HotFix_Number (true) A number of a system HotFix to be checked. In order for the machine to be verified, the HotFix should be installed, for example: “823980(true)” verifies that Microsoft’s RPC patch is installed on the operating system.
HotFix_Name (true) The full name of a system HotFix to be checked. In order for the machine to be verified, the HotFix should be installed, for example: “KB823980(true)” verifies that Microsoft’s RPC patch is installed on the operating system.
HWMonitor
This check is for CPU details. It does not support the begin_or or begin_and.
Parameter Description
cputype (“GenuineIntel”) The CPU type as described in the vendor ID string. The string has to be exactly 12 characters long. For example: “GenuineIntel”, or “AuthenticAMD”, or “aaa bbb ccc ” where spaces count as a character.
cpufamily(6) The CPU family.
cpumodel(9) The CPU model.
OsMonitor
This check is only for the operating system version and service pack, or only the screen saver configuration. If none of these parameters appear, OsMonitor will not check the system’s version and service pack on Windows XP platforms.
major_os_version_number_xp
minor_os_version_number_xp
os_version_operand_xp
service_pack_major_version_number_xp
service_pack_minor_version_number_xp
service_pack_version_operand_xp
If the parameter “enforce_screen_saver_minutes_to_activate” does not appear, the screen saver configuration is not checked.
OSMonitor does not support begin_or or begin_and.
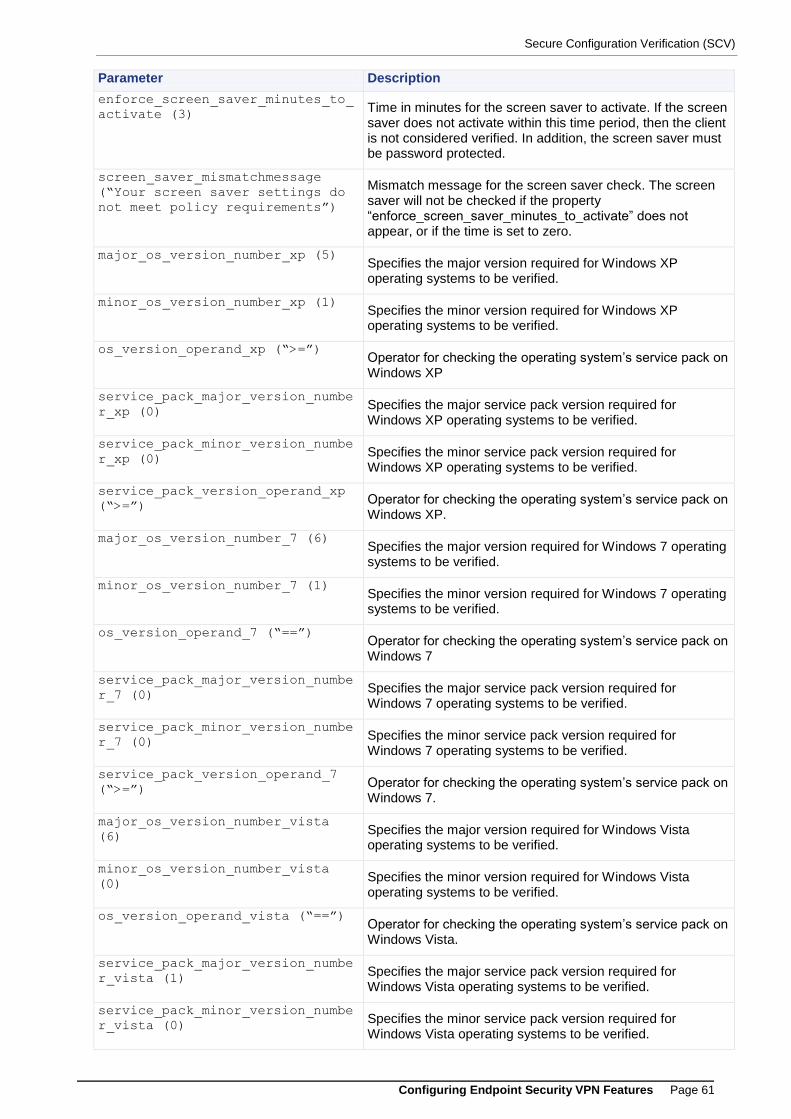
Secure Configuration Verification (SCV)
Configuring Endpoint Security VPN Features Page 61
Parameter Description
enforce_screen_saver_minutes_to_
activate (3) Time in minutes for the screen saver to activate. If the screen saver does not activate within this time period, then the client is not considered verified. In addition, the screen saver must be password protected.
screen_saver_mismatchmessage
(“Your screen saver settings do
not meet policy requirements”)
Mismatch message for the screen saver check. The screen saver will not be checked if the property “enforce_screen_saver_minutes_to_activate” does not appear, or if the time is set to zero.
major_os_version_number_xp (5) Specifies the major version required for Windows XP operating systems to be verified.
minor_os_version_number_xp (1) Specifies the minor version required for Windows XP operating systems to be verified.
os_version_operand_xp (“>=”) Operator for checking the operating system’s service pack on Windows XP
service_pack_major_version_numbe
r_xp (0) Specifies the major service pack version required for Windows XP operating systems to be verified.
service_pack_minor_version_numbe
r_xp (0) Specifies the minor service pack version required for Windows XP operating systems to be verified.
service_pack_version_operand_xp
(“>=”) Operator for checking the operating system’s service pack on Windows XP.
major_os_version_number_7 (6) Specifies the major version required for Windows 7 operating systems to be verified.
minor_os_version_number_7 (1) Specifies the minor version required for Windows 7 operating systems to be verified.
os_version_operand_7 (“==”) Operator for checking the operating system’s service pack on Windows 7
service_pack_major_version_numbe
r_7 (0) Specifies the major service pack version required for Windows 7 operating systems to be verified.
service_pack_minor_version_numbe
r_7 (0) Specifies the minor service pack version required for Windows 7 operating systems to be verified.
service_pack_version_operand_7
(“>=”) Operator for checking the operating system’s service pack on Windows 7.
major_os_version_number_vista
(6) Specifies the major version required for Windows Vista operating systems to be verified.
minor_os_version_number_vista
(0) Specifies the minor version required for Windows Vista operating systems to be verified.
os_version_operand_vista (“==”) Operator for checking the operating system’s service pack on Windows Vista.
service_pack_major_version_numbe
r_vista (1) Specifies the major service pack version required for Windows Vista operating systems to be verified.
service_pack_minor_version_numbe
r_vista (0) Specifies the minor service pack version required for Windows Vista operating systems to be verified.
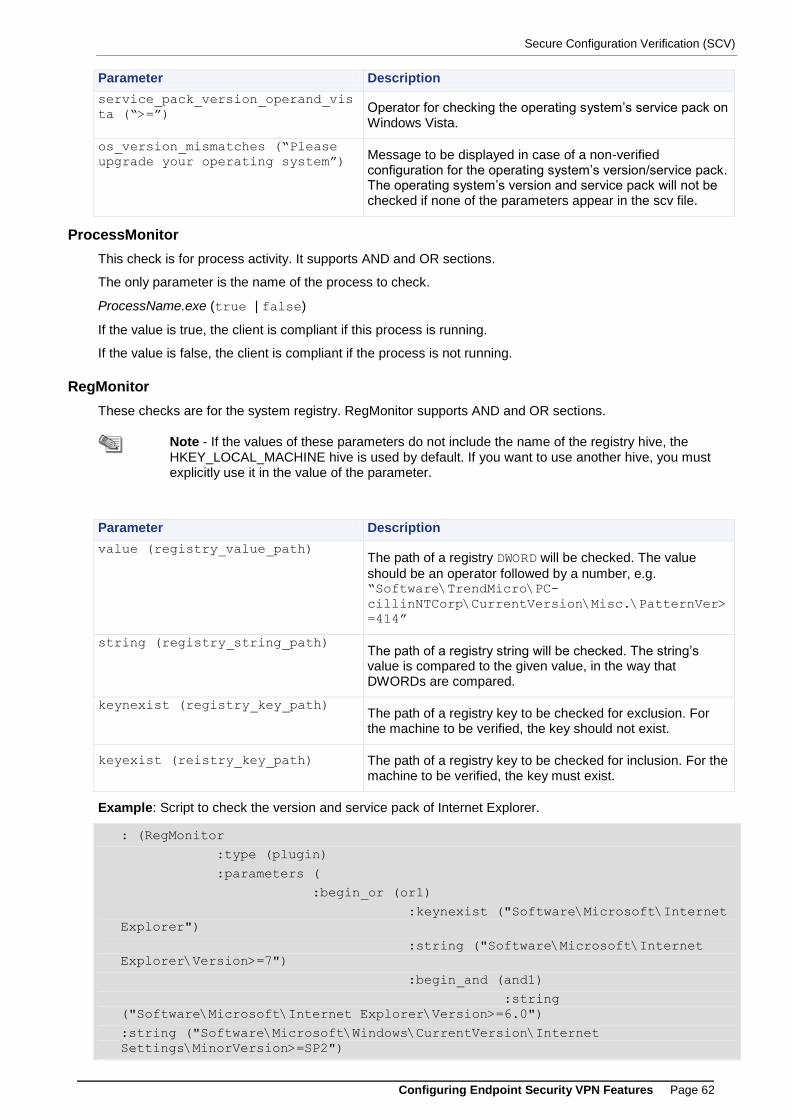
Secure Configuration Verification (SCV)
Configuring Endpoint Security VPN Features Page 62
Parameter Description
service_pack_version_operand_vis
ta (“>=”) Operator for checking the operating system’s service pack on Windows Vista.
os_version_mismatches (“Please
upgrade your operating system”) Message to be displayed in case of a non-verified configuration for the operating system’s version/service pack. The operating system’s version and service pack will not be checked if none of the parameters appear in the scv file.
ProcessMonitor
This check is for process activity. It supports AND and OR sections.
The only parameter is the name of the process to check.
ProcessName.exe (true | false)
If the value is true, the client is compliant if this process is running.
If the value is false, the client is compliant if the process is not running.
RegMonitor
These checks are for the system registry. RegMonitor supports AND and OR sections.
Note - If the values of these parameters do not include the name of the registry hive, the HKEY_LOCAL_MACHINE hive is used by default. If you want to use another hive, you must explicitly use it in the value of the parameter.
Parameter Description
value (registry_value_path) The path of a registry DWORD will be checked. The value
should be an operator followed by a number, e.g. “Software\TrendMicro\PC-
cillinNTCorp\CurrentVersion\Misc.\PatternVer>
=414”
string (registry_string_path) The path of a registry string will be checked. The string’s value is compared to the given value, in the way that DWORDs are compared.
keynexist (registry_key_path) The path of a registry key to be checked for exclusion. For the machine to be verified, the key should not exist.
keyexist (reistry_key_path) The path of a registry key to be checked for inclusion. For the machine to be verified, the key must exist.
Example: Script to check the version and service pack of Internet Explorer.
: (RegMonitor
:type (plugin)
:parameters (
:begin_or (or1)
:keynexist ("Software\Microsoft\Internet
Explorer")
:string ("Software\Microsoft\Internet
Explorer\Version>=7")
:begin_and (and1)
:string
("Software\Microsoft\Internet Explorer\Version>=6.0")
:string ("Software\Microsoft\Windows\CurrentVersion\Internet
Settings\MinorVersion>=SP2")
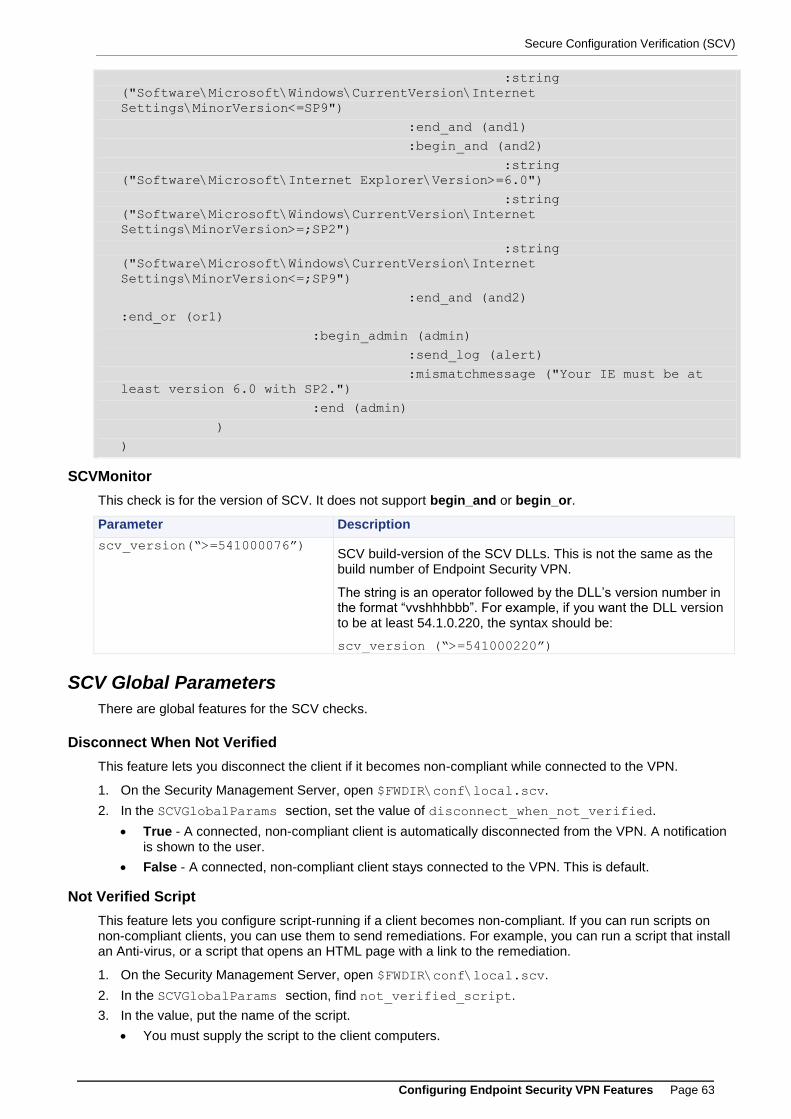
Secure Configuration Verification (SCV)
Configuring Endpoint Security VPN Features Page 63
:string
("Software\Microsoft\Windows\CurrentVersion\Internet
Settings\MinorVersion<=SP9")
:end_and (and1)
:begin_and (and2)
:string
("Software\Microsoft\Internet Explorer\Version>=6.0")
:string
("Software\Microsoft\Windows\CurrentVersion\Internet
Settings\MinorVersion>=;SP2")
:string
("Software\Microsoft\Windows\CurrentVersion\Internet
Settings\MinorVersion<=;SP9")
:end_and (and2)
:end_or (or1)
:begin_admin (admin)
:send_log (alert)
:mismatchmessage ("Your IE must be at
least version 6.0 with SP2.")
:end (admin)
)
)
SCVMonitor
This check is for the version of SCV. It does not support begin_and or begin_or.
Parameter Description
scv_version(“>=541000076”) SCV build-version of the SCV DLLs. This is not the same as the build number of Endpoint Security VPN.
The string is an operator followed by the DLL’s version number in the format “vvshhhbbb”. For example, if you want the DLL version to be at least 54.1.0.220, the syntax should be:
scv_version (“>=541000220”)
SCV Global Parameters
There are global features for the SCV checks.
Disconnect When Not Verified
This feature lets you disconnect the client if it becomes non-compliant while connected to the VPN.
1. On the Security Management Server, open $FWDIR\conf\local.scv.
2. In the SCVGlobalParams section, set the value of disconnect_when_not_verified.
True - A connected, non-compliant client is automatically disconnected from the VPN. A notification is shown to the user.
False - A connected, non-compliant client stays connected to the VPN. This is default.
Not Verified Script
This feature lets you configure script-running if a client becomes non-compliant. If you can run scripts on non-compliant clients, you can use them to send remediations. For example, you can run a script that install an Anti-virus, or a script that opens an HTML page with a link to the remediation.
1. On the Security Management Server, open $FWDIR\conf\local.scv.
2. In the SCVGlobalParams section, find not_verified_script.
3. In the value, put the name of the script.
You must supply the script to the client computers.

Secure Configuration Verification (SCV)
Configuring Endpoint Security VPN Features Page 64
If necessary, you must make sure it is in the search path.
4. Set the value of not_verified_script_run_show.
True - The user will see the script running.
False - The script run will be hidden. (default)
5. Set the value not_verified_script_run_admin.
True - The script will run under the Endpoint Security client Service account with administrator permissions, even if the user does not have these permissions.
False - The script will run under the local user account permissions (default). If administrator permissions are necessary, the script will fail.
6. Set the value of not_verified_script_run_always.
True - The script runs every time the client becomes non-compliant.
False - The script runs the first time that the client becomes non-compliant. (default)
Enforcing the SCV Checks
To enforce a specific SCV check:
Set the SCV parameters in SCVNames.
Include the name of the check in SCVPolicy.
Sample
You must maintain the same indentation format.
(SCVObject
:SCVNames (
: (BrowserMonitor
:type (plugin)
:parameters (
:browser_major_version (5)
:browser_minor_version (0)
:browser_version_operand (">=")
:browser_version_mismatchmessage ("Upgrade your Internet
browser.")
:intranet_download_signed_activex (disable)
:intranet_run_activex (disable)
:intranet_download_files (disable)
:intranet_java_permissions (disable)
:trusted_download_signed_activex (disable)
:trusted_run_activex (disable)
:trusted_download_files (disable)
:trusted_java_permissions (disable)
:internet_download_signed_activex (disable)
:internet_run_activex (disable)
:internet_download_files (disable)
:internet_java_permissions (disable)
:restricted_download_signed_activex (disable)
:restricted_run_activex (disable)

Secure Configuration Verification (SCV)
Configuring Endpoint Security VPN Features Page 65
:restricted_download_files (disable)
:restricted_java_permissions (disable)
:send_log (alert)
:internet_options_mismatch_message ("Your Internet browser
settings do not meet policy requirements\nPlease check the following
settings:\n1. In your browser, go to Tools -> Internet Options -> Security.\n2.
For each Web content zone, select custom level and disable the following items:
DownLoad signed ActiveX, Run ActiveX Controls, Download Files and Java
Permissions.")
)
)
: (OsMonitor
:type (plugin)
:parameters (
:os_version_mismatchmessage ("Upgrade your operating
system.")
:enforce_screen_saver_minutes_to_activate (3)
:screen_saver_mismatchmessage ("Your screen saver settings do
not meet policy requirements\nCheck these settings:\n1. Right click on your
desktop and select properties.\n2. Select the Screen Saver tab.\n3. Under Wait
choose 3 minutes and check the Password Protection box.")
:send_log (log)
:major_os_version_number_xp (5)
:minor_os_version_number_xp (1)
:os_version_operand_xp ("==")
:service_pack_major_version_number_xp (0)
:service_pack_minor_version_number_xp (0)
:service_pack_version_operand_xp (">=")
:major_os_version_number_7 (6)
:minor_os_version_number_7 (1)
:os_version_operand_7 ("==")
:service_pack_major_version_number_7 (0)
:service_pack_minor_version_number_7 (0)
:service_pack_version_operand_7 (">=")
:major_os_version_number_vista (0)
:minor_os_version_number_vista (6)
:os_version_operand_vista ("==")
:service_pack_major_version_number_vista (1)
:service_pack_minor_version_number_vista (0)
:service_pack_version_operand_vista (">=")
)
)
: (ProcessMonitor
:type (plugin)
:parameters (
:begin_or (or1)
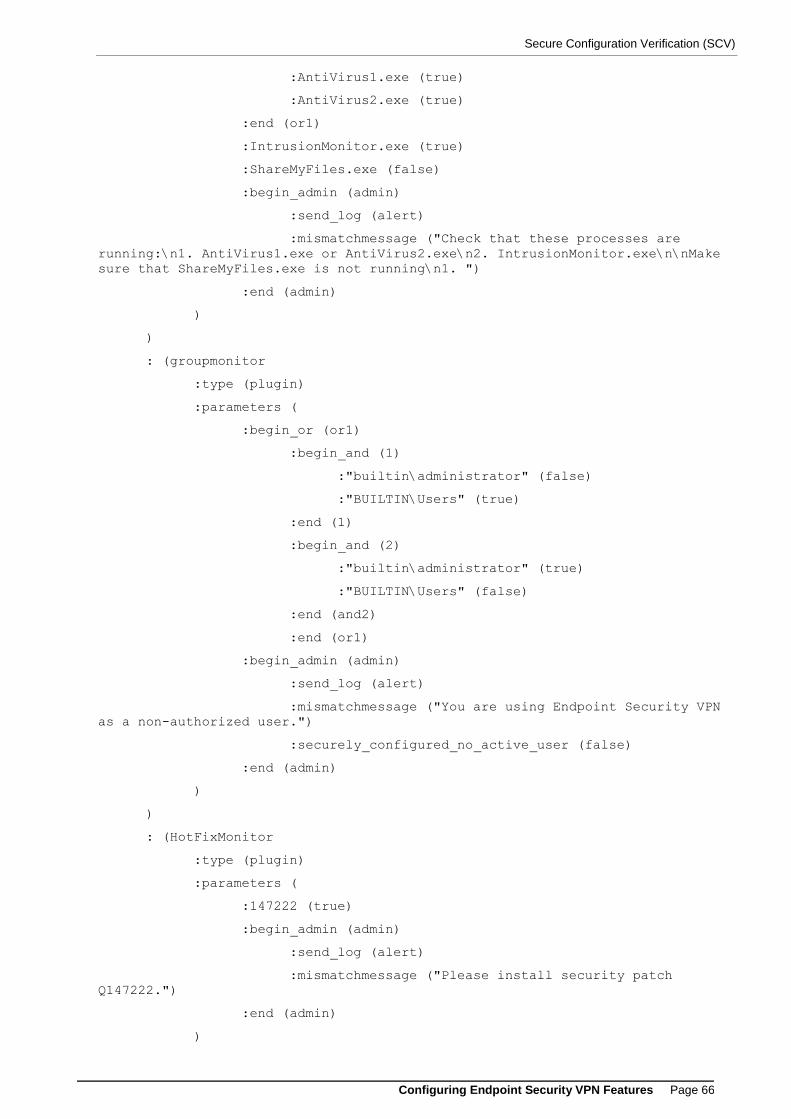
Secure Configuration Verification (SCV)
Configuring Endpoint Security VPN Features Page 66
:AntiVirus1.exe (true)
:AntiVirus2.exe (true)
:end (or1)
:IntrusionMonitor.exe (true)
:ShareMyFiles.exe (false)
:begin_admin (admin)
:send_log (alert)
:mismatchmessage ("Check that these processes are
running:\n1. AntiVirus1.exe or AntiVirus2.exe\n2. IntrusionMonitor.exe\n\nMake
sure that ShareMyFiles.exe is not running\n1. ")
:end (admin)
)
)
: (groupmonitor
:type (plugin)
:parameters (
:begin_or (or1)
:begin_and (1)
:"builtin\administrator" (false)
:"BUILTIN\Users" (true)
:end (1)
:begin_and (2)
:"builtin\administrator" (true)
:"BUILTIN\Users" (false)
:end (and2)
:end (or1)
:begin_admin (admin)
:send_log (alert)
:mismatchmessage ("You are using Endpoint Security VPN
as a non-authorized user.")
:securely_configured_no_active_user (false)
:end (admin)
)
)
: (HotFixMonitor
:type (plugin)
:parameters (
:147222 (true)
:begin_admin (admin)
:send_log (alert)
:mismatchmessage ("Please install security patch
Q147222.")
:end (admin)
)
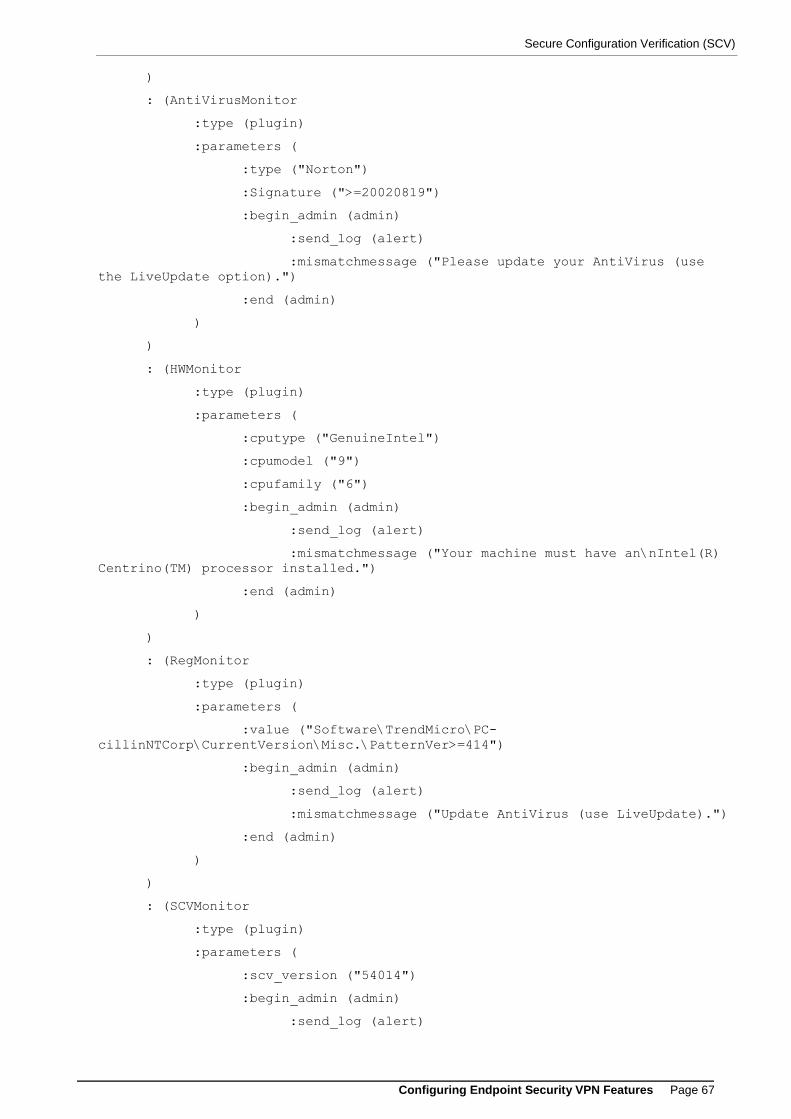
Secure Configuration Verification (SCV)
Configuring Endpoint Security VPN Features Page 67
)
: (AntiVirusMonitor
:type (plugin)
:parameters (
:type ("Norton")
:Signature (">=20020819")
:begin_admin (admin)
:send_log (alert)
:mismatchmessage ("Please update your AntiVirus (use
the LiveUpdate option).")
:end (admin)
)
)
: (HWMonitor
:type (plugin)
:parameters (
:cputype ("GenuineIntel")
:cpumodel ("9")
:cpufamily ("6")
:begin_admin (admin)
:send_log (alert)
:mismatchmessage ("Your machine must have an\nIntel(R)
Centrino(TM) processor installed.")
:end (admin)
)
)
: (RegMonitor
:type (plugin)
:parameters (
:value ("Software\TrendMicro\PC-
cillinNTCorp\CurrentVersion\Misc.\PatternVer>=414")
:begin_admin (admin)
:send_log (alert)
:mismatchmessage ("Update AntiVirus (use LiveUpdate).")
:end (admin)
)
)
: (SCVMonitor
:type (plugin)
:parameters (
:scv_version ("54014")
:begin_admin (admin)
:send_log (alert)
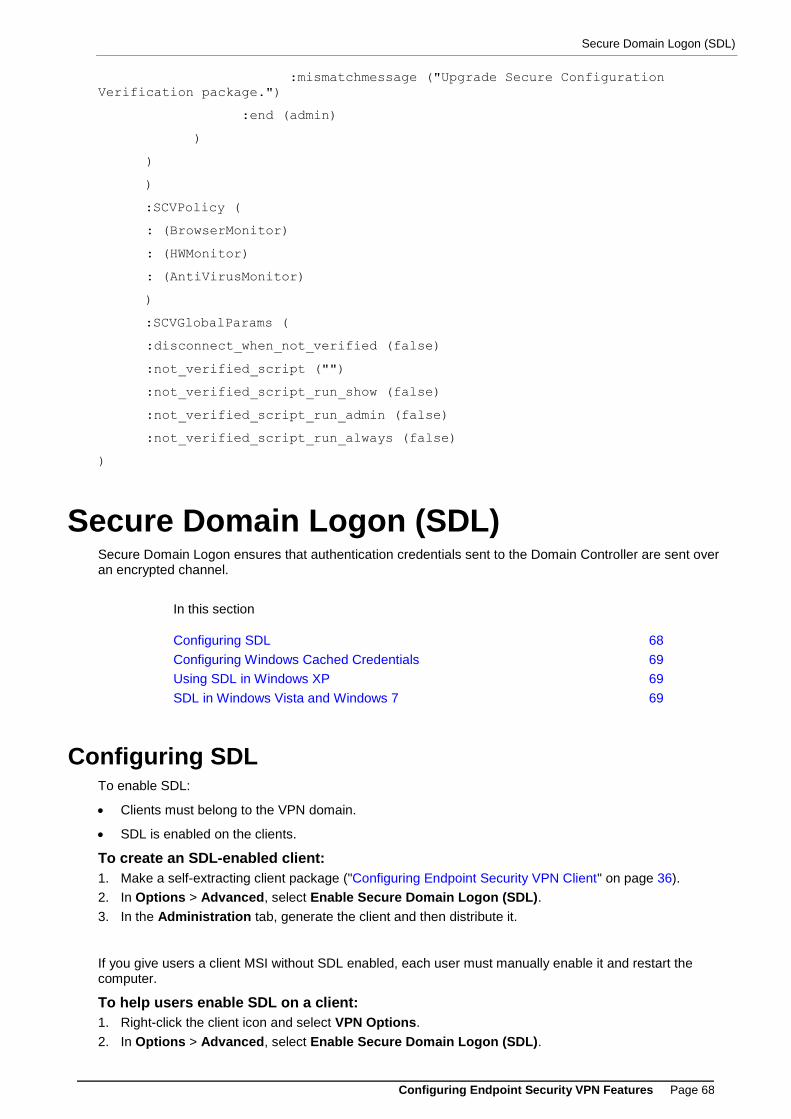
Secure Domain Logon (SDL)
Configuring Endpoint Security VPN Features Page 68
:mismatchmessage ("Upgrade Secure Configuration
Verification package.")
:end (admin)
)
)
)
:SCVPolicy (
: (BrowserMonitor)
: (HWMonitor)
: (AntiVirusMonitor)
)
:SCVGlobalParams (
:disconnect_when_not_verified (false)
:not_verified_script ("")
:not_verified_script_run_show (false)
:not_verified_script_run_admin (false)
:not_verified_script_run_always (false)
)
Secure Domain Logon (SDL) Secure Domain Logon ensures that authentication credentials sent to the Domain Controller are sent over an encrypted channel.
In this section
Configuring SDL 68
Configuring Windows Cached Credentials 69
Using SDL in Windows XP 69
SDL in Windows Vista and Windows 7 69
Configuring SDL To enable SDL:
Clients must belong to the VPN domain.
SDL is enabled on the clients.
To create an SDL-enabled client:
1. Make a self-extracting client package ("Configuring Endpoint Security VPN Client" on page 36).
2. In Options > Advanced, select Enable Secure Domain Logon (SDL).
3. In the Administration tab, generate the client and then distribute it.
If you give users a client MSI without SDL enabled, each user must manually enable it and restart the computer.
To help users enable SDL on a client:
1. Right-click the client icon and select VPN Options.
2. In Options > Advanced, select Enable Secure Domain Logon (SDL).
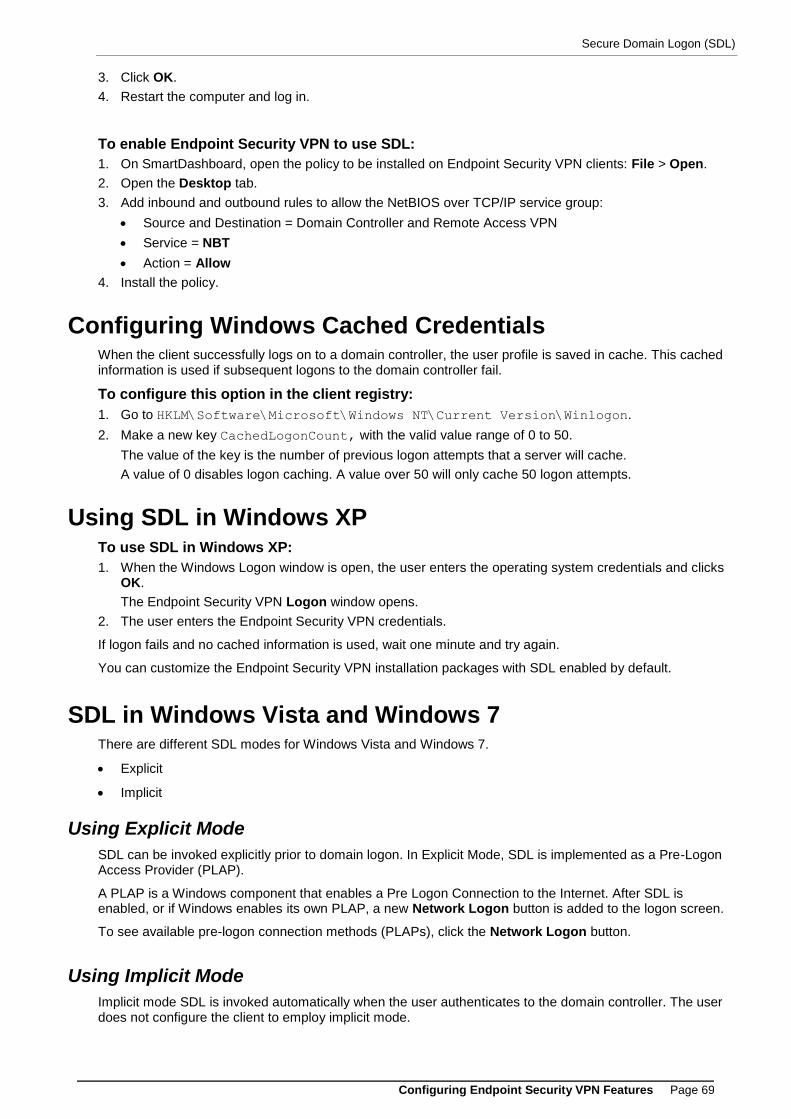
Secure Domain Logon (SDL)
Configuring Endpoint Security VPN Features Page 69
3. Click OK.
4. Restart the computer and log in.
To enable Endpoint Security VPN to use SDL:
1. On SmartDashboard, open the policy to be installed on Endpoint Security VPN clients: File > Open.
2. Open the Desktop tab.
3. Add inbound and outbound rules to allow the NetBIOS over TCP/IP service group:
Source and Destination = Domain Controller and Remote Access VPN
Service = NBT
Action = Allow
4. Install the policy.
Configuring Windows Cached Credentials When the client successfully logs on to a domain controller, the user profile is saved in cache. This cached information is used if subsequent logons to the domain controller fail.
To configure this option in the client registry:
1. Go to HKLM\Software\Microsoft\Windows NT\Current Version\Winlogon.
2. Make a new key CachedLogonCount, with the valid value range of 0 to 50.
The value of the key is the number of previous logon attempts that a server will cache.
A value of 0 disables logon caching. A value over 50 will only cache 50 logon attempts.
Using SDL in Windows XP To use SDL in Windows XP:
1. When the Windows Logon window is open, the user enters the operating system credentials and clicks OK.
The Endpoint Security VPN Logon window opens.
2. The user enters the Endpoint Security VPN credentials.
If logon fails and no cached information is used, wait one minute and try again.
You can customize the Endpoint Security VPN installation packages with SDL enabled by default.
SDL in Windows Vista and Windows 7 There are different SDL modes for Windows Vista and Windows 7.
Explicit
Implicit
Using Explicit Mode
SDL can be invoked explicitly prior to domain logon. In Explicit Mode, SDL is implemented as a Pre-Logon Access Provider (PLAP).
A PLAP is a Windows component that enables a Pre Logon Connection to the Internet. After SDL is enabled, or if Windows enables its own PLAP, a new Network Logon button is added to the logon screen.
To see available pre-logon connection methods (PLAPs), click the Network Logon button.
Using Implicit Mode
Implicit mode SDL is invoked automatically when the user authenticates to the domain controller. The user does not configure the client to employ implicit mode.
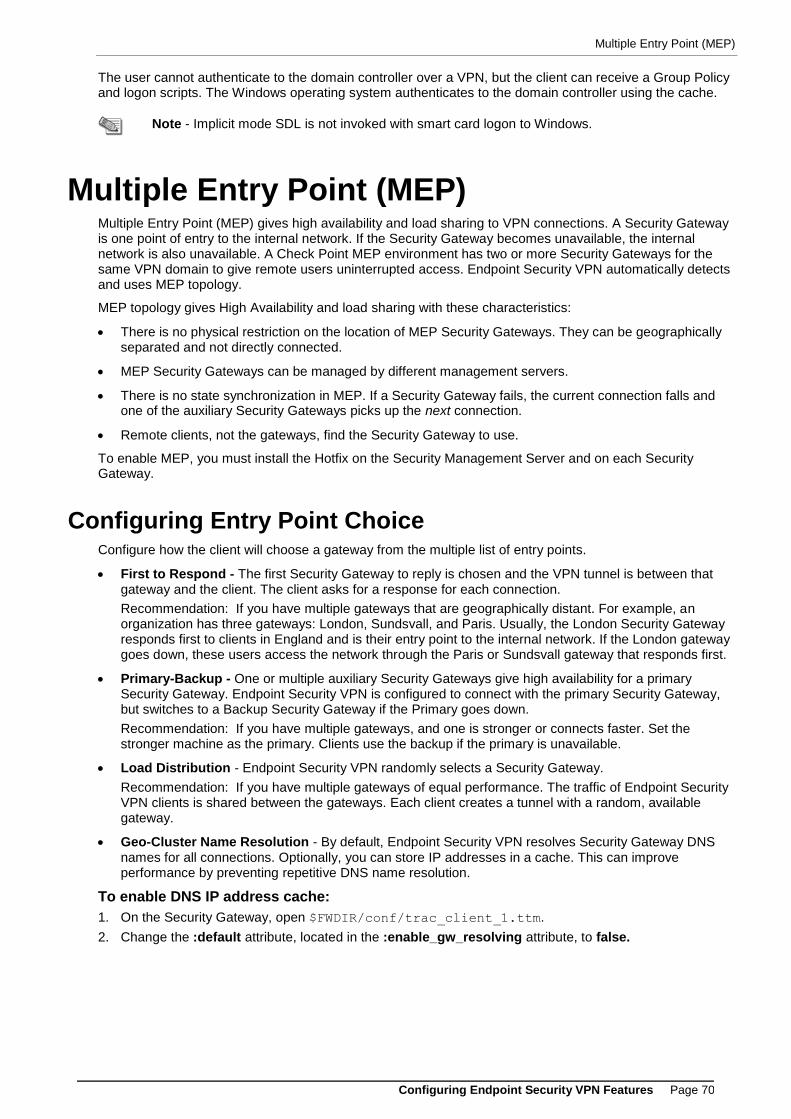
Multiple Entry Point (MEP)
Configuring Endpoint Security VPN Features Page 70
The user cannot authenticate to the domain controller over a VPN, but the client can receive a Group Policy and logon scripts. The Windows operating system authenticates to the domain controller using the cache.
Note - Implicit mode SDL is not invoked with smart card logon to Windows.
Multiple Entry Point (MEP) Multiple Entry Point (MEP) gives high availability and load sharing to VPN connections. A Security Gateway is one point of entry to the internal network. If the Security Gateway becomes unavailable, the internal network is also unavailable. A Check Point MEP environment has two or more Security Gateways for the same VPN domain to give remote users uninterrupted access. Endpoint Security VPN automatically detects and uses MEP topology.
MEP topology gives High Availability and load sharing with these characteristics:
There is no physical restriction on the location of MEP Security Gateways. They can be geographically separated and not directly connected.
MEP Security Gateways can be managed by different management servers.
There is no state synchronization in MEP. If a Security Gateway fails, the current connection falls and one of the auxiliary Security Gateways picks up the next connection.
Remote clients, not the gateways, find the Security Gateway to use.
To enable MEP, you must install the Hotfix on the Security Management Server and on each Security Gateway.
Configuring Entry Point Choice Configure how the client will choose a gateway from the multiple list of entry points.
First to Respond - The first Security Gateway to reply is chosen and the VPN tunnel is between that gateway and the client. The client asks for a response for each connection.
Recommendation: If you have multiple gateways that are geographically distant. For example, an organization has three gateways: London, Sundsvall, and Paris. Usually, the London Security Gateway responds first to clients in England and is their entry point to the internal network. If the London gateway goes down, these users access the network through the Paris or Sundsvall gateway that responds first.
Primary-Backup - One or multiple auxiliary Security Gateways give high availability for a primary Security Gateway. Endpoint Security VPN is configured to connect with the primary Security Gateway, but switches to a Backup Security Gateway if the Primary goes down.
Recommendation: If you have multiple gateways, and one is stronger or connects faster. Set the stronger machine as the primary. Clients use the backup if the primary is unavailable.
Load Distribution - Endpoint Security VPN randomly selects a Security Gateway.
Recommendation: If you have multiple gateways of equal performance. The traffic of Endpoint Security VPN clients is shared between the gateways. Each client creates a tunnel with a random, available gateway.
Geo-Cluster Name Resolution - By default, Endpoint Security VPN resolves Security Gateway DNS names for all connections. Optionally, you can store IP addresses in a cache. This can improve performance by preventing repetitive DNS name resolution.
To enable DNS IP address cache:
1. On the Security Gateway, open $FWDIR/conf/trac_client_1.ttm.
2. Change the :default attribute, located in the :enable_gw_resolving attribute, to false.
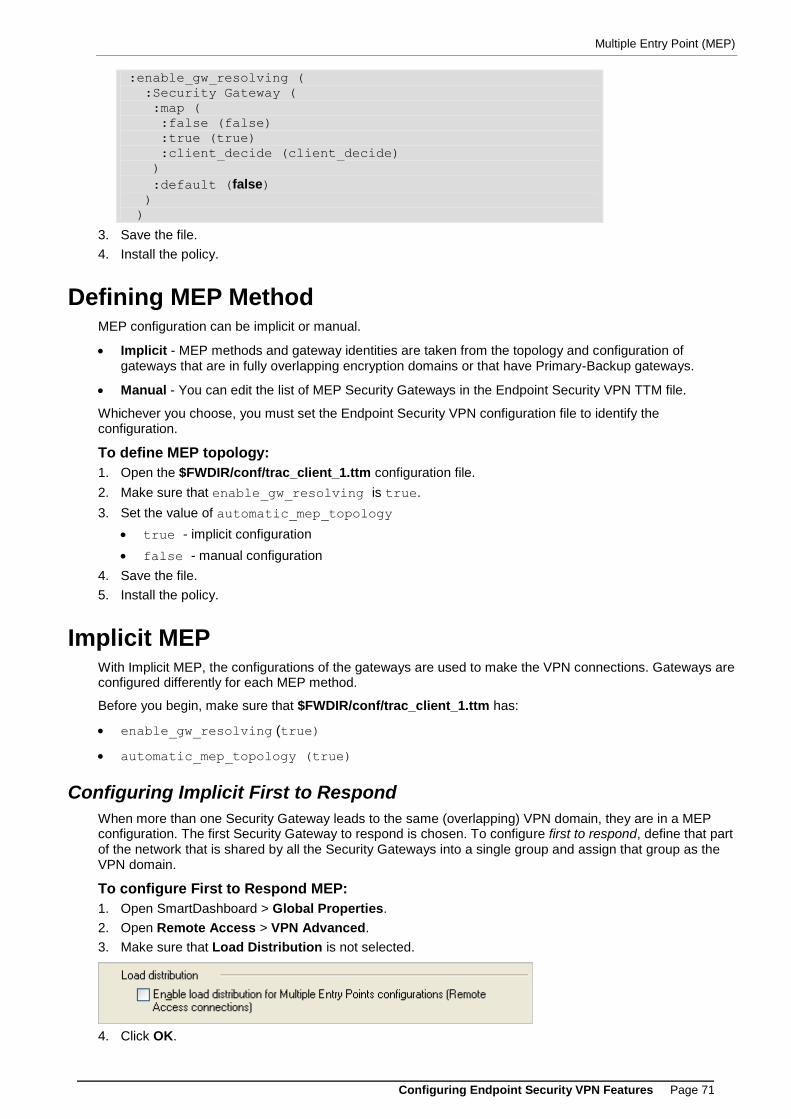
Multiple Entry Point (MEP)
Configuring Endpoint Security VPN Features Page 71
:enable_gw_resolving (
:Security Gateway (
:map (
:false (false)
:true (true)
:client_decide (client_decide)
)
:default (false) )
)
3. Save the file.
4. Install the policy.
Defining MEP Method MEP configuration can be implicit or manual.
Implicit - MEP methods and gateway identities are taken from the topology and configuration of gateways that are in fully overlapping encryption domains or that have Primary-Backup gateways.
Manual - You can edit the list of MEP Security Gateways in the Endpoint Security VPN TTM file.
Whichever you choose, you must set the Endpoint Security VPN configuration file to identify the configuration.
To define MEP topology:
1. Open the $FWDIR/conf/trac_client_1.ttm configuration file.
2. Make sure that enable_gw_resolving is true.
3. Set the value of automatic_mep_topology
true - implicit configuration
false - manual configuration
4. Save the file.
5. Install the policy.
Implicit MEP With Implicit MEP, the configurations of the gateways are used to make the VPN connections. Gateways are configured differently for each MEP method.
Before you begin, make sure that $FWDIR/conf/trac_client_1.ttm has:
enable_gw_resolving (true)
automatic_mep_topology (true)
Configuring Implicit First to Respond
When more than one Security Gateway leads to the same (overlapping) VPN domain, they are in a MEP configuration. The first Security Gateway to respond is chosen. To configure first to respond, define that part of the network that is shared by all the Security Gateways into a single group and assign that group as the VPN domain.
To configure First to Respond MEP:
1. Open SmartDashboard > Global Properties.
2. Open Remote Access > VPN Advanced.
3. Make sure that Load Distribution is not selected.
4. Click OK.
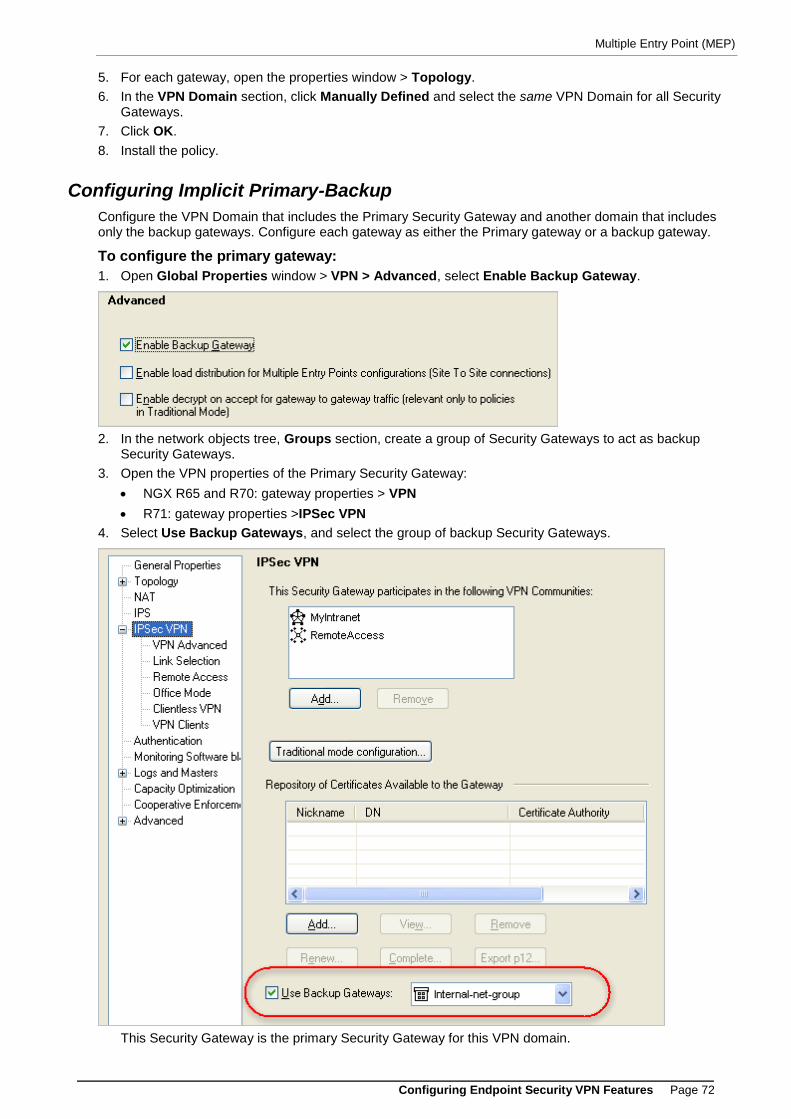
Multiple Entry Point (MEP)
Configuring Endpoint Security VPN Features Page 72
5. For each gateway, open the properties window > Topology.
6. In the VPN Domain section, click Manually Defined and select the same VPN Domain for all Security Gateways.
7. Click OK.
8. Install the policy.
Configuring Implicit Primary-Backup
Configure the VPN Domain that includes the Primary Security Gateway and another domain that includes only the backup gateways. Configure each gateway as either the Primary gateway or a backup gateway.
To configure the primary gateway:
1. Open Global Properties window > VPN > Advanced, select Enable Backup Gateway.
2. In the network objects tree, Groups section, create a group of Security Gateways to act as backup
Security Gateways.
3. Open the VPN properties of the Primary Security Gateway:
NGX R65 and R70: gateway properties > VPN
R71: gateway properties >IPSec VPN
4. Select Use Backup Gateways, and select the group of backup Security Gateways.
This Security Gateway is the primary Security Gateway for this VPN domain.
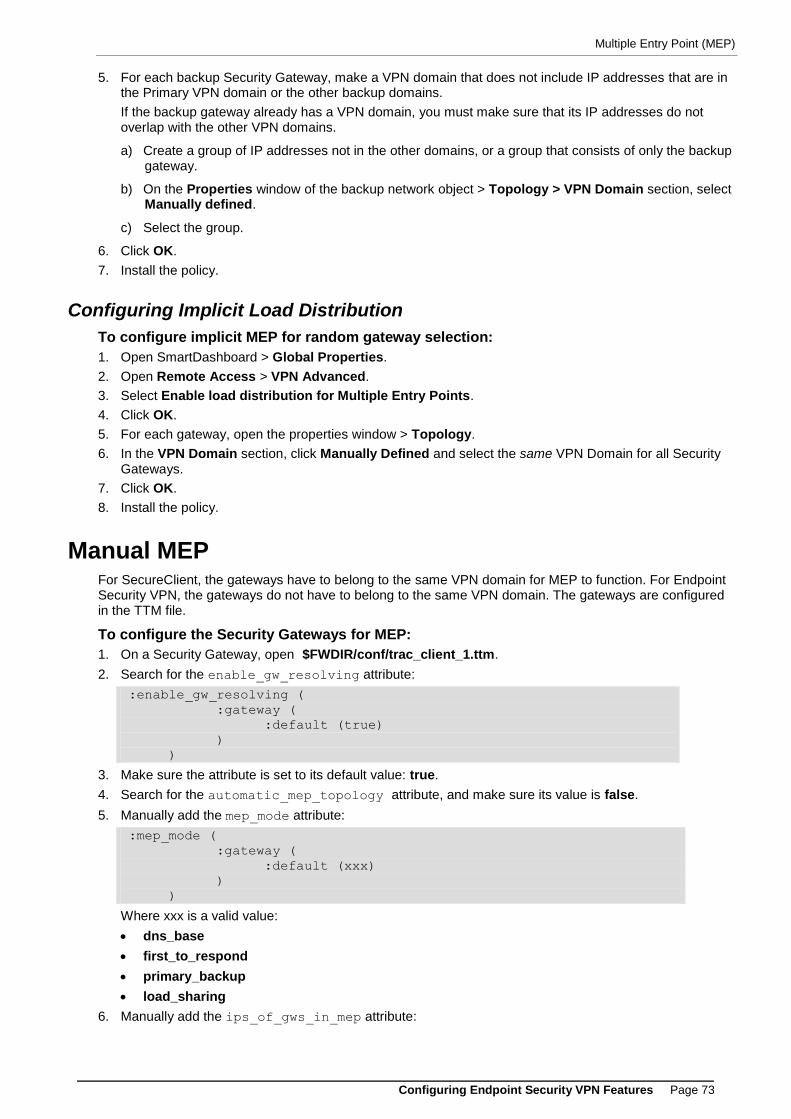
Multiple Entry Point (MEP)
Configuring Endpoint Security VPN Features Page 73
5. For each backup Security Gateway, make a VPN domain that does not include IP addresses that are in the Primary VPN domain or the other backup domains.
If the backup gateway already has a VPN domain, you must make sure that its IP addresses do not overlap with the other VPN domains.
a) Create a group of IP addresses not in the other domains, or a group that consists of only the backup gateway.
b) On the Properties window of the backup network object > Topology > VPN Domain section, select Manually defined.
c) Select the group.
6. Click OK.
7. Install the policy.
Configuring Implicit Load Distribution
To configure implicit MEP for random gateway selection:
1. Open SmartDashboard > Global Properties.
2. Open Remote Access > VPN Advanced.
3. Select Enable load distribution for Multiple Entry Points.
4. Click OK.
5. For each gateway, open the properties window > Topology.
6. In the VPN Domain section, click Manually Defined and select the same VPN Domain for all Security Gateways.
7. Click OK.
8. Install the policy.
Manual MEP For SecureClient, the gateways have to belong to the same VPN domain for MEP to function. For Endpoint Security VPN, the gateways do not have to belong to the same VPN domain. The gateways are configured in the TTM file.
To configure the Security Gateways for MEP:
1. On a Security Gateway, open $FWDIR/conf/trac_client_1.ttm.
2. Search for the enable_gw_resolving attribute:
:enable_gw_resolving (
:gateway (
:default (true)
)
)
3. Make sure the attribute is set to its default value: true.
4. Search for the automatic_mep_topology attribute, and make sure its value is false.
5. Manually add the mep_mode attribute:
:mep_mode (
:gateway (
:default (xxx)
)
)
Where xxx is a valid value:
dns_base
first_to_respond
primary_backup
load_sharing
6. Manually add the ips_of_gws_in_mep attribute:
Global Properties for Endpoint Security VPN Gateways
Configuring Endpoint Security VPN Features Page 74
:ips_of_gws_in_mep (
:gateway (
:default (192.168.53.220À.168.53.133&#)
)
)
These are the IP addresses the client should try.
IP addresses are separated by an ampersand and hash symbol (&#)
The last IP address in the list has a final &#.
7. Save the file.
8. Install the policy.
Making a Desktop Rule for MEP To use MEP, traffic to multiple sites in the encryption domain must be allowed. But the Desktop Policy sets the main site as the default Destination for outbound traffic. You must make sure that your policy allows traffic to the gateways in the encryption domain.
To add the MEP Rule:
1. In SmartDashboard, open the Desktop tab.
2. In Outbound rules, add a new rule:
Destination - a Group network object that contains all gateways in the encryption domain.
Service - the Visitor Mode service (default is 443), the NAT-T port (default is 4500 UDP), and HTTP.
Action - Allow.
Global Properties for Endpoint Security VPN Gateways
Many Endpoint Security VPN properties are centrally managed on the server, rather than per gateway or per client.
To configure Endpoint Security VPN features in Global Properties:
1. Open SmartDashboard.
2. Open Policy > Global Properties.
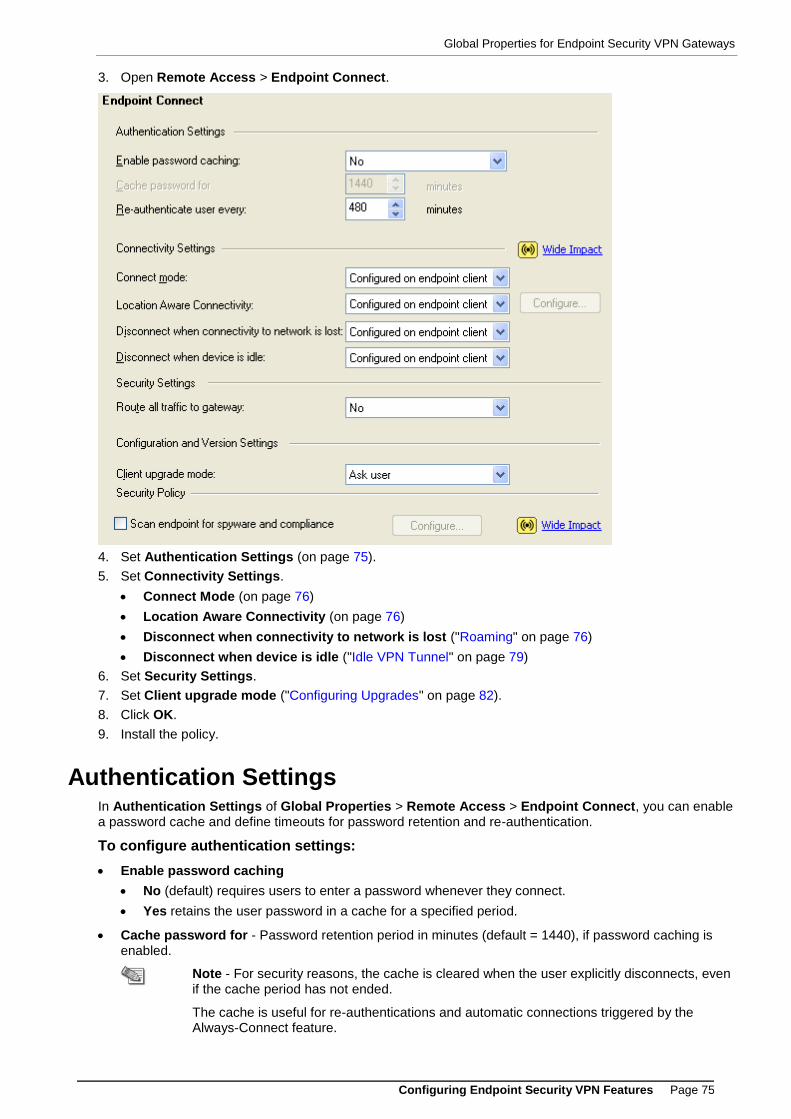
Global Properties for Endpoint Security VPN Gateways
Configuring Endpoint Security VPN Features Page 75
3. Open Remote Access > Endpoint Connect.
4. Set Authentication Settings (on page 75).
5. Set Connectivity Settings.
Connect Mode (on page 76)
Location Aware Connectivity (on page 76)
Disconnect when connectivity to network is lost ("Roaming" on page 76)
Disconnect when device is idle ("Idle VPN Tunnel" on page 79)
6. Set Security Settings.
7. Set Client upgrade mode ("Configuring Upgrades" on page 82).
8. Click OK.
9. Install the policy.
Authentication Settings In Authentication Settings of Global Properties > Remote Access > Endpoint Connect, you can enable a password cache and define timeouts for password retention and re-authentication.
To configure authentication settings:
Enable password caching
No (default) requires users to enter a password whenever they connect.
Yes retains the user password in a cache for a specified period.
Cache password for - Password retention period in minutes (default = 1440), if password caching is enabled.
Note - For security reasons, the cache is cleared when the user explicitly disconnects, even if the cache period has not ended.
The cache is useful for re-authentications and automatic connections triggered by the Always-Connect feature.
Global Properties for Endpoint Security VPN Gateways
Configuring Endpoint Security VPN Features Page 76
Re-authenticate - Authentication timeout in minutes (default = 480), after which users must re-authenticate the current connection.
Connect Mode In the Connectivity Settings of Global Properties > Remote Access > Endpoint Connect, configure how clients connect to the gateway.
Manual - VPN connections are not initiated automatically. Users select a site and authenticate every time they need to connect.
Always connected - Endpoint Security VPN will automatically establish a connection to the last connected gateway.
Configured on endpoint client - Connection method is set by each Endpoint Security VPN client. In the client, this is configured on Sites > Properties > Settings.
Roaming If the main IP address of a client changes, interface roaming maintains the logical connection. The client tries to reconnect on every interface change. It stays in Reconnecting status until the network connection is returned or roaming times out.
Disconnect when connectivity to network is lost:
No - Roaming is set with unlimited timeout. The client keeps trying to reconnect until the session times-out.
Configured on the endpoint client - Default client configuration sets this option to false, so roaming is unlimited by default. If you create a client MSI that enabled the Disconnect option for clients, roaming is limited to the set time-out (default is 2 minutes).
Yes - Roaming is limited by a time-out that is 2 minutes by default. The client will give up on Roaming after the time-out passes and will fail the connection. If the time-out is set to 0, the client does not try to reconnect automatically after the main IP address changes.
You can configure how long the client will continue to roam until it fails the connection.
To configure the roaming timeout:
1. Open GuiDBedit.
2. Open the Global Properties category and find the endpoint_vpn_implicit_timeout parameter.
3. Enter the number of minutes that you want clients to roam before failing the connection.
Note - Some gateways do not accept a zero value for this setting.
4. Save the changes.
5. Close GuiDBedit.
6. Open SmartDashboard and install the policy.
Location Aware Connectivity Endpoint Security VPN intelligently detects whether or not it is inside the VPN domain (Enterprise LAN), and automatically connects or disconnects as required.
When the client is detected within the internal network, the VPN connection is terminated.
If the client is in Always-Connect mode, the VPN connection is established again when the client exits.
Choose a location awareness configuration.
Interface-topology-based (recommended)
The location is determined by the gateway interface that received the client connection, whether it is defined as internal or external in the topology. For an interface listed as both external and internal, the location is considered external.
Global Properties for Endpoint Security VPN Gateways
Configuring Endpoint Security VPN Features Page 77
The Interface-topology-based setting was introduced in Check Point NGX R65 HFA 60 and is the preferred method. It is reliable and requires no special configuration, but it has no GUI (it uses GuiDBedit). This setting requires the NGX R66 plug-in for Connectra on the management server.
Specific network considered as internal
The originating IP of the client connection, as seen from the gateway, is compared to a configured list of internal networks. To use this setting, you must configure the internal networks.
Domain Controller (DC) connectivity (default but limited)
The location is based on the availability of the DC on the client network, assuming the DC is accessible only from within the internal network (not externally or through the VPN tunnel).
Enabling Location Awareness
Before you begin: On NGX R65, make sure that the NGX R66 plug-in for Connectra is installed on the SmartCenter server.
To enable location awareness:
1. In SmartDashboard, open Global Properties > Remote Access > Endpoint Connect.
2. In Location Aware Connectivity, select Yes.
3. Click Configure.
Configuring Location Awareness
After you enable the Location Aware Connectivity feature, configure how it will operate.
To configure location awareness for topology:
1. After enabling the Location Awareness feature, save the policy and close SmartDashboard.
2. Connect to the Security Management Server with GuiDBedit.
3. On the Tables tab, open Global Properties > Properties > firewall_properties.
4. Open endpoint_vpn_preferences > endpoint_vpn_la_preferences and find the la_use_gw_topology_to_identify_location property.
5. Set the Value field in the Edit textbox to True.
6. Save and close.
7. Open SmartDashboard.
8. Install the policy.
To configure location awareness for internal and DC:
1. In Global Properties > Endpoint Connect, click Configure by Location Aware Connectivity.
The Location Awareness Settings window opens.
2. Select how clients are identified as internal.
a) Client can access its defined domain controller. See if client can access the Microsoft Domain controllers on the internal network, which are inaccessible through a VPN tunnel.
b) Client connection arrives from the following networks. Define a group of known internal networks. Click Manage to define a network.
3. Click OK.
4. Install the policy.
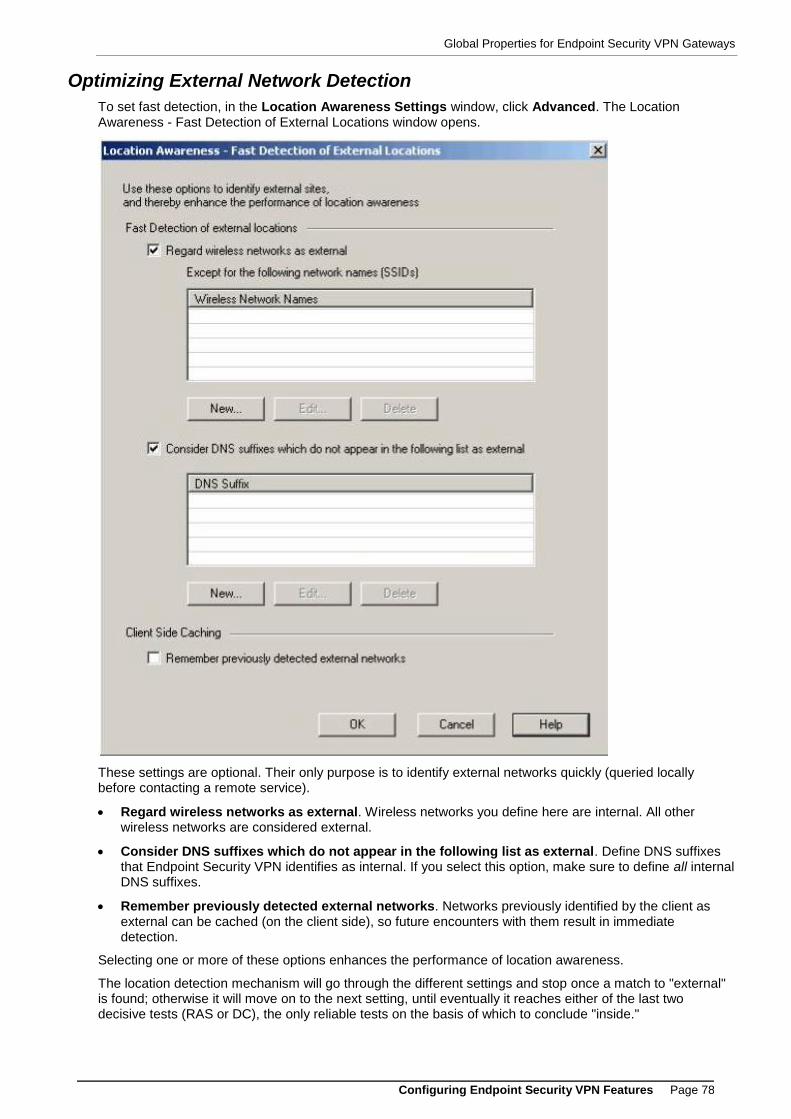
Global Properties for Endpoint Security VPN Gateways
Configuring Endpoint Security VPN Features Page 78
Optimizing External Network Detection
To set fast detection, in the Location Awareness Settings window, click Advanced. The Location Awareness - Fast Detection of External Locations window opens.
These settings are optional. Their only purpose is to identify external networks quickly (queried locally before contacting a remote service).
Regard wireless networks as external. Wireless networks you define here are internal. All other wireless networks are considered external.
Consider DNS suffixes which do not appear in the following list as external. Define DNS suffixes that Endpoint Security VPN identifies as internal. If you select this option, make sure to define all internal DNS suffixes.
Remember previously detected external networks. Networks previously identified by the client as external can be cached (on the client side), so future encounters with them result in immediate detection.
Selecting one or more of these options enhances the performance of location awareness.
The location detection mechanism will go through the different settings and stop once a match to "external" is found; otherwise it will move on to the next setting, until eventually it reaches either of the last two decisive tests (RAS or DC), the only reliable tests on the basis of which to conclude "inside."

Global Properties for Endpoint Security VPN Gateways
Configuring Endpoint Security VPN Features Page 79
Configuring Location Awareness for NGX R65 Gateways
On R65 SmartCenter servers without the Connectra R66 plug-in, Location Awareness does not appear in the SmartDashboard. You must configure the settings manually through trac_client_1.ttm. After you install the plug-in, most of the Location Awareness settings appear in the SmartDashboard or GuiDBedit. The values in the TTM file for these settings are ignored, and the file is not updated with values set in the SmartDashboard.
To configure location awareness in the configuration file:
1. Open $FWDIR/conf/trac_client_1.ttm on the gateway.
2. Enable location awareness:
location_awareness_enabled - set to client_decide or true
3. Set the parameters:
Parameter Description
la_detect_wlan_as_external Set to True to make sure wireless networks are treated as external locations, except for the internal wireless networks that you define as internal
la_wlan_networks_exceptions Enter the list of internal wireless networks.
la_defined_dns_suffixes Enter the list of internal DNS suffixes to make sure unknown DNS suffixes are treated as external locations. (This parameter is applied only if the list is not empty.)
la_prefer_dc_over_internal_ network
Set to True to find the location according to the Domain Controller, or leave as False to use the internal network configuration.
la_cache_external_networks Set to True to let the client save the detected external networks in a cache, for faster location awareness.
4. Save the file.
5. Install the policy.
Idle VPN Tunnel Typically, VPN tunnels carry work-related traffic. To protect sensitive data and access while a remote access user is away from the machine, make sure that idle tunnels are disconnected.
To configure tunnel idleness:
1. Connect to the Security Management Server with GuiDBedit.
2. Open the Global Properties > properties > firewall_properties object.
3. Find disconnect_on_idle and these parameters:
do_not_check_idleness_on_icmp_packets
do_not_check_idleness_on_these_services (Enter the port numbers for the services.)
enable_disconnect_on_idle
idle_timeout_in_minutes
4. Save and install the policy.
Intelligent Auto-Detect Endpoint Security VPN uses different network transports in parallel and automatically detects which is preferable. It always detects the optimal connectivity method for IKE and IPSec (and for IPSec transport during Roaming), so there is no additional configuration in the client.
Current transports in use:
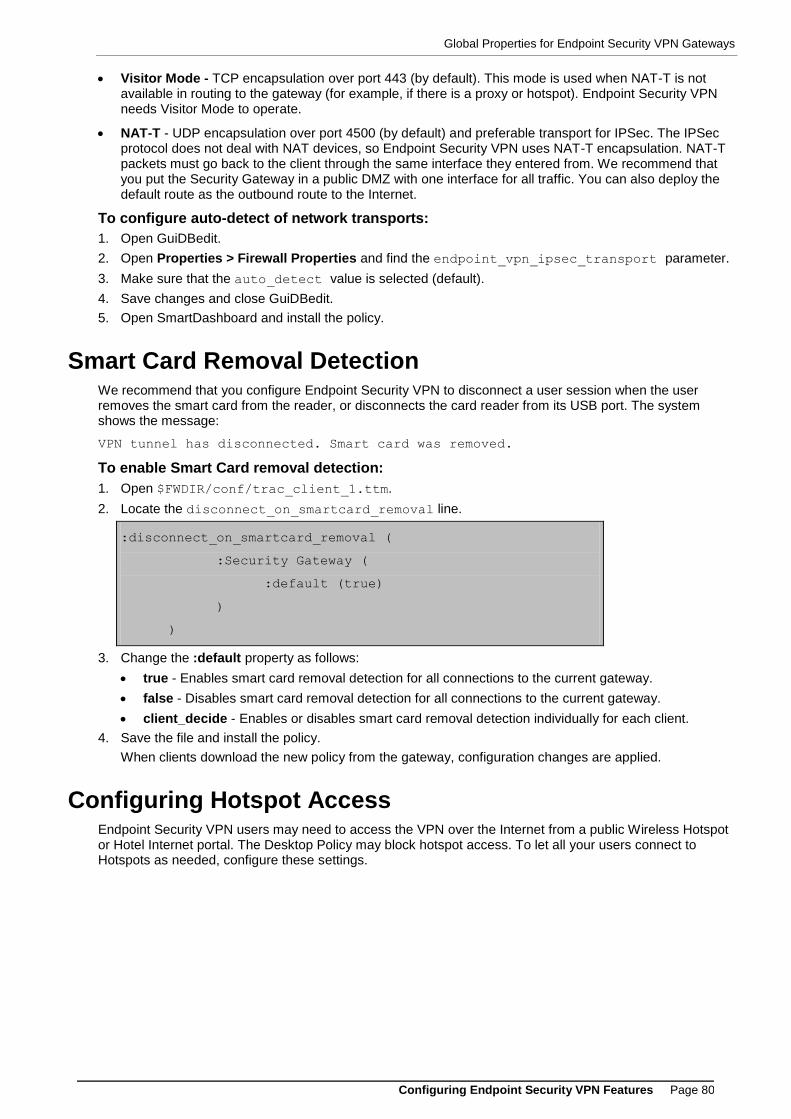
Global Properties for Endpoint Security VPN Gateways
Configuring Endpoint Security VPN Features Page 80
Visitor Mode - TCP encapsulation over port 443 (by default). This mode is used when NAT-T is not available in routing to the gateway (for example, if there is a proxy or hotspot). Endpoint Security VPN needs Visitor Mode to operate.
NAT-T - UDP encapsulation over port 4500 (by default) and preferable transport for IPSec. The IPSec protocol does not deal with NAT devices, so Endpoint Security VPN uses NAT-T encapsulation. NAT-T packets must go back to the client through the same interface they entered from. We recommend that you put the Security Gateway in a public DMZ with one interface for all traffic. You can also deploy the default route as the outbound route to the Internet.
To configure auto-detect of network transports:
1. Open GuiDBedit.
2. Open Properties > Firewall Properties and find the endpoint_vpn_ipsec_transport parameter.
3. Make sure that the auto_detect value is selected (default).
4. Save changes and close GuiDBedit.
5. Open SmartDashboard and install the policy.
Smart Card Removal Detection We recommend that you configure Endpoint Security VPN to disconnect a user session when the user removes the smart card from the reader, or disconnects the card reader from its USB port. The system shows the message:
VPN tunnel has disconnected. Smart card was removed.
To enable Smart Card removal detection:
1. Open $FWDIR/conf/trac_client_1.ttm.
2. Locate the disconnect_on_smartcard_removal line.
:disconnect_on_smartcard_removal (
:Security Gateway (
:default (true)
)
)
3. Change the :default property as follows:
true - Enables smart card removal detection for all connections to the current gateway.
false - Disables smart card removal detection for all connections to the current gateway.
client_decide - Enables or disables smart card removal detection individually for each client.
4. Save the file and install the policy.
When clients download the new policy from the gateway, configuration changes are applied.
Configuring Hotspot Access Endpoint Security VPN users may need to access the VPN over the Internet from a public Wireless Hotspot or Hotel Internet portal. The Desktop Policy may block hotspot access. To let all your users connect to Hotspots as needed, configure these settings.
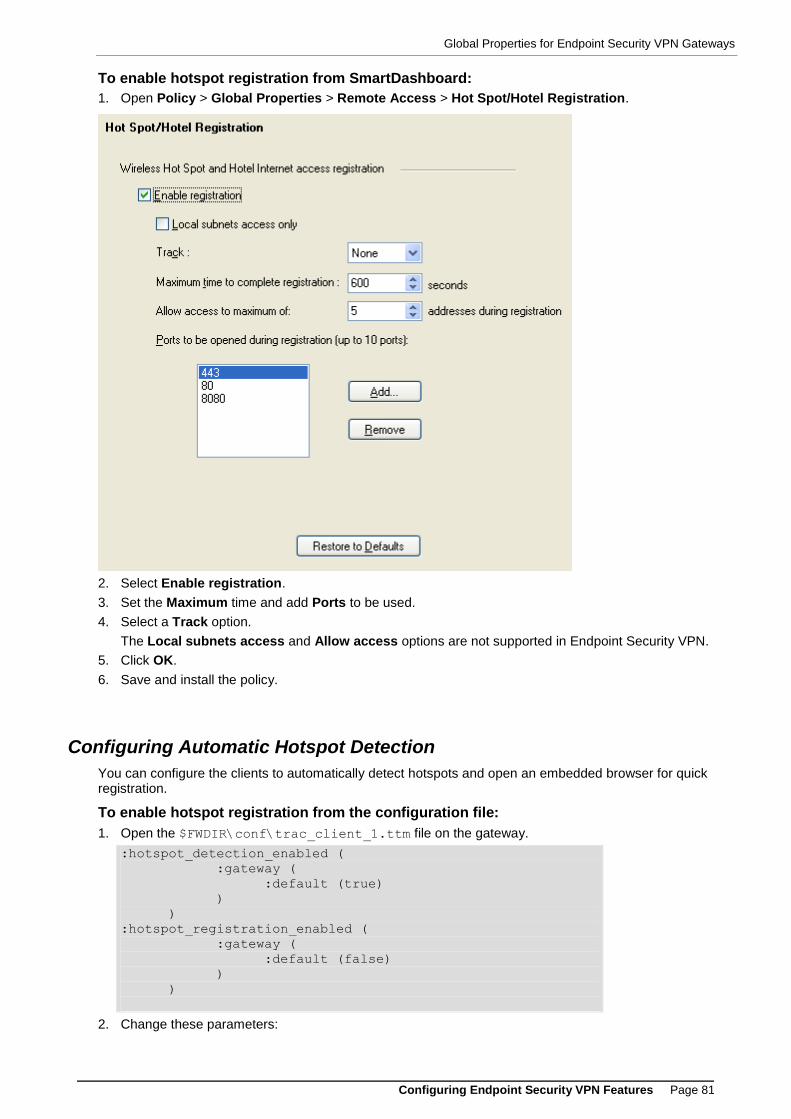
Global Properties for Endpoint Security VPN Gateways
Configuring Endpoint Security VPN Features Page 81
To enable hotspot registration from SmartDashboard:
1. Open Policy > Global Properties > Remote Access > Hot Spot/Hotel Registration.
2. Select Enable registration.
3. Set the Maximum time and add Ports to be used.
4. Select a Track option.
The Local subnets access and Allow access options are not supported in Endpoint Security VPN.
5. Click OK.
6. Save and install the policy.
Configuring Automatic Hotspot Detection
You can configure the clients to automatically detect hotspots and open an embedded browser for quick registration.
To enable hotspot registration from the configuration file:
1. Open the $FWDIR\conf\trac_client_1.ttm file on the gateway.
:hotspot_detection_enabled (
:gateway (
:default (true)
)
)
:hotspot_registration_enabled (
:gateway (
:default (false)
)
)
2. Change these parameters:
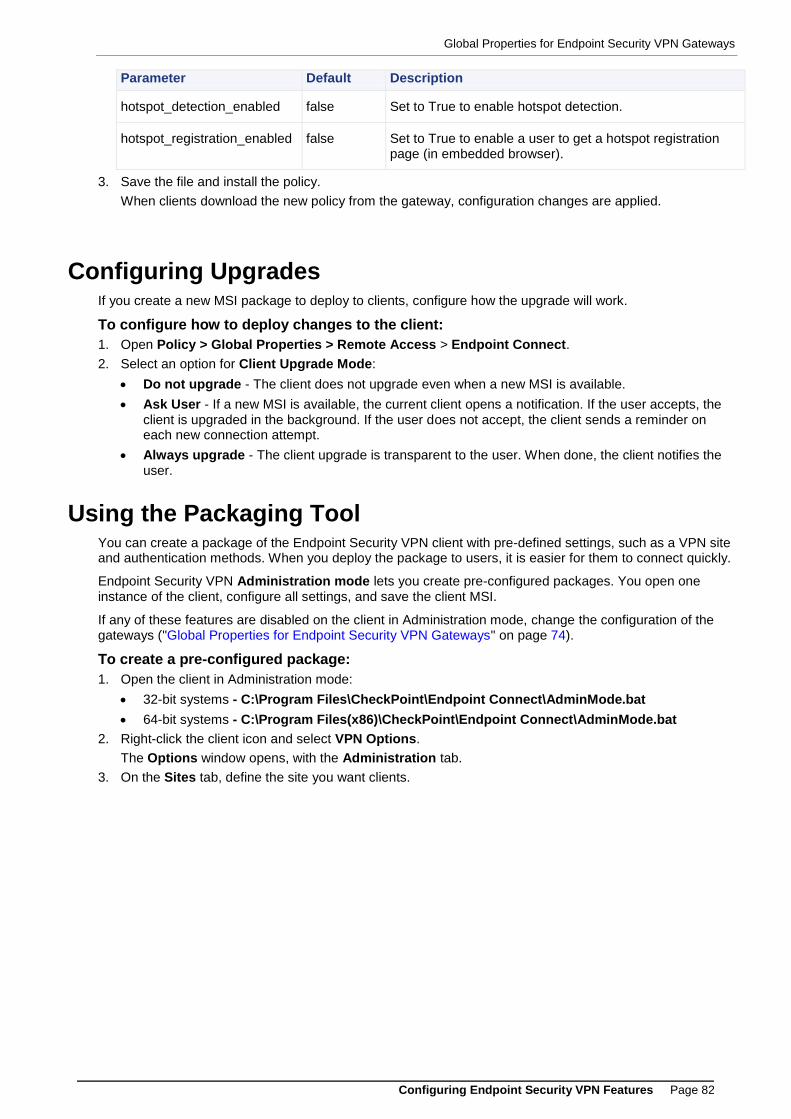
Global Properties for Endpoint Security VPN Gateways
Configuring Endpoint Security VPN Features Page 82
Parameter Default Description
hotspot_detection_enabled false Set to True to enable hotspot detection.
hotspot_registration_enabled false Set to True to enable a user to get a hotspot registration page (in embedded browser).
3. Save the file and install the policy.
When clients download the new policy from the gateway, configuration changes are applied.
Configuring Upgrades If you create a new MSI package to deploy to clients, configure how the upgrade will work.
To configure how to deploy changes to the client:
1. Open Policy > Global Properties > Remote Access > Endpoint Connect.
2. Select an option for Client Upgrade Mode:
Do not upgrade - The client does not upgrade even when a new MSI is available.
Ask User - If a new MSI is available, the current client opens a notification. If the user accepts, the client is upgraded in the background. If the user does not accept, the client sends a reminder on each new connection attempt.
Always upgrade - The client upgrade is transparent to the user. When done, the client notifies the user.
Using the Packaging Tool You can create a package of the Endpoint Security VPN client with pre-defined settings, such as a VPN site and authentication methods. When you deploy the package to users, it is easier for them to connect quickly.
Endpoint Security VPN Administration mode lets you create pre-configured packages. You open one instance of the client, configure all settings, and save the client MSI.
If any of these features are disabled on the client in Administration mode, change the configuration of the gateways ("Global Properties for Endpoint Security VPN Gateways" on page 74).
To create a pre-configured package:
1. Open the client in Administration mode:
32-bit systems - C:\Program Files\CheckPoint\Endpoint Connect\AdminMode.bat
64-bit systems - C:\Program Files(x86)\CheckPoint\Endpoint Connect\AdminMode.bat
2. Right-click the client icon and select VPN Options.
The Options window opens, with the Administration tab.
3. On the Sites tab, define the site you want clients.
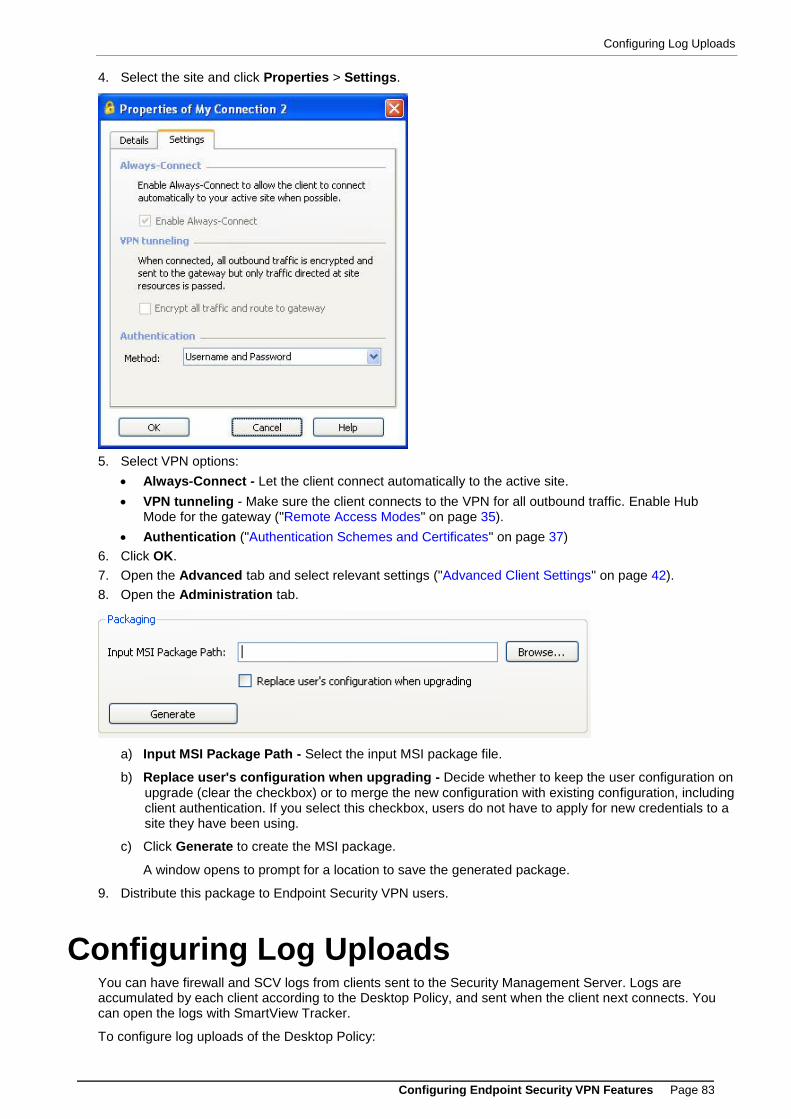
Configuring Log Uploads
Configuring Endpoint Security VPN Features Page 83
4. Select the site and click Properties > Settings.
5. Select VPN options:
Always-Connect - Let the client connect automatically to the active site.
VPN tunneling - Make sure the client connects to the VPN for all outbound traffic. Enable Hub Mode for the gateway ("Remote Access Modes" on page 35).
Authentication ("Authentication Schemes and Certificates" on page 37)
6. Click OK.
7. Open the Advanced tab and select relevant settings ("Advanced Client Settings" on page 42).
8. Open the Administration tab.
a) Input MSI Package Path - Select the input MSI package file.
b) Replace user's configuration when upgrading - Decide whether to keep the user configuration on upgrade (clear the checkbox) or to merge the new configuration with existing configuration, including client authentication. If you select this checkbox, users do not have to apply for new credentials to a site they have been using.
c) Click Generate to create the MSI package.
A window opens to prompt for a location to save the generated package.
9. Distribute this package to Endpoint Security VPN users.
Configuring Log Uploads You can have firewall and SCV logs from clients sent to the Security Management Server. Logs are accumulated by each client according to the Desktop Policy, and sent when the client next connects. You can open the logs with SmartView Tracker.
To configure log uploads of the Desktop Policy:

Configuring Post Connect Scripts
Configuring Endpoint Security VPN Features Page 84
1. In the policy, set the rules that you want clients to log to Track = Alert.
2. Open trac_client_1.ttm
3. Set fw_log_upload_enable to true.
If false, the client will not accumulate logs, regardless of the rule Track settings.
4. Save the TTM file.
5. Install the policy.
Configuring Post Connect Scripts The Post Connect feature lets you run a script on client computers after connection is established. You must make sure that the script resides on the client computers, in the correct path.
To set the script path:
1. Open GuiDBedit.
2. Set desktop_post_connect_script to a full path on client machines for a script that Endpoint
Security will run after a connection is established (leave empty to disable the feature).
3. Set desktop_post_connect_script_show_window to true to make the script run in a hidden
window (default: false).
4. Save and close GuiDBedit.
5. Install the policy.
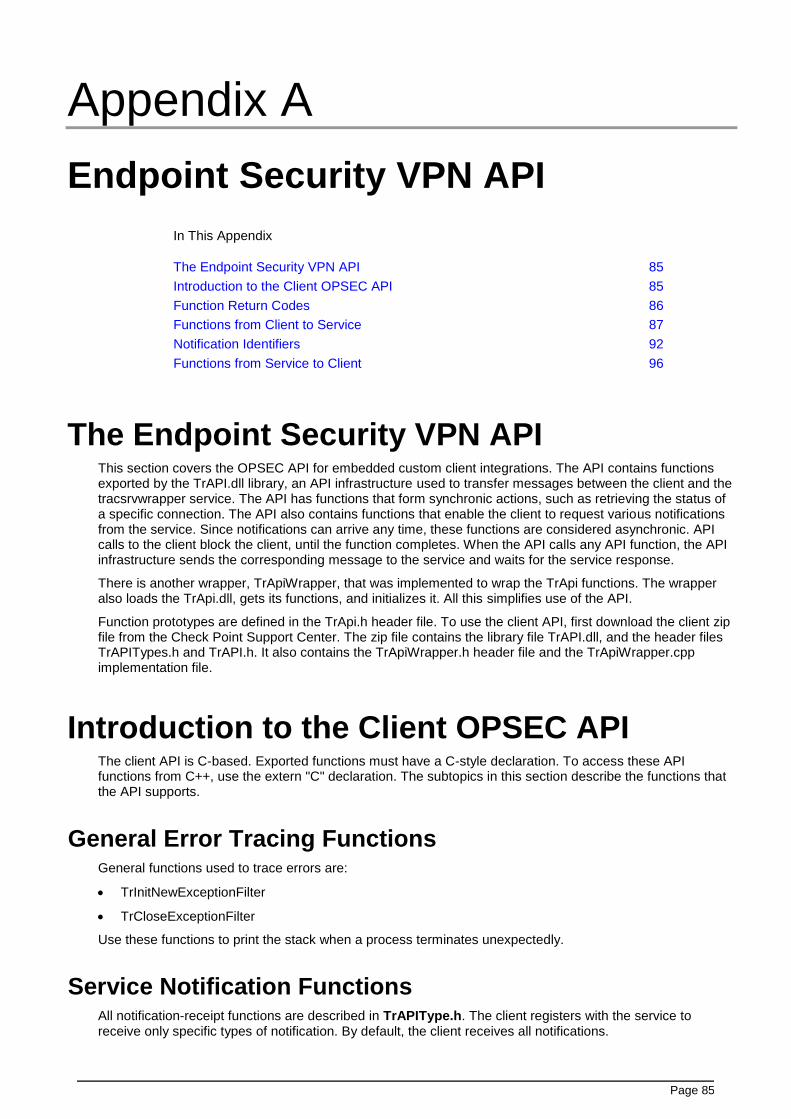
Page 85
Appendix A
Endpoint Security VPN API
In This Appendix
The Endpoint Security VPN API 85
Introduction to the Client OPSEC API 85
Function Return Codes 86
Functions from Client to Service 87
Notification Identifiers 92
Functions from Service to Client 96
The Endpoint Security VPN API This section covers the OPSEC API for embedded custom client integrations. The API contains functions exported by the TrAPI.dll library, an API infrastructure used to transfer messages between the client and the tracsrvwrapper service. The API has functions that form synchronic actions, such as retrieving the status of a specific connection. The API also contains functions that enable the client to request various notifications from the service. Since notifications can arrive any time, these functions are considered asynchronic. API calls to the client block the client, until the function completes. When the API calls any API function, the API infrastructure sends the corresponding message to the service and waits for the service response.
There is another wrapper, TrApiWrapper, that was implemented to wrap the TrApi functions. The wrapper also loads the TrApi.dll, gets its functions, and initializes it. All this simplifies use of the API.
Function prototypes are defined in the TrApi.h header file. To use the client API, first download the client zip file from the Check Point Support Center. The zip file contains the library file TrAPI.dll, and the header files TrAPITypes.h and TrAPI.h. It also contains the TrApiWrapper.h header file and the TrApiWrapper.cpp implementation file.
Introduction to the Client OPSEC API The client API is C-based. Exported functions must have a C-style declaration. To access these API functions from C++, use the extern "C" declaration. The subtopics in this section describe the functions that the API supports.
General Error Tracing Functions General functions used to trace errors are:
TrInitNewExceptionFilter
TrCloseExceptionFilter
Use these functions to print the stack when a process terminates unexpectedly.
Service Notification Functions All notification-receipt functions are described in TrAPIType.h. The client registers with the service to receive only specific types of notification. By default, the client receives all notifications.
Function Return Codes
Endpoint Security VPN API Page 86
Functions have been designed to enable the user to receive notification from the trac service.
TrRegisterNotificationCallback
TrUnregisterNotificationCallback
Function Return Codes Several return codes with numerical equivalents have been defined for API Functions.
Function Return Code Equivalent Meaning
TrOK 0 Function executed without error.
TrFAIL -1000 Function failed.
TrConnAlreadyConnected -999 Connect function failed because the client was already connected.
TrConnNameAlreadyExisted -998 Connect function failed because a site with the same name already exists.
TrConnAddrAlreadyExisted -997 Connect function failed because a site with the same IP address already exists.
TrParamsFAIL -996 Function failed because an incorrect parameter was passed to it.
TrAllocFAIL -995 Function failed because of memory shortage.
TrComSendFAIL -994 Function failed to establish communication with the service.
TrAPIInitFAIL -993 Function failed to communicate with the service.
TrICSNoCompliance -992 Function failed because the user failed the end point compliance test.
TrProxyAuthFailed -991 Function failed because proxy authentication failed.
TrProxyAuthRequired -990 Function failed because proxy authentication credentials were not presented.
Functions from Client to Service
Endpoint Security VPN API Page 87
Functions from Client to Service These functions transfer messages to the service.
TrAPIInit
Description This is the first function called after theTrAPI.dll is loaded. It is only run once, before any other function is called. If the service goes down, the function needs to be initialized again.
Prototype TRAPI_CPAPI TrStatus TrAPIInit();
TrAPIInitDebug
Description This function creates logs.
Prototype TRAPI_CPAPI TrStatus TrAPIInitDebug(TrString filename,int max_size
int max_files,int TopicLevel;
Arguments Name IN/OUT Description
filename in Name of the log file.
max_size in Maximum size of log in bytes.
max_files in Maximum number of files.
TopicLevel in The number of topics the logs should contain.
TrAPIStopDebug
Description This function stops the debug logs.
Prototype TRAPI_CPAPI TrStatus TrAPIStopDebug();
TrAPIDebug
Description This function writes a text message to the log file.
Prototype TRAPI_CPAPI void TrAPIDebug(const char *TopicNames,int
TopicLevel,int err, const char *fmt,...);
Arguments Name IN/OUT Description
TopicNames in The names of topics used in the logs.
TopicLevel in The number of topics.
err in Error level number. for example fatal error=1, informative error message=5.
fmt in The text message to be inserted in the log file.
TrStart
Description This function starts the service.
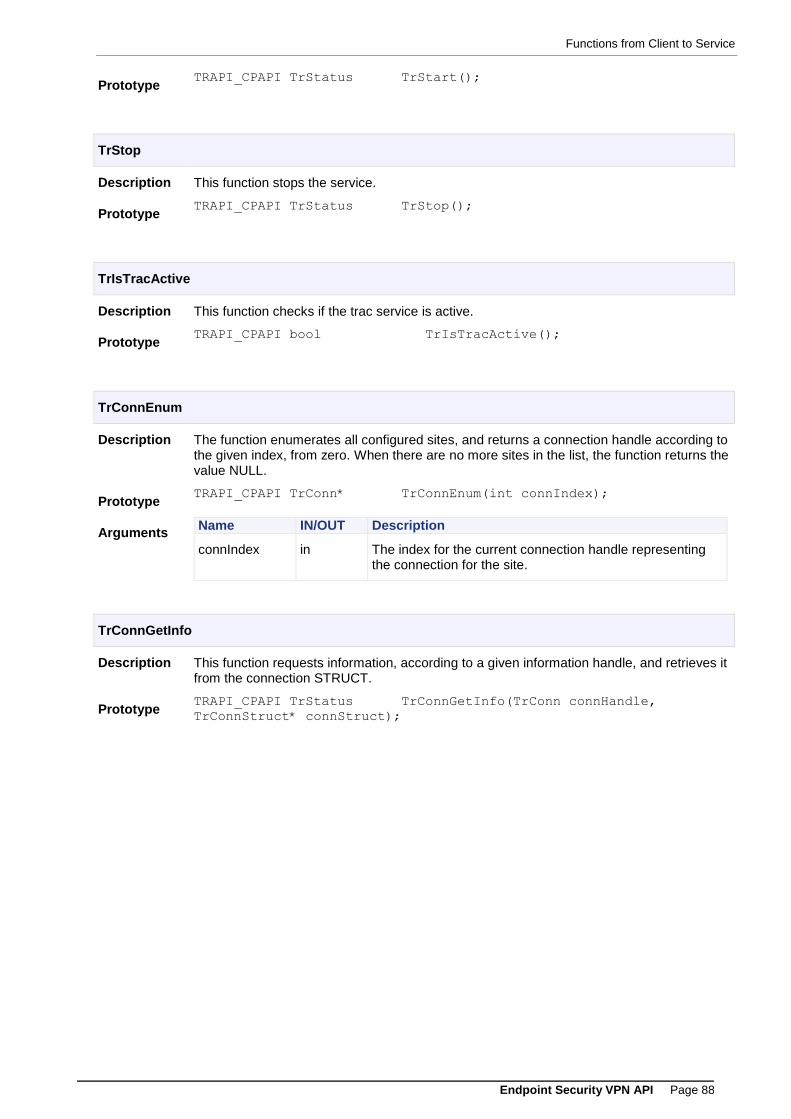
Functions from Client to Service
Endpoint Security VPN API Page 88
Prototype TRAPI_CPAPI TrStatus TrStart();
TrStop
Description This function stops the service.
Prototype TRAPI_CPAPI TrStatus TrStop();
TrIsTracActive
Description This function checks if the trac service is active.
Prototype TRAPI_CPAPI bool TrIsTracActive();
TrConnEnum
Description The function enumerates all configured sites, and returns a connection handle according to the given index, from zero. When there are no more sites in the list, the function returns the value NULL.
Prototype TRAPI_CPAPI TrConn* TrConnEnum(int connIndex);
Arguments Name IN/OUT Description
connIndex in The index for the current connection handle representing the connection for the site.
TrConnGetInfo
Description This function requests information, according to a given information handle, and retrieves it from the connection STRUCT.
Prototype TRAPI_CPAPI TrStatus TrConnGetInfo(TrConn connHandle,
TrConnStruct* connStruct);
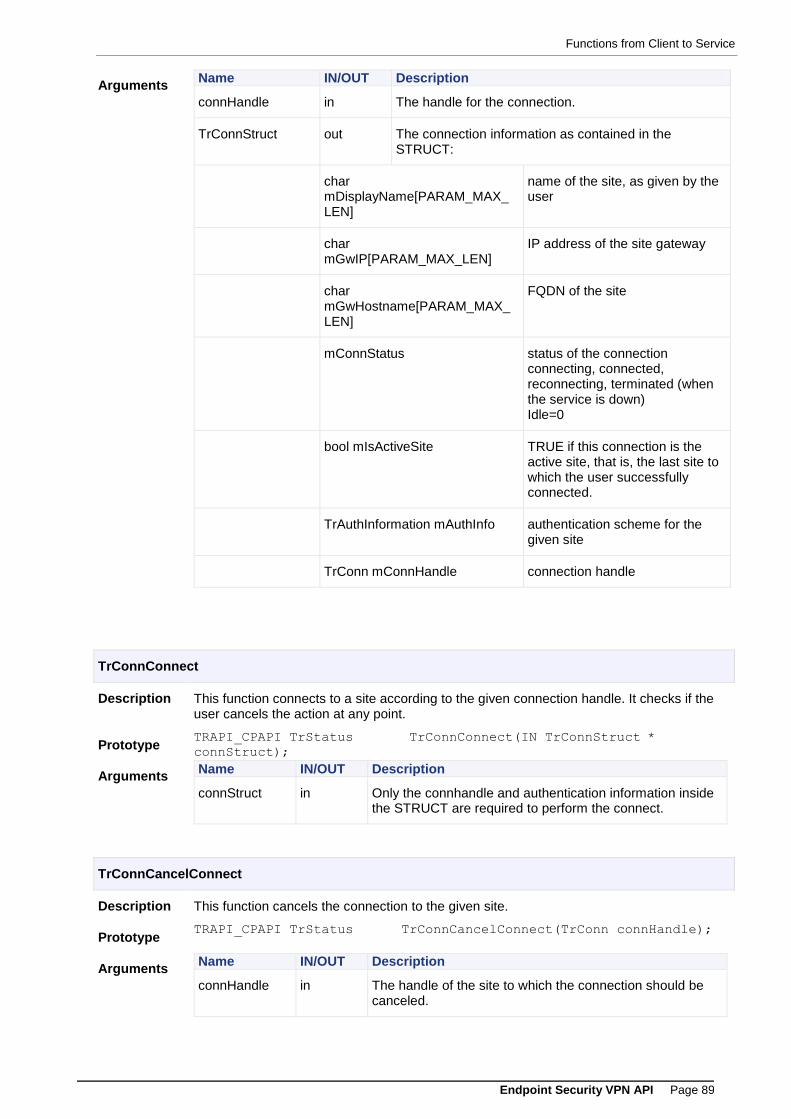
Functions from Client to Service
Endpoint Security VPN API Page 89
Arguments Name IN/OUT Description
connHandle in The handle for the connection.
TrConnStruct out The connection information as contained in the STRUCT:
char mDisplayName[PARAM_MAX_ LEN]
name of the site, as given by the user
char mGwIP[PARAM_MAX_LEN]
IP address of the site gateway
char mGwHostname[PARAM_MAX_ LEN]
FQDN of the site
mConnStatus status of the connection connecting, connected, reconnecting, terminated (when the service is down) Idle=0
bool mIsActiveSite TRUE if this connection is the active site, that is, the last site to which the user successfully connected.
TrAuthInformation mAuthInfo authentication scheme for the given site
TrConn mConnHandle connection handle
TrConnConnect
Description This function connects to a site according to the given connection handle. It checks if the user cancels the action at any point.
Prototype TRAPI_CPAPI TrStatus TrConnConnect(IN TrConnStruct *
connStruct);
Arguments Name IN/OUT Description
connStruct in Only the connhandle and authentication information inside the STRUCT are required to perform the connect.
TrConnCancelConnect
Description This function cancels the connection to the given site.
Prototype TRAPI_CPAPI TrStatus TrConnCancelConnect(TrConn connHandle);
Arguments Name IN/OUT Description
connHandle in The handle of the site to which the connection should be canceled.
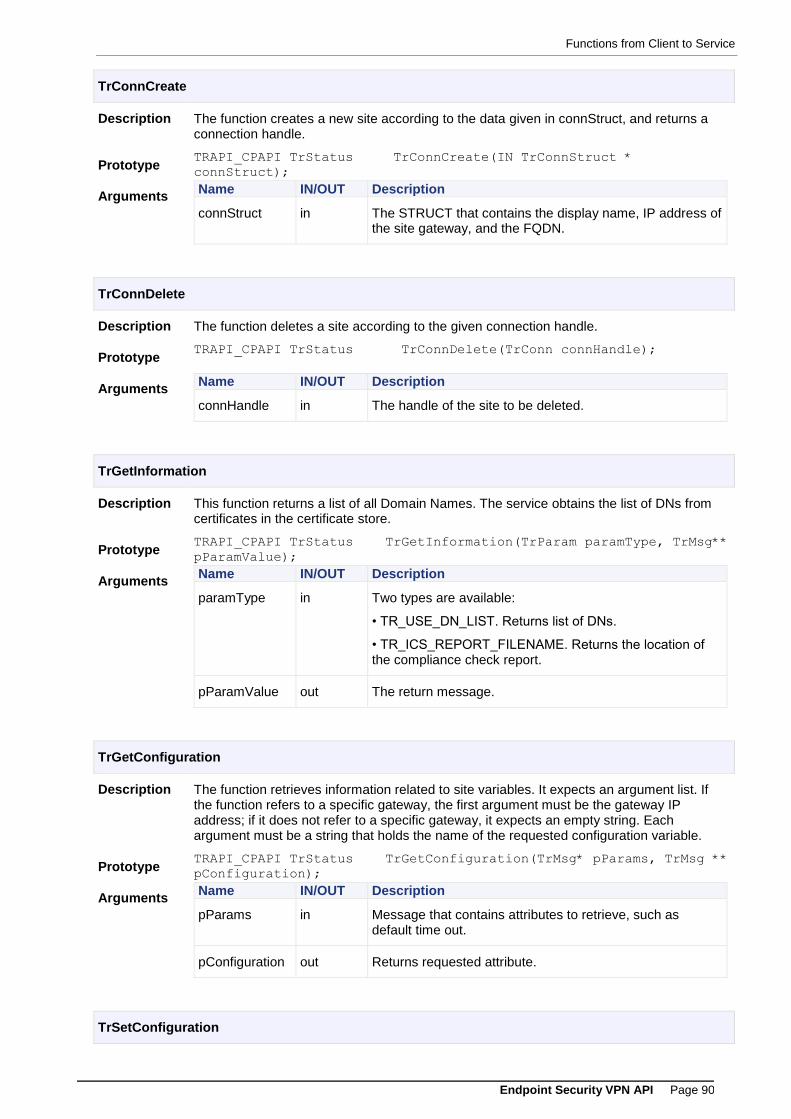
Functions from Client to Service
Endpoint Security VPN API Page 90
TrConnCreate
Description The function creates a new site according to the data given in connStruct, and returns a connection handle.
Prototype TRAPI_CPAPI TrStatus TrConnCreate(IN TrConnStruct *
connStruct);
Arguments Name IN/OUT Description
connStruct in The STRUCT that contains the display name, IP address of the site gateway, and the FQDN.
TrConnDelete
Description The function deletes a site according to the given connection handle.
Prototype TRAPI_CPAPI TrStatus TrConnDelete(TrConn connHandle);
Arguments Name IN/OUT Description
connHandle in The handle of the site to be deleted.
TrGetInformation
Description This function returns a list of all Domain Names. The service obtains the list of DNs from certificates in the certificate store.
Prototype TRAPI_CPAPI TrStatus TrGetInformation(TrParam paramType, TrMsg**
pParamValue);
Arguments Name IN/OUT Description
paramType in Two types are available:
• TR_USE_DN_LIST. Returns list of DNs.
• TR_ICS_REPORT_FILENAME. Returns the location of the compliance check report.
pParamValue out The return message.
TrGetConfiguration
Description The function retrieves information related to site variables. It expects an argument list. If the function refers to a specific gateway, the first argument must be the gateway IP address; if it does not refer to a specific gateway, it expects an empty string. Each argument must be a string that holds the name of the requested configuration variable.
Prototype TRAPI_CPAPI TrStatus TrGetConfiguration(TrMsg* pParams, TrMsg **
pConfiguration);
Arguments Name IN/OUT Description
pParams in Message that contains attributes to retrieve, such as default time out.
pConfiguration out Returns requested attribute.
TrSetConfiguration
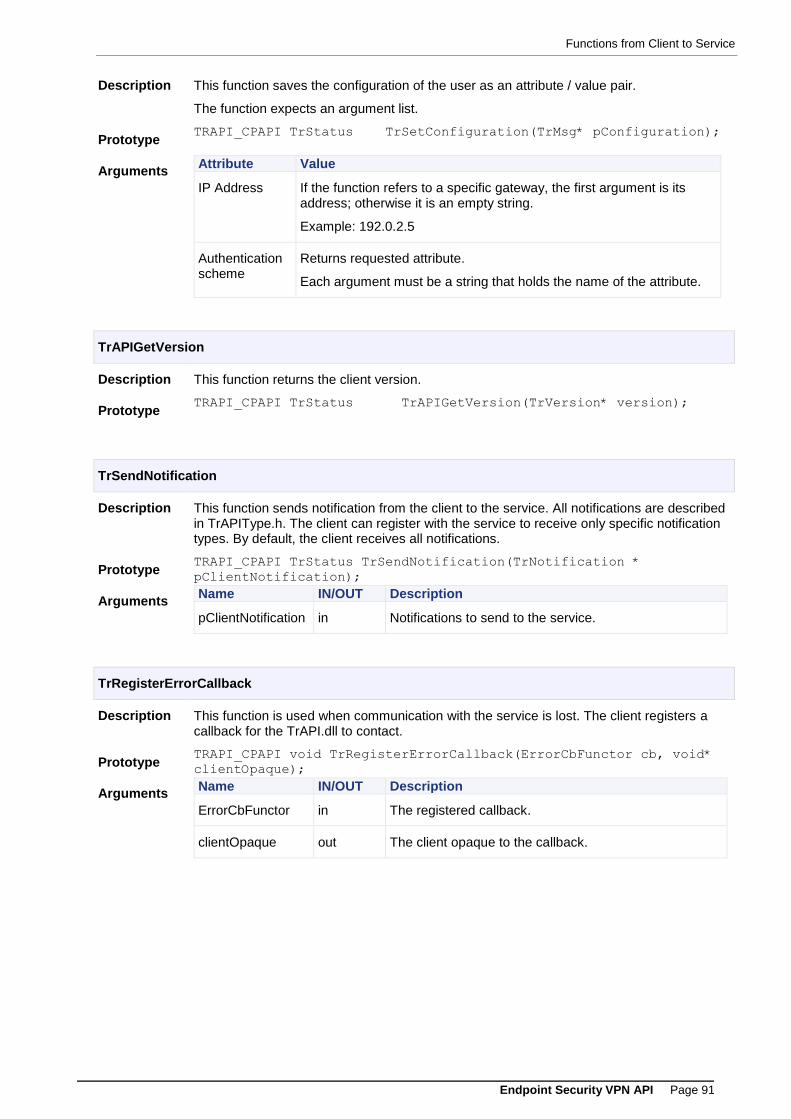
Functions from Client to Service
Endpoint Security VPN API Page 91
Description This function saves the configuration of the user as an attribute / value pair.
The function expects an argument list.
Prototype TRAPI_CPAPI TrStatus TrSetConfiguration(TrMsg* pConfiguration);
Arguments Attribute Value
IP Address If the function refers to a specific gateway, the first argument is its address; otherwise it is an empty string.
Example: 192.0.2.5
Authentication scheme
Returns requested attribute.
Each argument must be a string that holds the name of the attribute.
TrAPIGetVersion
Description This function returns the client version.
Prototype TRAPI_CPAPI TrStatus TrAPIGetVersion(TrVersion* version);
TrSendNotification
Description This function sends notification from the client to the service. All notifications are described in TrAPIType.h. The client can register with the service to receive only specific notification types. By default, the client receives all notifications.
Prototype TRAPI_CPAPI TrStatus TrSendNotification(TrNotification *
pClientNotification);
Arguments Name IN/OUT Description
pClientNotification in Notifications to send to the service.
TrRegisterErrorCallback
Description This function is used when communication with the service is lost. The client registers a callback for the TrAPI.dll to contact.
Prototype TRAPI_CPAPI void TrRegisterErrorCallback(ErrorCbFunctor cb, void*
clientOpaque);
Arguments Name IN/OUT Description
ErrorCbFunctor in The registered callback.
clientOpaque out The client opaque to the callback.
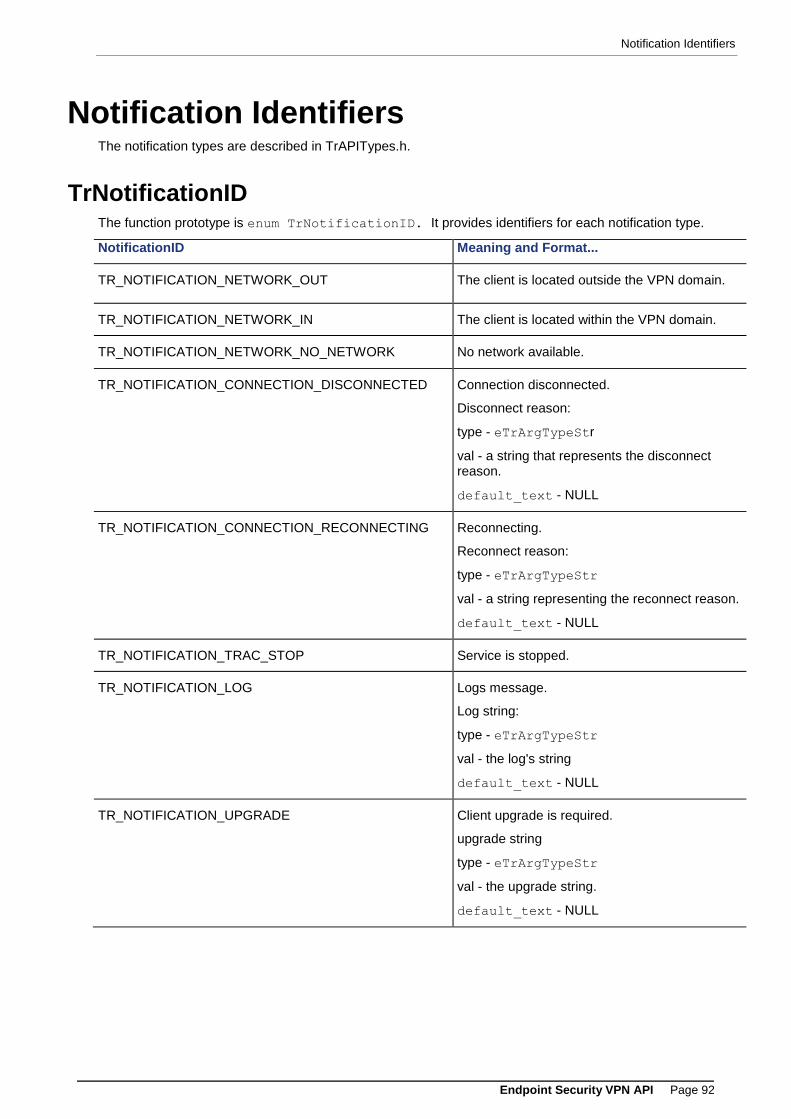
Notification Identifiers
Endpoint Security VPN API Page 92
Notification Identifiers The notification types are described in TrAPITypes.h.
TrNotificationID The function prototype is enum TrNotificationID. It provides identifiers for each notification type.
NotificationID Meaning and Format...
TR_NOTIFICATION_NETWORK_OUT The client is located outside the VPN domain.
TR_NOTIFICATION_NETWORK_IN The client is located within the VPN domain.
TR_NOTIFICATION_NETWORK_NO_NETWORK No network available.
TR_NOTIFICATION_CONNECTION_DISCONNECTED Connection disconnected.
Disconnect reason:
type - eTrArgTypeStr
val - a string that represents the disconnect reason.
default_text - NULL
TR_NOTIFICATION_CONNECTION_RECONNECTING Reconnecting.
Reconnect reason:
type - eTrArgTypeStr
val - a string representing the reconnect reason.
default_text - NULL
TR_NOTIFICATION_TRAC_STOP Service is stopped.
TR_NOTIFICATION_LOG Logs message.
Log string:
type - eTrArgTypeStr
val - the log's string
default_text - NULL
TR_NOTIFICATION_UPGRADE Client upgrade is required.
upgrade string
type - eTrArgTypeStr
val - the upgrade string.
default_text - NULL

Notification Identifiers
Endpoint Security VPN API Page 93
NotificationID Meaning and Format...
TR_NOTIFICATION_CLIENT_UPGRADE Upgrade notification sent by the client to the service.
Perform upgrade.
type - eTrArgTypeInt32
val - an integer represents the user decision regarding upgrade: 1 for upgrade, 0 for no_upgrade.
default_text - NULL
TR_NOTIFICATION_ICS_NO_COMPLIANCE End point failed the endpoint compliance test.
TR_NOTIFICATION_AUTH_SUPPLY_CREDS Supply authentication credentials. The number of arguments depends on the authentication. scheme:
GW:
type - eTrArgTypeStr
val - a string representing the gateway's name.
default_text - NULL
Authentication type (TrAuthType):
type - eTrArgTypeInt32
val - an integer represents the authentication type.
default_text - NULL
Number of parameters:
type - eTrArgTypeInt32
val - an integer represents the number of parameters (e.g. 2 for username+password, 1 for certificate dn, 3 for username+pin+passcode)
default_text - NULL
#) Param number #
type - eTrArgTypeStr
val - a string representing the parameter (e.g. "username" or "passcode", etc.).
default_text - NULL
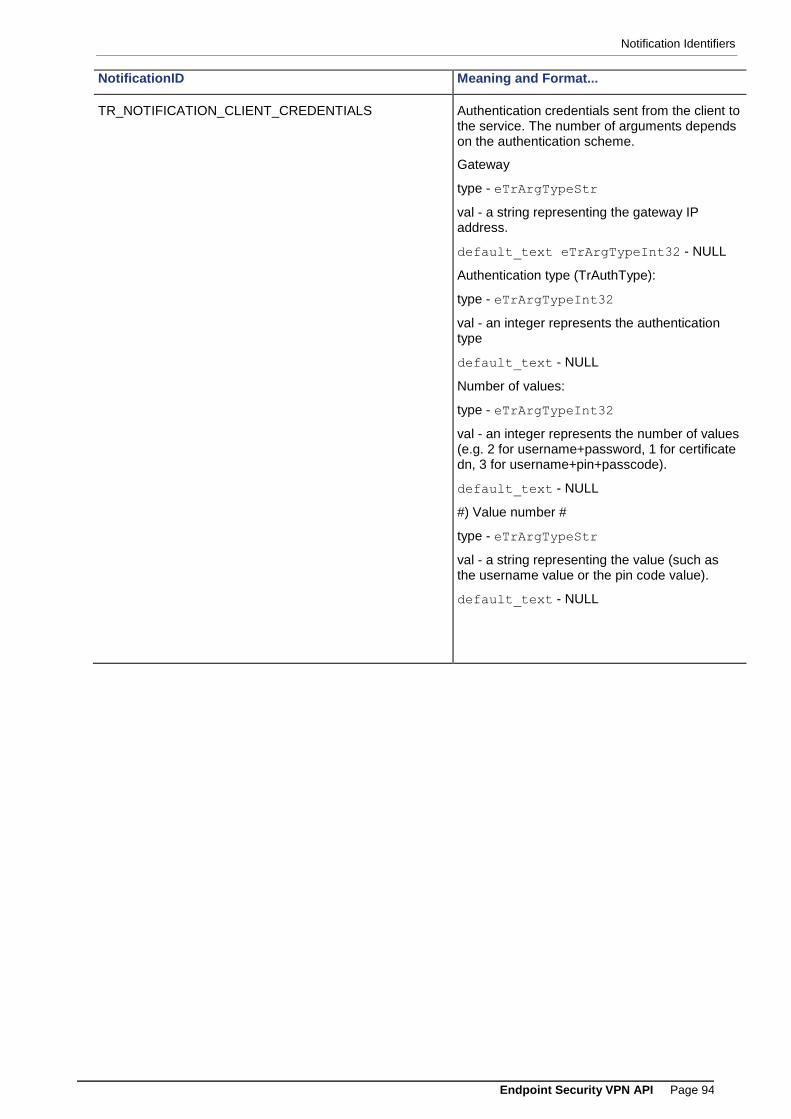
Notification Identifiers
Endpoint Security VPN API Page 94
NotificationID Meaning and Format...
TR_NOTIFICATION_CLIENT_CREDENTIALS Authentication credentials sent from the client to the service. The number of arguments depends on the authentication scheme.
Gateway
type - eTrArgTypeStr
val - a string representing the gateway IP address.
default_text eTrArgTypeInt32 - NULL
Authentication type (TrAuthType):
type - eTrArgTypeInt32
val - an integer represents the authentication type
default_text - NULL
Number of values:
type - eTrArgTypeInt32
val - an integer represents the number of values (e.g. 2 for username+password, 1 for certificate dn, 3 for username+pin+passcode).
default_text - NULL
#) Value number #
type - eTrArgTypeStr
val - a string representing the value (such as the username value or the pin code value).
default_text - NULL
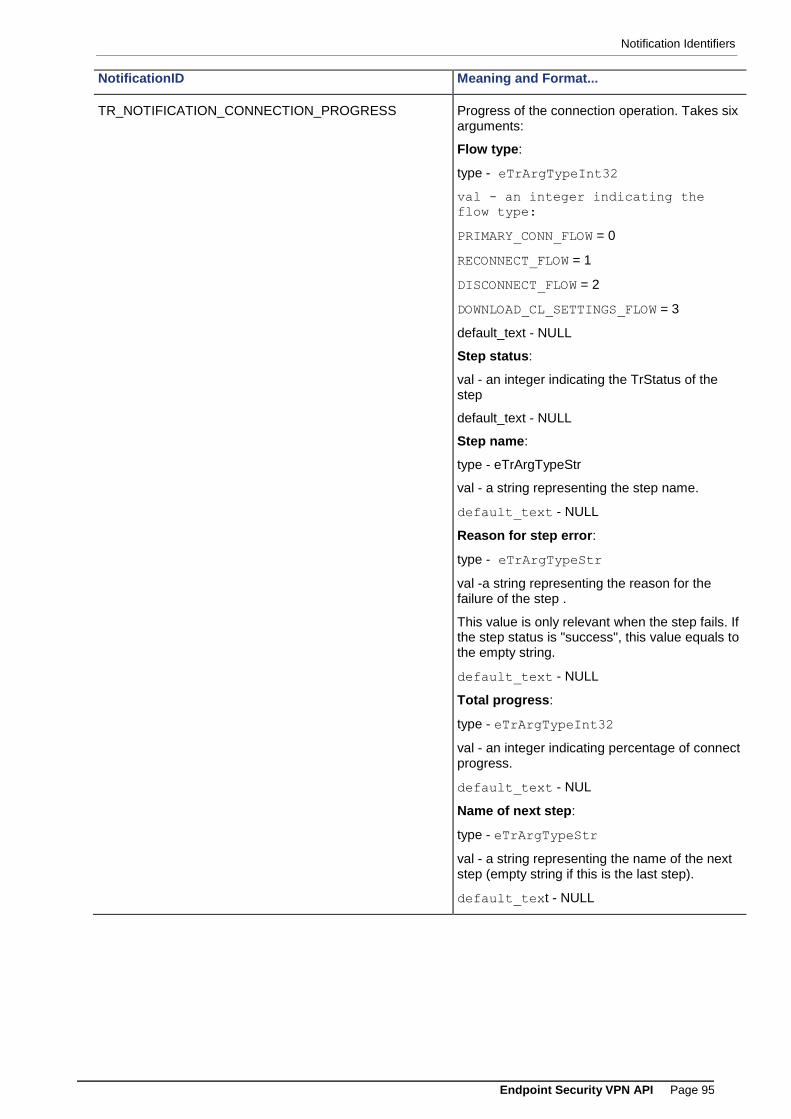
Notification Identifiers
Endpoint Security VPN API Page 95
NotificationID Meaning and Format...
TR_NOTIFICATION_CONNECTION_PROGRESS Progress of the connection operation. Takes six arguments:
Flow type:
type - eTrArgTypeInt32
val - an integer indicating the
flow type:
PRIMARY_CONN_FLOW = 0
RECONNECT_FLOW = 1
DISCONNECT_FLOW = 2
DOWNLOAD_CL_SETTINGS_FLOW = 3
default_text - NULL
Step status:
val - an integer indicating the TrStatus of the step
default_text - NULL
Step name:
type - eTrArgTypeStr
val - a string representing the step name.
default_text - NULL
Reason for step error:
type - eTrArgTypeStr
val -a string representing the reason for the failure of the step .
This value is only relevant when the step fails. If the step status is "success", this value equals to the empty string.
default_text - NULL
Total progress:
type - eTrArgTypeInt32
val - an integer indicating percentage of connect progress.
default_text - NUL
Name of next step:
type - eTrArgTypeStr
val - a string representing the name of the next step (empty string if this is the last step).
default_text - NULL
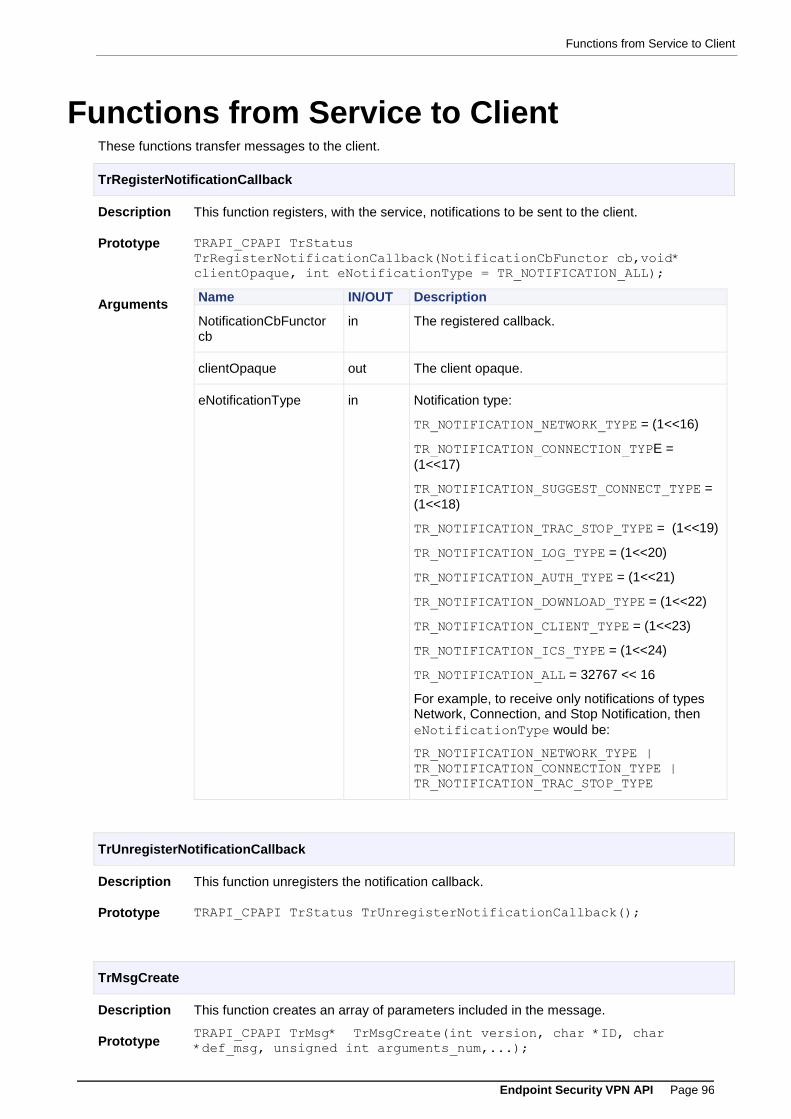
Functions from Service to Client
Endpoint Security VPN API Page 96
Functions from Service to Client These functions transfer messages to the client.
TrRegisterNotificationCallback
Description This function registers, with the service, notifications to be sent to the client.
Prototype TRAPI_CPAPI TrStatus
TrRegisterNotificationCallback(NotificationCbFunctor cb,void*
clientOpaque, int eNotificationType = TR_NOTIFICATION_ALL);
Arguments Name IN/OUT Description
NotificationCbFunctor cb
in The registered callback.
clientOpaque out The client opaque.
eNotificationType in Notification type:
TR_NOTIFICATION_NETWORK_TYPE = (1<<16)
TR_NOTIFICATION_CONNECTION_TYPE =
(1<<17)
TR_NOTIFICATION_SUGGEST_CONNECT_TYPE =
(1<<18)
TR_NOTIFICATION_TRAC_STOP_TYPE = (1<<19)
TR_NOTIFICATION_LOG_TYPE = (1<<20)
TR_NOTIFICATION_AUTH_TYPE = (1<<21)
TR_NOTIFICATION_DOWNLOAD_TYPE = (1<<22)
TR_NOTIFICATION_CLIENT_TYPE = (1<<23)
TR_NOTIFICATION_ICS_TYPE = (1<<24)
TR_NOTIFICATION_ALL = 32767 << 16
For example, to receive only notifications of types Network, Connection, and Stop Notification, then
eNotificationType would be:
TR_NOTIFICATION_NETWORK_TYPE |
TR_NOTIFICATION_CONNECTION_TYPE |
TR_NOTIFICATION_TRAC_STOP_TYPE
TrUnregisterNotificationCallback
Description This function unregisters the notification callback.
Prototype TRAPI_CPAPI TrStatus TrUnregisterNotificationCallback();
TrMsgCreate
Description This function creates an array of parameters included in the message.
Prototype TRAPI_CPAPI TrMsg* TrMsgCreate(int version, char *ID, char
*def_msg, unsigned int arguments_num,...);
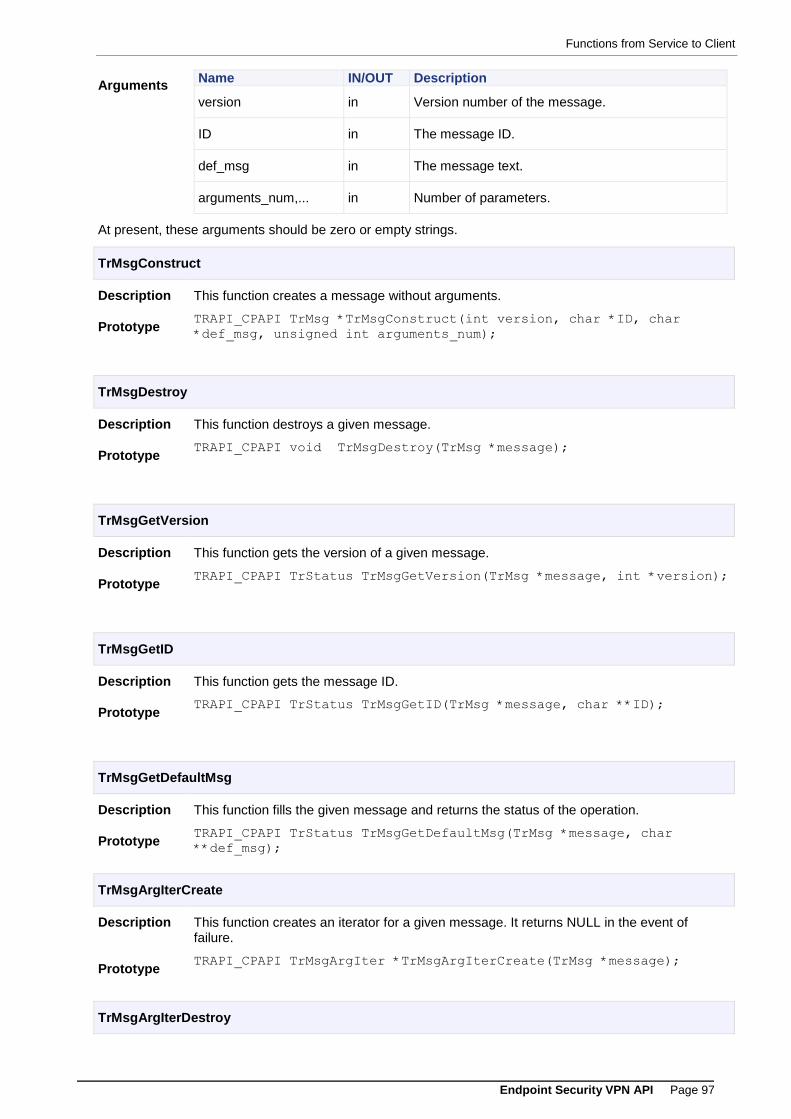
Functions from Service to Client
Endpoint Security VPN API Page 97
Arguments Name IN/OUT Description
version in Version number of the message.
ID in The message ID.
def_msg in The message text.
arguments_num,... in Number of parameters.
At present, these arguments should be zero or empty strings.
TrMsgConstruct
Description This function creates a message without arguments.
Prototype TRAPI_CPAPI TrMsg *TrMsgConstruct(int version, char *ID, char
*def_msg, unsigned int arguments_num);
TrMsgDestroy
Description This function destroys a given message.
Prototype TRAPI_CPAPI void TrMsgDestroy(TrMsg *message);
TrMsgGetVersion
Description This function gets the version of a given message.
Prototype TRAPI_CPAPI TrStatus TrMsgGetVersion(TrMsg *message, int *version);
TrMsgGetID
Description This function gets the message ID.
Prototype TRAPI_CPAPI TrStatus TrMsgGetID(TrMsg *message, char **ID);
TrMsgGetDefaultMsg
Description This function fills the given message and returns the status of the operation.
Prototype TRAPI_CPAPI TrStatus TrMsgGetDefaultMsg(TrMsg *message, char
**def_msg);
TrMsgArgIterCreate
Description This function creates an iterator for a given message. It returns NULL in the event of failure.
Prototype TRAPI_CPAPI TrMsgArgIter *TrMsgArgIterCreate(TrMsg *message);
TrMsgArgIterDestroy

Functions from Service to Client
Endpoint Security VPN API Page 98
Description This function destroys an iterator.
Prototype TRAPI_CPAPI void TrMsgArgIterDestroy(TrMsgArgIter *iter);
TrMsgArgIterGetArgNum
Description This function fills the argument number and returns the status of the operation.
Prototype TRAPI_CPAPI TrStatus TrMsgArgIterGetArgNum(TrMsgArgIter *iter, int
*arg_num);
TrMsgArgIterGetNextArg
Description This functions fills the next TrArg in the TrMsg.
If there are no more TrArgs, it populates arg with NULL, and the return code is TrOK.
If the function fails, an appropriate TrStatus error code is returned, and arg is NULL.
Prototype TRAPI_CPAPI TrStatus TrMsgArgIterGetNextArg(TrMsgArgIter *iter,
TrArg **arg);
TrMsgSetIntArg
Description This function sets the argument in the given position to an argument of type int. It overrides the current argument in the function.
Prototype TRAPI_CPAPI TrStatus TrMsgSetIntArg(TrMsg *message,int pos, int
val, char * default_txt);
TrMsgSetStrArg
Description This function sets the argument in the given position to an argument of type str, and overrides the current argument in the function.
Prototype TRAPI_CPAPI TrStatus TrMsgSetStrArg(TrMsg *message, int pos, char *
val, char * default_txt);
TrNotificationConstruct
Description This function creates a new TrNotification, and returns NULL in the event of error.
Prototype TRAPI_CPAPI TrNotification*
TrNotificationConstruct(TrNotificationID ID, unsigned int
arguments_num);
TrNotificationGetID
Description This function fills the notification ID, and returns the status of the operation.
Prototype TRAPI_CPAPI TrStatus TrNotificationGetID(TrNotification
*notification, TrNotificationID *ID);
TrNotificationClone
Description This function clones a given TrNotification.
Prototype TRAPI_CPAPI TrNotification* TrNotificationClone(TrNotification
*notification);

Functions from Service to Client
Endpoint Security VPN API Page 99
TrNotificationDestroy
Description This function destroys a given TrNotification.
Prototype TRAPI_CPAPI void TrNotificationDestroy(TrNotification
*notification);
TrNotificationArgIterCreate
Description This function creates a TrNotificationArgIter for a given notification, and returns
NULL in the event of failure.
Prototype TRAPI_CPAPI TrNotificationArgIter
*TrNotificationArgIterCreate(TrNotification * notification);
TrNotificationArgIterDestroy
Description This function destroys a given TrNotificationArgIter.
Prototype TRAPI_CPAPI void TrNotificationArgIterDestroy(TrNotificationArgIter
*iter);
TrNotificationArgIterGetArgNum
Description This function fills the argument number, and returns the status of the operation.
Prototype TRAPI_CPAPI TrStatus
TrNotificationArgIterGetArgNum(TrNotificationArgIter *iter, int
*arg_num);
TrNotificationArgIterGetNextArg
Description This function fills the next TrArg in the TrNotification.
When there are no more TrArgs, arg is filled with NULL, and the return code is TrOK.
In the event of failure, the function returns the appropriate TrStatus error code, and arg
is NULL.
Prototype TRAPI_CPAPI TrStatus
TrNotificationArgIterGetNextArg(TrNotificationArgIter *iter, TrArg
**arg);
TrNotificationSetIntArg
Description This function sets the argument in the given position to an argument of type int, and overrides the current argument in the function.
Prototype TRAPI_CPAPI TrStatus TrNotificationSetIntArg(TrNotification
*notification,int pos, int val, char * default_txt);
TrNotificationSetStrArg
Description This function sets the argument in the given position to an argument of type str, and overrides the current argument in the function.
Prototype TRAPI_CPAPI TrStatus TrNotificationSetStrArg(TrNotification
*notification, int pos, const char * val, char * default_txt);

Functions from Service to Client
Endpoint Security VPN API Page 100
TrNotificationSetDoubleArg
Description This function sets the argument in the given position to an argument of type double, and overrides the current argument in the function.
Prototype TRAPI_CPAPI TrStatus TrNotificationSetDoubleArg(TrNotification
*notification, int pos, double val, char * default_txt);
TrArgGetType
Description This function fills the TrArg type, and returns the status of the operation.
Prototype TRAPI_CPAPI TrStatus TrArgGetType(TrArg *arg, TrArgType *type);
TrArgGetIntVal
Description This functions fills the int value, and returns the status, of the operation. If TrArg is not of
type int, an error is returned.
Prototype TRAPI_CPAPI TrStatus TrArgGetIntVal(TrArg *arg, int *val);
TrArgGetDoubleVal
Description This function fills the double value, and returns the status of the operation. If TrArg is not
double, an error is returned.
Prototype TRAPI_CPAPI TrStatus TrArgGetDoubleVal(TrArg *arg, double *val);
TrArgGetStrVal
Description This function fills the string value, and returns the status of the operation. If TrArg is not a
string, an error is returned.
Prototype TRAPI_CPAPI TrStatus TrArgGetStrVal(TrArg* arg, char **str);
TrArgGetDefText
Description This function fills the TrArg default text, and returns the status of the operation.
Prototype TRAPI_CPAPI TrStatus TrArgGetDefText(TrArg *arg, char **def_text);
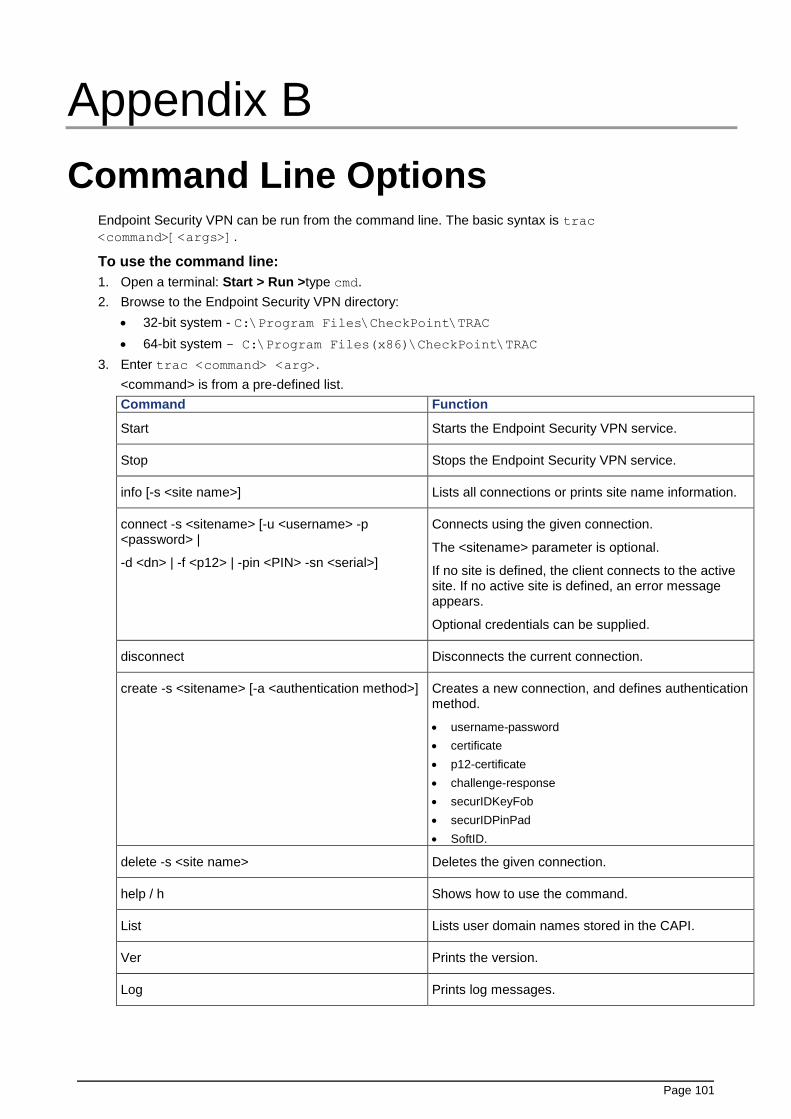
Page 101
Appendix B
Command Line Options Endpoint Security VPN can be run from the command line. The basic syntax is trac
<command>[<args>].
To use the command line:
1. Open a terminal: Start > Run >type cmd.
2. Browse to the Endpoint Security VPN directory:
32-bit system - C:\Program Files\CheckPoint\TRAC
64-bit system - C:\Program Files(x86)\CheckPoint\TRAC
3. Enter trac <command> <arg>.
<command> is from a pre-defined list.
Command Function
Start Starts the Endpoint Security VPN service.
Stop Stops the Endpoint Security VPN service.
info [-s <site name>] Lists all connections or prints site name information.
connect -s <sitename> [-u <username> -p <password> |
-d <dn> | -f <p12> | -pin <PIN> -sn <serial>]
Connects using the given connection.
The <sitename> parameter is optional.
If no site is defined, the client connects to the active site. If no active site is defined, an error message appears.
Optional credentials can be supplied.
disconnect Disconnects the current connection.
create -s <sitename> [-a <authentication method>] Creates a new connection, and defines authentication method.
username-password
certificate
p12-certificate
challenge-response
securIDKeyFob
securIDPinPad
SoftID.
delete -s <site name> Deletes the given connection.
help / h Shows how to use the command.
List Lists user domain names stored in the CAPI.
Ver Prints the version.
Log Prints log messages.
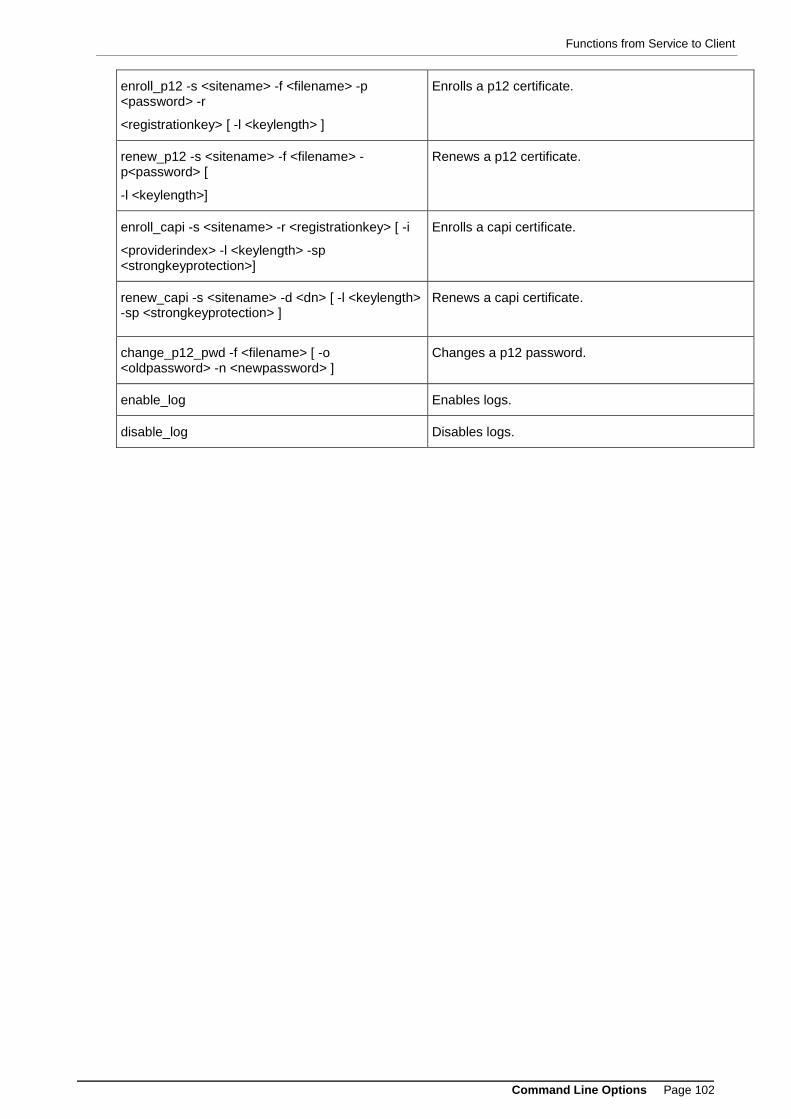
Functions from Service to Client
Command Line Options Page 102
enroll_p12 -s <sitename> -f <filename> -p <password> -r
<registrationkey> [ -l <keylength> ]
Enrolls a p12 certificate.
renew_p12 -s <sitename> -f <filename> -p<password> [
-l <keylength>]
Renews a p12 certificate.
enroll_capi -s <sitename> -r <registrationkey> [ -i
<providerindex> -l <keylength> -sp <strongkeyprotection>]
Enrolls a capi certificate.
renew_capi -s <sitename> -d <dn> [ -l <keylength> -sp <strongkeyprotection> ]
Renews a capi certificate.
change_p12_pwd -f <filename> [ -o <oldpassword> -n <newpassword> ]
Changes a p12 password.
enable_log Enables logs.
disable_log Disables logs.
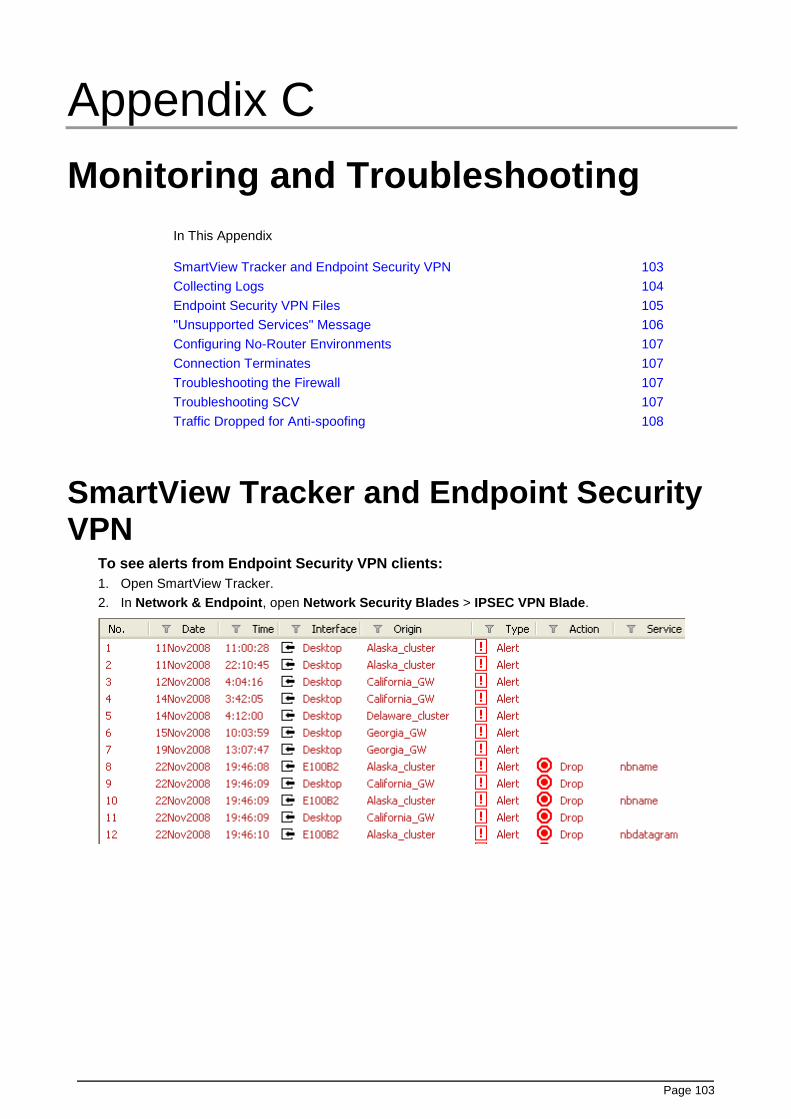
Page 103
Appendix C
Monitoring and Troubleshooting
In This Appendix
SmartView Tracker and Endpoint Security VPN 103
Collecting Logs 104
Endpoint Security VPN Files 105
"Unsupported Services" Message 106
Configuring No-Router Environments 107
Connection Terminates 107
Troubleshooting the Firewall 107
Troubleshooting SCV 107
Traffic Dropped for Anti-spoofing 108
SmartView Tracker and Endpoint Security VPN
To see alerts from Endpoint Security VPN clients:
1. Open SmartView Tracker.
2. In Network & Endpoint, open Network Security Blades > IPSEC VPN Blade.
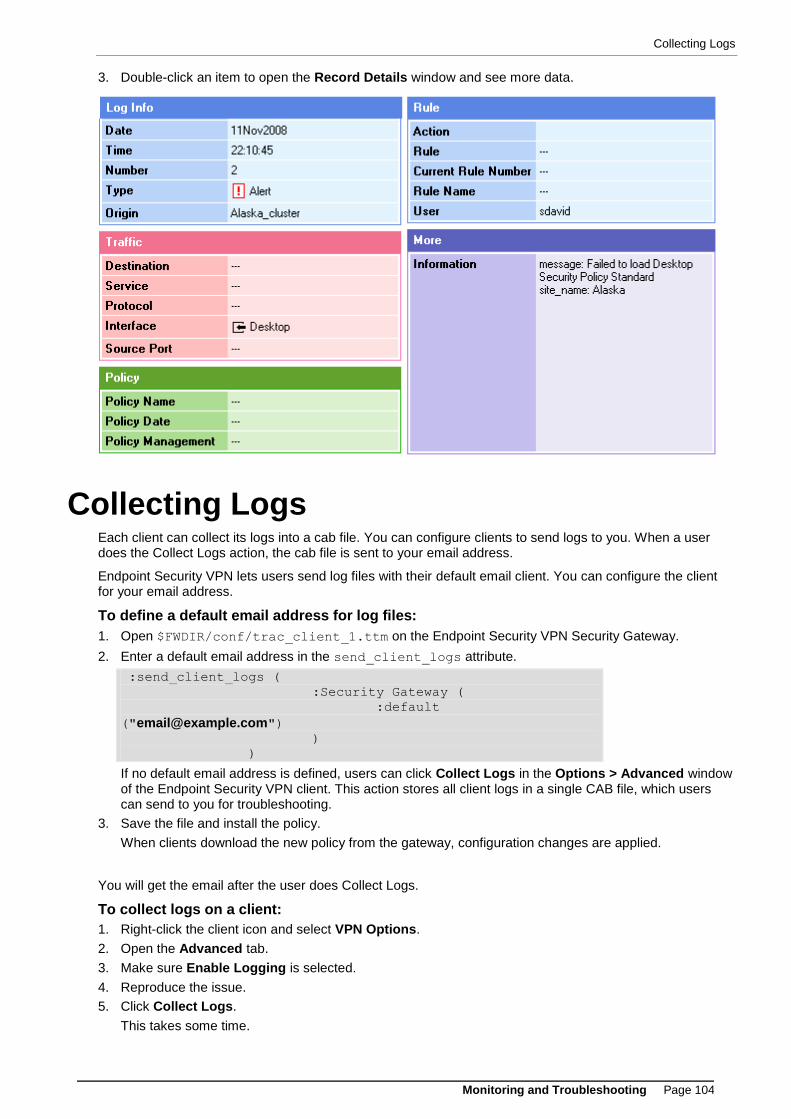
Collecting Logs
Monitoring and Troubleshooting Page 104
3. Double-click an item to open the Record Details window and see more data.
Collecting Logs Each client can collect its logs into a cab file. You can configure clients to send logs to you. When a user does the Collect Logs action, the cab file is sent to your email address.
Endpoint Security VPN lets users send log files with their default email client. You can configure the client for your email address.
To define a default email address for log files:
1. Open $FWDIR/conf/trac_client_1.ttm on the Endpoint Security VPN Security Gateway.
2. Enter a default email address in the send_client_logs attribute.
:send_client_logs (
:Security Gateway (
:default
)
)
If no default email address is defined, users can click Collect Logs in the Options > Advanced window of the Endpoint Security VPN client. This action stores all client logs in a single CAB file, which users can send to you for troubleshooting.
3. Save the file and install the policy.
When clients download the new policy from the gateway, configuration changes are applied.
You will get the email after the user does Collect Logs.
To collect logs on a client:
1. Right-click the client icon and select VPN Options.
2. Open the Advanced tab.
3. Make sure Enable Logging is selected.
4. Reproduce the issue.
5. Click Collect Logs.
This takes some time.
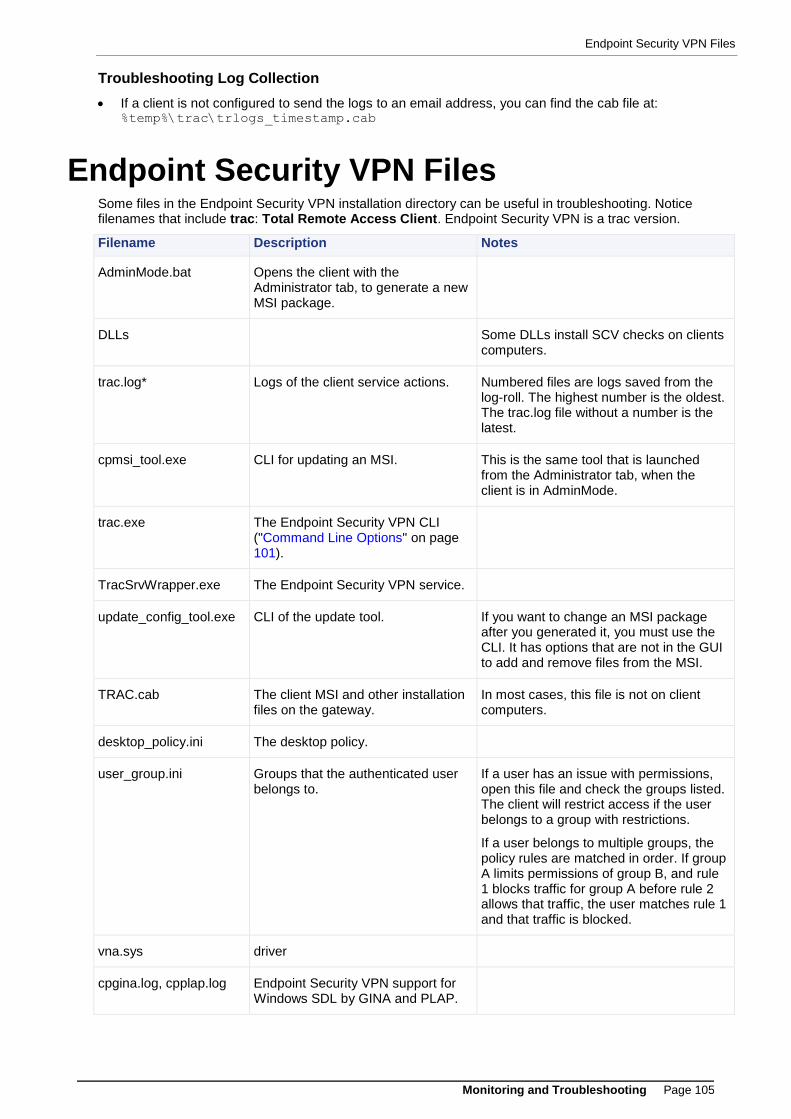
Endpoint Security VPN Files
Monitoring and Troubleshooting Page 105
Troubleshooting Log Collection
If a client is not configured to send the logs to an email address, you can find the cab file at: %temp%\trac\trlogs_timestamp.cab
Endpoint Security VPN Files Some files in the Endpoint Security VPN installation directory can be useful in troubleshooting. Notice filenames that include trac: Total Remote Access Client. Endpoint Security VPN is a trac version.
Filename Description Notes
AdminMode.bat Opens the client with the Administrator tab, to generate a new MSI package.
DLLs Some DLLs install SCV checks on clients computers.
trac.log* Logs of the client service actions. Numbered files are logs saved from the log-roll. The highest number is the oldest. The trac.log file without a number is the latest.
cpmsi_tool.exe CLI for updating an MSI. This is the same tool that is launched from the Administrator tab, when the client is in AdminMode.
trac.exe The Endpoint Security VPN CLI ("Command Line Options" on page 101).
TracSrvWrapper.exe The Endpoint Security VPN service.
update_config_tool.exe CLI of the update tool. If you want to change an MSI package after you generated it, you must use the CLI. It has options that are not in the GUI to add and remove files from the MSI.
TRAC.cab The client MSI and other installation files on the gateway.
In most cases, this file is not on client computers.
desktop_policy.ini The desktop policy.
user_group.ini Groups that the authenticated user belongs to.
If a user has an issue with permissions, open this file and check the groups listed. The client will restrict access if the user belongs to a group with restrictions.
If a user belongs to multiple groups, the policy rules are matched in order. If group A limits permissions of group B, and rule 1 blocks traffic for group A before rule 2 allows that traffic, the user matches rule 1 and that traffic is blocked.
vna.sys driver
cpgina.log, cpplap.log Endpoint Security VPN support for Windows SDL by GINA and PLAP.

"Unsupported Services" Message
Monitoring and Troubleshooting Page 106
Filename Description Notes
helpdesk.log Log of basic actions of the client service.
Logged events include: connect, disconnect, idle, upgrade, and similar client actions.
trac_fwpktlog.log Log of firewall activity with rule number.
Display firewall packet drop and accept logs.
collect.bat Collects logs. If the Collect Logs action did not work (for example, if the computer was shut down before the logs finished collecting), run this batch file on a client to run the collection and see the verbose output of the log collections.
LangPack1.xml Translated resource files. If you want to change the language of the client GUI, you can edit this XML file.
The change is applied after the client restarts.
You cannot add more languages to the list of supplied translations, but you can overwrite a language that you do not need with another one. For example, under French, you can put Portuguese strings.
Thee are some log files (such as trac_fwpkt.log and helpdesk.log) which are not cyclic and will grow as Endpoint Security VPN is used.
When the client needs more disk space, you can delete these log files without affecting the application.
"Unsupported Services" Message
Symptom Client shows an error message: Firewall policy contains unsupported services. Contact your system administrator
Causes Endpoint Security VPN does not recognize all services that may be in policy rules.
Solution 1. Open trac.log.
2. Find: ConvertRule: ERROR - BuildProtocolString failed!!
3. Go up two lines and find the rule number:
ConvertRule: rule = rule-<number>, start converting...
4. Open desktop_policy.ini and find the rule number.
5. In the svc section, find the services of the rule that are not supported.
(For example, dcerpc services are not supported.)
6. Open SmartDashboard, find the rule in the Desktop policy, and remove the unsupported service.
Configuring No-Router Environments
Monitoring and Troubleshooting Page 107
Configuring No-Router Environments You must configure the server in SmartDashboard if there is no router between the Security Gateway and the Endpoint Security VPN client (for example, in a lab environment).
To configure Endpoint Security VPN to operate without a router:
1. In SmartDashboard, open the properties of the Endpoint Security VPN Security Gateway.
2. Open Office Mode:
R71: IPSEC VPN > Office Mode
NGX R65 and R70: Remote Access > Office Mode
3. Select the Multiple Interfaces option: Support connectivity enhancement for gateways with multiple external interfaces
Connection Terminates If all client connections stop at a given interval (default is 15 minutes), the DHCP server might be configured to use the lowest IP lease timeout.
To repair this issue:
1. In SmartDashboard, open the Gateway Properties window of the Endpoint Security VPN gateway.
2. Open Office Mode:
R71: IPSec VPN > Office Mode
R70 and NGX R65: Remote Access > Office Mode
3. Click Offer Office Mode to group or Allow Office Mode to all users.
4. Click Optional Parameters.
5. Increase the value of IP lease duration.
6. Click OK.
7. Install Policy.
Troubleshooting the Firewall You can use the Windows service query (sc query) to see the status of the firewall in the desktop policy.
Service Name vsdatant
Description Check Point service for the desktop policy firewall.
Syntax sc query vsdatant
Example Output STATE : 4 Running
<STOPPABLE, NOT_PAUSABLE, IGNORES_SHUTDOWN>
Troubleshooting SCV "file is corrupt"
Symptom Client shows an error message: Compliance Policy file is corrupt. Please contact your system administrator.
Scenario An SCV check defined in the SCVPolicy section is not defined in the local.scv policy, SCVNames section.
Solution Make sure that the SCVNames section includes all the checks that are to be run on clients.

Traffic Dropped for Anti-spoofing
Monitoring and Troubleshooting Page 108
"unsupported format"
Symptom Client shows an error message: Compliance Policy is in an supported format
Scenario Can be one of these issues:
There is no SCVObject section in the local.scv policy file.
An SCV plug-in configured in the local.scv policy file does not exist on the client computer, or it has a functionality issue.
The SCV Check type as defined in the local.scv policy is not a plug-in.
The local.scv policy context has an incorrect format.
The local.scv file was edited on an operating system that is different than the gateway operating system and the file was saved in an encoding that the gateway cannot read.
Solution See the SCV section in this Administration Guide and follow the instructions to edit and maintain the local.scv file.
"policy is not updated"
Symptom Client shows an error message: Your compliance policy is not updated with the latest security policy. Connect again to update the policy.
Scenario The policy enforced on the client computer is not updated with the latest security policy defined on the gateway.
Solution Connect the client computer again to the gateway. The client pulls the latest security policy when it connects to the gateway.
Traffic Dropped for Anti-spoofing
Symptom Traffic is dropped.
Scenario For environments in which clients connect to the VPN community from internal interfaces (and the VPN community is behind an external interface), Anti-spoofing must be configured differently.
Solution Include the office mode network in the internal interface Anti-spoofing settings.