Embed Size (px)
Citation preview
ULTIMA COMPANY LLC
EPA CERTIFIED ENGINES49 STATE APPLICATIONS*NOT LEGAL FOR USE IN CALIFORNIA
2016
Ultima Company LLC is not a representative of any other motorcycle manufacturer and the parts we sell are not necessarily recommended by any othermotorcycle manufacturer.All words used in this catalog denoting any motorcycle manufacturer, models or motorcycle, or part numbers are intended for use as reference only.
Harley-Davidson® Parts: Harley® and Harley-Davidson® and other model names of Harley® motorcycles are used as a reference only. Some H-D®part numbers are also used as reference only. We are not an authorized Harley® dealer and in no way do we have, or intend to imply any kind of businessrelationship with Harley-Davidson Motor Company®. Our intention is to provide products that can be used on a Harley-Davidson® motorcycle.Names and words that are registered trademarks of Harley-Davidson® Inc. Milwaukee, WI, such as Evolution®, Harley-Davidson®, Harley®, H-D®,HD®, and Softail® are not intended to imply that they are Harley-Davidson® original equipment by their use in connection with Harley-Davidson®factory part numbers.The following model designations for Harley-Davidson® motorcycles are used in this catalog for reference only: EL, FL, FLH, FLHR, FLHS, FLHT, FLHTC,FLHTC-I, FLHTC Ultra Classic, FLHX, FLST, FLSTC, FLSTF, FLSTN, FLSTS, FLT, FLTC, FLTC Ultra Classic, FXB, FXD, FXDB, FXDC, FXDG, FXDL, FXDS, FXDS-Conv., FXDWG, FXE, FXEF, FXLR, FXR, FXRC, FXRD, FXRDG, FXRP, FXRS, FXRSE, FXRS-Conv., FXRS-SP, FXRT, FXS, FXSB, FXST, FXSTC, FXSTS, FXSTSB,FXWG, GE, K, KH, WL, WLA, XL, XLCH, XLCR, XLH, XLH 883, XLH 1100, XLH 1200, XLR, XLS, XLT, XLX AND XR-1000.All other trademarks, registered trademarks and brand names used in this catalog are the property of their respective holders.
WARNINGSerious injury, death and property damage can result from the improper use, control, alteration, or maintenance of motorcycles. The dealer and dealerscustomers must exercise good judgement in the use, control, alteration, part selection and installation, and maintenance of motorcycles. Ultima® hasno control over the judgement of others and assumes no responsibility or liability of any nature for the failure of others to use good judgement.
COPYRIGHT ULTIMA® COMPANY LLC 2008 REV 7/18/16
1
2
ULTIMA® EPA CERTIFIED ENGINESDISTRIBUTED EXCLUSIVELY BY MIDWEST MOTORCYCLE SUPPLY
Failure to read and comply with this document completely may Void Warranty.
Limited Engine Warranty:Ultima’s component parts used in all EPA Certified 100-113 CI engines are guaranteed to the original purchaser to be free of manufacturingdefects in materials and workmanship for a period of 24 months from the date of purchase. Ultima’s component parts used in all EPA Certified120 & 127 CI engines are guaranteed to the original purchaser to be free of manufacturing defects and workmanship for a period of 12 monthsfrom the date of purchase.In the event that any warranty service is required, the original purchaser must call or write Ultima Company LLC immediately with the problem.Many problems can be rectified by a telephone call and need no further course of action. Merchandise that is suspected of being defectivemust not be replaced by a Dealer or End User without prior authorization from Ultima Company LLC. If it is deemed necessary for Ultima tomake an evaluation to determine whether the part was defective, it must be packaged properly to prevent further damage and be returnedprepaid to Ultima Company LLC with a copy of the original invoice of purchase and detailed letter outlining the nature of the problem, how thepart was used and the circumstances at the time of failure. If, after an evaluation has been made by Ultima and the part was found to bedefective, repair to the existing part or replacement will be granted at Ultima’s discretion. Engines that have been modified in any way fromthe original purchased configuration will have the warranty voided.Cost associated with removing or installation of complete engines are not covered under this warranty, furthermore this warranty coversparts repair or replacement only and no other associated expenses.
If you have any questions regarding your warranty rights and responsibilities, you should contact:Ultima Company, L.L.C. • 2100 Highway Z • Pevely, MO 63070
Phone: (314)773-3064 • Fax: (314)664-3065 • [email protected]
OWNER’S LIMITED WARRANTY RESPONSIBILITIES• As the engine owner, you are responsible for the performance of the required maintenance listed in your owner’s manual. Ultima recommends that you retain all receipts covering maintenance on your engine, but Ultima cannot deny warranty solely for the lack of receipts or for your failure to ensure the performance of all scheduled maintenance.
• You are responsible for presenting your engine to a Ultima dealer as soon as a problem exists. ECS warranty repairs should be completed in a reasonable amount of time, not to exceed 30 days.
• As the engine owner, you should be aware that Ultima may deny your warranty coverage if your engine or a part has failed due to abuse, neglect, improper maintenance or unapproved modifications.
Additional Warranty Provisions:1. Ultima® shall have no obligation in the event an Ultima® part is modified by any other person or organization.2. Ultima® shall have no obligation in the event an Ultima® part becomes defective in whole or in part as a result of improper installation,improper use, abnormal operation, or any other misuse or mistreatment of the Ultima® part.
3. Ultima® shall not be liable for any consequential or incidental damage resulting from the failure of an Ultima® part, the breach of anywarranties, the failure to deliver, delay in delivery, delivery in non-conforming condition, or for any other breach of contract or duty betweenUltima® and a customer.
4. Ultima® parts are designed exclusively for motorcycle applications. Ultima® shall have no warranty or liability obligation if an Ultima® part isused in any other application.
3
Ultima Company, L.L.C. - Emission Control System Warranty StatementYOUR WARRANTY RIGHTS AND OBLIGATIONSThe U.S. Environmental Protection Agency and Ultima Company, L.L.C., (hereinafter Ultima), are pleased to explain the emission control systemwarranty on your 2010 and later engine. In all states other than California, new motors must be designed, built, and equipped to meet U.S. EPAFederal anti-smog standards. Ultima must warrant the emission control system on your engine for the periods of time listed below providedthere has been no abuse, neglect or improper maintenance of your engine.
Your emission control system may include parts such as the carburetor or fuel-injection system, the ignition system, catalytic converter andengine computer. Also included may be hoses, belts, connectors and other emission-related assemblies.
Where a warrantable condition exists, Ultima will repair your engine at no cost to you, including diagnosis, parts and labor.
MANUFACTURER’S E.C.S. WARRANTY COVERAGE• For a period of use of five (5) years or 30,000 kilometers (18,641 miles), whichever occurs first
If an emission-related part on your engine is defective, the part will be repaired or replaced by Ultima. This is your emission control systemDEFECTS WARRANTY.
OWNER’S E.C.S. WARRANTY RESPONSIBILITIES• As the engine owner, you are responsible for the performance of the required maintenance listed in your owner’s manual. Ultima
recommends that you retain all receipts covering maintenance on your engine, but Ultima cannot deny warranty solely for the lack of receipts or for your failure to ensure the performance of all scheduled maintenance.
• You are responsible for presenting your engine to a Ultima dealer as soon as a problem exists. The warranty repairs should be completed in a reasonable amount of time, not to exceed 30 days.
• As the engine owner, you should be aware that Ultima may deny your warranty coverage if your engine or a part has failed due to abuse, neglect, improper maintenance or unapproved modifications.
If you have any questions regarding your warranty rights and responsibilities, you should contact:Ultima Company, L.L.C. • 2100 State Road Z • Pevely, MO 63070
Phone: (636)931-3305 • Fax: (636)931-3241 • [email protected]
Ultima Company, L.L.C. - Limited Warranty on Emission Control SystemUltima Company, L.L.C. (hereinafter Ultima) warrants that each new 2010 and later Ultima engine:
A. is designed, built and equipped so as to conform at the time of initial retail purchase with all applicable regulations of the United States Environmental Protection Agency; and
B. is free from defects in material and workmanship which cause such engine to fail to conform with applicable regulations of the United States Environmental Protection Agency for a period of use of 30,000 kilometers (18,641 miles), or 5 (five) years from the date of initial retaildelivery, whichever first occurs.
I. COVERAGE. Warranty defects shall be remedied during customary business hours at any authorized Ultima engine dealer located within the United States of America in compliance with the Clean Air Act and applicable regulations of the United States Environmental ProtectionAgency. Any part or parts replaced under this warranty shall become the property of Ultima.
II. LIMITATIONS. This Emission Control System warranty shall not cover any of the following:A. Repair or replacement required as a result of
(1) accident,(2) misuse,(3) repairs improperly performed or replacements improperly installed,(4) use of replacement parts or accessories not conforming to Ultima’s specifications which adversely affect performance and/or(5) use in competitive racing or related events.
B. Inspections, replacement of parts and other services and adjustments required for required maintenance.C. Any engine on which the odometer mileage has been changed so that actual mileage cannot be readily determined.
III. LIMITED LIABILITY.A. The liability of Ultima under this Emission Control System Warranty is limited solely to the remedying of defects in material
workmanship by an authorized Ultima engine dealer at its place of business during customary business hours. This warranty does not cover inconvenience or loss of use of the engine or transportation of the engine to or from the Ultima dealer. Ultima shall not be liable for any other expenses, loss or damage, whether direct, incidental, consequential or exemplary arising in the connection with the sale or use of or inability to use the Ultima engine for any purpose. Some states do not allow the exclusion or limitation of any incidental or consequential damages, so the above limitations may not apply to you. 5
B. No express emission control system warranty is given by Ultima except as specifically set forth therein. Any emission control system warranty implied by law, including any warranty of the merchant ability or fitness for a particular purpose, is limited to the express emission control system warranty terms stated in this warranty. The foregoing statements of warranty are exclusive and in lieu of all other remedies. Some states do not allow limitations on how long an implied warranty lasts so the above limitations may not apply to you.
C. No dealer is authorized to modify this Limited Emission Control System Warranty.
IV. LEGAL RIGHTS. This warranty gives you specific legal rights, and you may also have other rights which vary from state to state.
V. This warranty is in addition to the Ultima Company, L.L.C. limited engine warranty.
VI. ADDITIONAL INFORMATION. Any replacement part that is equivalent in performance and durability may be used in the performance of any maintenance or repairs. However, Ultima is not liable for these parts. The owner is responsible for the performance of all required maintenance. Such maintenance may be performed at a service establishment or by any individual. The warranty period begins on the date the engine is delivered to an ultimate purchaser.
If you have any questions regarding your warranty rights and responsibilities, you should contact:Ultima Company, L.L.C. • 2100 Highway Z • Pevely, MO 63070
Phone: (314)773-3064 • Fax: (314)664-3065• [email protected]
6
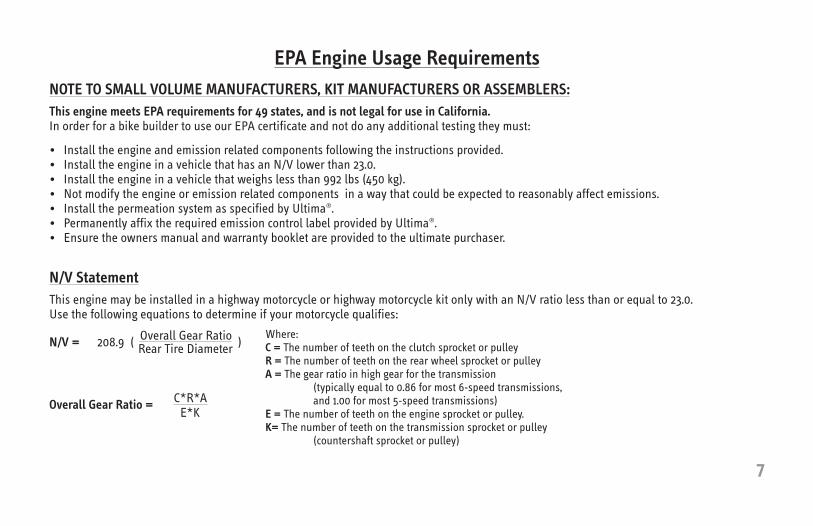
N/V StatementThis engine may be installed in a highway motorcycle or highway motorcycle kit only with an N/V ratio less than or equal to 23.0. Use the following equations to determine if your motorcycle qualifies:
N/V = 208.9 ( Overall Gear Ratio ) Rear Tire Diameter
Overall Gear Ratio = C*R*AE*K
Where: C = The number of teeth on the clutch sprocket or pulley R = The number of teeth on the rear wheel sprocket or pulley A = The gear ratio in high gear for the transmission
(typically equal to 0.86 for most 6-speed transmissions, and 1.00 for most 5-speed transmissions)
E = The number of teeth on the engine sprocket or pulley. K= The number of teeth on the transmission sprocket or pulley
(countershaft sprocket or pulley)
EPA Engine Usage Requirements
7
NOTE TO SMALL VOLUME MANUFACTURERS, KIT MANUFACTURERS OR ASSEMBLERS:This engine meets EPA requirements for 49 states, and is not legal for use in California.In order for a bike builder to use our EPA certificate and not do any additional testing they must:
• Install the engine and emission related components following the instructions provided. • Install the engine in a vehicle that has an N/V lower than 23.0. • Install the engine in a vehicle that weighs less than 992 lbs (450 kg).• Not modify the engine or emission related components in a way that could be expected to reasonably affect emissions. • Install the permeation system as specified by Ultima®.• Permanently affix the required emission control label provided by Ultima®.• Ensure the owners manual and warranty booklet are provided to the ultimate purchaser.
Weight LimitThis engine may be installed in a highway motorcycle or kit that weighs 992 lbs (450 kg) or less only, with full fuel, oil and other fluids. Does not include weight of rider or cargo.
Changing Specified ComponentsYou must not make any changes to the engine that could be reasonably expected to increase the exhaust emissions of any pollutant. The fuelmetering system, ignition system, camshaft and all other internal engine components must remain in exactly the configuration in which theengine was delivered. You may not modify, recalibrate or remove or fail to properly install carburetor, air cleaner cover, air cleaner housingand air cleaner supplied with the engine. In California only, you must install various other evaporative emission control system componentsavailable through Ultima Company LLC. Use of engines in the state of California requires additional documentation and testing not outlined inthis manual. Contact Ultima for engine applications concerning the state of California.
Exhaust SystemsThis engine must be installed w/an exhaust system that creates no more than 1.0 p.s.i. exhaust back pressure w/the engine running at 1800rpm. The exhaust back pressure must be measured within 1 foot of the exhaust flange face.
Assembly Failure StatementWARNING! Failure to meet the requirements listed above will make the manufacturer of the vehicle, or the manufacturer of the kit, or theassembler of the motorcycle containing this engine, liable for violations of certification, introduction into commerce, and anti-tamperingrequirements, as provided under the federal Clean Air Act and U.S. EPA regulations and subject to monetary fines and other penalties.
8
Emmision Control Information LabelWARNING! The label that accompanies this engine is marked with the serial number of the engine. This label must be installed on themotorcycle that contains this engine and none other. The label must be installed on the frame of the motorcycle or a plate permanentlyattached to the frame of the motorcycle in a location that is visible when the seat of the motorcycle has been removed. It is not legal to installthis engine in a motorcycle without affixing the label. The ECI label will not be issued to the end user/manufacturer until the warranty/anti-tampering contract and the notice to the installer have been signed and received by Ultima Motors, LLC.
Anti Tampering RequirementsWARNING! Tampering is prohibited. Any act by any person, including the manufacturer of the motorcycle or the ultimate purchaser of themotorcycle, which renders inoperable or reduces the effectiveness of any part, component or element of design of the engine with regard to emission control is “tampering.”
Tampering is specifically prohibited under the clean air act (42USC203(a)(3)). Failure to observe this warning can lead to penalties beingimposed by the federal government.
These anti-tampering requirements must be thoroughly read and understood before signing of warranty card contract, located in the back ofthe manual. Warranty card contract must be signed and sent to Ultima within 30 days of original purchase by the end user in order forwarranty to be valid.
Notice To InstallerThis letter which is included with the engine should be read, understood and signed. This notice should be sent to Ultima along with thewarranty/anti-tampering contract.
Note to motorcycle or kit manufacturer:This Ultima engine owner’s manual must be provided to the ultimate purchaser of this engine. The ECI label will not be issued to the enduser/manufacturer until the warranty/anti-tampering contract and the notice to the installer have been signed and received by UltimaMotors, LLC.
9
10
Installation Notes:Ultima® Engines should be installed by trained professional mechanics into motorcycle in which they were intended for use. Failure to do somay result in injury and even death. It is the customer’s responsibility to insure their mechanic has proper training.
Fitment and Clearance Issues:Every effort has been made to insure these engines will install into most available frame models without modifications. Some of the knownfitment issues we have encountered are listed below. Please read these carefully as they will aid in installation.
Fitment Issues: All Crank Cases1. Ultima® crank cases are designed to fit most OEM motorcycles built from 1984-1999 using Evolution® style engines. On rubber mountedengines, please check that the front engine mount bracket weld or tab does not interfere with the case before applying final torque to theengine mount bolts — clearance the bracket if needed.
2. On most FXR® or bikes using midshift controls it may be necessary to clearance the case for the inner shift arm.
Fitment Issues: Cylinder 100-107-113-120-127 Ci1. On some frames using offset engines and forward controls it may be necessary to space the inner shift arm or the shifter mounting bracketaway from the front cylinder fins to provide adequate clearance between the shift arm or rod and the cylinder fins.
Fitment Issues: Cylinder Heads 100-107-113-120-127 Ci1. If installing these engines into a Stock Style Softail® type frames it will be necessary to relocate the coil and bracket.
11
FIG. 2
FEED LINE POINTS TOWARD TRANS
FIG. 3
CRANKCASEPRESSUREFITTING
FIG. 4
DRAINPLUG
FEEDLINE
CRANKCASEPRESSURE FITTING
RETURNLINE
THESE LINESMUST BE
CONNECTEDPROPERLYTO THEOIL TANK
AND FILTERHOUSING
ORENGINE FAILURE
CANOCCUR!!!
INSIDE LINE (NEAR SEATPOST) RETURN
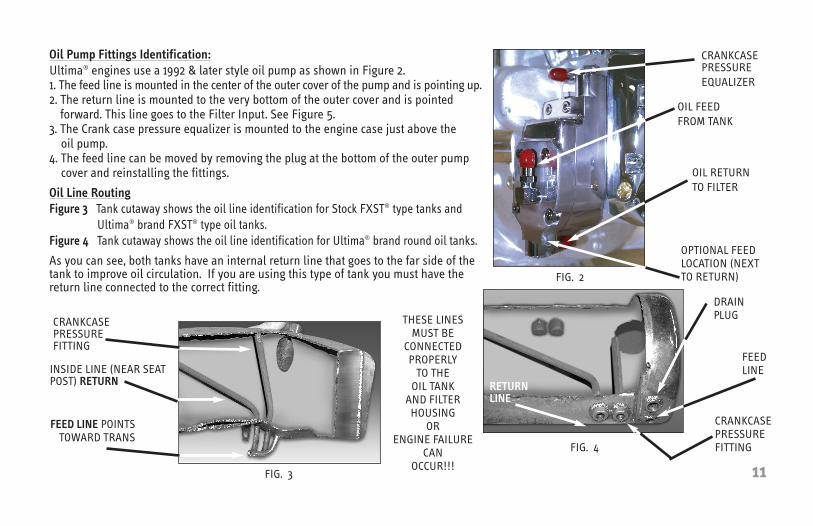
Oil Pump Fittings Identification:Ultima® engines use a 1992 & later style oil pump as shown in Figure 2.1. The feed line is mounted in the center of the outer cover of the pump and is pointing up.2. The return line is mounted to the very bottom of the outer cover and is pointedforward. This line goes to the Filter Input. See Figure 5.
3. The Crank case pressure equalizer is mounted to the engine case just above the oil pump.
4. The feed line can be moved by removing the plug at the bottom of the outer pumpcover and reinstalling the fittings.
Oil Line RoutingFigure 3 Tank cutaway shows the oil line identification for Stock FXST® type tanks and
Ultima® brand FXST® type oil tanks.Figure 4 Tank cutaway shows the oil line identification for Ultima® brand round oil tanks.
As you can see, both tanks have an internal return line that goes to the far side of thetank to improve oil circulation. If you are using this type of tank you must have thereturn line connected to the correct fitting.
CRANKCASEPRESSUREEQUALIZER
OIL FEEDFROM TANK
OIL RETURNTO FILTER
OPTIONAL FEEDLOCATION (NEXTTO RETURN)
12
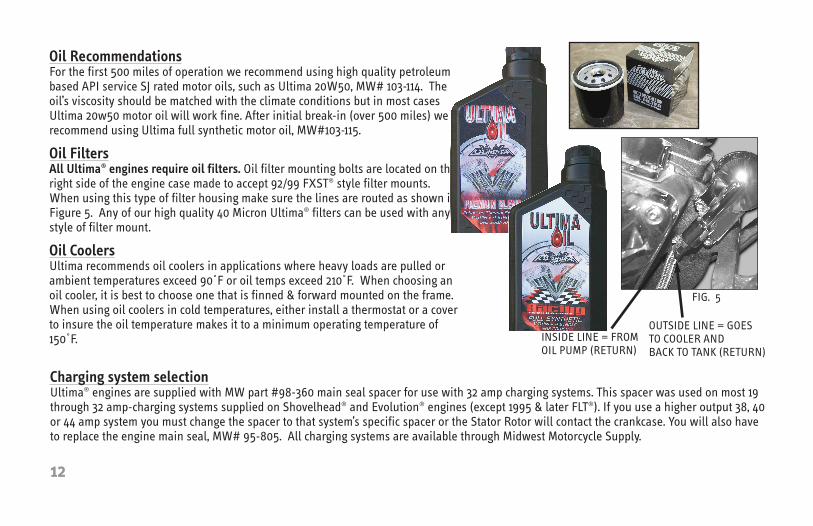
FIG. 5
INSIDE LINE = FROMOIL PUMP (RETURN)
OUTSIDE LINE = GOESTO COOLER ANDBACK TO TANK (RETURN)
Oil RecommendationsFor the first 500 miles of operation we recommend using high quality petroleumbased API service SJ rated motor oils, such as Ultima 20W50, MW# 103-114. Theoil’s viscosity should be matched with the climate conditions but in most casesUltima 20w50 motor oil will work fine. After initial break-in (over 500 miles) werecommend using Ultima full synthetic motor oil, MW#103-115.
Oil FiltersAll Ultima® engines require oil filters. Oil filter mounting bolts are located on theright side of the engine case made to accept 92/99 FXST® style filter mounts.When using this type of filter housing make sure the lines are routed as shown inFigure 5. Any of our high quality 40 Micron Ultima® filters can be used with anystyle of filter mount.
Oil CoolersUltima recommends oil coolers in applications where heavy loads are pulled orambient temperatures exceed 90˚F or oil temps exceed 210˚F. When choosing anoil cooler, it is best to choose one that is finned & forward mounted on the frame.When using oil coolers in cold temperatures, either install a thermostat or a coverto insure the oil temperature makes it to a minimum operating temperature of150˚F.
Charging system selectionUltima® engines are supplied with MW part #98-360 main seal spacer for use with 32 amp charging systems. This spacer was used on most 19through 32 amp-charging systems supplied on Shovelhead® and Evolution® engines (except 1995 & later FLT®). If you use a higher output 38, 40or 44 amp system you must change the spacer to that system’s specific spacer or the Stator Rotor will contact the crankcase. You will also haveto replace the engine main seal, MW# 95-805. All charging systems are available through Midwest Motorcycle Supply.
13
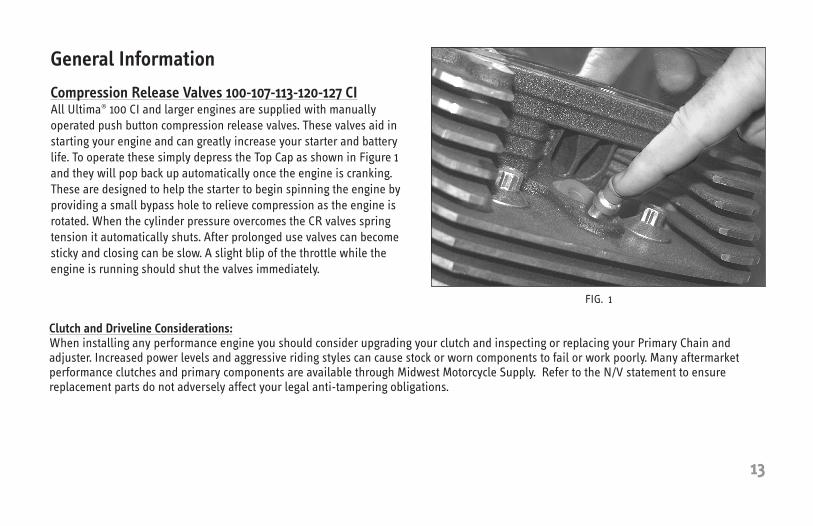
FIG. 1
General Information
Compression Release Valves 100-107-113-120-127 CIAll Ultima® 100 CI and larger engines are supplied with manuallyoperated push button compression release valves. These valves aid instarting your engine and can greatly increase your starter and batterylife. To operate these simply depress the Top Cap as shown in Figure 1and they will pop back up automatically once the engine is cranking.These are designed to help the starter to begin spinning the engine byproviding a small bypass hole to relieve compression as the engine isrotated. When the cylinder pressure overcomes the CR valves springtension it automatically shuts. After prolonged use valves can becomesticky and closing can be slow. A slight blip of the throttle while theengine is running should shut the valves immediately.
Clutch and Driveline Considerations:When installing any performance engine you should consider upgrading your clutch and inspecting or replacing your Primary Chain andadjuster. Increased power levels and aggressive riding styles can cause stock or worn components to fail or work poorly. Many aftermarketperformance clutches and primary components are available through Midwest Motorcycle Supply. Refer to the N/V statement to ensurereplacement parts do not adversely affect your legal anti-tampering obligations.
Starter and Battery ConsiderationsUltima® 100 thru 113 CI configurations will typically have no startingproblems when using components with comparable power ratings asused on OEM motorcycles built after 1989. Ultima® starters, batteries& battery cables are recommended when upgrading from the stockcomponents. Typically an Ultima Thunderfire® starter with a 1.4 to1.75kw rating when used with an Ultima® AGM battery & high qualityUltima® cables will give the best performance on our 80 thru 113CIengines. An Ultima Thunderfire® starter with a 2.0 to 2.4kw ratingwhen used with an Ultima® AGM battery & high quality Ultima®
cables will give the best performance on our 120, 127 CI engines.
14
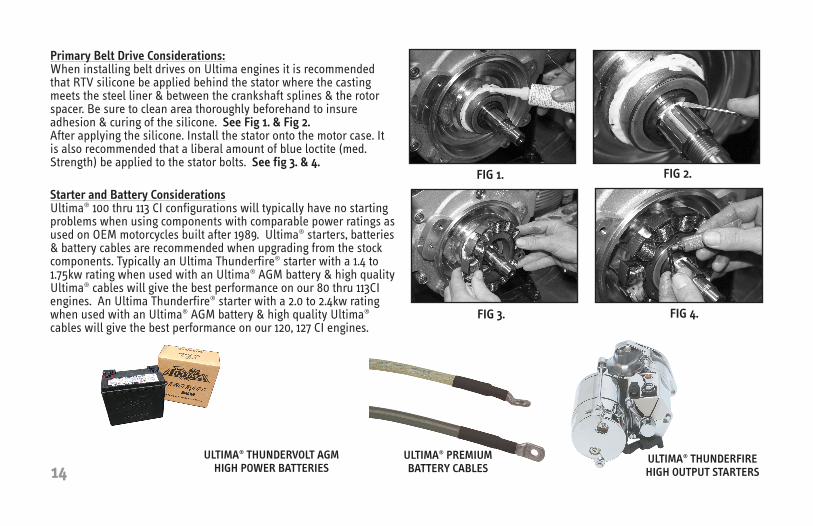
FIG 1. FIG 2.
FIG 3. FIG 4.
Primary Belt Drive Considerations:When installing belt drives on Ultima engines it is recommendedthat RTV silicone be applied behind the stator where the castingmeets the steel liner & between the crankshaft splines & the rotorspacer. Be sure to clean area thoroughly beforehand to insureadhesion & curing of the silicone. See Fig 1. & Fig 2.After applying the silicone. Install the stator onto the motor case. Itis also recommended that a liberal amount of blue loctite (med.Strength) be applied to the stator bolts. See fig 3. & 4.
ULTIMA® THUNDERVOLT AGMHIGH POWER BATTERIES
ULTIMA® PREMIUM BATTERY CABLES
ULTIMA® THUNDERFIREHIGH OUTPUT STARTERS
15
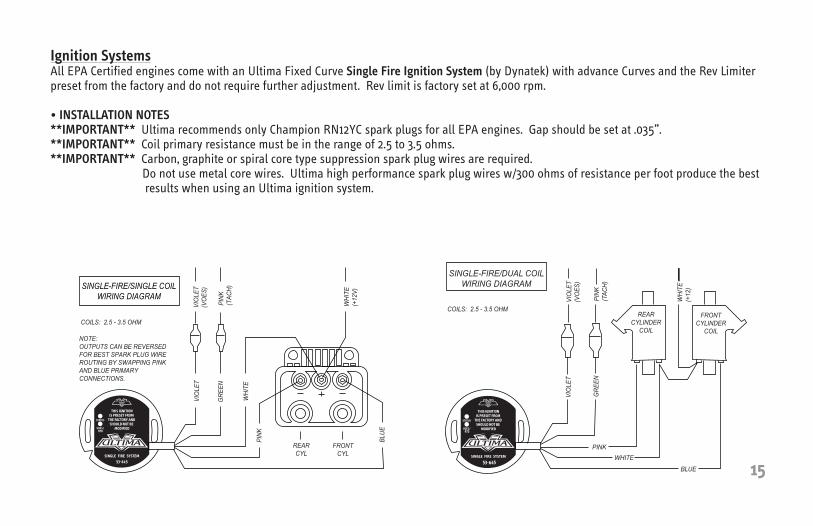
Ignition SystemsAll EPA Certified engines come with an Ultima Fixed Curve Single Fire Ignition System (by Dynatek) with advance Curves and the Rev Limiterpreset from the factory and do not require further adjustment. Rev limit is factory set at 6,000 rpm.
• INSTALLATION NOTES**IMPORTANT** Ultima recommends only Champion RN12YC spark plugs for all EPA engines. Gap should be set at .035”.**IMPORTANT** Coil primary resistance must be in the range of 2.5 to 3.5 ohms.**IMPORTANT** Carbon, graphite or spiral core type suppression spark plug wires are required.
Do not use metal core wires. Ultima high performance spark plug wires w/300 ohms of resistance per foot produce the best results when using an Ultima ignition system.
STATUS
VIO
LET
GRE
EN
VIO
LET
(VO
ES)
PINK
(TAC
H)
WHI
TE(+
12V)
PINK
WHI
TE
BLUE
REARCYL
COILS: 2.5 - 3.5 OHM
SINGLE-FIRE/SINGLE COILWIRING DIAGRAM
FRONTCYL
NOTE:OUTPUTS CAN BE REVERSEDFOR BEST SPARK PLUG WIREROUTING BY SWAPPING PINKAND BLUE PRIMARYCONNECTIONS.
STATUS
VIO
LET
GRE
EN
VIO
LET
(VO
ES)
PINK
(TAC
H)
WHI
TE(+
12)
PINKWHITE
BLUE
REARCYLINDER
COIL
FRONTCYLINDER
COIL
COILS: 2.5 - 3.5 OHM
SINGLE-FIRE/DUAL COILWIRING DIAGRAM
START UP AND BREAK IN RECOMMENDATIONSTo give your engine maximum life and performance please read these recommendations thoroughly. These recommendations are assumingthat your engine has been installed by a professional mechanic and all aspects of proper engine installation have been addressed.
Pre-Start ChecksOil System:
Some things that you should not do prior to starting your engine are:
1. Never assume your oil tank is clean enough:Oil is your engine’s life blood and installing a new engine in a motorcycle that has not had the oil system (tank, cooler, filter housing)thoroughly cleaned with new oil lines installed is definitely something not to do. All new tanks and coolers should be inspected andcleaned prior to installation.
2. Never assume your oil lines are on correctly:Double check that your feed line, return line and crank case pressure equalizer line are routed to their proper fittings. If you are unsurecontact the components manufacturer or professional mechanic for proper routing.
3. Never run your engine without an oil filter installed. Oil filters prolong engine life and are a must for performance engines.
16
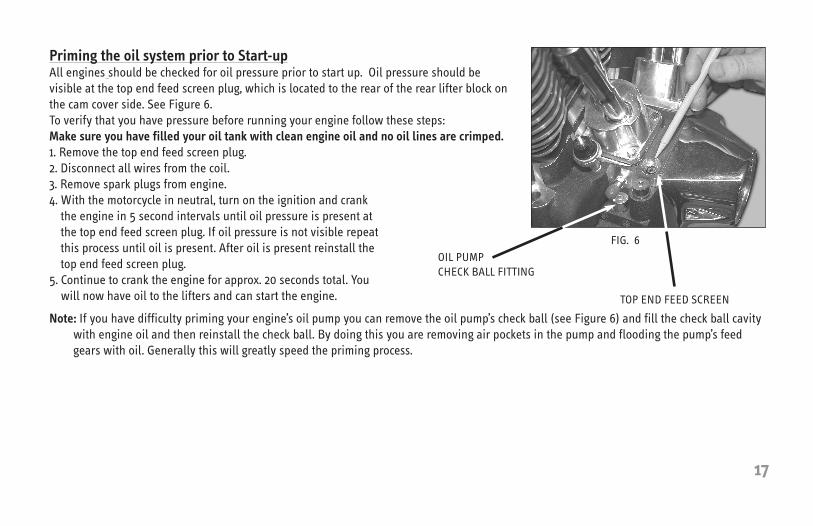
Priming the oil system prior to Start-upAll engines should be checked for oil pressure prior to start up. Oil pressure should bevisible at the top end feed screen plug, which is located to the rear of the rear lifter block onthe cam cover side. See Figure 6.To verify that you have pressure before running your engine follow these steps:Make sure you have filled your oil tank with clean engine oil and no oil lines are crimped.1. Remove the top end feed screen plug.2. Disconnect all wires from the coil.3. Remove spark plugs from engine.4. With the motorcycle in neutral, turn on the ignition and crankthe engine in 5 second intervals until oil pressure is present atthe top end feed screen plug. If oil pressure is not visible repeatthis process until oil is present. After oil is present reinstall thetop end feed screen plug.
5. Continue to crank the engine for approx. 20 seconds total. Youwill now have oil to the lifters and can start the engine.
Note: If you have difficulty priming your engine’s oil pump you can remove the oil pump’s check ball (see Figure 6) and fill the check ball cavitywith engine oil and then reinstall the check ball. By doing this you are removing air pockets in the pump and flooding the pump’s feedgears with oil. Generally this will greatly speed the priming process.
17
FIG. 6OIL PUMPCHECK BALL FITTING
TOP END FEED SCREEN
FUEL RECOMMENDATIONS:High quality fuel will have a direct effect on your engine’s performance.Ultima® engines are designed to run on a Minimum of 91 octane fuel. Search out the best fuels in your area. There are large variations in fuelquality nationwide.
Initial Start UpOne of the most important parts of the break-in procedure is the initial starting of your engine!!!!Read this completely before starting the engine!!!!!!1. Twist the throttle wide open and make sure that the fuel pump is working.2. Give the engine 2 full fuel squirts and full enrichment or choke.3. Leave the throttle shut and start the engine.Some of the things you should not do to a new engine are:= Do not start the engine without first going though the oil pump/lifter priming process described earlier.= Do not start the engine without a large fan pointed at the engine and on its highest setting.= Do not rev the engine or blip the throttle repeatedly.= Do not let the engine idle for long periods.While these things may seem unimportant please consider that new engines create much more heat than engines that have been broke in.Remember these are Air Cooled engines.On the initial start we recommend letting the engine run approx. 2 minutes then letting it cool before repeating this procedure. Do overallchecks before restarting. Do not over heat the engine! For each 2 minute cycle, run the engine at idle 10-15 seconds then at 2000-2600 rpmfor 10-15 seconds. Check and verify that your engine has adequate oil pressure and is returning oil to the oil tank.After you have run the engine for approx. 4-5 minutes, verify that no intake air leaks or oil leaks are present.
Do not let the engine get excessively hot! You can now TAKE YOUR FIRST RIDE!
18
Break-in procedures for Ultima® EnginesFollow these guidelines closely or you may void your warranty.Avoid over heating your engine!!!!!!!!!!!
The heat of a new engine can be directly related to engine rpm, load and friction.
Do not lug the engine. If you have a 6-speed transmission do not run your bike in 6th gear during break-in. We stronglyrecommend you keep the engine rpm above 2400 and below 3500 rpm for the first 500 miles and run the engine at varyingspeeds.
Short trips under 10 miles and not in traffic on the first 2 rides are preferred. Try to ride on cool evenings and do not idle the bike very long.Keep air moving around the engine to keep it cool. Making the next 3-4 trips fewer than 30 miles will help to keep the heat down. When takingyour initial rides on your new engine do so riding solo to avoid lugging the engine. If the engine feels like it is getting excessively hot shut itdown and let it cool. Typical engine oil operating temperatures are 165°F-205°F degrees and should not be exceeded.
During the first 500 miles of operation we highly recommend running the engines on an open road at varying engine speeds. If you have anoil temperature gauge try to keep your engine oil temperature below 200°F degrees even after break-in.
For the first 1000-1500 miles you should monitor your engine temperature and always avoid prolonged idling or sitting in traffic. If you getstuck in traffic pull over and take a break. DO NOT break-in your engine at Daytona or Sturgis or any other rally.
After 2000 miles avoid running your engine above 5500 rpm. Your engine is electronically limited at 6000 RPM and running the engines athigher rpm’s will only shorten engine life especially on poorly tuned engines.
19
Break-In Service and Hardware Re-torquingWith a new engine we feel the first oil/filter change should occur after the first 100-150 miles and all cover bolts and engine-mounting boltsshould be checked for proper torque. Keeping your engine oil clean is very important to the overall life of the engine. During the Break-In, orlook at it as the “Wear-In” period, engines produce very small metallic pieces that need a good filter to remove them. We do not recommendextremely fine 10-micron filters as they can clog quickly and begin to by-pass oil instead of filtering it. Use the 40 Micron Filters during break-inand for the life of the engine. Checking cover bolts and engine mounting bolts is just good preventative maintenance during this period.
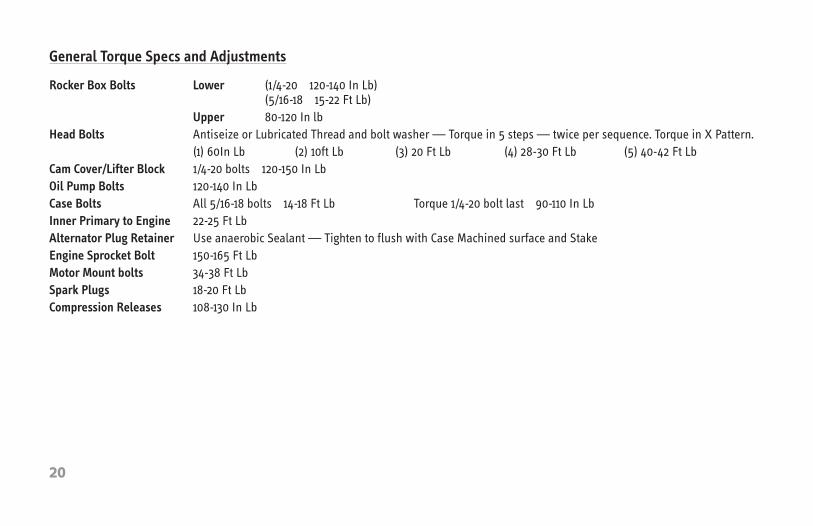
General Torque Specs and Adjustments
Rocker Box Bolts Lower (1/4-20 120-140 In Lb)(5/16-18 15-22 Ft Lb)
Upper 80-120 In lbHead Bolts Antiseize or Lubricated Thread and bolt washer — Torque in 5 steps — twice per sequence. Torque in X Pattern.
(1) 60In Lb (2) 10ft Lb (3) 20 Ft Lb (4) 28-30 Ft Lb (5) 40-42 Ft LbCam Cover/Lifter Block 1/4-20 bolts 120-150 In LbOil Pump Bolts 120-140 In LbCase Bolts All 5/16-18 bolts 14-18 Ft Lb Torque 1/4-20 bolt last 90-110 In LbInner Primary to Engine 22-25 Ft LbAlternator Plug Retainer Use anaerobic Sealant — Tighten to flush with Case Machined surface and StakeEngine Sprocket Bolt 150-165 Ft LbMotor Mount bolts 34-38 Ft LbSpark Plugs 18-20 Ft LbCompression Releases 108-130 In Lb
20

Troubleshooting
Below you will find a list of common issues we have encountered with new engine installations. If you do not see your problem or cannotresolve one of these problems please contact your dealer for more information.
Engine Won’t Start
Common causes:1. No fuel supply.2. No spark.3. Engine has been flooded.
When trying to start the engine for the first time, and it is difficult, you need to verify that you have compression, fuel and spark. Give thethrottle 1-2 full turns prior to starting so you can see if the fuel pump is working properly and that fuel is being delivered. After you give theengine a few squirts from the fuel pump, give it a full enrichment or choke for best initial starting and do this with the throttle closed. Do notkeep twisting the throttle if the engine does not start. Stop and evaluate the problem or you can Gas Foul the spark plugs. If no spark is presentverify all connections and contact your qualified technician for technical help.
21
Excessive lifter noise
Common causes:
1. Engine was not properly primed prior to start-up.
2. No oil feed to lifters.
3. Oil lines are not connected properly.
If you have excessive lifter noise at start-up shut the engine off immediately and go through the priming process described earlier in thisdocument. Ultima® engines are primed from the factory but if no oil is being fed from the oil pump the lifters will lose their prime quickly.Engines that are run with dry lifters are at risk to bend pushrods and can have permanent damage. Always check the pressure whendiagnosing this with a quality pressure gauge reading from the oil-sending unit feed hole located behind the rear lifter block.
Refer to Figure 3 and 4, in the “Oil Line Routing” heading earlier in this booklet, or your oil tank’s manufacturer regarding oil line connections to yourtank if you are unsure. If you hook the oil lines up wrong you can damage the engine!! A good rule of thumb is the feed line is the lowest fitting in theoil tank and will pick up oil from the bottom of the tank. The vent line is the highest fitting and oil should never be able to reach the line inside thetank. The vent line has to be in airspace in the tank and never immersed in oil. The return line is also a fitting mounted high in the tank and can workin or out of the oil in the tank but should also be in airspace.
22
Excessive Oil Consumption:Common causes:
1. Oil tank is over filled.
2. Crankcase pressure line and return lines are crossed.
3. Oil filter lines are crossed or plugged.
4. Filter has a check valve and lines are crossed (this will sometimes cause the filter to burst).
Typically this problem occurs when either the engine is not returning oil or the crankcase pressure fitting is not open to the oil tank, which canmake the oil filter housing retain oil. If air cleaner assembly retains oil, you must remove and clean the air filter element. The most commoncause is when Softail® style tanks are used and get over filled. Do not fill these tanks up to the bottom of the filler. Most tanks have oil linesinternally that bring the vent and return to the top side so it will be in airspace and not immersed in oil which is very important to be correct.Some tanks have the return side routed to the far side of the tank to improve oil circulation. These tanks must have the return line on theproper hose barb or when they are hooked up as a vent they can be immersed in oil when on the kickstand which can also cause the problem.Also be careful of oil filter housings. If you have over filled your oil tank and have this problem you must drain the engine’s crankcase beforerefilling. Ultima® Cases have a drain plug located at the bottom of the engine and you can drain the case if needed. When refilling the oil tankonly put in about 2.5-3 quarts before starting the engine and add additional oil cautiously. Unfortunately it is hard to say how much oil yourtank will hold without this happening again so if you experience this be precise on the amount you add to your tank on the refill during oilchanges.
We have seen some aftermarket oil filter housings that were not drilled from the factory causing the return side to be completely blocked. Wehave also seen directional filters, which will only work with oil flowing in the proper direction. Be sure that your filter and housing are routedproperly and passages are not blocked.
23

NOTES

NOTES

NOTES
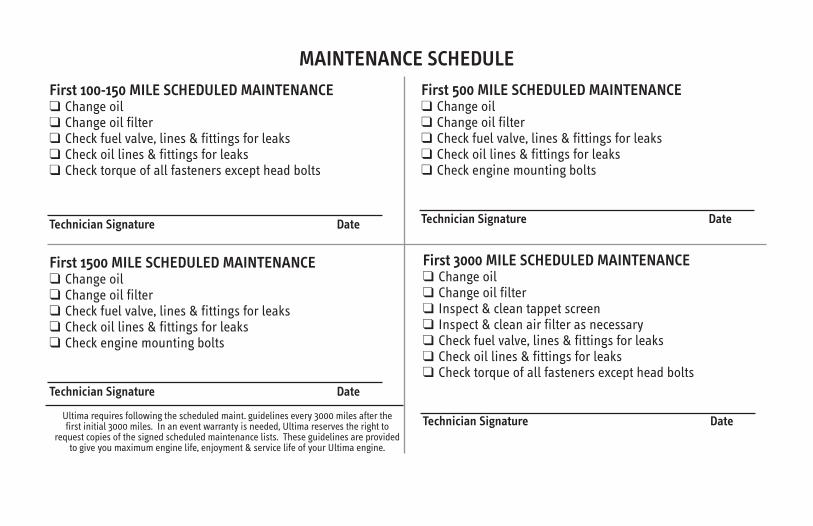
First 100-150 MILE SCHEDULED MAINTENANCE� Change oil� Change oil filter� Check fuel valve, lines & fittings for leaks� Check oil lines & fittings for leaks� Check torque of all fasteners except head bolts
Technician Signature Date
First 500 MILE SCHEDULED MAINTENANCE� Change oil� Change oil filter� Check fuel valve, lines & fittings for leaks� Check oil lines & fittings for leaks� Check engine mounting bolts
Technician Signature Date
First 1500 MILE SCHEDULED MAINTENANCE� Change oil� Change oil filter� Check fuel valve, lines & fittings for leaks� Check oil lines & fittings for leaks� Check engine mounting bolts
Technician Signature Date
First 3000 MILE SCHEDULED MAINTENANCE� Change oil� Change oil filter� Inspect & clean tappet screen� Inspect & clean air filter as necessary� Check fuel valve, lines & fittings for leaks� Check oil lines & fittings for leaks� Check torque of all fasteners except head bolts
Technician Signature DateUltima requires following the scheduled maint. guidelines every 3000 miles after thefirst initial 3000 miles. In an event warranty is needed, Ultima reserves the right to
request copies of the signed scheduled maintenance lists. These guidelines are providedto give you maximum engine life, enjoyment & service life of your Ultima engine.
MAINTENANCE SCHEDULE
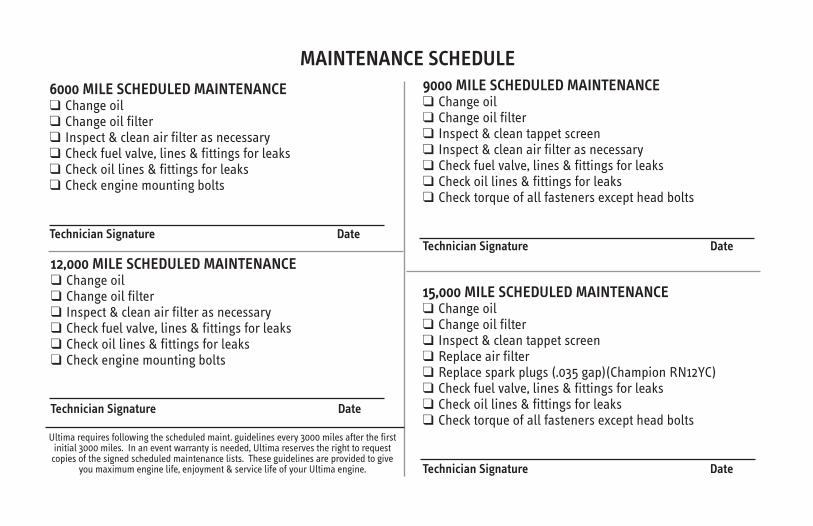
Ultima requires following the scheduled maint. guidelines every 3000 miles after the firstinitial 3000 miles. In an event warranty is needed, Ultima reserves the right to requestcopies of the signed scheduled maintenance lists. These guidelines are provided to give
you maximum engine life, enjoyment & service life of your Ultima engine.
15,000 MILE SCHEDULED MAINTENANCE� Change oil� Change oil filter� Inspect & clean tappet screen� Replace air filter� Replace spark plugs (.035 gap)(Champion RN12YC)� Check fuel valve, lines & fittings for leaks� Check oil lines & fittings for leaks� Check torque of all fasteners except head bolts
Technician Signature Date
6000 MILE SCHEDULED MAINTENANCE� Change oil� Change oil filter� Inspect & clean air filter as necessary� Check fuel valve, lines & fittings for leaks� Check oil lines & fittings for leaks� Check engine mounting bolts
Technician Signature Date
9000 MILE SCHEDULED MAINTENANCE� Change oil� Change oil filter� Inspect & clean tappet screen� Inspect & clean air filter as necessary� Check fuel valve, lines & fittings for leaks� Check oil lines & fittings for leaks� Check torque of all fasteners except head bolts
Technician Signature Date12,000 MILE SCHEDULED MAINTENANCE� Change oil� Change oil filter� Inspect & clean air filter as necessary� Check fuel valve, lines & fittings for leaks� Check oil lines & fittings for leaks� Check engine mounting bolts
Technician Signature Date
MAINTENANCE SCHEDULE
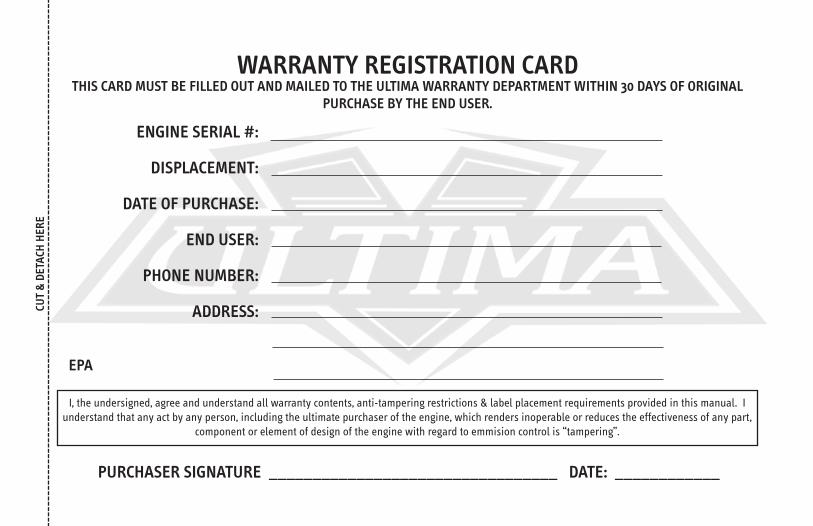
WARRANTY REGISTRATION CARDTHIS CARD MUST BE FILLED OUT AND MAILED TO THE ULTIMA WARRANTY DEPARTMENT WITHIN 30 DAYS OF ORIGINAL
PURCHASE BY THE END USER.
ENGINE SERIAL #:
DISPLACEMENT:
DATE OF PURCHASE:
END USER:
PHONE NUMBER:
ADDRESS:
I, the undersigned, agree and understand all warranty contents, anti-tampering restrictions & label placement requirements provided in this manual. Iunderstand that any act by any person, including the ultimate purchaser of the engine, which renders inoperable or reduces the effectiveness of any part,
component or element of design of the engine with regard to emmision control is “tampering”.
PURCHASER SIGNATURE _________________________________ DATE: ____________
EPA
CUT & DET
ACH HER
E
AFFIXSTAMPHERE
ULTIMA COMPANY., LLC WARRANTY DEPARTMENT2100 HIGHWAY ZPEVELY, MO 63070