Embed Size (px)
Citation preview
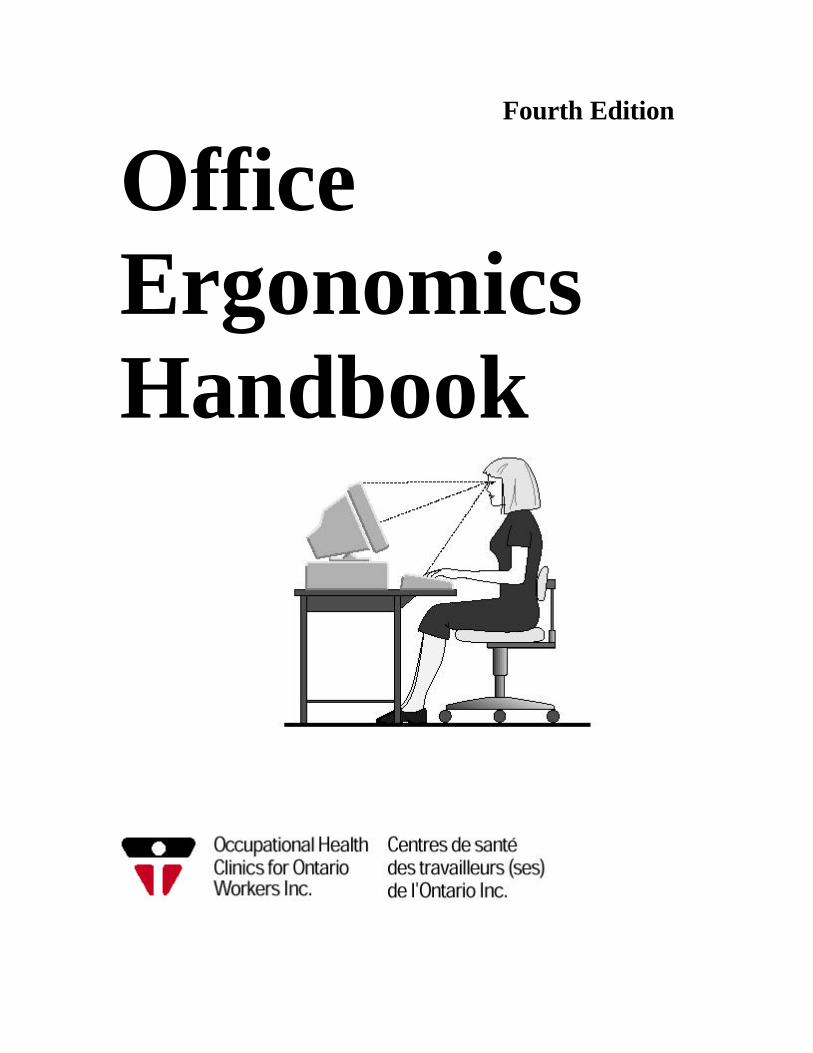
Fourth Edition
Office Ergonomics Handbook
Your Workstation
Office Ergonomic Handbook
Introduction 1 What is Ergonomics? 2 Office Products 2 How Should I Sit at my Computer Workstation? 3 Your Chair 5 Your Chair 6 What makes a Chair Ergonomic? 6 How do I Adjust my Chair? 10 Your Workstation 12 Adjustable Desks 13 Adjusting a Non-Adjustable Working Surface 13 Your Overall Office 14 How Should I Hold my Telephone 15 Your Keyboard and Mouse 16 How do I Adjust My Keyboard and Mouse? 17 What About all Those “Ergonomic” Keyboards? 17 Keyboard Trays 18 Adjusting your Keyboard 18 Adjusting your Mouse 18 Wrist Rests 19 Setting up Your Keyboard and Mouse 20 Your Monitor 22 How do I Adjust my Monitor? 23 Adjusting Your Monitor 23 Monitor Arms 25 Document Holders 25 What Should I do About My Glasses? 26 Laptops 28 Your Office Equipment 29 Your Office Lighting 30 What is Glare? 30 How Can I Reduce Glare? 31 Anti-Glare Screens 32 Muscle Recovery Are You Giving Your Body a Break 33 How should I Arrange My Office? 34 Short Term Fixes 34 Putting it all Together 36 What About Indoor Air Quality? 37 What About Thermal Comfort? 38 What Should I know About Electro Magnetic Fields? 39 What Precautions Should I take to Reduce EMF Exposure? 39 What is Noise? 40 How do I Reduce Annoying or Distracting Noise? 40 Stressed ??? 41 How Does My Body React to Stress? 41 What are Some Sources of Stress in the Workplace? 41
TABLE OF CONTENTS
Your Workstation
Office Ergonomic Handbook
What can be Done to Reduce Workplace Stress? 42 What Else can I do to Reduce Stress in my Life? 42 Putting it All Together 43 Appendix A: Legislation 48 Appendix B: Additional Resources/References 50 This handbook is intended to be a guideline only. If you have questions concerning the use of this handbook please contact the Ergonomist at the Occupational Health Clinics for Ontario Workers nearest you.

Introduction
.
Introduction
Office Ergonomic Handbook 2
Ergonomics can be defined as fitting the job to the worker. All workers are not the same size and everyone has limits. Ergonomics aims to design workstations, work processes, equipment, and tools to fit you. As a worker, it is important that you know how to adjust your office workstation to suit you. If a job does not fit a worker, the worker is more likely to be exposed to risk factors that may lead to musculoskeletal injury. The main ergonomic risk factors in the office include the following: • repetition: tasks or body movements carried out over and over again. • awkward postures: body positions that are not considered neutral or "ideal" such as
twisting your neck to view your monitor or reaching forward or to the side to use your mouse.
• static forces: maintaining a position for a long period of time (i.e. prolonged sitting, viewing the monitor with a bent neck, or reaching for the keyboard).
Every person responds to ergonomic risk factors in different ways. For example, one worker may have symptoms of an injury while another worker performing the same tasks may not have symptoms. Ergonomic risk factors should be identified and reduced to lower the risk of injury. When selecting office products, adjustability is the most important feature. Even though a product claims to be "ergonomic" it may not suit your needs. Therefore, BUYER BEWARE. You can use the information in this workbook to determine what equipment you need to make your office fit you. BEFORE YOU BUY • Find out what you need • Try Before You Buy - arrange to get some samples of equipment from different
suppliers. • Make sure the supplier explains and demonstrates adjustment features to the
users.
What is Ergonomics?
Office Products

Introduction
Office Ergonomic Handbook 3
"Preferred" sitting posture for computer work: Wrists: Naturally straight position; not bent up, down, or from side to side Elbows: Bent approximately between 90 and 100 degrees (right angle), close to
your body, and supported if possible
Shoulders: Relaxed (not slouched or raised) Neck: Facing forward and not looking up, down, or to either side Hips: Bent around 90 degrees with your thighs roughly parallel to the floor Low back: Supported to maintain its natural curve Knees: Bent at approximately 90 degrees with enough space between the back of
your knees and the chair to place your fist. To test if correct, you should be able to place your closed fist between the space.
Feet. Placed flat on the floor or supported by a footrest. Many short breaks are better for the body than fewer, long breaks. These breaks, often called "Micro-Breaks", last from 2 to 95 seconds and should be taken throughout the day. During these Micro-Breaks, look away from the computer screen and focus on objects in the distance, remove your hands from the keyboard and/or gently stretch muscles. An example of an "active micro break” is taking 5-15 seconds every 5 minutes to rest the eyes and upper body.
How Should I Sit at My Computer Workstation?
Your Workstation
Office Ergonomic Handbook 4
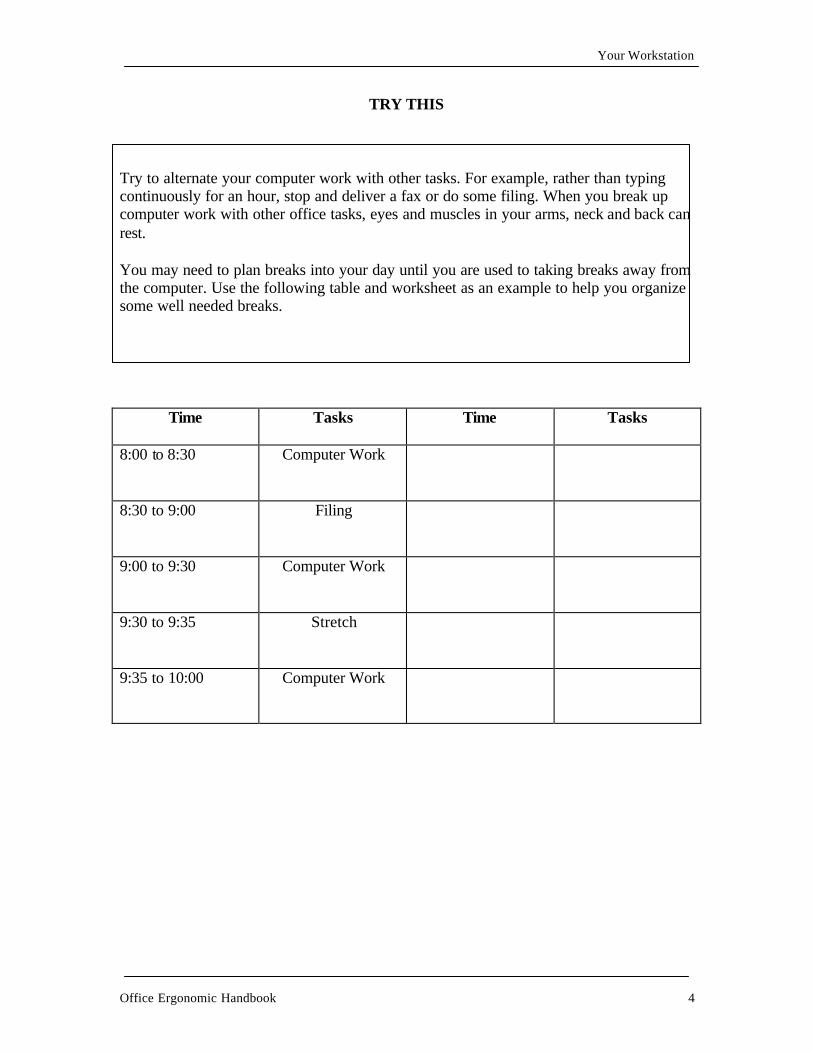
TRY THIS
Try to alternate your computer work with other tasks. For example, rather than typing continuously for an hour, stop and deliver a fax or do some filing. When you break up computer work with other office tasks, eyes and muscles in your arms, neck and back can rest. You may need to plan breaks into your day until you are used to taking breaks away from the computer. Use the following table and worksheet as an example to help you organize some well needed breaks.
Time
Tasks Time Tasks
8:00 to 8:30
Computer Work
8:30 to 9:00
Filing
9:00 to 9:30
Computer Work
9:30 to 9:35
Stretch
9:35 to 10:00
Computer Work
Your Chair
Your Chair
Office Ergonomic Handbook 6
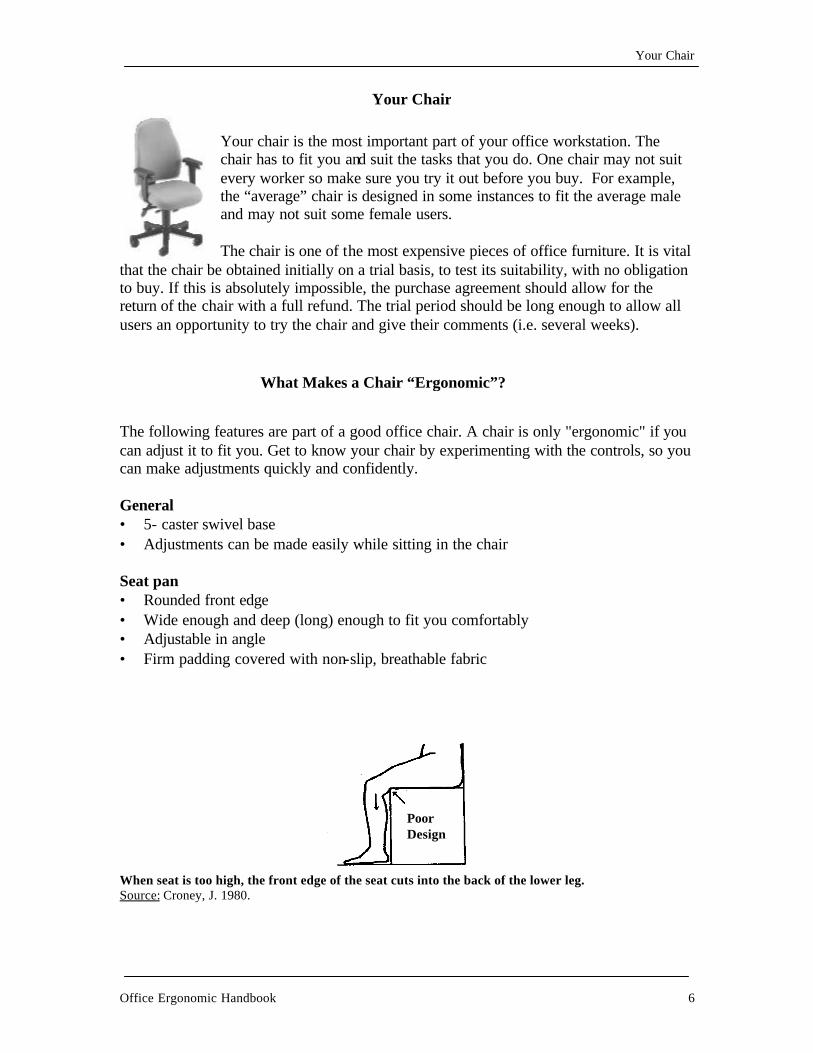
Your chair is the most important part of your office workstation. The chair has to fit you and suit the tasks that you do. One chair may not suit every worker so make sure you try it out before you buy. For example, the “average” chair is designed in some instances to fit the average male and may not suit some female users. The chair is one of the most expensive pieces of office furniture. It is vital
that the chair be obtained initially on a trial basis, to test its suitability, with no obligation to buy. If this is absolutely impossible, the purchase agreement should allow for the return of the chair with a full refund. The trial period should be long enough to allow all users an opportunity to try the chair and give their comments (i.e. several weeks). The following features are part of a good office chair. A chair is only "ergonomic" if you can adjust it to fit you. Get to know your chair by experimenting with the controls, so you can make adjustments quickly and confidently. General • 5- caster swivel base • Adjustments can be made easily while sitting in the chair
Seat pan • Rounded front edge • Wide enough and deep (long) enough to fit you comfortably • Adjustable in angle • Firm padding covered with non-slip, breathable fabric
PoorDesign
When seat is too high, the front edge of the seat cuts into the back of the lower leg. Source: Croney, J. 1980.
Your Chair
What Makes a Chair “Ergonomic”?
Your Chair
Office Ergonomic Handbook 7
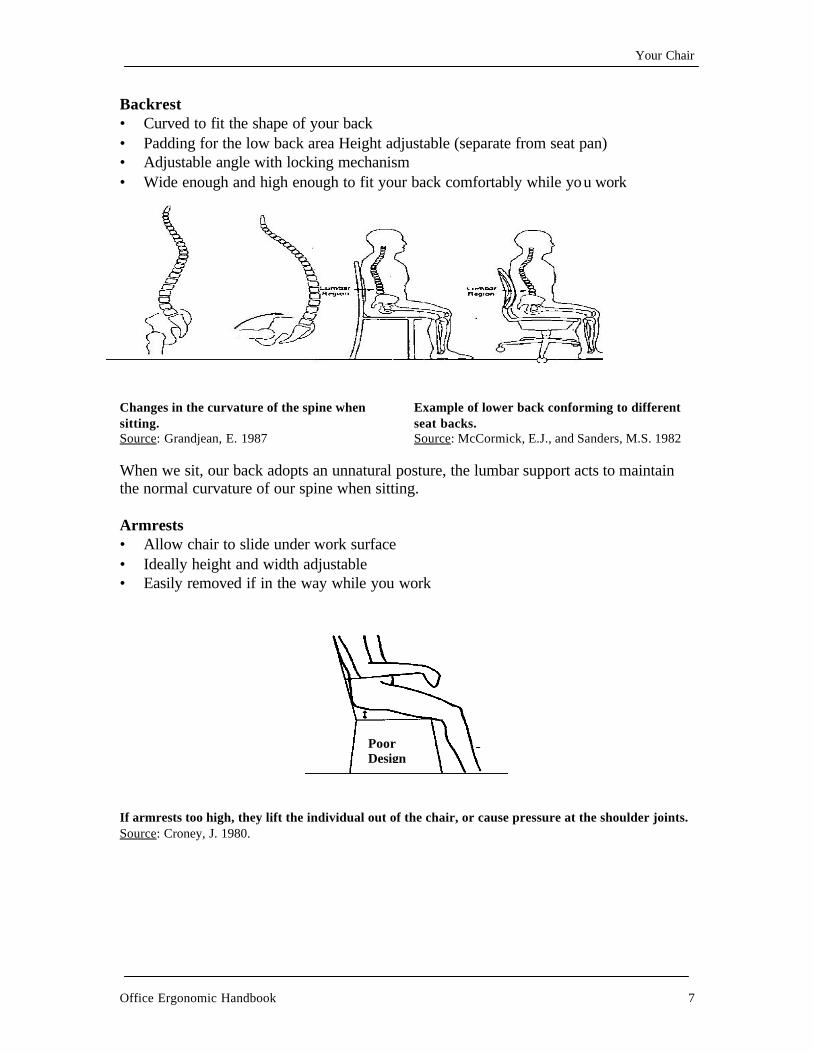
Backrest • Curved to fit the shape of your back • Padding for the low back area Height adjustable (separate from seat pan) • Adjustable angle with locking mechanism • Wide enough and high enough to fit your back comfortably while you work
Changes in the curvature of the spine when sitting.
Example of lower back conforming to different seat backs.
Source: Grandjean, E. 1987 Source: McCormick, E.J., and Sanders, M.S. 1982 When we sit, our back adopts an unnatural posture, the lumbar support acts to maintain the normal curvature of our spine when sitting. Armrests • Allow chair to slide under work surface • Ideally height and width adjustable • Easily removed if in the way while you work
PoorDesign
If armrests too high, they lift the individual out of the chair, or cause pressure at the shoulder joints. Source: Croney, J. 1980.
Your Chair
Office Ergonomic Handbook 8
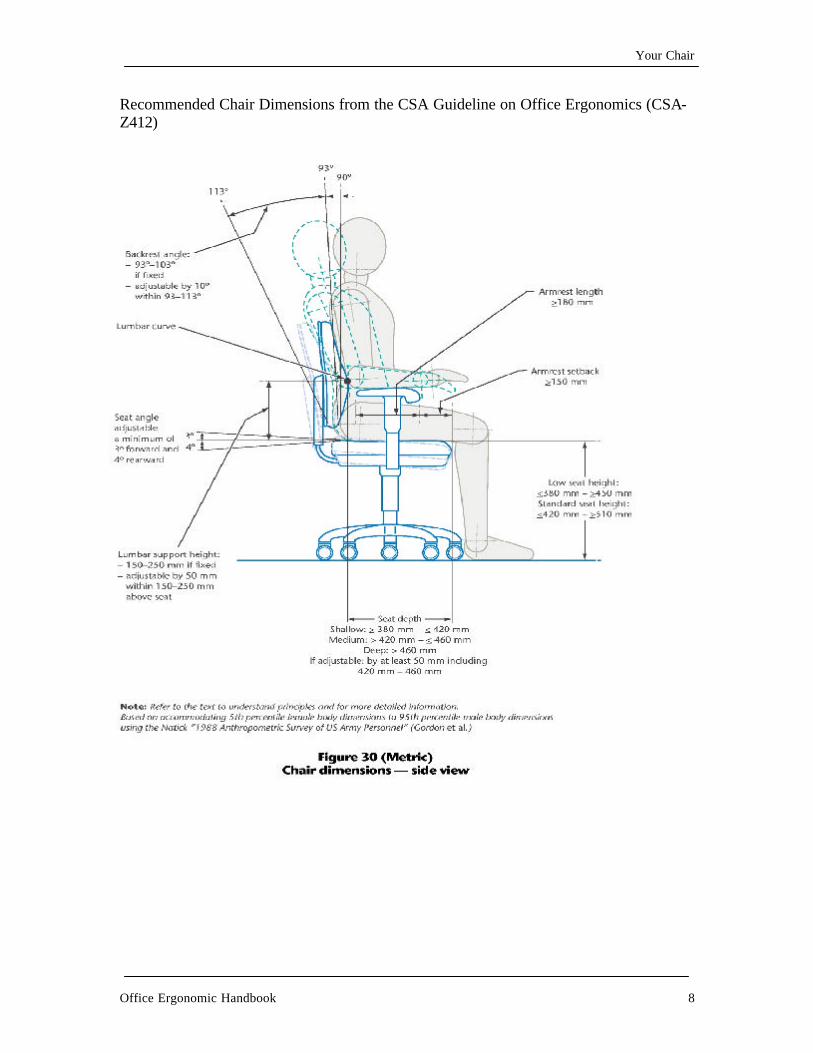
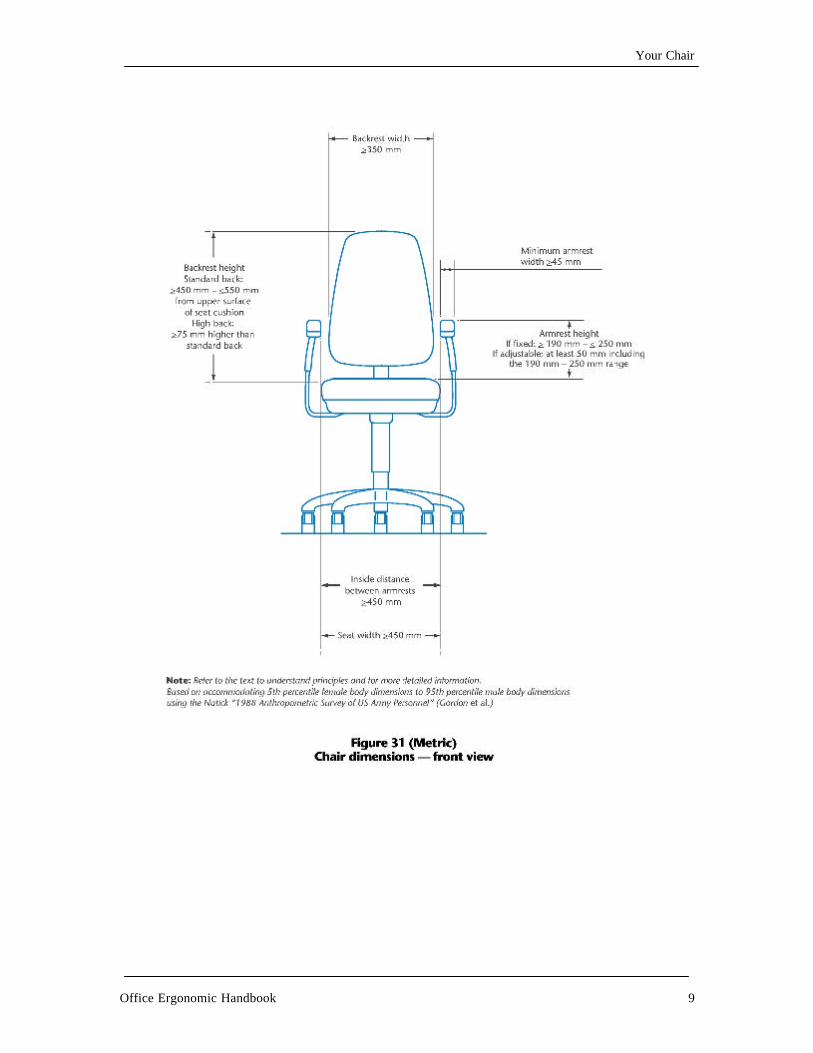
Recommended Chair Dimensions from the CSA Guideline on Office Ergonomics (CSA-Z412)
Your Chair
Office Ergonomic Handbook 9
Your Chair
Office Ergonomic Handbook 10
How you adjust your chair depends on the other pieces of your workstation. You should understand how to adjust your chair independent of the other work station components. Chair adjustments should be made while sitting in your chair.
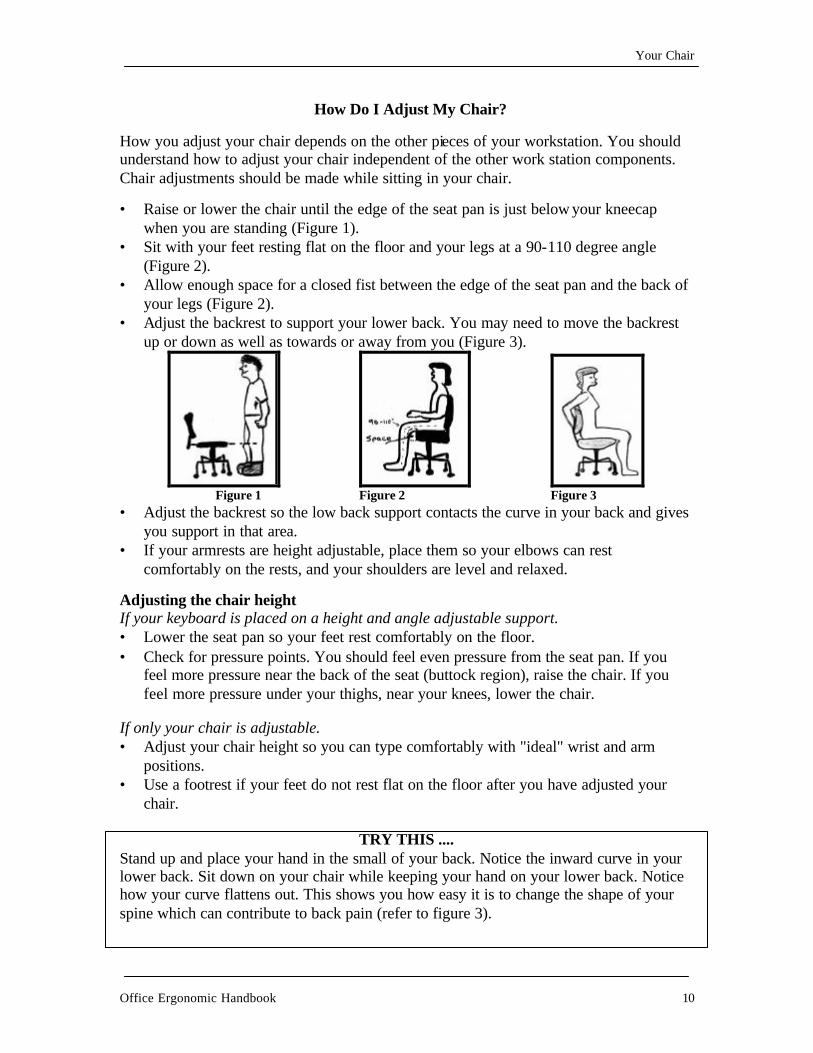
• Raise or lower the chair until the edge of the seat pan is just below your kneecap when you are standing (Figure 1).
• Sit with your feet resting flat on the floor and your legs at a 90-110 degree angle (Figure 2).
• Allow enough space for a closed fist between the edge of the seat pan and the back of your legs (Figure 2).
• Adjust the backrest to support your lower back. You may need to move the backrest up or down as well as towards or away from you (Figure 3).
Figure 1 Figure 2 Figure 3
• Adjust the backrest so the low back support contacts the curve in your back and gives you support in that area.
• If your armrests are height adjustable, place them so your elbows can rest comfortably on the rests, and your shoulders are level and relaxed.
Adjusting the chair height If your keyboard is placed on a height and angle adjustable support. • Lower the seat pan so your feet rest comfortably on the floor. • Check for pressure points. You should feel even pressure from the seat pan. If you
feel more pressure near the back of the seat (buttock region), raise the chair. If you feel more pressure under your thighs, near your knees, lower the chair.
If only your chair is adjustable. • Adjust your chair height so you can type comfortably with "ideal" wrist and arm
positions. • Use a footrest if your feet do not rest flat on the floor after you have adjusted your
chair.
TRY THIS .... Stand up and place your hand in the small of your back. Notice the inward curve in your lower back. Sit down on your chair while keeping your hand on your lower back. Notice how your curve flattens out. This shows you how easy it is to change the shape of your spine which can contribute to back pain (refer to figure 3).
How Do I Adjust My Chair?
Your Chair
Office Ergonomic Handbook 11
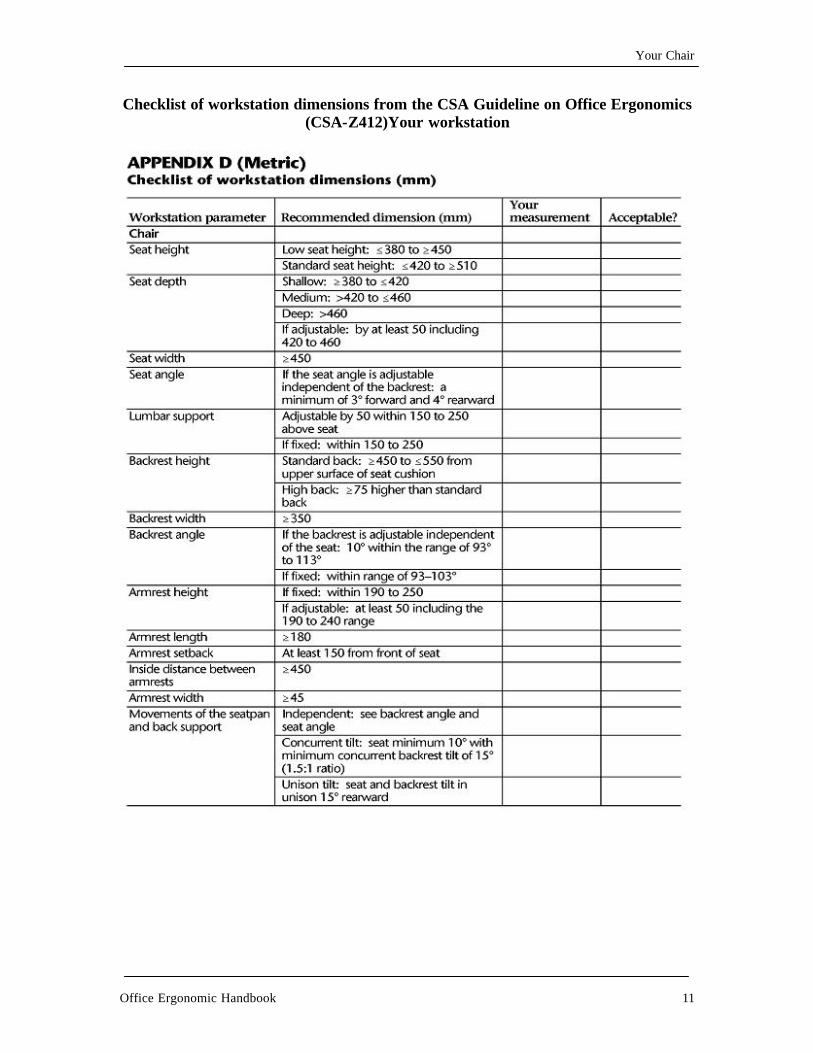
Checklist of workstation dimensions from the CSA Guideline on Office Ergonomics (CSA-Z412)Your workstation
Your Workstation
Your Workstation
Office Ergonomic Handbook 13
It is often possible to add adjustable accessories to your desk. If you are purchasing a new desk you may want one with adjustability included. There are several methods of achieving adjustability.
1. You can purchase a complete workstation that allows for both regular desk work and space for the computer. The computer section should have an adjustable portion for the keyboard and mouse, and a separate adjustable portion for the monitor. The portion of the desk designed for the keyboard should have enough space for the mouse to be placed at its side.
2. You can add attachments to your desk such as keyboard and monitor trays. 3. You can use a smaller separate computer workstation and continue to use your desk for regular work.
If you have shelves above the workstation, ensure they do not interfere with adjusting the monitor height or block overhead lights.
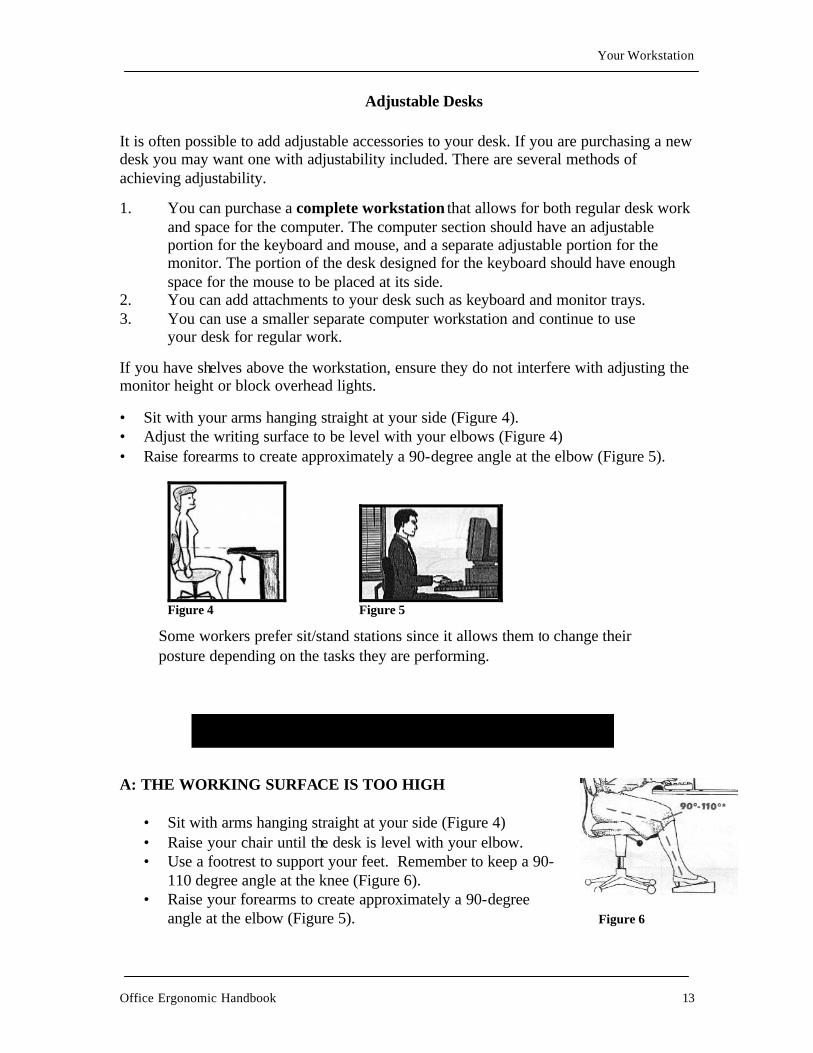
• Sit with your arms hanging straight at your side (Figure 4). • Adjust the writing surface to be level with your elbows (Figure 4) • Raise forearms to create approximately a 90-degree angle at the elbow (Figure 5).
Figure 4 Figure 5
A: THE WORKING SURFACE IS TOO HIGH
• Sit with arms hanging straight at your side (Figure 4) • Raise your chair until the desk is level with your elbow. • Use a footrest to support your feet. Remember to keep a 90-
110 degree angle at the knee (Figure 6). • Raise your forearms to create approximately a 90-degree
angle at the elbow (Figure 5). Figure 6
Adjusting a Non-adjustable Working Surface
Adjustable Desks
Some workers prefer sit/stand stations since it allows them to change their posture depending on the tasks they are performing.
Your Workstation
Office Ergonomic Handbook 14
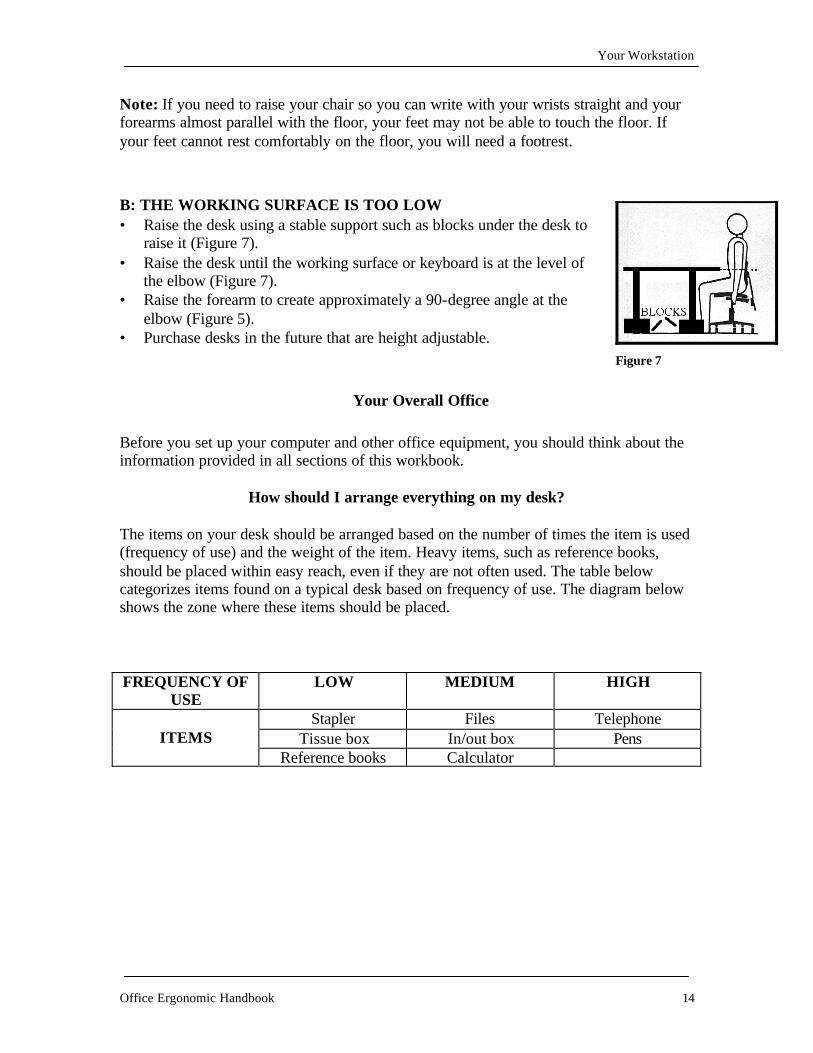
Note: If you need to raise your chair so you can write with your wrists straight and your forearms almost parallel with the floor, your feet may not be able to touch the floor. If your feet cannot rest comfortably on the floor, you will need a footrest. B: THE WORKING SURFACE IS TOO LOW • Raise the desk using a stable support such as blocks under the desk to
raise it (Figure 7). • Raise the desk until the working surface or keyboard is at the level of
the elbow (Figure 7). • Raise the forearm to create approximately a 90-degree angle at the
elbow (Figure 5). • Purchase desks in the future that are height adjustable.
Before you set up your computer and other office equipment, you should think about the information provided in all sections of this workbook.
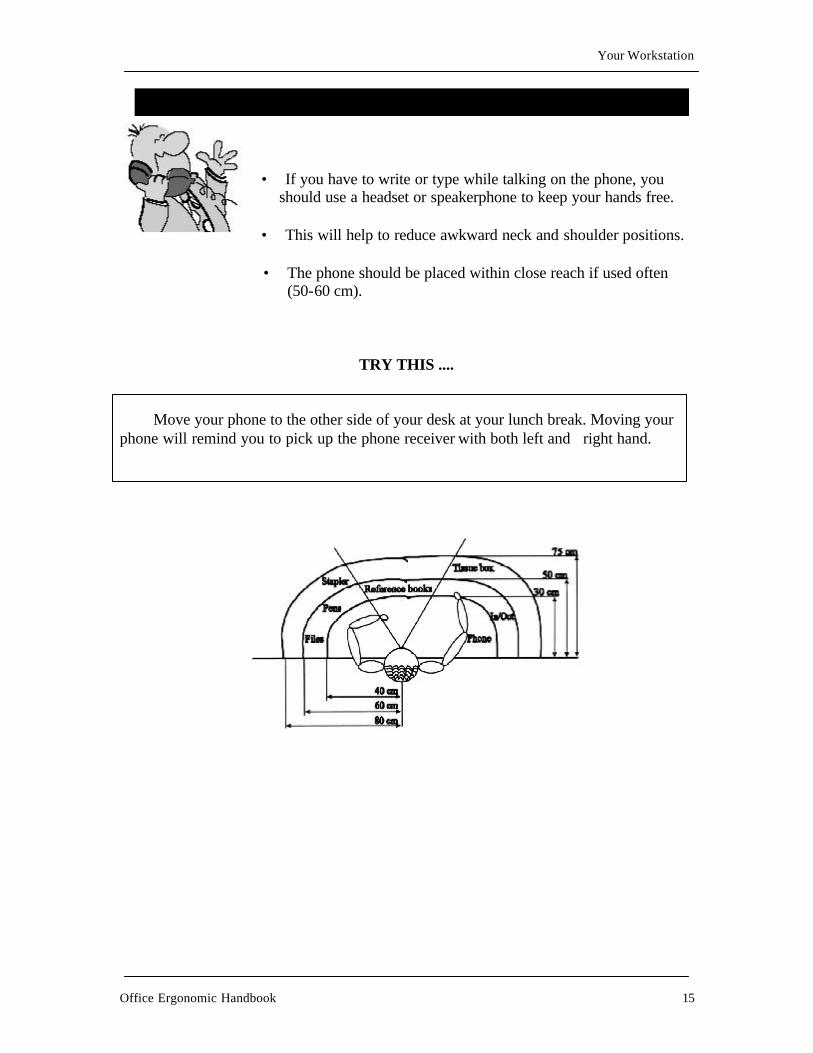
How should I arrange everything on my desk? The items on your desk should be arranged based on the number of times the item is used (frequency of use) and the weight of the item. Heavy items, such as reference books, should be placed within easy reach, even if they are not often used. The table below categorizes items found on a typical desk based on frequency of use. The diagram below shows the zone where these items should be placed. FREQUENCY OF
USE LOW MEDIUM HIGH
Stapler Files Telephone Tissue box In/out box Pens
ITEMS
Reference books Calculator
Figure 7
Your Overall Office
Your Workstation
Office Ergonomic Handbook 15
• If you have to write or type while talking on the phone, you should use a headset or speakerphone to keep your hands free. • This will help to reduce awkward neck and shoulder positions.
• The phone should be placed within close reach if used often
(50-60 cm).
TRY THIS ....
Move your phone to the other side of your desk at your lunch break. Moving your phone will remind you to pick up the phone receiver with both left and right hand.
How Should I Hold My Telephone?
Your Computer
Your Computer
Your Computer
Office Ergonomic Handbook 17
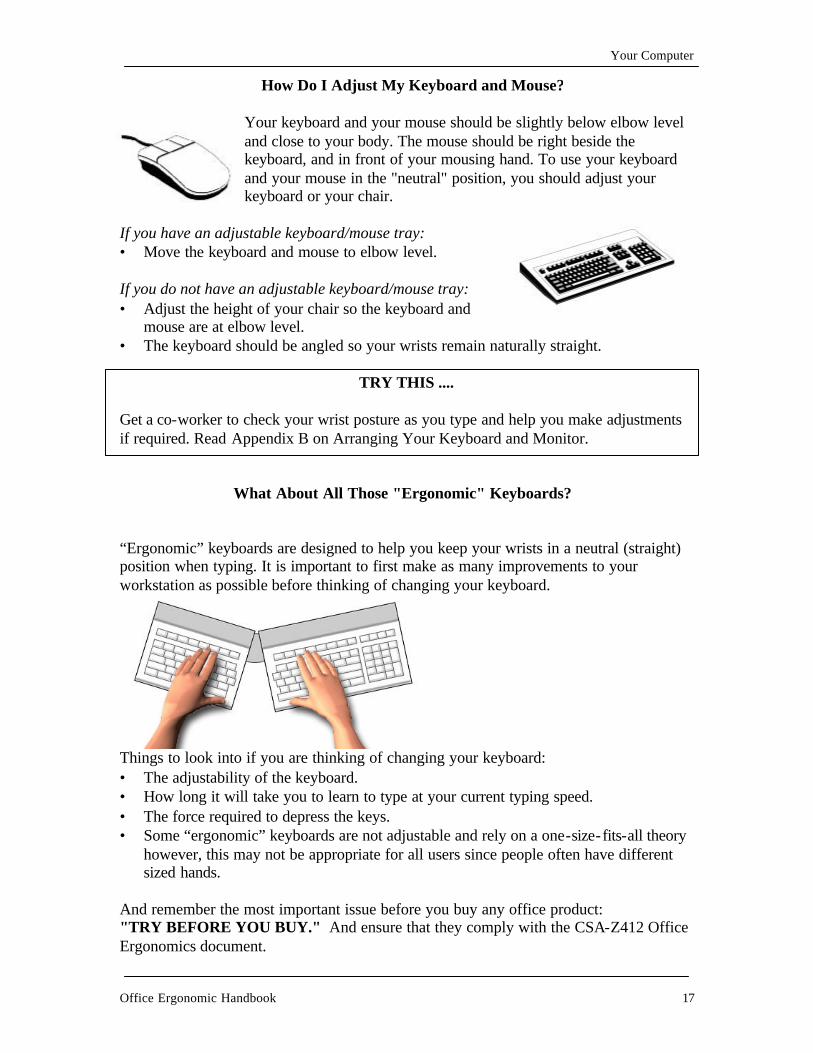
Your keyboard and your mouse should be slightly below elbow level and close to your body. The mouse should be right beside the keyboard, and in front of your mousing hand. To use your keyboard and your mouse in the "neutral" position, you should adjust your keyboard or your chair.
If you have an adjustable keyboard/mouse tray: • Move the keyboard and mouse to elbow level. If you do not have an adjustable keyboard/mouse tray: • Adjust the height of your chair so the keyboard and
mouse are at elbow level. • The keyboard should be angled so your wrists remain naturally straight.
TRY THIS .... Get a co-worker to check your wrist posture as you type and help you make adjustments if required. Read Appendix B on Arranging Your Keyboard and Monitor. “Ergonomic” keyboards are designed to help you keep your wrists in a neutral (straight) position when typing. It is important to first make as many improvements to your workstation as possible before thinking of changing your keyboard.
Things to look into if you are thinking of changing your keyboard: • The adjustability of the keyboard. • How long it will take you to learn to type at your current typing speed. • The force required to depress the keys. • Some “ergonomic” keyboards are not adjustable and rely on a one-size-fits-all theory
however, this may not be appropriate for all users since people often have different sized hands.
And remember the most important issue before you buy any office product: "TRY BEFORE YOU BUY." And ensure that they comply with the CSA-Z412 Office Ergonomics document.
How Do I Adjust My Keyboard and Mouse?
What About All Those "Ergonomic" Keyboards?
Your Computer
Office Ergonomic Handbook 18
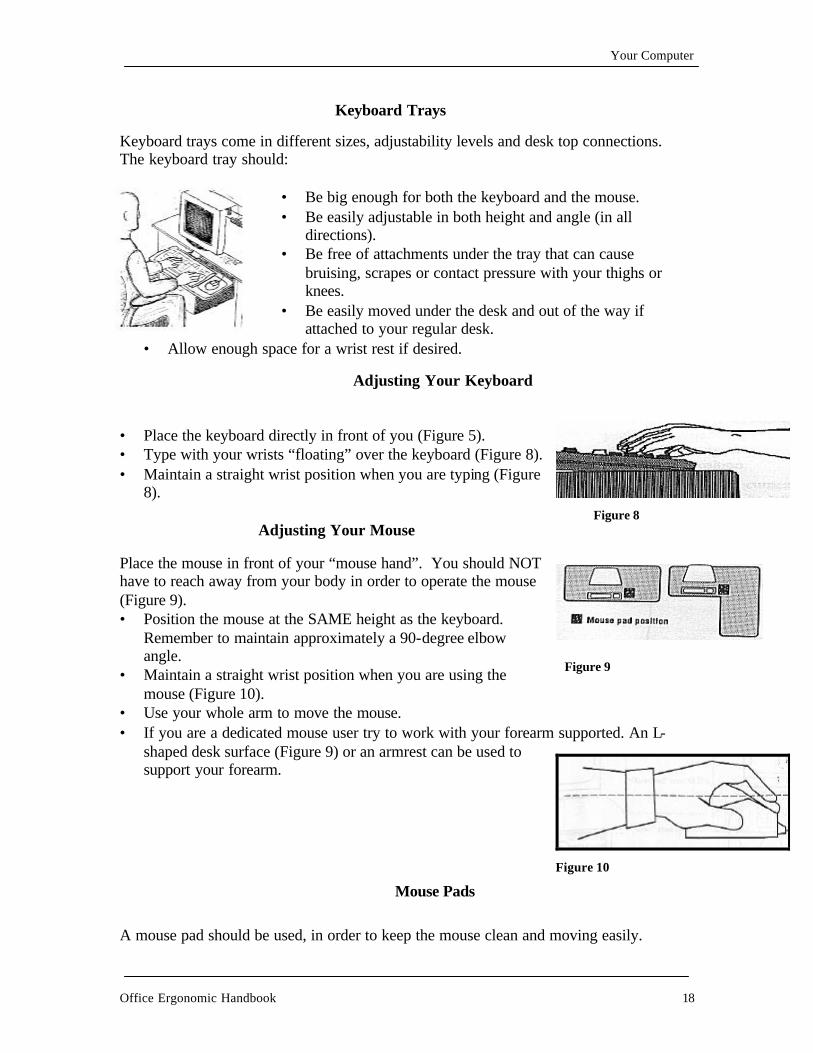
Keyboard trays come in different sizes, adjustability levels and desk top connections. The keyboard tray should:
• Be big enough for both the keyboard and the mouse. • Be easily adjustable in both height and angle (in all
directions). • Be free of attachments under the tray that can cause
bruising, scrapes or contact pressure with your thighs or knees.
• Be easily moved under the desk and out of the way if attached to your regular desk.
• Allow enough space for a wrist rest if desired. • Place the keyboard directly in front of you (Figure 5). • Type with your wrists “floating” over the keyboard (Figure 8). • Maintain a straight wrist position when you are typing (Figure
8).
Place the mouse in front of your “mouse hand”. You should NOT have to reach away from your body in order to operate the mouse (Figure 9). • Position the mouse at the SAME height as the keyboard.
Remember to maintain approximately a 90-degree elbow angle.
• Maintain a straight wrist position when you are using the mouse (Figure 10).
• Use your whole arm to move the mouse. • If you are a dedicated mouse user try to work with your forearm supported. An L-
shaped desk surface (Figure 9) or an armrest can be used to support your forearm.
A mouse pad should be used, in order to keep the mouse clean and moving easily.
Figure 8
Figure 9
Figure 10
Keyboard Trays
Adjusting Your Mouse
Adjusting Your Keyboard
Mouse Pads
Your Computer
Office Ergonomic Handbook 19
Mouse Tips
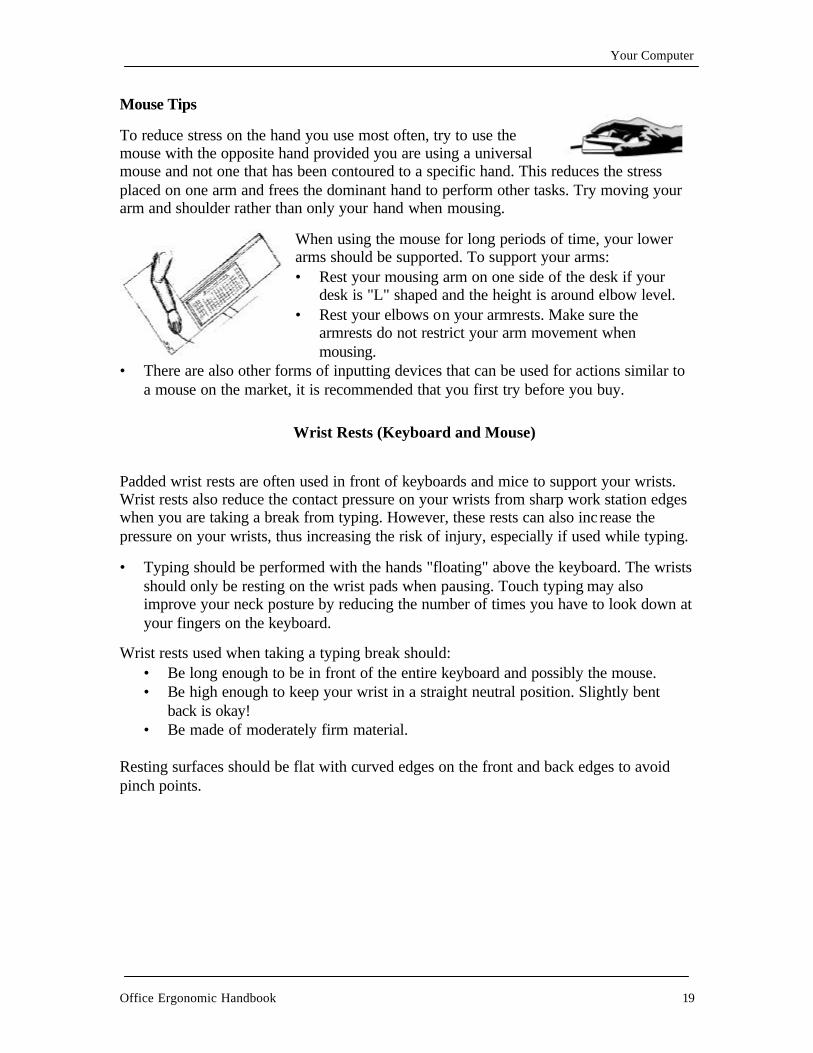
To reduce stress on the hand you use most often, try to use the mouse with the opposite hand provided you are using a universal mouse and not one that has been contoured to a specific hand. This reduces the stress placed on one arm and frees the dominant hand to perform other tasks. Try moving your arm and shoulder rather than only your hand when mousing.
When using the mouse for long periods of time, your lower arms should be supported. To support your arms: • Rest your mousing arm on one side of the desk if your
desk is "L" shaped and the height is around elbow level. • Rest your elbows on your armrests. Make sure the
armrests do not restrict your arm movement when mousing.
• There are also other forms of inputting devices that can be used for actions similar to a mouse on the market, it is recommended that you first try before you buy.
Padded wrist rests are often used in front of keyboards and mice to support your wrists. Wrist rests also reduce the contact pressure on your wrists from sharp work station edges when you are taking a break from typing. However, these rests can also inc rease the pressure on your wrists, thus increasing the risk of injury, especially if used while typing.
• Typing should be performed with the hands "floating" above the keyboard. The wrists should only be resting on the wrist pads when pausing. Touch typing may also improve your neck posture by reducing the number of times you have to look down at your fingers on the keyboard.
Wrist rests used when taking a typing break should: • Be long enough to be in front of the entire keyboard and possibly the mouse. • Be high enough to keep your wrist in a straight neutral position. Slightly bent
back is okay! • Be made of moderately firm material.
Resting surfaces should be flat with curved edges on the front and back edges to avoid pinch points.
Wrist Rests (Keyboard and Mouse)
Your Computer
Office Ergonomic Handbook 20
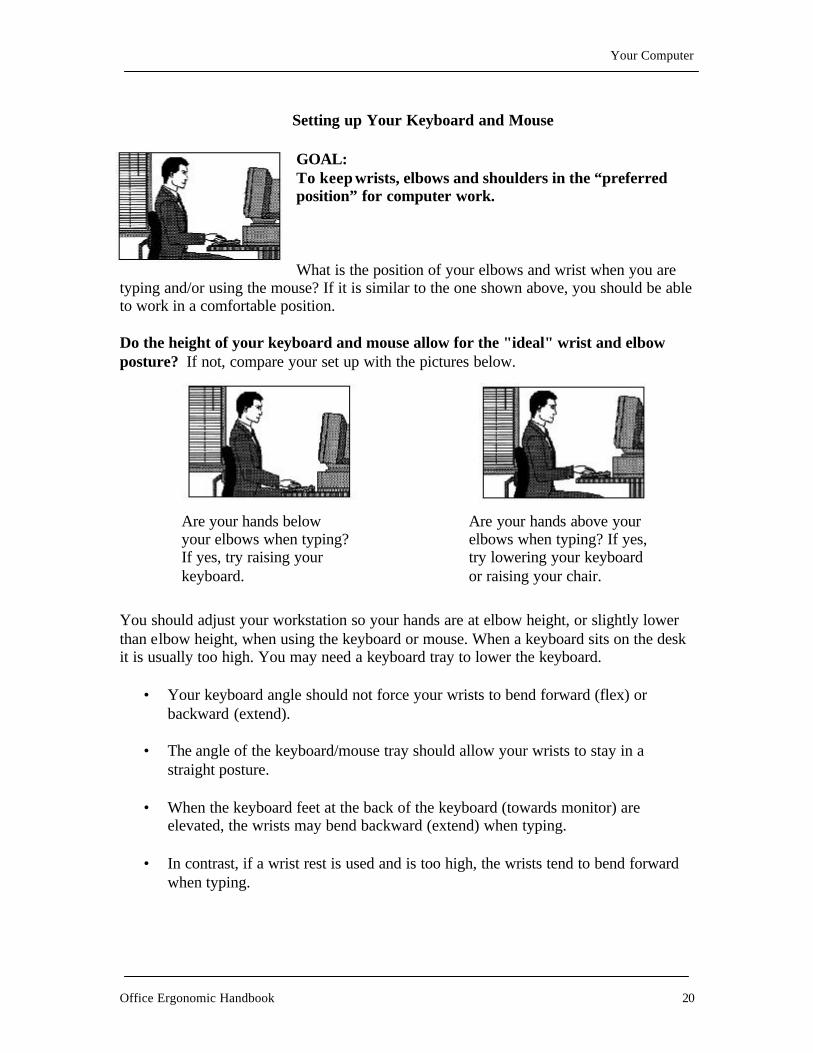
GOAL: To keep wrists, elbows and shoulders in the “preferred position” for computer work. What is the position of your elbows and wrist when you are
typing and/or using the mouse? If it is similar to the one shown above, you should be able to work in a comfortable position. Do the height of your keyboard and mouse allow for the "ideal" wrist and elbow posture? If not, compare your set up with the pictures below.
You should adjust your workstation so your hands are at elbow height, or slightly lower than elbow height, when using the keyboard or mouse. When a keyboard sits on the desk it is usually too high. You may need a keyboard tray to lower the keyboard.
• Your keyboard angle should not force your wrists to bend forward (flex) or backward (extend).
• The angle of the keyboard/mouse tray should allow your wrists to stay in a
straight posture.
• When the keyboard feet at the back of the keyboard (towards monitor) are elevated, the wrists may bend backward (extend) when typing.
• In contrast, if a wrist rest is used and is too high, the wrists tend to bend forward
when typing.
Are your hands below your elbows when typing? If yes, try raising your keyboard.
Are your hands above your elbows when typing? If yes, try lowering your keyboard or raising your chair.
Setting up Your Keyboard and Mouse
Your Computer
Office Ergonomic Handbook 21
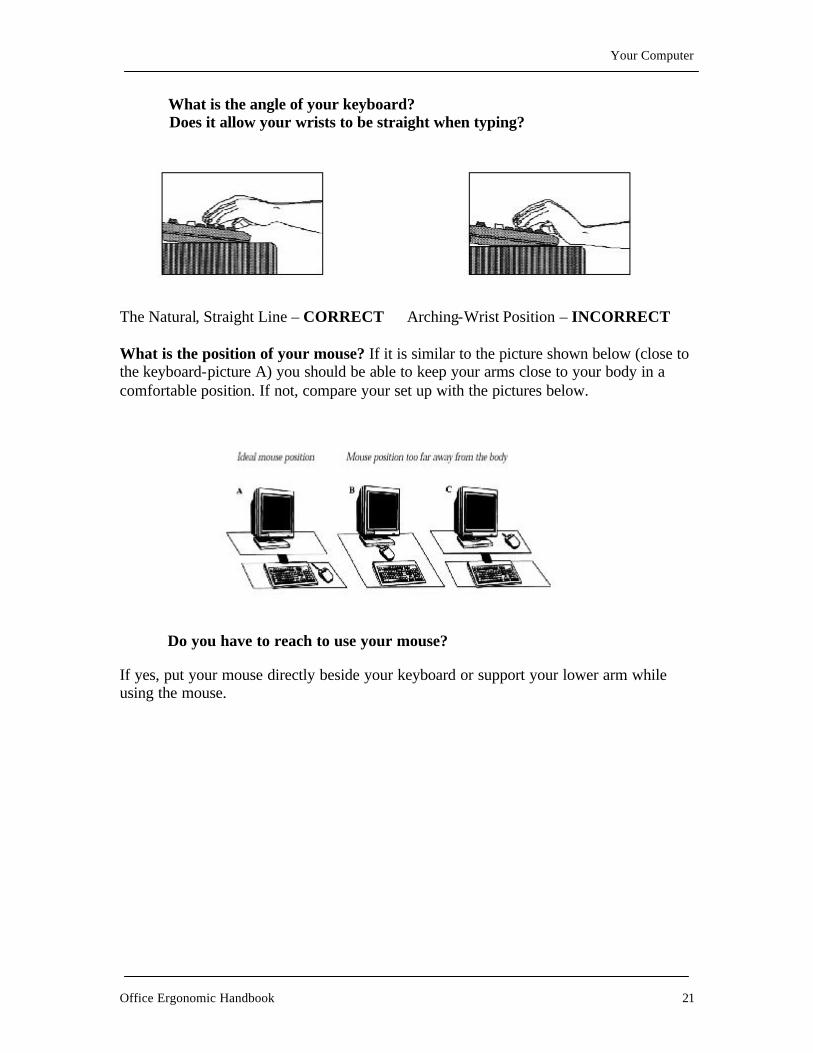
What is the angle of your keyboard? Does it allow your wrists to be straight when typing?
The Natural, Straight Line – CORRECT Arching-Wrist Position – INCORRECT What is the position of your mouse? If it is similar to the picture shown below (close to the keyboard-picture A) you should be able to keep your arms close to your body in a comfortable position. If not, compare your set up with the pictures below.
Do you have to reach to use your mouse? If yes, put your mouse directly beside your keyboard or support your lower arm while using the mouse.

Your Monitor
Your Monitor
Office Ergonomic Handbook 23
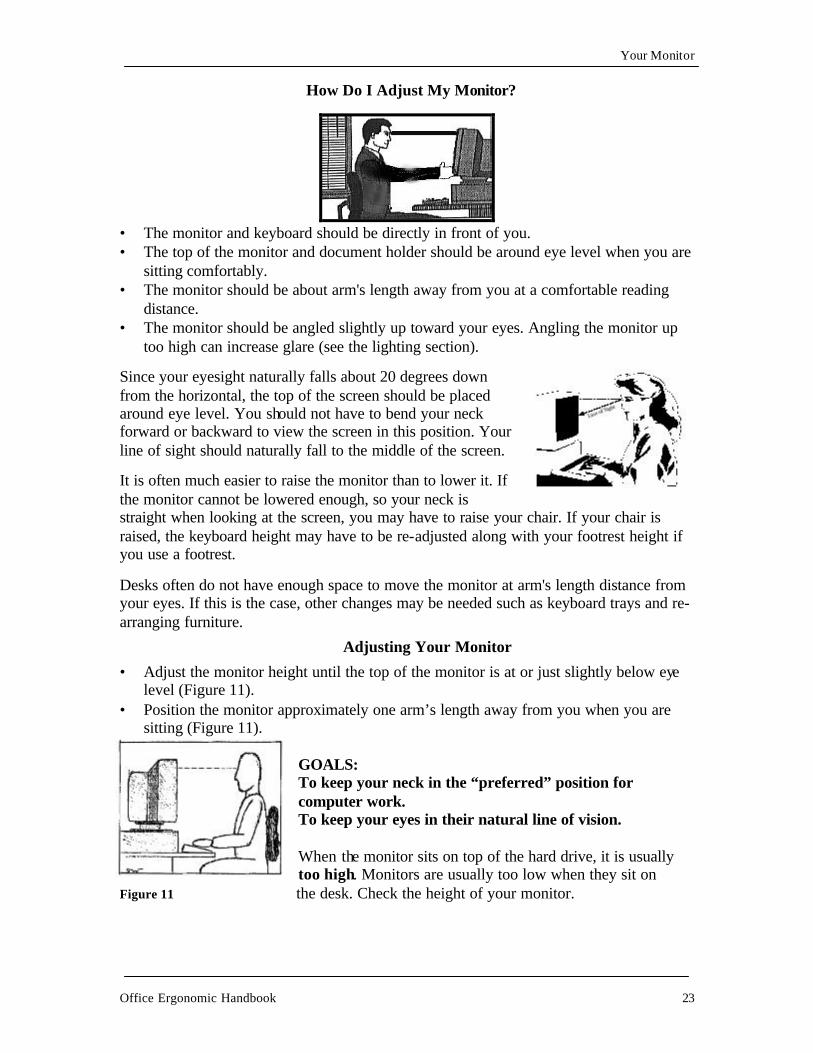
• The monitor and keyboard should be directly in front of you. • The top of the monitor and document holder should be around eye level when you are
sitting comfortably. • The monitor should be about arm's length away from you at a comfortable reading
distance. • The monitor should be angled slightly up toward your eyes. Angling the monitor up
too high can increase glare (see the lighting section).
Since your eyesight naturally falls about 20 degrees down from the horizontal, the top of the screen should be placed around eye level. You should not have to bend your neck forward or backward to view the screen in this position. Your line of sight should naturally fall to the middle of the screen.
It is often much easier to raise the monitor than to lower it. If the monitor cannot be lowered enough, so your neck is straight when looking at the screen, you may have to raise your chair. If your chair is raised, the keyboard height may have to be re-adjusted along with your footrest height if you use a footrest.
Desks often do not have enough space to move the monitor at arm's length distance from your eyes. If this is the case, other changes may be needed such as keyboard trays and re-arranging furniture. • Adjust the monitor height until the top of the monitor is at or just slightly below eye
level (Figure 11). • Position the monitor approximately one arm’s length away from you when you are
sitting (Figure 11). GOALS: To keep your neck in the “preferred” position for computer work. To keep your eyes in their natural line of vision. When the monitor sits on top of the hard drive, it is usually too high. Monitors are usually too low when they sit on
Figure 11 the desk. Check the height of your monitor.
How Do I Adjust My Monitor?
Adjusting Your Monitor
Your Monitor
Office Ergonomic Handbook 24
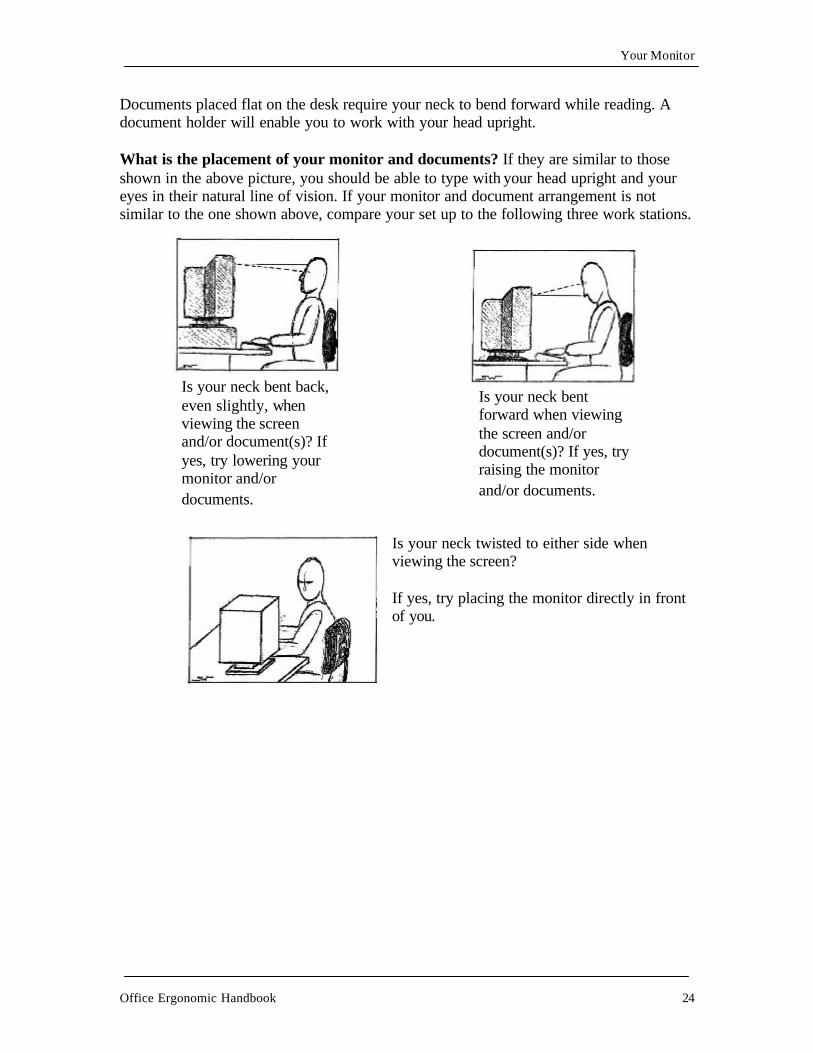
Documents placed flat on the desk require your neck to bend forward while reading. A document holder will enable you to work with your head upright. What is the placement of your monitor and documents? If they are similar to those shown in the above picture, you should be able to type with your head upright and your eyes in their natural line of vision. If your monitor and document arrangement is not similar to the one shown above, compare your set up to the following three work stations.
Is your neck twisted to either side when viewing the screen? If yes, try placing the monitor directly in front of you.
Is your neck bent back, even slightly, when viewing the screen and/or document(s)? If yes, try lowering your monitor and/or documents.
Is your neck bent forward when viewing the screen and/or document(s)? If yes, try raising the monitor and/or documents.
Your Monitor
Office Ergonomic Handbook 25
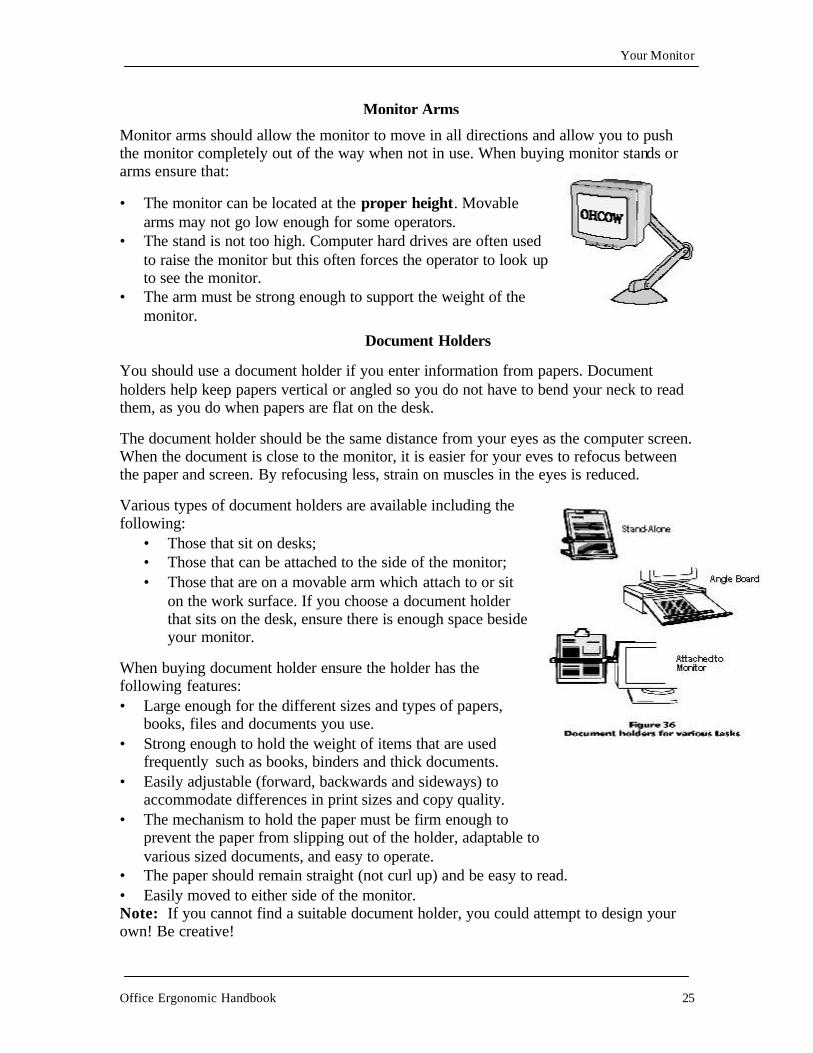
Monitor arms should allow the monitor to move in all directions and allow you to push the monitor completely out of the way when not in use. When buying monitor stands or arms ensure that:
• The monitor can be located at the proper height. Movable arms may not go low enough for some operators.
• The stand is not too high. Computer hard drives are often used to raise the monitor but this often forces the operator to look up to see the monitor.
• The arm must be strong enough to support the weight of the monitor.
You should use a document holder if you enter information from papers. Document holders help keep papers vertical or angled so you do not have to bend your neck to read them, as you do when papers are flat on the desk.
The document holder should be the same distance from your eyes as the computer screen. When the document is close to the monitor, it is easier for your eves to refocus between the paper and screen. By refocusing less, strain on muscles in the eyes is reduced.
Various types of document holders are available including the following:
• Those that sit on desks; • Those that can be attached to the side of the monitor; • Those that are on a movable arm which attach to or sit
on the work surface. If you choose a document holder that sits on the desk, ensure there is enough space beside your monitor.
When buying document holder ensure the holder has the following features: • Large enough for the different sizes and types of papers,
books, files and documents you use. • Strong enough to hold the weight of items that are used
frequently such as books, binders and thick documents. • Easily adjustable (forward, backwards and sideways) to
accommodate differences in print sizes and copy quality. • The mechanism to hold the paper must be firm enough to
prevent the paper from slipping out of the holder, adaptable to various sized documents, and easy to operate.
• The paper should remain straight (not curl up) and be easy to read. • Easily moved to either side of the monitor. Note: If you cannot find a suitable document holder, you could attempt to design your own! Be creative!
Monitor Arms
Document Holders
Your Monitor
Office Ergonomic Handbook 26
Vision problems can lead to eye strain and headaches. If you work in an office, you should have regular eye examinations to correct vision problems. You should explain the work you do with computers to your eye doctor. If you wear bifocals, you may have trouble when working on computers since the lenses are generally designed for reading at a viewing distance of 40 to 50 cm and a downward gaze of about 25 degrees. The monitor should be lower and closer to a person who wears
bifocal glasses depending on which portion of the glasses is used to read the monitor. If work station design changes do not correct bifocal glasses problems, special computer glasses can be purchased.
TRY THIS .... Your ophthalmologist or optometrist will gain a better understanding about your office with a sketch or photograph. Mark the distance from your eyes to the monitor, documents, and the keyboard on the sketch.
POINTS TO REMEMBER WHEN POSITIONING YOUR MONITOR • Cables are usually available in varying lengths so you can position your monitor
wherever necessary. • Some hard drives or central processing units (CPUs) can be placed on their side.
Check with your computer technician before turning your hard drive on its side. • You may need a co-worker to watch you to determine if you are working in an
awkward position. It is often difficult to tell if your neck is slightly bent. Even if your neck is only slightly bent back, your neck and shoulder muscles may ache and tire faster than when in an "ideal" position.
• Your monitor and document holder should be at eye level or slightly lower than eye level. When sitting comfortably in your chair, your eyes should fall naturally on the middle of the screen without having to bend your neck forward or backward.
• Bifocal wearers have special needs. Those who look through the bottom part of their glasses tend to look up at a screen that is around eye level. If your neck is bent back, try lowering your monitor further. The monitor should be lower and slightly angled up towards your eyes. When the monitor is angled up, it may be affected by glare from overhead lights. An anti-glare screen can be used to reduce glare.
What Should I Do About My Glasses?
Your Monitor
Office Ergonomic Handbook 27
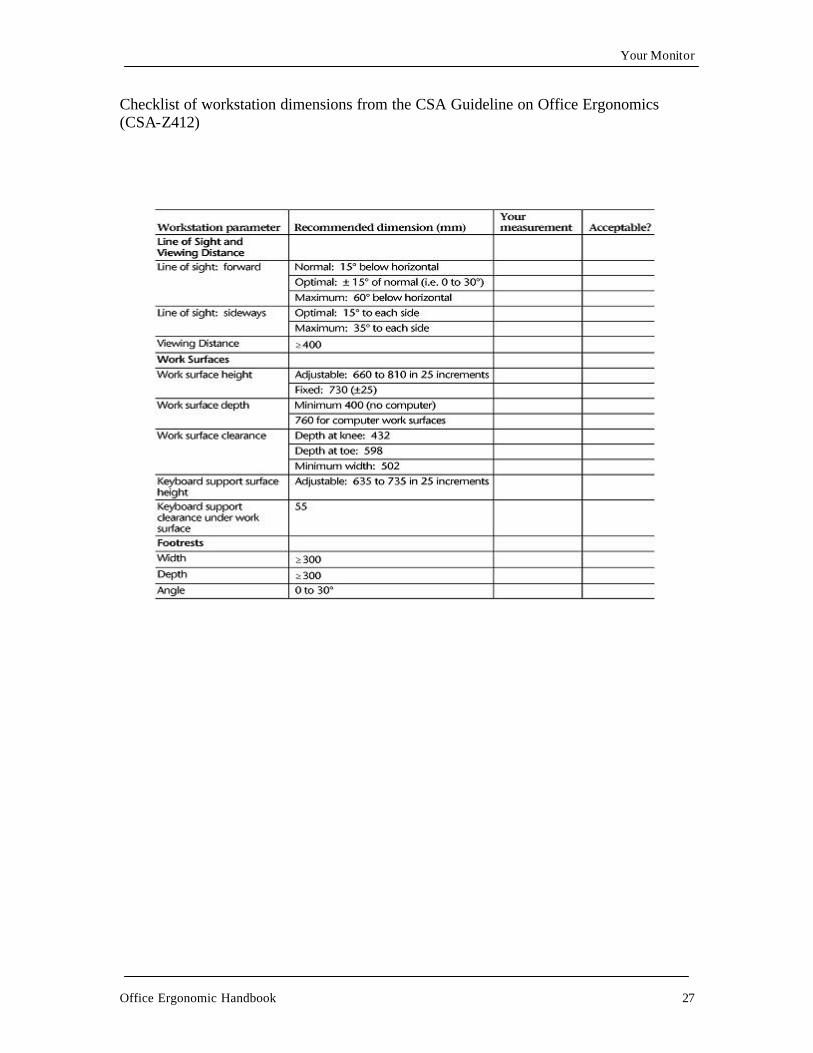
Checklist of workstation dimensions from the CSA Guideline on Office Ergonomics (CSA-Z412)
Your Monitor
Office Ergonomic Handbook 28
Laptops
The use of laptops is increasing as prices decrease. Originally designed for easy transport and short-term use, the portability of laptops is a popular feature. Since many people now travel as part of their job, the laptop is starting to replace the traditional computer in some offices. There are a variety of problems that can arise from prolonged laptop use: • The worker may place the laptop at an angle which is comfortable for the hands and
arms, but can result in neck fatigue from bending to view the screen. • Conversely, the worker may raise the laptop to view the screen, thereby placing the
hands and arms in awkward postures. • The small screen size can result in difficulty with reading and can lead to bending of
the neck and upper back. • Small key spacing results in cramped and awkward postures of the hands, arms, and
shoulders. • Worker can experience awkward postures of the wrist when manipulating the
trackball or guiding device. • Angling of the monitor to compensate for low height of the laptop can result in
increased glare upon the screen. SOLUTIONS • Use a computer docking station when in the office. This normally consists of a full
size monitor, keyboard, and mouse with the laptop basically serving as the hard drive. • When on the road, pack a light-weight keyboard and mouse
Your Office Environment
Your Office Environment
Office Ergonomic Handbook 30
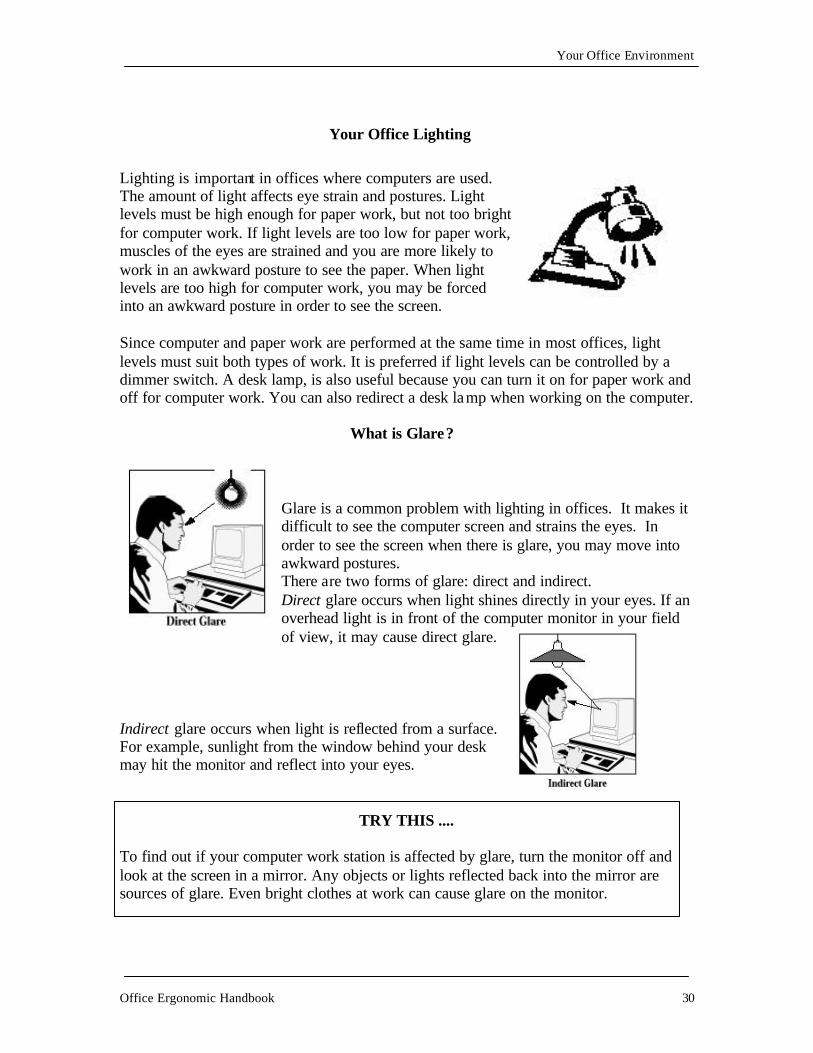
Lighting is important in offices where computers are used. The amount of light affects eye strain and postures. Light levels must be high enough for paper work, but not too bright for computer work. If light levels are too low for paper work, muscles of the eyes are strained and you are more likely to work in an awkward posture to see the paper. When light levels are too high for computer work, you may be forced into an awkward posture in order to see the screen. Since computer and paper work are performed at the same time in most offices, light levels must suit both types of work. It is preferred if light levels can be controlled by a dimmer switch. A desk lamp, is also useful because you can turn it on for paper work and off for computer work. You can also redirect a desk lamp when working on the computer.
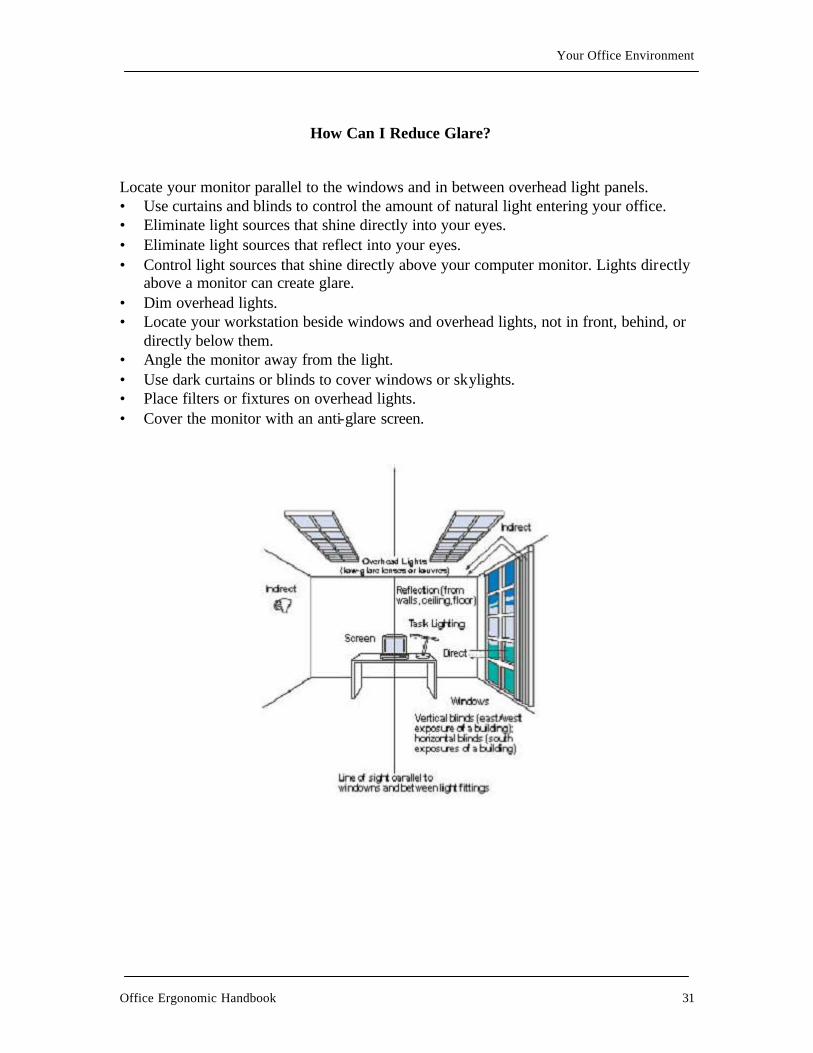
Glare is a common problem with lighting in offices. It makes it difficult to see the computer screen and strains the eyes. In order to see the screen when there is glare, you may move into awkward postures. There are two forms of glare: direct and indirect. Direct glare occurs when light shines directly in your eyes. If an overhead light is in front of the computer monitor in your field of view, it may cause direct glare.
Indirect glare occurs when light is reflected from a surface. For example, sunlight from the window behind your desk may hit the monitor and reflect into your eyes.
TRY THIS .... To find out if your computer work station is affected by glare, turn the monitor off and look at the screen in a mirror. Any objects or lights reflected back into the mirror are sources of glare. Even bright clothes at work can cause glare on the monitor.
What is Glare?
Your Office Lighting
Your Office Environment
Office Ergonomic Handbook 31
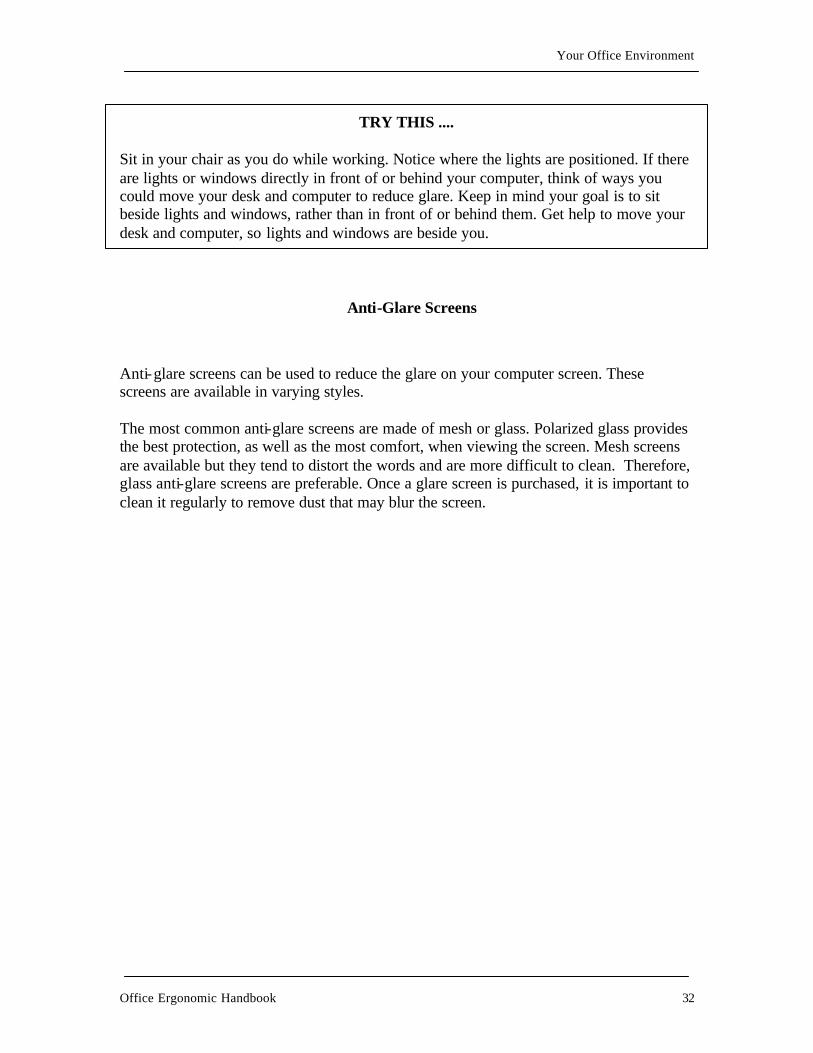
Locate your monitor parallel to the windows and in between overhead light panels. • Use curtains and blinds to control the amount of natural light entering your office. • Eliminate light sources that shine directly into your eyes. • Eliminate light sources that reflect into your eyes. • Control light sources that shine directly above your computer monitor. Lights directly
above a monitor can create glare. • Dim overhead lights. • Locate your workstation beside windows and overhead lights, not in front, behind, or
directly below them. • Angle the monitor away from the light. • Use dark curtains or blinds to cover windows or skylights. • Place filters or fixtures on overhead lights. • Cover the monitor with an anti-glare screen.
How Can I Reduce Glare?
Your Office Environment
Office Ergonomic Handbook 32
TRY THIS ....
Sit in your chair as you do while working. Notice where the lights are positioned. If there are lights or windows directly in front of or behind your computer, think of ways you could move your desk and computer to reduce glare. Keep in mind your goal is to sit beside lights and windows, rather than in front of or behind them. Get help to move your desk and computer, so lights and windows are beside you.
Anti-glare screens can be used to reduce the glare on your computer screen. These screens are available in varying styles.
The most common anti-glare screens are made of mesh or glass. Polarized glass provides the best protection, as well as the most comfort, when viewing the screen. Mesh screens are available but they tend to distort the words and are more difficult to clean. Therefore, glass anti-glare screens are preferable. Once a glare screen is purchased, it is important to clean it regularly to remove dust that may blur the screen.
Anti-Glare Screens

Your Office Environment
Office Ergonomic Handbook 33
It is important to stand up and get away from your desk and/or computer regularly throughout the day even if your work station is designed to suit your body. A five minute break away from the computer every hour allows your eyes, neck, back, shoulders, and arms to rest.
The previous description of the "ideal" sitting position is provided only as a general guideline because the muscles work best when the body joints are in "neutral" positions. However, you should not remain in any one position (seated or otherwise) for long periods of time. Changing positions throughout the day will help to reduce the stress and strain that builds up from staying in one position for a long time. For
example, adjusting the angle of the back rest of your chair even slightly will help change the position of your spine, giving certain muscles a "break”. Movement is also necessary to reduce the stress that builds up from sitting. Getting up and walking around, even short distances, throughout the day helps to reduce stress by improving circulation in the muscles and the spine. If your computer workstation can be adjusted, one option is to stand while working at your computer. Even if your work station is not fully adjustable, tasks like talking on the phone, can be done while standing. It is preferable to break up sitting and standing tasks throughout the day. Other daily tasks, such as filing and delivering, can be done when you take a break away from your computer. Avoid remaining seated for extended periods of time. Try to stand up and change your position every hour.
Muscle Recovery Are You Giving Your Body a Break?

Your Office Environment
Office Ergonomic Handbook 34
• Printers, faxes etc. should not obstruct movement. • Adequate space should be available for maintenance on any
piece of equipment. • You should use filing cabinets with a locking system so that
no more than one drawer can be opened at once. If more than one drawer is opened there is a risk of the cabinet tipping.
• Files and books that are used most often should be kept within easy reach.
• Files should be arranged in a filing cabinet so frequently used files are in the middle drawer or closest to elbow level. This should reduce the amount of bending and reaching required.
• Filing cabinets should be located so you have to stand up from your chair and walk to them. If the cabinet is far enough away you may have to stand to reach it. You will be less likely to twist and reach which may result in injury.
• There should be enough space between the cabinet and the wall to pull open the drawers (approx. 107 cm for vertical files and 81 cm for lateral files).
• File and desk drawers should be kept closed when not in use to avoid trips, bumps and scrapes.
• Frequently used books or binders should be within easy reach when you are sitting at your desk. This is very important, especially if these books are often used while you talk on the phone.
• Heavy books should be obtained while standing and placed on the middle shelf or around elbow level.
• Shelf depth should allow for a comfortable reach.
If any of the above products are not available, experiment with the following:
• Wrist rests can be made from pieces of foam or rolled up towels.
• A stable surface such as text books, a pad of photocopy paper or monitor trays can be placed under monitors in order to adjust the height. They can also be used as footrests.
• File folders make good document holders when placed between the function keys
of the keyboard and the front of the monitor. One to two sheets of paper can rest on the folder when being viewed.
• Documents can be taped to the side of the monitor when typing from only one
page.
• Clip boards can be used as document holders and work best if they can be placed between the keyboard and the monitor.
How Should I Arrange Everything in My Office?
Short Term Fixes
Your Office Environment
Office Ergonomic Handbook 35
Various boxes can be used as footrests. For example, an empty orange crate can be turned upside down. If you are creative, it can even be padded for a more comfortable rest. Makeshift footrests may not last as long as those commercially produced but they may be more accessible. Cables are available so you can move computer components and telephones.

Putting It All Together
Putting it all Together
Office Ergonomic Handbook 37
Other office environmental concerns include indoor air quality, thermal comfort, electromagnetic fields, and noise.
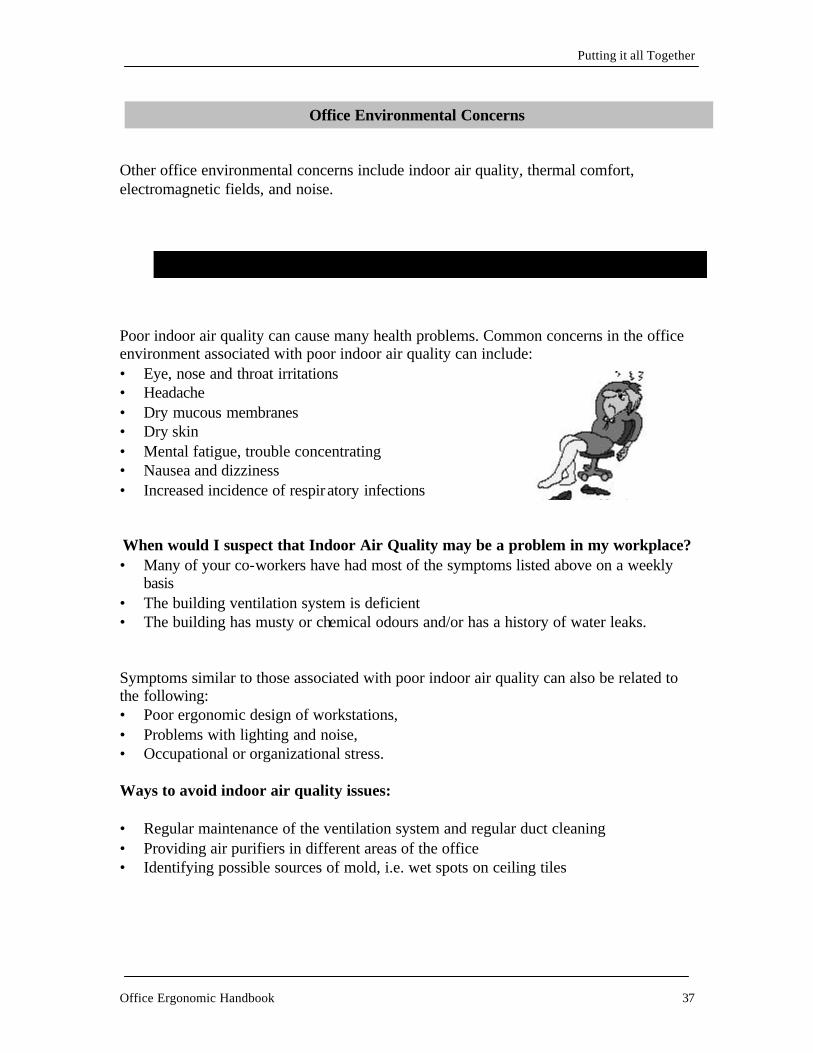
Poor indoor air quality can cause many health problems. Common concerns in the office environment associated with poor indoor air quality can include: • Eye, nose and throat irritations • Headache • Dry mucous membranes • Dry skin • Mental fatigue, trouble concentrating • Nausea and dizziness • Increased incidence of respiratory infections When would I suspect that Indoor Air Quality may be a problem in my workplace? • Many of your co-workers have had most of the symptoms listed above on a weekly
basis • The building ventilation system is deficient • The building has musty or chemical odours and/or has a history of water leaks. Symptoms similar to those associated with poor indoor air quality can also be related to the following: • Poor ergonomic design of workstations, • Problems with lighting and noise, • Occupational or organizational stress. Ways to avoid indoor air quality issues: • Regular maintenance of the ventilation system and regular duct cleaning • Providing air purifiers in different areas of the office • Identifying possible sources of mold, i.e. wet spots on ceiling tiles
What About Indoor Air Quality?
Office Environmental Concerns

Putting it all Together
Office Ergonomic Handbook 38
Do you feel hot, cold, or both? Is your skin dry? Is there a draft that makes you feel cold? If you answered yes to these questions, there may be temperature, humidity, and/or draft problems in your workplace. Thermal comfort is affected by your heating, ventilation and air conditioning (HVAC) system, the work activities you are doing, and personal preference. The recommended temperature range is 20 to 23.5 C in the winter and 23 to 26 degrees C in the summer with a relative humidity between 30% and 60%. The temperature range is lower in the winter because people tend to dress in warmer clothes.
Feeling cold can lead to increased muscle tension, increased stress levels, and awkward working postures, such as hunched shoulders.
What can be done about thermal comfort in my work place? • Discuss the following issues with your Joint Health and Safety Committee:
Problems Possible Causes Drafts Vents may not be positioned properly Varying temperatures throughout the office HVAC system may not be working
properly Static shocks Humidity level may be too low • Agree on one temperature setting at your work place. Workers can then dress
according to their personal preference. • If temperatures vary or you do not have control over the temperature, dress in layers. • As a temporary solution, investigate the use of heaters or fans to accommodate
personal preferences. What can I do if I have concerns about indoor air quality or thermal comfort in my
office? If you are concerned about indoor air quality or thermal comfort, talk to your Joint Health and Safety Committee members or contact an Occupational Health Clinics for Ontario Workers Inc. (OHCOW )Occupational Hygienist at the Clinic nearest to you.
What About Thermal Comfort?
Putting it all Together
Office Ergonomic Handbook 39
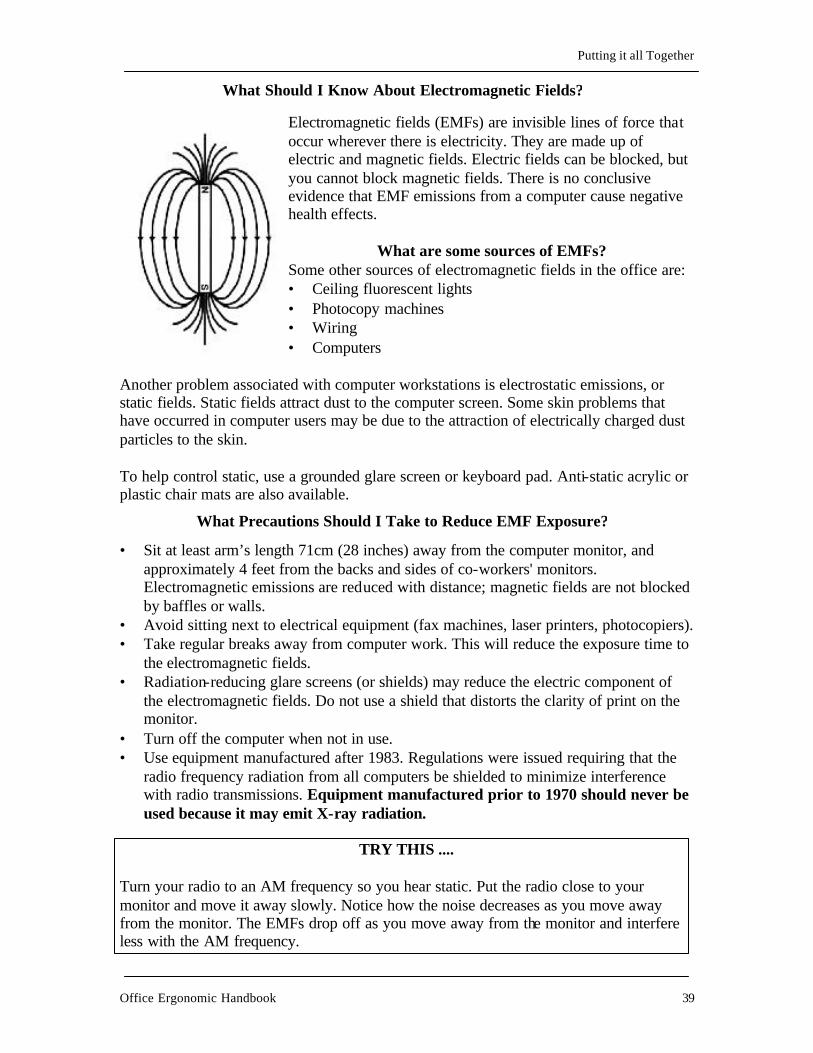
Electromagnetic fields (EMFs) are invisible lines of force that occur wherever there is electricity. They are made up of electric and magnetic fields. Electric fields can be blocked, but you cannot block magnetic fields. There is no conclusive evidence that EMF emissions from a computer cause negative health effects.
What are some sources of EMFs? Some other sources of electromagnetic fields in the office are: • Ceiling fluorescent lights • Photocopy machines • Wiring • Computers
Another problem associated with computer workstations is electrostatic emissions, or static fields. Static fields attract dust to the computer screen. Some skin problems that have occurred in computer users may be due to the attraction of electrically charged dust particles to the skin. To help control static, use a grounded glare screen or keyboard pad. Anti-static acrylic or plastic chair mats are also available.
• Sit at least arm’s length 71cm (28 inches) away from the computer monitor, and
approximately 4 feet from the backs and sides of co-workers' monitors. Electromagnetic emissions are reduced with distance; magnetic fields are not blocked by baffles or walls.
• Avoid sitting next to electrical equipment (fax machines, laser printers, photocopiers). • Take regular breaks away from computer work. This will reduce the exposure time to
the electromagnetic fields. • Radiation-reducing glare screens (or shields) may reduce the electric component of
the electromagnetic fields. Do not use a shield that distorts the clarity of print on the monitor.
• Turn off the computer when not in use. • Use equipment manufactured after 1983. Regulations were issued requiring that the
radio frequency radiation from all computers be shielded to minimize interference with radio transmissions. Equipment manufactured prior to 1970 should never be used because it may emit X-ray radiation.
TRY THIS ....
Turn your radio to an AM frequency so you hear static. Put the radio close to your monitor and move it away slowly. Notice how the noise decreases as you move away from the monitor. The EMFs drop off as you move away from the monitor and interfere less with the AM frequency.
What Should I Know About Electromagnetic Fields?
What Precautions Should I Take to Reduce EMF Exposure?
Putting it all Together
Office Ergonomic Handbook 40
Noise is any unpleasant sound. We tend to call it "sound" when it is not annoying and "noise" when it is! Noise levels in your office are probably not high enough to damage your hearing, but noise may still cause problems.
Noise may: • Interfere with communication. • Annoy or distract people nearby. • Increase the level of concentration required and in turn, increase the level of fatigue. • Cause stress.
Some sources of noise in an office environment are co-workers, the ventilation systems, fans, computers, photocopiers, fax machines, telephones, and the everyday outdoor noises, such as traffic.
Noise reduction is a specialized field in itself, but there are a number of techniques that may be used to reduce noise.
• Sound-absorbing tile, carpet, and barrier walls can be used. • Noisy equipment can be isolated. For example, place the photocopy machine
in a separate room to reduce noise. • Use ear plugs as a temporary solution while investigating noise reduction
methods. • Follow a regular maintenance schedule for the office equipment.
How Do I Reduce Annoying or Distracting Noise?
Where Does Noise Come From in My Office
What is Noise?
Putting it all Together
Office Ergonomic Handbook 41
Is your head pounding? Stomach upset? Feeling cold and clammy? You may be experiencing stress. Stress is a serious workplace problem. You may experience stress as you drive through traffic to get to work, when you look at your "to do" list, or after your boss asks you to finish typing a letter which must be faxed immediately. It is no wonder you may be feeling tired by the end of the work day.
• Upset stomach. • Increased heart rate and blood pressure. • Cold, clammy hands. • Increased muscle tension. • Rapid and shallow breathing.
TRY THIS .... To feel physical stress, make a fist with your right hand. Squeeze tightly for several seconds. Notice the tension in your hand, wrist and arm. To feel relaxation, open your hand gradually and pay attention to how light it feels in comparison to when you made a fist. This exercise can be performed with all muscle groups. Stress at work can play an important role in injury development. Stress can cause increased tightness in the shoulder and neck muscles and increase the risk of injury. Therefore, a reduction in stress may reduce the risk of injury. What are some sources of stress in the workplace? Stress levels at work can be affected by the following: • A lack of job security • A lack of control over how you do your job • Having too much or too little to do • Monotonous, repetitive work • Not knowing what is expected of you • Conflicting expectations or task demands • Not being able to predict what people expect from you • A lack of help, cooperation, and support from co-workers • A lack of conversational privacy, distractions from noise
How Does My Body React to Stress?
Stressed????
CSA-Z412 states: “Poorly designed working conditions therefore place a stress load on workers both physically and psychologically. When people feel stresses, they often carry extra tension in their muscles. They may use excessive force to accomplish a task, or move in a jerky fashion rather than in a smooth, controlled fashion. This can exacerbate the physical job demands and contribute to work-related musculoskeletal disorders.”
Putting it all Together
Office Ergonomic Handbook 42
There are several things that can be done within your office environment to help reduce stress. Some examples are as follows:
• Good communication, including regular staff meetings, is the key to reducing stress in the work place.
• Control over everyday activities. • There should be an open-door policy so
workers can freely talk to supervisors about tasks to be performed and job expectations.
• If there are threats to job security, workers should be informed as soon as information
about the future is known. • Roles and responsibilities should be dearly defined when tasks
are assigned. • Every effort should be made to create a socially supportive work
place where all workers feel they are an important part of the team.
• Workers should be given a chance to use and develop their skills. • Reduce monotony through job enlargement and/or enhancement.
Some other things you can do to reduce stress include regular breaks, breathing and stretching exercises, and living a healthy life style.
Living a healthy lifestyle strengthens your body. Along with regular exercise, a healthy lifestyle includes the following: • Not smoking or being exposed to smoke • Eating a balanced diet from the Canada Food Guide • Getting enough rest and relaxation Stretching can give your body a break and reduce stress.
For stretching exercises that suit your needs, talk to a health professional.
TRY THIS .... When you feel stress, your breathing becomes rapid and shallow. By concentrating on deep breathing, you can reduce your stress level. Sit or stand comfortably with your hands on your stomach. Breathe in through your nose slowly and deeply. Once you have inhaled as much as you can, hold your breath for a few seconds before breathing out. Exhale slowly through your mouth with your lips positioned as if you were going to whistle. When you are finished exhaling, breath in again slowly and repeat the cycle until you start to feel better.
What Can Be Done to Reduce Workplace Stress?
What Else Can I Do to Reduce Stress in My Life?
Putting it all Together
Office Ergonomic Handbook 43
A STEP BY STEP CHECKLIST FOR SETTING UP THE COMPUTER WORKSTATION TO FIT
YOU !
In order to be comfortable at your computer workstation the following steps should be used to ensure the workstation fits your needs. If you feel fatigued or start to experience muscle pain use this checklist to re-evaluate your workstation. Do not be afraid to adjust your workstation. Remember, prevention is the best cure for musculoskeletal injuries!
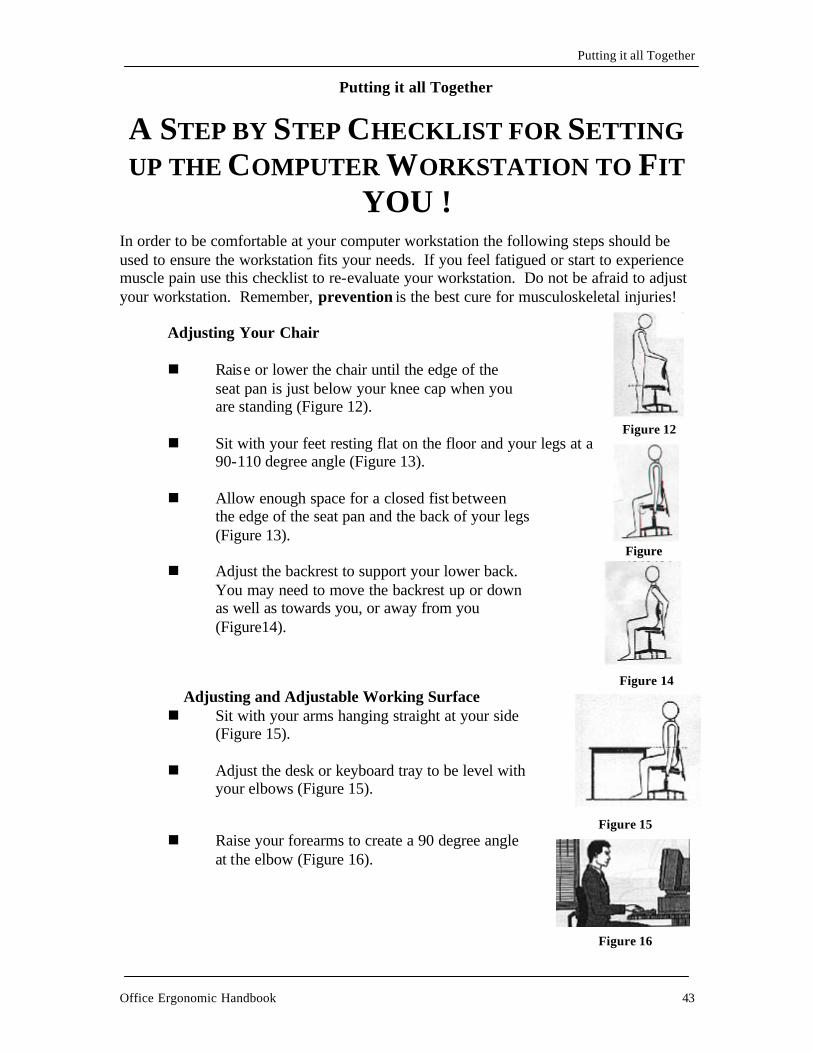
Adjusting Your Chair n Raise or lower the chair until the edge of the
seat pan is just below your knee cap when you are standing (Figure 12).
n Sit with your feet resting flat on the floor and your legs at a
90-110 degree angle (Figure 13). n Allow enough space for a closed fist between
the edge of the seat pan and the back of your legs (Figure 13).
n Adjust the backrest to support your lower back.
You may need to move the backrest up or down as well as towards you, or away from you (Figure14).
Figure 14 Adjusting and Adjustable Working Surface
n Sit with your arms hanging straight at your side (Figure 15).
n Adjust the desk or keyboard tray to be level with
your elbows (Figure 15).
Figure 15 n Raise your forearms to create a 90 degree angle at the elbow (Figure 16).
Figure 16
Putting it all Together
Figure 12
Figure 1313131
Putting it all Together
Office Ergonomic Handbook 44
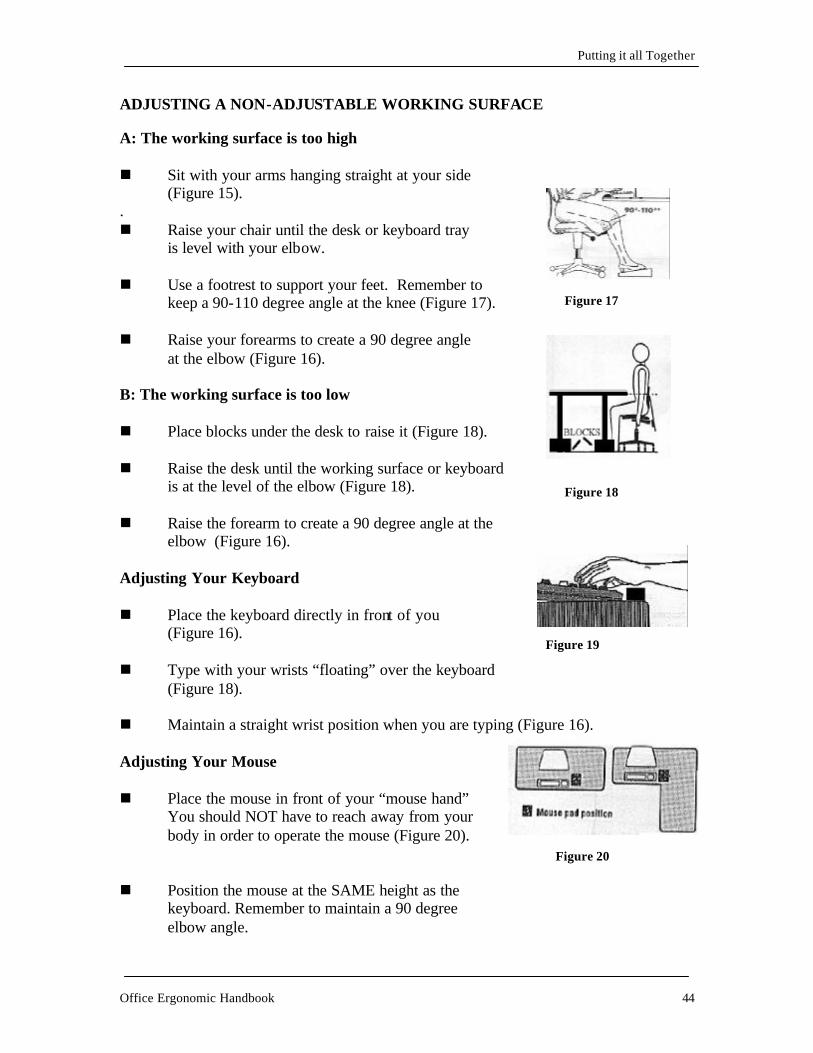
ADJUSTING A NON-ADJUSTABLE WORKING SURFACE A: The working surface is too high n Sit with your arms hanging straight at your side
(Figure 15). . n Raise your chair until the desk or keyboard tray
is level with your elbow. n Use a footrest to support your feet. Remember to
keep a 90-110 degree angle at the knee (Figure 17).
n Raise your forearms to create a 90 degree angle at the elbow (Figure 16).
B: The working surface is too low n Place blocks under the desk to raise it (Figure 18). n Raise the desk until the working surface or keyboard
is at the level of the elbow (Figure 18). n Raise the forearm to create a 90 degree angle at the
elbow (Figure 16). Adjusting Your Keyboard n Place the keyboard directly in front of you
(Figure 16). n Type with your wrists “floating” over the keyboard
(Figure 18). n Maintain a straight wrist position when you are typing (Figure 16). Adjusting Your Mouse n Place the mouse in front of your “mouse hand”
You should NOT have to reach away from your body in order to operate the mouse (Figure 20).
n Position the mouse at the SAME height as the keyboard. Remember to maintain a 90 degree elbow angle.
Figure 17
Figure 18
Figure 19
Figure 20
Putting it all Together
Office Ergonomic Handbook 45
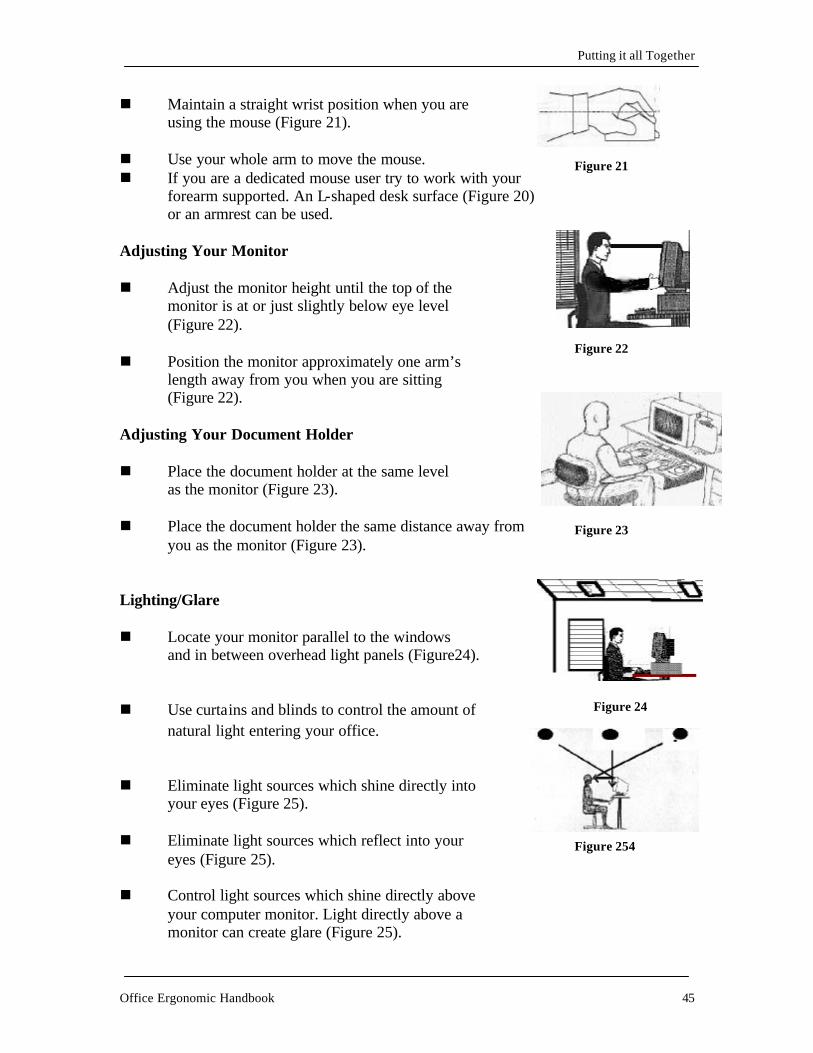
n Maintain a straight wrist position when you are using the mouse (Figure 21).
n Use your whole arm to move the mouse. n If you are a dedicated mouse user try to work with your forearm supported. An L-shaped desk surface (Figure 20) or an armrest can be used. Adjusting Your Monitor n Adjust the monitor height until the top of the
monitor is at or just slightly below eye level (Figure 22).
n Position the monitor approximately one arm’s
length away from you when you are sitting (Figure 22).
Adjusting Your Document Holder n Place the document holder at the same level
as the monitor (Figure 23). n Place the document holder the same distance away from
you as the monitor (Figure 23).
Lighting/Glare n Locate your monitor parallel to the windows
and in between overhead light panels (Figure24).
n Use curtains and blinds to control the amount of
natural light entering your office. n Eliminate light sources which shine directly into
your eyes (Figure 25). n Eliminate light sources which reflect into your
eyes (Figure 25). n Control light sources which shine directly above
your computer monitor. Light directly above a monitor can create glare (Figure 25).
Figure 24
Figure 21
Figure 22
Figure 23
Figure 254

Putting it all Together
Office Ergonomic Handbook 46
Noise n Install sound absorbing materials when possible.
(carpets, acoustical tiles, office dividers, rubber pads under printers)
n Locate photocopiers, fax machines and other noisy
office equipment in a separate room. n Follow a regular maintenance schedule for the office
equipment. Now that you have completed the workbook, you should be able to adjust your workstation to suit you. It will take some effort for the principles from this workbook to become a part of your everyday life. Refer back to this workbook periodically to refresh your knowledge about office ergonomics.
POINTS TO REMEMBER • Ergonomic equipment is only ergonomic if used correctly. Learn how to use your
equipment! • Reduce repetitive movements, awkward postures and static forces. Be conscious of
your body positions and movements! • Take a break away from your computer at least once every hour. Remember to keep
moving! • All aspects of your office interact to affect your health (workstation design, stress, air
quality noise, etc.). Keep the communication lines open!
APPENDICES
Appendix A: Legislation
Appendix B: Additional
References/Resources
Appendix A - Legislation
Office Ergonomic Handbook 48
As a worker in Ontario, you may be covered by the Occupational Health and Safety Act (provincial) or the Canada Labour Code (federal). Members of your Joint Health and Safety Committee should know which legislation applies to you. Under the Occupational Health and Safety Act and the Canada Labour Code, workers have three basic rights: • The right to know about workplace health and safety hazards • The right to participate in making recommendations about health and safety concerns • The right to refuse work if they have reason to believe it endangers their health and
safety. These rights can be used to protect office workers. In Ontario while the only specific regulations that apply to ergonomics concern health care workers, they may be of use to you as a guide. Specifically, Health Care and Residential Facilities (Ontario Regulation 67/93) reads:
If a worker is required to use a video display terminal for a continuous period of one hour or more, the worker shall have at least five minutes of time free from such work in every hour.
Sections 22 through 27 deal with lighting and read in part:
If a glare from a direct lighting source is likely to be a hazard to a worker, the source shall be shielded by louvres, lenses, lens covers or diffusers which control the glare.
Lighting is also discussed in Section 6 of the Canada Occupational Safety and Health Regulations. Some of the highlights are as follows: Section 6.7(2) Reflection glare on a VDT screen shall be reduced to the point where an employee at a task position is able to
(a) read every portion of any text displayed on the screen and (b) (b) see every portion of the visual display on the screen.
Section 6.7(3) Where VDT work requires the reading of a document, supplementary lighting shall be provided where necessary to give a level of lighting of at least 500 lux on the document.
OCCUPATIONAL HEALTH AND SAFETY ACT (1992)
Legislation
Appendix A - Legislation
Office Ergonomic Handbook 49
Recently the federal government's Treasury Board has passed a series of policy, which provide specific guidelines for office workers. These guidelines can be found on the Treasury Board website www.tbs-sct.gc.ca. They may be helpful to you when trying to assess your needs and develop language for your own collective agreement. British Columbia and Saskatchewan are the only provinces which has passed Ergonomic Regulations. Section 4.46 of BC regulations stated defines ergonomics as:
"musculoskeletal injury" or "MSI" means an injury or disorder of the muscles, tendons, ligaments, joints, nerves, blood vessels or related soft tissue including a sprain, strain and inflammation, that may be caused or aggravated by work.
The full text of the regulations, which includes risk factors and safety requirements may be found on the B.C. W.C.B. website.
Appendix B – Additional Resources/References
Office Ergonomic Handbook 50
CSA-Z412 Guideline on Office Ergonomics Canadian Standards Association 178 Rexdale Boulevard Toronto, Ontario M9W 1R3 Tel: (416) 747-4000 /1 800 463-6727 Fax: (416) 747-4149 Croney, J. Anthropometry for Designers. Tiptree, Essex. Anchor Press. 1980. Grandjean, E. (1987). Ergonomics in Computerized Offices. Taylor & Francis:London. Grandjean, E. Design of VDT Workstations. In: Handbook of Human Factors. Edited by G. Salvendy. New York. Wiley and Sons. 1987. ISO 6385, Ergonomic Principles in the Design of Work Systems Standards Council of Canada 270 Albert Street, Suite 200 OTTAWA ON K1P 6N7 Tel.: (613) 238-3222 Fax: (613) 569-7808 Web: http://www.scc.ca/home_e.html Ministry of Labour (1995). VDT Workstations: Layout and Lighting. Ministry of Labour: Toronto. MOL Publications tel. 1-800-268-8013 Workers' Compensation Board of B.C. (1994). Draft Ergonomics Regulations. WCB of BC: Richmond. WCB tel. (604) 279-7586. Some of the Diagrams are reproduced with the permission of the Canadian Standards Association from CSA-Z412-00. While the use of this material has been authorized, CSA shall not be held responsible for the manner in which the material is represented nor for any interpretations thereof.
Office Ergonomic Handbook 51
If you need further assistance, call the Occupational Health Clinics for Ontario Workers Inc. closest to you.
Provincial Office 15 Gervais Dr. Don Mills On
M3C 1Y8 416-443-6320
416-443-6323(fax) 1-877-817-0336 (toll free) E-mail: [email protected] Website: www.ohcow.on.ca
Toronto Windsor
970 Lawrence Ave, West 3129 Marentette Ave., Main Floor Unit 1 Toronto On Windsor On M6A 3B6 N8X 4G1 416-449-0009 519-973-4800 416-449-7772 (fax) 519-973-1906 (fax) 1-800-461-7120 (toll free) 1-800-565-3185 (toll free) E-mail: [email protected] E-mail: [email protected]
Hamilton Sarnia
848 Main Street, East 171 Kendall Street Hamilton On Point Edward On L8M 1L9 N7V 4G6 905-549-2552 519-337-4627 905-549-7993 (fax) 519-337-9442 (fax) 1-800-263-2129 (toll free) E-mail: [email protected] E-mail: [email protected]
Sudbury London 1300 Paris St. Unit 4 3-380 Adelaide St. North Sudbury On London On P3E 3A3 N6B 3P6
705-523-2330 519-423-3535 705-523-2606 (fax) 519-642-7834 (fax) 1-800-461-7120 (toll free) E-mail: [email protected] E-mail: [email protected]
Every effort has been made to ensure the accuracy of the information in this workbook.
OHCOW assumes no responsibility for how this information is used.