Embed Size (px)
Citation preview
Version 1.1 Copyright © 2016
ESP8266 Quick Start Guide
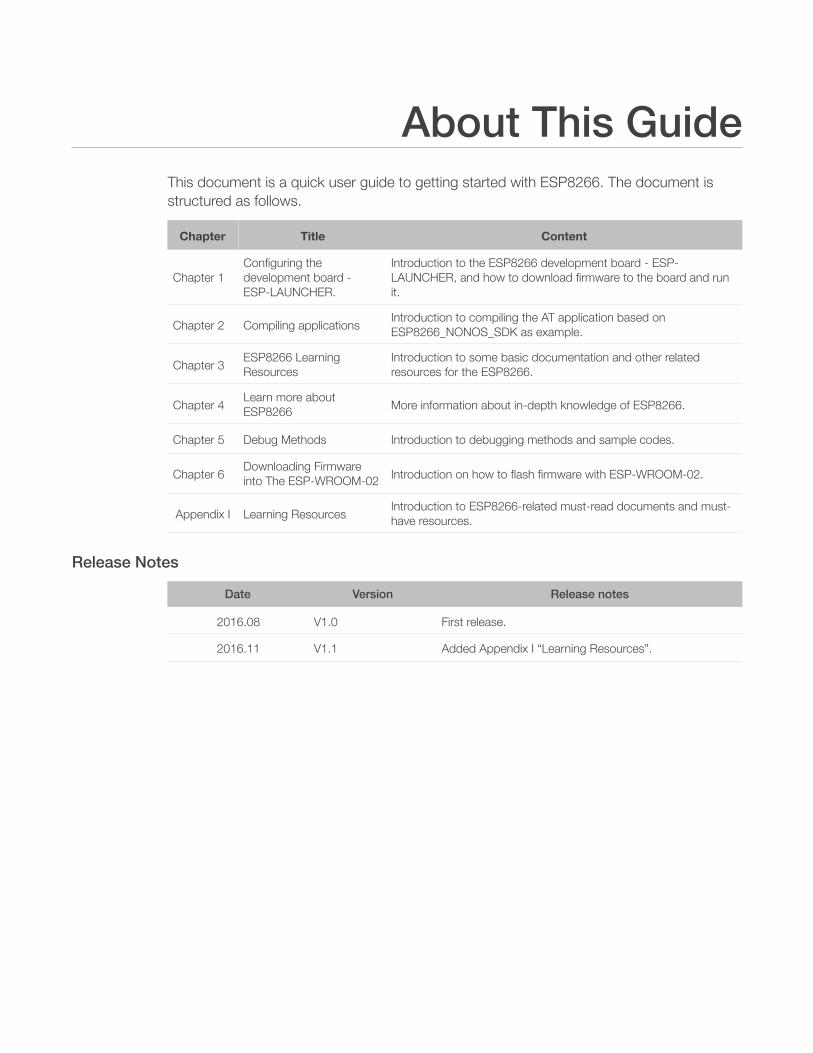
About This Guide This document is a quick user guide to getting started with ESP8266. The document is structured as follows.
Release Notes
Chapter Title Content
Chapter 1Configuring the development board - ESP-LAUNCHER.
Introduction to the ESP8266 development board - ESP-LAUNCHER, and how to download firmware to the board and run it.
Chapter 2 Compiling applications Introduction to compiling the AT application based on ESP8266_NONOS_SDK as example.
Chapter 3 ESP8266 Learning Resources
Introduction to some basic documentation and other related resources for the ESP8266.
Chapter 4 Learn more about ESP8266 More information about in-depth knowledge of ESP8266.
Chapter 5 Debug Methods Introduction to debugging methods and sample codes.
Chapter 6 Downloading Firmware into The ESP-WROOM-02 Introduction on how to flash firmware with ESP-WROOM-02.
Appendix Ⅰ Learning Resources Introduction to ESP8266-related must-read documents and must-have resources.
Date Version Release notes
2016.08 V1.0 First release.
2016.11 V1.1 Added Appendix Ⅰ “Learning Resources”.
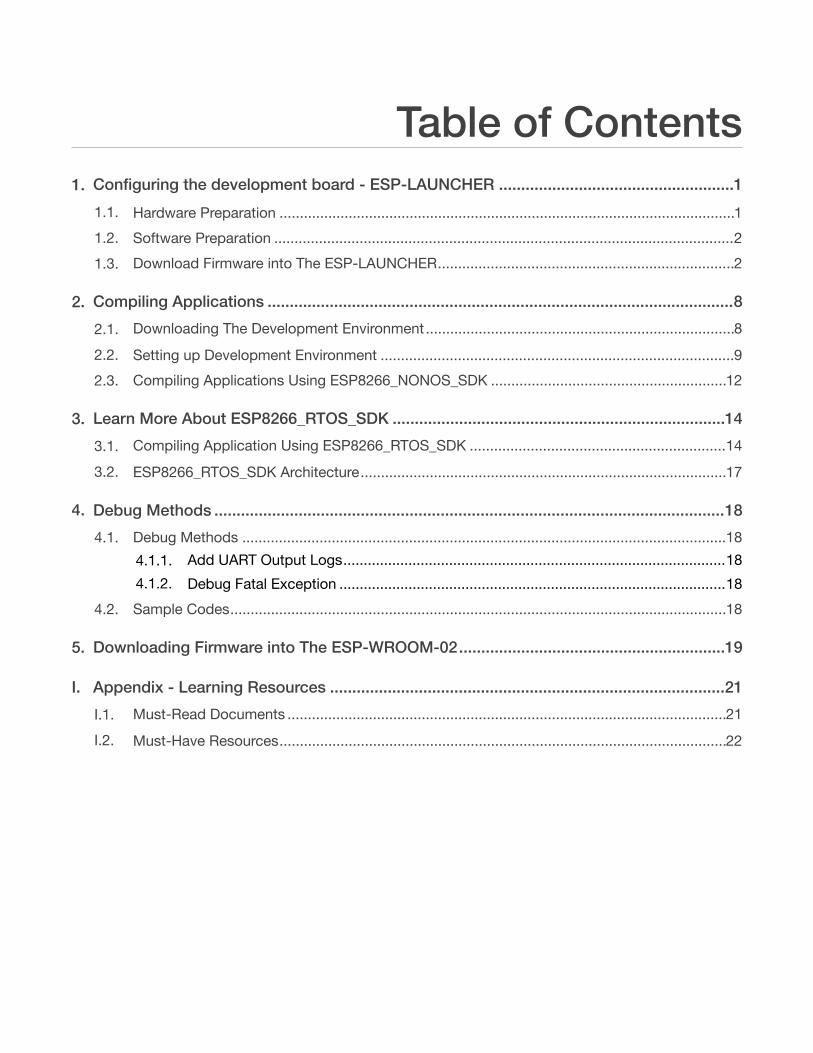
Table of Contents 1. Configuring the development board - ESP-LAUNCHER 1 .....................................................
1.1. Hardware Preparation 1................................................................................................................1.2. Software Preparation 2.................................................................................................................1.3. Download Firmware into The ESP-LAUNCHER 2.........................................................................
2. Compiling Applications 8 .........................................................................................................2.1. Downloading The Development Environment 8............................................................................
2.2. Setting up Development Environment 9.......................................................................................2.3. Compiling Applications Using ESP8266_NONOS_SDK 12..........................................................
3. Learn More About ESP8266_RTOS_SDK 14 ...........................................................................3.1. Compiling Application Using ESP8266_RTOS_SDK 14...............................................................
3.2. ESP8266_RTOS_SDK Architecture 17..........................................................................................
4. Debug Methods 18 ...................................................................................................................4.1. Debug Methods 18.......................................................................................................................
4.1.1. Add UART Output Logs 18..............................................................................................4.1.2. Debug Fatal Exception 18...............................................................................................
4.2. Sample Codes 18..........................................................................................................................
5. Downloading Firmware into The ESP-WROOM-02 19 ............................................................
I. Appendix - Learning Resources 21 .........................................................................................I.1. Must-Read Documents 21............................................................................................................I.2. Must-Have Resources 22..............................................................................................................
"
1. Configuring the development board - ESP-LAUNCHER
1. Configuring the development board - ESP-LAUNCHER
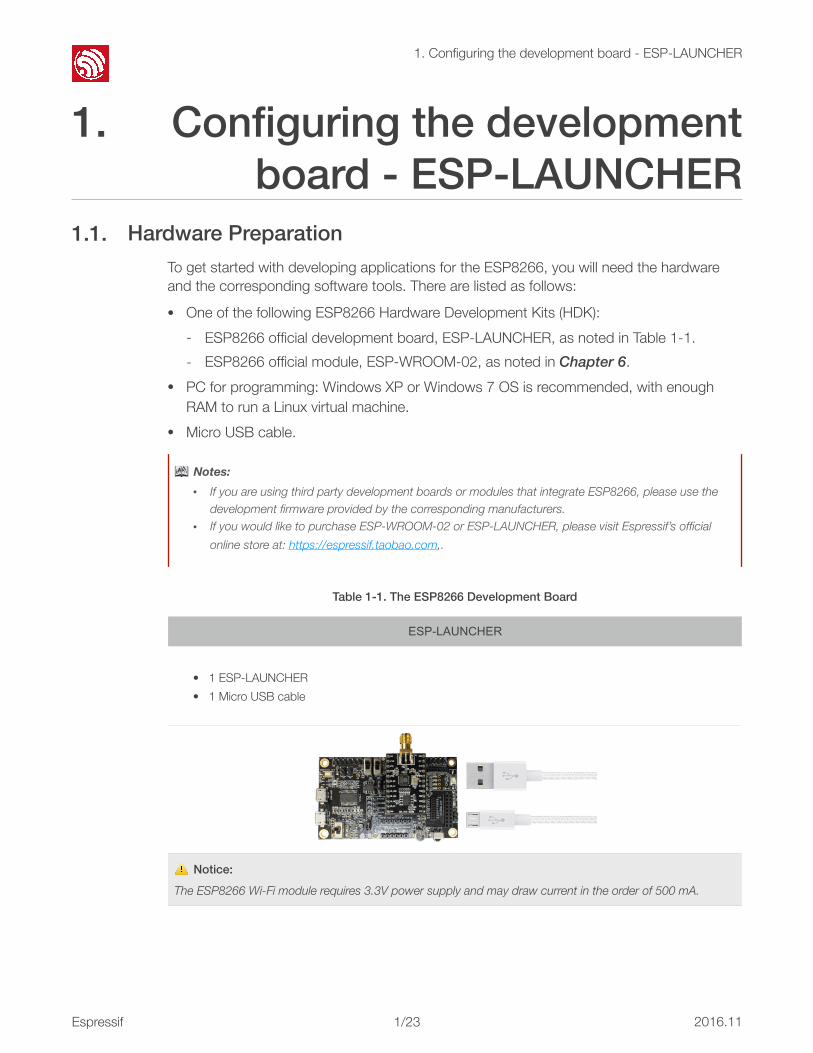
1.1. Hardware Preparation To get started with developing applications for the ESP8266, you will need the hardware and the corresponding software tools. There are listed as follows: • One of the following ESP8266 Hardware Development Kits (HDK):
- ESP8266 official development board, ESP-LAUNCHER, as noted in Table 1-1. - ESP8266 official module, ESP-WROOM-02, as noted in Chapter 6.
• PC for programming: Windows XP or Windows 7 OS is recommended, with enough RAM to run a Linux virtual machine.
• Micro USB cable.
📖 Notes: • If you are using third party development boards or modules that integrate ESP8266, please use the
development firmware provided by the corresponding manufacturers. • If you would like to purchase ESP-WROOM-02 or ESP-LAUNCHER, please visit Espressif’s official
online store at: https://espressif.taobao.com,.
Table 1-1. The ESP8266 Development Board
ESP-LAUNCHER
• 1 ESP-LAUNCHER • 1 Micro USB cable
⚠ Notice: The ESP8266 Wi-Fi module requires 3.3V power supply and may draw current in the order of 500 mA.
! !
Espressif " /231 2016.11
"
1. Configuring the development board - ESP-LAUNCHER
1.2. Software Preparation • ESP8266 official Flash Download Tool
- Download: http://www.espressif.com/support/download/other-tools • ESP8266 official SDK
- Download SDK: http://www.espressif.com/support/download/sdks-demos
- The official AT firmware (ESP8266_NONOS_SDK\bin\at) can be downloaded into the ESP-LAUNCHER by referring to the BIN locations mentioned in the "ReadMe" file which is in the same directory. For instructions on downloading the firmware into the ESP-LAUNCHER, please refer to Section 1.3.
• PC UART terminal emulator tool - SecureCRT/ minicom is recommended.
- UART tools mentioned above can support the default baud rate (74880) of ESP8266. Note that certain USB-UART converters may not support all baud rates if you are using a third party development board.
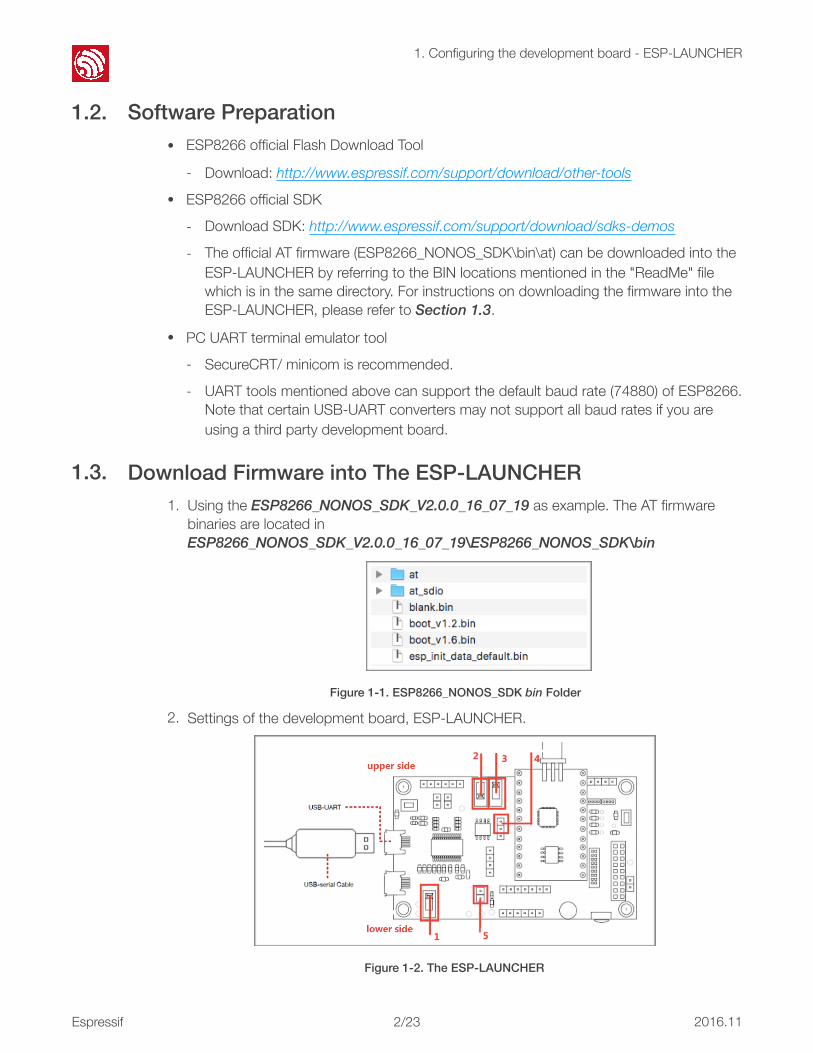
1.3. Download Firmware into The ESP-LAUNCHER 1. Using the ESP8266_NONOS_SDK_V2.0.0_16_07_19 as example. The AT firmware
binaries are located in ESP8266_NONOS_SDK_V2.0.0_16_07_19\ESP8266_NONOS_SDK\bin
" Figure 1-1. ESP8266_NONOS_SDK bin Folder
2. Settings of the development board, ESP-LAUNCHER.
" Figure 1-2. The ESP-LAUNCHER
Espressif " /232 2016.11
"
1. Configuring the development board - ESP-LAUNCHER
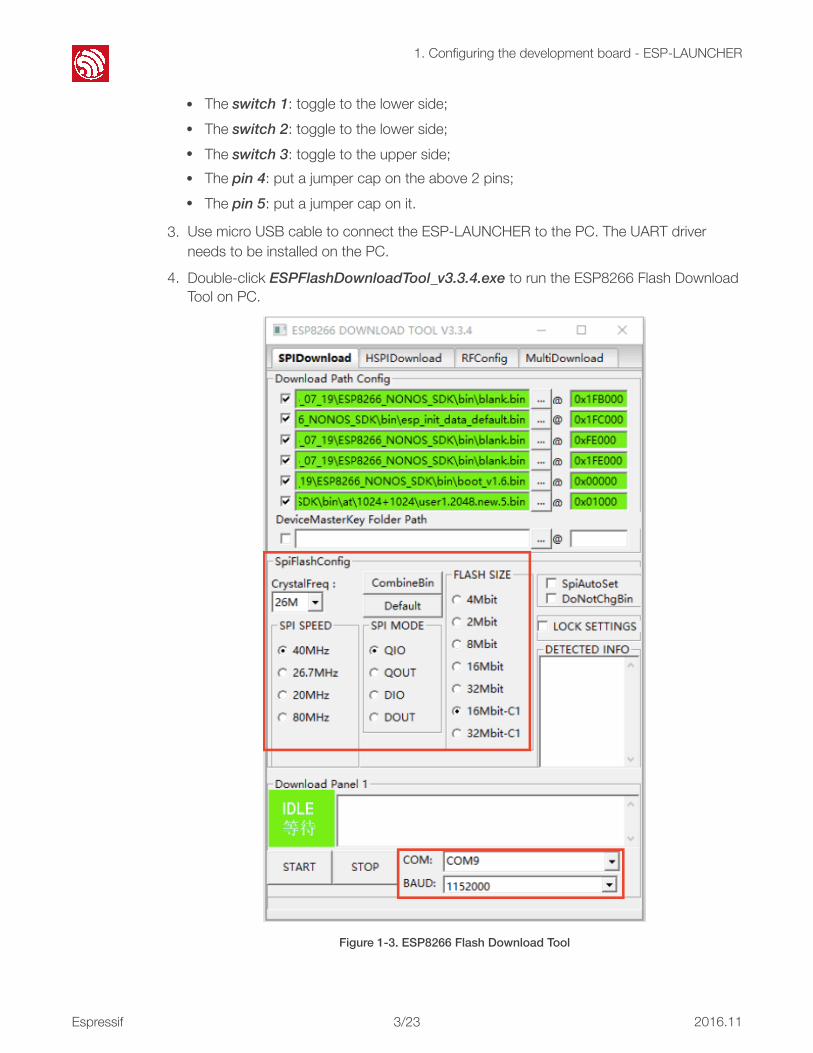
• The switch 1: toggle to the lower side; • The switch 2: toggle to the lower side; • The switch 3: toggle to the upper side; • The pin 4: put a jumper cap on the above 2 pins; • The pin 5: put a jumper cap on it.
3. Use micro USB cable to connect the ESP-LAUNCHER to the PC. The UART driver needs to be installed on the PC.
4. Double-click ESPFlashDownloadTool_v3.3.4.exe to run the ESP8266 Flash Download Tool on PC.
" Figure 1-3. ESP8266 Flash Download Tool
Espressif " /233 2016.11
"
1. Configuring the development board - ESP-LAUNCHER
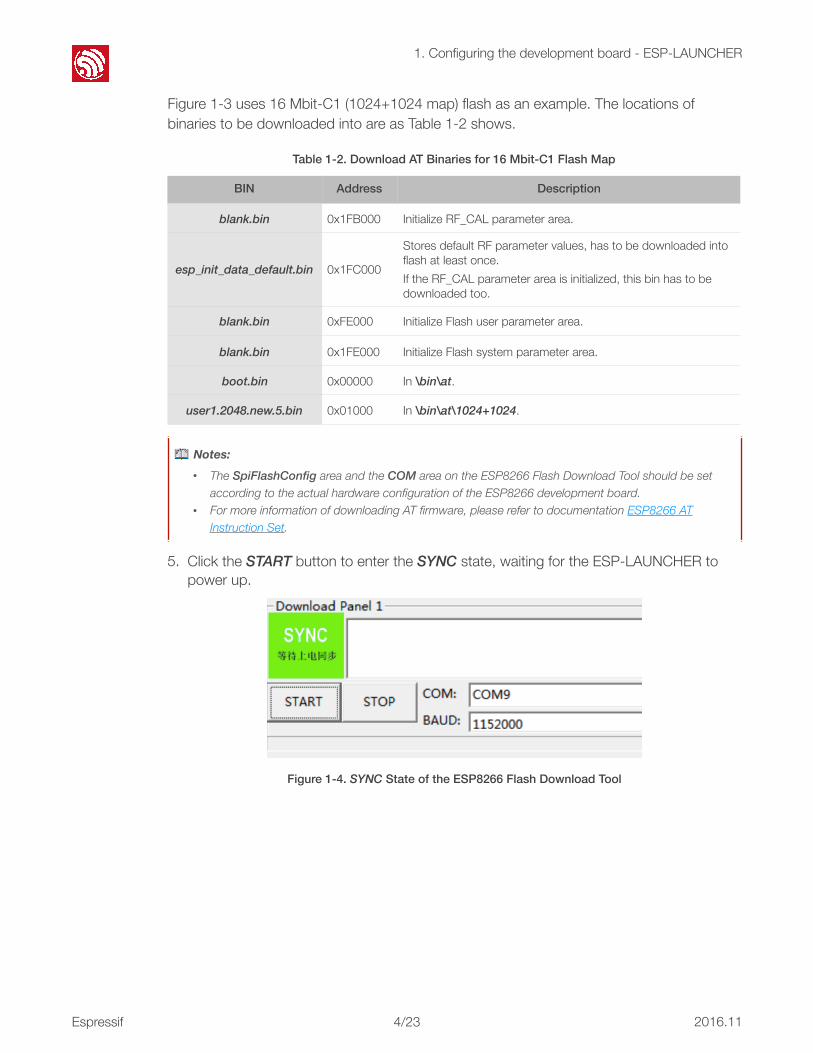
Figure 1-3 uses 16 Mbit-C1 (1024+1024 map) flash as an example. The locations of binaries to be downloaded into are as Table 1-2 shows.
5. Click the START button to enter the SYNC state, waiting for the ESP-LAUNCHER to power up.
" Figure 1-4. SYNC State of the ESP8266 Flash Download Tool
Table 1-2. Download AT Binaries for 16 Mbit-C1 Flash Map
BIN Address Description
blank.bin 0x1FB000 Initialize RF_CAL parameter area.
esp_init_data_default.bin 0x1FC000
Stores default RF parameter values, has to be downloaded into flash at least once. If the RF_CAL parameter area is initialized, this bin has to be downloaded too.
blank.bin 0xFE000 Initialize Flash user parameter area.
blank.bin 0x1FE000 Initialize Flash system parameter area.
boot.bin 0x00000 In \bin\at.
user1.2048.new.5.bin 0x01000 In \bin\at\1024+1024.
📖 Notes: • The SpiFlashConfig area and the COM area on the ESP8266 Flash Download Tool should be set
according to the actual hardware configuration of the ESP8266 development board. • For more information of downloading AT firmware, please refer to documentation ESP8266 AT
Instruction Set.
Espressif " /234 2016.11
"
1. Configuring the development board - ESP-LAUNCHER
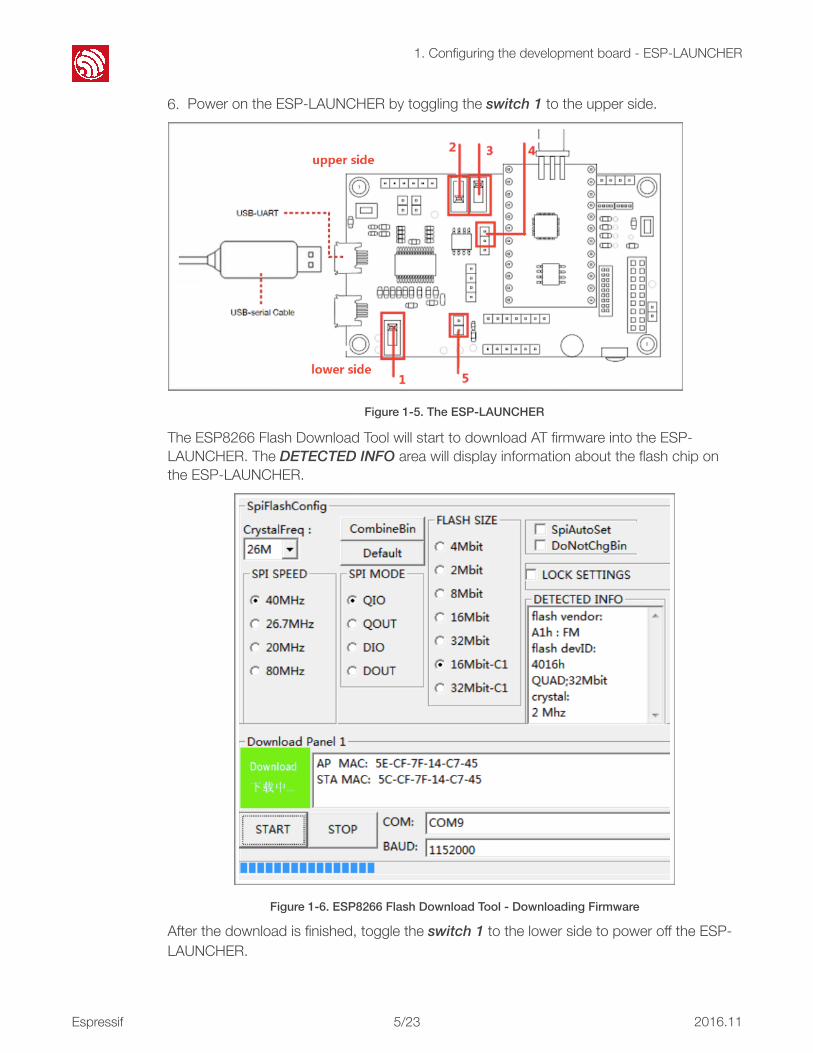
6. Power on the ESP-LAUNCHER by toggling the switch 1 to the upper side.
" Figure 1-5. The ESP-LAUNCHER
The ESP8266 Flash Download Tool will start to download AT firmware into the ESP-LAUNCHER. The DETECTED INFO area will display information about the flash chip on the ESP-LAUNCHER.
" Figure 1-6. ESP8266 Flash Download Tool - Downloading Firmware
After the download is finished, toggle the switch 1 to the lower side to power off the ESP-LAUNCHER.
Espressif " /235 2016.11
"
1. Configuring the development board - ESP-LAUNCHER
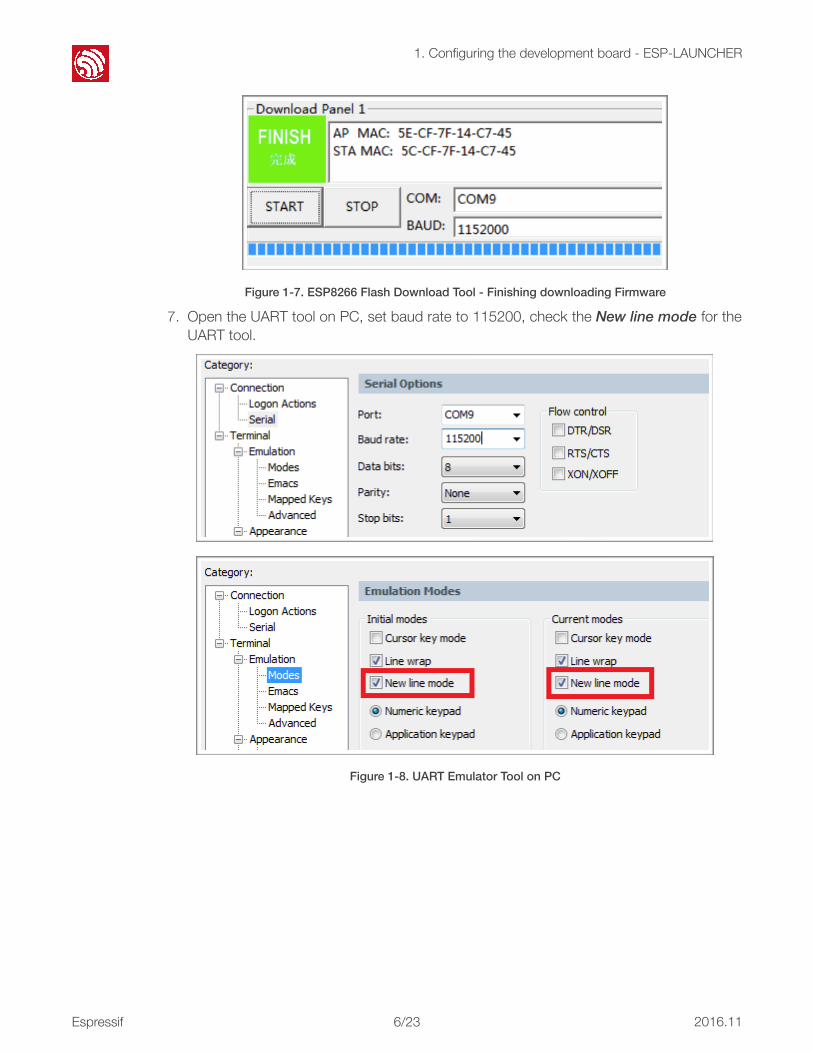
" Figure 1-7. ESP8266 Flash Download Tool - Finishing downloading Firmware
7. Open the UART tool on PC, set baud rate to 115200, check the New line mode for the UART tool.
"
" Figure 1-8. UART Emulator Tool on PC
Espressif " /236 2016.11
"
1. Configuring the development board - ESP-LAUNCHER
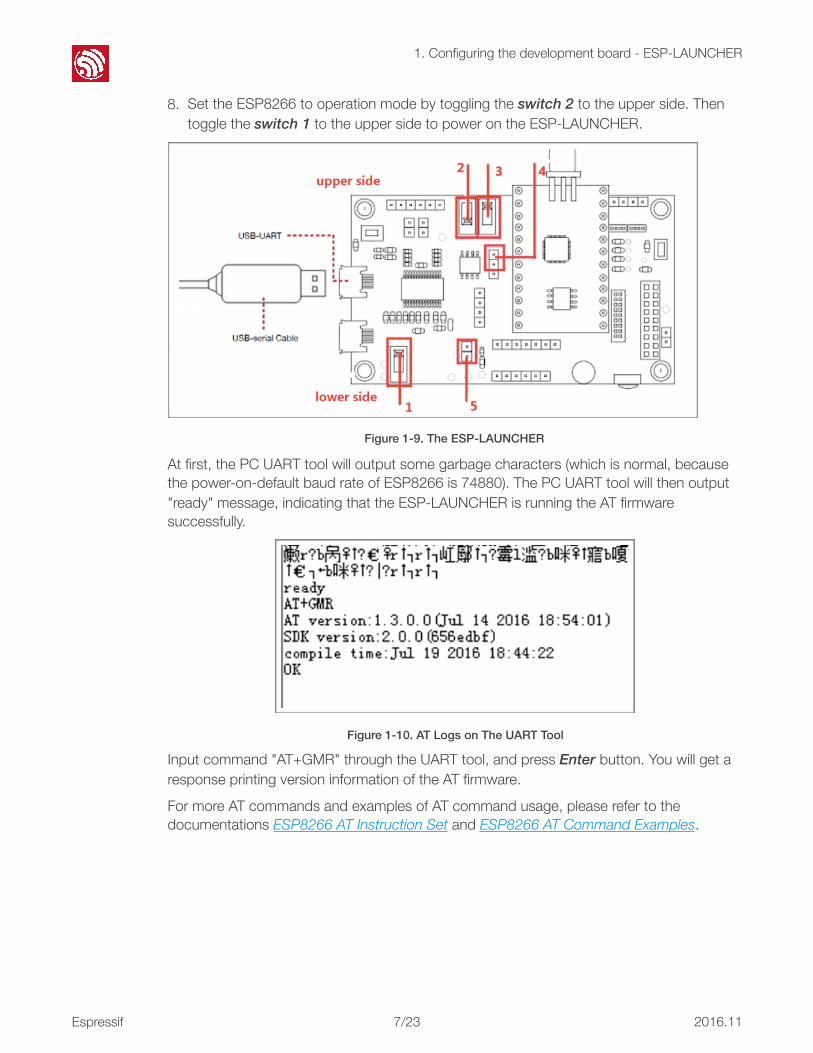
8. Set the ESP8266 to operation mode by toggling the switch 2 to the upper side. Then toggle the switch 1 to the upper side to power on the ESP-LAUNCHER.
" Figure 1-9. The ESP-LAUNCHER
At first, the PC UART tool will output some garbage characters (which is normal, because the power-on-default baud rate of ESP8266 is 74880). The PC UART tool will then output "ready" message, indicating that the ESP-LAUNCHER is running the AT firmware successfully.
" Figure 1-10. AT Logs on The UART Tool
Input command "AT+GMR" through the UART tool, and press Enter button. You will get a response printing version information of the AT firmware. For more AT commands and examples of AT command usage, please refer to the documentations ESP8266 AT Instruction Set and ESP8266 AT Command Examples.
Espressif " /237 2016.11
"
2. Compiling Applications
2. Compiling Applications This chapter presents the workflow of compiling a program for the ESP8266 based on the ESP8266_NONOS_SDK, using the AT demo application provided by Espressif Systems as an example.
2.1. Downloading The Development Environment 1. PC: Windows XP or Windows 7 OS is recommended. 2. The development environment provided by Espressif Systems is based on Lubuntu. The
Espressif Systems also provides a virtual image of the development environment that can be run on VirtualBox. • Download VirtualBox-5.0.16-105871-Win.exe:
https://www.virtualbox.org/wiki/Downloads
• Download ESP8266_lubuntu_20141021.ova at: Baidu: https://pan.baidu.com/s/1dEOw8bZ
Password: v81b Google: https://drive.google.com/folderview?id=0B5bwBE9A5dBXaExvdDExVFNrUXM&usp=sharing
📖 Note: Please choose the correct version of VirtualBox according to your host machine OS.
Espressif " /"8 23 2016.11

"
2. Compiling Applications
2.2. Setting up Development Environment Steps Results
1. Start Windows OS and install the virtual machine.
• Double-click VirtualBox-5.0.16-105871-Win.exe and install VirtualBox.
📖 Note: VirtualBox has different versions. We are using Windows V.5.0.16 as an example. • Double-click Oracle VM
VirtualBox.exe to run the program and the system will display the main menu 👉 .
💬 Tip:
ESP8266 virtual machine takes up a lot of space (RAM). Please make sure your machine has enough memory to spare.
2. Set VirtualBox default machine folder.
• Create a new folder, for example, D:\VM.
• Select File > Preferences, the system shows the dialog box 👉 .
• In the General tab, set the location for the virtual machine in Default Machine Folder, for example, D:\VM.
💬 Tip:
ESP8266 virtual machine takes up a lot of space (RAM). Please make sure your machine has enough memory to spare.
"
Espressif " /"9 23 2016.11
"
2. Compiling Applications
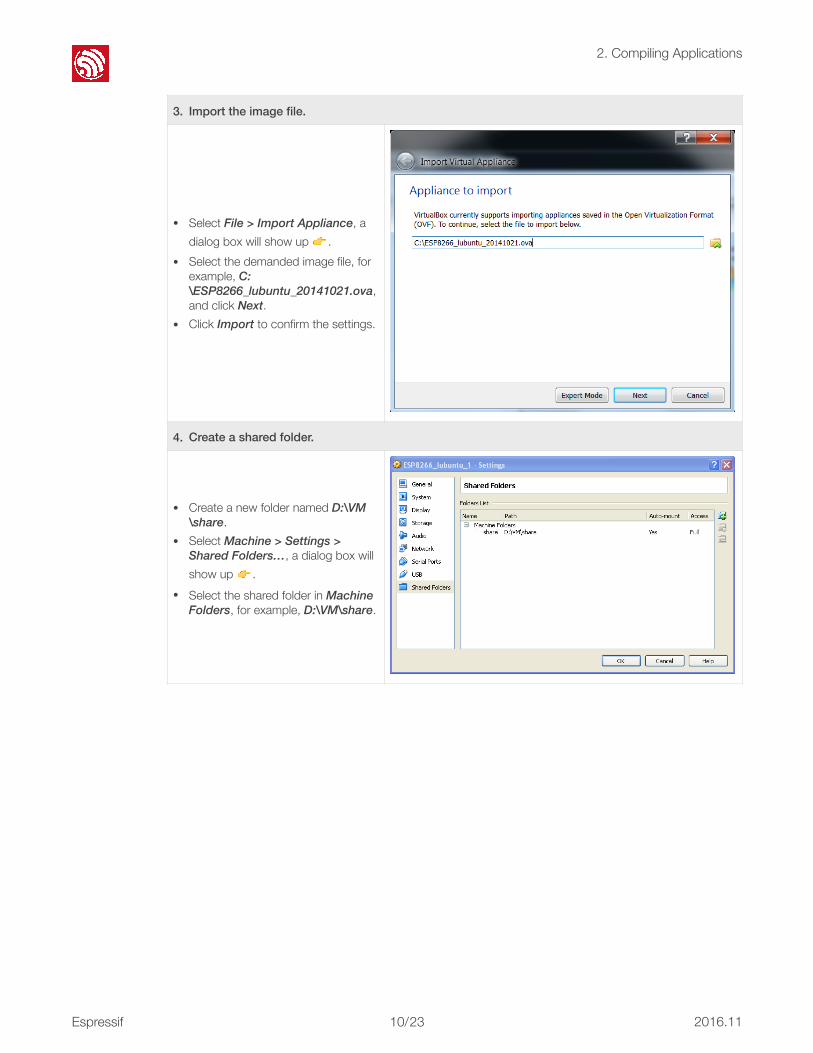
3. Import the image file.
• Select File > Import Appliance, a dialog box will show up 👉 .
• Select the demanded image file, for example, C:\ESP8266_lubuntu_20141021.ova, and click Next.
• Click Import to confirm the settings.
4. Create a shared folder.
• Create a new folder named D:\VM\share.
• Select Machine > Settings > Shared Folders…, a dialog box will show up 👉 .
• Select the shared folder in Machine Folders, for example, D:\VM\share.
Espressif " /"10 23 2016.11
"
2. Compiling Applications
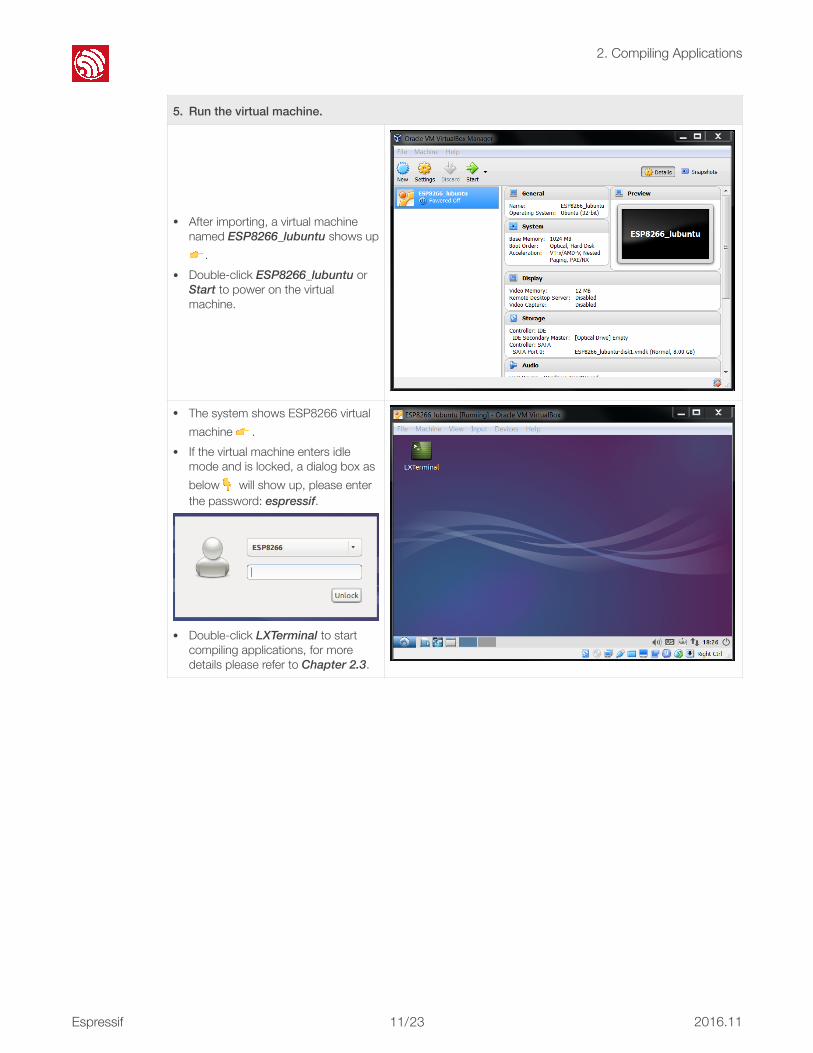
5. Run the virtual machine.
• After importing, a virtual machine named ESP8266_lubuntu shows up 👉 .
• Double-click ESP8266_lubuntu or Start to power on the virtual machine.
• The system shows ESP8266 virtual machine 👉 .
• If the virtual machine enters idle mode and is locked, a dialog box as below👇 will show up, please enter the password: espressif.
" • Double-click LXTerminal to start
compiling applications, for more details please refer to Chapter 2.3.
Espressif " /"11 23 2016.11
"
2. Compiling Applications
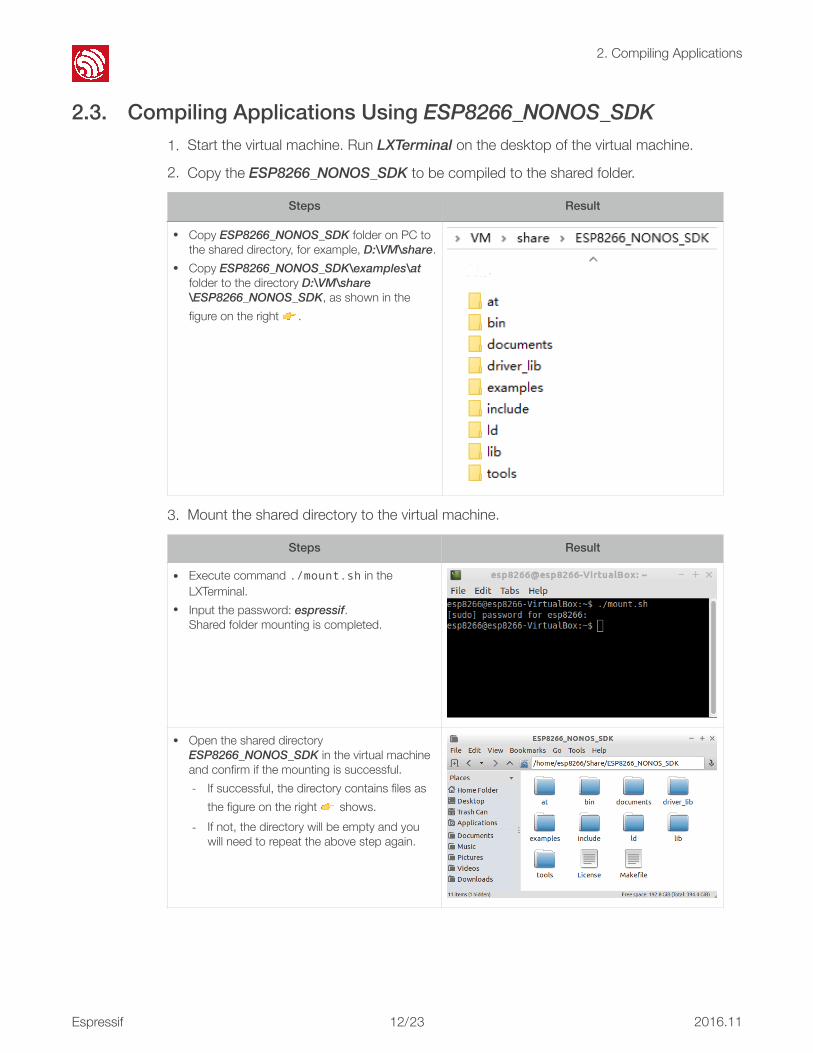
2.3. Compiling Applications Using ESP8266_NONOS_SDK 1. Start the virtual machine. Run LXTerminal on the desktop of the virtual machine.
2. Copy the ESP8266_NONOS_SDK to be compiled to the shared folder.
3. Mount the shared directory to the virtual machine.
Steps Result
• Copy ESP8266_NONOS_SDK folder on PC to the shared directory, for example, D:\VM\share.
• Copy ESP8266_NONOS_SDK\examples\at folder to the directory D:\VM\share\ESP8266_NONOS_SDK, as shown in the figure on the right 👉 .
Steps Result
• Execute command ./mount.sh in the LXTerminal.
• Input the password: espressif.Shared folder mounting is completed.
• Open the shared directory ESP8266_NONOS_SDK in the virtual machine and confirm if the mounting is successful. - If successful, the directory contains files as
the figure on the right 👉 shows. - If not, the directory will be empty and you
will need to repeat the above step again.
Espressif " /"12 23 2016.11
"
2. Compiling Applications
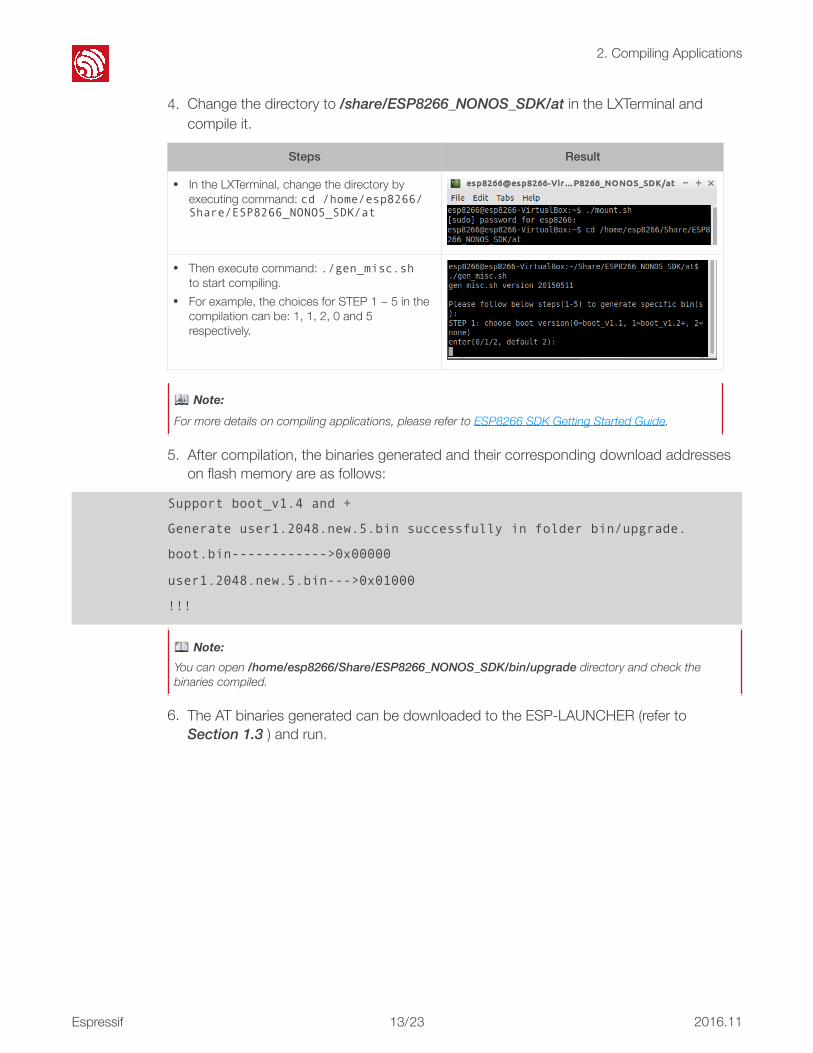
4. Change the directory to /share/ESP8266_NONOS_SDK/at in the LXTerminal and compile it.
5. After compilation, the binaries generated and their corresponding download addresses on flash memory are as follows:
Support boot_v1.4 and +
Generate user1.2048.new.5.bin successfully in folder bin/upgrade.
boot.bin------------>0x00000
user1.2048.new.5.bin--->0x01000
!!!
6. The AT binaries generated can be downloaded to the ESP-LAUNCHER (refer to Section 1.3 ) and run.
Steps Result
• In the LXTerminal, change the directory by executing command: cd /home/esp8266/Share/ESP8266_NONOS_SDK/at
• Then execute command: ./gen_misc.sh to start compiling.
• For example, the choices for STEP 1 ~ 5 in the compilation can be: 1, 1, 2, 0 and 5 respectively.
📖 Note: For more details on compiling applications, please refer to ESP8266 SDK Getting Started Guide.
📖 Note: You can open /home/esp8266/Share/ESP8266_NONOS_SDK/bin/upgrade directory and check the binaries compiled.
Espressif " /"13 23 2016.11
"
3. Learn More About ESP8266_RTOS_SDK
3. Learn More About ESP8266_RTOS_SDK
3.1. Compiling Application Using ESP8266_RTOS_SDK 1. Download the ESP8266_RTOS_SDK at:
https://github.com/espressif/ESP8266_RTOS_SDK ESP8266_IOT_PLATFORM is a demo application based on ESP8266_RTOS_SDK. Download at: https://github.com/espressif/ESP8266_IOT_PLATFORM
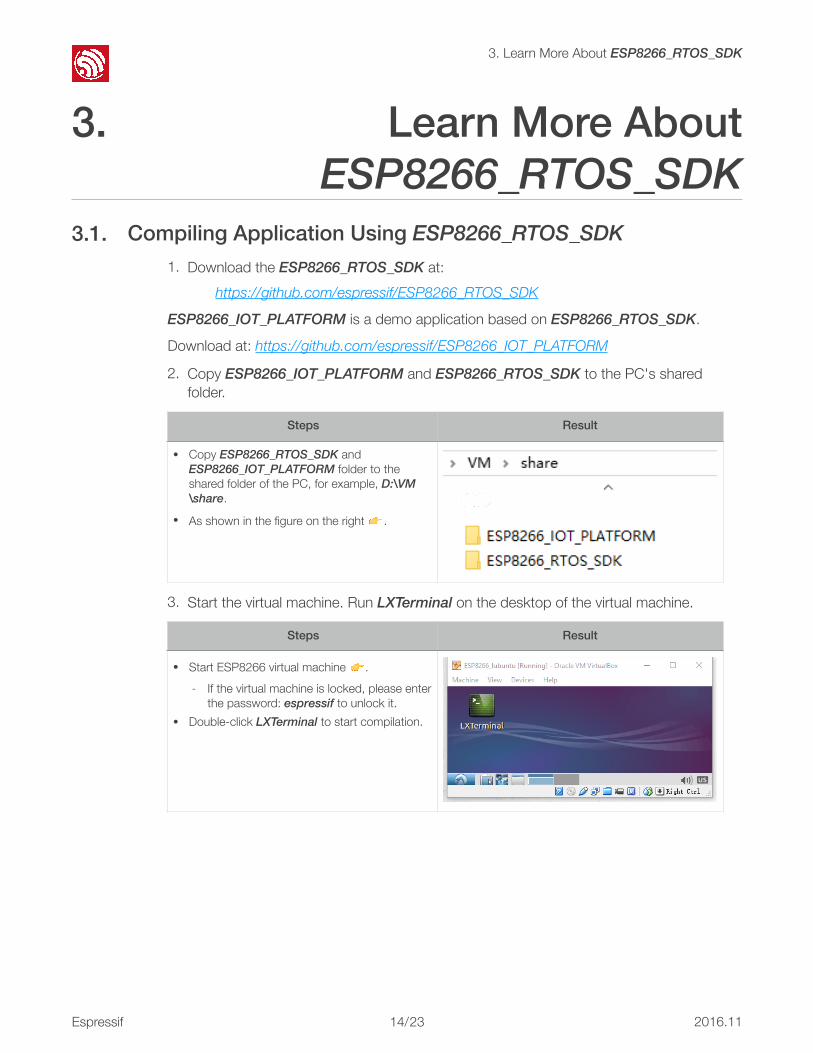
2. Copy ESP8266_IOT_PLATFORM and ESP8266_RTOS_SDK to the PC's shared folder.
3. Start the virtual machine. Run LXTerminal on the desktop of the virtual machine.
Steps Result
• Copy ESP8266_RTOS_SDK and ESP8266_IOT_PLATFORM folder to the shared folder of the PC, for example, D:\VM\share.
• As shown in the figure on the right 👉 .
Steps Result
• Start ESP8266 virtual machine 👉 . - If the virtual machine is locked, please enter
the password: espressif to unlock it. • Double-click LXTerminal to start compilation.
Espressif " /"14 23 2016.11
"
3. Learn More About ESP8266_RTOS_SDK
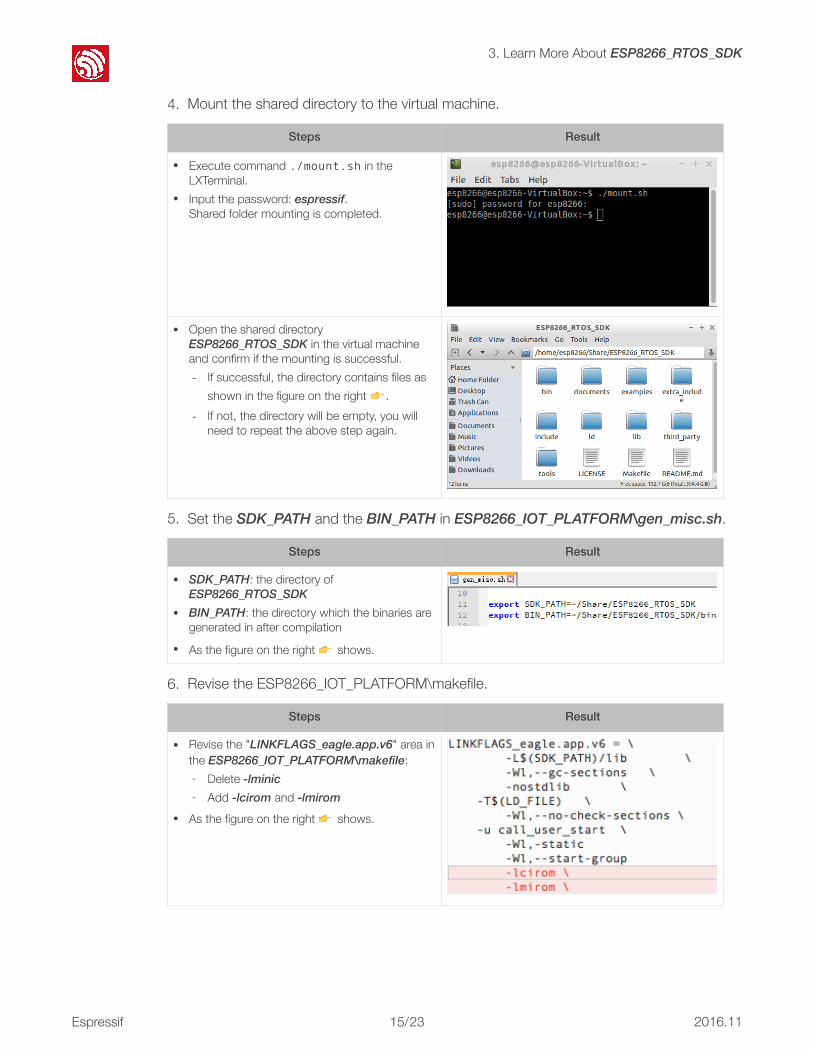
4. Mount the shared directory to the virtual machine.
5. Set the SDK_PATH and the BIN_PATH in ESP8266_IOT_PLATFORM\gen_misc.sh.
6. Revise the ESP8266_IOT_PLATFORM\makefile.
Steps Result
• Execute command ./mount.sh in the LXTerminal.
• Input the password: espressif.Shared folder mounting is completed.
• Open the shared directory ESP8266_RTOS_SDK in the virtual machine and confirm if the mounting is successful. - If successful, the directory contains files as
shown in the figure on the right 👉 . - If not, the directory will be empty, you will
need to repeat the above step again.
Steps Result
• SDK_PATH: the directory of ESP8266_RTOS_SDK
• BIN_PATH: the directory which the binaries are generated in after compilation
• As the figure on the right 👉 shows.
Steps Result
• Revise the "LINKFLAGS_eagle.app.v6" area in the ESP8266_IOT_PLATFORM\makefile: - Delete -lminic - Add -lcirom and -lmirom
• As the figure on the right 👉 shows.
Espressif " /"15 23 2016.11
"
3. Learn More About ESP8266_RTOS_SDK
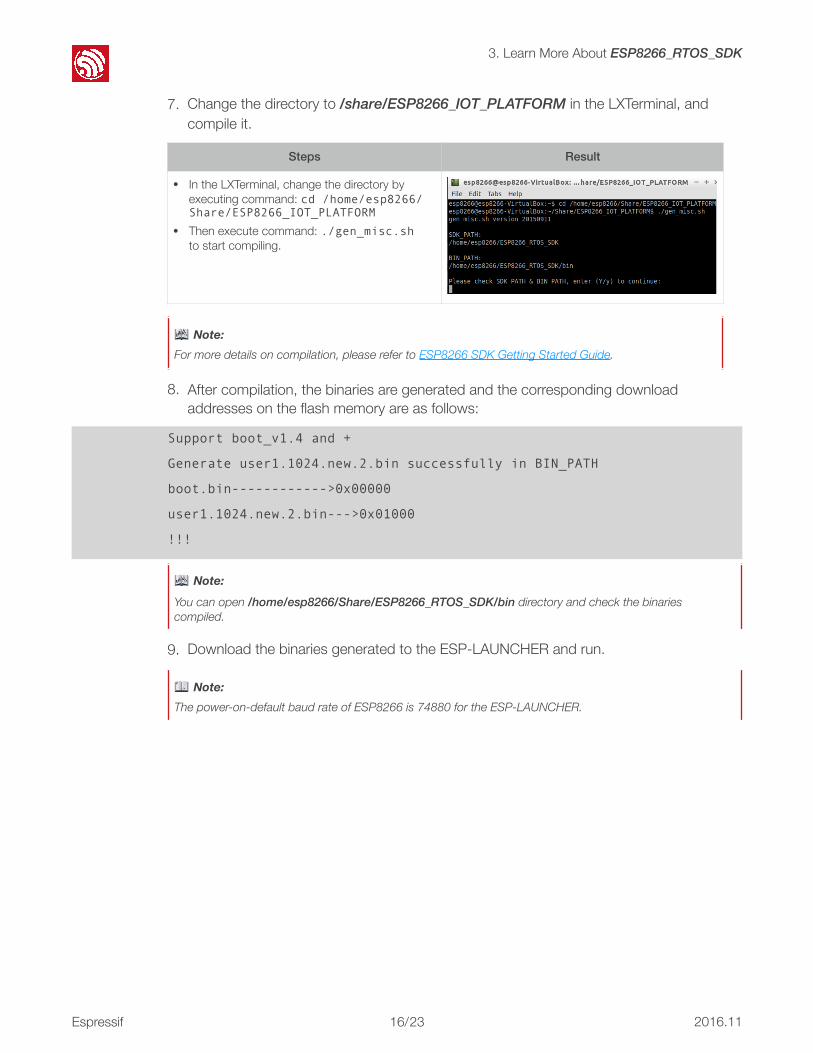
7. Change the directory to /share/ESP8266_IOT_PLATFORM in the LXTerminal, and compile it.
8. After compilation, the binaries are generated and the corresponding download addresses on the flash memory are as follows:
Support boot_v1.4 and +
Generate user1.1024.new.2.bin successfully in BIN_PATH
boot.bin------------>0x00000
user1.1024.new.2.bin--->0x01000
!!!
9. Download the binaries generated to the ESP-LAUNCHER and run.
Steps Result
• In the LXTerminal, change the directory by executing command: cd /home/esp8266/Share/ESP8266_IOT_PLATFORM
• Then execute command: ./gen_misc.sh to start compiling.
📖 Note: For more details on compilation, please refer to ESP8266 SDK Getting Started Guide.
📖 Note: You can open /home/esp8266/Share/ESP8266_RTOS_SDK/bin directory and check the binaries compiled.
📖 Note: The power-on-default baud rate of ESP8266 is 74880 for the ESP-LAUNCHER.
Espressif " /"16 23 2016.11
"
3. Learn More About ESP8266_RTOS_SDK
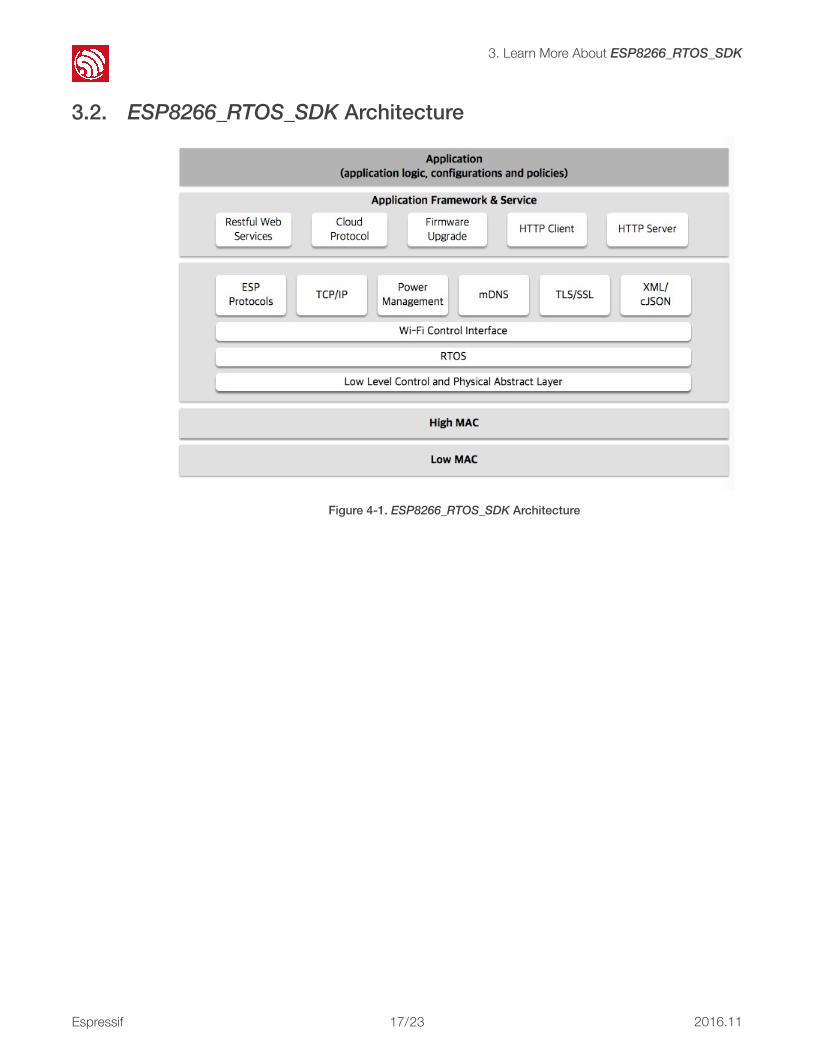
3.2. ESP8266_RTOS_SDK Architecture
" Figure 4-1. ESP8266_RTOS_SDK Architecture
Espressif " /"17 23 2016.11
"
4. Debug Methods
4. Debug Methods 4.1. Debug Methods 4.1.1. Add UART Output Logs
For ESP8266_NONOS_SDK, you can add debug logs as shown:
os_printf("SDK version:%s\n", system_get_sdk_version());
For ESP8266_RTOS_SDK, you can add debug logs as shown:
printf("SDK version:%s\n", system_get_sdk_version());
4.1.2. Debug Fatal Exception
If a fatal exception occurred, UART output logs will be as shown:
Fatal exception (28):
epc1=0x4025bfa6, epc2=0x00000000, epc3=0x00000000, excvaddr=0x0000000f, depc=0x00000000
1. Find the corresponding .s file which is generated with the running binaries in the same directory (ESP8266_SDK\bin).
For example, if running eagle.flash.bin and eagle.irom0text.bin, the corresponding file is eagle.s.
2. Locate the address of epc1 (as 0x40XXXXXX) in the .s file to find the target function that fatal exception occurred.
3. Add logs before and after the target function is called to debug the fatal exception problem.
4.2. Sample Codes ESP8266 Sample Codes: http://www.espressif.com/support/explore/sample-codes.
Espressif " /"18 23 2016.11
"
5. Downloading Firmware into The ESP-WROOM-02
5. Downloading Firmware into The ESP-WROOM-02
Please follow the steps below to download firmware into ESP-WROOM-02. 1. ESP-WROOM-02 is the official ESP8266 module provided by Espressif Systems. Lead
out the pins of ESP-WROOM-02 as shown in Table 4-1.
2. Connect ESP-WROOM-02 to USB-to-TTL converter using Dupont lines as shown in Figure 6-1.
! !
Figure 6-1. ESP-WROOM-02 Download Mode
3. Connect the USB-to-TTL converter to the PC. 4. Download firmware to flash with ESP8266 DOWNLOAD TOOL.
Table 6-1. ESP-WROOM-02 Pins
Pin Pin status Figure
EN Pull up
3V3 3.3V power supply (VDD)
IO15 Pull down
IO0UART Download mode: pull down; FLASH Boot mode: floating/pull up
GND GND
RXD UART Download Rx
TXD UART Download Tx, floating/pull up"
EN
3V3
ESP-WROOM-02
3V3
TXD
RXDTXD
RXD
GNDGND
IO15 IO0
USB-to-TTL converter
PC
Espressif " /"19 23 2016.11
"
5. Downloading Firmware into The ESP-WROOM-02
5. After downloading, set IO0 as floating or pull up and switch ESP-WROOM-02 to working mode.
6. Power on ESP-LAUNCHER again and the chip will read and run programs from the flash.
📖 Note: On how to download firmware, please refer to Section 1.3.
📖 Note: IO0 is an internal pull up pin. For more information on ESP-WROOM-02 hardware, please refer to ESP8266 System Description and ESP-WROOM-02 Datasheet.
Espressif " /"20 23 2016.11
"
Appendix I
I. Appendix - Learning Resources
I.1. Must-Read Documents • ESP8266EX Datasheet
Description: This document introduces the specifications of ESP8266EX, including an overview of the features, protocols, technical parameters and applications. It also introduces pin layout and the relevant description, as well as major functional modules and protocols applied on ESP8266EX (CPU, flash and memory, clock, radio, Wi-Fi, and low-power management). Besides, it provides descriptions of peripheral interfaces integrated on ESP8266EX, lists the electrical data of ESP8266EX and illustrates the package details for ESP8266EX.
• ESP8266 Hardware Resources Description: This zip package includes manufacturing specifications of the ESP8266 board and the modules, manufacturing BOM and schematics.
• ESP8266 Non-OS SDK IoT_Demo Guide Description: This document provides simple demo implementations of three types of smart devices: Smart Light, Smart Power Plug, and Sensor Device. It also introduces the readers to curl toolkits, functions in LAN and WAN.
• ESP8266 RTOS SDK Programming Guide Description: This document provides sample codes based on ESP8266_RTOS_SDK, including basic examples, networking protocol examples and advanced examples.
• ESP8266 AT Command Examples Description: This document introduces some specific examples on the usage of Espressif AT commands, including single connection as a TCP client, UDP transmission and transparent transmission, and multiple connection as a TCP server.
• ESP8266 AT Instruction Set Description: This document provides lists of AT commands based on ESP8266_NONOS_SDK, including user-defined AT commands, basic AT commands, Wi-Fi AT commands and TCP/IP-related AT commands. It also introduces the downloading of AT firmware into flash.
• ESP8266 Non-OS SDK API Reference Description: This document lists ESP8266_NONOS_SDK APIs, provides an overview of ESP8266_NONOS_SDK and introduces the readers to system APIs, TCP/UDP APIs, mesh APIs, application specific APIs, definitions and data structures, and APIs for peripheral interfacing.
Espressif " /"21 23 2016.11
"
Appendix I
• ESP8266 RTOS SDK API Reference Description: This document lists ESP8266_RTOS_SDK APIs, including functions for Wi-Fi related APIs and boot APIs, etc.
• FAQ
I.2. Must-Have Resources • ESP8266 SDKs
Description: This website page provides links to the latest version of ESP8266 SDK and the older ones.
• ESP8266 Tools Description: This website page provides links to the ESP8266 flash download tools and ESP8266 performance evaluation tools.
• ESP8266 APK • ESP8266 Certification and Test Guide • ESP8266 BBS • ESP8266 Resources
Espressif " /"22 23 2016.11

Disclaimer and Copyright Notice Information in this document, including URL references, is subject to change without notice. THIS DOCUMENT IS PROVIDED AS IS WITH NO WARRANTIES WHATSOEVER, INCLUDING ANY WARRANTY OF MERCHANTABILITY, NON-INFRINGEMENT, FITNESS FOR ANY PARTICULAR PURPOSE, OR ANY WARRANTY OTHERWISE ARISING OUT OF ANY PROPOSAL, SPECIFICATION OR SAMPLE. All liability, including liability for infringement of any proprietary rights, relating to use of information in this document is disclaimed. No licenses express or implied, by estoppel or otherwise, to any intellectual property rights are granted herein. The Wi-Fi Alliance Member logo is a trademark of the Wi-Fi Alliance. The Bluetooth logo is a registered trademark of Bluetooth SIG. All trade names, trademarks and registered trademarks mentioned in this document are property of their respective owners, and are hereby acknowledged. Copyright © 2016 Espressif Inc. All rights reserved.
Espressif IOT Teamwww.espressif.com
�