Embed Size (px)
Citation preview
UNIVERSITY OF WATERLOO
Exchange 2010 Calendar Using Outlook Web App
(OWA) at the University of Waterloo
Information Systems and Technology
11/10/2010
Outlook Web App Tutorial

2
Table of Contents
1 BEFORE GETTING STARTED ............................................................................................................. 3
2 YOUR EXCHANGE ACCOUNT ........................................................................................................... 4
2.1 Using Exchange Calendar over the Web .......................................................................................... 4
3 WORKING WITH EXCHANGE CALENDAR.......................................................................................... 6
3.1 Browsing through Different Dates ................................................................................................... 6
3.2 Creating an Appointment ................................................................................................................. 7
3.3 Controlling how Outlook Calendar Shows Your Time ...................................................................... 8
3.4 Setting up Repeating Appointments ................................................................................................ 9
4 MAKING APPOINTMENTS WITH OTHER PEOPLE ........................................................................... 12
4.1 About Finding People ..................................................................................................................... 12
4.2 Inviting People to a Meeting .......................................................................................................... 12
4.3 Booking a meeting, time-first ......................................................................................................... 12
4.4 Using the Scheduling Assistant ...................................................................................................... 14
4.5 Set Your Work Hours ...................................................................................................................... 15
4.6 Managing Responses to your Meeting Requests ........................................................................... 17
4.7 Updating a Meeting Request ......................................................................................................... 17
4.8 Checking Attendance at Your Meeting .......................................................................................... 17
5 RECEIVING MEETING REQUESTS ................................................................................................... 19
5.1 Deal with Meeting Requests when you get them .......................................................................... 19
5.2 Declining a Meeting ....................................................................................................................... 20
5.3 Recovering a Declined Meeting ..................................................................................................... 20
6 OPENING SHARED CALENDARS FOR PEOPLE AND RESOURCES ...................................................... 22
6.1 Sharing Your Calendar .................................................................................................................... 26
6.2 Monitoring Access to Your Calendar .............................................................................................. 27
7 DAY EVENTS, AVAILABILITY AND VACATION TIMES ...................................................................... 29
7.1 Advising Colleagues of your vacation ............................................................................................. 30
8 PRINTING YOUR CALENDAR .......................................................................................................... 31
3
1 Before Getting Started There are two common ways to manage your calendar in Exchange. One way is using the
Outlook client, and the other way is using the Outlook Web App (OWA). This document
describes how to use the Outlook Web App (OWA). There is another document available from
IST that describes how to use the Outlook client, for both Outlook 2007 and Outlook 2010. OWA
works well with Safari, Firefox and Internet Explorer. Other web browsers are supported in a
“Light” version which does not provide all features.
Before we get started to describe how to use OWA to manage your calendar, it is important for
you to understand what it can and can’t do. OWA does not have as many features as the
Outlook client. The following features are not available in OWA (but are available in the Outlook
client):
The scheduling assistant does not see free/busy information for the members of a defined group.
There is no option to email meeting reminders. The OWA has pop-up messages only, and these occur only when OWA is open.
You can offer various viewing rights on your calendar, but can’t allow scheduling or delegate rights.
Must view Calendars and Task lists separately only. The following features are not available in OWA or in the Outlook client. These are features which some may have used in Bookit.
Calendars can be posted to the web using Windows LiveID. Another option for doing this is being investigated.
No importance levels to meetings, other than using a personalized colour coding system. Meetings can be set as high priority or low priority, which will mark the associated high priority emails, but the importance level is not visible in most calendar views.
University holidays will not initially be added to Exchange Calendar.
It is important to book people using their Exchange email address, as an alternate email address will not be linked to their Exchange personality, and will not show their free/busy information.
Meeting attendees cannot see if meeting invitees are attending the meeting, or not (only the meeting organizer can see this information).
Recommendation: OWA will be fine for anyone who is invited to meetings, but doesn’t schedule meetings for large groups on a regular basis. Anyone who administers resources should use the Outlook Client.
4
2 Your Exchange Account To use Exchange Calendar, you need an account on the Exchange server. If you are already using
Exchange for email, and have an account @connect.uwaterloo.ca, then you already have a
calendar on the Exchange server and can start using calendar.
If you do not have a connect account, you can request one by sending email to
[email protected]. In addition to using Exchange Calendar, you can also use Exchange for
email. If you want to continue with your existing email set-up, it will be necessary to forward
your connect email to your regular account.
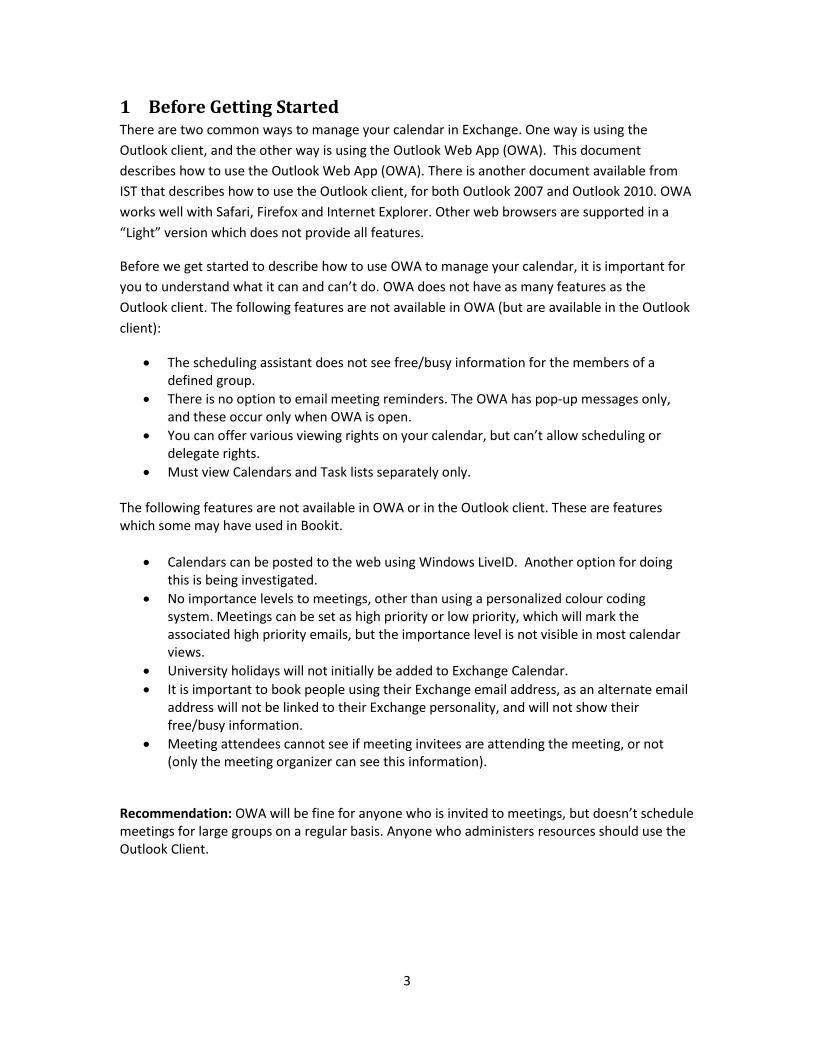
2.1 Using Exchange Calendar over the Web To use Exchange Calendar from the web, you connect to:
https://connect.uwaterloo.ca
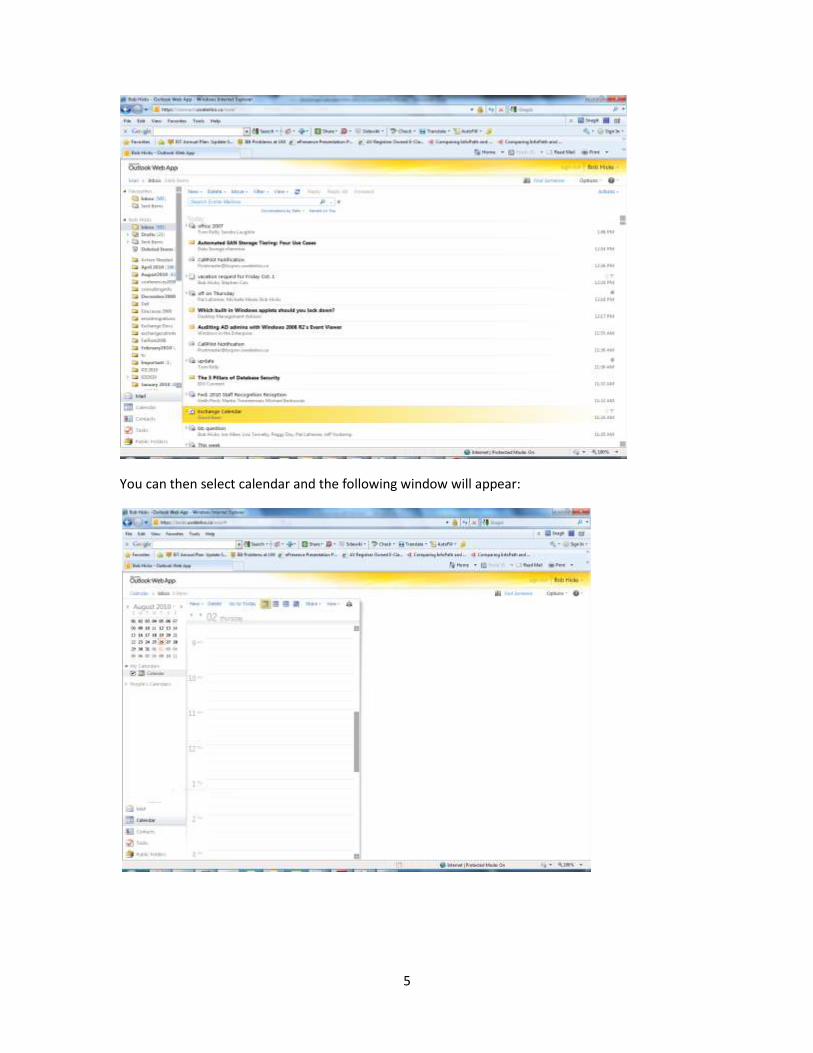
You sign in with your Exchange account, which will open OWA with your Mail account. With
Exchange Calendar you will receive meeting requests through email. You will be able to respond
to meeting requests directly from your email, or through your calendar.
5
You can then select calendar and the following window will appear:
6
3 Working with Exchange Calendar
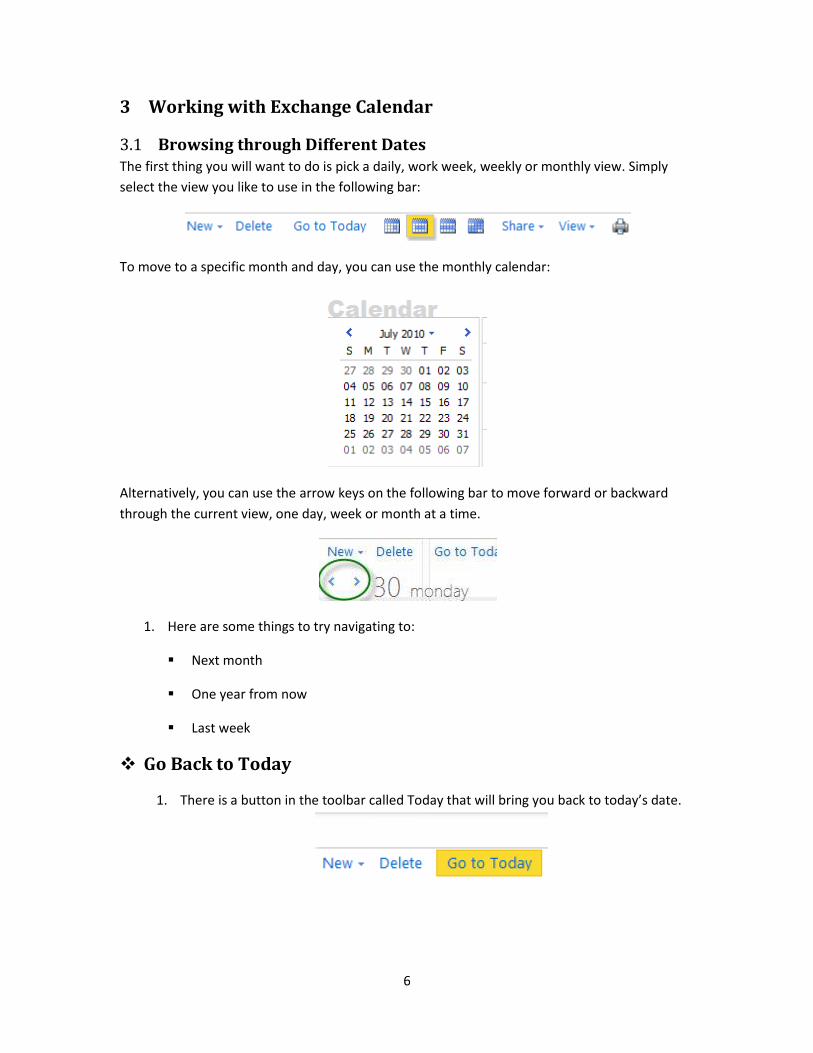
3.1 Browsing through Different Dates The first thing you will want to do is pick a daily, work week, weekly or monthly view. Simply
select the view you like to use in the following bar:
To move to a specific month and day, you can use the monthly calendar:
Alternatively, you can use the arrow keys on the following bar to move forward or backward
through the current view, one day, week or month at a time.
1. Here are some things to try navigating to:
Next month
One year from now
Last week
Go Back to Today
1. There is a button in the toolbar called Today that will bring you back to today’s date.
7
3.2 Creating an Appointment There are four types of appointments that you can choose:
1. Appointment: an appointment involves only you.
2. Meeting: you invite other people to an appointment.
3. Event: lasts all day, and might not block out time in your calendar.
4. Task: a task only involves you, and doesn’t need a scheduled time.
Let’s start by creating a personal appointment with no other attendees.
Create an Appointment from the Calendar
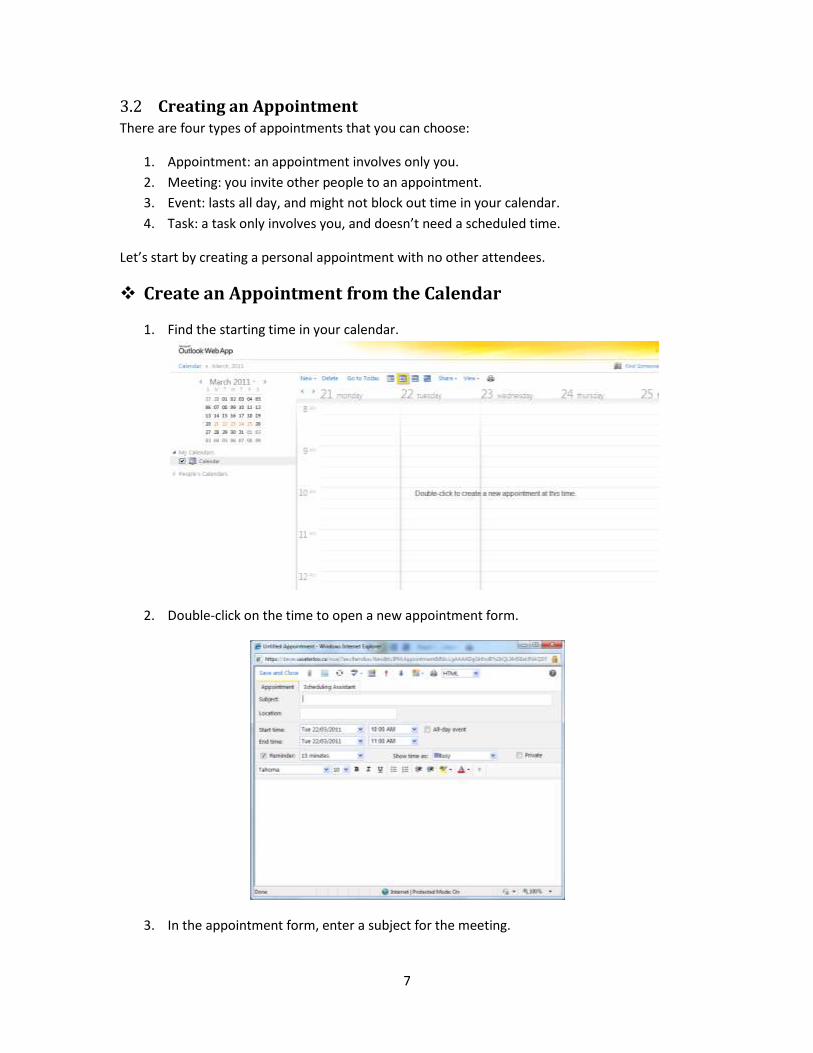
1. Find the starting time in your calendar.
2. Double-click on the time to open a new appointment form.
3. In the appointment form, enter a subject for the meeting.
8
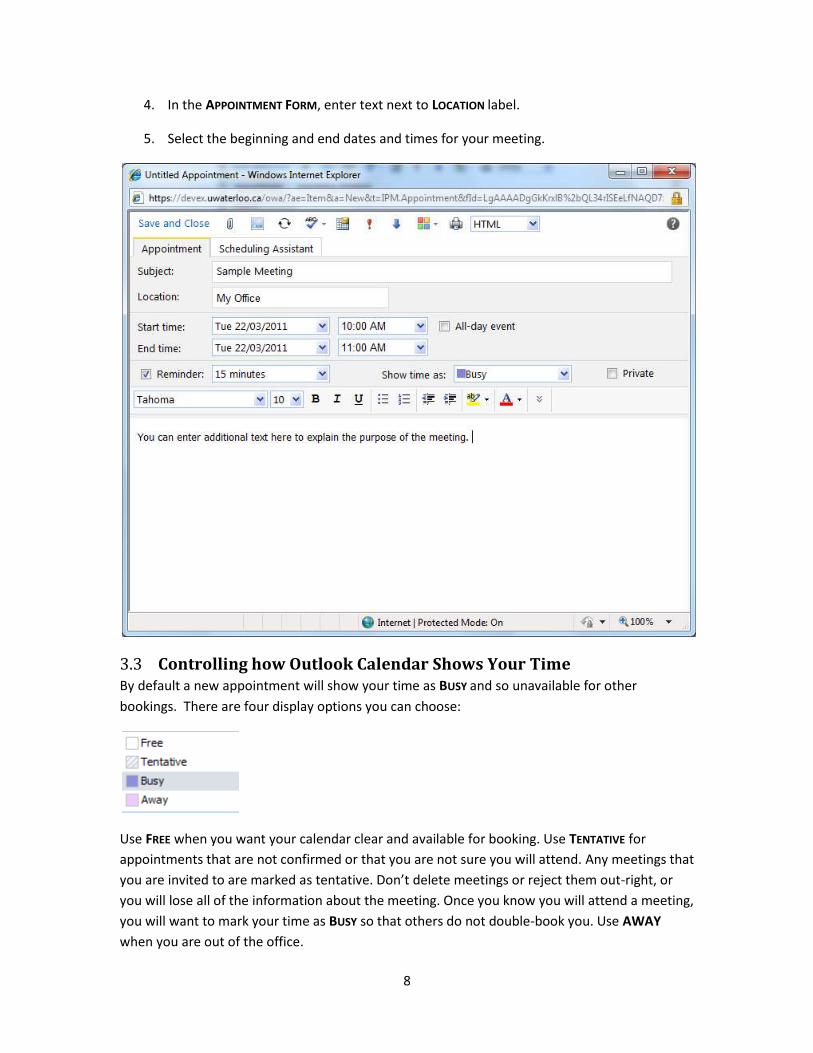
4. In the APPOINTMENT FORM, enter text next to LOCATION label.
5. Select the beginning and end dates and times for your meeting.
3.3 Controlling how Outlook Calendar Shows Your Time By default a new appointment will show your time as BUSY and so unavailable for other
bookings. There are four display options you can choose:
Use FREE when you want your calendar clear and available for booking. Use TENTATIVE for
appointments that are not confirmed or that you are not sure you will attend. Any meetings that
you are invited to are marked as tentative. Don’t delete meetings or reject them out-right, or
you will lose all of the information about the meeting. Once you know you will attend a meeting,
you will want to mark your time as BUSY so that others do not double-book you. Use AWAY
when you are out of the office.
9
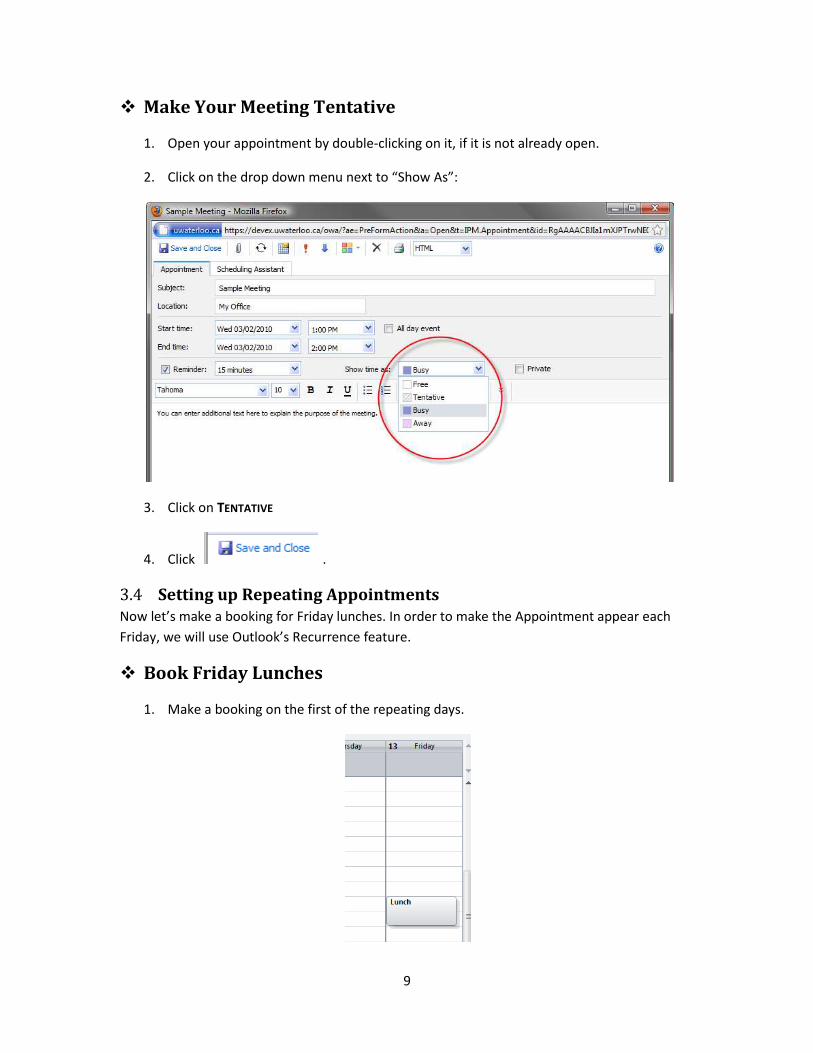
Make Your Meeting Tentative
1. Open your appointment by double-clicking on it, if it is not already open.
2. Click on the drop down menu next to “Show As”:
3. Click on TENTATIVE
4. Click .
3.4 Setting up Repeating Appointments Now let’s make a booking for Friday lunches. In order to make the Appointment appear each
Friday, we will use Outlook’s Recurrence feature.
Book Friday Lunches
1. Make a booking on the first of the repeating days.
10
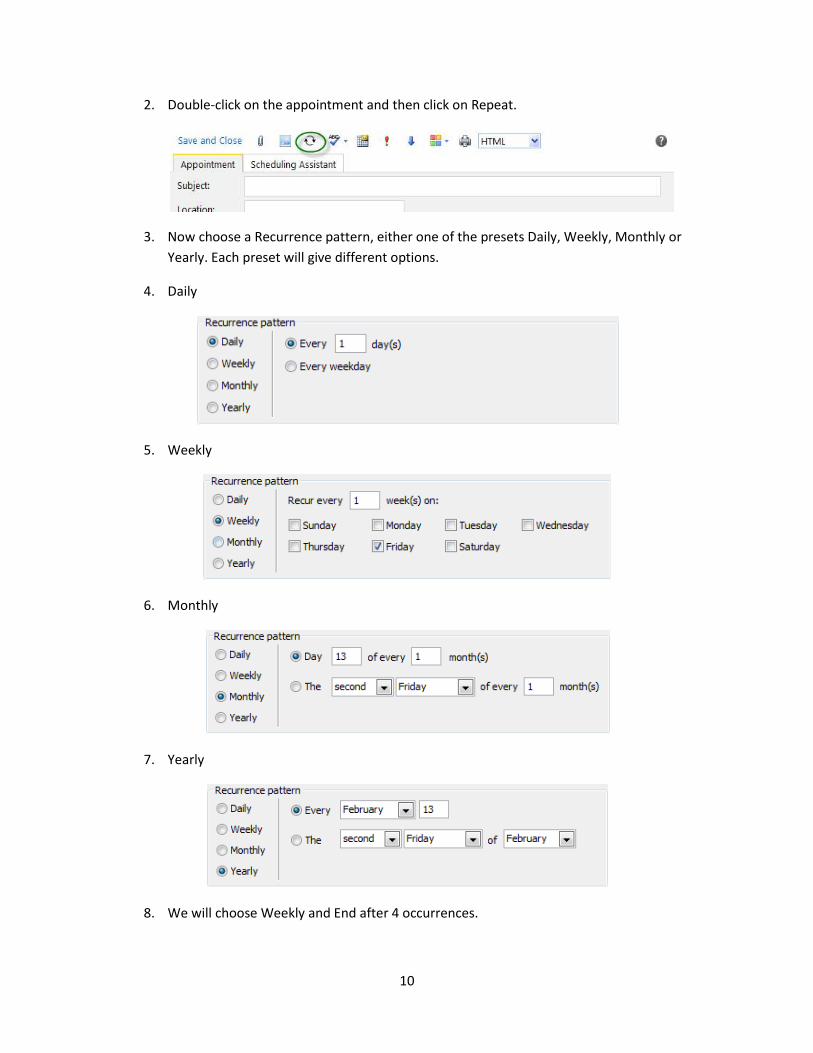
2. Double-click on the appointment and then click on Repeat.
3. Now choose a Recurrence pattern, either one of the presets Daily, Weekly, Monthly or
Yearly. Each preset will give different options.
4. Daily
5. Weekly
6. Monthly
7. Yearly
8. We will choose Weekly and End after 4 occurrences.
11
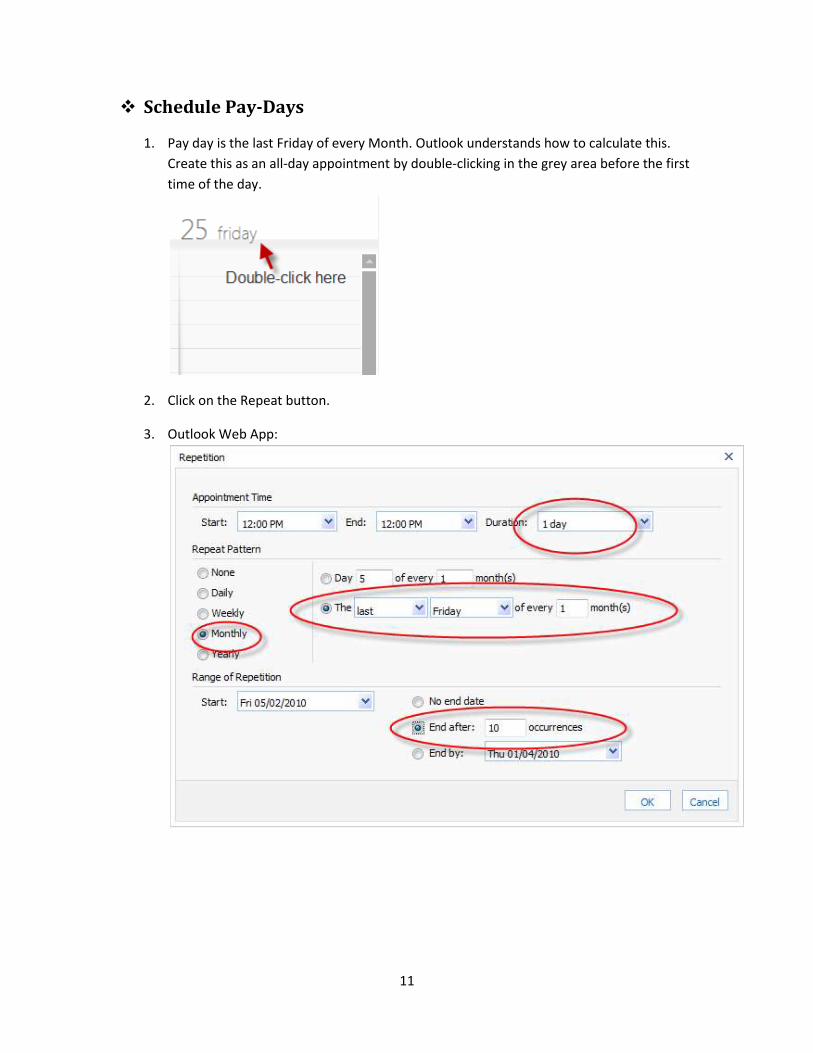
Schedule Pay-Days
1. Pay day is the last Friday of every Month. Outlook understands how to calculate this.
Create this as an all-day appointment by double-clicking in the grey area before the first
time of the day.
2. Click on the Repeat button.
3. Outlook Web App:
12
4 Making Appointments with Other People
4.1 About Finding People In order to book other people into your meetings, you will need to help Outlook to find them in
Exchange Calendar. There is a Global Address List (GAL) that has a list of everyone who has a
calendar on the system. You can also invite people to your meeting using only their email
address, but in this case you might not be able to see whether they are free or busy.
4.2 Inviting People to a Meeting There are several ways to create a meeting and invite people to it. You can create a meeting
first, then add the people. Or you can start with a MEETING INVITATION that lets you both add
people and choose the time. In Microsoft Outlook there is also an interface called PLAN A
MEETING that lets you pick the people first.
4.3 Booking a meeting, time-first This method works just like a personal appointment. Once we’ve created the appointment and
set a time, we’ll invite the attendees.
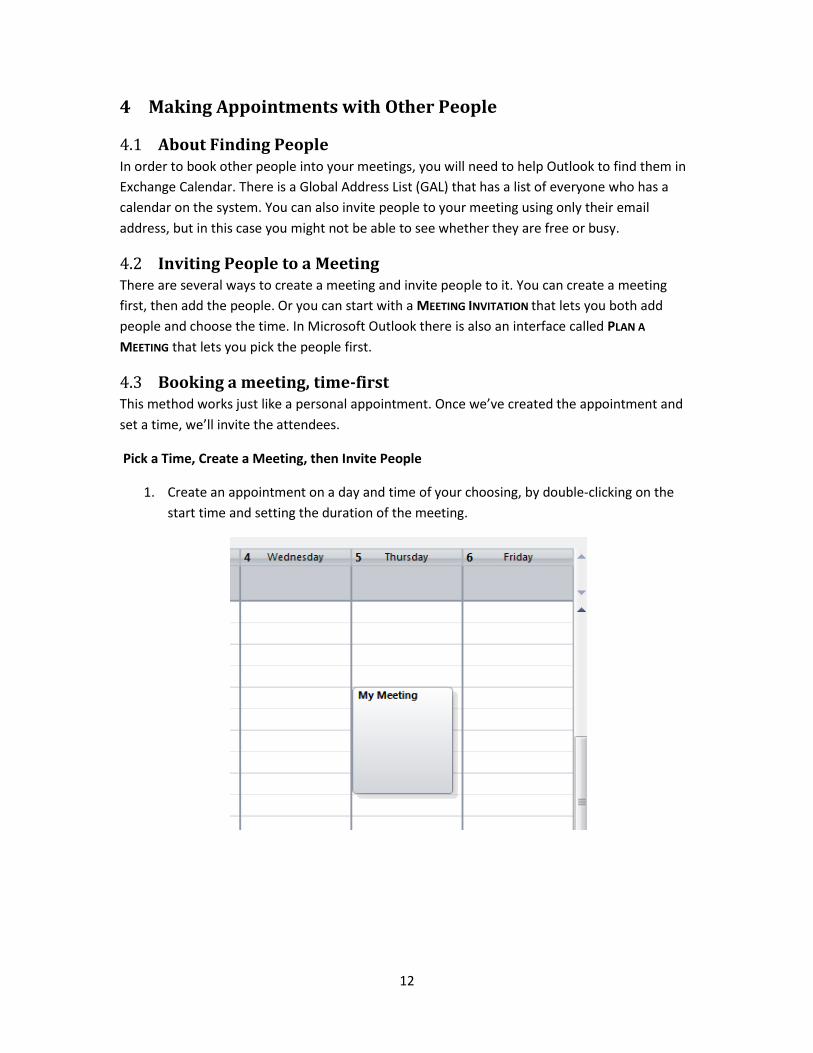
Pick a Time, Create a Meeting, then Invite People
1. Create an appointment on a day and time of your choosing, by double-clicking on the
start time and setting the duration of the meeting.
13
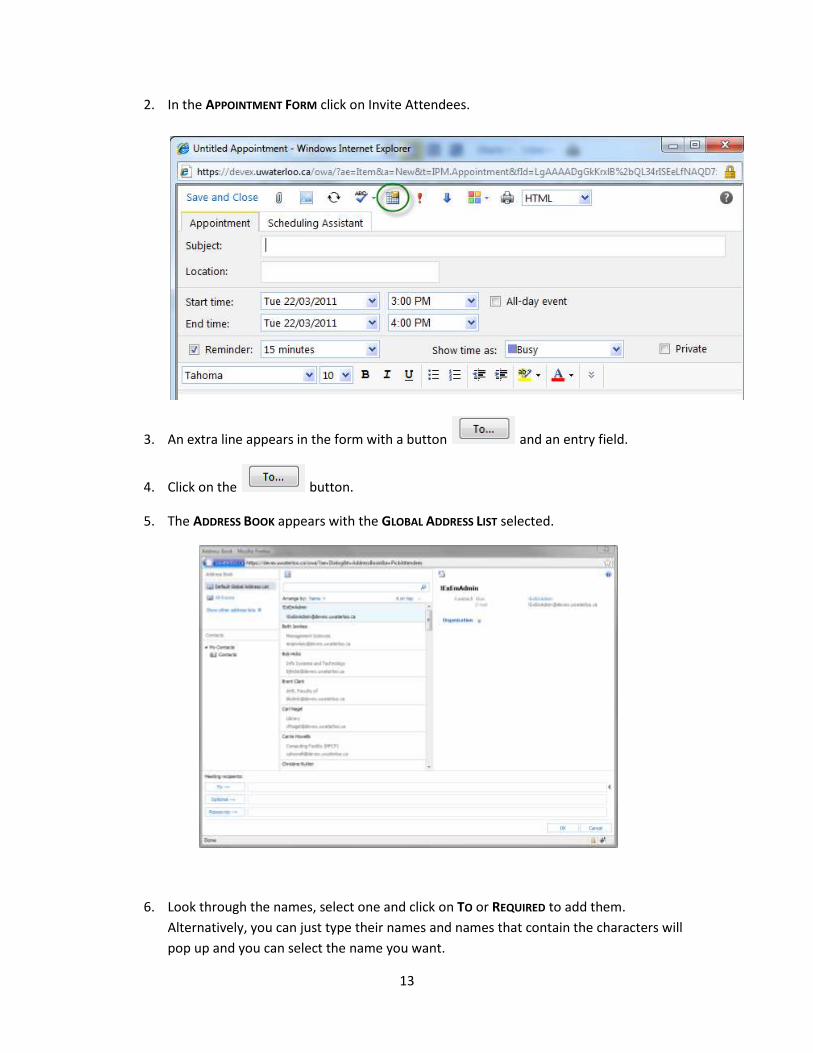
2. In the APPOINTMENT FORM click on Invite Attendees.
3. An extra line appears in the form with a button and an entry field.
4. Click on the button.
5. The ADDRESS BOOK appears with the GLOBAL ADDRESS LIST selected.
6. Look through the names, select one and click on TO or REQUIRED to add them.
Alternatively, you can just type their names and names that contain the characters will
pop up and you can select the name you want.
14
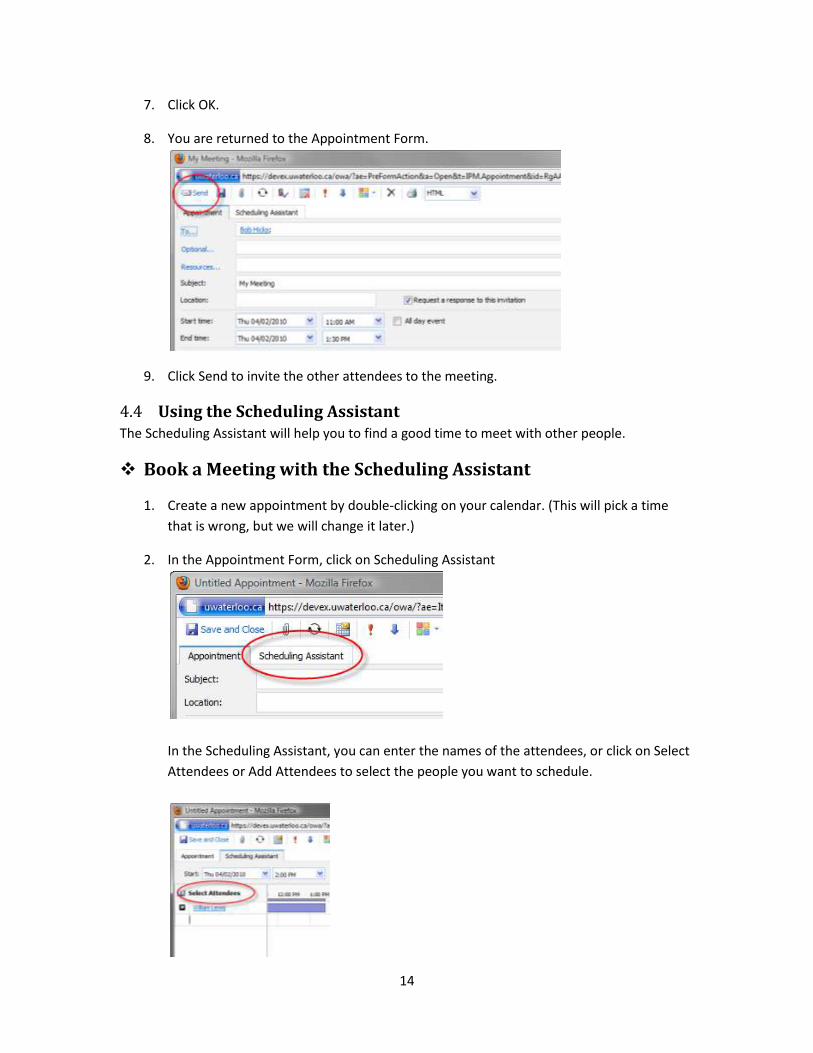
7. Click OK.
8. You are returned to the Appointment Form.
9. Click Send to invite the other attendees to the meeting.
4.4 Using the Scheduling Assistant The Scheduling Assistant will help you to find a good time to meet with other people.
Book a Meeting with the Scheduling Assistant
1. Create a new appointment by double-clicking on your calendar. (This will pick a time
that is wrong, but we will change it later.)
2. In the Appointment Form, click on Scheduling Assistant
In the Scheduling Assistant, you can enter the names of the attendees, or click on Select
Attendees or Add Attendees to select the people you want to schedule.
15
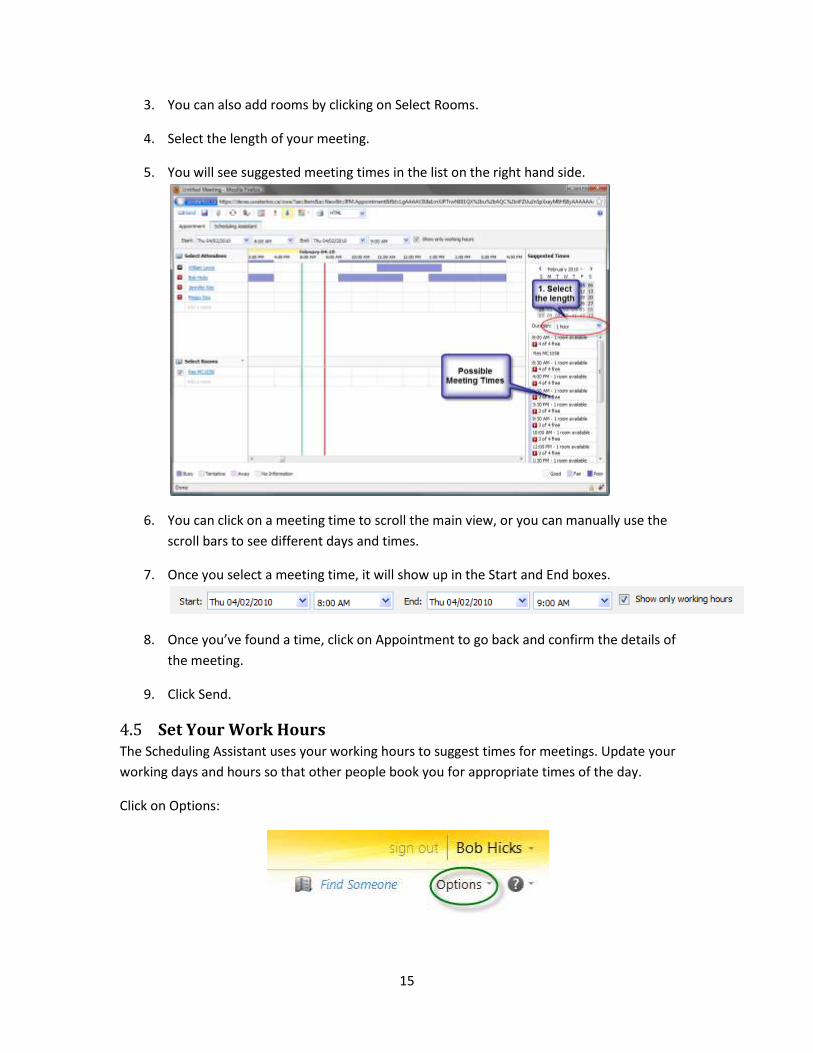
3. You can also add rooms by clicking on Select Rooms.
4. Select the length of your meeting.
5. You will see suggested meeting times in the list on the right hand side.
6. You can click on a meeting time to scroll the main view, or you can manually use the
scroll bars to see different days and times.
7. Once you select a meeting time, it will show up in the Start and End boxes.
8. Once you’ve found a time, click on Appointment to go back and confirm the details of
the meeting.
9. Click Send.
4.5 Set Your Work Hours The Scheduling Assistant uses your working hours to suggest times for meetings. Update your
working days and hours so that other people book you for appropriate times of the day.
Click on Options:
16
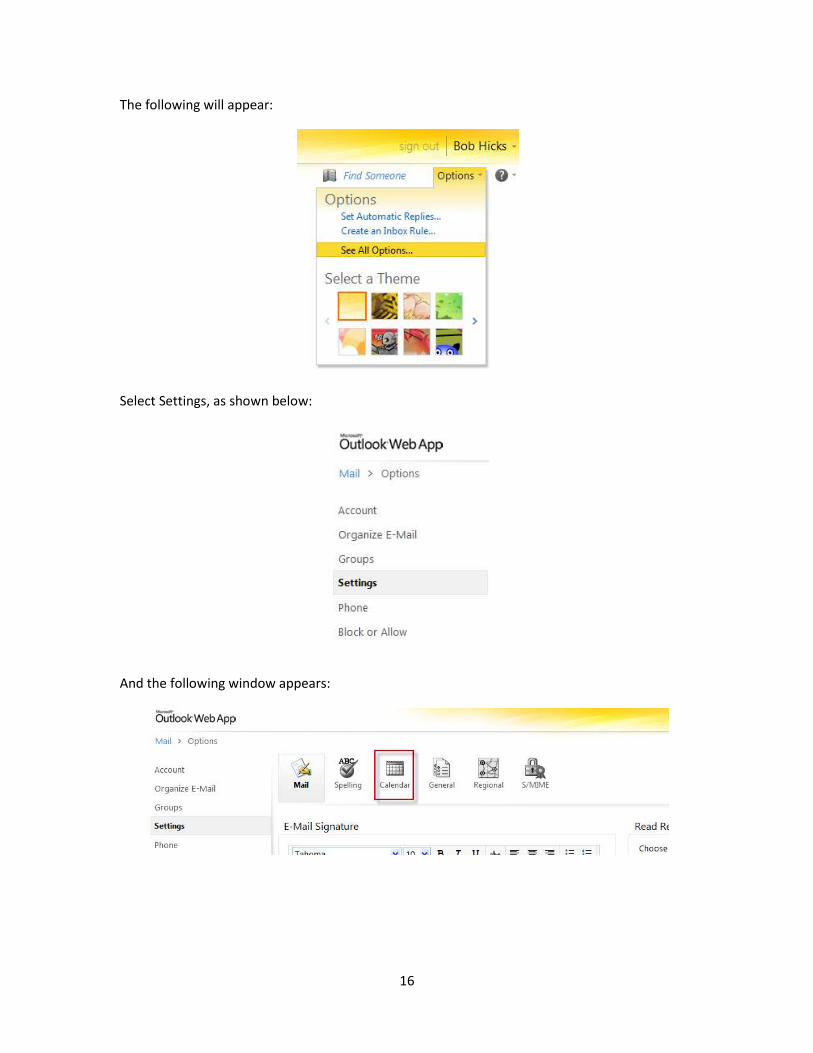
The following will appear:
Select Settings, as shown below:
And the following window appears:

17
Click on “Calendar” and then select the days you work and the start and end of your work day.
Save your changes, then click on “My Mail” in the top right corner. Then you will need to click on
“Calendar” to go back to working on your calendar.
4.6 Managing Responses to your Meeting Requests After you send out a meeting request, the invitees get to respond with Accept, Tentative or
Decline. They have the option of sending you an email with their response. If they do not send
you the email, there is no method in Exchange Calendar for you to find out whether they are
attending.
4.7 Updating a Meeting Request If something about the meeting changes, you can edit the meeting in your calendar. It is then
imperative that you choose Send Update to email all of the attendees so that their calendars
also get updated.
Otherwise they will have old information about the meeting in their calendars.
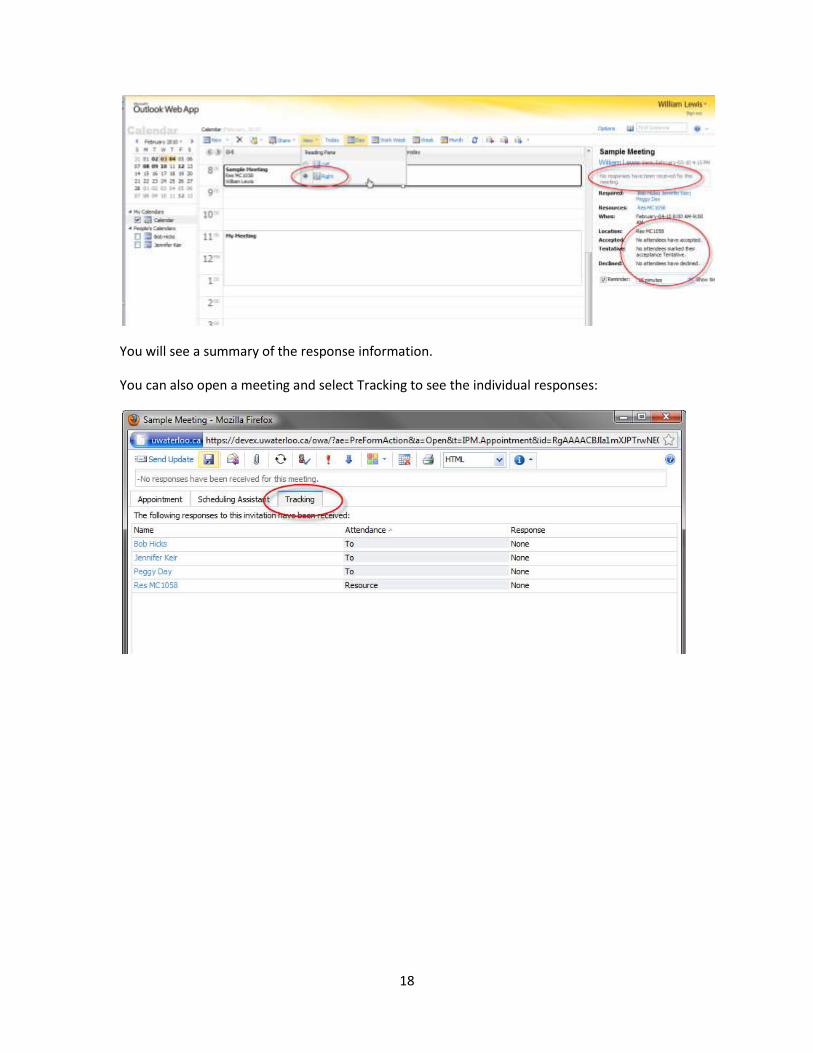
4.8 Checking Attendance at Your Meeting To see what the responses to your meeting have been, use the Reading Pane, which appears by
default in the daily view, but can also be used in the weekly views.
18
You will see a summary of the response information.
You can also open a meeting and select Tracking to see the individual responses:
19
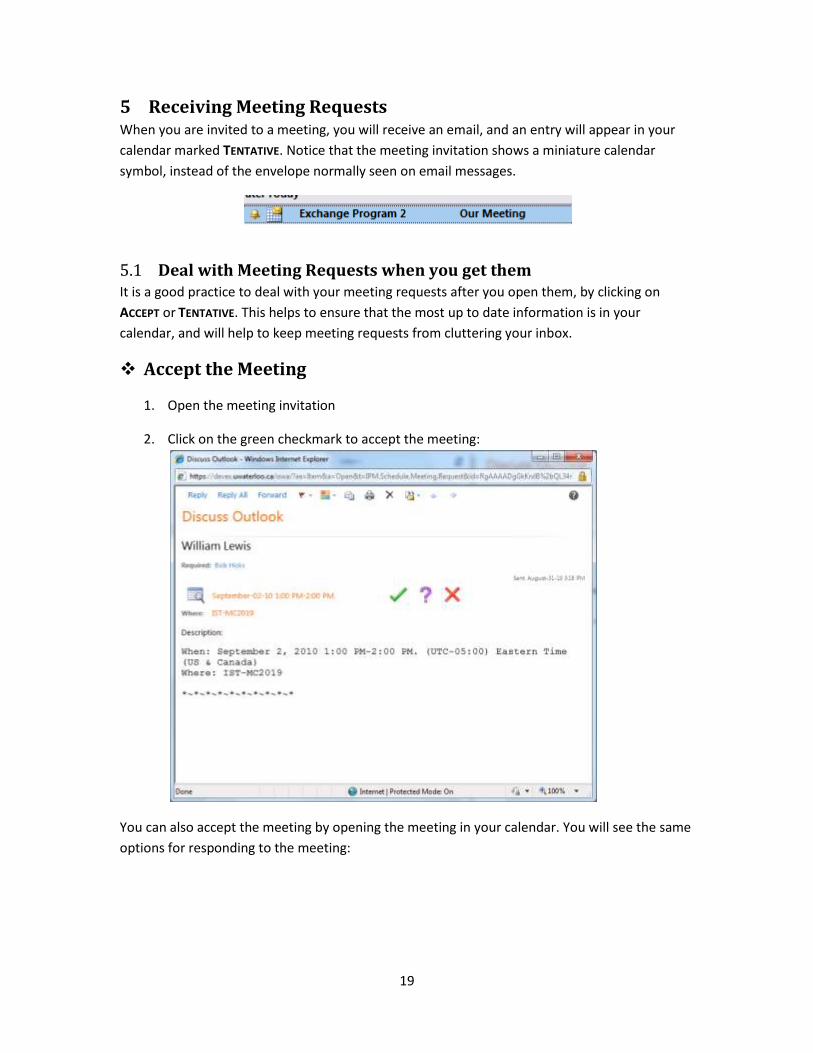
5 Receiving Meeting Requests When you are invited to a meeting, you will receive an email, and an entry will appear in your
calendar marked TENTATIVE. Notice that the meeting invitation shows a miniature calendar
symbol, instead of the envelope normally seen on email messages.
5.1 Deal with Meeting Requests when you get them It is a good practice to deal with your meeting requests after you open them, by clicking on
ACCEPT or TENTATIVE. This helps to ensure that the most up to date information is in your
calendar, and will help to keep meeting requests from cluttering your inbox.
Accept the Meeting
1. Open the meeting invitation
2. Click on the green checkmark to accept the meeting:
You can also accept the meeting by opening the meeting in your calendar. You will see the same
options for responding to the meeting:
20
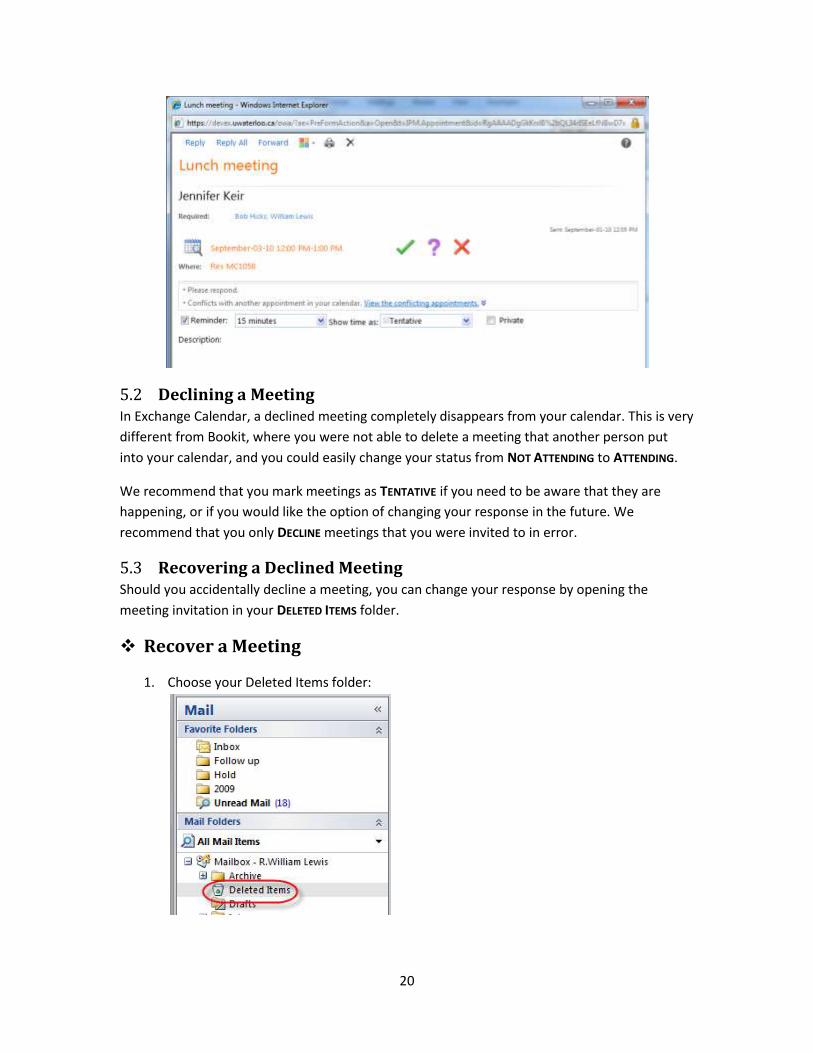
5.2 Declining a Meeting In Exchange Calendar, a declined meeting completely disappears from your calendar. This is very
different from Bookit, where you were not able to delete a meeting that another person put
into your calendar, and you could easily change your status from NOT ATTENDING to ATTENDING.
We recommend that you mark meetings as TENTATIVE if you need to be aware that they are
happening, or if you would like the option of changing your response in the future. We
recommend that you only DECLINE meetings that you were invited to in error.
5.3 Recovering a Declined Meeting Should you accidentally decline a meeting, you can change your response by opening the
meeting invitation in your DELETED ITEMS folder.
Recover a Meeting
1. Choose your Deleted Items folder:
21
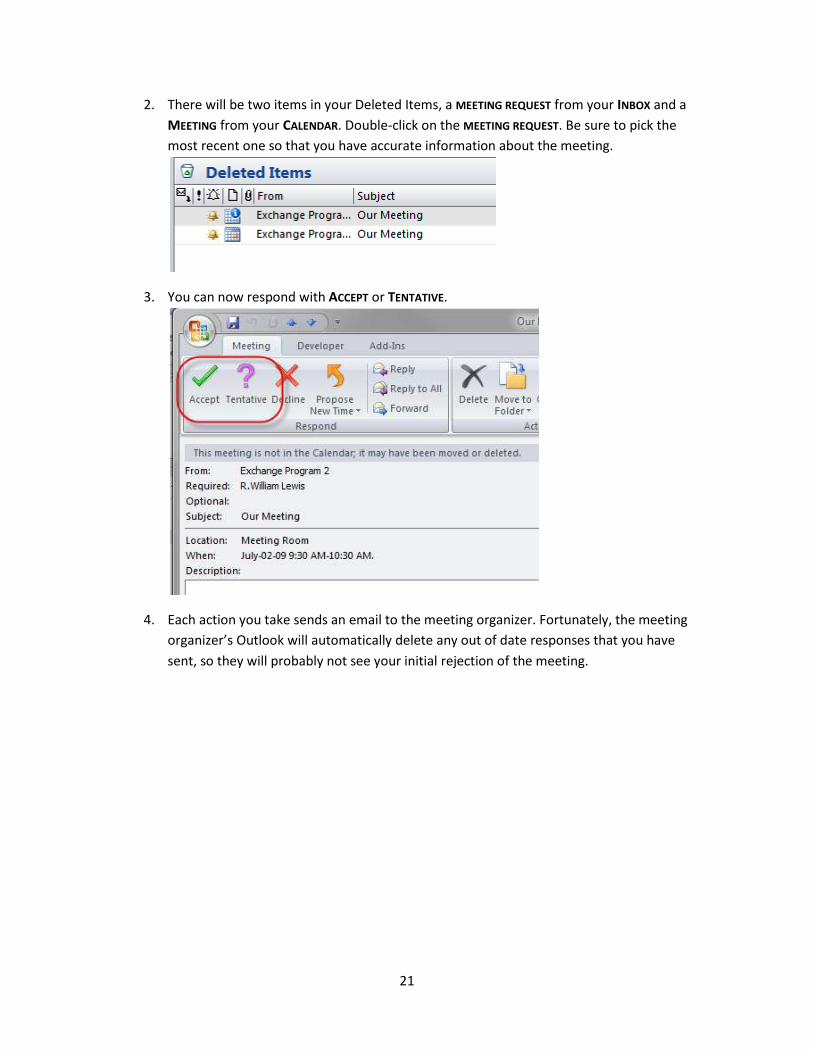
2. There will be two items in your Deleted Items, a MEETING REQUEST from your INBOX and a
MEETING from your CALENDAR. Double-click on the MEETING REQUEST. Be sure to pick the
most recent one so that you have accurate information about the meeting.
3. You can now respond with ACCEPT or TENTATIVE.
4. Each action you take sends an email to the meeting organizer. Fortunately, the meeting
organizer’s Outlook will automatically delete any out of date responses that you have
sent, so they will probably not see your initial rejection of the meeting.
22
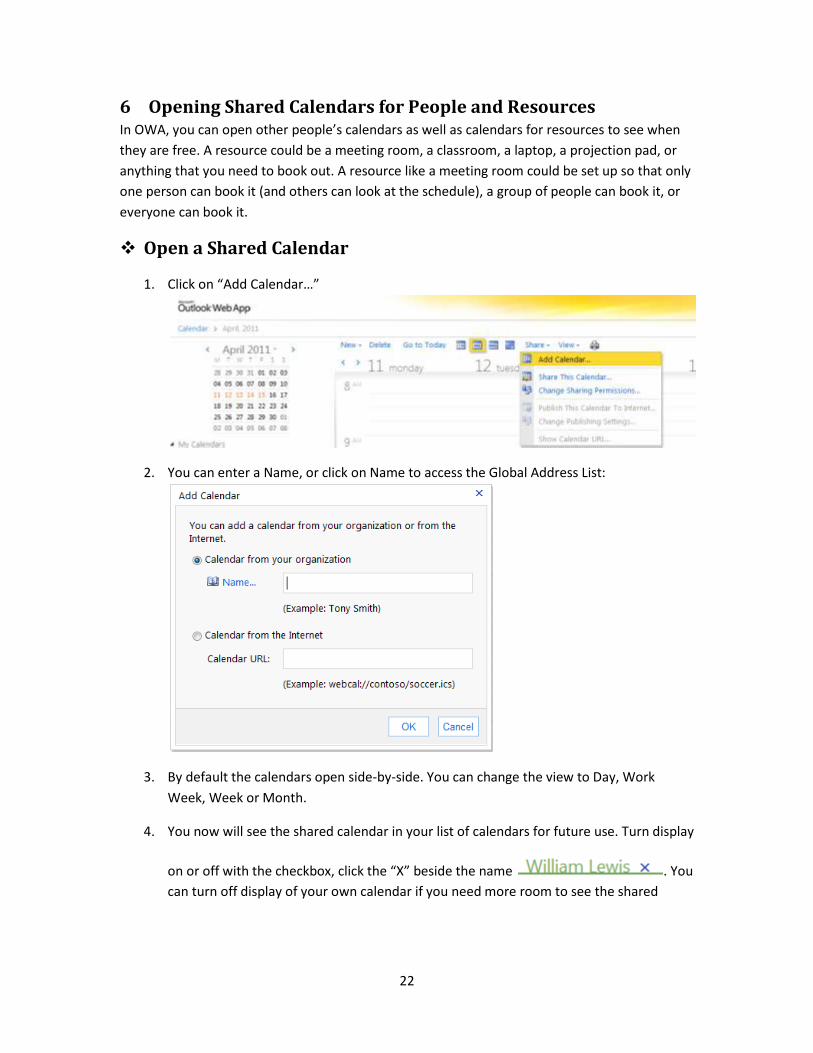
6 Opening Shared Calendars for People and Resources In OWA, you can open other people’s calendars as well as calendars for resources to see when
they are free. A resource could be a meeting room, a classroom, a laptop, a projection pad, or
anything that you need to book out. A resource like a meeting room could be set up so that only
one person can book it (and others can look at the schedule), a group of people can book it, or
everyone can book it.
Open a Shared Calendar
1. Click on “Add Calendar…”
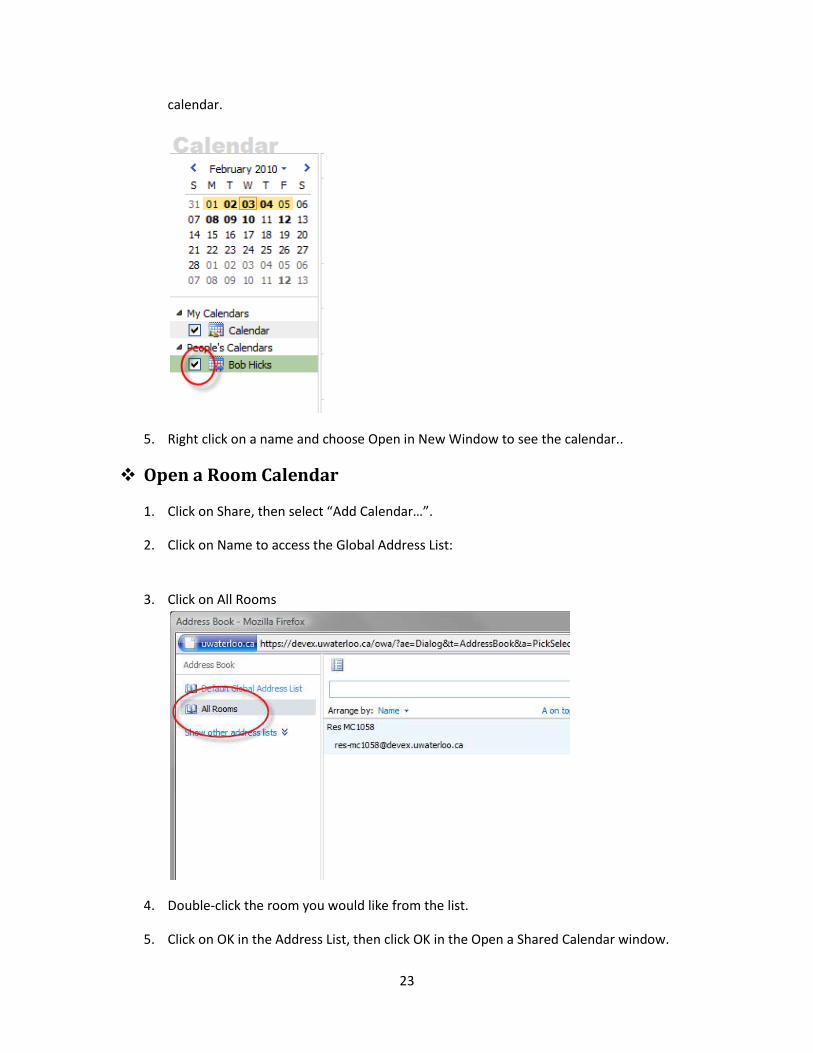
2. You can enter a Name, or click on Name to access the Global Address List:
3. By default the calendars open side-by-side. You can change the view to Day, Work
Week, Week or Month.
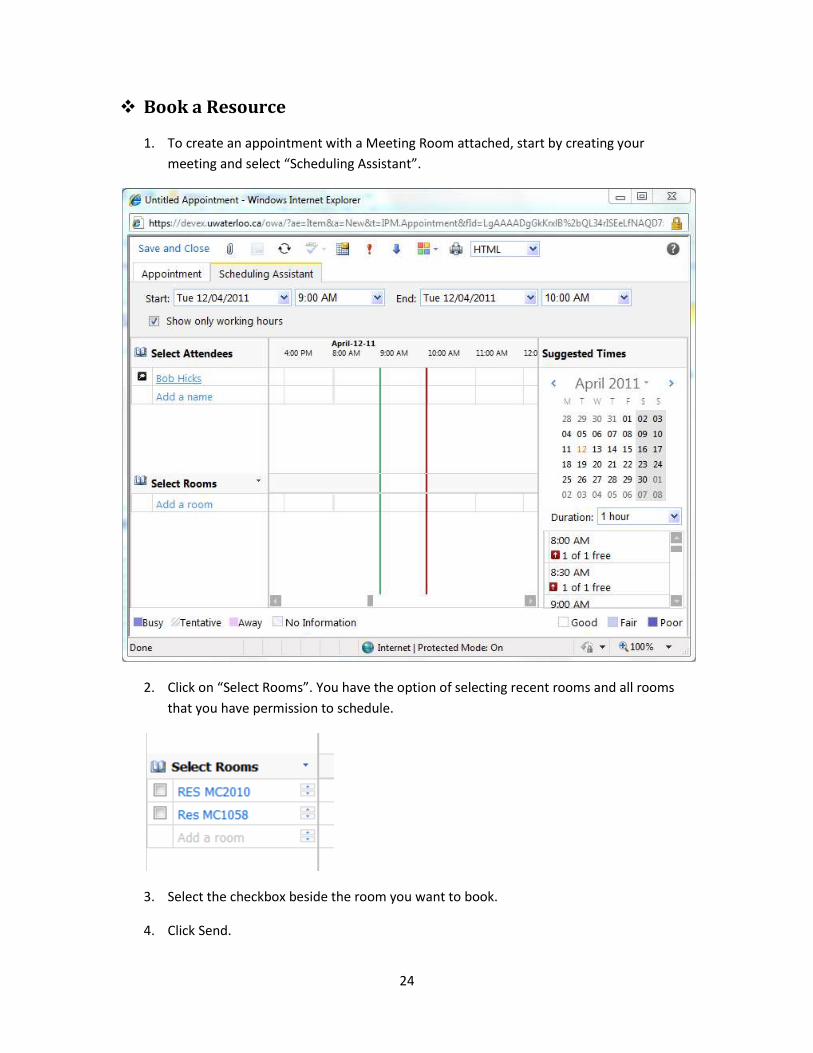
4. You now will see the shared calendar in your list of calendars for future use. Turn display
on or off with the checkbox, click the “X” beside the name . You
can turn off display of your own calendar if you need more room to see the shared
23
calendar.
5. Right click on a name and choose Open in New Window to see the calendar..
Open a Room Calendar
1. Click on Share, then select “Add Calendar…”.
2. Click on Name to access the Global Address List:
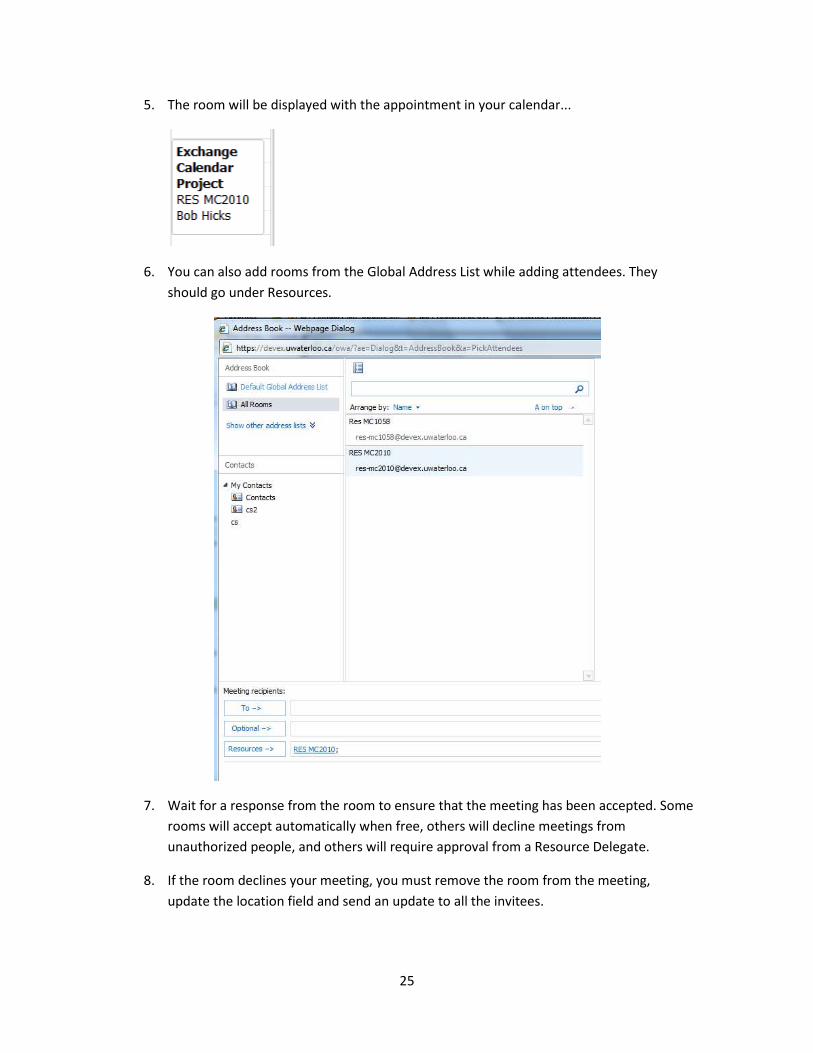
3. Click on All Rooms
4. Double-click the room you would like from the list.
5. Click on OK in the Address List, then click OK in the Open a Shared Calendar window.
24
Book a Resource
1. To create an appointment with a Meeting Room attached, start by creating your
meeting and select “Scheduling Assistant”.
2. Click on “Select Rooms”. You have the option of selecting recent rooms and all rooms
that you have permission to schedule.
3. Select the checkbox beside the room you want to book.
4. Click Send.
25
5. The room will be displayed with the appointment in your calendar...
6. You can also add rooms from the Global Address List while adding attendees. They
should go under Resources.
7. Wait for a response from the room to ensure that the meeting has been accepted. Some
rooms will accept automatically when free, others will decline meetings from
unauthorized people, and others will require approval from a Resource Delegate.
8. If the room declines your meeting, you must remove the room from the meeting,
update the location field and send an update to all the invitees.
26
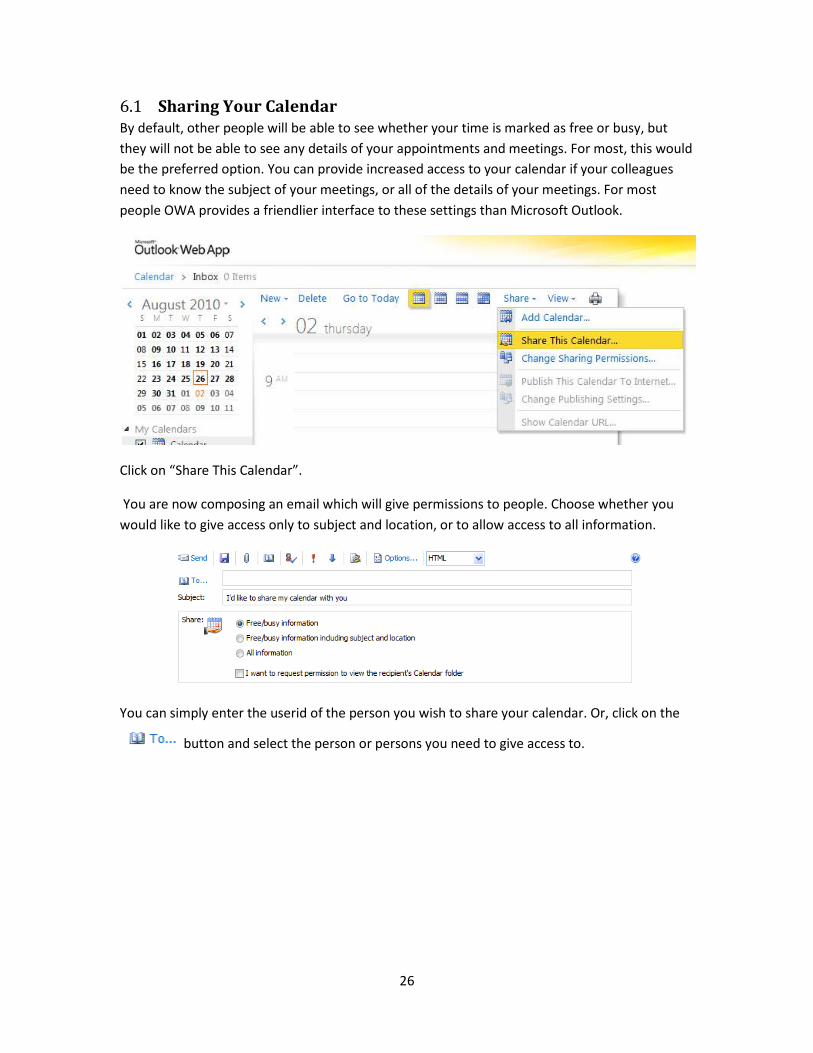
6.1 Sharing Your Calendar By default, other people will be able to see whether your time is marked as free or busy, but
they will not be able to see any details of your appointments and meetings. For most, this would
be the preferred option. You can provide increased access to your calendar if your colleagues
need to know the subject of your meetings, or all of the details of your meetings. For most
people OWA provides a friendlier interface to these settings than Microsoft Outlook.
Click on “Share This Calendar”.
You are now composing an email which will give permissions to people. Choose whether you
would like to give access only to subject and location, or to allow access to all information.
You can simply enter the userid of the person you wish to share your calendar. Or, click on the
button and select the person or persons you need to give access to.
27
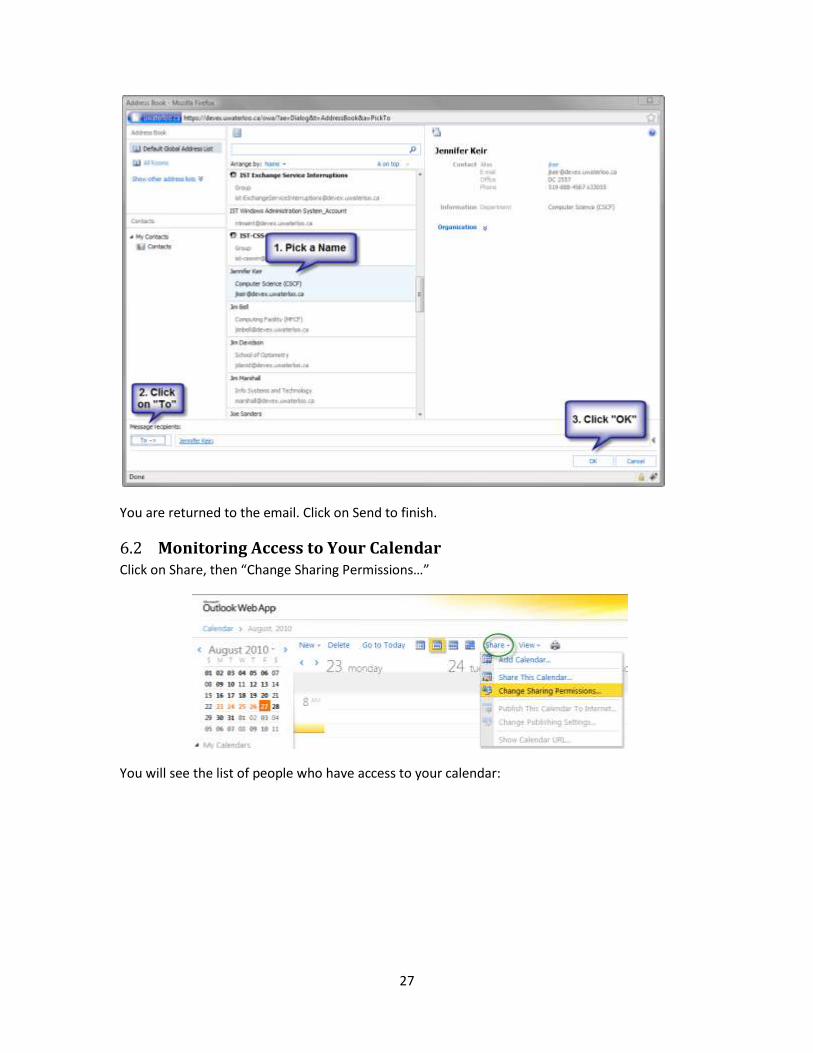
You are returned to the email. Click on Send to finish.
6.2 Monitoring Access to Your Calendar Click on Share, then “Change Sharing Permissions…”
You will see the list of people who have access to your calendar:
28
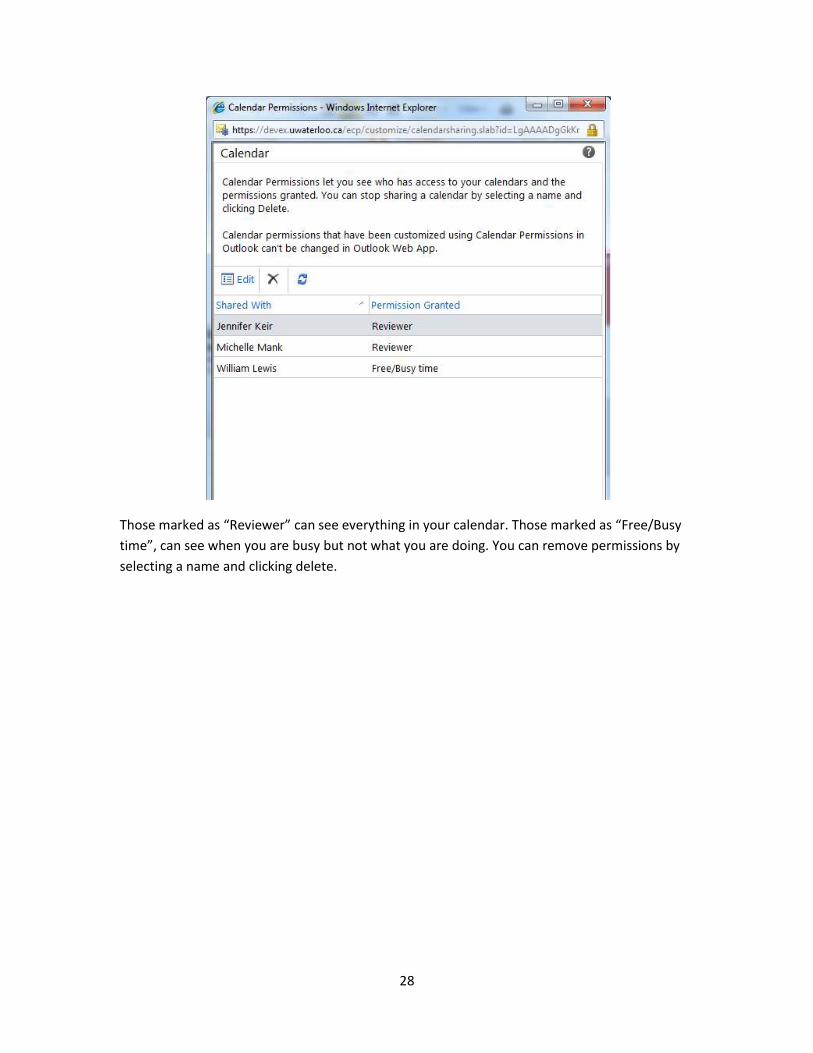
Those marked as “Reviewer” can see everything in your calendar. Those marked as “Free/Busy
time”, can see when you are busy but not what you are doing. You can remove permissions by
selecting a name and clicking delete.
29
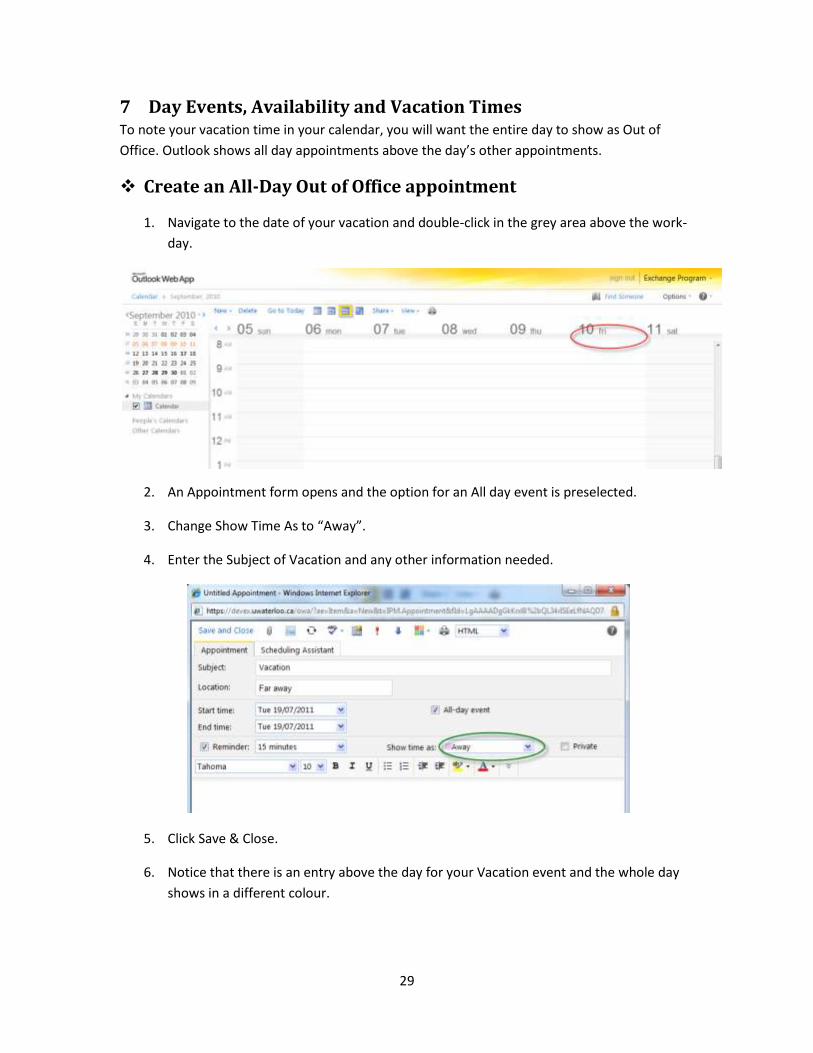
7 Day Events, Availability and Vacation Times To note your vacation time in your calendar, you will want the entire day to show as Out of
Office. Outlook shows all day appointments above the day’s other appointments.
Create an All-Day Out of Office appointment
1. Navigate to the date of your vacation and double-click in the grey area above the work-
day.
2. An Appointment form opens and the option for an All day event is preselected.
3. Change Show Time As to “Away”.
4. Enter the Subject of Vacation and any other information needed.
5. Click Save & Close.
6. Notice that there is an entry above the day for your Vacation event and the whole day
shows in a different colour.
30
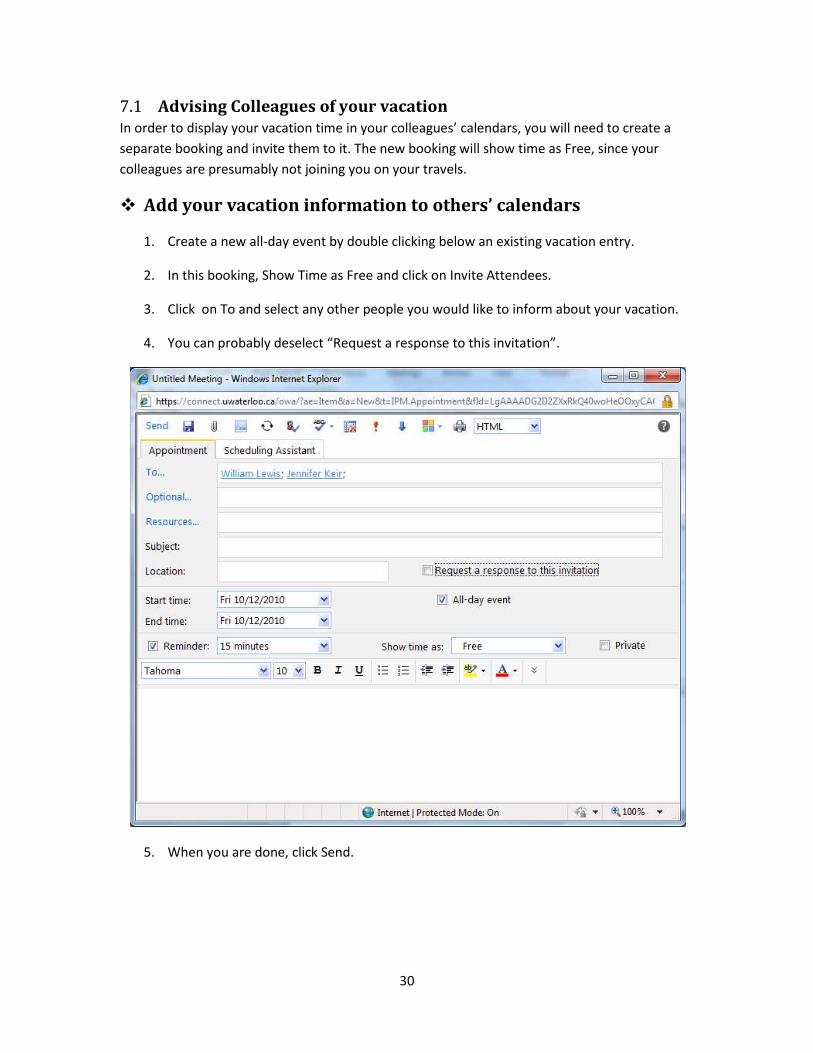
7.1 Advising Colleagues of your vacation In order to display your vacation time in your colleagues’ calendars, you will need to create a
separate booking and invite them to it. The new booking will show time as Free, since your
colleagues are presumably not joining you on your travels.
Add your vacation information to others’ calendars
1. Create a new all-day event by double clicking below an existing vacation entry.
2. In this booking, Show Time as Free and click on Invite Attendees.
3. Click on To and select any other people you would like to inform about your vacation.
4. You can probably deselect “Request a response to this invitation”.
5. When you are done, click Send.
31
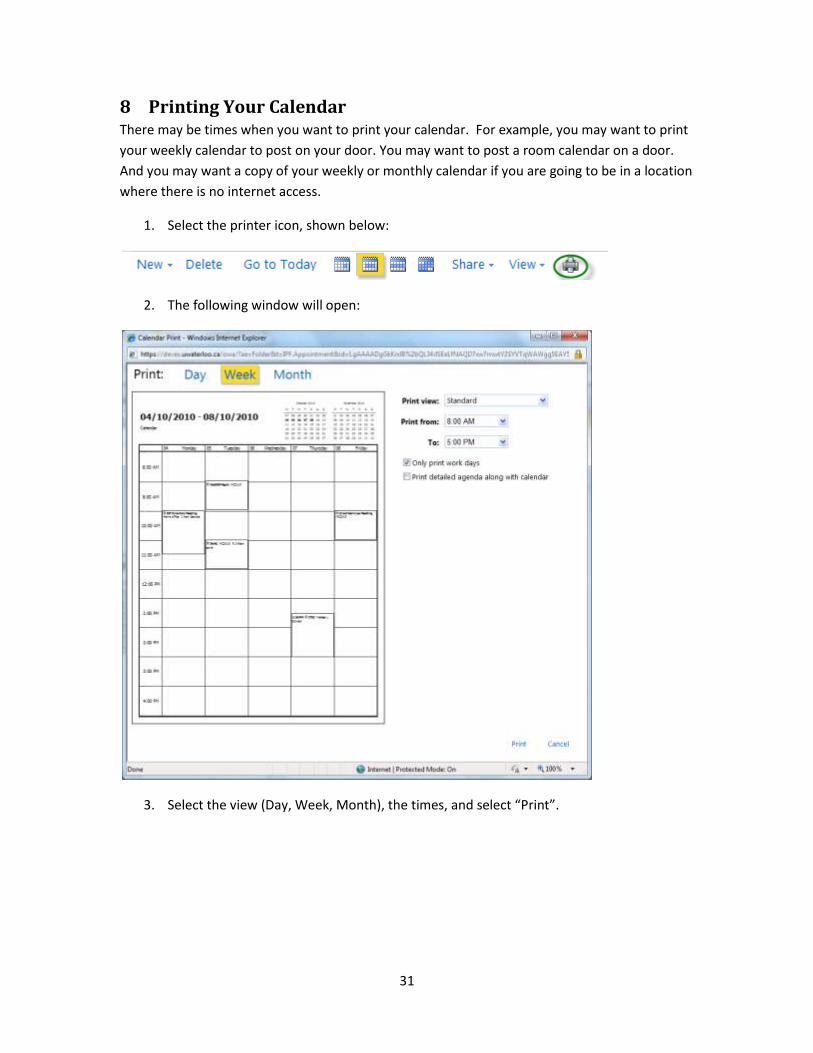
8 Printing Your Calendar There may be times when you want to print your calendar. For example, you may want to print
your weekly calendar to post on your door. You may want to post a room calendar on a door.
And you may want a copy of your weekly or monthly calendar if you are going to be in a location
where there is no internet access.
1. Select the printer icon, shown below:
2. The following window will open:
3. Select the view (Day, Week, Month), the times, and select “Print”.


![[USING OUTLOOK: SIGNATURES/AUTO REPLY/CALENDAR] · Services 2014 Richman Property Ted Brand [USING OUTLOOK: SIGNATURES/AUTO REPLY/CALENDAR]](https://img.pdfslide.net/doc/110x75/5b4744237f8b9af5078c0236/using-outlook-signaturesauto-replycalendar-services-2014-richman-property.jpg)