Embed Size (px)
Citation preview
EXPERTNailing System
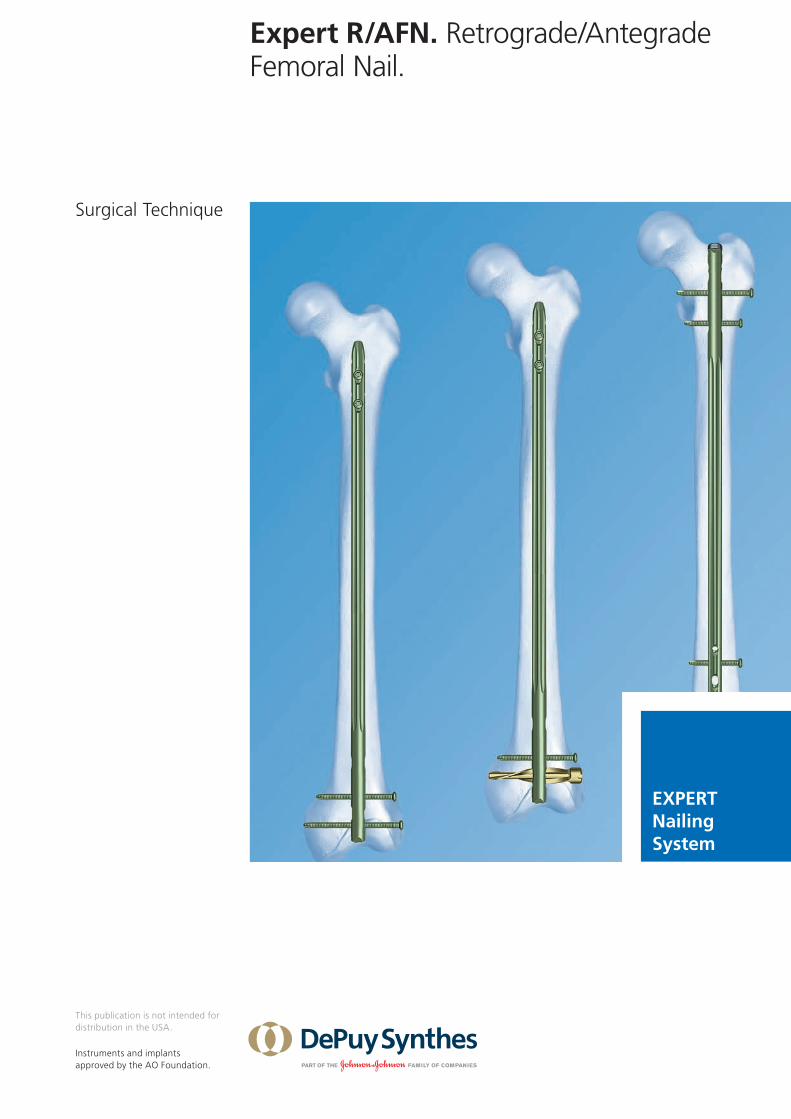
Expert R/AFN. Retrograde/Antegrade Femoral Nail.
Surgical Technique
Instruments and implants approved by the AO Foundation.
This publication is not intended for distribution in the USA.

Image intensifier control
This description alone does not provide sufficient background for direct use of DePuy Synthes products. Instruction by a surgeon experienced in handling these products is highly recommended.
Processing, Reprocessing, Care and MaintenanceFor general guidelines, function control and dismantling of multi-part instruments, as well as processing guidelines for implants, please contact your local sales representative or refer to:http://emea.depuysynthes.com/hcp/reprocessing-care-maintenanceFor general information about reprocessing, care and maintenance of Synthes reusable devices, instrument trays and cases, as well as processing of Synthes non-sterile implants, please consult the Important Information leaflet (SE_023827) or refer to: http://emea.depuysynthes.com/hcp/reprocessing-care-maintenance
Expert Retrograde/Antegrade Femoral Nail Surgical Technique DePuy Synthes 1
TABLE OF CONTENTS
INTRODUCTION Expert R/AFN 4
AO Principles 7
Indications and Contraindications 9
Cases 10
RETROGRADE APPROACH Opening the Distal Femur 12
Reaming (Optional) 21
Inserting Nail 22
Standard Locking 27
End Cap Insertion 32
Spiral Blade Locking (Optional) 33
End Cap Insertion 39
Freehand Locking 40
Interlocking with PAD for Expert RFN (Optional) 47
ANTEGRADE APPROACH Opening the Proximal Femur 52
Reaming (Optional) 61
Inserting Nail 62
Standard Locking 66
End Cap Insertion 67
Freehand Locking 69
2 DePuy Synthes Expert Retrograde/Antegrade Femoral Nail Surgical Technique
Table of Contents
IMPLANT REMOVAL 70
PRODUCT INFORMATION Nails 75
Locking Implants 79
Instruments 83 • Comparison Table 97 • Handling Information 99 • Modular Cases 101
Vario Case 105
Power Tools 107
Optional: Angular Stable Locking System (ASLS) 108
MRI INFORMATION 110


4 DePuy Synthes Expert Retrograde/Antegrade Femoral Nail Surgical Technique
EXPERT R/AFNRETROGRADE/ANTEGRADE FEMORAL NAIL.
ADVANCED NAIL DESIGNThe nail design offers great flexibility• One system for retrograde and antegrade technique• One system for left and right femur• Anatomic bend for ease in insertion and extraction• Cannulation of all nails for guided insertion in reamed
and unreamed technique• Large portfolio with nail diameters ranging
from B9.0 to 15.0 mm and lengths ranging from 160 to 480 mm
• Versatile locking configuration for static, dynamic, standard and spiral blade locking
retrogradeRFN, 160–200 mmstraight
retrogradeRFN, 220–280 mmantecurvature 1500 mm
retrogradeR/AFN, 300–480 mmantecurvature 1500 mm
antegradeR/AFN, 300–480 mmantecurvature 1500 mm
Expert Retrograde/Antegrade Femoral Nail Surgical Technique DePuy Synthes 1
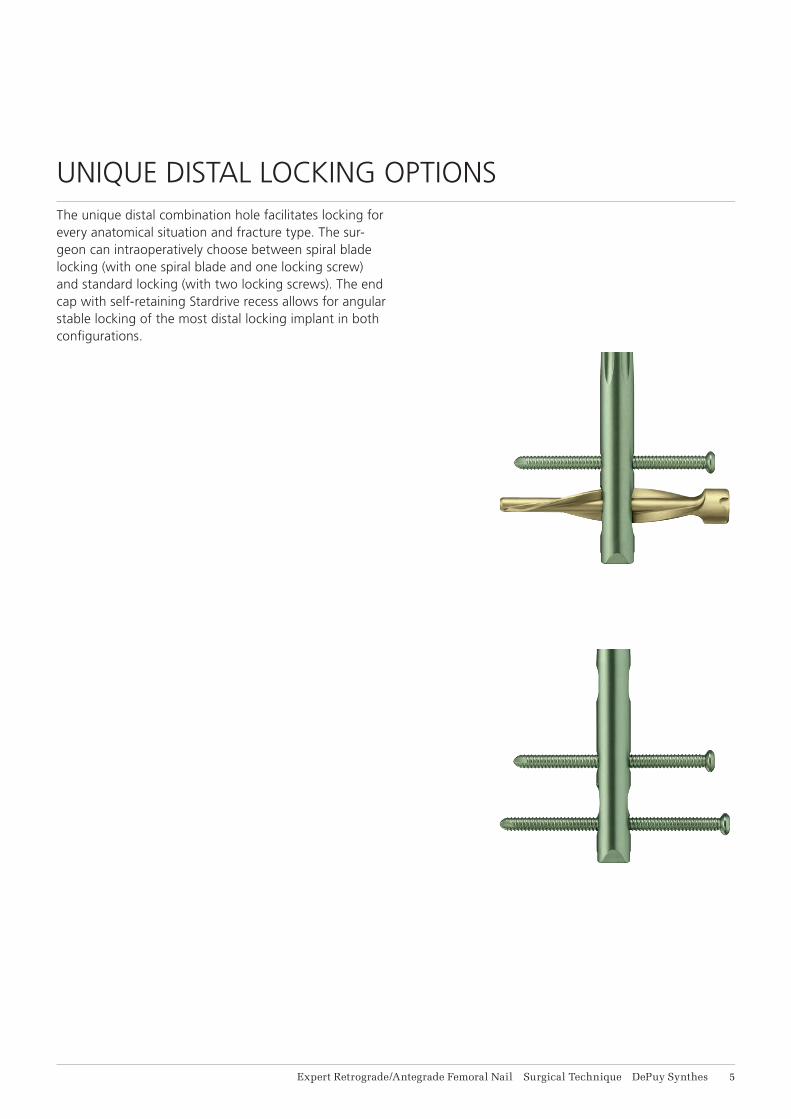
UNIQUE DISTAL LOCKING OPTIONS The unique distal combination hole facilitates locking for every anatomical situation and fracture type. The sur-geon can intraoperatively choose between spiral blade locking (with one spiral blade and one locking screw) and standard locking (with two locking screws). The end cap with self-retaining Stardrive recess allows for angular stable locking of the most distal locking implant in both confi gurations.
Stardrive®
T40
This pat
ient
has
som
e Sy
nthe
s® lo
ck
ing screws with hexalobular internal drive according to EN ISO 10664
Stardrive®
T25
This pat
ient
has
som
e Sy
nthe
s® lo
ck
ing screws with hexalobular internal drive according to EN ISO 10664
6 DePuy Synthes Expert Retrograde/Antegrade Femoral Nail Surgical Technique
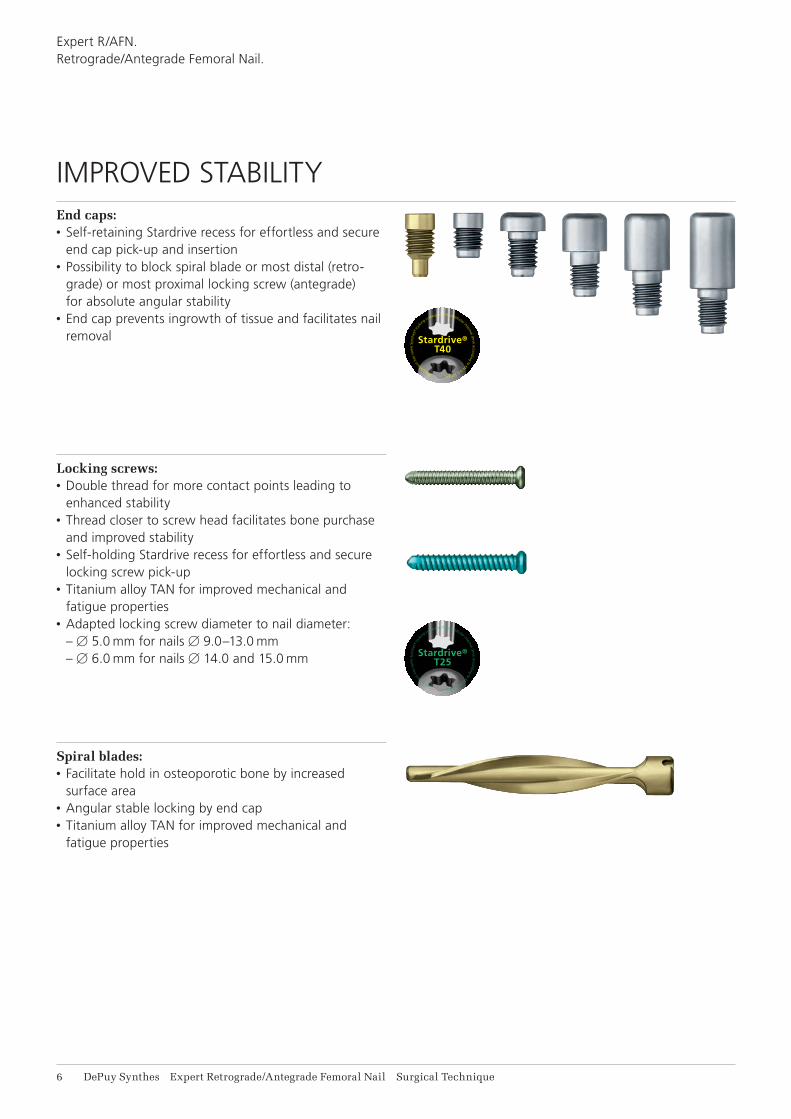
End caps:• Self-retaining Stardrive recess for effortless and secure
end cap pick-up and insertion• Possibility to block spiral blade or most distal (retro-
grade) or most proximal locking screw (antegrade) for absolute angular stability
• End cap prevents ingrowth of tissue and facilitates nail removal
Locking screws:• Double thread for more contact points leading to
enhanced stability• Thread closer to screw head facilitates bone purchase
and improved stability• Self-holding Stardrive recess for effortless and secure
locking screw pick-up• Titanium alloy TAN for improved mechanical and
fatigue properties• Adapted locking screw diameter to nail diameter: – B5.0 mm for nails B9.0–13.0 mm – B6.0 mm for nails B14.0 and 15.0 mm
Spiral blades:• Facilitate hold in osteoporotic bone by increased
surface area• Angular stable locking by end cap• Titanium alloy TAN for improved mechanical and
fatigue properties
IMPROVED STABILITY
Expert R/AFN.Retrograde/Antegrade Femoral Nail.
1
4
2
3
Expert Retrograde/Antegrade Femoral Nail Surgical Technique DePuy Synthes 7
AO PRINCIPLES
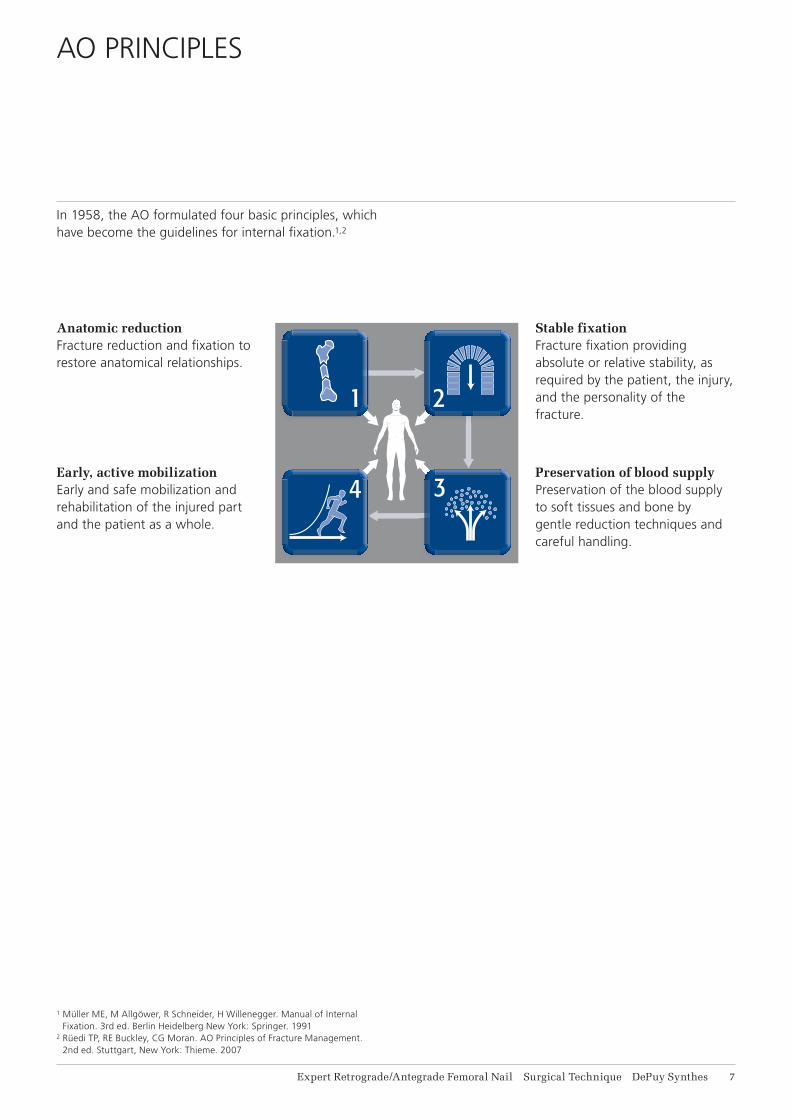
In 1958, the AO formulated four basic principles, which have become the guidelines for internal fixation.1,2
1 Müller ME, M Allgöwer, R Schneider, H Willenegger. Manual of Internal Fixation. 3rd ed. Berlin Heidelberg New York: Springer. 1991
2 Rüedi TP, RE Buckley, CG Moran. AO Principles of Fracture Management. 2nd ed. Stuttgart, New York: Thieme. 2007
Anatomic reductionFracture reduction and fixation to restore anatomical relationships.
Early, active mobilizationEarly and safe mobilization and rehabilitation of the injured part and the patient as a whole.
Stable fixationFracture fixation providing absolute or relative stability, as required by the patient, the injury, and the personality of the fracture.
Preservation of blood supplyPreservation of the blood supply to soft tissues and bone by gentle reduction techniques and careful handling.
8 DePuy Synthes Expert Retrograde/Antegrade Femoral Nail Surgical Technique
Preservation of blood supplyWhen the canal is not reamed, intramedullary nailing generates minimal trauma to the endosteum and, there-fore, the blood supply is maximised through the unin-jured endosteum and periosteum. Reaming the canal temporarily disrupts the endosteal blood supply but probably stimulates the revascularisation and therefore the bone healing.
Early, active mobilisationIntramedullary nailing, combined with the AO technique, provides relatively stable fracture fixation with minimal trauma to vascular supply. This helps to create an improved environment for bone healing, accelerating the patient’s return to previous mobility and function.
AO Principles
Expert Retrograde/Antegrade Femoral Nail Surgical Technique DePuy Synthes 9
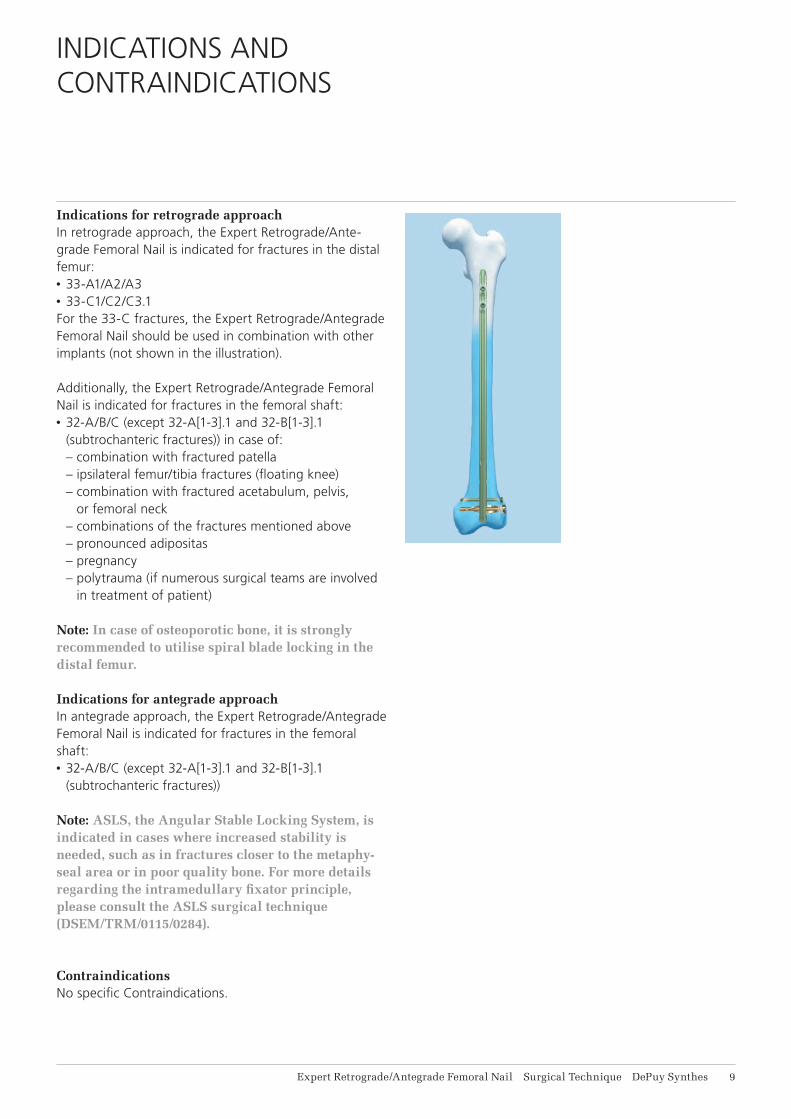
Indications for retrograde approachIn retrograde approach, the Expert Retrograde/Ante-grade Femoral Nail is indicated for fractures in the distal femur:• 33-A1/A2/A3• 33-C1/C2/C3.1For the 33-C fractures, the Expert Retrograde/Antegrade Femoral Nail should be used in combination with other implants (not shown in the illustration).
Additionally, the Expert Retrograde/Antegrade Femoral Nail is indicated for fractures in the femoral shaft:• 32-A/B/C (except 32-A[1-3].1 and 32-B[1-3].1
(subtrochanteric fractures)) in case of: – combination with fractured patella – ipsilateral femur/tibia fractures (floating knee) – combination with fractured acetabulum, pelvis,
or femoral neck – combinations of the fractures mentioned above – pronounced adipositas – pregnancy – polytrauma (if numerous surgical teams are involved
in treatment of patient)
Note: In case of osteoporotic bone, it is strongly recommended to utilise spiral blade locking in the distal femur.
Indications for antegrade approachIn antegrade approach, the Expert Retrograde/ Antegrade Femoral Nail is indicated for fractures in the femoral shaft:• 32-A/B/C (except 32-A[1-3].1 and 32-B[1-3].1
(subtrochanteric fractures))
Note: ASLS, the Angular Stable Locking System, is indicated in cases where increased stability is needed, such as in fractures closer to the metaphy-seal area or in poor quality bone. For more details regarding the intramedullary fixator principle, please consult the ASLS surgical technique (DSEM/TRM/0115/0284).
ContraindicationsNo specific Contraindications.
INDICATIONS AND CONTRAINDICATIONS

11 DePuy Synthes Expert Retrograde/Antegrade Femoral Nail Surgical Technique
CASES
Case 1Retrograde approach – standard locking
Case 1Retrograde approach – standard locking
Case 3Antegrade approach – standard locking
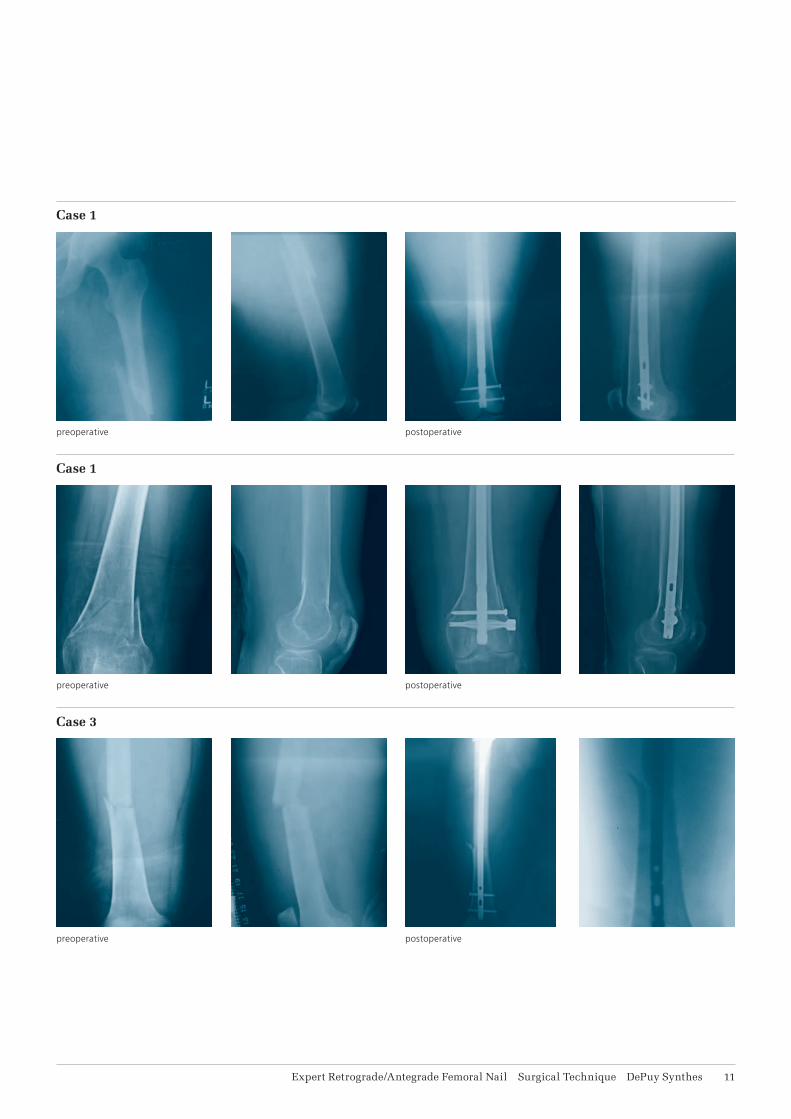
Expert Retrograde/Antegrade Femoral Nail Surgical Technique DePuy Synthes 11
Case 1
Case 1
Case 3
preoperative
preoperative
preoperative
postoperative
postoperative
postoperative
12 DePuy Synthes Expert Retrograde/Antegrade Femoral Nail Surgical Technique
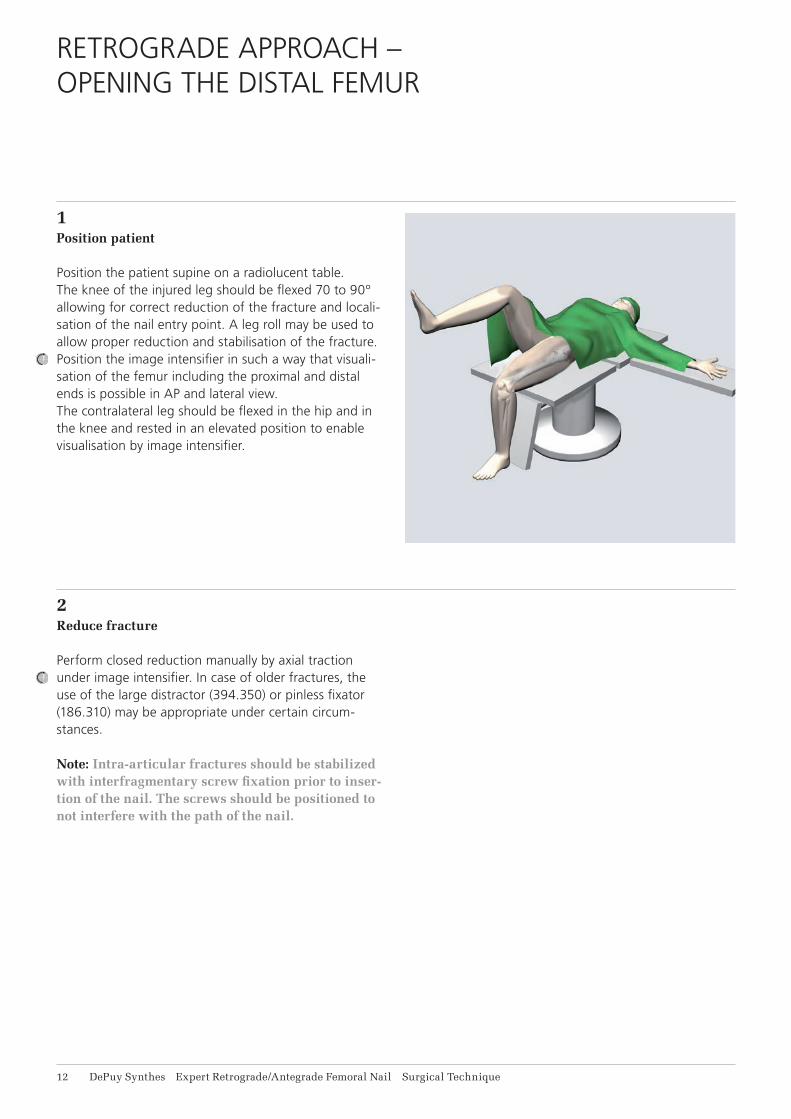
1Position patient
Position the patient supine on a radiolucent table. The knee of the injured leg should be flexed 70 to 90º allowing for correct reduction of the fracture and locali-sation of the nail entry point. A leg roll may be used to allow proper reduction and stabilisation of the fracture.Position the image intensifier in such a way that visuali- sation of the femur including the proximal and distal ends is possible in AP and lateral view.The contralateral leg should be flexed in the hip and in the knee and rested in an elevated position to enable visualisation by image intensifier.
2Reduce fracture
Perform closed reduction manually by axial traction under image intensifier. In case of older fractures, the use of the large distractor (394.350) or pinless fixator (186.310) may be appropriate under certain circum-stances.
Note: Intra-articular fractures should be stabilized with interfragmentary screw fixation prior to inser-tion of the nail. The screws should be positioned to not interfere with the path of the nail.
RETROGRADE APPROACH – OPENING THE DISTAL FEMUR
Expert Retrograde/Antegrade Femoral Nail Surgical Technique DePuy Synthes 11
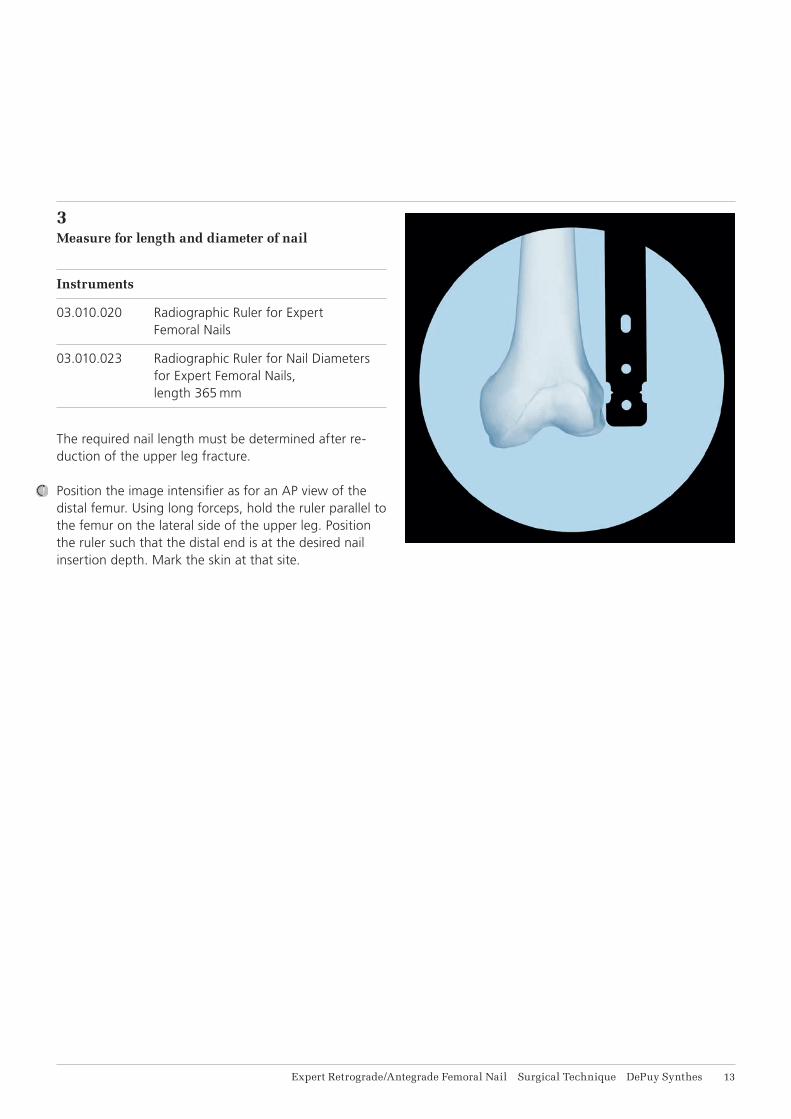
3Measure for length and diameter of nail
Instruments
03.010.020 Radiographic Ruler for Expert Femoral Nails
03.010.023 Radiographic Ruler for Nail Diameters for Expert Femoral Nails, length 365 mm
The required nail length must be determined after re-duction of the upper leg fracture.
Position the image intensifier as for an AP view of the distal femur. Using long forceps, hold the ruler parallel to the femur on the lateral side of the upper leg. Position the ruler such that the distal end is at the desired nail insertion depth. Mark the skin at that site.
14 DePuy Synthes Expert Retrograde/Antegrade Femoral Nail Surgical Technique
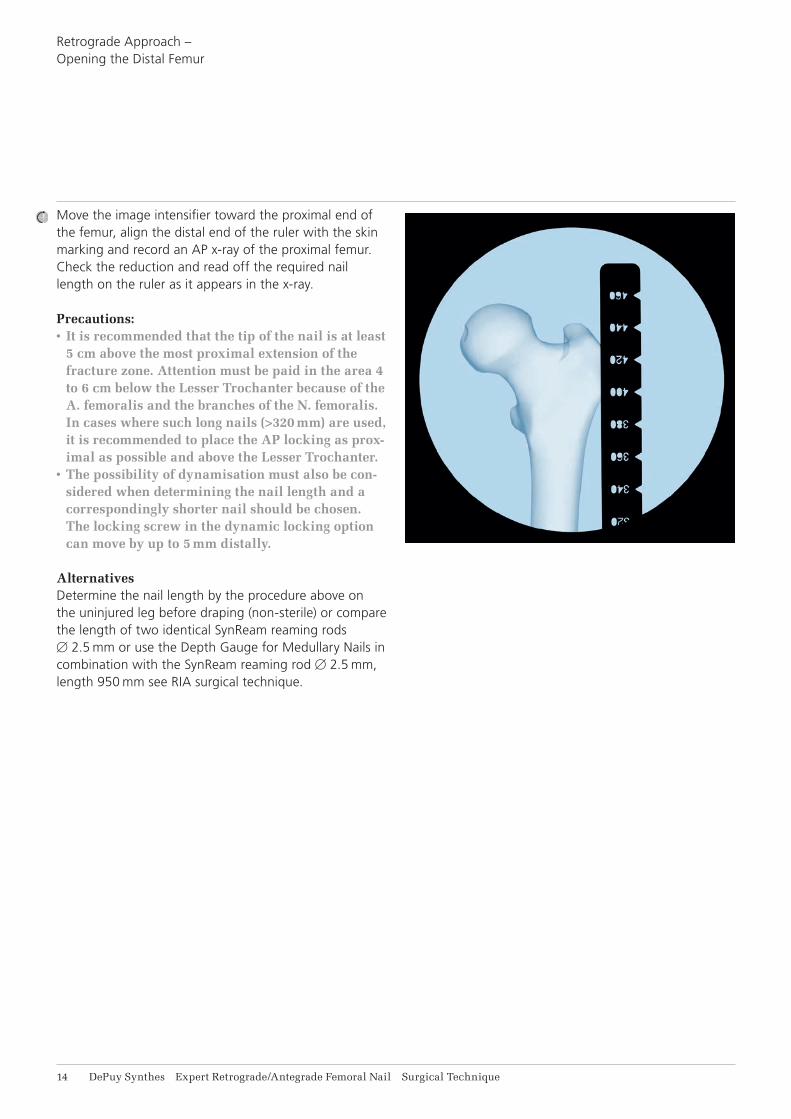
Move the image intensifier toward the proximal end of the femur, align the distal end of the ruler with the skin marking and record an AP x-ray of the proximal femur. Check the reduction and read off the required nail length on the ruler as it appears in the x-ray.
Precautions:• It is recommended that the tip of the nail is at least
5 cm above the most proximal extension of the fracture zone. Attention must be paid in the area 4 to 6 cm below the Lesser Trochanter because of the A. femoralis and the branches of the N. femoralis. In cases where such long nails (>320 mm) are used, it is recommended to place the AP locking as prox-imal as possible and above the Lesser Trochanter.
• The possibility of dynamisation must also be con-sidered when determining the nail length and a correspondingly shorter nail should be chosen. The locking screw in the dynamic locking option can move by up to 5 mm distally.
AlternativesDetermine the nail length by the procedure above on the uninjured leg before draping (non-sterile) or compare the length of two identical SynReam reaming rods B 2.5 mm or use the Depth Gauge for Medullary Nails in combination with the SynReam reaming rod B 2.5 mm, length 950 mm see RIA surgical technique.
Retrograde Approach – Opening the Distal Femur
Expert Retrograde/Antegrade Femoral Nail Surgical Technique DePuy Synthes 11
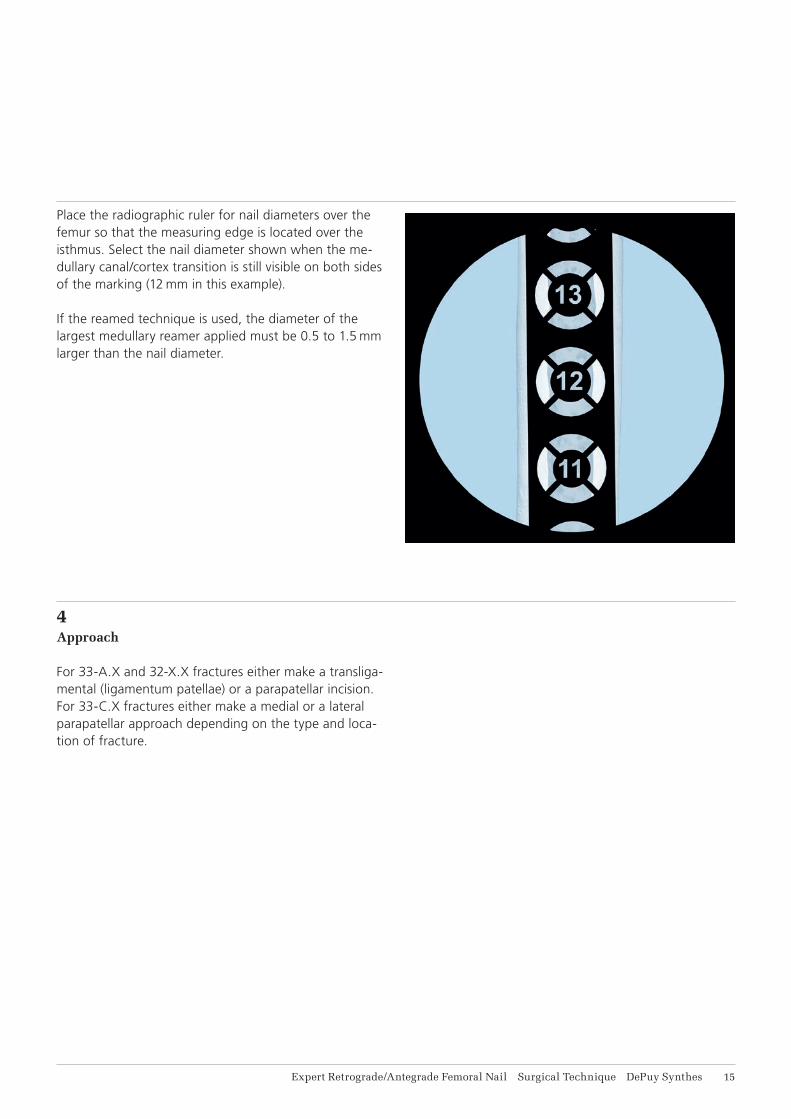
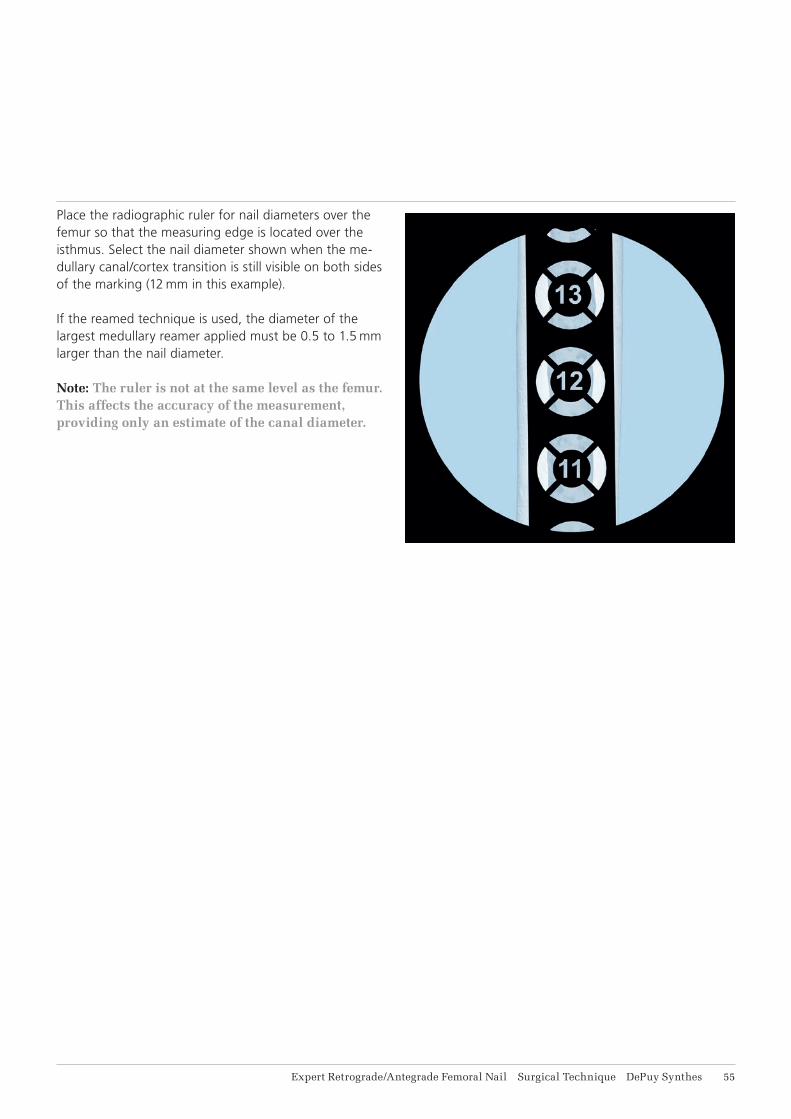
Place the radiographic ruler for nail diameters over the femur so that the measuring edge is located over the isthmus. Select the nail diameter shown when the me-dullary canal/cortex transition is still visible on both sides of the marking (12 mm in this example).
If the reamed technique is used, the diameter of the largest medullary reamer applied must be 0.5 to 1.5 mm larger than the nail diameter.
4Approach
For 33-A.X and 32-X.X fractures either make a transliga-mental (ligamentum patellae) or a parapatellar incision.For 33-C.X fractures either make a medial or a lateral parapatellar approach depending on the type and loca-tion of fracture.
16 DePuy Synthes Expert Retrograde/Antegrade Femoral Nail Surgical Technique
Retrograde Approach – Opening the Distal Femur
5Determine entry point
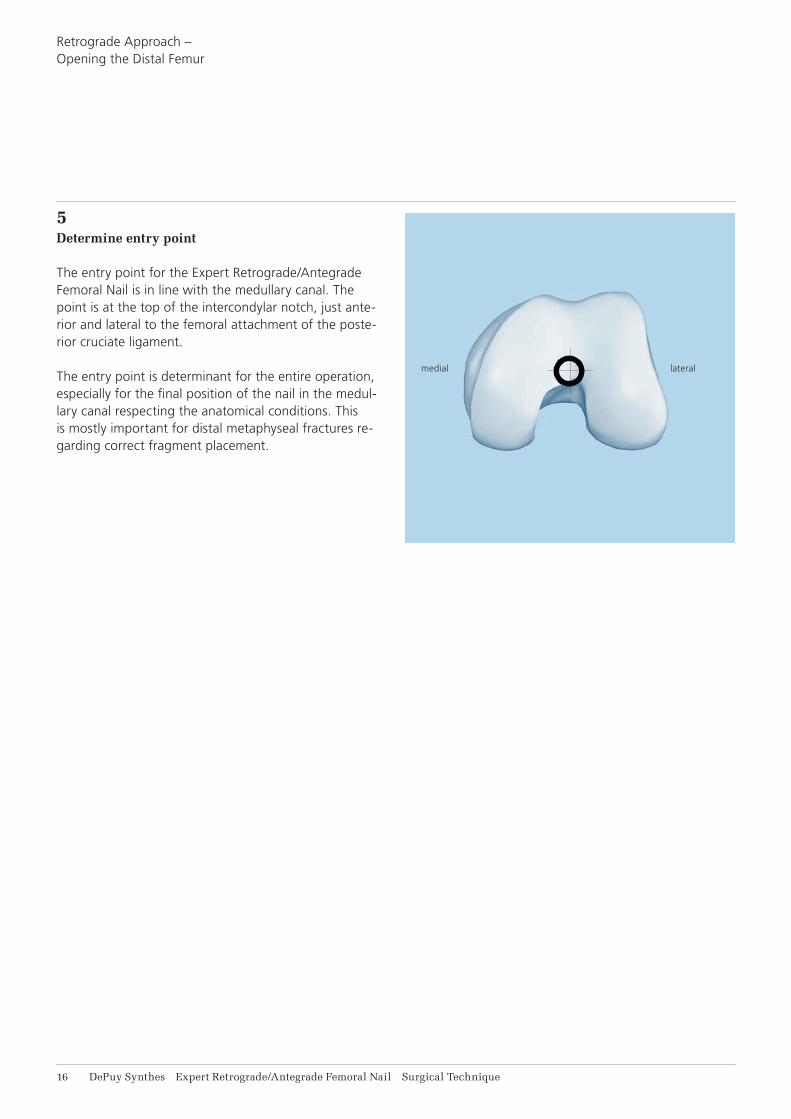
The entry point for the Expert Retrograde/Antegrade Femoral Nail is in line with the medullary canal. The point is at the top of the intercondylar notch, just ante-rior and lateral to the femoral attachment of the poste-rior cruciate ligament.
The entry point is determinant for the entire operation, especially for the final position of the nail in the medul-lary canal respecting the anatomical conditions. This is mostly important for distal metaphyseal fractures re-garding correct fragment placement.
medial lateral
7–9°
Expert Retrograde/Antegrade Femoral Nail Surgical Technique DePuy Synthes 17
6Insert guide wire
Instruments
03.010.500 Handle, with Quick Couplingand03.010.502 Protection Sleeve 13.0 for Expert R/AFN,
retrograde, with Quick Couplingand03.010.507 Multihole Drill Guide for Protection
Sleeve 13.0, retrograde
or
357.127 Protection Sleeve 13.0, for retrograde approach
and357.128 Drill Sleeve 13.0/3.2, with trocar tip, for
retrograde approach, for No. 357.127
393.100 Universal Chuck with T-Handle
357.399 Guide Wire B 3.2 mm, length 400 mm
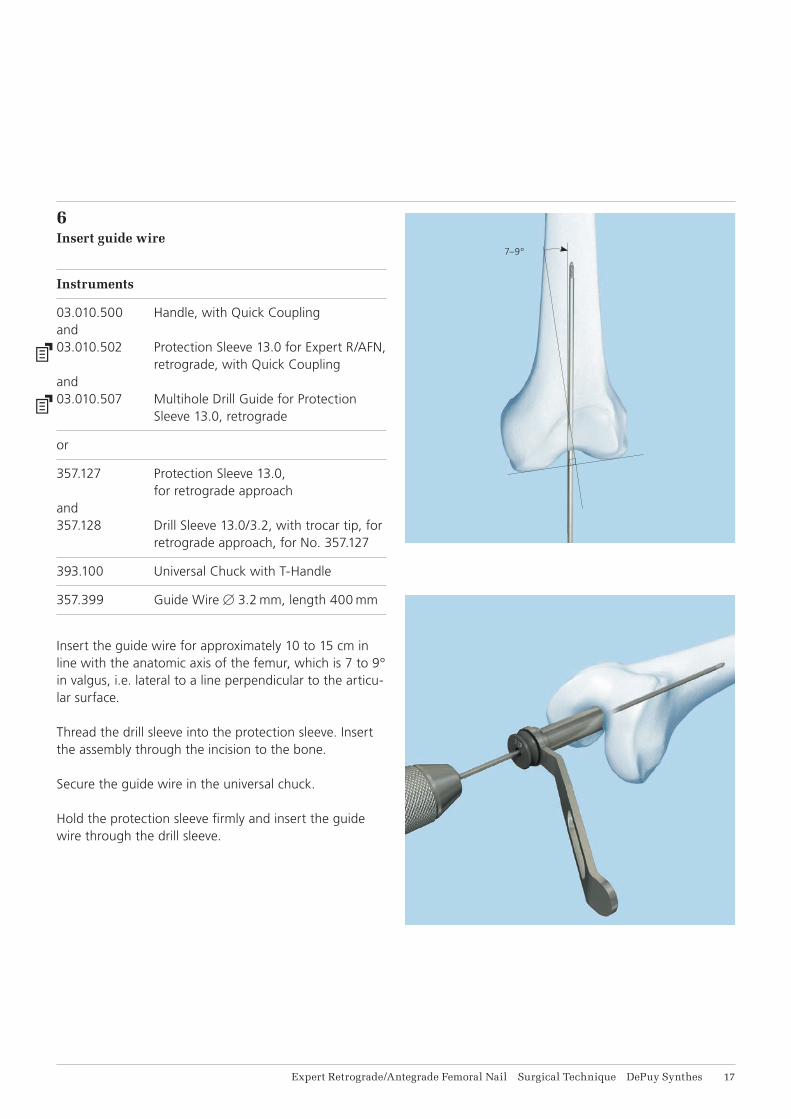
Insert the guide wire for approximately 10 to 15 cm in line with the anatomic axis of the femur, which is 7 to 9º in valgus, i.e. lateral to a line perpendicular to the articu-lar surface.
Thread the drill sleeve into the protection sleeve. Insert the assembly through the incision to the bone.
Secure the guide wire in the universal chuck.
Hold the protection sleeve firmly and insert the guide wire through the drill sleeve.
18 DePuy Synthes Expert Retrograde/Antegrade Femoral Nail Surgical Technique
Retrograde Approach – Opening the Distal Femur
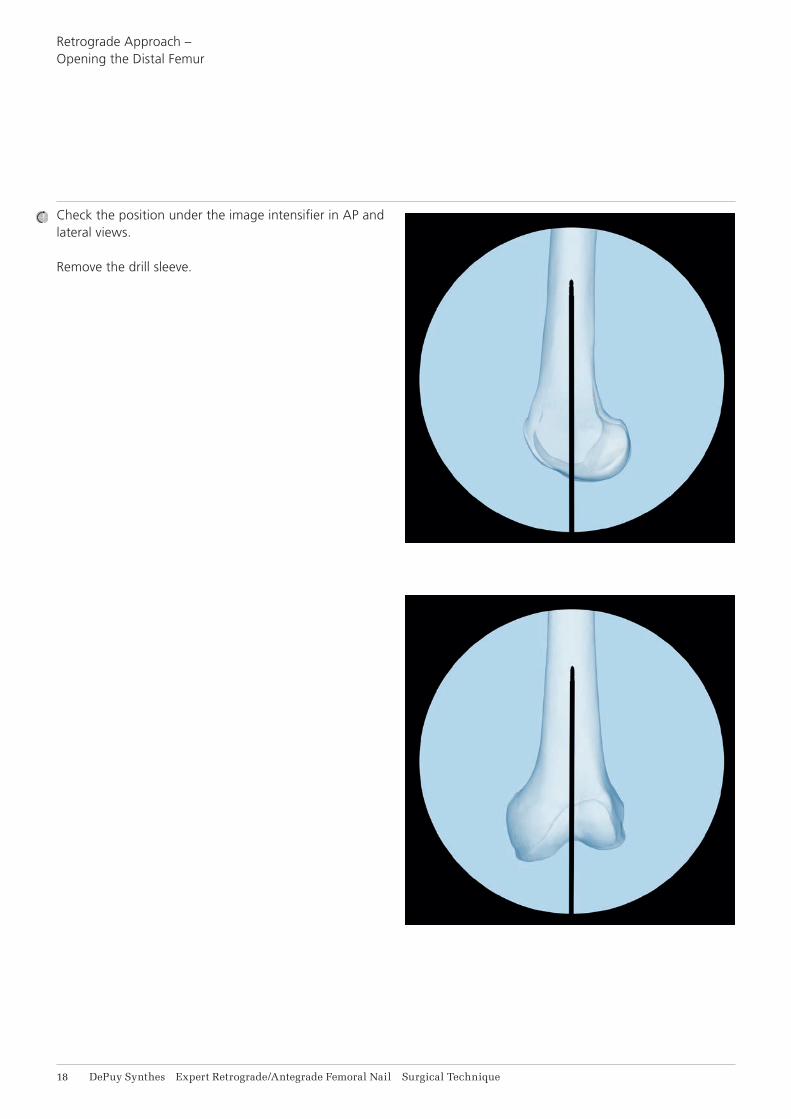
Check the position under the image intensifier in AP and lateral views.
Remove the drill sleeve.
Expert Retrograde/Antegrade Femoral Nail Surgical Technique DePuy Synthes 19
7aOpen medullary canal – drill bit
Instruments
351.270 Drill Bit B13.0 mm, cannulated, length 290 mm, 3-flute, for Quick Coupling No. 511.760
357.127 Protection Sleeve 13.0, for retrograde approach
or
03.010.500 Handle, with Quick Couplingand03.010.502 Protection Sleeve 13.0 for Expert R/AFN,
retrograde, with Quick Coupling
03.010.115 Guide Wire B3.2 mm, length 290 mm
Push the drill bit over the guide wire and through the protection sleeve to the bone. Drill to a depth of approx-imately 3 to 5 cm to open the cortex.
Precautions:• The use of the drill bit for opening the medullary
canal is suitable for nails B9.0 to 12.0 mm. For the larger nails B13.0 to 15.0 mm, the use of a ream-ing system is recommended.
• Take care to not plunge the drill bit into the frac-ture site because this may displace the fracture.
Remove the drill bit and the protection sleeve.
21 DePuy Synthes Expert Retrograde/Antegrade Femoral Nail Surgical Technique
Retrograde Approach – Opening the Distal Femur
7bOpen medullary canal – awl
Instruments
03.010.041 Awl B14.0/3.2 mm, cannulated
03.010.115 Guide Wire B3.2 mm, length 290 mm
Alternatively, the awl may be used to open the medul-lary canal.
Remove the protection sleeve.
Push the awl over the guide wire and open the medul-lary canal.
Precaution: • The use of the awl for opening the medullary canal
is suitable for nails B9.0 to 13.0 mm. For the larger nails B14.0 and 15.0 mm, the use of a reaming sys-tem is recommended.
• Take care to not plunge the awl into the fracture site because this may displace the fracture.
Remove the awl.
Expert Retrograde/Antegrade Femoral Nail Surgical Technique DePuy Synthes 21
Reaming medullary canal (optional)If necessary, enlarge the femoral canal with the medul-lary reamer up to the desired diameter.
Check fracture reduction under the image intensifier.
Inserting the reaming rodInsert the reaming rod into the medullary canal.
ReamingStarting with the smallest diameter, ream the medullary canal in 0.5 mm increments. The holding forceps is used to control the rotation of the reaming rod. Advance the reamer head with slight forward and backward move-ments. Do not use force. Continue reaming until the diameter of the canal is 0.5 to 1.5 mm larger than the nail diameter.
Precaution: All Expert Retrograde/Antegrade Femo-ral Nails can be inserted over the reaming rod. The tip of the reaming rod must be correctly positioned in the medullary canal since it determines the final proximal position of the nail.
Retrograde Approach –
REAMING (OPTIONAL)

22 DePuy Synthes Expert Retrograde/Antegrade Femoral Nail Surgical Technique
Retrograde Approach –
INSERTING NAIL
1Mount nail on insertion handle
Instruments
03.010.146 Connecting Screw, cannulated, with Internal M6x1 Thread
03.010.046 Insertion Handle, long, for Expert Femoral Nails
or03.010.486 Insertion Handle, radiolucent,
length 100 mm
03.010.093 Rod Pusher for Reaming Rod with Hexagonal Screwdriver B8.0 mm
03.010.092 Screwdriver, hexagonal with spherical head B 8.0 mm
or03.010.517 Screwdriver, hexagonal B 8.0 mm, with T-Handle, with spherical head, length 322 mm
Slide the connecting screw onto the rod pusher until it is secured and insert it into the insertion handle.
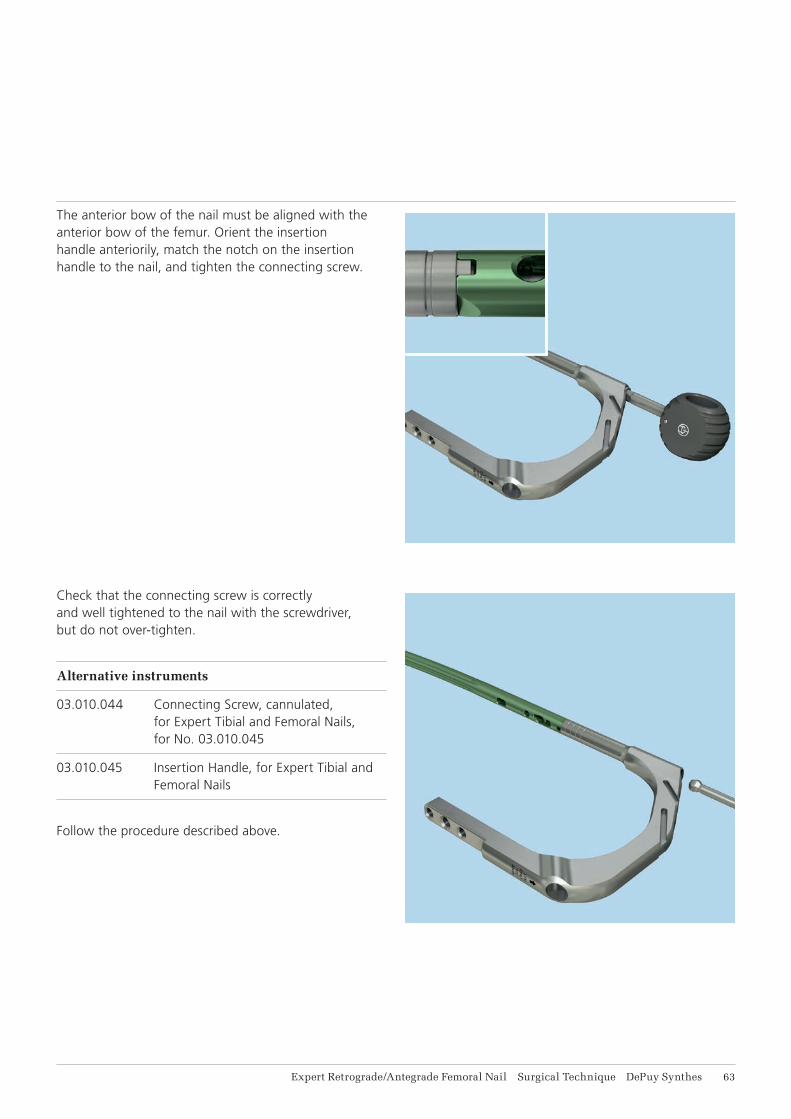
The anterior bow of the nail must be aligned with the anterior bow of the femur. Orient the insertion handle anteriorily, match the notch on the insertion handle to the nail, and tighten the connecting screw.
Expert Retrograde/Antegrade Femoral Nail Surgical Technique DePuy Synthes 21
Check that the connecting screw is correctly and well tightened to the nail with the screwdriver. Do not over-tighten.
Alternative instruments
03.010.044 Connecting Screw, cannulated, for Expert Tibial and Femoral Nails, for No. 03.010.045
03.010.045 Insertion Handle, for Expert Tibial and Femoral Nails
Follow the procedure described before.
0 mm
5 mm
10 mm
15 mm
20 mm
24 DePuy Synthes Expert Retrograde/Antegrade Femoral Nail Surgical Technique
Retrograde Approach –Inserting Nail
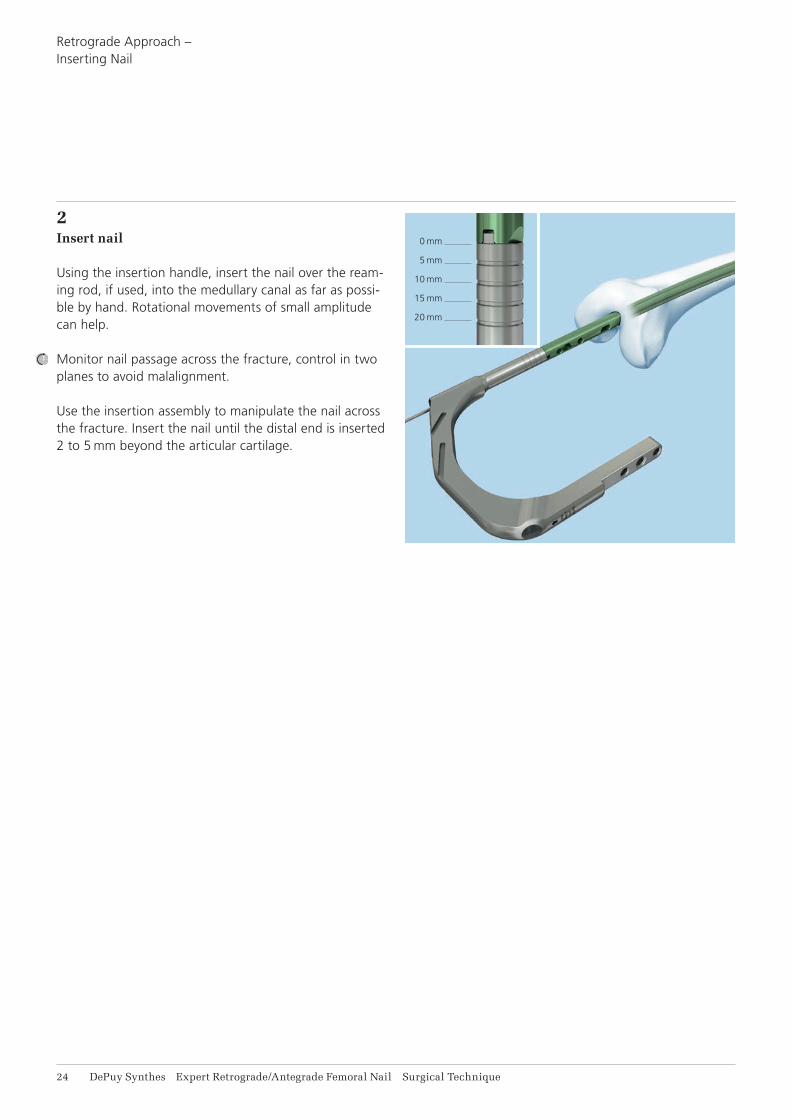
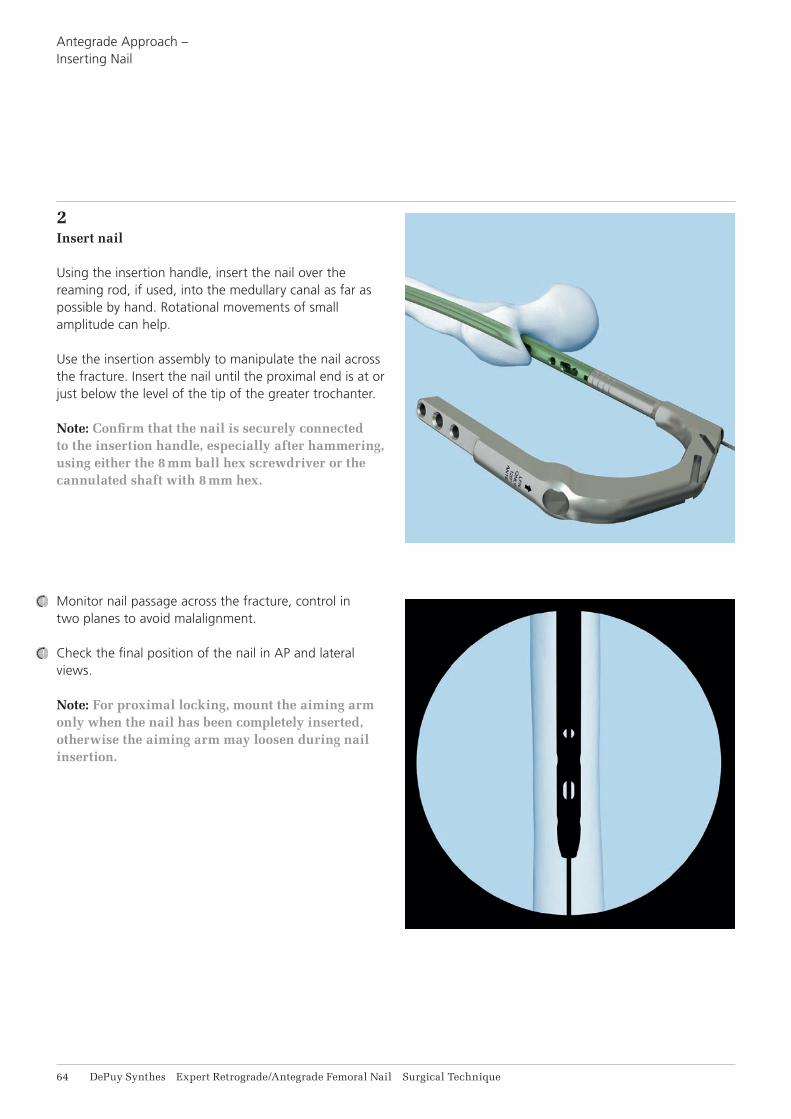
2Insert nail
Using the insertion handle, insert the nail over the ream-ing rod, if used, into the medullary canal as far as possi-ble by hand. Rotational movements of small amplitude can help.
Monitor nail passage across the fracture, control in two planes to avoid malalignment.
Use the insertion assembly to manipulate the nail across the fracture. Insert the nail until the distal end is inserted 2 to 5 mm beyond the articular cartilage.
Expert Retrograde/Antegrade Femoral Nail Surgical Technique DePuy Synthes 21
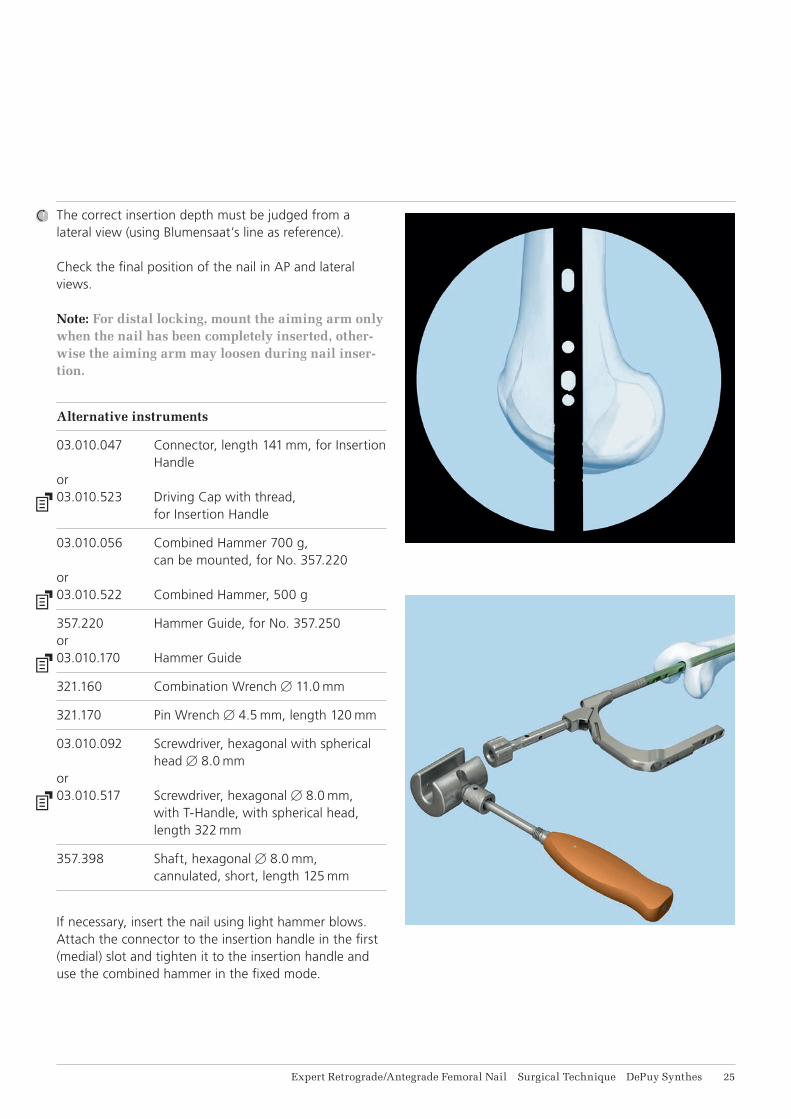
The correct insertion depth must be judged from a lateral view (using Blumensaat’s line as reference).
Check the final position of the nail in AP and lateral views.
Note: For distal locking, mount the aiming arm only when the nail has been completely inserted, other-wise the aiming arm may loosen during nail inser-tion.
Alternative instruments
03.010.047 Connector, length 141 mm, for Insertion Handle
or 03.010.523 Driving Cap with thread,
for Insertion Handle
03.010.056 Combined Hammer 700 g, can be mounted, for No. 357.220
or03.010.522 Combined Hammer, 500 g
357.220 Hammer Guide, for No. 357.250or03.010.170 Hammer Guide
321.160 Combination Wrench B11.0 mm
321.170 Pin Wrench B4.5 mm, length 120 mm
03.010.092 Screwdriver, hexagonal with spherical head B8.0 mm
or03.010.517 Screwdriver, hexagonal B 8.0 mm,
with T-Handle, with spherical head, length 322 mm
357.398 Shaft, hexagonal B8.0 mm, cannulated, short, length 125 mm
If necessary, insert the nail using light hammer blows. Attach the connector to the insertion handle in the first (medial) slot and tighten it to the insertion handle and use the combined hammer in the fixed mode.
26 DePuy Synthes Expert Retrograde/Antegrade Femoral Nail Surgical Technique
Retrograde Approach –Inserting Nail
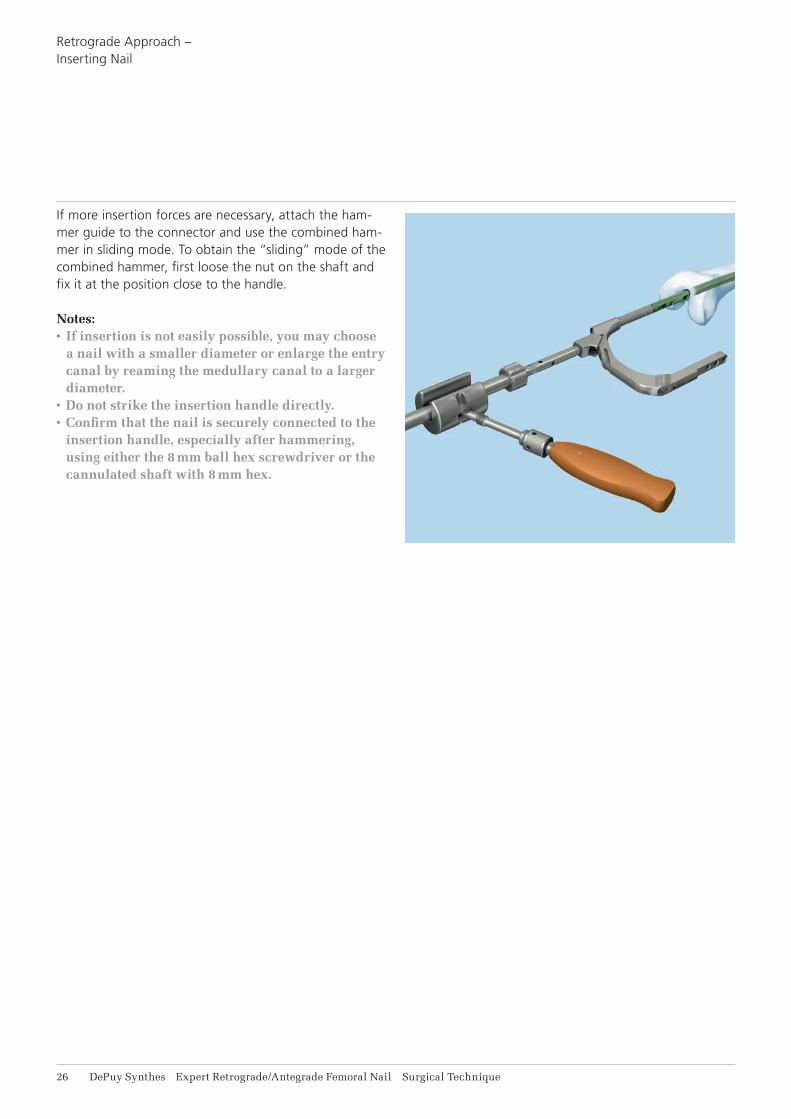
If more insertion forces are necessary, attach the ham-mer guide to the connector and use the combined ham-mer in sliding mode. To obtain the “sliding” mode of the combined hammer, first loose the nut on the shaft and fix it at the position close to the handle.
Notes: • If insertion is not easily possible, you may choose
a nail with a smaller diameter or enlarge the entry canal by reaming the medullary canal to a larger diameter.
• Do not strike the insertion handle directly.• Confirm that the nail is securely connected to the
insertion handle, especially after hammering, using either the 8 mm ball hex screwdriver or the cannulated shaft with 8 mm hex.
Expert Retrograde/Antegrade Femoral Nail Surgical Technique DePuy Synthes 27
If the proximal aiming device is used for interlocking, please refer to page 47.
1Mount aiming arm for retrograde standard locking
Instrument
03.010.481 Aiming Arm, radiolucent, for Expert R/AFN, retrograde, for Standard Locking
or03.010.050 Aiming Arm for Expert R/AFN,
retrograde, for Standard Locking
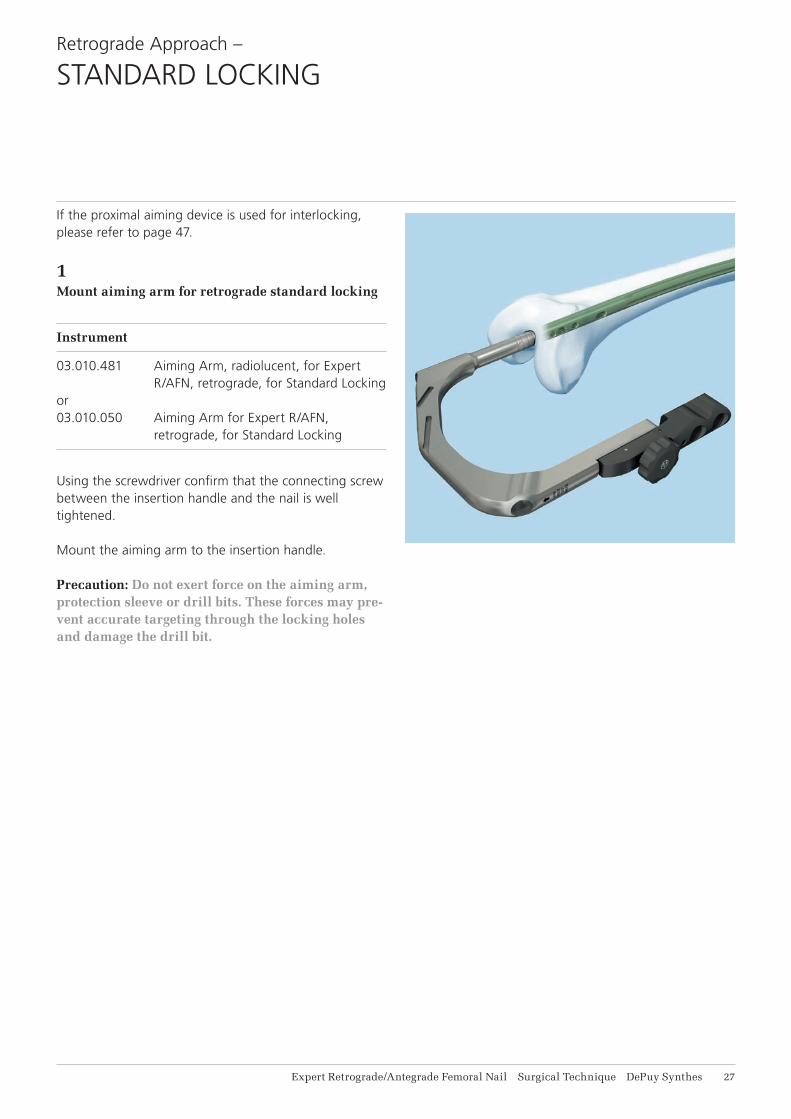
Using the screwdriver confirm that the connecting screw between the insertion handle and the nail is well tightened.
Mount the aiming arm to the insertion handle.
Precaution: Do not exert force on the aiming arm, protection sleeve or drill bits. These forces may pre-vent accurate targeting through the locking holes and damage the drill bit.
Retrograde Approach –
STANDARD LOCKING
28 DePuy Synthes Expert Retrograde/Antegrade Femoral Nail Surgical Technique
Retrograde Approach – Standard Locking
2Insert trocar combination
Instruments
03.010.063 Protection Sleeve 12.0/8.0, length 188 mm
03.010.065 Drill Sleeve 8.0/4.2, for No. 03.010.063
03.010.070 Trocar B4.2 mm, for No. 03.010.065
For nails B9.0 to 13.0 mm (light green): Locking screws B5.0 mm
Assemble the three-part trocar combination (protection sleeve, drill sleeve and trocar) and insert it through the desired LM hole in the aiming arm. Make a stab inci-sion and insert the trocar to the bone.
Remove the trocar.
Optional instruments
03.010.066 Drill Sleeve 8.0/5.0, for No. 03.010.063
03.010.071 Trocar B5.0 mm, for No. 03.010.066
For nails B14.0 and 15.0 mm (aqua): Locking screws B6.0 mm
Follow the procedure described above.
Expert Retrograde/Antegrade Femoral Nail Surgical Technique DePuy Synthes 29
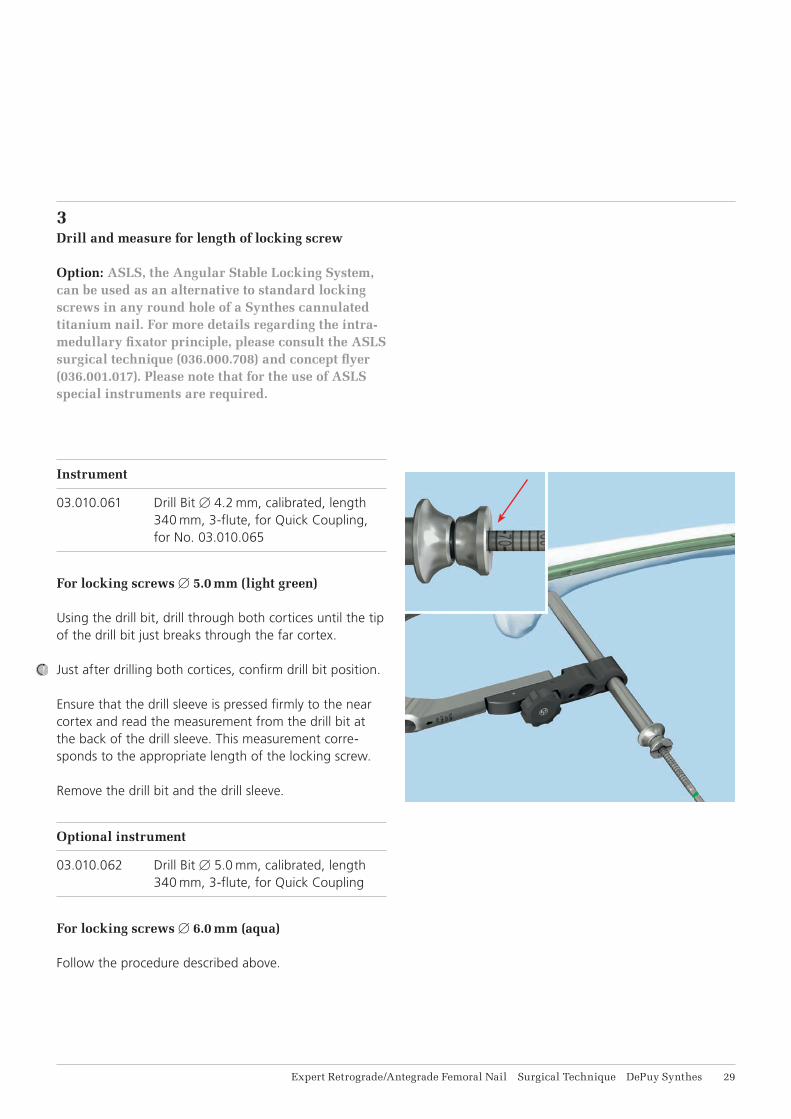
3Drill and measure for length of locking screw
Option: ASLS, the Angular Stable Locking System, can be used as an alternative to standard locking screws in any round hole of a Synthes cannulated titanium nail. For more details regarding the intra-medullary fixator principle, please consult the ASLS surgical technique (036.000.708) and concept flyer (036.001.017). Please note that for the use of ASLS special instruments are required.
Instrument
03.010.061 Drill Bit B4.2 mm, calibrated, length 340 mm, 3-flute, for Quick Coupling, for No. 03.010.065
For locking screws B5.0 mm (light green)
Using the drill bit, drill through both cortices until the tip of the drill bit just breaks through the far cortex.
Just after drilling both cortices, confirm drill bit position.
Ensure that the drill sleeve is pressed firmly to the near cortex and read the measurement from the drill bit at the back of the drill sleeve. This measurement corre-sponds to the appropriate length of the locking screw.
Remove the drill bit and the drill sleeve.
Optional instrument
03.010.062 Drill Bit B5.0 mm, calibrated, length 340 mm, 3-flute, for Quick Coupling
For locking screws B6.0 mm (aqua)
Follow the procedure described above.

11 DePuy Synthes Expert Retrograde/Antegrade Femoral Nail Surgical Technique
Retrograde Approach – Standard Locking
Alternative instrument
03.010.072 Depth Gauge for Locking Screws, measuring range up to 110 mm, for No. 03.010.063
or03.010.428 Depth Gauge for Locking Screws,
measuring range to 110 mm
After drilling both cortices, remove the drill bit and the drill sleeve.
Disassemble the depth gauge into two parts: the sleeve and the slider with hook. Insert the slider with hook into the protection sleeve. Make sure that the hook is just outside the far cortex and that the protection sleeve is firmly pressed against the near cortex.
Control the correct position of the hook of the depth gauge in regard to the far cortex of the femur.
Read the measurement on the shaft of the depth gauge, which corresponds to the appropriate length of the locking screw.
Expert Retrograde/Antegrade Femoral Nail Surgical Technique DePuy Synthes 11
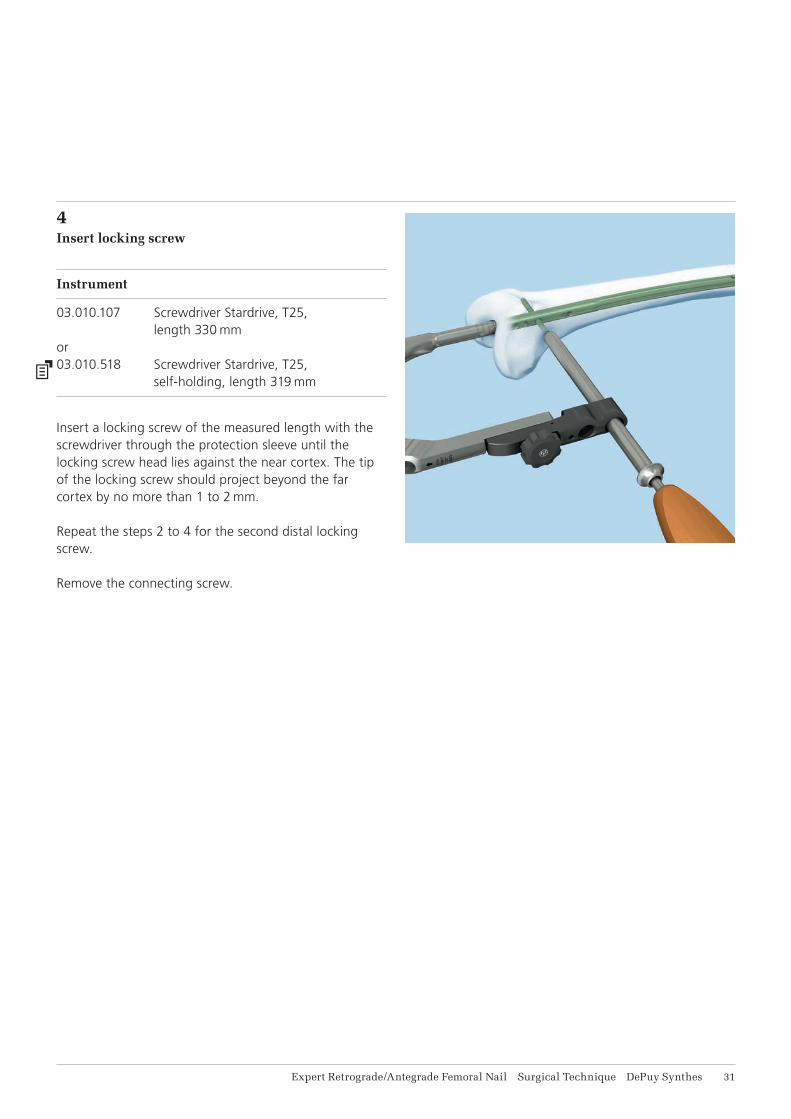
4Insert locking screw
Instrument
03.010.107 Screwdriver Stardrive, T25, length 330 mm
or03.010.518 Screwdriver Stardrive, T25,
self-holding, length 319 mm
Insert a locking screw of the measured length with the screwdriver through the protection sleeve until the locking screw head lies against the near cortex. The tip of the locking screw should project beyond the far cortex by no more than 1 to 2 mm.
Repeat the steps 2 to 4 for the second distal locking screw.
Remove the connecting screw.
12 DePuy Synthes Expert Retrograde/Antegrade Femoral Nail Surgical Technique
Retrograde Approach –
END CAP INSERTION
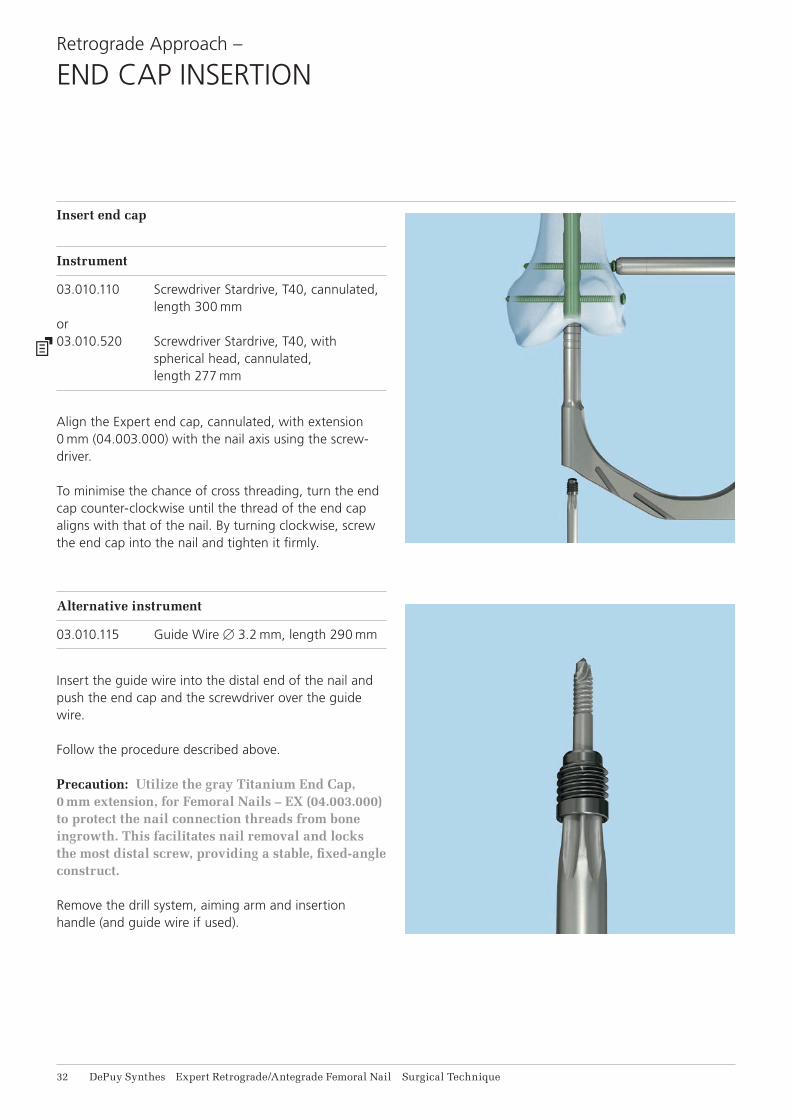
Insert end cap
Instrument
03.010.110 Screwdriver Stardrive, T40, cannulated, length 300 mm
or03.010.520 Screwdriver Stardrive, T40, with
spherical head, cannulated, length 277 mm
Align the Expert end cap, cannulated, with extension 0 mm (04.003.000) with the nail axis using the screw-driver.
To minimise the chance of cross threading, turn the end cap counter-clockwise until the thread of the end cap aligns with that of the nail. By turning clockwise, screw the end cap into the nail and tighten it firmly.
Alternative instrument
03.010.115 Guide Wire B3.2 mm, length 290 mm
Insert the guide wire into the distal end of the nail and push the end cap and the screwdriver over the guide wire.
Follow the procedure described above.
Precaution: Utilize the gray Titanium End Cap, 0 mm extension, for Femoral Nails – EX (04.003.000) to protect the nail connection threads from bone ingrowth. This facilitates nail removal and locks the most distal screw, providing a stable, fixed-angle construct.
Remove the drill system, aiming arm and insertion handle (and guide wire if used).
Expert Retrograde/Antegrade Femoral Nail Surgical Technique DePuy Synthes 11
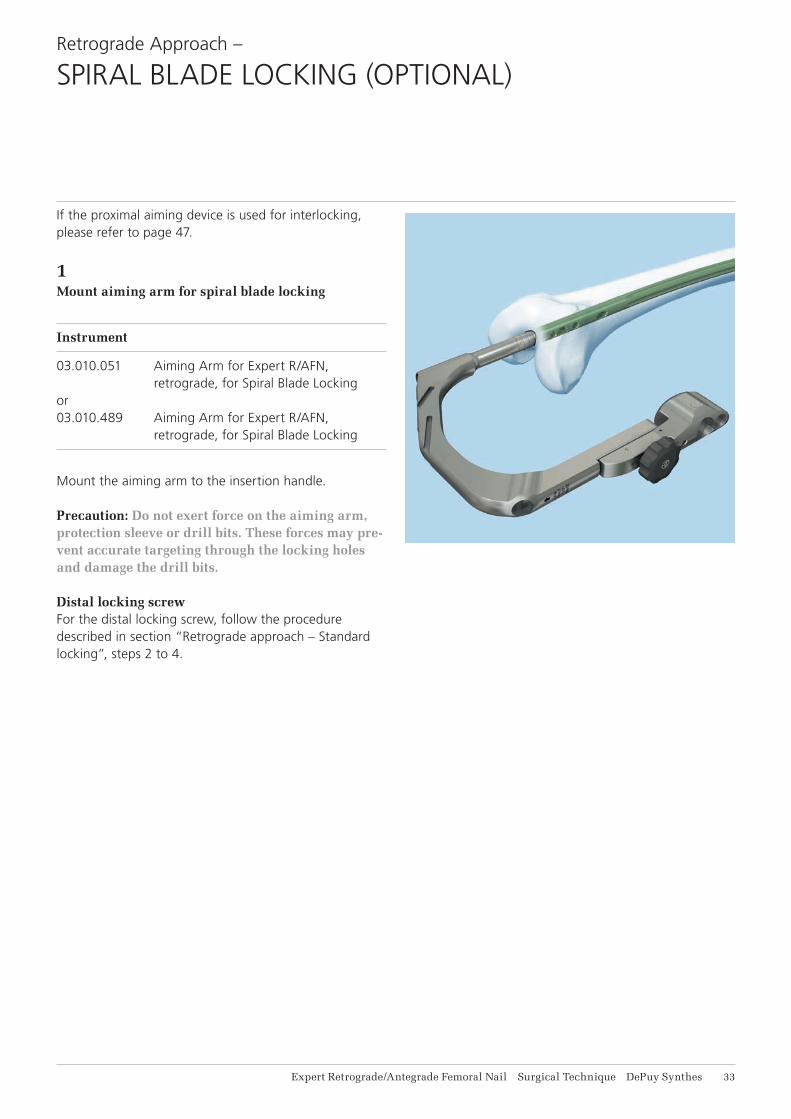
If the proximal aiming device is used for interlocking, please refer to page 47.
1Mount aiming arm for spiral blade locking
Instrument
03.010.051 Aiming Arm for Expert R/AFN, retrograde, for Spiral Blade Locking
or03.010.489 Aiming Arm for Expert R/AFN,
retrograde, for Spiral Blade Locking
Mount the aiming arm to the insertion handle.
Precaution: Do not exert force on the aiming arm, protection sleeve or drill bits. These forces may pre-vent accurate targeting through the locking holes and damage the drill bits.
Distal locking screwFor the distal locking screw, follow the procedure described in section “Retrograde approach – Standard locking”, steps 2 to 4.
Retrograde Approach –
SPIRAL BLADE LOCKING (OPTIONAL)
14 DePuy Synthes Expert Retrograde/Antegrade Femoral Nail Surgical Technique
Retrograde Approach – Spiral Blade Locking (Optional)
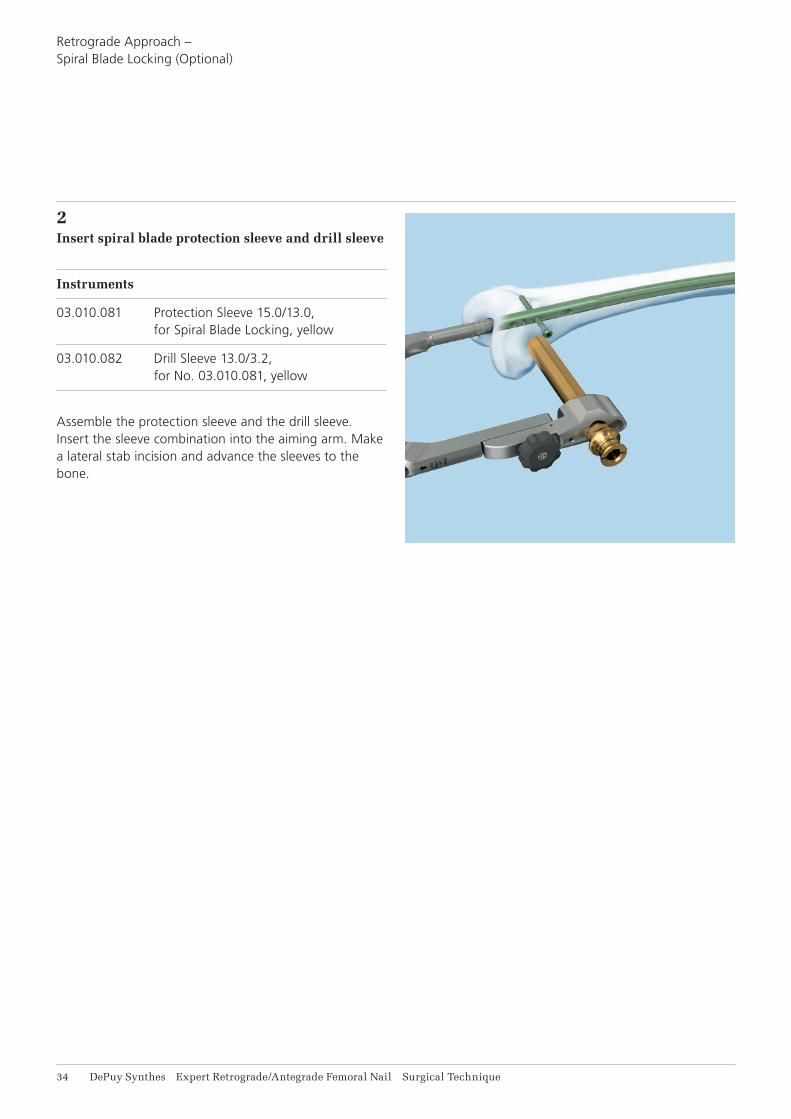
2Insert spiral blade protection sleeve and drill sleeve
Instruments
03.010.081 Protection Sleeve 15.0/13.0, for Spiral Blade Locking, yellow
03.010.082 Drill Sleeve 13.0/3.2, for No. 03.010.081, yellow
Assemble the protection sleeve and the drill sleeve. Insert the sleeve combination into the aiming arm. Make a lateral stab incision and advance the sleeves to the bone.
Expert Retrograde/Antegrade Femoral Nail Surgical Technique DePuy Synthes 11
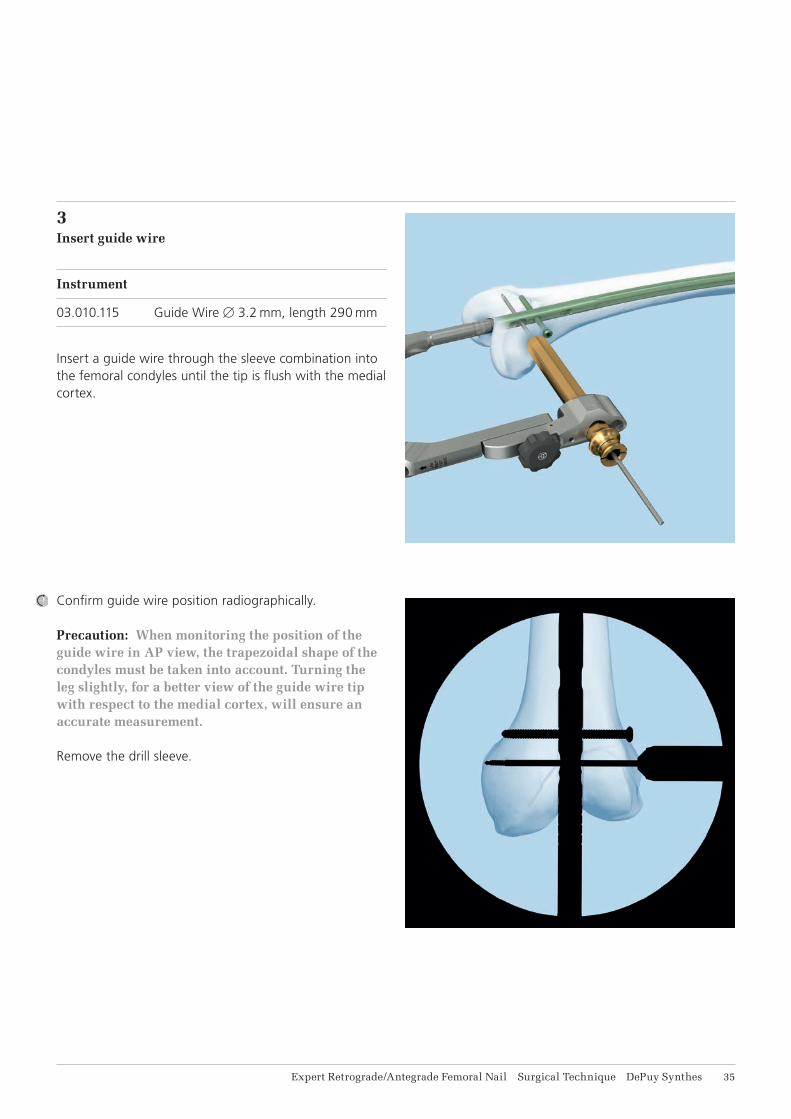
3Insert guide wire
Instrument
03.010.115 Guide Wire B3.2 mm, length 290 mm
Insert a guide wire through the sleeve combination into the femoral condyles until the tip is flush with the medial cortex.
Confirm guide wire position radiographically.
Precaution: When monitoring the position of the guide wire in AP view, the trapezoidal shape of the condyles must be taken into account. Turning the leg slightly, for a better view of the guide wire tip with respect to the medial cortex, will ensure an accurate measurement.
Remove the drill sleeve.
16 DePuy Synthes Expert Retrograde/Antegrade Femoral Nail Surgical Technique
Retrograde Approach – Spiral Blade Locking (Optional)
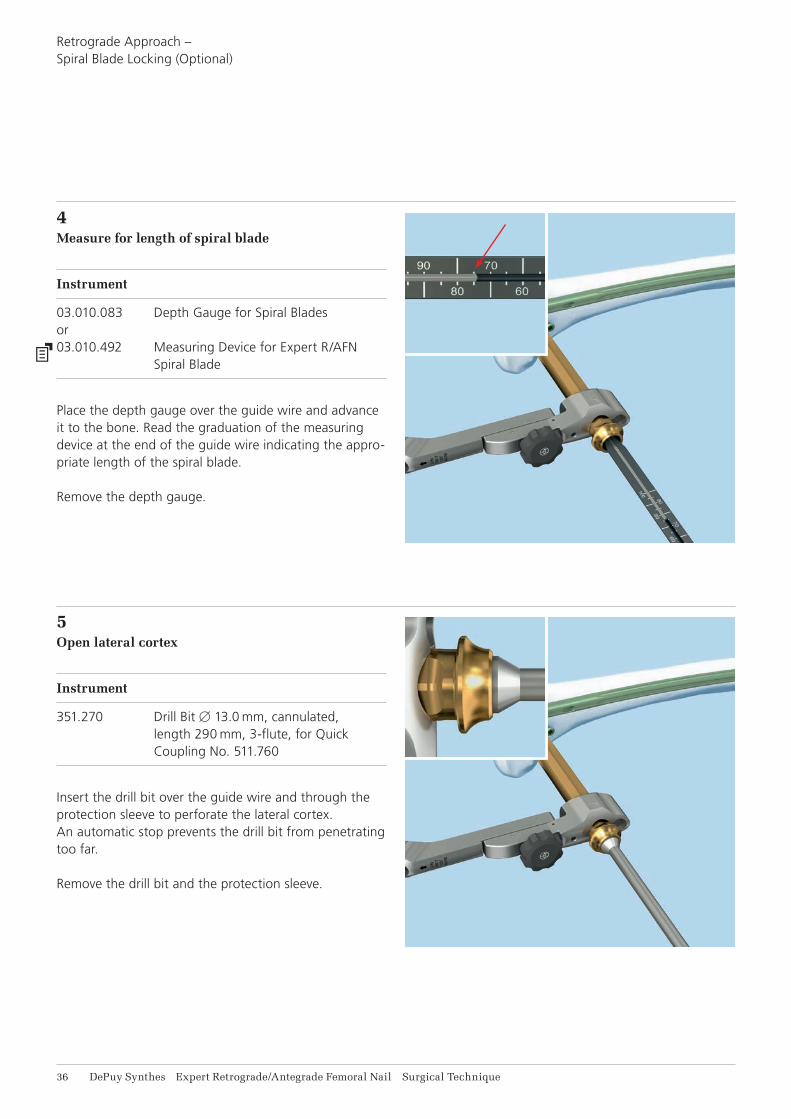
4Measure for length of spiral blade
Instrument
03.010.083 Depth Gauge for Spiral Bladesor03.010.492 Measuring Device for Expert R/AFN
Spiral Blade
Place the depth gauge over the guide wire and advance it to the bone. Read the graduation of the measuring device at the end of the guide wire indicating the appro-priate length of the spiral blade.
Remove the depth gauge.
5Open lateral cortex
Instrument
351.270 Drill Bit B13.0 mm, cannulated, length 290 mm, 3-flute, for Quick Coupling No. 511.760
Insert the drill bit over the guide wire and through the protection sleeve to perforate the lateral cortex. An automatic stop prevents the drill bit from penetrating too far.
Remove the drill bit and the protection sleeve.
Expert Retrograde/Antegrade Femoral Nail Surgical Technique DePuy Synthes 17
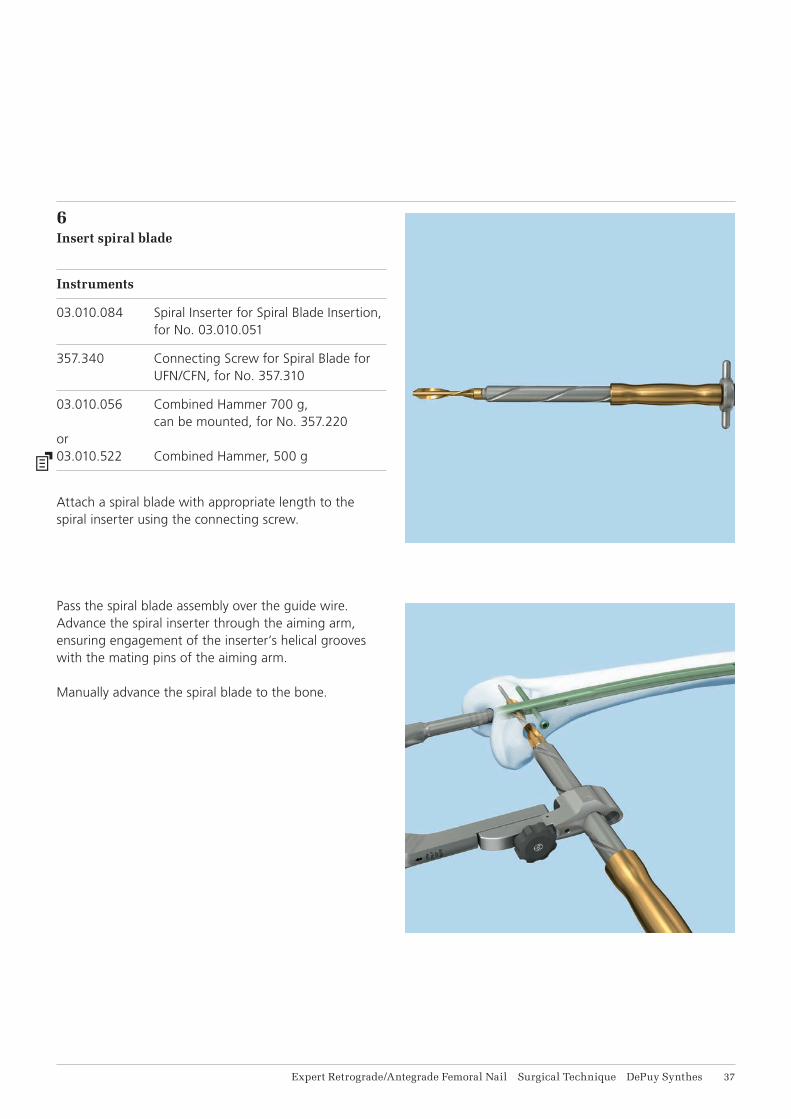
6Insert spiral blade
Instruments
03.010.084 Spiral Inserter for Spiral Blade Insertion, for No. 03.010.051
357.340 Connecting Screw for Spiral Blade for UFN/CFN, for No. 357.310
03.010.056 Combined Hammer 700 g, can be mounted, for No. 357.220
or03.010.522 Combined Hammer, 500 g
Attach a spiral blade with appropriate length to the spiral inserter using the connecting screw.
Pass the spiral blade assembly over the guide wire. Advance the spiral inserter through the aiming arm, ensuring engagement of the inserter’s helical grooves with the mating pins of the aiming arm.
Manually advance the spiral blade to the bone.
18 DePuy Synthes Expert Retrograde/Antegrade Femoral Nail Surgical Technique
Retrograde Approach – Spiral Blade Locking (Optional)
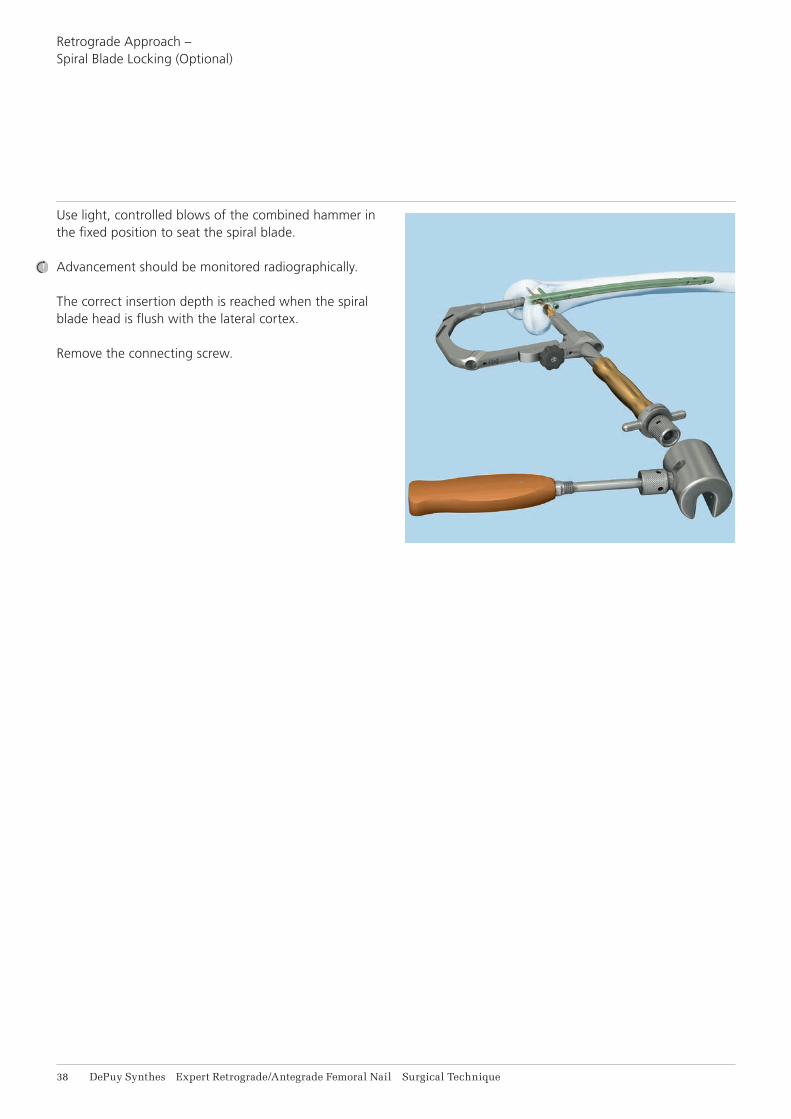
Use light, controlled blows of the combined hammer in the fixed position to seat the spiral blade.
Advancement should be monitored radiographically.
The correct insertion depth is reached when the spiral blade head is flush with the lateral cortex.
Remove the connecting screw.
Expert Retrograde/Antegrade Femoral Nail Surgical Technique DePuy Synthes 19
Insert end cap
Instrument
03.010.110 Screwdriver Stardrive, T40, cannulated, length 300 mm
or03.010.520 Screwdriver Stardrive, T40, with
spherical head, cannulated, length 277 mm
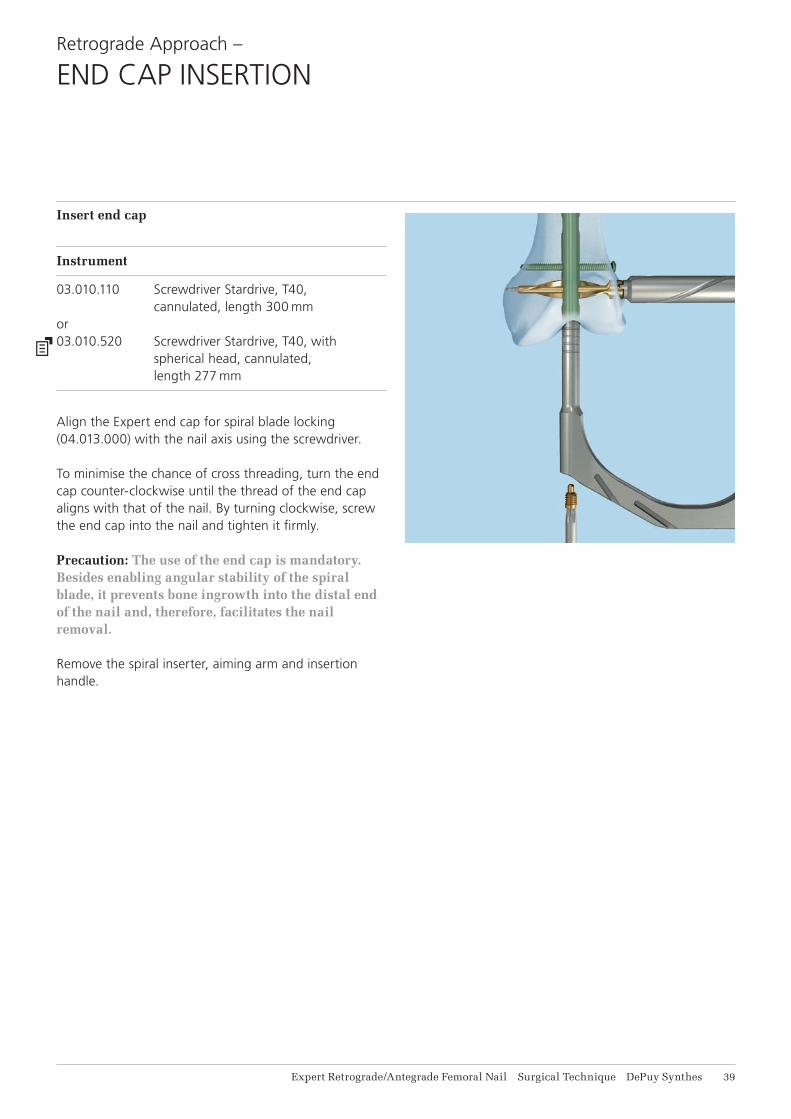
Align the Expert end cap for spiral blade locking (04.013.000) with the nail axis using the screwdriver.
To minimise the chance of cross threading, turn the end cap counter-clockwise until the thread of the end cap aligns with that of the nail. By turning clockwise, screw the end cap into the nail and tighten it firmly.
Precaution: The use of the end cap is mandatory. Besides enabling angular stability of the spiral blade, it prevents bone ingrowth into the distal end of the nail and, therefore, facilitates the nail removal.
Remove the spiral inserter, aiming arm and insertion handle.
Retrograde Approach –
END CAP INSERTION
41 DePuy Synthes Expert Retrograde/Antegrade Femoral Nail Surgical Technique
Retrograde Approach –
FREEHAND LOCKING
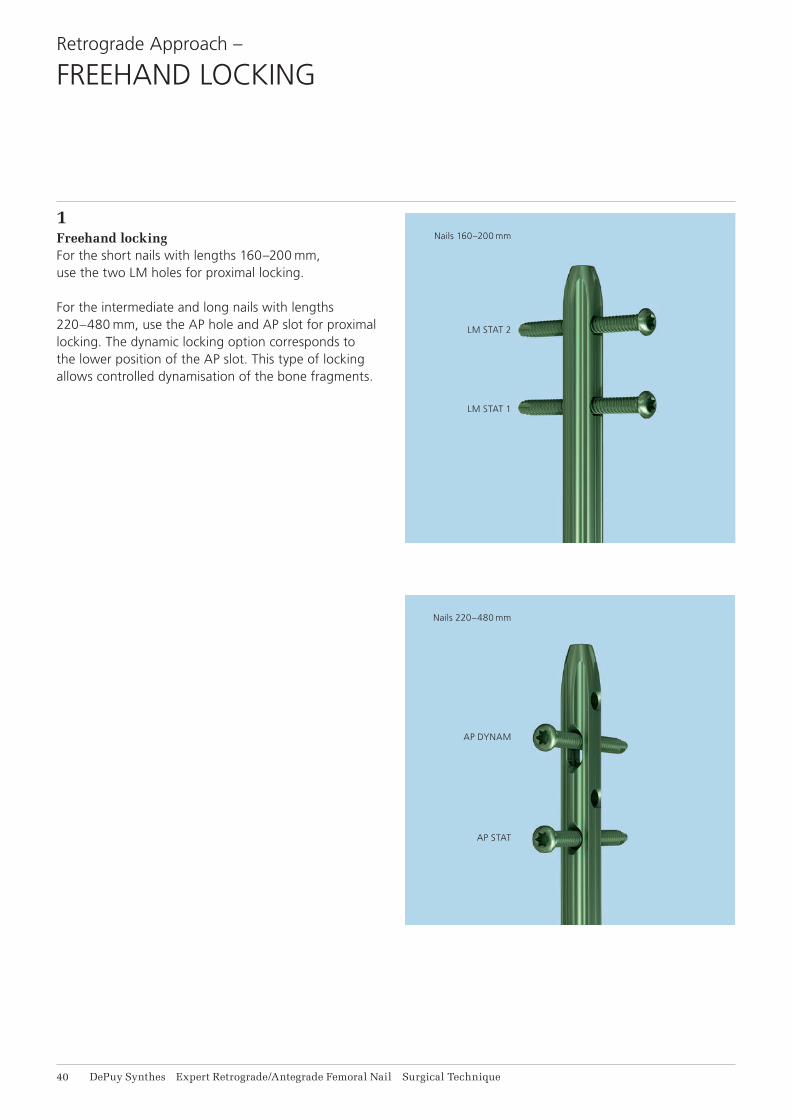
1Freehand lockingFor the short nails with lengths 160–200 mm, use the two LM holes for proximal locking.
For the intermediate and long nails with lengths 220–480 mm, use the AP hole and AP slot for proximal locking. The dynamic locking option corresponds to the lower position of the AP slot. This type of locking allows controlled dynamisation of the bone fragments.
Nails 160–200 mm
LM STAT 2
LM STAT 1
Nails 220–480 mm
AP DYNAM
AP STAT
Expert Retrograde/Antegrade Femoral Nail Surgical Technique DePuy Synthes 41
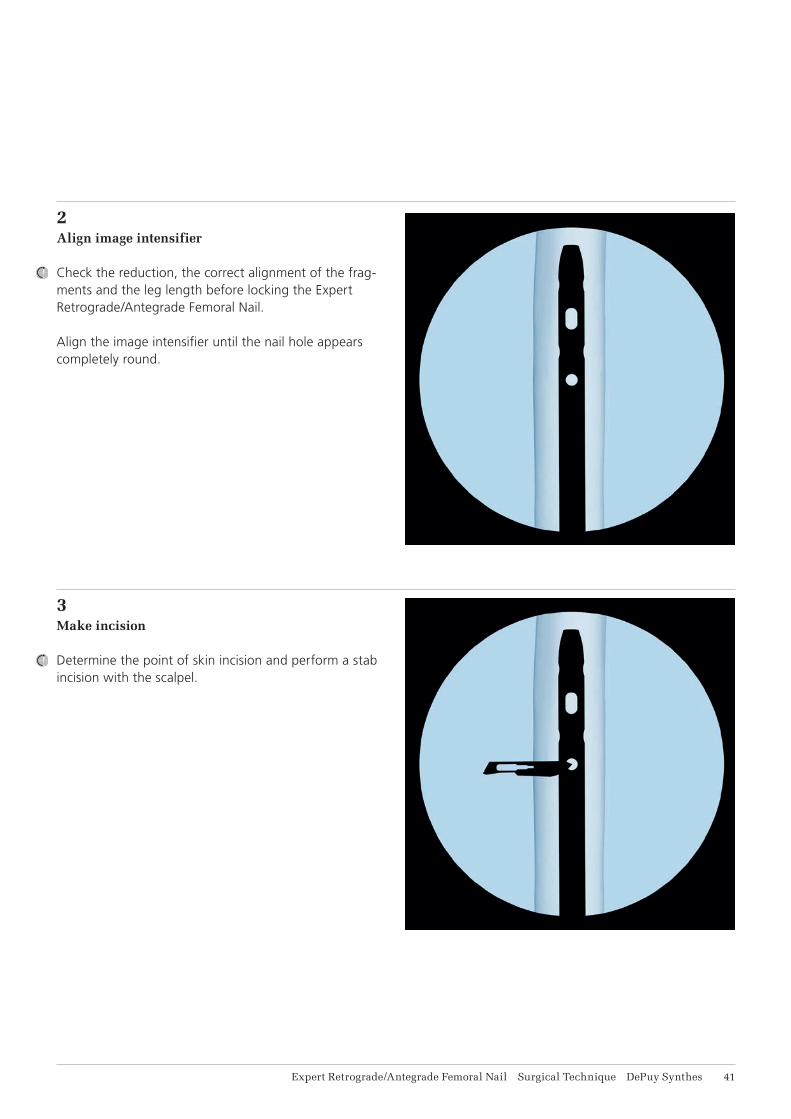
2Align image intensifier
Check the reduction, the correct alignment of the frag-ments and the leg length before locking the Expert Retrograde/Antegrade Femoral Nail.
Align the image intensifier until the nail hole appears completely round.
3Make incision
Determine the point of skin incision and perform a stab incision with the scalpel.

42 DePuy Synthes Expert Retrograde/Antegrade Femoral Nail Surgical Technique
Retrograde Approach – Freehand Locking
4Drill
Option: ASLS, the Angular Stable Locking System, can be used as an alternative to standard locking screws in any round hole of a Synthes cannulated titanium nail. For more details regarding the intra-medullary fixator principle, please consult the ASLS surgical technique (036.000.708) and concept flyer (036.001.017). Please note that for the use of ASLS special instruments are required.
Instrument
03.010.101 Drill Bit B4.2 mm, calibrated, length 145 mm, 3-flute, with Coupling for RDL
For nails B9.0 to 13.0 mm (light green): Locking screws B5.0 mm
Insert the desired drill bit into the radiolucent drive (511.300) and push through the incision down to the bone.
Expert Retrograde/Antegrade Femoral Nail Surgical Technique DePuy Synthes 41
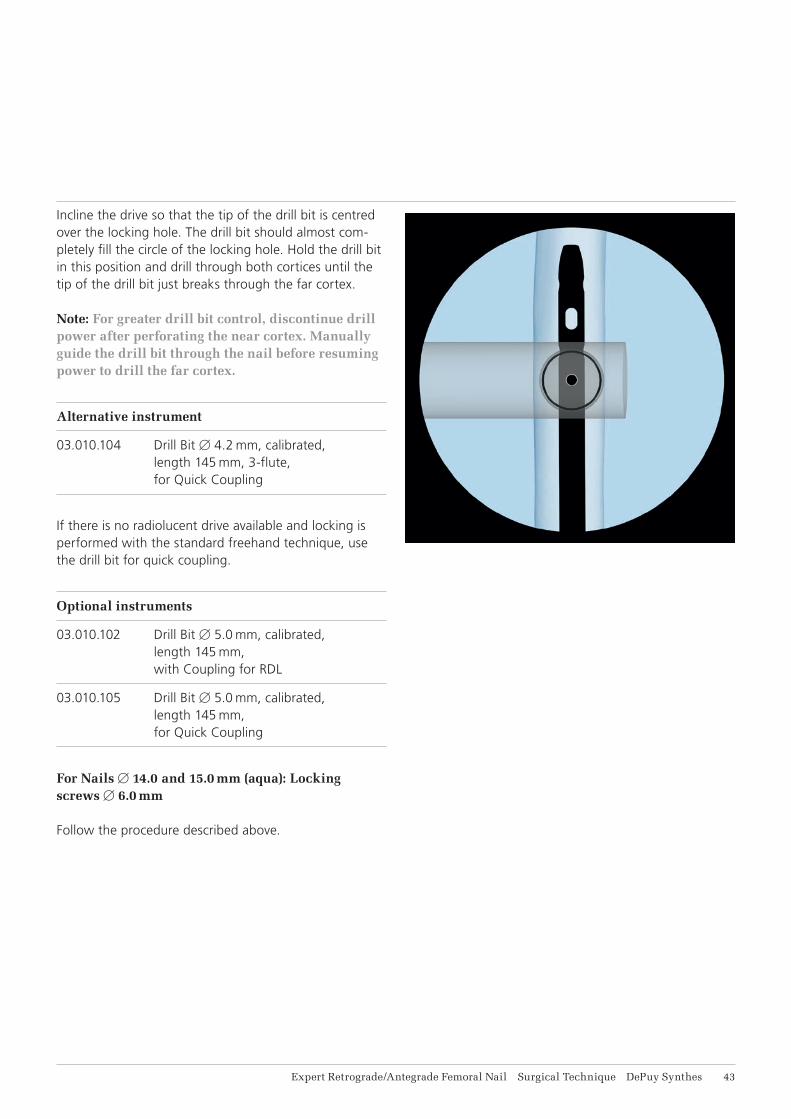
Incline the drive so that the tip of the drill bit is centred over the locking hole. The drill bit should almost com-pletely fill the circle of the locking hole. Hold the drill bit in this position and drill through both cortices until the tip of the drill bit just breaks through the far cortex.
Note: For greater drill bit control, discontinue drill power after perforating the near cortex. Manually guide the drill bit through the nail before resuming power to drill the far cortex.
Alternative instrument
03.010.104 Drill Bit B4.2 mm, calibrated, length 145 mm, 3-flute, for Quick Coupling
If there is no radiolucent drive available and locking is performed with the standard freehand technique, use the drill bit for quick coupling.
Optional instruments
03.010.102 Drill Bit B5.0 mm, calibrated, length 145 mm, with Coupling for RDL
03.010.105 Drill Bit B5.0 mm, calibrated, length 145 mm, for Quick Coupling
For Nails B14.0 and 15.0 mm (aqua): Locking screws B 6.0 mm
Follow the procedure described above.
44 DePuy Synthes Expert Retrograde/Antegrade Femoral Nail Surgical Technique
Retrograde Approach – Freehand Locking
5Measure for length of locking screw
Instrument
03.010.072 Depth Gauge for Locking Screws, measuring range up to 110 mm, for No. 03.010.063
or03.010.428 Depth Gauge for Locking Screws,
measuring range to 110 mm
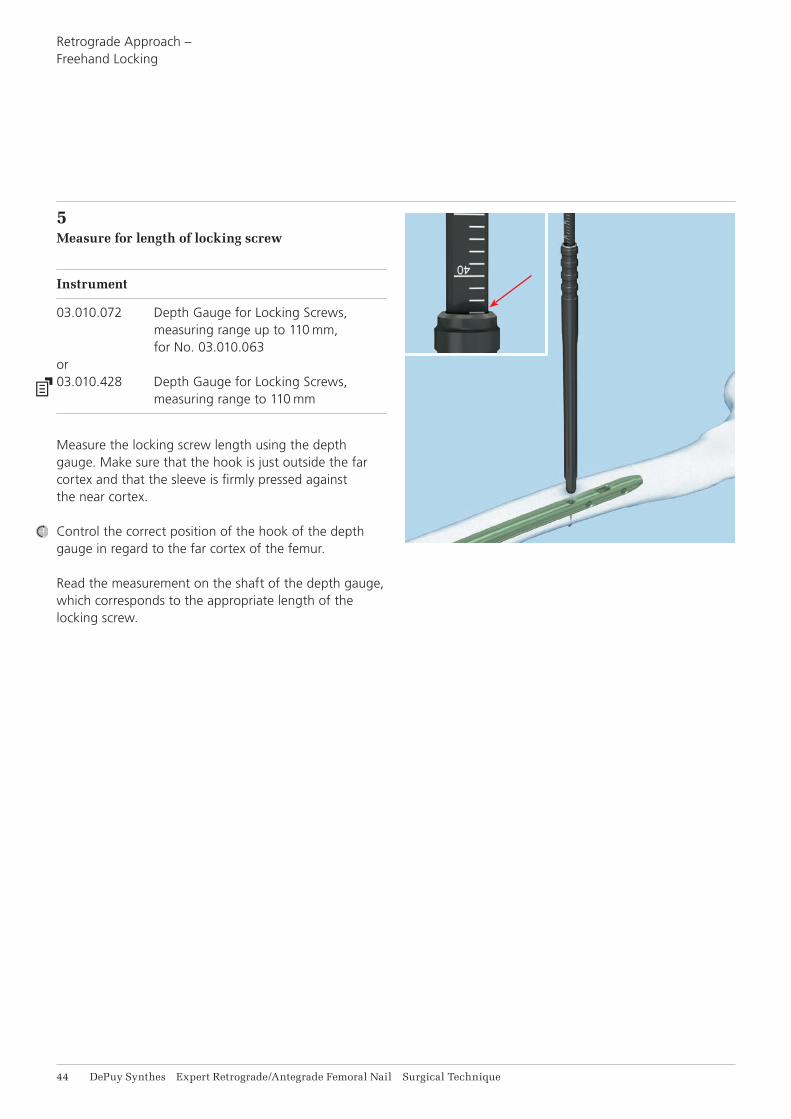
Measure the locking screw length using the depth gauge. Make sure that the hook is just outside the far cortex and that the sleeve is firmly pressed against the near cortex.
Control the correct position of the hook of the depth gauge in regard to the far cortex of the femur.
Read the measurement on the shaft of the depth gauge, which corresponds to the appropriate length of the locking screw.
Expert Retrograde/Antegrade Femoral Nail Surgical Technique DePuy Synthes 41
Alternative instrument
03.010.106 Direct Measuring Device for Drill Bits of length 145 mm, for Nos. 03.010.100 to 03.010.105
or03.010.429 Direct Measuring Device for Drill Bits,
length 145 mm
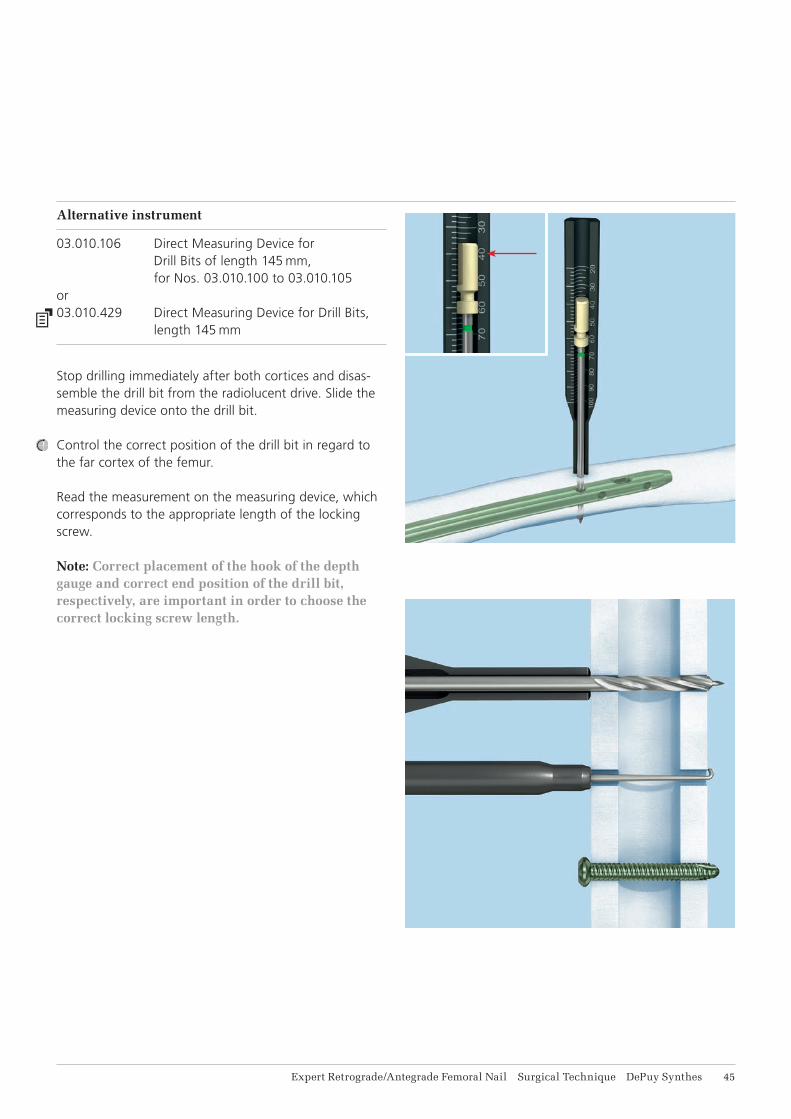
Stop drilling immediately after both cortices and disas-semble the drill bit from the radiolucent drive. Slide the measuring device onto the drill bit.
Control the correct position of the drill bit in regard to the far cortex of the femur.
Read the measurement on the measuring device, which corresponds to the appropriate length of the locking screw.
Note: Correct placement of the hook of the depth gauge and correct end position of the drill bit, respectively, are important in order to choose the correct locking screw length.
a
b
c
d
e
46 DePuy Synthes Expert Retrograde/Antegrade Femoral Nail Surgical Technique
Retrograde Approach – Freehand Locking
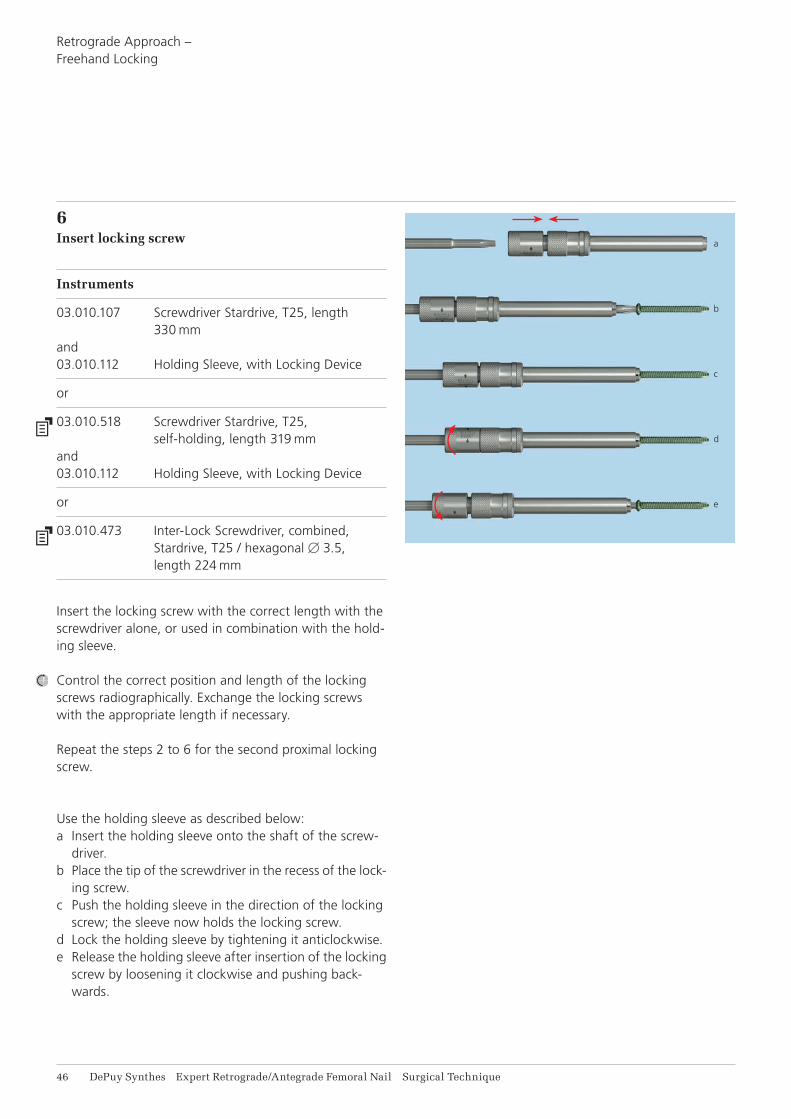
6Insert locking screw
Instruments
03.010.107 Screwdriver Stardrive, T25, length 330 mm
and03.010.112 Holding Sleeve, with Locking Device
or
03.010.518 Screwdriver Stardrive, T25, self-holding, length 319 mm
and03.010.112 Holding Sleeve, with Locking Device
or
03.010.473 Inter-Lock Screwdriver, combined, Stardrive, T25 / hexagonal B3.5, length 224 mm
Insert the locking screw with the correct length with the screwdriver alone, or used in combination with the hold-ing sleeve.
Control the correct position and length of the locking screws radiographically. Exchange the locking screws with the appropriate length if necessary.
Repeat the steps 2 to 6 for the second proximal locking screw.
Use the holding sleeve as described below:a Insert the holding sleeve onto the shaft of the screw-
driver.b Place the tip of the screwdriver in the recess of the lock-
ing screw.c Push the holding sleeve in the direction of the locking
screw; the sleeve now holds the locking screw.d Lock the holding sleeve by tightening it anticlockwise.e Release the holding sleeve after insertion of the locking
screw by loosening it clockwise and pushing back-wards.
Expert Retrograde/Antegrade Femoral Nail Surgical Technique DePuy Synthes 47
Besides distal standard or spiral blade locking, the proxi-mal aiming device for Expert Retrograde Femoral Nail (03.010.142, 03.010.143, 03.010.144 and 03.010.129), al-lows for guided proximal locking of all Expert Retrograde Femoral Nails of length 160 to 200 mm.
Retrograde Approach –
INTERLOCKING WITH PAD FOR EXPERT RFN (OPTIONAL)
48 DePuy Synthes Expert Retrograde/Antegrade Femoral Nail Surgical Technique
Retrograde Approach –Interlocking with PAD for Expert RFN (Optional)
Distal Standard Locking
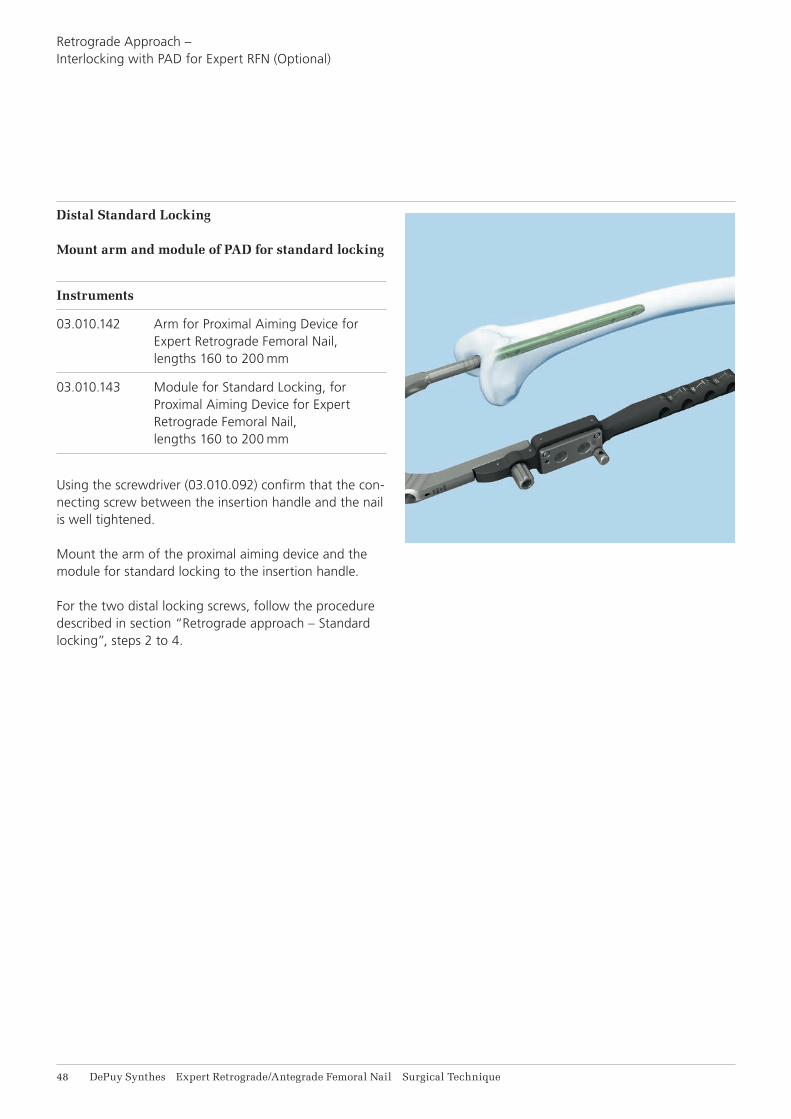
Mount arm and module of PAD for standard locking
Instruments
03.010.142 Arm for Proximal Aiming Device for Expert Retrograde Femoral Nail, lengths 160 to 200 mm
03.010.143 Module for Standard Locking, for Proximal Aiming Device for Expert Retrograde Femoral Nail, lengths 160 to 200 mm
Using the screwdriver (03.010.092) confirm that the con-necting screw between the insertion handle and the nail is well tightened.
Mount the arm of the proximal aiming device and the module for standard locking to the insertion handle.
For the two distal locking screws, follow the procedure described in section “Retrograde approach – Standard locking”, steps 2 to 4.
Expert Retrograde/Antegrade Femoral Nail Surgical Technique DePuy Synthes 49
Distal Spiral Blade Locking
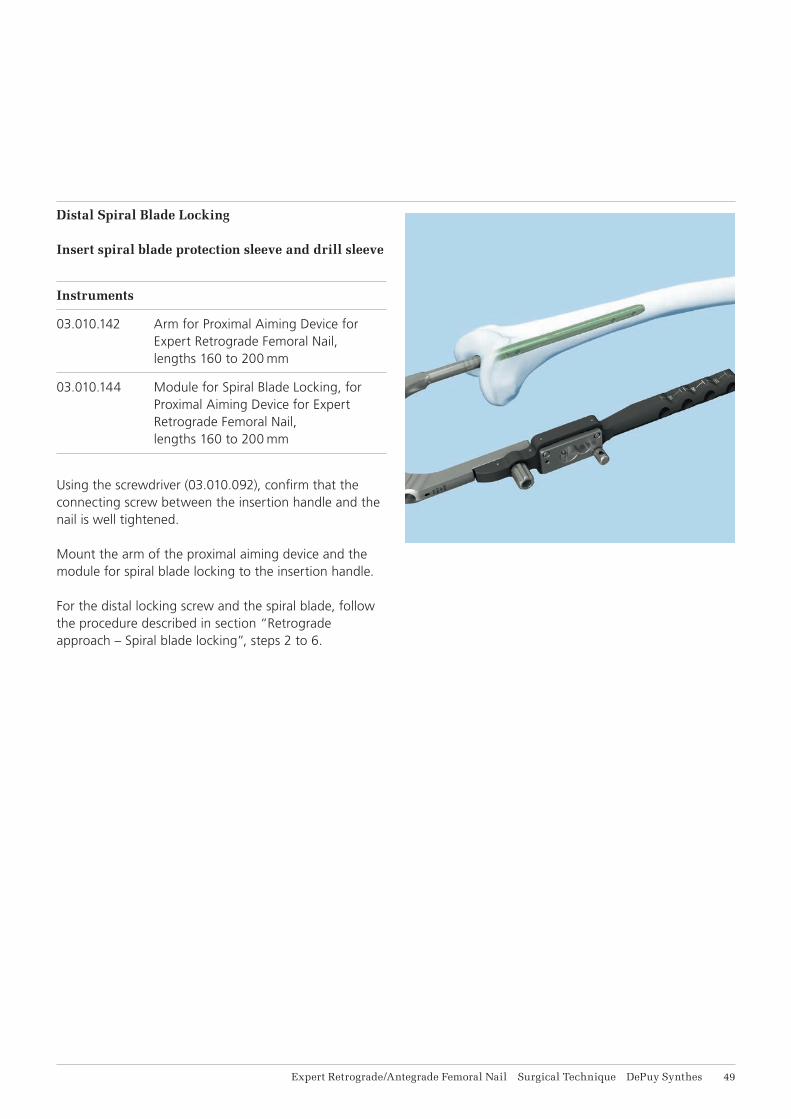
Insert spiral blade protection sleeve and drill sleeve
Instruments
03.010.142 Arm for Proximal Aiming Device for Expert Retrograde Femoral Nail, lengths 160 to 200 mm
03.010.144 Module for Spiral Blade Locking, for Proximal Aiming Device for Expert Retrograde Femoral Nail, lengths 160 to 200 mm
Using the screwdriver (03.010.092), confirm that the connecting screw between the insertion handle and the nail is well tightened.
Mount the arm of the proximal aiming device and the module for spiral blade locking to the insertion handle.
For the distal locking screw and the spiral blade, follow the procedure described in section “Retrograde approach – Spiral blade locking”, steps 2 to 6.
11 DePuy Synthes Expert Retrograde/Antegrade Femoral Nail Surgical Technique
Retrograde Approach –Interlocking with PAD for Expert RFN (Optional)
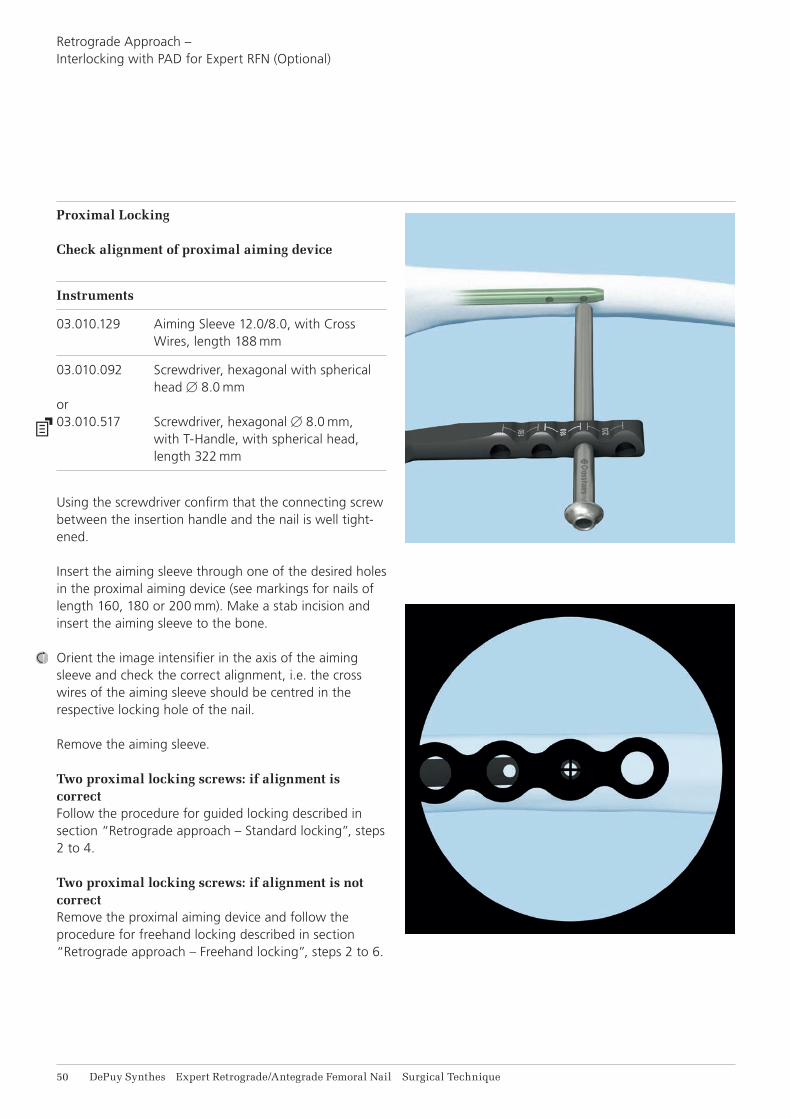
Proximal Locking
Check alignment of proximal aiming device
Instruments
03.010.129 Aiming Sleeve 12.0/8.0, with Cross Wires, length 188 mm
03.010.092 Screwdriver, hexagonal with spherical head B8.0 mm
or03.010.517 Screwdriver, hexagonal B 8.0 mm,
with T-Handle, with spherical head, length 322 mm
Using the screwdriver confirm that the connecting screw between the insertion handle and the nail is well tight-ened.
Insert the aiming sleeve through one of the desired holes in the proximal aiming device (see markings for nails of length 160, 180 or 200 mm). Make a stab incision and insert the aiming sleeve to the bone.
Orient the image intensifier in the axis of the aiming sleeve and check the correct alignment, i.e. the cross wires of the aiming sleeve should be centred in the respective locking hole of the nail.
Remove the aiming sleeve.
Two proximal locking screws: if alignment is correctFollow the procedure for guided locking described in section “Retrograde approach – Standard locking”, steps 2 to 4.
Two proximal locking screws: if alignment is not correctRemove the proximal aiming device and follow the procedure for freehand locking described in section “Retrograde approach – Freehand locking”, steps 2 to 6.
Expert Retrograde/Antegrade Femoral Nail Surgical Technique DePuy Synthes 11
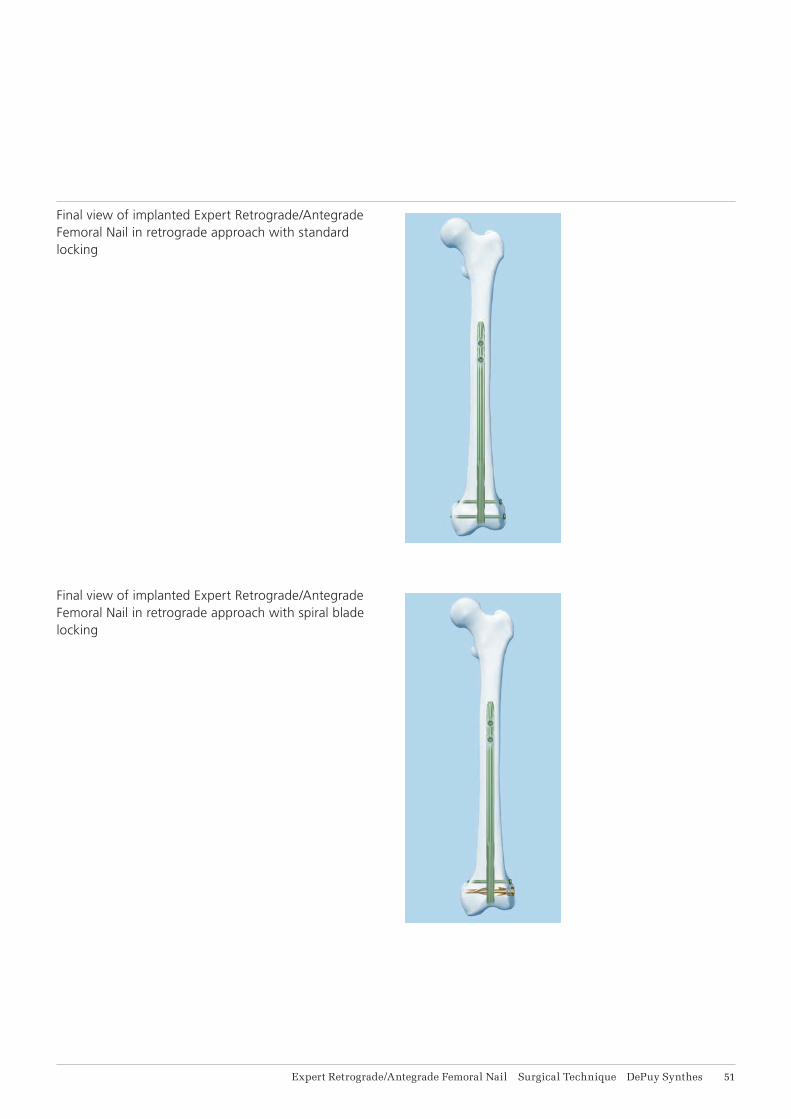
Final view of implanted Expert Retrograde/Antegrade Femoral Nail in retrograde approach with standard locking
Final view of implanted Expert Retrograde/Antegrade Femoral Nail in retrograde approach with spiral blade locking
12 DePuy Synthes Expert Retrograde/Antegrade Femoral Nail Surgical Technique
ANTEGRADE APPROACH – OPENING THE PROXIMAL FEMUR
1Position patient
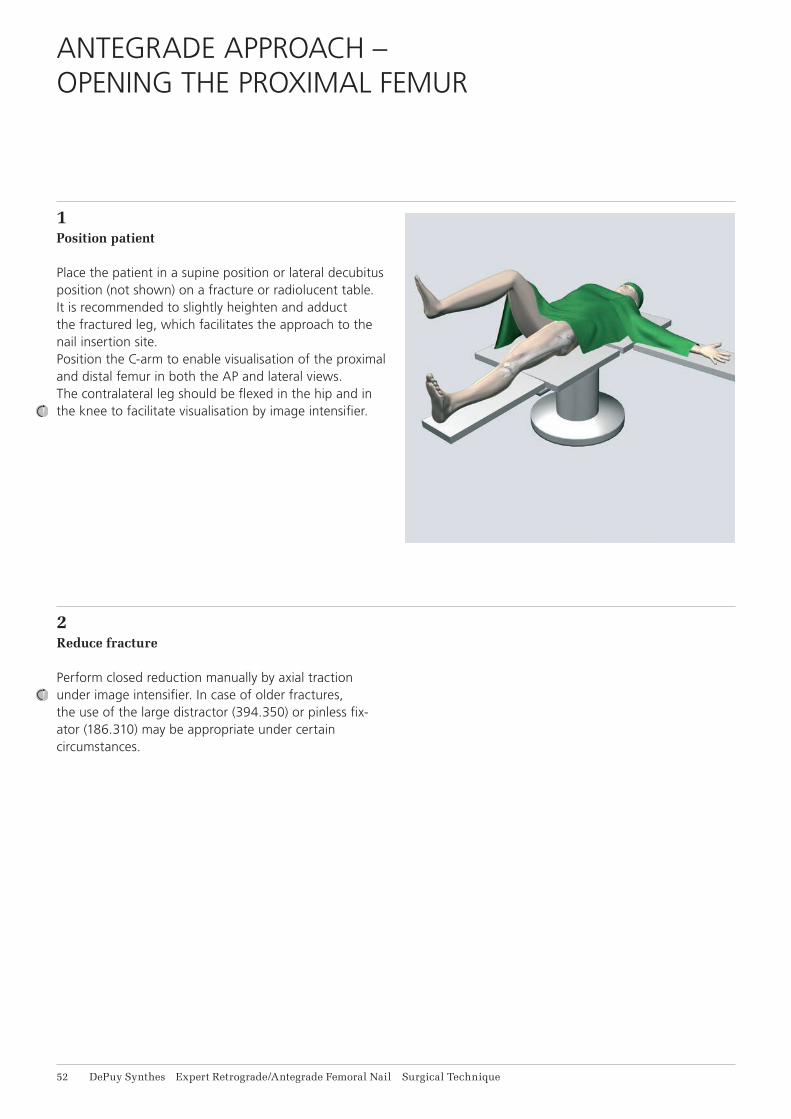
Place the patient in a supine position or lateral decubitus position (not shown) on a fracture or radiolucent table. It is recommended to slightly heighten and adduct the fractured leg, which facilitates the approach to the nail insertion site.Position the C-arm to enable visualisation of the proximal and distal femur in both the AP and lateral views. The contralateral leg should be flexed in the hip and in the knee to facilitate visualisation by image intensifier.
2Reduce fracture
Perform closed reduction manually by axial traction under image intensifier. In case of older fractures, the use of the large distractor (394.350) or pinless fix-ator (186.310) may be appropriate under certain circumstances.

Expert Retrograde/Antegrade Femoral Nail Surgical Technique DePuy Synthes 11
3Measure for length and diameter of nail
Instruments
03.010.020 Radiographic Ruler for Expert Femoral Nails
03.010.023 Radiographic Ruler for Nail Diameters for Expert Femoral Nails, length 365 mm
The required nail length must be determined after reduction of the upper leg fracture.
Position the image intensifier as for an AP view of the proximal femur. Using long forceps, hold the ruler paral-lel to the femur on the lateral side of the upper leg. position the ruler such that the end is located at or just below the level of the tip of the greater trochanter. Mark the skin on the lateral side.
14 DePuy Synthes Expert Retrograde/Antegrade Femoral Nail Surgical Technique
Antegrade Approach – Opening the Proximal Femur
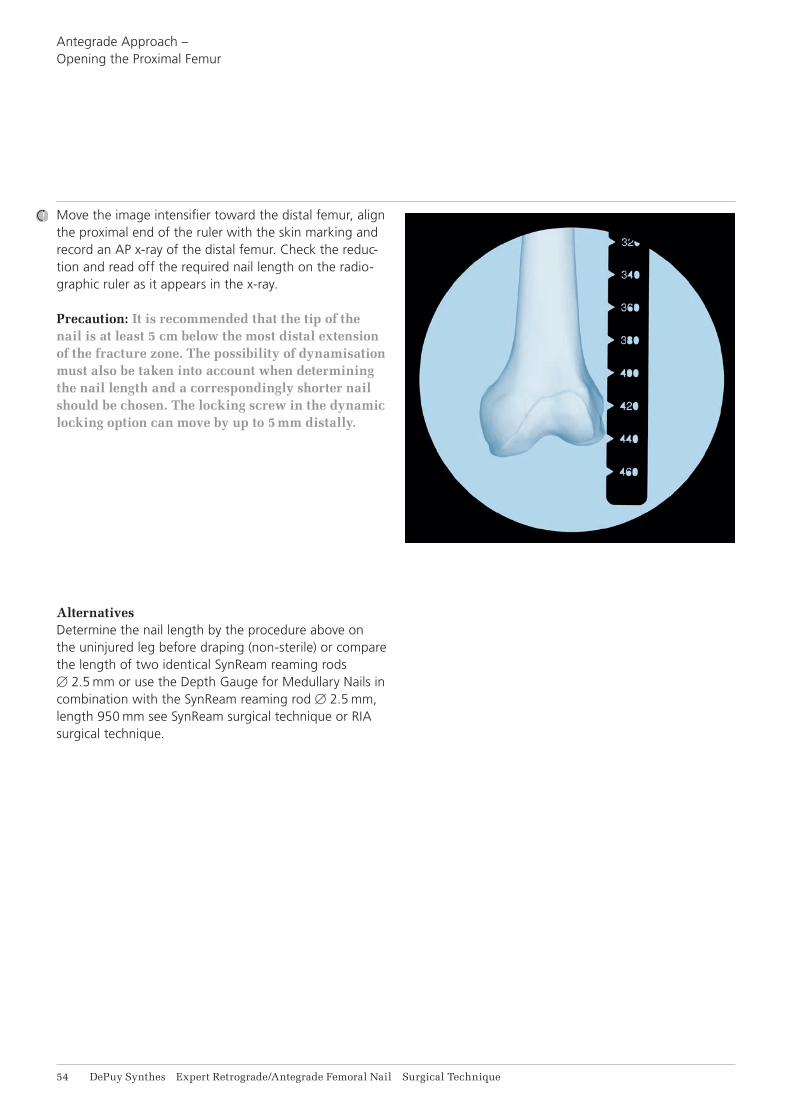
Move the image intensifier toward the distal femur, align the proximal end of the ruler with the skin marking and record an AP x-ray of the distal femur. Check the reduc-tion and read off the required nail length on the radio-graphic ruler as it appears in the x-ray.
Precaution: It is recommended that the tip of the nail is at least 5 cm below the most distal extension of the fracture zone. The possibility of dynamisation must also be taken into account when determining the nail length and a correspondingly shorter nail should be chosen. The locking screw in the dynamic locking option can move by up to 5 mm distally.
AlternativesDetermine the nail length by the procedure above on the uninjured leg before draping (non-sterile) or compare the length of two identical SynReam reaming rods B 2.5 mm or use the Depth Gauge for Medullary Nails in combination with the SynReam reaming rod B 2.5 mm, length 950 mm see SynReam surgical technique or RIA surgical technique.
Expert Retrograde/Antegrade Femoral Nail Surgical Technique DePuy Synthes 11
Place the radiographic ruler for nail diameters over the femur so that the measuring edge is located over the isthmus. Select the nail diameter shown when the me-dullary canal/cortex transition is still visible on both sides of the marking (12 mm in this example).
If the reamed technique is used, the diameter of the largest medullary reamer applied must be 0.5 to 1.5 mm larger than the nail diameter.
Note: The ruler is not at the same level as the femur. This affects the accuracy of the measurement, providing only an estimate of the canal diameter.
16 DePuy Synthes Expert Retrograde/Antegrade Femoral Nail Surgical Technique
Antegrade Approach – Opening the Proximal Femur
4Approach
Make a longitudinal stab incision about 3 cm long approximately 10 to 15 cm proximal to the tip of the greater trochanter towards the tip, through the gluteus medius.
5Determine entry point
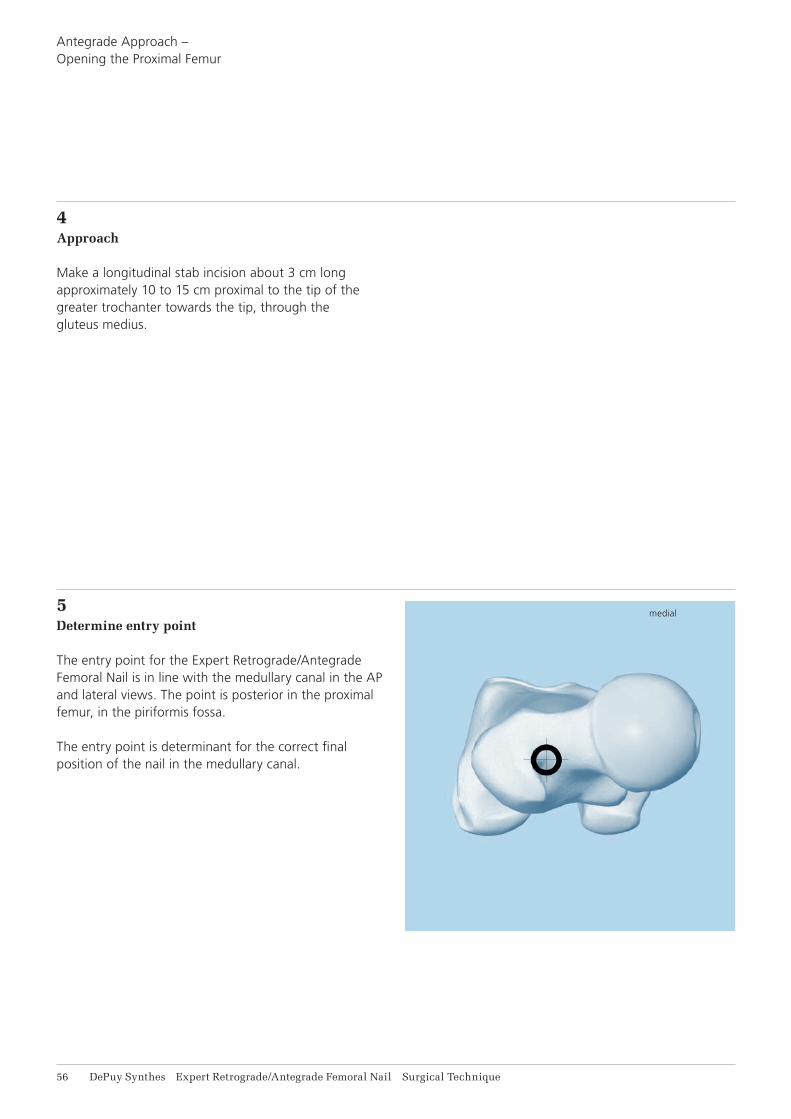
The entry point for the Expert Retrograde/Antegrade Femoral Nail is in line with the medullary canal in the AP and lateral views. The point is posterior in the proximal femur, in the piriformis fossa.
The entry point is determinant for the correct final position of the nail in the medullary canal.
medial
Expert Retrograde/Antegrade Femoral Nail Surgical Technique DePuy Synthes 17
6Insert guide wire
Instruments
03.010.500 Handle, with Quick Couplingand03.010.503 Protection Sleeve 13.0 for Expert R/AFN,
antegrade, with Quick Couplingand03.010.508 Multihole Drill Guide for Protection
Sleeve 13.0, for Expert R/AFN, antegrade
or
03.010.030 Protection Sleeve 13.0, for antegrade approach
and03.010.031 Drill Sleeve 13.0/3.2, for antegrade
approach, for No. 03.010.030
393.100 Universal Chuck with T-Handle
357.399 Guide Wire B 3.2 mm, length 400 mm
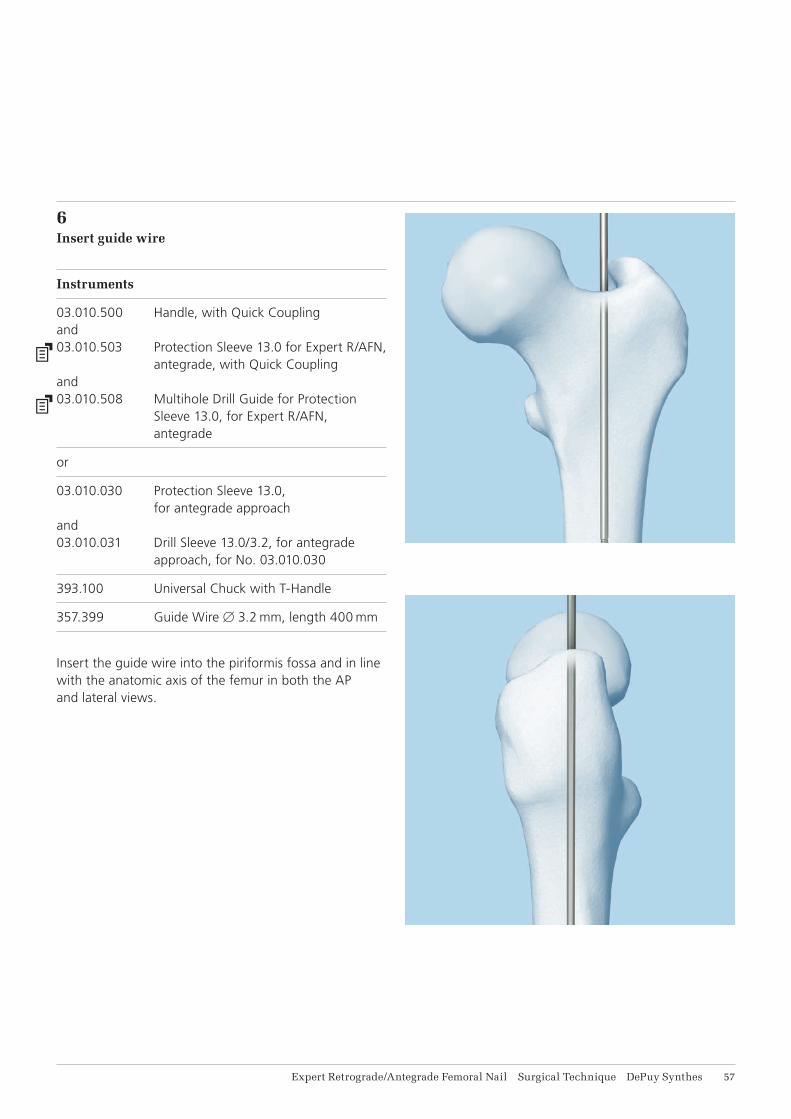
Insert the guide wire into the piriformis fossa and in line with the anatomic axis of the femur in both the AP and lateral views.
18 DePuy Synthes Expert Retrograde/Antegrade Femoral Nail Surgical Technique
Antegrade Approach – Opening the Proximal Femur
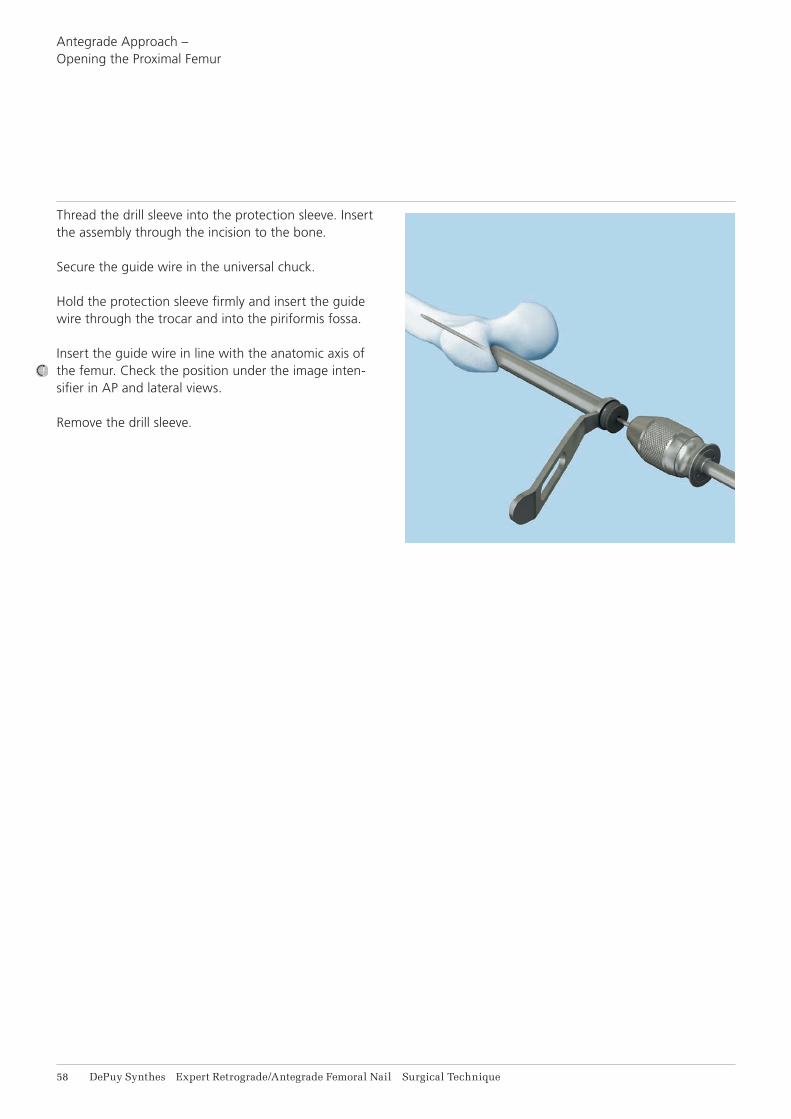
Thread the drill sleeve into the protection sleeve. Insert the assembly through the incision to the bone.
Secure the guide wire in the universal chuck.
Hold the protection sleeve firmly and insert the guide wire through the trocar and into the piriformis fossa.
Insert the guide wire in line with the anatomic axis of the femur. Check the position under the image inten-sifier in AP and lateral views.
Remove the drill sleeve.
Expert Retrograde/Antegrade Femoral Nail Surgical Technique DePuy Synthes 19
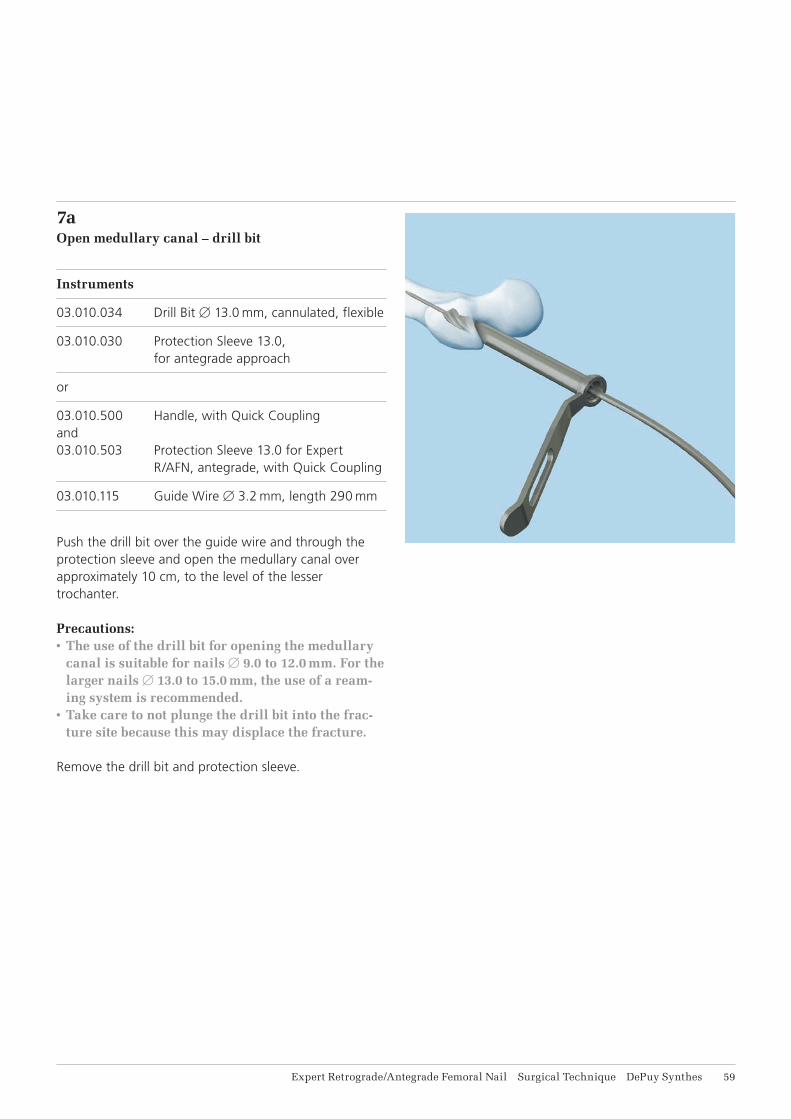
7aOpen medullary canal – drill bit
Instruments
03.010.034 Drill Bit B13.0 mm, cannulated, flexible
03.010.030 Protection Sleeve 13.0, for antegrade approach
or
03.010.500 Handle, with Quick Couplingand03.010.503 Protection Sleeve 13.0 for Expert
R/AFN, antegrade, with Quick Coupling
03.010.115 Guide Wire B3.2 mm, length 290 mm
Push the drill bit over the guide wire and through the protection sleeve and open the medullary canal over approximately 10 cm, to the level of the lesser trochanter.
Precautions: • The use of the drill bit for opening the medullary
canal is suitable for nails B9.0 to 12.0 mm. For the larger nails B13.0 to 15.0 mm, the use of a ream-ing system is recommended.
• Take care to not plunge the drill bit into the frac-ture site because this may displace the fracture.
Remove the drill bit and protection sleeve.
61 DePuy Synthes Expert Retrograde/Antegrade Femoral Nail Surgical Technique
Antegrade Approach – Opening the Proximal Femur
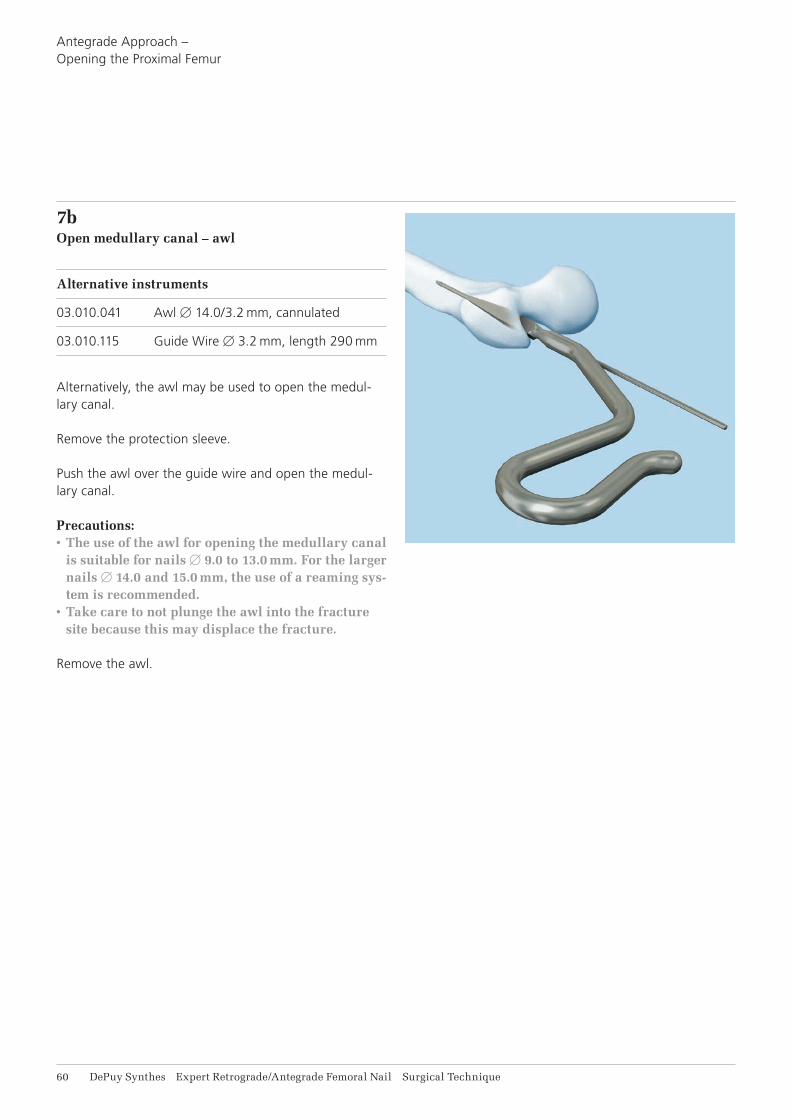
7bOpen medullary canal – awl
Alternative instruments
03.010.041 Awl B14.0/3.2 mm, cannulated
03.010.115 Guide Wire B3.2 mm, length 290 mm
Alternatively, the awl may be used to open the medul-lary canal.
Remove the protection sleeve.
Push the awl over the guide wire and open the medul-lary canal.
Precautions: • The use of the awl for opening the medullary canal
is suitable for nails B9.0 to 13.0 mm. For the larger nails B14.0 and 15.0 mm, the use of a reaming sys-tem is recommended.
• Take care to not plunge the awl into the fracture site because this may displace the fracture.
Remove the awl.
Expert Retrograde/Antegrade Femoral Nail Surgical Technique DePuy Synthes 61
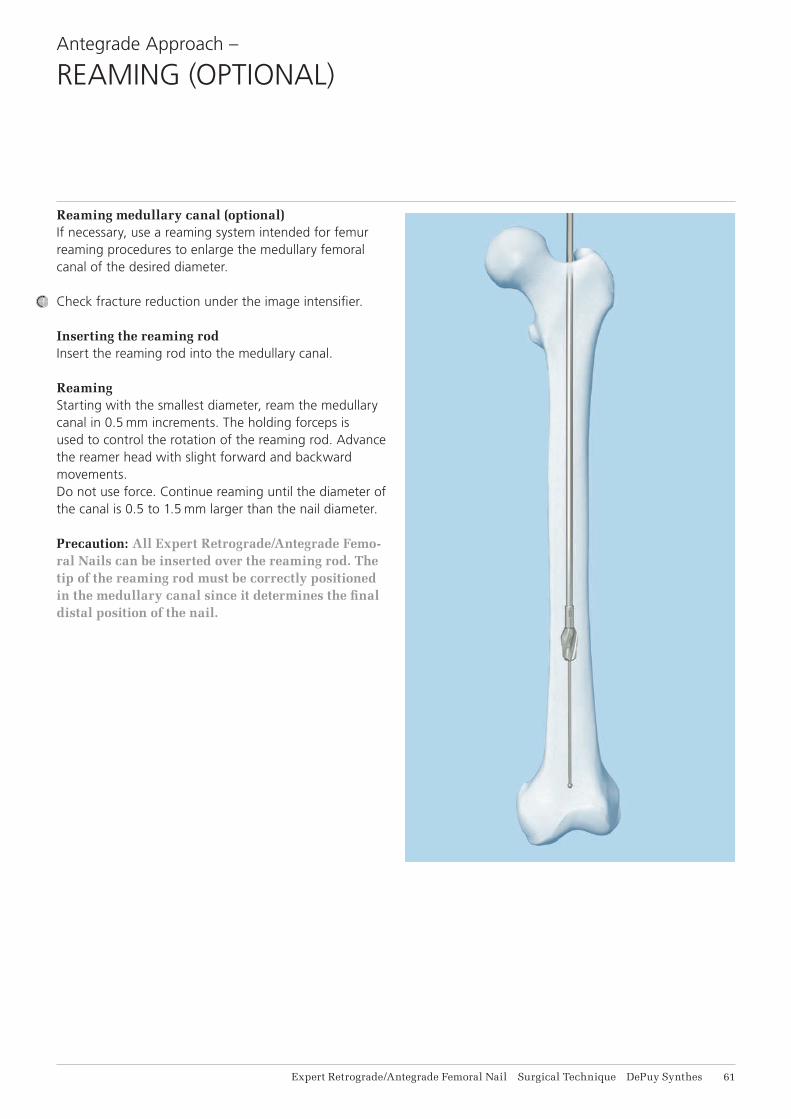
Reaming medullary canal (optional)If necessary, use a reaming system intended for femur reaming procedures to enlarge the medullary femoral canal of the desired diameter.
Check fracture reduction under the image intensifier.
Inserting the reaming rodInsert the reaming rod into the medullary canal.
ReamingStarting with the smallest diameter, ream the medullary canal in 0.5 mm increments. The holding forceps is used to control the rotation of the reaming rod. Advance the reamer head with slight forward and backward movements. Do not use force. Continue reaming until the diameter of the canal is 0.5 to 1.5 mm larger than the nail diameter.
Precaution: All Expert Retrograde/Antegrade Femo-ral Nails can be inserted over the reaming rod. The tip of the reaming rod must be correctly positioned in the medullary canal since it determines the final distal position of the nail.
Antegrade Approach –
REAMING (OPTIONAL)
62 DePuy Synthes Expert Retrograde/Antegrade Femoral Nail Surgical Technique
Antegrade Approach –
INSERTING NAIL
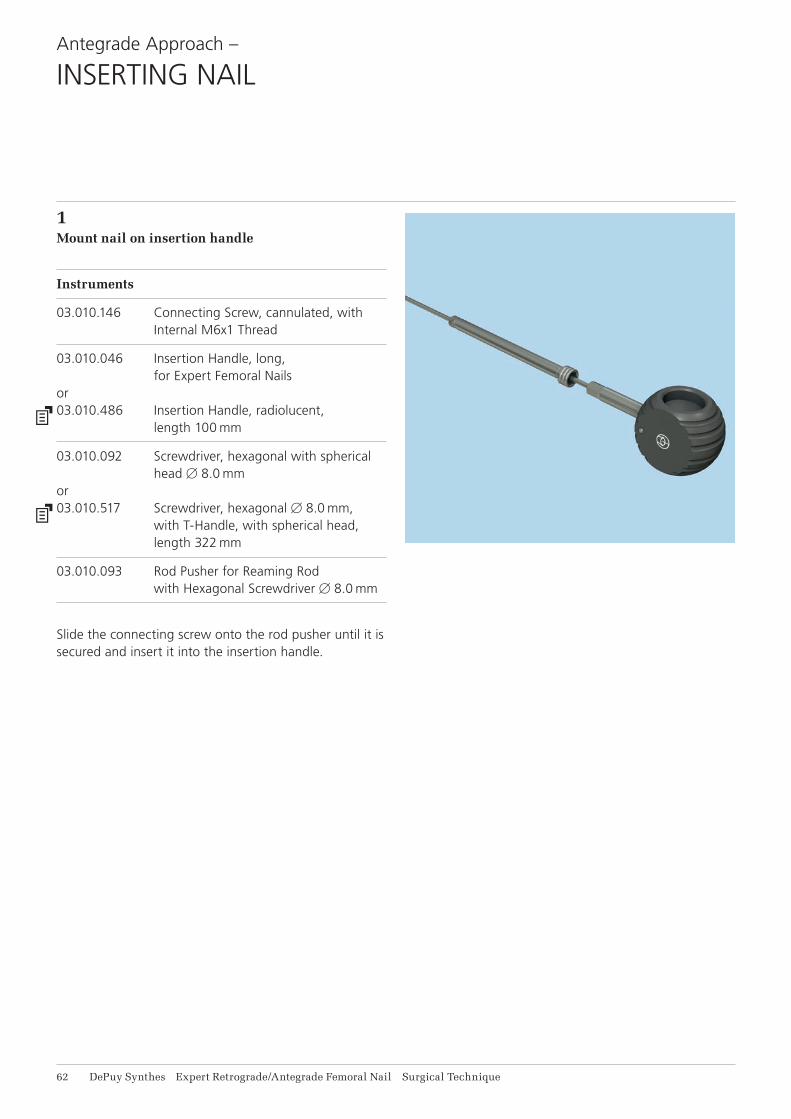
1Mount nail on insertion handle
Instruments
03.010.146 Connecting Screw, cannulated, with Internal M6x1 Thread
03.010.046 Insertion Handle, long, for Expert Femoral Nails
or03.010.486 Insertion Handle, radiolucent,
length 100 mm
03.010.092 Screwdriver, hexagonal with spherical head B 8.0 mm
or03.010.517 Screwdriver, hexagonal B 8.0 mm, with T-Handle, with spherical head, length 322 mm
03.010.093 Rod Pusher for Reaming Rod with Hexagonal Screwdriver B8.0 mm
Slide the connecting screw onto the rod pusher until it is secured and insert it into the insertion handle.
Expert Retrograde/Antegrade Femoral Nail Surgical Technique DePuy Synthes 61
The anterior bow of the nail must be aligned with the anterior bow of the femur. Orient the insertion handle anteriorily, match the notch on the insertion handle to the nail, and tighten the connecting screw.
Check that the connecting screw is correctly and well tightened to the nail with the screwdriver, but do not over-tighten.
Alternative instruments
03.010.044 Connecting Screw, cannulated, for Expert Tibial and Femoral Nails, for No. 03.010.045
03.010.045 Insertion Handle, for Expert Tibial and Femoral Nails
Follow the procedure described above.
64 DePuy Synthes Expert Retrograde/Antegrade Femoral Nail Surgical Technique
Antegrade Approach – Inserting Nail
2Insert nail
Using the insertion handle, insert the nail over the reaming rod, if used, into the medullary canal as far as possible by hand. Rotational movements of small amplitude can help.
Use the insertion assembly to manipulate the nail across the fracture. Insert the nail until the proximal end is at or just below the level of the tip of the greater trochanter.
Note: Confirm that the nail is securely connected to the insertion handle, especially after hammering, using either the 8 mm ball hex screwdriver or the cannulated shaft with 8 mm hex.
Monitor nail passage across the fracture, control in two planes to avoid malalignment.
Check the final position of the nail in AP and lateral views.
Note: For proximal locking, mount the aiming arm only when the nail has been completely inserted, otherwise the aiming arm may loosen during nail insertion.
Expert Retrograde/Antegrade Femoral Nail Surgical Technique DePuy Synthes 61
Alternative instruments
03.010.047 Connector, length 141 mm, for Insertion Handle
03.010.056 Combined Hammer 700 g, can be mounted, for No. 357.220
or03.010.522 Combined Hammer, 500 g
357.220 Hammer Guide, for No. 357.250or03.010.170 Hammer Guide
321.160 Combination Wrench B11.0 mm
321.170 Pin Wrench B4.5 mm, length 120 mm
03.010.092 Screwdriver, hexagonal with spherical head B8.0 mm
or03.010.517 Screwdriver, hexagonal B 8.0 mm, with T-Handle, with spherical head, length 322 mm
357.398 Shaft, hexagonal B8.0 mm, cannulated, short, length 125 mm
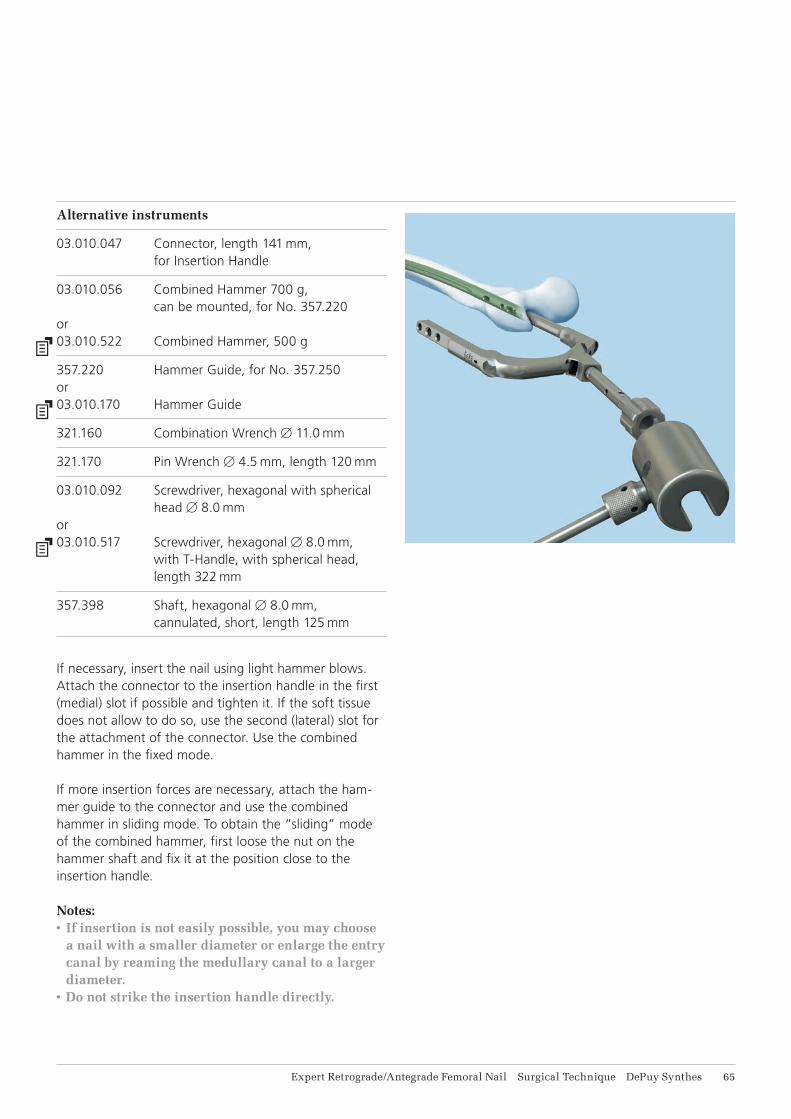
If necessary, insert the nail using light hammer blows. Attach the connector to the insertion handle in the first (medial) slot if possible and tighten it. If the soft tissue does not allow to do so, use the second (lateral) slot for the attachment of the connector. Use the combined hammer in the fixed mode.
If more insertion forces are necessary, attach the ham-mer guide to the connector and use the combined hammer in sliding mode. To obtain the “sliding” mode of the combined hammer, first loose the nut on the hammer shaft and fix it at the position close to the insertion handle.
Notes: • If insertion is not easily possible, you may choose
a nail with a smaller diameter or enlarge the entry canal by reaming the medullary canal to a larger diameter.
• Do not strike the insertion handle directly.
66 DePuy Synthes Expert Retrograde/Antegrade Femoral Nail Surgical Technique
Antegrade Approach –
STANDARD LOCKING
1Mount aiming arm
Instrument
03.010.480 Aiming Arm, radiolucent, for Expert R/AFN, antegrade, for Standard Locking
or03.010.049 Aiming Arm for Expert R/AFN,
antegrade, for Standard Locking
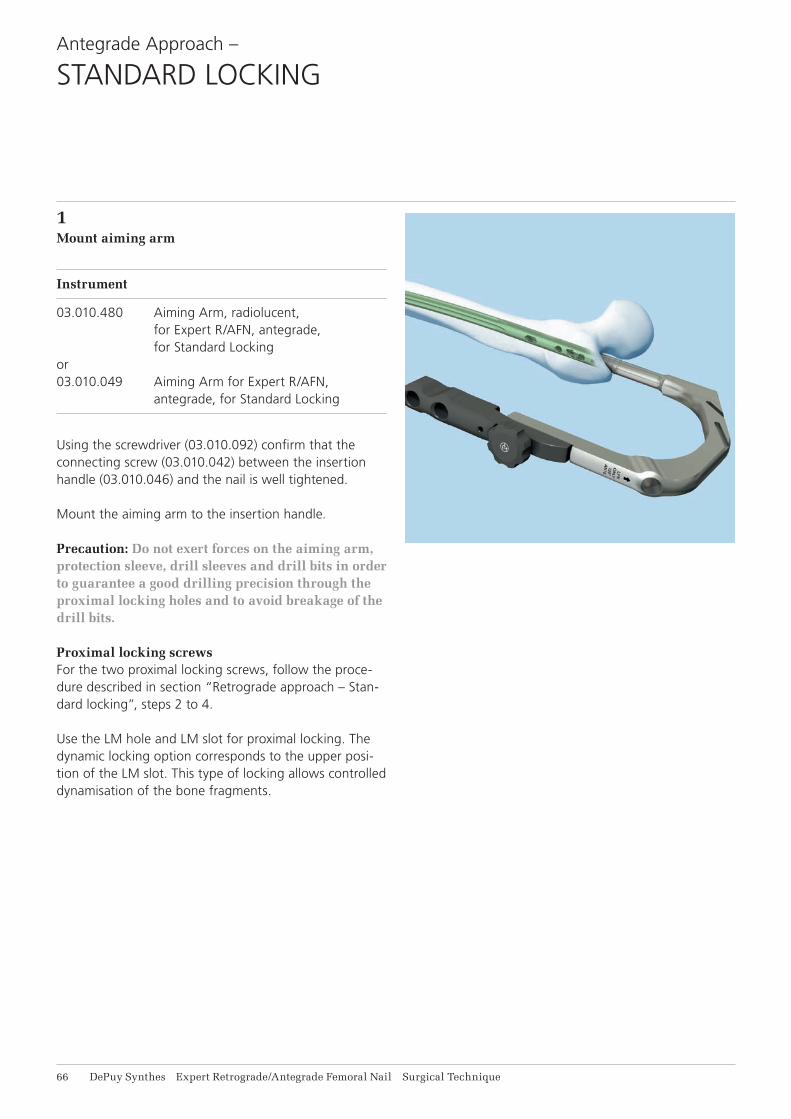
Using the screwdriver (03.010.092) confirm that the connecting screw (03.010.042) between the insertion handle (03.010.046) and the nail is well tightened.
Mount the aiming arm to the insertion handle.
Precaution: Do not exert forces on the aiming arm, protection sleeve, drill sleeves and drill bits in order to guarantee a good drilling precision through the proximal locking holes and to avoid breakage of the drill bits.
Proximal locking screwsFor the two proximal locking screws, follow the proce-dure described in section “Retrograde approach – Stan-dard locking”, steps 2 to 4.
Use the LM hole and LM slot for proximal locking. The dynamic locking option corresponds to the upper posi-tion of the LM slot. This type of locking allows controlled dynamisation of the bone fragments.
Expert Retrograde/Antegrade Femoral Nail Surgical Technique DePuy Synthes 67
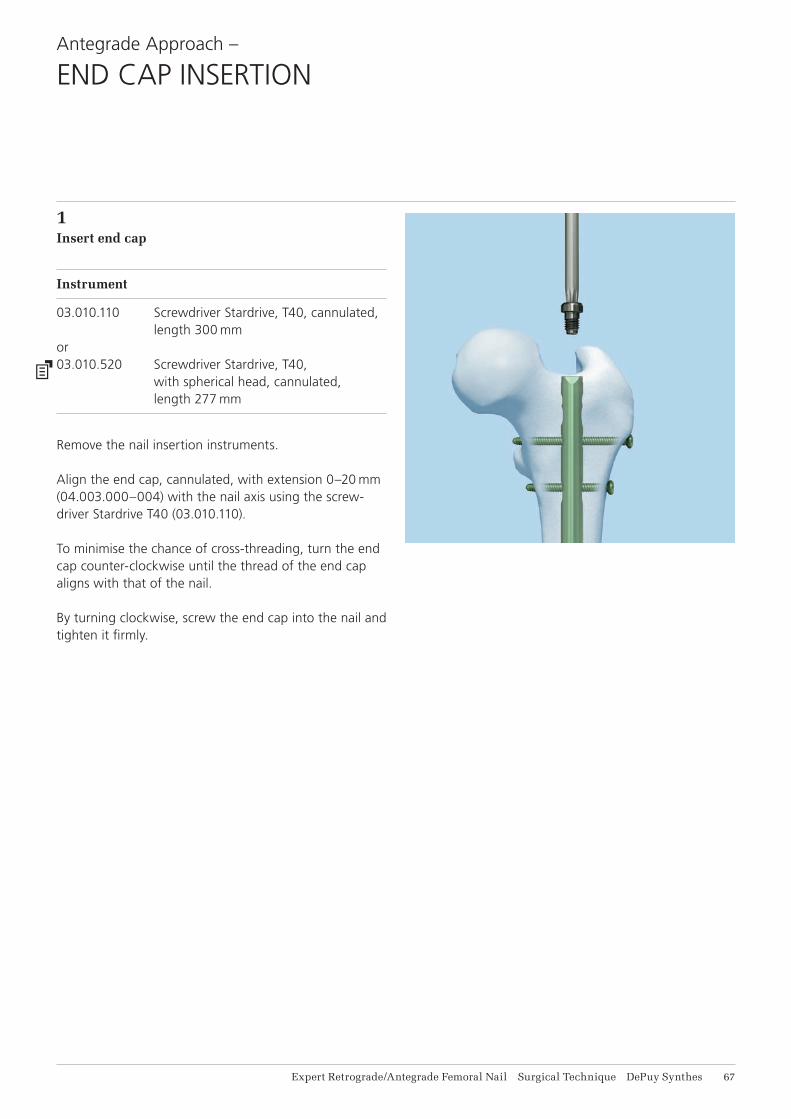
1Insert end cap
Instrument
03.010.110 Screwdriver Stardrive, T40, cannulated, length 300 mm
or03.010.520 Screwdriver Stardrive, T40,
with spherical head, cannulated, length 277 mm
Remove the nail insertion instruments.
Align the end cap, cannulated, with extension 0–20 mm (04.003.000–004) with the nail axis using the screw-driver Stardrive T40 (03.010.110).
To minimise the chance of cross-threading, turn the end cap counter-clockwise until the thread of the end cap aligns with that of the nail.
By turning clockwise, screw the end cap into the nail and tighten it firmly.
Antegrade Approach –
END CAP INSERTION
68 DePuy Synthes Expert Retrograde/Antegrade Femoral Nail Surgical Technique
Antegrade Approach – End Cap Insertion
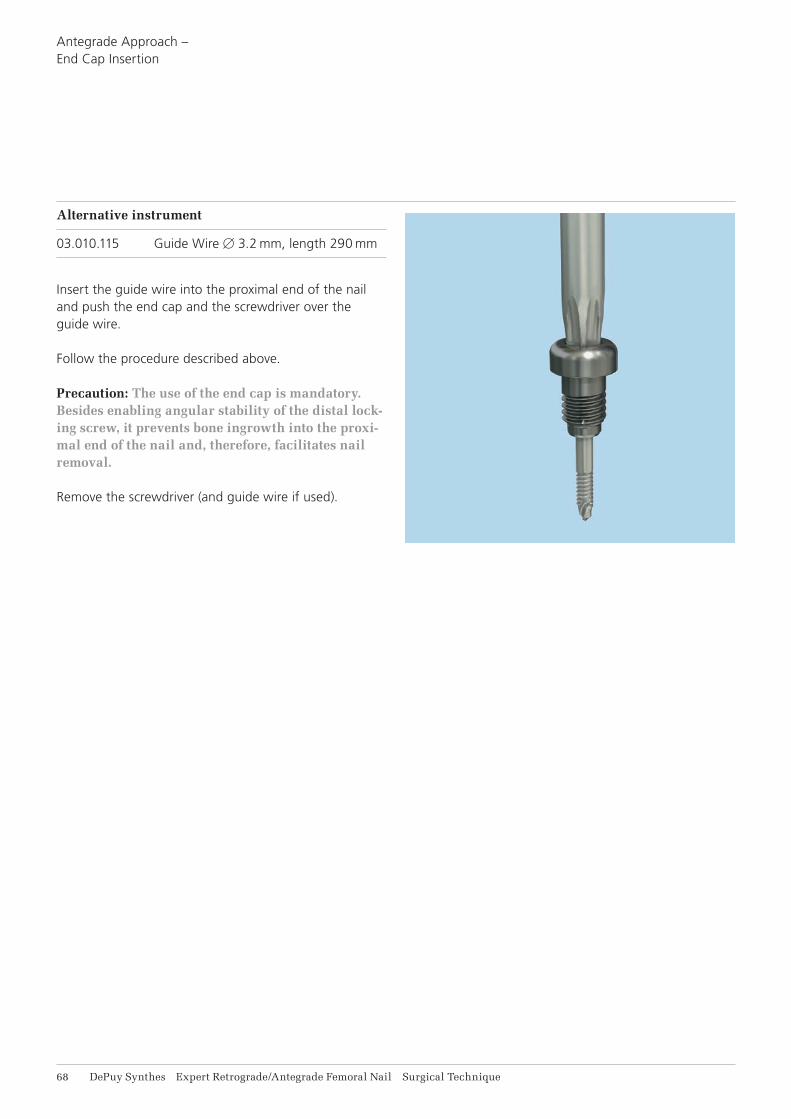
Alternative instrument
03.010.115 Guide Wire B3.2 mm, length 290 mm
Insert the guide wire into the proximal end of the nail and push the end cap and the screwdriver over the guide wire.
Follow the procedure described above.
Precaution: The use of the end cap is mandatory. Besides enabling angular stability of the distal lock-ing screw, it prevents bone ingrowth into the proxi-mal end of the nail and, therefore, facilitates nail removal.
Remove the screwdriver (and guide wire if used).
LM STAT 2
LM STAT 1
Expert Retrograde/Antegrade Femoral Nail Surgical Technique DePuy Synthes 69
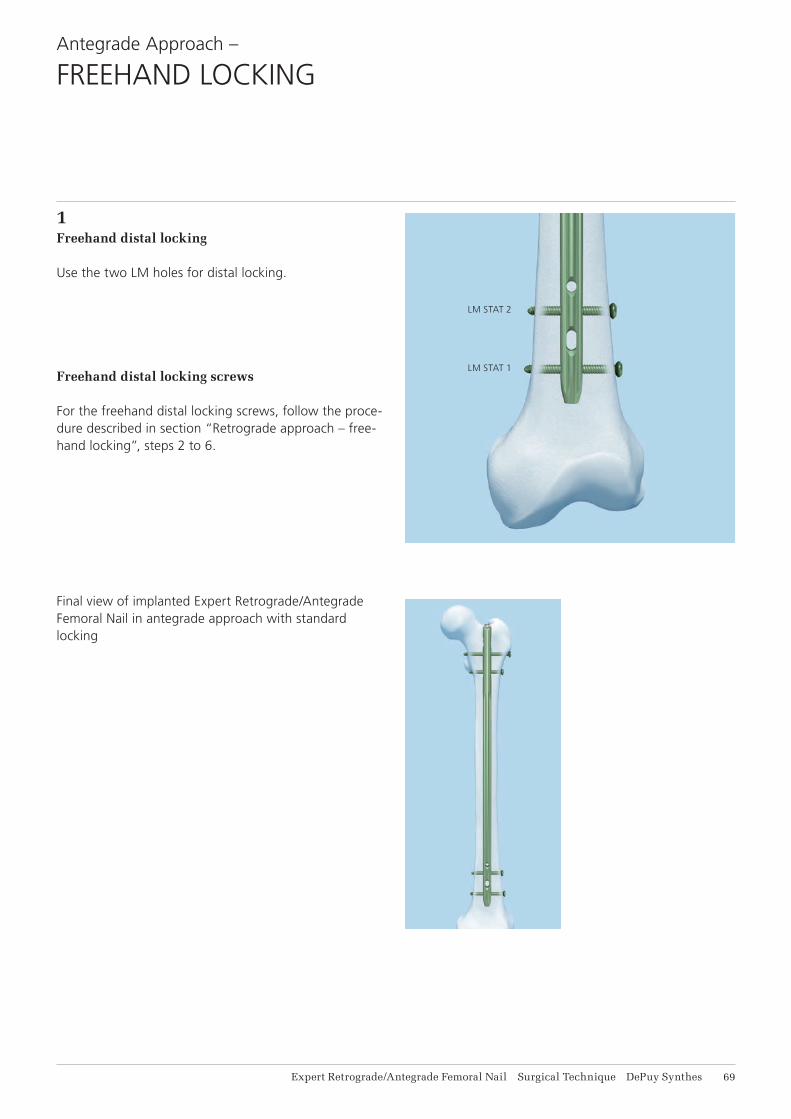
1Freehand distal locking
Use the two LM holes for distal locking.
Freehand distal locking screws
For the freehand distal locking screws, follow the proce-dure described in section “Retrograde approach – free-hand locking”, steps 2 to 6.
Final view of implanted Expert Retrograde/Antegrade Femoral Nail in antegrade approach with standard locking
Antegrade Approach –
FREEHAND LOCKING

71 DePuy Synthes Expert Retrograde/Antegrade Femoral Nail Surgical Technique
IMPLANT REMOVAL
For R/AFN in retrograde position with spiral blade locking:
1Remove end cap
Instrument
03.010.110 Screwdriver Stardrive, T40, cannulated, length 300 mm
or03.010.520 Screwdriver Stardrive, T40,
with spherical head, cannulated, length 277 mm
Implant removal is an elective procedure.
Clear the Stardrive socket of the end cap from any ingrown tissue.
Remove the end cap with the screwdriver.
Note: When removing implants after long-term implantation, especially in the presence of large amounts of bony ingrowth, first use a solid screw-driver to loosen the end cap and locking screws. The T40 inter-lock screwdriver can be used to remove the end cap or locking screws from the surgical site.
Expert Retrograde/Antegrade Femoral Nail Surgical Technique DePuy Synthes 71
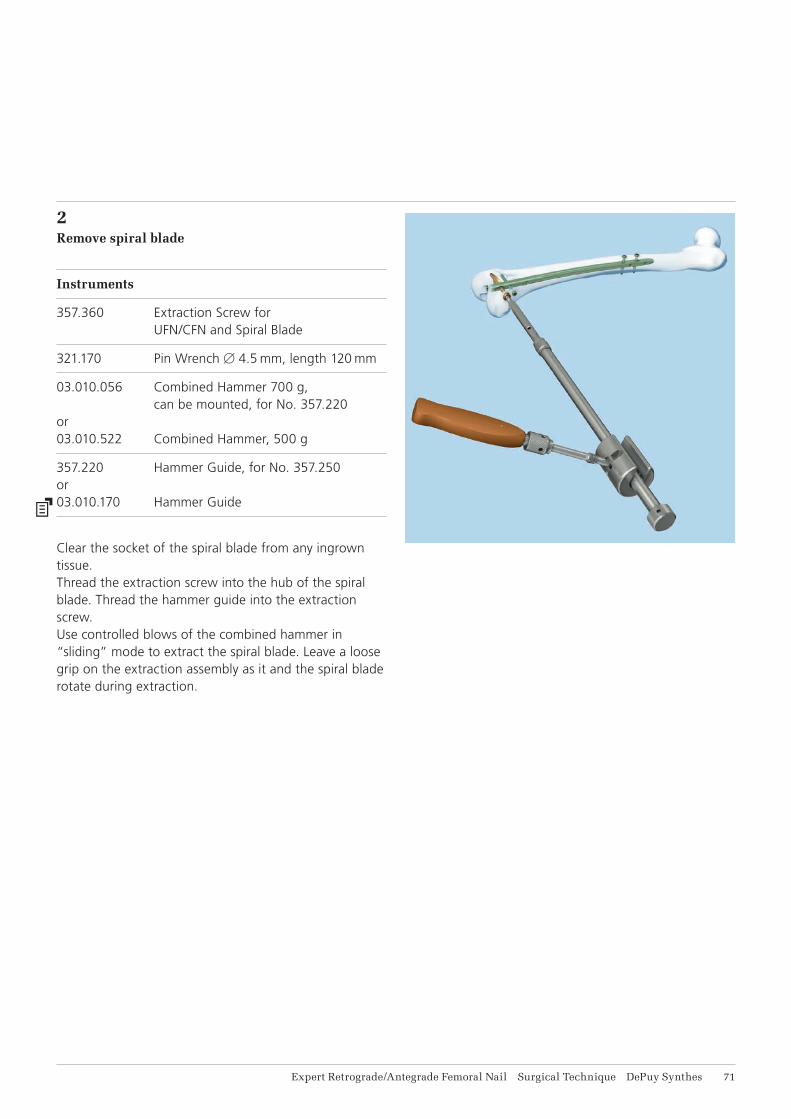
2Remove spiral blade
Instruments
357.360 Extraction Screw for UFN/CFN and Spiral Blade
321.170 Pin Wrench B4.5 mm, length 120 mm
03.010.056 Combined Hammer 700 g, can be mounted, for No. 357.220
or03.010.522 Combined Hammer, 500 g
357.220 Hammer Guide, for No. 357.250or03.010.170 Hammer Guide
Clear the socket of the spiral blade from any ingrown tissue.Thread the extraction screw into the hub of the spiral blade. Thread the hammer guide into the extraction screw. Use controlled blows of the combined hammer in “sliding” mode to extract the spiral blade. Leave a loose grip on the extraction assembly as it and the spiral blade rotate during extraction.
72 DePuy Synthes Expert Retrograde/Antegrade Femoral Nail Surgical Technique
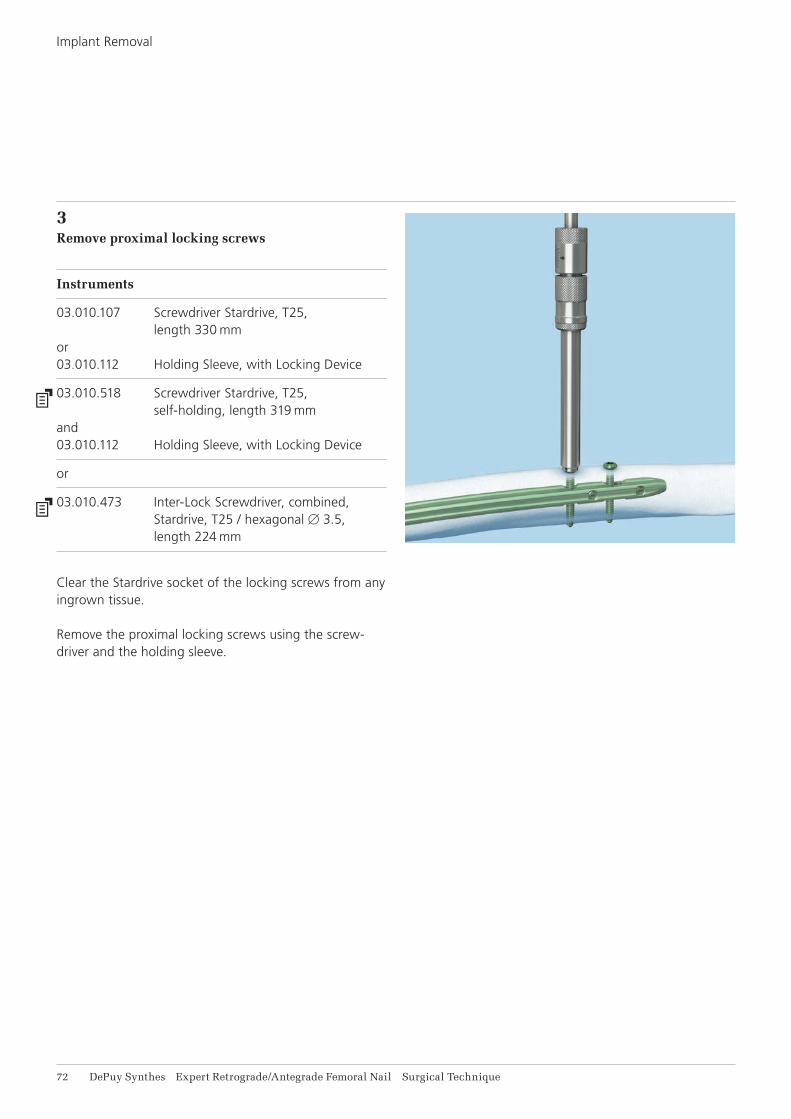
Implant Removal
3Remove proximal locking screws
Instruments
03.010.107 Screwdriver Stardrive, T25, length 330 mm
or03.010.112 Holding Sleeve, with Locking Device
03.010.518 Screwdriver Stardrive, T25, self-holding, length 319 mm
and03.010.112 Holding Sleeve, with Locking Device
or
03.010.473 Inter-Lock Screwdriver, combined, Stardrive, T25 / hexagonal B3.5, length 224 mm
Clear the Stardrive socket of the locking screws from any ingrown tissue.
Remove the proximal locking screws using the screw-driver and the holding sleeve.

Expert Retrograde/Antegrade Femoral Nail Surgical Technique DePuy Synthes 71
4Attach extraction screw and hammer guide
Instruments
03.010.000 Extraction Screw, for Tibial and Femoral Nails
357.220 Hammer Guide, for No. 357.250* or03.010.170 Hammer Guide
03.010.107 Screwdriver Stardrive, T25, length 330 mm
or03.010.518 Screwdriver Stardrive, T25,
self-holding, length 319 mm
Before removing the distal locking screw, screw the extraction screw into the nail and tighten it to prevent rotation or displacement of the nail.
Attach the hammer guide to the extraction screw.
Remove the remaining locking screw with the screw-driver.
* Also suitable for No. 03.010.056
74 DePuy Synthes Expert Retrograde/Antegrade Femoral Nail Surgical Technique
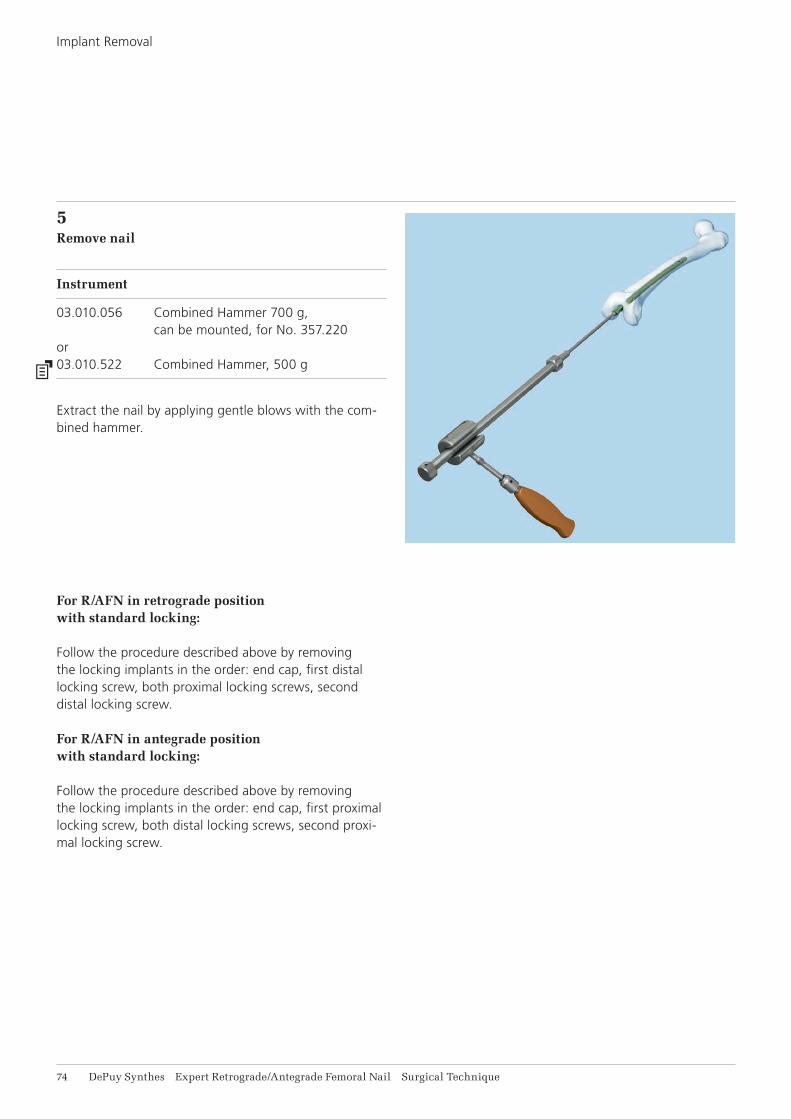
Implant Removal
5Remove nail
Instrument
03.010.056 Combined Hammer 700 g, can be mounted, for No. 357.220
or03.010.522 Combined Hammer, 500 g
Extract the nail by applying gentle blows with the com-bined hammer.
For R/AFN in retrograde position with standard locking:
Follow the procedure described above by removing the locking implants in the order: end cap, first distal locking screw, both proximal locking screws, second distal locking screw.
For R/AFN in antegrade position with standard locking:
Follow the procedure described above by removing the locking implants in the order: end cap, first proximal locking screw, both distal locking screws, second proxi-mal locking screw.
13 mm
0 mm
21 mm
35 mm
42 | 38 | 34 mm
34 mm
22 mm17 mm
46 mm
18 | 14 | 10 mm
0 mm
0 mm 0 mm
Expert Retrograde/Antegrade Femoral Nail Surgical Technique DePuy Synthes 71
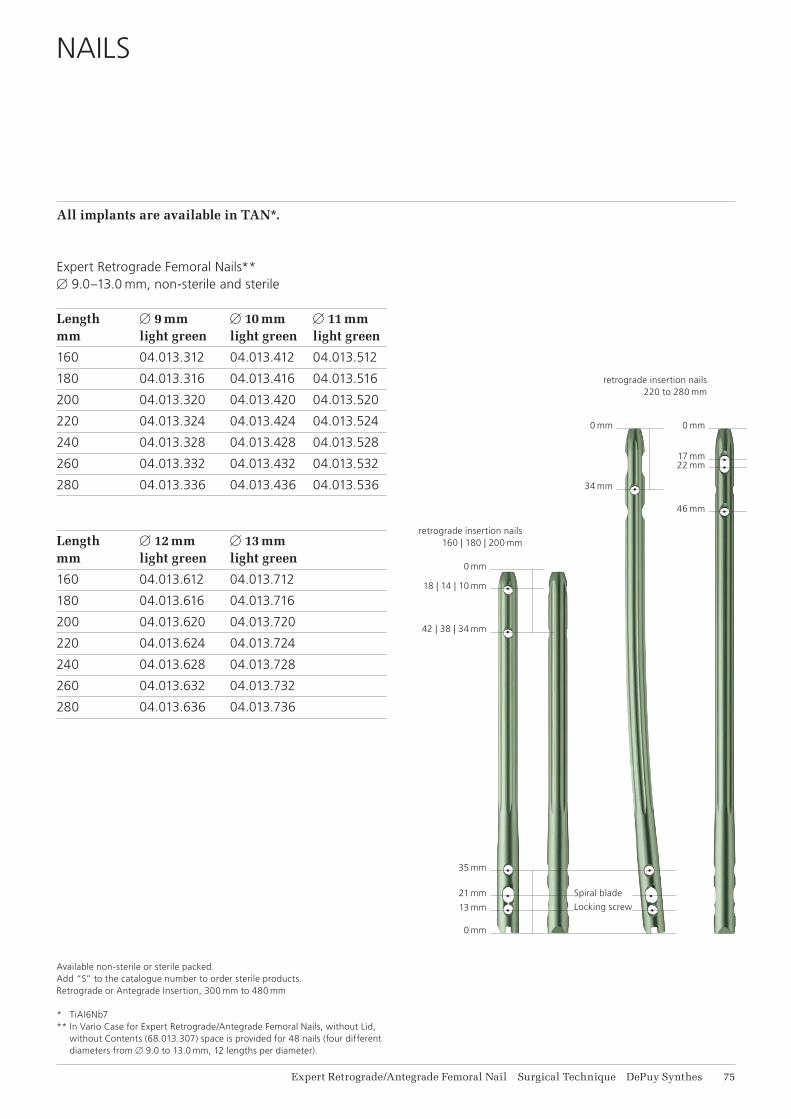
All implants are available in TAN*.
Expert Retrograde Femoral Nails**B9.0–13.0 mm, non-sterile and sterile
Length B 9 mm B 10 mm B 11 mm mm light green light green light green
160 04.013.312 04.013.412 04.013.512
180 04.013.316 04.013.416 04.013.516
200 04.013.320 04.013.420 04.013.520
220 04.013.324 04.013.424 04.013.524
240 04.013.328 04.013.428 04.013.528
260 04.013.332 04.013.432 04.013.532
280 04.013.336 04.013.436 04.013.536
Length B 12 mm B 13 mm mm light green light green
160 04.013.612 04.013.712
180 04.013.616 04.013.716
200 04.013.620 04.013.720
220 04.013.624 04.013.724
240 04.013.628 04.013.728
260 04.013.632 04.013.732
280 04.013.636 04.013.736
NAILS
Available non-sterile or sterile packed. Add “S” to the catalogue number to order sterile products.Retrograde or Antegrade Insertion, 300 mm to 480 mm
* TiAl6Nb7** In Vario Case for Expert Retrograde/Antegrade Femoral Nails, without Lid,
without Contents (68.013.307) space is provided for 48 nails (four different diameters from B9.0 to 13.0 mm, 12 lengths per diameter).
retrograde insertion nails160 | 180 | 200 mm
retrograde insertion nails220 to 280 mm
Locking screw
Spiral blade
13 mm
21 mm
35 mm
42 | 38 | 34 mm
34 mm
22 mm17 mm
46 mm
18 | 14 | 10 mm
0 mm
0 mm 0 mm
0 mm
76 DePuy Synthes Expert Retrograde/Antegrade Femoral Nail Surgical Technique
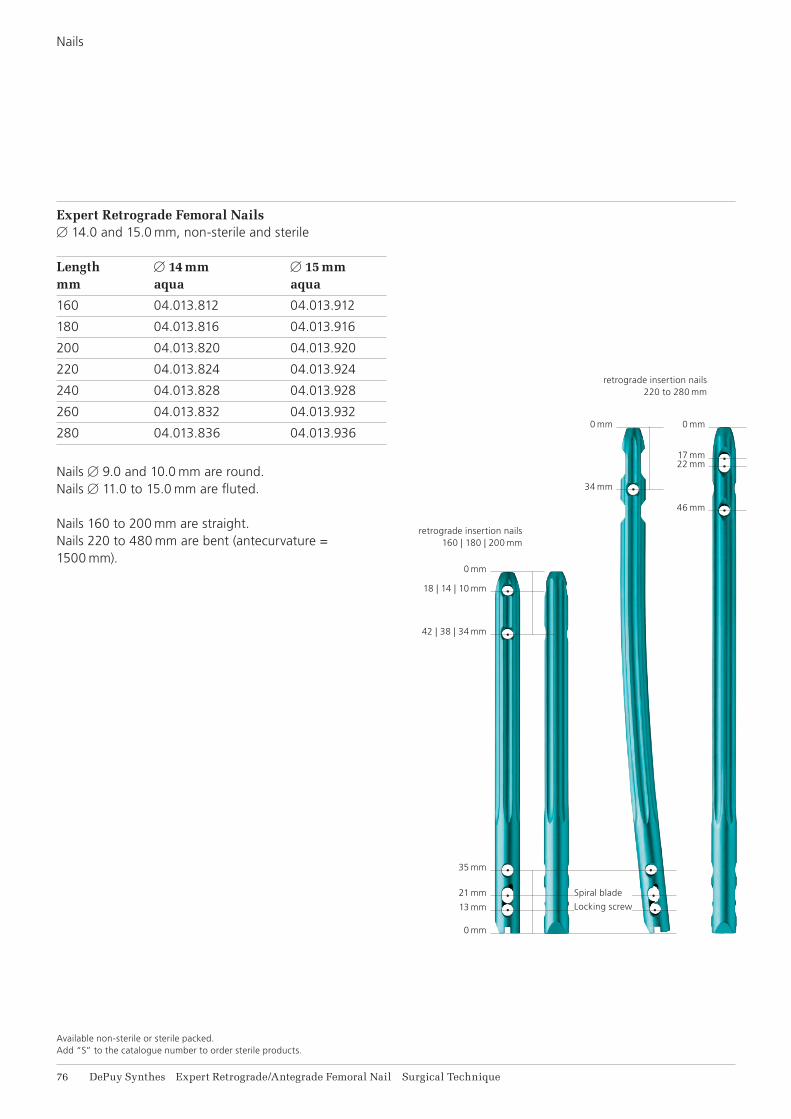
Nails
Expert Retrograde Femoral NailsB14.0 and 15.0 mm, non-sterile and sterile
Length B 14 mm B 15 mm mm aqua aqua
160 04.013.812 04.013.912
180 04.013.816 04.013.916
200 04.013.820 04.013.920
220 04.013.824 04.013.924
240 04.013.828 04.013.928
260 04.013.832 04.013.932
280 04.013.836 04.013.936
Nails B9.0 and 10.0 mm are round.Nails B11.0 to 15.0 mm are fluted.
Nails 160 to 200 mm are straight. Nails 220 to 480 mm are bent (antecurvature = 1500 mm).
Available non-sterile or sterile packed. Add “S” to the catalogue number to order sterile products.
retrograde insertion nails160 | 180 | 200 mm
retrograde insertion nails220 to 280 mm
Locking screw
Spiral blade
13 mm
21 mm
46 mm
58 mm
35 mm
17 mm
29 mm34 mm
65 mm
0 mm 0 mm
60 mm
0 mm
Expert Retrograde/Antegrade Femoral Nail Surgical Technique DePuy Synthes 77
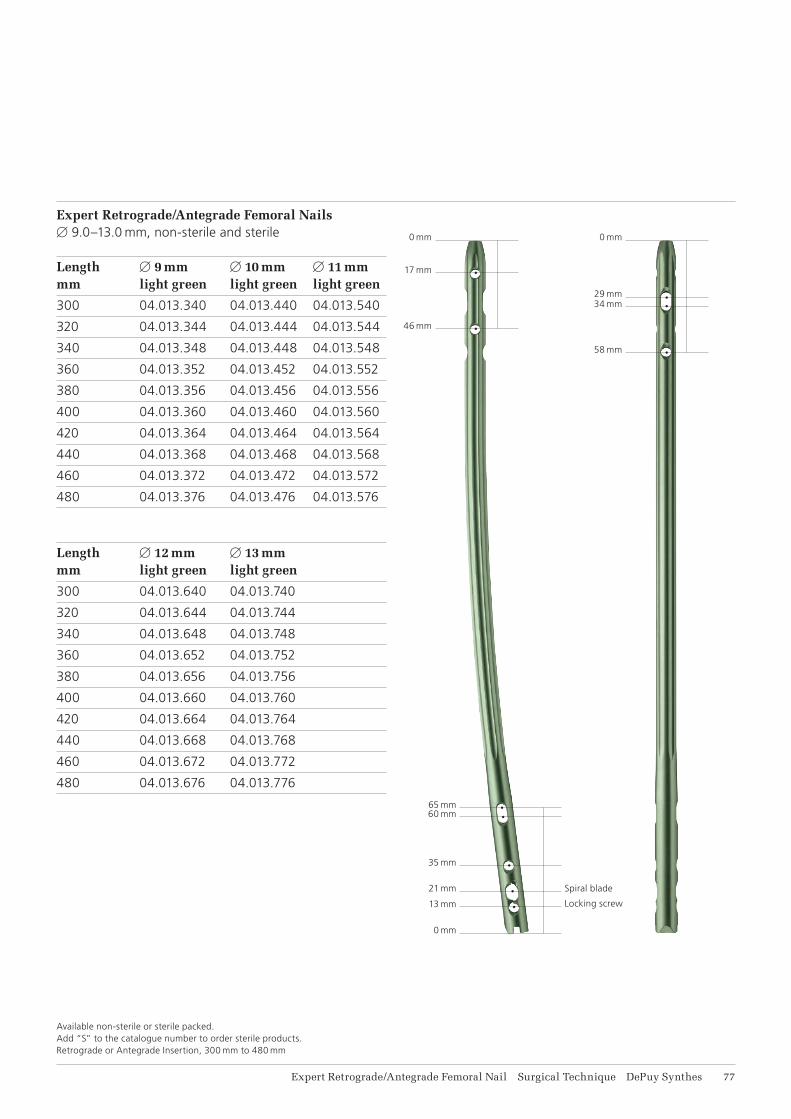
Expert Retrograde/Antegrade Femoral NailsB9.0–13.0 mm, non-sterile and sterile
Length B 9 mm B 10 mm B 11 mm mm light green light green light green
300 04.013.340 04.013.440 04.013.540
320 04.013.344 04.013.444 04.013.544
340 04.013.348 04.013.448 04.013.548
360 04.013.352 04.013.452 04.013.552
380 04.013.356 04.013.456 04.013.556
400 04.013.360 04.013.460 04.013.560
420 04.013.364 04.013.464 04.013.564
440 04.013.368 04.013.468 04.013.568
460 04.013.372 04.013.472 04.013.572
480 04.013.376 04.013.476 04.013.576
Length B 12 mm B 13 mm mm light green light green
300 04.013.640 04.013.740
320 04.013.644 04.013.744
340 04.013.648 04.013.748
360 04.013.652 04.013.752
380 04.013.656 04.013.756
400 04.013.660 04.013.760
420 04.013.664 04.013.764
440 04.013.668 04.013.768
460 04.013.672 04.013.772
480 04.013.676 04.013.776
Available non-sterile or sterile packed. Add “S” to the catalogue number to order sterile products.Retrograde or Antegrade Insertion, 300 mm to 480 mm
Locking screw
Spiral blade
13 mm
21 mm
46 mm
58 mm
35 mm
17 mm
29 mm34 mm
65 mm
0 mm 0 mm
60 mm
0 mm
78 DePuy Synthes Expert Retrograde/Antegrade Femoral Nail Surgical Technique
Nails
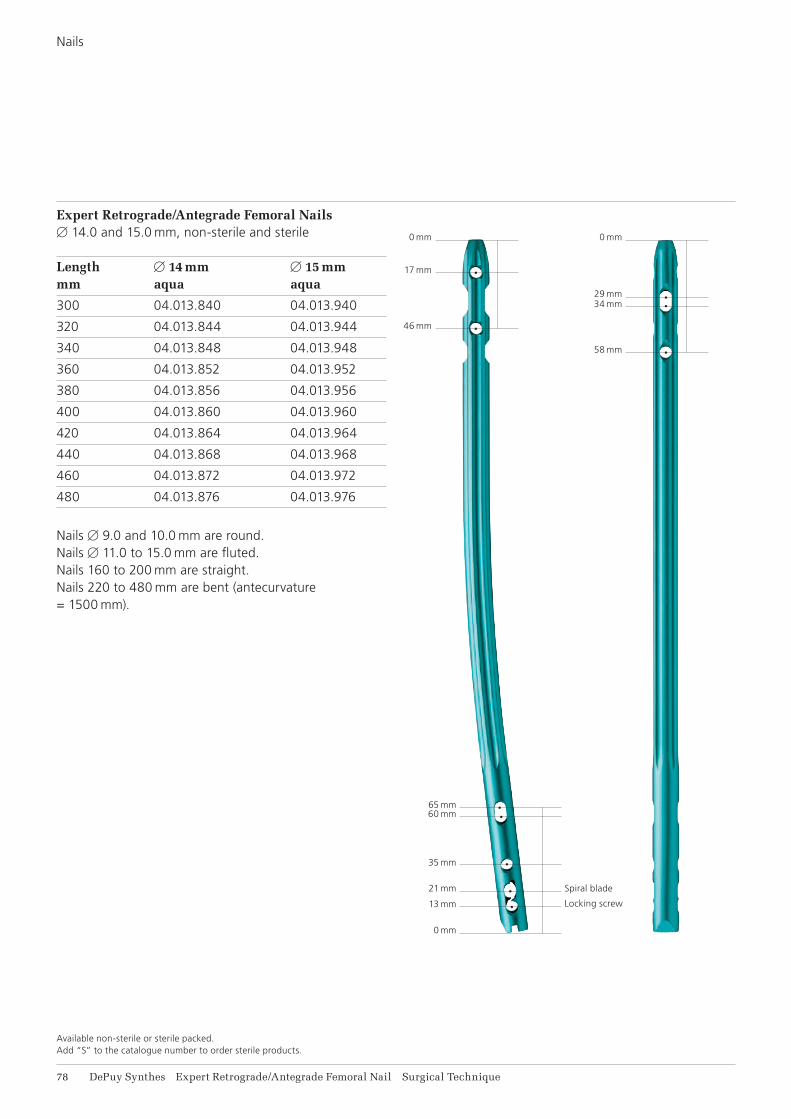
Expert Retrograde/Antegrade Femoral NailsB14.0 and 15.0 mm, non-sterile and sterile
Length B 14 mm B 15 mm mm aqua aqua
300 04.013.840 04.013.940
320 04.013.844 04.013.944
340 04.013.848 04.013.948
360 04.013.852 04.013.952
380 04.013.856 04.013.956
400 04.013.860 04.013.960
420 04.013.864 04.013.964
440 04.013.868 04.013.968
460 04.013.872 04.013.972
480 04.013.876 04.013.976
Nails B9.0 and 10.0 mm are round.Nails B11.0 to 15.0 mm are fluted.Nails 160 to 200 mm are straight.Nails 220 to 480 mm are bent (antecurvature = 1500 mm).
Locking screw
Spiral blade
Available non-sterile or sterile packed. Add “S” to the catalogue number to order sterile products.
Expert Retrograde/Antegrade Femoral Nail Surgical Technique DePuy Synthes 79
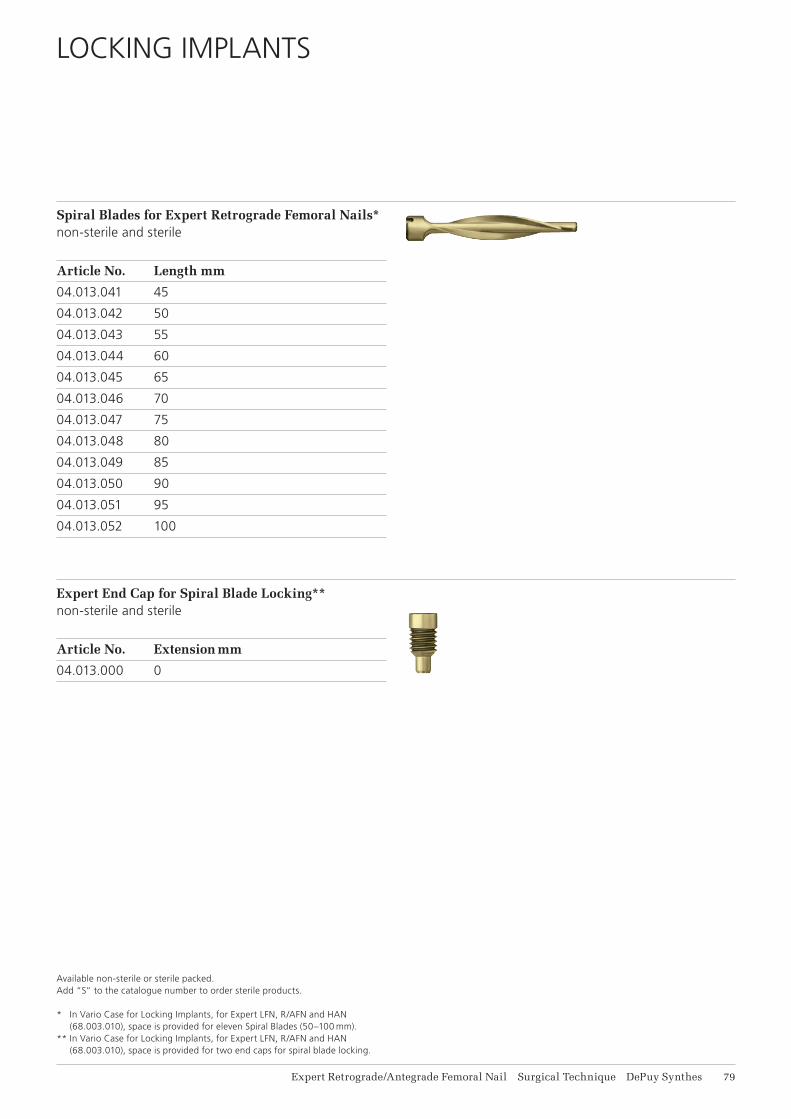
Spiral Blades for Expert Retrograde Femoral Nails*non-sterile and sterile
Article No. Length mm
04.013.041 45
04.013.042 50
04.013.043 55
04.013.044 60
04.013.045 65
04.013.046 70
04.013.047 75
04.013.048 80
04.013.049 85
04.013.050 90
04.013.051 95
04.013.052 100
Expert End Cap for Spiral Blade Locking**non-sterile and sterile
Article No. Extension mm
04.013.000 0
LOCKING IMPLANTS
Available non-sterile or sterile packed. Add “S” to the catalogue number to order sterile products.
* In Vario Case for Locking Implants, for Expert LFN, R/AFN and HAN (68.003.010), space is provided for eleven Spiral Blades (50–100 mm).
** In Vario Case for Locking Implants, for Expert LFN, R/AFN and HAN (68.003.010), space is provided for two end caps for spiral blade locking.
81 DePuy Synthes Expert Retrograde/Antegrade Femoral Nail Surgical Technique
Locking Implants
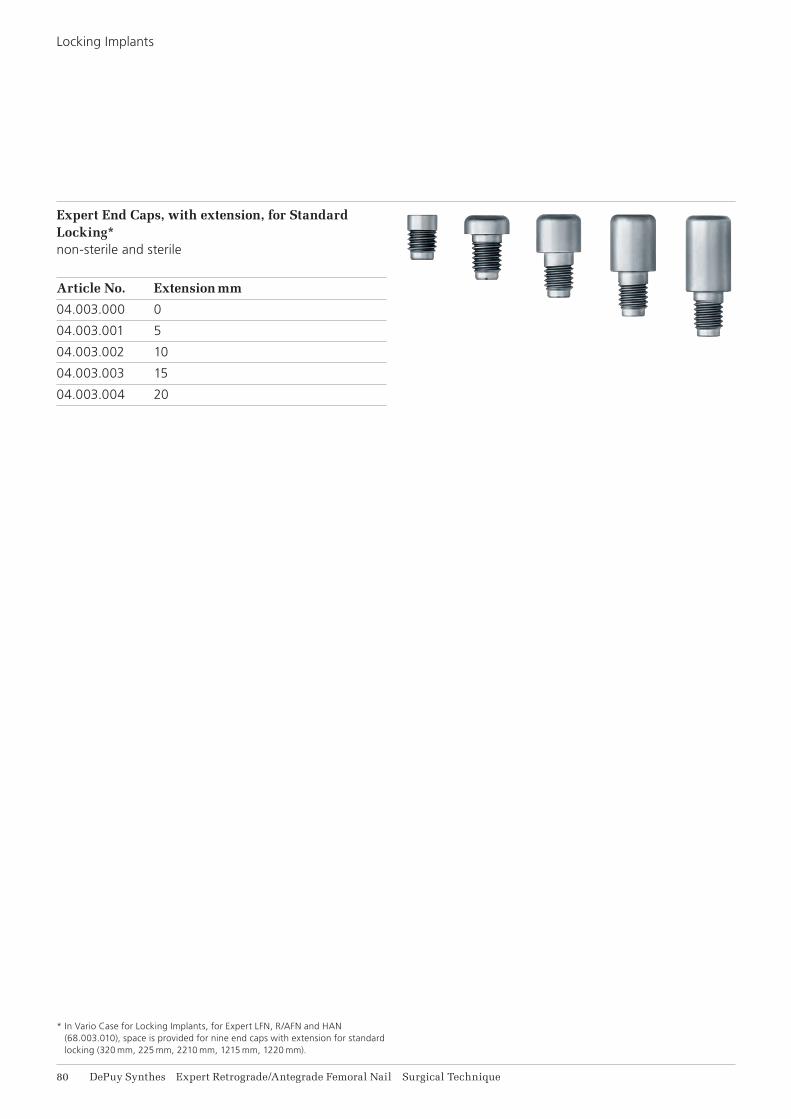
Expert End Caps, with extension, for Standard Locking*non-sterile and sterile
Article No. Extension mm
04.003.000 0
04.003.001 5
04.003.002 10
04.003.003 15
04.003.004 20
* In Vario Case for Locking Implants, for Expert LFN, R/AFN and HAN (68.003.010), space is provided for nine end caps with extension for standard locking (320 mm, 225 mm, 2210 mm, 1215 mm, 1220 mm).

Expert Retrograde/Antegrade Femoral Nail Surgical Technique DePuy Synthes 81
Locking Screws Stardrive B5.0 mm (light green), Drill B4.2 mmnon-sterile and sterile
Article No. Extension mm
04.005.516 26
04.005.518 28
04.005.520 30
04.005.522 32
04.005.524 34
04.005.526 36
04.005.528 38
04.005.530 40
04.005.532 42
04.005.534 44
04.005.536 46
04.005.538 48
04.005.540 50
04.005.542 52
04.005.544 54
04.005.546 56
04.005.548 58
04.005.550 60
04.005.554 64
04.005.558 68
04.005.562 72
04.005.566 76
04.005.570 80
04.005.575 85
04.005.580 90
04.005.585 95
04.005.590 100
82 DePuy Synthes Expert Retrograde/Antegrade Femoral Nail Surgical Technique
Locking Implants
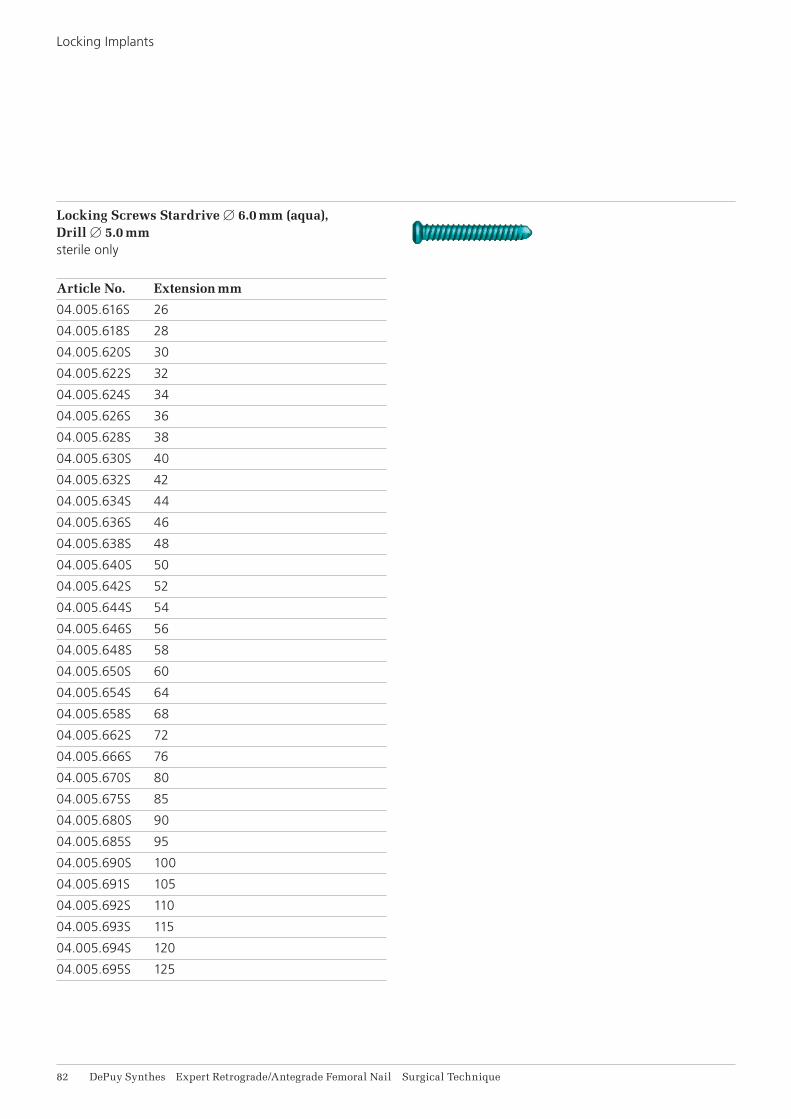
Locking Screws Stardrive B6.0 mm (aqua), Drill B5.0 mmsterile only
Article No. Extension mm
04.005.616S 26
04.005.618S 28
04.005.620S 30
04.005.622S 32
04.005.624S 34
04.005.626S 36
04.005.628S 38
04.005.630S 40
04.005.632S 42
04.005.634S 44
04.005.636S 46
04.005.638S 48
04.005.640S 50
04.005.642S 52
04.005.644S 54
04.005.646S 56
04.005.648S 58
04.005.650S 60
04.005.654S 64
04.005.658S 68
04.005.662S 72
04.005.666S 76
04.005.670S 80
04.005.675S 85
04.005.680S 90
04.005.685S 95
04.005.690S 100
04.005.691S 105
04.005.692S 110
04.005.693S 115
04.005.694S 120
04.005.695S 125
Expert Retrograde/Antegrade Femoral Nail Surgical Technique DePuy Synthes 81
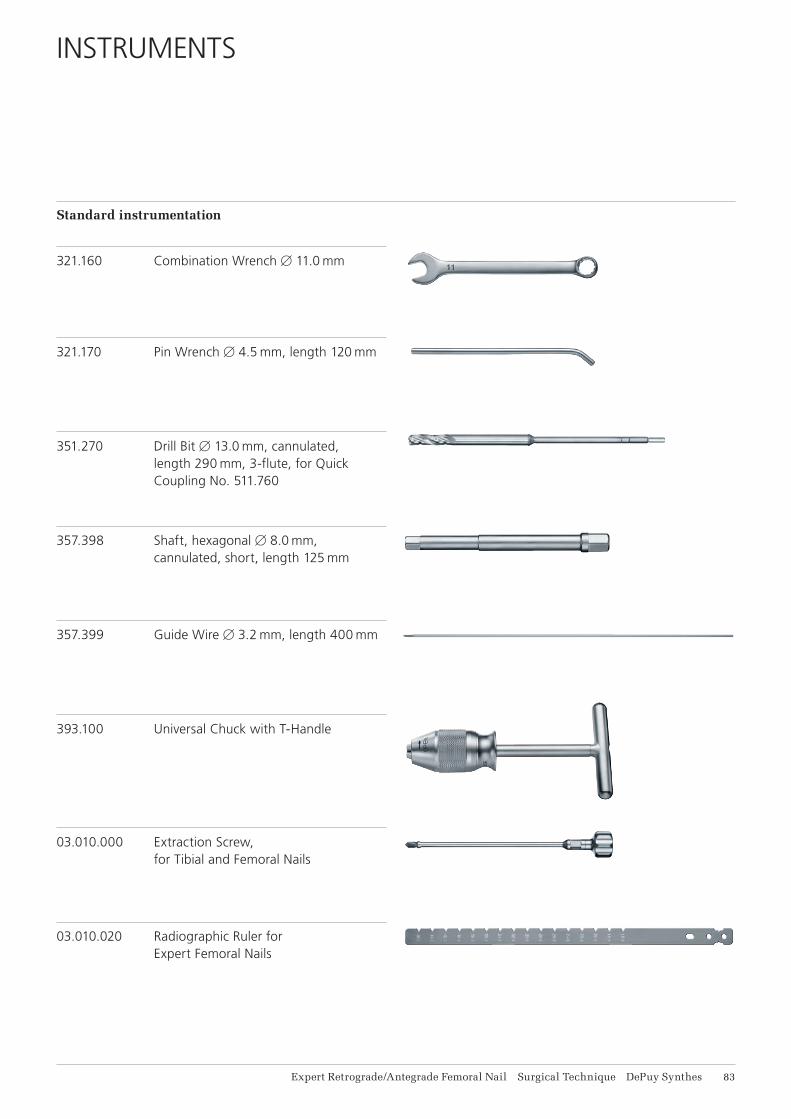
Standard instrumentation
321.160 Combination Wrench B11.0 mm
321.170 Pin Wrench B4.5 mm, length 120 mm
351.270 Drill Bit B13.0 mm, cannulated, length 290 mm, 3-flute, for Quick Coupling No. 511.760
INSTRUMENTS
357.398 Shaft, hexagonal B8.0 mm, cannulated, short, length 125 mm
357.399 Guide Wire B3.2 mm, length 400 mm
393.100 Universal Chuck with T-Handle
03.010.000 Extraction Screw, for Tibial and Femoral Nails
03.010.020 Radiographic Ruler for Expert Femoral Nails

84 DePuy Synthes Expert Retrograde/Antegrade Femoral Nail Surgical Technique
Instruments
03.010.034 Drill Bit B13.0 mm, cannulated, flexible
03.010.061 Drill Bit B4.2 mm, calibrated, length 340 mm, 3-flute, for Quick Coupling, for No. 03.010.065
03.010.063 Protection Sleeve 12.0/8.0, length 188 mm
03.010.065 Drill Sleeve 8.0/4.2, for No. 03.010.063
03.010.070 Trocar B4.2 mm, for No. 03.010.065
03.010.146 Connecting Screw, cannulated, with Internal M6x1 Thread
03.010.170 Hammer Guide
03.010.023 Radiographic Ruler for Nail Diameters for Expert Femoral Nails, length 365 mm
Expert Retrograde/Antegrade Femoral Nail Surgical Technique DePuy Synthes 81
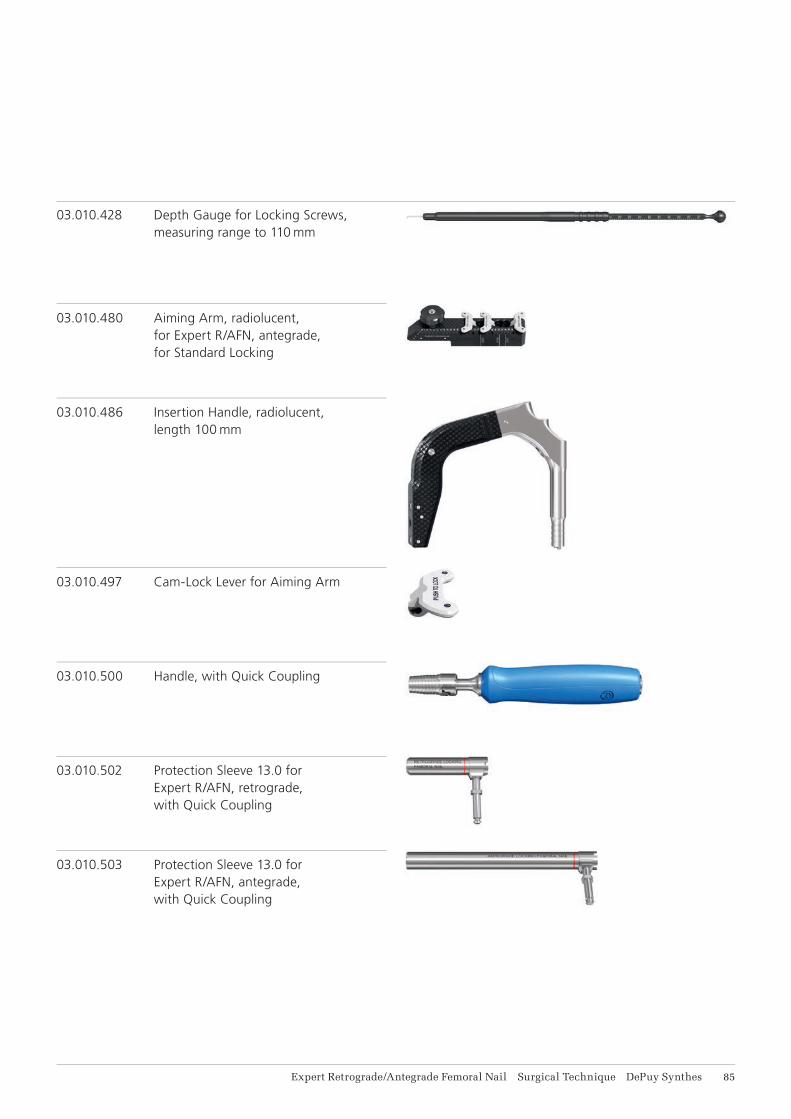
03.010.428 Depth Gauge for Locking Screws, measuring range to 110 mm
03.010.480 Aiming Arm, radiolucent, for Expert R/AFN, antegrade, for Standard Locking
03.010.486 Insertion Handle, radiolucent, length 100 mm
03.010.497 Cam-Lock Lever for Aiming Arm
03.010.500 Handle, with Quick Coupling
03.010.502 Protection Sleeve 13.0 for Expert R/AFN, retrograde, with Quick Coupling
03.010.503 Protection Sleeve 13.0 for Expert R/AFN, antegrade, with Quick Coupling

86 DePuy Synthes Expert Retrograde/Antegrade Femoral Nail Surgical Technique
Instruments
03.010.507 Multihole Drill Guide for Protection Sleeve 13.0, for Expert R/AFN, retrograde
03.010.508 Multihole Drill Guide for Protection Sleeve 13.0, for Expert R/AFN, antegrade
03.010.517 Screwdriver, hexagonal B 8.0 mm, with T-Handle, with spherical head, length 322 mm
03.010.518 Screwdriver Stardrive, T25, self-holding, length 319 mm
03.010.520 Screwdriver Stardrive, T40, with spherical head, cannulated, length 277 mm
03.010.522 Combined Hammer, 500 g
03.010.523 Driving Cap with thread, for Insertion Handle
Do not use standard instruments together with alterna-tive instruments before contacting your DePuy Synthes representative.

Expert Retrograde/Antegrade Femoral Nail Surgical Technique DePuy Synthes 87
Optional instruments
351.050 Tissue Protector
03.010.041 Awl B14.0/3.2 mm, cannulated
03.010.062 Drill Bit B5.0 mm, calibrated, length 340 mm, 3-flute, for Quick Coupling
03.010.066 Drill Sleeve 8.0/5.0, for No. 03.010.063
357.340 Connecting Screw for Spiral Blade for UFN/CFN, for No. 357.310
357.360 Extraction Screw for UFN/CFN and Spiral Blade
03.010.019 Depth Gauge for Locking Screws, measuring range up to 110 mm, for No. 03.010.009
88 DePuy Synthes Expert Retrograde/Antegrade Femoral Nail Surgical Technique
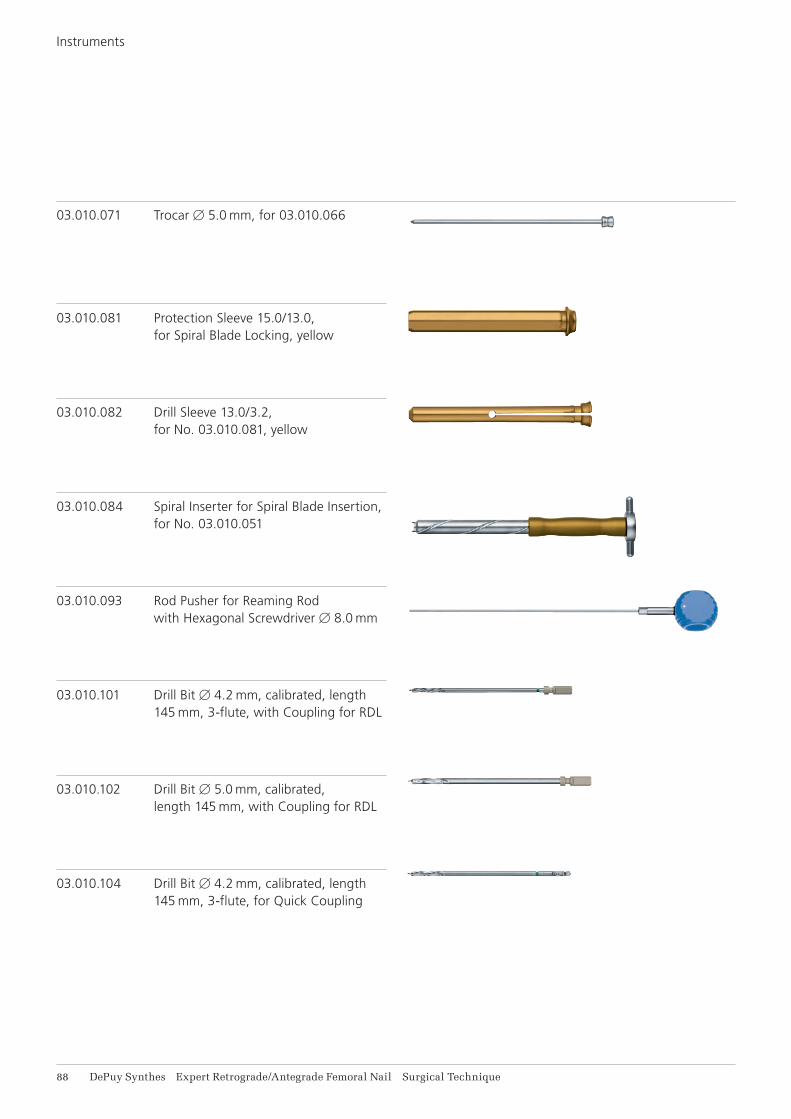
Instruments
03.010.082 Drill Sleeve 13.0/3.2, for No. 03.010.081, yellow
03.010.084 Spiral Inserter for Spiral Blade Insertion, for No. 03.010.051
03.010.093 Rod Pusher for Reaming Rod with Hexagonal Screwdriver B8.0 mm
03.010.071 Trocar B5.0 mm, for 03.010.066
03.010.101 Drill Bit B4.2 mm, calibrated, length 145 mm, 3-flute, with Coupling for RDL
03.010.102 Drill Bit B5.0 mm, calibrated, length 145 mm, with Coupling for RDL
03.010.104 Drill Bit B4.2 mm, calibrated, length 145 mm, 3-flute, for Quick Coupling
03.010.081 Protection Sleeve 15.0/13.0, for Spiral Blade Locking, yellow
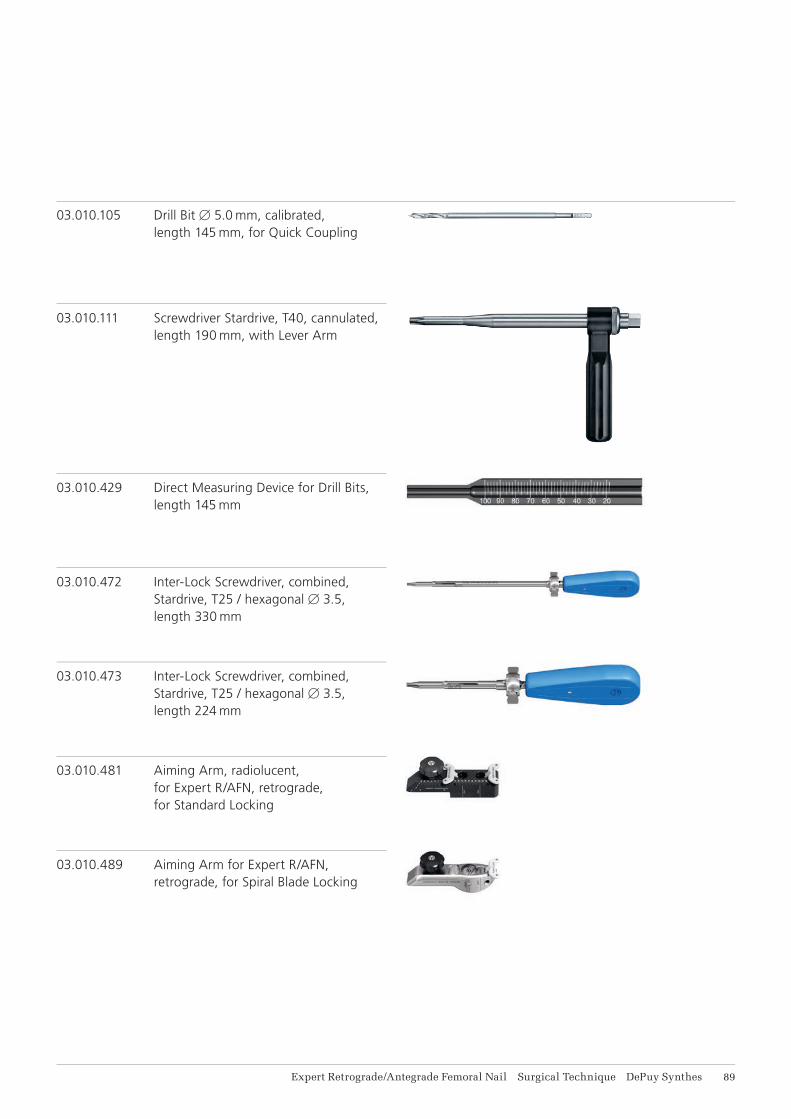
Expert Retrograde/Antegrade Femoral Nail Surgical Technique DePuy Synthes 89
03.010.105 Drill Bit B5.0 mm, calibrated, length 145 mm, for Quick Coupling
03.010.111 Screwdriver Stardrive, T40, cannulated, length 190 mm, with Lever Arm
03.010.429 Direct Measuring Device for Drill Bits, length 145 mm
03.010.472 Inter-Lock Screwdriver, combined, Stardrive, T25 / hexagonal B3.5, length 330 mm
03.010.473 Inter-Lock Screwdriver, combined, Stardrive, T25 / hexagonal B3.5, length 224 mm
03.010.481 Aiming Arm, radiolucent, for Expert R/AFN, retrograde, for Standard Locking
03.010.489 Aiming Arm for Expert R/AFN, retrograde, for Spiral Blade Locking
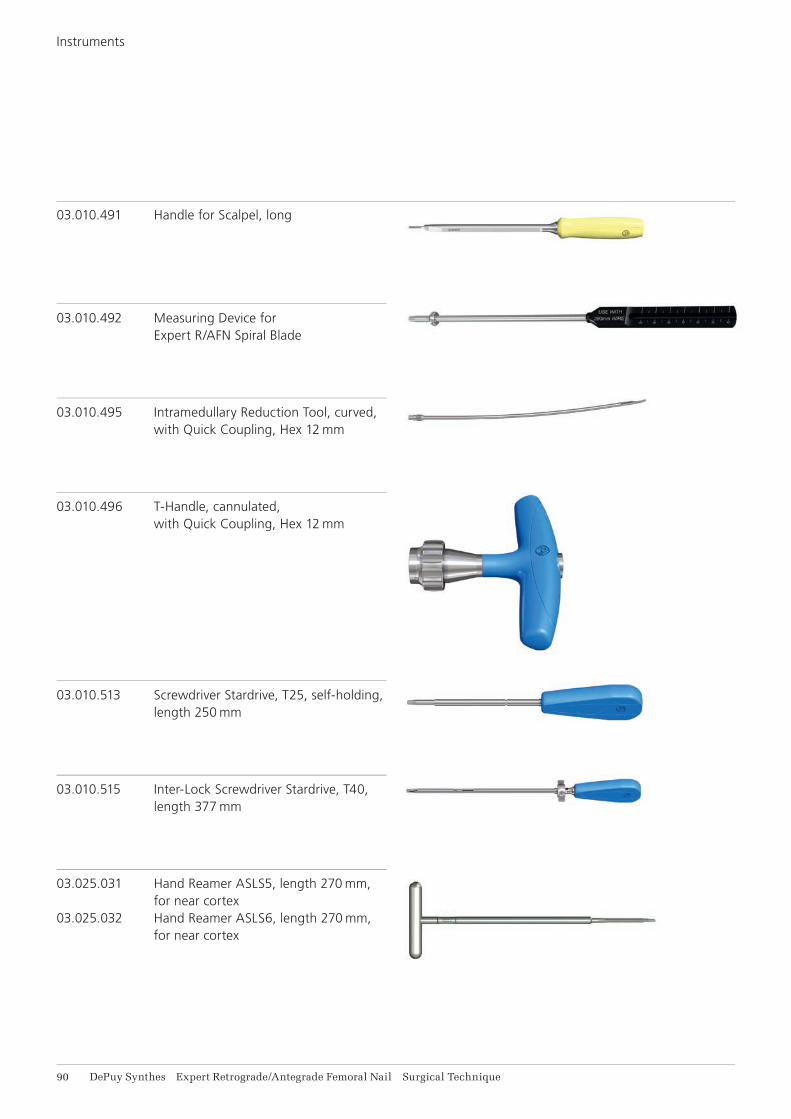
91 DePuy Synthes Expert Retrograde/Antegrade Femoral Nail Surgical Technique
Instruments
03.010.495 Intramedullary Reduction Tool, curved, with Quick Coupling, Hex 12 mm
03.010.496 T-Handle, cannulated, with Quick Coupling, Hex 12 mm
03.010.513 Screwdriver Stardrive, T25, self-holding, length 250 mm
03.010.515 Inter-Lock Screwdriver Stardrive, T40, length 377 mm
03.010.491 Handle for Scalpel, long
03.025.031 Hand Reamer ASLS5, length 270 mm, for near cortex
03.025.032 Hand Reamer ASLS6, length 270 mm, for near cortex
03.010.492 Measuring Device for Expert R/AFN Spiral Blade
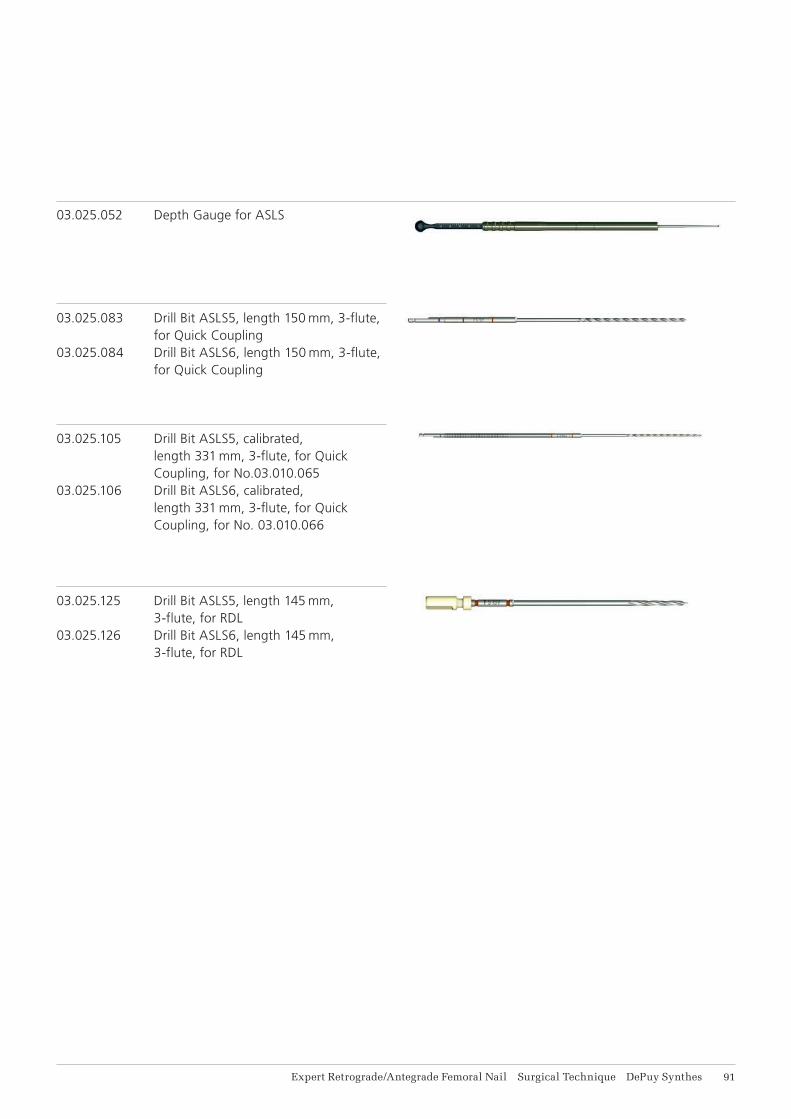
Expert Retrograde/Antegrade Femoral Nail Surgical Technique DePuy Synthes 91
03.025.083 Drill Bit ASLS5, length 150 mm, 3-flute, for Quick Coupling
03.025.084 Drill Bit ASLS6, length 150 mm, 3-flute, for Quick Coupling
03.025.105 Drill Bit ASLS5, calibrated, length 331 mm, 3-flute, for Quick Coupling, for No.03.010.065
03.025.106 Drill Bit ASLS6, calibrated, length 331 mm, 3-flute, for Quick Coupling, for No. 03.010.066
03.025.125 Drill Bit ASLS5, length 145 mm, 3-flute, for RDL
03.025.126 Drill Bit ASLS6, length 145 mm, 3-flute, for RDL
03.025.052 Depth Gauge for ASLS
92 DePuy Synthes Expert Retrograde/Antegrade Femoral Nail Surgical Technique
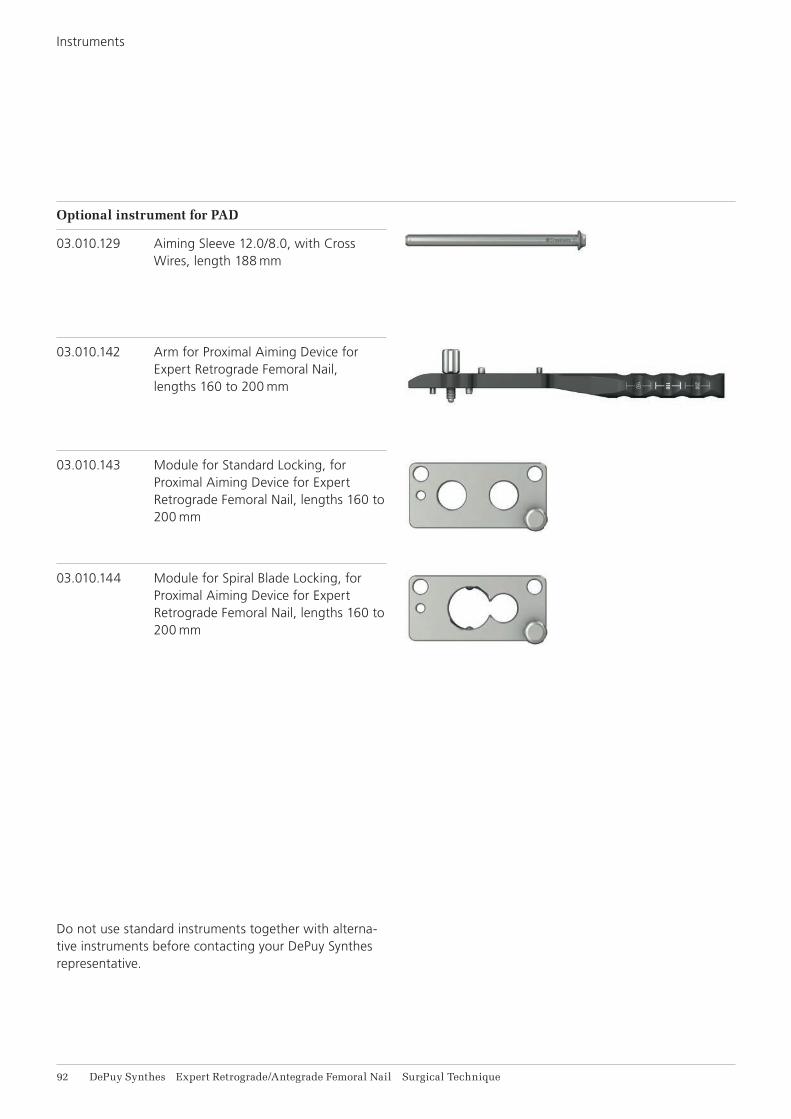
Optional instrument for PAD
03.010.129 Aiming Sleeve 12.0/8.0, with Cross Wires, length 188 mm
Do not use standard instruments together with alterna-tive instruments before contacting your DePuy Synthes representative.
03.010.142 Arm for Proximal Aiming Device for Expert Retrograde Femoral Nail, lengths 160 to 200 mm
03.010.143 Module for Standard Locking, for Proximal Aiming Device for Expert Retrograde Femoral Nail, lengths 160 to 200 mm
03.010.144 Module for Spiral Blade Locking, for Proximal Aiming Device for Expert Retrograde Femoral Nail, lengths 160 to 200 mm
Instruments
Expert Retrograde/Antegrade Femoral Nail Surgical Technique DePuy Synthes 91
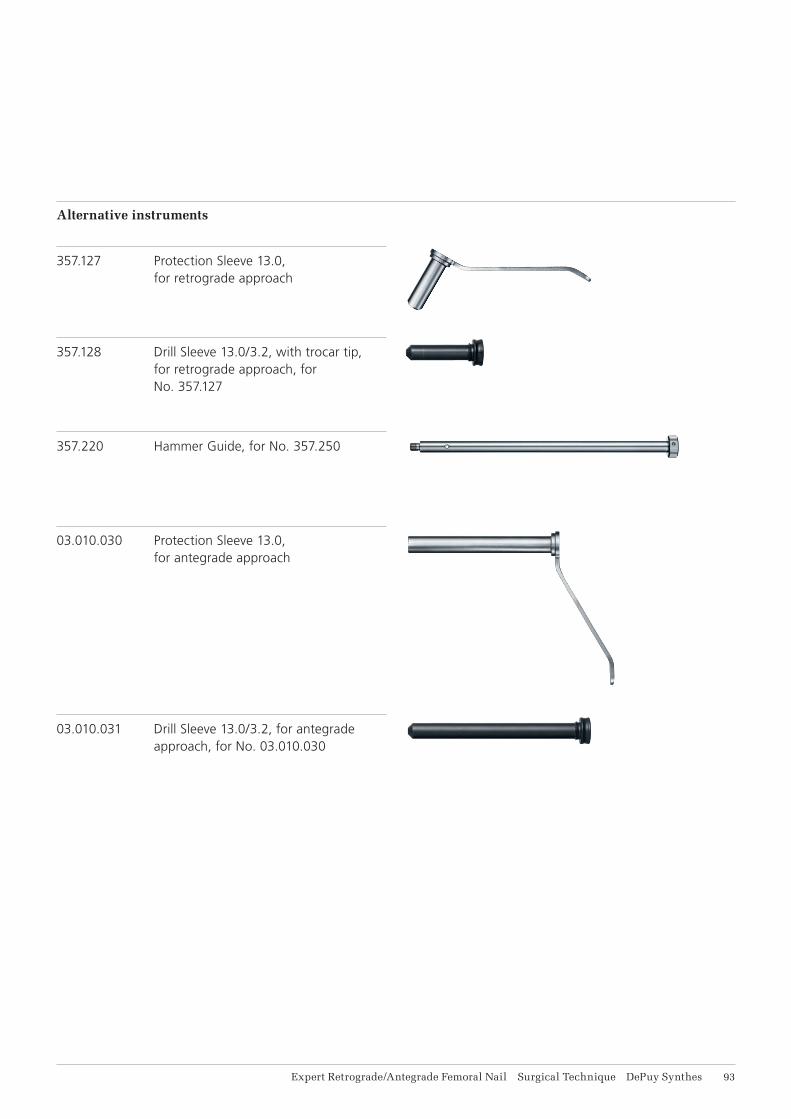
Alternative instruments
357.127 Protection Sleeve 13.0, for retrograde approach
357.128 Drill Sleeve 13.0/3.2, with trocar tip, for retrograde approach, for No. 357.127
357.220 Hammer Guide, for No. 357.250
03.010.030 Protection Sleeve 13.0, for antegrade approach
03.010.031 Drill Sleeve 13.0/3.2, for antegrade approach, for No. 03.010.030
94 DePuy Synthes Expert Retrograde/Antegrade Femoral Nail Surgical Technique
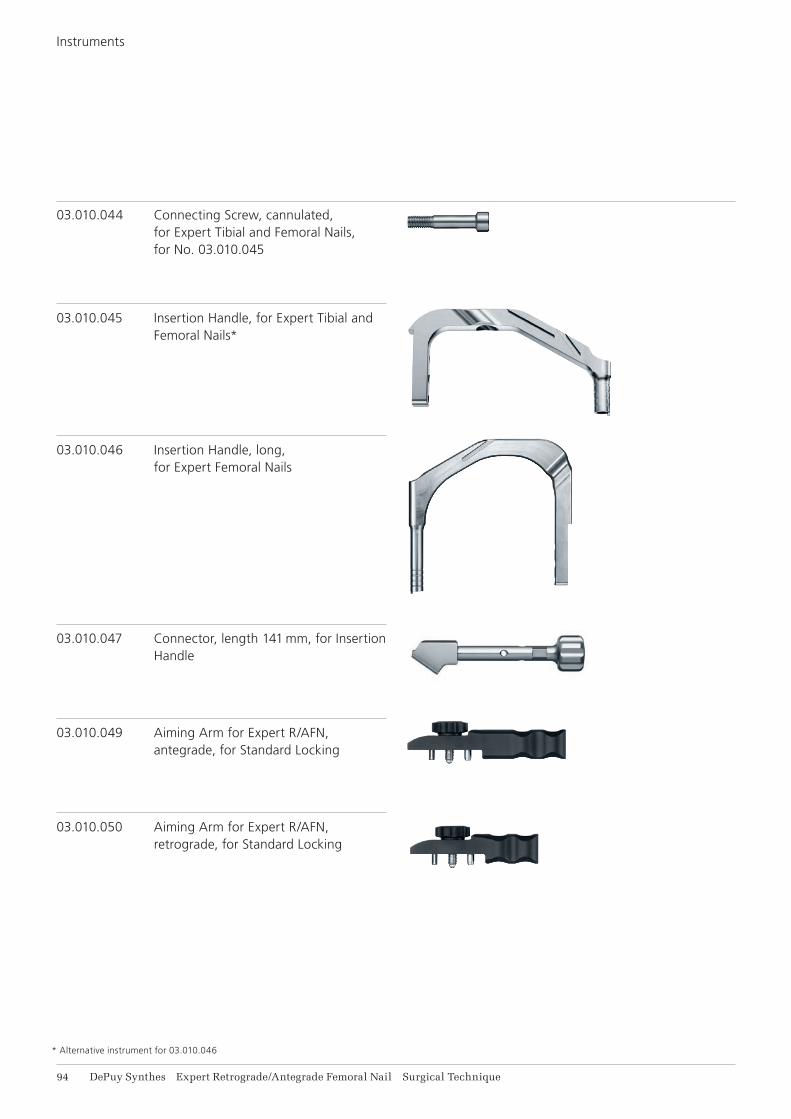
03.010.044 Connecting Screw, cannulated, for Expert Tibial and Femoral Nails, for No. 03.010.045
03.010.045 Insertion Handle, for Expert Tibial and Femoral Nails*
03.010.046 Insertion Handle, long, for Expert Femoral Nails
03.010.047 Connector, length 141 mm, for Insertion Handle
03.010.049 Aiming Arm for Expert R/AFN, antegrade, for Standard Locking
03.010.050 Aiming Arm for Expert R/AFN, retrograde, for Standard Locking
* Alternative instrument for 03.010.046
Instruments

Expert Retrograde/Antegrade Femoral Nail Surgical Technique DePuy Synthes 91
03.010.056 Combined Hammer 700 g, can be mounted, for No. 357.220
03.010.072 Depth Gauge for Locking Screws, measuring range up to 110 mm, for No. 03.010.063
03.010.083 Depth Gauge for Spiral Blades
03.010.092 Screwdriver, hexagonal with spherical head B8.0 mm
03.010.106 Direct Measuring Device for Drill Bits of length 145 mm, for Nos. 03.010.100 to 03.010.105
03.010.107 Screwdriver Stardrive, T25, length 330 mm
03.010.051 Aiming Arm for Expert R/AFN, retrograde, for Spiral Blade Locking
96 DePuy Synthes Expert Retrograde/Antegrade Femoral Nail Surgical Technique
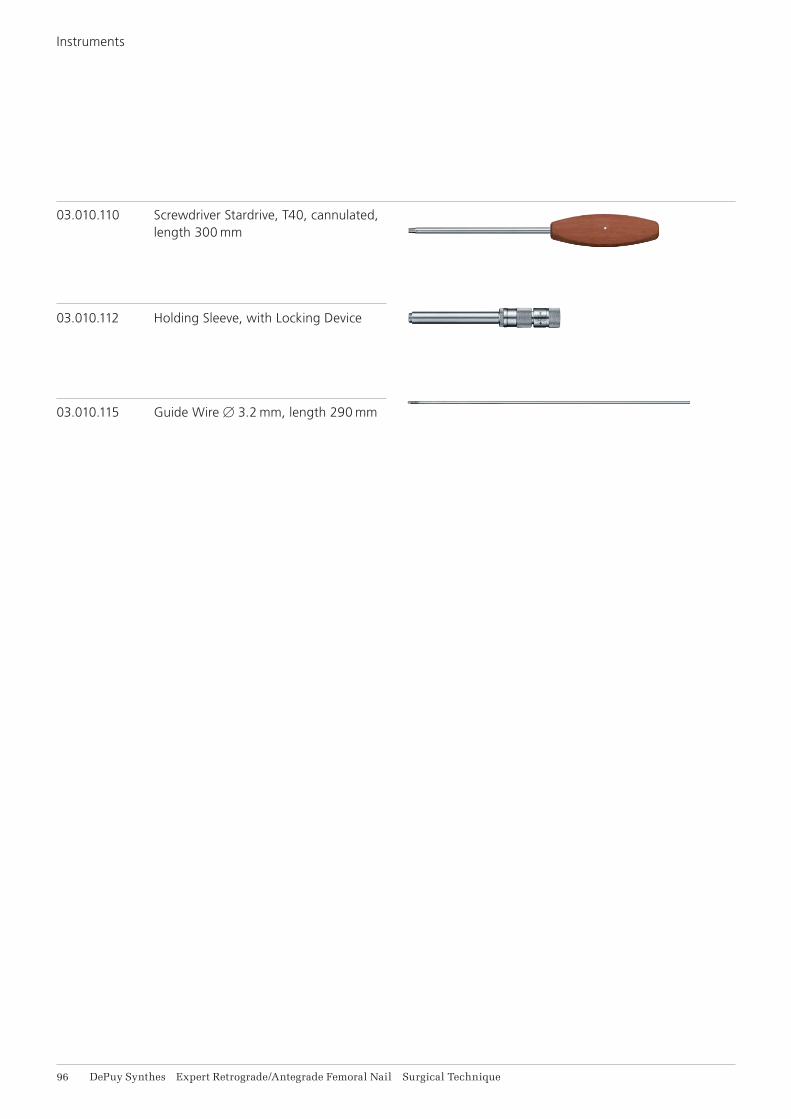
03.010.110 Screwdriver Stardrive, T40, cannulated, length 300 mm
03.010.112 Holding Sleeve, with Locking Device
03.010.115 Guide Wire B3.2 mm, length 290 mm
Instruments
�� �� � � ��
� � � ��
�� �
Expert Retrograde/Antegrade Femoral Nail Surgical Technique DePuy Synthes 97
Instruments
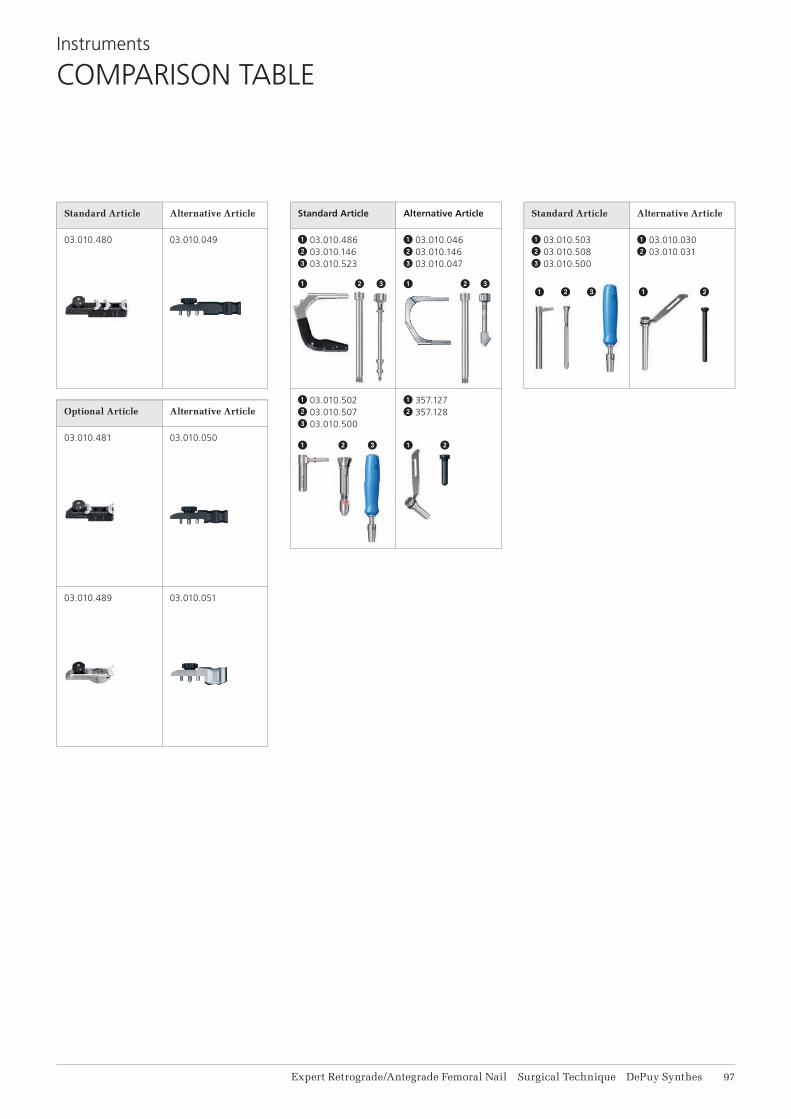
COMPARISON TABLE
Standard Article Alternative Article
�03.010.503�03.010.508�03.010.500
�03.010.030�03.010.031
Standard Article Alternative Article
�03.010.486�03.010.146�03.010.523
�03.010.046�03.010.146�03.010.047
�03.010.502�03.010.507�03.010.500
�357.127�357.128
Standard Article Alternative Article
03.010.480 03.010.049
Optional Article Alternative Article
03.010.481 03.010.050
03.010.489 03.010.051
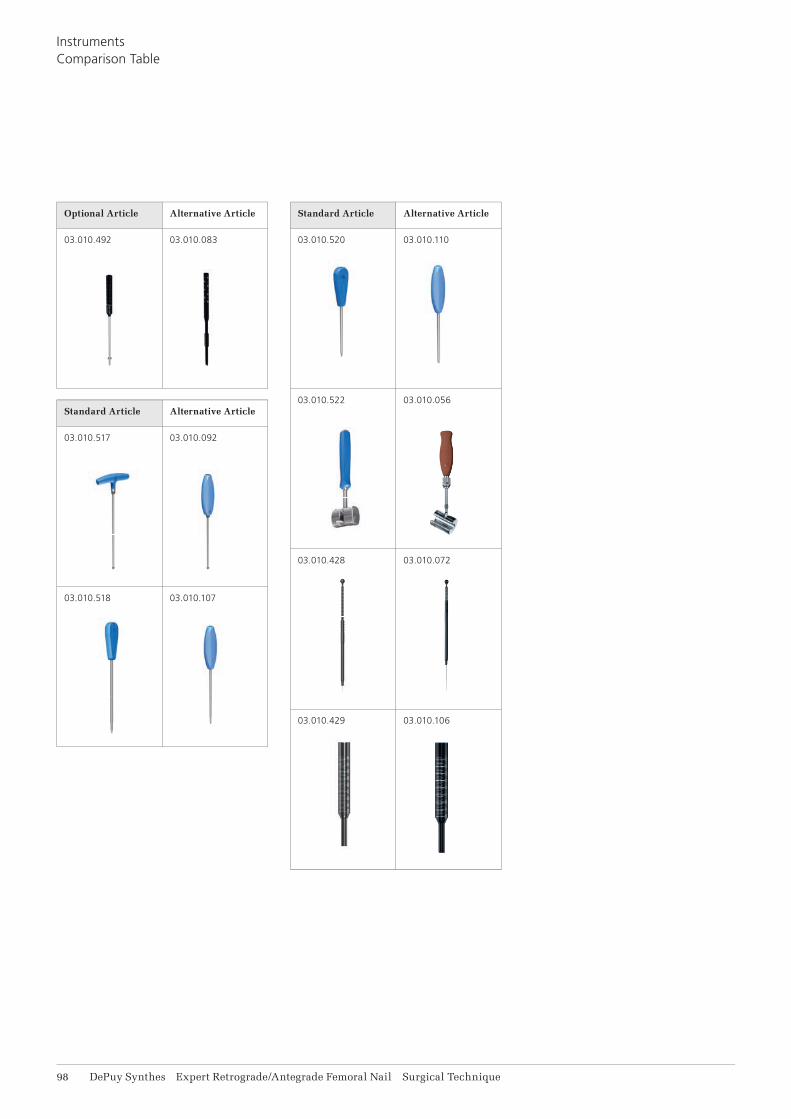
98 DePuy Synthes Expert Retrograde/Antegrade Femoral Nail Surgical Technique
Optional Article Alternative Article
03.010.492 03.010.083
Standard Article Alternative Article
03.010.517 03.010.092
03.010.518 03.010.107
Standard Article Alternative Article
03.010.520 03.010.110
03.010.522 03.010.056
03.010.428 03.010.072
03.010.429 03.010.106
InstrumentsComparison Table
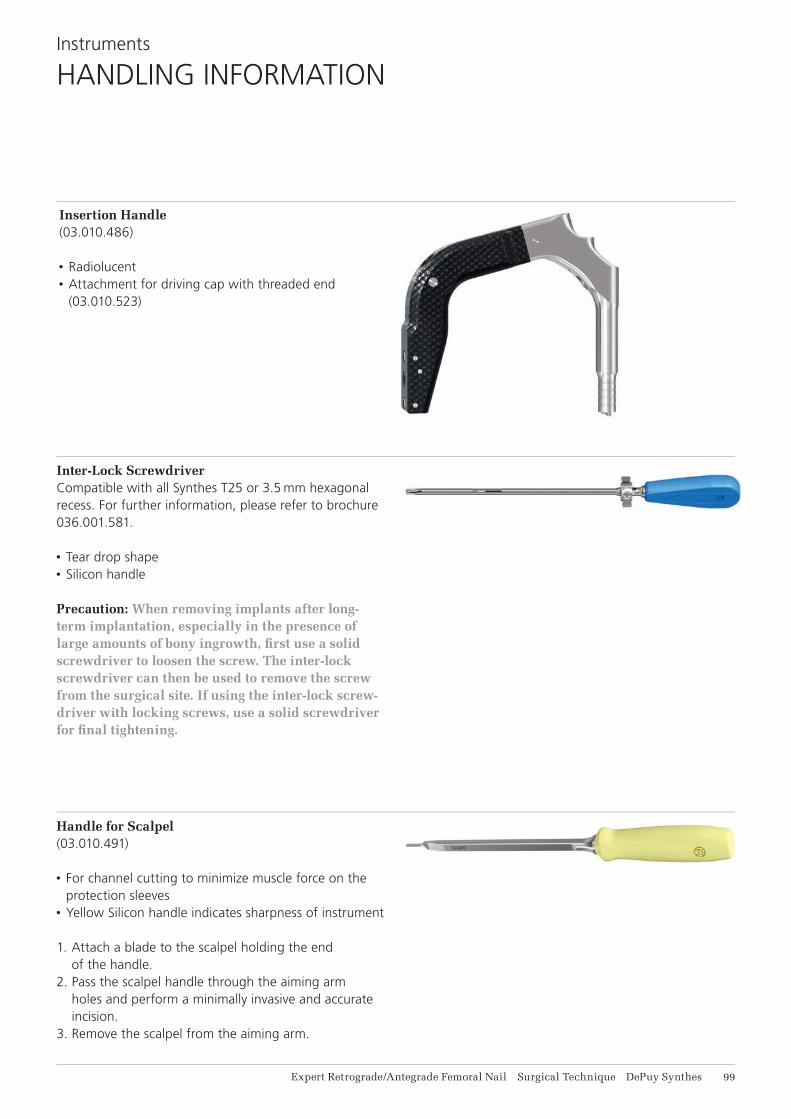
Expert Retrograde/Antegrade Femoral Nail Surgical Technique DePuy Synthes 99
Instruments
HANDLING INFORMATION
Inter-Lock ScrewdriverCompatible with all Synthes T25 or 3.5 mm hexagonal recess. For further information, please refer to brochure 036.001.581.
• Tear drop shape• Silicon handle
Precaution: When removing implants after long-term implantation, especially in the presence of large amounts of bony ingrowth, fi rst use a solid screwdriver to loosen the screw. The inter-lock screwdriver can then be used to remove the screw from the surgical site. If using the inter-lock screw-driver with locking screws, use a solid screwdriver for fi nal tightening.
Handle for Scalpel (03.010.491)
• For channel cutting to minimize muscle force on the protection sleeves
• Yellow Silicon handle indicates sharpness of instrument
1. Attach a blade to the scalpel holding the end of the handle.
2. Pass the scalpel handle through the aiming arm holes and perform a minimally invasive and accurate incision.
3. Remove the scalpel from the aiming arm.
Insertion Handle (03.010.486)
• Radiolucent• Attachment for driving cap with threaded end
(03.010.523)
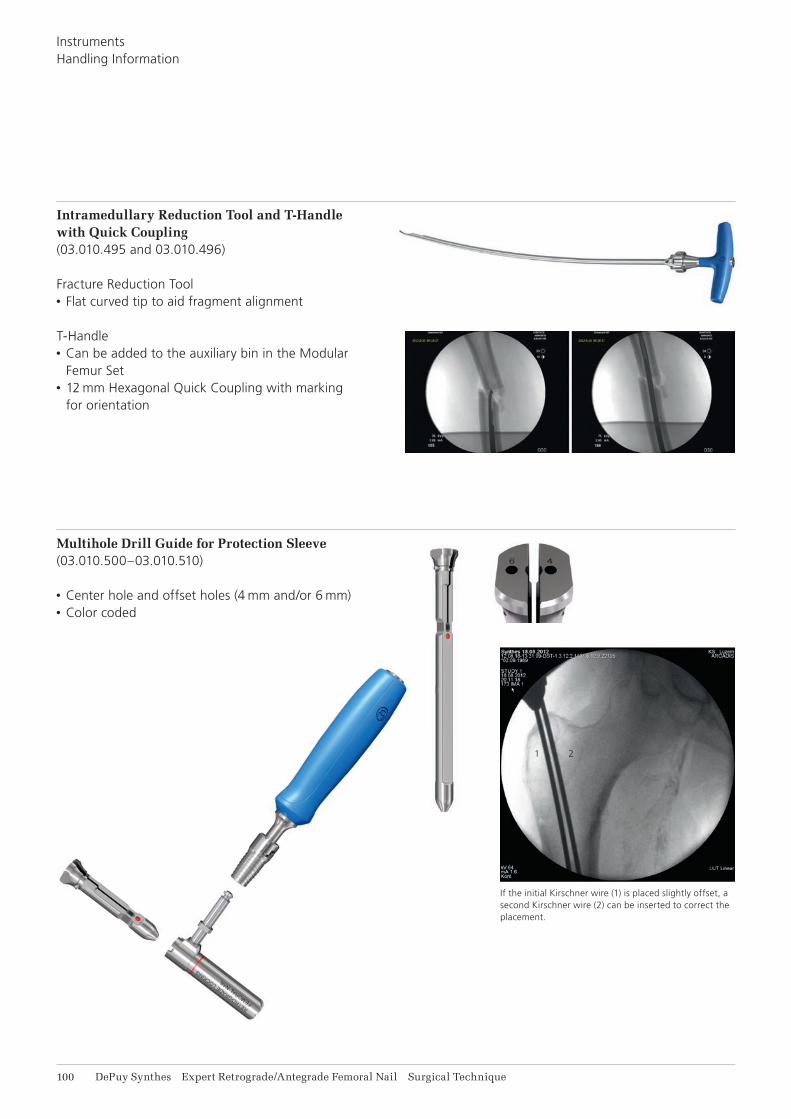
1 2
111 DePuy Synthes Expert Retrograde/Antegrade Femoral Nail Surgical Technique
Intramedullary Reduction Tool and T-Handle with Quick Coupling (03.010.495 and 03.010.496)
Fracture Reduction Tool• Flat curved tip to aid fragment alignment
T-Handle • Can be added to the auxiliary bin in the Modular
Femur Set• 12 mm Hexagonal Quick Coupling with marking
for orientation
Multihole Drill Guide for Protection Sleeve (03.010.500–03.010.510)
• Center hole and offset holes (4 mm and/or 6 mm)• Color coded
If the initial Kirschner wire (1) is placed slightly offset, a second Kirschner wire (2) can be inserted to correct the placement.
InstrumentsHandling Information

Expert Retrograde/Antegrade Femoral Nail Surgical Technique DePuy Synthes 111
Instruments
MODULAR CASES
The modularity of the system enables sets to be con-fi gured according to the hospital’s clinical needs. Each set confi guration consists of basic instruments, dedi-cated system instruments and optional instruments (if required). For femoral nails (LFN, ALFN, R/AFN) the fe-mur set must be added to the set confi guration. The modular trays also contain the ASLS instruments. For further information about ASLS refer to pages 108 and 109.
The instrument modules listed on the right side are available.
For ease of use within the operating theatre, all modular trays have an additional marking:• Mandatory modular trays have a solid white marking• Optional trays have a hatched black marking• Each system has a control picture for reference
ETN R/AFN LFN ALFN
01.010.412 Instruments for ETN
01.010.413 Instruments for R/AFN
01.010.414 Instruments for LFN
01.010.415 Instruments for ALFN
ETN Aiming Arm (separate)
01.010.411Instruments for Expert Femoral Nail
01.010.410Basic Instruments for Expert Nail
01.010.416Additional Instruments for Expert Nail (Optional)
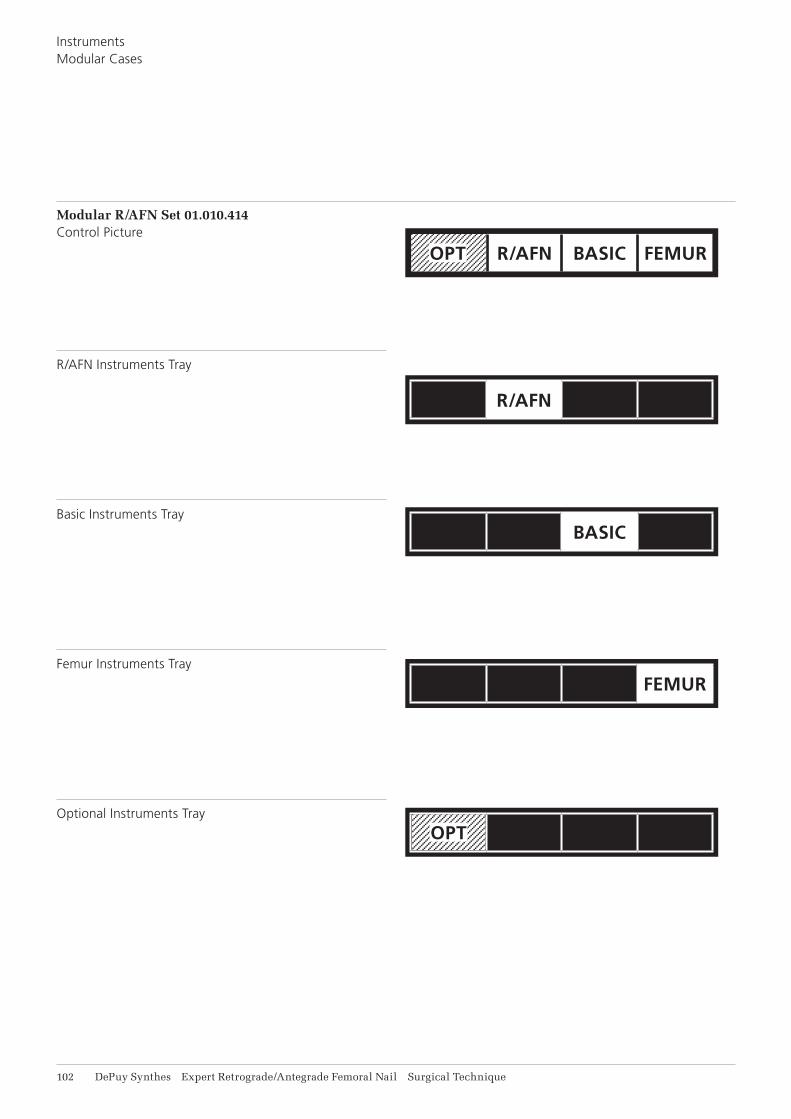
R/AFN BASIC FEMUR
R/AFN
BASIC
OPT
OPT
FEMUR
112 DePuy Synthes Expert Retrograde/Antegrade Femoral Nail Surgical Technique
Modular R/AFN Set 01.010.414Control Picture
R/AFN Instruments Tray
Basic Instruments Tray
Femur Instruments Tray
Optional Instruments Tray
InstrumentsModular Cases
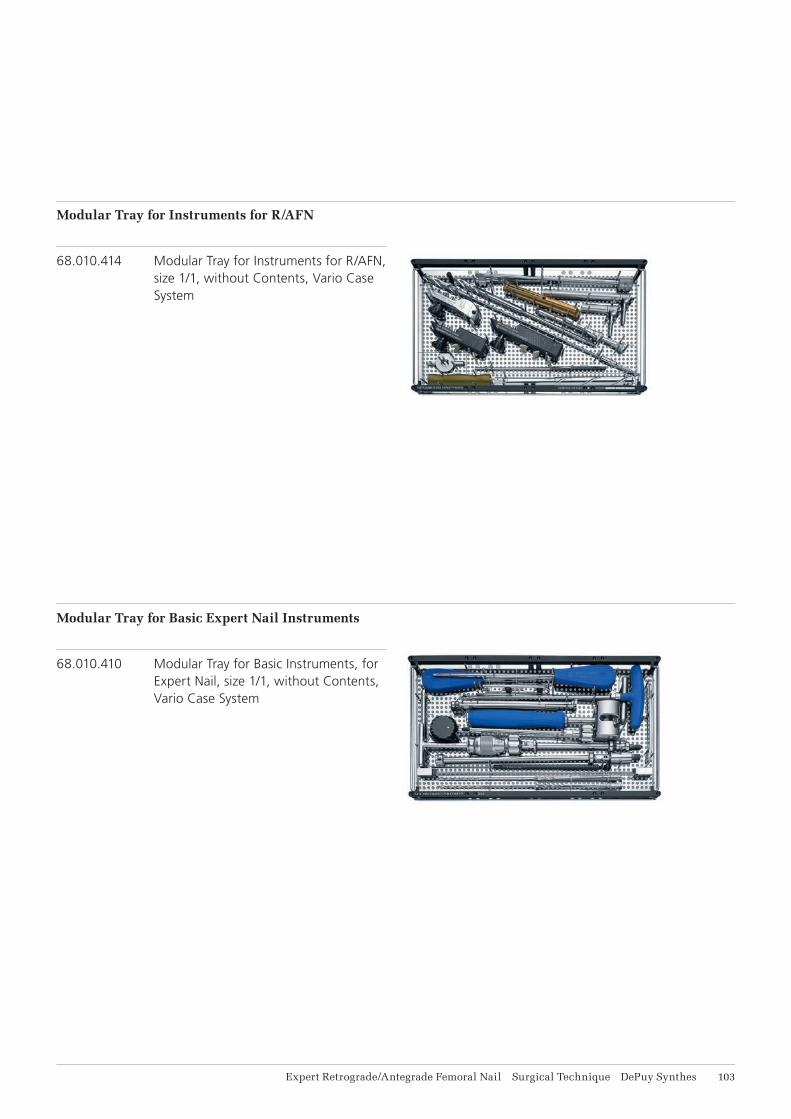
Expert Retrograde/Antegrade Femoral Nail Surgical Technique DePuy Synthes 111
Modular Tray for Instruments for R/AFN
68.010.414 Modular Tray for Instruments for R/AFN, size 1/1, without Contents, Vario Case System
Modular Tray for Basic Expert Nail Instruments
68.010.410 Modular Tray for Basic Instruments, for Expert Nail, size 1/1, without Contents, Vario Case System

114 DePuy Synthes Expert Retrograde/Antegrade Femoral Nail Surgical Technique
Modular Tray for Femur Expert Nail Instruments
68.010.411 Modular Tray for Instruments, for Expert Femoral Nails, size 1/1, without Contents, Vario Case System
Modular Tray for Optional Expert Nail Instruments
68.010.416 Modular Tray, for Additional Instruments, for Expert, size 1/1, without Contents, Vario Case System
InstrumentsModular Cases
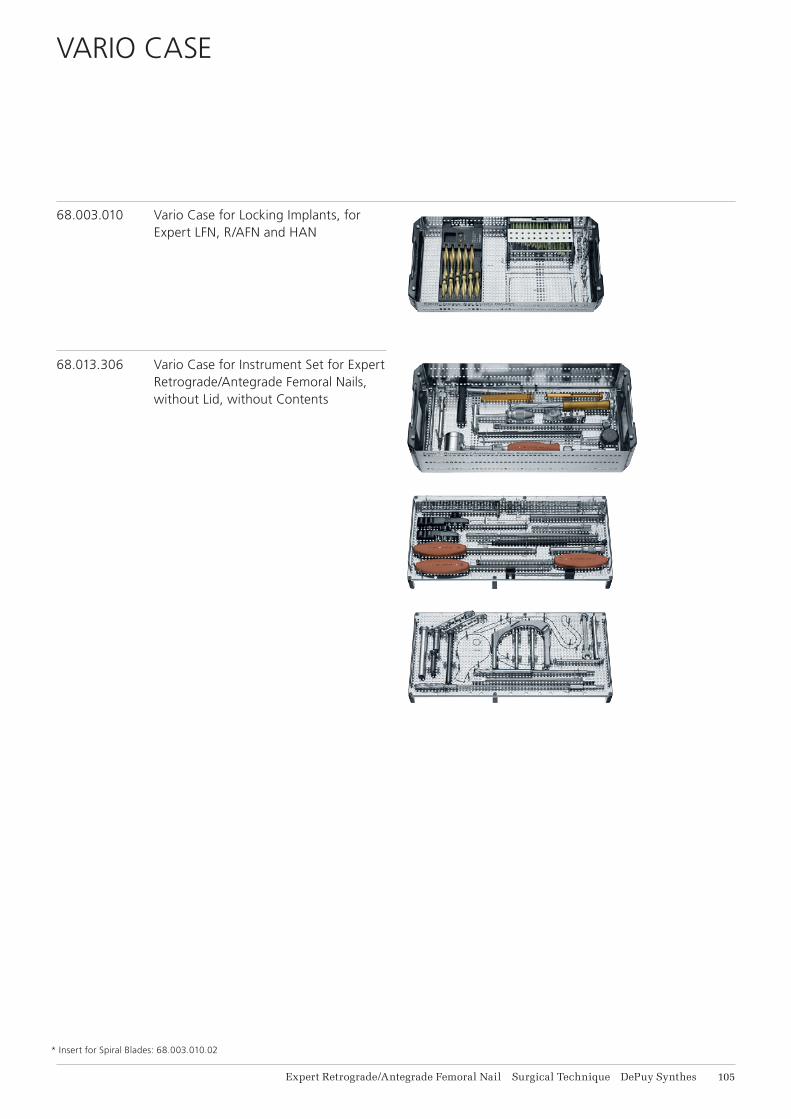
Expert Retrograde/Antegrade Femoral Nail Surgical Technique DePuy Synthes 111
VARIO CASE
68.003.010 Vario Case for Locking Implants, for Expert LFN, R/AFN and HAN
68.013.306 Vario Case for Instrument Set for Expert Retrograde/Antegrade Femoral Nails, without Lid, without Contents
* Insert for Spiral Blades: 68.003.010.02
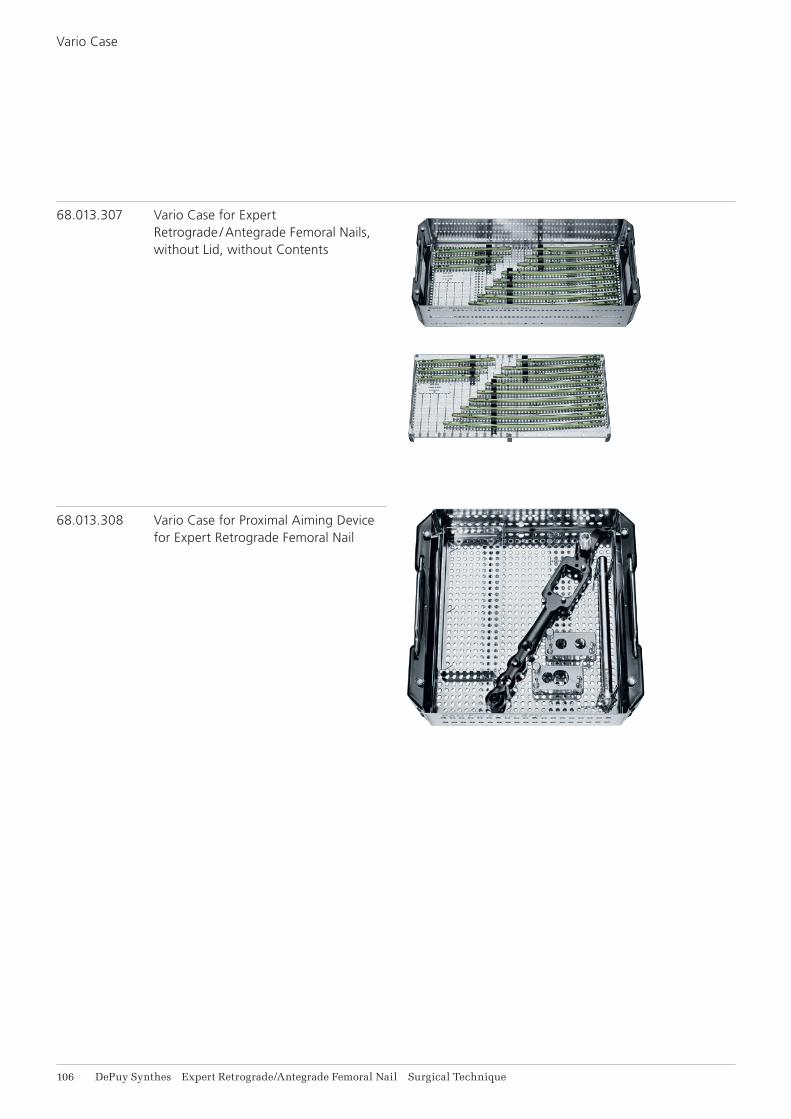
116 DePuy Synthes Expert Retrograde/Antegrade Femoral Nail Surgical Technique
68.013.307 Vario Case for Expert Retrograde / Antegrade Femoral Nails, without Lid, without Contents
68.013.308 Vario Case for Proximal Aiming Device for Expert Retrograde Femoral Nail
Vario Case
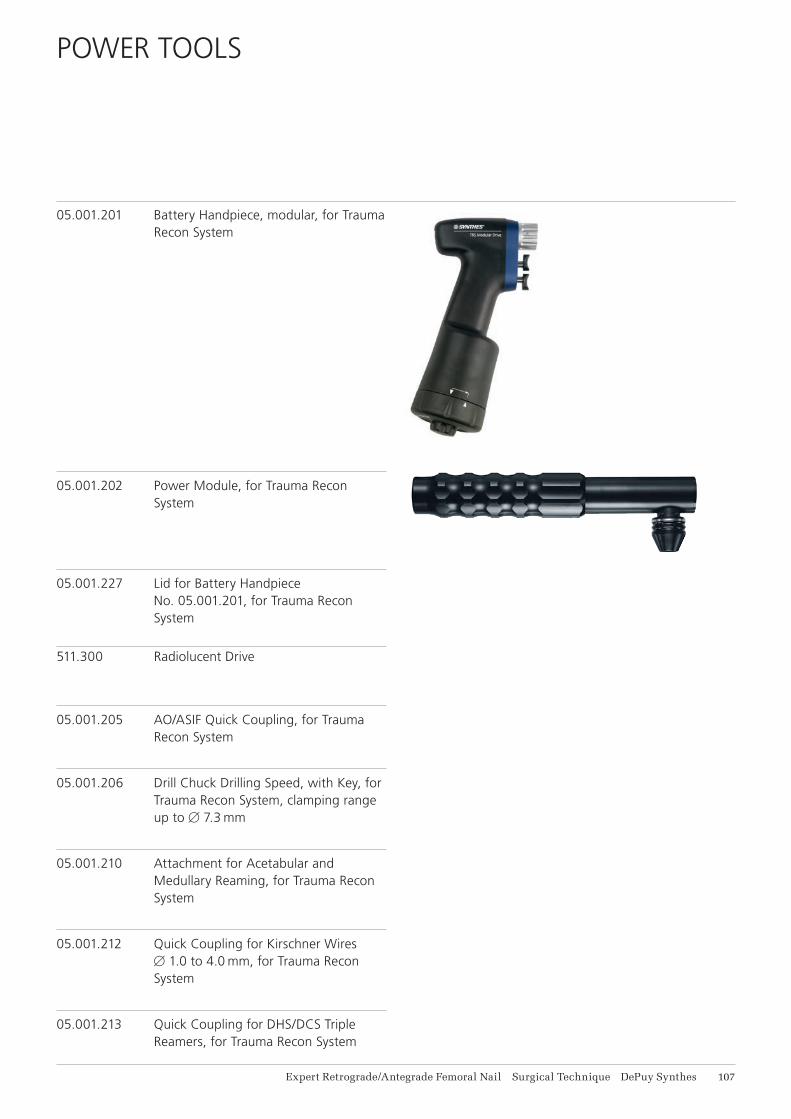
Expert Retrograde/Antegrade Femoral Nail Surgical Technique DePuy Synthes 117
POWER TOOLS
05.001.201 Battery Handpiece, modular, for Trauma Recon System
05.001.202 Power Module, for Trauma Recon System
05.001.227 Lid for Battery Handpiece No. 05.001.201, for Trauma Recon System
511.300 Radiolucent Drive
05.001.205 AO/ASIF Quick Coupling, for Trauma Recon System
05.001.206 Drill Chuck Drilling Speed, with Key, for Trauma Recon System, clamping range up to B 7.3 mm
05.001.210 Attachment for Acetabular and Medullary Reaming, for Trauma Recon System
05.001.212 Quick Coupling for Kirschner Wires B 1.0 to 4.0 mm, for Trauma Recon System
05.001.213 Quick Coupling for DHS/DCS Triple Reamers, for Trauma Recon System
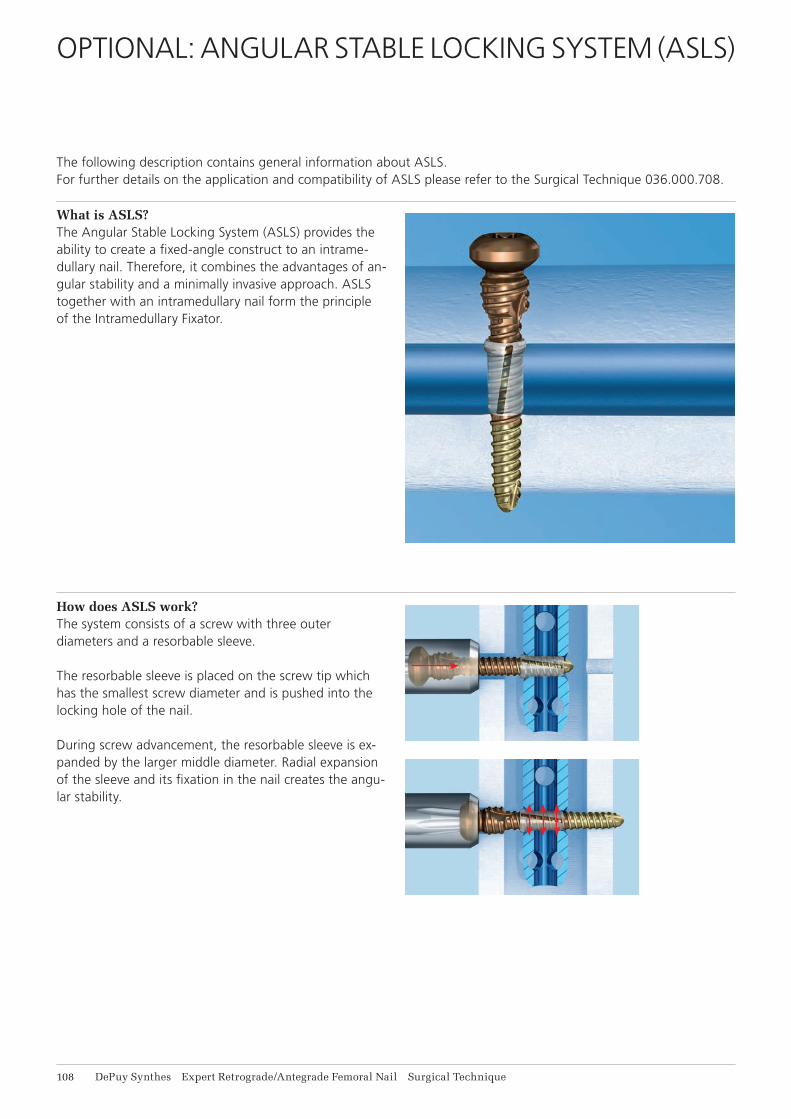
118 DePuy Synthes Expert Retrograde/Antegrade Femoral Nail Surgical Technique
What is ASLS?The Angular Stable Locking System (ASLS) provides the ability to create a fixed-angle construct to an intrame-dullary nail. Therefore, it combines the advantages of an-gular stability and a minimally invasive approach. ASLS together with an intramedullary nail form the principle of the Intramedullary Fixator.
How does ASLS work?The system consists of a screw with three outer diameters and a resorbable sleeve.
The resorbable sleeve is placed on the screw tip which has the smallest screw diameter and is pushed into the locking hole of the nail.
During screw advancement, the resorbable sleeve is ex-panded by the larger middle diameter. Radial expansion of the sleeve and its fixation in the nail creates the angu-lar stability.
The following description contains general information about ASLS.For further details on the application and compatibility of ASLS please refer to the Surgical Technique 036.000.708.
OPTIONAL: ANGULAR STABLE LOCKING SYSTEM (ASLS)

Expert Retrograde/Antegrade Femoral Nail Surgical Technique DePuy Synthes 119
Where can I use ASLS?ASLS is particularly indicated in cases where increased stability is needed, for example in fractures closer to the metaphyseal area or in poor quality bone.
ASLS can be used in combination with all Synthes can-nulated titanium nails as an alternative to standard lock-ing screws. It is especially suited for the use with the Expert Nailing System.
Implants
ASLS screws• Titanium–6% aluminium–7% niobium alloy (TAN)• Fully threaded shaft with 3 diameters• Self-tapping, blunt tip• Stardrive T25 recess• Sterile-packed
ASLS sleeves• 70:30 poly (L-lactide-co-D,L-lactide)• Bioresorbable, provides 80% decreased fracture site
motion during first 12 weeks of healing• Gradually degrades within 2 years (resorption rate var-
ies per patient and implant site)• Inner thread for secure fit to screw• Expands in nail locking hole• Available in diameters of 4 mm (ASLS4), 5 mm (ASLS5)
and 6 mm (ASLS6)• Sterile-packed
Expert Retrogate/Antegrade Femoral Nail (R/AFN)
Expert Humeral Nail (HN) and Expert Proximal Humeral Nail (PHN)
Expert Lateral Femoral Nail (LFN)
Expert Hindfoot Arthodesis Nail (HAN)
Expert Tibia Nail (TN)

111 DePuy Synthes Expert Retrograde/Antegrade Femoral Nail Surgical Technique
MRI INFORMATION
Torque, Displacement and Image Artifacts according to ASTM F 2213-06, ASTM F 2052-06e1 and ASTM F2119-07Non-clinical testing of worst case scenario in a 3 T MRI system did not reveal any relevant torque or displace-ment of the construct for an experimentally measured local spatial gradient of the magnetic field of 3.69 T/m. The largest image artifact extended approximately 169 mm from the construct when scanned using the Gradient Echo (GE). Testing was conducted on a 3 T MRI system.
Radio-Frequency-(RF-)induced heating according to ASTM F2182-11aNon-clinical electromagnetic and thermal testing of worst case scenario lead to peak temperature rise of 9.5 °C with an average temperature rise of 6.6 °C (1.5 T) and a peak temperature rise of 5.9 °C (3 T) under MRI Conditions using RF Coils (whole body averaged specific absorption rate [SAR] of 2 W/kg for 6 minutes [1.5 T] and for 15 minutes [3 T]).
Precautions: The above mentioned test relies on non-clinical testing. The actual temperature rise in the patient will depend on a variety of factors beyond the SAR and time of RF application. Thus, it is recommended to pay particular attention to the following points: • It is recommended to thoroughly monitor patients
undergoing MR scanning for perceived tempera-ture and/or pain sensations.
• Patients with impaired thermoregulation or temperature sensation should be excluded from MR scanning procedures.
• Generally, it is recommended to use a MR system with low field strength in the presence of conduc-tive implants. The employed specific absorption rate (SAR) should be reduced as far as possible.
• Using the ventilation system may further contrib-ute to reduce temperature increase in the body.


0123
Synthes GmbHEimattstrasse 34436 OberdorfSwitzerlandTel: +41 61 965 61 11Fax: +41 61 965 66 00www.depuysynthes.com ©
DeP
uy S
ynth
es T
raum
a, a
div
isio
n of
Syn
thes
Gm
bH. 2
016.
A
ll ri
ghts
res
erve
d.
036.
000.
519
DS
EM
/TR
M/0
615/
0415
(1)
09/1
6
Not all products are currently available in all markets.
This publication is not intended for distribution in the USA.
All surgical techniques are available as PDF files at www.depuysynthes.com/ifu