Embed Size (px)
Citation preview
2A-1
Exploring the Phases of the Moon Activity UCIObs – 5 Grade Level: 3 – 5 Source: Copyright (2009) by Tammy Smecker-Hane. Contact [email protected] with questions.
Standards: This activity addresses these California Science Content Standards: Gr 3 Earth Science:
4b. Students know the way in which the Moon's appearance changes during the four-week lunar cycle. 4d. Students know that Earth is one of several planets that orbit the Sun and that the Moon orbits Earth.
What Is This Activity About?
This activity gives students a chance to do hands-on experiments to learn that the relative position of the Earth/Moon/Sun determine what the observed phase of the Moon. Additional optional activities are also discussed.
What Will Students Do?
Students will use a lamp as the Sun, a Styrofoam ball as the Moon, and a student as the Earth. They will vary the location of the Moon in its orbit around the Earth and the student who is the Earth will observe the phase of the Moon.
Tips and Suggestions:
Use a dark room and one or more bright lights (an unshaded lamp) in the center of the classroom to act as the Sun. Use Styrofoam balls (1 per group) as the Moon. Make sure to hold the balls slightly above the children’s heads so the “Earth” doesn’t shadow the Moon.
Activity UCIObs-5 Rising and Setting of the Moon is an excellent subsequent activity. Students also might enjoy making daily observations of the moon over a month to record the progression of the moon’s phases to verify the results of these exercises; see the Optional Activities in this exercise or the other Moon Journal Activity in this kit.
What Will Students Learn? Concepts: Phases of the Moon, Positions of the Moon and Sun in the Sky Inquiry Skills: Visualizing, Ordering, Predicting, Inferring Big Ideas: Spatial Reasoning, Patterns of Change
2A-2
What you will need: Pencils (1 per group) Scissors (1 per student) Lamp that can shine in all directions (i.e., a lamp base with a bare 100 to 150 Watt bulb and no lampshade) Styrofoam Balls (1 per group) 1 copy of pages 7-10 1 copy of the exercise (pages 11-14 or pages 11-17 if you want to add the optional moon images and journal) for each group Optional: Black plastic garbage bags or butcher paper to tape over windows and darken the classroom Teacher Preparation: 1. If you are unfamiliar with basic astronomy and moon phases, please read the accompanying
document entitled Night_Sky_Lectures.pdf by T. Smecker-Hane. This will teach you all you need to know to do this experiment.
2. Make a single set of photocopies of pages 7-10 and cut each page in half. Each group will
get one of the half-pages. Make a photocopy of the “Moon Phase Experiment” (pages 11-14 or pages 11-17 if you want to add the optional material) for each group.
3. Covering the windows with garbage bags or butcher paper is highly recommended. Any
outside light will mess up the shadows and can lead students to draw the wrong conclusions. Teacher’s Classroom Instructions: 1. This exercise will take approximately 45 to 60 minutes to complete.
2. Explain the names of the Moon phases and draw them on the blackboard: New (entirely
dark), Full (entirely lit), Crescent (mostly dark), Gibbous (mostly lit) and First Quarter (western half lit, eastern half dark) and Third Quarter (eastern half lit and western side dark). Tell them that you will define the terms “waxing” and “waning” after the experiment, because you don’t want to give away the answers now.
3. Divide the students into groups with 3 to 4 students per group.
4. Ask each group cut out the 8 images of the Moon (pages 11-12). Tell them not to cut off the words beneath the pictures. These images of the Moon come from Brian Casey and you can find them on the web at http:// www.briancasey.org/artifacts/astro/moon.cgi.
4. Ask each group of students to discuss among themselves what they think the progression of the phases during the 28 day-long lunar cycle. Encourage a lively discussion with all students participating. Have them order the pictures in a time sequence, starting with the New Moon as #1, and write the numbers (2 – 8) on the other pictures of the Moon showing their predicted progression over time. All students in the group should come to agreement. Don’t be tempted to lead them toward the correct answer. One of the goals of this exercise is to understand that the observed pattern has a physical reason behind it, and its instructive for them to “discover” it on their own.
2A-3
5. Draw on the blackboard the relative positions of the Earth and Sun and the path describing
the Moon’s orbit. See Figure 1. Review these crucial facts with the students: A. The moon completes one orbit around the Earth in 4 weeks (1 week = 7 days; 4 weeks = 28 days) traveling at a speed of 64,000 km/day or 1,700 miles/hr. When viewed from above, looking down on the Earth’s North pole, the Moon will orbit the Earth in the counter-clockwise direction as time passes. B. The Earth also orbits counter-clockwise around the Sun taking1 year = 52 weeks = 365 days to complete one orbit and traveling at an speed of 2,600,000 km/day or 67,000 miles/hr. In this exercise we can make the assumption that the Earth remains in the same spot while the Moon orbits around the Earth. C. The Earth also revolves around its axis once per day. Similarly, the Moon rotates once around its axis, but much more slowly, taking the full 28 days to make one complete revolution. This means that one side of the Moon always faces the Earth and the backside is never seen unless, like the Apollo astronauts, you take a spaceship and orbit the Moon.
6. Introduce the idea that the relative position of the E/M/S determines what phase of the Moon an observer on the Earth will see, and there is a very orderly progression (sequence) of the phases of the Moon over time. We are going to experiment to see what it is and check whether we ordered the phases in the right sequence. Explain that any observer on the Earth (no matter what longitude or location) will see the same phase on a given night. Explain what each group will do. Split into 8 groups so each can study one particular example of the E/M/S geometry. (If you have more than 8 groups then you can assign a particular phase to more than one group.) Give each group the diagram showing the particular geometry of E/M/S that they are to examine (half page of pages 7-10) and the instruction packet (pages 11-17). As per the instructions, let each person in the group have a try at being the Earth and observing the phase. Have them draw the phase once they have agreed on the answer. Place a lamp representing the Sun in the center of the classroom. Even for a large classroom, you should only use one bright lamp placed in the middle of the classroom otherwise you will have shadowing effects that may ruin the results. Darken the room if needed by taping dark plastic trash bags or butcher paper to the windows. While the groups are working, the teacher should draw Figure 1 on the board, number the Moon’s locations from 1 through 8 as shown on the figure, but do not label them with the name of their phases. Next draw Table 1 on the board, but leave blank the names of the phases & sketches (we have given you the answers). In the third column draw a blank circle in each entry so students can sketch their moon phase or tape one of their pictures to the board. When the groups are finished, present and discuss each group’s results to the whole class. Ask for one spokesperson per group to come up and fill in the name of the phase and draw their phase on the board (alternatively you could ask them to bring up the picture of the correct phase and tape it to the blackboard). By putting all of them together, we will see the

2A-4
progress of the phases and check our predictions. At the conclusion, you can ask the class what they think the terms “waxing”, which means the moon as growing more luminous as days go by, and “waning”, which means the moon is growing darker as days go by, are. Show that this makes sense given the sequence they observed. Now also point out that “gibbous” mean a phase that is more than half full and “crescent” means a phase that is less than half full. Optional Activities I. Activity UCIObs-6 Rising and Setting of the Moon The Activity UCIObs-6 Rising and Setting of the Moon is an excellent follow-on to the Moon Phase activity, in which students will explore why each different phase of the moon rises and sets at a different time of day. II. Eclipses Discuss eclipses. The E/M/S do not all in the exactly the same orbital plane. The Moon’s orbital plane is tipped by 5 degrees relative to the plane of the Earth’s orbit around the Sun. Because the planes are tilted, we do not see eclipses every month. Describe the location of the E/M/S when there is a solar eclipse (the Moon lies between the Earth and Sun) and a lunar eclipse (the Earth lies between the Sun and Moon). II. Google Moon This would require a teacher to have access to a computer and LCD display in the classroom. In collaboration with NASA and the US Geological Survey, Google.com has created a very interesting website, http://www.google.com/moon, that features an interactive map of the Moon that includes information about the 6 Apollo landing sites with information, photos and short videos. It allows you to look at both low and high resolution images of the Moon as well as contour maps to explore the heights/depths of the craters. Students will be captivated by exploring the Moon's terrain and the details given about the Apollo missions serve as a very good history lesson. III. Lunar Observations You can have students observe the Moon (during daytime time for some phases and in the evening for others) each day over 28 days to verify the progression of the phases of the Moon. Use the Moon Observation Diary on the next page. You might want to put one up in the classroom and hand out a copy to each student. They could get extra credit if they fill out the Moon journal at home and bring it in when complete.
2A-5
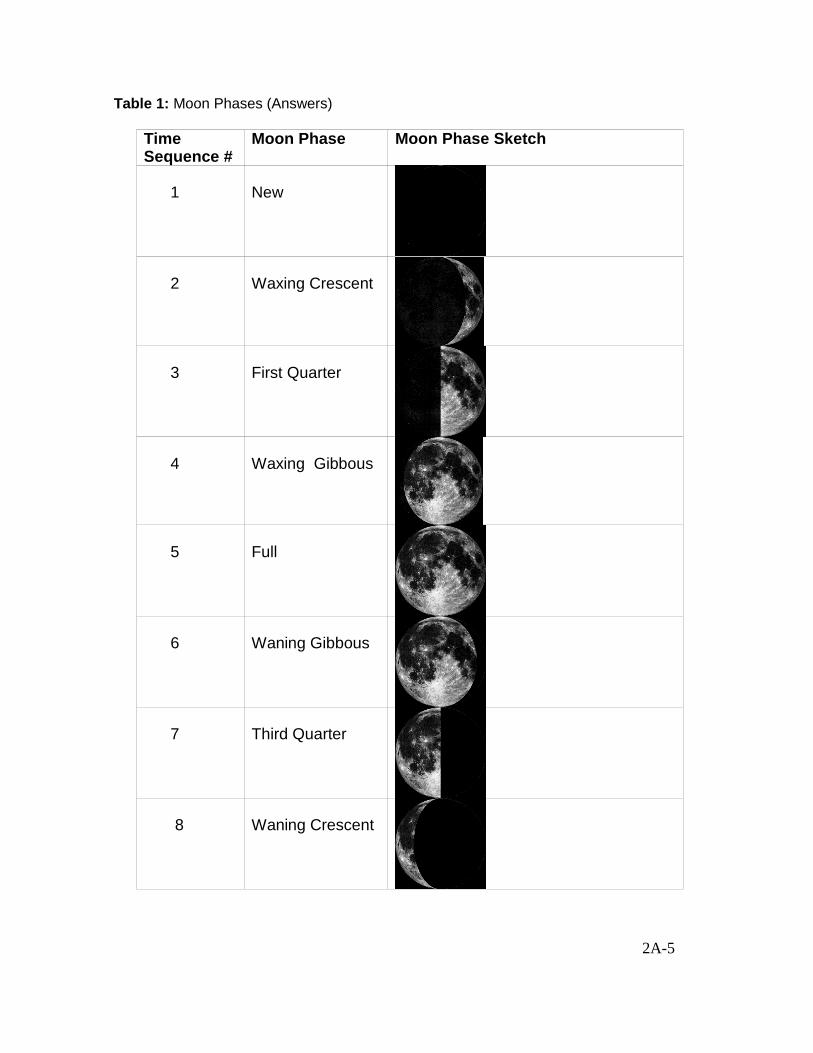
Table 1: Moon Phases (Answers)
Time Sequence #
Moon Phase Moon Phase Sketch
1
New
2
Waxing Crescent
3
First Quarter
4
Waxing Gibbous
5
Full
6
Waning Gibbous
7
Third Quarter
8
Waning Crescent
2A-6
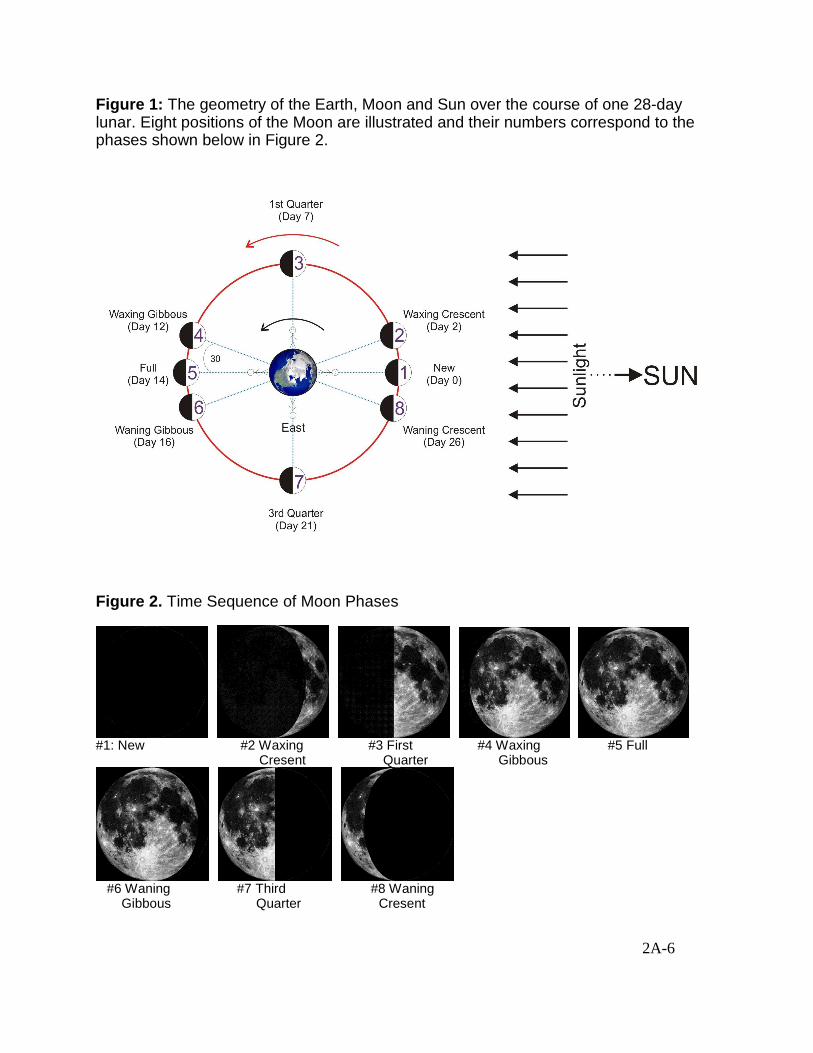
Figure 1: The geometry of the Earth, Moon and Sun over the course of one 28-day lunar. Eight positions of the Moon are illustrated and their numbers correspond to the phases shown below in Figure 2.
Figure 2. Time Sequence of Moon Phases
#1: New #2 Waxing #3 First #4 Waxing #5 Full Cresent Quarter Gibbous
#6 Waning #7 Third #8 Waning Gibbous Quarter Cresent
2A-7
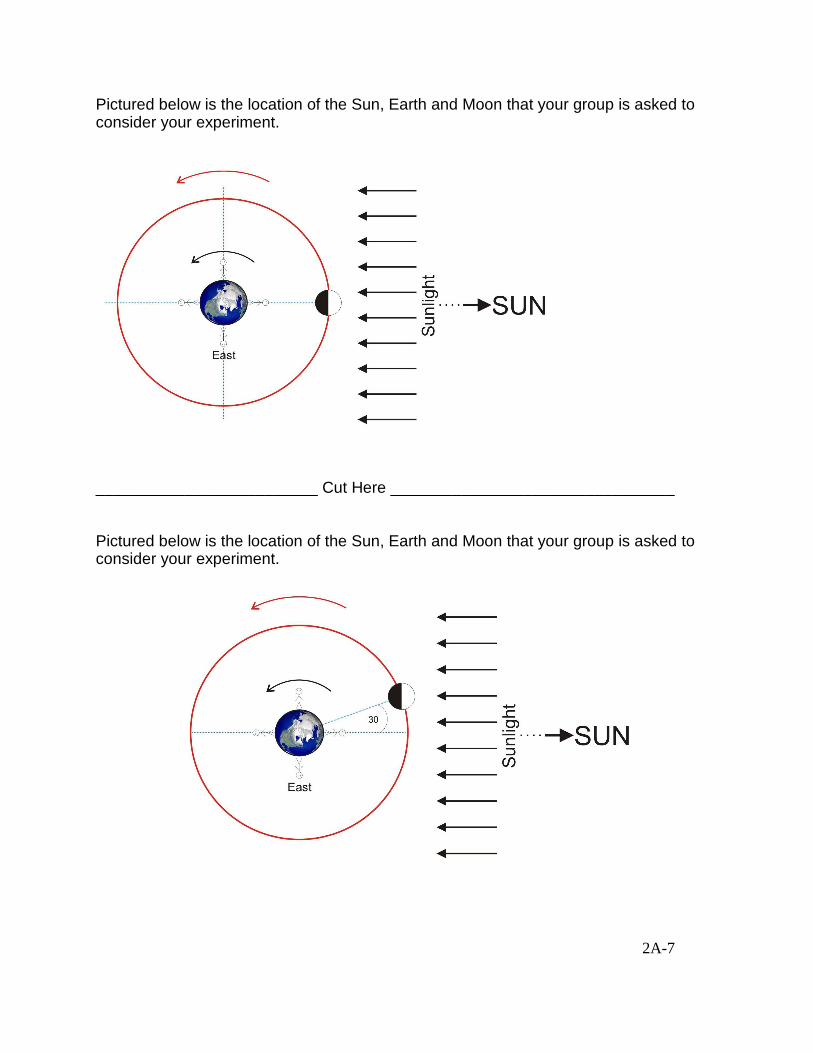
Pictured below is the location of the Sun, Earth and Moon that your group is asked to consider your experiment.
_________________________ Cut Here ________________________________ Pictured below is the location of the Sun, Earth and Moon that your group is asked to consider your experiment.
2A-8
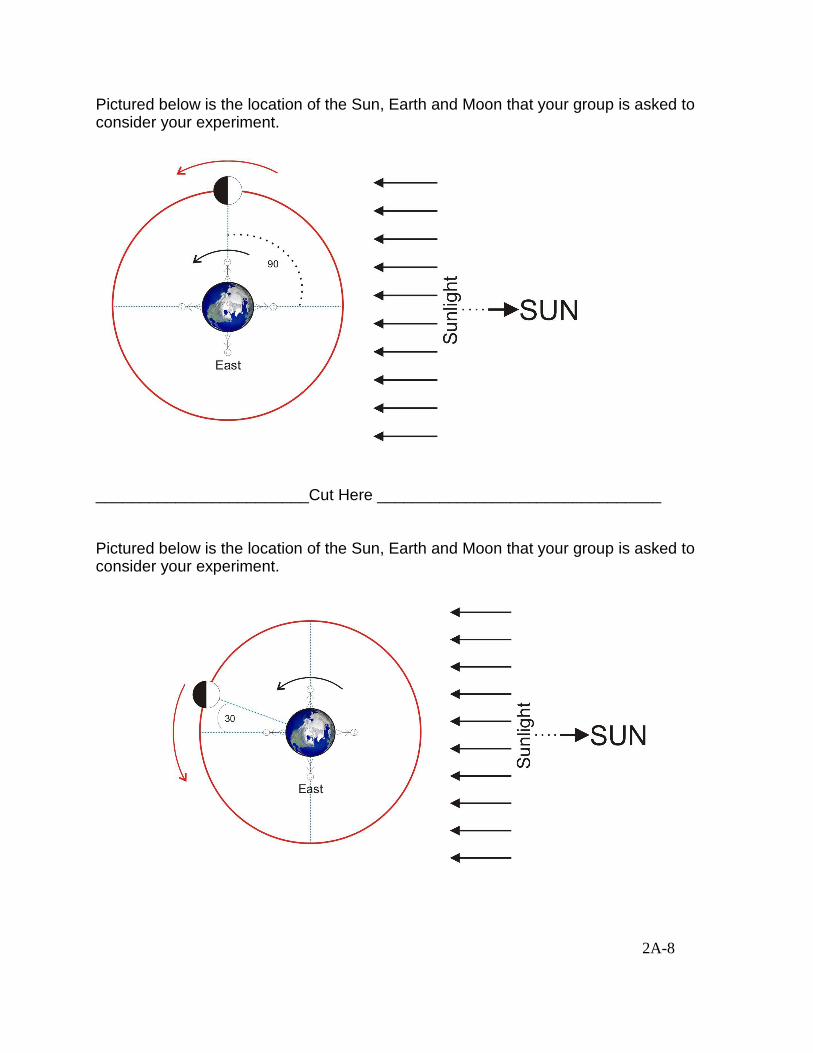
Pictured below is the location of the Sun, Earth and Moon that your group is asked to consider your experiment.
________________________Cut Here ________________________________ Pictured below is the location of the Sun, Earth and Moon that your group is asked to consider your experiment.
2A-9
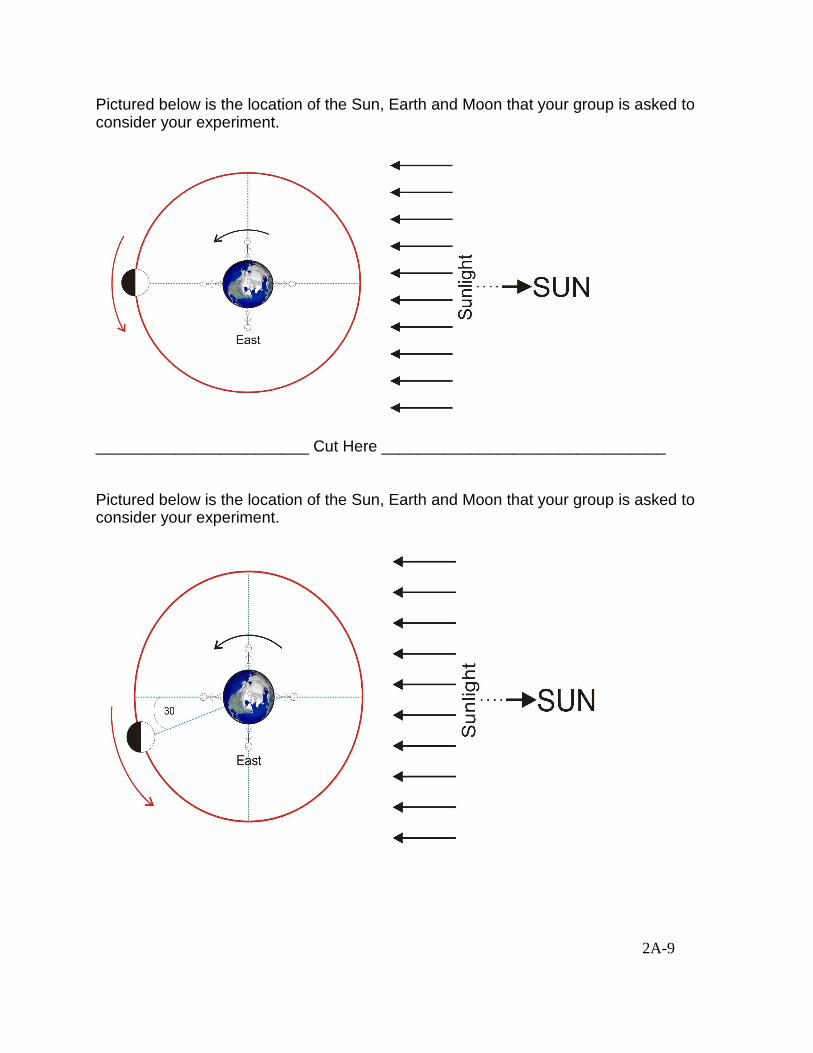
Pictured below is the location of the Sun, Earth and Moon that your group is asked to consider your experiment.
________________________ Cut Here ________________________________ Pictured below is the location of the Sun, Earth and Moon that your group is asked to consider your experiment.
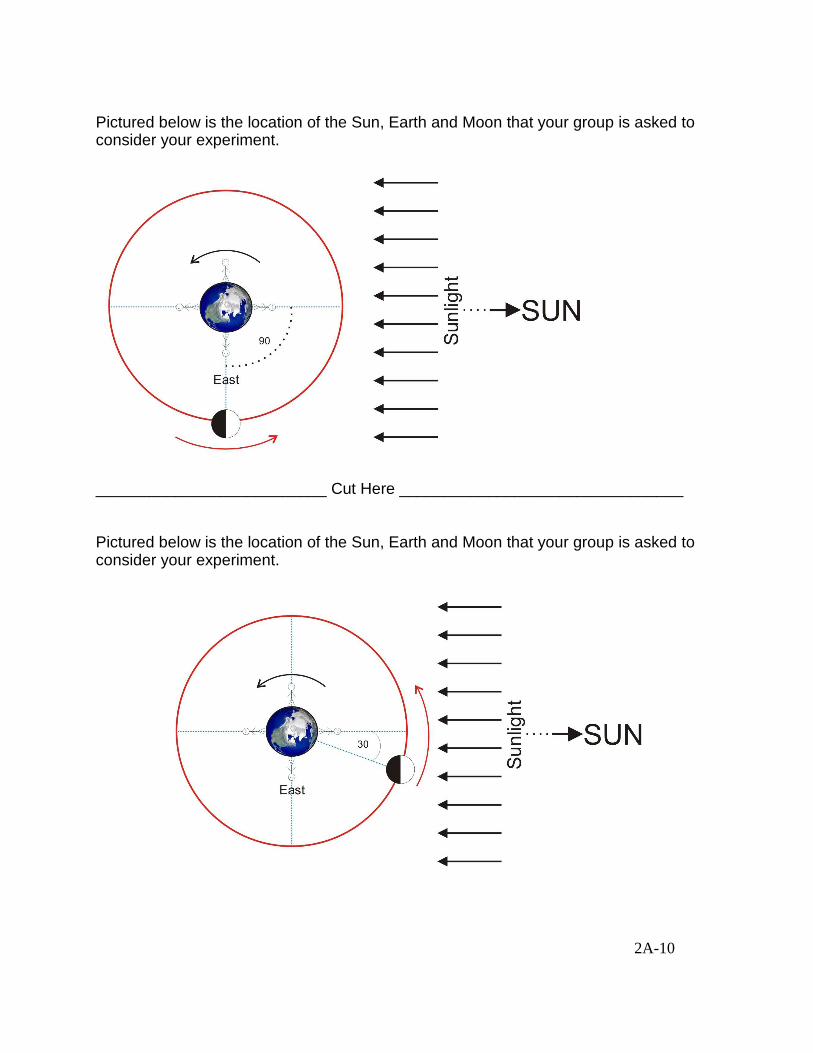
2A-10
Pictured below is the location of the Sun, Earth and Moon that your group is asked to consider your experiment.
__________________________ Cut Here ________________________________ Pictured below is the location of the Sun, Earth and Moon that your group is asked to consider your experiment.
2A-11
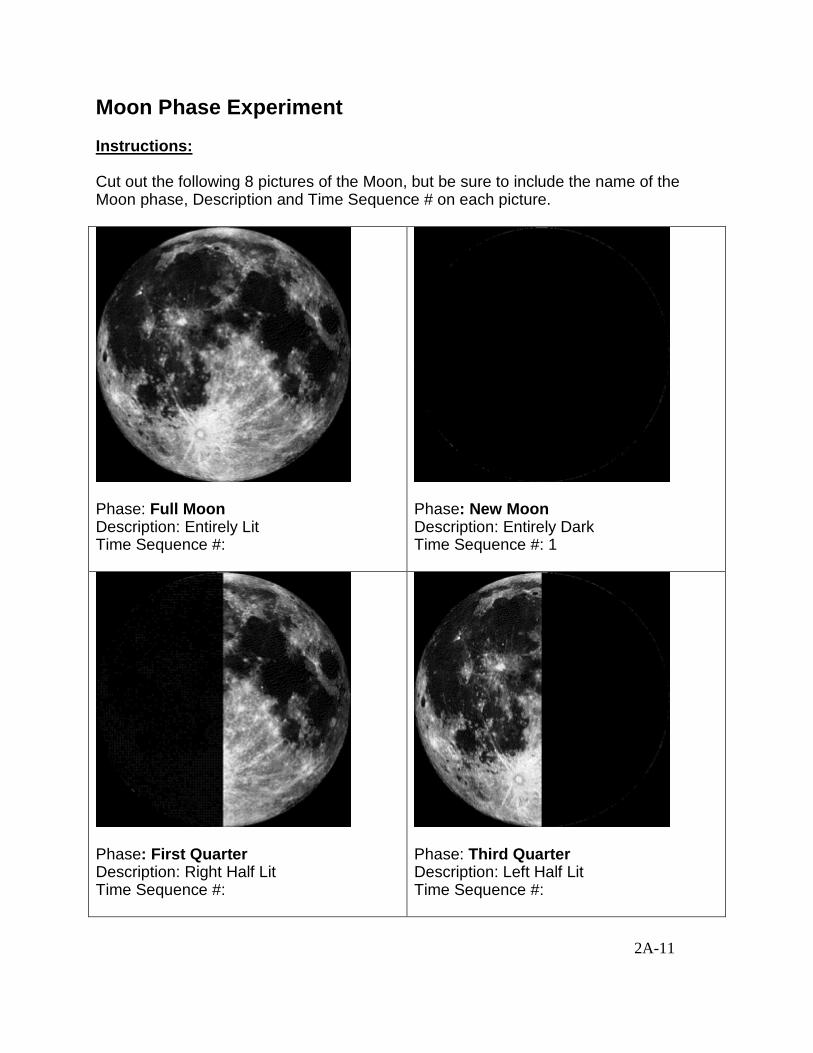
Moon Phase Experiment Instructions: Cut out the following 8 pictures of the Moon, but be sure to include the name of the Moon phase, Description and Time Sequence # on each picture.
Phase: Full Moon Description: Entirely Lit Time Sequence #:
Phase: New Moon Description: Entirely Dark Time Sequence #: 1
Phase: First Quarter Description: Right Half Lit Time Sequence #:
Phase: Third Quarter Description: Left Half Lit Time Sequence #:

2A-12
Phase: Waxing Gibbous Description: A Small Slice of the Left Side is Dark Time Sequence #:
Phase: Waning Gibbous Description: A Small Slice of the Right Side is Dark Time Sequence #:
Phase: Waxing Cresent Description: A Small Slice on the Right Side is Lit Time Sequence #:
Phase: Waning Cresent Description: A Small Slice of the Left Side is Lit Time Sequence #:
2A-13
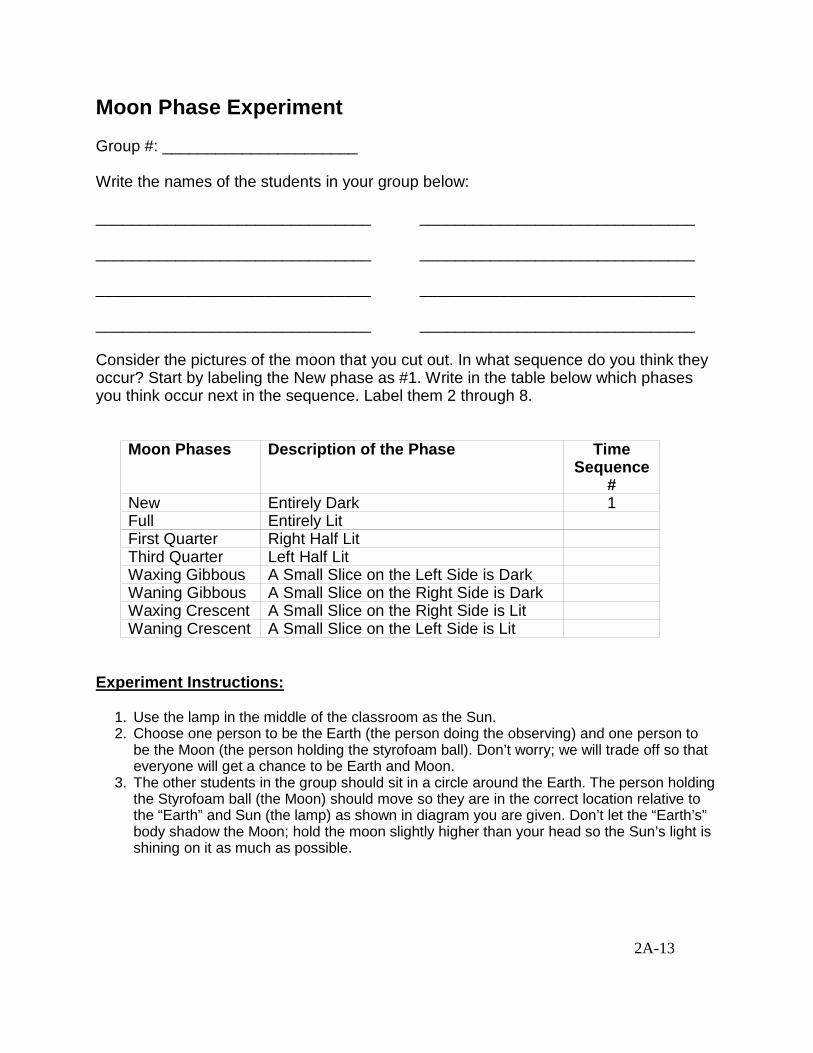
Moon Phase Experiment Group #: ______________________ Write the names of the students in your group below: _______________________________ _______________________________ _______________________________ _______________________________ _______________________________ _______________________________ _______________________________ _______________________________ Consider the pictures of the moon that you cut out. In what sequence do you think they occur? Start by labeling the New phase as #1. Write in the table below which phases you think occur next in the sequence. Label them 2 through 8.
Moon Phases Description of the Phase Time
Sequence#
New Entirely Dark 1 Full Entirely Lit First Quarter Right Half Lit Third Quarter Left Half Lit Waxing Gibbous A Small Slice on the Left Side is Dark Waning Gibbous A Small Slice on the Right Side is Dark Waxing Crescent A Small Slice on the Right Side is Lit Waning Crescent A Small Slice on the Left Side is Lit
Experiment Instructions:
1. Use the lamp in the middle of the classroom as the Sun. 2. Choose one person to be the Earth (the person doing the observing) and one person to
be the Moon (the person holding the styrofoam ball). Don’t worry; we will trade off so that everyone will get a chance to be Earth and Moon.
3. The other students in the group should sit in a circle around the Earth. The person holding the Styrofoam ball (the Moon) should move so they are in the correct location relative to the “Earth” and Sun (the lamp) as shown in diagram you are given. Don’t let the “Earth’s” body shadow the Moon; hold the moon slightly higher than your head so the Sun’s light is shining on it as much as possible.
2A-14
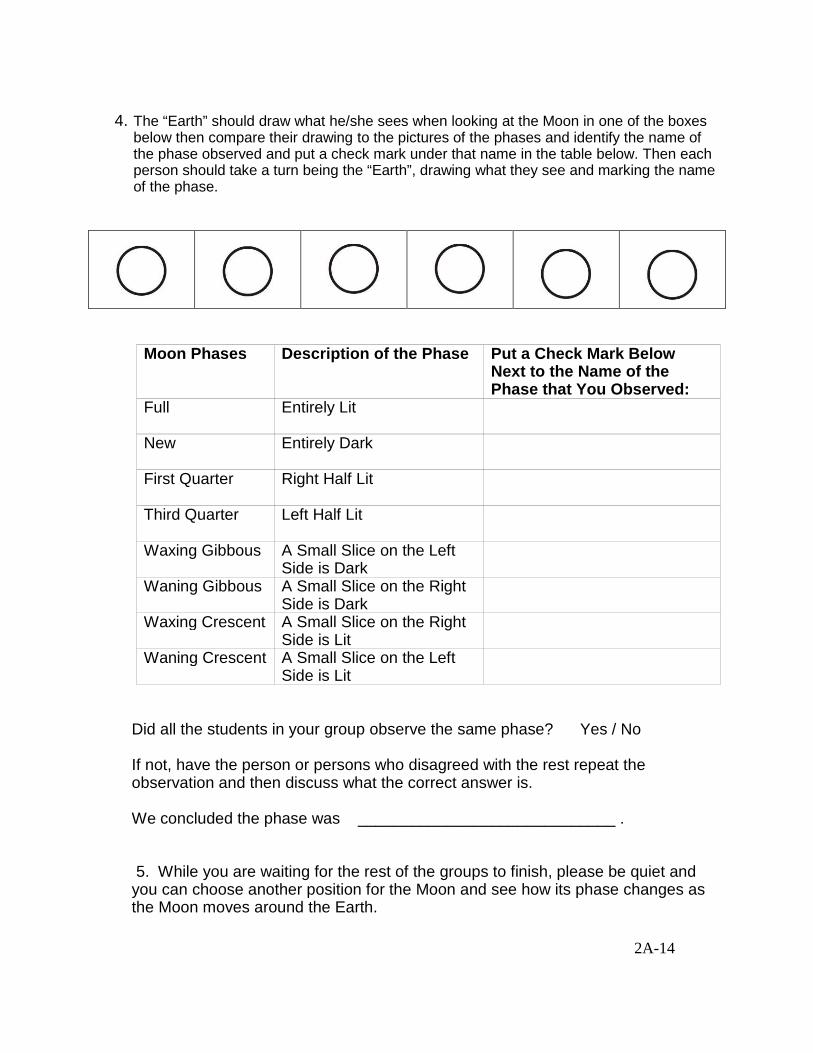
4. The “Earth” should draw what he/she sees when looking at the Moon in one of the boxes
below then compare their drawing to the pictures of the phases and identify the name of the phase observed and put a check mark under that name in the table below. Then each person should take a turn being the “Earth”, drawing what they see and marking the name of the phase.
Moon Phases Description of the Phase Put a Check Ma rk Below Next to the Name of the Phase that You Observed:
Full Entirely Lit
New Entirely Dark
First Quarter Right Half Lit
Third Quarter Left Half Lit
Waxing Gibbous A Small Slice on the Left Side is Dark
Waning Gibbous A Small Slice on the Right Side is Dark
Waxing Crescent A Small Slice on the Right Side is Lit
Waning Crescent A Small Slice on the Left Side is Lit
Did all the students in your group observe the same phase? Yes / No If not, have the person or persons who disagreed with the rest repeat the observation and then discuss what the correct answer is. We concluded the phase was _____________________________ . 5. While you are waiting for the rest of the groups to finish, please be quiet and you can choose another position for the Moon and see how its phase changes as the Moon moves around the Earth.
2A-15
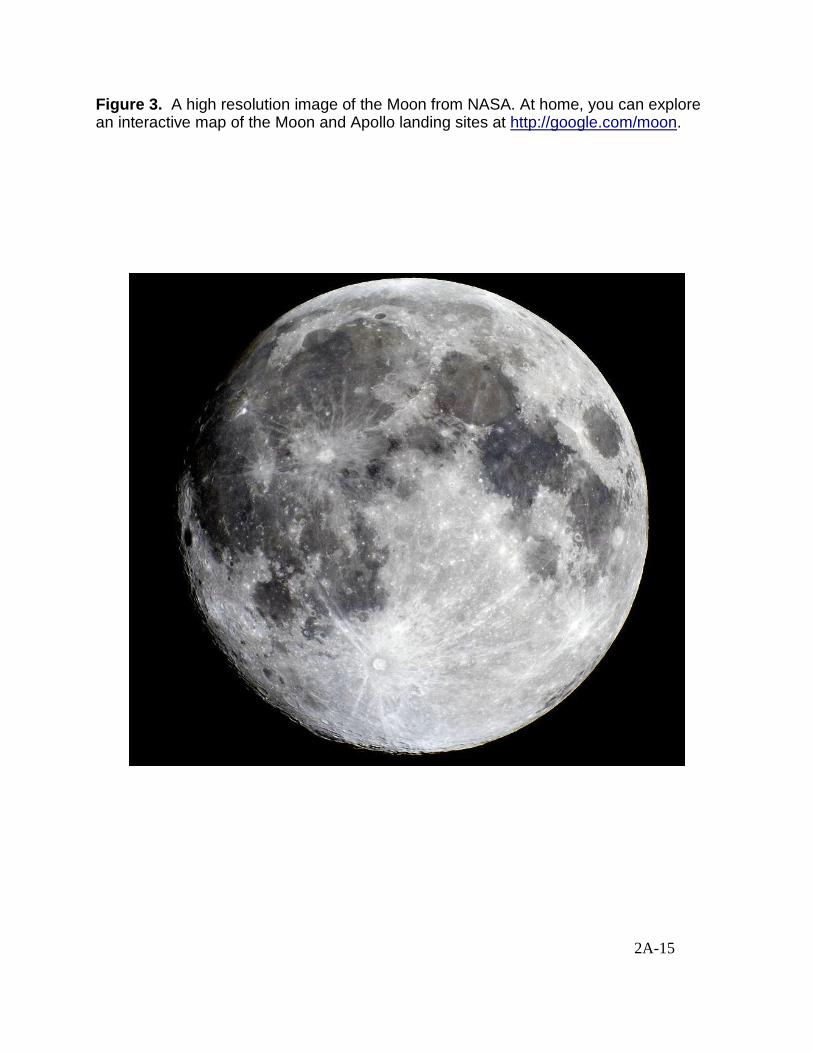
Figure 3. A high resolution image of the Moon from NASA. At home, you can explore an interactive map of the Moon and Apollo landing sites at http://google.com/moon.
2A-16
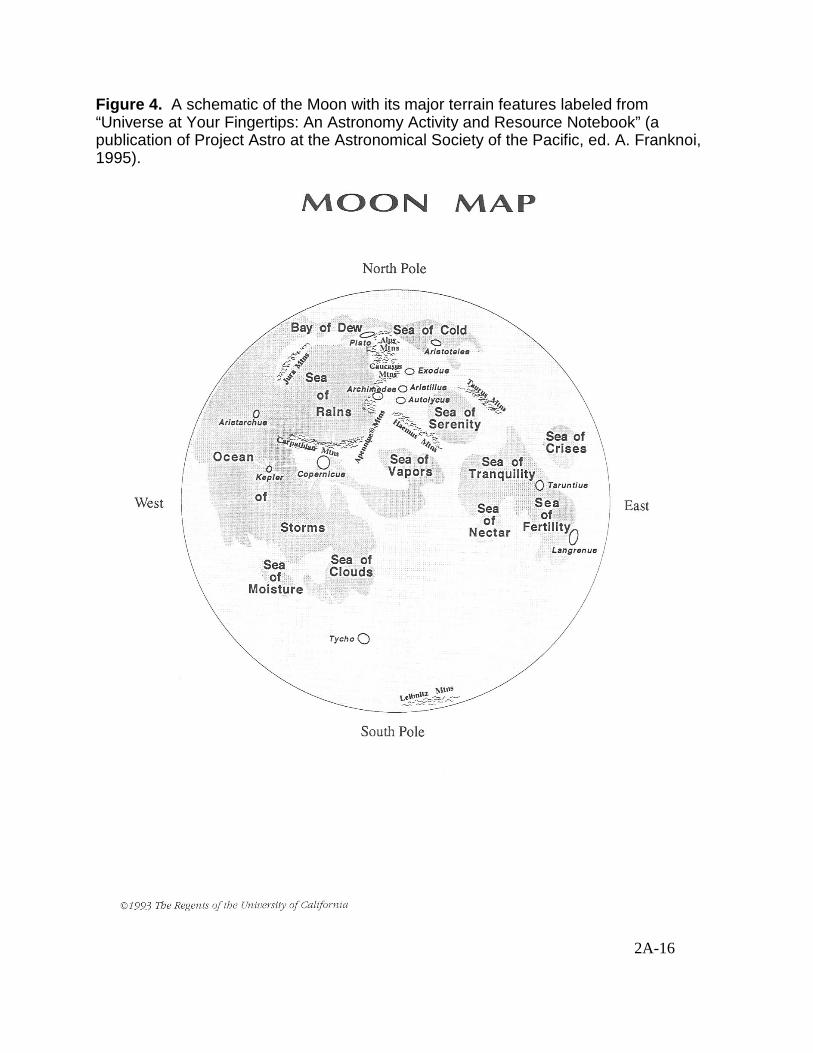
Figure 4. A schematic of the Moon with its major terrain features labeled from “Universe at Your Fingertips: An Astronomy Activity and Resource Notebook” (a publication of Project Astro at the Astronomical Society of the Pacific, ed. A. Franknoi, 1995).
2A-17
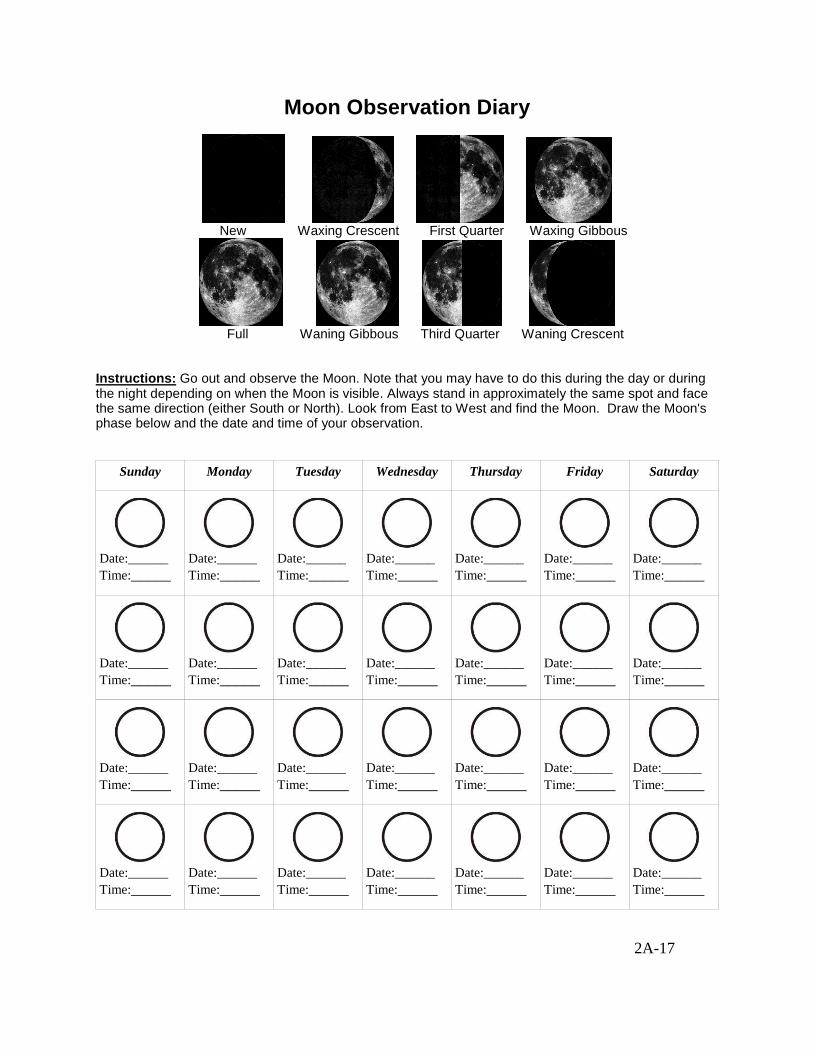
Moon Observation Diary
New Waxing Crescent First Quarter Waxing Gibbous
Full Waning Gibbous Third Quarter Waning Crescent
Instructions: Go out and observe the Moon. Note that you may have to do this during the day or during the night depending on when the Moon is visible. Always stand in approximately the same spot and face the same direction (either South or North). Look from East to West and find the Moon. Draw the Moon's phase below and the date and time of your observation.
Sunday Monday Tuesday Wednesday Thursday Friday Saturday
Date:______ Time:_____
Date:______ Time:_____
Date:______ Time:_____
Date:______ Time:_____
Date:______ Time:_____
Date:______ Time:_____
Date:______ Time:_____
Date:______ Time:_____
Date:______ Time:_____
Date:______ Time:_____
Date:______ Time:_____
Date:______ Time:_____
Date:______ Time:_____
Date:______ Time:_____
Date:______ Time:_____
Date:______ Time:_____
Date:______ Time:_____
Date:______ Time:_____
Date:______ Time:_____
Date:______ Time:_____
Date:______ Time:_____
Date:______ Time:_____
Date:______ Time:_____
Date:______ Time:_____
Date:______ Time:_____
Date:______ Time:_____
Date:______ Time:_____
Date:______ Time:_____