Embed Size (px)
Citation preview
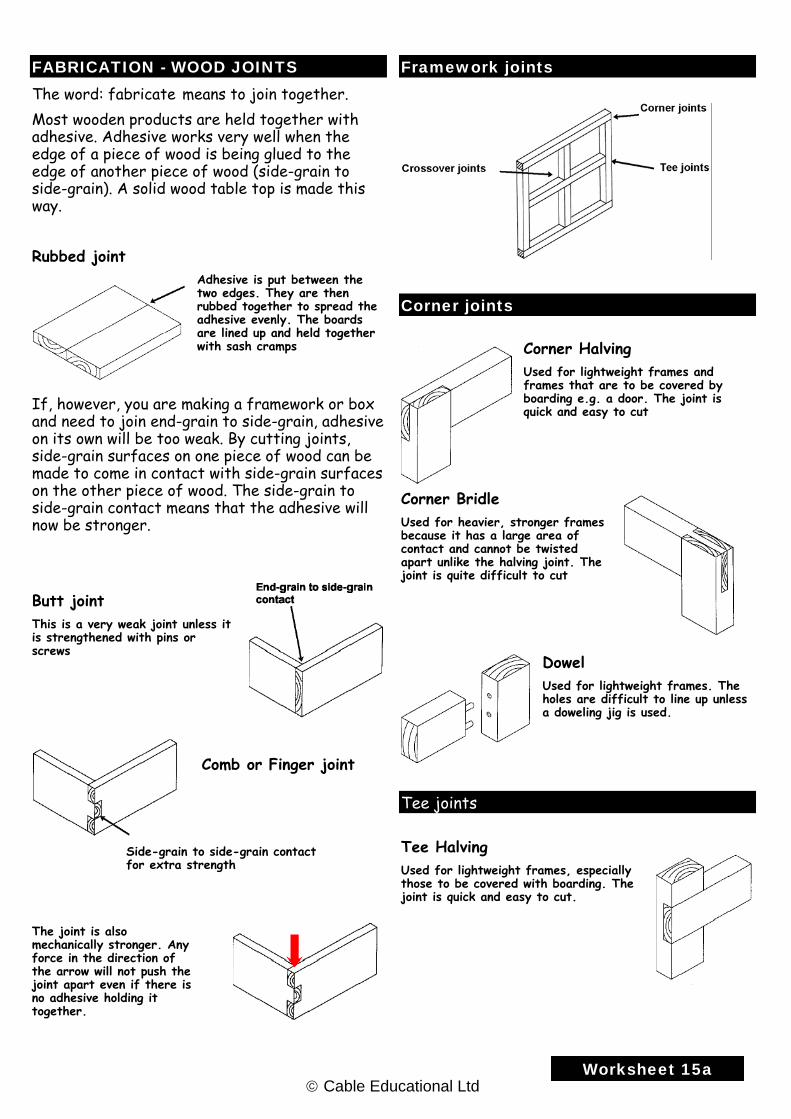
FABRICATION - WOOD JOINTS The word: fabricate means to join together. Most wooden products are held together with adhesive. Adhesive works very well when the edge of a piece of wood is being glued to the edge of another piece of wood (side-grain to side-grain). A solid wood table top is made this way. Rubbed joint
Adhesive is put between the two edges. They are then rubbed together to spread the adhesive evenly. The boards are lined up and held together with sash cramps
If, however, you are making a framework or box and need to join end-grain to side-grain, adhesive on its own will be too weak. By cutting joints, side-grain surfaces on one piece of wood can be made to come in contact with side-grain surfaces on the other piece of wood. The side-grain to side-grain contact means that the adhesive will now be stronger. Butt joint This is a very weak joint unless it is strengthened with pins or screws
Comb or Finger joint
Side-grain to side-grain contact for extra strength
The joint is also mechanically stronger. Any force in the direction of the arrow will not push the joint apart even if there is no adhesive holding it together.
Framework joints
Corner joints
Corner Halving Used for lightweight frames and frames that are to be covered by boarding e.g. a door. The joint is quick and easy to cut
Corner Bridle Used for heavier, stronger frames because it has a large area of contact and cannot be twisted apart unlike the halving joint. The joint is quite difficult to cut
Dowel Used for lightweight frames. The holes are difficult to line up unless a doweling jig is used.
Tee joints Tee Halving Used for lightweight frames, especially those to be covered with boarding. The joint is quick and easy to cut.
Worksheet 15a © Cable Educational Ltd
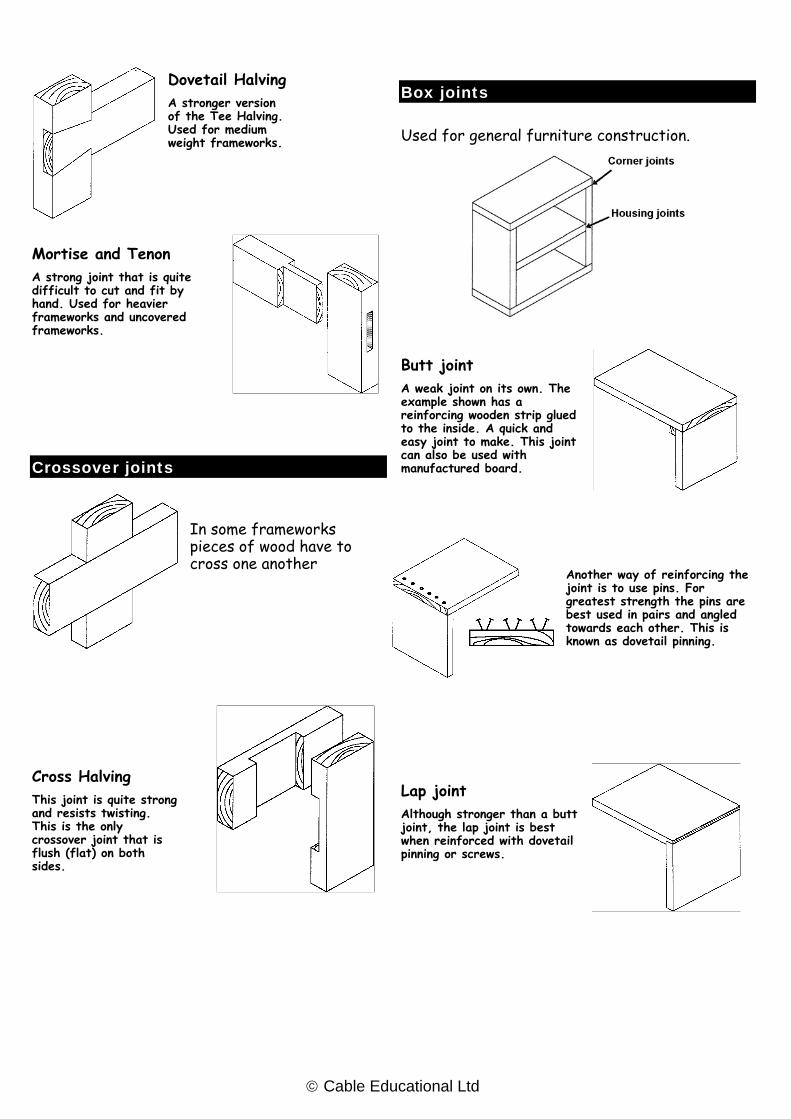
Dovetail Halving A stronger version of the Tee Halving. Used for medium weight frameworks.
Mortise and Tenon A strong joint that is quite difficult to cut and fit by hand. Used for heavier frameworks and uncovered frameworks.
Crossover joints
In some frameworks pieces of wood have to cross one another
Cross Halving This joint is quite strong and resists twisting. This is the only crossover joint that is flush (flat) on both sides.
Box joints
Used for general furniture construction.
Butt joint A weak joint on its own. The example shown has a reinforcing wooden strip glued to the inside. A quick and easy joint to make. This joint can also be used with manufactured board.
Another way of reinforcing the joint is to use pins. For greatest strength the pins are best used in pairs and angled towards each other. This is known as dovetail pinning.
Lap joint Although stronger than a butt joint, the lap joint is best when reinforced with dovetail pinning or screws.
© Cable Educational Ltd
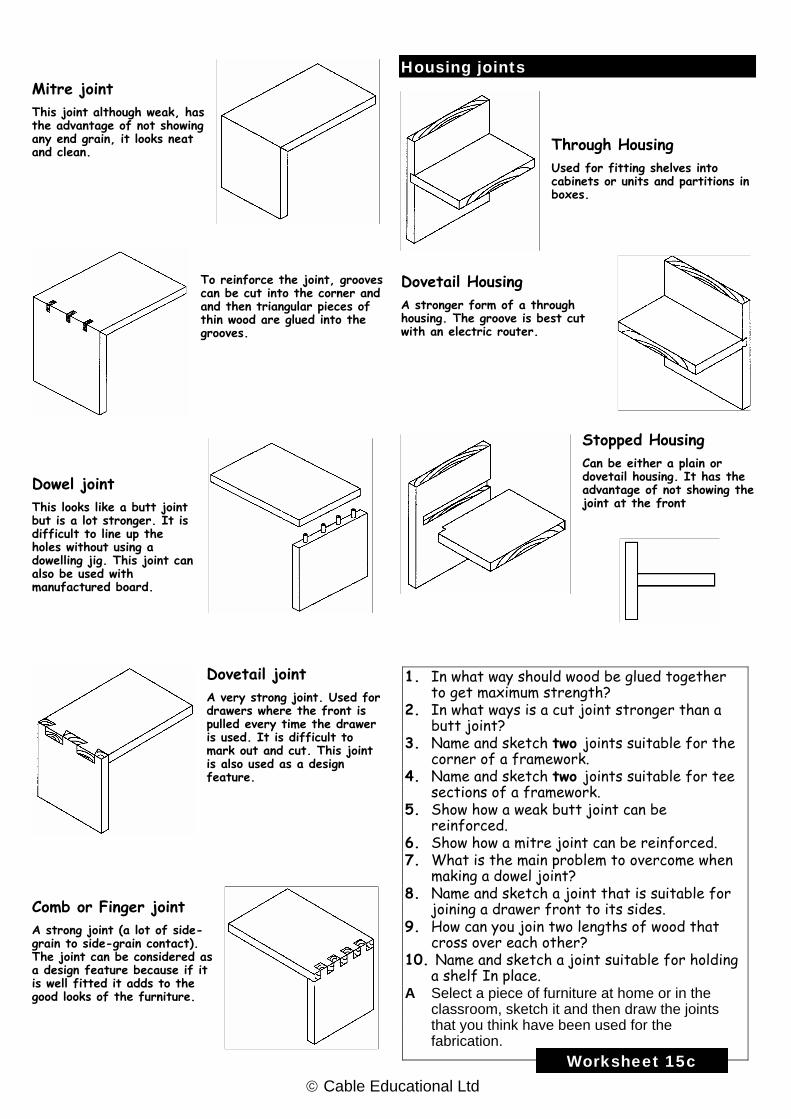
Mitre joint This joint although weak, has the advantage of not showing any end grain, it looks neat and clean.
To reinforce the joint, grooves can be cut into the corner and and then triangular pieces of thin wood are glued into the grooves.
Dowel joint This looks like a butt joint but is a lot stronger. It is difficult to line up the holes without using a dowelling jig. This joint can also be used with manufactured board.
Dovetail joint A very strong joint. Used for drawers where the front is pulled every time the drawer is used. It is difficult to mark out and cut. This joint is also used as a design feature.
Comb or Finger joint A strong joint (a lot of side-grain to side-grain contact). The joint can be considered as a design feature because if it is well fitted it adds to the good looks of the furniture.
Housing joints Through Housing Used for fitting shelves into cabinets or units and partitions in boxes.
Dovetail Housing A stronger form of a through housing. The groove is best cut with an electric router.
Stopped Housing Can be either a plain or dovetail housing. It has the advantage of not showing the joint at the front
1. In what way should wood be glued together to get maximum strength?
2. In what ways is a cut joint stronger than a butt joint?
3. Name and sketch two joints suitable for the corner of a framework.
4. Name and sketch two joints suitable for tee sections of a framework.
5. Show how a weak butt joint can be reinforced.
6. Show how a mitre joint can be reinforced. 7. What is the main problem to overcome when
making a dowel joint? 8. Name and sketch a joint that is suitable for
joining a drawer front to its sides. 9. How can you join two lengths of wood that
cross over each other? 10. Name and sketch a joint suitable for holding
a shelf In place. A Select a piece of furniture at home or in the
classroom, sketch it and then draw the joints that you think have been used for the fabrication.
Worksheet 15c © Cable Educational Ltd
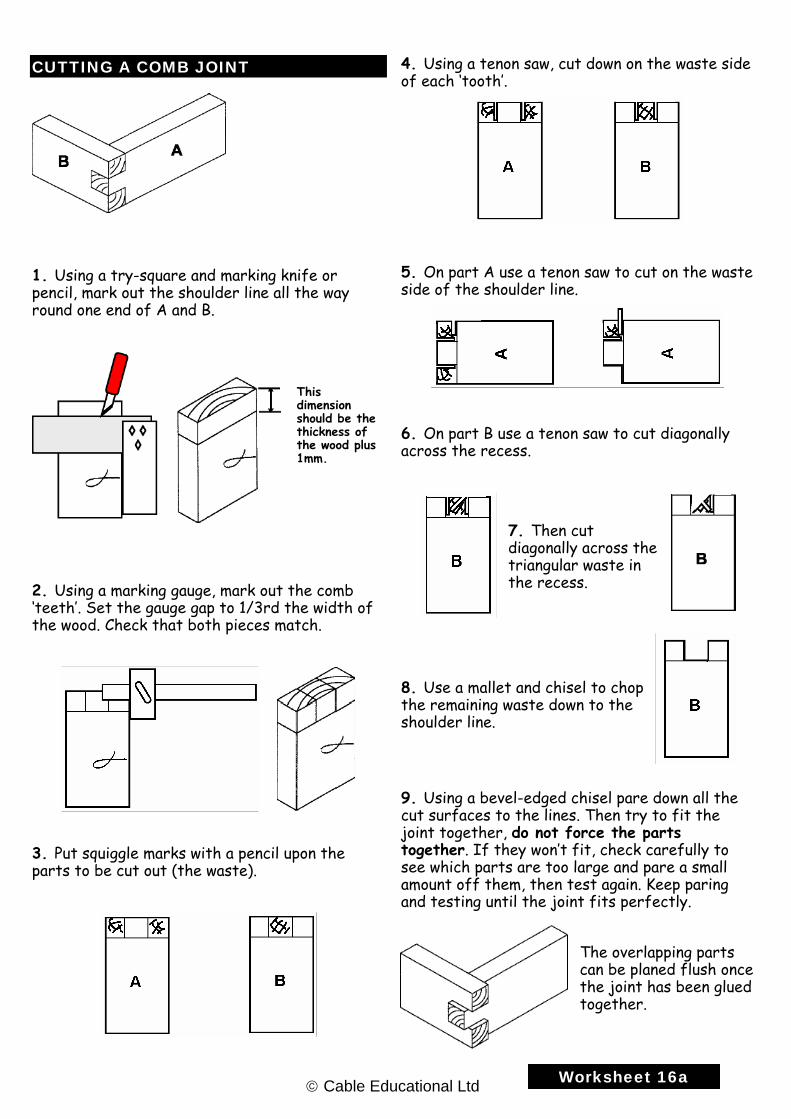
CUTTING A COMB JOINT
1. Using a try-square and marking knife or pencil, mark out the shoulder line all the way round one end of A and B.
2. Using a marking gauge, mark out the comb ‘teeth’. Set the gauge gap to 1/3rd the width of the wood. Check that both pieces match.
3. Put squiggle marks with a pencil upon the parts to be cut out (the waste).
4. Using a tenon saw, cut down on the waste side of each ‘tooth’.
5. On part A use a tenon saw to cut on the waste side of the shoulder line.
This dimension should be the thickness of the wood plus 1mm.
6. On part B use a tenon saw to cut diagonally across the recess.
7. Then cut diagonally across the triangular waste in the recess.
8. Use a mallet and chisel to chop the remaining waste down to the shoulder line. 9. Using a bevel-edged chisel pare down all the cut surfaces to the lines. Then try to fit the joint together, do not force the parts together. If they won’t fit, check carefully to see which parts are too large and pare a small amount off them, then test again. Keep paring and testing until the joint fits perfectly.
The overlapping parts can be planed flush once the joint has been glued together.
Worksheet 16a © Cable Educational Ltd
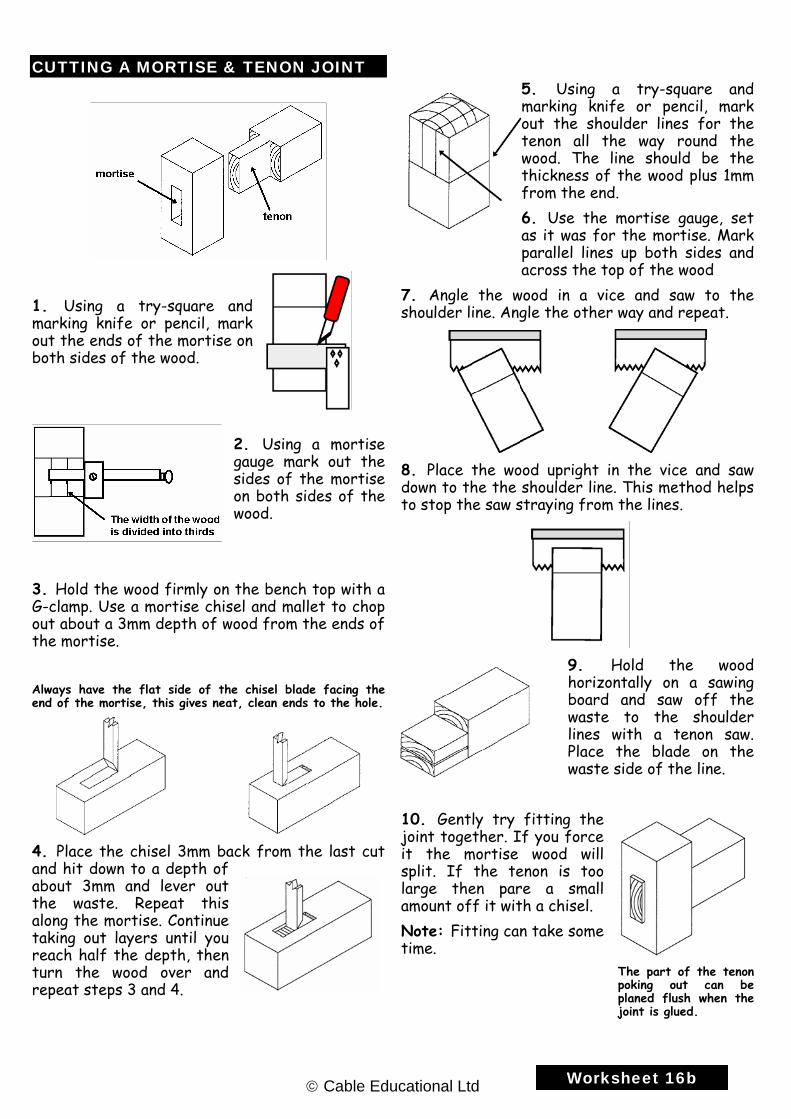
CUTTING A MORTISE & TENON JOINT
1. Using a try-square and marking knife or pencil, mark out the ends of the mortise on both sides of the wood.
2. Using a mortise gauge mark out the sides of the mortise on both sides of the wood.
3. Hold the wood firmly on the bench top with a G-clamp. Use a mortise chisel and mallet to chop out about a 3mm depth of wood from the ends of the mortise. Always have the flat side of the chisel blade facing the end of the mortise, this gives neat, clean ends to the hole.
4. Place the chisel 3mm back from the last cut and hit down to a depth of about 3mm and lever out the waste. Repeat this along the mortise. Continue taking out layers until you reach half the depth, then turn the wood over and repeat steps 3 and 4.
5. Using a try-square and marking knife or pencil, mark out the shoulder lines for the tenon all the way round the wood. The line should be the thickness of the wood plus 1mm from the end. 6. Use the mortise gauge, set as it was for the mortise. Mark parallel lines up both sides and across the top of the wood
7. Angle the wood in a vice and saw to the shoulder line. Angle the other way and repeat.
8. Place the wood upright in the vice and saw down to the the shoulder line. This method helps to stop the saw straying from the lines.
9. Hold the wood horizontally on a sawing board and saw off the waste to the shoulder lines with a tenon saw. Place the blade on the waste side of the line.
10. Gently try fitting the joint together. If you force it the mortise wood will split. If the tenon is too large then pare a small amount off it with a chisel. Note: Fitting can take some time.
The part of the tenon poking out can be planed flush when the joint is glued.
Worksheet 16b © Cable Educational Ltd
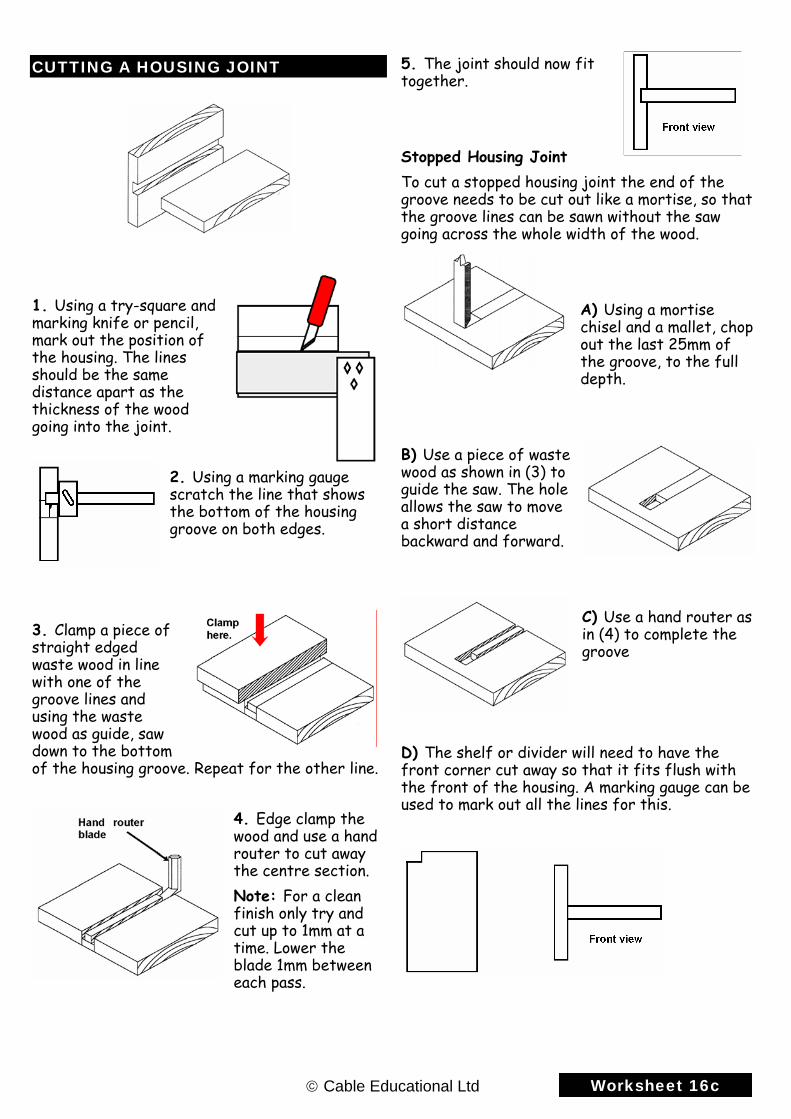
CUTTING A HOUSING JOINT
1. Using a try-square and marking knife or pencil, mark out the position of the housing. The lines should be the same distance apart as the thickness of the wood going into the joint.
2. Using a marking gauge scratch the line that shows the bottom of the housing groove on both edges.
3. Clamp a piece of straight edged waste wood in line with one of the groove lines and using the waste wood as guide, saw down to the bottom of the housing groove. Repeat for the other line.
4. Edge clamp the wood and use a hand router to cut away the centre section. Note: For a clean finish only try and cut up to 1mm at a time. Lower the blade 1mm between each pass.
5. The joint should now fit together. Stopped Housing Joint To cut a stopped housing joint the end of the groove needs to be cut out like a mortise, so that the groove lines can be sawn without the saw going across the whole width of the wood.
A) Using a mortise chisel and a mallet, chop out the last 25mm of the groove, to the full depth.
B) Use a piece of waste wood as shown in (3) to guide the saw. The hole allows the saw to move a short distance backward and forward.
C) Use a hand router as in (4) to complete the groove
D) The shelf or divider will need to have the front corner cut away so that it fits flush with the front of the housing. A marking gauge can be used to mark out all the lines for this.
Worksheet 16c © Cable Educational Ltd
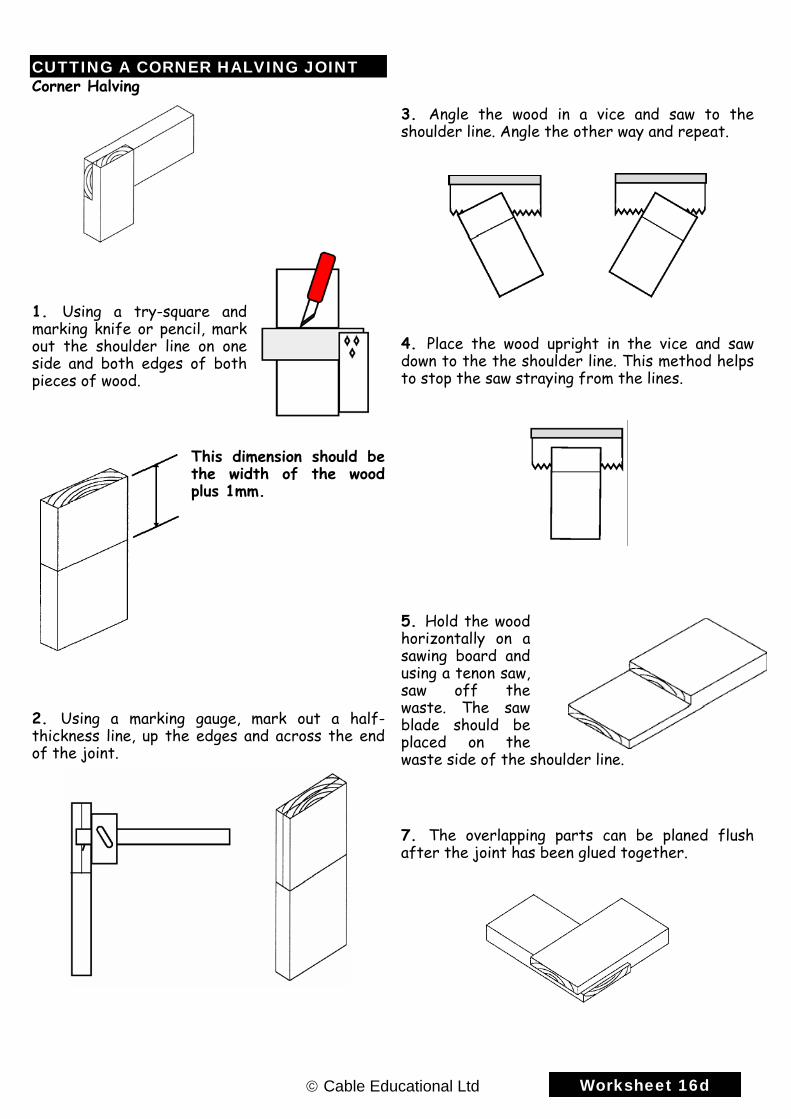
CUTTING A CORNER HALVING JOINT Corner Halving
1. Using a try-square and marking knife or pencil, mark out the shoulder line on one side and both edges of both pieces of wood.
This dimension should be the width of the wood plus 1mm.
2. Using a marking gauge, mark out a half-thickness line, up the edges and across the end of the joint.
3. Angle the wood in a vice and saw to the shoulder line. Angle the other way and repeat.
4. Place the wood upright in the vice and saw down to the the shoulder line. This method helps to stop the saw straying from the lines.
5. Hold the wood horizontally on a sawing board and using a tenon saw, saw off the waste. The saw blade should be placed on the waste side of the shoulder line. 7. The overlapping parts can be planed flush after the joint has been glued together.
Worksheet 16d © Cable Educational Ltd
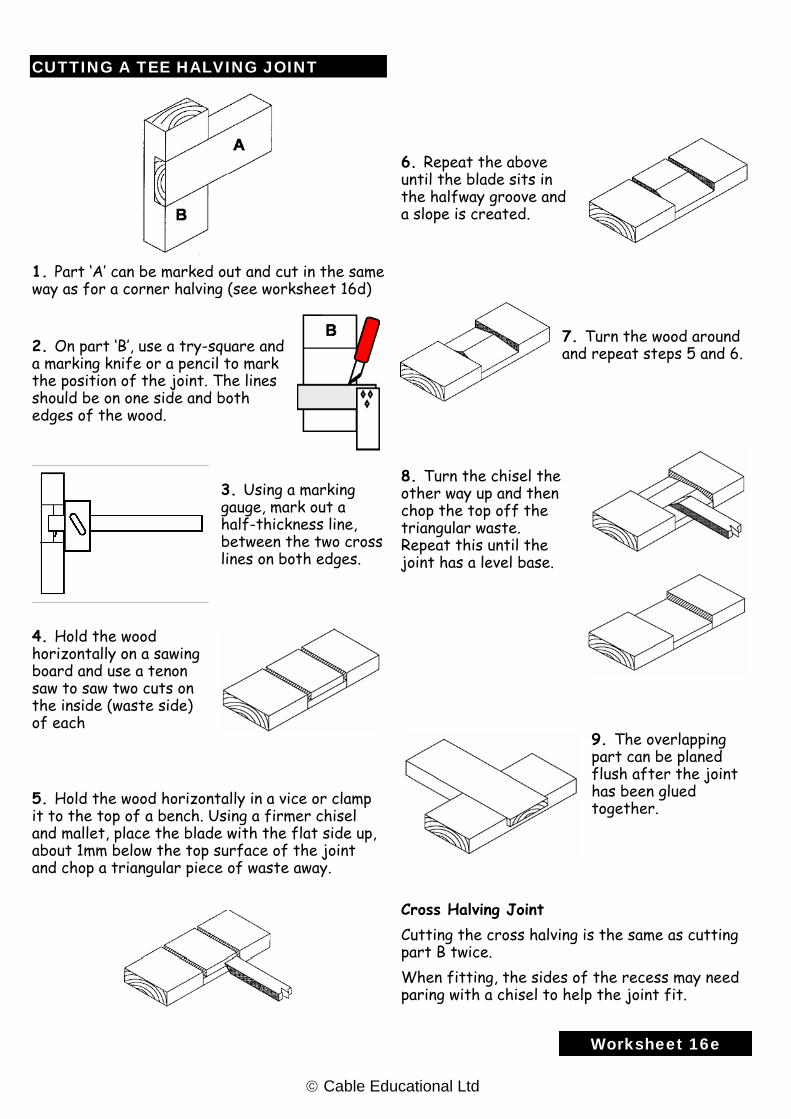
CUTTING A TEE HALVING JOINT
1. Part ‘A’ can be marked out and cut in the same way as for a corner halving (see worksheet 16d)
2. On part ‘B’, use a try-square and a marking knife or a pencil to mark the position of the joint. The lines should be on one side and both edges of the wood.
3. Using a marking gauge, mark out a half-thickness line, between the two cross lines on both edges.
4. Hold the wood horizontally on a sawing board and use a tenon saw to saw two cuts on the inside (waste side) of each 5. Hold the wood horizontally in a vice or clamp it to the top of a bench. Using a firmer chisel and mallet, place the blade with the flat side up, about 1mm below the top surface of the joint and chop a triangular piece of waste away.
6. Repeat the above until the blade sits in the halfway groove and a slope is created.
7. Turn the wood around and repeat steps 5 and 6.
8. Turn the chisel the other way up and then chop the top off the triangular waste. Repeat this until the joint has a level base.
9. The overlapping part can be planed flush after the joint has been glued together.
Cross Halving Joint Cutting the cross halving is the same as cutting part B twice. When fitting, the sides of the recess may need paring with a chisel to help the joint fit.
Worksheet 16e
© Cable Educational Ltd
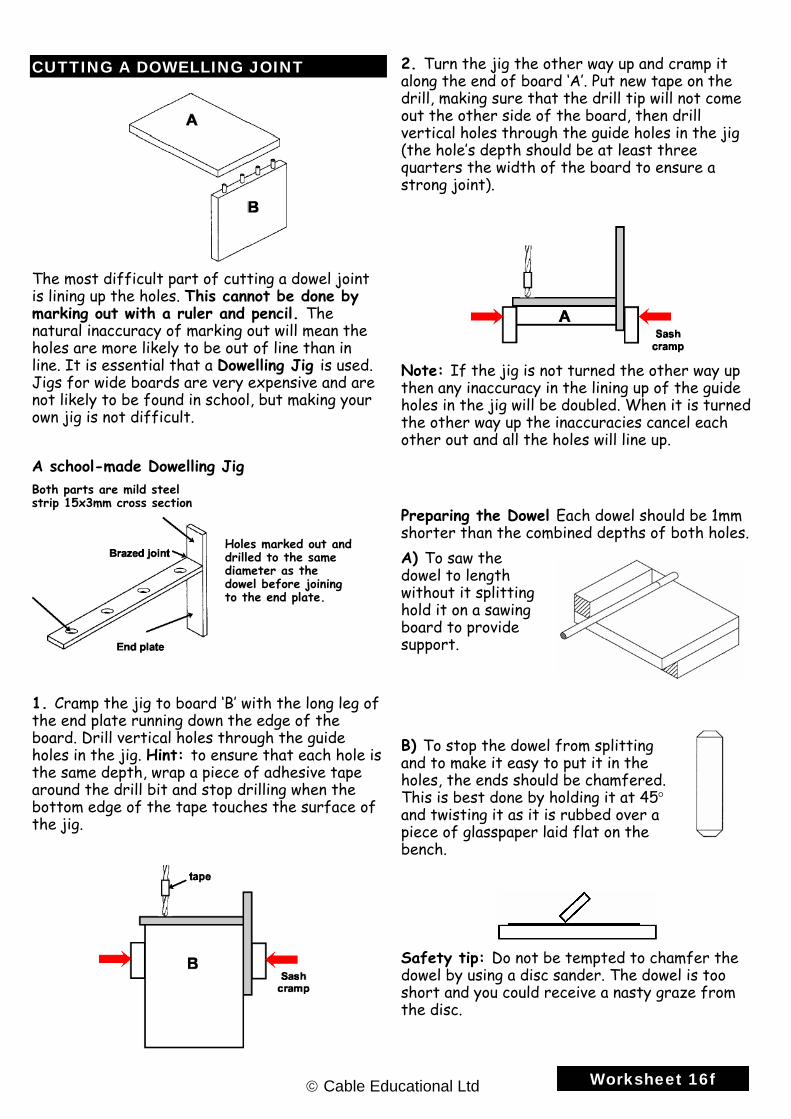
CUTTING A DOWELLING JOINT
The most difficult part of cutting a dowel joint is lining up the holes. This cannot be done by marking out with a ruler and pencil. The natural inaccuracy of marking out will mean the holes are more likely to be out of line than in line. It is essential that a Dowelling Jig is used. Jigs for wide boards are very expensive and are not likely to be found in school, but making your own jig is not difficult.
A school-made Dowelling Jig Both parts are mild steel strip 15x3mm cross section
1. Cramp the jig to board ‘B’ with the long leg of the end plate running down the edge of the board. Drill vertical holes through the guide holes in the jig. Hint: to ensure that each hole is the same depth, wrap a piece of adhesive tape around the drill bit and stop drilling when the bottom edge of the tape touches the surface of the jig.
2. Turn the jig the other way up and cramp it along the end of board ‘A’. Put new tape on the drill, making sure that the drill tip will not come out the other side of the board, then drill vertical holes through the guide holes in the jig (the hole’s depth should be at least three quarters the width of the board to ensure a strong joint).
Note: If the jig is not turned the other way up then any inaccuracy in the lining up of the guide holes in the jig will be doubled. When it is turned the other way up the inaccuracies cancel each other out and all the holes will line up. Preparing the Dowel Each dowel should be 1mm shorter than the combined depths of both holes.
Holes marked out and drilled to the same diameter as the dowel before joining to the end plate.
A) To saw the dowel to length without it splitting hold it on a sawing board to provide support. B) To stop the dowel from splitting and to make it easy to put it in the holes, the ends should be chamfered. This is best done by holding it at 45° and twisting it as it is rubbed over a piece of glasspaper laid flat on the bench.
Safety tip: Do not be tempted to chamfer the dowel by using a disc sander. The dowel is too short and you could receive a nasty graze from the disc.
Worksheet 16f © Cable Educational Ltd