Embed Size (px)
Citation preview

FERRAMENTA ONLINEPERSONALIZAÇÃO EXPRESSO

2
ÍNDICE
OBJETIVO 3PASSO 1 - Transferir o seu desenho a partir do website da Eldon 3PASSO 2 - Definir os parâmetros principais 5PASSO 3 - Criar uma paleta de ferramentas da Eldon 6PASSO 4 - Inserir blocos 9ANEXO - Operações de maquinação incluídas no ELDON_ToolKit.dwg 10
Scope
In order to make Express Customization a user-friendly tool for our customers, ELDON has developed a Tool Kit that will help you to define some of the most common machining operations we can offer. After downloading ELDON_ToolKit.dwg from our website and following this document, you will easily be able to create a drawing that is fully compatible with our Express Customization service.
STEP 1. Download your drawing from the ELDON website.
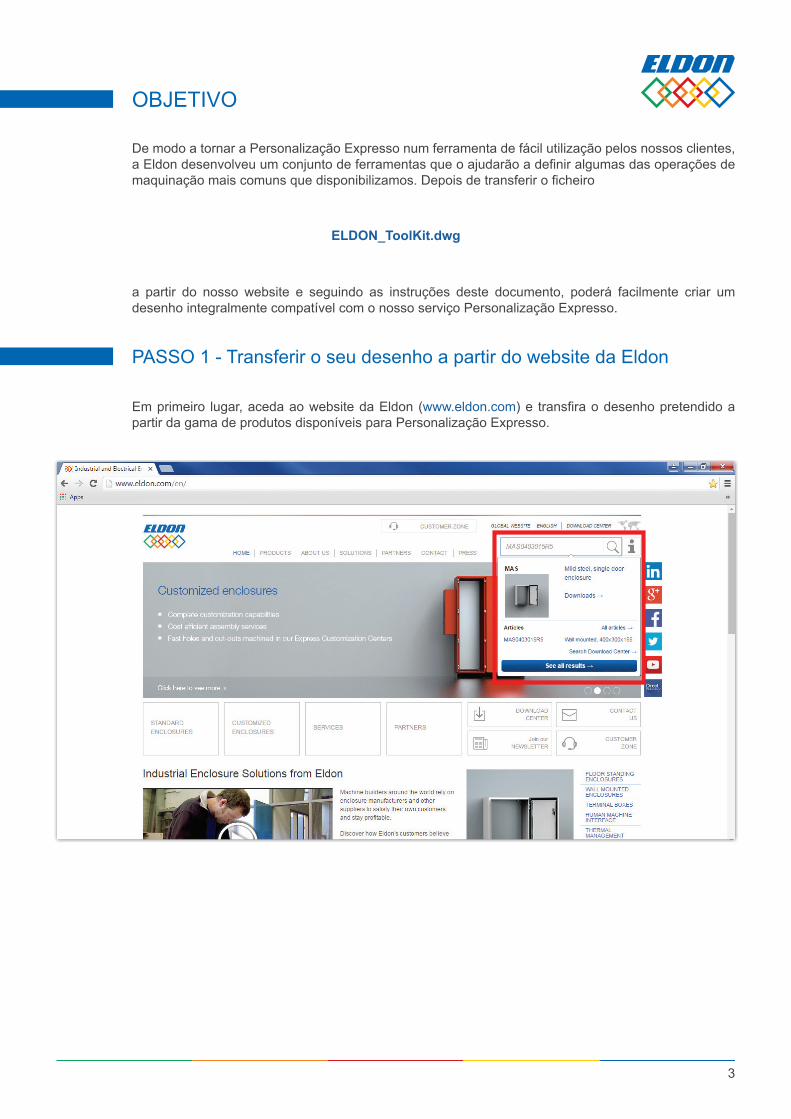
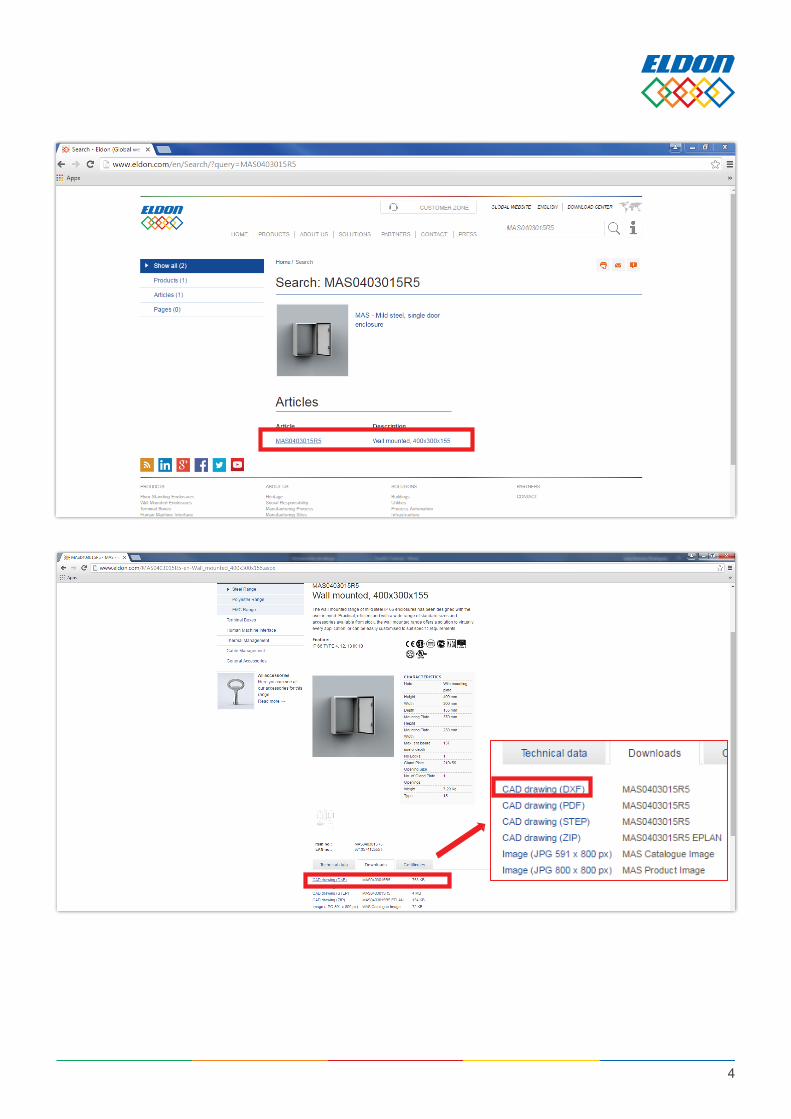
- First of all, go to the Eldon website (www.eldon.com) and download the relevant drawing from the range ofELDON products available for Express Customization.
3
De modo a tornar a Personalização Expresso num ferramenta de fácil utilização pelos nossos clientes, a Eldon desenvolveu um conjunto de ferramentas que o ajudarão a definir algumas das operações de maquinação mais comuns que disponibilizamos. Depois de transferir o ficheiro
a partir do nosso website e seguindo as instruções deste documento, poderá facilmente criar um desenho integralmente compatível com o nosso serviço Personalização Expresso.
ELDON_ToolKit.dwg
OBJETIVO
PASSO 1 - Transferir o seu desenho a partir do website da Eldon
Em primeiro lugar, aceda ao website da Eldon (www.eldon.com) e transfira o desenho pretendido a partir da gama de produtos disponíveis para Personalização Expresso.
4
STEP 2. Set the main parameters.
- Once you have downloaded the drawing from our website, open the drawing with AutoCAD. Before defining what you want to machine, it is very important to check two main parameters:
• Units should be set in mm. To check this, type “Units” in the command line and press <Enter>. A window will appear on your screen. Please ensure millimeters is selected.
• Check the scale and make sure it is 1:1.
2.1
STEP 2. Set the main parameters.
- Once you have downloaded the drawing from our website, open the drawing with AutoCAD. Before defining what you want to machine, it is very important to check two main parameters:
• Units should be set in mm. To check this, type “Units” in the command line and press <Enter>. A window will appear on your screen. Please ensure millimeters is selected.
• Check the scale and make sure it is 1:1.
2.2
5
PASSO 2 - Definir os parâmetros principais
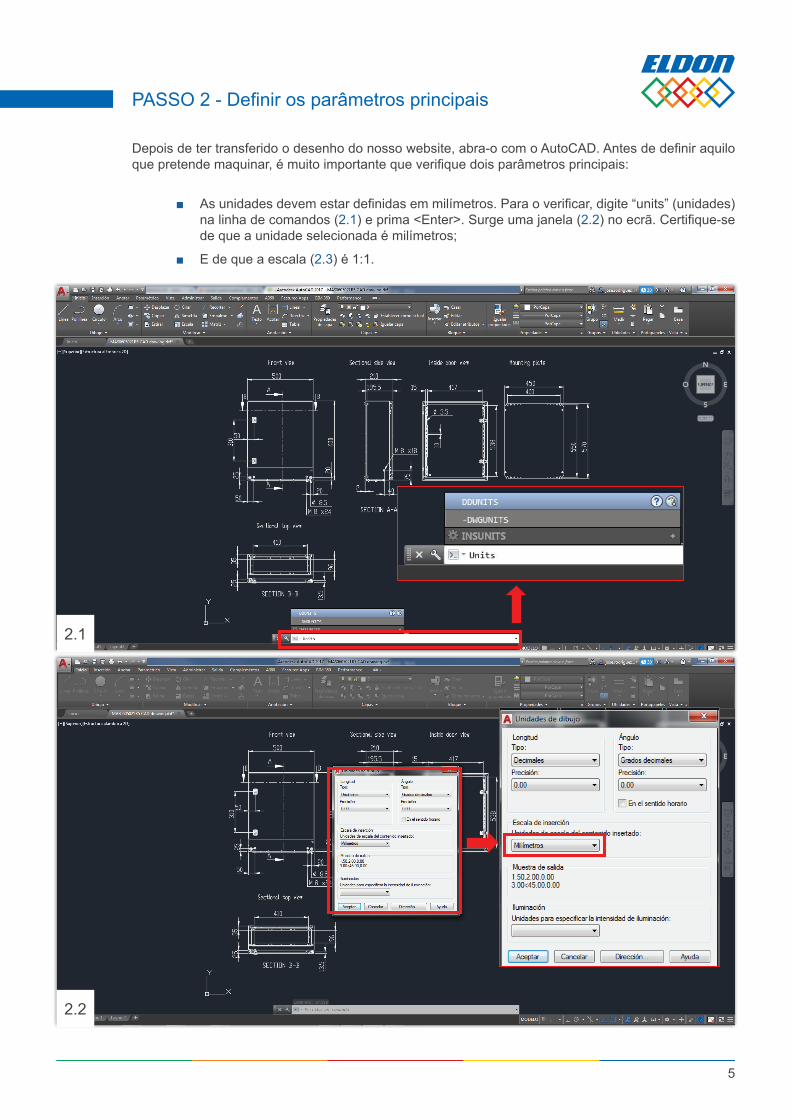
Depois de ter transferido o desenho do nosso website, abra-o com o AutoCAD. Antes de definir aquilo que pretende maquinar, é muito importante que verifique dois parâmetros principais:
■ As unidades devem estar definidas em milímetros. Para o verificar, digite “units” (unidades) na linha de comandos (2.1) e prima <Enter>. Surge uma janela (2.2) no ecrã. Certifique-se de que a unidade selecionada é milímetros;
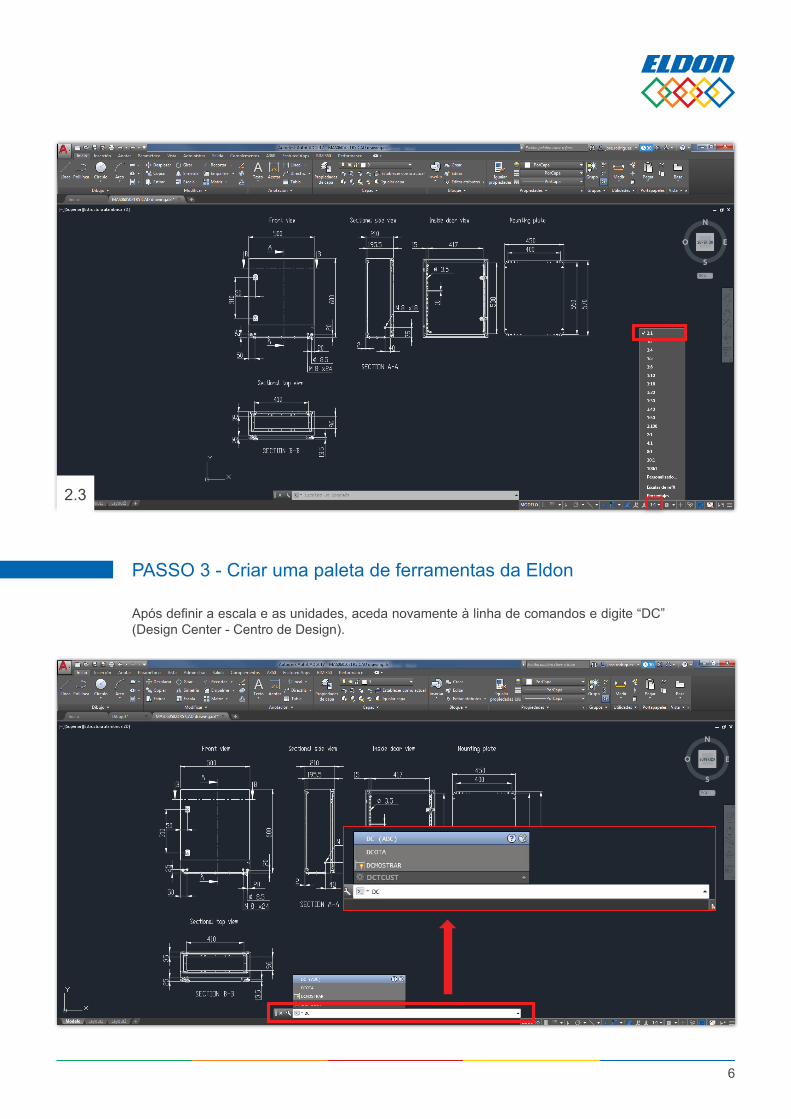
■ E de que a escala (2.3) é 1:1.
2.3
STEP 3. Create an Eldon tool palette.
- After setting scale and units, go to the command line again and type “DC” (Design Center).
- Design Center will appear on the left-hand side.
6
PASSO 3 - Criar uma paleta de ferramentas da Eldon
Após definir a escala e as unidades, aceda novamente à linha de comandos e digite “DC” (Design Center - Centro de Design).
STEP 3. Create an Eldon tool palette.
- After setting scale and units, go to the command line again and type “DC” (Design Center).
- Design Center will appear on the left-hand side.
- Look for the ELDON_ToolKit file previously downloaded, press the right-hand button on it and select “Create a tool palette”.
7
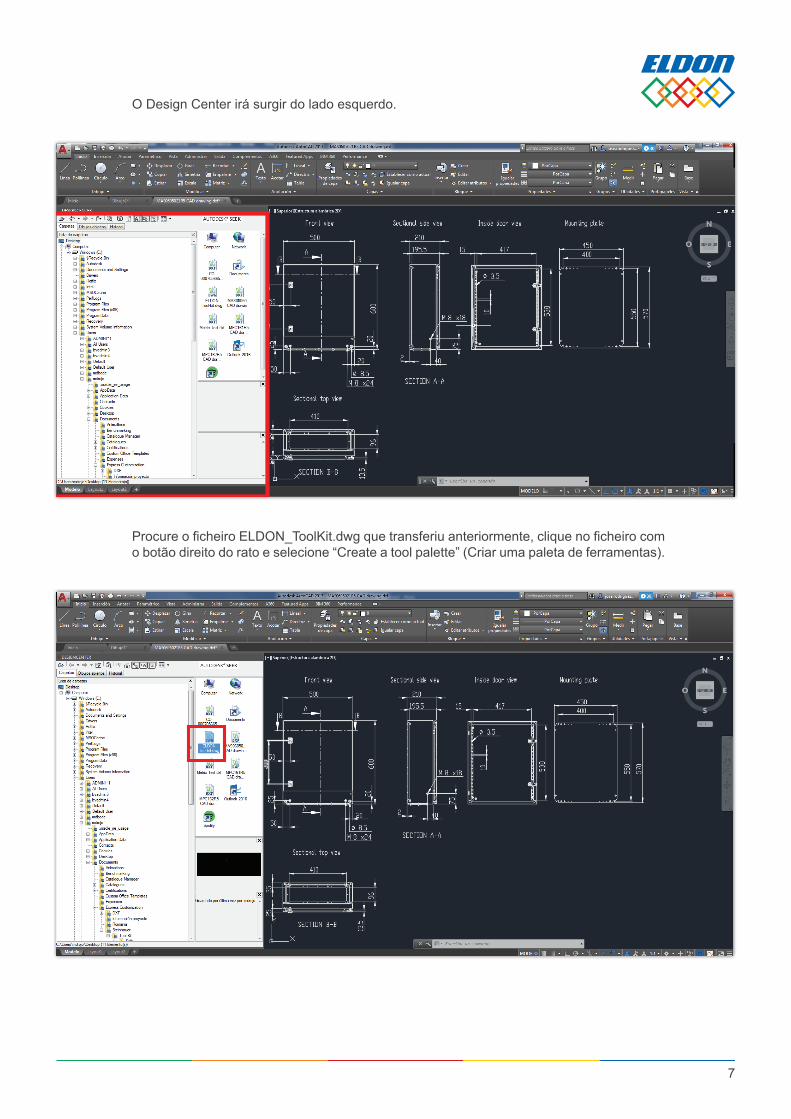
O Design Center irá surgir do lado esquerdo.
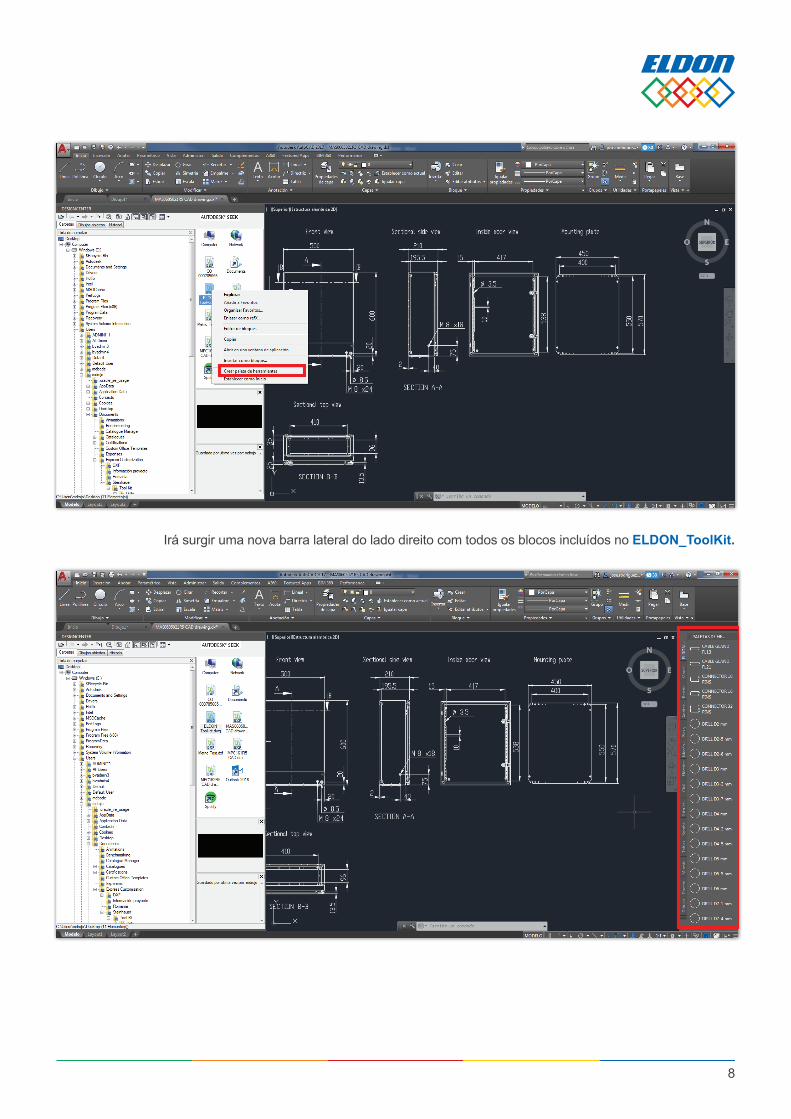
Procure o ficheiro ELDON_ToolKit.dwg que transferiu anteriormente, clique no ficheiro com o botão direito do rato e selecione “Create a tool palette” (Criar uma paleta de ferramentas).
- Look for the ELDON_ToolKit file previously downloaded, press the right-hand button on it and select “Create a tool palette”.
- A new sidebar will appear on the right-hand side with all the blocks included in ELDON_ToolKit.
STEP 4(??). Insert blocks
- To insert a block, select it, and click where you want to machine the enclosure, or specify the coordinates of its center.
NOTE: A block is referenced by its center.
- Repeat as many times as required, using different blocks or the same one.
8
Irá surgir uma nova barra lateral do lado direito com todos os blocos incluídos no ELDON_ToolKit.
- A new sidebar will appear on the right-hand side with all the blocks included in ELDON_ToolKit.
STEP 4(??). Insert blocks
- To insert a block, select it, and click where you want to machine the enclosure, or specify the coordinates of its center.
NOTE: A block is referenced by its center.
- Repeat as many times as required, using different blocks or the same one.
9
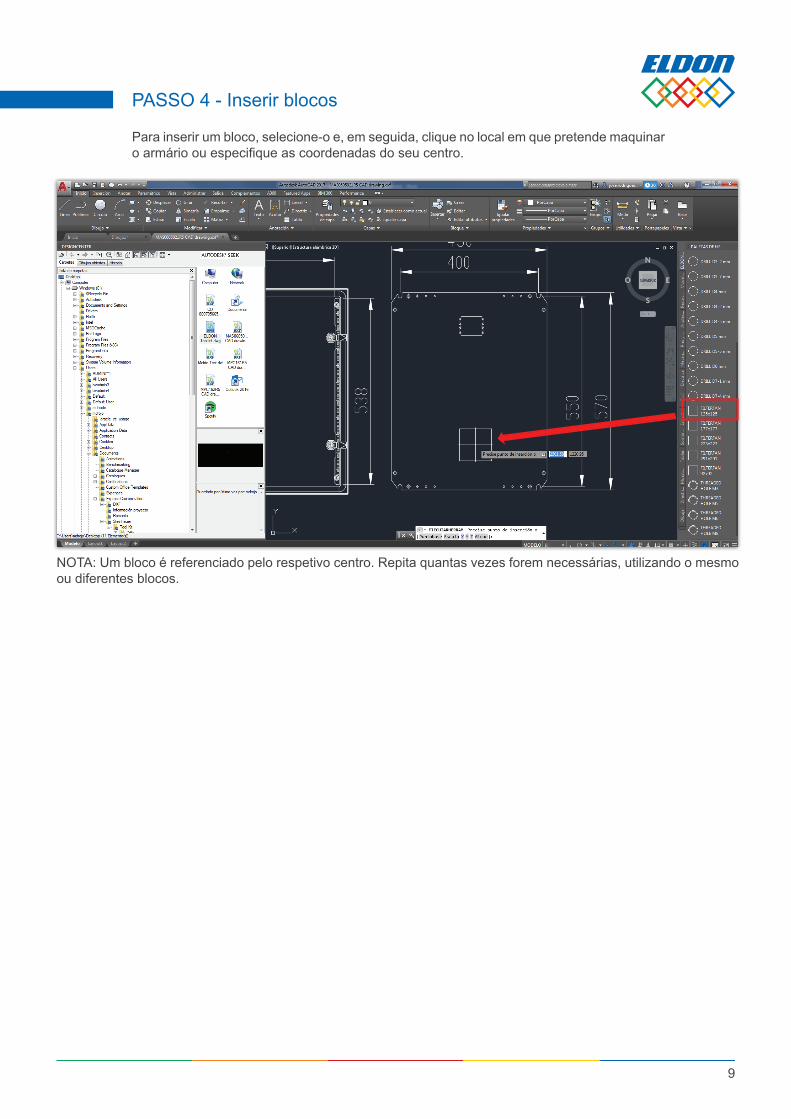
PASSO 4 - Inserir blocos
Para inserir um bloco, selecione-o e, em seguida, clique no local em que pretende maquinar o armário ou especifique as coordenadas do seu centro.
NOTA: Um bloco é referenciado pelo respetivo centro. Repita quantas vezes forem necessárias, utilizando o mesmo ou diferentes blocos.
10
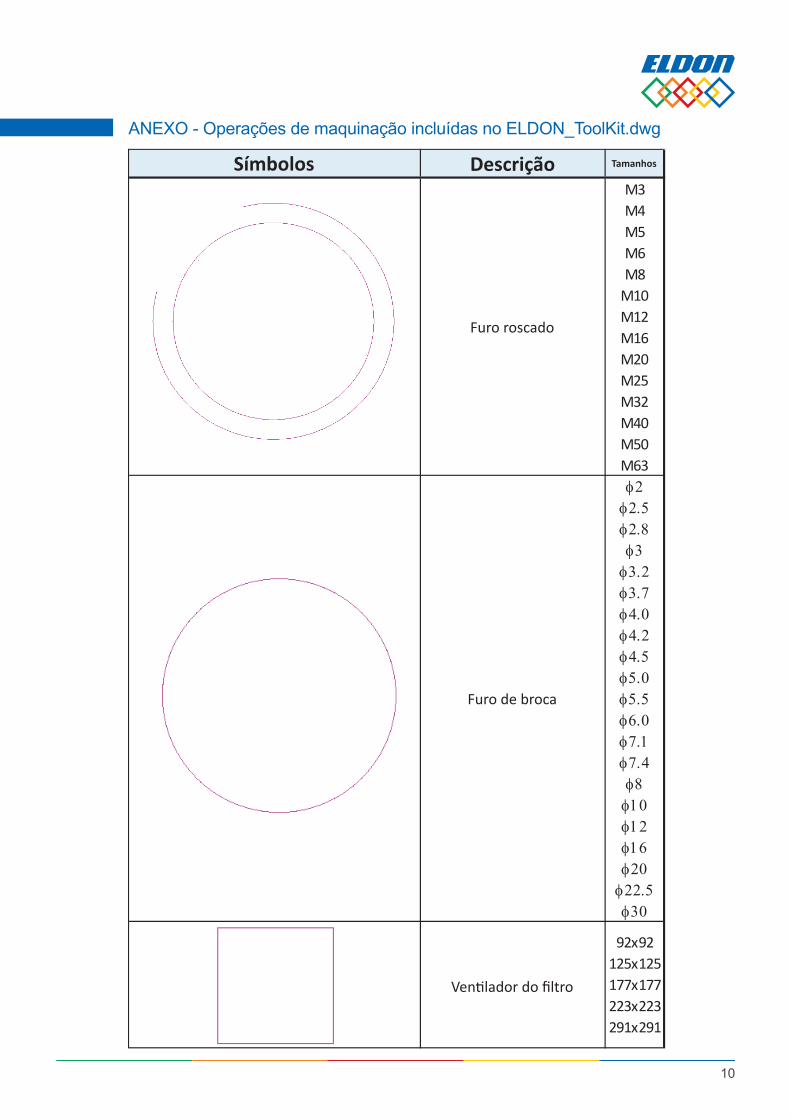
ANEXO - Operações de maquinação incluídas no ELDON_ToolKit.dwgANNEX. Machining operations included in ELDON_ToolKit.dwg
Symbols Description Sizes
Threaded Hole
M3M4M5M6M8
M10M12M16M20M25M32M40M50M63
Drill Hole
φ2φ2.5φ2.8φ3φ3.2φ3.7φ4.0φ4.2φ4.5φ5.0φ5.5φ6.0φ7.1φ7.4φ8φ10φ12φ16φ20φ22.5φ30
Filter Fan
92x92125x125177x177223x223291x291
Furo roscado
Furo de broca
Ventilador do filtro
TamanhosSímbolos Descrição
11
NOTE: In addition to these operations, customers are able to define different cut-out shapes, holes, etc., to meet their specific needs.
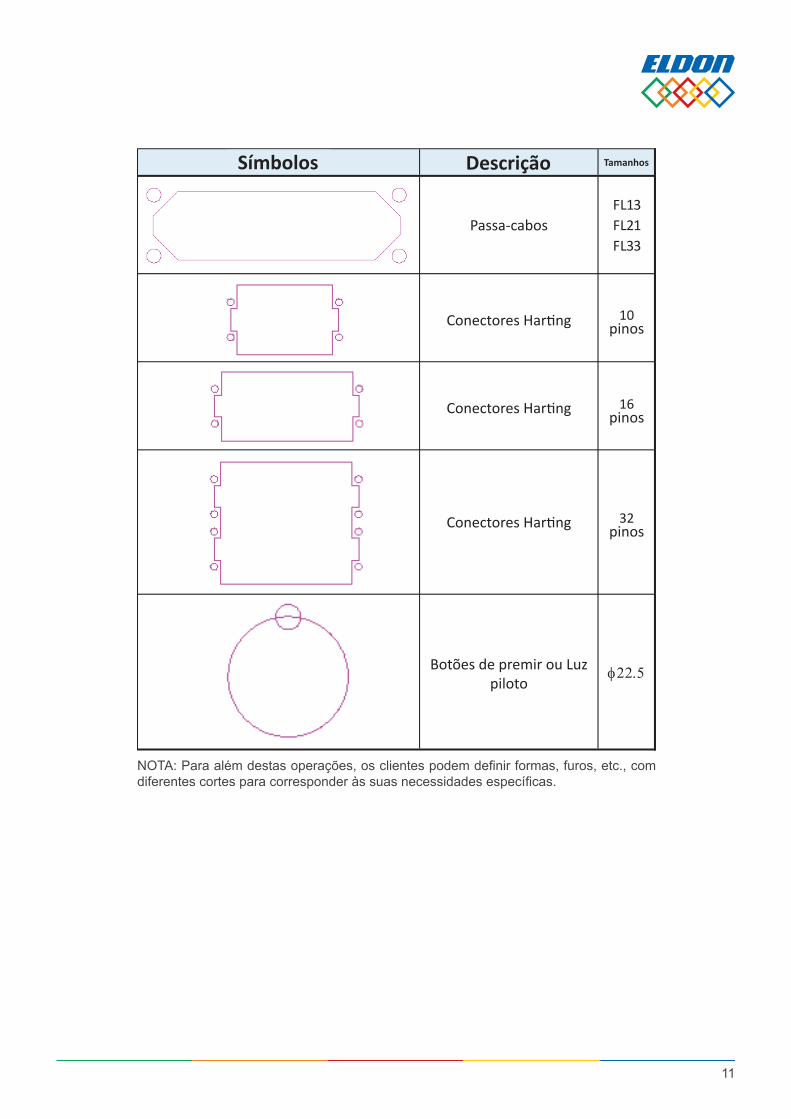
Symbols Description Sizes
Cable GlandFL13FL21FL33
Harting Connectors 10 pins
Harting Connectors 16 pins
Harting Connectors 32 pins
Pushbuttons or Pilot Light φ22.5
NOTA: Para além destas operações, os clientes podem definir formas, furos, etc., com diferentes cortes para corresponder às suas necessidades específicas.
Passa-cabos
Conectores Harting
Conectores Harting
Conectores Harting
Botões de premir ou Luz piloto
pines
pines
10pinos
16pinos
32pinos
TamanhosSímbolos Descrição