Embed Size (px)
Citation preview
Cape Canaveral Hospital Holmes Regional Medical Center Palm Bay Community Hospital
FIRST ACCESS Provider Portal
User Guide
Updated: 08/2006
FIRST ACCESS Provider Portal User Guide
First Access User Guide Page 2
Table of Contents
System Requirements…………………………………………………………………………………………..3 JAVA applet download …………………………………………………………………………………………4 Access and Log in to First Access provider portal………………………………………….……..……..5 Patient List – STAR /HBOC Physician Census List…………………………………………………..……7 Walk Order Report……………………………………………………………………………………………….8 Find Patient – Patient Search……………………. ……………………………………………………….…..9 Add / Remove Patient from Worklist………………………………………………………………………..10 Find Patient – Station Census………………………………………………………………………………..11 Results – Laboratory, Pathology, Radiology………………………….……………………………..……12 Rad PACS – Viewing reports…………..... ………………………………………………….………..……..13 Rad PACS – Images via Web MI……………………………..………………………………………………14 Documents – View transcribed documents…………………………………………...………………......15 Patient Info – Facesheet and Medical Records Coding…………………………………………..……..16 Physician Info – Physician directory………………………………………………………….………........17 Medical Records – Online Chart access ……………………………….……..…………………………...18 Chart Deficiencies – Electronic Signature …………………….…………………………………………..21 HomeCare - On line chart access & Electronic Signature for Homecare & Hospice…….………...26 My Page – Personal settings- internet links – enhancement summary………………………………27 Tips for Success………………………………………………………………………………………………..28
FIRST ACCESS Provider Portal User Guide
First Access User Guide Page 3
FIRST Access Provider Portal
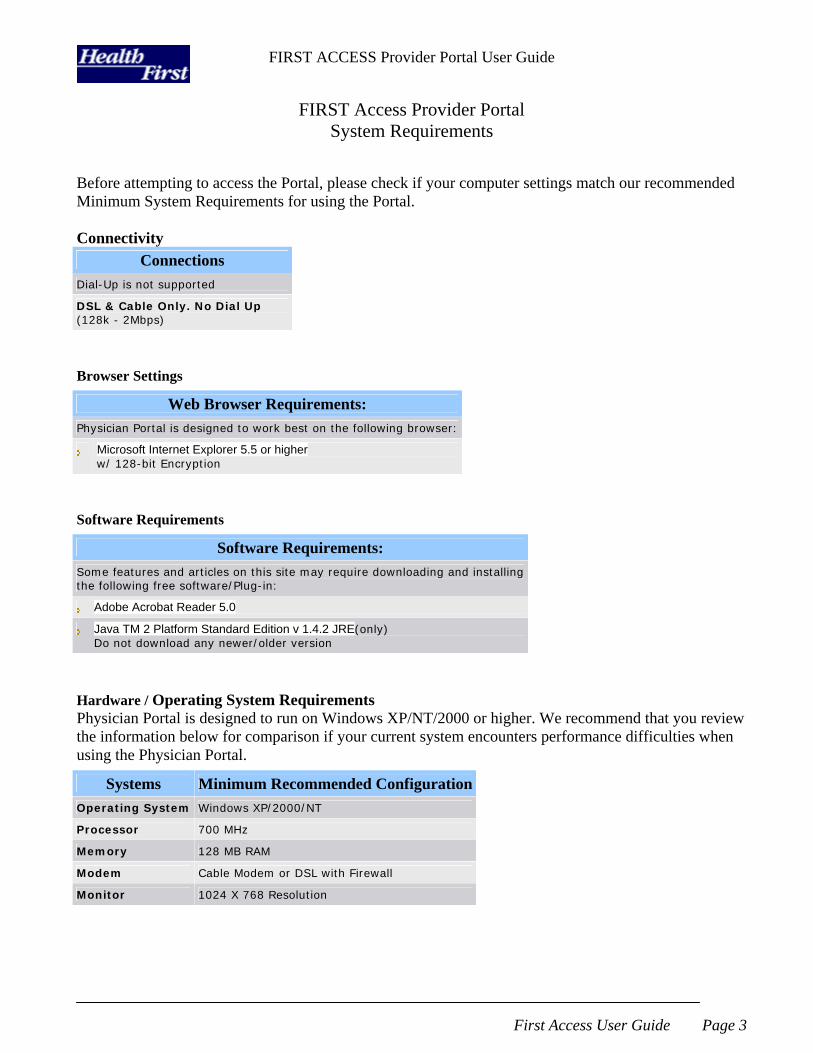
System Requirements Before attempting to access the Portal, please check if your computer settings match our recommended Minimum System Requirements for using the Portal. Connectivity
Connections
Dial-Up is not supported
DSL & Cable Only. No Dial Up (128k - 2Mbps)
Browser Settings
Web Browser Requirements: Physician Portal is designed to work best on the following browser:
Microsoft Internet Explorer 5.5 or higher w/ 128-bit Encryption
Software Requirements
Software Requirements: Some features and articles on this site may require downloading and installing the following free software/Plug-in:
Adobe Acrobat Reader 5.0
Java TM 2 Platform Standard Edition v 1.4.2 JRE(only) Do not download any newer/older version
Hardware / Operating System Requirements Physician Portal is designed to run on Windows XP/NT/2000 or higher. We recommend that you review the information below for comparison if your current system encounters performance difficulties when using the Physician Portal.
Systems Minimum Recommended Configuration
Operating System Windows XP/2000/NT
Processor 700 MHz
Memory 128 MB RAM
Modem Cable Modem or DSL with Firewall
Monitor 1024 X 768 Resolution
FIRST ACCESS Provider Portal User Guide
First Access User Guide Page 4
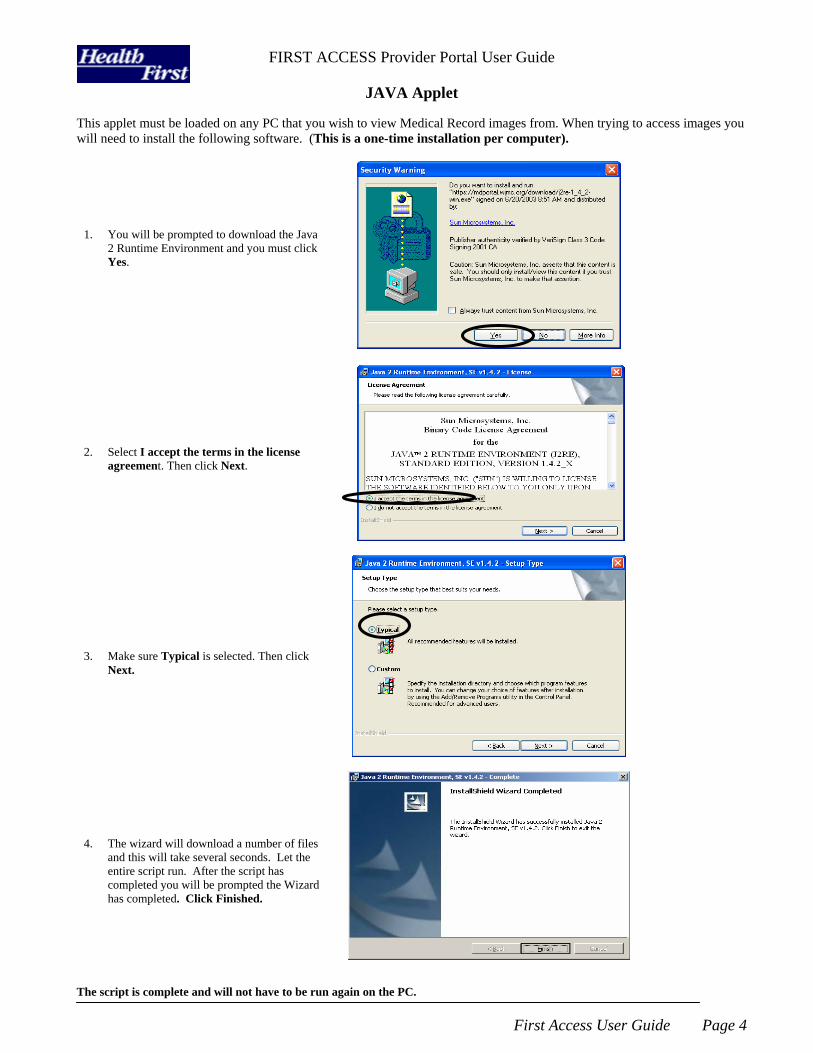
JAVA Applet This applet must be loaded on any PC that you wish to view Medical Record images from. When trying to access images you will need to install the following software. (This is a one-time installation per computer).
1. You will be prompted to download the Java 2 Runtime Environment and you must click Yes.
2. Select I accept the terms in the license agreement. Then click Next.
3. Make sure Typical is selected. Then click Next.
4. The wizard will download a number of files and this will take several seconds. Let the entire script run. After the script has completed you will be prompted the Wizard has completed. Click Finished.
The script is complete and will not have to be run again on the PC.
FIRST ACCESS Provider Portal User Guide
First Access User Guide Page 5
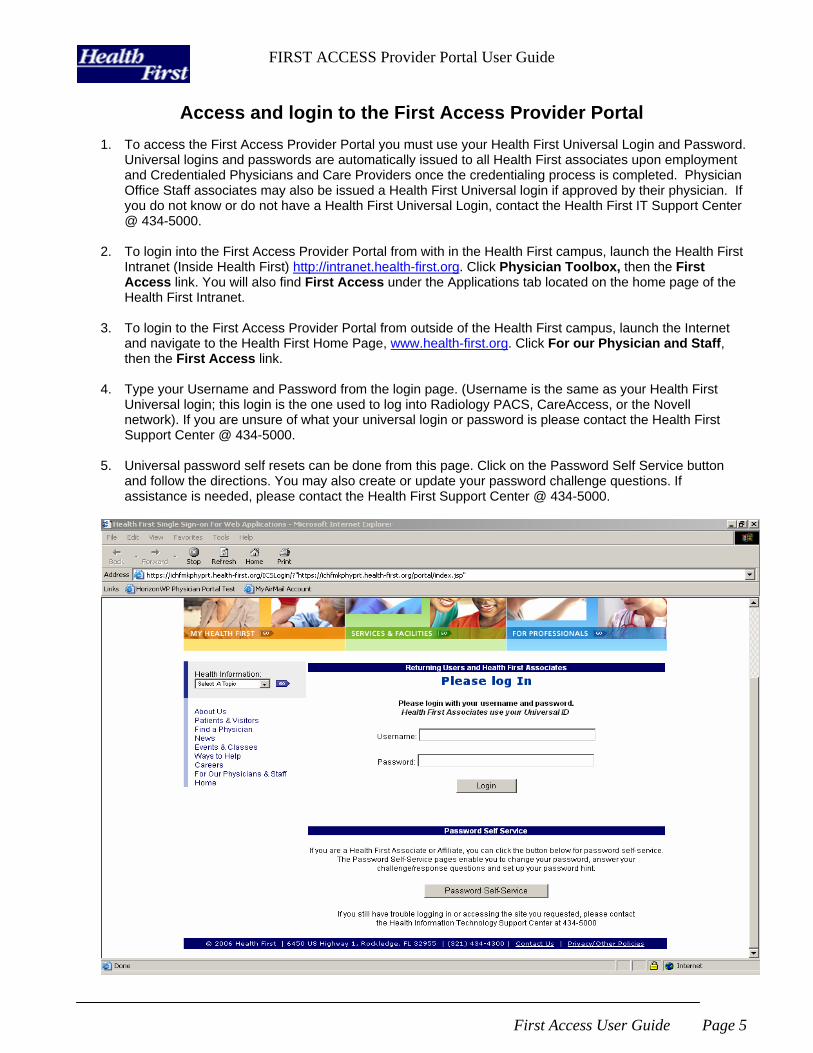
Access and login to the First Access Provider Portal
1. To access the First Access Provider Portal you must use your Health First Universal Login and Password.
Universal logins and passwords are automatically issued to all Health First associates upon employment and Credentialed Physicians and Care Providers once the credentialing process is completed. Physician Office Staff associates may also be issued a Health First Universal login if approved by their physician. If you do not know or do not have a Health First Universal Login, contact the Health First IT Support Center @ 434-5000.
2. To login into the First Access Provider Portal from with in the Health First campus, launch the Health First
Intranet (Inside Health First) http://intranet.health-first.org. Click Physician Toolbox, then the First Access link. You will also find First Access under the Applications tab located on the home page of the Health First Intranet.
3. To login to the First Access Provider Portal from outside of the Health First campus, launch the Internet
and navigate to the Health First Home Page, www.health-first.org. Click For our Physician and Staff, then the First Access link.
4. Type your Username and Password from the login page. (Username is the same as your Health First
Universal login; this login is the one used to log into Radiology PACS, CareAccess, or the Novell network). If you are unsure of what your universal login or password is please contact the Health First Support Center @ 434-5000.
5. Universal password self resets can be done from this page. Click on the Password Self Service button
and follow the directions. You may also create or update your password challenge questions. If assistance is needed, please contact the Health First Support Center @ 434-5000.
FIRST ACCESS Provider Portal User Guide
First Access User Guide Page 6
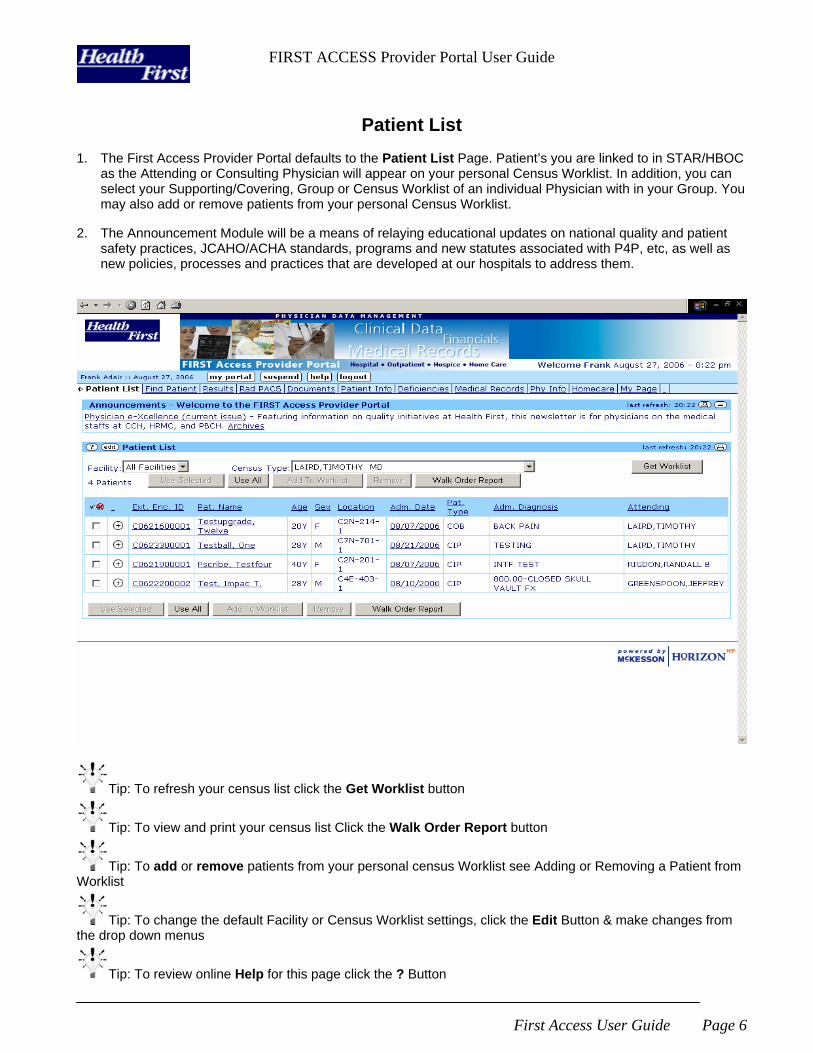
Patient List 1. The First Access Provider Portal defaults to the Patient List Page. Patient’s you are linked to in STAR/HBOC
as the Attending or Consulting Physician will appear on your personal Census Worklist. In addition, you can select your Supporting/Covering, Group or Census Worklist of an individual Physician with in your Group. You may also add or remove patients from your personal Census Worklist.
2. The Announcement Module will be a means of relaying educational updates on national quality and patient
safety practices, JCAHO/ACHA standards, programs and new statutes associated with P4P, etc, as well as new policies, processes and practices that are developed at our hospitals to address them.
Tip: To refresh your census list click the Get Worklist button
Tip: To view and print your census list Click the Walk Order Report button
Tip: To add or remove patients from your personal census Worklist see Adding or Removing a Patient from Worklist
Tip: To change the default Facility or Census Worklist settings, click the Edit Button & make changes from the drop down menus
Tip: To review online Help for this page click the ? Button
FIRST ACCESS Provider Portal User Guide
First Access User Guide Page 7
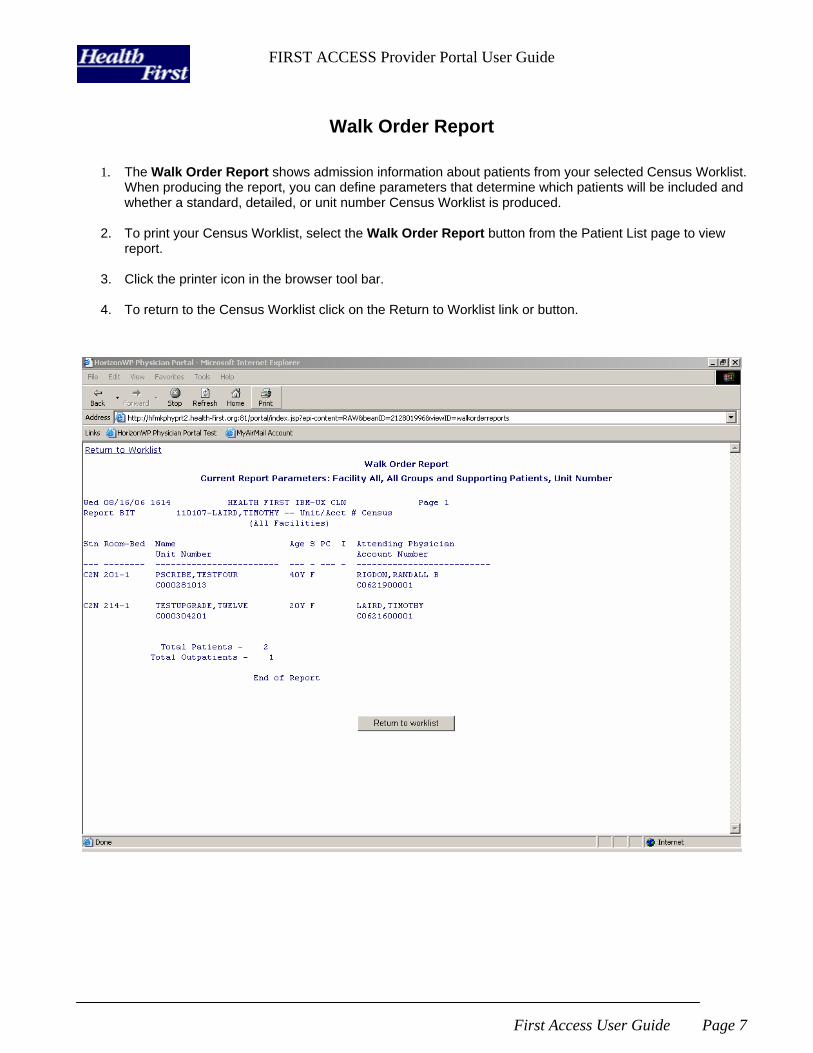
Walk Order Report
1. The Walk Order Report shows admission information about patients from your selected Census Worklist. When producing the report, you can define parameters that determine which patients will be included and whether a standard, detailed, or unit number Census Worklist is produced.
2. To print your Census Worklist, select the Walk Order Report button from the Patient List page to view report.
3. Click the printer icon in the browser tool bar.
4. To return to the Census Worklist click on the Return to Worklist link or button.
FIRST ACCESS Provider Portal User Guide
First Access User Guide Page 8
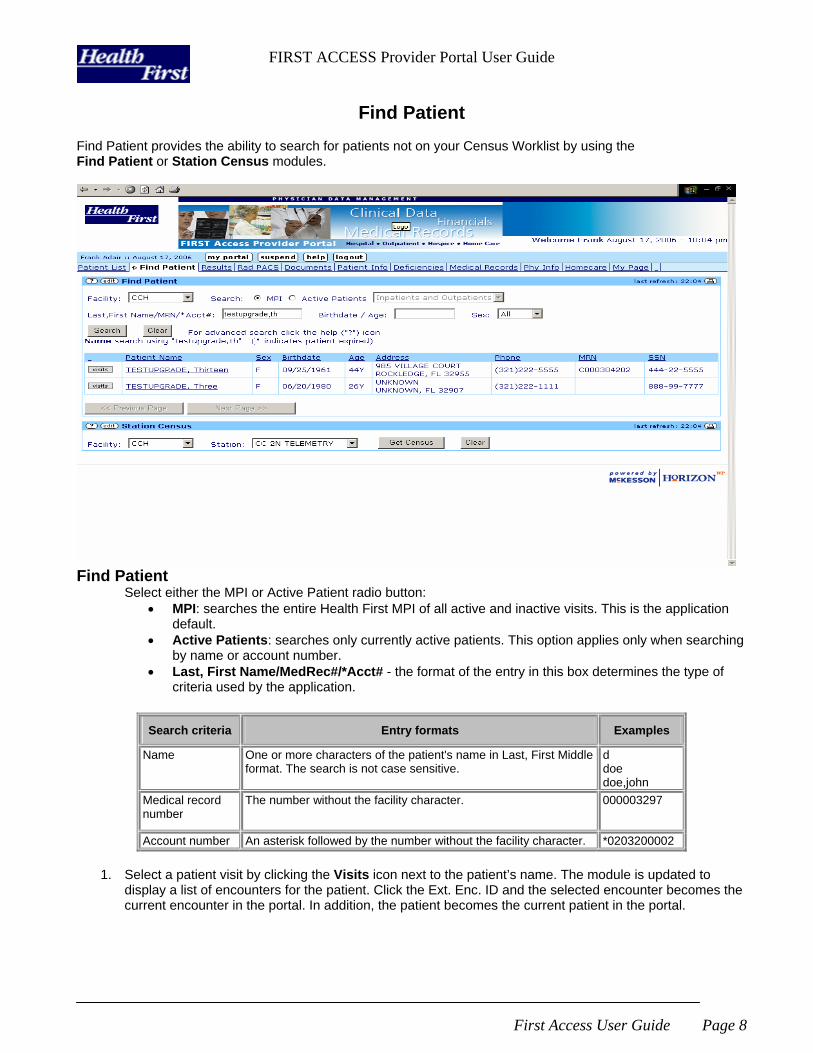
Find Patient
Find Patient provides the ability to search for patients not on your Census Worklist by using the Find Patient or Station Census modules.
Find Patient
Select either the MPI or Active Patient radio button: • MPI: searches the entire Health First MPI of all active and inactive visits. This is the application
default. • Active Patients: searches only currently active patients. This option applies only when searching
by name or account number. • Last, First Name/MedRec#/*Acct# - the format of the entry in this box determines the type of
criteria used by the application.
Search criteria Entry formats Examples
Name One or more characters of the patient's name in Last, First Middle format. The search is not case sensitive.
d doe doe,john
Medical record number
The number without the facility character. 000003297
Account number An asterisk followed by the number without the facility character. *0203200002
1. Select a patient visit by clicking the Visits icon next to the patient’s name. The module is updated to display a list of encounters for the patient. Click the Ext. Enc. ID and the selected encounter becomes the current encounter in the portal. In addition, the patient becomes the current patient in the portal.
FIRST ACCESS Provider Portal User Guide
First Access User Guide Page 9
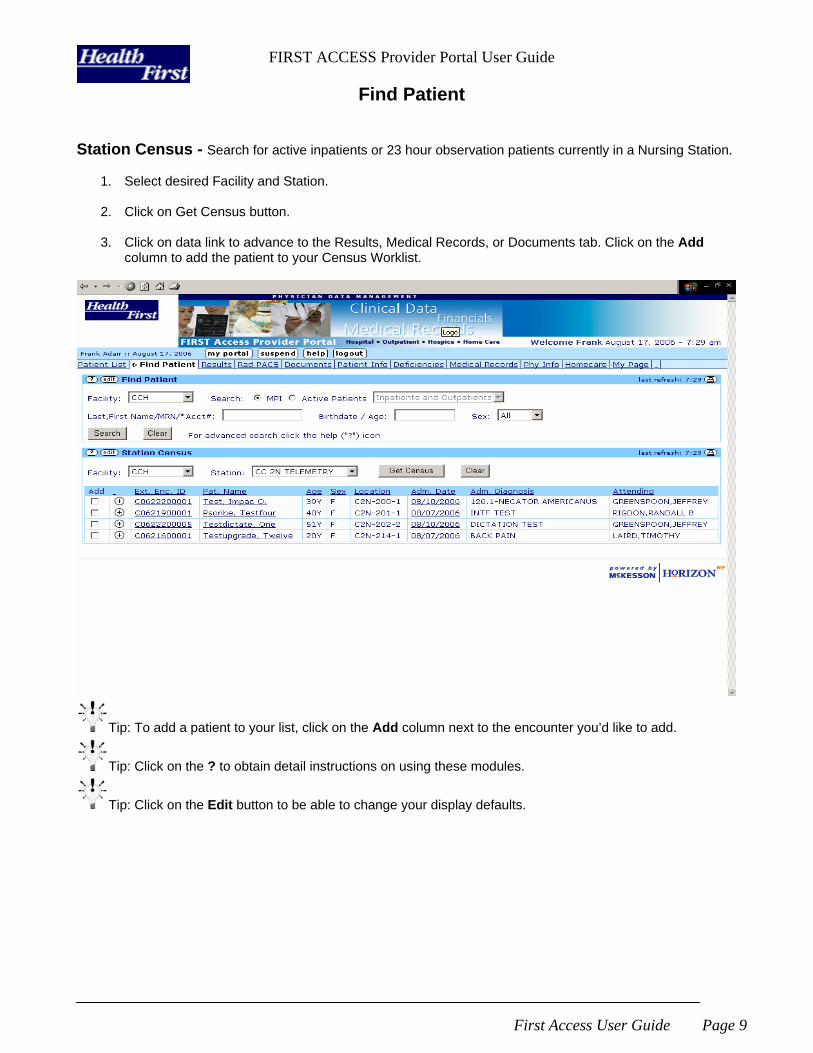
Find Patient Station Census - Search for active inpatients or 23 hour observation patients currently in a Nursing Station.
1. Select desired Facility and Station. 2. Click on Get Census button.
3. Click on data link to advance to the Results, Medical Records, or Documents tab. Click on the Add
column to add the patient to your Census Worklist.
Tip: To add a patient to your list, click on the Add column next to the encounter you’d like to add.
Tip: Click on the ? to obtain detail instructions on using these modules.
Tip: Click on the Edit button to be able to change your display defaults.
FIRST ACCESS Provider Portal User Guide
First Access User Guide Page 10
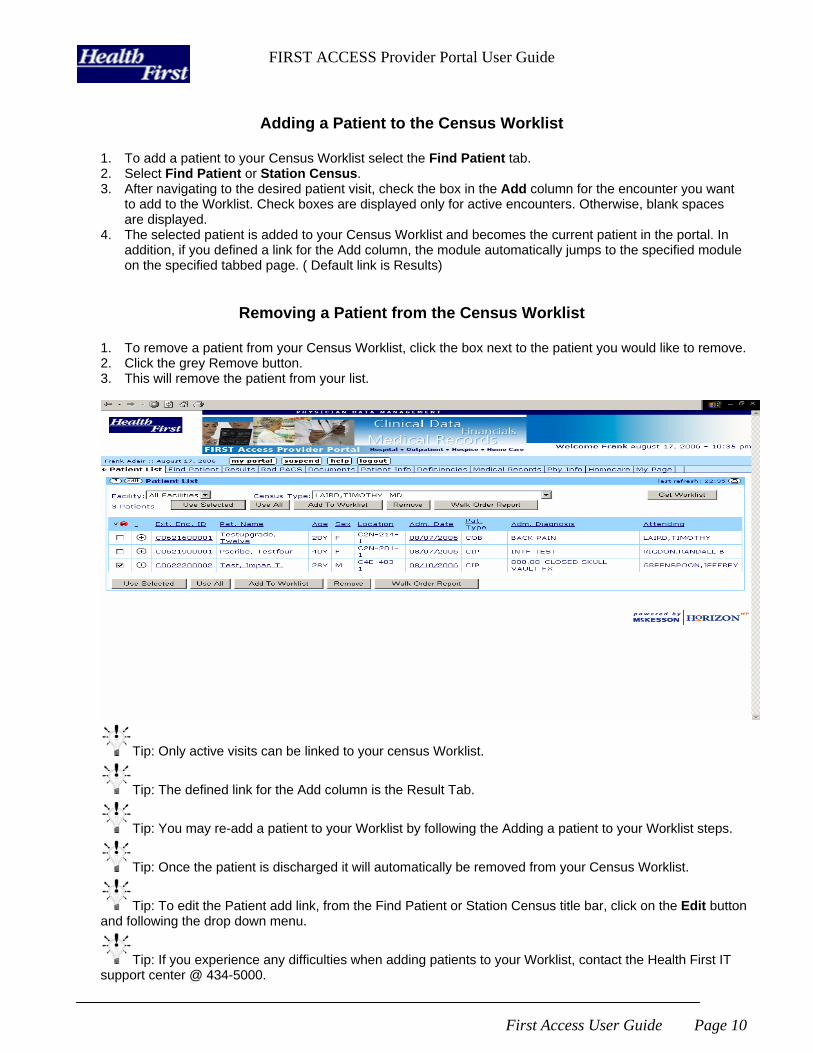
Adding a Patient to the Census Worklist
1. To add a patient to your Census Worklist select the Find Patient tab. 2. Select Find Patient or Station Census. 3. After navigating to the desired patient visit, check the box in the Add column for the encounter you want
to add to the Worklist. Check boxes are displayed only for active encounters. Otherwise, blank spaces are displayed.
4. The selected patient is added to your Census Worklist and becomes the current patient in the portal. In addition, if you defined a link for the Add column, the module automatically jumps to the specified module on the specified tabbed page. ( Default link is Results)
Removing a Patient from the Census Worklist
1. To remove a patient from your Census Worklist, click the box next to the patient you would like to remove. 2. Click the grey Remove button. 3. This will remove the patient from your list.
Tip: Only active visits can be linked to your census Worklist.
Tip: The defined link for the Add column is the Result Tab.
Tip: You may re-add a patient to your Worklist by following the Adding a patient to your Worklist steps.
Tip: Once the patient is discharged it will automatically be removed from your Census Worklist.
Tip: To edit the Patient add link, from the Find Patient or Station Census title bar, click on the Edit button and following the drop down menu.
Tip: If you experience any difficulties when adding patients to your Worklist, contact the Health First IT support center @ 434-5000.
FIRST ACCESS Provider Portal User Guide
First Access User Guide Page 11
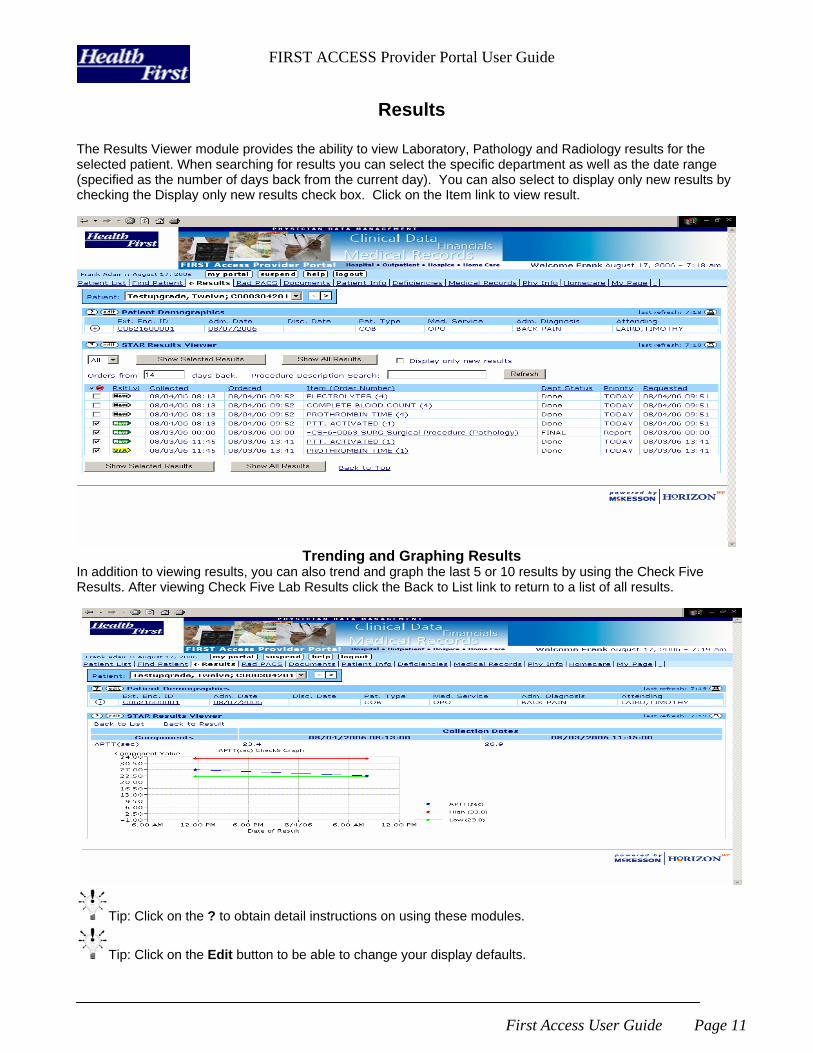
Results
The Results Viewer module provides the ability to view Laboratory, Pathology and Radiology results for the selected patient. When searching for results you can select the specific department as well as the date range (specified as the number of days back from the current day). You can also select to display only new results by checking the Display only new results check box. Click on the Item link to view result.
Trending and Graphing Results
In addition to viewing results, you can also trend and graph the last 5 or 10 results by using the Check Five Results. After viewing Check Five Lab Results click the Back to List link to return to a list of all results.
Tip: Click on the ? to obtain detail instructions on using these modules.
Tip: Click on the Edit button to be able to change your display defaults.
FIRST ACCESS Provider Portal User Guide
First Access User Guide Page 12
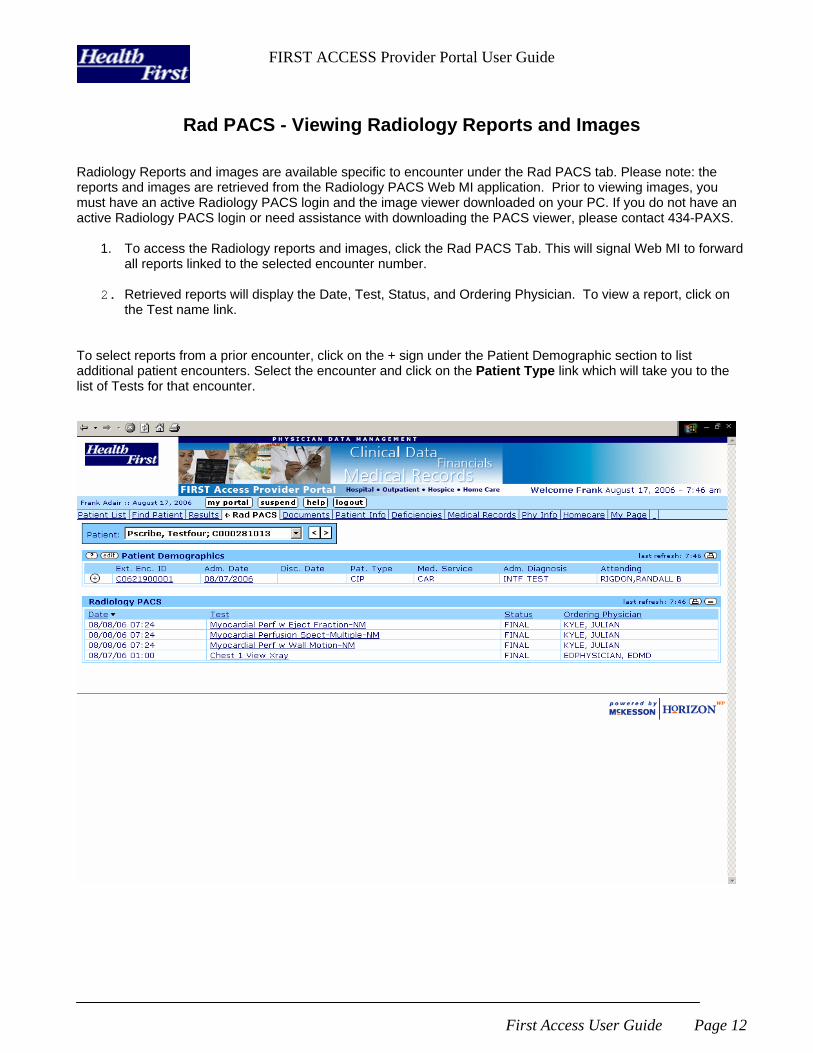
Rad PACS - Viewing Radiology Reports and Images Radiology Reports and images are available specific to encounter under the Rad PACS tab. Please note: the reports and images are retrieved from the Radiology PACS Web MI application. Prior to viewing images, you must have an active Radiology PACS login and the image viewer downloaded on your PC. If you do not have an active Radiology PACS login or need assistance with downloading the PACS viewer, please contact 434-PAXS.
1. To access the Radiology reports and images, click the Rad PACS Tab. This will signal Web MI to forward
all reports linked to the selected encounter number.
2. Retrieved reports will display the Date, Test, Status, and Ordering Physician. To view a report, click on the Test name link.
To select reports from a prior encounter, click on the + sign under the Patient Demographic section to list additional patient encounters. Select the encounter and click on the Patient Type link which will take you to the list of Tests for that encounter.
FIRST ACCESS Provider Portal User Guide
First Access User Guide Page 13
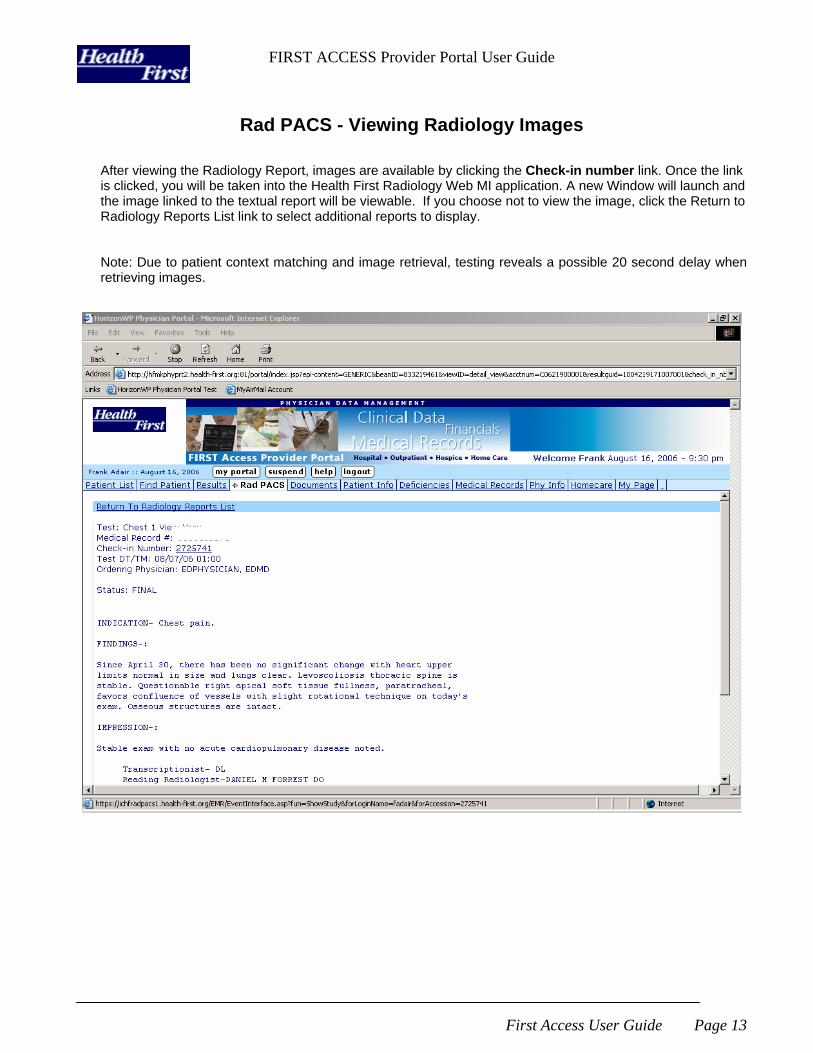
Rad PACS - Viewing Radiology Images After viewing the Radiology Report, images are available by clicking the Check-in number link. Once the link is clicked, you will be taken into the Health First Radiology Web MI application. A new Window will launch and the image linked to the textual report will be viewable. If you choose not to view the image, click the Return to Radiology Reports List link to select additional reports to display. Note: Due to patient context matching and image retrieval, testing reveals a possible 20 second delay when retrieving images.
FIRST ACCESS Provider Portal User Guide
First Access User Guide Page 14
Rad PACS - Viewing Radiology Images
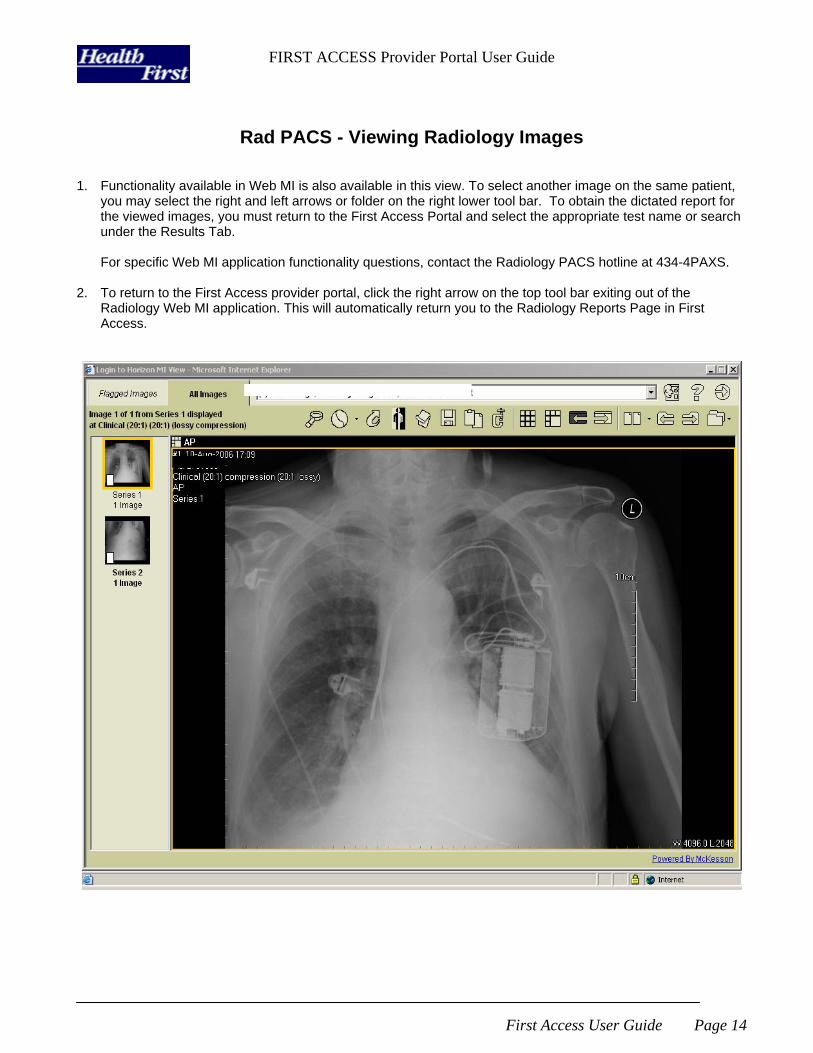
1. Functionality available in Web MI is also available in this view. To select another image on the same patient,
you may select the right and left arrows or folder on the right lower tool bar. To obtain the dictated report for the viewed images, you must return to the First Access Portal and select the appropriate test name or search under the Results Tab. For specific Web MI application functionality questions, contact the Radiology PACS hotline at 434-4PAXS.
2. To return to the First Access provider portal, click the right arrow on the top tool bar exiting out of the
Radiology Web MI application. This will automatically return you to the Radiology Reports Page in First Access.

FIRST ACCESS Provider Portal User Guide
First Access User Guide Page 15
Documents
The Documents tab lists all dictation transcribed by the HIM department and Pathology related reports specific to encounter number. Please note: the documents are retrieved from the SCM application. Testing reveals a possible 6 – 10 second delay when retrieving documents.
1. Click the Document Tab, this will signal SCM to forward all documents linked to the encounter.
2. Retrieved documents will display the Dictation Date, Document Title, and Dictating Physician. To view a document, click on the Document Title. All documents viewed under this section are in a Preliminary Status. A message will display at the top of the report stating:
************************* PRELIMINARY REPORT *************************** ************ See Patient Chart for Final Signed Report ***************** ************************************************************************
3. After reviewing the documents, click the Return to Dictation Reports link to select additional documents to
display.
4. To select documents from a prior encounter, click on the + sign under the Patient Demographic section to list additional patient encounters.
5. Select the encounter and click on the Adm. Date link which will take you to the list of Documents for that
encounter.
FIRST ACCESS Provider Portal User Guide
First Access User Guide Page 16
Patient Info
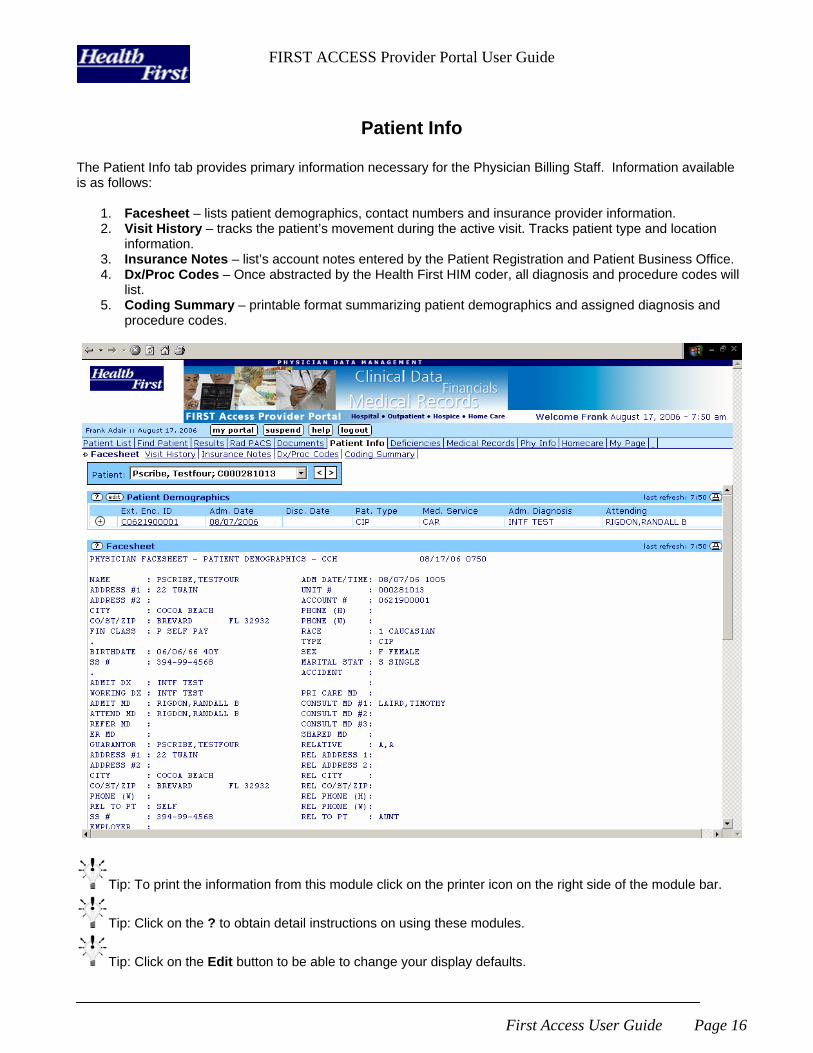
The Patient Info tab provides primary information necessary for the Physician Billing Staff. Information available is as follows:
1. Facesheet – lists patient demographics, contact numbers and insurance provider information. 2. Visit History – tracks the patient’s movement during the active visit. Tracks patient type and location
information. 3. Insurance Notes – list’s account notes entered by the Patient Registration and Patient Business Office. 4. Dx/Proc Codes – Once abstracted by the Health First HIM coder, all diagnosis and procedure codes will
list. 5. Coding Summary – printable format summarizing patient demographics and assigned diagnosis and
procedure codes.
Tip: To print the information from this module click on the printer icon on the right side of the module bar.
Tip: Click on the ? to obtain detail instructions on using these modules.
Tip: Click on the Edit button to be able to change your display defaults.
FIRST ACCESS Provider Portal User Guide
First Access User Guide Page 17
Physician Info
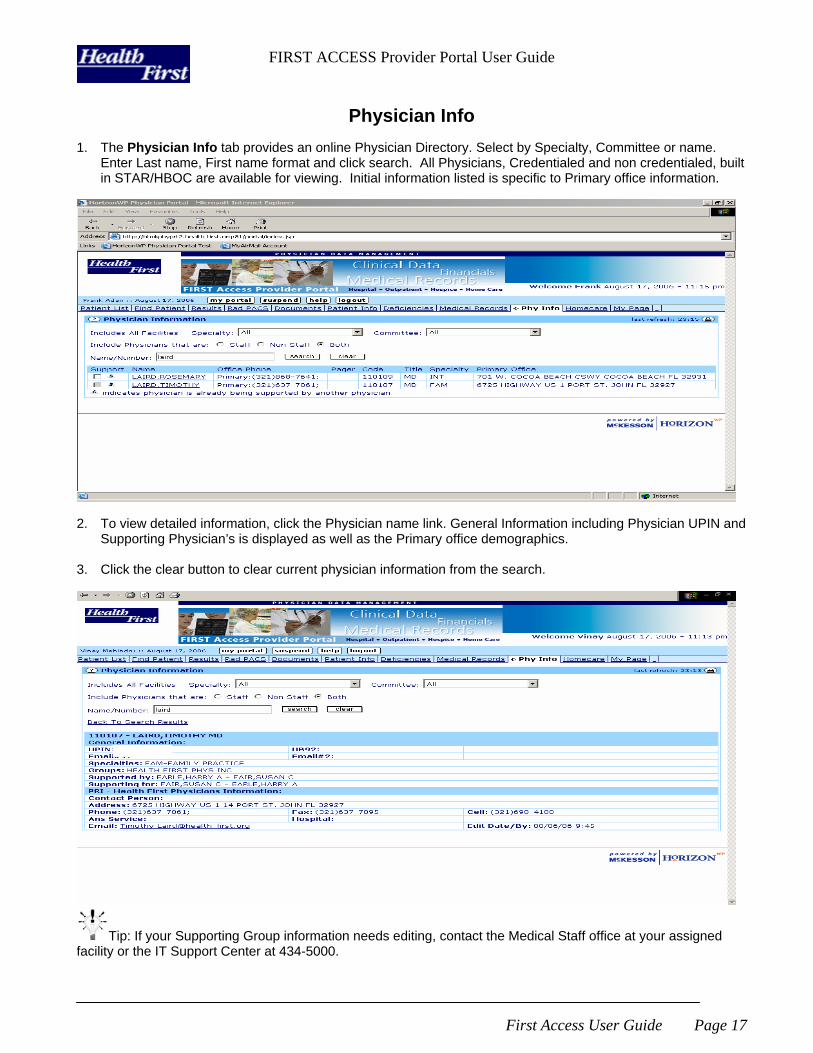
1. The Physician Info tab provides an online Physician Directory. Select by Specialty, Committee or name.
Enter Last name, First name format and click search. All Physicians, Credentialed and non credentialed, built in STAR/HBOC are available for viewing. Initial information listed is specific to Primary office information.
2. To view detailed information, click the Physician name link. General Information including Physician UPIN and
Supporting Physician’s is displayed as well as the Primary office demographics. 3. Click the clear button to clear current physician information from the search.
Tip: If your Supporting Group information needs editing, contact the Medical Staff office at your assigned facility or the IT Support Center at 434-5000.
FIRST ACCESS Provider Portal User Guide
First Access User Guide Page 18
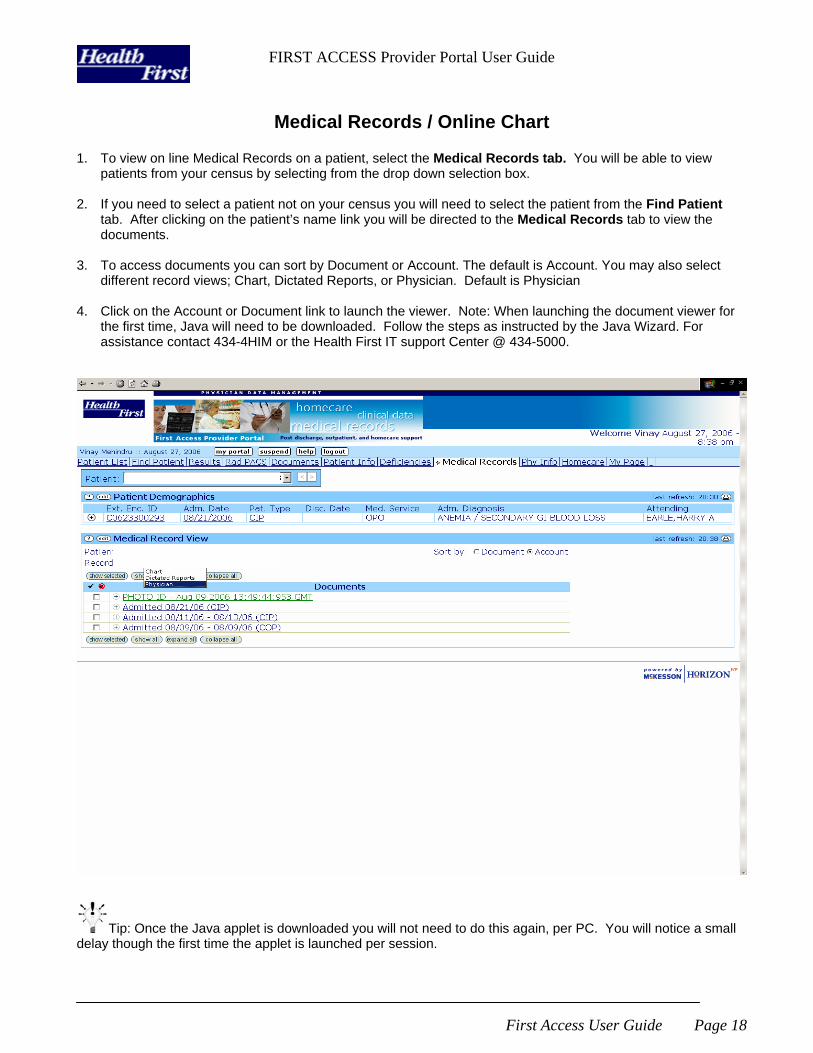
Medical Records / Online Chart 1. To view on line Medical Records on a patient, select the Medical Records tab. You will be able to view
patients from your census by selecting from the drop down selection box. 2. If you need to select a patient not on your census you will need to select the patient from the Find Patient
tab. After clicking on the patient’s name link you will be directed to the Medical Records tab to view the documents.
3. To access documents you can sort by Document or Account. The default is Account. You may also select
different record views; Chart, Dictated Reports, or Physician. Default is Physician 4. Click on the Account or Document link to launch the viewer. Note: When launching the document viewer for
the first time, Java will need to be downloaded. Follow the steps as instructed by the Java Wizard. For assistance contact 434-4HIM or the Health First IT support Center @ 434-5000.
Tip: Once the Java applet is downloaded you will not need to do this again, per PC. You will notice a small delay though the first time the applet is launched per session.
FIRST ACCESS Provider Portal User Guide
First Access User Guide Page 19
Online Chart navigation
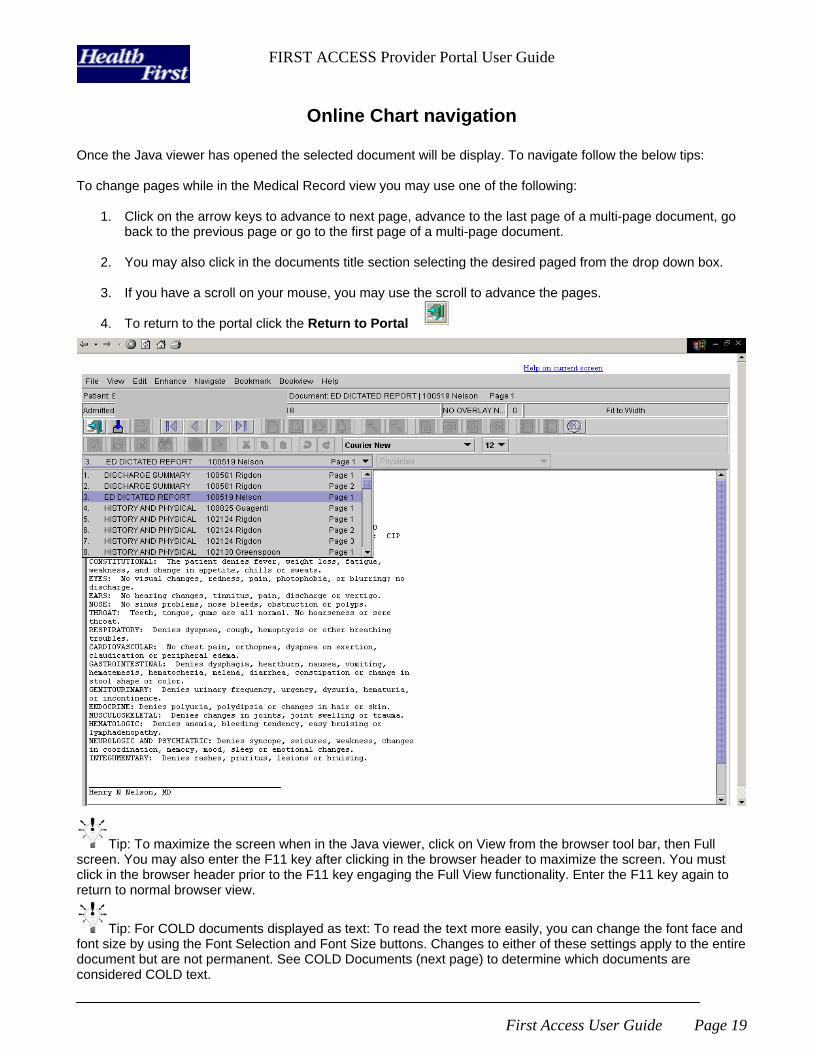
Once the Java viewer has opened the selected document will be display. To navigate follow the below tips: To change pages while in the Medical Record view you may use one of the following:
1. Click on the arrow keys to advance to next page, advance to the last page of a multi-page document, go back to the previous page or go to the first page of a multi-page document.
2. You may also click in the documents title section selecting the desired paged from the drop down box.
3. If you have a scroll on your mouse, you may use the scroll to advance the pages.
4. To return to the portal click the Return to Portal
Tip: To maximize the screen when in the Java viewer, click on View from the browser tool bar, then Full screen. You may also enter the F11 key after clicking in the browser header to maximize the screen. You must click in the browser header prior to the F11 key engaging the Full View functionality. Enter the F11 key again to return to normal browser view.
Tip: For COLD documents displayed as text: To read the text more easily, you can change the font face and font size by using the Font Selection and Font Size buttons. Changes to either of these settings apply to the entire document but are not permanent. See COLD Documents (next page) to determine which documents are considered COLD text.
FIRST ACCESS Provider Portal User Guide
First Access User Guide Page 20
Online Medical Record /Chart Viewing
Documents available under the Medical Records tab are electronically fed by a cold feed interface, scanned during the Registration process, or scanned after discharge by the HIM Department. Turnaround time for scanned documents is 24 hours after the paper chart is received in the HIM Department.
Cold Fed documents are:
STAR – displayed as text
Laboratory Discharge Cumulative - Upon discharge at 12MN
Laboratory Outpatient Summary – Upon discharge at 12MN
Radiology – Real-time
FORMFAST
Facesheet – Real-time
POWERPATH – displayed as text
Pathology - Real-time
eSCRIPTION – displayed as text
All HIM transcribed dictation - Real-time
EmSTAT
ED Visit Report – Upon discharge from the Emergency Department
Note: Physician T-sheets will be scanned by the HIM department post discharge
SIS – Surgical Information Systems
Pre Op, Intra Op, and Post Op Reports – Real-time
SCM
Vitals, I&O, flow sheets, clinical notes – 3 days post discharge
FIRST ACCESS Provider Portal User Guide
First Access User Guide Page 21
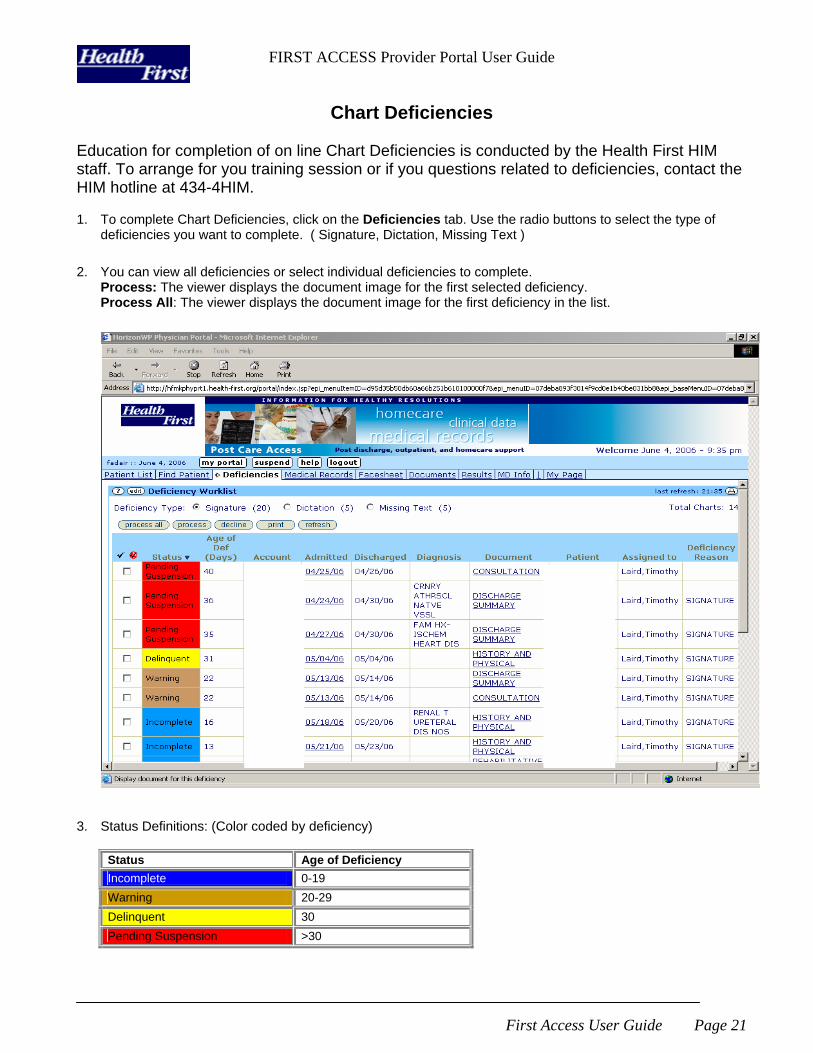
Chart Deficiencies
Education for completion of on line Chart Deficiencies is conducted by the Health First HIM staff. To arrange for you training session or if you questions related to deficiencies, contact the HIM hotline at 434-4HIM. 1. To complete Chart Deficiencies, click on the Deficiencies tab. Use the radio buttons to select the type of
deficiencies you want to complete. ( Signature, Dictation, Missing Text )
2. You can view all deficiencies or select individual deficiencies to complete. Process: The viewer displays the document image for the first selected deficiency. Process All: The viewer displays the document image for the first deficiency in the list.
3. Status Definitions: (Color coded by deficiency)
Status Age of Deficiency Incomplete 0-19 Warning 20-29 Delinquent 30 Pending Suspension >30

FIRST ACCESS Provider Portal User Guide
First Access User Guide Page 22
Chart Deficiencies – Electronic PIN
Once you select a deficiency you will be prompted to enter your PIN number. This PIN serves as your electronic signature and should be protected as such. Your PIN must be between 4-6 characters (numeric only) Note: This is not equivalent to your application password. This code generates your Electronic Signature. You can change your PIN by clicking the Edit button on the Deficiency List. You must know your old PIN in order to change it. If you forget your PIN, you must call the HIM hotline, 434-4HIM to have it reset.
FIRST ACCESS Provider Portal User Guide
First Access User Guide Page 23
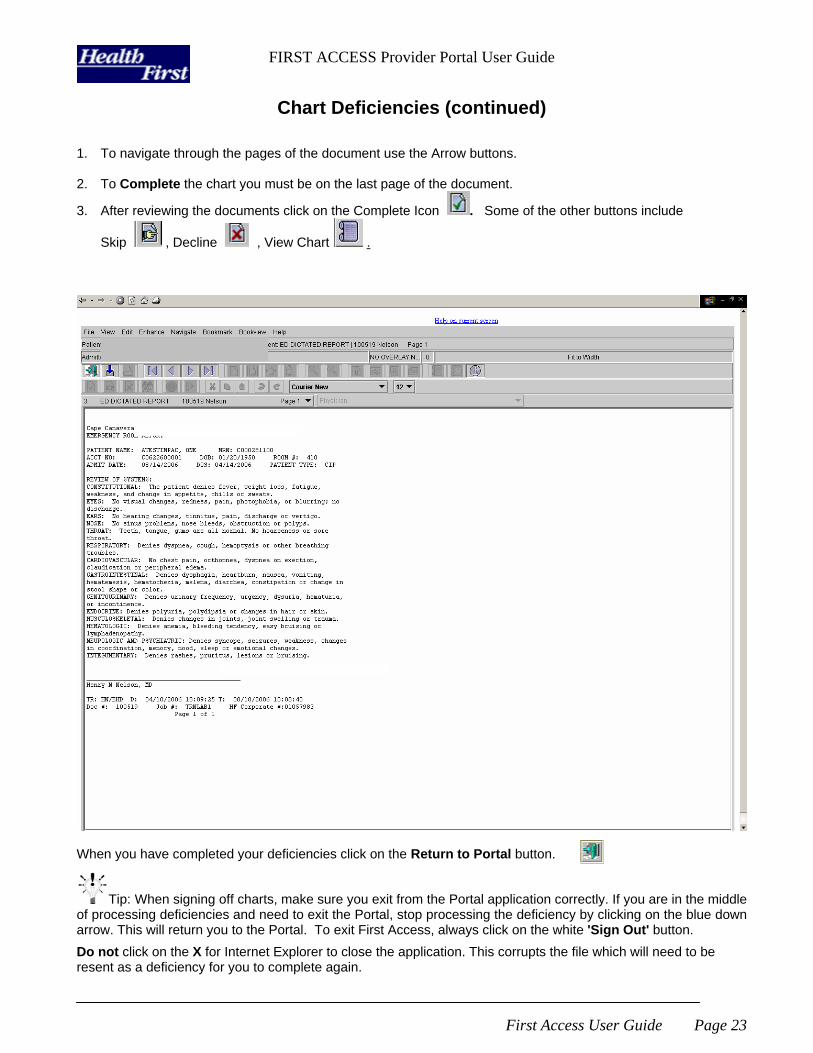
Chart Deficiencies (continued) 1. To navigate through the pages of the document use the Arrow buttons. 2. To Complete the chart you must be on the last page of the document.
3. After reviewing the documents click on the Complete Icon . Some of the other buttons include
Skip , Decline , View Chart .
When you have completed your deficiencies click on the Return to Portal button.
Tip: When signing off charts, make sure you exit from the Portal application correctly. If you are in the middle of processing deficiencies and need to exit the Portal, stop processing the deficiency by clicking on the blue down arrow. This will return you to the Portal. To exit First Access, always click on the white 'Sign Out' button. Do not click on the X for Internet Explorer to close the application. This corrupts the file which will need to be resent as a deficiency for you to complete again.
FIRST ACCESS Provider Portal User Guide
First Access User Guide Page 24
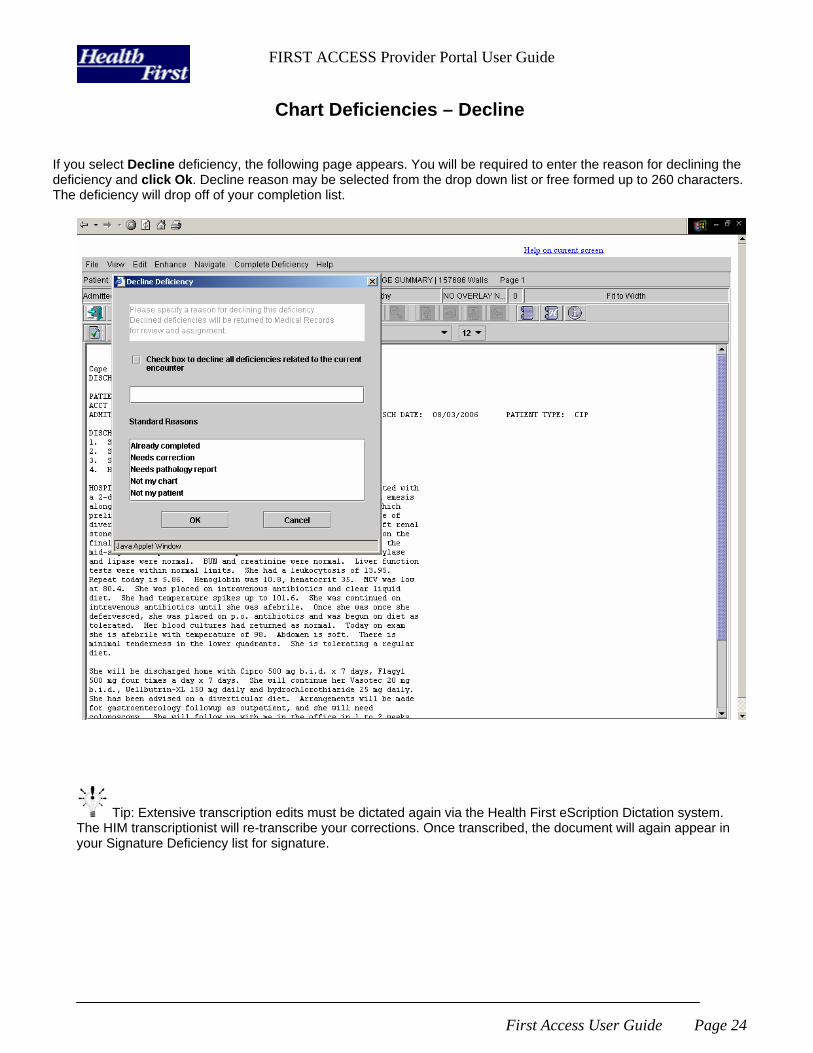
Chart Deficiencies – Decline
If you select Decline deficiency, the following page appears. You will be required to enter the reason for declining the deficiency and click Ok. Decline reason may be selected from the drop down list or free formed up to 260 characters. The deficiency will drop off of your completion list.
Tip: Extensive transcription edits must be dictated again via the Health First eScription Dictation system. The HIM transcriptionist will re-transcribe your corrections. Once transcribed, the document will again appear in your Signature Deficiency list for signature.
FIRST ACCESS Provider Portal User Guide
First Access User Guide Page 25
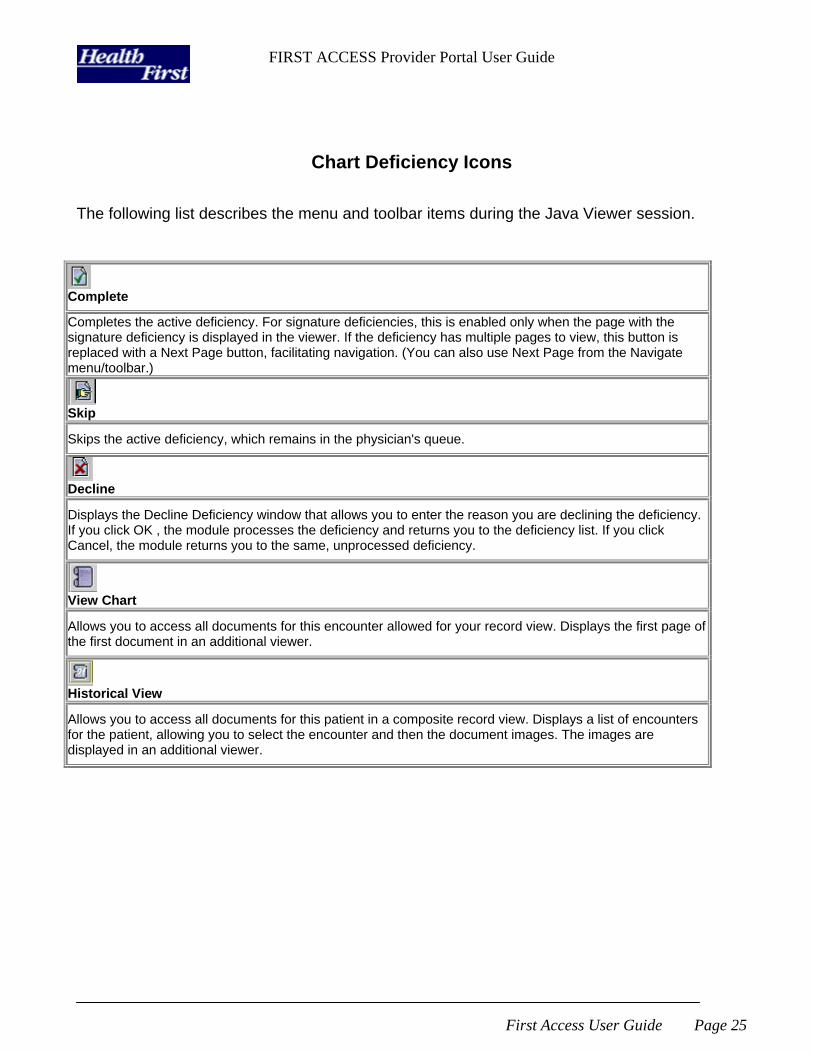
Chart Deficiency Icons The following list describes the menu and toolbar items during the Java Viewer session.
Complete
Completes the active deficiency. For signature deficiencies, this is enabled only when the page with the signature deficiency is displayed in the viewer. If the deficiency has multiple pages to view, this button is replaced with a Next Page button, facilitating navigation. (You can also use Next Page from the Navigate menu/toolbar.)
Skip
Skips the active deficiency, which remains in the physician's queue.
Decline
Displays the Decline Deficiency window that allows you to enter the reason you are declining the deficiency. If you click OK , the module processes the deficiency and returns you to the deficiency list. If you click Cancel, the module returns you to the same, unprocessed deficiency.
View Chart
Allows you to access all documents for this encounter allowed for your record view. Displays the first page of the first document in an additional viewer.
Historical View
Allows you to access all documents for this patient in a composite record view. Displays a list of encounters for the patient, allowing you to select the encounter and then the document images. The images are displayed in an additional viewer.

FIRST ACCESS Provider Portal User Guide
First Access User Guide Page 26
HomeCare The Homecare Module is currently under construction. Initial availability is scheduled for 4th quarter 2006 – 1st quarter 2007. Online Chart access for all Health First Homecare and Hospice patient encounters will be available. In addition to on line chart review, Electronic signature for Orders, Hospice certifications, and 485’s will also be available.
FIRST ACCESS Provider Portal User Guide
First Access User Guide Page 27
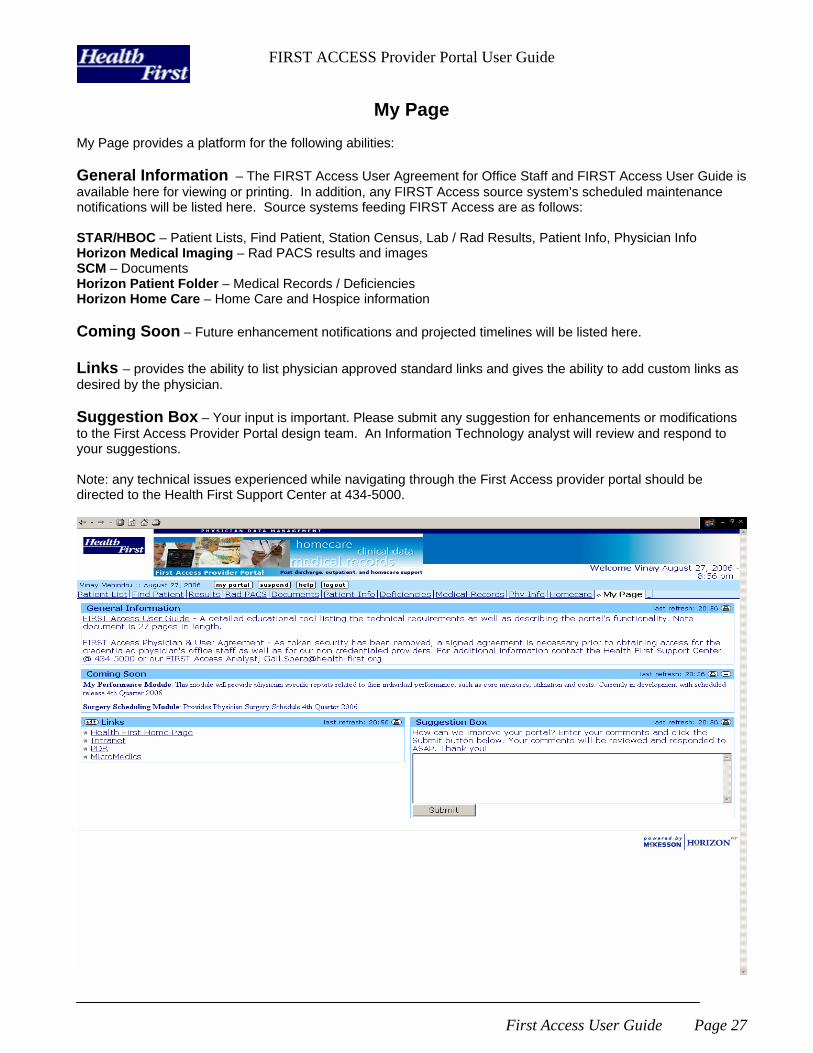
My Page
My Page provides a platform for the following abilities: General Information – The FIRST Access User Agreement for Office Staff and FIRST Access User Guide is available here for viewing or printing. In addition, any FIRST Access source system’s scheduled maintenance notifications will be listed here. Source systems feeding FIRST Access are as follows: STAR/HBOC – Patient Lists, Find Patient, Station Census, Lab / Rad Results, Patient Info, Physician Info Horizon Medical Imaging – Rad PACS results and images SCM – Documents Horizon Patient Folder – Medical Records / Deficiencies Horizon Home Care – Home Care and Hospice information Coming Soon – Future enhancement notifications and projected timelines will be listed here. Links – provides the ability to list physician approved standard links and gives the ability to add custom links as desired by the physician. Suggestion Box – Your input is important. Please submit any suggestion for enhancements or modifications to the First Access Provider Portal design team. An Information Technology analyst will review and respond to your suggestions. Note: any technical issues experienced while navigating through the First Access provider portal should be directed to the Health First Support Center at 434-5000.
FIRST ACCESS Provider Portal User Guide
First Access User Guide Page 28
Tips for the Successful First Access User Data links – any data element that is underlined is considered a data link. For your convenience, default values have been provided to assist you with navigating from tab to tab. You may customize your data links on any page by clicking the edit button and follow the online drop down boxes. Refer to the Online documentation for more detailed instructions by clicking the ? button. Suggested Default Data Links are as follows: Patient Encounter/Account number – forwards to the Results Tab Patient Name – forwards the Physician to the Medical Record Tab and the Office Staff to the Patient Info Tab Admit Date – forwards all users to the Document Tab Patient Type – will forward the user to the Rad PACS Tab Listing multiple patient encounters - Whenever a different patient encounter / visit is needed, click on the + sign listed next to the patient’s name under the Patient List module, Patient Demographics, Find Patient, Station Census. Training – Several options are available to the First Access Provider Portal user.
1. Generalize training - can be arrange with the Health First Center for Learning @ 434-8953 2. Chart deficiencies – this education is provided by the Health First HIM Department. Contact 434-4HIM to
set up your deficiency training.
3. Rad PACS – detailed training of this module if provided by the Health First Radiology PACS Administrators. Contact 434-PAXS for additional information.
4. Self Learning – First Access User Guide and other helpful information is available on the Health First Web
Site http://www.health-first.org/internal_access