Embed Size (px)
Citation preview
First Walkthrough:Fundamentals of Camtasia Studio
© 2009 TechSmith Corporation, All Rights Reserved
Prior to any recording, here are a few tips to consider:
Clean off your desktop so that the recording 1. area is clear from distractions.
Close any applications that you do not need 2. open or running. Then open any applications that you plan to record and resize them on your desktop as needed.
First Walkthrough: Fundamentals of Camtasia Studio
GettinG Ready
2
For this training exercise we will be creating a video tutorial that demonstrates how to slow down your mouse cursor on your computer.
This exercise is designed so that you can follow these steps from start to finish. You will record, edit, and produce a video with Camtasia Studio. There are many options that we do not explore or may have advanced features. For more tutorials on some of these tasks, the TechSmith Learning Center (http://training.techsmith.com) has numerous videos and written tutorials available.
Table of ContentsRecording with Camtasia Studio . . . . . . . . . . . . . . 3 - 4
Editing with Camtasia Studio . . . . . . . . . . . . . . . . . 5 - 8
Producing with Camtasia Studio. . . . . . . . . . . . . 9 & 10 Sample Script . . . . . . . . . . . . . . . . . . . . . . . . . . . . . . . 11
Just the Steps: Start to Finish . . . . . . . . . . . . . . . . . .12
For most recordings you may want to 3. prepare a script to read while recording au-dio. A script will help you plan out what you want to say and what you want to show. If you don’t want to write a whole script, and out-line of both what to say and do is helpful. For this project we provide a script on page 11.
Complete a “dry run-through” of your re-4. cording. This will help you to expect the unexpected during the actual recording.
Make sure you have a microphone connected 5. for recording your audio. You can use a built-in microphone if you have one, but external microphones tend to provide a better recording quality.
Create a folder in a designated area on your 6. computer for saving your files to. (i.e. desktop; my documents; network; etc.)
We want to know what you think! After finishing this project, go to: http://www.techsmith.com/camtasiaprojectguide to complete a short survey.
© 2009 TechSmith Corporation, All Rights Reserved
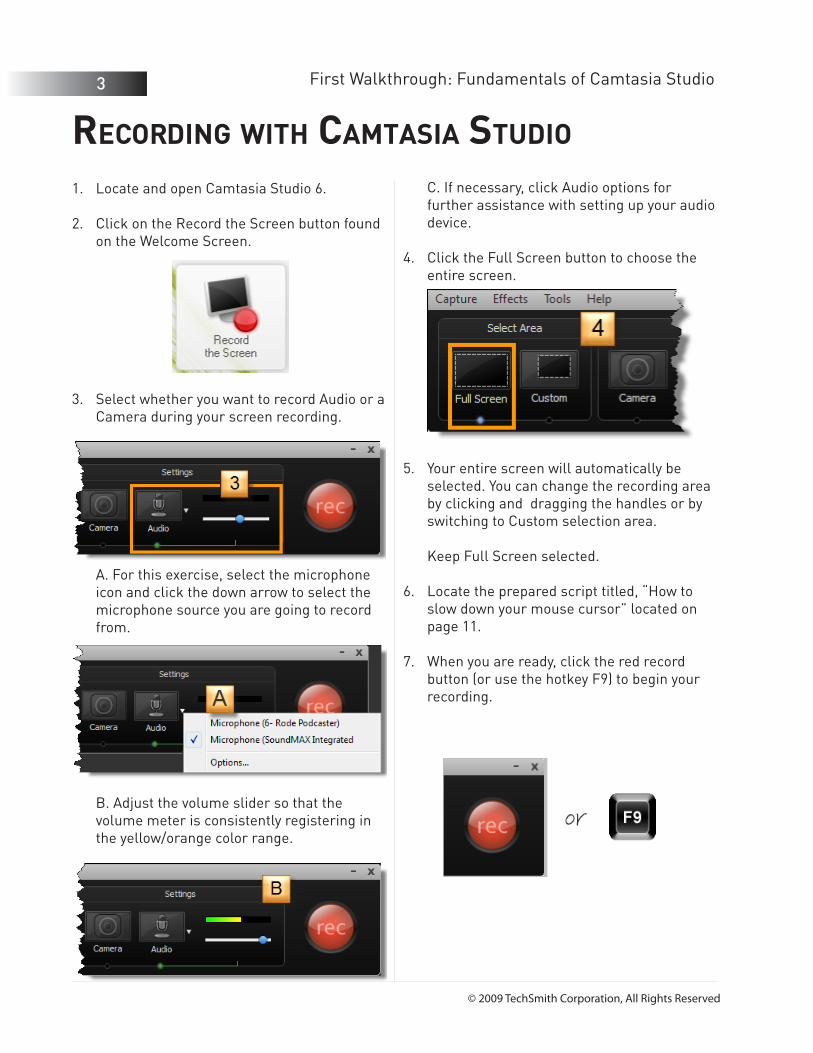
Locate and open Camtasia Studio 6. 1.
Click on the Record the Screen button found 2. on the Welcome Screen.
Select whether you want to record Audio or a 3. Camera during your screen recording. A. For this exercise, select the microphone icon and click the down arrow to select the microphone source you are going to record from. B. Adjust the volume slider so that the volume meter is consistently registering in the yellow/orange color range.
C. If necessary, click Audio options for further assistance with setting up your audio device.
Click the Full Screen button to choose the 4. entire screen.
Your entire screen will automatically be 5. selected. You can change the recording area by clicking and dragging the handles or by switching to Custom selection area. Keep Full Screen selected.
Locate the prepared script titled, “How to 6. slow down your mouse cursor” located on page 11.
When you are ready, click the red record 7. button (or use the hotkey F9) to begin your recording.
RecoRdinG with camtasia studio
3 First Walkthrough: Fundamentals of Camtasia Studio
© 2009 TechSmith Corporation, All Rights Reserved
First Walkthrough: Fundamentals of Camtasia Studio
RecoRdinG with camtasia studio
4
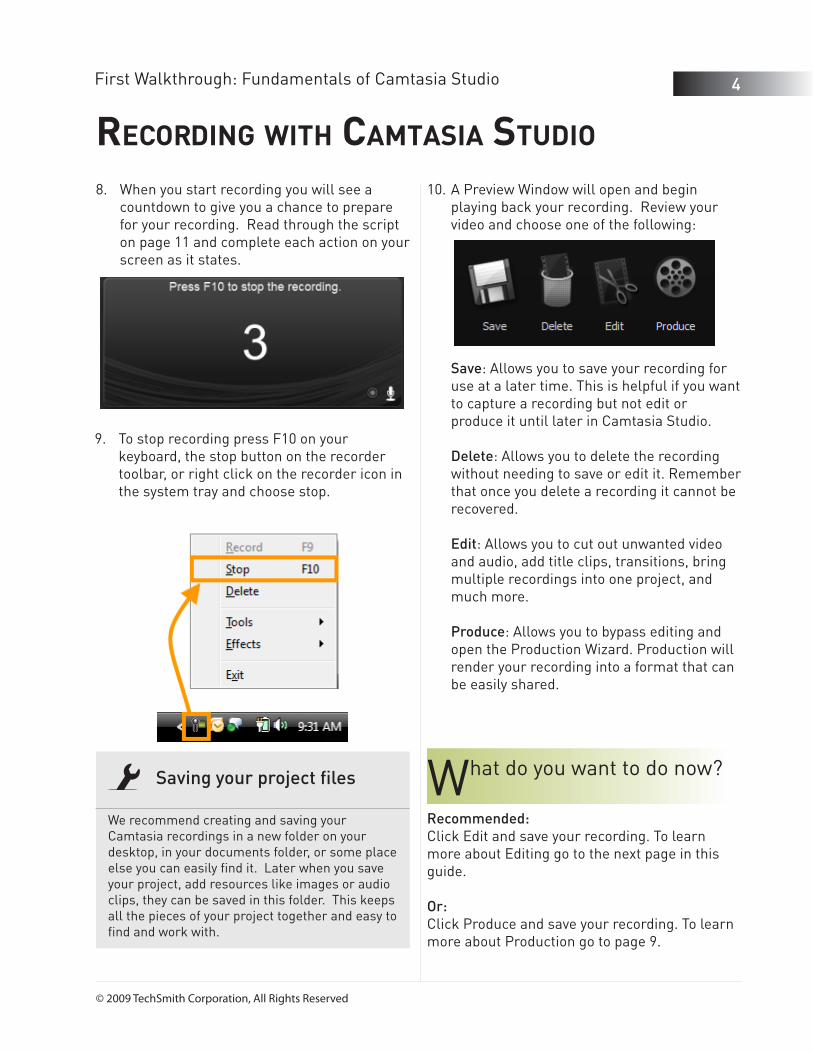
When you start recording you will see a 8. countdown to give you a chance to prepare for your recording. Read through the script on page 11 and complete each action on your screen as it states.
To stop recording press F10 on your 9. keyboard, the stop button on the recorder toolbar, or right click on the recorder icon in the system tray and choose stop.
A Preview Window will open and begin 10. playing back your recording. Review your video and choose one of the following:
What do you want to do now?
Recommended: Click Edit and save your recording. To learn more about Editing go to the next page in this guide.
Or:Click Produce and save your recording. To learn more about Production go to page 9.
Saving your project files
We recommend creating and saving your Camtasia recordings in a new folder on your desktop, in your documents folder, or some place else you can easily find it. Later when you save your project, add resources like images or audio clips, they can be saved in this folder. This keeps all the pieces of your project together and easy to find and work with.
Save: Allows you to save your recording for use at a later time. This is helpful if you want to capture a recording but not edit or produce it until later in Camtasia Studio. Delete: Allows you to delete the recording without needing to save or edit it. Remember that once you delete a recording it cannot be recovered. Edit: Allows you to cut out unwanted video and audio, add title clips, transitions, bring multiple recordings into one project, and much more. Produce: Allows you to bypass editing and open the Production Wizard. Production will render your recording into a format that can be easily shared.
© 2009 TechSmith Corporation, All Rights Reserved
editinG with camtasia studio
Before you begin editing, remember that you do not need to use every editing feature. As you continue through this project, you may skip one or more of the steps
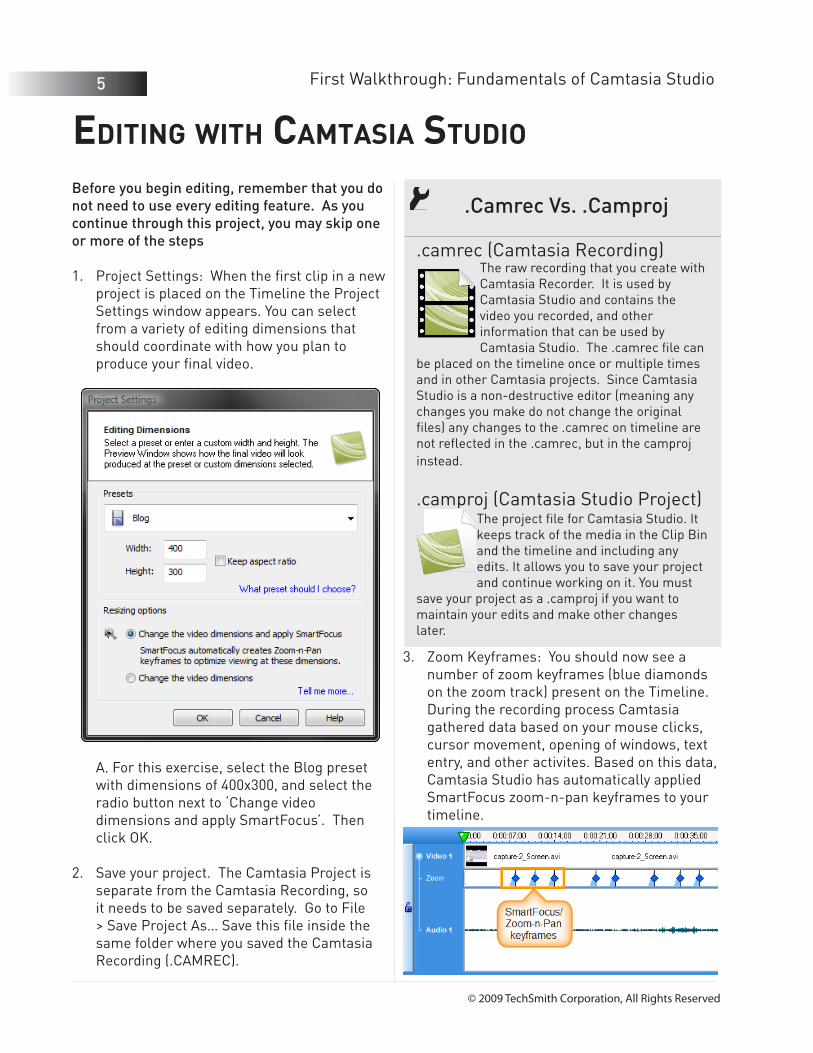
Project Settings: When the first clip in a new 1. project is placed on the Timeline the Project Settings window appears. You can select from a variety of editing dimensions that should coordinate with how you plan to produce your final video. A. For this exercise, select the Blog preset with dimensions of 400x300, and select the radio button next to ‘Change video dimensions and apply SmartFocus’. Then click OK.
Save your project. The Camtasia Project is 2. separate from the Camtasia Recording, so it needs to be saved separately. Go to File > Save Project As… Save this file inside the same folder where you saved the Camtasia Recording (.CAMREC).
5
Zoom Keyframes: You should now see a 3. number of zoom keyframes (blue diamonds on the zoom track) present on the Timeline. During the recording process Camtasia gathered data based on your mouse clicks, cursor movement, opening of windows, text entry, and other activites. Based on this data, Camtasia Studio has automatically applied SmartFocus zoom-n-pan keyframes to your timeline.
.Camrec Vs. .Camproj
.camrec (Camtasia Recording)The raw recording that you create with Camtasia Recorder. It is used by Camtasia Studio and contains the video you recorded, and other information that can be used by Camtasia Studio. The .camrec file can
be placed on the timeline once or multiple times and in other Camtasia projects. Since Camtasia Studio is a non-destructive editor (meaning any changes you make do not change the original files) any changes to the .camrec on timeline are not reflected in the .camrec, but in the camproj instead.
.camproj (Camtasia Studio Project)The project file for Camtasia Studio. It keeps track of the media in the Clip Bin and the timeline and including any edits. It allows you to save your project and continue working on it. You must
save your project as a .camproj if you want to maintain your edits and make other changes later.
First Walkthrough: Fundamentals of Camtasia Studio
© 2009 TechSmith Corporation, All Rights Reserved
editinG with camtasia studio
First Walkthrough: Fundamentals of Camtasia Studio 6
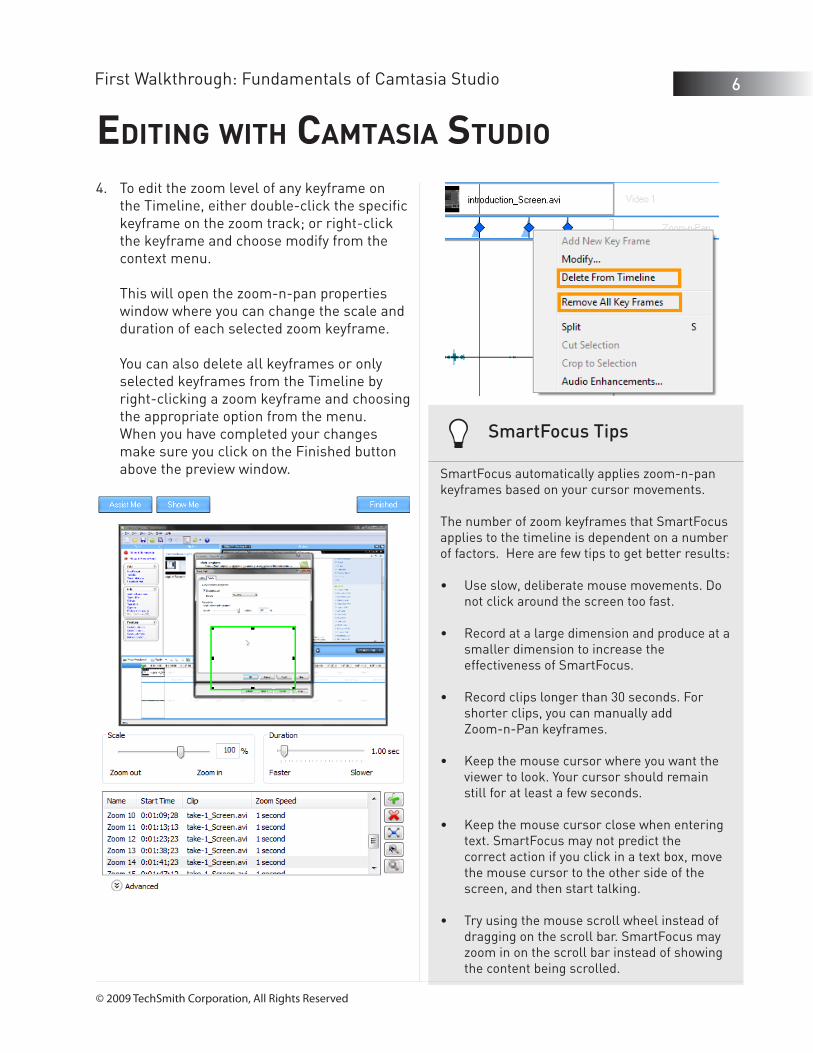
To edit the zoom level of any keyframe on 4. the Timeline, either double-click the specific keyframe on the zoom track; or right-click the keyframe and choose modify from the context menu. This will open the zoom-n-pan properties window where you can change the scale and duration of each selected zoom keyframe. You can also delete all keyframes or only selected keyframes from the Timeline by right-clicking a zoom keyframe and choosing the appropriate option from the menu. When you have completed your changes make sure you click on the Finished button above the preview window.
SmartFocus Tips
SmartFocus automatically applies zoom-n-pan keyframes based on your cursor movements.
The number of zoom keyframes that SmartFocus applies to the timeline is dependent on a number of factors. Here are few tips to get better results:
Use slow, deliberate mouse movements. Do •not click around the screen too fast.
Record at a large dimension and produce at a •smaller dimension to increase the effectiveness of SmartFocus.
Record clips longer than 30 seconds. For •shorter clips, you can manually add Zoom-n-Pan keyframes.
Keep the mouse cursor where you want the •viewer to look. Your cursor should remain still for at least a few seconds.
Keep the mouse cursor close when entering •text. SmartFocus may not predict the correct action if you click in a text box, move the mouse cursor to the other side of the screen, and then start talking.
Try using the mouse scroll wheel instead of •dragging on the scroll bar. SmartFocus may zoom in on the scroll bar instead of showing the content being scrolled.
© 2009 TechSmith Corporation, All Rights Reserved
editinG with camtasia studio
7
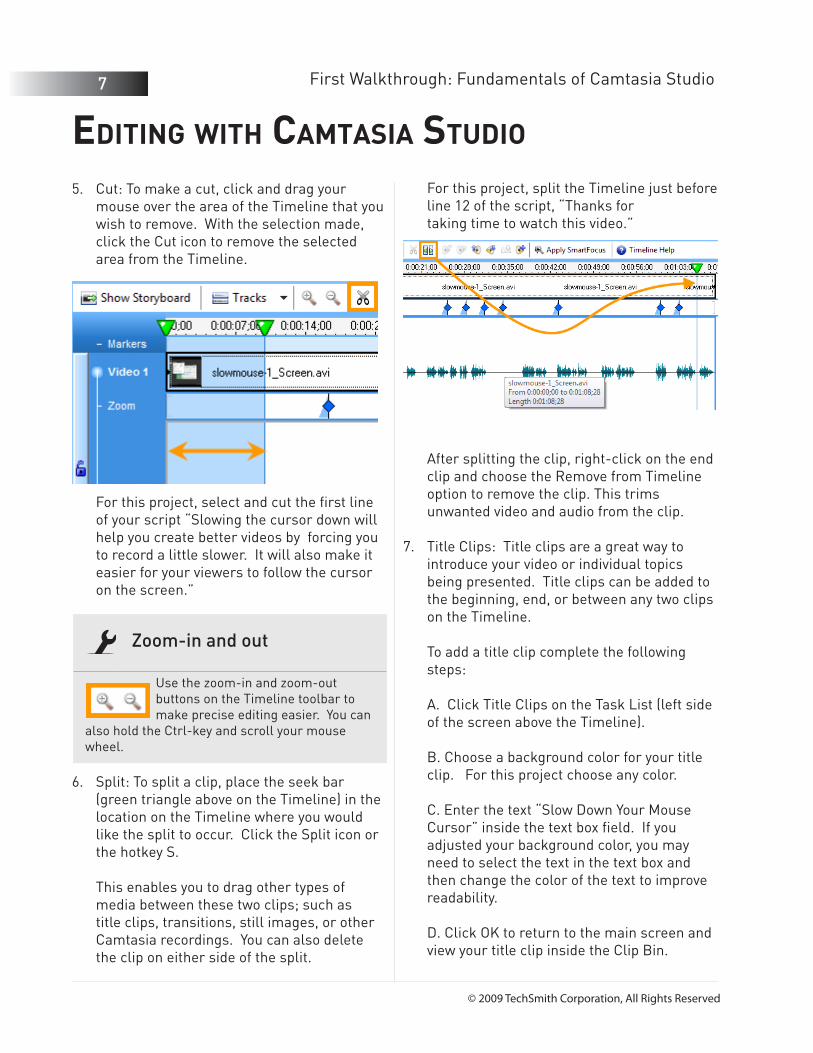
Cut: To make a cut, click and drag your 5. mouse over the area of the Timeline that you wish to remove. With the selection made, click the Cut icon to remove the selected area from the Timeline.
Split: To split a clip, place the seek bar 6. (green triangle above on the Timeline) in the location on the Timeline where you would like the split to occur. Click the Split icon or the hotkey S. This enables you to drag other types of media between these two clips; such as title clips, transitions, still images, or other Camtasia recordings. You can also delete the clip on either side of the split.
For this project, split the Timeline just before line 12 of the script, “Thanks for taking time to watch this video.”
After splitting the clip, right-click on the end clip and choose the Remove from Timeline option to remove the clip. This trims unwanted video and audio from the clip.
Title Clips: Title clips are a great way to 7. introduce your video or individual topics being presented. Title clips can be added to the beginning, end, or between any two clips on the Timeline. To add a title clip complete the following steps: A. Click Title Clips on the Task List (left side of the screen above the Timeline). B. Choose a background color for your title clip. For this project choose any color. C. Enter the text “Slow Down Your Mouse Cursor” inside the text box field. If you adjusted your background color, you may need to select the text in the text box and then change the color of the text to improve readability. D. Click OK to return to the main screen and view your title clip inside the Clip Bin.
Zoom-in and out
Use the zoom-in and zoom-out buttons on the Timeline toolbar to make precise editing easier. You can
also hold the Ctrl-key and scroll your mouse wheel.
For this project, select and cut the first line of your script “Slowing the cursor down will help you create better videos by forcing you to record a little slower. It will also make it easier for your viewers to follow the cursor on the screen.”
First Walkthrough: Fundamentals of Camtasia Studio
© 2009 TechSmith Corporation, All Rights Reserved
First Walkthrough: Fundamentals of Camtasia Studio
editinG with camtasia studio
8
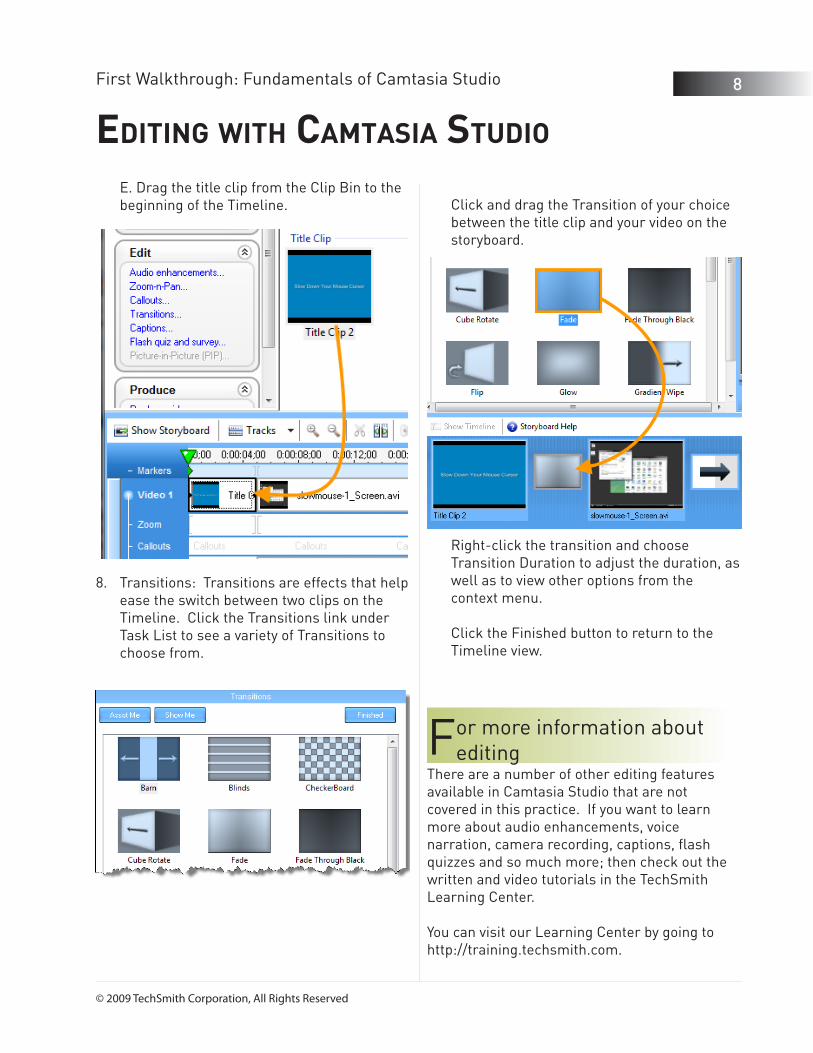
E. Drag the title clip from the Clip Bin to the beginning of the Timeline.
Transitions: Transitions are effects that help 8. ease the switch between two clips on the Timeline. Click the Transitions link under Task List to see a variety of Transitions to choose from.
Click and drag the Transition of your choice between the title clip and your video on the storyboard.
Right-click the transition and choose Transition Duration to adjust the duration, as well as to view other options from the context menu. Click the Finished button to return to the Timeline view.
There are a number of other editing features available in Camtasia Studio that are not covered in this practice. If you want to learn more about audio enhancements, voice narration, camera recording, captions, flash quizzes and so much more; then check out the written and video tutorials in the TechSmith Learning Center. You can visit our Learning Center by going to http://training.techsmith.com.
For more information about editing
© 2009 TechSmith Corporation, All Rights Reserved
PRoducinG with camtasia studio
9
Producing your Camtasia Studio recording or project into a sharable format is necessary before sharing your video with others.
Camtasia Studio has numerous predefined production settings, called presets, available. As you become more familiar with Camtasia Studio try the different outputsand customized settings to find the one that works best for you.
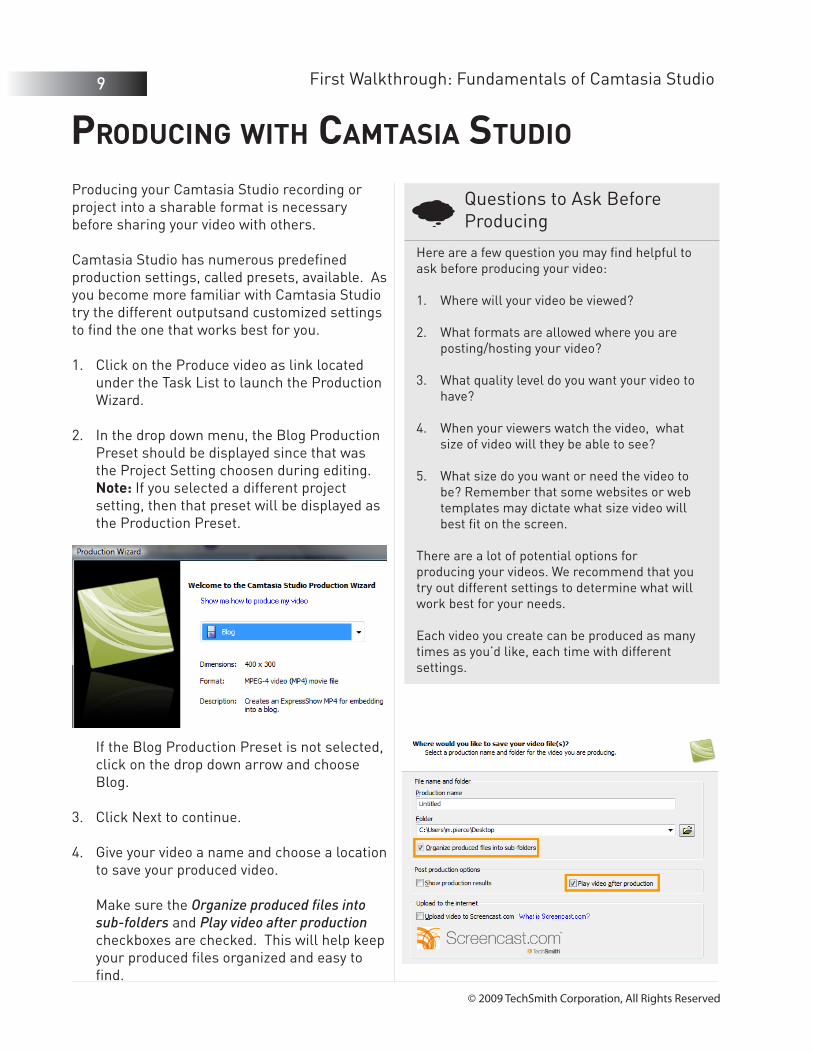
Click on the Produce video as link located 1. under the Task List to launch the Production Wizard.
In the drop down menu, the Blog Production 2. Preset should be displayed since that was the Project Setting choosen during editing. Note: If you selected a different project setting, then that preset will be displayed as the Production Preset.
Questions to Ask Before Producing
Here are a few question you may find helpful to ask before producing your video:
Where will your video be viewed? 1.
What formats are allowed where you are 2. posting/hosting your video?
What quality level do you want your video to 3. have?
When your viewers watch the video, what 4. size of video will they be able to see?
What size do you want or need the video to 5. be? Remember that some websites or web templates may dictate what size video will best fit on the screen.
There are a lot of potential options for producing your videos. We recommend that you try out different settings to determine what will work best for your needs. Each video you create can be produced as many times as you’d like, each time with different settings.
If the Blog Production Preset is not selected, click on the drop down arrow and choose Blog.
Click Next to continue. 3.
Give your video a name and choose a location 4. to save your produced video. Make sure the Organize produced files into sub-folders and Play video after production checkboxes are checked. This will help keep your produced files organized and easy to find.
First Walkthrough: Fundamentals of Camtasia Studio
© 2009 TechSmith Corporation, All Rights Reserved
Project Settings to Production Settings
When you set your Project Settings during editing, there are several different preset options. These options correlate directly to the Production Settings.
If you choose a Web Project Setting, size of 640 x 480, the Web Production Setting will have the same size settings. This will help ensure that your video maintains the way it looked during editing as it does after production. If you choose a different dimension during production your video may lose quality due to changes in the video size.
First Walkthrough: Fundamentals of Camtasia Studio
PRoducinG with camtasia studio
10
Screencast.com
Need a place to host your videos? Screencast.com is TechSmith’s hosting solution. You can upload directly from Camtasia Studio. You maintain complete ownership and control of your files. You can control who sees your content; individuals or the world. It’s your choice.
Screencast.com will also maintain the quality level used to produce your videos. Meaning if you upload HD-quality, you and your viewers will be able to see HD-quality.
With Screencast.com’s free account- you will get 2 GB of storage and 2 GB of monthly bandwidth. You can get a free account through Camtasia Studio. Check upload with Screencast.com, then click on the Get Free Account and get started today.
You may want to upload your video to Screencast.com. Check the Upload to Screencast.com check box, login or setup a free account, and upload your video.
If you are using a Production Preset click 5. Next to see a summary of your video produc-tion properties.
Click Finish to begin rendering your video. 6. Note: Rendering time for your videos can vary and depend on several factors. Some include: video length, content type, and computer processor speed. Longer videos with lots of motion and a low processor speed can take a long time.
When your video has finished rendering, if 7. you selected the Play video after production check box, your video will open in your default web browser for you to preview. When you have finished previewing the video, close the browser and go back to Camtasia Studio. You can now upload your videos or share them with others for viewing.
To learn more about sharing your produced video, we recommend watching the How to Share video tutorial in our Learning Center.
View the tutorial at: http://www.techsmith.com/learn/camtasia/6/getting-started/share.asp
We’d love to hear what you think of this project guide. Take a quick survey here:
For more information about sharing
© 2009 TechSmith Corporation, All Rights Reserved
First Walkthrough: Fundamentals of Camtasia Studio
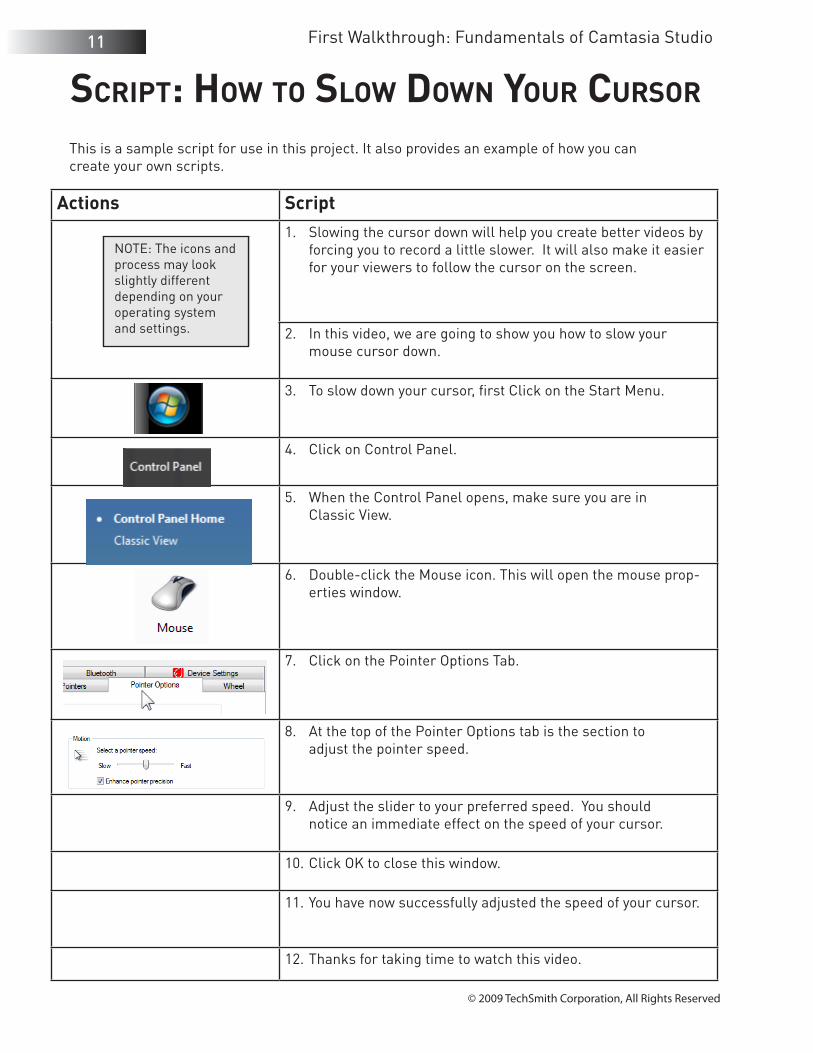
scRiPt: how to slow down youR cuRsoR
11
Actions ScriptSlowing the cursor down will help you create better videos by 1. forcing you to record a little slower. It will also make it easier for your viewers to follow the cursor on the screen.
In this video, we are going to show you how to slow your 2. mouse cursor down.
To slow down your cursor, first Click on the Start Menu. 3.
Click on Control Panel. 4.
When the Control Panel opens, make sure you are in 5. Classic View.
Double-click the Mouse icon. This will open the mouse prop-6. erties window.
Click on the Pointer Options Tab. 7.
At the top of the Pointer Options tab is the section to 8. adjust the pointer speed.
Adjust the slider to your preferred speed. You should 9. notice an immediate effect on the speed of your cursor.
Click OK to close this window. 10.
You have now successfully adjusted the speed of your cursor.11.
Thanks for taking time to watch this video.12.
NOTE: The icons and process may look slightly different depending on your operating system and settings.
This is a sample script for use in this project. It also provides an example of how you can create your own scripts.
© 2009 TechSmith Corporation, All Rights Reserved
First Walkthrough: Fundamentals of Camtasia Studio
Just the stePs: staRt to Finish
12
Click on the New Screen Recording button 1. found on the Welcome Screen.
Select whether you want to record Audio or a 2. Camera during your screen recording.
Choose Full Screen. 3.
Locate the prepared script “How to slow 4. down your mouse cursor”.
Click the Red Record button (or use the hot-5. key F9) to begin your recording.
Read through the script and complete the 6. actions on your screen.
Stop recording by pressing F10 on your 7. keyboard, the stop button on the recorder toolbar, or right click on the recorder icon in the system tray and choose stop.
Click the Edit button and give your 8. recording a name (i.e. mouse). Save this file to the desired location on your computer.
After splitting the clip, right-click on the end 12. clip and choose the Remove from Timeline option to remove the clip.
To add a title clip complete the following 13. steps: A. Click Title Clips on the Task List. B. Choose a background color for your title clip. For this project choose any color. C. Enter the text “Slow Down Your Mouse Cursor” inside the text box field. D. Click OK to return to the main screen and view your title clip inside the Clip bin.
Click and drag the title clip to the beginning 14. of the Timeline.
Click on Transitions in the Task List. 15.
Click and drag the Transition of your choice 16. between the title clip and the video on the storyboard. Then click the Finished button to return to the Timeline view.
Click on the Produce video as link located 17. under the Task List to launch the Production Wizard.
If the Blog Production Preset is not selected, 18. click on the drop down menu and choose Blog.
Click Next to continue. 19.
Give your video a name and choose a location 20. to save your produced video.
Click Next to see a summary of your video 21. production properties.
Click Finish to begin rendering your video. 22.
ProductionEditing
Select the Blog preset with dimensions of 9. 400x300, and select the radio button next to change video dimensions and apply SmartFocus. Then click OK.
On the Timeline select and cut the first line 10. of your script “Slowing the cursor down will help you create better videos by forcing you to record a little slower. It will also make it easier for your viewers to follow the cursor on the screen.”
Split the Timeline just before line 12 of the 11. script, “Thanks for taking time to watch this video.”
Recording