Embed Size (px)
Citation preview
CAE PERFORMANCE PRODUCTS 7 MAIN ROAD CASTLEMAINE, VIC. 3450 Telephone : ( 03 ) 5472 1442 Fax ( 03 ) 5472 4111 GENIII-A/C MOUNT-LS-1
Page 1 of 6
Fitting Instructions – LS1/LS2 Aluminium Air Conditioner Compressor Mounting Kit.
The high mounting of the air conditioner compressor is required for some LS series conversion applications. It is fitted to the Left-Hand Side viewed by looking at the front of the engine.
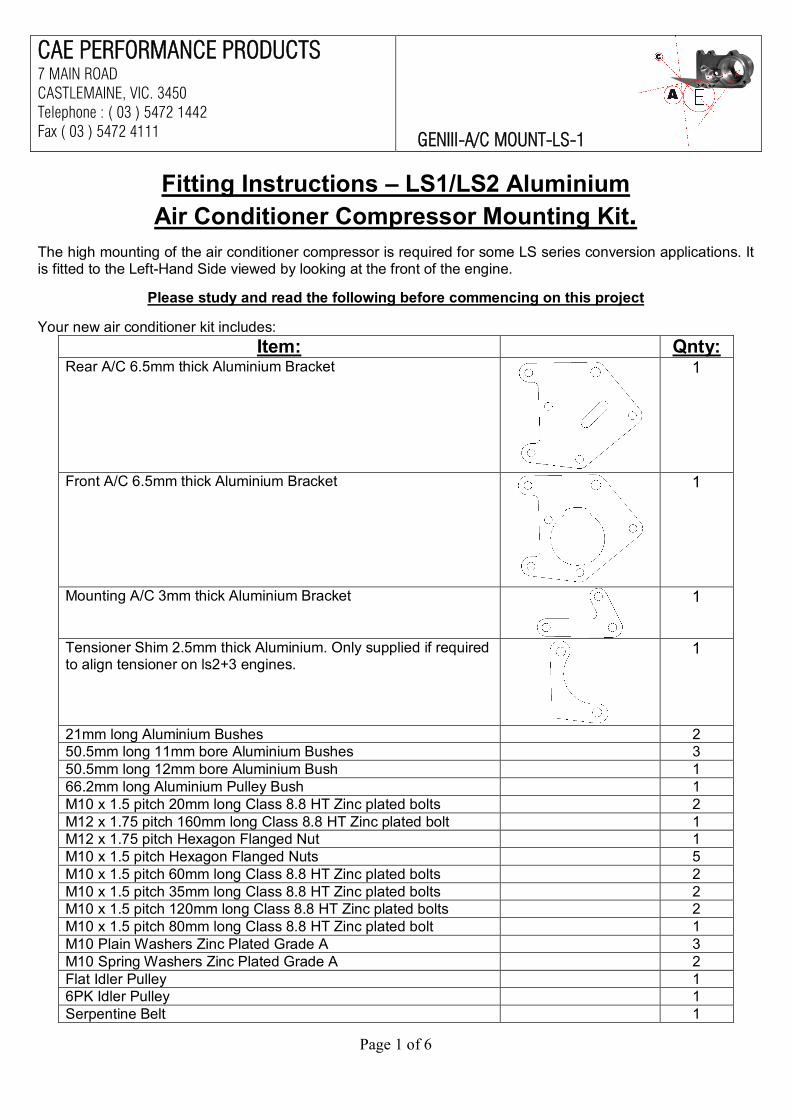
Please study and read the following before commencing on this project Your new air conditioner kit includes:
Item: Qnty: Rear A/C 6.5mm thick Aluminium Bracket
1
Front A/C 6.5mm thick Aluminium Bracket
1
Mounting A/C 3mm thick Aluminium Bracket
1
Tensioner Shim 2.5mm thick Aluminium. Only supplied if required to align tensioner on ls2+3 engines.
1
21mm long Aluminium Bushes 2 50.5mm long 11mm bore Aluminium Bushes 3 50.5mm long 12mm bore Aluminium Bush 1 66.2mm long Aluminium Pulley Bush 1 M10 x 1.5 pitch 20mm long Class 8.8 HT Zinc plated bolts 2 M12 x 1.75 pitch 160mm long Class 8.8 HT Zinc plated bolt 1 M12 x 1.75 pitch Hexagon Flanged Nut 1 M10 x 1.5 pitch Hexagon Flanged Nuts 5 M10 x 1.5 pitch 60mm long Class 8.8 HT Zinc plated bolts 2 M10 x 1.5 pitch 35mm long Class 8.8 HT Zinc plated bolts 2 M10 x 1.5 pitch 120mm long Class 8.8 HT Zinc plated bolts 2 M10 x 1.5 pitch 80mm long Class 8.8 HT Zinc plated bolt 1 M10 Plain Washers Zinc Plated Grade A 3 M10 Spring Washers Zinc Plated Grade A 2 Flat Idler Pulley 1 6PK Idler Pulley 1 Serpentine Belt 1

CAE PERFORMANCE PRODUCTS 7 MAIN ROAD CASTLEMAINE, VIC. 3450 Telephone : ( 03 ) 5472 1442 Fax ( 03 ) 5472 4111 GENIII-A/C MOUNT-LS-1
Page 2 of 6
1) If have not do so already, remove the factory A/C compressor from engine by discharging the air conditioning service system, and remove refrigerant lines from compressor. Remove front belt, insert a socket drive into the belt tensioner and rotate anti-clockwise to release tension, and remove the belt. Disconnect any electrical connectors. Remove the compressor from the vehicle, the idler and auto tensioner from the engine. 2) Remove factory belt tensioner and set aside, this will be used again later. 3) On a clear work space, feed the M12 x 160mm long bolt through the top hole of the back bracket and slide on the supplied 48mm long spacer bushes with the 12mm bore.
4) Sit 48mm long bush with an 11mm bore, on the far right 10mm hole. (see Picture 1)
Diagram 1 - The factory LS1/2 Set up from a Commodore
Picture 1 – Note the location of the M12 Bolt and bushes

CAE PERFORMANCE PRODUCTS 7 MAIN ROAD CASTLEMAINE, VIC. 3450 Telephone : ( 03 ) 5472 1442 Fax ( 03 ) 5472 4111 GENIII-A/C MOUNT-LS-1
Page 3 of 6
5) Sit the front plate over the assembly 6) Fit one of the M10 x 80mm long bolts through the 3mm Mounting plate and the assembly (see Picture 2)
7) Fit assembly to engine (See Picture 3) by fitting the two M10 x 20mm long bolts through the mounting plate and screw to the water pump, and the M10 x 80 to the head. NOTE! In some cases, were space is a premium, it maybe easier to fit the rest of the assembly together on a bench BEFORE fitting the bracket assembly to the engine. If this is so, first fit the tensioner as per step 8 and 9 but do not refit the pulley until the assembly is all in the vehicle. Fit the back idler (step 10). Next bolt the compressor unit to the bracket as per steps 11, 12, and 13. Ensure all bolts are tight. Fit the assembly to the engine as written above in step 7. Then fit the tensioner pulley to the tensioner and fit the supplied serpentine belt as per step 14. 8) Remove OEM tensioner pulley from the tensioner. Fit the two M10 x 120mm bolts through tensioner mounting holes with a washer between the bolt head and the tensioner and fit supplied flat idler pulley. (See Picture 4). Slide tensioner shim on the bolts, with the long edges of the tensioner and the shim aligning parallel with one another.
Picture 2 – Assembly prior to mounting to engine.
Picture 3 - Mounting A/C bracket assembly to the head and water pump

CAE PERFORMANCE PRODUCTS 7 MAIN ROAD CASTLEMAINE, VIC. 3450 Telephone : ( 03 ) 5472 1442 Fax ( 03 ) 5472 4111 GENIII-A/C MOUNT-LS-1
Page 4 of 6
9) Bolt tensioner to assembly, with a 48mm bush between the two plates for the bolt to go through. Have the tensioning marks facing towards the throttle body.
10) Fit supplied 6PK idler pulley to the 66.2mm long pulley bush, this is a tight fit, ensure the pulley is square to the bush when fitting, then slide the 66.2mm long pulley bush on to the M12 bolt and fasten with M12 washer and Nyloc nut (See Picture 5)
11) Fit the two M10 x 60mm long bolts to the front mounting holes on the right side of the A/C compressor and the two 23.5mm bushes (see Picture 6)
Picture 4 – The tensioner
Picture 5 – The Idler and tensioner located on the mounting bracket assembly
Picture 6 - Notice the position of the bushes for installing compressor unit to an LS1 or 2
CAE PERFORMANCE PRODUCTS 7 MAIN ROAD CASTLEMAINE, VIC. 3450 Telephone : ( 03 ) 5472 1442 Fax ( 03 ) 5472 4111 GENIII-A/C MOUNT-LS-1
Page 5 of 6
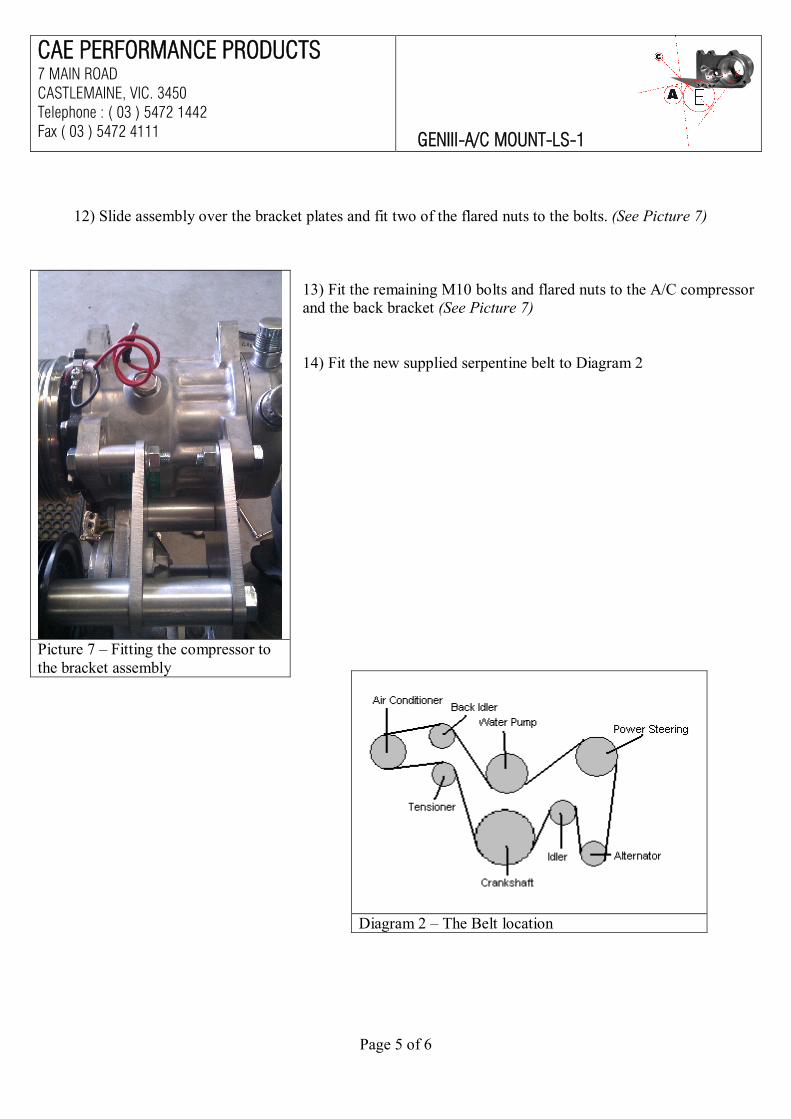
12) Slide assembly over the bracket plates and fit two of the flared nuts to the bolts. (See Picture 7)
13) Fit the remaining M10 bolts and flared nuts to the A/C compressor and the back bracket (See Picture 7) 14) Fit the new supplied serpentine belt to Diagram 2
Picture 7 – Fitting the compressor to the bracket assembly
Diagram 2 – The Belt location

CAE PERFORMANCE PRODUCTS 7 MAIN ROAD CASTLEMAINE, VIC. 3450 Telephone : ( 03 ) 5472 1442 Fax ( 03 ) 5472 4111 GENIII-A/C MOUNT-LS-1
Page 6 of 6
The Completed Assembly