Embed Size (px)
Citation preview
Marketo Lead Management Fundamentals V. 2.0 20
Exercise Guide for Marketo’s
Introductory Training Course
Big Launch Webinar: Prepare Your Event © 2011 Marketo Proprietary and Confidential ii
Contents
Marketo Fundamentals .............................................................................................................................................5
Get Started .................................................................................................................................................................5
Please Read: Prepare your Workspace BEFORE Class ..................................................................................................... 5
Import a Test List of Leads ............................................................................................................................................. 6
The Big Launch Webinar Training ................................................................................................................................... 6
Big Launch Webinar: Prepare Your Event ..............................................................................................................9
Leads, Smart Lists, Events, Digital Assets .............................................................................................................9
Identify Audience ........................................................................................................................................................... 9
1. System Smart Lists ................................................................................................................................................. 9 1.1. All Leads: Create a New Lead ........................................................................................................................ 9 1.2. All Leads: Lead Search ................................................................................................................................. 10 1.3. Unsubscribe a Lead ..................................................................................................................................... 10 1.4. Marketing Suspended Leads ....................................................................................................................... 11 1.5. Bounced Email Addresses ........................................................................................................................... 11 1.6. Possible Duplicates ...................................................................................................................................... 11 1.7. Blacklist ....................................................................................................................................................... 12
2. My Smart Lists ...................................................................................................................................................... 13 2.1: My Domain .................................................................................................................................................. 13 2.2: Website Visits to Key Page .......................................................................................................................... 13 2.3: Key Industries .............................................................................................................................................. 13 2.4: Competitors ................................................................................................................................................ 14
3. My Smart Lists (Using Salesforce) ........................................................................................................................ 15 3.1 Salesforce Leads ............................................................................................................................................... 15 3.2 Salesforce Contacts ..................................................................................................................................... 15 3.3 Leads with an Opportunity Stage Open ...................................................................................................... 15
4. Static Lists ............................................................................................................................................................ 16 4.1. Big Launch Webinar Invitees ....................................................................................................................... 16
Big Launch Webinar: Prepare Your Event © 2011 Marketo Proprietary and Confidential iii
4.2 Export a List to Create Your Own Template ................................................................................................ 17
5. Delete a Lead ....................................................................................................................................................... 17
6. Anonymous Leads ................................................................................................................................................ 17 6.1 Anonymous Leads Smart List ...................................................................................................................... 17 6.2 Anonymous Leads Web Activity ..................................................................................................................... 18
Set Up Event ................................................................................................................................................................ 19
7. Create an Event .................................................................................................................................................... 19
8. Assign Tags to the Event ...................................................................................................................................... 21
9. Assign Costs to the Event ..................................................................................................................................... 23
Create Assets ............................................................................................................................................................... 24
10. Add Images ...................................................................................................................................................... 25
11. Create Form ..................................................................................................................................................... 26
12. Create Landing Pages ...................................................................................................................................... 28
13. Create Emails ................................................................................................................................................... 31 13.1 Marketing Email ............................................................................................................................................ 31 13.2 Auto-Response Email ..................................................................................................................................... 32
Big Launch Webinar: Event Lifecycle ................................................................................................................... 34
Outbound Marketing, Event Processing ............................................................................................................... 34
Send Invite (Batch Filter Campaign) ............................................................................................................................. 34
14. Create Invitation Campaign ............................................................................................................................. 34
Thank-you (Trigger Campaign) ..................................................................................................................................... 37
15. Create Trigger Auto-Response Campaign ........................................................................................................ 37
Event Registration ........................................................................................................................................................ 38
16. Registration: Update Member Progression Status .......................................................................................... 38
Lead Lifecycle ............................................................................................................................................................... 40
17. Lead Scoring Campaigns .................................................................................................................................. 40 17.1. Visits Any Web Page ............................................................................................................................... 40 17.2. Clicks Link Any Email ............................................................................................................................... 42 17.3. Attends Webinar ..................................................................................................................................... 42
18. Sync Lead Back to Sales ................................................................................................................................... 43
Re-invite and Reminder Campaigns ............................................................................................................................. 44
19. Re-invitation Campaign ................................................................................................................................... 44
Big Launch Webinar: Prepare Your Event © 2011 Marketo Proprietary and Confidential iv
20. Reminder Campaign ........................................................................................................................................ 45
Big Launch Webinar: Event Launch & Review ..................................................................................................... 46
Follow-ups, Reporting ............................................................................................................................................ 46
Follow-up Campaigns ................................................................................................................................................... 46
21. Thanks for Attending ....................................................................................................................................... 46
22. Sorry We Missed You ....................................................................................................................................... 47
23. Record Success: Downloaded .......................................................................................................................... 48
24. EXAMPLE: Nurturing Track .............................................................................................................................. 49
Reporting on the Webinar ............................................................................................................................................ 50
25. Reports: Leads by Source ................................................................................................................................ 50
26. Reports: Program Performance Overview ....................................................................................................... 50
Revenue Cycle Modeler: Visualize & Measure Lead Stage ................................................................................. 51
Report on Lead Status ............................................................................................................................................ 51
Build a Simple Revenue Model ..................................................................................................................................... 51
27. Clone a Revenue Model: Success with Detours............................................................................................... 52
Sample Revenue Models ............................................................................................................................................. 52 Model 1: Leads Leap to Sales Accepted ................................................................................................................ 52 Model 2: Filter out Rejects; Recycle and Re-Engage Lost Prospects and Customers ........................................... 53
Resources ................................................................................................................................................................ 54
Marketo Customer Community .................................................................................................................................... 54
Resources Section on Marketo.com ............................................................................................................................. 54
Big Launch Webinar: Prepare Your Event © 2011 Marketo Proprietary and Confidential 5
Marketo Fundamentals
GET STARTED
Welcome to Marketo Lead Management! In this Fundamentals course you will learn how to use Marketo’s many features to manage your marketing initiatives and generate quality sales leads.
The training theme is the Big Launch Webinar. Using this theme, the Fundamentals training program covers the Marketo activities and skills required to launch an event. Skills you learn in this training program will apply to many of the other activities that marketers commonly do, such as:
♦ segmenting and targeting your lead database
♦ building digital assets capture interest, respond to inquiries and follow-up
♦ setting up and managing event registrations
♦ creating a multi-stage outbound email marketing programs
♦ scoring lead actions and attributes then measuring results with analytics
This Lab Guide accompanies the Marketo Lead Management Fundamentals Course. Register to take the Live Fundamentals Course or view it on-demand in our Customer Community.
PLEASE READ: PREPARE YOUR WORKSPACE BEFORE CLASS
To get the most of this training, complete the following PRIOR to starting the Fundamentals course:
1 Be sure to use only the following Internet Browsers: Firefox 4, or Internet Explorer 9
2 Obtain a login to Marketo
3 Complete the setup steps for your Marketo App Install/Data synchronization, installation of Munchkin tracking code and CNAME. Log in to our Customer Community Knowledge Base for detailed instructions
4 Log in to Marketo and import the MKTO Seed List.csv (instructions below). We will use these fictitious lead records in our exercises.
Big Launch Webinar: Prepare Your Event © 2011 Marketo Proprietary and Confidential 6
IMPORT A TEST LIST OF LEADS
1. Save the file to your desktop; do not change the file name or alter the records 2. Log in to Marketo at https://app.marketo.com/ 3. Navigate to the Lead Database section 4. Click New > Import List
a. Browse and select MKTO Seed List.csv b. Format is “Comma Separated Values” c. If other settings are displayed, leave their settings as is d. Click Next
5. Marketo previews the file, and will alert you of any column headers that do not match by highlighting in red. Your file should be clear of discrepancies; click Next
6. On the next screen: a. For List Name enter: “MKTO Seed List” b. Revenue Stage: None c. Acquisition Program: None d. Click Import
7. A job status window will appear in the upper right-hand corner. While this list is processing, you may be asked to refresh your browser. Please refresh!
8. Upon completion, “MKTO Seed List” will now appear in the left-side Explorer tree under My Lists; click on the list name to view the leads.
NOTE: Please do not use this template for your future list imports of actual leads; you will instead use a custom template based on your own Marketo instance.
THE BIG LAUNCH WEBINAR TRAINING
The Marketo Fundamentals training follows the flow depicted in the Big Launch Webinar ribbon. You will work through the tasks required to build a complete, webinar for a big product launch, starting with identifying your audience, working through building the creative, event communications, managing registration, and doing follow-up and reporting-- all in Marketo.
The following exercises, along with the live or on-demand Marketo Lead Management Fundamentals course, will show you the entire Marketo application. This Big Launch Webinar story is intended to help you remember the details. There are three main phases, noted by the color changes in the ribbon:
Gray: Prepare Your Event
Orange: Event Lifecycle
Purple: Event Launch and Review
Big Launch Webinar: Prepare Your Event © 2011 Marketo Proprietary and Confidential 7
Prepare Your Event
1. Identify Audience: Who to Invite?
• Target and segment leads
• Manage data and duplication
2. Set Up the Event: • Events and a programs are very similar in Marketo: this section teaches fundamentals you can apply across all marketing initiatives
• Create an Event; add Costs and Tags for reporting purposes
3. Build and Manage Creative Assets:
• Images
• Forms
• Landing pages
• Emails
Big Launch Webinar: Prepare Your Event © 2011 Marketo Proprietary and Confidential 8
Event Lifecycle
4. Send an Invite • Learn to use Marketo Smart Campaigns: the building blocks for all Marketo functions.
• Filter Campaigns – what are they, when to use them
5. Trigger a Thank You • Use Marketo to react automatically to lead activity with a Trigger Smart Campaign.
6. Register Attendees: Status & Reporting
• Manage registration status
• Create detailed reports
7. Lead Lifecycle • When is a lead marketing qualified or Sales ready? Use Marketo to deliver leads to the sales team using scoring and lead status
8. Revenue Modeler • Visualize your lead lifecycle and your entire business process with Revenue Cycle Modeler.
9. Reminders • Schedule and launch a reminder to registrants, and re-invite those who have not yet registered.
Event Launch and Review
10. Day of Webinar • Work with webinar partner to update attendance status for the event.
11. Thank you Follow-up • Send a post-event follow-up to attendees and no-shows
• Place attendees into a drip nurturing program.
12. Reports & Analysis • Analyze and report on lead actions, including anonymous web activity
• Do lead drill-down and create charts to see the results of marketing activities.
Big Launch Webinar: Prepare Your Event © 2011 Marketo Proprietary and Confidential 9
Big Launch Webinar: Prepare Your Event
LEADS, SMART LISTS, EVENTS, DIGITAL ASSETS
In this section, you will learn to select and segment leads, build smart lists, and build forms, landing pages and emails.
Get Started: Navigate to the Lead Database section of Marketo.
IDENTIFY AUDIENCE
1. SYSTEM SMART LISTS
1.1. All Leads: Create a New Lead
An email address is all that is required to create a new known lead in Marketo. Create the following new lead record:
1. New Menu > New Lead 2. Enter in your own Name and Email information 3. Click Enter.
Your lead record is now in Marketo.
Repeat these steps to create any additional lead records for colleagues you wish to include as recipients for your later email exercises.
Big Launch Webinar: Prepare Your Event © 2011 Marketo Proprietary and Confidential 10
1.2. All Leads: Lead Search
You can search for lead(s) by name, email, title, or company using the dedicated Lead Search box
1. Click on Lead Database to return to the starting page 2. In the search box, enter any of the values you provided for your own lead record 3. Click Enter.
Your lead record should appear.
1.3. Unsubscribe a Lead
Leads have the option to unsubscribe from any of your marketing communications, and will appear in your Unsubscribed System Smart List. If you are a new Marketo customer you may already have leads in this list from if they were unsubscribed in your Sales CRM.
You can add or remove any lead to the unsubscribed list using Single Flow action.
We will add a test record to the Unsubscribed List:
1. New > New Lead 2. Create a new lead, this time with test information
a. First Name = Marketo b. Last Name = Training c. Email = [email protected]
3. Locate this lead using Lead Search 4. Click on the lead to highlight the record 5. Lead Actions > Flow Actions > Change Data Value
a. Select Unsubscribed b. Change Value to be “True” c. Click Run Now
6. When the Flow Step is complete an indicator will appear 7. Click on the Unsubscribed Leads list to see the Test record.
We’ll use this Test record for several more exercises below.
Big Launch Webinar: Prepare Your Event © 2011 Marketo Proprietary and Confidential 11
1.4. Marketing Suspended Leads
You can set any Lead to be Marketing Suspended, and they will not receive your marketing emails. This is an ideal setting for leads entering in negotiations with your Sales team so that your communications do not pose any conflict.
1. Click on your Test lead record to highlight 2. Lead Actions > Flow Actions > Change Data Value
a. Select Suspended b. Change Value to be “True” c. Click Run Now
3. When the Flow Step is complete an indicator will appear 4. Click on the Marketing Suspended list to see the Test record.
1.5. Bounced Email Addresses
Email Addresses that experience a hard bounce are automatically set in Marketo with an Email Invalid status. They are usually ‘junk’ leads that you may want to consider deleting.
1. Click on your Test lead record to highlight 2. Lead Actions > Flow Actions > Change Data Value
a. Select Email Invalid b. Change Value to be “1” c. Click Run Now
3. When the Flow Step is complete an indicator will appear 4. Click on the Bounced Email Addresses list to see the Test record.
1.6. Possible Duplicates
Duplicates are identified by matching email addresses. You can easily merge multiple records for a Lead in Marketo; you will be prompted to reconcile any fields with conflicting information.
1. Create another lead record for [email protected] 2. Navigate to Possible Duplicates List 3. Click on both records to highlight using the Shift key 4. Click on Merge Leads 5. Click on Merge 6. Leads will disappear from this list.
Big Launch Webinar: Prepare Your Event © 2011 Marketo Proprietary and Confidential 12
1.7. Blacklist
You can set any Lead to be blacklisted from all communications. This is an ideal setting for your competitors.
1. Locate your Test lead using Lead Search 2. Click on the lead to highlight the record 3. Lead Actions > Flow Actions > Change Data Value
a. Select Black Listed b. Change Value to be “True” c. Click Run Now
4. When the Flow Step is complete an indicator will appear 5. Click on the Blacklisted Leads list to see the Test record.
Big Launch Webinar: Prepare Your Event © 2011 Marketo Proprietary and Confidential 13
2. MY SMART LISTS
You can create your own tailored Smart Lists to contain 1 or more filters, arranged with the logic you need to achieve desired results. Use any data field or lead activity in your Marketo instance as a Filter.
To create ANY Smart List in Marketo:
1. New > New Smart List OR right-click on My Smart Lists > New Smart List a. You may also right-click on any existing Smart List to clone it as a starting point
2. Drag in Filter(s) from the Palette to the Canvas; use the Filter Search box to find Filters by keyword 3. Click on the name of Smart List to view the results.
2.1: My Domain
See which colleagues are in your database.
1. Drag in Email Address a. set operator to “contains” b. type in your domain with the @ sign, such as “@marketo.com”
2.2: Website Visits to Key Page
See which Leads have been active on one of the pages where you have placed your Munchkin code.
1. Drag in Visited Web Page a. Click on Add Constraint b. select Web Page constraint
2. Select one of your tracked pages from the drop list.
2.3: Key Industries
A Key Industry Smart List lets you target key leads for your marketing efforts. Below are sample industries; select your own key industries if desired.
1. Drag in Industry Filter (under Lead Attributes) 2. Click the “+” sign to add multiple values; a popup will appear
a. Select Healthcare from the drop list and move to the right window by clicking Add; or type it into the right-side box
b. Select Technology from the drop list and move to the right window; or type it into the right-side box
c. Click OK.
Big Launch Webinar: Prepare Your Event © 2011 Marketo Proprietary and Confidential 14
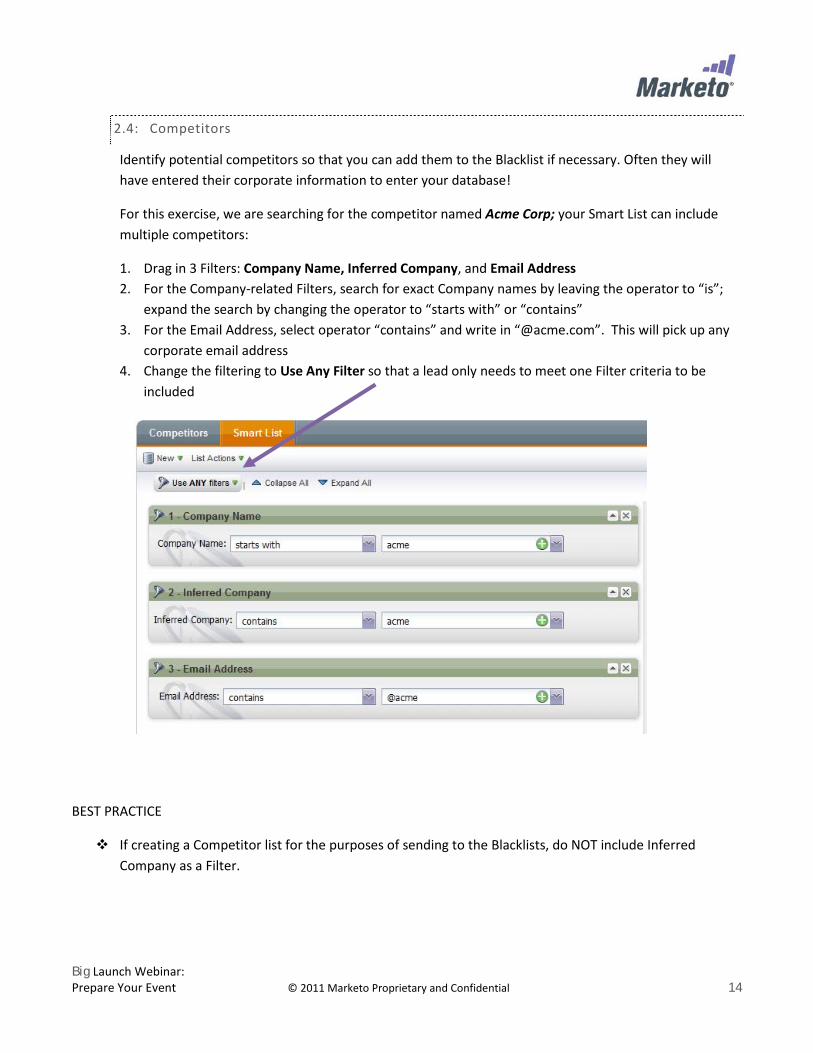
2.4: Competitors
Identify potential competitors so that you can add them to the Blacklist if necessary. Often they will have entered their corporate information to enter your database!
For this exercise, we are searching for the competitor named Acme Corp; your Smart List can include multiple competitors:
1. Drag in 3 Filters: Company Name, Inferred Company, and Email Address 2. For the Company-related Filters, search for exact Company names by leaving the operator to “is”;
expand the search by changing the operator to “starts with” or “contains” 3. For the Email Address, select operator “contains” and write in “@acme.com”. This will pick up any
corporate email address 4. Change the filtering to Use Any Filter so that a lead only needs to meet one Filter criteria to be
included
BEST PRACTICE
If creating a Competitor list for the purposes of sending to the Blacklists, do NOT include Inferred Company as a Filter.
Big Launch Webinar: Prepare Your Event © 2011 Marketo Proprietary and Confidential 15
3. MY SMART LISTS (USING SALESFORCE)
You can create your own tailored Smart Lists to contain 1 or more filters, arranged with the logic you need to achieve desired results. Use any data field or lead activity in your Marketo instance as a Filter.
To create ANY Smart List:
1. New > New Smart List OR right-click on My Smart Lists > New Smart List a. You may also right-click on any existing Smart List to clone it as a starting point
2. Drag in Filter(s) from the Palette to the Canvas; use the Filter Search box to find Filters by keyword 3. Click on the name of Smart List to view the results.
3.1 Salesforce Leads
1. Search for “SFDC” 2. Drag SFDC Type into the Canvas; set the value to = Lead
3.2 Salesforce Contacts
1. Right-click on the Salesforce Leads to clone 2. Change SFDC Type to = Contact
3.3 Leads with an Opportunity Stage Open
1. Right-click to clone the Salesforce Leads Smart List 2. Add a second Filter, Has Opportunity
a. Set Value to be “true” or “is any” b. Click to add a Constraint, Stage c. Set Stage value to “Open”
Big Launch Webinar: Prepare Your Event © 2011 Marketo Proprietary and Confidential 16
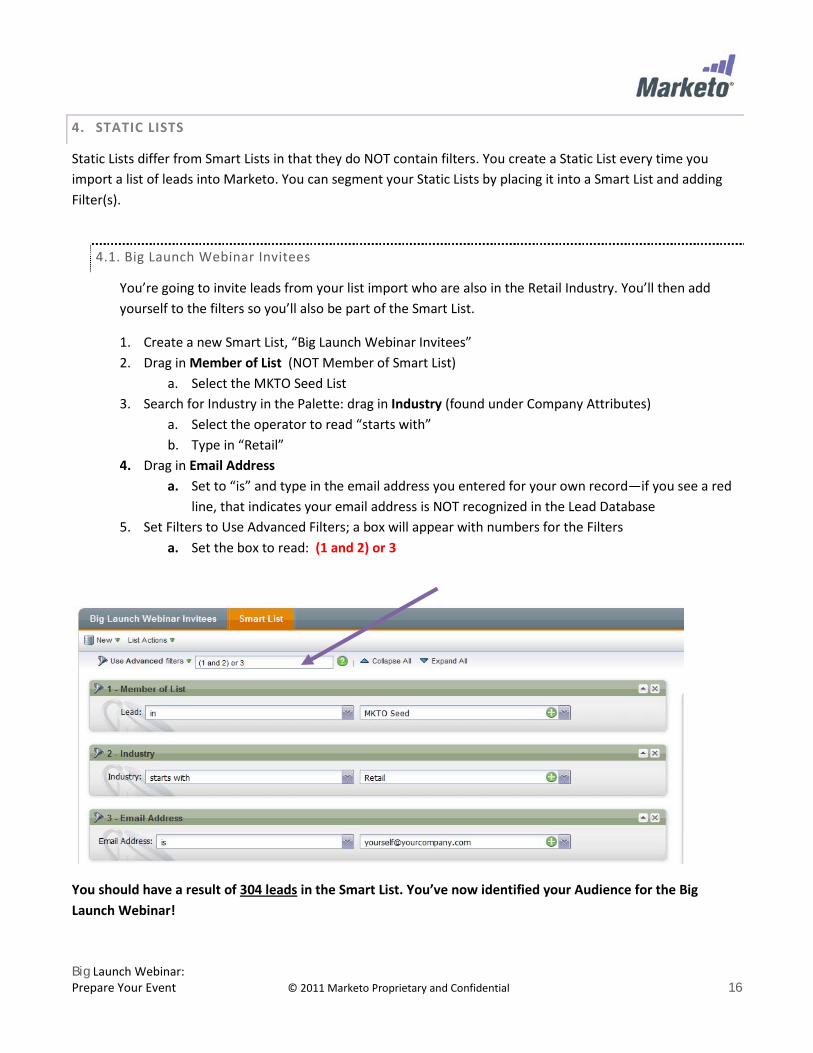
4. STATIC LISTS
Static Lists differ from Smart Lists in that they do NOT contain filters. You create a Static List every time you import a list of leads into Marketo. You can segment your Static Lists by placing it into a Smart List and adding Filter(s).
4.1. Big Launch Webinar Invitees
You’re going to invite leads from your list import who are also in the Retail Industry. You’ll then add yourself to the filters so you’ll also be part of the Smart List.
1. Create a new Smart List, “Big Launch Webinar Invitees” 2. Drag in Member of List (NOT Member of Smart List)
a. Select the MKTO Seed List 3. Search for Industry in the Palette: drag in Industry (found under Company Attributes)
a. Select the operator to read “starts with” b. Type in “Retail”
4. Drag in Email Address a. Set to “is” and type in the email address you entered for your own record—if you see a red
line, that indicates your email address is NOT recognized in the Lead Database 5. Set Filters to Use Advanced Filters; a box will appear with numbers for the Filters
a. Set the box to read: (1 and 2) or 3
You should have a result of 304 leads in the Smart List. You’ve now identified your Audience for the Big Launch Webinar!
Big Launch Webinar: Prepare Your Event © 2011 Marketo Proprietary and Confidential 17
4.2 Export a List to Create Your Own Template
When it comes time to import any of your actual leads into Marketo, you’ll need to work off a template of all the fields in your Marketo instance. The easiest way to create a Template is by exporting a list from the Lead Database that will include ALL the Columns.
1. Click to select a small Smart List, such as “My Domain” 2. Click on List Actions > Export List, or click on the small Excel icon at the bottom of the list 3. Select to export “All Columns” 4. Save to your desktop.
5. DELETE A LEAD
Deleting a known lead in Marketo always gives you the option to save or delete the lead from Salesforce.com if it exists there.
1. Find your Test lead record 2. Highlight the record and click Delete Lead 3. SFDC option will appear; “True” setting will also remove the lead from SFDC 4. Click Run now
Once complete, the Lead no longer exists in Marketo.
6. ANONYMOUS LEADS
Marketo tracks Anonymous lead behavior taking place on all your website pages where you place the Munchkin tracking code, providing you with insight and lead history that remains on file when they do become a Known lead.
6.1 Anonymous Leads Smart List
In the Lead Database section:
1. Create new Smart List, “Anonymous”; a. Filter: Is Anonymous = True
2. Clicking on Smart List name will display records with no name
Big Launch Webinar: Prepare Your Event © 2011 Marketo Proprietary and Confidential 18
6.2 Anonymous Leads Web Activity
In the Analytics section:
1. Click on Web Activity report 2. On the Smart List tab, drag in Filter: Member of Smart List 3. Select the Anonymous List 4. Click on Report to see the results 5. Click on Smart List tab and remove Filter.
Big Launch Webinar: Prepare Your Event © 2011 Marketo Proprietary and Confidential 19
SET UP EVENT
Marketo Events are like Marketo Programs, but are defined by occurring on a scheduled date and time. If it is an online event such as a Webinar, you may also integrate a Marketo Event with your WebEx Events. WebEx Event customers: please be sure to review our guide on integrating and using WebEx with your Marketo Webinar Events.
Get Started: Navigate to the Marketing Activities section of Marketo.
You need to place all your Programs and Events into Folders.
7. CREATE AN EVENT
Create a Folder and two sub- Folders now to use for the remainder of the Fundamentals Course exercises:
1. Right-click on Marketing Activities, or click New > New Campaign Folder a. Call it “MKTO Training”
2. Right-click on MKTO Training and select New Campaign Folder a. Call it “MKTO Events”
These Folders should appear in the Explorer tree.
Create a new Event for the Big Launch Webinar:
1. Select either New > New Event, or right-click on the Events folder in the Tree to select a New Event (this will place it automatically in the folder)
1. In the pop-up window, enter the initial Event information: a. Name of Webinar: Big Launch Webinar b. Channel: Webinar c. Click Create
2. You’ll now see the Event Summary in the Canvas:
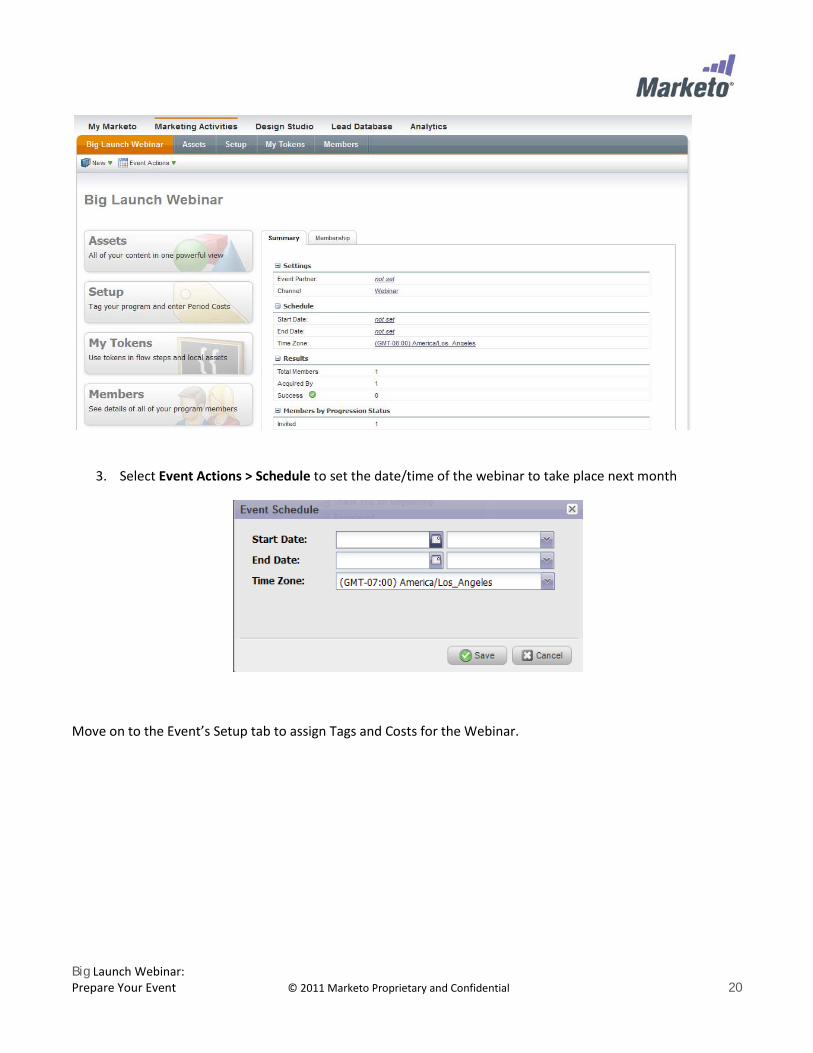
Big Launch Webinar: Prepare Your Event © 2011 Marketo Proprietary and Confidential 20
3. Select Event Actions > Schedule to set the date/time of the webinar to take place next month
Move on to the Event’s Setup tab to assign Tags and Costs for the Webinar.
Big Launch Webinar: Prepare Your Event © 2011 Marketo Proprietary and Confidential 21
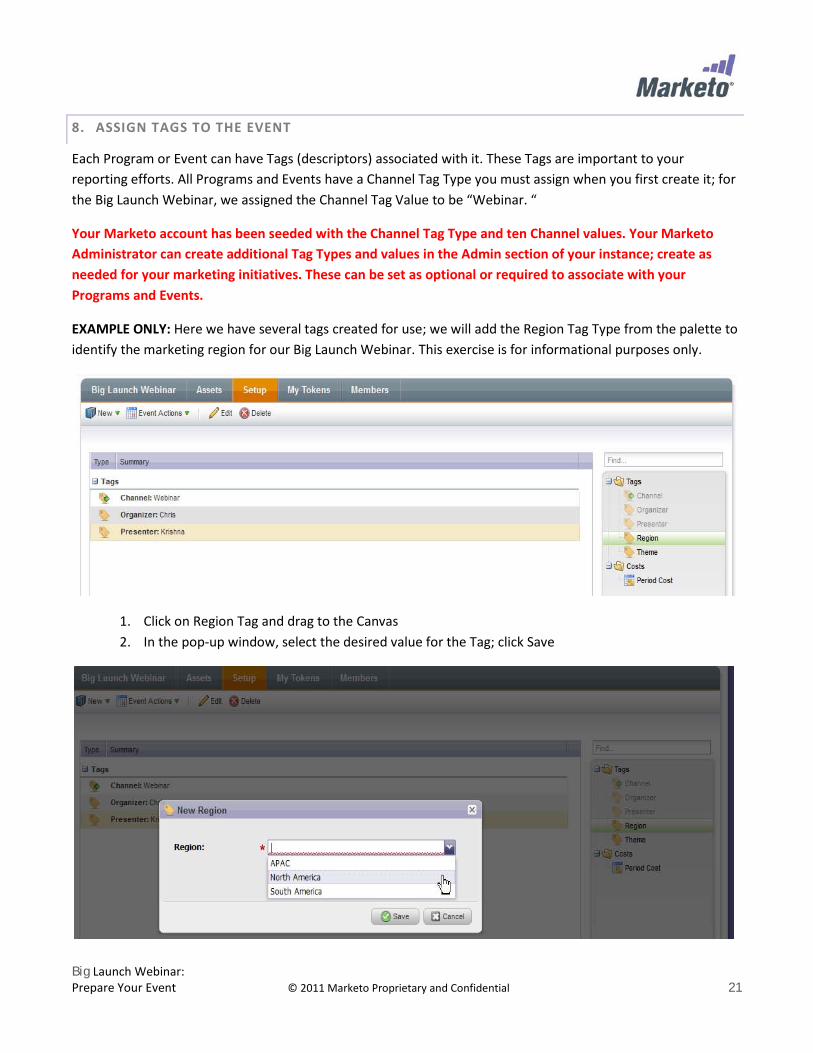
8. ASSIGN TAGS TO THE EVENT
Each Program or Event can have Tags (descriptors) associated with it. These Tags are important to your reporting efforts. All Programs and Events have a Channel Tag Type you must assign when you first create it; for the Big Launch Webinar, we assigned the Channel Tag Value to be “Webinar. “
Your Marketo account has been seeded with the Channel Tag Type and ten Channel values. Your Marketo Administrator can create additional Tag Types and values in the Admin section of your instance; create as needed for your marketing initiatives. These can be set as optional or required to associate with your Programs and Events.
EXAMPLE ONLY: Here we have several tags created for use; we will add the Region Tag Type from the palette to identify the marketing region for our Big Launch Webinar. This exercise is for informational purposes only.
1. Click on Region Tag and drag to the Canvas 2. In the pop-up window, select the desired value for the Tag; click Save
Big Launch Webinar: Prepare Your Event © 2011 Marketo Proprietary and Confidential 22
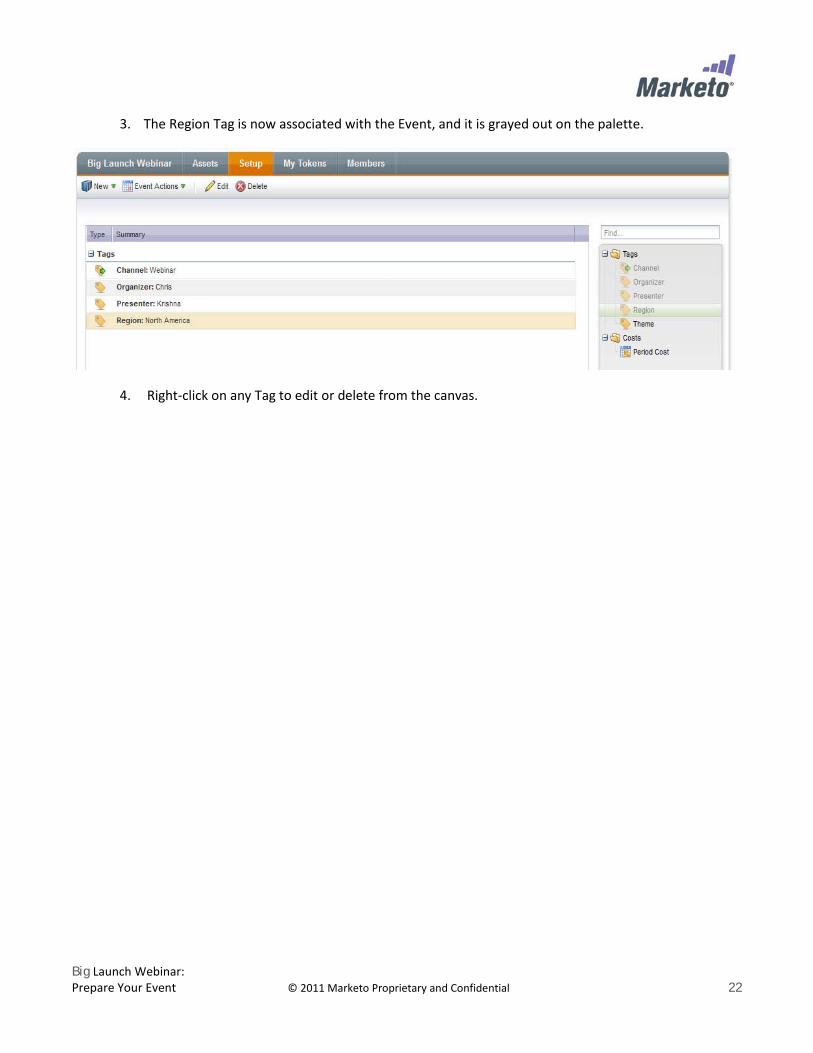
3. The Region Tag is now associated with the Event, and it is grayed out on the palette.
4. Right-click on any Tag to edit or delete from the canvas.
Big Launch Webinar: Prepare Your Event © 2011 Marketo Proprietary and Confidential 23
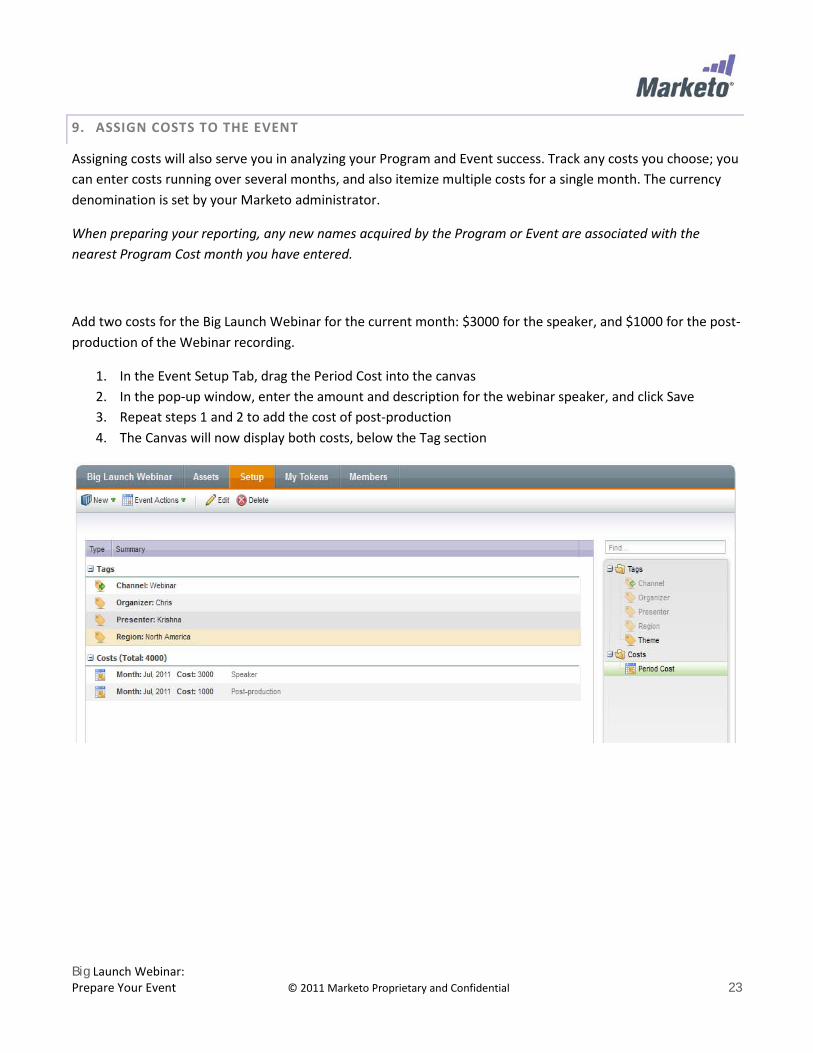
9. ASSIGN COSTS TO THE EVENT
Assigning costs will also serve you in analyzing your Program and Event success. Track any costs you choose; you can enter costs running over several months, and also itemize multiple costs for a single month. The currency denomination is set by your Marketo administrator.
When preparing your reporting, any new names acquired by the Program or Event are associated with the nearest Program Cost month you have entered.
Add two costs for the Big Launch Webinar for the current month: $3000 for the speaker, and $1000 for the post-production of the Webinar recording.
1. In the Event Setup Tab, drag the Period Cost into the canvas 2. In the pop-up window, enter the amount and description for the webinar speaker, and click Save 3. Repeat steps 1 and 2 to add the cost of post-production 4. The Canvas will now display both costs, below the Tag section
Big Launch Webinar: Prepare Your Event © 2011 Marketo Proprietary and Confidential 24
CREATE ASSETS
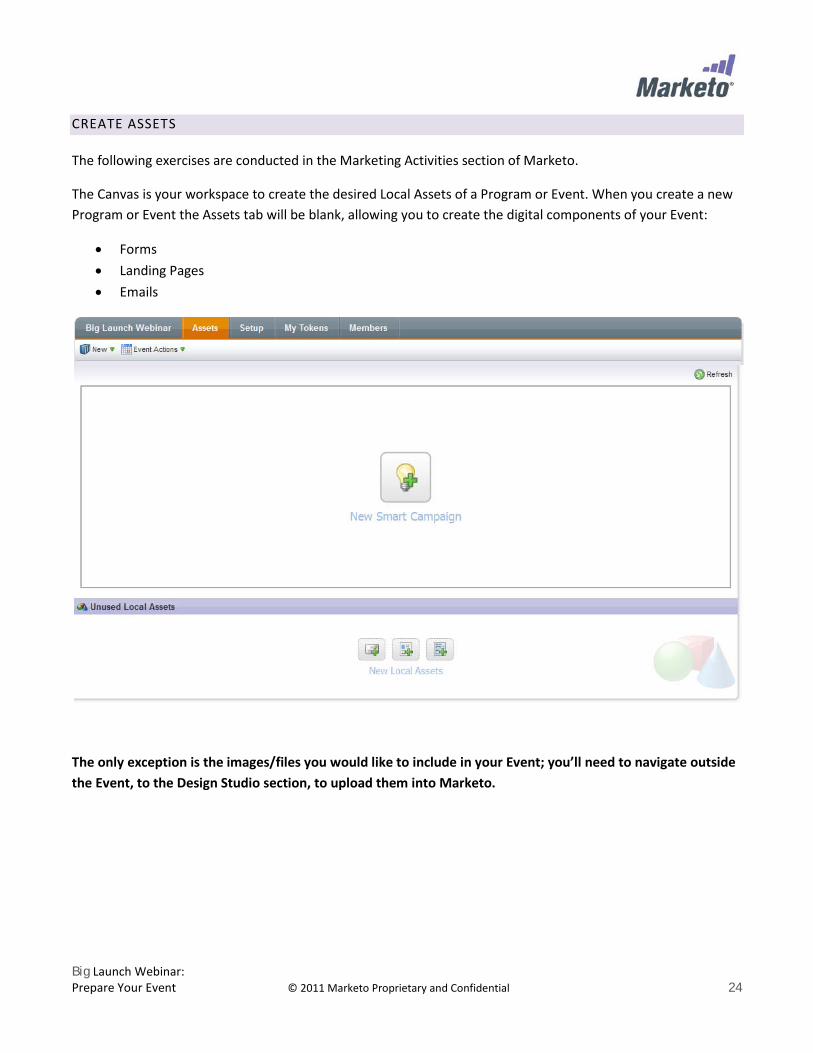
The following exercises are conducted in the Marketing Activities section of Marketo.
The Canvas is your workspace to create the desired Local Assets of a Program or Event. When you create a new Program or Event the Assets tab will be blank, allowing you to create the digital components of your Event:
• Forms • Landing Pages • Emails
The only exception is the images/files you would like to include in your Event; you’ll need to navigate outside the Event, to the Design Studio section, to upload them into Marketo.
Big Launch Webinar: Prepare Your Event © 2011 Marketo Proprietary and Confidential 25
10. ADD IMAGES
For this exercise only: please navigate to Marketo’s Design Studio.
You can store any image or file assets in Marketo. Images and files of any format can be uploaded, with a size limit of 40 MB per item. You can upload one image/file asset at a time, or grab all the images from a single web page. All these items are stored in the Design Studio section of Marketo.
Grab the images from one of the pages of your company’s website:
1. Navigate to the Design Studio section 2. New > Grab images from Web page 3. Enter the URL of web page desired; click Next 4. Marketo will display all the images of that page, allowing you to pick and choose exactly which images
you wish to import 5. Click the checkbox next to each desired image; click Next 6. Your images are now imported, and can be organized into folders as desired.
Big Launch Webinar: Prepare Your Event © 2011 Marketo Proprietary and Confidential 26
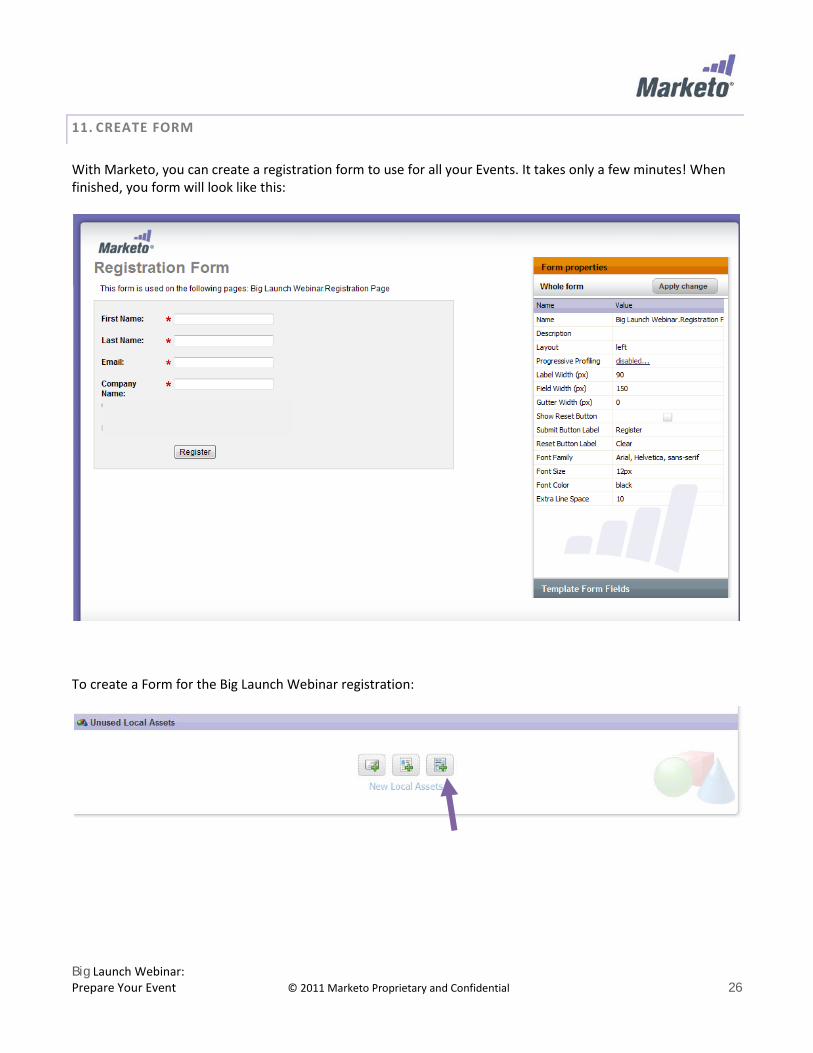
11. CREATE FORM
With Marketo, you can create a registration form to use for all your Events. It takes only a few minutes! When finished, you form will look like this:
To create a Form for the Big Launch Webinar registration:
Big Launch Webinar: Prepare Your Event © 2011 Marketo Proprietary and Confidential 27
1. On the Unused Local Assets section, click on the Form icon, or select New > New Local Asset > Form a. Call it “Registration Form” b. Click Create, and the Form Editor will open
2. From the Palette, click on Template Form fields to open the list of potential Fields 3. Drag in the following fields:
• First Name • Last Name • Email Address • Company Name
4. Click on Form Properties to close this section 5. Under Whole Form properties
a. Remove the Clear button from the form by de-selecting “Show Reset Button” checkbox b. Click on Submit button label to change the Submit button to read “Register”
6. Double-click on each field to bring up Field Specific settings; for each, click the checkbox “Is Required” 7. Email Address: change the Label to read “Email”
Close Form to save; it will now appear in the Unused Local Assets section.
Big Launch Webinar: Prepare Your Event © 2011 Marketo Proprietary and Confidential 28
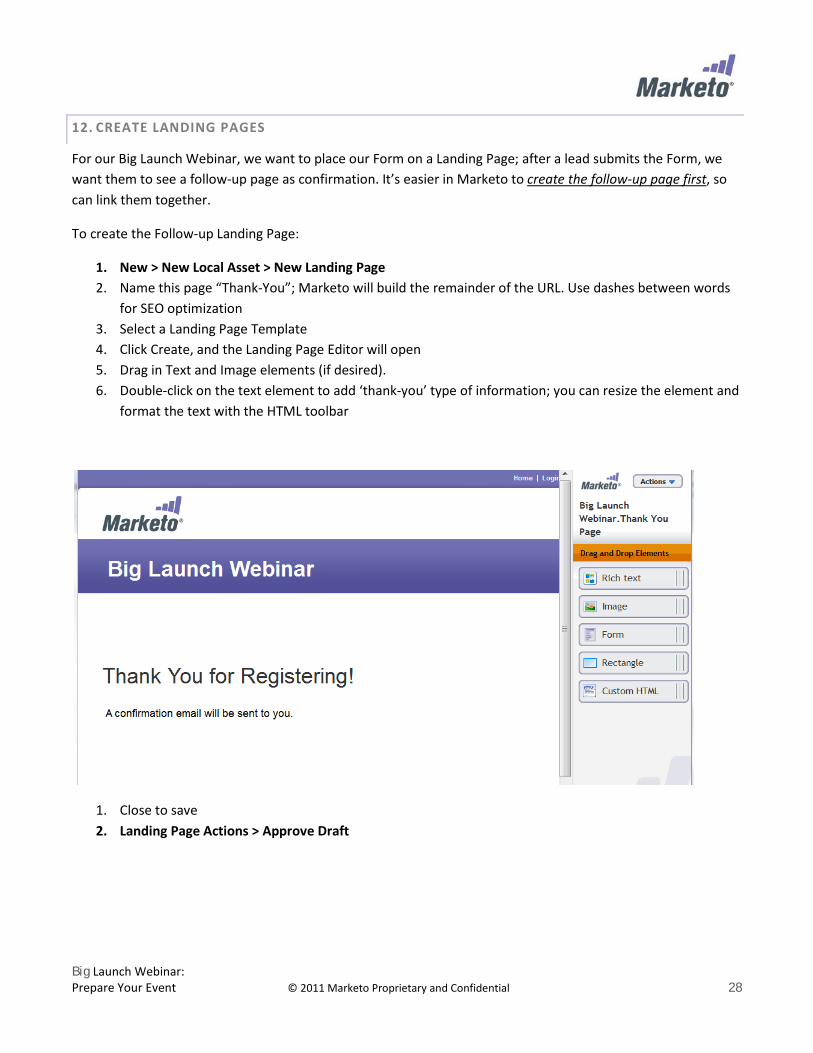
12. CREATE LANDING PAGES
For our Big Launch Webinar, we want to place our Form on a Landing Page; after a lead submits the Form, we want them to see a follow-up page as confirmation. It’s easier in Marketo to create the follow-up page first
To create the Follow-up Landing Page:
, so can link them together.
1. New > New Local Asset > New Landing Page 2. Name this page “Thank-You”; Marketo will build the remainder of the URL. Use dashes between words
for SEO optimization 3. Select a Landing Page Template 4. Click Create, and the Landing Page Editor will open 5. Drag in Text and Image elements (if desired). 6. Double-click on the text element to add ‘thank-you’ type of information; you can resize the element and
format the text with the HTML toolbar
1. Close to save 2. Landing Page Actions > Approve Draft

Big Launch Webinar: Prepare Your Event © 2011 Marketo Proprietary and Confidential 29
From this same page, create the Registration Landing Page:
1. Landing Page Actions > Clone 2. Name the new page “Registration” 3. Update the text accordingly 4. Drag in the Form element
a. Select your Registration form, and select your Thank-you page to follow; click Insert.
5. Click on Actions > Edit Page Meta tags to enter key data for this page to be found via search engines.
Big Launch Webinar: Prepare Your Event © 2011 Marketo Proprietary and Confidential 30
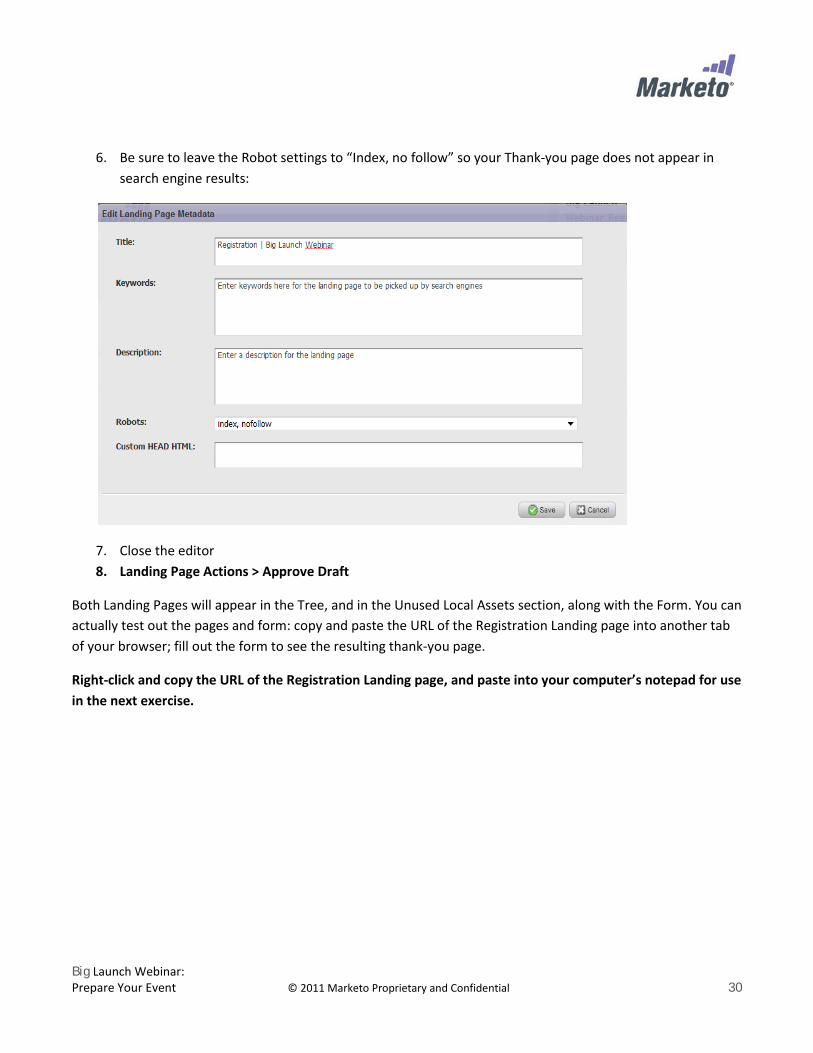
6. Be sure to leave the Robot settings to “Index, no follow” so your Thank-you page does not appear in search engine results:
7. Close the editor 8. Landing Page Actions > Approve Draft
Both Landing Pages will appear in the Tree, and in the Unused Local Assets section, along with the Form. You can actually test out the pages and form: copy and paste the URL of the Registration Landing page into another tab of your browser; fill out the form to see the resulting thank-you page.
Right-click and copy the URL of the Registration Landing page, and paste into your computer’s notepad for use in the next exercise.
Big Launch Webinar: Prepare Your Event © 2011 Marketo Proprietary and Confidential 31
13. CREATE EMAILS
You’ll need emails to promote your Big Launch Webinar. We’ll create a promotional email inviting leads to register, and a follow-up email the confirm registration should they fill out the form.
Just as you used tokens to personalize the event, you can use Lead Tokens to personalize your email messages with known lead information. They will take the format of {{Lead.token name}}.
13.1 Marketing Email
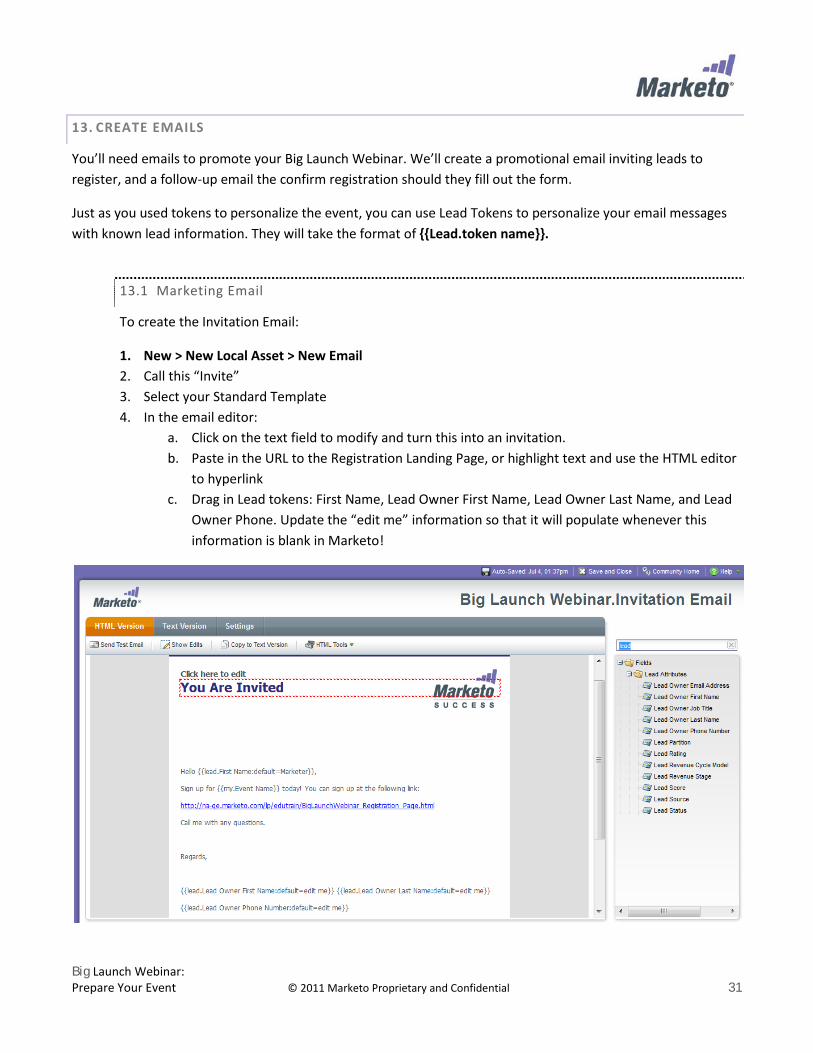
To create the Invitation Email:
1. New > New Local Asset > New Email 2. Call this “Invite” 3. Select your Standard Template 4. In the email editor:
a. Click on the text field to modify and turn this into an invitation. b. Paste in the URL to the Registration Landing Page, or highlight text and use the HTML editor
to hyperlink c. Drag in Lead tokens: First Name, Lead Owner First Name, Lead Owner Last Name, and Lead
Owner Phone. Update the “edit me” information so that it will populate whenever this information is blank in Marketo!
Big Launch Webinar: Prepare Your Event © 2011 Marketo Proprietary and Confidential 32
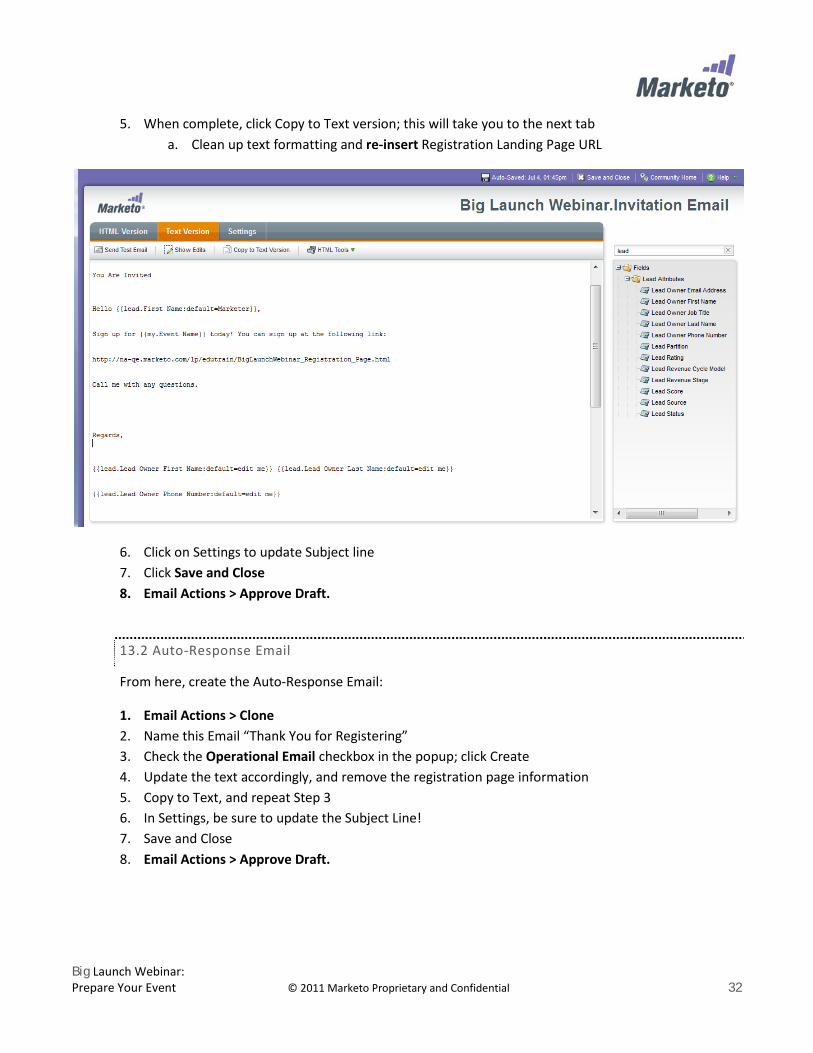
5. When complete, click Copy to Text version; this will take you to the next tab a. Clean up text formatting and re-insert Registration Landing Page URL
6. Click on Settings to update Subject line 7. Click Save and Close 8. Email Actions > Approve Draft.
13.2 Auto-Response Email
From here, create the Auto-Response Email:
1. Email Actions > Clone 2. Name this Email “Thank You for Registering” 3. Check the Operational Email checkbox in the popup; click Create 4. Update the text accordingly, and remove the registration page information 5. Copy to Text, and repeat Step 3 6. In Settings, be sure to update the Subject Line! 7. Save and Close 8. Email Actions > Approve Draft.
Big Launch Webinar: Prepare Your Event © 2011 Marketo Proprietary and Confidential 33
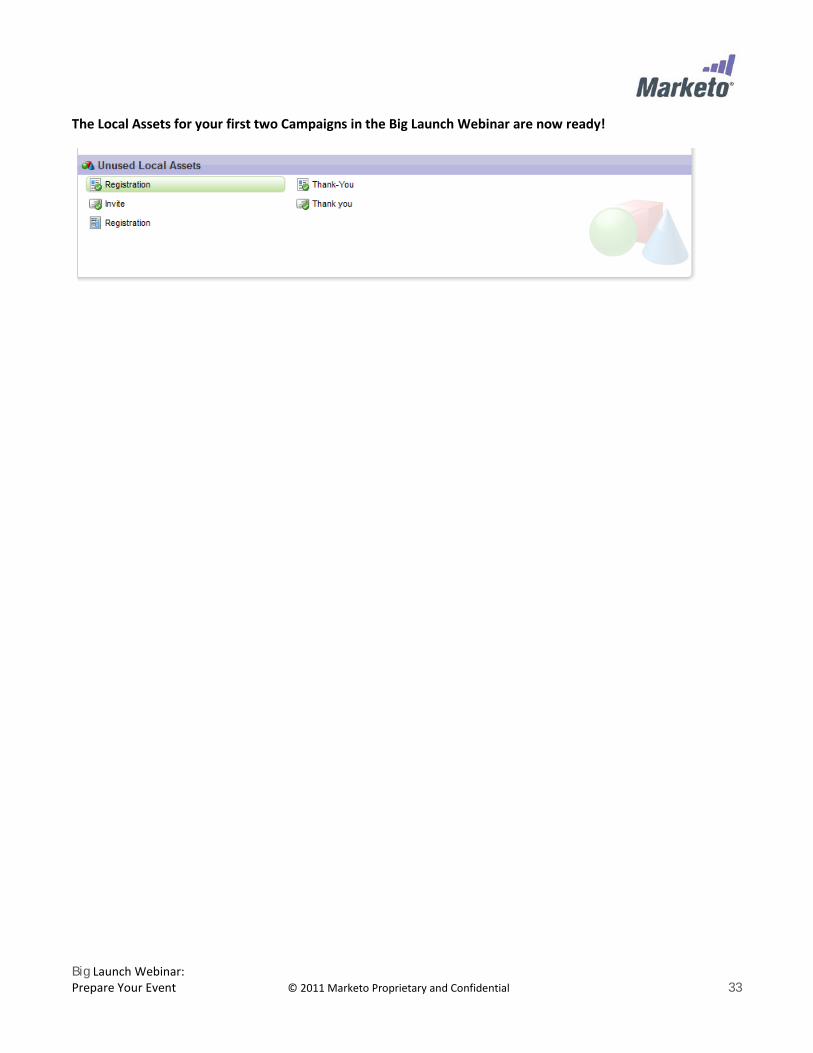
The Local Assets for your first two Campaigns in the Big Launch Webinar are now ready!
Big Launch Webinar: Event Lifecycle © 2011 Marketo Proprietary and Confidential 34
Big Launch Webinar:
Event Lifecycle
OUTBOUND MARKETING, EVENT PROCESSING
Get Started: Navigate to the Marketing Activities section of Marketo. Select the Big Webinar Event, the Assets Tab.
SEND INVITE (BATCH FILTER CAMPAIGN)
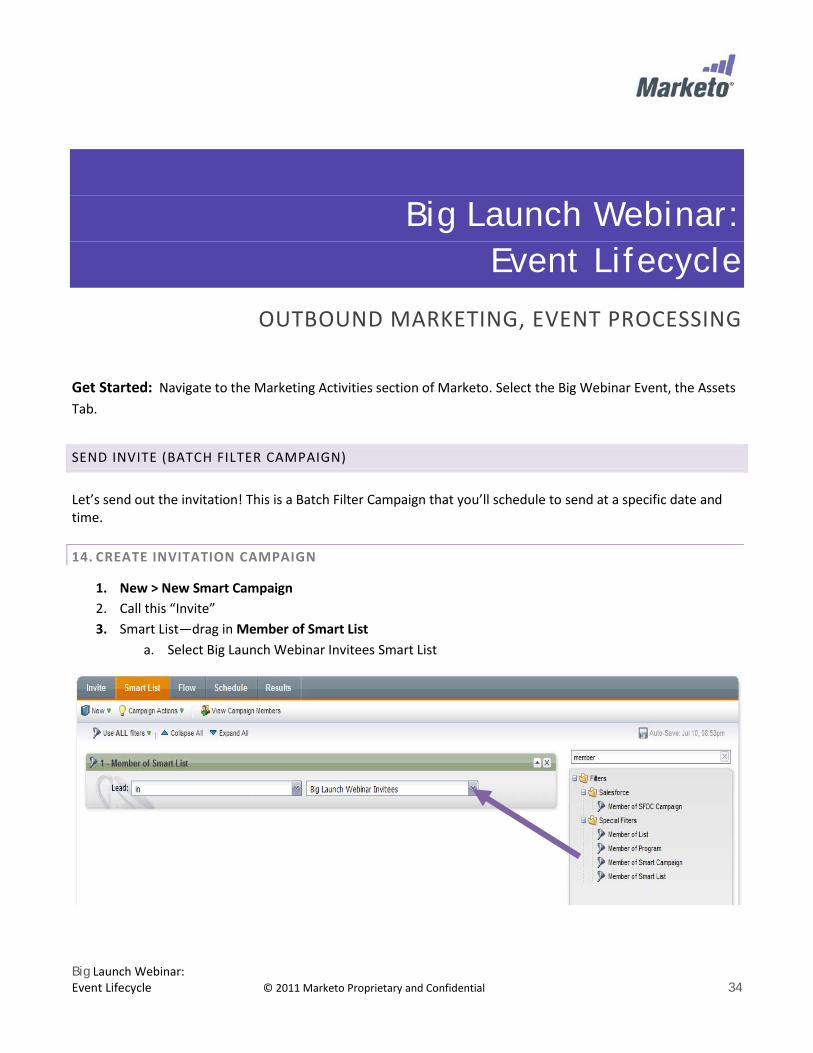
Let’s send out the invitation! This is a Batch Filter Campaign that you’ll schedule to send at a specific date and time. 14. CREATE INVITATION CAMPAIGN
1. New > New Smart Campaign 2. Call this “Invite” 3. Smart List—drag in Member of Smart List
a. Select Big Launch Webinar Invitees Smart List

Big Launch Webinar: Event Lifecycle © 2011 Marketo Proprietary and Confidential 35
4. Flow: a. Drag in Send Email, and select your Invite email b. Drag in Change Status in Progression, and select “Invited”
Big Launch Webinar: Event Lifecycle © 2011 Marketo Proprietary and Confidential 36
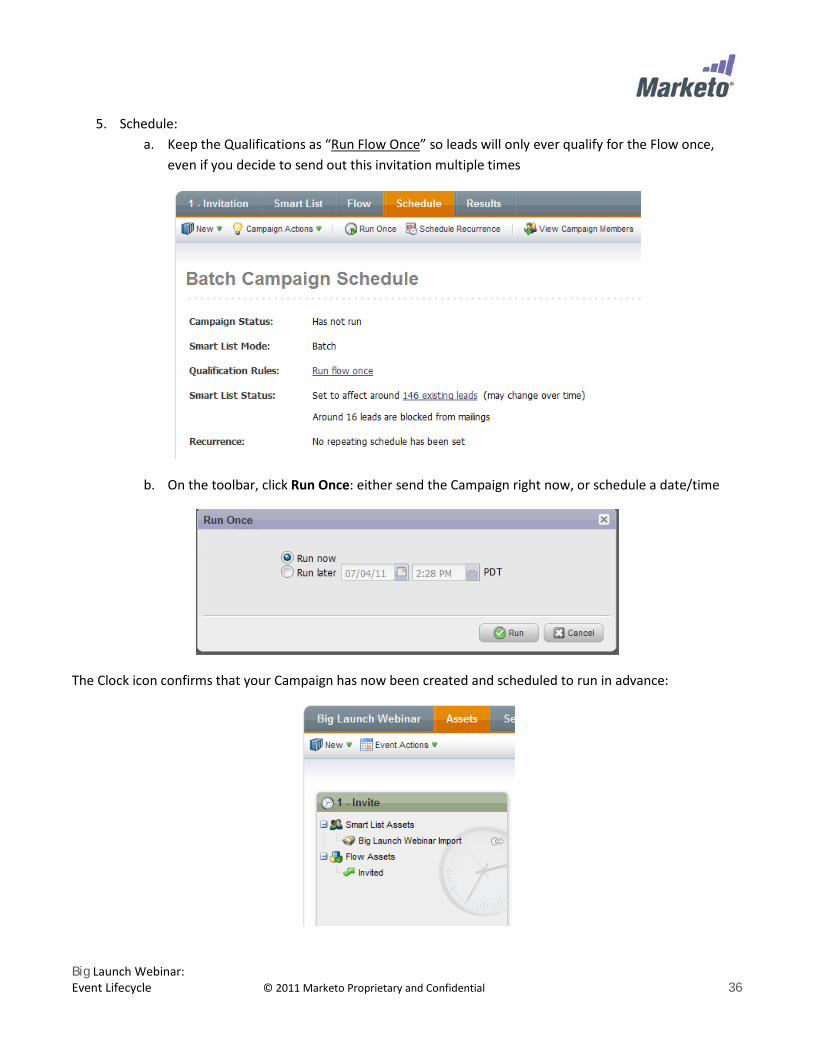
5. Schedule: a. Keep the Qualifications as “Run Flow Once
” so leads will only ever qualify for the Flow once, even if you decide to send out this invitation multiple times
b. On the toolbar, click Run Once: either send the Campaign right now, or schedule a date/time
The Clock icon confirms that your Campaign has now been created and scheduled to run in advance:
Big Launch Webinar: Event Lifecycle © 2011 Marketo Proprietary and Confidential 37
THANK-YOU (TRIGGER CAMPAIGN)
Make sure your Trigger Campaign is in place as soon as possible so leads receive their confirmation after submitting their registration!
15. CREATE TRIGGER AUTO-RESPONSE CAMPAIGN
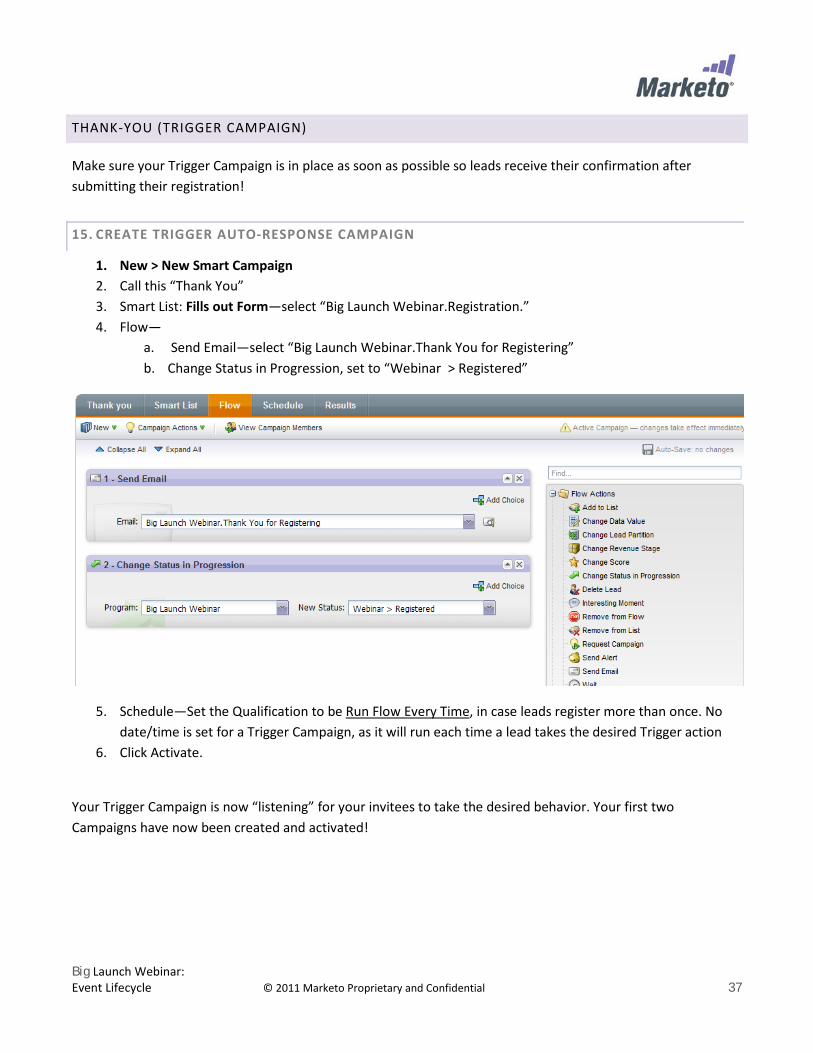
1. New > New Smart Campaign 2. Call this “Thank You” 3. Smart List: Fills out Form—select “Big Launch Webinar.Registration.” 4. Flow—
a. Send Email—select “Big Launch Webinar.Thank You for Registering” b. Change Status in Progression, set to “Webinar > Registered”
5. Schedule—Set the Qualification to be Run Flow Every Time
6. Click Activate.
, in case leads register more than once. No date/time is set for a Trigger Campaign, as it will run each time a lead takes the desired Trigger action
Your Trigger Campaign is now “listening” for your invitees to take the desired behavior. Your first two Campaigns have now been created and activated!

Big Launch Webinar: Event Lifecycle © 2011 Marketo Proprietary and Confidential 38
EVENT REGISTRATION
With any Program or Event, there are defined Progression Statuses that a Member can take in the progress of participating. You can use some or all of these steps provided by Marketo, or modify the steps in the Admin section.
Marketo provides these Progression Steps for a Webinar Event, culminating with the Success steps of attending the webinar or downloading its content later:
Invited Pending Approval Waitlisted Registered Rejected No Show Attended Downloaded
16. REGISTRATION: UPDATE MEMBER PROGRESSION STATUS
As leads register for the Webinar, you can automatically update their Progression status as part of your existing Campaign: in the previous exercised, you added this as a Flow step in your Campaign: Change Status in Progression—set to Webinar > Registered.
You can also update their Status in the Member Grid via Change Status, and/or by importing a list of updated status information for your Members:
Change Status:
1. Click on Member(s) to be updated 2. Click on Change Status
a. Set to Registered 3. The single flow action will run automatically 4. When complete, the Member grid will show the new Status
Big Launch Webinar: Event Lifecycle © 2011 Marketo Proprietary and Confidential 39
Member Import
1. Prepare a .csv file of those members you wish to update to Registered a. include only one column of data, their email address; make sure the column header reads
“Email Address” 2. Click Import Members 3. Select your file, leave other settings as is. 4. Click Next 5. Click Next again 6. Marketo will ask you to indicate the Member Status
a. Select Registered b. Click Import.
Big Launch Webinar: Event Lifecycle © 2011 Marketo Proprietary and Confidential 40
LEAD LIFECYCLE
Lead Lifecycle Campaigns should live in Programs SEPARATE from Programs and Events you create for other marketing initiatives. Lead Lifecycle Program Campaigns operate on all your Leads across your Marketo instance; separating them also makes it easier to find and update as your lead lifecycle processes evolve.
17. LEAD SCORING CAMPAIGNS
Lead Scoring Campaigns reward your leads with Lead Score points for their interest in your company, helping you prioritize which leads are “hotter”. The following Smart Campaigns will reward leads who take desired behaviors, including desired behaviors for the Big Launch Webinar.
These exercises are examples; DO NOT activate these Campaigns.
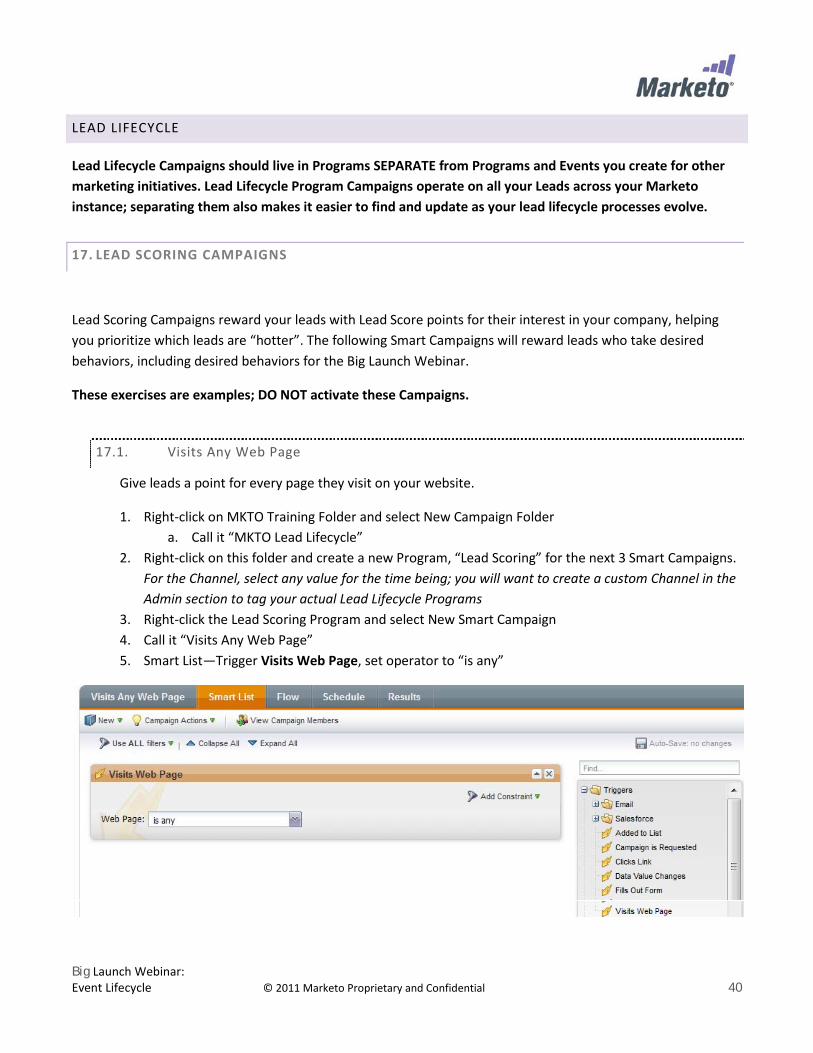
17.1. Visits Any Web Page
Give leads a point for every page they visit on your website.
1. Right-click on MKTO Training Folder and select New Campaign Folder a. Call it “MKTO Lead Lifecycle”
2. Right-click on this folder and create a new Program, “Lead Scoring” for the next 3 Smart Campaigns. For the Channel, select any value for the time being; you will want to create a custom Channel in the Admin section to tag your actual Lead Lifecycle Programs
3. Right-click the Lead Scoring Program and select New Smart Campaign 4. Call it “Visits Any Web Page” 5. Smart List—Trigger Visits Web Page, set operator to “is any”
Big Launch Webinar: Event Lifecycle © 2011 Marketo Proprietary and Confidential 41
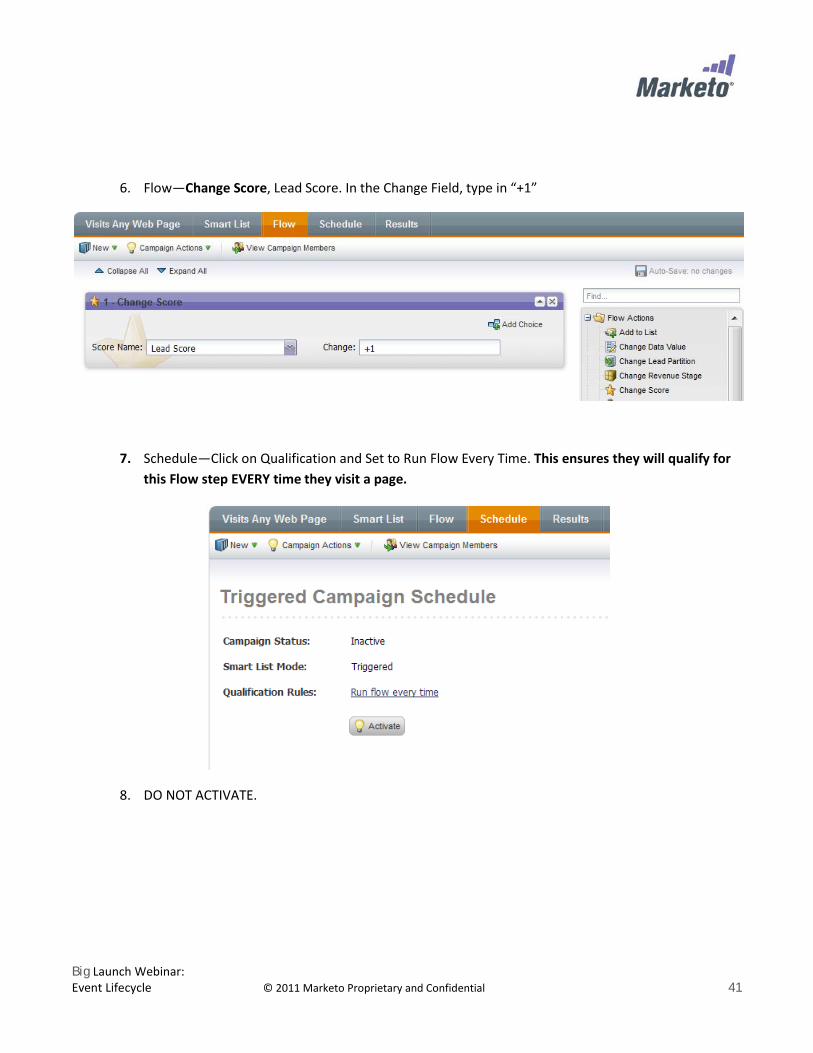
6. Flow—Change Score, Lead Score. In the Change Field, type in “+1”
7. Schedule—Click on Qualification and Set to Run Flow Every Time. This ensures they will qualify for this Flow step EVERY time they visit a page.
8. DO NOT ACTIVATE.
Big Launch Webinar: Event Lifecycle © 2011 Marketo Proprietary and Confidential 42
17.2. Clicks Link Any Email
Give leads credit for responding to any of your marketing emails. This Smart Campaign will NOT give credit if they should happen to click on the Unsubscribe Link.
1. Right-click on the Lead Scoring Program and select New Smart Campaign 2. Call it “Clicks Link Any Email” 3. Smart List—Trigger Clicks Link in Email, operator set to “is any” 4. Flow—Change Score, Lead Score +3 5. Schedule—set Qualification to be Run Flow Every Time 6. DO NOT ACTIVATE.
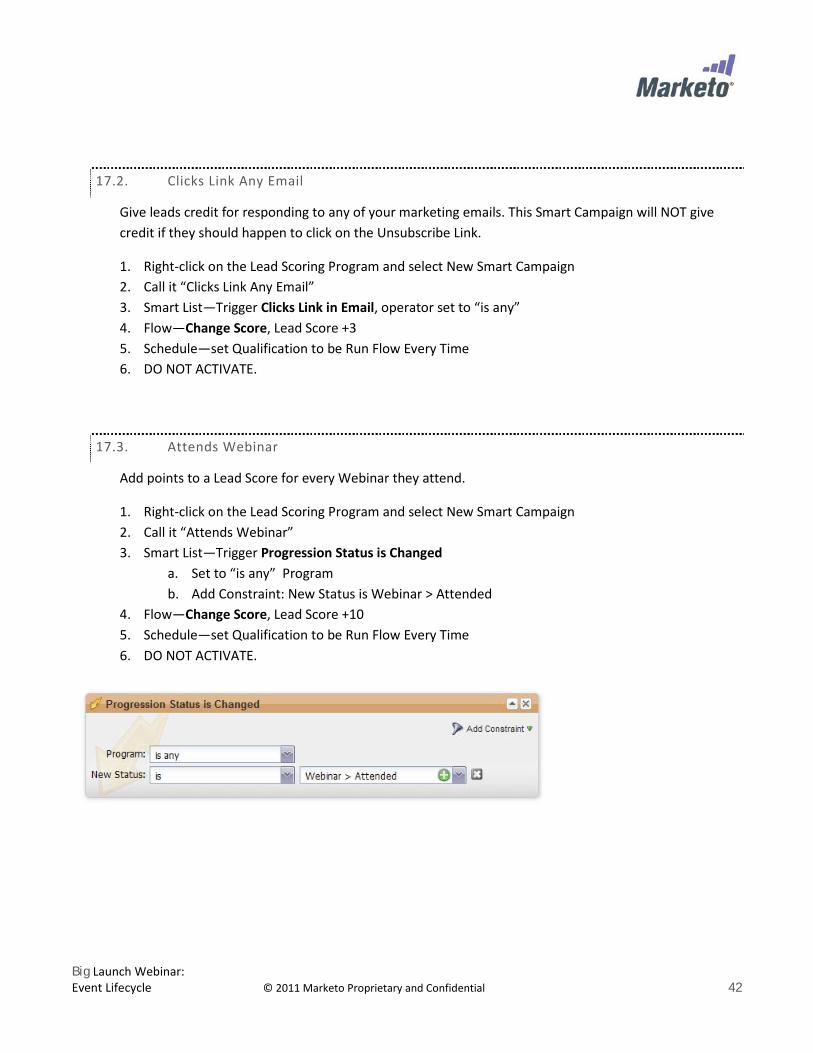
17.3. Attends Webinar
Add points to a Lead Score for every Webinar they attend.
1. Right-click on the Lead Scoring Program and select New Smart Campaign 2. Call it “Attends Webinar” 3. Smart List—Trigger Progression Status is Changed
a. Set to “is any” Program b. Add Constraint: New Status is Webinar > Attended
4. Flow—Change Score, Lead Score +10 5. Schedule—set Qualification to be Run Flow Every Time 6. DO NOT ACTIVATE.
Big Launch Webinar: Event Lifecycle © 2011 Marketo Proprietary and Confidential 43
18. SYNC LEAD BACK TO SALES
With Smart Campaigns you can create multiple scenarios to send sales-ready leads to your sales team by syncing to Salesforce, and/or sending a Sales Alert email. This sample Campaign would automatically sync and update Sales when you update lead attendance at a webinar Event. Leads attending the Big Launch Webinar would qualify for this Campaign.
New Marketo customers: Regardless of which CRM you use, or if you are using Marketo Lead Management as a stand-alone application, review your sync options in further detail with your Customer Enablement Manager before activating any Sync Campaigns.
The below is a sample of lead sync Campaign should you wish to practice this activity; do NOT activate this Campaign. This exercise involves the creation of an Email in the Design Studio directed to your sales rep to serve as an internal Alert, and includes text that the lead has attended an Event. It also includes email tokens for the lead’s contact information.
1. In the Lead Lifecycle Folder, create a New Program, “Send Leads to Sales” 2. Right-click on the Program to create a New Smart Campaign: Sync Webinar Attendees 3. Smart List—Trigger Progression Status is Changed: any Program
a. Add Constraint: New Status is Webinar > Attended 4. Flow—Send Alert: insert your Sales Email. If using Salesforce, you can also use the Sync and Task Steps 5. Schedule—Run Flow Every Time 6. DO NOT Activate.
Big Launch Webinar: Event Lifecycle © 2011 Marketo Proprietary and Confidential 44
RE-INVITE AND REMINDER CAMPAIGNS
Are there members who have been invited but not yet registered? Send them a re-invitation. And don’t forget to send your registrants a reminder to attend! Both tasks involve Batch Filter Campaigns. Take advantage of existing local assets whenever possible and clone them as a starting point.
BEST PRACTICE
Avoid cloning an Operational Email so that you do not copy this setting into your new email.
19. RE-INVITATION CAMPAIGN
Return to your Big Launch Webinar Event, the Assets tab
1. Right-click on the Invite email to Clone 2. Call it “Re-Invite” 3. Modify the email
a. Be sure to update the Subject line in your real emails! b. Close c. Right-click to approve
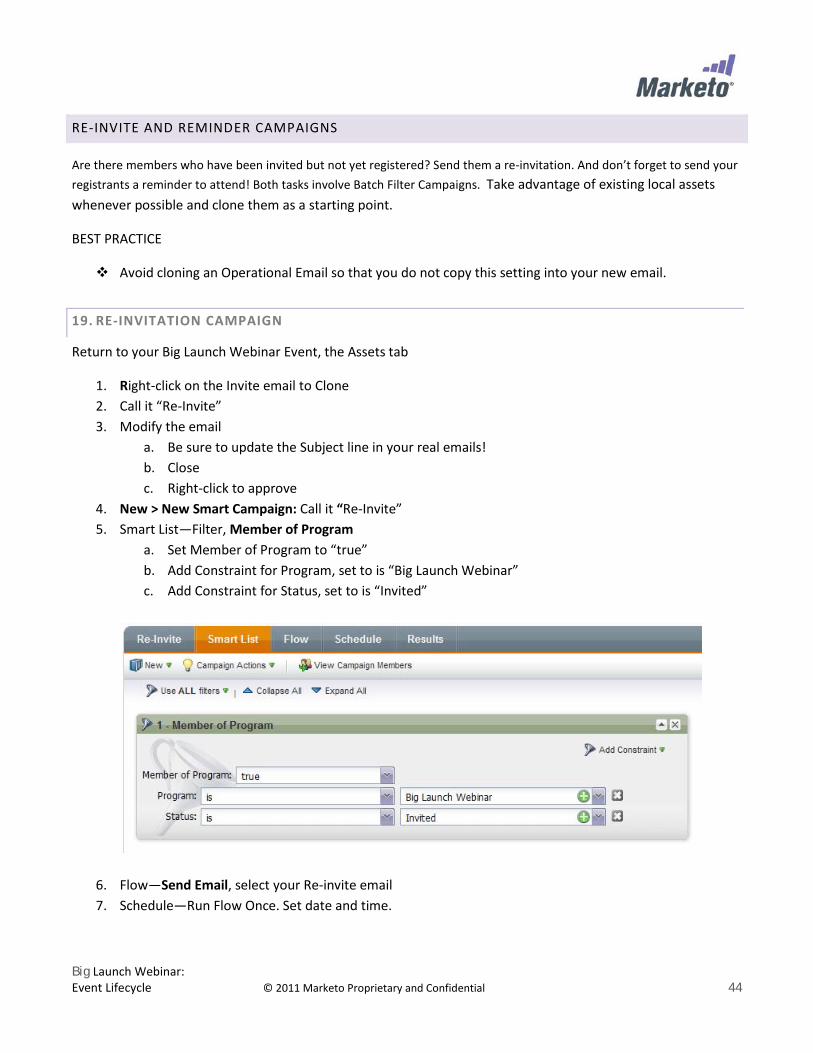
4. New > New Smart Campaign: Call it “Re-Invite” 5. Smart List—Filter, Member of Program
a. Set Member of Program to “true” b. Add Constraint for Program, set to is “Big Launch Webinar” c. Add Constraint for Status, set to is “Invited”
6. Flow—Send Email, select your Re-invite email 7. Schedule—Run Flow Once. Set date and time.
Big Launch Webinar: Event Lifecycle © 2011 Marketo Proprietary and Confidential 45
20. REMINDER CAMPAIGN
1. Right-click on the Invite email to Clone 2. Call it “Reminder” email 3. Modify the email
a. Be sure to update the Subject line in your real emails! b. Close c. Right-click to approve
4. New > New Smart Campaign: Call it “Reminder” 5. Smart List—Filter, Member of Program
a. Set Member of Program to “true” b. Add Constraint for Program, set to is “Big Launch Webinar” c. Add Constraint for Status, set to is “Registered”
6. Flow—Send Email, select your Reminder email 7. Schedule—Run Flow Once. Set date and time.
Big Launch Webinar: Event Launch & Review © 2011 Marketo Proprietary and Confidential 46
Big Launch Webinar:
Event Launch & Review
FOLLOW-UPS, REPORTING
Get Started: Navigate to the Marketing Activities and Analytics section of Marketo.
FOLLOW-UP CAMPAIGNS
Make sure you schedule your follow-ups to take place after you’ve had time to update Member status, and any content you wish to share is complete and ready to go. Follow-up communications should be Batch Filter Campaigns, so they can be scheduled to be sent after your post-event work is completed.
21. THANKS FOR ATTENDING
1. Right-click the “Reminder” email to Clone 2. Call it “Thanks for Attending” 3. Modify the email
a. Be sure to update the Subject line in your real emails! b. Close c. Right-click to approve
4. New > New Smart Campaign: “Thanks for Attending” 5. Smart List—Filter, Member of Program
a. Set Member of Program to “true” b. Add Constraint for Program, set to is “Big Launch Webinar” c. Add Constraint for Status, set to is “Attended”
6. Flow—Send Email, select your Thank-you email 7. Schedule—Run Flow Once. Set date and time.
Big Launch Webinar: Event Launch & Review © 2011 Marketo Proprietary and Confidential 47
22. SORRY WE MISSED YOU
Make sure all you first update the Progression Status for all who registered for an Event, but did not attend, to “No Show”.
1. Right-click your Invite email to Clone 2. Call it “Sorry We Missed You” 3. Modify the email
a. Be sure to update the Subject line in your real emails! b. Close c. Right-click to approve
4. New > New Smart Campaign: “Sorry We Missed You” 5. Smart List—Filter, Member of Program
a. Set Member of Program to “true” b. Add Constraint for Program, set to is “Big Launch Webinar” c. Add Constraint for Status, set to is “No Show”
6. Flow—Send Email, select your Sorry email 7. Schedule—Run Flow Once. Set date and time.
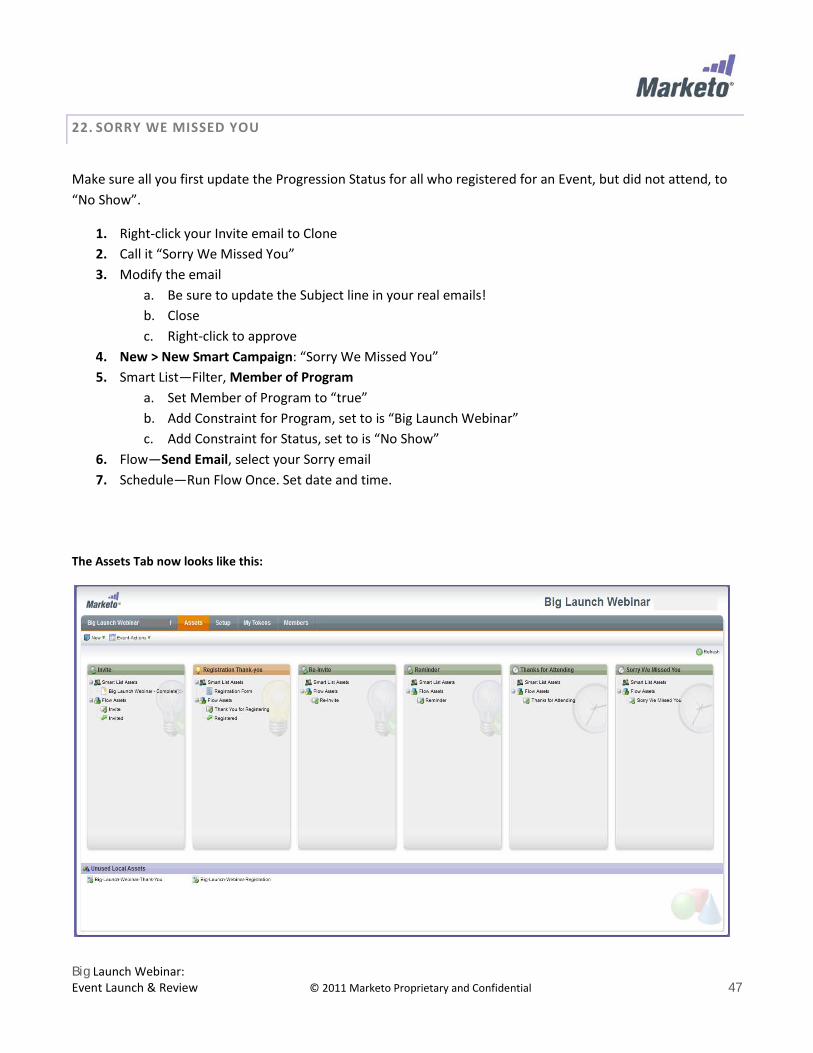
The Assets Tab now looks like this:

Big Launch Webinar: Event Launch & Review © 2011 Marketo Proprietary and Confidential 48
23. RECORD SUCCESS: DOWNLOADED
You’ve now sent out your Webinar content to your attendees and no-show registrants. Those “no-shows” can graduate to being a Successful Member if they download the content!
1. New > New Smart Campaign: “Downloaded” 2. Trigger—Clicks Link in Email, Email is Sorry We Missed You 3. Flow—Change Status in Progression, Status is now Webinar > Downloaded 4. Schedule—Run Flow Once.
The Campaigns for your Big Launch Webinar Event are now complete! Keep your MKTO Training Folder and contents for reference as you continue to use Marketo Lead Management.
Big Launch Webinar: Event Launch & Review © 2011 Marketo Proprietary and Confidential 49
24. EXAMPLE: NURTURING TRACK
With Marketo you can place any leads in a nurturing track to receive multiple emails in a sequence. Start thinking about and sketching out the answers to the following questions: What audience would you want to place in a nurturing Campaign? What types of content would you send?
BEST PRACTICES:
• Create a Program to contain your lead nurturing Campaigns, Channel = Content • For each nurturing Campaign, make sure your Send Email steps in the Flow step are separated by Wait
Steps. This way leads won’t receive the multiple emails at once! • You can even begin the Flow with a Wait step if you wish to let leads “breathe”.
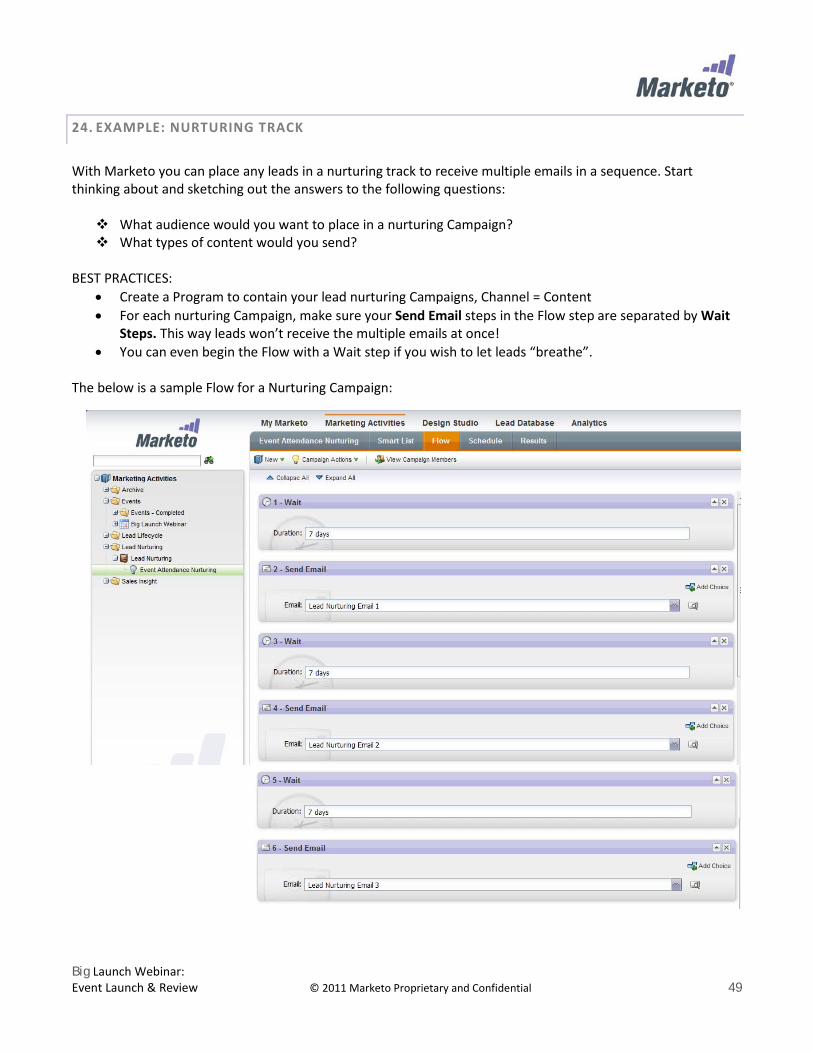
The below is a sample Flow for a Nurturing Campaign:
Big Launch Webinar: Event Launch & Review © 2011 Marketo Proprietary and Confidential 50
REPORTING ON THE WEBINAR
Be sure to use the existing reports as a TEMPLATE: clone and create your own versions of the reports so you can freely edit, and place them in a Folder.
GET STARTED: Navigate to the Analytics Section of Marketo.
25. REPORTS: LEADS BY SOURCE
See the source of your new leads in your Marketo instance; if you have Salesforce, you’ll also be able to see their associated Opportunity information:
1. Program Reports > Leads by Source a. Right-click to clone and create your own Report
2. Report Actions > Report Settings a. Change the time frame
3. Subscriptions > New Report Subscription to set a weekly schedule to receive/distribute this report to others
26. REPORTS: PROGRAM PERFORMANCE OVERVIEW
Review the quantitative performance of your Programs and Events:
1. Program Reports > Program Performance a. Right-click to clone and create your own Report b. Click on Report to see the summary by Program or Event
2. Subscriptions > New Report Subscription to set a monthly schedule to receive/distribute this report to others
Revenue Cycle Modeler: Visualize & Measure Lead Stage © 2011 Marketo Proprietary and Confidential 51
Revenue Cycle Modeler:
Visualize & Measure Lead Stage
REPORT ON LEAD STATUS
Get Started: Navigate to the Analytics Tab and click on the Revenue Modeler.
BUILD A SIMPLE REVENUE MODEL
The Marketo Lead Management Revenue Model is a reporting tool that helps visualize how leads come in to your organization and shows how they progress through the sales cycle. Building a Revenue Model is an exercise that Sales and Marketing should do together. Marketo Revenue Modeler brings:
• Alignment—facilitates the conversation between Marketing to Sales on how leads pass from new to closed-won
• Metrics—it shows how leads move through stages and permits waterfall reporting on lead stage and phase
Revenue Cycle Modeler: Visualize & Measure Lead Stage © 2011 Marketo Proprietary and Confidential 52
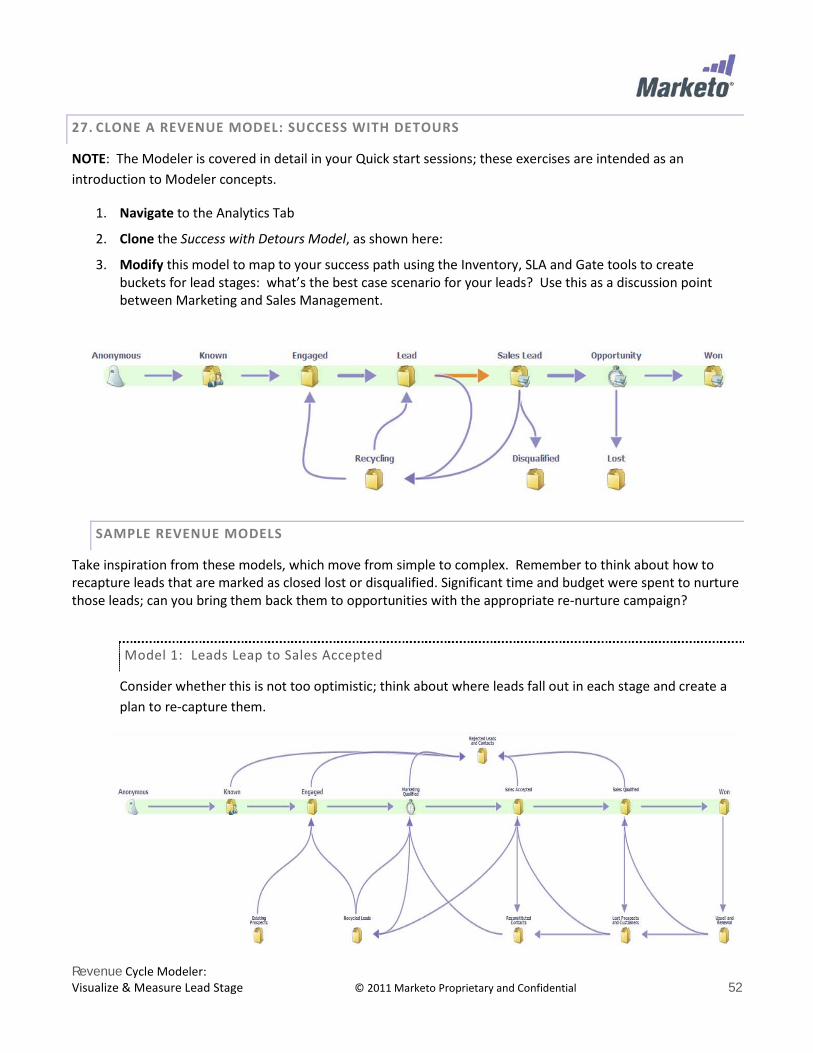
27. CLONE A REVENUE MODEL: SUCCESS WITH DETOURS
NOTE: The Modeler is covered in detail in your Quick start sessions; these exercises are intended as an introduction to Modeler concepts.
1. Navigate to the Analytics Tab
2. Clone the Success with Detours Model, as shown here:
3. Modify this model to map to your success path using the Inventory, SLA and Gate tools to create buckets for lead stages: what’s the best case scenario for your leads? Use this as a discussion point between Marketing and Sales Management.
SAMPLE REVENUE MODELS
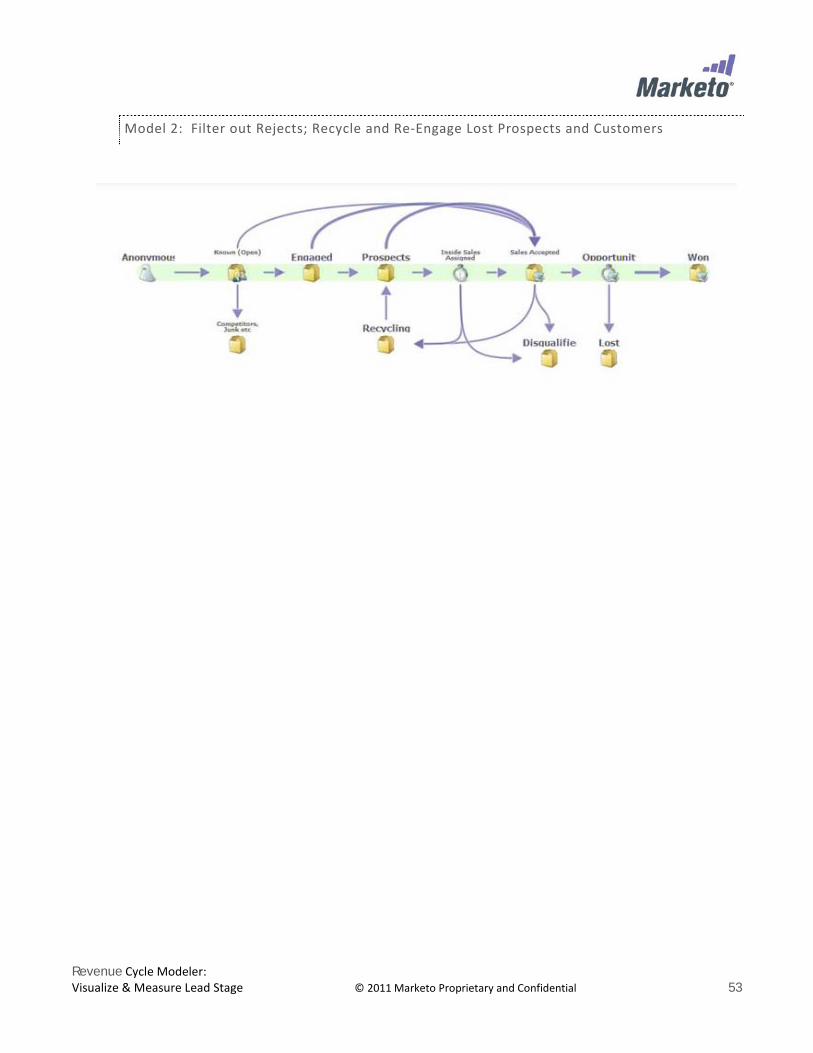
Take inspiration from these models, which move from simple to complex. Remember to think about how to recapture leads that are marked as closed lost or disqualified. Significant time and budget were spent to nurture those leads; can you bring them back them to opportunities with the appropriate re-nurture campaign?
Model 1: Leads Leap to Sales Accepted
Consider whether this is not too optimistic; think about where leads fall out in each stage and create a plan to re-capture them.
Revenue Cycle Modeler: Visualize & Measure Lead Stage © 2011 Marketo Proprietary and Confidential 53
Model 2: Filter out Rejects; Recycle and Re-Engage Lost Prospects and Customers
Resources © 2011 Marketo Proprietary and Confidential 54
Resources
MARKETO CUSTOMER COMMUNITY
Our Customer Community is available 24/7 to help you reach Marketo stardom!
Take advantage of all our help content, and interact with other Marketo users, partners, and employees around the world.
Knowledge Base: articles, videos, and tutorials Technical Support: create and track technical support tickets Tutorials on many topics Ideas: share and vote on product ideas Discussion: post questions and answers Marketo University: access information on our entire curriculum Marketo Masters Webinar Series: recorded sessions and subscription
RESOURCES SECTION ON MARKETO.COM
Visit our Resources section for all of our best practices and tools to maximize your B2B marketing and sales effectiveness!
To give feedback on this Exercise Guide, please send comments to [email protected].