Embed Size (px)
Citation preview
Free Children’s Knitting Patterns from
KnittingDaily:
9 Free Knitting Patterns
for Children
©F+W Media, Inc. | All rights reserved | F+W Media grants permission for any or all pages in this issue to be copied for personal use | www.knittingdaily.com 2
FREE CHILDREN’S KNITTING PATTERNS FROM KNITTINGDAILY:
9 FREE KNITTING PATTERNS FOR CHILDREN
A Knitting Daily eBook edited by
Kathleen Cubley
E D I T O R I A L S T A F F
EDITOR, KNITTING DAILY Kathleen Cubley
C R E A T I V E S E R V I C E S
PRODUCTION DESIGNER Janice TapiaPHOTOGRAPHY As noted
ILLUSTRATION Gayle Ford
Projects and information are for inspiration and personal use only. Interweave Knits and Knitting Daily do not recommend, approve, or endorse any of the advertisers, products, services, or views advertised in this publication. Nor does Knits or Knitting Daily evaluate the advertisers’ claims in any way. You should, therefore, use your own judgment in evalu ating the advertisers, products, services, and views advertised in Knits or Knitting Daily.
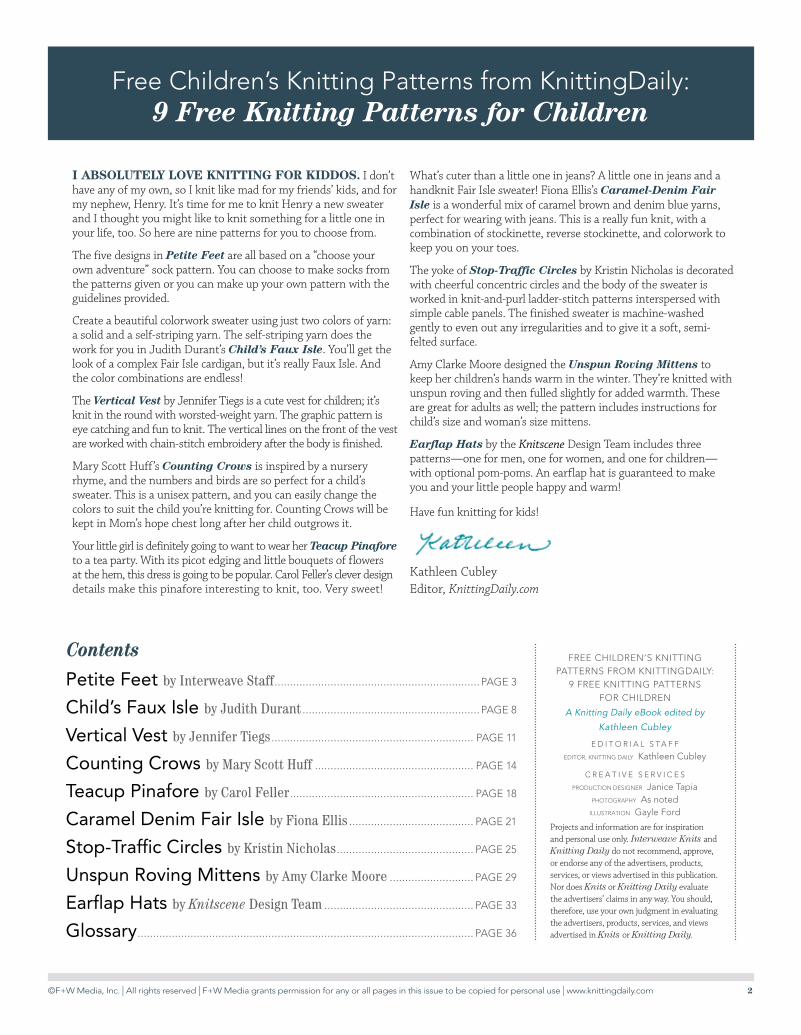
Contents
Petite Feet by Interweave Staff ..................................................................PAGE 3
Child’s Faux Isle by Judith Durant .........................................................PAGE 8
Vertical Vest by Jennifer Tiegs ................................................................. PAGE 11
Counting Crows by Mary Scott Huff ................................................... PAGE 14
Teacup Pinafore by Carol Feller ........................................................... PAGE 18
Caramel Denim Fair Isle by Fiona Ellis ........................................ PAGE 21
Stop-Traffic Circles by Kristin Nicholas ............................................ PAGE 25
Unspun Roving Mittens by Amy Clarke Moore ........................... PAGE 29
Earflap Hats by Knitscene Design Team ................................................ PAGE 33
Glossary ............................................................................................................ PAGE 36
Free Children’s Knitting Patterns from KnittingDaily: 9 Free Knitting Patterns for Children
I ABSOLUTELY LOVE KNITTING FOR KIDDOS. I don’t have any of my own, so I knit like mad for my friends’ kids, and for my nephew, Henry. It’s time for me to knit Henry a new sweater and I thought you might like to knit something for a little one in your life, too. So here are nine patterns for you to choose from.
The five designs in Petite Feet are all based on a “choose your own adventure” sock pattern. You can choose to make socks from the patterns given or you can make up your own pattern with the guidelines provided.
Create a beautiful colorwork sweater using just two colors of yarn: a solid and a self-striping yarn. The self-striping yarn does the work for you in Judith Durant’s Child’s Faux Isle. You’ll get the look of a complex Fair Isle cardigan, but it’s really Faux Isle. And the color combinations are endless!
The Vertical Vest by Jennifer Tiegs is a cute vest for children; it’s knit in the round with worsted-weight yarn. The graphic pattern is eye catching and fun to knit. The vertical lines on the front of the vest are worked with chain-stitch embroidery after the body is finished.
Mary Scott Huff’s Counting Crows is inspired by a nursery rhyme, and the numbers and birds are so perfect for a child’s sweater. This is a unisex pattern, and you can easily change the colors to suit the child you’re knitting for. Counting Crows will be kept in Mom’s hope chest long after her child outgrows it.
Your little girl is definitely going to want to wear her Teacup Pinafore to a tea party. With its picot edging and little bouquets of flowers at the hem, this dress is going to be popular. Carol Feller’s clever design details make this pinafore interesting to knit, too. Very sweet!
What’s cuter than a little one in jeans? A little one in jeans and a handknit Fair Isle sweater! Fiona Ellis’s Caramel-Denim Fair Isle is a wonderful mix of caramel brown and denim blue yarns, perfect for wearing with jeans. This is a really fun knit, with a combination of stockinette, reverse stockinette, and colorwork to keep you on your toes.
The yoke of Stop-Traffic Circles by Kristin Nicholas is decorated with cheerful concentric circles and the body of the sweater is worked in knit-and-purl ladder-stitch patterns interspersed with simple cable panels. The finished sweater is machine-washed gently to even out any irregularities and to give it a soft, semi-felted surface.
Amy Clarke Moore designed the Unspun Roving Mittens to keep her children’s hands warm in the winter. They’re knitted with unspun roving and then fulled slightly for added warmth. These are great for adults as well; the pattern includes instructions for child’s size and woman’s size mittens.
Earflap Hats by the Knitscene Design Team includes three patterns—one for men, one for women, and one for children—with optional pom-poms. An earflap hat is guaranteed to make you and your little people happy and warm!
Have fun knitting for kids!
Kathleen Cubley Editor, KnittingDaily.com
©F+W Media, Inc. | All rights reserved | F+W Media grants permission for any or all pages in this issue to be copied for personal use | www.knittingdaily.com 3
The following sock pattern comes from Ann Budd’s The Knitter’s Handy Book of Patterns (Interweave, 2002) and is a choose-your-own-ending formula. Determine the finished size of your sock and the gauge (based on your yarn and needles); then follow the instructions using the correct numbers from each table. You can use the basic pattern here to work a plain sock with a ribbed cuff or integrate the directions with the following five “recipe” patterns. Each recipe lists the materials needed for that sock design, then directs you how to work the sock by referring back to the basic pattern.
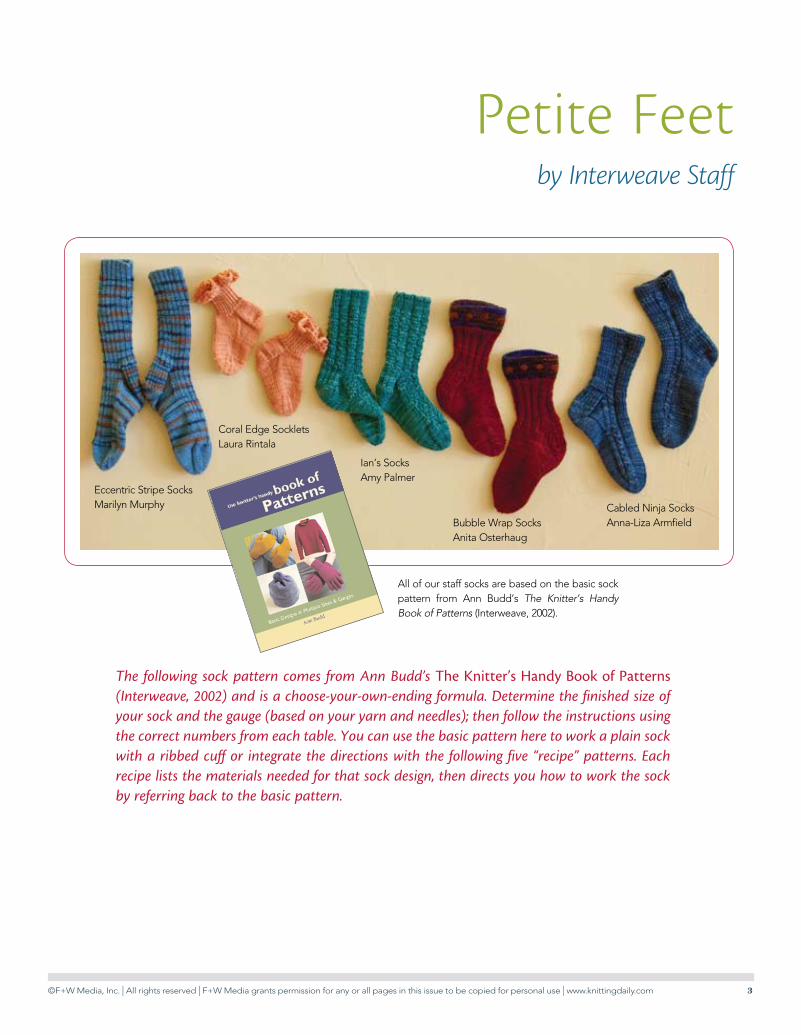
Petite Feetby Interweave Staff
Eccentric Stripe SocksMarilyn Murphy
Coral Edge SockletsLaura Rintala
Ian’s SocksAmy Palmer
Bubble Wrap SocksAnita Osterhaug
Cabled Ninja SocksAnna-Liza Armfield
All of our staff socks are based on the basic sock pattern from Ann Budd’s The Knitter’s Handy Book of Patterns (Interweave, 2002).
©F+W Media, Inc. | All rights reserved | F+W Media grants permission for any or all pages in this issue to be copied for personal use | www.knittingdaily.com 4
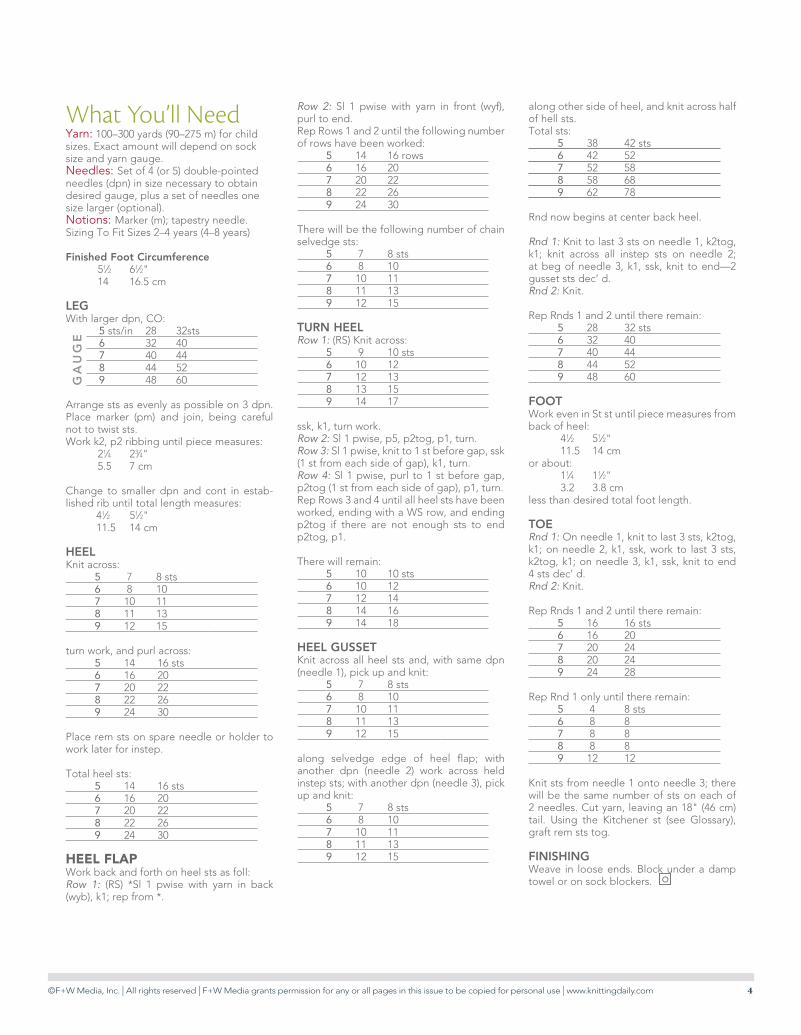
What You’ll NeedYarn: 100–300 yards (90–275 m) for child sizes. Exact amount will depend on sock size and yarn gauge. Needles: Set of 4 (or 5) double-pointed needles (dpn) in size necessary to obtain desired gauge, plus a set of needles one size larger (optional).Notions: Marker (m); tapestry needle.Sizing To Fit Sizes 2–4 years (4–8 years)
Finished Foot Circumference 51⁄2 61⁄2" 14 16.5 cm
LEGWith larger dpn, CO: 5 sts/in 28 32sts 6 32 40 7 40 44 8 44 52 9 48 60
Arrange sts as evenly as possible on 3 dpn. Place marker (pm) and join, being careful not to twist sts.Work k2, p2 ribbing until piece measures: 21⁄4 23⁄4" 5.5 7 cm
Change to smaller dpn and cont in estab-lished rib until total length measures: 41⁄2 51⁄2" 11.5 14 cm
HEELKnit across: 5 7 8 sts 6 8 10 7 10 11 8 11 13 9 12 15
turn work, and purl across: 5 14 16 sts 6 16 20 7 20 22 8 22 26 9 24 30
Place rem sts on spare needle or holder to work later for instep.
Total heel sts: 5 14 16 sts 6 16 20 7 20 22 8 22 26 9 24 30
HEEL FLAPWork back and forth on heel sts as foll:Row 1: (RS) *Sl 1 pwise with yarn in back (wyb), k1; rep from *.
Row 2: Sl 1 pwise with yarn in front (wyf), purl to end.Rep Rows 1 and 2 until the following number of rows have been worked: 5 14 16 rows 6 16 20 7 20 22 8 22 26 9 24 30
There will be the following number of chain selvedge sts: 5 7 8 sts 6 8 10 7 10 11 8 11 13 9 12 15
TURN HEELRow 1: (RS) Knit across: 5 9 10 sts 6 10 12 7 12 13 8 13 15 9 14 17
ssk, k1, turn work.Row 2: Sl 1 pwise, p5, p2tog, p1, turn.Row 3: Sl 1 pwise, knit to 1 st before gap, ssk (1 st from each side of gap), k1, turn.Row 4: Sl 1 pwise, purl to 1 st before gap, p2tog (1 st from each side of gap), p1, turn.Rep Rows 3 and 4 until all heel sts have been worked, ending with a WS row, and ending p2tog if there are not enough sts to end p2tog, p1.
There will remain: 5 10 10 sts 6 10 12 7 12 14 8 14 16 9 14 18
HEEL GUSSETKnit across all heel sts and, with same dpn (needle 1), pick up and knit: 5 7 8 sts 6 8 10 7 10 11 8 11 13 9 12 15
along selvedge edge of heel flap; with another dpn (needle 2) work across held instep sts; with another dpn (needle 3), pick up and knit: 5 7 8 sts 6 8 10 7 10 11 8 11 13 9 12 15
along other side of heel, and knit across half of hell sts.Total sts: 5 38 42 sts 6 42 52 7 52 58 8 58 68 9 62 78
Rnd now begins at center back heel.
Rnd 1: Knit to last 3 sts on needle 1, k2tog, k1; knit across all instep sts on needle 2; at beg of needle 3, k1, ssk, knit to end—2 gusset sts dec’ d.Rnd 2: Knit.
Rep Rnds 1 and 2 until there remain: 5 28 32 sts 6 32 40 7 40 44 8 44 52 9 48 60
FOOTWork even in St st until piece measures from back of heel: 41⁄2 51⁄2" 11.5 14 cmor about: 11⁄4 11⁄2" 3.2 3.8 cmless than desired total foot length.
TOERnd 1: On needle 1, knit to last 3 sts, k2tog, k1; on needle 2, k1, ssk, work to last 3 sts, k2tog, k1; on needle 3, k1, ssk, knit to end 4 sts dec’ d.Rnd 2: Knit.
Rep Rnds 1 and 2 until there remain: 5 16 16 sts 6 16 20 7 20 24 8 20 24 9 24 28
Rep Rnd 1 only until there remain: 5 4 8 sts 6 8 8 7 8 8 8 8 8 9 12 12
Knit sts from needle 1 onto needle 3; there will be the same number of sts on each of 2 needles. Cut yarn, leaving an 18" (46 cm) tail. Using the Kitchener st (see Glossary), graft rem sts tog.
FINISHINGWeave in loose ends. Block under a damp towel or on sock blockers. o
GA
UG
E
©F+W Media, Inc. | All rights reserved | F+W Media grants permission for any or all pages in this issue to be copied for personal use | www.knittingdaily.com 5
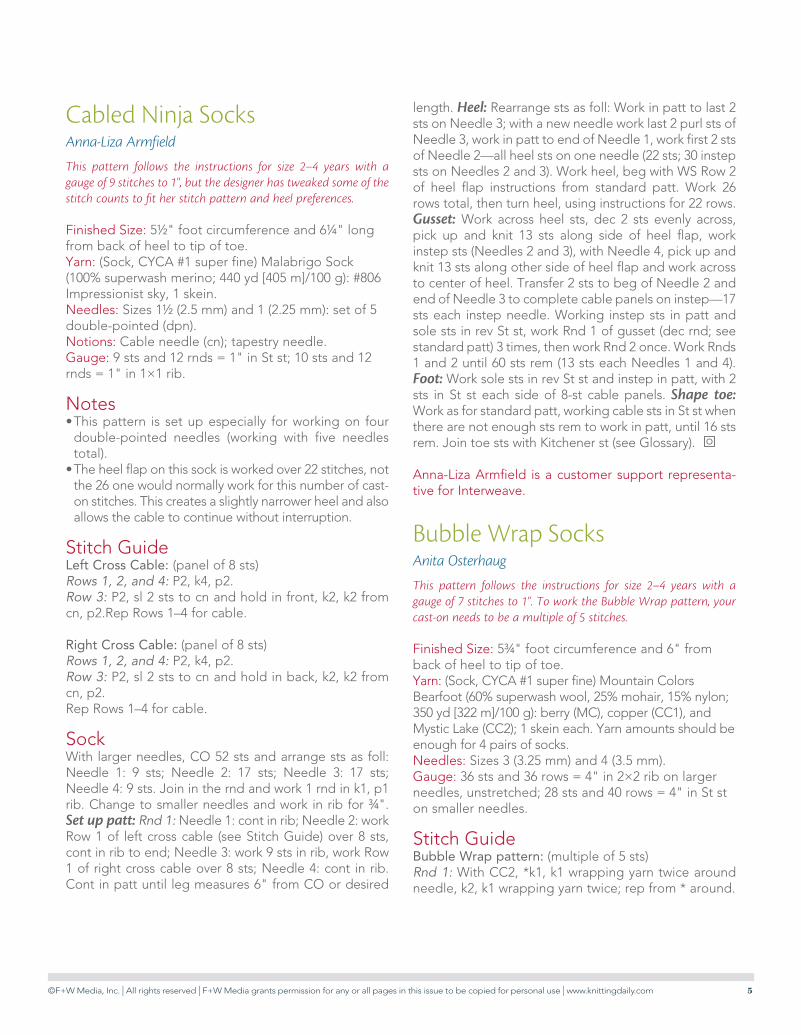
Cabled Ninja SocksAnna-Liza Armfield
This pattern follows the instructions for size 2–4 years with a gauge of 9 stitches to 1", but the designer has tweaked some of the stitch counts to fit her stitch pattern and heel preferences.
Finished Size: 5½" foot circumference and 6¼" long from back of heel to tip of toe. Yarn: (Sock, CYCA #1 super fine) Malabrigo Sock (100% superwash merino; 440 yd [405 m]/100 g): #806 Impressionist sky, 1 skein.Needles: Sizes 1½ (2.5 mm) and 1 (2.25 mm): set of 5 double-pointed (dpn).Notions: Cable needle (cn); tapestry needle.Gauge: 9 sts and 12 rnds = 1" in St st; 10 sts and 12 rnds = 1" in 1×1 rib.
Notes• This pattern is set up especially for working on four
double-pointed needles (working with five needles total).
• The heel flap on this sock is worked over 22 stitches, not the 26 one would normally work for this number of cast-on stitches. This creates a slightly narrower heel and also allows the cable to continue without interruption.
Stitch GuideLeft Cross Cable: (panel of 8 sts)Rows 1, 2, and 4: P2, k4, p2.Row 3: P2, sl 2 sts to cn and hold in front, k2, k2 from cn, p2.Rep Rows 1–4 for cable.
Right Cross Cable: (panel of 8 sts)Rows 1, 2, and 4: P2, k4, p2.Row 3: P2, sl 2 sts to cn and hold in back, k2, k2 from cn, p2.Rep Rows 1–4 for cable.
SockWith larger needles, CO 52 sts and arrange sts as foll: Needle 1: 9 sts; Needle 2: 17 sts; Needle 3: 17 sts; Needle 4: 9 sts. Join in the rnd and work 1 rnd in k1, p1 rib. Change to smaller needles and work in rib for ¾". Set up patt: Rnd 1: Needle 1: cont in rib; Needle 2: work Row 1 of left cross cable (see Stitch Guide) over 8 sts, cont in rib to end; Needle 3: work 9 sts in rib, work Row 1 of right cross cable over 8 sts; Needle 4: cont in rib. Cont in patt until leg measures 6" from CO or desired
length. Heel: Rearrange sts as foll: Work in patt to last 2 sts on Needle 3; with a new needle work last 2 purl sts of Needle 3, work in patt to end of Needle 1, work first 2 sts of Needle 2—all heel sts on one needle (22 sts; 30 instep sts on Needles 2 and 3). Work heel, beg with WS Row 2 of heel flap instructions from standard patt. Work 26 rows total, then turn heel, using instructions for 22 rows. Gusset: Work across heel sts, dec 2 sts evenly across, pick up and knit 13 sts along side of heel flap, work instep sts (Needles 2 and 3), with Needle 4, pick up and knit 13 sts along other side of heel flap and work across to center of heel. Transfer 2 sts to beg of Needle 2 and end of Needle 3 to complete cable panels on instep—17 sts each instep needle. Working instep sts in patt and sole sts in rev St st, work Rnd 1 of gusset (dec rnd; see standard patt) 3 times, then work Rnd 2 once. Work Rnds 1 and 2 until 60 sts rem (13 sts each Needles 1 and 4). Foot: Work sole sts in rev St st and instep in patt, with 2 sts in St st each side of 8-st cable panels. Shape toe: Work as for standard patt, working cable sts in St st when there are not enough sts rem to work in patt, until 16 sts rem. Join toe sts with Kitchener st (see Glossary). o
Anna-Liza Armfield is a customer support representa-tive for Interweave.
Bubble Wrap SocksAnita Osterhaug
This pattern follows the instructions for size 2–4 years with a gauge of 7 stitches to 1". To work the Bubble Wrap pattern, your cast-on needs to be a multiple of 5 stitches.
Finished Size: 5¾" foot circumference and 6" from back of heel to tip of toe. Yarn: (Sock, CYCA #1 super fine) Mountain Colors Bearfoot (60% superwash wool, 25% mohair, 15% nylon; 350 yd [322 m]/100 g): berry (MC), copper (CC1), and Mystic Lake (CC2); 1 skein each. Yarn amounts should be enough for 4 pairs of socks.Needles: Sizes 3 (3.25 mm) and 4 (3.5 mm). Gauge: 36 sts and 36 rows = 4" in 2×2 rib on larger needles, unstretched; 28 sts and 40 rows = 4" in St st on smaller needles.
Stitch GuideBubble Wrap pattern: (multiple of 5 sts)Rnd 1: With CC2, *k1, k1 wrapping yarn twice around needle, k2, k1 wrapping yarn twice; rep from * around.
©F+W Media, Inc. | All rights reserved | F+W Media grants permission for any or all pages in this issue to be copied for personal use | www.knittingdaily.com 6
Rnd 2: With CC1, *(k1, yo, k1, yo, k1) all in same st, sl 1 (dropping extra loop), k2, sl 1 (dropping extra loop); rep from * around.Rnds 3 and 4: With CC1, *p5, sl 1, k2, sl 1; rep from * around.Rnd 5: With CC1, *k2tog, k3tog, pass st over (k2tog st over k3tog st), sl 1, k2, sl 1; rep from * around.Rnd 6: With CC2, *k1, drop first elongated st off needle, sl 2, drop 2nd elongated st, with left needle pick up first elon-gated st, sl 2 sts from right needle to left needle, pick up 2nd elongated st with left needle (the 2 elongated sts will now be crossed over the 2 normal sts), k4; rep from * around.
SockFacing: With larger needles and CC2, CO according to standard patt and work 12 rnds in St st. Purl 1 rnd (turning rnd). Cuff: Knit 5 rnds. Work Rnds 1–6 of Bubble Wrap patt (see Stitch Guide). With CC2, knit 5 rnds. Leg: Change to MC and knit 1 rnd. Work in k2, p2 rib with MC to achieve desired leg length (see standard patt), changing to smaller needles when leg, measured from turning rnd, equals one half of total length. Work remainder of sock using smaller needles and MC in St st, foll standard patt.
FinishingFold facing to WS. With CC2, sew facing loosely along last rnd of CC2 before rib beg. o
Anita Osterhaug is associate editor of Handwoven magazine.
Ian’s SocksAmy Palmer
This pattern follows the instructions for size 2–4 years with a gauge of 6 stitches to 1". To work the rib patterns, your cast-on needs to be a multiple of 4 stitches.
Finished Size: 5¼" foot circumference and 5½" long from back of heel to tip of toe.Yarn: (Worsted weight, CYCA #4 medium) Art yarns Supermerino (100% superwash merino; 104 yd [95 m]/50 g): #223 blue, 1 skein.Needles: Size 5 (3.75 mm). gauge 12 sts and 16½ rnds = 2" in St st; 16 sts and 20 rnds = 2" in woven rib patt.
Stitch Guide3×1 rib: (multiple of 4 sts)All rnds: *K3, p1; rep from * around.Woven rib pattern: (multiple of 4 sts)
Rnd 1: *Sl 1 pwise with yarn in front (wyf), k1, sl 1 pwise wyf, p1; rep from * around.Rnds 2 and 4: *K3, p1; rep from * around.Rnd 3: *K1, sl 1 pwise wyf, k1, p1; rep from * around.Rep Rnds 1–4 for patt.
SockFoll standard patt, CO and work in 3×1 rib (see Stitch Guide) for 1". Work Rnds 1–4 of woven rib patt (see Stitch Guide) 9 times—leg measures 4½" from CO. Work to end as for standard patt, working instep sts in woven rib patt and sole and toe sts in St st. o
Amy Palmer is assistant editor for the Interweave Yarn Group, which includes Interweave Knits and Interweave Crochet magazines.
Eccentric Stripe SocksMarilyn Murphy
This pattern follows the instructions for size 4–8 years with a gauge of 9 stitches to 1". To work with the 2×2 rib pattern, your cast-on needs to be a multiple of 4 stitches.
Finished Size: 5½" foot circumference and 6" long from back of heel to tip of toe. Yarn: (Sock, CYCA #1 super fine) Lorna’s Laces Shepherd Sock (80% superwash wool, 20% nylon; 215 yd [197 m]/100 g): pond blue (MC) and jeans (CC), 1 skein each.Needles: Size 0 (2 mm). Gauge: 9 sts and 14 rnds = 1" in St st; 16 sts and 13 rnds = 1" in 2×2 rib.
Notes• Use a jogless join when changing colors as follows: Work
one round in the new color. On the second round, slip the first stitch purlwise, then work the rest of the round in pattern. Work subsequent rounds in pattern.
• Stripe Sequence: In pattern, work *3 rnds CC, 3 rnds MC; rep from *.
SockWith MC and foll standard patt, CO and work 8 rnds in k2, p2 (2×2) rib. Cont in rib, change to stripe sequence (see Notes) for remainder of leg, ending with a MC stripe. Change to CC and work heel using CC only. Gusset: Change to stripe sequence (working first 3 rnds with CC) and work heel and gusset sts in St st, cont instep sts in rib. When gusset is completed, cont foot in patt (St st on sole sts; rib on instep sts) to beg of toe
©F+W Media, Inc. | All rights reserved | F+W Media grants permission for any or all pages in this issue to be copied for personal use | www.knittingdaily.com 7
shaping. Toe: Change to St st and MC on all sts and shape toe and finish socks as for standard patt. o
Marilyn Murphy is consulting executive editor of Interweave Knits.
Coral Edge SockletsLaura Rintala
This pattern follows the instructions for size 4‒8 years with a gauge of 6 stitches to 1". Because of the yarn used, the sock won’t actually measure 61⁄2" circumference; the sock will fit a 1–2 year-old. The gauge for the actual sock won’t be 6 stitches to 1", either—the designer has just chosen to use that set of numbers from the standard pattern.
Finished Size: 4½" foot circumference and 4¼" long from back of heel to tip of toe. Yarn: (Sock, CYCA #1 super fine) Hand Jive Nature’s Palette (100% merino; 185 yd [170 m]/50 g) #NP 134 coral bells, 1 skein.Needles: Size 1 (2.25 mm): set of 4 or 5 double-pointed (dpn).Notions: Size C/2 (2.75 mm) crochet hook; tapestry needle.
Gauge: 9 sts and 13 rows = 1" in St st.
SOCKCO and work rib as for standard patt, working leg in rib for 1¼" before beg heel. Foll patt through end of gusset shaping. Foot: Work even in St st until piece measures 3¼" from back of heel. Work toe as for stan-dard patt.
FinishingLace edging: Use crochet hook to work edging (see Glossary for crochet instructions).Rnd 1: Join yarn with sl st to any st on cuff edge, *ch 2, sl st in next st of cuff edge; rep from *, working 35 ch-2 sps evenly around cuff edge, sl st in first cuff edge st to join, turn.Rnd 2: Sl st in first ch-2 sp, *ch 3, sl st in next ch-2 sp; rep from * around, end ch 3, sl st in first ch-2 sp; do not turn.Rnd 3: Sl st in first ch-3 sp, *ch 3, sc in next ch-3 sp; rep from * around, ending sc in first ch-3 sp, sl st to first sl st to join. Fasten off.Weave in all loose ends. Block flat. o
Laura Rintala was the managing editor of Interweave Knits.
©F+W Media, Inc. | All rights reserved | F+W Media grants permission for any or all pages in this issue to be copied for personal use | www.knittingdaily.com 8
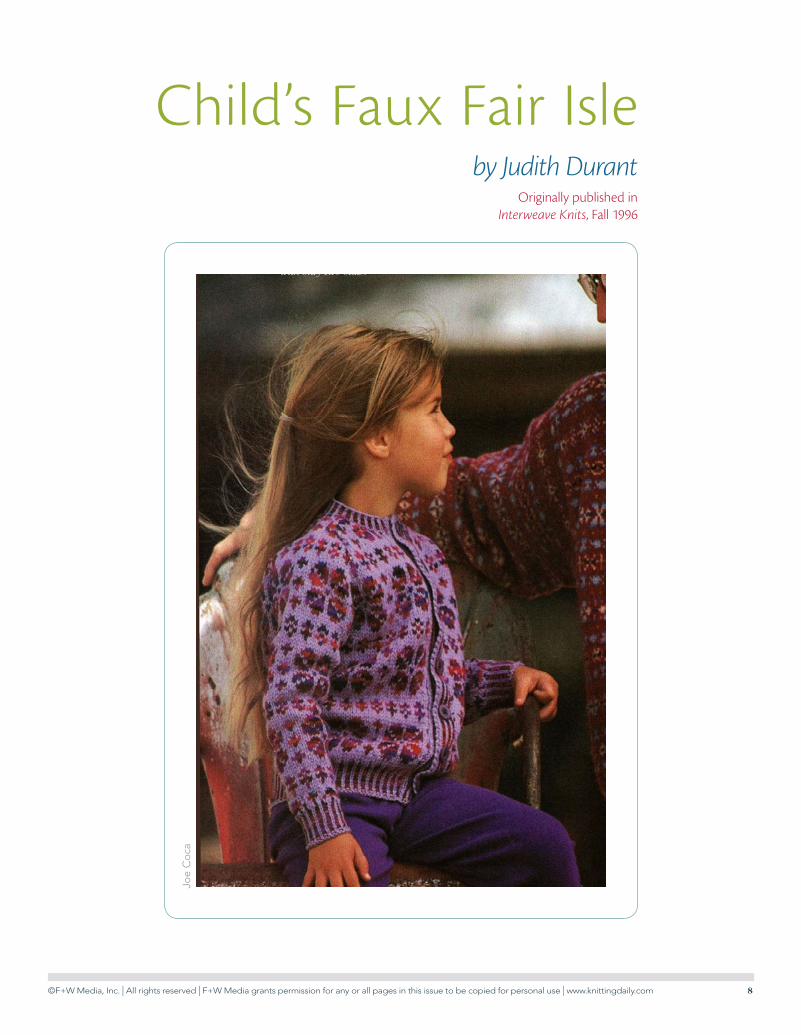
Child’s Faux Fair Isleby Judith Durant
Originally published in Interweave Knits, Fall 1996
Joe
Co
ca

©F+W Media, Inc. | All rights reserved | F+W Media grants permission for any or all pages in this issue to be copied for personal use | www.knittingdaily.com 9
CHILD’S FAUX FAIR ISLEJudith Durant
IF YOU LOVE the effect of colorwork, but dis-like using many balls of yarn, here is an easy way out. Variegated yarn gives the appear-ance of many changes of color while working with only two balls. For this sweater I used a variegated yarn with short repeats—the yarn changes every 3 inches (7.5 cm) or so. Yarn with a longer repeat will give the effect of stripes. Use any Fair Isle pattern that uses the background color in the pattern motif and substitute variegated yarn for all pat-tern stitches.Finished Size: 28" (30", 32") (71 (76, 81) cm) chest circumference. Sweater shown is size 28.
Yarn: Lana Borgosesia Knitaly worsted weight (100% wool; 215 yd (197 m)/ 100 g): #1940 lavender (MC), 2 (3, 3) skeins; Mountain Colors 4/8’s wool (100% wool; 250 yd(228m)/4 oz): Lo-ganberry (CC), 2 skeins.
Needles: Body—Size 8 (5mm). Rib-bings—Size 6 (4mm). Adjust needle size if necessary to obtain gauge.
Notions: Stitch holders; seven 3/4" (2 cm) buttons.
Gauge: 18 sts and 22 rows = 4" (10 cm) in St st on larger needle.Abbreviations:M1: k into the back of the running thread between the st just worked and the next st.1 × 1 Variegated RibbingSet-up row: (WS) With MC, p1, *with
CC, p1, with MC, p1; rep from *.Row 1: K1 MC, *p1 CC, k1 MC; rep from
*.Row 2: P1 MC, *k1 CC, p1 MC; rep from
*. Rep these 2 rows for pattern.• Back: With smaller needles and MC, CO 61 (65, 69) sts. Work 1 × 1 Varie-
gated Ribbing for 2" (5 cm), ending on RS row. Increase rnd: With WS and MC, p8 (10, 4), *M1, p15 (15, 12); rep from * 2 (2, 4) more times, end M1, p8 (10, 5)—65 (69, 75) sts. Change to larger needles. Beg as indicated, follow chart until piece mea-sures 101⁄ 2 (111⁄ 2, 13)" (26.5 (29, 33) cm) from beginning. Shape raglan: BO 2 (2, 3) sts at beg of next 2 rows—61 (65, 69) sts rem. Dec 1 st at beg and end of every other row 19 (20, 21) times—23 (25, 27) sts rem. Place sts on holder.• Left Front: With MC and smaller needles, CO 29 (31, 33) sts. Work 1 × 1 Variegated Ribbing for 2" (5 cm), end-ing on RS row. Increase rnd: With WS facing, and MC, p1 (3, 3), *M1, p7 (7, 6); rep from * 3 (3, 4) more times—33 (35, 38) sts. Change to larger needles. Beg as indicated, follow chart until piece measures 101⁄ 2 (111⁄ 2, 13) “ (26.5 (29, 33) cm) from beg, ending on same row as for back. Shape raglan: BO 2 (2, 3) sts at beg of next row—31 (33, 35) sts rem. Work to end of row. P1 row. Dec 1 st at beg of every other row 13 (14, 15) times, ending on a RS row—18 (19, 20) sts rem. At beg of next row, p5 (6, 7) and place on holder for neck, purl rem 13 sts. Con-tinue to work decs at armhole edge every other row 6 more times, and at the same time, dec 1 st at neck edge every RS row 6 times. BO last st.• Right Front: Work as for Left Front, beg as indicated, and reverse shaping.• Sleeves: With smaller needles and MC, CO 31 (33, 35) sts. Work 1 × 1 Variegated Ribbing for 11⁄ 4 (11⁄ 2, 2)" (4 (4, 5) cm), ending on RS row. Increase rnd: With WS fac-ing and MC, p6 (7, 5), *M1, p4 (4, 5); rep from * 5 more times, end p1 (2, 0)—37 (39, 41) sts. Change to larger needles. Beg as indicated, follow chart and at the same time, inc 1 st beg and end of every 14th (14th, 11th) row 4 (4, 5) times—45 (47, 51) sts. Work 60 (60, 59) rows total or until piece measures 12 (121⁄ 2, 13)" (30.5 (32, 33) cm) from beg. End same row as for back. BO 2 (2, 3) sts at beg of next two rows—41
(43, 45) sts rem. Dec 1 st at beg and end of every other row 19 (20, 21) times—3 sts rem. Place on holder.• Finishing: Block pieces, omitting rib-bing. Sew raglan seams. Sew side and sleeve seams. Neck Band: With smaller needles, MC, and RS facing, beg at right front, k5 (6, 7) sts from right front holder, pick up and knit 9 sts along right neck edge, k3 from sleeve holder, k23 (25, 27) back neck sts, k3 from sleeve holder, pick up and knit 9 along left neck edge, k5 (6, 7) sts from left front holder—57 (61, 65) sts. Work 1 × 1 Variegated Ribbing for 1" (2.5 cm). BO loosely in rib with MC. Button Band: With smaller needles and MC, CO 9 sts. Set-up row: (WS) With MC, k1, p1, *with CC, p1, with MC, p1; rep from * 2 more times, end with MC, k1. Row 1: K2 MC, * p1 CC, k1 MC; rep from * 2 more times, k1 MC. Row 2: K1 MC, p1 MC, * k1 CC, p1 MC, rep from * 1 more time, k1 CC, p1 MC, k1 MC. Rep these 2 rows until band is same row length as front edge of sweater. Sew band in place. Mark position for 7 buttons on button band, the fi rst 1" (2.5 cm) above lower edge, the last 1/2" (1.5 cm) from top of neckband, and 5 more evenly spaced between. Buttonhole Band: Work as for Button Band making buttonholes oppo-site markers as follows: 1st buttonhole row: (RS) Rib 3, BO 3, rib to end. 2nd button-hole row: (WS) Rib to end, casting on 3 sts over bound off sts in previous row.Sew bands in place. Sew on buttons. Y
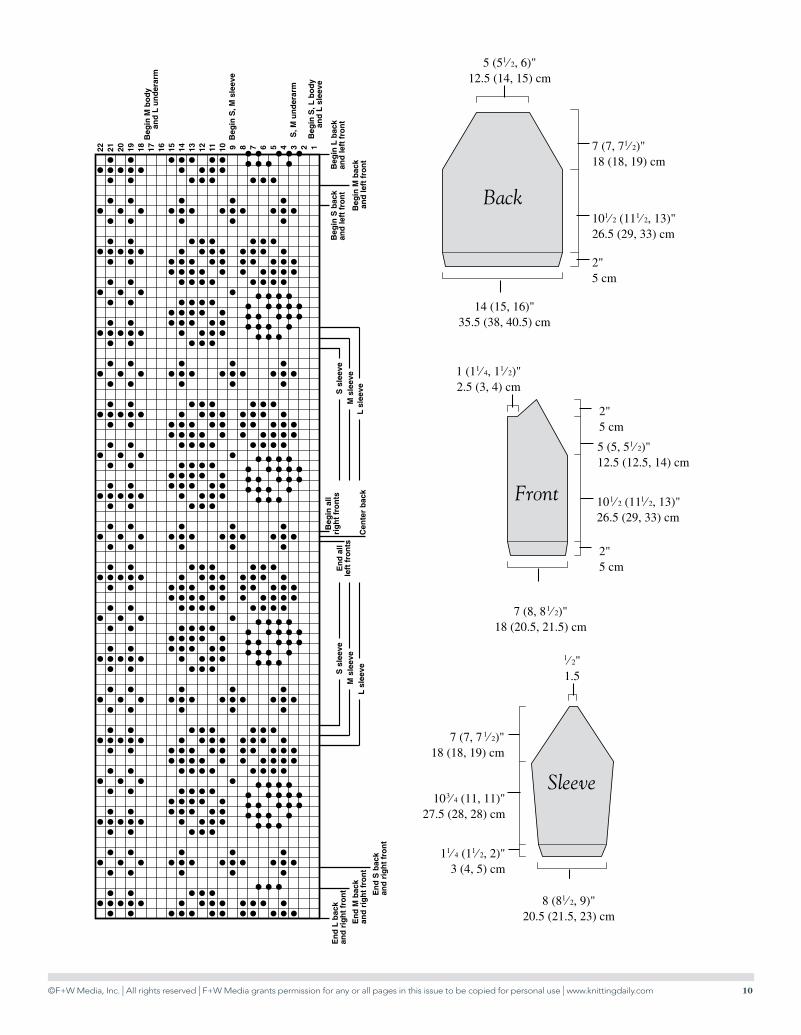
5 (51⁄ 2, 6)"12.5 (14, 15) cm
14 (15, 16)"35.5 (38, 40.5) cm
101⁄ 2 (111⁄ 2, 13)"26.5 (29, 33) cm
7 (7, 71⁄ 2)"18 (18, 19) cm
2"5 cm
Back
1 (11⁄ 4, 11⁄ 2)"2.5 (3, 4) cm
2"5 cm
2"5 cm
101⁄ 2 (111⁄ 2, 13)"26.5 (29, 33) cm
5 (5, 51⁄ 2)"12.5 (12.5, 14) cm
7 (8, 81⁄ 2)"18 (20.5, 21.5) cm
Front
7 (7, 7 1⁄ 2)"18 (18, 19) cm
103⁄ 4 (11, 11)"27.5 (28, 28) cm
11⁄ 4 (11⁄ 2, 2)"3 (4, 5) cm
8 (81⁄ 2, 9)"20.5 (21.5, 23) cm
1⁄ 2"1.5
Sleeve
Yarn with a long color repeat will produce a striped pattern.
Dale of Norway “Heilo” 100% wool 109 yd (100 m)/50g Brown Sheep
“Handpainted Originals”
Yarn Swap
©F+W Media, Inc. | All rights reserved | F+W Media grants permission for any or all pages in this issue to be copied for personal use | www.knittingdaily.com 10
10 9 8 7 6 5 3 14 2111213141516171819202122
Beg
in S
, L b
od
y
an
d L
sle
eve
Beg
in S
, M s
leev
e
Beg
in M
bo
dy
a
nd
L u
nd
erar
m
S, M
un
der
arm
Cen
ter
bac
k
Beg
in L
bac
kan
d le
ft f
ron
tB
egin
S b
ack
and
left
fro
nt
Beg
in M
bac
k a
nd
left
fro
nt
En
d a
ll le
ft f
ron
ts
Beg
in a
llri
gh
t fr
on
tsE
nd
L b
ack
and
rig
ht
fro
nt
En
d M
bac
kan
d r
igh
t fr
on
t
En
d S
bac
kan
d r
igh
t fr
on
t
L sl
eeve
M s
leev
eS
sle
eve
L sl
eeve
M s
leev
eS
sle
eve
●●●
●●
●
●●
●●
●
●●
●●
●●
●
●
●●
●
●●
●
●
●
●
●
●●
●
●●
●
●
●
●
●
●
●
●
●
● ●
●
●
●
●
●
● ●
●
● ●
●
●
●
●
●
●
●
●
●● ●
●●
●
●●
● ●
●
● ●
●●
●●
●
●
●●
●
●
●●
● ● ●
●●
● ● ●
●●
● ●
●
●●
● ● ●
●●
● ● ●
●●
● ●
●●●
●●
●
●●
●●
●
●●
●●
●●
●
●
●●
●
●●
●
●
●
●
●
●●
●
●●
●
●
●
●
●
●
●
●
●
● ●
●
●
●
●
●
● ●
●
● ●
●
●
●
●
●
●
●
●
●● ●
●●
●
●●
● ●
●
● ●
●●
●●
●
●
●●
●
●
●●
● ● ●
●●
● ● ●
●●
● ●
●●●
●●
●
●●
●●
●
●●
●●
●●
●
●
●●
●
●●
●
●
●
●
●
●●
●
●●
●
●
●
●
●
●
●
●
●
● ●
●
●
●
●
●
● ●
●
● ●
●
●
●
●
●
●
●
●
●● ●
●●
●
●●
● ●
●
● ●
●●
●●
●
●
●●
●
●
●●
● ● ●
●●
● ● ●
●●
● ●
●●●
●●
●
●●
●●
●
●●
●●
●●
●
●
●●
●
●●
●
●
●
●
●
●●
●
●●
●
●
●
●
●
●
●
●
●
● ●
●
●
●
●
●
● ●
●
● ●
●
●
●
●
●
●
●
●
●● ●
●●
●
●●
● ●
●
● ●
●●
●●
●
●
●●
●
●
●●
● ● ●
●●
● ● ●
●●
● ●
●● ● ● ●●
● ●●●● ●
● ●●● ●● ● ●
● ●●● ●● ● ●
●●
●
●
●●
● ●
●
●●●
●
●
●●
●
●
●●
● ●
●
●●●
●
●
●●
●
●
●●
● ●
●
●●●
●
●
●●
●
●
●●
● ●
●
●●●
●
●
●●
●
●
●●
● ●
●
●●●
●
●
●●
●
●
●●
● ●
●
●●●
●
●
●●
●
●
●●
● ●
●
●●●
●
●
●●
●
●
●●
● ●
●
●●●
●
●
●●
●
●●
●
●●● ● ●●
●● ●
●
●●
● ● ● ● ● ●● ●●●● ●
●●
●●
●●
●●
●●
●●
●●
●●
●●
●
●
●
● ● ● ●● ●●●● ●
5 (51⁄ 2, 6)"12.5 (14, 15) cm
14 (15, 16)"35.5 (38, 40.5) cm
101⁄ 2 (111⁄ 2, 13)"26.5 (29, 33) cm
7 (7, 71⁄ 2)"18 (18, 19) cm
2"5 cm
Back
1 (11⁄ 4, 11⁄ 2)"2.5 (3, 4) cm
2"5 cm
2"5 cm
101⁄ 2 (111⁄ 2, 13)"26.5 (29, 33) cm
5 (5, 51⁄ 2)"12.5 (12.5, 14) cm
7 (8, 81⁄ 2)"18 (20.5, 21.5) cm
Front
7 (7, 71⁄ 2)"18 (18, 19) cm
103⁄ 4 (11, 11)"27.5 (28, 28) cm
11⁄ 4 (11⁄ 2, 2)"3 (4, 5) cm
8 (81⁄ 2, 9)"20.5 (21.5, 23) cm
1⁄ 2"1.5
Sleeve
Yarn with a long color repeat will produce a striped pattern.
Dale of Norway “Heilo” 100% wool 109 yd (100 m)/50g Brown Sheep
“Handpainted Originals”
Yarn Swap
5 (51⁄ 2, 6)"12.5 (14, 15) cm
14 (15, 16)"35.5 (38, 40.5) cm
101⁄ 2 (111⁄ 2, 13)"26.5 (29, 33) cm
7 (7, 71⁄ 2)"18 (18, 19) cm
2"5 cm
Back
1 (11⁄ 4, 11⁄ 2)"2.5 (3, 4) cm
2"5 cm
2"5 cm
101⁄ 2 (111⁄ 2, 13)"26.5 (29, 33) cm
5 (5, 51⁄ 2)"12.5 (12.5, 14) cm
7 (8, 81⁄ 2)"18 (20.5, 21.5) cm
Front
7 (7, 7 1⁄ 2)"18 (18, 19) cm
103⁄ 4 (11, 11)"27.5 (28, 28) cm
11⁄ 4 (11⁄ 2, 2)"3 (4, 5) cm
8 (81⁄ 2, 9)"20.5 (21.5, 23) cm
1⁄ 2"1.5
Sleeve
Yarn with a long color repeat will produce a striped pattern.
Dale of Norway “Heilo” 100% wool 109 yd (100 m)/50g Brown Sheep
“Handpainted Originals”
Yarn Swap
©F+W Media, Inc. | All rights reserved | F+W Media grants permission for any or all pages in this issue to be copied for personal use | www.knittingdaily.com 11
Har
per
Poin
t Ph
otog
raph
y
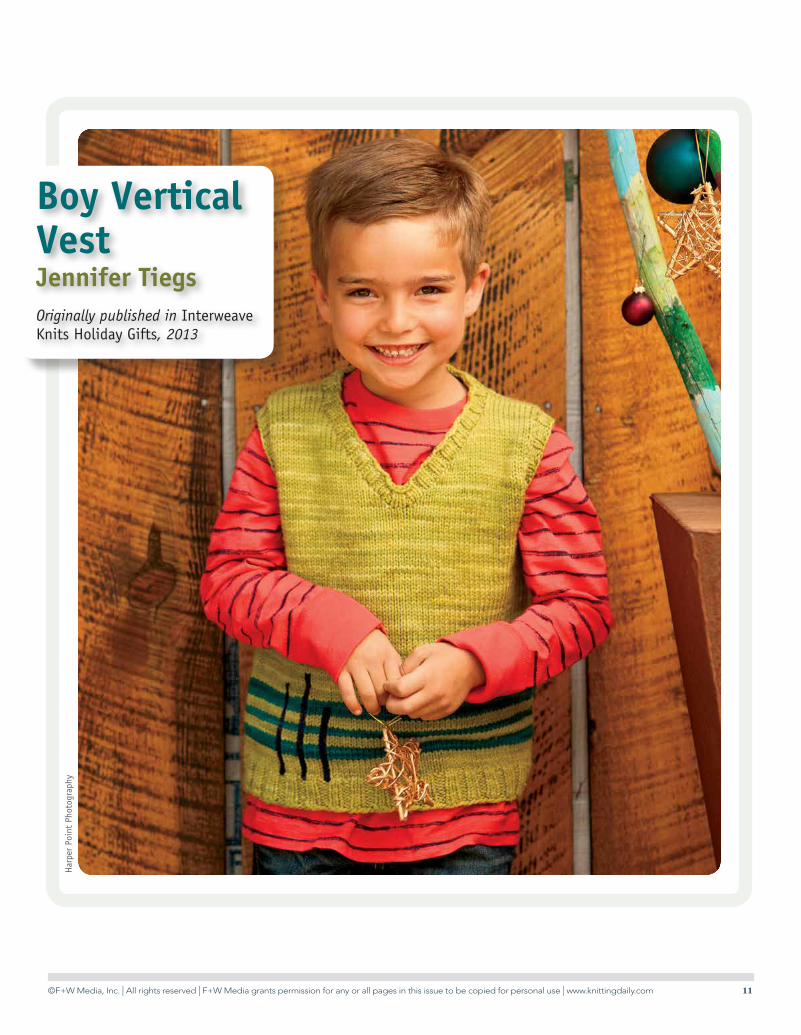
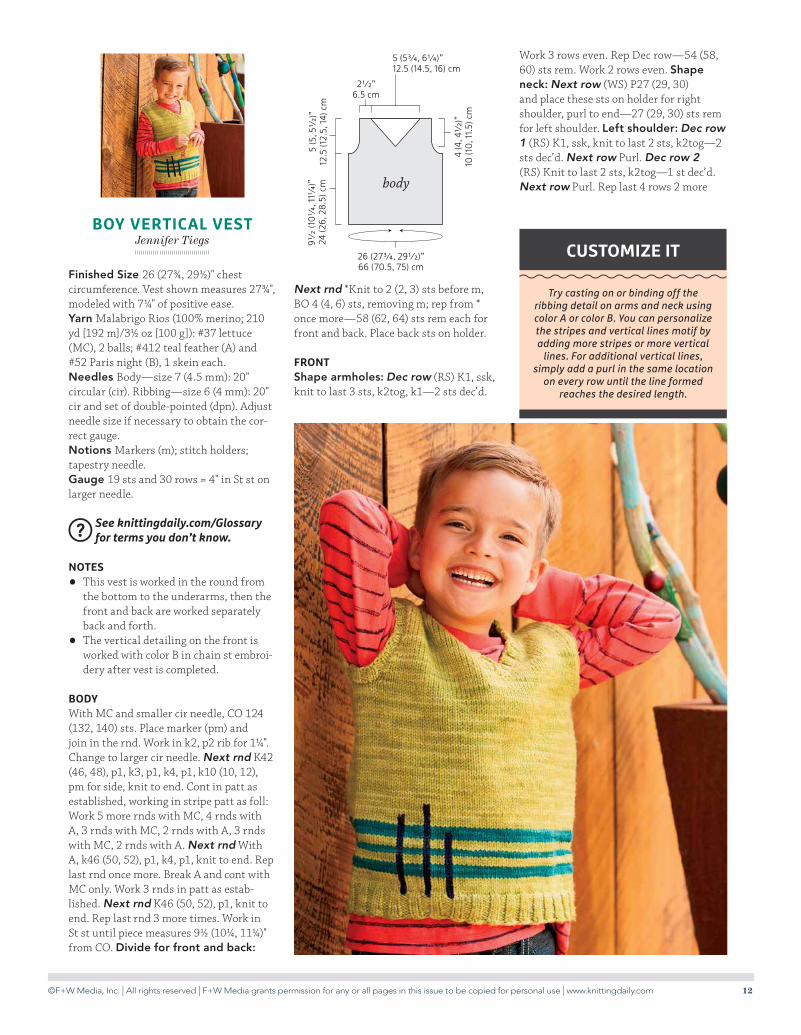
Boy Vertical VestJennifer TiegsOriginally published in Interweave Knits Holiday Gifts, 2013
©F+W Media, Inc. | All rights reserved | F+W Media grants permission for any or all pages in this issue to be copied for personal use | www.knittingdaily.com 12
BOY VERTICAL VESTJennifer Tiegs
Finished Size 26 (273/4, 291/2)" chest circumference. Vest shown measures 273/4", modeled with 71/4" of positive ease.Yarn Malabrigo Rios (100% merino; 210 yd [192 m]/31/2 oz [100 g]): #37 lettuce (MC), 2 balls; #412 teal feather (A) and #52 Paris night (B), 1 skein each.Needles Body—size 7 (4.5 mm): 20" circular (cir). Ribbing—size 6 (4 mm): 20" cir and set of double-pointed (dpn). Adjust needle size if necessary to obtain the cor-rect gauge.Notions Markers (m); stitch holders; tapestry needle.Gauge 19 sts and 30 rows = 4" in St st on larger needle.
? See knittingdaily.com/Glossary for terms you don’t know.
NOTES
• This vest is worked in the round from the bottom to the underarms, then the front and back are worked separately back and forth.
• The vertical detailing on the front is worked with color B in chain st embroi-dery after vest is completed.
BODYWith MC and smaller cir needle, CO 124 (132, 140) sts. Place marker (pm) and join in the rnd. Work in k2, p2 rib for 11/4". Change to larger cir needle. Next rnd K42 (46, 48), p1, k3, p1, k4, p1, k10 (10, 12), pm for side, knit to end. Cont in patt as established, working in stripe patt as foll: Work 5 more rnds with MC, 4 rnds with A, 3 rnds with MC, 2 rnds with A, 3 rnds with MC, 2 rnds with A. Next rnd With A, k46 (50, 52), p1, k4, p1, knit to end. Rep last rnd once more. Break A and cont with MC only. Work 3 rnds in patt as estab-lished. Next rnd K46 (50, 52), p1, knit to end. Rep last rnd 3 more times. Work in St st until piece measures 91/2 (101/4, 111/4)" from CO. Divide for front and back:
Next rnd *Knit to 2 (2, 3) sts before m, BO 4 (4, 6) sts, removing m; rep from * once more—58 (62, 64) sts rem each for front and back. Place back sts on holder.
FRONTShape armholes: Dec row (RS) K1, ssk, knit to last 3 sts, k2tog, k1—2 sts dec’d.
Work 3 rows even. Rep Dec row—54 (58, 60) sts rem. Work 2 rows even. Shape neck: Next row (WS) P27 (29, 30) and place these sts on holder for right shoulder, purl to end—27 (29, 30) sts rem for left shoulder. Left shoulder: Dec row 1 (RS) K1, ssk, knit to last 2 sts, k2tog—2 sts dec’d. Next row Purl. Dec row 2 (RS) Knit to last 2 sts, k2tog—1 st dec’d. Next row Purl. Rep last 4 rows 2 more
Try casting on or binding off the ribbing detail on arms and neck using color A or color B. You can personalize the stripes and vertical lines motif by adding more stripes or more vertical
lines. For additional vertical lines, simply add a purl in the same location
on every row until the line formed reaches the desired length.
CUSTOMIZE IT
body
26 (273/4, 291/2)”66 (70.5, 75) cm
91/2
(101
/4, 1
11/4
)”24
(26,
28
.5) c
m5
(5, 5
1/2)
”12
.5 (1
2.5,
14)
cm
21/2”6.5 cm
5 (53/4, 61/4)”12.5 (14.5, 16) cm
4 (4
, 41/
2)”
10 (1
0, 1
1.5)
cm
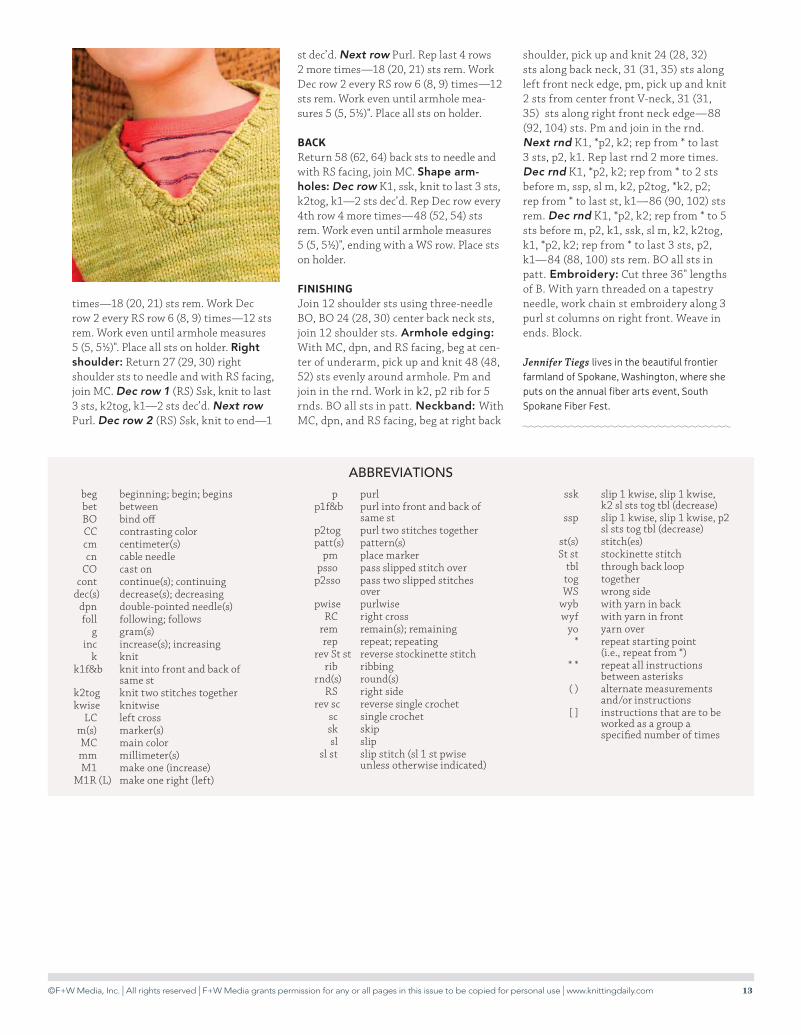
©F+W Media, Inc. | All rights reserved | F+W Media grants permission for any or all pages in this issue to be copied for personal use | www.knittingdaily.com 13
st dec’d. Next row Purl. Rep last 4 rows 2 more times—18 (20, 21) sts rem. Work Dec row 2 every RS row 6 (8, 9) times—12 sts rem. Work even until armhole mea-sures 5 (5, 51/2)". Place all sts on holder.
BACKReturn 58 (62, 64) back sts to needle and with RS facing, join MC. Shape arm-holes: Dec row K1, ssk, knit to last 3 sts, k2tog, k1—2 sts dec’d. Rep Dec row every 4th row 4 more times—48 (52, 54) sts rem. Work even until armhole measures 5 (5, 51/2)", ending with a WS row. Place sts on holder.
FINISHINGJoin 12 shoulder sts using three-needle BO, BO 24 (28, 30) center back neck sts, join 12 shoulder sts. Armhole edging: With MC, dpn, and RS facing, beg at cen-ter of underarm, pick up and knit 48 (48, 52) sts evenly around armhole. Pm and join in the rnd. Work in k2, p2 rib for 5 rnds. BO all sts in patt. Neckband: With MC, dpn, and RS facing, beg at right back
shoulder, pick up and knit 24 (28, 32) sts along back neck, 31 (31, 35) sts along left front neck edge, pm, pick up and knit 2 sts from center front V-neck, 31 (31, 35) sts along right front neck edge—88 (92, 104) sts. Pm and join in the rnd. Next rnd K1, *p2, k2; rep from * to last 3 sts, p2, k1. Rep last rnd 2 more times. Dec rnd K1, *p2, k2; rep from * to 2 sts before m, ssp, sl m, k2, p2tog, *k2, p2; rep from * to last st, k1—86 (90, 102) sts rem. Dec rnd K1, *p2, k2; rep from * to 5 sts before m, p2, k1, ssk, sl m, k2, k2tog, k1, *p2, k2; rep from * to last 3 sts, p2, k1—84 (88, 100) sts rem. BO all sts in patt. Embroidery: Cut three 36" lengths of B. With yarn threaded on a tapestry needle, work chain st embroidery along 3 purl st columns on right front. Weave in ends. Block.
Jennifer Tiegs lives in the beautiful frontier farmland of Spokane, Washington, where she puts on the annual fiber arts event, South Spokane Fiber Fest.
times—18 (20, 21) sts rem. Work Dec row 2 every RS row 6 (8, 9) times—12 sts rem. Work even until armhole measures 5 (5, 51/2)". Place all sts on holder. Right shoulder: Return 27 (29, 30) right shoulder sts to needle and with RS facing, join MC. Dec row 1 (RS) Ssk, knit to last 3 sts, k2tog, k1—2 sts dec’d. Next row Purl. Dec row 2 (RS) Ssk, knit to end—1
ABBREVIATIONS
beg beginning; begin; begins bet between BO bind off CC contrasting color cm centimeter(s) cn cable needle CO cast on cont continue(s); continuing dec(s) decrease(s); decreasing dpn double-pointed needle(s) foll following; follows g gram(s) inc increase(s); increasing k knit k1f&b knit into front and back of
same st k2tog knit two stitches together kwise knitwise LC left cross m(s) marker(s) MC main color mm millimeter(s) M1 make one (increase) M1R (L) make one right (left)
p purl p1f&b purl into front and back of
same st p2tog purl two stitches together patt(s) pattern(s) pm place marker psso pass slipped stitch over p2sso pass two slipped stitches
over pwise purlwise RC right cross rem remain(s); remaining rep repeat; repeating rev St st reverse stockinette stitch rib ribbing rnd(s) round(s) RS right side rev sc reverse single crochet sc single crochet sk skip sl slip sl st slip stitch (sl 1 st pwise
unless otherwise indicated)
ssk slip 1 kwise, slip 1 kwise, k2 sl sts tog tbl (decrease)
ssp slip 1 kwise, slip 1 kwise, p2 sl sts tog tbl (decrease)
st(s) stitch(es) St st stockinette stitch tbl through back loop tog together WS wrong side wyb with yarn in back wyf with yarn in front yo yarn over * repeat starting point
(i.e., repeat from *) * * repeat all instructions
between asterisks ( ) alternate measurements
and/or instructions [ ] instructions that are to be
worked as a group a specified number of times
Interweave Knits IS A MUST-HAVE FOR THOSE WHO LOVE TO KNIT!
interweaveknits.com
I N T E R W E A V E
KNITS
©F+W Media, Inc. | All rights reserved | F+W Media grants permission for any or all pages in this issue to be copied for personal use | www.knittingdaily.com 14
���
yyyyyyyyyyyyyyyyyyyyyyyyyyyyyyyyyyyyyyyyyy yyyyyyyyyyyyyyyyyyy
I’ll admit it: I’m a wee bit superstitious. Any
time I see crows, I run through the rhyme in my
head to see what sort of omen their number might
portend. It’s not that I really believe they can predict
the future; it’s more like buying lottery tickets, or
reading horoscopes, or any of the other little things
we humans are still doing to explain or anticipate
our fortunes. It’s in our nature to ascribe meaning
to the creatures we share the planet with, to seek
the comfort which attends explanation, and to
somehow relate to black birds that steal shiny
baubles and mate for life.
yyyyyyyyyyyyyyyyyy
counting crows
FINISHED SIZE
About 32 (36, 40)" (81.5 [91.5, 101.5] cm) chest circumference. Sweater shown measures 36" (91.5 cm).
YARN
Sportweight (#2 Fine).Shown here: Dale of Norway Heilo (100% wool; 109 yd [100 m]/50 g): #4137 red (MC), 6 (7, 8) balls; #2434 tan (CC1) and #0090 black (CC2), 3 (4, 4) balls each.
NEEDLES
Body and sleeves: size U.S. 3 (3.25 mm): 24" (60 cm) circular (cir) and set of 4 or 5 double-pointed (dpn). Edging: size U.S. 2 (2.75 mm): 24" (60 cm) cir and set of 2 dpn. Adjust needle size if necessary to obtain the correct gauge.
NOTIONS
Stitch holders or waste yarn; markers (m); tapestry needle; sharp-point sewing needle and matching thread; five ¾" (2 cm) buttons.
GAUGE
24 stitches and 26 rounds = 4" (10 cm) in charted pattern on larger needle, worked in rounds.
Counting CrowsMary Scott Huff
Note: Before beginning, please download this document, which contains information you'll need for the finishing work on this project.
©F+W Media, Inc. | All rights reserved | F+W Media grants permission for any or all pages in this issue to be copied for personal use | www.knittingdaily.com 15
BODYWith CC1 and smaller dpn, CO 5 sts. Work 5-st I-cord (see Glossary) until piece measures 32 (36, 40)" (81.5 [91.5, 101.5] cm) from CO. Place sts on holder. With larger needle and MC, pick up and knit 192 (216, 240) sts evenly spaced along edge of I-cord. Place marker (pm) and join for work-ing in rnds, being careful not to twist sts. Knit 5 rnds. Work Rows 1–11 of Baubles chart. Change to MC and work even in St st until piece measures 7½ (9½, 11½)" (19 [24, 29] cm) from lower edge of I-cord. Work Rows 1–16 of Numbers chart, rep numeral sequence as needed to fit your size. Work Rows 1–11 of Baubles chart, then work Rows 1–34 of Crows chart (see page 28; see Note), beg and end as indicated for your size. Work Rows 1–3 of Seeds chart—piece measures 17¼ (19¼, 21¼)" (44 [49, 54] cm) from lower edge of I-cord. MC
CC1
CC2
pattern repeat
17½ (19½, 21½)"44.5 (49.5, 54.5) cm
1½ (2, 2)"3.8 (5, 5) cm
32 (36, 40)"81.5 (91.5, 101.5) cm
4¾ (5¼, 6)"12 (13.5, 15) cm
5¾ (6¼, 7)"14.5 (16, 18) cm
Body15½ (17½, 19½)"39.5 (44.5, 49.5) cm
1"2.5 cm
8 (8¾, 9)"20.5 (22, 23) cm
about 14¼ (15¾, 17)"about 36 (40, 43) cm
Sleeve
11
9
7
5
3
1
Baubles
15
13
11
9
7
5
3
1
Numbers
3
1
Seeds
Use flower-head or lace pins when
pinning pieces together. The large
heads of these fine, sharp, snag-
free pins won’t catch on floats or
disappear between stitches.
16
©F+W Media, Inc. | All rights reserved | F+W Media grants permission for any or all pages in this issue to be copied for personal use | www.knittingdaily.com 16
MC
CC1
CC2
pattern repeat
beg and endbody36"
beg and endbody
32"
beg and endbody40"
33
31
29
27
25
23
21
19
17
15
13
11
9
7
5
3
1
Crows
Place Stitches on HoldersWith CC1, BO 3 sts for half of top of left armhole, k28 (32, 36) and place these sts on a holder for left front shoulder, k34 (38, 42) and place these sts on a second holder for front neck, k28 (32, 36) and place these sts on a third holder for right front shoulder, BO 6 sts for top of right armhole, k28 (32, 36) and place these sts on a fourth holder for right back shoulder, k34 (38, 42) and place these sts on a fifth holder for back neck, k28 (32, 36) and place these sts on a sixth holder for left back shoulder, BO rem 3 sts for other half of top of left armhole.
SLEEVES (make 2)With CC1 and smaller dpn, CO 5 sts. Work 5-st I-cord until piece measures 8 (8¾, 9)" (20.5 [22, 23] cm) from CO. Place sts on holder. With larger dpn and MC, pick up and knit 48 (52, 54) sts evenly spaced along edge of I-cord. Pm and join for working in rnds, being careful not to twist sts. Knit 4 rnds. Inc 1 st each side of marker on next rnd, then every 5th rnd to beg of facing. At the same time work Rows 1–11 of Baubles chart, working inc’d sts
NoteThere are three colors in Rows 4–22 of
Crows chart. To work with just two colors per row, work the stitches des-ignated as CC1 on these rows in the background color for that area, then use the duplicate stitch (see Glossary) to add the CC1 color after the knitting is complete.
©F+W Media, Inc. | All rights reserved | F+W Media grants permission for any or all pages in this issue to be copied for personal use | www.knittingdaily.com 17
into pattern. Change to MC and work in St st until piece mea-sures 7 (9, 11)" (18 [23, 28] cm) from lower edge of I-cord. Work Rows 1–11 of Baubles chart. Work Rows 1–34 of Crows chart, then work Rows 29–34 again. Work Rows 1–3 of Seeds chart. With CC1, knit 1 rnd. Purl 6 rnds for facing, inc 1 st each side of marker every rnd. Loosely BO all sts.
FINISHINGButt ends of I-cord tog and with CC1 threaded on a tapestry needle, sew tog as invisibly as possible. Weave in loose ends. Block pieces to measurements.
Cut Armholes and NecklineMeasure, mark, machine stitch, and cut armhole openings as described on pages 125–127. Measure, mark, machine stitch, and cut front neckline curve to a depth of 1½ (2, 2)" (3.8 [5, 5] cm), as described on page 129.
SeamsPlace 28 (32, 36) held right front shoulder sts on one needle and corresponding right back shoulder sts on another needle. With RS tog, use the three-needle method as described on page 130 to BO the sts tog. With CC2, smaller needle, and RS facing, p28 (32, 36) held sts on left front shoulder edge for turning ridge. Work 6 rows even in St st for facing. BO all sts. Turn facing to WS and, with sharp-point sewing needle and matching thread, sew in place. With CC2, smaller needle, and RS facing, k28 (32, 36) held sts on left back shoulder edge. Work 5 rows even in St st for placket. Purl 1 row for turning ridge. Work 6 rows even in St st for facing. BO all sts. Turn facing to WS and sew in place.
Neck EdgingWith MC, smaller cir needle, and RS facing, pick up and knit 36 (40, 44) sts evenly spaced along front neck edge, k34 (38, 42) held back neck sts, then pick up and knit 4 sts along shoulder placket—74 (82, 90) sts total. Beg and end with p2, work in k2, p2 rib for 7 rows. Purl 1 row for a turning ridge, then work 7 more rows in established rib for facing. Loosely BO all sts in patt. Turn facing to WS along turning ridge and sew in place. Butt edges of top of left armhole and sew tog at armhole edge. Sew buttons to left back shoulder placket, the first at the arm-hole edge, the last on the neck edging, and the others evenly spaced in between. Make 5 button loops on left front shoulder
edge opposite buttons as foll: Join CC2 to shoulder. Make a loop of CC2 large enough to accommodate button; take a st in shoulder to secure. Work buttonhole st (see Glossary) over loop to strengthen. Rep for rem buttons. Insert sleeves into armholes and sew in place as described on page 132.
Take your knitting off the charts with The New Stranded Colorwork! Mary Scott Huff’s modern take on classic traditions of Norwegian colorwork techniques will have you confidently working on charted colorwork designs for the modern knitter. Visit the Knitting Daily Shop to purchase The New Stranded Colorwork.
Measure, mark, machine stitch, and cut armholes openings as described here. Measure, mark, machine stitch, and cut front neckline curve to a depth of 11⁄2 (2, 2)" (3.8 [5, 5] cm), as described here.
and sew in place as described here.
©F+W Media, Inc. | All rights reserved | F+W Media grants permission for any or all pages in this issue to be copied for personal use | www.knittingdaily.com 18
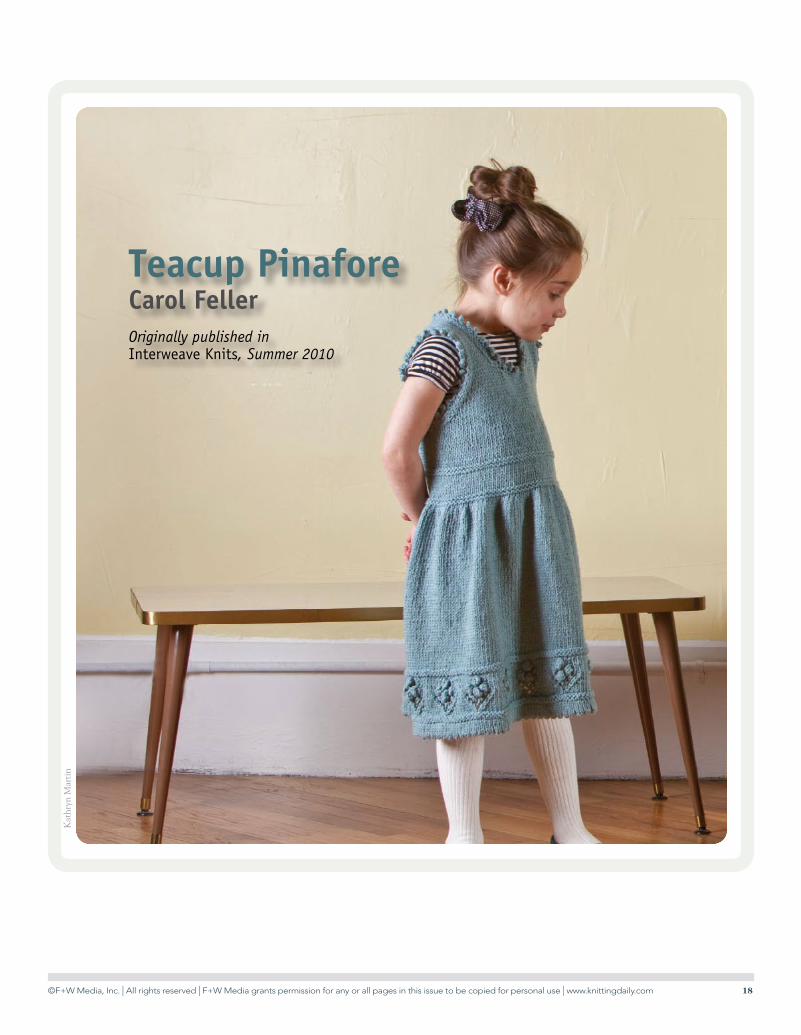
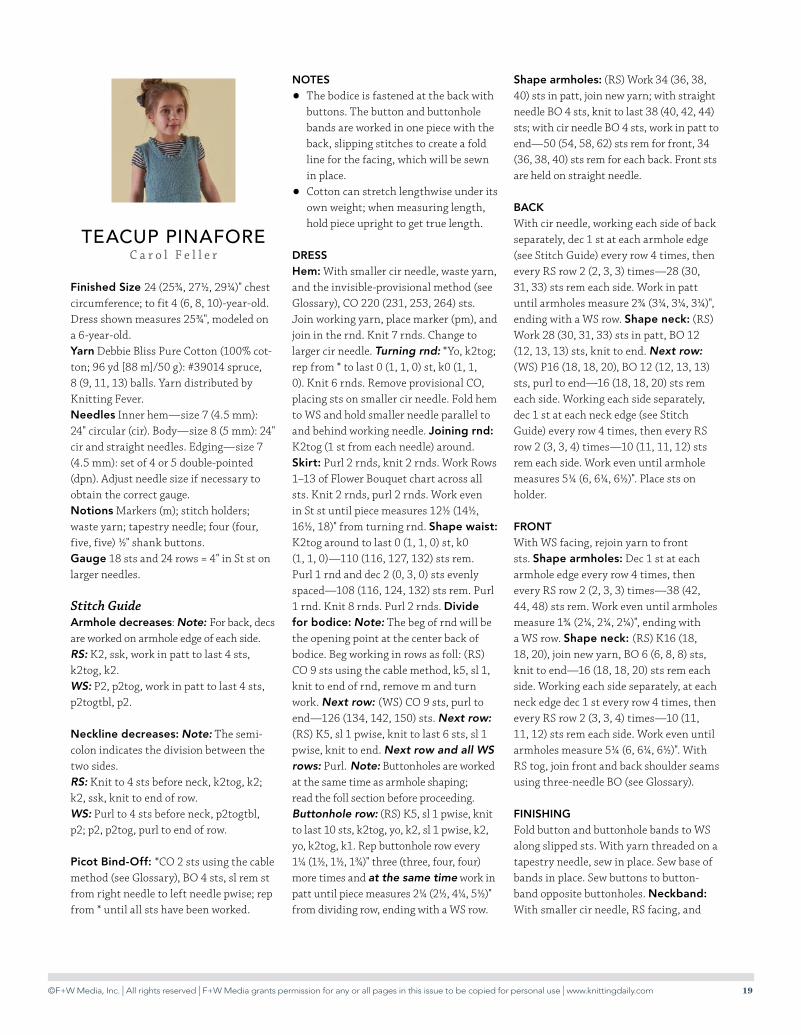
Teacup Pinafore Carol FellerOriginally published in Interweave Knits, Summer 2010
Kat
hryn
Mar
tin
©F+W Media, Inc. | All rights reserved | F+W Media grants permission for any or all pages in this issue to be copied for personal use | www.knittingdaily.com 19
Teacup pinaforeC a r o l F e l l e r
Finished Size 24 (253/4, 271/2, 291/4)" chest circumference; to fit 4 (6, 8, 10)-year-old. Dress shown measures 253/4", modeled on a 6-year-old.Yarn Debbie Bliss Pure Cotton (100% cot-ton; 96 yd [88 m]/50 g): #39014 spruce, 8 (9, 11, 13) balls. Yarn distributed by Knitting Fever.Needles Inner hem—size 7 (4.5 mm): 24" circular (cir). Body—size 8 (5 mm): 24" cir and straight needles. Edging—size 7 (4.5 mm): set of 4 or 5 double-pointed (dpn). Adjust needle size if necessary to obtain the correct gauge.Notions Markers (m); stitch holders; waste yarn; tapestry needle; four (four, five, five) 1/2" shank buttons.Gauge 18 sts and 24 rows = 4" in St st on larger needles.
Stitch GuideArmhole decreases: Note: For back, decs are worked on armhole edge of each side.RS: K2, ssk, work in patt to last 4 sts, k2tog, k2.WS: P2, p2tog, work in patt to last 4 sts, p2togtbl, p2.
Neckline decreases: Note: The semi-colon indicates the division between the two sides.RS: Knit to 4 sts before neck, k2tog, k2; k2, ssk, knit to end of row.WS: Purl to 4 sts before neck, p2togtbl, p2; p2, p2tog, purl to end of row.
Picot Bind-Off: *CO 2 sts using the cable method (see Glossary), BO 4 sts, sl rem st from right needle to left needle pwise; rep from * until all sts have been worked.
NOteS
• The bodice is fastened at the back with buttons. The button and buttonhole bands are worked in one piece with the back, slipping stitches to create a fold line for the facing, which will be sewn in place.
• Cotton can stretch lengthwise under its own weight; when measuring length, hold piece upright to get true length.
DreSSHem: With smaller cir needle, waste yarn, and the invisible-provisional method (see Glossary), CO 220 (231, 253, 264) sts. Join working yarn, place marker (pm), and join in the rnd. Knit 7 rnds. Change to larger cir needle. Turning rnd: *Yo, k2tog; rep from * to last 0 (1, 1, 0) st, k0 (1, 1, 0). Knit 6 rnds. Remove provisional CO, placing sts on smaller cir needle. Fold hem to WS and hold smaller needle parallel to and behind working needle. Joining rnd: K2tog (1 st from each needle) around. Skirt: Purl 2 rnds, knit 2 rnds. Work Rows 1–13 of Flower Bouquet chart across all sts. Knit 2 rnds, purl 2 rnds. Work even in St st until piece measures 121/2 (141/2, 161/2, 18)" from turning rnd. Shape waist: K2tog around to last 0 (1, 1, 0) st, k0 (1, 1, 0)—110 (116, 127, 132) sts rem. Purl 1 rnd and dec 2 (0, 3, 0) sts evenly spaced—108 (116, 124, 132) sts rem. Purl 1 rnd. Knit 8 rnds. Purl 2 rnds. Divide for bodice: Note: The beg of rnd will be the opening point at the center back of bodice. Beg working in rows as foll: (RS) CO 9 sts using the cable method, k5, sl 1, knit to end of rnd, remove m and turn work. Next row: (WS) CO 9 sts, purl to end—126 (134, 142, 150) sts. Next row: (RS) K5, sl 1 pwise, knit to last 6 sts, sl 1 pwise, knit to end. Next row and all WS rows: Purl. Note: Buttonholes are worked at the same time as armhole shaping; read the foll section before proceeding. Buttonhole row: (RS) K5, sl 1 pwise, knit to last 10 sts, k2tog, yo, k2, sl 1 pwise, k2, yo, k2tog, k1. Rep buttonhole row every 11/4 (11/2, 11/2, 13/4)" three (three, four, four) more times and at the same time work in patt until piece measures 21/4 (21/2, 41/4, 51/2)" from dividing row, ending with a WS row.
Shape armholes: (RS) Work 34 (36, 38, 40) sts in patt, join new yarn; with straight needle BO 4 sts, knit to last 38 (40, 42, 44) sts; with cir needle BO 4 sts, work in patt to end—50 (54, 58, 62) sts rem for front, 34 (36, 38, 40) sts rem for each back. Front sts are held on straight needle.
BAckWith cir needle, working each side of back separately, dec 1 st at each armhole edge (see Stitch Guide) every row 4 times, then every RS row 2 (2, 3, 3) times—28 (30, 31, 33) sts rem each side. Work in patt until armholes measure 23/4 (31/4, 31/4, 31/4)", ending with a WS row. Shape neck: (RS) Work 28 (30, 31, 33) sts in patt, BO 12 (12, 13, 13) sts, knit to end. Next row: (WS) P16 (18, 18, 20), BO 12 (12, 13, 13) sts, purl to end—16 (18, 18, 20) sts rem each side. Working each side separately, dec 1 st at each neck edge (see Stitch Guide) every row 4 times, then every RS row 2 (3, 3, 4) times—10 (11, 11, 12) sts rem each side. Work even until armhole measures 51/4 (6, 61/4, 61/2)". Place sts on holder.
FrONtWith WS facing, rejoin yarn to front sts. Shape armholes: Dec 1 st at each armhole edge every row 4 times, then every RS row 2 (2, 3, 3) times—38 (42, 44, 48) sts rem. Work even until armholes measure 13/4 (21/4, 21/4, 21/4)", ending with a WS row. Shape neck: (RS) K16 (18, 18, 20), join new yarn, BO 6 (6, 8, 8) sts, knit to end—16 (18, 18, 20) sts rem each side. Working each side separately, at each neck edge dec 1 st every row 4 times, then every RS row 2 (3, 3, 4) times—10 (11, 11, 12) sts rem each side. Work even until armholes measure 51/4 (6, 61/4, 61/2)". With RS tog, join front and back shoulder seams using three-needle BO (see Glossary).
FiNiSHiNGFold button and buttonhole bands to WS along slipped sts. With yarn threaded on a tapestry needle, sew in place. Sew base of bands in place. Sew buttons to button-band opposite buttonholes. Neckband: With smaller cir needle, RS facing, and
©F+W Media, Inc. | All rights reserved | F+W Media grants permission for any or all pages in this issue to be copied for personal use | www.knittingdaily.com 20
beg at center back, pick up and knit 72 (76, 84, 90) sts around neck opening, picking up through both layers of bands. Do not join. Knit 1 row. BO all sts using picot BO (see Stitch Guide). Armhole trim: With dpn, RS facing, and beg at center of underarm, pick up and knit 52 (58, 60, 62) sts around arm-hole opening. Pm and join in the rnd. Purl 1 rnd. BO all sts using picot BO. Weave in loose ends. Block to schematic dimensions.
Carol Feller lives in Cork, Ireland. Her
knitwear designs have been published in a
variety of books and magazines; her self-
published patterns can be found at www
.stolenstitches.com.
Figure 1 Figure 2
Cable Cast-On
Figure 3
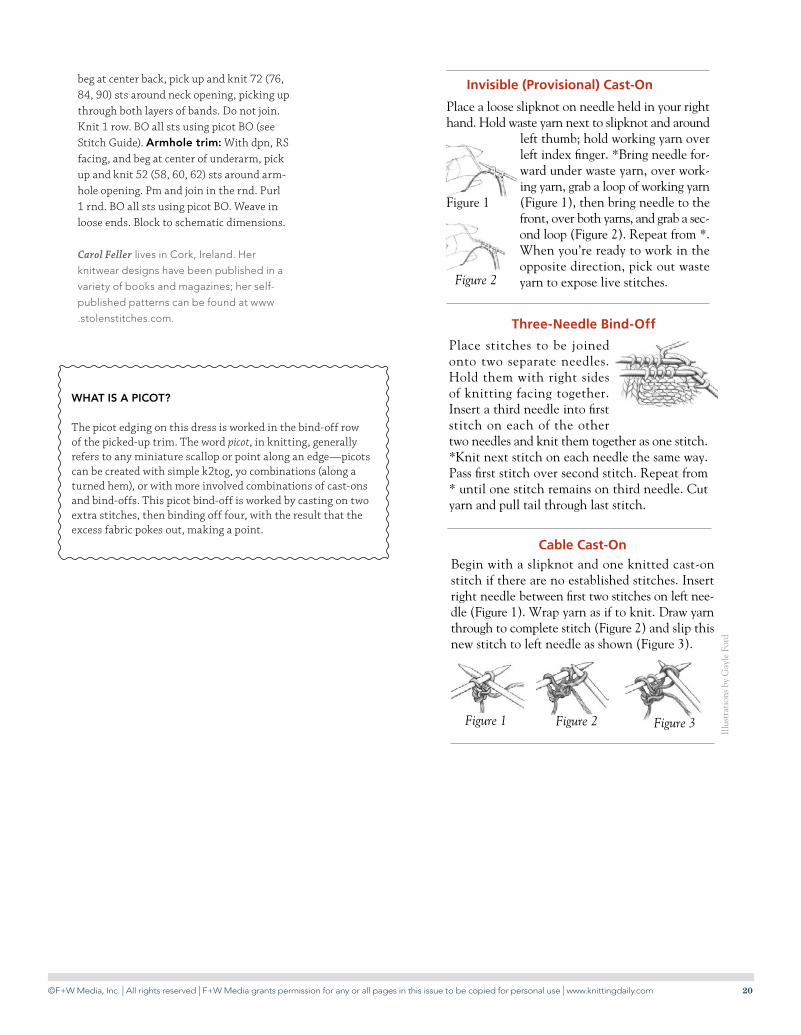
Begin with a slipknot and one knitted cast-on stitch if there are no established stitches. Insert right needle be tween first two stitches on left nee-dle (Figure 1). Wrap yarn as if to knit. Draw yarn through to complete stitch (Figure 2) and slip this new stitch to left needle as shown (Figure 3).
Invisible (Provisional) Cast-On
Place a loose slipknot on needle held in your right hand. Hold waste yarn next to slipknot and around
left thumb; hold working yarn over left index finger. *Bring needle for-ward under waste yarn, over work-ing yarn, grab a loop of working yarn (Figure 1), then bring needle to the front, over both yarns, and grab a sec-ond loop (Figure 2). Repeat from *. When you’re ready to work in the opposite direction, pick out waste yarn to expose live stitches.
Figure 1
Figure 2
Place stitches to be joined onto two separate needles. Hold them with right sides of knitting facing together. Insert a third needle into first stitch on each of the other two needles and knit them together as one stitch. *Knit next stitch on each needle the same way. Pass first stitch over second stitch. Repeat from * until one stitch remains on third needle. Cut yarn and pull tail through last stitch.
Three-Needle Bind-Off
WHAt iS A PicOt?
The picot edging on this dress is worked in the bind-off row of the picked-up trim. The word picot, in knitting, generally refers to any miniature scallop or point along an edge—picots can be created with simple k2tog, yo combinations (along a turned hem), or with more involved combinations of cast-ons and bind-offs. This picot bind-off is worked by casting on two extra stitches, then binding off four, with the result that the excess fabric pokes out, making a point.
Illu
stra
tion
s by
Gay
le F
ord
©F+W Media, Inc. | All rights reserved | F+W Media grants permission for any or all pages in this issue to be copied for personal use | www.knittingdaily.com 21
Chr
is H
artl
ove
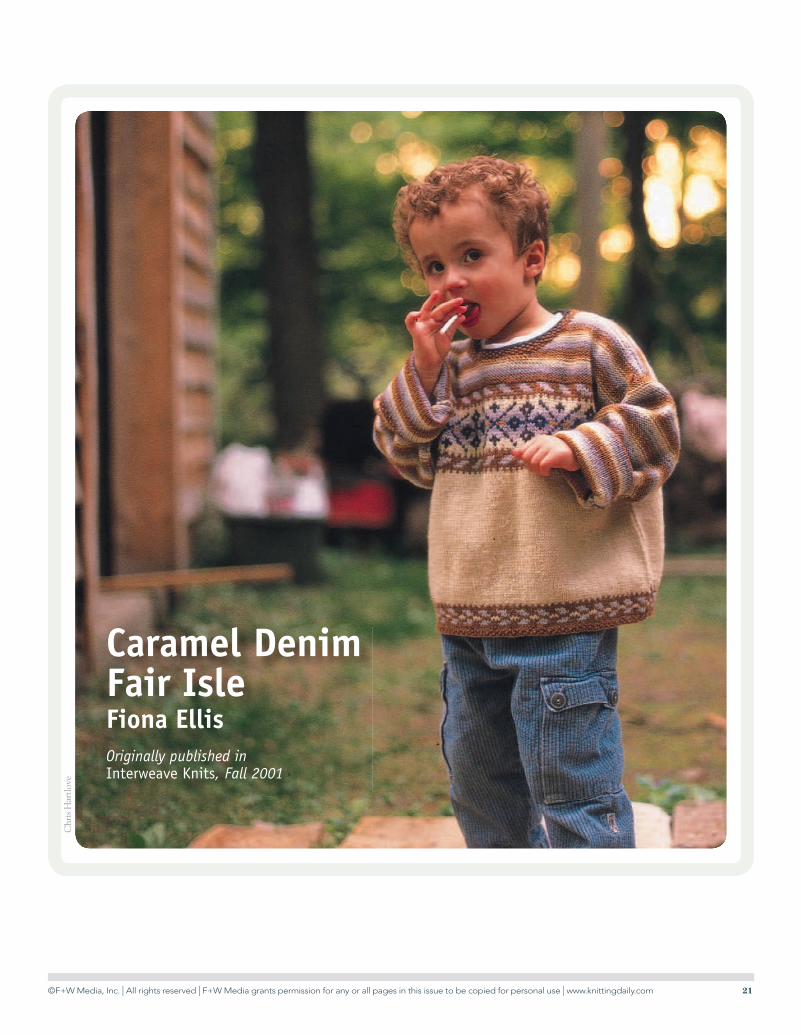
Caramel Denim Fair Isle Fiona EllisOriginally published in Interweave Knits, Fall 2001
©F+W Media, Inc. | All rights reserved | F+W Media grants permission for any or all pages in this issue to be copied for personal use | www.knittingdaily.com 22
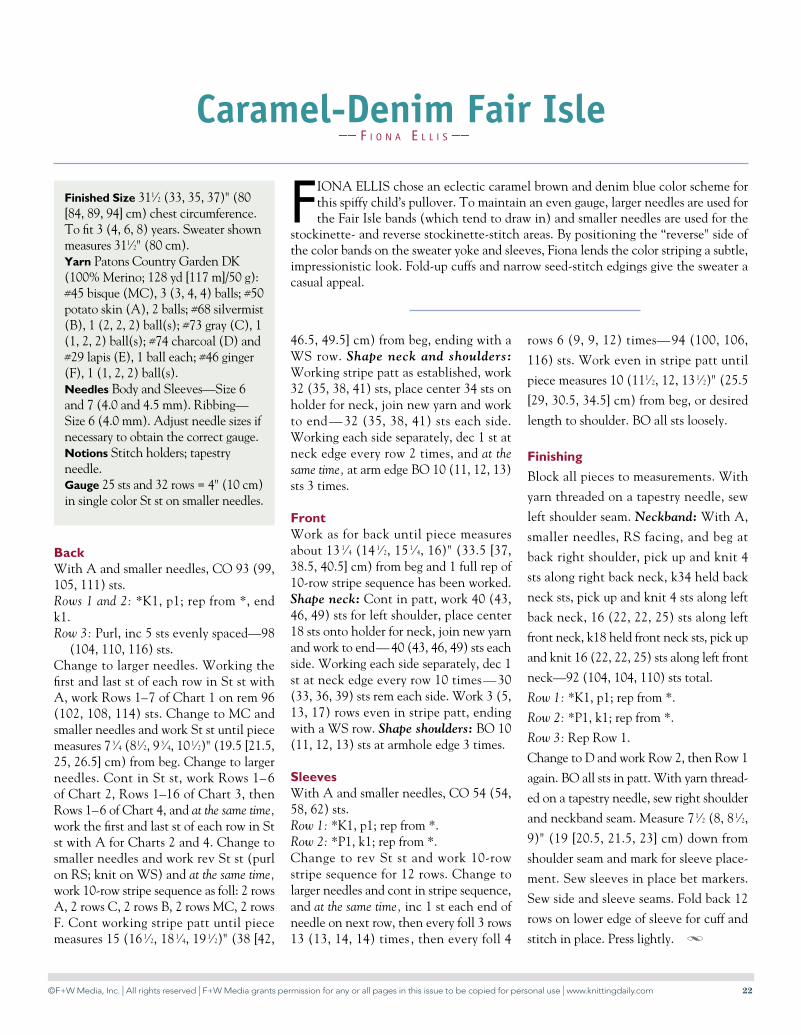
BackWith A and smaller needles, CO 93 (99, 105, 111) sts.Rows 1 and 2: *K1, p1; rep from *, end k1.Row 3: Purl, inc 5 sts evenly spaced—98
(104, 110, 116) sts.Change to larger needles. Working the fi rst and last st of each row in St st with A, work Rows 1–7 of Chart 1 on rem 96 (102, 108, 114) sts. Change to MC and smaller needles and work St st until piece measures 7 3⁄4 (81⁄2, 93⁄4, 101⁄2)" (19.5 [21.5, 25, 26.5] cm) from beg. Change to larger needles. Cont in St st, work Rows 1– 6 of Chart 2, Rows 1–16 of Chart 3, then Rows 1–6 of Chart 4, and at the same time, work the fi rst and last st of each row in St st with A for Charts 2 and 4. Change to smaller needles and work rev St st (purl on RS; knit on WS) and at the same time, work 10-row stripe sequence as foll: 2 rows A, 2 rows C, 2 rows B, 2 rows MC, 2 rows F. Cont working stripe patt until piece measures 15 (16 1⁄2, 18 1⁄4, 19 1⁄2)" (38 [42,
46.5, 49.5] cm) from beg, ending with a WS row. Shape neck and shoulders: Working stripe patt as established, work 32 (35, 38, 41) sts, place center 34 sts on holder for neck, join new yarn and work to end — 32 (35, 38, 41) sts each side. Working each side separately, dec 1 st at neck edge every row 2 times, and at the same time, at arm edge BO 10 (11, 12, 13) sts 3 times.
FrontWork as for back until piece measures about 13 1⁄4 (14 1⁄2, 15 1⁄4, 16)" (33.5 [37, 38.5, 40.5] cm) from beg and 1 full rep of 10-row stripe sequence has been worked. Shape neck: Cont in patt, work 40 (43, 46, 49) sts for left shoulder, place center 18 sts onto holder for neck, join new yarn and work to end— 40 (43, 46, 49) sts each side. Working each side separately, dec 1 st at neck edge every row 10 times—30 (33, 36, 39) sts rem each side. Work 3 (5, 13, 17) rows even in stripe patt, ending with a WS row. Shape shoulders: BO 10 (11, 12, 13) sts at armhole edge 3 times.
SleevesWith A and smaller needles, CO 54 (54, 58, 62) sts.Row 1: *K1, p1; rep from *.Row 2: *P1, k1; rep from *.Change to rev St st and work 10-row stripe sequence for 12 rows. Change to larger needles and cont in stripe sequence, and at the same time, inc 1 st each end of needle on next row, then every foll 3 rows 13 (13, 14, 14) times , then every foll 4
rows 6 (9, 9, 12) times— 94 (100, 106,
116) sts. Work even in stripe patt until
piece measures 10 (111⁄2, 12, 13 1⁄2)" (25.5
[29, 30.5, 34.5] cm) from beg, or desired
length to shoulder. BO all sts loosely.
Finishing
Block all pieces to measurements. With
yarn threaded on a tapestry needle, sew
left shoulder seam. Neckband: With A,
smaller needles, RS facing, and beg at
back right shoulder, pick up and knit 4
sts along right back neck, k34 held back
neck sts, pick up and knit 4 sts along left
back neck, 16 (22, 22, 25) sts along left
front neck, k18 held front neck sts, pick up
and knit 16 (22, 22, 25) sts along left front
neck—92 (104, 104, 110) sts total.
Row 1: *K1, p1; rep from *.
Row 2: *P1, k1; rep from *.
Row 3: Rep Row 1.
Change to D and work Row 2, then Row 1
again. BO all sts in patt. With yarn thread-
ed on a tapestry needle, sew right shoulder
and neckband seam. Measure 71⁄2 (8, 8 1⁄2,
9)" (19 [20.5, 21.5, 23] cm) down from
shoulder seam and mark for sleeve place-
ment. Sew sleeves in place bet markers.
Sew side and sleeve seams. Fold back 12
rows on lower edge of sleeve for cuff and
stitch in place. Press lightly. Y
Caramel-Denim Fair Isle—— F I O N A E L L I S ——
FIONA ELLIS chose an eclectic caramel brown and denim blue color scheme for this spiffy child’s pullover. To maintain an even gauge, larger needles are used for the Fair Isle bands (which tend to draw in) and smaller needles are used for the
stockinette- and reverse stockinette-stitch areas. By positioning the “reverse" side of the color bands on the sweater yoke and sleeves, Fiona lends the color striping a subtle, impressionistic look. Fold-up cuffs and narrow seed-stitch edgings give the sweater a casual appeal.
Finished Size 311⁄2 (33, 35, 37)" (80 [84, 89, 94] cm) chest circumference. To fi t 3 (4, 6, 8) years. Sweater shown measures 311⁄2" (80 cm).Yarn Patons Country Garden DK (100% Merino; 128 yd [117 m]/50 g): #45 bisque (MC), 3 (3, 4, 4) balls; #50 potato skin (A), 2 balls; #68 silvermist (B), 1 (2, 2, 2) ball(s); #73 gray (C), 1 (1, 2, 2) ball(s); #74 charcoal (D) and #29 lapis (E), 1 ball each; #46 ginger (F), 1 (1, 2, 2) ball(s).Needles Body and Sleeves—Size 6 and 7 (4.0 and 4.5 mm). Ribbing—Size 6 (4.0 mm). Adjust needle sizes if necessary to obtain the correct gauge.Notions Stitch holders; tapestry needle.Gauge 25 sts and 32 rows = 4" (10 cm) in single color St st on smaller needles.
©F+W Media, Inc. | All rights reserved | F+W Media grants permission for any or all pages in this issue to be copied for personal use | www.knittingdaily.com 23
bisque
potato skin
silvermist
gray
charcoal
lapis
ginger
repeat box
bisque (MC)
potato skin (A)
silvermist (B)
gray (C)
charcoal (D)
lapis (E)
ginger (F)
pattern repeat
Chart 3
endsize 3
endsize 8
begsize 8
endsize 6
begsize 6
endsize 4
center st begsize 4
begsize 3
15
13
11
9
7
5
3
1
5
3
1
5
3
1
Chart 1Chart 2 Chart 4
7
5
3
1
©F+W Media, Inc. | All rights reserved | F+W Media grants permission for any or all pages in this issue to be copied for personal use | www.knittingdaily.com 24
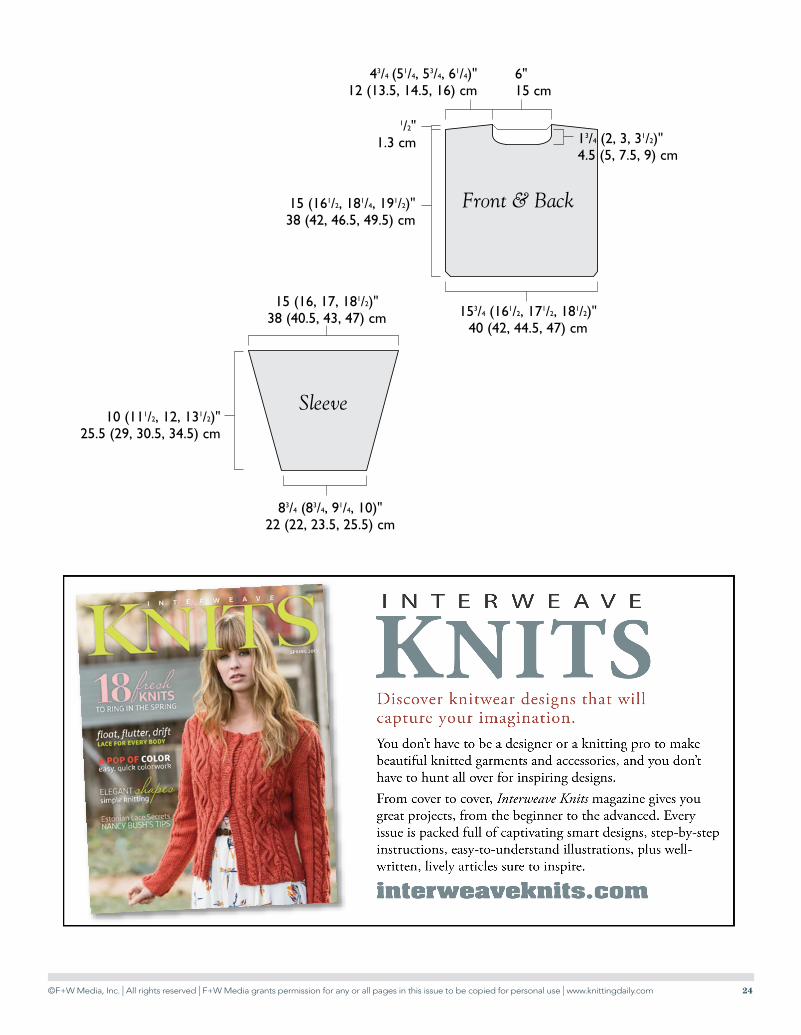
43/4 (51/4, 53/4, 61/4)"12 (13.5, 14.5, 16) cm
6"15 cm
1/2"1.3 cm 13/4 (2, 3, 31/2)"
4.5 (5, 7.5, 9) cm
15 (161/2, 181/4, 191/2)"38 (42, 46.5, 49.5) cm
153/4 (161/2, 171/2, 181/2)"40 (42, 44.5, 47) cm
Front & Back
Sleeve
15 (16, 17, 181/2)"38 (40.5, 43, 47) cm
10 (111/2, 12, 131/2)"25.5 (29, 30.5, 34.5) cm
83/4 (83/4, 91/4, 10)"22 (22, 23.5, 25.5) cm
©F+W Media, Inc. | All rights reserved | F+W Media grants permission for any or all pages in this issue to be copied for personal use | www.knittingdaily.com 25
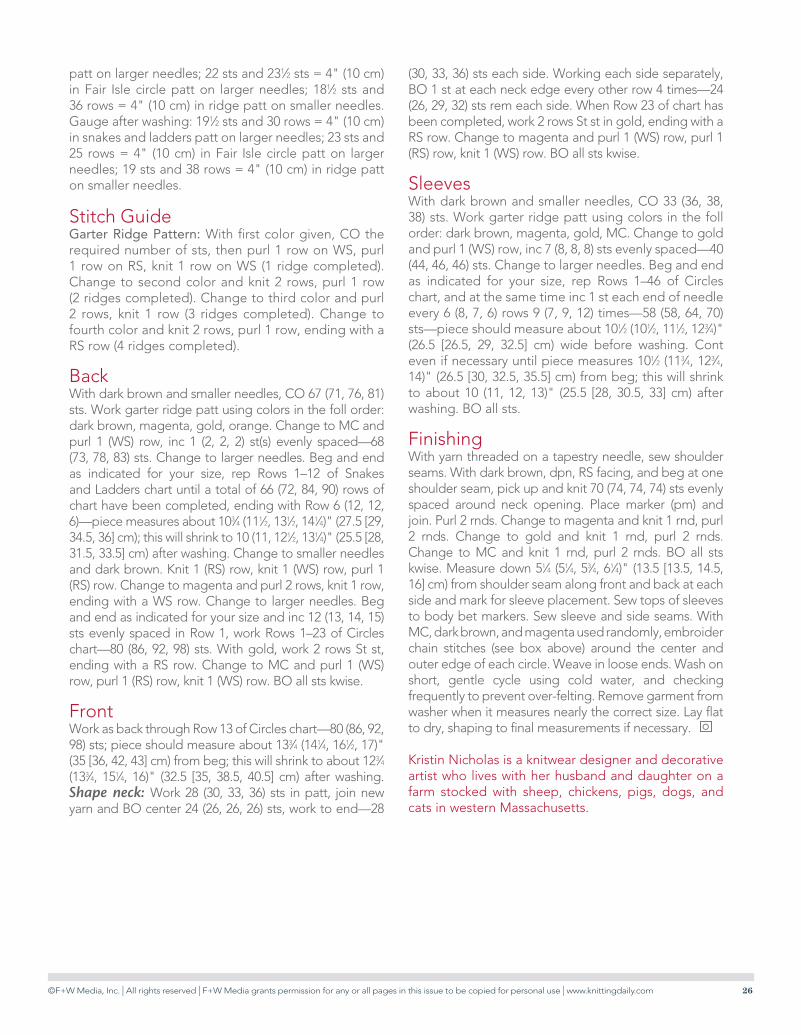
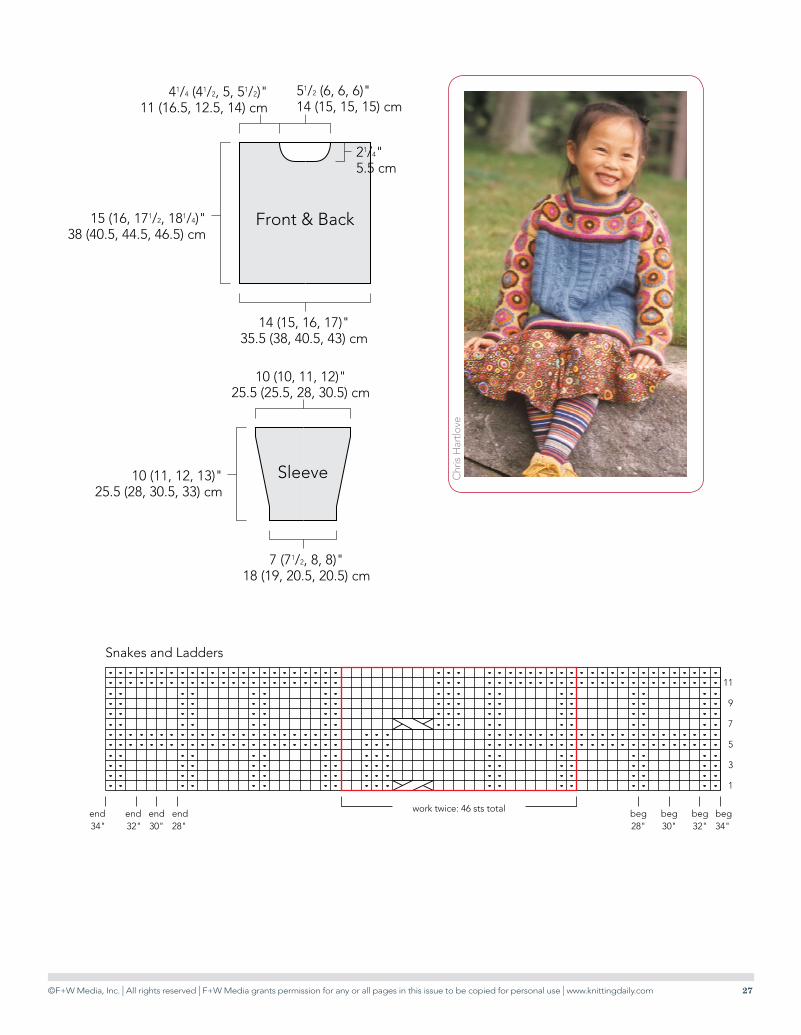
The yoke of Kristin Nicholas’s vibrant child’s sweater is decorated with cheerful concentric circles. Simple chain-stitch embroidery around the knitted-in circle motifs gives them added dimension and a smooth outline. The body of the sweater is worked in knit-and-purl ladder-stitch patterns interspersed with simple cable panels. Bright garter-stitch stripes punctuate the design and border the hem, sleeves, and collar. After finishing the sweater, Kristin washed it gently in her machine to even out any irregularities in the embroidery and to give the sweater a soft semifelted surface.
Finished Size: 28 (30, 32, 34)" (71 [76, 81.5, 86.5] cm) chest circumference. Sweater shown measures 32" (86.5 cm).
Yarn: Worsted weight (CYCA #4 medium). Shown here: Goddess Julia (50% wool, 25% kid mohair, 25% alpaca; 93 yd [85 m]/50 g): #4936 blue thyme (MC), 5 (6, 6, 7) balls; #B118 espresso (dark brown) and #2983 magenta, 1 ball each; #2163 golden honey (gold) and #2250 French pumpkin (orange), 2 (2, 3, 3) balls each.
Needles: Body and sleeves—Size 3 (3.25 mm) and 5 (3.75 mm). Neck edging—Size 3 (3.25 mm): set of 4 double-pointed (dpn). Adjust needle sizes if necessary to obtain the correct gauge.
Notions: Markers (m); cable needle (cn); tapestry needle.
Gauge: Fabric will shrink about 3% in width and 6% in length when washed. Gauge before washing: 19 sts and 28 rows = 4" (10 cm) in snakes and ladders
Stop-Traffic Circlesdesign by Kristin Nicholas
Originally published in Interweave Knits, Winter 2003
Chr
is H
artlo
ve
©F+W Media, Inc. | All rights reserved | F+W Media grants permission for any or all pages in this issue to be copied for personal use | www.knittingdaily.com 26
patt on larger needles; 22 sts and 231⁄2 sts = 4" (10 cm) in Fair Isle circle patt on larger needles; 181⁄2 sts and 36 rows = 4" (10 cm) in ridge patt on smaller needles. Gauge after washing: 191⁄2 sts and 30 rows = 4" (10 cm) in snakes and ladders patt on larger needles; 23 sts and 25 rows = 4" (10 cm) in Fair Isle circle patt on larger needles; 19 sts and 38 rows = 4" (10 cm) in ridge patt on smaller needles.
Stitch GuideGarter Ridge Pattern: With first color given, CO the required number of sts, then purl 1 row on WS, purl 1 row on RS, knit 1 row on WS (1 ridge completed). Change to second color and knit 2 rows, purl 1 row (2 ridges completed). Change to third color and purl 2 rows, knit 1 row (3 ridges completed). Change to fourth color and knit 2 rows, purl 1 row, ending with a RS row (4 ridges completed).
BackWith dark brown and smaller needles, CO 67 (71, 76, 81) sts. Work garter ridge patt using colors in the foll order: dark brown, magenta, gold, orange. Change to MC and purl 1 (WS) row, inc 1 (2, 2, 2) st(s) evenly spaced—68 (73, 78, 83) sts. Change to larger needles. Beg and end as indicated for your size, rep Rows 1–12 of Snakes and Ladders chart until a total of 66 (72, 84, 90) rows of chart have been completed, ending with Row 6 (12, 12, 6)—piece measures about 103⁄4 (111⁄2, 131⁄2, 141⁄4)" (27.5 [29, 34.5, 36] cm); this will shrink to 10 (11, 121⁄2, 131⁄4)" (25.5 [28, 31.5, 33.5] cm) after washing. Change to smaller needles and dark brown. Knit 1 (RS) row, knit 1 (WS) row, purl 1 (RS) row. Change to magenta and purl 2 rows, knit 1 row, ending with a WS row. Change to larger needles. Beg and end as indicated for your size and inc 12 (13, 14, 15) sts evenly spaced in Row 1, work Rows 1–23 of Circles chart—80 (86, 92, 98) sts. With gold, work 2 rows St st, ending with a RS row. Change to MC and purl 1 (WS) row, purl 1 (RS) row, knit 1 (WS) row. BO all sts kwise.
FrontWork as back through Row 13 of Circles chart—80 (86, 92, 98) sts; piece should measure about 133⁄4 (141⁄4, 161⁄2, 17)" (35 [36, 42, 43] cm) from beg; this will shrink to about 123⁄4 (133⁄4, 151⁄4, 16)" (32.5 [35, 38.5, 40.5] cm) after washing. Shape neck: Work 28 (30, 33, 36) sts in patt, join new yarn and BO center 24 (26, 26, 26) sts, work to end—28
(30, 33, 36) sts each side. Working each side separately, BO 1 st at each neck edge every other row 4 times—24 (26, 29, 32) sts rem each side. When Row 23 of chart has been completed, work 2 rows St st in gold, ending with a RS row. Change to magenta and purl 1 (WS) row, purl 1 (RS) row, knit 1 (WS) row. BO all sts kwise.
SleevesWith dark brown and smaller needles, CO 33 (36, 38, 38) sts. Work garter ridge patt using colors in the foll order: dark brown, magenta, gold, MC. Change to gold and purl 1 (WS) row, inc 7 (8, 8, 8) sts evenly spaced—40 (44, 46, 46) sts. Change to larger needles. Beg and end as indicated for your size, rep Rows 1–46 of Circles chart, and at the same time inc 1 st each end of needle every 6 (8, 7, 6) rows 9 (7, 9, 12) times—58 (58, 64, 70) sts—piece should measure about 101⁄2 (101⁄2, 111⁄2, 123⁄4)" (26.5 [26.5, 29, 32.5] cm) wide before washing. Cont even if necessary until piece measures 101⁄2 (113⁄4, 123⁄4, 14)" (26.5 [30, 32.5, 35.5] cm) from beg; this will shrink to about 10 (11, 12, 13)" (25.5 [28, 30.5, 33] cm) after washing. BO all sts.
FinishingWith yarn threaded on a tapestry needle, sew shoulder seams. With dark brown, dpn, RS facing, and beg at one shoulder seam, pick up and knit 70 (74, 74, 74) sts evenly spaced around neck opening. Place marker (pm) and join. Purl 2 rnds. Change to magenta and knit 1 rnd, purl 2 rnds. Change to gold and knit 1 rnd, purl 2 rnds. Change to MC and knit 1 rnd, purl 2 rnds. BO all sts kwise. Measure down 51⁄4 (51⁄4, 53⁄4, 61⁄4)" (13.5 [13.5, 14.5, 16] cm) from shoulder seam along front and back at each side and mark for sleeve placement. Sew tops of sleeves to body bet markers. Sew sleeve and side seams. With MC, dark brown, and magenta used randomly, embroider chain stitches (see box above) around the center and outer edge of each circle. Weave in loose ends. Wash on short, gentle cycle using cold water, and checking frequently to prevent over-felting. Remove garment from washer when it measures nearly the correct size. Lay flat to dry, shaping to final measurements if necessary. o
Kristin Nicholas is a knitwear designer and decorative artist who lives with her husband and daughter on a farm stocked with sheep, chickens, pigs, dogs, and cats in western Massachusetts.
©F+W Media, Inc. | All rights reserved | F+W Media grants permission for any or all pages in this issue to be copied for personal use | www.knittingdaily.com 27
11
9
7
5
3
1
end28"
beg28"
work twice: 46 sts totalend30"
beg30"
beg32"
beg34"
end32"
end34"
Snakes and Ladders
Sleeve
10 (10, 11, 12)"25.5 (25.5, 28, 30.5) cm
10 (11, 12, 13)"25.5 (28, 30.5, 33) cm
7 (71/2, 8, 8)"18 (19, 20.5, 20.5) cm
Front & Back
41/4 (41/2, 5, 51/2)"11 (16.5, 12.5, 14) cm
51/2 (6, 6, 6)"14 (15, 15, 15) cm
21/4"5.5 cm
15 (16, 171/2, 181/4)"38 (40.5, 44.5, 46.5) cm
14 (15, 16, 17)"35.5 (38, 40.5, 43) cm
Chr
is H
artlo
ve

©F+W Media, Inc. | All rights reserved | F+W Media grants permission for any or all pages in this issue to be copied for personal use | www.knittingdaily.com 28
45
43
41
39
37
35
33
31
29
27
25
23
21
19
17
15
13
11
9
7
5
3
1
beg28"32"
backand front;
30" sleeve
beg28"
sleeveend28"32"
backand front;
30" sleeve
end28"sleeve
beg30"34"backand front
end30"34"
backand front
end32"34"
sleeve
beg32"34"sleeve
Circles
MC: k on RS; p on WS
MC: p on RS, k on WS
gold: k on RS; p on WS
orange: k on RS; p on WS
pattern repeat
2/2RC: sl 2 sts onto cn and hold in back, k2, k2 from cn
2/2LC: sl 2 sts onto cn and hold in front, k2, k2 from cn
MC: k on RS; p on WS
MC: p on RS, k on WS
gold: k on RS; p on WS
orange: k on RS; p on WS
pattern repeat
2/2RC: sl 2 sts onto cn and hold in back, k2, k2 from cn
2/2LC: sl 2 sts onto cn and hold in front, k2, k2 from cn
MC: k on RS; p on WS
MC: p on RS, k on WS
gold: k on RS; p on WS
orange: k on RS; p on WS
pattern repeat
2/2RC: sl 2 sts onto cn and hold in back, k2, k2 from cn
2/2LC: sl 2 sts onto cn and hold in front, k2, k2 from cn
MC: k on RS; p on WS
MC: p on RS, k on WS
gold: k on RS; p on WS
orange: k on RS; p on WS
pattern repeat
2/2RC: sl 2 sts onto cn and hold in back, k2, k2 from cn
2/2LC: sl 2 sts onto cn and hold in front, k2, k2 from cn
©F+W Media, Inc. | All rights reserved | F+W Media grants permission for any or all pages in this issue to be copied for personal use | www.knittingdaily.com 29
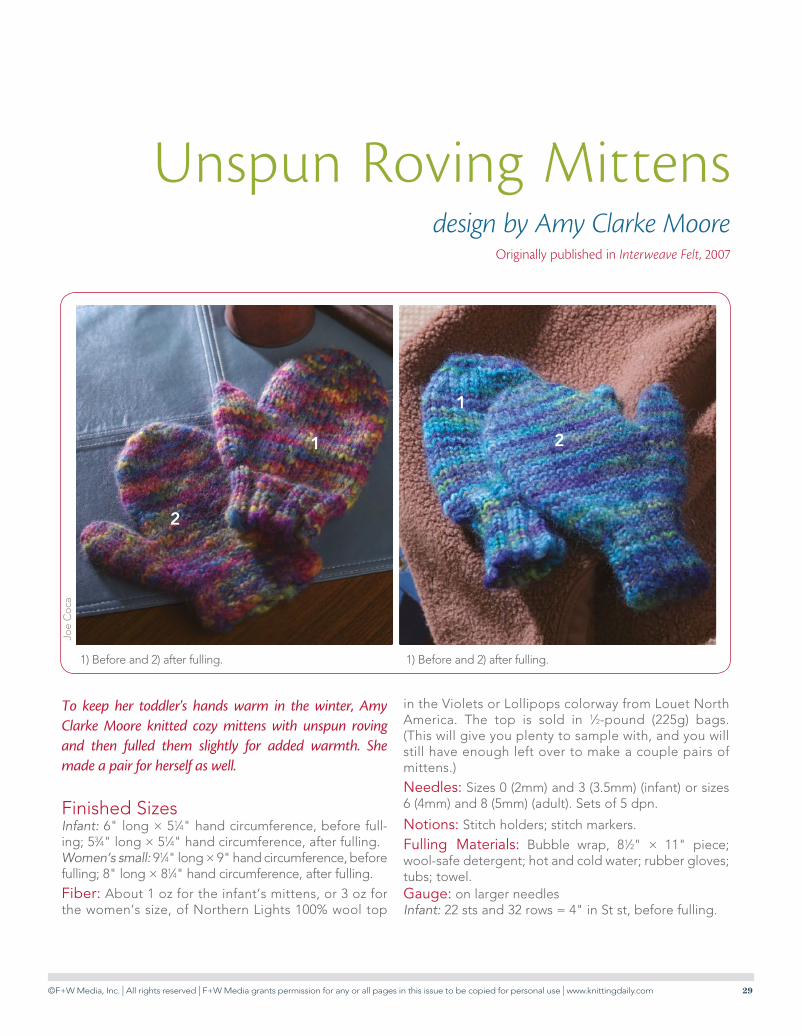
Unspun Roving Mittensdesign by Amy Clarke Moore
Originally published in Interweave Felt, 2007
To keep her toddler's hands warm in the winter, Amy Clarke Moore knitted cozy mittens with unspun roving and then fulled them slightly for added warmth. She made a pair for herself as well.
Finished SizesInfant: 6" long × 51⁄4" hand circumference, before full-ing; 53⁄4" long × 51⁄4" hand circumference, after fulling.Women’s small: 91⁄4" long × 9" hand circumference, before fulling; 8" long × 81⁄4" hand circumference, after fulling.
Fiber: About 1 oz for the infant’s mittens, or 3 oz for the women’s size, of Northern Lights 100% wool top
in the Violets or Lollipops colorway from Louet North America. The top is sold in 1⁄2-pound (225g) bags. (This will give you plenty to sample with, and you will still have enough left over to make a couple pairs of mittens.)
Needles: Sizes 0 (2mm) and 3 (3.5mm) (infant) or sizes 6 (4mm) and 8 (5mm) (adult). Sets of 5 dpn.
Notions: Stitch holders; stitch markers.
Fulling Materials: Bubble wrap, 81⁄2" × 11" piece; wool-safe detergent; hot and cold water; rubber gloves; tubs; towel.Gauge: on larger needlesInfant: 22 sts and 32 rows = 4" in St st, before fulling.
1) Before and 2) after fulling. 1) Before and 2) after fulling.
1
1 2
2
Joe
Coc
a
©F+W Media, Inc. | All rights reserved | F+W Media grants permission for any or all pages in this issue to be copied for personal use | www.knittingdaily.com 30
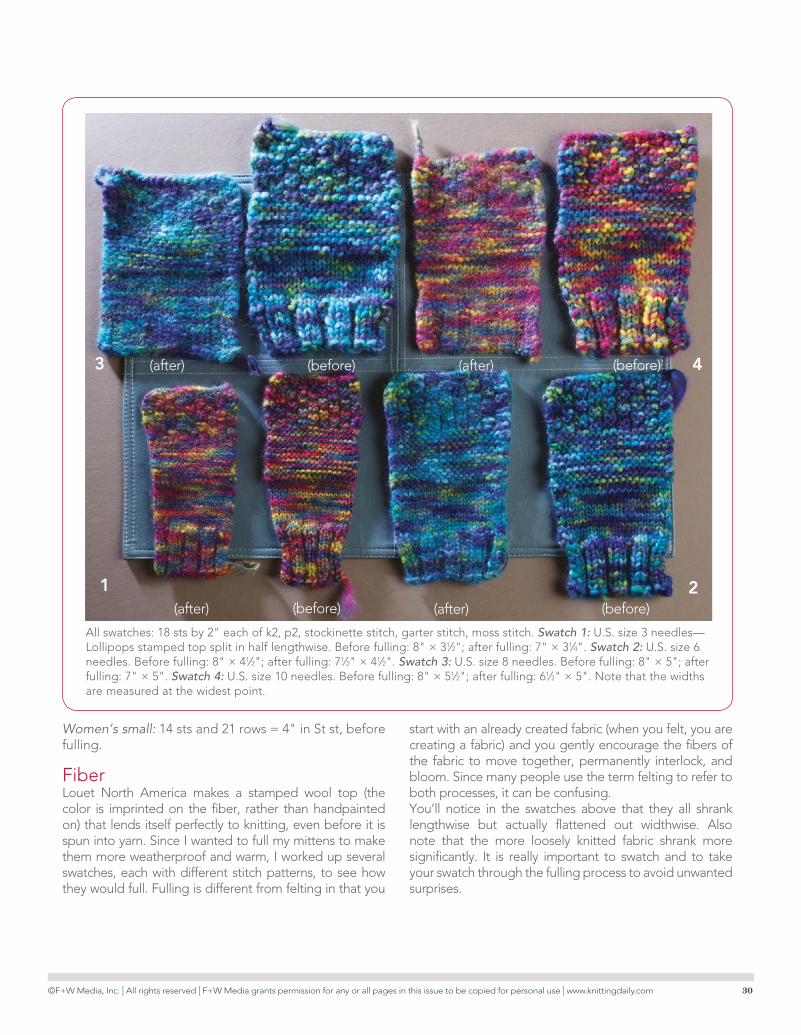
Women’s small: 14 sts and 21 rows = 4" in St st, before fulling.
FiberLouet North America makes a stamped wool top (the color is imprinted on the fiber, rather than handpainted on) that lends itself perfectly to knitting, even before it is spun into yarn. Since I wanted to full my mittens to make them more weatherproof and warm, I worked up several swatches, each with different stitch patterns, to see how they would full. Fulling is different from felting in that you
start with an already created fabric (when you felt, you are creating a fabric) and you gently encourage the fibers of the fabric to move together, permanently interlock, and bloom. Since many people use the term felting to refer to both processes, it can be confusing.You’ll notice in the swatches above that they all shrank lengthwise but actually flattened out widthwise. Also note that the more loosely knitted fabric shrank more significantly. It is really important to swatch and to take your swatch through the fulling process to avoid unwanted surprises.
All swatches: 18 sts by 2" each of k2, p2, stockinette stitch, garter stitch, moss stitch. Swatch 1: U.S. size 3 needles—Lollipops stamped top split in half lengthwise. Before fulling: 8" × 31⁄2"; after fulling: 7" × 31⁄4". Swatch 2: U.S. size 6 needles. Before fulling: 8" × 41⁄2"; after fulling: 71⁄2" × 41⁄2". Swatch 3: U.S. size 8 needles. Before fulling: 8" × 5"; after fulling: 7" × 5". Swatch 4: U.S. size 10 needles. Before fulling: 8" × 51⁄2"; after fulling: 61⁄2" × 5". Note that the widths are measured at the widest point.
1 2
3 4(after) (before) (after) (before)
(after) (before)(after) (before)
©F+W Media, Inc. | All rights reserved | F+W Media grants permission for any or all pages in this issue to be copied for personal use | www.knittingdaily.com 31
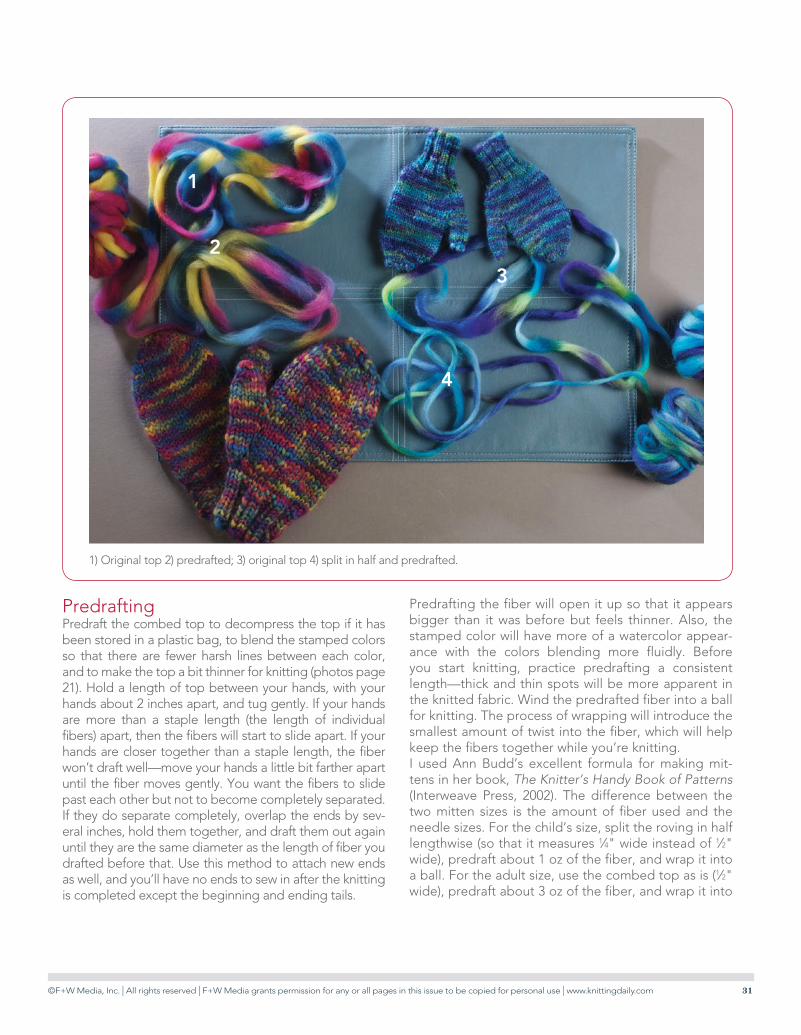
PredraftingPredraft the combed top to decompress the top if it has been stored in a plastic bag, to blend the stamped colors so that there are fewer harsh lines between each color, and to make the top a bit thinner for knitting (photos page 21). Hold a length of top between your hands, with your hands about 2 inches apart, and tug gently. If your hands are more than a staple length (the length of individual fibers) apart, then the fibers will start to slide apart. If your hands are closer together than a staple length, the fiber won’t draft well—move your hands a little bit farther apart until the fiber moves gently. You want the fibers to slide past each other but not to become completely separated. If they do separate completely, overlap the ends by sev-eral inches, hold them together, and draft them out again until they are the same diameter as the length of fiber you drafted before that. Use this method to attach new ends as well, and you’ll have no ends to sew in after the knitting is completed except the beginning and ending tails.
Predrafting the fiber will open it up so that it appears bigger than it was before but feels thinner. Also, the stamped color will have more of a watercolor appear-ance with the colors blending more fluidly. Before you start knitting, practice predrafting a consistent length—thick and thin spots will be more apparent in the knitted fabric. Wind the predrafted fiber into a ball for knitting. The process of wrapping will introduce the smallest amount of twist into the fiber, which will help keep the fibers together while you’re knitting.I used Ann Budd’s excellent formula for making mit-tens in her book, The Knitter’s Handy Book of Patterns (Interweave Press, 2002). The difference between the two mitten sizes is the amount of fiber used and the needle sizes. For the child’s size, split the roving in half lengthwise (so that it measures 1⁄4" wide instead of 1⁄2" wide), predraft about 1 oz of the fiber, and wrap it into a ball. For the adult size, use the combed top as is (1⁄2" wide), predraft about 3 oz of the fiber, and wrap it into
1) Original top 2) predrafted; 3) original top 4) split in half and predrafted.
1
32
4
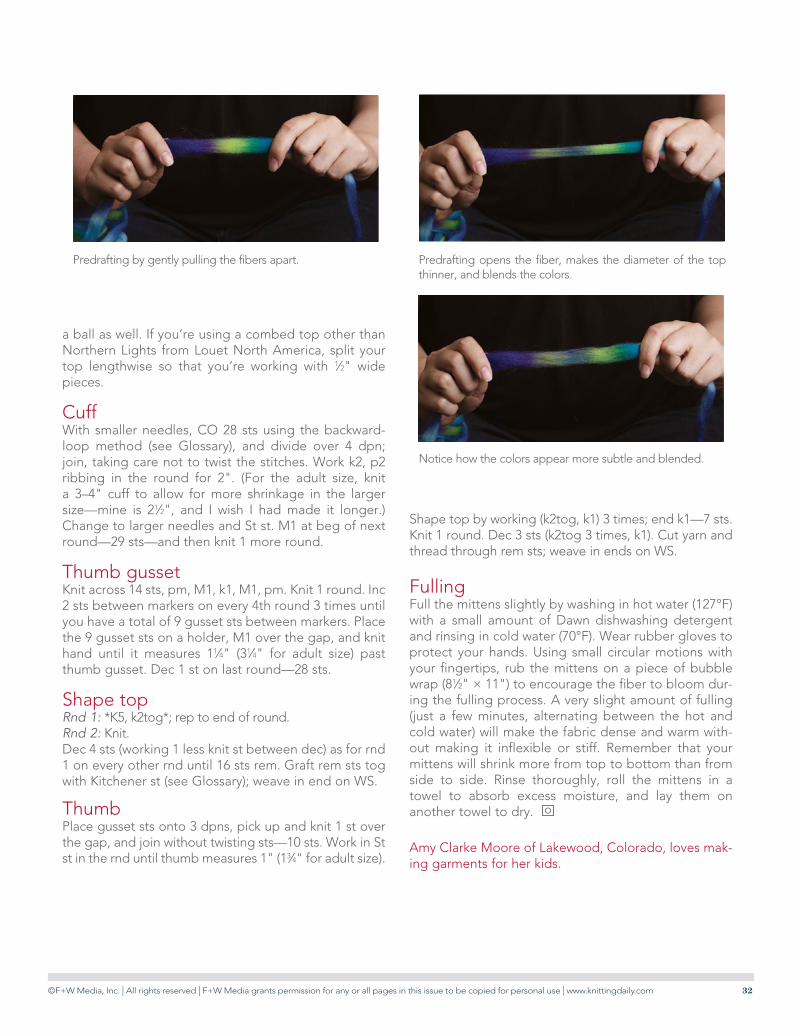
©F+W Media, Inc. | All rights reserved | F+W Media grants permission for any or all pages in this issue to be copied for personal use | www.knittingdaily.com 32
a ball as well. If you’re using a combed top other than Northern Lights from Louet North America, split your top lengthwise so that you’re working with 1⁄2" wide pieces.
CuffWith smaller needles, CO 28 sts using the backward-loop method (see Glossary), and divide over 4 dpn; join, taking care not to twist the stitches. Work k2, p2 ribbing in the round for 2". (For the adult size, knit a 3–4" cuff to allow for more shrinkage in the larger size—mine is 21⁄2", and I wish I had made it longer.) Change to larger needles and St st. M1 at beg of next round—29 sts—and then knit 1 more round.
Thumb gussetKnit across 14 sts, pm, M1, k1, M1, pm. Knit 1 round. Inc 2 sts between markers on every 4th round 3 times until you have a total of 9 gusset sts between markers. Place the 9 gusset sts on a holder, M1 over the gap, and knit hand until it measures 11⁄4" (31⁄4" for adult size) past thumb gusset. Dec 1 st on last round—28 sts.
Shape topRnd 1: *K5, k2tog*; rep to end of round.Rnd 2: Knit.Dec 4 sts (working 1 less knit st between dec) as for rnd 1 on every other rnd until 16 sts rem. Graft rem sts tog with Kitchener st (see Glossary); weave in end on WS.
ThumbPlace gusset sts onto 3 dpns, pick up and knit 1 st over the gap, and join without twisting sts—10 sts. Work in St st in the rnd until thumb measures 1" (13⁄4" for adult size).
Shape top by working (k2tog, k1) 3 times; end k1—7 sts. Knit 1 round. Dec 3 sts (k2tog 3 times, k1). Cut yarn and thread through rem sts; weave in ends on WS.
FullingFull the mittens slightly by washing in hot water (127°F) with a small amount of Dawn dishwashing detergent and rinsing in cold water (70°F). Wear rubber gloves to protect your hands. Using small circular motions with your fingertips, rub the mittens on a piece of bubble wrap (81⁄2" × 11") to encourage the fiber to bloom dur-ing the fulling process. A very slight amount of fulling (just a few minutes, alternating between the hot and cold water) will make the fabric dense and warm with-out making it inflexible or stiff. Remember that your mittens will shrink more from top to bottom than from side to side. Rinse thoroughly, roll the mittens in a towel to absorb excess moisture, and lay them on another towel to dry. o
Amy Clarke Moore of Lakewood, Colorado, loves mak-ing garments for her kids.
Notice how the colors appear more subtle and blended.
Predrafting by gently pulling the fibers apart. Predrafting opens the fiber, makes the diameter of the top thinner, and blends the colors.
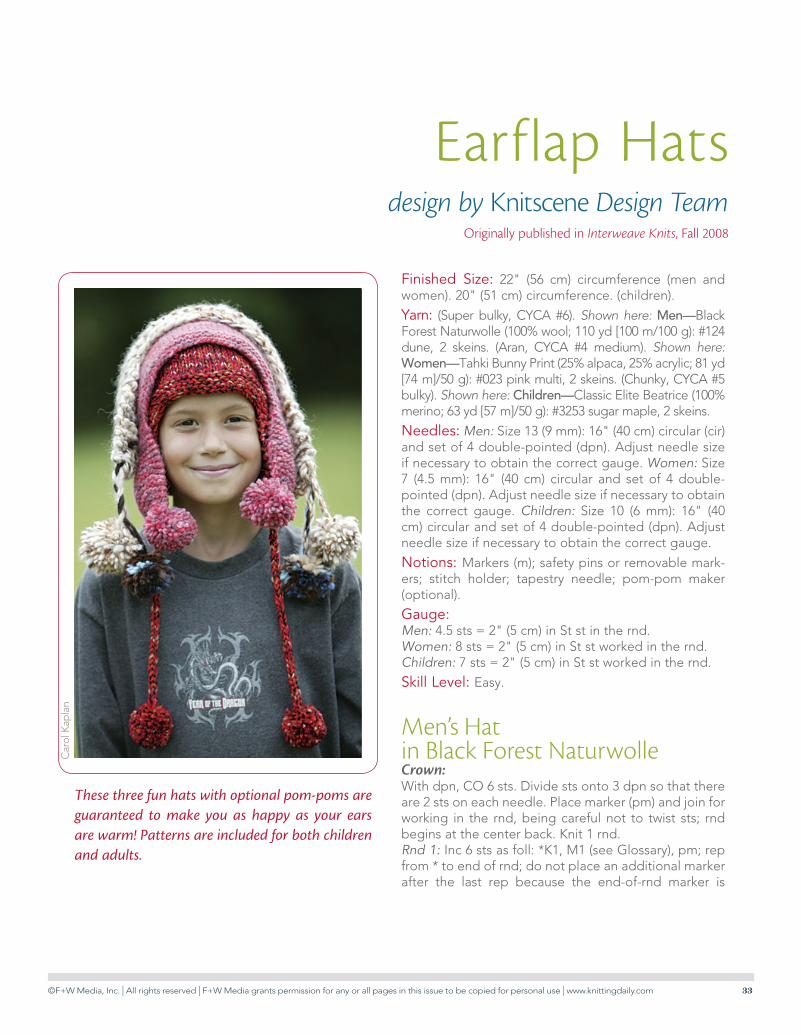
©F+W Media, Inc. | All rights reserved | F+W Media grants permission for any or all pages in this issue to be copied for personal use | www.knittingdaily.com 33
Finished Size: 22" (56 cm) circumference (men and women). 20" (51 cm) circumference. (children).
Yarn: (Super bulky, CYCA #6). Shown here: Men—Black Forest Naturwolle (100% wool; 110 yd [100 m/100 g): #124 dune, 2 skeins. (Aran, CYCA #4 medium). Shown here: Women—Tahki Bunny Print (25% alpaca, 25% acrylic; 81 yd [74 m]/50 g): #023 pink multi, 2 skeins. (Chunky, CYCA #5 bulky). Shown here: Children—Classic Elite Beatrice (100% merino; 63 yd [57 m]/50 g): #3253 sugar maple, 2 skeins.
Needles: Men: Size 13 (9 mm): 16" (40 cm) circular (cir) and set of 4 double-pointed (dpn). Adjust needle size if necessary to obtain the correct gauge. Women: Size 7 (4.5 mm): 16" (40 cm) circular and set of 4 double-pointed (dpn). Adjust needle size if necessary to obtain the correct gauge. Children: Size 10 (6 mm): 16" (40 cm) circular and set of 4 double-pointed (dpn). Adjust needle size if necessary to obtain the correct gauge.
Notions: Markers (m); safety pins or removable mark-ers; stitch holder; tapestry needle; pom-pom maker (optional).
Gauge:Men: 4.5 sts = 2" (5 cm) in St st in the rnd. Women: 8 sts = 2" (5 cm) in St st worked in the rnd. Children: 7 sts = 2" (5 cm) in St st worked in the rnd.
Skill Level: Easy.
Men’s Hat in Black Forest Naturwolle Crown:With dpn, CO 6 sts. Divide sts onto 3 dpn so that there are 2 sts on each needle. Place marker (pm) and join for working in the rnd, being careful not to twist sts; rnd begins at the center back. Knit 1 rnd.Rnd 1: Inc 6 sts as foll: *K1, M1 (see Glossary), pm; rep from * to end of rnd; do not place an additional marker after the last rep because the end-of-rnd marker is
These three fun hats with optional pom-poms are guaranteed to make you as happy as your ears are warm! Patterns are included for both children and adults.
Earflap Hatsdesign by Knitscene Design Team
Originally published in Interweave Knits, Fall 2008
Car
ol K
apla
n
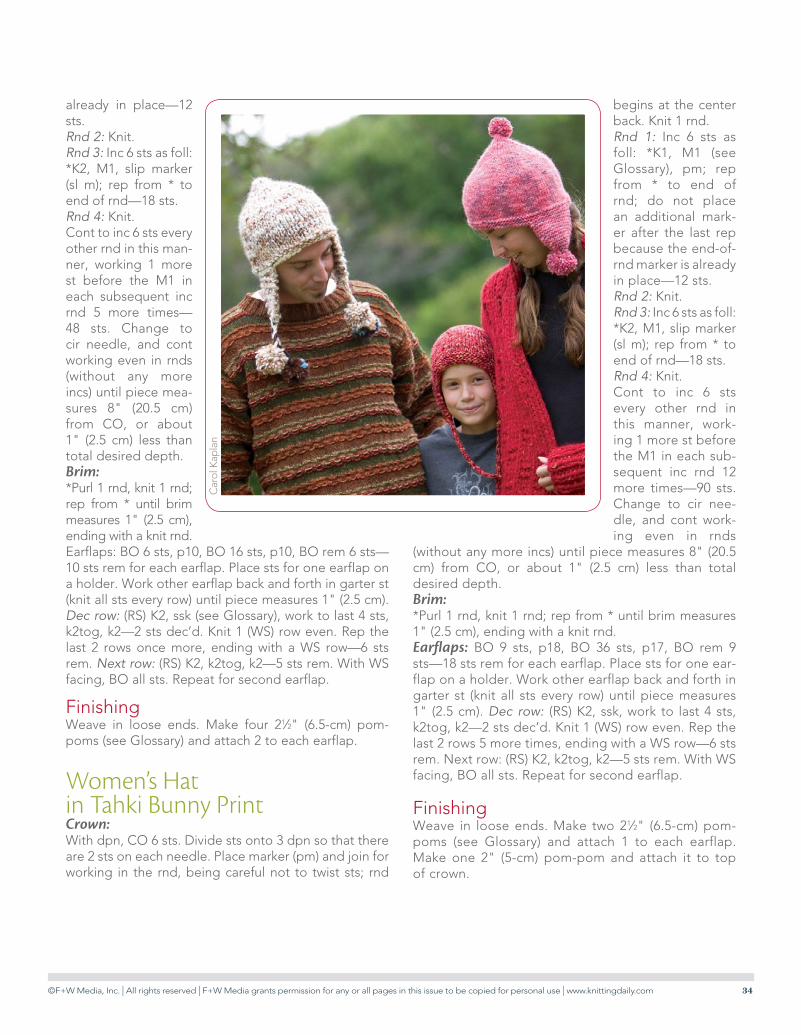
©F+W Media, Inc. | All rights reserved | F+W Media grants permission for any or all pages in this issue to be copied for personal use | www.knittingdaily.com 34
already in place—12 sts.Rnd 2: Knit.Rnd 3: Inc 6 sts as foll: *K2, M1, slip marker (sl m); rep from * to end of rnd—18 sts.Rnd 4: Knit.Cont to inc 6 sts every other rnd in this man-ner, working 1 more st before the M1 in each subsequent inc rnd 5 more times—48 sts. Change to cir needle, and cont working even in rnds (without any more incs) until piece mea-sures 8" (20.5 cm) from CO, or about 1" (2.5 cm) less than total desired depth. Brim:*Purl 1 rnd, knit 1 rnd; rep from * until brim measures 1" (2.5 cm), ending with a knit rnd. Earflaps: BO 6 sts, p10, BO 16 sts, p10, BO rem 6 sts—10 sts rem for each earflap. Place sts for one earflap on a holder. Work other earflap back and forth in garter st (knit all sts every row) until piece measures 1" (2.5 cm). Dec row: (RS) K2, ssk (see Glossary), work to last 4 sts, k2tog, k2—2 sts dec’d. Knit 1 (WS) row even. Rep the last 2 rows once more, ending with a WS row—6 sts rem. Next row: (RS) K2, k2tog, k2—5 sts rem. With WS facing, BO all sts. Repeat for second earflap.
FinishingWeave in loose ends. Make four 21⁄2" (6.5-cm) pom-poms (see Glossary) and attach 2 to each earflap.
Women’s Hat in Tahki Bunny PrintCrown:With dpn, CO 6 sts. Divide sts onto 3 dpn so that there are 2 sts on each needle. Place marker (pm) and join for working in the rnd, being careful not to twist sts; rnd
begins at the center back. Knit 1 rnd.Rnd 1: Inc 6 sts as foll: *K1, M1 (see Glossary), pm; rep from * to end of rnd; do not place an additional mark-er after the last rep because the end-of-rnd marker is already in place—12 sts.Rnd 2: Knit.Rnd 3: Inc 6 sts as foll: *K2, M1, slip marker (sl m); rep from * to end of rnd—18 sts. Rnd 4: Knit. Cont to inc 6 sts every other rnd in this manner, work-ing 1 more st before the M1 in each sub-sequent inc rnd 12 more times—90 sts. Change to cir nee-dle, and cont work-ing even in rnds
(without any more incs) until piece measures 8" (20.5 cm) from CO, or about 1" (2.5 cm) less than total desired depth. Brim:*Purl 1 rnd, knit 1 rnd; rep from * until brim measures 1" (2.5 cm), ending with a knit rnd. Earflaps: BO 9 sts, p18, BO 36 sts, p17, BO rem 9 sts—18 sts rem for each earflap. Place sts for one ear-flap on a holder. Work other earflap back and forth in garter st (knit all sts every row) until piece measures 1" (2.5 cm). Dec row: (RS) K2, ssk, work to last 4 sts, k2tog, k2—2 sts dec’d. Knit 1 (WS) row even. Rep the last 2 rows 5 more times, ending with a WS row—6 sts rem. Next row: (RS) K2, k2tog, k2—5 sts rem. With WS facing, BO all sts. Repeat for second earflap.
FinishingWeave in loose ends. Make two 21⁄2" (6.5-cm) pom-poms (see Glossary) and attach 1 to each earflap. Make one 2" (5-cm) pom-pom and attach it to top of crown.
Car
ol K
apla
n
©F+W Media, Inc. | All rights reserved | F+W Media grants permission for any or all pages in this issue to be copied for personal use | www.knittingdaily.com 35
Child’s Hat in Classic Elite BeatriceCrown:With dpn, CO 6 sts. Divide sts onto 3 dpn so that there are 2 sts on each needle. Place marker (pm) and join for working in the rnd, being careful not to twist sts; rnd begins at the center back. Knit 1 rnd.Rnd 1: Inc 6 sts as foll: *K1, M1, pm; rep from * to end of rnd; do not place an additional marker after the last rep because the end-of-rnd marker is already in place—12 sts.Rnd 2: Knit.Rnd 3: Inc 6 sts as foll: *K2, M1, slip marker (sl m); rep from * to end of rnd—18 sts. Rnd 4: Knit. Cont to inc 6 sts every other rnd in this manner, work-ing 1 more st before the M1 in each subsequent inc rnd 8 more times—66 sts. Change to cir needle, and cont working even in rnds (without any more incs) until piece measures 8" (20.5 cm) from CO, or about 1" (2.5 cm)
less than total desired depth. Brim:*Purl 1 rnd, knit 1 rnd; rep from * until brim measures 1" (2.5 cm), ending with a knit rnd. Earflaps: BO 6 sts, p14, BO 26 sts, p14, BO rem 6 sts—14 sts rem for each earflap. Place sts for one earflap on a holder. Work other earflap back and forth in garter st (knit all sts every row) until piece measures 1" (2.5 cm). Dec row: (RS) K2, ssk (see Glossary), work to last 4 sts, k2tog, k2—2 sts dec’d. Knit 1 (WS) row even. Rep the last 2 rows 3 more times, ending with a WS row—6 sts rem. Next row: (RS) K2, k2tog, k2—5 sts rem. Next row: P2tog, p1, p2tog—3 sts rem. Ties:Work rem 3 sts in 3-st I-cord (see Glossary) until tie measures about 12" (30.5 cm). BO all sts. Repeat steps for earflap & tie for second earflap.
FinishingWeave in loose ends. Make two 21⁄2" (6.5-cm) pom-poms and attach 1 to each earflap tie. o
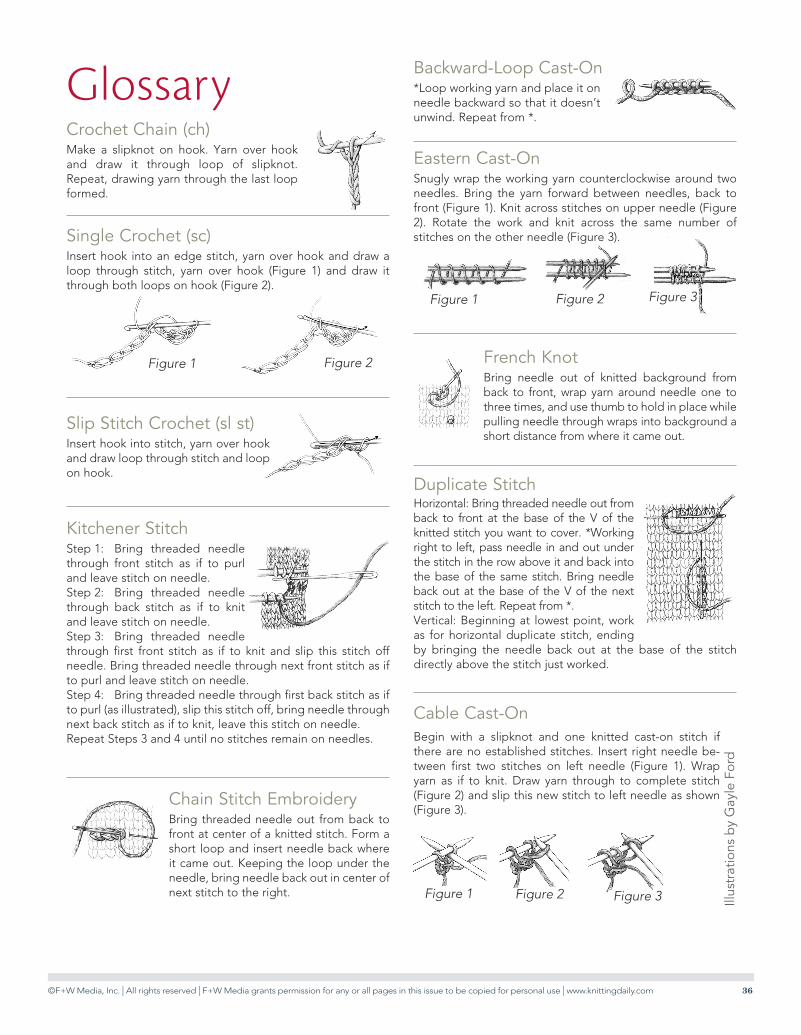
©F+W Media, Inc. | All rights reserved | F+W Media grants permission for any or all pages in this issue to be copied for personal use | www.knittingdaily.com 36
Glossary Backward-Loop Cast-On*Loop working yarn and place it on needle backward so that it doesn’t unwind. Repeat from *.
Kitchener StitchStep 1: Bring threaded needle through front stitch as if to purl and leave stitch on needle.Step 2: Bring threaded needle through back stitch as if to knit and leave stitch on needle.Step 3: Bring threaded needle through first front stitch as if to knit and slip this stitch off needle. Bring threaded needle through next front stitch as if to purl and leave stitch on needle.Step 4: Bring threaded needle through first back stitch as if to purl (as illustrated), slip this stitch off, bring needle through next back stitch as if to knit, leave this stitch on needle.Repeat Steps 3 and 4 until no stitches remain on needles.
Crochet Chain (ch)Make a slipknot on hook. Yarn over hook and draw it through loop of slipknot. Repeat, drawing yarn through the last loop formed.
Eastern Cast-OnSnugly wrap the working yarn counterclockwise around two needles. Bring the yarn forward between needles, back to front (Figure 1). Knit across stitches on upper needle (Figure 2). Rotate the work and knit across the same number of stitches on the other needle (Figure 3).
Figure 1 Figure 2 Figure 3
Slip Stitch Crochet (sl st)Insert hook into stitch, yarn over hook and draw loop through stitch and loop on hook.
Chain Stitch EmbroideryBring threaded needle out from back to front at center of a knitted stitch. Form a short loop and insert needle back where it came out. Keeping the loop under the needle, bring needle back out in center of next stitch to the right.
French KnotBring needle out of knitted background from back to front, wrap yarn around needle one to three times, and use thumb to hold in place while pulling needle through wraps into background a short distance from where it came out.
Single Crochet (sc)Insert hook into an edge stitch, yarn over hook and draw a loop through stitch, yarn over hook (Figure 1) and draw it through both loops on hook (Figure 2).
Figure 1 Figure 2
Illus
trat
ions
by
Gay
le F
ord
Figure 1 Figure 2
Cable Cast-On
Figure 3
Begin with a slipknot and one knitted cast-on stitch if there are no established stitches. Insert right needle be-tween first two stitches on left needle (Figure 1). Wrap yarn as if to knit. Draw yarn through to complete stitch (Figure 2) and slip this new stitch to left needle as shown (Figure 3).
Horizontal: Bring threaded needle out from back to front at the base of the V of the knitted stitch you want to cover. *Working right to left, pass needle in and out under the stitch in the row above it and back into the base of the same stitch. Bring needle back out at the base of the V of the next stitch to the left. Repeat from *.Vertical: Beginning at lowest point, work as for horizontal duplicate stitch, ending by bringing the needle back out at the base of the stitch directly above the stitch just worked.
Duplicate Stitch
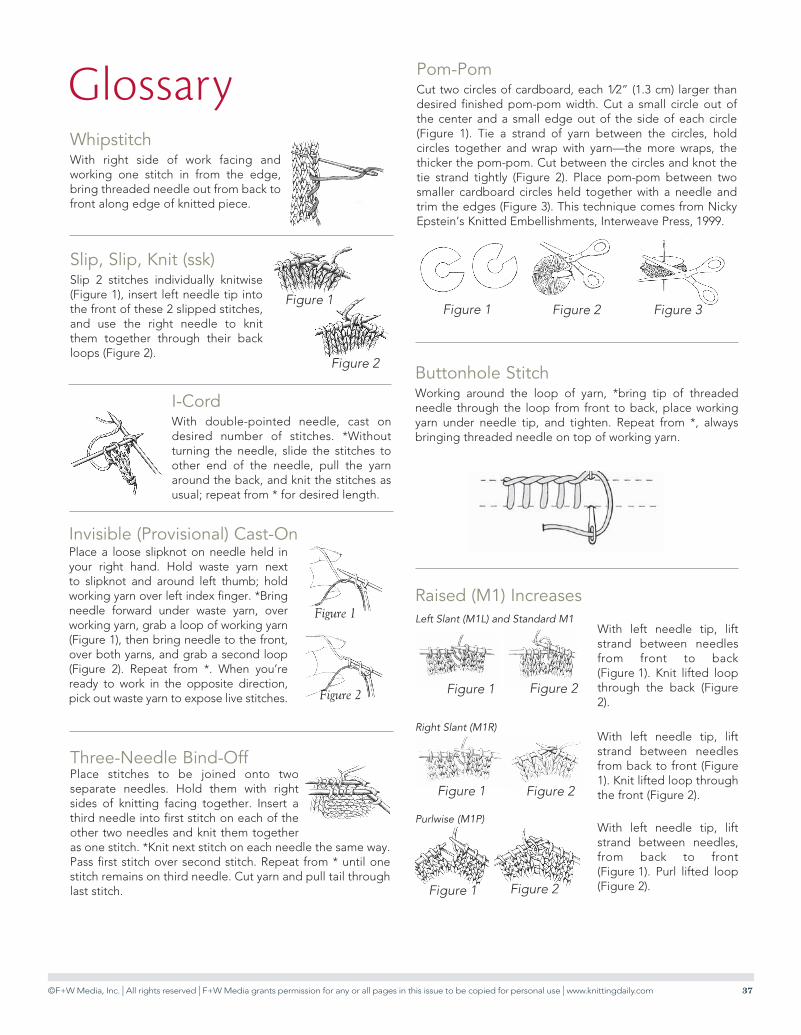
©F+W Media, Inc. | All rights reserved | F+W Media grants permission for any or all pages in this issue to be copied for personal use | www.knittingdaily.com 37
Glossary
Slip, Slip, Knit (ssk)Slip 2 stitches individually knitwise (Figure 1), insert left needle tip into the front of these 2 slipped stitches, and use the right needle to knit them together through their back loops (Figure 2).
Figure 2
Figure 1
Raised (M1) Increases
Right Slant (M1R)With left needle tip, lift strand between needles from back to front (Figure 1). Knit lifted loop through the front (Figure 2).Figure 1 Figure 2
With left needle tip, lift strand between needles from front to back (Figure 1). Knit lifted loop through the back (Figure 2).
Figure 1 Figure 2
Left Slant (M1L) and Standard M1
Figure 1 Figure 2
With left needle tip, lift strand between needles, from back to front (Figure 1). Purl lifted loop (Figure 2).
Purlwise (M1P)
I-CordWith double-pointed needle, cast on desired number of stitches. *Without turning the needle, slide the stitches to other end of the needle, pull the yarn around the back, and knit the stitches as usual; repeat from * for desired length.
Pom-PomCut two circles of cardboard, each 1⁄2” (1.3 cm) larger than desired finished pom-pom width. Cut a small circle out of the center and a small edge out of the side of each circle (Figure 1). Tie a strand of yarn between the circles, hold circles together and wrap with yarn—the more wraps, the thicker the pom-pom. Cut between the circles and knot the tie strand tightly (Figure 2). Place pom-pom between two smaller cardboard circles held together with a needle and trim the edges (Figure 3). This technique comes from Nicky Epstein’s Knitted Embellishments, Interweave Press, 1999.
Figure 1 Figure 2 Figure 3
WhipstitchWith right side of work facing and working one stitch in from the edge, bring threaded needle out from back to front along edge of knitted piece.
Place a loose slipknot on needle held in your right hand. Hold waste yarn next to slipknot and around left thumb; hold working yarn over left index finger. *Bring needle forward under waste yarn, over working yarn, grab a loop of working yarn (Figure 1), then bring needle to the front, over both yarns, and grab a second loop (Figure 2). Repeat from *. When you’re ready to work in the opposite direction, pick out waste yarn to expose live stitches.
Invisible (Provisional) Cast-On
Figure 1
Figure 2
Place stitches to be joined onto two separate needles. Hold them with right sides of knitting facing together. Insert a third needle into first stitch on each of the other two needles and knit them together as one stitch. *Knit next stitch on each needle the same way. Pass first stitch over second stitch. Repeat from * until one stitch remains on third needle. Cut yarn and pull tail through last stitch.
Three-Needle Bind-Off
the new stranded colorwork138
Long-Tail (Continental) Cast-On Leaving a long tail (about ½" [1.3 cm] for each stitch to be cast
on), make a slipknot and place on right needle. Place thumb
and index finger of your left hand between the yarn ends so
that working yarn is around your index finger and tail end is
around your thumb and secure the yarn ends with your other
fingers. Hold your palm upward, making a V of yarn (Figure 1).
*Bring needle up through loop on thumb (Figure 2), catch first
strand around index finger, and go back down through loop on
thumb (Figure 3). Drop loop off thumb and, placing thumb back
in V configuration, tighten resulting stitch on needle (Figure 4).
Repeat from * for the desired number of stitches.
DECREASES
yyyyyyyyyyyyyyyyyyy
Knit 2 Together (k2tog)Knit 2 stitches together as if they were a single stitch.
Slip, Slip, Knit (ssk) Slip 2 stitches individually knitwise (Figure 1), insert left needle
tip into the front of these 2 slipped stitches, and use the right
needle to knit them together through their back loops (Figure 2).
EMBROIDERY
yyyyyyyyyyyyyyyyyyy
Buttonhole Stitch Working around the loop of yarn, *bring tip of threaded needle
through the loop from front to back, place working yarn under
needle tip, and tighten. Repeat from *, always bringing threaded
needle on top of working yarn.
Figure 1
Figure 1
Figure 3
Figure 2
Figure 2
Figure 4Buttonhole StitchWorking around the loop of yarn, *bring tip of threaded needle through the loop from front to back, place working yarn under needle tip, and tighten. Repeat from *, always bringing threaded needle on top of working yarn.