Embed Size (px)
DESCRIPTION
Instructions for teacher created websites.
Citation preview
1
Front Page
YYoouurr WWeebb AAddddrreessss Every teacher already has a website that is published to the Internet.
http://staffweb.wylieisd.net/staff/your log in name
VVeerryy IImmppoorrttaanntt All teachers of WISD have web space housed on a server. A shortcut folder has been assigned to each teacher. The name of the folder is My Web Space and is accessible through the H:drive..
22xx LLooggiinn Getting to Front Page Enter: https://2x.wylieisd.net. Use the user name and password for Wylie ISD. You can also access 2X from the Wylie ISD home page, through the Wylie East link. The 2X link is
on the right.
Use your usual password and hit Log In. Select Microsoft Office from the selection
Now a window should appear with the Front Page Icon. Double click to open it. If a screen appears asking you about access, choose Full access.
Go to File and choose Open
Go to My Documents
Find the My Web Space folder.
Click Open to access your folder list.
This should have your default page in it: if is published to the web.
RReemmeemmbbeerr::
Remember to save often.
DDeeffaauulltt PPaaggee ((YYoouurr OOppeenniinngg WWeebbppaaggee)) BBeeggiinn bbyy ccrreeaattiinngg yyoouurr wweebbssiittee bbyy cchhoooossiinngg aa tthheemmee ffrroomm tthhee ttaasskk bbaarr oonn tthhee rriigghhtt.. AAppppllyy tthhee tthheemmee ttoo
sseelleecctteedd ppaaggeess oorr aass tthhee ddeeffaauulltt tthheemmee..
CCrreeaattiinngg SSuubb--FFoollddeerrss ffoorr YYoouurr WWeebb ((PPoowweerrPPooiinntt PPrreesseennttaattiioonnss,, HHaannddoouuttss,, PPiiccttuurreess,, VViiddeeooss,, CClliipp AArrtt))
SSuubbffoollddeerrss
2
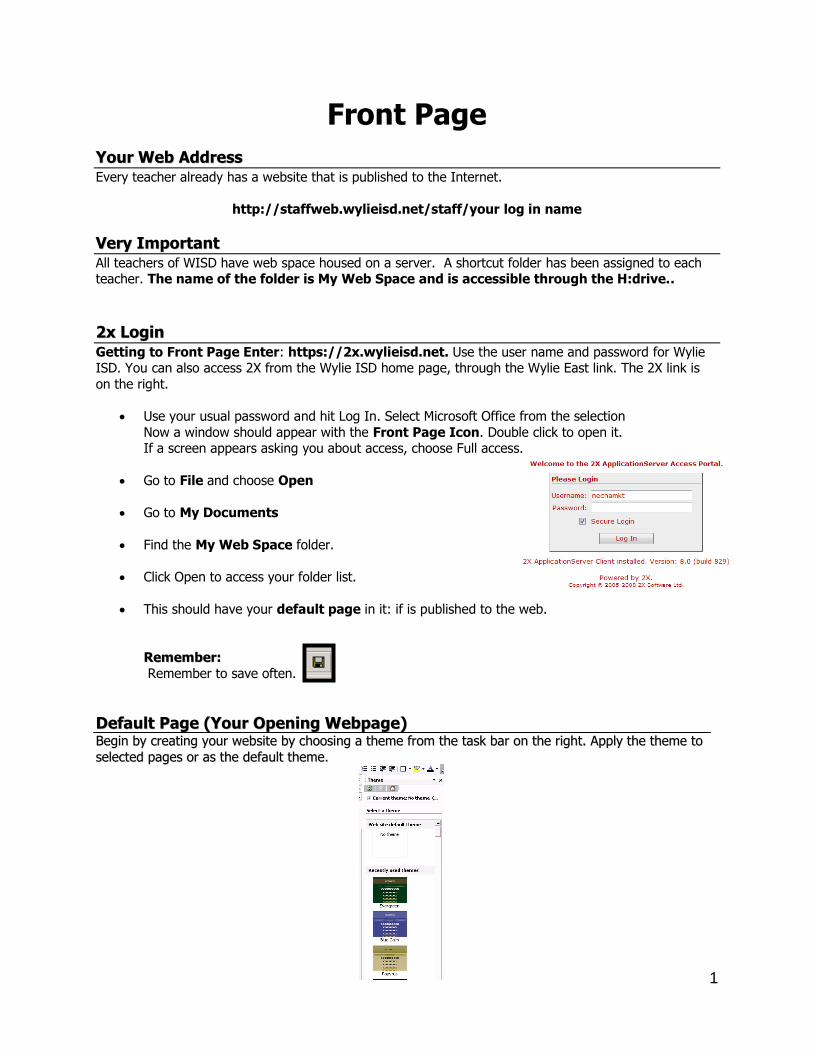
SSuubbffoollddeerrss To help with organization, you may want to create subfolders in your web space folder for assignments,
calendars or a syllabus. You may want to make handouts accessible to download, or use pictures or examples of student work. Since everything that goes on your web must be in your web folder,
subfolders will help keep everything organized
Open your web space folder (file open from Front Page).
Create a new folder for each topic (i.e. pictures, calendars, Algebra II)
RReessoolluuttiioonnss Ever visit a website in which it was necessary to scroll horizontally to see the entire web page? That is
because people set their computer screen resolutions at different settings, usually because of the size of their monitor screens.
The higher the settings, the smaller things look on your screen.
Check your screen’s settings:
Use - D keystroke to go to your Desktop. Right-click the screen and select Properties.
Click the Settings tab
Find the Screen Resolution area and note at what your pixels are set. You can change them
by moving the slider left or right - OK.
Factory Standard Settings:
15‖ screen: 800 x 600
17‖ screen: 1024 x 768
3
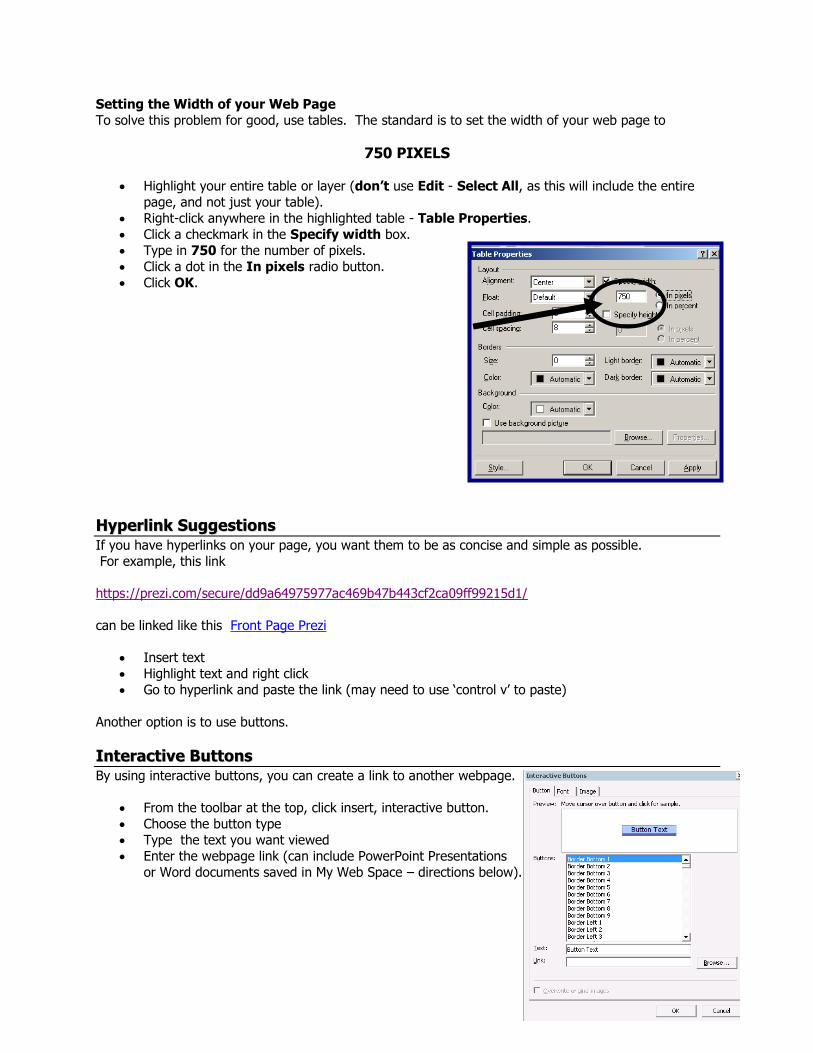
Setting the Width of your Web Page
To solve this problem for good, use tables. The standard is to set the width of your web page to
750 PIXELS
Highlight your entire table or layer (don’t use Edit - Select All, as this will include the entire
page, and not just your table).
Right-click anywhere in the highlighted table - Table Properties.
Click a checkmark in the Specify width box.
Type in 750 for the number of pixels.
Click a dot in the In pixels radio button.
Click OK.
HHyyppeerrlliinnkk SSuuggggeessttiioonnss If you have hyperlinks on your page, you want them to be as concise and simple as possible.
For example, this link
https://prezi.com/secure/dd9a64975977ac469b47b443cf2ca09ff99215d1/
can be linked like this Front Page Prezi
Insert text
Highlight text and right click
Go to hyperlink and paste the link (may need to use ‗control v‘ to paste)
Another option is to use buttons.
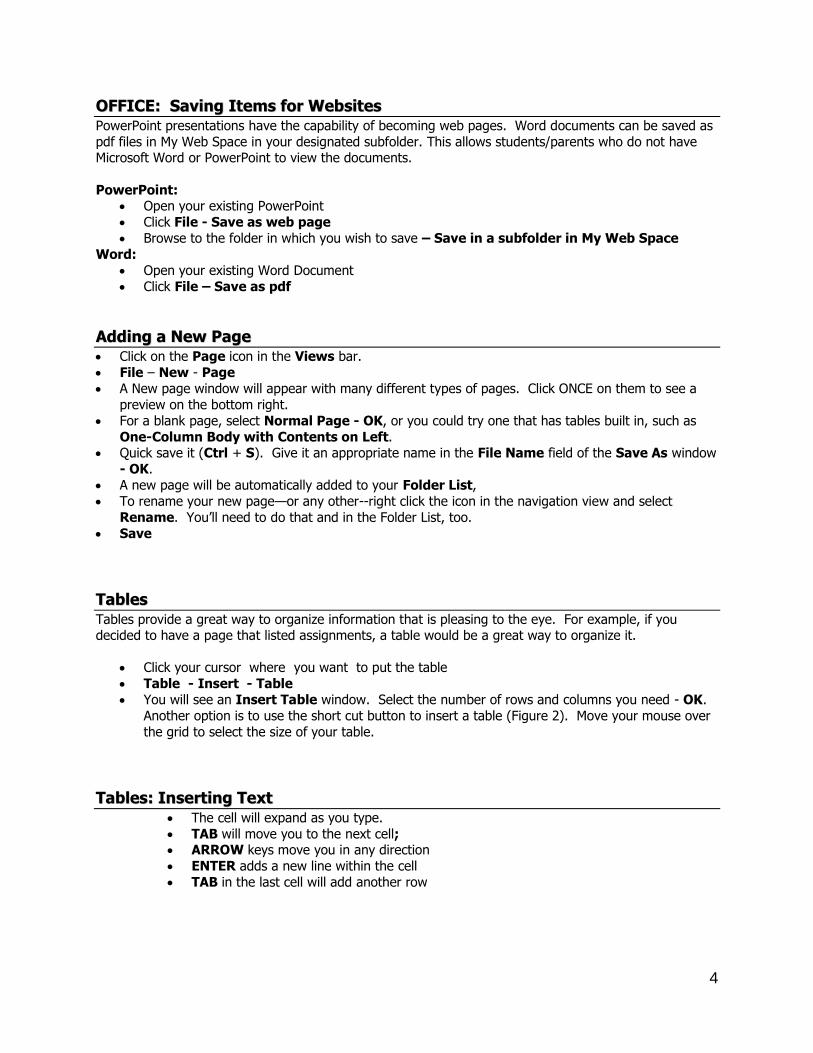
IInntteerraaccttiivvee BBuuttttoonnss By using interactive buttons, you can create a link to another webpage.
From the toolbar at the top, click insert, interactive button.
Choose the button type
Type the text you want viewed
Enter the webpage link (can include PowerPoint Presentations
or Word documents saved in My Web Space – directions below).
4
OOFFFFIICCEE:: SSaavviinngg IItteemmss ffoorr WWeebbssiitteess PowerPoint presentations have the capability of becoming web pages. Word documents can be saved as
pdf files in My Web Space in your designated subfolder. This allows students/parents who do not have Microsoft Word or PowerPoint to view the documents.
PowerPoint: Open your existing PowerPoint
Click File - Save as web page
Browse to the folder in which you wish to save – Save in a subfolder in My Web Space
Word:
Open your existing Word Document
Click File – Save as pdf
AAddddiinngg aa NNeeww PPaaggee Click on the Page icon in the Views bar.
File – New - Page
A New page window will appear with many different types of pages. Click ONCE on them to see a
preview on the bottom right.
For a blank page, select Normal Page - OK, or you could try one that has tables built in, such as
One-Column Body with Contents on Left. Quick save it (Ctrl + S). Give it an appropriate name in the File Name field of the Save As window
- OK.
A new page will be automatically added to your Folder List,
To rename your new page—or any other--right click the icon in the navigation view and select
Rename. You‘ll need to do that and in the Folder List, too.
Save
TTaabblleess Tables provide a great way to organize information that is pleasing to the eye. For example, if you decided to have a page that listed assignments, a table would be a great way to organize it.
Click your cursor where you want to put the table
Table - Insert - Table
You will see an Insert Table window. Select the number of rows and columns you need - OK.
Another option is to use the short cut button to insert a table (Figure 2). Move your mouse over
the grid to select the size of your table.
TTaabblleess:: IInnsseerrttiinngg TTeexxtt The cell will expand as you type.
TAB will move you to the next cell; ARROW keys move you in any direction
ENTER adds a new line within the cell
TAB in the last cell will add another row
5
TTaabblleess:: AAddddiinngg RRoowwss oorr CCoolluummnnss Click in the table where you want to add a row or column
TABLE – INSERT- ROWS OR COLUMNS
Select the number of rows or columns and where they are to be inserted
TTaabblleess:: DDeelleettiinngg RRoowwss oorr CCoolluummnnss Select the rows or columns you want deleted by highlighting
TABLES – DELETE CELLS
TTaabblleess:: FFoorrmmaattttiinngg Highlight all or part of a cell to be formatted
TABLES – PROPERTIES – TABLES or right click in any cell
Terms:
Float. Determines how text outside the table will float around it. If you change from default,
it may cause text to be on top of text.
Cell Padding. Increase or decrease the distance or padding between the borders of the cell
and the text.
Cell Spacing. Increase or decrease the distance or padding between the outside frame of
the table and the cell borders inside it. Borders. This is the outside line of your table. If you have trouble changing color of the
border, it is because of the theme you are using. Themes automatically determine matching
colors. To gain control of the color, you‘ll need to go theme-less.
LLaayyeerrss A layer is an invisible container that you can place anywhere on your page. It can hold anything you want like text, pictures, tables, or even a video. Why bother to put these things in a layer? Because layers give
you control like the ability to position them absolutely anywhere on a page that you just can't get with
regular page elements on their own.
INSERT – LAYERS
Move the layer by right clicking and dragging to the new location
Right click on layer to edit LAYER PROPERTIES (similar to formatting tables).
IIMMAAGGEESS
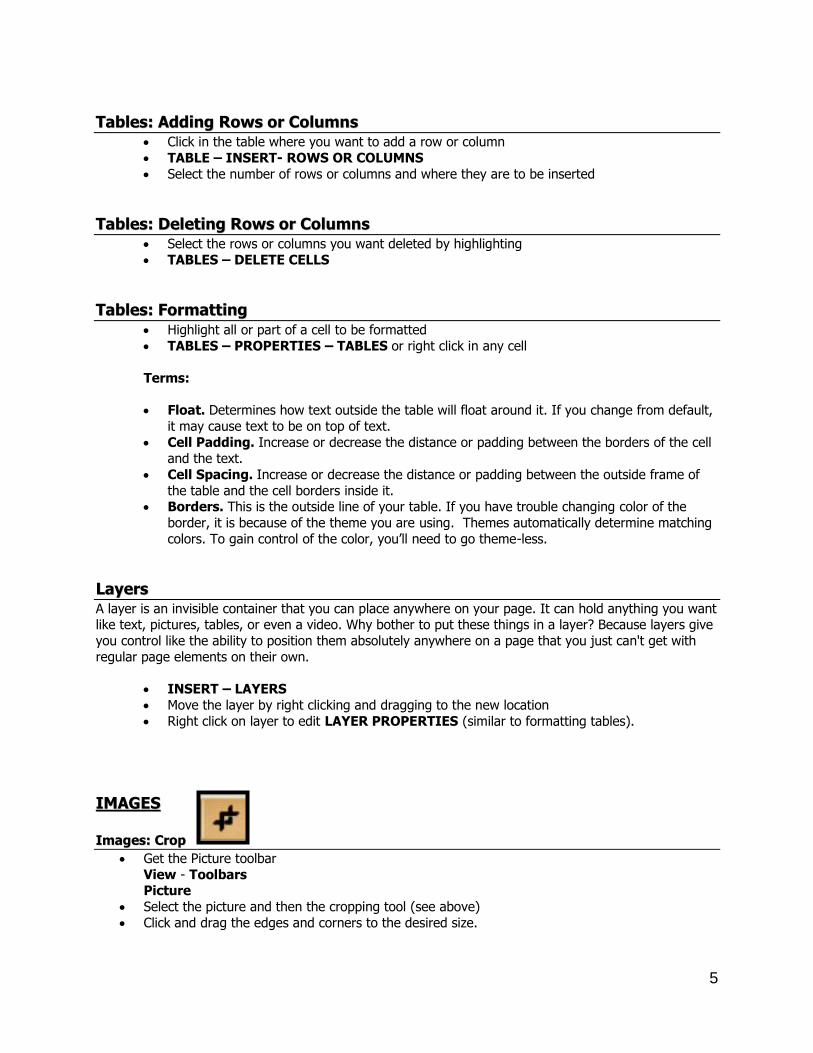
IImmaaggeess:: CCrroopp
Get the Picture toolbar
View - Toolbars Picture
Select the picture and then the cropping tool (see above)
Click and drag the edges and corners to the desired size.
6
IImmaaggeess:: AAuuttoo TThhuummbbnnaaiillss
You always want your images to be as small as possible on your web page. The heavier a image, handout, or any other item that must be downloaded, the longer it takes for a computer to display it,
especially if a person is on a dial-up connection with a low bandwidth.
You can reduce the download time for pictures to be visible (people like that) and make it more
convenient for them to see a variety of images, too, if you use thumbnails.
Insert – Pictures - From File
The picture will land on your page - click the image
Click the Auto-thumbnail button on the Picture toolbar - a small, shortcut menu will replace it.
Auto thumbnails download quickly.
IImmaaggeess:: HHyyppeerrlliinnkkss
You can make specific areas ―hot‖ with a hyperlink‖ by using the buttons above from the Picture toolbar.
Select a picture by clicking it.
Click the rectangle, oval or polygonal hotspot buttons.
Click and drag an oval. An Edit Hyperlink window will appear.
IImmaaggeess:: CChhaannggiinngg FFoorrmmaattss
To reduce the length of time to load images, you can reduce the size of the file. Right-click the picture you want to edit.
Select Picture Properties.
Select the General tab.
If the picture is a .jpg format, in the Type area, reduce the Quality by changing the number.
You can also convert .bmps to .gifs, etc. Be careful about converting .jpgs to .gifs: doing
so may not only reduce the quality of the picture, but increase the size of the file as
well
This isn‘t an exact science, so you‘ll need to play with this and see how the changes affect the
appearances of your pictures by viewing them through Internet Explorer.
DDeelleettiinngg aa WWeebb oorr aa PPaaggee Sometimes you just have to cut your losses and start over. It‘s easy to delete a web in FP, but
permanent, too. Be totally sure you want to terminate it: a delete cannot be undone. Open the doomed web.
In the Folder List area, right-click on the condemned.
Select Delete
Confirm the delete


![E-monitoring of websites of Teacher Education …vijayateacherscollege.org/pdf/website template.pdfE-monitoring of websites of Teacher Education Institutions [TEIs] recognized by the](https://img.pdfslide.net/doc/110x75/5e705a119093f37f6138565e/e-monitoring-of-websites-of-teacher-education-v-templatepdf-e-monitoring-of-websites.jpg)