Embed Size (px)
Citation preview
GDI+ Custom Controls with Visual C# 2005
Iulian Serban Dragos Brezoi Tiberiu Radu Adam Ward
Chapter 6 "Working with Images"

For More Information: http://www.packtpub.com/Csharpcontrols/book
In this package, you will find: A Biography of the authors of the book
A preview chapter from the book, Chapter 6 "Working with Images"
A synopsis of the book’s content
Information on where to buy this book
About the Authors Iulian Serban is a software architect who started programming at a very young age. He evolved through a lot of programming languages including Pascal, Delphi, C++ Builder, Visual C++ with MFC. and finally .NET and C #. By the age of 17 he started working for Syncfusion, one of the largest .NET control builders in the US, writing professional custom controls code. Nowadays he devotes most of his spare time to his own IT business, which is set to release significant software projects soon. I’m using this opportunity to thank the Syncfusion team for their continued support, and for their professionalism.
Dragos Brezoi started programming looking to create an application for processing and adding extra effects to his guitar’s sound. Several years after, he got a Masters Degree in Computer Science from the Politehnica University of Bucharest, and is now researching for a Ph.D. program in Advanced Automatics. Dragos currently works as a programmer for Mikon Systems, developing industrial software. His skills cover a wide area of specialization from PLC and DSP programming to SCADA, OPC and DCS solutions. At this moment he is creating professional human-machine interfaces, with a focus on developing advanced custom controls with C#. My big thanks go to my son, Matei, who was a wonderful and cooperative baby and let me work on this book.
Tiberiu Radu has been working with computers for over 10 years now, programming in a wide range of languages including Pascal, C/C++, Visual Basic, Delphi, and C#. As a Microsoft Student Partner in the Microsoft Academic Program, he's devoting a lot of time to many .NET-related technologies. Tiberiu is in the last year of studies with the Automatic Control and Computers Faculty of the Politehnica University of Bucharest. While researching for his own IT security business, he developed skills in embedded programming and new web technologies, and is seeking new and innovating networking security solutions.

For More Information: http://www.packtpub.com/Csharpcontrols/book
Adam Ward works for a communications technology company in Derby, England. Adam excels in experimental programming techniques and has a particular interest in high-speed algorithms and graphical methods. His professional in a varied Research and Development environment and he thrives on tasks requiring innovation, skill and fine-tuning. He has also been involved in experimental coding collaborations showcasing the power of C#. Away from work, Adam is turning his attentions to Linux systems and especially cross-platform programming under .NET-compatible systems Preface.

For More Information: http://www.packtpub.com/Csharpcontrols/book
6 Working with Images
Ever since Graphical User Interfaces (GUIs) were invented, developers have been keen to use images to make their programs easier to use, and more attractive and intuitive to their users. Images brighten up an otherwise boring and clinical computer screen, and make the general computing experience more enjoyable.
Visual support facilitates the information absorption and presentation of up-to-date information. Any user can more easily understand information just by looking at a picture. Images are the most intuitive memories because the human mind in most cases has a visual memory. This means that when you recall a memory it is frequently a visual one. Think briefly of a tree. What comes to your mind first? Is it the roughness of bark, the taste of fruit or nuts, the smell of tree, the rustle of leaves—or is it a picture of a tree?
Have you ever wondered what it was like before the GUI? There were just text-mode applications. The GUI tried and succeeded in emulating different features of reality. Today, computers can easily reproduce the image and the sound of a tree and in the years to come they will become increasingly better at it.
As regards to the custom controls, these can be user-friendly, if you do the job the right way. It is up to you to develop a custom control that has a good-looking interface. The rendering can be done using drawing lines and curves, using brushes and text; but sometimes it can be improved using images. For example, the Save button in a common application has a floppy disk picture associated, loaded from an image file.
In this chapter, we will discuss how .NET deals with images, and how it can be used to improve your software. We'll visit the Image, Bitmap, and Graphics objects and create a powerful component that you can include in your own programs. You'll learn how to create a picture from scratch without any user intervention, and you'll see some of the cool capabilities of GDI+ in action. Most of the examples take the form of short code snippets, although we will look at creating a small but powerful component that will fast-track you towards some of the more detailed image effects that .NET has to offer.
For More Information: http://www.packtpub.com/Csharpcontrols/book
Working with Images
100
For the rest of this chapter, you will:
• Learn about the basic .NET classes that deal with images: Image and Bitmap • Display images • Apply various effects on images • Use images to build better-looking custom controls
As usual, at the end of the chapter you'll build a full custom control where you'll apply the new theory. Let's get started.
Drawing Images All of the examples in this chapter will require the use of a few namespaces. Make sure each C# file has the following using clauses:
using System; using System.Drawing; using System.Drawing.Imaging; using System.Drawing.Drawing2D;
This will make sure that C# knows where to find each of the classes we will be using.
Using the Image Class The Image class is usually your first port of call when using images in .NET programming. It enables you to store a picture in memory so that it can be manipulated, and it exposes many pieces of information about that picture, including its size and how many colors are used. Image is the base class from which another class, Bitmap, is derived. We'll be looking at Bitmap in a while, but we should look at Image's capabilities first.
The Image class comes packed with lots of useful functionality, such as:
• Loading an image from a file and exposing information about it. • Saving a picture to a file in a specified format such as JPEG or GIF. • Rotating or flipping a picture. • Enabling detailed manipulation of the picture by using other classes in conjunction
with the Image object. For example, you can draw lines on the picture by using an associated Graphics object.
There are of course many other properties and methods of the Image class but the ones outlined above are by far the most commonly used. To introduce the Image class we'll use three of the above features in one go!
Besides being a programmer, I am also an amateur photographer, and I like to take personal portraits. I often take several dozen photographs on my digital camera over the course of a day. One problem I face is that I hold my camera at 90 degrees to the horizontal; so that I can fit the chosen subject in the viewfinder properly.
For More Information: http://www.packtpub.com/Csharpcontrols/book
Chapter 6
101
This is annoying because all the saved pictures on my camera are stored sideways and my camera doesn't have an auto-rotate feature. So every day I have to open all the new photographs on my computer, rotate them by 90 degrees to make them appear the right way up and then save them again. I like to save them as JPEG files to save space.
How could I use C# to make my life easier? Simple, just by creating a method that will rotate the image 90 degrees. private void RotateAndSaveImage(String input, String output) { //create an object that we can use to examine an image file Image img = Image.FromFile(input); //rotate the picture by 90 degrees img.RotateFlip(RotateFlipType.Rotate90FlipNone); //re-save the picture as a Jpeg img.Save(output, System.Drawing.Imaging.ImageFormat.Jpeg); //tidy up after we've finished img.Dispose(); }
That's an outline of the whole process of loading, rotating, and saving a picture, all wrapped in a short method; exception handling and parameter validation were omitted for clarity. Let us look at it in detail.
Firstly, the RotateAndSaveImage() method takes two string parameters: input and output. The input parameter is the path of the picture file we want to use. The output parameter is the name of the new file that will be created when the Image.Save() method is called.
Further I could use a for loop to iterate through all the files within a folder on my computer. I can even try this on my camera's memory card directly and pass each filename to this RotateAndSaveImage() method. So in doing this, I can save valuable time, being free to travel further from home in pursuit of my hobby.
Using the Bitmap Class We used the Image class to load an existing picture, and in earlier chapters we saw how graphical effects could be drawn onto controls. These two processes can be combined to enable the creation of brand new images purely by writing code.
So let's do exactly that, create a usable picture from scratch. Since the Image class is abstract, it does not have a constructor that would allow creating an image that doesn't already exist; but we still need a blank canvas to paint onto. This is where the Bitmap class comes in. Bitmap does have a constructor that lets us immediately create a blank picture in memory. The following code helps us understand the concept better:
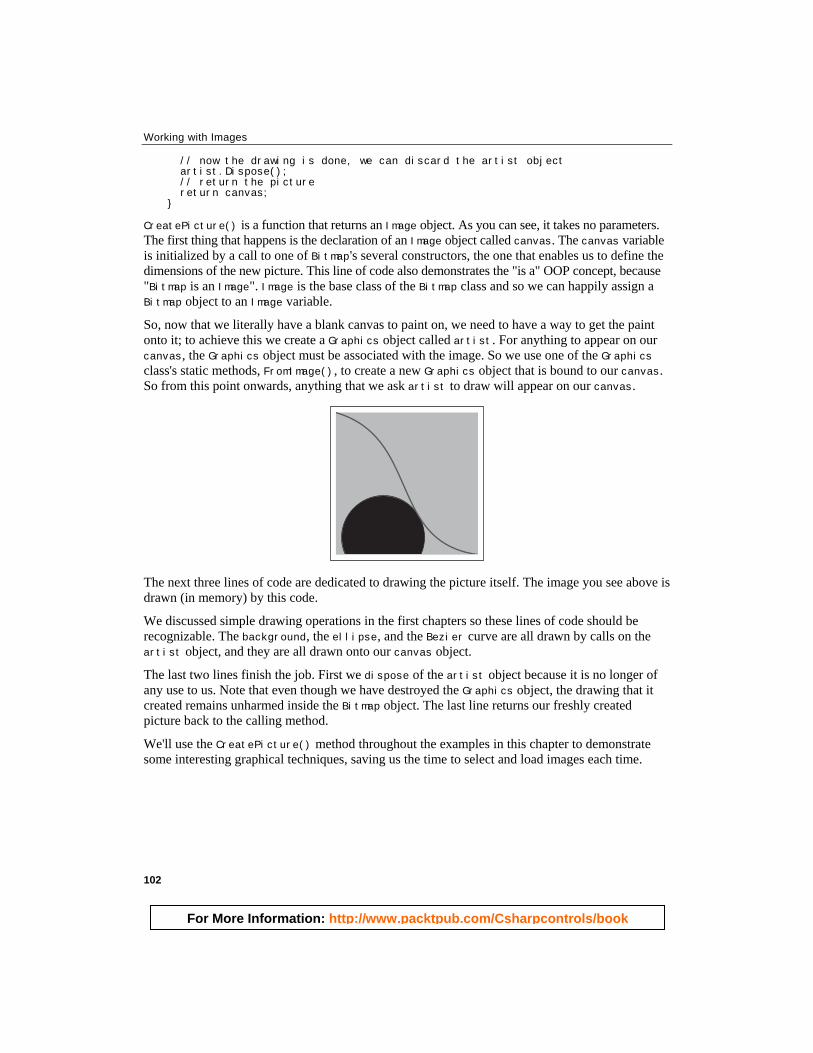
private Image CreatePicture() { // Create a new Bitmap object, 50 x 50 pixels in size Image canvas = new Bitmap(50, 50); // create an object that will do the drawing operations Graphics artist = Graphics.FromImage(canvas); // draw a few shapes on the canvas picture artist.Clear(Color.Lime); artist.FillEllipse(Brushes.Red, 3, 30, 30, 30); artist.DrawBezier(new Pen(Color.Blue, 3), 0, 0, 40, 15, 10, 35, 50, 50);
For More Information: http://www.packtpub.com/Csharpcontrols/book
Working with Images
102
// now the drawing is done, we can discard the artist object artist.Dispose(); // return the picture return canvas; }
CreatePicture() is a function that returns an Image object. As you can see, it takes no parameters. The first thing that happens is the declaration of an Image object called canvas. The canvas variable is initialized by a call to one of Bitmap's several constructors, the one that enables us to define the dimensions of the new picture. This line of code also demonstrates the "is a" OOP concept, because "Bitmap is an Image". Image is the base class of the Bitmap class and so we can happily assign a Bitmap object to an Image variable.
So, now that we literally have a blank canvas to paint on, we need to have a way to get the paint onto it; to achieve this we create a Graphics object called artist. For anything to appear on our canvas, the Graphics object must be associated with the image. So we use one of the Graphics class's static methods, FromImage(), to create a new Graphics object that is bound to our canvas. So from this point onwards, anything that we ask artist to draw will appear on our canvas.
The next three lines of code are dedicated to drawing the picture itself. The image you see above is drawn (in memory) by this code.
We discussed simple drawing operations in the first chapters so these lines of code should be recognizable. The background, the ellipse, and the Bezier curve are all drawn by calls on the artist object, and they are all drawn onto our canvas object.
The last two lines finish the job. First we dispose of the artist object because it is no longer of any use to us. Note that even though we have destroyed the Graphics object, the drawing that it created remains unharmed inside the Bitmap object. The last line returns our freshly created picture back to the calling method.
We'll use the CreatePicture() method throughout the examples in this chapter to demonstrate some interesting graphical techniques, saving us the time to select and load images each time.
For More Information: http://www.packtpub.com/Csharpcontrols/book
Chapter 6
103
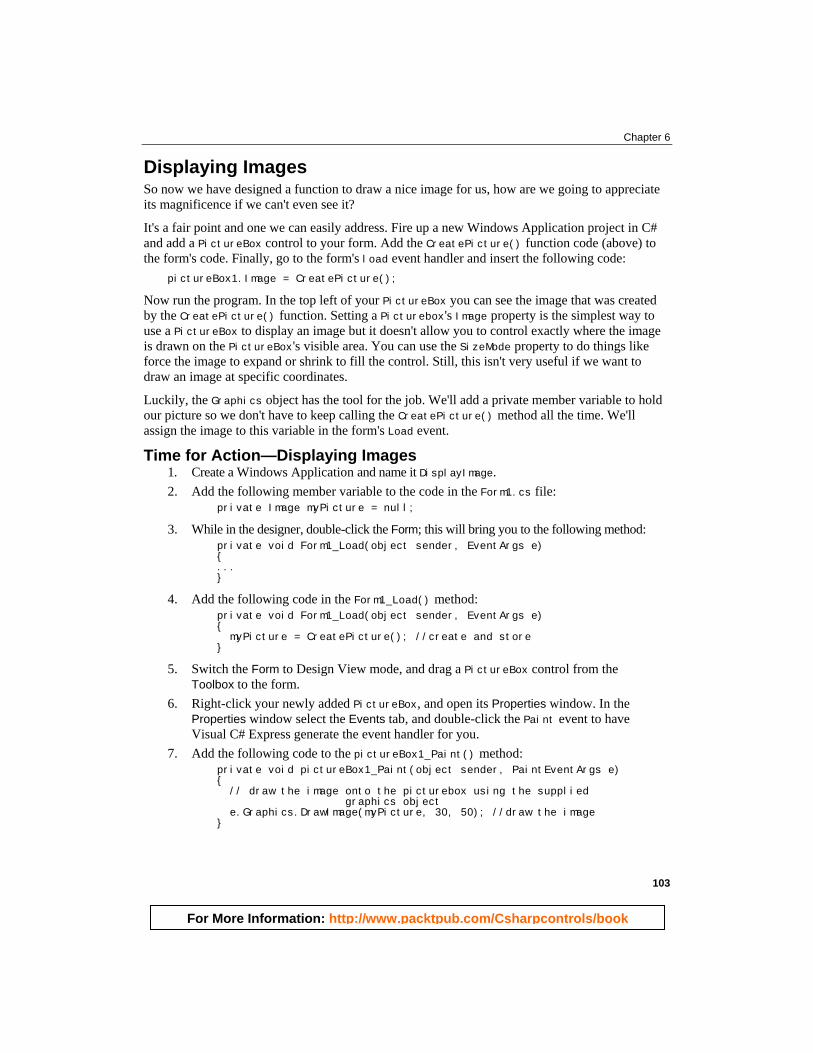
Displaying Images So now we have designed a function to draw a nice image for us, how are we going to appreciate its magnificence if we can't even see it?
It's a fair point and one we can easily address. Fire up a new Windows Application project in C# and add a PictureBox control to your form. Add the CreatePicture() function code (above) to the form's code. Finally, go to the form's load event handler and insert the following code:
pictureBox1.Image = CreatePicture();
Now run the program. In the top left of your PictureBox you can see the image that was created by the CreatePicture() function. Setting a Picturebox's Image property is the simplest way to use a PictureBox to display an image but it doesn't allow you to control exactly where the image is drawn on the PictureBox's visible area. You can use the SizeMode property to do things like force the image to expand or shrink to fill the control. Still, this isn't very useful if we want to draw an image at specific coordinates.
Luckily, the Graphics object has the tool for the job. We'll add a private member variable to hold our picture so we don't have to keep calling the CreatePicture() method all the time. We'll assign the image to this variable in the form's Load event.
Time for Action—Displaying Images 1. Create a Windows Application and name it DisplayImage. 2. Add the following member variable to the code in the Form1.cs file:
private Image myPicture = null;
3. While in the designer, double-click the Form; this will bring you to the following method: private void Form1_Load(object sender, EventArgs e) { ... }
4. Add the following code in the Form1_Load() method: private void Form1_Load(object sender, EventArgs e) { myPicture = CreatePicture(); //create and store }
5. Switch the Form to Design View mode, and drag a PictureBox control from the Toolbox to the form.
6. Right-click your newly added PictureBox, and open its Properties window. In the Properties window select the Events tab, and double-click the Paint event to have Visual C# Express generate the event handler for you.
7. Add the following code to the pictureBox1_Paint() method: private void pictureBox1_Paint(object sender, PaintEventArgs e) { // draw the image onto the picturebox using the supplied graphics object e.Graphics.DrawImage(myPicture, 30, 50); //draw the image }
For More Information: http://www.packtpub.com/Csharpcontrols/book
Working with Images
104
8. Add the CreatePicture() method as shown below to the Form1.cs file. private Image CreatePicture() { // Create a new Bitmap object, 50 x 50 pixels in size Image canvas = new Bitmap(50, 50); // create an object that will do the drawing operations Graphics artist = Graphics.FromImage(canvas); // draw a few shapes on the canvas picture artist.Clear(Color.Lime); artist.FillEllipse(Brushes.Red, 3, 30, 30, 30); artist.DrawBezier(new Pen(Color.Blue, 3), 0, 0, 40, 15, 10, 35, 50, 50); // now the drawing is done, we can discard the artist object artist.Dispose(); // return the picture return canvas; }
9. Change the BackColor of the picturebox to ControlLightLight (Window color) and the BorderStyle to Fixed3D border.
10. Build and then execute the project.
What Just Happened? In the sequence that the program runs, the member variable myPicture is declared and initialized to null. Then the form's Load event handler calls CreatePicture() and passes the resultant image to the myPicture variable. From this point onwards, every time the Paint event of the PictureBox fires, it uses the Graphics object supplied by the PaintEventArgs parameter to draw the image onto the PictureBox. Its position is 30 pixels to the right and 50 pixels below the top left corner of the PictureBox. We should end up with a form that looks something like the one that follows:
For More Information: http://www.packtpub.com/Csharpcontrols/book
Chapter 6
105
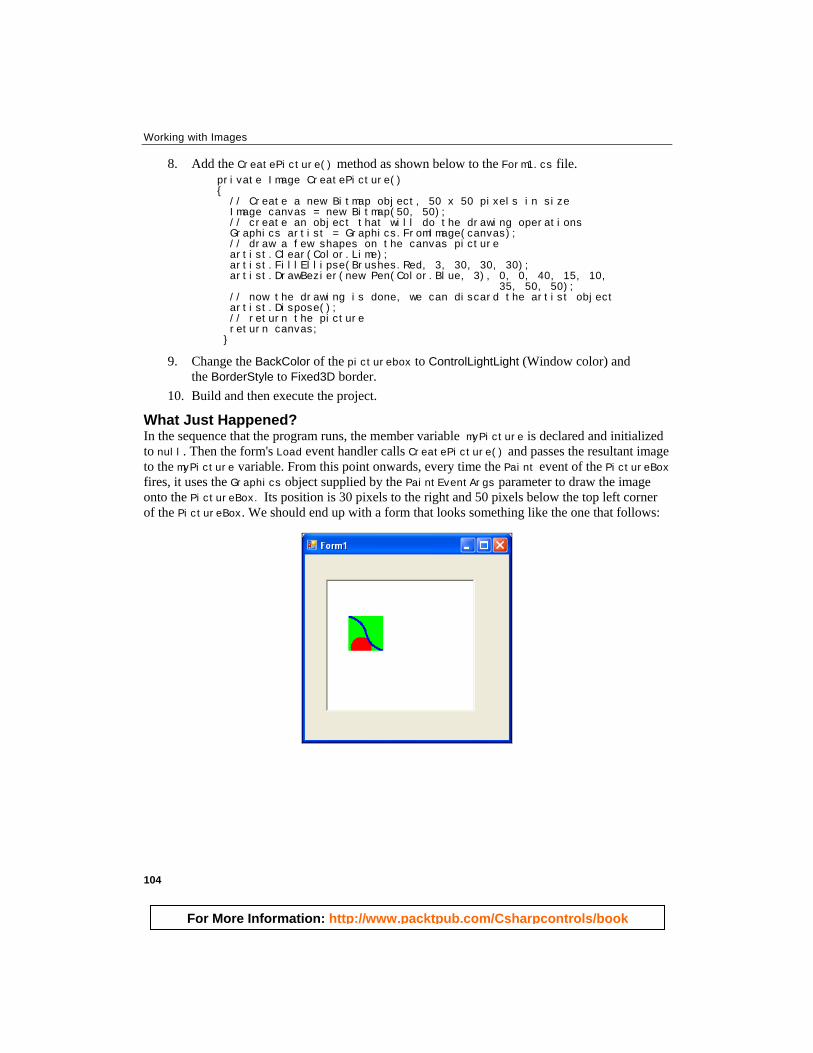
Image Effects GDI+ provides a host of exciting tools to let you draw your images in complex ways. Skewing, rotating, and even tiling are all possible. We'll have a go at tiling first because it's quick and easy to set up.
You'll need to have the CreatePicture() function ready again, and also have a PictureBox set up on your form. We'll use the Paint event of the PictureBox to demonstrate this effect.
// declare a member variable to cache the image private Image myPicture = null; // use form load to create and store our image private void Form1_Load(object sender, EventArgs e) { myPicture = CreatePicture(); //create and store } private void pictureBox1_Paint(object sender, PaintEventArgs e) { // create a texturebrush that will do the tiling for us TextureBrush tex = new TextureBrush(myPicture, WrapMode.Tile); // draw the effect onto the picturebox using the supplied graphics object e.Graphics.FillRectangle(tex, e.ClipRectangle); tex.Dispose(); }
You will no doubt have noticed a new class, TextureBrush. As you can imagine, given its name, it is derived from the Brush class that we looked at earlier in the book. Brushes are used to fill areas rather than to draw outlines of shapes. This means we can use TextureBrush to fill rectangles, ellipses, GraphicsPath objects, or anything else. We supply an Image object to initialize the TextureBrush instead of initializing it with a color as we do with other normal brushes. This image will become the 'paint' that this brush applies to our drawing surfaces.
The second parameter of the TextureBrush's constructor lets us specify what kind of behavior the brush will exhibit. There are a few different WrapMode styles to play with; so feel free to experiment with different ones and look at their effects. For the time being, we just want to Tile the background of our PictureBox with our now familiar picture. Enter the previous code into your program and run it.
You will get a result that looks similar to the following screenshot:

For More Information: http://www.packtpub.com/Csharpcontrols/book
Working with Images
106
You may also have noticed that this is identical to the effect that the PictureBox uses when its BackgroundImageLayout property is set to Tile. So why bother using all those lines of code when we can just set a property? Good question, and if you only wanted to tile the image horizontally and vertically then you probably would just pass an image to the pictureBox1.BackgroundImage and set its BackgroundImageLayout to Tile and forget about it. But that's just not good enough for us, is it? No, it's not.
What if we want to choose the angle at which the tiles are displayed? We stay with our TextureBrush and modify our Paint event handler a little. By adding a transformation to the TextureBrush we can alter the way it paints our tiles.
Take this example: private void pictureBox1_Paint(object sender, PaintEventArgs e) { //create a texturebrush that will do the tiling for us TextureBrush tex = new TextureBrush(myPicture, WrapMode.Tile); //Rotate the brush by 45 degrees clockwise tex.RotateTransform(45); //draw the effect onto the picturebox using the supplied graphics object e.Graphics.FillRectangle(tex, e.ClipRectangle); tex.Dispose(); }
Run the program again. By adding a single line we have radically altered the tile effect; basically instead of tiling horizontally from left to right, it is now striping the image from top left to bottom right. This is due to our specified angle of 45 degrees, that we have passed to the RotateTransform() method of the TextureBrush.
Other kinds of transformation are also available to the TextureBrush, such as TranslateTransform, which slides the tiles left, right, up, or down. Finally, ScaleTransform enables us to change the size of the image before it is tiled onto the screen. Experiment with them and you will be able to see the effects of each.
For More Information: http://www.packtpub.com/Csharpcontrols/book
Chapter 6
107
Skewing, Rotation, and Scaling We are going to build a class to help us apply these effects on images. Skewing, rotating, and scaling images (if handled separately) can seem daunting, but if you take the right approach, they are closely related to each other. It is convenient to design a control (or a helper class) for this task because it's quite possible that you may want to include these features in several of your programs. This kind of code re-use is a central tenet of Object Orientated Programming and we shall once again see its benefits here.
First we should understand what each of these three terms means.
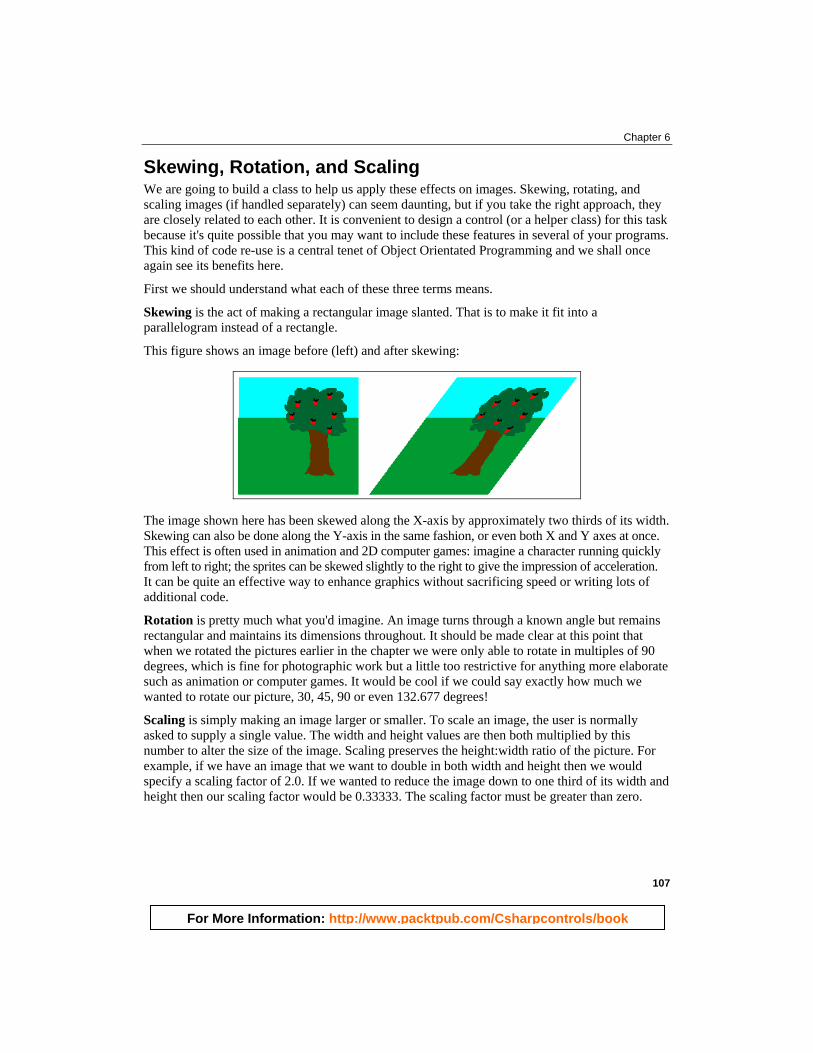
Skewing is the act of making a rectangular image slanted. That is to make it fit into a parallelogram instead of a rectangle.
This figure shows an image before (left) and after skewing:
The image shown here has been skewed along the X-axis by approximately two thirds of its width. Skewing can also be done along the Y-axis in the same fashion, or even both X and Y axes at once. This effect is often used in animation and 2D computer games: imagine a character running quickly from left to right; the sprites can be skewed slightly to the right to give the impression of acceleration. It can be quite an effective way to enhance graphics without sacrificing speed or writing lots of additional code.
Rotation is pretty much what you'd imagine. An image turns through a known angle but remains rectangular and maintains its dimensions throughout. It should be made clear at this point that when we rotated the pictures earlier in the chapter we were only able to rotate in multiples of 90 degrees, which is fine for photographic work but a little too restrictive for anything more elaborate such as animation or computer games. It would be cool if we could say exactly how much we wanted to rotate our picture, 30, 45, 90 or even 132.677 degrees!
Scaling is simply making an image larger or smaller. To scale an image, the user is normally asked to supply a single value. The width and height values are then both multiplied by this number to alter the size of the image. Scaling preserves the height:width ratio of the picture. For example, if we have an image that we want to double in both width and height then we would specify a scaling factor of 2.0. If we wanted to reduce the image down to one third of its width and height then our scaling factor would be 0.33333. The scaling factor must be greater than zero.
For More Information: http://www.packtpub.com/Csharpcontrols/book
Working with Images
108
Building the ImageWarper Class So you've learned how to create, draw, and apply different effects on image objects. These skills are important for custom control builders, since the appearance of a control is very important for its success with end users.
We'll build a simple but powerful control to help us with drawing images and adding graphical effects to your custom controls. This control will take advantage of the Graphics.DrawImage() method to unify skewing, rotation, and scaling into a single operation. You may have noticed that this method has about thirty different overload implementations! Do not fear, we will be using only one of them.
In order to unify skewing, rotation, and scaling into a single operation we need to identify some common ground that all three things share. What these operations have in common is that they all work with the coordinates system. A normal image can be drawn anywhere if you supply the right coordinates, but we will do something a little more complicated than that. The particular overload of DrawImage() that we will use is given below:
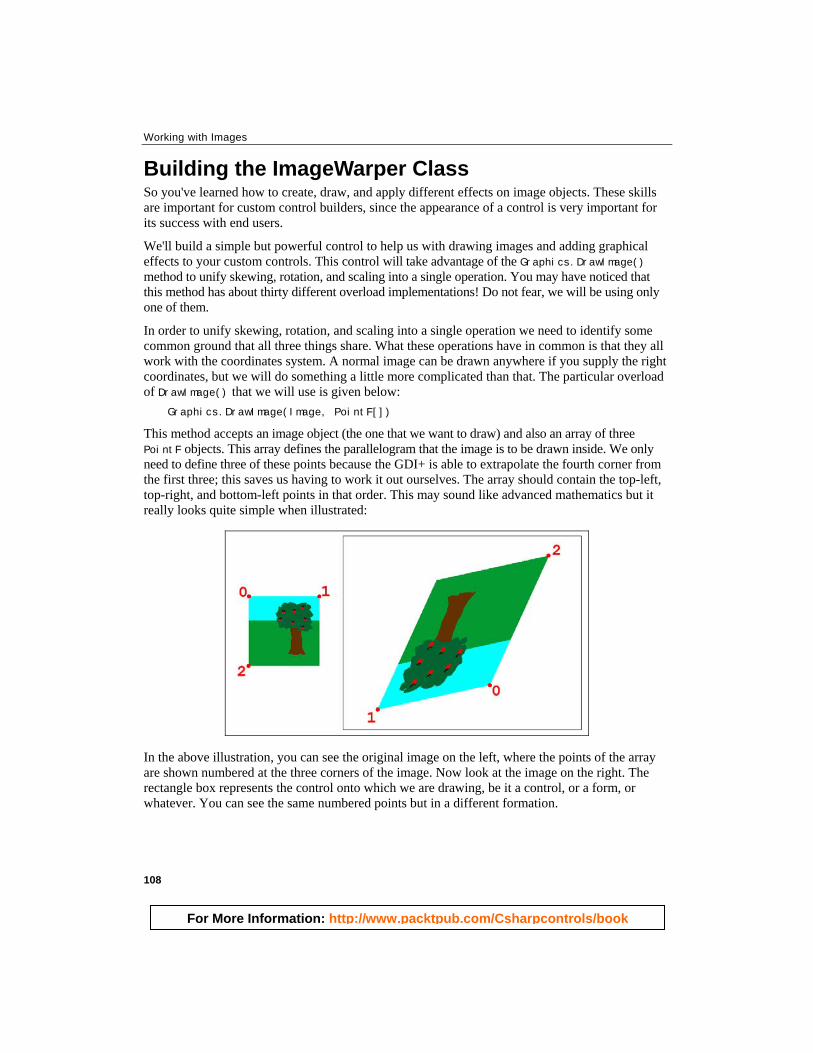
Graphics.DrawImage(Image, PointF[])
This method accepts an image object (the one that we want to draw) and also an array of three PointF objects. This array defines the parallelogram that the image is to be drawn inside. We only need to define three of these points because the GDI+ is able to extrapolate the fourth corner from the first three; this saves us having to work it out ourselves. The array should contain the top-left, top-right, and bottom-left points in that order. This may sound like advanced mathematics but it really looks quite simple when illustrated:
In the above illustration, you can see the original image on the left, where the points of the array are shown numbered at the three corners of the image. Now look at the image on the right. The rectangle box represents the control onto which we are drawing, be it a control, or a form, or whatever. You can see the same numbered points but in a different formation.
For More Information: http://www.packtpub.com/Csharpcontrols/book
Chapter 6
109
The picture on the right has had all three effects applied to it. We can see that it is skewed because it is no longer square. We know it has been rotated because it is upside down. And because it is much larger than the image on the left, we can deduce that it has been scaled. We can do all of this simply by manipulating three points on a two dimensional plane. That is pretty amazing isn't it?
Let's just write this control and examine how it works.
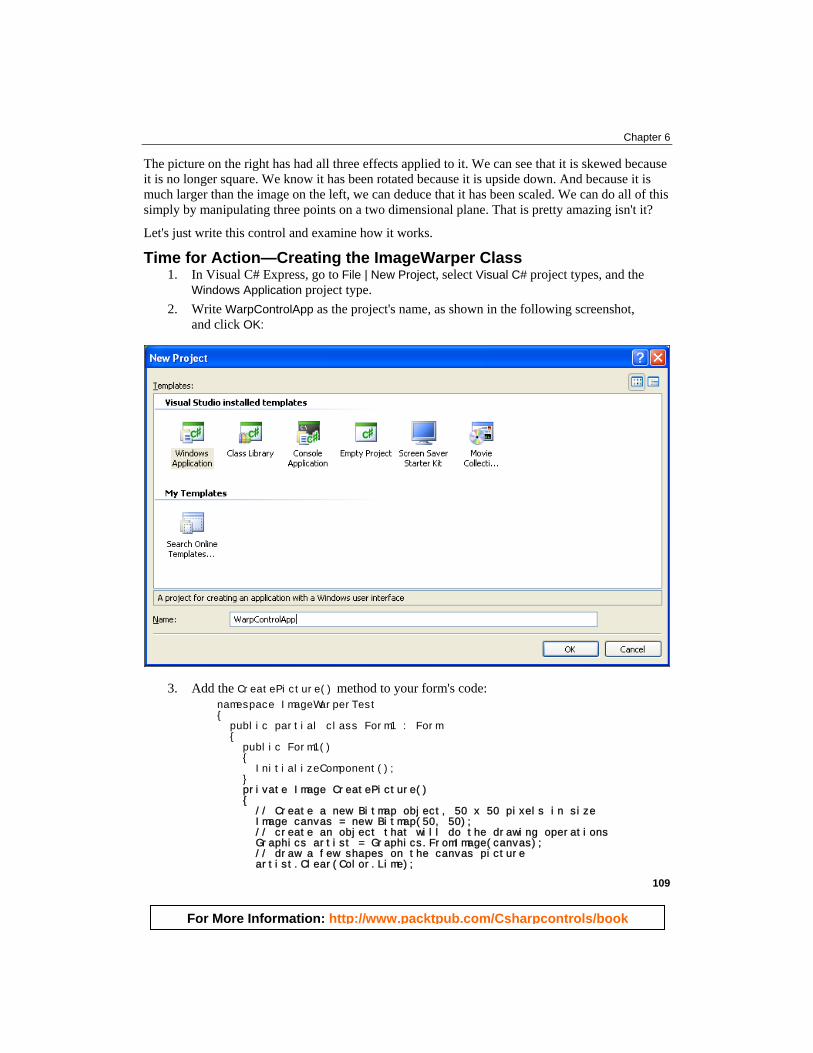
Time for Action—Creating the ImageWarper Class 1. In Visual C# Express, go to File | New Project, select Visual C# project types, and the
Windows Application project type. 2. Write WarpControlApp as the project's name, as shown in the following screenshot,
and click OK:
3. Add the CreatePicture() method to your form's code: namespace ImageWarperTest { public partial class Form1 : Form { public Form1() { InitializeComponent(); } private Image CreatePicture() { // Create a new Bitmap object, 50 x 50 pixels in size Image canvas = new Bitmap(50, 50); // create an object that will do the drawing operations Graphics artist = Graphics.FromImage(canvas); // draw a few shapes on the canvas picture artist.Clear(Color.Lime);
For More Information: http://www.packtpub.com/Csharpcontrols/book
Working with Images
110
artist.FillEllipse(Brushes.Red, 3, 30, 30, 30); artist.DrawBezier(new Pen(Color.Blue, 3), 0, 0, 40, 15, 10, 35, 50, 50); // now the drawing is done, we can discard the artist object artist.Dispose(); //return the picture return canvas; } } }
4. Right-click the project name in Solution Explorer, and select Add | New Item. Choose the Class template, change its name to ImageWarper.cs, and press Add.
5. Change the default generated code to: using System; using System.Drawing; using System.Drawing.Drawing2D; using System.ComponentModel; public class ImageWarper : Component { public void DrawWarpedPicture( Graphics surface, // the surface to draw on Image img, // the image to draw PointF sourceAxle, // pivot point passing through image. PointF destAxle, // pivot point's position on destination surface double degrees, // degrees through which the image is rotated clockwise double scale, // size multiplier SizeF skew // the slanting effect size, applies BEFORE scaling or rotation ) { // give this array temporary coords that will be overwritten in the loop below // the skewing is done here orthogonally, before any trigonometry is applied PointF[] temp = new PointF[3] { new PointF(skew.Width, -skew.Height), new PointF((img.Width - 1) + skew.Width, skew.Height), new PointF(-skew.Width,(img.Height - 1) - skew.Height) }; double ang, dist; double radians = degrees * (Math.PI / 180); // convert the images corner points into scaled, rotated, skewed and translated points for (int i = 0; i < 3; i++) { // measure the angle to the image's corner and then add the rotation value to it ang = GetBearingRadians(sourceAxle, temp[i], out dist) + radians; dist *= scale; // scale
temp[i] = new PointF((Single)((Math.Cos(ang) * dist) + destAxle.X), (Single)((Math.Sin(ang) * dist) + destAxle.Y));
} surface.DrawImage(img, temp); } private double GetBearingRadians(PointF reference, PointF target, out double distance) { double dx = target.X - reference.X; double dy = target.Y - reference.Y; double result = Math.Atan2(dy, dx); distance = Math.Sqrt((dx * dx) + (dy * dy)); if (result < 0)
For More Information: http://www.packtpub.com/Csharpcontrols/book
Chapter 6
111
result += (Math.PI * 2); // add the negative number to 360 degrees // to correct the atan2 value return result; } }
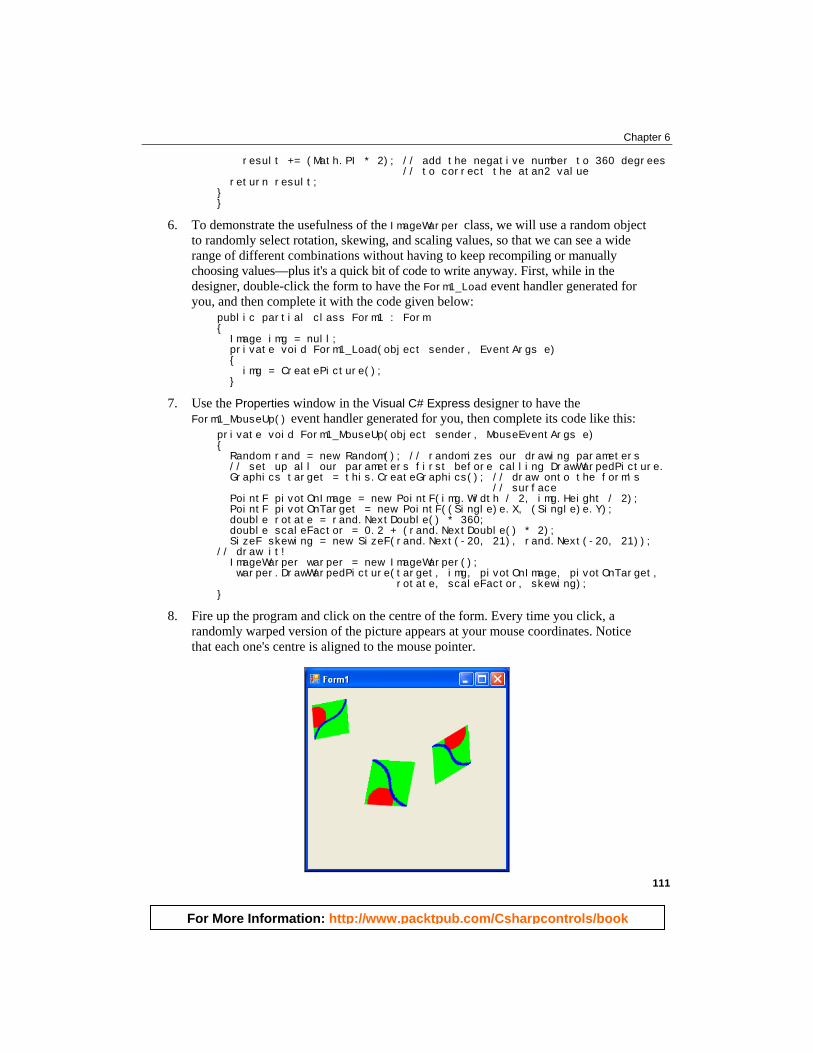
6. To demonstrate the usefulness of the ImageWarper class, we will use a random object to randomly select rotation, skewing, and scaling values, so that we can see a wide range of different combinations without having to keep recompiling or manually choosing values—plus it's a quick bit of code to write anyway. First, while in the designer, double-click the form to have the Form1_Load event handler generated for you, and then complete it with the code given below: public partial class Form1 : Form { Image img = null; private void Form1_Load(object sender, EventArgs e) { img = CreatePicture(); }
7. Use the Properties window in the Visual C# Express designer to have the Form1_MouseUp() event handler generated for you, then complete its code like this: private void Form1_MouseUp(object sender, MouseEventArgs e) { Random rand = new Random(); // randomizes our drawing parameters // set up all our parameters first before calling DrawWarpedPicture. Graphics target = this.CreateGraphics(); // draw onto the form's // surface PointF pivotOnImage = new PointF(img.Width / 2, img.Height / 2); PointF pivotOnTarget = new PointF((Single)e.X, (Single)e.Y); double rotate = rand.NextDouble() * 360; double scaleFactor = 0.2 + (rand.NextDouble() * 2); SizeF skewing = new SizeF(rand.Next(-20, 21), rand.Next(-20, 21)); // draw it! ImageWarper warper = new ImageWarper(); warper.DrawWarpedPicture(target, img, pivotOnImage, pivotOnTarget, rotate, scaleFactor, skewing); }
8. Fire up the program and click on the centre of the form. Every time you click, a randomly warped version of the picture appears at your mouse coordinates. Notice that each one's centre is aligned to the mouse pointer.
For More Information: http://www.packtpub.com/Csharpcontrols/book
Working with Images
112
What Just Happened? The main focus of this exercise is the ImageWarper class, so we'll discuss it first. The ImageWarper class serves to skew, rotate, scale, and draw an image using a Graphics object. It has only two methods, of which only one is public (and consequently, available to our program). Before demonstrating its use, we should briefly discuss its working.
Let's look at the parameters of the DrawWarpedPicture() method:
Parameters Description
Graphics surface This can be any Graphics object that you want to draw to. Image img This is the image object that you want to warp and draw. The actual
image is unaffected but it is drawn warped; this allows for repeated draw operations to be done without damaging the original.
PointF sourceAxle The point around which the image is rotated. Coordinates are relative to the top left corner of the image. This enables us to pick a feature on the image and make that point stationary while the image rotates around it.
PointF destAxle This is the point on the target surface where the sourceAxle is snapped to. Imagine you pin the image to the screen with a needle; the image can only spin around the needle. The needle passes through both sourceAxle and destAxle.
double degrees The angle that you want to rotate the image by. The method could be easily modified to change this to radians if needed. The degrees are converted to radians internally anyway before any processing is done. Degrees are easier to visualize though.
double scale The scaling factor. Numbers between 0 and 1 will shrink the image, numbers greater than 1 will enlarge it.
SizeF skew The number of pixels to skew each side of the image by. A size of (10,3) will cause the top side to move 10 pixels to the right, the bottom side moves 10 to the left. Then the left side moves up by 3 pixels and the right side down by 3.
The GetBearingRadians() method is not accessible to our programs but it is used by the component's DrawWarpedPicture() method; this is in accordance with the OOP's 'black box' principle. GetBearingRadians() calculates a 'compass bearing' from one point to another, returning this bearing as the angle expressed in radians.
The warping operations are applied in a specific sequence in DrawWarpedPicture(). First an array of PointF objects called temp is defined and this is where the skewing operation takes place. It is little more than adjusting the corners of the image to reflect the skew and storing these points in an array. Once that is done, a loop is used to iterate through the array and do the following things:
• Calculate the angle from the sourceAxle point to each point in the array. • Calculate the distance between the same points and multiply that distance by the
scale factor. • Finally, convert this angle and distance back into a rotated and scaled point relative
to the destAxle.
For More Information: http://www.packtpub.com/Csharpcontrols/book
Chapter 6
113
Once the array has been converted from the three image corners to skewed, rotated, and scaled points, the Graphics.DrawImage() method is called. Here we simply supply the image and the array of PointF objects. Then the GDI+ engine springs into action and does the hard work of drawing our image in its new position. All of this appears complex but it is very efficient and executes very quickly at run time. When you execute the project, each picture's centre is aligned to the mouse pointer. This is because of the pivotOnImage variable, which is set to half the width and half the height of the original image. The pivotOnTarget point is simply set to the mouse coordinates, so the pivoted image appears aligned to the mouse. This coordinate doesn't even have to be within the image's area; you can supply any coordinates to it and the image will appear offset by the correct amount. Keep clicking on the form to see more and more warped images appear
Why go to all this trouble to draw images in such a strange way? Well let's say you wanted to design a control that looks like a volume control dial from your car stereo. Maybe you want to have your company logo on the dial control that rotates along with the turning of the dial. Using conventional methods this might mean capturing dozens of images of the logo at varying angles and drawing the appropriate image at the right time, or writing a complicated way to draw the logo manually, which would involve storing lots of coordinates, and colors. Both of these methods are far from ideal because of the time and effort it would take to implement them. With this method all you need to do is store a single image and just rotate it with a given angle. It's a great solution to a difficult problem.
One notable aspect of the GDI+ drawing methods is that they support transparencies and images that can provide transparent pixel data. You could use a partially transparent GIF image instead of our CreatePicture() method and the image would display properly. To use the dial analogy, you could make a circular logo to fit inside your dial area but make all the pixels outside the circle transparent so we cannot see the actual rectangular outline of the whole image. We'd only see the opaque logo inside the dial.
The ImageWarperControl Based on the example above, let's now create a control named ImageWarperControl. This control will create an image and it will be able to scale, rotate, and skew this image. First, we will create an application that will be a typical Windows form and then we will create the ImageWarperControl that will create and draw a picture at certain scaling, rotating, and skewing factors provided by the application through control properties.
Time for Action—Creating the ImageWarperApp and the Image WarperControl
1. The first step is to create a new Windows Application project in Visual C# Express 2005 named ImageWarperApp.
2. Then add a control to the project. In the Solution Explorer, right-click on the project name and select Add | User Control and name the control ImageWarperControl.
For More Information: http://www.packtpub.com/Csharpcontrols/book
Working with Images
114
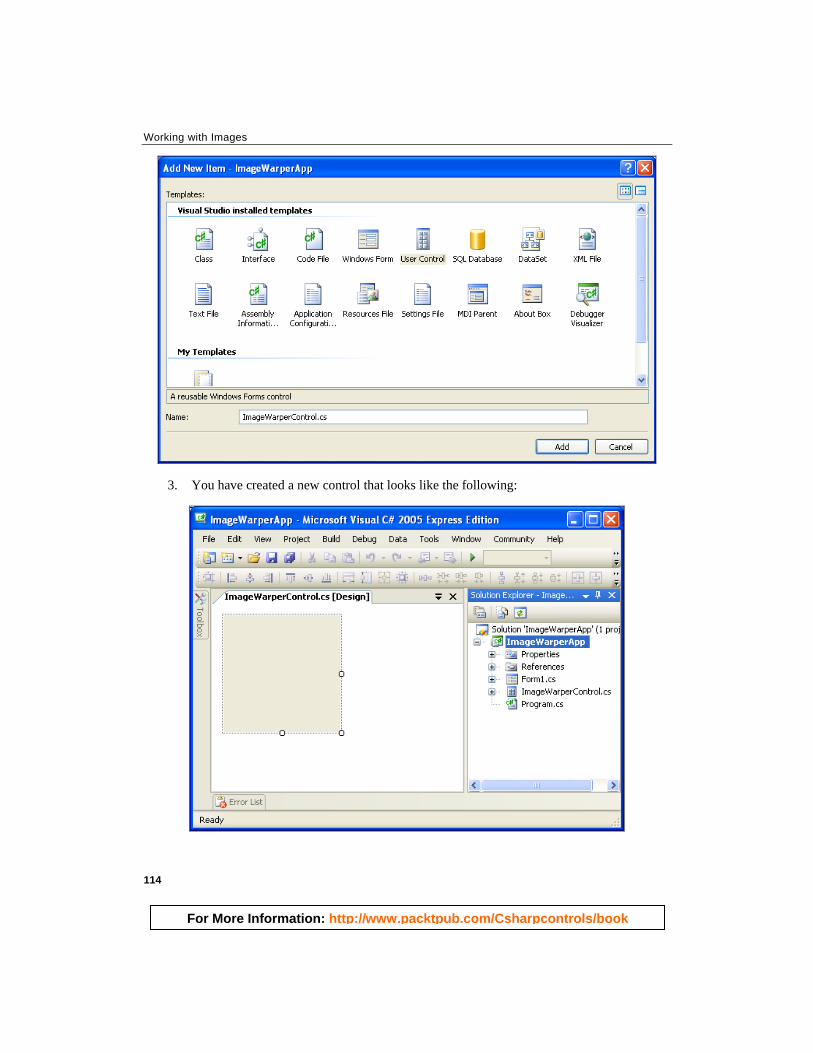
3. You have created a new control that looks like the following:
For More Information: http://www.packtpub.com/Csharpcontrols/book
Chapter 6
115
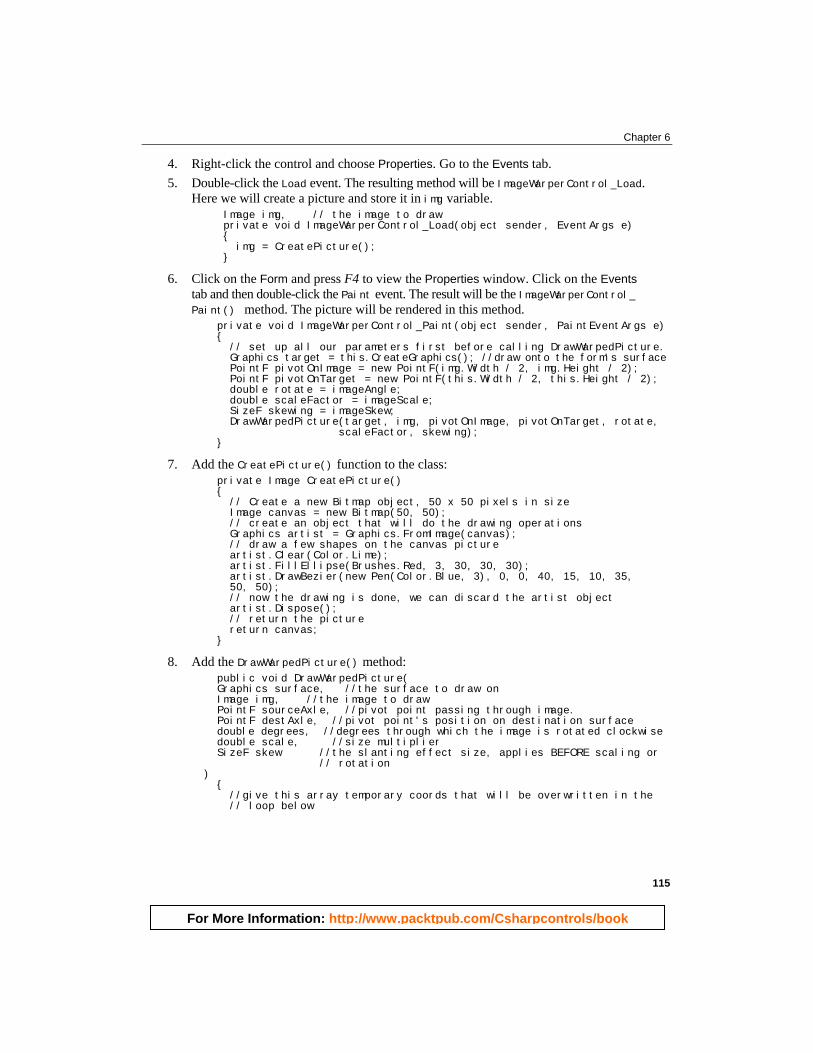
4. Right-click the control and choose Properties. Go to the Events tab. 5. Double-click the Load event. The resulting method will be ImageWarperControl_Load.
Here we will create a picture and store it in img variable. Image img, // the image to draw private void ImageWarperControl_Load(object sender, EventArgs e) { img = CreatePicture(); }
6. Click on the Form and press F4 to view the Properties window. Click on the Events tab and then double-click the Paint event. The result will be the ImageWarperControl_ Paint() method. The picture will be rendered in this method. private void ImageWarperControl_Paint(object sender, PaintEventArgs e) { // set up all our parameters first before calling DrawWarpedPicture. Graphics target = this.CreateGraphics(); //draw onto the form's surface PointF pivotOnImage = new PointF(img.Width / 2, img.Height / 2); PointF pivotOnTarget = new PointF(this.Width / 2, this.Height / 2); double rotate = imageAngle; double scaleFactor = imageScale; SizeF skewing = imageSkew; DrawWarpedPicture(target, img, pivotOnImage, pivotOnTarget, rotate, scaleFactor, skewing); }
7. Add the CreatePicture() function to the class: private Image CreatePicture() { // Create a new Bitmap object, 50 x 50 pixels in size Image canvas = new Bitmap(50, 50); // create an object that will do the drawing operations Graphics artist = Graphics.FromImage(canvas); // draw a few shapes on the canvas picture artist.Clear(Color.Lime); artist.FillEllipse(Brushes.Red, 3, 30, 30, 30); artist.DrawBezier(new Pen(Color.Blue, 3), 0, 0, 40, 15, 10, 35, 50, 50); // now the drawing is done, we can discard the artist object artist.Dispose(); // return the picture return canvas; }
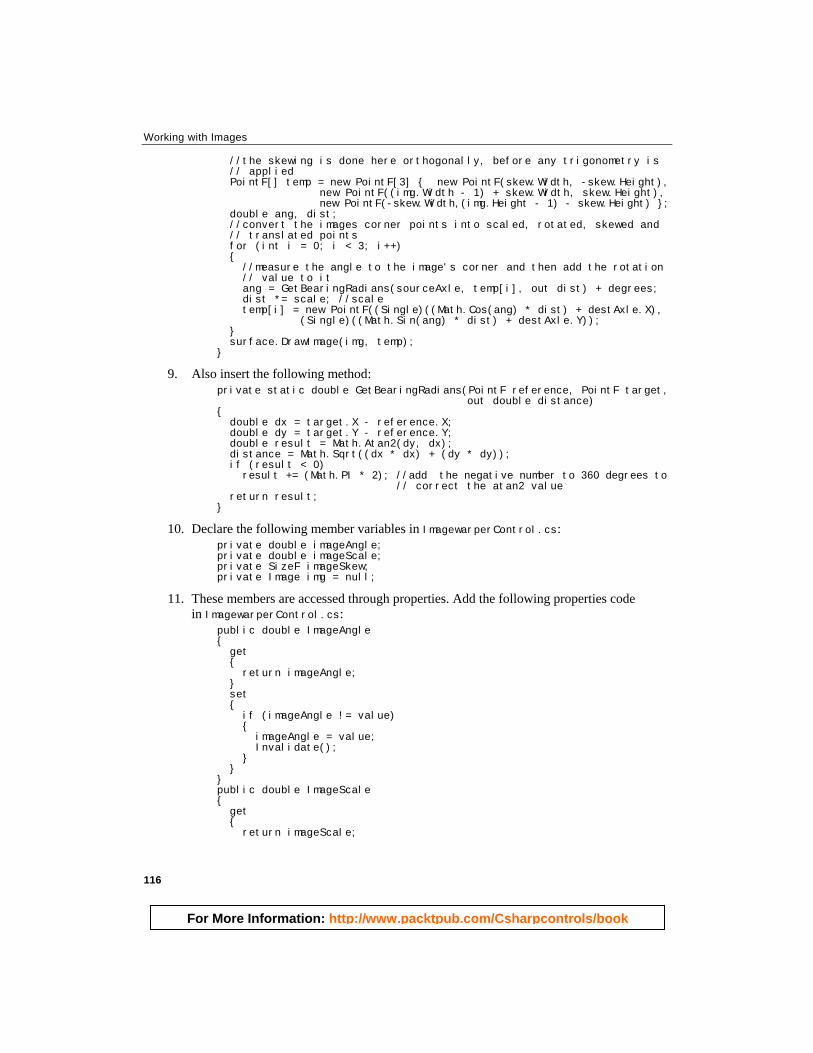
8. Add the DrawWarpedPicture() method: public void DrawWarpedPicture( Graphics surface, //the surface to draw on Image img, //the image to draw PointF sourceAxle, //pivot point passing through image. PointF destAxle, //pivot point's position on destination surface double degrees, //degrees through which the image is rotated clockwise double scale, //size multiplier SizeF skew //the slanting effect size, applies BEFORE scaling or // rotation ) { //give this array temporary coords that will be overwritten in the // loop below
For More Information: http://www.packtpub.com/Csharpcontrols/book
Working with Images
116
//the skewing is done here orthogonally, before any trigonometry is // applied PointF[] temp = new PointF[3] { new PointF(skew.Width, -skew.Height), new PointF((img.Width - 1) + skew.Width, skew.Height), new PointF(-skew.Width,(img.Height - 1) - skew.Height) }; double ang, dist; //convert the images corner points into scaled, rotated, skewed and // translated points for (int i = 0; i < 3; i++) { //measure the angle to the image's corner and then add the rotation // value to it ang = GetBearingRadians(sourceAxle, temp[i], out dist) + degrees; dist *= scale; //scale temp[i] = new PointF((Single)((Math.Cos(ang) * dist) + destAxle.X), (Single)((Math.Sin(ang) * dist) + destAxle.Y)); } surface.DrawImage(img, temp); }
9. Also insert the following method: private static double GetBearingRadians(PointF reference, PointF target, out double distance) { double dx = target.X - reference.X; double dy = target.Y - reference.Y; double result = Math.Atan2(dy, dx); distance = Math.Sqrt((dx * dx) + (dy * dy)); if (result < 0) result += (Math.PI * 2); //add the negative number to 360 degrees to // correct the atan2 value return result; }
10. Declare the following member variables in ImagewarperControl.cs: private double imageAngle; private double imageScale; private SizeF imageSkew; private Image img = null;
11. These members are accessed through properties. Add the following properties code in ImagewarperControl.cs: public double ImageAngle { get { return imageAngle; } set { if (imageAngle != value) { imageAngle = value; Invalidate(); } } } public double ImageScale { get { return imageScale;
For More Information: http://www.packtpub.com/Csharpcontrols/book
Chapter 6
117
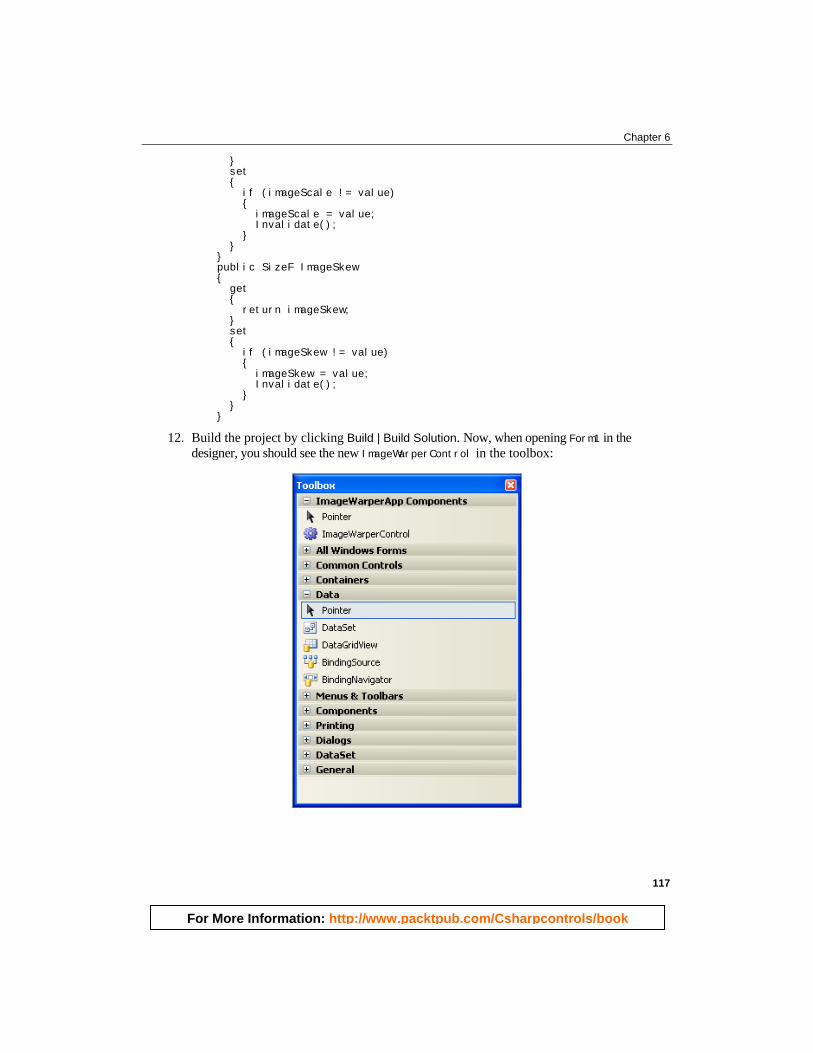
} set { if (imageScale != value) { imageScale = value; Invalidate(); } } } public SizeF ImageSkew { get { return imageSkew; } set { if (imageSkew != value) { imageSkew = value; Invalidate(); } } }
12. Build the project by clicking Build | Build Solution. Now, when opening Form1 in the designer, you should see the new ImageWarperControl in the toolbox:
For More Information: http://www.packtpub.com/Csharpcontrols/book
Working with Images
118
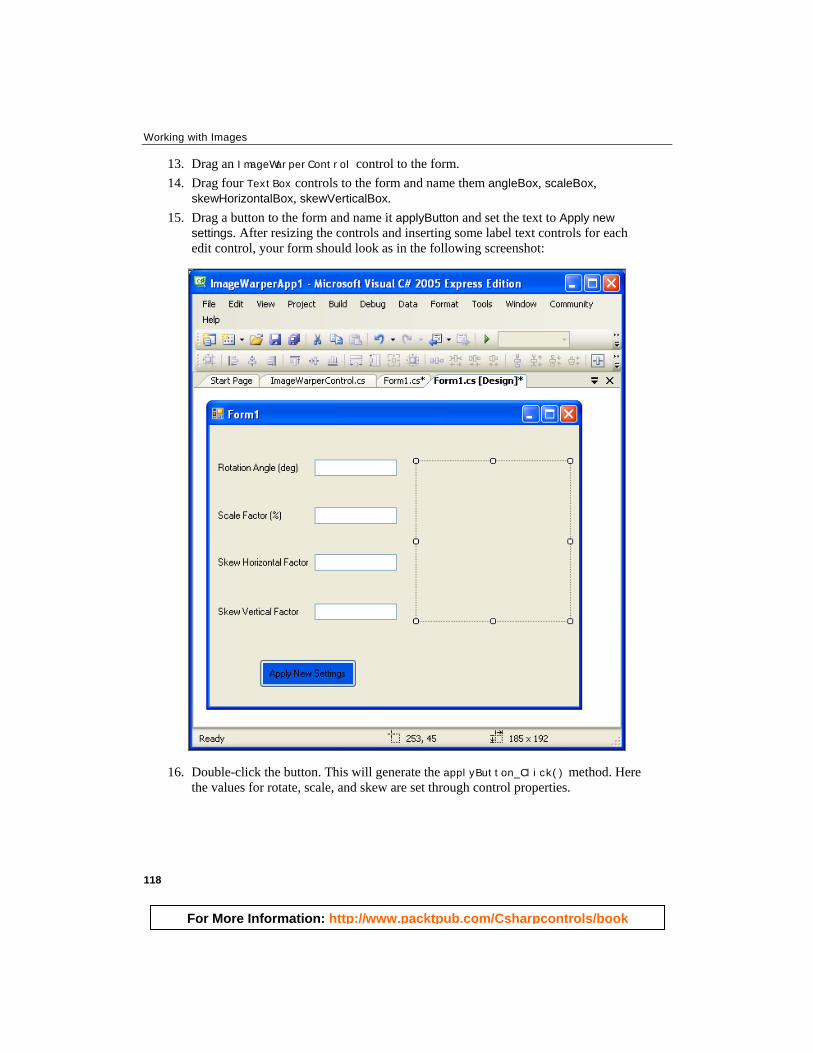
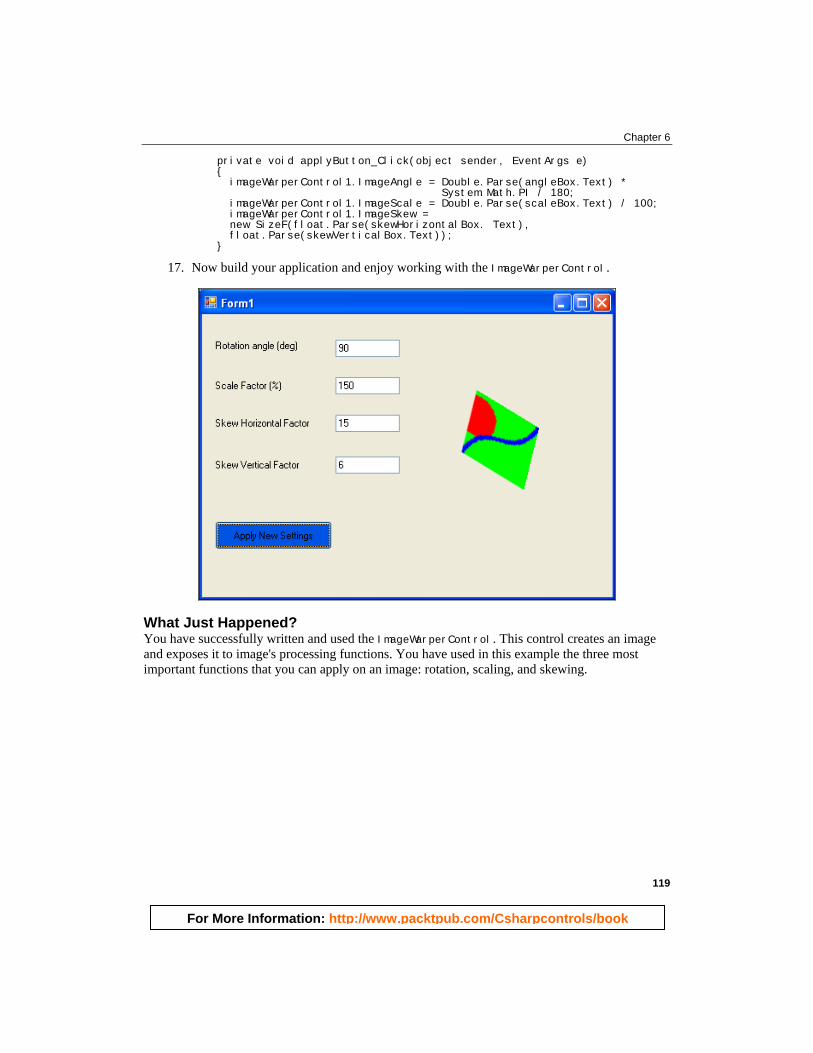
13. Drag an ImageWarperControl control to the form. 14. Drag four TextBox controls to the form and name them angleBox, scaleBox,
skewHorizontalBox, skewVerticalBox. 15. Drag a button to the form and name it applyButton and set the text to Apply new
settings. After resizing the controls and inserting some label text controls for each edit control, your form should look as in the following screenshot:
16. Double-click the button. This will generate the applyButton_Click() method. Here the values for rotate, scale, and skew are set through control properties.
For More Information: http://www.packtpub.com/Csharpcontrols/book
Chapter 6
119
private void applyButton_Click(object sender, EventArgs e) { imageWarperControl1.ImageAngle = Double.Parse(angleBox.Text) * System.Math.PI / 180; imageWarperControl1.ImageScale = Double.Parse(scaleBox.Text) / 100; imageWarperControl1.ImageSkew = new SizeF(float.Parse(skewHorizontalBox. Text), float.Parse(skewVerticalBox.Text)); }
17. Now build your application and enjoy working with the ImageWarperControl.
What Just Happened? You have successfully written and used the ImageWarperControl. This control creates an image and exposes it to image's processing functions. You have used in this example the three most important functions that you can apply on an image: rotation, scaling, and skewing.
For More Information: http://www.packtpub.com/Csharpcontrols/book
Working with Images
120
Summary In this chapter you explored the area of the GDI+ that deals with various kinds of images. The Image and Bitmap classes were used to load, and save an image and create a brand new image from scratch through code. With our ImageWarper component we looked at the GDI+ coordinate system in great detail, and learned how to combine skewing, rotation, and scaling in high resolution. That component is invisible to the user but can enable us to create some impressive graphical effects that have negligible effect upon our program's performance. We also briefly visited the quality control features of the Graphics class. Graphics under .NET is a massive subject and we have only skimmed the surface here, but now we have a sound basis upon which to build deeper knowledge later on.
Finally, you have created a custom control named ImageWarperControl that can apply different functions to an image. This can be the start for you to create image handling custom controls.
For More Information: http://www.packtpub.com/Csharpcontrols/book
GDI+ Custom Controls with Visual C# 2005 The amount of built-in functionality included in the .NET Framework is amazing. One could create complex applications with lots of functionality by simply assembling the pieces you're offered for free. Among those pieces you'll find lots of powerful, flexible, and configurable controls. Who would ever need to build their own controls, right?
While some can get away without ever needing to build a custom control, many don't, or don't want to. Sometimes building a custom control is a necessity, because what you want to achieve doesn't exist, or is too expensive to buy. This is particularly true for controls with customized shapes, which need to be drawn instead of reusing other existing controls.
In some other cases, developers build custom controls as part of their architecture, allowing them to reuse more efficiently common functionality (and code) that they trust and like. There are many circumstances where building a custom control can make a programmer's life easier.
Unfortunately, programmers frequently avoided learning how to build custom controls because learning all the complexities consume lots of time and energy. Comprehensive and advanced books on the subject well exceed 1,000 pages, and the excessive amount of information can indeed be intimidating.
This book takes a lighter approach, guiding you step by step into building your first custom controls, and writing quality code. You'll build a new example in each chapter, and in the end you'll build a completely functional custom control where you'll apply most of what you've learned in the book.
What This Book Covers Chapter 1: Introduction to Custom Controls will be your introduction to the world of .NET custom controls. You'll learn what controls are, why they are useful, what they are made of, and towards the end of the chapter you'll also create a simple yet functional custom control called TinyNoiseMaker.
Chapter 2: Introduction to GDI+ introduces you to the basics of drawing with GDI+. You will meet a few namespaces, classes, and events that form the foundations of drawing with .NET, and you'll see how to paint the surface of a custom control.
Chapter 3: Basic Drawing teaches you more about the coordinate system of GDI+, drawing lines and polygons using pens, brushes, and colors, and guides you to build a control named GradientLabel.

For More Information: http://www.packtpub.com/Csharpcontrols/book
Chapter 4: Drawing Complex Shapes and Using Transformations teaches you how to use graphics paths, regions, and transformations to build complex shapes. You'll then use the theory to build a Clock control.
Chapter 5: Drawing Control Parts, Borders, and Adornments explores using the ControlPaint class to implement common functionality and adds finishing touches to your control. To demonstrate the theory you'll build a simple custom control named GradientButton.
Chapter 6: Working with Images covers common techniques for manipulating images. You'll build a control called ImageWarper that scales, skews, and rotates an image.
Chapter 7: Printing introduces this very important area of GDI+. In many circumstances you'll want to add printing support to your controls, and you'll see exactly how to do so by creating the PrintableRichTextBox control.
Chapter 8: Collections teaches more details about .NET collections, including the new .NET 2.0 generics. Collections are very useful when building custom controls, and as an example you'll build a Font Picker control.
Chapter 9: Double Buffering introduces this advanced technique that can make a big difference in improving the speed and responsiveness of your control. Scrolling is one such area where double buffering could make a difference, and you'll end the chapter by implementing a control that displays a scrolling text.
Chapter 10: Handling Mouse Events deals with a very important topic for any desktop application you'll ever write. Luckily enough, all controls that ship with .NET have integrated mouse support, but at times you'll need to customize the features. In this chapter, you'll implement two applications: one will allow you to drag an image inside a delimited area, and the second lets you drag pictures from your Windows system into your form.
Chapter 11: Implementing Design-Time Support shows you how to make your user controls designer friendly. This way, your control will be friendly not only to the end users working with it but also to developers as well.
Chapter 12: Designing Intuitive Interfaces is a high-level overview of some human interface aspects that, handled correctly, can help you build controls and applications that are easier and more fun to use.
Chapter 13: The PieChart Control is a comprehensive case study, showing you how to develop a complete custom control in several stages, each time adding features, fixing bugs, and improving functionality.
Appendix A: Distributing Custom Controls shows you how to compile a custom control into a separate DLL file, which can be reused later in other projects. You'll be shown how to do this with both Visual Studio 2005 and Visual C# 2005 Express Edition, which offers different built-in features.

For More Information: http://www.packtpub.com/Csharpcontrols/book
Where to buy this book You can buy GDI+ Custom Controls with Visual C# 2005 from the Packt Publishing website: http://www.packtpub.com/Csharpcontrols/book.
Free shipping to the US, UK, Europe, Australia, New Zealand and India.
Alternatively, you can buy the book from Amazon, BN.com, Computer Manuals and most internet book retailers.
www.PacktPub.com


![interoperability.blob.core.windows.netinteroperability.blob.core.windows.net/files/MS-CUSTOM… · Web view[MSDN-CUICT/Word] Microsoft Corporation, ... All custom controls MUST](https://img.pdfslide.net/doc/110x75/5aa79cca7f8b9a54748c49ac/web-viewmsdn-cuictword-microsoft-corporation-all-custom-controls-must.jpg)