Embed Size (px)
Citation preview
Directorate for Quality and Standards in Education Curriculum Management Department – Geography – 2014
1
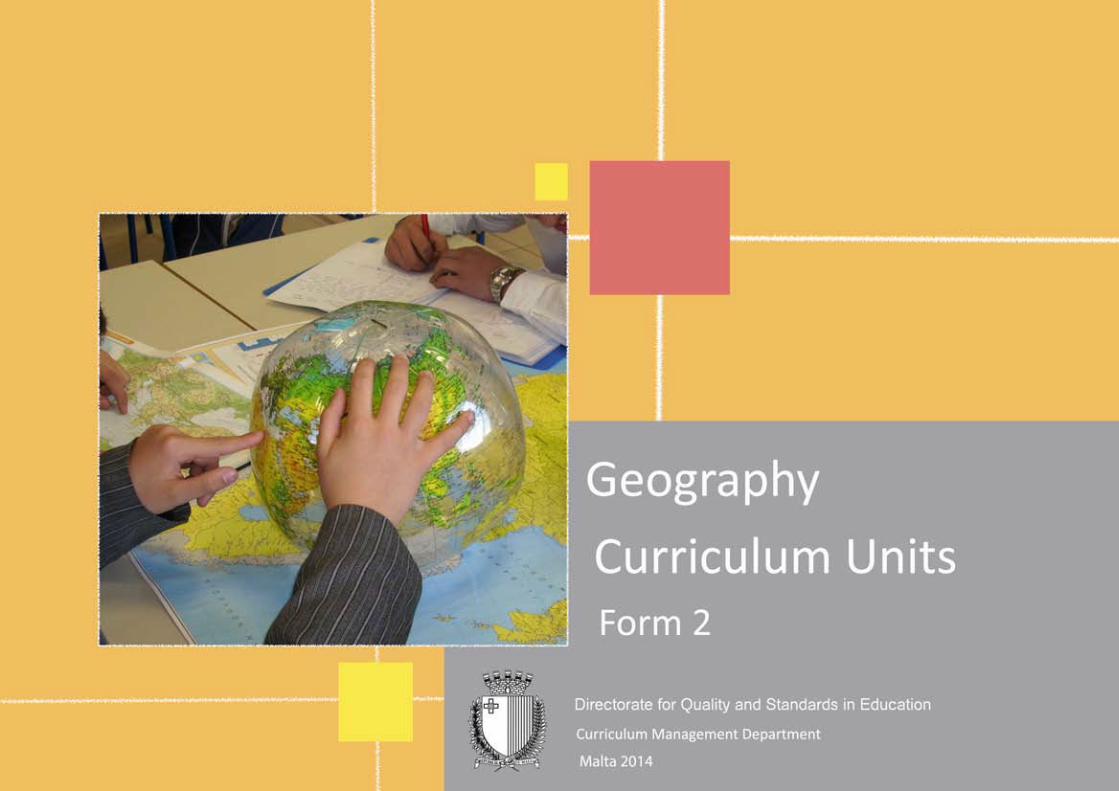
Geography Curriculum - Form 2
Directorate for Quality and Standards in Education Curriculum Management Department – Geography – 2014
2
Directorate for Quality and Standards in Education Curriculum Management Department
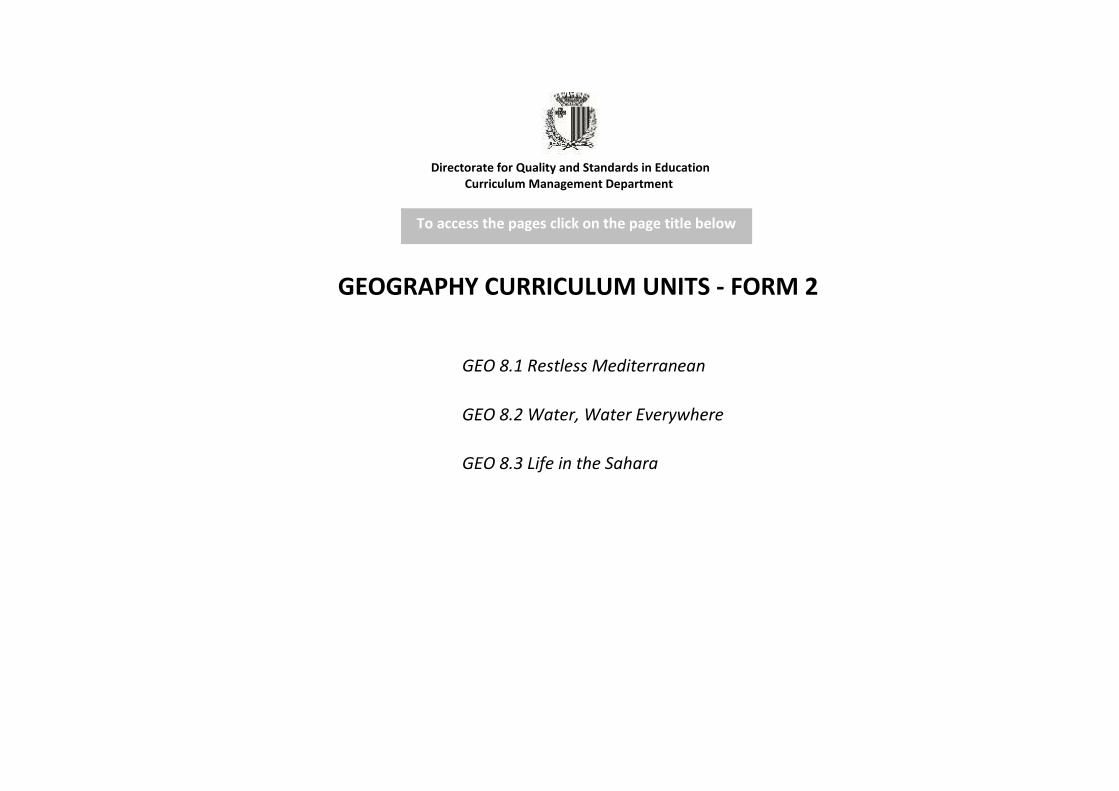
GEOGRAPHY CURRICULUM UNITS - FORM 2
GEO 8.1 Restless Mediterranean
GEO 8.2 Water, Water Everywhere
GEO 8.3 Life in the Sahara
To access the pages click on the page title below
Directorate for Quality and Standards in Education Curriculum Management Department – Geography – 2014
3
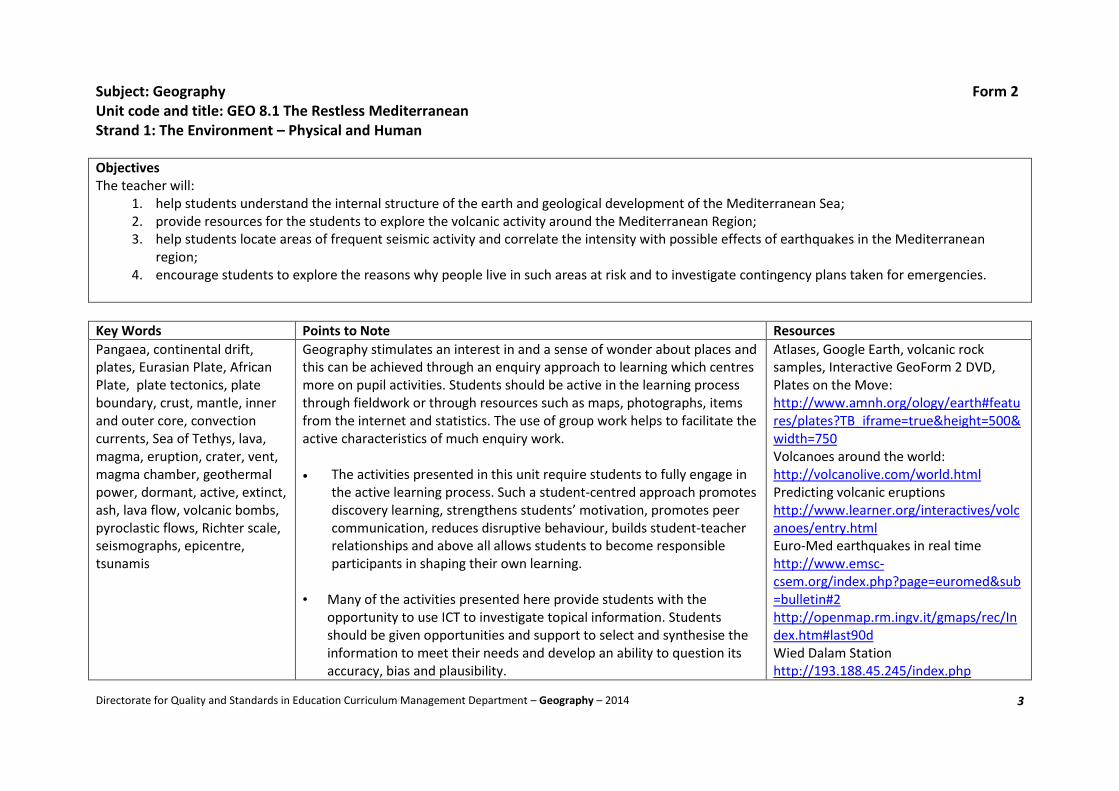
Subject: Geography Form 2 Unit code and title: GEO 8.1 The Restless Mediterranean Strand 1: The Environment – Physical and Human Objectives The teacher will:
1. help students understand the internal structure of the earth and geological development of the Mediterranean Sea; 2. provide resources for the students to explore the volcanic activity around the Mediterranean Region; 3. help students locate areas of frequent seismic activity and correlate the intensity with possible effects of earthquakes in the Mediterranean
region; 4. encourage students to explore the reasons why people live in such areas at risk and to investigate contingency plans taken for emergencies.
Key Words Points to Note Resources
Pangaea, continental drift, plates, Eurasian Plate, African Plate, plate tectonics, plate boundary, crust, mantle, inner and outer core, convection currents, Sea of Tethys, lava, magma, eruption, crater, vent, magma chamber, geothermal power, dormant, active, extinct, ash, lava flow, volcanic bombs, pyroclastic flows, Richter scale, seismographs, epicentre, tsunamis
Geography stimulates an interest in and a sense of wonder about places and this can be achieved through an enquiry approach to learning which centres more on pupil activities. Students should be active in the learning process through fieldwork or through resources such as maps, photographs, items from the internet and statistics. The use of group work helps to facilitate the active characteristics of much enquiry work. The activities presented in this unit require students to fully engage in
the active learning process. Such a student-centred approach promotes discovery learning, strengthens students’ motivation, promotes peer communication, reduces disruptive behaviour, builds student-teacher relationships and above all allows students to become responsible participants in shaping their own learning.
• Many of the activities presented here provide students with the
opportunity to use ICT to investigate topical information. Students should be given opportunities and support to select and synthesise the information to meet their needs and develop an ability to question its accuracy, bias and plausibility.
Atlases, Google Earth, volcanic rock samples, Interactive GeoForm 2 DVD, Plates on the Move: http://www.amnh.org/ology/earth#features/plates?TB_iframe=true&height=500&width=750 Volcanoes around the world: http://volcanolive.com/world.html Predicting volcanic eruptions http://www.learner.org/interactives/volcanoes/entry.html Euro-Med earthquakes in real time http://www.emsc-csem.org/index.php?page=euromed&sub=bulletin#2 http://openmap.rm.ingv.it/gmaps/rec/Index.htm#last90d Wied Dalam Station http://193.188.45.245/index.php
Directorate for Quality and Standards in Education Curriculum Management Department – Geography – 2014
4
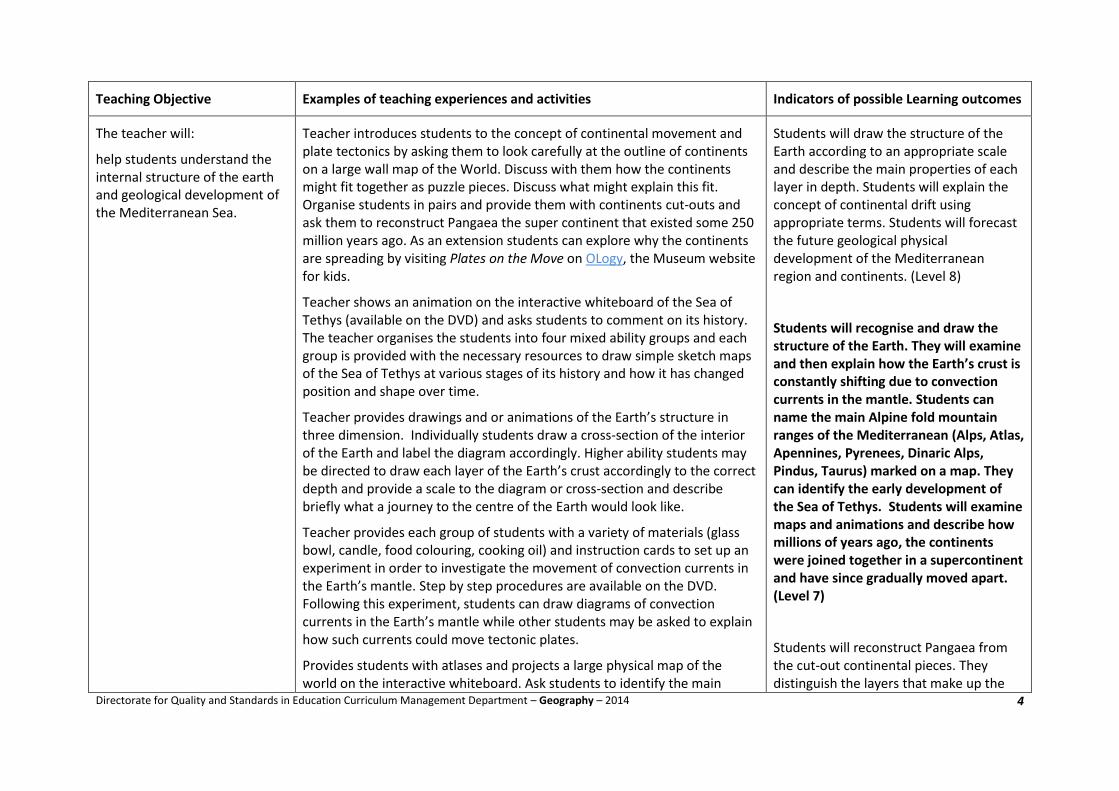
Teaching Objective Examples of teaching experiences and activities Indicators of possible Learning outcomes
The teacher will:
help students understand the internal structure of the earth and geological development of the Mediterranean Sea.
Teacher introduces students to the concept of continental movement and plate tectonics by asking them to look carefully at the outline of continents on a large wall map of the World. Discuss with them how the continents might fit together as puzzle pieces. Discuss what might explain this fit. Organise students in pairs and provide them with continents cut-outs and ask them to reconstruct Pangaea the super continent that existed some 250 million years ago. As an extension students can explore why the continents are spreading by visiting Plates on the Move on OLogy, the Museum website for kids.
Teacher shows an animation on the interactive whiteboard of the Sea of Tethys (available on the DVD) and asks students to comment on its history. The teacher organises the students into four mixed ability groups and each group is provided with the necessary resources to draw simple sketch maps of the Sea of Tethys at various stages of its history and how it has changed position and shape over time.
Teacher provides drawings and or animations of the Earth’s structure in three dimension. Individually students draw a cross-section of the interior of the Earth and label the diagram accordingly. Higher ability students may be directed to draw each layer of the Earth’s crust accordingly to the correct depth and provide a scale to the diagram or cross-section and describe briefly what a journey to the centre of the Earth would look like.
Teacher provides each group of students with a variety of materials (glass bowl, candle, food colouring, cooking oil) and instruction cards to set up an experiment in order to investigate the movement of convection currents in the Earth’s mantle. Step by step procedures are available on the DVD. Following this experiment, students can draw diagrams of convection currents in the Earth’s mantle while other students may be asked to explain how such currents could move tectonic plates.
Provides students with atlases and projects a large physical map of the world on the interactive whiteboard. Ask students to identify the main
Students will draw the structure of the Earth according to an appropriate scale and describe the main properties of each layer in depth. Students will explain the concept of continental drift using appropriate terms. Students will forecast the future geological physical development of the Mediterranean region and continents. (Level 8)
Students will recognise and draw the structure of the Earth. They will examine and then explain how the Earth’s crust is constantly shifting due to convection currents in the mantle. Students can name the main Alpine fold mountain ranges of the Mediterranean (Alps, Atlas, Apennines, Pyrenees, Dinaric Alps, Pindus, Taurus) marked on a map. They can identify the early development of the Sea of Tethys. Students will examine maps and animations and describe how millions of years ago, the continents were joined together in a supercontinent and have since gradually moved apart. (Level 7)
Students will reconstruct Pangaea from the cut-out continental pieces. They distinguish the layers that make up the
Directorate for Quality and Standards in Education Curriculum Management Department – Geography – 2014
5
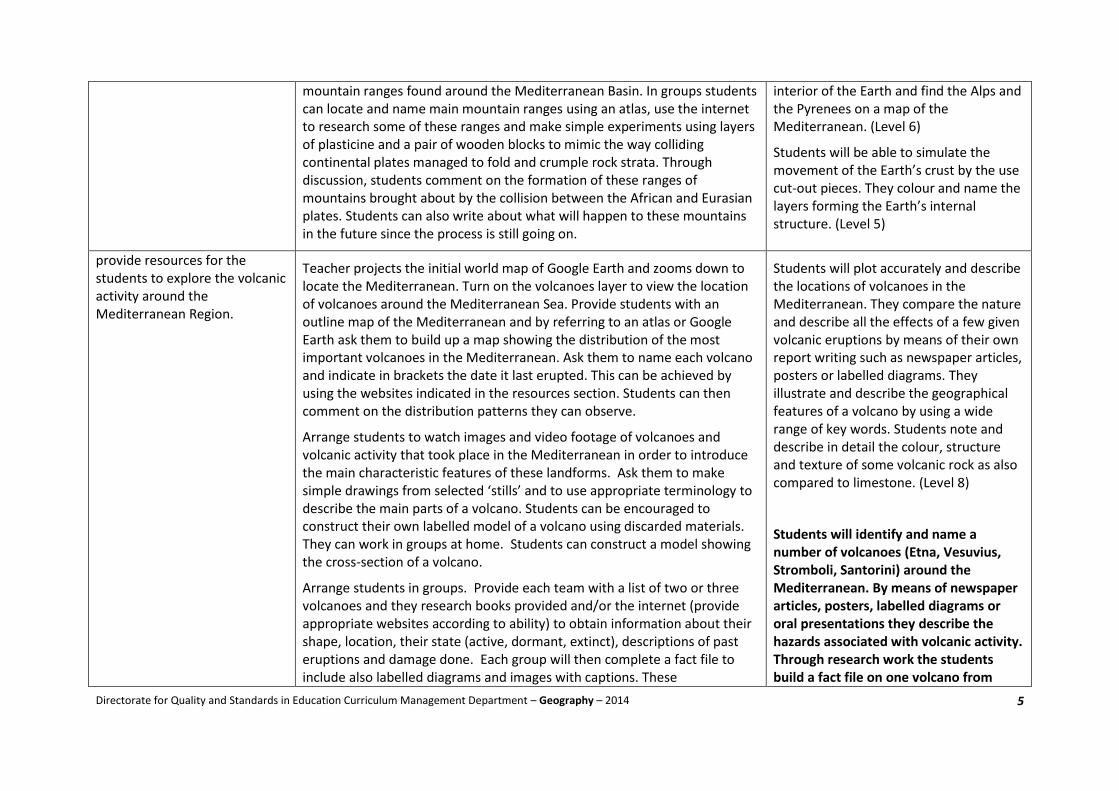
mountain ranges found around the Mediterranean Basin. In groups students can locate and name main mountain ranges using an atlas, use the internet to research some of these ranges and make simple experiments using layers of plasticine and a pair of wooden blocks to mimic the way colliding continental plates managed to fold and crumple rock strata. Through discussion, students comment on the formation of these ranges of mountains brought about by the collision between the African and Eurasian plates. Students can also write about what will happen to these mountains in the future since the process is still going on.
interior of the Earth and find the Alps and the Pyrenees on a map of the Mediterranean. (Level 6)
Students will be able to simulate the movement of the Earth’s crust by the use cut-out pieces. They colour and name the layers forming the Earth’s internal structure. (Level 5)
provide resources for the students to explore the volcanic activity around the Mediterranean Region.
Teacher projects the initial world map of Google Earth and zooms down to locate the Mediterranean. Turn on the volcanoes layer to view the location of volcanoes around the Mediterranean Sea. Provide students with an outline map of the Mediterranean and by referring to an atlas or Google Earth ask them to build up a map showing the distribution of the most important volcanoes in the Mediterranean. Ask them to name each volcano and indicate in brackets the date it last erupted. This can be achieved by using the websites indicated in the resources section. Students can then comment on the distribution patterns they can observe.
Arrange students to watch images and video footage of volcanoes and volcanic activity that took place in the Mediterranean in order to introduce the main characteristic features of these landforms. Ask them to make simple drawings from selected ‘stills’ and to use appropriate terminology to describe the main parts of a volcano. Students can be encouraged to construct their own labelled model of a volcano using discarded materials. They can work in groups at home. Students can construct a model showing the cross-section of a volcano.
Arrange students in groups. Provide each team with a list of two or three volcanoes and they research books provided and/or the internet (provide appropriate websites according to ability) to obtain information about their shape, location, their state (active, dormant, extinct), descriptions of past eruptions and damage done. Each group will then complete a fact file to include also labelled diagrams and images with captions. These
Students will plot accurately and describe the locations of volcanoes in the Mediterranean. They compare the nature and describe all the effects of a few given volcanic eruptions by means of their own report writing such as newspaper articles, posters or labelled diagrams. They illustrate and describe the geographical features of a volcano by using a wide range of key words. Students note and describe in detail the colour, structure and texture of some volcanic rock as also compared to limestone. (Level 8)
Students will identify and name a number of volcanoes (Etna, Vesuvius, Stromboli, Santorini) around the Mediterranean. By means of newspaper articles, posters, labelled diagrams or oral presentations they describe the hazards associated with volcanic activity. Through research work the students build a fact file on one volcano from
Directorate for Quality and Standards in Education Curriculum Management Department – Geography – 2014
6
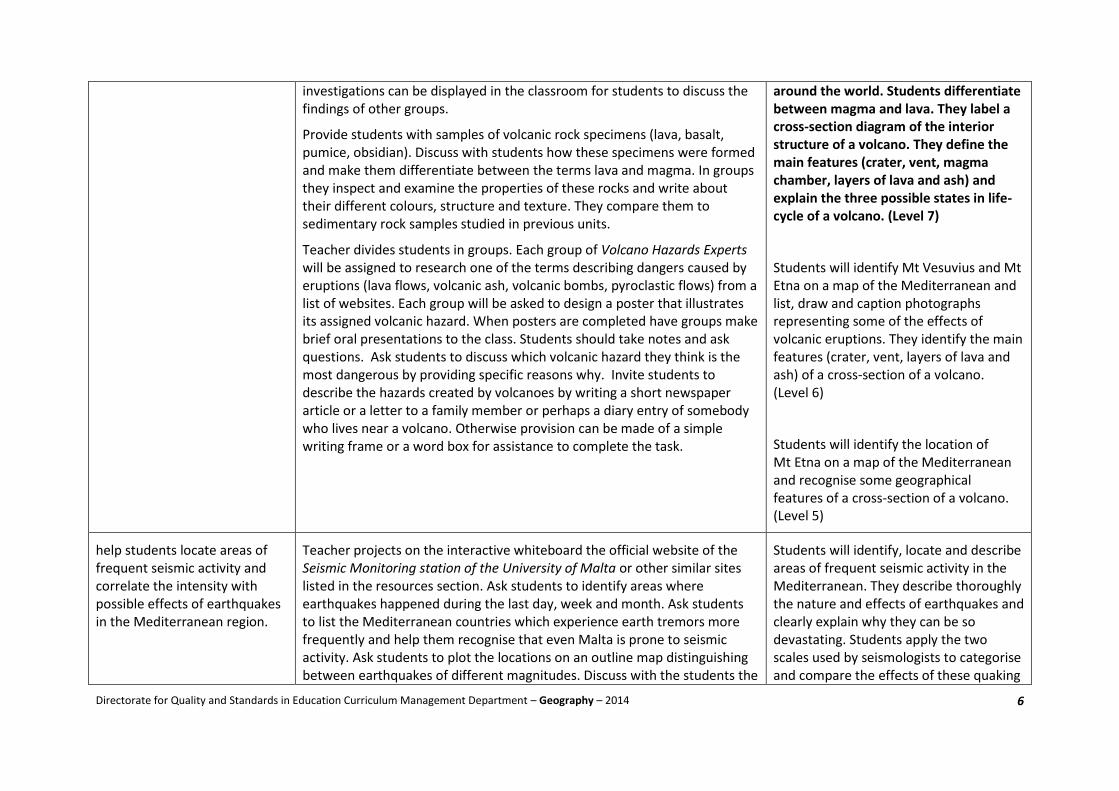
investigations can be displayed in the classroom for students to discuss the findings of other groups.
Provide students with samples of volcanic rock specimens (lava, basalt, pumice, obsidian). Discuss with students how these specimens were formed and make them differentiate between the terms lava and magma. In groups they inspect and examine the properties of these rocks and write about their different colours, structure and texture. They compare them to sedimentary rock samples studied in previous units.
Teacher divides students in groups. Each group of Volcano Hazards Experts will be assigned to research one of the terms describing dangers caused by eruptions (lava flows, volcanic ash, volcanic bombs, pyroclastic flows) from a list of websites. Each group will be asked to design a poster that illustrates its assigned volcanic hazard. When posters are completed have groups make brief oral presentations to the class. Students should take notes and ask questions. Ask students to discuss which volcanic hazard they think is the most dangerous by providing specific reasons why. Invite students to describe the hazards created by volcanoes by writing a short newspaper article or a letter to a family member or perhaps a diary entry of somebody who lives near a volcano. Otherwise provision can be made of a simple writing frame or a word box for assistance to complete the task.
around the world. Students differentiate between magma and lava. They label a cross-section diagram of the interior structure of a volcano. They define the main features (crater, vent, magma chamber, layers of lava and ash) and explain the three possible states in life-cycle of a volcano. (Level 7)
Students will identify Mt Vesuvius and Mt Etna on a map of the Mediterranean and list, draw and caption photographs representing some of the effects of volcanic eruptions. They identify the main features (crater, vent, layers of lava and ash) of a cross-section of a volcano. (Level 6)
Students will identify the location of Mt Etna on a map of the Mediterranean and recognise some geographical features of a cross-section of a volcano. (Level 5)
help students locate areas of frequent seismic activity and correlate the intensity with possible effects of earthquakes in the Mediterranean region.
Teacher projects on the interactive whiteboard the official website of the Seismic Monitoring station of the University of Malta or other similar sites listed in the resources section. Ask students to identify areas where earthquakes happened during the last day, week and month. Ask students to list the Mediterranean countries which experience earth tremors more frequently and help them recognise that even Malta is prone to seismic activity. Ask students to plot the locations on an outline map distinguishing between earthquakes of different magnitudes. Discuss with the students the
Students will identify, locate and describe areas of frequent seismic activity in the Mediterranean. They describe thoroughly the nature and effects of earthquakes and clearly explain why they can be so devastating. Students apply the two scales used by seismologists to categorise and compare the effects of these quaking
Directorate for Quality and Standards in Education Curriculum Management Department – Geography – 2014
7
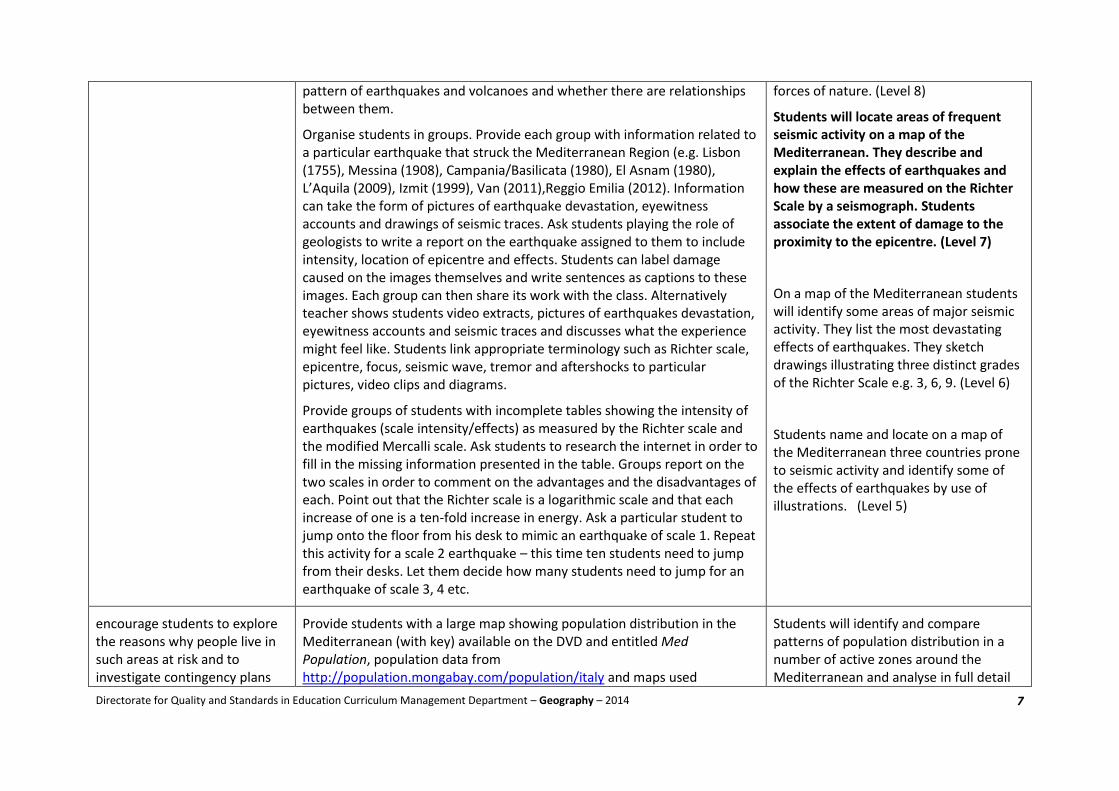
pattern of earthquakes and volcanoes and whether there are relationships between them.
Organise students in groups. Provide each group with information related to a particular earthquake that struck the Mediterranean Region (e.g. Lisbon (1755), Messina (1908), Campania/Basilicata (1980), El Asnam (1980), L’Aquila (2009), Izmit (1999), Van (2011),Reggio Emilia (2012). Information can take the form of pictures of earthquake devastation, eyewitness accounts and drawings of seismic traces. Ask students playing the role of geologists to write a report on the earthquake assigned to them to include intensity, location of epicentre and effects. Students can label damage caused on the images themselves and write sentences as captions to these images. Each group can then share its work with the class. Alternatively teacher shows students video extracts, pictures of earthquakes devastation, eyewitness accounts and seismic traces and discusses what the experience might feel like. Students link appropriate terminology such as Richter scale, epicentre, focus, seismic wave, tremor and aftershocks to particular pictures, video clips and diagrams.
Provide groups of students with incomplete tables showing the intensity of earthquakes (scale intensity/effects) as measured by the Richter scale and the modified Mercalli scale. Ask students to research the internet in order to fill in the missing information presented in the table. Groups report on the two scales in order to comment on the advantages and the disadvantages of each. Point out that the Richter scale is a logarithmic scale and that each increase of one is a ten-fold increase in energy. Ask a particular student to jump onto the floor from his desk to mimic an earthquake of scale 1. Repeat this activity for a scale 2 earthquake – this time ten students need to jump from their desks. Let them decide how many students need to jump for an earthquake of scale 3, 4 etc.
forces of nature. (Level 8)
Students will locate areas of frequent seismic activity on a map of the Mediterranean. They describe and explain the effects of earthquakes and how these are measured on the Richter Scale by a seismograph. Students associate the extent of damage to the proximity to the epicentre. (Level 7)
On a map of the Mediterranean students will identify some areas of major seismic activity. They list the most devastating effects of earthquakes. They sketch drawings illustrating three distinct grades of the Richter Scale e.g. 3, 6, 9. (Level 6)
Students name and locate on a map of the Mediterranean three countries prone to seismic activity and identify some of the effects of earthquakes by use of illustrations. (Level 5)
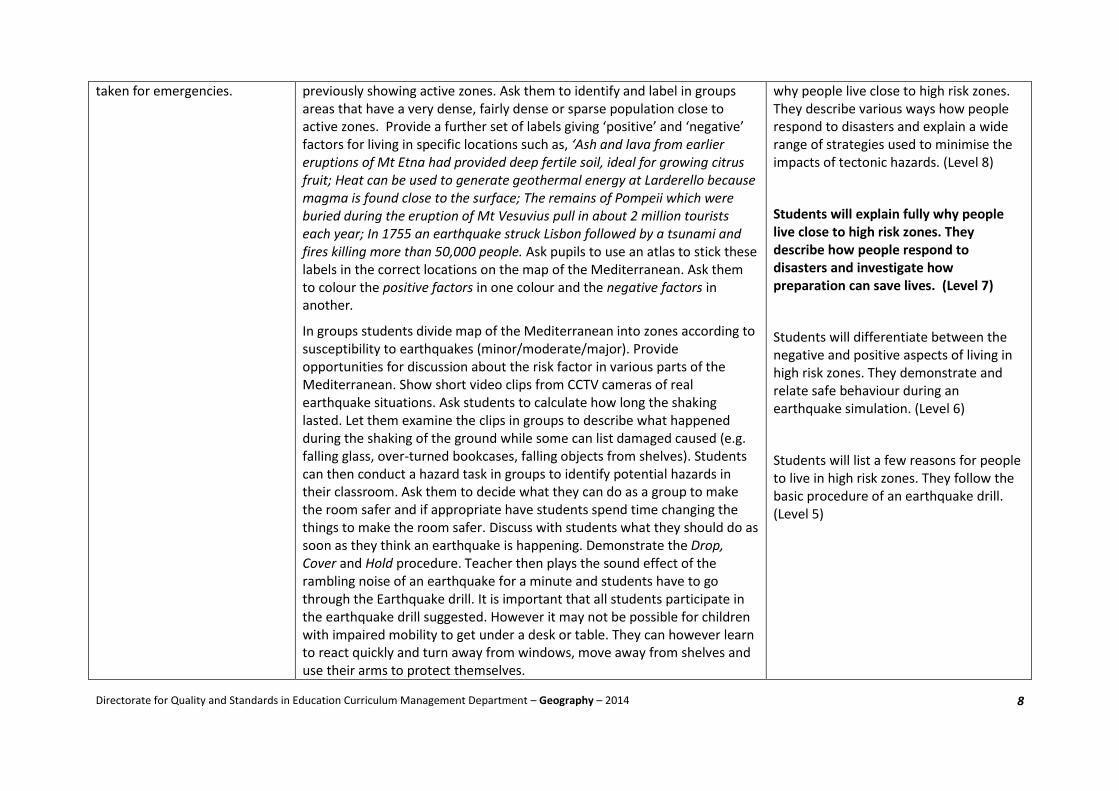
encourage students to explore the reasons why people live in such areas at risk and to investigate contingency plans
Provide students with a large map showing population distribution in the Mediterranean (with key) available on the DVD and entitled Med Population, population data from http://population.mongabay.com/population/italy and maps used
Students will identify and compare patterns of population distribution in a number of active zones around the Mediterranean and analyse in full detail
Directorate for Quality and Standards in Education Curriculum Management Department – Geography – 2014
8
taken for emergencies.
previously showing active zones. Ask them to identify and label in groups areas that have a very dense, fairly dense or sparse population close to active zones. Provide a further set of labels giving ‘positive’ and ‘negative’ factors for living in specific locations such as, ‘Ash and lava from earlier eruptions of Mt Etna had provided deep fertile soil, ideal for growing citrus fruit; Heat can be used to generate geothermal energy at Larderello because magma is found close to the surface; The remains of Pompeii which were buried during the eruption of Mt Vesuvius pull in about 2 million tourists each year; In 1755 an earthquake struck Lisbon followed by a tsunami and fires killing more than 50,000 people. Ask pupils to use an atlas to stick these labels in the correct locations on the map of the Mediterranean. Ask them to colour the positive factors in one colour and the negative factors in another.
In groups students divide map of the Mediterranean into zones according to susceptibility to earthquakes (minor/moderate/major). Provide opportunities for discussion about the risk factor in various parts of the Mediterranean. Show short video clips from CCTV cameras of real earthquake situations. Ask students to calculate how long the shaking lasted. Let them examine the clips in groups to describe what happened during the shaking of the ground while some can list damaged caused (e.g. falling glass, over-turned bookcases, falling objects from shelves). Students can then conduct a hazard task in groups to identify potential hazards in their classroom. Ask them to decide what they can do as a group to make the room safer and if appropriate have students spend time changing the things to make the room safer. Discuss with students what they should do as soon as they think an earthquake is happening. Demonstrate the Drop, Cover and Hold procedure. Teacher then plays the sound effect of the rambling noise of an earthquake for a minute and students have to go through the Earthquake drill. It is important that all students participate in the earthquake drill suggested. However it may not be possible for children with impaired mobility to get under a desk or table. They can however learn to react quickly and turn away from windows, move away from shelves and use their arms to protect themselves.
why people live close to high risk zones. They describe various ways how people respond to disasters and explain a wide range of strategies used to minimise the impacts of tectonic hazards. (Level 8)
Students will explain fully why people live close to high risk zones. They describe how people respond to disasters and investigate how preparation can save lives. (Level 7)
Students will differentiate between the negative and positive aspects of living in high risk zones. They demonstrate and relate safe behaviour during an earthquake simulation. (Level 6)
Students will list a few reasons for people to live in high risk zones. They follow the basic procedure of an earthquake drill. (Level 5)
Directorate for Quality and Standards in Education Curriculum Management Department – Geography – 2014
9
Subject: Geography Form 2 Unit Code and title: GEO 8.2 Water, Water Everywhere Strand 1: The Environment – Physical and Human Strand 2: Management, Conservation and Sustainability
Objectives The teacher will:
1. help students distinguish and explain the three types of rainfall; 2. encourage students trace the supply and the distribution of water for different daily uses; 3. explore with the students the use and misuse of water and devise ways for its proper management and conservation.
Key Words Points to Note Resources
evaporation, condensation, precipitation, ground water, percolation, water table, aquifer, upper water table, reverse osmosis, sewage treatment plants, conservation, relief rainfall, convectional rainfall, frontal rainfall, water vapour, borehole, pumping station
Geography stimulates an interest in and a sense of wonder about places and this can be achieved through an enquiry approach to learning which centres more on pupil activities. Students should be active in the learning process through fieldwork or through resources such as maps, photographs, items from the internet and statistics. The use of group work helps to facilitate the active characteristics of much enquiry work.
The activities presented in this unit require students to fully engage in the active learning process. Such a student-centred approach promotes discovery learning, strengthens students’ motivation, promotes peer communication, reduces disruptive behaviour, builds student-teacher relationships and above all allows students to become responsible participants in shaping their own learning.
Teachers are encouraged to take students on a visit to either a pumping station such as Ta’ Kandja or to a reverse osmosis desalination plant. During such visits teachers are recommended to provide constructive learning experiences where students can gain an understanding about the limited sources of water available and the increasing need to protect them.
Interactive Geography Form 2 DVD Hydrological cycle animations: http://www.metoffice.gov.uk/education/teachers/popup/popup_wboardap_water_cycle2.html; http://www.nwlg.org/resources/geog/hydro_cycle/hydro/cycle.htm aquifer in a cup http://water.epa.gov/learn/kids/drinkingwater/upload/2005_03_10_kids_activity_grades_k-3_aquiferinacup.pdf water conservation game: http://www.savewater.com.au/mission-h2o-game water conservation http://www.h2ouse.org/ types of rainfall animation
http://www.curriculumbits.com/prodimages/details/geography/types-of-rainfall.html
Directorate for Quality and Standards in Education Curriculum Management Department – Geography – 2014
10
Teaching Objective Examples of teaching experiences and activities Indicators of possible Learning Outcomes
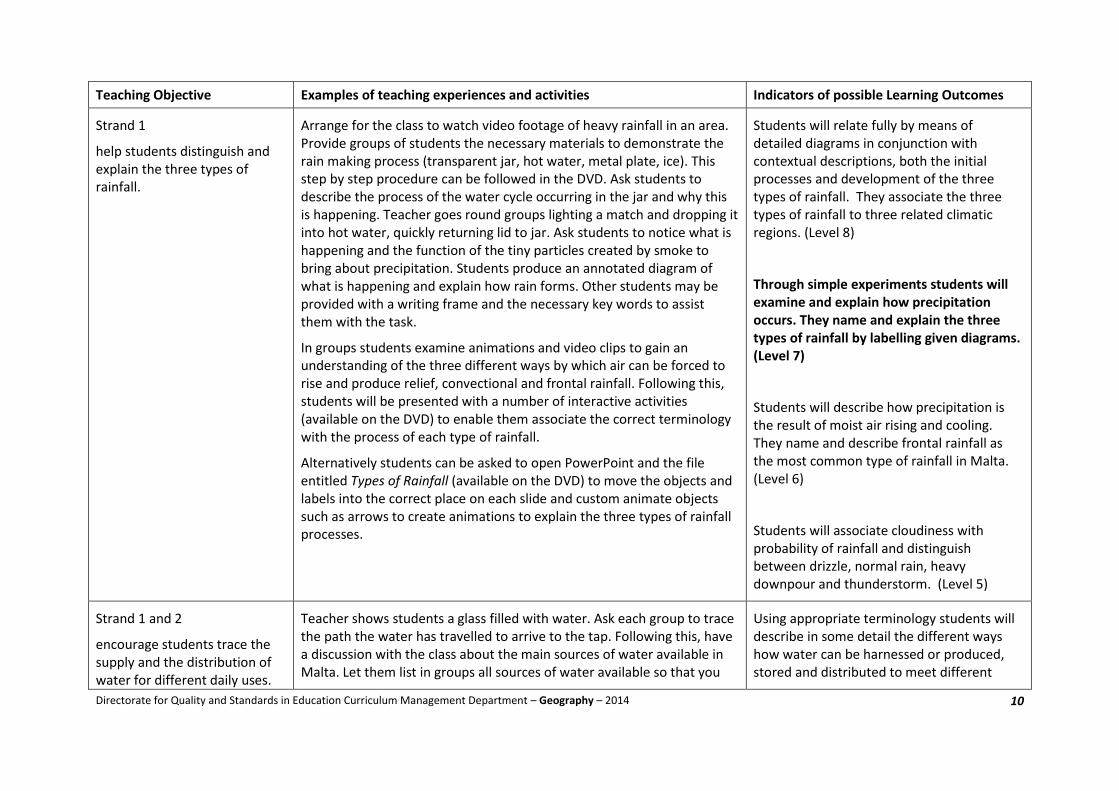
Strand 1
help students distinguish and explain the three types of rainfall.
Arrange for the class to watch video footage of heavy rainfall in an area. Provide groups of students the necessary materials to demonstrate the rain making process (transparent jar, hot water, metal plate, ice). This step by step procedure can be followed in the DVD. Ask students to describe the process of the water cycle occurring in the jar and why this is happening. Teacher goes round groups lighting a match and dropping it into hot water, quickly returning lid to jar. Ask students to notice what is happening and the function of the tiny particles created by smoke to bring about precipitation. Students produce an annotated diagram of what is happening and explain how rain forms. Other students may be provided with a writing frame and the necessary key words to assist them with the task.
In groups students examine animations and video clips to gain an understanding of the three different ways by which air can be forced to rise and produce relief, convectional and frontal rainfall. Following this, students will be presented with a number of interactive activities (available on the DVD) to enable them associate the correct terminology with the process of each type of rainfall.
Alternatively students can be asked to open PowerPoint and the file entitled Types of Rainfall (available on the DVD) to move the objects and labels into the correct place on each slide and custom animate objects such as arrows to create animations to explain the three types of rainfall processes.
Students will relate fully by means of detailed diagrams in conjunction with contextual descriptions, both the initial processes and development of the three types of rainfall. They associate the three types of rainfall to three related climatic regions. (Level 8)
Through simple experiments students will examine and explain how precipitation occurs. They name and explain the three types of rainfall by labelling given diagrams. (Level 7)
Students will describe how precipitation is the result of moist air rising and cooling. They name and describe frontal rainfall as the most common type of rainfall in Malta. (Level 6)
Students will associate cloudiness with probability of rainfall and distinguish between drizzle, normal rain, heavy downpour and thunderstorm. (Level 5)
Strand 1 and 2
encourage students trace the supply and the distribution of water for different daily uses.
Teacher shows students a glass filled with water. Ask each group to trace the path the water has travelled to arrive to the tap. Following this, have a discussion with the class about the main sources of water available in Malta. Let them list in groups all sources of water available so that you
Using appropriate terminology students will describe in some detail the different ways how water can be harnessed or produced, stored and distributed to meet different
Directorate for Quality and Standards in Education Curriculum Management Department – Geography – 2014
11
get some idea of what, if any, preconceptions exist. Let them discuss and come with answers to questions such as: Why unlike other European countries we need to change sea-water into potable water by reverse osmosis? Which is cheaper to produce, ground water or water from reverse osmosis? Which is the best quality water? Each group will then produce a chart highlighting the advantages and disadvantages of any one source of water.
Teacher takes students outside onto the school grounds and asks them to think about the last time it rained. Where did the water go when it fell on the pavement? On roofs? On soil? Have students pour some water on unpaved ground and let them decide what is happening to the water once it disappeared into the soil. The teacher provides each group of students with a variety of materials (gravel, sand, transparent container, food colouring) and instruction cards to set up an experiment in order to investigate how water is stored underground in rocks (refer to hyperlink in the resources column). Let students describe what is happening and place the correct labels such as saturated zone, unsaturated zone, water table, aquifer, porous and impermeable rocks onto the model itself.
Following this experiment, students can annotate and colour a cross-section diagram of the rock strata of the Maltese Islands indicating where the Perched Aquifer and the Mean Sea Level Aquifer are found. Provide opportunities for discussion and invite students to describe the diagram and explain how water is stored and tapped from underground. Other students may be provided with structured activities such as matching sentences or simple fill in exercises to complete the task.
The above experiment can also be used to show how wells or boreholes are used to pump water out of the ground as a source of drinking water or for watering crops. This can be achieved by placing a thin tube
demands. They set up and carry out experiments to note the problems of over extraction and pollution. They devise ways by which waste water can be treated and re-utilised. Students find out and report different sources of water in other Mediterranean countries and list the advantages and disadvantages of any one source of water (Level 8)
Students will describe the main sources of water in the Maltese Islands (aquifer, reverse osmosis, sewage treatment plants) and in other Mediterranean countries by tapping water from rivers (dams) and lakes. Students identify the two underground sources of water found locally on a cross-section diagram, namely the Upper and Lower Water Tables. Students explain the advantage of getting water from the aquifer rather than from reverse osmosis plants. (Level 7)
Directorate for Quality and Standards in Education Curriculum Management Department – Geography – 2014
12
attached to a spray nozzle into the gravel. This will simulate pumping water through a borehole. Ask students to describe what happens to the water level in the aquifer as they withdraw more and more water out. Following this food colouring representing pollutants will be poured onto the gravel and discuss how underground water in reality can be polluted. Then the students will report on the results of the experiment.
Teacher projects various images of sewage treatment plants found in various localities of the Maltese Islands. Ask students to list items that are found in waste water (toilet paper, soap, detergents), places in their homes where wastewater is produced (showers, washing machines) and public places where sewage is also produced (schools, hospitals). Teacher projects short video clip showing the process how water is cleaned before discharged back into the sea. In groups students list the steps involved in the process while other students may be encouraged to think of ways how this water could be recycled or re-used for other purposes.
Students will identify possible ways of getting reliable supplies of water in the Maltese Islands. Students will relate in very simple terms how water is extracted from boreholes and wells after that rain infiltrated the rocks and filled them up. They explain simply how reverse osmosis plants are used to change sea water into drinking water. (Level 6)
With the help of images students will identify and describe some possible ways of getting reliable supplies of water for different uses. (Level 5)
Strand 1 and 2
explore with the students the use and misuse of water and devise ways for its proper management and conservation.
Ask the class to compile a list of the various uses of water. Divide the students into groups and ask them to sort the list into categories – home, farm, industry, leisure and others.
Organise the class into four groups. Assign each group a room (e.g. bathroom, kitchen, garage and laundry room, garden) and ask them to come up with ideas of how to save and conserve water in that particular room. Students will write water conservation tips for the room allotted to them. Students can refer to the water conservation game listed in the resources column to help them complete the task.
Have students conduct a survey on how much water they use at home on a weekly basis. Explain how to fill out the survey and how to make tally marks each time an activity takes place. (directions of how to carry out the survey and the audit sheet entitled How much water do you use? are available on the DVD). After the students have completed the survey, discuss the results and ask them to consider what their families could do
Students will identify and explain all the possible domestic, agricultural, industrial and other economic uses of water. They study and quantify their own families’ water use with a focus on ways to reduce water consumption. Students describe potential sources of pollution to our drinking supplies and make suggestions how these problems can be properly managed. (Level 8)
Students will identify water as a universal need by categorising its various uses. They will carry out an investigation of water consumption at home and draw results as well as develop water conservation tips to
Directorate for Quality and Standards in Education Curriculum Management Department – Geography – 2014
13
to reduce the amount of water they use. How much water would that conserve? If everyone in the class followed the practice, how much water would it save in a year? As a supplementary activity have students write an article for the school newsletter describing ways by which people can conserve water and why it is important.
Suggest to the students that now they have learnt a great deal about water and water conservation, they have the responsibility to share their knowledge. One way of doing this is to make a set of posters and put them in places where they will be seen. Each poster would feature the word ‘Water’ and a reminder of some water saving tips. Ask them to suggest appropriate slogans. These might include: Put a stop to the drop; Every drop counts. Divide students into small groups and have each group agree on the slogan they want to illustrate. When posters are finished discuss places to display them other than the classroom. Help students make arrangements to display some of the posters in stores, libraries and other public places.
Provide each group of students with a number of images depicting how ground water can easily become contaminated due to human activity (e.g. landfill site, outflows of sewage, fertilisers, manure, rubbish dumped on valley floor). Let each group discuss the images and write about how the sources of ground water are being contaminated due to such activities. Some students can explore ways to protect ground water from such pollutants.
reduce consumption. Students can list some ways how ground water can become contaminated due to human activity. (Level 7)
Students will identify that water is a vital resource. Students will categorise the different uses of water from a given list according to economic use. They describe a few simple ways of reducing water consumption at home. (Level 6)
Students will, by the use of simple sentences state why we need to reduce water consumption. From a given list students will be able to choose between good and bad use of water. (Level 5)
Directorate for Quality and Standards in Education Curriculum Management Department – Geography – 2014
14
Subject: Geography Form 2 Unit code and title: GEO 8.3 Life in the Sahara Strand 1: The Environment – Physical and Human
Objectives The teacher will:
1. provide maps and resources for the students to identify and locate deserts around the world using latitude and longitude; 2. help students explore the climatic and geomorphic features of the Sahara Desert; 3. encourage students to focus on life in the desert and around oasis;
4. help students explore the economic activities of the Sahara region.
Key Words Points to Note Resources
globe, latitudes and longitudes, Equator, Tropic of Cancer, Tropic of Capricorn, Arctic Circle, Antarctic Circle, North Pole, South Pole, Prime (Greenwich) Meridian, International Date Line, sand dune, rock pedestal, oasis, nomads, oil well, oil rig, pipelines, oil tankers, oil refinery, irrigation scheme
Geography stimulates an interest in and a sense of wonder about places and this can be achieved through an enquiry approach to learning which centres more on pupil activities. Students should be active in the learning process through fieldwork or through resources such as maps, photographs, items from the internet and statistics. The use of group work helps to facilitate the active characteristics of much enquiry work.
The activities presented in this unit require students to fully engage in the active learning process. Such a student-centred approach promotes discovery learning, strengthens students’ motivation, promotes peer communication, reduces disruptive behaviour, builds student-teacher relationships and above all allows students to become responsible participants in shaping their own learning.
Knowing how to use the atlas is an important skill that every geographer should grasp. The use of latitudes and longitudes to locate given places is a tool that students can utilise in relation to the various geographical topics covered.
Knowing about the varied landscapes and features of the desert is important as most students have a simplistic perception of a desert. The desert environment is one which holds both natural and human wonders that geographers should find interesting to explore.
inflatable globes, globes, wall and outline maps of the world, atlases, sand and small pieces of rock to create a miniature desert, a small sized fan to create a sand dune in the miniature desert.
Hyperlinks:
Latitudes and longitudes:
http://www.youtube.com/watch?v=swKBi6hHHMA
http://www.youtube.com/watch?v=TyaMZJ0WdHM
Creating a sand dune http://www.ehow.com/info_7900492_desert-school-projects.html
The Tuareg Culture http://tuaregcultureandnews.blogspot.com/2008/07/who-are-tuareg-people.html
Directorate for Quality and Standards in Education Curriculum Management Department – Geography – 2014
15
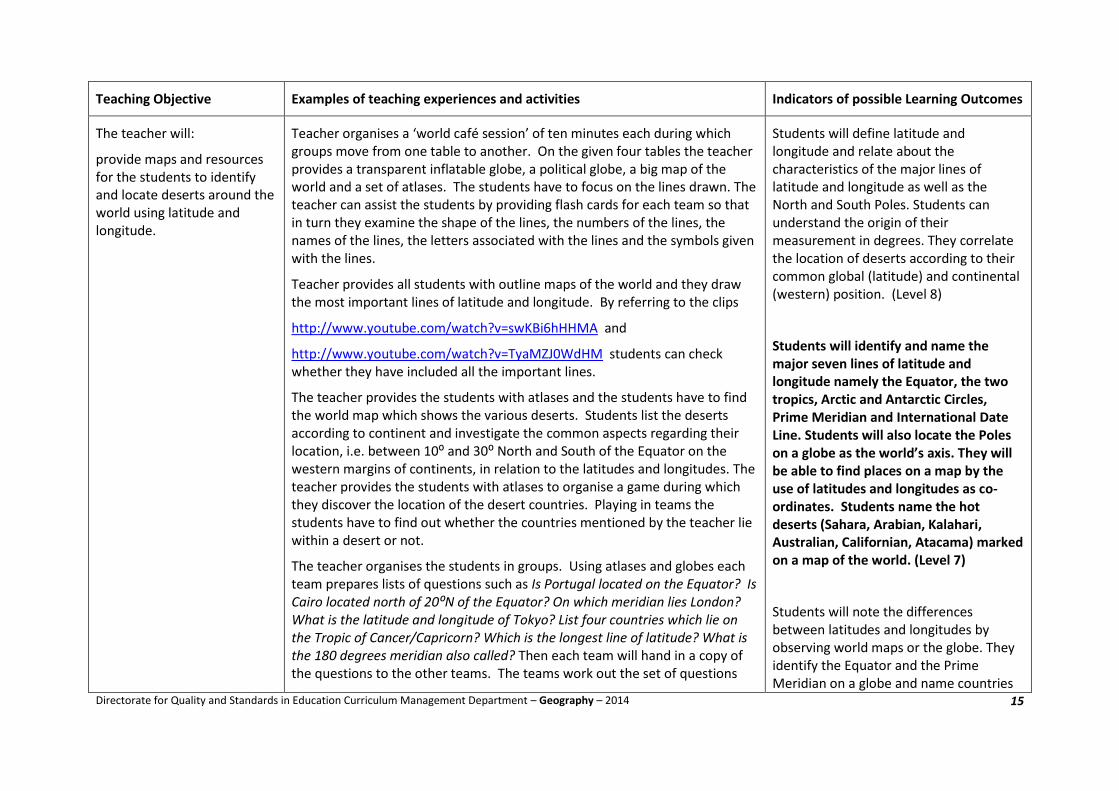
Teaching Objective Examples of teaching experiences and activities Indicators of possible Learning Outcomes
The teacher will:
provide maps and resources for the students to identify and locate deserts around the world using latitude and longitude.
Teacher organises a ‘world café session’ of ten minutes each during which groups move from one table to another. On the given four tables the teacher provides a transparent inflatable globe, a political globe, a big map of the world and a set of atlases. The students have to focus on the lines drawn. The teacher can assist the students by providing flash cards for each team so that in turn they examine the shape of the lines, the numbers of the lines, the names of the lines, the letters associated with the lines and the symbols given with the lines.
Teacher provides all students with outline maps of the world and they draw the most important lines of latitude and longitude. By referring to the clips
http://www.youtube.com/watch?v=swKBi6hHHMA and
http://www.youtube.com/watch?v=TyaMZJ0WdHM students can check whether they have included all the important lines.
The teacher provides the students with atlases and the students have to find the world map which shows the various deserts. Students list the deserts according to continent and investigate the common aspects regarding their location, i.e. between 10⁰ and 30⁰ North and South of the Equator on the western margins of continents, in relation to the latitudes and longitudes. The teacher provides the students with atlases to organise a game during which they discover the location of the desert countries. Playing in teams the students have to find out whether the countries mentioned by the teacher lie within a desert or not.
The teacher organises the students in groups. Using atlases and globes each team prepares lists of questions such as Is Portugal located on the Equator? Is Cairo located north of 20⁰N of the Equator? On which meridian lies London? What is the latitude and longitude of Tokyo? List four countries which lie on the Tropic of Cancer/Capricorn? Which is the longest line of latitude? What is the 180 degrees meridian also called? Then each team will hand in a copy of the questions to the other teams. The teams work out the set of questions
Students will define latitude and longitude and relate about the characteristics of the major lines of latitude and longitude as well as the North and South Poles. Students can understand the origin of their measurement in degrees. They correlate the location of deserts according to their common global (latitude) and continental (western) position. (Level 8)
Students will identify and name the major seven lines of latitude and longitude namely the Equator, the two tropics, Arctic and Antarctic Circles, Prime Meridian and International Date Line. Students will also locate the Poles on a globe as the world’s axis. They will be able to find places on a map by the use of latitudes and longitudes as co-ordinates. Students name the hot deserts (Sahara, Arabian, Kalahari, Australian, Californian, Atacama) marked on a map of the world. (Level 7)
Students will note the differences between latitudes and longitudes by observing world maps or the globe. They identify the Equator and the Prime Meridian on a globe and name countries
Directorate for Quality and Standards in Education Curriculum Management Department – Geography – 2014
16
prepared for them.
As homework activity teacher asks students to keep a record of a number of places mentioned in the news for a week, noting the latitude and longitude of each place.
Teacher provides students with a list of places such as Timbuktu, Nouakchott, Marzuq, Agades, Gabarone and Medina. By the use of Google Earth or an atlas, the students have to fill in a table to provide information on the continent, country, name of desert as well as latitude and longitude for each named location.
that lie on them. They locate the North and South Poles on a globe. Students can also find the Sahara Desert and some countries within it on a map. (Level 6)
Students will identify the Equator on a map or globe and name a few countries that lie in the Northern and Southern Hemisphere. They can locate the Sahara Desert on a map. (Level 5)
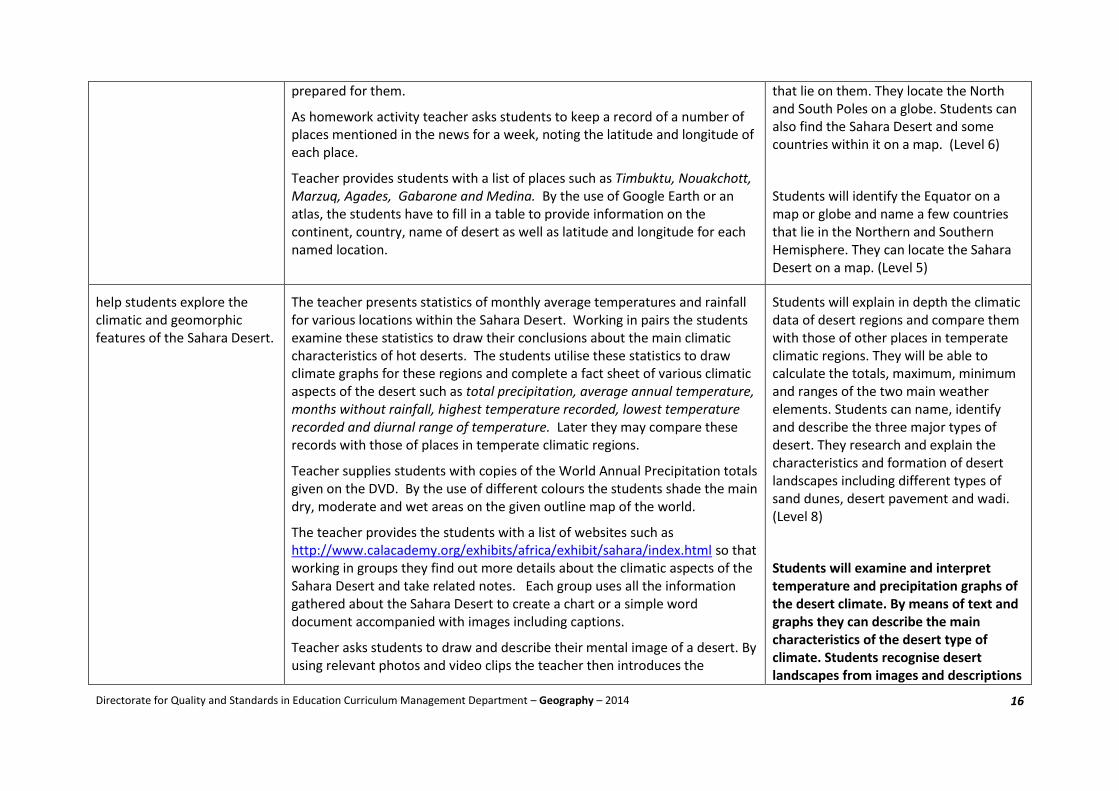
help students explore the climatic and geomorphic features of the Sahara Desert.
The teacher presents statistics of monthly average temperatures and rainfall for various locations within the Sahara Desert. Working in pairs the students examine these statistics to draw their conclusions about the main climatic characteristics of hot deserts. The students utilise these statistics to draw climate graphs for these regions and complete a fact sheet of various climatic aspects of the desert such as total precipitation, average annual temperature, months without rainfall, highest temperature recorded, lowest temperature recorded and diurnal range of temperature. Later they may compare these records with those of places in temperate climatic regions.
Teacher supplies students with copies of the World Annual Precipitation totals given on the DVD. By the use of different colours the students shade the main dry, moderate and wet areas on the given outline map of the world.
The teacher provides the students with a list of websites such as http://www.calacademy.org/exhibits/africa/exhibit/sahara/index.html so that working in groups they find out more details about the climatic aspects of the Sahara Desert and take related notes. Each group uses all the information gathered about the Sahara Desert to create a chart or a simple word document accompanied with images including captions.
Teacher asks students to draw and describe their mental image of a desert. By using relevant photos and video clips the teacher then introduces the
Students will explain in depth the climatic data of desert regions and compare them with those of other places in temperate climatic regions. They will be able to calculate the totals, maximum, minimum and ranges of the two main weather elements. Students can name, identify and describe the three major types of desert. They research and explain the characteristics and formation of desert landscapes including different types of sand dunes, desert pavement and wadi. (Level 8)
Students will examine and interpret temperature and precipitation graphs of the desert climate. By means of text and graphs they can describe the main characteristics of the desert type of climate. Students recognise desert landscapes from images and descriptions
Directorate for Quality and Standards in Education Curriculum Management Department – Geography – 2014
17
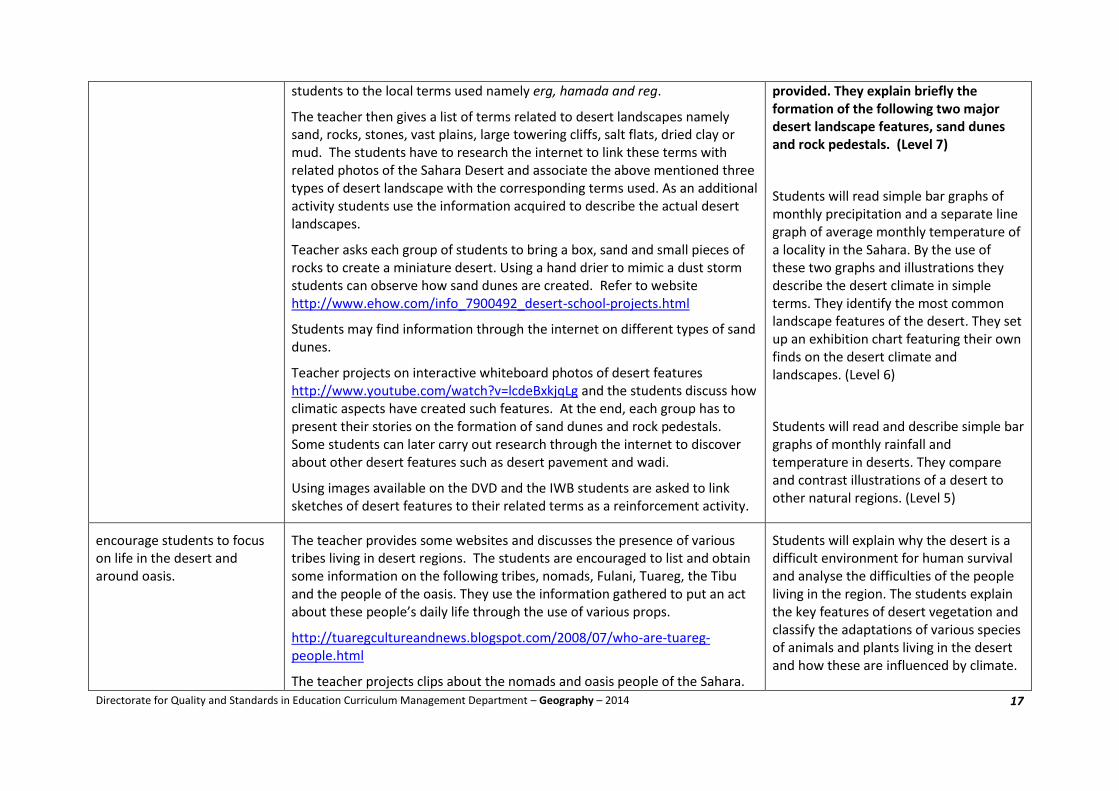
students to the local terms used namely erg, hamada and reg.
The teacher then gives a list of terms related to desert landscapes namely sand, rocks, stones, vast plains, large towering cliffs, salt flats, dried clay or mud. The students have to research the internet to link these terms with related photos of the Sahara Desert and associate the above mentioned three types of desert landscape with the corresponding terms used. As an additional activity students use the information acquired to describe the actual desert landscapes.
Teacher asks each group of students to bring a box, sand and small pieces of rocks to create a miniature desert. Using a hand drier to mimic a dust storm students can observe how sand dunes are created. Refer to website http://www.ehow.com/info_7900492_desert-school-projects.html
Students may find information through the internet on different types of sand dunes.
Teacher projects on interactive whiteboard photos of desert features http://www.youtube.com/watch?v=lcdeBxkjqLg and the students discuss how climatic aspects have created such features. At the end, each group has to present their stories on the formation of sand dunes and rock pedestals. Some students can later carry out research through the internet to discover about other desert features such as desert pavement and wadi.
Using images available on the DVD and the IWB students are asked to link sketches of desert features to their related terms as a reinforcement activity.
provided. They explain briefly the formation of the following two major desert landscape features, sand dunes and rock pedestals. (Level 7)
Students will read simple bar graphs of monthly precipitation and a separate line graph of average monthly temperature of a locality in the Sahara. By the use of these two graphs and illustrations they describe the desert climate in simple terms. They identify the most common landscape features of the desert. They set up an exhibition chart featuring their own finds on the desert climate and landscapes. (Level 6)
Students will read and describe simple bar graphs of monthly rainfall and temperature in deserts. They compare and contrast illustrations of a desert to other natural regions. (Level 5)
encourage students to focus on life in the desert and around oasis.
The teacher provides some websites and discusses the presence of various tribes living in desert regions. The students are encouraged to list and obtain some information on the following tribes, nomads, Fulani, Tuareg, the Tibu and the people of the oasis. They use the information gathered to put an act about these people’s daily life through the use of various props.
http://tuaregcultureandnews.blogspot.com/2008/07/who-are-tuareg-people.html
The teacher projects clips about the nomads and oasis people of the Sahara.
Students will explain why the desert is a difficult environment for human survival and analyse the difficulties of the people living in the region. The students explain the key features of desert vegetation and classify the adaptations of various species of animals and plants living in the desert and how these are influenced by climate.
Directorate for Quality and Standards in Education Curriculum Management Department – Geography – 2014
18
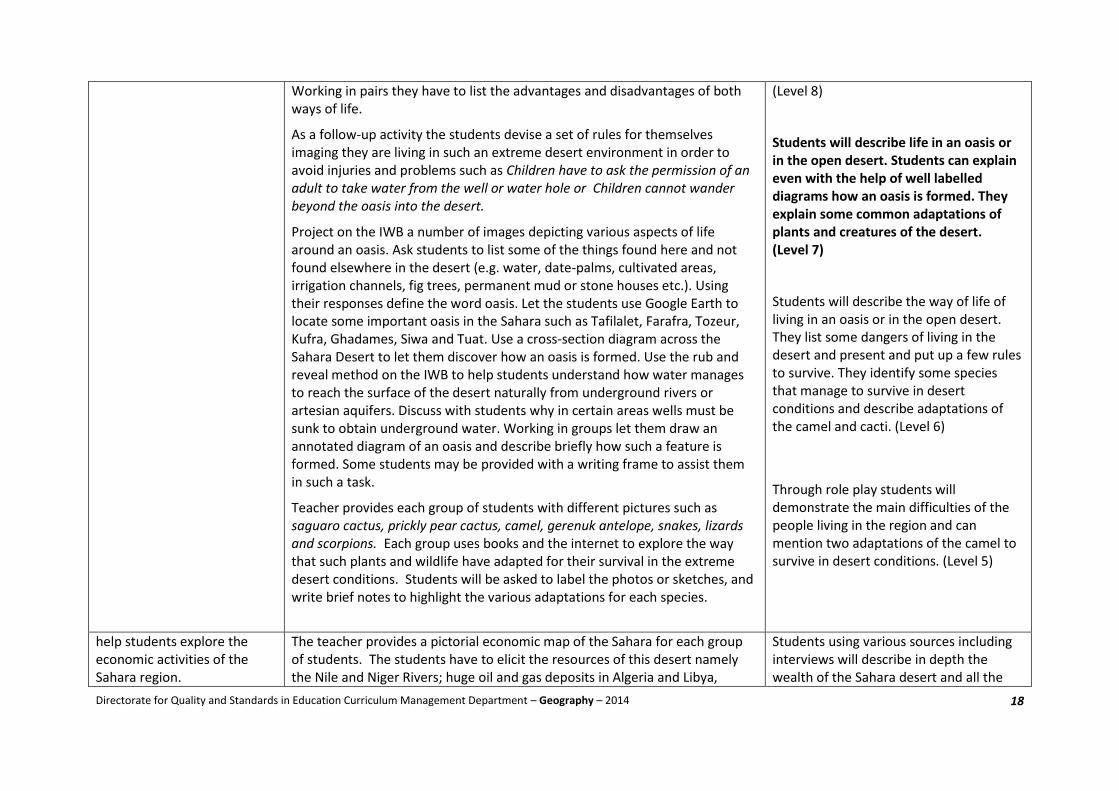
Working in pairs they have to list the advantages and disadvantages of both ways of life.
As a follow-up activity the students devise a set of rules for themselves imaging they are living in such an extreme desert environment in order to avoid injuries and problems such as Children have to ask the permission of an adult to take water from the well or water hole or Children cannot wander beyond the oasis into the desert.
Project on the IWB a number of images depicting various aspects of life around an oasis. Ask students to list some of the things found here and not found elsewhere in the desert (e.g. water, date-palms, cultivated areas, irrigation channels, fig trees, permanent mud or stone houses etc.). Using their responses define the word oasis. Let the students use Google Earth to locate some important oasis in the Sahara such as Tafilalet, Farafra, Tozeur, Kufra, Ghadames, Siwa and Tuat. Use a cross-section diagram across the Sahara Desert to let them discover how an oasis is formed. Use the rub and reveal method on the IWB to help students understand how water manages to reach the surface of the desert naturally from underground rivers or artesian aquifers. Discuss with students why in certain areas wells must be sunk to obtain underground water. Working in groups let them draw an annotated diagram of an oasis and describe briefly how such a feature is formed. Some students may be provided with a writing frame to assist them in such a task.
Teacher provides each group of students with different pictures such as saguaro cactus, prickly pear cactus, camel, gerenuk antelope, snakes, lizards and scorpions. Each group uses books and the internet to explore the way that such plants and wildlife have adapted for their survival in the extreme desert conditions. Students will be asked to label the photos or sketches, and write brief notes to highlight the various adaptations for each species.
(Level 8)
Students will describe life in an oasis or in the open desert. Students can explain even with the help of well labelled diagrams how an oasis is formed. They explain some common adaptations of plants and creatures of the desert. (Level 7)
Students will describe the way of life of living in an oasis or in the open desert. They list some dangers of living in the desert and present and put up a few rules to survive. They identify some species that manage to survive in desert conditions and describe adaptations of the camel and cacti. (Level 6)
Through role play students will demonstrate the main difficulties of the people living in the region and can mention two adaptations of the camel to survive in desert conditions. (Level 5)
help students explore the economic activities of the Sahara region.
The teacher provides a pictorial economic map of the Sahara for each group of students. The students have to elicit the resources of this desert namely the Nile and Niger Rivers; huge oil and gas deposits in Algeria and Libya,
Students using various sources including interviews will describe in depth the wealth of the Sahara desert and all the
Directorate for Quality and Standards in Education Curriculum Management Department – Geography – 2014
19
underground deposits of water, iron ore deposits of Fort Gouraud area of Mauritania, salt at Taoudenni Mali and at Bilma Niger. Some students can find more information about the processing and use of these resources of the desert from related websites. The teacher gives statistics about the number of Maltese people who work with international companies extracting resources discovered in the desert. The teacher may invite any such Maltese worker to class in order to relate about the processes involved in his/her work. Students will ask about their queries and write a short report for a newspaper article. The teacher projects a video clip or images of an oil well in the Sahara Desert. Students will be asked to take notes about the processes of extraction, transportation and refining of petroleum. Students can then research through the internet to discover the various by-products of oil and their uses. The teacher projects various clips about the desert related to tourist attractions such as jeep safari in the desert, camel market, visits to historical/archaeological places (e.g. El Djem, Siwa oasis), traditional dances by the Tuareg. Then each group has to devise a tourist programme related to one of the countries lying within the Sahara Desert. Students can use books or the internet to find more information about the various attractions of the country chosen. The students will write the itinerary, show it on a map and justify their choices. They can then add images of main attractions that are going to be included. Students will then present the tour devised to the rest of the class. The teacher supplies the groups of students with newspaper articles and headings and images on the new agricultural projects to turn parts of the Sahara green. Alternatively the teacher shows satellite imagery and pictures of irrigation schemes in the Sahara through Google Earth. Students imagine themselves to be water services authorities and issue a press release on this project. Students can elicit the ways by which this project is being carried out in point form from the given resources.
detailed processes and difficulties involved in bringing them to economic use. Students list some economic developments taking place in the desert regions. They can list tourist attractions and devise itineraries for visiting them. (Level 8) Students will list the different types of resources found in the Sahara Desert. They describe the processes involved in the extraction, transportation and refining of petroleum. They report about a scheme for the harnessing of underground water. Students list some desert places that can attract tourists to the Sahara desert. (Level 7) Students will list the main resources of the Sahara desert and the difficulties of the people working in the desert. Students list the main tourist attractions of the Sahara desert. (Level 6) Students will label a simple diagram illustrating the extraction of oil and water in desert areas. Students list a few tourist attractions of the Sahara desert. (Level 5)
Directorate for Quality and Standards in Education – Curriculum Management Department - 2014
Locational Knowledge in Geography
Geography deals with spatial distribution and places and therefore locational knowledge of the most
important and relevant places by means of maps is a vital tool and means of reaching most learning
outcomes. Students will be given opportunities to locate places and environments using a range of
resources including maps, globes, atlases, digital atlases, interactive games and internet satellite images.
In particular students can set relevant international events within a geographical framework and
understand spatial relationships. The table below includes a list of places whose map location should be
known by the students by the end of each year. These should be taught as an integral part of each
related unit. Maps and wall maps will still be used throughout the year for consolidation.
Locational Knowledge - Form 2
Mediterranean Places and Environments
Fold Mountains Alps, Atlas, Apennines, Pyrenees, Dinaric, Pindus, Taurus
Volcanoes Etna , Vesuvius, Stromboli, Santorini
The World Places and Environments
Main lines of Latitude and Longitude Equator, Prime Meridian, Tropic of Cancer, Tropic of Capricorn, Arctic Circle, Antarctic Circle, International Date Line
Poles North Pole, South Pole
Deserts Sahara, Arabian, Kalahari, Australian, Californian, Atacama

Form 2 Annual Examination Paper
The Form 2 Annual examination for Geography will consist of one paper of 1 hour 30
minutes duration. There will be two versions of the paper, one in English and one in
Maltese. Schools are to indicate the number of papers required in either language.
The examination paper will carry a maximum of 100 marks. Questions will be set on all the
three units of the Form 2 curriculum and graded to cater for students working in levels 5, 6,
7 and 8. The range of marks allotted for each level is indicated in the table below.
Level 8 5% to 15%
Level 7 60% to 75%
Level 6 6 to 15%
Level 5 5 to 10%
Questions will be structured with gradients of difficulty including objective questions (e.g.
completion, true/false, multiple choice questions, cloze questions) resource based questions
involving data response and problem solving as well as free response writing. The questions
set will assess the students’ understanding and application of the main geographical
concepts and knowledge, the acquisition of basic geographical skills and the development of
attitudes and values in both strands of learning. Candidates will be required to answer all
questions.
Level 8 questions will not be content-based but will test only higher order cognitive skills
such as reasoning and inference. Very often Level 8 questions will consist of the final
component of a set of structured questions rather than one stand-alone question.
The use of non-programmable calculators, geometrical instruments, pencil colours, piece of
string and blank sheet of paper for calculating straight and curved distances on Topographic
Maps are permitted during the examination.
Teachers are encouraged to follow this format in the setting of their school based half yearly
examination, however the above mentioned level weightings are not mandatory.

Il-Ġeografija – It-Tieni Sena tas-Sekondarja – L5 sa 8 Paġna 1 minn 12
ID-DIRETTORAT GĦAL KWALITÀ U STANDARDS FL-EDUKAZZJONI
Id-Dipartiment tat-Tmexxija tal-Kurrikulu
It-Taqsima tal-Assessjar Edukattiv
L-Eżamijiet Annwali tal-Iskejjel Sekondarji
IT-TIENI SENA IL-ĠEOGRAFIJA IL-ĦIN: Siegħa u nofs L-Isem: _____________________________________ Il-Klassi: _______________ Wieġeb il-mistoqsijiet kollha u ikteb ċar. Din hija lista ta’ kliem ġeografiku użat f’din il-karta tal-eżami u t-tifsira tiegħu bl-Ingliż.
Qalba interna Inner core
Qalba esterna Outer core
Mantell Mantle
Qoxra tad-dinja Crust
Kurrenti ċirkolari Convection currents
Muntanji mmewġa Fold mountains
Sismografu Seismograph
Epiċentru Epicentre
Ilma tal-pjan Water table
Impjant tar-reverse osmosis Reverse osmosis plant
Latitudni Latitude
Lonġitudni Longitude
Meridjan prinċipali Prime Meridian
Ċirku Artiku Arctic Circle
Tropiku ta’ Kaprikornu Tropic of Capricorn
Għaram ramel Sand dune
Pedestall tal-blat Rock pedestal
Taħriġ 1 a) Fl-ispazju t’hawn taħt, pinġi disinn li juri l-istruttura tad-dinja minn ġewwa u llejbiljah b’dan
il-kliem:
qalba ta’ ġewwa qalba ta’ barra mantell qoxra tad-dinja kurrenti ċirkolari
(5)
IL-LIVELLI
5-6-7-8
Il-Ġeografija – It-Tieni Sena tas-Sekondarja – L5 sa 8 Paġna 2 minn 12
b) Spjega kif dak li jiġri taħt il-qoxra tad-dinja jikkawża terremoti u vulkani.
____________________________________________________________________________
____________________________________________________________________________
____________________________________________________________________________
__________________________________________________________________________ (3)
c) Fuq il-mappa tal-Mediterran (Disinn 1) jidhru żewġ vulkani bl-ittri E u V. Ikteb l-isem ta’
dawn iż-żewġ vulkani fit-tabella t’hawn taħt.
Vulkan E
Vulkan V
(2)
d) Fuq il-mappa tal-Mediterran (Disinn 1) jidhru numru ta’ muntanji mmewġa mmarkati A u P.
Ikteb l-isem ta’ dawn il-muntanji fit-tabella t’hawn taħt.
Muntanji A
Muntanji P
(2)
Il-Ġeografija – It-Tieni Sena tas-Sekondarja – L5 sa 8 Paġna 3 minn 12
e) Disinn 1 u 2 juru vulkan attiv u vulkan rieqed.
Disinn 2 Disinn 3
(i) Liema disinn juri vulkan attiv ? ______________________________ (1)
(ii) Liema disinn juri vulkan rieqed? ______________________________ (1)
(iii) Għaliex taħseb hekk?
____________________________________________________________________________
____________________________________________________________________________
____________________________________________________________________________
__________________________________________________________________________ (3)
f) Bl-għajnuna ta’ disinn 4, spjega żewġ vantaġġi li l-vulkani għandhom għan-nies li jgħixu
madwarhom.
Disinn 4
____________________________________________________________________________
____________________________________________________________________________
____________________________________________________________________________
__________________________________________________________________________ (4)
Il-Ġeografija – It-Tieni Sena tas-Sekondarja – L5 sa 8 Paġna 4 minn 12
g) Ikteb żewġ perikli li l-vulkani jistgħu joħolqu għan-nies li jgħixu madwarhom.
____________________________________________________________________________
____________________________________________________________________________
__________________________________________________________________________ (4)
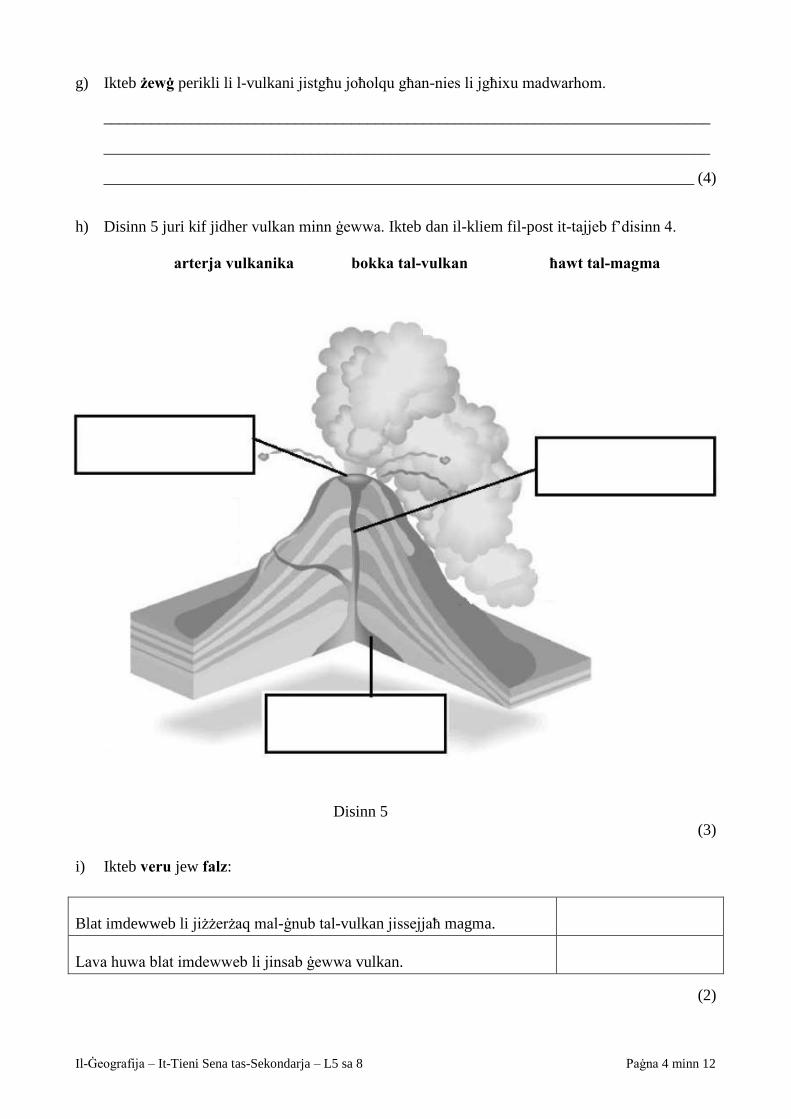
h) Disinn 5 juri kif jidher vulkan minn ġewwa. Ikteb dan il-kliem fil-post it-tajjeb f’disinn 4.
arterja vulkanika bokka tal-vulkan ħawt tal-magma
Disinn 5
(3)
i) Ikteb veru jew falz:
Blat imdewweb li jiżżerżaq mal-ġnub tal-vulkan jissejjaħ magma.
Lava huwa blat imdewweb li jinsab ġewwa vulkan.
(2)
Il-Ġeografija – It-Tieni Sena tas-Sekondarja – L5 sa 8 Paġna 5 minn 12
j) Ikteb kull kelma t’hawn taħt ħdejn it-tifsira t-tajba:
sismografu Richter epiċentru tsunami sħaba piroklastika
Kelma Tifsira
Sħaba ta’ rmied u gassijiet jaħarqu li joħorġu minn
vulkan.
L-istrument li jkejjel is-saħħa ta’ terremot.
Is-saħħa ta’ terremot titkejjel fuq din l-iskala.
Il-post fuq l-art minn fejn tinfirex mewġa sismika.
Mewġa kbira kawża ta’ terremot f’qiegħ il-baħar.
(5)
Taħriġ 2
a) F’Malta nsibu eżempji ta’ tliet użi differenti tal-ilma – użu domestiku, użu agrikolu u użu
industrijali. Agħti eżempju ta’ kull wieħed minn dawn l-użi.
Użu domestiku: ______________________________________________________________
Użu agrikolu: ________________________________________________________________
Użu industrijali: ______________________________________________________________
(6)
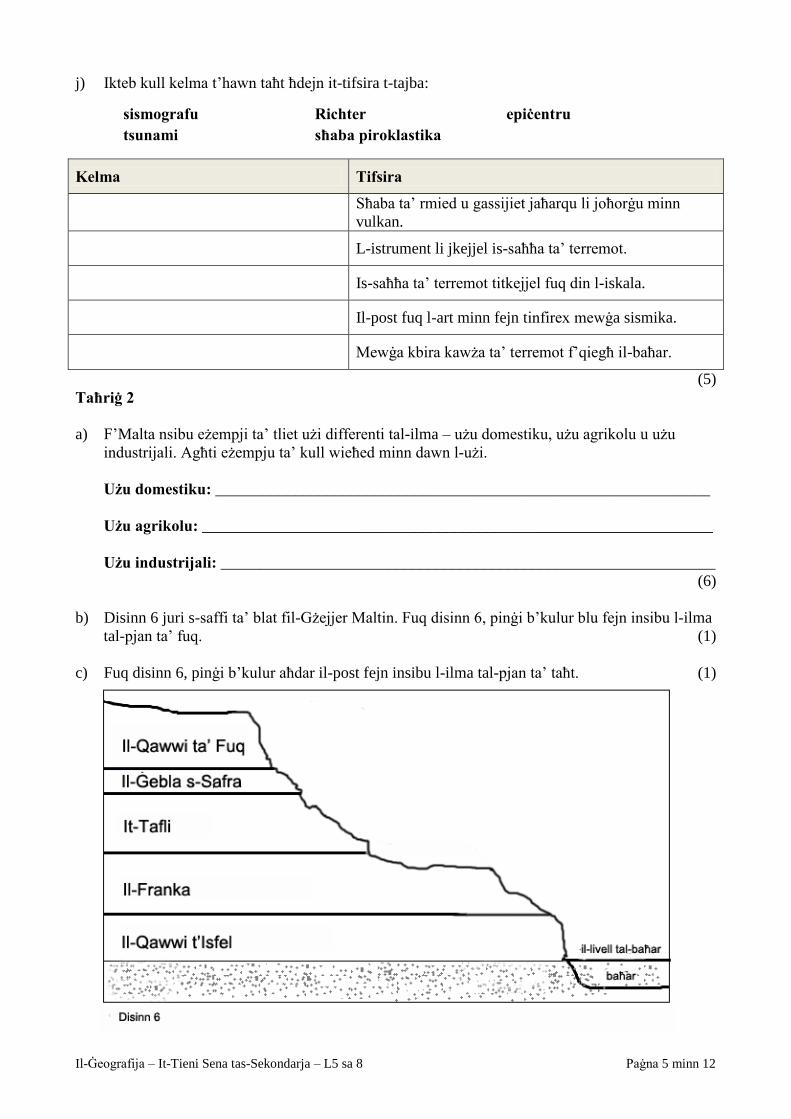
b) Disinn 6 juri s-saffi ta’ blat fil-Gżejjer Maltin. Fuq disinn 6, pinġi b’kulur blu fejn insibu l-ilma
tal-pjan ta’ fuq. (1)
c) Fuq disinn 6, pinġi b’kulur aħdar il-post fejn insibu l-ilma tal-pjan ta’ taħt. (1)
Il-Ġeografija – It-Tieni Sena tas-Sekondarja – L5 sa 8 Paġna 6 minn 12
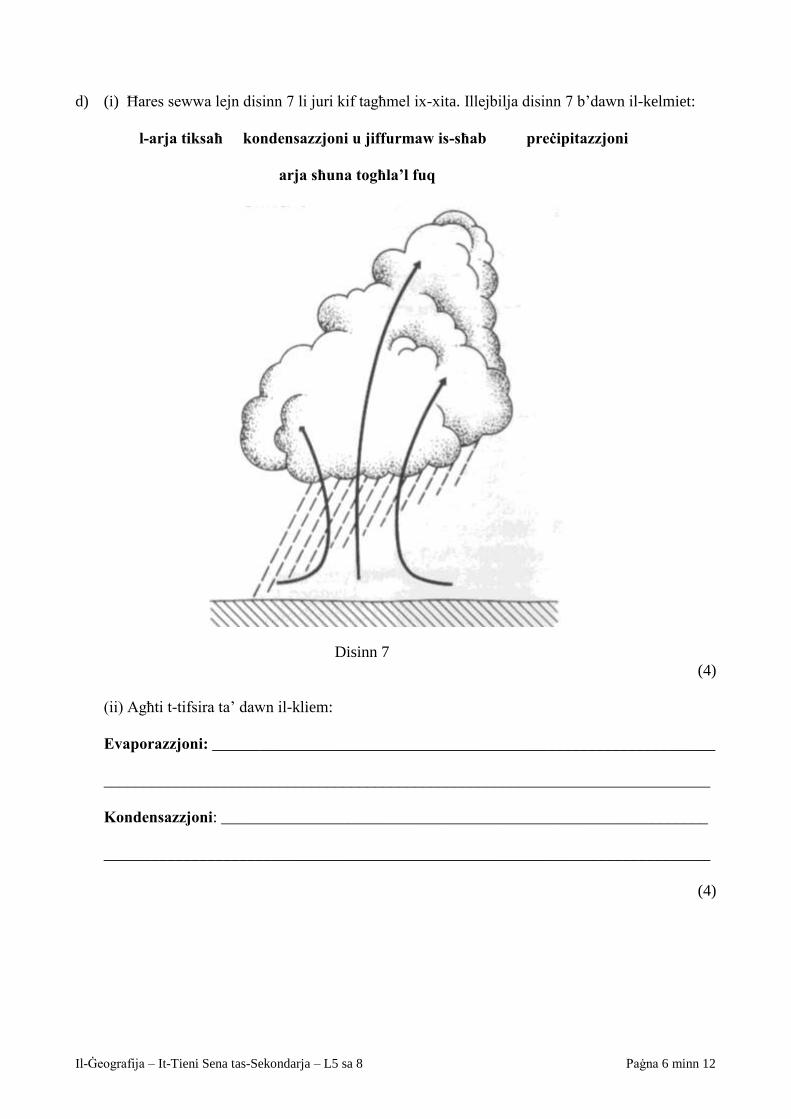
d) (i) Ħares sewwa lejn disinn 7 li juri kif tagħmel ix-xita. Illejbilja disinn 7 b’dawn il-kelmiet:
l-arja tiksaħ kondensazzjoni u jiffurmaw is-sħab preċipitazzjoni arja sħuna togħla’l fuq
Disinn 7
(4)
(ii) Agħti t-tifsira ta’ dawn il-kliem:
Evaporazzjoni: _______________________________________________________________
____________________________________________________________________________
Kondensazzjoni: _____________________________________________________________
____________________________________________________________________________
(4)
Il-Ġeografija – It-Tieni Sena tas-Sekondarja – L5 sa 8 Paġna 7 minn 12
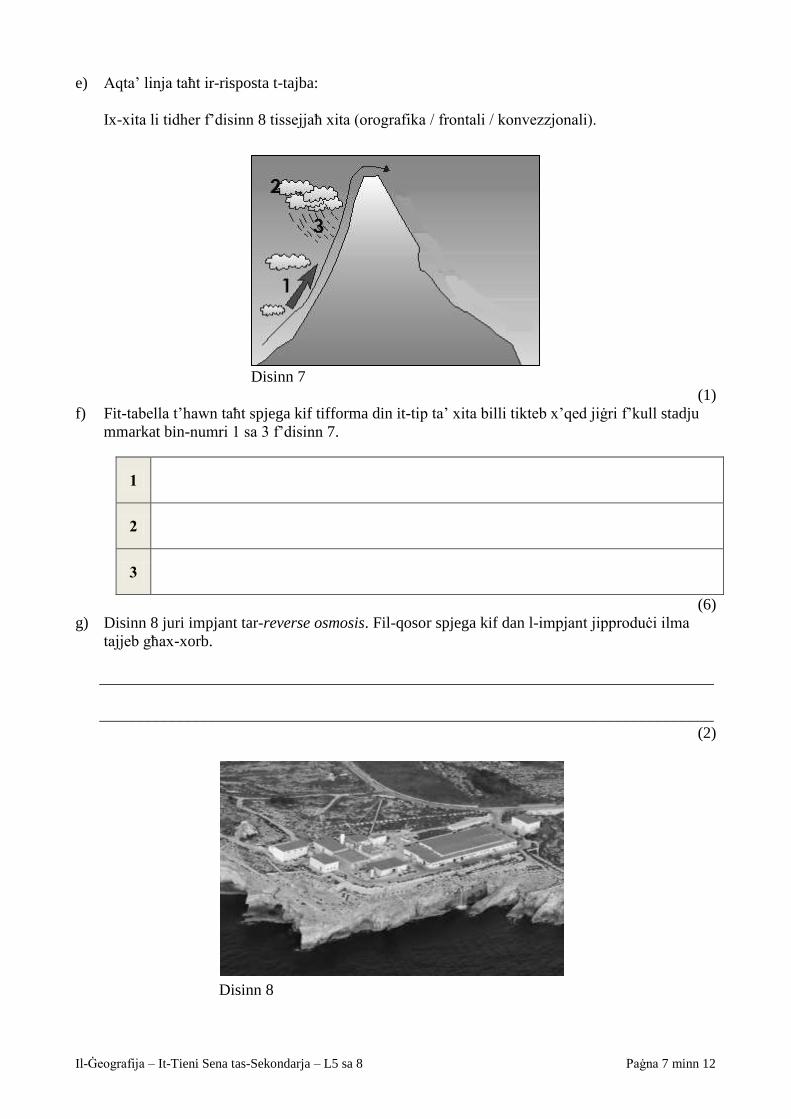
e) Aqta’ linja taħt ir-risposta t-tajba:
Ix-xita li tidher f’disinn 8 tissejjaħ xita (orografika / frontali / konvezzjonali).
Disinn 7
(1)
f) Fit-tabella t’hawn taħt spjega kif tifforma din it-tip ta’ xita billi tikteb x’qed jiġri f’kull stadju
mmarkat bin-numri 1 sa 3 f’disinn 7.
1
2
3
(6)
g) Disinn 8 juri impjant tar-reverse osmosis. Fil-qosor spjega kif dan l-impjant jipproduċi ilma
tajjeb għax-xorb.
_____________________________________________________________________________
_____________________________________________________________________________
(2)
Disinn 8
Il-Ġeografija – It-Tieni Sena tas-Sekondarja – L5 sa 8 Paġna 8 minn 12
h) Għalfejn fil-gżejjer Maltin jaqblilna li nġibu l-ilma mill-ħażna tal-ilma tal-pjan milli
mill-impjanti tar-reverse osmosis.
____________________________________________________________________________
____________________________________________________________________________
____________________________________________________________________________
(2)
i) F’Malta l-ilma huwa riżorsa skarsa. Semmi tliet modi kif inti tista’ tnaqqas il-konsum tal-ilma
fid-dar.
____________________________________________________________________________
____________________________________________________________________________
____________________________________________________________________________
____________________________________________________________________________
____________________________________________________________________________
__________________________________________________________________________ (6)
j) Semmi żewġ modi kif il-ħażna tal-ilma tal-pjan tista’ titniġġes u ma tibqax tajba għax-xorb.
____________________________________________________________________________
____________________________________________________________________________
____________________________________________________________________________
(2)
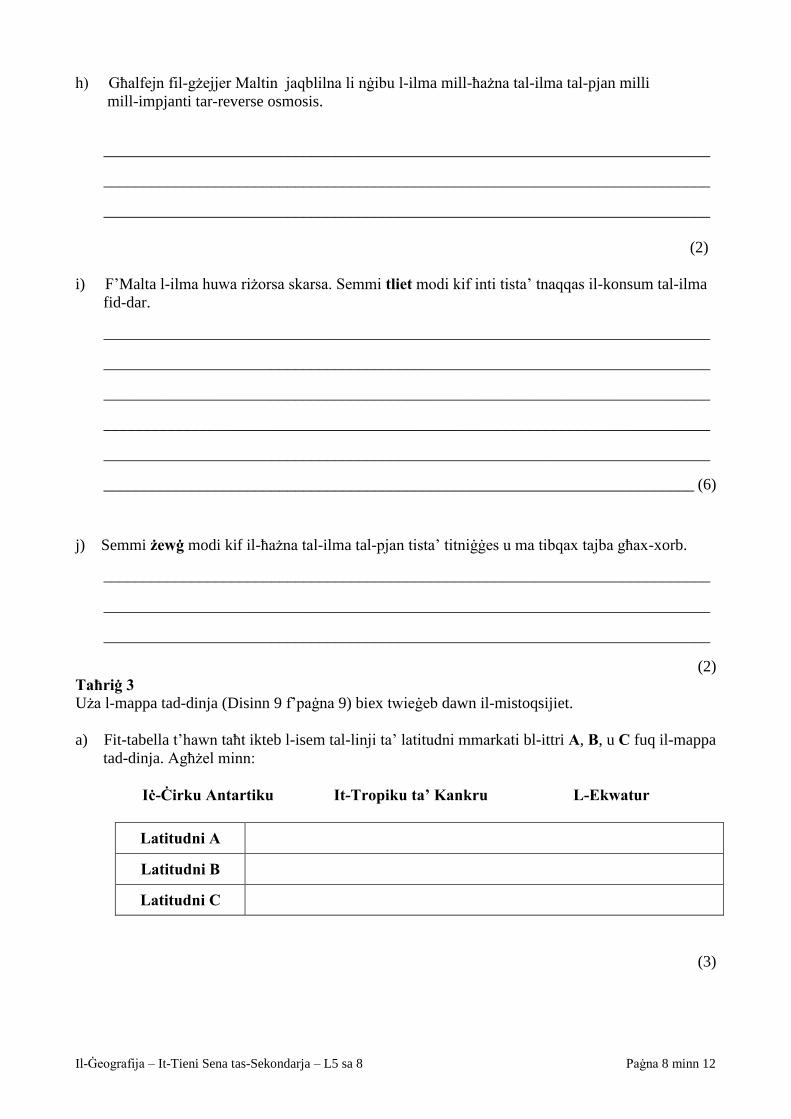
Taħriġ 3 Uża l-mappa tad-dinja (Disinn 9 f’paġna 9) biex twieġeb dawn il-mistoqsijiet.
a) Fit-tabella t’hawn taħt ikteb l-isem tal-linji ta’ latitudni mmarkati bl-ittri A, B, u C fuq il-mappa
tad-dinja. Agħżel minn:
Iċ-Ċirku Antartiku It-Tropiku ta’ Kankru L-Ekwatur
Latitudni A
Latitudni B
Latitudni C
(3)
Il-Ġeografija – It-Tieni Sena tas-Sekondarja – L5 sa 8 Paġna 9 minn 12
b) Fuq il-mappa tad-dinja jidhru żewġ linji ta’ lonġitudni mmarkati bl-ittri X u Y. Fit-tabella
t’hawn taħt ikteb l-ittra li turi l-Meridjan Prinċipali.
Meridjan Prinċipali
(1)
c) Fit-tabella t’hawn taħt ikteb l-isem tad-deżert immarkat bl-ittra D fuq il-mappa tad-dinja.
Agħżel minn:
Id-Deżert Awstraljan Id-Deżert Atakama Id-Deżert tas-Saħara
Deżert D
(1)
Disinn 9: Mappa tad-dinja
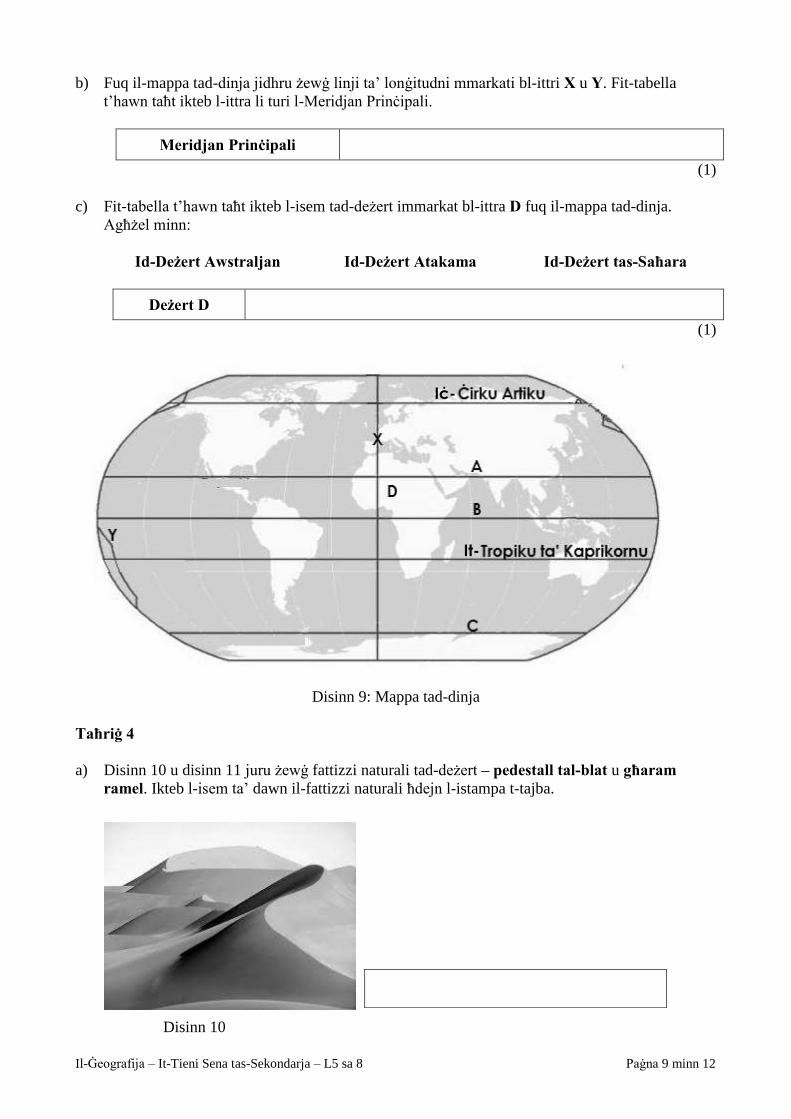
Taħriġ 4
a) Disinn 10 u disinn 11 juru żewġ fattizzi naturali tad-deżert – pedestall tal-blat u għaram ramel. Ikteb l-isem ta’ dawn il-fattizzi naturali ħdejn l-istampa t-tajba.
Disinn 10
Iċ-
It-
Il-Ġeografija – It-Tieni Sena tas-Sekondarja – L5 sa 8 Paġna 10 minn 12
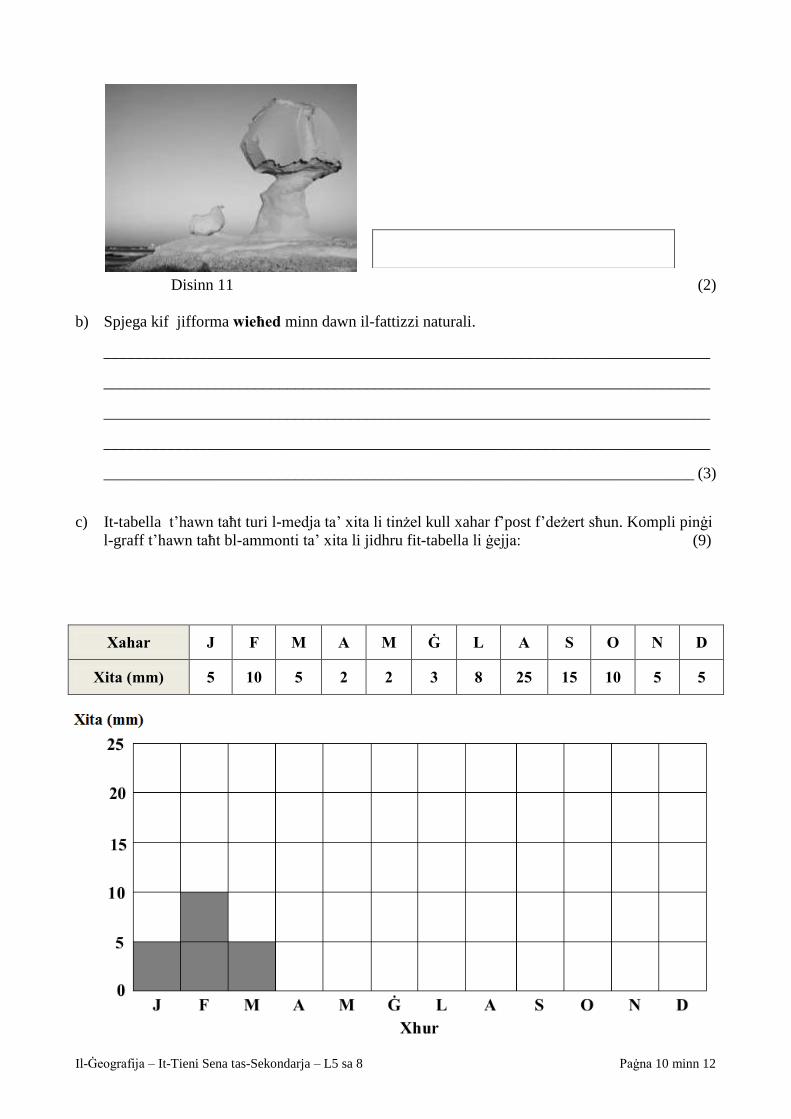
Disinn 11 (2)
b) Spjega kif jifforma wieħed minn dawn il-fattizzi naturali.
____________________________________________________________________________
____________________________________________________________________________
____________________________________________________________________________
____________________________________________________________________________
__________________________________________________________________________ (3)
c) It-tabella t’hawn taħt turi l-medja ta’ xita li tinżel kull xahar f’post f’deżert sħun. Kompli pinġi
l-graff t’hawn taħt bl-ammonti ta’ xita li jidhru fit-tabella li ġejja: (9)
Xahar J F M A M Ġ L A S O N D
Xita (mm) 5 10 5 2 2 3 8 25 15 10 5 5
Il-Ġeografija – It-Tieni Sena tas-Sekondarja – L5 sa 8 Paġna 11 minn 12
d) Ikteb żewġ sentenzi biex tiddeskrivi l-klima ta’ deżert sħun.
____________________________________________________________________________
____________________________________________________________________________
__________________________________________________________________________ (3)
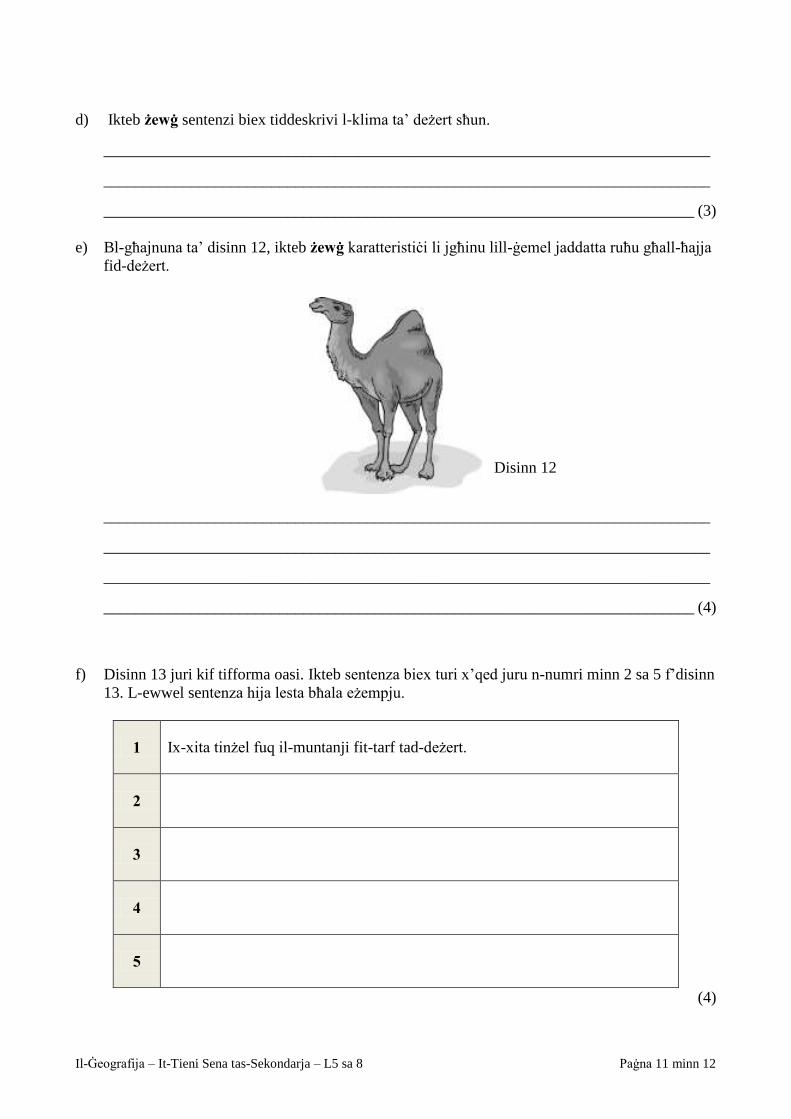
e) Bl-għajnuna ta’ disinn 12, ikteb żewġ karatteristiċi li jgħinu lill-ġemel jaddatta ruħu għall-ħajja
fid-deżert.
Disinn 12
____________________________________________________________________________
____________________________________________________________________________
____________________________________________________________________________
__________________________________________________________________________ (4)
f) Disinn 13 juri kif tifforma oasi. Ikteb sentenza biex turi x’qed juru n-numri minn 2 sa 5 f’disinn
13. L-ewwel sentenza hija lesta bħala eżempju.
1 Ix-xita tinżel fuq il-muntanji fit-tarf tad-deżert.
2
3
4
5
(4)
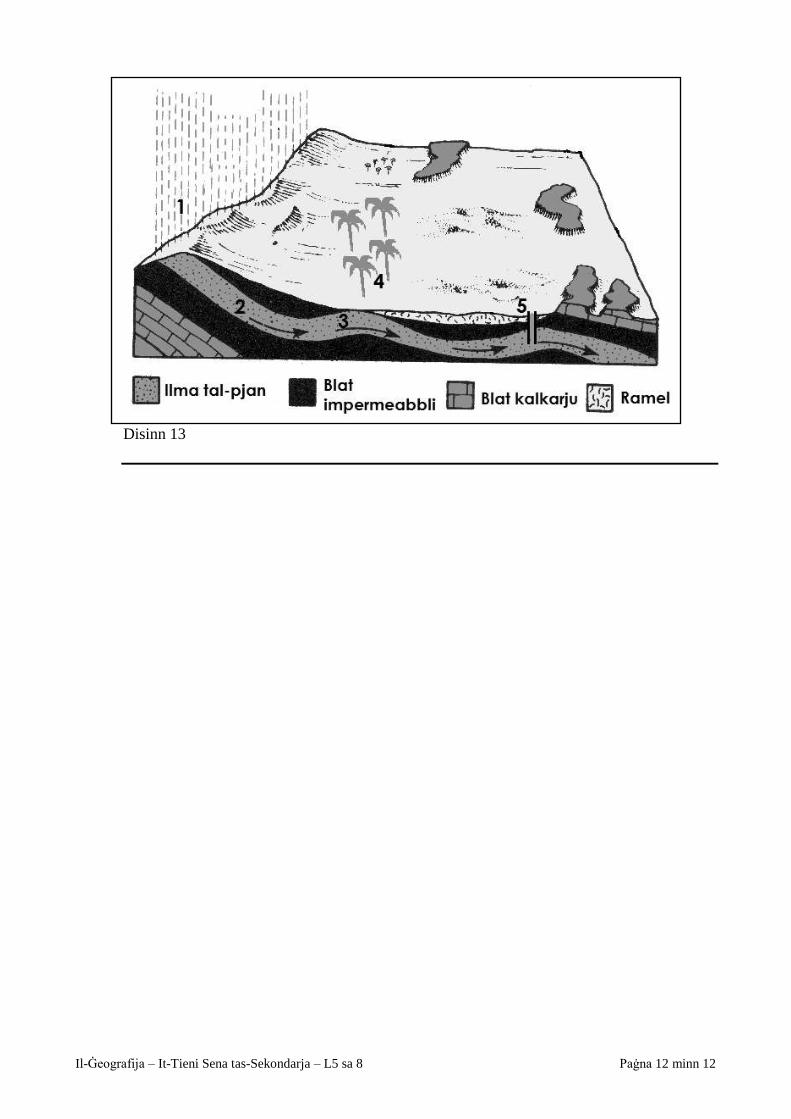
Il-Ġeografija – It-Tieni Sena tas-Sekondarja – L5 sa 8 Paġna 12 minn 12
Disinn 13
Geography – Form 2 Secondary – L5 to 8 Page 1 of 11
DIRECTORATE FOR QUALITY AND STANDARDS IN EDUCATION Department for Curriculum Management Educational Assessment Unit Annual Examinations for Secondary Schools FORM 2 GEOGRAPHY TIME: 1h 30min
Name: _____________________________________ Class: _______________
Answer all questions in the space provided.
Question 1
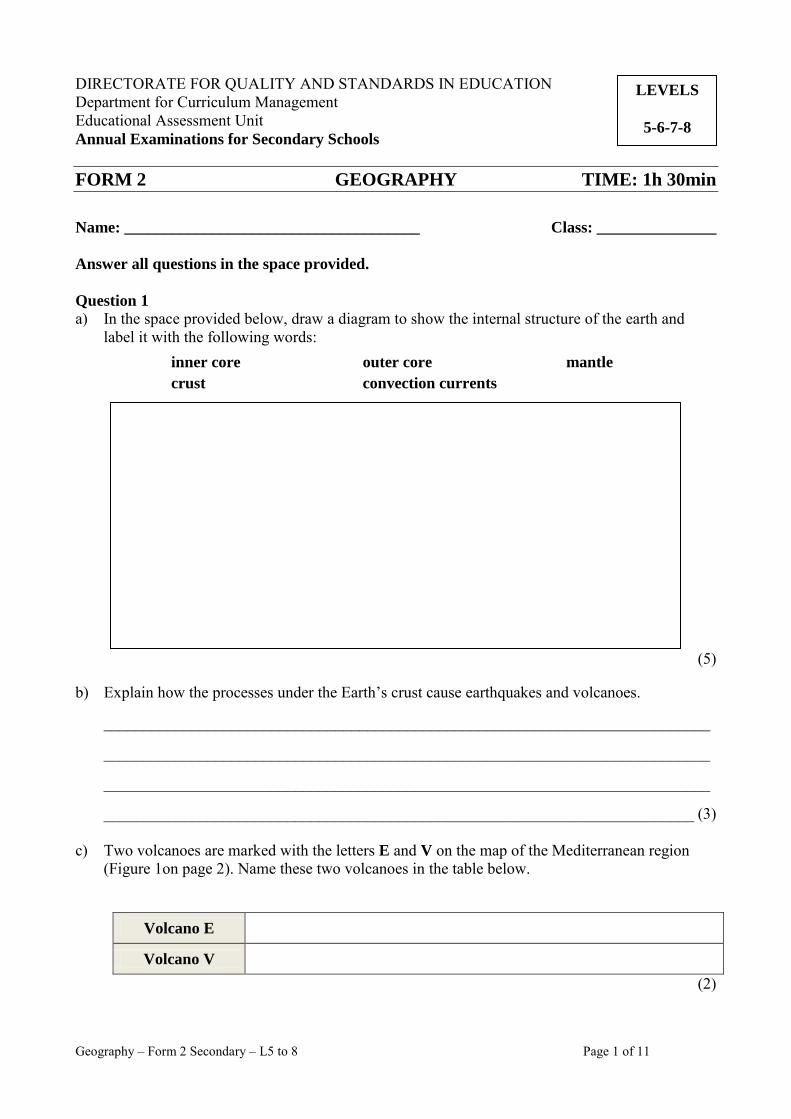
a) In the space provided below, draw a diagram to show the internal structure of the earth and label it with the following words:
inner core outer core mantle
crust convection currents
(5) b) Explain how the processes under the Earth’s crust cause earthquakes and volcanoes.
____________________________________________________________________________
____________________________________________________________________________
____________________________________________________________________________
__________________________________________________________________________ (3)
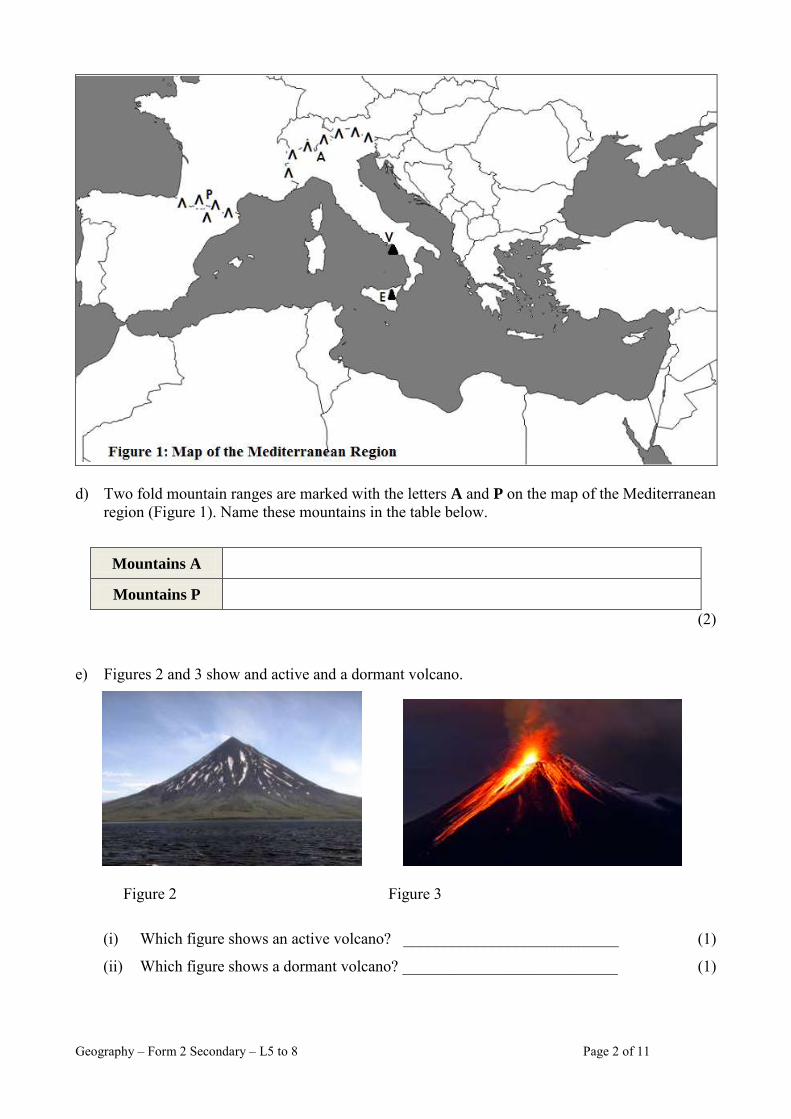
c) Two volcanoes are marked with the letters E and V on the map of the Mediterranean region (Figure 1on page 2). Name these two volcanoes in the table below.
Volcano E
Volcano V (2)
LEVELS
5-6-7-8
Geography – Form 2 Secondary – L5 to 8 Page 2 of 11
d) Two fold mountain ranges are marked with the letters A and P on the map of the Mediterranean
region (Figure 1). Name these mountains in the table below.
Mountains A
Mountains P (2)
e) Figures 2 and 3 show and active and a dormant volcano.
Figure 2 Figure 3
(i) Which figure shows an active volcano? ___________________________ (1)
(ii) Which figure shows a dormant volcano? ___________________________ (1)
Geography – Form 2 Secondary – L5 to 8 Page 3 of 11
(iii) Why do you think so?
____________________________________________________________________________
____________________________________________________________________________
_________________________________________________________________________ (3)
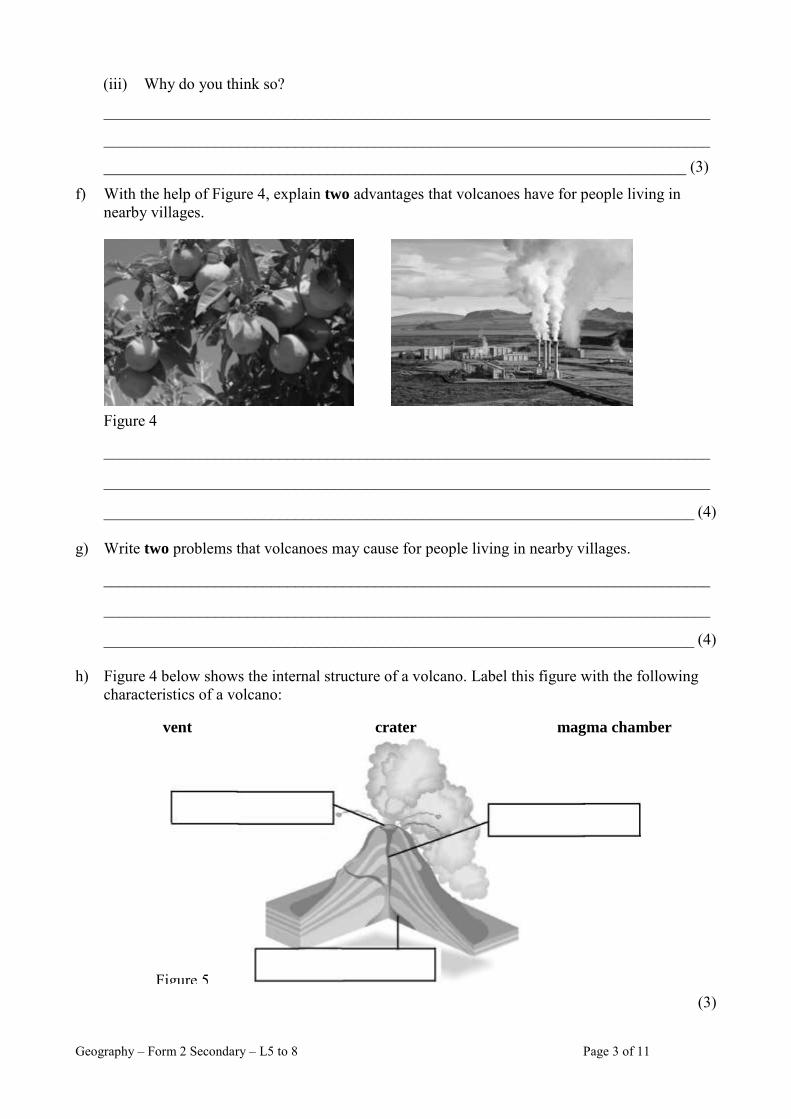
f) With the help of Figure 4, explain two advantages that volcanoes have for people living in nearby villages.
Figure 4
____________________________________________________________________________
____________________________________________________________________________
__________________________________________________________________________ (4) g) Write two problems that volcanoes may cause for people living in nearby villages.
____________________________________________________________________________
____________________________________________________________________________
__________________________________________________________________________ (4) h) Figure 4 below shows the internal structure of a volcano. Label this figure with the following
characteristics of a volcano:
vent crater magma chamber
(3) Figure 5
Geography – Form 2 Secondary – L5 to 8 Page 4 of 11
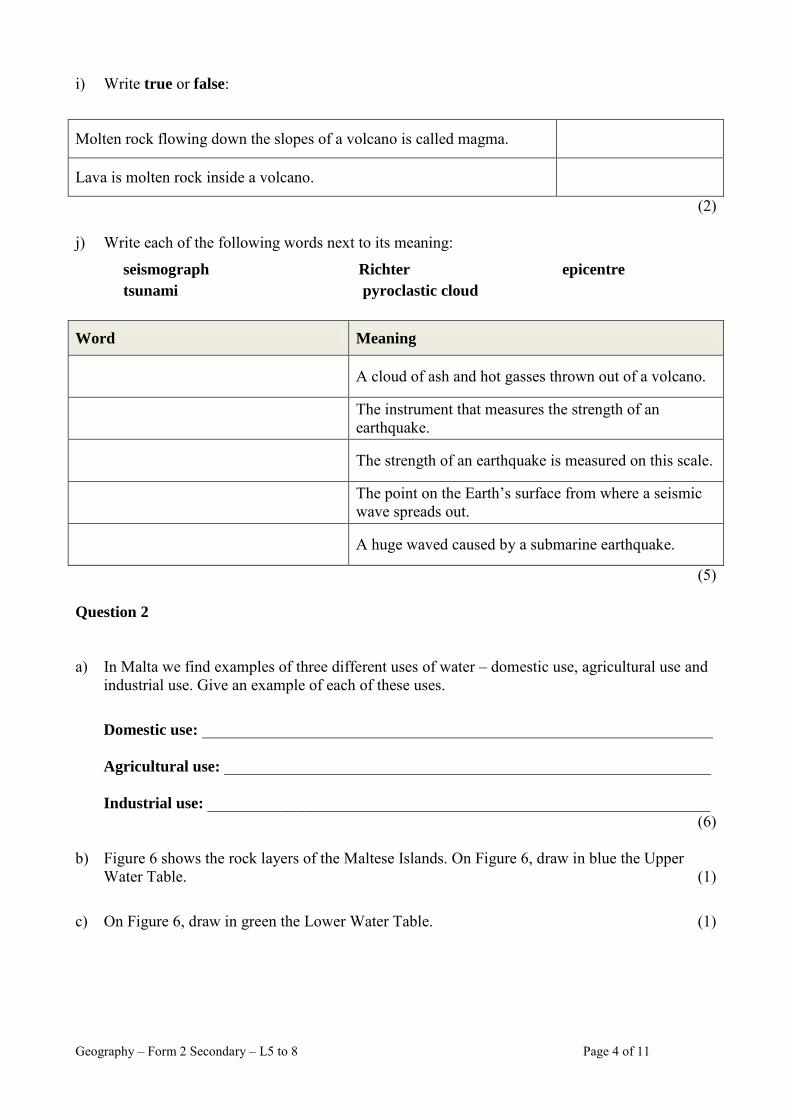
i) Write true or false:
Molten rock flowing down the slopes of a volcano is called magma.
Lava is molten rock inside a volcano.
(2) j) Write each of the following words next to its meaning:
seismograph Richter epicentre
tsunami pyroclastic cloud
Word Meaning
A cloud of ash and hot gasses thrown out of a volcano.
The instrument that measures the strength of an earthquake.
The strength of an earthquake is measured on this scale.
The point on the Earth’s surface from where a seismic wave spreads out.
A huge waved caused by a submarine earthquake.
(5) Question 2
a) In Malta we find examples of three different uses of water – domestic use, agricultural use and industrial use. Give an example of each of these uses.
Domestic use: ________________________________________________________________
Agricultural use: _____________________________________________________________
Industrial use: _______________________________________________________________
(6)
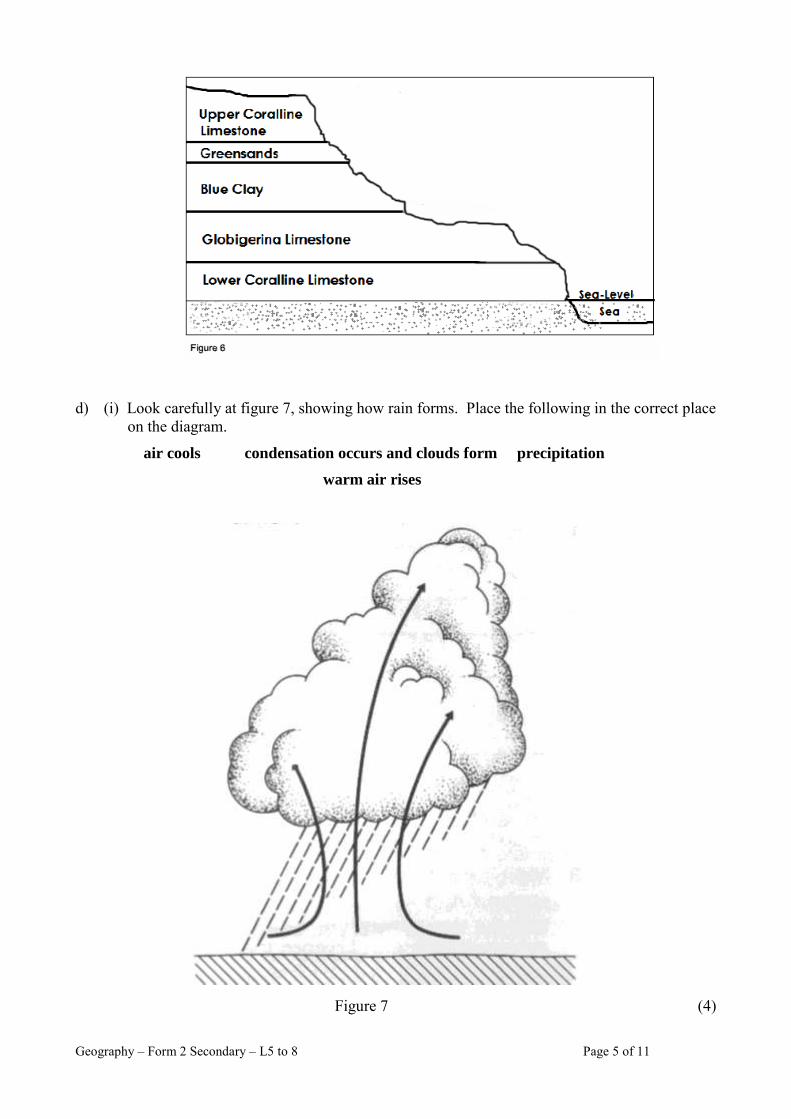
b) Figure 6 shows the rock layers of the Maltese Islands. On Figure 6, draw in blue the Upper Water Table. (1)
c) On Figure 6, draw in green the Lower Water Table. (1)
Geography – Form 2 Secondary – L5 to 8 Page 5 of 11
d) (i) Look carefully at figure 7, showing how rain forms. Place the following in the correct place on the diagram.
air cools condensation occurs and clouds form precipitation
warm air rises
Figure 7 (4)
Geography – Form 2 Secondary – L5 to 8 Page 6 of 11
(ii) Give the meaning of the following words:
Evaporation: ________________________________________________________________
____________________________________________________________________________
Condensation: _______________________________________________________________
____________________________________________________________________________
(4)
e) Underline the correct answer:
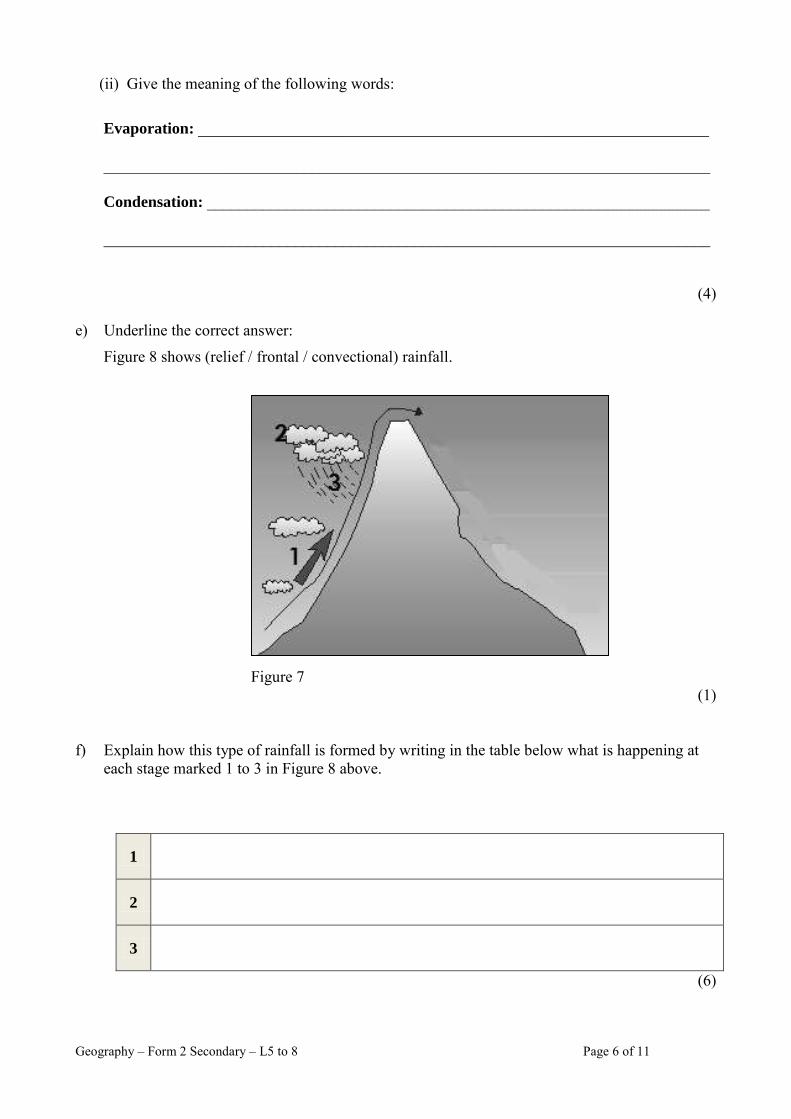
Figure 8 shows (relief / frontal / convectional) rainfall.
Figure 7 (1)
f) Explain how this type of rainfall is formed by writing in the table below what is happening at each stage marked 1 to 3 in Figure 8 above.
1
2
3
(6)
Geography – Form 2 Secondary – L5 to 8 Page 7 of 11
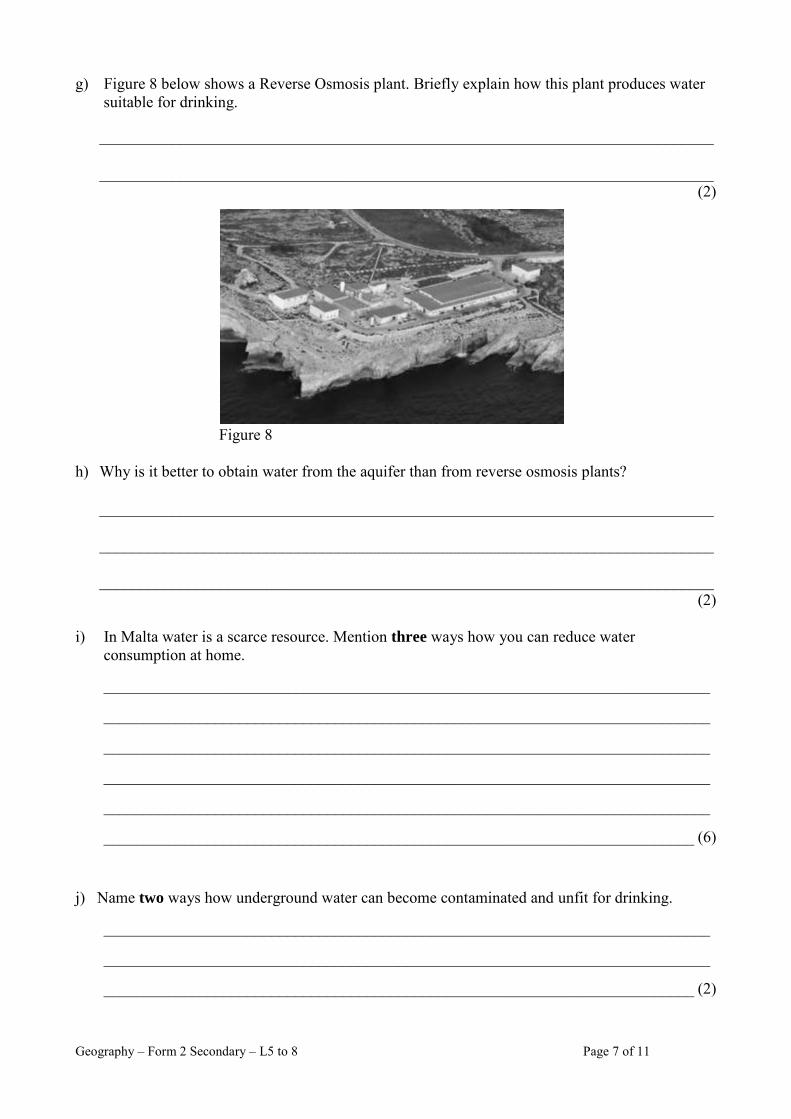
g) Figure 8 below shows a Reverse Osmosis plant. Briefly explain how this plant produces water suitable for drinking.
_____________________________________________________________________________ _____________________________________________________________________________
(2)
Figure 8
h) Why is it better to obtain water from the aquifer than from reverse osmosis plants?
_____________________________________________________________________________ _____________________________________________________________________________ _____________________________________________________________________________
(2)
i) In Malta water is a scarce resource. Mention three ways how you can reduce water consumption at home.
____________________________________________________________________________
____________________________________________________________________________
____________________________________________________________________________
____________________________________________________________________________
____________________________________________________________________________
__________________________________________________________________________ (6)
j) Name two ways how underground water can become contaminated and unfit for drinking.
____________________________________________________________________________
____________________________________________________________________________
__________________________________________________________________________ (2)

Geography – Form 2 Secondary – L5 to 8 Page 8 of 11
Question 3
Use the map of the world (Figure 9) to answer the following questions. a) In the table below write the names of the lines of latitude marked with the letters A, B and C.
Choose from:
Antarctic Circle Tropic of Cancer Equator
Latitude A
Latitude B
Latitude C (3)
b) Two lines of longitude X and Y are marked on the map of the world. In the table below write
the letter that shows the Prime Meridian.
Prime Meridian (1)
c) In the table below write the name of the desert marked with the letter D on the map of the
world. Choose from:
Australian Desert Atacama Desert Sahara Desert
Desert D (1)
Figure 9: Map of the world
Geography – Form 2 Secondary – L5 to 8 Page 9 of 11
Question 4
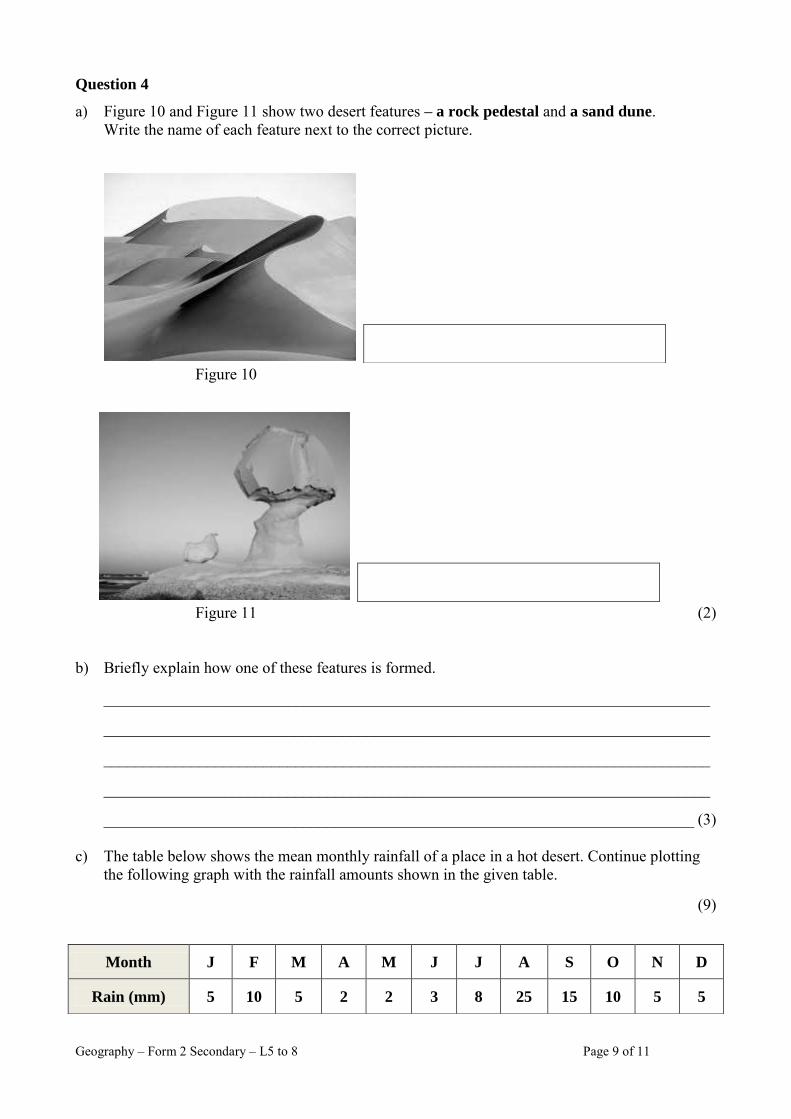
a) Figure 10 and Figure 11 show two desert features – a rock pedestal and a sand dune. Write the name of each feature next to the correct picture.
Figure 10
Figure 11 (2)
b) Briefly explain how one of these features is formed.
____________________________________________________________________________
____________________________________________________________________________
____________________________________________________________________________
____________________________________________________________________________
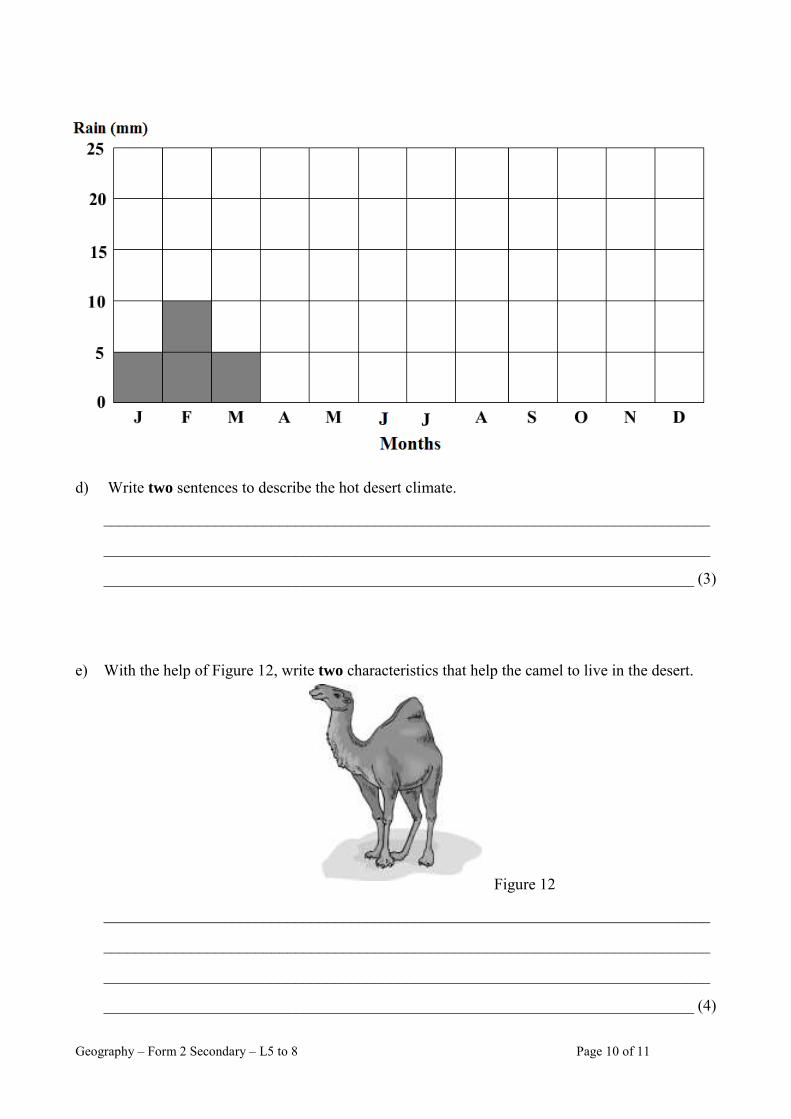
__________________________________________________________________________ (3) c) The table below shows the mean monthly rainfall of a place in a hot desert. Continue plotting
the following graph with the rainfall amounts shown in the given table.
(9)
Month J F M A M J J A S O N D
Rain (mm) 5 10 5 2 2 3 8 25 15 10 5 5
Geography – Form 2 Secondary – L5 to 8 Page 10 of 11
d) Write two sentences to describe the hot desert climate.
____________________________________________________________________________
____________________________________________________________________________
__________________________________________________________________________ (3) e) With the help of Figure 12, write two characteristics that help the camel to live in the desert.
Figure 12
____________________________________________________________________________
____________________________________________________________________________
____________________________________________________________________________
__________________________________________________________________________ (4)
J
Geography – Form 2 Secondary – L5 to 8 Page 11 of 11
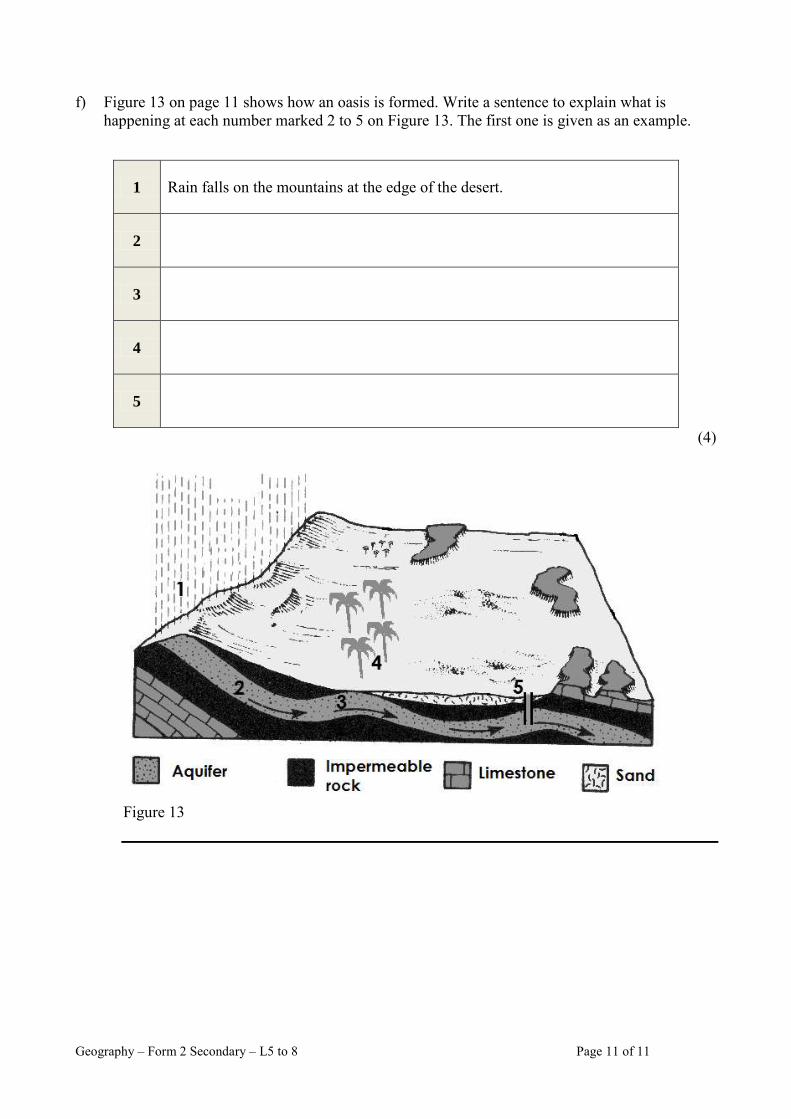
f) Figure 13 on page 11 shows how an oasis is formed. Write a sentence to explain what is
happening at each number marked 2 to 5 on Figure 13. The first one is given as an example.
1 Rain falls on the mountains at the edge of the desert.
2
3
4
5
(4)
Figure 13
Directorate for Quality and Standards in Education Curriculum Management Department – Geography – 2014
20