Embed Size (px)
Citation preview
Query Management FacilityVersion 12 Release 2
Getting Started with QMF Z Client
GC27-9133
IBM

Query Management FacilityVersion 12 Release 2
Getting Started with QMF Z Client
GC27-9133
IBM

NoteBefore using this information and the product it supports, be sure to read the general information under “Notices” at theend of this information.
November 15, 2019 edition
This edition applies to Version 12 Release 2 of IBM Query Management Facility (QMF) Enterprise EditionAdvanced, which is a feature of IBM Db2 12 for z/OS (5650-DB2), Version 12.1. It also applies to Version 12 Release2 of IBM QMF for z/OS (5697-QM2), which is a stand-alone IBM Db2 for z/OS tool. This information applies to allsubsequent releases and modifications until otherwise indicated in new editions.
© Rocket Software Inc. 2019

Contents
About this information . . . . . . . . vWho should read this information . . . . . . . vService updates and support information . . . . . v
Chapter 1. QMF overview . . . . . . . 1QMF features . . . . . . . . . . . . . . 1Configuration and invocation . . . . . . . . . 1
QMF Z Client program parameters . . . . . . 4Typical QMF workflow overview . . . . . . . 9QMF interface overview . . . . . . . . . . 9
Chapter 2. Setting preferences . . . . 13Customizing function keys . . . . . . . . . 13
Restoring default values for function keys . . . 13Global variables . . . . . . . . . . . . . 13
Creating user-defined global variables . . . . 14Editing global variables . . . . . . . . . 14Deleting global variables . . . . . . . . . 15
Chapter 3. Accessing data . . . . . . 17Repositories and data sources . . . . . . . . 17Connecting to repositories . . . . . . . . . 17Connecting to data sources . . . . . . . . . 18Accessing QMF objects . . . . . . . . . . 18Saving QMF objects . . . . . . . . . . . 18Working with folders . . . . . . . . . . . 19
Creating folders . . . . . . . . . . . . 19
Chapter 4. Working with data . . . . . 21Working with queries . . . . . . . . . . . 21
Creating queries using SQL editor . . . . . . 21Creating queries using prompted query editor. . 21Running existing queries . . . . . . . . . 22
Creating reports . . . . . . . . . . . . . 23Working with procedures . . . . . . . . . . 25
Creating procedures . . . . . . . . . . 25Working with existing procedures . . . . . . 25Procedures with logic . . . . . . . . . . 26
Working with database tables . . . . . . . . 29Editing database tables . . . . . . . . . 30
Working with batch objects . . . . . . . . . 31Creating batch objects . . . . . . . . . . 31Working with batch objects . . . . . . . . 33
Appendix A. Accessibility . . . . . . 35Accessibility in QMF Z Client . . . . . . . . 35Navigation in QMF Z Client. . . . . . . . . 35
Appendix B. Troubleshooting . . . . . 37QMF trace feature . . . . . . . . . . . . 37Interrupting QMF commands . . . . . . . . 38
Appendix C. QMF Commands . . . . . 39ACTIONS command . . . . . . . . . . . 39
ADD command . . . . . . . . . . . . . 39BACKWARD command . . . . . . . . . . 39BATCH command . . . . . . . . . . . . 40BOTTOM command . . . . . . . . . . . 40CHANGE command . . . . . . . . . . . 41CHECK command . . . . . . . . . . . . 41CLEAR command . . . . . . . . . . . . 41CLOSE command . . . . . . . . . . . . 42CONNECT command . . . . . . . . . . . 42CONVERT command . . . . . . . . . . . 43CREATE command . . . . . . . . . . . . 43DELETE command . . . . . . . . . . . . 44DESCRIBE command . . . . . . . . . . . 45DISPLAY command . . . . . . . . . . . 45DRAW command . . . . . . . . . . . . 47EDIT command . . . . . . . . . . . . . 47END command . . . . . . . . . . . . . 48ERASE command . . . . . . . . . . . . 48EXIT command . . . . . . . . . . . . . 49EXPORT command . . . . . . . . . . . . 49FAVORITE command . . . . . . . . . . . 54FORWARD command . . . . . . . . . . . 54HELP command . . . . . . . . . . . . . 55IMPORT command . . . . . . . . . . . . 55INSERT command . . . . . . . . . . . . 57ISPF command . . . . . . . . . . . . . 58LEFT command . . . . . . . . . . . . . 58LIMIT LOCAL command . . . . . . . . . . 59LIST command . . . . . . . . . . . . . 59MAIL TO command . . . . . . . . . . . 61REFRESH command . . . . . . . . . . . 64RENAME command . . . . . . . . . . . 64RESET command . . . . . . . . . . . . 65RESET GLOBAL command . . . . . . . . . 66RESET KEY command. . . . . . . . . . . 67RETRIEVE command . . . . . . . . . . . 67RIGHT command . . . . . . . . . . . . 68RUN command . . . . . . . . . . . . . 69RUNTSO command . . . . . . . . . . . 71SAVE AS command. . . . . . . . . . . . 73SAVE command . . . . . . . . . . . . . 75SEARCH command. . . . . . . . . . . . 76SET GLOBAL command . . . . . . . . . . 76SET INVISIBLE command . . . . . . . . . 77SET KEY command. . . . . . . . . . . . 77SET LOCAL command . . . . . . . . . . 78SET LOCAL WITH VALUES command . . . . . 78SET OPTIONS command . . . . . . . . . . 79SHOW command . . . . . . . . . . . . 79SORT command . . . . . . . . . . . . . 81SPECIFY command . . . . . . . . . . . . 81SWITCH command. . . . . . . . . . . . 82TOP command . . . . . . . . . . . . . 83TSO command . . . . . . . . . . . . . 83USE REPOSITORY command . . . . . . . . 83
iii

Appendix D. System global variables 85DSQQW global variables . . . . . . . . . . 85DSQAO global variables . . . . . . . . . . 90DSQEC global variables . . . . . . . . . . 92DSQDC global variables . . . . . . . . . . 96DSQCP global variables . . . . . . . . . . 97
Appendix E. SQL editor line commands 99
Appendix F. QMF usage codes . . . . 101
Appendix G. QMF edit codes. . . . . 103
Appendix H. IDs of QMF panels . . . 107
Notices . . . . . . . . . . . . . . 113Trademarks . . . . . . . . . . . . . . 114
Terms and conditions for product documentation 115Privacy policy considerations . . . . . . . . 115
Glossary . . . . . . . . . . . . . 117
Index . . . . . . . . . . . . . . . 119
iv Getting Started QMF Z Client
About this information
This information describes how to use the QMF™ Z Client application.1
Always check the Db2® and IMS™ Tools Library page for the most current versionof this publication:
http://www.ibm.com/software/data/db2imstools/db2tools-library.html
Who should read this informationThis information is intended for all QMF Z Client users.
Service updates and support informationTo find service updates and support information, including software fix packs,PTFs, Frequently Asked Questions (FAQs), technical notes, troubleshootinginformation, and downloads, see http://www.ibm.com/software/data/qmf/support.html
1. Throughout this information, the IBM® QMF Z Client client is referred to as QMF.
v

vi Getting Started QMF Z Client

Chapter 1. QMF overview
QMF featuresThe QMF Z Client solution offers a set of business intelligence functions formainframe users.
Relational queriesCreation of relational queries is facilitated by different query interfaces thatare tailored to different skill and knowledge levels.
ReportsQMF offers flexible design environment for reports, allowing you to group,aggregate, and summarize data, add calculation expressions, andconditionally format the report depending on the query results.
Data editing capabilitiesQMF provides built-in table editing capabilities that allow you to add,delete, and change entire rows or individual cells within a table. You canalso create, edit, and run sophisticated procedures to carry out a variety oftasks.
Procedures with logicProcedures with logic combine QMF commands with REXX statements andfunctions allowing you to create powerful application programs.
Configuration and invocationQMF Z Client can be started only from z/OS. QMF Z Client can be set up to rununder TSO, ISPF, or as a batch job.
Allocating files used by QMF Z Client
Before you can use QMF Z Client, you must install and configure QMF Server. Fordetailed information, see Installing and Managing QMF Server.
Before starting QMF Z Client, you must allocate and customize certain files thatare used by the application.
Complete the following steps:1. Access the FQMINI properties file that is stored in the FQMprfx.SFQMPARM
target library. The file contains configuration information for the QMF Z Clientsession. For more information, see “QMF Z Client program parameters” onpage 4. If you chose to tailor the default environment, copy the file to aworking version of the data set. Note, that you must keep the member name asFQMINI.
2. Allocate your FQMprfx.SFQMPARM(FQMINI) or working copy data set to theDDNAME FQMPARM.
3. Edit and customize the FQMprfx.SFQMSKEL(FQMBATCH) ISPF skeleton asappropriate for your environment. This skeleton is used to generate JCL jobswhen the QMF Z Client BATCH command is invoked. Note thatFQMprfx.SFQMSKEL, or a tailored version of this data set, must be allocated tothe DDNAME ISPSLIB.
1
||
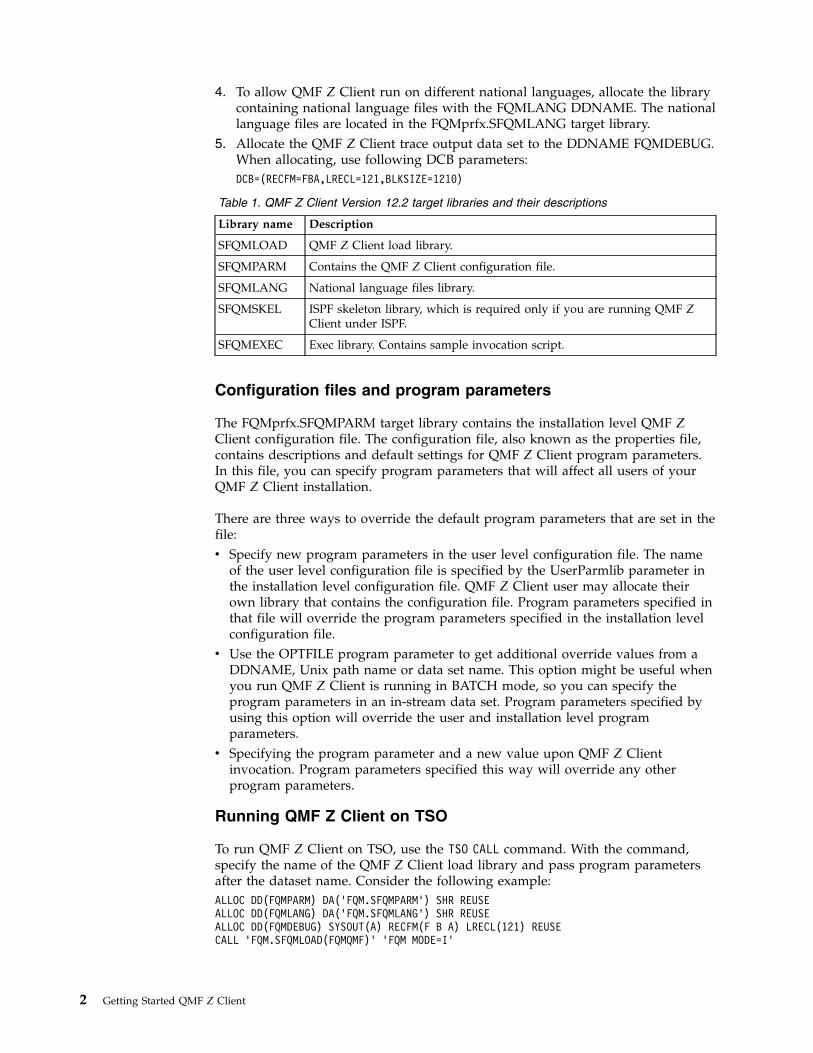
4. To allow QMF Z Client run on different national languages, allocate the librarycontaining national language files with the FQMLANG DDNAME. The nationallanguage files are located in the FQMprfx.SFQMLANG target library.
5. Allocate the QMF Z Client trace output data set to the DDNAME FQMDEBUG.When allocating, use following DCB parameters:DCB=(RECFM=FBA,LRECL=121,BLKSIZE=1210)
Table 1. QMF Z Client Version 12.2 target libraries and their descriptions
Library name Description
SFQMLOAD QMF Z Client load library.
SFQMPARM Contains the QMF Z Client configuration file.
SFQMLANG National language files library.
SFQMSKEL ISPF skeleton library, which is required only if you are running QMF ZClient under ISPF.
SFQMEXEC Exec library. Contains sample invocation script.
Configuration files and program parameters
The FQMprfx.SFQMPARM target library contains the installation level QMF ZClient configuration file. The configuration file, also known as the properties file,contains descriptions and default settings for QMF Z Client program parameters.In this file, you can specify program parameters that will affect all users of yourQMF Z Client installation.
There are three ways to override the default program parameters that are set in thefile:v Specify new program parameters in the user level configuration file. The name
of the user level configuration file is specified by the UserParmlib parameter inthe installation level configuration file. QMF Z Client user may allocate theirown library that contains the configuration file. Program parameters specified inthat file will override the program parameters specified in the installation levelconfiguration file.
v Use the OPTFILE program parameter to get additional override values from aDDNAME, Unix path name or data set name. This option might be useful whenyou run QMF Z Client is running in BATCH mode, so you can specify theprogram parameters in an in-stream data set. Program parameters specified byusing this option will override the user and installation level programparameters.
v Specifying the program parameter and a new value upon QMF Z Clientinvocation. Program parameters specified this way will override any otherprogram parameters.
Running QMF Z Client on TSO
To run QMF Z Client on TSO, use the TSO CALL command. With the command,specify the name of the QMF Z Client load library and pass program parametersafter the dataset name. Consider the following example:ALLOC DD(FQMPARM) DA(’FQM.SFQMPARM’) SHR REUSEALLOC DD(FQMLANG) DA(’FQM.SFQMLANG’) SHR REUSEALLOC DD(FQMDEBUG) SYSOUT(A) RECFM(F B A) LRECL(121) REUSECALL ’FQM.SFQMLOAD(FQMQMF)’ ’FQM MODE=I’
2 Getting Started QMF Z Client
The first program parameter is the QMF Z Client installation prefix, and it cannotbe omitted. Other parameters are optional.
The QMF Z Client load library is allocated as a task library for the duration of theCALL command. However, you must give QMF Z Client access to the GDDM loadlibrary. In most cases, GDDM library is not part of the TASKLIB. If GDDM libraryis not available, QMF Z Client terminates with an error.
Running QMF Z Client on ISPF
To run QMF Z Client on ISPF, start the QMF program dialog using the ISPFSELECT service. Access hlq.SFQMEXEC(FQMQMF) sample invocation script, copyit, and customize it for your environment.
Starting QMF in a batch environment
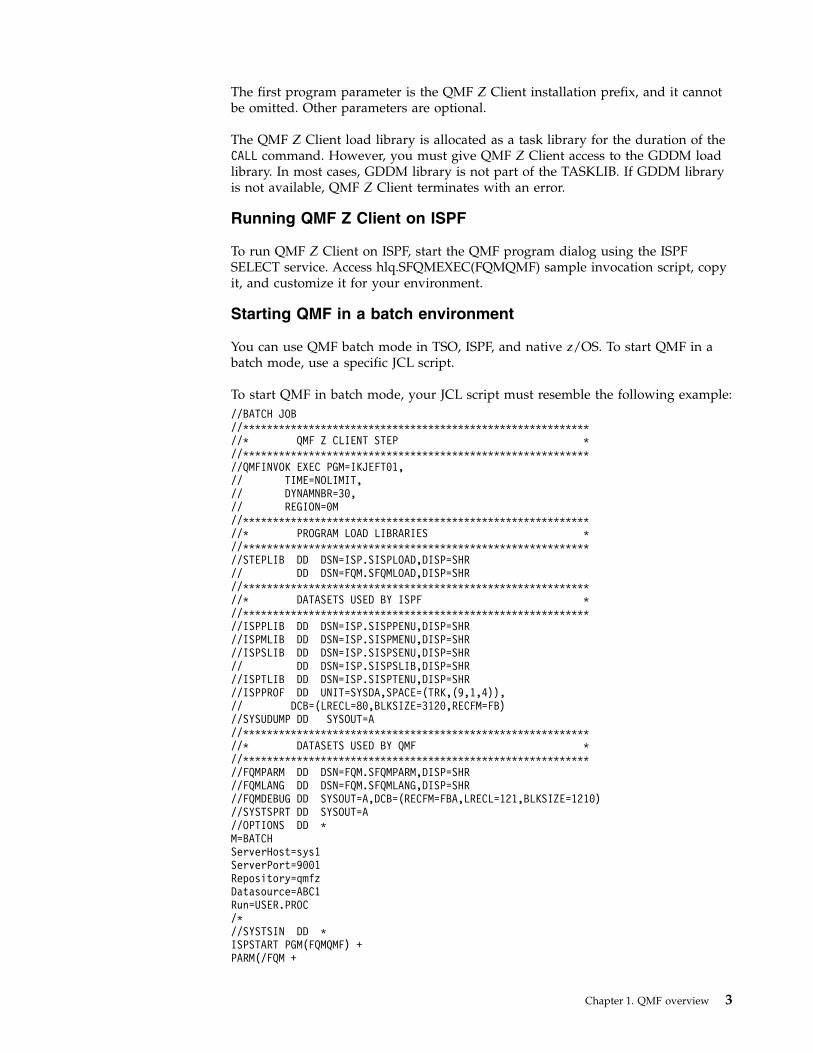
You can use QMF batch mode in TSO, ISPF, and native z/OS. To start QMF in abatch mode, use a specific JCL script.
To start QMF in batch mode, your JCL script must resemble the following example://BATCH JOB//**********************************************************//* QMF Z CLIENT STEP *//**********************************************************//QMFINVOK EXEC PGM=IKJEFT01,// TIME=NOLIMIT,// DYNAMNBR=30,// REGION=0M//**********************************************************//* PROGRAM LOAD LIBRARIES *//**********************************************************//STEPLIB DD DSN=ISP.SISPLOAD,DISP=SHR// DD DSN=FQM.SFQMLOAD,DISP=SHR//**********************************************************//* DATASETS USED BY ISPF *//**********************************************************//ISPPLIB DD DSN=ISP.SISPPENU,DISP=SHR//ISPMLIB DD DSN=ISP.SISPMENU,DISP=SHR//ISPSLIB DD DSN=ISP.SISPSENU,DISP=SHR// DD DSN=ISP.SISPSLIB,DISP=SHR//ISPTLIB DD DSN=ISP.SISPTENU,DISP=SHR//ISPPROF DD UNIT=SYSDA,SPACE=(TRK,(9,1,4)),// DCB=(LRECL=80,BLKSIZE=3120,RECFM=FB)//SYSUDUMP DD SYSOUT=A//**********************************************************//* DATASETS USED BY QMF *//**********************************************************//FQMPARM DD DSN=FQM.SFQMPARM,DISP=SHR//FQMLANG DD DSN=FQM.SFQMLANG,DISP=SHR//FQMDEBUG DD SYSOUT=A,DCB=(RECFM=FBA,LRECL=121,BLKSIZE=1210)//SYSTSPRT DD SYSOUT=A//OPTIONS DD *M=BATCHServerHost=sys1ServerPort=9001Repository=qmfzDatasource=ABC1Run=USER.PROC/*//SYSTSIN DD *ISPSTART PGM(FQMQMF) +PARM(/FQM +
Chapter 1. QMF overview 3
OPTFILE=DD:OPTIONS +) +NEWAPPL(FQM)/*
Testing QMF Z Client installation on a sample database
Before you start using QMF Z Client for the first time, complete the followingsteps to ensure that it is installed and configured properly:1. Run QMF Z Client.2. Make sure that the Switch Repository panel is displayed and the list of
available repositories is not empty. If the list is empty, contact your QMFadministrator or use the QMF Server application to create a repository.
QMF Z Client program parameters
Long nameShortname Description
ServerHostControls or sets
Host name of the QMF Server to connect to.
Valid valuesAny valid host name or IP address.
DefaultsThe default behavior is to fetch the list ofavailable QMF Servers from QMF ServerRegistry and ask the user to select one.
ServerPortControls or sets
QMF Server port number.
Valid values0 to 65535
Defaults2206
IOTimeoutControls or sets
Network IO operations timeout interval inmilliseconds.
Valid values0 to 99999999
Defaults30000
4 Getting Started QMF Z Client
Long nameShortname Description
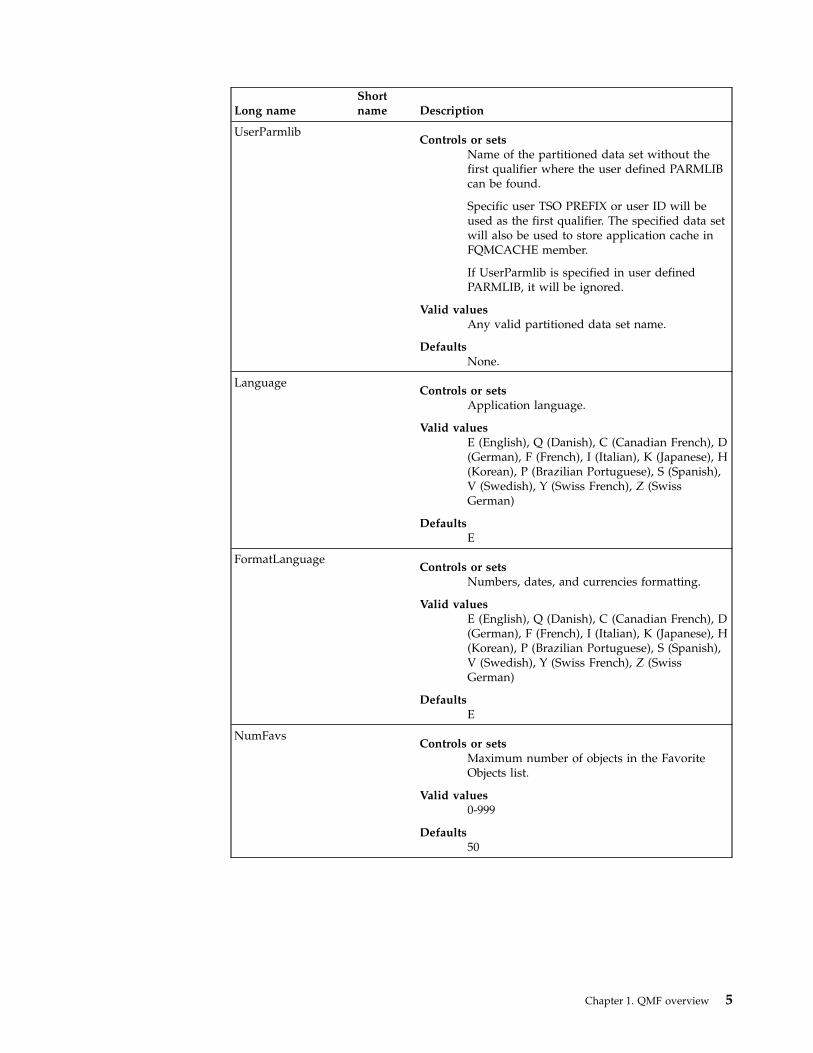
UserParmlibControls or sets
Name of the partitioned data set without thefirst qualifier where the user defined PARMLIBcan be found.
Specific user TSO PREFIX or user ID will beused as the first qualifier. The specified data setwill also be used to store application cache inFQMCACHE member.
If UserParmlib is specified in user definedPARMLIB, it will be ignored.
Valid valuesAny valid partitioned data set name.
DefaultsNone.
LanguageControls or sets
Application language.
Valid valuesE (English), Q (Danish), C (Canadian French), D(German), F (French), I (Italian), K (Japanese), H(Korean), P (Brazilian Portuguese), S (Spanish),V (Swedish), Y (Swiss French), Z (SwissGerman)
DefaultsE
FormatLanguageControls or sets
Numbers, dates, and currencies formatting.
Valid valuesE (English), Q (Danish), C (Canadian French), D(German), F (French), I (Italian), K (Japanese), H(Korean), P (Brazilian Portuguese), S (Spanish),V (Swedish), Y (Swiss French), Z (SwissGerman)
DefaultsE
NumFavsControls or sets
Maximum number of objects in the FavoriteObjects list.
Valid values0-999
Defaults50
Chapter 1. QMF overview 5
Long nameShortname Description
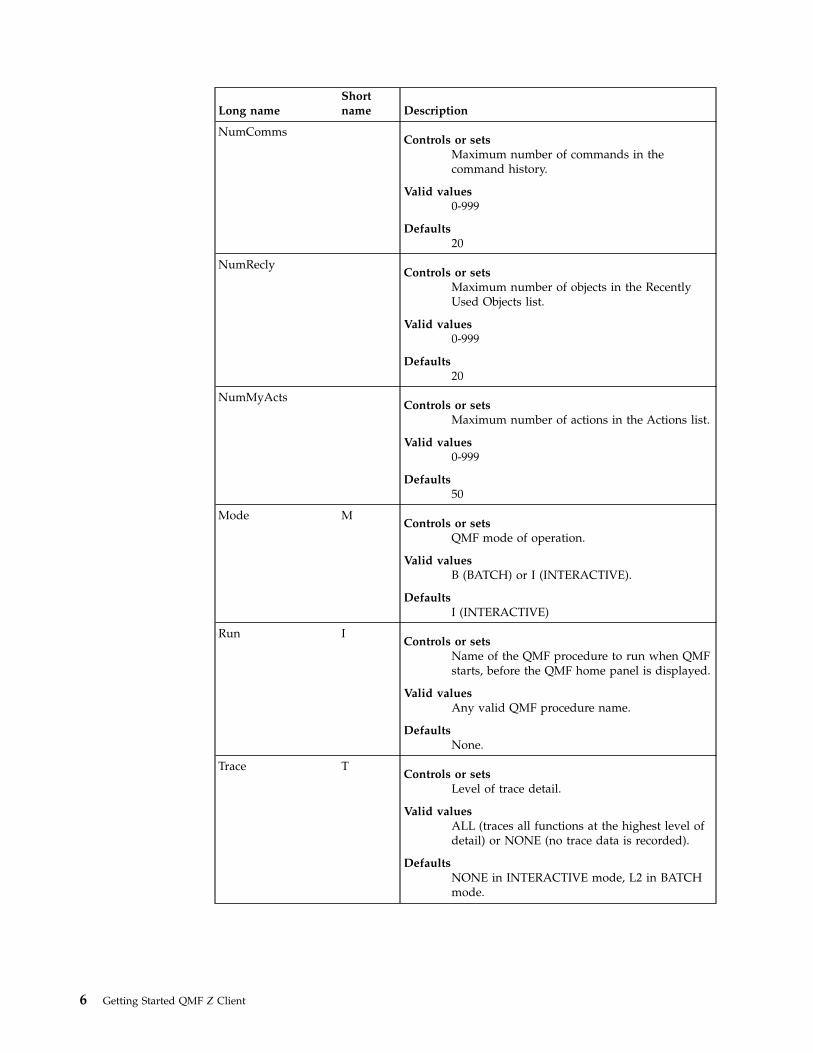
NumCommsControls or sets
Maximum number of commands in thecommand history.
Valid values0-999
Defaults20
NumReclyControls or sets
Maximum number of objects in the RecentlyUsed Objects list.
Valid values0-999
Defaults20
NumMyActsControls or sets
Maximum number of actions in the Actions list.
Valid values0-999
Defaults50
Mode MControls or sets
QMF mode of operation.
Valid valuesB (BATCH) or I (INTERACTIVE).
DefaultsI (INTERACTIVE)
Run IControls or sets
Name of the QMF procedure to run when QMFstarts, before the QMF home panel is displayed.
Valid valuesAny valid QMF procedure name.
DefaultsNone.
Trace TControls or sets
Level of trace detail.
Valid valuesALL (traces all functions at the highest level ofdetail) or NONE (no trace data is recorded).
DefaultsNONE in INTERACTIVE mode, L2 in BATCHmode.
6 Getting Started QMF Z Client
Long nameShortname Description
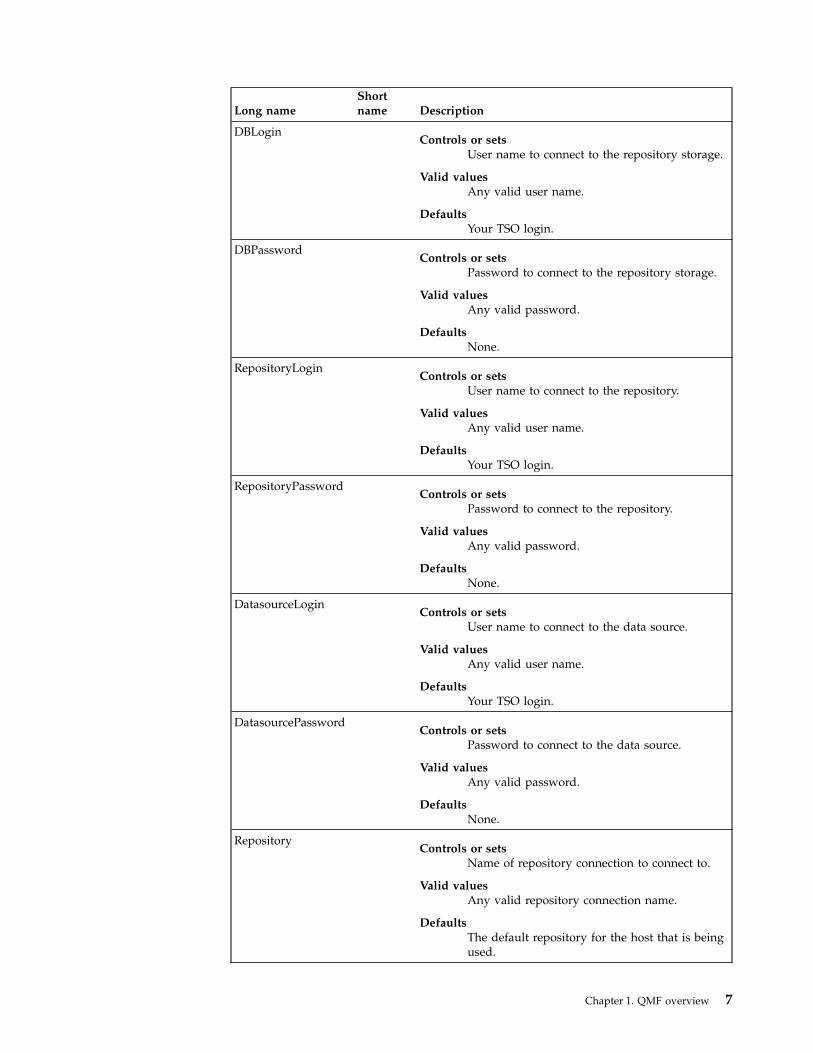
DBLoginControls or sets
User name to connect to the repository storage.
Valid valuesAny valid user name.
DefaultsYour TSO login.
DBPasswordControls or sets
Password to connect to the repository storage.
Valid valuesAny valid password.
DefaultsNone.
RepositoryLoginControls or sets
User name to connect to the repository.
Valid valuesAny valid user name.
DefaultsYour TSO login.
RepositoryPasswordControls or sets
Password to connect to the repository.
Valid valuesAny valid password.
DefaultsNone.
DatasourceLoginControls or sets
User name to connect to the data source.
Valid valuesAny valid user name.
DefaultsYour TSO login.
DatasourcePasswordControls or sets
Password to connect to the data source.
Valid valuesAny valid password.
DefaultsNone.
RepositoryControls or sets
Name of repository connection to connect to.
Valid valuesAny valid repository connection name.
DefaultsThe default repository for the host that is beingused.
Chapter 1. QMF overview 7
Long nameShortname Description
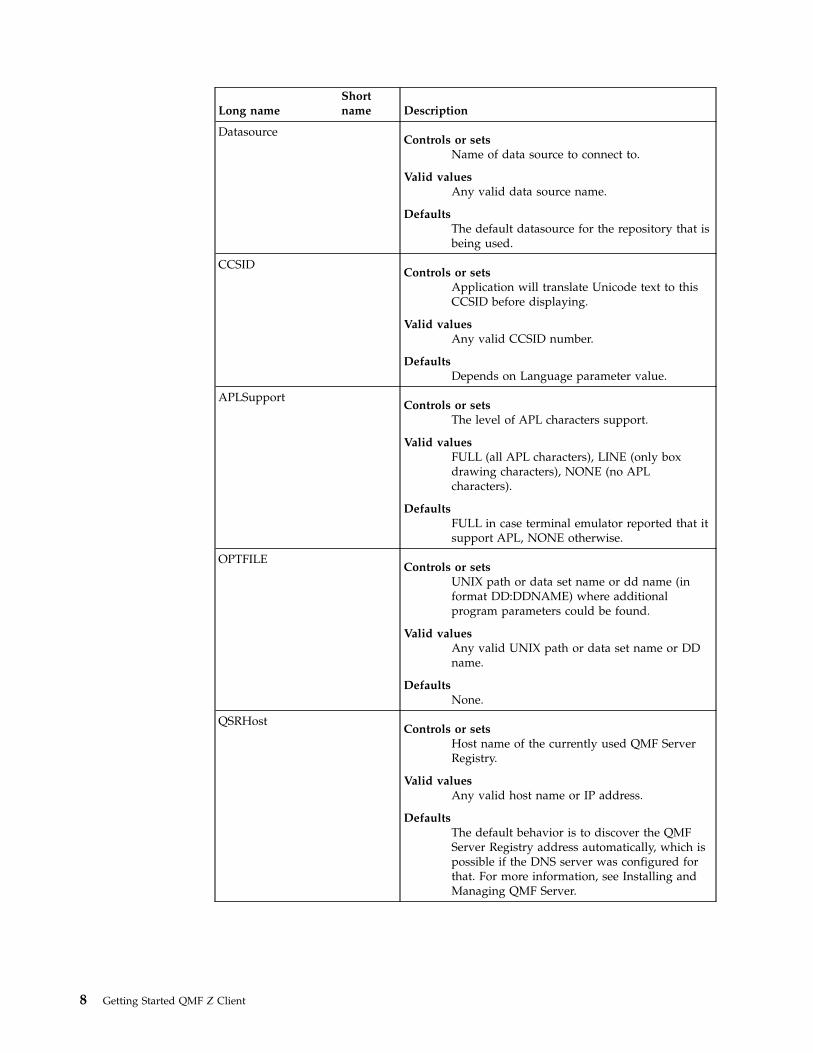
DatasourceControls or sets
Name of data source to connect to.
Valid valuesAny valid data source name.
DefaultsThe default datasource for the repository that isbeing used.
CCSIDControls or sets
Application will translate Unicode text to thisCCSID before displaying.
Valid valuesAny valid CCSID number.
DefaultsDepends on Language parameter value.
APLSupportControls or sets
The level of APL characters support.
Valid valuesFULL (all APL characters), LINE (only boxdrawing characters), NONE (no APLcharacters).
DefaultsFULL in case terminal emulator reported that itsupport APL, NONE otherwise.
OPTFILEControls or sets
UNIX path or data set name or dd name (informat DD:DDNAME) where additionalprogram parameters could be found.
Valid valuesAny valid UNIX path or data set name or DDname.
DefaultsNone.
QSRHostControls or sets
Host name of the currently used QMF ServerRegistry.
Valid valuesAny valid host name or IP address.
DefaultsThe default behavior is to discover the QMFServer Registry address automatically, which ispossible if the DNS server was configured forthat. For more information, see Installing andManaging QMF Server.
8 Getting Started QMF Z Client
Long nameShortname Description
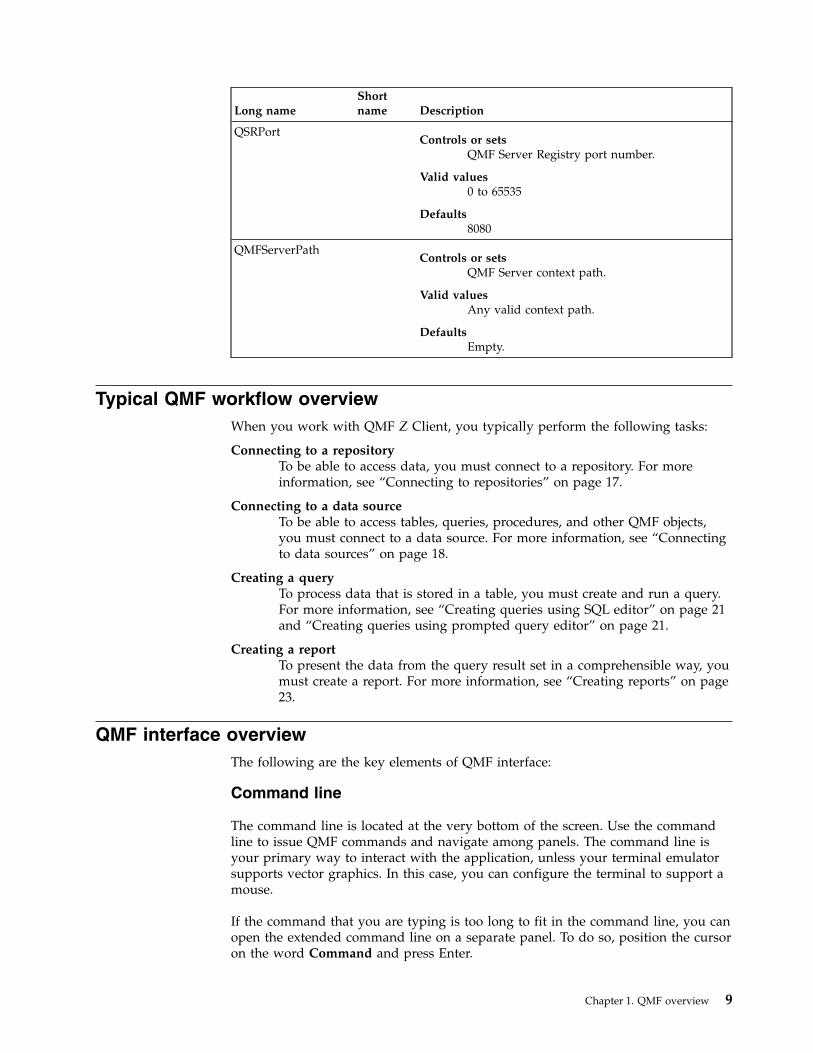
QSRPortControls or sets
QMF Server Registry port number.
Valid values0 to 65535
Defaults8080
QMFServerPathControls or sets
QMF Server context path.
Valid valuesAny valid context path.
DefaultsEmpty.
Typical QMF workflow overviewWhen you work with QMF Z Client, you typically perform the following tasks:
Connecting to a repositoryTo be able to access data, you must connect to a repository. For moreinformation, see “Connecting to repositories” on page 17.
Connecting to a data sourceTo be able to access tables, queries, procedures, and other QMF objects,you must connect to a data source. For more information, see “Connectingto data sources” on page 18.
Creating a queryTo process data that is stored in a table, you must create and run a query.For more information, see “Creating queries using SQL editor” on page 21and “Creating queries using prompted query editor” on page 21.
Creating a reportTo present the data from the query result set in a comprehensible way, youmust create a report. For more information, see “Creating reports” on page23.
QMF interface overviewThe following are the key elements of QMF interface:
Command line
The command line is located at the very bottom of the screen. Use the commandline to issue QMF commands and navigate among panels. The command line isyour primary way to interact with the application, unless your terminal emulatorsupports vector graphics. In this case, you can configure the terminal to support amouse.
If the command that you are typing is too long to fit in the command line, you canopen the extended command line on a separate panel. To do so, position the cursoron the word Command and press Enter.
Chapter 1. QMF overview 9
To view the complete list of QMF commands, see Appendix C, “QMF Commands,”on page 39.
Scroll field
In the Scroll specify the default value for the scroll. Valid values are:
A number in the range 1 - 9999Scrolls the number of pages or rows.
MAX Scrolls to the end.
HALF Scrolls by half a page.
PAGE Scrolls by one page.
DATA Scrolls to the line before the end of the page.
CSR Scrolls based on the position of the cursor. If the cursor is in a scrollablearea, scrolls to the end. If the cursor is outside of or at the end thescrollable area, scrolls one page.
Message line
The message line is located at the bottom of the screen directly above thecommand line. The Message line displays informational, warning, and errormessages.
Function keys
Function keys are located at the bottom of the screen above the Message line andcan be assigned to the programmable function keys on your keyboard. Eachfunction key can be configured to perform a specific QMF command. Forinformation about configuring function keys, see “Customizing function keys” onpage 13.
Action bar
The action bar is located at the top of the screen. It allows you to perform certainactions without typing anything in the command line. Note that the list of actionbar items may vary from panel to panel.
Context menu
On some QMF panels, you can right-click an object to access a context menu thatcontains the list of actions that you can perform on the object.
Quick access areas on the Home panel
The following quick access areas are available on the Home panel:
Favorite ObjectsDisplays the contents of the Favorite Objects panel. The Favorite Objectspanel displays the list of objects that you added to the list of favorites.
Favorite ActionsDisplays the contents of the Favorite Actions panel. The Favorite Actionspanel displays the list of available favorite QMF actions.
10 Getting Started QMF Z Client
Recently UsedDisplays the contents of the Recently Used panel. The Recently Used paneldisplays the list of objects that you have worked with recently.
To display an object or run an action from one of the areas, click the object oraction that you want to work with and press Enter.
Chapter 1. QMF overview 11

12 Getting Started QMF Z Client
Chapter 2. Setting preferences
Customizing function keysEach QMF panel has a set of pre-defined function keys, that you can configure toperform specific QMF commands.
Procedure1. Open the panel that you want to work with.2. On the command line, enter SHOW KEYS.3. On the Keys panel, position the cursor on the line that corresponds to the key
that you want to customize.4. In the Label field, type the name for the function key. If the name is too long
for the field, press the Show Field function key to open the Key Editor panel.5. In the Command field, type the QMF command to associate with the key. If the
command is too long for the field, press the Show Field function key to openthe Key Editor panel.
6. Optional: To reset all function keys to their default values, enter resetkey(panelid=ID keyid=all in the command line, where ID is the ID of thepanel whose function keys you want to reset. You can find this ID enclosed inparentheses in the Edit keys for panel field.
Note: To view the complete list of QMF panels and their IDs, see Appendix H,“IDs of QMF panels,” on page 107.
7. Press the End function key to save the changes and close the Keys panel.
Restoring default values for function keysYou can restore the default values for all function keys on a panel.
Procedure1. Open the panel that you want to work with.2. On the command line, enter SHOW KEYS.3. On the command line, enter reset key(panelid=ID keyid=all, where ID is the
ID of the panel whose function keys you want to reset. You can find this IDenclosed in parentheses in the Edit keys for panel field.
Note: To view the complete list of QMF panels and their IDs, see Appendix H,“IDs of QMF panels,” on page 107.
Global variablesQMF features a number of global variables that help you control various aspects ofyour QMF session, QMF commands, and panel display.
QMF has two types of global variables:
System global variablesDuring installation, system global variables are created. The name of eachsystem global variable begins with the DSQ prefix. You cannot create ordelete system global variables; you only can edit their default values.
13

Use system global variables to control various aspects of your QMFsession, QMF commands, and panel display. For example, use theDSQAO_CONNECT_ID system global variable to set the user ID that isused to connect to the current database.
User-defined global variablesYou can create user-defined global variables. You specify whether the valueof a user-defined global variable is permanent or applies only to thecurrent QMF session. You can create, edit, and delete user-defined globalvariables.
Use user-defined defined global variables to control the aspects of yourQMF session that are not covered by system global variables.
You can use the DSQEC_USERGLV_SAV system global variable to restore allsystem global variables to their default values and delete all user-defined globalvariables. For more information about system global variables, see “DSQEC globalvariables” on page 92.
The following topics describe working with global variables:
Creating user-defined global variablesUse the Globals panel to create user-defined global variables.
Procedure1. On the command line, type SHOW GLOBALS.2. On the Globals panel, press the Add function key.3. In the Variable name field on the Add Global Variable panel, type a name for
the new global variable. To avoid confusing user-defined global variables withsystem global variables, do not use the DSQ prefix.
4. In the Variable value field, enter the value for your variable.5. Optional: In the Variable description field, type a description of the variable.6. In the Variable lifetime field, specify whether the variable exists for the current
QMF session or permanently.7. Press Enter to create the global variable.
Editing global variablesYou cannot edit the names of system global variables; however, you can edit thedefault values of both system global variables and user-defined global variables.
Procedure1. On the command line, enter SHOW GLOBALS.2. On the Globals panel, position the cursor on the variable to edit. Press the
Show Field function key.3. On the Show Global Variable panel, edit the Variable name and Variable value
fields.4. Optional: In the Variable description field, edit the description.
Note: You can edit the description only of user-defined global variables whoseLIFETIME parameter is set to PERMANENT.
5. In the Variable lifetime field, specify whether the variable exists only duringthe current QMF session or permanently.
6. Press Enter to save the changes.
14 Getting Started QMF Z Client

Deleting global variablesYou can delete user-defined global variables.
Procedure1. On the command line, enter SHOW GLOBALS.2. On the Globals panel, position the cursor on the variable to delete. Press the
Delete function key.3. On the Prompt panel, select Yes. Press Enter to delete the variable.
Chapter 2. Setting preferences 15

16 Getting Started QMF Z Client
Chapter 3. Accessing data
Repositories and data sourcesTo work with QMF Z Client, you must connect to a repository, which stores datasources and application objects.
A repository is a centralized storage area created by your QMF administrator. It isthe place where your objects such as queries, procedures, forms, and reports can besaved. It is also where QMF will look for the information necessary to connect toany data sources that you need to access.
A data source stores the connection information that is required to access adatabase. In a repository, each data source is classified by the type of the databasethat it represents:
Hive Data is stored in Apache Hive™ data warehouses. This kind of storage isdesigned for summarizing, querying, and analyzing of large volumes ofdata with the help of HiveQL, a language that is similar to SQL.
JavaScriptData is provided by online services and stored in JavaScript tables.
QMF Data ServiceData is stored in tables on the QMF Data Service server.
RelationalData is stored in interrelated tables. Each table comprises a number ofcolumns and rows.
VirtualData is stored in virtual and JavaScript tables that collect information fromdifferent sources and present it as a single database. Virtual databasescache data from original databases so that you can work with it withoutreferring to original data sources separately.
Note: In QMF Z Client, you can connect to existing repositories and use existingdata sources. To create a repository or a data source, use QMF Server. For moreinformation, see Installing and Managing QMF Server.
Connecting to repositoriesIn order to access a repository and run repository objects by using QMF Z Client,you must be connected to a repository.
About this task
To connect to a repository, complete the following steps:
Procedure1. Click File > Switch Repository.2. On the Switch Repository panel, select the repository to which you want to
connect.
17
Note: To view the properties of a repository connection, position the cursor onthe repository and press the Describe function key.
3. Press Enter to connect to the specified repository.
Note: If you are trying to connect to a secured repository, QMF prompts you toenter the user credentials for that repository.
Connecting to data sourcesQMF data sources store data in database tables. Each database table comprises anumber of columns and rows. Queries for QMF data sources are written in SQL.
Procedure1. Click File > Connect To.2. On the Connect to panel, select the data source to which you want to connect.3. Press Enter to connect to the specified data source.
Accessing QMF objectsUse the Object List panel to access the list of QMF objects that are available to youin the current data source.
Procedure1. On the command line, enter LIST ALL.2. On the Object List panel, use the Name, Type, and Owner fields to filter the
list and find the object that you want to work with.3. To sort the list, press the Sort function key, specify the sort order that you want
to apply, and press Enter.4. To filter the list by date, use the Created and Modified fields. Use the
following syntax: [ >, <, =] N [d, m, y], where N is the number of days (d),months (m), or years (y). For example, enter <5d in the Created field to displaythe objects that were created fewer than five days ago.
5. In the Action field corresponding to the object, enter the command that youwant to perform on the object or right-click the field to view the list ofavailable commands. For more information about QMF commands, seeAppendix C, “QMF Commands,” on page 39.
Saving QMF objectsYou can save QMF objects to the database by using the Action bar. This is theequivalent of using the SAVE command or the SAVE AS command.
About this task
To save an object, complete the following steps:
Procedure1. If the object that you are working with is already saved in the database and
you only want to save the latest changes, click File > Save in the action barand skip the remaining steps.
2. If you want to save an object to the database, click File > Save As in the Actionbar. The Command Prompt panel opens.
18 Getting Started QMF Z Client
3. In the Object name field, specify the name for the object. If the name includesspaces or mixed case symbols, make sure that you enclose the name in doublequotation marks.
4. Optional: In the Comment field, specify a side note for the object.5. Optional: Press the Forward function key to display the second half of the
panel.6. In the Confirm field, specify whether to display a confirmation dialog when
saving the changes to the object or replacing it.7. Optional: In the Folder field, specify the folder to which you want to save the
link to the object.
Note: QMF folders only contain links to the QMF objects that are stored in adatabase, but not the actual objects.
8. Optional: In the Share field, specify whether you want to make the savedobject available to other users. Valid values are YES and NO.
9. Press Enter to save the object.
Working with foldersIn QMF Z Client, workspace folders store objects or other folders, while QMFCatalog folders store links to the objects.
About this task
Typical QMF workflow suggests the following order of operations when workingwith folders:
Procedure1. On the command line, enter list folders to access the list of folders that are
available on the current data source.2. To open a folder, enter sel in the Action field near the folder.3. In the HOME:/<location>/<folder name> field, click the folder name to return
to parent folder or click the location name to display the list of objects for thelocation.
Creating foldersCreate a workspace folder to store QMF objects and other folders.
About this task
To create a workspace folder, complete the following steps:
Procedure1. On the command line, type CREATE FOLDER ? and press Enter to open the
CREATE FOLDER command prompt.2. In the Folder Name field, specify the name for the new folder.3. In the Comment field enter a text that you want to associate with the folder.4. In the Folder field, specify the parent workspace folder for the folder that you
are creating. To view the list of available parent folders, position the cursor onthe field and press List.
5. Press Enter to create the folder.
Chapter 3. Accessing data 19

20 Getting Started QMF Z Client
Chapter 4. Working with data
Working with queriesTo request information from a relational data source, use the SQL editor or theprompted query editor to create a query.
The following topics describe working with QMF queries:
Creating queries using SQL editorUse the SQL editor to create and run queries against relational data sources.
Procedure1. To open the query editor, type CREATE QUERY on the command line. Press Enter.2. Position the cursor in the editor area.3. Type one or more SQL statements. Use a ; (semicolon) to separate multiple
statements.
Note: To insert, remove, copy, and reposition the lines in the editor area, seeAppendix E, “SQL editor line commands,” on page 99.
4. Press the Run function key to run the query and display the result set.5. Once the query result set is displayed, you have the following options:
Note: If the query contained multiple SQL statements, click Query > SpecifyResult Set to display a specific result set.
Creating queries using prompted query editorTo create a query without typing SQL statements, use the prompted query editor.
Procedure1. On the command line, type RESET QUERY(LANG=PROMPTED and press Enter.2. On the Tables panel, complete the following steps to specify one or more tables
to add to the query:a. In the Table owner field, specify the owner of the table that you want to
work with.b. In the Table name field, specify the name of the table that you want to
work with.
Note: To view the list of all tables that belong to the specified owner, pressthe List function key.
c. Press the Add function key to add the table to the query.d. Repeat the procedure for each table to include in the query and press the
Cancel function key to save the changes.Each time that you specify an additional table, you use the Joins panel tospecify the joining options.
3. Optional: To customize the list of columns that are included in the query resultset, complete the following steps:a. Position the cursor in the Columns area and press the Insert function key.
21
b. On the Columns panel, press the List function key to view the list ofavailable table columns.
c. On the Column List panel, position the cursor on the column to include inthe query result set and press the Add function key.
d. Repeat the previous step for each column to include in the result set.e. Press the Cancel function key to save the changes.
4. Optional: To specify row conditions for the query, complete the following steps:a. On the main editor panel, press the Switch function key to display the Row
Conditions and Sort Conditions areas.b. Position the cursor in the Row Conditions area and press the Insert
function key.c. On the Row Conditions panel, select the column whose rows to filter or
enter an expression in the Expression field. Press Enter.d. On the Comparison Operators panel, specify the comparison operators that
you want to use. Press Enter.e. On the next panel, specify the values for the comparison operator that you
have selected. Press Enter to save the changes.5. Optional: To specify sort conditions for the query, complete the following steps:
a. Position the cursor in the Sort Conditions area and press the Insertfunction key.
b. In the Order field on the Row Conditions panel, specify the sort order thatyou want to apply to the query result set.
c. In the Select column or enter expression field, select the column by whichto filter the result set or enter an expression. Press Enter to save thechanges.
6. Press the Run function key to run the query.
Running existing queriesYou can access the list of existing QMF queries to re-run, edit, or delete each one.
About this task
This topic describes running existing queries manually. To run a query unattended,that is without interacting with the application, use QMF in batch mode. For moreinformation about using QMF in batch mode, see “Working with batch objects” onpage 31.
Procedure1. On the command line, type LIST QUERIES and press Enter.2. On the Object List panel, use the Name and Owner fields to filter the list and
find the query that you want to work with.3. In the Action field corresponding to the query, access the context menu and
select one of the following actions:
Run Runs the query.
DisplayDisplays the query.
Edit Opens the query editor where you can edit the query.
Add To FavoritesAdds the query to the list of favorites.
22 Getting Started QMF Z Client
DescribeOpens the panel where you can view the query metadata and enter acomment.
RenameOpens the panel where you can rename the query.
Erase Deletes the query.
Creating reportsAfter you run a query or display a table, use the Form Editor to create a reportthat is based on the result set.
About this task
Use the Form Editor panels to configure different aspects of your report. TheForm.Main panel allows you to specify general preferences for your report. OtherForm panels allow you to specify the detailed preferences. To display a particularForm panel, click View and select the panel that you want to work with. Thefollowing Form panels are available:
Form.BreakSpecify the break options for the report. You can configure up to 6 breaklevels for your report and specify distinct break options for each level.Specify each set of break level options on the corresponding Form.Breakpanel (Form.Break1 to Form.Break6).
Form.CalculationsSpecify calculations for the report.
Form.ColumnsWork with the columns that you want to include in the report.
Form.ConditionsSpecify conditional expressions for the report.
Form.DetailSpecify detail block options for the report.
Form.FinalSpecify the text to display at the end of the report.
Form.OptionsSpecify detailed formatting options for the report.
Form.PageSpecify headers and footers for the pages of the report.
Procedure1. On the command line, type CREATE FORM to open the Form Editor for the
Form.Main panel, where you can specify general preferences for your report.If you previously specified the data source object for the report, skip step 2and continue with step 3 on page 24.
2. To specify the data source object for the report, complete the following steps:a. Click Form > Data Source Object.b. On the Data Source Object panel, specify whether to use an object from a
repository or from a data source. Press Enter.c. Specify the object that you want to work with, and press Enter.
Chapter 4. Working with data 23
3. In the Num field, view the order in which the columns are arranged in thequery result set.
4. In the Column heading field, enter headings for the columns of the report. Bydefault, column headings come from the result set.
5. Optional: In the Usage field, enter a usage code for each column. For moreinformation about QMF usage codes, see Appendix F, “QMF usage codes,” onpage 101.
6. Optional: In the Indent field, enter the number of spaces to insert before thecolumn. The default value comes from the result set.
7. Optional: In the Width field, enter the width of the column. The default valuecomes from the result set.
8. In the Edit field, enter an edit code for the column. For more informationabout QMF edit codes, see Appendix G, “QMF edit codes,” on page 103.
9. In the Seq field, specify the order for the columns in the report.10. In the Page heading and Page footing fields, specify the text for the header
and the footer of the report.11. In the Final text field, enter the text to display at the end of the report.12. In the Break 1 and Break 2 fields, enter the text to place in the report breaks.13. In the Options field, use the Outline check box to specify whether to enable
the outlining option for the report.14. Use the Default break text check box to specify whether to put the default
text at break levels of the report. The default break text is a string of 1-6asterisks (*).The Form.Main panel allows you to specify general preferences for yourreport. Other Form panels allow you to specify the detailed preferences. Todisplay a particular Form panel, click View and select the panel that you wantto work with. The following Form panels are available:
Form.BreakUse this panel to specify the break options for your report. You canconfigure up to 6 break levels for your report and specify distinctbreak options for each level. Each break level options can be specifiedon the corresponding Form.Break panel (Form.Break1 to Form.Break6).
Form.CalculationsUse this panel to specify calculation expressions for your report.
Form.ColumnsUse this panel to work with the query result set columns that youwant to include in your report.
Form.ConditionsUse this panel to specify conditional expressions for your report.
Form.DetailUse this panel to specify detail block options for your report.
Form.FinalUse this panel to display at the end of the report.
Form.OptionsUse this panel to specify the detailed formatting options for yourreport.
Form.PageUse this panel to specify heading and footing for the pages of yourreport.
24 Getting Started QMF Z Client
Working with proceduresUse a procedure to execute a series of QMF commands within a single RUNcommand, call other applications, and start QMF in batch mode.
The following topics describe working with procedures:
Creating proceduresTo create a procedure that executes a series of QMF commands, use the procedureeditor.
Before you begin
If the procedure includes running an object, make sure to create the object andsave it before you start working on your procedure.
Procedure1. On the command line, type CREATE PROC and press Enter.2. On the Editor panel, type one or more QMF commands.
Note: If the command is too long to fit on one line, finish the line with the +character and continue the command on the next line. Consider the followingexample:show+query
3. Press the Run function key to run the procedure.
Working with existing proceduresYou can access the list of procedures and run or edit each one.
Procedure1. On the command line, type LIST PROC and press Enter.2. On the Object List panel, use the Name and Owner fields to filter the list and
find the procedure that you want to work with.3. In the Action field corresponding to the procedure, access the context menu
and select the action to perform on the procedure.
Run Runs the procedure.
DisplayDisplays the procedure.
Edit Opens the procedure editor where you can edit the procedure.
Add To FavoritesAdds the procedure to the list of favorites.
DescribeOpens the panel where you can view the procedure metadata and entera comment.
RenameOpens the panel where you can rename the procedure.
Erase Deletes the procedure.
Chapter 4. Working with data 25
Note: To run a procedure unattended, that is without interacting with theapplication, use QMF in batch mode. For more information about using QMFin batch mode, see “Working with batch objects” on page 31.
Procedures with logic
Standard procedures can execute a series of QMF commands. Procedures withlogic enable you to add REXX programming statements and functions along withQMF commands to develop your own applications.
What is supported
The following features are supported:v ADDRESS QRW command environment
A command environment that allows execution of QMF commands whilerunning REXX procedures. For more information, see “ADDRESS QRW and theQMF command environment” on page 28.
v REXX variablesYou can assign REXX variables to QMF global variables and QMF globalvariables to REXX variables. For more information, see “REXX variables inprocedures with logic” on page 28.
Note:
For QMF TSO users:
The following features available in QMF TSO are not currently supported in QMFZ Client.v Callable interfacev Command interfacev Command synonyms
Creating REXX procedures
About this task
The steps for creating a procedure with logic are similar to that documented underWorking with procedures. The only differences are:v The first line of the procedure must indicate the start of a REXX procedure.v Commands directed to QMF must be preceded by the ADDRESS QRW
statement.v The QMF commands must be enclosed in double quotes.
Example 1/* REXX */
REXX statements..ADDRESS QRWqmf_command_1qmf_command_2.
26 Getting Started QMF Z Client
.REXX statements..
Example 2/* REXX */
SAY "HI, THIS IS A REXX SCRIPT"ADDRESS QRW"RUN PROC EXAMPLE_PROCEDURE"SAY "REXX SCRIPT IS DONE"
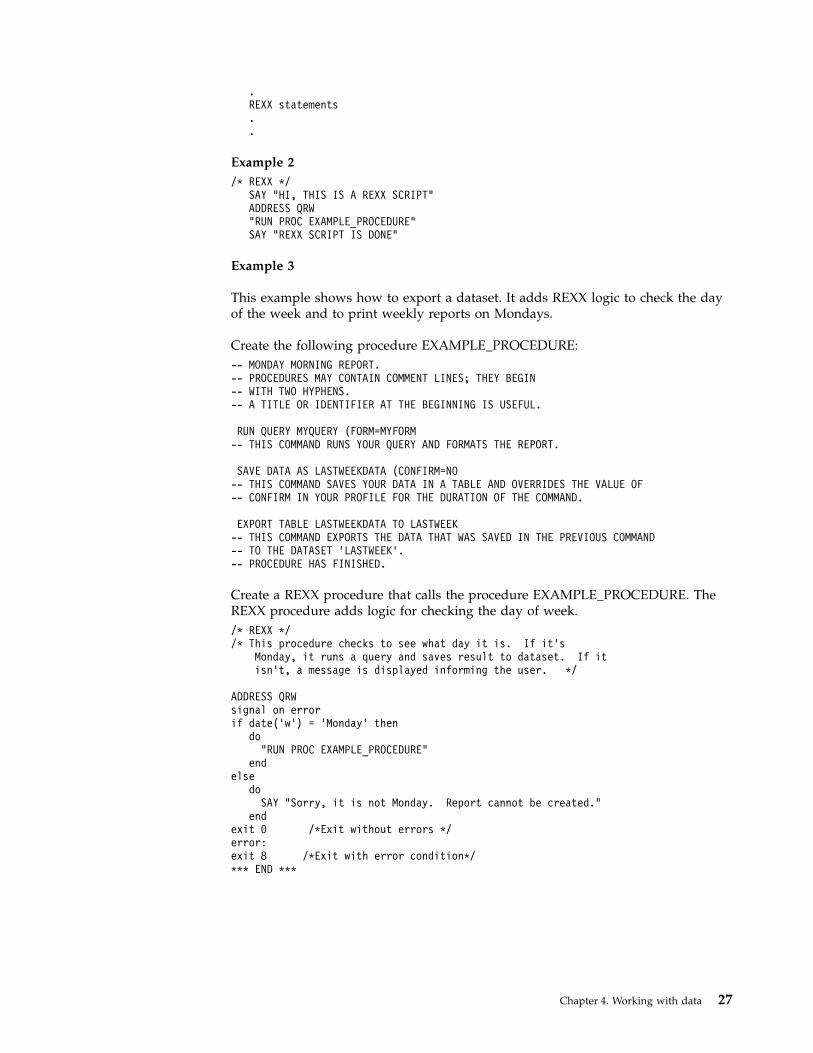
Example 3
This example shows how to export a dataset. It adds REXX logic to check the dayof the week and to print weekly reports on Mondays.
Create the following procedure EXAMPLE_PROCEDURE:-- MONDAY MORNING REPORT.-- PROCEDURES MAY CONTAIN COMMENT LINES; THEY BEGIN-- WITH TWO HYPHENS.-- A TITLE OR IDENTIFIER AT THE BEGINNING IS USEFUL.
RUN QUERY MYQUERY (FORM=MYFORM-- THIS COMMAND RUNS YOUR QUERY AND FORMATS THE REPORT.
SAVE DATA AS LASTWEEKDATA (CONFIRM=NO-- THIS COMMAND SAVES YOUR DATA IN A TABLE AND OVERRIDES THE VALUE OF-- CONFIRM IN YOUR PROFILE FOR THE DURATION OF THE COMMAND.
EXPORT TABLE LASTWEEKDATA TO LASTWEEK-- THIS COMMAND EXPORTS THE DATA THAT WAS SAVED IN THE PREVIOUS COMMAND-- TO THE DATASET ’LASTWEEK’.-- PROCEDURE HAS FINISHED.
Create a REXX procedure that calls the procedure EXAMPLE_PROCEDURE. TheREXX procedure adds logic for checking the day of week./* REXX *//* This procedure checks to see what day it is. If it’s
Monday, it runs a query and saves result to dataset. If itisn’t, a message is displayed informing the user. */
ADDRESS QRWsignal on errorif date(’w’) = ’Monday’ then
do"RUN PROC EXAMPLE_PROCEDURE"
endelse
doSAY "Sorry, it is not Monday. Report cannot be created."
endexit 0 /*Exit without errors */error:exit 8 /*Exit with error condition*/*** END ***
Chapter 4. Working with data 27
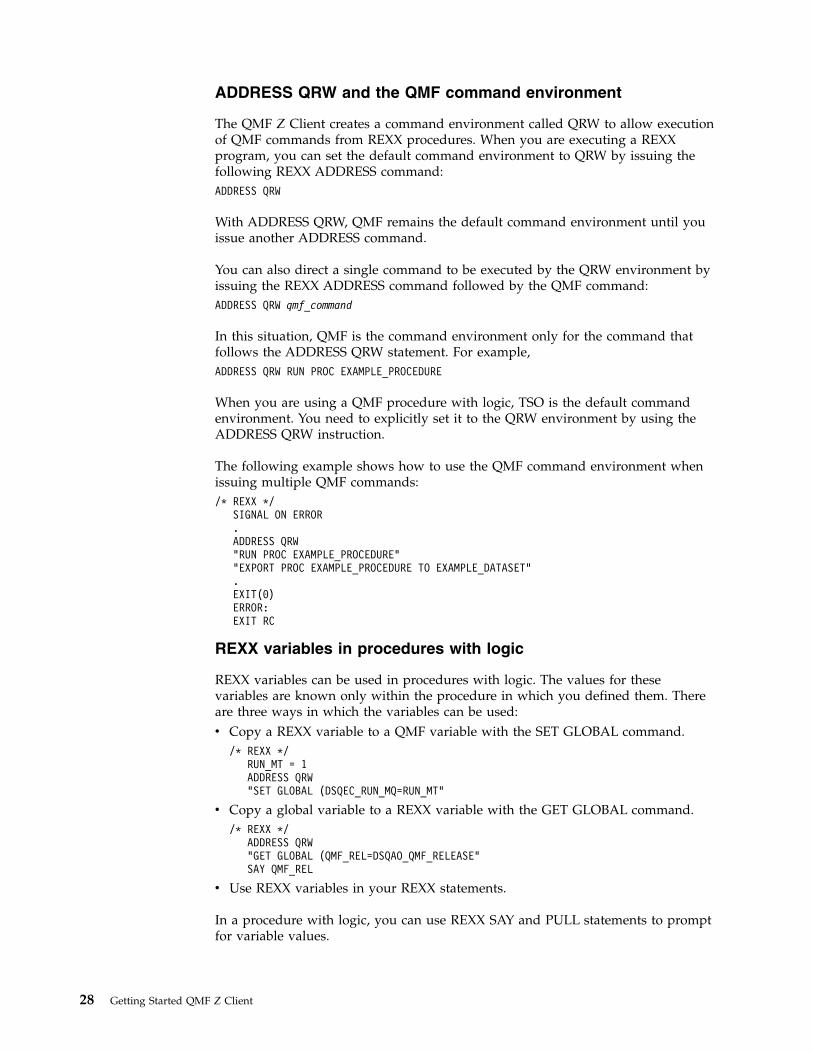
ADDRESS QRW and the QMF command environment
The QMF Z Client creates a command environment called QRW to allow executionof QMF commands from REXX procedures. When you are executing a REXXprogram, you can set the default command environment to QRW by issuing thefollowing REXX ADDRESS command:ADDRESS QRW
With ADDRESS QRW, QMF remains the default command environment until youissue another ADDRESS command.
You can also direct a single command to be executed by the QRW environment byissuing the REXX ADDRESS command followed by the QMF command:ADDRESS QRW qmf_command
In this situation, QMF is the command environment only for the command thatfollows the ADDRESS QRW statement. For example,ADDRESS QRW RUN PROC EXAMPLE_PROCEDURE
When you are using a QMF procedure with logic, TSO is the default commandenvironment. You need to explicitly set it to the QRW environment by using theADDRESS QRW instruction.
The following example shows how to use the QMF command environment whenissuing multiple QMF commands:/* REXX */
SIGNAL ON ERROR.ADDRESS QRW"RUN PROC EXAMPLE_PROCEDURE""EXPORT PROC EXAMPLE_PROCEDURE TO EXAMPLE_DATASET".EXIT(0)ERROR:EXIT RC
REXX variables in procedures with logic
REXX variables can be used in procedures with logic. The values for thesevariables are known only within the procedure in which you defined them. Thereare three ways in which the variables can be used:v Copy a REXX variable to a QMF variable with the SET GLOBAL command.
/* REXX */RUN_MT = 1ADDRESS QRW"SET GLOBAL (DSQEC_RUN_MQ=RUN_MT"
v Copy a global variable to a REXX variable with the GET GLOBAL command./* REXX */
ADDRESS QRW"GET GLOBAL (QMF_REL=DSQAO_QMF_RELEASE"SAY QMF_REL
v Use REXX variables in your REXX statements.
In a procedure with logic, you can use REXX SAY and PULL statements to promptfor variable values.
28 Getting Started QMF Z Client
Use a SAY statement (or a sequence of SAY statements) to display text on thescreen. The following example shows some sample SAY statements:say ’Hello,’ whoisuser’.’say ’Please enter the letter of the weekly report you would like, ’say ’or NONE to exit:’saysay ’ A. Sales results (Monday Only)’say ’ B. Tax figures’say ’ C. Cumulative salaries’
When you use these SAY statements, the output shown is as follows:Hello, username.Please enter the letter of the weekly report you would like,or NONE to exit:
A. Sales results (Monday Only)B. Tax figuresC. Cumulative salaries
Specify a REXX PULL statement to retrieve the input and place it in the REXXvariable answer as shown in the following example./* This procedure can produce any of three weekly reports
regularly produced by the Acme Company (Sales Results,Tax Figures, or Cumulative Salaries). It prompts the userfor the type of report required, runs the necessaryqueries, and checks for errors. */
/* REXX */ADDRESS QRWarg report . /* get any arguments from RUN PROC */ok = ’NO’ /* set variable for do loop */"GET GLOBAL (WHOISUSER = DSQAO_CONNECT_ID" /* identify user */
if report = ’’ then /* check to see if no arg entered */
/* if no arg entered, prompt user until A,B,C, or NONE is entered */do until ok = ’YES’
say ’Hello,’ whoisuser’.’say ’Please enter the letter of the weekly report you would like, ’say ’or None to exit:’saysay ’ A. Sales results (Monday Only)’say ’ B. Tax figures’say ’ C. Cumulative salaries’
pull answer /* get answer from user */answer = strip(answer) /* strip any leading or trailing blanks */
if answer = ’NONE’ then exit 3 /* exit immediately if NONE */if pos(answer,’ABC’) ¬= 0 then ok = ’YES’ /* if invalid value, */
end /* keep prompting. */else answer = report
An exit code of 3 was selected here to indicate the exit condition when the userenters None. As with any exit code, you choose the number to indicate an exitcondition.
Working with database tablesUse SQL to view, edit, save, erase, or export a database table.
Chapter 4. Working with data 29
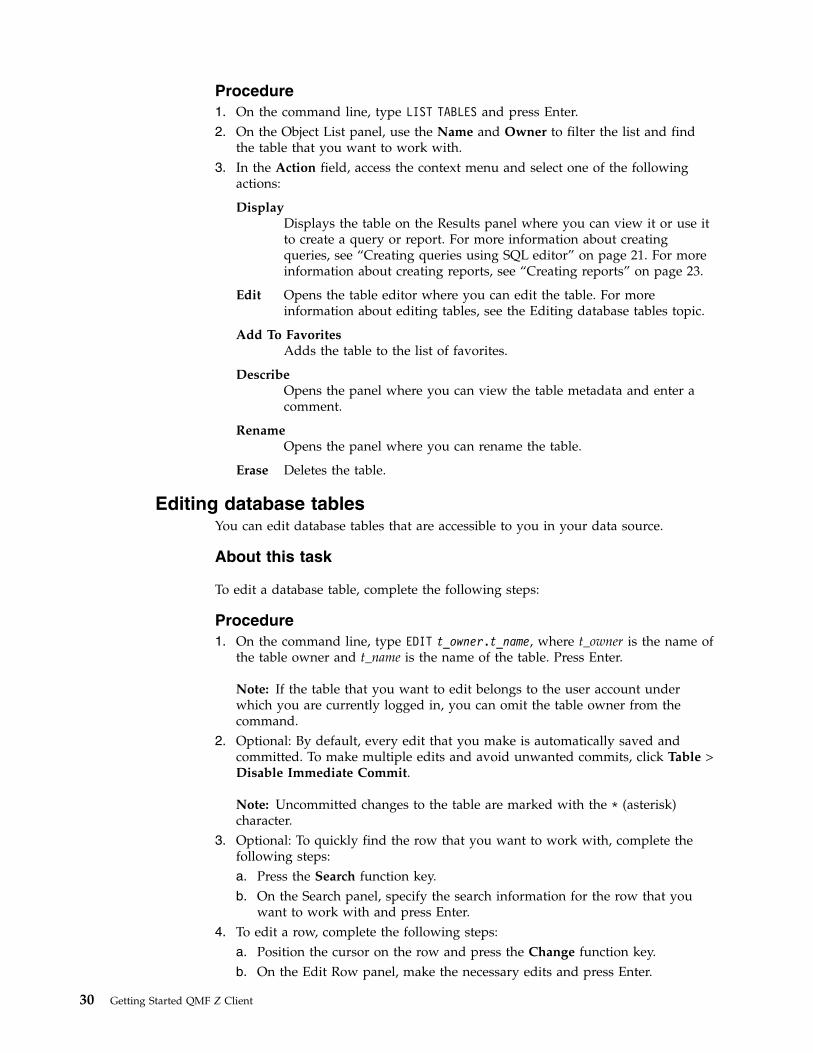
Procedure1. On the command line, type LIST TABLES and press Enter.2. On the Object List panel, use the Name and Owner to filter the list and find
the table that you want to work with.3. In the Action field, access the context menu and select one of the following
actions:
DisplayDisplays the table on the Results panel where you can view it or use itto create a query or report. For more information about creatingqueries, see “Creating queries using SQL editor” on page 21. For moreinformation about creating reports, see “Creating reports” on page 23.
Edit Opens the table editor where you can edit the table. For moreinformation about editing tables, see the Editing database tables topic.
Add To FavoritesAdds the table to the list of favorites.
DescribeOpens the panel where you can view the table metadata and enter acomment.
RenameOpens the panel where you can rename the table.
Erase Deletes the table.
Editing database tablesYou can edit database tables that are accessible to you in your data source.
About this task
To edit a database table, complete the following steps:
Procedure1. On the command line, type EDIT t_owner.t_name, where t_owner is the name of
the table owner and t_name is the name of the table. Press Enter.
Note: If the table that you want to edit belongs to the user account underwhich you are currently logged in, you can omit the table owner from thecommand.
2. Optional: By default, every edit that you make is automatically saved andcommitted. To make multiple edits and avoid unwanted commits, click Table >Disable Immediate Commit.
Note: Uncommitted changes to the table are marked with the * (asterisk)character.
3. Optional: To quickly find the row that you want to work with, complete thefollowing steps:a. Press the Search function key.b. On the Search panel, specify the search information for the row that you
want to work with and press Enter.4. To edit a row, complete the following steps:
a. Position the cursor on the row and press the Change function key.b. On the Edit Row panel, make the necessary edits and press Enter.
30 Getting Started QMF Z Client
5. To insert a new row, complete the following steps:a. Press the Add function key.b. On the Add Row panel, enter the appropriate information in each cell and
press Enter.6. To remove a row, position the cursor on the row and press the Delete function
key.7. If you have disabled the Immediate Commit option in step 2 on page 30, you
have the following options when you are done editing the table:v To save the edits, click Table > Commit.v To cancel the edits, click Table > Roll Back.
Working with batch objectsA batch object is a set of parameters that creates a JCL batch job, which you use torun QMF queries and procedures in background mode.
The following topics describe working with batch objects:
Creating batch objectsUse the batch wizard to create a batch object.
About this task
To create a batch object, complete the following steps:
Procedure1. On the command line, type BATCH and press Enter.2. Press the Add function key.3. On the Batch Wizard - Main Parameters panel, complete the following steps:
a. In the Batch object name field, enter a name for the object.b. In the Batch PROC name field, specify the full path to the batch procedure
that you want to use.c. Specify whether to create an object or use an existing one:v To create a batch procedure for a query, select Create batch PROC for
QUERY. Then continue with step 4.v To create a batch procedure for a procedure, select Create batch PROC
for PROC option. Then continue with step 5.v To use an existing batch procedure, select the Use existing batch PROC
option.d. Press the Next function key to open the next panel of the wizard.
4. On the Batch Wizard - Parameters for QUERY, complete the following steps:a. In the QUERY name field, enter the name of the query to use for the batch
object. To use the query that is currently open in the editor, select Usequery from work area. Note that the work area can contain several openobjects. If you select the Use query from work area option, the mostrecently opened query is used. Also note, that if the Use query from workarea check box is selected, the currently open query is saved with the namethat is specified in the Object name field.
b. In the FORM name field, enter the name of the form to use for your batchobject. To use the form that is currently open in the editor, select Use formfrom work area. Note, that the work area can contain several open objects.
Chapter 4. Working with data 31
If you select the Use form from work area option, the most recently openedform is used. Also note, that if the Use form from work area check box isselected, the currently open form is saved with the name that is specified inthe Object name field.
c. In the TABLE name to save result DATA field, specify the name for theresults file and the full path to the location where you want to save it.
d. Press the Next function key to open the next panel of the wizard.5. On the Batch Wizard - Parameters for PROC panel, complete the following
steps:a. In the PROC name field, specify the name of the procedure that you want
to use for your batch object. If you want to use the procedure that iscurrently open in the editor, select the Use procedure from work areaoption. Note, that the work area can contain several open objects. If youselect the Use procedure from work area option, the most recently openedprocedure is used.
b. Press the Next function key to open the next panel of the wizard.The Batch Wizard - REPORT Parameters panel opens. This panel allows you tospecify the email address to which you want to send your report. If you do notwant to send your report in an email, press the Next function key and go tostep 8.
6. On the Batch Wizard - REPORT Parameters panel, complete the followingsteps:a. In the Emails to send REPORT field, specify one or more email addresses
to which you want to send your report.b. In the From field, specify the email address of the sender.c. In the Subject field, type the subject of your email.d. In the Report type field, specify the format to which you want to convert
your report before sending the email. Valid values are: TEXT, PDF, and HTML.If you leave the field blank, the report is automatically converted to the textformat.
e. Press the Next function key to open the next panel of the wizard.7. On the Batch Wizard - SMTP Settings panel, complete the following steps:
a. In the SMTP server field, type the address of the SMTP server to use.b. In the Port field, type the number of the server port to use.c. In the User and Password fields, specify your QMF Z Client user
credentials.d. Press the Next function key to open the next panel of the wizard.
8. On the Batch Wizard - Common Parameters panel, complete the followingsteps:a. If you want to run a batch job for another user, use the TSO login for batch
job field and the TSO password for batch job field to specify logininformation of the user for which you want to run the batch job.
b. Use the Login to database field and the Password to database field, specifythe user credentials that you use to connect to the database that you wantto work with.
c. In the Name of repository field, see the name of the repository that you areworking with.
d. Use the Login to repository and Password to repository fields to specifythe login information for the repository.
32 Getting Started QMF Z Client
e. Use the Name of data source, Login to data source, and Password to datasource fields to specify the data source that you want to work with and thelogin information for it.
f. Press Enter to create your batch object.
Working with batch objectsRun, edit, or remove existing QMF batch objects.
Procedure1. On the command line, enter BATCH and press Enter.2. On the Batch List panel, position the cursor on the batch object that you want
to work with and press one of the following function keys:
SubmitRuns the specified batch object.
Edit Opens the specified object in Batch Wizard where you can edit it.Editing an object is similar to creating an object. For more informationabout creating batch objects, see “Creating batch objects” on page 31.
Add Creates a batch object. For more information about creating batchobjects, see “Creating batch objects” on page 31.
RemoveDeletes the specified batch object.
JCL ExportExports the specified batch object to a TSO data set or a UNIX file.
Chapter 4. Working with data 33

34 Getting Started QMF Z Client
Appendix A. Accessibility
Accessibility features help a user who has a physical disability, such as restrictedmobility or limited vision, to use a software product successfully.
Accessibility in QMF Z ClientQMF Z Client includes several accessibility features.
Accessibility features in QMF Z Client enable users to:v Use assistive technologies such as screen readers and screen magnifier software.
Consult the assistive technology documentation for specific information whenusing it to access z/OS® interfaces.
v Customize display attributes such as color and font size.v Operate specific or equivalent features by using only the keyboard. Refer to the
following publications for information about accessing ISPF interfaces:– z/OS ISPF User's Guide, Volume 1
– z/OS TSO/E Primer
– z/OS TSO/E User's Guide
Navigation in QMF Z ClientThe means that you can use to navigate among QMF panels will differ dependingon whether your terminal emulator supports vector graphics.
If you are using a mouse and a keyboard, you can navigate among QMF panels byclicking the Action bar items. To perform some of the actions, such as accessing thelist of favorites or recently used objects from the Home panel, you must positionthe cursor on the item that you want to access and press Enter.
If you are using only a keyboard, use the command lines and specific QMFcommands to navigate among panels. To access the Action bar, enter the ACTIONS Xcommand, where X is the underscored letter in the name of the Action bar item.
Some of the QMF panels feature clickable + and > characters. The + charactermarks the fields that support the LIST command. Clicking the + character is theequivalent of pressing the List function key. The > character marks the fields thatcan be opened on a separate panel. Clicking the > character is the equivalent ofpressing the Show Field function key.
35

36 Getting Started QMF Z Client
Appendix B. Troubleshooting
Diagnose and correct problems that you might experience with QMF.
QMF trace featureQMF provides a means of tracing QMF activity during a user-session. Trace outputcan help you analyze errors such as incorrect or missing output, performanceproblems, and loops. This section shows you how to allocate the storage data setfor the trace output, how to start the facility, and how to view the trace data fordiagnosis.
Allocating the trace data set
Trace information is recorded in the FQMDEBUG data set, which is used only fortrace purposes. Before you start a QMF session, this data set must be allocated,either automatically or manually.
To determine if the data set is automatically allocated, consult your TSOadministrator. To manually allocate the data set, issue the following TSO statementbefore you start QMF for the diagnostic session:ALLOC DDNAME(FQMDEBUG) SYSOUT(A) RECFM(F B A) LRECL(121)
Tracing QMF activity1. Allocate a data set whose ddname is FQMDEBUG.2. Use the DSQSDBUG parameter to start QMF Z Client. The value of this
parameter determines the level of detail in the trace output. Valid values are:
ALL QMF activity is traced at the highest level of detail, including theprogram failures that might occur during QMF initialization. If thetrace output exceeds 32,767 rows, you must use a transient data queueto hold it.
NONENo QMF activity is traced.
X Enables QMF Z Client internal debug trace. If you use this value,specify the level of detail in the trace output. Specify X1 for themedium level of detail. Specify X2 for the highest level of detail.
L Traces QMF Z Client messages and commands. If you use this value,specify the level of detail in the trace output. Specify L1 to log allmessages, specify L2 to log all of the L1 records and additional recordsthat describe the execution of QMF commands. Use the L2 value to logeach command that the user issues and QMF response to thecommand.
Use the values X1, X2, L1, and L2 in any combination to provide various levels ofdetail in the trace output.
Printing or displaying trace output
To allocate the FQMDEBUG data set for printing, issue the following statements:
37
FREE FILE(FQMDEBUG)ATTR DEBUG RECFM(F B A) LRECL(121)ALLOC DDNAME(FQMDEBUG) SYSOUT(A) USING(DEBUG)
The allocated data set contains 121-character records. The first character of eachrecord is an ANSI carriage-control character. The trace information is formattedwith 120 characters per line, not including the ANSI carriage-control character.
If you allocated the output from the FQMDEBUG data set to go to the HOLDqueue, issue the following TSO command to release the output to the OUTPUTqueue:FREE DDNAME(FQMDEBUG)
To allocate the FQMDEBUG data set as a sequential data set that you can displayby using an online editor, issue the following statements:FREE FILE(FQMDEBUG)ATTR DEBUG RECFM( F B A) LRECL(81)ALLOC DDNAME(FQMDEBUG) DSNAME(DEBUG.LIST) NEW KEEP
The allocated data set consists of 81-character records. The first character of eachrecord is an ANSI carriage-control character. The trace information is formattedwith 80 characters per line, not including the ANSI carriage-control character.
Interrupting QMF commandsUse the Attention function to interrupt the execution of a QMF command.
In TSO, the QMF interrupt handler can be activated even though a QMF commandis inactive. To interrupt QMF, press the Attn key.
38 Getting Started QMF Z Client
Appendix C. QMF Commands
ACTIONS commandUse the ACTIONS command to access the Action bar items from the command line.
Syntax>>--ACtions-+-------+-<<
+-value-+
Uppercase letters in the diagram show the minimum set of letters required to issuethe command.
Parameters
To expand a specific Action bar item, use the ACTIONS command with theunderscored letter of the Action bar item name as the command value. If you usethe ACTIONS command without any value, it positions the cursor on the Action bar,without expanding any specific item.
Examples
ACTIONS FExpands the File item of the Action bar.
AC F Also expands the File item of the Action bar.
ACTIONS VExpands the View item of the Action bar.
ADD commandUse the ADD command to create objects on certain QMF panels.
Syntax>>--ADd--<<
Uppercase letters in the diagram show the minimum set of letters required to issuethe command.
Parameters
Use the ADD command on the Globals panel to define new global variables or inthe Table Editor to add rows to database tables.
ExamplesADD
AD
BACKWARD commandUse the BACKWARD command to scroll the scrollable area towards the top.
39
Syntax>>--BACkward-----+---------+--<<
+--value--++--Max----++--Half---++--Page---++--CSR----+
Uppercase letters in the diagram show the minimum set of letters required to issuethe command.
Parameters
The following parameters can be specified for the BACKWARD command:
A number in the range 1 - 9999Scrolls the number of pages or rows.
MAX Scrolls to the top.
HALF Scrolls by half a page.
PAGE Scrolls by one page.
CSR Scrolls based on the position of the cursor. If the cursor is in a scrollablearea, scrolls to the top. If the cursor is outside of or at the end thescrollable area, scrolls one page.
If you issue the BACKWARD command without a parameter, the default parameter isused. You can view or change the default parameter in the Scroll field, which islocated in the lower right corner of the screen.
ExamplesBACKWARD MAX
BACKWARD 4
BAC
BATCH commandUse the BATCH command to open the Batch List panel, which you use to create andedit QMF batch objects and to run and export JCL jobs.
Syntax>>---BATch---<<
Uppercase letters in the diagram show the minimum set of letters required to issuethe command.
ExamplesBATCH
BAT
BOTTOM commandUse the BOTTOM command to scroll to the last line of the scrollable area. BOTTOM isequivalent to FORWARD MAX.
40 Getting Started QMF Z Client
Syntax>>--BOttom--<<
Uppercase letters in the diagram show the minimum set of letters required to issuethe command.
ExamplesBOTTOM
BO
CHANGE commandUse the CHANGE command to change any table, column, joining option, or conditionin a prompted query.
Syntax>>--CHAnge--<<
Uppercase letters in the diagram show the minimum set of letters required to issuethe command.
Parameters
To change a table, column, joining option, or condition in a prompted query, typeCHANGE on the command line, position the cursor on the element to change, andpress Enter.
ExamplesCHANGE
CHA
CHECK commandUse the CHECK command to check a FORM panel for errors. Note that you have tobe on one of the FORM panels of your report in order to use the CHECK command.
Syntax>>--CHEck--<<
Uppercase letters in the diagram show the minimum set of letters required to issuethe command.
ExamplesCHECK
CHE
CLEAR commandUse the CLEAR command to clear all Action fields on the Object List panel.
Syntax>>--CLEar--<<
Appendix C. QMF Commands 41

Uppercase letters in the diagram show the minimum set of letters required to issuethe command.
ExamplesCLEAR
CLE
CLOSE commandThe CLOSE command closes the currently open document.
Syntax>>--CLOse--+-----+--<<
+-All-+
Uppercase letters in the diagram show the minimum set of letters required to issuethe command.
Parameters
If you specify ALL as the parameter for the CLOSE command, the command closesall currently open documents.
ExamplesCLOSE
CLOSE ALL
CLO A
CONNECT commandUse the CONNECT command to connect to a remote database server.
Syntax
To connect to a database server, issue the following command:>>--CONNect--TO--servername--<<
To connect to a database server and set the user, issue the following command:>>--CONNect---authorizationid--TO--servername--(Password=password--<<
Uppercase letters in each diagram show the minimum set of letters required toissue the command.
Parameters
The following parameters can be specified for the CONNECT command:
servernameSpecifies the name of the server to which you want to connect.
authorizationidSpecifies the user ID for the database user. The user must be granted theCONNECT permission with a password.
PASSWORDSpecifies the password for the database user.
42 Getting Started QMF Z Client
ExamplesCONNECT TO example_server
CONN example_auth_id TO example_server(PASSWORD=abc
CONVERT commandThe CONVERT command converts a prompted query or an SQL query into a querywith standard SQL syntax. The original query remains unaffected by thisoperation.
Syntax
To convert the currently open query, use the following command:>>--CONVert--QUERY--<<
To convert a query that is stored in a database, use the following command:>>--CONVert--queryname--+-------------------+-<<
+-Substitute=Yes/No-+
Uppercase letters in each diagram show the minimum set of letters required toissue the command.
Parameters
The following parameters can be specified for the CONVERT command:
querynameThe name of the query that you want to convert.
SUBSTITUTESpecifies whether the variables in the query will be assigned values or not.Valid values for this parameter are:
YES If the query uses one or more variables, QMF attempts to assign avalue to each variable. If all the variables are defined either via the&variable parameter, or via a predefined global variable, noprompt panel will be displayed. If QMF cannot assign a value tothe variable, it will prompt the user to enter the value.
NO No values are assigned to the variables.
ExamplesCONVERT QUERY
CONV query01
CREATE commandUse the CREATE command to create QMF objects.
Syntax>>--CReate-+-Query--+--<<
+-Proc---++-FORm---++-FOLder-+-foldername-+(--------------------+
+-Folder=parentfolder-++-Comment=text--------+
Appendix C. QMF Commands 43
Uppercase letters in the diagram show the minimum set of letters required to issuethe command.
Parameters
The following parameters can be specified for the CREATE command:
QUERYCreates a query and opens the query editor.
PROC Creates a procedure and opens the procedure editor.
FORMCreates a default form for data and displays it on the screen.
FOLDERCreates a folder in the specified location.
Note: To create a workspace folder, you must specify the full path to theworkspace as the value for the Folder parameter.
The following parameters can be specified for the CREATE FOLDER command:
foldernameSpecifies the name of the folder that you are creating.
FOLDERSpecifies the name of the parent workspace folder.
COMMENTSpecifies a comment for the folder. Make sure to enclose the comment textin quotation marks or parentheses.
ExamplesCREATE QUERY
CREATE Q
CREATE PROC
CREATE FORM
CREATE FOLDER NEW_FOLDER (FOLDER=parent_folder
CREATE FOLDER NEW_FOLDER (RSBI:/.WORKSPACES/WORKSPACENAME
DELETE commandUse the DELETE command to remove specific items from some QMF panels.
Syntax>>--DELete--<<
Uppercase letters in the diagram show the minimum set of letters required to issuethe command.
Commentary
Use the DELETE command to remove any of the following items:v A column on the Form.Main panel or the Form.Columns panel.v A calculation expression on the Form.Calculations panel.v A conditional expression on the Form.Conditions panel.
44 Getting Started QMF Z Client
v A line of text on the Form.Break panel, or on the Form.Detail, Form.Final, orForm.Page panels.
v A row from a database table when using the Table Editor.v A list item on any of the Prompted Query Editor panels.v A user-defined global variable on the Globals panel.
To remove an item, complete the following steps:1. Type DELETE in the command line.2. Position the cursor on the item that you want to remove.3. Press Enter.
ExamplesDELETE
DEL
DESCRIBE commandUse the DESCRIBE command to view detailed information about QMF objects.
Syntax>>--DEScribe--<<
Commentary
Use the DESCRIBE command on the Object List panel to view detailed informationabout the following objects:v Formsv Proceduresv Queriesv Tablesv Viewsv Folders
To view the detailed information about an object, complete the following steps:1. Type DESCRIBE in the command line.2. Position the cursor on the item whose detailed information you want to view.3. Press Enter.
ExamplesDESCRIBE
DES
DISPLAY commandThe DISPLAY command displays an object from the temporary storage or from adatabase. The DISPLAY command can also be used to navigate among panels.
Syntax
To display a query, a procedure, or a database table, use the following command:
Appendix C. QMF Commands 45
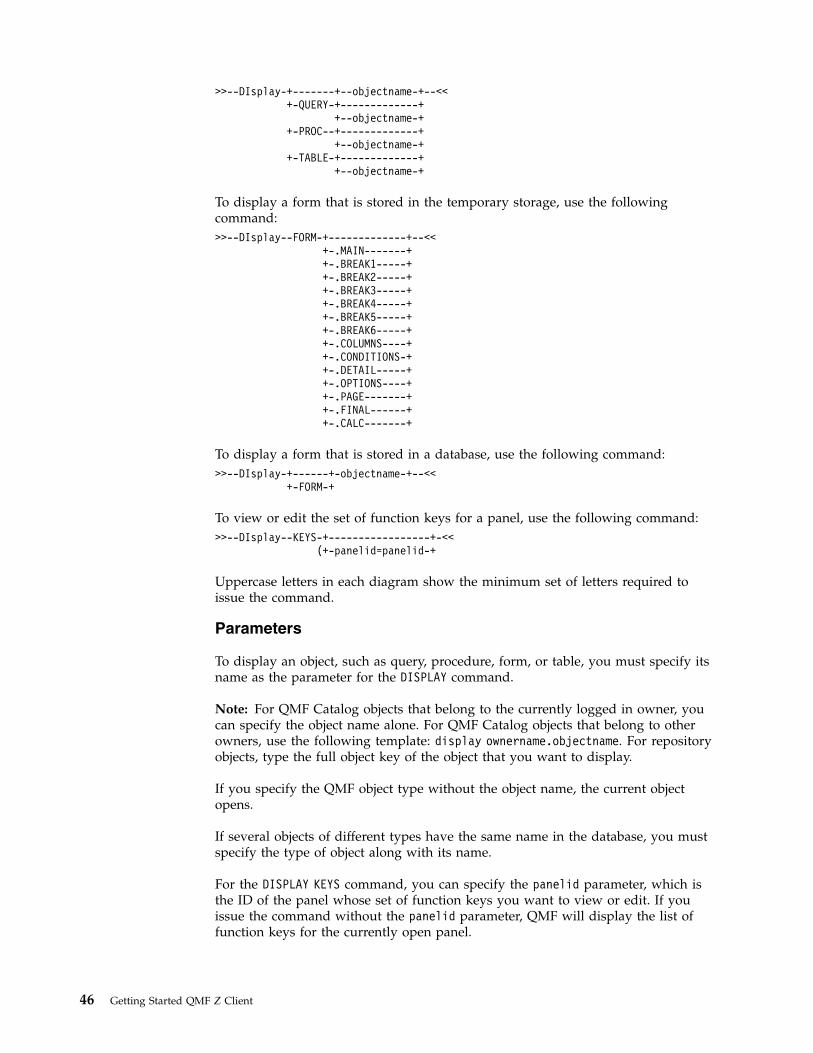
>>--DIsplay-+-------+--objectname-+--<<+-QUERY-+-------------+
+--objectname-++-PROC--+-------------+
+--objectname-++-TABLE-+-------------+
+--objectname-+
To display a form that is stored in the temporary storage, use the followingcommand:>>--DIsplay--FORM-+-------------+--<<
+-.MAIN-------++-.BREAK1-----++-.BREAK2-----++-.BREAK3-----++-.BREAK4-----++-.BREAK5-----++-.BREAK6-----++-.COLUMNS----++-.CONDITIONS-++-.DETAIL-----++-.OPTIONS----++-.PAGE-------++-.FINAL------++-.CALC-------+
To display a form that is stored in a database, use the following command:>>--DIsplay-+------+-objectname-+--<<
+-FORM-+
To view or edit the set of function keys for a panel, use the following command:>>--DIsplay--KEYS-+-----------------+-<<
(+-panelid=panelid-+
Uppercase letters in each diagram show the minimum set of letters required toissue the command.
Parameters
To display an object, such as query, procedure, form, or table, you must specify itsname as the parameter for the DISPLAY command.
Note: For QMF Catalog objects that belong to the currently logged in owner, youcan specify the object name alone. For QMF Catalog objects that belong to otherowners, use the following template: display ownername.objectname. For repositoryobjects, type the full object key of the object that you want to display.
If you specify the QMF object type without the object name, the current objectopens.
If several objects of different types have the same name in the database, you mustspecify the type of object along with its name.
For the DISPLAY KEYS command, you can specify the panelid parameter, which isthe ID of the panel whose set of function keys you want to view or edit. If youissue the command without the panelid parameter, QMF will display the list offunction keys for the currently open panel.
46 Getting Started QMF Z Client
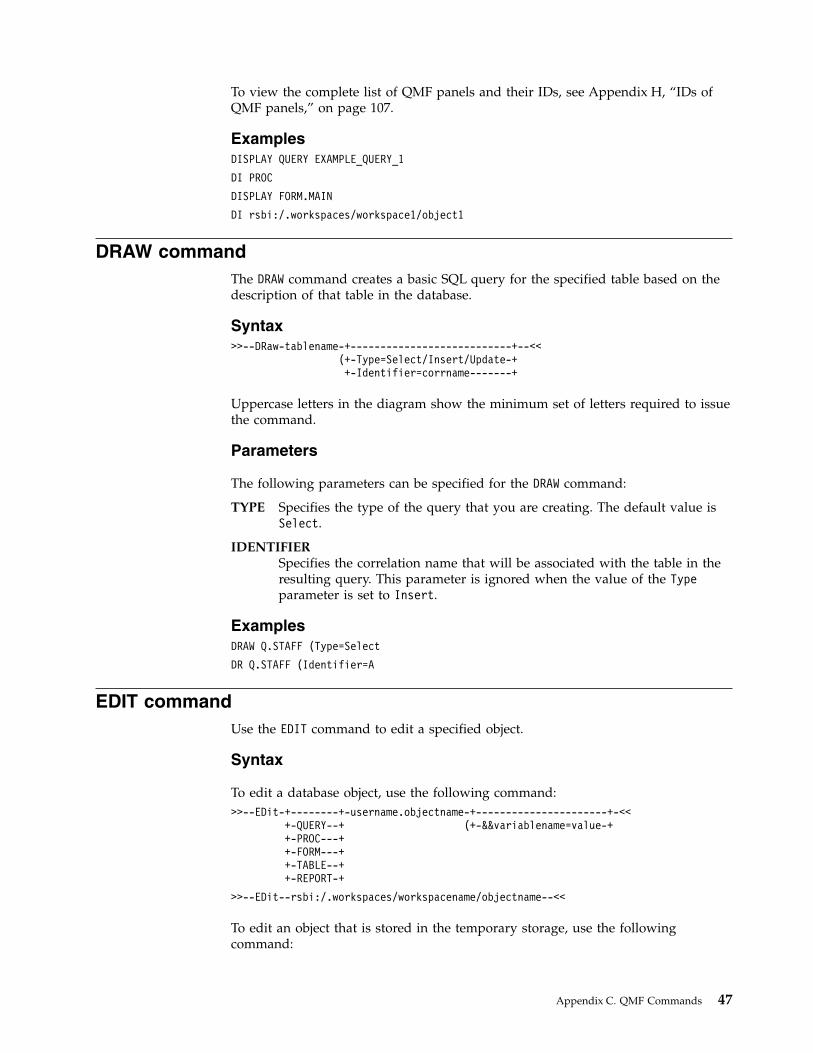
To view the complete list of QMF panels and their IDs, see Appendix H, “IDs ofQMF panels,” on page 107.
ExamplesDISPLAY QUERY EXAMPLE_QUERY_1
DI PROC
DISPLAY FORM.MAIN
DI rsbi:/.workspaces/workspace1/object1
DRAW commandThe DRAW command creates a basic SQL query for the specified table based on thedescription of that table in the database.
Syntax>>--DRaw-tablename-+---------------------------+--<<
(+-Type=Select/Insert/Update-++-Identifier=corrname-------+
Uppercase letters in the diagram show the minimum set of letters required to issuethe command.
Parameters
The following parameters can be specified for the DRAW command:
TYPE Specifies the type of the query that you are creating. The default value isSelect.
IDENTIFIERSpecifies the correlation name that will be associated with the table in theresulting query. This parameter is ignored when the value of the Typeparameter is set to Insert.
ExamplesDRAW Q.STAFF (Type=Select
DR Q.STAFF (Identifier=A
EDIT commandUse the EDIT command to edit a specified object.
Syntax
To edit a database object, use the following command:>>--EDit-+--------+-username.objectname-+----------------------+-<<
+-QUERY--+ (+-&&variablename=value-++-PROC---++-FORM---++-TABLE--++-REPORT-+
>>--EDit--rsbi:/.workspaces/workspacename/objectname--<<
To edit an object that is stored in the temporary storage, use the followingcommand:
Appendix C. QMF Commands 47
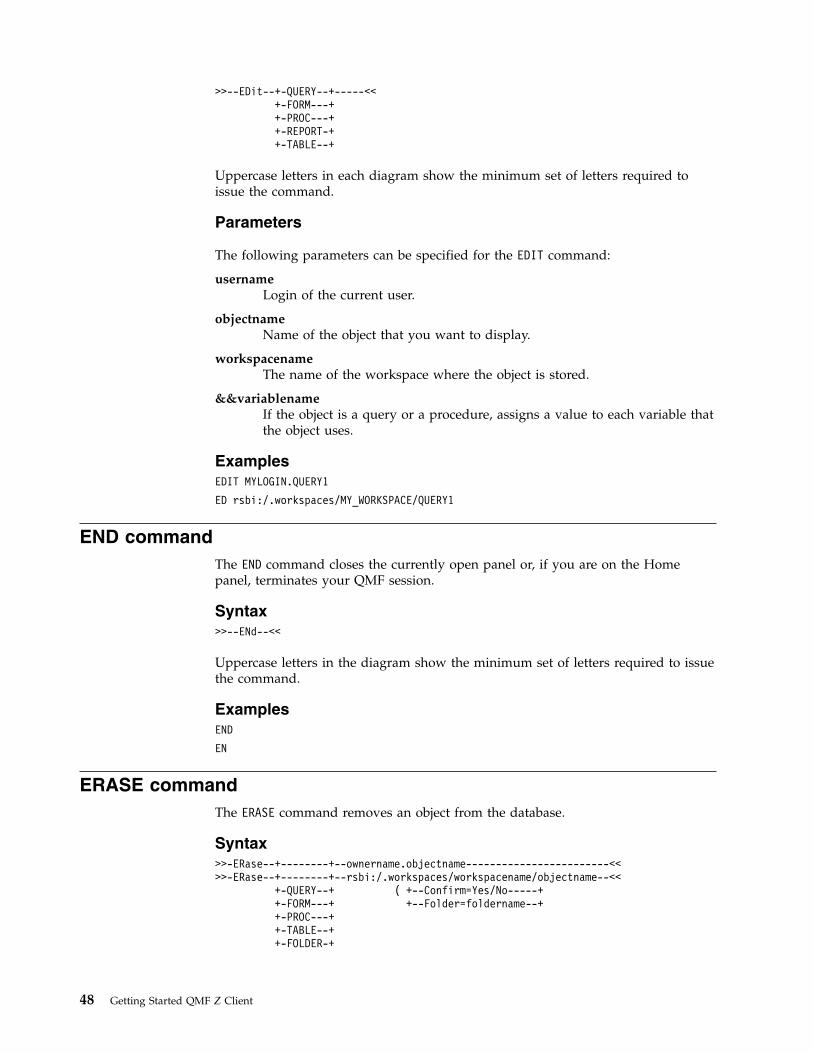
>>--EDit--+-QUERY--+-----<<+-FORM---++-PROC---++-REPORT-++-TABLE--+
Uppercase letters in each diagram show the minimum set of letters required toissue the command.
Parameters
The following parameters can be specified for the EDIT command:
usernameLogin of the current user.
objectnameName of the object that you want to display.
workspacenameThe name of the workspace where the object is stored.
&&variablenameIf the object is a query or a procedure, assigns a value to each variable thatthe object uses.
ExamplesEDIT MYLOGIN.QUERY1
ED rsbi:/.workspaces/MY_WORKSPACE/QUERY1
END commandThe END command closes the currently open panel or, if you are on the Homepanel, terminates your QMF session.
Syntax>>--ENd--<<
Uppercase letters in the diagram show the minimum set of letters required to issuethe command.
ExamplesEND
EN
ERASE commandThe ERASE command removes an object from the database.
Syntax>>-ERase--+--------+--ownername.objectname------------------------<<>>-ERase--+--------+--rsbi:/.workspaces/workspacename/objectname--<<
+-QUERY--+ ( +--Confirm=Yes/No-----++-FORM---+ +--Folder=foldername--++-PROC---++-TABLE--++-FOLDER-+
48 Getting Started QMF Z Client
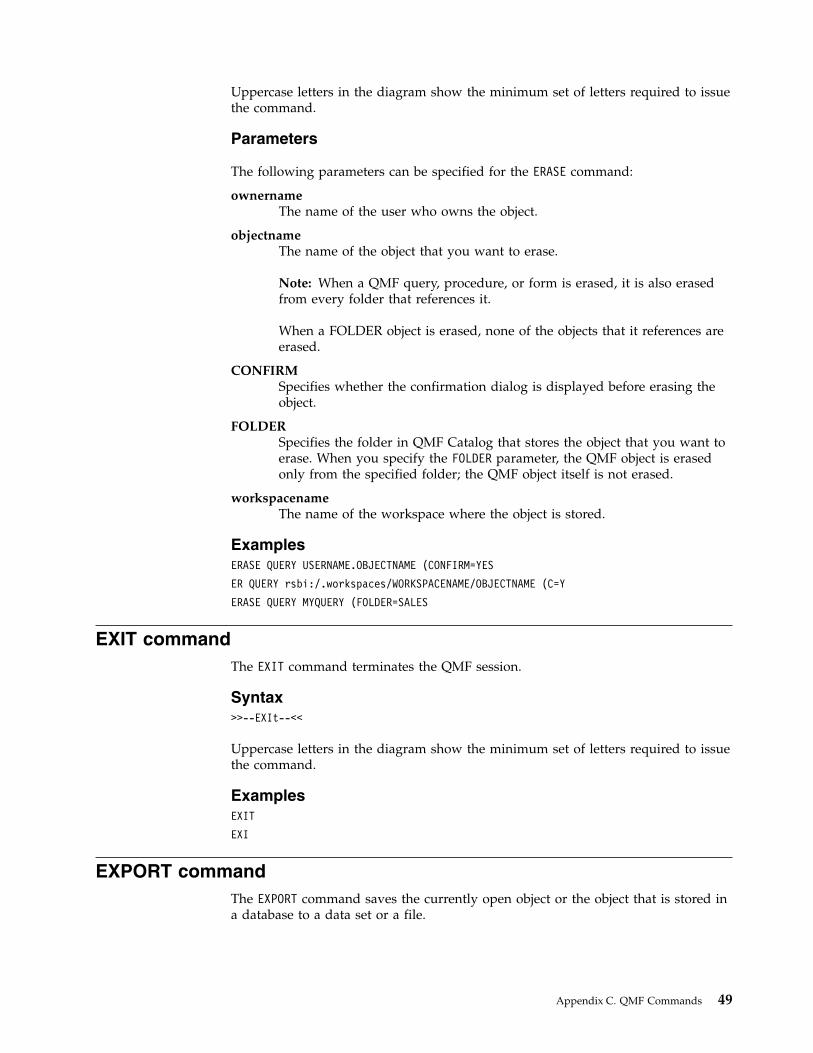
Uppercase letters in the diagram show the minimum set of letters required to issuethe command.
Parameters
The following parameters can be specified for the ERASE command:
ownernameThe name of the user who owns the object.
objectnameThe name of the object that you want to erase.
Note: When a QMF query, procedure, or form is erased, it is also erasedfrom every folder that references it.
When a FOLDER object is erased, none of the objects that it references areerased.
CONFIRMSpecifies whether the confirmation dialog is displayed before erasing theobject.
FOLDERSpecifies the folder in QMF Catalog that stores the object that you want toerase. When you specify the FOLDER parameter, the QMF object is erasedonly from the specified folder; the QMF object itself is not erased.
workspacenameThe name of the workspace where the object is stored.
ExamplesERASE QUERY USERNAME.OBJECTNAME (CONFIRM=YES
ER QUERY rsbi:/.workspaces/WORKSPACENAME/OBJECTNAME (C=Y
ERASE QUERY MYQUERY (FOLDER=SALES
EXIT commandThe EXIT command terminates the QMF session.
Syntax>>--EXIt--<<
Uppercase letters in the diagram show the minimum set of letters required to issuethe command.
ExamplesEXIT
EXI
EXPORT commandThe EXPORT command saves the currently open object or the object that is stored ina database to a data set or a file.
Appendix C. QMF Commands 49

Syntax
Use the following command to export a QMF query, procedure, form, report, ordata from the temporary storage:>>--EXPort-+-QUERY--+-TO-+-datasetname-+--+---------------------+--<<
+-PROC---+ +-pathname----+ (+-Member=membername---++-CONfirm=Yes/No------++-Saveatserver=Yes/No-+
+-FORM---+-TO-+-datasetname-+--+---------------------++-pathname----+ (+-Language=value------+
+-Member=membername---++-CONfirm=Yes/No------++-Saveatserver=Yes/No-+
+-REPORT-+-TO-+-datasetname-+--+---------------------++-pathname----+ (+-Dataformat=value----+
+-Member=membername---++-CONfirm=Yes/No------++-Saveatserver=Yes/No-++-Width=integer-------++-Length=integer------++-CCsid=value---------+
+-DATA---+-TO-+-datasetname-+--+---------------------++-pathname----+ (+-Dataformat=value----+
+-Outputmode=value----++-Member=membername---++-CONfirm=Yes/No------++-Saveatserver=Yes/No-++-DATEformat=value----++-Timeformat=value----++-Outputmode=value----++-LOBSInfile=Yes/No---++-LOBSTo=pth1;pth2;---++-LOBFile=value-------++-CCsid=value---------++-Unicode=Yes/No------++-Mode=GRID/RAW-------++-Columnheadings=Yes/No-+
Use the following command to export a QMF query, procedure, form, or table froma database:>>-EXPort-+-QUERY-+-objectname-TO-+-datasetname-+--+---------------------+-<<
+-PROC--+ +-pathname---+ (+-Member=membername---++-CONfirm=Yes/No------++-Saveatserver=Yes/No-+
+-FORM--+-formname-TO-+-datasetname-+----+---------------------++-pathname----+ (+-Language=value------+
+-Member=membername---++-CONfirm=Yes/No------++-Saveatserver=Yes/No-+
+-TABLE-+-tablename-+-TO-+-datasetname-+-+---------------------++-pathname----+(+-Dataformat=value----+
+-Outputmode=value----++-Member=membername---++-CONfirm=Yes/No------++-DATEformat=value----++-Timeformat=value----++-LOBSInfile=Yes/No---++-LOBSTo=pth1;pth2;---++-LOBFile=value-------++-CCsid=value---------+
+-Columnheadings=Yes/No-++-Unicode=Yes/No--------++-Saveatserver=Yes/No---+
50 Getting Started QMF Z Client
Uppercase letters in each diagram show the minimum set of letters required toissue the command.
Parameters
objectname, formname, tablenameThe name of the object that you want to export.
datasetnameThe name of the TSO data set where you want to export the object.
pathnameThe name of the UNIX file where you want to export the object.
MEMBERIndicates that the object will be exported to a member of TSO partitioneddata set.
membernameThe name of the member that receives the exported object. Member namesare limited to 8 characters. The member name is added (in parentheses) asa suffix to the data set name.
CONFIRMSpecifies whether the confirmation dialog must be displayed beforereplacing an existing file.
DATEFORMATSpecifies how the date is formatted in the HTML, CSV, or TXT export file.Date formats are specified by Java date pattern strings. Within date patternstrings, letters from 'A' to 'Z' and from 'a' to 'z' that are not enclosed inquotation marks are interpreted as pattern letters representing thecomponents of a date string. To avoid interpretation, text can be enclosedin single quotation marks (').
Note: If the format string includes spaces, enclose it in quotation marks.For more information about Java format strings, see the Java 2 SDK,Standard Edition Documentation.
TIMEFORMATSpecifies how the time is formatted in the HTML, CSV, or TXT export file.Time formats are specified by Java time pattern strings. Within timepattern strings, letters from 'A' to 'Z' and from 'a' to 'z' that are notenclosed in quotation marks are interpreted as pattern letters representingthe components of a time string. To avoid interpretation, text can beenclosed in single quotation marks (').
Note: If the format string includes spaces, enclose it in quotation marks.For more information about Java format strings, see the Java 2 SDK,Standard Edition Documentation.
LOBSINFILESpecifies whether the LOBs must be included in the exported data.
Note: For the EXPORT TABLE and EXPORT DATA commands, this parameter isavailable only for the IXF data format.
LOBSTOSpecifies the location to save the LOBs.
Appendix C. QMF Commands 51
Note: For the EXPORT TABLE and EXPORT DATA commands, this parameter isavailable only for the IXF data format.
LOBFILESpecifies the base name of the exported LOBs.
Note: For the EXPORT TABLE and EXPORT DATA commands, this parameter isavailable only for the IXF data format.
CCSIDSpecifies the code page (coded character set identification number) to usewhen saving the file. This value can either be an integer or the Java™
encoding name of the code page.
WIDTHSpecifies the width in units for a report page.
LENGTHSpecifies the length in units for a report page.
COLUMNHEADINGSSpecifies whether the column headers will be exported. This parameter isonly available for export into HTML, CSV, or TEXT files.
UNICODESpecifies whether the graphic columns will be saved as UNICODE. Thisoption is only applicable when saving data in IXF format.
MODESpecifies whether the query result set is saved with formatting and addedcalculated columns. You can specify one of the following values:v GRID - specifies that all of the data as it is currently formatted in the
current query result set will be saved. All calculated columns that havebeen added to the query result set will be saved.This is the default value for the PDF, XLS, and XLSX formats.
Note: MODE GRID exports labels if the value of theDSQDC_COL_LABELS global variable is set to 1. MODE GRID exportsnames if the value of the DSQDC_COL_LABELS global variable is set to0.
v RAW - specifies that all of the data in the current query result set will besaved. None of the formatting that has been applied to the data will besaved. None of the calculated columns that have been added to thequery results will be saved.This is the default value for all formats other than PDF, XLS, and XLSX.
Note: MODE RAW always exports names. This also applies when theMODE parameter is omitted.
Note: The parameter is ignored if Dataformat=XLS, XLSX.
SAVEATSERVERSpecifies whether or not to include the Root output directory in the exportpath of an object. In QMF Z Client, you can specify only the path that liesin the root directory set by administrator. Otherwise, the export will beforbidden and an error will occur.
LANGUAGESpecifies whether a form is exported in English or in the current session
52 Getting Started QMF Z Client
language. A form that is exported in English can be run in any session. Aform exported in the session language can only be run in a session of thesame language. The default value is provided by theDSQEC_FORM_LANG global variable.
DATAFORMATSpecifies the file format for the object that you are exporting. Valid valuesare:
HTMLThe HyperText Markup Language format. You can specify HTMLonly when you are exporting a report. This is the default formatfor UNIX files. The TSO data set or UNIX file can be transferred toa web server where it can be viewed via a web browser. Themaximum length of an exportable data row for this format is 32KB. You can use the XML format to export character data if youneed support for record lengths beyond this limit; the XML formatsupports record lengths of up to 2 GB.
IXF The Integrated Exchange Format. This can be used only whenexporting data objects and tables. The maximum length of anexportable data row for this format is 32 KB. You can use the XMLformat to export character data if you need support for recordlengths beyond this limit; the XML format supports record lengthsof up to 2 GB.
DBF The dBase database file format. This option can be used only whenexporting data objects and tables.
XML The Extensible Markup Language format. The data is exported asan XML document in Unicode UTF-8 format with a CCSID of 1208.You can use this option only when exporting data objects or tables,and this is the only option when exporting data or tables to aUNIX file.
The maximum length of an exportable data row for this format is32 KB.
If you are working with this format, ensure that all characters inthe XML data that you want to export are supported by the XMLparser.
PDF The Adobe Portable Document Format. This option can be usedonly when exporting reports.
XLS The Microsoft Excel Binary File format. This option can be usedonly when exporting data objects and tables.
XLSX The Microsoft Excel Binary File format used in Microsoft Excel2007 and later. This option can be used only when exporting dataobjects and tables.
TEXT The format for exporting reports without control information. Thisoption can be used only when exporting reports.
CSV The Comma-Separated Values format. This option can be used onlywhen exporting data objects and tables.
The maximum LRECL of data to be exported in this format is32756.
Appendix C. QMF Commands 53
OUTPUTMODESpecifies how to represent numeric data in the exported object. This optioncan only be specified when the export file format is IXF. Valid values are:
BINARYNumeric column data is encoded in its native internal format.
This does not apply to any numeric data in the header records ofthe exported object. These are always represented in a characterformat.
CHARACTERNumeric column data is converted to a character representation inEBCDIC.
ExamplesEXPORT PROC KATIE.PANELID TO dataset
EXPORT QUERY FIRSTQ TO LOREN (MEMBER=GAMMA
FAVORITE commandThe FAVORITE command adds an object to the list of favorite objects.
Syntax>>--FAvorite--objectname--<<
Uppercase letters in the diagram show the minimum set of letters required to issuethe command.
ExamplesFAVORITE example_object
FA example_object
FORWARD commandThe FORWARD command scrolls the scrollable area towards the bottom.
Syntax>>--FOrward-----+---------+--<<
+--value--++--Max----++--Half---++--Page---++--CSR----+
Uppercase letters in the diagram show the minimum set of letters required to issuethe command.
Parameters
The following parameters can be specified for the FORWARD command:
A number in the range 1 - 9999Scrolls the number of pages or rows.
MAX Scrolls to the bottom.
HALF Scrolls by half a page.
54 Getting Started QMF Z Client
PAGE Scrolls by one page.
CSR Scrolls based on the position of the cursor. If the cursor is in a scrollablearea, scrolls to the bottom. If the cursor is outside of or at the end thescrollable area, scrolls one page.
If you issue the FORWARD command without a parameter, the default parameter isused. You can view or change the default parameter in the Scroll field, which islocated in the lower right corner of the screen.
ExamplesFORWARD 4
FORWARD MAX
FO M
HELP commandThe HELP command displays the Help topic for the specified panel or for thecurrently displayed panel or error message.
Syntax>>--Help--+-----------+--<<
+-panelid---+
Uppercase letters in the diagram show the minimum set of letters required to issuethe command.
Parameters
If you use the HELP command without any parameters, it displays the help topicfor the currently open panel or for the error message that is displayed above thecommand line.
To display the help topic for a specific panel, specify the ID of the panel that youwant to display as the value for the HELP command. To view the full list of QMFpanels and their IDs, see Appendix H, “IDs of QMF panels,” on page 107.
If the topic that matches the specified ID is not found, the Help contents isdisplayed.
ExamplesHELP
H
IMPORT commandThe IMPORT command copies the contents of a TSO data set or UNIX file into QMFtemporary storage or into the database.
Syntax
Use the following command to import a QMF object into temporary storage:>>--IMport-+-QUERY-+-FROM-+-datasetname-+--+----------------+-<<
+-PROC--+ +-pathname----+ (+Member=mbrname--++-FORM--+ +-datasetname-+--+----------------+-<<
+-pathname----+ (+-Member=mbrname-+
Appendix C. QMF Commands 55
+-Language=value-++-DATA--+ +-datasetname-+--+----------------+-<<
+-pathname----+ (+Member=mbrname--++-Lobsfrom=value-+
Note: The MEMBER parameter is accepted only when you import from a TSOdata set.
Use the following command to import a QMF query, procedure, form, or table intothe database:>>-IMport-+-QUERY-+-objname-FROM-+-datasetname-+--------------------+-<<
+-PROC--+ +-pathname----+ (+-Member=mbrname--++-CONfirm=YES/NO--++-SHare=value-----++-COMment=value---++-Folder=value----+
+-FORM--+-objname-FROM-+-datasetname-+--------------------++-pathname----+ (+-Language=value--+
+-Member=mbrname--++-CONfirm=YES/NO--++-SHare=YES/NO----++-COMment=value---++-Folder=value----+
+-TABLE-+-tblname-FROM-+-datasetname-+---------------------++-pathname----+(+-Action=value------+
+-Member=mbrname----++-CONfirm=YES/NO----++-COMment=value-----++-ACCElerator=value-++-SPACE=value-------+
+-SPACE DATABASE=value-+
Parameters
The following parameters can be specified for the IMPORT command:
objname, tblnameSpecifies the name of the object that you want to import.
datasetname, pathnameSpecifies the name of the TSO data set or the UNIX pathname whosecontents you want to import.
MEMBERIndicates that the imported object is a member in a TSO partitioned dataset.
mbrnameSpecifies the name of the member whose contents you want to import.Member names are limited to 8 characters. The member name is added (inparentheses) as a suffix to the data set name.
CONFIRMSpecifies whether you want to display a confirmation dialog beforereplacing an existing object.
COMMENTSpecifies a comment with the imported object. Make sure to enclose thecomment text in quotation marks.
SHARESpecifies whether other users are allowed to use the imported object.
56 Getting Started QMF Z Client
LANGUAGESpecifies whether the QMF keywords that are contained within theimported form are recorded in English or in the current NLF sessionlanguage. Valid values are ENGLISH and SESSION.
ACTIONSpecifies whether the entire database table will be replaced or the new datawill be appended to the existing table. Valid values are: REPLACE andAPPEND.
FOLDERSpecifies the folder to which you want to import the object.
SPACESpecifies both the database name and the table space name to save thetable in a particular database container and table space.
Note:
v database.tablespace is used for Db2 for z/OS databases.v tablespace is used for Db2 for LUW databases.
SPACE DATABASESpecifies only the database name to save the table in a particular databasecontainer with the table space created automatically under the name of thecreated table.
Note: This parameter is used only for z/OS databases.
ACCELERATORSpecifies the name of the accelerator that you want to use to save yourdata. The ACCELERATOR keyword can be up to 128 characters long. TheACCELERATOR keyword cannot be specified if the SPACE keyword isalready specified for the command, unless the value of theDSQEC_SAV_ALLOWED global variable is set to 5. The default value forthe ACCELERATOR keyword is taken from the DSQEC_SAV_ACCELNMglobal variable.
The ACCELERATOR keyword is supported only on Db2 z/OS servers thatsupport IDAA.
LOBSFROMSpecifies the location where the saved LOBs are stored.
ExampleIMPORT TABLE MYTABLE FROM NEW.ROWS (ACTION=APPEND
INSERT commandUse the INSERT command to create certain items on certain QMF panels.
Syntax>>--INSert--<<
Uppercase letters in the diagram show the minimum set of letters required to issuethe command.
Appendix C. QMF Commands 57
Commentary
Use the INSERT command to create the following items:v A column on the Form.Main panel or the Form.Columns panel.v A calculation expression on the Form.Calculations panelv A conditional expression on the Form.Conditions panel.v A line of text on the Form.Break, Form.Detail, Form.Final, or Form.Page panels.v A list item on any of the Prompted Query editor panels.
To create an item, complete the following steps:1. Type INSERT in the command line.2. Position the cursor on the item after which you want to insert a new one.3. Press Enter.
ExamplesINSERT
INS
ISPF commandThe ISPF command calls the Interactive System Product Facility (ISPF).
Syntax>>--ISpf--+--------+--<<
+-option-+
Uppercase letters in the diagram show the minimum set of letters required to issuethe command.
Parameters
You can specify the OPTION parameter for the ISPF command. This parameterspecifies the initial option to pass to ISPF. For example, if you enter 3, the thirdISPF panel option is selected.
ExamplesISPF 3
IS 4
LEFT commandThe LEFT command scrolls toward the left boundary of a panel.
Syntax>>--LEft-----+---------+--<<
+--value--++--Max----++--Half---++--Page---++--CSR----+
Uppercase letters in the diagram show the minimum set of letters required to issuethe command.
58 Getting Started QMF Z Client
Parameters
The following parameters can be specified for the LEFT command:
value Scrolls the scrollable area to the left by this number of pages or columns (awhole number ranging from 1 through 9999). The scrolling unit, that ispages or columns, depends on the currently open panel.
MAX Scrolls to the leftmost boundary of the panel.
HALF Scrolls the scrollable area to the left by half a page.
PAGE Scrolls the scrollable area to the left by one page.
CSR The scroll is based on the position of a cursor. The column on which thecursor is placed is moved to the left boundary of the scrollable area. If thecursor is positioned outside of the scrollable area or on its left boundary, afull-page scroll occurs.
If you issue the LEFT command without a parameter, the default parameter is used.You can view or change the default parameter in the Scroll field, which is locatedin the lower right corner of the screen.
ExamplesLEFT
LE MAX
LE M
LIMIT LOCAL commandThe LIMIT LOCAL command creates a set of selectable values for a local variable.With this command issued, the Prompt Variables dialog allows you to select one ofthe pre-defined values. Variables that were created via the LIMIT LOCAL commandare available only for the current object (query, report), do not appear in the GlobalVariables list, and do not affect other procedures.
Syntax
>>--LIMit-Local-(variablename=value, ...--<<
Parameters
For the LIMIT LOCAL command, you can specify the variablename parameter. Itspecifies the name of the local variable that you want to work with.
Each value that you specify for a local variable can be from 1 to 55 characters long.To create a set of selectable values, separate them with a semicolon.
ExampleLIMIT LOCAL (Var1=1;2;3 Var2=2;4;5
LIM L (Var1=1;2;3 Var2=2;4
LIST commandThe LIST command displays the Object List panel.
Appendix C. QMF Commands 59
Syntax>>-LISt--+---------+--+-----------------------------------------+-<<
+-QUeries-+ (+-Folder=rsbi:/.workspaces/workspacename--++-Tables--+ +-Owner=authorizationid/patternstring/ALL-++-FORms---+ +-Name=ALL/objectname/patternstring-------++-Procs---+ +-Location=servername---------------------++-FOLders-++-All-----++-QMF-----++-Home----+
Uppercase letters in the diagram show the minimum set of letters required to issuethe command.
Depending on the object that you specify for the LIST command, the Object Listpanel displays the following objects:
LIST The Object List panel displays the object list that was viewed the last.When issued for the first time during a session, the LIST commandbehaves like the LIST HOME command.
LIST QUERIESThe Object List panel displays queries that can be accessed from thecurrent data source.
LIST TABLESThe Object List panel displays tables that can be accessed from the currentdata source.
LIST FORMSThe Object List panel displays forms that can be accessed from the currentdata source.
LIST PROCSThe Object List panel displays procedures that can be accessed from thecurrent data source.
LIST FOLDERSThe Object List panel displays folders that can be accessed from the currentdata source.
LIST ALLThe Object List panel displays all objects that can be accessed from thecurrent data source.
QMF The Object List panel displays QMF queries, forms, procedures, and foldersthat can be accessed from the current data source.
LIST HOMEOpens the List panel where you must specify the data source or theworkspace whose objects you want to display and press Enter. After youpress Enter, QMF displays all objects that can be accessed from the selecteddata source or workspace.
Parameters
The following parameters can be specified for the LIST command:
FOLDERSpecifies the folder in QMF Catalog or the workspace folder whosecontents you want to list. The default value is provided by theDSQEC_CURR_FOLDER global variable.
60 Getting Started QMF Z Client
OWNERSpecifies the owner whose objects you want to list.
To filter the list by owner names, use the % and _ characters. Use the %character to substitute any string of characters and use the _ to substituteany single character.
For example, to get a list of all objects whose owner name includes acertain character string, type that character string followed by orsurrounded by the % character.
NAMESpecifies the full name of the object that you want to display or a part ofit.
To filter the list by object names, use the % and _ characters. Use the %character to substitute any string of characters and use the _ to substituteany single character.
For example, to get a list of all objects whose names include a certaincharacter string, type that character string followed by or surrounded bythe % character.
LOCATIONSpecifies the location that contains the objects that you want to list.
ExamplesLIST QUERIES
LIS AL (F=rsbi:/.workspaces/MY_WORKSPACE
LIST TABLES (N=%TA%
MAIL TO commandThe MAIL TO command sends the specified object as an Internet Mail attachment.
Syntax
To email an object that is stored in a database, issue the following command:>>-MAil-+---------+-objectname-TO-emailaddress--<<
+--QUERY--+ (+-FRom=address-------------++--PROC---+ +-CClist=address1;address2-++--FORM---+ +-SUbject=subject----------+
+-Body=text----------------++-FOrmat=text/HTML---------++-SMTPServer=server_name---++-SMTPPOrt=port_number-----++-SMTPUser=username--------++-SMTPPAssword=password----+
+-DATEformat=java_date_format_string-++-Timeformat=java_time_format_string-+
>>-MAil-+---------+-objectname-TO-emailaddress--<<+--TABLE--+ (+-FRom=address-------------+
+-CClist=address1;address2-++-Dataformat=value---------++-SUbject=subject----------++-Body=text----------------++-FOrmat=text/HTML---------++-SMTPServer=server_name---++-SMTPPOrt=port_number-----++-SMTPUser=username--------+
Appendix C. QMF Commands 61

+-SMTPPAssword=password----++-DATEformat=java_date_format_string-++-Timeformat=java_time_format_string-+
Uppercase letters in each diagram show the minimum set of letters required toissue the command.
To email an object that is stored in the temporary storage, issue the followingcommand:>>-MAil-+-QUERY-+-TO-emailaddress--<<
+-PROC--+ (+-FRom=address-------------++-FORM--+ +-CClist=address1;address2-+
+-SUbject=subject----------++-Body=text----------------++-FOrmat=text/HTML---------++-SMTPServer=server_name---++-SMTPPOrt=port_number-----++-SMTPUser=username--------++-SMTPPAssword=password----+
+-DATEformat=java_date_format_string-++-Timeformat=java_time_format_string-+
>>-MAil-+-DATA-+-TO-emailaddress-+-----<<(+-FRom=address-------------++-CClist=address1;address2-++-Dataformat=value---------++-SUbject=subject----------++-Body=text----------------++-FOrmat=text/HTML---------++-SMTPServer=server_name---++-SMTPPOrt=port_number-----++-SMTPUser=username--------++-SMTPPAssword=password----+
+-DATEformat=java_date_format_string-++-Timeformat=java_time_format_string-+
>>-MAil-+-REPORT-+-TO-emailaddress--<<(+-FRom=address-------------++-CClist=address1;address2-++-SUbject=subject----------++-Body=text----------------++-FOrmat=text/HTML---------++-SMTPServer=server_name---++-SMTPPOrt=port_number-----++-SMTPUser=username--------++-SMTPPAssword=password----+
+-DATEformat=java_date_format_string-++-Timeformat=java_time_format_string-+
+-Method=value-------------++-Type=value---------------+
Uppercase letters in each diagram show the minimum set of letters required toissue the command.
To email a message, issue the following command:>>-MAil-+--MESSAGE--+-TO-emailaddress--<<
(+-FRom=address-------------++-CClist=address1;address2-++-SUbject=subject----------++-Body=text----------------++-FOrmat=text/HTML---------++-SMTPServer=server_name---++-SMTPPOrt=port_number-----++-SMTPUser=username--------++-SMTPPAssword=password----+
62 Getting Started QMF Z Client
+-Attachment=file1;file2---++-DATEformat=java_date_format_string-++-Timeformat=java_time_format_string-+
Uppercase letters in the diagram show the minimum set of letters required to issuethe command.
Parameters
The following parameters can be specified for the MAIL TO command:
emailaddressSpecifies the email address to which you want to send your object.
FROMSpecifies the email address of the sender.
CCLISTSpecifies one or several recipient email addresses.
DATAFORMATSpecifies the file format of the attached data object. Valid values are CSV,DBF, HTML, IXF, PDF, QMF, SHP, TEXT, WQML, XLS, XLSX, and XML.
If you omit this parameter, the DSQQW_EXP_DT_FRMT global variablesupplies the format to be used. For detailed information about theDSQQW_EXP_DT_FRMT global variable, see “DSQQW global variables”on page 85.
SUBJECTSpecifies the email subject line reference.
BODY Specifies the contents of the email message.
FORMATSpecifies the email format. Supported formats are Text and HTML.
SMTPSERVERSpecifies the name of the SMTP server that you want to use.
SMTPPORTSpecifies the number of the SMTP server port that you want to use.
SMTPUSERSpecifies the user name for authorization on the SMTP server.
SMTPPASSWORDSpecifies the password for authorization on the SMTP server.
DATEFORMATSpecifies how the date is formatted in the HTML, CSV, or TXT export file.
Date formats are specified by Java date pattern strings. Within date patternstrings, letters from 'A' to 'Z' and from 'a' to 'z' that are not enclosed inquotation marks are interpreted as pattern letters representing thecomponents of a date string.
To avoid interpretation, the text must be enclosed in single quotationmarks (') .
If the format string includes spaces, enclose it in quotation marks. Formore information about Java format strings, see the Java 2 SDK, StandardEdition Documentation.
Appendix C. QMF Commands 63
TIMEFORMATSpecifies how the time is formatted in the HTML, CSV, or TXT export file.
Time formats are specified by Java time pattern strings. Within timepattern strings, letters from 'A' to 'Z' and from 'a' to 'z' that are notenclosed in quotation marks are interpreted as pattern letters representingthe components of a time string.
To avoid interpretation, the text must be enclosed in single quotationmarks (').
If the format string includes spaces, enclose it in quotation marks. Formore information about Java format strings, see the Java 2 SDK, StandardEdition Documentation.
ATTACHMENTSpecifies the name and path to the files that will be attached to the email.If you want to attach a data set or a UNIX file, make sure to enclose thepath to the object in double quotation marks.
TYPE Specifies the format into which the report is converted. Valid values are:PDF, HTML, and TEXT.
METHODSpecifies whether the report is divided into pages. Valid values are: SPLITand CONT.
ExamplesMAIL QUERY TO [email protected] (SU="subj", SMTPS=smtp.example.com
MA QUERY TO [email protected] (SU="subj", SMTPS=smtp.example.com
REFRESH commandThe REFRESH command refreshes the list on the Object List panel.
The REFRESH command can be used on the Object List panel, to update the list.
Syntax>>--REFresh--<<
Uppercase letters in the diagram show the minimum set of letters required to issuethe command.
ExamplesREFRESH
REF
RENAME commandThe RENAME command changes the name of the specified object.
Syntax>>--REName-+--------+--source_object_name-TO-new_object_name--<<
+-QUERY--++-FORM---++-PROC---++-TABLE--++-FOLDER-+
64 Getting Started QMF Z Client
Uppercase letters in the diagram show the minimum set of letters required to issuethe command.
Parameters
The following parameters can be specified for the RENAME command:
source_object_nameSpecifies the current name of the object that you want to rename.
new_object_nameSpecifies the new name for the object that you want to rename.
Note: If the object that you are renaming is stored in QMF Catalog or belongs tothe currently logged in owner, type only the name of the object as the value forboth parameters. If the object is stored in a repository or belongs to a differentowner, type the full path to the object as the value for both parameters.
ExamplesRENAME QUERY QUERY_old TO QUERY_new
REN PROC rsbi:/.workspaces/.../PROC1 TO rsbi:/.workspaces/.../PROC2
RESET commandThe RESET command restores the specified object to its default state. The RESETcommand functions a little bit differently depending on the object that is beingreset.
Syntax>>--RESet-+---------+-----------------<<
+-Query---+(+-(Language=value-++--Model=Rel------+
+-Proc----++-Data----++-CONtext-++-FORM----+-------------+
+-.BREAK1-----++-.BREAK2-----++-.BREAK3-----++-.BREAK4-----++-.BREAK5-----++-.BREAK6-----++-.CALc-------++-.COLumns----++-.CONditions-++-.Detail-+-----------------+
(+-Variation=value-++-Using=value-----+
+-.Final------++-.Options----++-.Page-------+
Uppercase letters in the diagram show the minimum set of letters required to issuethe command.
Parameters
The RESET QUERY and RESET PROC commands create a new object and close thecurrently open one.
Appendix C. QMF Commands 65
For the RESET QUERY command, you can specify the following parameters:
LANGUAGESpecifies which query language to use. Valid values are:
SQL Specifies that the query that you want to reset was written in SQL.
PROMPTEDSpecifies that the query that you want to reset was created byusing the prompted query editor.
MODELSpecifies the data model used for queries. REL for relational data is theonly supported value.
The RESET DATA command closes the currently open query result set.
The RESET CONTEXT command restores the user context of the current user (that isthe list of global variables, the list of favorites, the list of recently used objects, thecontents of the Favorite Actions panel, and so on) to its default state.
The RESET FORM command restores the currently displayed Form panel to itsdefault state.
The following options can be specified for the RESET FORM.DETAIL command:
VARIATIONSpecifies which detail variation to reset. If this option is omitted, thecurrent detail variation is reset. Valid values are integers from 1 to 99 orALL. The ALL value resets all detail variations to their default values.
USINGSpecifies which detail variation to use as a template to reset or createanother variation. This can be helpful if you make a number ofmodifications to a detail panel and want to create another panel withsimilar changes. Valid values are integers from 1 to 99.
ExamplesRESET QUERY
RESET QUERY(LANG=PROMPTED
RES FORM.F
RESET GLOBAL commandThe RESET GLOBAL command deletes global variables that were created by anadministrator or a user, leaving only the global variables that were pre-defined bythe application developers.
Syntax>>--RESet Global--+-All-----------------+--<<
+-(varname1, varname2-+
Uppercase letters in the diagram show the minimum set of letters required to issuethe command.
Parameters
The following parameters can be specified for the RESET GLOBAL command:
66 Getting Started QMF Z Client
varnameSpecifies the name of a variable that you want to delete. You can name upto 10 variables. Use comma or blank space as a separator.
ALL Deletes all global variables that were created by an administrator or a user.
ExamplesRESET GLOBAL ALL
RES G (example_variable1, example_variable2
RESET KEY commandThe RESET KEY command resets the specified function key to its default state.
Syntax>>--RESet Key(Panelid=+----ALL---+, Keyid=+--ALL---+--<<
+--CURRENT-+ +-key_id-++-panel_id-+
Uppercase letters in the diagram show the minimum set of letters required to issuethe command.
Parameters
The following parameters can be specified for the RESET KEY command:
PANELIDSpecifies the panel that contains the key that you want to reset. Possiblevalues are:v ALL - resets the specified key on all the panels that use it.v CURRENT - resets the specified key on the currently open panel.v panel_id - resets the specified key on the panel whose ID you enter as
the value for the PANELID parameter. To view the complete list of QMFpanels and their IDs, see Appendix H, “IDs of QMF panels,” on page107.
KEYIDSpecifies the key that you want to reset. Possible values are:v ALL - resets all keys on the specified panel.v key_id - resets the specific key on the specified panel. Valid values are
integers from 1 to 24.
ExamplesRESET KEY (PANELID=CURRENT, KEYID=ALL
RES K (P=example_panel, K=ALL
RES K (P=example_panel, K=10
RETRIEVE commandThe RETRIEVE command re-displays the most recent command line entry.
Syntax
To display the most recent command line entry, type RETRIEVE in the Commandline.
Appendix C. QMF Commands 67
>>--RETrieve--<<
Uppercase letters in the diagram show the minimum set of letters required to issuethe command.
To go back more than one command line entry, enter several ? characters in thecommand line, where the number of ? characters determines how far you get inthe command line history.>>--??--<<
ExamplesRETRIEVE
RET
???
RIGHT commandThe RIGHT command scrolls towards the right boundary of a panel.
Syntax>>--RIght----+---------+--<<
+--value--++--Max----++--Half---++--Page---++--CSR----+
Uppercase letters in the diagram show the minimum set of letters required to issuethe command.
Parameters
The following parameters can be specified for the RIGHT command:
value Scrolls the scrollable area to the right by this number of pages or columns(a whole number ranging from 1 through 9999). The scrolling unit, that ispages or columns, depends on the currently open panel.
MAX Scrolls to the rightmost boundary of the panel.
HALF Scrolls the scrollable area to the right by half a page.
PAGE Scrolls the scrollable area to the right by one page.
CSR The scroll is based on the position of a cursor. The column on which thecursor is placed is moved to the right boundary of the scrollable area. Ifthe cursor is positioned outside of the scrollable area or on its leftboundary, a full-page scroll will occur.
If you issue the RIGHT command without a parameter, the default parameter isused. You can view or change the default parameter in the Scroll field, which islocated in the lower right corner of the screen.
ExamplesRIGHT
RIGHT MAX
RI HALF
68 Getting Started QMF Z Client
RUN commandUse the RUN command to run queries or procedures.
Syntax
To run a query, use the following command:>>-RUn-+-------+-objectname-+-------------------------+-<<
+-QUERY-+ (+-ACCElerator=value-------++-ACCELERATORDATABASE=name++-ACTion=append/replace---++-COMment=comment_text----++-CONfirm=Yes/No----------++-Form=FORM/formname------++-METHOD=method_name------++-MODE=GRID/RAW-----------++-ROWIDADD=YES/NO---------++-ROWIDDISP=value---------++-ROWIDNAME=text----------++-ROWLimit=integer--------++-SPACE=value-------------++-SPACE DATABASE=database-++-SCOPE=integer-----------++-Table=tablename---------++-&&variablename=value----+
Uppercase letters in the diagram show the minimum set of letters required to issuethe command.
To run a procedure, use the following command:>>-RUn-+------+-objectname-+--+----------------------+-<<
+-PROC-+ (+-&&variablename=value-+
Uppercase letters in the diagram show the minimum set of letters required to issuethe command.
Parameters
The following parameters can be specified for the RUN QUERY command:
objectnameSpecifies the name of the query that you want to run.
CONFIRMSpecifies whether or not to display a confirmation dialog before replacingor changing an object as a result of this command.
FORMIf you are running a query that must return a report, use this parameter toindicate which QMF form to use to format the selected data. You canspecify the keyword FORM to use the form object that is currently storedin the temporary storage, or specify the name of a form that is saved in thedatabase. Note, that if the temporary storage contains more than one openform at the same time, the most recently opened one will be used.
ROWLIMITSpecifies the maximum number of table rows to include in the query resultset.
&&variablenameAssigns a value to a variable in the query. The variable name can be 1 to
Appendix C. QMF Commands 69
17 characters long and the value can be 1 to 55 characters long. You canspecify any number of variables and values with the RUN command. Thevariable name must be prefaced with two ampersands and enclosed inquotation marks.
ACTIONSpecifies whether you want to replace the entire database table with thedata returned by the query or to append the data to the existing table. Thisoption is valid only if the TABLE option is also specified. Valid values areREPLACE and APPEND.
TABLESpecifies that you want to insert the query results into a table. Valid valuefor this parameter is the name of the table.
COMMENTCreates a comment and stores it with the data that is returned by thequery and inserted into the specified table. This option is valid only if theTABLE option is also specified.
SPACESpecifies the storage space to hold any tables that are created by the SAVEDATA command. If you leave the value of this parameter blank, theapplication uses the default space chosen by the database managerprogram.
SPACE DATABASESpecifies the database name to save the table in a particular databasecontainer. The table space is created automatically under the name of thecreated table. This parameter is used only for z/OS databases.
ACCELERATORSpecifies the name of the accelerator in which the table will be created.
ACCELERATORDATABASESpecifies the name of the database that you want to use to saveaccelerator-only tables. The ACCELERATORDATABASE keyword can beup to 128 characters long. The default value of theACCELERATORDATABASE parameter is taken from theDSQEC_SAV_ACCELDB global variable. If the DSQEC_SAV_ACCELDBglobal variable value is not empty, the database specified by the SPACEkeyword is ignored.
MODESpecifies whether the query result set is saved with the formatting andadded calculated columns. Valid values are:
RAW Saves the query result set without the formatting and addedcalculated columns.
GRID Saves the query result set with the formatting and addedcalculated columns.
METHODSpecifies the method of saving the query result set. Valid values are:
REGULARSends the query result set data from the client back to the databaseserver where it is inserted into the table.
FAST Reruns the query at the server and inserts the query resultsdirectly into the table.
70 Getting Started QMF Z Client
FASTSAFEReruns the query at the server without the ORDER BY clauses andinserts the query results directly into the table.
ROWIDADDSpecifies whether to add the Row ID column to the table.
ROWIDDISPSpecifies the disposition of the new Row ID column.
ROWIDNAMESpecifies the name for the new Row ID column.
SCOPESpecifies the commit scope of the data.
The following parameters can be specified for the RUN PROC command:
objectnameSpecifies the name of the procedure that you want to run.
&&variablenameAssigns a value to a variable in the procedure. The variable name can be 1to 17 characters long and the value can be 1 to 55 characters long. You canspecify any number of variables and values with the RUN command. Thevariable name must be prefaced with two ampersands and enclosed inquotation marks.
ExamplesRUN PROC EXAMPLE_PROCEDURE (&&VAR=’example_value’
RU QUERY EXAMPLE_QUERY (&&VAR=’example_value’ rowlimit=5
RUNTSO commandUse the RUNTSO command to start the Q.DSQQMFSP stored procedure from a CALLstatement. The RUNTSO command passes the name of a query or procedure to runon QMF for TSO. The query or procedure that is named in this command mustexist in the QMF catalog in the subsystem against which the RUNTSO commandruns.
Syntax>>-RUNTSO-objectname--+---------------------+-<<
(+-Tracelevel=+-None-++-L2---++-All--++-Ptf--+
+-L2DESTINATION=None/Dsqdebuf-++-LANGUAGE=value------+
Parameters
The following parameters can be specified for the RUNTSO command:
objectnameSpecifies the name of a QMF procedure or query that will run after QMFstarts. All types of QMF queries are accepted. The procedure can be eithera QMF linear procedure or a procedure with logic.
Appendix C. QMF Commands 71
The query or procedure that is named in this parameter must exist in theQMF catalog subsystem on which the stored procedure interfacecomponents are installed.
One result set is returned if the specified object is a query. Up to 21 resultsets can be returned from a procedure, including the trace output which isreturned as the last result set when the TRACELEVEL parameter is set to L2and the L2DESTINATION parameter is set to blank or null.
TRACELEVELSpecifies the level of trace detail. Valid values are:
NONETrace output is not generated. This is the default option.
L2 Traces QMF messages and commands at the highest level of detail.The destination of the trace output depends on the L2DESTINATIONsetting.
ALL Traces QMF activity at the highest level of detail, includingprogram initialization errors and other errors that might occurbefore the user profile is established. Trace output is sent to theDSQDEBUG DD card.
PTF This option is used to verify that the stored procedure interface isrunning correctly. Do not use this option unless instructed to do soby an IBM® Software Support representative.
L2DESTINATIONSpecifies the destination for the trace log when the TRACELEVEL is set to L2.Valid values are:
NONEReturns the trace output as the last result set from the storedprocedure run. This is the default value.
DSQDEBUGSends the trace output to the DSQDEBUG DD card.
LANGUAGESpecifies the language in which QMF runs.
This parameter can be a one-letter language identifier from the followingtable. Valid values are:v E - English. Name that QMF uses for this language is ENGLISH.v U - U/C English. Name that QMF uses for this language is UPPERCASE.v Q - Danish. Name that QMF uses for this language is DANSK.v C - Canadian French. Name that QMF uses for this language is FRANCAIS
CANADIEN.v F - French. Name that QMF uses for this language is FRANCAIS.v D - German. Name that QMF uses for this language is DEUTSCH.v I - Italian. Name that QMF uses for this language is ITALIANO.v K - Japanese. Name that QMF uses for this language is NIHONGO.v H - Korean. Name that QMF uses for this language is HANGEUL.v P - Brazilian Portuguese. Name that QMF uses for this language is
PORTUGUES.v S - Spanish. Name that QMF uses for this language is ESPANOL.v V - Swedish. Name that QMF uses for this language is SVENSKA.
72 Getting Started QMF Z Client
v Y - Swiss French. Name that QMF uses for this language is FRANCAIS(SUISSE).
v Z - Swiss German. Name that QMF uses for this language is DEUTSCH(SCHWEIZ).
The default value depends on the DSQEC_NLFCMD_LANG variable. Forexample, if DSQEC_NLFCMD_LANG=0 then DSQAO_NLF_LANG is usedas the language.
If DSQEC_NLFCMD_LANG=1 then E is used.
ExampleRUNTSO Q.STAFF (TRACELEVEL=NONE L2DESTINATION=NONE LANGUAGE=E
SAVE AS commandThe SAVE AS command saves the object that is currently displayed in the editor to adatabase.
Syntax
Use the SAVE AS command to save objects to QMF catalog or to a workspace.>>--SAve-+-Query-+-AS-objectname-(+----------------+--<<
+-Proc--++-CONfirm=Yes/No-++-Share=Yes/No---++-COMment=value--++-Folder=name----+
>>--SAve--Form-AS-objectname-(+----------------+--<<+-Language=value-++-CONfirm=Yes/No-++-Share=Yes/No---++-COMment=text---++-Folder=name----+
>>--SAve--Data-AS-tablename-(+----------------+--<<+-ACTion=value------++-CONfirm=Yes/No----++-COMment=text------++-SPACE=value-------++-ACCElerator=value-+
+-ACCELERATORDATABASE=name++-METHOD=method_name------++-MODE=GRID/RAW-----------++-RESULTSET=integer-------++-ROWIDADD=YES/NO---------++-ROWIDDISP=value---------++-ROWIDNAME=text----------++-ROWLimit=integer--------++-SPACE=value-------------++-SPACE DATABASE=database-++-SCOPE=integer-----------+
Uppercase letters in each diagram show the minimum set of letters required toissue the command.
Parameters
The following parameters can be specified for the SAVE AS command:
objectnameThe name to assign to the object (query, form, procedure, or table) when it
Appendix C. QMF Commands 73
is saved. When objectname refers to an object of the same type that alreadyexists in the database, QMF replaces the existing object with the one thatyou are saving.
If you want to save the object to a workspace, type the following string asa value for the objectname parameter: rsbi:/.workspaces/WORKSPACENAME/OBJECTNAME.
tablenameThe name for the table in the database. If the object already exists, theapplication replaces or appends the existing table according to the value ofthe ACTION parameter on the SAVE command. If the table does not exist,a new table is created using the specified column names and labels.
ACTIONSpecifies whether to replace the entire database table or append the data toan existing table. Valid values are REPLACE and APPEND. A table can replaceor be appended only to a table with the same number of columns, and thecorresponding columns must have the same data type and length. Ifcorresponding columns do not have the same data type or length, theymight be automatically converted from one data type or length to another,depending on the level of support that your database managementsoftware offers for implicit casting.
LANGUAGESpecifies whether a form is saved in English or in the current sessionlanguage. Valid values are ENGLISH and SESSION. A form that is saved inEnglish can be run in any NLF session. A form that is saved in the sessionlanguage can only be run in a session of the same language.
CONFIRMSpecifies whether or not to display a confirmation dialog before replacingor changing an object as a result of this command.
SHARESpecifies whether other users are allowed to use the saved object.
COMMENTStores a comment with the saved object. Enclose the comment text inquotation marks, double quotation marks, or parentheses.
FOLDERSpecifies the folder to which you want to save your object.
SPACESpecifies a storage space to hold the data created by the SAVE DATAcommand. A blank value specifies that the default storage space isdetermined by the database at the current location.
SPACE DATABASESpecifies the database name to save the table in a particular databasecontainer. The table space is created automatically under the name of thecreated table. This parameter is used only for z/OS databases.
ACCELERATORSpecifies the name of the accelerator in which you want to save your table.
ACCELERATORDATABASESpecifies the name of the database that you want to use to saveaccelerator-only tables. The ACCELERATORDATABASE keyword can beup to 128 characters long. The default value of theACCELERATORDATABASE parameter is taken from the
74 Getting Started QMF Z Client
DSQEC_SAV_ACCELDB global variable. If the DSQEC_SAV_ACCELDBglobal variable value is not empty, the database specified by the SPACEkeyword is ignored.
MODESpecifies whether the query result set is saved with the formatting andadded calculated columns. Valid values are:
RAW Saves the query result set without the formatting and addedcalculated columns.
GRID Saves the query result set with the formatting and addedcalculated columns.
METHODSpecifies the method of saving the query result set. Valid values are:
REGULARSends the query result set data from the client back to the databaseserver where it is inserted into the table.
FAST Reruns the query at the server and inserts the query resultsdirectly into the table.
FASTSAFEReruns the query at the server without the ORDER BY clauses andinserts the query results directly into the table.
RESULTSETSpecifies the number of the result set that you want to save.
ROWIDADDSpecifies whether to add the Row ID column to the table.
ROWIDDISPSpecifies the disposition of the new Row ID column.
ROWIDNAMESpecifies the name for the new Row ID column.
SCOPESpecifies the commit scope of the data.
ExamplesSAVE QUERY AS QUERY1 (CONFIRM=NO
SA Q AS rsbi:/.workspaces/MY_WORKSPACE/QUERY1
SAVE commandThe SAVE command saves the changes in the currently open object that has alreadybeen saved to a database. If the object has not been saved to a database yet, QMFdisplays a prompt panel that allows you to specify the location where you want tosave the object.
Syntax>>--SAve--<<
Uppercase letters in the diagram show the minimum set of letters required to issuethe command.
Appendix C. QMF Commands 75
ExamplesSAVE
SA
SEARCH commandUse the SEARCH command in the Table Editor to open the Search panel, where youcan specify the information that you want to locate in a database table.
Syntax>>--SEArch--<<
Uppercase letters in the diagram show the minimum set of letters required to issuethe command.
ExamplesSEARCH
SEA
SET GLOBAL commandThe SET GLOBAL command sets the values of existing global variables or createsglobal variables and values for them. Note, that the names of variables that youcreate cannot begin with the DSQ prefix. This prefix identifies system globalvariables. You cannot add or delete system global variables, you only can edit theirdefault values.
Syntax>>--SEt Global-(+-variable_name=value-------------+--<<
+-Lifetime=Current/Permanent------+
Uppercase letters in the diagram show the minimum set of letters required to issuethe command.
Parameters
The following parameters can be specified for the SET GLOBAL command:
variable_nameSpecifies the name of the global variable to which you want to assign avalue.
value Specifies the value that you want to assign to the global variable.
LIFETIMESpecifies the period of time during which the variable is available for use.Valid values are:
CURRENTThe variable is available only in the current session (default value).When the session ends, the variable will be deleted.
PERMANENTThe variable is available permanently, .
76 Getting Started QMF Z Client
ExamplesSET GLOBAL(EXAMPLE_VARIABLE=EXAMPLE_VALUE
SET G(DSQEC_RUN_MQ=0
SET INVISIBLE commandThe SET INVISIBLE command hides the specified local variables from the PromptVariables dialog. The Prompt Variables dialog will not request values for thevariables that are set invisible. If all local variables are set invisible, the PromptVariables dialog will not be displayed at all.
Syntax
>>--SEt-Invisible-(variablename1, variablename2, ...-----<<
Parameters
For the SET INVISIBLE command, you can specify the variablename parameter.Valid values are the names of variables that you do not want to display in thePrompt Variables dialog.
ExampleSET INVISIBLE (Var1, Var2
SET KEY commandThe SET KEY command allows you to assign a command to a function key.
Syntax>>--SEt Key(+-Panelid=+-ALL-----+--<<
+-CURRENT-++-panelid-+
+-Keyid=keyid-------++-Label=text--------++-Command=text------+
Uppercase letters in the diagram show the minimum set of letters required to issuethe command.
Parameters
The following parameters can be specified for the SET KEY command:
PANELIDSpecifies the panel that contains the key that you want to set. Possiblevalues are:v ALL - allows you to set the specified key on all the panels that use it.v CURRENT - allows you to set the specified key on the currently open
panel.v panelid - allows you to set the specified on the panel whose ID you
specify as the value for the PANELID parameter. To view the complete listof QMF panels and their IDs, see Appendix H, “IDs of QMF panels,” onpage 107.
Appendix C. QMF Commands 77
KEYIDSpecifies the number of the function key that you want to set. Valid valuesare integers from 1 to 24.
LABELSpecifies the label text associated with the key. If the value of the LABELparameter contains more than one word, the whole value must be enclosedin quotation marks.
COMMANDSpecifies the command that you want to assign to the key. If the value ofthe COMMAND parameter contains more than one word, the whole value mustbe enclosed in quotation marks.
ExamplesSET KEY(PANELID=FQMPHOME, KEYID=5, LABEL=GLOBALS, COMMAND="SHOW GLOBALS"
SET KEY(P=FQMPHOME, K=5, L=GLOBALS, C="SHOW GLOBALS"
SET LOCAL commandThe SET LOCAL command sets the values for existing local variables or creates newlocal variables and assigns values to them. Variables that were created via the SETLOCAL command are available only for the current object (query, report), do notappear in the Global Variables list, and do not affect other procedures.
Syntax
>>--SEt-Local-(variablename=value, ...--<<
Parameters
For the SET LOCAL command, you can specify the variablename parameter. Itspecifies the name of the local variable that you want to set or create. A localvariable name can be from 1 to 17 characters long. Variables whose names beginwith DSQ are restricted, and cannot be created or deleted.
The value of a local variable can be from 1 to 55 characters long. The values ofvariables whose names begin with DSQ are restricted.
ExampleSET LOCAL (Var1=abc, Var2=def
SET LOCAL WITH VALUES commandThe SET LOCAL WITH VALUES command creates a set of selectable values for a localvariable. With this command issued, the Prompt Variables dialog allows you toselect one of the pre-defined values or type another one by hand.
Syntax
>>-SEt-Local-With-Values-(variablename=value1; value2;...-<<
Parameters
For the SET LOCAL WITH VALUES command, you can specify the variablenameparameter. It specifies the name of the local variable that you want to set or create.
78 Getting Started QMF Z Client
A local variable name can be from 1 to 17 characters long. Variables whose namesbegin with DSQ are restricted, and cannot be created or deleted.
The values specified for a variable will be available to choose from in the PromptVariables window. The value can be from 1 to 55 characters long. The values ofvariables whose names begin with DSQ are restricted.
ExampleSET LOCAL WITH VALUES (Var1=abc; def, Var2=ghi
SET OPTIONS commandThe SET OPTIONS command specifies the procedure execution options.
Syntax>>-SEt-Options--+------------------------+--<<
(+-SToponerror=Yes/No-----++-SUppressmessages=value-+
Parameters
For the SET OPTIONS command, you can specify the following parameters:
STOPONERRORSpecifies whether the procedure stops running when an error occurs. Validvalues are YES and NO.
If you do not specify any value for the STOPONERROR parameter, the value istaken from the DSQQW_PROC_FAIL_ON_ERROR global variable.
SUPPRESSMESSAGESSpecifies which type of messages to suppress while the procedure isrunning. Valid values are:v ALL - suppresses all messages.v INFORM - suppresses information messages.v ERROR - suppresses error messages.
ExampleSET OPTIONS (STOPONERROR=YES SUPPRESSMESSAGES=ALL
SHOW commandThe SHOW command displays the specified panel.
Syntax>>-SHow--+-Query--------+---------------------------+-<<
(+-View=value----------------++-Resultset=value-----------+
+-Proc---------++-Globals------++-Home---------++-REPort-------++-Keys---------+------------------+
(+-PANELID=panel_id-++-FORM---------+-------------+
+-.Main-------++-.BREAK------++-.COLumns----+
Appendix C. QMF Commands 79
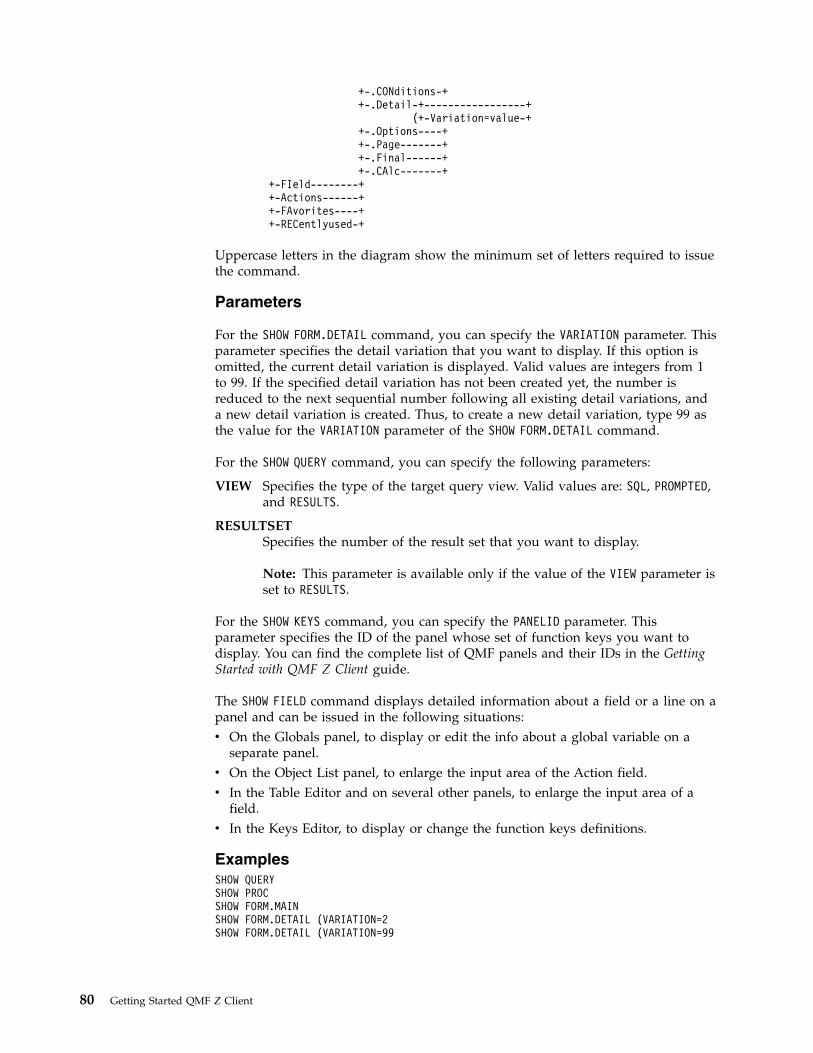
+-.CONditions-++-.Detail-+-----------------+
(+-Variation=value-++-.Options----++-.Page-------++-.Final------++-.CAlc-------+
+-FIeld--------++-Actions------++-FAvorites----++-RECentlyused-+
Uppercase letters in the diagram show the minimum set of letters required to issuethe command.
Parameters
For the SHOW FORM.DETAIL command, you can specify the VARIATION parameter. Thisparameter specifies the detail variation that you want to display. If this option isomitted, the current detail variation is displayed. Valid values are integers from 1to 99. If the specified detail variation has not been created yet, the number isreduced to the next sequential number following all existing detail variations, anda new detail variation is created. Thus, to create a new detail variation, type 99 asthe value for the VARIATION parameter of the SHOW FORM.DETAIL command.
For the SHOW QUERY command, you can specify the following parameters:
VIEW Specifies the type of the target query view. Valid values are: SQL, PROMPTED,and RESULTS.
RESULTSETSpecifies the number of the result set that you want to display.
Note: This parameter is available only if the value of the VIEW parameter isset to RESULTS.
For the SHOW KEYS command, you can specify the PANELID parameter. Thisparameter specifies the ID of the panel whose set of function keys you want todisplay. You can find the complete list of QMF panels and their IDs in the GettingStarted with QMF Z Client guide.
The SHOW FIELD command displays detailed information about a field or a line on apanel and can be issued in the following situations:v On the Globals panel, to display or edit the info about a global variable on a
separate panel.v On the Object List panel, to enlarge the input area of the Action field.v In the Table Editor and on several other panels, to enlarge the input area of a
field.v In the Keys Editor, to display or change the function keys definitions.
ExamplesSHOW QUERYSHOW PROCSHOW FORM.MAINSHOW FORM.DETAIL (VARIATION=2SHOW FORM.DETAIL (VARIATION=99
80 Getting Started QMF Z Client
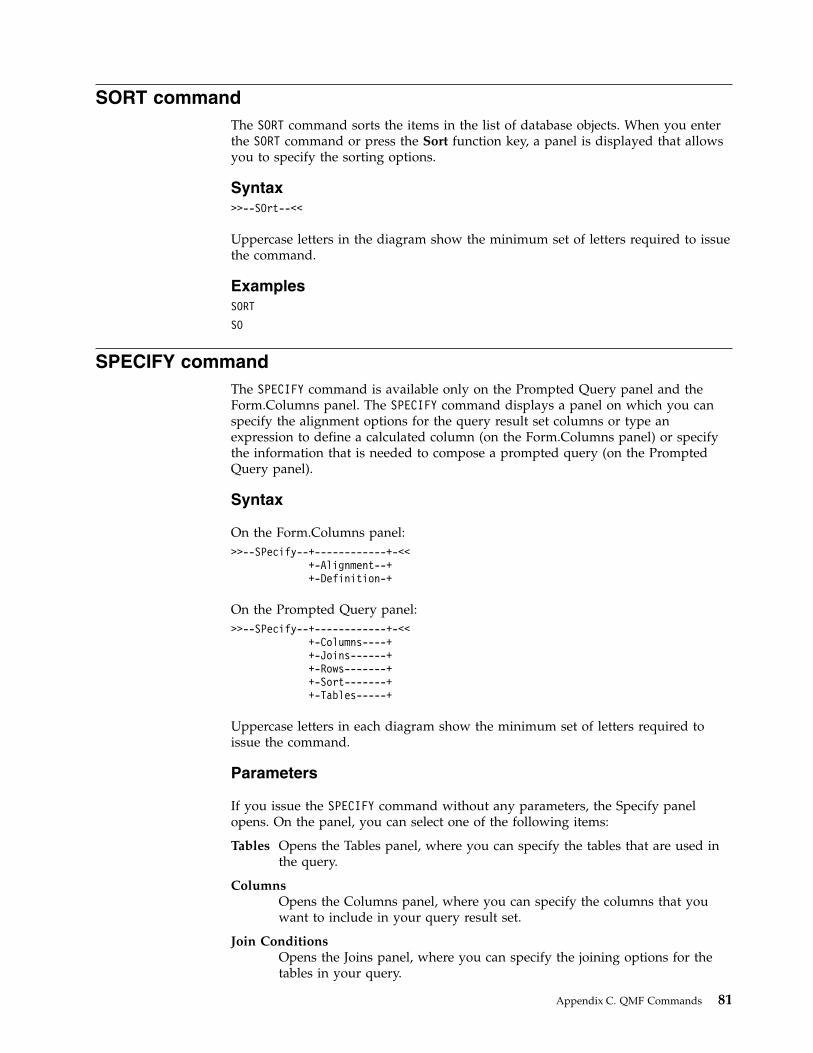
SORT commandThe SORT command sorts the items in the list of database objects. When you enterthe SORT command or press the Sort function key, a panel is displayed that allowsyou to specify the sorting options.
Syntax>>--SOrt--<<
Uppercase letters in the diagram show the minimum set of letters required to issuethe command.
ExamplesSORT
SO
SPECIFY commandThe SPECIFY command is available only on the Prompted Query panel and theForm.Columns panel. The SPECIFY command displays a panel on which you canspecify the alignment options for the query result set columns or type anexpression to define a calculated column (on the Form.Columns panel) or specifythe information that is needed to compose a prompted query (on the PromptedQuery panel).
Syntax
On the Form.Columns panel:>>--SPecify--+------------+-<<
+-Alignment--++-Definition-+
On the Prompted Query panel:>>--SPecify--+------------+-<<
+-Columns----++-Joins------++-Rows-------++-Sort-------++-Tables-----+
Uppercase letters in each diagram show the minimum set of letters required toissue the command.
Parameters
If you issue the SPECIFY command without any parameters, the Specify panelopens. On the panel, you can select one of the following items:
Tables Opens the Tables panel, where you can specify the tables that are used inthe query.
ColumnsOpens the Columns panel, where you can specify the columns that youwant to include in your query result set.
Join ConditionsOpens the Joins panel, where you can specify the joining options for thetables in your query.
Appendix C. QMF Commands 81
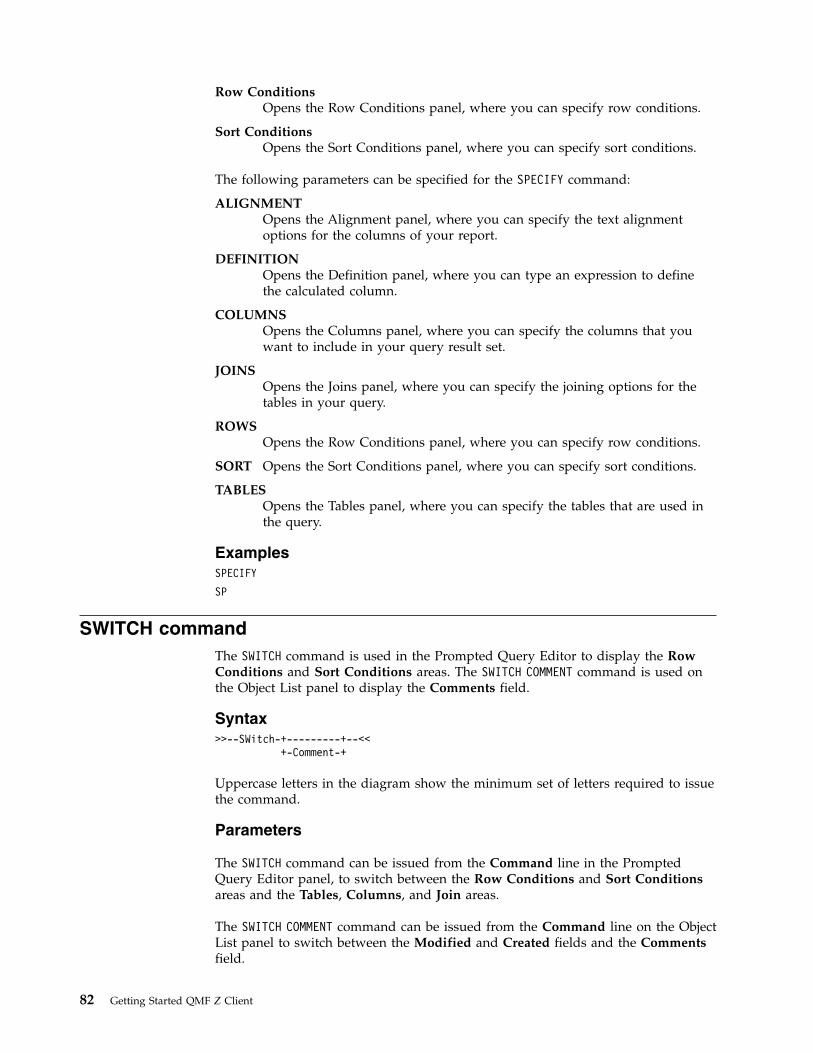
Row ConditionsOpens the Row Conditions panel, where you can specify row conditions.
Sort ConditionsOpens the Sort Conditions panel, where you can specify sort conditions.
The following parameters can be specified for the SPECIFY command:
ALIGNMENTOpens the Alignment panel, where you can specify the text alignmentoptions for the columns of your report.
DEFINITIONOpens the Definition panel, where you can type an expression to definethe calculated column.
COLUMNSOpens the Columns panel, where you can specify the columns that youwant to include in your query result set.
JOINSOpens the Joins panel, where you can specify the joining options for thetables in your query.
ROWSOpens the Row Conditions panel, where you can specify row conditions.
SORT Opens the Sort Conditions panel, where you can specify sort conditions.
TABLESOpens the Tables panel, where you can specify the tables that are used inthe query.
ExamplesSPECIFY
SP
SWITCH commandThe SWITCH command is used in the Prompted Query Editor to display the RowConditions and Sort Conditions areas. The SWITCH COMMENT command is used onthe Object List panel to display the Comments field.
Syntax>>--SWitch-+---------+--<<
+-Comment-+
Uppercase letters in the diagram show the minimum set of letters required to issuethe command.
Parameters
The SWITCH command can be issued from the Command line in the PromptedQuery Editor panel, to switch between the Row Conditions and Sort Conditionsareas and the Tables, Columns, and Join areas.
The SWITCH COMMENT command can be issued from the Command line on the ObjectList panel to switch between the Modified and Created fields and the Commentsfield.
82 Getting Started QMF Z Client

ExamplesSWITCH
SWITCH COMMENT
SW C
TOP commandThe TOP command scrolls towards the top of a scrollable area. TOP is equivalent toBACKWARD MAX.
Syntax>>--TOp--<<
Uppercase letters in the diagram show the minimum set of letters required to issuethe command.
ExamplesTOP
TO
TSO commandUse the TSO command to enter a command in the TSO environment withoutterminating the QMF session.
Syntax>>--TSo---commandstring--<<
Uppercase letters in the diagram show the minimum set of letters required to issuethe command.
Parameters
You can specify the commandstring parameter for the TSO command. Thecommandstring parameter is a character string that constitutes a valid command orexec in the TSO environment.
Every character that comes after the word TSO is sent to TSO and interpreted there.
If the execution is successful, you return to the same QMF panel from which youentered the TSO command. If the execution is not successful, you return to thesame QMF panel from which you entered the TSO command and receive an errormessage from TSO.
Example
To send the user JOHN5 a message with the TSO SEND command, type thefollowing:TSO SEND ’I RECEIVED YOUR PROC2. THANK YOU.’ USER(JOHN5)
USE REPOSITORY commandThe USE REPOSITORY command establishes a connection to the specified repository.
Appendix C. QMF Commands 83
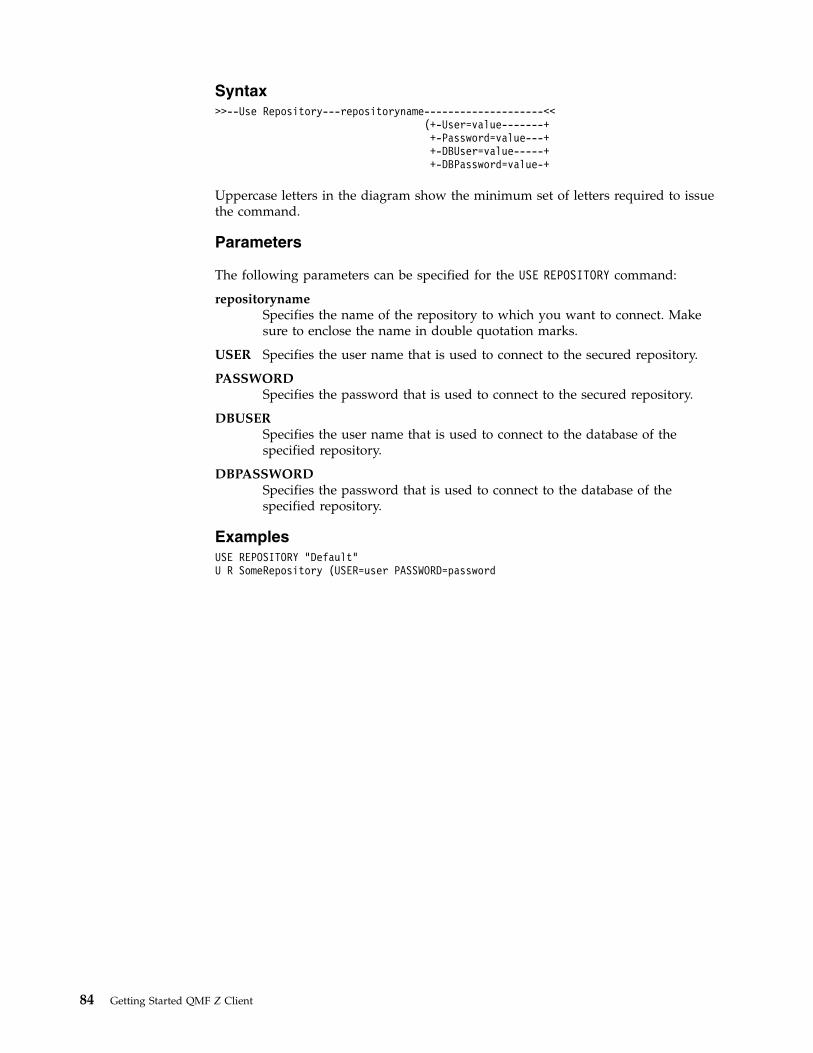
Syntax>>--Use Repository---repositoryname--------------------<<
(+-User=value-------++-Password=value---++-DBUser=value-----++-DBPassword=value-+
Uppercase letters in the diagram show the minimum set of letters required to issuethe command.
Parameters
The following parameters can be specified for the USE REPOSITORY command:
repositorynameSpecifies the name of the repository to which you want to connect. Makesure to enclose the name in double quotation marks.
USER Specifies the user name that is used to connect to the secured repository.
PASSWORDSpecifies the password that is used to connect to the secured repository.
DBUSERSpecifies the user name that is used to connect to the database of thespecified repository.
DBPASSWORDSpecifies the password that is used to connect to the database of thespecified repository.
ExamplesUSE REPOSITORY "Default"U R SomeRepository (USER=user PASSWORD=password
84 Getting Started QMF Z Client

Appendix D. System global variables
Use system global variables to control various aspects of your QMF session, QMFcommands, and panel display.
DSQQW global variablesGlobal variables that have names that begin with DSQQW provide informationabout the current query environment.
The following DSQQW global variables are currently available:
Name Length Description
DSQQW_AUTOMATION 1 Indicates whether the applicationwas started as an Automationserver.
DSQQW_CONNECTIONS 1 Controls the use of database serverconnections while running aprocedure. Value can be zero (0) tominimize the number ofconnections or one (1) to allow anew connection for each RUN QUERYcommand. Specifying a value ofzero (0) can force the distributedproduct to reset or complete a dataobject before continuing executionof a procedure. The default value isone (1).
DSQQW_DQ 1 The value of a double quotecharacter. This variable can be usedin queries and procedures toeliminate the need for the user toenter quotation marks with a textvalue. The default value is thedouble quote character.
DSQQW_EXP_DT_FRMT 1 The format to use when exportingdata with the EXPORT DATAcommand in a procedure. Specifythe value of:
v zero (0) for text format
v two (2) for HTML format
v three (3) for CSV format
v four (4) for IXF format
v five (5) for dbase III files
v six (6) for XML format
v seven (7) for PDF format
v eight (8) for XLS format
v nine (9) for XLSX format
85
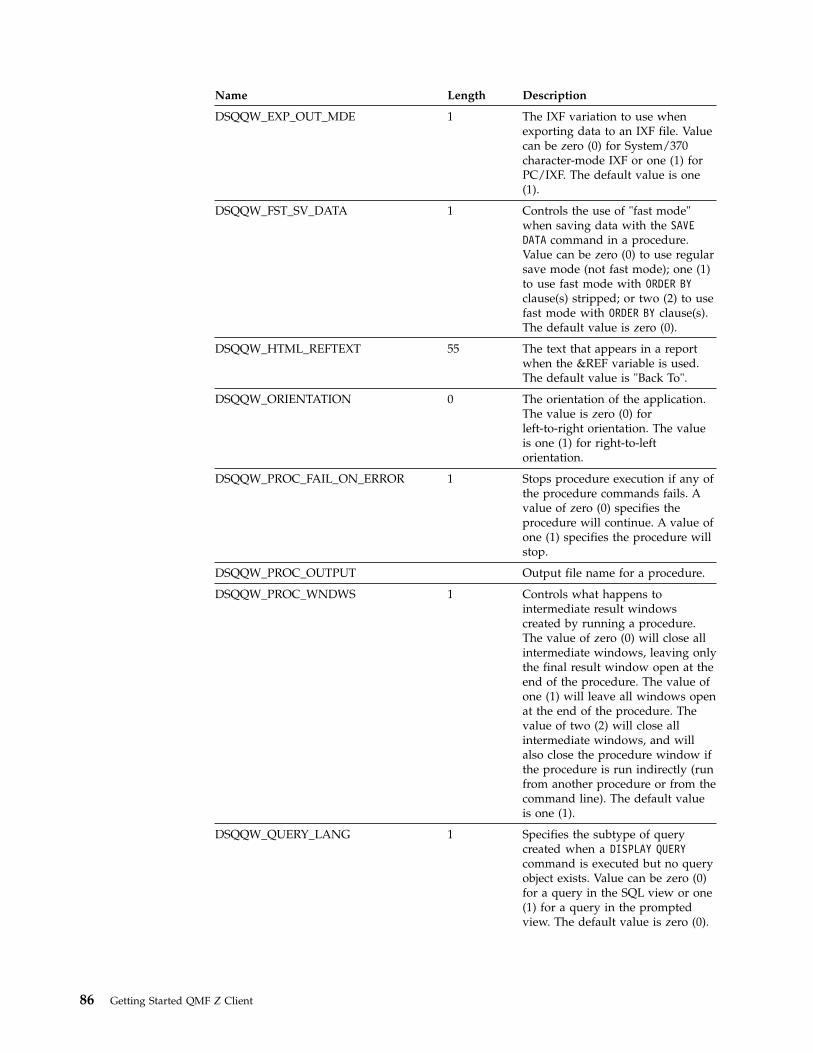
Name Length Description
DSQQW_EXP_OUT_MDE 1 The IXF variation to use whenexporting data to an IXF file. Valuecan be zero (0) for System/370character-mode IXF or one (1) forPC/IXF. The default value is one(1).
DSQQW_FST_SV_DATA 1 Controls the use of "fast mode"when saving data with the SAVEDATA command in a procedure.Value can be zero (0) to use regularsave mode (not fast mode); one (1)to use fast mode with ORDER BYclause(s) stripped; or two (2) to usefast mode with ORDER BY clause(s).The default value is zero (0).
DSQQW_HTML_REFTEXT 55 The text that appears in a reportwhen the &REF variable is used.The default value is "Back To".
DSQQW_ORIENTATION 0 The orientation of the application.The value is zero (0) forleft-to-right orientation. The valueis one (1) for right-to-leftorientation.
DSQQW_PROC_FAIL_ON_ERROR 1 Stops procedure execution if any ofthe procedure commands fails. Avalue of zero (0) specifies theprocedure will continue. A value ofone (1) specifies the procedure willstop.
DSQQW_PROC_OUTPUT Output file name for a procedure.
DSQQW_PROC_WNDWS 1 Controls what happens tointermediate result windowscreated by running a procedure.The value of zero (0) will close allintermediate windows, leaving onlythe final result window open at theend of the procedure. The value ofone (1) will leave all windows openat the end of the procedure. Thevalue of two (2) will close allintermediate windows, and willalso close the procedure window ifthe procedure is run indirectly (runfrom another procedure or from thecommand line). The default valueis one (1).
DSQQW_QUERY_LANG 1 Specifies the subtype of querycreated when a DISPLAY QUERYcommand is executed but no queryobject exists. Value can be zero (0)for a query in the SQL view or one(1) for a query in the promptedview. The default value is zero (0).
86 Getting Started QMF Z Client
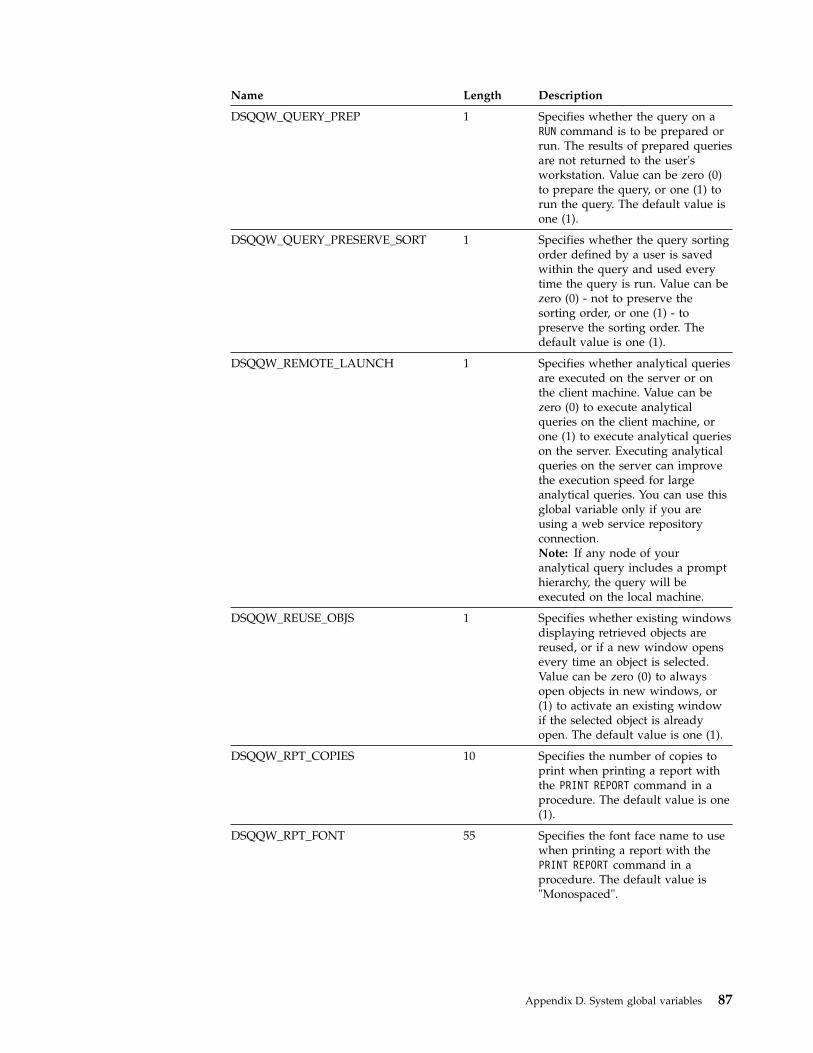
Name Length Description
DSQQW_QUERY_PREP 1 Specifies whether the query on aRUN command is to be prepared orrun. The results of prepared queriesare not returned to the user'sworkstation. Value can be zero (0)to prepare the query, or one (1) torun the query. The default value isone (1).
DSQQW_QUERY_PRESERVE_SORT 1 Specifies whether the query sortingorder defined by a user is savedwithin the query and used everytime the query is run. Value can bezero (0) - not to preserve thesorting order, or one (1) - topreserve the sorting order. Thedefault value is one (1).
DSQQW_REMOTE_LAUNCH 1 Specifies whether analytical queriesare executed on the server or onthe client machine. Value can bezero (0) to execute analyticalqueries on the client machine, orone (1) to execute analytical querieson the server. Executing analyticalqueries on the server can improvethe execution speed for largeanalytical queries. You can use thisglobal variable only if you areusing a web service repositoryconnection.Note: If any node of youranalytical query includes a prompthierarchy, the query will beexecuted on the local machine.
DSQQW_REUSE_OBJS 1 Specifies whether existing windowsdisplaying retrieved objects arereused, or if a new window opensevery time an object is selected.Value can be zero (0) to alwaysopen objects in new windows, or(1) to activate an existing windowif the selected object is alreadyopen. The default value is one (1).
DSQQW_RPT_COPIES 10 Specifies the number of copies toprint when printing a report withthe PRINT REPORT command in aprocedure. The default value is one(1).
DSQQW_RPT_FONT 55 Specifies the font face name to usewhen printing a report with thePRINT REPORT command in aprocedure. The default value is"Monospaced".
Appendix D. System global variables 87
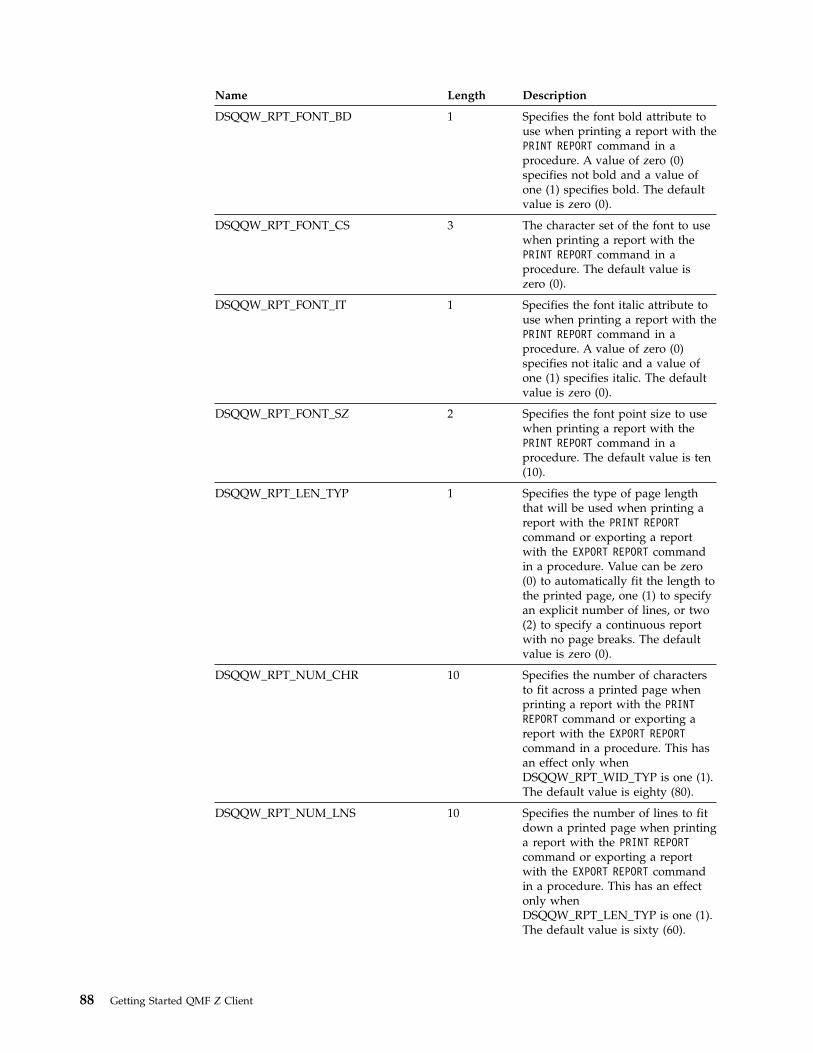
Name Length Description
DSQQW_RPT_FONT_BD 1 Specifies the font bold attribute touse when printing a report with thePRINT REPORT command in aprocedure. A value of zero (0)specifies not bold and a value ofone (1) specifies bold. The defaultvalue is zero (0).
DSQQW_RPT_FONT_CS 3 The character set of the font to usewhen printing a report with thePRINT REPORT command in aprocedure. The default value iszero (0).
DSQQW_RPT_FONT_IT 1 Specifies the font italic attribute touse when printing a report with thePRINT REPORT command in aprocedure. A value of zero (0)specifies not italic and a value ofone (1) specifies italic. The defaultvalue is zero (0).
DSQQW_RPT_FONT_SZ 2 Specifies the font point size to usewhen printing a report with thePRINT REPORT command in aprocedure. The default value is ten(10).
DSQQW_RPT_LEN_TYP 1 Specifies the type of page lengththat will be used when printing areport with the PRINT REPORTcommand or exporting a reportwith the EXPORT REPORT commandin a procedure. Value can be zero(0) to automatically fit the length tothe printed page, one (1) to specifyan explicit number of lines, or two(2) to specify a continuous reportwith no page breaks. The defaultvalue is zero (0).
DSQQW_RPT_NUM_CHR 10 Specifies the number of charactersto fit across a printed page whenprinting a report with the PRINTREPORT command or exporting areport with the EXPORT REPORTcommand in a procedure. This hasan effect only whenDSQQW_RPT_WID_TYP is one (1).The default value is eighty (80).
DSQQW_RPT_NUM_LNS 10 Specifies the number of lines to fitdown a printed page when printinga report with the PRINT REPORTcommand or exporting a reportwith the EXPORT REPORT commandin a procedure. This has an effectonly whenDSQQW_RPT_LEN_TYP is one (1).The default value is sixty (60).
88 Getting Started QMF Z Client
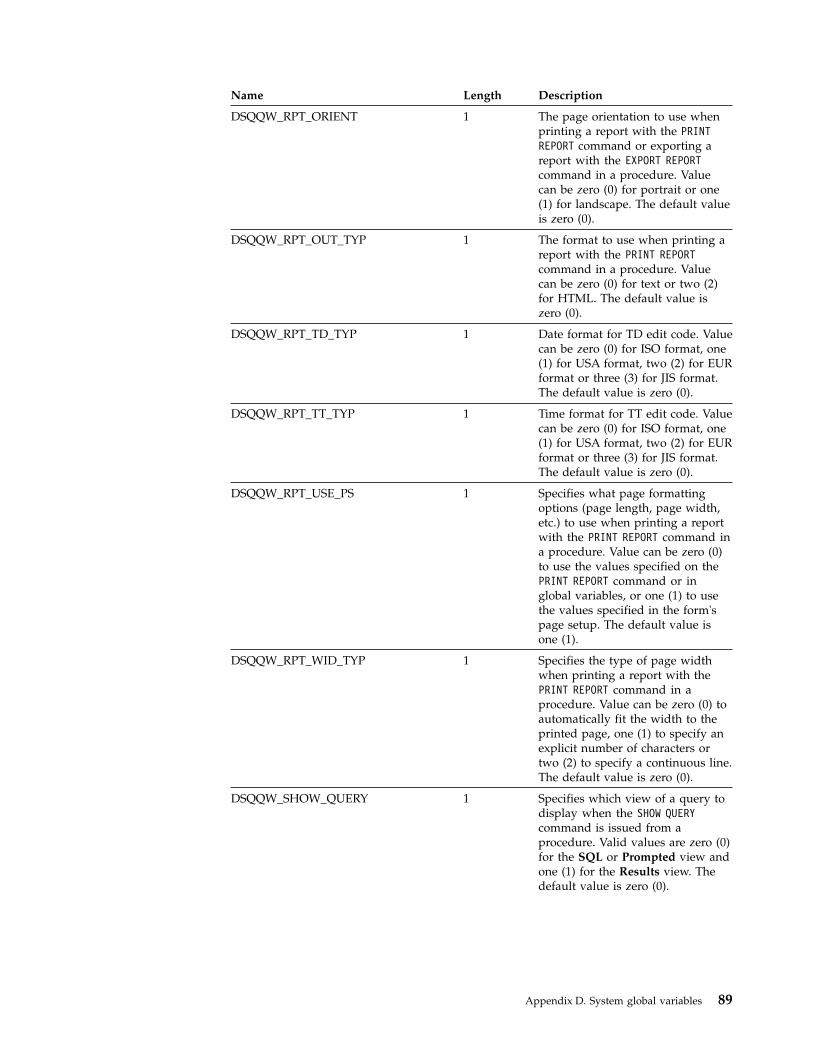
Name Length Description
DSQQW_RPT_ORIENT 1 The page orientation to use whenprinting a report with the PRINTREPORT command or exporting areport with the EXPORT REPORTcommand in a procedure. Valuecan be zero (0) for portrait or one(1) for landscape. The default valueis zero (0).
DSQQW_RPT_OUT_TYP 1 The format to use when printing areport with the PRINT REPORTcommand in a procedure. Valuecan be zero (0) for text or two (2)for HTML. The default value iszero (0).
DSQQW_RPT_TD_TYP 1 Date format for TD edit code. Valuecan be zero (0) for ISO format, one(1) for USA format, two (2) for EURformat or three (3) for JIS format.The default value is zero (0).
DSQQW_RPT_TT_TYP 1 Time format for TT edit code. Valuecan be zero (0) for ISO format, one(1) for USA format, two (2) for EURformat or three (3) for JIS format.The default value is zero (0).
DSQQW_RPT_USE_PS 1 Specifies what page formattingoptions (page length, page width,etc.) to use when printing a reportwith the PRINT REPORT command ina procedure. Value can be zero (0)to use the values specified on thePRINT REPORT command or inglobal variables, or one (1) to usethe values specified in the form'spage setup. The default value isone (1).
DSQQW_RPT_WID_TYP 1 Specifies the type of page widthwhen printing a report with thePRINT REPORT command in aprocedure. Value can be zero (0) toautomatically fit the width to theprinted page, one (1) to specify anexplicit number of characters ortwo (2) to specify a continuous line.The default value is zero (0).
DSQQW_SHOW_QUERY 1 Specifies which view of a query todisplay when the SHOW QUERYcommand is issued from aprocedure. Valid values are zero (0)for the SQL or Prompted view andone (1) for the Results view. Thedefault value is zero (0).
Appendix D. System global variables 89
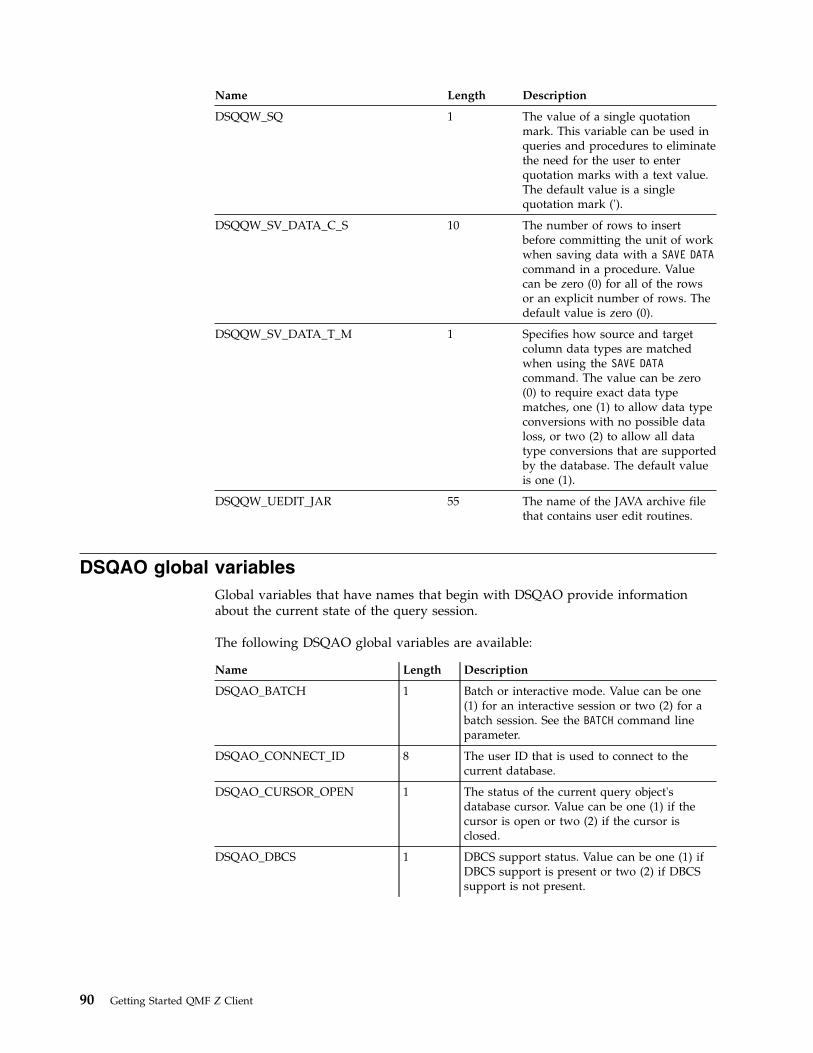
Name Length Description
DSQQW_SQ 1 The value of a single quotationmark. This variable can be used inqueries and procedures to eliminatethe need for the user to enterquotation marks with a text value.The default value is a singlequotation mark (').
DSQQW_SV_DATA_C_S 10 The number of rows to insertbefore committing the unit of workwhen saving data with a SAVE DATAcommand in a procedure. Valuecan be zero (0) for all of the rowsor an explicit number of rows. Thedefault value is zero (0).
DSQQW_SV_DATA_T_M 1 Specifies how source and targetcolumn data types are matchedwhen using the SAVE DATAcommand. The value can be zero(0) to require exact data typematches, one (1) to allow data typeconversions with no possible dataloss, or two (2) to allow all datatype conversions that are supportedby the database. The default valueis one (1).
DSQQW_UEDIT_JAR 55 The name of the JAVA archive filethat contains user edit routines.
DSQAO global variablesGlobal variables that have names that begin with DSQAO provide informationabout the current state of the query session.
The following DSQAO global variables are available:
Name Length Description
DSQAO_BATCH 1 Batch or interactive mode. Value can be one(1) for an interactive session or two (2) for abatch session. See the BATCH command lineparameter.
DSQAO_CONNECT_ID 8 The user ID that is used to connect to thecurrent database.
DSQAO_CURSOR_OPEN 1 The status of the current query object'sdatabase cursor. Value can be one (1) if thecursor is open or two (2) if the cursor isclosed.
DSQAO_DBCS 1 DBCS support status. Value can be one (1) ifDBCS support is present or two (2) if DBCSsupport is not present.
90 Getting Started QMF Z Client
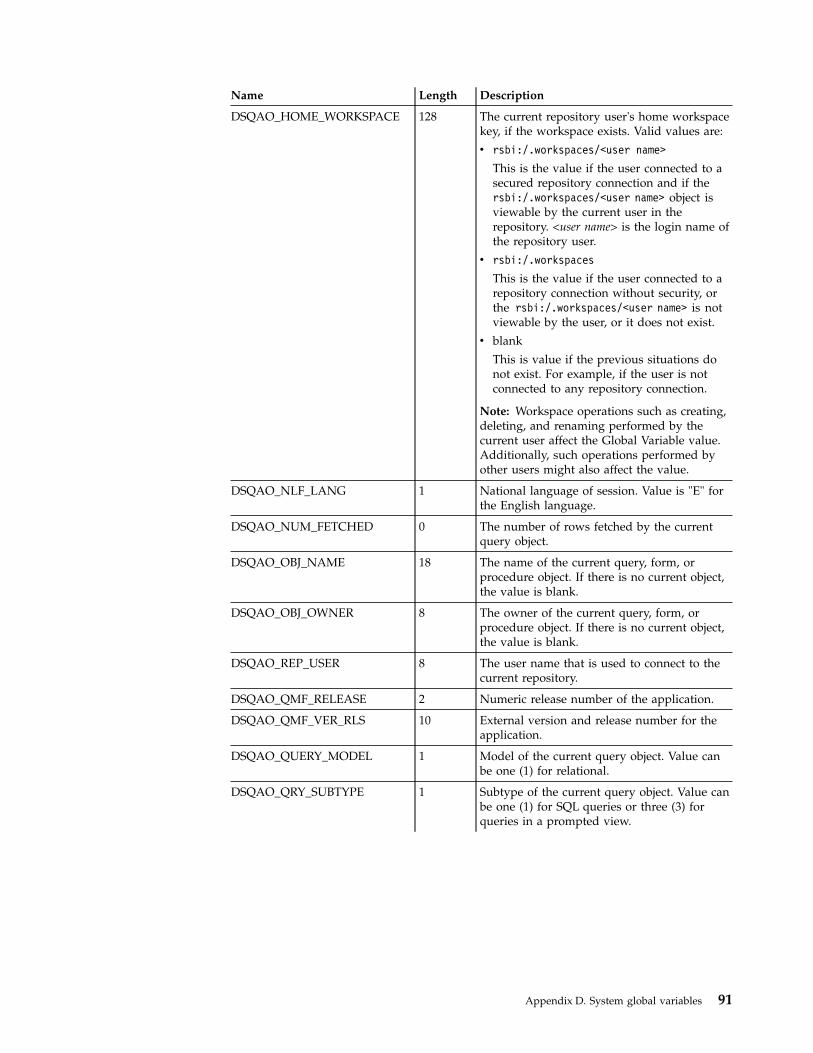
Name Length Description
DSQAO_HOME_WORKSPACE 128 The current repository user's home workspacekey, if the workspace exists. Valid values are:
v rsbi:/.workspaces/<user name>
This is the value if the user connected to asecured repository connection and if thersbi:/.workspaces/<user name> object isviewable by the current user in therepository. <user name> is the login name ofthe repository user.
v rsbi:/.workspaces
This is the value if the user connected to arepository connection without security, orthe rsbi:/.workspaces/<user name> is notviewable by the user, or it does not exist.
v blank
This is value if the previous situations donot exist. For example, if the user is notconnected to any repository connection.
Note: Workspace operations such as creating,deleting, and renaming performed by thecurrent user affect the Global Variable value.Additionally, such operations performed byother users might also affect the value.
DSQAO_NLF_LANG 1 National language of session. Value is "E" forthe English language.
DSQAO_NUM_FETCHED 0 The number of rows fetched by the currentquery object.
DSQAO_OBJ_NAME 18 The name of the current query, form, orprocedure object. If there is no current object,the value is blank.
DSQAO_OBJ_OWNER 8 The owner of the current query, form, orprocedure object. If there is no current object,the value is blank.
DSQAO_REP_USER 8 The user name that is used to connect to thecurrent repository.
DSQAO_QMF_RELEASE 2 Numeric release number of the application.
DSQAO_QMF_VER_RLS 10 External version and release number for theapplication.
DSQAO_QUERY_MODEL 1 Model of the current query object. Value canbe one (1) for relational.
DSQAO_QRY_SUBTYPE 1 Subtype of the current query object. Value canbe one (1) for SQL queries or three (3) forqueries in a prompted view.
Appendix D. System global variables 91
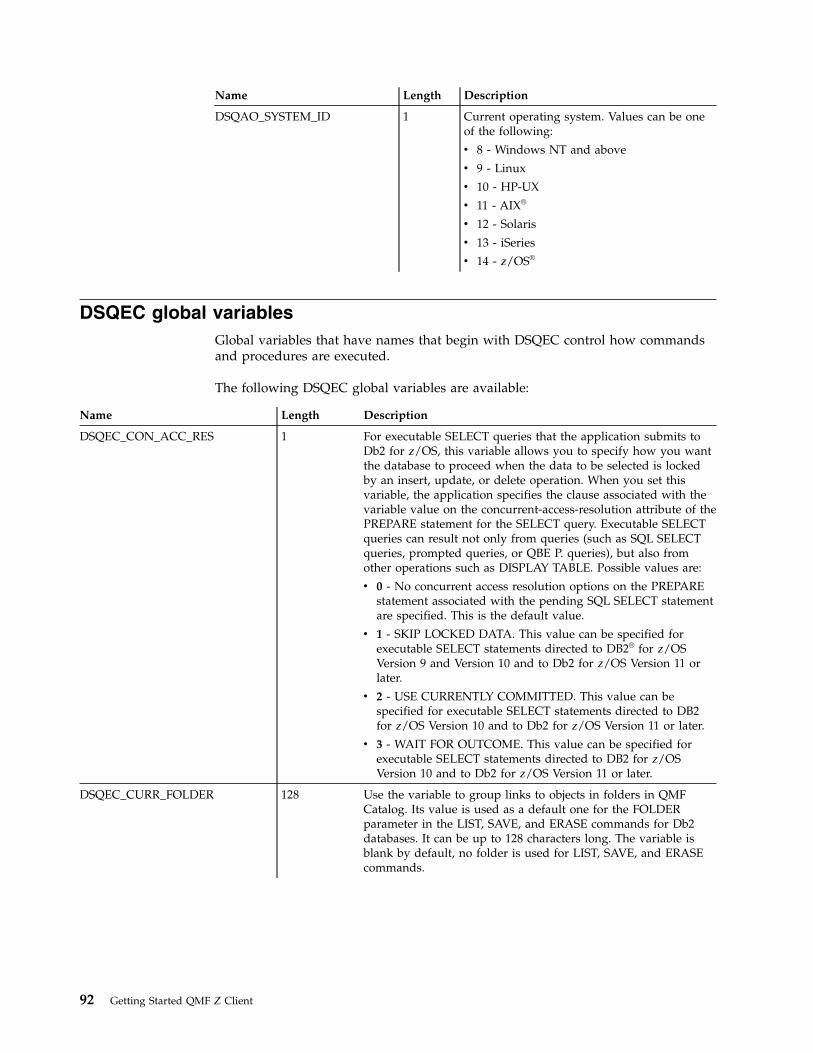
Name Length Description
DSQAO_SYSTEM_ID 1 Current operating system. Values can be oneof the following:
v 8 - Windows NT and above
v 9 - Linux
v 10 - HP-UX
v 11 - AIX®
v 12 - Solaris
v 13 - iSeries
v 14 - z/OS®
DSQEC global variablesGlobal variables that have names that begin with DSQEC control how commandsand procedures are executed.
The following DSQEC global variables are available:
Name Length Description
DSQEC_CON_ACC_RES 1 For executable SELECT queries that the application submits toDb2 for z/OS, this variable allows you to specify how you wantthe database to proceed when the data to be selected is lockedby an insert, update, or delete operation. When you set thisvariable, the application specifies the clause associated with thevariable value on the concurrent-access-resolution attribute of thePREPARE statement for the SELECT query. Executable SELECTqueries can result not only from queries (such as SQL SELECTqueries, prompted queries, or QBE P. queries), but also fromother operations such as DISPLAY TABLE. Possible values are:
v 0 - No concurrent access resolution options on the PREPAREstatement associated with the pending SQL SELECT statementare specified. This is the default value.
v 1 - SKIP LOCKED DATA. This value can be specified forexecutable SELECT statements directed to DB2® for z/OSVersion 9 and Version 10 and to Db2 for z/OS Version 11 orlater.
v 2 - USE CURRENTLY COMMITTED. This value can bespecified for executable SELECT statements directed to DB2for z/OS Version 10 and to Db2 for z/OS Version 11 or later.
v 3 - WAIT FOR OUTCOME. This value can be specified forexecutable SELECT statements directed to DB2 for z/OSVersion 10 and to Db2 for z/OS Version 11 or later.
DSQEC_CURR_FOLDER 128 Use the variable to group links to objects in folders in QMFCatalog. Its value is used as a default one for the FOLDERparameter in the LIST, SAVE, and ERASE commands for Db2databases. It can be up to 128 characters long. The variable isblank by default, no folder is used for LIST, SAVE, and ERASEcommands.
92 Getting Started QMF Z Client

Name Length Description
DSQEC_EXTND_STG 31 Specifies the number of megabytes of extended storage that theapplication will acquire on each request to the extended storagemanager when spilling data to extended storage in QMF forTSO. When a user performs an operation that requires extendedstorage, the application issues repeated requests to the extendedstorage manager for the specified amount until the operation iscomplete or extended storage is exhausted. When setting thisglobal variable, consider the average size of DATA objects withwhich your users work. If the average size is very large and youset the DSQEC_EXTND_STG variable too low, the applicationmust issue many calls to the extended storage manager tocomplete the DATA object, which could affect overallperformance. Values can be from 1 to 1000. The default value is25, indicating that the application requests 25MB of storage oneach request.
DSQEC_FORM_LANG 1 Defines the default NLF language in which a form will be savedor exported. Value can be zero (0) for the presiding NLFlanguage or one (1) for English. The default value is one (1).
DSQEC_LAST_RUN 1 Specifies the set of commands that cause the LAST_USEDcolumn of the Q.OBJECT_DIRECTORY table to be updated.Possible values are:
v 0 - Last used is updated on any activity.
v 1 - Last used is updated when RUN, SAVE, or IMPORTcommands are performed.
DSQEC_LIST_OWNER 128 Provides the default value for the OWNER parameter of theLIST command. Specify an authorization ID up to 128 characterslong. This variable is blank by default, resulting in a list ofobjects owned by the current authorization ID. You can useselection symbols in the variable value. Use an underscore (_) inplace of a single character and a percent sign (%) in place of zeroor more characters. For example, after you issue the followingcommand, followed by a LIST command, the application listsonly objects that are owned by user IDs that begin with thecharacters RO:
SET GLOBAL (DSQEC_LIST_OWNER=RO%The following command setsthe default owner to any user IDs that begin with I, have anycharacter in the second position, and any characters in theremaining positions:
SET GLOBAL (DSQEC_LIST_OWNER=I_%
DSQEC_NLFCMD_LANG 1 Defines the expected NLF language for commands inprocedures. Value can be zero (0) for the presiding NLFlanguage or one (1) for English. The default value is zero (0).
DSQEC_RESET_RPT 1 Determines whether a user will be prompted when anincomplete data object that will affect performance isencountered. Value can be zero (0) to complete the data objectwithout prompting, one (1) to prompt the user asking whetherthe data object should be completed, or two (2) to reset the dataobject without prompting.
Appendix D. System global variables 93
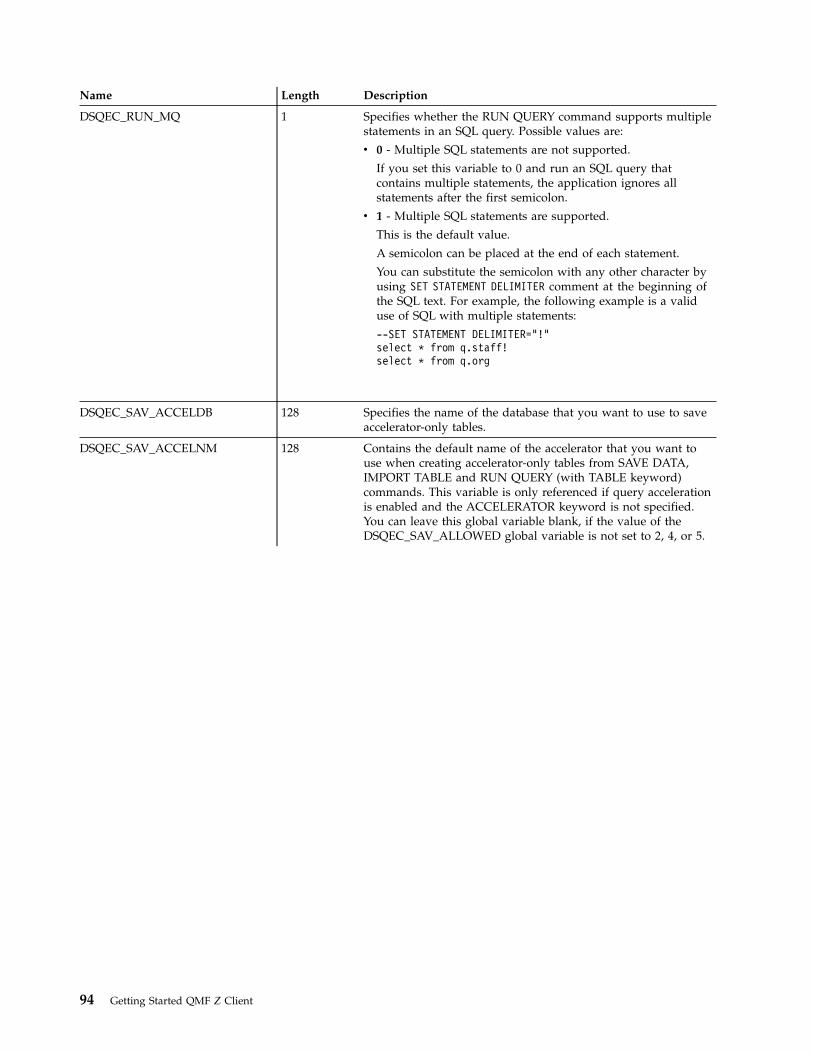
Name Length Description
DSQEC_RUN_MQ 1 Specifies whether the RUN QUERY command supports multiplestatements in an SQL query. Possible values are:
v 0 - Multiple SQL statements are not supported.
If you set this variable to 0 and run an SQL query thatcontains multiple statements, the application ignores allstatements after the first semicolon.
v 1 - Multiple SQL statements are supported.
This is the default value.
A semicolon can be placed at the end of each statement.
You can substitute the semicolon with any other character byusing SET STATEMENT DELIMITER comment at the beginning ofthe SQL text. For example, the following example is a validuse of SQL with multiple statements:
--SET STATEMENT DELIMITER="!"select * from q.staff!select * from q.org
DSQEC_SAV_ACCELDB 128 Specifies the name of the database that you want to use to saveaccelerator-only tables.
DSQEC_SAV_ACCELNM 128 Contains the default name of the accelerator that you want touse when creating accelerator-only tables from SAVE DATA,IMPORT TABLE and RUN QUERY (with TABLE keyword)commands. This variable is only referenced if query accelerationis enabled and the ACCELERATOR keyword is not specified.You can leave this global variable blank, if the value of theDSQEC_SAV_ALLOWED global variable is not set to 2, 4, or 5.
94 Getting Started QMF Z Client
Name Length Description
DSQEC_SAV_ALLOWED 1 This field specifies whether users can save data to a databasetable or to an accelerator table by using the SAVE DATA,IMPORT TABLE, and RUN QUERY (with the TABLE keyword)commands. Possible values of this global variable are:
v 0 - Specifies that users cannot save data at all.
v 1 - Specifies that users can save data only to database tables.This value is selected by default.
v 2 - Specifies that users can save data only to accelerator tables.If this option is selected, the DSQEC_SAV_ACCELNM globalvariable must contain the name of the accelerator that youwant to use by default. The DSQEC_SAV_ACCELNM globalvariable can be overridden with the ACCELERATOR keyword.Accelerator-only tables cannot be copied to more than oneaccelerator.
v 3 - Specifies that users can save data to either a database tableor an accelerator table. The data is saved to the database tableif no command keyword overrides, such as SPACE or ACCEL,are present.
v 4 - Specifies that users can save data to either a database tableor an accelerator table. If no command keyword overrides,such as SPACE or ACCELERATOR, are present, the data issaved to the accelerator. When this option is chosen,DSQEC_SAV_ACCELNM global variable must contain thename of the accelerator that you want to use by default.
v 5 - Specifies that users can save data to accelerator-shadowtables. These tables are saved in the database but also supportaccelerated read data queries and, therefore, can be saved toan accelerator as well. When this option is chosen,DSQEC_SAV_ACCELNM global variable must contain thename of the accelerator that you want to use.Accelerator-shadow tables can be copied to multipleaccelerators.
DSQEC_SHARE 1 Specifies the default value for whether a saved object will beshared with other users. Value can be zero (0) to not share theobject or one (1) to share the object.
DSQEC_SP_RS_NUM 1 Specifies the number of the result set that will be displayed for astored procedure. The default result set number is minus one(-1).
Appendix D. System global variables 95
Name Length Description
DSQEC_SQLQRYSZ_2M 1 Controls whether SQL queries greater than 32,767 bytes (32 KB)in length are supported by the RUN QUERY command. Possiblevalues are:
v 0 - SQL queries directed to DB2 for iSeries or Db2 for z/OS,Linux, UNIX, and Windows databases are limited to 32,767bytes (32 KB).
v 1 - SQL queries can be greater than 32 KB. The maximumsupported size of queries directed to DB2 for iSeries or Db2for Linux, UNIX, and Windows can be up to 65 KB in length.The maximum supported query size varies depending on thetype of database to which the query is directed:
– Queries directed to Db2 for z/OS can be up to 2 MB inlength.
– Queries directed to DB2 for iSeries or Db2 for Linux, UNIX,and Windows can be up to 65 KB in length.
These maximums assume that the version of the database towhich the RUN QUERY command is directed supports queriesof this size. SQL queries directed to DB2 for VM and VSE arelimited to 8 KB.
The default value is 1.
DSQEC_USERGLV_SAV 1 Determines whether the global variables that were created oredited by the user during the current QMF session are savedwhen the session ends. Saved variables and values will berestored at the start of the next QMF session. Valid values are:
v 0 - All system global variables are restored to their defaultstate at the start of the next session. All user-defined globalvariables are discarded.
v 1 - All global variables that were created by the user duringthe current session are discarded when the session ends. Allglobal variables that were edited by the user during thecurrent session are restored to their previous state.
v 2 - All global variables that were created or edited by the userduring the current session are saved when the session ends.Note that the global variables whose LIFETIME parameter wasset to CURRENT are still discarded. This is the default value.
DSQDC global variablesGlobal variables that have names that begin with DSQDC control how informationis displayed.
The following DSQDC global variables are available:
Name Length Description
DSQDC_COL_LABELS 1 Specifies whether column headings will be column names ordatabase labels in Classic Reports. Value can be zero (0) to specifythat column headings will be column names or one (1) to specifythat column headings will be database labels. The default value isone (1).
DSQDC_CURRENCY 18 Defines the custom currency symbol to use when the DC editcode is specified.
96 Getting Started QMF Z Client
Name Length Description
DSQDC_DISPLAY_RPT 1 Specifies whether a report is displayed after a RUN QUERYcommand in a procedure. Value can be zero (0) to not display areport or one (1) to automatically display a report with thedefault form. The default value is zero (0).
DSQDC_LIST_ORDER 2 Specifies the default sort order for objects in a list of databaseobjects. Valid values for this variable are combinations of twocharacters that are typed together, without a blank space betweenthem. Valid values for the first character are:
1 The list is sorted in the default order.
2 The list is sorted by object owner.
3 The list is sorted by object name.
4 The list is sorted by object type.
5 The list is sorted by the date modified.
6 The list is sorted by the date last used.
Valid values for the second character are:
A The list is sorted in the ascending order.
D The list is sorted in the descending order.
This variable applies only to the objects that are listed as a resultof the LIST command. This variable does not apply to the list thatwere produced via other means.
DSQDC_POS_SQLCODE 1 Specifies what happens when a positive SQL code is returnedfrom the database. Possible values are:
v 0 - Neither log the message or display the message text.
v 1 - Log the message associated with the SQL code.
v 2 - Display the online help that is associated with the SQLcode.
DSQCP global variablesGlobal variables that have names that begin with DSQCP control the operation ofthe table editor.
The following DSQCP global variables are available:
Name Length Description
DSQCP_TEDFLT 1 Defines the reserved character used in the TableEditor to indicate a default value for a column.The default value is "+".
DSQCP_TENULL 1 Defines the reserved character used in the TableEditor to indicate a null value for a column. Thedefault value is "-".
Appendix D. System global variables 97

98 Getting Started QMF Z Client

Appendix E. SQL editor line commands
Use line commands to insert, remove, copy, and reposition the lines in the SQLeditor area. The line command area is located to the left of the editor area.
INSERT
The INSERT line command inserts one or more blank lines. Use the followingsyntax with the INSERT line command:
I Inserts one blank line.
I<n> Inserts <n> blank lines after the line that is marked with the I character.
DELETE
The DELETE line command removes one or more lines. Use the following syntaxwith the DELETE line command:
D Removes one line.
D<n> Removes <n> lines, starting from the line that is marked with the Dcharacter.
DD ... DDRemoves all lines between the two DD commands, including the lines onwhich the DD commands are entered.
COPY
The COPY line command copies one or more lines and pastes them before or after aspecified line. Use the following syntax with the COPY line command:
C A/B Copies the line that is marked with the C character and pastes it after theline that is marked with the A character or before the line that is markedwith the B character.
C<n> A/BCopies <n> lines, starting from the one that is marked with the C character,and pastes them after the line that is marked with the A character or beforethe line that is marked with the B character.
CC ... CC A/BCopies all lines between the two CC commands, including the lines onwhich the CC commands are entered, and pastes them after the line that ismarked with the A character or before the line that is marked with the Bcharacter.
REPEAT
The REPEAT line command duplicates one or more lines. Use the following syntaxwith the REPEAT line command:
R Duplicates one line.
R<n> Inserts <n> copies of the line that is marked with the R character.
99

RR ... RRDuplicates the lines on which the RR commands are entered and all linesbetween them.
RR ... RR<n>Inserts <n> copies of the lines that are enclosed in the RR commands.
MOVE
The MOVE line command repositions one or more lines. Use the following syntaxwith the MOVE line command:
M A/BPlaces the line that is marked with the M character after the line that ismarked with the A character or before the line that is marked with the Bcharacter.
M<n> A/BPlaces <n> lines, starting from the line that is marked with the M character,after the line that is marked with the A character or before the line that ismarked with the B character.
MM ... MM A/BPlaces all lines between the two MM commands, including the lines onwhich the MM commands are entered, after the line that is marked with theA character or before the line that is marked with the B character.
100 Getting Started QMF Z Client
Appendix F. QMF usage codes
When you create a report, you specify a usage code for each column. The usagecode specifies the operation to perform on the data in the column.
ACROSSProduces a report with horizontal control breaks. Note that:v The number and titles of columns in your report are dependent on the
values in the ACROSS column. There is only one set of report columnsfor each value in the ACROSS column and the header for each is thevalue of the column. The set of report columns includes a column foreach one that uses an aggregation usage code, such as SUM, AVERAGE,COUNT.
v You can have only one ACROSS column in a report.v The CSUM, PCT, CPCT, TPCT, and TCPCT usage codes are only
partially supported when generating reports that also use the ACROSSusage code.
AVERAGEAnalyzes all values in a column and calculates the average. The calculatedvalue appears as a total in the report. The calculated value is formattedwith the edit code of the column. This usage code is only valid for numericdata.
BREAKnProvides a control break level. The "n" symbol represents a numberbetween 1 and 6. For example, the BREAK1 usage code specifies a controlcolumn for a level-1 break and BREAK2 specifies a control column for alevel-2 break. Any change in the value of the column causes a sectionbreak in the report. Subtotals are displayed for columns whose usage codeis one of the aggregation type. Also, the break text specified on theForm.Break panel is displayed.
BREAKnXSame as BREAKn, except the control column is omitted from the report.
CALCidProvides the evaluation of calculation expressions on the Form.Calculationspanel. The "id" part represents the ID of the calculation expression.
COUNTCounts the non-null values in the column. The calculated value appears asa total in the report and is formatted with the edit code K.
CPCT Calculates the cumulative percentage of each value in the column relativeto the current total.
CSUMCalculates the cumulative sum of the values in the column. The calculatedvalue replaces each detail line value and also appears as a total in thereport. The calculated value is formatted with the edit code of the column.The CSUM usage code is only partially supported when generating reportsthat also use the ACROSS usage code.
FIRST First value of the column. The calculated value appears as a total in thereport. The calculated value is formatted with the edit code of the column.
101
GROUPDisplays only one line of summary data for each set of values in thecolumn. More than one column can have usage code GROUP. If so, achange in value in any column starts a new group. All other columns withno usage code are omitted from the report.
LAST Last value in the column. The calculated value appears as a total in thereport. The calculated value is formatted with the edit code of the column.
MAXIMUMMaximum value in the column. The calculated value appears as a total inthe report. The calculated value is formatted with the edit code of thecolumn.
MINIMUMMinimum value in the column. The calculated value appears as a total inthe report. The calculated value is formatted with the edit code of thecolumn.
OMIT Excludes the column from the report.
PCT Calculates the percentage of each value in the column relative to thecurrent total. The calculated value replaces each detail line value and alsoappears as a total in the report. The calculated value is formatted with theedit code of the column. The PCT usage code is only partially supportedwhen generating reports that also use the ACROSS usage code.
STDEVCalculates the standard deviation of the values in the column. This usagecode is only valid for numeric data. The calculated value appears as a totalin the report. The calculated value is formatted with the edit code of thecolumn.
SUM Calculates the sum of the values in the column. This usage code is onlyvalid for numeric data. The calculated value appears as a total in thereport. The calculated value is formatted with the edit code of the column.
TPCT Calculates the percentage of each value in the column relative to the finaltotal. The calculated value replaces each detail line value and also appearsas a total in the report. The calculated value is formatted with the editcode of the column. The TPCT usage code is only partially supportedwhen generating reports that also use the ACROSS usage code.
TCPCTCalculates the cumulative percentage of each value in the column relativeto the final total. The calculated value replaces each detail line value andalso appears as a total in the report. The calculated value is formatted withthe edit code of the column. The TCPCT usage code is only partiallysupported when generating reports that also use the ACROSS usage code.
102 Getting Started QMF Z Client
Appendix G. QMF edit codes
An edit code is a set of characters that tells QMF how to format and punctuate thedata in a specific column of a report. Edit codes do not change the data in thedatabase; they merely control how the data is displayed. Below is the complete listof QMF edit codes.
Edit codes for character data
Use the character data edit codes to format the text fields in your report.
C Display character data.
CW Display character data with wrapping based on column width. If the valuedoes not fit on one line in the column, as much data as possible is placedwithin the column, and then additional data is wrapped to subsequentlines in the column.
CT Display character data with wrapping based on the text in the column. Ifthe value does not fit on one line in the column, as much data as possibleis placed on a line within the column, until a blank is found within the textthat triggers the wrapping of additional data to subsequent lines in thecolumn. If the string of text is too long to fit in the column and does notcontain a blank, the data is wrapped by width until a blank is found.
CDx Display character data with wrapping based on the specified delimiter. Ifthe value does not fit on one line in the column, a new line of data beginsin the column each time a special delimiter is encountered in the text. Ifthe string of text is too long to fit in the column and does not contain adelimiter, the data is wrapped by width until a delimiter is found. Thedelimiter specified by "x" can be any single character, including a blank.The delimiter character does not appear in the report.
X Format data as a series of hexadecimal characters.
XW Format data as a series of hexadecimal characters with wrapping based oncolumn width. Columns are wrapped according to the rules specified forthe CW edit code.
B Format data as a series of zeros and ones.
BW Formats data as a series of zeros and ones with wrapping based on columnwidth. Columns are wrapped according to the rules specified for the CWcode.
Edit codes for date data
Use the date data edit codes to format the fields that contain date information. Theletter "x" in the date edit codes represents the character to be used as the delimiterin the date value. The value of "x" can be any special character, including a blank,but excluding a letter or a number.
TDYx Year (4 digits), month, day.
TDMx Month, day, year (4 digits).
TDDx Day, month, year (4 digits).
103

TDYAxYear (last 2 digits), month, day.
TDMAxMonth, day, year (last 2 digits).
TDDAxDay, month, year (last 2 digits).
TDL Formats date according to the format specified as the default at thedatabase server requesting data.
TD Edit codes that appear on result set reports. That is, reports generated froma stored procedure CALL. They would be used on time or date data if thedata is not in the ISO format. If these edit codes are found on column data,then the edit code cannot be changed for that column. Also, the reportobject cannot be exported if this edit code is present in the form.
Edit codes for graphic data
Use the graphic data edit codes to format the fields that contain graphic or pureDBCS information.
G Display graphic data.
GW Display graphic data with wrapping based on column width. If the valuedoes not fit on one line in the column, as much data as possible is placedwithin the column, and then additional data is wrapped to subsequentlines in the column.
Edit codes for numeric data
Use the numeric data edit codes to format the fields that contain numericinformation. The letters "nn" in the numeric data edit codes represents a numberbetween 0 and 99. This number determines how many places to allow after thedecimal point. Numbers with more places after the decimal are rounded andnumbers with fewer places are padded.
E Displays numbers in scientific notation. Up to 17 significant digits, or up to34 significant digits when editing extended floating point data, are showneven if the width of the column can accommodate more. Used as thedefault form for columns with data type FLOAT.
EZ Displays numbers in scientific notation with zero values in the columnsuppressed. Up to 17 significant digits, or up to 34 significant digits whenediting extended floating point data, are shown even if the width of thecolumn can accommodate more.
Dnn Displays numbers in decimal notation formatted with a negative sign,thousands separator, and currency symbol.
DZnn Displays numbers in decimal notation formatted with a negative sign,thousands separator, currency symbol and any zero values in the columnsuppressed.
DCnn Displays numbers in decimal notation formatted with a negative sign,thousands separator, and a user-defined currency symbol. The currencysymbol that will be used instead of the standard currency symbol isdefined using the global variable DSQDC_CURRENCY.
DZCnnDisplays numbers in decimal notation formatted with a negative sign,
104 Getting Started QMF Z Client
thousands separator, a user-defined currency symbol and any zero valuesin the column suppressed. The currency symbol that will be used insteadof the standard currency symbol is defined using the global variableDSQDC_CURRENCY. If both edit code options "Z" and "C" are used, "C"must follow "Z"
Inn Displays numbers in decimal notation formatted with leading zerosdisplayed and a negative sign.
IZnn Displays numbers in decimal notation formatted with leading zerosdisplayed, a negative sign and any zero values in the column suppressed.
Jnn Displays numbers in decimal notation formatted with leading zerosdisplayed.
JZnn Displays numbers in decimal notation formatted with leading zerosdisplayed and any zero values in the column suppressed.
Knn Displays numbers in decimal notation formatted with a negative sign anda thousands separator.
KZnn Displays numbers in decimal notation formatted with a negative sign, athousands separator and any zero values in the column suppressed.
Lnn Displays numbers in decimal notation formatted with a negative sign.
LZnn Displays numbers in decimal notation formatted with a negative sign andany zero values in the column suppressed.
Pnn Displays numbers in decimal notation formatted with a negative sign,thousands separator, and a percent sign.
PZnn Displays numbers in decimal notation formatted with a negative sign,thousands separator, a percent sign and any zero values in the columnsuppressed.
Edit codes for time data
Use the time data edit codes to format the fields that contain time information. Theletter "x" in the time data edit code represents the character that will be used as thedelimiter in the time value. The value of "x" can be any character, including aspace, but excluding a letter or a number.
TTSx 24 hour clock, seconds included.
TTCx 12 hour clock, seconds included.
TTAx 24 hour clock, seconds excluded.
TTAN 24 hour clock, seconds excluded, and no delimiter between hours andminutes.
TTUx USA format (HHxMM PM, HHxMM AM).
TTL Formats time data according to the format specified as the local default atthe database server requesting data.
TT Edit codes that appear on result set reports. That is, reports generated froma stored procedure CALL. They would be used on time or date data if thedata was found not to be in ISO format. If these edit codes are found oncolumn data, then the edit code cannot be changed for that column. Also,the report object cannot be exported if this edit code is present in the form.
Appendix G. QMF edit codes 105
Edit codes for timestamp data
Use the timestamp data edit codes to format the fields that contain timestampinformation.
TSI yyyy–mm–dd–hh.mm.ss.nnnnnnnnnnnn, where yyyy is the four digit year, mm isthe two digit month, dd is the two digit day, hh is the two digit hour, mm isthe two digit minute, ss is the two digit second, and nnnnnnnnnnnn is thetwelve digit fractional seconds.
TSZ yyyy–mm–dd–hh.mm.ss.nnnnnnnnnnnn±th:tm, where yyyy is the four digityear, mm is the two digit month, dd is the two digit day, hh is the two digithour, mm is the two digit minute, ss is the two digit second, nnnnnnnnnnnn isthe twelve digit fractional seconds, ±th is the two-digit value representingthe time zone hour, shown as an offset relative to UTC, and tm is thetwo-digit value representing the time zone minutes between 0 and 59.
Note: To specify UTC, you can either specify a time zone of -24:00 or+24:00 or replace the time zone offset and its sign with an uppercase Z.
User defined edit codes
You can use the user defined edit codes Uxxxx and Vxxxx for special purposes. Thevalue "xxxx" can be any combination of characters, excluding embedded blanks.The following user edit codes are predefined:
VSSN or USSNSocial security number format (xxx–xx–xxxx).
VTEL Telephone number format ((xxx) xxx–xxxx).
VTEL2Telephone number format (xxx.xxx.xxxx).
VZIP Zip code format (xxxxx–xxxx).
Edit codes for metadata
Use the metadata edit code M to display the descriptive data for a report columnrather than the actual data. The metadata for a column is found in the DescriptorArea (DA) and consists of the type and the length of the data that will be includedin the column. If a column with the edit code M is null, a null indicator isdisplayed rather than the metadata. If the column size is less than the amountneeded to display the metadata, the metadata is truncated in order to fit into thecolumn space.
106 Getting Started QMF Z Client
Appendix H. IDs of QMF panels
Full-screen panels
Form.Main panelPanel ID is FQMPFMAN.
Form.Break panelPanel ID is FQMPFBRK.
Form.Calculations panelPanel ID is FQMPFCLC.
Form.Columns panelPanel ID is FQMPFCOL.
Form.Conditions panelPanel ID is FQMPFCON.
Form.Detail panelPanel ID is FQMPFDET.
Form.Final panelPanel ID is FQMPFFIN.
Form.Options panelPanel ID is FQMPFOPT.
Form.Page panelPanel ID is FQMPFPAG.
Globals panelPanel ID is FQMPGLOB.
Home panelPanel ID is FQMPHOME.
Keys panelPanel ID is FQMPKEYS.
Object List panelPanel ID is FQMPOBJL.
Procedure Editor panelPanel ID is FQMPPEDT.
Query Editor panelPanel ID is FQMPQEDT.
Prompted Query Editor panelPanel ID is FQMPPQRY.
Results panelPanel ID is FQMPRSLT.
Report panelPanel ID is FQMPRPRT.
Table Editor panelPanel ID is FQMPTBED.
107
Non-full-screen panels
About panelPanel ID is FQMPABOT.
Action panelPanel ID is FQMPACTE.
Action on <object_name> panelPanel ID is FQMPOACT.
Add Global Variable panelPanel ID is FQMPGLAD.
Add Row panelPanel ID is FQMPTEAD.
Alignment panelPanel ID is FQMPFCAL.
Attention Interrupt panelPanel ID is FQMPATTN.
Batch List panelPanel ID is FQMPBTLT.
Batch Wizard - Common Parameters panelPanel ID is FQMPBTD4.
Batch Wizard - Main Parameters panelPanel ID is FQMPBTD1.
Batch Wizard - Parameters for PROC panelPanel ID is FQMPBTDP.
Batch Wizard - Parameters for QUERY panelPanel ID is FQMPBTDQ.
Batch Wizard - REPORT Parameters panelPanel ID is FQMPBTD3.
Batch Wizard - SMTP Settings panelPanel ID is FQMPBTD5.
Columns panelPanel ID is FQMPPQCE.
Column Description panelPanel ID is FQMPCOLD.
Column List panelPanel ID is FQMPPQCL.
Command panelPanel ID is FQMPCMDS.
Command Prompt panelPanel ID is FQMPCMPD.
Comparison Operator panelPanel ID is FQMPPQOE.
Comparison Operators panelPanel ID is FQMPPQCO.
Comparison Operator: Between panelPanel ID is FQMPPQOB.
108 Getting Started QMF Z Client
Connect to panelPanel ID is FQMPCNDS.
Data Source Description panelPanel ID is FQMPDSDS.
Data Source Object panelPanel ID is FQMPFOB1.
Definition panelPanel ID is FQMPFCDF.
Edit Row panelPanel ID is FQMPTEED.
Export JCL panelPanel ID is FQMPJEXP.
Favorite Actions panelPanel ID is FQMPACTS.
Favorite Objects panelPanel ID is FQMPFAVS.
Form Break Number panelPanel ID is FQMPSPBK.
From Data Source panelPanel ID is FQMPFOB2.
Form Detail Variation panelPanel ID is FQMPSPDV.
From Open Object panelPanel ID is FQMPFOB4.
From Repository panelPanel ID is FQMPFOB3.
Help panelPanel ID is FQMPHELP.
Help table of contentsPanel ID is FQMPMGSB.
JavaScript procedure prompt panelPanel ID is FQMPPRMT.
Joins panelPanel ID is FQMPPQJE.
Join Columns panelPanel ID is FQMPPQJC.
Key Editor panelPanel ID is FQMPKDLG.
List panelPanel ID is FQMPLOCS.
Login panelPanel ID is FQMPAUTH.
Object Description panelPanel ID is FQMPODSC.
Appendix H. IDs of QMF panels 109
Prompt panelPanel ID is FQMPMSGB.
Prompt Variables panelPanel ID is FQMPVARS.
Query Number panelPanel ID is FQMPSPQN.
Repository Description panelPanel ID is FQMPREPD.
Recently Used panelPanel ID is FQMPRCUS.
Result Set Number panelPanel ID is FQMPSPRS.
Row Conditions panelPanel ID is FQMPPQRC.
Save Objects panelPanel ID is FQMPSVOB.
Screen Test panelPanel ID is FQMPSTST.
Search panelPanel ID is FQMPTESD.
Set Data Source panelPanel ID is FQMPSTDS.
Select Data Source panelPanel ID is FQMPSLDS.
Select Repository panelPanel ID is FQMPSERP.
Select Object panelPanel ID is FQMPOBLD.
Show Field panelPanel ID is FQMPSHFD.
Show Global Variable panelPanel ID is FQMPGLSH.
Sort Object List panelPanel ID is FQMPOSRT.
Sort Conditions panelPanel ID is FQMPPQSE.
Specify panel: Form.ColumnsPanel ID is FQMPFCSP.
Specify panel: Prompted QueryPanel ID is FQMPPQSC.
Switch Repository panelPanel ID is FQMPSRVR.
Tables panelPanel ID is FQMPPQTE.
110 Getting Started QMF Z Client

Windows panelPanel ID is FQMPODOC.
Workspace Description panelPanel ID is FQMPWSDS.
Appendix H. IDs of QMF panels 111

112 Getting Started QMF Z Client
Notices
This information was developed for products and services offered in the U.S.A.
IBM may not offer the products, services, or features discussed in this document inother countries. Consult your local IBM representative for information on theproducts and services currently available in your area. Any reference to an IBMproduct, program, or service is not intended to state or imply that only that IBMproduct, program, or service may be used. Any functionally equivalent product,program, or service that does not infringe any IBM intellectual property right maybe used instead. However, it is the user's responsibility to evaluate and verify theoperation of any non-IBM product, program, or service.
IBM may have patents or pending patent applications covering subject matterdescribed in this document. The furnishing of this document does not give youany license to these patents. You can send license inquiries, in writing, to:
IBM Director of LicensingIBM CorporationNorth Castle Drive, MD-NC119Armonk, NY 10504-1785US
For license inquiries regarding double-byte (DBCS) information, contact the IBMIntellectual Property Department in your country or send inquiries, in writing, to:
Intellectual Property LicensingLegal and Intellectual Property LawIBM Japan, Ltd.1623-14, Shimotsuruma, Yamato-shiKanagawa 242-8502 Japan
The following paragraph does not apply to the United Kingdom or any othercountry where such provisions are inconsistent with local law:INTERNATIONAL BUSINESS MACHINES CORPORATION PROVIDES THISPUBLICATION "AS IS" WITHOUT WARRANTY OF ANY KIND, EITHEREXPRESS OR IMPLIED, INCLUDING, BUT NOT LIMITED TO, THE IMPLIEDWARRANTIES OF NON-INFRINGEMENT, MERCHANTABILITY OR FITNESSFOR A PARTICULAR PURPOSE. Some states do not allow disclaimer of express orimplied warranties in certain transactions, therefore, this statement may not applyto you.
This information could include technical inaccuracies or typographical errors.Changes are periodically made to the information herein; these changes will beincorporated in new editions of the publication. IBM may make improvementsand/or changes in the product(s) and/or the program(s) described in thispublication at any time without notice.
Any references in this information to non-IBM websites are provided forconvenience only and do not in any manner serve as an endorsement of thosewebsites. The materials at those websites are not part of the materials for this IBMproduct and use of those websites is at your own risk.
113
IBM may use or distribute any of the information you supply in any way itbelieves appropriate without incurring any obligation to you.
Licensees of this program who wish to have information about it for the purposeof enabling: (i) the exchange of information between independently createdprograms and other programs (including this one) and (ii) the mutual use of theinformation which has been exchanged, should contact:
IBM Director of LicensingIBM CorporationNorth Castle Drive, MD-NC119Armonk, NY 10504-1785US
Such information may be available, subject to appropriate terms and conditions,including in some cases, payment of a fee.
The licensed program described in this document and all licensed materialavailable for it are provided by IBM under terms of the IBM Customer Agreement,IBM International Program License Agreement, or any equivalent agreementbetween us.
This information contains examples of data and reports used in daily businessoperations. To illustrate them as completely as possible, the examples include thenames of individuals, companies, brands, and products. All of these names arefictitious and any similarity to the names and addresses used by an actual businessenterprise is entirely coincidental.
COPYRIGHT LICENSE:
This information contains sample application programs in source language, whichillustrate programming techniques on various operating platforms. You may copy,modify, and distribute these sample programs in any form without payment toIBM, for the purposes of developing, using, marketing or distributing applicationprograms conforming to the application programming interface for the operatingplatform for which the sample programs are written. These examples have notbeen thoroughly tested under all conditions. IBM, therefore, cannot guarantee orimply reliability, serviceability, or function of these programs. The sampleprograms are provided "AS IS", without warranty of any kind. IBM shall not beliable for any damages arising out of your use of the sample programs.
TrademarksIBM, the IBM logo, and ibm.com® are trademarks or registered trademarks ofInternational Business Machines Corporation in the United States, other countries,or both. These and other IBM trademarked terms are marked on their firstoccurrence in this information with the appropriate symbol (® or ™), indicating USregistered or common law trademarks owned by IBM at the time this informationwas published. Such trademarks may also be registered or common lawtrademarks in other countries. A complete and current list of IBM trademarks isavailable on the web at http://www.ibm.com/legal/copytrade.shtml.
UNIX is a registered trademark of The Open Group in the United States and othercountries.
114 Getting Started QMF Z Client
Other company, product, and service names may be trademarks or service marksof others.
Terms and conditions for product documentationPermissions for the use of these publications are granted subject to the followingterms and conditions:
Applicability: These terms and conditions are in addition to any terms of use forthe IBM website.
Personal use: You may reproduce these publications for your personal,noncommercial use provided that all proprietary notices are preserved. You maynot distribute, display or make derivative work of these publications, or anyportion thereof, without the express consent of IBM.
Commercial use: You may reproduce, distribute and display these publicationssolely within your enterprise provided that all proprietary notices are preserved.You may not make derivative works of these publications, or reproduce, distributeor display these publications or any portion thereof outside your enterprise,without the express consent of IBM.
Rights: Except as expressly granted in this permission, no other permissions,licenses or rights are granted, either express or implied, to the publications or anyinformation, data, software or other intellectual property contained therein.
IBM reserves the right to withdraw the permissions granted herein whenever, in itsdiscretion, the use of the publications is detrimental to its interest or, asdetermined by IBM, the above instructions are not being properly followed.
You may not download, export or re-export this information except in fullcompliance with all applicable laws and regulations, including all United Statesexport laws and regulations.
IBM MAKES NO GUARANTEE ABOUT THE CONTENT OF THESEPUBLICATIONS. THE PUBLICATIONS ARE PROVIDED "AS-IS" AND WITHOUTWARRANTY OF ANY KIND, EITHER EXPRESSED OR IMPLIED, INCLUDINGBUT NOT LIMITED TO IMPLIED WARRANTIES OF MERCHANTABILITY,NON-INFRINGEMENT, AND FITNESS FOR A PARTICULAR PURPOSE.
Privacy policy considerationsIBM Software products, including software as a service solutions, (“SoftwareOfferings”) may use cookies or other technologies to collect product usageinformation, to help improve the end user experience, to tailor interactions withthe end user, or for other purposes. In many cases no personally identifiableinformation is collected by the Software Offerings. Some of our Software Offeringscan help enable you to collect personally identifiable information. If this SoftwareOffering uses cookies to collect personally identifiable information, specificinformation about this offering’s use of cookies is set forth below.
This Software Offering does not use cookies or other technologies to collectpersonally identifiable information.
If the configurations deployed for this Software Offering provide you as customerthe ability to collect personally identifiable information from end users via cookies
Notices 115
and other technologies, you should seek your own legal advice about any lawsapplicable to such data collection, including any requirements for notice andconsent.
For more information about the use of various technologies, including cookies, forthese purposes, see IBM’s Privacy Policy at http://www.ibm.com/privacy andIBM’s Online Privacy Statement at http://www.ibm.com/privacy/details thesection entitled “Cookies, Web Beacons and Other Technologies” and the “IBMSoftware Products and Software-as-a-Service Privacy Statement” athttp://www.ibm.com/software/info/product-privacy.
116 Getting Started QMF Z Client
Glossary
The glossary provides brief descriptions of product terms.
accessibility. Features that help those with physicaldisabilities, such as restricted mobility or limited vision,use their computer.
batch objects. A batch object is a set of parametersthat is used to create a JCL batch job.
calculated columns. Columns of data that you add tothe query results.
reports. Text-based, tabular reports that are generatedusing query results as the data source and a formtemplate.
command line. An interface that allows user tointeract with the QMF application via enteringcommands.
data sources. Data sources are QMF entities that storeconnection information to access databases.
formatting options. You can customize how the queryresults will appear in the editor window. You can applyformatting options to entire columns, individual cells,column headings, and summary cells. You can alsospecify that column and cell formatting be appliedbased on the results of a conditional expression.
forms. Forms are considered objects and they can besaved in your repository, in the QMF catalog, or in afile. When you open a form object that has been saved,you are actually running the form object to generate thereport. When opened, forms automatically use thecurrently active query results as the data source.
global variables. Global variables are variables thatstay active while the current session of QMF is active.This is in contrast to substitution variables that areactive only during the execution of an object (query,procedure, form). For objects that use global variables,the value currently defined for the global variable isused.
grouping and aggregation. Grouping and aggregationoptions can be applied to query result columns toorganize the result data into logical or summarizedgroupings. By adding grouping and aggregation youcan automatically obtain summary information aboutyour data and display the data more logically.
LOB data. A large object (LOB) is a Db2 for z/OS andDb2 for UNIX® data type that houses nontraditionaldata such as text, multimedia, image, video,photograph, sound, or any very large data file inside a
database table. Retrieving or saving LOB data canconsume a substantial amount of resources.
object key. A unique identifier that is given to everydatabase object. You can view the object key of aparticular object by accessing the Object List panel,placing the cursor on the object, and pressing theDescribe function key.
procedures. A set of commands that enable you to runqueries, print reports, import and export data, as wellas perform other actions.
Prompted Query Editor. When building queries usingthe Prompted Query editor, you supply tables as wellas join, column, sort, and row information and thePrompted Query editor constructs the Structured QueryLanguage (SQL) statements.
QMF catalogs. A set of database tables that containsaved objects (queries, procedures and forms); userresource limits and profiles; reports; and othermiscellaneous settings and information. QMF catalogsreside on database servers that host a Db2 database.
Query Editor. An interface that allows you to openany database table that is accessible to you in yourworkspace.
query parameters. Query parameters contain thevalue that will be sent to the query and used atruntime.
relational query. A query is a request for informationfrom a data source. To request information from arelational data source your query is constructed usingSQL statements.
SQL Query Editor. For those with SQL experience,one way of creating a query is to type their own SQLstatements in the SQL query editor. You can write asingle SQL statement that will return a single result setor multiple SQL statements that will return multipleresult sets.
substitution variables. Substitution variables are usedto enter changing values to a SQL query at run time.This feature enables you to substitute a part of an SQLstatement and make it more generic. Substitutionvariables are active only while the object (query,procedure or form) is running. As a result, only oneobject can access the substitution variable. The variablewill not exist after the object is executed.
117
Table Editor. An interface that allows you to open anydatabase table that is accessible to you in yourworkspace.
usage codes. Usage codes provide summaryinformation about the data in a column. For example,usage codes can provide total summary information atthe end of a column, or partial summaries at controlbreaks in a table. The usage codes available depend onthe data in the column and the type of summary.
workspaces. All of the data sources and objects thatyou can access are contained in one or moreworkspaces that have been pre-populated for you byyour administrator.
118 Getting Started QMF Z Client
Index
Aaccessibility 35accessibility in QMF environment 35accessing QMF objects 18actions command 39add command 39
Bbackward command 40batch command 40bottom command 41
Cchange command 41check command 41clear command 41close command 42connect command 42connecting to
data source 18repository 17
convert command 43create command 43creating
batch objects 31folders 19procedures 25reports 23user-defined global variables 14
creating queriesprompted query editor 21sql editor 21
customizing function keys 13
Ddelete command 44describe command 45display command 45draw command 47DSQAO 90DSQCP 97DSQDC 96DSQEC 92DSQQW 85
Eedit codes 103edit command 47editing
database tables 30editing default values of global
variables 14end command 48erase command 48exit command 49
export command 50
Ffavorite command 54forward command 54
Gglobal variables 13
DSQAO 90DSQCP 97DSQDC 96DSQEC 92DSQQW 85
Hhelp command 55
IIDs of QMF panels 107import command 55insert command 57ispf command 58
Lleft command 58limit local command 59line commands 99links
non-IBM web sites 115list command 60
Mmail to command 61
Nnavigation in QMF 35notices
legal 113
Pprompted query editor
creating queries 21
QQMF trace feature 37query
creating 21
Rrefresh command 64rename command 64repositories and data sources 17reset command 65reset global command 66reset key command 67retrieve command 67right command 68run command 69Running existing
queries 22runtso command 71
Ssave as command 73save command 75saving objects 18search command 76service information vset global command 76set invisible command 77set key command 77set local command 78set local with values command 78set options command 79show command 79sort command 81specify command 81sql editor
creating queries 21SQL editor 99SQL editor line commands 99support information vswitch command 82switch comment command 82system global variables table 85
Ttop command 83troubleshooting 37tso command 83
Uusage codes 101use repository command 84
Wworking with
batch objects 31, 33database tables 30folders 19procedures 25queries 21
119

120 Getting Started QMF Z Client

IBM®
Product Number: 5697-QM25650-DB25615-DB2
Printed in USA