Embed Size (px)
Citation preview
Getting Started With Audacity Audacity is free, open source software for recording and editing sounds. The completed sound file can contain multiple tracks. Audacity is used to create sound files for podcasting. This tutorial will explain the Audacity interface and how to use the tools and features of the program.
CONTENTS Toolbars in the Audacity Window Page 1 Important Menu Features in the Audacity Window Page 4 Understanding an Audio Track Page 8 Starting a Project – Recording and Importing Page 10 Editing the Tracks Page 13 Saving the Project Page 17 Exporting the File Page 17
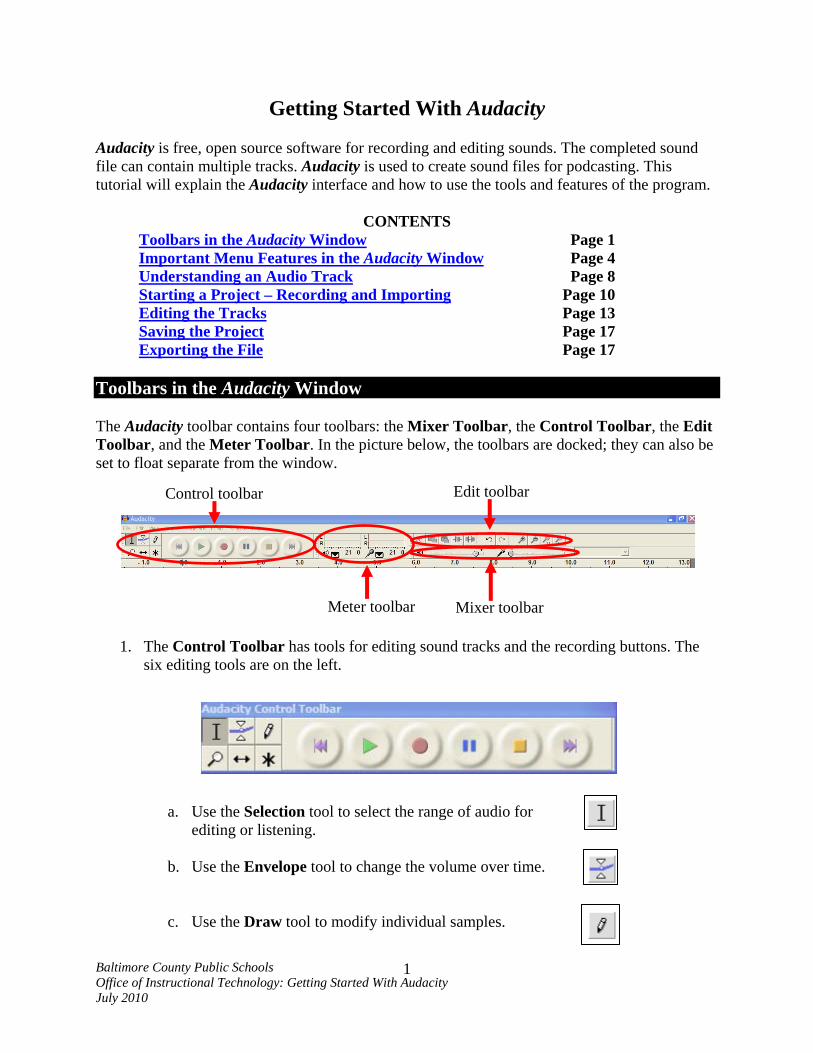
Toolbars in the Audacity Window The Audacity toolbar contains four toolbars: the Mixer Toolbar, the Control Toolbar, the Edit Toolbar, and the Meter Toolbar. In the picture below, the toolbars are docked; they can also be set to float separate from the window.
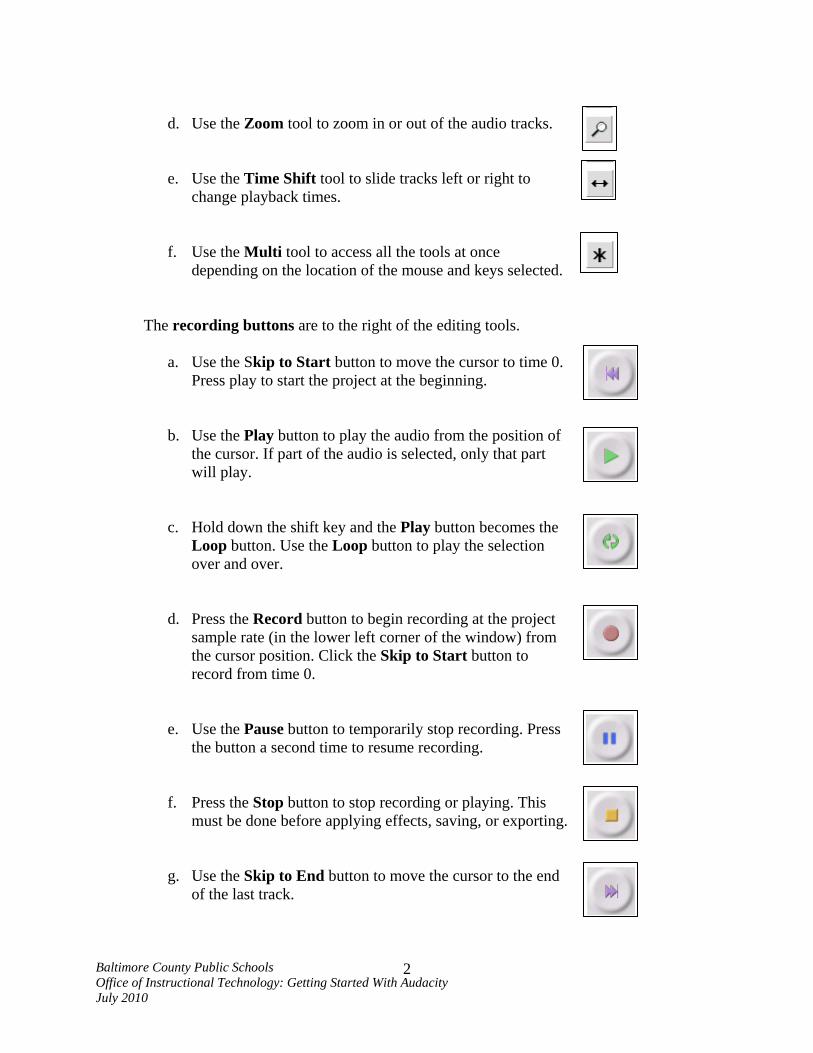
1. The Control Toolbar has tools for editing sound tracks and the recording buttons. The six editing tools are on the left.
Control toolbar Edit toolbar
Mixer toolbar Meter toolbar
a. Use the Selection tool to select the range of audio for editing or listening.
b. Use the Envelope tool to change the volume over time.
c. Use the Draw tool to modify individual samples.
Baltimore County Public Schools Office of Instructional Technology: Getting Started With Audacity July 2010
1
d. Use the Zoom tool to zoom in or out of the audio tracks.
e. Use the Time Shift tool to slide tracks left or right to change playback times.
f. Use the Multi tool to access all the tools at once depending on the location of the mouse and keys selected.
The recording buttons are to the right of the editing tools.
a. Use the Skip to Start button to move the cursor to time 0. Press play to start the project at the beginning.
b. Use the Play button to play the audio from the position of the cursor. If part of the audio is selected, only that part will play.
c. Hold down the shift key and the Play button becomes the Loop button. Use the Loop button to play the selection over and over.
d. Press the Record button to begin recording at the project sample rate (in the lower left corner of the window) from the cursor position. Click the Skip to Start button to record from time 0.
e. Use the Pause button to temporarily stop recording. Press the button a second time to resume recording.
f. Press the Stop button to stop recording or playing. This must be done before applying effects, saving, or exporting.
g. Use the Skip to End button to move the cursor to the end of the last track.
Baltimore County Public Schools Office of Instructional Technology: Getting Started With Audacity July 2010
2
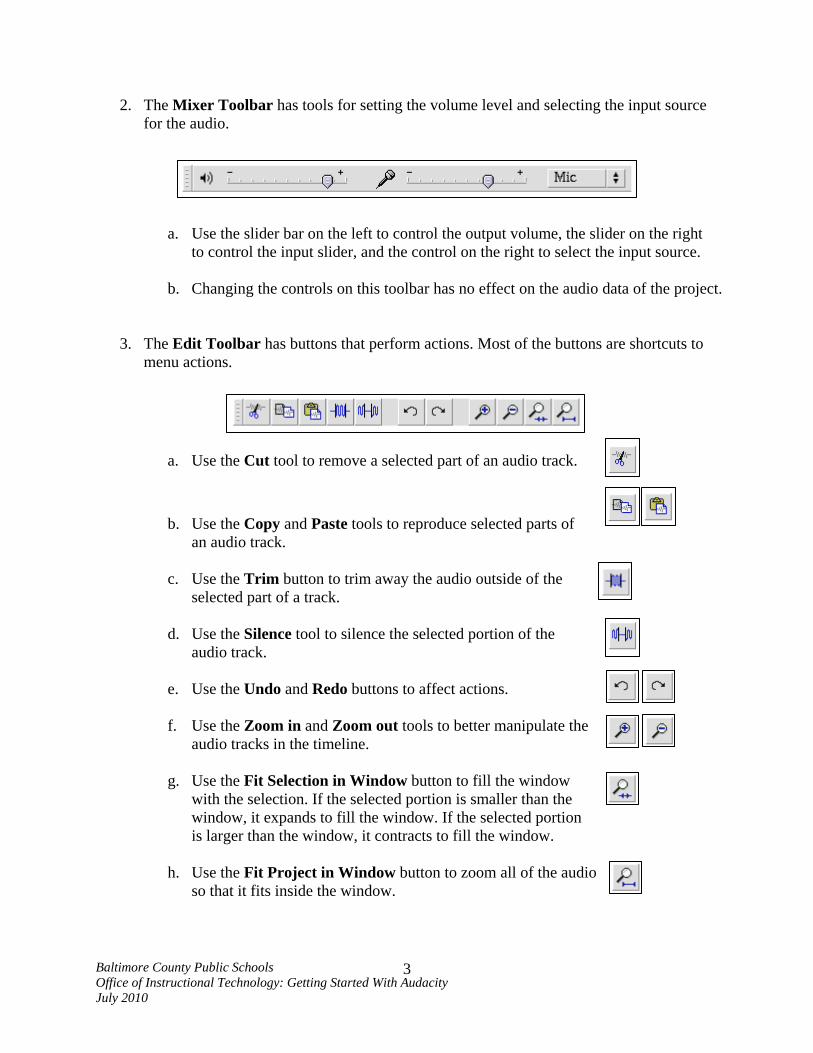
2. The Mixer Toolbar has tools for setting the volume level and selecting the input source for the audio.
a. Use the slider bar on the left to control the output volume, the slider on the right to control the input slider, and the control on the right to select the input source.
b. Changing the controls on this toolbar has no effect on the audio data of the project.
3. The Edit Toolbar has buttons that perform actions. Most of the buttons are shortcuts to menu actions.
a. Use the Cut tool to remove a selected part of an audio track.
b. Use the Copy and Paste tools to reproduce selected parts of an audio track.
c. Use the Trim button to trim away the audio outside of the
selected part of a track.
d. Use the Silence tool to silence the selected portion of the audio track.
e. Use the Undo and Redo buttons to affect actions.
f. Use the Zoom in and Zoom out tools to better manipulate the
audio tracks in the timeline.
g. Use the Fit Selection in Window button to fill the window with the selection. If the selected portion is smaller than the window, it expands to fill the window. If the selected portion is larger than the window, it contracts to fill the window.
h. Use the Fit Project in Window button to zoom all of the audio
so that it fits inside the window. Baltimore County Public Schools Office of Instructional Technology: Getting Started With Audacity July 2010
3
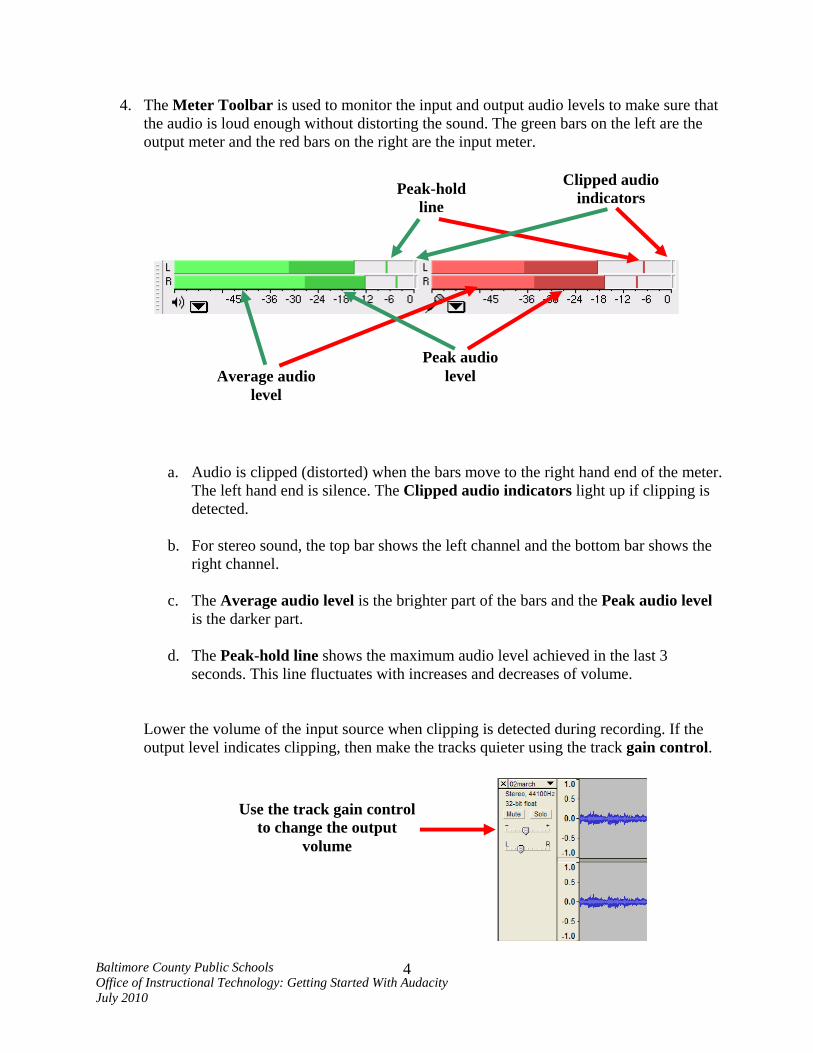
4. The Meter Toolbar is used to monitor the input and output audio levels to make sure that the audio is loud enough without distorting the sound. The green bars on the left are the output meter and the red bars on the right are the input meter.
Clipped audio
indicators Peak-hold line
Average audio level
Peak audio level
a. Audio is clipped (distorted) when the bars move to the right hand end of the meter. The left hand end is silence. The Clipped audio indicators light up if clipping is detected.
b. For stereo sound, the top bar shows the left channel and the bottom bar shows the
right channel.
c. The Average audio level is the brighter part of the bars and the Peak audio level is the darker part.
d. The Peak-hold line shows the maximum audio level achieved in the last 3
seconds. This line fluctuates with increases and decreases of volume.
Lower the volume of the input source when clipping is detected during recording. If the output level indicates clipping, then make the tracks quieter using the track gain control.
Use the track gain control
to change the output volume
Baltimore County Public Schools Office of Instructional Technology: Getting Started With Audacity July 2010
4
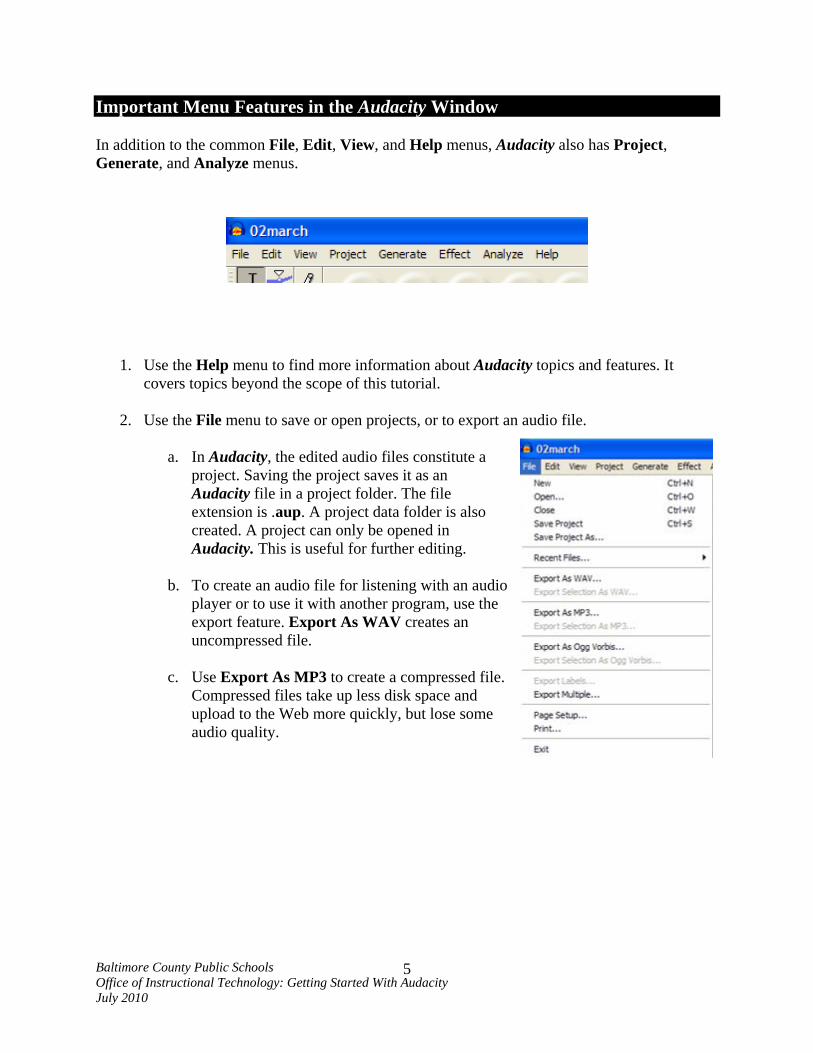
Important Menu Features in the Audacity Window In addition to the common File, Edit, View, and Help menus, Audacity also has Project, Generate, and Analyze menus.
1. Use the Help menu to find more information about Audacity topics and features. It covers topics beyond the scope of this tutorial.
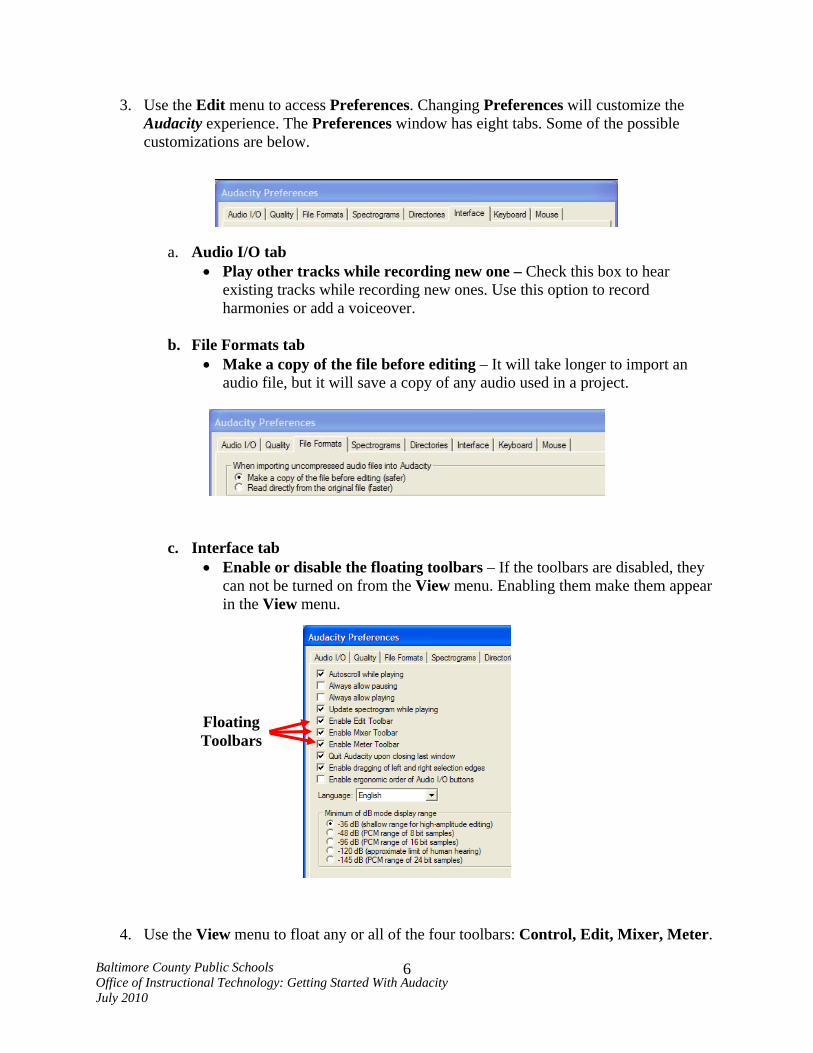
2. Use the File menu to save or open projects, or to export an audio file.
a. In Audacity, the edited audio files constitute a
project. Saving the project saves it as an Audacity file in a project folder. The file extension is .aup. A project data folder is also created. A project can only be opened in Audacity. This is useful for further editing.
b. To create an audio file for listening with an audio
player or to use it with another program, use the export feature. Export As WAV creates an uncompressed file.
c. Use Export As MP3 to create a compressed file.
Compressed files take up less disk space and upload to the Web more quickly, but lose some audio quality.
Baltimore County Public Schools Office of Instructional Technology: Getting Started With Audacity July 2010
5
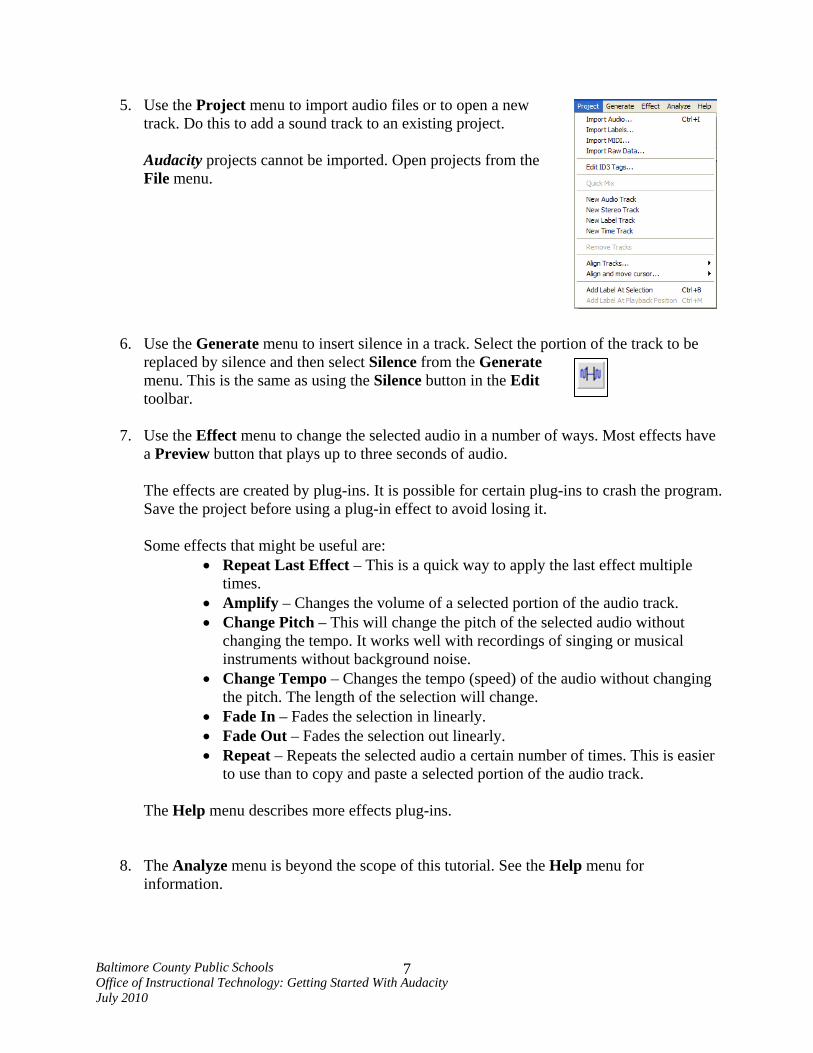
3. Use the Edit menu to access Preferences. Changing Preferences will customize the Audacity experience. The Preferences window has eight tabs. Some of the possible customizations are below.
a. Audio I/O tab • Play other tracks while recording new one – Check this box to hear
existing tracks while recording new ones. Use this option to record harmonies or add a voiceover.
b. File Formats tab
• Make a copy of the file before editing – It will take longer to import an audio file, but it will save a copy of any audio used in a project.
c. Interface tab • Enable or disable the floating toolbars – If the toolbars are disabled, they
can not be turned on from the View menu. Enabling them make them appear in the View menu.
Floating Toolbars
4. Use the View menu to float any or all of the four toolbars: Control, Edit, Mixer, Meter.
Baltimore County Public Schools Office of Instructional Technology: Getting Started With Audacity July 2010
6
5. Use the Project menu to import audio files or to open a new track. Do this to add a sound track to an existing project.
Audacity projects cannot be imported. Open projects from the File menu.
6. Use the Generate menu to insert silence in a track. Select the portion of the track to be replaced by silence and then select Silence from the Generate menu. This is the same as using the Silence button in the Edit toolbar.
7. Use the Effect menu to change the selected audio in a number of ways. Most effects have
a Preview button that plays up to three seconds of audio.
The effects are created by plug-ins. It is possible for certain plug-ins to crash the program. Save the project before using a plug-in effect to avoid losing it. Some effects that might be useful are:
• Repeat Last Effect – This is a quick way to apply the last effect multiple times.
• Amplify – Changes the volume of a selected portion of the audio track. • Change Pitch – This will change the pitch of the selected audio without
changing the tempo. It works well with recordings of singing or musical instruments without background noise.
• Change Tempo – Changes the tempo (speed) of the audio without changing the pitch. The length of the selection will change.
• Fade In – Fades the selection in linearly. • Fade Out – Fades the selection out linearly. • Repeat – Repeats the selected audio a certain number of times. This is easier
to use than to copy and paste a selected portion of the audio track.
The Help menu describes more effects plug-ins.
8. The Analyze menu is beyond the scope of this tutorial. See the Help menu for information.
Baltimore County Public Schools Office of Instructional Technology: Getting Started With Audacity July 2010
7
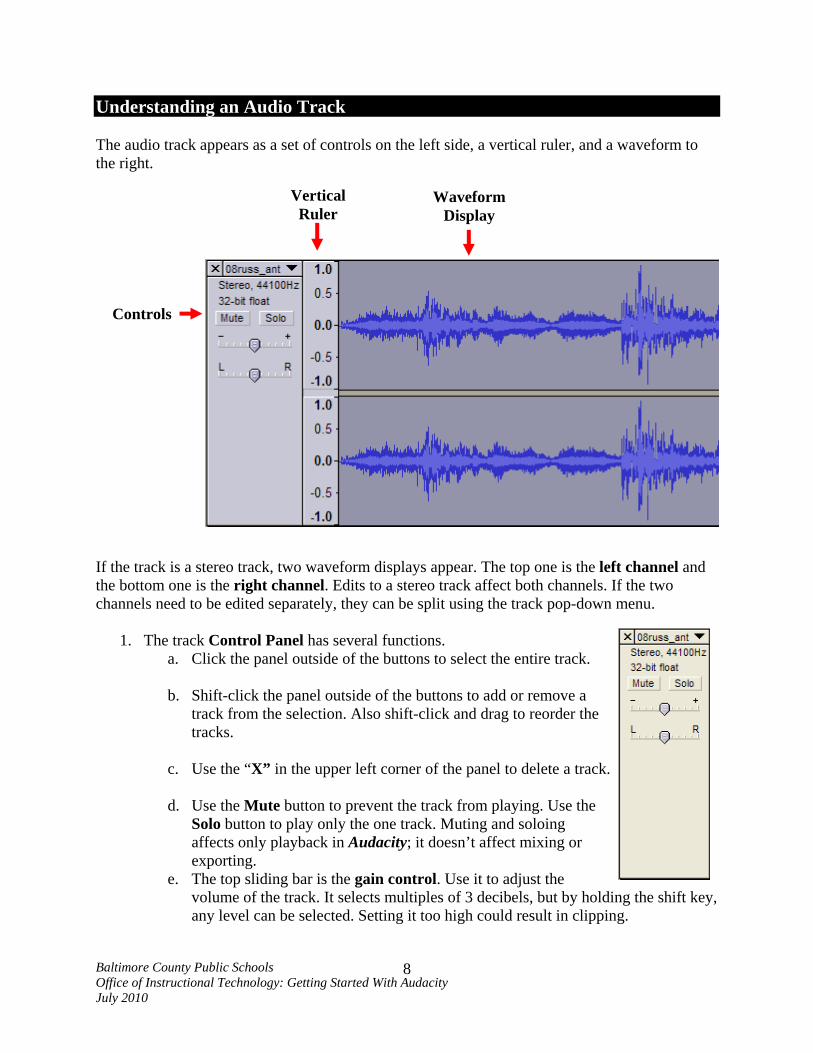
Understanding an Audio Track The audio track appears as a set of controls on the left side, a vertical ruler, and a waveform to the right.
Waveform Display
Vertical Ruler
Controls If the track is a stereo track, two waveform displays appear. The top one is the left channel and the bottom one is the right channel. Edits to a stereo track affect both channels. If the two channels need to be edited separately, they can be split using the track pop-down menu.
1. The track Control Panel has several functions. a. Click the panel outside of the buttons to select the entire track.
b. Shift-click the panel outside of the buttons to add or remove a
track from the selection. Also shift-click and drag to reorder the tracks.
c. Use the “X” in the upper left corner of the panel to delete a track.
d. Use the Mute button to prevent the track from playing. Use the
Solo button to play only the one track. Muting and soloing affects only playback in Audacity; it doesn’t affect mixing or exporting.
e. The top sliding bar is the gain control. Use it to adjust the volume of the track. It selects multiples of 3 decibels, but by holding the shift key, any level can be selected. Setting it too high could result in clipping.
Baltimore County Public Schools Office of Instructional Technology: Getting Started With Audacity July 2010
8
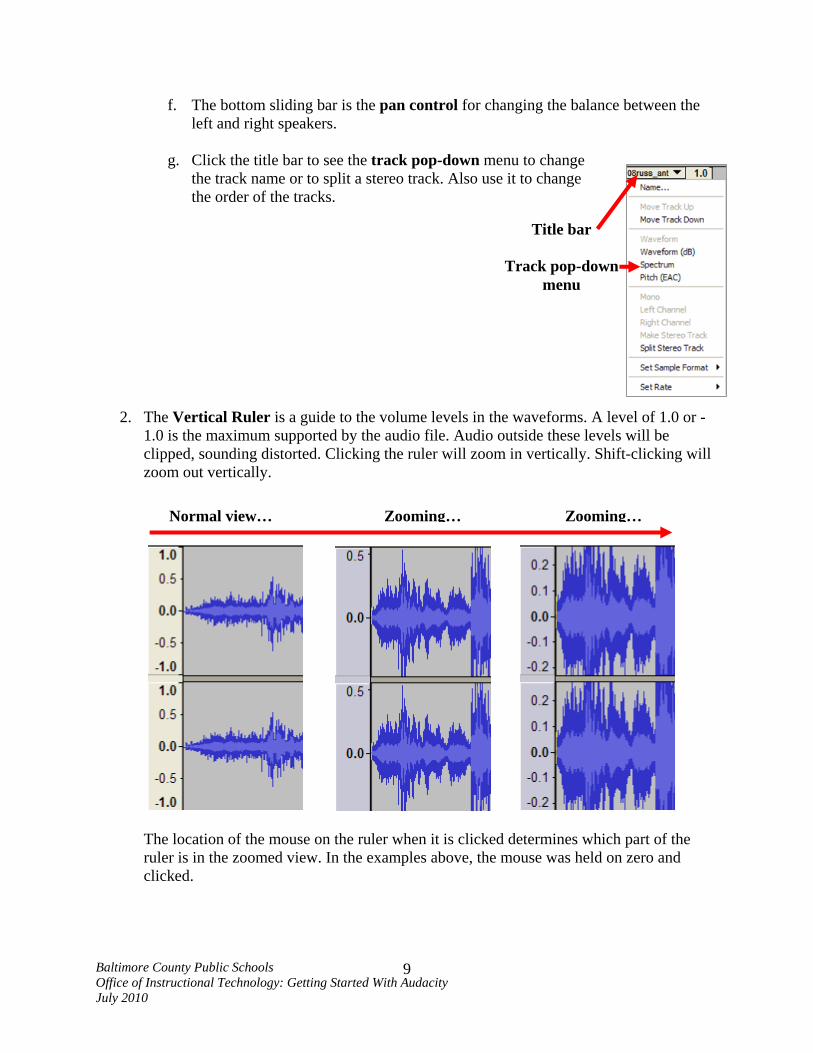
f. The bottom sliding bar is the pan control for changing the balance between the left and right speakers.
g. Click the title bar to see the track pop-down menu to change
the track name or to split a stereo track. Also use it to change the order of the tracks.
Title bar
Track pop-down menu
2. The Vertical Ruler is a guide to the volume levels in the waveforms. A level of 1.0 or -1.0 is the maximum supported by the audio file. Audio outside these levels will be clipped, sounding distorted. Clicking the ruler will zoom in vertically. Shift-clicking will zoom out vertically.
Normal view… Zooming… Zooming…
The location of the mouse on the ruler when it is clicked determines which part of the ruler is in the zoomed view. In the examples above, the mouse was held on zero and clicked.
Baltimore County Public Schools Office of Instructional Technology: Getting Started With Audacity July 2010
9
Starting a Project – Recording and Importing
This section will describe and explain the steps involved in creating a typical audio file. The steps in this project include:
• Recording narration • Importing music • Importing background sounds • Editing the tracks • Saving the project • Exporting the file
To actually follow the steps, you will need three resources: a primary source document for the narration in step 1, a music file for step 2, and a background sound file for step 3.
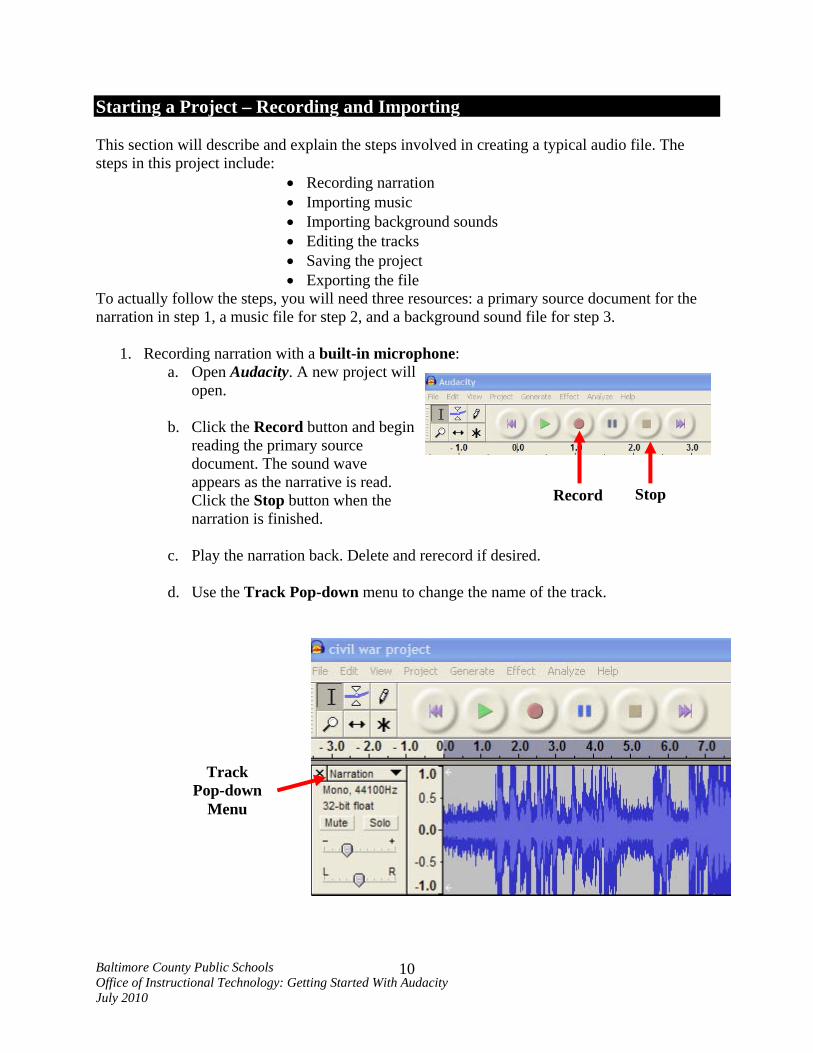
1. Recording narration with a built-in microphone: a. Open Audacity. A new project will
open.
b. Click the Record button and begin reading the primary source document. The sound wave appears as the narrative is read. Click the Stop button when the narration is finished.
c. Play the narration back. Delete and rerecord if desired.
d. Use the Track Pop-down menu to change the name of the track.
Record Stop
Track Pop-down
Menu
Baltimore County Public Schools Office of Instructional Technology: Getting Started With Audacity July 2010
10
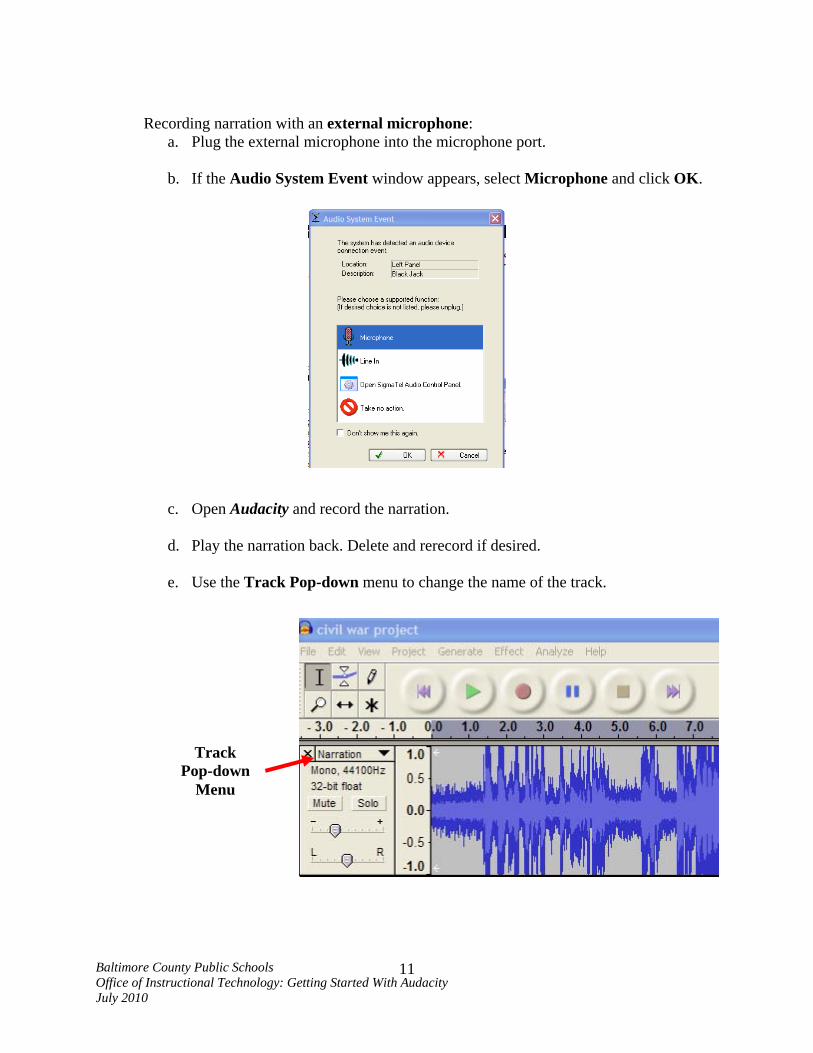
Recording narration with an external microphone:
a. Plug the external microphone into the microphone port.
b. If the Audio System Event window appears, select Microphone and click OK.
c. Open Audacity and record the narration.
d. Play the narration back. Delete and rerecord if desired.
e. Use the Track Pop-down menu to change the name of the track.
Track Pop-down
Menu
Baltimore County Public Schools Office of Instructional Technology: Getting Started With Audacity July 2010
11
2. Importing the music file:
a. From the Project menu, select Import Audio.
Note: Do not go to File and select Open. Doing so will open a second project and the two tracks will not appear together.
b. Navigate to the music file and open it. The waveform appears in the project
window. If the music was recorded in stereo, there will be two waveforms: one for the left channel, and one for the right channel. The project should look like this:
3. Importing background sounds:
a. From the Project menu, select Import Audio.
Narration
Track
b. Navigate to the Background Sounds file and open it. The waveform for the background sounds appears.
Music Track
c. Rename the tracks.
Now there are three tracks.
Background Sounds
Baltimore County Public Schools Office of Instructional Technology: Getting Started With Audacity July 2010
12
Editing the Tracks This project will begin with music at a normal volume. It will slowly fade to a lower volume. Narration will then begin and continue to the end. Musket fire will occur in the background. As the narration ends, the music fades in to a normal volume before fading out at the end.
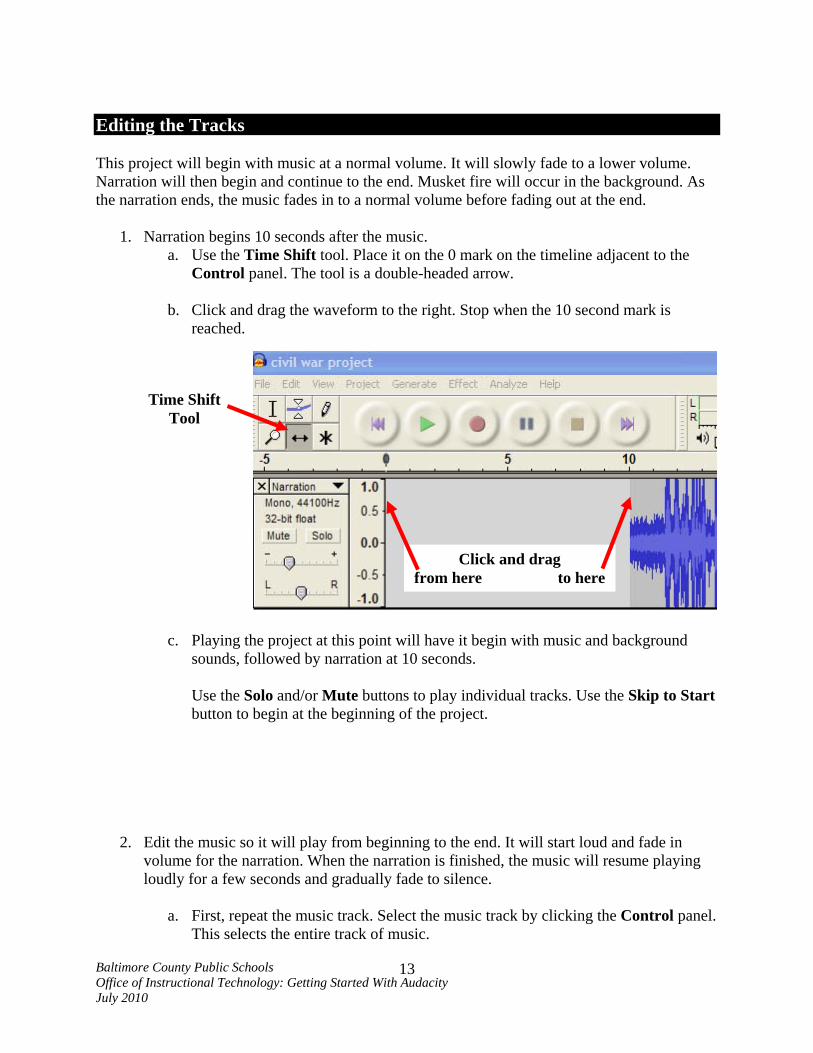
1. Narration begins 10 seconds after the music. a. Use the Time Shift tool. Place it on the 0 mark on the timeline adjacent to the
Control panel. The tool is a double-headed arrow.
b. Click and drag the waveform to the right. Stop when the 10 second mark is reached.
Time Shift
Tool
Click and drag from here to here
c. Playing the project at this point will have it begin with music and background sounds, followed by narration at 10 seconds.
Use the Solo and/or Mute buttons to play individual tracks. Use the Skip to Start button to begin at the beginning of the project.
2. Edit the music so it will play from beginning to the end. It will start loud and fade in volume for the narration. When the narration is finished, the music will resume playing loudly for a few seconds and gradually fade to silence.
a. First, repeat the music track. Select the music track by clicking the Control panel.
This selects the entire track of music.
Baltimore County Public Schools Office of Instructional Technology: Getting Started With Audacity July 2010
13
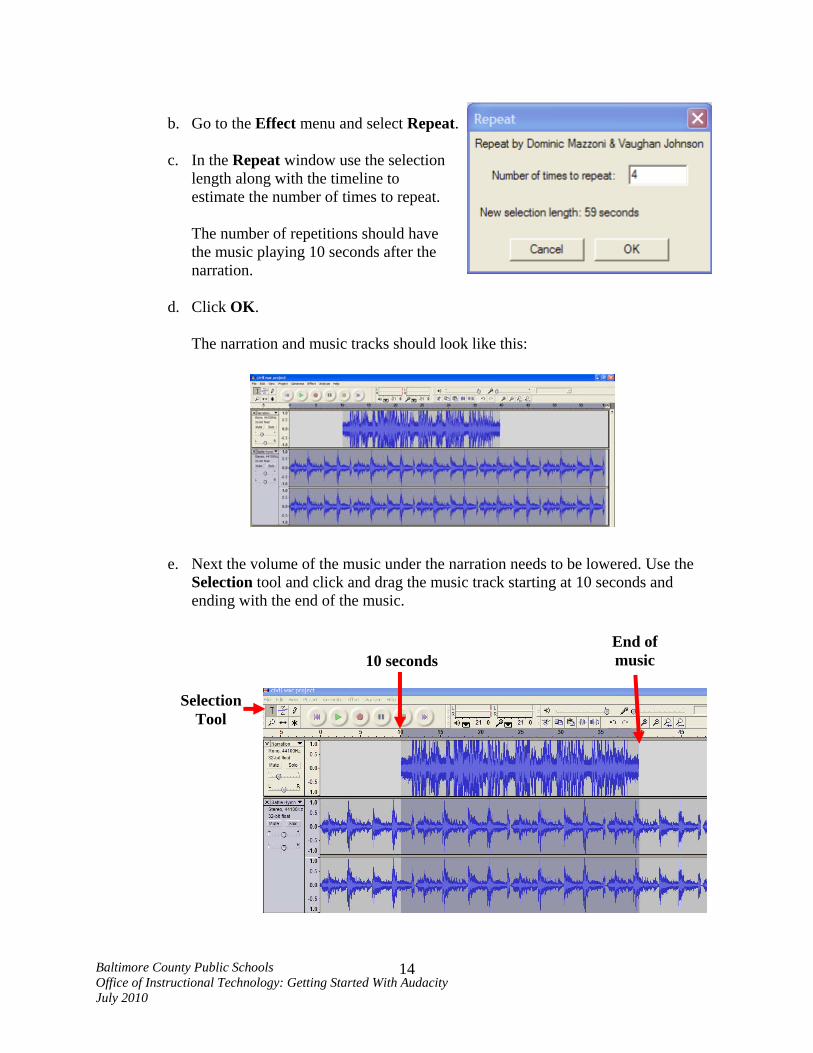
b. Go to the Effect menu and select Repeat.
c. In the Repeat window use the selection
length along with the timeline to estimate the number of times to repeat.
The number of repetitions should have the music playing 10 seconds after the narration.
d. Click OK.
The narration and music tracks should look like this:
e. Next the volume of the music under the narration needs to be lowered. Use the Selection tool and click and drag the music track starting at 10 seconds and ending with the end of the music.
End of
music
Selection Tool
10 seconds
Baltimore County Public Schools Office of Instructional Technology: Getting Started With Audacity July 2010
14
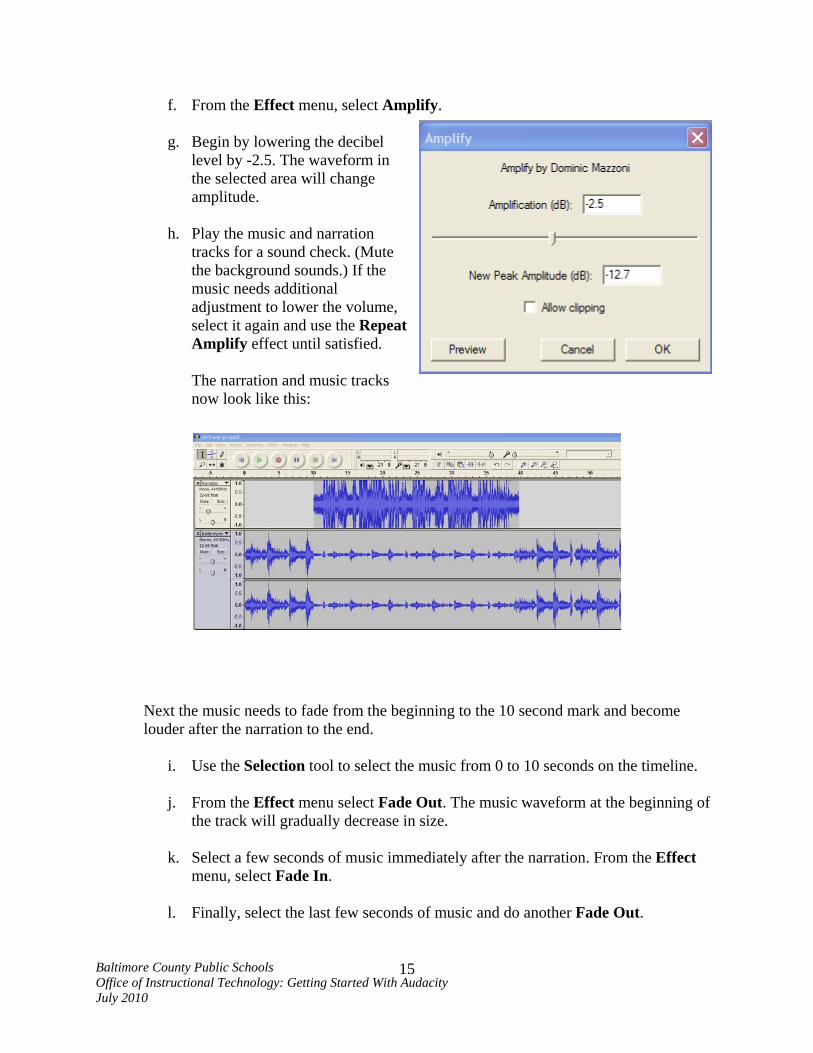
f. From the Effect menu, select Amplify.
g. Begin by lowering the decibel level by -2.5. The waveform in the selected area will change amplitude.
h. Play the music and narration
tracks for a sound check. (Mute the background sounds.) If the music needs additional adjustment to lower the volume, select it again and use the Repeat Amplify effect until satisfied.
The narration and music tracks now look like this:
Next the music needs to fade from the beginning to the 10 second mark and become louder after the narration to the end.
i. Use the Selection tool to select the music from 0 to 10 seconds on the timeline.
j. From the Effect menu select Fade Out. The music waveform at the beginning of
the track will gradually decrease in size.
k. Select a few seconds of music immediately after the narration. From the Effect menu, select Fade In.
l. Finally, select the last few seconds of music and do another Fade Out.
Baltimore County Public Schools Office of Instructional Technology: Getting Started With Audacity July 2010
15
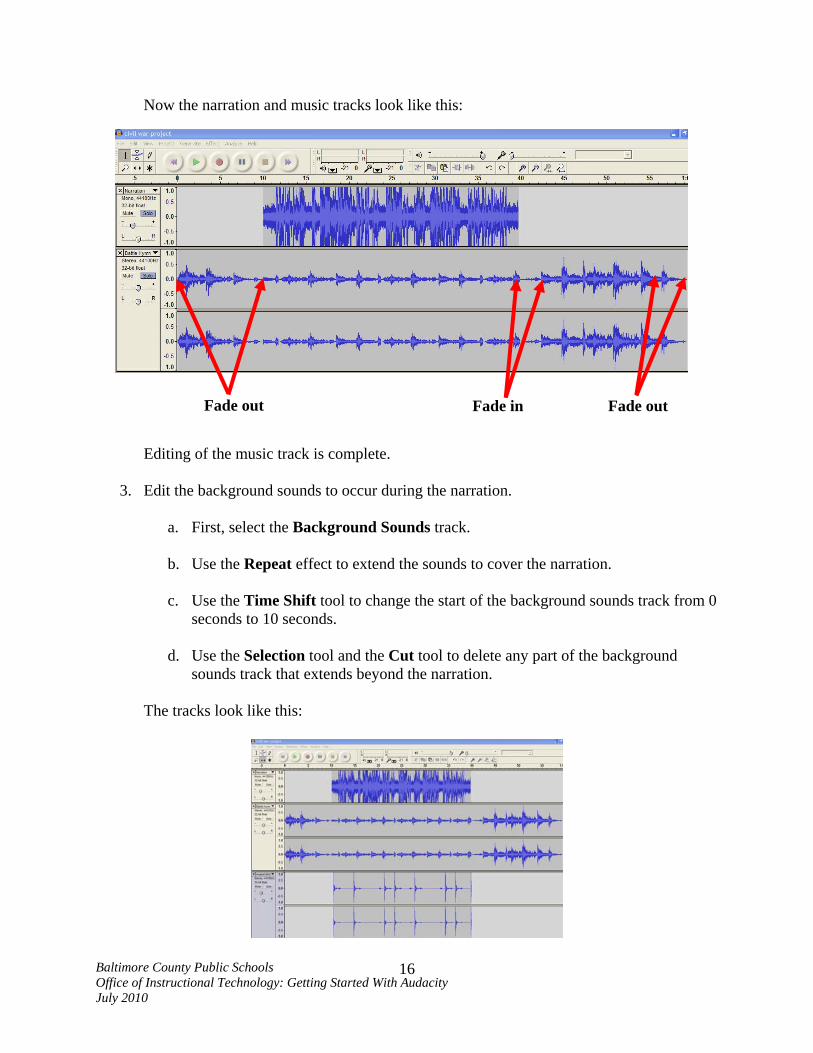
Now the narration and music tracks look like this:
Fade out Fade out Fade in
Editing of the music track is complete.
3. Edit the background sounds to occur during the narration.
a. First, select the Background Sounds track.
b. Use the Repeat effect to extend the sounds to cover the narration.
c. Use the Time Shift tool to change the start of the background sounds track from 0 seconds to 10 seconds.
d. Use the Selection tool and the Cut tool to delete any part of the background
sounds track that extends beyond the narration.
The tracks look like this:
Baltimore County Public Schools Office of Instructional Technology: Getting Started With Audacity July 2010
16

Saving the Project
Soon after starting a new project, it should be saved as a project and saved frequently throughout the creation of the project. Project files (extension .AUP) can always be opened in Audacity and further modified. Select Save Project As… from the File menu for the intial save.
Thereafter, use Save Project (or Control-S) to save changes to the project.
Exporting the File Exporting the file will mix the separate tracks and put them in an audio format compatible with most players.
Baltimore County Public Schools Office of Instructional Technology: Getting Started With Audacity July 2010
17


![Skaffold - storage.googleapis.com · [getting-started getting-started] Hello world! [getting-started getting-started] Hello world! [getting-started getting-started] Hello world! 5](https://img.pdfslide.net/doc/110x75/5ec939f2a76a033f091c5ac7/skaffold-getting-started-getting-started-hello-world-getting-started-getting-started.jpg)


