Embed Size (px)
Citation preview
Getting Started With
A Step-by-Step Guide to Using WorldAPP Analytics to Analyze Survey Data,
Create Charts, & Share Results Online
Getting Started With WorldAPP Analytics
© Copyright 2011 MarketSight LLC 2
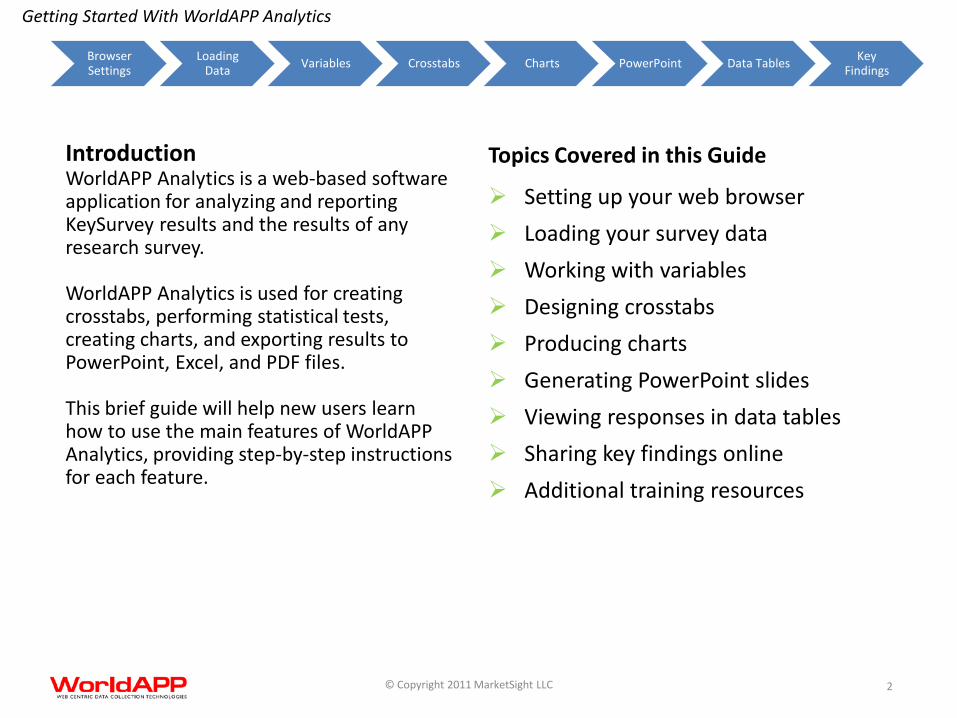
Introduction WorldAPP Analytics is a web-based software application for analyzing and reporting KeySurvey results and the results of any research survey. WorldAPP Analytics is used for creating crosstabs, performing statistical tests, creating charts, and exporting results to PowerPoint, Excel, and PDF files. This brief guide will help new users learn how to use the main features of WorldAPP Analytics, providing step-by-step instructions for each feature.
Topics Covered in this Guide
Setting up your web browser Loading your survey data Working with variables Designing crosstabs Producing charts Generating PowerPoint slides Viewing responses in data tables Sharing key findings online Additional training resources
Browser Settings
Loading Data Variables Crosstabs Charts PowerPoint Data Tables Key
Findings
Getting Started With WorldAPP Analytics
© Copyright 2011 MarketSight LLC 3
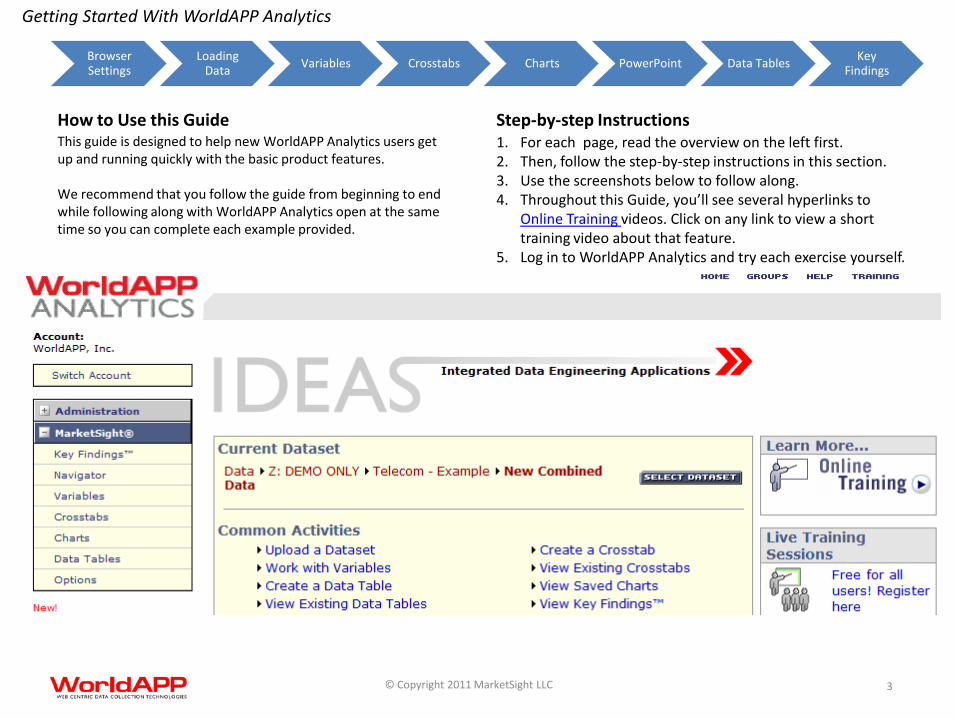
This guide is designed to help new WorldAPP Analytics users get up and running quickly with the basic product features. We recommend that you follow the guide from beginning to end while following along with WorldAPP Analytics open at the same time so you can complete each example provided.
1. For each page, read the overview on the left first. 2. Then, follow the step-by-step instructions in this section. 3. Use the screenshots below to follow along. 4. Throughout this Guide, you’ll see several hyperlinks to
Online Training videos. Click on any link to view a short training video about that feature.
5. Log in to WorldAPP Analytics and try each exercise yourself.
How to Use this Guide Step-by-step Instructions
Browser Settings
Loading Data Variables Crosstabs Charts PowerPoint Data Tables Key
Findings
Getting Started With WorldAPP Analytics
© Copyright 2011 MarketSight LLC 4
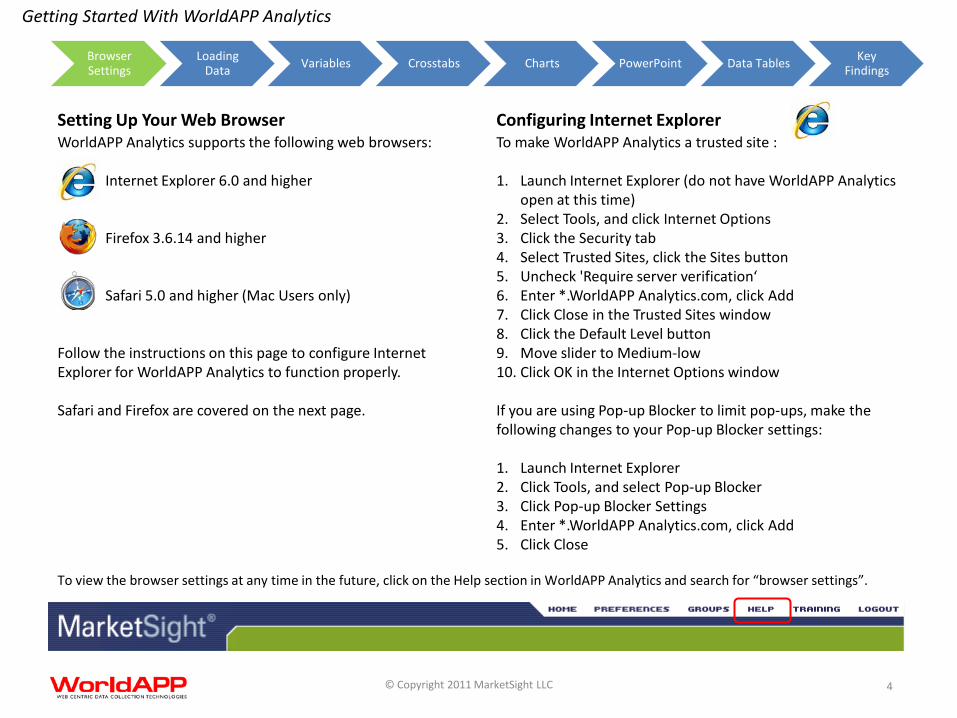
WorldAPP Analytics supports the following web browsers:
Internet Explorer 6.0 and higher Firefox 3.6.14 and higher Safari 5.0 and higher (Mac Users only)
Follow the instructions on this page to configure Internet Explorer for WorldAPP Analytics to function properly. Safari and Firefox are covered on the next page.
To make WorldAPP Analytics a trusted site :
1. Launch Internet Explorer (do not have WorldAPP Analytics open at this time)
2. Select Tools, and click Internet Options 3. Click the Security tab 4. Select Trusted Sites, click the Sites button 5. Uncheck 'Require server verification‘ 6. Enter *.WorldAPP Analytics.com, click Add 7. Click Close in the Trusted Sites window 8. Click the Default Level button 9. Move slider to Medium-low 10. Click OK in the Internet Options window
If you are using Pop-up Blocker to limit pop-ups, make the following changes to your Pop-up Blocker settings:
1. Launch Internet Explorer 2. Click Tools, and select Pop-up Blocker 3. Click Pop-up Blocker Settings 4. Enter *.WorldAPP Analytics.com, click Add 5. Click Close
Setting Up Your Web Browser Configuring Internet Explorer
Browser Settings
Loading Data Variables Crosstabs Charts PowerPoint Data Tables Key
Findings
To view the browser settings at any time in the future, click on the Help section in WorldAPP Analytics and search for “browser settings”.
Getting Started With WorldAPP Analytics
© Copyright 2011 MarketSight LLC 5
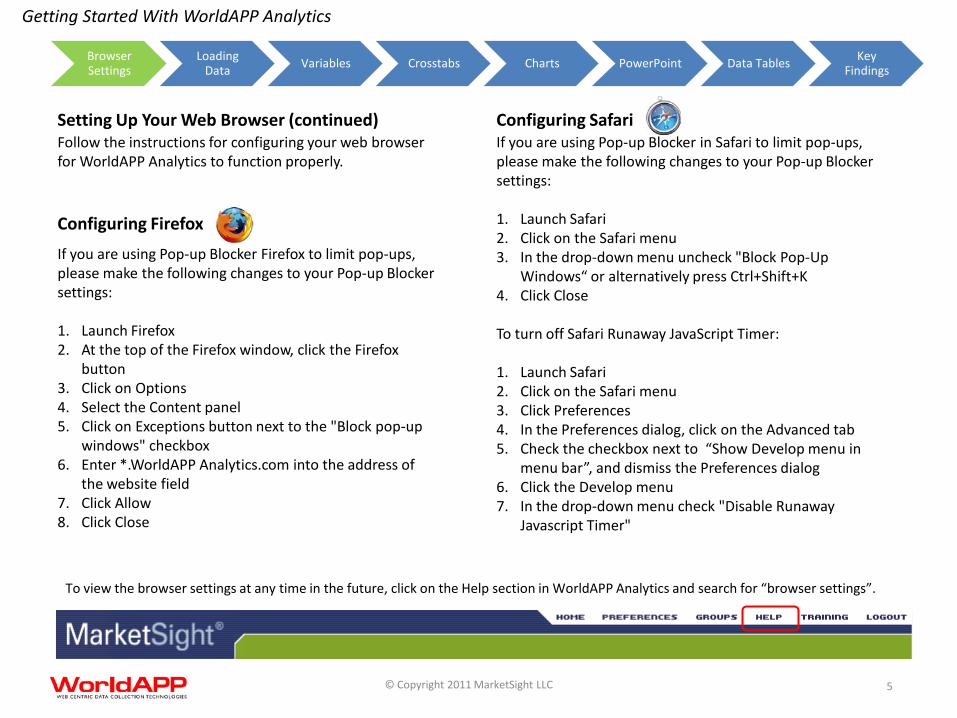
Setting Up Your Web Browser (continued) Configuring Safari
Browser Settings
Loading Data Variables Crosstabs Charts PowerPoint Data Tables Key
Findings
If you are using Pop-up Blocker in Safari to limit pop-ups, please make the following changes to your Pop-up Blocker settings: 1. Launch Safari 2. Click on the Safari menu 3. In the drop-down menu uncheck "Block Pop-Up
Windows“ or alternatively press Ctrl+Shift+K 4. Click Close To turn off Safari Runaway JavaScript Timer: 1. Launch Safari 2. Click on the Safari menu 3. Click Preferences 4. In the Preferences dialog, click on the Advanced tab 5. Check the checkbox next to “Show Develop menu in
menu bar”, and dismiss the Preferences dialog 6. Click the Develop menu 7. In the drop-down menu check "Disable Runaway
Javascript Timer"
If you are using Pop-up Blocker Firefox to limit pop-ups, please make the following changes to your Pop-up Blocker settings: 1. Launch Firefox 2. At the top of the Firefox window, click the Firefox
button 3. Click on Options 4. Select the Content panel 5. Click on Exceptions button next to the "Block pop-up
windows" checkbox 6. Enter *.WorldAPP Analytics.com into the address of
the website field 7. Click Allow 8. Click Close
Configuring Firefox
To view the browser settings at any time in the future, click on the Help section in WorldAPP Analytics and search for “browser settings”.
Follow the instructions for configuring your web browser for WorldAPP Analytics to function properly.
Getting Started With WorldAPP Analytics
© Copyright 2011 MarketSight LLC 6
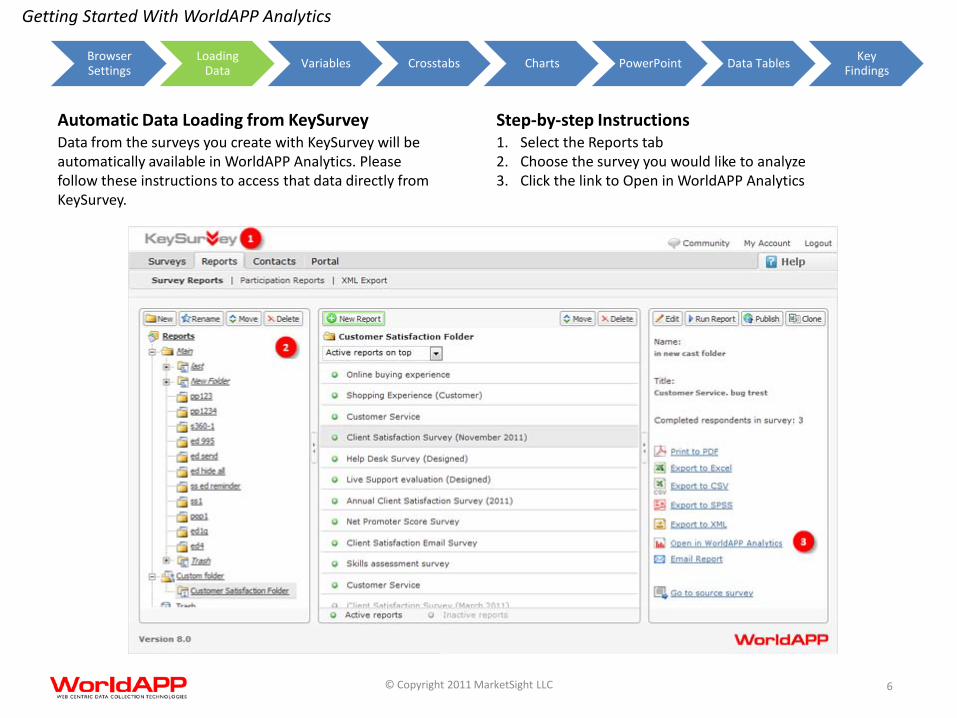
Data from the surveys you create with KeySurvey will be automatically available in WorldAPP Analytics. Please follow these instructions to access that data directly from KeySurvey.
1. Select the Reports tab 2. Choose the survey you would like to analyze 3. Click the link to Open in WorldAPP Analytics
Automatic Data Loading from KeySurvey Step-by-step Instructions
Browser Settings
Loading Data Variables Crosstabs Charts PowerPoint Data Tables Key
Findings

Getting Started With WorldAPP Analytics
© Copyright 2011 MarketSight LLC 7
Uploading your survey data to WorldAPP Analytics is easy and virtually all survey tools can output datasets in a format supported by WorldAPP Analytics, including the following formats: SPSS, Excel, SAS, and Triple-S.
1. Click on the Navigator menu item. 2. Right-click on the folder you want to put the dataset in. 3. Select Upload Dataset from the drop-down. 4. Browse your computer for the dataset to be uploaded. 5. WorldAPP Analytics will insert the Name automatically.
Loading Data Manually Step-by-step Instructions
Browser Settings
Loading Data Variables Crosstabs Charts PowerPoint Data Tables Key
Findings
1
2
3 4
5
Watch this Training Video to learn more.
Getting Started With WorldAPP Analytics
© Copyright 2011 MarketSight LLC 8
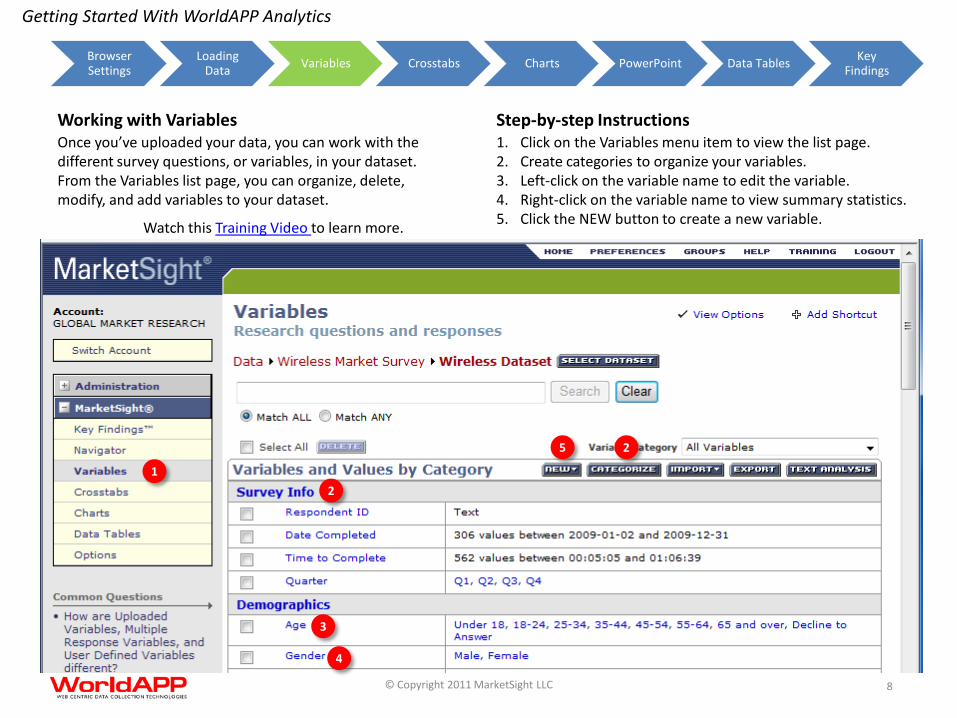
Once you’ve uploaded your data, you can work with the different survey questions, or variables, in your dataset. From the Variables list page, you can organize, delete, modify, and add variables to your dataset.
1. Click on the Variables menu item to view the list page. 2. Create categories to organize your variables. 3. Left-click on the variable name to edit the variable. 4. Right-click on the variable name to view summary statistics. 5. Click the NEW button to create a new variable.
Working with Variables Step-by-step Instructions
Browser Settings
Loading Data Variables Crosstabs Charts PowerPoint Data Tables Key
Findings
1 2
3
4
5 2
Watch this Training Video to learn more.
Getting Started With WorldAPP Analytics
© Copyright 2011 MarketSight LLC 9
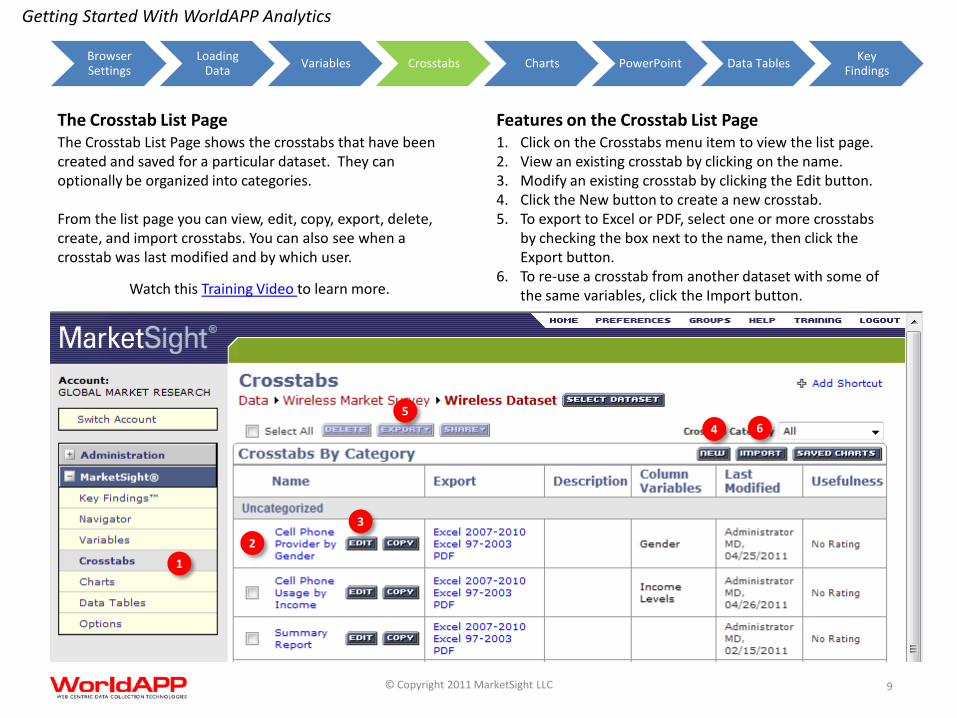
The Crosstab List Page shows the crosstabs that have been created and saved for a particular dataset. They can optionally be organized into categories. From the list page you can view, edit, copy, export, delete, create, and import crosstabs. You can also see when a crosstab was last modified and by which user.
1. Click on the Crosstabs menu item to view the list page. 2. View an existing crosstab by clicking on the name. 3. Modify an existing crosstab by clicking the Edit button. 4. Click the New button to create a new crosstab. 5. To export to Excel or PDF, select one or more crosstabs
by checking the box next to the name, then click the Export button.
6. To re-use a crosstab from another dataset with some of the same variables, click the Import button.
The Crosstab List Page Features on the Crosstab List Page
Browser Settings
Loading Data Variables Crosstabs Charts PowerPoint Data Tables Key
Findings
5
1 2
3
4 6
Watch this Training Video to learn more.
Getting Started With WorldAPP Analytics
© Copyright 2011 MarketSight LLC 10
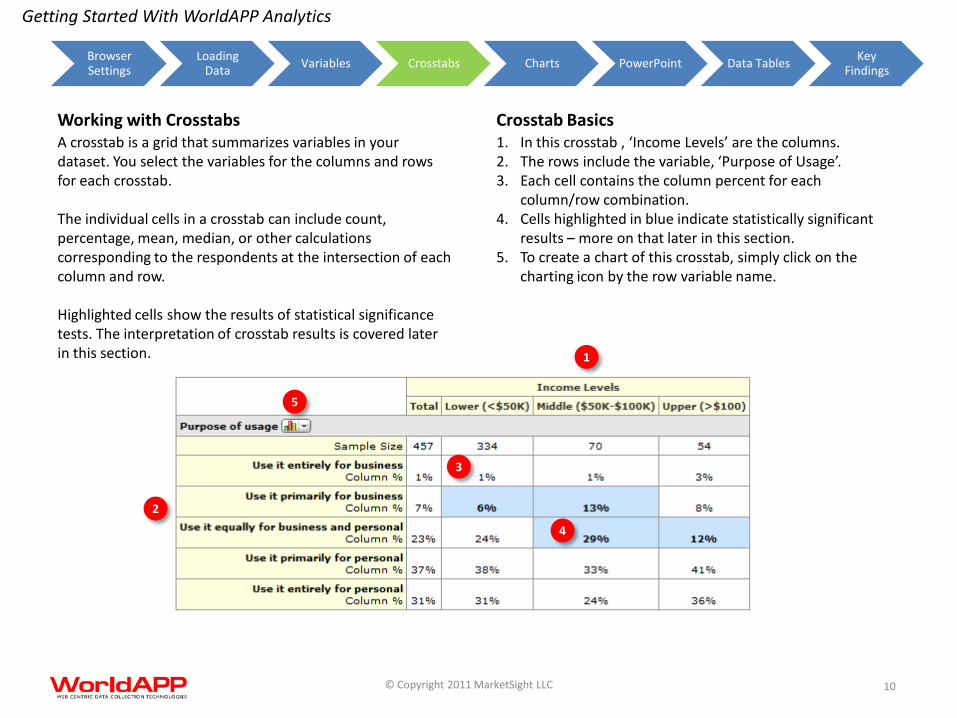
A crosstab is a grid that summarizes variables in your dataset. You select the variables for the columns and rows for each crosstab. The individual cells in a crosstab can include count, percentage, mean, median, or other calculations corresponding to the respondents at the intersection of each column and row. Highlighted cells show the results of statistical significance tests. The interpretation of crosstab results is covered later in this section.
1. In this crosstab , ‘Income Levels’ are the columns. 2. The rows include the variable, ‘Purpose of Usage’. 3. Each cell contains the column percent for each
column/row combination. 4. Cells highlighted in blue indicate statistically significant
results – more on that later in this section. 5. To create a chart of this crosstab, simply click on the
charting icon by the row variable name.
Working with Crosstabs Crosstab Basics
Browser Settings
Loading Data Variables Crosstabs Charts PowerPoint Data Tables Key
Findings
1
2
3
4
5
Getting Started With WorldAPP Analytics
© Copyright 2011 MarketSight LLC 11
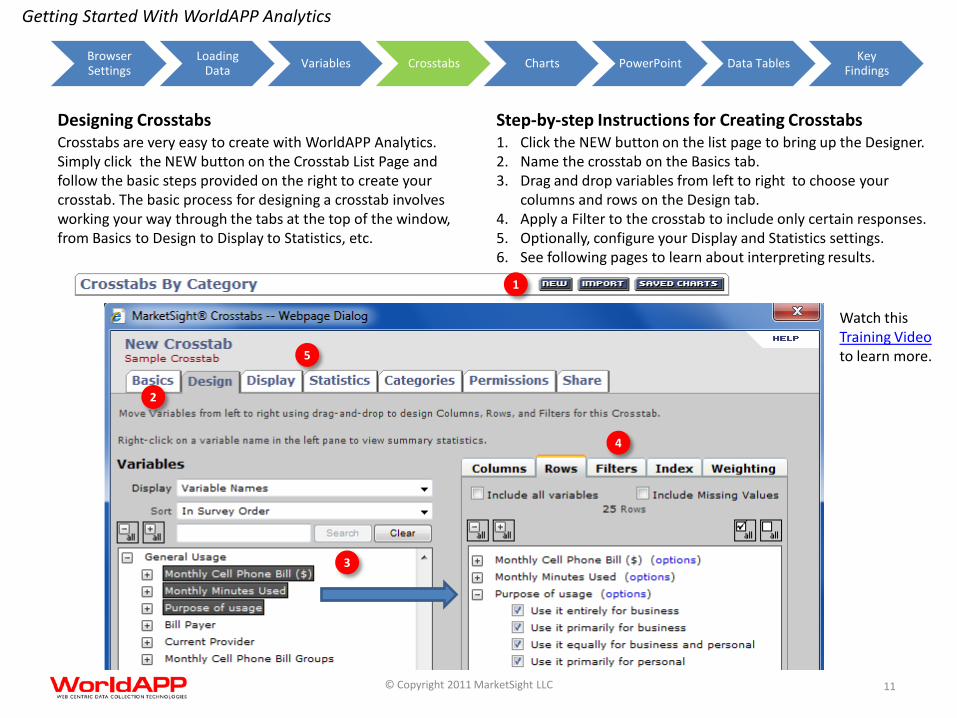
Crosstabs are very easy to create with WorldAPP Analytics. Simply click the NEW button on the Crosstab List Page and follow the basic steps provided on the right to create your crosstab. The basic process for designing a crosstab involves working your way through the tabs at the top of the window, from Basics to Design to Display to Statistics, etc.
1. Click the NEW button on the list page to bring up the Designer. 2. Name the crosstab on the Basics tab. 3. Drag and drop variables from left to right to choose your
columns and rows on the Design tab. 4. Apply a Filter to the crosstab to include only certain responses. 5. Optionally, configure your Display and Statistics settings. 6. See following pages to learn about interpreting results.
Designing Crosstabs Step-by-step Instructions for Creating Crosstabs
Browser Settings
Loading Data Variables Crosstabs Charts PowerPoint Data Tables Key
Findings
1
2
3
4
5
Watch this Training Video to learn more.
Getting Started With WorldAPP Analytics
© Copyright 2011 MarketSight LLC 12
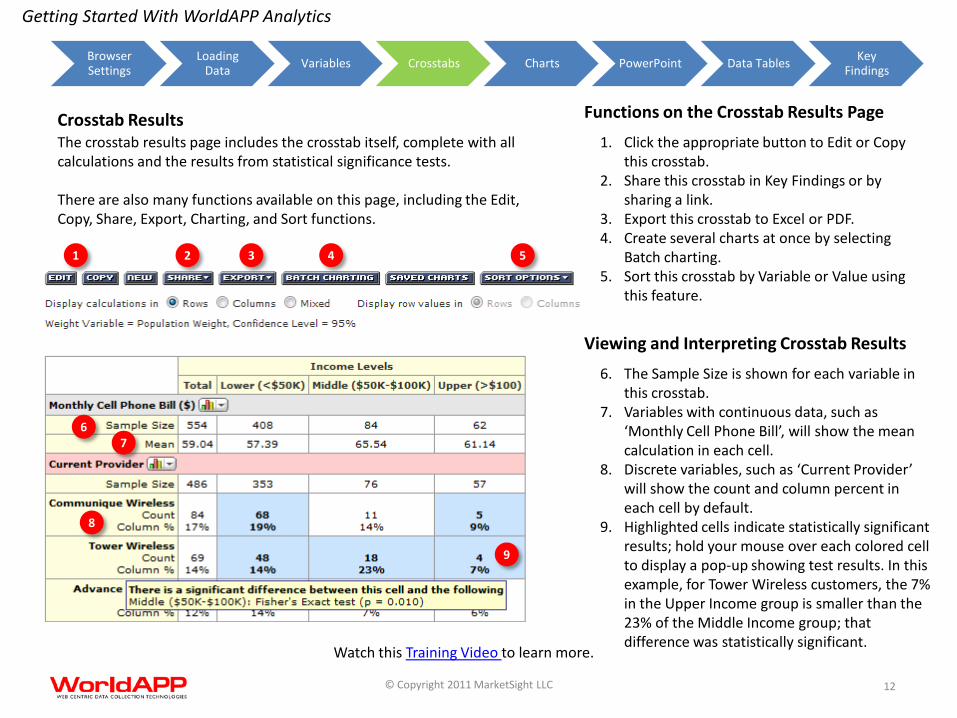
The crosstab results page includes the crosstab itself, complete with all calculations and the results from statistical significance tests. There are also many functions available on this page, including the Edit, Copy, Share, Export, Charting, and Sort functions.
1. Click the appropriate button to Edit or Copy this crosstab.
2. Share this crosstab in Key Findings or by sharing a link.
3. Export this crosstab to Excel or PDF. 4. Create several charts at once by selecting
Batch charting. 5. Sort this crosstab by Variable or Value using
this feature.
Crosstab Results Functions on the Crosstab Results Page
Browser Settings
Loading Data Variables Crosstabs Charts PowerPoint Data Tables Key
Findings
2 3 4 5 1
6. The Sample Size is shown for each variable in this crosstab.
7. Variables with continuous data, such as ‘Monthly Cell Phone Bill’, will show the mean calculation in each cell.
8. Discrete variables, such as ‘Current Provider’ will show the count and column percent in each cell by default.
9. Highlighted cells indicate statistically significant results; hold your mouse over each colored cell to display a pop-up showing test results. In this example, for Tower Wireless customers, the 7% in the Upper Income group is smaller than the 23% of the Middle Income group; that difference was statistically significant.
6 7
8
9
Viewing and Interpreting Crosstab Results
Watch this Training Video to learn more.
Getting Started With WorldAPP Analytics
© Copyright 2011 MarketSight LLC 13
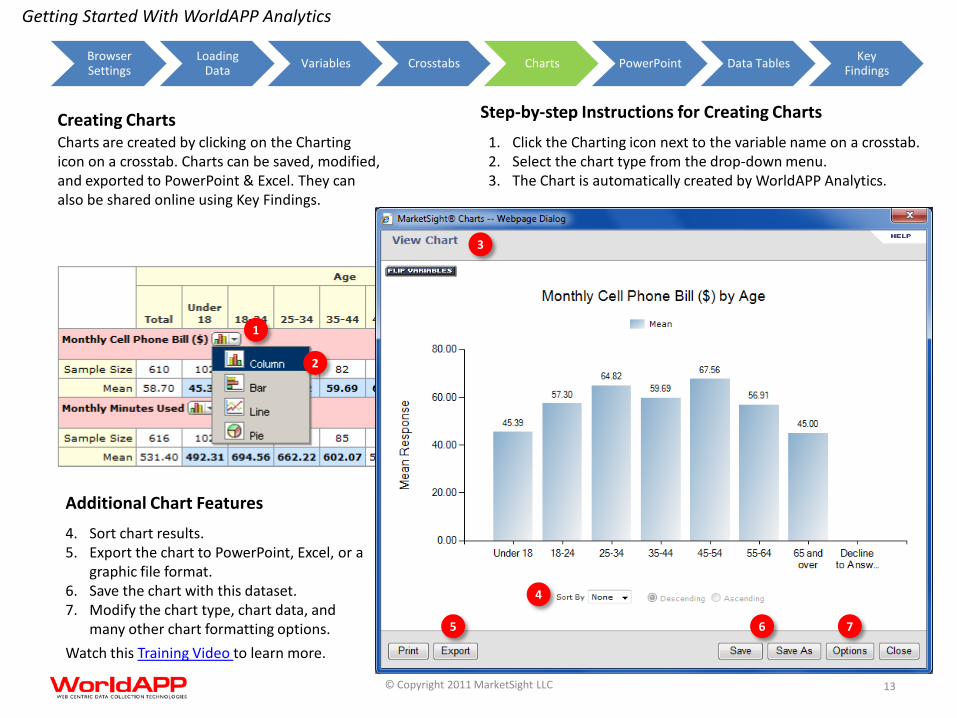
Charts are created by clicking on the Charting icon on a crosstab. Charts can be saved, modified, and exported to PowerPoint & Excel. They can also be shared online using Key Findings.
1. Click the Charting icon next to the variable name on a crosstab. 2. Select the chart type from the drop-down menu. 3. The Chart is automatically created by WorldAPP Analytics.
Creating Charts Step-by-step Instructions for Creating Charts
Browser Settings
Loading Data Variables Crosstabs Charts PowerPoint Data Tables Key
Findings
2
3
4
5
1
4. Sort chart results. 5. Export the chart to PowerPoint, Excel, or a
graphic file format. 6. Save the chart with this dataset. 7. Modify the chart type, chart data, and
many other chart formatting options.
6
Additional Chart Features
7
Watch this Training Video to learn more.
Getting Started With WorldAPP Analytics
© Copyright 2011 MarketSight LLC 14
2
1
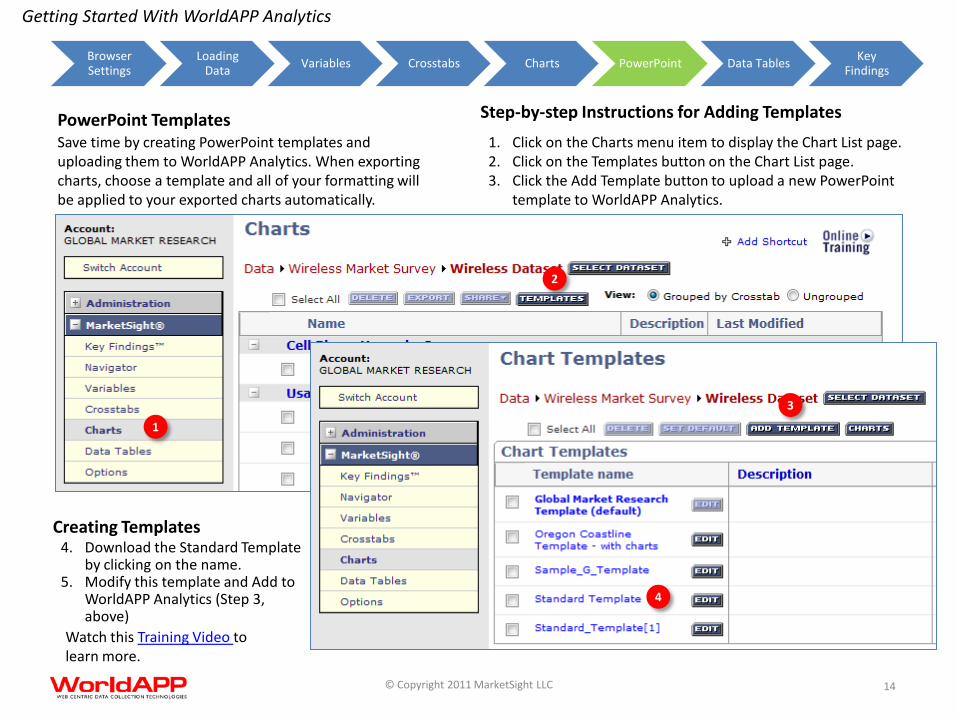
Save time by creating PowerPoint templates and uploading them to WorldAPP Analytics. When exporting charts, choose a template and all of your formatting will be applied to your exported charts automatically.
1. Click on the Charts menu item to display the Chart List page. 2. Click on the Templates button on the Chart List page. 3. Click the Add Template button to upload a new PowerPoint
template to WorldAPP Analytics.
PowerPoint Templates Step-by-step Instructions for Adding Templates
Browser Settings
Loading Data Variables Crosstabs Charts PowerPoint Data Tables Key
Findings
3
4
4. Download the Standard Template by clicking on the name.
5. Modify this template and Add to WorldAPP Analytics (Step 3, above)
Creating Templates
Watch this Training Video to learn more.
Getting Started With WorldAPP Analytics
© Copyright 2011 MarketSight LLC 15
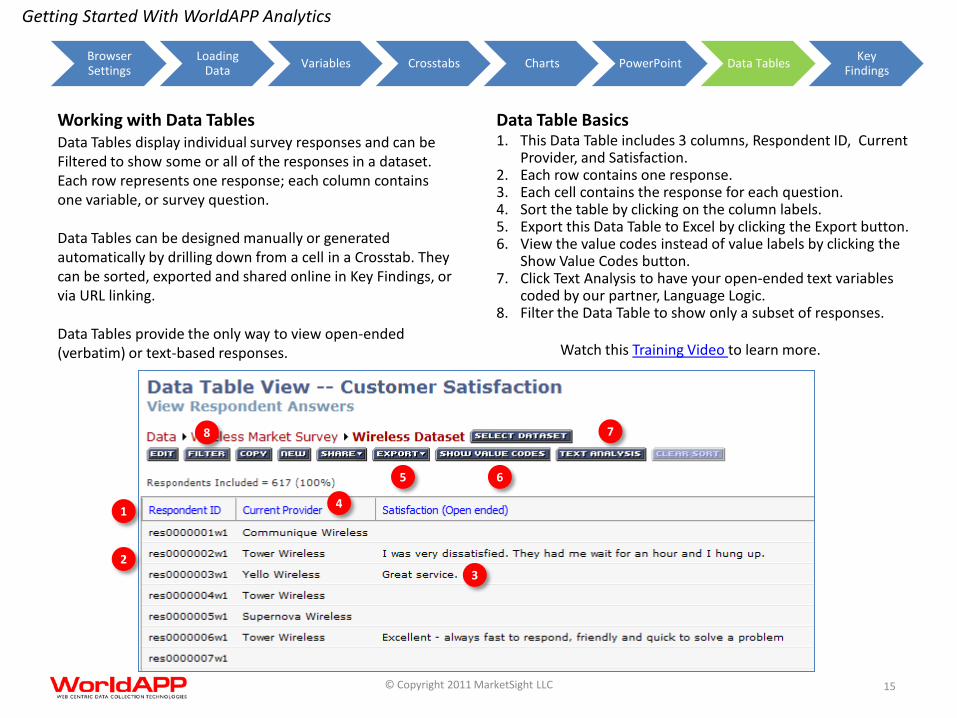
Data Tables display individual survey responses and can be Filtered to show some or all of the responses in a dataset. Each row represents one response; each column contains one variable, or survey question. Data Tables can be designed manually or generated automatically by drilling down from a cell in a Crosstab. They can be sorted, exported and shared online in Key Findings, or via URL linking. Data Tables provide the only way to view open-ended (verbatim) or text-based responses.
1. This Data Table includes 3 columns, Respondent ID, Current Provider, and Satisfaction.
2. Each row contains one response. 3. Each cell contains the response for each question. 4. Sort the table by clicking on the column labels. 5. Export this Data Table to Excel by clicking the Export button. 6. View the value codes instead of value labels by clicking the
Show Value Codes button. 7. Click Text Analysis to have your open-ended text variables
coded by our partner, Language Logic. 8. Filter the Data Table to show only a subset of responses.
Working with Data Tables Data Table Basics
Browser Settings
Loading Data Variables Crosstabs Charts PowerPoint Data Tables Key
Findings
1
2 3
4
5
7
6
8
Watch this Training Video to learn more.
Getting Started With WorldAPP Analytics
© Copyright 2011 MarketSight LLC 16
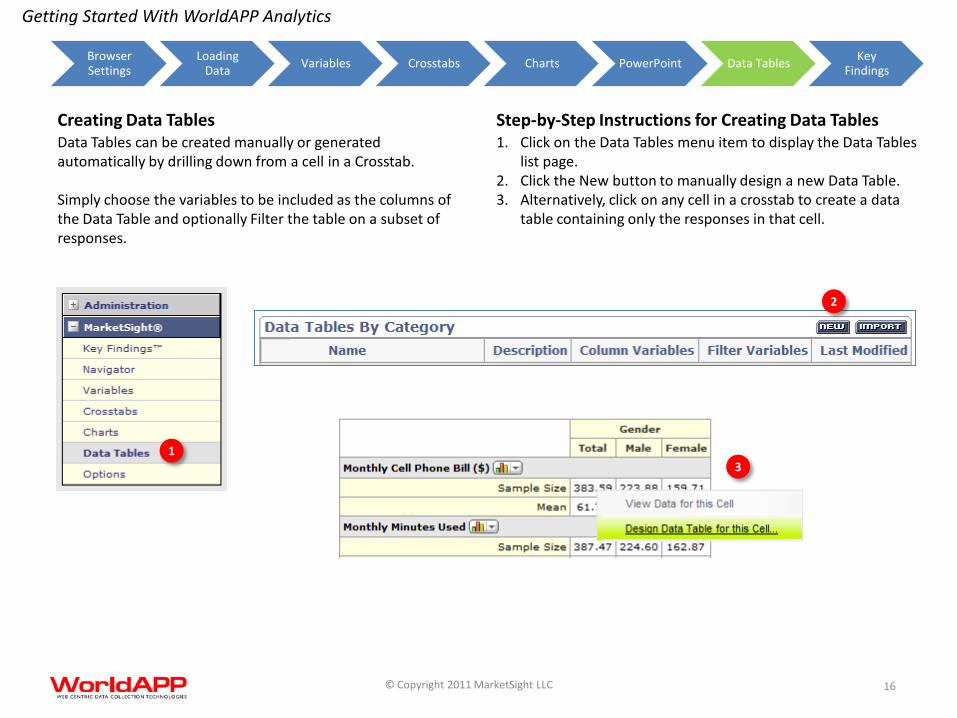
Data Tables can be created manually or generated automatically by drilling down from a cell in a Crosstab. Simply choose the variables to be included as the columns of the Data Table and optionally Filter the table on a subset of responses.
1. Click on the Data Tables menu item to display the Data Tables list page.
2. Click the New button to manually design a new Data Table. 3. Alternatively, click on any cell in a crosstab to create a data
table containing only the responses in that cell.
Creating Data Tables Step-by-Step Instructions for Creating Data Tables
Browser Settings
Loading Data Variables Crosstabs Charts PowerPoint Data Tables Key
Findings
1
2
3
Getting Started With WorldAPP Analytics
© Copyright 2011 MarketSight LLC 17
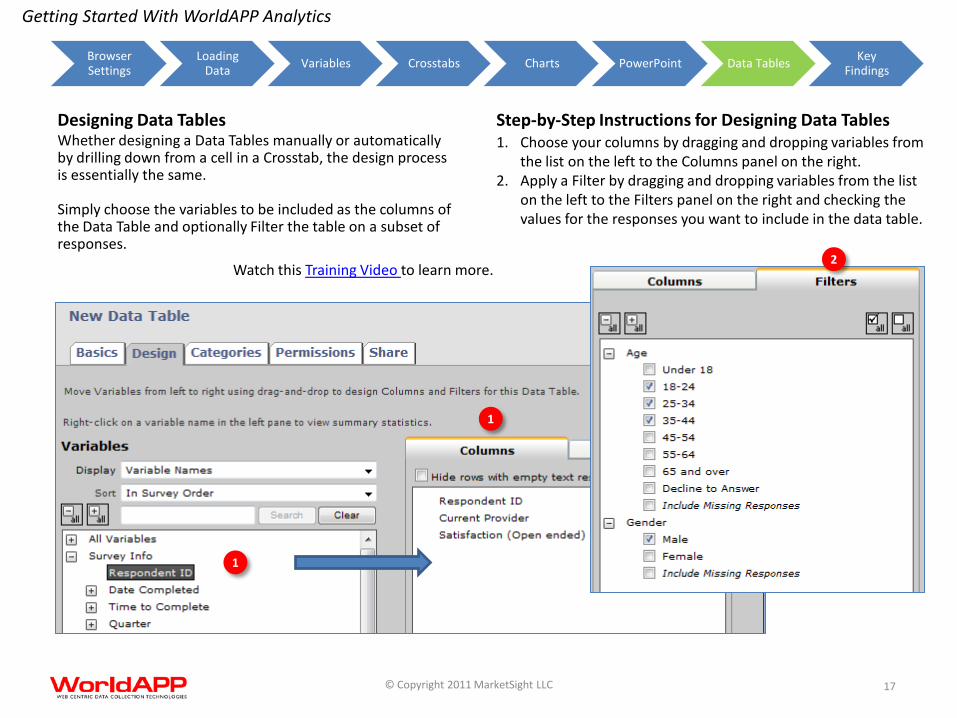
Whether designing a Data Tables manually or automatically by drilling down from a cell in a Crosstab, the design process is essentially the same. Simply choose the variables to be included as the columns of the Data Table and optionally Filter the table on a subset of responses.
1. Choose your columns by dragging and dropping variables from the list on the left to the Columns panel on the right.
2. Apply a Filter by dragging and dropping variables from the list on the left to the Filters panel on the right and checking the values for the responses you want to include in the data table.
Designing Data Tables Step-by-Step Instructions for Designing Data Tables
Browser Settings
Loading Data Variables Crosstabs Charts PowerPoint Data Tables Key
Findings
1
2
1
Watch this Training Video to learn more.
Getting Started With WorldAPP Analytics
© Copyright 2011 MarketSight LLC 18
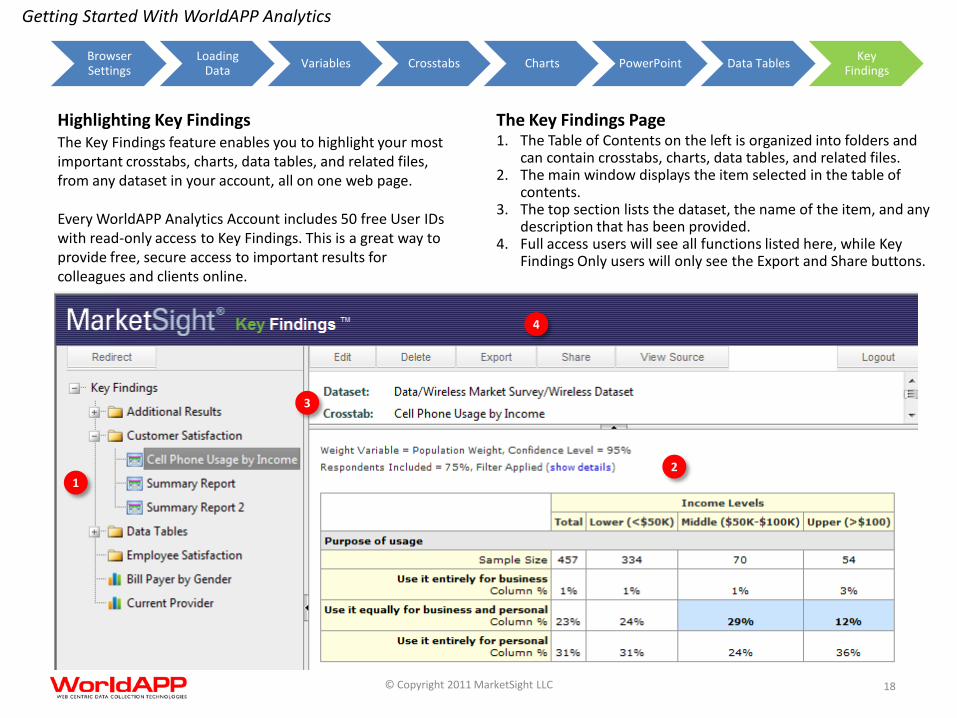
The Key Findings feature enables you to highlight your most important crosstabs, charts, data tables, and related files, from any dataset in your account, all on one web page. Every WorldAPP Analytics Account includes 50 free User IDs with read-only access to Key Findings. This is a great way to provide free, secure access to important results for colleagues and clients online.
1. The Table of Contents on the left is organized into folders and can contain crosstabs, charts, data tables, and related files.
2. The main window displays the item selected in the table of contents.
3. The top section lists the dataset, the name of the item, and any description that has been provided.
4. Full access users will see all functions listed here, while Key Findings Only users will only see the Export and Share buttons.
Highlighting Key Findings The Key Findings Page
Browser Settings
Loading Data Variables Crosstabs Charts PowerPoint Data Tables Key
Findings
1 2
3
4
Getting Started With WorldAPP Analytics
© Copyright 2011 MarketSight LLC 19
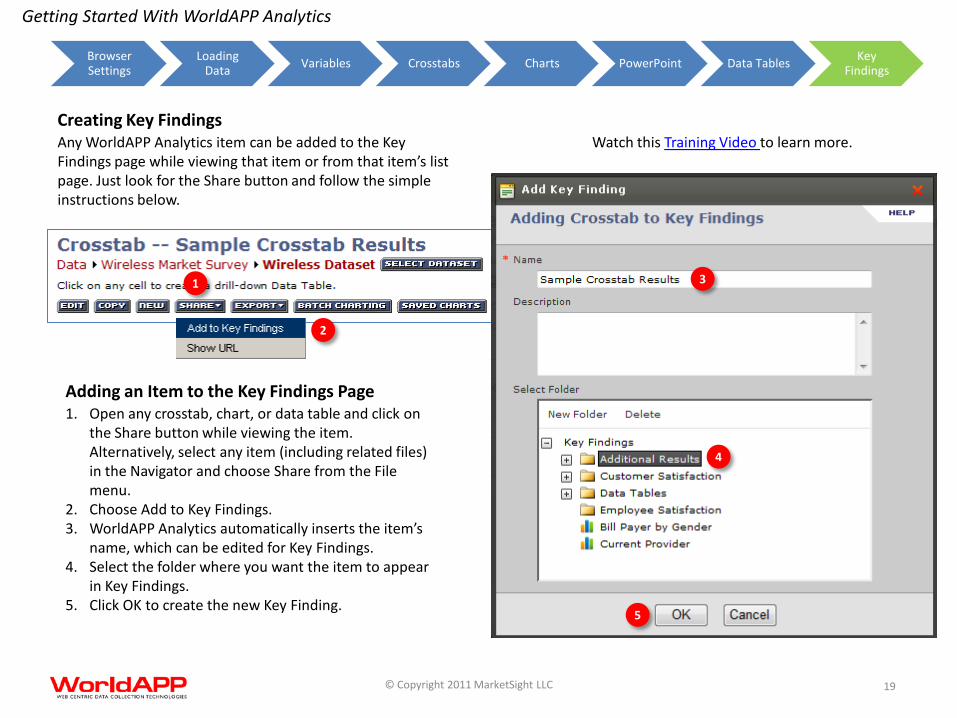
Any WorldAPP Analytics item can be added to the Key Findings page while viewing that item or from that item’s list page. Just look for the Share button and follow the simple instructions below.
1. Open any crosstab, chart, or data table and click on the Share button while viewing the item. Alternatively, select any item (including related files) in the Navigator and choose Share from the File menu.
2. Choose Add to Key Findings. 3. WorldAPP Analytics automatically inserts the item’s
name, which can be edited for Key Findings. 4. Select the folder where you want the item to appear
in Key Findings. 5. Click OK to create the new Key Finding.
Creating Key Findings
Adding an Item to the Key Findings Page
Browser Settings
Loading Data Variables Crosstabs Charts PowerPoint Data Tables Key
Findings
1
2
3
4
5
Watch this Training Video to learn more.
Getting Started With WorldAPP Analytics
© Copyright 2011 MarketSight LLC 20
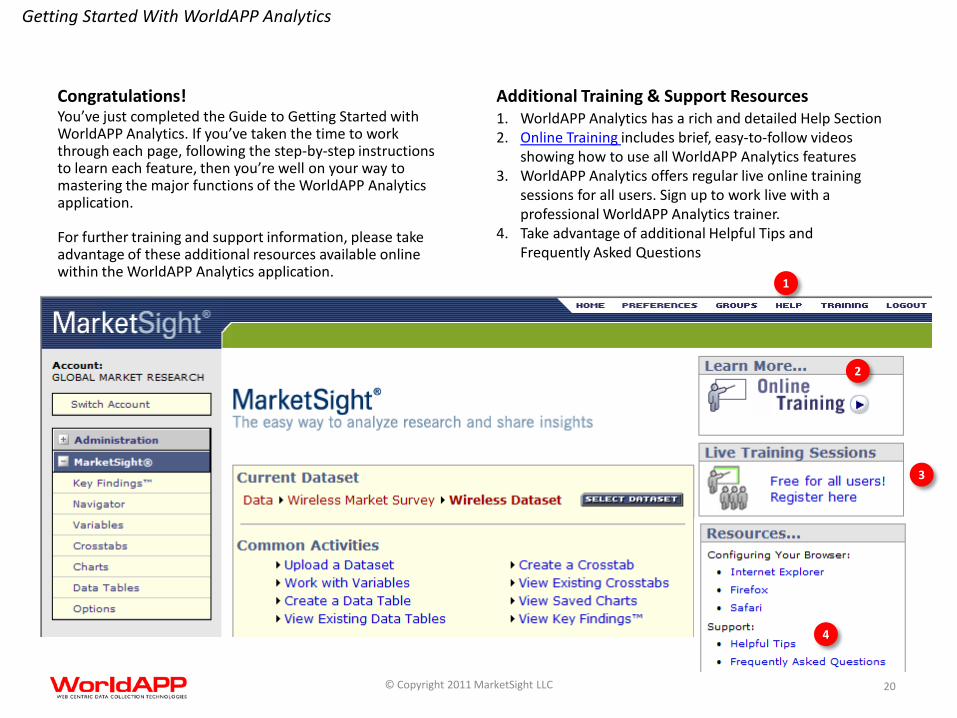
You’ve just completed the Guide to Getting Started with WorldAPP Analytics. If you’ve taken the time to work through each page, following the step-by-step instructions to learn each feature, then you’re well on your way to mastering the major functions of the WorldAPP Analytics application. For further training and support information, please take advantage of these additional resources available online within the WorldAPP Analytics application.
1. WorldAPP Analytics has a rich and detailed Help Section 2. Online Training includes brief, easy-to-follow videos
showing how to use all WorldAPP Analytics features 3. WorldAPP Analytics offers regular live online training
sessions for all users. Sign up to work live with a professional WorldAPP Analytics trainer.
4. Take advantage of additional Helpful Tips and Frequently Asked Questions
Congratulations! Additional Training & Support Resources
2
4
3
1


![Skaffold - storage.googleapis.com · [getting-started getting-started] Hello world! [getting-started getting-started] Hello world! [getting-started getting-started] Hello world! 5](https://img.pdfslide.net/doc/110x75/5ec939f2a76a033f091c5ac7/skaffold-getting-started-getting-started-hello-world-getting-started-getting-started.jpg)


