Embed Size (px)
Citation preview
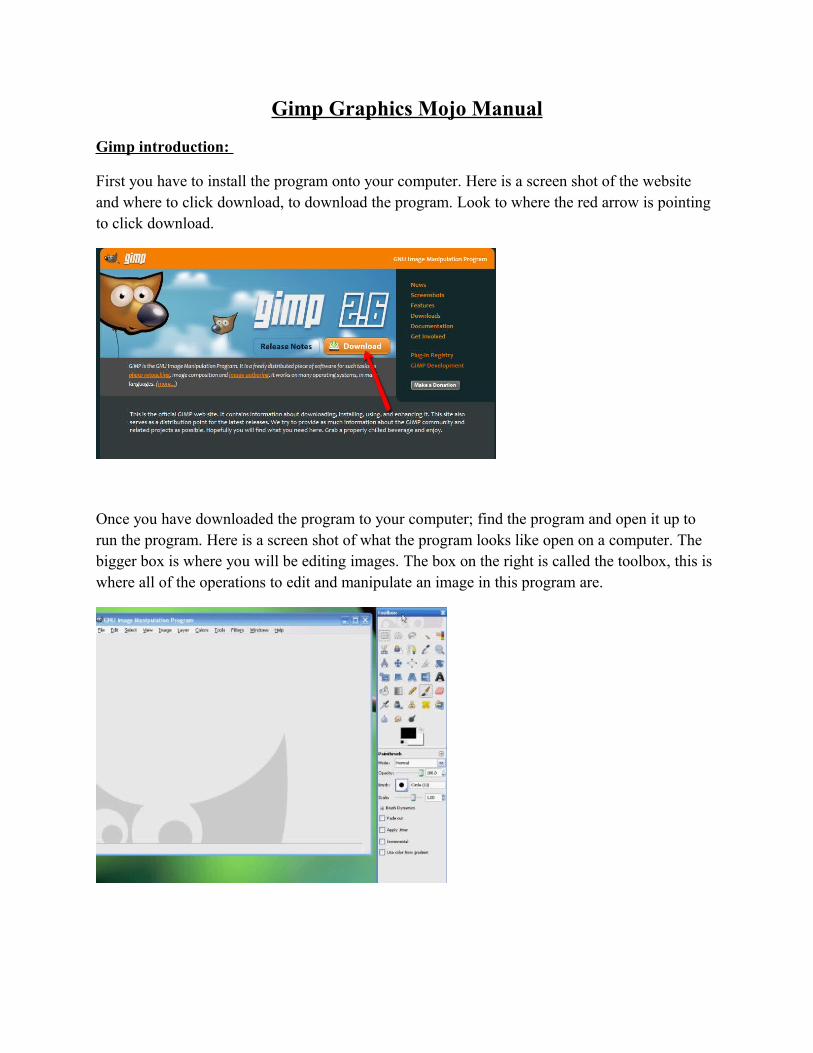
Gimp Graphics Mojo Manual
Gimp introduction:
First you have to install the program onto your computer. Here is a screen shot of the website and where to click download, to download the program. Look to where the red arrow is pointing to click download.
Once you have downloaded the program to your computer; find the program and open it up to run the program. Here is a screen shot of what the program looks like open on a computer. The bigger box is where you will be editing images. The box on the right is called the toolbox, this is where all of the operations to edit and manipulate an image in this program are.
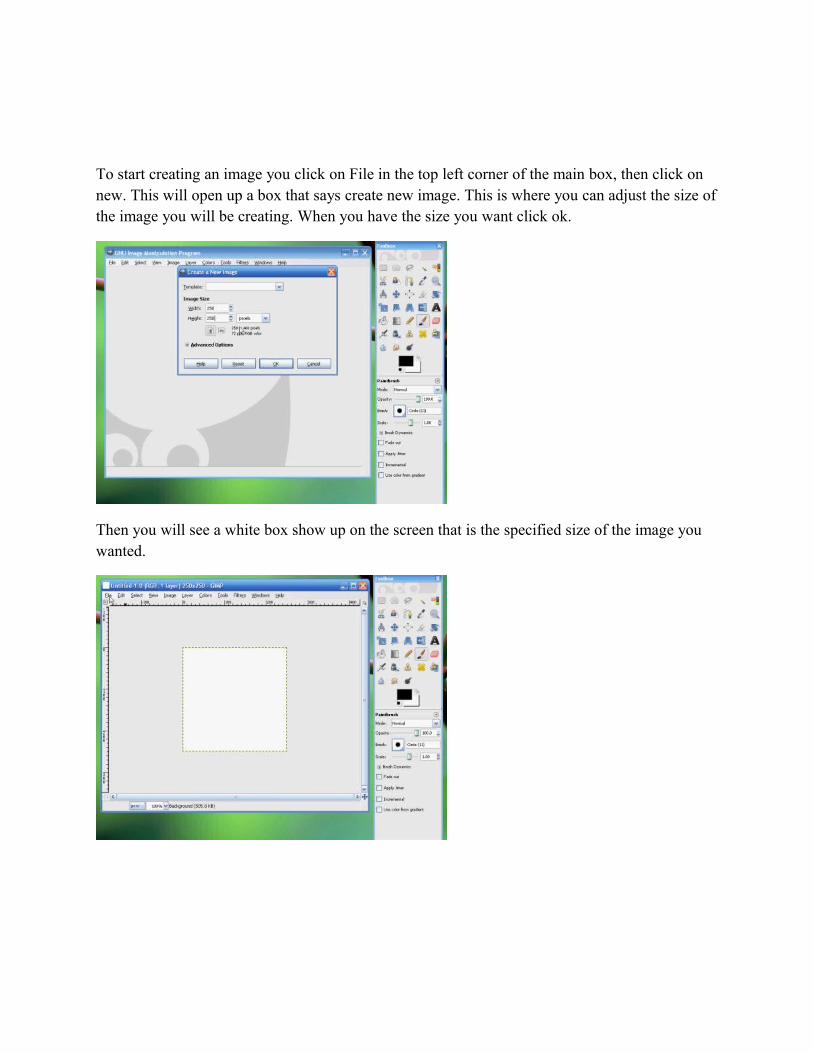
To start creating an image you click on File in the top left corner of the main box, then click on new. This will open up a box that says create new image. This is where you can adjust the size of the image you will be creating. When you have the size you want click ok.
Then you will see a white box show up on the screen that is the specified size of the image you wanted.
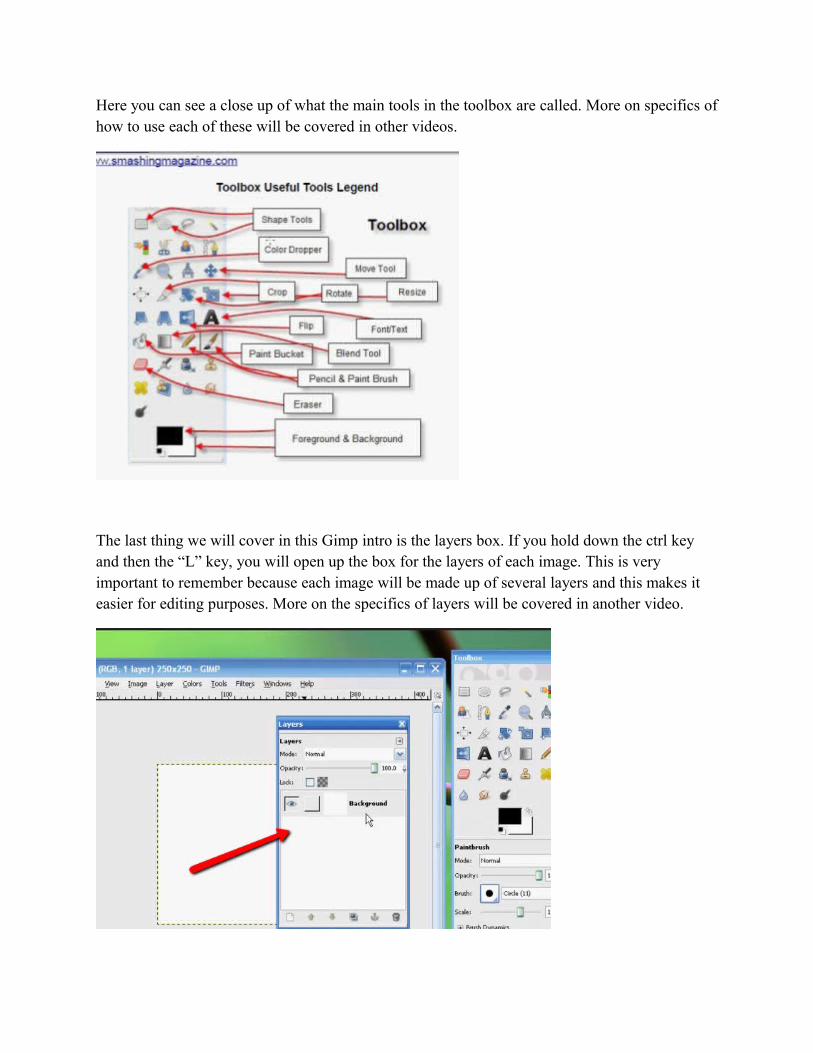
Here you can see a close up of what the main tools in the toolbox are called. More on specifics of how to use each of these will be covered in other videos.
The last thing we will cover in this Gimp intro is the layers box. If you hold down the ctrl key and then the “L” key, you will open up the box for the layers of each image. This is very important to remember because each image will be made up of several layers and this makes it easier for editing purposes. More on the specifics of layers will be covered in another video.
Graphic File Types:
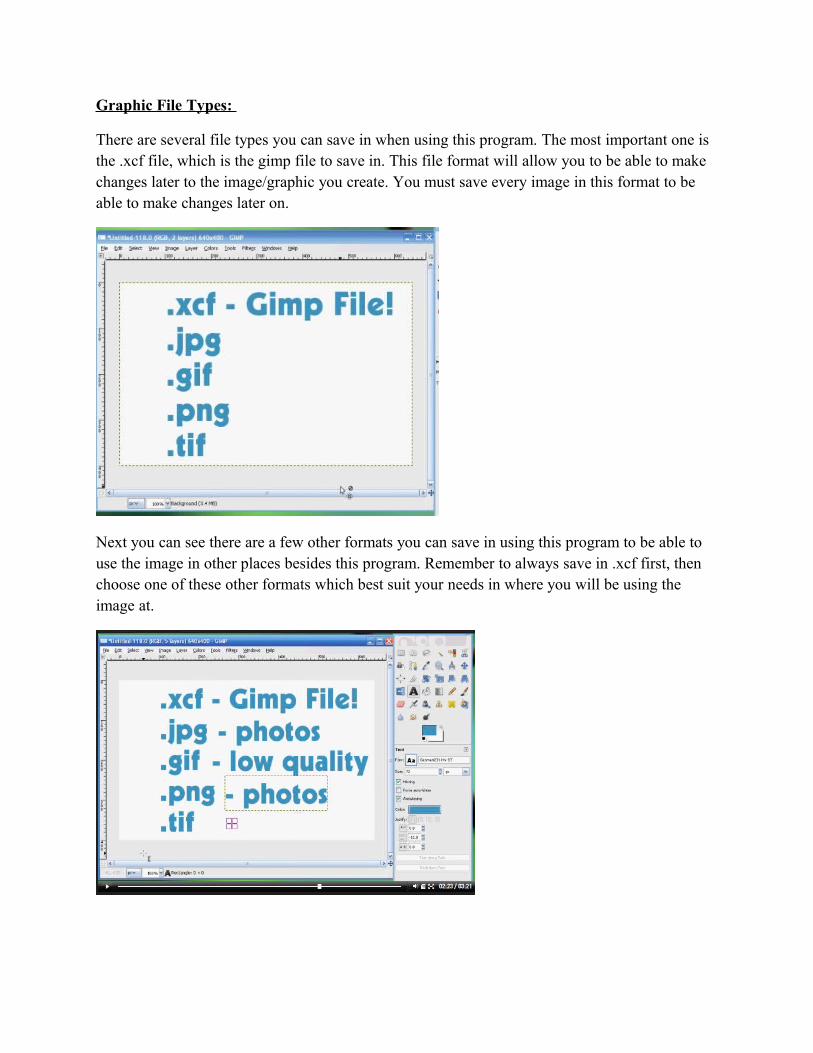
There are several file types you can save in when using this program. The most important one is the .xcf file, which is the gimp file to save in. This file format will allow you to be able to make changes later to the image/graphic you create. You must save every image in this format to be able to make changes later on.
Next you can see there are a few other formats you can save in using this program to be able to use the image in other places besides this program. Remember to always save in .xcf first, then choose one of these other formats which best suit your needs in where you will be using the image at.
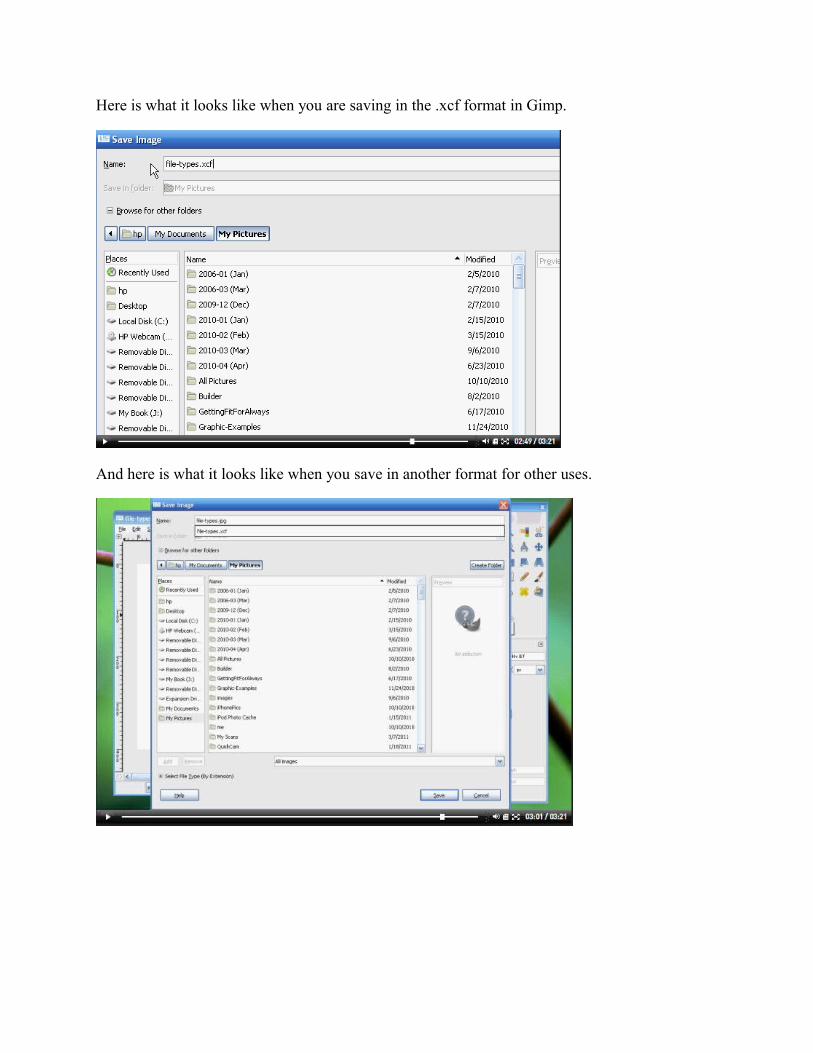
Here is what it looks like when you are saving in the .xcf format in Gimp.
And here is what it looks like when you save in another format for other uses.

When saving in .jpg or any of the other formats, there will be a few more steps for you to take; examples are shown below. Just click the export button to continue saving.
Then just click the save button. This flattens the image and allows it to be transformed into the specified format.
Using Stock Images:
To find images to use on your website or projects you may be needing images for, there are several options. Here are some screen shot of a few shown in the video with the links.
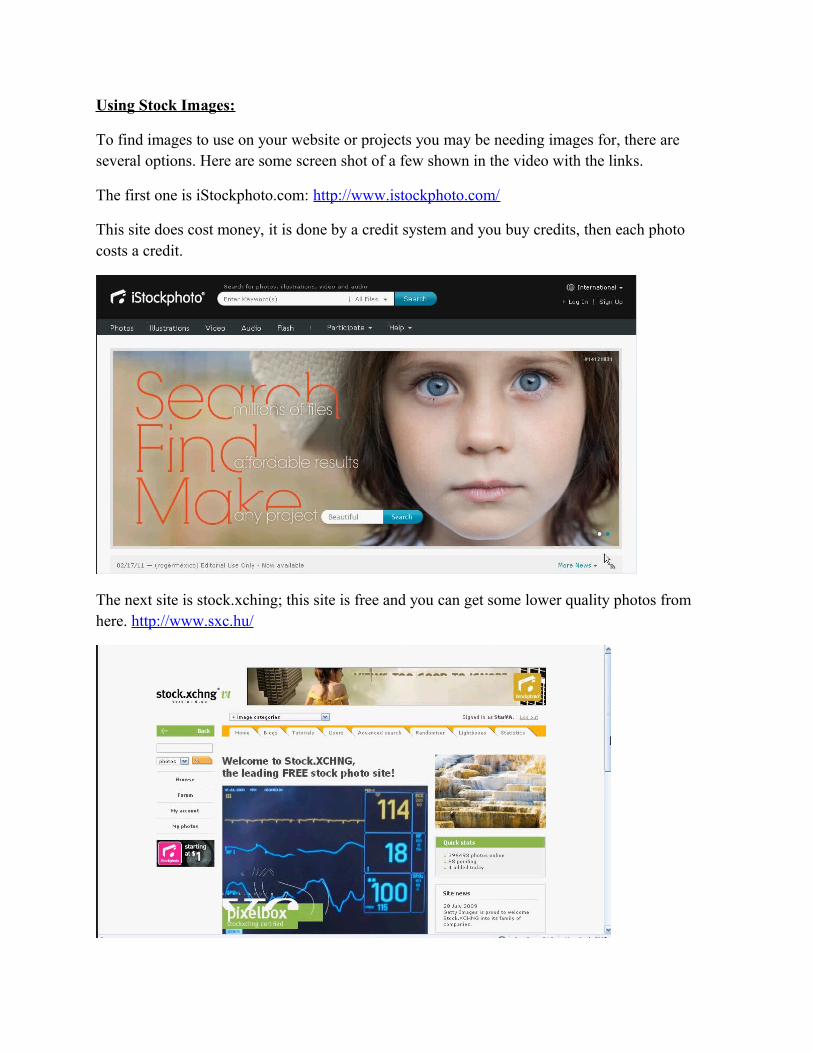
The first one is iStockphoto.com: http://www.istockphoto.com/
This site does cost money, it is done by a credit system and you buy credits, then each photo costs a credit.
The next site is stock.xching; this site is free and you can get some lower quality photos from here. http://www.sxc.hu/
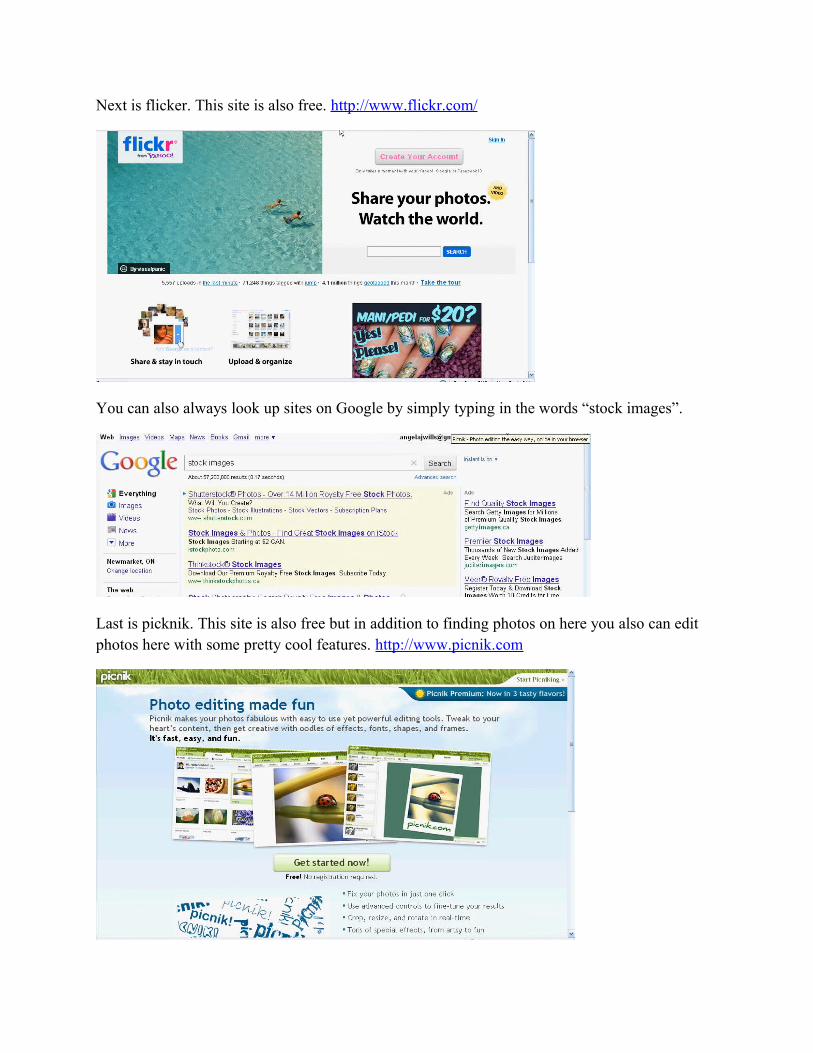
Next is flicker. This site is also free. http://www.flickr.com/
You can also always look up sites on Google by simply typing in the words “stock images”.
Last is picknik. This site is also free but in addition to finding photos on here you also can edit photos here with some pretty cool features. http://www.picnik.com
Resizing Images:
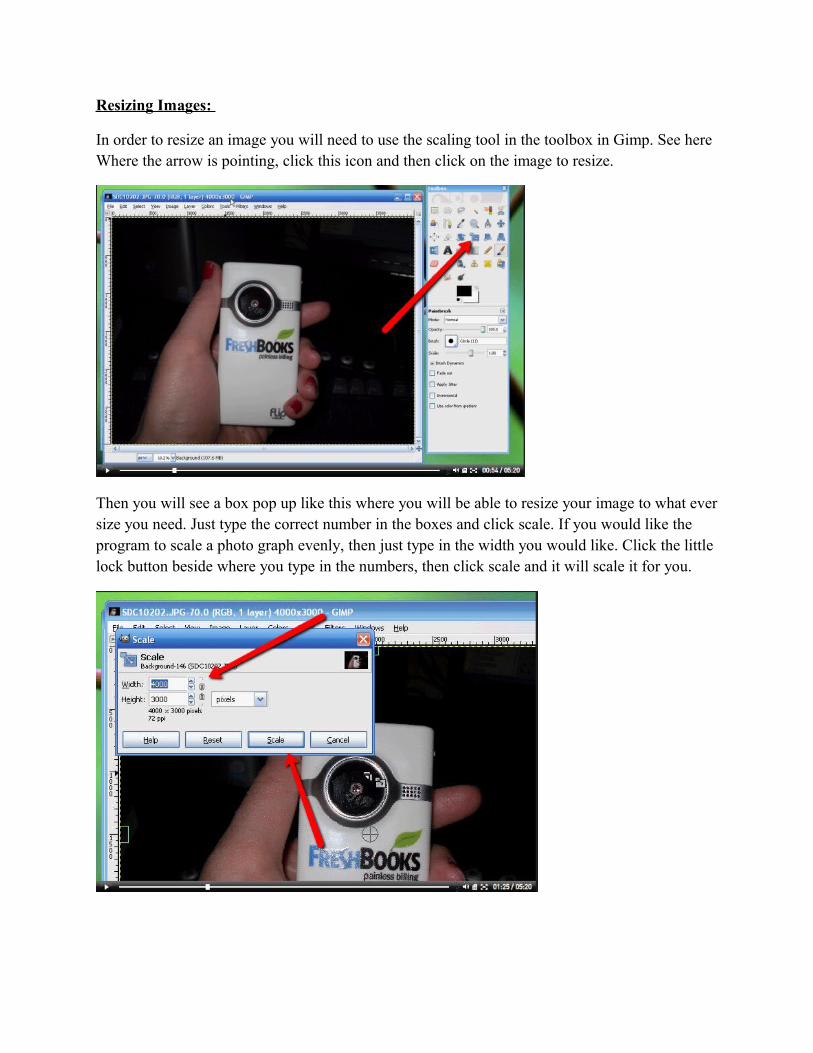
In order to resize an image you will need to use the scaling tool in the toolbox in Gimp. See here Where the arrow is pointing, click this icon and then click on the image to resize.
Then you will see a box pop up like this where you will be able to resize your image to what ever size you need. Just type the correct number in the boxes and click scale. If you would like the program to scale a photo graph evenly, then just type in the width you would like. Click the little lock button beside where you type in the numbers, then click scale and it will scale it for you.
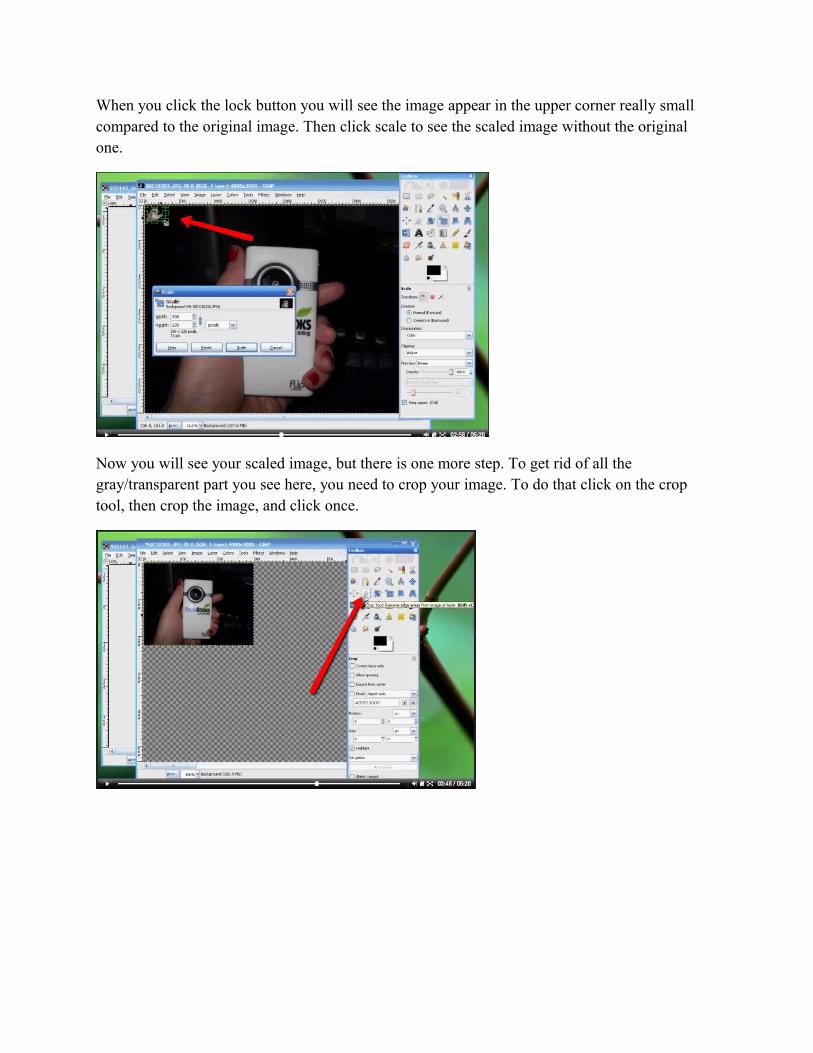
When you click the lock button you will see the image appear in the upper corner really small compared to the original image. Then click scale to see the scaled image without the original one.
Now you will see your scaled image, but there is one more step. To get rid of all the gray/transparent part you see here, you need to crop your image. To do that click on the crop tool, then crop the image, and click once.
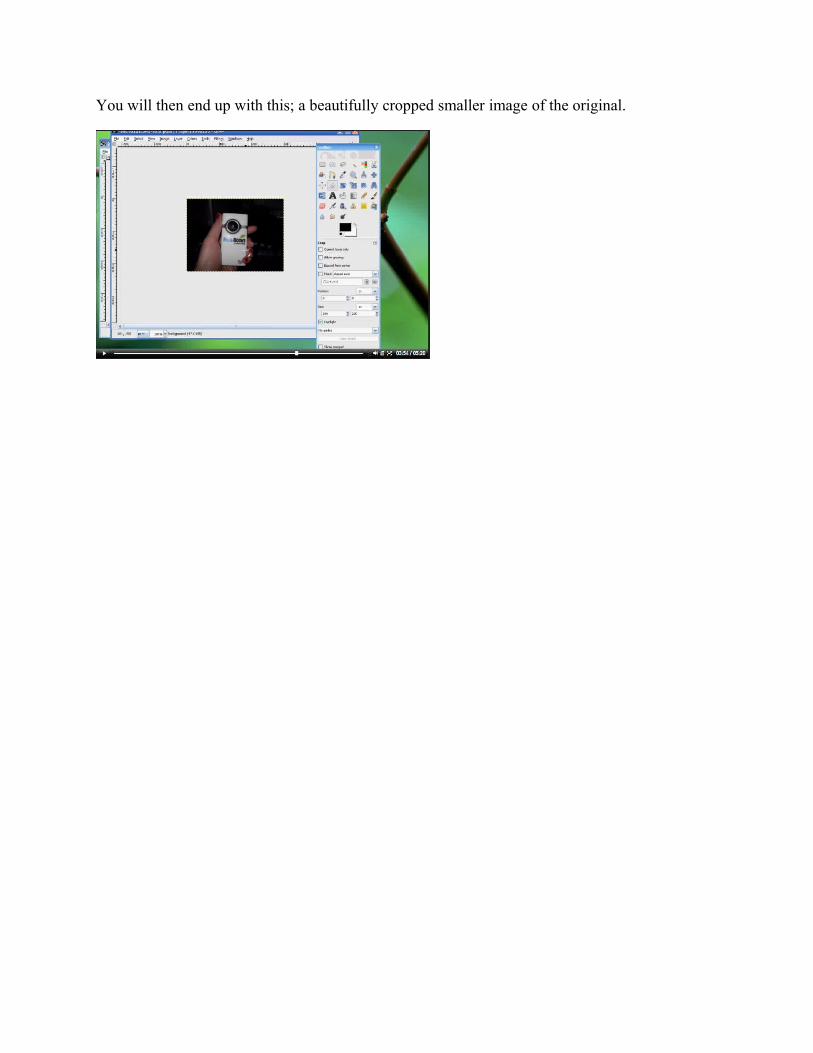
You will then end up with this; a beautifully cropped smaller image of the original.
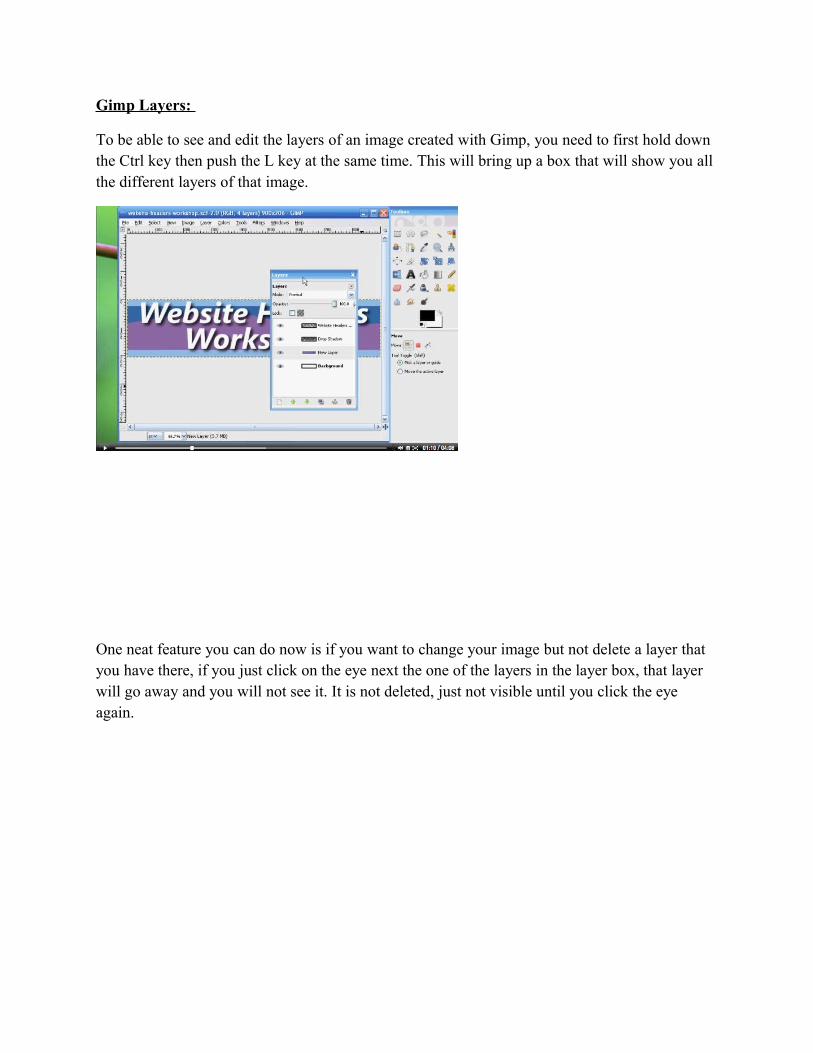
Gimp Layers:
To be able to see and edit the layers of an image created with Gimp, you need to first hold down the Ctrl key then push the L key at the same time. This will bring up a box that will show you all the different layers of that image.
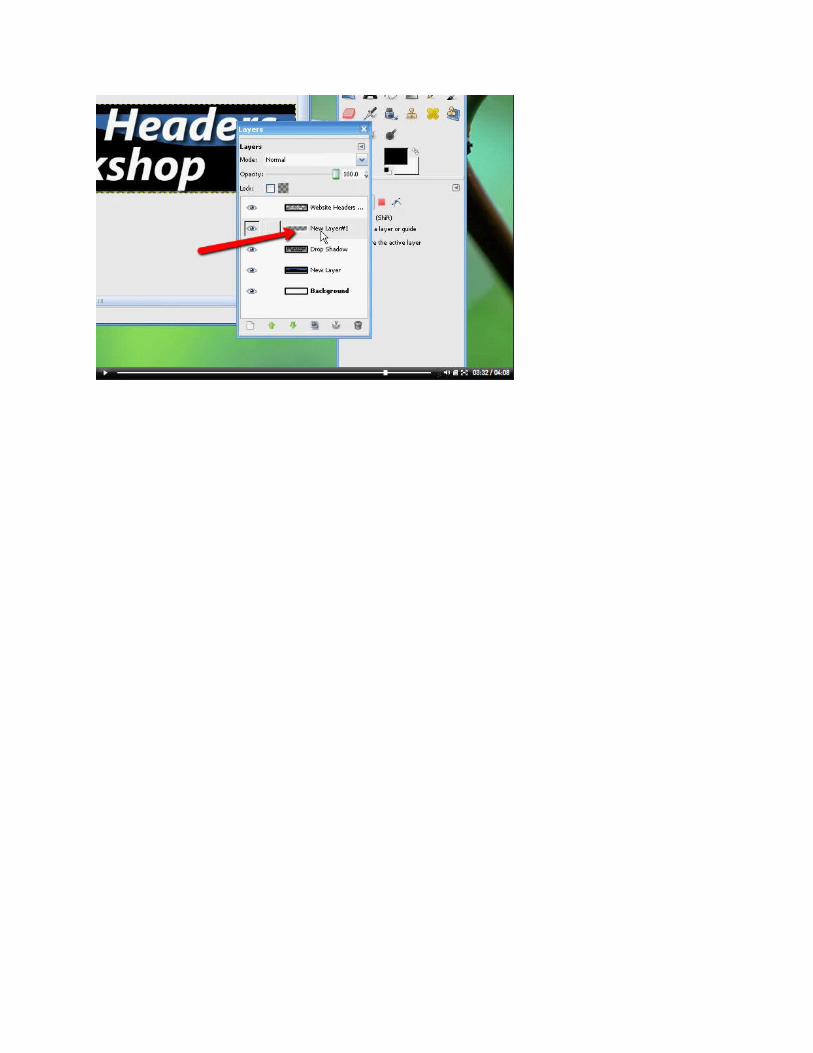
One neat feature you can do now is if you want to change your image but not delete a layer that you have there, if you just click on the eye next the one of the layers in the layer box, that layer will go away and you will not see it. It is not deleted, just not visible until you click the eye again.
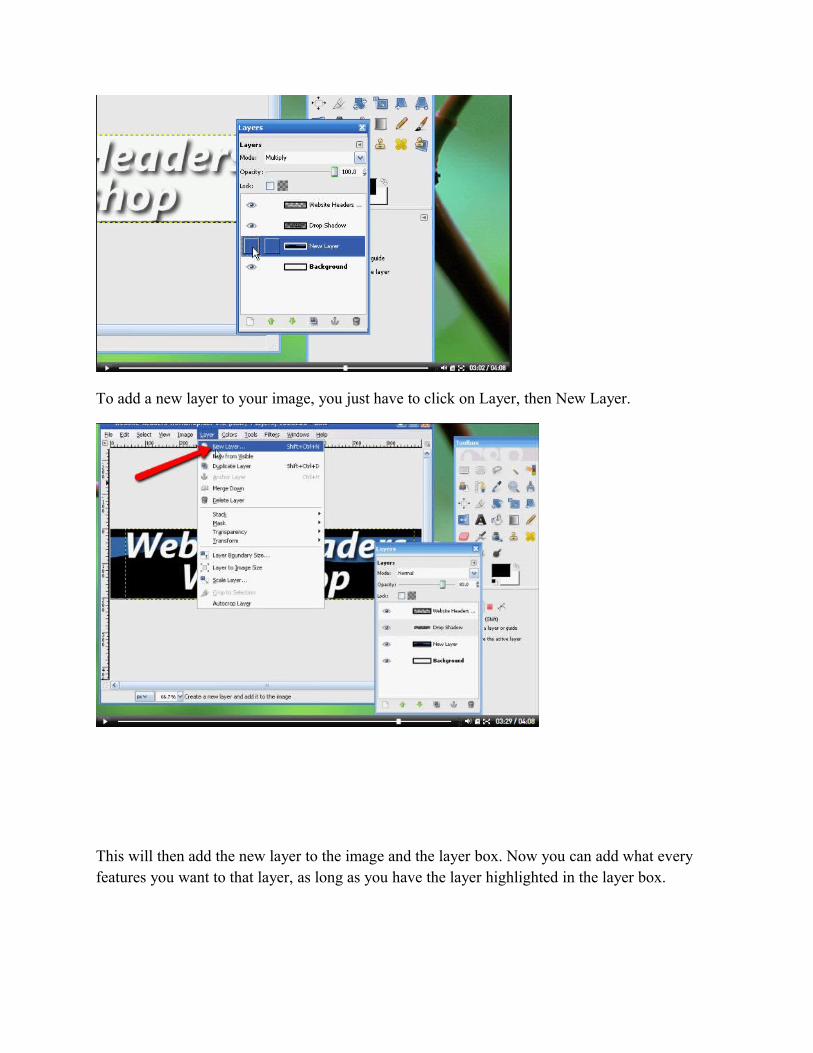
To add a new layer to your image, you just have to click on Layer, then New Layer.
This will then add the new layer to the image and the layer box. Now you can add what every features you want to that layer, as long as you have the layer highlighted in the layer box.
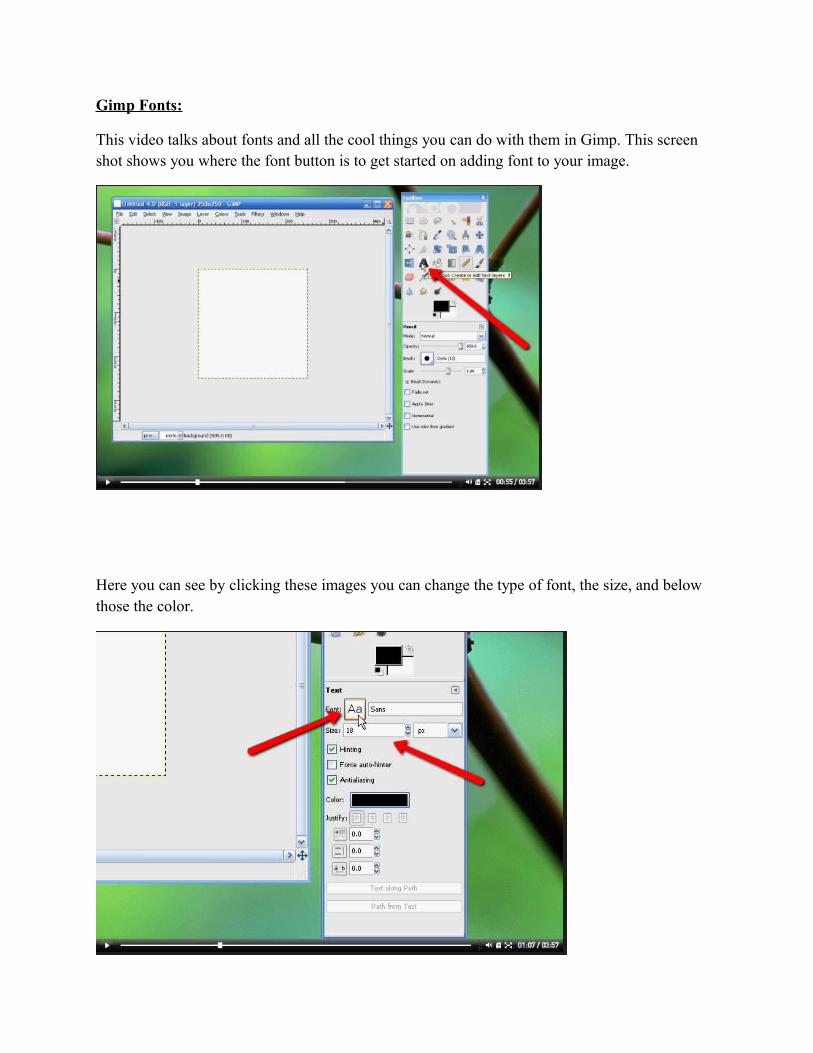
Gimp Fonts:
This video talks about fonts and all the cool things you can do with them in Gimp. This screen shot shows you where the font button is to get started on adding font to your image.
Here you can see by clicking these images you can change the type of font, the size, and below those the color.
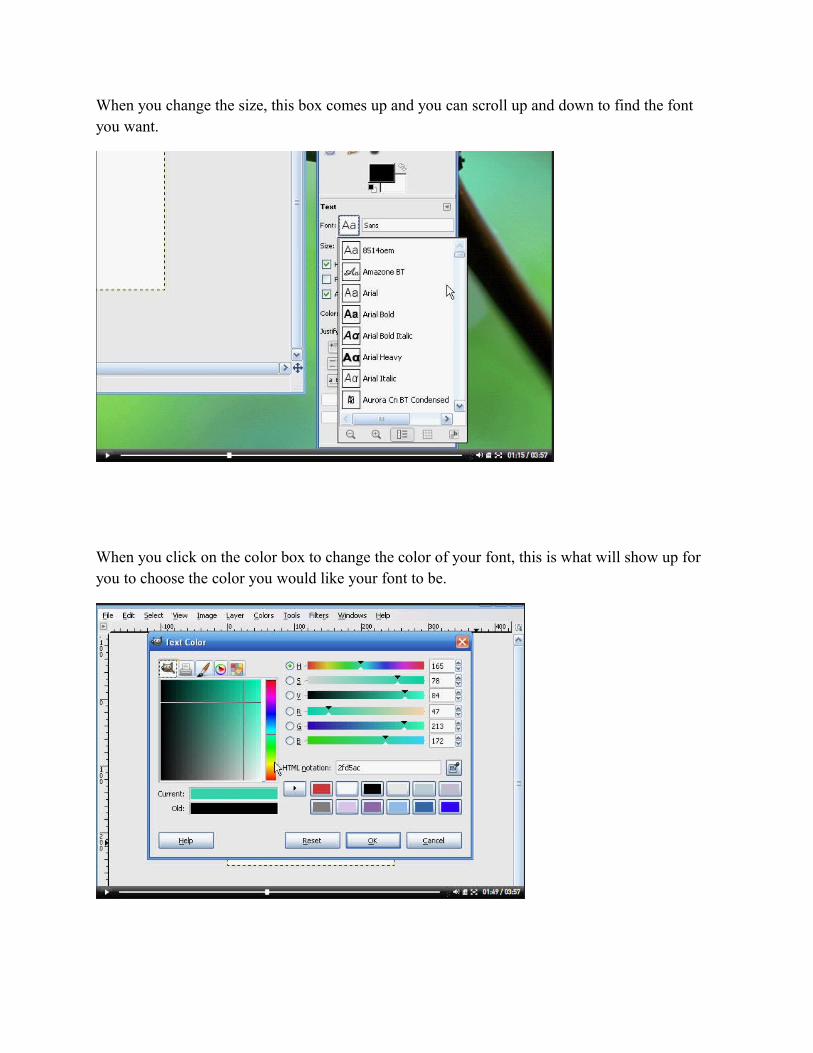
When you change the size, this box comes up and you can scroll up and down to find the font you want.
When you click on the color box to change the color of your font, this is what will show up for you to choose the color you would like your font to be.
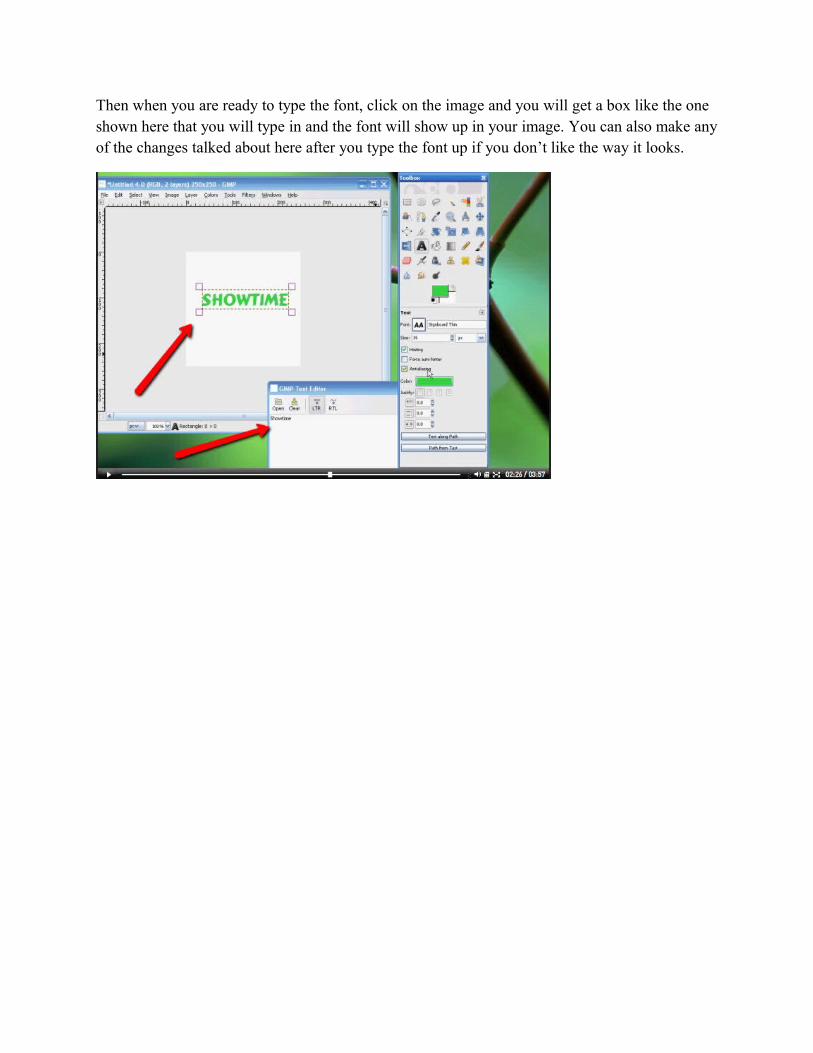
Then when you are ready to type the font, click on the image and you will get a box like the one shown here that you will type in and the font will show up in your image. You can also make any of the changes talked about here after you type the font up if you don’t like the way it looks.
Adding an Image:
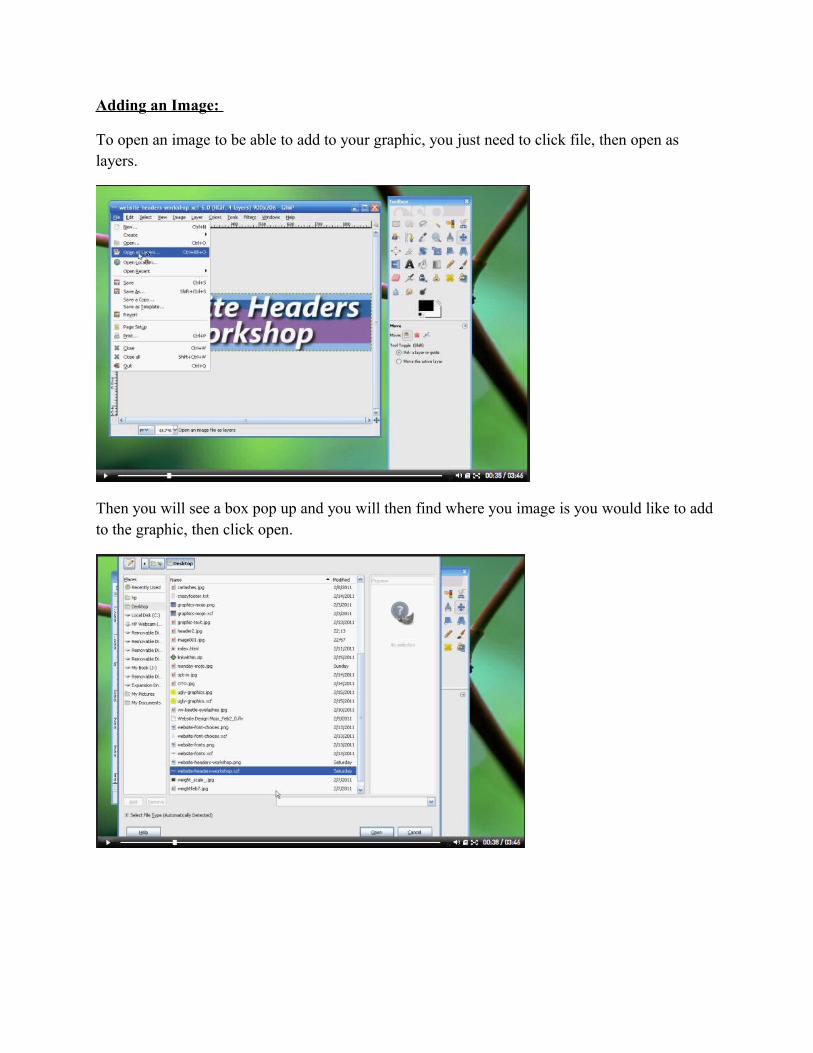
To open an image to be able to add to your graphic, you just need to click file, then open as layers.
Then you will see a box pop up and you will then find where you image is you would like to add to the graphic, then click open.
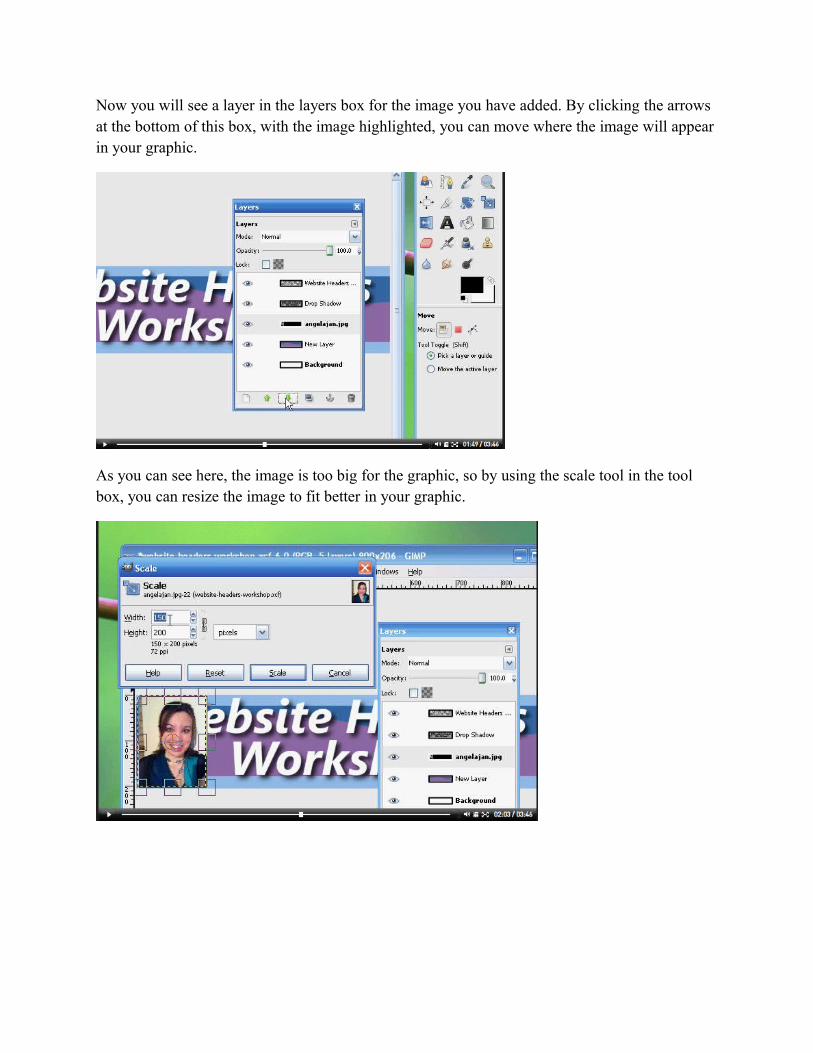
Now you will see a layer in the layers box for the image you have added. By clicking the arrows at the bottom of this box, with the image highlighted, you can move where the image will appear in your graphic.
As you can see here, the image is too big for the graphic, so by using the scale tool in the tool box, you can resize the image to fit better in your graphic.
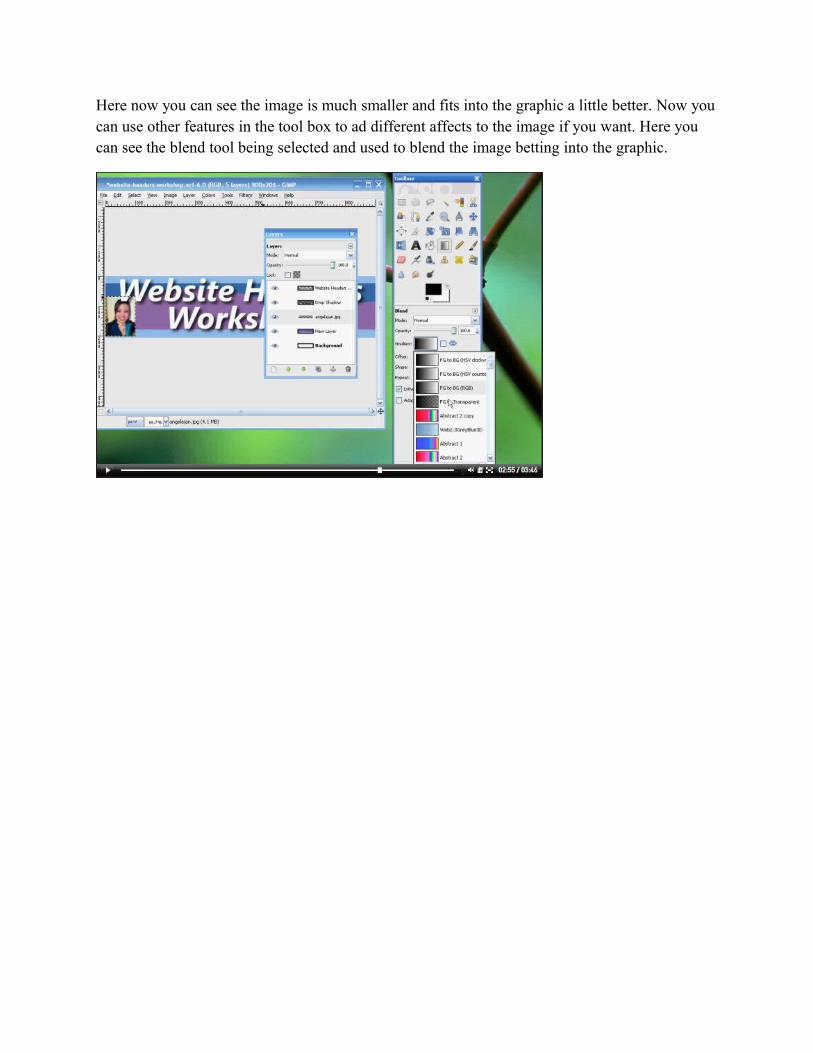
Here now you can see the image is much smaller and fits into the graphic a little better. Now you can use other features in the tool box to ad different affects to the image if you want. Here you can see the blend tool being selected and used to blend the image betting into the graphic.
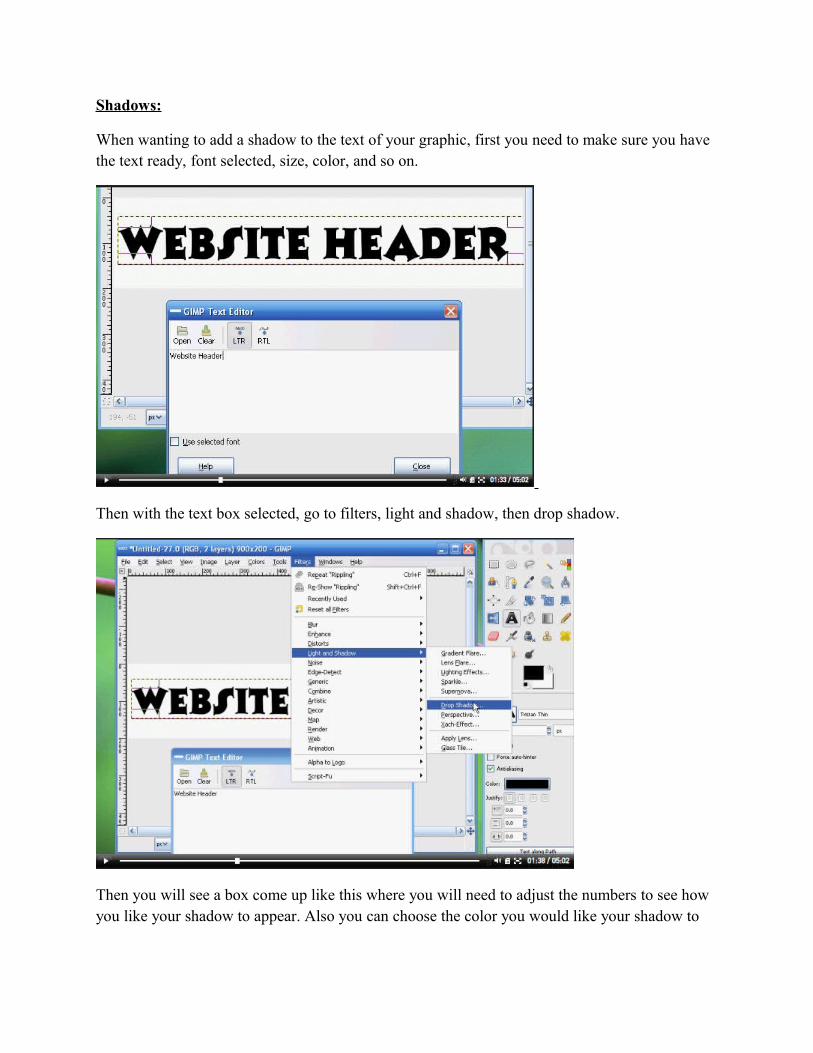
Shadows:
When wanting to add a shadow to the text of your graphic, first you need to make sure you have the text ready, font selected, size, color, and so on.
Then with the text box selected, go to filters, light and shadow, then drop shadow.
Then you will see a box come up like this where you will need to adjust the numbers to see how you like your shadow to appear. Also you can choose the color you would like your shadow to
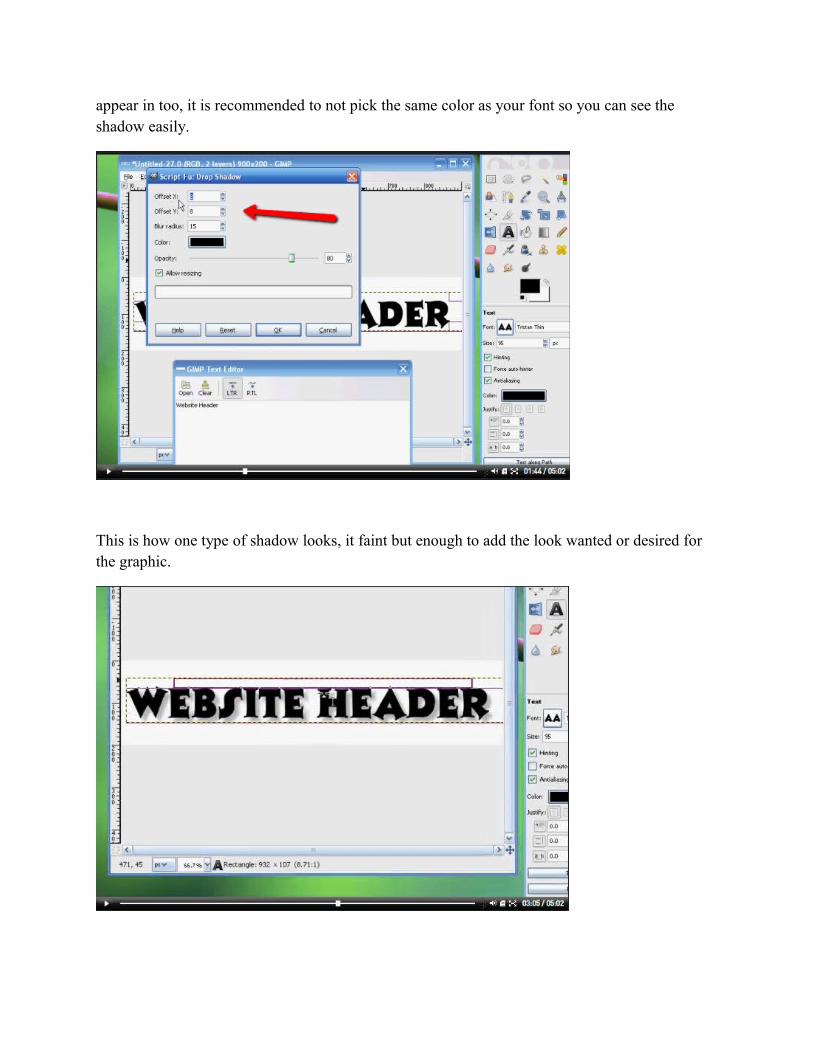
appear in too, it is recommended to not pick the same color as your font so you can see the shadow easily.
This is how one type of shadow looks, it faint but enough to add the look wanted or desired for the graphic.
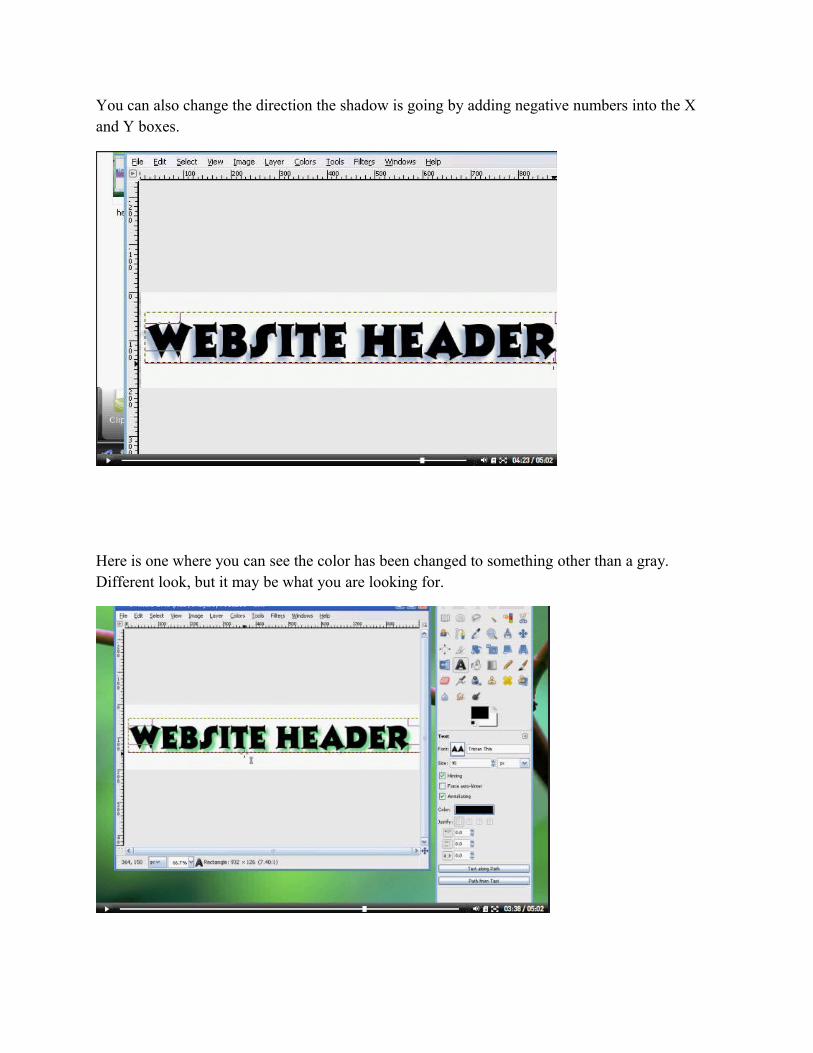
You can also change the direction the shadow is going by adding negative numbers into the X and Y boxes.
Here is one where you can see the color has been changed to something other than a gray. Different look, but it may be what you are looking for.
Curve Effects:
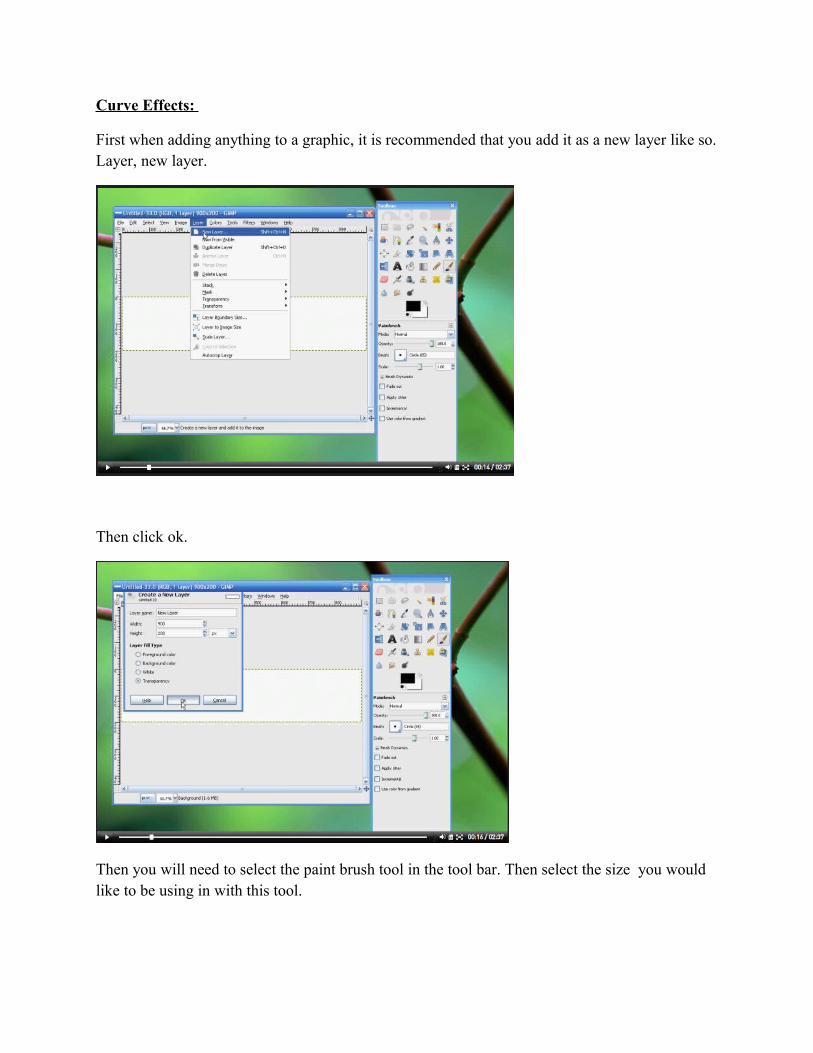
First when adding anything to a graphic, it is recommended that you add it as a new layer like so. Layer, new layer.
Then click ok.
Then you will need to select the paint brush tool in the tool bar. Then select the size you would like to be using in with this tool.

Now you will click on the far left side and hold down the button and drag all the way across the graphic, then release the button when you get to the other side.
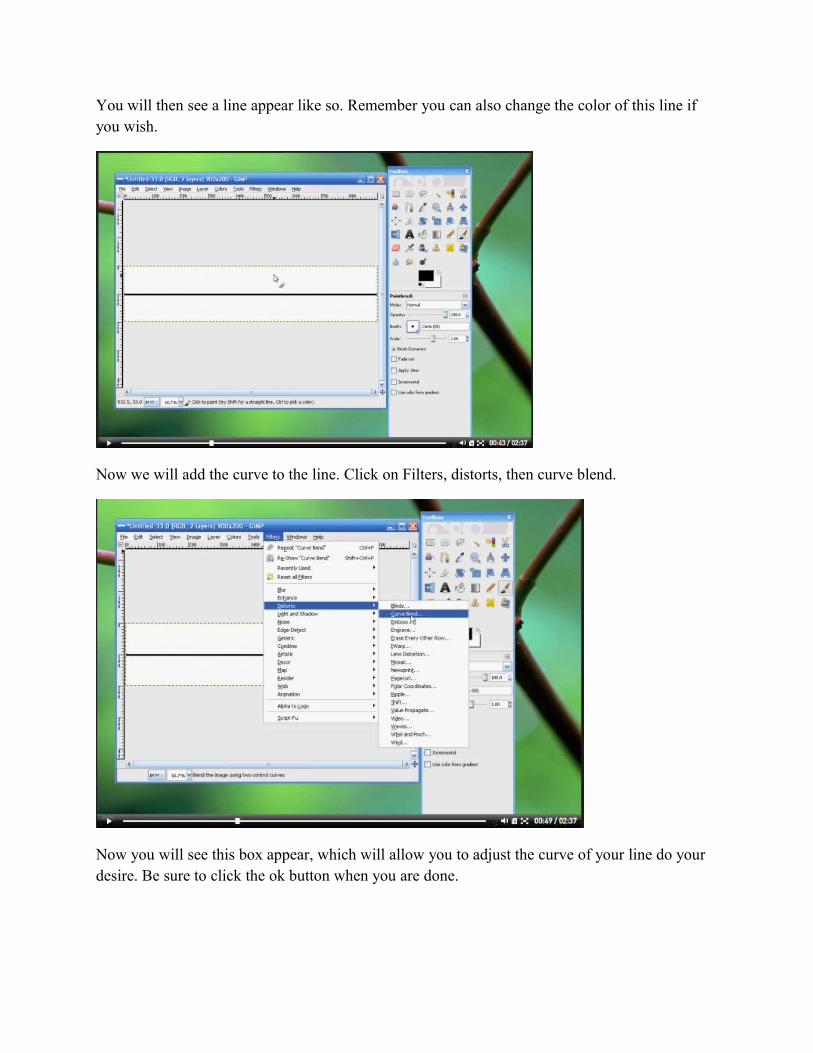
You will then see a line appear like so. Remember you can also change the color of this line if you wish.
Now we will add the curve to the line. Click on Filters, distorts, then curve blend.
Now you will see this box appear, which will allow you to adjust the curve of your line do your desire. Be sure to click the ok button when you are done.
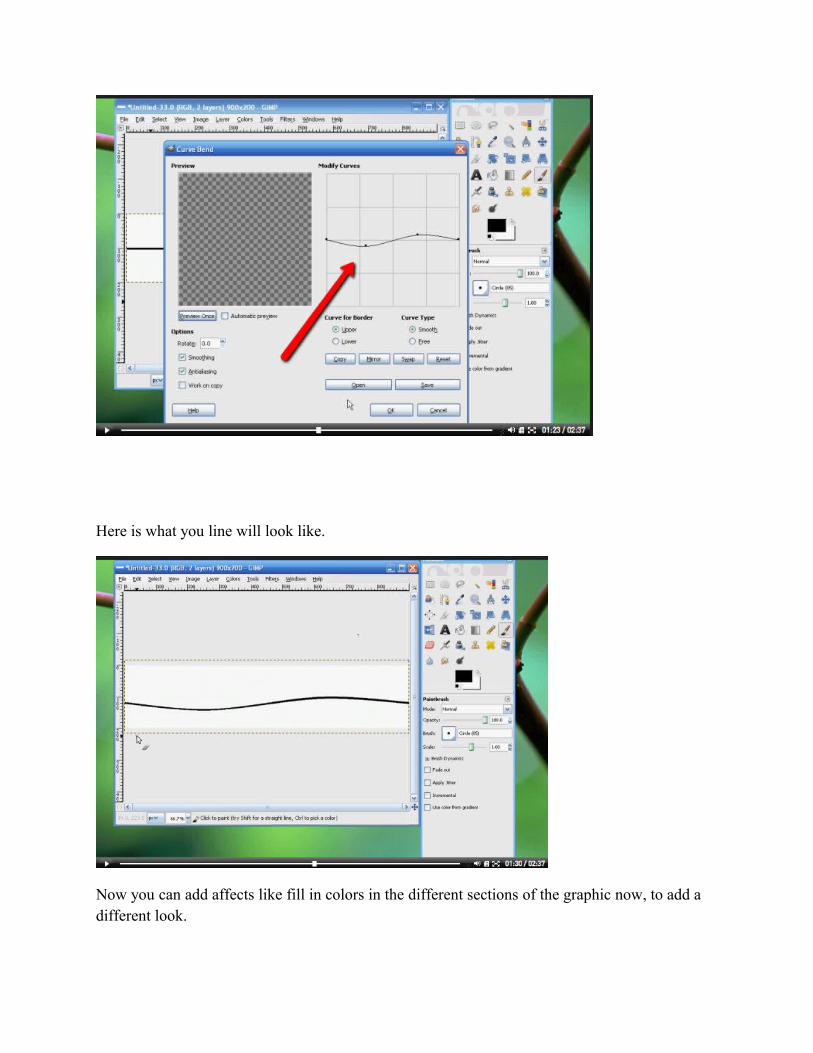
Here is what you line will look like.
Now you can add affects like fill in colors in the different sections of the graphic now, to add a different look.
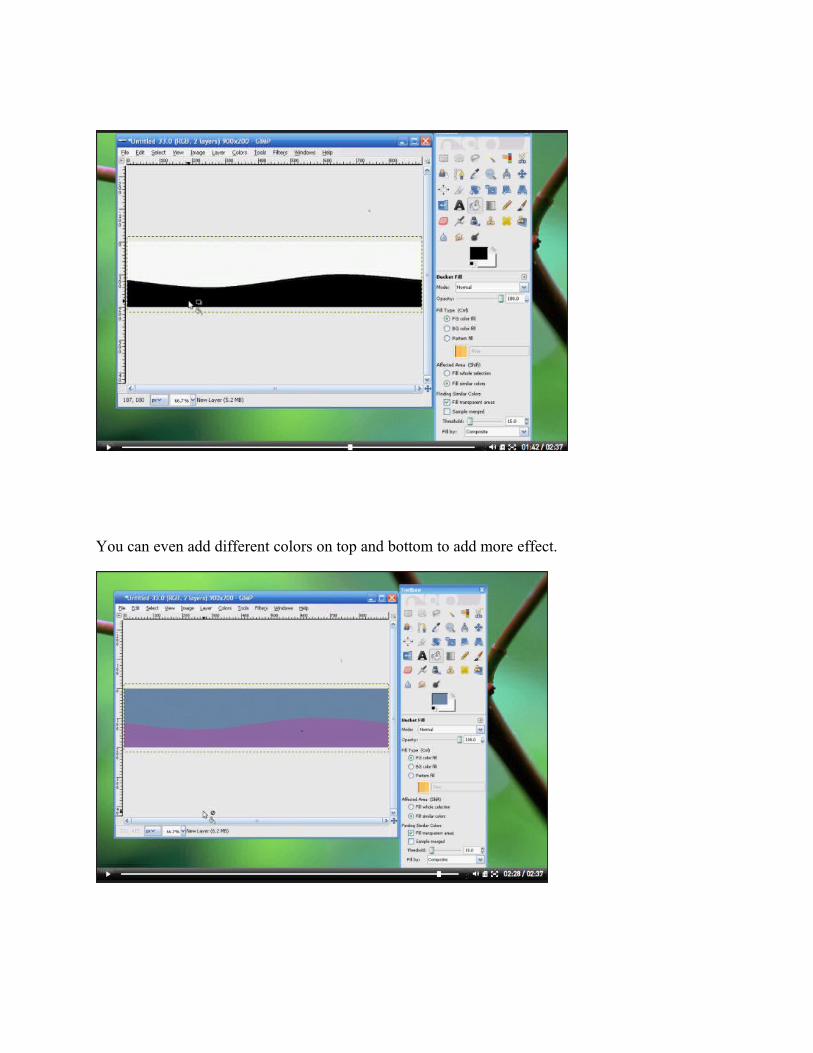
You can even add different colors on top and bottom to add more effect.
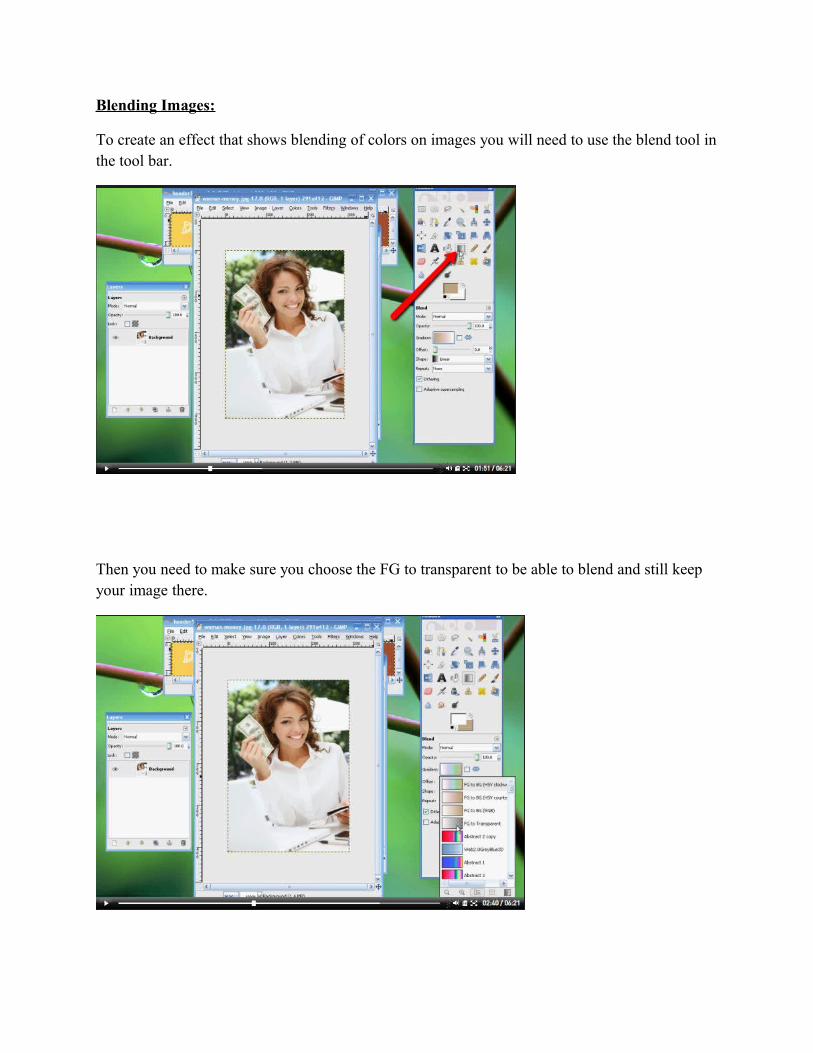
Blending Images:
To create an effect that shows blending of colors on images you will need to use the blend tool in the tool bar.
Then you need to make sure you choose the FG to transparent to be able to blend and still keep your image there.
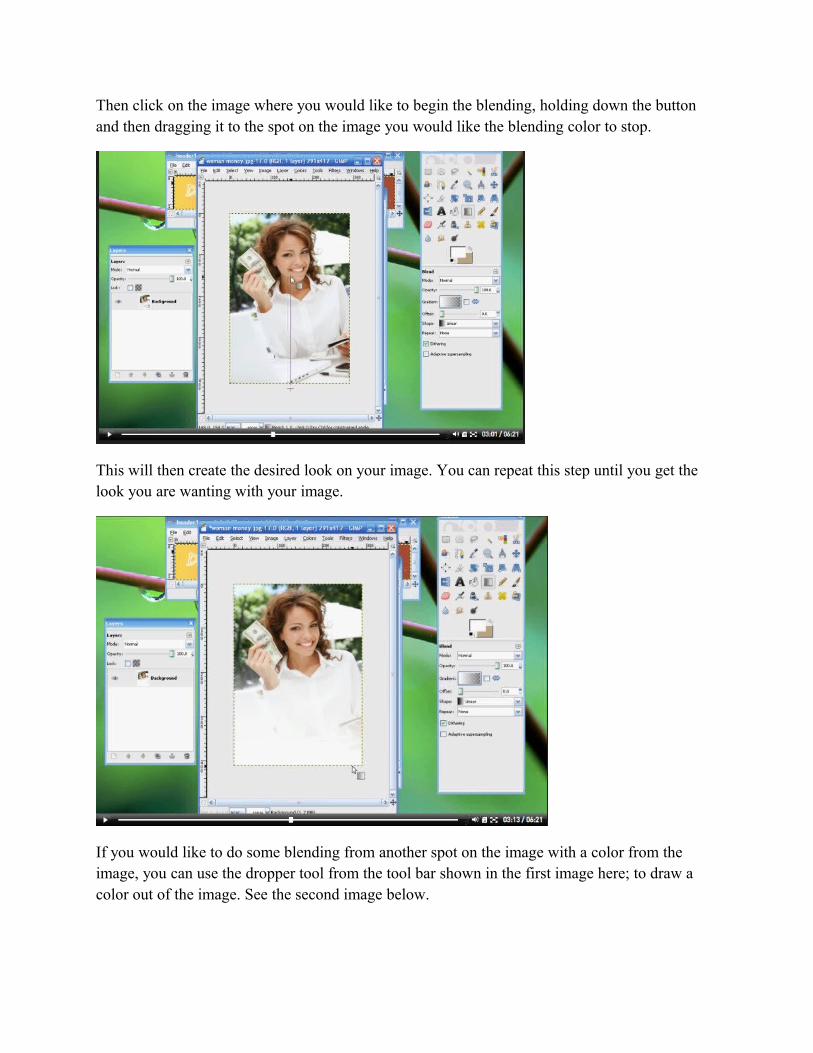
Then click on the image where you would like to begin the blending, holding down the button and then dragging it to the spot on the image you would like the blending color to stop.
This will then create the desired look on your image. You can repeat this step until you get the look you are wanting with your image.
If you would like to do some blending from another spot on the image with a color from the image, you can use the dropper tool from the tool bar shown in the first image here; to draw a color out of the image. See the second image below.
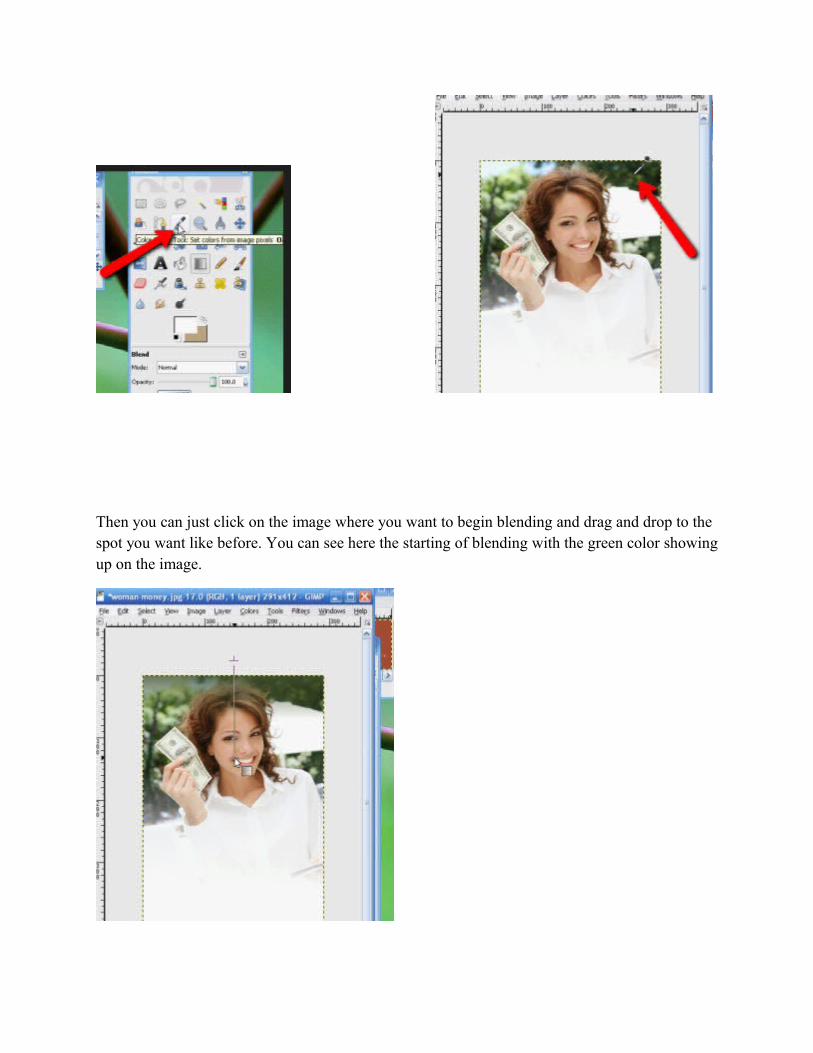
Then you can just click on the image where you want to begin blending and drag and drop to the spot you want like before. You can see here the starting of blending with the green color showing up on the image.
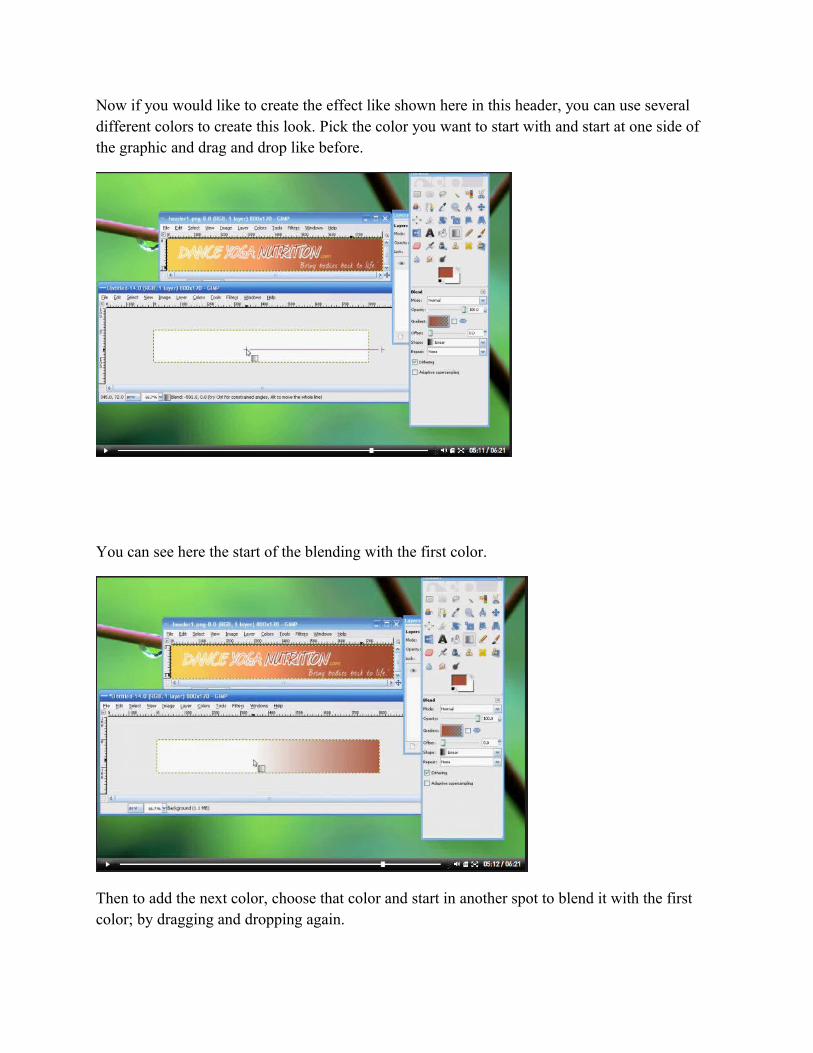
Now if you would like to create the effect like shown here in this header, you can use several different colors to create this look. Pick the color you want to start with and start at one side of the graphic and drag and drop like before.
You can see here the start of the blending with the first color.
Then to add the next color, choose that color and start in another spot to blend it with the first color; by dragging and dropping again.
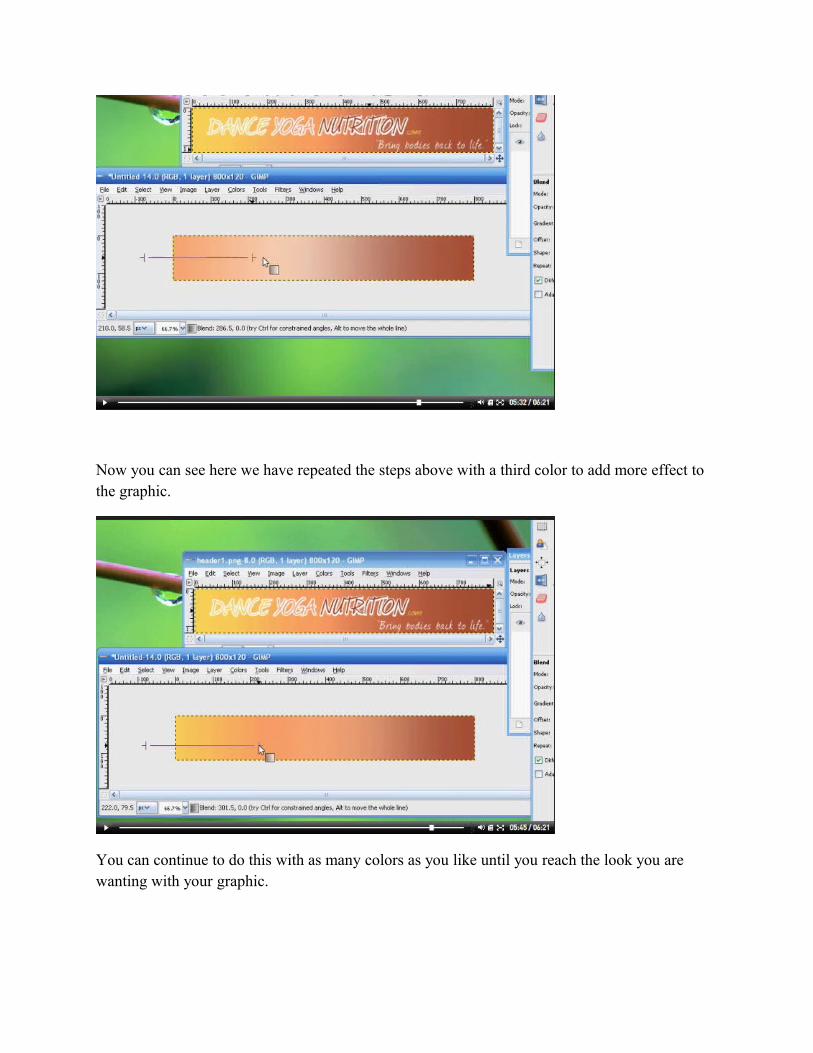
Now you can see here we have repeated the steps above with a third color to add more effect to the graphic.
You can continue to do this with as many colors as you like until you reach the look you are wanting with your graphic.

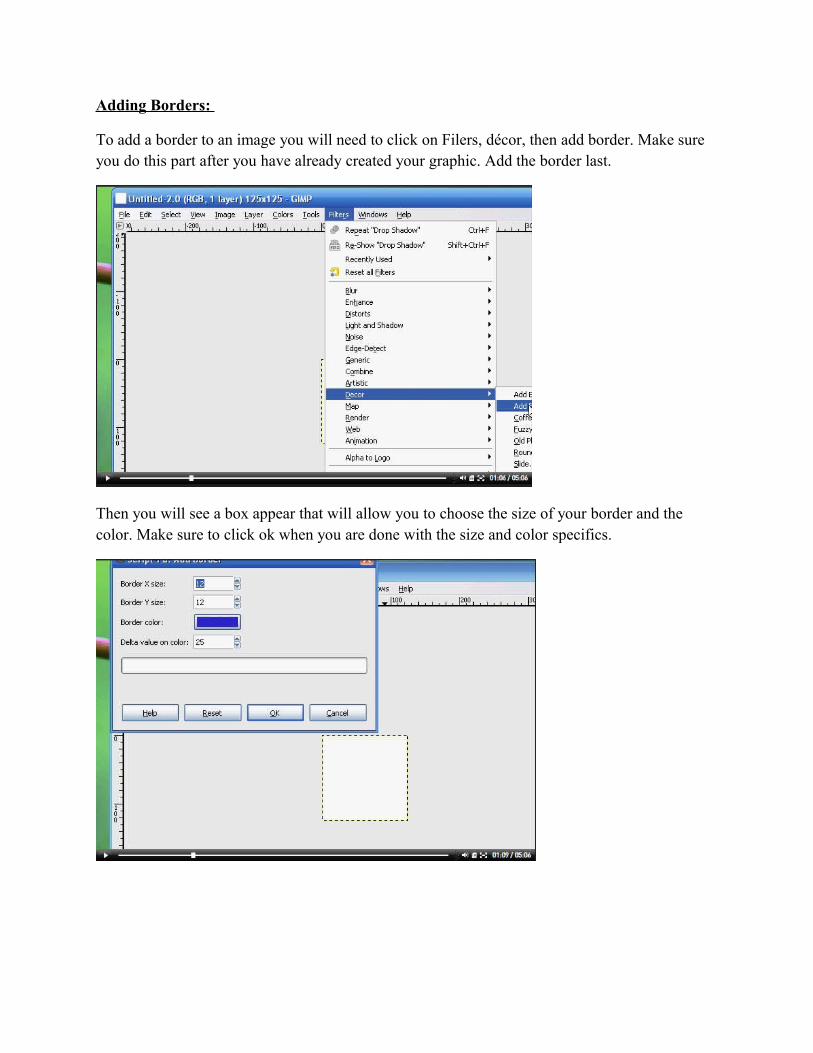
Adding Borders:
To add a border to an image you will need to click on Filers, décor, then add border. Make sure you do this part after you have already created your graphic. Add the border last.
Then you will see a box appear that will allow you to choose the size of your border and the color. Make sure to click ok when you are done with the size and color specifics.
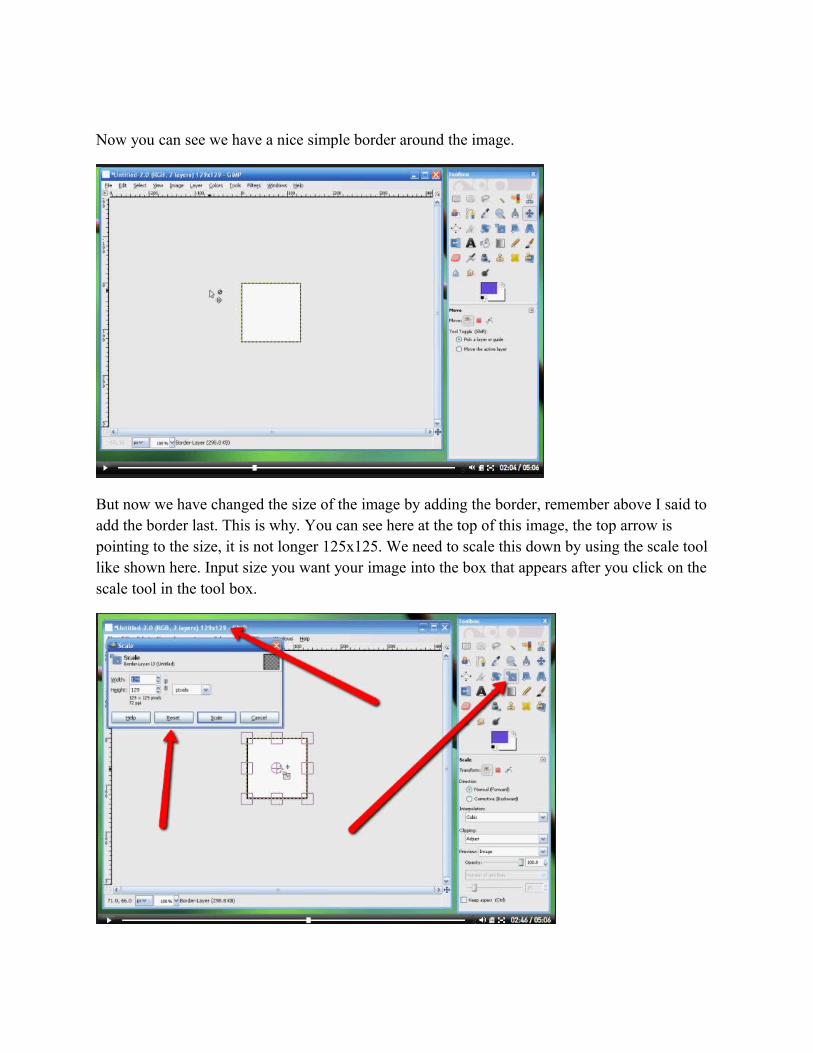
Now you can see we have a nice simple border around the image.
But now we have changed the size of the image by adding the border, remember above I said to add the border last. This is why. You can see here at the top of this image, the top arrow is pointing to the size, it is not longer 125x125. We need to scale this down by using the scale tool like shown here. Input size you want your image into the box that appears after you click on the scale tool in the tool box.
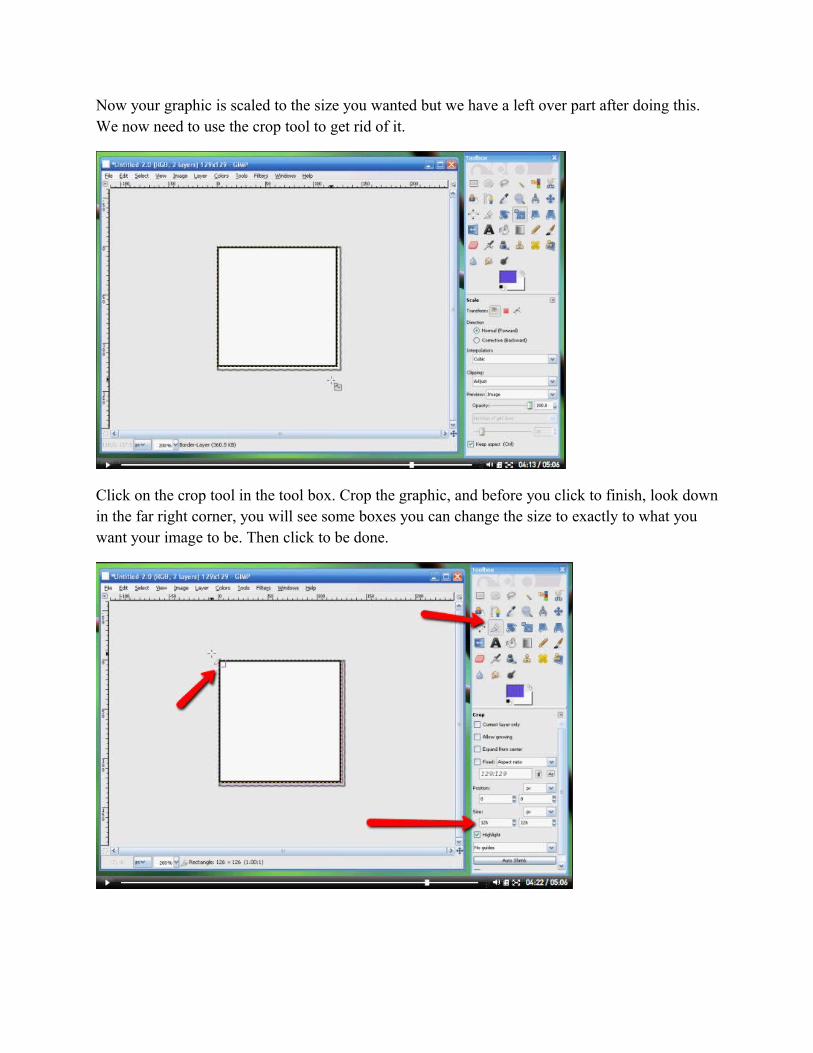
Now your graphic is scaled to the size you wanted but we have a left over part after doing this. We now need to use the crop tool to get rid of it.
Click on the crop tool in the tool box. Crop the graphic, and before you click to finish, look down in the far right corner, you will see some boxes you can change the size to exactly to what you want your image to be. Then click to be done.
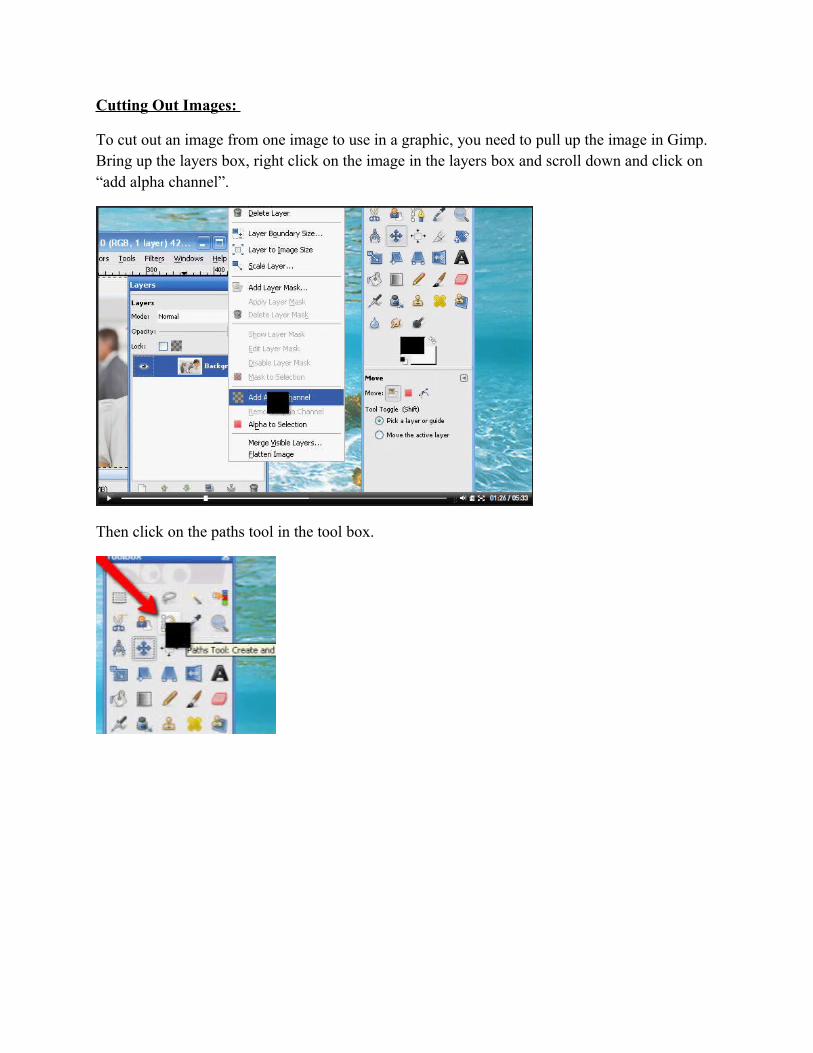
Cutting Out Images:
To cut out an image from one image to use in a graphic, you need to pull up the image in Gimp. Bring up the layers box, right click on the image in the layers box and scroll down and click on “add alpha channel”.
Then click on the paths tool in the tool box.
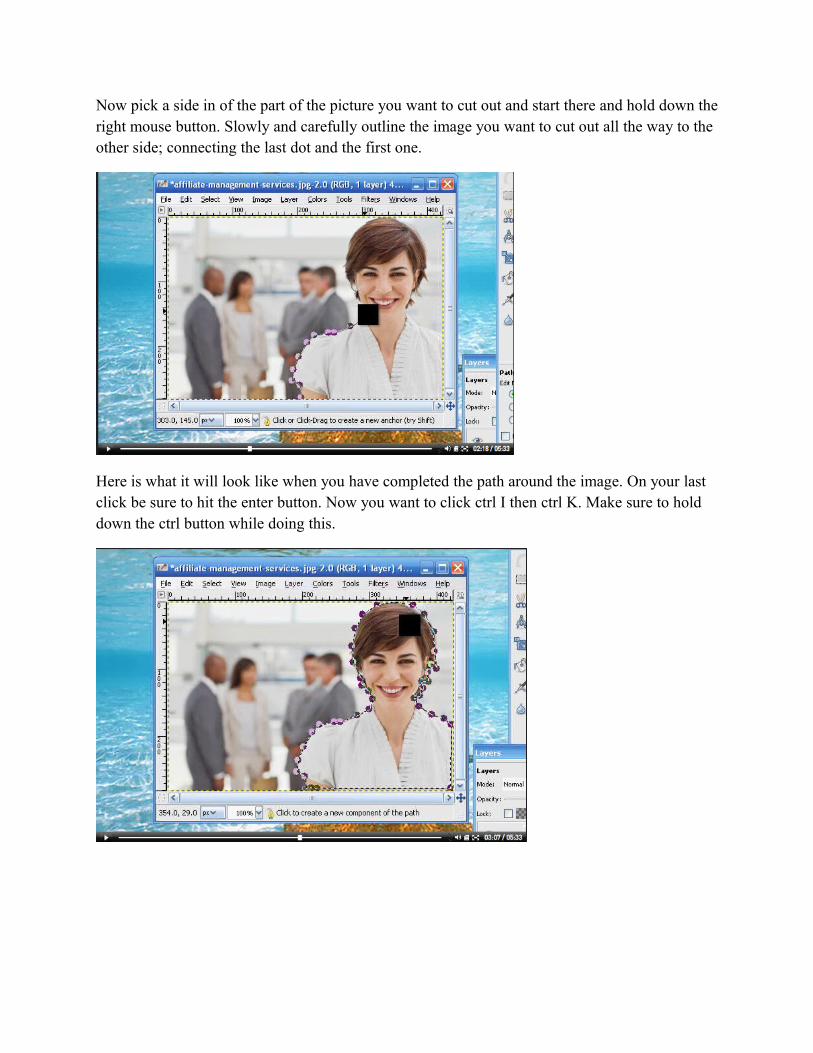
Now pick a side in of the part of the picture you want to cut out and start there and hold down the right mouse button. Slowly and carefully outline the image you want to cut out all the way to the other side; connecting the last dot and the first one.
Here is what it will look like when you have completed the path around the image. On your last click be sure to hit the enter button. Now you want to click ctrl I then ctrl K. Make sure to hold down the ctrl button while doing this.
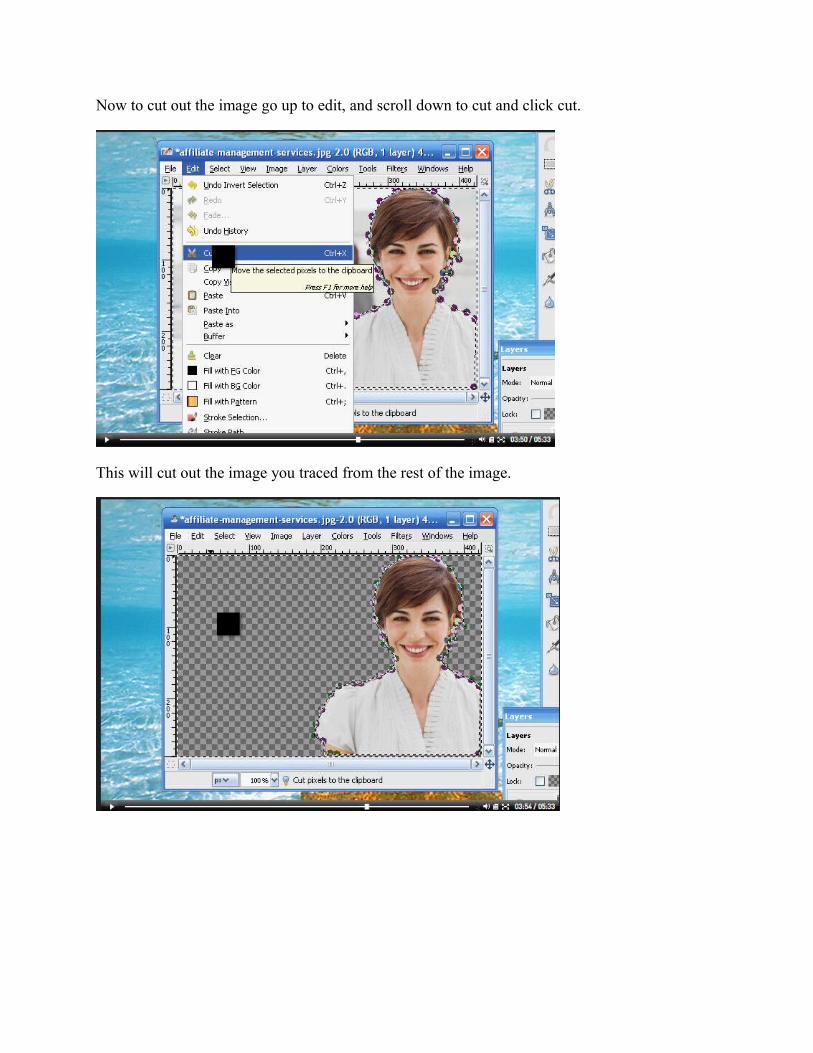
Now to cut out the image go up to edit, and scroll down to cut and click cut.
This will cut out the image you traced from the rest of the image.
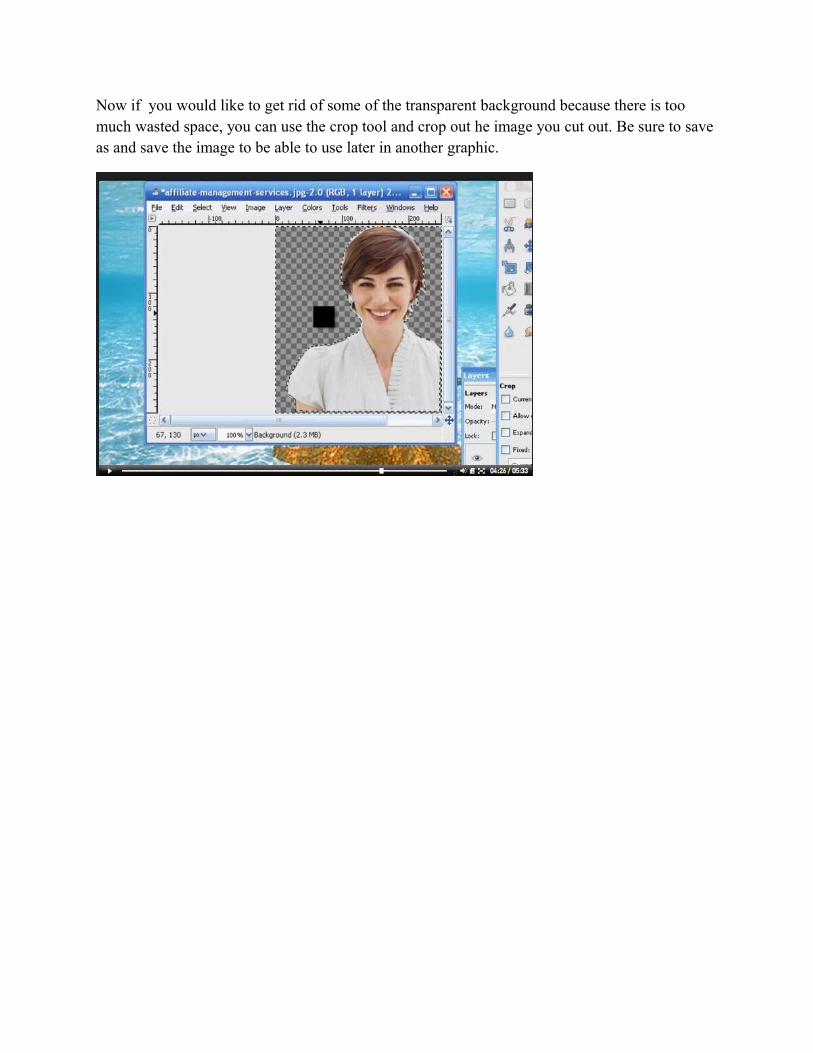
Now if you would like to get rid of some of the transparent background because there is too much wasted space, you can use the crop tool and crop out he image you cut out. Be sure to save as and save the image to be able to use later in another graphic.
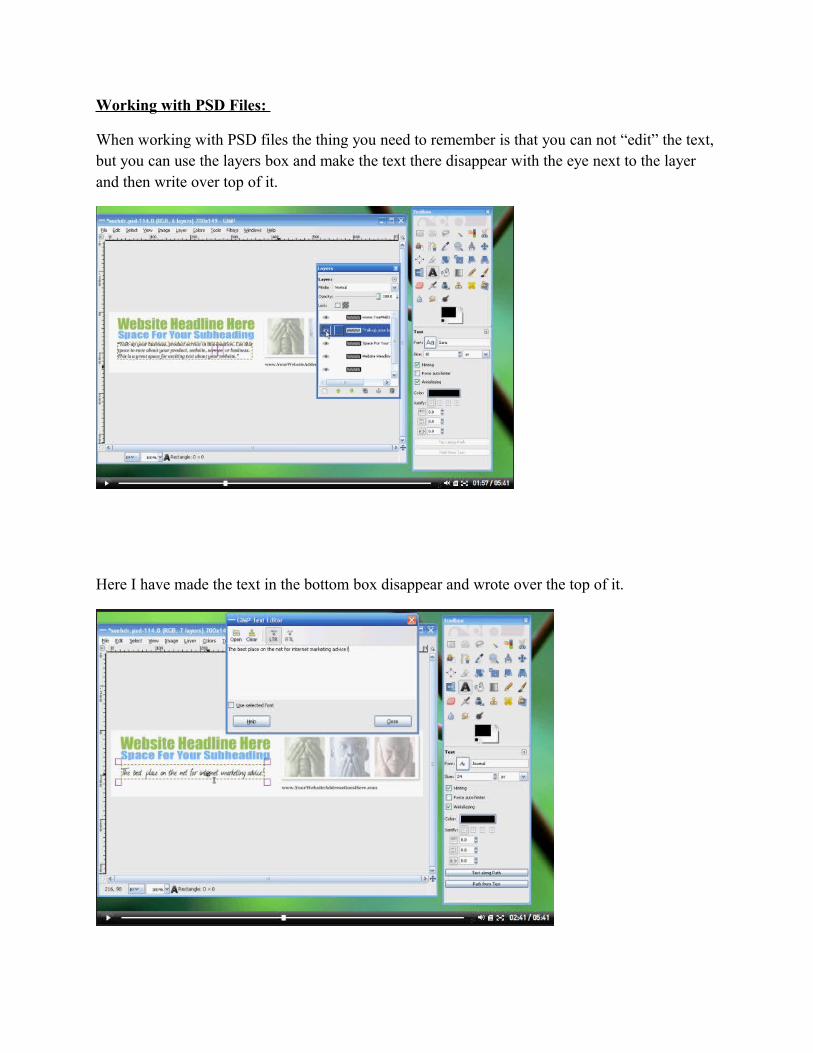
Working with PSD Files:
When working with PSD files the thing you need to remember is that you can not “edit” the text, but you can use the layers box and make the text there disappear with the eye next to the layer and then write over top of it.
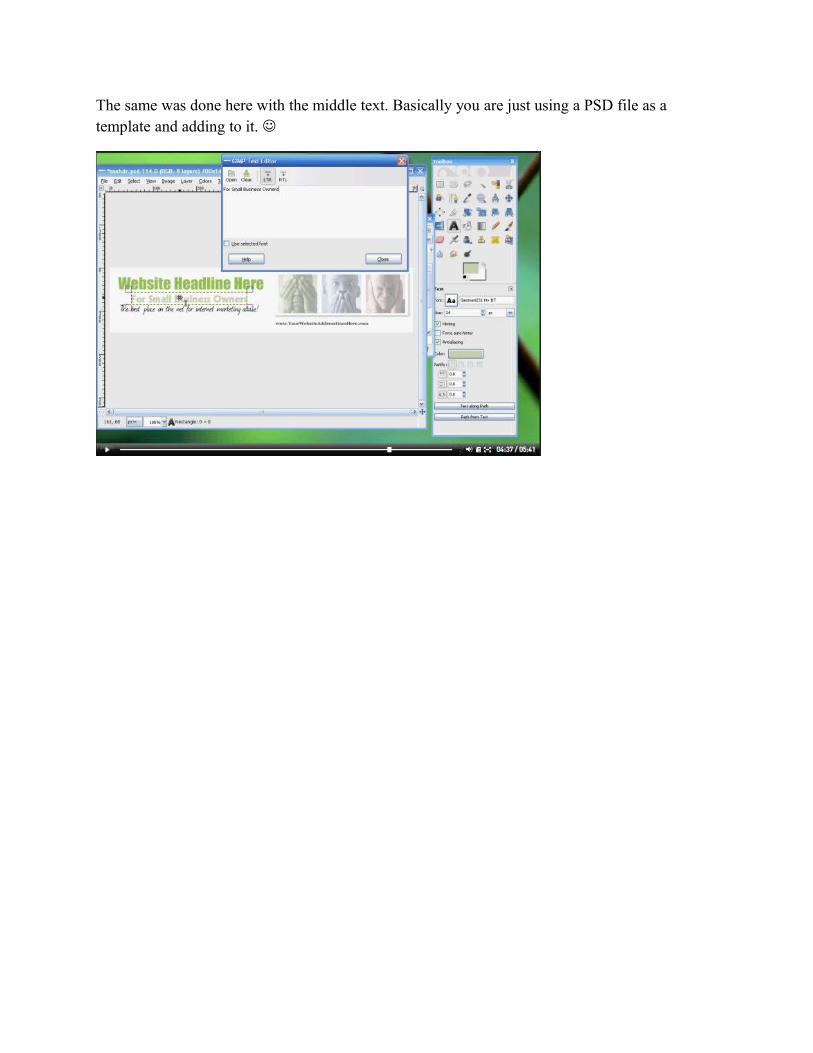
Here I have made the text in the bottom box disappear and wrote over the top of it.
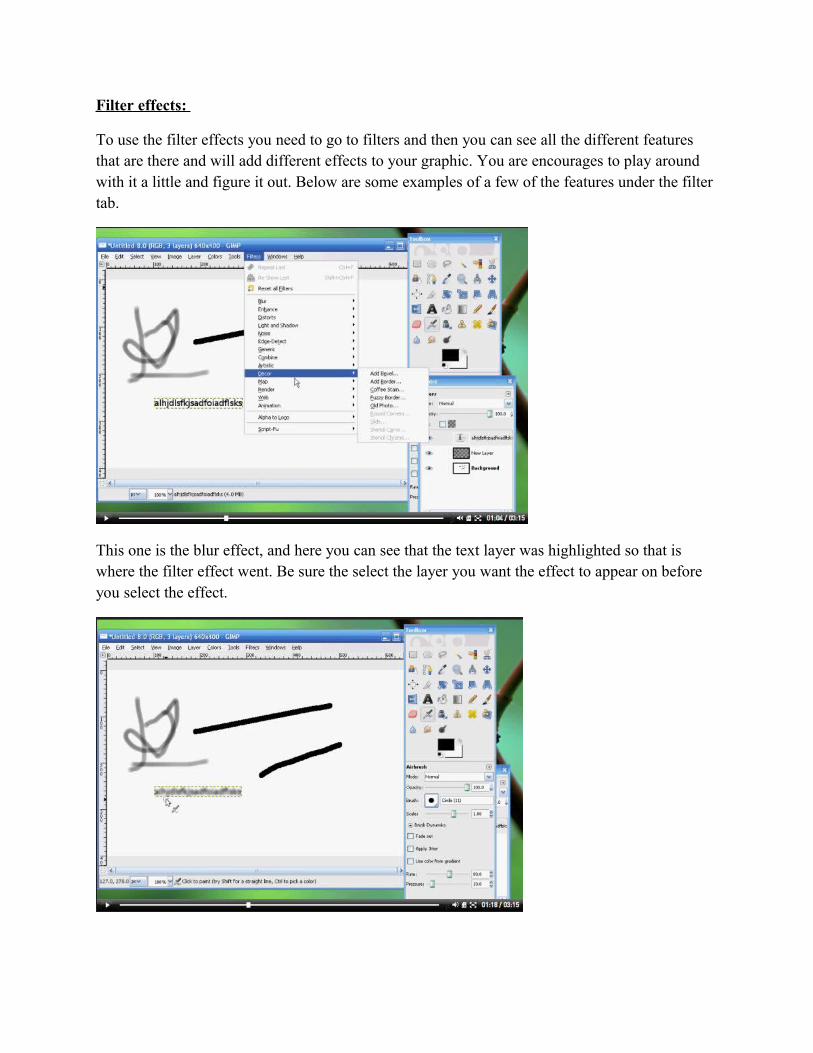
The same was done here with the middle text. Basically you are just using a PSD file as a template and adding to it.
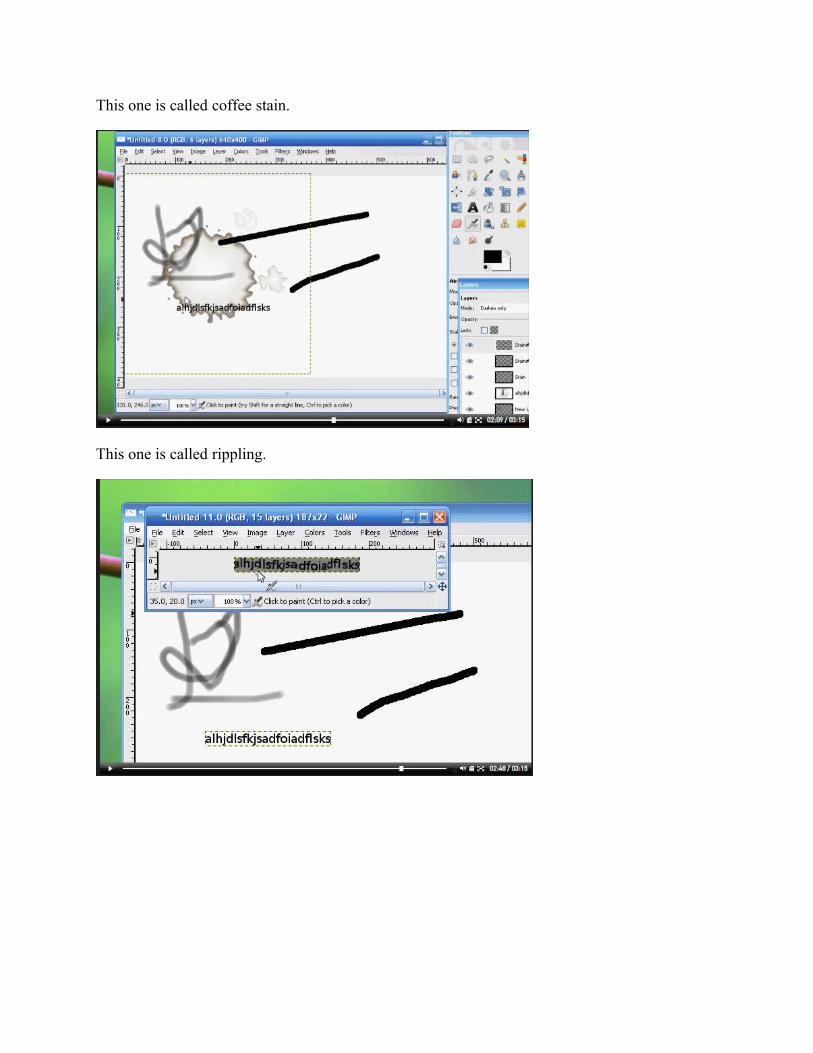
Filter effects:
To use the filter effects you need to go to filters and then you can see all the different features that are there and will add different effects to your graphic. You are encourages to play around with it a little and figure it out. Below are some examples of a few of the features under the filter tab.
This one is the blur effect, and here you can see that the text layer was highlighted so that is where the filter effect went. Be sure the select the layer you want the effect to appear on before you select the effect.
This one is called coffee stain.
This one is called rippling.
Transparent Backgrounds:
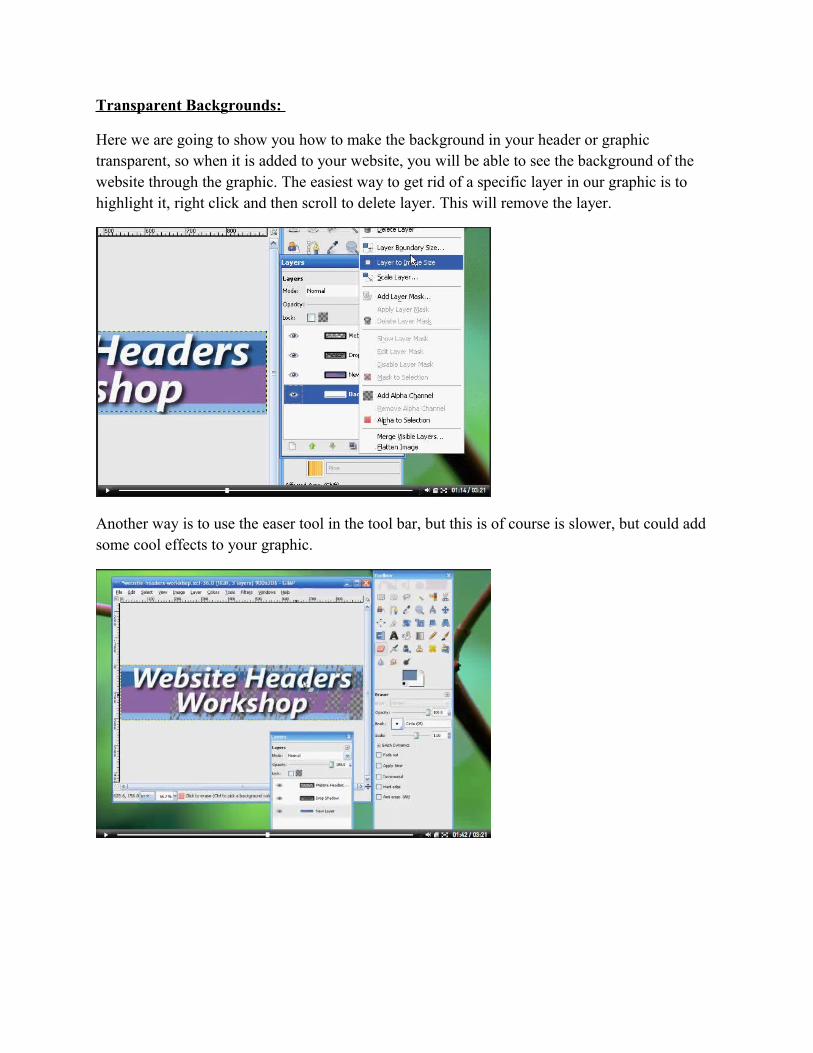
Here we are going to show you how to make the background in your header or graphic transparent, so when it is added to your website, you will be able to see the background of the website through the graphic. The easiest way to get rid of a specific layer in our graphic is to highlight it, right click and then scroll to delete layer. This will remove the layer.
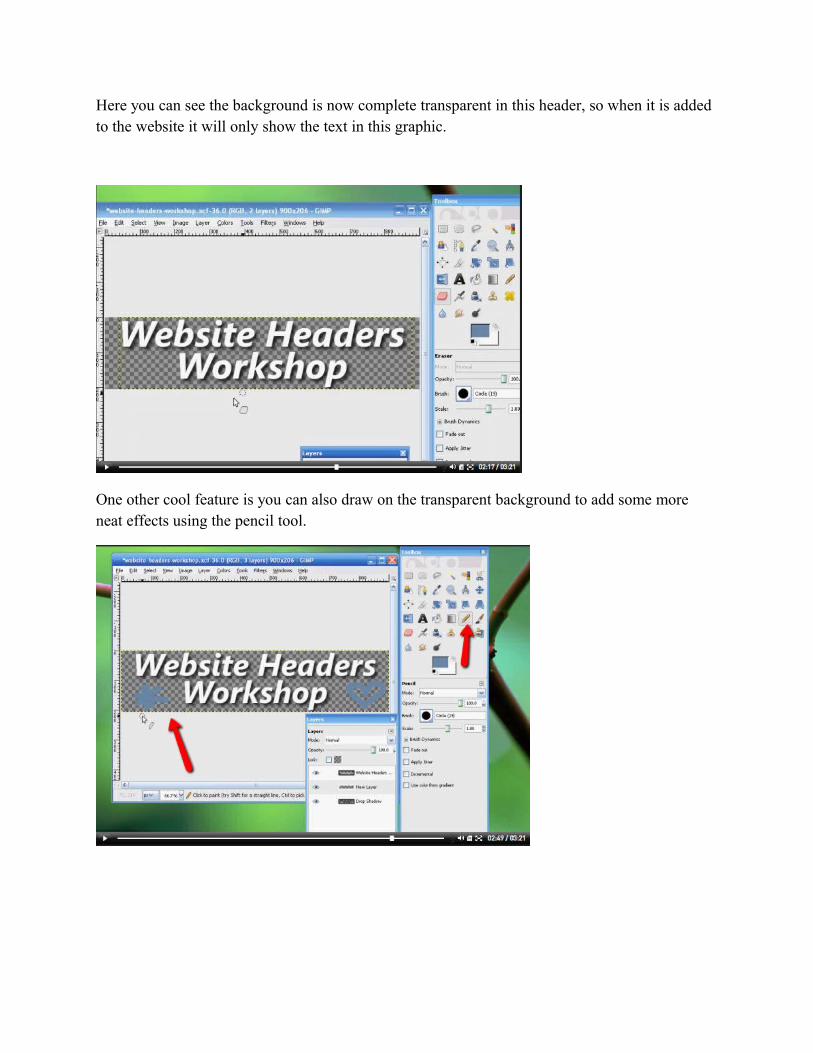
Another way is to use the easer tool in the tool bar, but this is of course is slower, but could add some cool effects to your graphic.
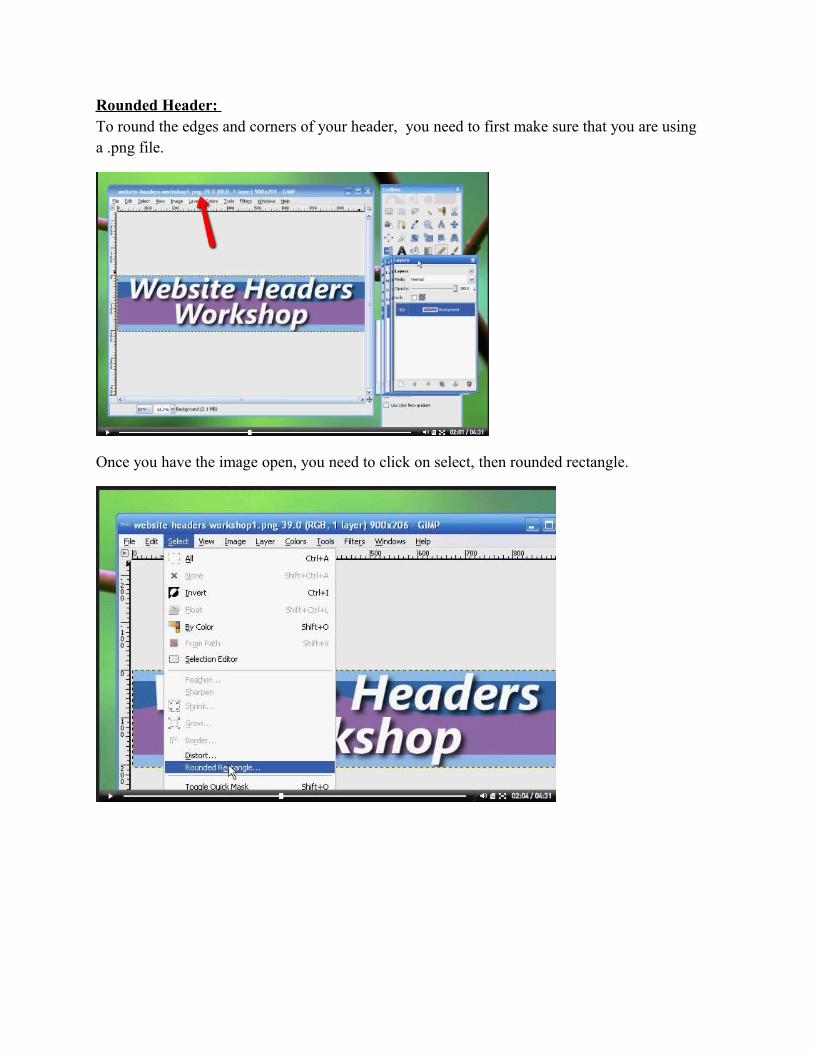
Here you can see the background is now complete transparent in this header, so when it is added to the website it will only show the text in this graphic.
One other cool feature is you can also draw on the transparent background to add some more neat effects using the pencil tool.
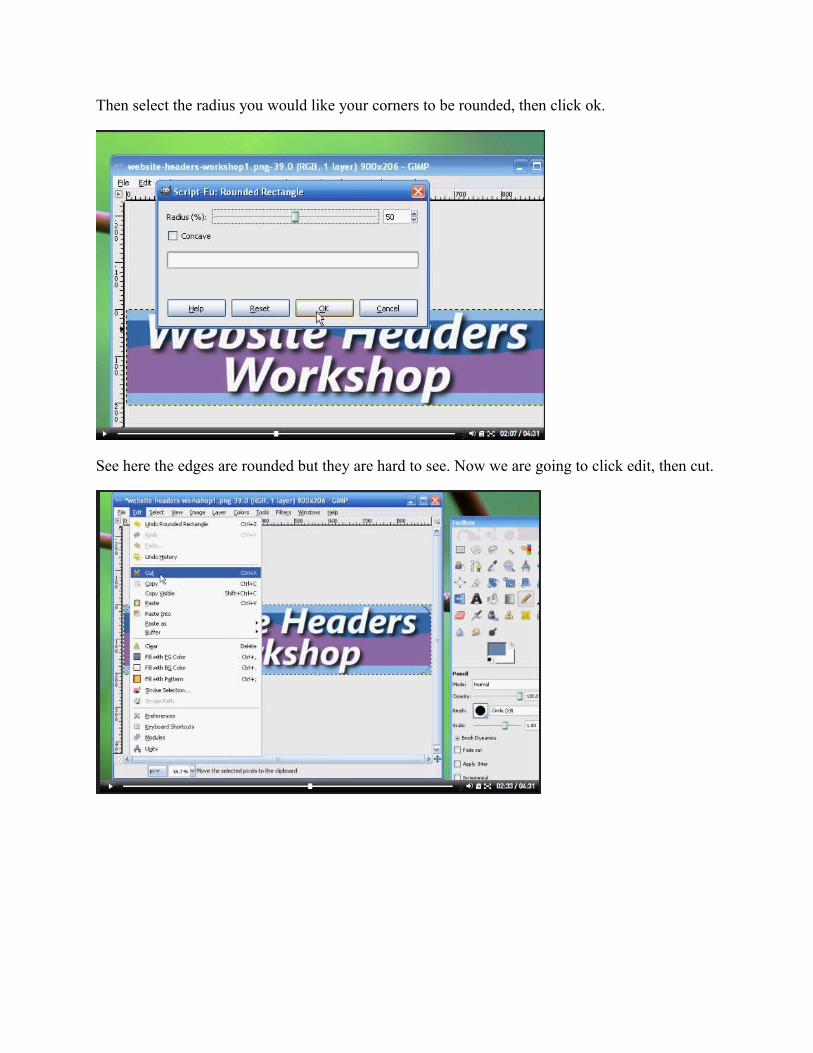
Rounded Header: To round the edges and corners of your header, you need to first make sure that you are using a .png file.
Once you have the image open, you need to click on select, then rounded rectangle.
Then select the radius you would like your corners to be rounded, then click ok.
See here the edges are rounded but they are hard to see. Now we are going to click edit, then cut.
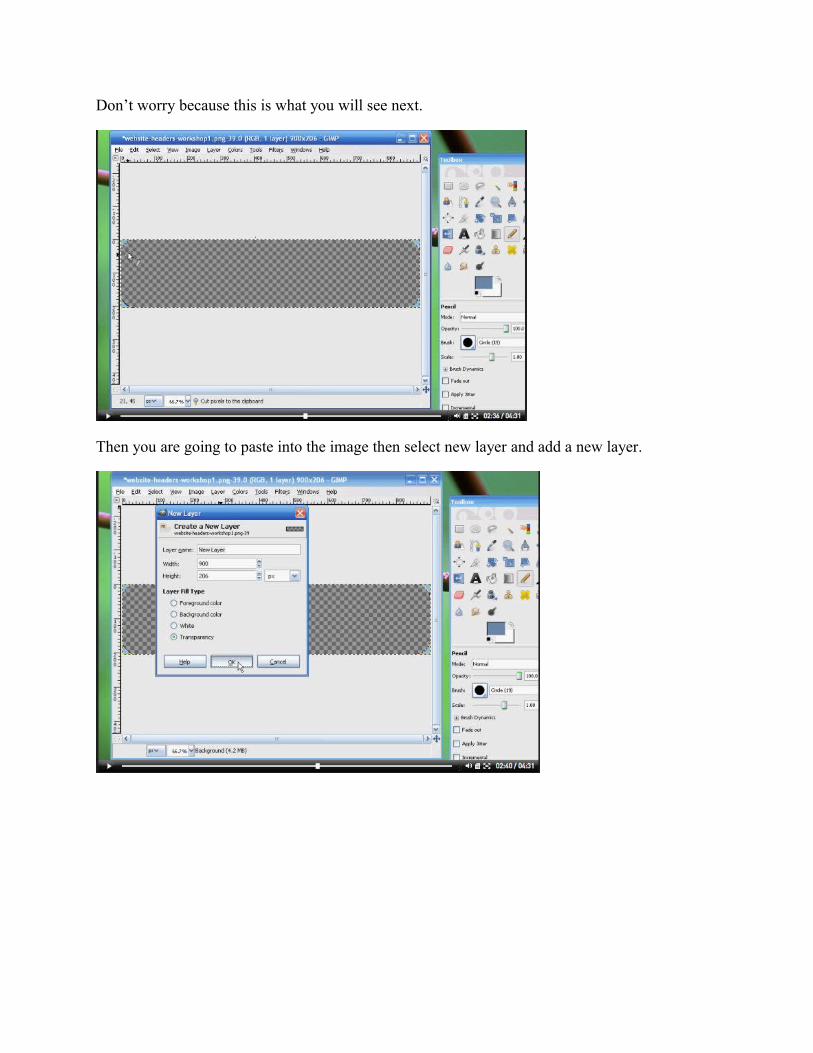
Don’t worry because this is what you will see next.
Then you are going to paste into the image then select new layer and add a new layer.
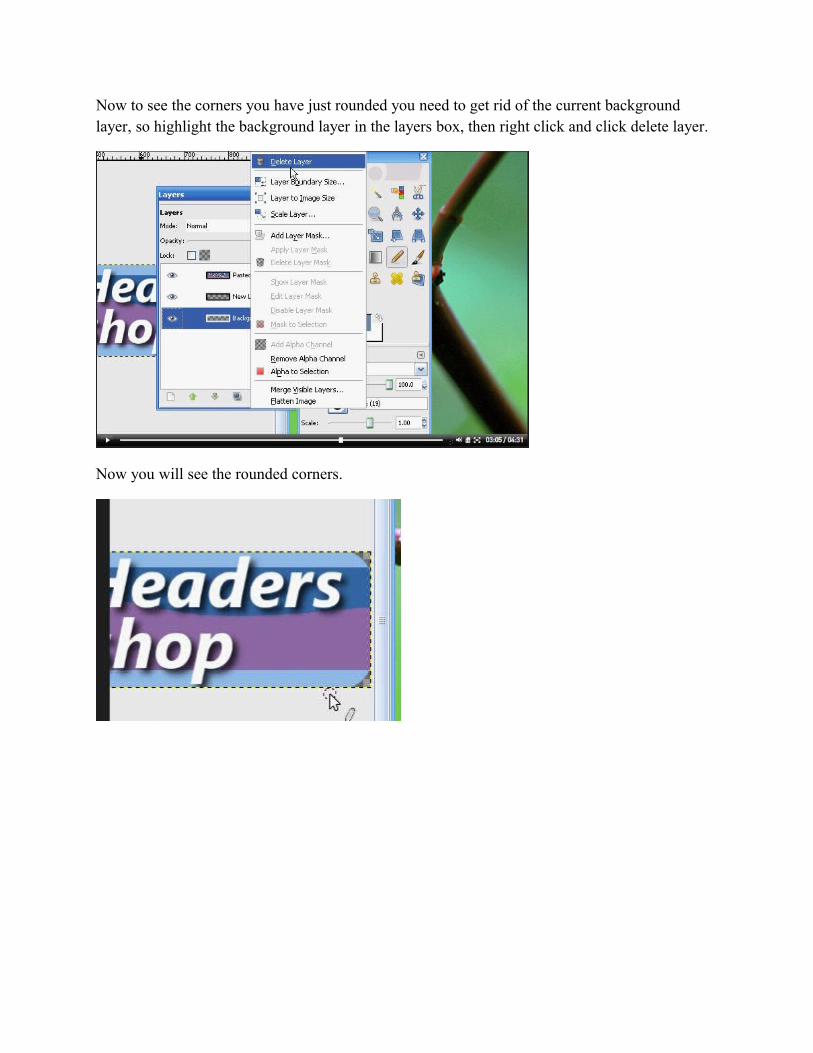
Now to see the corners you have just rounded you need to get rid of the current background layer, so highlight the background layer in the layers box, then right click and click delete layer.
Now you will see the rounded corners.
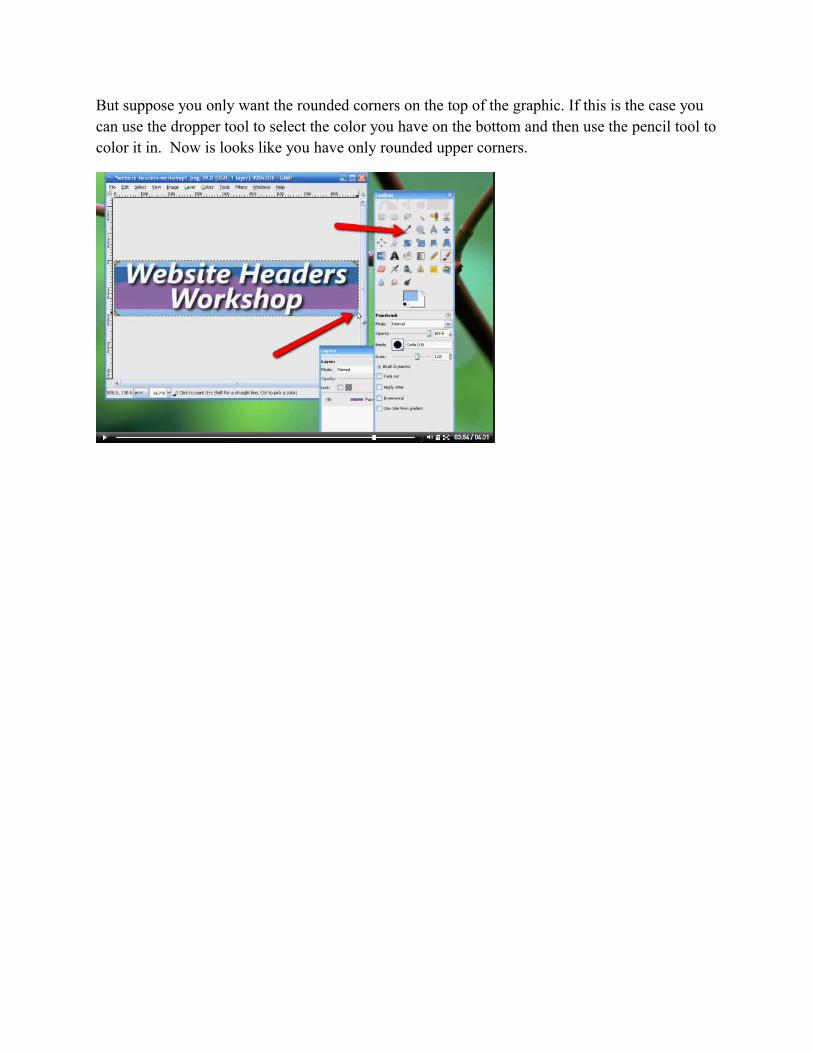
But suppose you only want the rounded corners on the top of the graphic. If this is the case you can use the dropper tool to select the color you have on the bottom and then use the pencil tool to color it in. Now is looks like you have only rounded upper corners.